

Page 1
ELECTRIC OVEN & GRILL SGBR 1500 B3
IAN 274498
ELECTRIC OVEN & GRILL
Operating instructions
CUPTOR ELECTRIC CU GRILL
Instrucţiuni de utilizare
МИНИ ФУРНА С ГРИЛ
Οδηүίες χρήσης
GRILL- UND BACKAUTOMAT
Bedienungsanleitung
Page 2
GB / CY Operating instructions Page 1
RO Instrucţiuni de utilizare Pagina 21
GR / CY Οδηүίες χρήσης Σελίδα 41
DE / AT / CH Bedienungsanleitung Seite 61
Before reading, unfold the page containing the illustrations and familiarise yourself with all functions of
the device.
Înainte de a citi instrucţiunile, priviţi imaginile şi familiarizaţi-vă cu toate funcţiile aparatului.
Πριν ξεκινήσετε την ανάγνωση, ανοίξτε τη σελίδα με τις εικόνες και εξοικειωθείτε με όλες τις λειτουργίες
της συσκευής.
Klappen Sie vor dem Lesen die Seite mit den Abbildungen aus und machen Sie sich anschließend mit allen
Funktionen des Gerätes vertraut.
Page 3

B
A
!
3
6
0.
-
Page 4

SGBR 1500 B3
GB│CY
│
1 ■
Contents
Introduction ............................................................2
Proper use .............................................................2
Package contents .......................................................2
Appliance description ....................................................2
Technical data ..........................................................2
Safety instructions ......................................................3
Setting up .............................................................6
Using the appliance .....................................................6
Glass door .........................................................................6
Inserting the crumb tray ...............................................................6
Using the rotisserie ...................................................................7
Using the baking tray/rack ............................................................8
Before first use .........................................................8
Operating the appliance .................................................9
Function switch ......................................................................9
Temperature control ..................................................................9
Timer .............................................................................9
Grilling and baking .....................................................9
Grilling with the rotisserie ...............................................10
Cleaning and care ......................................................12
Storage ..............................................................12
Troubleshooting .......................................................13
Disposal ..............................................................14
Kompernass Handels GmbH warranty ....................................14
Service ...........................................................................15
Importer ..........................................................................15
Recipes ...............................................................16
Page 5

SGBR 1500 B3
■ 2 │ GB
│
CY
Introduction
Congratulations on the purchase of your new
appliance.
You have selected a high-quality product.
The operating instructions are part of this product.
They contain important information on safety, usage
and disposal. Before using the product, familiarise
yourself with all handling and safety guidelines.
Use the product only as described and for the
range of applications specified. Please also pass
these operating instructions on to any future
owner(s).
Proper use
The automatic oven and grill is intended for the
heating, cooking and grilling of food.
This appliance is intended solely for use in private
homes. Do not use it for commercial applications.
All other uses are deemed to be improper and may
result in property damage or even in personal injury.
Package contents
♦ Electric Oven & Grill
♦ 1 baking tray
♦ 1 rack
♦ 2 tongs
♦ Rotisserie with 2 clamps
♦ 1 crumb tray
♦ Operating instructions
NOTE
Check contents for completeness and damage
immediately after unpacking. Contact Customer
Services if necessary.
Appliance description
Figure A:
Drive
Temperature control
Function switch
Timer
Control lamp
Glass door
Crumb tray
Lower heating element
Spit fitting
Figure B:
Tongs (baking tray or rack)
- Baking tray
3 Tongs (for spit)
! rack
. Restrainer
0 Skewer clamps
6 Rotisserie
Technical data
Rated voltage: 220 - 240 V ~,
50/60 Hz
Max. power consumption: 1500 W
All of the parts of this appliance
that come into contact with food
are food-safe.
Page 6

SGBR 1500 B3
GB│CY
│
3 ■
Safety instructions
DANGER – RISK OF ELECTRIC SHOCK!
► Do not open the housing of the appliance or attempt to
repair it. Doing so can lead to risks and also invalidates the
warranty. Defective appliances should be repaired by the
retailer or authorized personnel only.
► Arrange for defective power plugs and/or cables to be
replaced as soon as possible by a qualified technician or by
our Customer Service Department to avoid the risk of injury.
► Do not allow any liquids to penetrate the housing. Do not
expose the appliance to moisture and do not use it outdoors.
Additionally, do not place fluid-filled receptacles such as
flower vases on the appliance. This increases the risk of fire
and of receiving an electric shock! If liquids permeate into
the housing, unplug the appliance immediately and arrange
for it to be repaired by a qualified technician.
► Never touch the appliance, power cable or power plug with
wet hands. There is a risk of electric shock!
NEVER immerse the appliance in water or other liquids!
Risk of electrocution if residual liquids come into contact
with live components during operation.
Page 7

SGBR 1500 B3
■ 4 │ GB
│
CY
WARNING – RISK OF INJURY!
► This appliance may be used by children of the age of 8 years
or more and by persons with reduced physical, sensory or
mental capabilities or lack of experience and/or knowledge if
they are being supervised or have been instructed with regard
to the safe use of the appliance and have understood the
potential risks.
► Children must not use the appliance as a plaything.
► Cleaning and user maintenance must not be performed by
children unless they are older than 8 years of age and are
supervised.
► Children younger than 8 years of age must be kept away
from the appliance and the power cable.
► Route the power cable in such a way that no one can tread
on it or trip over it.
► Never touch the glass door or the housing during use, these
can get very hot. Use oven gloves or something similar to
open the glass door to avoid being burnt!
► Never touch the heating elements or the viewing window
when the appliance is in use, or before it has cooled down
completely. Do not reach into the cooking chamber when
the appliance is in use. Wait until the appliance has cooled
down. Otherwise, you could be burnt.
► Allow the appliance to cool down after use before trans-
porting it.
► Always use oven gloves or a pot holder if you need to take
hold of the appliance.
Caution! Hot surface!
Page 8

SGBR 1500 B3
GB│CY
│
5 ■
CAUTION – PROPERTY DAMAGE!
► Do not use an external timer switch or a separate remote
control system to operate the appliance.
► Never leave the appliance unattended during operation.
► Ensure that the appliance, the power cable and the plug do
not come into contact with heat sources such as hotplates or
naked flames.
► Only operate the appliance with the original accessories
supplied.
► Do not kink or crush the mains cable.
► To disconnect, always remove the plug itself from the mains
power socket, do not pull on the power cable.
► When the appliance is in use, ensure that there are no easily
inflammable materials in the immediate vicinity (e.g. dishcloths,
oven cloths, etc.).
► Never dry textiles or other objects on or above the appliance.
This increases the risk of fire!
Page 9

SGBR 1500 B3
■ 6 │ GB
│
CY
Setting up
WARNING! RISK OF FIRE!
► Never place the appliance beneath wall cup-
boards or next to curtains, cupboard walls or
other flammable objects.
► Always ensure a minimum distance between
the appliance and hanging cupboards, ceilings,
side walls or similar of at least 10 cm above
the appliance and 5 cm at the sides. For this
reason the appliance may not be used, for
example, in cupboards or similar. Otherwise
there is likely to be insufficient ventilation for the
appliance, which could cause a fire or damage.
► Always place the appliance on a heat-resistant
surface. Failure to do so increases the risk of
fire or of it being damaged. The area under
the bottom can discolour and be damaged.
Additionally, if placed on a soft upper surface,
the appliance could cause permanent damage
to it due to pressure indentations.
DANGER – ELECTRIC SHOCK!
► Do not place the appliance immediately ad-
jacent to sources of water, e.g. sinks or basins,
or in damp cellar areas. Otherwise, there is
a risk of receiving an electric shock.
■ Place the appliance on a solid, level and heat-
resistant surface (e.g. stainless steel worktops
or natural stone worktops such as granite).
Ensure there is sufficient ventilation around the
appliance.
■ Push the appliance up against the wall, with its
rear side facing the wall. The spacers on the
back must touch the wall. Ensure that the wall is
made of heat-resistant material, e.g. tiles, natural
stone or granite.
■ Clean all components as described in the
section “Cleaning and care”.
Using the appliance
Glass door
ATTENTION! DAMAGE TO PROPERTY!
►
Do not lean on the glass door . Do not
place any objects on the glass door .
This can cause damage to the hinges.
■ If you are cooking especially fatty foodstuffs, this
can result in increased smoke production. In this
case, do not close the glass door completely;
instead, leave it slightly open:
The glass door has a latching position so that
it remains open a little: if you carefully push the
glass door closed, it clicks into this position
shortly before closing completely.
■ When drying fruit (to make dried fruit), the glass
door should remain in the latching position
to ensure that moisture can escape and that the
fruit dries better.
Inserting the crumb tray
■ Push the crumb tray under the lower heating
element so that it rests flat on the bottom of
the appliance
. You can use the bent up side as
a handle.
Page 10
SGBR 1500 B3
GB│CY
│
7 ■
Using the rotisserie
WARNING! RISK OF INJURY!
► Always use the tongs 3to insert the hot rotis-
serie 6 into the appliance or to remove it.
■ You can use the two skewer clamps 0 to fix the
food onto the rotisserie 6. Loosen the restrainer .
on the skewer clamps 0, push them so that the
food is fixed firmly in between the clamps and
then screw the restrainer . tight again.
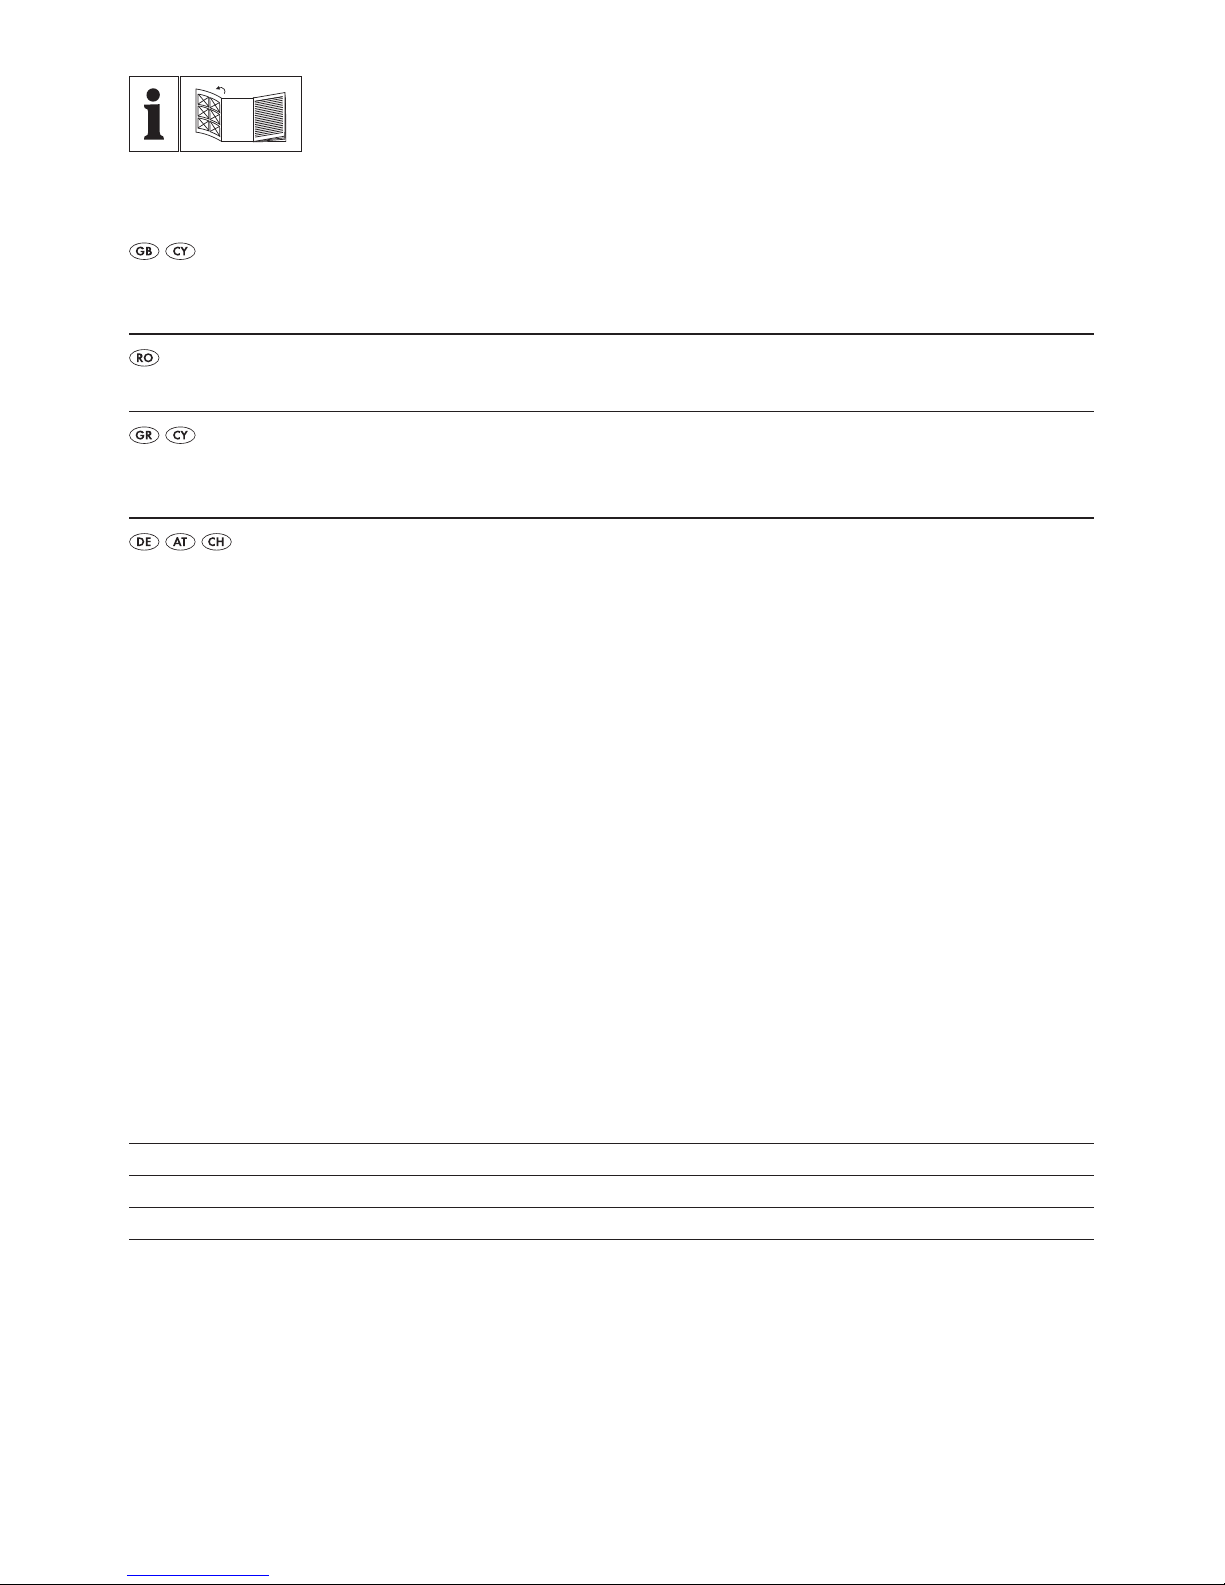
■ First push the end of the rotisserie 6 without the
notch into the drive (Figure 1):
Fig. 1: Push the rotisserie 6 into the drive .
■ Then insert the other end of the rotisserie 6 with
the deep groove in the spit fitting (Figure 2):
Fig. 2: Insert the rotisserie 6 in the spit fitting .
NOTE
► Always slide the baking tray - into the lower
rail when you use the rotisserie 6.
This will collect any drips.
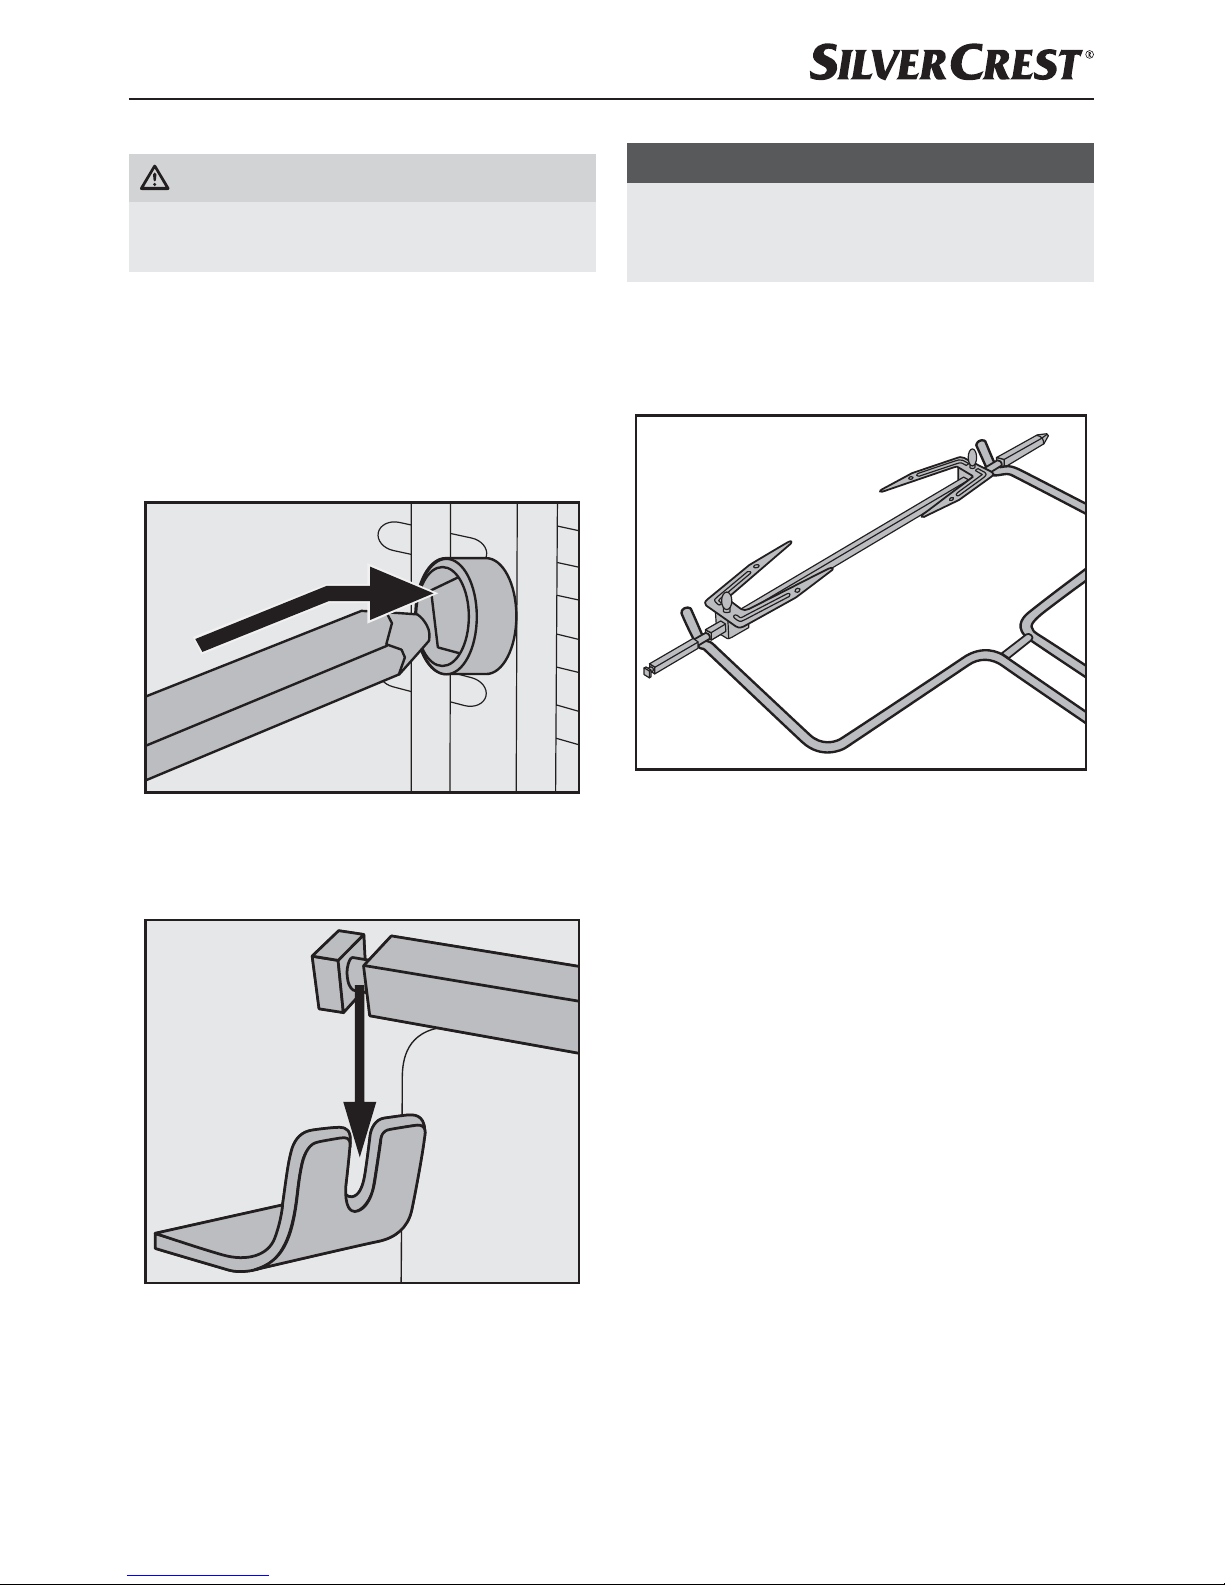
■ To remove the hot rotisserie 6, grip with
the hooks at the end of the tongs 3 into the
recesses on the rotisserie 6 (Figure 3):
Fig. 3: Hooking the tongs 3 onto the rotisserie 6
■ F
irst lift the left-hand side of the rotisserie 6 out
of the spit fitting and then pull the rotisserie 6
from the drive .
Page 11
SGBR 1500 B3
■ 8 │ GB
│
CY
Using the baking tray/rack
WARNING! RISK OF INJURY!
► Always use the tongs to insert the hot
baking tray -/the hot rack ! into the appliance or to remove it.
■ Push the baking tray -/the rack ! into one of
the 3 rails in the cooking chamber of the appliance.
ATTENTION! DAMAGE TO PROPERTY!
► Never place the baking tray -/the rack !
directly onto the heating elements .
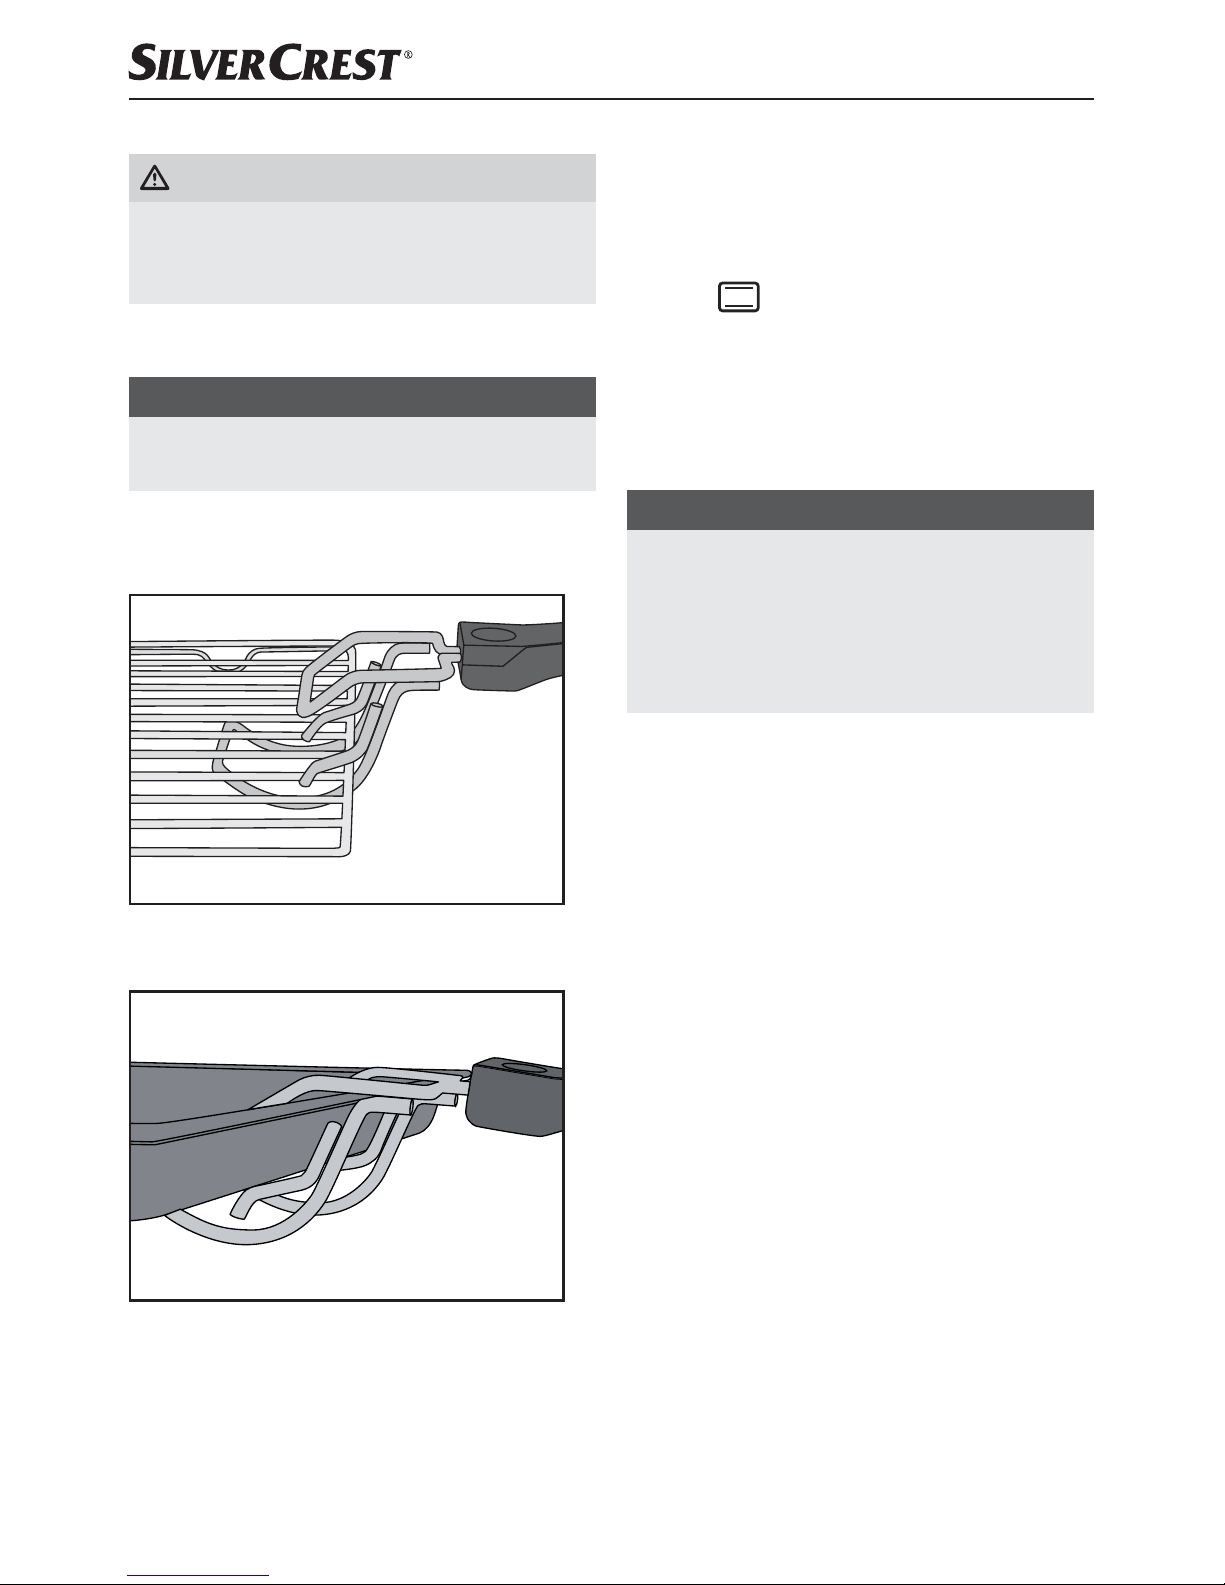
■ To remove the hot baking tray - or the rack !,
hook the tongs onto them as follows:
Fig. 4: Hooking the tongs onto the rack !
Fig. 5: Hooking the tongs onto the baking
tray -
Before first use
1) Insert the plug into a mains power socket.
2) Turn the temperature control clockwise to
the maximum temperature (to the stop).
3) Turn the function switch to "upper and lower
heat"
.
4) Open the glass door leave this open for this
operation.
5) Remove any installed accessories from the
cooking chamber.
6) Turn the timer to 20 minutes.
NOTE
► The first time the appliance heats up, a
small amount of smoke and odour may be
generated due to production-related residue.
This is normal and is completely harmless.
Provide sufficient ventilation by opening a
window, for example.
The appliance switches off automatically
after 20 minutes.
If you want to interrupt the heating process
prematurely, turn the temperature control
counter-clockwise to the stop and set the
timer to "OFF".
7) Allow the appliance to cool down, then clean
the appliance as described in the chapter
"Cleaning and care".
The appliance is now ready for use.
Page 12
SGBR 1500 B3
GB│CY
│
9 ■
Operating the appliance
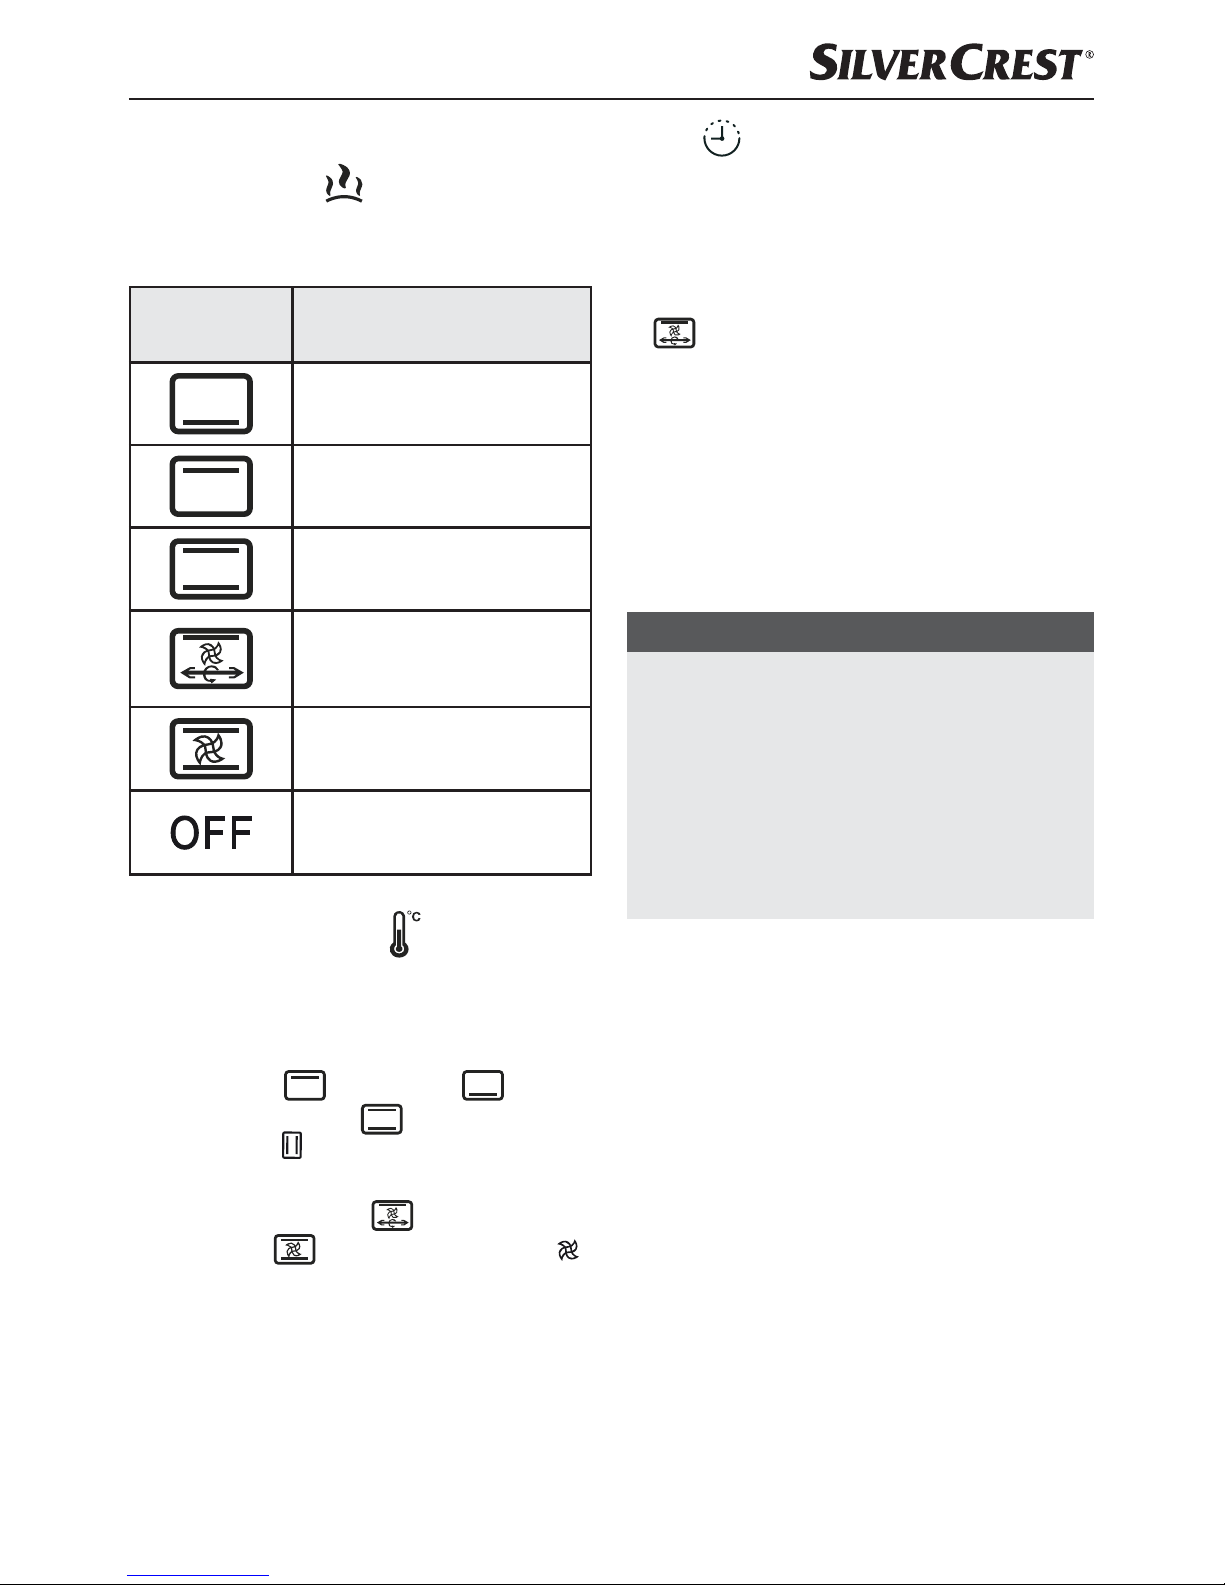
Function switch
You can switch on the appliance with the function
switch , and also set 5 different functions:
Symbol Meaning
“Lower heat”
e.g. for baking
“Upper heat”
e.g. to gratinate
"Upper & lower heat"
e.g. for baking a pizza
"Upper heat/hot air/
rotisserie"
e.g. to roast poultry
"Upper & lower heat/hot air"
e.g. to reheat rolls
"OFF" the appliance is
switched off.
Temperature control
Use the temperature control to set the desired
temperature.
■ If you set the temperature for the functions
“Upper heat”
, “Lower heat” or
“Upper & lower heat”
use the scale
marked with “
“.
■ If you set the temperature for the functions “Upper
heat/hot air/rotisserie”
or “Upper & lower
heat/hot air”
use the scale marked with „ “.
Timer
User the timer to set the cooking time.
■ Set the timer to the desired cooking time.
After expiry of the set time a signal tone sounds
and the appliance stops heating.
If the function "Upper heat/hot air/rotisserie"
is selected, the rotisserie 6 will also stop
turning.
Grilling and baking
1) Put the crumb tray into the appliance.
2) Remove the rack ! and baking tray - from
the appliance. If required, cover these with
baking paper or lightly grease the baking tray with suitable baking fat.
NOTE
► Depending on the meal, the oven must be
preheated. Refer to the guidelines in the
respective recipe. Preheating is useful for:
– very short baking times,
– crisp crusts,
– sensitive meals that require a constant
temperature, such as soufflés.
► If no preheating is required, skip step 3).
3) Allow the appliance to heat up for approx.
10 minutes (depending on the temperature
setting) to the required temperature:
– Select the required temperature using the
temperature control . Ensure that you use
the correct scale (see chapter "Temperature
control").
– Select the required function with the function
switch .
Page 13

SGBR 1500 B3
■ 10 │ GB
│
CY
NOTE
► As a general rule, if you are baking or grilling
with hot air you can dispense with a preheating
of the grilling/cooking space.
– Use the timer to set the preheat time
(approx. 10 minutes).
– Close the glass door .
4) Once the warm-up period is finished, place
the foodstuffs on the rack ! or the baking
tray - and slide it in on one of the rails.
Ensure that there is sufficient space between
the foodstuffs and the inner walls/heating
elements of the appliance.
NOTE
► If you wish to prepare food on the rack !
that drips excessively, then slide the baking
tray - onto the bottom rail. By doing this,
dripping fat for example will be caught and
the appliance is then easier to clean.
5) Close the glass door before starting the
grilling or baking process.
6) Use the timer to set the required grilling or
baking time. The maximum grilling or baking
time is 120 minutes.
NOTE
► If the cooking time for the food is less than
20 minutes, first set the timer to 40 minutes
and then turn it back to the required grilling
or baking time.
The control lamp indicates that the appliance is
now switched on. The switch of the timer now
rotates itself anti-clockwise to "OFF ".
The appliance switches off automatically after the
set period, there is a beep and the control lamp
switches off.
NOTE
If you want to interrupt the heating process
prematurely, turn the temperature control
counter-clockwise to the stop and set the timer
to "OFF ".
7) After cooking, remove the rack ! or the baking
tray - using the tongs .
8) Set the function switch to "OFF".
Grilling with the rotisserie
1) Put the crumb tray into the appliance.
2) If inserted, remove the rotisserie 6 from the
appliance.
3) Push the baking tray - onto the lower rail.
4) Fix the food to be grilled with the skewer
clamps 0. Ensure that the food in the cooking
chamber can turn freely without touching the
sides. The rotisserie 6may change its direction
of rotation if the food strikes against a resistance.
The two depressions on the rotisserie 6 must re-
main freely accessible, otherwise you will not be
able to grasp the rotisserie 6 with the tongs 3.
5) Fit the rotisserie 6 in the cooking chamber
(see chapter "Using the rotisserie")
6) Close the glass door .
Page 14

SGBR 1500 B3
GB│CY
│
11 ■
NOTE
If you want to interrupt the heating process prematurely, turn the temperature control counterclockwise to the stop and set the timer to
"OFF ".
7) Adjust the temperature control to the desired
temperature.
8) Set the function switch to "Upper heat/
hot air/rotisserie"
. Set the timer to the
desired grill time.
The appliance starts the grilling process and
the rotisserie 6 starts turning.
The control lamp indicates that the appliance is
now switched on. The switch of the timer now
rotates itself anti-clockwise to "OFF ".
The appliance switches off automatically after the
set period, there is a beep and the control lamp
switches off.
NOTE
If you want to interrupt the heating process
prematurely, turn the temperature control
counter-clockwise to the stop and set the timer
to "OFF ".
9) After the grilling process is completed remove
the rotisserie 6 with the help of the tongs 3.
10) Set the function switch to "OFF".
EXAMPLE: GRILLED CHICKEN
Ingredients
♦ Grilling chicken (approx. 1.3 kg,
guts removed)
♦ Spices (salt, paprika)
♦ Cooking oil
1) Season the chicken on the inside and outside
with salt and paprika powder. Brush it from
the outside with heat resistant cooking oil.
2) Push the chicken onto the spit and fix it in
place with the skewer clamps 0. Ensure that
the notches on the rotisserie 6 remain free
so that you can remove the rotisserie 6with
the help of the tongs 3. Depending on the
shape of the chicken, it may be necessary
to fasten the wings and legs with a fireproof
string to stop them impacting the sides when
turning.
3) Push the baking tray - onto the lower rail.
4) Preheat the appliance for about 10 minutes
using the function "Upper & lower heat/hot
air"
to 210°C.
5) Put the chicken on the rotisserie into the
appliance using the tongs 3.
6) Set the function switch to "Upper heat/hot
air/rotisserie"
and close the door.
7) Set the timer approx. 80 minutes. The
cooking time can vary depending on the
size and nature of the chicken.
8) Brush the chicken every now and again with
some cooking oil. This will make it crispy.
9) Once the set time is up, carefully remove the
rotisserie with the chicken using the tongs 3.
Loosen the skewer clamps 0 and pull the
chicken off the rotisserie 6.
Page 15
SGBR 1500 B3
■ 12 │ GB
│
CY
Cleaning and care
DANGER – ELECTRIC SHOCK!
► Before cleaning the appliance, disconnect the
plug from the mains power socket!
Risk of electric shock!
NEVER immerse the appliance in water or
any other liquid!
WARNING! RISK OF INJURY!
► Always allow the appliance to cool down
before cleaning it. Otherwise there is a risk
of burns!
■ It is best to clean the appliance and accessories
as soon as they have cooled down. This makes
food residues easier to remove.
ATTENTION! DAMAGE TO PROPERTY!
► Do not use abrasive or aggressive cleaning
materials. These could damage the surface of
the appliance!
► Do not clean the components of the appliance
in a dishwasher!
► Do not clean the cooking chamber with an
oven spray as this may make residues on the
heating elements impossible to remove.
■ Wipe the appliance with a damp cloth. If neces-
sary, put a little mild detergent on the cloth and
wipe this off afterwards with a cloth dampened
with clean water. Dry everything properly.
■ Clean the cooking chamber and the glass door
with a moist cloth. If necessary, put a little mild
detergent on the cloth and wipe this off afterwards with a cloth dampened with clean water.
Dry everything properly.
■ Clean the tongs /3, the rotisserie 6, the
skewer clamps 0, the restrainer ., the baking
tray -, the rack ! and the crumb tray in
warm soapy water. Dry all parts properly after
cleaning.
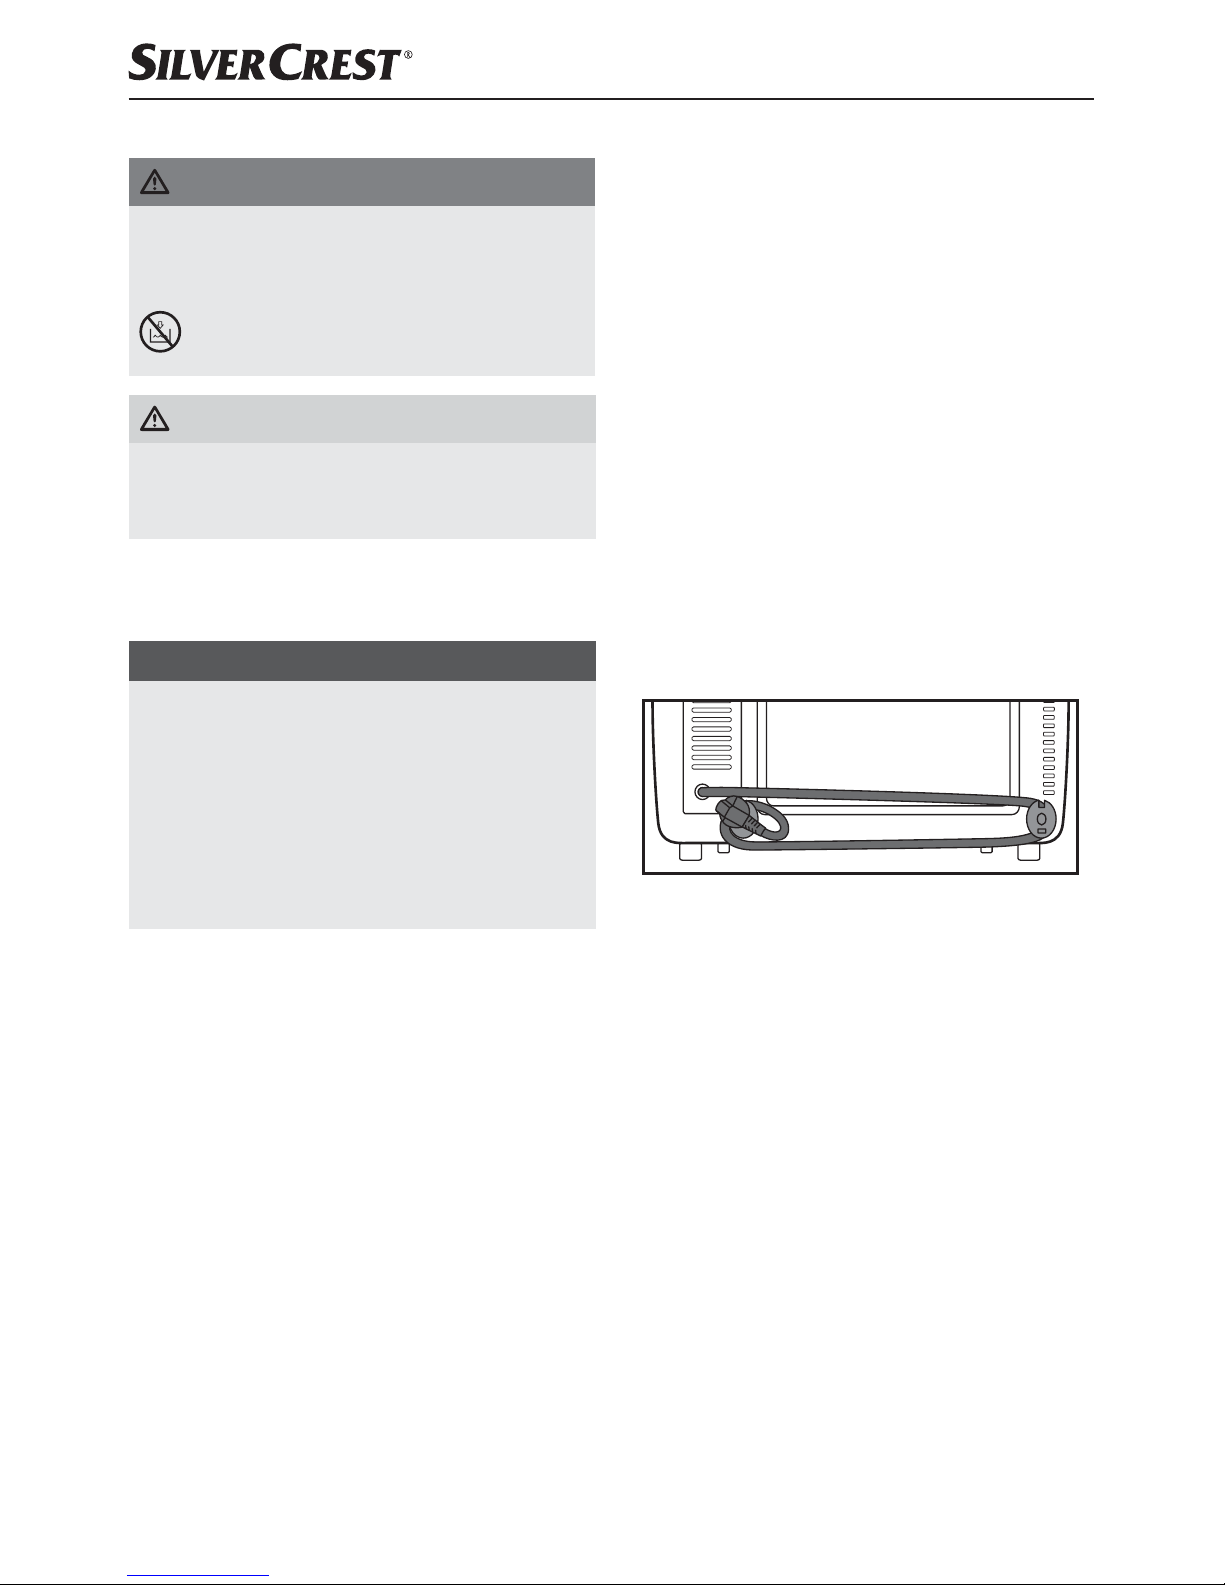
Storage
■ You can wind the mains cable around the spacers
on the rear side of the appliance and attach the
plug to one of the spacer:
■ Store the cleaned appliance and its accessories
in a clean, dust-free and dry location.
Page 16

SGBR 1500 B3
GB│CY
│
13 ■
Troubleshooting
Fault Cause Solution
The appliance is not
working.
The mains plug is not connected to the
mains power.
Insert the plug into a mains power
socket.
The mains power socket is defective.
Use a different mains power
socket.
The appliance is defective. Contact Customer Services.
The control lamp
comes on and but the
appliance does not
heat up.
The function switch is set to OFF.
Turn the function switch to the
desired function.
The cooking time of
the food seems very
long
The glass door has been opened often
to check the cooking progress.
Do not open the glass door
any more often than is absolutely
necessary.
The wrong temperature level has been set. Check the temperature settings.
Smoke and smells
develop during use.
There is detergent or food residue on the
heating elements.
Remove the food from the appliance and continue cooking
process with the glass door
open until the smoke stops.
If the malfunction cannot be corrected with the above suggestions, or if you have found some other
kind of malfunction, please contact our Customer Service.
Page 17

SGBR 1500 B3
■ 14 │ GB
│
CY
Disposal
Under no circumstance should
the appliance be disposed of
as standard domestic waste.
This product is subject to the
provisions of European Directive 2012/19/EU.
Dispose of the appliance via an approved waste
disposal company or your municipal waste disposal
facility. Please observe applicable regulations.
Please contact your waste disposal facility if you
are in any doubt.
The packaging is made of environmen-
tally friendly materials which you can
dispose of at your local recycling centre.
Kompernass Handels GmbH
warranty
Dear Customer,
This appliance has a 3-year warranty valid from
the date of purchase. If this product has any faults,
you, the buyer, have certain statutory rights. Your
statutory rights are not restricted in any way by the
warranty described below
.
Warranty conditions
The validity period of the warranty starts from the
date of purchase. Please keep your original receipt
in a safe place. This document will be required as
proof of purchase.
If any material or production fault occurs within
three years of the date of purchase of the product,
we will either repair or replace the product for you
at our discretion. This warranty service is dependent on you presenting the defective appliance and
the proof of purchase (receipt) and a short written
description of the fault and its time of occurrence.
If the defect is covered by the warranty, your product
will either be repaired or replaced by us. The repair
or replacement of a product does not signify the
beginning of a new warranty period.
Warranty period and statutory
claims for defects
The warranty period is not prolonged by repairs
effected under the warranty. This also applies to
replaced and repaired components. Any damage
and defects present at the time of purchase must
be reported immediately after unpacking. Repairs
carried out after expiry of the warranty period shall
be subject to a fee.
Scope of the warranty
This appliance has been manufactured in accordance with strict quality guidelines and inspected
meticulously prior to delivery.
The warranty covers material faults or production
faults. The warranty does not extend to product
parts subject to normal wear and tear or fragile
parts such as switches, batteries, baking moulds or
parts made of glass.
The warranty does not apply if the product has
been damaged, improperly used or improperly
maintained. The directions in the operating instructions for the product regarding proper use of
the product are to be strictly followed. Uses and
actions that are discouraged in the operating
instructions or which are warned against must be
avoided.
This product is intended solely for private use and
not for commercial purposes. The warranty shall be
deemed void in cases of misuse or improper handling,
use of force and modifications/repairs which have
not been carried out by one of our authorised
Service centres.
Page 18

SGBR 1500 B3
GB│CY
│
15 ■
Warranty claim procedure
To ensure quick processing of your case, please
observe the following instructions:
▯ Please have the till receipt and the item number
(e.g. IAN 12345) available as proof of purchase.
▯ You will find the item number on the type plate,
an engraving on the front page of the instructions
(bottom left), or as a sticker on the rear or bottom
of the appliance.
▯ If functional or other defects occur, please
contact the service department listed either by
telephone or by e-mail.
▯ You can return a defective product to us free of
charge to the service address that will be provided
to you. Ensure that you enclose the proof of purchase (till receipt) and information about what
the defect is and when it occurred.
You can download these instructions
along with many other manuals,
product videos and software on
www.lidl-service.com.
Service
Service Great Britain
Tel.: 0871 5000 720 (£ 0.10/Min.)
E-Mail: kompernass@lidl.co.uk
CY
Service Cyprus
Tel.: 8009 4409
E-Mail: kompernass@lidl.com.cy
IAN 274498
Importer
Please note that the following address is not the
service address. Please use the service address
provided in the operating instructions.
KOMPERNASS HANDELS GMBH
BURGSTRASSE 21
44867 BOCHUM
GERMANY
www.kompernass.com
Page 19

SGBR 1500 B3
■ 16 │ GB
│
CY
Recipes
In this section, we provide you with various sample
recipes for preparing dishes. These examples are
recommendations. Cooking times may vary.
These recipes are provided without guarantee.
All information on ingredients and preparation is
indicative only. Modify the suggested recipes to
taste. We hope you enjoy the recipes and wish
you “bon appetit”!
NOTE
Take note of the preparation guidelines provided
on the food packaging.
Muffins
Ingredients for four people:
♦ 1 cup of flour
♦ 1 teaspoon of baking powder
♦ 1 egg
♦ 1 tablespoon of melted butter
♦ 1 cup of milk
♦ 3 tablespoons of sugar
♦ 1 pinch salt
♦ for variations: also nuts, chopped bananas or
chocolate flakes
Preparation:
1) Gradually mix the flour, baking powder, egg,
milk, salt and sugar together in a bowl, one
by one.
2) Melt the butter in a saucepan and mix it into
the dough.
3) Subject to taste, blend in the nuts, chocolate
flakes or mashed bananas.
4) Place the prepared dough into standard muffin
moulds and place them on the baking tray -.
5) Bake the muffins at 220°C on the bottom rail
using top & bottom heat for about 15 minutes.
Hawaiian toast
Ingredients for 4 pieces of toast:
♦ 4 slices of toasting bread
♦ 1–2 tablespoons of remoulade
♦ 120 g cooked ham
♦ 1/2 tin of pineapples
♦ 4 slices of cheese for gratinating
♦ Curry
Preparation:
♦ Toast the bread slices.
♦ Spread the remoulade thinly over the pieces of
toast and lay the slices of cooked ham on top.
♦ Lay one slice of pineapple on each piece of
toast. Season with curry.
♦ Then place a slice of cheese over each of the
pineapple slices.
♦ Lay the Hawaiian toasts on the rack ! and
bake at 200°C for about 8 minutes on the
upper rail using top heat.
Baking deep-frozen pizza
Preparation:
♦ Place the rack ! on the upper rail in the cooking
chamber.
♦ Place the deep-frozen pizza (without packaging)
onto the rack !.
♦ Bake the pizza, using upper and lower heat, for
about 20 minutes.
♦ Please follow the instructions on the packaging
regarding temperature.
Page 20

SGBR 1500 B3
GB│CY
│
17 ■
Spritzgebäck cookies
Ingredients:
♦ 125 g butter
♦ 125 g sugar
♦ 1 packet of vanilla sugar
♦ 1 pinch salt
♦ 1 egg
♦ 1 egg white
♦ 250 g flour (type 405)
♦ 1 teaspoon of baking powder
♦ Zest of half a lemon
Preparation:
1) Beat the butter until foamy.
2) Add the sugar, vanilla sugar, lemon zest and
eggs.
3) Mix the flour, baking powder and salt and stir
into the mixture using a mixing spoon.
4) Allow the dough to stand for about 10 minutes.
5) Shape the dough as desired, e.g. with the assistance of a mincer, cookie cutters or a piping
bag.
6) Line the baking tray - with baking paper and
place the cookies on this.
7) Bake the cookies on the top rail of a preheated
oven at 180°C, using top and bottom heat,
for about 10–15 minutes, until they are golden
brown.
NOTE
This quantity of dough is sufficient for several
baking trays -.
Bread rolls
Ingredients:
♦ 300 g flour (or wholemeal flour)
♦ 2 heaped teaspoons of baking powder
♦ 200 g linseeds
♦ 1 egg
♦ 500 g quark or curd cheese
♦ 1 teaspoon of salt
♦ Subject to taste: caraway seeds, onions,
bacon ...
Preparation:
1) Knead all ingredients together well and then
shape into small rolls.
2) Line the baking tray - with baking paper and
place the rolls on this.
3) Bake on the top rail at about 200°C for
around 30 minutes.
NOTE
This quantity of dough is sufficient for several
baking trays -.
Page 21

SGBR 1500 B3
■ 18 │ GB
│
CY
Meringues
Ingredients:
♦ 1 egg white
♦ Salt
♦ 45 g sugar
Preparation:
1) Place the chilled egg white into a fat-free mixing
bowl. Ensure that no egg yolk is mixed in with
it or the meringue will not solidify.
2) Beat the egg white at a slow speed, so that the
bubbles formed in the meringue are not too
large.
3) Add a pinch of salt to taste.
4) Gradually add in half of the sugar when the
meringue starts to solidify.
5) Then beat it at the highest speed until stiff.
6) Add the remaining sugar. This allows the
meringue to attain the required solidity.
7) Fill a piping bag fitted with a large star nozzle
with the meringue mixture and squeeze out
rosettes, slithers or other shapes onto a baking
tray - lined with baking paper. Leave a little
space between each shape.
8) Preheat the oven with grill to approx. 100° C
with hot air.
9) Bake the meringues with hot air at approx.
100° C for about 2 hours.
Buttered croutons
Ingredients:
♦ 2 slices of toasting bread
♦ 1 tbsp. butter
Preparation:
1) Cut the bread into small cubes.
2) Melt the butter at low heat in a saucepan and
mix in the cubed bread.
3) Line a baking tray - with baking paper and
distribute the bread cubes evenly on it.
4) Bake the bread cubes at 170°C (top heat)
on the upper rail until golden brown (approx.
15–20 minutes).
NOTE
You can also use herb or garlic butter instead
of regular butter. Baking time is then reduced by
about 5 minutes.
Page 22

SGBR 1500 B3
GB│CY
│
19 ■
Minced meat baguettes
Ingredients:
♦ 2 baguette rolls
♦ 250 g minced meat (half and half)
♦ 2 tomatoes
♦ 1 onion (diced)
♦ 2 tbsp. tomato purée
♦ 40 g grated Parmesan cheese
♦ 4 slices of cheese
♦ Salt and pepper
Preparation:
1) Slice the baguettes and hollow them out.
2) Mix together the minced meat, tomato paste,
onion, Parmesan, some salt and a little pepper.
3) Shape the minced meat into four equal-sized,
flat burgers and place them on the baguette
halves.
4) Cut the tomatoes into slices and arrange them
on the baguettes.
5) Arrange the cheese slices on the baguettes.
6) Place the baguettes on a baking tray - and
then bake them on the bottom rail at about
230°C in a preheated oven using top and
bottom heat for about 20 minutes.
NOTE
You can also season the minced meat mixture
with basil, chilli or other spices.
Cauliflower (gratinated)
Ingredients:
♦ 1/2 head cauliflower (about 250g)
♦ 3 lemon slices
♦ 1 tbsp. butter
♦ 1 heaped tsp. flour
♦ 1 tbsp. lemon juice
♦ 1 tbsp. slivered almonds
♦ 2 tbsp. gratin cheese (grated)
♦ Salt, pepper, nutmeg
Preparation:
1) Divide the cauliflower into florets and wash
them.
2) Cook the cauliflower with the lemon slices in
boiling, salted water for 8–10 minutes until the
cauliflower is al dente. Retain about 150 ml
of the cooking water before pouring the rest
away.
3) Melt the butter in a saucepan and then brown
the flour, while stirring continuously, for about
1 minute.
4) Continue stirring and pour in the cauliflower
water and let it cook for about 2 minutes. If the
roux gets too solid, gradually add more water
until a creamy consistency is achieved. Season
with lemon juice, nutmeg, salt and pepper.
5) Place the cauliflower in a baking dish (about
14 cm in diameter) and pour the sauce evenly
over it.
6) Sprinkle in the cheese and almond slivers over it.
7) Place the baking dish on the baking tray -.
8) Bake the prepared dish at 200 °C in a preheated oven, using top and bottom heat, for
about 20 minutes on the bottom rail.
Page 23

SGBR 1500 B3
■ 20 │ GB
│
CY
Salmon-filled flaky pastries (burek)
Ingredients:
♦ 1 pack of flaky pastry slices (approx. 8 pieces)
♦ 1 pack of smoked salmon, sliced (about 200 g)
♦ 1 lemon
♦ 1 onion
♦ 1 pack of cream cheese (200 g)
♦ Fresh dill
♦ Salt and pepper
♦ 1 egg yolk
Preparation:
1) Separate the puff pastry sheets and, if necessary, allow them to thaw.
2) Mix the cream cheese with salt, pepper and
the juice of one lemon.
3) Finely dice the onion.
4) Add half of the salmon and the onion to the
cream cheese mixture and mix it all coarsely
with a blender.
5) Cut the remaining salmon into thin strips.
6) Add the salmon and the dill to the mixture and
blend all ingredients together.
7) Place individual tablespoonfuls of the mixture
on a flaky pastry sheet and fold them over.
8) Coat the resulting pouch with egg yolk.
9) Place the burek pieces on a baking sheet -.
Leave sufficient space between the individual
pouches because the flaky pastry will expand.
10) Bake the pastries on the lower rail at around
230°C using top and bottom heat for about
25–30 minutes. The flaky pastry should turn
light brown in colour.
NOTE
The stated quantity of pastry is sufficient for
several baking trays -.
Page 24

SGBR 1500 B3
RO
│
21 ■
Cuprins
Introducere ...........................................................22
Utilizarea conform destinaţiei ............................................22
Furnitura .............................................................22
Descrierea aparatului ..................................................22
Datele tehnice .........................................................22
Indicaţii de siguranţă ...................................................23
Amplasarea ..........................................................26
Utilizarea aparatului ...................................................26
Uşa de sticlă ......................................................................26
Introducerea tăvii pentru firimituri ......................................................26
Utilizarea rotisorului .................................................................27
Utilizarea tăvii de copt/grătarului ......................................................28
Înainte de prima utilizare ...............................................28
Deservirea aparatului ..................................................29
Comutator funcţional ................................................................29
Butonul de reglare a temperaturii ......................................................29
Temporizatorul .....................................................................29
Frigerea şi coacerea ....................................................29
Frigerea la rotisor ......................................................30
Curăţarea şi îngrijirea ..................................................32
Depozitarea ..........................................................32
Remedierea defecţiunilor. . . . . . . . . . . . . . . . . . . . . . . . . . . . . . . . . . . . . . . . . . . . . . . .33
Eliminarea ............................................................34
Garanţia Kompernass Handels GmbH .....................................34
Service-ul .........................................................................35
Importator ........................................................................35
Reţete. . . . . . . . . . . . . . . . . . . . . . . . . . . . . . . . . . . . . . . . . . . . . . . . . . . . . . . . . . . . . . . .35
Page 25

SGBR 1500 B3
■ 22 │ RO
Introducere
Felicitări pentru cumpărarea noului dvs. aparat.
Prin aceasta v-aţi decis pentru un produs de calitate
superioară. Instrucţiunile de utilizare fac parte
integrantă din acest produs. Acestea cuprind
informaţii importante pentru siguranţă, utilizare
şi eliminare. Înainte de utilizarea produsului,
familiarizaţi-vă cu toate indicaţiile privind operarea
şi siguranţa. Utilizaţi acest produs numai în modul
descris şi numai în scopurile menţionate. În cazul
transmiterii aparatului unei alte persoane, predaţi-i,
de asemenea, documentele aferente acestuia.
Utilizarea conform destinaţiei
Cuptorul electric cu grill este destinat exclusiv
încălzirii, preparării şi frigerii alimentelor.
Acest aparat este destinat exclusiv uzului casnic.
Este interzisă utilizarea profesională.
Orice altă utilizare este considerată neconformă cu
destinaţia şi poate conduce la pagube materiale
sau vătămări corporale.
Furnitura
♦ Cuptor electric cu grill
♦ 1 tavă de copt
♦ 1 grătar
♦ 2 cleşti
♦ Rotisor cu 2 ţepuşe
♦ 1 tavă pentru firimituri
♦ Instrucţiuni de utilizare
INDICAŢIE
Imediat după dezambalare, verificaţi dacă
furnitura este completă şi nu prezintă deteriorări.
Adresaţi-vă centrului de service dacă este cazul.
Descrierea aparatului
Figura A:
Mecanism de antrenare
Buton de reglare a temperaturii
Comutator funcţional
Temporizator
Bec de control
Uşă de sticlă
Tava pentru firimituri montată
Elemenţi inferiori de încălzire
Suport pentru rotisor
Figura B:
Cleşte (pentru tava de copt şi grătar)
- Tavă de copt
3 Cleşte (pentru rotisor)
! Grătar
. Opritor
0 Ţepuşe pentru rotisor
6 Rotisor
Datele tehnice
Tensiune nominală: 220 - 240 V ~,
50/60 Hz
Consum max.: 1500 W
Toate componentele acestui aparat
care intră în contact cu alimentele,
sunt adecvate pentru uz alimentar.
Page 26

SGBR 1500 B3
RO
│
23 ■
Indicaţii de siguranţă
PERICOL DE ELECTROCUTARE!
► Nu este permisă deschiderea sau repararea carcasei apa-
ratului. În aceste cazuri nu mai este asigurată siguranţa, iar
garanţia devine nulă. Solicitaţi repararea aparatului defect
numai distribuitorului sau personalului de specialitate autorizat.
► Pentru a evita pericolele, solicitaţi imediat înlocuirea de către
personalul de specialitate autorizat sau de către serviciul clienţi
a ştecărelor sau a cablurilor de alimentare deteriorate.
► Evitaţi pătrunderea oricăror lichide în carcasă. Nu expuneţi
aparatul mediilor umede şi nu-l utilizaţi în aer liber. De asemenea este interzisă aşezarea vaselor cu lichide pe cuptor,
cum ar fi vazele. Pericol de incendiu şi de electrocutare!
Dacă, din întâmplare, în carcasa aparatului se infiltrează
lichide, scoateţi imediat ştecărul din priză şi predaţi aparatul
unui specialist în vederea reparării.
► Nu puneţi mâinile ude pe aparat, pe cablul de alimentare
sau pe ştecăr. Pericol de electrocutare.
Nu introduceţi niciodată aparatul în apă sau în alte lichide!
Există pericol de moarte prin electrocutare dacă în timpul
funcţionării ajung resturi de lichid pe componentele conductoare de tensiune.
Page 27

SGBR 1500 B3
■ 24 │ RO
AVERTIZARE – PERICOL DE RĂNIRE!
► Acest aparat poate fi utilizat de copii începând cu vârsta de
8 ani, precum şi de persoane cu abilităţi fizice, senzoriale
sau mentale reduse sau fără experienţă şi/sau fără cunoştinţe necesare, dacă sunt supravegheate sau dacă au fost
instruite cu privire la utilizarea sigură a acestui aparat şi au
înţeles pericolele cu privire la acesta.
► Copiilor le este interzis să se joace cu aparatul.
► Curăţarea şi acţiunile de întreţinere destinate utilizatorului
nu se vor efectua de către copii, cu excepţia cazului în care
aceştia au vârsta peste 8 ani şi sunt supravegheaţi.
► Copiii cu vârsta sub 8 ani nu trebuie se afle în apropierea
aparatului şi a cablului de conexiune.
► Poziţionaţi cablul de alimentare astfel încât să nu se calce
pe el sau să devină un obstacol pentru persoane.
► În timpul utilizării nu atingeţi niciodată uşa de sticlă sau
carcasa, deoarece acestea devin foarte fierbinţi. Pentru a
deschide uşa de sticlă utilizaţi o lavetă de bucătărie sau
ceva similar, în scopul prevenirii arsurilor!
► Nu atingeţi niciodată elemenţii de încălzire sau geamul în
timpul funcţionării sau înaintea răcirii aparatului. Nu introduceţi mâna în interiorul aparatului în timp ce funcţionează.
Aşteptaţi până ce aparatul s-a răcit. Altfel vă puteţi arde.
► După utilizare, înainte de a-l transporta, aşteptaţi până când
aparatul s-a răcit.
► Utilizaţi întotdeauna mănuşi de bucătărie sau lavete atunci
când manevraţi aparatul!
Precauţie! Suprafeţe fierbinţi!
Page 28

SGBR 1500 B3
RO
│
25 ■
ATENŢIE - PAGUBE MATERIALE!
► Nu utilizaţi temporizatoare externe sau sisteme separate de
comandă de la distanţă pentru a opera aparatul.
► Nu lăsaţi niciodată aparatul nesupravegheat în timpul funcţio-
nării.
► Asiguraţi-vă că aparatul, cablul de alimentare sau ştecărul
nu vor intra în contact cu suprafeţe fierbinţi cum sunt plitele
sau flăcările deschise.
► Utilizaţi aparatul numai cu accesoriile originale din pachetul
de livrare.
► Nu îndoiţi şi nu striviţi cablul de alimentare.
► Scoateţi întotdeauna cablul din priză trăgând de ştecăr, nu
trageţi direct de cablu.
► În timpul funcţionării, în imediata apropiere a cuptorului electric
cu grill nu trebuie să se afle materiale inflamabile (de ex.
prosoape de bucătărie, lavete etc.).
► Nu uscaţi niciodată textile sau altfel de obiecte pe aparat,
deasupra acestuia sau în interior. Există pericol de incendiu.
Page 29

SGBR 1500 B3
■ 26 │ RO
Amplasarea
AVERTIZARE! PERICOL DE INCENDIU!
► Nu aşezaţi niciodată aparatul sub dulapuri
suspendate sau în apropierea perdelelor,
pereţilor de dulapuri sau a altor obiecte
inflamabile.
► Distanţa dintre aparat şi dulapurile suspendate,
plafoane, pereţii laterali etc. trebuie să fie
de minimum 10 cm în sus şi câte 5 cm în
lateral. De aceea, aparatul nu trebuie montat,
de exemplu, în dulapuri etc. Altfel nu este
posibilă aerisirea suficientă a aparatului,
care ar putea provoca incendii sau s-ar putea
defecta.
► Aşezaţi aparatul doar pe o suprafaţă termo-
rezistentă. Altfel există pericol de incendiu,
iar aparatul s-ar putea defecta. Zona de sub
aparat se poate păta sau poate fi deteriorată.
În plus, dacă suprafaţa este construită dintr-un
material moale, în aceasta se pot forma
adâncituri permanente.
PERICOL DE ELECTROCUTARE!
► Nu amplasaţi aparatul în imediata apropiere
a apei, de exemplu, lângă chiuvete, căzi
sau în pivniţe umede. Altfel există pericol de
electrocutare.
■ Așezaţi aparatul pe o suprafaţă dură, dreaptă
și rezistentă la căldură (de ex. blat de lucru
din oţel sau piatră naturală, cum este granitul).
Asiguraţi o aerisire suficientă pe toate părţile
aparatului.
■ Împingeţi aparatul cu partea din spate la perete.
Distanţierele de pe partea din spate trebuie să
atingă peretele. Asiguraţi-vă că peretele este
realizat dintr-un material termorezistent, de ex.
este acoperit cu faianţă, piatră naturală sau
granit.
■ Curăţaţi toate componentele în modul descris
în capitolul „Curăţarea şi îngrijirea”.
Utilizarea aparatului
Uşa de sticlă
ATENŢIE! PAGUBE MATERIALE!
►
Nu vă sprijiniţi de uşa de sticlă . Nu aşezaţi
niciun obiect pe uşa de sticlă . Acest lucru
ar deteriora balamalele.
■ În cazul preparării alimentelor cu multă grăsime
se poate forma foarte mult fum. În acest caz nu
închideţi de tot uşa de sticlă , ci lăsaţi-o puţin
deschisă:
Uşa de sticlă dispune de o poziţie de blocare,
astfel încât aceasta poate rămâne puţin deschisă:
La închiderea cu atenţie a uşii de sticlă ,
aceasta se va bloca, cu puţin înainte de
închidere, în poziţia respectivă.
■ De asemenea, la uscarea fructelor, pentru
obţinerea fructelor uscate, uşa de sticlă
trebuie să rămână în poziţia de blocare pentru
a permite degajarea umezelii şi uscarea
corespunzătoare a fructelor.
Introducerea tăvii pentru firimituri
■ Împingeţi tava pentru firimituri sub elemenţii
inferiori de încălzire , până la poziţionarea
plană a acesteia pe fundul aparatului
. Partea
îndoită în sus o puteţi utiliza ca mâner.
Page 30

SGBR 1500 B3
RO
│
27 ■
Utilizarea rotisorului
AVERTIZARE! PERICOL DE RĂNIRE!
► Utilizaţi întotdeauna cleştele 3 pentru intro-
ducerea sau scoaterea din aparat a rotisorului
fierbinte 6.
■ Cu ajutorul celor două ţepuşe 0 pot fi fixate pe
rotisor 6 produsele de preparat.
Desfaceţi opritoarele . de la ţepuşele pentru
rotisor 0, deplasaţi-le astfel încât produsele
de preparat să se fixeze bine între acestea şi
înşurubaţi la loc opritoarele ..
■ Introduceţi mai întâi capătul rotisorului 6 fără
canelură în mecanismul de antrenare (fig. 1):
Fig. 1: Introduceţi rotisorul 6 în mecanismul de
antrenare .
■ Apoi aşezaţi celălalt capăt al rotisorului 6 cu
canelura adâncă în suportul pentru rotisor
(fig. 2):
Fig. 2: Introduceţi rotisorul 6 în suport
INDICAŢIE
► Împingeţi întotdeauna tava de copt - pe
şina inferioară atunci când utilizaţi rotisorul 6.
În acest mod vor fi captate lichidele care se
scurg.
■ Pentru a scoate rotisorul fierbinte 6 introduceţi
cârligele de la capătul cleştelui 3 în decupajele
de la rotisor 6(fig
. 3):
Fig. 3: Prinderea cleştelui 3 la rotisor 6
■ Ridicaţi mai întâi partea stângă a rotisorului 6
din suport şi apoi scoateţi rotisorul 6 din
mecanismul de antrenare .
Page 31

SGBR 1500 B3
■ 28 │ RO
Utilizarea tăvii de copt/grătarului
AVERTIZARE! PERICOL DE RĂNIRE!
► Utilizaţi întotdeauna cleştele pentru intro-
ducerea sau scoaterea din aparat a tăvii de
copt fierbinţi -/grătarului fierbinte !.
■ Împingeţi tava de copt -/grătarul ! pe una
dintre cele 3 şine din interiorul aparatului.
ATENŢIE! PAGUBE MATERIALE!
► Nu aşezaţi niciodată tava de copt -/grăta-
rul ! direct pe elemenţii de încălzire .
■ Pentru a putea scoate tava de copt - sau
grătarul fierbinte !, prindeţi cleştele după
cum urmează:
Fig. 4: Prinderea cleştelui la grătar !
Fig. 5: Prinderea cleştelui la tava de copt -.
Înainte de prima utilizare
1) Introduceţi ştecărul în priză.
2) Rotiţi butonul de reglare a temperaturii până
la limită, în sensul acelor de ceasornic, la
temperatura maximă.
3) Rotiţi comutatorul funcţional pe „Încălzire
în partea superioară şi încălzire în partea
inferioară”
.
4) Deschideţi uşa de sticlă şi lăsaţi-o deschisă
pentru această operaţiune.
5) Scoateţi eventualele accesorii din interiorul
aparatului.
6) Rotiţi temporizatorul la 20 de minute.
INDICAŢIE
► La prima încălzire a aparatului se pot degaja
uşoare mirosuri şi fum din cauza resturilor
rămase din fabricaţie. Acest lucru este absolut
normal şi inofensiv.
Asiguraţi aerisirea suficientă a încăperii, de
exemplu, prin deschiderea ferestrei.
Aparatul se opreşte automat după 20 de
minute.
Pentru a întrerupe anticipat procesul
de încălzire rotiţi butonul de reglare a
temperaturii până la limită, în sens invers
acelor
de ceasornic şi poziţionaţi temporizatorul
pe „OFF - 0”.
7) Aşteptaţi ca aparatul să se răcească şi curăţaţi-l
conform descrierii din capitolul „Curăţarea şi
îngrijirea”.
Acum puteţi utiliza aparatul.
Page 32

SGBR 1500 B3
RO
│
29 ■
Deservirea aparatului
Comutator funcţional
Cu ajutorul comutatorului funcţional poate fi
pornit aparatul şi pot fi reglate 5 funcţii diferite:
Simbolul Semnificaţia
„Încălzire în partea
inferioară”
de exemplu pentru prăjituri
„Încălzire în partea
superioară”
de exemplu pentru gratinare
„Încălzire în partea superi-
oară & încălzire în partea
inferioară”
de exemplu pentru pizza
„Încălzire în partea
superioară/ventilaţie/rotisor”
de exemplu pentru frigerea
puilor
„Încălzire în partea superi-
oară & încălzire în partea
inferioară/ventilaţie”
de exemplu pentru coacerea
chiflelor
„OFF” aparatul este oprit
Butonul de reglare a temperaturii
Cu ajutorul butonului de reglare a temperaturii
poate fi reglată temperatura dorită.
■ La reglarea temperaturii pentru funcţiile
„Încălzire în partea superioară”
, „Încălzire
în partea inferioară”
sau „Încălzire
în partea superioară & încălzire în partea
inferioară”
orientaţi-vă cu ajutorul scalei cu
marcajul „ “.
■ La reglarea temperaturii pentru funcţiile „Încălzire
în partea superioară/ventilaţie/rotisor”
sau
„Încălzire în partea superioară & încălzire în
partea inferioară/ventilaţie”
orientaţi-vă cu
ajutorul scalei cu marcajul „ ”.
Temporizatorul
Cu ajutorul temporizatorului poate fi reglat
timpul de preparare:
■ Reglaţi temporizatorul pe timpul de preparare
dorit. După încheierea perioadei setate este
emis un semnal sonor, iar aparatul opreşte
încălzirea.
În cazul selectării funcţiei „Încălzire în partea
superioară/ventilaţie/rotisor”
se opreşte şi
rotirea rotisorului 6.
Frigerea şi coacerea
1) Introduceţi tava pentru firimituri în aparat.
2) Scoateţi grătarul ! şi tava de copt - din
aparat. Eventual aşezaţi hârtie de copt sau
ungeţi tava de copt - cu grăsime adecvată.
INDICAŢIE
► În funcţie de preparat poate fi necesară pre-
încălzirea cuptorului. Respectaţi indicaţiile din
reţeta respectivă. Preîncălzirea este recomandată întotdeauna pentru:
– durate de coacere foarte scurte,
– cruste crocante,
– preparate sensibile care necesită o tempe-
ratură constată, cum ar fi sufleurile.
► Dacă nu este necesară preîncălzirea, ignoraţi
pasul 3).
3) Aşteptaţi cca 10 minute (în funcţie de
temperatura reglată) până ce aparatul atinge
temperatura dorită:
– Selectaţi temperatura dorită cu ajutorul
butonului de reglare a temperaturii .
Se va avea în vedere utilizarea scalei corecte
(a se vedea capitolul „Butonul de reglare
a temperaturii”).
– Apoi selectaţi funcţia dorită cu ajutorul
comutatorului funcţional .
Page 33

SGBR 1500 B3
■ 30 │ RO
INDICAŢIE
► În cazul selectării funcţiei de ventilaţie, de
regulă, se poate renunţa la preîncălzirea
aparatului.
– Reglaţi timpul de preîncălzire cu ajutorul
temporizatorului (cca 10 minute).
– Închideţi uşa de sticlă .
4) După expirarea timpului aşezaţi produsul pe
grătar ! sau pe tava de copt - şi împingeţi
grătarul/tava de copt pe şine. Asiguraţi-vă
că există spaţiu suficient între produs şi pereţii
interiori şi elemenţii de încălzire ai aparatului.
INDICAŢIE
► În cazul preparării pe grătar ! a alimentelor
din care se scurg lichide, aşezaţi tava de copt pe şina de dedesubt. Astfel, lichidele se scurg
în tavă, iar aparatul va fi apoi mai uşor de
curăţat.
5) Închideţi uşa de sticlă înaintea începerii
preparării alimentelor pe grătar sau la cuptor.
6) Cu ajutorul temporizatorului reglaţi timpul
dorit de preparare pe grătar sau la cuptor.
Timpul maxim de coacere sau prăjire este de
120 de minute.
INDICAŢIE
► Dacă timpul de preparare a produsului pe
grătar sau la cuptor este mai mic de 20 de
minute, reglaţi mai întâi temporizatorul
pe 40 de minute şi apoi pe timpul dorit.
Becul de control indică faptul că aparatul este
pornit. Acum, comutatorul temporizatorului se
deplasează în sens invers acelor de ceasornic,
spre „OFF - 0”.
După expirarea timpului setat, aparatul se opreşte
automat, este emis un semnal sonor, iar becul de
control se stinge.
INDICAŢIE
Pentru a întrerupe anticipat procesul de încălzire
rotiţi butonul de reglare a temperaturii până
la limită, în sens invers acelor de ceasornic şi
poziţionaţi temporizatorul pe „OFF - 0”.
7) După încălzire scoateţi grătarul ! sau tava
de copt - cu ajutorul cleştelui .
8) Poziţionaţi comutatorul funcţional pe „OFF”.
Frigerea la rotisor
1) Introduceţi tava pentru firimituri în aparat.
2) Scoateţi rotisorul 6 din aparat dacă este cazul.
3) Împingeţi tava de copt - pe şina inferioară.
4) Fixaţi produsul de preparat cu ajutorul ţepuşelor
pentru rotisor 0. Asiguraţi-vă că produsul poate
fi rotit liber în interiorul aparatului, fără a-i atinge
marginile. Rotisorul 6îşi poate modifica
direcţia de rotaţie atunci când produsul
întâmpină rezistenţă.
Cele două decupaje de la rotisor 6 trebuie
menţinute uşor accesibile, altfel rotisorul 6
nu va putea fi prins cu cleştele 3.
5) Fixaţi rotisorul 6 în interiorul aparatului (a
se vedea capitolul „Utilizarea rotisorului”).
6) Închideţi uşa de sticlă .
Page 34

SGBR 1500 B3
RO
│
31 ■
INDICAŢIE
Pentru a întrerupe anticipat procesul de încălzire
rotiţi butonul de reglare a temperaturii până
la limită, în sens invers acelor de ceasornic şi
poziţionaţi temporizatorul pe „OFF - 0”.
7) Reglaţi temperatura dorită cu ajutorul butonului
de reglare a temperaturii .
8) Reglaţi comutatorul funcţional pe „Încălzire
în partea superioară/ventilaţie/rotisor”
.
Reglaţi timpul dorit de frigere cu ajutorul
temporizatorului .
Aparatul porneşte procesul de frigere, iar
rotisorul 6 se roteşte.
Becul de control indică faptul că aparatul este
pornit. Acum, comutatorul temporizatorului se
deplasează în sens invers acelor de ceasornic,
spre „OFF - 0”.
După expirarea timpului setat, aparatul se opreşte
automat, emite un semnal sonor, iar becul de
control se stinge.
INDICAŢIE
Pentru a întrerupe anticipat procesul de încălzire
rotiţi butonul de reglare a temperaturii până
la limită, în sens invers acelor de ceasornic şi
poziţionaţi temporizatorul pe „OFF - 0”.
9) După frigere scoateţi rotisorul 6 cu ajutorul
cleştelui 3.
10) Poziţionaţi comutatorul funcţional pe „OFF”.
EXEMPLU DE PUI LA ROTISOR
Ingrediente
♦ Pui pentru rotisor (cca 1,3 kg gata pentru
preparare)
♦ Condimente (sare, boia)
♦ Ulei alimentar
1) Condimentaţi puiul în interior şi la exterior
cu sare şi boia . Ungeţi-l la exterior cu ulei
alimentar pentru prăjit.
2) Introduceţi puiul pe frigare şi fixaţi-l cu ţepuşele
pentru rotisor 0. Asiguraţi-vă că decupajele
din rotisor 6se menţin libere pentru a putea
apuca rotisorul 6cu cleştele 3. În funcţie
de forma puiului poate fi necesară fixarea
aripilor şi a pulpelor cu sfoară ignifugă,
pentru ca acestea să nu lovească marginile
în timpul rotirii.
3) Împingeţi tava de copt - pe şina inferioară.
4) Preîncălziţi cuptorul cca 10 minute cu ajutorul
funcţiei „Încălzire în partea superioară &
încălzire în partea inferioară /ventilaţie”
la 210°C.
5) Introduceţi puiul pe rotisor cu ajutorul cleştelui 3 în aparat.
6) Reglaţi comutatorul funcţional pe „Încălzire în
partea superioară/ventilaţie/rotisor”
şi
închideţi uşa.
7) Reglaţi temporizatorul la cca 80 de
minute. Timpul de preparare poate varia în
funcţie de mărimea şi constituţia puiului.
8) Din când în când ungeţi puiul cu puţin ulei
alimentar. Astfel acesta va deveni crocant.
9) La încheierea timpului setat, scoateţi cu atenţie
frigarea cu puiul cu ajutorul cleştelui 3.
Desfaceţi ţepuşele 0 şi scoateţi puiul de pe
rotisor 6.
Page 35

SGBR 1500 B3
■ 32 │ RO
Curăţarea şi îngrijirea
PERICOL DE ELECTROCUTARE!
► Înainte de fiecare curăţare scoateţi ştecărul
din priză! Pericol de electrocutare!
Nu introduceţi niciodată aparatul în apă
sau în alte lichide!
AVERTIZARE! PERICOL DE RĂNIRE!
► Aşteptaţi până când aparatul s-a răcit înainte
de a-l curăţa. În caz contrar există pericol de
arsuri!
■ Se recomandă curăţarea aparatului şi a
accesoriilor imediat după răcirea acestora. Astfel
resturile de alimente pot fi îndepărtate mai uşor.
ATENŢIE! PAGUBE MATERIALE!
► Nu utilizaţi substanţe de curăţare abrazive
sau agresive. Acestea pot deteriora suprafaţa
aparatului!
► Nu spălaţi componentele aparatului în
maşina de spălat vase!
► Nu curăţaţi interiorul aparatului cu spray
pentru cuptor, deoarece reziduurile de pe
elemenţii de încălzire nu se vor mai putea
îndepărta.
■ Ştergeţi aparatul cu o lavetă umedă. Dacă
este necesar, adăugaţi un detergent delicat pe
lavetă şi ştergeţi cu o lavetă umezită cu apă
curată. Uscaţi totul foarte bine.
■ Curăţaţi interiorul aparatului şi uşa de sticlă cu
o lavetă umedă. Dacă este necesar, adăugaţi
un detergent delicat pe lavetă şi ştergeţi cu o
lavetă umezită cu apă curată. Uscaţi totul foarte
bine.
■ Curăţaţi cleştele /3, rotisorul 6, ţepuşele
pentru rotisor 0, opritoarele ., tava de copt
-, grătarul ! şi tava pentru firimituri în
apă caldă cu detergent de vase. După spălare
uscaţi bine toate componentele.
Depozitarea
■ Puteţi înfăşura cablul de alimentare în jurul
distanţierului, pe partea din spate a aparatului şi
puteţi fixa ştecărul pe unul dintre distanţiere:
■ Păstraţi aparatul şi accesoriile acestuia curăţate,
într-un loc curat, lipsit de praf şi uscat.
Page 36

SGBR 1500 B3
RO
│
33 ■
Remedierea defecţiunilor
Defecţiunea Cauza Remedierea
Aparatul nu
funcţionează.
Ştecărul nu este conectat la reţeaua electrică.
Introduceţi ştecărul în priză.
Priza este defectă.
Introduceţi aparatul într-o altă
priză.
Aparatul este defect. Adresaţi-vă centrului de service.
Becul de control
se aprinde, dar apa-
ratul nu încălzeşte.
Comutatorul funcţional este poziţionat
pe OFF.
Rotiţi comutatorul funcţional
pe funcţia dorită.
Timpul de preparare
a alimentelor este
prea lung.
Uşa de sticlă a fost deschisă de prea
multe ori pentru a verifica stadiul de preparare.
Nu deschideţi uşa de sticlă
mai des decât este neapărat
necesar.
Este setată o temperatură eronată. Verificaţi setările temperaturii.
Pe durata utilizării
este degajat fum
şi se înregistrează
zgomote.
Pe elemenţii de încălzire se află reziduuri de
detergent sau de alimente.
Scoateţi alimentele din aparat
şi continuaţi prepararea cu uşa
de sticlă deschisă până la
dispariţia fumului.
Dacă defecţiunile nu pot fi remediate prin măsurile specificate mai sus sau dacă constataţi alte tipuri
de defecţiuni, adresaţi-vă centrului nostru de service.
Page 37

SGBR 1500 B3
■ 34 │ RO
Eliminarea
Nu aruncaţi aparatul în
niciun caz în gunoiul menajer
obişnuit. Acest produs face
obiectul Directivei europene
2012/19/EU.
Eliminaţi aparatul prin intermediul unei firme
autorizate sau prin intermediul centrului local de
colectare a deşeurilor. Respectaţi reglementările
actuale în vigoare. Dacă aveţi nelămuriri,
contactaţi serviciul local de eliminare a deşeurilor.
Ambalajul este format din materiale
ecologice pe care le puteţi elimina la
centrele locale de eliminare a deşeurilor.
Garanţia
Kompernass Handels GmbH
Stimate client,
Pentru acest aparat se acordă o garanţie de 3 ani
de la data cumpărării. În cazul în care produsul
prezintă defecte, beneficiaţi de drepturi legale faţă
de vânzătorul produsului. Aceste drepturi legale
nu sunt limitate prin garanţia noastră prezentată în
cele ce urmează.
Condiţii de garanţie
Perioada de garanţie începe de la data
cumpărării. Păstraţi cu grijă bonul fiscal original.
Acesta este necesar pentru a dovedi cumpărarea.
Dacă în decurs de trei ani de la data cumpărării
acestui produs apare un defect de
material sau de fabricaţie, produsul va fi reparat sau
înlocuit de către noi – la alegerea noastră – în mod
gratuit. Garanţia presupune ca în timpul perioadei
de trei ani să se prezinte aparatul defect şi dovada
cumpărării (bonul fiscal), precum şi o scurtă descriere
în scris, în care să se specifice în ce constă defectul
şi când a apărut acesta.
Dacă defectul este acoperit de garanţia noastră, veţi
primi înapoi produsul reparat sau unul nou. Odată
cu reparaţia sau înlocuirea produsului nu începe o
nouă perioadă de garanţie.
Perioada de garanţie şi pretenţiile
legale privind defectele
Perioada de garanţie nu este prelungită după
efectuarea reparaţiilor realizate în perioada de
garanţie. Acest lucru este valabil şi pentru piesele
înlocuite şi reparate.
Eventualele deteriorări şi deficienţe prezente
deja la cumpărare trebuie semnalate imediat
după dezambalarea produsului. Reparaţiile
necesare după expirarea perioadei de garanţie se
efectuează contra cost.
Domeniul de aplicare a garanţiei
Aparatul a fost produs cu grijă, în conformitate
cu orientările stricte privind calitatea şi verificat cu
rigurozitate înaintea livrării.
Garanţia se acordă în caz de defecte de material
sau de fabricaţie. Această garanţie nu se extinde
asupra componentelor produsului care sunt
expuse uzurii normale şi care, prin urmare, pot fi
considerate piese de uzură sau asupra deteriorărilor
apărute la componentele fragile, de exemplu
comutatoare, acumulatori, forme de copt sau
componente realizate din sticlă.
Această garanţie se pierde în cazul în care
produsul a fost deteriorat, a fost utilizat sau
întreţinut în mod necorespunzător. Pentru
utilizarea corespunzătoare a produsului trebuie
respectate cu stricteţe toate indicaţiile prezentate
în instrucţiunile de utilizare. Trebuie evitate în mod
obligatoriu utilizările şi acţiunile nerecomandate
sau care fac obiectul unor avertizări în cadrul
instrucţiunilor de utilizare.
Aparatul este destinat numai uzului privat şi nu
utilizărilor comerciale. În cazul manevrării abuzive
sau necorespunzătoare, al uzului de forţă şi al
intervenţiilor care nu au fost realizate de către
filiala noastră autorizată de service, garanţia îşi
pierde valabilitatea.
Page 38

SGBR 1500 B3
RO
│
35 ■
Procedura de acordare a garanţiei
Pentru a se asigura prelucrarea rapidă a solicitării
dvs., urmaţi instrucţiunile de mai jos:
▯ Pentru toate solicitările păstraţi la îndemână
bonul fiscal şi numărul articolului (de exemplu
IAN 12345) ca dovadă a cumpărării.
▯
Numărul articolului poate fi consultat pe plăcuţa
de caracteristici, pe o gravură, pe coperta
instrucţiunilor (în partea stângă, jos) sau pe
autocolantul de pe partea din spate sau de jos.
▯ În cazul în care apar defecte funcţionale sau
alte defecţiuni, contactaţi mai întâi telefonic
sau prin e-mail departamentul de service
menţionat în continuare.
▯ Apoi puteţi expedia produsul înregistrat ca
fiind defect la adresa de service care v-a fost
comunicată, fără a plăti taxe poştale, anexând
dovada cumpărării (bonul fiscal) şi indicând în
ce constă defectul şi când a apărut acesta.
Acest manual, precum şi multe
altele, videoclipuri cu produsele şi
software-uri pot fi descărcate de pe
www.lidl-service.com.
Service-ul
R
Service România
Tel.: 0800896637
E-Mail: kompernass@lidl.ro
IAN 274498
Importator
Vă rugăm să aveţi în vedere faptul că următoarea
adresă nu reprezintă o adresă pentru service.
Contactaţi mai întâi centrul de service indicat.
KOMPERNASS HANDELS GMBH
BURGSTRASSE 21
44867 BOCHUM
GERMANY
www.kompernass.com
Reţete
În acest capitol vă sunt oferite câteva exemple pentru
prepararea mâncărurilor. Aceste exemple sunt
recomandări. Timpul de preparare poate varia.
Reţete fără garanţie. Toate ingredientele şi datele
de preparare sunt orientative. Completaţi aceste
propuneri cu experienţa personală. Vă urăm
succes şi poftă bună.
INDICAŢIE
Respectaţi indicaţiile de preparare de pe ambalajul
respectivului produs.
Brioşe
Ingrediente pentru 4 porţii:
♦ 1 cană de făină
♦ 1 linguriţă de praf de copt
♦ 1 ou
♦ 1 lingură de unt topit
♦ 1 cană de lapte
♦ 3 linguri de zahăr
♦ 1 priză de sare
♦ pentru sortimente diferite se pot adăuga nuci,
banane mărunţite sau fulgi de ciocolată
Prepararea:
1) Amestecaţi încet făina, praful de copt, oul,
laptele, sarea şi zahărul într-un castron.
2) Topiţi untul într-o cratiţă şi amestecaţi-l cu
aluatul.
3) După gust, adăugaţi nucă, fulgi de ciocolată
sau banane mărunţite.
4) Turnaţi aluatul preparat în formele speciale
pentru brioşe şi aşezaţi-le pe tava de copt -.
5) Coaceţi la 220 °C, cu căldură de sus şi de
jos, timp de aproximativ 15 minute, pe şina
inferioară.
Page 39

SGBR 1500 B3
■ 36 │ RO
Toast Hawaii
Ingrediente pentru 4 porţii:
♦ 4 felii de pâine toast
♦ 1–2 linguri de sos remoulade
♦ 120 g şuncă presată
♦ 1/2 cutie de ananas
♦ 4 felii de caşcaval pentru gratinare
♦ curry
Prepararea:
♦ Prăjiţi feliile de pâine.
♦ Apoi ungeţi-le cu sos remoulade şi adăugaţi
şunca.
♦ Aşezaţi câte o felie de ananas pe fiecare felie
de pâine. Presăraţi curry.
♦ Apoi aşezaţi câte o felie de caşcaval pe
ananas.
♦ Aşezaţi preparatul pe grătar ! şi coaceţi-l
cca 8 minute pe şina din mijloc la aproximativ
200 °C, cu căldură de sus şi aer recirculat.
Coacerea pizzei congelate
Prepararea:
♦ Introduceţi grătarul ! pe şina de sus în interiorul
aparatului.
♦ Aşezaţi pizza congelată fără ambalaj pe grătar !.
♦ Coaceţi pizza cu încălzire în partea superioară şi
inferioară cca 20 de minute.
♦ Respectaţi instrucţiunile de pe ambalajul
produsului în ceea ce priveşte temperatura.
Biscuiţi
Ingrediente:
♦ 125 g unt
♦ 125 g zahăr
♦ 1 vanilie
♦ 1 priză de sare
♦ 1 ou
♦ 1 albuş
♦ 250 g de făină (tip 405)
♦ 1 linguriţă de praf de copt
♦ Coaja rasă de la jumătate de lămâie
Prepararea:
1) Bateţi untul spumă.
2) Adăugaţi zahărul, zahărul vanilat, coaja de
lămâie şi ouăle.
3) Amestecaţi cu făina, praful de copt şi sarea şi
amestecaţi aluatul cu o lingură.
4) Lăsaţi aluatul să stea cca 10 minute.
5) Daţi aluatului forma dorită, de ex. cu ajutorul
maşinii de tocat, formelor speciale sau al
poşului.
6) Aşezaţi biscuiţii în tava de copt - acoperită
cu hârtie de copt.
7) Coaceţi biscuiţii până devin aurii în cuptorul
preîncălzit la 180 °C, cu căldură de sus şi de
jos, aprox. 10–15 minute, pe şina din mijloc.
INDICAŢIE
Aluatul este suficient pentru mai multe tăvi de
copt -.
Page 40

SGBR 1500 B3
RO
│
37 ■
Chifle
Ingrediente:
♦ 300 g de făină (sau făină integrală)
♦ 2 linguriţe de praf de copt
♦ 200 g de seminţe de in
♦ 1 ou
♦ 500 g brânză de vaci fină
♦ 1 linguriţă de sare
♦ după gust adăugaţi chimen, ceapă, bucăţele de
slănină ...
Prepararea:
1) frământaţi bine toate ingredientele şi daţi
formă chiflelor.
2) Aşezaţi chiflele în tava de copt - acoperită cu
hârtie de copt.
3) Coaceţi-le la cca 200 °C, cu căldură de
sus, timp de aproximativ 30 minute, pe şina
superioară.
INDICAŢIE
Aluatul este suficient pentru mai multe tăvi de
copt -.
Bezele
Ingrediente:
♦ 1 albuş
♦ sare
♦ 45 g zahăr
Prepararea:
1) vărsaţi albuşul rece într-un castron fără
grăsime. Nu trebuie să existe resturi de
gălbenuş, deoarece spuma nu va avea
consistenţă.
2) Bateţi albuşul la viteză mică pentru a evita
formarea bulelor de aer.
3) Condimentaţi cu un praf de sare.
4) Adăugaţi treptat jumătate din zahăr când
albuşul începe să se întărească.
5) Bateţi-l apoi la viteză maximă până devine
tare.
6) Adăugaţi zahărul rămas. Astfel bezeaua
primeşte consistenţa necesară.
7) Turnaţi bezeaua într-un poş care are montat un
şpriţ mare în formă de stea şi formaţi rozete,
limbi de pisică sau alte forme în tava de copt acoperită cu hârtie de copt.
8) Preîncălziţi cuptorul electric cu grill la cca
100° C, cu ventilaţie.
9) Lăsaţi bezelele să se coacă pe şina superioară
la cca 100° C, cu ventilaţie, timp de cca 2 ore.
Page 41

SGBR 1500 B3
■ 38 │ RO
Crutoane cu unt
Ingrediente:
♦ 2 felii de pâine toast
♦ 1 lingură de unt
Prepararea:
1) Tăiaţi pâinea toast în cuburi mici.
2) Topiţi untul într-o cratiţă, la temperatură
scăzută şi adăugaţi cuburile de pâine toast.
3) Puneţi hârtie de copt pe tavă de copt - şi
distribuiţi uniform cuburile de pâine pe ea.
4) Coaceţi cuburile de pâine toast la cca. 170 °C,
cu căldură de sus, pe şina superioară, până
când acestea devin aurii (cca 15 - 20 minute).
INDICAŢIE
De asemenea puteţi înlocui untul obişnuit cu cel
cu verdeţuri sau cu usturoi. Timpul de coacere se
reduce în acest caz cu cca 5 minute.
Baghete cu carne tocată
Ingrediente:
♦ 2 baghete mici
♦ 250 g carne tocată (amestec)
♦ 2 roşii
♦ 1 ceapă (tocată)
♦ 2 linguri de pastă de roşii
♦ 40 g parmezan ras
♦ 4 felii caşcaval
♦ sare şi piper
Prepararea:
1) Tăiaţi baghetele şi scobiţi interiorul.
2) Amestecaţi carnea tocată, pasta de roşii, ceapa,
parmezanul, puţină sare şi puţin piper.
3) Formaţi din amestec 4 chiftele mari, pe cât
posibil de plate şi aşezaţi-le pe jumătăţile de
baghetă.
4) Tăiaţi roşiile felii şi aşezaţi-le deasupra.
5) Aşezaţi şi feliile de caşcaval pe baghete.
6) Aşezaţi baghetele pe o tavă de copt - şi
coaceţi-le în cuptorul preîncălzit la 230 °C, cu
căldură de sus şi de jos, timp de cca 20 minute,
pe şina inferioară.
INDICAŢIE
Puteţi condimenta carnea tocată cu busuioc,
chilli sau alte condimente.
Page 42

SGBR 1500 B3
RO
│
39 ■
Conopidă (gratinată)
Ingrediente:
♦ 1/2 căpăţână conopidă (cca 250 g)
♦ 3 felii de lămâie
♦ 1 lingură de unt
♦ 1 linguriţă cu vârf de făină
♦ 1 lingură de suc de lămâie
♦ 1 lingură migdale tăiate
♦ 2 linguri caşcaval pentru gratinat (ras)
♦ sare, piper, nucşoară
Prepararea:
1) Tăiaţi conopida în bucheţele şi spălaţi-le.
2) Fierbeţi conopida cu feliile de lămâie în apă
cu sare, timp de 8-10 minute, astfel încât
conopida să nu fie prea moale. Când turnaţi
apa, păstraţi cca 150 ml din apa în care a
fiert.
3) Într-o cratiţă topiţi untul şi căliţi făina timp de
cca 1 minut, amestecând continuu.
4) Adăugaţi apa de la fierbere amestecând
continuu şi lăsaţi să fiarbă cca 2 minute. Dacă
amestecul de făină devine prea tare, adăugaţi
câte puţină apă până obţineţi o consistenţă
cremoasă. Condimentaţi cu zeamă de lămâie,
sare, piper şi nucşoară.
5) Puneţi conopida într-o formă de sufleu
(cca 14 cm diametru) şi turnaţi sosul uniform
deasupra.
6) Presăraţi caşcavalul şi migdalele tăiate.
7) Aşezaţi forma de sufleu pe tava de copt -.
8) Coaceţi sufleul la cca 200 °C în cuptorul
preîncălzit, cu căldură de sus şi de jos, timp
de cca 20 minute, pe şina inferioară.
Buzunare cu somon
Ingrediente:
♦ 1 pachet foi de plăcintă (cca 8 bucăţi)
♦ 1 pachet somon afumat, felii (cca 200 g)
♦ 1 lămâie
♦ 1 ceapă
♦ 1 pachet cremă de brânză (200 g)
♦ mărar proaspăt
♦ sare şi piper
♦ 1 gălbenuş
Prepararea:
1) Separaţi foile de plăcintă şi lăsaţi-le să se
decongeleze dacă este cazul.
2) Amestecaţi crema de brânză cu sare, piper şi
zeama de la o lămâie.
3) Tăiaţi ceapa în cubuleţe fine.
4) Adăugaţi jumătate din cantitatea de somon şi
ceapa la amestecul de brânză proaspătă şi
pasaţi folosind un blender de mână.
5) Tăiaţi restul de somon în fâşii fine.
6) Adăugaţi somonul şi mărarul în compoziţie şi
amestecaţi totul.
7) Pentru o foaie de plăcintă folosiţi o lingură din
compoziţia preparată şi împăturiţi.
8) Ungeţi buzunarul format cu gălbenuş.
9) Aşezaţi buzunarele pe tava de copt -.
Lăsaţi spaţiu suficient între buzunare, deoarece
foitajul creşte.
10) Lăsaţi buzunarele să se coacă pe şina inferioară
la cca 230 °C, cu căldură de sus şi de jos,
timp de cca 25-30 minute. Aluatul trebuie să
devină uşor maroniu.
INDICAŢIE
Cantitatea specificată ajunge pentru mai multe
tăvi de copt -.
Page 43

SGBR 1500 B3
■ 40 │ RO
Page 44

SGBR 1500 B3
GR│CY
│
41 ■
Περιεχόμενα
Εισαγωγή .............................................................42
Προβλεπόμενη χρήση ..................................................42
Παραδοτέος εξοπλισμός ................................................42
Περιγραφή συσκευής ...................................................42
Τεχνικά χαρακτηριστικά .................................................42
Υποδείξεις ασφαλείας ...................................................43
Τοποθέτηση ...........................................................46
Χρήση της συσκευής ....................................................47
Γυάλινη πόρτα .....................................................................47
Τοποθέτηση δίσκου συλλογής ψίχουλων ................................................47
Χρήση περιστρεφόμενης σούβλας .....................................................47
Χρήση ταψιού/σχάρας ..............................................................48
Πριν την πρώτη χρήση ..................................................49
Χρήση της συσκευής ....................................................49
Διακόπτης λειτουργίας ..............................................................49
Ρυθμιστής θερμοκρασίας ............................................................49
Χρονοδιακόπτης ...................................................................50
Ψήσιμο στη σχάρα και ψήσιμο ...........................................50
Ψήσιμο με την περιστρεφόμενη σούβλα ....................................51
Καθαρισμός και φροντίδα ...............................................54
Αποθήκευση ..........................................................54
Διόρθωση σφαλμάτων ..................................................55
Απόρριψη ............................................................56
Εγγύηση της Kompernass Handels GmbH ..................................56
Σέρβις ...........................................................................57
Εισαγωγέας .......................................................................57
Συνταγές .............................................................57
Page 45

SGBR 1500 B3
■ 42 │ GR
│
CY
Εισαγωγή
Συγχαρητήρια για την αγορά της νέας σας
συσκευής.
Αποφασίσατε έτσι για την απόκτηση ενός προϊόντος υψηλής ποιότητας. Οι οδηγίες χρήσης είναι
τμήμα αυτού του προϊόντος. Περιέχουν σημαντικές
υποδείξεις για την ασφάλεια, τη χρήση και την
απόρριψη. Πριν από τη χρήση του προϊόντος,
εξοικειωθείτε με όλες τις υποδείξεις χειρισμού και
ασφάλειας. Χρησιμοποιείτε το προϊόν μόνο όπως
περιγράφεται και για τους αναφερόμενους τομείς
χρήσης. Παραδώστε όλα τα έγγραφα σε περίπτωση παράδοσης του προϊόντος σε τρίτους.
Προβλεπόμενη χρήση
Ο αυτόματος φούρνος με γκριλ εξυπηρετεί αποκλειστικά για το ζέσταμα, το μαγείρεμα και το
ψήσιμο φαγητών.
Αυτή η συσκευή προορίζεται αποκλειστικά για
χρήση σε νοικοκυριά. Μην τη χρησιμοποιείτε για
επαγγελματικό σκοπό.
Κάθε άλλη χρήση ισχύει ως μη σύμφωνη με τους
κανονισμούς και μπορεί να οδηγήσει σε υλικές
ζημιές ή ακόμη και σε σωματικές βλάβες.
Παραδοτέος εξοπλισμός
♦ Φουρνάκι με γκριλ
♦ 1 ταψί
♦ 1 σχάρα
♦ 2 λαβίδες
♦ Περιστρεφόμενη σούβλα με 2 τσιμπίδες
♦ 1 δίσκος συλλογής ψίχουλων
♦ Οδηγίες χρήσης
ΥΠΟΔΕΙΞΗ
Ελέγξτε τον παραδοτέο εξοπλισμό ως προς την
πληρότητα και για ζημιές, απευθείας μετά την
αποσυσκευασία. Απευθυνθείτε, εάν απαιτείται,
στο τμήμα σέρβις.
Περιγραφή συσκευής
Εικόνα A:
Σύστημα μετάδοσης κίνησης
Ρυθμιστής θερμοκρασίας
Διακόπτης λειτουργίας
Χρονοδιακόπτης
Λυχνία ελέγχου
Γυάλινη πόρτα
Τοποθετημένος δίσκος συλλογής ψίχουλων
Κάτω θερμαντικές ράβδοι
Υποδοχή περιστρεφόμενης σούβλας
Εικόνα B:
Λαβίδα (για ταψί και σχάρα)
- Ταψί
3 Λαβίδα (για περιστρεφόμενη σούβλα)
! Σχάρα
. Αναστολέας
0 Τσιμπίδες περιστρεφόμενης σούβλας
6 Περιστρεφόμενη σούβλα
Τεχνικά χαρακτηριστικά
Ονομαστική τάση: 220 - 240 V ~,
50/60 Hz
Μέγ. κατανάλωση ισχύος: 1500 W
Όλα τα εξαρτήματα αυτής της συσκευής
που έρχονται σε επαφή με τρόφιμα μπορούν να χρησιμοποιούνται με ασφάλεια
στα τρόφιμα.
Page 46

SGBR 1500 B3
GR│CY
│
43 ■
Υποδείξεις ασφαλείας
ΚΙΝΔΥΝΟΣ ΗΛΕΚΤΡΟΠΛΗΞΙΑΣ!
► Δεν επιτρέπεται να ανοίγετε ή να επισκευάζετε το περίβλημα
της συσκευής. Σε αυτήν την περίπτωση δεν διασφαλίζεται
πλέον η ασφαλής λειτουργία και ακυρώνεται η εγγύηση. Η
ελαττωματική συσκευή πρέπει να επισκευάζεται μόνο από
τον προμηθευτή ή εξουσιοδοτημένο ειδικό προσωπικό.
► Τα βύσματα ή τα καλώδια που έχουν υποστεί βλάβη πρέπει
να αντικαθίστανται αμέσως από εξουσιοδοτημένο εξειδικευμένο προσωπικό ή από το τμήμα εξυπηρέτησης πελατών,
ώστε να αποφεύγονται κίνδυνοι.
► Μην αφήνετε υγρά να διεισδύουν μέσα στο περίβλημα
της συσκευής. Απαγορεύεται η έκθεση της συσκευής σε
υγρασία, καθώς και η χρήση της σε εξωτερικούς χώρους.
Επίσης, δεν επιτρέπεται να τοποθετείτε επάνω στη συσκευή
αντικείμενα γεμάτα με υγρά, όπως π.χ. βάζα. Υπάρχει κίνδυνος πυρκαγιάς και ηλεκτροπληξίας! Στην περίπτωση που
ωστόσο εισχωρήσουν υγρά μέσα στο περίβλημα, αποσυνδέστε αμέσως το βύσμα της συσκευής από την πρίζα και
παραδώστε τη συσκευή προς επισκευή.
► Ποτέ μην πιάνετε τη συσκευή, το καλώδιο και το βύσμα με
βρεγμένα χέρια. Σε αντίθετη περίπτωση υπάρχει κίνδυνος
ηλεκτροπληξίας.
Ποτέ μη βυθίζετε τη συσκευή σε νερό ή σε άλλα υγρά!
Υπάρχει κίνδυνος για τη ζωή εξαιτίας βραχυκυκλώματος,
όταν κατά τη λειτουργία υπόλοιπα υγρών καταλήγουν σε
ρευματοφόρα μέρη.
Page 47

SGBR 1500 B3
■ 44 │ GR
│
CY
ΠΡΟΕΙΔΟΠΟΙΗΣΗ – ΚΙΝΔΥΝΟΣ ΤΡΑΥΜΑΤΙΣΜΟΥ!
► Μπορεί να γίνεται χρήση αυτής της συσκευής από παιδιά
άνω των 8 ετών, καθώς και από άτομα με μειωμένες φυσικές,
αισθητηριακές ή νοητικές ικανότητες ή με έλλειψη εμπειρίας
και/ή γνώσεων, εφόσον επιτηρούνται ή έχουν εκπαιδευτεί
αναφορικά με την ασφαλή χρήση της συσκευής και έχουν
κατανοήσει τους επακόλουθους κινδύνους.
► Τα παιδιά δεν επιτρέπεται να παίζουν με τη συσκευή.
► Ο καθαρισμός και η συντήρηση χρήστη δεν επιτρέπεται να
διεξάγονται από παιδιά, εκτός εάν είναι άνω των 8 ετών και
επιτηρούνται.
► Παιδιά μικρότερα των 8 ετών πρέπει να παραμένουν μακριά
από τη συσκευή και το καλώδιο σύνδεσης.
► Τοποθετείτε το καλώδιο έτσι ώστε να μην μπορεί να το πατή-
σει κανείς ή να σκοντάψει σε αυτό.
► Ποτέ μην αγγίζετε τη γυάλινη πόρτα ή το περίβλημα κατά τη
διάρκεια της χρήσης, διότι αυτά μπορεί να είναι πολύ ζεστά.
Για το άνοιγμα της γυάλινης πόρτας χρησιμοποιείτε ένα πανί
κουζίνας ή κάτι παρόμοιο, ώστε να αποφεύγετε εγκαύματα!
► Ποτέ μην αγγίζετε τις θερμαντικές ράβδους ή το παράθυρο
παρακολούθησης κατά τη λειτουργία ή πριν κρυώσει η συσκευή. Κατά τη λειτουργία ποτέ μην πιάνετε μέσα στο χώρο
ψησίματος. Περιμένετε έως ότου κρυώσει η συσκευή. Αλλιώς
μπορεί να καείτε.
► Αφήνετε τη συσκευή να κρυώνει καλά μετά τη χρήση, πριν τη
μεταφέρετε.
► Χρησιμοποιείτε πάντα ειδικά γάντια ή πανιά όταν πιάνετε την
καυτή συσκευή!
Προσοχή! Καυτή επιφάνεια!
Page 48

SGBR 1500 B3
GR│CY
│
45 ■
ΠΡΟΣΟΧΗ – ΥΛΙΚΕΣ ΖΗΜΙΕΣ!
► Μη χρησιμοποιείτε εξωτερικό χρονοδιακόπτη ή ξεχωριστό
τηλεχειριστήριο για να λειτουργήσετε τη συσκευή.
► Ποτέ μην αφήνετε τη συσκευή ανεπιτήρητη κατά τη διάρκεια
της λειτουργίας.
► Βεβαιώνεστε ότι η συσκευή, το καλώδιο ή το βύσμα δεν έρ-
χονται σε επαφή με πηγές θερμότητας, όπως μάτια κουζίνας
ή φλόγες.
► Χρησιμοποιείτε τη συσκευή μόνο με τα παραδοτέα γνήσια
εξαρτήματα.
► Μην διπλώνετε ή μαγκώνετε το καλώδιο.
► Πιάνετε πάντα το βύσμα κατά την αποσύνδεση από την
πρίζα, μην τραβάτε ποτέ από το ίδιο το καλώδιο.
► Κατά τη διάρκεια της λειτουργίας δεν επιτρέπεται να υπάρχουν
εύφλεκτα υλικά πολύ κοντά στον αυτόματο φούρνο με γκριλ
(π.χ. πετσέτα, πανιά κουζίνας, κλπ.).
► Ποτέ μη στεγνώνετε υφάσματα ή αντικείμενα επάνω ή μέσα
στη συσκευή. Υπάρχει κίνδυνος πυρκαγιάς.
Page 49

SGBR 1500 B3
■ 46 │ GR
│
CY
Τοποθέτηση
ΠΡΟΕΙΔΟΠΟΙΗΣΗ!
ΚΙΝΔΥΝΟΣ ΠΥΡΚΑΓΙΑΣ!
► Ποτέ μην τοποθετείτε τη συσκευή κάτω από
εντοιχισμένα ερμάρια ή δίπλα σε κουρτίνες,
ράφια ή άλλα εύφλεκτα αντικείμενα.
► Η απόσταση της συσκευής από κρεμαστά
ντουλάπια, ταβάνια, πλαϊνούς τοίχους και
παρόμοια πρέπει να ανέρχεται προς τα
επάνω τουλάχιστον 10 εκ. και στο πλάι 5 εκ.
Συνεπώς η συσκευή δεν επιτρέπεται να τοποθετείται σε ντουλάπια ή παρόμοια έπιπλα.
Αλλιώς δεν είναι δυνατός ο επαρκής
αερισμός της συσκευής και η συσκευή θα
μπορούσε να προκαλέσει πυρκαγιά ή ζημιά.
► Τοποθετείτε τη συσκευή μόνο επάνω σε μια
θερμανθεκτική βάση. Αλλιώς υπάρχει κίνδυνος πυρκαγιάς και η συσκευή μπορεί να
πάθει βλάβη. Η περιοχή κάτω από τον πάτο
της συσκευής μπορεί να αποχρωματιστεί
και να υποστεί ζημιά. Επίσης, σε περίπτωση
μαλακιάς βάσης, μπορεί αυτή η βάση να
πιέζεται συνεχώς.
ΚΙΝΔΥΝΟΣ ΗΛΕΚΤΡΟΠΛΗΞΙΑΣ!
► Μην τοποθετείτε τη συσκευή πολύ κοντά σε
νερό, π.χ. σε νεροχύτες, σκάφες ή σε υγρούς
χώρους κελαριών. Αλλιώς υπάρχει κίνδυνος
ηλεκτροπληξίας.
■ Τοποθετείτε τη συσκευή επάνω σε μια σταθερή,
επίπεδη και θερμανθεκτική βάση (π.χ. πλάκες
εργασίας από ανοξείδωτο χάλυβα ή πλάκες
εργασίας από φυσική πέτρα, όπως γρανίτη).
Φροντίζετε για επαρκή αερισμό γύρω από τη
συσκευή.
■ Σπρώξτε τη συσκευή με την πίσω πλευρά μέχρι
τον τοίχο. Οι αποστάτες στην πίσω πλευρά
πρέπει να αγγίζουν τον τοίχο. Φροντίζετε ώστε
ο τοίχος να αποτελείται από θερμανθεκτικό
υλικό, π.χ. επένδυση από πλακάκια, φυσική
πέτρα ή γρανίτη.
■ Καθαρίζετε όλα τα εξαρτήματα, όπως περιγρά-
φεται στο Κεφάλαιο «Καθαρισμός και φροντίδα».
Χρήση της συσκευής
Γυάλινη πόρτα
ΠΡΟΣΟΧΗ! ΥΛΙΚΕΣ ΖΗΜΙΕΣ!
►
Μη στηρίζεστε στη γυάλινη πόρτα . Μην
τοποθετείτε αντικείμενα επάνω στη γυάλινη
πόρτα . Αυτό προκαλεί ζημιά στους
μεντεσέδες.
■ Όταν ετοιμάζετε ιδιαίτερα λιπαρά φαγητά,
ίσως δημιουργηθεί πολύς καπνός. Σε αυτή την
περίπτωση μην κλείνετε τη γυάλινη πόρτα
εντελώς, αλλά αφήνετέ την λίγο ανοιχτή:
Η γυάλινη πόρτα διαθέτει μία θέση μανδάλωσης, ώστε να μένει ελαφρώς ανοιχτή: Όταν
κλείνετε προσεκτικά τη γυάλινη πόρτα , αυτή
ασφαλίζει σε αυτή τη θέση λίγο πριν το κλείσιμο.
■ Και κατά την ξήρανση φρούτων για την δημι-
ουργία αποξηραμένων φρούτων, πρέπει η γυάλινη πόρτα (6) να παραμένει στην θέση μανδάλωσης, ώστε να μπορεί να εκφύγει η υγρασία
και τα φρούτα να ξηραίνονται καλύτερα.
Τοποθέτηση δίσκου
συλλογής ψίχουλων
■ Ωθήστε το δίσκο συλλογής ψίχουλων κάτω
από τις χαμηλές θερμαντικές ράβδους , ώστε
να βρίσκεται χαμηλά στον πάτο της συσκευής
.
Μπορείτε να χρησιμοποιήσετε ως λαβή την
πλευρά που έχει περιστραφεί προς τα επάνω
.
Page 50

SGBR 1500 B3
GR│CY
│
47 ■
Χρήση περιστρεφόμενης σούβλας
ΠΡΟΕΙΔΟΠΟΙΗΣΗ!
ΚΙΝΔΥΝΟΣ ΤΡΑΥΜΑΤΙΣΜΟΥ!
► Χρησιμοποιείτε πάντα τη λαβίδα 3 για να
τοποθετήσετε ή να αφαιρέσετε την καυτή περιστρεφόμενη σούβλα 6 στη / από τη συσκευή.
■ Με τις δύο τσιμπίδες της περιστρεφόμενης
σούβλας 0 μπορείτε να στερεώσετε το προϊόν
ψησίματος στην περιστρεφόμενη σούβλα 6.
Λύστε τους αναστολείς . των τσιμπίδων της
περιστρεφόμενης σούβλας 0, μετατοπίστε τους
κατά τέτοιο τρόπο, ώστε το προϊόν ψησίματος να
στερεώνεται σταθερά ανάμεσα τους και βιδώστε
ξανά καλά τους αναστολείς ..
■ Σπρώξτε αρχικά το άκρο της περιστρεφόμενης
σούβλας 6 χωρίς εγκοπή στο σύστημα μετάδοσης κίνησης (Εικ. 1):
Εικ. 1: Ώθηση περιστρεφόμενης σούβλας 6 στο
σύστημα μετάδοσης κίνησης .
■ Στη συνέχεια, τοποθετήστε το άλλο άκρο της
περιστρεφόμενης σούβλας 6 με τη βαθιά
εγκοπή στην υποδοχή της περιστρεφόμενης
σούβλας (Εικ. 2):
Εικ. 2: Τοποθέτηση περιστρεφόμενης σούβλας 6
στην υποδοχή περιστρεφόμενης σούβλας
ΥΠΟΔΕΙΞΗ
► Σπρώχνετε πάντα το ταψί - στη χαμηλότερη
ράγα, όταν χρησιμοποιείτε την περιστρεφόμενη σούβλα 6. Έτσι, τα υγρά που πέφτουν
συλλέγονται στο δοχείο.
■ Για να απομακρύνετε την καυτή περιστρεφόμενη
σούβλα 6, πιάστε με το άγκιστρο στο άκρο
της λαβίδας 3 τις εσοχές της περιστρεφόμενης
σούβλας 6(Εικ. 3):
Εικ. 3: Πιάσιμο της λαβίδας 3 στην περιστρεφό-
μενη σούβλα 6
■ Σηκώστε πρώτα την αριστερή πλευρά της περι-
στρεφόμενης σούβλας 6 από την υποδοχή της
περιστρεφόμενης σούβλας και στη συνέχεια
τραβήξτε την περιστρεφόμενη σούβλα 6 από
το σύστημα μετάδοσης κίνησης .
Page 51

SGBR 1500 B3
■ 48 │ GR
│
CY
Χρήση ταψιού/σχάρας
ΠΡΟΕΙΔΟΠΟΙΗΣΗ!
ΚΙΝΔΥΝΟΣ ΤΡΑΥΜΑΤΙΣΜΟΥ!
► Χρησιμοποιείτε πάντα τη λαβίδα για να
τοποθετήσετε ή να απομακρύνετε το καυτό
ταψί -/την καυτή σχάρα !στη / από τη
συσκευή.
■ Σπρώξτε το ταψί -/τη σχάρα ! σε μία από
τις 3 ράγες στο χώρο ψησίματος της συσκευής.
ΠΡΟΣΟΧΗ! ΥΛΙΚΕΣ ΖΗΜΙΕΣ!
► Ποτέ μην τοποθετείτε το ταψί -/τη σχάρα !
απευθείας επάνω στις θερμαντικές ράβδους .
■ Για να μπορέσετε να αφαιρέσετε το καυτό ταψί -
ή τη σχάρα !, πιάστε τη λαβίδα ως εξής:
Εικ. 4: Πιάσιμο της λαβίδας στη σχάρα !
Εικ. 5: Πιάσιμο της λαβίδας στο ταψί -.
Πριν την πρώτη χρήση
1) Βάλτε το βύσμα σε μια πρίζα.
2) Γυρίστε τέρμα δεξιά το ρυθμιστή θερμοκρασίας στην υψηλότερη θερμοκρασία.
3) Γυρίστε το διακόπτη λειτουργίας στη θέση
«Επάνω και κάτω αντίσταση»
.
4) Ανοίξτε τη γυάλινη πόρτα και αφήστε την
ανοιχτή για αυτή τη διαδικασία.
5) Απομακρύνετε τυχόν τοποθετημένα εξαρτήματα
από το χώρο ψησίματος.
6) Γυρίστε το χρονοδιακόπτη στα 20 λεπτά.
ΥΠΟΔΕΙΞΗ
► Κατά το πρώτο ζέσταμα της συσκευής μπορεί
να προκύψουν υπολείμματα από τη διαδικασία ετοιμασίας, όπως και μικρή ανάπτυξη
καπνού και οσμής. Αυτό είναι φυσιολογικό
και πλήρως ακίνδυνο.
Φροντίζετε για επαρκή αερισμό, για παράδειγμα ανοίξτε ένα παράθυρο.
Η συσκευή απενεργοποιείται αυτόματα
μετά από 20 λεπτά.
Εάν επιθυμείτε να διακόψετε πρόωρα τη θερμαντική διαδικασία, γυρίστε το ρυθμιστή θερμοκρασίας τέρμα αριστερά και θέστε το χρονοδιακόπτη στη θέση «OFF - 0».
7) Αφήστε τη συσκευή να κρυώσει και καθαρίστε
τη, όπως περιγράφεται στο Κεφάλαιο «Καθαρισμός και φροντίδα».
Η συσκευή είναι πλέον έτοιμη για λειτουργία.
Page 52

SGBR 1500 B3
GR│CY
│
49 ■
Χρήση της συσκευής
Διακόπτης λειτουργίας
Με το διακόπτη λειτουργίας μπορείτε να
ενεργοποιήσετε τη συσκευή, αλλά και να ρυθμίσετε
5 διαφορετικές λειτουργίες:
Σύμβολο Σημασία
«Κάτω αντίσταση»
π.χ. για ψήσιμο γλυκών
«Επάνω αντίσταση»
π.χ. για ψήσιμο στο φούρνο
"Επάνω και κάτω αντίσταση"
π.χ. για ψήσιμο πίτσας
»Επάνω θέρμανση/Κυκλοφο-
ρία αέρα/Περιστρεφόμενη
σούβλα»
π.χ. για ψήσιμο πουλερικών
στο γκριλ
"Επάνω και κάτω αντίσταση/
Αέρας"
π.χ. για ζέσταμα ψωμιών
"OFF" η συσκευή είναι απενερ-
γοποιημένη
Ρυθμιστής θερμοκρασίας
Με το ρυθμιστή θερμοκρασίας μπορείτε να
ρυθμίσετε την επιθυμητή θερμοκρασία.
■ Όταν ρυθμίζετε τη θερμοκρασία για τις λει-
τουργίες «Επάνω αντίσταση»
, «Κάτω
αντίσταση»
ή «Επάνω και κάτω αντίσταση»
, να προσανατολίζεστε στην κλίμακα που
επισημαίνεται με „ “.
■ Όταν ρυθμίζετε τη θερμοκρασία για τις λειτουρ-
γίες «Επάνω θέρμανση/Κυκλοφορία αέρα/Περιστρεφόμενη σούβλα»
ή «Επάνω και κάτω
αντίσταση/Αέρας»
, να προσανατολίζεστε
στην κλίμακα που επισημαίνεται με « ».
Χρονοδιακόπτης
Με τη βοήθεια του χρονοδιακόπτη μπορείτε να
ρυθμίσετε το χρόνο ψησίματος:
■ Θέστε το χρονοδιακόπτη στον επιθυμητό
χρόνο ψησίματος. Με το πέρας του ρυθμισμένου χρόνου ακούγεται ένας ήχος και η συσκευή
σταματά τη θέρμανση.
Εάν έχει επιλεγεί η λειτουργία «Επάνω αντίσταση/
Αέρας/Περιστρεφόμενη σούβλα»
, σταματάει και η περιστροφή της περιστρεφόμενης
σούβλας 6.
Ψήσιμο στη σχάρα και ψήσιμο
1) Τοποθετήστε το δίσκο συλλογής ψίχουλων
στη συσκευή.
2) Απομακρύνετε τη σχάρα ! και το ταψί - από
τη συσκευή. Τοποθετήστε σε αυτά εάν απαιτείται
χαρτί ψησίματος ή περάστε το ταψί - με κατάλληλο για ψήσιμο λίπος.
ΥΠΟΔΕΙΞΗ
► Αναλόγως του πιάτου, ο φούρνος πρέπει να
προθερμαίνεται. Τηρείτε τις οδηγίες της εκάστοτε συνταγής. Η προθέρμανση ενδείκνυται
σε κάθε περίπτωση για:
– πολύ σύντομους χρόνους ψησίματος,
– τραγανιστές κόρες,
– ευαίσθητα πιάτα που απαιτούν σταθερή
θερμοκρασία, όπως π.χ. σουφλέ.
► Εάν δεν απαιτείται προθέρμανση, υπερπηδήστε
το βήμα 3).
3) Αφήστε τη συσκευή να ζεσταθεί για περ. 10
λεπτά (ανάλογα με τη ρύθμιση θερμοκρασίας)
στην επιθυμητή θερμοκρασία:
– Επιλέξτε την επιθυμητή θερμοκρασία με το
ρυθμιστή θερμοκρασίας . Φροντίζετε
να χρησιμοποιείτε τη σωστή κλίμακα
(βλ. Κεφάλαιο «Ρυθμιστής θερμοκρασίας»).
– Στη συνέχεια επιλέξτε με το διακόπτη
λειτουργίας την επιθυμητή λειτουργία.
Page 53

SGBR 1500 B3
■ 50 │ GR
│
CY
ΥΠΟΔΕΙΞΗ
► Στην περίπτωση που επιλέξετε τη λειτουργία
με κυκλοφορία αέρα, μπορείτε κατά κανόνα
να αποφύγετε την προθέρμανση του χώρου
ψησίματος.
– Ρυθμίστε με το χρονοδιακόπτη το χρόνο
προθέρμανσης (περ. 10 λεπτά).
– Κλείστε τη γυάλινη πόρτα .
4) Μόλις περάσει ο χρόνος, τοποθετήστε το
προϊόν ψησίματος επάνω στη σχάρα ! ή στο
ταψί - και ωθήστε το σε μια από τις ράγες.
Φροντίστε για επαρκή απόσταση του προϊόντος ψησίματος από τα πλευρικά τοιχώματα
και τις θερμαντικές ράβδους της συσκευής.
ΥΠΟΔΕΙΞΗ
► Όταν ετοιμάζετε προϊόν ψησίματος που
στάζει πολύ επάνω στη σχάρα !, σπρώξτε
το ταψί - στη χαμηλότερη ράγα. Έτσι π.χ.
λίπος που στάζει προς τα κάτω συλλέγεται
στο δοχείο και η συσκευή αργότερα καθαρίζεται πιο εύκολα.
5) Κλείστε τη γυάλινη πόρτα , πριν εκκινήσετε
τη διαδικασία ψησίματος.
6) Ρυθμίστε με το χρονοδιακόπτη τον επιθυμητό χρόνο ψησίματος. Ο μέγιστος χρόνος
ψησίματος ανέρχεται σε 120 λεπτά.
ΥΠΟΔΕΙΞΗ
► Εάν ο χρόνος ψησίματος του προϊόντος
ψησίματος είναι μικρότερος από 20 λεπτά,
θέστε το χρονοδιακόπτη πρώτα στα
40 λεπτά και στη συνέχεια πίσω στον
επιθυμητό χρόνο ψησίματος.
Η λυχνία ελέγχου δείχνει ότι η συσκευή είναι
ενεργοποιημένη. Ο διακόπτης του χρονοδιακόπτη
κινείται τώρα προς τα αριστερά, στη θέση «OFF «.
Η συσκευή απενεργοποιείται αυτόματα μετά το
ρυθμισμένο χρόνο, ακούγεται ένας ήχος και
η λυχνία ελέγχου σβήνει.
ΥΠΟΔΕΙΞΗ
Εάν επιθυμείτε να διακόψετε πρόωρα τη θερμαντική διαδικασία, γυρίστε το ρυθμιστή θερμοκρασίας τέρμα αριστερά και θέστε το χρονοδιακόπτη στη θέση "OFF - 0".
7) Μετά τη θερμαντική διαδικασία βγάλτε τη
σχάρα ! ή το ταψί - με τη βοήθεια της
λαβίδας .
8) Θέστε το διακόπτη λειτουργίας στη θέση
«OFF».
Ψήσιμο με την
περιστρεφόμενη σούβλα
1) Τοποθετήστε το δίσκο συλλογής ψίχουλων
στη συσκευή.
2) Σε περίπτωση που έχει τοποθετηθεί, βγάλτε την
περιστρεφόμενη σούβλα 6 από τη συσκευή.
3) Σπρώξτε το ταψί - στη χαμηλότερη ράγα.
4) Στερεώστε το προϊόν ψησίματος με τις τσιμπίδες της περιστρεφόμενης σούβλας 0.
Φροντίζετε ώστε το προϊόν ψησίματος να μπορεί
να περιστρέφεται ελεύθερα μέσα στο χώρο ψησίματος, χωρίς να προσκρούει σε αυτόν. Υπάρχει
πιθανότητα η περιστρεφόμενη σούβλα 6να
αλλάξει τη φορά περιστροφής, εάν το προϊόν
ψησίματος προσκρούσει σε αντίσταση.
Οι δύο εσοχές που βρίσκονται στην περιστρεφόμενη σούβλα 6 πρέπει να είναι ελεύθερα
προσβάσιμες, ειδάλλως η περιστρεφόμενη σούβλα 6 δεν μπορεί να πιαστεί με τη λαβίδα 3.
5) Στερεώστε την περιστρεφόμενη σούβλα 6 στο
χώρο ψησίματος (βλ. Κεφάλαιο «Χρήση περιστρεφόμενης σούβλας»).
6) Κλείστε τη γυάλινη πόρτα .
Page 54

SGBR 1500 B3
GR│CY
│
51 ■
ΥΠΟΔΕΙΞΗ
Εάν επιθυμείτε να διακόψετε πρόωρα τη θερμαντική διαδικασία, γυρίστε το ρυθμιστή θερμοκρασίας τέρμα αριστερά και θέστε το χρονοδιακόπτη στη θέση "OFF - 0".
7) Ρυθμίστε στο ρυθμιστή θερμοκρασίας την
επιθυμητή θερμοκρασία.
8) ΘΕπάνω θέρμανση/Κυκλοφορία αέρα/Περιστρεφόμενη σούβλα»
.Ρυθμίστε στο χρονοδιακόπτη τον επιθυμητό χρόνο ψησίματος.
Η συσκευή αρχίζει τη διαδικασία ψησίματος και
η περιστρεφόμενη σούβλα 6 περιστρέφεται.
Η λυχνία ελέγχου δείχνει ότι η συσκευή είναι ενεργοποιημένη. Ο διακόπτης του χρονοδιακόπτη
κινείται τώρα προς τα αριστερά, στη θέση «OFF - 0».
Η συσκευή απενεργοποιείται αυτόματα μετά το
ρυθμισμένο χρόνο, ένας ήχος ακούγεται και η
λυχνία ελέγχου σβήνει.
ΥΠΟΔΕΙΞΗ
Εάν επιθυμείτε να διακόψετε πρόωρα τη θερμαντική διαδικασία, γυρίστε το ρυθμιστή θερμοκρασίας τέρμα αριστερά και θέστε το χρονοδιακόπτη στη θέση "OFF".
9) Μετά τη διαδικασία ψησίματος, βγάλτε την
περιστρεφόμενη σούβλα 6 με τη βοήθεια
της λαβίδας 3.
10) Θέστε το διακόπτη λειτουργίας στη θέση
«OFF».
ΠΑΡΑΔΕΙΓΜΑ ΚΟΤΟΠΟΥΛΟ ΣΤΗ ΣΧΑΡΑ
Συστατικά
♦ Κοτόπουλο (περ. 1,3 κιλά, καθαρισμένο από
εντόσθια)
♦ Μπαχαρικά (αλάτι, πιπεριά)
♦ Μαγειρικό λάδι
1) Πασπαλίζετε το κοτόπουλο μέσα και έξω με
αλάτι και τη σκόνη πιπεριάς. Απλώνετε εξωτερικά θερμανθεκτικό μαγειρικό λάδι.
2) Σπρώχνετε το κοτόπουλο στη σούβλα και το
στερεώνετε με τις τσιμπίδες περιστρεφόμενης
σούβλας 0. Φροντίστε ώστε οι εσοχές που
βρίσκονται στην περιστρεφόμενη σούβλα 6
να μένουν ελεύθερες, ώστε να μπορείτε να
πιάσετε την περιστρεφόμενη σούβλα 6με τη
βοήθεια της λαβίδας 3. Αναλόγως του σχήματος του κοτόπουλου, μπορεί να χρειάζεται
να στερεώσετε τις φτερούγες και τα μπούτια
με ένα πυρίμαχο σχοινί, ώστε να μην χτυπούν
κατά την περιστροφή.
3) Ωθήστε το ταψί - στη χαμηλότερη ράγα.
4) Προθερμάνετε τη συσκευή για περ. 10 λεπτά
με τη λειτουργία "Επάνω και κάτω αντίστα-
ση/Αέρας"
περ. στους 210°C.
5) Τοποθετήστε το κοτόπουλο στην περιστρεφόμενη σούβλα με τη βοήθεια της λαβίδας 3
στη συσκευή.
6) Θέστε το διακόπτη λειτουργίας στη θέση
«Επάνω θέρμανση/Κυκλοφορία αέρα/
Περιστρεφόμενη σούβλα»
και κλείστε
την πόρτα.
7) Θέστε το χρονοδιακόπτη περ. στα 80
λεπτά. Ο χρόνος ψησίματος μπορεί να
διαφέρει αναλόγως του μεγέθους και της
υφής του κοτόπουλου.
8) Πασπαλίζετε ανά διαστήματα το κοτόπουλο
με λίγο μαγειρικό λάδι. Έτσι, θα γίνει τραγανό.
9) Μόλις περάσει ο ρυθμισμένος χρόνος, βγάλτε προσεκτικά τη σούβλα με το κοτόπουλο με
τη βοήθεια της λαβίδας 3. Λύστε τις τσιμπίδες της περιστρεφόμενης σούβλας 0 και
βγάλτε το κοτόπουλο από την περιστρεφόμενη σούβλα 6.
Page 55

SGBR 1500 B3
■ 52 │ GR
│
CY
Καθαρισμός και φροντίδα
ΚΙΝΔΥΝΟΣ ΗΛΕΚΤΡΟΠΛΗΞΙΑΣ!
► Πριν από κάθε καθαρισμό αποσυνδέετε το
βύσμα από την πρίζα! Υπάρχει κίνδυνος
ηλεκτροπληξίας!
Ποτέ μη βυθίζετε τη συσκευή σε νερό ή σε
άλλα υγρά!
ΠΡΟΕΙΔΟΠΟΙΗΣΗ!
ΚΙΝΔΥΝΟΣ ΤΡΑΥΜΑΤΙΣΜΟΥ!
► Αφήνετε πάντα πρώτα τη συσκευή να κρυώνει,
προτού την καθαρίσετε. Σε αντίθετη περίπτωση υπάρχει κίνδυνος εγκαύματος!
■ Κατά προτίμηση καθαρίζετε τη συσκευή και
τα εξαρτήματα αμέσως μόλις κρυώσουν. Έτσι,
υπολείμματα τροφίμων απομακρύνονται ευκολότερα.
ΠΡΟΣΟΧΗ! ΥΛΙΚΕΣ ΖΗΜΙΕΣ!
► Μη χρησιμοποιείτε τριβικά ή επιθετικά απορ-
ρυπαντικά. Αυτά μπορεί να καταστρέψουν
την επιφάνεια!
► Μην καθαρίζετε τα μέρη της συσκευής στο
πλυντήριο πιάτων!
► Μην καθαρίζετε το χώρο ψησίματος με σπρέι
για φούρνους, διότι τα υπολείμματα στις
θερμαντικές ράβδους δεν θα αφαιρούνται
πλέον.
■ Σκουπίζετε τη συσκευή με ένα νωπό πανί. Εάν
χρειάζεται, προσθέτετε ήπιο απορρυπαντικό στο
πανί και ξεπλένετε με πανί βρεγμένο με καθαρό
νερό. Στεγνώνετέ τα όλα καλά.
■ Καθαρίζετε το χώρο ψησίματος και τη γυάλινη
πόρτα με ένα νωπό πανί. Εάν χρειάζεται,
προσθέτετε ήπιο απορρυπαντικό στο πανί και
ξεπλένετε με πανί βρεγμένο με καθαρό νερό.
Στεγνώνετέ τα όλα καλά.
■ Καθαρίζετε τις λαβίδες /3, την περιστρεφό-
μενη σούβλα 6, τις τσιμπίδες περιστρεφόμενης
σούβλας 0, τους αναστολείς ., το ταψί -, τη
σχάρα ! και το δίσκο συλλογής ψίχουλων
σε ζεστό νερό. Μετά το πλύσιμο στεγνώνετε
καλά όλα τα εξαρτήματα.
Αποθήκευση
■ Μπορείτε να τυλίξετε το καλώδιο δικτύου γύρω
από τον αποστάτη στην πίσω πλευρά της συσκευής και να στερεώσετε το βύσμα σε έναν από
τους αποστάτες:
■ Φυλάξτε την καθαρή συσκευή και τα εξαρτήμα-
τά της σε έναν καθαρό και στεγνό χώρο χωρίς
σκόνη.
Page 56

SGBR 1500 B3
GR│CY
│
53 ■
Διόρθωση σφαλμάτων
Σφάλμα Αιτία Λύση
Η συσκευή
δε λειτουργεί.
Το βύσμα δεν είναι συνδεδεμένο στην
πρίζα.
Συνδέστε το βύσμα σε μια πρίζα.
Η πρίζα είναι ελαττωματική. Χρησιμοποιήστε μια άλλη πρίζα.
Η συσκευή είναι ελαττωματική. Απευθυνθείτε στο τμήμα σέρβις.
Η λυχνία ελέγχου
ανάβει, αλλά η συ-
σκευή δεν θερμαίνει.
Ο διακόπτης λειτουργίας είναι στη θέση
OFF.
Γυρίστε το διακόπτη λειτουργίας
στην επιθυμητή λειτουργία.
Ο χρόνος ψησίματος
των φαγητών φαίνεται
πολύ μεγάλος.
Η γυάλινη πόρτα άνοιξε πολλές φορές,
για να ελεγχθεί η πρόοδος του ψησίματος.
Μην ανοίγετε τη γυάλινη πόρτα
συχνότερα από ότι χρειάζεται.
Έχει ρυθμιστεί λάθος θερμοκρασία.
Ελέγξτε τις ρυθμίσεις θερμοκρασίας.
Κατά τη χρήση
εμφανίζεται καπνός
και θόρυβος.
Στις θερμαντικές ράβδους υπάρχουν
υπολείμματα από τον καθαρισμό, καθώς και
υπολείμματα φαγητών.
Απομακρύνετε τα φαγητά από
τη συσκευή και συνεχίστε τη
διαδικασία ψησίματος με ανοιχτή
τη γυάλινη πόρτα , έως ότου
εξαφανιστεί ο καπνός.
Εάν οι βλάβες δεν διορθώνονται με τις ανωτέρω αναφερόμενες προτάσεις αντιμετώπισης σφαλμάτων,
ή εάν εξακριβώσετε άλλα είδη βλαβών, απευθυνθείτε στο τμήμα σέρβις μας.
Page 57

SGBR 1500 B3
■ 54 │ GR
│
CY
Απόρριψη
Σε καμία περίπτωση μην
απορρίπτετε τη συσκευή στα
οικιακά απορρίμματα. Αυτό το
προϊόν υπόκειται στην Ευρωπαϊκή Οδηγία 2012/19/ΕU.
Απορρίπτετε τη συσκευή μέσω μιας εγκεκριμένης
επιχείρησης απόρριψης ή μέσω της κοινοτικής
επιχείρησης απόρριψης. Τηρείτε τους ισχύοντες
κανονισμούς. Σε περίπτωση αμφιβολιών επικοινωνείτε με την αρμόδια επιχείρηση απόρριψης.
Η συσκευασία αποτελείται από φιλικά
προς το περιβάλλον υλικά, τα οποία
μπορείτε να απορρίψετε μέσω των τοπικών σημείων ανακύκλωσης.
Εγγύηση της
Kompernass Handels GmbH
Αξιότιμη πελάτισσα, αξιότιμε πελάτη,
Η παρούσα συσκευή διαθέτει 3 χρόνια εγγύηση
από την ημερομηνία αγοράς. Στην περίπτωση
ελλείψεων στο προϊόν έχετε νομικά δικαιώματα
έναντι του πωλητή του προϊόντος. Αυτά τα νομικά
δικαιώματα δεν περιορίζονται μέσω της κατωτέρω
αναφερόμενης εγγύησης.
Προϋποθέσεις εγγύησης
Η περίοδος εγγύησης ξεκινάει κατά την ημερομηνία
αγοράς. Φυλάξτε καλά την πρωτότυπη απόδειξη
ταμείου. Αυτό το έγγραφο απαιτείται ως απόδειξη
για την αγορά.
Εάν, εντός τριών ετών από την ημερομηνία αγοράς,
προκύψει στο προϊόν αυτό σφάλμα υλικού ή
κατασκευής, κατόπιν κρίσης μας, επισκευάζουμε
ή αντικαθιστούμε το προϊόν για εσάς δωρεάν.
Η παρούσα εγγύηση προϋποθέτει ότι εντός της
περιόδου τριών ετών η ελαττωματική συσκευή και
η απόδειξη αγοράς (απόδειξη ταμείου) θα υποβληθούν μαζί με σύντομη περιγραφή σχετικά με το
που βρίσκεται η έλλειψη και πότε προέκυψε.
Εάν το ελάττωμα καλύπτεται από την εγγύησή μας,
θα λάβετε το επισκευασμένο ή ένα νέο προϊόν.
Περίοδος εγγύησης και νομικές
απαιτήσεις λόγω ελλείψεων
Ο χρόνος εγγύησης δεν παρατείνεται μέσω της παροχής εγγύησης. Αυτό ισχύει και για εξαρτήματα,
τα οποία έχουν αντικατασταθεί και επισκευαστεί.
Ενδεχόμενες ήδη υπάρχουσες ζημιές και ελλείψεις
κατά την αγορά πρέπει να γνωστοποιούνται αμέσως μετά την αποσυσκευασία. Μετά τη λήξη του
χρόνου εγγύησης, τυχόν εμφανιζόμενες επισκευές
χρεώνονται.
Εύρος εγγύησης
Η συσκευή κατασκευάστηκε σύμφωνα με αυστηρές
οδηγίες ποιότητας και ελέγχθηκε προσεκτικά πριν
από την αποστολή.
Η απόδοση εγγύησης ισχύει για σφάλματα υλικού
ή κατασκευής. Η παρούσα εγγύηση δεν εκτείνεται
σε τμήματα του προϊόντος, τα οποία εκτίθενται σε
φυσιολογική φθορά και έτσι μπορεί να θεωρούνται
εξαρτήματα φθοράς ή για ζημιές σε εύθραυστα
εξαρτήματα, π.χ. διακόπτες, συσσωρευτές, ταψιά ή
εξαρτήματα που είναι κατασκευασμένα από γυαλί.
Η παρούσα εγγύηση ακυρώνεται εάν προκληθεί
ζημιά στο προϊόν, εάν δεν γίνεται σωστή χρήση ή
συντήρηση. Για μια σωστή χρήση του προϊόντος
πρέπει να τηρούνται επακριβώς οι αναφερόμενες
υποδείξεις στις οδηγίες χειρισμού. Σκοποί χρήσης
και χειρισμοί που δεν συνιστώνται ή για τους οποίους υπάρχει προειδοποίηση πρέπει απαραίτητα να
αποφεύγονται.
Το προϊόν προορίζεται μόνο για ιδιωτική και όχι
για επαγγελματική χρήση. Σε περίπτωση κακής μεταχείρισης και ακατάλληλης χρήσης, χρήσης βίας
και παρεμβάσεων, οι οποίες δεν διεξήχθησαν από
το εξουσιοδοτημένο μας τμήμα σέρβις, η εγγύηση
παύει να ισχύει.
Page 58

SGBR 1500 B3
GR│CY
│
55 ■
Διαδικασία σε περίπτωση εγγύησης
Για την εξασφάλιση γρήγορης επεξεργασίας του
ζητήματός σας, τηρείτε τις ακόλουθες υποδείξεις:
▯ Για όλες τις ερωτήσεις έχετε έτοιμη την απόδειξη
αγοράς και τον κωδικό προϊόντος (π.χ. ΙΑΝ
12345) ως απόδειξη για την αγορά.
▯
Μπορείτε να βρείτε τον κωδικό προϊόντος στην
πινακίδα τύπου, χαραγμένο, στην πρώτη σελίδα
των οδηγιών σας (κάτω αριστερά) ή σε αυτοκόλλητο στην πίσω ή κάτω πλευρά.
▯ Εάν προκύψουν σφάλματα λειτουργίας ή άλλες
ελλείψεις, επικοινωνήστε κατ’ αρχήν με το ακόλουθο αναφερόμενο τμήμα σέρβις τηλεφωνικά ή
με E-Mail.
▯ Ένα προϊόν που θεωρείται ελαττωματικό μπορείτε
να το αποστείλετε ατελώς στην αναφερόμενη διεύθυνση του σέρβις επισυνάπτοντας την απόδειξη
αγοράς (απόδειξη ταμείου) και αναφέροντας
που βρίσκεται η έλλειψη και πότε εμφανίστηκε.
Στην ιστοσελίδα www.lidl-service.com
μπορείτε να κατεβάσετε το παρόν και
πολλά άλλα εγχειρίδια, βίντεο προϊόντων
και λογισμικό.
Σέρβις
Σέρβις Ελλάδα
Tel.: 801 5000 019 (0,03 EUR/Min.)
E-Mail: kompernass@lidl.gr
CY
Σέρβις Κύπρος
Tel.: 8009 4409
E-Mail: kompernass@lidl.com.cy
IAN 274498
Εισαγωγέας
Η ακόλουθη διεύθυνση δεν είναι διεύθυνση σέρβις.
Επικοινωνήστε, κατ’ αρχήν, με την αναφερόμενη
υπηρεσία σέρβις.
KOMPERNASS HANDELS GMBH
BURGSTRASSE 21
44867 BOCHUM
GERMANY
www.kompernass.com
Συνταγές
Σε αυτό το κεφάλαιο σας δίνουμε μερικά παραδείγματα για την προετοιμασία φαγητών. Αυτά τα
παραδείγματα είναι προτάσεις. Η διάρκεια προετοιμασίας μπορεί να ποικίλει.
Συνταγές χωρίς εγγύηση. Όλα τα υλικά και τα
στοιχεία προετοιμασίας αποτελούν ενδεικτικές
τιμές. Συμπληρώστε αυτές τις προτάσεις συνταγών
σύμφωνα με τις προσωπικές σας εμπειρίες. Σας
ευχόμαστε σε κάθε περίπτωση καλή επιτυχία και
καλή όρεξη.
ΥΠΟΔΕΙΞΗ
Προσέξτε τις υποδείξεις προετοιμασίας στη
συσκευασία των τροφίμων.
Μάφιν
Υλικά για τέσσερα άτομα:
♦ 1 φλιτζάνι αλεύρι
♦ 1 ΚΓ μπέικιν πάουντερ
♦ 1 αυγό
♦ 1 ΚΣ λιωμένο βούτυρο
♦ 1 φλιτζάνι γάλα
♦ 3 κουταλιές της σούπας ζάχαρη
♦ 1 πρέζα αλάτι
♦ Για διαφορετικές εναλλακτικές, επιπλέον καρύδια,
ψιλοκομμένες μπανάνες ή νιφάδες σοκολάτας
Ετοιμασία:
1) Ανακατεύετε αργά και διαδοχικά σε ένα μπολ
το αλεύρι, το μπέικιν πάουντερ, το αυγό, το
γάλα, το αλάτι και τη ζάχαρη.
2) Λιώνετε το βούτυρο σε μια κατσαρόλα και το
ανακατεύετε με τη ζύμη.
3) Εάν επιθυμείτε, αναμιγνύετε με καρύδια, νιφάδες
σοκολάτας ή ψιλοκομμένες μπανάνες.
4) Βάζετε την έτοιμη ζύμη σε συνήθεις φόρμες για
μάφιν και τις τοποθετείτε επάνω στο ταψί .
5) Ψήνετε τα μάφιν στους 220° C στην επάνω και
κάτω αντίσταση για περίπου 15 λεπτά στην
κάτω ράγα.
Page 59

SGBR 1500 B3
■ 56 │ GR
│
CY
Τοστ Χαβάη
Υλικά για 4 τοστ:
♦ 4 φέτες ψωμί του τοστ
♦ 1–2 ΚΣ γαλλική πικάντικη σάλτσα
♦ 120 γρ. βρασμένο ζαμπόν
♦ 1/2 κονσέρβα ανανά
♦ 4 φέτες τυρί για ογκρατέν
♦ Κάρυ
Ετοιμασία:
♦ Τοστάρετε τις φέτες ψωμί του τοστ.
♦ Στη συνέχεια περνάτε με λίγη πικάντικη σάλτσα
και επιστρώνετε με το βρασμένο ζαμπόν.
♦ Βάζετε από μια φέτα ανανά επάνω στο επιστρω-
μένο τοστ. Καρυκεύετε με κάρυ.
♦ Στη συνέχεια τοποθετείτε από μια φέτα τυρί
επάνω στον ανανά.
♦ Τοποθετείτε τα τοστ Χαβάη επάνω στη σχάρα
και ψήνετε στον αυτόματο φούρνο με γκριλ, στην
επάνω ράγα, στους 200 °C, στην επάνω αντίσταση, για περ. 8 λεπτά.
Ψήσιμο κατεψυγμένης πίτσας
Ετοιμασία:
♦ Ωθείτε τη σχάρα στην επάνω ράγα του αυτό-
ματου φούρνου με γκριλ.
♦ Τοποθετήστε την κατεψυγμένη πίτσα χωρίς συ-
σκευασία επάνω στη σχάρα !.
♦ Ψήστε την πίτσα σε επάνω και κάτω θέρμανση
για περ. 20 λεπτά.
♦ Προσοχή στα στοιχεία συσκευασίας σχετικά
με τη θερμοκρασία.
Κουλουράκια
Υλικά:
♦ 125 γρ. βούτυρο
♦ 125 γρ. ζάχαρη
♦ 1 πακετάκι βανίλια
♦ 1 πρέζα αλάτι
♦ 1 αυγό
♦ 1 ασπράδι
♦ 250 γρ. αλεύρι (τύπος 405)
♦ 1 ΚΓ μπέικιν πάουντερ
♦ Ξύσμα μισού λεμονιού
Ετοιμασία:
1) Χτυπάτε το βούτυρο έως ότου γίνει αφρός.
2) Προσθέτετε τη ζάχαρη, τη βανίλια, το ξύσμα
λεμονιού και τα αυγά.
3) Αναμιγνύετε το αλεύρι, το μπέικιν πάουντερ
και το αλάτι και ανακατεύετε με ένα αντίστοιχο
κουτάλι ξεκινώντας από κάτω από τη ζύμη.
4) Αφήνετε τη ζύμη να καθίσει για περ. 10 λεπτά.
5) Δίνετε στη ζύμη την επιθυμητή μορφή, π.χ. με
τη βοήθεια της κρεατομηχανής, του κόφτη ή
της σακούλας διακόσμησης.
6) Τοποθετείτε τα κουλουράκια επάνω στο ταψί
με χαρτί ψησίματος .
7) Ψήνετε τα μπισκότα σε προθερμασμένο φούρνο
στους 180° C, στην επάνω και κάτω αντίσταση,
για περ. 10–15 λεπτά, στην επάνω ράγα, έως
ότου γίνουν χρυσοκίτρινα.
ΥΠΟΔΕΙΞΗ
Η ποσότητα ζύμης επαρκεί για περισσότερα
ταψιά .
Page 60

SGBR 1500 B3
GR│CY
│
57 ■
Ψωμάκια
Υλικά:
♦ 300 γρ. αλεύρι (ή αλεύρι ολικής άλεσης)
♦ 2 γεμάτες ΚΓ μπέικιν πάουντερ
♦ 200 γρ. λιναρόσπορος
♦ 1 αυγό
♦ 500 γρ. άσπρο μαλακό τυρί
♦ 1 ΚΓ αλάτι
♦ Εάν επιθυμείτε, κύμινο, κρεμμύδια, μπέικον ...
Ετοιμασία:
1) Ανακατεύετε όλα τα υλικά καλά και σχηματίζετε
μικρά ψωμάκια.
2) Τοποθετείτε τα ψωμάκια επάνω στο ταψί με
χαρτί ψησίματος.
3) Ψήνετε περ. στους 200° C επάνω αντίσταση,
για περίπου 30 λεπτά, στην επάνω ράγα.
ΥΠΟΔΕΙΞΗ
Η ποσότητα ζύμης επαρκεί για περισσότερα
ταψιά .
Μαρέγκα
Υλικά:
♦ 1 ασπράδι
♦ Αλάτι
♦ 45 γρ. ζάχαρη
Ετοιμασία:
1) Βάζετε το κρύο ασπράδι σε ένα μπολ ανάμειξης
χωρίς λίπος. Σε αυτό δεν πρέπει να αναμειχθεί καθόλου κρόκος, αλλιώς το χτυπημένο
ασπράδι δε θα είναι σφιχτό.
2) Χτυπάτε το ασπράδι σε αργή βαθμίδα, ώστε να
μη δημιουργούνται πολύ μεγάλες φουσκάλες
στο χτυπημένο ασπράδι.
3) Βάζετε μια πρέζα αλάτι.
4) Προσθέτετε το ήμισυ της ζάχαρης λίγο - λίγο,
όταν το χτυπημένο ασπράδι αρχίζει να σφίγγει.
5) Τότε χτυπάτε σε πιο υψηλή βαθμίδα έως ότου
σφίξει.
6) Προσθέτετε την υπόλοιπη ζάχαρη. Έτσι η μάζα
μαρέγκας γίνεται όσο στέρεη χρειάζεται.
7) Βάζετε τη μαρέγκα σε μια σακούλα διακόσμησης
με μεγάλο αστεροειδές στόμιο και κάνετε με λίγη
απόσταση ροζέτες, γλωττίδες και άλλα σχήματα
στο επιστρωμένο με χαρτί ψησίματος ταψί .
8) Προθερμαίνετε τον αυτόματο φούρνο και
γκριλ περ. στους 100° C κυκλοφορία αέρα.
9) Αφήνετε τη μαρέγκα στην επάνω ράγα περ.
στους 100° C κυκλοφορία αέρα να ψηθεί για
περ. 2 ώρες.
Page 61

SGBR 1500 B3
■ 58 │ GR
│
CY
Κρουτόν βουτύρου
Υλικά:
♦ 2 φέτες ψωμί τοστ
♦ 1 ΚΣ βούτυρο
Ετοιμασία:
1) Κόβετε το ψωμί του τοστ σε μικρούς κύβους.
2) Λιώνετε το βούτυρο σε ήπια θερμοκρασία σε
μια κατσαρόλα και ανακατεύετε μαζί το ψωμί
του τοστ.
3) Τοποθετείτε ένα ταψί με χαρτί ψησίματος
και ρίχνετε εκεί τους κύβους ψωμιού τοστ ομοιόμορφα.
4) Ψήνετε τους κύβους ψωμιού τοστ περ. στους
170°C, στην επάνω αντίσταση, στην επάνω
ράγα, έως ότου γίνουν χρυσοκίτρινοι (περ.
15 - 20 λεπτά).
ΥΠΟΔΕΙΞΗ
Μπορείτε επίσης να χρησιμοποιήσετε σκορδοβούτυρο ή βούτυρο με βότανα αντί του σκέτου
βουτύρου. Ο χρόνος ψησίματος μειώνεται τότε
περ. κατά 5 λεπτά.
Μπαγκέτες με κιμά
Υλικά:
♦ 2 ψωμάκια μπαγκέτες
♦ 250 γρ. κιμάς
(μισός μοσχάρι και μισός χοιρινός)
♦ 2 τομάτες
♦ 1 κρεμμύδι (κομμένο)
♦ 2 ΚΣ τομάτα πελτέ
♦ 40 γρ. τριμμένη παρμεζάνα
♦ 4 φέτες τυρί
♦ Αλάτι και πιπέρι
Ετοιμασία:
1) Κόβετε τις μπαγκέτες και βγάζετε την ψίχα.
2) Ανακατεύετε τον κιμά, τον πελτέ τομάτας, τα κρεμμύδια, την παρμεζάνα, λίγο αλάτι και πιπέρι.
3) Σχηματίζετε από τον κιμά 4 μεγάλα, ισομεγέθη
μπιφτέκια και τα τοποθετείτε επάνω στα μισά
κομμάτια των μπαγκετών.
4) Κόβετε την τομάτα σε φέτες και τις μοιράζετε
στις μπαγκέτες.
5) Μοιράζετε το τυρί στις μπαγκέτες.
6) Τοποθετείτε τις μπαγκέτες σε ένα ταψί και
τις ψήνετε περ. στους 225°C σε προθερμασμένο φούρνο, στην επάνω και κάτω αντίσταση,
περ. για 20 λεπτά, στην κάτω ράγα.
ΥΠΟΔΕΙΞΗ
Μπορείτε να καρυκεύσετε τον κιμά και με βασιλικό,
τσίλι ή άλλα καρυκεύματα.
Κουνουπίδι (ογκρατέν)
Υλικά:
♦ 1/2 κεφάλι κουνουπίδι (περ. 250 γρ.)
♦ 3 φέτες λεμονιού
♦ 1 ΚΣ βούτυρο
♦ 1 γεμάτη ΚΓ αλεύρι
♦ 1 ΚΣ χυμό λεμονιού
♦ 1 ΚΣ λεπτοκομμένα αμύγδαλα
♦ 2 ΚΣ τυρί που λιώνει (τριμμένο)
♦ Αλάτι, πιπέρι, μοσχοκάρυδο
Page 62

SGBR 1500 B3
GR│CY
│
59 ■
Ετοιμασία:
1) Κόβετε το κουνουπίδι σε κομμάτια και τα πλένετε.
2) Βράζετε το κουνουπίδι με τις φέτες λεμονιού σε
βραστό αλατισμένο νερό για 8-10 λεπτά, έτσι
ώστε το κουνουπίδι να γίνει αλ ντέντε. Κρατάτε
περ. 150 ml του βρασμένου νερού.
3) Λιώνετε σε μια κατσαρόλα το βούτυρο και
αχνίζετε το αλεύρι, ανακατεύοντάς το συνεχώς
περ. για 1 λεπτό.
4) Ανακατεύοντας συνεχώς, προσθέτετε το βραστό νερό από το κουνουπίδι και αφήνετε να
βράσει περ. για 2 λεπτά. Εάν το αχνισμένο
αλεύρι γίνει πολύ σφιχτό, προσθέτετε λίγο - λίγο
νερό, έως ότου δημιουργηθεί ιξώδης πυκνότητα. Καρυκεύετε με χυμό λεμονιού, αλάτι, πιπέρι
και μοσχοκάρυδο.
5) Βάζετε το κουνουπίδι σε ένα πυρέξ (διαμέτρου
περ. 14 εκ.) και περιχύνετε από πάνω τη σάλτσα ομοιόμορφα.
6) Πασπαλίζετε με το τυρί και τα ψιλοκομμένα
αμύγδαλα.
7) Τοποθετείτε το πυρέξ επάνω στο ταψί .
8) Ψήνετε το ογκρατέν περ. στους 200°C σε
προθερμασμένο φούρνο, στην επάνω και κάτω
αντίσταση, περ. για 20 λεπτά, στην κάτω ράγα.
Πουγκάκια φύλλου με γέμιση σολομού
♦ Υλικά: 1 πακ. φύλλα ζύμης (περ. 8 τεμάχια)
♦ 1 πακ. σολομός, καπνιστός σε φέτες
(περ. 200 γρ.)
♦ 1 λεμόνι
♦ 1 κρεμμύδι
♦ 1 πακ. νωπό τυρί (200 γρ.)
♦ Φρέσκος άνηθος
♦ Αλάτι και πιπέρι
♦ 1 κρόκος
Ετοιμασία:
1) Ξεχωρίζετε τα φύλλα ζύμης μεταξύ τους και τα
αφήνετε, εάν χρειάζεται, να ξεπαγώσουν.
2) Ανακατεύετε το νωπό τυρί με αλάτι, πιπέρι και
με το χυμό του λεμονιού.
3) Κόβετε τα κρεμμύδια σε μικρούς κύβους.
4) Βάζετε το ήμισυ του σολομού και τα κρεμμύδια
στη μάζα του νωπού τυριού και τα πολτοποιείτε όλα με ένα μίξερ χειρός.
5) Κόβετε τον υπόλοιπο σολομό σε λεπτές λωρίδες.
6) Προσθέτετε το σολομό και τον άνηθο στη
μάζα και τα ανακατεύετε όλα.
7) Βάζετε από μια κουταλιά της σούπας από τη
μάζα σε κάθε φύλλο και το διπλώνετε.
8) Απλώνετε στο πουγκί κρόκο αυγού.
9) Τοποθετείτε τα πουγκάκια ζύμης επάνω στο
ταψί . Αφήνετε επαρκή απόσταση ανάμεσα
στα πουγκάκια, διότι το φύλλο ζύμης ανοίγει.
10) Αφήνετε τα πουγκάκια να ψηθούν στην κάτω
ράγα, περ. στους 220° C, στην επάνω και
κάτω αντίσταση, για περ. 25-30 λεπτά.
Το φύλλο ζύμης πρέπει να αποκτήσει ελαφρύ
καφέ χρώμα.
ΥΠΟΔΕΙΞΗ
Η αναφερόμενη ποσότητα ζύμης επαρκεί για
περισσότερα ταψιά .
Page 63

SGBR 1500 B3
■ 60 │ GR
│
CY
Page 64

SGBR 1500 B3
DE│AT│CH
│
61 ■
Inhaltsverzeichnis
Einleitung .............................................................62
Bestimmungsgemäßer Gebrauch .........................................62
Lieferumfang ..........................................................62
Gerätebeschreibung. . . . . . . . . . . . . . . . . . . . . . . . . . . . . . . . . . . . . . . . . . . . . . . . . . . .62
Technische Daten ......................................................62
Sicherheitshinweise ....................................................63
Aufstellen ............................................................66
Benutzung des Gerätes .................................................66
Glastür ...........................................................................66
Krümelblech einlegen ...............................................................66
Drehspieß benutzen .................................................................67
Backblech/Gitterrost benutzen ........................................................68
Vor dem ersten Gebrauch ...............................................68
Bedienen des Gerätes ..................................................69
Funktionsschalter ...................................................................69
Temperaturregler
...................................................................69
Timer
............................................................................69
Grillen und Backen .....................................................69
Grillen mit Drehspieß ...................................................70
Reinigung und Pflege ...................................................72
Aufbewahrung ........................................................72
Fehlerbehebung .......................................................73
Entsorgung ...........................................................74
Garantie der Kompernaß Handels GmbH ..................................74
Service ...........................................................................75
Importeur .........................................................................75
Rezepte ..............................................................76
Page 65

SGBR 1500 B3
■ 62 │ DE
│AT│
CH
Einleitung
Herzlichen Glückwunsch zum Kauf Ihres neuen
Gerätes.
Sie haben sich damit für ein hochwertiges Produkt
entschieden. Die Bedienungsanleitung ist Bestandteil dieses Produkts. Sie enthält wichtige Hinweise
für Sicherheit, Gebrauch und Entsorgung. Machen
Sie sich vor der Benutzung des Produkts mit allen
Bedien- und Sicherheitshinweisen vertraut. Benutzen Sie das Produkt nur wie beschrieben und für
die angegebenen Einsatzbereiche. Händigen Sie
alle Unterlagen bei Weitergabe des Produkts an
Dritte mit aus.
Bestimmungsgemäßer
Gebrauch
Der Grill- und Backautomat dient ausschließlich dem
Erhitzen, Garen und Grillen von Speisen.
Dieses Gerät ist ausschließlich für die Benutzung in
privaten Haushalten bestimmt. Nutzen Sie es nicht
gewerblich.
Jede andere Verwendung gilt als nicht bestimmungsgemäß und kann zu Sachschäden oder sogar zu
Personenschäden führen.
Lieferumfang
♦ Grill- und Backautomat
♦ 1 Backblech
♦ 1 Gitterrost
♦ 2 Zangen
♦ Drehspieß mit 2 Klemmen
♦ 1 Krümelblech
♦ Bedienungsanleitung
HINWEIS
Kontrollieren Sie den Lieferumfang direkt nach
dem Auspacken auf Vollständigkeit und Beschädigungen. Wenden Sie sich, wenn nötig, an den
Service.
Gerätebeschreibung
Abbildung A:
Antrieb
Temperaturregler
Funktionsschalter
Timer
Kontrollleuchte
Glastür
eingesetztes Krümelblech
untere Heizstäbe
Drehspießaufnahme
Abbildung B:
Zange (für Backblech und Gitterrost)
- Backblech
3 Zange (für Drehspieß)
! Gitterrost
. Feststeller
0 Drehspießklemmen
6 Drehspieß
Technische Daten
Nennspannung: 220 - 240 V ~,
50/60 Hz
max. Leistungsaufnahme: 1500 W
Alles Teile dieses Gerätes, die mit
Lebensmitteln in Berührung kommen,
sind lebensmittelecht.
Page 66

SGBR 1500 B3
DE│AT│CH
│
63 ■
Sicherheitshinweise
GEFAHR – ELEKTRISCHER SCHLAG!
► Sie dürfen das Gerätegehäuse des Gerätes nicht öffnen
oder reparieren. In diesem Falle ist die Sicherheit nicht gegeben und die Gewährleistung erlischt. Lassen Sie ein defektes
Gerät nur vom Händler oder autorisiertem Fachpersonal
reparieren.
► Lassen Sie beschädigte Netzstecker oder Netzkabel sofort
von autorisiertem Fachpersonal oder dem Kundenservice
austauschen, um Gefährdungen zu vermeiden.
► Lassen Sie keine Flüssigkeiten in das Gerätegehäuse gelan-
gen. Sie dürfen das Gerät keiner Feuchtigkeit aussetzen und
nicht im Freien benutzen. Darüber hinaus dürfen Sie keine
mit Flüssigkeiten gefüllten Gegenstände, wie z. B. Vasen auf
dem Gerät abstellen. Es besteht Brandgefahr und Gefahr
eines elektrischen Schlags! Falls doch einmal Flüssigkeit in
das Gerätegehäuse gelangt, ziehen Sie sofort den Netzstecker des Geräts aus der Netzsteckdose und lassen Sie es
reparieren.
► Fassen Sie Gerät, Netzkabel und -stecker nie mit nassen
Händen an. Es besteht sonst die Gefahr eines elektrischen
Schlags.
Tauchen Sie das Gerät niemals in Wasser oder andere
Flüssigkeiten! Hier kann Lebensgefahr durch elektrischen
Schlag entstehen, wenn im Betrieb Flüssigkeitsreste auf
spannungsführende Teile gelangen.
Page 67

SGBR 1500 B3
■ 64 │ DE
│AT│
CH
WARNUNG – VERLETZUNGSGEFAHR!
► Dieses Gerät kann von Kindern ab 8 Jahren sowie von Per-
sonen mit reduzierten physischen, sensorischen oder mentalen
Fähigkeiten oder Mangel an Erfahrung und/oder Wissen
benutzt werden, wenn sie beaufsichtigt oder bezüglich des
sicheren Gebrauchs des Gerätes unterwiesen wurden und
die daraus resultierenden Gefahren verstanden haben.
► Kinder dürfen nicht mit dem Gerät spielen.
► Reinigung und Benutzer-Wartung dürfen nicht durch Kinder
durchgeführt werden, es sei denn, sie sind älter als 8 Jahre
und beaufsichtigt.
► Kinder jünger als 8 Jahre sind von Gerät und Anschlusslei-
tung fernzuhalten.
► Verlegen Sie das Netzkabel so, dass niemand darauf treten
oder darüber stolpern kann.
► Berühren Sie niemals die Glastür oder das Gehäuse wäh-
rend der Benutzung, da diese sehr heiß werden. Verwenden Sie zum Öffnen der Glastür einen Topflappen o.ä., um
Verbrennungen zu vermeiden!
► Berühren Sie niemals die Heizstäbe oder das Sichtfenster
während des Betriebs oder bevor das Gerät abgekühlt ist.
Fassen Sie während des Betriebs nicht in den Garraum.
Warten Sie bis das Gerät abgekühlt ist. Sie könnten sich
andernfalls verbrennen.
► Lassen Sie das Gerät nach dem Gebrauch erst abkühlen,
bevor Sie es transportieren.
► Benutzen Sie immer Topfhandschuhe oder Topflappen, wenn
Sie mit dem heißen Gerät hantieren!
Vorsicht! Heiße Oberfläche!
Page 68

SGBR 1500 B3
DE│AT│CH
│
65 ■
ACHTUNG – SACHSCHADEN!
► Benutzen Sie keine externe Zeitschaltuhr oder ein separates
Fernwirksystem, um das Gerät zu betreiben.
► Lassen Sie das Gerät während des Betriebes niemals unbeauf-
sichtigt.
► Stellen Sie sicher, dass das Gerät, das Netzkabel oder der
Netzstecker nicht mit heißen Quellen, wie Kochplatten oder
offenen Flammen, in Berührung kommen.
► Betreiben Sie das Gerät ausschließlich mit dem mitgeliefer-
ten Originalzubehör.
► Knicken oder quetschen Sie das Netzkabel nicht.
► Ziehen Sie das Netzkabel stets am Stecker aus der Steckdo-
se, ziehen Sie nicht am Kabel selbst.
► Es dürfen sich während des Betriebs keine leicht brennbaren
Materialien in unmittelbarer Umgebung des Grill- und Backautomaten befinden (z. B. Geschirrhandtuch, Topflappen etc.).
► Trocknen Sie niemals Textilien oder Gegenstände auf, über
oder im Gerät. Es besteht Brandgefahr.
Page 69

SGBR 1500 B3
■ 66 │ DE
│AT│
CH
Aufstellen
WARNUNG! BRANDGEFAHR!
► Stellen Sie das Gerät niemals unter Hänge-
schränke oder neben Gardinen, Schrankwänden
oder anderen entzündlichen Gegenständen.
► Der Abstand des Gerätes zu Hängeschränken,
Decken, seitlichen Wänden oder ähnlichem
muss nach oben hin mindestens 10 cm und
seitlich jeweils 5 cm betragen. Daher darf
das Gerät z. B. nicht in Schränke o. ä. gestellt
werden. Andernfalls ist keine ausreichende
Belüftung des Gerätes möglich und es könnte
einen Brand verursachen oder beschädigt
werden.
► Stellen Sie das Gerät nur auf eine hitzebestän-
dige Unterlage. Andernfalls besteht Brandgefahr und das Gerät kann beschädigt werden.
Der Bereich unter dem Geräteboden kann sich
verfärben und beschädigt werden. Darüber
hinaus können bei einem weichen Untergrund
dauerhafte Abdrücke in der Unterlage entstehen.
GEFAHR - ELEKTRISCHER SCHLAG!
► Stellen Sie das Gerät nicht in unmittelbarer
Nähe von Wasser auf, z. B. an Spülbecken,
Waschwannen oder in feuchten Kellerräumen. Andernfalls besteht die Gefahr eines
Stromschlags.
■ Stellen Sie das Gerät auf einem festen, ebenen
und hitzebeständigen Untergrund (z. B. Edelstahlarbeitsplatten oder Natursteinarbeitsplatten
wie Granit) auf. Sorgen Sie für ausreichende
Belüftung rund um das Gerät.
■ Schieben Sie das Gerät mit der Rückseite bis an
die Wand. Die Abstandhalter an der Rückseite
müssen die Wand berühren. Achten Sie darauf,
dass die Wand aus hitzebeständigem Material
besteht, z. B. ein Fliesenspiegel, Naturstein oder
Granit.
■ Reinigen Sie alle Teile wie im Kapitel „Reinigung
und Pflege“ beschrieben.
Benutzung des Gerätes
Glastür
ACHTUNG! SACHSCHADEN!
►
Stützen Sie sich nicht auf der Glastür
ab. Stellen Sie keine Gegenstände auf die
Glastür . Das führt zu Beschädigungen an
den Scharnieren.
■ Wenn Sie besonders fetthaltige Speisen zuberei-
ten, kann es zu erhöhter Rauchentwicklung kommen. Schließen Sie in diesem Fall die Glastür
nicht ganz, sondern lassen Sie sie einen Spalt
breit offen stehen:
Die Glastür hat eine Raststellung, so dass
diese einen Spalt breit offen steht: Wenn Sie die
Glastür vorsichtig zuklappen, rastet diese
kurz vor dem Schließen in dieser Stellung ein.
■ Auch beim Trocknen von Obst, um Trockenobst
herzustellen, sollte die Glastür in der Raststellung stehen bleiben, damit die Feuchtigkeit
entweichen kann und das Obst besser trocknet.
Krümelblech einlegen
■ Schieben Sie das Krümelblech unter die
unteren Heizstäbe , so dass es flach auf dem
Geräteboden aufliegt
. Die hochgebogene Seite
können Sie als Griff benutzen.
Page 70

SGBR 1500 B3
DE│AT│CH
│
67 ■
Drehspieß benutzen
WARNUNG! VERLETZUNGSGEFAHR!
► Benutzen Sie immer die Zange 3, um den
heißen Drehspieß 6 in das Gerät einzusetzen
oder herauszunehmen.
■ Mit den beiden Drehspießklemmen 0 können
Sie das Grillgut am Drehspieß 6 fixieren.
Lösen Sie die Feststeller . an den Drehspießklemmen 0, verschieben Sie diese so, dass das
Grillgut dazwischen fest geklemmt wird und
schrauben Sie die Feststeller . wieder fest.
■ Schieben Sie zuerst das Ende des Drehspießes 6
ohne Nut in den Antrieb (Abb. 1):
Abb. 1: Drehspieß 6 in den Antrieb schieben.
■ Legen Sie dann das andere Ende des Drehspie-
ßes 6 mit der tiefen Nut in die Drehspießaufnahme (Abb. 2):
Abb. 2: Drehspieß 6 in die Drehspießaufnahme
legen
HINWEIS
► Schieben Sie immer das Backblech - in die
untere Schiene, wenn Sie den Drehspieß 6
verwenden. So werden herunterfallende
Flüssigkeiten aufgefangen.
■ Um den heißen Drehspieß 6 zu entnehmen grei-
fen Sie mit den Haken am Ende der Zange 3 in
die Vertiefungen am Drehspieß 6(Abb
. 3):
Abb. 3: Einhaken der Zange 3 beim Drehspieß 6
■ Heben Sie zuerst die linke Seite des Drehspie-
ßes 6 aus der Drehspießaufnahme und
ziehen Sie dann den Drehspieß 6 aus dem
Antrieb .
Page 71

SGBR 1500 B3
■ 68 │ DE
│AT│
CH
Backblech/Gitterrost benutzen
WARNUNG! VERLETZUNGSGEFAHR!
► Benutzen Sie immer die Zange , um das hei-
ße Backblech -/den heißen Gitterrost !in
das Gerät einzusetzen oder herauszunehmen.
■ Schieben Sie das Backblech -/den Gitterrost !
in eine der 3 Schienen im Garraum des Gerätes.
ACHTUNG! SACHSCHADEN!
► Legen Sie das Backblech -/den Gitterrost !
niemals direkt auf die Heizstäbe .
■ Um das heiße Backblech - oder den Gitter-
rost ! entnehmen zu können, haken Sie die
Zange folgendermaßen ein:
Abb. 4: Einhaken der Zange beim Gitterrost !
Abb. 5: Einhaken der Zange beim Backblech -
Vor dem ersten Gebrauch
1) Stecken Sie den Netzstecker in eine Netzsteckdose.
2) Drehen Sie den Temperaturregler bis zum
Anschlag im Uhrzeigersinn auf die höchste
Temperatur.
3) Drehen Sie den Funktionsschalter auf
„Ober- und Unterhitze“
.
4) Öffnen Sie die Glastür und lassen Sie diese
für diesen Vorgang geöffnet.
5) Entnehmen Sie eventuell eingesetztes Zubehör
aus dem Garraum.
6) Drehen Sie den Timer auf 20 Minuten.
HINWEIS
► Beim erstmaligen Aufheizen des Gerätes
kann es durch fertigungsbedingte Rückstände
zu leichter Rauch- und Geruchsentwicklung
kommen. Das ist normal und völlig ungefährlich.
Sorgen Sie für ausreichende Belüftung, öffnen
Sie zum Beispiel ein Fenster.
Das Gerät schaltet sich nach 20 Minuten
automatisch aus.
Wenn Sie den Heizvorgang vorzeitig
unterbrechen wollen, drehen Sie den
Temperaturregler bis zum Anschlag
gegen den Uhrzeigersinn und stellen Sie
den Timer auf „OFF“.
7) Lassen Sie das Gerät abkühlen und reinigen
Sie das Gerät wie im Kapitel „Reinigen und
Pflegen“ beschrieben.
Das Gerät ist nun betriebsbereit.
Page 72

SGBR 1500 B3
DE│AT│CH
│
69 ■
Bedienen des Gerätes
Funktionsschalter
Am Funktionsschalter können Sie das Gerät
einschalten, sowie 5 verschiedene Funktionen
einstellen:
Symbol Bedeutung
„Unterhitze“
z. B. zum Kuchenbacken
„Oberhitze“
z. B. zum Überbacken
„Ober- & Unterhitze“
z. B. zum Pizza backen
„Oberhitze/Umluft/Dreh-
spieß“
z. B. um Geflügel zu grillen
„Ober- & Unterhitze/Umluft“
z. B. um Brötchen aufzuba-
cken
„OFF“
das Gerät ist ausgeschaltet
Temperaturregler
Am Temperaturregler können Sie die gewünschte Temperatur einstellen.
■ Wenn Sie die Temperatur für die Funktionen
„Oberhitze“
, „Unterhitze“ oder
„Ober- & Unterhitze“
einstellen, orientie-
ren Sie sich an der mit „
“ gekennzeichneten
Skala.
■ Wenn Sie die Temperatur für die Funktionen
„Oberhitze/Umluft/Drehspieß“
oder
„Ober- & Unterhitze/Umluft“
einstellen,
orientieren Sie sich an der mit „ “ gekennzeichneten Skala.
Timer
Mit Hilfe des Timers können Sie die Garzeit
einstellen:
■ Stellen Sie den Timer auf die gewünschte
Garzeit. Nach Beendigung der eingestellten
Zeit erklingt ein Signalton und das Gerät stoppt
das Heizen.
Falls die Funktion „Oberhitze/Umluft/Dreh-
spieß“
gewählt ist, stoppt auch das Drehen
des Drehspießes 6
.
Grillen und Backen
1) Legen Sie das Krümelblech in das Gerät.
2) Nehmen Sie den Gitterrost ! und das
Backblech - aus dem Gerät. Legen Sie diese
gegebenenfalls mit Backpapier aus bzw.
bestreichen Sie das Backblech - mit zum
Backen geeignetem Fett.
HINWEIS
► Je nach Gericht, muss der Backofen vorge-
heizt werden. Halten Sie sich an die Vorgaben im jeweiligen Rezept. Das Vorheizen ist
auf jeden Fall sinnvoll bei:
– sehr kurzen Backzeiten,
– knusprigen Krusten,
– empfindlichen Gerichten, die eine konstan-
te Temperatur erfordern, wie zum Beispiel
Soufflés.
► Wenn kein Vorheizen nötig ist, überspringen
Sie Handlungsschritt 3).
3) Lassen Sie das Gerät ca. 10 Minuten (je nach
Temperatureinstellung) auf die gewünschte
Temperatur aufheizen:
– Wählen Sie die gewünschte Temperatur mit
dem Temperaturregler . Achten Sie darauf, die korrekte Skala zu benutzen (siehe
Kapitel „Temperaturregler“.)
– Anschließend wählen Sie mit dem Funktions-
schalter die gewünschte Funktion.
Page 73

SGBR 1500 B3
■ 70 │ DE
│AT│
CH
HINWEIS
► Falls Sie die Funktion mit Umluft wählen,
können Sie in der Regel auf ein Vorheizen
des Grill- und Garraums verzichten.
– Stellen Sie mit dem Timer die Vorheizzeit
ein (ca. 10 Minuten).
– Schließen Sie die Glastür .
4) Ist die Zeit abgelaufen, legen Sie das Grillbzw. Backgut auf den Gitterrost ! bzw. das
Backblech - und schieben Sie es in eine der
Schienen. Achten Sie dabei auf einen ausreichenden Abstand des Grill- bzw. Backguts zu
den Innenwänden und den Heizstäben des
Geräts.
HINWEIS
► Wenn Sie stark tropfendes Grillgut auf dem
Gitterrost ! zubereiten, dann schieben Sie
das Backblech - in die unterste Schiene. So
wird z. B. herunter tropfendes Fett aufgefangen und das Gerät ist später leichter zu
reinigen.
5) Schließen Sie die Glastür , bevor Sie den
Grill- Backvorgang starten.
6) Stellen Sie mit dem Timer die gewünschte
Grill- bzw. Backzeit ein. Die maximale Grillbzw. Backzeit beträgt 120 Minuten.
HINWEIS
► Wenn die Garzeit Ihres Grill- bzw. Backguts
weniger als 20 Minuten beträgt, stellen Sie
den Timer zunächst auf 40 Minuten und
dann zurück auf die gewünschte Grill- bzw.
Backzeit.
Die Kontrollleuchte zeigt an, dass das Gerät ein-
geschaltet ist. Der Schalter des Timers bewegt
sich nun gegen den Uhrzeigersinn auf „OFF“ zu.
Das Gerät schaltet sich nach der eingestellten Zeit
automatisch aus, ein Signalton erklingt und die
Kontrollleuchte erlischt.
HINWEIS
Wenn Sie den Heizvorgang vorzeitig unterbrechen wollen, drehen Sie den Temperaturregler
bis zum Anschlag gegen den Uhrzeigersinn und
stellen Sie den Timer auf „OFF“.
7) Entnehmen Sie nach dem Heizvorgang den
Gitterrost ! bzw. das Backblech - mit Hilfe
der Zange .
8) Stellen Sie den Funktionsschalter auf „OFF“.
Grillen mit Drehspieß
1) Legen Sie das Krümelblech in das Gerät.
2) Falls eingesetzt, nehmen Sie den Drehspieß 6
aus dem Gerät.
3) Schieben Sie das Backblech - in die unterste
Schiene.
4) Fixieren Sie das Grillgut mit den Drehspießklemmen 0. Achten Sie darauf, dass das Grillgut sich frei im Garraum drehen kann, ohne im
Garraum anzustoßen. Es kann passieren, dass
der Drehspieß 6die Drehrichtung wechselt,
wenn das Grillgut gegen einen Widerstand
stößt. Die beiden Vertiefungen, die sich am
Drehspieß 6 befinden, müssen frei zugänglich
bleiben, ansonsten kann man den Drehspieß 6
nicht mit der Zange 3 greifen.
5) Befestigen Sie den Drehspieß 6 im Garraum
(siehe Kapitel „Drehspieß benutzen“).
6) Schließen Sie die Glastür .
Page 74

SGBR 1500 B3
DE│AT│CH
│
71 ■
HINWEIS
Wenn Sie den Heizvorgang vorzeitig unterbrechen wollen, drehen Sie den Temperaturregler
bis zum Anschlag gegen den Uhrzeigersinn und
stellen Sie den Timer auf „OFF“.
7) Stellen Sie am Temperaturregler die ge-
wünschte Temperatur ein.
8) Stellen Sie den Funktionsschalter auf „Ober-
hitze/Umluft/Drehspieß“
.Stellen Sie am
Timer die gewünschte Grillzeit ein.
Das Gerät startet den Grillvorgang und der
Drehspieß 6 dreht sich.
Die Kontrollleuchte zeigt an, dass das Gerät ein-
geschaltet ist. Der Schalter des Timers bewegt
sich nun gegen den Uhrzeigersinn auf „OFF“ zu.
Das Gerät schaltet sich nach der eingestellten Zeit
automatisch aus, ein Signalton erklingt und die
Kontrollleuchte erlischt.
HINWEIS
Wenn Sie den Heizvorgang vorzeitig unterbrechen wollen, drehen Sie den Temperaturregler
bis zum Anschlag gegen den Uhrzeigersinn und
stellen Sie den Timer auf „OFF“.
9) Entnehmen Sie nach dem Grillvorgang den
Drehspieß 6 mit Hilfe der Zange 3.
10) Stellen Sie den Funktionsschalter auf „OFF“.
BEISPIEL GRILLHÄHNCHEN
Zutaten
♦ Grillhähnchen (ca. 1,3 kg, ausgenommen)
♦ Gewürze (Salz, Paprika)
♦ Speiseöl
1) Würzen Sie das Grillhähnchen von innen
und außen mit Salz und Paprikapulver. Streichen Sie es von außen mit hitzebeständigem
Speiseöl ein.
2) Schieben Sie das Grillhähnchen auf den
Drehspieß 6 und fixieren Sie es mit den
Drehspießklemmen 0. Achten Sie dabei
darauf, dass die Vertiefungen am Drehspieß
6frei bleiben, damit Sie den Drehspieß 6
mit Hilfe der Zange 3greifen können. Je
nach Form des Grillhähnchens ist es nötig
die Flügel und Schenkel mit einer feuerfesten
Bindeschnur zu fixieren, damit diese während
des Drehens nicht anstoßen.
3) Schieben Sie das Backblech - in die
unterste Schiene.
4) Heizen Sie das Gerät ca. 10 Minuten mit
der Funktion „Ober- & Unterhitze/Umluft“
auf 210°C vor.
5) Setzen Sie das Grillhähnchen auf dem
Drehspieß mit Hilfe der Zange 3 in das
Gerät ein.
6) Stellen Sie den Funktionsschalter auf „Oberhitze/Umluft/Drehspieß“
und schließen
Sie die Tür.
7) Stellen Sie den Timer auf ca. 80 Minuten.
Die Garzeit kann je nach Größe und Beschaffenheit des Grillhähnchens variieren.
8) Bestreichen Sie das Grillhähnchen zwischendurch immer wieder mit etwas Speiseöl. So
wird es knusprig.
9) Wenn die eingestellte Zeit abgelaufen ist,
entnehmen Sie den Grillspieß mit dem Grillhähnchen vorsichtig mit der Zange 3. Lösen
Sie die Drehspießklemmen 0 und ziehen
Sie das Grillhähnchen vom Drehspieß 6.
Page 75

SGBR 1500 B3
■ 72 │ DE
│AT│
CH
Reinigung und Pflege
GEFAHR - ELEKTRISCHER SCHLAG!
► Ziehen Sie vor jeder Reinigung den Netzste-
cker aus der Netzsteckdose! Es besteht die
Gefahr eines elektrischen Schlages!
Tauchen Sie das Gerät niemals in Wasser
oder andere Flüssigkeiten!
WARNUNG! VERLETZUNGSGEFAHR!
► Lassen Sie das Gerät immer erst abkühlen,
bevor Sie es reinigen. Es besteht sonst Verbrennungsgefahr!
■ Reinigen Sie das Gerät und die Zubehörteile am
besten sofort nach dem Abkühlen. Dann lassen
sich Lebensmittelreste leichter entfernen.
ACHTUNG! SACHSCHADEN!
► Verwenden Sie keine scheuernden oder
aggressiven Reinigungsmittel. Diese können
die Oberfläche beschädigen!
► Reinigen Sie die Teile des Gerätes nicht in der
Spülmaschine!
► Reinigen Sie den Garraum nicht mit einem
Backofenspray, da sich Rückstände auf den
Heizstäben nicht mehr entfernen lassen.
■ Wischen Sie das Gerät mit einem feuchten Tuch
ab. Bei Bedarf geben Sie ein mildes Spülmittel
auf das Tuch und wischen Sie mit einem mit klarem Wasser befeuchteten Tuch nach. Trocknen
Sie alles gut ab.
■ Reinigen Sie den Garraum und die Glastür
mit einem feuchten Tuch. Bei Bedarf geben Sie
ein mildes Spülmittel auf das Tuch und wischen
Sie mit einem mit klarem Wasser befeuchteten
Tuch nach. Trocknen Sie alles gut ab.
■ Reinigen Sie die Zangen /3, den Drehspieß 6,
die Drehspießklemmen 0, die Feststeller ., das
Backblech -, den Gitterrost ! und das Krümelblech in warmem Spülwasser. Trocknen Sie
alle Teile nach der Reinigung gut ab.
Aufbewahrung
■ Sie können das Netzkabel um die Abstandhalter
auf der Rückseite des Gerätes wickeln und den
Stecker an einem der Abstandhalter fixieren:
■ Bewahren Sie das gereinigte Gerät und seine
Zubehörteile an einem sauberen, staubfreien
und trockenen Ort auf.
Page 76

SGBR 1500 B3
DE│AT│CH
│
73 ■
Fehlerbehebung
Fehler Ursache Lösung
Das Gerät
funktioniert nicht.
Der Netzstecker ist nicht mit dem Stromnetz
verbunden.
Stecken Sie den Netzstecker in
eine Netzsteckdose.
Die Netzsteckdose ist defekt.
Benutzen Sie eine andere Netzsteckdose.
Das Gerät ist defekt. Wenden Sie sich an den Service.
Die Kontrollleuchte
leuchtet, aber das
Gerät heizt nicht.
Der Funktionsschalter steht auf OFF.
Drehen Sie den Funktionsschalter
auf die gewünschte Funktion.
Die Garzeit der
Speisen erscheint
sehr lang.
Die Glastür wurde sehr oft geöffnet, um
den Garfortschritt zu kontrollieren.
Öffnen Sie die Glastür nicht
öfter, als unbedingt notwendig.
Es ist eine falsche Temperatur eingestellt.
Überprüfen Sie die Temperatureinstellungen.
Während der Benutzung tritt Rauch- und
Geruchsentwicklung
auf.
An den Heizstäben befinden sich Reinigungs- oder Lebensmittelrückstände.
Entnehmen Sie die Speisen aus
dem Gerät und führen Sie den
Garvorgang mit geöffneter
Glastür fort, bis die Rauchent-
wicklung verschwunden ist.
Sollten sich die Störungen nicht mit oben stehenden Fehlerbehebungen beheben lassen, oder wenn
Sie andere Arten von Störungen feststellen, wenden Sie sich bitte an unseren Service.
Page 77

SGBR 1500 B3
■ 74 │ DE
│AT│
CH
Entsorgung
Werfen Sie das Gerät kei-
nesfalls in den normalen
Hausmüll. Dieses Produkt
unterliegt der europäischen
Richtlinie 2012/19/EU.
Entsorgen Sie das Gerät über einen zugelassenen
Entsorgungsbetrieb oder über Ihre kommunale
Entsorgungseinrichtung. Beachten Sie die aktuell
geltenden Vorschriften. Setzen Sie sich im Zweifelsfall mit Ihrer Entsorgungseinrichtung in Verbindung.
Die Verpackung besteht aus umweltfreund-
lichen Materialien, die Sie über die örtlichen Recyclingstellen entsorgen können.
Garantie der
Kompernaß Handels GmbH
Sehr geehrte Kundin, sehr geehrter Kunde,
Sie erhalten auf dieses Gerät 3 Jahre Garantie ab
Kaufdatum. Im Falle von Mängeln dieses Produkts
stehen Ihnen gegen den Verkäufer des Produkts
gesetzliche Rechte zu. Diese gesetzlichen Rechte
werden durch unsere im Folgenden dargestellte
Garantie nicht eingeschränkt.
Garantiebedingungen
Die Garantiefrist beginnt mit dem Kaufdatum. Bitte
bewahren Sie den Original Kassenbon gut auf.
Diese Unterlage wird als Nachweis für den Kauf
benötigt.
Tritt innerhalb von drei Jahren ab dem Kaufdatum
dieses Produkts ein Material- oder Fabrikationsfehler auf, wird das Produkt von uns – nach unserer
Wahl – für Sie kostenlos repariert oder ersetzt.
Diese Garantieleistung setzt voraus, dass innerhalb
der Drei-Jahres-Frist das defekte Gerät und der
Kaufbeleg (Kassenbon) vorgelegt und schriftlich
kurz beschrieben wird, worin der Mangel besteht
und wann er aufgetreten ist.
Wenn der Defekt von unserer Garantie gedeckt ist,
erhalten Sie das reparierte oder ein neues Produkt
zurück. Mit Reparatur oder Austausch des Produkts
beginnt kein neuer Garantiezeitraum.
Garantiezeit und gesetzliche
Mängelansprüche
Die Garantiezeit wird durch die Gewährleistung
nicht verlängert. Dies gilt auch für ersetzte und
reparierte Teile. Eventuell schon beim Kauf vorhandene Schäden und Mängel müssen sofort nach
dem Auspacken gemeldet werden. Nach Ablauf
der Garantiezeit anfallende Reparaturen sind
kostenpflichtig.
Garantieumfang
Das Gerät wurde nach strengen Qualitätsrichtlinien
sorgfältig produziert und vor Auslieferung gewissenhaft geprüft.
Die Garantieleistung gilt für Material- oder Fabrikationsfehler. Diese Garantie erstreckt sich nicht auf
Produktteile, die normaler Abnutzung ausgesetzt
sind und daher als Verschleißteile angesehen werden
können oder für Beschädigungen an zerbrechlichen
Teilen, z. B. Schalter, Akkus, Backformen oder Teile
die aus Glas gefertigt sind.
Diese Garantie verfällt, wenn das Produkt beschädigt,
nicht sachgemäß benutzt oder gewartet wurde. Für
eine sachgemäße Benutzung des Produkts sind alle
in der Bedienungsanleitung aufgeführten Anweisungen genau einzuhalten. Verwendungszwecke und
Handlungen, von denen in der Bedienungsanleitung
abgeraten oder vor denen gewarnt wird, sind unbedingt zu vermeiden.
Das Produkt ist nur für den privaten und nicht für
den gewerblichen Gebrauch bestimmt. Bei missbräuchlicher und unsachgemäßer Behandlung,
Gewaltanwendung und bei Eingriffen, die nicht
von unserer autorisierten Service-Niederlassung
vorgenommen wurden, erlischt die Garantie.
Page 78

SGBR 1500 B3
DE│AT│CH
│
75 ■
Abwicklung im Garantiefall
Um eine schnelle Bearbeitung ihres Anliegens
zu gewährleisten, folgen Sie bitte den folgenden
Hinweisen:
▯ Bitte halten Sie für alle Anfragen den Kassenbon
und die Artikelnummer (z. B. IAN 12345) als
Nachweis für den Kauf bereit.
▯ Die Artikelnummer entnehmen Sie bitte dem
Typenschild, einer Gravur, auf dem Titelblatt
ihrer Anleitung (unten links) oder als Aufkleber
auf der Rück- oder Unterseite.
▯ Sollten Funktionsfehler oder sonstige Mängel
auftreten kontaktieren Sie zunächst die nachfolgend benannte Serviceabteilung telefonisch
oder per E-Mail.
▯
Ein als defekt er
fasstes Produkt können Sie dann
unter Beifügung des Kaufbelegs (Kassenbon)
und der Angabe, worin der Mangel besteht und
wann er aufgetreten ist, für Sie portofrei an die
Ihnen mitgeteilte Service Anschrift übersenden.
Auf www.lidl-service.com können Sie
diese und viele weitere Handbücher,
Produktvideos und Software herunterladen.
Service
Service Deutschland
Tel.: 0800 5435 111 (Kostenfrei aus dem
dt. Festnetz/Mobilfunknetz)
E-Mail: kompernass@lidl.de
Service Österreich
Tel.: 0820 201 222 (0,15 EUR/Min.)
E-Mail: kompernass@lidl.at
Service Schweiz
Tel.: 0842 665566 (0,08 CHF/Min.,
Mobilfunk max. 0,40 CHF/Min.)
E-Mail: kompernass@lidl.ch
IAN 274498
Importeur
Bitte beachten Sie, dass die folgende Anschrift
keine Serviceanschrift ist. Kontaktieren Sie zunächst
die benannte Servicestelle.
KOMPERNASS HANDELS GMBH
BURGSTRASSE 21
44867 BOCHUM
GERMANY
www.kompernass.com
Page 79

SGBR 1500 B3
■ 76 │ DE
│AT│
CH
Rezepte
In diesem Kapitel geben wir Ihnen einige Beispiele
für die Zubereitung von Speisen. Diese Beispiele
sind Empfehlungen. Die Zubereitungsdauer kann
variieren.
Rezepte ohne Gewähr. Alle Zutaten- und Zubereitungsangaben sind Anhaltswerte. Ergänzen
Sie diese Rezeptvorschläge um Ihre persönlichen
Erfahrungswerte. Wir wünschen Ihnen auf jeden
Fall gutes Gelingen und guten Appetit.
HINWEIS
Beachten Sie Zubereitungshinweise auf der
Verpackung der Lebensmittel.
Muffins
Zutaten für vier Personen:
♦ 1 Tasse Mehl
♦ 1 Teelöffel Backpulver
♦ 1 Ei
♦ 1 Esslöffel geschmolzene Butter
♦ 1 Tasse Milch
♦ 3 Esslöffel Zucker
♦ 1 Prise Salz
♦ für verschiedene Varianten zusätzlich Nüsse,
zerkleinerte Bananen oder Schokoflocken
Zubereitung:
1) Vermischen Sie in einer Schale Mehl, Backpulver, Ei, Milch, Salz und Zucker langsam
nacheinander.
2) Die Butter in einem Topf schmelzen und mit
dem Teig verrühren.
3) Je nach Geschmack mit Nüssen, Schokoflocken oder zerdrückten Bananen mischen.
4) Den fertigen Teig in typische Muffin-Formen
geben und diese auf das Backblech - stellen.
5) Die Muffins bei 220° C mit Ober- und Unterhitze etwa 15 Minuten auf der unteren Schiene
backen.
Hawaiitoast
Zutaten für 4 Toasts:
♦ 4 Scheiben Toast
♦ 1–2 Esslöffel Remoulade
♦ 120 g gekochter Schinken
♦ 1/2 Dose Ananas
♦ 4 Scheiben Käse zum Überbacken
♦ Curry
Zubereitung:
♦ Die Toastscheiben vortoasten.
♦ Anschließend dünn mit Remoulade bestreichen
und mit dem gekochten Schinken belegen.
♦ Jeweils eine Scheibe Ananas auf den belegten
Toast legen. Mit Curry würzen.
♦ Danach jeweils eine Scheibe Käse oben auf die
Ananas legen.
♦ Die Hawaiitoasts auf den Gitterrost ! legen
und im Grill- und Backautomaten auf der oberen
Schiene bei ca. 200 °C, Oberhitze ca. 8 Minuten überbacken.
Tiefgefrorene Pizza backen
Zubereitung:
♦ Schieben Sie den Gitterrost ! in die obere
Schiene des Grill- und Backraums.
♦ Legen Sie die tiefgefrorene Pizza ohne Verpa-
ckung auf den Gitterrost !.
♦ Backen Sie die Pizza bei Ober- und Unterhitze
ca. 20 Minuten.
♦ Bitte beachten Sie die Verpackungsangaben
bezüglich der Temperatur.
Page 80

SGBR 1500 B3
DE│AT│CH
│
77 ■
Spritzgebäck
Zutaten:
♦ 125 g Butter
♦ 125 g Zucker
♦ 1 Päckchen Vanillinzucker
♦ 1 Prise Salz
♦ 1 Ei
♦ 1 Eiweiß
♦ 250 g Mehl (Type 405)
♦ 1 Teelöffel Backpulver
♦ abgeriebene Schale einer halben Zitrone
Zubereitung:
1) Die Butter schaumig schlagen.
2) Den Zucker, den Vanillinzucker, die Zitronenschale und die Eier dazugeben.
3) Das Mehl, das Backpulver und das Salz
mischen und mit einem Rührlöffel unter den
Teig rühren.
4) Teig ca. 10 Minuten ruhen lassen.
5) Den Teig in die gewünschte Form, z. B. mit
Hilfe von Fleischwolf, Ausstechformen oder
Spritzbeutel, bringen.
6) Das Spritzgebäck auf das mit Backpapier
ausgelegte Backblech - legen.
7) Das Spritzgebäck im vorgeheizten Backofen
bei ca. 180°C Ober- und Unterhitze, ca.
10–15 Minuten auf der oberen Schiene,
goldgelb backen.
HINWEIS
Die Teigmenge reicht für mehrere Backbleche -.
Brötchen
Zutaten:
♦ 300 g Mehl (oder Vollkornmehl)
♦ gut 2 Teelöffel Backpulver
♦ 200 g Leinsamen
♦ 1 Ei
♦ 500 g Quark
♦ 1 Teelöffel Salz
♦ je nach Geschmack Kümmel, Zwiebeln, Speck
...
Zubereitung:
1) Alles gut durchkneten und kleine Brötchen
daraus formen.
2) Die Brötchen auf das mit Backpapier ausgelegte Backblech - legen.
3) Bei ca. 200° C Oberhitze ungefähr 30 Minuten auf der oberen Schiene backen.
HINWEIS
Die Teigmenge reicht für mehrere Backbleche -.
Page 81

SGBR 1500 B3
■ 78 │ DE
│AT│
CH
Baiser
Zutaten:
♦ 1 Eiweiß
♦ Salz
♦ 45 g Zucker
Zubereitung:
1) Das gekühlte Eiweiß in eine fettfreie Rührschüssel geben. Es darf kein Eigelb damit vermischt
werden, sonst wird der Eischnee nicht fest.
2) Das Eiweiß auf langsamer Stufe anschlagen,
damit sich keine zu großen Blasen im Eischnee
bilden.
3) Mit einer kleinen Prise Salz würzen.
4) Die Hälfte des Zuckers nach und nach
zufügen, wenn der Eischnee anfängt fest zu
werden.
5) Dann auf höchster Stufe steif schlagen.
6) Den restlichen Zucker zufügen. Dadurch erhält
die Baisermasse die nötige Festigkeit.
7) Das Baiser in einen Spritzbeutel mit großer
Sternentülle füllen und mit wenig Abstand Rosetten, Zungen oder sonstige Formen auf das
mit Backpapier belegte Backblech - spritzen.
8) Den Grill- und Backautomaten auf ca. 100° C
Umluft vorheizen.
9) Das Baiser auf der oberen Schiene bei ca.
100° C Umluft ca. 2 Stunden backen lassen.
Buttercroutons
Zutaten:
♦ 2 Scheiben Toastbrot
♦ 1 EL Butter
Zubereitung:
1) Schneiden Sie das Toastbrot in kleine Würfel.
2) Schmelzen Sie die Butter bei sanfter Hitze in einem Topf und mischen Sie das Toastbrot unter.
3) Legen Sie ein Backblech - mit Backpapier
aus und verteilen Sie die Toastbrot-Würfel
gleichmäßig darauf.
4) Backen Sie die Toastbrot-Würfel bei ca.
170°C Oberhitze auf er oberen Schiene, bis
Sie goldbraun sind (ca. 15 - 20 Minuten).
HINWEIS
Sie können auch Kräuter- oder Knoblauchbutter
anstatt der normalen Butter verwenden. Die
Backzeit verringert sich dann um ca. 5 Minuten.
Page 82

SGBR 1500 B3
DE│AT│CH
│
79 ■
Hackfleisch-Baguettes
Zutaten:
♦ 2 Baguette-Brötchen
♦ 250 g Hackfleisch (halb und halb)
♦ 2 Tomaten
♦ 1 Zwiebel (gewürfelt)
♦ 2 EL Tomatenmark
♦ 40 g geriebenen Parmesan
♦ 4 Scheiben Käse
♦ Salz und Pfeffer
Zubereitung:
1) Schneiden Sie die Baguettes auf und höhlen
Sie sie aus.
2) Vermengen Sie das Gehackte, das Tomatenmark, die Zwiebel, den Parmesan, etwas Salz
und etwas Pfeffer.
3) Formen Sie das Hackfleisch zu 4 gleich großen, möglichst flachen, Frikadellen und legen
Sie sie auf die Baguette-Hälften.
4) Schneiden Sie die Tomate in Scheiben und
verteilen Sie sie auf den Baguettes.
5) Verteilen Sie den Käse auf den Baguettes.
6) Legen Sie die Baguettes auf ein Backblech und backen Sie sie bei ca. 230°C im vorgeheizten Backofen bei Ober- und Unterhitze für
ca. 20 Minuten auf der unteren Schiene.
HINWEIS
Sie können das Hackfleisch auch mit Basilikum,
Chili oder anderen Gewürzen abschmecken.
Blumenkohl (überbacken)
Zutaten:
♦ 1/2 Kopf Blumenkohl (ca. 250 g)
♦ 3 Zitronenscheiben
♦ 1 EL Butter
♦ 1 gehäufter TL Mehl
♦ 1 EL Zitronensaft
♦ 1 EL Mandelstifte
♦ 2 EL Gratinkäse (gerieben)
♦ Salz, Pfeffer, Muskat
Zubereitung:
1) Teilen Sie den Blumenkohl in Röschen und
waschen Sie diese.
2) Garen Sie den Blumenkohl mit den Zitronenscheiben in kochendem Salzwasser für 8-10
Minuten, so dass der Blumenkohl bissfest ist.
Fangen Sie beim Abgießen ca. 150 ml des
Kochwassers auf.
3) Lassen Sie in einem Topf die Butter schmelzen
und schwitzen Sie das Mehl unter ständigem
Rühren ca. 1 Minute an.
4) Gießen Sie unter ständigem Rühren das Kochwasser des Blumenkohls hinzu und lassen Sie
es ca. 2 Minuten kochen. Wird die Mehlschwitze zu fest, geben Sie nach und nach noch etwas Wasser hinzu, bis eine sämige Konsistenz
entsteht. Mit Zitronensaft, Salz, Pfeffer und
Muskat würzen.
5) Geben Sie den Blumenkohl in eine Auflaufform
(ca. 14 cm Durchmesser) und gießen Sie die
Sauce gleichmäßig darüber.
6) Streuen Sie den Käse und die Mandelstifte
darüber.
7) Stellen Sie die Auflaufform auf das Backblech -.
8) Überbacken Sie den Auflauf bei ca. 200°C im
vorgeheizten Backofen bei Ober- und Unterhitze für ca. 20 Minuten auf der unteren Schiene.
Page 83

SGBR 1500 B3
■ 80 │ DE
│AT│
CH
Blätterteigtaschen mit Lachsfüllung
Zutaten:
♦ 1 Pck. Blätterteigplatten (ca. 8 Stück)
♦ 1 Pck. Lachs, geräuchert, in Scheiben
(ca. 200 g)
♦ 1 Zitrone
♦ 1 Zwiebel
♦ 1 Pck. Frischkäse (200 g)
♦ frischer Dill
♦ Salz und Pfeffer
♦ 1 Eigelb
Zubereitung:
1) Nehmen Sie die Blätterteigplatten auseinander
und lassen Sie sie gegebenenfalls auftauen.
2) Vermischen Sie den Frischkäse mit Salz, Pfeffer
und dem Saft einer Zitrone.
3) Schneiden Sie die Zwiebel in feine Würfel.
4) Geben Sie die Hälfte des Lachses und die
Zwiebeln zu der Frischkäsemasse und pürieren
Sie alles grob mit einem Stabmixer.
5) Schneiden Sie den restlichen Lachs in feine
Streifen.
6) Geben Sie den Lachs und den Dill zu der
Masse hinzu und vermischen Sie alles.
7) Geben Sie je einen Esslöffel mit der Masse auf
eine Blätterteigplatte und klappen Sie diese
zusammen.
8) Bestreichen Sie die entstandene Tasche mit
Eigelb.
9) Legen Sie die Blätterteigtaschen auf das
Backblech -. Lassen Sie genügend Abstand
zwischen den einzelnen Taschen, da der
Blätterteig aufgeht.
10) Die Blätterteigtaschen auf der unteren Schiene
bei ca. 230° C Ober- und Unterhitze ca.
25-30 Minuten backen lassen. Der Blätterteig
sollte sich leicht braun färben.
HINWEIS
Die angegebene Menge reicht für mehrere
Backbleche -.
Page 84

IAN 274498
KOMPERNASS HANDELS GMBH
BURGSTRASSE 21
44867 BOCHUM
DEUTSCHLAND / GERMANY
www.kompernass.com
Last Information Update · Versiunea informaţiilor
Έκδοση των πληροφοριών · Stand der Informationen:
06 / 2016 · Ident.-No.: SGBR1500B3-042016-1
 Loading...