

Page 1

3
1 – NOMAD™ ORIENTATION ............................... Page: 4
1.1 Battery Insertion
1.2 ON/OFF Button
1.3 Round Bubble Level
1.4 ADVANCE Button
1.5 ENTER Button
1.6 Mode Selection
1.7 Description of Display
2 – COMPASS MODE ..................................................... 6
2.1 Compass Settings
3 – FORWARD BEARING MODE .................................... 9
3.1 Store Forward Bearing
3.2 Clear Forward Bearing
4 – REVERSE BEARING MODE ...................................... 10
4.1 Store Reverse Bearing
4.2 Clear Reverse Bearing
5 – ICON WARNINGS ...................................................... 11
5.1 Low Battery Icon
5.2 Disturbance Icon
6 – SPECIFICATIONS ...................................................... 11
7 – WARRANTY & SERVICE ............................................ 12
SILVA NOMAD™
Electronic Compass
Operator’s Manual
ENGLISH
Page 2
4
Congratulations!
You have purchased a high quality SILVA electronic compass. Even though the
SILVA NOMAD™ is made rugged and durable to withstand the rigors associated with
outdoor use, care must be taken to assure long life of your instrument. Avoid impacts,
dropping, extreme temperatures and store the NOMAD™ out of the elements.
1 — NOMAD™ ORIENTATION
Orientation provides a short description of important NOMAD™ parts and display. A
detailed description of its operation is provided throughout the manual.
The buttons perform multiple tasks either by pressing or by holding. When instructed
to ”press” a button, press the button for less than 1 second. When instructed to
”hold” a button, press and hold for at least 2 seconds unless instructed otherwise.
1.1 Battery Insertion
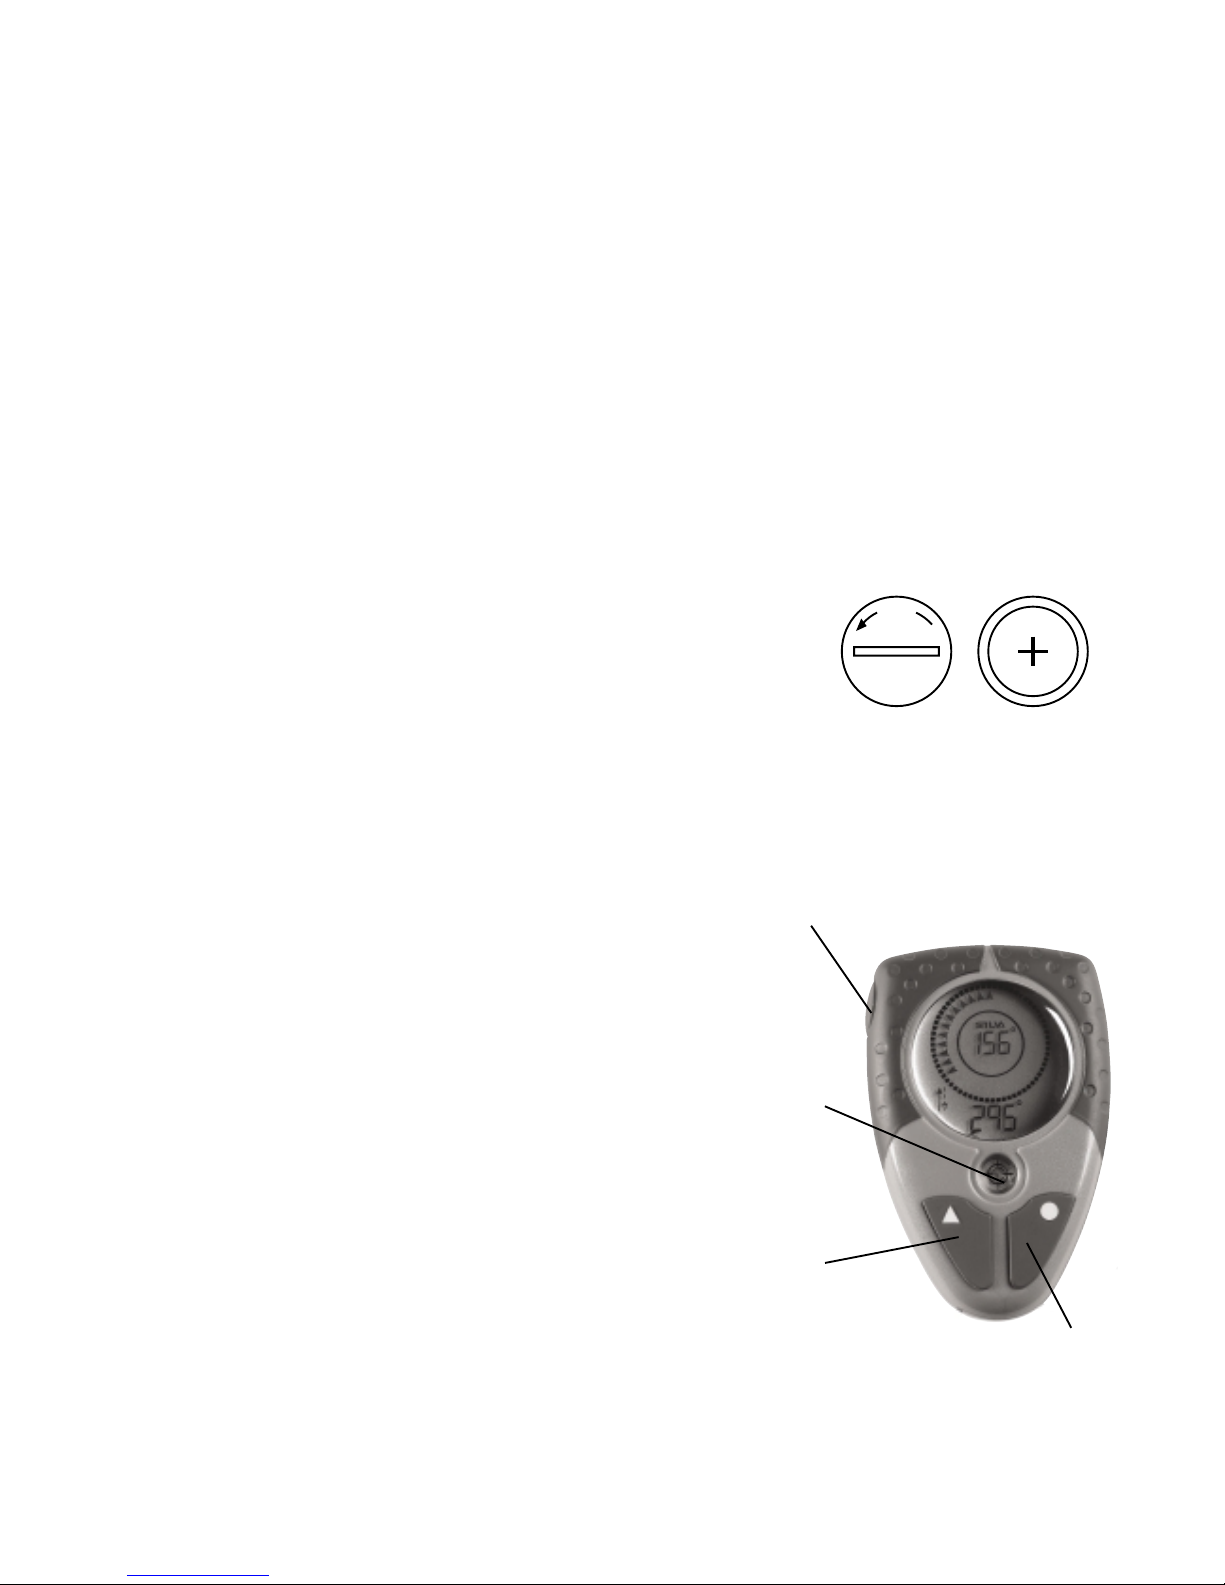
1. Remove battery cover by turning the battery cover counter clockwise.
2. Place one CR2032, 3 Volt Lithium battery in the NOMAD™. (Fig 1)
3. Replace battery cover. NOMAD™ will begin a reset
sequence, then power on automatically.
IMPORTANT! The NOMAD™ should be calibrated each time the battery is replaced.
If you install the battery for the fi rst time continue reading. Then calibrate the compass
when you reach section 2.1-1 Calibration Setting.
Figure 1
1.2 ON/OFF Button (Fig 2)
The ON/OFF button turns both NOMAD™ and back-
light power on and off.
1. Hold ON/OFF button for at least 3 seconds
to power NOMAD™ on. With NOMAD™ power
on, hold ON/OFF to power NOMAD™ off.
2. With NOMAD™ power on, press ON/OFF to turn
back light on for 30 seconds. Backlight will automa tically power off after 30 seconds of the last button
press. To power backlight off before 30 seconds
has elapsed, press ON/OFF.
Figure 2
O
P
E
N
ON/OFF
Level
ADV
ENT
Page 3
5
1.3 Round Bubble Level (Fig 2)
Important! When using the electronic compass, center the bubble in the round level.
This allows for highest possible compass accuracy.
1.4 ADVANCE (ADV) Button (Fig 2)
The advance button is used to advance through the 3 modes, or scroll through values
and settings.
1.5 ENTER (ENT) Button (Fig 2)
The ENT button is used to access settings, or enter bearings and values.
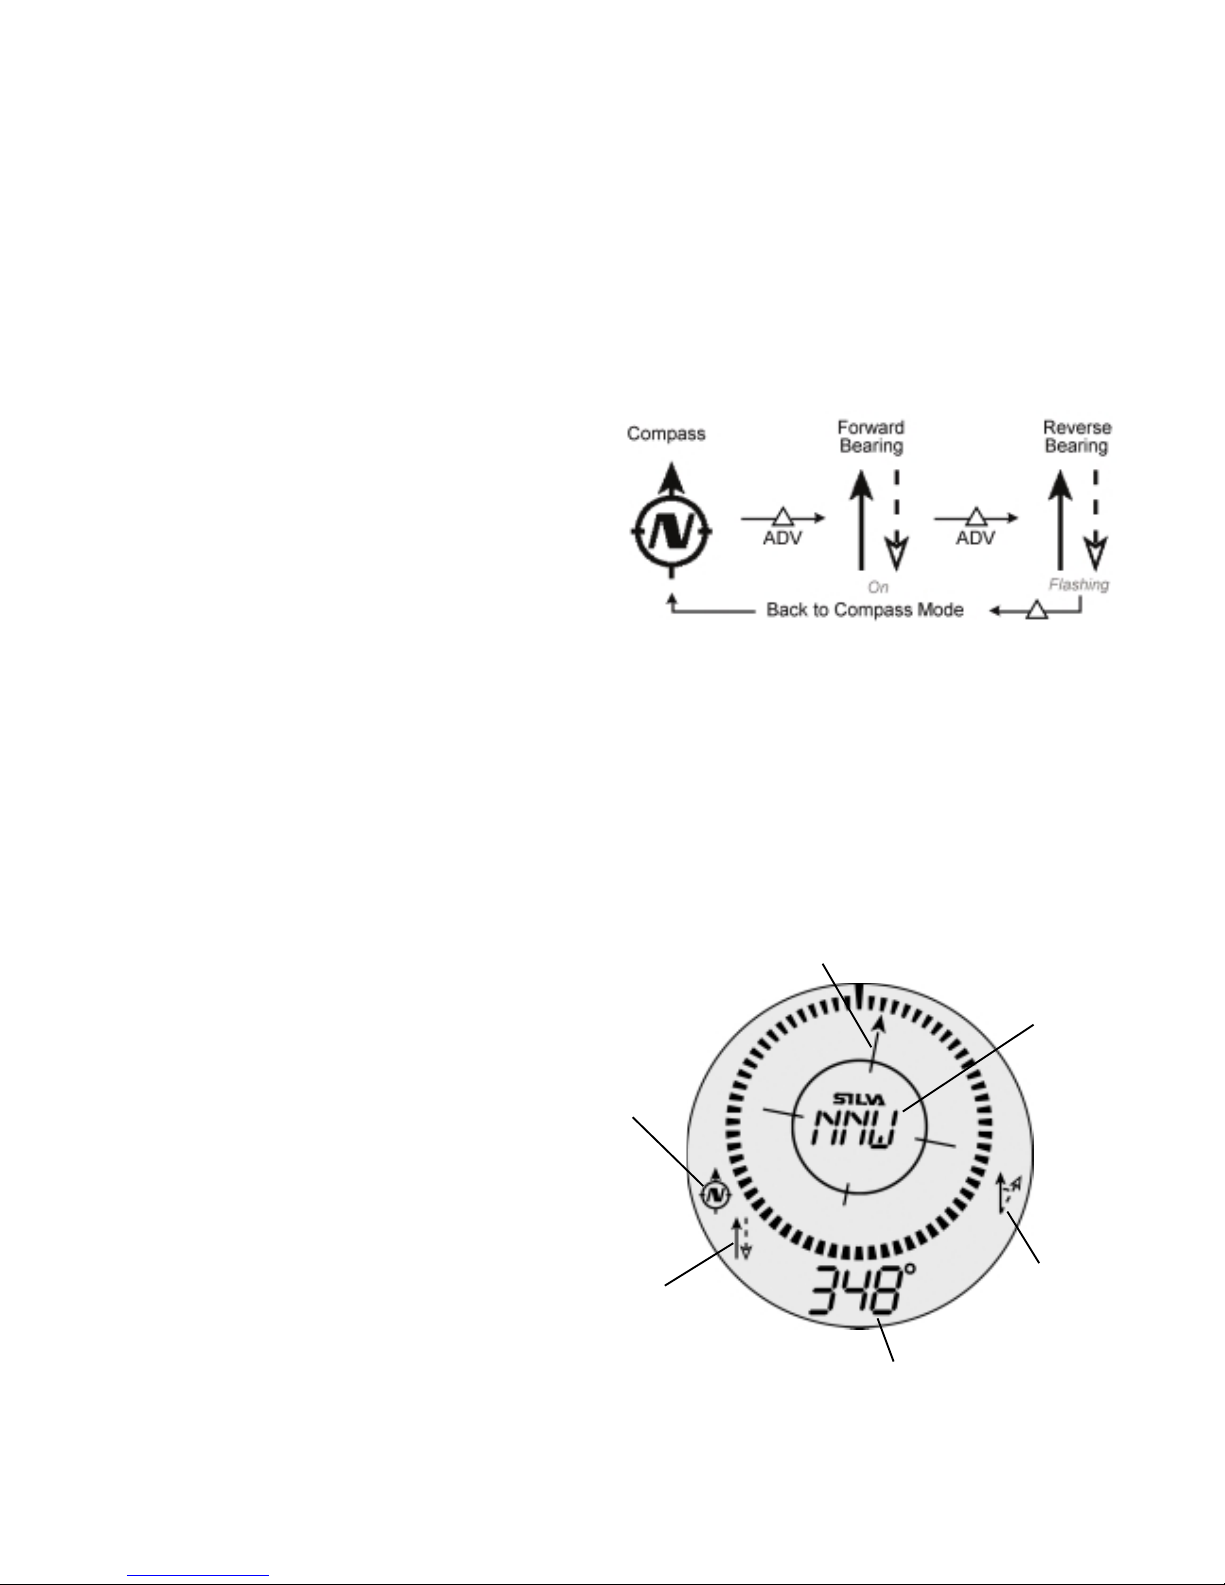
1.6 Mode Selection (Fig 3)
All settings and operations are accessed
in three modes -- Compass, Forward Bearing and Reverse Bearing Modes. Advance
through the modes by pressing the ADV
button repeatedly. Notice the different
icons displayed in each mode, shown in
fi gure 3.
1.7 Description of Display (Fig 4)
1.7-1 Compass Mode Icon
Compass Mode icon indicates the NOMAD™ is in Compass Mode.
1.7-2 Forward & Reverse Bearing Mode Icon
This icon has two functions. When in Forward Bearing Mode the icon remains on.
When in Reverse Bearing Mode the icon fl ashes.
1.7-3 Bearing
The compass bearing ranges from
0 to 359º (degrees) and indicates the
direction the NOMAD™ is facing.
Compass bearing is displayed in all
three modes.
1.7-4 Magnetic Declination Icon
The Magnetic Declination icon is
displayed only after a magnetic
declination angle is entered and
used in the bearing calculation.
Figure 3
Figure 4
1. 7 - 6
1. 7 - 5
1. 7 - 4
1. 7 - 1
1. 7 - 2
1. 7 - 3
Page 4
6
1.7-5 Heading
This displays the direction the NOMAD™ is facing, or a stored heading.
In Compass Mode, cardinal headings are displayed. There are 16 different cardinal
headings. ”N” indicates 0°, ”E” - 90°, ”S” -180° and ”W” - 270°, with an
additional 12 cardinal headings in between. In Forward and Reverse Bearing
Modes, a stored heading is displayed, in degrees.
1.7-6 Compass Rose
The arrow on the compass rose is used as a direction pointer. In Compass Mode, it
points at north. In Forward and Reverse Bearing Modes, the arrow will point in the
direction of a stored heading.
2 — COMPASS MODE
The Compass Mode provides basic directional information. Notice the Compass Mode
icon is displayed.
2.1 Compass Settings
In the Compass Mode there are two settings, the Calibration setting and Magnetic
Declination setting.
2.1-1 Calibration Setting
IMPORTANT! Calibrate NOMAD™ each time a battery is placed in the unit.
Place NOMAD™ on a level, non-magnetic surface, or hold level in your hand.
Hold ENT to access the Calibration setting -- ”CAL” fl ashes waiting for a decision.
You have three options.
a) Press ENT to enter Calibration setting.
b) Press ADV to advance to Declination setting (section 2.1-2).
c) Hold ENT to escape to Compass Mode without disrupting previous calibration.
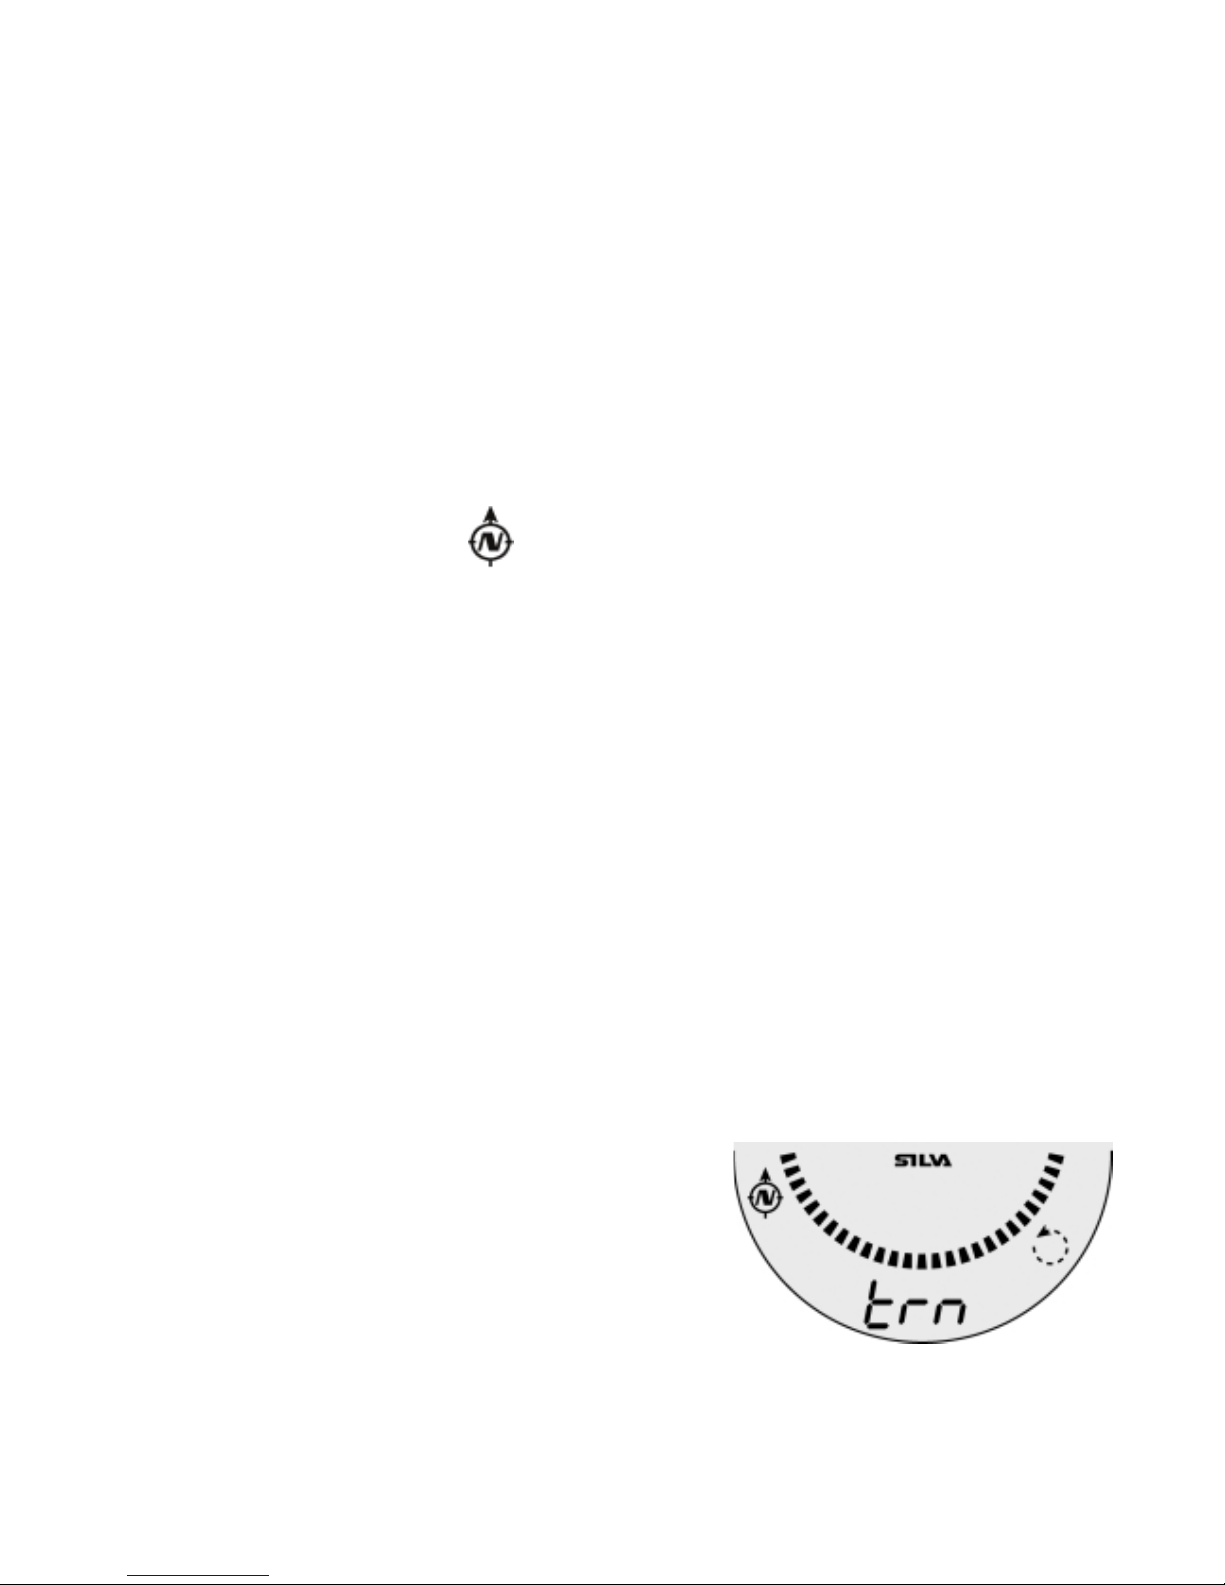
Press ENT to enter Calibration setting.
The ”trn” icon fl ashes waiting for you to rotate
the compass (Fig 5).
1. Rotate compass, or your body one
complete revolution.
Rotation should take approximately
20 seconds.
Figure 5
Page 5
7
2. Press ENT when fi nished to exit back to Compass Mode.
The compass is now calibrated.
If no buttons are pressed in calibration setting for 2 min., NOMAD™ will
automatically escape back to Compass Mode, without being calibrated.
2.1-2 Magnetic Declination Setting
When possible, use magnetic declination adjustment when using a map with
the NOMAD™. A magnetic compass senses Magnetic North and provides a
bearing based upon Magnetic North. However, the majority of maps are drawn to
True North, which provides bearings based upon True North. To make the compass
”speak the same language” as the map, you must adjust the compass for
magnetic declination.
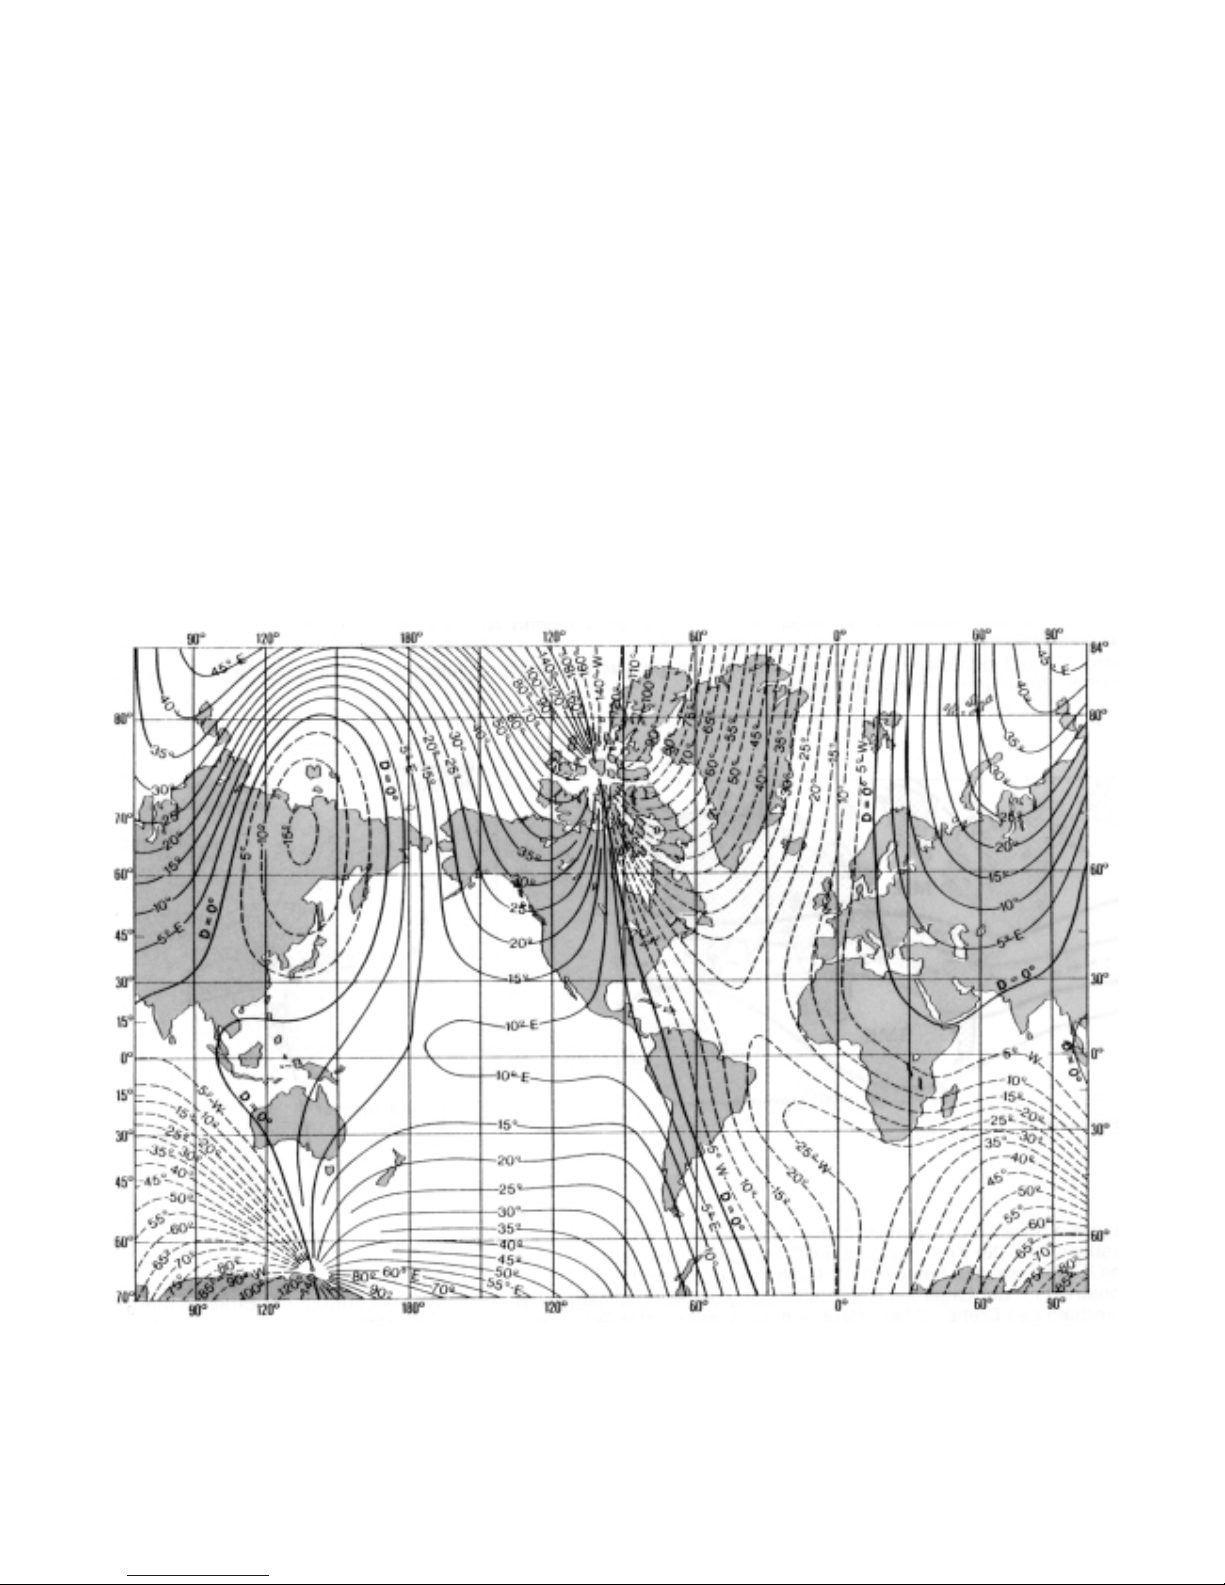
Determine magnetic declination from a map, or from the Magnetic
Declination Chart. (Fig 6)
Figure 6
Page 6
8
To access the Calibration setting in Compass Mode, hold ENT. Then, press ADV to
access the Declination setting. ”dEC” fl ashes waiting for a decision.
You have three options.
a) Press ENT to enter the Declination setting.
b) Press ADV to advance to Calibration setting (section 2.1-1).
c) Hold ENT to escape back to Compass Mode.
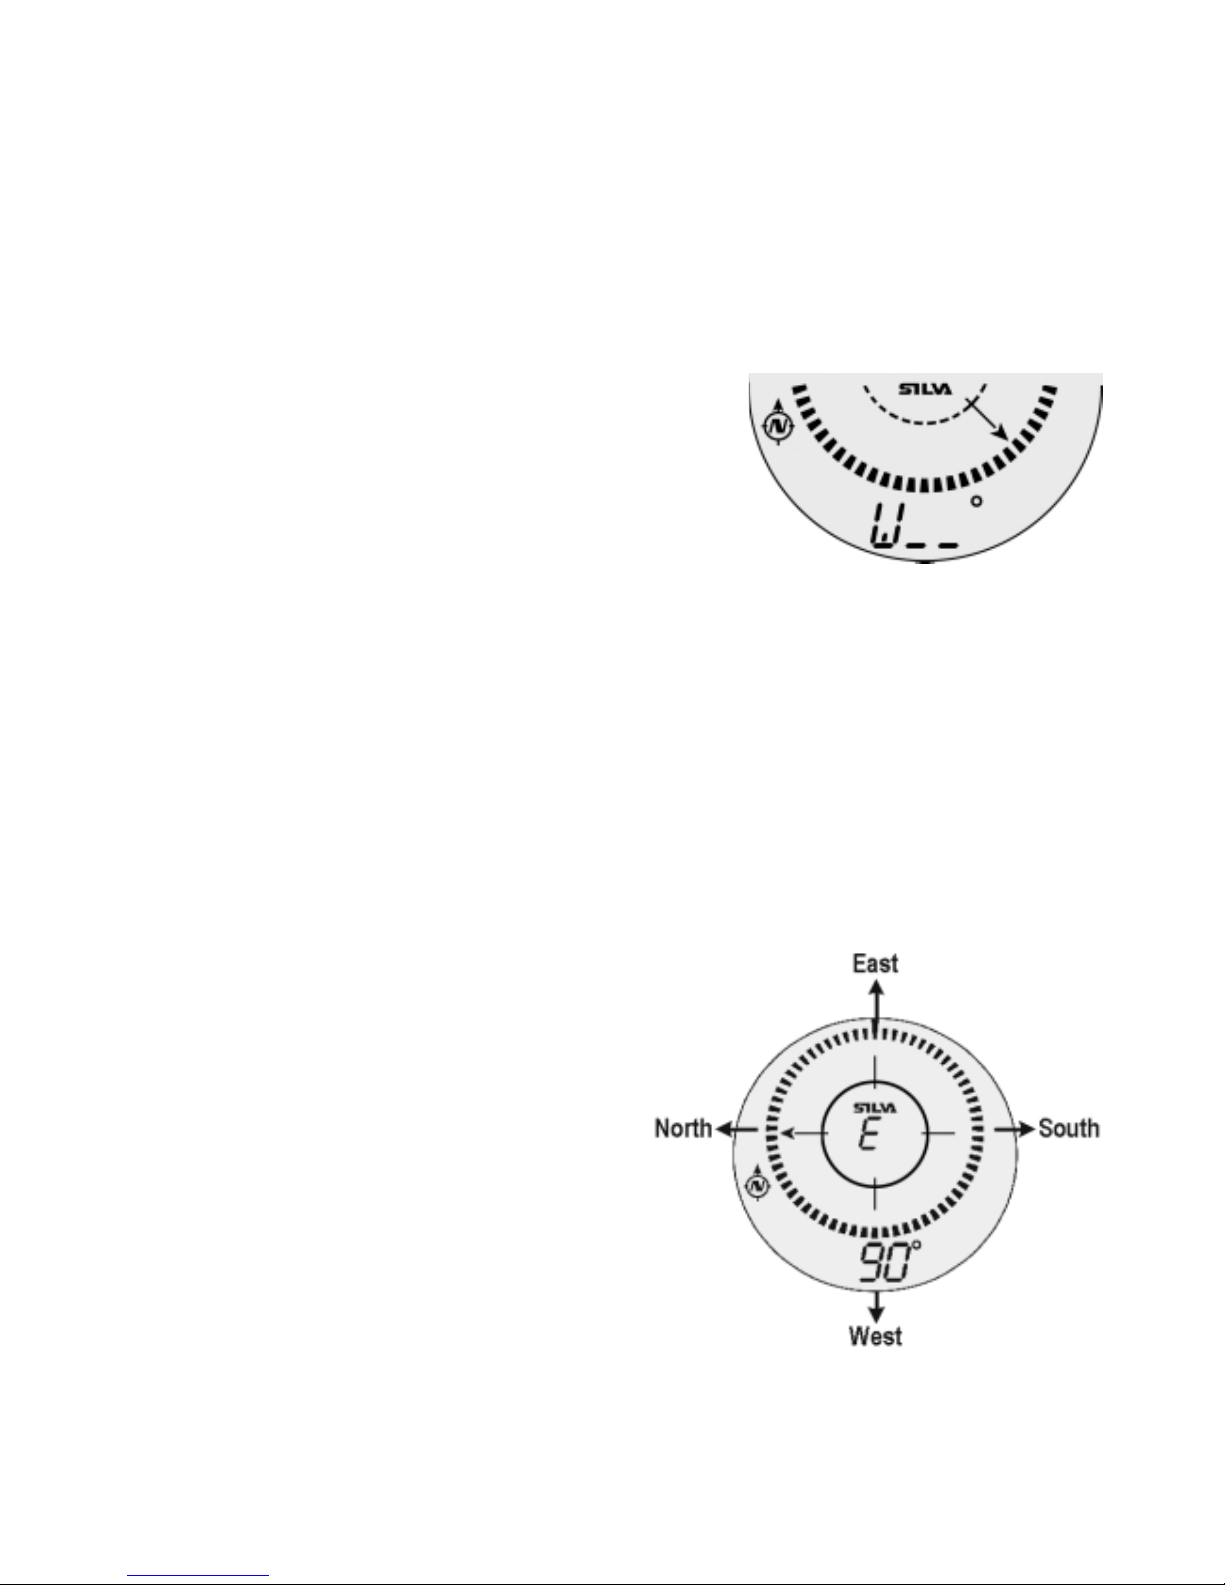
Press ENT to enter Declination setting. The fi rst
time you enter, ”W” fl ashes waiting for you to
change, or enter a value. (Fig 8)
1. Press ADV to scroll through values (W to E,or
1 to 2 to 3...).
2. Press ENT to save the value and move cursor
to the next digit.
3. At the last digit, press ENT to exit back to
Compass Mode.
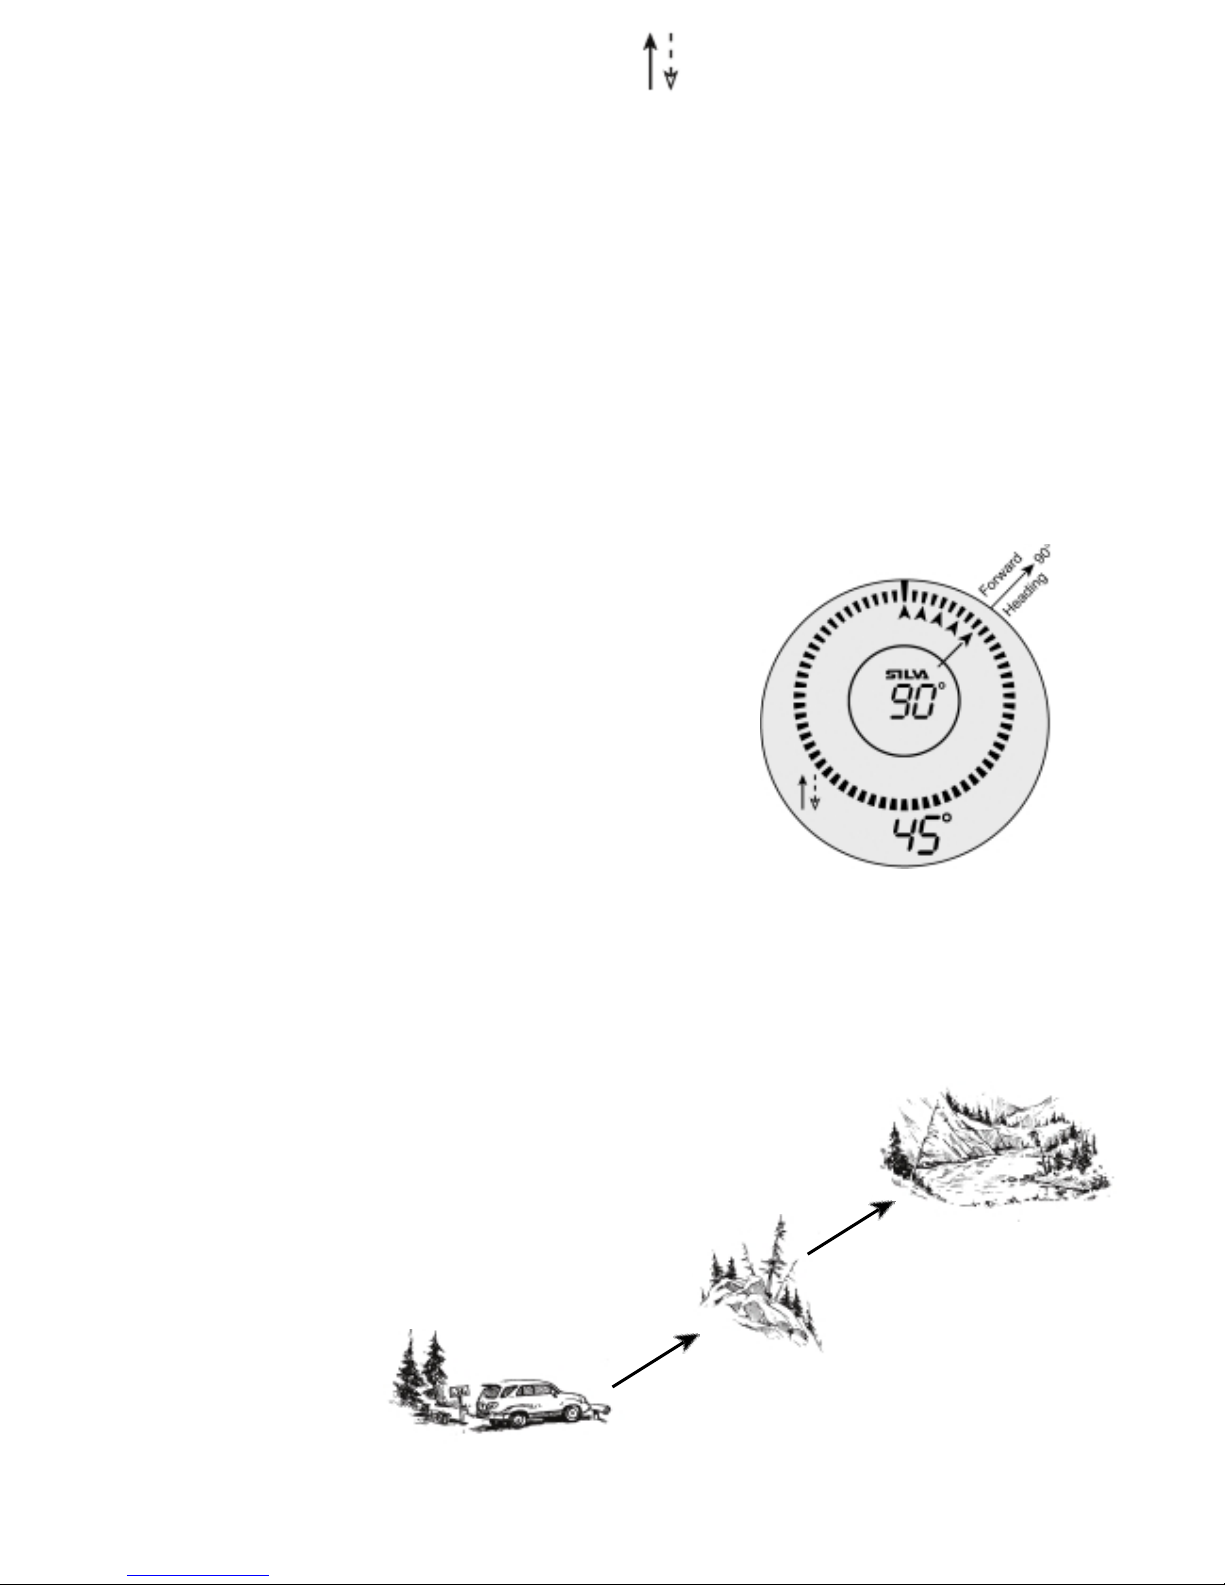
To use the compass, rotate your body and
hold compass level (center bubble in round
level). View the bearing or direction you
are facing at the bottom of the display with
cardinal headings in the center (N, NNE,
NE,...). The arrow on the compass rose
always points at north.
Figure 9 shows that you are facing a compass bearing of 90 degrees East.
The declination value will fl ash for three seconds before NOMAD™ returns to the
Compass Mode. The declination icon will be displayed in all three modes. Now,
the compass bearing is adjusted for magnetic declination and is b ased on True
North, same as the map.
In Compass Mode, turn declination adjustment on or off by holding ADV.
Figure 8
Figure 9
Page 7
9
3 — FORWARD BEARING MODE
In this mode, you enter a bearing to travel along. An arrow, arrowheads and a stored
forward bearing will help keep you travelling a straight line.
From the Compass Mode, enter Forward Bearing Mode by pressing ADV. The fi rst
time you enter this mode, ”- - -” fl ashes, waiting for an entry. Notice the Forward
Bearing Mode icon is on.
3.1 Store Forward Bearing
1. Point NOMAD™ in the direction that you want to travel (Ice Lake, for example).
2. Keep NOMAD™ level.
3. Hold ENT.
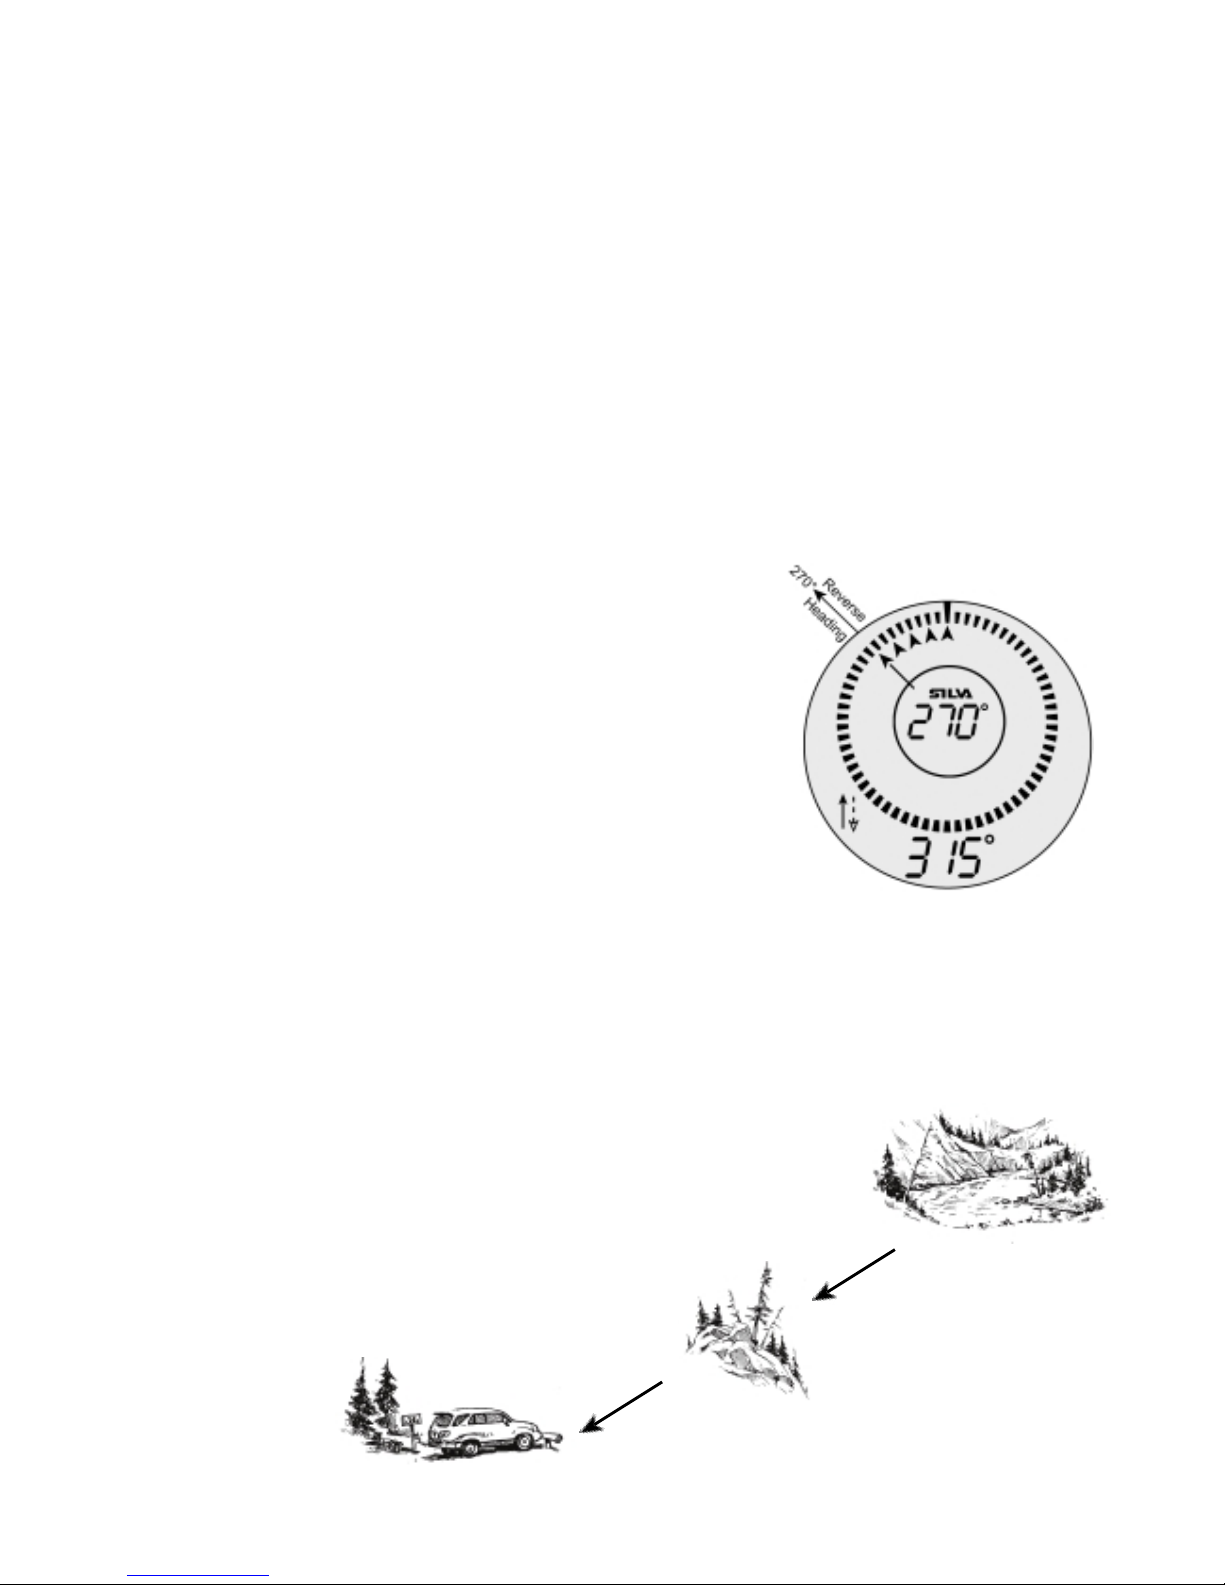
Notice the stored heading (Ice Lake) in the center of the display (90 - Figure 10), with
the actual compass bearing (direction you are facing) at the bottom of the display.
Rotate your body. A single fl ashing arrow and additio-
nal arrowheads are displayed in the compass rose.
(Fig 10) The more you turn away from the stored
heading the more arrowheads are displayed.
To face original stored heading (90° - Figure 10) rotate
your body in the direction of the arrowheads, until
only one arrow is left and the compass bearing, at
the bottom, matches the stored heading in the center.
Now you are on course and can begin travelling.
To store another bearing follow the steps in
section 3.1, above.
IMPORTANT! Previous bearing will be deleted
when storing another.
If Ice Lake is not in view, sight a landmark along the stored heading
(90°) and walk to the landmark. (Fig 11) At the landmark determine
another landmark using the same stored heading. Repeat until the
destination is in view.
Figure 10
Figure 11
Ice Lake
90°
90°
Page 8
10
3.2 Clear Forward Bearing
1. In Forward Bearing Mode, hold ADV.
The stored heading will disappear, being replaced by the fl ashing, ”- - -”.
Note! Clearing the forward bearing also clears the reverse bearing.
Reverse Bearing Mode provides a heading that is 180° from the stored forward
bearing. This can be very useful for returning once you’ve fi nished travelling the
forward bearing. If no heading is entered, ”- - -” will fl ash waiting for an entry. Notice
the Reverse Bearing Mode icon fl ashes.
4 — REVERSE BEARING MODE
4.1 Store Reverse Bearing
The reverse bearing is entered automatically only when a forward bearing is entered.
1. Press ADV to enter Reverse Bearing Mode.
If a heading of 90° to Ice Lake is entered in the
Forward Bearing Mode, a heading of 270° (back to
camp) will automatically be displayed in the Reverse
Bearing Mode. (Fig 12)
To stay on the 270° heading, use the fl ashing arrow,
arrowheads and the stored reverse bearing, as in Forward Bearing Mode. Remember to sight a landmark
(270°) if destination is not in view. (Fig 13)
4.2 Clear Reverse Bearing
When clearing a forward bearing, your reverse bearing will
also be automatically cleared. See section 3.2 -- Clear Forward Bearing.
Advance to Forward Bearing Mode and clear both the forward and reverse bearings simultaneously.
Figure 12
Figure 13
Ice Lake
270°
270°
Page 9

11
5 — ICON WARNINGS
This section describes icons displayed only under Warning conditions.
5.1 Low Battery Icon
The low battery icon is displayed when you have approximately 5% of battery life
remaining. Immediately after the Low Battery icon is displayed, you have approximately 1 - 1.5 hours with backlight on, or approximately 20-25 hours with backlight off
before the NOMAD™ will not power ON.
IMPORTANT! When replacing the battery all stored information will be lost. Remember to recalibrate the compass when replacing the battery.
5.2 Disturbance Icon (DIST)
The disturbance icon is displayed when the NOMAD™ senses an external disturbance.
If the icon is displayed, check yourself for metal objects (belt buckles, rings...), or
check for nearby objects that could cause the disturbance. Remove NOMAD™ from
the disturbance.
If the disturbance is caused by something the NOMAD™ cannot be removed from
(concentration of Iron Ore in the ground), recalibrate the NOMAD™ to differentiate
between Magnetic North and the disturbance. You must use the compass in the same
position that it was calibrated, however. If you move from that position, NOMAD™
may have to be recalibrated. See section 2.1-1 for Calibration.
6 — SPECIFICATIONS
Accuracy: +/- 5° with 1° display resolution
Update Rate : 5 times / second (during calibration)
1 time / second (during use)
Magnetic Declination Range: 69° West to 69° East
Battery Type: Qty. 1 - CR2032, 3V Lithium
Typical Battery Life: 500 hours (backlight off), 30 hours (backlight on)
Operating Temperature Range: -18° to +60° C (0 to + 140 F)
Storage Temperature Range: -23° to +71° C (-10 to + 160 F)
Dimensions: 8.9 x 6.1 x 2.3 cm (3.52 x 2.39 x 0.90 inches)
Weight (excluding battery): 113 g (4.0 oz)
Display Size: 3.8 cm (1.5 inches)
Water Resistant: yes
Page 10

12
7 — WARRANTY & SERVICE
The magneto-inductive magnetic sensor technology used in the NOMAD™ is licensed
under U.S. Patent numbers: 4,851,775 and 5,239,264 from PNI Corporation.
Silva warrants the NOMAD™ to be free of defects in materials and workmanship for
a period of one year. The warranty extends to the original purchaser from the date
of purchase.
Should the NOMAD™ prove defective or need repair, send NOMAD™ to your local
dealer or the national Silva distributor, include a brief description of the problem, and
proof of purchase.
Any repair to the NOMAD™ must be done by Silva or the warranty is void.
Silva reserves the right to amend this warranty, or offer alternative solutions if production of the NOMAD™ is discontinued.
Silva Sweden AB
Box 998
SE-191 29 Sollentuna
Sweden
[email protected]
www.silva.se
 Loading...