

Page 1

AN895
IEC 61000-4-2 ESD SYSTEM LEVEL PROTECTION
1. Introduction
This application note provides a brief overview about the possible ESD protecting realizations for any Silicon
Labs RF designs. However, experimental measurements have only been taken with, and thus the efficiency of
the ESD protection realizations has been demonstrated on, Si4x6x-based reference designs.
RF radio chips are designed for and tested against the different chip-level ESD standards such as Human Body
Model (HBM), Machine Model (MM) and Charged Device Model (CDM). These chip-level test results are
summarized in the RF IC’s Qualification Report.
However, in a real-world application the final module has to resist and stand against an ESD shock. For this
purpose, the final electronic product has to be tested against a different, more stringent standard that simulates
and replicates the real world ESD stress conditions. This system-level standard is the IEC 61000-4-2.
System/module designers should take care to comply with the IEC 61000-4-2 system-level ESD standard. This
application note shows Silicon Labs’ customers how to achieve the best possible system-level protections on
board level using Silicon Labs radio chips.
2. Si4x6x Qualification Report
The Si4x6x radios’ ESD robustness against the different chip level ESD standards are summarized in “Electrical
Verification” of the “Qualification Report”.
The following is a brief summary from those results:
ESD-HBM: pass up to 2 kV
ESD-MM: pass up to 50 V for all pins, excluding RF pins if it is 200 V
ESD-CDM: pass up to 500 V
3. Overview of IEC 61000-4-2 Standard
The IEC standard is a system level test that replicates a charged person discharging to a system in a system end
user environment. The purpose of the system level test is to ensure that finished products can survive normal
operation and it is generally assumed that the user of the product will not take any ESD precautions to lower ESD
stress to the product.
The IEC 61000-4-2 standard defines four standard levels of ESD protection, using two different testing
methodologies. Contact discharge involves discharging an ESD pulse directly from the ESD test gun that is
touching the device under test. This is the preferred method of testing. However, the standard provides for an
alternate test methodology known as air discharge for cases where contact discharge testing is not possible. In
the air discharge test, the ESD test gun is brought close to the device under test until a discharge occurs. The
standards are defined so that each level is considered equivalent – a Level 4 contact discharge of 8 kV is
considered equivalent to a 15 kV air discharge.
Rev. 0.3 3/21 Copyright © 2021 by Silicon Laboratories AN895
Page 2
AN895
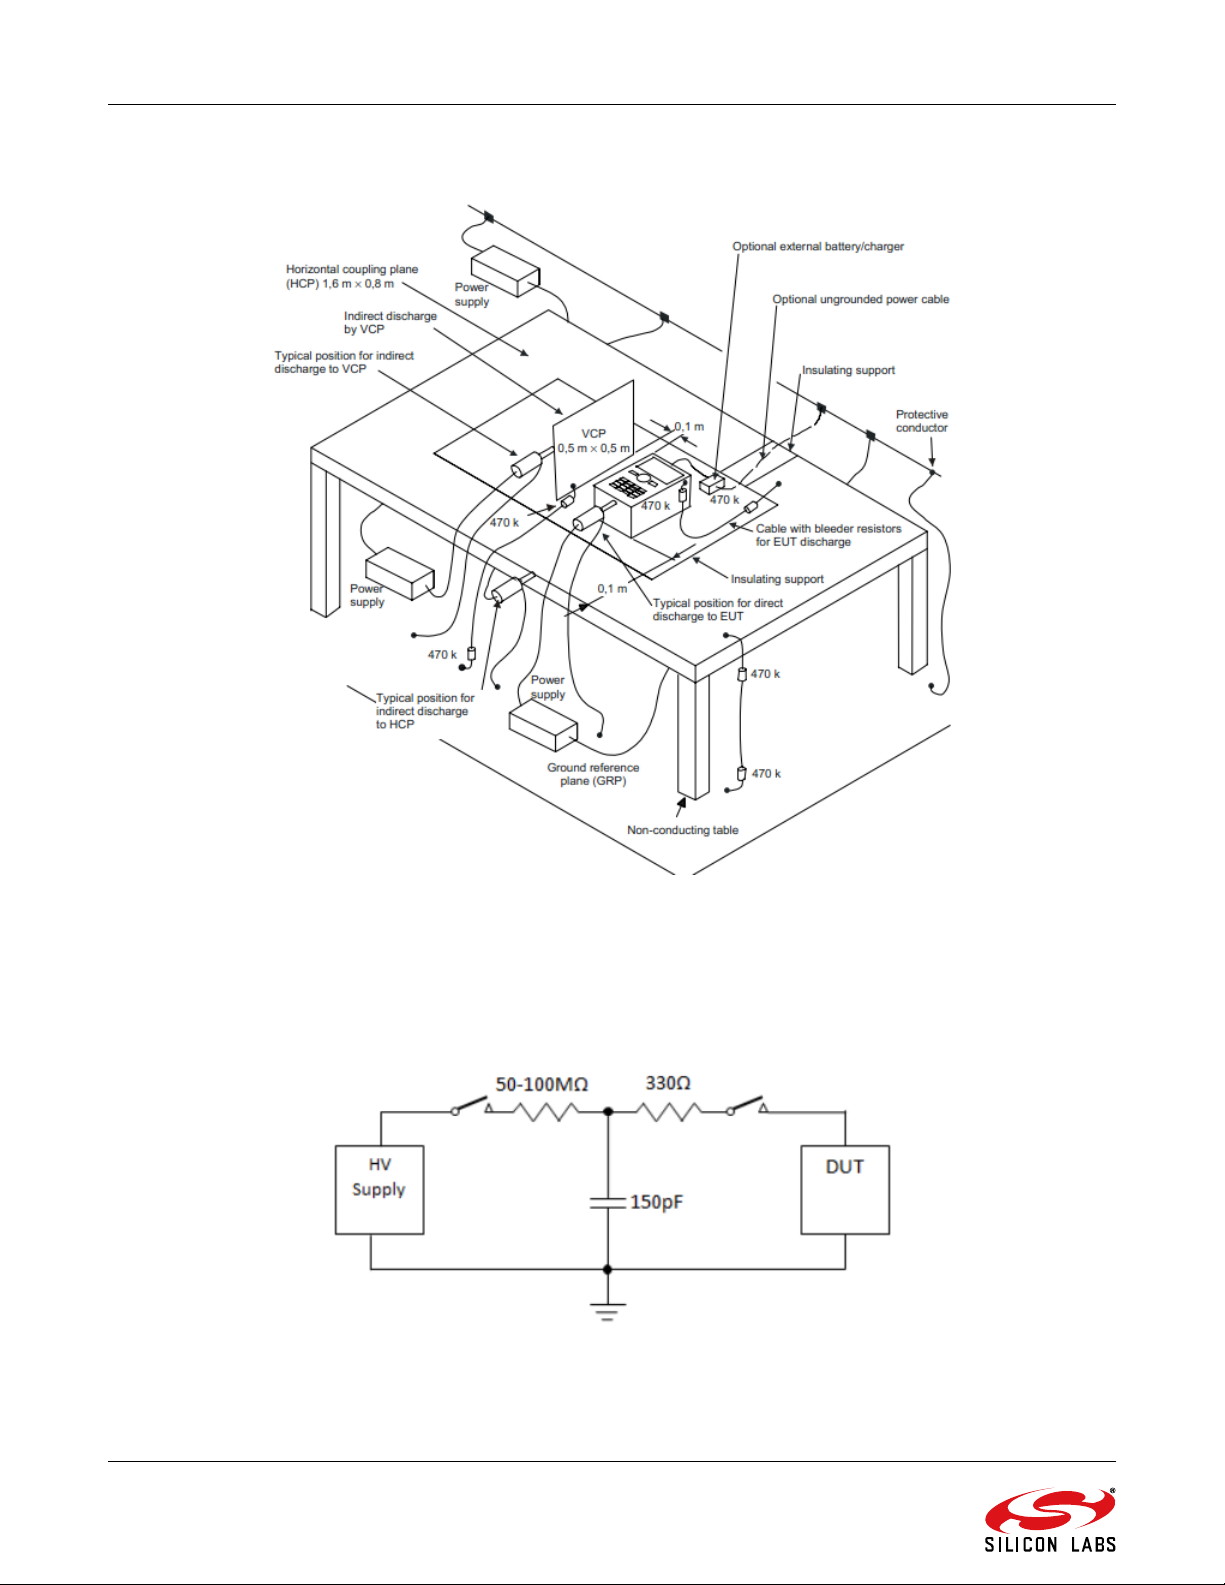
3.1. Recommended ESD Test Bench
Figure 1. IEC 61000-4-2 Test Bench
3.2. Simulation Circuit
The IEC standard replicates a charged person discharging into a system in an uncontrolled environment. This test
is performed to ensure the system will remain operational in an end user environment where no ESD stress
precautions are taken.
Figure 2. Simulation Circuit of IEC 61000-4-2
2 Rev. 0.3
Page 3
3.3. IEC 61000-4-2 Test Levels
Contact Discharge Air Discharge
Level Test Voltage (kV) Level Test Voltage (kV)
1212
2424
3638
48415
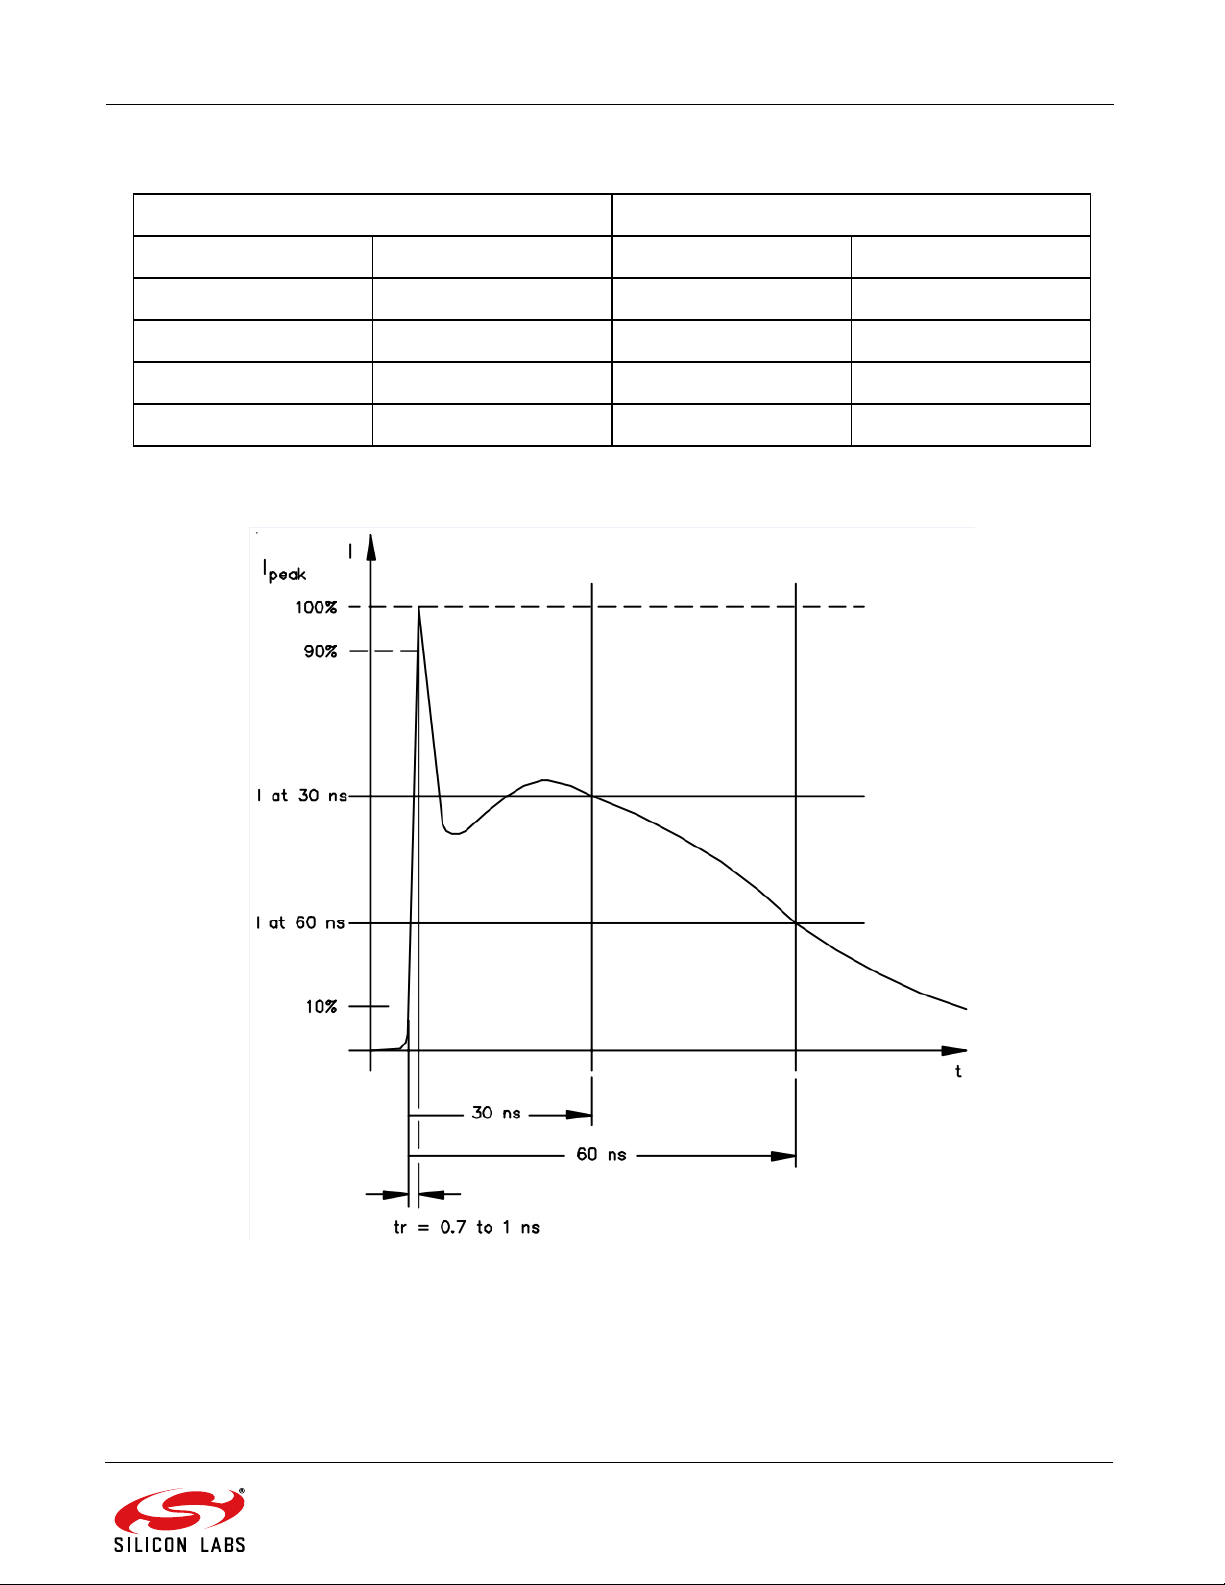
3.4. Pulse Waveform
AN895
Figure 3. IEC 61000-4-2 ESD Pulse Waveform
Rev. 0.3 3
Page 4
AN895
3.5. Peak Current of IEC 61000-4-2 ESD Standard
Applied Voltage (kV) Peak Current (A)
2 7.5
4 15.0
6 22.5
8 30.0
10 37.5
4 Rev. 0.3
Page 5
AN895
4. ESD Protection Circuit Example
This section contains an example of an ESD protection circuit that can effectively suppress an IEC 61000-4-2 ESD
shock.
The following passive components can be included in an effective external ESD protection circuit: series resistors,
ferrites, filtering capacitors and inductors, transient voltage suppressors (e.g., TVS diodes), thyristors, varistors,
polymer, etc.
The ESD protection circuit composed from these above components can block ESD currents and clamp ESDinduced high voltages. The exceeded ESD currents can be suppressed and shunted to minimize the effects of the
ESD pulses in the system. It is highly recommended to place the protection circuit as close as possible to the
connection point on the board where the ESD shock event can occur. This placing approach can minimize the
possibility of causing further couplings of the ESD currents and voltages to the other blocks on the module.
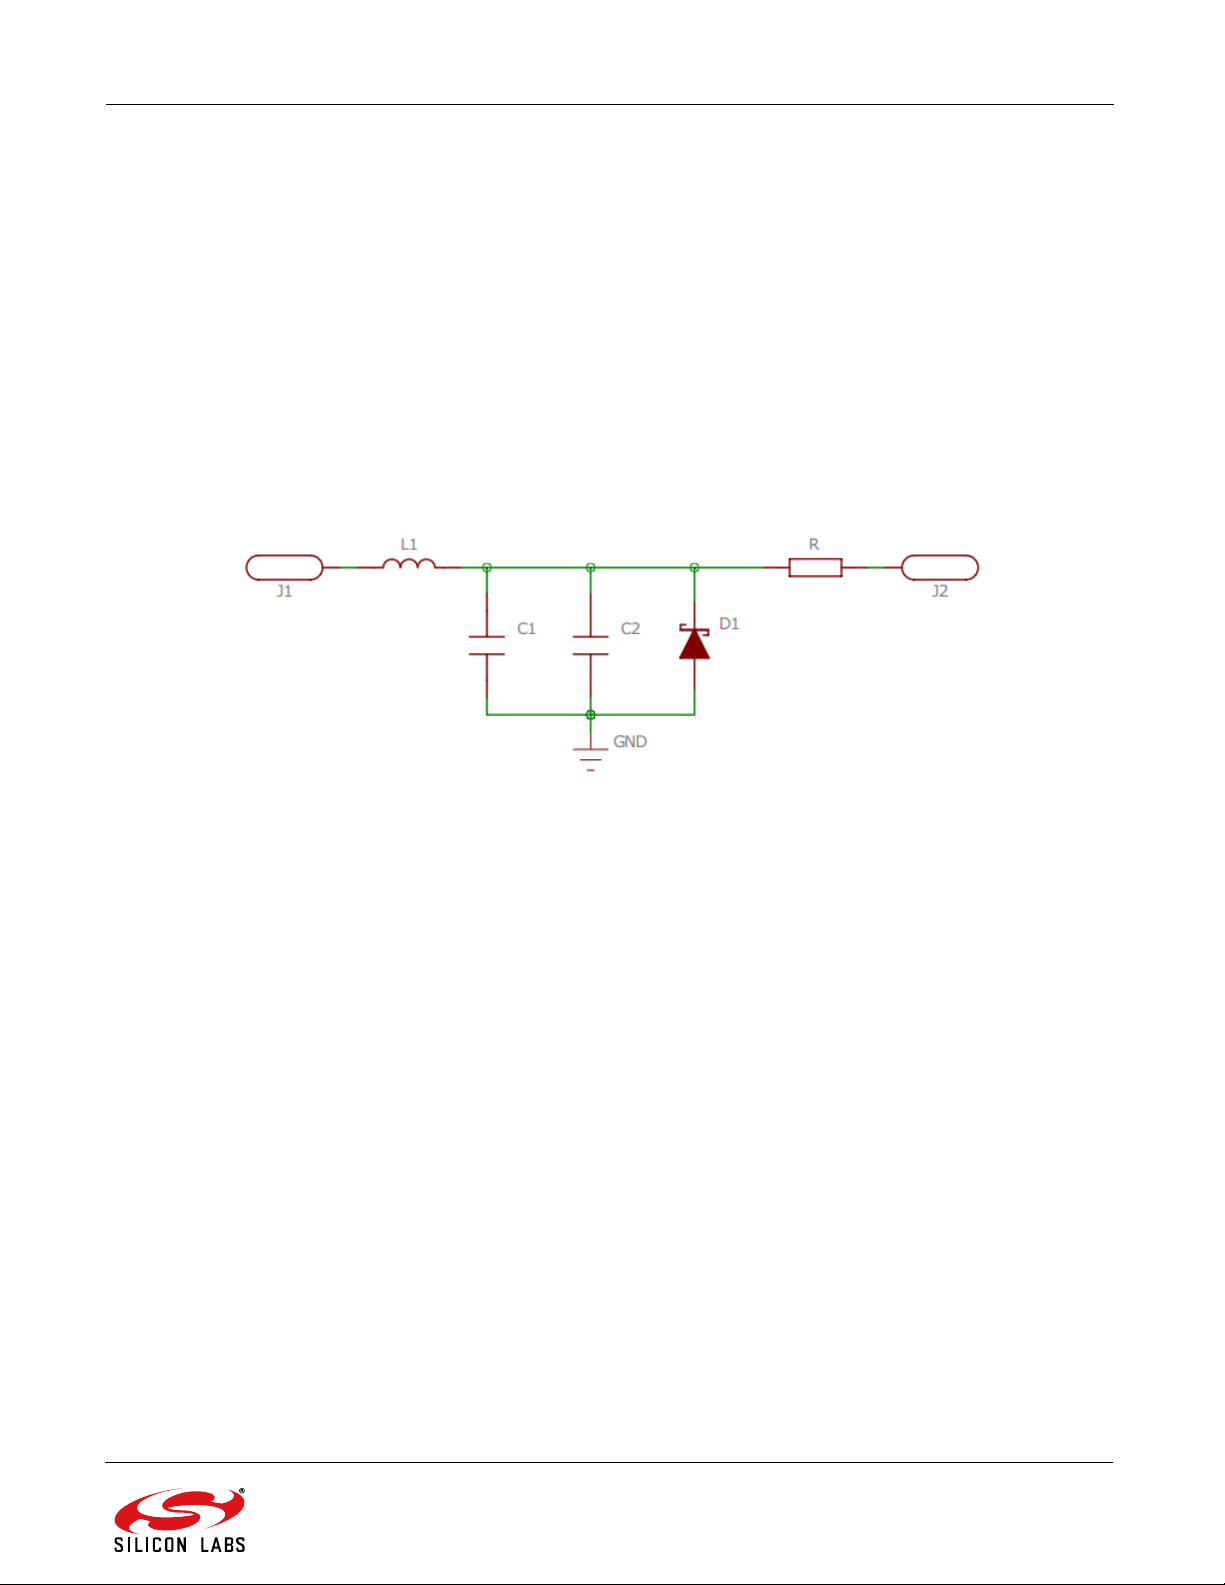
A general I/O connector of a piece of electrical equipment can be protected with the example circuit composed with
external passive components shown in Figure 4.
Figure 4. Example for ESD Protection Circuit
J1: connection point where the ESD shock occurs (high-voltage IEC 61000-4-2 Test Pulse)
J2: ESD-protected connection point (suppressed test signal)
L1: series filtering inductor
C1, C2: parallel filtering capacitors
D1: TVS diode
R: series resistor
The ESD shock is supposed to occur at the “J1” point. The “L-C” low-pass filtering section suppresses the fast ESD
shock signal; the “L1” inductor can block the large currents, while the “C1” and “C2” capacitors can limit the high
voltage induced by the transient fast current spike.
The “D1” TVS diode can be effectively used for suppressing the fast ramped-up ESD signals and plenty of these
kinds of diodes are available on the market from different manufacturers (specified for assisting equipment to pass
IEC 61000-4-2, even level 4 testing).
The optimum values for the components and even the optimum structure (i.e., it might not be necessary to use all
of the shown components in Figure 4) depend on the level of the ESD signal, board layout, and on the termination
at the “J2” point.
It is possible to select the filtering element values in a way where the largest suppression can be achieved at the
GHz region, since the ramp-up time of the fast ESD signal is around 1 ns, as shown in Figure 3.
Rev. 0.3 5
Page 6
AN895
5. Waveform Measurements as IEC 61000-4-2 Standard
Silicon Labs performed waveform measurements with the following setup:
IEC 61000-4-2 ESD standard test bench setup
IEC 61000-4-2 ESD standard test signals
Direct contact waveform measurements from the IEC 61000-4-2 test signal
Contact waveform measurements with applying an example ESD protection circuit
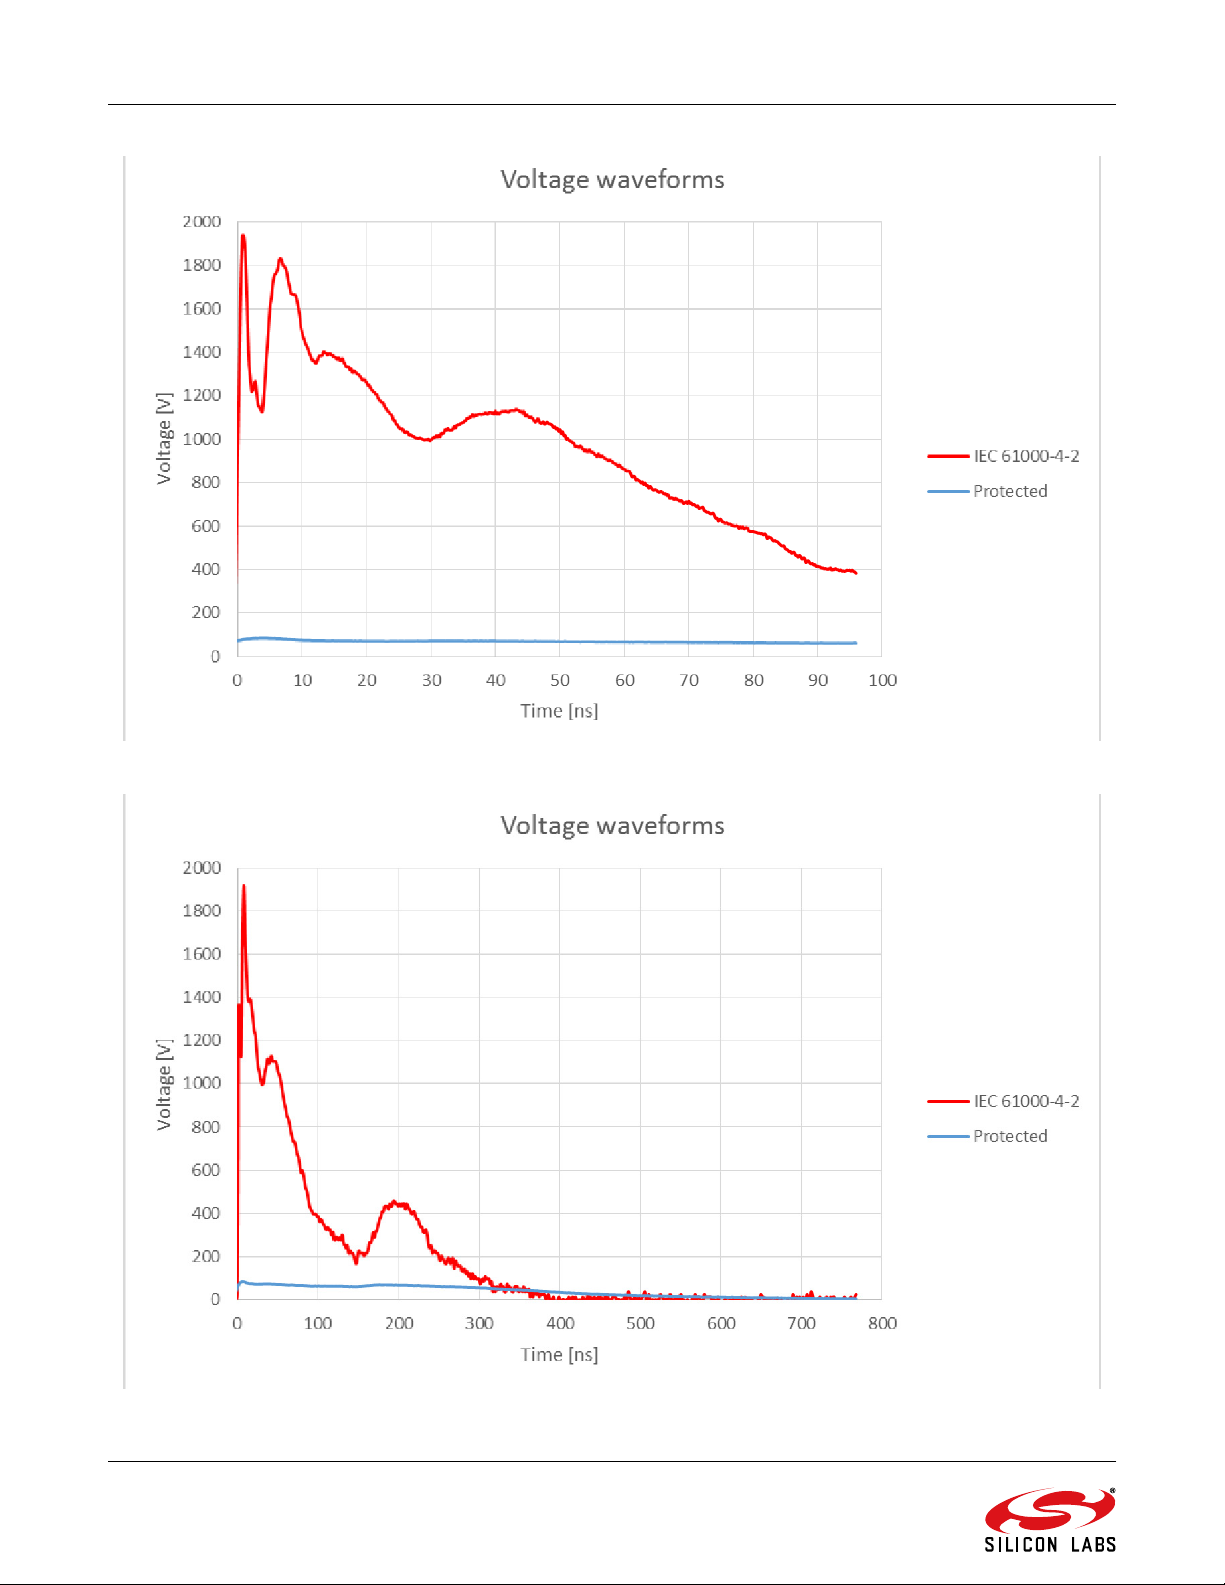
This section illustrates how the waveforms look before (direct measurement of IEC 61000-4-2 test signal) and after
an example ESD protection circuit. In addition, this section demonstrates the effectiveness of the protection circuit.
The TVS diode used in the example protection circuit (“D1”) is: SESD0402X1UN.
The ESD protection circuit was realized on a small PCB that only included the elements shown in Figure 4.
The following figures show the measured waveforms with different conditions such as voltage of the test signal,
different elements mounted on the ESD protection board, different element values, and etc. The conditions are
identified in each figure caption.
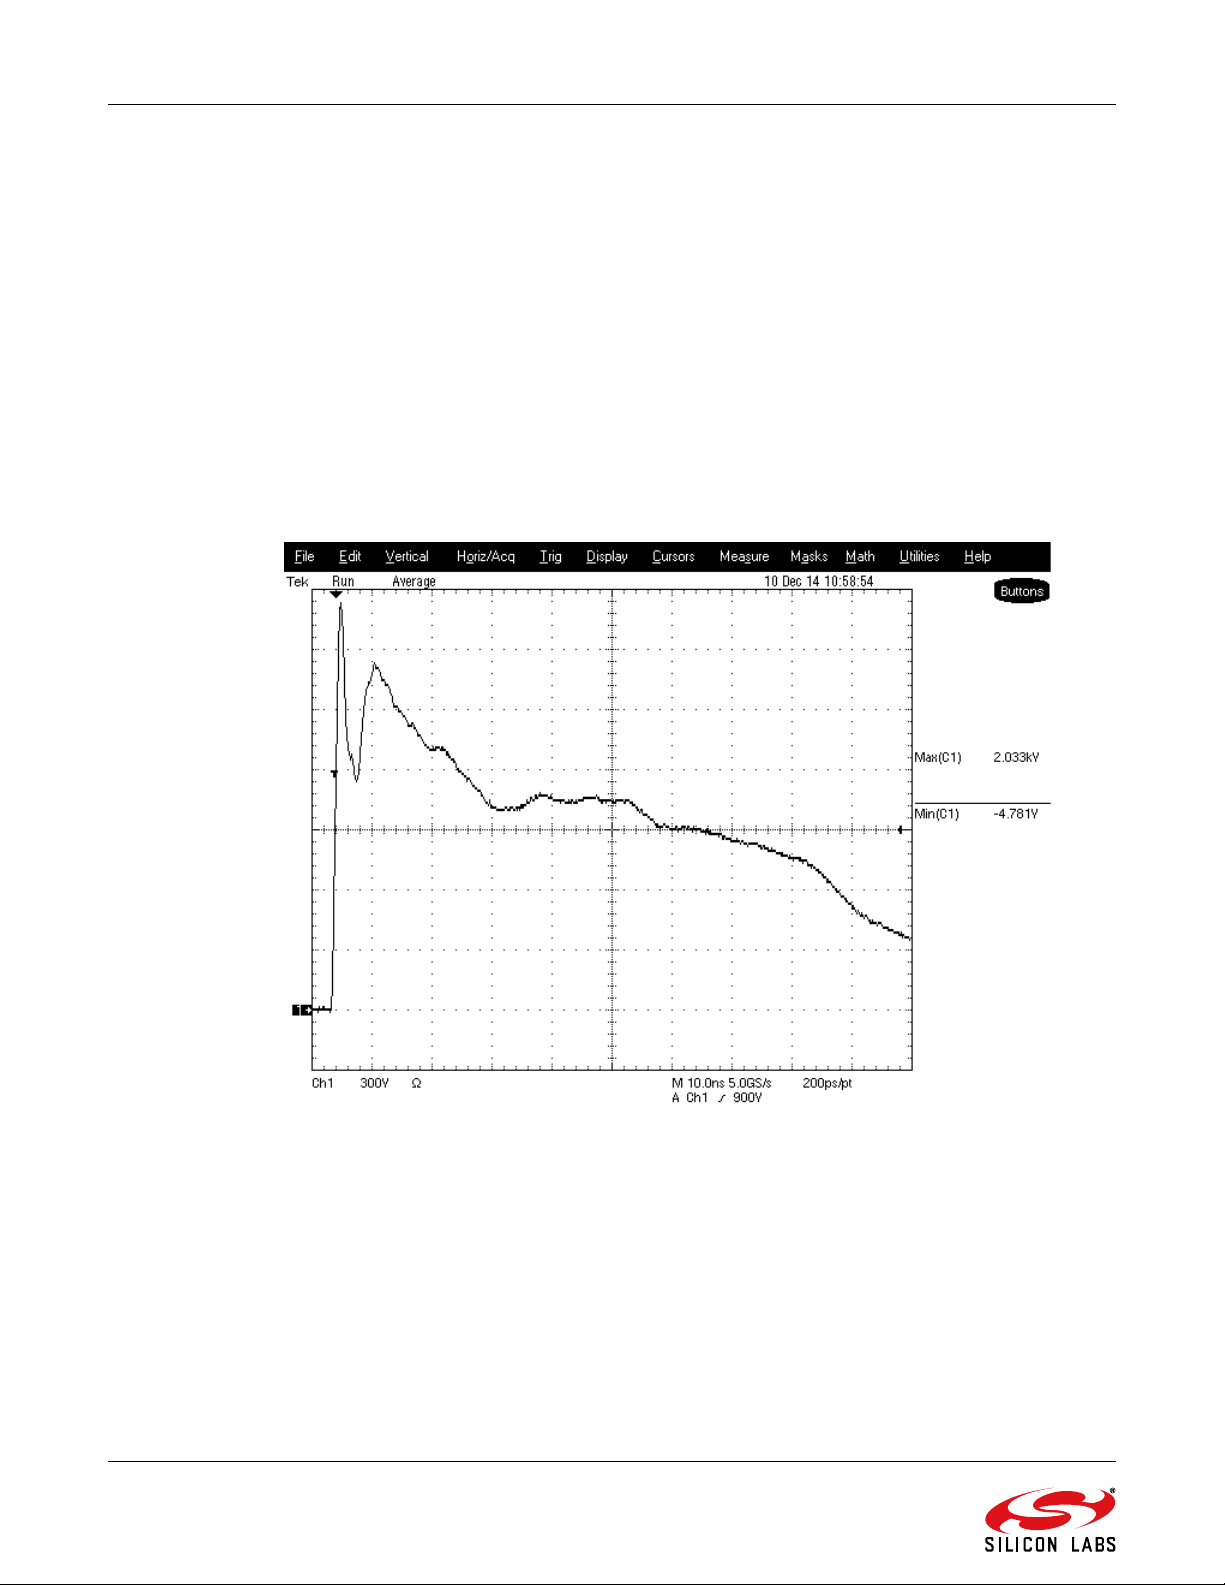
Figure 5. IEC 61000-4-2 Test Signal, +2 kV, without Protection
6 Rev. 0.3
Page 7

AN895
Figure 6. IEC 61000-4-2 Test Signal, +8 kV, without Protection
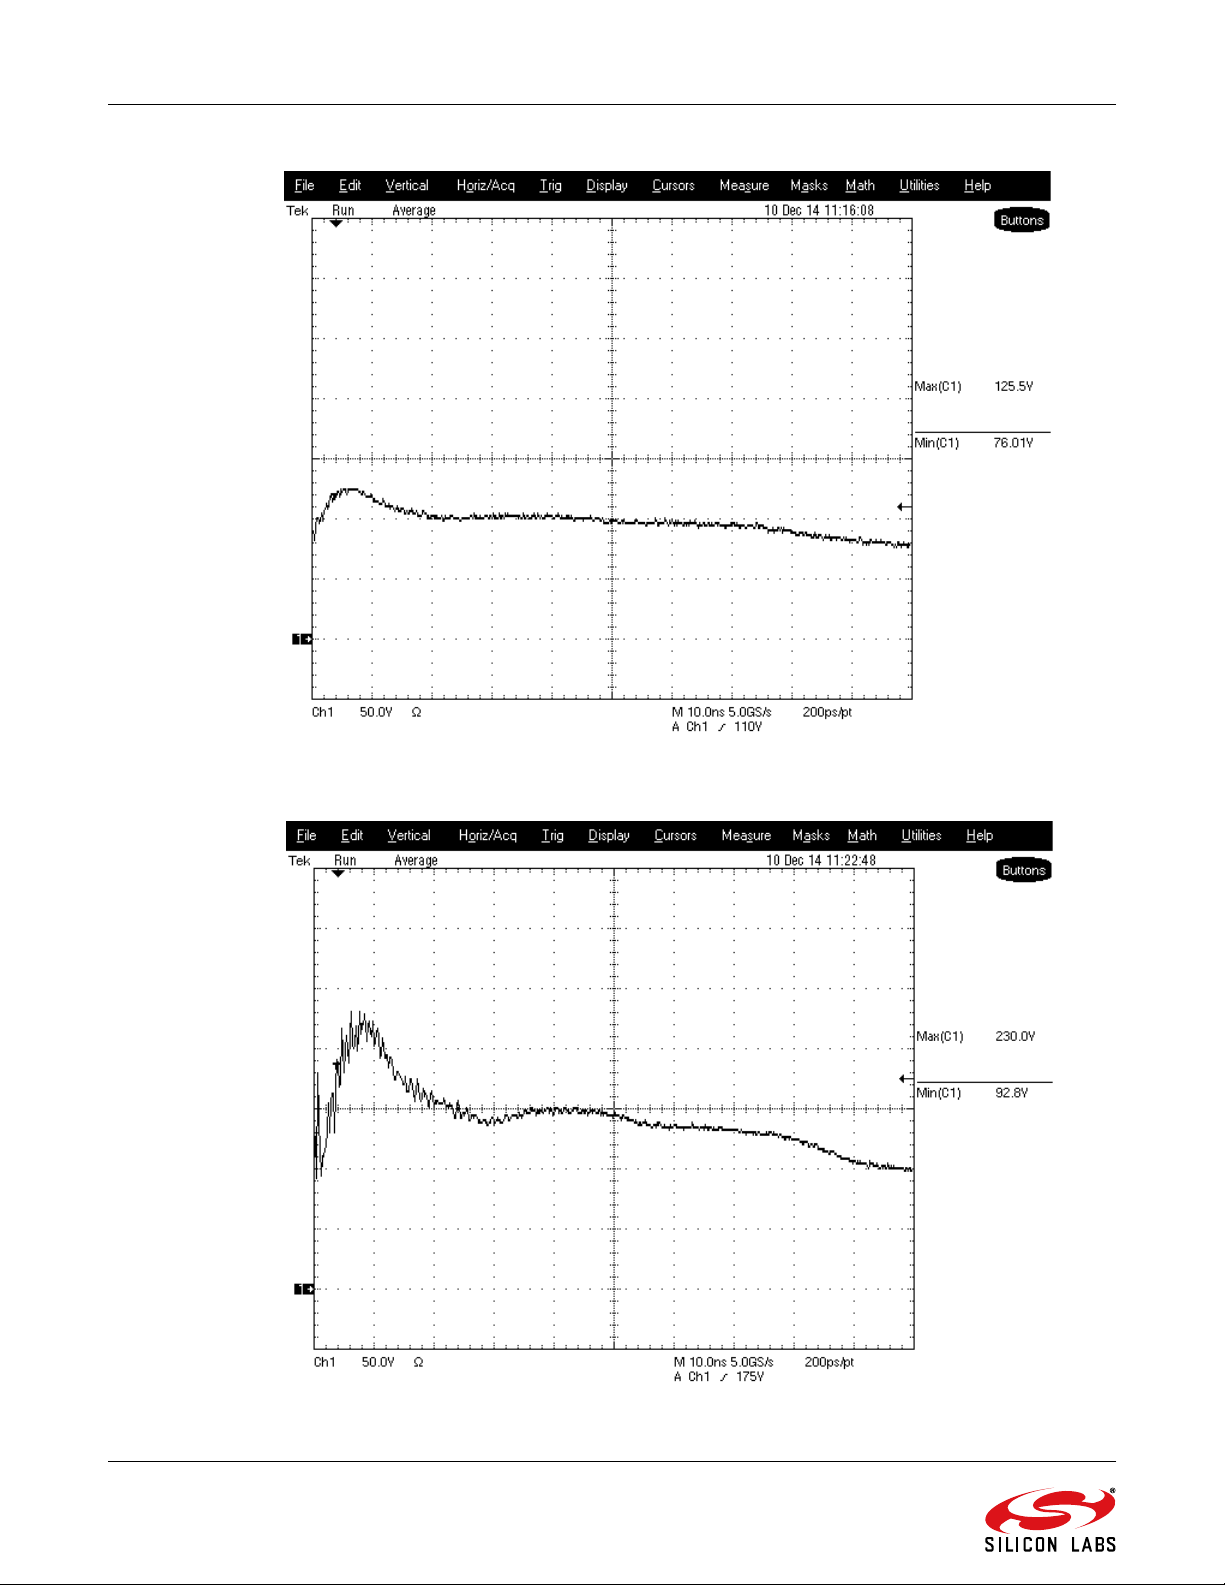
Figure 7. IEC 61000-4-2 Test Signal, +2 kV, TVS Diode Mounted
Rev. 0.3 7
Page 8
AN895
Figure 8. IEC 61000-4-2 Test Signal, +2 kV, TVS Diode and C1 = 2 nF Mounted
Figure 9. IEC 61000-4-2 Test Signal, +8 kV, TVS Diode and C1 = 2 nF Mounted
8 Rev. 0.3
Page 9

AN895
Figure 10. IEC 61000-4-2 Test Signal, +8 kV, TVS Diode and C1 = 2 nF, C2 = 33 pF Mounted
Figure 11. IEC 61000-4-2 Test Signal, +8 kV, TVS Diode and C1 = 2 nF, C2 = 33 pF, R =15
Mounted
Rev. 0.3 9
Page 10

AN895
Figure 12. IEC 61000-4-2 Test Signal, +8 kV, 2 TVS Diodes and C1 = 2 nF, C2 = 33 pF, R = 15
Mounted
Figure 13. IEC 61000-4-2 Test Signal, +2 kV, 2 TVS Diodes and C1 = 2 nF, C2 = 33 pF, R = 15
Mounted
10 Rev. 0.3
Page 11

AN895
Figure 14. IEC 61000-4-2 Test Signal, +2 kV, 2 TVS Diodes and C1 = 2 nF, R = 15 Mounted,
Extended Time Scale
Rev. 0.3 11
Page 12
AN895
Figure 15. IEC 61000-4-2 Test Signal, +2 kV, 2 TVS Diodes and C1= 2 nF, R = 15 Mounted
Figure 16. IEC 61000-4-2 Test Signal, +2 kV, 2 TVS Diodes and C1 = 2 nF, R = 15 Mounted
12 Rev. 0.3
Page 13
AN895
6. ESD Demonstration on Silicon Labs’ Reference Design
Silicon Labs has also performed some extra measurements to demonstrate the effectiveness of the example ESD
protection circuit. The measurement setup is as follows:
HW: Silicon Labs Wireless Motherboard with Si4x6x RF Pico Board connected
Contact stressing the HW with IEC 61000-4-2 test signal directly
Contact stressing the HW with IEC 61000-4-2 test signal, but via the ESD protection circuit
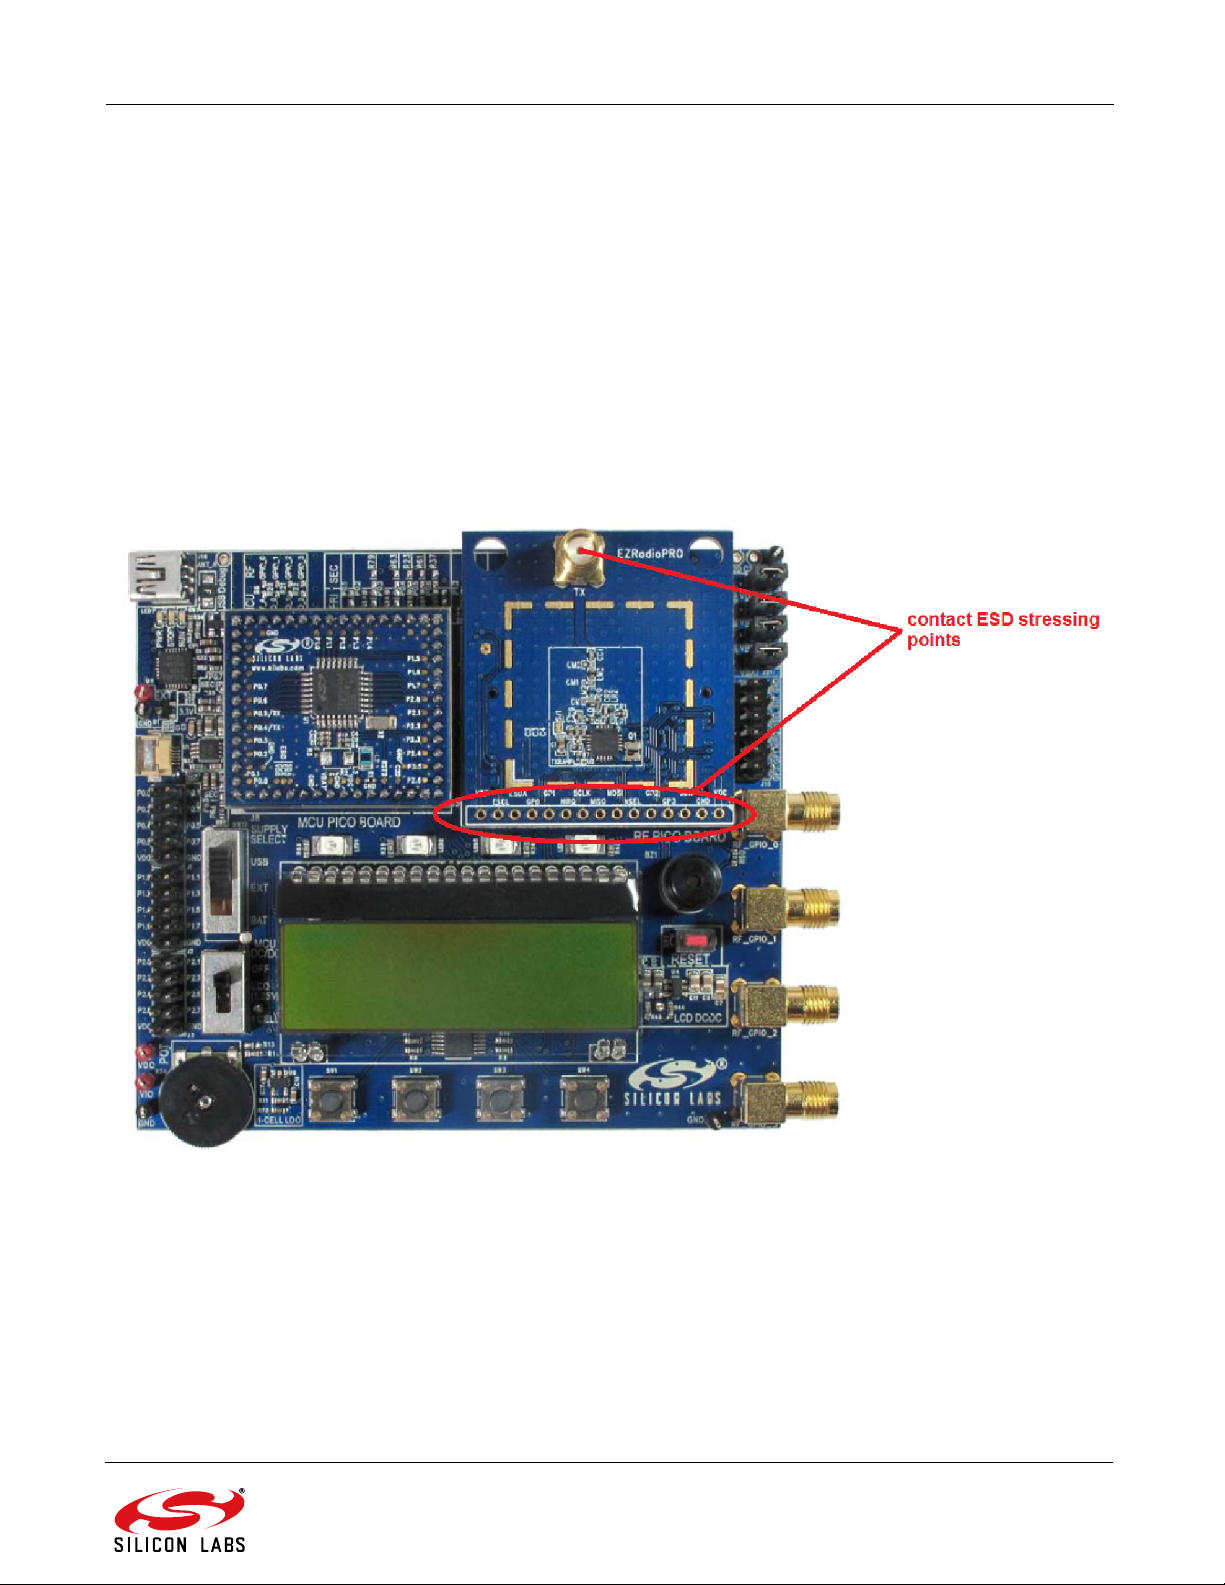
Contact stressing points on the HW: single-row via test points of the RF Pico Board (see Figure 17)
ESCL pin: non-directly connected trace with the RF chip
VDD pin: power supply, direct connection with the RF chip
NSEL: directly connected trace with the RF chip
RF port: RF antenna connection point, not test point, extra notes in Section 8.
Note: Contact stressing the HW at these connection points is a very worst-case event compared to a real application where
these points are typically not directly led out on the final module.
Figure 17. Wireless Motherboard with RF Pico Board Connected
Rev. 0.3 13
Page 14

AN895
The ESD protection circuit applied during these demonstration measurements is shown in Figure 18. This circuit
was realized in a small PCB, separated from the RF Pico Board and Wireless Motherboard. Note that the example
of ESD protection circuit shown below can be applied on any general design (i.e., not only Si4x6x-based designs)
excluding on the RF or antenna ports.
The results are summarized in Table 1.
Table 1. ESD Test Results on Silicon Labs Reference Design
Stressed Pin Presence of
Protection Circuit
ESCL NO FAIL — —
YES PASS PASS FAIL
NSEL NO FAIL — —
YES PASS PASS FAIL
VDD NO PASS FAIL —
YES PASS PASS PASS
RF port NO FAIL — —
YES PASS FAIL —
Figure 18. ESD Protection Circuit
IEC 61000-4-2 Test Signal Maximum Voltage
+2 kV +4 kV +6 kV
14 Rev. 0.3
Page 15

AN895
7. Layout Suggestions
The following layout suggestions are recommended to ensure the possible best immunity against any ESD shock:
Keep the antenna far from any connector that has potential risk for ESD shock.
Route traces far from the antenna; this helps to avoid any couplings between the traces and antenna that
prevents possible latch-up issues.
Always try to ensure good grounding in terms of RF (i.e., use large, continuous GND copper pouring on the
PCB with plenty of stitching vias).
Try to route the potential ESD risk traces (i.e., traces connected to the potential risk connectors) far from
the RF section.
Place the ESD protection circuit as close to the ESD shock point as possible. In this way, the further
couplings of the ESD shock signals can be minimized.
The application note, “AN629: Layout Design Guide”, also includes some RF-related recommendations. The
proper design of the PCB layout can minimize the possibility of any signal couplings and avoid the risk of failing
against an ESD shock.
Rev. 0.3 15
Page 16

AN895
8. Antenna Protection
Due to the high operating frequency (RF) of the protected port of an ESD protection circuit, the most important
considerations are the following:
Do not use parallel capacitors since they can de-tune the RF antenna. The RF antenna is also frequency
dependent, so a maximum 0.5…1.5 pF capacitors are allowed in the sub-GHz region).
Do not use series inductors since they also de-tune the RF antenna. However, series bypass (bypass at
the operating frequency) capacitor can be used.
Do not use series resistors since they bring extra loss into the RF front-end and therefore cause RF power
efficiency degradation.
Take care about the parasitics of the selected TVS diode (or any other suppressor). Select fast, low
capacitance devices to minimize the de-tuning of the RF antenna.
Parallel shunt from RF to GND inductors can be used to suppress any low frequency noises. The value of
the parallel inductor has to be the same as the “RF choke inductor” (i.e., the inductor has to show high
impedance at the operating RF frequency that is equal with SRF, self-resonant-frequency, of the chip
inductor).
Based on the additional RF port-related considerations described above, Figure 19 shows a generic suggested
ESD protection circuit for the RF antenna port. Note that the example of ESD protection circuit for RF and antenna
ports shown below can be applied on any general RF design (i.e., not only Si4x6x-based designs).
Figure 19. ESD Protection Circuit for RF Antenna Port
Recommended element values are summarized in Table 2. The ESD immunity measurement results on the RF
antenna port are included in Table 1 in section 6.
16 Rev. 0.3
Page 17

Table 2. Suggested Element Values for the Antenna Protection Circuit
Element RF Frequency Band Value
L1 310-510 MHz 270 nH
780-930 MHz 120 nH
2.4 GHz 22 nH
C1 310-510 MHz 270 pF
780-930 MHz 68 pF
2.4 GHz 10 pF
C2 310-510 MHz N.M. but can go up to 1.5 pF
780-930 MHz N.M. but can go up to 0.5 pF
2.4 GHz N.M. but should be kept < 0.2 pF
D1
Note: The purpose of these TVS diodes is to suppress the ESD signal. The
D2
selection of fast, low-capacitance devices is recommended.
AN895
Examples for the recommended TVS diodes: SESD0402X1UN, ESD101-B1-02EL, etc.
If it is not possible to select TVS diodes with the low capacitance values listed in the C2 row of Table 2 above, then
the following network implementation can be used as an additional ESD protection circuit in the RF path. This
approach creates a 3-element, low-pass PI filter structure. So, basically, the additional capacitance of the D1 and
D2 TVS diodes is resonated out by the series L2 inductor at the desired RF frequency.
Figure 20. Additional ESD Protection Circuit in the RF Path
Rev. 0.3 17
Page 18

AN895
9. POR when ESD Shock Occurs
This section highlights what happens if an ESD shock occurs that affects the operation of an Si4x6x device.
In most cases, when an ESD shock occurs, the radio chip is not damaged, but Power-On-Reset (POR) occurs.
This means that the radio chip can be re-configurable after the POR event and no hard impact results. By default,
the monitoring of the GPIO-1 signal results in detection of the POR, after which the chip settings can be sent to the
radio chip to get the radio properly working again.
Figure 21 shows the GPIO-1 signal during ESD shock. As shown in the figure, POR occurs and, when the GPIO-1
signal is high again, the radio can be configurable again by software.
Figure 21. GPIO-1 Signal during ESD Event
So, in most cases after an ESD shock, the radio chip can be used again, it only needs to be re-configured by
software. To accomplish this task, the GPIO-1 signal has to be monitored to make sure that the POR occurred after
an ESD event.
Silicon Labs also monitored the current consumption of the RF chip during ESD shock. The current consumption
never exceeded the TX current consumption value.
18 Rev. 0.3
Page 19

Smart. Connected.
Energy-Friendly.
IoT Portfolio
www.silabs.com/products
Disclaimer
Silicon Labs intends to provide customer s with the latest, accurate, and in-depth document ation of all peripherals and modules available for system and software implementers using or intending to use the Silicon Labs produc ts. Characterization data, available modules and peripherals, memory sizes and memory addresses refer to each
specic device, and “Typical ” parameters provided can and do vary in dierent applications. Application examples described herein are for illustrative purposes only. Silicon
Labs reserves the right to make changes without further notice to the product information, specications, and descriptions herein, and does not give warranties as to the
accuracy or completeness of the included information. Without prior notication, Silicon Labs may update product rmware during the manufacturing process for securit y or
re lia bilit y reason s. Such ch ang es will no t alter th e speci cati ons or th e per for mance of th e product . Sil ico n La bs sh all hav e no li abili ty fo r the conseq uence s of us e of the in for-
matio n supplied in th is document . This document does not imply or expre ssly grant any license to design or fabr icate any integrated circuits. T he product s are not desig ned or
authorized to be used within any FDA Class III devices, applications for which FDA premarket approval is required or Life Support Systems without the specic written consent
of Silicon Labs. A “Life Support System” is any product or system intended to support or sustain life and/or health, which, if it fails, can be reasonably expected to result in
signicant personal injur y or death. Silicon Labs products are not designed or authorized for militar y applications. Silicon Labs products shall under no circumstances be used
in weapons of mass destruction including (but not limited to) nuclear, biological or chemical weapons, or missiles capable of delivering such weapons. Silicon Labs disclaims
all express and implied warranties and shall not be responsible or liable for any injuries or damages related to use of a Silicon Labs product in such unauthorized applications.
No te: This con ten t ma y contain oensive te rmi no lo gy tha t is no w obs ole te. Sil ic on La bs is rep lac in g th es e te rm s with inclus ive lan gu ag e wh er ever possible . For mor e
information, visit www.silabs.com/about-us/inclusive-lexicon-project
Trademark Information
Silicon Laboratories Inc.®, Silicon Laboratories®, Silicon Labs®, SiLabs® and the Silicon Labs logo®, Bluegiga®, Bluegiga Logo®, Clockbuilder®, CMEMS®, DSPLL®, EFM®, EFM32®,
EFR, E mber®, Energy Micro, Energy Micro logo and combinations thereof, “the world’s most energy friendly microcontrollers”, Ember®, EZLink®, EZRadio®, EZRadioPRO®, Gecko®,
Gecko OS , Gecko OS Stud io, ISOmode m®, Precision32®, ProSLIC®, Simplicity Studio®, SiPHY®, Telegesis , the Telegesis Lo go®, USBXpress® , Zentr i, the Zentr i logo and Zentr i DMS,
Z-Wave®, and others are trademarks or registered trademarks of Silicon Labs. ARM, CORTEX, Cortex-M3 and THUMB are trademarks or registered trademark s of ARM Holdings. Keil is a registered trademark of ARM Limited. Wi-Fi is a registered trademark of the Wi-Fi Alliance. A ll other products or brand names mentioned herein are trademarks
of their respective holders.
Silicon Laboratories Inc.
400 West Cesar Chavez
Austin, TX 78701
USA
Quality
www.silabs.com/quality
Support & Community
www.silabs.com/community
www.silabs.com
 Loading...