

Page 1
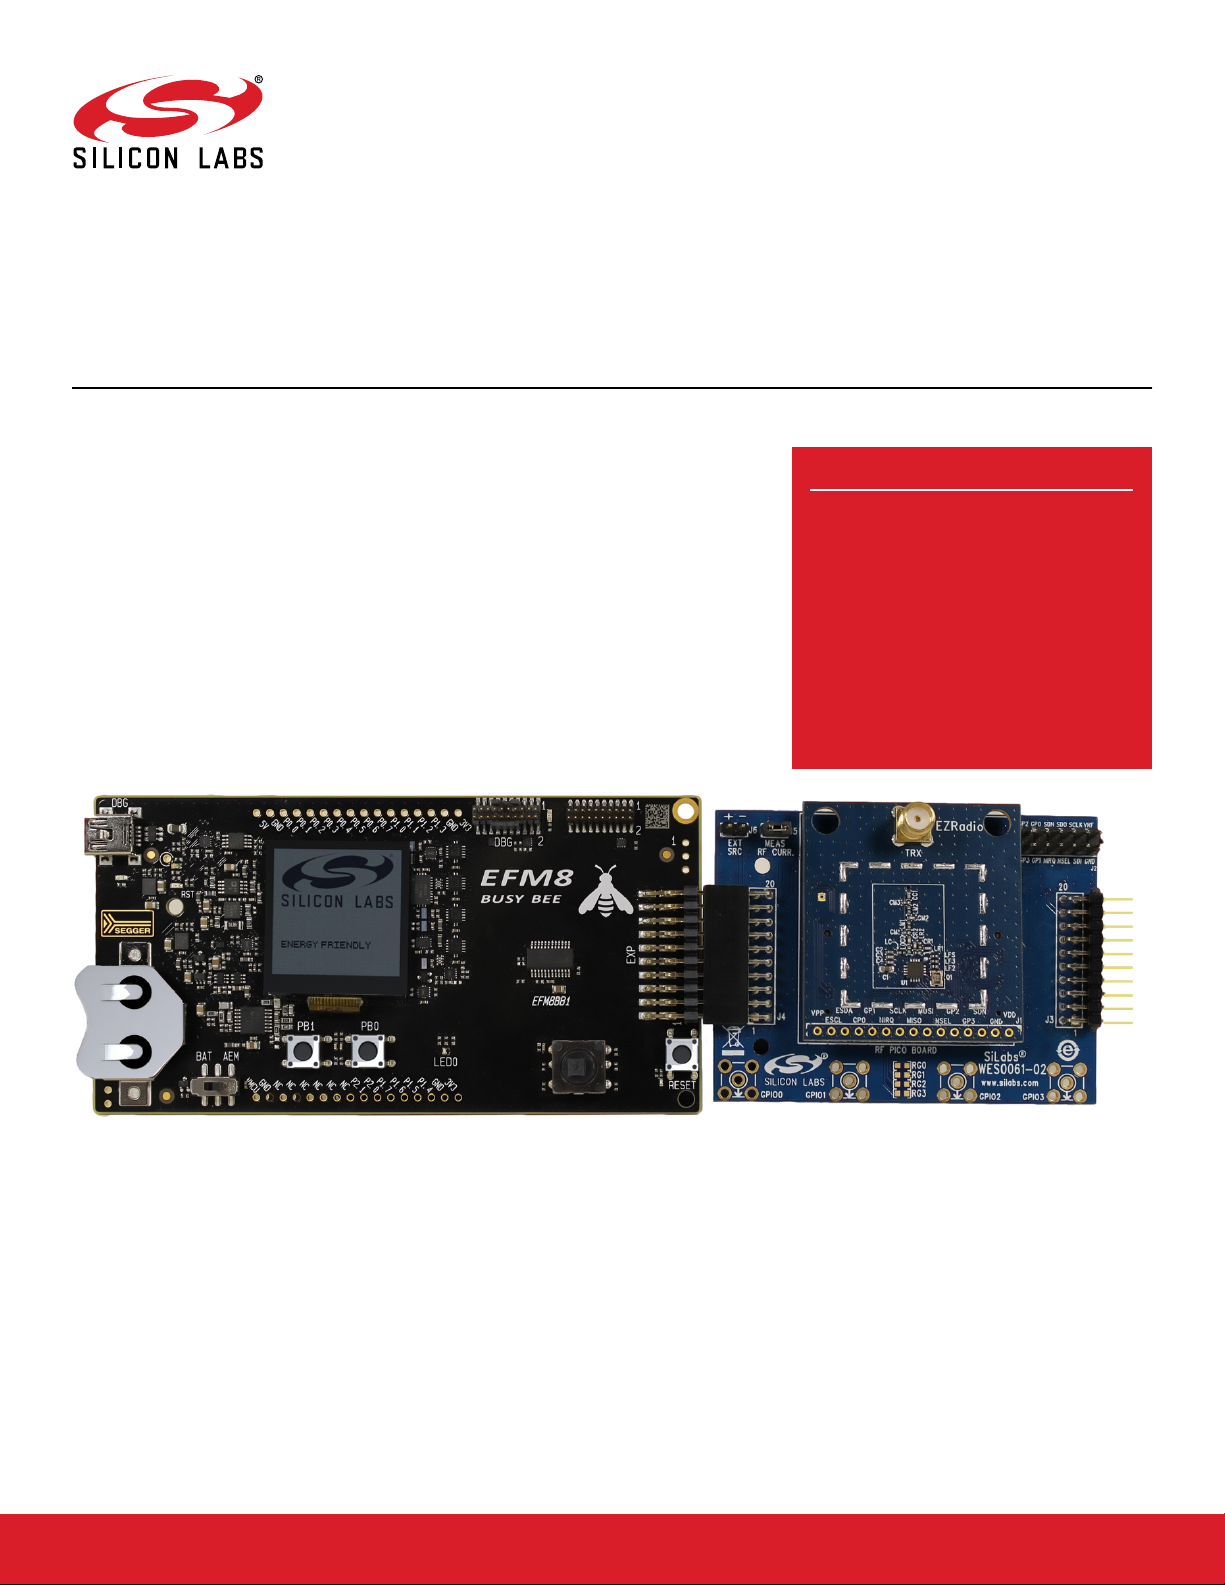
AN954: Programming Guide for EFM8 and
EZRadio®
This document is intended to serve as a guide for application development with EZRa-
Si4x55 ICs. It introduces the major parts of the hardware platform, such as the RF
dio®
Pico board, which contains the radio and the necessary RF components required to operate the device according to a desired regulatory standard.
It introduces the energy friendly microcontroller 8-bit (EFM8) which is required to control the radio, evaluate the RF parameters, and develop custom application programs.
Besides the hardware, this document also describes the application programming interface (API) that makes it possible for the EFM8 and RF Pico board to communicate with
each other. Using the software tools provided by Silicon Labs and following this programming guide will make software development as easy as possible, as these items
will assist in configuring the radio effectively.
KEY POINTS
• EFM8 along with an EZRadio is an ultralow cost two-chip wireless solution.
• The EZRadio is a sub-GHz wireless
communcation platform that can be a
receiver, transmitter, or tranciever.
• Configuration of the EZRadio can be done
with a simple GUI within a free tool
provided by Silicon Labs.
• Configuration of peripherals and pinouts on
the EFM8 is performed using an intuitive
GUI.
silabs.com | Smart. Connected. Energy-friendly. Rev. 0.1
Page 2
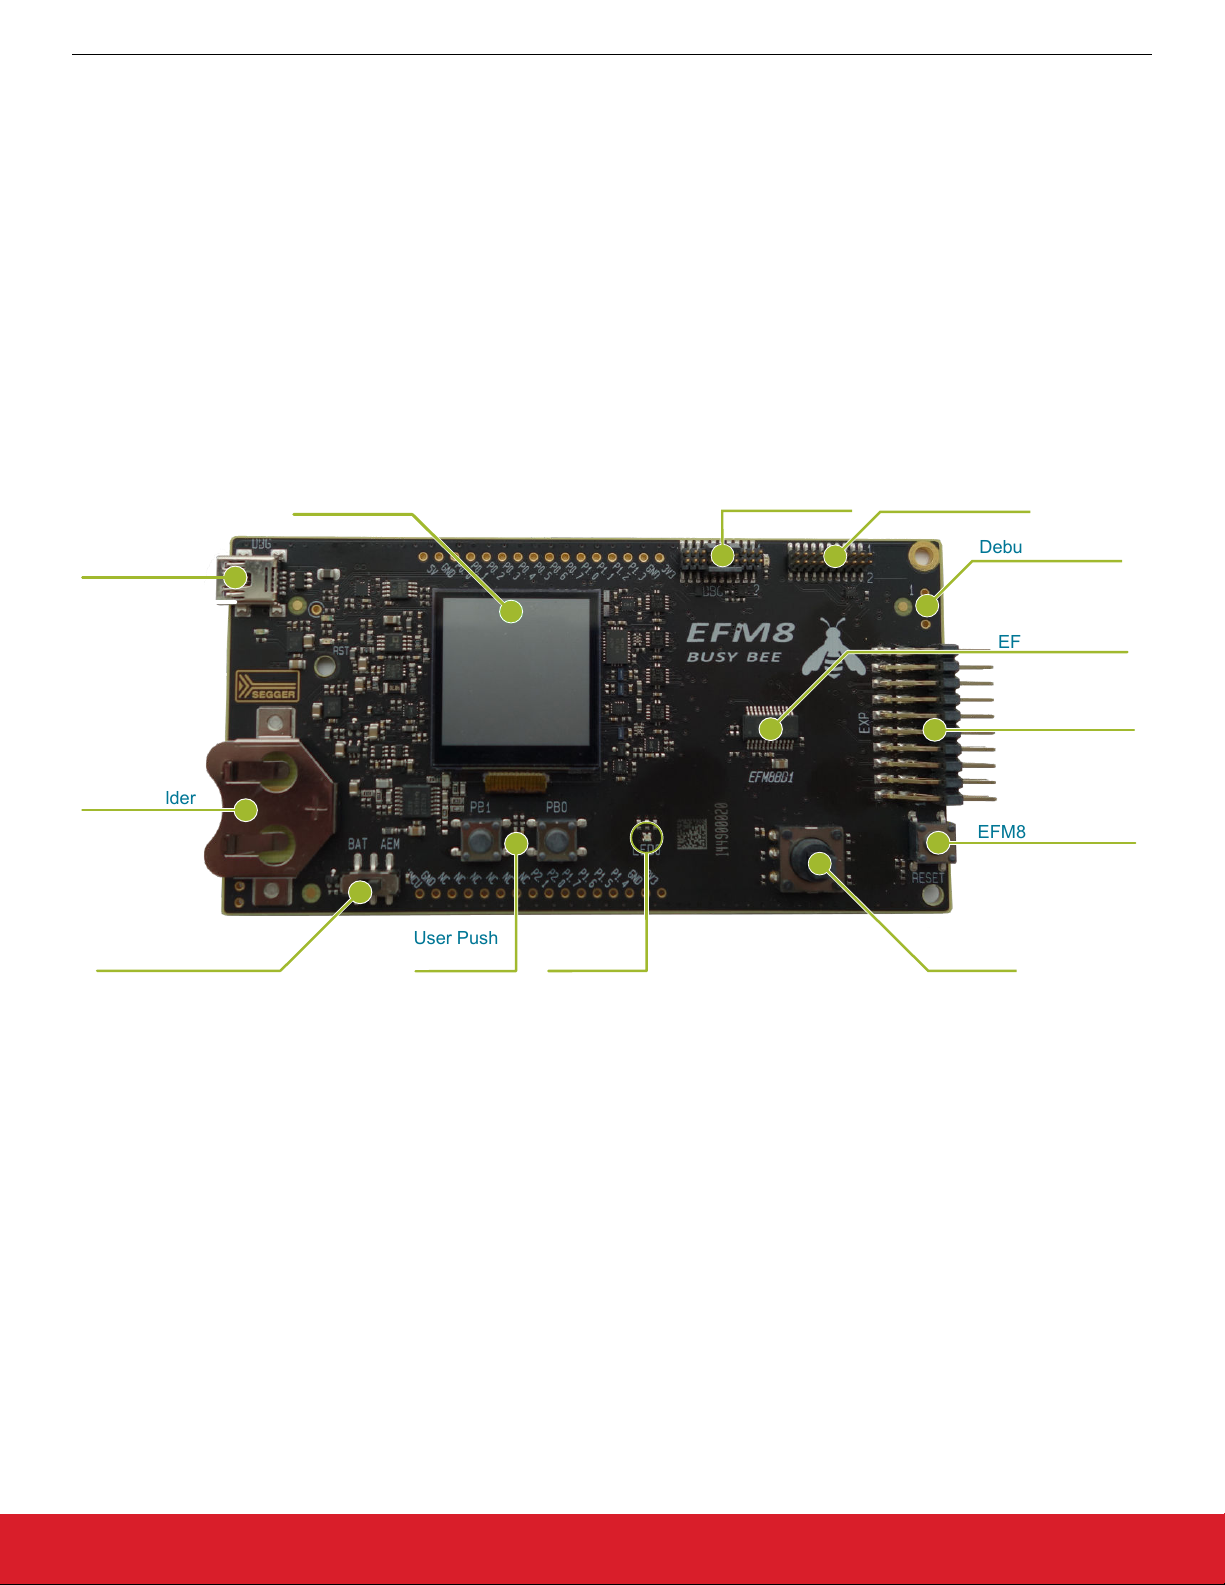
Kit USB
Connector
CR2032
Battery Holder
Power Source Select
User Push
Buttons
User LED
EFM8 Reset Button
EFM8BB1 MCU
Expansion
Header
Direct
Debug Connector
Joystick
128x128 Pixel
Memory LCD
Debug IN/OUT
Connector
Reference
Board Connector
AN954: Programming Guide for EFM8 and EZRadio ®
Hardware
1. Hardware
This section will introduce the hardware needed for this reference design and demo. Using an EFM8 along with an EZRadio is a two
chip low cost wireless solution. This section will also discuss the connections between the radio, the MCU, and the expansion board
used to connect the two.
1.1 Kits
In order to run the software demos and get started with developing, 3 boards are required. EFM8BB1, Expansion Board, and Si4455
1.2 Busy Bee Starter Kit
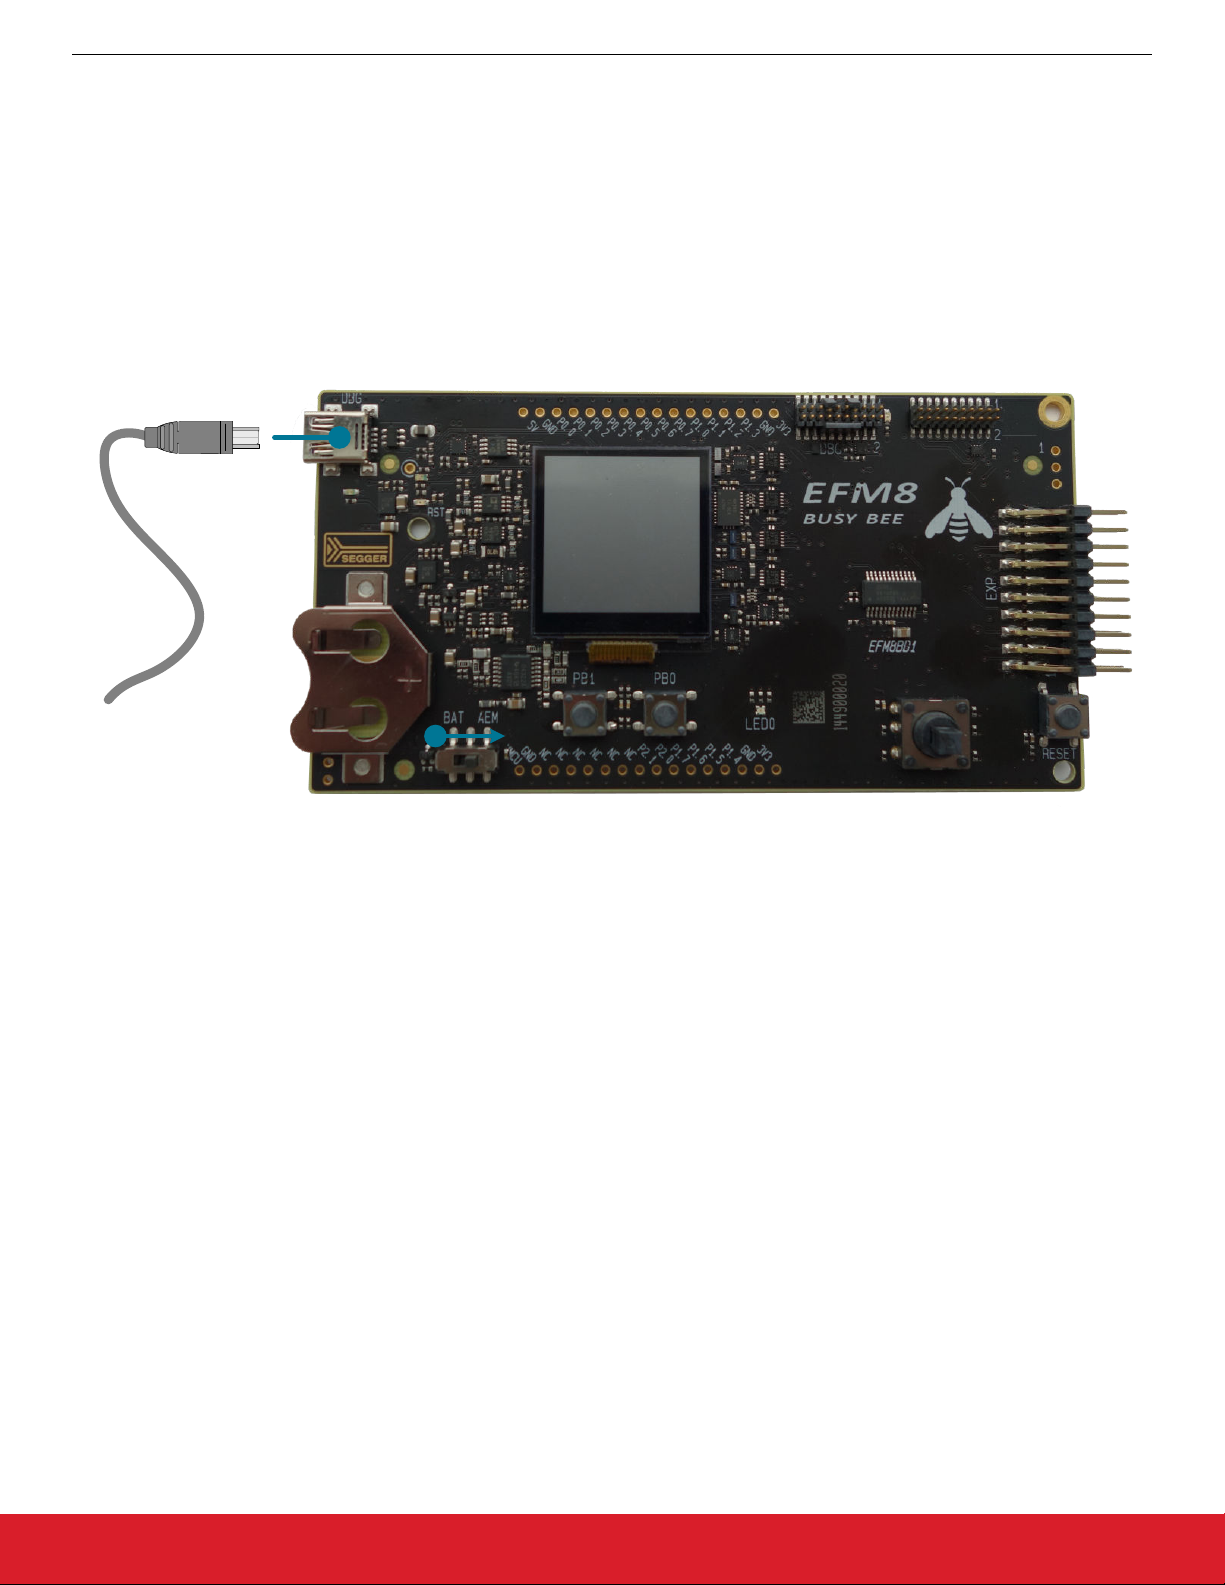
The EFM8BB1 Starter Kit (STK) is a platform that allows the user to demonstrate, evaluate, and develop solutions. This kit includes the
EFM8BB1 8-bit MCU. It has vast functionality and utilizes an LCD, buttons, joystick, debug interface, and much more to allow rapid
evaluation of both the MCU itself and any add-on hardware using the expansion (EXP) header.
silabs.com | Smart. Connected. Energy-friendly. Rev. 0.1 | 1
Figure 1.1. Busy Bee Starter Kit
Page 3
AN954: Programming Guide for EFM8 and EZRadio ®
Hardware
1.3 RF Pico Card
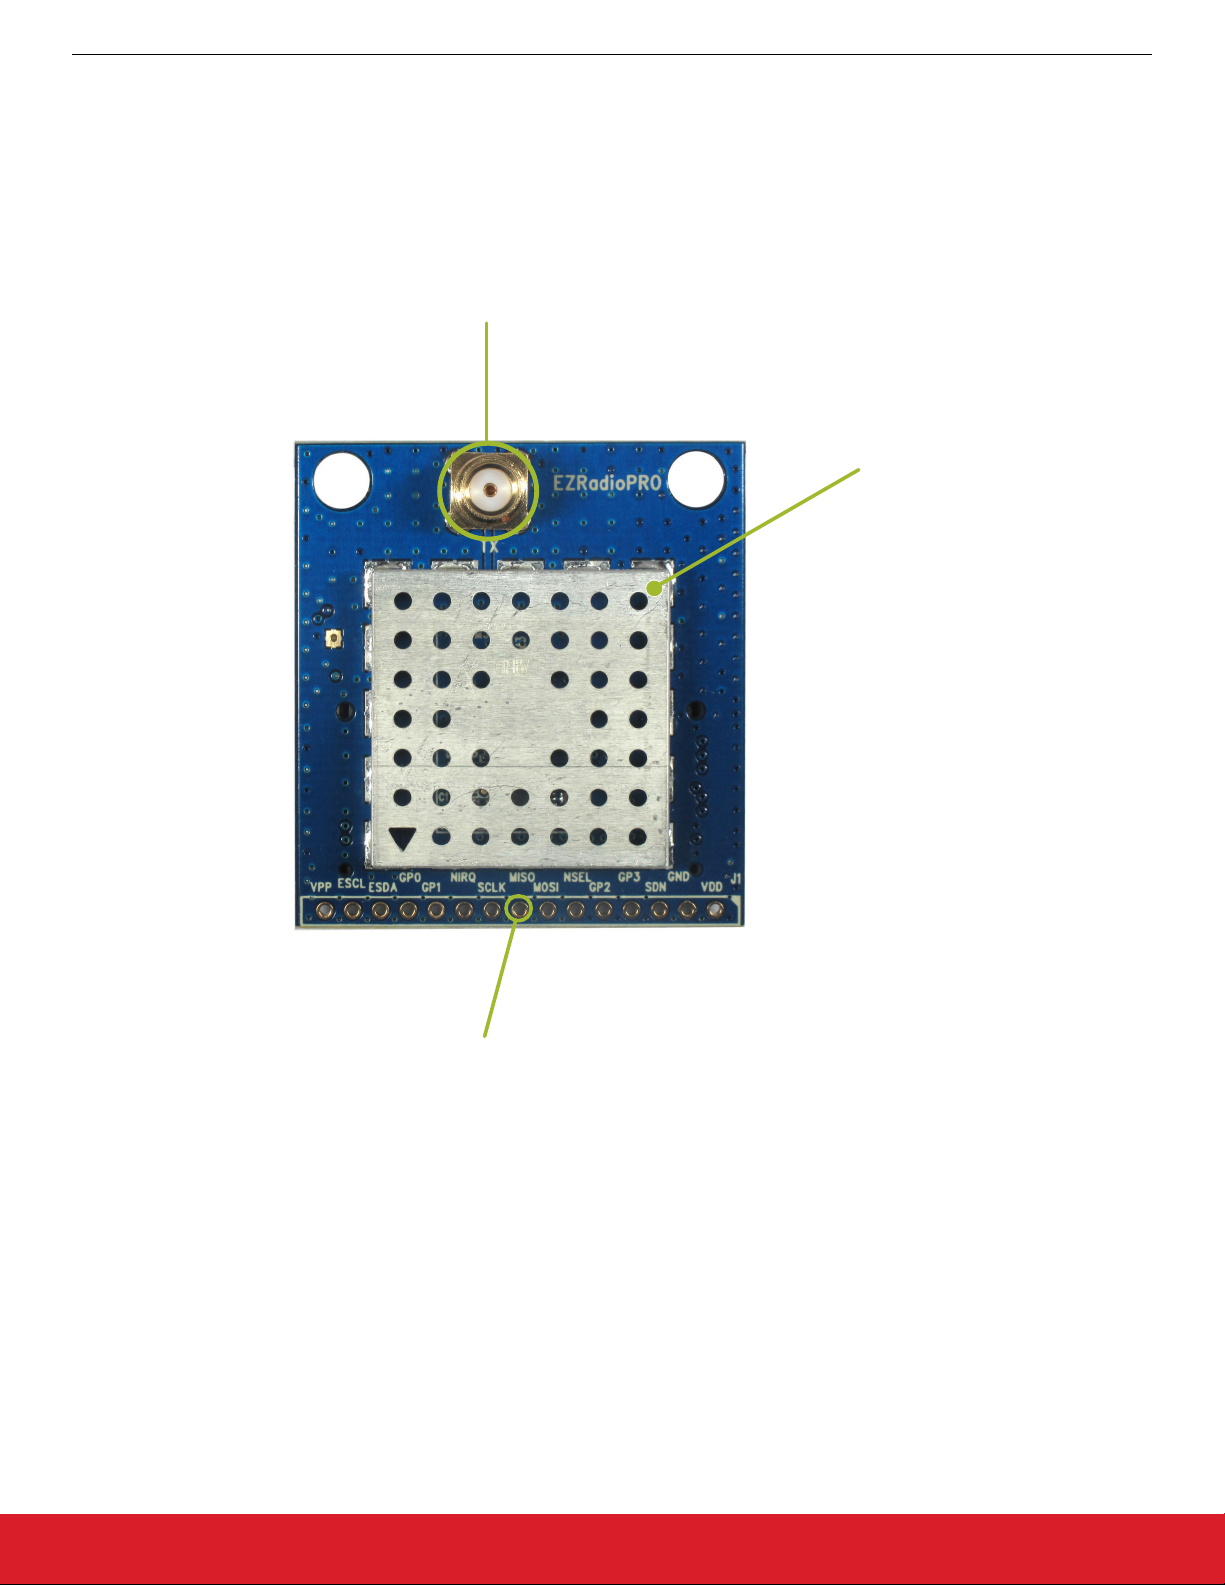
The RF pico board is a radio module that contains an EZRadio IC, a matching network, and an SMA connector on the top side. Other
than the antenna connector, these components are covered by a metal shield for noise reduction. The digital signals of the radio
(SCLK, SDI, SDO, NSEL, SCL, SDA, VDD and GND) can be accessed on test points at the edge of the board. The boards also have a
factory-loaded board identification memory (EBID) on the bottom side that contains data that describes the board properties. Via the
unified RF pico connector pair on the bottom side of the board, any RF Pico board can be connected to the EXP board explained next.
The Pico card comes with an antenna which is screwed into the SMA connector on the top of the card.
Antenna Connection
Noise Shield
Test Points
Figure 1.2. RF Pico Card
silabs.com | Smart. Connected. Energy-friendly. Rev. 0.1 | 2
Page 4
AN954: Programming Guide for EFM8 and EZRadio ®
Hardware
1.4 Expansion Board
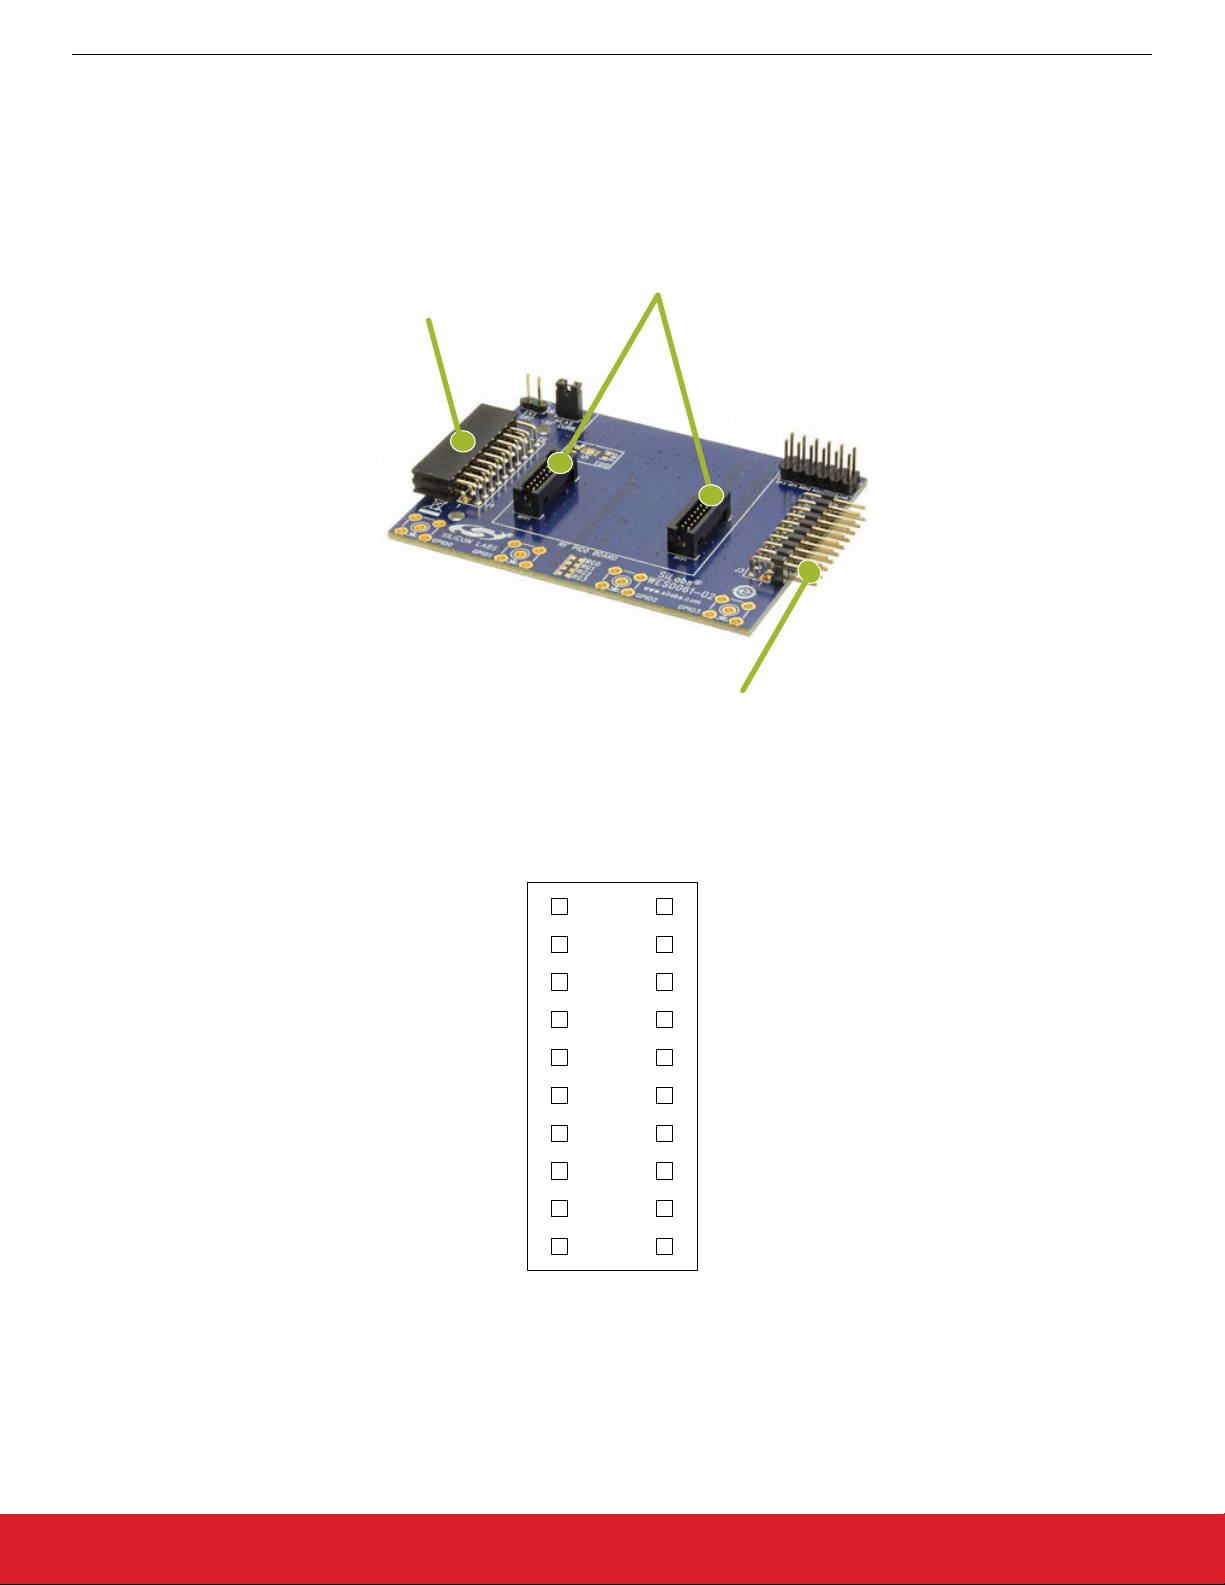
The expansion (EXP) board is used to connect the EFM8 Starter Kit to the RF Pico board. It has two sets of headers on each side, one
male, and one female. These are both mirrors of each other and can be used to transfer SPI, GPIOs, power, and ground. The RF Pico
card sits on top of this EXP board via the RFP1/2 ports located in the middle of the EXP board. A further layout of all the ports and
connections are outlined in the following figures and tables.
Female Expansion Header
(Connects to STK)
Pico Card Connectors
Figure 1.3. Expansion Board
Expansion Header Pins
GND
RF_NIRQ
RF_SDN
P1.5
P1.6
NC
P0.5
P1.3
EBID_SCL
EBID_SDA
1
3
5
7
9
11
13
15
17
19
Male Expansion Header
2
VMCU
4
MOSI
6
MISO
8
SCLK
10
RF_NSEL
12
14
16
18
20
P0.4
P0.5
P1.2
5V
3V
Figure 1.4. Expansion Board 20-pin Header
silabs.com | Smart. Connected. Energy-friendly. Rev. 0.1 | 3
Page 5

AN954: Programming Guide for EFM8 and EZRadio ®
Hardware
RFP2 Connector
1
3
5
7
9
11
13
15
17
19
2
GND
4
NC
6
NC
8
NC
10
NC
12
NC
14
NC
16
SDA
18
3V3
GND
20
GND
MOSI
SCLK
RF_NIRQ
SDA
RF_GPIO_0
RF_GPIO_2
NC
VRF
GND
RFP1 Connector
1
3
5
7
9
11
13
15
17
19
2
4
6
8
10
12
RF_GPIO_1
14
RF_GPIO_3
16
18
20
GND
MISO
RF_NSEL
RF_SDN
SCL
NC
VRF
GND
GND
NC
NC
NC
NC
NC
NC
SCL
3V3
GND
Figure 1.5. RFP1 and RPF2 Connectors
Table 1.1. EZRadio to EFM8 Connections
Pin Name Pin Function BB1 STK Pin
GND Ground GND
VDD Voltage Supply VDD
NIRQ Interrupt output, active low P0.0
SDN Shutdown input, active high P1.5
NSEL SPI select input P1.1
SCLK SPI clock P1.0
SDI SPI data input P0.6
SDO SPI data output P0.7
1.5 Radio Hardware Interface
The EZRadio devices can be controlled by the host MCU over a SPI bus and six additional signals. The user has access to the radio's
API via the SPI bus.
Table 1.2. SPI Signals
Signal Description
SCLK Serial clock, output from master
SDI Master output, slave input(MOSI)
SDO Master input, slave output(MISO)
NSEL Slave select, active low
The high state of the shutdown (SDN) pin is used to completely disable the radio and put the device into the lowest power consumption
state. The radio has an interrupt output pin (NIRQ) that can be used to promptly notify the host MCU of multiple events. The NIRQ pin is
active low and goes back to high if the pending interrupt flag is cleared by reading the appropriate interrupt pending registers.
silabs.com | Smart. Connected. Energy-friendly. Rev. 0.1 | 4
Page 6
AN954: Programming Guide for EFM8 and EZRadio ®
1.6 Setting Up the Hardware
1. Connect an RF Pico Board to the expansion board via the RFP1/2 connectors.
2. Connect the antenna to the SMA connector on the RF Pico Board.
3. Connect the BB1 starter kit to the expansion board via the 20 pin header.
4. Provide power to the board by connecting the DBG USB connector to the PC using the provided USB cable.
5. Move the switch to the AEM position.
6. Wait for Windows to install the driver of the debug interface, if necessary.
Hardware
Figure 1.6. Setting up the BB1 STK
silabs.com | Smart. Connected. Energy-friendly. Rev. 0.1 | 5
Page 7
AN954: Programming Guide for EFM8 and EZRadio ®
Software
2. Software
The first step to getting started with the EFM8BB1 is download Simplicty Studio from the Silicon Labs website (http://www.silabs.com/
simplicity-studio). Follow the installation wizard for a complete install. More information on specific tools included in Simplicity Studio
and their usage can be found at http://www.silabs.com/products/mcu/Pages/simplicity-studio.aspx.
The second software tool needed is Wireless Development Suite or WDS. This tool allows complete custimization to radio parameters.
It can be downloaded at https://www.silabs.com/products/wireless/EZRadio/Pages/WirelessDevelopmentSuite.aspx. For more information on WDS please refer to AN796 found at http://www.silabs.com/Support%20Documents/TechnicalDocs/AN796.pdf.
2.1 Simplicity Studio
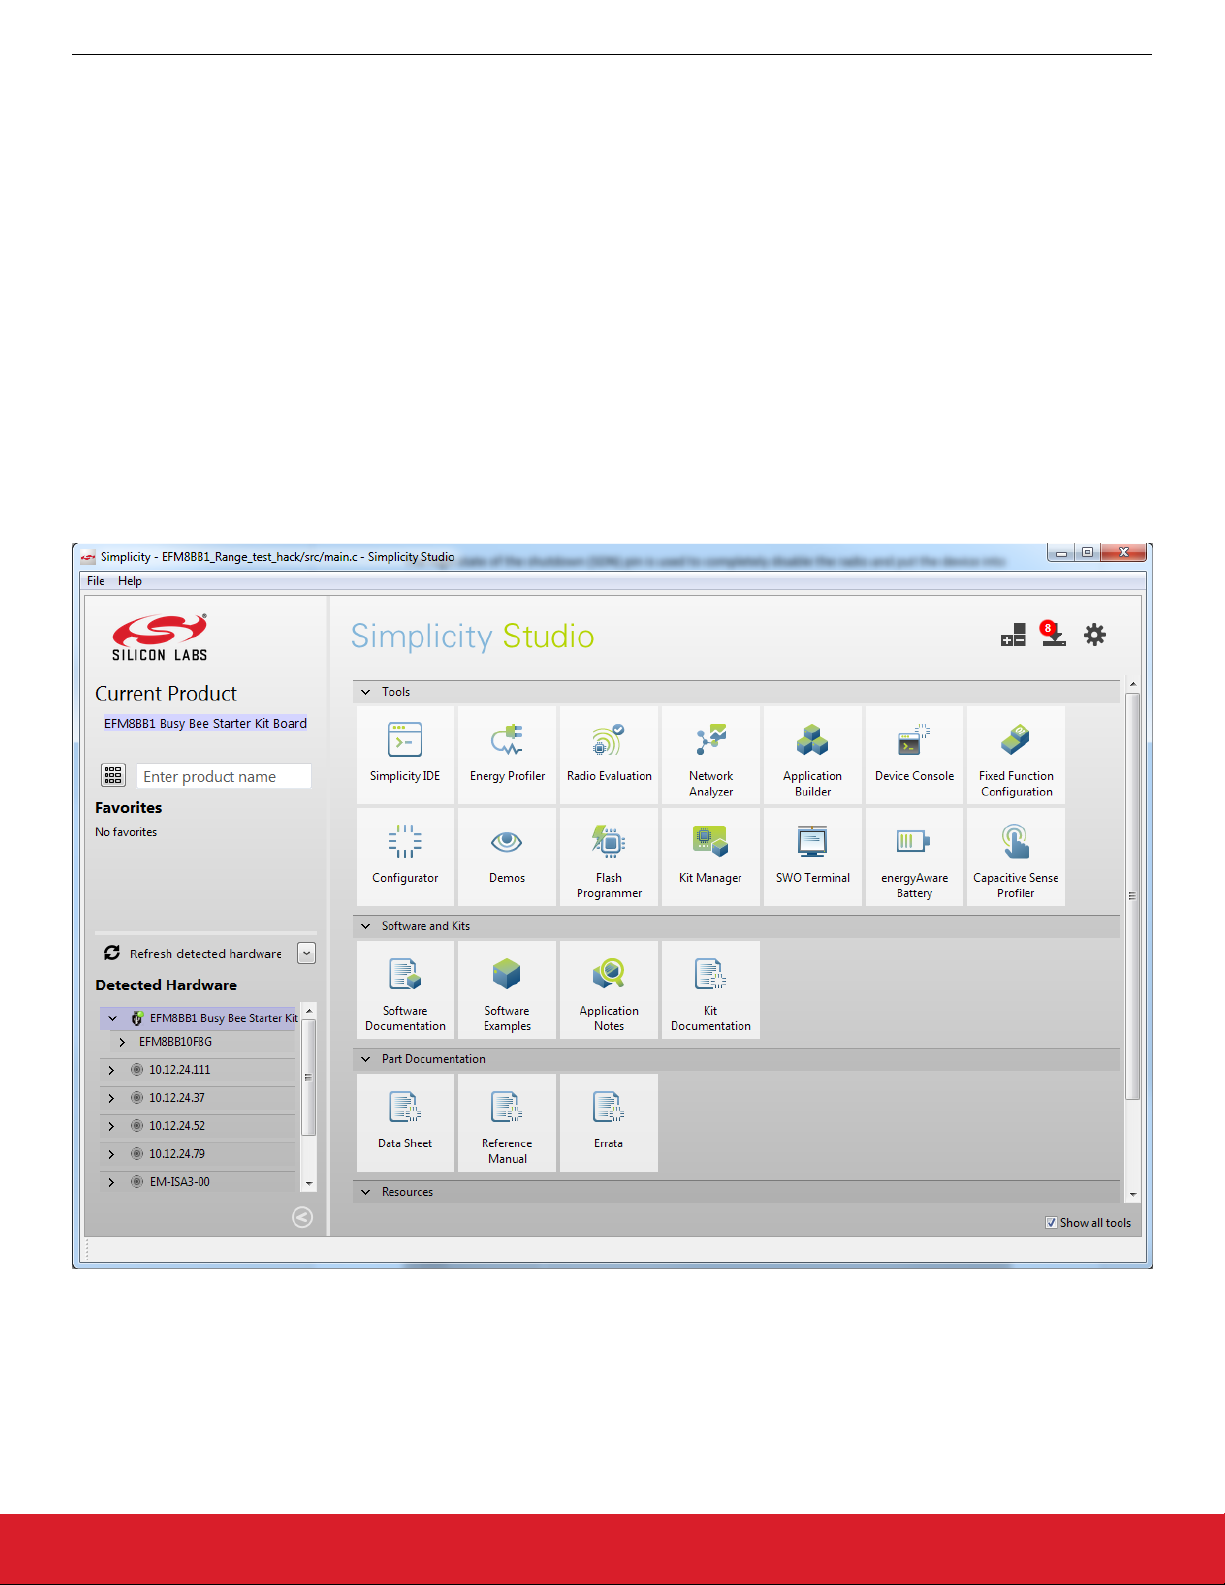
Simplicity Studio is a free tool offered by Silicon Labs that includes an IDE and many other tools to speed up development. This is the
main tool for developing on Silicon Labs' MCUs and running demos with the kit. Be sure that Simplicity Studio is installed and updated,
and the BB1 Starter Kit is connected. Once launched, Simplicity Studio will automatically detect any connected devices that it recognizes. After connecting the BB1 kit, the device will appear in the [Detected Hardware] area of the main Simplicity Studio launcher.
Note: There may be a delay after connecting the kit before it appears in Simplicity Studio. If the kit does not appear, ensure the switch
is in the AEM position and that the J-Link drivers are installed.
Figure 2.1. Simplicity Studio Main Page
2.2 Wireless Development Suite
Silicon Labs provides a powerful tool to help with EZRadio/PRO software development, the Wireless Development Suite (WDS). It is
available at https://www.silabs.com/products/wireless/EZRadio/Pages/WirelessDevelopmentSuite.aspx. WDS allows the user to virtually select a radio and use the EZConfigPRO Setup GUI. This setup interface provides an easy path to quickly select and load the desired configuration for the EZRadio/PRO devices. The EZConfigPRO Setup allows four different methods for device setup.
silabs.com | Smart. Connected. Energy-friendly. Rev. 0.1 | 6
Page 8

AN954: Programming Guide for EFM8 and EZRadio ®
Software
After the desired configuration is selected, the program gives the option to generate a header file which will contain all of the options
selected in the GUI. This file can then be used in a Simplicity Studio project to configure the radio and communicate with an MCU.
Using the header file generated by the WDS is highly recommended. Manual editing in the header file may cause problems and prevent
the radio from working correctly. For more complete information on WDS and EZConfigPRO usage, refer to the WDS User's Guide.
The following figures will be a guide to generating a customized header file. The reference design provided by Silicon Labs has a configuration file already included in the project. However, to make changes to the radio configurations it is recommended to generate a
new one.
Note: WDS is not necessary for getting the software demos running; however WDS is needed to customize the radio configuration.
Figure 2.2. WDS Introduction
WDS can be used without connecting the physical HW to the PC to obtain configuration parameters. After running the WDS, the user
needs to start simulation mode by clicking on the [Simulate radio button.]
Figure 2.3. WDS Simulate Device
silabs.com | Smart. Connected. Energy-friendly. Rev. 0.1 | 7
Page 9
AN954: Programming Guide for EFM8 and EZRadio ®
Software
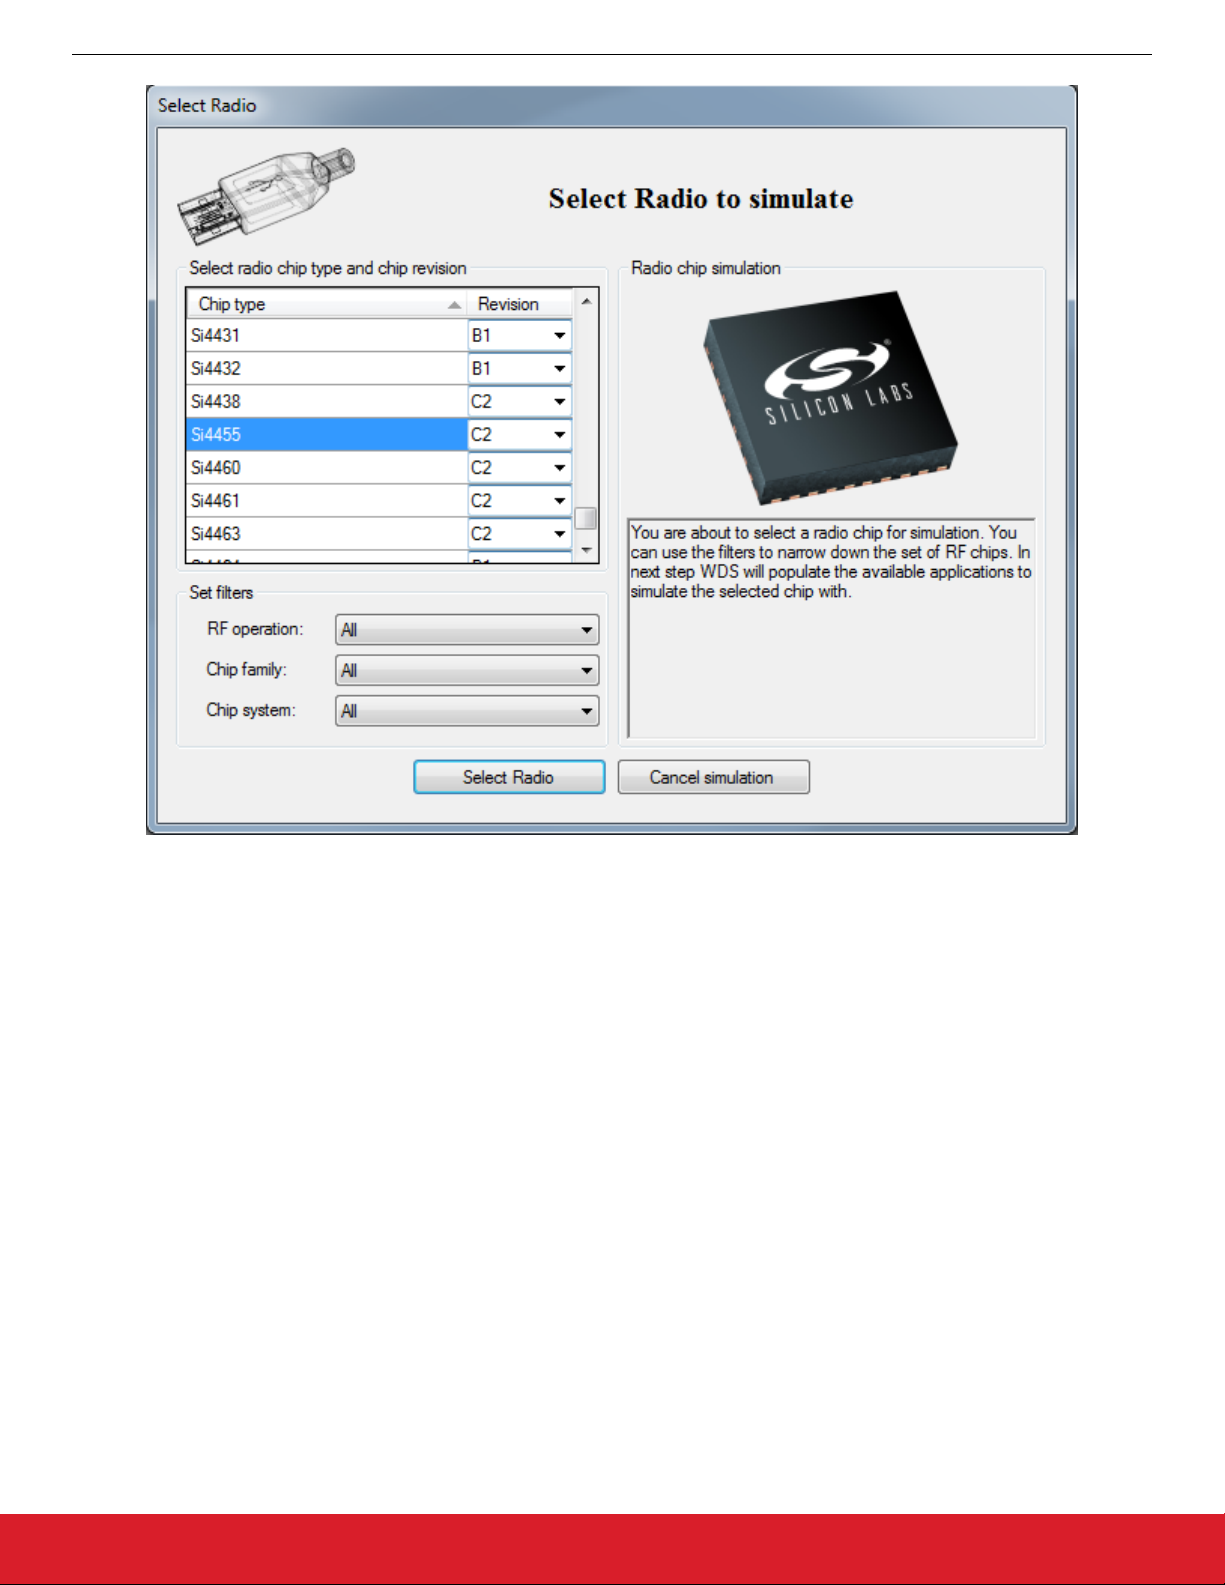
Figure 2.4. WDS Device Selection
Once the Radio is selected, the radio configurations screen will appear. This is the main page used to generate a configuration file that
can be used in a custom project. Preset configurations like Standard Packet TX and Unmodulated Carrier are available to quickly set up
a radio project. The Empty Framework project can be used as a blank template. Once the configurations are set, the [Generate
Source] button can be used to create the header file.
Note: WDS does not support EFM8 products. There are options to generate an entire project with MCU source code, however these
projects and code will most likely not work on EFM8 MCUs. When working with EFM8 and EZRadio/PRO, WDS is only used to generate the header file.
silabs.com | Smart. Connected. Energy-friendly. Rev. 0.1 | 8
Page 10
AN954: Programming Guide for EFM8 and EZRadio ®
Software
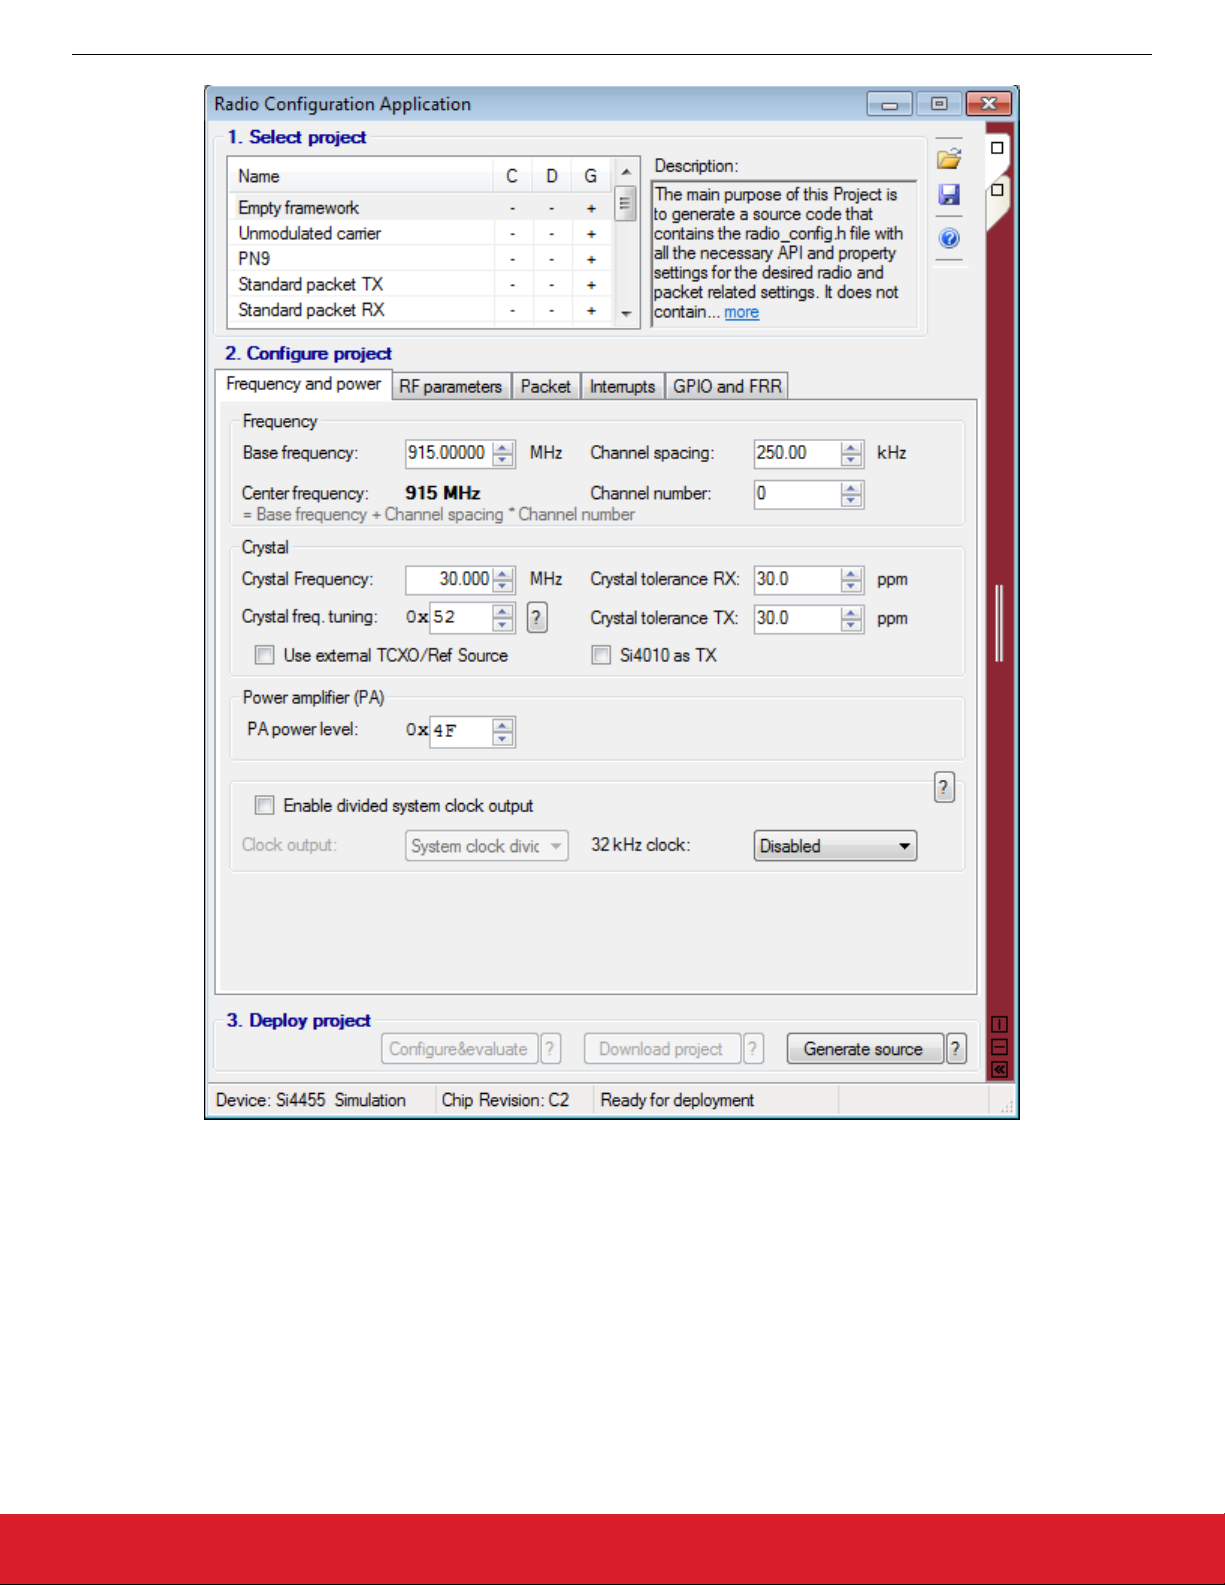
Figure 2.5. WDS Configuration
The generated header file can be used in a new or existing project within Simplicity Studio, or used with any other IDE.
silabs.com | Smart. Connected. Energy-friendly. Rev. 0.1 | 9
Page 11
AN954: Programming Guide for EFM8 and EZRadio ®
Software Demos
3. Software Demos
This document covers two demos, which run on combination of EFM8BB1 and a Si4455. The Range Test is used to evaluate the twochip solution of an EZRadio and an EFM8. The Bidirectional demo is used as a development platform.
The radio_config.h file holds the radio configurations and is a great learning tool for understanding how the radio is set up. The radio
API is located in the radio.c/h files. These functions are used to communicate to the radio and they will be further explained later in
this document.
3.1 Range Test
The Range test demo is an evaluation tool that allows the user to evaluate the combination of EFM8 and a sub-GHz radio. It has configurable settings that the user can alter and measure to know how this combination will perform in a specific application.
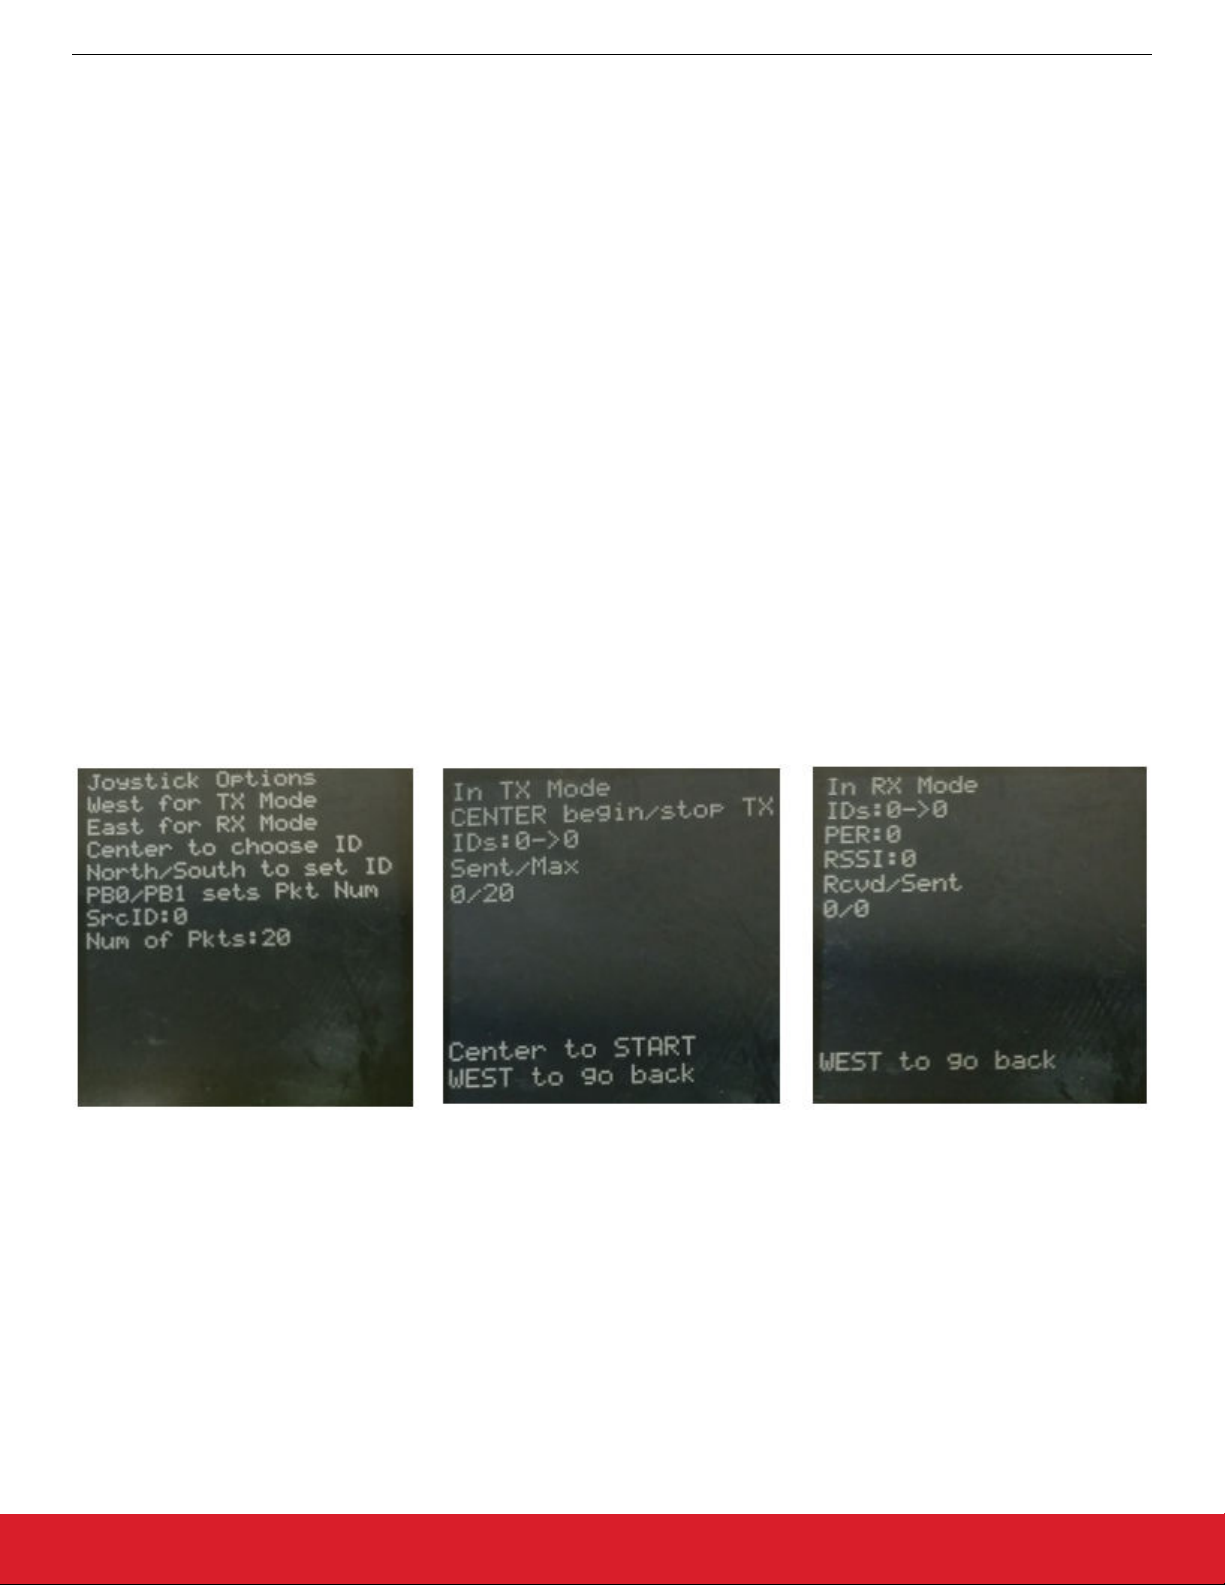
The menu screen of the demo has the user set a few parameters before entering into transmit mode or receive mode. The first configurable parameter is the self identification (ID) and destination ID. These are used to communicate with specific boards. To send a packet
between two kits the destination ID of the transmitter and self ID of the receiver must match and the self ID of the transmitter must
match the destination ID of the receiver. North and south on the joystick set the ID, and center of the joystick specifies which ID is being
altered.
The packet size is fixed at a size of seven but the number of packets to send can be altered. Once all of the parameters are set to the
desired values, the west and east positions of the joystick can be used to set the demo into transmit or receive mode.
In transmit mode, the screen will indicate the ID of the board, the ID to be sent to, the max number of packets to be sent, and the
number that has been sent. West on the joystick can be used to go back to the menu screen and change parameters. Center on the
joystick controls the transmission of packets. Pushing it begins the transmission which will continue until the max number of packets
has been sent. Center again can be used to stop and reset the number of packets sent.
In receive mode, the screen will show the IDs, percent of packets correctly received (PER), receive sensitivity (RSSI), number of packets received, and number of packets sent. When a packet is received the packets received, packets sent, RSSI, and PER will update.
Again, west can be used to go back to the menu screen.
Figure 3.1. Range Test Menu, Transmit, and Receive Screens
3.2 Bidirectional Packet
The Bidirectional Packet demo is a simple example of the Si4455 wireless radios along with an EFM8 BB1 starter kit. It is controlled via
the two push buttons on the starter kits. The tri-colored LED indicates either a button press or when a packet is received.. At first, the
LED is green and the push buttons cycle through the colors and transmit the state. The receiver will match the state of the sender such
that the two boards, when configured correctly and within range, will have the same color LEDs illuminated. The packet is 7 bytes, and
the last byte indicates the state of the transmitting board. This project is intended to be a starting point for developing an application
utilizing the sub-GHz radio and an EFM8 MCU.
3.3 Running the Demos
To get the software demos running, follow the steps for installing Simplicity Studio, putting the kit together, and connecting the kit to the
host or PC as shown in the figure.
silabs.com | Smart. Connected. Energy-friendly. Rev. 0.1 | 10
Page 12

4. Connect the USB cable
from the STK to the host PC
AN954: Programming Guide for EFM8 and EZRadio ®
Software Demos
1. Inset the RF Pico card
onto the EXP board
2. Insert the EXP board onto
3. Flip the switch to AEM
Figure 3.2. Assembling the Kit
With Simplicity Studio launched and the BB1 kit recognized, select [Software Demos]. Navigate to find the [Wireless] folder and
choose a demo. Select the Range Test demo by selecting the [EFM8BB1_Range_Test_Si4455]. Once the demo is deployed the menu
screen should appear on the starter kit.
the STK via 20 pin header
silabs.com | Smart. Connected. Energy-friendly. Rev. 0.1 | 11
Page 13

AN954: Programming Guide for EFM8 and EZRadio ®
Software Demos
Figure 3.3. Example Project Tree — Range Test
Some of the important files within the demo are described below.
File Name: main.c
Description: Contains all the logic for the demo, state controls, and API calls to the radio. Contains the screen outputs.
File Name: master_bsp.h
Description: Serves as glue for the entire project. It links all the libraries and files needed for the radio, SPI, screen, etcFile Name: Ini
tDevice.c
silabs.com | Smart. Connected. Energy-friendly. Rev. 0.1 | 12
Page 14

AN954: Programming Guide for EFM8 and EZRadio ®
Software Demos
Description: Contains hardware configurations of the 8-bit MCU including pin states, clocks, interrupts, SPI configuration, and more.
File Name: radio.c/h
Description: Contains the API functions, defines, and variables for the EZRadio. These functions add an abstraction layer for the user
and allow higher level calls. Some of the functions are explained later in this document.
File Name: radio_config.h
Description: Contains all of the configurations for the radio. The radio properties are set here, including frequency, packet size, data
rate, modulation, etc., as well as the GPIO configuration.
With the demo up and running the next part of this document will begin to go into detail about the radio. Understanding the radio in
depth will better enable customization for building a specific radio application.
silabs.com | Smart. Connected. Energy-friendly. Rev. 0.1 | 13
Page 15

AN954: Programming Guide for EFM8 and EZRadio ®
Application Programming Interface
4. Application Programming Interface
The programming interface allows the user to do the following:
• Send commands to the radio.
• Read status information.
• Set and read radio parameters.
• Handle the transmit and receive FIFOs.
The API commands are listed in the table below. The following sections describe the SPI transactions of sending commands and getting information from the chip.
Table 4.1. EZRadio/Pro API Commands
Command ID Name Description
BOOT_COMMANDS
0x02 POWER_UP
COMMON_COMMANDS
0x00 NOP No operation command.
0x01 PART_INFO Reports basic information about the device.
0x10 FUNC_INFO
0x11 SET_PROPERTY Sets the value of one or more properties.
0x12 GET_PROPERTY
0x13 GPIO_PIN_CFG Configures the GPIO pins.
0x15 FIFO_INFO
0x20 GET_INT_STATUS
0x33 REQUEST_DEVICE_STATE Request current device state and channel.
Command to power-up the device and select the operational mode and functionality.
Returns the Function revision information
of the device.
Retrieves the value of one or more properties.
Access the current byte counts in the TX
and RX FIFOs and pro- vide for resetting
the FIFOs.
Returns the interrupt status of ALL the possible interrupt events (both STATUS and
PENDING). Optionally, it may be used to
clear latched (PENDING) interrupt events.
0x34 CHANGE_STATE
0x38 OFFLINE_RECAL Recalibrates due to temperature change.
0x44 READ_CMD_BUFF
0x50 FRR_A_READ
0x51 FRR_B_READ
0x53 FRR_C_READ
0x57 FRR_D_READ
IR_CAL_COMMANDS
0x17 IRCAL Image rejection calibration.
silabs.com | Smart. Connected. Energy-friendly. Rev. 0.1 | 14
Manually switch the chip to a desired operating state.
Used to read CTS and the command response.
Reads the fast response registers (FRR)
starting with FRR_A.
Reads the fast response registers (FRR)
starting with FRR_B.
Reads the fast response registers (FRR)
starting with FRR_C.
Reads the fast response registers (FRR)
starting with FRR_D.
Page 16

AN954: Programming Guide for EFM8 and EZRadio ®
Application Programming Interface
Command ID Name Description
0x19 IRCAL_MANUAL Image rejection calibration.
TX_COMMANDS
0x31 START_TX
Switches to TX state and starts transmission of a packet.
0x37 TX_HOP Hop to a new frequency while in TX.
0x66 WRITE_TX_FIFO Writes data byte(s) to the TX FIFO.
RX_COMMANDS
Returns information about the length of the
0x16 PACKET_INFO
variable field in the last packet received
and (optionally) overrides field length.
Returns the interrupt status of the Modem
0x22 GET_MODEM_STATUS
Interrupt Group (both STATUS and PENDING). Optionally, it may be used to clear
latched (PENDING) interrupt events.
0x32 START_RX
0x36 RX_HOP
Switches to RX state and starts reception
of a packet.
Manually hop to a new frequency while in
RX mode.
0x77 READ_RX_INFO Reads data byte(s) from the RX FIFO.
ADVANCED_COMMANDS
Performs conversions using the Auxiliary
0x14 GET_ADC_READING
ADC and returns the results of those conversions.
Returns the interrupt status of the Packet
0x21 GET_PH_STATUS
Handler Interrupt Group (both STATUS and
PENDING). Optionally, it may be used to
clear latched (PENDING) interrupt events.
Returns the interrupt status of the Chip In-
0x23 GET_CHIP_STATUS
terrupt Group (both STATUS and PENDING). Optionally, it may be used to clear
latched (PENDING) interrupt events.
4.1 API Functions
The provided software examples heavily utilizes the radio API to communicate and successfully transmit packets. Some of the important API functions are defined and elaborated on below.
Function Name: void si4455_reset(void)
Description: This function is used to reset the Si446x radio by applying shutdown and releasing it. After this function si4455_boot
should be called. You can check if power-on reset has completed by waiting 4ms or by polling GPIO0, 2, or 3. When these GPIOs are
high, it is safe to call si4455_boot.
Return Value: None
Function Name: void si4455_power_up(U8 BOOT_OPTIONS, U8 XTAL_OPTIONS, U32 XO_FREQ)
Description: This function is used to initialize the radio after power-up.
Input Parameter(s): BOOT_OPTIONS: Patch mode selector.
XTAL_OPTIONS: Select if TCXO is in use.
XO_FREQ: Frequency of TCXO or external crystal oscillator in Hz.
silabs.com | Smart. Connected. Energy-friendly. Rev. 0.1 | 15
Page 17

AN954: Programming Guide for EFM8 and EZRadio ®
Application Programming Interface
Return Value: None
Note: Before this function si4455_reset should be called.
Function Name: U8 si4455_configuration_init(const U8*pSetPropCmd)
Description: This function is used to load all properties with a list of NULL terminated set property commands.
Input Parameter(s): *pSetPropCmd: First element of the list to be loaded.
Return Value: SI4455_COMMAND_ERROR: the list of commands is wrong.
SI4455_CTS_TIMEOUT: If a CTS error occurs.
SI4455_SUCCESS: If loading is successful.
Note: Before this function si4455_reset should be called.
Function Name: void si4455_start_tx(U8 CHANNEL, U8 CONDITION, U16 TX_LEN)
Description: Sends START_TX command to the radio.
Input Parameter(s): CHANNEL: Channel number.
CONDITION: Start TX condition.
TX_LEN: Payload length (exclude the PH generated CRC).
Return Value: None
Function Name: void si4455_start_rx(U8 CHANNEL, U8 CONDITION, U16 RX_LEN, U8 NEX- T_STATE1, U8 NEXT_STATE2, U8
NEXT_STATE3)
Description: Sends START_RX command to the radio.
Input Parameter(s): CHANNEL: Channel number.
CONDITION: Start RX condition.
RX_LEN: Payload length (exclude the PH generated CRC).
NEXT_STATE1: Next state when Preamble Timeout occurs.
NEXT_STATE2: Next state when a valid packet received.
NEXT_STATE3: Next state when invalid packet received (e.g., CRC error).
Return Value: None
Function Name: void si4455_get_int_status(U8 PH_CLR_PEND,U8 MODEM_CLR_PEND, U8 CHIP_CLR_PEND)
Description: Get the Interrupt status/pending flags form the radio and clear flags if requested.
Input Parameter(s): PH_CLR_PEND: Packet Handler pending flags clear.
MODEM_CLR_PEND: Modem Status pending flags clear.
CHIP_CLR_PEND: Chip State pending flags clear.
Return Value: None
Function Name: void si4455_write_tx_fifo(U8 numBytes, U8* pTxData)
Description: The function can be used to load data into TX FIFO.
Input Parameter(s): numBytes: Data length to beload.
pTxData: Pointer to the data (U8*).
silabs.com | Smart. Connected. Energy-friendly. Rev. 0.1 | 16
Page 18

AN954: Programming Guide for EFM8 and EZRadio ®
Application Programming Interface
Return Value: None
Function Name: void si4455_read_rx_fifo(U8 numBytes, U8* pRxData)
Description: Reads the RX FIFO content from the radio.
Input Parameter(s): numBytes: Data length to be read.
pRxData: Pointer to the buffer location.
Return Value: None
Function Name: void si4455_frr_d_read(U8 respByteCount)
Description: Reads the Fast Response Registers starting with D register into Si4455Cmd union.
Input Parameter(s): respByteCount: Number of Fast Response Registers to be read.
Return Value: None
4.2 Sending Commands to the Radio
The behavior of the radio can be changed by sending API commands to the radio. The radio can be configured through several properties that hold radio configuration settings, such as interrupt settings, modem parameters, packet handler settings, etc. For most of the
commands, the host MCU does not expect any response from the radio chip. Instead, other commands are used to read back a property from the chip, such as checking the interrupt status flags, reading the transmit/receive FIFOs.
The radio processes the request after receiving a command. During this time, the radio is not capable of receiving a new command.
The host MCU has to poll the radio and identify when the next command can be sent. The clear to send (CTS) signal shows the actual
status of the command buffer of the radio. It can be monitored over the SPI or on GPIOs, or the chip can generate an interrupt if it is
ready to receive the next command.
4.3 Checking that the Radio is Ready
4.3.1 Software Polling Method
To ensure the radio is ready to receive the next command, the host MCU has to pull down the select (NSEL) pin to monitor the status of
clear to send (CTS) over the SPI port. The 0x44 command ID has to be sent and eight clock pulses have to be generated on the SCLK
pin. During the additional eight clock cycles, the radio clocks out the CTS as a byte on the SDO pin. When completed, NSEL should be
pulled back to high. If the CTS byte is 0xFF, it means that the radio processed the last command successfully and is ready to receive
the next command; in any other case, the CTS read procedure has to be repeated from the beginning as long as the CTS byte is not
0xFF.
Figure 4.1. Software Polling
4.3.2 GPIO Checking Method
Any GPIO can be configured for monitoring CTS. GPIOs can be configured to go either high or low when the chip has completed the
command. The function of the GPIOs can be changed by the GPIO_PIN_CFG command. By default, GPIO1 is set as "High when command completed, low otherwise" after power-on reset. Therefore, this pin can be used for monitoring CTS right after power-on reset to
know when the chip is ready to boot up.
silabs.com | Smart. Connected. Energy-friendly. Rev. 0.1 | 17
Page 19

AN954: Programming Guide for EFM8 and EZRadio ®
Application Programming Interface
4.3.3 NIRQ Interrupt Checking Method
The radio asserts the CHIP_READY interrupt flag if a command is completed. The interrupt flag can be monitored by either the
GET_CHIP_STATUS or the GET_INT_STATUS command. Apart from monitoring the interrupt flags, the radio may pull down the NIRQ
pin if this feature is enabled. If a new command is sent while the CTS is asserted, then the radio ignores the new command. The radio
can generate an interrupt to communicate this error to the MCU by the CMD_ERROR interrupt flag in the CHIP_STATUS group. The
interrupt flag has to be read (by issuing a GET_CHIP_STATUS or GET_INTERRUPT_STATUS command) to clear the pending interrupt and release the NIRQ pin. No other action is needed to reset the command buffer of the radio, but, after a CMD_ERROR, the host
MCU should repeat the new command after the radio has processed the previous one.
All the commands that are sent to the radio have the same structure. After pulling down the NSEL pin of the radio, the command ID
should be sent first. The commands may have up to 15 input parameters.
Figure 4.2. NIRQ Method
4.4 Getting Response from the Radio
Reading from the radio requires several steps to be followed. The host MCU should send a command with the address it requests to
read. The radio holds the CTS at a non-0xFF value while it retrieves the requested information. Once the CTS is set (0xFF), the host
MCU can read the answer from the radio.
Send
Command
Read CTS
CTS Value
0xFF
Retrieve
Response
Not
0xFF
Figure 4.3. Read Procedure
If CTS is polled on the GPIOs, or the radio is configured to provide an interrupt if the answer is available, then the response can be read
out from the radio with the following SPI transaction.
silabs.com | Smart. Connected. Energy-friendly. Rev. 0.1 | 18
Page 20

AN954: Programming Guide for EFM8 and EZRadio ®
Application Programming Interface
Figure 4.4. Read Response From Radio
If CTS is polled over the SPI bus, first the host MCU should pull the NSEL pin low. This action should be followed by sending out the
0x44 Read command ID and providing an additional eight clock pulses on the SCLK pin. The radio will provide the CTS byte on its SDO
pin during the additional clock pulses. If the CTS byte is 0x00, then the response is not yet ready and the host MCU should pull up the
NSEL pin and repeat the procedure from the beginning until CTS becomes 0xFF. If CTS is 0xFF, then the host MCU should keep the
NSEL pin low and provide clock cycles on the SCLK pin, as many as the data to be read out requires. The radio will clock out the
requested data on its SDO pin during the additional clock pulses.
Figure 4.5. Monitor CTS and Read the Response
Reading the response from the radio can be interrupted earlier. For example, if the host MCU asked for five bytes of response, it may
read fewer bytes in one SPI transaction. As long as a new command is sent, the radio keeps the response for the last request in the
command buffer. The host MCU can read the response several times in a new SPI transaction. In such a case, the response is always
provided from the first byte.
Notes:
• Up to 16 bytes of response can be read from the radio in one SPI transaction. If more bytes are read, the radio will provide the same
16 bytes of response in a circular manner.
• If the command says that the host MCU expects N bytes of response, but during the read sequence, the host MCU provides less
than N bytes of clock pulses, it causes no issue for the radio. The response buffer is reset if a new command is issued.
• If the command says that the host MCU expects N bytes of response, but during the read sequence, the host MCU provides more
than N bytes of clock pulses, the radio will provide unpredictable bytes after the first N bytes. The host MCU does not need to reset
the SPI interface; it happens automatically if NSEL is pulled low before the next command is sent.
silabs.com | Smart. Connected. Energy-friendly. Rev. 0.1 | 19
Page 21

AN954: Programming Guide for EFM8 and EZRadio ®
Application Programming Interface
4.5 Using Fast Response Registers
There are several types of status information that can be read out from the radio faster. The FRR_CTL_x_MODE (where x can be A, B,
C, or D) properties define what status information is assigned to a given fast response register (FRR). The actual value of the registers
can be read by pulling down the NSEL pin, issuing the proper command ID, and providing an additional eight clock pulses on the SCLK
pin. During these clock pulses, the radio provides the value of the addressed FRR. The NSEL pin has to be pulled high after finishing
the register read.
Figure 4.6. Reading a Single Fast Response Register
It is also possible to read out multiple FRRs in a single SPI transaction. The NSEL pin has to be pulled low, and one of the FRRs has to
be addressed with the proper command ID. Providing an additional 8 x N clock cycles will clock out an additional N number of FRRs.
After the fourth byte is read, the radio will provide the value of the registers in a circular manner. The reading stops by pulling the NSEL
pin high.
Figure 4.7. Reading More Fast Response Registers
Note: If the pending interrupt status register is read through the FRR, the NIRQ pin does not go back to high. The pending interrupt
registers have to be read by a get response to a command sequence in order to release the NIRQ pin.
4.6 Write and Read the FIFOs
There are two 64-byte FIFOs for RX and TX data in the Si4x5x.
To fill data into the transmit FIFO, the host MCU should pull the NSEL pin low and send the 0x66 Transmit FIFO Write command ID
followed by the bytes to be filled into the FIFO. Finally, the host MCU should pull the NSEL pin high. Up to 64 bytes can be filled into the
FIFO during one SPI transaction.
silabs.com | Smart. Connected. Energy-friendly. Rev. 0.1 | 20
Page 22

AN954: Programming Guide for EFM8 and EZRadio ®
Application Programming Interface
Figure 4.8. Transmit FIFO Write
If the host MCU needs to read the receive FIFO, it has to pull the NSEL pin low and send the 0x77 Receive FIFO Read command ID.
The MCU should provide as many clock pulses on the SCLK pin as necessary for the radio to clock out the requested amount of bytes
from the FIFO on the SDO pin. Finally, the host MCU should pull up the NSEL pin.
Figure 4.9. Receive FIFO Read
If more than 64 bytes are written into the Transmit FIFO, then a FIFO overflow occurs. If more bytes are read from the Receive FIFO
than it holds, then FIFO underflow occurs. In either of these cases, the FIFO_UNDERFLOW_OVERFLOW_ERROR interrupt flag will
be set. The radio can also generate an interrupt on the NIRQ pin if this flag is enabled. The interrupt flag has to be read, issuing a
GET_CHIP_STATUS or GET_INTERRUPT_STATUS command, to clear the pending interrupt and release the NIRQ pin.
silabs.com | Smart. Connected. Energy-friendly. Rev. 0.1 | 21
Page 23

AN954: Programming Guide for EFM8 and EZRadio ®
Radio Initialization
5. Radio Initialization
5.1 Radio Chip Wake Up
First, the radio is in the off state. After the SDN pin is pulled low, the radio wakes up and performs a Power on Reset which takes a
maximum of 5 ms until the chip is ready to receive commands on the SPI bus. The GPIO1 pin goes high when the radio is ready for
receiving SPI commands. During the reset period, the radio cannot accept any SPI commands. There are two ways to determine if the
chip is ready to receive SPI commands after a reset event. Either use a timer in the host microcontroller to wait or connect the GPIO1
pin of the radio to the host MCU and poll the status of this pin. During power on reset, it remains low. Once the reset is finished, the
radio sets the GPIO1 to the high state.
Next, the radio device has to be sent to active mode by issuing a POWER_UP command via the SPI interface which takes approximately 5 ms to be completed. It can be monitored in three ways. If the command is completed either the GPIO1 pin of the radio goes
low by issuing the command and the radio sets it to high state or the NIRQ pin is asserted or the host MCU can monitor CTS over the
SPI.
silabs.com | Smart. Connected. Energy-friendly. Rev. 0.1 | 22
Page 24

Start
AN954: Programming Guide for EFM8 and EZRadio ®
Radio Initialization
SDN=1
Host MCU pulls
down SDN pin of
radio
Host MCU wakes the
internal API of the
radio
1. Host MCU
Initialize
2. Radio
Power On
Reset
(POR)
3. Radio
Boot
Wait
10us
SDN=0
Waiting
5ms for
POR
POWER_UP command
received
Radio sent
CTS to host?
Yes
GET_INT_STATUS
command received
Optional checking
No
Optional checking
GPIO1 went
high?
Yes
Optional checking
Radio pulled
NIRQ low?
Yes Yes
No
No
GPIO1
goes low
GPIO1 went
high?
No
Host MCU clears the
interrupts of the
radio
4. Radio
Ready
Radio sent
CTS to host?
Yes Yes
No
Figure 5.1. Radio Wake Up Process
GPIO1 went
high?
No
silabs.com | Smart. Connected. Energy-friendly. Rev. 0.1 | 23
Page 25

AN954: Programming Guide for EFM8 and EZRadio ®
Radio Initialization
5.2 State Transitions of the EZRadioPRO Devices
Ready state is designed to give a fast transition time to TX or RX state with reasonable current consumption. The crystal oscillator remains enabled in this mode, reducing the time required to switch to TX or RX mode by eliminating the crystal start-up time. An automatic sequencer will put the chip into RX or TX from any state. It is not necessary to manually step through the states. Although it is not
shown in the diagram, any of the lower power states can be returned to automatically after RX or TX.
Figure 5.2. Radio States
silabs.com | Smart. Connected. Energy-friendly. Rev. 0.1 | 24
Page 26

AN954: Programming Guide for EFM8 and EZRadio ®
Radio Initialization
Table 5.1. Radio States
State/Mode Response Time
TX RX
Shutdown 15 ms 15 ms
Sleep 500 μs 500 μs
SPI Active 340 μs 340 μs
Ready 110 μs 120 μs
TX Tune 60 μs 125 μs
RX Tune 120 μs 84 μs
TX N/A 132 μs
RX 120 μs N/A
Note: While the chip is in sleep state, the NSEL pin has to stay in high state. If the host processor is not able to provide this during
sleep, a pull-up resistor can be necessary on the NSEL pin.
RX Chain calibration
400μs @ 10mA
POR=1ms @ 1.25mA
Reg. inrush = 5μs @ 2mA
5.5ms
@
2mA
10ms @ 2mA
Shutdown = 30nA
Power Up Configuration
5ms @ 1.8mA Ready = 1.8mA
Figure 5.3. Supply Current versus Time Diagram from Shutdown to RF Initialized Ready State
silabs.com | Smart. Connected. Energy-friendly. Rev. 0.1 | 25
Page 27

Reg. inrush = 5μs @ 2mA
Shutdown = 30nA
POR=1ms @ 1.25mA
10ms @ 2mA
AN954: Programming Guide for EFM8 and EZRadio ®
Radio Initialization
RX Chain calibration
400μs @ 10mA
5.5ms
@
2mA
5ms @ 1.8mA
Standby = 50nA
Power Up Configuration
Figure 5.4. Supply Current versus Time Diagram from Shutdown to Standby State
RX Chain calibration
400μs @ 10mA
POR=1ms @ 1.25mA
Reg. inrush = 5μs @ 2mA
5.5ms
@
2mA
10ms @ 2mA
Shutdown = 30nA
5ms @ 1.8mA
TX = 18mA
Power Up Configuration
Figure 5.5. Supply Current versus Time Diagram from Shutdown to TX State
silabs.com | Smart. Connected. Energy-friendly. Rev. 0.1 | 26
Page 28

Reg. inrush = 5μs @ 2mA
Shutdown = 30nA
POR=1ms @ 1.25mA
10ms @ 2mA
AN954: Programming Guide for EFM8 and EZRadio ®
Radio Initialization
RX = 10.7mA
RX Chain calibration
400μs @ 10mA
5.5ms
@
2mA
5ms @ 1.8mA
Power Up Configuration
Figure 5.6. Supply Current versus Time Diagram from Shutdown to RX State
silabs.com | Smart. Connected. Energy-friendly. Rev. 0.1 | 27
Page 29

AN954: Programming Guide for EFM8 and EZRadio ®
Radio Initialization
5.3 Radio Configuration File
5.3.1 Radio Initialization with RF Parameters
The radio parameter configuration process can be accomplished by using the Wireless Development Studio (WDS). After the required
parameters are given to the radio configuration application, WDS creates the configuration data based on these parameters. If the
Launch IDE option is selected, WDS generates a radio_config.h header file that contains the configuration data. This header file contains all the information needed by the application to configure the radio properly. This information includes the parameters of the RF
link such as the modulation type, channel bandwidth, data rate, center frequency, crystal tolerance, crystal capacitor bank value, modulation source, CRC calculation, and sync word setting. For more complete information on WDS and EZConfigPRO usage, refer to the
WDS User's Guide.
Open WDS
Si446x_configuration_init(...)
4. Radio
ready
“Radio Control Application”
Run
Set:
Frequency and power
RF parameters
Packet
Interrupts
GPIOs
Fast response registers
Generate configuration
header file
(radio_config.h)
Export
radio_config.h
Include
radio_config.h
Host MCU reads one API
Command/property from
radio_config.h
Host MCU sends the API
command/property to
radio via SPI
Is API property
remaining
No
Radio sent
CTS?
Yes
5. Radio
ready and
initialized
Yes
No
Figure 5.7. Radio RF Initialization Process
silabs.com | Smart. Connected. Energy-friendly. Rev. 0.1 | 28
Page 30

AN954: Programming Guide for EFM8 and EZRadio ®
Radio Initialization
5.3.2 Generated Radio Configuration File
The configuration file is automatically generated by the "Radio Control Application" tool. It is interpreted as a C- header file called radio
_config.h and it has four sections. The first two sections are intended for the users and allow them to see the exact values of the API
properties. The last two sections are specifically intended for the example projects.
radio_config.h
User related
1. License of the active project
2. Radio setup configuration setting
in definitions
Silicon Labs example project related
3. Radio setup configuration
4. Specific configuration of the
example project
Figure 5.8. Radio_config.h File Structure
Below is an example radio_config.h file.
The "License of the Active Project" section consists of numerous commented lines about the license.
/**
* Copyright 2012 Silicon Laboratories, Inc.
* http://www.silabs.com
*
* @file radio_config.h
*
* H File Description:
* @brief Radio configuration macros and definitions.
*
* Project Name: EZRPRO_Examples
*
* THE SOFTWARE IS PROVIDED "AS IS", WITHOUT WARRANTY OF ANY KIND, EXPRESS OR IMPLIED,
INCLUDING BUT NOT LIMITED TO THE WARRANTIES OF MERCHANTABILITY, FITNESS FOR A
* PARTICULAR PURPOSE AND NONINFRINGEMENT. IN NO EVENT SHALL THE AUTHORS OR COPYRIGHT
* HOLDERS BE LIABLE FOR ANY CLAIM, DAMAGES OR OTHER LIABILITY, WHETHER IN AN ACTION OF
* CONTRACT, TORT OR OTHERWISE, ARISING FROM, OUT OF OR IN CONNECTION WITH THE
* SOFTWARE OR THE USE OR OTHER DEALINGS IN THE SOFTWARE.
*
* This software must be used in accordance with the End User License Agreement.
silabs.com | Smart. Connected. Energy-friendly. Rev. 0.1 | 29
Page 31

AN954: Programming Guide for EFM8 and EZRadio ®
Radio Initialization
The Radio Setup Configuration in Definitions section is the list of initialization commands that are sent to the radio over the SPI interface. The structure of one element of the list is shown below. The comment lines describe how the C definition configures the dedicated
API properties. The C define line stands for the initialization command.
/* Set Multiple Properties starting with MODEM_MOD_TYPE
* Starting Location: 0x2000
* Number of properties: 3
* Defaults: 0x02 0x80 0x07
* Descriptions:
* MODEM_MOD_TYPE - Modulation Type.
* Bit[7] : TX_DIRECT_MODE_TYPE : 0
* Bit[6:5] : TX_DIRECT_MODE_GPIO [1:0] : 0
* Bit[4:3] : MOD_SOURCE[1:0] : 0
* Bit[2:0] : MOD_TYPE[2:0]: 3
* MODEM_MAP_CONTROL - Controls bit mapping.
* Bit[7] : enmanch : 0
* Bit[6] : eninv_rxbit : 0
* Bit[5] : envinv_txbit : 0
* Bit[4] : envinv_fd : 0
* Bit[3] : envinv_adcq : 0
* MODEM_DSM_CTRL - DSM control.
* Bit[7] : dsmclk_sel : 0
* Bit[6] : dsm_mode : 0
* Bit[5] : dsmdt_en : 0
* Bit[4] : dsmdttp : 0
* Bit[3] : dsm_rst : 0
* Bit[2] : dsm_lsb : 1
* Bit[1:0] :dsm_order :3
*/
#define RADIO_CONFIGURATION_SET_PROPERTIES_MODEM_MOD_TYPE 0x11, 0x20, 0x03, 0x00, 0x03,
0x00, 0x07
The commented lines explain which API property/properties will be overwritten with new value(s). For example, this definition is responsible for initializing three API properties of the radio at one time, MODEM_MOD_TYPE, MODEM_MAP_CONTROL, and MODEM_DSM_CTRL. The format of the definition is as follows:
• The first byte is the command ID of the SET_PROPERTY API command.
• The next three bytes are the requirements of the command:
• MSB of the starting location of the API property
• Numberof the immediate adjacent API properties
• LSB of the starting location of the API property
• Finally, the values of the properties set by the command.
Figure 5.9. Command Structure
The Radio Setup Configuration section is intended only for the example project. This part only has a C-like structure, called Radio_Setup_Configuration_Array, that contains the previously mentioned definitions with the modification that the first element is the length of
the API command. The format of the definition remains almost the same but the length field is added. The importance of the extended
structure is to build the appropriate format of the input parameter for the Si4455_configuration_init(…) function. The format of a
line from the array is as follows:
The Specific Configuration of the Example Project section is intended for the example project. It contains some specific definitions for
the example application such as which channel is selected either for the transmission or for the reception. The content of the custom
packet is initialized in this section. It also contains WDS calculator-related information in the commented lines.
/**
#define CUSTOM_PACKET_TX_CONTENT {SiliconLabs}
#define CUSTOM_PACKET_RX_CONTENT {SiliconLabs}
#define CUSTOM_CHANNEL_NUMBER_TX 0
silabs.com | Smart. Connected. Energy-friendly. Rev. 0.1 | 30
Page 32

#define CUSTOM_CHANNEL_NUMBER_RX 0
Root Directory
bin
doc
out
SRC
AN954: Programming Guide for EFM8 and EZRadio ®
Radio Initialization
Doxyfile
Cleanup.bat
application
Drivers
Radio
Si446x/Si4455
Si446x_api_lib.c
Si446x_api_lib.h
Radio_hal.c
Radio_hal.h
Radio_comm.c
Radio_comm.h
Figure 5.10. Radio Driver File Location
silabs.com | Smart. Connected. Energy-friendly. Rev. 0.1 | 31
Page 33

AN954: Programming Guide for EFM8 and EZRadio ®
Patching the Radio
6. Patching the Radio
A Radio patch is a piece of software provided by Silicon Labs to change the operation of the radio chip. The patch runs on the internal
MCU of the radio chip and fixes bugs or adds/improves features of the firmware in the internal ROM. It is distributed in binary form and
has to be loaded in the RAM of the radio chip by the host MCU through the SPI interface. Since the RAM is volatile memory, the information stored in it gets lost when the power of the chip is removed. Consequently, the content of the firmware patch has to be downloaded into the radio chip each time after performing a power on reset.
6.1 Patch Usage
To apply a patch, the patch content has to be sent to the radio chip after POR but before issuing the POWER_UP command.
In the software demos the patch file is located at <radio>_patch.h. Following several lines of comments that identify the patch, it contains the patch data lines, eight bytes in a line. Each line has to be sent to the chip as an eight byte long command. A CTS reply has to
be read from the chip after each line.
After all lines are sent, the POWER_UP command has to be issued with the PATCH bit of the BOOT_OPTIONS argument set to 1.
Table 6.1. PATCH bit in POWER_UP
POWER_UP
command
CMD 0x02
BOOT_OPTIONS
XTAL_OPTIONS
X0_FREQ X0_FREQ[31:24]
X0_FREQ X0_FREQ[23:16]
X0_FREQ X0_FREQ[15:8]
X0_FREQ X0_FREQ[7:0]
6.2 Patching Support
If a patch is necessary for a selected radio chip version, WDS will apply it automatically without any user interaction.
When deploying an example project from WDS, it includes the necessary patch commands (Si446X_PATCH_CMDS) in the RADIO_CONFIGURATION_DATA_ARRAY automatically according to the selected chip version. The patch commands themselves are
defined in the <radio>_patch.h file that is also included in the project automatically. This way the patch will be applied as part of the
radio initialization process.
7 6 5 4 3 2 1 0
PATCH 0 FUNC[5:0]
0000000 TXCO
silabs.com | Smart. Connected. Energy-friendly. Rev. 0.1 | 32
Page 34

AN954: Programming Guide for EFM8 and EZRadio ®
Additional Resources
7. Additional Resources
• AN796: Wireless Development Suite General Description — This document describes the WDS, its features and general usage:
http://www.silabs.com/Support%20Documents/TechnicalDocs/an0822.pdf.
• AN632: WDS User's Guide for EZRadioPRO®Devices — This document describes how to combine the EZRadio/Pro with WDS:
https://www.silabs.com/Support%20Documents/TechnicalDocs/AN632.pdf.
• AN633: Programming Guide for EZRadioPro — This application note goes into deep detail about programming and customizing the
radios, Refer to this for advanced usage of the radios: https://www.silabs.com/Support%20Documents/TechnicalDocs/AN633.pdf.
• Si4455 Data Sheet — Information on the specific radio: https://www.silabs.com/Support%20Documents/TechnicalDocs/Si4455.pdf
• AN0822 Simplicity Studio User Guide — Introduction to using Simplicity Studio: http://www.silabs.com/Support%20Documents/
TechnicalDocs/an0822.pdf.
silabs.com | Smart. Connected. Energy-friendly. Rev. 0.1 | 33
Page 35

Simplicity Studio
One-click access to MCU and
wireless tools, documentation,
software, source code libraries &
more. Available for Windows,
Mac and Linux!
IoT Portfolio
www.silabs.com/IoT
Disclaimer
Silicon Labs intends to provide customers with the latest, accurate, and in-depth documentation of all peripherals and modules available for system and software implementers using or
intending to use the Silicon Labs products. Characterization data, available modules and peripherals, memory sizes and memory addresses refer to each specific device, and "Typical"
parameters provided can and do vary in different applications. Application examples described herein are for illustrative purposes only. Silicon Labs reserves the right to make changes
without further notice and limitation to product information, specifications, and descriptions herein, and does not give warranties as to the accuracy or completeness of the included
information. Silicon Labs shall have no liability for the consequences of use of the information supplied herein. This document does not imply or express copyright licenses granted
hereunder to design or fabricate any integrated circuits. The products are not designed or authorized to be used within any Life Support System without the specific written consent of
Silicon Labs. A "Life Support System" is any product or system intended to support or sustain life and/or health, which, if it fails, can be reasonably expected to result in significant personal
injury or death. Silicon Labs products are not designed or authorized for military applications. Silicon Labs products shall under no circumstances be used in weapons of mass
destruction including (but not limited to) nuclear, biological or chemical weapons, or missiles capable of delivering such weapons.
Trademark Information
Silicon Laboratories Inc.® , Silicon Laboratories®, Silicon Labs®, SiLabs® and the Silicon Labs logo®, Bluegiga®, Bluegiga Logo®, Clockbuilder®, CMEMS®, DSPLL®,
EFR, Ember®, Energy Micro, Energy Micro logo and combinations thereof, "the world’s most energy friendly microcontrollers", Ember®, EZLink®, EZRadio®, EZRadioPRO®,
Gecko®, ISOmodem®, Precision32®, ProSLIC®, Simplicity Studio®, SiPHY®, Telegesis, the Telegesis Logo®, USBXpress® and others are trademarks or registered trademarks of Silicon
Labs. ARM, CORTEX, Cortex-M3 and THUMB are trademarks or registered trademarks of ARM Holdings. Keil is a registered trademark of ARM Limited. All other products or brand
names mentioned herein are trademarks of their respective holders.
Silicon Laboratories Inc.
400 West Cesar Chavez
Austin, TX 78701
USA
SW/HW
www.silabs.com/simplicity
Quality
www.silabs.com/quality
Support and Community
community.silabs.com
EFM®, EFM32®,
http://www.silabs.com
 Loading...