

Page 1

UG294: CPT213B SLEXP8019A Kit User's
Guide
The CPT213B Capacitive Sense Evaluation Board is an excellent
starting point to get familiar with Capacitive Sense touch pads.
The device serves as a user input peripheral for application development. The device
can be configured for different touch sense capabilities and also contains easy access
breakout pads and other peripherals for user feedback.
The kit includes the following:
• CPT213B Capacitive Sense Evaluation
Board
• 1 x acrylic overlay
• Getting Started card
• 1 x mini USB cable
KEY FEATURES
• CPT213B Capacitive Sense device with
I2C
• 20-pin expansion header for connection
with a Silicon Labs Starter Kit (EFM8 or
EFM32)
• Breakout test points for easy access to
touch pads
• Power sources include USB and EXT
Header
• 13 Capacitive Sense touch pads
silabs.com | Building a more connected world. Rev. 0.1
Page 2
UG294: CPT213B SLEXP8019A Kit User's Guide
Getting Started
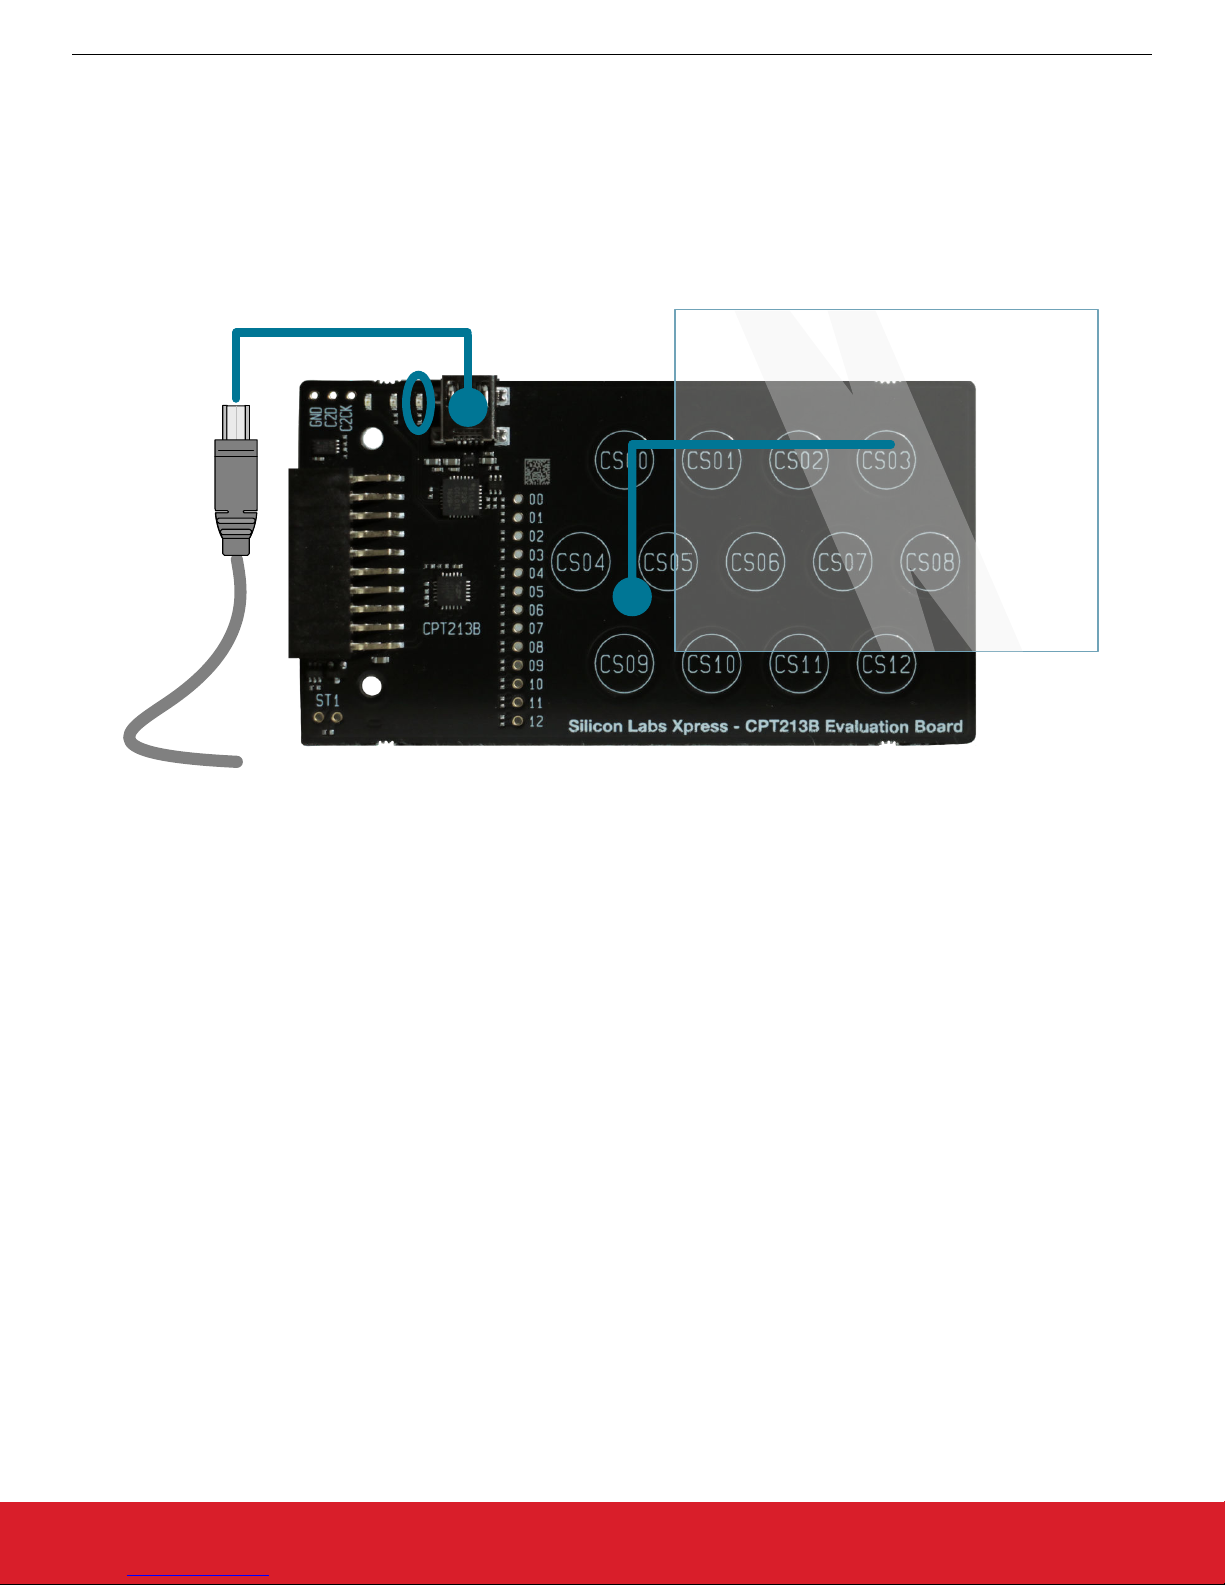
1. Getting Started
Hardware
To set up the hardware for the CPT213B SLEXP8019A kit:
1. Provide power to the board by connecting the DBG USB connector to the PC using the provided USB cable. When a connection
has been established successfully, the LED (marked in the picture) lights up.
2. Place the acrylic overlay on the board over the capacitive sense pads.
Figure 1.1. Hardware Setup
Software
The first step to get started with your new CPT213B SLEXP8019A kit is to go to
http://www.silabs.com/simplicity
The Simplicity Studio software package contains all the tools, drivers, software examples, and documentation needed to use the
CPT213B Capacitive Sense Evaluation Board. The board comes preconfigured for a Touch Demo for use with the acrylic overlay. The
demo enables the board to recognize touch events and touch release events. Every time a touch is sensed, the touch is communicated
on the I2C interface.
After downloading the latest version of Simplicity Studio and installing the software:
1. In the [Launcher], select [CPT213B] in [Device] pane. On the board, a successful USB connection is established when the LED
next to the USB connector turns on.
2. In the [Launcher], under [Compatible Tools], click the [Capacitive Sense Profiler] tile. This utility graphs touch-related data and
events received from the CPT213B SLEXP8019A for evaluation and analysis.
silabs.com | Building a more connected world. Rev. 0.1 | 2
Page 3
UG294: CPT213B SLEXP8019A Kit User's Guide
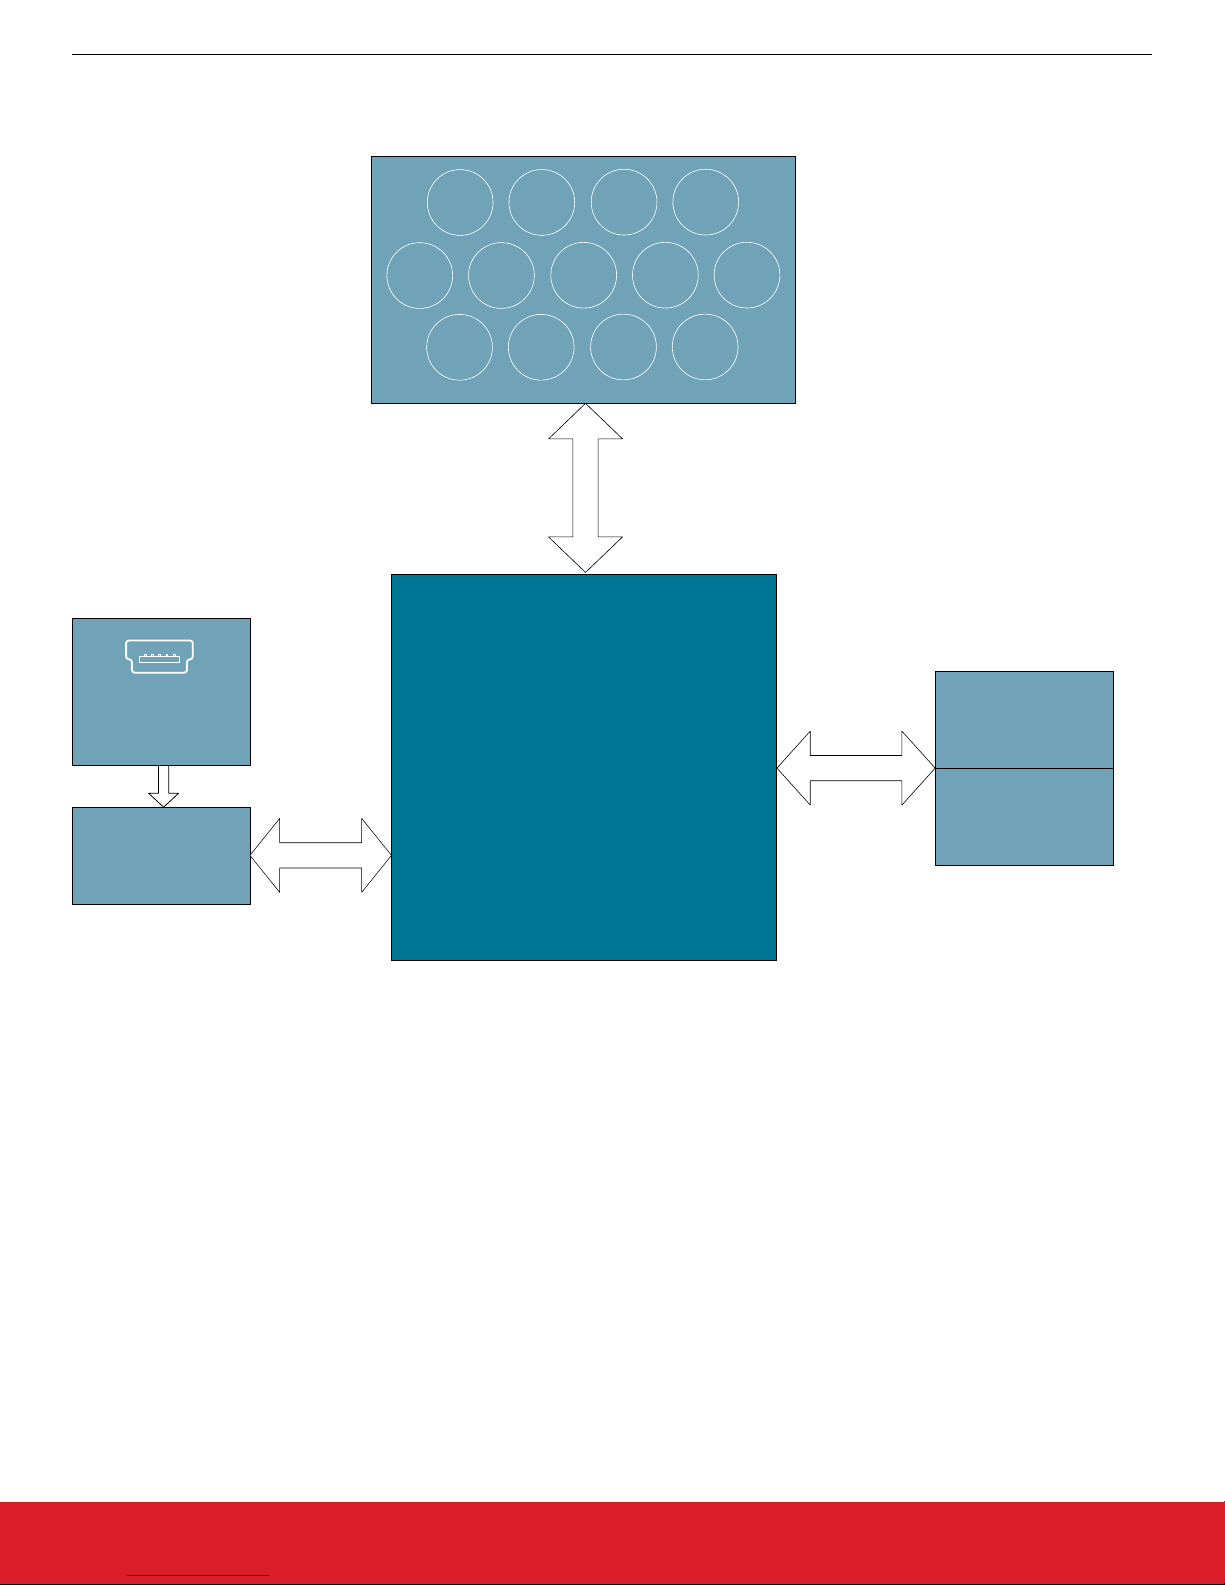
2. Kit Block Diagram
An overview of the CPT213B Capacitive Sense Evaluation Board is shown in the figure below.
CS03CS02CS01CS00
Kit Block Diagram
USB Mini-B
Connector
Device
Configuration
CS07CS06CS05CS04
CPT213B
I2C IEC Capacitive
Sense Device
CS08
CS12CS11CS10CS09
Device
Configuration
I2C
EXP Header
Figure 2.1. CPT213B SLEXP8019A Block Diagram
Buzzer
silabs.com | Building a more connected world. Rev. 0.1 | 3
Page 4
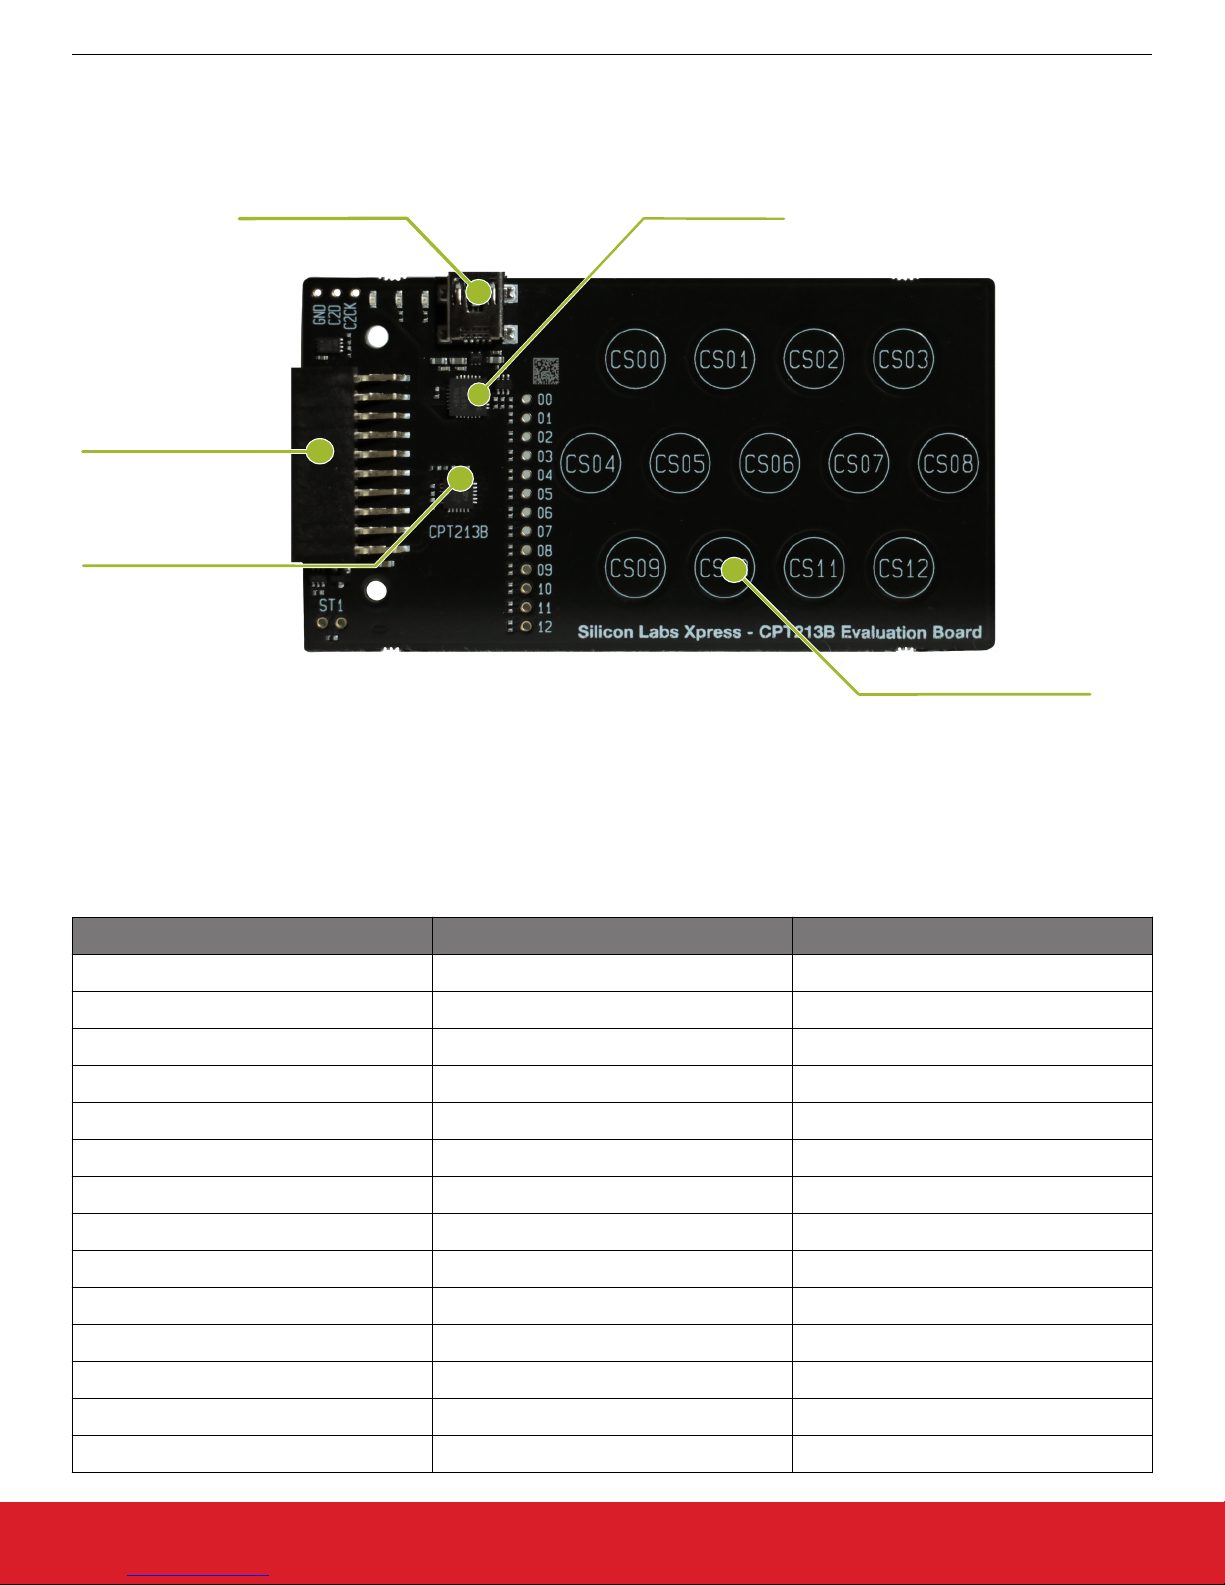
3. Kit Hardware Layout
Expansion
Header
Capacitive Touch Pads
Config and
Debug USB
CPT213B Device
ToolStick Base
Adapter
The layout of the CPT213B Capacitive Sense Evaluation Board is shown below.
UG294: CPT213B SLEXP8019A Kit User's Guide
Kit Hardware Layout
The CPT213B device on the kit can be connected to external peripherals other than the assigned pin functions using the vias on the
board. The table below shows all of the external connections to the fixed function CPT213B device.
CPT213B Pin Assigned Function Expansion Port Connection (EXP)
CS00 Capacitive Sense Pad CS00 —
CS01 Capacitive Sense Pad CS01 —
CS02 Capacitive Sense Pad CS02 —
CS03 Capacitive Sense Pad CS03 —
CS04 Capacitive Sense Pad CS04 —
CS05 Capacitive Sense Pad CS05 —
CS06 Capacitive Sense Pad CS06 —
CS07 Capacitive Sense Pad CS07 —
CS08 Capacitive Sense Pad CS08 —
CS09 Capacitive Sense Pad CS09 —
CS10 Capacitive Sense Pad CS10 —
Figure 3.1. CPT213B SLEXP8019A Hardware Layout
Table 3.1. CPT213B Device Connections
CS11 Capacitive Sense Pad CS11 —
CS12 Capacitive Sense Pad CS12 —
EB_SCL Event Buffer I2C SCL EXP15
silabs.com | Building a more connected world. Rev. 0.1 | 4
Page 5

UG294: CPT213B SLEXP8019A Kit User's Guide
Kit Hardware Layout
CPT213B Pin Assigned Function Expansion Port Connection (EXP)
EB_SDA Event Buffer I2C SDA EXP16
EB_INT Event Buffer Interrupt Pin EXP6
RSTb / Config Clk Configuration Clock EXP10
Config Data Configuration Data —
silabs.com | Building a more connected world. Rev. 0.1 | 5
Page 6

Automatically
Switches
USB Mini-B
Connector
Internal
ToolStick
LDO
EXP
Header
CPT Device
and
Peripherals
UG294: CPT213B SLEXP8019A Kit User's Guide
4. Power and Operation
4.1 Power Selection
The CPT213B Capacitive Sense Evaluation Board is designed to be powered by two different sources:
• Through the on-board USB.
• Through the EXP header.
The figure shows how the different power sources are connected to the device.
Power and Operation
Figure 4.1. CPT213B SLEXP8019A Power Supply
When the USB is connected, the board is powered from the LDO internal to the USB device, which is in turn powered by the USB
cable.
The board can also be powered externally through the VMCU and GND pins of the expansion header when the board is attached to a
power supply or an EFM MCU Starter Kit.
When power is provided through the USB or an external power supply, the device can act as a stand alone device. When it is connected to an EFM MCU Starter Kit through the expansion header, the device acts as a peripheral to the MCU by providing capacitive sense
capabilities.
4.2 Standalone
In standalone mode, the CPT213B SLEXP8019A on the CPT213B Capacitive Sense Evaluation Board is designed to showcase and
test the board's features or act as a breakout board for any application. To operate in this mode, apply power using the USB connector
or an external supply.
The board can operate on its own to demonstrate and test the board's touch features and functionalities. The CPT213B SLEXP8019A
features configurable options such as touch characteristics, output characteristics, and user feedback peripherals. The device's features can be configured in Simplicity Studio using [Xpress Configurator], and the capacitive sense data can be viewed in the [Capaci-
tive Sense Profiler].
The touch qualification engine on the device will process the touch information and output the results through I2C. The device outputs
can be accessed through the expansion header, and the capacitive sense inputs can be accessed through the vias on the board.
silabs.com | Building a more connected world. Rev. 0.1 | 6
Page 7

UG294: CPT213B SLEXP8019A Kit User's Guide
Power and Operation
4.3 Connected to the Expansion Header
The CPT213B Capacitive Sense Evaluation Board is designed to quickly attach to any EFM32 and EFM8 MCU starter kit and jumpstart the development of capacitive sense capable applications. Attach the CPT213B Capacitive Sense Evaluation Board to the STK
through the expansion header to connect the power and communication pins.
To see how the board works in conjunction with the MCU starter kit, go to the starter kit's [Demos] under [Getting Started] in Simplicity
Studio and run [CPT213B Demo].
For more details on the starter kit, see the corresponding starter kit's user guide.
Note: Not all EFM32 starter kits support this expansion board. See the available demos in Simplicity Studio for more information.
Figure 4.2. CPT213B SLEXP8019A Connected to an Example EFM8BB2 STK
silabs.com | Building a more connected world. Rev. 0.1 | 7
Page 8

CS00
CPT213B
Device
CS01
CS02
CS03
CS04
CS05
CS06
CS00
CS01
CS02
CS05
CS03
CS04
CS06
CS07
CS08
CS09
CS10
CS11
CS07
CS08
CS09
CS10
CS11
CS12
CS12
CS12
CS11
CS10CS09
CS07CS06CS05CS04
CS03CS02CS01CS00
CS08
UG294: CPT213B SLEXP8019A Kit User's Guide
Peripherals
5. Peripherals
The starter kit has a set of peripherals that showcase some of the features of the CPT213B device.
Be aware that some CPT213B I/O routed to peripherals are also routed to the breakout pads. This must be taken into consideration
when using the breakout pads for your application.
5.1 Capacitive Sense Touch Pads
The kit has 13 capacitive sense touch pads. The touch pads are connected in order to pins CS00 - CS12 of the CPT213B
SLEXP8019A. After the touch pad inputs have been processed by the touch qualification engine, the CPT213B SLEXP8019A will output the result through I2C.
The capacitive sense inputs can be configured for different thresholds, debounce counter values, scan periods, gain, scanning methods, touch time-outs, and touch exclusiveness using the [Xpress Configurator] in Simplicity Studio. The device outputs can also be
configured for different pin polarities and drive strength.
See the CPT213B SLEXP8019A Data Sheet for more detailed information on the different configurations.
Figure 5.1. Capacitive Sense Touch Pads
silabs.com | Building a more connected world. Rev. 0.1 | 8
Page 9

CS00
CS01
CS02
CS03
CS04
CS05
CS06
CS07
CS08
CS09
CS10
CS11
CS12
GND
Config Data
Config Clk
UG294: CPT213B SLEXP8019A Kit User's Guide
Connectors
6. Connectors
6.1 Test Points
The test points located on the left of the touch pads are routed to the capacitive sense input traces and power rails.
The capacitive sense input traces can be accessed through the vertically aligned vias located in middle of the board on the left of the
touch pads. All 13 CPT213B capacitive sensing touch pads are bound to each via.
At the bottom left corner of the board, there are two test points for VMCU labeled "ST1" to measure the active current of the board
using an in-circuit ammeter. A 2.54 mm pitch pin header can be soldered in for easy access to these pins.
Note: In order for the capacitive sense pins to be connected properly to your application or power to be measured correctly, the 0 ohm
resistors must be removed. The 0 ohm resistor for a channel can be found next to the corresponding via on the top side of the board.
At the top left corner of the board, there are three test points for Config Clk, Config Data, and GND to allow programming of external
CPT devices.
silabs.com | Building a more connected world. Rev. 0.1 | 9
Figure 6.1. Breakout Pads
Page 10

UG294: CPT213B SLEXP8019A Kit User's Guide
Connectors
6.2 Expansion Header
On the left hand side of the board is a female expansion header to connect to a Silicon Labs EFM8 or EFM32 Starter Kit (STK). The
connecter contains a number of output and communication pins that can be used to communicate with the MCU on the STK. The results from the touch qualification engine are routed out to these pins. Additionally, the VMCU, 3V3, and 5V power rails are also imported. The figure below shows the pin assignment of the expansion header.
The CPT213B SLEXP8019A outputs using I2C.
The pin assignment of the expansion header and the peripheral function are listed below in the figure and table.
EB_I2C
NC
NC
NC
NC
NC
EB_SDA
NC
NC
RSTb
NC
EB_INT
NC NC
CPT Pin
Figure 6.2. Expansion Header
Table 6.1. Pins available on Expansion Header
CPT213B pin EXP Header pin number
EB_SCL 15
EB_SDA 16
EB_INT 6
RSTb 10
silabs.com | Building a more connected world. Rev. 0.1 | 10
Page 11

7. Simplicity Studio
UG294: CPT213B SLEXP8019A Kit User's Guide
Simplicity Studio
Figure 7.1. Simplicity Studio
silabs.com | Building a more connected world. Rev. 0.1 | 11
Page 12

UG294: CPT213B SLEXP8019A Kit User's Guide
Simplicity Studio
7.1 Xpress Configurator
[Xpress Configurator] provides the necessary tools to modify the CPT213B SLEXP8019A's functionalities for a custom application in
an easy-to-use GUI. To use [Xpress Configurator] within Simplicity Studio:
1. Provide power to the board by connecting the USB connector to the PC using the provided USB cable.
2. Select [CPT213B] in the [Device] pane.
3. Go to [Compatible Tools] and click the [Xpress Configurator] tile.
4. Select the desired configuration for the engine and peripherals.
More information about each of the options in [Xpress Configurator] is available in AN957: "TouchXpress Configuration and Profiling
Guide." Application notes can be accessed within Simplicity Studio under [Documentation] or on the Silicon Labs website (www.si-
labs.com/interface-appnotes).
Figure 7.2. Simplicity Studio Xpress Configurator
silabs.com | Building a more connected world. Rev. 0.1 | 12
Page 13

UG294: CPT213B SLEXP8019A Kit User's Guide
Simplicity Studio
7.2 Capacitive Sense Profiler
The [Capacitive Sense Profiler] in Simplicity Studio displays touches, raw and processed data, and noise information in a simple-touse GUI. Touch and release any of the capacitive sensing peripherals on the board and the profiler will display the data in a table and
as a graph over time.
To access and setup the [Capacitive Sense Profiler] in [Simplicity Studio]:
1. Provide power to the board by connecting the USB connector to the PC using the provided USB cable.
2. select the [CPT213B] kit in the [Device] pane.
3. Go to [Compatible Tools] and select the [Capacitive Sense Profiler] tile.
4. In the [Control Panel], click [Use Device...] .
Once the board is connected, touch and release any of the capacitive sensing touch peripherals on the board to view the raw and processed data. The profiler can view the data as [Raw Data], [Noise], and [Buttons]. The Buttons view is particularly useful since it
shows the state of the capacitive sense touch pads as either on or off.
More information about [Capacitive Sense Profiler] is available in AN957: "TouchXpress Configuration and Profiling Guide." Application notes can be accessed within Simplicity Studio under [Documentation] or on the Silicon Labs website (www.silabs.com/interface-
appnotes).
Figure 7.3. Simplicity Studio Capacitive Sense Profiler
silabs.com | Building a more connected world. Rev. 0.1 | 13
Page 14

EFM STK
Board
EFM
MCU
AEM
Hardware
CPT
Device and
Peripherals
CPT EXP
Board
UG294: CPT213B SLEXP8019A Kit User's Guide
Advanced Energy Monitor
8. Advanced Energy Monitor
When the CPT213B Capacitive Sense Evaluation Board is connected to a Silicon Labs STK, the STK's Advanced Energy Monitor
(AEM) hardware also measures the CPT213B power consumption using the VMCU connection on the EXP header. By using the [Ener-
gy Profiler] in Simplicity Studio, current consumption and voltage can be measured in real time.
More details about AEM and its operation can be found in the STK User Guide. Note that AEM will measure the current for all circuitry
connected to VMCU, including the STK MCU and the CPT device.
Figure 8.1. Measuring CPT213B SLEXP8019A Current Using AEM
silabs.com | Building a more connected world. Rev. 0.1 | 14
Page 15

UG294: CPT213B SLEXP8019A Kit User's Guide
Schematics, Assembly Drawings, and BOM
9. Schematics, Assembly Drawings, and BOM
9.1 Board Files
The schematics, assembly drawings and bill of materials (BOM) for the CPT213B Capacitive Sense Evaluation Board are available
through Simplicity Studio when the kit documentation package has been installed. To access these documents, click the [Kit Docu-
mentation] tile after selecting the device in the left pane.
9.2 Board Revision History
• A00 — Initial production revision.
A00 Revision Boards
These boards do not currently have any known issues.
silabs.com | Building a more connected world. Rev. 0.1 | 15
Page 16

Simplicity Studio
One-click access to MCU and
wireless tools, documentation,
software, source code libraries &
more. Available for Windows,
Mac and Linux!
IoT Portfolio
www.silabs.com/IoT
Disclaimer
Silicon Labs intends to provide customers with the latest, accurate, and in-depth documentation of all peripherals and modules available for system and software implementers using or
intending to use the Silicon Labs products. Characterization data, available modules and peripherals, memory sizes and memory addresses refer to each specific device, and "Typical"
parameters provided can and do vary in different applications. Application examples described herein are for illustrative purposes only. Silicon Labs reserves the right to make changes
without further notice and limitation to product information, specifications, and descriptions herein, and does not give warranties as to the accuracy or completeness of the included
information. Silicon Labs shall have no liability for the consequences of use of the information supplied herein. This document does not imply or express copyright licenses granted
hereunder to design or fabricate any integrated circuits. The products are not designed or authorized to be used within any Life Support System without the specific written consent of
Silicon Labs. A "Life Support System" is any product or system intended to support or sustain life and/or health, which, if it fails, can be reasonably expected to result in significant personal
injury or death. Silicon Labs products are not designed or authorized for military applications. Silicon Labs products shall under no circumstances be used in weapons of mass
destruction including (but not limited to) nuclear, biological or chemical weapons, or missiles capable of delivering such weapons.
Trademark Information
Silicon Laboratories Inc.® , Silicon Laboratories®, Silicon Labs®, SiLabs® and the Silicon Labs logo®, Bluegiga®, Bluegiga Logo®, Clockbuilder®, CMEMS®, DSPLL®, EFM®, EFM32®,
EFR, Ember®, Energy Micro, Energy Micro logo and combinations thereof, "the world’s most energy friendly microcontrollers", Ember®, EZLink®, EZRadio®, EZRadioPRO®,
Gecko®, ISOmodem®, Micrium, Precision32®, ProSLIC®, Simplicity Studio®, SiPHY®, Telegesis, the Telegesis Logo®, USBXpress®, Zentri and others are trademarks or registered
trademarks of Silicon Labs. ARM, CORTEX, Cortex-M3 and THUMB are trademarks or registered trademarks of ARM Holdings. Keil is a registered trademark of ARM Limited. All
other products or brand names mentioned herein are trademarks of their respective holders.
Silicon Laboratories Inc.
400 West Cesar Chavez
Austin, TX 78701
USA
SW/HW
www.silabs.com/simplicity
Quality
www.silabs.com/quality
Support and Community
community.silabs.com
http://www.silabs.com
 Loading...