

Page 1

CP2105-EK
CP2105 EVALUATION KIT USER ’S GUIDE
1. Kit Contents
The CP2105 Evaluation Kit contains the following items:
CP2105 Evaluation Board
RS232 Serial Cable
USB Cable
DVD
Quick Start Guide
2. Relevant Documentation
Application notes can be found on the Interface Application Notes page for all fixed-function devices:
www.silabs.com/interface-appnotes.
AN721: CP210x/CP211x Device Customization Guide — Customize the VID, PID, serial number, and
other parameters stored in the CP2105 one-time programmable ROM.
AN197: Serial Communicat ions Guide for CP210x — Programming guide for using the Virtual COM Port
(VCP) drivers.
AN169: USBXpress Programmer’s Guide — Programming guide for using the USBXpress drivers.
AN220: C8051F32x and CP210x USB Driver Customization — VCP or USBXpress driver customization
tool.
AN223: Port Configuration and GPIO for CP210x — Programming guide and DLL for runtime control of
the CP2105 GPIO pins.
AN571: CP210x Virtual COM Port Interface — USB interface details for CP210x devices.
3. Software Setup
The Software Development Kit (SDK) for the CP2105 kit is included on the kit DVD. The latest version of this
installer can also be downloaded from the www.silabs.com/interface-software website. This package includes:
Device Customization Utility (AN721)
Documentation — data sheet, application notes, user’s guide, quick start guide, etc.
CP210x Virtual COM Port (VCP) Drivers
Software — Driver Customization Utility (AN220) and programming examples
The Windows installer should launch automatically after inserting the
appropriate directory on the
drivers to the system.
DVD to install the software package. Follow the instructions to install the SDK and
3.1. USBXpress Driver Development Kit
The Silicon Laboratories USBXpress® Development Kit provides a complete host software solution for interfacing to
CP210x devices. No USB protocol or host device driver e xpertise is req uired. Instead, a simple, high-level Applica tion
Program Interface (API) for the host software is used to provide complete USB connectivity. The USBXpress
Development Kit includes Windows device drivers, Windows device driver installer, host interface function library
(host API) provided in the form of a Windows Dynamic Link Library (DLL). See Application Note AN169, “USBXpress
Programmer’s Guide” for detailed information on using the USBXpress drivers.
The USBXpress drivers are available here: www.silabs.com/usbxpress.
Click the USBXpress Development Kit link in the Download for Windows 2000/XP/Server 2003/Vista/Win7 section
to download the USBXpress drivers. Run the installer and follow the steps to install the software to the desired
DVD. For Mac and Linux, browse to the
Rev. 0.5 7/13 Copyright © 2013 by Silicon Laboratories CP2105-EK
Page 2
CP2105-EK
CP2105 EK
Serial Device
RS232
USB
1
2
4
Serial Device
RS232
6
CP2105 USB-to-
UART Bridge
5
3
location. The default installation directory is C:\SiLabs\MCU\USBXpress_SDK.
Further installation instructions for the WinCE drivers can be found in the ReadMe.txt file contained inside the
driver package.
4. CP2105 Hardware Interface
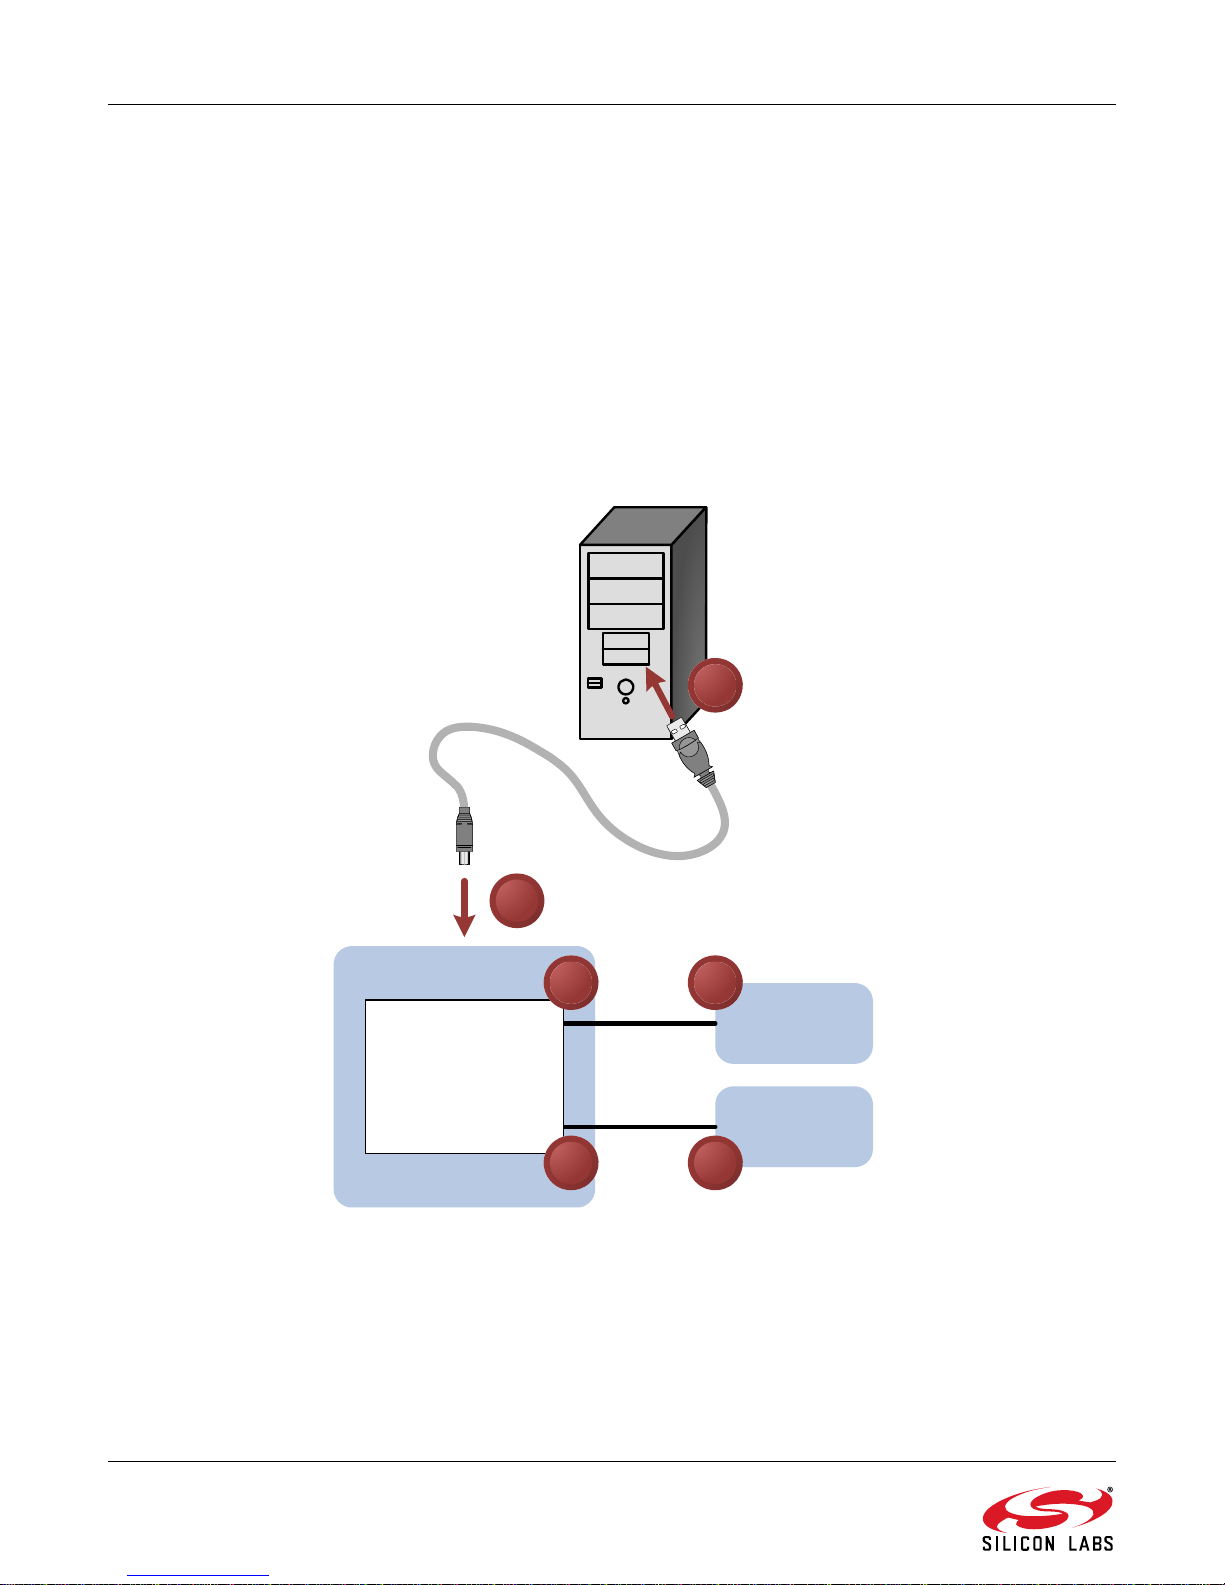
The evaluation board is connected to a PC as shown in Figure 1.
1. Connect one end of the USB cable to a USB Port on the PC.
2. Connect the other end of the USB cable to the USB connector on the
3. Connect one end of the RS232 serial cable to the DB-9 connector on the
4. Connect the other end of the RS232 serial cable to the target serial device.
5. (Optional) Connect the second RS232 serial cable to the second DB-9 connector on the
board.
6. (Optional) Connect the other end of the second RS232 serial cable to the second target serial device.
CP2105 evaluation board.
CP2105 evaluation board
CP2105 evaluation
.
2 Rev. 0.5
Figure 1. Hardware Setup
Page 3
CP2105-EK
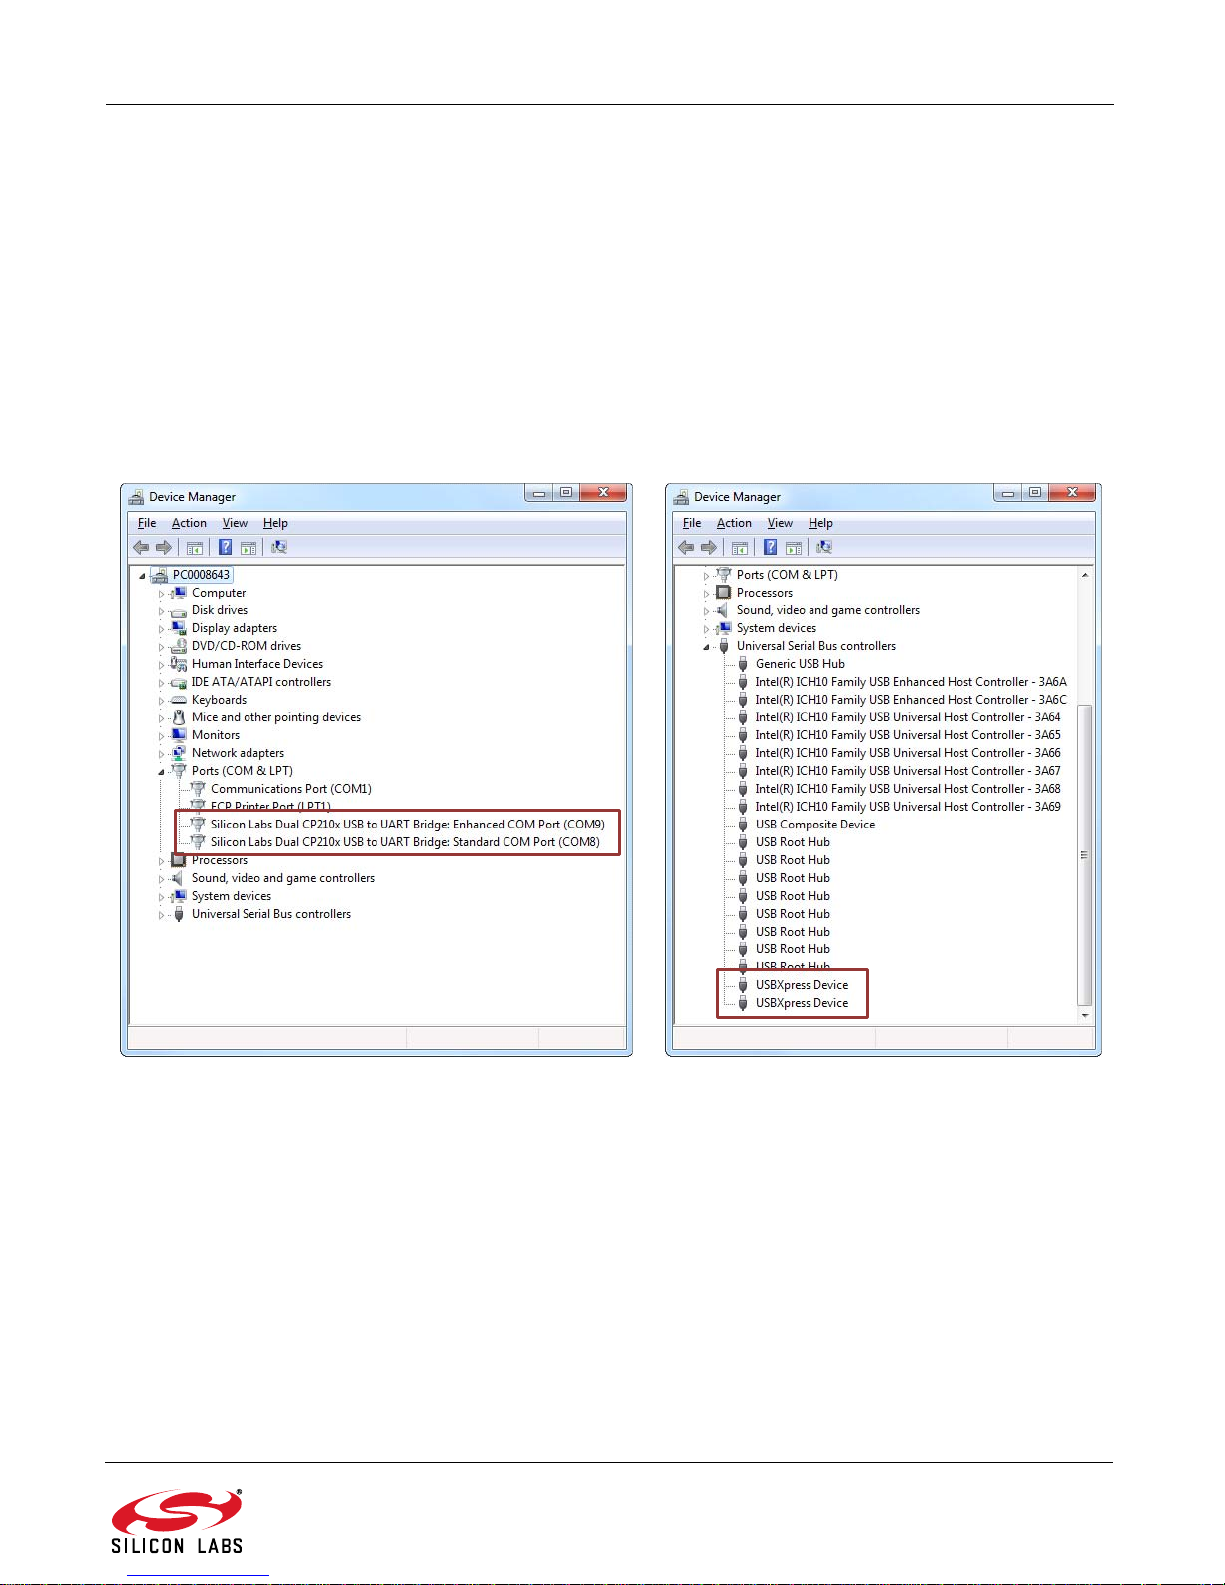
5. CP2105 Software Interface
If the Virtual COM Port drivers are used, the CP2105 wi ll appear as two COM ports in the Device Manager, as
shown in Figure 2. The CP2105 will always use the lowest available COM ports for operation. For instance, if COM
ports 1 and 2 are in use by other peripherals and applications, the CP2105 will use COM 3 and COM 4.
The CP2105 functions identically to two COM ports from the reference point of both the host application and the
serial devices, and it can support serial device control requests defined in the Microsoft Win32
API. Examples for how to communicate with the device as two serial COM ports are included in AN197 on the
www.silabs.com/interface-appnotes page or in the SDK.
If the USBXpress drivers are used, the CP2105 will appear as two USB USBXpress devices as shown in Figure 2.
Examples for how to communicate with the device using the USBXpress interface are included in AN169 on the
www.silabs.com/interface-appnotes page .
®
Communications
Figure 2. CP2105 in Device Manager
Rev. 0.5 3
Page 4

CP2105-EK
P2
CP2105
P1
SUSPEND LED
J1
Pin 2
Pin 1
J4
______
DS5
RS232
Transceiver
J6
Pin 1
RS232
Transceiver
P3
CP2105-EK
Standard
Enhanced
Pin 2
J8
J7
J3
DS0
DS1
J2
DS2
DS3
DS4
6. Target Board
The
CP2105
liminary software development. Numerous input/output (I/O) connections are provided to facilitate prototyping using
the evaluation board. Refer to
Evaluation Kit includes an evaluation board with a
Figure 3
for the locations of the various I/O connectors.
CP2105
P1 USB connector for USB interface
P2 DB9 connector for S tandard RS232 interface
P3 DB9 connector for Enhanced RS232 interface
J1 Enhanced UART signal access connector
J2, J3 GPIO access connector
J4 Power connector
J6 Standard UART signal access connector
J7, J8 SUSPEND
LED source connector
DSS–DS4 Green GPIO LEDs
DS5 Red SUSPEND
indicator LED
device preinstalled for ev alu ation and pr e-
Figure 3. CP2105 Evaluation Board with Default Shorting Blocks Installed
6.1. LED Headers (J2, J3)
Connectors J2 and J3 are provided to allow access to the GPIO pins on the CP2105 when in GPIO mode. Place
shorting blocks on J2 and J3 to connect the GPIO pins to the five green LEDs DS0–DS4. These LEDs can be used
to indicate active communications through the CP2105. Table 1 shows the LED corresponding to each header
position. When using the CP2105 in Modem mode, the shorting blocks on J2 and J3 should be removed.
4 Rev. 0.5
Table 1. J2 and J3 LED Locations
LED Pins
DS0 J2[1:2]
DS1 J2[3:4]
DS2 J3[1:2]
DS3 J3[3:4]
DS4 J3[5:6]
Page 5

CP2105-EK
6.2. Universal Serial Bus (USB) Interface (P1)
A Universal Serial Bus (USB) connector (P1) is provided to facilitate connections to the USB interface on the
CP2105. See Table 2 for the USB pin definitions.
Table 2. USB Connector Pin Descriptions
Pin # Description
1 VBUS
2D3D+
4 GND (Ground)
6.3. UART Signals (P2, P3, J1, J6)
Two RS232 transceiver circuits and DB-9 connectors (P2, P3) are provided on the evaluation board to connect the
CP2105 virtual serial ports to external serial devices. See Table 3 for the RS232 P2 and P3 pin descriptions. The
J2 and J6 connectors are provided to facilitate direct access to the CP2105’s UART signals. Shorting blocks on J1
are required to connect the Standard UART signals to P2, and the shorting blocks on J6 are required to connect
the Enhanced UART signals to P3. See Table 4 for J1 and J6 pin descriptions.
Table 3. RS232 Pin Descriptions
Pin Signal
1 DCD Input Data Carrier Detect
2 RXD Input Receive Data
3 TXD Output Transmit Data
4 DTR Output Data Terminal Ready
5 GND Ground
6 DSR Input Data Set Ready
7 RTS Output Request to Send
8 CTS Input Clear to Send
9 RI Input Ring Indicator
CP2105
Direction
Description
Table 4. J1, J6 Pin Descriptions
Pins Signal
1-2 TXD Output Transmit Data
3-4 RXD Input Receive Data
5-6 DTR Output Data Terminal Ready
7-8 RI Input Ring Indicator
9-10 DCD Input Data Carrier Detect
11-12 DSR Input Data Set Ready
13-14 CTS Input Clear to Send
15-16 RTS Output Request to Send
CP2105
Direction
Description
Rev. 0.5 5
Page 6

CP2105-EK
6.4. Power Connector (J4)
This header (J4) is included on the evaluation board to provide several power options. The following describes the
functions of the pins.
Pins 1–2 connect CP2105 VIO input (Pin 5) to CP2105 VDD (Pin 6). Remove the shorting block to power
VIO from an external source.
Pins 3–4 connect the main +3 V net to the CP2105 VDD (Pin 6). The main +3 V net powers the other
components (five green LEDs and RS-232 Sipex Part) on the board.
6.5. SUSPEND LED Source Selector(J7, J8)
These headers (J7, J8) are included on the evaluation board to provide several options for the SUSPEND LED
source. The following describes the function of each pin:
J7[1:2] connects CP2105 Standard UART SUSPEND output (Pin 1) to the SUSPEND LED.
J7[2:3] connects CP2105 Enhanced UART SUSPEND output (Pin 17) to the SUSPEND LED.
J7[2]:J8[1] connects the main +3 V net to the SUSPEND LED. This will cause the SUSPEND LED to act as
a power LED.
6 Rev. 0.5
Page 7

7. Schematic
CP2105-EK
Figure 4. CP2105 Evaluation Board Schematic
Rev. 0.5 7
Page 8

CP2105-EK
DOCUMENT CHANGE LIST
Revision 0.1 to Revision 0.2
Updated Windows installation instructions for VCP
drivers.
Updated Windows installation instructions for
USBXpress drivers.
Revision 0.2 to Revision 0.3
Updated Figure 3 with shorting blocks installed.
Revision 0.3 to Revision 0.4
Updated "Figure 2. CP2105 in Device Manager" on
page 3.
Revision 0.4 to Revision 0.5
Updated “1. Kit Contents” to change CD-ROM to
DVD.
Added “2. Relevant Documentation”.
Updated “3. Software Setup” to point to the drivers
on the website.
Updated Figure 1 and Figure 2.
8 Rev. 0.5
Page 9

Simplicity Studio
One-click access to MCU and
wireless tools, documentation,
software, source code libraries &
more. Available for Windows,
Mac and Linux!
IoT Portfolio
www.silabs.com/IoT
Disclaimer
Silicon Labs intends to provide customers with the latest, accurate, and in-depth documentation of all peripherals and modules available for system and software implementers using or
intending to use the Silicon Labs products. Characterization data, available modules and peripherals, memory sizes and memory addresses refer to each specific device, and "Typical"
parameters provided can and do vary in different applications. Application examples described herein are for illustrative purposes only. Silicon Labs reserves the right to make changes
without further notice and limitation to product information, specifications, and descriptions herein, and does not give warranties as to the accuracy or completeness of the included
information. Silicon Labs shall have no liability for the consequences of use of the information supplied herein. This document does not imply or express copyright licenses granted
hereunder to design or fabricate any integrated circuits. The products are not designed or authorized to be used within any Life Support System without the specific written consent of
Silicon Labs. A "Life Support System" is any product or system intended to support or sustain life and/or health, which, if it fails, can be reasonably expected to result in significant personal
injury or death. Silicon Labs products are not designed or authorized for military applications. Silicon Labs products shall under no circumstances be used in weapons of mass
destruction including (but not limited to) nuclear, biological or chemical weapons, or missiles capable of delivering such weapons.
Trademark Information
Silicon Laboratories Inc.® , Silicon Laboratories®, Silicon Labs®, SiLabs® and the Silicon Labs logo®, Bluegiga®, Bluegiga Logo®, Clockbuilder®, CMEMS®, DSPLL®, EFM®, EFM32®,
Ember®, Energy Micro, Energy Micro logo and combinations thereof, "the world’s most energy friendly microcontrollers", Ember®, EZLink®, EZRadio®, EZRadioPRO®,
EFR,
Gecko®, ISOmodem®, Precision32®, ProSLIC®, Simplicity Studio®, SiPHY®, Telegesis, the Telegesis Logo®, USBXpress® and others are trademarks or registered trademarks of Silicon
Labs. ARM, CORTEX, Cortex-M3 and THUMB are trademarks or registered trademarks of ARM Holdings. Keil is a registered trademark of ARM Limited. All other products or brand
names mentioned herein are trademarks of their respective holders.
Silicon Laboratories Inc.
400 West Cesar Chavez
Austin, TX 78701
USA
SW/HW
www.silabs.com/simplicity
Quality
www.silabs.com/quality
Support and Community
community.silabs.com
http://www.silabs.com
 Loading...