

Page 1

2-1About PRICOM
Users Manual CX
Section 1: PRICOM C-700
PRICOM C-700 is a 10BASE-T print server developed exclusively for Canon Bubble Jet
Printers. PRICOM C-700 is compatible with status monitor of Canon printer driver.
You can check the printer status , which is connected to the network at real time on the
screen of your computer.
II. About PRICOM
Operating Requirements
System requirements for the network connection
-Network cable
-Ethernet HUB
-Printer
Network Environment
Windows 95/98/Me, Windows NT 4.0, Windows 2000, Windows XP
Operating environment
-Temperature : 10°C to 35°C
-Humidity : 20% to 80% RH (no condensation allowed)
Storage environment
-Temperature : -10°C to 50°C
-Humidity : 20% to 90% RH (no condensation allowed)
EMI
VCCI Class A
FCC Class A
EN55022 Class A
EN55024
Page 2
2-2About PRICOM
Users Manual CX
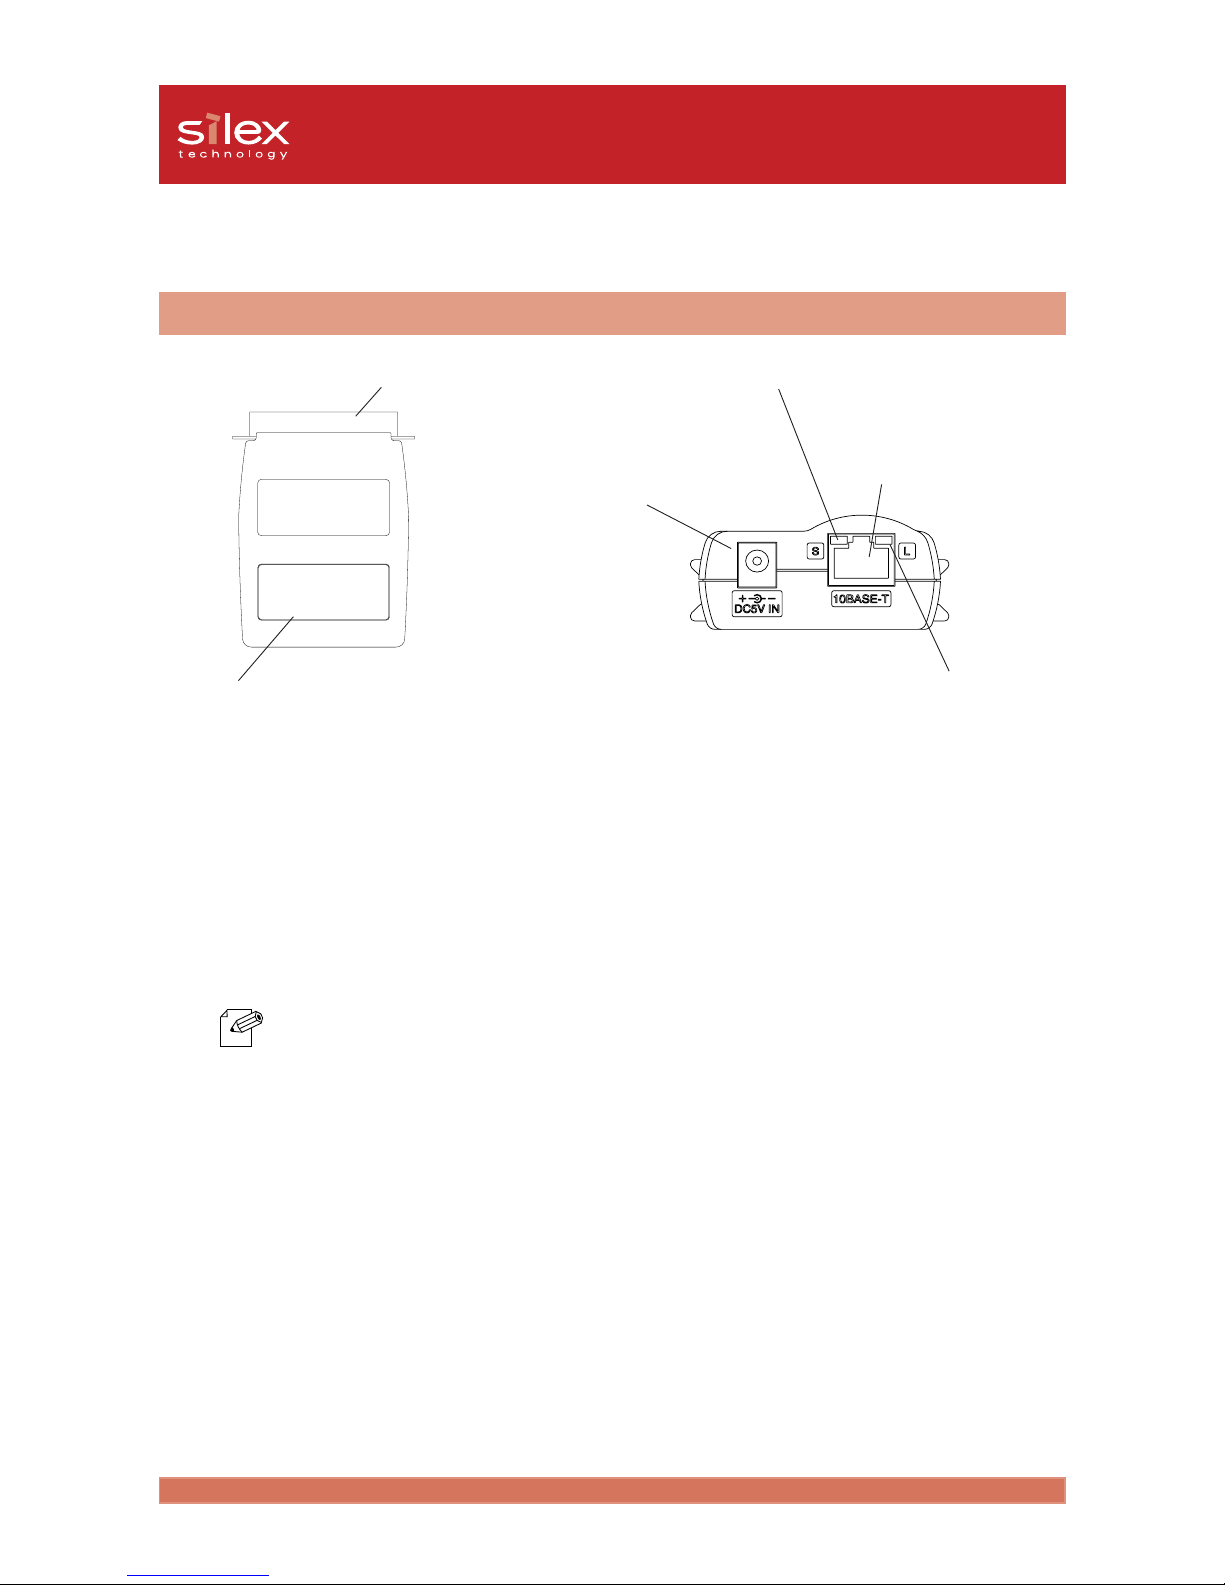
Parts on PRICOM C-700
Parts and Function
Printer Port (Parallel Port)
Ethernet Address
(The last 6 digits are the product’s serial number)
Power Connector
LINK LED
STATUS LED
Network Port
(10BASE-T)
(Bottom)
-Printer Port (Parallel Port)
Connect to the parallel interface port of the printer.
For the location of the parallel interface port of the printer, please refer to the printer’s manual.
-Ethernet Address
The Ethernet Address of the device. The last 6 digits are the product’s serial number.
Ethernet Address 00:80:92:18:0E: 1A is noted as 008092180E1A.
The product’s number (serial number) is 180E1A.
(Back)
-Network Port (10BASE-T)
Connects to the network cable (twisted pair cable).
-LINK LED (Green)
Lights, when a proper 10BASE-T network connection is established.
-STATUS LED (Orange)
Flashes during data transfer.
-Power Connector
Connects to the AC adapter.
BottomBottom
BottomBottom
Bottom
Back Back
Back Back
Back
NOTE
Page 3
2-3About PRICOM
Users Manual CX
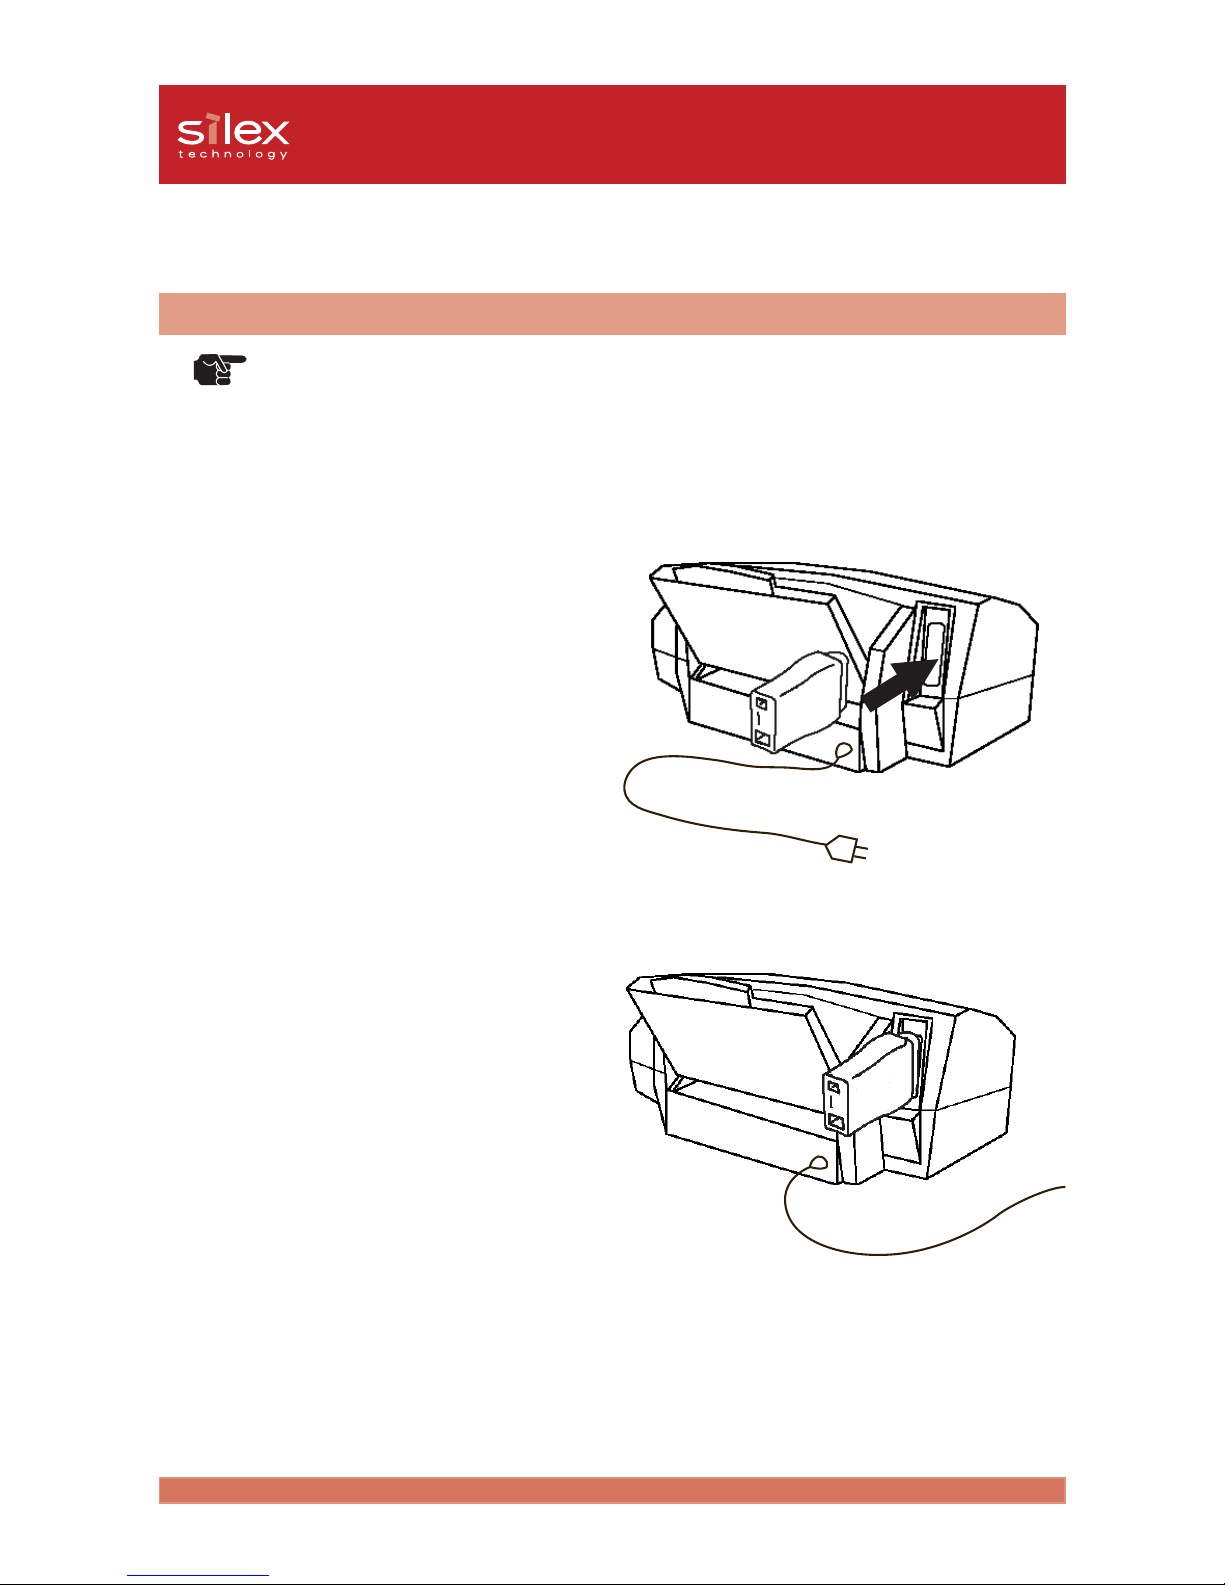
Connect PRICOM C-700 to the Printer
-Before connecting PRICOM C-700 to the printer, make sure that the power cord of the
printer is unplugged.
-If you have already used PRICOM C-700 in another network, make sure to initialize
PRICOM C-700 to factory default. You can initialize PRICOM C-700 from PRICOM User
Software CX. For further information, refer to chapter “III. Using PRICOM in a Windows
Environment” of this on-line manual.
Hardware Installation
TIP
1. Make sure that the printer is
switched off and the power cord is
unplugged. Attach the PRICOM C700 to the paralell interface port of
the printer.
Make sure that the AC adapter is not
connected to PRICOM C-700 at this
time.
2. After PRICOM C-700 and the printer
have been connected, make sure that
the printer is still switched off. Then
plug the power cord of the printer
into a power socket.
Page 4
2-4About PRICOM
Users Manual CX
1. Make sure that the AC adapter is not
connected to PRICOM C-700 and
switch off the printer.
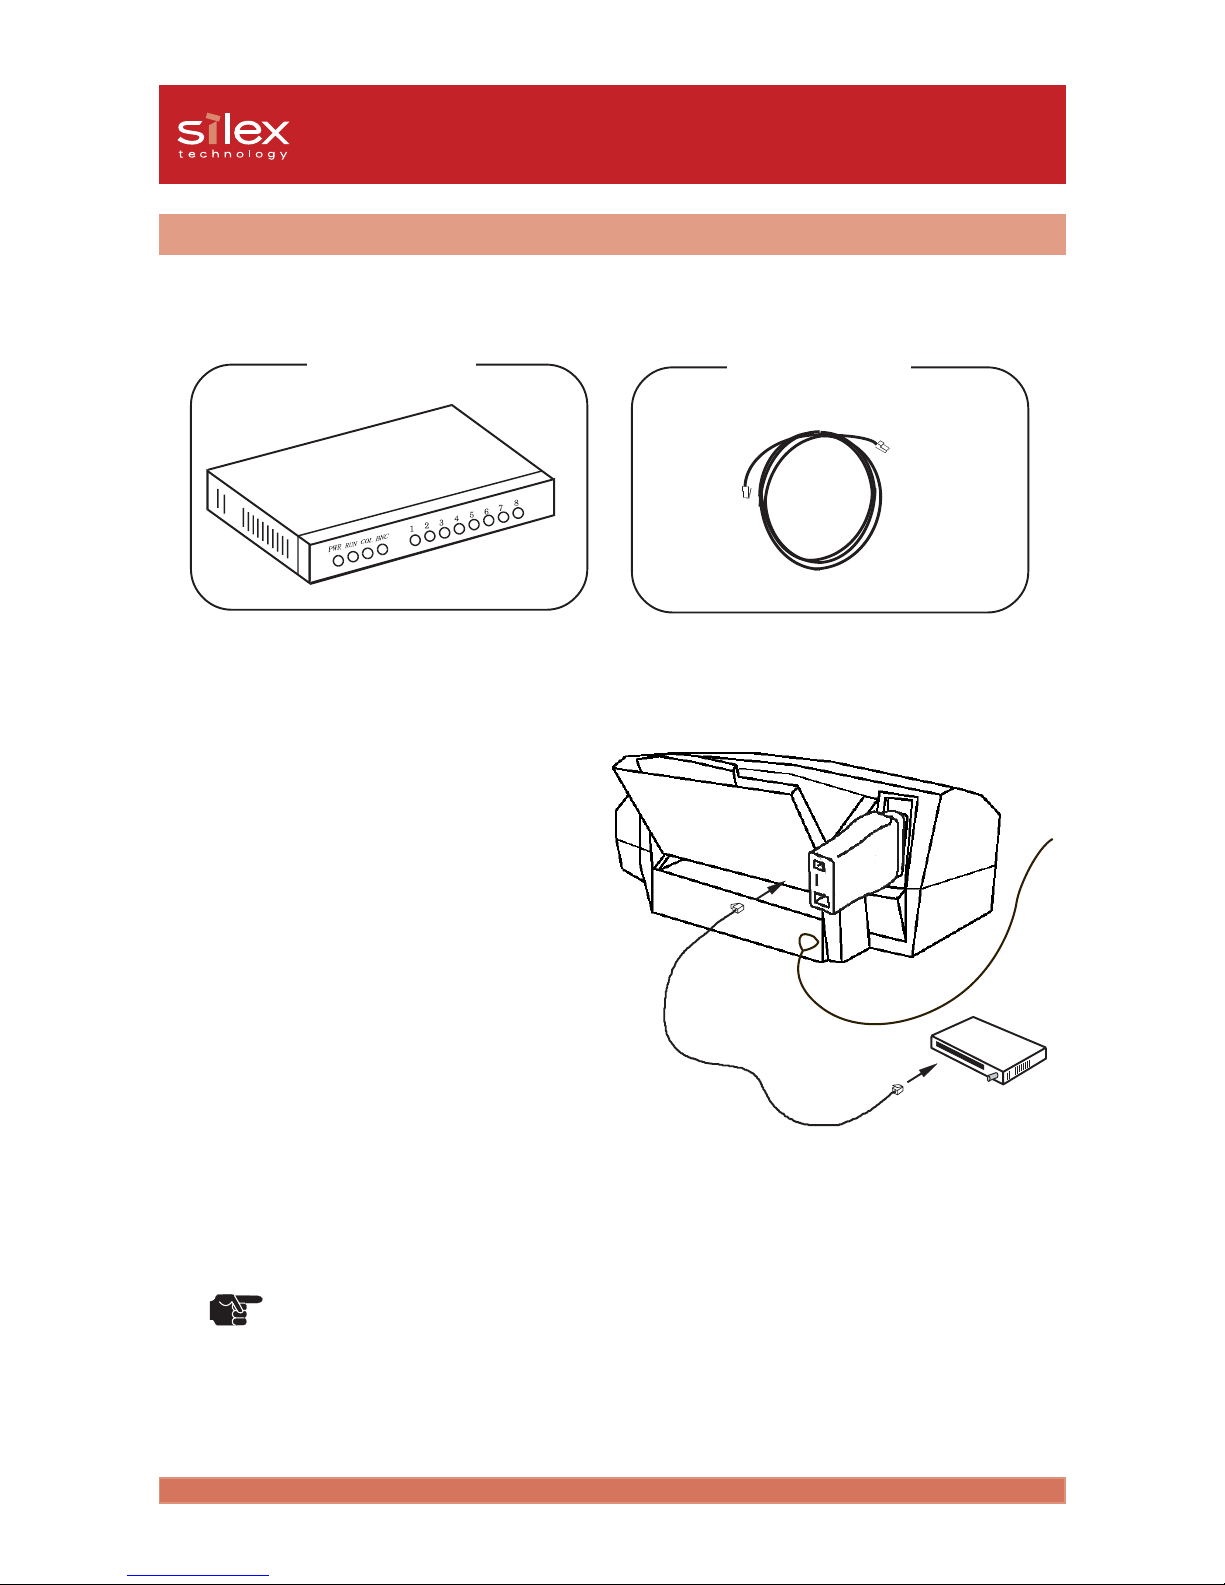
2. Connect the network cable (twisted
pair cable) to the network port of
PRICOM C-700.
3. Connect the other end of the network
cable to the Ethernet HUB.
4. Connect the AC adapter to PRICOM
C-700 and switch on the printer and
check for the proper printer
functions.
Using an AC adapter other than the one supplied may cause damage.
Prepare the following items.
Ethernet HUB
Network Cable
TIP
Connection to the Network
Page 5

2-5About PRICOM
Users Manual CX
Specification
The main points of functionality are as follows.
Functional Specification
Automatic IP address configuration with DHCP, BOOTP, RARP
DHCP/BOOTP
PRICOM C-700 supports the DHCP/BOOTP protocol. The IP address can be set within the network where
the DHCP/BOOTP server is operating.
-PRICOM C-700 supports DHCP protocols that are in accordance with RFC2131/2132.
Windows NT 4.0, Windows 2000 and DHCP servers of Windows .NET Server are supported.
-To use the DHCP function, please contact your network administrator.
RARP
The PRICOM C-700 supports RARP protocol. The IP address can be set within the network where the
RARP server is operating.
-Please consult your network administrator when using the RARP function of PRICOM C-
700.
Web Browser
The PRICOM C-700 is equipped with HTTP server that allows you to monitor the printer status or
change the configuration of PRICOM C-700 using a web browser. If the network is connected to the
internet, product support information can be obtained.
-It is recommended to use the following web browsers to use the HTTP function: Internet
Explorer 3.0 (or higher) or Netscape Navigator 3.0 (or higher). If a different web browser
is used, make sure it is compatible with HTTP 1.0 (RFC1945) and HTML 2.0 (RFC1866).
-Assign IP address to PRICOM C-700 and enable TCP/IP protocol to use HTTP function.
-During the initial configuration, the PRICOM C-700 can not be accessed via web browser
as an IP address has not yet been assigned.
TIP
TIP
TIP
Page 6

2-6About PRICOM
Users Manual CX
Hardware Specification
-CPU
32bit RISC CPU
-Memory
RAM : 512KByte
FlashROM : 512KByte
-Network Interface
10BASE-T 1 port
-Printer Interface
Centronics (36 pin Amphenole)
IEEE1284 parallel port (bidirectional)
-Others
LED Lamp: 2 LEDs, one for Status (Orange), one for 10BASE-T Link(Green)
Page 7

2-7About PRICOM
Users Manual CX
Software Specification
Supported Protocol
TCP/IP, IPX Peer to Peer
TCP/IP
Network Layer : ARP, RARP, ICMP, IP
Session Layer : TCP, UDP
Application Layer : LPR, TELNET, BOOTP, SNMP, HTTP, DHCP, #9100
IP Address can be set with Setup Utility.
Supports silex technology, Inc. original setup protocol .
IPX Peer to Peer
Supports silex technology, Inc. original protocol .
Page 8

2-8About PRICOM
Users Manual CX
Section 2: PRICOM C-5100
PRICOM C-5100 is a 10BASE-T/100BASE-TX print server developed exclusively for
Canon Bubble Jet Printers. PRICOM C-5100 is compatible with status monitor of Canon
printer driver. You can check the printer status, which is connected to the network at
real time on the screen of your computer.
Operation Requirements
System requirements for the network connection
-Network cable(Category 5 in 100BASE-TX environment)
-Ethernet HUB(HUB)
-Printer
Network Environment
Windows 95/98/Me, Windows NT 4.0, Windows 2000, Windows XP
Operating environment
-Temperature : 10°C to 35°C
-Humidity : 20% to 80% RH (no condensation allowed)
Storage environment
-Temperature : -10°C to 50°C
-Humidity : 20% to 90% RH (no condensation allowed)
EMI
VCCI Class B
FCC Class B
EN55022 Class B
EN55024
Page 9

2-9About PRICOM
Users Manual CX
Parts on PRICOM C-5100
Parts and Function
Bottom Back Bottom Back
Bottom Back Bottom Back
Bottom Back
(Bottom)
-Printer Port (Parallel Port)
Connect to parallel port of printer.
-Dip Switches (1-4)
The following list describes the function of each switch.
-Ethernet Address
The Ethernet Address of the device. The last 6 digits are the product’s serial number.
1 OFF Normal operating setting
2 ON Initialization/Reset to factory default upon power up
OFF Normal operating setting
3 ON Prints Diagnostic/Configuration report upon power up
OFF Normal operating setting
4 OFF Normal operating setting
STATUS LED
1 2 3 41 2 3 4
1 2 3 41 2 3 4
1 2 3 4
ONON
ONON
ON
OFFOFF
OFFOFF
OFF
Parallel Port
Dip Switches
Network Port
(10BASE-T/100BASE-TX)
LINK LED
Power Connector
<Initialization/Reset to factory default>
1. Switch off the printer. Make sure that PRICOM C-5100 is not connected to the AC adapter, then
switch on the dip switch No. 2.
2. Connect the AC adapter to PRICOM C-5100 and switch on the printer.
3. Unplug the AC adapter of PRICOM C-5100 and switch off the dip switch No. 2.
<Diagnostic/Configuration report>
1. Swtich off the printer. Make sure that PRICOM C-5100 is not connected to the AC adapter, and
then switch on the dip switch No.3.
2. Connect the AC adapter to PRICOM C-5100. Switch on the printer and the diagnostic report will
start.
Page 10

2-10About PRICOM
Users Manual CX
-Do not turn off the power supply until the LINK LED lights during initialization of PRICOM
C-5100.
-Do not turn off the power supply until the diagnostic report is completed during diagnostic
report of PRICOM C-5100.
-When normal operating setting, make sure that all dip switches are off.
-You can initialize PRICOM C-5100 from PRICOM User Software CX. For further
information, refer to chapter “III. Using PRICOM in a Windows Environment” of this on line manual.
-Diagnostic/Configuration report is not available with Canon Bubble Jet Printer. Do not
use the dip switch function.
(Back)
-Network Port (10BASE-T/100BASE-TX)
Connects to the network cable.
-10BASE LINK LED(Green)
Lights when a proper 10BASE-T network connection is established.
-100BASE-TX LINK LED(Green)
Lights when a proper 100BASE-TX network connection is established.
-STATUS LED(Orange)
Lights while the power is supplied. Flashes during data transfer.
-Power Connector
Connects to the AC adapter.
TIP
Page 11

2-11About PRICOM
Users Manual CX
Connect PRICOM C-5100 to the Printer
-Before connecting PRICOM C-5100 to the printer, make sure that the power cord of the
printer is unplugged.
-If you have already used PRICOM C-5100 in another network, make sure to initialize
PRICOM C-5100 to factory default. You can initialize PRICOM C-5100 from PRICOM
User Software CX. For further information, refer to chapter “III. Using PRICOM in a
Windows Environment” of this on-line manual.
Hardware Installation
TIP
1. Make sure that the printer is
switched off and unplug the power
cord of the printer. Attach PRICOM
C-5100 to the parallel interface port
of the printer.
Make sure that the AC adapter is not
connected to PRICOM C-5100 at this
time.
2. After PRICOM C-5100 and the
printer have been connected, make
sure that the printer is still switched
off. Then plug the power cord of the
printer into a power socket.
Page 12

2-12About PRICOM
Users Manual CX
Connection to the Network
1. Make sure that the AC adapter is not
connected to PRICOM C-5100, and
switch off the printer.
2. Connect the network cable to the
network port of PRICOM C-5100.
3. Connect the other end of the network
cable to the Ethernet HUB.
4. Connect the AC adapter to PRICOM
C-5100, then switch on the printer
and check for proper printer
functions.
Using an AC adapter other than the one supplied may cause damage.
When using PRICOM in a 100 BASE-TX environment, make sure to use a
100BASE-TX compatible HUB and twisted pair cable (Category 5 or above).
Ethernet HUB Network Cable
TIP
TIP
The following items are needed to connect PRICOM C-5100 to the network.
Prepare the following items.
Page 13

2-13About PRICOM
Users Manual CX
Specification
The main points of functionality are as follows.
Functional Specification
Automatic IP address configuration with DHCP, BOOTP, RARP
DHCP/BOOTP
PRICOM C-5100 supports the DHCP/BOOTP protocol. The IP address can be set within the network
where the DHCP/BOOTP server is operating.
-PRICOM C-5100 supports RARP protocols that are in accordance with RFC2131/2132.
-To use the DHCP function, please contact your network administrator.
RARP
The PRICOM C-5100 supports RARP protocol. The IP address can be set within the network where the
RARP server is operating.
-Please consult your network administrator when using the RARP function of PRICOM C-
5100.
IPP (TCP/IP)
PRICOM C-5100 supports the Internet Printing Protocol (IPP Version 1.0), that allows you to print
documents directly to any accessible printer via the Internet.
-A global IP Address should be assigned to the PRICOM C-5100 when printing at remote
area using PRICOM C-5100s IPP function. For detail, please consult your network
administrator.
Web Browser
The PRICOM C-5100 is equipped with HTTP server that allows you to monitor the printer status or
change the configuration of PRICOM C-5100 using a web browser. If the network is connected to the
internet, product suport information can be obtained.
-It is recommended to use the following web browsers to use the HTTP function: Internet
Explorer 3.0 (or higher) or Netscape Navigator 3.0 (or higher). If a different web browser
is used, make sure it is compatible with HTTP 1.0 (RFC1945) and HTML 2.0 (RFC1866).
-Assign IP address to PRICOM C-5100 and enable TCP/IP protocol to use HTTP function.
-During the initial configuration, the PRICOM C-5100 can not be accessed via web browser
as an IP address has not yet been assigned.
The PRICOM C-5100 supports Hewlett Packard’s print server Jet Direct function.
silex technology, Inc. original status monitor can be used with PJL compatible printers.
TIP
TIP
TIP
TIP
NOTE
Page 14

2-14About PRICOM
Users Manual CX
Hardware Specification
-CPU
32bit RISC CPU
-Memory
RAM : 2MByte
FLASHROM : 1MByte
-Network Interface
10BASE-T/100BASE-TX 1 port (automatic detection)
-Printer Interface
Centronics (36 pin Amphenole)
IEEE1284 parallel port (bidirectional)
-Others
DIP Switch : 4 bit
LED Lamp : 3 LEDs, one for Status (Orange), one for 10BASE Link
(Green), one for 100BASE Link (Green).
Page 15

2-15About PRICOM
Users Manual CX
Software Specification
Supported Protocol
TCP/IP, IPX Peer to Peer
TCP/IP
Network Layer : ARP, RARP, ICMP, IP
Session Layer : TCP, UDP
Application Layer : LPR, FTP, TELNET, BOOTP, SNMP, HTTP, DHCP,
IPP, #9100
IP Address can be set with Setup Utility.
silex technology, Inc. original setup protocol compatible.
IPX Peer to Peer
silex technology, Inc. original protocol compatible.
Page 16

2-16About PRICOM
Users Manual CX
Operating Environment
System requirements for the network connection
-Network cable (Category 5 in 100BASE-TX environment)
-USB Cable
-Ethernet HUB
-Printer or Canon Multifunction MP Series
Network Environment
Windows 95/98/Me, Windows NT 4.0, Windows 2000, Windows XP
Operating environment
-Temperature : 5°C to 35°C
-Humidity : 20% to 80% RH (no condensation allowed)
Storage environment
-Temperature : -10°C to 50°C
-Humidity : 20% to 90% RH (no condensation allowed)
EMI
VCCI Class B
FCC Class B
EN55022 Class B
EN55024
Section 3: PRICOM C-6200U
PRICOM C-6200U is a mini print server that supports 10BASE-T/100BASE-TX and has
a USB connection. This server supports the Canon Bubble Jet Printer Series, printers
equipped with CAPT, and multifunction printer. The print job process and printer status
can be checked visually through the status monitor of the Canon printer driver. In addition
to the print function, the scanner function and the card reader function of multifunction
printer can be shared over the network.
Page 17

2-17About PRICOM
Users Manual CX
DC5V IN
LAN
USB
Parts on PRICOM C-6200U
Parts and Function
TopTop
TopTop
Top
Bottom Bottom
Bottom Bottom
Bottom
BackBack
BackBack
Back
Right Side Right Side
Right Side Right Side
Right Side
(Top)
You can check the LED on the board.
-10BASE LINK LED(Green)
Lights when a proper 10BASE-T network connection is established.
-100BASE-TX LINK LED(Green)
Lights when a proper 100BASE-TX network connection is established.
-STATUS LED(Orange)
Flashes during data transfer.
10BASE LINK LED
(Green)
100BASE LINK LED
(Green)
STATUS LED (Orange)
Ethernet Address
(The last 6 digits are the product’s serial number)
Network Port
(10BASE-T/100BASE-TX)
USB Port
Power Connector
Push Switch
Page 18

2-18About PRICOM
Users Manual CX
(Bottom)
-Ethernet Address
The Ethernet Address of the device. The last 6 digits are the product’s serial number.
-Ethernet Address 00:80:92:18:0E: 1A is noted as 008092180E1A.
-The product’s number (serial number) is 180E1A.
(Back)
-Network Port (10BASE-T/100BASE-TX)
Connect to the network cable. In 100BASE-TX environment, use category 5.
-USB Port
Connect to the USB cable.
-Power Connector
Connect to the AC adapter.
(Right Side)
-Push Switch
By pushing this switch, you can initialize PRICOM C-6200U to factory default and print Diagnostic/
Configuration report.
<Factory Default>
1. Make sure that the AC adapter is not connected to PRICOM C-6200U.
2. While pushing the push switch, connect the AC adapter to PRICOM C-6200U.The STATUS LED
will blink once when the connection is made.
3. Continue to push the push switch for two seconds. The STATUS LED will blink again when
factory default is successfully completed. Remove your hand from the push switch.
<Diagnostic/Configuration report>
While PRICOM C-6200U is in use, push on the push switch for more than 5 seconds. The test print
will be executed. This is available only with printers with fonts.
-Do not turn off the power to PRICOM C-6200U while it is initializing to factory default.
-When PRICOM C-6200U is turned on again after factory default is completed or the
Diagnostic/Configuration report is executed, do not push on the push switch.
-Factory default can be executed from the PRICOM User Software CX. For further
information, refer to Chapter “III. Using PRICOM in a Windows Environment” of this on line manual.
-Diagnostic/Configuration report is not available with Canon Bubble Jet Printer. Do not
use the push switch function.
NOTE
TIP
Page 19

2-19About PRICOM
Users Manual CX
Connection to the Network
-If you have already used PRICOM C-6200U on another network, initialize PRICOM
C-6200U to factory default. You can initialize PRICOM C-6200U from PRICOM User
Software CX. For further information, refer to Chapter 3 of this on-line manual.
-PRICOM C-6200U can not be used with USB HUB.
-If you are using PRICOM C-6200U in a 100BASE-TX environment, prepare 100BASE
Ethernet HUB and network cable (Category 5).
To connect PRICOM C-6200U to the network, printer or complex machine, follow the
steps below.
1. Connect PRICOM C-6200U and the
Ethernet hub between the network
cable.
2. Connect the AC adapter to PRICOM
C-6200U and plug the power of the
printer or complex machine cord in
the outlet.
Ethernet HUB
Network Cable
USB Cable
TIP
Hardware Installation
Page 20

2-20About PRICOM
Users Manual CX
3. Connect the USB cable type “A” to PRICOM C-6200U and the USB cable type “B” to
the printer or complex machine.
-The shape of connector of the USB cable type “A” and that of type “B” are different from
each other. Check it with care.
<USB Cable Connector>
4. Turn on the printer or multifunction printer, and check that it works correctly.
-Using AC adapter other than the one supplied may cause problem.
-Do not connect any devices other than the printer, scanner or complex machine to the USB
port of PRICOM C-6200U through the USB cable.
-Give more than 2-second intervals for connecting and disconnecting the USB port.
-Do not disconnect the USB cable while printing, scanning, reading, or writing in the memory
card.
TIP
Type A
NOTE
TypeB
Page 21

2-21About PRICOM
Users Manual CX
Specification
The main points of functionality are as follows:
Functional Specification
Automatic IP address configuration with DHCP, BOOTP, RARP
DHCP/BOOTP
PRICOM C-6200U supports the DHCP/BOOTP protocol. The IP address can be set within the network
where the DHCP/BOOTP server is operating.
-PRICOM C-6200U supports DHCP protocols that are in accordance with RFC2131/2132.
Windows NT 4.0 and DHCP servers of Windows 2000 are supported.
-To use the DHCP function, please contact your network administrator.
RARP
The PRICOM C-6200U supports RARP protocol. The IP address can be set within the network where the
RARP server is operating.
-Please consult your network administrator when using the RARP function of PRICOM C6200U.
IPP (TCP/IP)
PRICOM C-6200U supports the Internet Printing Protocol (IPP Version 1.0), that allows you to print
documents directly to any accessible printer via the Internet.
-A global IP Address should be assigned to the PRICOM C-6200U when printing at remote
area using PRICOM C-6200U’s IPP function. For detail, please consult your network
administrator.
Web Browser
The PRICOM C-6200U is equipped with HTTP server that allows you to monitor the printer status or
change the configuration of PRICOM C-6200U using a web browser. If the network is connected to the
internet, product support information can be obtained.
-It is recommended to use the following web browsers to use the HTTP function: Internet
Explorer 3.0 (or higher) or Netscape Navigator 3.0 (or higher). If a different web browser
is used, make sure it is compatible with HTTP 1.0 (RFC1945) and HTML 2.0 (RFC1866).
-Assign IP address to PRICOM C-6200U and enable TCP/IP protocol to use HTTP function.
-During the initial configuration, the PRICOM C-6200U can not be accessed via web browser
as an IP address has not yet been assigned.
TIP
TIP
TIP
TIP
Page 22

2-22About PRICOM
Users Manual CX
Scanner Server function
If PRICOM C-6200U is used with a multifunction printer, the scanner function of the multifunction printer
can be shared over the network by using PRICOM USB utility bundled with the product.
-The scanner server function is supported only in Windows2000/WindowsXP.
-The PRICOM C-6200U can physically connect to one multifunction printer.
Storage Server function
The card reader function of multifunction printer can be shared over the network using the NetBEUI/
NetBIOS protocol and the PRICOM C-6200U.
-Printing using NetBEUI/NetBIOS protocol is not supported.
-The PRICOM C-6200U can physically connect to only one multifunction printer.
TIP
TIP
Page 23

2-23About PRICOM
Users Manual CX
Hardware Specification
-CPU
32bit RISC CPU
-Memory
RAM : 8MByte
FlashROM : 1MByte
-Network Interface
10BASE-T/100BASE-TX 1 port (automatic detection)
-USB Interface
A Port
-Others
Push Switch : 1 button
LED Lamp : 3 LEDs, one for Status (Orange), one for 10BASE Link
(Green), one for 100BASE Link (Green).
Page 24

2-24About PRICOM
Users Manual CX
Software Specification
Supported Protocol
TCP/IP, IPX Peer to Peer, NetBEUI
TCP/IP
Network Layer : ARP, RARP, ICMP, IP
Session Layer : TCP, UDP
Presentation Layer : WINS
Application Layer : LPR, FTP, TELNET, BOOTP, SNMP, HTTP, DHCP,
IPP, #9100, NetBIOS over TCP
IP Address can be set with Setup Utility.
Supports silex technology, Inc. original setup protocol .
IPX Peer to Peer
Supports silex technology, Inc. original protocol .
NetBEUI
SMB, NetBIOS
-Windows embedded printing client functions; LPR/IPP/FTP are not supported when you
connect PRICOM to CAPT compatible printers.
Please use PRICOM-Print CX in the CD-ROM attached to the product.
TIP
 Loading...