

Page 1

Table of Contents
System Overview.................................................... 1
PINs (Personal ID Codes)....................................2
Code 2 ...................................................................... 2
Normal User............................................................. 2
Maintenance Code.................................................... 2
Installer Code........................................................... 3
Basic Touchpad Operation...................................4
Touchpad Buttons..................................................... 5
System Status Lights................................................. 7
Access Control Operation.....................................9
Opening an Access Controlled Door........................ 9
U
Using the Anti-Passback Feature....................... 9
U
Changing Door Lock/Unlock Schedules........... 10
U
Viewing Door Status......................................... 11
Single-Area Operation ......................................... 12
U
Arming/Disarming the Entire System ............... 12
U
Arming/Disarming Perimeter Zones................. 13
U
Arming/Disarming with Entry/Exit Delays....... 13
U
Activating Auto Arm ......................................... 14
U
Cancelling Auto Arm........................................ 14
U
Bypassing Zones............................................... 15
U
Unbypassing Zones........................................... 16
U
Activating/Deactivating Code 2........................ 17
U
Activating/Deactivating the Chime Feature ..... 17
Multi-Area Operation............................................18
Special Information for Multi-Partition Maintenance
Personnel................................................................18
U
Arming/Disarming All Areas............................ 19
U
Arming/Disarming a Specific Area................... 20
U
Arming/Disarming Perimeter Zones................. 20
U
Arming/Disarming with Entry/Exit Delays....... 21
U
Activating Auto Arm ......................................... 22
U
Cancelling Auto Arm........................................ 23
U
Bypassing Zones............................................... 23
U
Unbypassing Zones........................................... 24
U
Activating/Deactivating Code 2........................ 25
U
Activating/Deactivating the Chime Feature ..... 25
Other Important Features.....................................27
U
Activating a Duress (Holdup) Alarm............27
U
Pressing the Emergency keys........................27
U
Adding, Changing, Removing Users.............27
Setting System Time and Date............................30
Set Time.................................................................. 30
Set Date .................................................................. 30
Viewing System Status .......................................31
Pressing the STAT Button....................................... 31
i
Page 2

STATUS: LCD Display...........................................31
Default LCD Display.............................................. 31
Viewing Zone Descriptions................................31
System Testing................................................... 32
U
Auto Test........................................................... 32
U
Dialer Test........................................................ 32
Emergency Procedures ....................................... 33
In Case of Accidental Activation........................ 33
When an Alarm Occurs...................................... 33
Silencing Alarms................................................ 34
Troubleshooting...................................................35
Identifying Sounds ............................................. 35
Power Outages (No AC Power) ......................... 36
Accidental Activation.........................................36
Touchpad Display Reads “System Trouble”...... 36
Not Ready Zones................................................36
System Messages................................................ 37
Terms Used in This Manual................................. 43
Quick Reference...................................................45
ii
Page 3

iii
Page 4

System Overview
Your Model 4821 security system can protect your
building using sensing devices such as door contact
switches and motion detectors. These devices
provide 24-hour electronic surveillance detection
and reporting.
The 4821 can monitor up to 400 separate zones,
which are simply protected areas in your building
such as doors and windows. Through touchpads and
audible signals, you can quickly identify which part
of your system is in alarm. You can also disarm
selected areas in your building, while other areas are
still armed.
Touchpads are normally installed in main office
areas and building entries for convenient operation.
Programmable in many ways, they provide an
extremely high degree of tamper-resistant security.
Access Control
The 4821 can provide controlled access at up to 24
door access stations.
Attempted Burglary (Intrusion)
It is important to arm your system whenever your
building is not occupied. You can arm and disarm
your system from any of the touchpads if you have
the appropriate access code.
Entry and exit delays give you an adjustable, preprogrammed amount of time to enter or leave after
arming or disarming the system without activating
alarms.
Fire and Smoke Detection (Not UL Listed)
Your system monitors for fire even when your
system is disarmed. When the system detects a fire,
a local alarm sounds and your installer’s central
station is notified.
Auxiliary Conditions
A variety of auxiliary alarms can be programmed to
be sent to the appropriate officials or environmental
service companies under prescribed conditions such
as non-medical emergencies and equipment
malfunctions.
1
Page 5

Your system can communicate information about
emergency conditions through the telephone lines to
a central monitoring station. If your system is
programmed to automatically notify the central
station when an alarm occurs, they will dispatch the
appropriate authorities to your building when they
receive a signal. See page 33 for more details.
2
PINs (Personal ID Codes)
A PIN is a confidential 4- to 8-digit number you
enter on a system touchpad that enables you to
perform various system functions, including door
access. Your installer will program the PINs you
need to operate your system.
Important
To comply with industry standards, this product is
equipped with line seizure. This means that any time
the system dialer needs to communicate with the
central station, you cannot use any telephones that
are on the same lines as the security system.
If the phone is in use when the dialer needs to contact
the central station, a warning tone will sound for 10
seconds before the system seizes the line.
This condition will normally last less than one
minute, but under faulty telephone circuit conditions,
could last as long as 15 minutes.
Code 2
(Lowest Privilege Level)
This code enables a temporary user of your system
to arm and disarm, but it can be used only when the
Code 2 function is active (see page 16 or 25). Code
2 users can operate the system only during a
timeframe that is determined by the main user.
Normal User
Normal users can arm and disarm the system and
perform most functions described in this manual.
Maintenance Code
This access code has the same capabilities as a
Normal user, but also enables users to run system
Page 6

tests, upload/download software changes, and add or
delete users to the system.
Note: Your installation company representative can
tell you how to perform these functions.
Installer Code
(Highest Privilege Level)
Your system installer uses this code to install and
initially program your system. It provides access to
all system functions, both from the touchpads and
from the central station (through the telephone lines).
If you do not want the installation company to have
access to your system once it has been installed, ask
the installer for the installation code and instructions
for changing it. Once you change the code, only you
can arm and disarm the system. If you need to
change the programming of your system, you will
have to give the installation company the new code.
Talk to your installer; there are many reasons why
you might want your installation company to be able
to access your system at any time.
3
Page 7
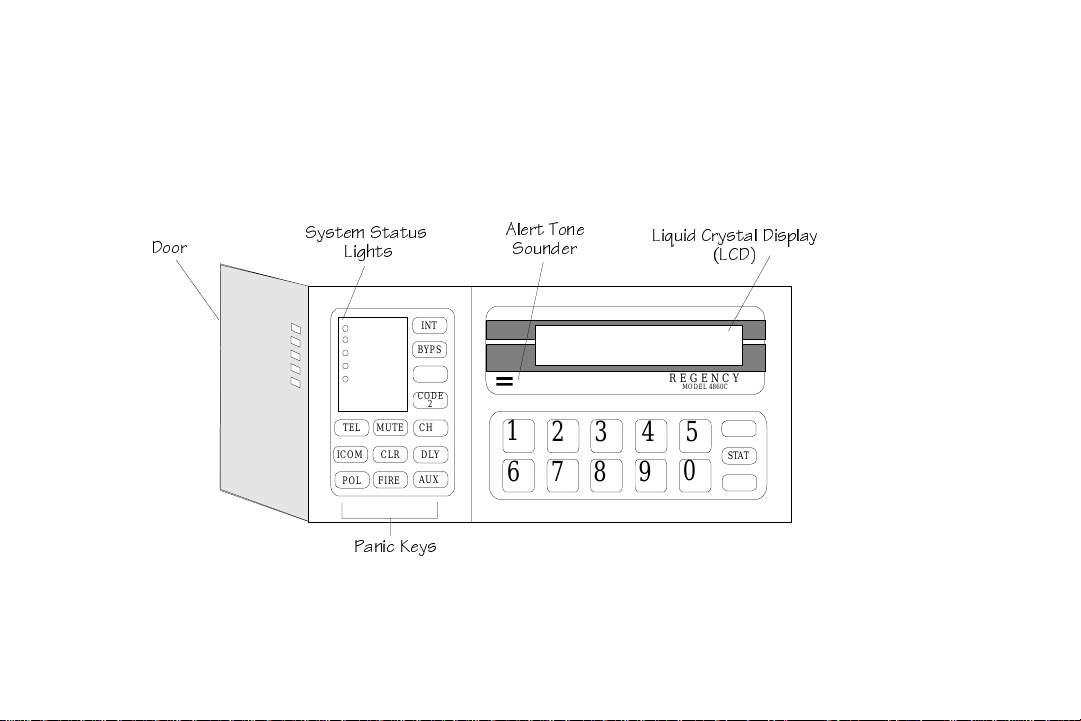
Basic Touchpad Operation
Your system can display two messages, each with two lines of text, that alternately display on all of your touchpad
LCDs. These messages often include the date and time, but you can have your installer customize them for you.
One steady message can also be displayed. For some installations, an interactive menu displays the options
available to you on the second line of the LCD. The display rate of these options is programmable.
4
4__b
CicdU] CdQdec
<YWXdc
READY
ARMED
NO DELAY
INTERIOR
CHIME
MUTE
TEL
CLRICOM
POL
FIRE
INT
BYPS
MEM
CODE
2
CHM
DLY
AUX
1\Ubd D_^U
C_e^TUb
Thu Aug 31 1995
03:35 PM
1
2
34
789
6
<YaeYT 3bicdQ\ 4Yc`\Qi
REGENCY
MODEL 4860C
5
0
OFFON
@Q^YS ;Uic
Figure 1. Model 4860C Commercial LCD Touchpad
<34
ENTR
STAT
DOOR
4860c
Page 8
Touchpad Buttons
For operating an access controlled
door.
Activates/deactivates interior zones.
Used to bypass individual zones and
to check which zones have been
bypassed.
Displays event history. This key is
typically used only by your system
installer.
Enables Code 2 users to arm or
disarm the system.
Silences alarm/trouble sounds at
speakers and touchpads. In the
interactive menu system, the LCD
indicates whether it will silence all
areas or the area that you are in.
Also exits some menus.
Controls whether or not a chime tone
will sound when someone enters a
Chime zone while the system is
disarmed.
Erases a mistake made while
entering a code or command.
Toggles zone status between delayed
and instant. When the system is
armed and the NO DELAY LED is
on, zones programmed for entry and
exit delay will be instant.
Police key. If enabled through
programming, transmits an alarm to
the central station for dispatching the
police. This key must be held for
one full second.
5
Page 9
6
Fire key. If enabled through
programming, transmits an alarm to
the central station for dispatching the
fire department. This key must be
held for one full second.
Auxiliary key. If enabled through
programming, transmits a special
alarm to the central station for
dispatching the proper authorities.
This key must be held for one full
second.
To arm (turn ON) your
system, enter your code and
press this button.
To disarm (turn OFF) your
system, enter your code and
press this button.
Other number keys are for entering
numeric data, typically PIN / access
codes.
In programming mode, accepts
programmed options (similar to an
Enter key on a computer). Also
exits interactive menus.
View system status. Displays active
alarms and trouble conditions. Also
displays Not Ready zones.
Note: The
TEL
and
ICOM
touchpad but are not used.
keys appear on the
Page 10
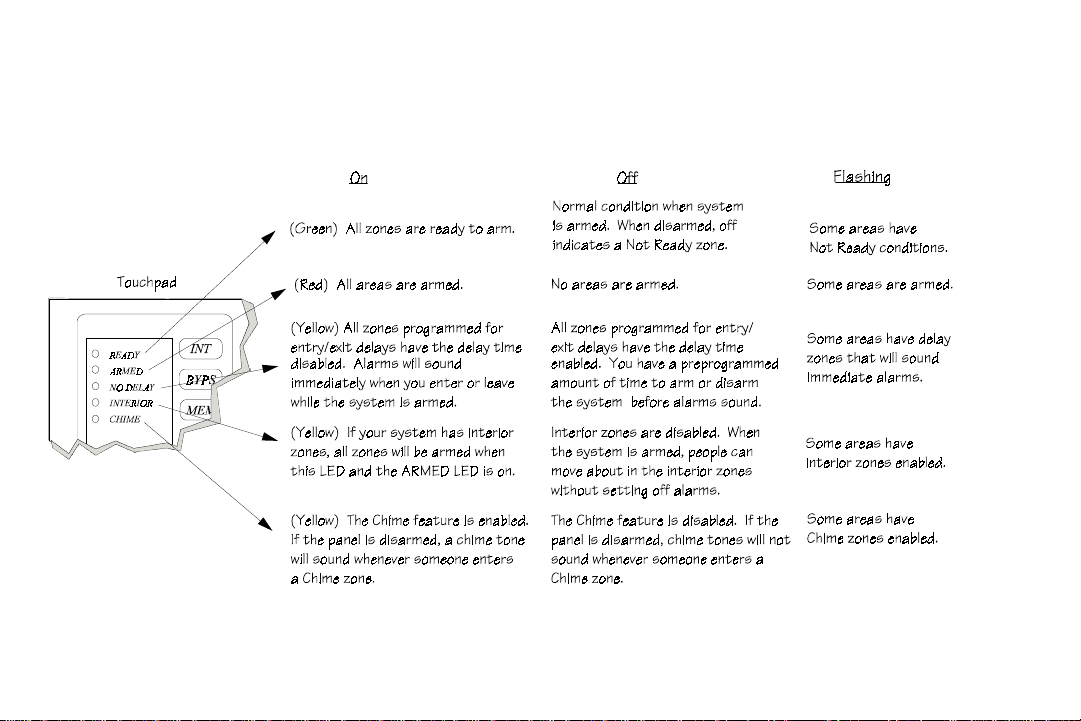
System Status Lights
The light-emitting diodes (LEDs) reflect only the areas controlled by the touchpad.
Figure 2. System Status Lights
7
Page 11

Access Control Operation
access. Both a card and a PIN are required to gain
access.
Opening an Access Controlled Door
To open a door
Present your card to the card reader. You will hear a
click and the red LED will turn on indicating that the
door can be opened.
OR
DOOR
Press
plus your PIN.
To open a door for another person
This operation would apply at a door station where a
receptionist, security guard, or other person “buzzes
in” another person after identification.
Enter the device ID number of the door, then press
DOOR
and your PIN. You may hear a click or other
sound indicating that the door can be opened.
U
To open a high security door
High security doors are used to secure areas within
an installation that not all employees are allowed to
Present your card. The touchpad will display
CODE
. Enter your PIN.
Using the Anti-Passback Feature
DOOR ENTR
Menu
ENTER
Anti-passback means preventing one user from
giving access to another person by passing
back
his
or her card after accessing a door. When the antipassback feature is used, the system keeps track of
each user in the building. A user cannot enter twice;
he or she must follow every Entry with an Exit.
DOOR ENTR
The
menu is for changing users’ anti-
passback status so that they can access or be
prevented from accessing the system.
Press
DOOR ENTR
[Code].
The menu options shown on the next page will begin
displaying.
9
Page 12
1 - User Status
Use to check the user’s current status (for example,
Inside or Outside).
2 - Forgive
Forgive means allow the user to enter or exit a door
even though the system has detected a problem with
the user’s anti-passback status.
3 - Lockout User
Change the user’s status so he or she will be unable
to enter the building.
4 - Num User In
Use this option to see how many users, according to
the system, are currently inside the building.
5 - Forgive All
Reset anti-passback status and allow all users to
enter the next time they attempt door access.
MUTE - Exit
MUTE
Press
to exit the menu.
Changing Door Lock/Unlock Schedules
DOOR BYPS
Menu
This menu is for changing door access schedules
from the touchpad. You can use this feature to
temporarily override door schedules. Any operations
made using the touchpad will be overridden the next
time the schedule for the door takes effect.
To activate the door schedule menu:
From the touchpad assigned to the current door,
press
DOOR BYPS
[Code].
From any touchpad, enter the number of the door,
DOOR DOOR
#4, press
[Code]. For example, to access Door
4 DOOR BYPS
[Code].
The status of the door will display for a few seconds,
then a menu with the following options will begin
scrolling.
0 - Unlock Door
Unlocks the door until the next scheduled lock time.
Use this option to unlock a door that is currently
10
Page 13

scheduled to be locked. All users will be able to
access the door.
9 - Lock Door
Locks the door until the next scheduled unlock time.
Use this option to lock a door that is currently
scheduled to be unlocked. No users will be able to
access the door without a card or PIN.
1 - To Sched
Restores the selected door to its scheduled setting.
2 - All Sched
Restore all doors to their scheduled settings.
3 - All Locked
Lock all doors. Overrides all door schedules.
4 - Select Door
Select another door to lock or unlock.
5 - Access Door
Open a door to allow individual access (not the same
as unlocking).
STAT - STATUS
View the status of the door.
Viewing Door Status
DOOR STAT
Press
[Code] to view status of a door.
A list of doors and their locked/unlocked status
displays.
11
Page 14
Single-Area Operation
Note: Multi-area instructions are on page 18.
For a typical single-area installation, pressing a
button on the touchpad simply toggles the function
on or off (see page 5 for touchpad button
descriptions). However, depending on how the
installer programs your system, the touchpad may
prompt you to first enter a code or enable you to use
interactive menus to activate functions.
Since the operating instructions for a toggle system
vary slightly from a menu system, both methods of
operation are included in this section. Your installer
can tell you what method to use and check (;)
which options are programmed for your system.
Arming/Disarming the Entire System
U
U
When your system is armed, your building is
protected so that alarms will sound if the system
senses an intruder.
When your system is disarmed, you can move freely
throughout the premises without causing an alarm.
U
Toggle Method
Enter your code.
Your system may be programmed to automatically
arm the interior zones when you enter your code. If
your system is not programmed this way, first press
INT
to arm the interior zones.
U
Menu Method
Users can arm/disarm only the areas they can access.
1. Enter a code. A STATUS: display on the LCD
indicates that you are in the interactive menus
(see page 31 for system status messages).
2. If your system is not programmed to
automatically arm the interior zones when you
INT 9
arm the system, press
INT 0
or
3. Press
to turn off interiors.
to arm or to disarm.
to turn on interiors
What Happens
The LCD will return to the normal display.
12
Page 15
When you arm the entire system, the ARMED and
INTERIOR LEDs are on.
When you disarm the entire system, the ARMED
and INTERIOR LEDs are off and the green READY
LED is on.
2. If your system is programmed to automatically
arm the interior zones when you arm the system,
INT 0
press
3. Press
to turn off the interior zones.
to arm or to disarm.
Arming/Disarming Perimeter Zones
If desired, you can arm only the perimeter zones,
enabling free movement throughout interior zones.
U
Toggle Method
1. Enter your code.
2. If your system is programmed to automatically
arm the interior zones when you arm the system,
INT
you will have to press
to disarm the
interior zones (only the perimeter zones will
then be armed).
U
Menu Method
1. Enter a code to access the interactive menus.
What Happens
The ARMED LED is on and the INTERIOR LED is
off when you arm the perimeter zones.
Arming/Disarming with Entry/Exit Delays
Delay times are a number of seconds allowing you to
leave or enter your building without setting off an
alarm.
What Happens
If the system has been programmed for an Exit
Delay, once you arm the system, the touchpad beeps
and the LCD begins displaying the number of
seconds before an alarm will sound. If your system
has been programmed for an Entry Delay, the
touchpad beeps and the LCD displays the number of
seconds before the system arms.
13
Page 16

Activating Auto Arm
Note: Auto Arm cannot be used in UL installations.
If your system is programmed for the Auto Arm
feature, it can arm itself automatically. All you have
to do is enter the number of minutes for the system
to count down before arming.
When you set the arm time, the display will always
show the default time of 10 minutes, not the previous
arm time. (This option is not available with toggle
systems.)
1. Enter a code. A
STATUS:
display on the LCD
indicates that you are in the interactive menus
(see page 31 for system status messages).
1
2. Press
for Set Arm Time.
3. Enter the number of minutes before auto arming
ENTR
goes into effect, then press
ENTR
to accept the default number of minutes).
4. Press
ENTR
to return to the normal display.
(or just press
What Happens
The LCD will return to the normal display and the
next automatic arming will occur at the new time.
A warning message displays telling you how many
minutes are left before automatic arming begins.
Cancelling Auto Arm
If your system is programmed to arm automatically,
you can manually turn off this feature.
Resetting the time and date (page 29) automatically
cancels auto arming or you may enter zero minutes
for the Arm Time. (This option is not available with
toggle systems.)
To cancel the time when automatic arming would
occur:
1. Enter a code to activate the interactive menus.
1
2. Press
3. Press
for Set Arm Time.
CLR 0
to erase the default number of
minutes (10) before auto arming goes into effect,
ENTR
then press
.
14
Page 17

What Happens
The LCD will return to the normal display and the
next automatic arming will be cancelled.
Bypassing Zones
Bypassing a zone means temporarily turning off
protection to a point in your building. For example,
you may want to leave a door or window open
without activating alarms when the rest of your
building is armed.
You may also need to bypass a zone when you have
a Not Ready condition that cannot be immediately
corrected. (See page 36 for information about Not
Ready conditions.)
Do not bypass zones unless it is necessary. You
cannot bypass fire or other 24-hour zones.
2. Press
BYPS
.
3. Enter code, if necessary. (When the system is
armed, it prompts you for a code.)
Menu Method
1. Enter a code to activate the interactive menus.
BYPS
2. Press
. You can then press 0 to see which
zones are already bypassed.
3. Press
4. Enter the zone number and press
1
to bypass a zone.
ENTR
.
5. Repeat steps 3 and 4 to bypass other zones, or
press
ENTR ENTR
to exit.
To see what zones are already bypassed, press the
BYPS
button.
Toggle Method
1. Press the number of the zone to bypass.
What Happens
Protection is turned off for the zone and the system
will not detect alarms. The LCD will display a
description and number of the bypassed zone. A
message also follows the normal display on the LCD
to remind you that a zone is bypassed.
15
Page 18

Unbypassing Zones
Reinstating (unbypassing) a zone means turning the
BYPS
protection back on. You can press the
button
to see what zones are currently bypassed.
Reinstate bypassed zones as soon as possible so that
you do not accidentally leave a zone unprotected.
You cannot unbypass zones if doing so will cause an
alarm.
Note: Some systems can be programmed to
automatically reinstate any bypassed zones when the
system is disarmed.
Toggle Method
1. Press the number of the zone to reinstate.
BYPS
2. Press
.
3. Enter code, if necessary. (When the system is
armed, it prompts you for a code.)
Menu Method
1. Enter a code to activate the interactive menus.
2. Press
BYPS .
3. Press 2 to unbypass a zone.
4. Enter the zone number and press
ENTR
.
5. Repeat steps 3 and 4 to unbypass other zones, or
press
ENTR ENTR
to return to the normal
display.
What Happens
The LCD will display a description and number of
the reinstated zone.
16
Page 19

Activating/Deactivating Code 2
When Code 2 is enabled, temporary users (such as a
cleaning service) with a Code 2 access code can arm
or disarm your system.
Both Methods
1. Press
CODE 2
+ Code. The LCD displays
whether the Code 2 function is enabled or
disabled.
2. You can press
0
to disable Code 2 or
9
to
enable Code 2.
What Happens
When Code 2 is enabled, temporary users (such as a
cleaning service) with a Code 2 access code can arm
or disarm your system.
Activating/Deactivating the Chime Feature
The Chime feature is used to sound a tone when
someone enters a Chime zone. For example, your
system can sound a tone whenever someone enters or
leaves the house through the back door. This is
normally used when the system is disarmed.
Toggle Method
CHM
.
To turn on the chime tones, press
To turn off the chime tones, press
CHM
.
Menu Method
CHM
1. Press
2. Press
.
9
to activate (turn on) or 0 to deactivate
(turn off) the chime feature.
What Happens
The CHIME LED will be on when the Chime feature
is activated. A tone sounds whenever someone
enters or leaves a Chime zone.
17
Page 20

Multi-Area Operation
For multi-area installations, the system is divided
into multiple areas for separate access and arming
capabilities in each area of the building.
How you operate your system depends on how your
system is configured. In a toggle system, pressing a
button on the touchpad simply toggles the function
on or off (though you may have to first enter your
code). The function activated or deactivated affects
only the areas that you are allowed to access. See
page 5 for touchpad button descriptions.
In a menu system, an interactive menu guides you
through a particular task by displaying options for
your area. You can activate functions by selecting
options from these menus. Figure 3 shows the main
interactive menu display.
Since the operating instructions for a toggle system
vary slightly from a menu system, both methods of
operation are included in this section. Your installer
can tell you what method to use and which options
(;) are programmed for your system.
6Ybcd <Y^U
1 9^ Q\Qb]
H 3b_cc 1\Qb]
1 1b]UT
4 1b] 4U\Qi
D Db_eR\U
> >_d BUQTi
B BUQTi d_
RU Qb]UT
CUS_^T <Y^U
1fQY\QR\U
?`dY_^c
?^ dXYc TYc`\Qi QbUQc ! Q^T " QbU TYcQb]UT QbUQ #
Yc Qb]UT Q^T QbUQ $ Yc Y^ Q\Qb] DXUecUb T_Uc ^_d
XQfU QSSUcc d_ QbUQc %( _b dXUi T_ ^_d UhYcd
1bUQc !(
AREAS:RRAA---0-Disarm/Reset
Figure 3. Interactive Main Menu
Special Information for Multi-Partition
Maintenance Personnel
If you have access to multiple partitions within a
system, you will need to enter the number of the
partition before you perform any functions in the
partition. (In a UL listed installation, multipartitioning can be used only in single-owner
installations.)
18
area_arm
Page 21

Arming/Disarming All Areas
When your system is armed, your building is
protected so that alarms will sound if the system
senses an intruder.
When your system is disarmed, you can move freely
throughout the premises without causing an alarm.
Toggle Method
Enter your code.
If your system is not programmed to automatically
arm the interior zones when you arm the system, you
will have to first turn on the interior zones in each
area before arming. Use the following steps:
1. Enter a code. A
STATUS:
display on the LCD
indicates that you are in the interactive menus
(see page 31 for system status messages).
2. Enter the number of the area where you want to
turn on the interior zones.
Your system may be programmed to automatically
arm the interior zones when you enter your code. If
your system is not programmed this way, first press
INT
+ code to arm the interior zones.
Menu Method
Users can arm/disarm only the areas they can access.
If your system is programmed to automatically arm
the interior zones when you arm the system, follow
these steps:
1. Enter a code to access the interactive menus.
2. Press
to arm or to disarm all areas.
INT
3. Press
to turn on the interior zones. (Your
system must be programmed for interior zones in
this area).
Repeat Steps 2 and 3 for each area where you
want to turn on the interior zones.
ENTR
4. Press
5. Press
to return to the normal display.
to arm or to disarm all areas.
What Happens
When your system is armed, the ARMED and
INTERIOR LEDs are on to indicate that the entire
19
Page 22

system is armed. Flashing indicates that only some
areas are armed.
When your system is disarmed and all zones are
ready, the ARMED LED is off and the green
READY LED is on.
Arming/Disarming a Specific Area
Users can arm/disarm only the areas they can access.
(Operates the same for all systems.)
1. Enter a code. When
STATUS:
displays on the
LCD, it indicates that you are in the interactive
menus (see page 31 for system status messages).
2. Enter the number of the area that you want to
arm or disarm.
3. Your system can be programmed to
automatically turn on the interior zones when you
arm an area. For systems not programmed this
INT
way, press
4. Press
to arm the interior zones.
to arm this area or to disarm.
Repeat Steps 2-4 for each area you want to arm.
5. Press
ENTR ENTR
to exit.
What Happens
When your system is armed, the ARMED and
INTERIOR LEDs are on. Flashing LEDs indicate
that some areas are disarmed (the area you just
armed will still be armed).
When your system is disarmed, the ARMED LED is
off and the green READY LED is on.
Arming/Disarming Perimeter Zones
You can arm only the perimeter zones, enabling free
movement throughout interior zones.
Toggle Method
1. Enter your code.
2. If your system is programmed to automatically
arm the interior zones when you enter your
INT
code, press
to turn off the interior zones.
20
Page 23

Menu Method
If your system is not programmed to automatically
arm the interior zones when you arm the system,
follow these steps:
1. Enter a code to access the interactive menus.
2. For all areas, press
to arm or to disarm
(for individual areas first select the area number).
3. Press
ENTR ENTR
to return to the normal
display.
If your system is programmed to automatically arm
the interior zones when you arm the system, you will
have to turn off the interior zones in each area before
arming. Use the following steps:
1. Follow Steps 1-3 above.
2. Enter the number of the area where you want to
turn off the interior zones.
INT
3. Press
. (Your system must be programmed
for interior zones in this area).
Repeat Steps 2 and 3 for each area where you
want to turn off the interior zones.
4. Press
ENTR
to return to the normal display.
What Happens
When you arm the perimeter zones, the ARMED
LED is on. If the INTERIOR LED is also on, then
the interior zones are also protected. When the
INTERIOR LED is off, you can move freely within
the interior zones, but the perimeter zones are armed.
Flashing LEDs indicate that not all areas are armed.
Arming/Disarming with Entry/Exit Delays
Delay times give you time to leave your building
after arming and return to your building to disarm
your system without setting off alarms. The same
instructions for “Arming/Disarming All Areas”
applies; however, you must enter your access code
within a specified number of seconds. (The number
of seconds is programmed by your installer.)
The system beeps as the LCD displays the number of
seconds before the system arms or an alarm sounds.
21
Page 24

Activating Auto Arm
Note: Auto Arm cannot be used in UL installations.
If your system is programmed for the Auto Arm
feature, the system can automatically arm itself. All
you have to do is enter the number of minutes for the
system to count down before arming.
Note that when setting the arm time, the display will
always show the default time of 10 minutes (not the
previous arm time).
1. Enter code to activate the interactive menus.
2. Enter the number of the area in which to initiate
auto arming.
1
3. Press
for Set Arm Time.
4. Enter the number of minutes before auto arming
ENTR
goes into effect, then press
ENTR
to accept the default number of minutes).
(or just press
5. Repeat Steps 2-4 to activate auto arming in other
ENTR
o exit.
areas, or press
t
6. Press
*Note: This feature is not available with toggle systems.
ENTR
to return to the normal display
.
What Happens
The LCD will return to the normal display and the
next automatic arming will occur at the new time. A
message appears after the normal display messages
warning you of how many minutes are left before
automatic arming begins.
22
Page 25

Cancelling Auto Arm
If your system is programmed to arm automatically,
you can manually turn off this feature.
Resetting the time and date (page 29) automatically
cancels auto arming.
1. Enter code to access the interactive menus.
2. Enter the number of the area in which you want
to cancel the auto arming.
1
3. Press
4. Press
for Set Arm Time.
CLR 0
to erase the default number of
minutes (10) before auto arming goes into effect,
ENTR
then press
.
5. Repeat Steps 2-4 to cancel auto arming in other
ENTR
o exit.
areas, or press
6. Press
*Note: This feature is not available with toggle systems.
ENTR
to return to the normal display
t
.
What Happens
The next automatic arming of the system will be
cancelled.
Bypassing Zones
Bypassing a zone means temporarily turning off
protection to a part of your building. This enables
you to access that zone and still protect the other
areas in your building. You may also need to bypass
a zone if you have a Not Ready condition that cannot
be immediately corrected. (See page 36 for
information about not ready conditions.) You
should not bypass fire or other 24-hour zones.
You can press
1 STAT
to see what zones are
available in each area.
Toggle Method
To see what zones are already bypassed, press the
BYPS
button.
1. Press the number of the zone to bypass.
BYPS
2. Press
.
23
Page 26

3. Enter code, if necessary. (When the system is
armed, it prompts you for a code.)
Menu Method
1. Enter a code to activate the interactive menus.
2. Enter the area number where the zone you want
to bypass is located (if prompted).
BYPS .
3. Press
You can then press 0 to see which
zones are already bypassed.
4. Press
5. Enter the zone # and press
1
to bypass a zone.
ENTR
.
6. Repeat Steps 4 and 5 to bypass other zones, or
ENTR
o exit.
press
t
What Happens
Protection is turned off for the zone and the system
will not detect alarms. The LCD displays the area
and the zone bypassed. A message also follows the
normal display telling you that a zone is bypassed.
24
Unbypassing Zones
Reinstating (unbypassing) a zone means turning the
BYPS
protection back on. You can press the
button
to see what zones are currently bypassed.
Reinstate bypassed zones as soon as possible so that
you do not accidentally leave a zone unprotected.
You cannot unbypass zones if doing so will cause an
alarm.
Note: Some systems can be programmed to
automatically reinstate any bypassed zones when the
system is disarmed.
Toggle Method
1. Press the number of the zone to reinstate.
BYPS
2. Press
+ code (if prompted).
Menu Method
1. Enter a code to activate the interactive menus.
2. Enter the area number where the zone you want
to bypass is located (if necessary).
Page 27

3. Press
BYPS .
4. Press 2 to unbypass a zone.
ENTR
5. Enter the zone number and press
.
6. Repeat Steps 4 and 5 to bypass other zones, or
ENTR
o exit.
CODE 2
t
+ code. The LCD displays
press
U
Activating/Deactivating Code 2
U
1. Press
whether the Code 2 function is enabled or
disabled.
Activating/Deactivating the Chime
Feature
The Chime feature is used to sound a tone when
someone enters a Chime zone. For example, your
system can sound a tone whenever someone enters or
leaves the house through the back door. This is
normally used when the system is disarmed.
U
Toggle Method
CHM
CHM
.
.
To turn on the chime tones, press
To turn off the chime tones, press
2. Press
3. Press
0
to disable or
MUTE
to exit.
9
to enable Code 2.
Note: This feature operates the same for all systems.
What Happens
When Code 2 is enabled, temporary users (such as a
cleaning service) with a Code 2 access code can arm
or disarm your system.
U
Menu Method
1. Enter a code to activate the interactive menus.
2. Enter the area number where the zone you want
to turn on chime tones is located.
CHM
ENTR
.
to exit.
3. Press
4. Press
25
Page 28

5. Repeat steps 2-4 to turn the Chime feature on or
ENTR
off in other areas, or press
to return to the
normal display.
What Happens
The CHIME LED will be on when you turn on the
Chime feature. A tone sounds whenever someone
enters or leaves a Chime zone.
The LED will not light if you try to activate chime
sounds in an area where this feature is not enabled
through programming.
A flashing LED indicates that the Chime feature is
not active in all areas.
26
Page 29

Other Important Features
This section of the manual describes operation of
other system features. These features operate the
same whether you are using a single- or multi-area
system.
Activating a Duress (Holdup)
Alarm
Press 1 or 2 digits assigned as duress digits, followed
by your access code.
The system will transmit a silent alarm to the central
station indicating that the user is being forced to
disarm the system. In response, central station
personnel will dispatch the proper authorities.
The system automatically calls the central station. In
response, the central station will dispatch the police,
fire department, or other emergency personnel.
Each of these keys must be programmed by your
installer to be active. Not all keys will be enabled for
all installations.
Adding, Changing, Removing
Users
Your system may be configured so that new users
are added or removed by your installation company.
If that is the case, you will not need to use this
section.
If you will be adding, changing, or removing
users from your own system, follow the steps in this
section.
Pressing the Emergency keys
FIRE, POL
Press
press these keys for at least one full second to
activate the alarms.
or
AUX
as needed. You must
Adding Users
1. Press
7 ENTR
Installer code or maintenance code to perform
this function).
+ Code (you must use the
27
Page 30

The first line of the LCD will show
Id:
The second line will display
Number
followed by a scrolling menu of the
available options.
[CLR] - Start Over
CLR
Press
to start over if you make a mistake.
Enter
Enter The
4. The LCD will display
Access Code:
Enter the user’s code
Enter the 4- to 8-digit code that will give this
user access to the system, then press
5.
The LCD will display
Swipe/Type Card
ENTR
28
.
[ENTR] - Accept
[MUTE] - Exit menu
MUTE
Press
if you want to quit before you
finish adding this user.
2. Enter the number of the user (not the user’s
access code). For example, to select User 3,
3 ENTR
press
3. The LCD will display
.
Profile:
Enter the number of the user profile that will
control this user’s access rights and press
ENTR
. (User profiles are programmed by your
installer. If you will be adding users on-site,
your installer will provide you with the profile
numbers you need.)
Enter the encoded card PIN or present the card
ENTR
to the card reader, then press
6. Press
MUTE
to exit when you are finished.
.
Changing or Removing Users
1. Press
7 ENTR
+ Code (you must use the
Installer code or maintenance code to perform
this function).
The first line of the LCD will show
Id:
The second line will display
Number
followed by a scrolling menu of the
Enter
Enter The
available options.
[CLR] - Start Over
CLR
Press
to start over if you make a mistake.
Page 31

[ENTR] - Accept
[MUTE] - Exit menu
MUTE
Press
if you want to quit before you
finish changing or removing this user.
2. Enter the number of the user (not the user’s
access code). For example, to select User 3,
press
3 ENTR
.
6. Press
MUTE
to exit when you are finished.
3. At the
Profile:
prompt, press
4. The LCD will display
Access Code:
ENTR
.
on the
first line and the user’s access code on the
CLR
second line. Press
to erase the digits of the
code.
5. If you are changing the code, enter the new
ENTR
digits for the code and press
If you are removing the code, just press
Press
ENTR
again after the swipe/type card or
.
ENTR
the PIN will not be removed.
.
29
Page 32

Setting System Time and Date
A common system setup includes time and date as
one of the two-line messages that alternately display
on your touchpad LCDs. Your installer may have
programmed this for you.
If your system is programmed for Auto Arm,
resetting the time and date cancels Auto Arm times.
To change the time
to 3:45 p.m., enter:
Set Date
1. Press
2. Press
1 ENTR
2
to select
30
1 5 ENTR
4 5 ENTR
+ any code (except Code 2).
Set Date.
Your system can also be programmed for automatic
daylight savings time adjustments.
Set Time
1. Press
2. Press
1 ENTR
1
to select
+ any code (except Code 2).
Set Time
.
3. Enter digit(s) for the hour in 24-hour military
ENTR
format, then press
4. Enter digit(s) for minutes, then press
MUTE
5. Press
to exit.
Example:
.
ENTR
1 ENTR + code + 1
.
3. Enter digit(s) for the month, then press
4. Enter digit(s) for the day, then press
ENTR
5. Enter four digits for the year, then press
MUTE
6. Press
Example:
To change the system
date to September 15,
1996, enter:
to exit.
1 ENTR + code + 2
9 ENTR
1 5 ENTR
1 9
ENTR
ENTR
.
.
.
Page 33

Viewing System Status
Pressing the STAT Button
At the normal display (page 4) and main interactive
STAT
menu (page 18) only, press
The LCD either displays a message that all zones are
ready or shows the status of Not Ready zones. Also
displays active alarms and trouble conditions.
STATUS: LCD Display
If your system uses the interactive menus, the LCD
will display a
STATUS:
line when you enter your
code. This line will display the following messages:
Message Description
Alarm System is in alarm
X Alarm Cross alarm is in progress
Armed System is armed (on)
Arm Delay An arming delay is in progress
Trouble A trouble condition exists
Not Ready System is not ready to be armed
Ready System is ready to arm
.
Default LCD Display
A system status line can be displayed as part of the
message(s) that appear on your LCD when there is
no activity at the touchpads. See your installer for
programming your system for this display.
Viewing Zone Descriptions
At the normal display, press
The LCD displays each zone number on the first line
and a brief description of the zone on the second
line, then returns to the normal display.
1 STAT
.
31
Page 34

System Testing
Your system may not need the tests described in this
section. Discuss testing with your security company
installer to develop the procedures best suited to
your installation.
Important
Weekly tests are recommended to ensure proper
system operation.
The phone line that the system is connected to will
be busy during the following tests.
Auto Test
Your system may be programmed to conduct an
automatic test of communication between your
system and the central station. Your installer will tell
you if your system has been programmed for this
feature and when the test will occur.
No audible signal will occur during this test.
32
Dialer Test
The dialer test manually tests the communication
between your system and the central station. You can
perform this test at any time.
1. Press
3 ENTR
+ Installer code or maintenance
code.
2. Press
3
to initiate the dialer test.
The dialer will call the central station and report the
test code.
Page 35

Emergency Procedures
In Case of Accidental Activation
If your security system is accidentally activated, do
not panic.
entering your access code on any touchpad
necessary, press
If your system is programmed for delayed reporting
and you disarm your system before reporting begins,
an alarm will not be sent to the central station.
Consult your security company if using this feature.
When an Alarm Occurs
message on the LCD, LEAVE IMMEDIATELY
If your security system goes into alarm condition,
three things will happen:
Cancel the alarm immediately by
0
to reset the system.
Important
If you enter the building and find an alarm
and call your central station or the police.
. If
1. A loud audible warning will be heard from all
system bells and/or speakers. The sound will
vary depending on the type of alarm.
MUTE
You can press
trouble or alarm condition.
2. The touchpad LCD will indicate what type of
alarm has occurred.
Note: Alarms are displayed in the following
order of priority: 1) Fire 2) Intrusion
3) Emergency 4) Auxiliary 5) Cross alarm.
You can press
location of the alarm.
3. If your system is programmed to do so, it will
dial your security dealer's central monitoring
station to report the nature and location of the
alarm. Central station personnel will dispatch the
proper authorities to your building.
When an alarm condition has been cleared in a
multi-area system and you enter your code, the
display indicates which area was in alarm (see Figure
3 on page 18). Press
+ code to silence any
STAT
to see the zone number and
0
to reset the system.
33
Page 36

When an alarm occurs in a zone programmed for
silent or invisible alarms, audible warnings do not
sound and LCD messages do NOT display, but the
alarm is still reported to the central station.
Silencing Alarms
Refer to page 33 for additional details on what to do when an alarm sounds.
Alarm Speaker Sound Bell Sound
FIRE Rapid high-low siren sound. Each high-low
sound lasts approximately 1/2 second.
INTRUSION (Burglary) Loud whoop sound; 3 whoops per second. Steady.
EMERGENCY (Non-Medical) Slow, high-low siren sound. Each sound lasts
about 6 seconds.
AUXILIARY Low-high siren sound. *None
* Note: Contact your installing company to program bell sounds.
To silence any alarm: To reset an alarm:
34
1 sec. on, 1 sec. off.
*None
Single-Area Systems
Multi-Area Systems
Press
Press
MUTE
MUTE
+ code.
+ code.
Enter your code.
Enter your code, then press
.
Page 37

Troubleshooting
Identifying Sounds
See page 33 for what to do when an alarm occurs. The following table can help you identify other conditions:
Speaker Sound Bell Sound Condition How to Silence/Reset
Three short beeps; repeats every 2.5 sec. N/A Cross (X)
Alarm alert
Two short, low-pitch beeps. N/A Trouble
Low pitch bell (or “ding”) sound. N/A Exit Delay Enter a code.
High pitch bell (or “ding”) sound. N/A Entry Delay Enter a code.
Slow two-tone (“ding-dong”) bell sound. N/A Doorbell 1 N/A
Slow bell (“ding”) sound. N/A Doorbell 2 N/A
Two quarter-second chime tones. N/A Ready and Not
Ready Chimes
Loud whoop sound for two seconds on
internal and external speakers.
* If your system is programmed to silence trouble sounds, trouble conditions will not be audible, but the message
Trouble Silenced
will display on the LCD.
Steady Audio Test N/A
Enter a code.
MUTE
Press
N/A
+ code.*
35
Page 38

Power Outages (No AC Power)
Your system will display
your touchpad LCD. You can press
silence trouble sounds (enter access code also if
prompted). When you press the
LCD will display the message
Your system will remain operational on the backup
battery until the power is restored or you reset the
circuit breaker. If you have further problems,
contact your installer.
System Trouble
MUTE
to
STAT
button, the
No AC Power
on
.
Accidental Activation
36
Touchpad Display Reads “System
Trouble”
Problems with arming can occur if your system has a
MUTE
trouble condition or system failure. Press
silence trouble sounds and enter your access code if
prompted. In a multi-area system, only the areas that
are accessible with your code at the touchpad you
STAT
are operating are silenced. Press
to see the
problem that your system is encountering. Contact
your installation company immediately for service.
Your system will not be fully operational until the
problem has been corrected.
to
Enter your code to deactivate the alarms. If the LCD
displays the interactive menu, you may also need to
0
press
to reset the system. If your system is
programmed to automatically report alarms to the
central station, you should notify them of the false
alarm. See page 33 for complete information about
what happens when an alarm occurs.
Not Ready Zones
Not Ready zones occur when a door or window has
been left open or some other problem exists and is
preventing you from arming the system. Press
to identify the Not Ready zone and correct it if you
can. If you cannot correct the problem, but you must
arm the system, you can bypass the zone (see page
15 or 23).
STAT
Page 39

System Messages
Your system communicates with you primarily through the touchpad. Refer to the following list if you need more
information about a message that appears on your touchpad LCD. Messages are in alphabetical order.
Access code not
verified
Access Denied.
Can Not Arm
Can Not Disarm
Can Not Reset
CODE2 Not Active
CODE2 User
No Common Areas
Normal User
Outside Time Win
To Zone <
number
An invalid access code was entered. A valid entry is 4 to 8 digits.
First line. Reasons display on the second line (explained below).
The user does not have any arming privileges.
The user does not have privileges to disarm the system.
The user does not have privileges to reset the system.
The Code 2 feature must be active (enabled by any code other than Code 2) and
within a valid timeframe before the user is granted access.
A Code 2 user tried to perform a function that is not allowed by a Code 2 user.
The user does not have access to all areas.
A Normal user tried to perform a function that is not allowed by a Normal user.
The user entered a valid code, but is not allowed access at this time. Access is
limited to a specific timeframe.
>
The user cannot bypass the zone indicated.
37
Page 40

All Zones Ready
Already Bypassed
Area Can Not Arm
When In Alarm!
Areas Not Ready
To Arm!
At Least 1 Zone
Not Bypassable
Bypassed
Code Required
Delay Key Locked
When Armed
Denied! Would
Cause Alarm
After pressing the
STAT
button, this message indicates that there are no
troubles or alarms in the system, and the system is ready to arm.
User tried to bypass a zone that is already bypassed.
You cannot arm an area that has an active alarm condition.
User attempted to arm a multi-area system where there are Not Ready areas.
The user tried to bypass a zone that cannot be bypassed.
Confirms a zone bypass. Configuring your system for automatic bypass is
recommended if you forget to unbypass zones you want protected. Contact your
installer to do this.
For security reasons, some functions require an access code.
You cannot change the exit or entry delay state when your system is armed.
Contact your installer if you would like this changed.
The user attempted to unbypass a zone from a touchpad. The zone is in a state
where an alarm would occur if it was unbypassed (such as an open window).
38
Page 41

Interiors Locked
When Armed
You cannot change the interior state when your system is armed. Contact your
installer if you would like this changed.
Invalid Date
Please Correct
No AC Power
No Alarms
In Memory
No Bypass
Privilege
No Chime Zones
No Common Areas
No Delay Zones
No Interiors
Valid entries for date are 1-12 (month), 1-31 (day), and 1900-2155 (year). See
page 30 for instructions on entering the date.
There is no AC power to your system, but it is operating on backup battery. See
page 36.
No history of alarms.
The user is not allowed to bypass zones.
Your system does not have chime zones configured.
The user does not have privileges to perform the function at this touchpad.
Your system does not have exit or entry delay zones configured.
Your system does not have interior zones configured.
39
Page 42

40
No Zones Are
Bypassed
No zones at this
area mask
Not a Valid STAT
Function
Not Implemented
At this Time
Not Ready
Not Ready To
Arm. Press STAT
Privilege Level
Cannot Set CODE2
Reminder: Auto
DST Is Active!
System Trouble
Bypassed zone status. All zones are being monitored by the system.
STAT
The user has pressed the
button at a touchpad which does not have access
to any zones.
The function attempted is not a valid status function or the user inadvertently
STAT
pressed another button when using the
button.
The user tried to perform a function that is currently not available, or made an
error entering data.
The system is not ready to be armed (a sensored door or window may be open).
STAT
Pressing the
button will identify the area where there is a problem.
A Code 2 user cannot activate or deactivate the Code 2 feature.
There is no need to reset your system clock in the Spring or Fall. Your system
is configured to automatically adjust for daylight savings time.
STAT
When you press
, the system displays location and type of trouble on the
first line of the LCD. Line 2 displays the zone description. Call your installer if
you receive this message.
Page 43

Trouble Silenced
Timeout.
Unbypassed
Zone Is Not
A Valid Zone
Zone Is Not
Bypassable!
Zone Not
Accessible here
Zones In Area
Not Ready to Arm
A trouble condition exists, but your system is programmed to silence trouble
sounds. Contact your installer to resolve the trouble condition.
The user has paused for too long while performing a function and will have to
start over. The number of seconds before the system times out can be changed
through programming.
The zone has been successfully unbypassed.
User has attempted to bypass a zone that has not been assigned. Valid zone
numbers are 1-999.
Your system is programmed so that this zone cannot be manually bypassed.
The user may have access to all zones, but cannot perform functions on this
touchpad.
An attempt was made to arm an area where at least one zone is Not Ready.
41
Page 44

Terms Used in This Manual
access code
A 4-to-8 digit code that lets users operate the system.
Different types of access codes exist to allow or
prohibit functions such as arming, disarming,
programming, and so on.
anti-passback
Feature that prevents one user from giving access to
another person by passing back his or her card after
accessing a door. When the anti-passback feature is
used, the system keeps track of each user in the
building. A user cannot enter twice; he or she must
follow every Entry with an Exit.
arm
Turn on your system (alarms will sound if someone
enters the premises).
bypass
Turn off protection to an area (zone) in your
building.
Central Monitoring Station
Your system reports alarms and other problems to
the central station via the telephone lines. When
emergencies occur, central station personnel
dispatch the appropriate authorities.
chime feature
If the system is disarmed, a warning tone will sound
whenever someone enters or leaves a zone
programmed with the Chime feature.
Code 2 feature
Enables temporary users, such as guests and
housekeepers, to operate the system during a
timeframe designated by the main user.
control panel
The electronic brains of your system, the part housed
in the metal cabinet.
Cross (X) alarm alert
To prevent false alarms, multiple zones can be
programmed for cross alarm so that the system will
not go into alarm unless two of these zones go into
alarm. An alert sounds when one of these zones go
into alarm. For example, in a restaurant where there
is a lot of smoke from cooking, the system can be
43
Page 45

programmed to go into alarm only if two smoke
detectors in the same zone go into alarm.
disarm
Turn off your system (alarms will not sound if
someone enters the premises).
duress feature
If you are forced to disarm the system, a silent alarm
is sent to the central station when you enter a 1- or 2digit code along with your access code.
entry delay
A programmed number of seconds that allows you to
enter your building when the system is armed
without causing an alarm.
exit delay
A programmed number of seconds that gives you
time to exit your building once the system has been
armed.
Not Ready zones
Zones where a door or window is open. You cannot
arm the system until all zones are ready.
panic keys
POL, FIRE
, and
AUX
keys on the touchpad, used
to quickly send an alarm to the central station.
PIN (personal ID code)
An access code. The term PIN is more commonly
used by the access control industry.
profile
A set of features used to control access. Users are
assigned profiles to determine which features they
can access. Your installer creates and assigns
profiles through programming.
sensors
Detection devices such as smoke detectors, heat
detectors, and door contact switches.
trouble condition
A system malfunction that requires service. Contact
your installation company immediately.
zone
An area of protection. A zone can be a room, a
section of a room, or a group of rooms (interior
zones). You can protect outside entries, doors, and
windows (perimeter zones).
44
Page 46

Quick Reference
This section is a quick reference to the most commonly used features. If you need more complete information
about a feature, refer to the section of this manual that describes the feature in detail.
To Keystrokes
Cancel an Alarm
Single area system: Enter your code.
Multi-area system: Enter your code, then press
Silence an Alarm or Trouble
Press
MUTE
[Code].
Door Access Operations
Open a door Present your card to the reader.
then enter your PIN.
DOOR
then enter your PIN.
[Code]
[Code]
Open a door for another person (grant
access to a door)
Access the anti-passback menu
Access the door schedule change menu
OR
DOOR
Press
1. Enter the number of the door.
2. Press
DOOR
DOOR
ENTR
BYPS
.
45
Page 47

Arm / Disarm Operations
Arm entire system or all areas you have
access to
Disarm entire system or all areas you have
access to
Bypass / Unbypass a Zone
Check off Toggle or Menu method, whichever applies.
Toggle Method:
Menu Method:
Toggle Method:
Menu Method:
Enter your code.
Enter your code, then press
Enter your code.
Enter your code, then press
Toggle Method
1. Enter the zone number.
2. Press
BYPS
and enter your code (if prompted).
Menu Method
1.Enter your code.
2. Enter the area number (if prompted).
BYPS
3. Press
.
46
.
.
4. Enter
1
to bypass or 2 to unbypass.
5. Enter the zone number and press
ENTR
.
Page 48

Set Date and Time
To set the date
Example:
To change the
system date to
September 15
1996, enter:
1 ENTR + code + 2
9 ENTR
1 5 ENTR
1 9 9 6 ENTR
1. Press
2. Press
1 ENTR
2
[Code].
to select Set Date.
3. Enter the digit(s) for month, then press
4. Enter the digit(s) for day, then press
5. Enter the digit(s) for year, then press
ENTR
ENTR
ENTR
.
.
.
To set the time
Example:
To change the time
to 3:45 p.m., enter:
1 ENTR + code + 1
1 5 ENTR
4 5 ENTR
6. Press
1. Press
2. Press
MUTE
to exit.
1 ENTR
1
[Code].
to select Set Time.
3. Enter the digit(s) for hour in 24-hour military format, then
ENTR
press
4. Enter the digit(s) for minutes, then press
6. Press
.
MUTE
to exit.
ENTR
.
47
 Loading...