

Page 1

MODEL 4734 SECURITY SYSTEM
OWNER'S MANUAL
TABLE OF CONTENTS
1
1.1 Introduction 1
1.2 System components 1
1.3 Features 3
1.4 Types of alarms 5
1.5 Other audible signals 6
1.6 Access codes 7
1.7 Model 3825 touchpad 9
1.8 System status lights 9
1.9 Touchpad function buttons 11
SYSTEM OVERVIEW
Page
1
2 SYSTEM OPERATIONS 12
2.1 If you make a mistake 12
2.2 Entering access codes 12
2.3 Arming the system (single-area system) 12
2.4 Disarming the system (single-area system) 14
2.5 Controlling auto-arming 15
2.6 Arming/disarming (multi-area system) 15
2.7 Bypassing a zone 16
2.8 Unbypassing a zone 17
2.9 Viewing system status 17
2.10 Resetting an alarm 18
2.11 Silencing (muting) a trouble condition 18
2.12 Viewing alarm memory 18
2.13 Viewing event history 19
2.14 Enabling special features 19
2.15 Access codes 20
2.16 Setting the time (and date) 22
2.17 Access 4300 system 23
2.18 System testing 23
2.19 Quick reference guide 25
Page 2

3 PROGRAMMING 27
3.1 Entering programming mode 27
3.2 Selecting a menu 27
3.3 Viewing menu selections 27
3.4 Accept programming changes 27
3.5 If you make a mistake while programming 27
3.6 Exiting a menu 28
3.7 Exit programming mode 28
3.8 Time windows (menu 0) 28
3.9 Access menu (menu 1) 29
3.10 Holidays menu (menu 2) 30
3.11 DST dates (menu 3) 31
4 IN CASE OF TROUBLE 32
4.1 What happens when an alarm occurs 32
4.2 In case of accidental activation 32
4.3 Evacuation planning 32
5 APPENDIX 34
5.1 Sample installations 34
5.2 LCD display messages 35
5.3 System data 36
Page 3

Section 1: System Overview
Introduction
The Regency Model 4734 Access Expander is an add-on
device to the 4720 security system, designed especially
for businesses needing to control access for a large
number of users. The 4734 enables you to easily control a
large facility with access for 1,000 users and provides
your business with dependable, 24-hour protection.
The 4734 system has been custom programmed and
installed using the components, options, and features that
most closely meet your needs. Because the installation is
managed by your local security company, your system
may include some features not covered in this manual or
may lack some features that are discussed.
It is important that you familiarize yourself with how the
4734 operates. Please read this manual thoroughly.
Knowing how to fully operate the system will allow you to
obtain the highest degree of security and will prevent false
alarms. If you have any questions that are not covered in
this manual, contact your alarm system installer. Your
installer can also help you fill out the system data pages at
the back of this guide.
The following sections describe the capabilities of the
system in general terms. Operation instructions begin in
section 2 on page 14.
System Components
The major components of your Model 4734 Security
System are:
• Sensors and detectors
• Control communication panel (4720 base unit)
• Card access stations
• Touchpads
1 4734user.doc
Page 4

Sensors
The system can monitor up to 80 different zones, or
protection points, within your home or business. A
variety of sensors, including door contact switches,
motion detectors, smoke detectors, and heat detectors can
be used.
Control panel
The 4734's control panel is the electronic center of the
system, the part housed in the metal cabinet. All sensors,
card access stations, and touchpads are connected to the
panel. The panel issues signals that activate warning
tones and alarm bells. It also notifies your security
company's central monitoring station when these signals
occur. The control panel contains a standby battery that is
constantly being charged to provide many hours of system
operation if you should experience a power failure.
Card access stations
Card access stations are the devices that control access to
your premises. They are located at the entry to secured
areas. Users present or swipe cards (or enter codes) at the
access station to gain access to the controlled access area.
If the card or code is valid, the door is temporarily
unlocked to allow the user to enter. Your installation may
include as many as 15 access stations.
Touchpads
Touchpads are the system component most visible to you.
You will use them to arm or disarm (turn on or turn off)
the system; assign access codes; activate the chime or
interior features; and perform all other system functions.
Your system may include up to 15 touchpads distributed
throughout your premises.
The majority of the rest of the manual is devoted to
teaching you how to use the touchpads to operate and
program your system.
2 4734user.doc
Page 5

Central Monitoring Station
While not an actual system component, the central
monitoring station (referred to throughout the rest of this
manual as the "central station") is important to your
security. When an alarm occurs on your premises, a
signal is sent, via the telephone lines, to the central
station. Central station personnel dispatch the appropriate
authorities when they receive the signal.
IMPORTANT: To comply with industry standards, the
4734 is equipped with line seizure. This means that any
time the system's dialer needs to communicate with the
central station, it will NOT be possible to use any
telephones that are on the same line(s) as the security
system. Normally this condition will last less than one
minute, but under adverse telephone circuit conditions,
could last for as long as 15 minutes.
Features
Zones
Zones are protection points within your building. A zone
can be a room, a section of a room, or a group of rooms.
The 4734 allows you to assign up to 80 different zones.
Some special types of zones are described below.
Perimeter and Interior Zones
If you choose to divide your premises into "perimeter"
and "interior" zones, you can operate security for them
separately. Perimeter zones include all outside entries,
doors, and windows. Interior zones are locations inside
the premises where occupants can move about freely
while still protected from intrusion.
3 4734user.doc
Page 6

Exit/Entry Delay Zones
The exit delay gives you time to leave the building after
arming the system. Your system may be programmed to
beep during the delay period.
If a delayed zone is still active (that is, if someone is still
in the zone) at the moment the exit delay elapses, it will
cause an immediate alarm.
The entry delay gives you time to disarm the system after
entering the building. A beep will sound during the delay
period.
If the NO DELAY light is on, all delays are ignored. If
anyone enters a zone while the system is armed, an alarm
will sound immediately.
Chime Zones
When the system is disarmed, chime zones emit a warning
sound whenever anyone enters them.
Multi-area System
The 4734 can divide your premises into up to 8 "areas," or
groups of zones, that can be armed and disarmed
independently. Special menus display on the touchpad
allowing you to control your system easily. See section
3.3 for information on how to control a multi-area system.
If you and your installer have decided to set up a multi-
area system, your installer will create the areas for you.
You can control who has access to each area. See
programming access rights section (section 4.11) for more
information.
Instructions for operating a multi-area system are found
throughout this guide.
Auto-arming System
Your system can be programmed to arm or disarm
automatically at specified times.
4 4734user.doc
Page 7

A programmed number of minutes before the system autoarms, the touchpads display the number of minutes until
arming will occur. The touchpads also beep every 10
seconds during this period.
If you are using this feature, your installer will perform
the necessary programming. The auto-arm delay can be
canceled or extended, if desired. See section 3.4 for
specific instructions.
Panic Keys
The POL , FIRE and AUX keys on the touchpad are
known as "panic keys." If your installer has enabled these
keys, they can be used to quickly send a signal to the
central station that a particular alarm condition has
occurred. Typically POL is used for police emergencies,
FIRE for fire emergencies, and AUX for other, non-
medical emergencies that may occur at your site.
Duress Alarm Feature
This feature sends a duress alarm to the central station. If
you choose to use this feature your installer will program
one or two digits to act as duress triggers. You would use
these numbers to activate a silent alarm during a duress
situation.
For example, if you are forced to disarm the system during
a hold-up, you would press the digit(s) as if they were part
of your access code. Your central station would receive
the signal but lights or messages would not display on
your touchpad and no audible alarm would sound.
See section 3.19 for special information on choosing
access codes if you are using the duress alarm feature.
Code 2 Feature
If you choose to use this feature, you can allow secondary
users (cleaners, babysitters, etc.) to disarm the system one
time. See section 3.17 for more information.
5 4734user.doc
Page 8

Intercom and Telephone Features
Optional accessories allow your touchpads to be used as
intercoms (either two-way or listen-only) or as hands-free
telephones.
Types of Alarms
When the system is in alarm, the touchpads beep and
display the alarm location, and the system speakers
produce the high volume sounds described below. The
alarms are ranked in priority order.
Fire
If the 4734 senses a fire, a high volume, high pitch pulsing
alarm will sound and the system will send a fire alarm
signal to the central station.
Panic
These alarms, triggered manually whenever anyone
presses one of the panic keys from the touchpad, produce
a slowly alternating, high/low pitch constant tone.
Intrusion
An intrusion (or burglary) alarm causes the 4734 to sound
a high volume, alternating high/low pitch constant tone
and to send a report to the central station.
Tamper Alarm
Your system may be protected against attempts to disable
it. Components such as outside bell or siren enclosures,
the control cabinet, and telephone equipment can be
protected from unauthorized access or tampering. Your
system can be set up to monitor and report these
conditions to the central station. Tamper alarms sound a
high volume, alternating high/low pitch constant tone
(same as intrusion).
6 4734user.doc
Page 9

Auxiliary Alarms
Flooding and furnace failure are two examples of
auxiliary alarms. You and your alarm installer will decide
if your installation needs any auxiliary alarms. Auxiliary
alarms produce alternating high/low pitch pulsed tones.
Other Audible Signals
Other conditions, besides alarms, that cause audible
signals are:
Trouble condition
A one-second beep every few seconds while a trouble
condition exists. (A trouble condition is a situation in
your system that is not as it should be. It could be a door
left or forced open, a sensor failure, or other system
problem.)
Exit/entry delay
One beep sounds each second during the entry delay time.
The signal may also be emitted during the exit delay.
Door chime
A series of beeps sounds each time a perimeter door is
opened or closed.
Access Codes
The following paragraphs describe the types of access
codes. See section 3.19 to learn how to change codes and
for special information about choosing codes.
Access codes are 4 to 6-digit codes that allow persons to
arm, disarm, and control your system. Anyone who has
been assigned an access code must keep the code
confidential.
There are several types of access codes. They are the
main access code (sometimes called the "master system
7 4734user.doc
Page 10

code"), primary access codes, and secondary access codes
(also called "Code 2").
Main access code
Your main access code allows you to program the system,
including change other code numbers, assign access
rights, and reset the time display. This is a master control
code number which must be written down and stored in a
safe place. Without the main access code, it is virtually
impossible for anyone to reprogram your system.
NOTE 1: Because the main access code can activate the
WALK TEST, a system test during which the 4734 is
temporarily unable to respond to fire alarms, this code
cannot be used by an end-user in a UL commercial fire
installation. If your installation is UL Listed for
commercial fire, your installer will do any
reprogramming or other tasks that require the use of the
main access code.
NOTE 2: Another master code, called "Code 0" or
"installer's code," allows your installer to program your
system initially. You have a right to know what this code
is and to change it. Upon your request, your installer will
show you how to do so.
Primary access codes
Primary access codes allow the user to arm or disarm the
system.
Secondary access codes (Code 2 feature)
Secondary codes are typically used in residential
installations. House guests, cleaning persons, and
babysitters are examples of persons who might need a
secondary access code. Secondary access codes can
disarm the system one time only. See section 3.17 for
more information.
Model 4660C Touchpad
8 4734user.doc
Page 11
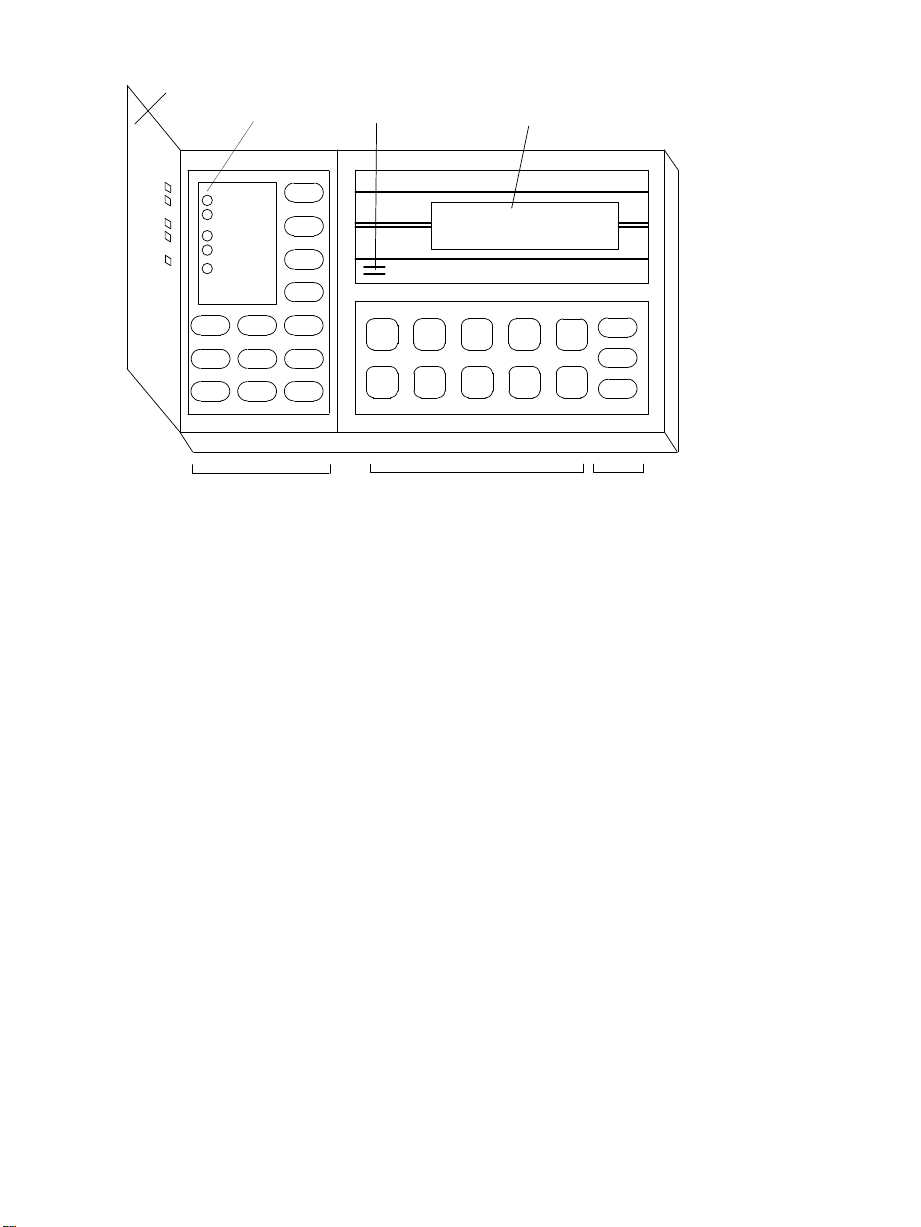
System Status
Door
Lights
Alert Tone
Sounder
LCD
(Liquid Crystal Display)
CLR
INT
BYPS
MEM
CODE
DLY
AUX
R E G E N C Y
MODEL 4660C
2
1
2
6
7 8
4
3
5
9
0
READY
ARMED
NO DELAY
INTERIOR
CHIME
TEL MUTE CHM
ICOM
POL FIRE
Function Buttons Digit Buttons Function
MODEL 4660C
System Status Lights
The lights on the top left of the touchpad tell you
information about your system, including whether
certain features have been enabled or disabled. The
meaning of each light is described below for your
convenience. Refer to the sections where the feature is
described if you need more information.
TEST
STAT
DOOR
Buttons
In single-area systems, the term "areas controlled by this
touchpad" means the entire premises.
READY
ON - Normal operating condition. All zones are ready
to be armed.
OFF - A zone is in a not ready condition.
FLASHING - In both single- and multi-area systems,
flashing indicates that the system is reporting to the
central station. In a multi-area system, flashing also
Page 12

indicates that some of the areas controlled by this
touchpad have not ready zones.
ARMED
ON - All areas controlled by this touchpad are armed.
OFF - All areas controlled by this touchpad are
disarmed.
FLASHING - Some, but not all, areas controlled by this
touchpad are armed.
NO DELAY
ON - All areas controlled by this touchpad will generate
an alarm immediately.
OFF - All areas controlled by this touchpad will not
generate an alarm until the programmed amount of time
has elapsed.
FLASHING - Some, but not all, areas controlled by this
touchpad will generate an alarm immediately.
INTERIOR
ON - All areas controlled by this touchpad have interior
zones enabled.
OFF - All areas controlled by this touchpad have
interior zones disabled. (But perimeter zones are
protected.)
FLASHING - Some, but not all, areas controlled by this
touchpad have interior zones enabled.
CHIME
ON - The chime feature is enabled. A warning tone will
sound when anyone enters a chime zone. (The system is
disarmed in this case.)
10 4734user.doc
Page 13

OFF - Chime feature disabled. (If the system is armed,
an alarm, not a chime tone, sounds when anyone enters
the zone.)
FLASHING - Some, but not all, areas controlled by this
touchpad have the chime feature enabled.
Touchpad Function Buttons
Some keys, when used for multi-area operation or programming, have
different functions than those described here. Their alternate functions are
described in the appropriate sections.
INT
DLY
DOOR
0 - 9
STAT
BYPS
MEM
CODE 2
MUTE
Turns the interior feature on and off.
Turns the No Delay feature on and off, which
makes delayed zones respond instantly.
Use to allow entry to controlled areas.
Digit buttons. Use for entering numerical
information such as access codes.
Displays zones that are not ready or are in
trouble, and other system troubles. (If
troubles exist, they display first when you
press STAT , then not ready zones.)
Bypasses (deactivates) individual zones or
doors so that they will not be monitored.
Also displays zones and doors that have been
bypassed.
Displays zones that were in an alarm
condition since the last time the system was
armed.
Enables the code 2 feature.
Silences an audible trouble signal. You must
always press this key twice.
CHM
Turns the chime feature on and off.
11 4734user.doc
Page 14

CLR
Erases a mistake you may have made while
entering data.
TEST
POL
FIRE
AUX
ICOM
TEL
Use to enter a variety of test modes (and to
accept programming changes in program
mode).
Panic key. When pressed for one full second,
this key sends an immediate alarm to the
central station. Typically used for police
emergencies.
Panic key. When pressed for one full second,
this key sends an immediate alarm to the
central station. Typically used for fire
emergencies.
Auxiliary panic key. When pressed for one
full second, this key sends an immediate
alarm to the central station. Can be used for
special emergency situations that can occur at
your site.
Activates the intercom feature.
Activates the telephone feature.
Other Touchpads
Other touchpads may be used with the 4734 but these
may have slightly different buttons or indicator lights.
The differences you will encounter if you are using one
of the compatible touchpads are described below.
*Model 4205
The 4205 touchpad is designed specifically for door
access and does not have all the functions of the 4660C.
Model 4660R Residential Touchpad
The residential touchpad operates the same as the 4660C
commercial model. The only difference is that there is
no DOOR button on the 4660Rthe * button
performs these functions.
12 4734user.doc
Page 15

*Model 4433 Touchpad
The Model 4433's two * keys, when pressed
simultaneously, cause a panic alarm. There is no "No
Delay" indicator light or button with this model. The
DOOR key is used for both the Code 2 and Door
functions. The CHIME key is used for both the Chime
and Interior functions.
*Model 4533, 4553, and 4563 Touchpads
The INSTANT key and indicator light on these models
function the same as the DLY key and the No Delay
indicator light on the 4660C. The CHM/INT key
combines the functions of CHM and INT . You would
press CHM/INT to perform either function.
*Not UL Listed
13
Page 16

Section 2: Access Control
Operations
NOTE: The Model 4734 Security System is not UL
Listed for door access control.
Up to 1,000 users can gain access to your secured
premises by using card readers or touchpads. Up to 15
doors can be set up as access stations. Card readers can
be either the card-swipe or proximity-reader type. If
touchpads are used, users enter their access codes on a
touchpad (instead of swiping or presenting a card).
Touchpads and card readers can be combined for a total
of 15 per installation.
Authorized users gain access by sliding a card or by
presenting a card or tag at the reader stationed at the
door.
The model 4300 is for card-swipe access using model
4301 cards.
Models 4310 and 4312 are proximity readers, (model
4312 is weather-resistant for outdoor use). The 4310/12
reads model 4303 tags, which can be attached to a
keychain, and model 4304 cards.
Users can also access a door by entering a valid code at
a touchpad stationed at the door.
Using a Card or Proximity Reader
To open a door using a card-swipe access card (model
4301), slide your card through the slot in the card
reader.
To open a door using a proximity access card (model
4304) or tag (model 4303), present your card or tag
within 6 inches of the proximity reader.
Using a Touchpad
Press DOOR followed by your access code. (Some
model touchpads do not have a DOOR key. Use the *
key for door access with these models.)
14
Page 17

If you prefer that system users use only cards, not codes,
to access doors, you can program this by selecting a
"card only" profile number. See section 4.11 for more
information.
15
Page 18

Remote Door Access
Users can access any door/ touchpad they have been
given access from any other door/touchpad. This would
be useful, for example, for allowing another person to
enter a door after an intercom conversation.
1. Enter the number of the door (1-15).
2. Press DOOR (or present your access card).
3. Enter a valid code (or present your access card). In this
case, a valid code is one that is valid at both locations,
the location of the person wanting access and the
location of the person granting access.
High Security Door
High Security Option
The high security option allows access to doors in high
security sections of your installation. This access right
should be given only to users who need to access the
high security area. You can determine, through the user
profile you assign to each user, which users will have
the high security option. (See section 4.11 for more
information on assigning access rights to users.)
If you are using the high security door feature, a
touchpad, in addition to a card/proximity reader, will be
stationed at the high security door.
Users who have access to high security areas of your
installation must enter a PIN (personal identification
number) on a touchpad after they display their cards.
1. Present your access card to the reader. (To
remotely access a high security door, press the
number of the door before presenting your access
card.)
2. When "ENTER CODE B" displays, enter your
PIN.
16
Page 19

Section 3: Other System Operations
If You Make a Mistake
Press CLR any time to erase an incorrect command.
Entering Access Codes
Many system operations, including resetting an alarm,
bypassing a zone, and conducting a system test require
you to enter a valid access code. When you enter your
code at a touchpad, you have five seconds to enter each
digit. If you pause longer than five seconds, the
touchpad will beep and display "TRY AGAIN." You
will have to reenter the code from the beginning.
Multi-area System Operation
Many multi-area systems operate the same as single-area
systems, except that any feature you activate or
deactivate is valid only in areas to which you have
access. When you're using a touchpad available to more
than one area, you must enter your access code to
perform any function. When you enter your access
code, the area menu displays. See section 3.4 for more
information about the area menu.
If a touchpad is programmed for use in only one area,
operations are performed the same as with a single-area
system.
Area Menu
The area menu lets you control individual areas to which
you have been given access. The area menu is always
used in a multi-area system. It can also be used in a
single-area system if your installer has enabled it.
When you enter your access code, the display will show
the status of the first area that you have access to and a
menu. The first line of the display shows the status of
the area. The second displays "Command?", then the
options that are available to you. The options repeat
until you make a selection.
17
Page 20

When used in the area menu, most keys have the same
function as described in section 1.9, but a few are
different. For your convenience, the table below lists all
the keys available with the area menu.
Key Function
0
1
2
3 Allows the user to set the arm delay. After pressing 3 ,
TEST
BYPS
CHM
CLR
Disarms all areas to which the user has access and
returns to the normal operating display. Also resets
alarms for all areas in alarm.
Arm/disarm the area currently being displayed. Also
resets alarms for the area shown.
Arms all areas to which the user has access and returns
to the normal operating display. (The areas must be
ready to arm.)
press the number of minutes desired, then press TEST .
Press 0 to cancel the auto-arm delay (and prevent the
auto-arm.)
Skips to the next area when performing any of the above
functions.
Bypasses/unbypasses a zone.
Toggles the chime feature in the area.
Exits area mode.
CODE 2
DLY
INT
MUTE
STAT
Toggles the code 2 feature in the area.
Enables/disables entry and exit delays in the area.
Turns the area's interior zones on or off.
Silences trouble condition in area.
Shows any not ready zones in the area.
18
Page 21

Arming the SystemSingle Area System
See Section 3.8 for multi-area system information.
Make sure the touchpad's green READY light is lit and
the ARMED light is off.
Enter your access code at any touchpad. When you
finish, the green READY light will go off and the
ARMED light will go on.
You now have a specified amount of time to exit without
causing an alarm. (You and your installer will
determine the exact number of seconds20-40 seconds
is typical.) If your system is programmed to beep during
the exit delay period, the touchpad will begin beeping to
indicate the countdown of seconds until all zones are
armed.
Not Ready Zones
If you have a "not ready" zone in your system, indicated
when the touchpad's READY light is off and "NOT
READY" displays on your LCD, you will not be able to
arm your system until the zone is ready. Not ready
conditions are caused by such things as a door being left
ajar or a window being left open. Once you close the
door or window or fix whatever is causing the not ready
condition, the system will automatically display
"READY."
To find out which zone is not ready, press STAT . The
zone number will display on the first line of the
touchpad. The location of the problem will display on
the second line.
The following is an example of a display.
#3 NOT READY:
LOADING DOCK
In a multi-area system, the location on the second line of
the display will be followed by the area name
appropriate for that zone.
19
Page 22

Trouble Message
If the touchpad displays "TROUBLE" while you are
arming the system, stop immediately and contact your
security company for servicing. DO NOT attempt to
arm the system until the trouble condition has been
cleared. Your system will not be fully operational
during a trouble condition.
Residential System
If you are using the 4734 in your home, you may want to
follow the procedure below when arming your system.
Arm your system when your home is unoccupied or
when residents are sleeping.
1. Make sure the green READY light is on and that the
ARMED light is off. (If the READY light is off, see
"Not ready zones" section above.)
2. If you are leaving your home unoccupied, press INT
to turn on the INTERIOR light. All zones will now be
active and you will have an exit/entry delay period.
If you are staying home, you should turn off the
INTERIOR light (press INT ). This allows you to
move freely about the interior of your home while the
system continues to detect an intrusion. For special
circumstances, you could use combinations of
INTERIOR and NO DELAY. For example, if you
wanted maximum protection from intruders while your
family is sleeping, you could arm the system from your
bedside, turning on both the INTERIOR and NO
DELAY features.
3. Enter your access code, (for example, "5432"), at a
touchpad. The green READY light will turn off and the
ARMED light will turn on. The system is now armed.
DisarmingSingle-area System
See section 3.8 for multi-area system operation.
When you open a door while the system is armed, you
will hear an entry warning tone and you will have a
programmed amount of time to enter the building and
20
Page 23

disarm the system. The warning tone will stop as soon
as you enter the first digit of your access code.
To disarm the system, enter your access code at the
touchpad.
Controlling Auto-Arming
Your system may be programmed for auto-arming. In
this case, the entire system or certain areas can be armed
or disarmed automatically at specified times.
Your installer will program the time(s) that auto-arming
occurs. You can arm or disarm manually by entering
your access code.
If you have a multi-area system or are using the area
menu, you can change the arm delay. See section 3.4
for more information.
Arming/DisarmingMulti-Area System
When you enter your access code in a multi-area system,
the arm menu displays. The options that are relevant to
arming/disarming are described below. See section 3.4
for complete descriptions of how the arm menu works
and the options available through it.
To arm or disarm the area currently being displayed,
press 1 . (Use the TEST key to move to the next area.)
To arm all areas you have access to and return to the
normal operating display, press 2 . All areas must be
ready to arm.
To disarm all areas that you have access to and
return to the normal operating display, press 0 .
This also resets alarms for all areas in alarm.
Bypassing a Zone
In some cases you may want to temporarily bypass, that
is, turn off protection, on a particular zone. A bypassed
zone has no protection. You cannot bypass 24-hour
fire and panic zones.
The steps to bypass a zone are:
21
Page 24

1. Enter the number of the zone to bypass.
2. Press BYPS .
3. If your system is programmed to require an access
code, the LCD will display the number of the zone
you are attempting to bypass and will prompt you to
enter the access code. If, for example, you are
attempting to bypass zone 5, the touchpad will
display "5-ENTER CODE."
4. If you were successful, the touchpad will display
"BYPASSED."
5. If the touchpad displays "RESTRICTED ZONE,"
you have attempted to bypass a fire or panic zone.
These zones cannot be bypassed.
6. To view zones that have been bypassed, press
BYPS . The numbers and locations of zones that
have been bypassed will display. If the system is
armed when you attempt to find out which zones
have been bypassed, you must enter your access
code. In this case, after you press BYPS , the
touchpad will display "ENTER CODE."
22
Page 25

Unbypassing a Zone
Unbypassing a zone makes it ready once again to detect
alarms.
1. Enter the number of the zone to unbypass.
2. Press BYPS .
If the touchpad displays "RESTRICTED ZONE," you
have attempted to unbypass a fire or panic zone or a not
ready zone with an armed system. Fire and panic zones
cannot be bypassed (so there is no need to unbypass
them). Not ready zones cannot be unbypassed if doing
so would cause an alarm.
Bypassing/Unbypassing Doors
To latch doors open or to unlatch doors that have been
latched open, follow these steps.
1. Enter the ID number of the door you want to latch
or unlatch. (If the doorstation you want to
latch/unlatch is the one you're currently using, you
don't need to enter the ID number.)
2. Press DOOR BYPS .
3. Enter your user code.
23
Page 26

Viewing System Information
STAT lets you find out which zones are not ready to be
armed. If your LCD indicates "NOT READY" or
"TROUBLE" when you attempt to arm the system, press
STAT to see the affected zones.
If you're using the area menu, STAT gives the status of
the area you are currently attempting to arm. To see
additional areas to which you have access, press TEST
to skip to the areas you wish to view, then press STAT .
STAT , in combination with other keys, allows you to
view other system information.
1 STAT displays all the zone numbers and names in
the areas controlled by the touchpad you are currently
using.
2 STAT displays the number and location of the
touchpad you are currently using.
4 STAT displays the installed version of the 4734
software.
Resetting an Alarm
To reset an alarm in a single-area system, enter your
access code. In a multi-area system, enter your access
code, then 0 . The alarm will stop sounding and the
system will disarm.
Silencing (Muting) a Trouble Condition
To silence a trouble condition alert tone, press
MUTE MUTE . The touchpad will now display
"SILENCED" instead of "TROUBLE." If a new trouble
condition should occur in the meantime, "TROUBLE"
will again display and the alert tone will be reactivated.
In a multi-area system, enter your access code before
pressing MUTE MUTE . Each area must be silenced
separately.
Viewing Alarm Memory
24
Page 27

The alarm memory feature records alarm information.
Press MEM to display the location of any alarms that
have occurred. This function only remembers activity
from a single arming period. The next time you arm the
system, the memory from the previous period will be
erased automatically. If you need to clear alarm
memory manually, press MUTE MEM .
Viewing Event History
The event history feature records all system events such
as openings/closings, door access, zone trouble or
bypass, as well as the date and time each event occurred.
1. To view the history, press 1 MEM .
2. The touchpad will prompt you to enter a starting
date.
3. If you want to view today's events, press TEST .
4. To view events that occurred on and after a specific
date, press the digits for the month, day, and year,
then press TEST . (To view all events, enter
00/00/00 as the date.)
Enabling Special Features
Chime feature
Press CHM to turn the chime feature on and off. (In a
multi-area system, enter your access code before
pressing CHM ).
Duress alarm feature
Before entering your access code, press the one or two
digits that you and your installer have designated as a
trigger to silently signal the central station that you are
being forced to disarm the system.
25
Page 28

Code 2 feature
Press CODE 2 followed by your access code to turn the
code 2 feature on when arming the system. This will
allow secondary code users, (that is, users whose
profiles have been enabled for the code 2 feature), to
disarm your system one time. (In a multi-area system,
enter your access code before pressing CODE 2 .)
X-10 Module Activation
If your system includes a Model 4181 Power Line
Interface, you can use X-10 compatible modules to
control devices, (such as lights), in up to 32 locations on
your premises. These devices can be programmed by
your installer to activate automatically or from a
touchpad.
Your installer assigns a code to each module. Each
module also has a pair of digits associated with it.
These digits should be written down in the data section
at the back of this manual (pages 51 to 52).
1. Enter the digits of the device you want to activate
(from chart on pages 51 to 52).
2. Press DOOR .
3. Press 1 to turn the module on or 0 to turn it off.
Access Codes
Below is some important information about access
codes. Instructions for changing codes follow.
• Access codes must be 4 to 6 digits long.
• When selecting access codes, make them as
different from each other as possible to prevent one
user from accidentally discovering another user's
code. Don't choose numbers such as "1111,"
"2222," and so on. While they are easy codes for
you to remember, they might also be easy codes to
break.
26
Page 29

• If you are using the duress alarm feature, make
certain that no access codes begin with the digit(s)
you selected as a duress trigger.
• Write down new access code numbers and keep
them in a secure location.
Changing a code (or adding a new code)
Do not reprogram access codes unless your installer has
recommended it. If you need to reprogram access
codes, here are the steps:
1. Make sure the system is disarmed and that you are
not in the set time mode.
2. Press 7 TEST followed by your main access
code.
3. The display will show "BULK LOAD?" If you
are programming multiple cards or codes, all of
which will have the same user profile, select Yes.
To program each card or code individually, select
No for the Bulk Load option.
4. The display shows "CODE#:__". Enter the # of
the code you want to change, then press TEST .
5. The display now shows "PROFILE#__". Select
the profile (0-15) that will be used with this code,
then press TEST . (If you selected Yes for "Bulk
Load" in step 3, this step will be skipped for the rest
of the codes you program. All codes programmed
during this session will have the same user profile.)
6. The code number for that user displays. Press
CLR , enter the new access code, then press TEST
.
7. To locate another code to work with:
press INT plus the number of the code you want
to change (not the code itself), then press TEST .
- OR -
Press TEST as many times as necessary until the
code you want to change displays.
27
Page 30

8. When you are finished making all the changes,
press MUTE MUTE to return to normal operation.
Deleting an access code
(Never delete your main access codeCode 1.)
An access code is deleted when you clear it from the
system without changing it. Here are the steps.
1. Follow steps 1 through 5 for changing an access
code.
2. When the code you want to delete is displayed,
press CLR TEST . The code is now removed from
the system. (If you need to locate another code to
work with, see step 7 in changing codes.)
3. When you are finished deleting codes, press
MUTE MUTE to return to normal operation.
28
Page 31

Intercom Operation
In conjunction with the model 4640 intercom system,
the touchpad can be used as an intercom providing twoway or listen-only communications.
Two-Way Communication
To turn on one intercom only, press the number of the
touchpad you wish to call (1-8), then press ICOM . To
turn off the intercom, press ICOM again.
To turn on all intercoms (or page), press ICOM . To
turn off all intercoms, press ICOM again.
Listen-Only Communication
To listen to one intercom only, press the number of the
touchpad you wish to call twice, then press
ICOM . To stop listening to a touchpad, press ICOM
again.
EXAMPLE:
To listen to touchpad 7, press:
7 7 ICOM .
To listen to all intercoms, press 1 0 ICOM . To stop
listening, press ICOM again.
Do Not Disturb Feature
If you want to block all communication from an
intercom station, press 9 ICOM . Anyone attempting
to call the station will hear a busy tone. Press ICOM
again to reinstate communication.
Intercom Timeout
The programmed intercom timeout function allows you
to automatically limit use of the touchpad intercom from
between 15 - 255 seconds. The intercom will hang up
automatically after the programmed amount of time has
elapsed. It emits a warning beep 10 seconds before it
turns off.
Timeout does not automatically occur when you are
listening to only one station. This allows you to monitor
an area continuously.
29
Page 32

Telephone Operation
In conjunction with the 4640 intercom system, the
touchpad can be used as a hands-free telephone with
many features, including, basic operation (place, answer,
and hang up a call); redial; mute or place a call on hold;
transfer a call to another touchpad; memory dialing; and
automatic timeout.
To place, answer, or hang up a call, press TEL .
To redial the last number called, press 9 TEL .
To place your call on hold (or mute), press MUTE .
The touchpad beeps while the call is on hold. Press
MUTE when you're ready to begin talking again.
To transfer a call to another touchpad, follow these
steps.
1. Press MUTE . The touchpad beeps while the call is
on hold.
2. Enter the number of the touchpad you're
transferring to, (1-8).
3. Press ICOM and announce the call.
4. The user of the touchpad receiving the call presses
TEL to complete the transfer.
Memory Dialing
The touchpad telephone has the memory to store two
12-digit phone numbers for quick dialing.
To store a phone number, follow these steps:
1. Press TEL .
2. Enter the digits you want to store.
3. Press MEM .
4. Press 1 if you are storing the first number or 2 if
you are storing the second number.
5. Press TEL .
To dial a memory phone number, press 1 or 2 ,
depending on which number you want to dial, then press
TEL .
30
Page 33

To erase a memory phone number (that is, remove it
from memory so you can replace it with another
number), follow these steps.
1. Press TEL MEM and 1 or 2, depending on which
number you want to erase.
2. Press TEL again.
Telephone Timeout
The programmed telephone timeout function allows you
to automatically limit use of the touchpad telephone
from between 15 and 255 seconds. The telephone will
hang up automatically after the programmed amount of
time has elapsed. It emits a warning beep 10 seconds
before it turns off.
Setting the Time (and Date)
The time setting is five digits long.
The first digit indicates AM or PM. Use 0 for AM, 1 for
PM.
The last four digits indicate the actual time in hours and
minutes.
After you enter the digits for the time, press TEST .
EXAMPLE:
To set the time for 9:15 AM, you would enter the
following:
9 TEST + your main access code
0 (for AM)
0 9 1 5 (for the actual time)
TEST
Note that leading 0's are required when entering single
digits for minutes and hours. For example, you would
always enter the number "9" as "09."
31
Page 34

Setting the Date
You will be prompted to enter the date whenever you
reset the time.
If the date shown does not need to be changed, press
TEST .
If you need to change the date, enter it in the
MM/DD/YY format. Use leading 0's. Press TEST
when you finish entering the date.
EXAMPLE:
To set the date as July 1, 1993, press:
0 7 0 1 9 3
TEST
When the date is set, the system automatically sets the
correct day of the week (that is, Monday, Tuesday, etc.).
32
Page 35

Setting (or Clearing) Holiday Status
You can select the current day to be a holiday so that it
will follow holiday time windows. You can also deselect the current day so that it will not follow holiday
time windows.
This procedure is a short-cut method that allows you to
quickly change holiday status (for example, to allow
holiday access). It is not the same as programming
holiday dates. Use programming menu 3 to program
holidays (see section 4.12 for more information.)
1. Press 1 2 TEST plus your user code. (You must
be authorized to use the programming function.)
2. Press 1 to select holiday or 0 to de-select
holiday.
3. Press TEST .
System Testing
Testing overall system operation
Weekly tests are recommended to insure proper
system operation. Discuss testing procedures with
your security company to determine which are the
best for you.
This test does not test the sensors and detection devices
that activate alarms.
1. Call your central station to inform them that you
plan to run a system test.
2. Make sure the system is disarmed.
3. Press TEST followed by your access code.
4. The lights will flash, an alarm will sound for two
seconds and a dialer test will be transmitted to the
central station. The central station can respond in a
variety of ways. Your installation company will
inform you of what responses to expect.
33
Page 36

Fire Test Procedure
The test described below must be performed weekly in
a UL household fire installation. This procedure tests
the bell(s) attached to the system using standby power
only.
1. Call the central station to inform them that you will
be conducting a test.
2. Make sure the system is disarmed.
3. Remove the screw that secures the model 9220
transformer to the outlet. (The 9220 is housed in
tan plastic and is plugged into an electrical outlet.)
4. Unplug the transformer from the 120 volt
receptacle.
5. Press TEST followed by your access code. The
bell(s) will sound for a few seconds. The test will
be recorded at the central station.
6. Plug the transformer back into the receptacle.
7. Replace the transformer retaining screw.
While the transformer is unplugged, the system may
sound the AC trouble audible signal. If this happens,
press MUTE MUTE to silence it. The trouble condition
will clear automatically within one minute after the
transformer has been reinstalled.
34
Page 37

Section 4. Programming
The 4734's user-friendly menu system allows you to
easily program some system features directly from the
touchpad. The sections below guide you through the
steps.
Entering Programming Mode
To enter programming mode, press 1 1 TEST plus
your access code.
Selecting a Menu
When you're in programming mode, the available menus
display continuously on the second line of the LCD until
you select one to work with. The available menus are:
0 - Time Windows
1 - Codes/Cards
2 - Profiles
3 - Holidays
4 - DST Dates
To select a menu, press the menu number plus TEST .
Viewing Menu Selections
To view the current settings for a menu, press TEST .
The top line of the display shows the current setting, the
bottom line shows the keys that are available to you.
You can continue to press TEST until you locate the
option you want to change.
Accept Programming ChangeS
Press the TEST key after making programming changes
to accept the changes, similar to the way you would use
the ENTER key with a computer.
If You Make a Mistake While Programming
35
Page 38

If you make a mistake while programming and you have
not yet pressed TEST , press MUTE to restore the
previous selection for the option.
If you have already pressed TEST , you must press
MUTE to exit the current menu, re-enter the correct
menu, and locate the option.
Exiting a Menu
When you finish programming options for a particular
menu, press MUTE one time.
Exit Programming Mode
To exit programming mode, press MUTE once or twice
(depending on where you are in the program) until you
no longer see the scrolling menu prompts.
Changing Menu Options
Sections 4.9 through 4.13 of this manual are step-bystep instructions for working with each programmable
menu. In the instructions, menu prompts that appear on
the LCD are shown in boldface followed by an
explanation of the possible choices for that menu option.
The instructions assume that your system retains its
factory-programmed settings.
When a menu option appears on the LCD, it has been
selected. When an option that is available does not
appear on the LCD, it has not been selected. Pressing
the key for the option both selects and de-selects the
option.
Once you've made a change and the LCD displays the
new setting for the option, press TEST to complete the
change.
To skip over a menu option without changing it, just
press TEST .
If you want to restore the factory programming for any
menu option, (except user codes), press CHM or INT
while you are working with that option.
36
Page 39

Time Windows (Menu 0)
The 4734 allows you to specify 32 time windows, or
periods, which you can use to control when users can
access the system or when arming/disarming can occur.
For auto-arming systems, you can program a delay
period which would allow you to cancel the auto-arm or
extend the delay period.
Your security installer has already set up time windows
and arranged them into groups for you to select and
assign to users. If you want to change existing time
windows, you can do so through menu 0. Consult your
installer before changing time windows.
1. Press 1 1 TEST + your access code to enter
programming mode.
2. Press 0 TEST to enter the time windows menu
(menu 0).
"NUMBER: #0"
3. Select the time window you want to work with (0-
31), then press TEST .
"START #0: 00:00"
4. Enter the start time using the 24-hour clock
(military time). When you're finished entering the
time, press TEST .
"END #0: 00:00"
5. Enter the end time in the 24-hour format. Press
TEST when you're finished.
EXAMPLE:
To program 5 pm, you would enter:
1 7 0 0 TEST .
6. The display now reads "DAYS#0:SMTWTFSH",
prompting you to choose the days of the week for
this time window. From the table below select the
digit that corresponds to the days you want to assign
to the first time window. Pressing the appropriate
digit selectsor deselectsa day.
37
Page 40

EXAMPLE:
To program Monday through Friday, press 1 2 3 4
5 . When you've finished selecting days for this time
window, press TEST .
Assigning Days
Digit Day
0 Sunday
1 Monday
2 Tuesday
3 Wednesday
4 Thursday
5 Friday
6 Saturday
7 Holiday
Cards/Codes (Menu 1)
This menu allows you to program user codes and select
"profiles" for each user. Profiles determine which
system features each user will have access to. Your
installer will tell you what access rights each profile has.
Follow the steps below to add new user codes and assign
user profiles to the new codes.
1. You must be in programming mode. If necessary,
press 1 1 TEST + your main access code.
2. Press 1 TEST to go to the cards/codes menu.
(Note that from here on, you are performing the
same procedure as described in section 3.19.)
"BULK LOAD? YES/NO"
3. If you are programming cards or codes cards for
users who will have the same user profile, select
"Yes" here. "No" means that you will continue to
select the profile each code or card individually.
38
Page 41

"CODE#:__"
4. Enter the number of the user (2-999) that you want
to work with.
"#2PROFILE:0"
5. Select a profile number for this user. There are 16
possible profiles, numbered 0-15.
"#2 CODE:______"
6. Enter a 4 to 6 digit access code for this user. Be
sure to record the number in the system data section
at the back of this guide.
7. You will now return to step 5 to continue adding
users. If you want to skip to a particular user, press
INT plus the number of the user (2-999). (Note
that if you selected "Yes" for Bulk Load, the
display will skip step #6, and all new users added in
this session will have the same user profile.)
Profiles (Menu 2)
Use the profiles menu to set up profiles, that is, to
determine which features can be accessed by each
profile. There are 16 profiles, numbered 0 - 15.
1. You must be in programming mode. If necessary,
press 1 1 TEST + your main access code.
2. Press 2 TEST to go to the profiles menu. In the
instructions below, steps 3 - 13 describe the
programmable options. These instructions assume
you are working with profile #0.
3. "PROFILE#0"
This display is for selecting the profile you want to
work with. Press TEST to select profile 0. (To
choose a different profile, enter the profile number
and press TEST .)
4. "WIN GRP#0"
This step is for assigning a window group to the
profile. Window groups are sets of time windows
that have been arranged by your installer. Select a
39
Page 42

window group for profile 0 and press TEST . If
you want the profile to have access any time (no
time restrictions), select window group 32,
ALWAYS. If you never want the profile to have
access to your building, (because, for example, a
card has been lost,) select window group 33,
NEVER. (See section 4.9 if you need more
information about time windows and window
groups.)
5. "ARS#0:12345678"
In this step you choose the areas that profile #0 will
have access to. Selecting the number of the area
selects or deselects the area.
EXAMPLE 1:
If "2" displays, area 2 has been selected for this profile.
To deselect area 2, press 2 .
EXAMPLE 2:
If "2" does not display on your LCD, area 2 has not
been selected for this profile. To select area 2, press 2
.
6. "DOOR#0: YES/NO"
Press 1 for Yes or 0 for No. This step determines if
the profile will have access to all doors in the areas it
has been assigned.
7. "BYPASS#0:YES/NO"
Press 1 for Yes or 0 for No. Selecting Yes means
the profile will be allowed to bypass zones.
8. "ARM#0:YES/NO"
Press 1 for Yes or 0 for No. Selecting Yes means
the profile will be allowed to arm the system.
9. "DISARM#0:YES/NO"
Press 1 for Yes or 0 for No. Selecting Yes means
the profile will be allowed to disarm the system.
10. "PROGRAM#0:YES/NO"
40
Page 43

Press 1 for Yes or 0 for No. Selecting Yes means
the profile will be allowed to program cards and codes
and all other user-programmable options and perform
special system operations, such as the walk test.
11. "CODE 2#0:YES/NO"
Press 1 for Yes or 0 for No. Selecting Yes means
that the code for this profile becomes a restricted code
for temporary users of the system. When a primary user
arms the system using the CODE 2 key, codes with the
Code 2 option can disarm the system only once.
Normally Code 2 restricted codes can never disarm the
system. (See section 3.17 for more information about
the Code 2 feature.)
12. "HIGH SEC#0:YES/NO"
Press 1 for Yes or 0 for No. Selecting Yes means
that the code for this profile becomes a high security
code which requires a PIN to be entered on a touchpad
in addition to presenting a card.
13. "CARD ONLY#0:YES/NO"
Press 1 for Yes or 0 for No. Selecting Yes means
that the profile can gain access to a door through an
access card only, not through a touchpad.
Holidays (Menu 3)
The holidays menu lets you determine up to 16 days that
will be treated as holidays. Days designated as holidays
will follow holiday window groups' schedules and
access rights. (Some holidays must be reprogrammed
every year.)
1. You must be in programming mode. If necessary,
press 1 1 TEST + your main access code.
2. Press 3 TEST to go to the holidays menu.
3. "DATE:#1: 01/01"
Enter the month and day of the first holiday. Use a
leading zero for single digit months. When you're
finished entering the date for this holiday, press
TEST .
41
Page 44

4. Continue programming any other holidays. If you
need to change the date of a holiday, press TEST
as many times as necessary to locate the holiday,
then make the changes. As with any programming
changes you make with the 4734, always press TEST
when you're finished.
DST Dates (Menu 4)
This menu is for programming the dates the system will
be adjusted one hour forward for daylight savings time
or one hour back for standard time. (DST dates may
have to be reprogrammed each year.)
1. You must be in programming mode. If necessary,
press 1 1 TEST + your main access code.
2. Press 4 TEST to go into the DST dates menu.
3. "FWD DATE:00/00"
Enter the date that daylight savings time will begin.
Press TEST .
4. "BACK DATE:00/00"
Enter the date that standard time will begin and press
TEST .
42
Page 45

Section 5: In Case Of Trouble
What Happens When an Alarm Occurs
If your system goes into alarm, the following things will
happen:
1. A loud audible warning will be heard from all
system speakers.
2. The touchpad will display the type of alarm, (for
example, fire, panic, or police), and the location of
the zone where the alarm is occurring.
3. The system will automatically dial your central
station, reporting the nature and location of the
alarm. The central station will, in turn, dispatch the
proper authorities to your home or business.
In Case of Accidental Activation
If your security system is activated accidentally, do not
panic. It is important to abort the alarm as soon as
possible. Just enter your access code at the nearest
touchpad.
Your system may be programmed for delayed reporting,
a way to prevent false alarms. In this case, disarming
the system before the delay period ends will prevent an
alarm from being reported to the central station.
Consult your security installer for further information if
this is the case for you.
Evacuation Planning
It is vital for every household or business to develop and
rehearse an evacuation plan in case of fire.
Fire is a major cause of accidental death. In as few as
two minutes from its start, a fire can be deadly. It is
important that you draw up and regularly practice a fire
evacuation plan to insure rapid escapes.
Draw up a floor plan of your business, clearly showing
at least two exits from each room. Make sure that each
43
Page 46

worker knows the location of the exit nearest his or her
work area.
Make sure workers are familiar with and can quickly
recognize your system's audible alarm signals. (See
section 1.4.)
Instruct workers to feel closed doors BEFORE opening
them. If a door is warm, DO NOT OPEN IT. Use an
alternate route, such as through a bedroom window.
Thick smoke usually accompanies a fire. When moving
through smoke, stay as close to the ground as possible,
crawling if necessary. It is a good idea to keep a
flashlight in a designated place in each room for
emergencies.
Make sure all family members or workers realize that
personal belongings can be replaced, but people can't.
Warn them to get out of the building as soon as a fire is
detected. Do NOT stop to pack or look for belongings.
Under no condition should anyone return after
escaping from a burning building.
A good evacuation plan should specify a certain meeting
place outside of the building so that all evacuees can be
accounted for and given medical treatment if necessary.
Once everyone has safely evacuated the building, call
the fire department immediately from a nearby phone.
Do NOT stop inside a burning building to call the fire
department.
Once the fire evacuation plan has been drawn up, you
should review and practice it periodically to make sure
everyone knows exactly what to do if a fire occurs.
Section 6: Appendix
Sample Installation
44
Page 47

LAB
ACCT
COMP
COMPANY X
PRES
RECEP
BOILER
ROOM
GARAGE
INTERIOR DOOR SENSORS
EXTERIOR DOOR & WINDOW SENSORS
SMOKE ALARMS
HEAT SENSORS
MOTION DETECTORS
VICE
45
Page 48

LCD Display Messages
Message What it Means
NORMAL SYSTEM MESSAGES
ZONE BYPASS A zone has been bypassed.
DOOR BYPASS A door has been bypassed.
ZONE DOOR
BYPASS
CODE 2 Users with secondary codes can disarm the system.
*FIRE ALARM A zone is in alarm.
Notify your installation company immediately if any of the messages below
displays on your LCD. Your system will not be fully operational until the
condition described by the message has been corrected.
AC Loss of AC power to the system.
BATTERY Control panel battery is low.
DEVICE 0 Control panel problem.
DEVICE 1 Problem with (optional) printer if used.
DEVICE 7 EEPROM (memory) problem.
LINE 1 Phone line #1 is faulty or in need of service.
LINE 2 Phone line #2 is faulty or in need of service (applies only to
SERVICE The control panel requires service.
Both doors and zones have been bypassed.
SYSTEM TROUBLE MESSAGES
systems with more than one phone line).
SILENCED A trouble condition has been silenced but the condition still
exists.
TOUCHPAD (1-15) Problem with specified touchpad.
TROUBLE A trouble condition, for example, a broken wire,
exists.
*"Fire" is used here as an example. Zone type, (either fire, intrusion, panic, tamper, or auxiliary), displays.
46
Page 49

System Data
Keep the following code numbers and information confidential and
stored in a safe place.
System installation company: ____________________________________
Name of installer: _____________________________________________
For service, call: ______________________________________________
Before testing, call:____________________________________________
Your account # is:_____________________________________________
Your central station password is: _________________________________
Number of seconds programmed for exit delay:______________________
Number of seconds programmed for entry delay:_____________________
Begin recording your access codes on the next page.
Your zone locations are:
1. ____________________________ 16. ___________________________
2. ____________________________ 17. ___________________________
3. ____________________________ 18. ___________________________
4. ____________________________ 19. ___________________________
5. ____________________________ 20. ___________________________
6. ____________________________ 21. ___________________________
7. ____________________________ 22. ___________________________
8. ____________________________ 23. ___________________________
9. ____________________________ 24. ___________________________
10. ____________________________ 25. ___________________________
47
Page 50

11. ____________________________ 26. ___________________________
12. ____________________________ 27. ___________________________
13. ____________________________ 28. ___________________________
14. ____________________________ 29. ___________________________
15. ____________________________ 30. ___________________________
(continued on next page)
48
Page 51

Zone locations (continued)
31. ____________________________ 56. ___________________________
32. ____________________________ 57. ___________________________
33. ____________________________ 58. ___________________________
34. ____________________________ 59. ___________________________
35. ____________________________ 60. ___________________________
36. ____________________________ 61. ___________________________
37. ____________________________ 62. ___________________________
38. ____________________________ 63. ___________________________
39. ____________________________ 64. ___________________________
40. ____________________________ 65. ___________________________
41. ____________________________ 66. ___________________________
42. ____________________________ 67. ___________________________
43. ____________________________ 68. ___________________________
44. ____________________________ 69. ___________________________
45. ____________________________ 70. ___________________________
46. ____________________________ 71. ___________________________
47. ____________________________ 72. ___________________________
48. ____________________________ 73. ___________________________
49. ____________________________ 74. ___________________________
50. ____________________________ 75. ___________________________
49
Page 52

51. ____________________________ 76. ___________________________
52. ____________________________ 77. ___________________________
53. ____________________________ 78. ___________________________
54. ____________________________ 79. ___________________________
55. ____________________________ 80. ___________________________
50
Page 53

Time Windows
In this space, your installer can note the time windows that have been set up
for your system.
Time Window Start End Days
0 S M T W TH F S H
1 S M T W TH F S H
2 S M T W TH F S H
3 S M T W TH F S H
4 S M T W TH F S H
5 S M T W TH F S H
6 S M T W TH F S H
7 S M T W TH F S H
8 S M T W TH F S H
9 S M T W TH F S H
10 S M T W TH F S H
11 S M T W TH F S H
12 S M T W TH F S H
13 S M T W TH F S H
14 S M T W TH F S H
15 S M T W TH F S H
16 S M T W TH F S H
17 S M T W TH F S H
18 S M T W TH F S H
19 S M T W TH F S H
20 S M T W TH F S H
21 S M T W TH F S H
22 S M T W TH F S H
51
Page 54

23 S M T W TH F S H
24 S M T W TH F S H
25 S M T W TH F S H
26 S M T W TH F S H
27 S M T W TH F S H
28 S M T W TH F S H
29 S M T W TH F S H
30 S M T W TH F S H
31 S M T W TH F S H
52
Page 55

Window Groups
Use this form to record which time windows have been assigned to which
groups.
Window Group # Windows
0
1
2
3
4
5
6
7
8
9
10
11
12
13
14
15
16
17
18
19
20
21
22
23
53
Page 56

24
25
26
27
28
29
30
31
54
Page 57

User Profiles
You can use this form to record the options available to each profile.
High
# Areas Door Bypass Arm Disarm Code 2
0 1 2 3 4 5 6 7 8 Y / N Y / N Y / N Y / N Y / N Y / N Y / N
1 1 2 3 4 5 6 7 8 Y / N Y / N Y / N Y / N Y / N Y / N Y / N
2 1 2 3 4 5 6 7 8 Y / N Y / N Y / N Y / N Y / N Y / N Y / N
3 1 2 3 4 5 6 7 8 Y / N Y / N Y / N Y / N Y / N Y / N Y / N
4 1 2 3 4 5 6 7 8 Y / N Y / N Y / N Y / N Y / N Y / N Y / N
5 1 2 3 4 5 6 7 8 Y / N Y / N Y / N Y / N Y / N Y / N Y / N
6 1 2 3 4 5 6 7 8 Y / N Y / N Y / N Y / N Y / N Y / N Y / N
7 1 2 3 4 5 6 7 8 Y / N Y / N Y / N Y / N Y / N Y / N Y / N
8 1 2 3 4 5 6 7 8 Y / N Y / N Y / N Y / N Y / N Y / N Y / N
9 1 2 3 4 5 6 7 8 Y / N Y / N Y / N Y / N Y / N Y / N Y / N
10 1 2 3 4 5 6 7 8 Y / N Y / N Y / N Y / N Y / N Y / N Y / N
11 1 2 3 4 5 6 7 8 Y / N Y / N Y / N Y / N Y / N Y / N Y / N
12 1 2 3 4 5 6 7 8 Y / N Y / N Y / N Y / N Y / N Y / N Y / N
Sec.
Card
Only
55
Page 58

13 1 2 3 4 5 6 7 8 Y / N Y / N Y / N Y / N Y / N Y / N Y / N
14 1 2 3 4 5 6 7 8 Y / N Y / N Y / N Y / N Y / N Y / N Y / N
15 1 2 3 4 5 6 7 8 Y / N Y / N Y / N Y / N Y / N Y / N Y / N
56
Page 59

X-10 Compatible Module Data
If your installation uses X-10 compatible modules for automatic control of
devices, such as doors, lights, and so on, your installer will record here the
keystrokes necessary to activate each doors/devices.
To Activate Press
Device House code Unit
10
11
12
13
1
2
3
4
5
6
7
8
9
1 0 1 DOOR
1 0 2 DOOR
1 0 3 DOOR
1 0 4 DOOR
1 0 5 DOOR
1 0 6 DOOR
1 0 7 DOOR
1 0 8 DOOR
1 0 9 DOOR
1 1 0 DOOR
1 1 1 DOOR
1 1 2 DOOR
1 1 3 DOOR
14
15
16
57
1 1 4 DOOR
1 1 5 DOOR
1 1 6 DOOR
(continued on next page)
Page 60

X-10 Compatible Module Data (continued)
To Activate Press
Device House code Unit
10
11
12
13
1
2
3
4
5
6
7
8
9
2 0 1 DOOR
2 0 2 DOOR
2 0 3 DOOR
2 0 4 DOOR
2 0 5 DOOR
2 0 6 DOOR
2 0 7 DOOR
2 0 8 DOOR
2 0 9 DOOR
2 1 0 DOOR
2 1 1 DOOR
2 1 2 DOOR
2 1 3 DOOR
14
15
16
58
2 1 4 DOOR
2 1 5 DOOR
2 1 6 DOOR
Page 61

Regency 4734 Security System
Quick Reference Guide
ACCESS OPERATIONS
ACCESS A DOOR Present your card or tag within 6 inches of proximity
REMOTE DOOR ACCESS 1. Enter the number of the door (1-15).
reader
OR
Swipe your card through the slot in the card reader
OR
Press DOOR + valid ID code at a touchpad.
2. Present your card or tag within 6 inches of proximity
reader
OR
Swipe your card through the slot in the card reader
OR
Press DOOR + valid ID code at a touchpad.
ACCESS A HIGH SECURITY
DOOR
BASIC SECURITY OPERATIONS
ARM/DISARM Access code
BYPASS/UNBYPASS A DOOR
BYPASS/UNBYPASS A ZONE
1. Present your card or tag within 6 inches of proximity
reader
OR
Swipe your card through the slot in the card reader
2. When "ENTER CODE B" displays, enter your
PIN.
Door # + DOOR BYPS (+ Access code)
Zone # + BYPS (+ Access code)
59
Page 62

CHANGE AN ACCESS CODE
1. Press 7 TEST .
2. Select Yes or No for Bulk Load.
3. Enter # of user you want to change (2-999).
4. Press CLR + New access code + TEST
5. Press MUTE MUTE
DELETE AN ACCESS CODE
INTERCOM USEBASIC 2-WAY
OPERATION
RESET ALARM Access code
SET DATE
1. Press 7 TEST .
2. Select Yes or No for Bulk Load.
3. Enter # of user you want to change (2-999).
4. Press CLR TEST
5. Press MUTE MUTE
To enable all intercoms, press ICOM .
To enable one intercom, press number of intercom (1-
15) + ICOM .
8 TEST + DATE (using MM/DD/YY format with
leading 0's) + TEST
SET TIME
9 TEST + # for AM/PM
+ TIME (using HH/MM format with leading 0's) +
TEST
60
Page 63

SILENCE TROUBLE
MUTE MUTE
TEST OVERALL SYSTEM
MULTI-AREA SYSTEM OPERATIONS
DISARM ALL AREAS/RESET
ALARM
TOGGLE ARM/DISARM 1. Access code
ARM ALL AREAS
SET ARM DELAY 1. Access code
TEST + Access code
Access code + 0
2. TEST (as many times as necessary until area you
want to select displays)
3. 1 + CLR
Access code + 2
2. TEST (as many times as necessary until area you
want to select displays)
3. 3 + # of minutes
SKIP TO NEXT AREA IN MENU
4. TEST CLR
TEST
61
 Loading...