

Page 1

User's Manual Page i
Table of Contents
Section 1. Introduction.......................................................................................1
Section 2. System Overview............................................................................... 2
Monitoring Capabilities .....................................................................2
Intrusion......................................................................................2
Fire.............................................................................................. 2
Equipment Tampering and Auxiliary..........................................2
Access Codes ..................................................................................... 3
Installer’s Code (Code 0)............................................................3
Main User’s Code (Code 1)........................................................ 3
Primary Access Codes (Codes 2-98)........................................... 4
High Security Door Access Code (Optional).............................. 4
Touchpad Descriptions ......................................................................4
Models 4660B and 4660C........................................................... 4
Model 4205 Slimline Touchpad (not UL listed)..........................5
System Status Lights .......................................................................... 6
Touchpad Buttons..............................................................................7
Section 3. Using Your Model 4720 Security System........................................ 9
Arming Your System.......................................................................... 9
Disarming Your System.....................................................................9
Resolving Not Ready Conditions..................................................... 10
Viewing Alarms and Alarm Memory............................................... 10
Viewing Trouble and Supervisory Conditions .......................... 10
Viewing Alarm Memory............................................................ 10
Silencing Trouble Sounds ................................................................ 11
Bypassing Zones .............................................................................. 11
Bypassing a Zone...................................................................... 11
Reinstating a Bypassed Zone .................................................... 11
Bypassing or Reinstating an Armed System.............................. 12
Activating Chime Sounds.................................................................12
Sending Silent Duress (Hold Up) Alarms ........................................ 12
Activating Doorstrikes ..................................................................... 12
Activating High Security Doorstrikes .............................................. 13
Page 2

Model 4720 Commercial Security System
Page ii User's Manual
Intercom Operation (Optional).........................................................13
Two-way Communications on All Intercoms (Paging) ............. 13
Two-way Communications on One Intercom............................ 13
Listen-only Communications With All Intercoms...................... 13
Listen-only Communications With One Intercom.....................14
Preprogrammed Time-out......................................................... 14
Telephone Operation (Optional)......................................................14
Basic Telephone Operation....................................................... 14
Automatic Redialing.................................................................. 15
Preprogrammed Time-out.........................................................15
Memory Dialing........................................................................15
Programming Your 4720 Security System....................................... 17
Resetting the Time.....................................................................17
Resetting the Date..................................................................... 18
Reprogramming Access Codes..................................................18
Testing Your 4000 Security System.................................................20
Section 4. In Case of Trouble........................................................................... 21
AC Power Failures........................................................................... 21
In Case of Accidental Activation ..................................................... 21
What Happens When an Alarm Occurs?..........................................21
Audible Alarms................................................................................ 22
Beeper Sounds .................................................................................23
Section 5. System Messages.............................................................................. 24
Trouble Messages ............................................................................ 24
Error Messages................................................................................. 25
LCD Displays...................................................................................25
System Data......................................................................................................27
Page 3

User's Manual Page 1
Section 1.
Introduction
Congratulations! You have just purchased a Regency 4000 Series Security
System; one of the most sophisticated and flexible commercial security
systems available today.
The electronic heart of your security system is the Model 4720 Control
Communication panel. It has a stand-by back-up battery to prevent system
shutdown during power failures. Typically, you will not have to open the
control panel cabinet once it is installed.
Your security system can monitor up to 80 separate zones, using different
types of sensors (door contact switches, motion and smoke detectors, and so
on). Everyday system control is accomplished through touchpads.
Touchpads are normally installed in main office areas and building entries.
Programmable in thousands of different combinations, they allow you to
quickly and conveniently arm and disarm system functions and zones,
providing an extremely high degree of tamper-proof security.
It is vital that you familiarize yourself with the information in this manual
for optimum system performance and prevention of false alarms. It is also
recommended that you keep this manual in a secure place for future
reference.
Talk to your system installer if you have any questions about which features
are included in your system. If anything covered in this manual differs from
what your installation company representative has told you, follow your
representative’s instructions.
The 4720 Commercial Security System is UL listed for
commercial burglary and fire use.
Page 4

Page 2 User's Manual
Section 2.
System Overview
Monitoring Capabilities
Your Model 4720 security system is active 24 hours a day, monitoring for
fire, auxiliary conditions (depending on your needs), and touchpad activated
alarms. The intrusion (burglary) portion of the system must be turned on
and off (armed and disarmed) as occupants come and go.
Intrusion
It is important that your intrusion system be on at all times when your
building or place of business is not occupied. The Model 4720 system can
be armed or disarmed with the appropriate code from any of the system
touchpads.
One or more of your doors have been "sensored" to allow entrance and exit
alarm delays. This is done to give you an adjustable, pre-programmed
amount of time to leave after arming the system, without setting off an
alarm. An optional warning beep can sound to count down the time you
have for your exit.
Fire
If your alarm specialist installed smoke detectors or heat sensors, you have
24-hour fire protection. Fire protection is active even when your system is
disarmed. If a fire is sensed, your system touchpad will sound a local alarm
and send a fire alarm signal to your security installer's monitoring station.
Equipment Tampering and Auxiliary
A wide variety of emergency and auxiliary alarms can be programmed to be
sent to the appropriate officials or environmental service companies under
prescribed conditions. These conditions include panic alarms, non-medical
emergency alarms, and tampering alarms.
Page 5

Section 2. System Overview
User's Manual Page 3
Access Codes
An access code is a confidential number, 3 to 6 digits in length. You enter
this code into the system touchpads to program, arm and disarm, and
command all functions of the system.
Note: When selecting access codes for your system, do not use numbers
such as 1111, 2222, and so forth. While they are easy codes for you
to remember, they may also be easy codes to break.
Installer’s Code (Code 0)
Your installation company uses this special code to install and initially
program your system. It can also be used to arm and disarm your system,
both from the touchpads and from the central station (by telephone lines).
If you do not want the installation company to have access to your system
once it has been installed, ask the installer for the installation code and
instructions for changing it. Once you have changed the code, only you can
arm and disarm the system. If it becomes necessary to change the
programming of your system, you will have to give the installation company
the new code. Talk to your installer about the installation code. There are
many reasons why you might want your installation company to be able to
access your system at any time.
Main User’s Code (Code 1)
Warning
Without this number, it is virtually impossible for anyone to re-
program or reset your security system.
Code 1 (sometimes known as the master code) enables you to change other
code numbers, and change the day and time shown on your touchpad liquid
crystal display (LCD) and optional printer. This main user code number
should be written down and stored for periodic use in a safe, secure place.
Because code 1 can activate the Walk Test mode, during which the 4720 is
temporarily prevented from responding to an actual fire alarm, code 1
cannot be used by the end user in a UL commercial fire installation. Your
installer must reprogram options and perform other tasks that require the use
of code 1.
Page 6

Model 4720 Commercial Security System
Page 4 User's Manual
Primary Access Codes (Codes 2-98)
Up to 98 primary access codes can be provided by your security system.
These primary codes are the basic keys to your security system. They can
be programmed to allow the user to arm and disarm the system, operate all
DOOR functions, and bypass system zones.
Primary codes can be individually programmed with specific time windows
appropriate for each employee or user. For example, night shift workers can
be programmed for PM hours only, or part-time workers for their scheduled
work hours only.
High Security Door Access Code (Optional)
Note: This product is not listed for UL 294 access control systems.
With this code, you can create a higher level of security for door access
control. When using the high security option, two access codes are required
to unlock a protected door. The first code is a common code for all users,
the second code is the normal access code. Both codes must be used to
unlock the door.
This further prevents unauthorized access to areas such as sensitive
document storage, government security projects, and so on.
The high security code is also beneficial in that only one code has to be
changed when access requirements change.
Note: You can easily change the primary codes and the high security door
access code at any Model 4660B/C touchpad whenever necessary, to
deny access to terminated or transferred employees (see pg. 18).
Touchpad Descriptions
This section describes the touchpads that can be used with the 4720.
Touchpads that are not UL listed (Model 4205) can be used with the 4720,
but may have slightly different buttons or indicator lights.
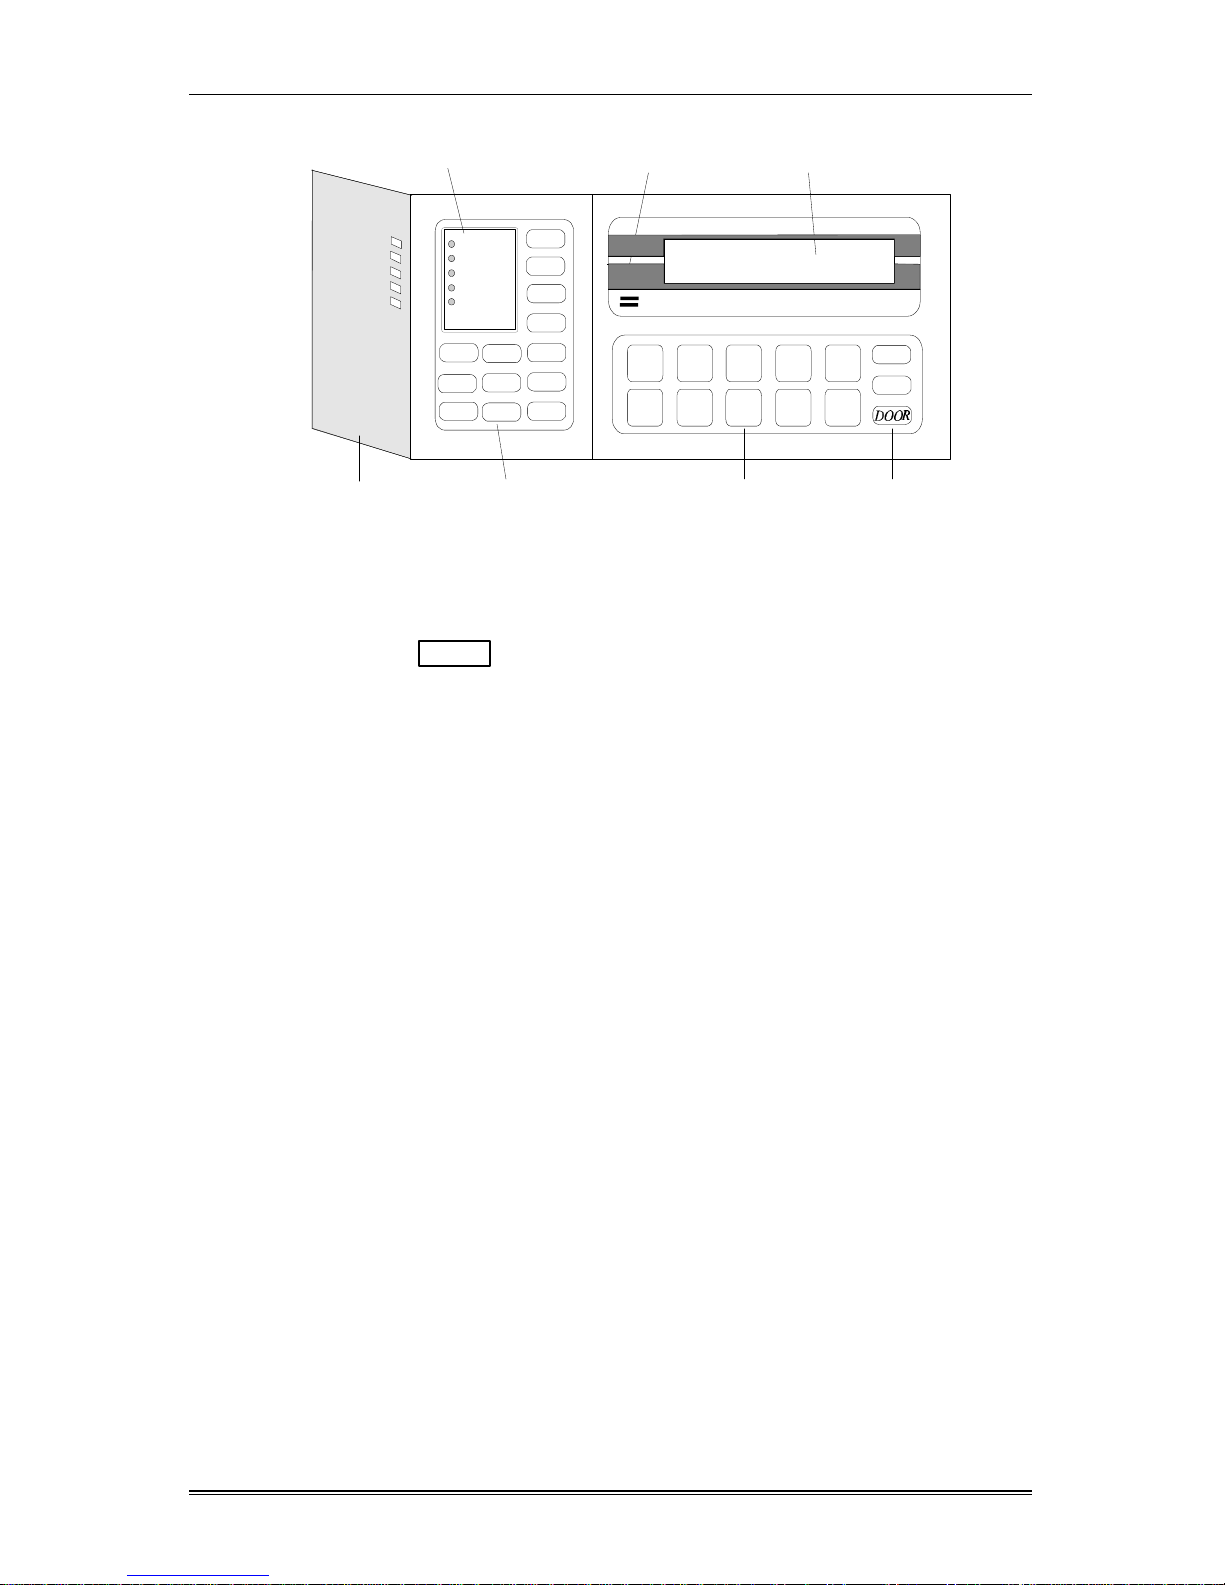
Models 4660B and 4660C
The 4660B or 4660C touchpads, recommended for commercial use with the
4720 security system, are used to program on/off combinations and to
operate most functions. Figure 1 shows the 4660C touchpad.
An optional intercom/telephone module, the Model 4140, can be used with
the touchpad.
Page 7
Section 2. System Overview
User's Manual Page 5
R E G E N C Y
MODEL 4660C
1
2 3
4
5
6
7
8
9
0
TEST
STAT
INT
BYPS
CODE
2
DLY
ICOM
POL
CLR
TEL
FIRE
MUTE
AUX
CHM
MEM
READY
ARMED
NO DELAY
INTERIOR
CHIME
Door
Funct ion B ut t ons
pgs. 7-8
Funct ion B ut t ons
pg. 7
Digit B ut t ons
pg. 7
Alert Tone S ounder
pgs. 22-23
English Language LCD
Section 5
System Status Lights
pg. 6
Figure 1. Model 4660C LCD Touchpad
Note: The 4660B and 4660C touchpads are the same. The only difference
is that the DOOR button is disabled on the 4660B.
Model 4205 Slimline Touchpad (not UL listed)
The Model 4205 is a vertically designed, weather-resistant touchpad for
indoor or outdoor use. It can be used for arming, disarming, and auxiliary
door access.
Page 8

Model 4720 Commercial Security System
Page 6 User's Manual
System Status Lights
The lights on the top left of the touchpad provide information about your
system, including features that have been enabled or disabled. The table
below describes the LED (light-emitting diodes) functions of the 4660B/C
touchpads.
On Off
The system is disarmed and all
enabled zones are ready to be
armed.
(Zones that are disabled have
either been bypassed, or they are
interior zones that have been
turned off.)
System Disarmed. Indicates
zones in a Not Ready condition
(a sensored door or window may
be open). Not Ready zones can
be viewed by pressing STAT .
System Armed. The system is in
operating condition.
Flashing. The system is
reporting to the central station.
The system is armed. The system is disarmed.
Used in residential installations only.
Usually used in residential installations only.
All zones will be armed when the
ARMED light is ON.
Interior zones are disabled.
When the system is armed, it
protects the building against
entry from the outside, but people
can move around inside without
setting off an alarm.
The CHIME feature is enabled.
When the panel is disarmed and
someone enters the protected area
via a zone programmed as a chime
zone, a chime tone will sound.
The CHIME feature is disabled.
NO chime tone will sound when
someone enters the protected
area.
Note: The CHIME and INTERIOR LEDs are both toggled with
either the CHM or INT buttons.
Page 9
Section 2. System Overview
User's Manual Page 7
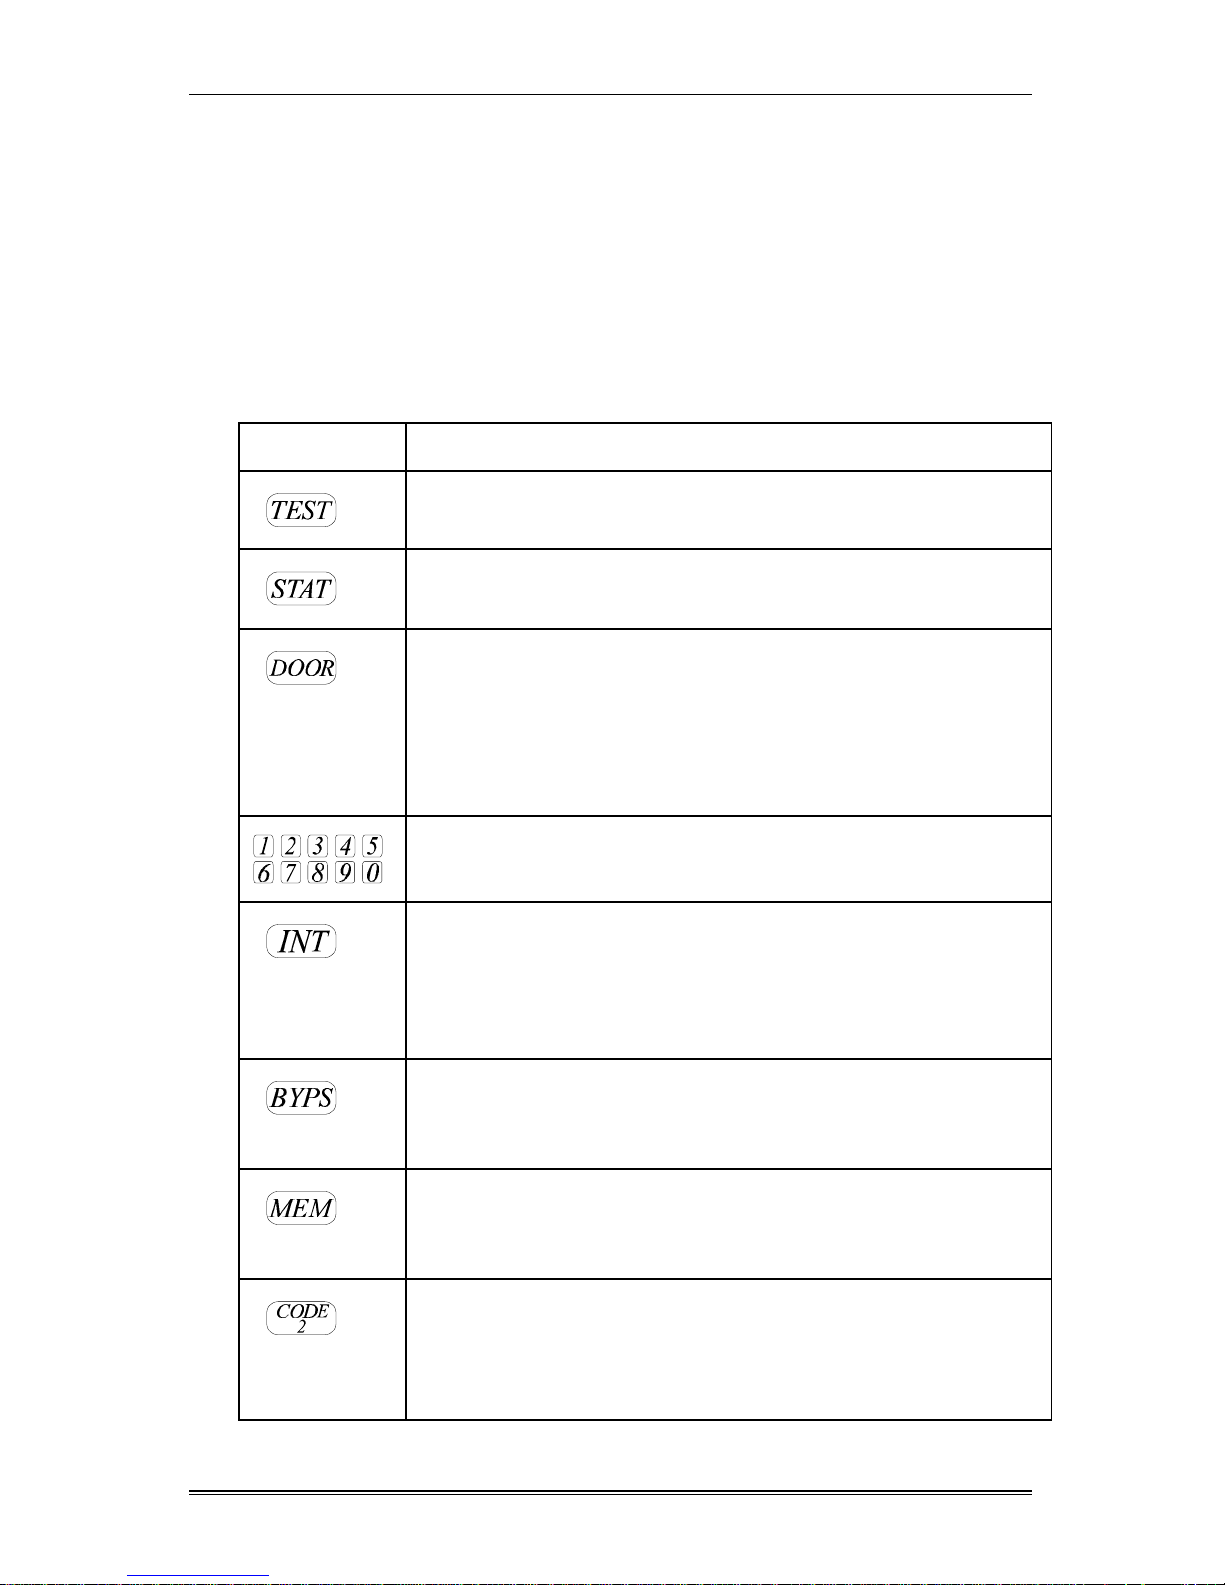
Touchpad Buttons
Buttons always visible on the touchpad are for frequently used functions
such as arming, disarming, and door access.
The buttons hidden by the door on the left side of the touchpad allow for
more specialized system control such as zone bypassing, system testing, and
programming. Some of these functions can be performed only by the
installer.
Button Description
Used to enter a variety of test modes.
Used to display zones that are not ready or in trouble and to
display system trouble conditions.
On 4660C touchpads, this button is used in conjunction with an
access code to activate doorstrikes for entrance to areas
programmed for authorized access only. On 4660B touchpads,
this button is disabled and has no effect.
This button cannot be used if the Code 2 feature is used.
Used to enter numerical information, such as access codes.
Controls whether or not zones programmed as interior will
respond to alarms when the system is armed.
Press this button to turn on the INTERIOR and CHIME LEDs.
Press it again to turn them off.
Used to bypass (deactivate) individual zones (sensors) from
system monitoring or control. It also allows you to check which
zones have been bypassed.
When the system is disarmed, pressing this button will display
any zones that were in an alarm condition since the last time the
system was armed.
Controls whether or not secondary access codes can be used to
disarm the system. The Code 2 feature would normally be used in
residential installations only. It cannot be used if door access is
used.
Touchpad buttons continued on next page.
Page 10
Model 4720 Commercial Security System
Page 8 User's Manual
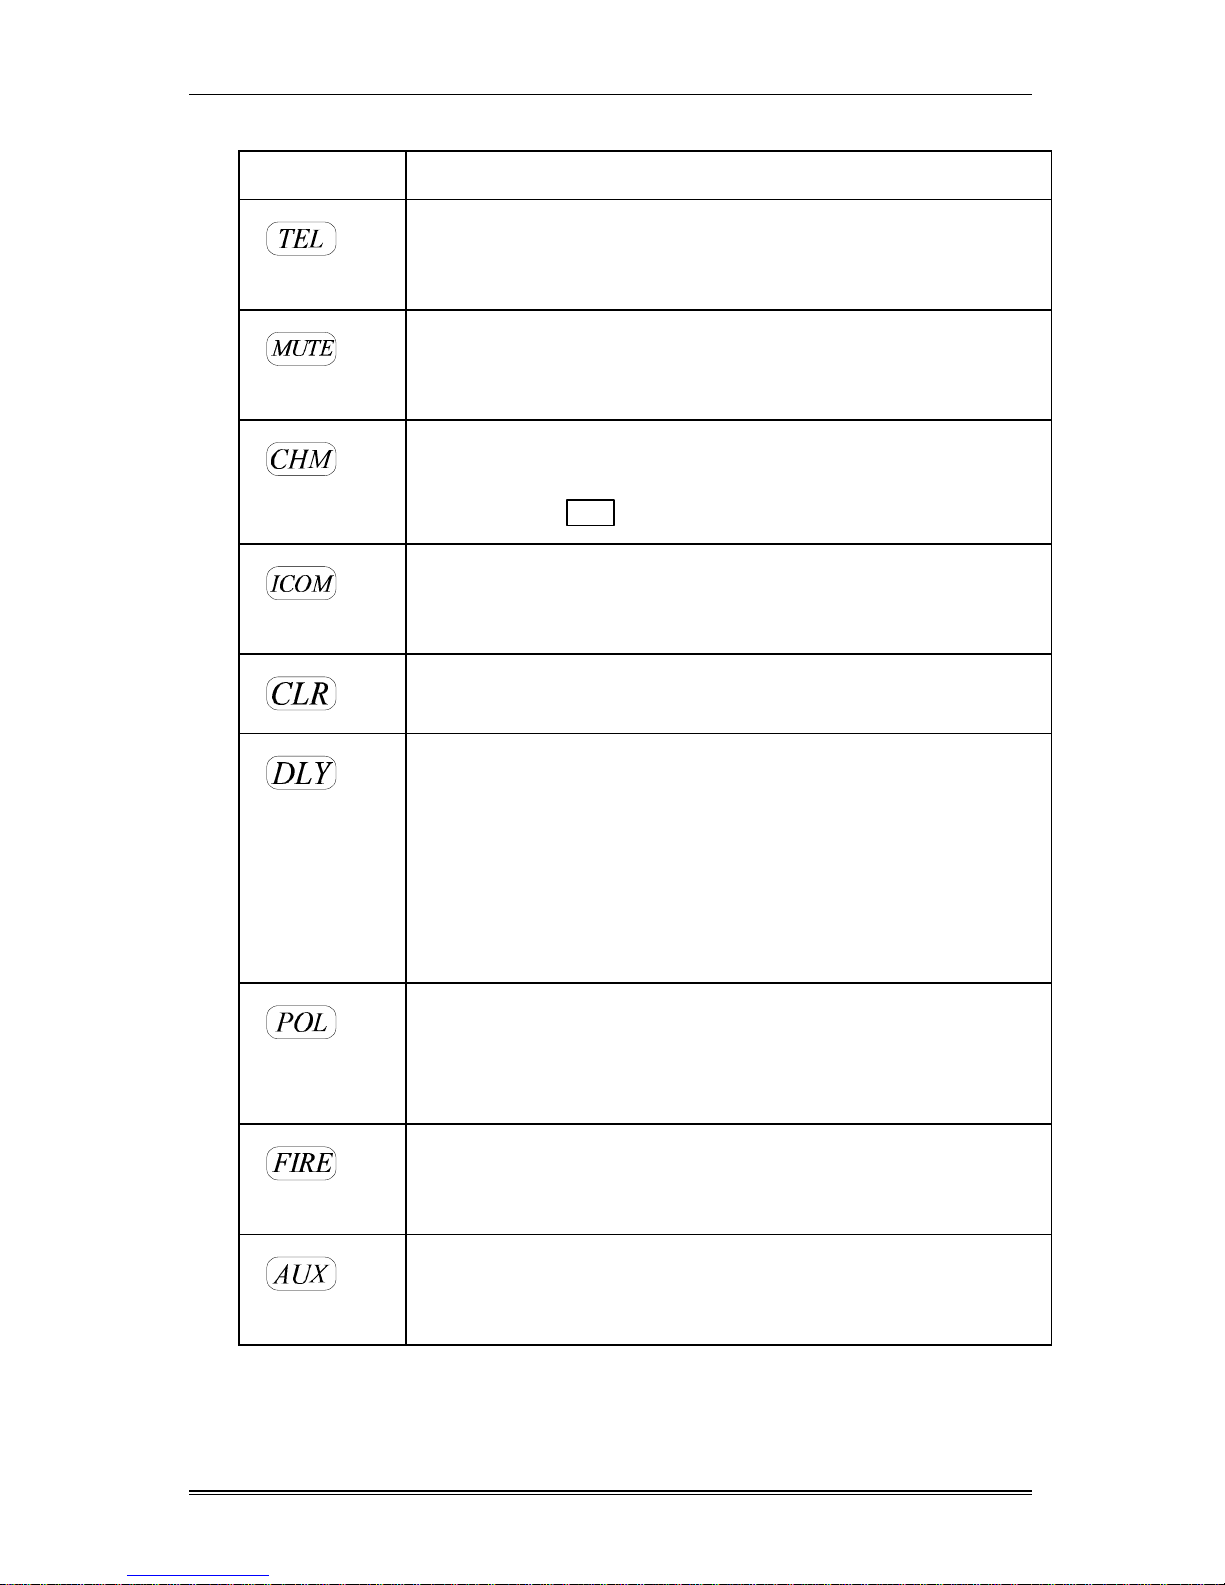
Touchpad buttons continued.
Button Description
Controls the telephone functions. It will not function unless the
Model 4140 intercom system and the Model 4640 audio module
is used.
(press twice)
Silences the audible trouble signal. Pressing this button will also
exit any of the special test modes and return the system to normal
operation.
Controls whether or not a chime tone will be generated when
someone passes through a chime zone while the system is
disarmed. The INT button performs the same function.
Controls the intercom functions. It will not function unless the
Model 4140 intercom system and the Model 4640 audio module
are used.
If you make a mistake while entering a code or command, press
this button and start over.
For zones that have been programmed with an entry or exit delay,
pressing this button controls whether these zones will be delayed
or instant. Delayed zones allow a user to exit after arming, or to
disarm after entering, without generating an alarm. Instant zones
cause an immediate alarm when the zone is violated.
When the NO DELAY LED is on and the system is armed, zones
programmed for entry and exit delay are instant.
When pressed and held for one full second, this button generates
an immediate alarm to the central monitoring station, indicating
that the police should be dispatched. This is typically an audible
alarm (see page 22).
When pressed and held for one full second, this button generates
an immediate alarm to the central station, from which the fire
department will be dispatched.
When pressed and held for one full second, this button generates
an immediate alarm to the central monitoring station, for nonmedical emergency situations (typically silent alarm).
Page 11

User's Manual Page 9
Section 3.
Using Your Model 4720 Security System
The following is an operating guide for each of your Model 4720 security
system functions or capabilities. Go over each with your installer if you
have any questions, and practice them until you feel comfortable with the
day-to-day operation of each function.
Arming Your System
When leaving your office or business you will want to arm the intrusion
protection of your security system as follows:
1. Make sure the green READY light is lit, and the ARMED light is off.
2. Enter your access code (3 to 6 digits) on the touchpad.
Note: You have a 3-second timeframe to enter each digit of your access
code. If you pause for 3 seconds, you will hear a short beep and the
touchpad display will tell you to TRY AGAIN.
If make a mistake entering your code, you can also press the CLR
button and start over again.
When you finish, the green READY light will go off, the red ARMED light
will come on, and your system will be armed.
The LCD will show the seconds remaining until the exit time expires. (You
and your alarm company will have determined the exact number of seconds
necessary.) The touchpad may give you an exit warning tone with beeps to
count down your exit time for you. You must be out of the building with the
door shut before the time runs out or an alarm will sound.
If the touchpad shows a TROUBLE condition when you attempt to arm the
system, contact your central station for servicing immediately. DO NOT
attempt to arm the system until the TROUBLE condition is cleared as your
system will not be fully operational.
Disarming Your System
To disarm, simply enter your access code (3 to 6 digits) on the touchpad.
When you return and open a building door on the delay circuit, an entry
warning tone will sound and you will have a programmed amount of time to
enter and disarm the system.
Page 12

Model 4720 Commercial Security System
Page 10 User's Manual
The warning tone will stop as soon as you enter the first digit of your access
code, allowing you to clearly hear the beeps as you finish entering your
code. The LCD will show the number of seconds until the system does into
alarm if not disarmed.
The ARMED light will go off, and the READY light will go back on.
If you do not want the chime zones to sound, press the CHM or INT
button to turn off the CHIME and INTERIOR LEDs, if needed.
Resolving Not Ready Conditions
If the LCD reads NOT READY and the touchpad READY light is off, there
is a Not Ready condition. This typically means that one or more of your
building's zones are not prepared for system arming (for example, a door is
ajar or a window is left open). Before you can arm the system, you must
identify and correct the Not Ready condition.
To do this, press the STAT button and the LCD will display the zone
number and location of the open sensor (for example, 3 BACK DOOR).
Close the door involved and the unit will automatically indicate a ready
status (READY light is on).
If the display reads TROUBLE, press the STAT button and the display will
list the trouble conditions (see page 24).
Viewing Alarms and Alarm Memory
When an alarm occurs, the touchpad displays ALARM on the first line of
the LCD. Press MEM to view the location of the alarm.
Viewing Trouble and Supervisory Conditions
When a system trouble or sprinkler supervisory condition occurs, the
touchpad will beep and display TROUBLE or SUPERVISORY on the first
line of the LCD. Press STAT to view the location of the trouble or
supervisory.
Viewing Alarm Memory
The alarm memory function records alarm information. Events remain in
memory for a single arming period. Press MEM to display the zone
Page 13

Section 3. Using Your Model 4720 Security System
User's Manual Page 11
number and location of any alarms that have occurred since the last time the
system was armed. The next time you arm the system, memory from the
previous arming period will automatically be erased.
Silencing Trouble Sounds
To silence a trouble condition alert tone, press MUTE MUTE .
The LCD will display SILENCED instead of TROUBLE. If a new
condition occurs, the TROUBLE display and alert tone will be reactivated.
Bypassing Zones
You may need to bypass certain zones at certain times. Remember that
while a zone is bypassed, there is no protection on that zone. Do not give
the code that allows for bypassing to casual users of the system such as
cleaning or delivery persons.
The BYPS button is used to disable individual intrusion zones. You cannot
bypass 24-hour fire and panic zones.
Bypassing a Zone
When the system is disarmed:
1. Enter the number of the zone you wish to bypass.
2. Press BYPS .
3. Enter your access code, if required.
If the LCD reads RESTRICTED, and you hear a warning tone, you have
attempted to bypass a fire or panic zone that cannot be bypassed.
To find out what zones are bypassed, simply press BYPS .
Reinstating a Bypassed Zone
When the system is disarmed:
1. Enter the number of the zone you wish to reinstate.
2. Press BYPS .
3. Enter your access code, if required.
Page 14

Model 4720 Commercial Security System
Page 12 User's Manual
The zone is now reinstated. Repeat steps for all zones that you want to
reinstate.
Bypassing or Reinstating an Armed System
The procedure to bypass or reinstate a zone is the same as when the system
is disarmed, except that the LCD will always display ENTER CODE.
After bypassing a zone, the display will not show BYPASSED, so that no
one else will know that part of the system has been disabled.
Note: If reinstating an armed zone will cause an alarm, the LCD will show
RESTRICTED ZONE and the zone will remain bypassed.
Activating Chime Sounds
When the system is disarmed, you can turn the chime function on and off by
pressing CHM or INT .
The chime function will cause a chime sound whenever any chime zone
sensor is activated while the system is disarmed.
Sending Silent Duress (Hold Up) Alarms
If forced to disarm the system under duress, for example, during an armed
robbery, you can still trigger an alarm report.
By pressing a predetermined 1-2 digit duress code (record on page 27)
before entering your access code, you can silently transmit a duress alarm to
the alarm central station.
The system lights and alarms will not indicate that a silent duress alarm is
being sent.
Activating Doorstrikes
To activate doorstrikes and open doors programmed for authorized access
only,
1. Press DOOR .
2. Enter the proper access code.
Page 15

Section 3. Using Your Model 4720 Security System
User's Manual Page 13
Activating High Security Doorstrikes
Use these steps if the high security access option (see page 4) was selected
during programming:
1. Press DOOR . The display will show ENTER CODE A.
2. Enter the high security access code (code ID #99). The display will
show ENTER CODE B.
3. Enter your access code.
The doorstrike is now activated.
Intercom Operation (Optional)
Your touchpad can function as an intercom, or as a "hands-free" telephone,
if the Model 4640 Audio Module and Model 4140 Telephone Intercom
Controller is included in your system.
Note: The intercom feature has not been investigated by UL.
The intercom feature provides the following options:
Two-way Communications on All Intercoms (Paging)
To make all system intercoms become active at once, press ICOM .
To turn off, press ICOM .
Two-way Communications on One Intercom
1. Press the number of the intercom station you wish to call.
2. Press ICOM .
Listen-only Communications With All Intercoms
1. Press the 1 key.
2. Press the 0 key.
3. Press ICOM .
To turn off, press ICOM .
Page 16

Model 4720 Commercial Security System
Page 14 User's Manual
Listen-only Communications With One Intercom
1. Press the number of the intercom station you wish to listen to twice.
2. Press ICOM .
You can now hear activity in that touchpad intercom area, but they cannot
hear you.
To turn off, press ICOM .
Preprogrammed Time-out
The time-out option allows you to automatically limit touchpad intercom or
telephone usage to anywhere between 15 and 255 seconds. The touchpad
intercom (or telephone) will automatically hang-up after the programmed
time has elapsed. As a warning, the system will emit a warning beep 10
seconds before hanging up the intercom.
Telephone Operation (Optional)
The telephone feature provides the following options:
Basic Telephone Operation
To: Steps
Answer the phone
Press TEL .
Place a phone call
1. Press TEL .
2. Enter digits of the phone number you wish to
call (up to 12 digits).
Hang up
Press TEL .
Mute your conversation
(place on hold)
Press MUTE .
The touchpad will beep while the Mute function is activated.
Activate 2-way
communication (remove
hold):
Press MUTE .
Page 17

Section 3. Using Your Model 4720 Security System
User's Manual Page 15
To: Steps
Transfer a call to another
touchpad
1. Answer an incoming call by pressing TEL .
2. Put caller on hold by pressing MUTE .
A short beep will be heard every 2 seconds until
the MUTE button is pressed again.
3. Press the number of the touchpad to which
you want to transfer the call.
4. Press ICOM and announce the call transfer
to the person at the second touchpad.
5. To complete the call transfer, the person at the
second touchpad should press TEL .
Automatic Redialing
1. To redial the last phone number called, press 9.
2. Press TEL .
Preprogrammed Time-out
The time period is the same as the intercom time-out (see page 14).
Memory Dialing
To: Steps
Store a phone number in
memory
1. Press TEL .
2. Press digits of the phone number you wish
to store.
3. Press MEM .
4. Press either digit 1 or 2 (for memory
location 1 or 2).
Page 18

Model 4720 Commercial Security System
Page 16 User's Manual
To: Steps
The phone number is now in memory and
a call has been placed to the phone
number.
5. Press TEL to terminate the call.
Dial a memory phone
number
1. Press digit 1 or 2 (for memory location 1
or 2).
2. Press TEL .
Clear a phone number from
memory
1. Press TEL .
2. Press MEM .
3. Press the digits of the phone number you
wish to store.
4. Press either digit 1 or 2 (for memory
location 1 or 2).
5. Press TEL .
Page 19

Section 3. Using Your Model 4720 Security System
User's Manual Page 17
Programming Your 4720 Security System
Your security dealer or installer will complete all initial programming for
you. However, as time goes on, you will undoubtedly want to make
changes.
Most program changes will be handled by your installer, but resetting time
and date displays and changing access codes are two functions you can do
yourself from the touchpad.
One important thing to remember is that your system is disabled when you
are in programming mode. You will not be protected until you exit
programming mode.
Resetting the Time
1. Press 9 .
2. Press TEST .
3. Enter your main access code. The display will now read TIME?.
4. Enter a 6-digit time setting. The first digit is for the day of the week.
Choose the number of the day from the list below:
1 Monday 5 Friday
2 Tuesday 6 Saturday
3 Wednesday 7 Sunday
4 Thursday
The second digit is 0=AM or 1=PM
Enter the last four digits as the actual time in hours and minutes.
Upon pressing the sixth digit, the touchpad will return to its normal
operation with the correct time in place.
Example: To reset the time for Tuesday 3:15 PM you would enter the
following:
Remember to include a leading zero before 1-digit numbers when entering
the time portion.
Page 20

Model 4720 Commercial Security System
Page 18 User's Manual
Resetting the Date
If your system includes an on-site printer, the display will prompt you to set
the date after setting the time.
When the display reads DATE?, enter a 6-digit date in MMDDYY format.
Upon pressing the sixth digit, the touchpad will return to its normal
operation.
Example: To reset the date for March 25, 1995, you would enter the
following:
Always remember to enter leading zeros for 1-digit months and days
(03=March).
Reprogramming Access Codes
Do NOT program new access codes unless you check first with your
installer. He or she will inform you as to which functions and time windows
apply to each code. Make sure the system is disarmed and that you are NOT
in set time mode.
You can only reprogram access codes by using touchpads with English
language LCD displays.
Displaying Codes
1. Press 7 .
2. Press TEST .
3. Enter your main access code. The display will read CODE 1:.
4. To display the access code number you entered (for example, CODE 1:
5432), press TEST .
5. To skip to the next code in the sequence, press TEST .
6. To skip over more than one code, press CHM , enter the ID number of
the code you wish to change (not the code itself), and then press TEST .
Page 21

Section 3. Using Your Model 4720 Security System
User's Manual Page 19
Changing Your Access Code
Access codes are 3 to 6 digits in length. You must be sure that codes do not
conflict. For example, assigning a code as 543 would prevent another code
previously assigned as 5432 from working.
After entering a new access code, always remember to press the TEST
button. You can record new access code numbers on page 29.
Note: When changing codes, make sure that no code starts with the duress
trigger digits (see page 12).
1. Display the code you wish to change (Steps 1-6 in Displaying Codes).
2. To change the access code displayed, press CLR .
3. Enter the new access code you have assigned (3 to 6 digits).
4. Store the new code in memory by pressing TEST .
The display will then show the next access code in sequence. Repeat Steps
1-3 for each additional code you wish to change.
Deleting Codes
Note: Do NOT delete your main access code.
1. Display the code you wish to delete (Steps 1-6 in Displaying Codes).
2. Press CLR to clear a code from memory without assigning a new code.
3. Press TEST .
Exiting Programming Mode
To return to normal operation, press MUTE MUTE .
Page 22

Model 4720 Commercial Security System
Page 20 User's Manual
Testing Your 4000 Security System
IMPORTANT
Weekly tests are recommended to ensure
proper system operation.
Discuss testing with your security company installer to develop the optimum
schedule and procedures that will be right for your system and operation.
Testing is required for UL Fire (NFPA 72 Central Station Regulations) and
is described below. This test must be performed with AC power
disconnected. The purpose of this procedure is to ensure that battery
malfunctions will be discovered during the test.
Disconnect the AC power transformer by unscrewing the mounting screws
that hold the cover in place. Thereafter, AC power is disconnected from the
unit by removing the transformer from the wall receptacle.
Once the test has been completed, reconnect AC power by plugging the
transformer into its receptacle. Then replace the transformer cover and
mounting screws.
Note: While the system transformer is unplugged, the LCD display may
read TROUBLE - AC. Press MUTE MUTE to silence.
To test overall system operation:
1. Call and warn your security company's central station that you plan to
run a system test.
2. Be sure the system is disarmed.
3. Press the TEST button followed by your access code.
If all systems are operating properly, the touchpad will reset momentarily,
your alarm will sound for a few seconds, and a dialer test will be transmitted
to the central station. There are a variety of central station response
procedures. Your security company will inform you as to what response
you should expect from a test.
Note: The system test will not test the sensors and detection devices that
activate alarms. Be sure to test smoke and other fire detectors
regularly, following the procedures provided by the detector
manufacturers. Regular tests ensure they are operating properly.
Page 23

User's Manual Page 21
Section 4.
In Case of Trouble
AC Power Failures
During brief power outages in your building, your security system will
function normally using the rechargeable battery installed in the master
control panel.
When your power returns, these batteries will automatically recharge.
In Case of Accidental Activation
In the event that your security system is activated accidentally, do not panic.
It is important to cancel the alarm as soon as possible by entering your
access code on the nearest touchpad.
What Happens When an Alarm Occurs?
IMPORTANT
If you enter your office or building and find an alarm message on the
LCD, LEAVE IMMEDIATELY and call your central station or the
police.
Should your security system go into an alarm condition, three things will
happen:
1. A loud audible warning will be heard from all system speakers. The
sound will vary depending on the type of alarm. See Audible Alarm
descriptions on page 22.
2. The touchpad LCD display will indicate that an alarm has occurred.
Press MEM to see the type of alarm (Fire, Panic, Intrusion, Auxiliary),
its zone number, and the location of the alarm.
3. Your security dealer's central monitoring station will be automatically
dialed, reporting the nature and location of the alarm. They, in turn,
will dispatch the proper authorities to your building.
When an alarm occurs in zone programmed for silent alarm, the audible
warning and displayed message (#1 and #2) will NOT occur, but the alarm
condition will still be reported to the central station (#3).
Page 24

Model 4720 Commercial Security System
Page 22 User's Manual
When an alarm or trouble condition occurs, the touchpad displays ALARM,
TROUBLE, or in some cases, SUPERVISORY on the first line of the LCD.
It also tells you to press a key to see the location of the alarm or trouble
condition. In the case of an alarm, press the MEM key. In the case of a
trouble or supervisory, press STAT .
Audible Alarms
The alarms below are ranked in priority order.
Type Sound Description
Fire High volume, high pitch
pulsing tone
This alarm has precedence over all
other alarms. For example, if an
intrusion alarm has been sounded, and
subsequently a fire condition is
detected, the fire alarm will take
priority over the intrusion alarm. See
page 2 for more information.
Panic Slowly alternating high/low
pitch steady tone
Triggered manually whenever anyone
presses one of the panic keys ( POL ,
FIRE , or AUX on the touchpad).
Intrusion Rapidly alternating high/low
pitch steady tone
An intrusion (or burglary) alarm causes
this alarm to sound and sends a report
to the central station. See page 2 for
more information.
Auxiliary Alternating high/low pitch
rapidly pulsing tone.
An auxiliary alarm has the lowest
priority if other alarms such as fire,
panic, or intrusion are sounding
simultaneously. See page 2 for more
information.
Page 25

Section 4. In Case of Trouble
User's Manual Page 23
Beeper Sounds
The following table describes other audible signals:
Type Sound Description
Alarms During alarms, the beeper will beep as the LCD continuously displays
affected zones.
Trouble
Condition
A long beep once every 4
seconds.
Alerts users to system trouble
conditions. (Can be silenced by
pressing MUTE MUTE .)
Entry Warning A beep sounds once each
second during countdown.
The touchpad LCD display counts
down the number of seconds left to
disarm the system and avoid an alarm.
Exit Warning
(Optional)
A short beep sounds each
second during countdown.
The touchpad LCD display counts
down the number of seconds left until
the system arms.
Door Chime A beep sounds twice each time a door programmed for the chime
feature is opened or closed.
Page 26

Page 24 User's Manual
Section 5.
System Messages
Trouble Messages
Your security system is designed to provide you with many years of reliable
trouble-free protection, but unforeseen problems may occur. For many
problems with a component or zone in your Model 4720 system, a low
volume, high pitch tone will sound for one second every few seconds. Press
MUTE MUTE to silence the trouble alert tone. The 4660B/C touchpad
LCD will also display TROUBLE. To view the trouble condition, press the
STAT button. The LCD will show one of the following indications:
1-80 LOCATION Indicates zone number 1-80 and the location.
AC System has lost AC power.
BATTERY Low battery condition in the control panel.
DATA LOST
FAILED
The 4720 was not able to report to the central station
because of bad phone line, etc.).
DEVICE 0 Problem with the 4720 communicator.
DEVICE 1 Problem with the (optional) printer interface.
DEVICE 2
DEVICE 3
Problem with a zone expander.
DEVICE 4 Problem with the intercom or telephone module.
DEVICE 5 Problem with the auxiliary control module.
DEVICE 7 Problem with the EEPROM memory.
LINE 1 Phone line #1 is bad or needs service.
LINE 2 Phone line #2 is bad (if using two phone lines).
PAPER Problem with the optional printer, such as out of paper.
TOUCHPAD 1-15 Problem with a particular touchpad unit.
Contact your installation company immediately for repairs whenever any of
these conditions are indicated.
Page 27

Section 5. System Messages
User's Manual Page 25
Error Messages
If operation or programming errors occur, the LCD will display the
following messages to explain the problem:
RESTRICTED
CODE
The touchpad or feature you are trying to use is not
available with this code.
RESTRICTED
DOOR
The code entered cannot be used to open the door.
RESTRICTED
TIME
The code entered cannot be used at this time of day.
RESTRICTED
ZONE
Zone cannot be bypassed (fire or other 24-hour zones
cannot be bypassed).
TRY AGAIN An invalid code or command was used. Restart from the
beginning.
LCD Displays
The English language LCD will normally display the day and time, plus
status and instructions for many status lights and touchpad functions. The
LCD will also display the following messages (in addition to trouble and
error messages):
# SEC TO ALARM This message provides a visual countdown of seconds
before an alarm is sounded and sent to the control
monitoring station. (After opening and entering a delayed
door, a warning will sound.)
## SEC TO EXIT (Displays after arming.) Your security system can be
programmed for a timed exit delay. The beeper will sound
(warning sound is optional) until the delay time is up and
the LCD will display the countdown to exit time.
ARMED The system is armed.
AUXILIARY
ALARM
Special sensors installed to protect furnaces, freezers, and so
on have triggered an alarm.
BYPASSED
(System disarmed)
One or more of the zones have been bypassed, or turned off.
This message will not be displayed if the system is armed.
FIRE ALARM Flashes - One or more zones programmed for fire
monitoring are in alarm.
INTRUSION Flashes - One or more zones programmed for intrusion
Page 28

Model 4720 Commercial Security System
Page 26 User's Manual
ALARM monitoring are in alarm.
NOT READY One or more zones are in a Not Ready condition (a sensored
door or window may be open).
PANIC ALARM A user initiated alarm signaling a break-in attempt or other
panic situation.
READY System is disarmed and all zones are ready to be armed.
SERVICE The 4720 control panel requires service. The system will
not function at this time and you must contact the
installation company immediately for repairs.
SILENCED A trouble condition alarm has been silenced, but the trouble
still exists in the system.
TAMPER ALARM An attempt was made to disable the alarm system.
TROUBLE Trouble condition exists in the system (a broken wire, low
battery, loss of system power, and so on). You can press
STAT to find out the source of trouble.
Page 29

User's Manual Page 27
System Data
Keep the following information CONFIDENTIAL and
stored in a safe place.
System Installation company: ____________________________________
Name of installer: _____________________________________________
For service, call: _____________________ or ______________________
Before testing, call: ______________________ or ___________________
Your account # is: _____________________________________________
Number of seconds programmed for exit delay: _____________________
Number of seconds programmed for entry delay: ____________________
Your main user’s code (code 1) is: ________________________________
Your duress digits are: _________________________________________
Your system is custom programmed for the following features:
____ Delayed reporting ____ Area Arming
____ Panic Alarm ____ Card Access Control
____ Fire and Smoke Detection ____ On-site Printer
____ Auxiliary Alarm for:
________________________ ________________________
________________________ ________________________
________________________ ________________________
________________________ ________________________
Your system touchpad locations are:
1. ____________________________ 9. _____________________________
2. ____________________________ 10. _____________________________
3. ____________________________ 11. _____________________________
4. ____________________________ 12. _____________________________
5. ____________________________ 13. _____________________________
6. ____________________________ 14. _____________________________
7. ____________________________ 15. _____________________________
8. ____________________________
Page 30

Model 4720 Commercial Security System
Page 28 User's Manual
Your system zone locations are:
1. ____________________________ 41. ____________________________
2. ____________________________ 42. ____________________________
3. ____________________________ 43. ____________________________
4. ____________________________ 44. ____________________________
5. ____________________________ 45. ____________________________
6. ____________________________ 46. ____________________________
7. ____________________________ 47. ____________________________
8. ____________________________ 48. ____________________________
9. ____________________________ 49. ____________________________
10. ____________________________ 50. ____________________________
11. ____________________________ 51. ____________________________
12. ____________________________ 52. ____________________________
13. ____________________________ 53. ____________________________
14. ____________________________ 54. ____________________________
15. ____________________________ 55. ____________________________
16. ____________________________ 56. ____________________________
17. ____________________________ 57. ____________________________
18. ____________________________ 58. ____________________________
19. ____________________________ 59. ____________________________
20. ____________________________ 60. ____________________________
21. ____________________________ 61. ____________________________
22. ____________________________ 62. ____________________________
23. ____________________________ 63. ____________________________
24. ____________________________ 64. ____________________________
25. ____________________________ 65. ____________________________
26. ____________________________ 66. ____________________________
27. ____________________________ 67. ____________________________
28. ____________________________ 68. ____________________________
29. ____________________________ 69. ____________________________
30. ____________________________ 70. ____________________________
31. ____________________________ 71. ____________________________
32. ____________________________ 72. ____________________________
33. ____________________________ 73. ____________________________
34. ____________________________ 74. ____________________________
35. ____________________________ 75. ____________________________
36. ____________________________ 76. ____________________________
37. ____________________________ 77. ____________________________
38. ____________________________ 78. ____________________________
39. ____________________________ 79. ____________________________
40. ____________________________ 80. ____________________________
Page 31

System Data
User's Manual Page 29
Your access code assignments are:
# Access Code Options Assigned To
1
2 3 4 5 6 7 8 9 10 11 12 13 14 15 16 17 18 19 20 21 22 23 24 25 26 27 28 29 30 31 32 33
Page 32

Model 4720 Commercial Security System
Page 30 User's Manual
# Access Code Options Assigned To
34
35 36 37 38 39 40 41 42 43 44 45 46 47 48 49 50 51 52 53 54 55 56 57 58 59 60 61 62 63 64 65 66
Page 33

System Data
User's Manual Page 31
# Access Code Options Assigned To
67
68 69 70 71 72 73 74 75 76 77 78 79 80 81 82 83 84 85 86 87 88 89 90 91 92 93 94 95 96 97 98
Page 34

Limited Warranty
The manufacturer warrants that the products of its manufacture shall be free
from defects in materials or workmanship for one year from the date on the
panel if such goods have been properly installed, are subject to normal use,
and have not been modified in any manner whatsoever. Upon return of a
defective product to your alarm installer, the manufacturer will, at its sole
discretion, either repair or replace, at no cost to the customer, such goods as
may be of defective material or workmanship. Customers outside the
United States are to return products to their distributor to repair.
The manufacturer shall not under any circumstances be liable for any
incidental or consequential damages arising from loss of property or
other damage or losses owing to the failure of the manufacturers'
products beyond the cost of repair or replacement of any defective
products.
The manufacturer makes no warranty of fitness or merchantability and
no other warranty, oral or written, express or implied, beyond the one-
year warranty expressly specified herein.
Page 35

Part Number 150480 R E G E N C Y
Revised April 1995 7550 Meridian Circle
Maple Grove, Minnesota 55369-4927
 Loading...