

Page 1
TM
SIGARMS
SIGARMS
The SIGARMSTMSight Adjustment Tool is used to adjust, remove and install front
and rear sights on SIG SauerTMPistols. There are two variants - one for Classic
Pistols (P220, P225, P226, P228, P229, P239, P245) and one for sigproTMPistols
(SP2340, SP2009). This card includes separate instructions for front & rear
sights, as well as general information to assist you in sighting your pistol.
UNLOAD THE PISTOL BEFORE STARTING!
UNLOAD THE PISTOL BEFORE STARTING!
TM
SIGHT ADJUSTMENT TOOL
SIGHT ADJUSTMENT TOOL
perating II
OOperating
nstructions
nstructions
General Information
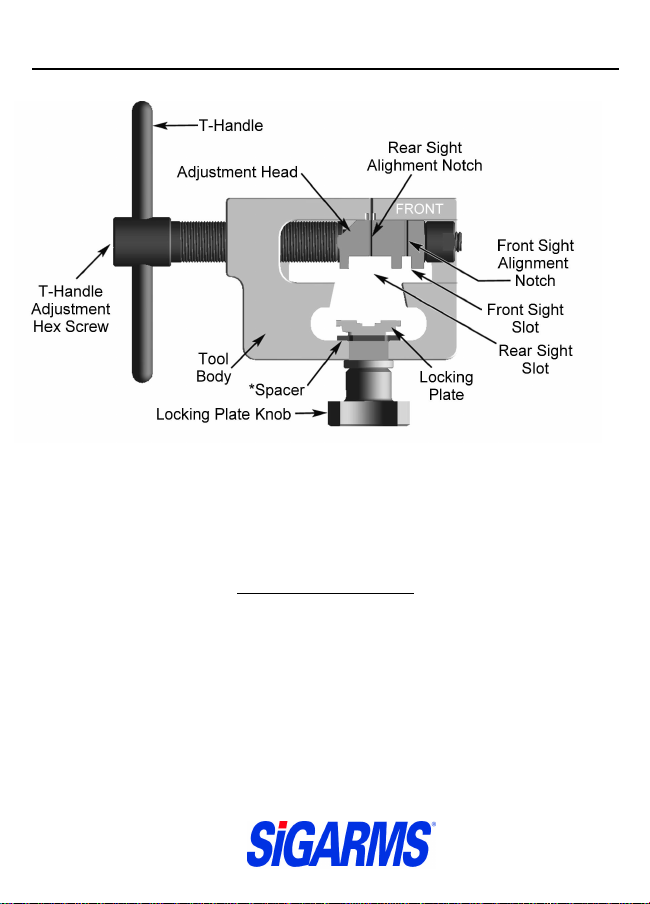
1. You can adjust the position of the T-Handle by loosening the T-Handle
Adjustment Hex Screw (use a 1/8” hex key) - do not overtighten.
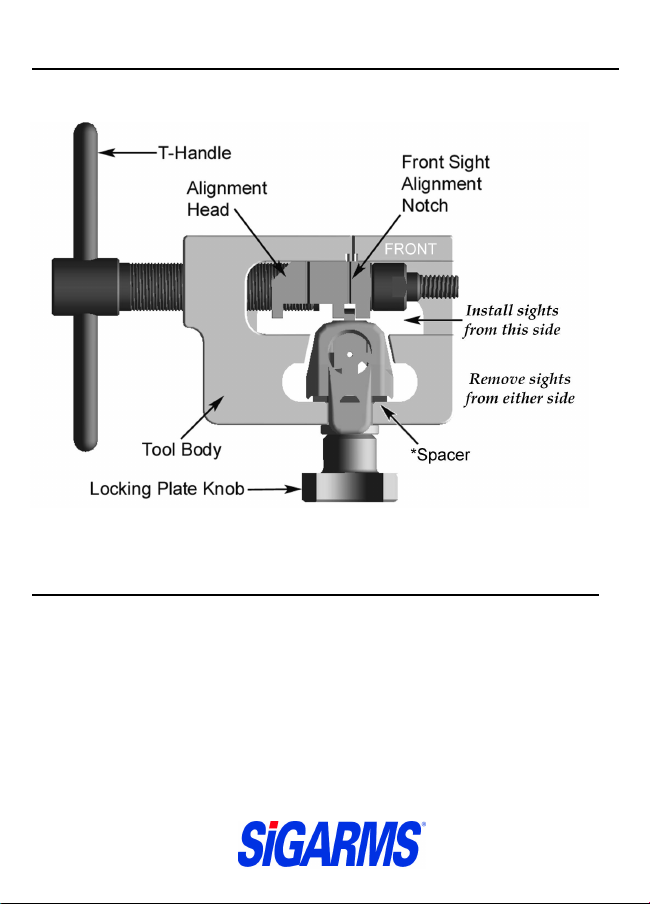
2. Sights may be removed from either side of the slide. Sights should ALWAYS
be installed from the left side of the slide, as viewed by the shooter when firing.
3. When installing, the sight base must be aligned and seated in the dovetail of
the slide before making adjustments with the Sight Adjustment Tool. Tapping the
opposite side of the sight base with a plastic hammer or end of a plastic screw
driver will help seat the sight in the dovetail.
4. A drop of gun oil in the dovetail slot prior to starting will ease installation.
5. Not all after-market sights may be manufactured to the correct dovetail
dimensions - to ensure the right fit use only genuine SIG Sauer
available in contrast, three-dot, and SIGLITE
TM
night sights.
TM
sights -
Page 2
TM
SIGARMS
SIGARMS
perating II
OOperating
TM
SIGHT ADJUSTMENT TOOL
SIGHT ADJUSTMENT TOOL
nstructions / FF
nstructions /
ront SS
ront
* Remove Spacer for P239
in .40 S&W / .357 SIG
ight
ight
Front Sight Adjustment, Removal and Installation
1. Unload & field strip the pistol.
2. Install the slide on the Locking Plate from the front of the tool body. Ensure the
Alignment Head is centered allowing the rear sight to pass through its slot for
correct slide positioning within the tool.
3. Center the front sight blade in the narrow slot of the Alignment Head.
4. Tighten the Locking Plate Knob hand tight
5. Turn the T-handle to move the Alignment Head & sight in the desired direction.
Note: See the front page of these instructions for information that will assist
you in correctly installing your new sights.
Note: Diagram may vary from actual tool.
Page 3

TM
SIGARMS
SIGARMS
perating II
OOperating
TM
SIGHT ADJUSTMENT TOOL
SIGHT ADJUSTMENT TOOL
nstructions / RR
nstructions /
ear SS
ear
* Remove Spacer for P239
in .40 S&W / .357 SIG
ight
ight
Rear Sight Adjustment, Removal and Installation
1. Unload & field strip the pistol.
2. Install the slide on the Locking Plate from the rear of the tool body.
3. Center the rear sight blade in the wide slot of the Alignment Head.
4. Tighten the Locking Plate Knob hand tight
5. Turn the T-handle to move the Alignment Head & sight in the desired direction.
Note: See the front page of these instructions for information that will assist
you in correctly installing your new sights.
Note: Diagram may vary from actual tool.
Page 4

TM
SIGARMS
SIGARMS
Sight Adjustment - General Information
Sight Adjustment - General Information
TM
SIGHT ADJUSTMENT TOOL
SIGHT ADJUSTMENT TOOL
General Note - No sight corrections should be made until the shooter
has become familiar with the firing characteristics of the pistol.
When zeroing, the target should be at 25 yards and the pistol should be
fired from a rested position (use single-action mode for best results - not
applicable if pistol is Double-Action Only). Sighting should be "point
of aim, point of impact."
1. Windage (left/right) - A change in windage is accomplished by
moving the rear sight either to the left or right in its dovetail. When
doing this, follow the rear sight rule: “To move impact left, move rear
sight left; to move impact right, move rear sight right”. Moving the
rear sight 0.020 inches in the dovetail alters the point of impact by
approximately 3 inches at 25 yards.
2. Elevation (up/down) - For both the front and rear sights, 30 different
height combinations are available. The sights are numbered according to
their height. A change in elevation is accomplished by changing either
the rear or front sight. It is recommended that the rear sight be changed
first. The sight number is shown on each sight.
1" between number 2" between number
changes at 25 yards changes at 25 yards
When changing the sights, remember this rule: “NUMBERS UP,
IMPACT UP; NUMBERS DOWN, IMPACT DOWN”. This is true
whether it concerns the front or rear sights. Replacement sights in the
various height combinations are available from SIGARMS.
sigpro, SIGARMS & SIG Sauer
are Registered Trademarks of SIGARMS Inc.
Copywrite SIGARMS Inc. 2002
CARD-SAT 8/2002
 Loading...