

Page 1
Instruction manual
Page 2

Caution !
Please always read this instruction
manual entirely, before using the
rifle. The rifle may only be passed
on together with this instruction
manual.
As a supporting measure to this
instruction manual, please ask
your dealer to explain your rifle to
you in detail and let him instruct
you about its use.
2
Page 3

Contents
Page
Safety rules 4 – 5
11. Assembling, taking down 6 – 7
12. Safety system and bolt handle lock 8 – 9
13. Loading the rifle 10
14. Firing and repeating 10
15. Unloading 11
16. Removing and replacing the bolt assembly 11
17. Changing the barrel 12
18. Changing the bolt head 13 – 15
19. Removing / changing the fore-end 16
10. The trigger assembly 17
11. Open sights (adjustable) 17
12. Mounting the telescopic sight 18
13. Mounting the fixed scope mount 19
14. Caliber group table 20
15. Case 21
16. Care and maintenance 21
17. Operating and functional parts of the bolt assembly 22
18. Warranty conditions 23
3
Page 4
Safety rules
Your new Blaser bolt action rifle model
R 93 differs from other repeaters through
a number of special design features.
Although your Blaser firearm exhibits
additional safety features, do not forget
that you must take care when handling
firearms and also observe the statutory
regulations.
First of all, check you have the right user
manual: the model name R 93 and cali-
english
ber can be found on the left side of the
barrel at the rear.
General safety rules for handling
firearms
- Make sure the firearm and ammunition
never get into unauthorized hands.
- Always store firearm and ammunition
under lock and key in separate cabinets
that are not accessible to unauthorized
persons.
- Observe current statutory regulations
for the carrying and safekeeping of
firearms and ammunition.
- Make sure you are thoroughly familiar
with how to handle your firearm and,
with the firearm unloaded, practice all
of the functions and the actions you
will need to make, before you carry it.
- Always treat any firearm as loaded and
ready to shoot. If you are not certain of
its status, check by opening the bolt
and looking in the magazine and
cartridge chamber (barrel). You should
handle an unloaded firearm in the
same way as a loaded one.
4
Page 5

Safety rules
- Whenever holding the rifle, always
point the muzzle in a safe direction to
ensure you neither injure people nor
damage property.
- Before loading, check the barrel for
obstructions and make sure no foreign
matter (water, snow, soil) can get into
the barrel after loading, too.
- Only use CIP-approved ammunition
which is in good condition and check
that the ammunition is correct for the
caliber of the rifle. Wrongly re-loaded
ammunition can damage your rifle and
cause serious injury.
- Do not load your rifle until just before
you fire it.
- Do not cock your rifle (take off safety)
until you are ready to fire. When
cocking (taking off safety), point the
muzzle in a safe direction.
- Before making each shot, check the
terrain in front of and behind the target.
- Aim your rifle only at targets you have
definitely identified.
- Keep your finger away from the trigger
unless you wish to fire the rifle.
- If a cartridge fails, wait approximately
60 seconds before opening the breech
to avoid danger from a cartridge that
may be late firing.
- Always wear ear defenders when firing
(ear plugs).
Unload your gun
- before negotiating obstacles
- before climbing into or leaving raised
blinds
- before entering a building
- before climbing into a vehicle
- before entering a town or village
- if you temporarily put the rifle down
or hand it to someone.
5
Page 6
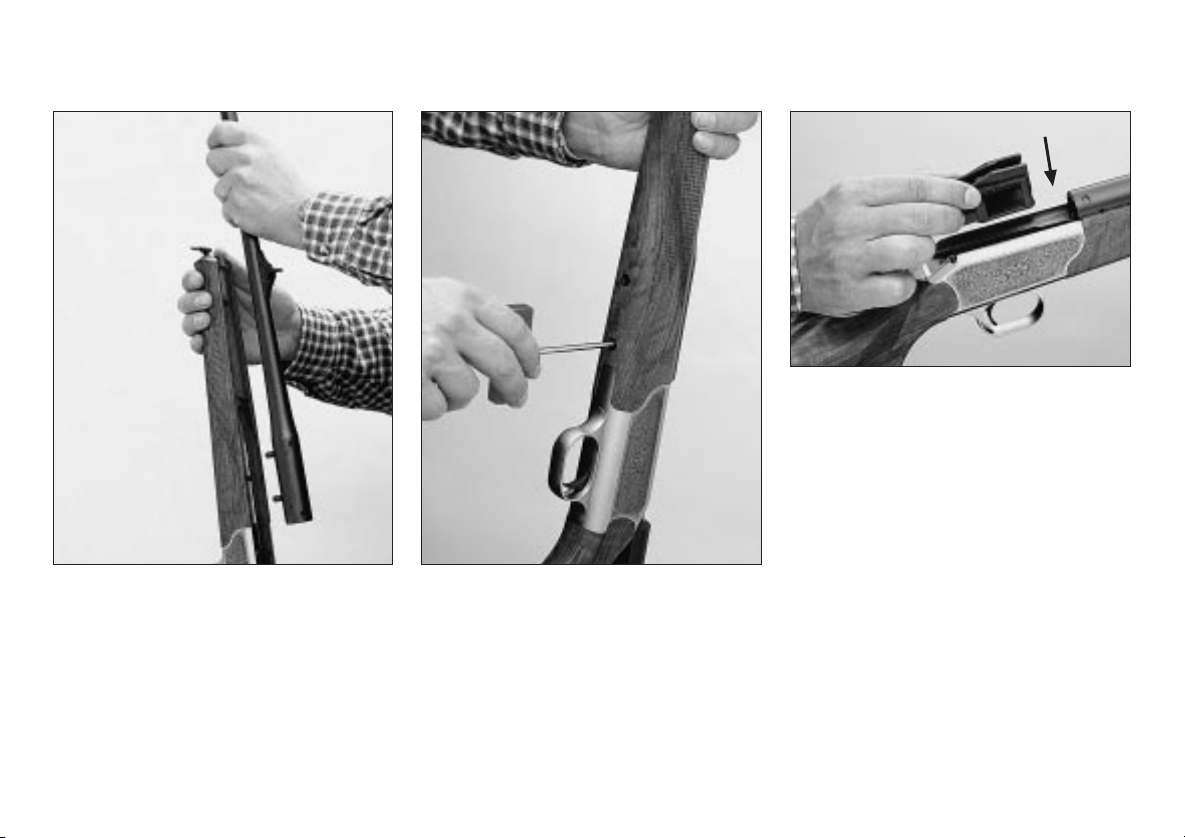
1. Assembling, taking down
english
fig. 1 fig. 2
fig. 3
- Drop the magazine into the receiver
with the magazine lips upwards
(fig. 3).
1.1 Assembling
- Remove the large allen key (SW 4)
from its pocket in the shipping carton.
With the barrel screw studs pointing
down, insert the barrel into the receiver (fig. 1).
6
- Then, insert the allen key into the holes
on the bottom of the fore-end and
tighten the two allen screws equally
locking the barrel and receiver together
(fig. 2). Do not use any extension tools
on the allen key to tighten screws.
Good hand tightness is sufficient.
Page 7
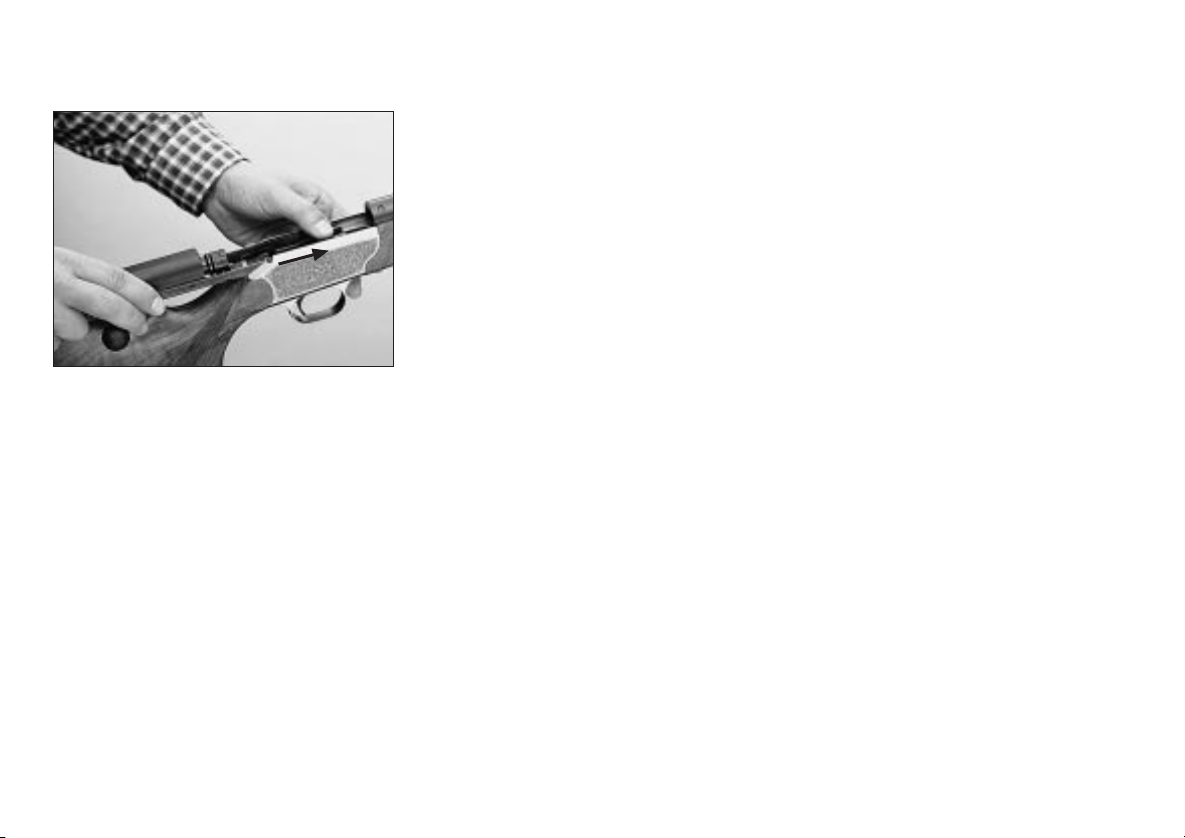
1. Assembling, taking down
fig. 4
- Push the magazine down to the
bottom of the receiver - with your
thumb - and hold! (fig. 4).
- Place both bolt rails parallel on the rear
end of the receiver and insert the bolt
by sliding the bolt rails forward. Push
forward on the bolt handle until the
bolt is closed completely.
- To remove the bolt, magazine
and barrel read chapter 6 and 7 of
instructions.
WARNING:
Always make sure the bolt handle is
locked in the back position when installing the bolt assembly, i.e. at an angle of
approx. 45°. If the bolt handle is close to
vertical, you cannot mount the bolt
assembly. Pull the bolt handle back until
it engages in the 45° position.
WARNING:
When assembling the rifle, ensure that
the barrel, bolt and magazine all match
and are of the correct caliber.
1.2 Taking down
- Push the safety slide forward slightly
with the thumb (approx. 1/16“),
simultaneously pulling the bolt handle
back with forefinger and middle finger
(unlocking - fig. 9).
Then pull the bolt all the way straight
back.
- Unload the rifle (see chapter 5).
- Push down and hold the bolt stop pin
(fig. 10) simultaneously withdrawing
the bolt assembly with the other hand.
- With the 4 mm AF allen key supplied,
undo the two barrel attachment
screws.
- Remove the barrel.
7
Page 8
2. Safety system and bolt handle lock
2.1 Safety system
The safety system of the Blaser R 93 bolt
action rifle is centered on the uncocked
firing spring: you operate the safety slide
to cock the firing spring just before firing
the rifle or to release it again. When
repeating, it remains cocked. With the
safety slide released, the bolt handle is
simultaneously locked to prevent accidental opening of the bolt when carrying
the rifle, provided this was fully closed.
WARNING:
When cocking and uncocking, keep your
fingers off the trigger (unlike firearms
with a hammer which you may be used
to). In the case of a Blaser rifle, this will
discharge a shot!
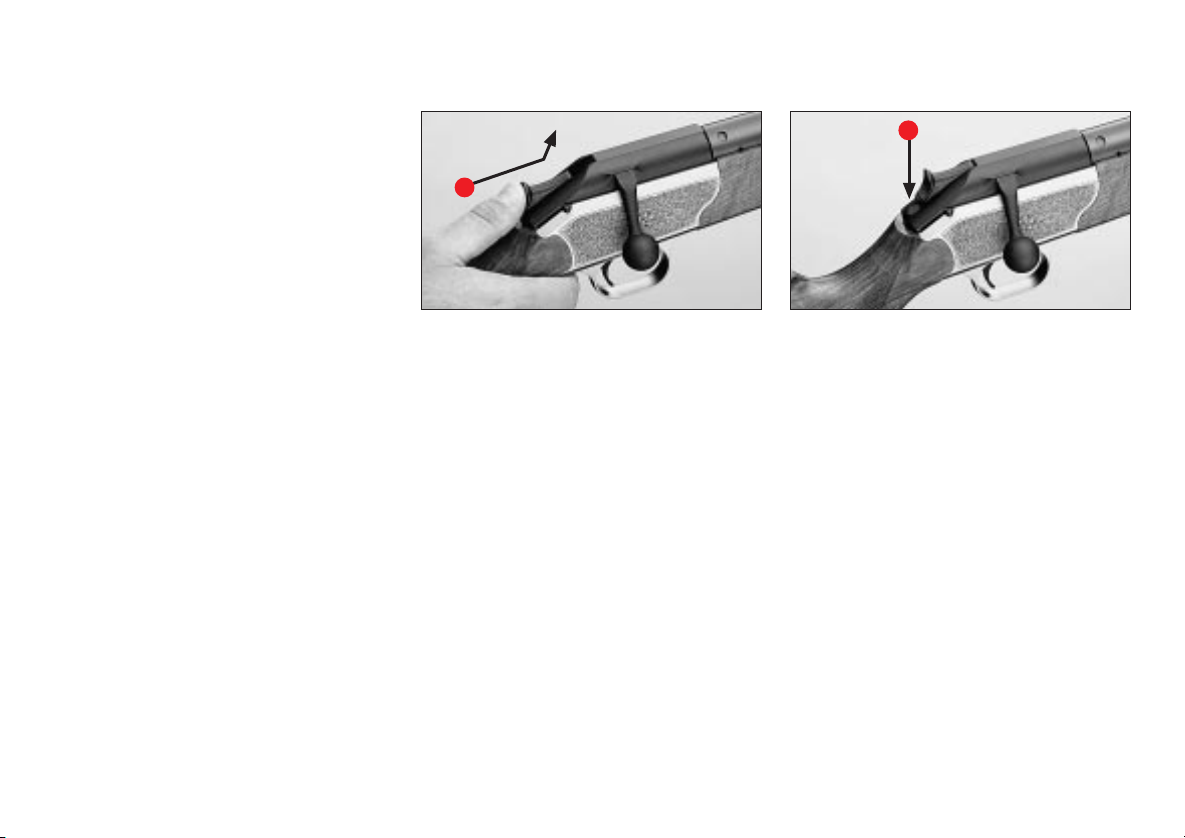
fig. 5 fig. 6
2.2 Cocking (taking off safety)
- Press your thumb right into the ribbed
finger recess.
- Slide the safety slide forwards firmly
with the thumb as far as the stop and
lift off the thumb to allow the slide to
engage in the cocked position (fig. 5).
You should see a red warning dot
behind the slide to indicate the
„Off safe“ position (fig. 6).
8
Page 9

2. Safety system and bolt handle lock
fig. 7 fig. 8 fig. 9
2.3 Uncocking
(»breech in safe position«)
- Press with your thumb firmly on the
safety slide towards the front/bottom
position (unlock - fig. 7) and let it slide
back into its original position (fig. 8).
2.4 Bolt handle lock
Prevents accidental opening of the bolt.
It is automatically activated when the rifle
is uncocked and fully locked.
2.5 In the „On Safe“ position the bolt
handle is locked
- To open the bolt (for loading and
unloading) in the „On Safe“ position,
push the safety slide with your thumb
1/16" forward, hold and simultaneously pull bolt handle backwards (fig.9),
then open bolt all the way.
9
Page 10

3. Loading the rifle
4. Firing and repeating
- Pull back the slide („On safe“)
- Open the bolt (see chapter 2.5)
- Place a cartridge onto the magazine
and press firmly downwards - with
the thumbs if necessary - so that it
snaps through the magazine lips.
Capacity of magazine: 3 cartridges.
Exceptions are as follows:
Caliber group
Mini = 4 cartridges
Ultra Magnum = 2 cartridges
Swiss = single shot
Shotgun = single shot
Hornet = single shot
- Should you wish, you can insert a
further cartridge in the chamber by
hand.
- Press down the cartridges in the magazine with the thumb and push the bolt
handle forward all the way with the
other hand until it locks.
CHECK THAT:
The red dot is not visible, bolt handle is
all the way forward. The rifle is now
loaded, uncocked and locked to prevent
accidental opening.
10
- Cock the rifle by pushing the safety
slide forward with the thumb
(take off safety - see chapter 2.2).
- Sight the target and fire.
- Repeating: Pull back the bolt as far as
the bolt stop allows and then push it
forward again.
IMPORTANT:
If the bolt handle is not in its most forward position, the rifle will not fire for
safety reasons.
Should you wish to reload for a repeat
shot very quietly, push the bolt with the
thumb more at the top of the bolt handle, pressing the ball of the bolt handle
forwards with the ball of the thumb.
WARNING:
When the safety slide is locked in the
forward position the rifle is cocked automatically with each reload action. When
you do not want to fire any more, you
simply move the safety slide immediately
backwards (safety on).
WARNING:
Always wait until you are ready to fire
before cocking the rifle. If, after firing,
the rifle is cocked again when you are
not yet ready to shoot, simply uncock the
rifle by moving the safety slide back
(safety on).
Page 11

5. Unloading the rifle
6. Removing and replacing the bolt assembly
- Remove your finger from the trigger
and point the rifle in a safe direction.
- Move the safety slide in the „On Safe“
position (as in chapter 2.3)
- To remove cartridge from chamber,
push the safety slide 1/16" forward
with your thumb, hold and pull bolt
handle backwards, then open bolt
slowly until the cartridge can be
grasped with the fingers before it
clears the receiver.
- Remove the cartridge from the firearm.
- With the bolt open, point rifle barrel
upwards. With your finger push the
cartridge in the magazine forward until
it snaps out of the magazine lips, then
remove cartridge from the receiver.
Repeat procedure until magazine and
chamber are empty.
Warning:
Make sure there are no cartridges left in
the chamber or magazine.
fig. 10
6.1 Removing the bolt assembly
- Unload the rifle (see chapter 5).
- Pull the bolt assembly all the way back.
- Push down and hold the bolt stop pin
(fig. 10) and simultaneously withdraw
the bolt assembly backwards with the
other hand.
Note: A number of short-case calibers
(.222 Rem., .22-250, .243 Win., 6x62
Frères, 6.5x55, 6.5x57, 7x57, 7.5x55,
.308 Win. and 8x57 IS) have a moving
bolt stop integrated into the magazine
on the right hand side. To remove the
bolt assembly from the rifle if you are
using one of the above calibers:
- Press the right magazine lip inwards.
This puts the short-case bolt stop out
of operation.
- Pull the bolt backwards until the
normal bolt stop takes effect.
- Then press in and hold the bolt stop
pin (fig. 10) and simultaneously
withdraw the bolt assembly backwards
with the other hand.
6.2 Installing the bolt assembly
- Push the magazine down to the
bottom of the receiver and hold it
there.
- Carefully position the ends of the two
slide rails onto the rear end of the
receiver in line with the bolt guide.
- Push the bolt assembly forward to fit
into the guide on the receiver.
- Do not use force when doing this! If
the bolt assembly does not slide on
smoothly, try again taking more care.
11
Page 12

7. Changing the barrel
There are 8 caliber groups available (see
table on page 42). When changing the
barrel to a different caliber group, you
will also have to change the bolt head to
suit the caliber group of the barrel you
have chosen to use. The table on page
42 shows the correct components to be
used together. In addition, bolt heads
and barrels are stamped with markings
which identify the caliber group (fig. 11).
english
Take a final check that these markings
match after the rifle is assembled.
Caliber group markings:
Hornet Marking HO
Mini Marking MI
Standard Marking ST
Medium Marking ME
Magnum Marking MA
Ultra Magnum Marking UM
Swiss Marking CH
Shotgun Marking 28
Make sure you also use the correct
magazine to match the caliber of the
barrel. The caliber marking can be
found on the side of the magazine.
Note: Single-shot inserts are supplied
with barrels in the calibers .22 Hornet,
28/70 and 10.3x60R. Magazines are not
available for these.
Changing the barrel:
- Unload the rifle (see chapter 5).
- Remove the bolt assembly
(see chapter 6.1).
- Remove the magazine (remove the
scope if fitted, see chapter 12.2 or
13.2 as appropriate).
- Fully undo both attachment screws
with the 4 mm AF allen key, these are
captive so cannot be lost.
- Lift the barrel out of the receiver.
- Place the new barrel in the bed of the
receiver.
- Tighten both barrel attachment
screws hand-tight with the allen key.
MAMA
fig.11
- Insert a magazine matching the caliber
of the barrel into the magazine housing.
- Check that the marking stamped on
the bolt head (HO, MI, ST, ME, MA,
UM, CH, 28, see chapter 7 and fig.
11) matches the caliber group of the
barrel.
- If you have to change the bolt head in
the bolt assembly, see chapter 8.
Note:
Always keep the barrel bedding clean.
Excessive oil or grease between the barrel
and receiver will impair the accuracy of
the rifle.
12
Page 13

8. Changing the bolt head
fig.12 fig.13 fig.14
8.1 Changing the bolt head
It is advisable to have this operation
explained by your gunsmith.
- Unload the rifle (see chapter 5).
- Remove the bolt assembly from the
rifle (see chapter 6.1).
- Place bolt assembly upside down on a
flat surface.
- With a small screwdriver or similar tool
push the retaining latch to the left side
and up (fig. 12).
- Grasp the retaining latch with thumb
and forefinger and push to the left.
With your other hand pull the bolt
head out of the bolt assembly
(fig. 13).
8.2 Installing the bolt head
- Grip the new bolt head to be installed
and line up the two grooves of the
expanding shell and bolt head by turning them in relation to each other
(fig. 14).
- Lift the retaining latch in the
bolt housing.
- Now insert the bolt head with the
groove facing exactly upwards into the
bolt housing over the firing pin as far
as the stop and hold it there.
13
Page 14

8. Changing the bolt head
fig.15 fig.16 fig.17
english
Note: To make this process easier, jiggle
the firing mechanism up and down with
the thumb of the other hand (fig. 15).
- Flip the retaining latch down again and
push it back into its recess so that it
snaps into position (fig. 16).
Warning: If the retaining latch is not
in the correct position, a warning pin will
project from the outside of the rail
(fig. 17).
14
Page 15

8. Changing the bolt head
rivet
fig.18 fig.19
The bolt assembly can only be inserted
in the receiver when the warning pin
is flush in the bolt rail (fig. 18), indicating that the retaining latch is seated
correctly.
Warning:
The bolt head assembly consists of two
major parts: The bolt head and the surrounding expanding shell.
These two parts are bound together by
a rivet (fig. 19). It is strictly forbidden to
Note: Bolt heads for left-hand bolts are
stamped »L« below the caliber group
marking.
loosen that rivet!
Firing the rifle with the expanding shell
removed, will inevitably cause the blow-
out of the bolt head assembly and injury
or death to the shooter or bystanders!
bolt head
expanding shell
15
Page 16

9. Removing /
changing the fore-end
fig. 20
The Safari and Match versions of the
Blaser R 93 repeating rifle have a special,
wide fore-end. Therefore, should you
wish to fit a Safari or Match barrel to the
R 93 basic version, you will have to change the fore-end.
Removing or changing the fore-end:
- Unload rifle (as in chapter 5).
- Use allen key (SW4) to unscrew the two
barrel attachment screws holding barrel
and receiver together.
- Lift off the barrel.
- Using the long allen key (SW4) to
unscrew fore-end screw (fig. 20).
- Pull the fore-end off.
- To assemble the fore-end reverse above
instructions.
- Ensure that the spacer is in the correct
position.
16
Page 17

10. Trigger assembly
11. Open sights
(adjustable)
11.
The Blaser R 93 bolt action rifle is
equipped with a light and crisp trigger.
The trigger resistance is adjusted at the
factory to virtually the lightest setting
allowable under international safety
standards. The setting can and may only
be altered by the factory or by your
authorized Blaser dealer following factory
instructions.
11.1 Front sight for height adjustment
- Insert the 1.5 mm AF allen key in the
hole of the mounting saddle in front
of the sight and turn the allen screw
in the appropriate direction:
- Front sight (spring-loaded)
screw out = point of impact lower
screw in = point of impact higher
11.2 Rear sight (notch) for side
adjustment
- The sight has holes left and right for a
1.5 mm allen key.
- To alter the point of impact
to the left
Undo the right stud screw, screw in
the left stud screw.
- To alter the point of impact
to the right
Undo the left stud screw, screw in the
right stud screw.
Screw the stud screws in with
sensitivity.
17
Page 18

12. Mounting the telescopic sight
The R 93 barrels are equipped with
notches to accept Blaser QD scope mount
bases for 1“, 26 mm or 30 mm rings or
rail or Zeiss ZM rail. It is assumed that an
authorized dealer has fitted your scope
correctly to match the barrel.
12.1 Mounting the scope
- Flip open the covers of the front and
rear locking lever, then thumb these
english
fully up and forward.
- Take the center tube of the scope in
your right hand and hold it so that you
can reach the front lever with your
thumb (fig. 21).
- Grasp the stock with your left hand
and steady the stock against your
upper thigh.
- Carefully locate the two round locating
pins of the scope mount in the oval
notches milled into the top right of the
barrel. Tilt scope to the left and hold it
in that position.
- First thumb the front lever (fig. 22)
then the rear lever back and down as
far as they can go. If you need to apply
either no force or a lot of force when
doing this, then the mount is adjusted
wrongly. In either case, get your authorized dealer to adjust it to the factory
specifications. The force required to
close the locking levers should be
about the same as that of the safety
slide.
- Now close the covers of both locking
levers.
Make sure the mounting faces are
clean and free of grease!
12.2 Removing the scope
- Grasp the fore-end with the left hand
and steady the rifle on your upper
thigh.
- Flip open the covers of the two
locking levers.
- First release the rear locking lever
by thumbing it forwards as far as it
can go.
- Grasp the center tube of the scope
mount with the right hand.
- Now release the front locking lever by
thumbing it forwards and upwards as
far as it can go.
- Remove the scope upwards and to the
right.
18
fig. 21 fig. 22
Page 19

13. Mounting the fixed scope mount
13.1 Mounting the scope
- Loosen the two screws on the side of
the mount a few turns with an 1/8“
allen key.
- Grasp the centre tube of the scope
with the right hand above the mount.
- Hold the fore-end of the rifle with your
left hand and steady the stock against
your upper thigh.
- Carefully locate the two round locating
pins of the scope mount in the oval
notches milled into the top right of the
barrel. Tilt scope to the left and hold it
in that position.
- Tighten the two screws on the side of
the mount hand tight with an 1/8“
allen key.
Make sure the mounting faces are
clean and free of grease!
13.2 Removing the scope
- Grasp the rifle with your left hand
around the fore-end and scope,
steadying the rifle on your upper thigh.
- Loosen the two screws on the side of
the mount a few turns with an 1/8“
allen key.
- Remove the scope.
19
Page 20

14. Caliber group table
Hornet
„HO“:
.22 Hornet
Mini
„MI“:
.222 Rem.
.222 Rem. Mag.
Standard
„ST“:
.22-250
5,6x57
.243 Win.
6 mm Rem.
6x62 Frères
.25-06
6,5x55
6,5x57
6,5x65 RWS
.270 Win.
.280 Rem.
7x57
7x64
.308 Win.
.30-06
8x57 IS
9,3x62
Medium
„ME“:
6,5x68
7,5x55
8x68 S
9,3x64
Magnum
„MA“:
.257 Weath.
Mag.
.264 Win. Mag.
7 mm Rem. Mag.
.300 Win. Mag.
.300 Weath.
Mag.
.338 Win. Mag.
.375 H & H
.416 Rem. Mag.
Ultra Magnum
„UM“:
.300 Rem. Ultra
Mag.
Swiss
„CH“:
10,3x60 R
Shotgun
„28“:
28/70
20
Some of the listed calibers may not be available.
Page 21

15. Case
16. Care and maintenance
The R 93 together with extra barrel,
2 scopes and accessories for travelling is
securely stowed in a double-shell ABS
carrying case with 3 locks.
Always make sure you use suitable
materials that are intended for the
purpose of cleaning rifles.
Barrels:
After firing, prior to storing for long
periods and after carrying the rifle, treat
barrels and cartridge chamber with suitable gun oil, particularly when conditions
are damp or wet. Make sure you
thoroughly remove excess oil from barrels
and cartridge chamber before firing.
With a heavy build-up of cartridge deposits, we recommend treating these parts
with chemical barrel cleaners.
WARNING:
Make sure you read and adhere to the
instructions and warnings given by the
manufacturer of the cleaning agent.
Metal parts:
Always keep all metal parts of the rifle
clean and lightly oiled.
Stock:
The wooden stocks of all Blaser hunting
rifles have an oil finish. We recommend
regular treatment with a good quality
stock oil or wax.
Gun oil is unsuitable for stock care!
Optics:
Refer to the service instructions of the
manufacturer.
Maintenance:
Take your rifle to your gun dealer for
examination and maintenance before the
hunting season and before hunting trips.
Like your automobile, your rifle is an item
of equipment that needs regular maintenance and inspection.
21
Page 22

17. Operating and functional parts of the bolt assembly
Safety slide down
- uncocked position
= safety on
Finger recess
Bolt handle
Warning pin of
retaining latch
Guide rail
Butt stock
Safety slide up
- cocked position
= safety off
Bolt stop pin Trigger Trigger guard Receiver Fore-end
Opening aidBreech lock
Expanding shell
Bolt head with radial lock
outer collar
EjectorExtractor
Magazine
Cartridge chamber
with radial lock inner
collar
Pin notch of
scope mount
Barrel
22
Page 23

18. Warranty conditions
1. Manufacturer’s warranty
The warranty of Blaser Jagdwaffen GmbH supplements the statutory warranty rights through the
dealer, under the condition that the accompanying warranty card is received at Blaser
Jagdwaffen GmbH fully completed within ten
days of the purchase date. The warranty applies
only to the original purchaser who resides in the
country of purchase.
The warranty relates exclusively to the metal and
synthetic parts of the gun and to original Blaser
scope mounts, but not to the sight optics.
Wooden parts require special care and as a natural product are subject to natural changes which
rule out a warranty for them.
The warranty period is ten years and starts on the
purchase date. The warranty covers all defects and
damage to the rifle (metal and synthetic parts)
which are demonstrably due to material or production defects. In such cases, the manufacturer
will pay the costs of materials and labor. For the
warranty work to be carried out, the rifle is to be
handed in to the authorized dealer or to the production company in Isny.
The customer bears the risk and cost of transport
of the rifle to and from the dealer or production
company. The warranty will be implemented at
the manufacturer’s option by repair or the replacement of faulty parts, replaced parts become the
property of the manufacturer.
2. Warranty on the performance of the bolt
assembly
The shooting accuracy of a rifle depends on many
factors. The most important factor is the ammunition. Not every barrel will fire equally well with
every type of ammunition, there can be considerable performance variations. The sight optics and
their mounting are just as important. Parallax,
loose graticules, defects in graticule adjustment
and incorrect mounting are the most frequently
occurring causes for an unsatisfactory shooting
performance. For that reason, you are advised to
use a branded scope that is mounted by a specialist and to find the best ammunition for your rifle
by testing several types. Ammunition of the same
make and quality can have a different shooting
performance and different point of impact from
one production facility to another and from one
rifle to another.
With the optimal choice of ammunition, sight
optics and mounting, we guarantee the excellent
shooting performance of our rifles.
Complaints concerning shooting performance
must be made in writing within 20 days of the
date of purchase. We reserve the right to pass the
rifle for inspection to an independent institute
(DEVA or national test firing body). Should this
institute confirm that the firearm has an excellent
shooting performance, we are entitled to demand
payment from the customer for the cost of this.
3. Scope of the warranty
Claims under the warranty do not bring about any
extension or renewal of the warranty period either
for the rifle or for fitted replacement parts. The
warranty period for fitted replacement parts ends
with the warranty period for the overall rifle.
The warranty is not valid in the event of:
- Damage due to normal wear and tear, through
non-observance of the instruction manual or
through improper use or handling and when
the rifle shows physical damage of whatever
kind.
- Damage due to acts of God or environmental
effects.
- Repairs, machining or modifications to the rifle
by workshops or other persons not authorized
to perform these.
- Use of re-loaded or non-CIP-approved ammunition.
- Burnishing carried out by third parties.
- The warranty is not valid for optical sight devices and scope mountings of manufacturers
other than Blaser.
Further or other claims, especially those for compensation for damage arising outside the rifle
(i.e. consequential damage) are - provided no liability is enacted by statute - excluded.
23
Page 24

Blaser Jagdwaffen GmbH
D-88316 Isny
GERMANY
 Loading...