

Instruction manual
WARNING !
Please read and understand this
i n s t ruction manual entire l y, bef o re using the rifle. Keep this
manual with your fire a rm. Upon
change of ownership, transfer
this manual with the fire a rm .
As a supporting measure to this
i n s t ruction manual, please ask
your dealer to explain your rifle
to you in detail and let him ins t ruct you about its use.

CAUTION!
Please always read this instruction manual
entirely, before using the break action
single shot rifle. The break action single
shot rifle may only be passed on together
with this instruction manual.
As a supporting measure to this
instruction manual, please ask your
dealer to explain your break action
single shot rifle to you in detail and
let him instruct you about its use.
2

Table of Contents
Page
General Safety Rules 4-5
Description of the individual parts of the firearm 6
11. Assembling the rifle 7-8
12. Disassembling the rifle 9-12
13. Operating and handling 13-18
14. Front sight and rear sight 19
15. Mounting the scope 20-21
16. Care and maintenance 22
17. Warranty conditions 23
3

Safety Rules
Due to its special design characteristics,
your new Blaser single shot rifle K 95
differs from other single shot rifles. The
improved safety features of your Blaser
rifle must however, never induce you to
disregard the required care and legal
provisions for handling arms.
Please check first, whether you have the
correct instruction manual.
The type designation K 95 and the
indication of the calibre are displayed on
the left side of the barrel, at the rear.
General safety rules for handling
firearms
- Make sure the firearm and ammunition
never get into unauthorized hands.
- Always store firearm and ammunition
under lock and key in separate cabinets
that are not accessible to unauthorized
persons.
- Observe current statutory regulations
for the carrying and safekeeping of
firearms and ammunition.
- Make sure you are thoroughly familiar
with how to handle your firearm and,
with the firearm unloaded, practice all
of the functions and the actions you
will need to make, before you carry it.
- Always treat any firearm as loaded and
ready to shoot. If you are not certain of
its status, check by opening the bolt
and looking in the magazine and
cartridge chamber (barrel). You should
handle an unloaded firearm in the same
way as a loaded one.
4

Safety Rules
- Whenever holding the rifle, always
point the muzzle in a safe direction to
ensure you neither injure people nor
damage property.
- Before loading, check the barrel for
obstructions and make sure no foreign
matter (water, snow, soil) can get into
the barrel after loading, too.
- Only use CIP-approved ammunition
which is in good condition and check
that the ammunition is correct for the
caliber of the rifle. Wrongly re-loaded
ammunition can damage your rifle and
cause serious injury.
- Do not load your rifle until just before
you fire it.
- Do not cock your rifle (take off safety)
until you are ready to fire. When
cocking (taking off safety), point the
muzzle in a safe direction.
- Before making each shot, check the
terrain in front of and behind the
target.
- Aim your rifle only at targets you have
definitely identified.
- Keep your finger away from the trigger
unless you wish to fire the rifle.
- If a cartridge fails, wait approximately
60 seconds before opening the breech
to avoid danger from a cartridge that
may be late firing.
- Always wear ear defenders when firing
(ear plugs).
Unload your gun
- before negotiating obstacles
- before climbing into or leaving raised
blinds
- before entering a building
- before climbing into a vehicle
- before entering a town or village
- if you temporarily put the rifle down
or hand it to someone.
5
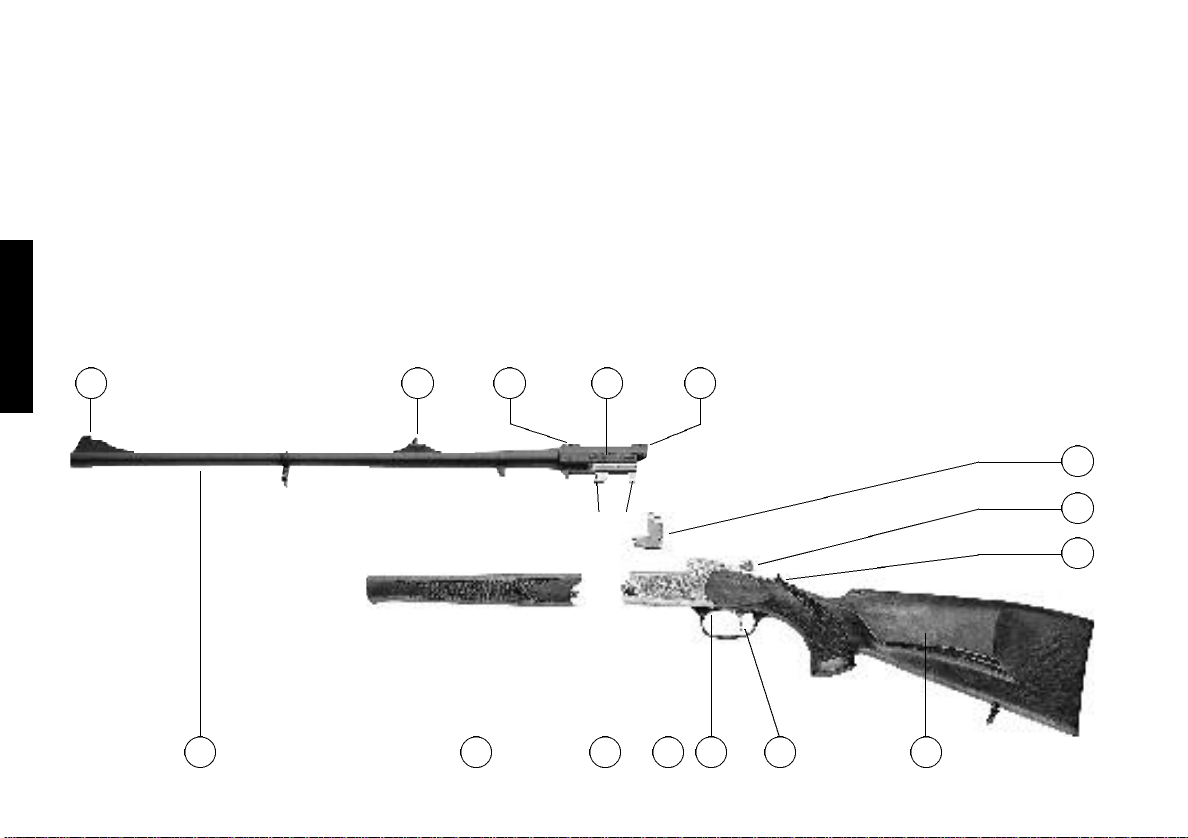
Description of the individual parts of the firearm
1 Front sight
2 Rear sight
3 Pin notches for the original Blaser
saddle mount (DBP)
4 Indication of model and calibre
5 Breech block
6 Top lever
17 Safety slide
18 Stock
19 Trigger
10 Block release
11 Receiver
12 Barrel lugs
13 Fore-end
14 Barrel
421 3 3
5
6
7
13
6
11 1014 812
9
1. Assembling the rifle
1.1. Hooking in barrel
This is only possible with the fore-end
removed.
Pull out extractor all the way to the stop.
Do not touch top lever. Place the
foremost barrel lug on the hinge pin. Due
to the tight fit, you have to proceed carefully. Grip barrel lug part and receiver with
one hand, press the barrel lug into its
bed, closing the rifle at the same time.
Hooking in the barrel requires a certain
degree of skill; but please refrain from
using force! The best solution is, to ask an
expert to show you the procedure and to
do it in his presence several times.
CAUTION:
In the event of unskilful handling, the
breech block may, when the barrel is
tilted, slip out of its slightly inclined position (pointing to the front) and snap
backwards into a vertical position (green
dot on the left side of the breech block is
not visible any longer). If this happens,
the rifle cannot be closed any more.
In this case push the top lever all the way
to the right, and with the other hand,
return the breech block into its slightly
inclined position (to the front).
7
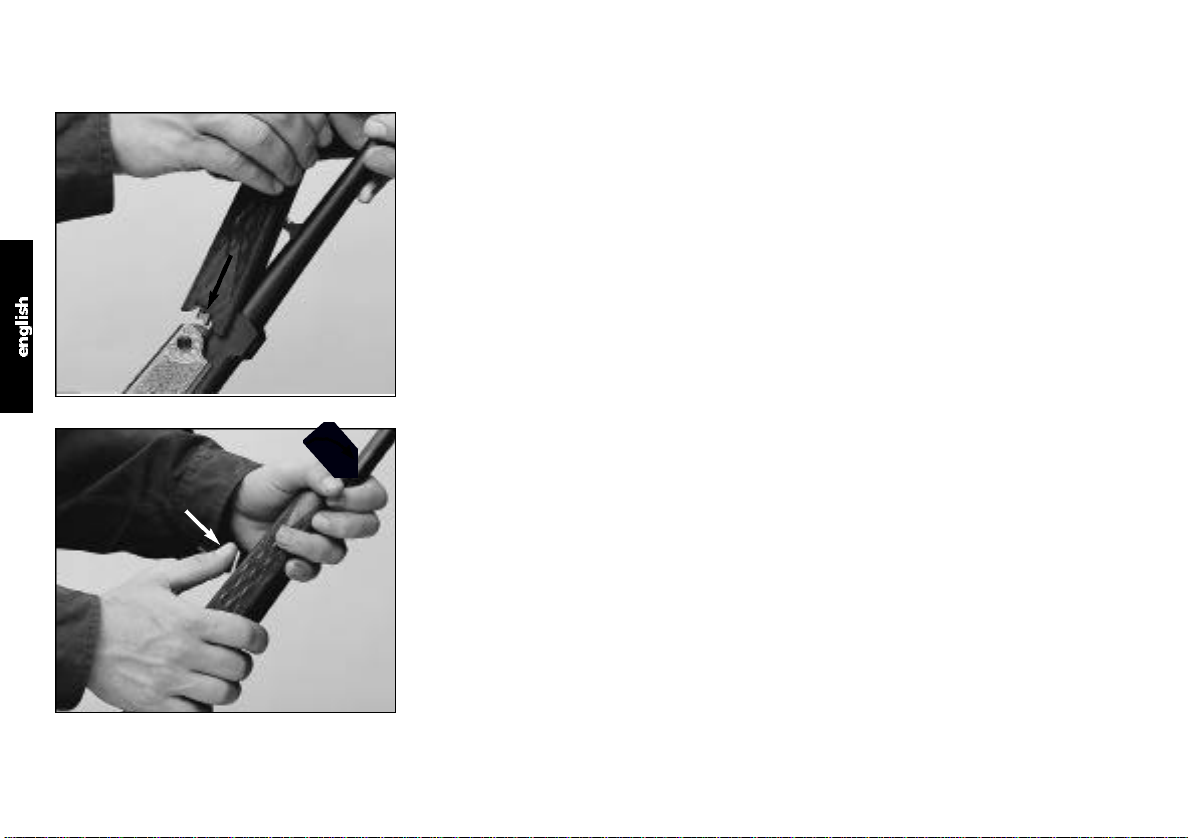
1. Assembling the rifle
1.2 Attaching fore-end
Place the fore-end over the hinge pin,
flush with the receiver, and tilt it towards
the barrel all the way to the stop. We
recommend to lift the flap of the fore-end
with the forefinger and hold it in this
position. Press down the fore-end.
The flap of the fore-end snaps into place.
Close the flap of the fore-end completely.
The fore-end is now latched.
8

CAUTION!
Unload your rifle prior to disassembly
(refer to page 17).
2.1. Taking off the fore-end
Support the rifle on your thigh. Pull out
the flap on the fore-end with one hand.
You may take off the fore-end now.
Facilitate pulling off the fore-end by
pressing it away from the barrel at the top
with your other hand.
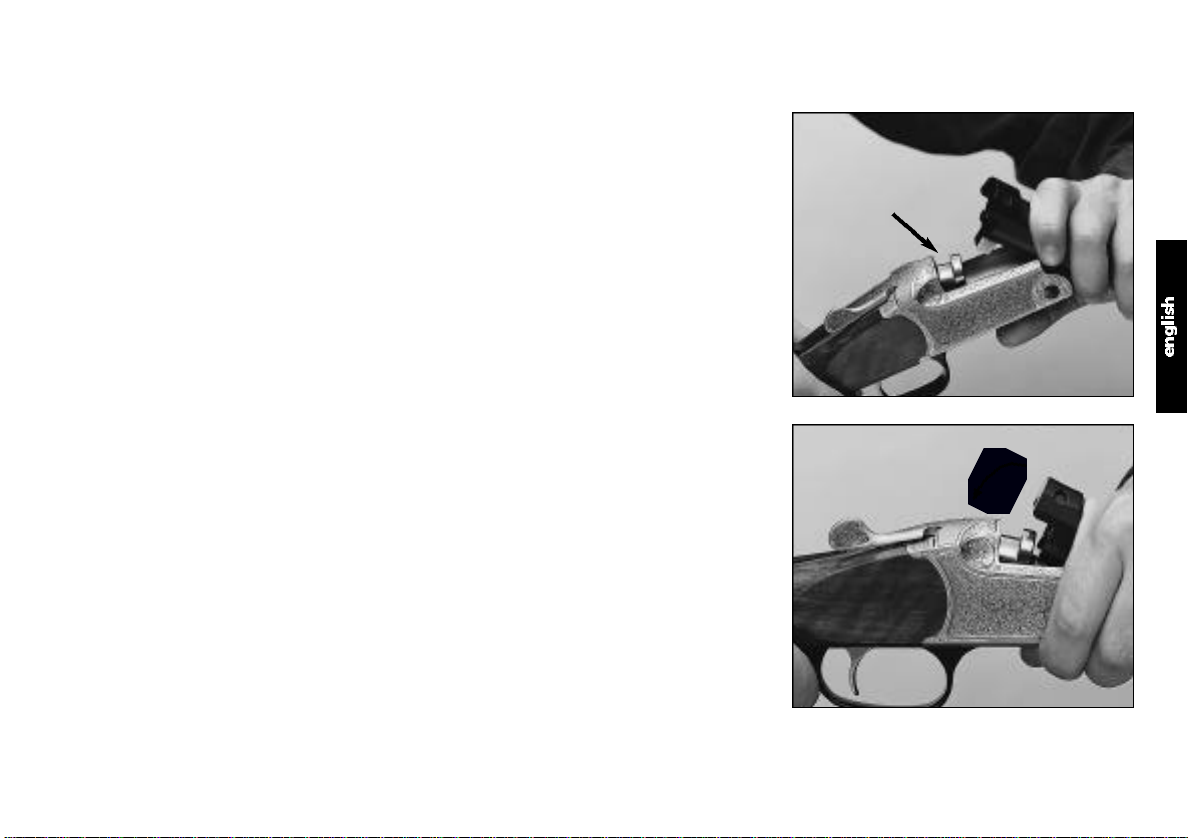
2. Disassembling the rifle
9

2. Disassembling the rifle
2.2 Hooking off the barrel
This is only possible with the fore-end
removed.
Push the top lever all the way to the right
and keep it in this position.
Tilt the barrel all the way downwards,
unlatching the barrel lug.
10

2.3. Removing breech block
(with barrel detached)
This is only required, when you want to
clean the rifle thoroughly or safeguard it
against unauthorized use by removing the
breech block.
Press the block release button »A« beside
the trigger and keep it pressed down.
Now push the top lever to the right
simultaneously, until the breech block
unlatches.
When unlatching, the block jumps
forward a bit and can now be removed
towards the front.
2. Disassembling the rifle
A
11

2. Disassembling the rifle
W
A
2.4 Reinserting breech block
Place the breech block with the
semicircular shaft bearing »W« on the
shaft at the bottom of the receiver and tilt
it backwards. Press the block release
button »A« beside the trigger and keep it
pressed
down. Now, the top lever can be pushed
all the way to the right (slightly further
than for opening the rifle). Hold the top
lever in this position, you may now release the locking button »A«. Press the
breech block down into the receiver at
the back and release the top lever.
If you tilt the breech block all the way to
the back during assembly (green dot on
the left is not visible any more), push the
top lever to the right again (without
pressing the block release button) and let
the block snap into its slightly tilted
position by pushing it slightly towards the
front. In this position, the rifle can be
closed
(green dot is visible).
12

WARNING:
Do not move the safety to the
“off safe“ position until you are ready
to fire.
Keep your finger away from the trigger
unless you wish to fire the rifle.
When you interrupt or finish firing
move the safety slide immediately backwards in the “on safe“ position.
Before making each shot, check the terrain in front of and behind the
target.
Ensure that the target and the environment allow shots to be fired without
danger.
Always wear ear protection and safety
glasses when shooting. Alert bystanders
to the importance of wearing ear protection.
If a cartridge fails, wait approximately
60 seconds before opening the breech
to avoid danger from a cartridge that
may be late firing.
Always keep muzzle of the rifle pointed
in a safe direction.
Before loading, always wipe off any excess grease and oil, then verify that
there is no obstruction in the chamber
or the trigger guard.
Do not place your finger on trigger,
keep it outside of the trigger guard.
Never load or unload the rifle inside a
vehicle, inside a building or other confined space (except in a designated firing range).
Do not load the rifle by inserting the
magazine until immediately before
shooting.
Never rely on safety mechanisms. They
are never a substitute for careful and
correct handling of your rifle.
Never let a loaded rifle out of your
hands.
3. Operating and handling
3.1. Opening the rifle
Push the top lever all the way to the right
and keep it in this position.
The breech block now releases the barrel,
the rifle can be opened.
WARNING:
You should never point the muzzle at anything, unless you are planning
to shoot, especially when you are loading and unloading the rifle. Muzzle direction could be the difference between LIFE and DEATH.
13

3. Operating and handling
14
3.2 Closing the rifle
Do not touch the top lever. Grip barrel
and swivel stock upwards. The breech
block snaps into place in the barrel and is
latched by the breech wedge. Check,
whether the top lever is locked, by pushing it slightly to the left. The rifle cannot
be cocked if the lever is in an unlocked
position. To lock the top lever, a small
degree of force is required, particularly
with new rifles. This is due to the precise
fit of the breech wegde.
CAUTION:
In the event of unskilful handling, the
breech block may, when the barrel is
tilted, slip out of its slightly inclined
position (pointing to the front) and snap
backwards into a vertical position (green
dot on the left side of the breech block is
not visible any longer). If this happens,
the
rifle cannot be closed any more.
In this case push the top lever all the way
to the right and with the other hand,
return the breech block into its slightly
inclined position (to the front).

3.3. Cocking the lock
(putting the rifle „off safe“)
Press the safety slide forward until it
snaps into position.
CAUTION:
Safety slide to the front:
The breech is closed.
The lock is cocked.
If loaded, the rifle is now ready to fire!
3. Operating and handling
15

3. Operating and handling
3.4. Uncocking the lock
(putting the rifle „on safe“)
With your thumb, simply pull the safety
slide backwards against a slight resistance
and let is slide back.
With a bit of practice, this can be done
without a sound.
CAUTION:
Do not touch the trigger under any
circumstances, this would fire the rifle!
Safety slide in its rear position:
The lock is uncocked.
The rifle is safe.
You may also uncock your rifle by pushing
the top lever to the right.
The safety slide will then slide back.
This will be more noisy.
Always use ammunition that complies with
the performance standards established by the
Sporting Arms and Ammunition Manufacturers’ Institute, Inc. of the United States (SAAMI)
3.A Ammunition
WARNING:
Use only commercially available, SAAMI
proofed ammunition in the original
packaging, and which matches the caliber of your rifle. The correct caliber is
stamped on the left side of the rifle barrel at the rear.
Never use reloaded, “refurbished“,
hand-loaded, non-standard ammunition, or ammunition of a different
caliber.
Never use dirty, wet, corroded, bent,
damaged or oiled ammunition.
Never leave ammunition unattended.
WARNING
16

3. Operating and handling
3.5. Loading the rifle
Remove the oil from barrel and chamber
and check it for foreign obstacles. Make
absolutely sure, that the ammunition
corresponds with the calibre of your rifle.
Insert the correct cartridge into the magazine. Close the rifle.
3.6. Firing a shot
Initial situation: The rifle is loaded and
locked. The lock is not cocked.
Surroundings, background and aim are
clearly
discernible. Cock the lock (safety slide
all the way to the front). Fire the shot by
actuating the fine trigger.
During the shot, the cocking slide snaps
back into its original position, due to the
recoil.
3.7. Trigger
CAUTION:
The Blaser single shot rifle model K 95 is
equipped with a fine trigger. The trigger
pull is adjusted at the plant closely to the
finest possible adjustment as provided by
international safety standards.
The adjustment can and may only be
altered by the manufacturer.
CALIFORNIA PROPOSITION 65 WARNING
Discharging firearms in poorly ventilated areas, cleaning firearms, or handling ammunition may result in exposure to lead and other substances known to cause birth
defects, reproductive harm, and other serious physical injury. Have adequate ventilation at all times. Wash hands thoroughly after exposure.
WARNING
Using the WRONG ammunition could destroy your rifle
and cause serious personal injury or death. If a bullet is in
the bore, do not attempt to shoot it out by using another
cartridge. This can generate excessive pressure, damage
the firearm and cause serious personal injury.
17

3. Operating and handling
3.8 Unloading the rifle
Open the rifle.
(see 3.1.)
When the barrel is tilted, the cartridge
extractor pulls out the cartridge from the
magazine, so that it can be taken out by
hand.
18

4. Open sights
Due to differing sighting habits and requirements, the rifle is tested and adjusted through open sighting in the plant
to an approximate degree of accuracy
only. Accurate test-shooting by adjusting
rear and front sight should be performed
by you, together with your dealer, to
allow the sighting to be tailored to your
personal requirements.
4.1. Front sight for height adjustment
- Insert the 1.5 mm AF allen key into the
hole of the front sight base and turn
the allen screw as required:
- Front sight (spring-loaded)
screw out = point of impact lower
screw in = point of impact higher
4.2. Rear sight (notch) for side
adjustment
- The sight has holes left and right for a
1.5 mm allen key
- Point of impact more to the left: loosen
allen screw on the right side, tighten
allen screw on the left side.
- Point of impact more to the right:
loosen allen screw on the left side,
tighten allen screw on the right side.
Please tighten allen screws with
sensitivity.
19

5. Mounting the scope
The K 95 has been prepared for the
original Blaser saddle mount (DBP). We
assume that an authorized dealer has
fitted your scope correctly to match the
barrel.
5.1. Mounting the scope:
- Flip the covers of the front and rear
locking lever open, ensuring that both
of them are swivelled fully forward/up.
- Grip the rifle at the fore-end with your
left hand and support stock on your
thigh.
- Grip the scope at the centre tube above
the mount with your right hand in such
a manner, that you can reach the front
locking lever with your thumb.
- Carefully place the two round pins of
the scope mount into the two oval
notches in the upper right side of the
barrel. Tilt scope to the left and keep
it in this position.
- First press the front and then the rear
mounting lever (which were flipped
open previously) backwards/down with
your thumb, until they reach the stop
(tension). If this can be done too easily
or only by using considerable force,
then the mounts are set incorrectly. In
either case, have your authorized dealer
correct this to specification.
- Close the two saddle covers of the
locking levers now.
Ensure that the mounting surfaces are
clean and free from oil.
20

5.2 Removing scope
5. Mounting the scope
- Grip rifle at the fore-end with your left
hand and support it on your thigh.
- Flip both covers of the locking levers
open.
- Fist swivel the rear locking lever all the
way to the front/top with your thumb,
until it reaches the stop.
1.
Locking lever pushed forwards (open)
for mounting or removing of scope.
Cover open.
- Grip the centre tube of the scope with
your right hand and keep it in this
position.
- Now swivel the front locking lever all
the way to the front/top with your
thumb, until it reaches the stop.
- Tilt scope to the right and remove it.
A
2.
Locking leverpulled backwards (tighten-
e d ) . This position is reached, when the
front edge of the locking lever (A) stands
at a 90° angle to the barrel axis.
B
3.
Locking leverpulled backwards (tighten-
e d ) .Cover closed. When the locking
lever is in its correct position, the line on
the cover is parallel to the barrel axis (B).
21

6. Care and maintenance
WARNING:
B e f o re perf o rming any
cleaning or maintenance,
make sure the rifle is completely unloaded.
Always make sure you use suitable
materials that are intended for the
purpose of cleaning rifles.
Barrels:
After firing, prior to storing for long
periods and after carrying the rifle, treat
barrels and cartridge chamber with suitable gun oil, particularly when conditions
are damp or wet.
Make sure you thoroughly remove excess
oil from barrels and cartridge chamber
before firing. With a heavy build-up of
cartridge deposits inside the barrel, we
recommend treating these parts with
chemical barrel cleaners.
WARNING:
Make sure you read and adhere to the
instructions and warnings given by the
manufacturer of the cleaning agent.
Metal parts:
Always keep all metal parts of the rifle
clean and lightly oiled.
Stock:
The wooden stocks of all Blaser hunting
rifles have an oil finish. We recommend
regular treatment with a good quality
stock oil or wax.
Gun oil is unsuitable for stock care!
Optics:
Refer to the service instructions of the
manufacturer.
Maintenance:
Take your rifle to your gun dealer for
examination and maintenance before the
hunting season and before hunting trips.
Like your automobile, your rifle is an item
of equipment that needs regular maintenance and inspection.
22

7. Warranty conditions
LIMITED 5 YEAR WARRANTY
BLASER fire a rms are warranted by the
BLASER Jagdwaffen GmbH to be free of
defects in material or workmanship under
normal use and service for a period of 5
years from date of first purchase by a
consumer.
BLASER’s obligation is limited (at BLASER’s
choice) to repairing or replacing at any
of its authorized warranty service stations
any part of a BLASER fire a rm which
BLASER examination discloses to be
defective.
The warranty shall not apply to problems,
malfunctions or defects resulting from accidents, alterations, misuse or bro k e n
stocks. If in the opinion of BLASER gunsmiths or of its authorized warranty service
stations any modifications, changes or additions made outside the BLASER factory
have affected the operation of the weapon
to render it faulty, this warranty shall be
void. This warranty shall also be void if any
part not of BLASER manufacture has been
incorporated into the rifle or if other than
factory loaded ammunition is fired in the
BLASER rifle.
Should you have occasion require warranty service, please contact your local dealer
or the distributor of your country for directions on returning your rifle to an authorized warranty station.
BLASER expressly disclaims any and all implied warranties arising under the UCC or
Common Law, including warranties of fitness for a particular purpose and implied
warranties of merchantability.
BLASER shall not be responsible for any incidental or consequential damages for economic loss or injury or property damage as
a result of any alleged breach of an express
or implied warranty, as a result of negligence, or as a result of any other act or
omission of BLASER. Exclusion or limitation
of consequential or incidental damages are
not allowed in some states so this limitation
or exclusion may not apply to you.
This warranty gives you specific legal rights,
and you may also have other rights which
vary from state to state.
SAVE YOUR RECEIPT AS PROOF OF
PURCHASE.
USA/Canada
SIG Arms Inc.
Corporate Park
Exeter, NH 03833
(603) 772-2303
www.sigarms.com
SIGARMS is a trademark of
SIG Arms Inc.
Manufacturer:
BLASER Jagdwaffen GmbH
Ziegelstadel 1
D-88316 Isny, GERMANY

I M P O RTA N T:
Do not discard.
Keep this manual with
your firearm. Upon change
of ownership, transfer this
manual with the firearm.
18 Industrial Drive, Exeter, NH 03833
SIGARMS Inc.
Ph: (603) 772-2302
Fax: (603) 772-9082
Blaser Jagdwaffen GmbH
D-88316 Isny · GERMANY
OM-K95-USA
 Loading...