

Page 1
SIGMA HEXA-600C User Manual Page 1
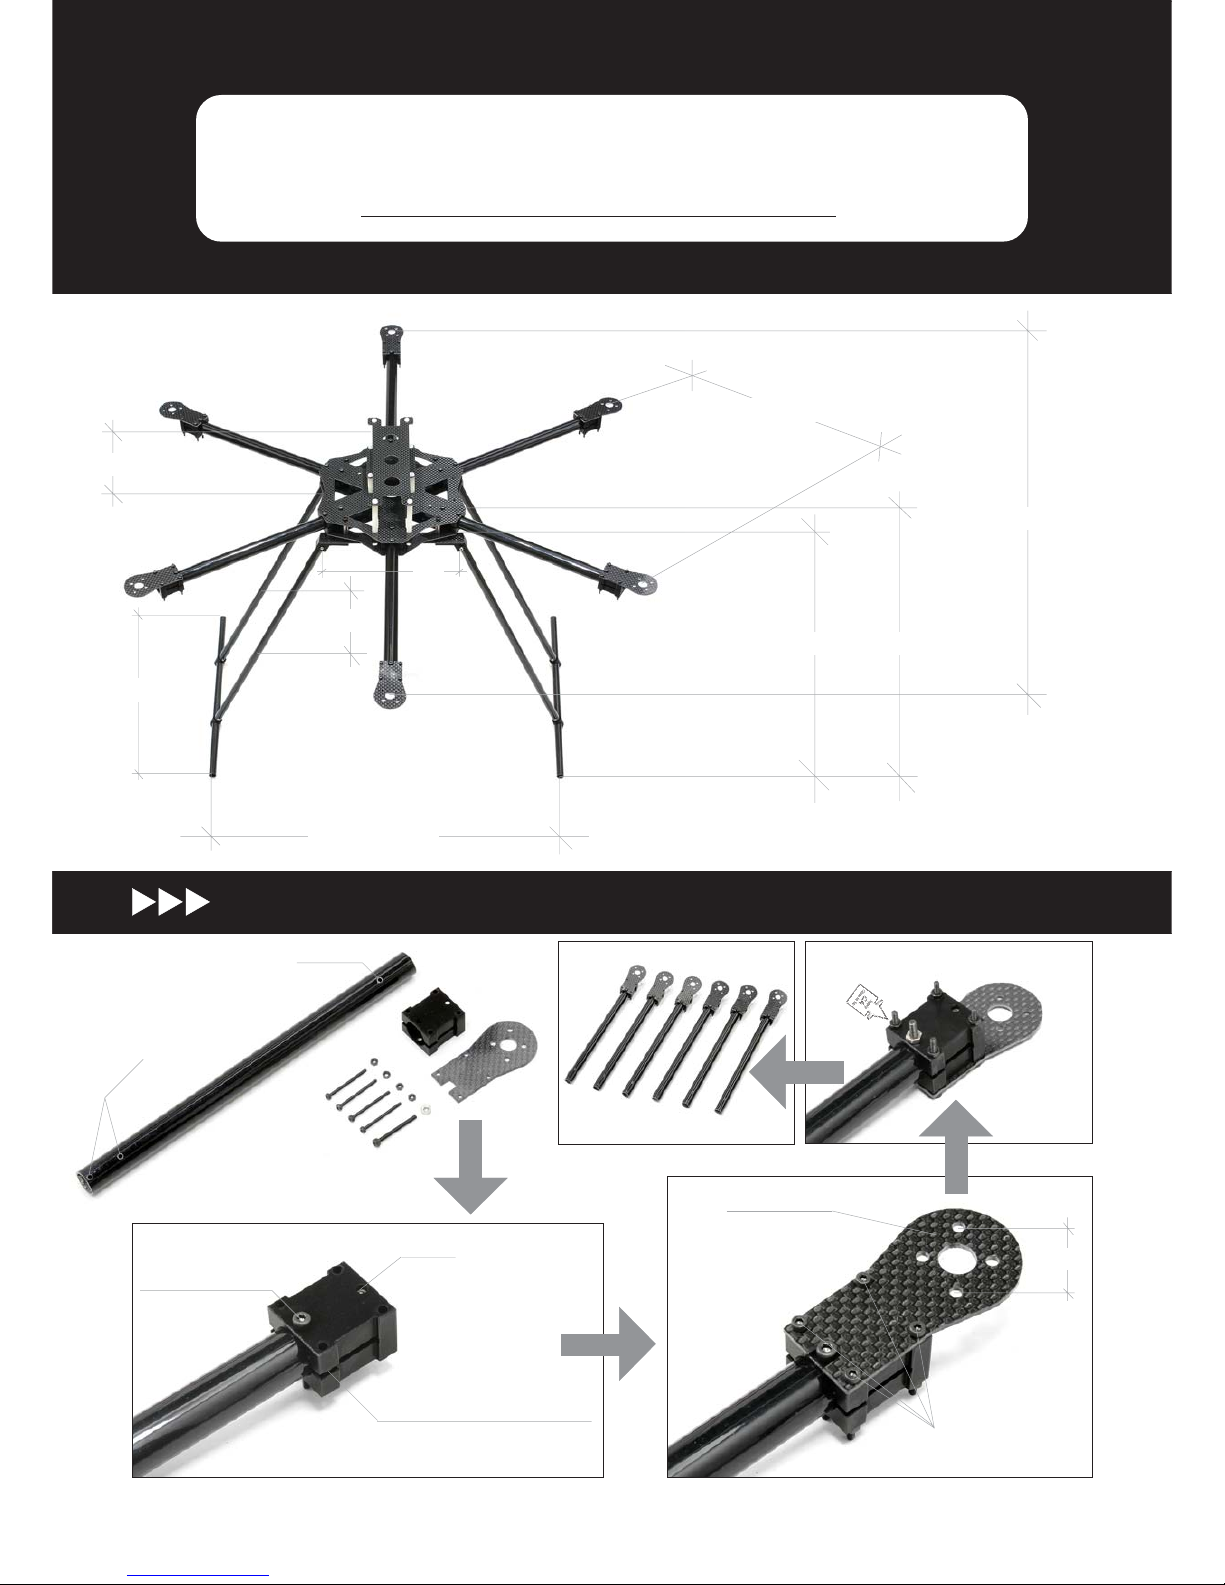
M2 x 25 Socket Screw
19mm
Back View
All screw need to use screw
glue for higher intensity
Not use
M2.5 x 25 Socket Screw
Note the direction of this gap
Note the direction
4x M2 x 25 Socket Screw
1x M2.5 x 25 Socket Screw
One hole
TWO holes
6 sets complete
305mm
420mm
325mm
288mm
578mm
40mm
STEP 1
How to assemble
SIGMA HEXA-600C
SIGMA HEXA-600C
Version 1.1
Read the manual carefully before using SIGMA HEXA-600C
250mm
88mm
146mm
Page 2
SIGMA HEXA-600C User Manual Page 2
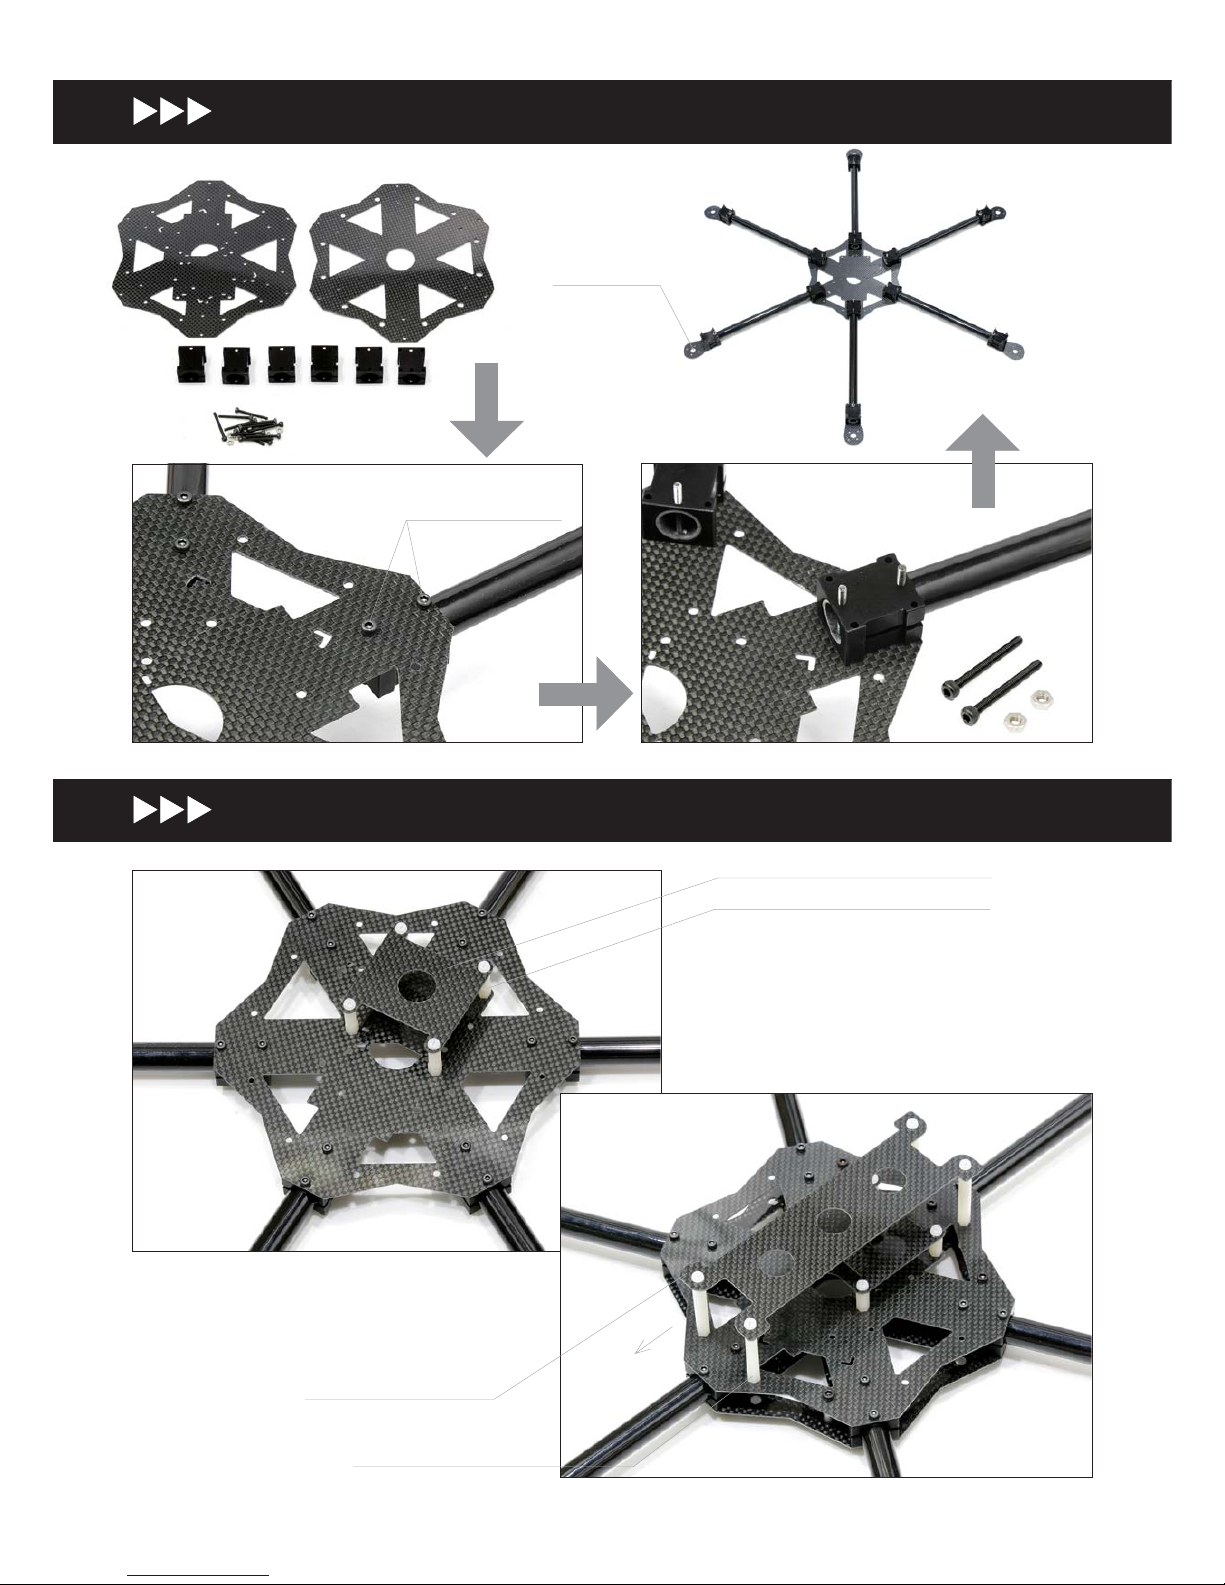
STEP 2
Upper Plate Lower Plate
6 x Arm Mount
12 x M2.5 Socket Screw
Back View
M2.5 x 25Socket Screw
Complete
Note the direction
STEP 3
Use Nylon Screw (M3 x 15)
Device Mounting Plate
M2.5 x 25 Socket Screw
Use Nylon Screw (M3 x 40)
Battery Mounting Plate
HEAD Direction
( + Mode)
Page 3
SIGMA HEXA-600C User Manual Page 3
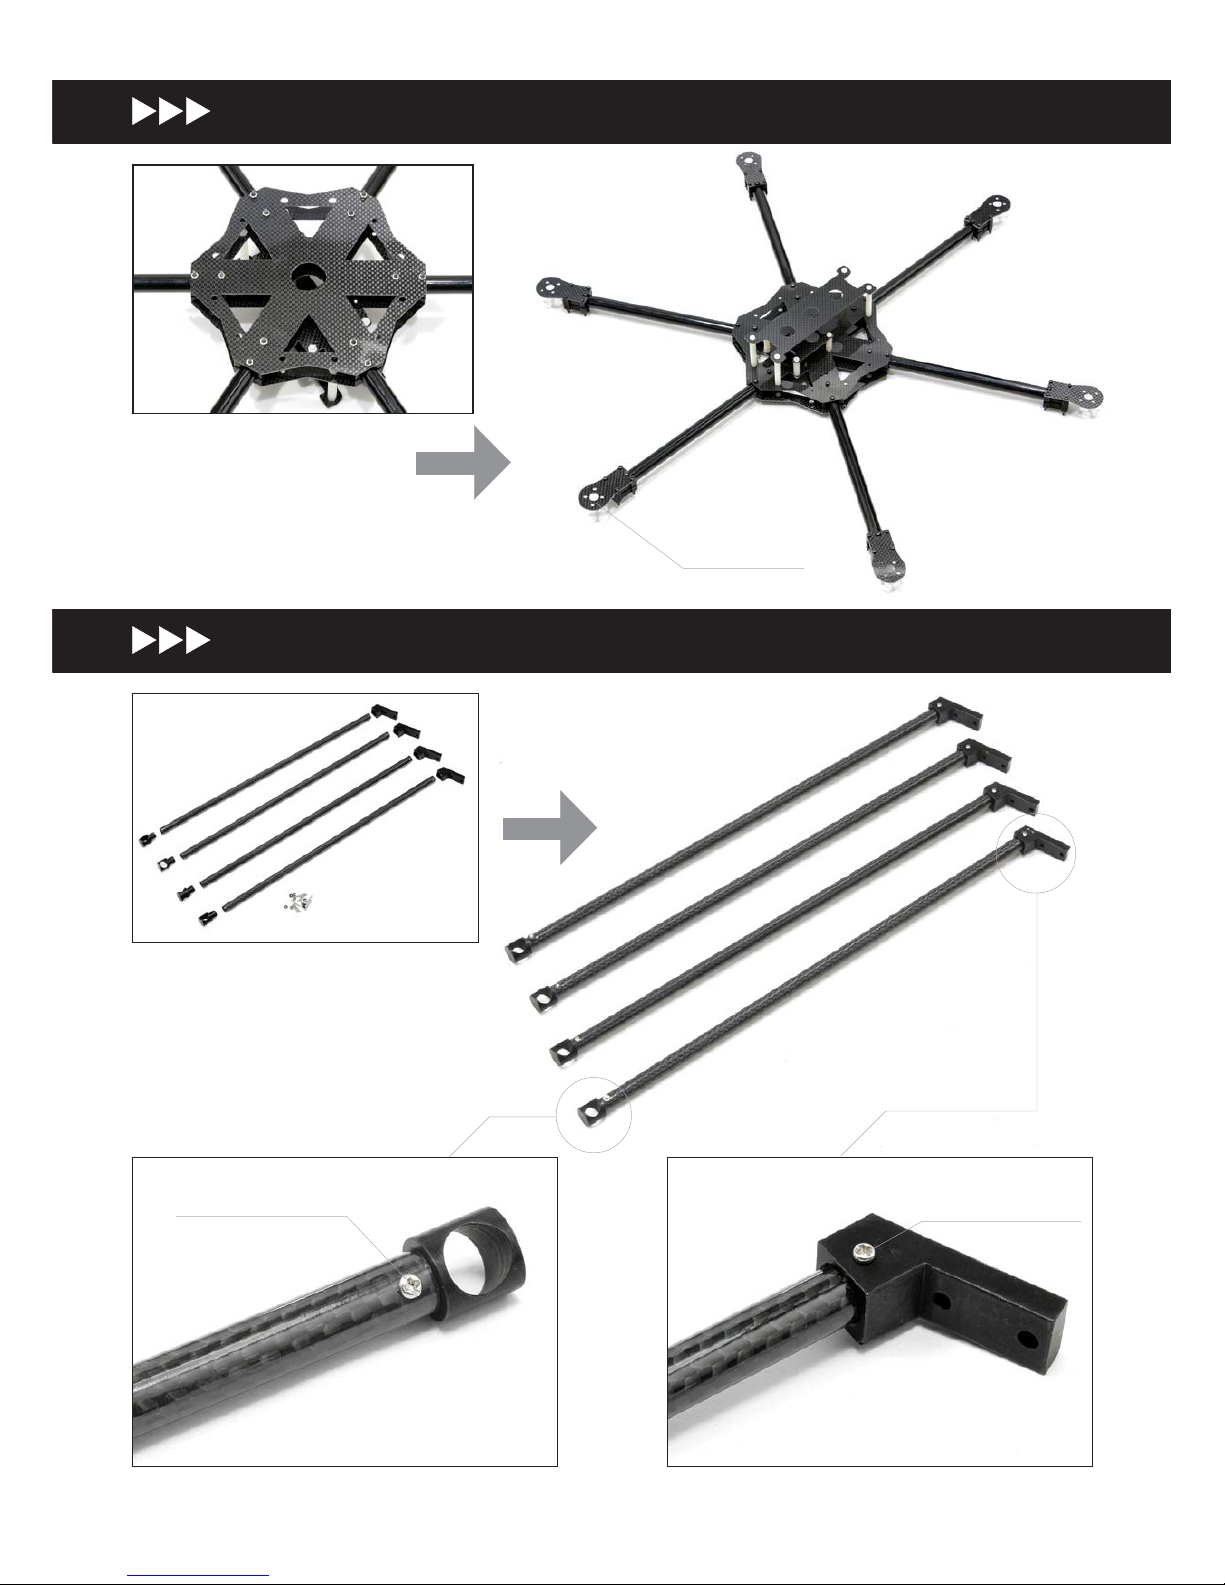
Install Lower Plate
Note the direction
Prepare the parts
M2 x 12 Screw
M2 x 14 Screw
Complete
Length: 320mm
Complete
STEP 4
STEP 5
Page 4

SIGMA HEXA-600C User Manual Page 4
M3 x 12 Socket Screw
M3 x 6 Socket Screw
4x M5.0 Aluminum column
Aluminum column
M3 x 6 Socket Screw
Lower Plate
You need to install the 4 sets aluminum column on the frame.
Shown above is one of them.
HEAD Direction( + Mode)
HEAD Direction(X Mode)
Aluminum column
install here(cross this hole)
Aluminum column
install here(cross this hole)
M3 x 6 Socket Screw
STEP 6
STEP 7
Page 5

SIGMA HEXA-600C User Manual Page 5
Aluminum column
install here(cross this hole)
M3 x 12 Socket Screw
M3 x 12 Socket Screw
Complete
STEP 8
97mm
97mm
73mm
Pull to each side for higher intensity
Approx: 150mm
Wrap with tape
is recommend
Page 6

SIGMA HEXA-600C User Manual Page 6
Install AV200 to
SIGMA HEXA-600C
SIGMA HEXA-600C
Read the manual carefully before install
Photohigher Mini AV200 Camera Gimbal
This gimbal is a professional level camera housing with 5: 1 tilt, 10: 1
reduction on roll for very fine and smooth gyro stabilization directly
off the flight controller of your SIGMA HEXA-600C.
It is precision engineered and well designed and crafted it is primarily
constructed from lightweight alloys and machined engineering plastics.
It has a high speed coreless roll servo with an external 10 turn potentiometer - digital servo on tilt driving a toothed belt for smooth motion
with a fully adjustable camera table for c of g positioning and balancing.
The mount will easily house a large DSLR (Canon 7D/5D II) or a high
quality HD video camera - due to its weight and size it is recommended that a heavy lift Droidworx AD-4 or AD-6 is used. With
heavier payloads shorter flight times are to be expected.
Weight: 590 grams
Internal space dimensions: 145mm (high) x 170mm (wide).
Install the Nylon Screw (M3 x 6)
Install the Nylon Screw (M3 x 6)
Page 7

SIGMA HEXA-600C User Manual Page 7
M3 x 12 Socket Screw
M3 Socket Screw (Prepare by yourself)
Nylon Nut (M3 x 6)
Complete
Page 8

SIGMA HEXA-600C User Manual Page 8
Total: 380g
Total: 460g
With AV200
Total: 1080g
With AV200+5DII
Total: 2460g
Page 9

SIGMA HEXA-600C User Manual Page 9
Install FC3X-360CM to
SIGMA HEXA-600C
SIGMA HEXA-600C
Read the manual carefully before install
SIGMA FC3X-360CM Multirotor 3-Axis Carbon Fiber DSLR Gimbal
SIGMA FC3X-360CM 3-axis camera mount is specially designed for SIGMA HEXA-600C aircraft and XAircraft X650V4/V8, made by carbon fiber
material, having structure of high structural strength, light weight. It is capable of installing DSLR and most of DV. The 3-axis includes Tilt, Roll and
horizental(Pan), wherein the direction axes can rotate in unlimited 360 degrees, the rotation speed and direction are controlled by radio set.
SIGMA FC3X-360CM using a tripod and tripod-in-one design, when camera mount rotates in horizontal, the tripod is also synchronous rotation,
this way will avoid possibility that traditional camera mount will photographed the tripod while taking photos, which offers more flexible and
creative space for photography workers. Tilt axis using the dual steering gear backlash design, which could not only offer strong drive power,
but also more higher control precise. The Tilt and Roll axis both can be driven by common flight controller, such as: DJI WK-M, ACEONE or
XAircraft FC1212+AHRS,etc. so as to obtail a better gyro stability augmentation effect. Other flight controllers, such as FY-30A, etc can also be
used to finish closed-loop control augmentation.
Product Technical Parameter:
Weight: 1.06kg
Outside dimensions: 310mm (W) x 244mm (D) x 278mm (H)
Camera mount innerspace size: 170mm (W) x 80mm (D) x 140mm (H)
Maximum load: 2kg (SLR camera and most DV can be installed)
 Loading...