

Page 1

F30N04121
ELECTRONIC FLASH MACRO
EM-140
DG
NA-iTTL
使用説明書
INSTRUCTIONS
MODE D’EMPLOI
INSTRUCCIONES
ISTRUZIONI PER L’USO
說明書
日本語
ENGLISH
DEUTSCH
FRANÇAIS
ESPAÑOL
ITALIANO
中 文
2~9
10~17
18~26
27~34
35~42
43~50
51~57
Page 2
Page 3
ᮇㄊ
このたびは、シグマエレクトロニックフラッシュマクロEM-140 DGをお買い上げいただきありがとうござ
います。このフラッシュは、高度なテクニックを要するマクロ領域でのフラッシュ撮影をオートで簡単に
行うことができます。
カメラにより、使用できる機能や操作方法が異なりますので、ご使用カメラに該当する箇所を選んでお読
みください。本説明書をご精読の上、フラッシュの機能、操作、取り扱い上の注意点を正しく理解して、
写真撮影をお楽しみください。なお、ご使用のカメラの説明書の、フラッシュの使用方法に関する項目も
あわせてご覧ください。お読みになった後は、お使いになる方がいつでも見られる所に必ず保管してくだ
さい。(このフラッシュはニコン一眼レフカメラ専用です。)
安全上のご注意
人的損害や物的損害を未然に防止するため、ご使用の前にこの項目の内容を十分ご理解いただくよう
お願いします。
㆑࿈
Ἰណ
記号は注意、もしくは警告を促す内容を告げています。
この表示を無視して、誤った取り扱いをすると、人が死亡または重傷を負う可能性が想定され
る内容を示しています。
この表示を無視して、誤った取り扱いをすると、人が障害を負う可能性が想定される内容およ
㆑࿈
フラッシュ内部には、高電圧回路が組み込まれています。感電や火傷のおそれがありますので、分解、改
造等は絶対にしないでください。また、万一落下等で破損した場合には、内部の部品に手を触れぬよう十
分注意して下さい。
フラッシュを人の目に近づけて撮影しないでください。目の近くでフラッシュを発光すると視力障害を起
こす危険性があります。特に、乳幼児を撮影するときは1m以上離れてください。
カメラのホットシューにフラッシュを接続して使用するときには、カメラのシンクロターミナルに手を触
Ἰណ
このフラッシュをニコン一眼レフ以外のカメラには使用しないでください。誤動作やカメラの電子回路
に悪影響を及ぼす可能性があります。
このフラッシュは防水構造になっていません。雨天や水辺で使用するときは、濡らさないように注意し
て下さい。水が内部に入り込みますと故障の原因になります。
ホコリの多い場所や、高温、多湿になる場所に放置しないでください。故障や火災の原因となります。
急激な温度変化により、フラッシュ内部に結露が生じることがあります。寒い屋外から暖かい室内に入
るときなどは、ケースやビニール袋に入れ、周囲の温度になじませてから使用してください。
防虫剤はフラッシュに悪影響を与えます。タンスや押入などに保管しないでください。
シンナー、ベンジン等の有機溶剤で拭かないでください。変色、変形等の原因となります。
Page 4
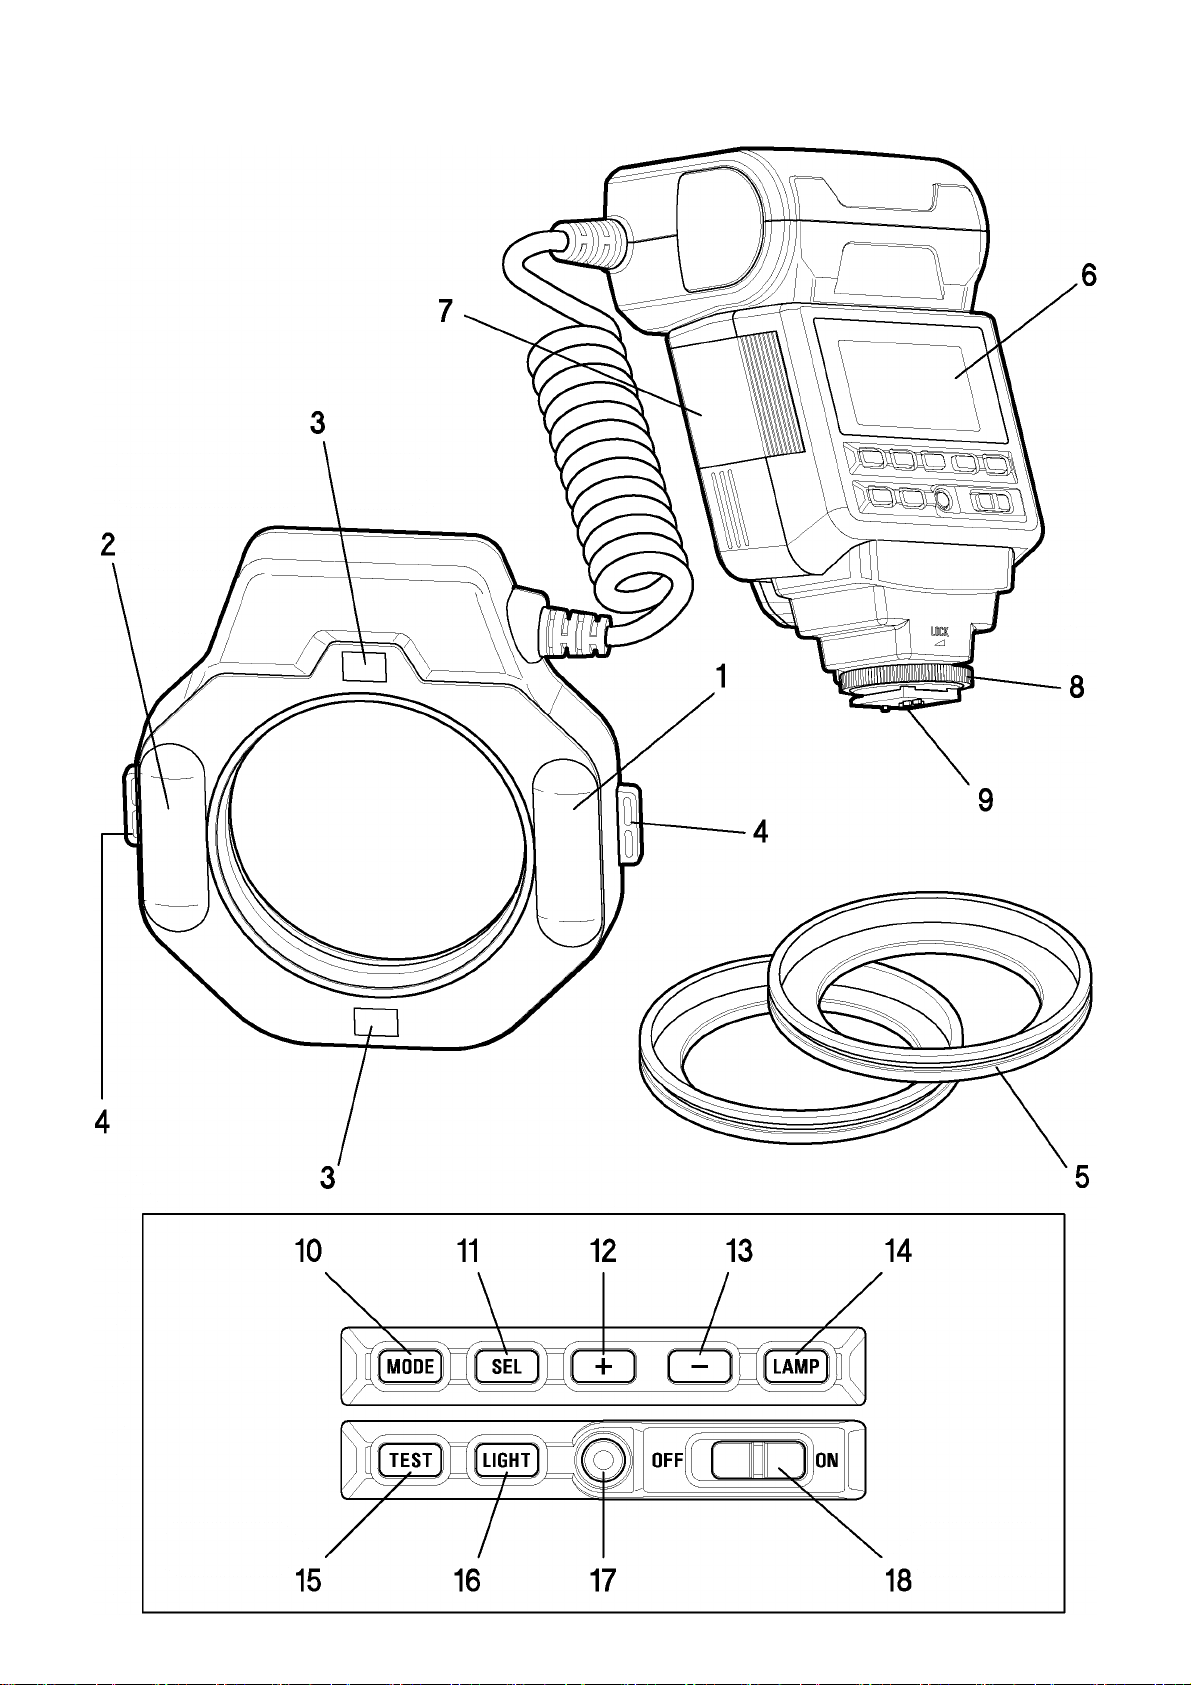
各部の名称(1ページ)
発光部
1. 発光部1(左) 2. 発光部2(右) 3. 照明ランプ 4. 着脱ボタン 5. マクロフラッシュアダプター
制御部
6. 液晶パネル 7. 電池室カバー 8. シュー締付けリング 9. 取付けシュー 10. MODEボタン
11. SELボタン 12. +ボタン 13. −ボタン 14. LAMPボタン 15. TESTボタン
16. LIGHTボタン 17. レディライト 18. 電源スイッチ
使用可能なレンズについて
このフラッシュはマクロレンズ(MACRO 50mm F2.8 EX DG、MACRO 105mm F2.8 EX DG等)のご使用を前
提として設計されていますが、他のレンズでもご使用になれます。ただし、以下のような制限事項がございます
のでご注意ください。
オートフォーカスによって、レンズ先端が回転したり前後に動くレンズでは、レンズ、およびカメラのフォーカス機構に
負担がかかり、故障の原因となります。必ずマニュアルフォーカスにしてご使用ください。
フィルター径がØ55mm, およびØ58mmのレンズの場合は、付属のマクロフラッシュアダプターにて取り付け
が可能です。それ以外のフィルター径のレンズにご使用の場合は、別売りのマクロフラッシュアダプターが必
要となります。(Ø52mm, Ø62mm, Ø72mm, Ø77mmをご用意しています)
ご使用のレンズの焦点距離や、被写体までの距離などの条件によって、画面にケラレを生じることがあります。
必ずテスト撮影を行い、ケラレが生じてないか確認してください。
カメラ、レンズの組み合わせについて
このフラッシュは、以下のカメラに使用できます。
D2シリーズ、 D70、 D1シリーズ、 D100、 F6、 F5、 F4シリーズ、
F3シリーズ(接続にはアダプターが必要です)、 F100、 F90Xシリーズ、 F90シリーズ、 F80シリーズ、
F70D、 U、 F60D、 F50D、 F-801S、 F-801、 F-601M、 F-601、 F-501、 F-401X、 F-401S、
F-401、 F-301、 FA、 FE10、 FE2、 FG、 FM10、 New FM2、 プロネア600i
この説明書では、ご使用になるレンズを下記の様に分類しています。ご使用レンズがどのグループに属するかご
確認ください。
CPU内蔵ニッコールレンズ
Dタイプレンズ、Gタイプレンズ、IXニッコールレンズ、Dタイプ以外
のAFレンズ(F3AF用を除く)Ai-Pタイプレンズ
CPU内蔵ニッコール以外のレンズ
Ai-S、Ai、シリーズEレンズ等
◆ IXニッコールレンズは、ニコン
APS
対応一眼レフカメラ専用のレンズです。
35mm
版カメラにはご使用できません。
電池について
このフラッシュには電源として、単三形のアルカリ乾電池、もしくはニッカド電池、ニッケル水素電池を4本使
用します。レディライトの点灯まで30秒以上かかるときは、電池を4本とも新しいものと交換してください。
電池や電池室カバーの接点は、常にきれいにしてください。
単三形ニッカド電池を使用する場合は、電池側の接点の形状が規格で統一されていませんので、使用できるこ
とを確認してからお買い求めください。
交換するときには4本とも同じメーカーの同じ種類のものを使用してください。誤った使い方は、液漏れ、発
熱、破裂等のおそれがあります。
電池を分解したり、火中、水中への投下、ショート等は破裂のおそれがありますので、絶対にしないでくださ
い。また、ニッカド電池、ニッケル水素電池以外は充電しないでください。
撮影が済みましたら、電池を取り出して保管してください。電池を入れたまま長期間放置しますと、液漏れが
Page 5

生じてフラッシュ内部を損傷するおそれがあります。
長期間の旅行、寒冷地での撮影、または大量に撮影するときには、予備の電池をご用意ください。
寒冷地では電池の性能が極端に低下します。電池を保温しながら使用してください。寒冷地での撮影にはニッ
カド電池、ニッケル水素電池の使用をおすすめします。
Page 6
電池の入れ方
① 電源スイッチがOFFになっているのを確認して、電池室
カバーを図のように開きます。
② 単三形電池4本を電池室カバー内面の表示に従い、電池の
+−の向きを間違えないように入れます。
③ 電池室カバーを戻して閉じます。
④ 電源スイッチをONにすると充電が開始され、発光可能な
状態まで充電されるとレディライトが点灯します。
⑤ TESTボタンを押して、発光するか確認します。
オートパワーオフ機構について
このフラッシュにはオートパワーオフ機構がついています。電源スイッチがONの状態で、約90秒間フラッシュ
の操作がないと、電池の消耗を防ぐため自動的に電源がOFFになります。TESTボタンを押すか、カメラ本体の
シャッターボタンを半押しすると再度電源がONになります。ただし、ワイヤレスのスレーブモード、通常スレ
ーブモード、指定スレーブモードでは、オートパワーオフ機構は働きません。
エラー表示について
電池が消耗したり、電気信号に異常が生じた場合、液晶パネルの照射角表示が点滅することがあります。このエ
ラー表示が出た場合には、電源スイッチを一旦OFFにしてから、再度ONにしてください。それでも表示が消え
ない場合には電池を点検してください。
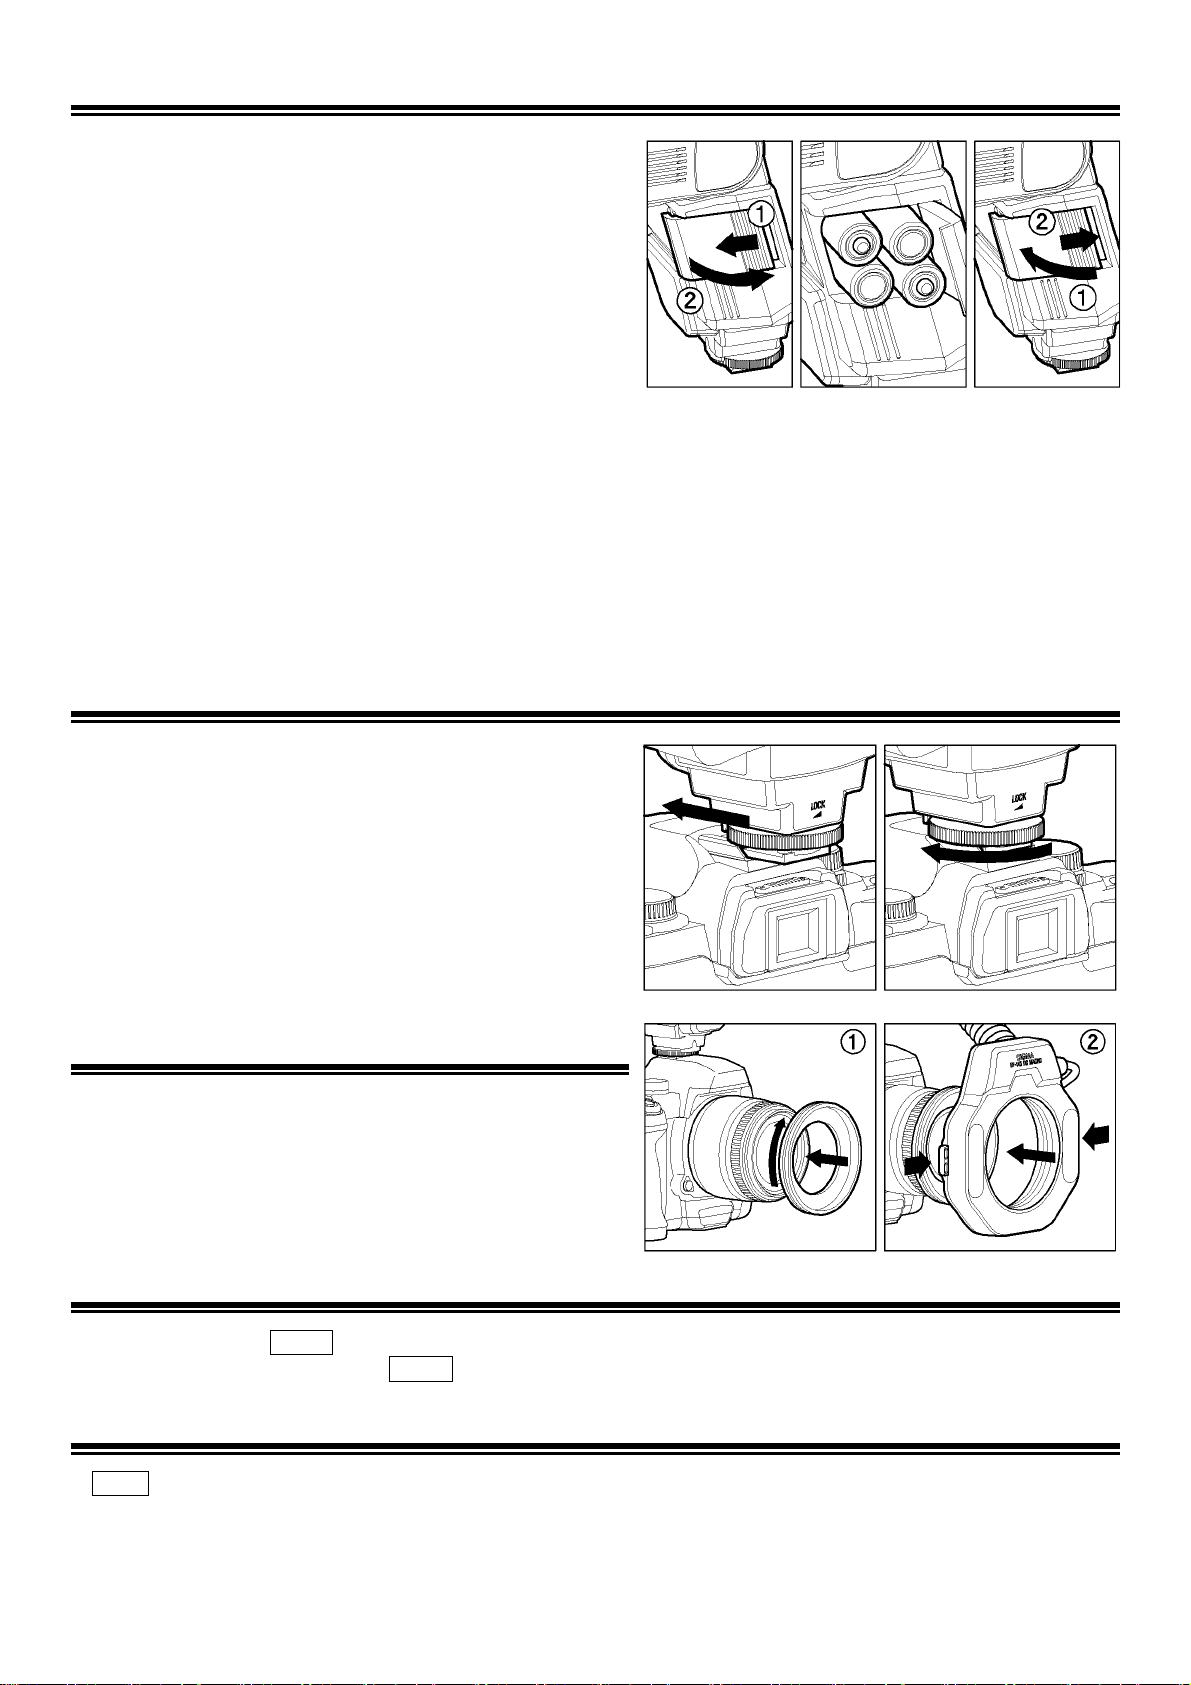
制御部の取り付け方
電源スイッチがOFFになっているのを確認してから、カメ
ラのホットシューに止まるまで差し込みます。シュー締付
けリングを回し固定してください。
カメラへの着脱はフラッシュの下部を持って行い、取付
けシューやカメラのホットシューに無理な力が加わらな
いように注意してください。
フラッシュ内蔵のカメラでは、必ず内蔵フラッシュを収納した状態で取り付けてください。
取り外す際には、シュー締め付けリングを
◄LOCK
と反対方向に最後まで回してからカメラから外してください。
発光部の取り付け方
① レンズのフィルター径にあったマクロフラッシュアダプ
ターをレンズ先端に取り付けます。
② 発光部左右の着脱ボタンを押しながらマクロフラッシュ
アダプターにはめ込み、指を離して固定します。
ۋ 着脱ボタンを押しながら発光部を回転させることで、位
置の調整ができます。
Page 7

液晶パネルの照明
LIGHTボタンを押すと、約8秒間液晶パネルが照明されます。照明中に再度 LIGHTボタンを押すと、その時点か
ら更に8秒間照明が継続します。
照明ランプ
LAMPボタンを押すと、発光部の照明ランプが20秒間点灯します。暗いときにオートフォーカスがうまく動作し
ない場合や、マニュアルでのピント合わせが難しい場合、照明ランプを点灯させるとピントあわせがしやすくな
ります。
ۋ シャッターボタンを押すと消灯します。
Page 8
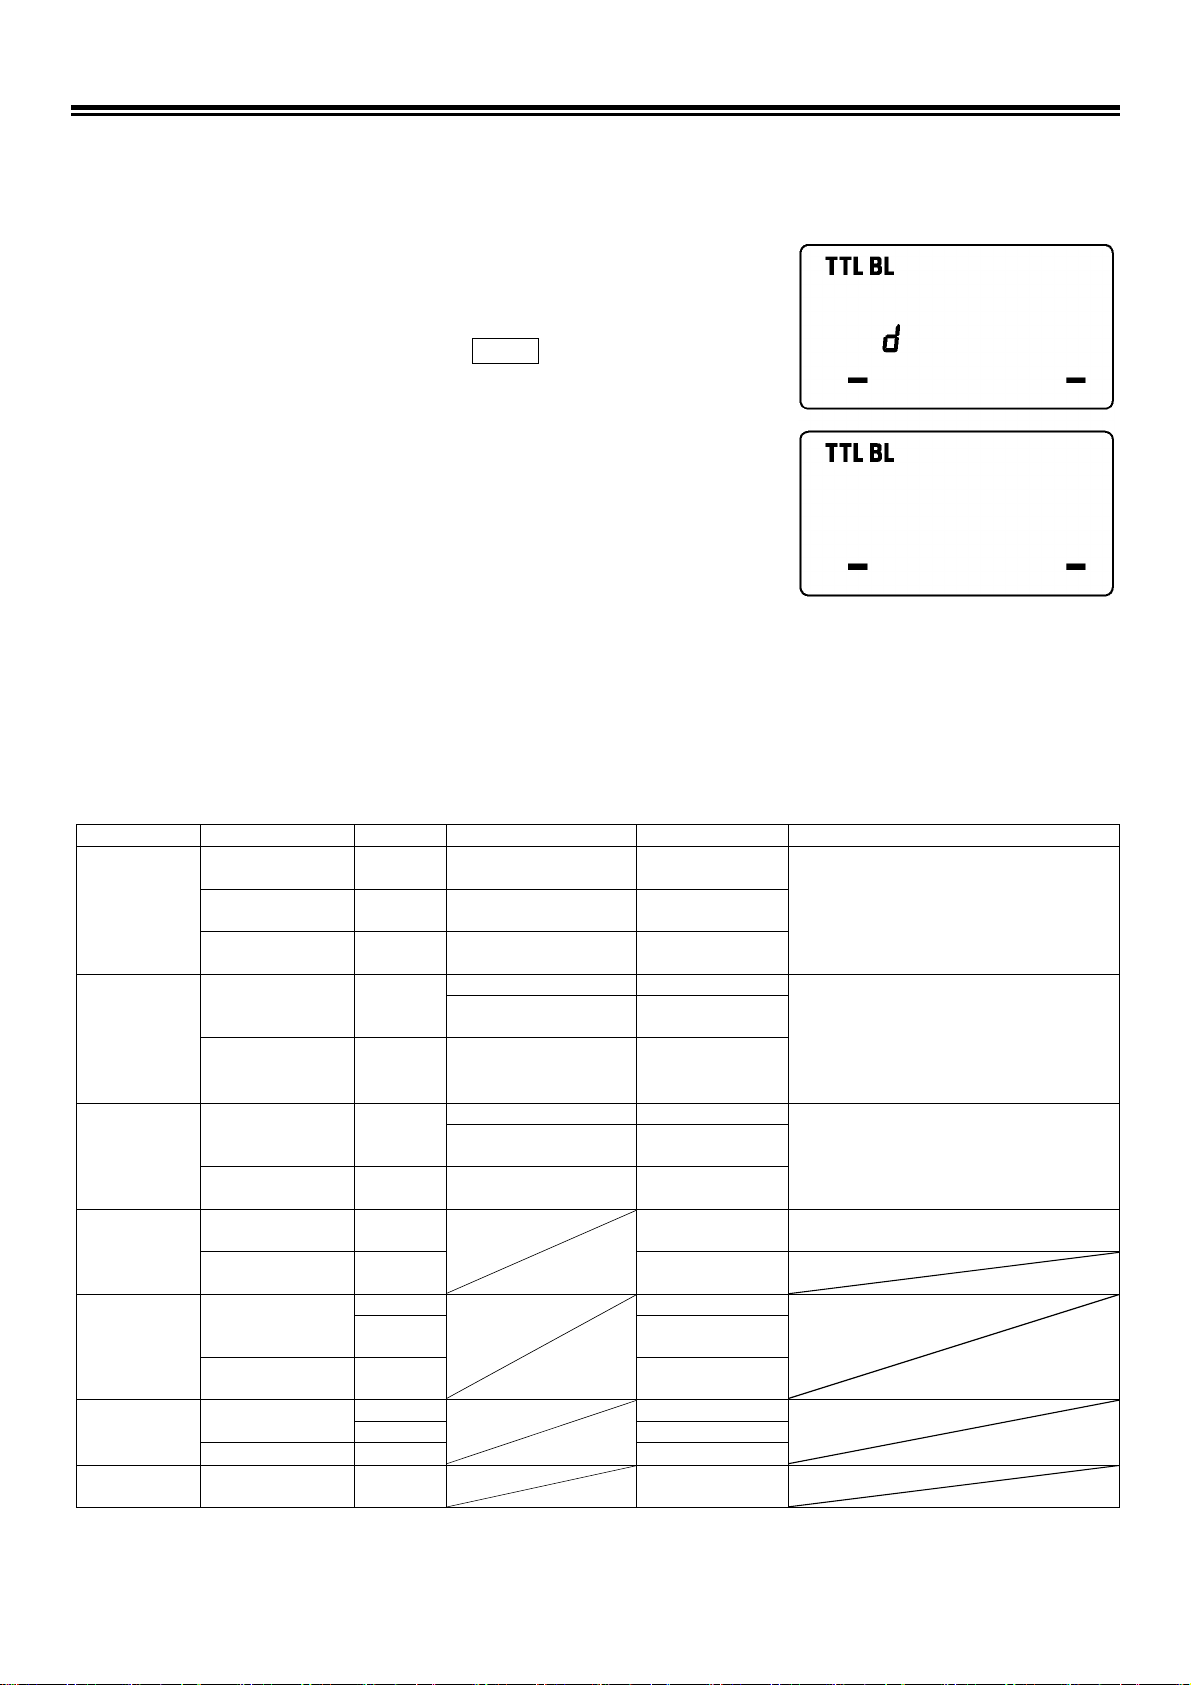
TTL撮影
TTLモードでは、被写体が適正露出になるように、フラッシュの発光量をカメラが制御します。
◆ カメラ、使用レンズ、撮影モード、測光モードの組み合わせにより、その機能が異なります。《表
A
》を参照
してください。
◆ F3シリーズ、FM10、New FM2、FE10ではTTL調光はできません。
①カメラの撮影モードをセットします。カメラによって撮影モードのセット
方法が異なりますので、ご使用のカメラの説明書をご覧ください。
②フラッシュの電源を入れます。
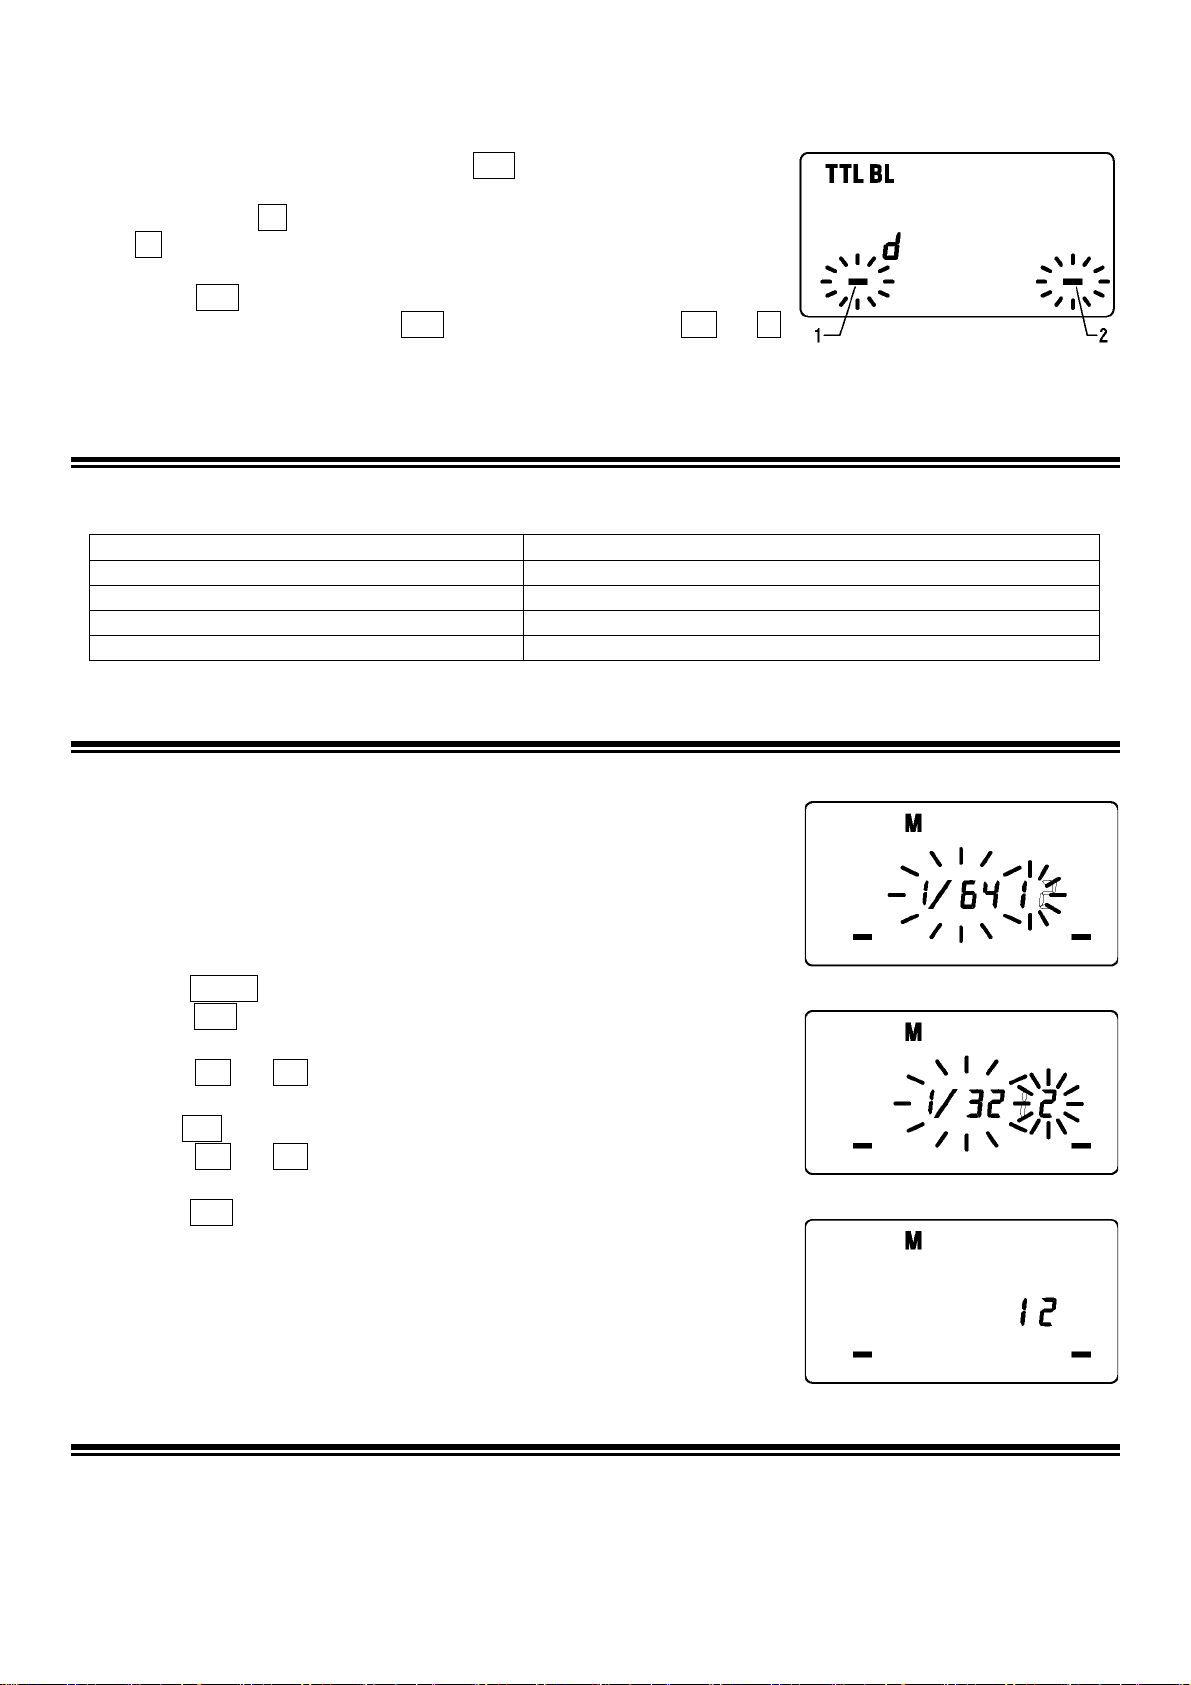
③MODEボタンでTTL BLまたはTTLを選択します。
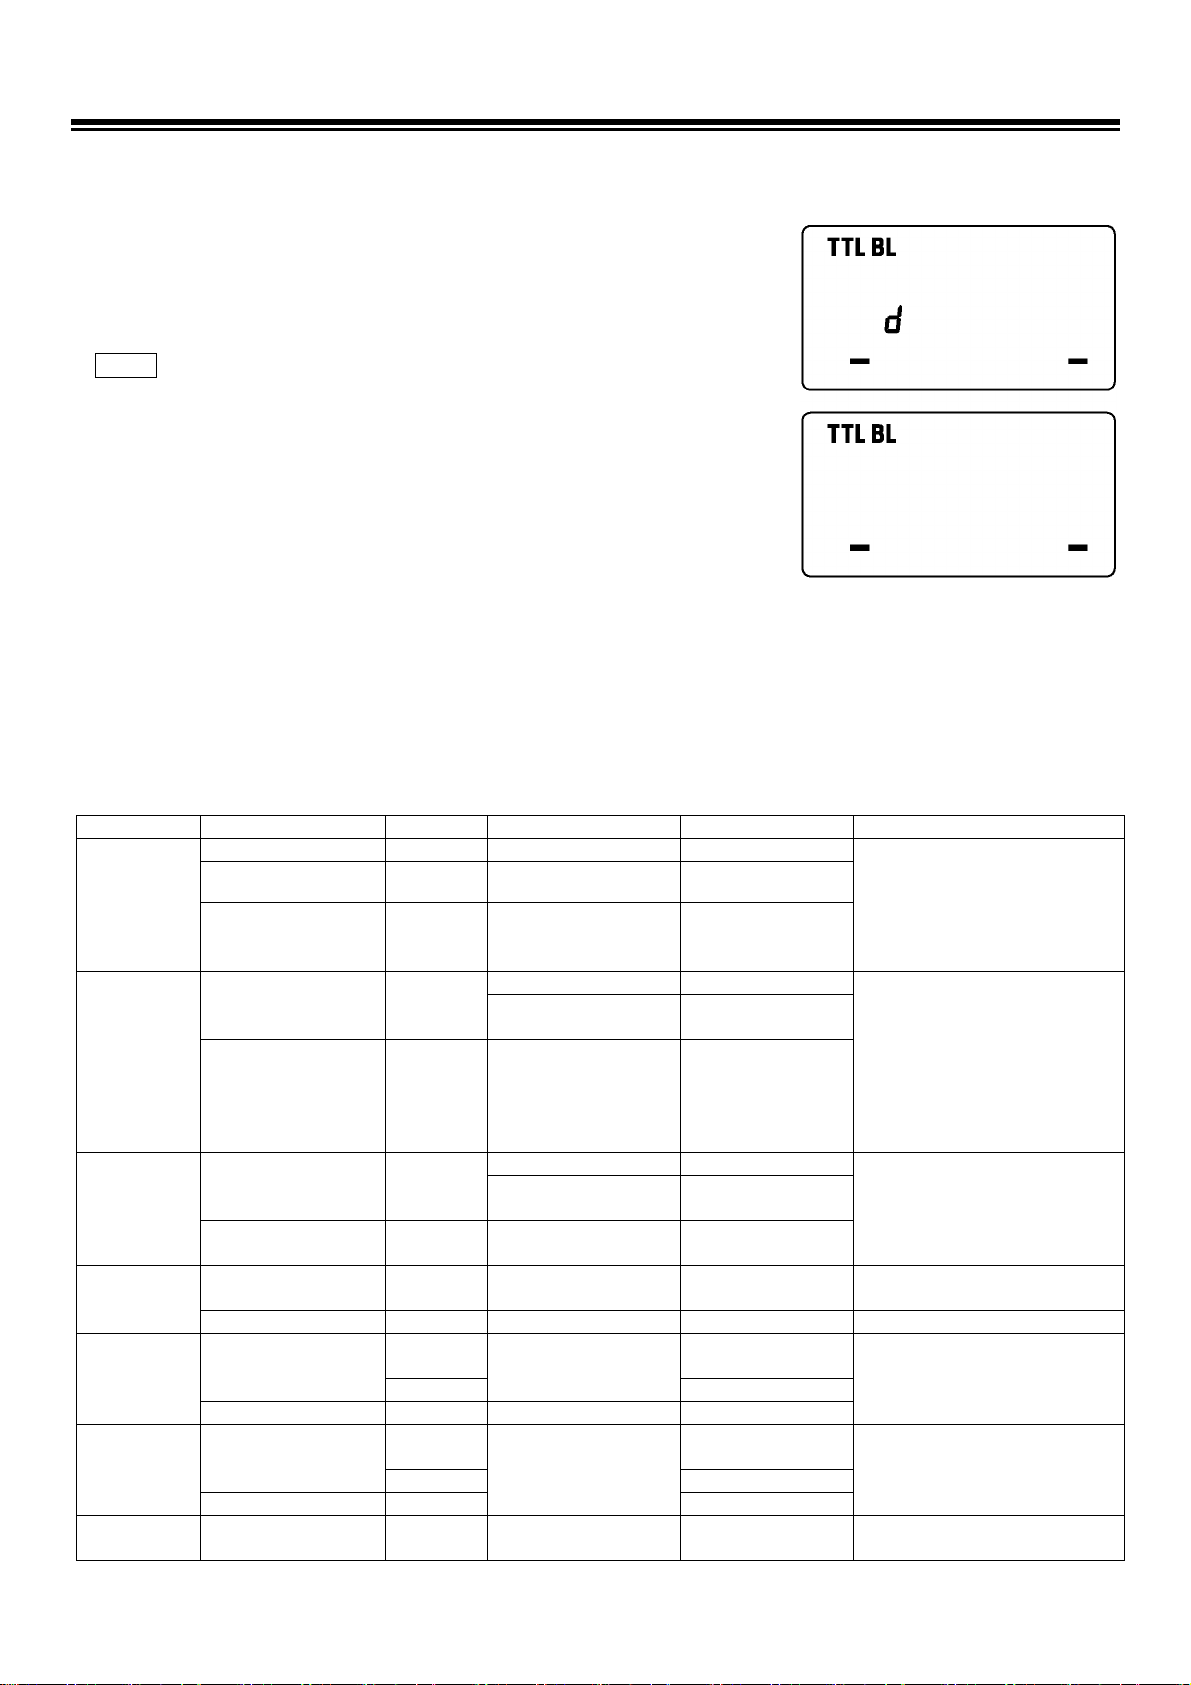
ۋデジタル一眼レフカメラの場合は、必ずTTL BLを選択してください。ご
使用のカメラによって、i-TTL、もしくはD-TTL調光方式で制御されます。
どちらの場合も液晶パネルに”d”の文字が表示されます。
ۋF6、F5、F4、F100、F90X/F90/F80シリーズ、F70D、F-801S、F-801、
U、プロネア600iの場合はTTL/BLまたはTTLを選択します。
上記以外のカメラの場合はTTLを選択します。
④被写体にピントを合わせます。
⑤ 充電が完了したのを確認してから、シャッターボタンを押して撮影します。
ۋ
光量が不足しているおそれがある場合は、発光直後にフラッシュの液晶パネルの
TTL/BL
または
TTL
表示が5秒間点滅しま
す。その時には、撮影距離、絞り値、調光範囲を再確認し、被写体に近づくなどして撮影し直してください。
ۋ充電が完了すると、ファインダー内にフラッシュマークが点灯します。充電が完了していないと、シャッター
はフラッシュ無しの状態で適正露出となるように、スローシャッターとなりますので、ご注意ください。
《表
A
》
カメラ
レンズ
撮影モード
測光モード
調光機能
備 考
Dタイプレンズ
全モード
全モード
3D-マルチBL調光
Dタイプ以外の
AFレンズ
全モード
全モード
マルチBL調光
F6 F5
F100
F90X
シ リ ー ズ゙
F90
シ リ ー ズ゙
F80
シ リ ー ズ゙
F70D
CPU
内蔵以外のレンズ
A/M
中央部重点測光
スポット測光
簡易TTL-BL調光
TTL調光に切換可能。
F5、F100、F80シリーズがスポ
ット測 光の場合は、常 に TTL 調
光。
マルチパターン測光
TTL-BL調光
CPU内蔵レンズ
全モード
中央部重点測光
スポット測光
簡易TTL-BL調光
F4
シ リ ー ズ
F-801S
F-801
U
プロネア
600i
CPU
内蔵以外のレンズ
A/M
中央部重点測光
スポット測光
簡易TTL-BL調光
TTL調光に切換可能。
F4シリーズのみ、F3用AFレンズ、
Ai-S、Ai、シリーズEレンズでも
TTL-BL調光可能。
F4がスポット測光の場合は、常
にTTL調光。
プロネア
600i
の撮影モードがMの場
合は、常に
TTL
調光。また、簡易
TTL-BL
調光は使用不可。
マルチパターン測光
TTL-BL調光
CPU内蔵レンズ
全モード
中央部重点測光
スポット測光
簡易TTL-BL調光
F-601
F-601M
CPU
内蔵以外のレンズ
A/M
中央部重点測光
スポット測光
簡易TTL-BL調光
F-601Mでスポット測光は使用不
可。
CPU内蔵レンズ
P/S
A/M
TTL-BL調光
撮影モードがMの場合は、 簡易
TTL-BL調光
F60D
F50D
F-401X
CPU
内蔵以外のレンズ
M
簡易TTL-BL調光
P
TTLプログラム
フラッシュ
CPU内蔵レンズ、
Ai-S、Ai、シリーズ
E、
F3AF用レンズ
A/M TTL調光
F-501
F-301
上記以外のレンズ
A/M TTL調光
P/S
TTLプログラム
フラッシュ
CPU内蔵レンズ
A/M
TTL調光
F-401S
F-401
CPU
内蔵以外のレンズ
M TTL調光
FA, FE2
FG, F3
CPU内蔵レンズ
CPU
内蔵以外のレンズ
A/M TTL調光
ۋ デジタル一眼レフカメラの場合、ご使用のレンズタイプや撮影モード等の組合わせによる機能の変化は、“F5、
Page 9

F100”等と同じグループとなります(ただし、TTL調光機能はすべてD-TTLもしくはi-TTL方式となります)。
Page 10
片側のみを発光させることによって、陰影のついた立体感のある写真を撮影することができます。
① TTL/ BL (TTL)モードの状態で、SELボタンを押して発光部表示を点滅
させます。
② +ボタンを押すと発光部1(左)、−ボタンを押すと発光部2(右)の
み発光します。(発光する側の発光部表示のみが点滅します。)
③ SELボタンを数回押して表示を点灯させます。
撮影後はSELボタンを押し、+或いは−ボタンを押して、発光部表示
を両方点灯させてください。
連続撮影時のご注意
連続発光による加熱での劣化を防止するため、以下の表に示す回数以下で止めて10分以上休ませてください。
モード
最大連続発光回数
TTL, M(1/1, 1/2)
15回
M(1/4, 1/8)
20回
M(1/16~1/32)
40回
MULTI
10サイクル
マニュアル発光撮影
任意の発光量をセットすることが可能です。
ۋ マニュアル発光による撮影は、非常に高度な技術を要します。オート
での撮影をお薦めします。マニュアル発光撮影を行う場合は、市販の
フラッシュメーターを使用するか、テスト撮影を行って露出を決定し
てください。
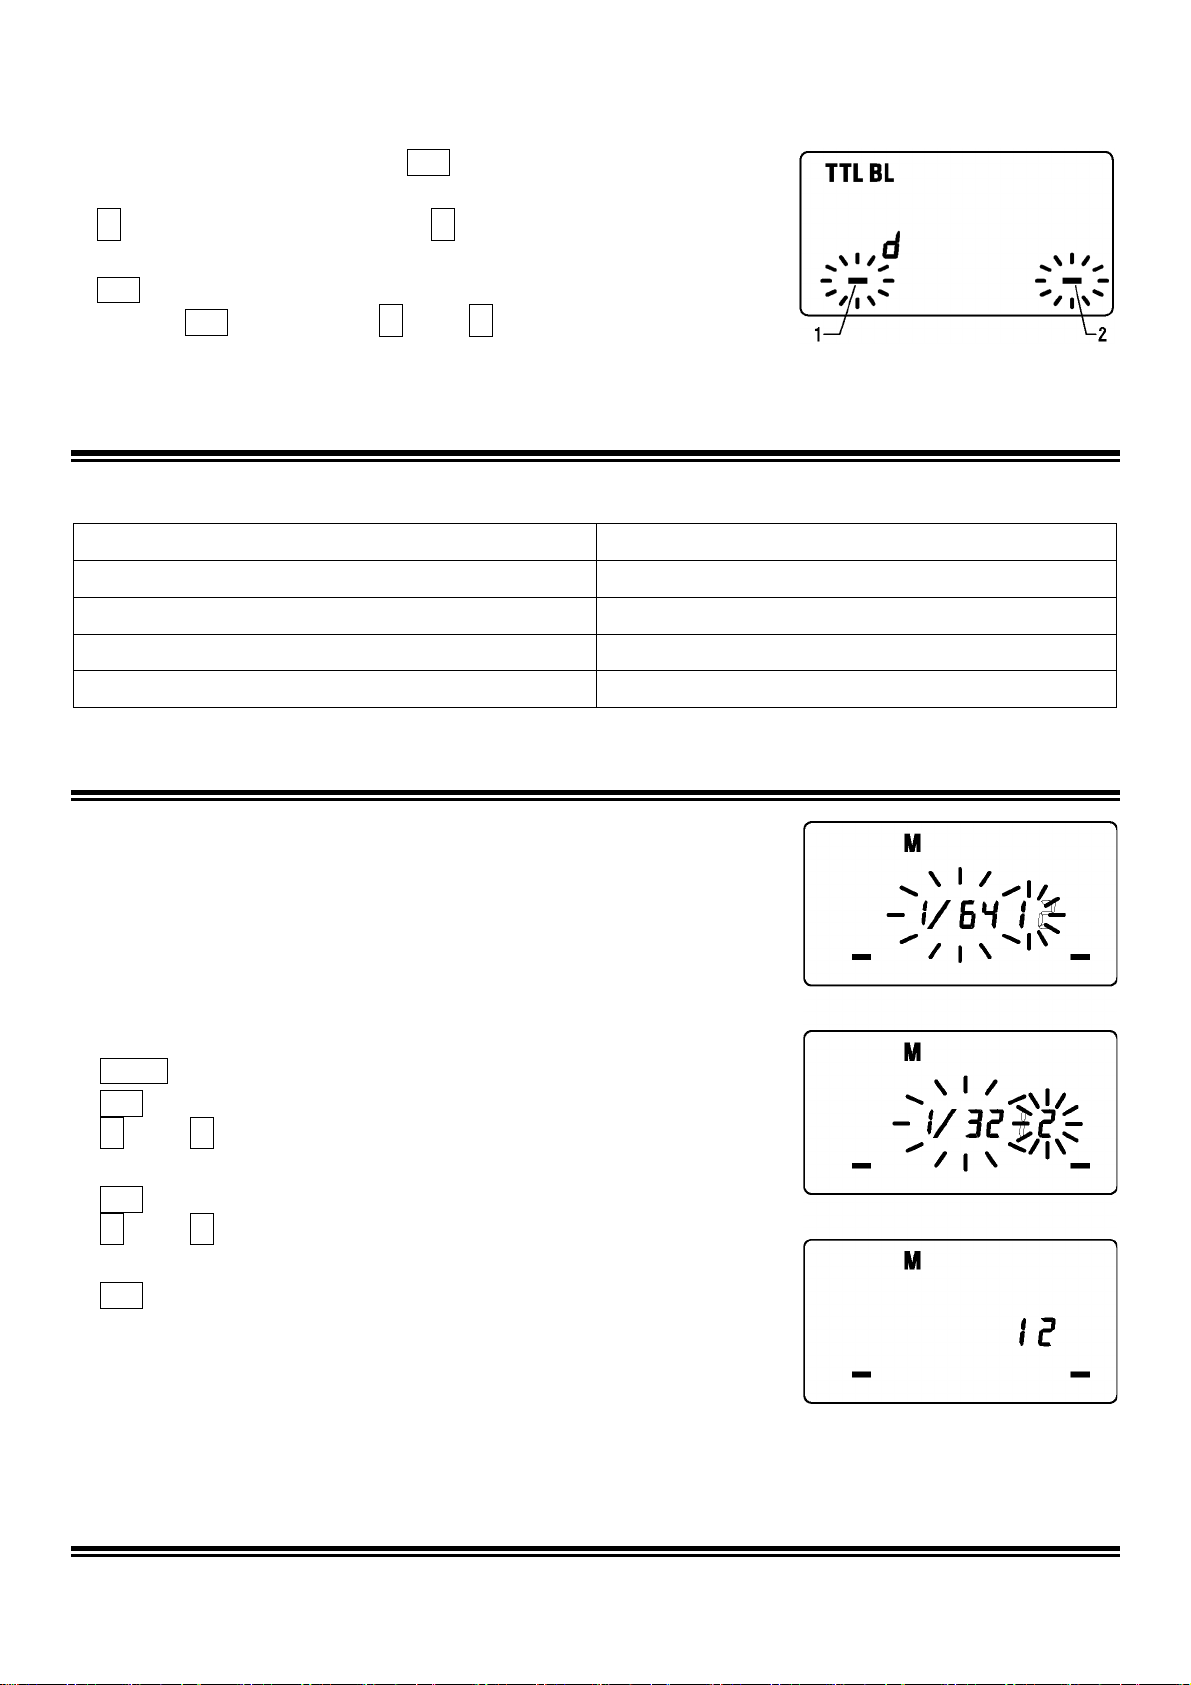
ۋ 左右の発光部、個々に発光量1/1~1/64、および発光なしを設定できます。
① カメラの撮影モードをMにセットします。
② MODEボタンで M を選択します。
③ SELボタンを押します。(発光部1(左)の発光量表示が点滅します)
④ +或いは−ボタンを押して発光部1(左)発光量を設定します。
(--を表示させると、発光部1(左)は発光しません。)
⑤ SELボタンを押します。(発光部2(右)の発光量表示が点滅します)
⑥ +或いは−ボタンを押して発光部2(右)発光量を設定します。
(--を表示させると、発光部2(右)は発光しません。)
⑦ SELボタンを押して表示を点灯させます。
ۋ 発光部1と2の発光量を同一にセットした場合は、発光量表示が点灯し
ます。異なる発光量をセットした場合は、発光量表示がでません。
ۋ ガイドナンバーは巻末の[表1]を参照してください。
ۋ マニュアル発光での適正露出は、次の計算式で割り出せます。
フラッシュの発光量(ガイドナンバー)/撮影距離(m)=絞り値(F)
FVロック撮影
FVロック撮影は、ファインダーの任意の部分に適正露光させるフラッシュ撮影です。
Page 11

ۋ D70、F6で使用できます。
ۋ フラッシュ側での設定はできません。設定方法は各カメラの使用説明書をご覧ください。
Page 12
露出補正
意図的にオーバーやアンダーに露出をずらして撮影したいときに使用します。
フラッシュの光量のみを補正する場合(調光補正)
ۋ デジタル一眼レフカメラ、F6、F5、F4シリーズ、F100、F90X/F90/F80
シリーズ/F70D、U、F-801S、F-801、F-601M、F-601、プロネア600i
でのみ可能です。
ۋ
カメラ側に調光補正機能を備えている場合は、フラッシュ側、カメラ側のいずれ
でも設定できます。また、併用することもできますが、その時の補正量はフラッ
シュ側とカメラ側の補正量を加算した値になります。
ۋ F-601M、F-601では、カメラ側で操作してください。
ۋ 補正ステップと範囲は、1/3段ステップで−3段~+1段です。
① MODEボタンでTTL BL (TTL)を選択します。
② SELボタンを押して を点滅させます。
③ +或いは−ボタンを押して補正量の設定をします。
④ SELボタンを数回押して表示を点灯させます。
◆解除するには、上記②からの手順で、補正量を+0に戻してください。
フラッシュの光量と背景露出の両方を補正する場合
F3シリーズ、FM10、New FM2、FE10以外のカメラで可能です。カメラ側の露出補正ボタンやダイヤルなどを
操作して行ってください。操作方法は、各カメラの使用説明書をご覧ください。
Mモード時の露出補正
Mモード時には、適正露出を求めたうえでカメラ側の絞り値を変えるか、フラッシュの光量を変えるかのいずれ
かの方法があります。
後幕シンクロ撮影
スローシンクロで、動いている被写体を撮影すると、通常は被写体の軌跡が動く被写体の前方に写し込まれます。
これは、シャッター幕が全開したときにフラッシュが発光するため、フラッシュ発光後~シャッター幕が閉じる
までの軌跡が写し込まれるためです(先幕シンクロ)。 後幕シンクロモードを使用すると、シャッター幕が全開
した後、閉じるときにフラッシュが発光するため、シャッター幕全開~フラッシュ発光までの軌跡が、動く被写
体の後方に写し込まれ、自然な動きが表現できます。
ۋ 後幕シンクロ対応カメラのみで使用できます。
ۋ フラッシュ側での設定はできません。設定方法は各カメラの使用説明書をご覧ください。
ۋ カメラ側で設定すると、フラッシュの液晶パネル上に
が表示されます。
モデリング発光
モデリング発光機能を使用すると、フラッシュ撮影による被写体の影の出かたや多灯発光によるライティングの
バランスを確認することができます。
① MODEボタンでモードを選択します。
② +或いは−ボタンを数回押して液晶パネルに を表示させます。
③ 充電完了を確認したら、TESTボタンを押して発光させます。
連続してモデリング発光する場合、加熱での劣化を防止するため、10回を限度としてください。10回発光さ
せた後は10分以上休ませてください。
Page 13

マルチ発光撮影
シャッターの開いている間にフラッシュを連続発光して、被写体の動きを1コマの画面に連続分解写真のように
写し込むことができます。背景が暗く、被写体が明るい方がより効果的です。
マルチ発光の発光周波数はボタンを押すたびに切り換わり、1~100Hzの範囲で設定できます。また、連続発光
可能回数は90回までとなっていますが、発光量と発光周波数によって変わります。最大連続発光回数は巻末の[表
3]を参照してください。
Page 14
① カメラの撮影モードをMにセットし、任意の絞り値を設定します。
② MODE ボタンで MULTI を選択します。
③ SEL ボタンを押して発光周波数表示を点滅させます。
④ +或いは−ボタンを押して発光周波数を設定します。
⑤ SELボタンを押して発光量表示を点滅させます。
⑥ +或いは−ボタンを押して発光量を設定します。
⑦ SELボタンを押して発光回数表示を点滅させます。
⑧ +或いは−ボタンを押して発光回数を設定します。
⑨ SELボタンを押して表示を点灯させます。
⑩ ピントを合わせ、充電完了を確認して撮影します。
(発光回数)(発光周波数) 以上のシャッター速度を設定してください。
ワイヤレス撮影
このフラッシュをメイン光源とし、EF-500 DG SUPER NA-iTTLを補助光源としたワイヤレスフラッシュ撮
影が可能です。
ۋD70、F6で使用できます。
ۋここではカメラに取り付けるフラッシュを「マスター」、カメラから離して置くフラッシュを「スレーブ」と
表記します。
ۋ画面内にフラッシュが入らないよう注意してください。
ۋマスターからスレーブまでの距離は約5m以内にセットしてください。
ۋスレーブ側の設定は、スレーブ側の使用説明書(ワイヤレス撮影)の項目を参照してセットしてください。
䝳䜨䝨 䝰䜽i-TTL⮤ິㄢ ක᧔ᙫ
ワイヤレスi-TTL自動調光撮影では、カメラが自動的に適正露出になるように制御します。
スレーブ側の設定
①スレーブ側の使用説明書に従い、グループ番号を3にセットします。
②スレーブを決めておいた位置にセットします。
マスター側の設定
③MODEボタンで を選択します。
④マスターとスレーブの充電完了を確認し撮影ます。
ۋワイヤレスi-TTL自動調光撮影は、、FVロック撮影、後幕シンクロ撮影が併用できます。ワイヤレス撮影の設定
後、各項目に準じて操作してください。スレーブ側の操作は必要ありません。
䝳䜨䝨 䝰䜽䝢 䝏䝩䜦 䝯Ⓠක᧔ᙫ
マスターで発光量を設定するだけでワイヤレスマニュアル発光撮影ができます。露出は市販のフラッシュ
メーターで決定してください。
スレーブ側の設定
①スレーブ側の使用説明書に従い、グループ番号を3にセットします。
②スレーブを決めておいた位置にセットします。
マスター側の設定
③MODEボタンで を選択します。
④ SELボタンを2秒以上押し続け、発光モード表示を点滅させます。
Page 15

⑤ MODEボタンで Mを選択します。
⑥ SELボタンを押して発光モード表示を点灯させます。
⑦ もう一度SELボタンを押し、後はマニュアル発光撮影の手順で、それぞれの発光量を設定してください。
Page 16

モードを変更すると設定が解除されます。
スレーブ側のグループ番号をに1セットすると発光部1(左)、グループ番号を2にセットすると発光部2(右)
の設定に基づき発光します。
䝳䜨䝨 䝰䜽䝢 䝯䝅Ⓠ ක᧔ᙫ
スレーブ側の設定
① スレーブ側の使用説明書に従い、グループ番号を3にセットします。
② スレーブを決めておいた位置にセットします。
マスター側の設定
③MODEボタンで を選択します。
④ SELボタンを2秒以上押し続け、発光モード表示を点滅させます。
⑤ MODEボタンで MULTIを選択します。
⑥ SELボタンを押して発光モード表示を点灯させます。
⑦ もう一度SELボタンを押し、後はマルチフラッシュ発光撮影の手順で、そ
れぞれの発光量を設定してください。
モードを変更すると設定が解除されます。
䝅䝧 䝷䝑䝯スᏽ
他の人がワイヤレス撮影をしていると、その信号光によりお使いのフラッシュが発光してしまうことがありま
す。このような場合には、他の人とは違うチャンネルを設定します。
① ワイヤレスの各モードの状態でSEL ボタンを数回押してチャンネル表示
を点滅させます。
② +或いは−ボタンを押してチャンネル番号を設定します。(C1~C4のい
ずれかにセットします。)
③ SELボタンを押して表示を点灯させます。
④ スレーブ側のフラッシュもスレーブ側の使用説明書に従い、マスター側
と同じチャンネル番号をセットします。
主要諸元
ガイドナンバー:14(ISO 100/m、2灯フル発光時)
使用電源:単三形アルカリ乾電池4本又は、単三形ニッカド電池4本、単三形ニッケル水素電池4本
充電時間:約4秒(アルカリ乾電池使用)(常温25℃時)、
約3秒(ニッカド電池又は、ニッケル水素電池使用)(常温25℃時)
照射角度:垂直・水平 80度
オートパワーオフ/オートパワーオン:内蔵
質 量:430g(電池別)
寸 法:(幅高長)制御部 76.7mm136.2mm82.4mm
発光部 126.6mm128.8mm30.5mm
品質保証とアフターサービスについて
保証の詳細とアフターサービスに関しては、別紙の≪保証規定≫をご参照ください。
Page 17
ENGLISH
Thank you for purchasing the Sigma Electronic FlashMacro EM-140 DG. The advanced features of this
flashgun allow you to enjoy AF Macro photography. Depending on the camera model, functions and
operation may vary. Please read this instruction booklet carefully. To add to your enjoyment of
photography, the flash has a variety of features. To make the most of all these features, and to get the
maximum performance and enjoyment from your flash, please read this instruction booklet, together with
your camera’s instruction manual, before using the flash, and keep it handy for future reference. (This
Flashgun is exclusive to Nikon SLR cameras)
PRECAUTIONS
In order to avoid causing any damage or injury, please read this instruction manual very carefully,
paying attention to the cautionary signs below, before using the flash.
Please take special note of the two cautionary signs below.
Warning !!
Caution!!
Symbol denotes the important points, where warning and caution are required.
Symbol contains information regarding the actions that must be avoided.
Using the product disregarding this warning sign might cause serious injury
or other dangerous results.
Using the product disregarding this caution sign might cause injury or
damage.
Warning !!
This flash contains high voltage circuits. To avoid electric shock or burns, do not attempt to
disassemble the flash. If the outside shell of the unit is broken or cracked, do not touch the
mechanism inside.
Do not fire the flash close to eyes. Otherwise the bright light could damage the eyes. Keep at least
1m/3feet distance between face and the flash unit, when taking a picture with flash.
Do not touch the synchro terminal of your camera when the flash is attached to hot shoe. High
voltage circuitry could cause electric shock.
Never use your camera in an environment where flammable, burnable, gas, liquids or chemicals,
etc, exist. Otherwise, it might cause fire or explosion.
Caution !!
Do not use this flash unit on any camera other than the Nikon NA series cameras; otherwise the
flash may damage the circuitry of these cameras.
This flash unit is not waterproof. When using the flash and camera in the rain or snow or near water,
keep it from getting wet. It is often impractical to repair internal electrical components damaged by
water.
Never subject the flash and camera to shock, dust, high temperature or humidity. These factors
might cause fire or malfunctioning of your equipment.
When the flash is subjected to sudden temperature change, as when the flash unit is brought from a
cold exterior to warm interior, condensation might form inside. In such a case, place your equipment
in a sealed plastic bag before such a change, and do not use the flash unit, until it reaches room
temperature.
Do not store your flash in a drawer or cupboard etc., containing naphthalene, camphor or other
insecticides. These chemicals will have negative effects on the flash unit.
Do not use a thinner, Benzene or other cleaning agents to remove dirt or finger prints from the
component. Clean with a soft, moistened cloth.
For extended storage, choose a cool dry place, preferably with good ventilation. It is recommended
that the flash be charged and fired several times a month, to maintain proper capacitor functioning.
Page 18
DESCRIPTION OF THE PARTS
Flash Unit
1.Left Flashtube 2.Right Flashtube 3. Auxiliary Light 4. Release Tab 5.MacroFlash Adapter
Controller Unit
6.LCD Panel 7.Battery Cover 8.Shoe Ring 9.Shoe 10.MODE Button 11.SEL SELECT Button
12. + Increment Button 13. - Decrement Button 14.LAMP Button 15.TEST Button
16.LIGHT Button 17.Ready Light 18.Power Switch
LENS USABILITY
Although this Flash is designed specifically for Macro lenses (MACRO 50mm F2.8 EX DG, MACRO
105mm F2.8 EX DG, etc.) it is also possible to use it with other lens types, however please pay attention to
the following points.
Front part or other parts of some lenses rotate while focusing, and also attaching the ring flash to such
lenses would affect focusing mechanism of your camera, possibly resulting in malfunction. Please use
Manual Focus only with such lenses.
Ø55mm, and Ø58mm filter MacroFlash Adapters are bundled with your flashgun. If you want to attach
your flashgun to a lens which has a different filter size then please purchase separately a MacroFlash
Adapter.(Only Ø52mm, Ø62mm, Ø72mm, Ø77mm macroflash adapters are available).
Depending on the lens’ focal length or the distance to subject or another reason, it is possible that your
image might be affected by vignetting. Please take some test shoots first to be sure that your setting is
not causing vignetting.
CAMERA MODELS AND FUNCTIONS
This flash can be used with cameras, which are given below.
D2 Series, D70, D1 Series, D100, F6, F5, F4 Series, F3 Series (*), F100, F90X/N90S Series,
F90/N90 Series, F80 Series, F70D/N70, U/F65/N65, F60D/N60, F50D/N50, F-801S/N8008S,
F-801/N8008, F601M, F-601/N6006, F501/N2020, F401X, F401S/N4004S, F-401/N4004, F-301,
N2000, FA, FE10, FE-2, FG, FM10, New FM2, Pronea 600i
(*) It is necessary to use adapter for connection.
This instruction book is used for the following lens types. (Please check your lens.)
With Built-in CPU Nikon Lenses
D Type Lenses, G Type Lenses, IX Nikor Lenses, Except D type AF
lens (does not include F3AF), Ai-P type lens
Without Built-in CPU Nikon Lenses
Ai-S, Ai, Series E lens
ABOUT THE BATTERY
This flash unit uses four “AA” type Alkaline dry cell batteries or Ni-Cad, Ni-MH, rechargeable batteries.
Manganese batteries can also be used but as they have a shorter life than Alkaline batteries, we do not
recommend using them. Please replace batteries if it takes more than 30seconds to light the Ready Lamp.
ۋ To assure proper electrical contact, clean the battery terminals before installing the batteries
ۋ NiCad batteries do not have standardized contacts. If you use NiCad batteries, please confirm that the
battery contacts touch the battery compartment properly.
ۋ To prevent battery explosion, leakage or overheating, use four new AA batteries of the same type and
brand. Do not mix the type or new and used batteries.
ۋ Do not disassemble or short-circuit batteries, or expose them fire or water; they may explode. Also, do
not recharge the batteries other than Ni-Cd rechargeable batteries.
ۋ When the flash will not be used for an extended period of time, remove the batteries from the flash, to
avoid the possibility of damage from leakage.
ۋ
Battery performance decreases at low temperatures. Keep batteries insulated when using the flash in cold weather.
ۋ As with any flash, it is recommended you carry spare batteries when on a long trip, or when
photographing outdoors in cold weather.
Page 19
BATTERY LOADING
1.
Be sure to set the Power Switch to the off position then
slide, the battery cover in the direction of the arrow to open.
2. Insert four AA size batteries into the battery chamber. Be
sure the + and – ends of the batteries are aligned
according to the diagram in the chamber.
3. Close the cover.
4. Slide the Power Switch to the ON position. After few
seconds, the Ready Lamp will light, indicating that the
flash unit can be fired.
5. Please press the “Test Button” to be sure that the flash is
working properly.
AUTO POWER OFF
To conserve battery power, the flash unit automatically turns itself off when the flash is not used within
approximately 90seconds. To turn the flash on again, depress the “TEST” button or the camera shutter button,
halfway. Please note that, “Auto Power Off” mechanism does not work with wireless TTL flash mode, normal
slave flash, and designated slave flash modes.
ERROR INDICATION
If the battery power is not sufficient or there is electric information error between the camera and flash unit, the
“
Flash Coverage Angle” will blink on the LCD panel. When this occurs, turn the power switch off and on.
If it still blinks, after this procedure, check the battery power.
ATTACHING THE CONTROLLER UNIT
Be sure turn off the Power Switch. Then insert the Shoe
Base into the hot shoe on the camera and turn the Shoe
Locking Ring until it is tight.
ۋ When you attach or remove the flash, grasp the
bottom of the flash to prevent damage to the shoe foot
and camera’s hot shoe.
ۋ If the camera’s built-in flash is set in up position,
please close it before you attach the flash unit.
ۋ To remove the flash, rotate the shoe-locking ring in
the opposite direction of ◄LOCK mark, until it stops.
ATTACHING THE FLASH UNIT
1. Attach the MacroFlash adapter to the lens’ filter tread.
2. While pressing the left and right release tabs on both
sides of the holder, place the flash unit over the adapter,
then release both tabs.
You can adjust the position by rotating the flash unit.
Press the release tab when you detach the unit from the lens.
LCD PANEL ILLUMINATION
When you press the LIGHT button, the LCD panel will illuminate for about 8 seconds. The illumination stays on
longer than 8sec, if you press the LIGHT button once again.
AUXILIARY LIGHT
If LAMP button on the Flash Units is pushed, the auxiliary light will emit for 20 seconds. In a dark place, it will
be easy to focus by using the auxiliary light. This fuction is very convenient when composing pictures where
auto focus does not operate well or where focus adjusment in manual is difficult.
ۋ If the shutter button is depressed it will stop working.
Page 20
TTL MODE
TTL mode can provide correct exposure for subject, and will control the amount of flash.
ۋ Please refer to <<CHART A>>, which shows the combinations of camera and lens types, exposure
mode, and flash modes.
ۋ TTL function does not work, in the case of Cameras F3 series, FM10, New FM2, FE10.
1. Set the exposure mode of the camera. (However, depending on the
camera, exposure setting may vary). Please refer to Camera’s
Instruction manual.
2. Slide the Flash’s power switch to the ON position.
3. Select TTL/BL or TTL by pressing the MODE button.
ۋ
When you use Digital SLR Camera, please do not fail to select TTL/BL.
CLS compatible models are controlled by i-TTL exposure system. CLS
incompatible models are controlled by D-TTL exposure system. In both
cases, the character " d " (digital) will be displayed on the LCD panel.
ۋ In the case of cameras; F6, F5, F4 series, F100, F90X/F90/F80
(N90S/N90/N80) series, F70D/N70, F810S/N8008S, F801/ N8008S
and Pronea 600i. TTL/BL or TTL can be selected. However, Nikon
cameras, other than those on the above list can select only TTL.
4. Focus on the subject.
5. Confirm the Ready Light and press the shutter release button.
ۋ When the camera does not receive the appropriate exposure for the subject, the TTL/BL or TTL mark on
the LCD panel will appear for 5 seconds after shooting, which shows that the flash power is not enough
for this situation. Please re-take a closer distance or use a wider aperture.
ۋ When the flash is fully charged, the ready light in the camera’s viewfinder will appear. If it does not
appear, shutter of the camera may operate at a slow shutter speed without triggering the flash.
<<CHART A>>
Camera
Lens Type
Exp. Mode
Metering
TTL System
Note
D Type
All Modes
All Modes
3-D Multi-Sensor
BL
AF lens other than
D type
All Modes
All Modes
Multi-Sensor BL
F6, F5
F100
F90X/N90ser.
F80/N80ser.
F70D/N70
Without Built in CPU
A/M
Modes
Center-weighted,
Spot Metering
Center Weighted /
Spot Fill-Flash
Can switch to TTL Mode. With F5, F100,
F80, series Cameras spot metering
system is always TTL.
Matrix Pattern
TTL BL
With Built-in CPU
All Modes
Center-weighted,
Spot Metering
Center Weighted /
Spot Fill-Flash
F4 Series
F-801S/N8008S
F-801/N8008
F65/N65
Pronea 600i
Without
Built-in CPU
A/M
Modes
Center-weighted,
Spot Metering
Center
Weighted/Spot
Fill-Flash
Can switch to TTL Mode. TTL BL can
work with only F4 series, AF F3, Ai-S,
Ai, Series E lens. Spot metering system of
F4 is always TTL. Pronea 600i will be
TTL, when exposure mode is “M”.
Center Weighted BL cannot work.
Matrix Pattern
TTL BL
With Built-in CPU
All Modes
Center-weighted,
Spot Metering
Center Weighted /
Spot Fill-Flash
F601/N6006
F-601M
Without
Built-in CPU
A/M
Modes
Center-weighted,
Spot Metering
Center Weighted /
Spot Fill-Flash
Spot Metering cannot use with
F-601M
With Built-in CPU
P/S
A/M
TTL BL
If exposure mode is “M”, it will be Center
Weighted/Spot Fill-Flash
F60D/N60
F50D/N50
F-401X/4004S
Without
Built-in CPU
M
Center Weighted /
Spot Fill-Flash
P
TTL Programmed
Built-in CPU lens
,Ai-S, Ai, Series E,
AF F3 Lens
A/M
TTL
F501/N2020
F301/N2000
Except above
lenses
A/M TTL
P/S
TTL Programmed
With Built-in CPU
A/M
TTL
F401S/N4004S
F401/N4004
Without Built-in CPU
M TTL
FA, FE2
FG, F3
With Built-in CPU;
Without Built-in CPU
A/M TTL
ۋ
When you use Digital SLR cameras, functions will vary depending on the lens type and combinations of exposure
modes, same as F5 and F100 group. (However, all TTL exposure functions will be the D-TTL (i-TTL) system).
Page 21
It is possible to give the three dimensional effect to your pictures by firing only one side of the
flash.
1. In the TTL/BL(TTL) mode, press the SEL button to make the Flash
Unit display blink.
2. By pressing the
+
button, the left flashtube will fire, and by pressing
the
-
button, the right flashtube will fire. (Only the firing side will
blink on the flash unit display)
3. Press the SEL button several times to stop the blinking.
After shooting please press SEL button and then the
+ or -
button. By doing this flash unit will be set to default mode, display will
show both sides.
LIMITS OF CONTINUOUS SHOOTING
To prevent overheating of the flash’s circuitry, please do not use your Flash unit for at least 10minutes after
using the number of flash exposures, shown in the below table have been made in quick succession.
Mode
Number of Flash Exposures
TTL, M(1/1,1/2)
15 Continuous Flash Shots
M(1/4, 1/8)
20 Continuous Flash Shots
M(1/16-1/32)
40 Continuous Flash Shots
Multi
10 Cycle
MANUAL FLASH OPERATION
Manual flash provides adjustment of desired flash intensity (flash output level).
The shooting in Manual Mode requires a very advanced technique. We
recommend you use the Auto mode. When using Manual Flash
photography, first take some test shots. It will be beneficial to use a
flash meter device for determining the exposure.
Flash intensity of left and right tubes can be set between 1/1~1/64. It is
also possible to set without firing one of them.
1. Set the camera’s exposure mode to M.
2. Press the MODE button on the flash unit to select M.
3. Press the SEL button. (The flash intensity display of the left flashtube
blinks).
4. Press the + or - button to set the left flashtube output level.
(If “ -- “ is displayed, the left flashtube will not fire).
5.
Press the SEL button. (The flash intensity display of right flashtube will blink).
6. Press the + or - button to set the right flashtube output level.
(If “ -- “ is displayed, the right flashtube will not fire).
7. Press the SEL button to stop the indicator blinking.
If the flash output level values of both tubes are the same, the flash
output level will be displayed. When the different flash intensity is set,
the flash output level will not be displayed on the LCD.
Regarding Guide Number, please refer to the [Table.1] on the last page.
You can calculate the correct exposure by using the following formula:
Guide Number “GN” / Flash to Subject Distance = F-stop
FV LOCK (D70,F6 only)
“FV” lock mode allows you to choose exposure for the part of the viewfinder, and lock it in, before taking
the picture.
ۋ You cannot set this function on the flashgun directly. For details please refer to your camera’s instruction
manual.
Page 22

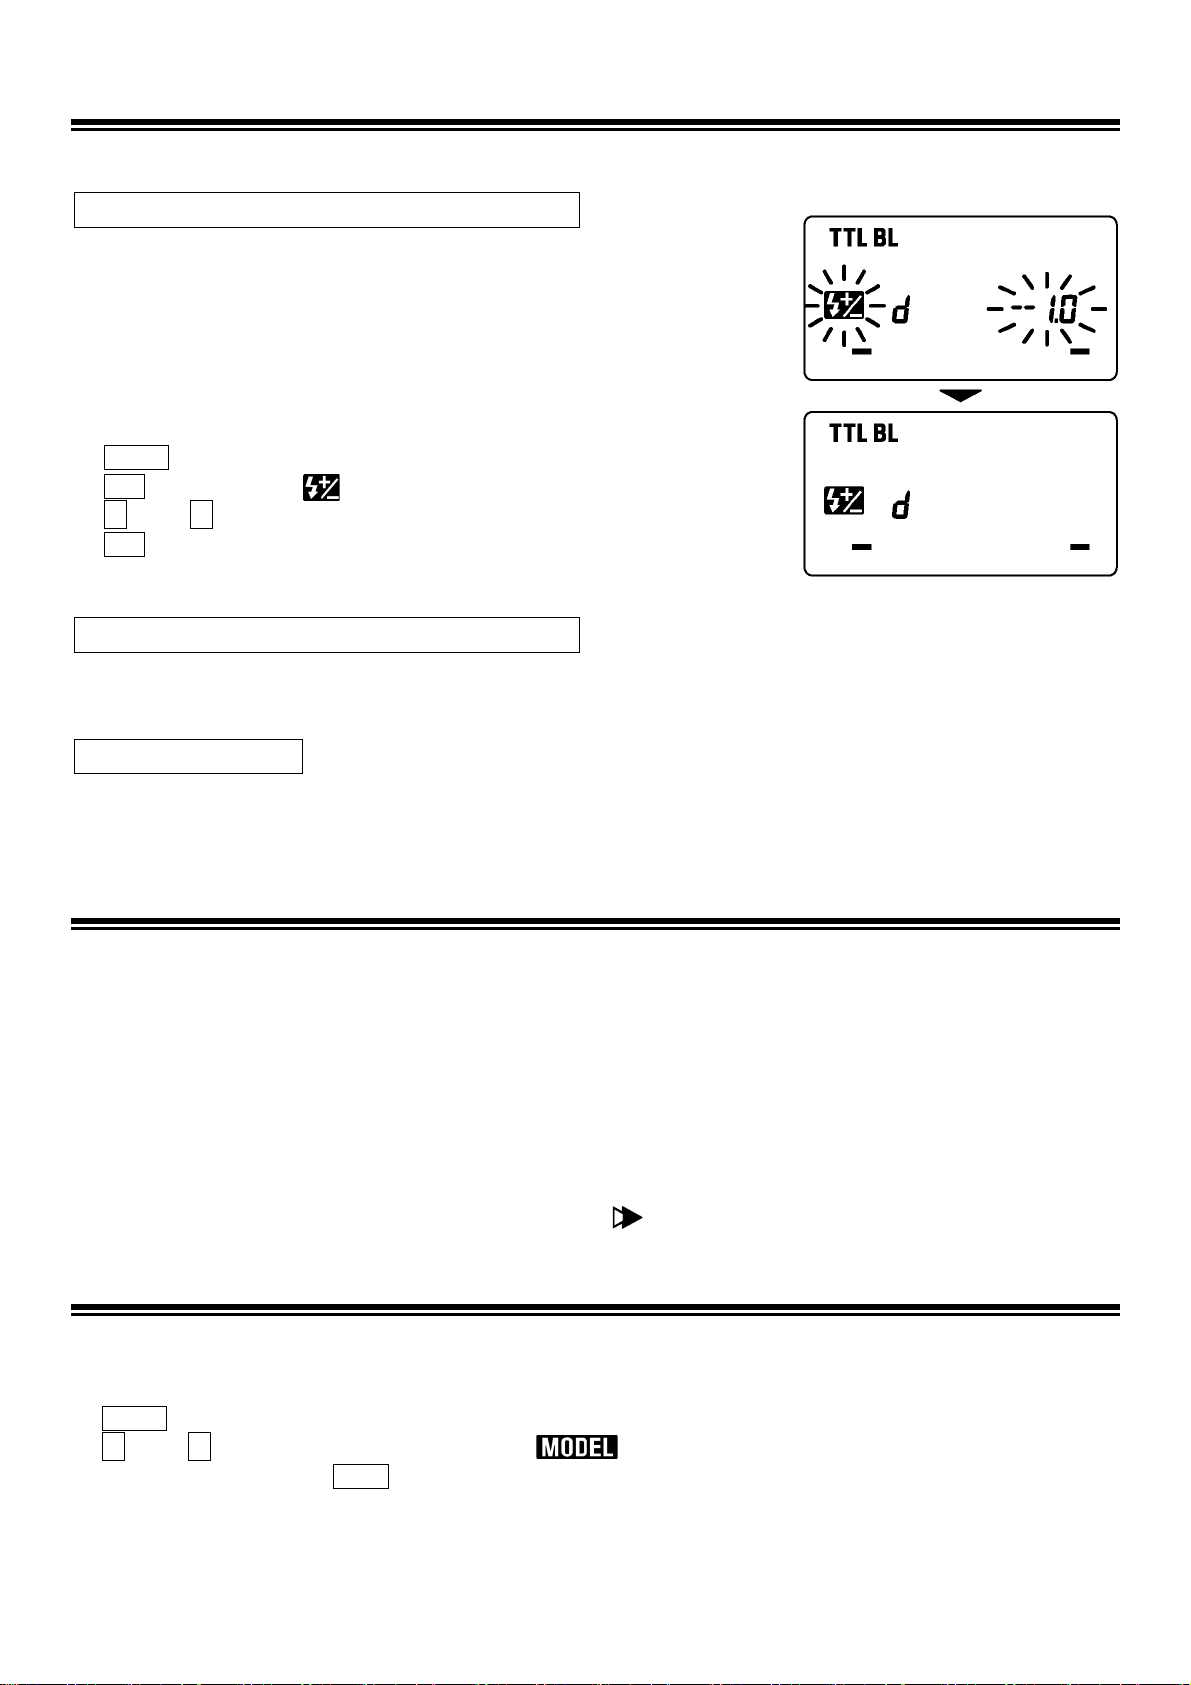
EXPOSURE COMPENSATION
You can compensate the exposure by changing the flash power level.
Intentional exposure compensation of the EM-140 DG NA-iTTL flash’s power level
ۋ
Dedicated exclusively to Digital SLR Cameras, F6, F5, F4 series, F100,
F90/N90, F90X/N90S, F80/F80 series, F70D, U/F65/N65, F801S/N800S,
F801/N8008, F601M, F601/N6006 and Pronea 600i only.
ۋ
Cameras with EV compensation capability allow you to make exposure
compensation on either the EM-140 DG NA-iTTL or the camera (or both).
If you use both controls, exposure is modified by the sum total of both
exposure compensation values, and will affect the background exposure.
ۋ If your camera is an F601 / N6006 series camera, set the exposure
compensation by operating the camera’s synchronization mode.
ۋ It can be set at 1/3 stop increments from +1.0 stops to –3.0 stops.
1. Press the MODE button to select the TTL/BL (TTL) mode.
2.
Press the SEL button to make the compensation amount indicator
blink.
3. Press the
+
button and
-
button to set the compensation amount.
4. Press the SEL button to make the compensation amount indicator
stop blinking.
Intentional exposure compensation of the EM-140 DG NA-iTTL flash’s power level and background
◆This function can be used except F3 series, FM10, New FM2 and FE10.
Use your camera’s exposure compensation control button or dial to make exposure compensation to both
foreground and background. (Please refer to your camera’s instruction)
Exposure compensation on the M mode
On the M mode, you can change the aperture value on the camera, or change the flash power level, after
setting the exposure compensation.
REAR-CURTAIN SYNCHRONIZATION
When you photograph a moving subject with slow synchronization, usually the furrow of the subject will be
exposed in front of the subject. The ordinary flash light will fire when the first shutter curtain is fully opened, thus
the subject will be exposed from the time flash is fired to the time the shutter is closed (This is front curtain
synchronization). When you use rear curtain synchronization, the flash will fire just before the rear curtain begins
to close, and the subject will be exposed by ambient light from the time the shutter opens until the flash fires. As
a result, the furrow of the subject will therefore be recorded behind the subject, creating a more natural effect.
ۋ It can be used with cameras providing rear-curtain sync. only.
ۋ
You cannot set this function on the flashgun directly. For details please refer to your camera’s instruction manual.
ۋ
The LCD panel on the flash will indicate
mark, when the “Second-curtain synchronization” function is set.
MODELING FLASH
If you use the Modeling flash, you can check the lighting and shadow effects, before you take the picture.
1. Press the MODE button and select the mode.
2. Press the
+
button or
-
button several times to make the icon on the LCD panel appear.
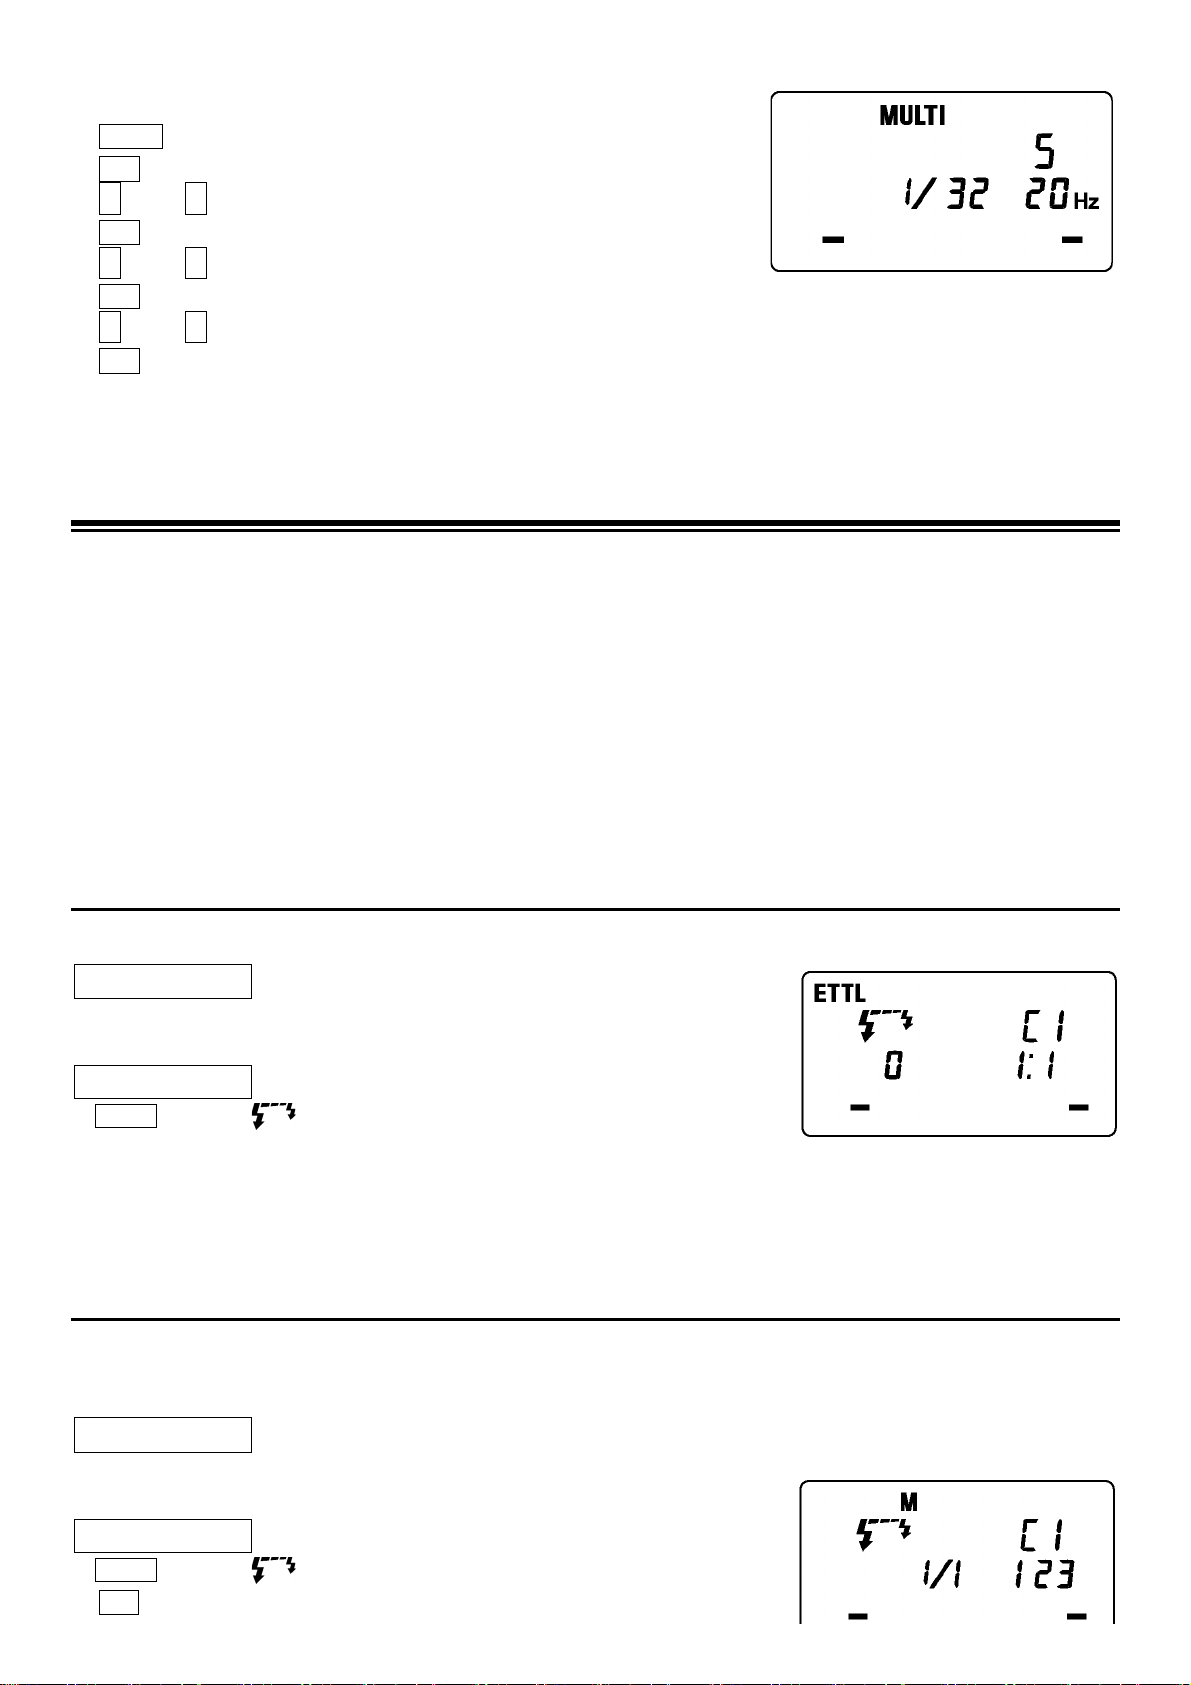
3. Confirm that the flash is charged, then press the TEST button to fire.
MULTI FLASH MODE
While the shutter is open, the flash will fire repeatedly. By doing so a series of images of the subject will be exposed
in one frame. A dark background with a bright subject shows more effectively in this mode. It is possible to set the
firing frequency between 1Hz and 100Hz. Up to 90 flashes can be fired continuously. The maximum number of
flashes varies, depending on the flash guide number and firing frequency settings. (Please refer to table3 on the last
page).
1. Set the camera’s exposure mode to M mode, and set the F number
2. Press the MODE button until the Multi-flash mode appears
Page 23

3. Press the SEL button until the flash firing frequency starts to blink.
4. Press the
+ or -
button to set the desired flash frequency value.
5. After pressing the SEL button again, the flash power level will blink.
6. Press the + or - button to set the desired power level.
7. Press the SEL button again, the number of flashes will blink.
8. Press the + or - button to set the desired number of flashes.
9. Press the SEL button again, the display will stop blinking.
10. When the ready light of the flash is illuminated, the unit is ready to use.
Note: Please set the shutter speed longer than; Number of Flashes you want Firing Frequency
WIRELESS FLASH (D70, F6 only)
It is possible to use Wireless Flash photography if this flash unit is used as the master, and EF-500 DG
SUPER NA-iTTL as the slave light source.
In this instruction, we call a flash unit, which is attached to the camera body “Master unit ”, and we call a
flash unit at a remote position “Slave unit”.
Set the distance between master and slave units less than 5meters.
Concerning the slave flash settings, please refer to slave flash’s instruction manual (wireless
photography section).
WIRELESS i-ETTL FLASH
In this Wireless i-TTL Autoflash function, the camera automatically calculates the correct exposure.
Slave Unit Setting
1. Follow the slave unit’s instruction manual and set the group number to 3.
2. Place the Slave Unit at the desired position.
Master Unit Setting
3. Press the MODE button to select the
mark.
4. After you confirm that both master and slave units are fully charged
you can take the picture.
Wireless i-TTL Auto Flash photography, FV lock and rear-curtain
synchronization can be used together. After setting Wireless
photography, please operate it according to each feature. Operation of
the slave unit is not necessary.
Wireless Manual Flash
You can manually set the wireless manual flash with the master unit. To determine the proper flash
exposure, use a hand held flash meter.
Slave Unit’s Setting
1. Follow the slave unit’s instruction manual and set the group number to 3.
2. Place the Slave Unit at the desired position.
Master Unit’s Setting
3. Press the MODE button to select the
mark.
4. Press and hold the SEL button for more than 2 seconds to make the
mode indicator blink.
5. Press the MODE button on the flash unit to select M.
6. Press the SEL button. The flash mode will be displayed.
7.
Press the SEL button once more and follow the procedure of Manual Flash, to set up each flash output amount.
Changing the mode cancels the setting.
Setting the Slave unit’s group number 1 will control leftflash tube (1) and group number 2 will control
rightflash tube (2).
Page 24

Wireless Multi Flash
Slave Unit’s Setting
1. Follow the slave unit’s instruction manual and set the group number to 3.
2. Place the Slave Unit at the desired position.
MasterUnit’s Setting
1. Press the MODE button to select the
mark.
2. Press and hold the SEL button for longer than 2 seconds to make the
mode indicator blink.
3. Press the MODE button on the flash unit to select MULTI.
4. Press the SEL button to stop the mode indicator blinking.
5. Press SEL button once again, and follow the procedure of Multi Flash
to set up each flash output amount.
Changing the mode cancels the setting.
Channel Setting
In case other photographers are using Wireless Flash mode near you, your flash may be connected with
anther person’s flash unit and therefore may fire. In these circumstances, set a different channel for your
flash from that of the other person’s flash unit.
1. In any of the Wireless modes, press the SEL button several times to
make the channel indicator blink.
2. Press the
+ or –
button to set the channel number. (C1 ~ C4)
3. Press the SEL button to make the indicator stop blinking.
4. Follow the slave unit’s instruction manual and set the channel number
the same as the master unit.
SPECIFICATIONS
Guide Number : 14 ISO 100/m (when the flash is fired at full power)
Power Source : AA Alkaline Battery or AA NiCd Battery or AA Ni-Mh Battery x 4pcs
Recycling Time : about 6.0 sec. (Alkaline batteries)
: about 4.0 sec. (Ni-Cd, Ni-MH Nickel-Metal Hydride)
Angle of Coverage : Vertical / Horizontal 80 degrees
Weight : 430g (without batteries)
Dimensions (Controller) : 76.7mm×136.2mm×82.4mm
Dimensions (Flash Unit) : 126.6mm×128.8mm×30.5mm
Page 25

DEUTSCH
Vielen Dank, dass Sie sich für ein Sigma Elektronik Makroblitzgerät EM-140 DG entschieden haben. Die
fortschrittlichen Funktionen des Blitzgerätes ermöglichen es Ihnen, die Makrofotografie unbeschwert zu
genießen und Ihre fotografischen Vorstellungen umzusetzen. Abhängig von dem jeweiligen Kameramodell
das eingesetzt wird, können Funktionen und Handhabung differieren. Um ein Maximum an Leistung und
Bedienungskomfort mit Ihrem Blitzgerät zu erzielen, lesen Sie sich daher bitte diese Gebrauchsanleitung
zusammen mit der Anleitung Ihrer Kamera vor dem ersten Gebrauch sorgfältig durch. Halten Sie die
Anleitung für zukünftiges Nachschlagen griffbereit. (Dieses Blitzgerät ist ausschließlich für Nikon SLR
Kameras bestimmt)
Vorsichtsmaßnahmen
Um Verletzungen oder Beschädigungen zu verhindern, lesen Sie diese Bedienungsanleitung vor dem
ersten Einsatz Ihres Blitzgerätes bitte sehr sorgfältig und vollständig durch und beachten Sie unbedingt
die untenstehenden Warnzeichen. Bitte beachten Sie speziell die beiden folgenden Warnzeichen.
Warnung!!
Achtung!!
Dieses Symbol verweist auf die wichtigen Punkte, an denen Vorsicht geboten ist.
Dieses Symbol enthält Informationen bezüglich zu unterlassender Handlungen.
Wenn Sie die entsprechenden Hinweise nicht befolgen, kann dies zu
ernsthaften Verletzungen oder anderen gefährlichen Folgen führen.
Wenn Sie die entsprechenden Hinweise nicht befolgen, können Verletzungen
oder Schäden entstehen.
Warnung!!
Dieses Blitzgerät enthält hochspannungsführende Schaltkreise. Um elektrische Schläge oder
Verbrennungen zu vermeiden, versuchen Sie nicht, das Gerät zu öffnen. Sollte das äußere Gehäuse
gebrochen oder zersprungen sein, berühren Sie keine inneren Geräteteile.
Blitzen Sie nicht aus kurzer Entfernung direkt in die Augen. Andernfalls kann das grelle Licht die Augen
verletzen. Halten Sie beim Fotografieren zumindest einen Abstand von einem Meter zwischen Gesicht
und Blitzgerät ein.
Berühren Sie nicht einen eventuell zusätzlich vorhanden Blitzkontakt (X) Ihrer Kamera, wenn das
Blitzgerät im Zubehörschuh steckt. Hochspannungsführende Stromkreise könnten einen elektrischen
Stromschlag verursachen.
Benutzen Sie Ihre Ausrüstung nie in der Umgebung entflammbarer, brennbarer Gase, Flüssigkeiten oder
Chemikalien etc. Andernfalls könnte dies zu einem Brand oder einer Explosion führen.
Achtung!!
Benutzen Sie dieses Blitzgerät nicht an einer anderen Kamera als an einer der Nikon-Serie; andernfalls
könnte der Blitz die Schaltkreise der Kamera beschädigen.
Dieses Blitzgerät ist nicht wasserdicht. Wenn Sie die Ausrüstung im Regen, Schnee oder in der Nähe
von Wasser verwenden, bewahren Sie sie davor, nass zu werden. Es ist häufig unmöglich,
Wasserschäden interner elektrischer Komponenten zu reparieren.
Setzen Sie das Blitzgerät niemals Stößen, Staub, Hitze oder Feuchtigkeit aus. Diese Faktoren könnten
einen Brand oder Fehlfunktionen Ihrer Ausrüstung verursachen.
Wenn das Gerät plötzlichen Temperaturschwankungen ausgesetzt, etwa aus einer kalten Umgebung in
einen warmen Innenraum gebracht wird, kann sich Kondensniederschlag im Inneren des Gerätes bilden.
In solchen Fällen stecken Sie das Gerät bitte vor dem Temperaturwechsel in eine zu verschließende
Plastiktasche und benutzen Sie es erst wieder, wenn es sich der Raumtemperatur angepasst hat.
Bewahren Sie das Gerät nicht in einer Schublade oder einem Schrank auf, wo es schädlichen Dämpfen
wie derer von Naphthalin, Kampfer oder Insektiziden ausgesetzt ist.
Verwenden Sie weder Verdünner, Benzin noch andere Reinigungsmittel, um Schmutz oder
Fingerabdrücke von dem Gerät zu entfernen. Benutzen Sie ein weiches, gegebenenfalls angefeuchtetes,
fusselfreies Tuch.
Bewahren Sie das Blitzgerät an einem trockenen, kühlen und gut belüfteten Ort auf. Lösen Sie den Blitz
von Zeit zu Zeit aus, um seine volle Leistungsfähigkeit langfristig zu erhalten.
Page 26

Beschreibung der Teile
Blitzeinheit
1.Linke Blitzröhre 2.Rechte Blitzröhre 3. AF Hilfslicht 4.Entriegelungsklemmen 5.Makroblitzadapter
Steuereinheit
6.LCD Feld 7.Batteriefachdeckel 8.Klemmrad 9.Aufsteckfuß
10.MODE Taste 11.SEL Wahltaste 12. + Steigerungstaste 13. -
Reduzierungstaste
14.LAMP Taste 15.TEST Taste 16.LIGHT Taste 17.Bereitschaftslampe 18.Hauptschalter
Verwendbarkeit von Objektiven
Obwohl dieses Blitzgerät speziell für Makroobjektive konzipiert wurde (Makro 50mm F2,8 EX DG, Makro
105mm F2,8 EX DG, etc.) kann es auch an anderen Objektivtypen verwendet werden. Beachten Sie hierbei
bitte folgende Hinweise:
ۋ Die Frontlinse oder andere Bauteile einiger Objektive rotieren während des Scharfstellens. Der angesetzte
Ringblitz dreht sich dadurch ebenfalls mit und kann den Fokussiermechanismus Ihrer Kamera beeinträchtigen.
Bitte fokussieren Sie bei der Verwendung solcher Objektive bitte manuell.
ۋ Zum Lieferumfang des Blitzgerätes gehören Makroblitzadpter in den Größen Ø55mm und Ø58mm. Wenn
Sie Ihr Blitzgerät an einem Objektiv mit anderem Filtergewinde anschließen möchten, benötigen Sie die
separat erhältichen Makroblitzadapter in entsprechender Größe. (In den Größen Ø52mm, Ø62mm, Ø72mm
und Ø77mm verfügbar).
ۋ In Abhängigkeit von der Objektivbrennweite, dem Motivabstand und anderen Faktoren kann es passieren,
dass Ihr Bild Vignettierungen (Randabschattungen) aufweist. Bitte fertigen Sie zunächst einige
Testaufnahmen an und vergewissern Sie sich, dass die Einstellungen keine Vignettierungen verursachen.)
Kameramodelle und Funktionen
Das Gerät ist zur Verwendung mit den nachstehend genannten Kameras geeignet. Die Bedienung und die
verfügbaren Funktionen unterscheiden sich dabei je nach Kameramodell. Bitte entnehmen Sie die
entsprechenden Angaben der Bedienungsanleitung lhrer Kamera.
D2 Series, D70, D1 Series, D100,
F6, F5, F4, F3 (Mit Adapter), F100, F90X Serie, F90, F80, F70, F65, F60D, F50D, F-801S, F801, F601M, F601,
F501, F401X, F401S, F-401, F-301, FA, FE10, FE-2, FG, FM10, FM2 neu, Pronea 600i
Diese Bedienungsanleitung gilt für die folgenden Objektivtypen (bitte vergleichen Sie sie mit lhrer Ausrüstung)
:
Objektive mit eingebauter CPU
Objektive vom D-Typ, Objektive vom G-Typ, Nikon IX Objektive,
AF-Objektive ohne D-Charakteristik (ohne F3 AF), Ai-P Objektive
Objektive ohne eingebaute CPU
Ai-S Objektive, Ai Objektive, Serie E Objektive
Batteriehinweise
Dieses Blitzgerät benötigt vier „AA“ Alkaline Trockenbatterien oder wiederaufladbare Ni-Cad oder Ni-MH Akkus.
Wechseln Sie den kompletten Batteriesatz aus, wenn die Aufladezeit mehr als 30 Sekunden beträgt.
ۋ Um einwandfreien elektrischen Kontakt zu gewährleisten, reinigen Sie die Batteriekontakte, bevor Sie
die Batterien einsetzen.
ۋ NiCad Akkus besitzen keine standardisierten Kontakte. Falls Sie NiCad Akkus verwenden, vergewissern
Sie sich, dass die Batteriekontakte jene des Batteriefaches einwandfrei berühren.
ۋ Verwenden Sie ausschließlich vier frische „AA“ Mignonzellen einer Marke und eines Typs, um die
Gefahr des Platzens einer Batterie, des Austritts von Batteriesäure oder der Überhitzung vorzubeugen.
Mischen Sie keinesfalls frische und gebrauchte Batterien.
ۋ
Batterien dürfen weder geöffnet, noch kurzgeschlossen bzw. ins Feuer geworfen werden, da sie explodieren
können. Zur Wiederaufladung dürfen nur hierfür geeignete Zellen verwendet werden, wie etwa NiCad.
ۋ Wenn Sie das Blitzgerät längere Zeit nicht benutzen wollen, entnehmen Sie bitte die Batterien, um
Schäden durch austretende Batteriesäure zu verhindern.
ۋ Bei niedrigen Temperaturen lässt die Leistung jeder Batterie nach. Bewahren Sie die Batterien daher
bei kalter Witterung bis zur Aufnahme getrennt vom Blitzgerät möglichst körperwarm auf.
ۋ Wie bei jedem Blitzgerät empfiehlt sich die Mitnahme von Ersatzbatterien auf einer Reise oder für
Außenaufnahmen bei winterlichen Temperaturen.
Page 27

Einlegen der Batterien
1. Vergewissern Sie sich, dass der Hauptschalter auf
OFF steht und öffnen Sie den Batteriefachdeckel
durch Schieben in Pfeilrichtung und klappen Sie ihn
nach oben.
2. Setzen Sie vier Mignonzellen Typ „AA“ entsprechend
der Markierung der Polung (+ und -) in das
Batteriefach ein.
3. Schließen Sie den Batteriefachdeckel.
4. Schalten Sie das Gerät am Hauptschalter ein. Nach
einigen Sekunden leuchtet die Blitzbereitschaftslampe
auf und zeigt somit an, dass das Gerät nunmehr zündbereit ist.
5. Um sich von der Funktionsfähigkeit durch einen Probeblitz zu überzeugen, genügt ein Druck auf den
Testauslöser.
Automatische Abschaltung
Um Strom zu sparen, schaltet sich das Gerät 90 Sekunden nach der letzten Betätigung automatisch ab.
Zur Wiedereinschaltung genügt ein Druck auf den Testauslöser oder das Antippen des Kameraauslösers.
Die automatische Abschaltung steht nicht im kabellosen Blitzbetrieb zur Verfügung.
Fehleranzeige
Bei ungenügender Batteriespannung bzw. fehlerhaftem Informationsaustausch zwischen Kamera und
Blitzgerät blinkt die Anzeige des Leuchtwinkels auf dem Display. Schalten Sie das Gerät in diesem Fall
kurzfristig aus und wieder ein. Führt dies nicht zum Erlöschen der Anzeige, prüfen Sie bitte die
Batteriespannung.
Anbringen der Steuereinheit
Vergewissern Sie sich, dass das Gerät ausgeschaltet ist. Schieben Sie dann den Aufsteckfuß des Blitzes
in den Zubehörschuh der Kamera und drehen Sie das Klemmrad handfest an.
ۋ Fassen Sie das Gerät zum Ansetzen bzw. Abnehmen
ausschließlich an seinem Unterteil an, um
Beschädigungen am Steckfuß oder am Zubehörschuh
der Kamera zu vermeiden.
ۋ Falls der eingebaute Blitz der Kamera ausgeklappt
sein sollte, muss er vor dem Anbringen des EM-140
eingeklappt werden.
ۋ Um den Blitz abzunehmen, drehen Sie das Klemmrad
in entgegengesetzter Richtung der ◄LOCKMarkierung bis zum Anschlag.
Anbringen der Blitzeinheit
1. Bitte schrauben Sie den Makroblitzadapter in das
Filtergewinde des Objektivs.
2. Drücken Sie die beiden Entriegelungsklemmen nieder,
stecken das Blitzgerät auf den Adapter und lassen die
beiden Klemmen los.
Sie können die Position durch Drehen des
Blitzgerätes auf dem Adapter justieren.
Zum Abnehmen des Blitzgerätes von dem Objektiv
drücken Sie bitte die Entriegelungsklemmen nieder.
Beleuchtung der LCD
Beim Druck auf die LIGHT Taste wird das Display für ca. acht Sekunden lang beleuchtet. Durch erneuten
Druck auf die LIGHT Taste bleibt die Beleuchtung für länger als acht Sekunden aktiviert.
Page 28

AF Hilfslicht
Wenn die LAMP Taste an der Steuereinheit betätigt wird, leuchtet für 20 Sekunden das AF Hilfslicht.
Hierdurch es bei schlechten Lichtverhältnissen möglich, die Fokussierung vorzunehmen. Diese Funktion ist
besonders hilfreich, wenn der AF keine korrekten Ergebnisse liefert und die manuelle Scharfstellung nur
schwierig möglich ist.
ۋ Wenn der Auslöser der Kamera gedrückt wird, erlischt das Hilfslicht.
TTL Blitzautomatik
Die TTL Blitzautomatik sorgt für die korrekte Belichtung des Motivs durch die Kontrolle des abgegebenen
Blitzlichtes.
ۋ Bitte beachten Sie hierzu Tabelle A, die die verschiedenen Kombinationen von Kamera und
Objektivtypen, Belichtungsmethoden und Blitzbetriebsarten zeigt.
ۋ Die TTL Blitzautomatik ist mit den Kameras des Typs F3, FM10, FM2 neu und FE10 nicht möglich.
1. Stellen Sie an der Kamera die Belichtungsfunktion ein (je nach
Kameramodell kann die Einstellung variieren). Einzelheiten hierüber
entnehmen Sie bitte der Bedienungsanleitung der Kamera.
2. Schalten Sie das Blitzgerät am Hauptschalter ein.
3. Wählen Sie TTL/BL oder TTL durch Drücken der MODE Taste.
◆ Wenn Sie eine Digital-SLR Kamera verwenden, stellen Sie bitte die
TTL/BL Betriebsart ein. CLS-kompatible Modelle werden durch die
i-TTL Blitzsteuerung geregelt. CLS-inkompatible Modelle werden
durch die D-TTL Blitzsteuerung geregelt. In beiden Fällen wird der
Buchstabe "d" (digital) im Display angezeigt.
◆ Im Falle einer der folgenden Kameras: F6, F5, F4, F100,
F90X/F90/F80, F70, F801S, F801 und Pronea 600i kann zwischen
TTL/BL oder TTL gewählt werden. An anderen Modellen als den oben
genannten kann nur TTL gewählt werden.
4. Stellen Sie auf das Objekt scharf.
5. Warten Sie das Aufleuchten der Bereitschaftslampe ab und lösen Sie aus.
ۋ Wenn die Kamera keine korrekte Belichtung ermitteln konnte, erscheint nach der Aufnahme das TTL/BL
oder TTL Symbol für fünf Sekunden auf dem Display, was anzeigt, dass die Blitzlichtmenge für die
vorliegende Situation nicht ausreichte. Wiederholen Sie in diesem Fall die Aufnahme aus kürzerer
Entfernung oder mit größerer Blendenöffnung.
ۋ Sobald das Blitzgerät die volle Ladekapazität erreicht hat, erscheint die Bereitschaftsanzeige im Sucher.
Wenn der Auslöser vor Erreichen der Zündbereitschaft betätigt wird, löst die Kamera entsprechend der
Lichtverhältnisse mit langer Verschlusszeit ohne Aktivierung des Blitzes aus.
Es ist möglich, Ihren Bildern einen dreidimensionalen Effekt zu verleihen, indem Sie nur eine der
beiden Blitzröhren auslösen.
1. Drücken Sie im TTL/BL(TTL) Betrieb SEL Taste, sodass die
Blitzröhrenanzeige blinkt.
2. Durch Drücken der + Taste wird die linke und durch Drücken
der
-
Taste die rechte Blitzröhre blitzen. (Nur die blitzende Seite
wird blinkend auf dem Dispaly angezeigt.)
3. Drücken Sie die mehrfach die SEL Taste, bis das Blinken stoppt.
Drücken Sie nach der Aufnahme wieder die SEL Taste und
benutzen Sie die + oder - Tasten, um beide Blitzröhren zu
aktivieren.
Page 29

Tabelle A
Kamera
Objektiv Typ
Belichtungs
-methode
Messcharakteristik
TTL Betriebsart
Bemerkungen
Objektive vom
D-Typ
Alle
Betriebsarten
Alle Methoden
3D-Multi-Sensor-A
ufhellblitz
AF-Objektive außer
D-Typ
Alle
Betriebsarten
Alle Methoden
Multi-Sensor-Aufhe
llblitz
F6
F5
F100
F90X
F80
F70
Objektive ohne
eingebauten Chip
A/M
Betriebsart
Mittenbetonte
Messung;
Spotmessung
Mittenbetonter /
Spot-Aufhellblitz
Alle Betriebsarten können auf normale
TTL-Blitzautomatik umgeschaltet werden. Ist bei
einer F5, F100 oder F80 die Spotmessung
gewählt, ist nur normale TTL-Blitzautomatik
möglich.
Matrix-Messung
Matrixgesteuerter
Aufhellblitz TTL
Objektive mit
eingebautem Chip
Alle
Betriebsarten
Mittenbetonte
Messung;
Spotmessung
Mittenbetonter /
Spot-Aufhellblitz
F4
F801S
F801
F65
Pronea
600i
Objektive ohne
eingebauten Chip
A/M
Betriebsart
Mittenbetonte
Messung:
Spotmessung
Mittenbetonter /
Spot-Aufhellblitz
Alle Betriebsarten können auf normale
TTL-Blitzautomatik umgeschaltet werden. An der
F4 ist matrixgesteuertes TTL-Aufhellblitzen mit
Ai-S, Ai, Serie E, AF-F3 Objektiven möglich. Ist bei
der F4 die Spotmessung gewählt, ist nur normale
TTL-Blitzautomatik möglich. Mittenbetonter /
Spot-Aufhellblitz ist an der Pronea 600i nicht
möglich. Bei manueller Belichtungseinstellung ist
nur TTL-Blitzautomatik möglich.
Matrix-Messung
Matrixgesteuerter
Aufhellblitz TTL
Objektive mit
eingebautem Chip
Alle
Betriebsarten
Mittenbetonte
Messung;
Spotmessung
Mittenbetonter /
Spot-Aufhellblitz
F601
F601M
Objektive ohne
eingebauten Chip
A/M
Betriebsart
Mittenbetonte
Messung;
Spotmessung
Mittenbetonter /
Spot-Aufhellblitz
Spotmessung steht mit der F-601M nicht zur
Verfügung.
Objektive mit
eingebautem Chip
P/S
A/M
Matrixgesteuerter
Aufhellblitz TTL
Bei manueller Belichtungseinstellung ist nur
Mittenbetonter / Spot-Aufhellblitz möglich.
F60
F50
F401X
Objektive ohne
eingebauten Chip
M
Mittenbetonter /
Spot-Aufhellblitz
P
TTL
Programm-Blitzaut
omatik
Objektive mit
eingebautem Chip,
Ai-S, Ai, Serie E,
AF-F3 Objektive
A/M
TTL-Blitzautomatik
F501
F301
Außer oben
genannte Objektive
A/M
TTL-Blitzautomatik
P/S
TTL Programm -
Blitzautomatik
Objektive mit
eingebautem Chip
A/M
TTL-Blitzautomatik
F401S
F401
Objektive ohne
eingebauten Chip
M
TTL-Blitzautomatik
FA,
FE2
FG,
F3
Objektive mit
eingebautem Chip;
Objektive ohne
eingebauten Chip
A/M
TTL-Blitzautomatik
◆ Beim Einsatz an Digital-SLR Kameras variieren die Funktionen in Abhängigkeit des verwendeten
Objektives und der Kombination der Belichtungsmethoden, so wie in der F5 und F100 Gruppe. (Alle TTL
Belichtungsfunktionen entsprechen der D-TTL (i-TTL) Steuerung).
Grenzen der Serienauslösung
Um ein Überhitzen des Gerätes zu verhindern, legen Sie eine 10minütige Pause nach dem Absolvieren
der im folgenden genannten Aufnahmeserien ein.
Betriebsart
Anzahl der Blitzaufnahmen
TTL, M (1/1, ½)
15 Serienauslösungen
M (1/4, 1/8)
20 Serienauslösungen
M (1/16-1/32)
40 Serienauslösungen
Multi
10 Sequenzen
Page 30

Manueller Blitzbetrieb
Die manuelle Blitzsteuerung erlaubt die gezielte Einstellung der gewünschten Blitzleistung.
Der Einsatz der manuellen Blitzsteuerung erfordert einige Erfahrung. Wir
empfehlen den Einsatz der automatischen Blitzsteuerung. Wenn Sie die
manuelle Betriebsart einsetzen möchten, fertigen Sie bitte zunächst einige
Testaufnahmen an. Der Einsatz eines Blitzbelichtungsmessers für die
Ermittlung der korrekten Belichtung ist hierbei sehr hilfreich.
Die Blitzintensität der rechten und linken Blitzröhre kann zwischen
1/1~1/64 eingestellt werden. Es ist ebenfalls möglich, eine der beiden
Röhren völlig auszuschalten.
1. Stellen Sie die Belichtungsmethode der Kamera auf manuell (M).
2. Drücken Sie die MODE Taste am Blitzgerät und wählen Sie M.
3. Drücken Sie die SEL Taste. (Die Blitzintensitätsanzeige der linken
Blitzröhre blinkt).
4. Drücken Sie die
+
oder
-
Taste, um die Blitzleistung der linken
Blitzröhre einzustellen.(Falls “ -- “ angezeigt wird, blitzt die Röhre nicht)
5. Drücken Sie die SEL Taste. (Die Blitzintensitätsanzeige der linken
Blitzröhre blinkt).
6. Drücken Sie die
+
oder
-
Taste, um die Blitzleistung der rechten
Blitzröhre einzustellen.(Falls “ -- “ angezeigt wird, blitzt die Röhre nicht)
7. Drücken Sie die SEL Taste, um das Blinken zu beenden.
ۋ Sofern für beide Blitzröhren die identische Blitzleistung eingestellt ist, wird
diese angezeigt. Sind unterschiedliche Blitzleistungen eingestellt, werden
diese im Display nicht angezeigt.
ۋ Die entsprechende Leitzahl entnehmen Sie bitte der Tabelle auf der
letzten Seite [Tabelle 1].
ۋ Sie können die korrekte Belichtung auch anhand der folgenden Formel ermitteln:
Leitzahl / Entfernung zwischen Blitz und Motiv = Blende
BLITZBELICHUNGS-MESSWERTSPEICHER (FV LOCK)
(Nur D70,F6)
Der Blitzbelichtungs-Messwertspeicher fixiert die für ein Motiv ermittelte Belichtung, sodas Sie den
Bildausschnitt verändern können, ohne dass die Blitzleistung hierbei neu berechnet wird.
◆ Sie können diese Funktion nicht direkt am Blitzgerät einstellen. Einzelheiten schlagen Sie bitte in der
Bedienungsanleitung der Kamera nach.
Belichtungskorrektur
Sie können die Blitzbelichtung korrigieren durch Verändern der Blitzleistung.
Absichtliche Belichtungskorrektur über die Blitzleistung des EM-140 DG NA-iTTL
◆ Nur möglich an Digital-SLR-Kameras, F6, F5, F4 Serie, F100, F90/N90, F90X/N90S, F80/F80 Serie, F70D,
U/F65/N65, F801S/N800S, F801/ N8008, F601M, F601/N6006 und Pronea 600i.
◆ Kameras mit einer EV Belichtungskorrekturmöglichkeit erlauben Ihnen,
die Belichtung entweder am EM-140 DG NA-iTTL oder an der Kamera
(oder an beiden) vorzunehmen. Falls Sie beide Möglichkeiten einsetzen,
besteht die Gesamtkorrektur aus der Summe beider Korrekturfaktoren
und beeinflusst auch die Hintergrundbelichtung entsprechend.
◆ Falls Sie eine F601 einsetzen, nehmen Sie die Einstellung der
Belichtungskorrektur an der Kamera vor.
◆ Die Einstellung kann in 1/3 Schritten in dem Bereich von +1,0 bis –3,0
vorgenommen werden.
1.
Drücken Sie die MODE Taste, um die TTL/BL (TTL) Betriebsart zu wählen.
2. Drücken Sie die SEL Taste, sodass die Blitzbelichtungskorrekturanzeige
blinkt.
3. Drücken Sie die
+
oder
-
Taste, um den Korrekturfaktor einzustellen.
4. Drücken Sie die SEL Taste, um das Blinken zu beenden.
Page 31

Absichtliche Belichtungskorrektur der Blitzleistung des EM-140 DG NA-iTTL und des Hintergrundes
ۋ Diese Funktion steht an allen Kameras außer der F3, FM10, FM2 neu und FE10 zur Verfügung.
Benutzen Sie die Korrektureinstellung Ihrer Kamera. Hierdurch wird automatisch eine ausgewogene Belichtung
von Hauptmotiv und Hintergrund erreicht (siehe Bedienungsanleitung Ihrer Kamera).
Absichtliche Belichtungskorrektur mit manueller Steuerung
In der manuellen Betriebsart können Sie an der Kamera eine andere Blende als am EF-500 DG SUPER
NA-iTTL einstellen, oder Sie ändern die Blitzleistung.
Synchronisation auf den zweiten Verschlussvorhang
Bei Blitzaufnahmen bewegter Objekte mit längerer Verschlusszeit werden vom Objektiv ausgehende
Leuchtspuren vor ihm abgebildet, denn der Blitz zündet im Normalfall, sobald der erste Verschlussvorhang das
Bildfenster vollständig freigegeben hat. Das Objekt wird somit belichtet vom Moment des Blitzes an bis zum
Schließen des Bildfensters am Ende der Verschlusszeit. Wird der Blitz hingegen auf den zweiten
Verschlussvorhang synchronisiert, so zündet der Blitz erst kurz bevor der zweite Vorhang das Bildfenster wieder
verschließt. Hierdurch wird das Motiv zunächst durch das vorhandene Licht und erst am Ende des
Verschlussablaufes vom Blitzlicht belichtet, sodass die Leuchtspuren des Objektes hinter ihm erscheinen, was
weitaus natürlicher wirkt.
◆ Diese Funktion steht nur an Kameras zur Verfügung, die eine Synchronisation auf den 2. Verschlussvorhang
zulassen.
◆ Sie können diese Funktion nicht direkt am Blitzgerät einstellen. Einzelheiten schlagen Sie bitte in der
Bedienungsanleitung der Kamera nach.
◆ Das LCD des Blitzgerätes zeigt das Symbol, wenn die Funktion gewählt wurde.
Einstelllicht
Mit dem Einstelllicht können Sie die Lichtwirkung und den Schattenverlauf vor der Aufnahme überprüfen.
1. Drücken Sie die MODE Taste und wählen Sie die Betriebsart.
2. Drücken Sie die
+
oder – Taste, bis das Symbol auf dem LCD erscheint.
3.
Warten Sie das Aufleuchten der Bereitschaftslampe ab und drücken Sie die TEST Taste zur Auslösung des Einstelllichtes.
Stroboskopbetrieb
Während der Verschluss geöffnet ist, sendet das Blitzgerät eine Serie von Blitzen aus. Hierdurch entsteht auf
einem Bild eine Sequenz von Aufnahmen eines Motivs. Ein helles Motiv vor dunklem Hintergrund ist am
effektivsten für diese Funktion. Die Blitzfrequenz kann zwischen 1 Hz und 199 Hz eingestellt werden. Bis zu 90
Blitze können kontinuierlich abgegeben werden. Die maximale Anzahl von Blitzen variiert in Abhängigkeit von
der Leitzahl und der eingestellten Frequenz. Bitte beachten Sie die Tabelle 3.
1. Stellen Sie die Belichtungsfunktion der Kamera auf M und stellen Sie
eine Blende ein.
2. Drücken Sie wiederholt die Betriebsartentaste MODE, bis die
Stroboskopanzeige MULTI erscheint.
3. Drücken Sie die Wahltaste SEL, bis die Blitzfrequenzanzeige zu
blinken beginnt.
4. Drücken Sie die Taste
+
oder – , um den gewünschten Wert
einzustellen.
5. Nach dem erneuten Druck auf die Wahltaste SEL beginnt die Angabe der Blitzleistung zu blinken.
6. Drücken Sie die Taste
+
oder – , um den gewünschten Wert einzustellen.
7. Nach dem erneuten Druck auf die Wahltaste SEL beginnt der Wert der Blitzanzahl zu blinken.
8. Drücken Sie die Taste
+
oder – , um die gewünschte Anzahl von Blitzen einzustellen.
9. Nach dem erneuten Druck auf die Wahltaste SEL stellt die Anzeige das Blinken ein.
10. Sobald die Bereitschaftslampe aufleuchtet, ist der Blitz einsatzbereit.
Achtung: Bitte wählen Sie eine längere Verschlusszeit als:
Anzahl der eingestellten Blitze / Blitzfrequenz in Hz
Page 32

Kabelloses Blitzen
(Nur D70, F6)
Sie können dieses Blitzgerät in der kabellosen Blitzlichtfotografie als Master einsetzen und damit einen
SIGMA EF-500 DG SUPER NA-iTTL als Slave Blitz auslösen.
ۋ In dieser Bedienungsanleitung wird das Blitzgerät, welches mit der Kamera verbunden ist, als
„Master“ bezeichnet und das entsprechend platzierte fernausgelöste Gerät als „Slave“.
ۋ Bitte platzieren Sie Master und Slave innerhalb eines Abstandes von max. 5 Metern zueinander.
ۋ Bezüglich der Einstellungen am Slave Blitzgerät schlagen Sie bitte im Kapitel Kabelloses Blitzen in
dessen Bedienungsanleitung nach.
KABELLOSE i-TTL AUTOMATIK
In der kabellosen i-TTL Automatik ermittelt die Kamera automatisch die korrekte Belichtung.
Einstellungen an der Slave Einheit
1. Stellen Sie entsprechend der Bedienungsanleitung des Slave Blitzes
die Gruppennummer auf 3.
2. Platzieren Sie das Slave Gerät an der gewünschten Position.
Einstellungen an der Master Einheit
3. Drücken Sie die MODE Taste und wählen Sie das
Symbol.
4. Nachdem beide Blitzgeräte vollständig aufgeladen sind, können Sie
die Aufnahme anfertigen.
ۋ Kabellose iTTL Blitzlichtsteuerung, Messwertspeicherung, Belichtungskorrektur und Synchronisation auf
den 2. Verschlussvorhang können miteinander kombiniert werden. Nach dem Aktivieren der kabellosen
Blitzlichtsteuerung nehmen Sie die weiteren Einstellungen entsprechend der jeweiligen Funktion vor.
Eine Einstellung an der Slave Einheit ist nicht notwendig.
Kabelloser, manueller Blitzbetrieb
Sie können an der Master Einheit den manuellen, kabellosen Blitzbetrieb einstellen. Zur Bestimmung der
korrekten Belichtung ist ein Hand-Blitzbelichtungsmesser sehr hilfreich.
Einstellungen an der Slave Einheit
1. Stellen Sie entsprechend der Bedienungsanleitung des Slave Blitzes die Gruppennummer auf 3.
2. Platzieren Sie das Slave Gerät an der gewünschten Position.
Einstellungen an der Master Einheit
3. Drücken Sie die MODE Taste und wählen Sie das
Symbol.
4. Drücken und Halten Sie die SEL Taste für mehr als 2 Sekunden,
sodass die Modus Anzeige zu blinken beginnt.
5. Drücken Sie die MODE Taste und wählen Sie M.
6. Nach dem Drücken der SEL Taste wird die Betriebsart angezeigt.
7. Drücken Sie die SEL Taste ein weiteres Mal und befolgen Sie die
Schritte für das manuelle Blitzen. Stellen Sie für jedes Blitzgerät die
gewünschte Blitzleistung ein.
Das Wechseln der Betriebsart löscht die Einstellungen.
Die Einstellung der Gruppennummer auf 1 steuert die linke Blitzröhre, die Einstellung auf
Gruppennummer 2 steuert die rechte Blitzröhre.
Kabelloser Stroboskopbetrieb
Einstellungen an der Slave Einheit
1. Stellen Sie entsprechend der Bedienungsanleitung des Slave Blitzes die Gruppennummer auf 3.
2. Platzieren Sie das Slave Gerät an der gewünschten Position.
Page 33

Einstellungen an der Master Einheit
3. Drücken Sie die MODE Taste und wählen Sie das
Symbol.
4. Drücken und Halten Sie die SEL Taste für mehr als 2 Sekunden,
sodass die Modus Anzeige zu blinken beginnt.
5. Drücken Sie die MODE Taste und wählen Sie MULTI.
6. Drücken Sie die SEL Taste, um das Blinken zu beenden.
7. Drücken Sie die SEL Taste ein weiteres Mal und befolgen Sie die Schritte für das Stroboskopblitzen.
Stellen Sie für jedes Blitzgerät die gewünschte Blitzleistung ein.
Das Wechseln der Betriebsart löscht die Einstellungen.
Kanalwahl
Falls andere Fotografen in Ihrer Nähe ebenfalls den kabellosen Blitzbetrieb nutzen, könnte dies zu
versehentlichen Fehlauslösungen führen. Wählen Sie unter diesen Umständen einen anderen Kanal an
Ihrem Blitzgerät, als die andere Person an ihrem Gerät eingestellt hat.
1. Drücken Sie in dem jeweiligen kabellosen Blitzbetrieb mehrmals die
SEL Taste, sodass die Anzeige der Kanalwahl blinkt.
2. Drücken Sie die + oder – Taste, um den gewünschten Kanal
einzustellen. (C1~C4)
3. Drücken Sie die SEL Taste, um das Blinken zu beenden.
4. Bitte stellen Sie an der Slave Einheit entsprechend deren
Bedienungsanleitung den gleichen Kanal ein wie an der Master
Einheit.
Technische Daten
Leitzahl
14 (ISO 100/m, Blitzkopfeinstellung)
Energieversorgung
4 AA Type Alkaline Batterien oder
4 AA Type Ni-Cd Akkus oder
4 AA Type Ni-MH Nickel-Metall Hydrid Akkus
Aufladezeit
ca. 4,0 s mit Alkaline Batterien
ca. 3,0 s mit Ni-Cd oder Ni-MH Akkus
Automatische Abschaltung
Vorhanden
Gewicht
430 Gramm
Abmessungen
Steuereinheit 76.7mm (B) x 136.2mm (H) x 82.4mm (T)
Blitzeinheit 126.6mm (B) x 128.8mm (H) x 30.5mm (T)
Page 34

FRANÇAIS
Nous vous remercions d'avoir choisi le flash électronique Sigma Macro EM-140 DG. Ses caractéristiques
avancées vous permettront de profiter au mieux du plaisir de la macrophotographie. Les fonctions et le
mode opératoire pouvant varier d'un appareil à l'autre, nous vous recommandons de lire attentivement ce
mode d'emploi avant toute utilisation. Ce flash dispose d'une grande diversité de fonctions qui vous
augmenteront le plaisir que vous éprouvez à faire de la photographie. Pour pouvoir exploiter ses
nombreuses possibilités et en tirer le meilleur parti, nous vous suggérons de vous référer régulièrement à
cette notice d'utilisation, tout en ayant sous la main celle de votre appareil.
(Ce flash a été conçu spécifiquement pour être utilisé avec les boîtiers reflex Nikon)
PRECAUTIONS
Pour éviter tout dommage ou erreur de manipulation, nous vous demandons de lire attentivement ce
mode d’emploi avant d’utiliser votre appareil.
Nous attirons particulièrement votre attention sur les deux signes d’avertissement ci-dessous.
Mise en garde !!
Avertissement !!
Ce symbole marque un point important où la plus grande prudence est requise
Ce symbole correspond à une information qu’il convient de respecter
La non prise en compte de cette mise en garde pourrait entraîner un
accident grave ou un dommage sérieux au produit.
Le non respect de cet avertissement pourrait entraîner un accident ou
endommager le produit.
Mise en garde !!
Ce flash comprend des circuits électriques à haut voltage. N'essayez jamais de démonter le produit,
ceci pouvant entraîner une électrocution ou une brûlure. Si la coque est cassée ou fêlée, ne touchez
pas les composants internes.
Ne déclenchez jamais d'éclair à proximité des yeux. L'intensité lumineuse pourrait créer des
dommages irréversibles. Laissez toujours une distance d'au moins 1m/3 pieds entre le visage et
l'appareil lorsque vous photographiez avec le flash.
Ne touchez pas la griffe lorsque le flash est monté sur l'appareil. Vous pourriez subir une décharge à
haute tension.
N'utilisez jamais le flash dans un environnement de produits inflammables tels que gaz, produits
chimiques, solvants, etc…en raison de risques d'incendie ou d'explosion.
Avertissement !!
N'utilisez ce flash que sur un boîtier Nikon. Tout autre emploi pourrait endommager les circuits
électriques et électroniques de l'appareil.
Ce flash n'est pas étanche. Tenez-le à l'abri en cas d'utilisation sous la pluie, la neige ou les
embruns. Des circuits endommagés par l'eau sont souvent irréparables.
N'exposez pas votre flash, ni l'appareil, à un choc, à la poussière, à de très hautes températures ou
à l'humidité. Ces éléments pourraient causer des dégâts ou un dysfonctionnement.
Si le flash est soumis à un brusque contraste de température, comme de passer d'un extérieur froid
à un intérieur bien chauffé, une condensation peut se former à l'intérieur. Dans une telle
circonstance, placez le flash dans un sac plastique fermé et ne l'utilisez pas tant qu'il n'a pas atteint
la température de la pièce.
Ne rangez pas le flash dans un tiroir ou une armoire contenant de la naphtaline, du camphre ou tout
autre insecticide. Ceci pourrait provoquer des dysfonctionnements.
N'employez pas de dissolvant, de benzène ou tout autre agent chimique pour nettoyer votre flash
ou enlever des traces de doigts. N'utilisez qu'un chiffon doux et humide.
En cas de stockage prolongé, placez le flash dans un endroit sec et tempéré, de préférence ventilé.
Faites le fonctionner plusieurs fois par mois pour entretenir le condensateur.
Page 35

DESCRIPTION DES ELEMENTS
Module de flash
1.Réflecteur gauche 2.Réflecteur droit 3.Lampe d'assistance 4.Bouton de verrouillage
5.Adaptateur
Module de contrôle
6.Ecran ACL 7.Couvercle du compartiment piles 8.Vis de blocage du sabot 9.Sabot
10.Bouton de mode MODE 11.Bouton de sélection SEL 12. + Touche d'incrément
13. - Touche de décrément 14.Bouton de lampe LAMP 15.BoutonTEST
16.Bouton de rétro éclairage LIGHT 17.Témoin de charge 18.Interrupteur
ADAPTATION AUX OBJECTIFS
Bien que conçu spécialement pour les objectifs Macro (MACRO 50mm F2.8 EX DG, MACRO 105mm F2.8 EX
DG, etc.), ce flash peut aussi être utilisé avec d'autres types d'objectifs. Nous attirons cependant votre attention
sur les points suivants :
ۋ La partie avant de certains objectifs tourne lors de la mise au point. Si vous attachez le module flash à de
tels objectifs, vous risquez d'endommager le mécanisme de mise au point autofocus de votre boîtier.
N'utilisez que la mise au point manuelle avec des tels objectifs.
ۋ Des adaptateurs Macro pour pas de vis porte-filtre de diamètres Ø55mm et Ø58mm sont livrés avec le flash.
Si vous souhaitez l'utiliser avec un objectif dont le diamètre de filtre est différent, vous pouvez acheter un
adaptateur optionnel vendu séparément (diamètres disponibles : Ø52mm, Ø62mm, Ø72mm, Ø77mm).
ۋ L'image peut être affectée de vignettage du fait de la longueur focale, de la distance ou d'un autre paramètre.
Nous vous conseillons de procéder à des essais préalables et de vérifier que la configuration retenue ne
cause pas de vignettage.
FONCTIONS ET TYPE DE BOITIERS COMPATIBLES
Ce flash peut être utilisé avec les boîtiers de la liste ci-dessous. En fonction de l’appareil, le ode d’opérer et
les caractéristiques utilisables peuvent différer. Veuillez donc vous référer attentivement à ce qui est
indiqué pour votre appareil.
séries D2, D70, D1, D100, F6, F5, séries F4, séries F3(avec adaptateur), F100, séries F90X/N90S, séries
F90/N90, F80, F70D/N70, F65/N65, F60D/N60, F50D/N50, F-801S/N8008S, F-801/N8008, F601M,
F-601/N6006, F501/N2020, F401X, F401S/N4004S, F-401/N4004, F-301, N2000, FA, FE10, FE-2, FG, FM10,
New FM2, Pronea 600I
Le mode d’emploi est utilisable avec les types d’objectifs suivants:
Objectifs avec électronique intégrée
Objectifs type D, Objectifs type G, Objectifs Nikkor IX, Objectifs AF sauf
type D (F3AF exclus), objectifs type Ai-P
Objectifs sans électronique
Objectifs de types Ai-S, Ai, séries E
ALIMENTATION ELECTRIQUE
Ce flash fonctionne avec quatre piles alcalines ou quatre accus rechargeables Ni-Cd ou Ni-MH de type “AA”.
Des piles au manganèse peuvent aussi être utilisées, mais leur durée d'utilisation est plus courte que celle des
piles alcalines, et leur usage n'est donc pas conseillé. Remplacez les piles dès que le temps de charge excède
30 secondes.
ۋ Nettoyez les contacts des piles avant installation pour assurer une bonne conductivité
ۋ Les accus Ni-Cd n'étant pas standardisés, vérifiez les contacts avec les extrémités du compartiment de piles.
ۋ Afin d'éviter tout risque d'explosion, d'écoulement ou de surchauffe, utilisez toujours quatre piles AA neuves
de même type et de la même marque. Ne mélangez ni différents types, ni des piles neuves avec des piles
usagées.
ۋ Ne cherchez pas à démonter les piles, ni à les décharger. Ne les exposez ni au feu, ni à l'eau : il y aurait
danger d'explosion. De même, ne cherchez pas à recharger des piles, ou des accumulateurs autres que des
accus Ni-Cd ou Ni-Mh.
ۋ Si vous n'utilisez pas le flash pendant une longue période, ôtez les piles afin d'éviter tout risque d'écoulement.
ۋ La performance des piles diminue sous de basses températures. Protégez-les du froid lorsque vous utilisez le
flash par temps froid.
ۋ Il est toujours recommandé d'emmener des piles de rechange lors d'un long voyage ou en cas d'utilisation
par grand froid.
Page 36

MISE EN PLACE DES PILES
1.
Assurez-vous que le flash est éteint (interrupteur principal
en position "OFF"). Ouvrez alors le compartiment de piles
en faisant glisser le couvercle dans le sens de la flèche.
2.
Insérez quatre piles AA dans le compartiment de piles, en
respectant les polarités + et – comme indiqué sur les parois.
3. Refermez le couvercle
4. Allumez le flash en plaçant l'interrupteur en position "ON".
Après quelques secondes, la lampe témoin de charge
s'allume, indiquant que le flash est prêt à fonctionner.
5. Appuyez sur le bouton TEST pour vous assurer que le
flash fonctionne correctement.
MISE EN VEILLE AUTOMATIQUE
Le flash se met en veille automatiquement après environ 90 secondes de non-activation, afin de préserver la
puissance des piles. Pour le remettre en route, appuyez sur le bouton TEST ou appuyez à mi-course sur le
déclencheur de l'appareil. Le système de mise en veille automatique ne fonctionne pas en mode de flash à
distance sans cordon, de mode flash asservi normal ou de mode flash asservi désigné.
INDICATEUR D'ANOMALIE
Si la puissance des piles est insuffisante, ou s'il y a un problème d'information électrique entre le flash et le
boîtier, le témoin de couverture d'angle clignote sur l'écran LCD. Dans ce cas, éteignez le flash et rallumez-le.
Si le témoin clignote encore, vérifiez la puissance des piles.
MISE EN PLACE DU MODULE DE CONTRÔLE
Assurez-vous que le flash est éteint. Placez ensuite le
sabot du flash dans la griffe porte flash de l'appareil et
tournez la vis de verrouillage pour bloquer le sabot.
ۋ Lorsque vous attachez ou retirez le flash, tenez bien
le corps du flash afin d'éviter d'endommager le sabot
ou la griffe porte flash.
ۋ Si le flash intégré du boîtier est relevé, rabaissez-le
avant de mettre en place le flash sur la griffe.
ۋ Pour retirer le flash, débloquez le sabot en tournant la
vis de verrouillage dans le sens inverse au symbole
◄LOCK jusqu'en butée.
MISE EN PLACE DU MODULE FLASH
1. Attachez l'adaptateur Macro sur le porte-filtre
2. Appuyez sur les boutons de verrouillage droit et gauche
de la tête flash et placez le flash sur l'adaptateur.
Relâchez ensuite les boutons de verrouillage.
ۋ Ajustez la position en faisant pivoter la tête flash.
ۋ Appuyez sur les deux boutons de verrouillage pour
enlever le flash de l'objectif.
RETRO ECLAIRAGE DE L'ECRAN LCD
Si vous appuyez sur le bouton LIGHT , l'écran LCD est éclairé pendant environ 8 secondes. Ce rétro éclairage
peut être prolongé en appuyant à nouveau sur le bouton LIGHT .
LAMPE D'ASSISTANCE
Dans un endroit sombre, la mise au point autofocus est plus aisée avec la lampe d'assistance. Appuyez sur le
bouton LAMP du module de contrôle pour activer la lampe pendant 20 secondes. Cette fonctionnalité est très
utile pour faciliter la composition dans des conditions où l'autofocus ou la mise au point manuelle sont délicats.
ۋ La lampe est désactivée dès que l'on appuye sur le déclencheur.
Page 37

MODE TTL
Le mode TTL procure une exposition correcte du sujet en contrôlant la quantité de lumière émise par le flash.
ۋ Reportez-vous au tableau A pour les différentes combinaisons appareils – objectif – modes d'exposition
et modes flash.
ۋ La fonction TTL ne fonctionne pas avec les boîtiers F-3, FM10,
Nouveau FM2, FE10, Nikonos V.
1. Choisissez le mode d'exposition de l'appareil (celui-ci peut varier d'un
boîtier à l'autre. Veuillez vous référer au mode d'emploi de l'appareil.
2. Mettez le flash sous tension en utilisant l'interrupteur.
3. Sélectionnez TTL/BL ou TTL en appuyant sur le bouton MODE .
ۋ Avec un reflex numérique, sélectionnez impérativement le mode TTL/BL.
Les boîtiers dotés du CLS seront contrôlés par le mode i-TTL. Les autres
fonctionneront avec le contrôle d'exposition D-TTL. Dans les deux cas, la
lettre " d " (digital) s'affichera sur l'écran de contrôle ACL.
ۋ Les modes TTL/BL ou TTL sont accessibles avec les boîtiers F6, F5, F4,
F100, F90X / F90 / F80 (N90S / N90 / N80), F70D / N70, F65 / N65,
F810S / N8008S, F801 / N8008S et Pronea 600i. Avec les autres
appareils, sélectionnez le mode TTL.
4. Faites la mise au point sur le sujet.
5. Vérifiez que le témoin de charge est allumé, et prenez la photo.
ۋ
Si la pellicule ne reçoit pas la quantité de lumière nécessaire pour une exposition correcte du sujet, le témoin
TTL/BL ou TTL s'affichera pendant 5 secondes sur l'écran LCD après la prise de vue, indiquant que la puissance
du flash est insuffisante. Reprenez alors la photo à une moindre distance, ou avec un plus grande ouverture.
ۋ Lorsque le flash est chargé, le témoin situé dans le viseur s'affiche. S'il n'apparaît pas, l'obturateur de
l'appareil pourra se déclencher à une vitesse lente sans flash.
tableau A
Appareil
Type d'objectif
Mode d'expo.
Mode de mesure
Système TTL
Remarques
Type D
Tous modes
Tous modes
Dosage auto flash/ambiance
par Multi capteur 3D
objectif AF
non D
Tous modes
Tous modes
Dosage auto flash/ambiance
par Multi capteur
F6, F5
F100
F90X/N90
F80/N80
F70D/N70
sans
microprocesseur
Modes A/M
Pondéré central,
Spot
Atténuation des ombres en
mesure pondérée centrale
Mode TTL possible. Avec F5, F100,
F80, la mesure spot est toujours TTL.
Matriciel
Dosage matriciel
flash/ambiance
avec
microprocesseur
Tous modes
Pondéré central
Spot
Atténuation des ombres en
mesure pondérée centrale
F4
F60/N65
F-801S/N8008S
F-801/N8008
Pronea 600i
sans
microprocesseur
Modes A/M
Pondéré central
Spot
Atténuation des ombres en
mesure pondérée centrale
Mode TTL possible. TTL Matriciel F4
avec objectifs AF F3, Ai-S, Ai, Séries E.
Le système spot du F4 est toujours
TTL. Le Pronea 600i est TTL avec
mode d'exposition M. L'atténuation des
ombres en mesure pondérée centrale
est indisponible.
Matriciel
Dosage matriciel
flash/ambiance
avec
microprocesseur
Tous modes
Pondéré central,
Spot
Atténuation des ombres en
mesure pondérée centrale
F601/N6006
F-601M
sans
microprocesseur
Tous modes
Pondéré central,
Spot
Atténuation des ombres en
mesure pondérée centrale
Pas de mesure Spot avec
F-601M
Avec
microprocesseur
P/S
A/M
Dosage matriciel
flash/ambiance
En mode “M”, atténuation des ombres en
mesure pondérée centrale
F60D/N60
F50D/N50
F-401X/4004S
Sans
microprocesseur
M
Atténuation des ombres en
mesure pondérée centrale
P
Programme TTL
Avec
microprocesseur,
Ai-S, Ai, Séries E,
objectifs pour F3
A/M
TTL
F501/N2020
F301/N2000
Autres
A/M TTL
P/S
Programme TTL
Avec
microprocesseur
A/M
TTL
F401S/N4004S
F401/N4004
Sans
microprocesseur
M TTL
FA, FE2, FG, F3
Tous
A/M TTL
Avec un boîtier reflex numérique, les fonctionnalités varient selon le type d'objectif et les modes d'exposition
comme pour le groupe F5 et F100, mais avec un contrôle automatique de l'exposition D-TTL ou i-TTL.
Page 38

Il est possible de donner un effet tri-dimensionnel à vos images en activant seulement l'un des
deux réflecteurs.
1. En mode TTL/BL(TTL), appuyez sur le bouton SEL pour faire
clignoter l'affichage.
2. Appuyez sur
+
pour activer le tube gauche, ou sur
-
pour activer
le tube droit. (seul le côté actif clignote)
3. Appuyez plusiers fois sur SEL pour valider et faire cesser le
clignotement.
ۋ Après la prise de vue, appuyez sur SEL puis sur
+ ou -
pour
réactiver les deux côtés.
LIMITES DES PRISES DE VUE CONSECUTIVES AU FLASH
Pour éviter une surchauffe, laissez le flash au repos au moins 10 minutes après des séquences de prises
de vues consécutives en respectant le tableau ci-dessous.
Mode
Nombre d'éclairs
TTL, M(1/1,1/2)
15 éclairs consécutifs
M(1/4, 1/8)
20 éclairs consécutifs
M(1/16-1/32)
40 éclairs consécutifs
Stroboscopique
10 Cycles
MODE OPERATOIRE EN FLASH MANUEL
Le flash manuel permet de régler la puissance du flash.
La prise de vue en mode manuel nécessite un savoir-faire important.
Nous vous recommandons d'utiliser le mode automatique. Avant
d'utiliser le mode manuel, il est recommandé de faire des essais
préalables, et il peut être utile d'utilser un flashmètre pour déterminer
l'exposition.
La puissance des tubes gauche et droit peut être réglée entre 1/1 et
1/64, et il est aussi possible de n'activer qu'un seul réflecteur.
1. Réglez le mode d'exposition du boîtier sur M.
2. Appuyez sur le bouton MODE du flash et sélectionnez M.
3. Appuyez sur le bouton SEL. (la puissance du tube gauche clignote).
4. Appuyez sur + ou - pour régler la puissance du tube gauche.
(si “ - - “ est affiché, le tube gauche est désactivé).
5. Appuyez sur SEL button. (la puissance du tube droit clignote).
6. Appuyez sur + ou - pour régler la puissance du tube droit.
(si “ -- “ est affiché, le tube droit est désactivé).
7. Appuyez sur SEL pour valider et faire cesser le clignotement.
ۋ Si les puissances des deux tubes sont identiques, la puissance du
flash s'affiche. Si des niveaux différents sont sélectionnés, la
puissance du flash n'est pas affichée.
ۋ Pour déterminer le Nombre Guide, veuillez vous reporter au tableau
[Table 1] en dernière page.
ۋ L'exposition correcte peut être calculée par la formule :
mbre Guide “NG” / Distance du flash a sujet = valeur d'ouverture F
MEMORISATION DE LA PUISSANCE DU FLASH FV (Pour D70,F6)
La fonction de mémorisation “FV” permet de garder en mémoire l'exposition au flash appropriée pour une
partie de l'image, même si vous modifiez ensuite le cadrage.
Vous ne pouvez pas sélectionner cette fonction directement sur le flash. Pour plus de détails, veuillez
vous reporter au mode d'emploi du boîtier.
Page 39

CORRECTION D'EXPOSITION AU FLASH
Vous pouvez effectuer une correction d'exposition en modifiant la puissance du flash.
Correction d'exposition volontaire de l'éclairage au flash EM-140 DG NA-iTTL
ۋ Accessible uniquement avec les boîtiers reflex numériques et F6, F5, séries F4, F100, F90/N90,
F90X/N90S, séries F80/F80, F70D, U/F65/N65, F801S/N800S, F801/ N8008, F601M, F601/N6006,
Pronea 600i.
ۋ Les appareils disposant d'une possibilité de correction d'exposition
permettent en outre d'effectuer la correction d'exposition au choix par
le flash EM-140 DG NA-iTTL ou par le boîtier (ou les deux à la fois). Si
vous associez les deux, l'exposition sera modifiée de la somme des
deux corrections, et elle concernera également l'arrière-plan.
ۋ Si votre appareil est de la série F601/N6006, il faut régler la correction
d'exposition au niveau du mode de synchronisation du boîtier.
ۋ La correction peut s'opérer par 1/3 de valeur de +1.0 IL to –3.0 IL.
1. Appuyez sur le bouton MODE pour sélectionner le mode TTL/BL
(TTL).
2. Appuyez sur le bouton SEL pour faire clignoter l'icône de correction
d'exposition .
3. Appuyez sur la touche
+ ou –
pour régler la valeur de la correction.
4. Appuyez sur SEL pour valider et faire cesser le clignotement.
Correction d'exposition volontaire de l'éclairage au flash EM-140 DG NA-iTTL et de l'arrière-plan
ۋ Cette fonction n'est pas accessible aux boîtiers des séries F3, FM10, nouveau FM2 et FE10. Utilisez la
commande de correction d'exposition de l'appareil pour une correction d'exposition globale de
l'avant-plan et de l'arrière-plan (veuillez vous reporter au mode d'emploi du boîtier).
Correction d'exposition en mode M
En mode manuel M, vous pouvez changer le diaphragme sur l'appareil ou modifier la puissance du flash
après avoir décidé d'une correction d'exposition.
SYNCHRONISATION SUR LE SECOND RIDEAU
Lorsque vous photographiez un sujet en mouvement en synchronisation lente, l'écho du sujet apparaît
devant lui. Ceci est dû au fait que l'éclair est normalement activé lorsque le rideau est entièrement ouvert,
ce qui fait que le sujet demeure exposé jusqu'à la fermeture du rideau (synchronisation sur le premier
rideau). Avec la synchronisation sur le second rideau, le flash est activé juste avant la fermeture du rideau,
et le sujet est donc exposé entre l'ouverture de l'obturateur et le moment de l'éclair.
◆ Cette fonction n'est accessible qu'aux boîtiers disposant de la synchronisation sur le second rideau. .
◆ Vous ne pouvez pas sélectionner cette fonction directement sur le flash. Pour plus de détails, veuillez
vous reporter au mode d'emploi du boîtier
◆ L'écran LCD du flash affiche l'icône lorsque la fonction est activée.
FLASH PREDICTIF
Le flash prédictif permet de visualiser l'éclairage et les effets d'ombres avant de prendre la photo.
1. Appuyez sur le bouton MODE et sélectionnez le mode flash souhaité.
2. Appuyez sur
+ ou –
à plusieurs reprises pour faire apparaître l'icône sur l'écran ACL.
3. Assurez-vous que le flash est chargé, et appuyez sur le bouton TEST pour activer le flash prédictif.
MODE DE FLASH STROBOSCOPIQUE (MULTI FLASH)
Dans ce mode créatif, le flash émet une série d'éclairs pendant l'ouverture de l'obturateur, générant ainsi
une série d'images du sujet sur la même vue. Le sujet sera particulièrement mis en valeur si l'arrière-plan
est sombre. La fréquence des éclairs peut être choisie entre 1Hz et 199Hz. Il est possible de produire
jusqu'à 90 éclairs en continu. Le nombre maximal d'éclairs dépend du nombre guide du flash et de la
fréquence retenue. (voir le tableau 3 en dernière page)
Page 40

1. Sélectionnez le mode M sur le boîtier et choisissez l'ouverture.
2. Appuyez sur le bouton MODE jusqu'à ce que le symbole du mode multi-flash apparaisse.
3. Appuyez sur SEL jusqu'à ce que la fréquence se mette à clignoter
4. Appuyez su
+ ou –
pour sélectionne la fréquence souhaitée.
5. Après une nouvelle pression sur SEL , la puissance du flash clignote
6. Appuyez sur
+ ou –
pour choisir la puissance souhaitée.
7. Appuyez sur SEL , le nombre d'éclairs clignote
8. Appuyez sur
+ ou –
pour sélectionner le nombre d'éclairs souhaité.
9. Appuyez à nouveau sur SEL , l'affichage cesse de clignoter.
10. Dès que la lampe témoin de charge s'allume, le flash est prêt
Nota: Utilisez toujours une vitesse d'obturation plus lente que la valeur ci-dessous :
[Intervalle entre deux éclairs] / [Nombre d'éclairs]
FLASH DISTANT SANS FIL
(Pour D70, F6)
Il est possible d'utiliser le flash distant sans fil avec le flash EM-140 DG en tant que flash maître et le flash
EF-500 DG SUPER NA-iTTL en tant que flash asservi pour l'éclairage.
ۋ Dans les instructions qui suivant, nous appellerons "flash maître" le flash installé sur le boîtier, et "flash
asservi" le ou les flashes placés à distance de l'appareil.
ۋ Maintenez une distance minimale de 5 mètres entre le flash maître et le flash asservi.
ۋ Pour le réglage du flash asservi, veuillez vous reporter au mode d'emploi du flash (section flash distant sans
fil).
FLASH DISTANT SANS FIL i-TTL
En mode distant sans fil i-TTL, le boîtier calcule automatiquement l'exposition correcte.
Réglage du flash asservi
1.
Suivez le mode d'emploi du flash asservi pour régler la sélection sur le groupe 3.
2. Placez le flash asservi à l'emplacement souhaité.
Réglage du flash maître
3. Appuyez sur le bouton MODE et sélectionnez le symbole .
4. Après avoir vérifié que les deux flashes sont chargés, prenez la photo.
ۋ Le mode sans cordon Auto iTTL Auto, la mémorisation de puissance FV,
la correction d'exposition et la synchronisation sur le second rideau
peuvent être utilisés ensemble. Une fois le mode sans cordon activé,
réglez chaque autres fonction séparément sur le flash maître. Aucun
autre réglage n'est nécessaire sur le flash asservi.
FLASH SANS FIL MANUEL
Vous pouvez régler manuellement la puissance du flash asservi à partir du flash maître. Utilisez un flashmètre
pour déterminer l'exposition correcte.
Réglage du flash asservi
1.
Suivez le mode d'emploi du flash asservi pour régler la sélection sur le groupe 3.
2. Placez le flash asservi à l'emplacement souhaité.
Réglage du flash maître
3. Appuyez sur le bouton MODE et sélectionnez le symbole .
4. Appuyez sur SEL pendant plus de 2 secondes pour faire clignoter
l'indicateur de mode .
5. Appuyez sur MODE et sélectionnez le symbole M qui clignote.
6. Appuyez sur SEL pour confirmer le choix et faire cesser le clignotement.
7. Appuyez à nouveau sur SEL et suivez la procédure normale de réglage
de puissance manuelle.
Si vous changez de mode, les réglages seront annulés.
Un flash esclave réglé sur le groupe 1 sera activé par le tube gauche (1), un flash esclave réglé sur le groupe
2 sera activé par le tube droit (2).
Page 41

FLASH DISTANT STROBOSCOPIQUE (MULTI FLASH)
Réglage du flash asservi
1. Suivez le mode d'emploi du flash asservi pour régler la sélection sur le groupe 3.
2. Placez le flash asservi à l'emplacement souhaité.
Réglage du flash maître
3. Appuyez sur le bouton MODE et sélectionnez le symbole .
4. Appuyez sur SEL pendant plus de 2 secondes pour faire clignoter
l'indicateur de mode.
5. Appuyez sur MODE et sélectionnez le symbole MULTI.
6. Appuyez sur SEL pour faire cesser le clignotement.
7. Appuyez à nouveau sur SEL et suivez la procédure de flash stroboscopique et de réglage de la puissance.
Si vous changez de mode, les réglages seront annulés.
CHANNEL SETTING
Si d'autres photographes utilisent le mode flash sans fil à proximité, il y a un risque que votre flash soit activé
par le flash d'un autre et se déclenche inopinément. Dans ces circonstances, nous vous conseillons de
paramétrer un canal de communication qui vous soit propre afin d'éviter les interférences.
1. En mode distant, appuyez sur le bouton SEL à plusieurs reprises jusqu'à
ce que l'indicateur de canal clignote.
2. Appuyez sur les touches
+ ou –
pour choisir un canal (C1 à C4)
3. Appuyez sur SEL pour faire cesser le clignotement.
4. Suivez les instructions du mode d'emploi du flash asservi et réglez-le sur
le même canal que le flash maître.
CARACTERISTIQUES TECHNIQUES
TYPE : Flash électronique à tête zoom automatique et orientable à contrôle TTL
NOMBRE GUIDE : 14 (100 ISO/m)
ALIMENTATION : Quatre piles alcalines de type AA ou : Quatre accumulateurs Ni-Cd de type AA ou
: Quatre accumulateurs Ni-Mh de type AA
TEMPS DE RECYCLAGE
: environ 4.0 sec. (avec piles alcalines) : environ 3.0 sec. (accus Ni-Cd et Ni-Mh)
MISE EN VEILLE AUTOMATIQUE : oui
TEMPERATURE DE COULEUR : pour films couleurs de type lumière du jour
POIDS : 430 g
DIMENSIONS (Module de contrôle) : 76.7mm (l) x 136.2mm (H) x 82.4mm (L)
DIMENSIONS (Module de flash) : 126.6 (l) x 128.8mm (H) x 30.54mm (L)
Page 42

ESPAÑOL
Muchas gracias por comprar el Flash electrónico Macro Sigma EM-140 DG. Las avanzadas características
de este producto le permitirán disfrutar de la Macro fotografía AF. Dependiendo del modelo de cámara, las
funciones pueden variar. Por favor lea este manual de instrucciones detenidamente. Para que pueda
disfrutar de la fotografía, el flash tiene mucha variedad de características. Para utilizar la mayoría de éstas,
y obtener el máximo rendimiento y disfrutar de su flash, por favor lea este libro de instrucciones junto con
el manual de su cámara antes de utilizar el flash, y guárdelo a mano para próximas consultas.
(Este flash es exclusivo para cámaras Nikon)
PRECAUCIONES
Para evitar posibles daños o perjuicios. Por favor lea el manual de instrucciones muy atentamente, y
preste atención a los símbolos de precaución que vienen a continuación antes de utilizar el flash.
Por favor tome nota de los dos símbolos de precaución que aparecen a continuación.
Advertencia!!
Cuidado!!
Este símbolo significa puntos importantes, que se requiere cuidado o advertencia.
O Este símbolo contiene información con respecto a acciones que deben prevenir.
Ignorar el símbolo de Advertencia al utilizar este producto, puede causar
serio perjuicios o otros daños.
Ignorar el símbolo de Advertencia al utilizar este producto, puede causar
daños o perjuicios.
Advertencia!!
Este flash contiene circuitos de alto voltaje. Para evitar quemaduras no intente desmontar el flash.
Si la carcasa exterior se rompe no toque los mecanismos interiores.
No dispare el flash cerca de los ojos. El brillo del destello podría dañar los ojos. Mantenga una
distancia de al menos 1m entre la cara y la cámara, cuando realice fotografías con flash.
No toque el terminal sincro de la cámara cuando el flash está conectado a la zapata. El circuito de
alto voltaje podría causar un shock eléctrico.
Nunca utilice el equipo en ambientes inflamables, con llamas, gases, líquidos o químicos, etc.
Podría causar un incendio o una explosión.
Cuidado!!
No utilice esta unidad de flash en ninguna otra cámara que las Nikon; De otro modo el flash podría
dañar el circuito de esas cámaras.
Esta unidad de flash no es resistente al agua. Cuando utilice el flash y la cámara con lluvia, nieve o
cerca del agua, cuide que no se humedezca. A menudo es imposible reparar componentes
eléctricos internos estropeados a causa del agua.
Nunca deje la cámara en un lugar con polvo, alta temperatura o húmedo. Estos factores pueden
causar fuego o estropear su equipo.
Cuando el flash está sujeto a cambios bruscos de temperatura, como cuando transporta la unidad
de flash de un lugar frío exterior a uno cálido interior. En este caso, ponga su equipo en una bolsa
de plástico sellada y no utilice la unidad de flash hasta que alcance la temperatura de ola habitación.
No almacene el flash en un armario, cajón, etc., si contiene naftalina, o otros insecticidas. Esto
podría producir efectos negativos en la unidad de flash.
No utilice gasolina o otros agentes de limpieza para sacar el polvo o huellas dactilares. Límpiese
con un trapo de ropa suave.
Para un almacenamiento prolongado, escoja un lugar frío y seco, preferiblemente con buena
ventilación. Dispare el flash unas cuantas veces al mes para mantener en buen estado sus
funciones.
Page 43

DESCRIPCIÓN DE LAS PARTES
Unidad de Flash
1.Lámpara izquierda 2.Lámpara derecha 3.Luz modelado 4.Pestaña
5.Aro adaptador Flash Macro
Unidad de Control
6.Pantalla LCD 7.Tapa batería 8.Rosca zapata 9.Zapata 10.Botón MODO
11.Botón SELECTOR <SEL> 12.Botón de incremento + 13.Botón de disminución - 14.Botón de LUZ
15. Botón de TEST 16. Botón de iluminación 17. Flash listo 18. Interruptor de encendido
USO CON OBJETIVOS
Aunque este Flash ha sido diseñado especialmente para Objetivos Macro (MACRO 50mm F2.8 EX DG,
MACRO 105mm F2.8 EX DG, etc.) también se puede utilizar con otro tipo de objetivos, aun así ponga
atención a los siguientes puntos:
La parte frontal u otras partes de algunos objetivos ruedan durante el enfoque, y también el aro del flash
acoplado podría afectar al mecanismo de enfoque de su cámara. Por favor utilice el enfoque manual.
Los aros adaptadores de filtros para Flash Macro Ø55mm y Ø58mm están incorporados en el flash. Si
desea adaptar su Flash a un objetivo con un diámetro de filtro distinto, por favor adquiera un adaptador.
(Solo están disponibles los adaptadores para Flash Macro Ø52mm, Ø62mm, Ø72mm, Ø77mm)
Dependiendo de la focal del objetivo o la distancia con el sujeto u otra razón, es posible que se produzca
viñeteo en su imagen. Por favor, haga pruebas y asegúrese que sus ajustes no le causen viñeteo.
ACERCA DE LAS PILAS
Esta unidad de flash utiliza cuatro pilas Alcalinas de tipo “AA” o pilas recargables Ni-Cad. Las pilas de
Magnesio también se pueden utilizar aunque tienen una vida más corta que las alcalinas. No recomendamos
utilizarlas. Por favor cambie las pilas si la Luz de Preparado tarda más de 30 segundos en iluminarse.
ۋ Para asegurar un buen contacto eléctrico, limpie las terminales de las pilas antes de instalarlas.
ۋ Las pilas NiCad Ni-MH, no tienen contactos estandarizados. Si utiliza las pilas Ni-Cad, por favor
confirme que los contactos de las baterías coinciden correctamente con el compartimento de las pilas.
ۋ Para prevenir la explosión de las pilas, una fuga o recalentamiento, utilice cuatro pilas nuevas AA del
mismo tipo y de la misma marca. No mezcle diferentes tipos ni pilas nuevas y usadas.
ۋ No desmonte o haga un corto circuito con las pilas, o las exponga al fuego o al agua; podrían explotar.
Tampoco intente recargar pilas que no sean Ni-Cd recargables.
ۋ Cuando el flash no se vaya a utilizar en un periodo largo, saque las pilas del flash, para evitar posibles
daños o roturas.
ۋ La vida de las pilas decrece a temperaturas bajas. Guarde las pilas en un lugar cálido cuando utilice el
flash con un tiempo frío.
ۋ Como con ningún flash, se recomienda que se lleven pilas de recambio cuando se realice un viaje largo
o se fotografíe al exterior con temperaturas bajas.
CARGA DE LAS PILAS
1. Asegúrese de ajustar el flash a la posición off,
entonces deslice la tapa de las pilas en dirección de la
flecha para abrir el compartimento.
2. Inserte cuatro pilas del tamaño AA en el
compartimento de las pilas. Asegúrese que el + y el –
de las pilas coincide con el dibujo del compartimento.
3. Cierre la tapa.
4. Deslice el interruptor de encendido a la posición ON.
Después de unos segundos la luz de preparado se
iluminará, indicando que la unidad de flash ya está a
punto.
5. Por favor presione el “botón de Test “ para estar seguro de que el flash funciona correctamente.
Page 44

DESACTIVACIÓN AUTOMÁTICA
Para conservar las pilas , la unidad de flash se desactiva automáticamente cundo no se ha utilizado en
aproximadamente 90 segundos. Para volver activar el flash, presione el botón de TEST o el disparador de
la cámara levemente. El mecanismo de “desactivado automático” no funciona con el modo esclavo.
AJUSTE DEL CABEZAL DEL FLASH
Presione el botón de bloqueo y desbloqueo del movimiento arriba y abajo, mientras ajusta el cabezal a la
posición deseada. Aparecerá en la pantalla LCD cuando ponga en marcha el flash, y si esta marca
parpadea entonces el cabezal del flash no está ajustado a una posición correcta.
ADAPTAR LA UNIDAD DE CONTROL
Asegúrese que el flash está desconectado. Entonces
inserte ola base de la zapata en la zapata de la cámara
y gire el anillo de la zapata hasta que esté ajustado.
ۋ Cuando coloque o desmonte el flash, agarre el botón
del flash para prevenir daños en el pie de la zapata
y la zapata de la cámara.
ۋ Si el flash incorporado de la cámara esta alzado, por
favor ciérrela antes de montar la unidad de flash.
ۋ Para desmontar el flash de la cámara, gire el anillo de
la zapata en la dirección opuesta a la marca hasta el
final.
ADAPTAR LA UNIDAD DE FLASH
1. Por favor, acerque el adaptador para Flash Macro a la
pestaña.
2. Mientras presiona la pestaña derecha e izquierda por
los dos lados del adaptador, ponga la unidad de Flash
debajo del adaptador, luego suelte las pestañas.
Puede ajustar la posición mediante la rotación de la
unidad de flash.
Por favor, suelte las pestañas cuando saque la unidad
de flash del objetivo.
ILUMINACIÓN DE LA PANTALLA LCD
Cuando presiona el botón Light, la pantalla LCD se iluminará acerca de 8 segundos. La iluminación se
prolongará si vuelve a presionar el botón light otra vez.
LUZ DE MODELADO
Si el botón LAMP de la Unidad de Flash está presionado, la luz auxiliar estará encendida durante 20
segundos. La luz de modelado le facilitará los ajustes en el foco en lugares con poca luz. Esta función es
muy conveniente en una situación donde el auto foco no funciona correctamente o el ajuste del enfoque
manual es complicado.
ۋ Si el botón no está activado, la luz no actuará.
Page 45

FLASH AUTOMÁTICO TTL
En el modo TTL AUTO, la cámara controlará la cantidad de luz para
obtener la exposición correcta del sujeto.
1. Ajuste la exposición de la cámara al modo P
2. Conecte el flash, la marca TTL BL (TTL) aparecerá en la pantalla LCD
y el flash empezará a cargarse.(Si la marca TTL BL (TTL) no aparece,
presione el botón MODE varias veces para seleccionar el modo TTL
BL (TTL))
3. Enfoque el sujeto.
◆ Al emplear con cámaras Réflex Digitales acuérdese de escoger
TTL/BL. Cámaras compatibles con CLS son controladas a través de
sistemas de exposición i-TTL. Cámaras incompatibles CLS son
controladas a través de un sistema de exposición D-TTL. En ambos
casos la letra "d" (digital) se mostrará en la pantalla LCD.
4. Presione el botón de disparo después que el flash esté
completamente cargado.
ۋ Dependiendo de la combinación de cámara-objetivo, el modo de exposición y el de medición, el sistema TTL
puede variar. Consulte la tabla.
ۋ Dependiendo de la combinación de cámara-objetivo, el modo de exposición y el de medición, el sistema
TTL puede variar. Consulte la Cuadro A.
Cuadro A
cámara
Tipo de objetivo
Modo de exposición
Medición
Sistema TTL
Notas
Tipo D
Todos los modos
Todos los modos
3D Matricial BL
Otros obj. AF
Que no sean
tipo D
Todos los modos
Todos los modos
Matricial BL
F6, F5
F100
F90X/N90ser
F80/N80ser
F70D/N70
Sin CPU
incorporada
Modos A/M
Medición central
Spot
Medición central BL
Se puede cambiar a TTL.Con las cámaras
F5,F100, F80 el sistema de medición Spot es
siempre TTL
Matricial
TTL BL
Con CPU
incorporada
Todos los modos
Medición central
Spot
Medición central
Spot
Series F4
F801s/N8008
F801/N8008
Pronea 600i
Sin CPU
incorporada
Modos A/M
Medición central
Spot
Medición central
Spot
Se puede cambiar a TTL. Solo las cámara F4
pueden trabajar con TTL BL. El sistema de
medición Spot de la F4 siempre es TTL, La
Pronea 600i será TTL cuando el modo es M la
medición central BL no funciona
Matricial
TTL BL
Con CPU
incorporada
Todos los modos
Medición central
Spot
Medición central
Spot
F601/N6006
F-601M
Sin CPU
incorporada
Modos A/M
Medición central
Spot
Medición central
Spot
La medición Spot no se puede usar con la
F-601M
Con CPU
incorporada
P/S
A/M
TTL BL
Si el modo de exposición es M será Central
promedio/Spot
F60D/N60
F50D/N50
F401x/4004S
Sin CPU
incorporada
M
Medición central
Spot
TTL program.
P
Con CPU
incorporada
Ai-S, Series E,
obj. Para F-3
A/M
TTL
F501/N2020
F301/N2000
Objetivos
compatibles
A/M TTL
P/S
TTL program
Con CPU
incorporada
A/M
TTL
F401S /N4004S
F401/N4004
Sin CPU
incorporada
M TTL
FA, FE2
FG, F3
Con CPU
incorporada
Sin CPU
incorporada
A/M TTL
ۋ Al emplear con Cámaras réflex digitales las funciones pueden variar dependiendo del objetivo empleado
y de las ditintas combinaciones de los modos de exposición. Tanto en la F5 y el grupo F100. (Aun así
todas las funciones de exposición TTL serán D-TTL (i-TTL).
Page 46

Puede dar el efecto de tres dimensiones en sus imágenes utilizando una de las dos lámparas.
1. En el modo TTL BL (TTL), presione el botón SEL para que el
indicador de la Unidad de Flash parpadee.
2. Presionando el botón
+
de la lámpara de la izquierda, y presionando
el botón -
de la lámpara de la derecha, se encenderá. (Solo
parpadeará el lado utilizado de la Unidad de Flash)
3. Presione el botón SEL varias veces para desactivar el parpadeo.
Después del disparo presione el botón
+ o –
y permitir la
visualización de las dos.
LIMITACIONES DEL DISPARO CONTINUO
Para prevenir recalentamientos, por favor no utilice la unidad de flash por lo menos 10 minutos después
de utilizar el número de exposiciones que se muestran en la tabla a continuación.
Modo
Número de exposiciones con Flash
TTL, M(1/1,1/2)
15 Disparos continuos de flash
M(1/4, 1/8)
20 Disparos continuos de flash
M(1/16-1/32)
40 Disparos continuos de flash
Multi
Ciclo 10
FLASH MANUAL
En el modo de flash manual, puede ajustar el nivel de potencia del flash que desee (potencia del flash
externo).
La utilización en Modo Manual requiere una técnica muy avanzada. Le recomendamos que utilice el
Modo Automático. Cuando realice fotografías con el Flash Manual, por favor haga pruebas, éstas serán
más exactas si utiliza un medidor de flash para determinar la exposición.
Puede ajustar la intensidad de las lámparas de Flash de la izquierda y
de la derecha entre 1/1~1/64, y también la puede ajustar utilizando
una de las dos lámparas.
1. Ajuste la exposición de la cámara al modo M.
2. Presione el botón MODE de la Unidad de Flash para seleccionar M.
3. Presione el botón SEL. (El indicador de potencia de la lámpara de la
izquierda parpadeará).
4. Presione el botón + o – para seleccionar el nivel de potencia
del flash de la izquierda deseada. (Si se muestra “--“, la lámpara de
la izquierda no se activará).
5. Presione el botón SEL. (El indicador de potencia de la lámpara de la
derecha parpadeará).
6. Presione el botón + o – para seleccionar la potencia del flash
de la derecha deseada. (Si se muestra “--“, la lámpara de la derecha
no se activará).
7. Presione el botón SEL para que el indicador deje de parpadear.
Si los valores de la potencia del flash de las dos lámparas son los
mismos, entonces éstos se mostrarán. Si la potencia de las dos
lámparas es distinta, ésta no aparecerá en la pantalla LCD.
Referente al Número Guía, por favor consulte [Tabla 1] de la última
página.
Puede calcular la exposición correcta usando la fórmula siguiente:
Número Guía “GN” / Distancia del Flash al Sujeto = Número del Diafragma (NF)
Page 47

BLOQUEO FV (Solo D70,F6)
El bloqueo “FV” le permite escoger la exposiciñon desde el visor óptico y fijarlo antes de realizar la toma.
ۋ Esta función no puede prefijarse directamente desde el flash. Más información en el manual de
instruccones de la cámara.
COMPENSACIÓN DE EXPOSICIÓN
Puede utilizar la compensación de exposición del flash combinado la compensación de exposición normal
(para controlar la exposición del fondo) en las fotografías con flash. La compensación de exposición del
flash se puede ajustar 1/3pasos en +/- 3 pasos).
ۋ Dedicado exclusivamente para cámaras Réflex Digitales, series F6,
F5, F4, F100, F90/N90, F90X/N90S, F80/F80, F70D, U/F65/N65,
F801S/N800S, F801/ N8008, F601M, F601/N6006 y Pronea 600i.
1. Presione el botón SEL y seleccione .
2. Presione los botones + o - para ajustar la compensación de exposición
del flash deseada.
3. La marca dejará de parpadear y quedará fija hasta que vuelva a
presionar el botón SEL.
4. Enfoque el sujeto.
5. Por favor compruebe que el sujeto está dentro del rango del flash que
aparece en la pantalla LCD del flash.
6. Puede realizar la fotografía después de confirmar que la Luz de
Preparado del flash está iluminada.
ۋ Para cancelar la compensación de exposición, por favor empiece
desde el paso 1 y escoja +0 en el dispositivo.
SINCRONIZACIÓN CON LA SEGUNDA CORTINILLA
Cuando se fotografía un sujeto en movimiento con sincronización lenta, normalmente el efecto movimiento
se reflejará por delante del sujeto. La luz del flash ordinario, se dispara en el momento que la primera
cortinilla está totalmente abierta, de modo que el sujeto se expondrá desde el momento que se dispare el
flash hasta que se cierre el obturador (Sincronización con la primera cortinilla). Cuando se utiliza la
sincronización con la segunda cortinilla, el flash se dispara justo antes que empiece a cerrarse la segunda
cortinilla, y la exposición captará la luz ambiente desde el momento que se obre el obturador hasta que se
dispara el flash. El efecto movimiento del sujeto se expondrá detrás del sujeto. Será un efecto más natural.
◆ Tan solo puede emplearse con cámaras que dispongan de sincronización el la segunda cortinilla.
◆ Esta función no puede prefijarse directamente desde el flash. Más información en el manual de
instruccones de la cámara.
◆ La pantalla LCD del flash indicará la marca , cuando este ajustado la sincronización a la segunda
cortinilla.
FLASH DI RIEMPIMENTO
Se si usa la funzione Flash di riempimento è possibile controllare gli effetti di luce e ombra, prima di
scattare la foto.
1. Premere il pulsante MODE impostare il modo di funzionamento desiderato.
2. Premere il pulsante + o - alcune volte per far apparire la scritta sul display LCD.
3. Accertarsi che il flash sia pronto al lampo, poi premere il pulsante TEST per farlo scattare.
MODO DE MULTI FLASH (Estroboscópico)
Mientras el obturador está abierto, el flash puede disparar repetidamente. Para realizar una serie de
imágenes del sujeto en un solo fotograma. En un fondo oscuro con el sujeto iluminado, este modo es más
efectivo. Es posible ajustar la frecuencia de disparos entre 1Hz y 199Hz. Superior a 90 disparos
continuados. El máximo números de disparos varía dependiendo del número guía del flash y de la
frecuencia de disparos. (Por favor mire Cuadro 3 de la última página)
Page 48

1. Ajuste la cámara al modo M y seleccione el número F.
2. Presione el botón MODE hasta que aparezca el modo multi-flash.
3. Presione el botón SEL hasta que parpadee el flash de frecuencia.
4. Presione el botón
+ o –
para ajustar el valor deseado.
5. Después de presionar el botón SEL otra vez, el nivel de la potencia
del flash parpadeará.
6. Presione el botón
+ o –
para ajustar el nivel de la potencia del
flash deseado
7. Presione el botón SEL para que parpadee el número de disparos
8. Presione los botón
+ o –
para seleccionar el número de disparos deseados
9. Vuelva a presionar el botón SEL para que deje de parpadear.
10. Cuando se ilumine la Luz de Preparado del flash, la unidad está lista para utilizarlo.
Nota: Por favor seleccione una velocidad de obturación superior a;
Número de disparos que quiere / Frecuencia de disparo
FLASH INALÁMBRICO (Solo D70,F6)
Puede tomar fotografías con Flash inalámbrico si utiliza dicha unidad de control como principal y el EF-500
SUPER NA-iTTL como Flash esclavo.
En esta instrucción, llamamos unidad de flash, lo que esta adjunto al cuerpo de la cámara “Unidad
Master” y llamamos a la unidad de flash por control remoto “unidad esclava” la cual está localizada en la
correcta posición.
Por favor, compruebe que la distancia entre la unidad principal y la esclava sea menor de 5 metros.
Referente a los ajustes del flash esclavo, por favor consulte el manual de instrucciones de dicho
producto (sección de flash en control remoto).
FLASH INALÁMBRICO CON i-TTL
En Auto flash inalámbrico con i-TTL, la cámara calcula automáticamente la exposición correcta.
Ajustes del Flash Esclavo
1. Siga el manual de instrucciones del flash esclavo y ajuste el número del grupo a 3.
2. Ponga la Unidad Esclava a la posición deseada.
Ajustes del Flash Principal
3. Presione el botón MODE para seleccionar el icono .
4. Después de comprobar que el Flash principal y el esclavo están
completamente cargados, puede tomar fotografías.
Puede utilizar conjuntamente el Flash inalámbrico iTTL automático, el
bloqueo FV, la compensación de la exposición y la sincronización a la cortinilla trasera. Después de
ajustar el modo inalámbrico, por favor utilícelo según las características. No es necesario realizar la
operación con la unidad esclava.
FLASH MANUAL INALÁMBRICO
Puede ajustar manualmente el Flash Manual Inalámbrico con la unidad principal. Para determinar la
correcta exposición del flash, utilice un medidor de mano para flash.
Ajustes de la Unidad Esclava
1. Siga el manual de instrucciones del flash esclavo y ajuste el número del grupo a 3.
2. Ponga el Flash Esclavo a la posición deseada.
Ajustes de la Unidad Principal
3. Presione el botón MODE para seleccionar el icono .
4. Presione y mantenga presionado el botón SEL más de 2 segundos
para que parpadee el indicador de modo.
5. Presione el botón MODE en la unidad de flash para seleccionar M.
Page 49

6. Presione el botón SEL y se mostrará el modo de flash.
7. Presione el botón SEL una vez más, siga el procedimiento del Flash Manual y ajuste la intensidad de
cada flash.
Cambiar el modo implica cancelar los ajustes.
Ajustando el grupo número 1 de la unidad Esclava controlará la lámpara de la izquierda (1) y con el
grupo número 2 controlará la lámpara de la derecha (2).
MULTI FLASH INALÁMBRICO
Ajustes de la Unidad Esclava
1. Siga el manual de instrucciones del flash esclavo y ajuste el número del grupo a 3.
2. Ponga la Unidad Esclava a la posición deseada.
Ajustes de la Unidad Principal
3. Presione el botón MODE para seleccionar el icono .
4. Presione y mantenga presionado el botón SEL más de 2 segundos
para que el indicador de modo parpadee.
5. Presione el botón MODE en la unidad de flash para seleccionar
MULTI.
6. Presione el botón SEL para que el indicador de modo deje de parpadear.
7. Presione el botón SEL otra vez, siga los procedimientos de Multi Flash y ajuste la potencia de cada
flash.
Cambiar el modo implica cancelar los ajustes.
CHANNEL SETTING
En caso que otros fotógrafos estén utilizando el Flash en modo Control Remoto cerca de UD., puede que
su flash se conecte con las otras unidades de flash de otras personas y éste se dispare. En estas
circunstancias, por favor ajuste en su flash un canal diferente al de las otras personas.
1. Presione el botón SEL en algún Flash con Control Remoto varias
veces para que el indicador de canal parpadee.
2. Presione el botón
+ o –
para seleccionar el número del canal (C1 ~
C4)
3. Presione el botón SEL para que el indicador deje de parpadear.
4. Por favor, siga el manual de instrucciones de la unidad esclava y
seleccione el mismo número de canal que el de la unidad principal.
ESPECIFICACIONES
NUMERO GUIA: 14 ( 100 ISO/m)
ALIMENTACION: Cuatro pilas alcalinas de tipo AA
cuatro pilas Ni-Cd de tipo AA,
cuatro pilas Niquel-hidrógeno de tipo AA.
TIEMPO DE RECICLAJE: acerca de 4.0 seg. (pilas alcalinas),
acerca de 3.0 seg. ( con pilas Ni-Cd o Niquel-hidrógeno)
AUTODESCONECTABLE: disponible
PESO: 430 g.
DIMENSIONES (Unidad de Control): 76.7mm x 136.2mm x 82.4mm
DIMENSIONES (Unidad de Flash): 126.6mm x 128.8mm x 30.5mm
Page 50

ITALIANO
Grazie per avere acquistato il flash elettronico Sigma FlashMacro EM-140 DG. Le sue elevate prestazioni
vi permetteranno di dedicarvi con soddisfazione alle riprese di macrofotografia in autofocus. Leggete
attentamente queste istruzioni. Questo flash vi offre tantissime modalità di funzionamento che vi
soddisferanno grandemente. Per ottenere le migliori prestazioni, leggete attentamente questo manuale e
quello della fotocamera prima di usarlo e tenetelo a portata di mano per ogni evenienza. (Flash esclusivo
per le fotocamere Nikon.)
ATTENZIONE
DESCRIZIONE DELLE PARTI
Corpo del flash
1.Torcia flash sinistra 2.Torcia flash destra 3.Luce ausiliaria 4.Fermi di blocco
5.Adattatore per macrofotografia
Unità di controllo
6.Pannello LCD 7.Coperchio vano batterie 8.Ghiera blocco della slitta 9.Slitta dei contatti
10.Pulsante MODE 11.Pulsante SEL per la selezione dei modi 12.+ pulsante per incremento valori
13.– Pulsante decremento valori 14. Pulsante LAMP 15.Pulsante TEST 16. Pulsante LIGHT
17.Pulsante di pronto lampo 18.Interruttore
Attenzione!!
Il flash contiene circuiti ad alto voltaggio. Per evitare di prendere la corrente o di bruciarsi, non cercate di
smontare il flash. Se la carrozzeria è rotta o incrinata, non toccate le parti interne.
Non scattate flash vicino agli occhi. La luce molto intensa può provocare danni alla vista. Tenete almeno 1
metro di distanza tra il flash e il viso quando fotografate.
Non toccate il terminale syncro della macchina quando il flash è collegato. Il circuito ad alto voltaggio può
causare scosse elettriche.
Non usate la macchina in ambienti con materiali infiammabili, gas, agenti chimici o infiammabili liquidi. C'è
il rischio di causare un'esplosione.
Attenzione!!
Non utilizzate altri apparecchi fotografici che non siano della serie Nikon NA. In caso contrario, il flash
potrebbe danneggiare i circuiti della macchina.
Questo flash teme l'acqua. Se usato sotto pioggia, neve o vicino all'acqua va protetto. Spesso non è
possibile riparare componenti interni danneggiati dall'acqua.
Flash e apparecchio fotografico non vanno esposti a urti, polvere, alte temperature e umidità. Questi fattori
possono causare malfunzionamento o incendio dell'apparecchiatura.
Quando il flash è sottoposto a sbalzi improvvisi di temperatura (es. dal freddo di un esterno al caldo di un
ambiente interno) può formarsi della condensa. In questi casi, riponete l'attrezzatura in un sacchetto di
plastica e non usatela fino a quando non è a temperatura ambiente.
Non riponete il flash in un cassetto o armadietto con naftalina, canfora o altro insetticida. Possono avere
un effetto negativo sul suo funzionamento.
Non utilizzate un lucidante, Benzene o altro agente di pulizia per rimuovere sporco o impronte. Pulite
solamente con un panno morbido appena inumidito.
Se non intendete usare il flash per un lungo periodo, cercate un luogo asciutto e fresco dove riporlo,
preferibilmente con una buona ventilazione. Fate scattare il flash più volte nell'arco di un mese, affinché
mantenga adeguate capacità di funzionamento.
Per evitare danni o ferite a terzi, leggete attentamente il manuale di istruzioni e fate attenzione ai segni di
allerta riportati di seguito prima di usare il flash. In particolar modo, fate attenzione a questi due segnali:
Attenzione!!
Attenzione!!
Questo denota punti rilevanti, per i quali attenzione e cautela sono particolarmente richiesti
Il simbolo contiene informazioni su ciò che non si deve fare
Usare questo prodotto nell'inosservanza del presente segnale di pericolo può
causare serie ferite o mettervi in serio pericolo
Usare questo prodotto nell'inosservanza del presente segnale di pericolo può
causare serie ferite o danni.
Page 51

COMPATIBILITÀ OBIETTIVI
E’ possibile usare questo flash, costruito apposta per gli obiettivi macro (MACRO 50mm F2.8 EX DG,
MACRO 105mm F2.8 EX DG, etc.), anche con altri obiettivi, per farlo leggete attentamente le seguenti
istruzioni
◆ La parte frontale di molti obiettivi ruota, durante la messa a fuoco, se vi attaccate il flash il meccanismo
di messa a fuoco dell’obiettivo potrebbe sforzare e funzionare male. Con questi obiettivi usate solamente
la messa a fuoco manuale.
◆ Asssieme al flash trovate due anelli adattatori, del diametro di 55mm e 58mm. Se l’obiettivo, al quale
volete fissare il flash, ha un diametro diverso, dovete acquistare un altro anello adattatore. Sono
disponibili anelli solamente nei diametri 52mm 62mm 72mm 77mm.
◆ A seconda della focale dell’obiettivo usato, l’immagine potrebbe risultare vignettata. Fate alcuni scatti di
prova, prima di fotografare per davvero.
MODELLI DI FOTOCAMERA E FUNZIONI
Le modalità d‘impiego e le risorse utilizzabili del Sigma EF-500 DG SUPER NA-iTTL possono cambiare secondo
la particolare fotocamera alla quale viene abbinato – che può appartenere a uno dei seguenti modelli:
D2, D70, D1, D100, Nikon F6, F5, F4, F3(Occorre un adattatore), F100, F90X/N90S; F90/N90/ F80. F70/N70.
F65/N65, F60/N60; F50D/N50; F801S/N8008S; F 801/N8008; F601M; F 601/N6006; F501/N2020; F401X;
F401S/N4004S; F401/N4004; F301, N2000; FA; FE10; FE-2; FG; FM10; New FM2; Pronea 600i
Quanto ai tipi di obiettivi applicabili, fra la nostra terminologia e le denominazioni ufficiali Nikon sussistono
queste relazioni:
Obiettivi Nikon con CPU incorporato
Obiettivi D, Obiettivi D, Obiettivi IX Nikkor, Eccettuati gli obiettivi
D AF (escluso F3AF) e AiP
Obiettivi Nikon senza CPU incorporato
Ai-S, Ai, obiettivi serie E
BATTERIA
Questo flash usa quattro pile AA di tipo alcalino o batterie ricaricabili Ni-Cad e Ni-MH. Anche le batterie al
Manganese possono essere usate ma hanno una durata più ridotta rispetto alle alcaline. Se la spia di
pronto lampo impiega più di 30 secondi ad illuminarsi, le pile vanno sostituite
ۋ Per assicurare contatti elettrici ottimali, pulite i terminali delle batterie prima di installarle
ۋ Le batterie NiCad non hanno contatti standard. Se le utilizzate, verificate che i contatti delle batterie
siano correttamente allocati
ۋ Per evitare esplosioni delle batterie, perdite o surriscaldamento, usate quattro batterie nuove della
stessa marca. Non mischiate batterie di marche diverse, vecchie e nuove insieme
ۋ Non mandate in corto le batterie, non smontatele, non esponetele a fonti di calore o d'energia:
potrebbero esplodere. Non ricaricate altre batterie se non quelle ricaricabili al Ni-Cd
ۋ Se non si utilizza il flash per un periodo prolungato, togliere le batterie per evitare danni o perdite
ۋ La funzionalità delle batterie decresce alle basse temperature. Tenete quindi le batterie protette quando
utilizzate il flash al freddo.
CARICAMENTO DELLE BATTERIE
1. Accertatevi che il pulsante d'accensione sia su off,
quindi facendolo scivolare nel verso indicato dalla
freccia, aprite il coperchio del vano batterie
2. Inserite quattro batterie AA nel vano apposito.
Accertatevi che i poli + e - sulle batterie corrispondano
a quelli segnati all'interno del vano.
3. Chiudete il coperchio
4. Spostate il pulsante d'accensione su ON. Dopo
qualche secondo la spia di pronto lampo si illuminerà,
indicando che il flash è pronto.
5. Per essere sicuri del corretto funzionamento del flash,
premere il pulsante test
Page 52

AUTO POWER OFF
Per risparmiare l'energia delle batterie, il flash si spegne automaticamente quando non viene usato per
oltre 90 secondi. Per ripristinare il funzionamento, premete il pulsante test oppure quello di scatto della
macchina fino a metà. La funzione Auto Power Off non funziona quando il flash è in modalità flash
ausiliario a distanza senza fili, flash ausiliario normale e nelle modalità flash prestabiliti
INDICAZIONI D'ERRORE
Se la potenza delle batterie non è sufficiente o c'è un'indicazione di errore tra la macchina e l'unità del flash,
la spia che indica l'angolo di copertura del flash lampeggerà sul display LCD. Se ciò avviene, portate
l'interruttore acceso/spento su OFF e quindi su ON. Se l'indicatore lampeggia ancora, controllate lo stato
delle batterie.
INSERIMENTO DELL’UNITÀ DI CONTROLLO
Accertatevi che il flash sia spento. Inserite quindi la slitta
del flash in quella della macchina e ruotate l'anello di
bloccaggio saldamente
ۋ Quando attaccate o staccate il flash, afferratelo
saldamente dal basso per evitare danni all'innesto.
ۋ Se il flash incorporato della macchina è estratto,
chiudetelo prima di attaccare l'unità flash esterna
ۋ Per rimuovere il flash, ruotate l'anello di ancoraggio in
direzione opposta rispetto al segno ◄LOCK, fino a
quando si ferma.
INSERIMENTO DEL FLASH
1. Avvitare l’adattatore del FlashMacro alla filettatura
della lente frontale
2. Premere i pulsanti destro e sinistro e inserire il flash
nell’anello adattatore, poi rilasciare i pulsanti
◆ E’ possibile regolare la posizione del flash ruotando la
montatura
◆ Premere nuovamente sui pulsanti laterali per staccare
il flash dall’obiettivo
ILLUMINAZIONE DEL DISPLAY LCD
Quando premete il pulsante LIGHT, il display LCD si illumina per circa 8 secondi. Se premete nuovamente
il pulsante LIGHT il display rimane illuminato più a lungo.
ILLUMINATORE AUSILIARIO
Se il pulsante LAMP, sul corpo del flash, viene premuto, s’accende, per circa 20 secondi, un illuminatore
ausiliario. Quando si fotografa in ambienti poco illuminati, ciò è molto utile per mettere bene a fuoco il
soggetto. Questa funzione è utilissima in tutti quei casi in cui bisogna procedere alla messa a fuoco
manuale.
ۋ Premendo a metà corsa il pulsante di scatto della fotocamera la luce ausiliaria si spegne
Page 53

MODO TTL
Il modo di esposizione TTL impressiona correttamente il fotogramma controllando la quantità di luce
emessa dal flash.
ۋ Riferirsi alla tabella “A” per trovare la combinazione di fotocamera, obiettivo, modo di esposizione e flash
ۋ Non si ha esposizione TTL con le fotocamere F3, FM10, FM2 New, FE10.
1. Impostare sulla fotocamera il modo di esposizione (A seconda del
modello l'impostazione può variare) Consultare il manuale d'istruzioni
della fotocamera.
2. Accendere l'interruttore del flash.
3. Impostare TTL/BL o TTL premendo il pulsante MODE
ۋ Quando usate una reflex digitale non dimenticate di impostare
TTL/BL. I modelli compatibili CLS sono controllati dal sistema di
esposizione i-TTL. I modelli CLS incompatibili sono controllati dal
sistema di esposizione D-TTL. Sia in un caso, sia nell’altro, la lettera
“d” (digital) comparirà nel pannello LCD.
ۋ
Con le fotocamere F6, F5, F4, F100, F90X / F90 / F80 (N90S / N90 / N80),
F70D / N70, F65 / N65, F810S / N8008S, F801 / N8008S e Pronea 600i, la
modalità TTL/BL o TTL può venire impostata. Tutte le altre fotocamere Nikon,
non comprese nella lista, possono usufruire solamente della esposizione
TTL.
4. Enfoque el sujeto.
6. Attendere la ,spia di pronto lampo e premere il pulsante di scatto della fotocamera
ۋ Se la quantità di luce emessa non è sufficiente a illuminare bene il soggetto, l'indicazione TTL/BL oppure
TTL comparirà nel display LCD per circa 5 secondi dopo lo scatto. Rifare la foto a una distanza minore
oppure con un valore di diaframma più aperto.
ۋ Quando il flash è carico, nel mirino della fotocamera compare la spia di pronto lampo. Se non compare
l'esposizione avverrà a una velocità lenta, senza che il flash scatti.
tabella “A”
Fotocamera
Tipo d'obiettivo
Modo
d'esposizione
Misurazione
esposimetrica
Sistemi TTL
Note
Tipo D
Tutti i modi
Tutti i modi
3D Multi Sensor BL
Altri obiettivi
diversi dal tipo D
Tutti i modi
Tutti i modi
Multi Sensor BL
F6, F5
F100
F90X/N90ser
F80/N80ser
F70D/N70
Senza CPU
incorporato
Modi A/M
Misurazione con
preferenza al centro/
Misurazione spot
Preferenza al centro BL
Spot/Fill Flash
Con le fotocamre F5, F100, F80, si
ha la misurazione TTL anche con il
modo Spot
Matrix
TTL BL
Con CPU
incorporato
Tutti i modi
Misurazione con
preferenza al centro/
Misurazione spot
Preferenza al centro
BL, Spot/Fill Flash
F4
F801S/N8008S
F801/N8008
Pronea 8001
Senza CPU
incorporato
Modi A/M
Misurazione con
preferenza al centro/
Misurazione spot
Preferenza al centro
BL
Spot/Fill Flash
In TTL e TTL BL funziona solamente
con le fotocamere F4, obiettivi AF
compatibili con F3, Ai-S, obiettivi serie
E. La lettura Spot della F4 usufruisce
anche del TTL in esposizione.Il sistema
di esposizione mantiene il TTL con la
Pronea 800i impostata su M. La
misurazione al centro BL non è attiva
Matrix
TTL BL
Con CPU
incorporato
Tutti i modi
Preferenza al centro,
misurazione spot
Preferenza al centro BL
Spot/Fill Flash
F601/N6006
F601M
Senza CPU
incorporato
Modi A/M
Preferenza al centro,
misurazione spot
Preferenza al centro BL
Spot/Fill Flash
Il sistema di misurazione spot non
funziona con la F-601M
Con CPU
incorporato
P/S
A/M
TTL Programmato
Se l'esposizione è su M, la
misurazione sarà con preferenza al
centro BL, Spot e Fill Flash
F60D/N60
F50D/N50
F401X/4004S
Senza CPU incorporato
M
Preferenza al centro BL
P
Program TTL
Obiettivo con CPU
AI-S, Ai, Serie E
Obiettivi per F3
A/M
TTL
F501/N2020
F301/N2000
altri obiettivi
A/M TTL
P/S
TTL Programmato
Con CPU incorporato
A/M
TTL
F401S/N4004S
F401/N4004
Senza CPU incorporato
M TTL
FA F3
FE2 FG
Con CPU incorporato
senza CP U incorporato
A/M TTL
ۋ Quando si usano fotocamere digitali SLR, le funzioni utilizzabili dipendono dalla combinazione di
obiettivo e modalità di esposizione, esattamente come nel gruppo F5 ed F100. Tutte le funzioni di
esposizione TTL sono attive con il sistema D-TTL ( i-TTL).
Page 54

E’ possible ottenere un’impressione di tridimensionalità, usando una sola lampada flash.
1. Nella modalità TTL/BL(TTL) premere il pulsante SEL se si vuole far
lampeggiare il display.
2. Premendo il pulsante
+
si accenderà la torcia sinistra, premendo
….s’accenderà quella destra. S’accende solamente la torcia la cui spia
lampeggia nel display.
3. Premere il pulsante SEL alcune volte per far cessare il lampeggiamento
della spia.
Dopo lo scatto premere il pulsante
+ o -
LIMITAZIONI QUANDO SI SCATTA IN SEQUENZA
Per evitare il surriscaldamento, non usate il flash per almeno 10 minuti dopo una sequenza di scatti, come
indicato nella tabella
Modalità
Numero di esposizioni flash
TTL, M (1/1,1/2))
15 esposizioni continuate
M(1/4, 1/8)
20 esposizioni continuate
M(1/16-1/32)
40 esposizioni continuate
Multi
10 cicli
FLASH MANUALE
La regolazione manuale serve a impostare la potenza di emissione
desiderata ( livello d’uscita della torcia)
La ripresa nella Modalità Manuale richiede molta competenza. E’
consigliabile usare sempre la Modalità Automatica. Quando usate la
Modalità Manuale, eseguite prima alcuni scatti di prova. Meglio se
misurate la luce con un esposimetro flash.
L’intensità della luce emessa dalla torcia sinistra e destra può essere
regolata dal rapporto 1:1 a 1:64, oppure si può anche tenere spenta una
delle due torce.
1. Impostare la modalità di esposizione della fotocamera su M
2. Premere il puslante MODE sul flash per selezionare il funzionamento
manuale M.
3. Premere il pulsante SEL , inizierà a lampeggiare il valore di emissione
della torcia sinistra
4. Premere il pulsante
+ o -
per regolare la potenza di emissione della
torcia sinistra. (Se compare il segnale “ - - “ la torcia sinistra non
s’accenderà).
5. Premere il pulsante SEL e inizierà a lampeggiare il valore d’intensità
d’emissione della torcia di destra.
6. Premendo il puslante
+ o -
s’imposta la potenza della torcia di destra.
Se compare il segnale.“ - - “ la torcia di destra non s’accenderà.
7. Premendo il pulsante SEL le spie smettono di lampeggiare
ۋ Se i valori di potenza sono uguali per entrambe le torce, il valore è
visualizzato nel display, se il valore è diverso non sarà visualizzato nello LCD.
ۋ Circa i valori di Numero Guida, riferirsi alla Tabella 1 presente nell’ultima pagina.
Per calcolare il corretto valore di esposizione, usate la seguente formula:
Numero Guida (GN) /distanza soggetto-flash = valore di diaframma.
FV LOCK (Solo D70,F6)
La modalità “FV” lock consente di scegliere a campione dell’esposizione quella di una parte della inquadratura e
a bloccarla, prima di scattare..
ۋ Non è possibile impostare direttamente la funzione sul flash. Per maggiori dettagli leggere il libretto
d’istruzioni della fotocamera.
Page 55

COMPENSAZIONE DELL'ESPOSIZIONE
Correzione intenzionale dell’esposizione mediante variazione di potenza del flash EM-140 DG NA-iTTL
ۋ Esclusivamente per le fotocamere digitali SLR, F6, F5, F4 series, F100,
F90/N90, F90X/N90S, F80/F80, F70D, U/F65/N65, F801S/N800S, F801/
N8008, F601M, F601/N6006 e Pronea 600i.
ۋ Con le fotocamere con la possibilità di correggere l'esposizione
intenzionalmente l'operazione può venire eseguita sia sui comandi della
fotocamera, sia su quelli del flash, o su entrambi. Se si usano entrambi
l'esposizione sarà corretta di un valore corrispondente alla somma dei
valori di correzione impostati su flash e fotocamera, e influenzerà
specialmente la esposizione dello sfondo.
ۋ Se la fotocamera è un modello F601/N6006, regolare la compensazione
mediante il modo di sincronizzazione della fotocamera
ۋ La correzione può venire effettuata con scarti di 1/3 di diaframma da + 1.0
a - 3.0 diaframmi
1. Premere il pulsante MODE per selezionare il modo TTL/BL (TTL)
2.
Premere il pulsante SEL per far lampeggiare il valore di compensazione
3. Premere il pulsante
+ o -
per impostare il valore della correzione
4. Premere il pulsante SEL per far smettere di lampeggiare l'indicazione della correzione
Correzione intenzionale dell’esposizione mediante la potenza del flash EM-140 DG NA-iTTL e sfondo
ۋ Questa funzione non è possibile con la F3; FM10, FM2 New e FE10
Usare il comando di correzione della esposizione per correggere sia l'esposizione del primo piano che dello
sfondo ( Leggere il libretto d'istruzioni della fotocamera)
Correzione dell’esposizione nel modo M
Nel modo M (manuale) si può cambiare l'apertura di diaframma, oppure la potenza del flash dopo aver
impostato la correzione della esposizione.
SINCRONIZZAZIONE SULLA SECONDA TENDINA
Quando si fotografa un soggetto in movimento con sincronizzazione lenta, davanti a lui comparirà la sua scia.
Infatti la luce del flash scatterà quando la prima tendina è completamente aperta, quindi il soggetto rimarrà
esposto da quando partirà il flash a quando si chiuderà la tendina (sincronizzazione della prima tendina).
Quando si utilizza la sincronizzazione della seconda tendina, il flash scatterà appena prima della chiusura della
seconda tendina, così che la scia del soggetto esposto alla luce ambiente sarà dietro il soggetto stesso, con un
effetto più naturale.
◆ Può essere usata solo con le fotocamere dotate di sincronizzazione sulla seconda tendina.
◆ Non è possibile impostare direttamente sul flash tale funzione. Per maggiori dettagli consultare il libretto
d’istruzioni.
◆ Il simbolo
di "sincronizzazione sulla seconda tendina" apparirà sul display LCD del flash
FLASH DI RIEMPIMENTO
Se si usa la funzione Flash di riempimento è possibile controllare gli effetti di luce e ombra, prima di scattare la foto.
1. Premere il pulsante MODE impostare il modo di funzionamento desiderato.
2. Premere il pulsante
+ o -
alcune volte per far apparire la scritta sul display LCD.
3. Accertarsi che il flash sia pronto al lampo, poi premere il pulsante TEST per farlo scattare.
MODALITÀ MULTI FLASH
Mentre l’otturatore è aperto, il flash scatterà ripetutamente e una serie di immagini del soggetto verrà esposta
sul medesimo fotogramma.. Uno sfondo scuro con un soggetto chiaro ottimizza l’impiego di questa modalità. E’
possibile regolare la frequenza degli scatti del flash tra 1Hz e 199 Hz. Si possono raggiungere fino a 90 scatti di
seguito. Il numero massimo di scatti varia a seconda del numero guida del flash e della frequenza di scatto.
Fate riferimento alla tabella 3
Page 56

1. Regolate la modalità di esposizione della macchina su M e
impostate anche il valore di diaframma
2. Premete il pulsante Mode fino a quando appare l’opzione
Multi-flash
3. Premete SEL fino a quando la frequenza di scatto del flash
comincia a lampeggiare
4. Premete il pulsante + o - per impostare il valore desiderato
5. Dopo aver premuto nuovamente il pulsante SEL, la spia del livello
di potenza del flash inizierà a lampeggiare
6. Premete il pulsante + o - per regolare il livello di potenza
7. Premete il pulsante SEL e il numero di scatti inizierà a lampeggiare
8. Premete il pulsante + o - per impostare il numero dei lampi che si vuole ottenere
9. Premete il pulsante SEL e il display cesserà di lampeggiare
10. Quando la spia READY del flash è illuminata, il flash è pronta per l’uso
Nota
: regolate la velocità dell’otturatore maggiore di;
(Numero dei lampi desiderati-Frequenza dei lampi)
FLASH TELECOMANDATO SENZA FILI (WIRELESS)
(Solo
D70,F6)
E’ possibile fotografare nella modalità Flash senza fili (Wireless) se questo flash è usato come master,
assieme ai modelli di flash EF-500 SUPER NA-iTTL usati come flash secondari (Slave Flash).
ۋ In questo libretto viene chiamato flash principale (Master Flash) quello attaccato alla fotocamera e flash
secondario ( Slave Flash) quello sistemato a distanza, nella posizione desiderata.
ۋ Attenzione, la distanza tra flash Master e flash secondario, deve essere inferiore ai 5 metri.
ۋ Riguardo alle regolazione dei flash secondari, leggere i relativi manuali d’uso alla voce “ flash senza fili,
in modalità wireless”.
MODALITÀ WIRELESS i-TTL
Nella modalità Wireless i-TTL la fotocamera calcola automaticamente la corretta esposizione.
Settaggio del flash secondario
1.
Seguire le istruzioni del manuale relative al flash secondario e settare sul numero 3
.
2. Mettere il flash secondario nella posizione desiderata.
Settaggio del flash principale
3. Premere il pulsante MODE per fare apparire l’icona .
4. Dopo esservi assicurati che sia il flash principale, sia il flash
secondario siano pronti al flash, potete scattare la fotografia.
La modalità Flash senza fili Automatica iTTL, FV Lock, compensazione dell’esposizione e
sincronizzazione sulla seconda tendina possono essere utilizzate tutte assieme. Dopo aver impostato
la modalità Senza Fili, eseguire le varie regolazioni come al solito. Non è necessario ripetere le
impostazioni sul flash secondario.
FLASH WIRELESS IN MANUALE
E’ possibile impostare manualmente il flash seguendo le istruzioni che trovate qui di seguito
Settaggio dei flash secondari
1. Seguire le istruzioni del manuale relative al flash secondario e settare sul numero 3.
2. Mettete il flash secondario nella posizione desiderata.
Settaggio del flash principale
3. Premere il pulsante MODE per impostare l’icona
.
4. Tenere premuto il pulsante SEL per più di 2 secondi, in modo che
l’indicazione nel display si metta a lampeggiare.
5. Premere il pulsante MODE del flash per impostare M.
6. Premere il pulsante SEL per far comparire la modalità d’uso del flash
Page 57

7. Premere il pulsante SEL ancora una volta e seguire la procedura per impostare il Flash Manuale e
scegliere la potenza di ciascun flash secondario..
Cambiando la modalità di uso del flash si cancellano anche tutti i settaggi.
Settare il flash in modalità Slave (secondario) sul numero 1 per accendere la lampada di sinistra (1), sul
numero 2 per accendere la lampada destra (2)
MULTI FLASH WIRELESS
Settaggio del flash secondario
1. Seguire le istruzioni del manuale relative al flash secondario e settare sul numero 3.
2. Mettere il flash nella posizione desiderata.
Settaggio del flash principale
3. Premere il pulsante MODE per impostare l’icona .
4. Premere il pulsante SEL ancora per due secondi per far lampeggiare
l’indicatore
5. Premere il pulsante MODE sul flash per impostare MULTI.
6. Premere il pulsante SEL per far cessare il lampeggiamento
dell’indicatore.
7. Premere il pulsante Press SEL ancora una volta e seguire la procedura Multi Flash, poi impostare il
valore di emissione del lampo su ciascun flash.
Quando si cambia la modalità flash i precedenti settaggi vengono cancellati.
CHANNEL SETTING
Se un altro fotografo, che riprende vicino a voi, usa la modalità flash senza fili, può accadere che faccia
scattare i vostri flash. In questo caso dovete scegliere un canale di trasmissione diverso dal suo.
1. Per tutte le modalità wireless premere il pulsante SEL diverse volte
finché l’indicatore dei canali non lampeggia.
2. Premere il pulsante + o – per impostare il canale (C1-C4)
3. Premere il pulsante SEL per far cessare il lampeggiamento
dell’indicatore di canale.
4. Seguite le istruzioni del manuale e impostate il medesimo canale sul
flash master.
SPECIFICHE
NUMERO GUIDA: 14 ( ISO 100)
ALIMENTAZIONE: Quattro batterie alcaline AA, oppure quattro batterie AA Ni-Cd, oppure quattro batterie
Nickel-Metal Hydride
TEMPO DI CARICA: circa 4.0 secondi ( batterie alcaline); circa 3.0 secondi con batterie Ni-Cd e
Nickel-Metal Hydride)
SPEGNIMENTO AUTOMATICO: Sì
PESO: 430 gr
DIMENSIONI(Unità di controllo): 76.7 x 136.2 x 82.4mm
DIMENSIONI(Corpo del flash): 126.6 x 128.8 x 30.5mm
Page 58

中 文
歡迎閣下購買適馬EM–140 DG電子微距閃光燈,其全新設定概念及專業功能,讓閣下盡享AF微距攝影的樂
趣;閃燈內置功能和操作方式,將因應相機型號而有所差別。詳情請細閱閃燈操作說明書。為要把本產品各
功能發揮淋漓盡致以達預期效果,請將本說明書和相機說明書一起閱讀,並妥為保存以方便將來查閱。
(祗適用於尼康單鏡相機)
注 意
各部位名稱
閃燈 部
1.左閃光燈管 2.右閃光燈管 3.對焦輔助光發射部 4.裝配/釋放鈕 5. 微距閃光燈接環
控制 部
6.LCD顯示屏 7.電池倉蓋 8.熱靴鎖環 9.熱靴座 10.模式按鈕 11.選擇/輸入按鈕 12.+增加按鈕
13.-減少按鈕 14.對焦輔助光按鈕 15.閃光測試按鈕 16.夜光”按鈕 17.充電完成提示燈 18.電源開關
為避免構成任何損毀或受傷,於使用本產品前,請小心及詳細地閱讀本說明書,隨時留意下列注意標誌所
述事項。請特別留意下列兩種注意標誌。
警告!! 如忽略此警告標誌所述的情況下使用本產品可能構成嚴重受傷或其他危險結果。
注意!! 如忽略此注意標誌所述的情況下使用本產品可能構成受傷或損毀。
標誌代表警告及注意等的重要事項。
標誌含有需要避免的動作。
警告!!
本閃光燈內建高壓電路。為避免觸電或消傷,請不要嘗試拆開本閃光燈。如本閃光燈外殼爆裂或損毀,
請不要觸摸內部的元件。
不要靠近眼睛觸發閃光燈,否則其強光可能對眼睛做成傷害。拍攝時,請保持閃光燈與臉部至少1米∕
3呎的距離。
當閃光燈已安裝在相機的熱靴座後不要接觸相機的閃光燈同步接點。其高壓可導致觸電。
不要在易燃的氣體、液體及化學物品附近使用相機,否則可能引起爆炸。
注意!!
不要把本閃光燈使用在非Nikon相機上,否則閃光燈可能對相機的電路構成損害。
本閃光燈並不防水。當在下雨、降雪或近水的地方使用相機及閃光燈時,請避免弄濕。因弄濕而損毀
的電子元件一般都較難維修。
不要把閃光燈曝露在震盪、滿佈塵埃、高溫或高濕度的環境底下。在這些情況下可引致火警或令器材
不正常工作。
當閃光燈遇到溫度驟變的環境,例如把閃光燈從寒冷的室外帶到溫暖的室內時,閃燈內部及外部會有積水。預防方法為先
把閃光燈放入密封膠袋內才把它帶到溫度驟變的另一地方,直到閃光燈達到該地方之溫度方可使用。
不要把閃光燈存放在抽屜或廚櫃內,因其可能含有樟腦或其他殺蟲劑會對閃光燈做成不良影響。
不要使用天拿水、苯或其他清潔劑來抹掉閃光燈表面的塵埃或指紋。應使用微濕及柔軟的布。
如需要長時間存放,請選擇乾爽清涼的地方,最好有良好的通風系統。建議每個月都使用閃光燈來作
數次閃光,以維持電容正常工作。
Page 59

適用鏡頭
此閃燈整體設計理念,是以適馬MACRO 50mm F2.8 EX DG,、MACRO 105mm F2.8 EX DG,等微距鏡頭為
基礎 ;同時亦可配合其他類型鏡種使用,但必需 注 意以下事項:
因微距閃燈需附夾在鏡頭前端操作,但部份鏡頭前鏡筒,在取時焦時其前鏡筒將跟隨拾焦而轉動,此將導
致損壞鏡頭和相機的對焦系統;若閃燈配用此類型鏡種,強烈建議改用手動調焦操作,免生意外。
Ø 55mm及 Ø 58mm的閃燈連接環,將昷閃燈附奉;其他口徑的連接環,可自行選購。(可提供選購的微距
閃燈適配連接環: Ø52mm, Ø62mm, Ø72mm, Ø77mm)
在微距閃燈攝影時,影像出現暗角現象,全關乎鏡頭自身的焦距或被攝體的拍攝距離所營成;故建議先行
預攝以觀效果,避免暗角現象產生。
相容相機型號
本產品可配合下列相機使用: D2系列、D70、D1系列、D100、F6、F5、F4系列、F3系列(須使用轉接器方可接
駁使用)、F100、F90X/N90S系列、F80系列、F70D/N70、U/F65/N65、F60D/N60、F50D/N50、F-801S/N8008S、
F-801/N8008、F601M、F-601/N6006、F501/N2020、F401X,F401S/N4004S、F-401/N4004、F-301、N2000、
FA、FE10、FE-2、FG、FM10、New FM2、Pronea 600i
此說明書適用於下列鏡頭類型(請參閱所使用的鏡頭):
內置處理器的藝康鏡頭
“D”型鏡頭ࠉ“G”型鏡頭ࠉ“IX”型藝康鏡頭ࠉ
非”D”型的”Ai-P”型自動對焦鏡頭(並不包括F3AF)
沒有內置處理器的藝康鏡頭
Ai-S, Ai 及E系列鏡頭
關於電池
本產品使用四枚AA型鹼性電池或Ni-Cd/Ni-MH充電池。雖然錳電池可被用使於本產品上,但因其電量遠不及
鹼性電池,所以並不建議使用。如電池組須要30秒以上方能充電完成(提示燈亮起),請更換新電池。
ۋ 為確保妥善的電力接觸,可清潔電池接點後才安裝電池。
ۋ Ni-Cd電池的兩端接點因沒有標準,如使用該種電池的話,請確定電池室接點與電池接點妥善地接觸。
ۋ
為防止電池發生爆炸、洩漏或過熱,請使用相同品種及品牌之電池,不要把品種不同或新舊不一之電池混合使用。
ۋ 不要把電池拆開、短路或暴露於水火當中,否則可能引起爆炸。此外,不要把非充電性質之電池拿來充電。
ۋ 如需長時間閒置此閃光燈,請把電池取出,以防電池洩漏可能帶來的損毀。
ۋ
低溫能影響電池的效能,如需於寒冷天氣下使用此閃光燈,請盡量縮短閃光燈暴露於空氣的時間及適時關閉電源。
ۋ 建議於長途旅程或於寒冷的戶外進行拍攝工作前攜帶足夠後備電池。
安裝電池
1. 確定已把電源關閉後(推至OFF位),依附圖箭咀方向所
示把電池室蓋掩推出並揭開。
2.
按照附圖所示之正負極方向放入四枚AA型電池到電池室內。
3. 把電池室蓋掩關上。
4. 把電源開關掣推至ON,數秒後充電完成提示燈將會亮起,
表示閃光燈已就緒等待引發。
5. 請按下“閃光測試”按鈕以確定閃光燈能正常運作。
自動關閉電源
為節省電力,本閃光燈於停用大約5分鐘後便會自動關閉電源。此時可按“閃光測試”按鈕或半按相機上之快門
釋放掣重新啟動閃光燈。請留意,在無線TTL模式、一般伺服模式及指定伺服模式時,自動關閉電源機制將不
能正常運作。
錯誤發生時顯示 之 訊息
如電池電量不足或相機與閃光燈之間的通訊發生錯誤,閃光燈上的液晶顯示屏會出現“Er”圖示並不停閃爍。此
Page 60

時,可把閃光燈電源關閉後再重新啟動,如繼續出現該錯誤訊息,請檢查電池的電量。
Page 61

安裝閃燈控制部
請確定已把電源關閉,把閃光燈的熱靴座插到相機的熱靴
上,然後順時針方向轉動“熱靴鎖環”直到鎖緊為止。
ۋ 每次安裝或移除閃光燈時,請抓住閃光燈底部以防損壞
閃光燈的靴座或相機的熱靴。
ۋ 如相機的內置閃光燈被開啟彈出,請把其按回成收藏狀
態後方可安裝本閃光燈。
ۋ 如要把已安裝的閃光燈移除,先逆時針方向轉動“熱靴鎖
環”直至不能再轉時,然後才可把閃光燈抽出。
安裝閃燈部
1. 將閃燈連接環,裝置於鏡頭前沿位置。
2. 請按著閃燈旁的裝配/釋放鈕,將閃燈部安放在連接環
上。
閃燈在連接環上,可利用旋轉方式修正工作位置。
請按著閃燈旁的裝配/釋放鈕,在鏡上卸除閃燈部件。
液晶顯示屏夜光 照 明
當按下LIGHT按鈕時,液晶顯示屏的夜光照明系統會被啟動,照明維持大約8秒鐘。
如連續按下多次LIGHT按鈕,此照明系統會從最後一次起計維持大約8秒鐘。
對焦輔助光
為方便在昏暗環境下進行拍攝,可按動LAMP鈕,使輔助對焦燈啟動;此功能有利於手動對焦及對焦困難時,
亦可進行優化的微距攝影(輔助對焦燈光延續時間乎20秒)
當按下相機快門繹放鈕時,輔助對焦燈光便會自行熄滅
TTL模式
透過鏡後測光來控制閃光燈輸出的光量,TTL模式能提供主體正確曝光。
◆ 相機與鏡頭之配搭所能允許的曝光及閃燈模式詳列於表A。
◆ TTL功能並不適用於F3系統、FM10、FM2及FE10。
1. 設定相機的曝光模式(曝光模式因應相機型號各異),請參閱相機使用說
明書。
2. 把相機開關掣推到“ON”位置。
3. 按下“MODE”選擇“TTL/BL”或“TTL”模式。
◆ 配用在數 碼單鏡反光機時,請勿將TTL/BL功能設定取消,因閃燈內的
“CLS”系亇是由 i-TTL 曝光檢測系亇所控制;而不適配用CLS系統功能
的相機型號,則由D-TTL曝光檢測系亇所控制。但以上兩項情況運作時,
“d”提示訊號,均顯示在閃燈背面LCD屏幕上。
◆ F6、F5、F4系列、F100、F90X/F90/F80
系列、F70D、F801S、F801及Pronea
600i
均可選擇
“TTL/BL”或“TTL”
模式。其他型號只能選擇
“TTL”
模式。
4. 向主體對焦。
5. 確定“充電完成提示燈”已亮起後,按下快門釋放掣。
◆ 如閃光燈之最大輸出並不足夠應付當時的環境時,待閃光燈發射後液晶顯示屏上的“TTL/BL”或“TTL”會持續
Page 62

顯示5秒鐘。請移近主體再重新拍攝或使用更大的鏡頭光圈。
Page 63

◆ 如閃光燈充滿電後,相機觀景器內的“就緒”顯示燈會亮起。如果“就緒”顯示燈沒有亮起的話,相機上的快門
速度可能被設在一個較慢的檔次而令閃光燈不能被觸發。
表
A
相機
鏡頭類型
曝光模式
測光
TTL系統
備註
D型
所有模式
所有模式
立體多重感應BL
非D型自動對焦鏡頭
所有模式
所有模式
多重感應BL
F6, F5
F100
F90X/N90系列
F80/N80系列
F70D/N70
沒有內置微處理器鏡頭
A/M模式
中央重心,
重點測光
中央重心∕
重點補光
可轉移到TTL模式。使用F5,F100,F80等相
機時重點測光系統一定是TTL
矩陣
TTL BL
內置微處理器鏡頭
所有模式
中央重心,
重點測光
中央重心∕
重點補光
F4 系列
F801S/N8008S
F801/N8008
F65/N65
Pronea 600i
沒有內置微處理器鏡頭
A/M模式
中央重心,
重點測光
中央重心∕
重點補光
可轉移到TTL模式。TTL BL只適用於F4系列,
AF F3,Ai-S,Ai,E系列鏡頭。F4的重點測光
必定是TTL。若Pronea 600i 的曝光系統為“M”,
將變為TTL而中央重心BL亦不能工作
矩陣
TTL BL
內置微處理器鏡頭
所有模式
中央重心,
重點測光
中央重心∕
重點補光
F601/N6006
F601M
沒有內置微處理器鏡頭
A/M模式
中央重心,
重點測光
中央重心∕
重點補光
F601M沒有重點測光
內置微處理器鏡頭
P/S
A/M
TTL BL
如曝光模式為“M”,TTL系統將為中央重心∕重
點補光
F60D/N60
F50D/N50
F-401X/4004S
沒有內置微處理器鏡頭
M
中央重心∕
重點補光
P TTL 程序
內 置微 處 理 器 鏡 頭,
Ai-S,Ai,E系列,F3用
自動對焦鏡頭
A/M TTL
F501/N2020
F301/N2000
除以上鏡頭外
A/M TTL
P/S TTL 程序
內置微處理器鏡頭
A/M TTL
F401S/N4004S
F401/N4004
沒有內置微處理器鏡頭
M TTL
FA,FE2
FG,F3
內置或非內置 微 處 理
器鏡頭
A/M TTL
ۋ 配用在數碼單鏡反光機時,其所測光功能的選用(TTL、TTL/BL、D-TTL、i-TTL),均視乎相機型號與所配用鏡
種類型和曝光摸式組合設定,如F5和F100系列。
閃燈可單管發放 , 創作充滿三維立 體感的影像效果。
1. 處TTL/BL(TTL)模式按下SEL鈕,讓閃燈提示閃動
2. 以按下
+
右燈或
-
左燈鈕 ,選擇所欲發射的燈管 (經選定的燈管,
將在閃燈屏幕上眨動提示)
3. 按SEL鈕使眨動提示停止
拍攝完成後,按下
+
右燈或
-
左燈鈕,讓⍴方的提示在屏幕上顯示
閃燈連發限制
為免令閃燈電路過熱,如於短時間內連續讓閃光燈進行下列表格所述次數之閃光,請務必讓閃光燈休息至少
10分鐘。
模式
閃光次數
TTL,手動(全輸出,半輸出)
連續15次
手動(1/4輸出,1/8輸出)
連續20次
手動(1/16輸出,1/32輸出)
連續40次
頻閃
循環10次
Page 64

手動調控閃光操 作
此功能可自行設定所需閃光值(閃燈輸出值)
使用此模式,需對燈光攝影具備較高技巧認識,才可獲最佳效果,故建
議選用閃燈自動模式;若需採用此手動調控閃光模式,建議實拍前多作
試拍或依據㳳光表所提供訊息,作拍攝時曝光選擇
左和右閃燈,光比可選擇輸出值自1/1 焍 1/64乏設定,同時亦可選擇左
或右燈其中一組不作發射
1. 將相機設定為 M曝光模式
2. 閃燈按下MODE模式鈕,選定為M
3. 按SEL鈕(左閃光管提示眨動)
4. 按 + 或 - 鈕,設定左閃光管輸出值 (若提示為〝- -〞,左閃光管
將不發射)
5. 按SEL鈕(右閃光管提示眨動)
6. 按 + 或 - 鈕,設定右閃光管輸出值 (若提示為〝- -〞,右閃光管
將不發射)
7. 按SEL 鈕,讓眨動停止
若左/右兩組閃燈輸出值相同,閃燈顯示屏幕上將會提示;反之將不會提示
請查閱本書最後頁(表1),以查引閃燈弻出指數G/N
閣下可依據以下程式,計算相應的曝光值 :
閃燈指數GN / 閃燈與被攝體距離 = F 光圈值
閃光值鎖 (只適用於D70,F6)
“FV” 閃光值鎖定模式 -- 在拍攝時可讓攝影者在觀景窗內的檢視畫面,任意選取及鎖定某部份的閃光量,作
拍攝曝光基準。
ۋ 此功能不可直接在閃燈上設定,詳情請參閱閣下所擁相機使用手ℴ。
曝光補償
閃燈輸出可被調控來作為曝光補償。
手動控制EM-140 DG NA-iTTL閃光燈的輸出作曝光補償
ۋ 專適配於 各種數碼SLR相機、F6、F5、F4 系列, F100、F90/N90、
F90X/N90S、F80/F80 系列、F70D、U/F65/N65、F801S/N800S、F801/
N8008、F601M、F601/N6006 及Pronea 600i 。
ۋ 相機上的EV補償功能可讓使用者選擇於閃光燈或在相機機身控制曝光
補償值。如兩者皆調控的話,兩者曝光補償值的和,將會是最後的曝光
值結果,背景的曝光亦會隨之被改變。
ۋ 如所使用的相機為F601/N6006系列,是以調控相機的閃燈同步模式來進
行曝光補償。
ۋ 曝光補償可由-3到+1作1/3級調節。
1. 按下MODE按鈕來選擇TTL/BL (TTL) 模式。
2. 按下SEL按鈕使補償數值(圖示)閃爍。
3. 按下+
或 –按鈕來設定補償值。
4. 按下SEL按鈕令補償數值圖示停止閃爍。
手動控制EM-140 DG NA-iTTL閃光燈的輸出作前景及背景的曝光補償
ۋ 此功能不適用於F3系列、FM10、FM2、及FE10。
使用相機上的曝光補償按鈕或轉盤來控制前景及背景的曝光補償。(請參閱相機說明書。)
Page 65

於“M”模式下的曝光補償控制
在“M”模式下,相對閃光燈的距離及光圈顯示,可對相機作光圈調節或改變閃光燈的輸出以進行曝光補償。
第二簾幕閃燈同 步
當使用慢速閃燈同步來拍攝移動主體時,閃光燈發射後主體移動之殘影會出現在主體之前。這是因為一般閃光燈在
快門簾幕剛開時便發射,主體於快門簾幕關閉前的所有活動亦會被記錄下來(此為第一簾幕閃燈同步)。當使用第
二簾幕閃燈同步時,閃光燈會於快門將開始關閉前才發射,因此,主體於快門剛開啟至閃光燈發射之間的移動軌跡
會被記錄於主體之後,使最後的成像有較自然的動感效果。
ۋ 適配用於內置後簾同步閃光功能的相機型號。
ۋ 閃燈後簾同步閃光模式,祗可在機身上設定,不能單獨在燈體上設定;詳情請參閱相機操作手ℴ。
ۋ 當第二簾幕閃燈同步功能被設定後,閃光燈的液晶顯示屏上會顯示 記號。
造型閃光燈
如使用造型閃光燈功能時,光影效果能在正式拍攝前即時讓使用者看見。
1. 按下MODE按鈕來選擇模式。
2. 按下+或 -按鈕數次來令 指示顯示在液晶顯示屏上。
3. 確定閃光燈已完成充電,按下“閃光測試”按鈕來進行測試。
頻閃模式
當使用慢快門的時候,頻閃模式能令閃光燈於快門開啟時作連續發射。主體的影像會被連續地記錄在該張底片上。
在一個黑暗背景前,此效果將會非常明顯。連閃頻率可調範圍由每秒1次到每秒199次,最多可連閃90次。連閃次
數受限於連閃頻率及輸出數值,詳情請參閱最後頁表3。
1. 把相機設定到手動曝光模式,並選擇光圈。
2. 按下閃光燈上的MODE按鈕來選擇頻閃模式(MULTI)。
3. 按下 SEL 按鈕使連閃頻率數值在液晶顯示屏上閃爍。
4. 按下 + 或 - 按鈕來選擇連閃頻率數值。
5. 再按一下 SEL 按鈕,令閃光燈輸出值閃爍。
6. 按下 + 或 - 按鈕來設定閃光燈輸出值。
7. 再按一下 SEL 按鈕,令頻閃次數閃爍。
8. 按下 + 或 - 按鈕來設定頻閃次數。
9. 再按一下 SEL 按鈕來停止閃爍。
10. 當充電完成提示燈亮起,表示閃光燈已就緒。
注意 :請把快門設定為不短於(頻閃次數÷連閃頻率)。
無線閃光 (只適用於D70,F6)
可作無線控閃光拍攝操作;以此閃燈作無線主控閃燈,適馬
EF-500 DG SUPER NA-iTTL
作被控從屬閃燈
(SLAVE)
在本節往後的說明中,與相機直接連接的閃光燈被稱為“主燈”,而遙距的閃光燈被稱為“從屬燈”
主控和被控燈的相距,請勿超逾5公尺範圍
被控從屬閃燈(SLAVE)的設定,請參閱操作手ℴ(無線控閃光拍攝)內,被控從屬閃燈(SLAVE)說明
無線 i-TTL 閃光
相機將自動配合相應正確的曝光,當在設定為無線 i-TTL自動閃光功能
從屬閃燈設定
1. 依隨操作手ℴ內從屬燈設定步驟和設定組⇓號為3
Page 66

2. 將從屬燈設置在所欲安放位置
Page 67

誘發主控燈設定
3. 按MODE 鈕,選擇 符號出現
4. 在確認主控燈和從屬閃燈均充電完成,便可進行拍攝
無線怍控iTTL全自動閃燈攝影,F值鎖定,曝光補償和後簾快門閃光同步,
均可一起使用。無線怍控閃燈攝影設定後,請按其功能所屬各自行操作,而
不需改動從屬閃燈設定。
手動調控閃 光操作無線怍控閃光
閣下可按個人意欲設定主控燈作無線控怍閃光。可利用手持閃燈㳳光錶以確定恰當的閃燈曝光值
設定從屬閃燈
1. 依隨操作手ℴ內從屬燈設定步驟和設定組⇓號為3
2. 將從屬燈設置在所欲安放位置
誘發主控燈設定
3. 按MODE 鈕,選擇 符號出現
4. 持續按下SEL鈕約2秒以上,使模式提示眨動
5. 按MODE 鈕,選擇M
6. 按SEL鈕,閃光模式便會出現
7. 再次按下SEL鈕,跟隨前頁手動調控閃光操作所述步驟,同時設定各燈輸出值
改動MODE模式取消所有設定
從屬燈組別設定為1,這將由左燈管(1)控制,從屬燈組別設定為2,將由右燈管(2)控制。
無線怍控根 閃
設定從屬閃燈
1. 依隨操作手ℴ內從屬燈設定步驟和設定組⇓號為3
2. 將從屬燈設置在所欲安放位置
誘發主控燈設定
3. 按MODE 鈕,選擇 符號出現
4. 持續按下SEL鈕約2秒以上,使模式提示眨動
5. 按MODE 鈕,選擇 MULTI符號出現
6. 按SEL鈕使眨動中的模式提示停止
7. 再次按下SEL鈕,跟隨前頁手動調控頻閃光操作所述步驟,同時設定各燈輸出值
改動MODE模式取消所有設定
怍控頻道設 定
偶在同一環境下,其他攝影者剛和閣下同時使用無線怍控閃光模式進行拍攝,這或可導致閣下的閃燈被誘發;在此
情⅝下,請改設其他不備干擾的道
1. 在怍控摸式下按動SEL鈕數次,待頻道提示眨動
2. 按 + 或
-
鈕以選擇怍控頻道(C1 ~C4 )
3. 按下 SEL鈕使眨動中的設定停止
4. 跟隨前頁從屬閃燈的設定步橌以設定與主控燈相同的頻道
規 格
閃燈指數:14(ISO 100/M) 電源:四枚AA型鹼性 或 四枚AA型Ni-Cd 或 四枚AA型Ni-MH
回電時間:大約4秒(鹼性電)或大約3秒(Ni-Cd 及 Ni-MH) 自動關閉電源:可以 重量:430克
尺寸㸯(控制部㸞:76.7毫米(闊)X 136.2毫米(高)X 82.4毫米(長)
閃燈部㸞:126.6毫米(闊)X 128.8毫米(高)X 30.5毫米(長)
Page 68

Page 69

[表1][Table1][Tabelle1][Tabla1][Tablla1][Tabel1][Tableau1] [Cuadro1]
ガイドナンバー/ GN / NG (ISO100・m)
2灯 / 2 tubes
1灯 / 1 tube
1/1
14.0
14.0
1/2
10.0
10.0
1/4
7.0
7.0
1/8
5.0
5.0
1/16
3.5
3.5
1/32
2.5
2.5
1/64
1.8
1.8
[表2][Table2][Tabelle2][Tabla2][Tablla2][Tabel2][Tableau2][Cuadro2]
ガイドナンバー/ GN / NG (ISO100・m)
2灯 / 2 tubes
1灯 / 1 tube
1/125
10
10
1/160
8.9
8.9
1/180
7.9
7.9
1/250
7.0
7.0
1/320
6.3
6.3
1/350
5.9
5.9
1/400
5.6
5.6
1/500
5.0
5.0
1/640
4.5
4.5
1/750
4.2
4.2
1/800
4.0
4.0
1/1000
3.5
3.5
1/1250
3.1
3.1
1/1500
3.0
3.0
1/1600
2.8
2.8
1/2000
2.5
2.5
1/2500
2.2
2.2
1/3000
2.1
2.1
1/3200
2.0
2.0
1/4000
1.8
1.8
1~3 Hz
1~90
4~5 Hz
1~80
6~7 Hz
1~70
8~9 Hz
1~60
10 Hz
1~50
11~14 Hz
1~40
15~19 Hz
1~35
20~50 Hz
1~30
1/64
60~199 Hz
1~20
1~3 Hz
1~60
4~5 Hz
1~50
6~7 Hz
1~40
8~9 Hz
1~30
10~14 Hz
1~20
15~19 Hz
1~18
20~50 Hz
1~14
1/32
60~199 Hz
1~12
1~3 Hz
1~30
4~7 Hz
1~20
1~2 Hz
1~14
3 Hz
1~12
4 Hz
1~10
5 Hz
1~8
6 Hz
1~6
7 Hz
1~5
8~9 Hz
1~4
1/8
10~199 Hz
1~3
1 Hz
1~7
2 Hz
1~6
[表3][Table3][Tabelle3][Tabla3][Tablla3][Tabel3][Tableau1][Cuadro3]
Page 70

ENGLISH
The CE Mark is a Directive conformity mark of the European Community (EC).
DEUTSCH
Die CE-Kennzeichnung ist eine Konformitätserklärung des Herstellers, die dokumentiert, daß das
betreffende Produkt die Anforderungen von EG-Richtlinien einhält.
FRANÇAIS
Le label CE garantit la conformité aux normes établies par la Communauté Européenne.
NEDERLANDS
Het CE teken is een aanduiding voor de Europese Gemeenschap (EC).
ESPAÑOL
El logotipo CE es una directiva de conformidad con la Comunidad Europea (CE).
ITALIANO
Questo è il marchio di conformità alle direttive della comunità Europea (CE).
SVENSKA
CE-märket betyder att varan blivit godkänd av EU:s gemensamma kvalitetsnorm.
DANSK
CE-mærket er i overensstemmelse med de gældende regler i EU.
SIGMA (Deutschland) GmbH
Carl-Zeiss-Str. 10/2, D-63322 Rödermark, F.R.GERMANY
Verkauf : 0 60 74-8 65 16 55 Service : 0 60 74-8 65 16 66 Fax : 0 60 74-8 65 16 77
EF-500 SUPER NA 01 版 2001.3.24
株式会社シグマ本社〒201-8630東京都狛江市岩戸南2-3-15 03(3480)1431(代)
東京営業所(ダイヤルイン) 03( 3 480) 2 301
大阪営業所 〒541-0059大阪市中央区博労町1-7-2 堺筋トラストビル8F 06(6 2 71)1 548
工場・東北営業所 〒969-3395福島県耶麻郡磐梯町大字大谷字日知坂6594 0242(73)2771(代)
福岡営業所 〒812-0013福岡市博多区博多駅東1-11-15博多駅東口ビル6F 09 2 (4 75)5 635
札幌営業所 〒007-0865札幌市東区伏古5条4丁目1番9号 伏古ビル2F 0 11 (786 ) 37 10
インターネットホームページアドレス http://www.sigma-photo.co.jp
 Loading...