

Page 1

日本語
4~19
ENGLISH
20~35
DEUTSCH
36~51
FRANÇAIS
52~67
ESPAÑOL
68~83
ITALIANO
84~99
DANSK
100~115
NEDERLANDS
116~131
简体中文
132~147
繁體中文
148~163
한 국 어
164~179
РУCCКИЙ
180~195
PORTUGUÊS
196~211
J E D F Es
I Dk
N Cs Ct K R P
F50E17201
ELECTRONIC FLASH EF-630
FOR CANON
使用説明書/INSTRUCTIONS
Page 2

2
Page 3

3
Page 4

人的損害や物的損害を未然に防止するため、ご使用の前にこの項目
警 告
この表示を無視して、誤った取り扱いをすると、人が死亡ま
この表示を無視して、誤った取り扱いをすると、人が障害を
。
フラッシュ内部には、高電圧回路が組み込まれています。感
電や火傷のおそれがありますので、分解、改造等は絶対にし
ないでください。また、万一落下等で破損した場合には、内
部の部品に手を触れぬよう十分注意してください。
フラッシュを人の目に近づけて撮影しないでください。目の
近くでフラッシュを発光すると視力障害を起こす危険性があ
ります。特に、乳幼児を撮影するときは1m以上離れてくだ
さい。
カメラのホットシューにフ
とき
には、カメラのシンクロターミナルに手を触れないでくださ
い。高電圧がかかり感電することがあります。
可燃性のガスが大気中に存在するおそれのある場所では、使
用しないでください。火災の原因となります。
発光部を手でおおったり、肌に密着させたまま発光しないで
ください。火傷の原因となります。
車の運転手などに向けて発光しないでください。事故の原因
となります。
このフラッシュを
EOS シリーズ以外のカメラには
使用しないでください。誤動作やカメラの電子回路に悪影響
を及ぼす可能性があります。
このフラッシュは防水構造になっていません。雨天や水辺で
使用するときは、濡らさないように注意してください。水が
内部に入り込みますと故障の原因になります。
ホコリの多い場所や、高温、多湿になる場所に放置しないで
ください。故障や火災の原因となります。
急激な温度変化により、フラッシュ内部に結露が生じること
があります。寒い屋外から暖かい室内に入るときなどは、ケ
ースやビニール袋に入れ、周囲の温度になじませてから使用
してください。
防虫剤はフラッシュに悪影響を与えます。タンスや押入など
に保管しないでください。
シンナー、ベンジン等の有機溶剤で拭かないでください。変
色、変形等の原因となります。
フラッシュは使用せずに放置すると性能が劣化します。1ヶ
月に1度を目安に発光テストを数回行
日本語
このたびは、シグマエレクトロニックフラッシュ EF-630 (FOR
CANON) をお買い上げいただきありがとうございます。本説明書を
ご精読の上、フラッシュの機能、操作、取り扱い上の注意点を正し
く理解して、写真撮影をお楽しみください。尚、ご使用のカメラの
使用説明書のフラッシュ撮影に関する項目も併せてご覧ください。
お読みになった後は、いつでも見られる所に保管してください。
安全上のご注意
の内容を十分ご理解いただくようお願いします。
たは重傷を負う可能性が想定される内容を示しています。
負う可能性が想定される内容および物的損害の発生が想定
注 意
される内容を示しています。
各文章の
各文章の
4
記号は注意、もしくは警告を促す内容を告げています
記号は行為を禁止する内容を告げています。
警 告
注 意
ラッシュを接続して使用する
キヤノン
っ
てください
。
Page 5
発光部を布や衣服などでおおったまま発光しないでくださ
い。火災の原因となることがあります。
1.
2.
3.
4.
5.
6.
7.
8.
9.
10.
11.
12.
13.
14.
15.
16.
17.
18.
(左ボタン)
ボタン
E-TTL II / E-TTL 自動調光方式の EOS デジタルカメラ
電池について
このフラッシュは、単三形のニッケル水素電池、もしくはアルカリ
乾電池を 4 本使用します。
電池や電池室カバーの接点は、常にきれいにしてください。
交換するときには 4 本とも同じメーカーの同じ種類のものを使用
してください。誤った使い方は、液漏れ、発熱、破裂等のおそれ
があります。
電池の分解、火中、水中への投下、ショート等は破裂のおそれが
ありますので絶対にしないでください。また、ニッケル水素電池
以外は充電しないでください。
長期間使用しない場合、電池を取り出して保管してください。電
池を入れたまま長期間放置しますと、液漏れが生じてフラッシュ
内部を損傷するおそれがあります。
長期間の旅行、寒冷地での撮影、または大量に撮影するときには、
予備の電池をご用意ください。
単 3 形リチウム乾電池は使用しないでください。故障の原因とな
ることがあります。
電池を処分する場合は、お住まいの自治体の規則に従ってくださ
い。
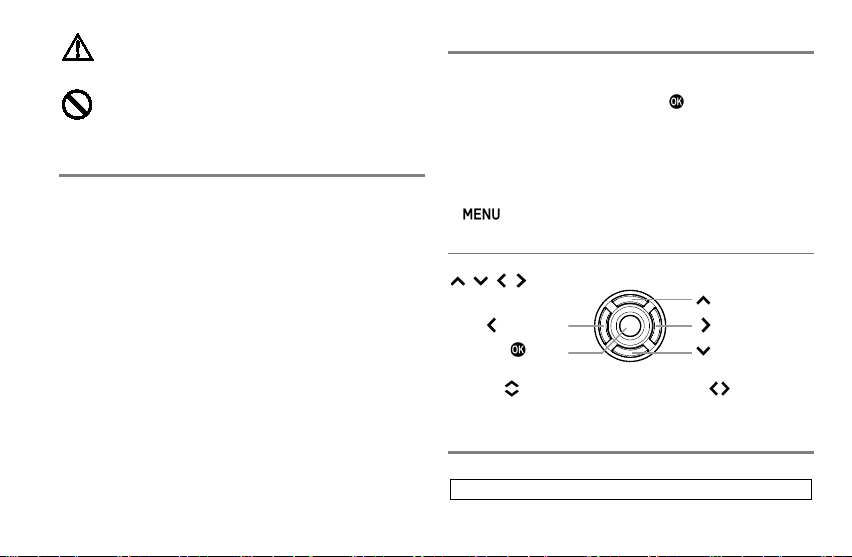
各部の名称(P.2)
発光部
ワイヤレス信号受光窓
ビープ音スイッチ
AF 補助光発光部
電池室カバー
取付けシュー
液晶パネル
バックライトスイッチ
ボタン
セレクター(13)について
本書ではセレクターの各ポジションを
上下で操作する場合は
います。
電源スイッチ
レディライト/TEST ボタン
ボタン
セレクター
シューロックレバー
ダイヤル
シンクロ端子
キャッチライトパネル
ワイドパネル
/ / /
(上ボタン)
(右ボタン)
(下ボタン)
、左右で操作する場合は で表して
対応するカメラについて
このフラッシュは以下のカメラに対応しています。
で表しています。
5
Page 6
電池の入れ方
1. 電源スイッチを「OFF」にして、電池室カバーをスライドして開
きます。P.3-(1)
2. 電池室内の表示に従い、電池の+-の向きを間違えないように入
れます。P.3-(2)
3. 電池室カバーを閉じます。P.3 -(3)
4. 電源スイッチを「ON」にします。発光可能な状態まで充電される
とレディライトが緑色で点滅、フルに充電されると赤で点灯しま
す。
ご注意!!
電池容量が少なくなると、液晶パネルに
マークが表示されます。電池容量が完全になくな
ると、右図のような画面に切り換わり、操作がで
きなくなります。新しい電池と交換してください。
エラー警告について
液晶パネルに マークが表示された場合、フラッシュに何らか
の異常が発生した恐れがあります。一旦電源スイッチを入れ直す、
もしくは電池をご確認ください。それでも表示が消えない場合は、
弊社営業所にご相談ください。
オートパワーオフについて
約 1.5 分間フラッシュが操作されないと、電池の消耗を防ぐため自
動的に電源が OFF になります。TEST ボタンを押すか、カメラ本体
のシャッターボタンを半押しすると再度電源が ON になります。た
だし、「WL SL AVE 」「S-FL NORMAL」「S-FL SLAVE」モードではオ
ートパワーオフが働きません。
6
カメラへの取り付け方
1. 電源スイッチを「OFF」にします。
2. シューロックレバーが「UNLOCK ►」の位置にあることを確認し
ます。P.3-(4)
3. カメラのホットシューに止まるまで差し込み、シューロックレバ
ーを「◄LOCK」方向にカチッとロックされるまでスライドしま
す。P.3-(5)
取り外しは、シューロックレバーのボタンを押しながら「UN
LOCK►」方向に止まるまでスライドし、フラッシュを引き抜いて
ください。
ご注意!!
シューロックレバーが「UNLOCK►」から外れた位置でフラッシュ
を引き抜くと、カメラのホットシューとフラッシュの取付けシュー
を破損する恐れがあります。
発光部のセット
通常の撮影では発光部を正面方向にセットします。P.3-(6)
ご注意!!
電源スイッチを ON にし、ステータスエリアに マーク
が表示される、もしくはステータスエリアの距離表示が点滅してい
る場合、発光部が正しく正面方向にセットされていませんのでご注
意ください。
Page 7
連続撮影時のご注意
モード
最大連続発光回数
TTL, M(1/1, 1/2)
20 回
M(1/4, 1/8)
25回
M(1/16~1/32)
40回
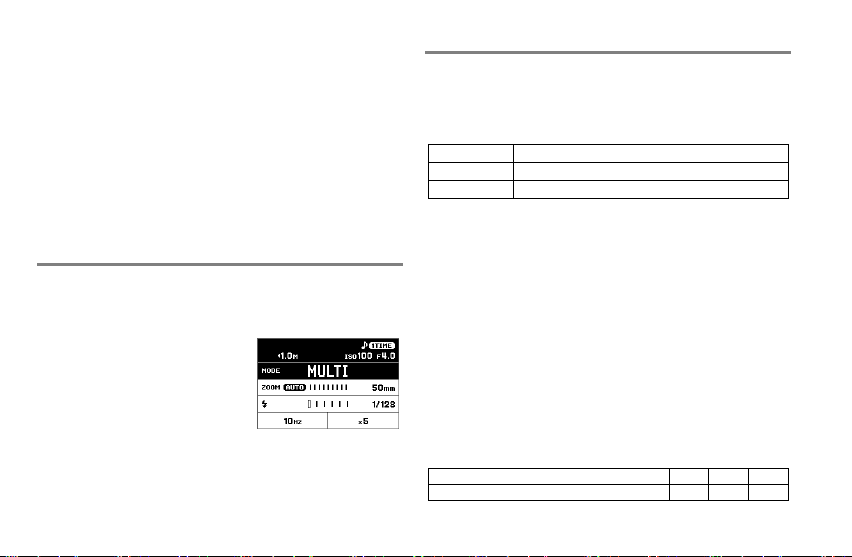
MULTI
10 サイクル
メイン画面
セットアップメニュー
発光モード
光モードにおける詳細を設定で
きます。
フラッシュ撮影のオプション機
能の追加や、フラッシュの基本
①
②
③
④
⑤
連続発光による加熱での劣化を防止するため、以下の表に示す回数
以下で止めて 10 分以上休ませてください。
ボタンでメイン画面とセットアップメニューを切り替えます。
(電源を「ON」にした時は、必ずメイン画面からスタートします。)
ご注意!!
液晶パネルに マークが表示された場合、加熱防止のためにフ
ラッシュの発光が制限されます。 マークが消えるまで休ませ
てください。
設定の基本ステップ
設定の基本を説明します。EF-630 は以下のステップで殆どの設定
が簡単に行えます。
ご注意!!
電源スイッチが「」(ロック)のポジションにあると、設定が
きません。設定の際は必ず「ON」に合わせてください。
カメラのメニュー画面でフラッシュの設定を変更できる「ストロボ
機能設定」と「ストロボカスタム機能設定」の項目には対応してい
ません。フラッシュ側で設定を行ってください。
の変更や、個々の発
状態を設定できます。
タブエリア
サブメニュー
変更で
ステータスエリア
発光モードエリア
モード詳細エリア
メイン画面での基本操作
発光モードを選ぶ
ボタンで発光モードエリアを選び、
ボタン、もしくはダイヤルで発光
モードを変更します。
発光モードの詳細を設定する
ボタンでモード詳細エリアを選び、
ボタン、もしくはダイヤルで設定
値を変更します。
7
Page 8
セットアップメニューでの
シャッタースピード
絞り
(1/60 秒 ~ フラッシュ同調速度※)
(30 秒 ~ フラッシュ同調速度※)
Tv
自動設定
M
任意に設定可
※
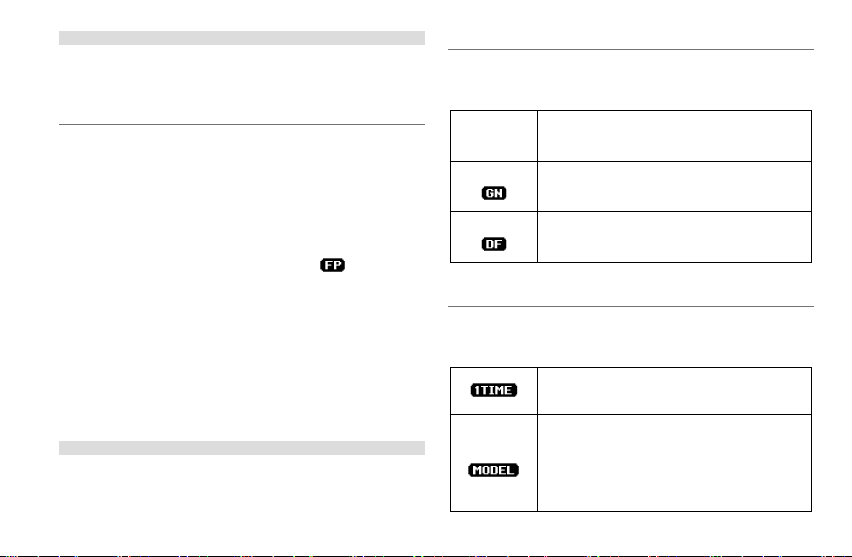
FP
に設定すると、高速側のシャッタースピードの
制限が無くなります。
基本操作
ダイヤル回すとページが切り替わり
ます。(タブエリアが選択されている
ときは、 ボタンでも切り替えでき
ます。)
セットアップメニューでは
ボタンで希望の項目を選び、 ボ
タンか
開きます。(項目によっては専用画面
が開いたり、確認メッセージが表示さ
れるものがあります。)
サブメニューでは
( ボタンを押すとオプションが変
更されずにサブメニューが閉じま
す 。)
ボタンでサブメニューを
ボタンで希望のオプションを選び、
ボタンか
ボタンで確定します。
E-TTL II / E-TTL自動調光撮影
E-TTL II / E-TTL 自動調光方式による撮影です。通常はこのモード
で撮影してください。
1. 発光モードを「TTL」にセットします。
2. 被写体が撮影範囲内にあるかをステ
ータスエリアの距離表示で確認しま
す。
8
3. レディライトで充電を確認し、撮影します。
フラッシュの撮影が正常に行われるとステータスエリアに
マークが約 5 秒間表示されます。 マークが表示されない場合
は、光量が不足、もしくは過多の可能性がありますので、条件を変
更して撮影し直してください。
シャッタースピードと絞りについて
カメラの各露出モードにおけるシャッタースピードと絞りの関係は
以下のようになります。
自動設定
P
自動設定
Av
フラッシュ同調速度※以下で任意に設
定可
発光を
「ON」
ご注意!!
カメラのシャッタースピードや絞り値表示が点滅している状態で撮
影すると、露出が合わない可能性があります。その際は条件を変更
して撮影してください。
カメラの撮影モードが「かんたん撮
影ゾーン」に設定されている時は、
図のような画面になり、TEST ボタ
ンと ボタン以外のボタン操作
が禁止されます。
自動設定
任意に設定可
Page 9
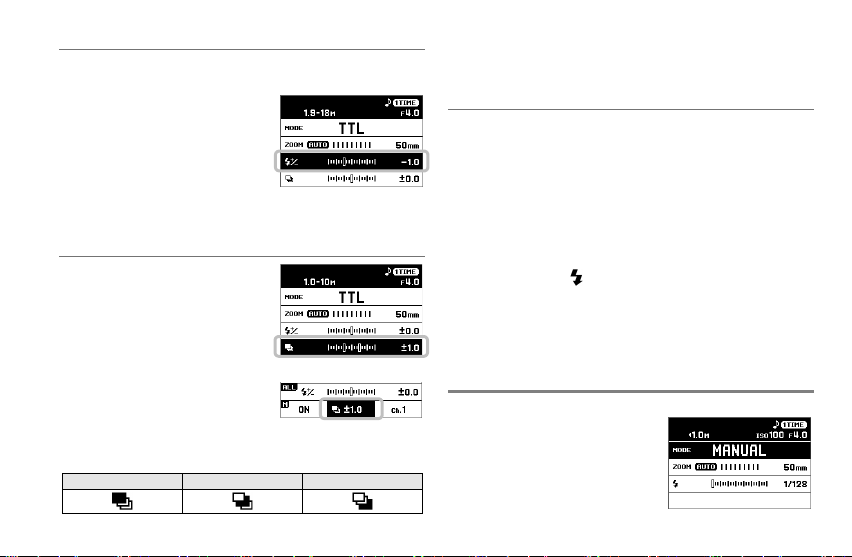
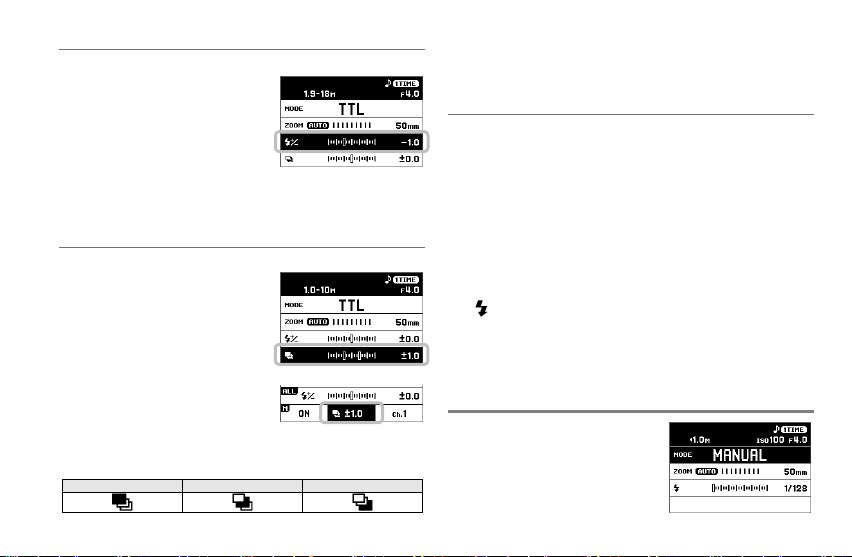
調光補正
1 枚目
2 枚目
3 枚目
(MODE WL TTL)
背景の露出には影響を与えずに、フラッシュの発光量のみ補正する
ことができます。
発光モード:「TTL」「WL TTL」「 WL
SLAVE」で使用できます。
モード詳細エリアで補正量をセットし
ます。補正量は 1/3 段ステップ(カメ
ラが 1/2 段ステップの時は 1/2 段ステ
ップ)で、±3 段までできます。)
カメラ側の調光補正機能は使用しないでください。
FEB撮影 (Flash Exposure Bracketing)
フラッシュの発光量を変えながら 3 枚
の撮影をすることができます。
発光モード:「TTL」「 WL TTL」で使用
できます。
モード詳細エリアで補正量をセットし
ます。補正量は 1/3 段ステップ(カメ
ラが 1/2 段ステップの時は 1/2 段ステ
ップ)で、±3 段までできます。)
レディライトで充電を確認しながら、3
枚撮影します。
標準→アンダー→オーバーの順で撮影されます。
FEB
アイコンが以下のように変化し、何枚目の撮影かがわかります。
3 枚の撮影が終了すると FEB は自動的に解除されます
FEB は調光補正と併用できます。
FEロック撮影
被写体の任意の部分に適正調光させる撮影方法です。
発光モード:「TTL」「 WL TTL」で使用できます。
1. 被写体にピントを合わせます。
2. 調光したい部分を画面の中央に合わせ、カメラの「M-Fn」ボタン
を押します。
フラッシュがプリ発光し、被写体に必要な発光量が記憶されます。
ファインダー内に「FEL」が約 0.5 秒間表示されます。
3. 構図を決めて撮影します。
ファインダー内の「 」が点滅した時は光量が不足しています。
条件を変更して再度 FE ロックしてください。
カメラによって FE ロックが割り当てられているボタンが異なり
ます。ご使用のカメラの説明書を参照してください。
マニュアル発光撮影
発光量を任意に設定することができます。
1. 発光モードを「MANUAL」にセット
します。
2. モード詳細エリアで、発光量を設定
します。(1/128~1/1 の範囲、1/3EV
ピッチで設定できます。)
9
Page 10

3. レディライトで充電を確認し、撮影します。
WL TTL
ワイヤレス ETTL 自動調光撮影
WL MANUAL
ワイヤレスマニュアル発光撮影
WL MU LTI
ワイヤレスマルチ発光撮影
EF-630 の発光グループ
A B C
EF-610 DG SUPER のスレーブ ID
1 2 3
ステータスエリアの距離表示部で、適正露出が得られる距離が計算
され表示されます。同じ発光量でも、カメラの ISO 感度や絞り値を
変更すると、適正露出が得られる距離が変わります。
マニュアル発光での適正露出は、次の計算式で割り出せます。
フラッシュの発光量(GN)/撮影距離(m)=絞り値(F)
このフラッシュの GN(ガイドナンバー)は巻末の[表 1]を参照
してください。
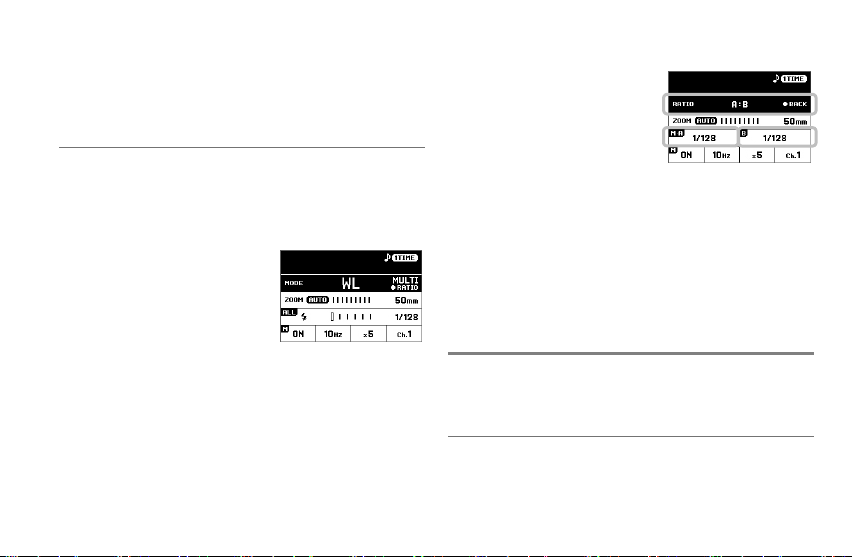
マルチ発光撮影
シャッターの開いている間にフラッシュを連続発光して、被写体の
動きを1コマの画面に連続分解写真のように写し込むことができま
す。
カメラの露出モードは M で使用してください。
1. 発光モードを「MULTI」にセットします。
2. モード詳細エリアで、発光量、発光
間隔「Hz」(例: 10Hz = 1 秒間に 10
回の間隔で発光します)、発光回数
「x」を設定します。
3. 「発光回数」÷「発光間隔」より遅い
シャッタースピードをセットします。
4. レディライトで充電を確認し、撮影します。
連続して発光できる回数は発光量と発光間隔の組み合わせで異なり
ます。巻末の[表 2]を参照してください。
10
ワイヤレス撮影
フラッシュをカメラから離して設置すると、ライティングによる表
現の幅が広がります。EF-630 はフラッシュ光による通信で、離れ
たフラッシュを制御します。
EF-630 は、用途に合わせて 3 つのワイヤレス撮影モードを備え
ています。
カメラに取り付けるフラッシュを「マスター」、カメラから離して
置くフラッシュを「スレーブ」と表記します。
被写体よりフラッシュは約 0.5m~5m、カメラは約 1m~5m の範
囲内にセットしてください。
フラッシュをカメラから離して使用するときは、付属のミニスタ
ンドを取り付けると便利です。ミニスタンドには三脚用のねじ穴
もついています。
カメラの内蔵ストロボを利用したワイヤレス撮影も可能です(ワ
イヤレスストロボ撮影のマスター機能を備えた機種に限ります)。
カメラ側の設定はカメラの説明書を参照してください。
EF-610 DG SUPER EO-ETTL II との組み合わせでも使用できま
す。その場合は EF-630 を「マスター」にしてください。EF-610
DG SUPER の設定は EF-610 DG SUPER の使用説明書に従って
ください。光量比設定時の「発光グループ」は EF-610 DG SUPER
の「スレーブ ID」に相当します。
Page 11
ワイヤレス撮影の準備(マスターの設定)
ON
コントロール機能+本発光※
OFF
コントロール機能のみ
発光グループ設定
スレーブを 2 つ(A, B)、または 3 つ
(A, B, C)のグループに分けて光量比
や発光量を変えた撮影ができます。
1. 希望のワイヤレス撮影モードに設定
し、発光モードエリアが選択されて
いる状態で ボタンを押すと、発光
グループ設定画面に切り替わります。
2. ダイヤル、または ボタンで発光
グループの設定を切り替えます。
(OFFは光量比撮影を行わない設定
です)
3. 設定後は ボタンを押し、通常画面に戻ります。
マスター発光設定
「マスター」をコントロール機能のみ
にするか、フラッシュとして発光させ
るかを設定します。
※光量比を設定したワイヤレス撮影の際、「マスター」はグループ
「A」に属します。
チャンネル設定
他の人がワイヤレス撮影をしている時、
異なるチャンネルに設定することで誤
作動を防げます。(チャンネル 1~4 か
ら選択できます)
ワイヤレス撮影の準備(スレーブの設定)
1. 発光モードを「WL S LAVE 」にセットします。
2. モード詳細エリアでマスターと同じ
チャンネルを設定します。
3. 光量比を設定したワイヤレス撮影を
行う場合は、モード詳細エリアで振
り分けたい発光グループを設定しま
す。(光量比撮影を行わない場合は A、
B、C のどれでも構いません)
ワイヤレスE-TTL II / E-TTL自動調光撮影
ワイヤレス E-TTL II / E-TTL 自動調光撮影では、カメラが自動的に
適正露出になるように制御します。
1 灯、またはすべてのスレーブを同一光量で発光させる
自動調光撮影
マスターの設定
1. 発光モードを「WL TTL」にセットし
ます。
2. 必要に応じ、モ ー ド詳細エリアで「チ
ャンネルの設定」「マスターの発光設
定」を行います。
スレーブの設定
3. 「ワイヤレス撮影の準備(スレーブの設定)」の項目に従い設定し
ます。
4. スレーブを設置し、充電完了を確認して撮影します。(スレーブは
AF 補助光が点滅して充電完了を知らせます。)
11
Page 12

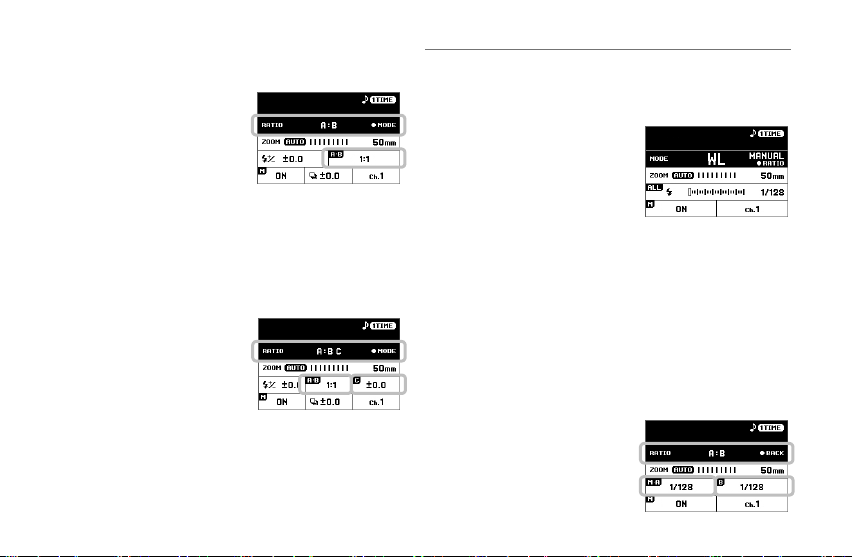
光量比を設定した自動調光撮影(2 グループ)
グループ「A」とグループ「B」の総和が適正露出になるように制御
されます。
マスターの設定
1. 「ワイヤレス撮影の準備(マスター
の設定)」の項目に従い、「発光グル
ープ設定」を「A:B」に設定します。
2. モード詳細エリアで光量比を設定し
ます。(
8:1~1:8 の間で設定できます)
スレーブの設定
3. 「ワイヤレス撮影の準備(スレーブの設定)」の項目に従い設定し
ます。
光量比を設定した自動調光撮影(3 グループ)
グループ「C」は被写体の背景の影を消すなど、補助的な光源とし
て使用してください。
マスターの設定
1. 「ワイヤレス撮影の準備(マスターの
設定)」の項目に従い、「発光グルー
プ設定」を「A:B C」に設定します。
2. モード詳細エリアで「A:B」の光量
比を設定します。(8:1~1:8 の間で設
定できます)
3. モード詳細エリアで「C」の調光補正値を設定します。
スレーブの設定
4. 「ワイヤレス撮影の準備(スレーブの設定)」の項目に従い設定し
ます。
12
ワイヤレスマニュアル撮影
任意に発光量を設定できるワイヤレスマニュアル撮影です。露出は
市販のフラッシュメーターで決定してください。
1 灯、またはすべてのスレーブを同一光量で発光させる
マニュアル撮影
マスターの設定
1. 発光モードを「WL MANUAL」にセ
ットします。
2. 必要に応じ、モード詳細エリアで「チ
ャンネルの設定」「マスターの発光設
定」を行います。
3. モード詳細エリアで、発光量を設定します。( 1/128~1/1 の範囲、
1/3EV ピッチで設定できます。)
スレーブの設定
4. 発光モードを「WL S LAVE 」にセットします。
5. 「ワイヤレス撮影の準備(スレーブの設定)」の項目に従い設定し
ます。
6. スレーブを設置し、充電完了を確認して撮影します。(スレーブは
AF 補助光が点滅して充電完了を知らせます。)
グループごとに発光量を設定するマニュアル撮影
2 つ、または 3 つのグループごとに発光量を設定したマニュアル撮
影ができます。
マスターの設定
1. 「ワイヤレス撮影の準備(マスター
の設定)」の項目に従い、「発光グル
ープ設定」を「A:B」ま た は「 A:B:C」
に設定します。
Page 13
2. モード詳細エリアで各グループの発光量を設定します。
スレーブの設定
3. 「ワイヤレス撮影の準備(スレーブの設定)」の項目に従い設定し
ます。
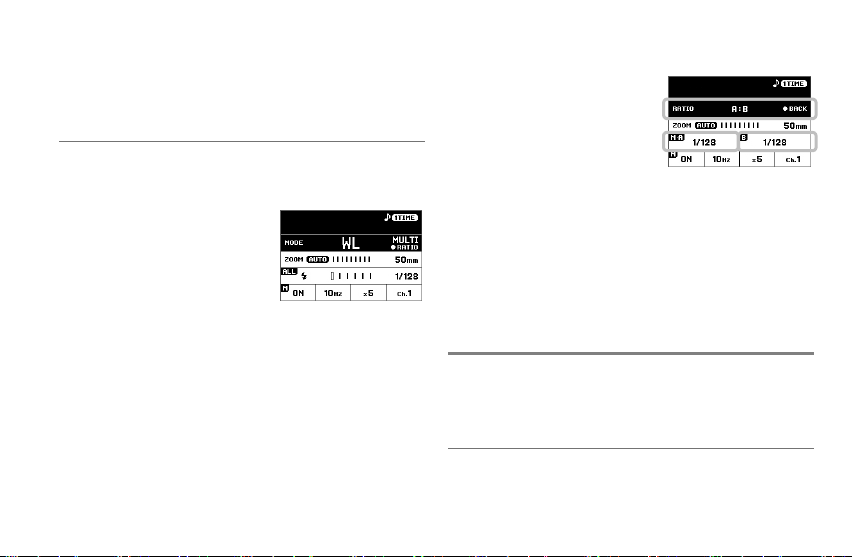
ワイヤレスマルチ発光撮影
ワイヤレスで 1 灯、または複数のフラッシュをマルチ発光させるこ
とができます。
カメラの露出モードは M で使用してください。
1 灯、またはすべてのスレーブを同一光量で発光させる
マルチ発光撮影
マスターの設定
1. 発光モードを「WL MULT I」にセット
します。
2. 必要に応じ、モード詳細エリアで「チ
ャンネルの設定」「マスターの発光設
定」をします。
3. モード詳細エリアで、発光量、発光間隔「Hz」( 例 : 10Hz = 1 秒間
に 10 回の間隔で発光します)、発光回数「x」を設定します。
スレーブの設定
4. 「ワイヤレス撮影の準備(スレーブの設定)」の項目に従い設定し
ます。
5. 「発光回数」÷「発光間隔」より遅いシャッタースピードをセッ
トします。)
6. スレーブを設置し、充電完了を確認して撮影します。(スレーブは
AF 補助光が点滅して充電完了を知らせます。)
グループごとに発光量を設定するマルチ発光撮影
2 つ、または 3 つのグループごとに発光量を設定したマルチ発光撮
影ができます。
マスターの設定
1. 「ワイヤレス撮影の準備(マスター
の設定)」の項目に従い、「発光グル
ープ設定」を「A:B」ま た は「 A: B:C」
に設定します
2. モード詳細エリアで各グループの発光量を設定します。
3. モード詳細エリアで、発光量、発光間隔「Hz」( 例 : 10Hz = 1 秒間
に 10 回の間隔で発光します)、発光回数「x」を設定します。
スレーブの設定
4. 「ワイヤレス撮影の準備(スレーブの設定)」の項目に従い設定し
ます。
以降、前項目の 5 より同手順で撮影してください。
スレーブ発光
EF-630 は他のフラッシュ光に反応して光る機能を備えています。
自動調光撮影はできませんが、気軽にカメラからフラッシュを離し
た撮影が行えます。
通常スレーブ発光
カメラに取り付けたフラッシュの光に反応し、カメラから離した
EF-630 を同調発光させることができます。
カメラの内蔵フラッシュでは、プリ発光により誤作動してしまう
ため、同調発光させることができません。
13
Page 14
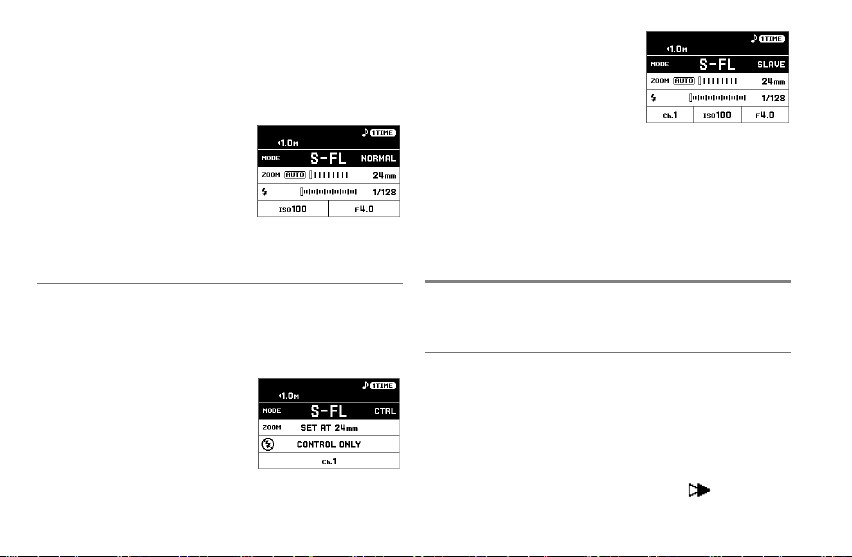
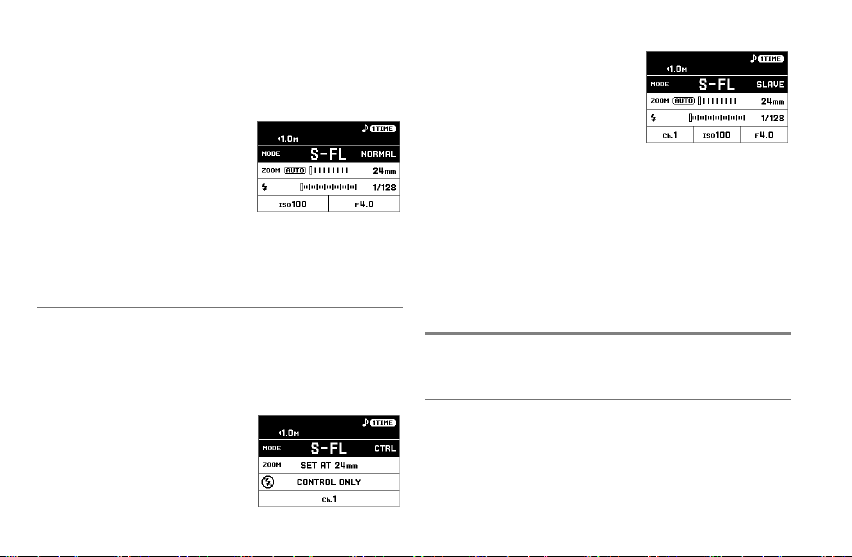
カメラに取り付ける制御用フラッシュは、マニュアル発光モードに
し、1/16 程度の発光量にセットします。
カメラの露出モードを M、シャッタースピードを 1/30 秒以下、絞
りと ISO は任意の値をセットします。
1. EF-630 の発光モードを「S-FL NORMAL」にセットします。
2. モード詳細エリアで、カメラの設定
と同じ ISO と絞り値をセットします。
3. 発光用フラッシュから被写体の距離
と、ステータスエリアの距離表示が
おおむね一致するように、モード詳
細エリアで発光量を調整します。
4. 充電完了を確認して撮影します。
指定スレーブ発光
複数の EF-630 を使用し、設定したチャンネルが一致するフラッシ
ュのみを同調発光させることができます。1 台を制御用としてカメ
ラに取り付けて、他を発光用として使用します。
カメラの露出モードを M、シャッタースピードを 1/30 以下、絞り
と ISO は任意の値をセットします。
制御用フラッシュの設定
1. 発光モードを「S-FL CTRL」にセッ
トします。
2. 必要に応じてチャンネルを設定しま
す。(モード詳細エリアで Ch.1 ~
Ch.3 を選びます。)
発光用フラッシュの設定
3. 発光モードを「S-FL S LAVE」にセットします。
14
4. モード詳細エリアで、制御用フラッシ
ュと同じチャンネルを設定します。
5. モード詳細エリアで、カメラの設定と
同じ ISO と絞り値をセットします。
6. 発光用フラッシュから被写体の距離
と、ステータスエリアの距離表示が
おむね一致するように、モード詳細エリアで発光量を調整します。
7. 充電完了を確認して撮影します。
他マウント用の EF-630 や、EF-610 DG SUPER との組み合わせ
でも使用できます。(EF-610 DG SUPER の設定は EF-610 DG
SUPER の使用説明書に従ってください)
お
オプション機能について
セットアップメニューから設定、追加できるオプション機能を説明
します。
後幕シンクロ撮影 (MENU 1)
シャッター幕が閉じる直前にフラッシュが発光します。動く被写体
の後方に流れる光や軌跡が撮影できるため、自然な動きが表現でき
ます。
カメラの露出モード:P、Av、Tv、M で使用できます。
発光モード:「TTL」「 MANUAL」「 WL」で使用できます。
1. 「MENU 1」→「REAR CURTAIN SYNC」→「ON」にセットし
ます。
2. メイン画面に戻ります。(ステータスエリアに マークが表示
されます。)
Page 15
ご注意!!
NORMAL
1 TIME
出方を確認することができます。
後幕シンクロ撮影に対応していない発光モードの時は「ON」にセッ
トできません。
FP発光(ハイスピードシンクロ) (MENU 1)
FP 発光はフラッシュを連続発光させて、シャッターの走行開始か
ら終了まで発光を維持することにより、フラッシュ同調速度より高
速のシャッタースピードで撮影できます。
カメラの露出モード:P、Av、Tv、M で使用できます。
発光モード:「TTL」「 MANUAL」「WL TTL」「 WL MANUAL」で使用
できます。
1. 「MENU 1」→「FP」→「ON」にセットします。
2. メイン画面に戻ります。(ステータスエリアに マークが表示
されます。)
「TTL」モードでは、ステータスエリアの距離表示で、被写体が撮
影範囲内にあるかを確認して撮影してください。
「MANUAL」モードでは被写体までの距離とステータスエリアの距
離表示の数値が一致するように、絞りなどを調整して撮影してくだ
さい。
FP 発光では、フラッシュのガイドナンバーがシャッター速度によ
って変化し、光の到達距離が短くなります。ガイドナンバーは巻末
の[表 3]を参照してください。
ご注意!!
FP 発光に対応していない発光モードの時は「ON」にセットできま
せん。
配光モード (MENU 1)
EF-630 は 3 通りの配光モードを備えており、目的によって選択す
ることができます。
「MENU 1」→「LIGHT DISTRIBUTION」
通常配光
-
(初期設定)
DIFFUSE
一般的な撮影向きの基本的な配光特性をもった
モードです。
ガイドナンバー優先配光
GN
周辺部の光量は落ちますが、より大きなガイドナ
ンバーが得られるモードです。
フラット配光
周辺光量の落ち込みを減らし、均一な配光特性を
もったモードです。
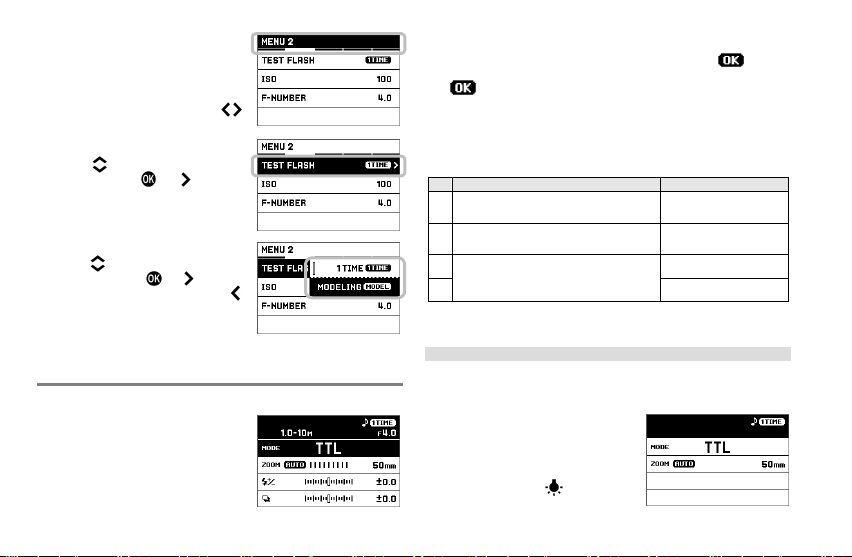
テスト発光 (MENU 2)
EF-630 は 2 通りのテスト発光モードを備えており、いずれかを
TEST ボタンに割り当てることができます。
「MENU 2」→「TEST FLASH」
テスト発光
(初期設定)
MODELING
通常のテスト発光が行われます。
モデリング発光
発光モード:「TTL」「 MANUAL」「 MULT I」で使
用できます。
TEST ボタンを押し続けると、約 1.5 秒間連続発
光が行われ、フラッシュ撮影による被写体の影の
15
Page 16
ご注意!!
8
8
ON
常に点灯します。
モデリング発光に対応していない発光モードの時は「MODELING」
にセットできません。
カメラとフラッシュが通信しているときは TEST ボタンを操作でき
ません。(カメラの絞り込みボタンを押すと TEST ボタンの割り当
てに関わらずモデリング発光が行われます。)
カスタムモード (MENU 3)
好みの設定を登録し、簡単に呼び出す
ことができます(2 つのパターンを登
録できます)。
カスタムモードの登録・呼出し
1. 発光モード、モード詳細エリア、セ
ットアップメニューの内容を一通り
好みの状態に設定します。
2. 「MENU 3」→「CUSTOM MODE SETTING」から「C1」「 C2」
のいずれかを選び ボタンを押します。
3. 「OK」を選び ボタンで確定します。
登録された内容は、カスタムモードとして発光モードに追加されま
す(カスタムモードは、発光モードエリアに もしくは
マークが表示されます)。
登録されたカスタムモードを消去する
1. 「MENU 3」→「CUSTOM MODE DELETE」から「C1」「 C2」
のいずれかを選び ボタンを押します。
2. 「OK」を選び ボタンで確定します。
16
AF補助光 (MENU 4)
暗い場所ではオートフォーカスの作動をアシストするために AF 補
助光が照射されます(有効範囲・約 0.7m~10m)。
AF 補助光が不要な場合は「MENU 4」→「AF ASSIST LIGHT」
→「OFF」にセットしてください。
液晶パネルの照明 (MENU 4)
電源を ON にすると液晶パネルが照明されます。照明の点灯、消灯
に関する設定を変更することができます。
「MENU 4」→「LCD LIGHT」
AUTO
(初期設定)
8 SEC
設定に関わらず、 ボタンで点灯・消灯させることができます。
最後にボタン・ダイヤル操作を行った時点から
秒で消灯します。消灯時にボタン・ダイヤル操作
を行うと自動で点灯します。
ボタン・ダイヤル操作に関わらず、点灯時点から
秒で消灯します。
液晶パネルの調整 (MENU 4)
液晶パネルのコントラストや照明の明るさを調整することができま
す。
「MENU 4」→「DISPLAY SETTING」
Page 17
コントラスト
M
FEET
MODEL
モデル名
SERIAL No.
VERSION
BRIGHTNESS
CONTRAST
調整を確定する場合は「OK」を選び ボタンで確定します。
キャンセルする場合は「CANCEL」を選び ボタンで確定します。
明るさ
ボタンで見やすい明るさに調整してくだ
さい。
ボタンで見やすいコントラストに調整し
てください。
距離表示の単位変更 (MENU 4)
ステータスエリアの距離表示を変更することができます。
「MENU 4」→「M / FEET」
(初期設定) メートル表記
フィート表記
情報表示 (MENU 5)
以下の情報が確認できます。
「MENU 5」→「INFORMATION」
シリアルナンバー
ファームウェアバージョン
設定の初期化 (MENU 5)
フラッシュの設定を初期の設定に戻すことができます。
「MENU 5」→「RESET SETTINGS」
初期化を実行するには「OK」を選び ボタンで確定します。
設定の初期化を実行すると、登録されたカスタムモードも消去さ
れます。
その他の便利な機能
照射角について
照射角を (オート)でご使用
の場合、レンズの焦点距離に最適な照
射角に自動的にセットされます。
カメラの撮像素子サイズも考慮し制
御されるため、実際のレンズの焦点
距離と異なる数値が表示される場合
があります。
発光モードによってはレンズの焦点距離に関わらず、照射角が固
定される場合があります。
照射角は手動で切り替えできます。モード詳細エリアで ボタン
を押します。
AUTO ⇔ 24 ⇔ 28 ⇔ 35 ⇔ 50 ⇔ 70 ⇔ 85 ⇔ 105 ⇔ 135 ⇔ 200mm
照射角が変わると、ガイドナンバーも変化します。
17
Page 18

ワイドパネル
17mm までの広角レンズを使用するときには、ワイドパネルを使用
してください。
ワイドパネル+キャッチライトパネルを止まるまで引き出します
(強く引っ張らないでください)。 キャッチライトパネルは元の位置
に収納してください。P.3-(7)
ワイドパネル使用中は、モード詳細エリアの照射角表示部に
マークが表示されます。
バウンス撮影
フラッシュの発光部を天井や壁へ向けて発光し、光を拡散させるこ
とにより、影の少ない柔らかな写真を撮ることができます。
発光部を上方 90°、下方 7°、左右 180°にセットできます。P. 3-(8)
バウンス中はステータスエリアに マークが表示され
ます。
バウンスさせる反射面の色が写真全体にあらわれますので、なる
べく白い面を選んでください。また、バウンスさせる反射面の状
況や撮影距離などの撮影条件によって調光できる範囲が変化しま
す。
近接撮影
発光部を下方に 7°傾けることで、近接撮影において画面下部に十分
に光ををまわすことができます。
下方に 7°バウンスさせている時は、ステータスエリアの距離表示
が点滅します。
18
キャッチライトパネル
バウンス撮影時に、人物の目にキャッチライトを入れることができ
るキャッチライトパネルを内蔵しています。
ワイドパネル+キャッチライトパネルを止まるまで引き出します
(強く引っ張らないでください)。ワイドパネルは元の位置に収納し
てください。P.3-(9)
バウンス角度を上方 90°にし、被写体から近い距離での撮影が効
果的です。P.3-(10)
シンクロ端子
EF-630 は、市販のシンクロコードでカメラと接続できるシンクロ
端子を備えています。
シンクロコード接続での撮影は、発光モードを「MANUAL」で使用
してください。
「MENU 2」の「ISO」「 F-NUMBER」でカメラと同じ ISO と F 値
をセットし、フラッシュから被写体の距離と、ステータスエリアの
距離表示がおおむね一致するように、モード詳細エリアで発光量を
調整します。
ご注意!!
シンクロ端子を使用してのフラッシュ撮影では、E-TTL II / E-TTL に
よる自動調光撮影はできません。
シンクロ端子極性が、中央のピンがプラス、外周部がマイナスのも
ののみ対応しています。逆の極性のものをご使用の場合は市販の変
換コード等を利用してください。
Page 19
誤操作防止機能
ピッ(1 回)
充電完了
ピッピッ(2 回)
調光 OK
ピー(2 秒間)
エラー警告
http://www.sigma-photo.co.jp/support/index.htm
電源スイッチを「」(ロック)ポジションにすると、TEST ボタン
と ボタン以外の操作が禁止され、誤操作を防ぐことができます。
ロック中はステータスエリアに マークが表示されます。
ビープ音
液晶パネルの表示を見なくても音だけでフラッシュの状態を知るこ
とができます。
本体正面の BEEP スイッチを「ON」にしてください。(ON にする
とステータスエリアに マークが表示されます。)
主な仕様
形式:クリップオン式直列制御 TTL オートズームフラッシュ
ガイドナンバー:63(ISO100/m、200mm 位置) 使用電源:単三
形アルカリ乾電池、又は単三形ニッケル水素電池 4 本 充電時間:
約 3 秒(アルカリ乾電池使用)、約 1.8 秒(ニッケル水素電池使用)
発光回数:約 120 回(アルカリ乾電池使用)、約 185 回(ニッケル
水素電池使用) 閃光時間:約 1/700 秒(フル発光時) 照射角
度:24~200mm の使用レンズに合わせて自動セット(ワイドパネ
ル使用で 17mm レンズの画角をカバー) 質量:490g 寸法(幅×
高×長):79.4×148.4×121.5mm
品質保証とアフターサービスについて
この製品の保証の内容、およびアフターサービスについては、別紙
の“保証書”を御覧ください。
製品のお問い合わせは… シグマ カスタマーサポート部
フリーコール : 0120-9977-88
携帯電話・PHS
サポート・インターネットページアドレス
株式会社シグマ 本社
〒215-8530 神奈川県川崎市麻生区栗木 2 丁目 4 番 16 号
をご利用の方は 044-989-7436 にご連絡ください
(044) 989-7430 (代) FAX: (044) 989-7451
インターネットホームページアドレス
http://www.sigma-photo.co.jp
この製品は、クラス B 情報技術装置です。この製品は、家庭環境で
使用することを目的としていますが、この製品がラジオやテレビジ
ョン受信機に近接して使用されると、受信障害を引き起こすことが
あります。使用説明書に従って正しい取り扱いをしてください。
19
Page 20

To avoid causing damage or injury, please read this instruction
. Please take special note
of the following two cautionary symbols.
Warni ng !!
Using the product and disregarding this warning sign
may cause serious injury or other dangerous results.
Caution !!
Using the product disregarding this caution sign
may cause injury or damage.
This symbol denotes a warning or point, where caution is
required.
This Symbol contains information regarding the actions that
must be avoided.
This flash contains high voltage circuits. To avoid electric
shock or burns, do not attempt to disassemble the flash. If the
outside shell of the unit is broken or cracked, do not touch the
mechanism inside.
Do not fire the flash close to eyes. Otherwise the bright light
could damage the eyes. Keep at least 1m/3feet distance
between face and the flash unit when taking a picture with
flash.
Do not touch the synchro terminal of your camera when the
flash is attached to the hot shoe. High voltage circuitry could
cause an electric shock.
Never use your camera in an environment where flammable,
burnable, gas, liquids or chemicals, etc, exist. Otherwise it
might cause fire or explosion.
Do not cover the Flash Head with your hands or fire the flash
when it is next to your skin as it could cause burns.
Do not fire the flash toward car drivers as it could cause an
accident.
Do not use this flash unit on any camera other than the
Canon EOS series cameras, otherwise the flash may damage
the circuitry of these cameras.
This flash unit is not waterproof. When using the flash and
camera in the rain or snow or near water, keep it from getting
wet. It is often impractical to repair internal electrical
components damaged by water.
Never subject the flash and camera to shock, dust, high
temperature or humidity. These factors might cause fire or
malfunctioning of your equipment.
When the flash is subjected to sudden temperature change,
as when the flash unit is brought from a cold exterior to warm
interior, condensation might form inside. In such a case, place
your equipment in a sealed plastic bag before such a change,
and do not use the flash unit until it reaches room temperature.
Do not store your flash in a drawer or cupboard etc.
containing naphthalene, camphor or other insecticides. These
chemicals will have a negative effects on the flash unit.
Do not use a thinner, Benzene or other cleaning agents to
remove dirt or finger prints from the component. Clean with a
soft, moistened cloth.
ENGLISH
Thank you very much for purchasing the Sigma Electronic Flash
EF-630 (FOR CANON). To add to your enjoyment of photography,
the flash has a variety of features. To make the most of all these
features and to get the maximum performance and enjoyment from
your flash, please read this instruction booklet together with your
camera’s instruction manual before using the flash, and also keep it
handy for your future reference.
SAFETY PRECAUTIONS
Caution !!
manual carefully, before using the flash
Warning !!
20
Page 21
For extended storage, choose a cool dry place, preferably
with good ventilation. It is recommended that the flash be
charged and fired several times a month, to maintain proper
capacitor functioning.
Do not fire the flash while covering the Flash Head with cloths
or clothes as it could cause fire.
1.
2.
3.
4.
5.
6.
7.
8.
9.
Button
10.
11.
12.
13.
14.
15.
16.
17.
18.
(Left button)
button
E-TTL II / E-TTL auto flash system EOS digital camera
ABOUT THE BATTERY
This flash unit uses four “AA” type Ni-MH rechargeable batteries or
alkaline dry cell batteries.
To assure proper electrical contact, clean the battery terminals
before installing the batteries.
To prevent battery explosion, leakage or overheating, use four
new AA batteries of the same type and brand. Do not mix the type
or new and used batteries.
Do not disassemble or short-circuit the batteries, or expose them
to fire or water; they may explode. Do not recharge the batteries
other than Ni-MH rechargeable batteries.
When the flash will not be used for an extended period of time,
remove the batteries from the flash to avoid the possibility of
damage from leakage.
As with any flash, it is recommended you carry spare batteries
when on a long trip or when photographing outdoors in cold
weather.
Do not use Lithium AA/R6 Batteries. It may cause your equipment
to malfunction.
Please follow all guidelines, rules and regulations of your
community regarding the disposal of batteries.
DESCRIPTION OF THE PARTS (P.2)
Flash Head
Wireless Signal Receiving
Window
BEEP Switch
AF Assist Light
Battery Cover
Shoe
LCD Panel
Backlight Switch
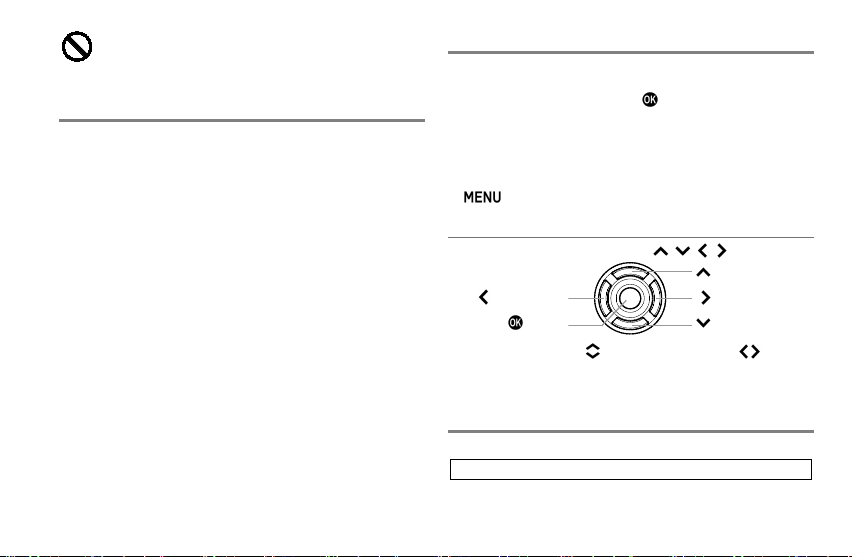
SELECTOR (13)
In this instruction manual, each position of selector is shown as
/ / / .
The buttons are used as follows: To operate Up and Down
buttons: . To operate Left and Right buttons: .
Power Switch
Ready Light /TEST Button
Button
Selector
Shoe Lock Lever
Dial
Sync. Terminal
Catch Light Panel
Wide Panel
(Up button)
(Right button)
(Down button)
COMPATIBLE CAMERAS
This flash is compatible with the following cameras.
21
Page 22

LOADING THE BATTERIES
1. Turn the power switch to [OFF] and open the battery compartment
by sliding the cover. P.3 -(1)
2. Follow the indication in the battery compartment and insert the
batteries with the "+" and "-" electrodes in the correct direction.
P.3-(2)
3. Close the battery compartment cover. P.3 -(3)
4. Turn the power switch to [ON]. When the flashgun is charged to
the level that flash firing is possible, the Ready light starts blinking
in green. When the flashgun is fully charged, the light lights up in
red.
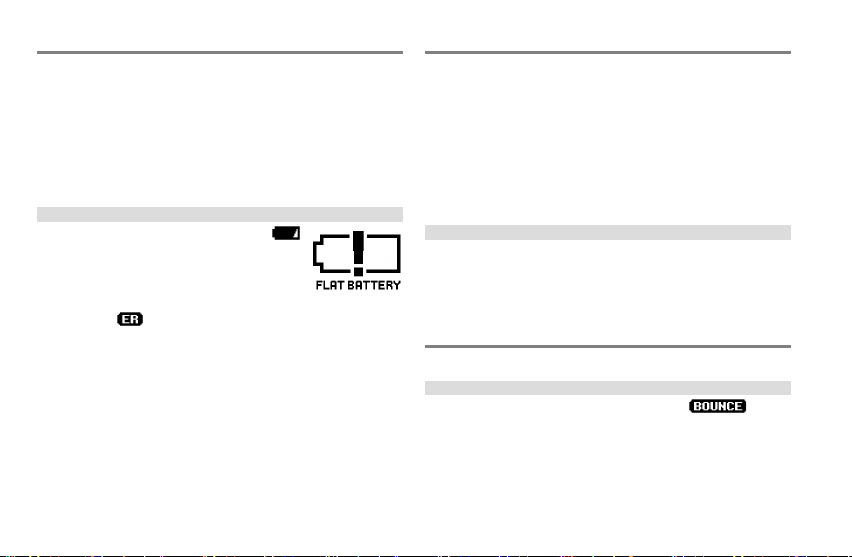
Caution!!
When the battery capacity gets low, the
mark is indicated on the LCD panel. When the
battery capacity decreases to zero, the display
indicates the mark on the right, and the flash will
no longer function. Please replace the batteries.
ERROR WARNING
When the mark is indicated on the LCD panel, the flash may
have failures. Reset the power switch or check the battery. If the
indication remains, contact our sales office.
AUTO POWER OFF
To conserve battery power, the flash unit automatically turns itself off
when the flash has not been used for approximately 1.5 minutes. To
turn the flash on again, depress the TEST button or the camera
shutter button halfway. However, the auto power off does not work in
[WL SLAVE] mode, [S-FL NORMAL] mode and [S-FL SLAVE] mode.
22
ATTACHMENT TO THE CAMERA
1. Turn the power switch to [OFF].
2. Confirm that the shoe lock lever is in the [UNLOCK ►] position.
P.3-(4)
3. Insert the flash on to the hot shoe of the camera until it stops.
Slide the shoe lock lever to the [◄LOCK] direction until the lever
is locked with a clicking sound. P.3-(5)
When removing the flash, slide the shoe lock lever to the [UN
LOCK►] direction until it stops while continuing to press the shoe
lock lever button. Then pull out the flash.
Caution!!
If the flash is pulled out while the shoe lock lever is not in the
[UNLOCK►] position, the hot shoe of the camera and the
attachment shoe of the flash could be damaged.
ADJUSTING THE FLASH HEAD
In regular shooting, set the flash head to face forwards. P.3-(6)
Caution!!
After the power switch is turned to ON, if the mark is
indicated in the Status area, or if the distance indication in the Status
area is blinking, the flash head is not correctly set to the front
direction.
Page 23
LIMITS OF CONTINUOUS SHOOTING
Mode
Number of Flash Exposures
TTL, M(1/1, 1/2)
20 Continuous Flash Shots
M(1/4, 1/8)
25 Continuous Flash Shots
M(1/16~1/32)
40 Continuous Flash Shots
MULTI
10 Cycle
Main Screen
Setup Menu
Changes the Flash mode and
mode.
Adds the optional functions of
basic conditions of the flash.
① Status area
Mode details area
④ Tab area
To prevent overheating of the flashgun’s circuitry, do not use your
flash unit for at least 10 minutes after continuously firing the flash for
the number of exposures shown in the table below.
Switchover between the Main screen and the Setup menu by using
the button. (When the power is set to [ON], always start
from the Main screen.)
Caution!!
In case the icon appears on the display, the amount of light will
be limited to prevent overheating of the flashgun’s circuitry. Refrain
from using the flashgun until the icon disappears.
BASIC STEPS OF SETTING
This section describes the basics of the settings. With EF-630, most
settings can be conducted easily by the following steps.
Caution!!
When the power switch is at the [ ] (lock) position, the settings
cannot be changed. Be sure to set to [ON] to change the settings.
[Flash function settings] and [Flash C.Fn settings] where the flash
settings can be changed on the Menu screen of the camera are not
supported. Please perform the settings at the flash side.
sets the details of each Flash
② Flash mode area
③
BASIC OPERATIONS ON MAIN SCREEN
SELECTING FLASH MODE
Select the Flash mode area by using
the buttons and change the Flash
mode by using the buttons or the
dial.
SETTING DETAILS OF FLASH MODE
Select Mode details area by using the
buttons and change the setting
values by using the buttons or the
dial.
flash shooting and sets the
⑤ Sub menu
23
Page 24
BASIC OPERATION IN SETUP
Shutter Speed
Aperture
Automatically set
(1/60sec - flash synchronized speed*)
Automatically set
(30sec - flash synchronized speed*)
Enables you to freely set the speed in
a range equal to or below the flash
*
When the FP flash is set to [ON], the restriction of the shutter
speed at the high speed side becomes disabled.
MENU
To move to the next tab, turn the Dial.
(When the icon in the tab area is
selected, it is possible to change the
setting menu by pressing the
buttons as well.)
While in the Set-up Menu:
Use the buttons to select menu
items. Press the or button to
open sub-menus or dialogs.
(In some items, a special screen or a
dialog message may open.)
While in set-up sub-menus:
Use the buttons to select setting
options. Press the or button to
apply new settings. (Press the
button to close sub-menus without
applying changes.)
E-TTL II / E-TTL AUTO EXPOSURE
This uses the E-TTL II / E-TTL auto flash system. Use this mode for
general photo shooting.
1. Set the Flash mode to [TTL].
2. Confirm that the subject is within the
shooting range by checking the
distance indication in the Status
area.
24
3. Check the flashgun status with the Ready light and start shooting.
When shooting with a flash is correctly conducted, the mark is
indicated for approximately five seconds in the Status area. When
the mark is not displayed, the light amount may be insufficient
or too much. Change the condition and conduct shooting again.
SHUTTER SPEED AND APERTURE
The relationships between the shutter speeds and apertures in
different exposure modes of the camera are as follows.
P
Av
Tv
M Can be set freely.
synchronized speed * .
Caution!!
When shooting while the shutter speed and aperture values are
blinking, the exposure may be mismatched. In that case, change the
conditions before you start shooting.
When the shooting mode of the
camera is set to [Basic Zone], the
screen changes to that shown in the
diagram. Buttons are disabled other
than the TEST and buttons.
Automatically set.
Can be set freely.
Automatically set.
Page 25
FLASH EXPOSURE COMPENSATION
1st Frame
2nd Frame
3rd Frame
(MODE WL TTL)
Compensating only the light amount of the flash is possible without
affecting exposure of the background.
It can be used with [TTL], [WL TTL],
and [WL SLAVE] flash modes.
Set the compensation amount in the
Mode details area. The compensation
amount has 1/3 steps (when the
camera has 1/2 steps, it is changed to
1/2 steps) and up to ±3 steps can be set.
Do not use the flash exposure compensation function on the camera.
FEB SHOOTING (Flash Exposure Bracketing)
Three photographs can be taken by changing the flash amount.
It can be used with [TTL], and [WL TTL]
flash modes.
Set the compensation amount in the
Mode details area. The compensation
amount has 1/3 steps (when the camera
has 1/2 steps, it is changed to 1/2
steps) and up to ±3 steps can be set.
Take three photographs while checking
the charged amount with the ready
light.
The three photographs are in an order of appropriate exposure →
under exposure → over exposure.
FEB icon will change as follows depending on the frame number.
When three photographs have been taken, FEB is automatically
released.
FEB can be combined with the flash exposure compensation.
FE LOCK SHOOTING
This is a shooting method that exposes any desired section of the
subject with the correct flash exposure.
It can be used with [TTL], and [WL TTL] flash modes.
1. Focus on the subject.
2. Align the section of the scene which you require the flash
exposure to be correct to the center of the image. Press the
[M-Fn] button on the camera.
The flash preflashes, and the flash amount necessary for the
subject is stored.
[FEL] is displayed for approximately 0.5 seconds in the finder.
3. Decide the composition and take pictures.
If [ ] blinks in the finder, the flash amount is insufficient. Change
the conditions and re-lock the FE.
The allocated FE lock buttom varies depending on the actual
camera. Please refer to the instruction manual of your camera.
MANUAL FLASH
Discretional setting of the flash amount
is possible.
1. Set the Flash mode to [MANUAL].
2. Set the flash amount in the Mode
details area. (Available range for
setting: 1/128 to 1/1, Available pitch
25
Page 26
for setting: 1/3EV.)
WL TTL
Wireless E-TTL II / E-TTL auto flash
WL MANUAL
Wireless manual flash
WL MU LTI
Wireless multi-flash
EF-630 slave ID
A B C
EF-610 DG SUPER slave ID
1 2 3
3. Check the flashgun status with the Ready light and start shooting.
In the distance display section in the Status area, the distance that
appropriate exposure can be obtained is calculated and displayed.
Even with the same flashing amount, the distance to obtain the
appropriate exposure varies if the camera’s ISO sensitivity or the
aperture value is changed.
An appropriate exposure when using manual flash can be
calculated using the following formula.
Guide Number (GN) / Shooting distance (m) = Aperture value (F)
For the GN (Guide Number) of this flash, refer to [Table 1] attached
at the end of this manual.
MULTI FLASH
Displaying movement of the subject in one frame as if the image is a
photographic playback is possible by continuously emitting light with
the flash while the shutter is open.
Use the camera’s manual (“M”) exposure mode.
1. Set the Flash mode to [MU LTI ].
2. In the Mode details area, set the flash
amount, flash interval in "Hz" (eg.: 10
Hz = Emits light with the frequency of
10 times per second), and the
number of flashes in "x".
3. Set a shutter speed that is slower
than the value of the “number of flashes" / "flash frequency."
4. Check the flashgun status with the Ready light and start shooting.
The number of flashes that can be fired continuously varies
depending on the combination of the flash amount and the flash
frequency. Refer to [Table 2] at the end of this manual.
26
WIRELESS FLASH
When the flash is used at a location far from the camera, the
creative possibilities are expanded. The EF-630 is controlled
remotely by the camera’s built-in flash or a separate Master flash
unit.
EF-630 has three wireless flash modes for different applications.
The flash attached to the camera is called [Master unit], and the
flash used at a distance from the camera is called [Slave unit].
Please set the flash unit between 0.5m~ 5m (1.6~ 16ft) from the
subject, and set the camera body between 1m~ 5m (1.6~ 16ft)
from the subject.
When setting a Slave unit at the desired position, you can use
mini-stand. This mini-stand has a screw hole for a tripod.
Wireless flash can be used with the camera’s integrated flash
(only in case of models that have the master function of wireless
flash shooting). For the camera settings, refer to the camera's
instruction manual.
The EF-630 can also be used in combination with the EF-610 DG
SUPER EO-ETTL II. In this case, use the EF-610 DG SUPER as
the Slave unit. When setting EF-610 DG SUPER, refer to the
instruction manual of EF-610 DG SUPER (notation method of the
EF-610 DG SUPER slave ID is different. Refer to the following
table.)
Page 27

PREPARATION OF WIRELESS FLASH (MASTER UNIT)
ON
Control function + Flash*
OFF
Control function only
SLAVE GROUP SETTING
Shooting with different flash ratios and
flash amounts is available by dividing
the slaves into two groups [A, B] or
three groups [A, B, C].
1. When the desired wireless flash
mode is set, and when the flash
mode area is selected, pressing the
button opens the Slave group
setting screen.
2. The slave group setting can be
switched by using the dial or the
button. (When OFF is selected,
flash ratio shooting is not performed.)
3. After setting, press the button to return to the normal screen.
MASTER FLASH SETTING
It sets whether "Master" is set for the
control function only or for the control
function and light emission as a flash.
* During wireless shooting where the flash ratio is set, "Master"
belongs to Group [A].
CHANNEL SETTING
When another person is performing
wireless flash, setting a different
channel prevents malfunctions (selecting
from channels 1 to 4 is possible).
PREPARATION OF WIRELESS FLASH (SLAVE UNIT)
1. Set the flash mode to [WL SLAVE].
2. In the Mode details area, set a
channel that is the same as Master.
3. When using wireless flash with the
flash ratio setting, set the slave ID to
that of the desired group in the
Mode details area (if shooting using
flash ratio is not performed, then either one of A, B, or C can be
selected).
WIRELESS E-TTL II / E-TTL AUTO FLASH
In the wireless E-TTL II / E-TTL auto flash, the camera automatically
controls the exposure to an appropriate value.
Auto flash with one flash or all slave flashes with the same
flash amount
MASTER UNIT SETTING
1. Set the Flash mode to [WL TTL].
2. When necessary, perform "Setting
the channel" and "Master unit flash
setting" in the Mode details area.
SLAVE UNIT SETTING
3. Perform the setting by following "PREPARATION OF WIRELESS
FLASH (SLAVE UNIT)".
4. Place the slave unit, confirm the completion of charging, and then
start shooting (the slave notifies the completion of charging by
blinking the AF assist light.)
27
Page 28
Auto flash with flash ratio setting (two groups)
Flash is controlled so the total sum of Group [A] and Group [B]
becomes an appropriate exposure.
MASTER UNIT SETTING
1. Set the slave group setting to [A:B]
by following "PREPARATION OF
WIRELESS FLASH (MASTER UNIT
2. Set the flash ratio in the Mode
details area. (Setting from 8:1 to 1:8
is possible.)
SLAVE UNIT SETTING
3. Perform the setting by following "PREPARATION OF WIRELESS
FLASH (SLAVE UNIT)".
)".
Auto flash with flash ratio setting (three groups)
Use Group [C] as a secondary light source, such as for eliminating a
background shade of a subject.
MASTER UNIT SETTING
1. Set the slave flash group to [A:B C]
by following "PREPARATION OF
WIRELESS FLASH (MASTER UNIT
2. Set the flash ratio of [A:B] in the
Mode details area (setting from 8:1
to 1:8 is possible).
3. Set the flash exposure compensation of [C] in the Mode details
area.
SLAVE UNIT SETTING
4. Perform the setting by following "PREPARATION OF WIRELESS
FLASH (SLAVE UNIT)".
)".
28
WIRELESS MANUAL FLASH
As well as manual flash photography, wireless shooting whereby the
flash output can be manually set is also available. Decide the
exposure by using a commercially-available flash meter.
Manual flash with one flash or all slave flashes with the
same flash amount
MASTER UNIT SETTING
1.
Set the Flash mode to [WL
2. When necessary, perform "Setting
the channel" and "Master unit flash
setting" in the Mode details area.
3. Set the flash amount in the Mode details area. (Available range for
setting: 1/128 to 1/1, Available pitch for setting: 1/3EV.)
SLAVE UNIT SETTING
4. Set the Flash mode to [WL SLAVE].
5. Perform the setting by following "PREPARATION OF WIRELESS
FLASH (SLAVE UNIT)".
6. Place the slave unit, confirm the completion of charging, and then
start shooting (the slave notifies the completion of charging by
blinking the AF assist light.)
MANUAL].
Manual flash where the flash amount is set for each group
Manual flash with the flash amount setting is available for each of
the two or three groups.
MASTER UNIT SETTING
1. Set [Flash group setting] to [A:B] or
[A:B:C] by following "P REPARATION
OF WIRELESS FLASH (MASTER
UNIT)".
Page 29
2. Set the flash amount of each group in the Mode details area.
SLAVE UNIT SETTING
3. Perform the setting by following "PREPARATION OF WIRELESS
FLASH (SLAVE UNIT)".
WIRELESS MULTI FLASH
Wireless multi-flash is available for one flash or for multiple flashes.
Use the camera’s manual (“M”) exposure mode.
Multi-flash with one flash or all slaves with the same flash
amount
MASTER UNIT SETTING
1. Set the Flash mode to [WL MULT I].
2. When necessary, perform "Setting
the channel" and "Master unit flash
setting" in the Mode details area.
3. In the Mode details area, set the flash amount, flash interval in
"Hz" (eg.: 10 Hz = Emits light with the frequency of 10 times per
second), and the number of flashes in "x".
SLAVE UNIT SETTING
4. Perform the setting by following "PREPARATION OF WIRELESS
FLASH (SLAVE UNIT)".
5. Set a shutter speed that is slower than the value of the "number of
flashes" / "flash frequency."
6. Place the slave unit, confirm the completion of charging, and then
start shooting (the slave notifies the completion of charging by
blinking the AF assist light.)
Multi-flash with flash amount setting for each group
Multi-flash with the flash amount setting is available for two or three
groups.
MASTER UNIT SETTING
1. Set "Flash group setting" to [A:B] or
[A:B:C] by following "PREPARATION
OF WIRELESS FLASH."
2. Set the flash amount of each group
in the Mode details area.
3. In the Mode details area, set the flash amount, flash interval in
"Hz" (eg.: 10 Hz = Emits light with the frequency of 10 times per
second), and the number of flashes in "x".
SLAVE UNIT SETTING
4. Perform the setting by following "PREPARATION OF WIRELESS
FLASH (SLAVE UNIT)".
Continue with the procedures from Step 5 of the previous item to
take photographs.
SLAVE FLASH
The EF-630 includes a function which allows it to fire by reacting to
the flash from another flash unit. This allows for easy and convenient
shooting with the flash positioned at a distance from the camera.
The light output, however, is not automatically adjusted in this mode.
NORMAL SLAVE FLASH
The Master unit attached to the camera can be used to trigger a
synchronized flash with the EF-630, even when it’s positioned at a
distance from the camera.
The camera’s built-in flash operates erroneously with the pre-flash,
29
Page 30
therefore, synchronized flash is not possible.
Set the Master flash to manual mode and set the flash output to
approximately 1/16.
Set the camera’s exposure mode to M, the shutter speed to 1/30
second or shorter, and the aperture and ISO at discretional values.
1. Set the Flash mode of the Slave
EF-630 to [S-FL NORMAL].
2. In the Mode details area, set the ISO
and the aperture values to
those of the camera settings.
3. Adjust the flash amount in the Mode
details area so the distance between
the Slave flash and the subject is approximately the same as the
distance indicated in the Status area.
4. Check the completion of charging and start shooting.
match
DESIGNATED SLAVE FLASH
If using two or more EF-630 flash units, you can designate which
flash units will fire together by using the channel settings. In this
mode, one flash unit will be used as the Slave Controller and the
others for firing as Slaves.
Set the camera exposure mode to M, the shutter speed to 1/30
second or shorter, and the aperture and ISO at discretional values.
SETTING THE CONTROL (MASTER)
FLASH
1. Set the Flash mode to [S-FL CTRL].
2. Set the channel as needed. (In the
Mode details area, select Ch.1 to
Ch.3.)
30
SETTING THE FIRING (SLAVE) FLASH
3. Set the Flash mode to [S-FL SLAVE].
4. In the Mode details area, set the
channel to match that of the Control
flash.
5. In the Mode details area, set the ISO
and aperture value to match those of
the Control flash.
6. Adjust the flash amount on the Mode details area so the distance
between the Slave flash and the subject is approximately the
same as the distance indicated in the Status area.
7. Check the completion of charging and start shooting.
In Slave mode, this flash can also be used in combination with the
EF-630 and / or EF-610 DG SUPER for other camera fittings. (For
details on setting up the EF-610 DG SUPER, please follow its
instruction manual.)
OPTIONAL FUNCTIONS
This section describes optional functions that can be set and added
from the Setup menu.
REAR CURTAIN SYNCHRONIZATION (MENU 1)
The flash fires just before the shutter is closed. The light behind the
moving subject and the path of the light can be captured; therefore,
the photos can express the subject’s natural movement.
It can be used with the camera’s P, Av, Tv, and M exposure modes.
It can be used with [TTL], [MANUAL], and [WL] Flash modes.
1. Set [MENU 1] → [REAR CURTAIN SYNC] → [ON].
Page 31

2. Return to the Main screen. (In the Status area, the mark
NORMAL
(Default)
Normal light distribution
Basic light distribution characteristics for general
shooting.
Guide number prioritized light distribution
The flash beam’s angle is decreased but a larger
guide number is available.
Flat light distribution
providing a more uniform light distribution.
1 TIME
(Default)
Modeling flash
button is kept pressed, continuous
so the subject’s shadows can be checked.
appears.)
Caution!!
This function cannot be set to "ON" in Flash modes that are not
compatible with Rear curtain synchronization.
FP FLASH
The FP flash keeps firing while the shutter curtain is running. Thus
you can use a shutter speed faster than the synchronized speed.
It can be used with the camera’s P, Av, Tv, and M exposure modes.
It can be used with [TTL], [MANUAL], [WL TTL] and [WL MANU AL]
Flash modes.
1. Set [MENU 1] → [FP] → [ON].
2. Return to the Main screen. (In the Status area, the mark
appears.)
In [TTL] mode, confirm that the subject is within the shooting range
by checking the distance indicated in the Status area before you
start shooting.
In [MANUAL] mode, adjust the aperture, etc. before you start
shooting so the distance to the subject and the distance indicated in
the Status area match each other.
The Guide Number will change depending on the shutter speed.
(Please refer to [Table 3] on the last page.)
Caution!!
This function cannot be set to "ON" in the Flash modes that are not
compatible with the FP flash.
(
High- speed Sync
)
(MENU 1)
LIGHT DISTRIBUTION MODE (MENU 1)
The EF-630 has three Light Distribution modes that can be selected
according to the purpose of use.
[MENU 1] → [LIGHT DISTRIBUTION]
-
GN
DIFFUSE
Prevents a decrease of the surrounding light amount
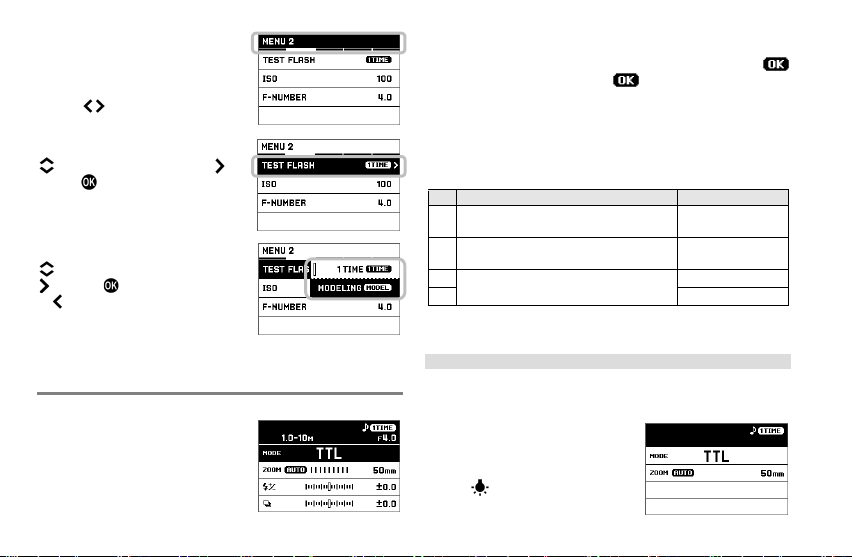
TEST FLASH (MENU 2)
EF-630 has two Test flash modes. One of the Test flash modes can
be allocated to the TEST button.
[MENU 2] → [TEST FLASH]
Test flash
Executes a single test flash.
MODELING
It can be used with [TTL], [MANUAL] and [MULTI]
flash modes.
When the TEST
flashing of approximately 1.5 seconds is conducted
31
Page 32

After 8 seconds of non-operation, the light will turn
off. When a button or dial is used while the light is
off, the light will automatically turn on.
Regardless of whether a button or dial is being
the light will turn off after 8 seconds from
when the light initially turned on.
ON
The light is kept ON continuously.
Caution!!
The [MODELING] Setting can not be selected in any flash mode
where the modeling flash is not available.
When the camera and flash are communicating, operation of the
TEST button is not available. (Pressing the camera’s Depth-of-field
preview button emits the modeling flash regardless of the TEST
button allocation).
CUSTOM MODE (MENU 3)
It is possible to store and recall custom
settings. (Two series of custom settings
can be stored.)
STORING AND RECALLING
CUSTOM SETTINGS
1. Set the Flash mode, Mode details area, and Setup menu contents
as desired.
2. From [MENU 3] → [CUSTOM MODE SETTING], select [C1] or
[C2] and press the button.
3. Select [OK] and confirm with the button.
The registered contents are added to the Flash mode as the Custom
mode. (The Custom mode is indicated with the or mark
in the Flash mode area.)
DELETING THE REGISTERED CUSTOM MODE
1. From [MENU 3] → [CUSTOM MODE DELETE], select [C1] or
[C2] and press the button.
2. Select [OK] and confirm with the button.
32
AF ASSIST LIGHT (MENU 4)
The AF assist light will turn on automatically as you focus on a
subject in a dark area. The effective range of the AF assist light is
from about 0.7 to 10 meters (2.3-29.5 feet).
When the AF assist light is not necessary, set [MENU 4] → [AF
ASSIST LIGHT] → [OFF].
LCD PANEL LIGHT (MENU 4)
When the power supply is turned to ON, the LCD panel lights up.
The ON/OFF settings of the light can be changed.
[MENU 4] → [LCD LIGHT]
AUTO
(Default)
8 SEC
pressed,
Regardless of the setting, the light can be turned on/off with the
button.
LCD PANEL ADJUSTMENT (MENU 4)
The contrast and brightness of the LCD panel can be adjusted.
[MENU 4] → [DISPLAY SETTING]
Page 33

BRIGHTNESS
level by
using the buttons.
CONTRAST
the buttons.
M (Default)
Meter indication
FEET
Feet indication
MODEL
Model name
SERIAL No.
Serial number
VERSION
Firmware version
BRIGHTNESS
CONTRAST
When finalizing the adjustment, select [OK] and confirm with the
button.
When cancelling the adjustment, select [CANCEL] and confirm with
the button.
Adjust the brightness to the desired
Adjust the contrast to the desired level by using
CHANGING THE UNIT OF MEASUREMENT INDICATION (MENU 4)
The unit of measurement in the Status area can be changed.
[MENU 4] → [M / FEET]
FLASH UNIT INFORMATION (MENU 5)
The following information can be checked.
[MENU 5] → [INFORMATION]
INITIALIZATION OF SETTINGS (MENU 5)
It is possible to reset the flash unit back to factory settings.
[MENU 5] → [RESET SETTINGS]
To initialize the setting, select [OK] and confirm with the button.
When the settings are reset, stored custom modes are deleted.
OTHER USEFUL FUNCTIONS
FLASH HEAD SETTING
When the flash head setting is used
with (Auto), the flash head is
automatically set to the flash angle
that is the optimal to the lens’s focal
length.
The flash head takes into account the size of the camera’s image
sensor, therefore the focal length displayed on the flash may be
different to that of the lens.
Depending on the Flash mode, the flash head setting may be
fixed regardless of the focal length of the lens.
The flash head setting can be changed manually. Press the
buttons in the Mode details area.
AUTO ⇔ 24 ⇔ 28 ⇔ 35 ⇔ 50 ⇔ 70 ⇔ 85 ⇔ 105 ⇔ 135 ⇔ 200mm
Depending on the flash head setting, the flash’s Guide Number
will change.
33
Page 34

WIDE PANEL
This flashgun is equipped with a built-in wide panel, which can
provide an ultra-wide 17mm angle of coverage. Slide out the wide
panel and catch light panel and flip it down to cover the flash’s head.
(Be careful to slide the panels out smoothly.) Then put the catch light
panel back in its place. P.3-(7)
The Flash head indicating section within the Mode details area
may display the mark when the wide panel is in use.
BOUNCE FLASH
By firing the flash toward the ceiling or a wall, it is possible to
disperse the light and take pictures with soft light and reduced
shadows.
The flash head can be set to the upper side at 90°, the lower side at
7°, and the right and left sides at 180°. P. 3-(8)
During bouncing, the mark is indicated in the Status
area.
Choose a white surface for bouncing the flash, otherwise the
image’s colour may be incorrect. Depending on the reflecting
surface, the subject distance and other factors, the effective
distance range for TTL AUTO may change.
CLOSE-UP EXPOSURES
By tilting the flash head down to the 7° position, the lower section of
the frame can be bright enough for close-up exposures.
When it is bounced to the lower side at 7°, the distance indication
in the Status area blinks.
34
CATCH LIGHT PANEL
This flash is equipped with a built-in catch light panel, which can
create a catch light in the eyes of the subject when the bounce flash
mode is activated. Slide out the wide panel and catch light panel,
then put the wide panel back in its place. (Be careful to slide the
panels out smoothly.) P. 3-(9)
To create a catch light effectively, tilt the flash head upward 90
degrees and take pictures at a close distance. P.3-(10)
SYNC.TERMINAL
EF-630 has a synchro terminal that can connect to the camera by a
commercially available flash synchro cable.
When shooting with a synchro cable, use the Flash in [MANUAL]
mode.
With [MENU 2] → [ISO] [F-NUMBER], set the ISO and the aperture
(F) value to match that of the camera. Adjust the flash power output
in the Mode details area until the distance displayed in the Status
area is approximately the same as the distance between the flash
and the subject.
Caution!!
E-TTL II / E-TTL auto flash does not work if the Sync.Terminal is
used.
The EF-630’s Sync.Terminal is compatible with plugs that have a
positive (+) polarity on the central pin and a negative (-) polarity on
the shield. If the plug has reverse polarity, use a commerciallyavailable polarity conversion cord.
Page 35

ACCIDENTAL OPERATION PREVENTION
One short beep
Indicates the completion of charging.
Two short beeps
Indicates the light adjustment is OK.
One long beep (2 sec.)
Error warning
When the power switch is set to the [ ] (lock) position, operations
other than the TEST button and the button become disabled,
preventing accidental changes to the flash settings.
Whilst
the flash is locked, the
mark is displayed in the Status area.
BEEP SOUNDS
Certain conditions of the flash are indicated by a sound, making
them easy to recognize without having to look at the LCD panel.
Turn the BEEP switch on the front side of the main body to [ON].
(When it is turned to ON, the
mark is displayed in the Status area.)
SPECIFICATIONS
TYPE: Clip-on type serial-controlled TTL auto zoom electric flash
GUIDE NUMBER: 63(ISO100/m, 200mm head position)
POWER SOURCE: Four AA type alkaline batteries or Four AA type
Ni-MH rechargeable batteries
RECYCLING TIME: about 3.0 sec. (Alkaline batteries) : about 1.8
sec. (Ni-MH rechargeable batteries)
NUMBER OF FLASHES : about 120 flashes (Alkaline batteries) :
about 185 flashes (Ni-MH rechargeable batteries)
FLASH DURATION: about 1/700sec. (full power firing)
FLASH ILLUMINATION ANGLE: 24~200mm motor powered control
(17mm with Built-in Wide Panel)
WEIGHT: 490g/17.28oz.
DIMENSIONS: (W)79.4mm/3.13in. x (H)148.4mm/5.84in. x
(L)121.5mm/4.78in.
This device complies with Part 15 of the FCC Rules. Operation is subject to the
following two conditions: (1) this d evice may not cause harmful interference, and
(2) this device must accept any interference received, including interference that
may cause undesired operation.
The CE Mark is a Directive conformit y mark of the European Community (EC).
SIGMA (Deutschland) GmbH
Carl Zeiss Str. 10/2, D 63322 Roedermark, Germany
Verkauf:01805-90 90 85-0
Service:01805-90 90 85-85 Fax(Service):01805-90 9 0 85-35
Disposal of Electric and Electronic Equipment in Private Households
Disposal of used Electrical & Electronic Equipm ent (Applicable in the European
Union and other European countries with separate collection systems)
This symbol on the product, in the manual/warranty, and/or on the packaging
indicates that this product must not be treated as household waste. Instead it
should be handed over to the appropriate collection point for the recycling of
electrical and electronic equipment. If your equipment contains easy removable
batteries, please dispose of these separately according to your local legislation. It
is your responsibility to ensure that this product is recycled correctly. In doing so
you will help conserve natural resources, protect the environment and human
health. For more detailed information about rec ycling this product, please contact
your local city office, your household waste disposal service or the shop where
you purchased the product.
35
Page 36

Um Verletzungen oder Beschädigungen zu verhindern, lesen Sie
bitte sehr sorgfältig und vollständig durch und beachten Sie
Bitte beachten Sie
speziell die beiden folgenden Warnzeichen.
Warnung!!
Wenn Sie die entsprechenden Hinweise nicht befolgen,
gefährlichen Folgen führen.
Wenn Sie die entsprechenden Hinweise nicht befolgen,
können Verletzungen oder Schäden entstehen.
Dieses Symbol verweist auf die wichtigen Punkte, an denen
Vorsicht geboten ist.
Dieses Symbol enthält Informationen bezüglich zu unterlassender
Handlungen.
Dieses Blitzgerät enthält hochspannungsführende Schaltkreise. Um
elektrische
versuchen
Sie
gebrochen
oder zersprungen sein, berühren Sie keine inneren Geräteteile.
Blitzen Sie nicht aus kurzer Entfernung direkt in die Augen.
Andernfalls kann das grelle Licht die Augen verletzen. Halten
Sie beim Fotografieren zumindest einen Abstand von einem
Meter zwischen Gesicht und Blitzgerät ein.
Berühren Sie nicht einen eventuell zusätzlich vorhanden
Blitzkontakt (X) Ihrer Kamera, wenn das Blitzgerät im
Zubehörschuh steckt. Hochspannungsführende Stromkreise
könnten einen elektrischen Stromschlag verursachen.
Benutzen Sie Ihre Ausrüstung nie in der Umgebung entflammbarer,
brennbarer
nfalls
könnte dies zu einem Brand oder einer Explosion führen.
Bedecken Sie den Blitzkopf während des Blitzens weder mit
der Hand, noch zünden Sie den Blitz in unmittelbarer Nähe
zur Haut, da dies Verbrennungen verursachen könnte.
Blenden Sie mit dem Blitz keine Autofahrer, da dies einen
Unfall verursachen könnte.
Benutzen Sie dieses Blitzgerät nicht an einer anderen
Kamera als an einer der
andernfalls
könnte der Blitz die Schaltkreise der Kamera beschädigen.
Dieses Blitzgerät ist nicht wasserdicht. Wenn Sie die
Ausrüstung im Regen, Schnee oder in der Nähe von Wasser
verwenden, bewahren Sie sie davor, nass zu werden. Es ist
häufig unmöglich, Wasserschäden interner elektrischer
Komponenten zu reparieren.
Setzen Sie das Blitzgerät niemals Stößen, Staub, Hitze oder
Feuchtigkeit aus. Diese Faktoren könnten einen Brand oder
Fehlfunktionen Ihrer Ausrüstung verursachen.
Wenn das Gerät plötzlichen Temperaturschwankungen
ausgesetzt, etwa aus einer kalten Umgebung in einen warmen
Innenraum gebracht wird, kann sich Kondensniederschlag im
Inneren des Gerätes bilden. In solchen Fällen stecken Sie
das Gerät bitte vor dem Temperaturwechsel in eine zu
verschließende Plastiktasche und benutzen Sie es erst
wieder, wenn es sich der Raumtemperatur angepasst hat.
Bewahren Sie das Gerät nicht in einer Schublade oder einem
Schrank auf, wo es schädlichen Dämpfen wie derer von
Naphthalin, Kampfer oder Insektiziden ausgesetzt ist.
DEUTSCH
Vielen Dank, dass Sie sich für ein SIGMA EF-630 (FÜR CANON)
Blitzgerät entschieden haben. Sie sollten diese Gebrauchsanleitung
im Zusammenhang mit Ihrer Kamerabedienungsanleitung studieren
und für zukünftiges Nachschlagen griffbereit halten, um die
Funktionen in vollem Umfang nutzen und die maximale Leistung
des Gerätes ausschöpfen zu können.
VORSICHTSMAßNAHMEN
diese Bedienungsanleitung vor dem ersten Einsatz Ihres Blitzgerätes
unbedingt die untenstehenden Warnzeichen.
kann dies zu ernsthaften Verletzungen oder anderen
Achtung!!
Achtung!!
Gase, Flüssigkeiten oder Chemikalien etc. Ander
CANON EOS-Serie;
Warnung!!
Schläge oder Verbrennungen zu vermeiden,
nicht, das Gerät zu öffnen. Sollte das äußere Gehäuse
36
Page 37

Verwenden Sie weder Verdünner,
Benzin noch andere Reinigungsmittel
,
um
Benutzen
Sie ein weiches, gegebenenfalls angefeuchtetes, fusselfreies Tuch.
Bewahren Sie das Blitzgerät an einem trockenen, kühlen und
gut belüfteten Ort auf. Lösen Sie den Blitz von Zeit zu Zeit
aus, um seine volle Leistungsfähigkeit langfristig zu erhalten.
Bedecken Sie den Blitzkopf während des Blitzens nicht mit
Kleidung oder Stoffen, da dies einen Brand verursachen könnte.
1. Blitzkopf
2.
3.
4.
5.
6.
7.
8.
9. Tas te
10. Hauptschalter
11.
12.
13.
14.
15.
16.
17.
18. Weitwinkelstreuscheibe
aste)
EOS-Digitalkameras mit E-TTL II / E-TTL Blitzbelichtungsautomatik
Schmutz oder Fingerabdrücke von dem Gerät zu entfernen.
BATTERIEHINWEISE
Für dieses Blitzgerät werden vier wiederaufladbare Ni-MH-Mignonzellen
oder Alkali-Trockenzellen („AA“) benötigt.
Um einwandfreien elektrischen Kontakt zu gewährleisten, reinigen
Sie die Batteriekontakte, bevor Sie die Batterien einsetzen.
Verwenden
Batterien dürfen weder geöffnet, noch kurzgeschlossen bzw. ins
Wenn Sie das Blitzgerät längere Zeit nicht benutzen wollen,
Wie bei jedem Blitzgerät empfiehlt sich die Mitnahme von
Verwenden Sie keine Lithium AA/R6 Akkus/Batterien. Es könnte
Bitte befolgen Sie alle Richtlinien, Regeln und Vorschriften, die an
Marke und eines Typs, um die Gefahr des Platzens einer Batterie,
des Austritts von Batteriesäure oder der Überhitzung vorzubeugen.
Mischen Sie keinesfalls frische und gebrauchte Batterien.
Feuer geworfen werden, da sie explodieren können. Nur
wiederaufladbare Ni-MH-Batterien dürfen wiederaufgeladen werden
entnehmen Sie bitte die Batterien, um Schäden durch austretende
Batteriesäure zu verhindern.
Ersatzbatterien auf einer Reise oder für Außenaufnahmen bei
winterlichen Temperaturen.
an Ihren Geräten zu Fehlfunktionen kommen.
Ihrem Standort für die Entsorgung von Batterien gelten.
Sie ausschließlich vier frische „AA“ Mignonzellen einer
BESCHREIBUNG DER TEILE(S.2)
Fenster für den kabellosen
Signalempfang
Hinweiston-Umschalter
AF-Hilfslicht
Batteriefachdeckel
Aufsteckfuß
Flüssigkeitskristallanzeige
Displaybeleuchtung
Bereitschaftslampe/
Testauslöser
Tast e
Multifunktionstaste
Blitzschuh-Sperrhebel
Einstellrad
Synchr.- Anschluss
Reflektorfolie
MULTIFUNKTIONSTASTE (13)
In dieser Bedienungsanleitung werden die einzelnen Tasten der
Multifunktionstaste wie folgt dargestellt: / / / .
(Auf-Taste)
(Links-T
Die Tasten werden folgendermaßen verwendet:
.
Bedienung der Auf- und Ab-Tasten: .
Bedienung der Links- und Rechts-Tas te n: .
-Tas te
(Rechts-Taste)
(Ab-Taste)
KOMPATIBLE KAMERAS
Dieses Blitzgerät ist mit den folgenden Kameras kompatibel:
37
Page 38

EINLEGEN DER BATTERIEN
1. Stellen Sie den Hauptschalter auf [OFF] und öffnen Sie das
Batteriefach durch Schieben des Deckels: P.3 -(1)
2. Setzen Sie die Batterien entsprechend der Markierung der Polung
(„+“ und „-“) in das Batteriefach ein. P.3 -(2)
3. Schließen Sie das Batteriefach. P.3-(3)
4. Stellen Sie den Hauptschalter auf [ON]. Wenn das Blitzgerät
zündbereit ist, beginnt die Bereitschaftslampe grün zu blinken.
Wenn der Blitz vollständig geladen ist, leuchtet die Anzeige rot auf.
Achtung!!
Bei niedrigem Ladezustand der Batterien
erscheint das Symbol auf dem LC-Display.
Wenn die Batterien fast leer sind, wird das rechts
abgebildete Symbol angezeigt und das Blitzgerät
ist nicht mehr einsatzbereit. Tauschen Sie die
Batterien aus.
FEHLERWARNUNG
Wenn das Symbol auf dem LC-Display angezeigt wird, liegen
unter Umständen Fehler im Blitzgerät vor. Schalten Sie das Gerät
in diesem Fall kurz aus und wieder ein. Führt dies nicht zum
Erlöschen der Anzeige, prüfen Sie bitte die Batterien. Wenn das
Symbol weiterhin angezeigt wird, setzen Sie sich mit unserem
Service in Verbindung.
AUTOMATISCHE ABSCHALTUNG
Um Strom zu sparen, schaltet sich das Gerät 1.5 Minuten nach der
letzten Betätigung automatisch ab. Zur Wiedereinschaltung genügt
ein Druck auf den Testauslöser oder das Antippen des
Kameraauslösers. Die automatische Abschaltung funktioniert jedoch
nicht im [WL SLAVE] -Modus, [S-FL NORMAL] -Modus und [S-FL
SLAVE] -Modus.
38
ANSCHLIESSEN AN DIE KAMERA
1. Stellen Sie den Hauptschalter auf [OFF].
2. Stellen Sie sicher, dass sich der Blitzschuh-Sperrhebel in der
Position [UNLOCK ►] befindet. P.3-(4)
3. Schieben Sie den Aufsteckfuß des Blitzgeräts in den Blitzschuh
an der Kamera, bis es sich nicht mehr weiterbewegt. Schieben
Sie den Blitzschuh-Sperrhebel in die Position [◄LOCK], bis er
hörbar einrastet. P.3-(5)
Zum Abnehmen des Blitzgeräts schieben Sie den BlitzschuhSperrhebel bis zum Anschlag in die Position [UNLOCK ►], während
Sie die Taste für den Blitzschuh-Sperrhebel gedrückt halten. Ziehen
Sie dann das Blitzgerät aus dem Blitzschuh heraus.
Achtung!!
Wenn sich der Blitzschuh-Sperrhebel beim Herausziehen des
Blitzgeräts nicht in der Position [UNLOCK ►] befindet, können der
Blitzschuh an der Kamera und der Aufsteckfuß am Blitzgerät
beschädigt werden.
ANPASSEN DES BLITZKOPFES
Richten Sie bei normalen Aufnahmen den Blitzkopf nach vorne aus.
P.3-(6)
Achtung!!
Wenn nach dem Einschalten des Blitzgeräts das Symbol
im Statusbereich zu sehen ist oder die Reichweitenanzeige im
Statusbereich blinkt, ist der Blitzkopf nicht korrekt nach vorne
ausgerichtet.
Page 39

GRENZEN DER SERIENAUSLÖSUNG
Betriebsart
Anzahl der Blitzaufnahmen
TTL, M (1/1, ½)
20 Serienauslösungen
M (1/4, 1/8)
25 Serienauslösungen
M (1/16-1/32)
40 Serienauslösungen
Multi
10 Sequenzen
Hauptbildschirm
Setup Menü
Ändert den Blitzmodus und
Fügt die optionalen Funktionen
für den Blitzmodus hinzu und
legt die Ausgangskonfiguration
für das Blitzgerät fest.
① Statusbereich
Modusdetailbereich
④ Registerkartenbereich
Um ein Überhitzen des Gerätes zu verhindern, legen Sie eine
10minütige Pause nach dem Absolvieren der im folgenden
genannten Aufnahmeserien ein.
Verwenden Sie die Taste , um vom Hauptbildschirm zum
Konfigurationsbildschirm umzuschalten. (Wird das Gerät eingeschaltet
[ON], beginnen Sie im Hauptbildschirm.)
Achtung!!
Falls das Symbol auf dem Display angezeigt wird, wird die
Lichtmenge begrenzt, um ein Überhitzen im Schaltkreis des
Blitzgeräts zu verhindern. Verwenden Sie das Blitzgerät nicht,
solange das Symbol angezeigt wird.
GRUNDEINSTELLUNGEN
In diesem Abschnitt werden die Grundeinstellungen beschrieben.
Die meisten Einstellungen für das Blitzgerät EF-630 können auf
folgende Weise vorgenommen werden.
Achtung!!
Die Einstellungen können nicht geändert werden, solange sich der
Hauptschalter in der Position [ ] (lock) befindet. Stellen Sie den
Hauptschalter auf [ON], um die Einstellungen zu ändern.
[Blitzfunktion Einstellungen] und [Blitz C.Fn Einstellungen], bei
denen die Blitzeinstellungen über die Menüanzeige der Kamera
verändert werden können, werden nicht unterstützt. Führen Sie die
Einstellungen bitte am Blitz durch.
ermöglicht das Einstellen der
Details für jeden Blitzmodus.
② Blitzmodusbereich
③
ALLGEMEINE BEDIENFUNKTIONEN
AUF DEM HAUPTBILDSCHIRM
AUSWÄHLEN DES BLITZMODUS
Wählen Sie den Blitzmodusbereich
mithilfe der Tasten aus und ändern
Sie den Blitzmodus mit den
Tasten oder dem Einstellrad.
EINSTELLEN DER DETAILS FÜR
DEN BLITZMODUS
Wählen Sie den Modusdetailbereich
mit den Tasten aus und ändern Sie
die Einstellungen mit den Tasten
oder dem Einstellrad.
⑤ Untermenü
39
Page 40

ALLGEMEINE BEDIENFUNKTIONEN IM SETUP MENÜ
Verschlusszeit
Blende
Wird automatisch eingestellt.
*
Wird automatisch
Wird automatisch eingestellt.
Kann frei
Wird automatisch
eingestellt.
Kann frei
gewählt werden.
*
Wenn die FP-Kurzeitsynchronisation auf [ON] gestellt ist, wird die
Beschränkung der Verschlusszeit für kürzere Verschlusszeiten deaktiviert.
Die einzelnen Registerkarten werden durch
Drehen des Einstellrad ausgewählt.
(Ist ein Symbol im Registerkarten Bereich
ausgewählt, ist es auch möglich mit den
Tasten in eine andere Registerkarte
zu wechseln)
BEI GEÖFFNETEM SETUP-MENÜ:
Drücken Sie die Tasten, um die
gewünschten Menüeinträge auszuwählen.
Drücken Sie die oder Ta ste , um
Untermenüs oder Dialogfelder zu öffnen.
(
Bei einigen Optionen wird ein spezieller
Bildschirm oder eine Dialogmeldung geöffnet.)
BEI GEÖFFNETEN UNTERMENÜS:
Drücken Sie die Tasten, um die
gewünschten Optionen auszuwählen.
Drücken Sie die oder Ta st e, um die
neuen Einstellungen zu übernehmen.
(Drücken Sie die Tas te, um
schließen, ohne Änderungen vorzunehmen.)
Untermenüs zu
E-TTL II / E-TTL BLITZBELICHTUNGSAUTOMATIK
Hierbei arbeitet die E-TTL II / E-TTL
Blitzbelichtungsautomatik. Verwenden
Sie diese Betriebsart für allgemeine
Aufnahmezwecke.
1. Stellen Sie die Blitzbetriebsart auf
[TTL] ein.
2. Stellen Sie anhand der Reichweitenanzeige im Statusbereich
sicher, dass sich das Motiv im Aufnahmebereich befindet.
40
3. Beginnen Sie mit den Aufnahmen, wenn die Bereitschaftslampe
erkennen lässt, dass der Ladezustand ausreicht.
Bei korrekter Verwendung des Blitzgeräts wird das Symbol
ungefähr fünf Sekunden lang im Statusbereich angezeigt. Wird das
Symbol nicht angezeigt, sind die Lichtverhältnisse möglicherweise zu
dunkel oder zu hell. Ändern Sie die Verhältnisse und versuchen Sie erneut,
die Aufnahmen durchzuführen.
VERSCHLUSSZEIT UND BLENDE
Die verschiedenen Belichtungsmodi der Kamera wirken sich folgendermaßen
auf die Einstellmöglichkeiten von Verschlusszeit und Blende aus.
P
(
1/60 Sek. – Blitzsynchronzeit
Av
(30 Sek. – Blitzsynchronzeit*)
Ermöglicht die freie Wahl der Verschlusszeit in
Tv
einem Bereich, der die Blitzsynchronisationszeit
nicht überschreitet *.
M
Achtung!!
Wenn Verschlusszeit und Blendenwert bei der Aufnahme blinken, könnten
Fehlbelichtungen daraus resultieren. Führen Sie in diesem Fall die
notwendigen Änderungen durch, bevor Sie mit den Aufnahmen beginnen.
Wenn an der Kamera ein Aufnahmemodus
aus dem [Motivbereich] eingestellt ist,
erscheint die in der Abbildung dargestellte
Anzeige. Alle Tasten außer TEST und
sind deaktiviert.
)
eingestellt.
gewählt werden.
Page 41

BLITZBELICHTUNGSKORREKTUR
1. Aufnahme
2. Aufnahme
3. Aufnahme
(MODE WL TTL)
Die Lichtmenge des Blitzgeräts kann
korrigiert werden, ohne dabei die Belichtung
des Hintergrunds zu beeinflussen.
Sie ist in den Blitzmodi [TTL], [WL TTL]
und [WL SLAVE] verfügbar.
Stellen Sie den Korrekturwert im
Modusdetailbereich ein. Die Korrektur
kann im Bereich von 1/3-Schritten erfolgen (bei einigen Kameras in
1/2-Schritten), und es können bis zu ±3 EV eingestellt werden.
Verwenden Sie nicht die Blitzbelichtungskorrektur der Kamera.
FEB (BLITZBELICHTUNGSREIHE)
Es können drei Aufnahmen mit unterschiedlicher Blitzstärke erstellt werden.
Sie ist in den Blitzmodi [TTL] und [WL
TTL] verfügbar.
Stellen Sie den Korrekturwert im
Modusdetailbereich ein. Die Korrektur
kann im Bereich von 1/3-Schritten
erfolgen (bei einigen Kameras in 1/2Schritten), und es können bis zu ±3 EV
eingestellt werden.
Machen Sie drei Aufnahmen und
warten nach jeder Aufnahme die
erneute Blitzbereitschaft mit Hilfe der Blitzbereitschaftsanzeige ab.
Die Aufnahmen werden in der Reihenfolge gemessene Belichtung
→ Unterbelichtung → Überbelichtung erstellt.
Das FEB-Symbol ändert sich je nach Anzahl der Aufnahmen wie folgt.
Nach drei Aufnahmen wird die FEB-Funktion automatisch abgeschaltet.
Die FEB-Funktion kann mit der Blitzbelichtungskorrektur kombiniert werden.
AUFNAHMEN MIT FE-LOCK
Diese Aufnahmemethode ermöglicht es Ihnen, die Blitzbelichtung
auf ein bestimmtes Motivdetail abzustimmen.
Sie ist in den Blitzmodi [TTL] und [WL TTL] verfügbar.
1. Fokussieren Sie auf das Motiv.
2. Richten Sie den Bereich des Motivs in der Bildmitte aus, der
korrekt mit dem Blitz belichtet werden soll. Drücken Sie die
[M-Fn]-Taste an der Kamera.
Das Blitzgerät sendet einen Vorblitz, um die für das Motiv
notwendige Blitzstärke zu ermitteln und zu speichern.
Im Sucher erscheint für etwa 0,5 Sekunden [FEL].
3. Wählen Sie anschließend den endgültigen Bildausschnitt und
machen Sie Ihre Aufnahmen.
Wenn im Sucher [ ] blinkt, reicht die Blitzstärke nicht für eine
korrekte Belichtung aus. Ändern Sie die Bedingungen und führen
Sie eine erneute Blitzbelichtungsspeicherung durch.
Die Position der FE-Lock-Ta ste ist abhängig vom Kameramodell.
Bitte beachten Sie die Bedienungsanleitung Ihrer Kamera.
(
BLITZBELICHTUNGSSPEICHERUNG
)
MANUELLER BLITZBETRIEB
Die Stärke des Blitzes kann entsprechend
den Erfordernissen angepasst werden.
Stellen Sie den Blitzmodus auf [
1.
ein.
2. Stellen Sie die Blitzstärke im Modus-
detailbereichein. (Einstellbereich: 1/128
bis 1/1. Abstufung: 1/3EV.)
MANUAL]
41
Page 42

3. Beginnen Sie mit den Aufnahmen, wenn die Bereitschaftslampe
WL TTL
Kabellose E-TTL II / E-TTL Blitzbelichtungsautomatik
WL
MANUAL
Kabelloser Manueller Blizbetrieb
WL MU LTI
Kabelloser Stroboskopbetrieb
EF-630 Slave-ID
A B C
EF-610 DG SUPER Slave-ID
1 2 3
erkennen lässt, dass der Ladezustand ausreicht.
Im Statusbereich wird die Reichweite ermittelt und angezeigt,
innerhalb derer eine korrekte Belichtung gewährleistet ist. Selbst bei
unveränderter Blitzstärke schwankt die Reichweite, bei der korrekte
Belichtungen erzielt werden, wenn ISO-Wert oder Blende an der
Kamera verändert werden.
Die Korrekte Belichtung bei manuellem Blitzbetrieb kann anhand
der folgenden Formel ermittelt werden:
Leitzahl (GN) / Aufnahmeabstand (m) = Blendenwert (F)
[Tabelle 1] am Ende dieser Bedienungsanleitung enthält Informationen
zur Leitzahl (GN = Guide Number) dieses Blitzgeräts.
STROBOSKOPBETRIEB
Durch wiederholtes zünden des Blitzes bei geöffnetem Verschluss
ist es möglich, Bewegungen des Motivs darzustellen. So erscheint
in einer einzigen Aufnahme das Motiv an verschiedenen Positionen.
Verwenden Sie dafür den manuellen Belichtungsmodus („M“) der Kamera.
1.
Stellen Sie den Blitzmodus [
2. Stellen Sie im Modusdetailbereich die
Blitzleistung, die Blitzfrequenz in Hz
(Beispiel: 10Hz = Das Blitzlicht wird in
einer Frequenz von 10 Mal pro Sekunde
gezündet) und die Anzahl der Blitze ein.
3. Wählen Sie eine Verschlusszeit, die
länger als der Wert „Anzahl der Blitze“ / „Blitzfrequenz" ist.
4. Überprüfen Sie den Ladezustand anhand der Bereitschaftslampe
und beginnen Sie mit der Aufnahme.
Die Anzahl der Blitze, die ununterbrochen ausgelöst werden können,
variiert je nach eingestellter Blitzleistung und Blitzfrequenz. [Tabelle
2] am Ende dieser Bedienungsanleitung enthält weitere Hinweise.
MU LTI]
ein.
42
KABELLOSES BLITZEN
Durch den Einsatz des Blitzgeräts in größerem Abstand zur Kamera
ergeben sich zusätzliche kreative Möglichkeiten. Das Blitzgerät
EF-630 kann durch den internen Blitz der Kamera oder durch ein
Master-Blitzgerät angesteuert werden.
Der EF-630 verfügt über drei Modi zum kabellosen Blitzen für
unterschiedliche Anwendungen.
Das an der Kamera angeschlossene Blitzgerät wird als
[Master-Gerät] und das entfernt von der Kamera eingesetzte
Blitzgerät wird als [Slave-Gerät] bezeichnet.
Halten Sie mit dem Blitzgerät einen Abstand von ca. 0,5m-5m
zum Motiv ein, und platzieren Sie die Kamera zwischen 1m – 5m
vom Motiv entfernt.
Wenn Sie das EF-630 von der Kamera entfesselt an der
gewünschten Stelle platzieren, leistet ein Blitzgeräteständer, der
auch über ein Stativgewinde verfügt, gute Dienste.
Das kabellose Blitzen kann mit dem integrierten Blitz der Kamera
durchgeführt werden (nur bei Modellen, die über eine MasterFunktion für kabelloses Blitzen verfügen). Die Kameraeinstellungen
finden Sie in der Bedienungsanleitung der Kamera.
Der EF-630 kann auch in Kombination mit dem
EO-ETTL II
eingesetzt werden. Setzen Sie in diesem Fall den
EF-610 DG SUPER
SUPER
SUPER ein (die Kennzeichnung der Slave-ID des EF-610 DG SUPER
ist unterschiedlich. Bitte beachten Sie die folgende Tabelle.).
als Slave-Gerät ein. Stellen Sie den
entsprechend der Bedienungsanleitung des
EF-610 DG SUPER
EF-610 DG
EF-610 DG
Page 43

VORBEREITUNG FÜR DAS KABELLOSE BLITZEN
ON
Steuerung + Blitz*
OFF
Nur Steuerfunktion
EINSTELLUNG DER SLAVE-GRUPPE
Sie können Aufnahmen mit unterschiedlichen Blitzleistungs-verhältnissen und
unterschiedlichen Blitzstärken erstellen, indem Sie die Slave-Geräte in zwei
[A, B
] oder drei [A, B, C] Gruppen einteilen.
1. Wenn der gewünschte Modus für
kabelloses Blitzen eingestellt und der
Blitzmodusbereich ausgewählt ist, drücken
Sie die -Tast e, um das Display zum
Einstellen der Slave-Gruppe zu öffnen.
2.
Die Einstellung der Slave-Gruppe erfolgt
über das Einstellrad oder die Taste.
(Wird OFF gewählt, erfolgen Aufnahmen
ohne Blitzleistungsverhältnis.)
3.
Drücken Sie nach dem Einstellen die
zurückzukehren.
EINSTELLEN DES MASTER-GERÄTS
Hier stellen Sie ein, ob der Master nur zur Steuerung dienen soll,
oder ob er zur Steuerung und als lichtgebendes Blitzgerät dienen soll.
Wenn für das kabellose Blitzen ein Blitzleistungsverhältnis eingestellt
*
wurde, gehört das Master-Gerät zur Gruppe [A].
KANALWAHL
Sollte eine weitere Person gleichzeitig kabellos blitzen, können
Störungen verhindert werden, indem
ein anderer Kanal gewählt wird (es
stehen die Kanäle 1 bis 4 zur Verfügung
-Tast e, um zum normalen
Display
(
MASTER-GERÄT)
).
VORBEREITUNG FÜR DAS KABELLOSE BLITZEN (S LAV E-GERÄT)
1. Stellen Sie den Blitzmodus auf [WL SLAVE].
2. Stellen Sie im Modusdetailbereich
denselben Kanal wie am MasterGerät ein.
3.
Wenn Sie mit der BlitzleistungsverhältnisEinstellung kabellos Blitzen, stellen
Sie im Modusdetailbereich die SlaveID der gewünschten Gruppe ein
(werden Aufnahmen ohne Blitzleistungsverhältnis-Einstellung
durchgeführt, kann A, B oder C gewählt werden).
KABELLOSE E-TTL II / E-TTL BLITZBELICHTUNGS-AUTOMATIK
Bei der kabellosen E-TTL II / E-TTL Blitzbelichtungsautomatik steuert
die Kamera die Belichtung automatisch entsprechend einem
geeigneten Wert.
Blitzbelichtungsautomatik mit einem Blitzgerät oder
mehreren Slave-Blitzgeräten mit derselben Blitzstärke
EINSTELLEN DES MASTER-GERÄTS
1. Stellen Sie den Blitzmodus auf [WL
TTL].
2. Führen Sie bei Bedarf die Schritte
unter „
Kanalwahl“
Master-Geräts“ im
durch.
EINSTELLEN DES SLAVE-GERÄTS
3. Führen Sie die Einstellung wie unter „VORBEREITUNG FÜR
DAS KABELLOSE BLITZEN (SLAVE-GERÄT)“ beschrieben durch.
4. Platzieren Sie das Slave-Gerät, stellen Sie sicher, dass es
vollständig aufgeladen ist und beginnen dann mit Ihrer Aufnahme
(wenn das AF-Hilfslicht blinkt, ist das Slave-Gerät bereit).
und „
Einstellen des
Modusdetailbereich
43
Page 44

Blitzbelichtungsautomatik mit
Blitzleistungsverhältnis-Einstellung (zwei Gruppen)
Die Blitze werden so dosiert, dass sich aus der Gesamtsumme von
Gruppe [A] und Gruppe [B] eine korrekte Belichtung ergibt.
EINSTELLEN DES MASTER-GERÄTS
1. Stellen Sie die Slave-Gruppe auf
[A:B] wie unter „VORBEREITUNG
FÜR DAS KABELLOSE BLITZEN
(MASTER-GERÄT)“ beschrieben.
2.
Stellen Sie das Blitzleistungsverhältnis im
Modusdetailbereich ein (es sind Einstellungen von 8:1 bis 1:8 möglich).
EINSTELLEN DES SLAVE-GERÄTS
3. Führen Sie die Einstellung wie unter „VORBEREITUNG FÜR
DAS KABELLOSE BLITZEN (SLAVE-GERÄT)“ beschrieben durch.
Blitzbelichtungsautomatik mit
Blitzleistungsverhältnis-Einstellung (drei Gruppen)
Nutzen Sie die Gruppe [C] als eine sekundäre Lichtquelle, z.B. um
einen Schlagschatten hinter dem Objekt zu vermeiden.
EINSTELLEN DES MASTER-GERÄTS
1. Wählen Sie die Slave-Gruppe [A:B C],
wie unter „
DAS KABELLOSE BLITZEN (
GERÄT)
2.
Stellen Sie das Blitzleistungsverhältnis
[A:B] in der Betriebsartenanzeige ein
(es sind Einstellungen von 8:1 bis 1:8 möglich).
3.
Stel len Sie die Blitzbelichtungskorrektur [C] im Modusdetailbereich ein.
EINSTELLEN DES SLAVE-GERÄTS
4. Führen Sie die Einstellung wie unter „VORBEREITUNG FÜR
DAS KABELLOSE BLITZEN (SLAVE-GERÄT)“ beschrieben durch.
VORBEREITUNG FÜR
“ beschrieben.
MASTER-
44
KABELLOSER MANUELLER BLIZBETRIEB
Ähnlich wie beim manuellen Einsatz des Blitzgeräts kann die Blitzleistung
auch im kabellosen Blitzbetrieb manuell gesteuert werden. Ermitteln
Sie die Belichtung mit einem handelsüblichen Blitzbelichtungsmesser.
Manuelles Blitzen mit einem Blitzgerät oder mehreren SlaveBlitzgeräten mit derselben Blitzstärke
EINSTELLEN DES MASTER-GERÄTS
1.
Stellen Sie den Blitzmodus [WL
2.
Führen Sie bei Bedarf die Schritte unter
„Kanalwahl“ und „Einstellen des MasterGeräts“ im
3.
EINSTELLEN DES SLAVE-GERÄTS
4. Set the Flash mode to [WL SLAVE].
5. Führen Sie die Einstellung wie unter „VORBEREITUNG FÜR DAS
6. Platzieren Sie das Slave-Gerät, stellen Sie sicher, dass es
Manuelles Blitzen mit zugewiesener Blitzstärke für die
jeweilige Gruppe
Beim manuellen Blitzen kann die Blitzstärke für jede der zwei bzw.
drei Gruppen eingestellt werden.
EINSTELLEN DES MASTER-GERÄTS
1. Stellen Sie [Flash group setting] auf
Modusdetailbereich
Stellen Sie die Blitzstärke im Modusdetailbereichein. (Einstellbereich:
1/128 bis 1/1. Abstufung: 1/3EV.)
KABELLOSE BLITZEN (SLAVE-GERÄT)“ beschrieben durch.
vollständig aufgeladen ist und beginnen dann mit Ihrer Aufnahme
(wenn das AF-Hilfslicht blinkt, ist das Slave-Gerät bereit).
[A:B] oder [A:B:C], wie unter
„VORBEREITUNG FÜR DAS KABELLOSE
BLITZEN (MASTER-GERÄT)“
MANUAL
beschrieben.
durch.
] ein.
Page 45

2. Stellen Sie die Blitzstärke jeder Gruppe im Modusdetailbereich ein.
EINSTELLEN DES SLAVE-GERÄTS
3. Führen Sie die Einstellung wie unter „VORBEREITUNG FÜR
DAS KABELLOSE BLITZEN (SLAVE-GERÄT)“ beschrieben durch.
KABELLOSER STROBOSKOPBETRIEB
Der kabellose Stroboskopbetrieb ist mit einem oder mehreren
Blitzgeräten möglich.
Stellen Sie Ihrer Kamera auf den manuellen Belichtungsmodus (M)
ein.
Stroboskopbetrieb mit einem Blitzgerät oder mehreren
Slave-Blitzgeräten mit derselben Blitzstärke
EINSTELLEN DES MASTER-GERÄTS
1.
Stel len Sie den Blitzmodus [WL
ein.
2. Führen Sie bei Bedarf die Schritte
unter „
Kanalwahl“
Master-Geräts“ im
durch.
3. In the Mode details area, set the flash amount, flash interval in
"Hz" (eg.: 10 Hz = Emits light with the frequency of 10 times per
second), and the number of flashes in "x".
EINSTELLEN DES SLAVE-GERÄTS
4. Führen Sie die Einstellung wie unter „VORBEREITUNG FÜR
DAS KABELLOSE BLITZEN (SLAVE-GERÄT)“ beschrieben durch.
5. Wählen Sie eine Verschlusszeit, die länger als der Wert „Anzahl
der Blitze“ / „Blitzfrequenz" ist.
6. Platzieren Sie das Slave-Gerät, stellen Sie sicher, dass es
vollständig aufgeladen ist und beginnen dann mit Ihrer Aufnahme
(wenn das AF-Hilfslicht blinkt, ist das Slave-Gerät bereit).
und „
Einstellen des
Modusdetailbereich
MU LTI]
Stroboskopbetrieb mit zugewiesener Blitzstärke für die
jeweilige Gruppe
Beim Stroboskopbetrieb kann die Blitzstärke für jede der zwei bzw.
drei Gruppen eingestellt werden.
EINSTELLEN DES MASTER-GERÄTS
1. Stellen Sie „Flash group setting“ auf
[A:B] oder [A:B:C], wie unter
„VORBEREITUNG FÜR DAS KABELLOSE
BLITZEN“ beschrieben.
2. Stellen Sie die Blitzstärke jeder Gruppe im Modusdetailbereich ein.
3. In the Mode details area, set the flash amount, flash interval in
"Hz" (eg.: 10 Hz = Emits light with the frequency of 10 times per
second), and the number of flashes in "x".
EINSTELLEN DES SLAVE-GERÄTS
5. Führen Sie die Einstellung wie unter „VORBEREITUNG FÜR
DAS KABELLOSE BLITZEN (SLAVE-GERÄT)“ beschrieben durch.
Fahren Sie wie bei Schritt 5 im vorangestellten Abschnitt fort und
machen Sie Ihre Aufnahmen.
„SLAVE“ GERÄT
Das Blitzgerät EF-630 ist mit einer Funktion ausgestattet, die das
Blitzlicht in Reaktion auf einen von einem anderen Gerät
ausgehenden Blitz aktiviert. Diese Funktion erlaubt den kreativen
Einsatz des Blitzgeräts losgelöst von der Kamera. Die Blitzleistung
wird jedoch in dieser Betriebsart nicht automatisch gesteuert.
NORMALER „SLAVE“ GERÄTE BETRIEB
Das an der Kamera angebrachte Master-Gerät kann dazu verwendet
werden, die synchronisierte Auslösung des entfernt von der Kamera
positionierten Blitzgeräts EF-630 zu aktivieren.
45
Page 46

Der interne Blitz der Kamera arbeitet allerdings mit dem Vorblitz, sodass
kein synchronisierter Blitz möglich ist .
Stellen Sie das Master-Blitzgerät auf manuellen Betrieb und die
Blitzleistung auf ungefähr 1/16 ein.
Stellen Sie den Belichtungsmodus der Kamera auf
Verschlusszeit auf 1/30 Sekunde oder kürzer und passen Sie die Blende
und ISO-Einstellung entsprechend an.
1. Stellen Sie am Slave-Gerät EF-630 den
Blitzmodus [S-FL NORMAL ] ein.
2. Passen Sie die ISO-Einstellung und den
Blendenwert im Modusdetailbereich an
die Einstellungen der Kamera an.
3. Passen Sie die Blitzleistung im Modusdetailbereichso an, dass die im
Stausbereich angezeigte Reichweite dem Abstand zwischen SlaveGerät und Motiv entspricht.
4. Vergewissern Sie sich, dass beide Blitzgeräte aufgeladen und Blitzbereit
sind und beginnen Sie mit der Aufnahme.
„M“ und die
KABELLOSE ZÜNDUNG BESTIMMTER „SLAVE“ GERÄTE
Falls Sie 2 oder mehr EF-630 Blitzgeräte einsetzen, können Sie durch den
Einsatz der Kanalwahl bestimmen, welche Geräte gleichzeitig blitzen
sollen. In dieser Betriebsart wird ein Gerät als Slave Controller und die
anderen werden als blitzende „Slave“ Geräte eingesetzt.
Stellen Sie den Belichtungsmodus der Kamera auf „M“ und die
Verschlusszeit auf 1/30 Sekunde oder kürzer und passen Sie die Blende
und ISO-Einstellung entsprechend an.
EINSTELLUNG DES STEUERNDEN
BLITZGERÄTS (MASTER)
1. Stellen Sie den Blitzmodus [S-FL CTRL]
ein.
2. Stellen Sie den Kanal je nach Bedarf ein.
(Wählen Sie im Modusdetail-bereicheinen
Kanal aus: Ch.1 bis Ch.3.)
46
EINSTELLUNG DER BLITZENDEN GERÄTE (SLAVE)
3.
Stellen Sie den Blitzmodus [
4.
Wählen Sie im Modusdetail-bereichdenselben
Kanal wie am steuernden
5. Passen Sie die ISO-Einstellung und den
Blendenwert im Modusdetailbereich an die
Einstellungen
6. Passen Sie die Blitzleistung im
Modusdetailbereichso an, dass die im Stausbereich angezeigte
Reichweite dem Abstand zwischen Slave- Gerät und Motiv entspricht.
7. Vergewissern Sie sich, dass die Blitzgeräte aufgeladen und Blitzbereit
sind und beginnen Sie mit der Aufnahme.
Im Slave-Modus kann dieses Blitzgerät auch in Kombination mit dem EF-630
und/oder dem EF-610 DG SUPER für andere Kameraanschlüsse verwendet
werden. (Detaillierte Informationen zur Einrichtung des Blitzgeräts EF-610
DG SUPER finden Sie in der entsprechenden Bedienungsanleitung.)
S-FL SLAVE]
Gerät aus.
des steuernden Blitzgeräts an.
ein
.
OPTIONALE FUNKTIONEN
In diesem Abschnitt werden optionale Funktionen beschrieben, die
über das Setup-Menü aufgerufen und eingestellt werden können.
REAR CURTAIN SYNCHRONIZATION (MENÜ 1)
Hierbei wird der Blitz erst kurz bevor der zweite Verschlussvorhang
schließt gezündet. So werden die Leuchtspuren eines sich
bewegenden Objektes hinter ihm erscheinen, sodass die Aufnahmen
den natürlichen Bewegungsablauf des Objekts wiedergeben.
Diese Option kann mit den Kamera-Belichtungsmodi P, Av, Tv und
M verwendet werden.
Sie ist in den Blitzmodi [TTL], [MANUAL] und [WL] verfügbar.
1. Wählen Sie [MENU 1] → [REAR CURTAIN SYNC] → [ON].
2. Kehren Sie in den Hauptbildschirm zurück. (Im Statusbereich wird
Page 47

das Symbol angezeigt.)
(Voreinstellung)
Normale Lichtverteilung
Aufnahmezwecke.
GN
Leitzahl priorisierende Lichtverteilung
Der Ausleuchtwinkel des Blitzes wird enger, aber es
steht eine höhere Leitzahl zur Verfügung.
DIFFUSE
Flache Lichtverteilung
und erzielt eine einheitlichere Lichtverteilung.
1 TIME (1 MAL)
(Voreinstellung)
Modellierblitz
ausgelöst, damit Sie die Lichtwirkung und den
Schattenverlauf am Motiv überprüfen können.
Achtung!!
Diese Funktion kann nicht auf („ON“) gestellt werden, wenn ein
Blitzmodus verwendet wird, der nicht mit der Synchronisation auf
den zweiten Verschlussvorhang kompatibel ist.
FP-KURZZEITSYNCHRONISATION (MENÜ 1)
Bei der FP-Kurzzeitsynchronisation sendet das Gerät ununterbrochen
Blitze, während der Verschluss abläuft. So können Sie eine kürzere
Verschlusszeit als die eigentliche Synchronzeit verwenden.
Diese Option kann mit den Kamera-Belichtungsmodi P, Av, Tv und
M verwendet werden.
Sie ist in den Blitzmodi [TTL], [MANUAL], [WL TTL] und [WL
MANUAL] verfügbar.
1. Wählen Sie [MENU 1] → [FP] → [ON].
2. Kehren Sie in den Hauptbildschirm zurück. (Im Statusbereich wird
das Symbol angezeigt.)
Vergewissern Sie sich im [TTL] Blitzmodus, dass sich das Motiv im
Aufnahmebereich befindet. Überprüfen Sie dazu die im Statusbereich
angezeigte Reichweite, bevor Sie mit den Aufnahmen beginnen.
Im [MANUAL] Blitzmodus passen Sie die Blende usw. vor der
Aufnahme so an, dass der Abstand zum Motiv und die im
Statusbereich angezeigt Reichweite übereinstimmen.
Die Leitzahl hängt dabei von der Verschlusszeit ab. Bitte beachten
Sie die Tabelle 3 auf der letzten Seite.
Achtung!!
Diese Funktion kann nicht auf („ON“) gestellt werden, ein Blitzmodus
verwendet wird, der nicht mit der FP-Kurzzeitsynchronisation
kompatibel ist.
LICHTVERTEILUNGSMODUS (MENÜ 1)
Das Blitzgerät EF-630 verfügt über drei Lichtverteilungsmodi, die
entsprechend dem Verwendungszweck ausgewählt werden können.
[MENU 1] → [LIGHT DISTRIBUTION]
NORMAL
-
Generelle Lichtverteilungseigenschaften für allgemeine
(Leitzahl)
(Diffus)
Verhindert die Abschwächung des Umgebungslichts
TESTBLITZ (MENÜ 2)
Das Blitzgerät EF-630 verfügt über zwei Testblitzmodi. Eine der
Testblitzmodi kann der TEST-Taste zugewiesen werden.
[MENU 2] → [TEST FLASH]
Testblitz
Löst einen einzelnen Testblitz aus.
MODELING
(MODELLIERUNG)
Sie ist in den Blitzmodi [TTL], [MANUAL] und
[MULTI] verfügbar.
Wenn die TEST-Tas te gedrückt gehalten wird, wird
der Blitz ungefähr 1,5 Sekunden lang kontinuierlich
47
Page 48

Nach 8 Sekunden Stillstandzeit wird die
Beleuchtung ausgeschaltet. Wird dann eine
Taste oder ein Einstellrad verwendet, wird die
Beleuchtung automatisch wieder eingeschaltet.
Die Beleuchtung bleibt nach dem Einschalten 8
bleibt auch
aus, wenn eine Taste oder ein Einstellrad
verwendet wird.
ON
Die Beleuchtung bleibt an.
Achtung!!
Die [MODELING] -Einstellung kann nicht in einem Blitzmodus
ausgewählt werden, in dem der Modellierblitz nicht zur Verfügung
steht.
Während der Kommunikation zwischen Kamera und Blitzgerät steht
die TEST-Taste nicht zur Verfügung. (Durch betätigen der
Abblendtaste an der Kamera wird der Modellierblitz unabhängig von
der Zuordnung der TEST-Taste ausgelöst).
BENUTZEREINSTELLUNG (MENÜ 3)
Es ist möglich, benutzerdefinierte
Einstellungen zu speichern und
abzurufen. (Es können zwei Benutzereinstellungsprofile gespeichert werden.)
SPEICHERN UND ABRUFEN VON BENUTZEREINSTELLUNGEN
1. Stellen Sie den Blitzmodus, den Modusdetailbereich und das
Setup-Menü entsprechend Ihren Erfordernissen ein.
2. Wählen Sie im [MENU 3] → [CUSTOM MODE SETTING] die
Option [C1] oder [C2] und drücken Sie die Taste .
3. Wählen Sie [OK] aus und bestätigen Sie die Auswahl mit der
Taste .
Die gewählten Einstellungen werden als Blitzmodus hinzugefügt
und stehen als Benutzereinstellung zur Verfügung. (Die Benutzereinstellung wird im Blitzmodusbereichdurch das oder
Symbol angezeigt.)
48
LÖSCHEN EINER GESPEICHERTEN BENUTZEREINSTELLUNG
1. Wählen Sie im [MENU 3] → [CUSTOM MODE DELETE] die
Option [C1] oder [C2] und drücken Sie die Taste .
2. Wählen Sie [OK] und bestätigen Sie die Auswahl mit der Tas te .
AF-HILFSLICHT (MENÜ 4)
Das AF-Hilfslicht wird automatisch eingeschaltet, wenn Sie
versuchen, ein nicht ausreichend beleuchtetes Motiv aufzunehmen.
Der Wirkungsbereich des AF-Hilfslichts reicht von 0,7 bis 10 Meter.
Wenn das AF-Hilfslicht nicht erforderlich ist, wählen Sie [MENU 4]
→ [AF ASSIST LIGHT] → [OFF].
LC-DISPLAYBELEUCHTUNG (MENÜ 4)
Wenn das Blitzgerät eingeschaltet wird, wird das LC-Display
beleuchtet. Die EIN/AUS-Einstellungen für die Beleuchtung können
geändert werden.
[MENU 4] → [LCD LIGHT]
AUTO
(Voreinstellung)
Unabhängig von der gewählten Einstellung kann die Beleuchtung
mit der Taste ausgeschaltet werden.
8 SEC
Sekunden lang an, erlischt dann und
Page 49

LC-DISPLAYANPASSUNGEN (MENÜ 4)
HELLIGKEIT
den Erfordernissen angepasst werden.
KONTRAST
den Erfordernissen angepasst werden.
M (Voreinstellung)
Anzeige in Meter
FEET
Anzeige in Fuß
MODEL
Modelname
SERIAL No.
Seriennummer
VERSION
Firmware-Version
Der Kontrast und die Helligkeit des LC-Displays können angepasst
werden.
[MENU 4] → [DISPLAY SETTING]
BRIGHTNESS
CONTRAST
Wählen Sie abschließend [OK] und drücken Sie zur Bestätigung die
Taste .
Wählen Sie [CANCEL], um die Anpassung abzubrechen, und
drücken Sie zur Bestätigung die Taste .
Die Helligkeit kann mit den Tasten entsprechend
Der Kontrast kann mit den Tasten entsprechend
ÄNDERN DER MASSEINHEIT (MENÜ 4)
Die im Statusbereich angezeigte Maßeinheit kann geändert werden.
[MENU 4] → [M / FEET]
INFORMATIONEN ZUM BLITZGERÄT (MENÜ 5)
Die folgenden Informationen können abgerufen werden.
[MENU 5] → [INFORMATION]
RÜCKSETZEN DER EINSTELLUNGEN (MENÜ 5)
Das Blitzgerät kann auf die werkseitigen Einstellungen
zurückgesetzt werden.
[MENU 5] → [RESET SETTINGS]
Wenn Sie die Einstellungen zurücksetzen möchten, wählen Sie
[OK] und drücken Sie zur Bestätigung die Taste .
Beim Zurücksetzen der Einstellungen werden auch alle gespeicherten
Benutzereinstellungen gelöscht.
ANDERE NÜTZLICHE FUNKTIONEN
BLITZKOPF-EINSTELLUNG (ZOOMREFLEKTOR)
Bei Verwendung der Blitzkopf-Einstellung
(Auto) passt der Zoomreflektor
des Blitzgeräts den Ausleuchtwinkel
automatisch der Brennweite des Objektivs
an.
Die Einstellung für den Zoomreflektor
berücksichtigt auch die Größe des
Bildsensors der Kamera. Darum kann die auf dem Blitzgerät
angezeigte Brennweite von der tatsächlichen Brennweite des
Objektivs abweichen.
Je nach Blitzmodi kann die Zoomreflektoreinstellung auf einen
Wert eingestellt werden, der unabhängig von der Brennweite des
Objektivs ist.
Die Zoomreflektoreinstellung kann manuell geändert werden.
Drücken Sie die Tasten im Modusdetailbereich.
AUTO ⇔ 24 ⇔ 28 ⇔ 35 ⇔ 50 ⇔ 70 ⇔ 85 ⇔ 105 ⇔ 135 ⇔ 200mm
49
Page 50

Die Blitzleistung ändert sich in Abhängigkeit von der Zoom-
reflektoreinstellung.
Weitwinkelstreuscheibe
Das Blitzgerät ist mit einer eingebauten Weitwinkelstreuscheibe
ausgestattet, die die Ausleuchtung des Bildwinkels eines 17mm
Objektivs ermöglicht. Ziehen Sie die Weitwinkelstreuscheibe
gemeinsam mit der eingebauten Reflektorfolie vorsichtig heraus und
klappen Sie ausschließlich die Weitwinkelstreuscheibe vor den
Blitzkopf. P.3-(7)
Wird die Weitwinkelstreuscheibe verwendet, wird im Modus-
detailbereich im Abschnitt für den Blitzkopf das Symbol
angezeigt
INDIREKTES BLITZEN
Durch Ausrichtung des Blitzes an die Decke oder gegen eine Wand
wird das Licht gestreut, sodass Aufnahmen mit einer weicheren
Ausleuchtung und weniger Schlagschatten möglich sind.
Der Blitzkopf kann 90° nach oben oder 7° nach unten geneigt und
jeweils 180° nach rechts oder links geschwenkt werden, unten ein
Winkel von 7° und rechts und links ein Winkel von 180°
ausgeleuchtet wird. P.3 -(8)
Bei indirektem Blitzen wird im Statusbereich das Symbol
Das Motiv wird in die Farbe der reflektierenden Oberfläche
angezeigt.
getaucht. Wählen Sie deshalb bitte eine weiße Oberfläche für das
indirekte Blitzen. Abhängig von der reflektierenden Oberfläche,
der Motiv-Entfernung und anderen Faktoren kann sich die
effektive Distanz für die TTL-Automatik verändern.
Nahaufnahmen
Das Neigen des Blitzkopfes um 7° nach unten eignet sich für
Nahaufnahmen.
50
Bei Ausrichtung des Blitzes um 7° nach unten blinkt die
Reichweitenanzeige im Statusbereich.
Eingebaute Reflektorfolie
Das Blitzgerät ist mit einer eingebauten Reflektorfolie ausgestattet,
die eine dezente frontale Aufhellung beim indirekten Blitzen
gestattet (bspw. ein Lichtreflex im Auge des Models). Ziehen Sie die
Weitwinkelstreuscheibe gemeinsam mit der eingebauten
Reflektorfolie vorsichtig heraus und schieben Sie nur die
Weitwinkelstreuscheibe wieder zurück.P.3-(9)
Neigen Sie für eine natürliche Ausleuchtung mit dezenter frontaler
Aufhellung den Blitzkopf um 90 Grad nach oben und fotografieren
Sie aus kurzer Entfernung. P.3-(10)
SYNCHRONISATIONSANSCHLUSS
Das Blitzgerät EF-630 ist mit einem Synchronisationsanschluss
ausgestattet, über den die Verbindung zur Kamera mithilfe eines im
Handel erhältlichen Blitzsynchronisationskabels hergestellt werden
kann.
Verwenden Sie das Blitzgerät bei Aufnahmen mit einen
Synchronisationskabel im [MANUAL] Modus.
Wählen Sie unter [MENU 2] → [ISO] [F-NUMBER] dieselben ISOund Blendenwerte (F) wie an der Kamera. Passen Sie die
Blitzleistung im Modusdetailbereich an, sodass die im Statusbereich
angezeigte Reichweite ungefähr dem Abstand zwischen dem Blitz
und dem Motiv entspricht.
Achtung!!
Die E-TTL II / E-TTL Automatik ist nicht verfügbar, wenn der
Synchronisation-sanschluss verwendet wird.
Der Synchronisationsanschluss des Blitzgeräts EF-630 ist
kompatibel mit Steckern, die den Pluspol (+) auf dem mittigen Stift
Page 51

und den Minuspol (-) auf dem Mantel haben. Verwenden Sie ein
Weist darauf hin, dass der Ladevorgang
abgeschlossen ist.
Weisen darauf hin, dass die Lichtanpassung
in Ordnung ist.
Ein langer Ton (2 Sek.)
Fehlerwarnung
Umpolungskabel, falls der Stecker umgekehrte Polarität aufweist.
SCHUTZ GEGEN UNBEABSICHTIGTE ÄNDERUNGEN
Wenn sich der Hauptschalter in der Position [ ] (lock) befindet, sind
alle Funktionen außer der TEST-Taste und der Taste deaktiviert,
um unbeabsichtigte Änderungen an den Einstellungen des Blitzgeräts
zu verhindern.
Solange das Blitzgerät gesperrt ist, wird im Statusbereich das
Symbol angezeigt.
HINWEISTÖNE
Verschiedene Tonsignale lassen den Zustand des Blitzgeräts erkennen,
ohne dass ein Blick auf das LCD-Kontrollfeld erforderlich ist.
Schalten Sie den Hinweiston-Umschalter auf der Vorderseite des
Geräts auf [ON]. (Im eingeschalteten Zustand wird im Statusbereich
das Symbol angezeigt.)
Ein kurzer Ton
Zwei kurze Töne
TECHNISCHE DATEN
Type : Systemblitzgerät, Aufsteck-Type, serienmäßige TTL-Messung,
mit Auto-Zoomreflektor
Leitzahl: 63 (ISO 100/m, 200mm Blitzkopfeinstellung)
Energieversorgung: 4 AA Type Alkaline Batterien oder 4 AA Type
Ni-MH Nickel-Metall Hydrid Akkus
Aufladezeit: ca. 3,0 s mit Alkaline Batterien :ca. 1,8 s mit Ni-MH Akkus
Blitzanzahl: ca. 120 mit Alkaline Batterien :ca. 185 mit Ni-Cd oder
Ni-MH Akkus
Blitzdauer: ca. 1/700 s bei voller Leistung
Ausleuchtwinkel: 24mm~200mm motorgesteuert
:17mm mit eingebauter Weitwinkelstreuscheibe
Gewicht: 490 Gramm
Abmessungen: 79.4mm (B) x 148.4mm (H) x 121.5mm (T)
Die CE-Kennzeichnung ist eine Konformitätserklärung des Herstellers, die dokumentiert,
daß das betreffende Produkt die Anforderungen von EG-Richtlinien einhält.
SIGMA (Deutschland) GmbH
Carl Zeiss Str. 10/2, D 63322 Roedermark, Germany
Verkauf:01805-90 90 85-0
Service:01805-90 90 85-85 Fax(Service):01805-90 9 0 85-35
Entsorgung von Elektro- und Elektronikgeräten aus privaten Haushalten
von Elektro- und Elektronikgeräten (Anzuwenden in der Europäischen
Entsorgung
Union und anderen europäischen Ländern m it entsprechend geregeltem AbfallSammelsystem)
SIGMA unterstützt den Umweltschutz. Diese Produkt und die enthalt enen
Zubehörteile erfüllen die Anforderungen der WEEE-Richtlinie. Bitte bewahren Sie
diese Information auf. Dieses Symbol weist auf die getrennte Rücknahme
elektrischer und elektronischer Geräte in EU-Lä ndern hin. Bitte werfen Sie das
Gerät nicht in den Hausmüll. Inform ieren Sie sich über das in Ihrem Land gültige
Rücknahmesystem und nutzen Sie dieses zur Entsor gung. Batterien und Akkus
sollten separat entsorgt werden.
51
Page 52

Pour éviter tout dommage ou erreur de manipulation, nous vous
votre attention sur
les deux signes d’avertissement ci-dessous.
Mise en garde !!
La non prise en compte de cette mise en garde
pourrait entraîner un accident grave ou un
dommage sérieux au produit.
Avertissement !!
Ce symbole marque un point important où la plus grande
prudence est requise
Ce symbole correspond à une information qu’il convient de
respecter
Ce flash comprend des circuits électriques à haut voltage.
N'essayez jamais de démonter le produit, ceci pouvant
entraîner une électrocution ou une brûlure. Si la coque est
cassée ou fêlée, ne touchez pas les composants internes.
Ne déclenchez jamais d'éclair à proximité des yeux. L'intensité
lumineuse
irréversibles. Laissez
toujours une distance d'au moins 1m/3 pieds entre le visage
et l'appareil lorsque vous photographiez avec le flash.
Ne touchez pas la griffe lorsque le flash est monté sur
l'app
N'utilisez jamais le flash dans un environnement de produits
inflammables tels que gaz, produits chimiques, solvants,
etc…en raison de risques d'incendie ou d'explosion.
Ne couvrez pas la tête du flash avec les mains et ne
déclenchez le flash près de la peau, car ceci pourrait
entraîner des brûlures.
Ne déclenchez pas le flash vers un automobiliste, car ceci
pourrait provoquer un accident.
N'utilisez ce flash que sur un boîtier reflex Canon EOS. Tout
autre emploi pourrait endommager les circuits électriques et
électroniques de l'appareil.
Ce flash n'est pas étanche. Tenez-le à l'abri en cas
d'utilisation sous la pluie, la neige ou les embruns. Des
circuits endommagés par l'eau sont souvent irréparables.
N'exposez pas votre flash, ni l'appareil, à un choc, à la
poussière, à de très hautes températures ou à l'humidité. Ces
éléments pourraient causer des dégâts ou un dysfonctionnement.
Si le flash est soumis à un brusque contraste de température,
comme de passer d'un extérieur froid à un intérieur bien
chauffé,
Dans
une telle circonstance, placez le flash dans un sac plastique
fermé
température
de la pièce.
Ne rangez pas le flash dans un tiroir ou une armoire
contenant de la naphtal
ou tout autre
insecticide. Ceci pourrait provoquer des dysfonctionnements.
FRANÇAIS
Nous vous remercions d'avoir choisi le flash électronique Sigma
EF-630 (pour CANON). Pour profiter au mieux de ses possibilités et
en tirer le meilleur parti, nous vous suggérons de lire attentivement
ce mode d'emploi avant toute utilisation, en ayant sous la main celui
de votre appareil. Nous vous conseillons également de le garder
toujours à portée de main.
PRECAUTIONS
demandons de lire attentivement ce mode d’emploi avant d’utiliser
votre appareil. Nous attirons particulièrement
areil. Vous pourriez subir une décharge à haute tension.
Avertissement !!
Le non respect de cet avertissement pourrait
entraîner un accident ou endommager le produit.
Mise en garde !!
52
pourrait créer des dommages
une condensation peut se former à l'intérieur.
et ne
l'utilisez pas tant qu'il n'a pas atteint la
ine, du camphre
Page 53

N'employez pas de dissolvant, de benzène ou tout autre
agent chimique pour nettoyer votre flash ou enlever des
traces de doigts. N'utilisez qu'un chiffon doux et humide.
En cas de stockage prolongé, placez le flash dans un endroit
sec et tempéré, de préférence
Faites le fonctionner
plusieurs fois par mois pour entretenir le condensateur.
Ne déclenchez pas le flash si la tête du flash est recouverte
avec des chiffons ou des vêtements, car ceci pourrait
provoquer un incendie.
1. Tête Flash
2.
3. Sélecteur de son électronique
4.
5.
6.
7.
8.
9.
Bouton de
10. Interrupteur
11.
12.
13.
14.
15.
16.
17.
18. Elargisseur d'angle
(Touche gauche)
Boîtiers EOS compatibles E-TTL / E-TT L II
ventilé.
ALIMENTATION ELECTRIQUE
Ce flash utilise quatre accus rechargeables Ni-MH de type « AA »
ou 4 piles sèches alcalines.
Nettoyez les contacts des piles avant installation pour assurer une
bonne conductivité
Afin d'éviter tout risque d'explosion, d'écoulement ou de
surchauffe, utilisez toujours quatre piles AA neuves de même type
et de la même marque. Ne mélangez ni différents types, ni des
piles neuves avec des piles usagées.
Ne cherchez pas à démonter les piles, ni à les décharger. Ne les
exposez ni au feu, ni à l'eau : il y aurait danger d'explosion. Ne
rechargez pas des piles autres que des accus rechargeables Ni-MH.
Si vous n'utilisez pas le flash pendant une longue période, ôtez
les piles afin d'éviter tout risque d'écoulement.
Il est toujours recommandé d'emmener des piles de rechange lors
d'un long voyage ou en cas d'utilisation par grand froid.
N'utilisez pas de piles AA/R6 Lithium. Ceci pourrait provoquer un
dysfonctionnement de votre équipement.
Veuillez suivre toutes les règlementations de votre pays de résidence
concernant la collecte et le recyclage des piles et accumulateurs.
DESCRIPTION DES ELEMENTS(P.2)
Récepteur de signal sans fil
Lumière d'assistance AF
Couvercle du compartiment
piles
Sabot
Ecran LCD
Bouton de rétroéclairage
SELECTEUR (13)
Dans ce mode d’emploi, chaque position du sélecteur est identifiée
comme suit : / / / .
Bouton
Les
touches sont utilisées comme suit : pour monter ou descendre :
touches . Pour aller à droite ou à gauche : touches .
Lampe témoin de charge /
Bouton TEST
Bouton de
Sélecteur
Loquet de verrouillage du sabot
Molette
Prise Sync.
Réflecteur de lumière
(To uche du haut)
(Touche droite)
(Touche du bas)
APPAREILS COMPATIBLES
Ce flash est compatible avec les appareils suivants.
53
Page 54

MISE EN PLACE DES PILES
1. Placez l’interrupteur en position [OFF] et ouvrez le compartiment
piles en faisant glisser le couvercle. P.3-(1)
2. Suivez les indications du compartiment piles et insérez les piles
en respectant les polarités + et – comme indiqué. P.3-(2)
3. Refermez le couvercle du compartiment piles. P.3-(3)
4. Placez l’interrupteur en position [ON]. Quand la charge du flash
est suffisante pour déclencher un éclair, la lampe témoin de
charge commence à clignoter en vert. Lorsque le flash est à
pleine charge, la lampe témoin de charge s’allume en rouge.
Avertissement!!
Si la charge des piles est faible, le symbole
s'affiche sur l’écran LCD. Quand les piles sont
déchargées, l’icône ci-contre s'affiche et le flash
cesse de fonctionner. Veuillez changer les piles.
MESSSAGE D’ERREUR
Lorsque le symbole s'affiche sur l’écran LCD, le flash peut
avoir des défaillances. Eteignez et rallumez le flash ou vérifiez les
piles. Si l’indication persiste, contacter votre revendeur.
MISE EN VEILLE AUTOMATIQUE
Le flash se met en veille automatiquement après environ 90
secondes de non-activation, afin de préserver la puissance des
piles. Pour le remettre en route, appuyez sur le bouton TEST ou
appuyez à mi-course sur le déclencheur de l'appareil. La mise en
veille automatique ne fonctionne pas en mode [WL SLAVE], [S-FL
NORMAL] et en mode [S-FL SLAVE].
54
MISE EN PLACE DU FLASH
1. Placez l’interrupteur en position [OFF]
2. Vérifiez que le loquet de verrouillage du sabot est en position
[UNLOCK ►]. P.3-(4)
3. Insérez le flash sur la griffe de l’appareil jusqu'à la butée. Faites
glisser le loquet de verrouillage du sabot dans la direction
[◄LOCK] jusqu'à ce que le loquet soit bloqué avec un bruit de
cliquetis. P.3-(5)
Lorsque vous retirez le flash, actionnez le loquet de verrouillage de
sabot dans la direction [UN LOCK►] jusqu'à la butée tout en
continuant d’appuyer sur le loquet de verrouillage du sabot. Puis
retirez sur le flash.
Avertissement!!
Si le flash est retiré alors que le loquet de verrouillage du sabot
n’est pas en position [UNLOCK►], la griffe de l’appareil photo et le
sabot de fixation du flash pourraient être endommagés.
RÉGLAGE DE LA TÊTE DU FLASH
En prise de vue générale, Placez la face de la tête flash vers l’avant.
P.3-(6)
Avertissement!!
Une fois l’interrupteur en position ON, si le symbole
indiqué dans la zone d’État, ou si l’indication de distance clignote
dans la zone d’état, cela signifie que la tête du flash n’est pas
correctement positionnée vers l’avant.
est
Page 55

LIMITES DES PRISES DE VUE CONSECUTIVES AU FLASH
Mode
Nombre d'éclairs
TTL, M(1/1,1/2)
20 éclairs consécutifs
M(1/4, 1/8)
25 éclairs consécutifs
M(1/16-1/32)
40 éclairs consécutifs
Stroboscopique
10 Cycles
Ecran principal
Menu de configuration
Modifie le Mode flash et définit
les
Ajoute des fonctions optionnelles
définit
les réglages de base du flash
①
②
③ Zone des détails de mode
④
⑤
Pour éviter une surchauffe, laissez le flash au repos au moins 10
minutes après des séquences de prises de vues consécutives en
respectant le tableau ci-dessous.
Avertissement!!
Si l'icône apparaît sur l’affichage, la puissance de l’éclair sera
limitée afin d’éviter la surchauffe des circuits du flash. N'utilisez pas
le flash jusqu'à ce que l’icône disparaisse.
RÉGLAGES DE BASE
Ce chapitre décrit les réglages de base. Avec le Flash EF-630, la
plupart des réglages peuvent se faire facilement en suivant les
étapes suivantes.
Avertissement!!
Lorsque l’interrupteur est en position [ ] (verrouillage), il est
impossible de modifier les réglages. Assurez-vous qu'il est sur [ON]
pour modifier les réglages.
Il n’est pas possible d’utiliser les fonctions [Réglage fonctions flash]
et [Réglage C.Fn flash] si les réglages du flash ne peuvent être
modifiés depuis l’écran de Menu du boîtier. Veuillez effectuer les
réglages sur le flash.
Vous pouvez passer de l’écran principal au menu de configuration
en utilisant le bouton . (Lorsque vous positionnez l’interrupteur
sur [ON], l’Ecran principal s’affiche en premier).
détails de chaque Mode flash.
Zone d’état
Zone de mode flash
OPERATIONS DE BASES SUR
L’ECRAN PRINCIPAL
SELECTION DU MODE FLASH
Sélectionnez la zone de mode flash en
utilisant les touches et modifiez le
mode flash en utilisant les touches
ou la molette.
SELECTION DES DÉTAILS DU
MODE FLASH
Sélectionnez la zone de détails du
mode en utilisant les touches et
modifier les valeurs de réglage en
utilisant les touches ou la molette.
de prise de vue au flash et
Barre des tâches
Sous-menu
55
Page 56

OP ERATIO N DE BASE DANS LE MENU DE CONFIGURATION
Vitesse d’obturation
Ouverture
Fixée automatiquement
(
1/60 sec - vitesse de synchronisation du flash*)
Fixée
Fixée automatiquement
(30 sec - vitesse de synchronisation du flash
*)
Peut être fixée
librement.
Permet De choisir librement la vitesse dès
lors qu'elle est égale ou inférieure à la
Fixée
automatiquement
Peut être fixée
librement.
*
Lorsque le flash FP est réglé sur [ON], la limitation de la vitesse
d’obturation du côté de la haute vitesse est inopérante.
Pour passer d'un onglet à l'autre,
tournez la molette. (Lorsque le curseur
est positionné sur la barre des tâches,
il est aussi possible de changer de
onglet en appuyant sur les touches )
Dans le menu de configuration :
Utilisez les touches pour sélectionner
des éléments du menu. Appuyez sur le
bouton ou la touche pour ouvrir
des sous-menus ou des boîtes de dialogue.
(Dans certains réglages, un écran
spécial ou un message peut apparaître.)
Dans un sous-menu de configuration :
Utilisez les touches pour sélectionner
des options de réglage. Appuyez sur le
bouton
ou la touche pour appliquer
les nouveaux réglages. (Appuyez sur
la touche pour fermer les sousmenus sans appliquer de modification)
EXPOSITION AUTOMATIQUE E-TTL / E-TTL II
Ce mode utilise le système de flash
automatique E-TTL / E-TTL II. Utilisez
ce mode pour la prise de vue générale.
1. Réglez le Mode flash sur [TTL].
2. Vérifiez que le sujet est dans la zone
couverte par le flash en vérifiant
l’information de distance dans la zone d’État.
56
3. Vérifiez la charge du flash avec la lampe témoin de charge et
commencez la prise de vue.
Lorsque la prise de vue au flash est correctement réalisée, le
symbole est indiqué pendant environ cinq secondes dans la
zone d’état. Lorsque le symbole n’est pas affiché, la
puissance du flash peut être insuffisante ou trop forte. Changez la
condition de prise de vue puis recommencez.
VITESSE D’OBTURATION ET OUVERTURE
Les relations entre les vitesses d’obturation et les ouvertures dans
les différents modes d’exposition de l’appareil sont indiquées ci-dessous :
P
Av
Tv
M
vitesse de synchronisation du flash*.
Avertissement!!
En cas de prise de vue avec des valeurs de vitesse d’obturation et
d’ouverture qui clignotent, l’exposition peut être incorrecte. Dans ce
cas, changez les conditions de prise de vue.
Lorsque le mode prise de vue du
boîtier est réglé sur [Zone Elémentaire]
l’écran passe à celui indiqué sur
l’image. Les boutons sont désactivés
sauf le bouton
et le bouton TE ST.
,
automatiquement
Page 57

CORRECTION D’EXPOSITION AU FLASH
1ère vue
2onde vue
3ème vue
(MODE WL TTL)
La correction de la seule puissance du flash est possible pour ne pas
affecter l’exposition de l’arrière-plan.
Elle peut être utilisée en mode flash
[TTL], [WL TTL], et [WL SLAVE].
Définissez la valeur du niveau de
correction dans la zone de détails du
mode. La correction peut être paramétrée
à ±3 IL par palier de 1/3 de valeur (lorsque le boîtier possède des
paliers de 1/2 valeur, la correction se fera par palier de 1/2 valeur).
Ne pas utiliser la fonction de correction d’exposition au flash sur le boîtier.
PRISE DE VUE FEB (Flash Exposure Bracketing)
Trois photographies peuvent être prises en changeant le niveau de
puissance du flash.
Elle peut être utilisée en mode flash
[TTL] et [WL TTL].
Définissez la valeur du niveau de correction
dans la zone de détails du mode. La
correction peut être paramétrée à ±3 IL par
palier de 1/3 de valeur (lorsque le boîtier
possède des paliers de 1/2 valeur, la
correction se fera par palier de 1/2 valeur).
Prenez trois photographies tout en
vérifiant le niveau de charge avec la lampe témoin de charge.
Les trois photographies sont dans l'ordre : exposition appropriée
→ sous exposition → surexposition.
L’icône FEB se modifie comme suit, selon le numéro de la vue.
Lorsque les trois photographies ont été prises, l’icône FEB disparaît.
Le mode FEB peut être combinée avec la correction d’exposition au flash
MEMORISATION D’EXPOSITION AU FLASH (FE LOCK)
Il s’agit d’une méthode de prise de vue qui expose une partie
précise du sujet avec l’exposition correcte au flash.
Elle peut être utilisée en mode flash [TTL] et [WL TTL].
1. Faites la mise au point sur le sujet.
2. Placez le sujet à mémoriser au centre de l’image. Appuyez sur le
bouton [M-Fn] du boîtier.
Le flash envoie un pré-éclair et calcule la puissance nécessaire
du flash, qu'il mémorise ensuite.
Le viseur de l'appareil affiche “FEL” pendant 0,5 sec.
3. Prenez la photo après avoir recadré l'image.
Si le symbole
n'est pas assez puissant pour une exposition correcte.
Rapprochez-vous du sujet et reprenez le processus.
Les modalités de la fonction de mémorisation FE peuvent varier
selon le boîtier utilisé. Nous vous conseillons de vous reporter au
mode d'emploi de votre appareil.
clignote dans le viseur, cela signifie que le flash
FLASH MANUEL
IL est possible de gérer librement la puissance du flash.
1. Réglez le Mode flash sur [MANUAL].
2. Réglez la puissance du flash dans la
zone de détails du mode. (Plage
disponible pour le réglage : 1/128 à
1/1, par incréments de 1/3 de valeur.)
3. Vérifiez la charge du flash avec la
57
Page 58

lampe témoin de charge et commencez la prise de vue.
WL TTL
Flash distant automatique ETT-L / E-TT L II
WL MANUAL
Flash manuel sans fil
WL MU LTI
Flash sans fil stroboscopique
ID EF-630 esclave
A B C
ID EF-610 DG SUPER esclave
1 2 3
Dans la partie consacrée à l’affichage de la distance dans la zone d’état,
la distance exposée de façon appropriée est affichée. Avec la même
puissance de flash, la distance d’exposition appropriée varie si la
sensibilité ISO de l’appareil photo ou la valeur de l’ouverture est modifiée.
L’exposition appropriée lorsque vous utilisez le flash en mode
manuel peut être calculée selon la formule suivante : Nombre guide
(NG) / Distance de prise de vue (m) = valeur de l’ouverture (F)
Pour le NG (Nombre guide) de ce flash, veuillez consulter le
[tableau 1] disponible à la fin du mode d’emploi.
MODE FLASH STROBOSCOPIQUE (M ULTI FLASH)
Le Reproduire le mouvement du sujet en le décomposant dans une
image est possible en émettant des éclairs successifs avec le flash
tandis que l’obturateur reste ouvert.
Utilisez le mode d’exposition manuel ("M") de l’appareil photo.
1. Réglez le mode flash sur [MULTI].
2. Dans la zone détails mode, réglez la
puissance du flash, la fréquence du
flash en Hz (ex.: 10Hz = émission d’éclairs
avec la fréquence de 10 fois par
seconde) et le nombre d’éclairs en « x ».
3. Réglez une vitesse d’obturation
inférieure à la valeur du « nombre d’éclairs » / « fréquence du flash »
4. Vérifiez la charge du flash avec la lampe témoin de charge et
commencez la prise de vue.
Le nombre d’éclairs pouvant être déclenchés en continu varie en
fonction de la combinaison de la puissance du flash et la fréquence
des éclairs. Veuillez consulter le [tableau 2] disponible à la fin de ce
mode d’emploi.
58
FLASH SANS CORDON
Lorsque le flash est utilisé de façon éloignée de l’appareil, les possibilités
créatives en sont étendues. Le flash EF-630 est contrôlé à distance
par le flash intégré de l’appareil photo ou d’un autre flash «
Le flash EF-630 possède trois modes de flash distant sans fil pour
différentes applications
Le flash fixé à l’appareil est appelé [Flash Maître], et le flash utilisé
à distance de l’appareil photo est appelé [Flash esclave].
Placez le flash à une distance comprise entre 0,5m et 5m (1.6
~16pieds) du sujet, et l'appareil également à une distance
comprise entre 0,5m et 5m (1.6 ~16pieds) du sujet.
Lorsque vous installez un flash asservi à un endroit donné, vous
pouvez utiliser le support livré avec le flash. Ce support comporte
un pas de vis pour trépied.
Le mode Flash distant sans fil peut être activé par le flash intégré
de l’appareil (uniquement dans pour les modèles qui ont la
fonction flash maître en prise de vue sans fil). Pour les réglages
de l’appareil, nous vous conseillons de vous reporter au mode
d'emploi de votre appareil.
T
Le
flash EF-630 est utilisable également en combinaison avec le
flash EF-610 DG SUPER EO-ETTL II. Dans ce cas, utilisez le EF-610
DG SUPER comme flash esclave. Lorsque vous réglez le flash
EF-610 DG SUPER, consultez le mode d’emploi du flash EF-610 DG
SUPER (la méthode de numérotation de l’ID du flash EF-610 DG
SUPER esclave est différente. Consultez le tableau ci-dessous).
flash maître».
Page 59

PRÉPARATION POUR LE FLASH DISTANT SANS FIL (FLASH MAÎTRE)
ON
Fonction de commande + Flash*
OFF
Fonction de commande exclusivement
RÉGLAGE DU GROUPE ESCLAVE
Il est possible de photographier avec
différents niveaux de puissance du
flash en répartissant les flashes esclaves
en deux groupes [A, B] ou en trois
groupes [A, B, C].
1. Lorsque le mode du flash distant
sans fil est choisi, et lorsque la zone
de mode flash est sélectionnée,
appuyez sur le bouton
l’écran de réglage du groupe esclave.
2. Le réglage du groupe esclave peut
être activé à l’aide de la molette ou
des boutons . (Lorsque OFF est sélectionné, la prise de vue
à différents niveaux de puissance n’est pas assurée.)
3. Après le réglage, appuyez sur le bouton pour revenir à un
affichage normal.
RÉGLAGE DU FLASH MAÎTRE
Ceci permet de régler le flash “Maître”
uniquement comme flash de commande ou
comme flash de commande et d’éclairage.
*Pendant la prise de vue sans fil où le niveau de puissance est
paramétré, le flash « Maître » appartient au groupe [A].
RÉGLAGE DU CANAL
Lorsqu’une autre personne utilise un flash
distant sans fil, veuillez sélectionner un
canal différent afin d’éviter un problème de communication (il est
pour ouvrir
possible de sélectionner les canaux de 1 à 4).
PREPARATION POUR LE FLASH DISTANT SANS FIL (FLASH ESCLAVE)
1.
Réglez le mode flash sur [WL
2. Dans la zone de détails du mode,
sélectionnez le même canal que le
flash maître.
3. Lors de l’utilisation de flash distant
sans fil avec un réglage de niveau de
puissance, définissez l’ID esclave du
groupe désiré dans la zone de détails du mode (si la prise de vue
avec niveau de puissance n’est pas activée, alors l’un ou l’autre
des canaux A, B ou C peut être sélectionné).
SLAVE].
FLASH DISTANT AUTOMATIQUE ETT-L / E-TTL II
En mode distant sans fil automatique E-TTL / E-TTL II, le boîtier
règle automatiquement l’exposition à la valeur appropriée .
Flash Automatique avec un flash ou plusieurs flashes
esclaves avec le même niveau de puissance flash.
REGLAGE DU FLASH MAÎTRE
1. Réglez le mode flash sur [WL TTL].
2. Si nécessaire, dans la zone de
détails du mode, sélectionnez le
même canal que le flash maître.
RÉGLAGE DU FLASH ESCLAVE
3. Effectuez le réglage en suivant le processus
POUR LE FLASH DISTANT SANS FIL (FLASH ESCLAVE)»
4. Placez le flash esclave, vérifiez l’état de charge du flash et puis
commencez la prise de vue (La charge est notifiée sur le flash
esclave par le clignotement de la lumière d’assistance AF.)
«PREPARATION
.
59
Page 60

Flash Automatique avec réglage du niveau de puissance
(deux groupes)
Les flashes sont réglés de sorte que la somme totale des groupes [A]
et [B] procure l’exposition appropriée.
REGLAGE DU FLASH MAÎTRE
1. Réglez le groupe esclave en affectant
[A:B] en suivant
POUR LE FLASH DISTANT SANS FIL
(FLASH MAÎTRE)»
2. Réglez le niveau de puissance du flash dans la zone de détails du
mode. (le réglage est possible depuis 8:1 jusqu’à 1:8.)
RÉGLAGE DU FLASH ESCLAVE
3. Effectuez le réglage en suivant le processus
POUR LE FLASH DISTANT SANS FIL (FLASH ESCLAVE)».
Flash Automatique avec réglage du niveau de puissance
(trois groupes)
Utilisez le groupe [C] comme une source secondaire de lumière, par
exemple pour éliminer une ombre portée d’un sujet.
REGLAGE DU FLASH MAÎTRE
1.
Réglez le groupe esclave en affectant
[A:B C] en suivant
POUR LE FLASH DISTANT SANS FIL
(FLASH MAÎTRE)»
2. Réglez le niveau de puissance du
groupe [A :B] dans la zone de détails
du mode. (le réglage est possible depuis 8:1 jusqu’à 1:8.)
3. Réglez la correction d’exposition du groupe [C] dans la zone de
détails du mode.
RÉGLAGE DU FLASH ESCLAVE
4. Effectuez le réglage en suivant le processus
POUR LE FLASH DISTANT SANS FIL (FLASH ESCLAVE)».
«PR ÉPAR ATI ON
.
«PRÉPARATION
.
«PREPARATION
«PREPARATION
60
FLASH MANUEL SANS FIL
Tout comme pour la photographie au flash manuel, la prise de vue
sans fil avec réglage manuel de la puissance du flash est également
disponible. Déterminez l’exposition en utilisant un flashmètre disponible
dans le commerce.
Flash Manuel avec un flash ou plusieurs flashes esclaves
le
même niveau de puissance.
avec
REGLAGE DU FLASH MAÎTRE
1.
Réglez le mode flash sur [WL
2. Si nécessaire, dans la zone de
détails du mode, sélectionnez le
même canal que le flash maître.
3.
Réglez la puissance du flash dans la zone de détails du mode. (Plage
disponible pour le réglage : 1/128 à 1/1, par incréments de 1/3 de valeur.)
RÉGLAGE DU FLASH ESCLAVE
4. Réglez le mode flash sur [WL SLAVE].
5. Effectuez le réglage en suivant le processus
POUR LE FLASH DISTANT SANS FIL (FLASH ESCLAVE)»
6. Placez le flash esclave, vérifiez l’état de charge du flash et puis
commencez la prise de vue (La charge est notifiée sur le flash
esclave par le clignotement de la lumière d’assistance AF.)
Flash manuel avec un niveau de puissance du flash défini
pour chaque groupe
Le flash manuel est possible avec un réglage du niveau de
puissance ajustable pour chacun des deux ou trois groupes.
REGLAGE DU FLASH MAÎTRE
1. Définissez «Réglage de groupe de
Flash» sur [A:B] ou [A:B:C] en
suivant
«PREPARATION POUR LE
FLASH DISTANT SANS FIL (FLASH
MAÎTRE)»
.
MANUAL].
«PREPARATION
.
Page 61

2. Définissez le niveau de puissance flash de chaque groupe dans la
zone de détails du mode.
RÉGLAGE DU FLASH ESCLAVE
3. Effectuez le réglage en suivant le processus
POUR LE FLASH DISTANT SANS FIL (FLASH ESCLAVE)».
«PREPARATION
FLASH DISTANT STROBOSCOPIQUE
Le mode flash distant stroboscopique est disponible pour un flash
ou pour plusieurs flashes.
Utilisez le mode d’exposition manuel ("M") de l’appareil photo.
Flash stroboscopique avec un ou plusieurs flashes esclaves
avec le même niveau de puissance.
REGLAGE DU FLASH MAÎTRE
1. Réglez le mode flash sur [WL MULTI].
2. Si nécessaire, dans la zone de détails
du mode, sélectionnez le même canal
que le flash maître.
3. Dans la zone détails mode, réglez la puissance du flash, la
fréquence du flash en Hz (ex.: 10 Hz = émission d’éclairs avec la
fréquence de 10 fois par seconde) et le nombre d’éclairs en « x ».
RÉGLAGE DU FLASH ESCLAVE
4. Effectuez le réglage en suivant le processus «PREPARATION
POUR LE FLASH DISTANT SANS FIL (FLASH ESCLAVE)».
5. Réglez une vitesse d’obturation inférieure à la valeur du « nombre
d’éclairs » / « fréquence du flash »
6. Placez le flash esclave, vérifiez l’état de charge du flash et puis
commencez la prise de vue (La charge est notifiée sur le flash
esclave par le clignotement de la lumière d’assistance AF.)
Flash stroboscopique avec un niveau de puissance flash
réglé pour chaque groupe.
Le flash stroboscopique est possible avec un réglage du niveau de
puissance ajustable pour chacun des deux ou trois groupes.
REGLAGE DU FLASH MAÎTRE
1. Définissez « Réglage de groupe de
Flash » sur [A:B] ou [A:B:C] en
suivant « PREPARATION POUR LE
FLASH DISTANT SANS FIL ».
2. Définissez le niveau de puissance
flash de chaque groupe dans la zone de détails du mode.
3. Dans la zone détails mode, réglez la puissance du flash, la
fréquence du flash en Hz (ex.: 10 Hz = émission d’éclairs avec la
fréquence de 10 fois par seconde) et le nombre d’éclairs en « x ».
RÉGLAGE DU FLASH ESCLAVE
4. Effectuez le réglage en suivant le processus «PREPARATION
POUR LE FLASH DISTANT SANS FIL (FLASH ESCLAVE)».
Continuez en suivant les procédures depuis l’étape 5 de l’article
précédent pour prendre des photos.
FLASH ESCLAVE
Le flash EF-630 comprend une fonction qui lui permet de se déclencher
en réagissant à la lumière d’un autre flash. Cela facilite la prise de vue
avec le flash positionné à distance de l’appareil. Néanmoins, la
puissance de sortie n’est pas automatiquement ajustée dans ce mode.
FLASH ESCLAVE NORMAL
Le flash maître positionné sur l’appareil peut être utilisé pour
déclencher un flash synchronisé avec le flash EF-630, même
lorsqu’il est positionné à distance de l’appareil.
61
Page 62

Le flash intégré de l’appareil fonctionne incorrectement avec le
pré-flash et ne peut donc pas être utilisé pour cette fonction.
Réglez le flash maître en mode manuel et réglez la puissance du
flash à environ 1/16.
Réglez le mode d’exposition de l’appareil sur M, la vitesse
d’obturation à 1/30 seconde ou moins et l’ouverture et la sensibilité
ISO à des valeurs choisies.
1.
Réglez le Mode flash du flash EF-630
esclave sur [S-FL NORMAL].
2. Dans la zone des détails de mode,
réglez la sensibilité ISO et les valeurs
d’ouverture à celles des réglages de
l’appareil.
3.
Ajustez la puissance du flash dans la zone des détails de mode afin
que la distance entre le flash esclave et le sujet soit approximativement
identique à la distance indiquée dans la zone d’état.
4.
Assurez-vous que le flash est chargé et commencez la prise de vue.
FLASH ESCLAVE DESIGNE
Si vous utilisez deux ou plus de deux flashes EF-630, vous pouvez
désigner quels flashes se déclencheront ensemble en paramétrant
des canaux de communication. Dans ce mode, un flash servira de
flash de contrôle, et les autres de flashes esclaves d'éclairage.
Réglez le mode d’exposition de l’appareil sur M, la vitesse
d’obturation à 1/30 seconde ou moins et l’ouverture et la sensibilité
ISO à des valeurs choisies.
PRÉPARATION DU FLASH DE
CONTROLE (MAÎTRE)
1.
Réglez le Mode flash sur [S-FL
2. Réglez le canal selon les besoins.
(Dans la zone des détails de mode,
sélectionnez Ch.1 à Ch.3).
CTRL].
62
PRÉPARATION DU FLASH D’ECLAIRAGE (ESCLAVE)
3. Réglez le Mode flash sur [S-FL SLAVE].
4. Dans la zone des détails de mode,
choisissez le canal pour correspondre
à celui du flash de contrôle
5. Dans la zone des détails de mode,
réglez la sensibilité ISO et la valeur
d’ouverture pour correspondre à
celles du flash de contrôle.
6.
Ajustez la puissance du flash dans la zone des détails de mode afin
que la distance entre le flash esclave et le sujet soit approximativement
identique à la distance indiquée dans la zone d’état.
7. Assurez-vous que le flash est chargé et commencez la prise de vue.
En mode esclave, ce flash peut également être utilisé en
combinaison avec le flash EF-630 et / ou EF-610 DG SUPER
pour les autres applications de l’appareil. (Pour plus de détails sur
le paramétrage du flash EF-610 DG SUPER, veuillez consulter le
mode d’emploi.)
FONCTIONS OPTIONNELLES
Ce chapitre décrit les fonctions optionnelles qui peuvent être
paramétrées et ajoutées dans le menu de configuration.
SYNCHRONISATION SUR LE DEUXIEME RIDEAU (MENU 1)
Dans ce mode, le flash est activé juste avant la fermeture du rideau.
L’écho lumineux du sujet en mouvement est capturé derrière lui,
donnant ainsi un effet plus naturel du mouvement sur la photo.
Cette fonction peut être utilisée en mode d’exposition P, Av, Tv et M
de l’appareil.
Elle peut être utilisée en mode flash [TTL], [MANUAL], et [WL].
Page 63

1. Réglez [MENU 1] → [REAR CURTAIN SYNC] → [ON].
NORMAL
(Par défaut)
Priorité au Nombre guide dans la dispersion de la
grand Nombre Guide.
Répartition de la lumière uniforme
pour une répartition plus uniforme de la lumière.
1 TIME (1 FOIS)
(Par défaut)
Lampe Pilote
secondes afin de vérifier les ombres du sujet.
2. Revenez à l’écran principal. (Dans la zone d’état, le symbole
apparaît.)
Avertissement!!
Il est impossible d'activer cette fonction dans les modes Flash qui ne
sont pas compatibles avec la synchronisation au deuxième rideau.
SYNCHRONISATION GRANDE VITESSE FP (MENU 1)
La synchronisation rapide (Grande Vitesse) permet d’émettre un
flash même si le rideau de l’obturateur est en mouvement. Vous
pouvez ainsi utiliser une vitesse d’obturation plus rapide que la
vitesse de synchronisation.
Cette fonction peut être utilisée en mode d’exposition P, Av, Tv et M
de l’appareil.
Elle peut être utilisée en mode flash [TTL], [MANUAL], [WL TTL], et
[WL MANUAL].
1. Réglez [MENU 1] → [FP] → [ON].
2. Revenez à l’écran principal. (Dans la zone d’état, le symbole
apparaît.)
En mode [TTL], assurez-vous que le sujet est dans le champ de
prise de vue en contrôlant la distance indiquée dans la zone d’état
avant de commencer la prise de vue.
En mode [MANUAL], réglez l’ouverture, etc. avant de commencer la
prise de vue afin de faire correspondre la distance jusqu’au sujet et
celle indiquée sur la zone d’état.
Le Nombre Guide change en fonction de la vitesse d’obturation (voir
le tableau 3 en dernière page)
Avertissement!!
Il est impossible d'activer cette fonction dans les modes Flash qui
sont pas compatibles avec la synchronisation rapide Grande Vitesse.
MODE DE REPARTITION DE LA LUMIÈRE (MENU 1)
Le flash EF-630 possède trois modes de dispersion de la lumière
qui peuvent être choisis selon le type d’utilisation.
[MENU 1] → [LIGHT DISTRIBUTION]
Répartition normale de la lumière
Dispersion normale pour une prise de vue classique.
lumière
GN
Le faisceau du flash est concentré pour assurer un plus
DIFFUSE
Evite la diminution de la quantité de lumière en périphérie
TEST DU FLASH (MENU 2)
Le flash EF-630 dispose de deux modes de test du flash. L’un des
modes test du flash peut être affecté au bouton TEST.
[MENU 2] → [TEST FLASH]
Test du flash
Exécute un seul test du flash.
Elle peut être utilisée en mode flash [TTL],
[MANU AL], et [MU LTI].
Lorsque le bouton TEST est maintenu enfoncé,
le flash clignote en continu pendant environ 1,5
ne
MODELING
(LAMPE PILOTE)
63
Page 64

La lumière s’éteint après 8 secondes d'inactivité
et se rallume automatiquement si un bouton ou la
molette est utilisé.
Indépendamment d'une action sur un bouton ou
la molette, la lumière s’éteint au bout de 8
secondes.
ON
L’éclairage est continuellement activé.
Avertissement!!
Le paramètre [MODELING] ne peut pas être sélectionné dans les
modes de flash où l’utilisation de la lampe pilote n’est pas
disponible.
Lorsque l’appareil photo et le flash sont en communication, le
fonctionnement du bouton TEST n’est pas disponible. (L’appui sur le
bouton d’aperçu de profondeur de champ du boîtier commande la
lampe pilote indépendamment de l’affectation du bouton TEST).
MODE PERSONNALISÉ (MENU 3)
Il est possible de mémoriser et de
rappeler des réglages personnalisés.
(Deux séries de réglages personnalisés
peuvent être enregistrés).
ENREGISTREMENT ET RAPPEL DES REGLAGES
PERSONNALISES
1. Réglez le mode flash, la zone des détails de mode et le contenu
du menu de configuration comme vous le désirez.
2. Dans [MENU 3] → [CUSTOM MODE SETTING], sélectionnez
[C1] ou [C2] et appuyez sur le bouton .
3. Sélectionnez [OK] et confirmez avec le bouton .
Le contenu enregistré est ajouté au mode flash en tant que mode
personnalisé. (un mode personnalisé est indiqué par le symbole
ou dans la zone de mode flash.)
64
SUPPRESSION D'UN MODE PERSONNALISÉ ENREGISTRÉ
1. Dans [MENU 3] → [CUSTOM MODE DELETE], sélectionnez [C1]
ou [C2] et appuyez sur le bouton .
2. Sélectionnez [OK] et confirmez avec le bouton .
LUMIÈRE D’ASSISTANCE AF (MENU 4)
La lumière d’assistance AF s’allume automatiquement lorsque vous
photographiez un sujet dans un endroit sombre. La portée effective
de la lumière d’assistance AF est d’environ 0,7 à 10 mètres.
Lorsque la lumière d’assistance AF n’est pas nécessaire,
sélectionnez [MENU 4] → [AF ASSIST LIGHT] → [OFF].
ÉCLAIRAGE ÉCRAN LCD (MENU 4)
Lorsque vous allumez le flash, l’écran LCD s’allume. Les réglages
ON/OFF de l’éclairage peuvent être modifiés.
[MENU 4] → [LCD LIGHT]
AUTO
(Par défaut)
8 SEC
Quel que soit le réglage, l’éclairage peut être activé/désactivé en
appuyant sur le bouton .
Page 65

AJUSTEMENT DE L’ECRAN LCD (MENU 4)
LUMINOSITE
Réglez la luminosité désirée en utilisant les
touches .
CONTRASTE
Réglez le contraste au niveau désiré en utilisant
les touches .
M (Par défaut)
Indication en mètre
FEET
Indication en pied
MODEL
Nom du modèle
SERIAL No.
Numéro de série
VERSION
Version du Firmware
Le contraste et la luminosité de l’écran LCD peuvent être ajustés.
[MENU 4] → [DISPLAY SETTING]
BRIGHTNESS
CONTRAST
Pour terminer le réglage, sélectionnez [OK] et validez avec le
bouton .
Pour annuler le réglage, sélectionnez [CANCEL] et validez avec le
bouton .
MODIFICATION DES UNITÉS DE MESURE (MENU 4)
L’unité de mesure dans la zone d’état peut être changée.
[MENU 4] → [M / FEET]
INFORMATION DU FLASH (MENU 5)
Les informations suivantes peuvent être vérifiées.
[MENU 5] → [INFORMATION]
INITIALISATION DES REGLAGES (MENU 5)
Il est possible de réinitialiser le flash dans ses réglages usine.
[MENU 5] → [RESET SETTINGS]
Pour réinitialiser le réglage, sélectionnez [OK] et validez avec le
bouton .
Lorsque les réglages sont réinitialisés, les modes personnalisés
enregistrés sont supprimés.
AUTRES FONCTIONS UTILES
RÉGLAGE DE LA TÊTE FLASH
Lorsque le réglage tête du flash est
utilisé en (Auto), le flash
ajuste automatiquement et de façon
optimale, l’angle de flash en fonction
de la focale de l’objectif.
La tête flash prenant en compte la taille du capteur d’image de
l’appareil, la focale affichée sur le flash peut être différente de
celle de l’objectif.
Selon le mode flash, le réglage de la tête flash peut être géré
indépendamment de la focale de l’objectif.
Le réglage de la tête flash peut être modifié manuellement. Appuyez
sur les touches situées dans la zone détails mode.
AUTO ⇔ 24 ⇔ 28 ⇔ 35 ⇔ 50 ⇔ 70 ⇔ 85 ⇔ 105 ⇔ 135 ⇔ 200mm
La portée de l'éclair du flash varie en fonction de la position de la
tête zoom.
65
Page 66

ELARGISSEUR D'ANGLE
Ce flash est pourvu d'un élargisseur d'angle intégré qui procure une
couverture d'angle pour une focale de 17mm. Pour l'utiliser, veuillez
extraire avec précaution l'élargisseur et le réflecteur et les rabattre
devant la tête flash. Remettez ensuite le réflecteur dans son
logement. P.3-(7)
La section correspondant aux indications de la tête flash dans la
zone des détails de mode affiche le symbole lorsque
l’élargisseur d’angle est utilisé.
FLASH INDIRECT
En déclenchant le flash vers le plafond ou vers un mur, il est
possible de disperser la lumière et de prendre des photos avec une
lumière douce et des ombres réduites.
La tête flash peut être orientée vers le haut à 90°, vers le bas à 7° et
sur les côtés droit et gauche à 180°. P.3-(8)
En flash indirect, le symbole
d’état.
La lumière prenant la teinte de la surface sur laquelle elle se
réfléchit, il est recommandé de choisir une surface blanche. Selon
les propriétés réfléchissantes de la surface, la distance du sujet et
d'autres facteurs, l'intensité et la distance réelle parcourue par
l'éclair peuvent varier.
Prise de vue rapprochée
En inclinant la tête flash vers le bas de 7 °, la partie inférieure de la
vue peut être suffisamment lumineuse pour les plans rapprochés.
En cas de position indirecte de 7° vers le bas, l’indication de
distance dans la zone d’état clignote.
est affiché dans la zone
66
REFLECTEUR DE LUMIERE
Ce flash est pourvu d'un réflecteur de lumière intégré qui permet de
créer un effet de lumière harmonieux dans les yeux du sujet en
mode d'éclairage indirect. . Pour l'utiliser, veuillez extraire avec
précaution l'élargisseur et le réflecteur et les rabattre devant la tête
flash. Remettez ensuite le diffuseur dans son logement.P.3-(9)
Pour tirer le meilleur parti du diffuseur, orientez la tête à 90° vers
le haut et photographiez à faible distance. P.3-(10)
PRISE SYNC.
Le flash EF-630 dispose d’une prise synchro permettant de le
connecter à l’appareil par un câble synchro flash disponible dans le
commerce.
Lorsque vous photographiez avec un câble de synchro, utilisez le
Flash en mode [MANUAL].
Dans [MENU 2] → [ISO] [F-NUMBER], réglez la sensibilité ISO et
la valeur de l’ouverture (F) pour qu’ils correspondent ceux de
l’appareil. Réglez la puissance du flash dans la zone des détails de
mode jusqu'à ce que la distance affichée dans la zone d’état soit
approximativement identique à la distance entre le flash et le sujet.
Avertissement!!
Le Flash Auto E-TTL II / E-TTL ne fonctionne pas si la prise synchro
est utilisée.
La prise synchro du flash EF-630 est compatible avec les prises qui
ont une polarité positive (+) sur le contact central et une polarité
négative (-) sur le tour. Si la prise a une polarité inversée, utilisez un
cordon de conversion de polarité disponible dans le commerce.
Page 67

PRÉVENTION DE MISE EN MARCHE INOPINÉE
Un son court
Indique la fin de la charge
Deux sons courts
Indique que le réglage de lumière est OK
Un son long (2 SEC.)
Attention erreur
Lorsque l’interrupteur est sur la position [ ] (verrouillage), les
opérations autres que celles sur le bouton TEST et le bouton
ne sont plus possibles, empêchant ainsi toute modification
accidentelle des réglages du flash.
Pendant que le flash est verrouillé, le symbole s’affiche dans
la zone d’état.
SON ELECTRONIQUE
Certaines conditions du flash sont indiquées par un son, ce qui les
rend faciles à reconnaître sans avoir à regarder l’écran LCD.
Tournez le sélecteur de son électronique situé sur le devant sur
[ON]. (Lorsqu’il est mis sur ON, le symbole s’affiche dans la
zone d’État.)
CARACTERISTIQUES TECHNIQUES
TYPE : Flash électronique à tête zoom automatique et orientable à
contrôle TTL
NOMBRE GUIDE : 63 (100 ISO/m, avec réflecteur en position
200mm)
ALIMENTATION : Quatre piles alcalines de type AA ou
: Quatre accumulateurs Ni-Mh de type AA
TEMPS DE RECYCLAGE : environ 3,0 sec. (avec piles alcalines)
: environ 1,8 sec. (accus Ni-Mh)
NOMBRE D'ECLAIRS : environ 120 éclairs (piles alcalines)
: environ about 185 éclairs (accus Ni-Mh)
DUREE DE L'ECLAIR : environ 1 / 700 sec. (à pleine puissance)
ANGLE D'ECLAIRAGE : 24~200mm avec motorisation automatique
17mm avec l'élargisseur d'angle intégré.
POIDS : 490 g
DIMENSIONS : 79.4mm(l) x 148.4mm(H) x 121.5mm(L)
Le label CE garantit la conform ité aux normes établies par la Communauté
Européenne.
SIG MA (De utschland) GmbH
Carl Zeiss Str. 10/2, D 63322 Roedermark, Germany
Verkauf:01805-90 90 85-0
Service:01805-90 90 85-85 Fax(Service):01805-90 9 0 85-35
Elimination des Déchets d'Equipements Electriques et Electroniques
(Applicable dans l'Union Européenne se lon les dispositions particulières de
chaque Etat membre)
Ce symbole inscrit sur le produit ou sur l'em ballage, le mode d'emploi et la carte
de garantie indique que le produit ne odit pas être élim iné avec les autres déchets
ménagers. Il doit être remis à un point de collecte agréé des Déchets
d'Equipements Electrique et Electroniques en fin de vie. En vous assurant que ce
produit sera éliminé correctement, vous aidere z à lutter contre l'impact négatif
pour l'environnement et la santé humaine qui résu lterait d'un mode d'élimination
inapproprié. Si votre produit contient des accum ulateurs ou piles aisément
amovibles, éliminez-les séparément selon les d ispositions locales en vigueur.
ménagers
67
Page 68

Para evitar posibles daños o perjuicios. Por favor lea el manual de
instrucciones muy atentamente, y preste atención a los símbolos
os dos símbolos de precaución que
aparecen a continuación.
Ignorar el símbolo de Advertencia al utilizar este
producto, puede causar serio perjuicios o otros
daños.
Cuidado!!
Ignorar el símbolo de Advertencia al utilizar este
Este símbolo significa puntos importantes, que se requiere
cuidado o advertencia.
O Este símbolo contiene información con respecto a
acciones que deben prevenir.
Este flash contiene circuitos de alto voltaje. Para evitar
quemaduras no intente desmontar el flash. Si la carcasa
exterior se rompe no toque los mecanismos interiores.
No dispare el flash cerca de los ojos. El brillo del destello
podría dañar los ojos. Mantenga una distancia de al menos
1m entre la cara y la cámara, cuando realice fotografías con
flash.
No utilice esta unidad de flash en ninguna otra cámara que
las
; De otro modo el flash podría
dañar el circuito de esas cámaras.
Nunca utilice el equipo en ambientes inflamables, con llamas,
gases, líquidos o químicos, etc. Podría causar un incendio
o una explosión.
No cubra el cabezal del flash con las manos o dispare el flash
cuando está cerca de su piel, ya que podría provocar
quemaduras.
No dispare el flash hacia los vehículos en marcha, ya que
podría causar un accidente.
No utilice esta unidad de flash en ninguna otra cámara que
las
; De otro modo el flash podría
dañar el circuito de esas cámaras.
Esta unidad de flash no es resistente al agua. Cuando utilice
el flash y la cámara con lluvia, nieve o cerca del agua, cuide
que no se humedezca. A menudo es imposible reparar
componentes eléctricos internos estropeados a causa del
agua.
Nunca deje la cámara en un lugar con polvo, alta temperatura
o húmedo. Estos factores pueden causar fuego o estropear
su equipo.
Cuando el flash está sujeto a cambios bruscos de
temperatura, como cuando transporta la unidad de flash de
un lugar frío exterior a uno cálido interior. En este caso,
ponga su equipo en una bolsa de plástico sellada y no utilice
la unidad de flash hasta que alcance la temperatura de ola
habitación.
No almacene el flash en un armario, cajón, etc., si contiene
naftalina, o otros insecticidas. Esto podría producir efectos
negativos en la unidad de flash.
ESPAÑOL
Muchas gracias por comprar el Flash electrónico Sigma EF-630
(PARA CANON). Para utilizar la mayoría de estas características, y
obtener el máximo rendimiento y disfrutar de su flash, por favor lea
este libro de instrucciones junto con el manual de su cámara antes
de utilizar el flash, y guárdelo a mano para próximas consultas.
PRECAUCIONES
de precaución que vienen a continuación antes de utilizar el flash.
Por favor tome nota de l
Advertencia
68
!!
producto, puede causar daños o perjuicios.
Advertencia!!
CANON de la serie EOS
Cuidado!!
SIGMA de la serie sd / dp
Page 69

No utilice gasolina o otros agentes de limpieza para sacar el
polvo o huellas dactilares. Límpiese con un trapo de ropa suave.
Para un almacenamiento prolongado, escoja un lugar frío y
seco, preferiblemente con buena ventilación. Dispare el flash
unas cuantas veces al mes para mantener en buen estado
sus funciones.
No dispare el flash si el cabezal está cubierto con ropa, ya
que podría provocar un incendio.
DESCRIPCIÓN DE LAS PARTES(P.2)
1. Cabezal de flash
2.
3.
4.
5.
6.
7.
8.
9.
Botón de
10. Interruptor de encendido
11.
12.
13.
14.
15.
16.
17.
18. Panel angular
(Botón izquierdo)
E-TTL II / E-TTL sistema auto flash cámara digital EOS
ACERCA DE LAS PILAS
Esta unidad de flash utiliza cuatro pilas recargables de Ni-MH de
tipo “AA” o pilas alcalinas.
Para asegurar un buen contacto eléctrico, limpie las terminales de
las pilas antes de instalarlas.
Para prevenir la explosión de las pilas, una fuga o
recalentamiento, utilice cuatro pilas nuevas AA del mismo tipo y
de la misma marca. No mezcle diferentes tipos ni pilas nuevas y
usadas.
No desmonte o haga un corto circuito con las pilas, o las exponga
al fuego o al agua; podrían explotar.No recargue otro tipo de
baterías que no sean recargables de Ni-MH.
Cuando el flash no se vaya a utilizar en un periodo largo, saque
las pilas del flash, para evitar posibles daños o roturas.
Como con ningún flash, se recomienda que se lleven pilas de
recambio cuando se realice un viaje largo o se fotografíe al
exterior con temperaturas bajas.
No utilice pilas de litio AA / R6. Puede ocasionar que el equipo no
funcione correctamente.
Por favor, siga todas las instrucciones, reglas y regulaciones de
su comunidad respecto a la eliminación de baterías.
Ventana de recepción de
señal Wifi
Interruptor de pitido
Luz asistencia AF
Tapa de las pilas
Zapata
Pantalla LCD
Interruptor de luz trasera
Luz de preparado / Botón de
TEST
Botón de
Selector
Palanca de bloqueo de zapata
Dial
Terminal Sincro.
Panel de luz rebotada
SELECTOR (13)
En este manual de instrucciones, cada posición del selector se
muestra como / / / .
(Botón arriba)
(Botón derecho)
Botón
Los botones se usan como se indica a continuación: Para operar
los botones de arriba y abajo : . Para operar los botones de
derecha e izquierda : .
(Botón abajo)
CÁMARAS CO MPAT IBLES
Este flash es compatible con las siguientes cámaras.
69
Page 70

CARGA DE LAS BATERÍAS
1. Coloque el interruptor de alimentación en [OFF] y abra el
compartimento de la batería deslizando la tapa. P.3-(1)
2. Siga las indicaciones que se encuentran en el compartimento de
baterías e inserte las pilas con los electrodos "+" y "-" en la
correcta posición. P.3-(2)
3. Cierre la tapa del compartimento. P.3-(3)
4. Coloque el interruptor de alimentación en [ON]. Cuando la
antorcha del flash está cargada a un nivel suficiente como para
utilizar el flash, la luz de Ready (Listo) empieza a parpadear en
verde. Cuando el flash está totalmente cargado, la luz se ilumina
en color rojo.
¡¡Precaución!!
Cuando disminuye la capacidad de la batería, el
icono lo indica en el panel LCD. Cuando
la bacteria se agota por completo, la pantalla
muestra el icono de la derecha, y el flash deja de
funcionar. Por favor, reemplace las baterías.
ADVERTENCIA DE ERROR
Cuando el icono aparece en el panel LCD panel, el flash
puede estar fallando. Resetee el interruptor de alimentación y
compruebe la batería. Si la indicación permanece, contacte con
nuestro distribuidor más cercano.
DESACTIVACIÓN AUTOMÁTICA
Para conservar las pilas, la unidad de flash se desactiva
automáticamente cundo no se ha utilizado en aproximadamente 90
segundos. Para volver activar el flash, presione el botón de TEST o
el disparador de la cámara levemente. Sin embargo, la desconexión
automática no funciona en los modos [WL S LAV E], [S-FL NORMAL]
y [S-FL SLAVE].
70
ACOPLE A LA CÁM AR A
1. Coloque el interruptor de alimentación en [OFF].
2. Confirme que la palanca de bloqueo de la zapata está en la
posición de desbloqueo [UN LOCK ►]. P.3-(4)
3. Inserte el flash en la Zapata de la cámara hasta que se detenga.
Deslice la palanca de bloqueo a la posición [◄LOCK] hasta que
oiga un clic que indica que el flash ha quedado bloqueado. P.3-(5)
Cuando desconecte el flash de la cámara, deslice la palanca de
bloque hasta la posición [UN LOCK►] mientras mantiene el botón
de la palanca presionado. Cuando esté desbloqueado lo puede
sacar de la zapata.
¡¡Precaución!!
Si se saca el flash de la zapata sin estar la palanca de desbloqueo
en la posición [UN LOCK►], tanto la zapata de la cámara como el
acople de zapata del flash pueden sufrir daños.
AJUSTE DEL CABEZAL DEL FLASH
En disparos normales, ajuste el cabezal del flash en dirección a la
cara del sujeto (hacia delante). P.3-(6)
¡¡Precaución!!
Después de encender el flash, si el icono aparece en el
area de estado, o si el indicador de distancia en la pantalla de
estado aparece parpadeando, el cabezal del flash no está ajustado
correctamente en posición frontal.
Page 71

LIMITACIONES DEL DISPARO CONTINUO
Modo
Número de exposiciones con Flash
TTL, M(1/1,1/2)
20 Disparos continuos de flash
M(1/4, 1/8)
25 Disparos continuos de flash
M(1/16-1/32)
40 Disparos continuos de flash
Multi
Ciclo 10
Pantalla principal
Menú de configuración
Cambia el modo de Flash y
ajusta los detalles de cada modo
de Flash.
Añade las funciones opcionales
de disparo con flash y ajusta las
condiciones básicas del flash.
① Área de Estado
②
③ Área de Detalles de Modo
④ Área de pestañas
⑤
Para prevenir recalentamientos, por favor no utilice la unidad de
flash por lo menos 10 minutos después de utilizar el número de
exposiciones que se muestran en la tabla a continuación.
Conmute entre la Pantalla principal y el Menú de configuración
usando el botón . (Cuando se enciende el flash siempre
aparece primero la Pantalla principal.)
¡¡Precaución!!
En caso de que aparezca el icono en la pantalla, la cantidad
de luz que dispara el flash se limitará para evitar el
sobrecalentamiento de la circuitería del flash. Absténgase de utilizar
el flash hasta que el icono desaparezca.
AJUSTES BÁSICOS
Esta sección describe los ajustes básicos del flash. Con el EF-630,
la mayor parte de los ajustes se pueden realizar siguiendo estos
pasos.
¡¡Precaución!!
Cuando el interruptor de alimentación está en posición de bloqueo
[ ], los ajustes no se pueden modificar. Asegúrese de ajustar el
interruptor en [ON] para modificar los ajustes.
[Ajustes funciones del flash] and [Ajustes C.Fn flash] cuando los
ajustes del flash se pueden cambiar en la pantalla del menú de la
cámara, no son compatibles. Por favor, realice los ajustes en el
flash.
Área de Modo de Flash
OERACIONES BÁSICAS EN LA PANTALLA PRINCIPAL
SELECCIÓN DEL MODO DE FLASH
Seleccione el área de Modo de Flash
usando los botones y cambie el
Modo de Flash usando los botones
o el dial.
AJUSTE DE LOS DETALLES DEL
MODO DE FLASH
Seleccione el área Detalles de modo
usando los botones y cambie los
valores de ajuste usando los botones
o el dial.
Sub menú
71
Page 72

USO BÁSICO DEL MENÚ DE CONFIGURACIÓN
Velocidad de obturación
Apertura
Se ajusta automáticamente.
(
1/60seg. - velocidad sincronizada del destello*)
Se ajusta
automáticamente.
Se ajusta automáticamente.
(30seg - velocidad sincronizada del destello*)
Se puede ajustar
libremente.
Le permite ajustar la velocidad libremente
Se ajusta
automáticamente.
Se puede ajustar
libremente.
*
Cuando se activa el flash FP, la limitación de la velocidad de
obturación en la zona de alta velocidad se desactiva.
Para desplazarse hacia la siguiente
pestaña, gire el dial. (Cuando se
encuentra el cursor al área de pestañas,
que se puede cambiar a otra pestaña
presionando los botones .)
En el Menú de Configuración:
Utilice los botones para seleccionar
los elementos del menú. Presione el
botón o para abrir los submenús o diálogos. (En algunos
elementos, una pantalla especial o un
mensaje de diálogo se abrirá.)
En los sub-menús de configuración:
Utilice los botones para seleccionar
las opciones de ajuste. Presione el
botón
o
ajustes. (Presione el botón para cerrar
los sub-menús sin aplicar cambios.)
para aplicar los nuevos
E-TTL II / E-TTL AUTO FLASH
Utiliza el sistema de flash automático E-TTL II / E-TTL. Use este
modo para los disparos generales.
1. Ajuste el Modo de Flash a [TTL].
2. Confirme que el sujeto se encuentra
en el rango de disparo comprobando
la distancia indicada en el área de
Estado.
72
3. Compruebe el estado de carga del flash con la luz (Ready) y
empiece a disparar.
Cuando la fotografía con flash se produce de forma correcta, el
icono aparece durante unos cinco segundos en el área de
estado. Cuando no aparece el icono , la luz puede no haber
sido suficiente o demasiada. Cambie las condiciones y vuelva a
realizar la toma.
VELOCIDAD DE OBTURACIÓN Y APERTURA
La relación entre velocidad de obturación y apertura en los distintos
modos de exposición de la cámara son los siguientes.
P
Av
Tv
a una velocidad igual o inferior a la velocidad
de sincronización del flash*.
M
¡¡Precaución!!
Al disparar mientras los valores de velocidad de obturación y
apertura parpadean, la exposición puede estar desajustada. En ese
caso, cambie las condiciones antes de empezar a disparar.
Cuando el modo de disparo de la
cámara está ajustado en [Zona
básica], la pantalla cambia a la que
se muestra en el diagrama. Los
botones están desactivados excepto
TEST y .
Page 73

COMPENSACIÓN DE LA EXPOSICIÓN DEL FLASH
1ª Toma
2ª Toma
3ª Toma
(MODE WL TTL)
Compensar solo la luz del flash es posible
sin afectar la exposición del fondo.
Se puede usar con los modos de flash
[TTL], [WL TTL], y [WL SLAVE].
Ajuste la cantidad de compensación en
el área de detalles del Modo. La de
compensación tiene 1/3 pasos (cuando la cámara tiene 1/2 pasos,
se cambia a 1/2 pasos) y se pueden ajustar hasta ± 3 pasos.
No utilice la función de compensación de la exposición del flash
en la cámara.
DISPARO FEB (Bracketing de Exposición con Flash)
Se pueden tomar tres fotografías cambiando la intensidad de flash.
Se puede usar con los modos de flash
[TTL] y [WL TTL].
Ajuste la cantidad de compensación en
el área de detalles del Modo. La de
compensación tiene 1/3 pasos (cuando
la cámara tiene 1/2 pasos, se cambia a
1/2 pasos) y se pueden ajustar hasta ±
3 pasos.
Tome tres fotografías mientras comprueba
la cantidad de carga con la luz testigo.
Las tres fotografías están en el orden de exposición apropiada →
sub exposición → sobre exposición.
El icono FEB cambia según se muestra con el número de disparo.
Cuando se han tomado la tres fotografías,
FEB se puede combinar con la compensación de la exposición del flash.
DISPARO CON BLOQUEO FE
Este es un método de disparo que expone cualquier sección
deseada del sujeto con la exposición de flash correcta.
Se puede usar con los modos de flash [TTL] y [WL TTL].
1. Enfoque al tema.
2. Alinee la sección de la escena, en el centro de la imagen, para la
que necesita que la exposición del flash sea correcta. Pulse el
botón [M-Fn] de la cámara.
El flash parpadea y la cantidad de flash necesaria para el sujeto
se memoriza.
[FEL] se visualiza durante aproximadamente 0,5 segundos en el visor.
3. Decida la composición y tome las imágenes.
Si [ ] parpadea en el visor, la cantidad de inflamación es
insuficiente. Cambiar las condiciones y volver a bloquear FE.
El
botón de bloqueo FE asignado varía dependiendo de la cámara
usada. Consulte el manual de instrucciones de su cámara.
FEB se detiene automáticamente.
FLASH MANUAL
Se puede ajustar la cantidad de luz del flash de forma manual.
1.
Ajuste el Modo de Flash a [
2. Ajuste la cantidad de luz del flash en
el área Modo Detalles. (Rango
disponible de ajuste: de 1/128 a 1/1,
Pasos de ajuste disponibles: 1/3EV.)
MANUAL].
3. Compruebe el estado de carga del
73
Page 74

flash con la indicación luminosa y empiece a disparar.
WL TTL
Inalámbrico E-TTL II / E-TTL auto flash
WL MANUAL
Inalámbrico flash manual
WL MU LTI
Inalámbrico multi-flash
EF-630 esclavo ID
A B C
EF-610 DG SUPER esclavo ID
1 2 3
En la sección que muestra la distancia en el área de Estado, la
distancia a la cual se puede obtener una exposición apropiada se
calcula y se muestra. Incluso con el mismo nivel de luz de flash, la
distancia para obtener una exposición apropiada varia si se
modifica la apertura o el valor ISO de la cámara.
Se puede calcular la exposición adecuada usando el flash en modo
manual con la siguiente fórmula.
Número guía (GN) / Distancia de disparo (m) = Valor de apertura (F)
Para saber el número guía de este flash (GN), diríjase a la [Tabla 1]
adjuntada al final de este manual.
MULTI FLASH
Mostrar el movimiento de un sujeto en una sola toma como si la
imagen fuera una reproducción fotográfica es posible emitiendo luz
de flash de forma continua mientras el obturador permanece abierto.
Use el modo de exposición manual de la cámara (“M”).
1. Ajuste el Modo de Flash a [MULTI].
2. En el área de Modo Detalles, ajuste
el nivel de luz de flash, el intervalo
de flash en Hz (ej.: 10 Hz = Emite luz
con una frecuencia de 10 veces por
segundo), y el número de disparos
en "x".
3. Ajuste una velocidad de obturación más lenta que el valor de
“número de flashes" / "frecuencia de flash".
4. Compruebe el estado de carga del flash con la luz de “Listo” y
empiece a disparar.
El número de disparos de flash que se pueden realizar de forma
continua varía según la combinación del nivel de luz de flash y la
frecuencia del flash. Diríjase a la [Tabla2] al final de este manual.
74
CONTROL REMOTO DEL FLASH
Cuando el flash se utiliza en una localización alejada de la cámara,
se expanden las posibilidades creativas. El EF-630 se controla
remotamente por el flash incorporado de la cámara o por una
Unidad Máster separada.
EF-630 tiene tres modos de flash inalámbrico para diferentes
aplicaciones.
El flash conectado a la cámara se llama [Unidad Máster], y el flash
usado a distancia se llama [Unidad esclava].
Por favor coloque la unidad de flash a 0.5m a 5m del sujeto y
coloque la cámara a una distancia de 1m a 5m del sujeto.
Cuando se ajusta la unidad esclava en la posición deseada, se
puede utilizar un mini-soporte. Este soporte incorpora una rosca
para el trípode.
El flash inalámbrico se puede utilizar con el flash integrado de la
cámara (sólo en modelos con función principal de disparo con
flash inalámbrico). Para conocer los ajustes de la cámara,
consulte el manual de instrucciones de la cámara.
El EF-630 también se puede utilizar en combinación con el
EF-610 DG SUPER EO-ETTL II. En este caso, utilice la EF-610
DG SUPER como unidad esclava. Cuando ajuste EF-610 DG
SUPER, consulte el manual de instrucciones del EF-610 DG
SUPER (el método de notación del EF-610 DG ID de esclavo
SUPER es diferente. Consulte la siguiente tabla.)
Page 75

PREPARACIÓN DEL DISPARO INALÁMBRICO
ON
Función Control + Flash*
OFF
Solo función Control
(UNIDAD MASTER)
AJUSTES GRUPO ESCLAVO
El disparo con diferentes proporciones
de flash y potencias de flash está disponible
dividiendo los esclavos en dos grupos
[A, B] o tres grupos [A, B, C].
1. Cuando se selecciona el modo de
flash inalámbrico deseado y cuando
se selecciona el área del modo de
flash, al pulsar el botón
pantalla de ajuste del grupo Esclavo.
2. El ajuste del grupo esclavo se puede
cambiar usando el dial o el botón .
(
Cuando se selecciona OFF, no se realiza
el disparo de la relación de destello.)
3. Después de ajustar, presione el botón
inicial.
AJUSTES FLASH MASTER
Establece si el "Master" está ajustado para la función de control
solamente o para la función de control y la emisión de luz como un flash.
Durante el disparo inalámbrico en el que se establece la relación
*
de flash, "Master" pertenece al Grupo [A].
AJUSTES DEL CANAL
Cuando otra persona está usando
flash inalámbrico, la configuración de
un canal diferente evita fallos de
funcionamiento (es posible seleccionar de los canales 1 al 4).
se
abre la
para volver a la pantalla
PREPARACIÓN DEL DISPARO INALÁMBRICO (UNIDAD ESCLAVA)
1.
Ajuste el modo de flash a [WL
2. En el
área Detalles de modo, configure
un canal que sea el mismo que el
Master.
3. Cuando utilice un flash inalámbrico
con la configuración de relación de
flash, ajuste el ID de esclavo en el
del grupo deseado en el área de detalles de modo (si no se
realiza el disparo utilizando la relación de flash), puede seleccionar
A, B o C ).
SLAVE
].
INALÁMBRICO E-TTL II / E-TTL AUTO FLASH
En el flash automático inalámbrico E-TTL II / E-TTL, la cámara
controla automáticamente la exposición a un valor apropiado.
Flash automático con un flash o esclavo destellan con la
misma potencia de flash
AJUSTE UNIDAD MASTER
1. Ajuste el Modo de Flash a [WL TTL].
2.
Cuando sea necesario, realice "Ajuste
del canal" y "Ajuste de flash de la
unidad Master" en el área Detalles
del modo.
AJUSTE UNIDAD ESCLAVA
3.
Realice el ajuste siguiendo "PREPARACIÓN DEL FLASH INALÁMBRICO
(UNIDAD ESCLAVA)"
4. Coloque la unidad esclava, confirme la finalización de la carga y,
a continuación, inicie la toma (el flash esclavo notifica que finalizó
la carga parpadeando la luz de ayuda de AF).
.
75
Page 76

Flash automático con ajuste de relación de flash (dos grupos)
Los flashes se controlan para que la suma total del Grupo [A] y del
Grupo [B] se convierta en una exposición adecuada.
AJUSTE UNIDAD MASTER
1.
Configure el ajuste del grupo esclavo
en [A:B] siguiendo
DEL FLASH INALÁMBRICO (MASTER
UNIT)".
2. Ajuste la relación de destello en el
área de detalles del modo. (El ajuste
de 8: 1 a 1: 8 es posible.)
AJUSTE UNIDAD ESCLAVA
3.
Realice el ajuste siguiendo "PREPARACIÓN DEL FLASH INALÁMBRICO
(UNIDAD ESCLAVA)"
"PREPARACIÓN
.
Flash automático con ajuste de relación de flash (tres grupos)
Utilice el grupo [C] como una fuente de luz secundaria, como para
eliminar una sombra de fondo de un sujeto.
AJUSTE UNIDAD MASTER
1. Ajuste el grupo de flash esclavo en
[A:B C] siguiendo "
DEL FLASH INALÁMBRICO (UNIDAD
MASTER)
2. Ajuste la relación de flash de [A:B]
en el área de detalles del modo (es
posible el ajuste de 8:1 a 1:8).
3. Ajuste la compensación de la exposición del flash de [C] en el
área de detalles del modo.
AJUSTE UNIDAD ESCLAVA
4.
Realice el ajuste siguiendo "PREPARACIÓN DEL FLASH INALÁMBRICO
(UNIDAD ESCLAVA)"
".
PREPARACIÓN
.
76
FLASH MANUAL INALÁMBRICO
Así como en la fotografía con flash manual, el disparo inalámbrico
mediante el cual la potencia del flash se puede ajustar de forma
manual también está disponible. Decidir la exposición utilizando un
fotómetro de flash comercialmente disponible.
Flash manual con un flash o todos los esclavos parpadean
con la misma intensidad
AJUSTE UNIDAD MASTER
1.
Ajuste el Modo de Flash a [
2.
Cuando sea necesario, realice "Ajuste
del canal" y "Ajuste de flash de la unidad
Master" en el área Detalles del modo.
3.
Ajuste la cantidad de luz del flash en el área Modo Detalles. (Rango
disponible de ajuste: de 1/128 a 1/1, Pasos de ajuste disponibles: 1/ 3E V.)
AJUSTE UNIDAD ESCLAVA
4. Ajuste el Modo de Flash a [WL SLAVE].
5.
Realice el ajuste siguiendo "PREPARACIÓN DEL FLASH INALÁMBRICO
(UNIDAD ESCLAVA)"
6. Coloque la unidad esclava, confirme la finalización de la carga y,
a continuación, inicie la toma (el flash esclavo notifica que finalizó
la carga parpadeando la luz de ayuda de AF).
Flash manual en el que se establece la cantidad de
destello para cada grupo
El flash manual con la configuración de la intensidad de flash está disponible
para cada uno de los dos o tres grupos.
AJUSTE UNIDAD MASTER
1.
Ajuste [Ajuste del grupo de flash] en [A:B]
o [A:B:C] siguiendo "PREPARACIÓN
DEL FLASH INALÁMBRICO (UNIDAD
MASTER)".
WL
MANUAL
].
.
Page 77

2. Establezca la cantidad de flash de cada grupo en el área Detalles
de modo.
AJUSTE UNIDAD ESCLAVA
3.
Realice el ajuste siguiendo "PREPARACIÓN DEL FLASH INALÁMBRICO
(UNIDAD ESCLAVA)"
.
MULTI FLASH INALÁMBRICO
Multi-flash inalámbrico está disponible para un flash o para múltiples
flashes.
Use el modo de exposición manual de la cámara (“M”).
Multi-flash con un flash o todos los esclavos con la misma
intensidad
AJUSTE UNIDAD MASTER
1. Ajuste el Modo de Flash a [WL
MULTI].
2.
Cuando sea necesario, realice "Ajuste
del canal" y "Ajuste de flash de la
unidad Master" en el área Detalles
del modo.
3. En el área de Modo Detalles, ajuste el nivel de luz de flash, el
intervalo de flash en Hz (ej.: 10 Hz = Emite luz con una frecuencia
de 10 veces por segundo), y el número de disparos en "x".
AJUSTE UNIDAD ESCLAVA
4.
Realice el ajuste siguiendo "PREPARACIÓN DEL FLASH INALÁMBRICO
(UNIDAD ESCLAVA)"
5. Ajuste una velocidad de obturación más lenta que el valor de
“número de flashes" / "frecuencia de flash".
6. Coloque la unidad esclava, confirme la finalización de la carga y,
a continuación, inicie la toma (el flash esclavo notifica que finalizó
la carga parpadeando la luz de ayuda de AF).
.
Multi-flash con ajuste de cantidad de flash para cada grupo
El flash múltiple con la configuración de la cantidad de flash está
disponible para dos o tres grupos.
AJUSTE UNIDAD MASTER
1.
Ajuste "
Ajuste del grupo de flash" en [A:B]
o [
A:B:C]
siguiendo "PREPARACIÓN
DEL FLASH INALÁMBRICO"
2.
Establezca la cantidad de flash de cada
grupo en el área Detalles de modo.
3. En el área de Modo Detalles, ajuste el nivel de luz de flash, el
intervalo de flash en Hz (ej.: 10 Hz = Emite luz con una frecuencia
de 10 veces por segundo), y el número de disparos en "x".
AJUSTE UNIDAD ESCLAVA
4.
Realice el ajuste siguiendo "PREPARACIÓN DEL FLASH INALÁMBRICO
(UNIDAD ESCLAVA)"
Continúe con los procedimientos del paso 5 del artículo anterior
para tomar fotografías.
.
.
FLASH ESCLAVO
El EF-630 incluye una función que le permite reaccionar al disparo de
otra unidad de flash. Esto permite realizar disparos de forma más fácil y
conveniente con un flash posicionado a cierta distancia de la cámara. La
luz de salida, sin embargo, no se ajusta de forma automática en este modo.
FLASH ESCLAVO NORMAL
La unidad Máster conectada a la cámara se puede usar para
disparar un flash sincronizado con el EF-630, incluso cuando se
encuentra a cierta distancia de la cámara.
El flash incorporado de la cámara funciona de forma errónea con
el pre-flash, por lo tanto, no es posible sincronizar el flash.
77
Page 78

Ajuste el flash Máster a modo manual y seleccione la salida a
aproximadamente 1/16.
Ajuste el modo de exposición de la cámara a M, la velocidad de
obturación a 1/30 segundos o un tiempo menor, y la apertura y el
valor ISO a valores prudenciales.
1. Ajuste el modo de Flash del esclavo
EF-630 a [S-FL NORMAL ].
2. En el
área de Modo Detalles, ajuste los
valores ISO y de apertura para que
coincidan con los ajustes de la cámara.
3. Ajuste la cantidad de luz del flash en
el área de Modo Detalles de forma que la distancia entre el flash
esclavo y el sujeto sea aproximadamente la misma que la
distancia indicada en el área de Estado.
4. Compruebe que la carga está completa y empiece a disparar.
DESIGNACIÓN DEL FLASH ESCLAVO
Si utiliza dos o más unidades EF-630, puede desganar cual de los
flashes se dispararán juntos utilizando los ajustes del canal. En este
modo una unidad de flash se utilizará como controlador esclavo y el
resto para disparar como esclavos.
Ajuste el modo de exposición de la cámara a M, la velocidad de
obturación a 1/30 segundos o inferior, y la apertura y la ISO a
valores prudenciales.
AJUSTE DE LOS CONTROLES DEL
FLASH (MÁSTER)
1. Ajuste el modo de Flash a [S-FL
CTRL].
2. Ajuste el canal según la necesidad.
(En el área Modo Detalle, seleccione
del Canal1 al Canal3.)
78
AJUSTE DEL DISPARO DE FLASH (ESCLAVO)
3. Ajuste el modo de Flash a [S-FL SLAVE].
4. En el área Modo Detalle, ajuste el
canal para que cuadre con el canal
del flash de control.
5. En el área Modo Detalle, ajuste los
valores ISO y de apertura para que
sean los mismos que los del flash de
control.
6.
Ajuste la cantidad de luz de flash en el área Modo Detalle de forma
que la distancia entre el flash esclavo y el sujeto sea aproximadamente
la misma que la distancia indicada en el área de Estado.
7.
Compruebe que la carga se haya completado y empiece a disparar.
En Modo Esclavo, este flash también puede ser usado en combinación
con el EF-630 y / o el EF-610 DG SUPER para encajar con otras
cámaras. (Para detalles acerca de la configuración del EF-610
DG SUPER, siga las indicaciones de su manual de instrucciones.)
FUNCIONES OPCIONALES
En esta sección encontrará las funciones opcionales que se pueden
ajustar y añadir desde el menú de configuración.
SINCRONIZACIÓN CON LA SEGUNDA CORTINILLA (MENÚ 1)
El flash se dispara justo antes de que se cierre el obturador. La luz
trasera del sujeto en movimiento y la trayectoria de la luz se pueden
capturar; de esta forma, las fotografías pueden expresar el movimiento
natural del sujeto.
Se puede usar con los modos de exposición P, Av, Tv, y M de la
cámara.
Se puede usar con los modos de flash [TTL], [MANUAL], y [WL].
Page 79

1. Ajuste [MENU 1] → [REAR CURTAIN SYNC] → [ON].
NORMAL
(por defecto)
Distribución de luz normal
Características básicas de distribución de luz
para disparos generales.
Distribución de luz con prioridad al número
e disminuye pero se
alcanza un mayor número guía.
Distribución de luz plana
Previene una disminución de la luz alrededor
proporcionando una distribución de luz más
uniforme.
1 TIME
(1
VEZ)
(por defecto)
Flash de modelado
para poder detectar las sombras que produce el sujeto.
2. Vuelva a la pantalla principal. (En el área de estado, aparece el
icono .)
¡¡Precaución!!
Esta función no se puede ajustar a "ON" en los modos de flash que
no son compatibles con la sincronización de la cortinilla trasera.
FP FLASH (Sincro Alta Velocidad) (MENÚ 1)
El flash FP continua disparando mientras la cortina del obturador
funciona. Esto le permite utilizar una velocidad de obturación mayor
que la velocidad de sincronización.
Se puede usar con los modos de exposición P, Av, Tv, y M de la
cámara.
Se puede usar con los modos de flash [TTL], [MANUAL], [WL TTL]
y [WL MANU AL].
1. Ajuste [MENU 1] → [FP] → [ON].
2. Vuelva a la pantalla principal. (En el área de estado, aparece el
icono .)
En modo [TTL], confirme que el sujeto se encuentra en el rango de
disparo comprobando la distancia indicada en el área de Estado
antes de empezar a disparar.
En modo [MANUAL], ajuste la apertura, etc. Antes de empezar a
disparar de forma que la distancia hasta el sujeto y la distancia
indicada en el área de Estado coincidan.
El Número Guía variará en función de la velocidad de obturación.
(Por favor mire Cuadro 3 de la última página)
¡¡Precaución!!
Esta función no se puede ajustar a "ON" en los modos de flash que
no son compatibles con flash FP.
MODO DISTRIBUCIÓN DE LUZ (MENÚ 1)
El EF-630 tiene tres modos de Distribución de Luz que se pueden
seleccionar según el próposito de su uso.
[MENU 1] → [LIGHT DISTRIBUTION]
-
guía
GN
El ángulo de haz de luz s
DIFFUSE
TEST DE FLASH (MENÚ 2)
El EF-630 tiene dos modos de test. Uno de los modos de Test de
Flash puede asignarse al botón TEST.
[MENU 2] → [TEST FLASH]
Test de flash
Ejecuta un test simple de flash.
MODELING
(MODELADO)
Se puede usar con los modos de flash [TTL],
[MANUAL] y [MULTI].
Cuando se mantiene pulsado el botón TEST, se realiza
un flash continuo de aproximadamente 1.5 segundos
79
Page 80

Después de 8 segundos sin operación, la luz se
usa mientras la
luz está apagada, la luz se enciende de forma
automática.
Independientemente de si está siendo presionado
un botón o un dial, la luz se apagará después de 8
segundos desde que la luz se activó inicialmente.
ON
La luz se mantiene encendida de forma continua.
¡¡Precaución!!
El ajuste [MODELING] no se puede seleccionar en ningún modo de
flash en el que el flash de modelado no esté disponible.
Cuando la cámara y el flash se comunican, el funcionamiento del
botón TEST no está disponible. (Al presionar el botón de
previsualización de profundidad de campo de la cámara emite el
flash de modelado independientemente de la asignación del botón
TEST).
MODO PERSONALIZACIÓN (MENÚ 3)
Es posible almacenar y recuperar
ajustes personalizados. (Se pueden
almacenar dos series de ajustes
personalizados.)
ALMACENAJE Y RECUPERACIÓN
DE AJUSTES PERSONALIZADOS
1. Ajuste el modo de Flash, área de Más detalles, y configure el
menú de contenidos según se deseo.
2. Desde [MENU 3] → [CUSTOM MODE SETTING], seleccione [C1]
o [C2] y pulse el botón .
3. Seleccione [OK] y confirme con el botón .
Los contenidos registrados se añaden al modo de Flash como
Modo Personalizado. (El Modo Personalizado se indica con los
iconos o en el área de Modo de Flash.)
BORRADO DE LOS AJUSTES PERSONALIZADOS GUARDADOS
1. Desde [MENU 3] → [CUSTOM MODE DELETE], seleccione [C1]
o [C2] y pulse el botón .
2. Seleccione [OK] y confirme con el botón .
80
LUZ DE ASISTENCIA AF (MENÚ 4)
La luz de asistencia de AF se activará de forma automática si
enfoca hacia un sujeto en una zona oscura. Tel rango efectivo de la
luz de asistencia AF es de 0.7 a 10 metros.
Cuando la luz de asistencia AF no sea necesaria, ajuste [MENU
4] → [AF ASSIST LIGHT] → [OFF].
LUZ DEL PANEL LCD (MENÚ 4)
Cuando se conecta la fuente de alimentación, el panel LCD se
ilumina. Los ajustes de ON/OFF de la luz se pueden modificar.
[MENU 4] → [LCD LIGHT]
AUTO
(por defecto)
Independientemente del ajuste, la luz se puede encender y
apagar con el botón .
apagará. Cuando un botón o dial se
8 SEC
AJUSTE DEL PANEL LCD (MENÚ 4)
El contraste y el brillo del panel LCD se pueden ajustar.
[MENU 4] → [DISPLAY SETTING]
Page 81

BRILLO
Ajuste el brillo al nivel deseado usando los
botones .
CONTRASTE
Ajuste el contraste al nivel deseado usando los
botones .
M (por defecto)
Indicación en metros.
FEET
Indicación en pies
MODEL
Nombre del modelo
SERIAL No.
Número de serie
VERSION
Versión del firmware
BRIGHTNESS
CONTRAST
Cuando finalice el ajuste, seleccione [OK] y confirme con el botón
.
Cuando cancele el ajuste, seleccione [CANCEL] y confirme con el
botón .
CAMBIO DE LA INDICACIÓN DE LA UNIDAD DE MEDIDA (MENÚ 4)
Se puede modificar la unidad de medida en el área de Estado.
[MENU 4] → [M / FEET]
INFORMACIÓN DE LA UNIDAD DE FLASH (MENÚ 5)
Se puede comprobar la siguiente información.
[MENU 5] → [INFORMATION]
REINICIO DE LOS AJUSTES (MENÚ 5)
Se puede restablecer el flash para volver a los ajustes de fábrica.
[MENU 5] → [RESET SETTINGS]
Para iniciar los ajustes, seleccione [OK] y confirme con el botón .
Cuando se restablecen los ajustes, los modos personalizados
almacenados se borran.
OTRAS FUNCIONES ÚTILES
AJUSTES DEL CABEZAL DE FLASH
Cuando el ajuste del cabezal de flash
se usa con (Auto), el cabezal
del flash se ajusta automáticamente al
ángulo de flash óptimo para la
distancia focal del objetivo.
El cabezal del flash tiene en cuenta el tamaño del sensor de
imagen de la cámara, por lo tanto, la longitud focal que se
muestra en el flash puede ser diferente a la del objetivo.
Dependiendo del modo de Flash, el ajuste del cabezal del flash
se puede fijar sin tener en cuenta la distancia focal del objetivo.
El ajuste del cabezal de flash se puede modificar de forma manual.
Presione los botones en el área Modo Detalle.
AUTO ⇔ 24 ⇔ 28 ⇔ 35 ⇔ 50 ⇔ 70 ⇔ 85 ⇔ 105 ⇔ 135 ⇔ 200mm
Dependiendo del ajuste del cabezal del flash, la potencia del flash
puede cambiar.
81
Page 82

PANTALLA ANGULAR
Este flash está equipado con un panel angular, que proporciona un
ángulo de cobertura ultra angular de 17mm. Extraiga el panel
angular y el panel de luz rebotada y déjelo caer hasta cubrir el
cabezal del flash. (Sea cuidadoso a la hora de deslizar los paneles).
Después recoja el panel de luz rebotada a su lugar. P. 3-(7)
La sección de indicación del cabezal de Flash en el área Modo
Detalles puede mostrar el icono cuando el panel ampliado
está en uso.
FLASH REFLEJADO
Disparando el flash hacia el techo o una pared, es posible dispersar
la luz y tomar fotografías con una iluminación más suave y reducir
las sombras.
El cabezal del flash se puede ajustar hacia arriba a 90°, hacia el
lado inferior a 7°, y hacia los lados derecho y izquierdo a 180°.
P.3-(8)
Durante el rebote, el icono aparece en el área de
Estado.
La fotografía recibirá el color de la superficie reflectante. Por favor
escoja una superficie blanca para reflejar el flash. Dependiendo
de la superficie reflejada, de la distancia del sujeto y de otros
factores, la distancia efectiva para el TTL AUTO puede cambiar.
EXPOSICIONES DE APROXIMACIÓNS
Al inclinar el cabezal del flash hacia abajo a la posición de 7°, la
sección inferior del encuadre puede ser lo suficientemente brillante
como para realizar exposiciones de primer plano.
Cuando se rebota hacia la parte inferior a 7°, la indicación de
distancia en el área de Estado parpadea.
82
PANEL DE LUZ REBOTADA
Este flash está equipado con un panel de luz rebotada, que permite
iluminar los ojos del sujeto cuando el flash esta con el cabezal
basculado (en posición de luz rebotada). Extraiga los dos paneles
simultáneamente, y después recoja el panel angular a su lugar.
(Sea cuidadoso a la hora de deslizar los paneles.)P.3-(9)
Para crear una luz de captura efectiva, incline el cabezal del flash
90º hacia arriba y tome las fotografías a una distancia cercana.
P.3-(10)
TERMINAL SINCRO.
El EF-630 tiene un terminal sincro que se puede conectar a la
cámara con un cable de sincro de flash comercial.
Cuando dispara con un cable sincro, utilice el flash em modo
[MANUAL].
Con [MENU 2] → [ISO] [F-NUMBER], ajuste los valores ISO y
apertura (F) para que coincidan con los de la cámara. Ajuste la
potencia de salida del flash en el área Modo Detalles hasta que la
distancia mostrada en el área de Estado sea aproximadamente la
misma distancia entre el flash y el sujeto.
¡¡Precaución!!
El flash auto E-TTL II / E-TTL si su utiliza el Terminal Sincro.
El Terminal Sincro. del EF-630’s es compatible con cables que
tengan la polaridad postiva (+) en el pin central pin y la polaridad
negativa (-) en el protector. Si el cable tiene la polaridad invertida,
utilice un convertidor de polaridad comercial.
Page 83

PREVENCIÓN DEL USO ACCIDENTAL
Un pitido corto
Indica que la carga se ha completado.
Dos pitidos cortos
Indica que el ajuste de la luz es correcto.
Un pitido largo (2 seg.)
Alarma de error.
Cuando el interruptor de encendido se ajusta a la posición [ ]
(bloqueo), se deshabilitan todas las operaciones que no sean el
botón TEST y el botón , para prevenir el cambio accidental de
los ajustes del flash.
Mientras que el flash esté bloqueado, el icono aparece en el
área de Estado.
SONIDOS Y PITIDOS
Ciertas condiciones del flash se indican con un sonido, haciéndolas
fácilmente reconocibles sin necesidad de mirar la pantalla LCD.
Ajuste el interruptor de PITIDO en la parte frontal del cuerpo a
[ON]. (Cuando se ajusta en ON, el icono se muestra en el área
de Estado.)
ESPECIFICACIONES
TIPO: Flash electrónico automático zoom TTL tipo Clip-on con
controlador de serie.
NUMERO GUIA: 63 ( 100 ISO/m, posición del cabezal 200 mm)
ALIMENTACION: Cuatro pilas alcalinas de tipo AA
TIEMPO DE RECICLAJE: acerca de 3.0 seg. (pilas alcalinas)
NÚMERO DE DISPAROS: acerca de 120 disparos (pilas alcalinas)
Ccuatro pilas Niquel-hidrógeno de tipo AA.
acerca de 1.8 seg. (Niquel-hidrógeno)
acerca 185 disparos (Niquel-hidrógeno)
DURACIÓN DEL DISPARO: acerca de 1/ 700 seg.(disparo a
máxima potencia)
ANGULO DE ILUMINACION DEL FLASH: 24mm a 200mm
controlador de motor de potencia
17mm con la pantalla angular incorporada.
PESO: 490 g.
DIMENSIONES: 79.4mm x 148.4mm x 121.5mm
El logotipo CE es una directiva de confor midad con la Comunidad Europea (CE).
SIGMA (Deutschland) GmbH
Carl Zeiss Str. 10/2, D 63322 Roedermark, Germany
Verkauf:01805-90 90 85-0
Service:01805-90 90 85-85 Fax(Service):01805-90 9 0 85-35
Reciclaje de Equipos Eléctricos y Elect rónicos de Uso Privado
Reciclaje de Equipos Eléctricos y Electrónicos Usados (Aplicable en la Unión
Europea y en otros países con sistema de rec iclaje por separado)
Este símbolo indica que este producto no debería tratarse como los demás
materiales residuales de uso general. Estos productos deben reciclarse en el
contenedor específico para los equipos e léctricos y electrónicos. Depositando
estos productos correctamente, UD. ayuda al tratamiento adecuado de los
productos reciclables y previene los ef ectos potencialmente negativos para el
medioambiente y la salud, que podrían verse afectados por un i ncorrecto
reciclado del producto. Si su equipo contiene baterías o acumuladores de fácil
extracción, por favor deposítelos en el contenedor adecuado según las
normativas locales. El reciclaje de los materiales ayuda a la conservación de los
recursos naturales. Para más inf ormación acerca del reciclaje de estos productos,
contacte con la autoridad local, el servicio de reciclaje o el establecimiento donde
adquirió el producto.
83
Page 84

Per evitare danni o ferite a terzi, leggete attentamente il manuale
di istruzioni e fate attenzione ai segni di allerta riportati di seguito
prima di usare il flash. In particolar modo, fate attenzione a questi
due segnali:
Attenzione!!
Usare questo prodotto nell'inosservanza del
presente segnale di pericolo può causare serie
ferite o mettervi in serio pericolo
Attenzione!!
Usare questo prodotto nell'inosservanza del
presente segnale di pericolo può causare serie
ferite o danni.
Questo denota punti rilevanti, per i quali attenzione e cautela
sono particolarmente richiesti
Il simbolo contiene informazioni su ciò che non si deve fare
Il flash contiene circuiti ad alto voltaggio. Per evitare di
prendere la corrente o di bruciarsi, non cercate di smontare il
flash. Se la carrozzeria è rotta o incrinata, non toccate le parti
interne.
Non scattate flash vicino agli occhi. La luce molto intensa può
provocare danni alla vista. Tenete almeno 1 metro di distanza
tra il flash e il viso quando fotografate.
Non toccate il terminale syncro della macchina quando il flash
è collegato. Il circuito ad alto voltaggio può causare scosse
elettriche.
Non usate la macchina in ambienti con materiali infiammabili,
gas, agenti chimici o infiammabili liquidi.
il rischio di
causare un'esplosione.
Non coprire la Parabola del flash con una mano o avvicinarla
alla pelle quando si scatta: il calore potrebbe scottarvi.
Non scattare lampi con il flash rivolto verso gli automobilisti,
potreste causare un incident
Non utilizzate altri apparecchi fotografici che non siano della
serie Canon EOS. In caso contrario, il flash potrebbe
danneggiare i circuiti della macchina.
Questo flash teme l'acqua. Se usato sotto pioggia, neve o
vicino all'acqua va protetto. Spesso non è possibile riparare
componenti interni danneggiati dall'acqua.
Flash e apparecchio fotografico non vanno esposti a urti,
polvere, alte temperature e umidità. Questi fattori possono
causare malfunzionamento o incendio dell'apparecchiatura.
Quando
temperatura
(es. dal freddo di un esterno al caldo di un ambiente interno)
può formarsi della condensa. In questi casi, riponete
l'attrezzatura in un sacchetto di plastica e non usatela fino a
quando non è a temperatura ambiente.
Non riponete il flash in un cassetto o armadietto con naftalina,
canfora o altro insetticida. Possono avere un effetto negativo
sul suo funzionamento.
Non utilizzate un lucidante, Benzene o altro agente di pulizia
per rimuovere sporco o impronte. Pulite solamente con un
panno morbido appena inumidito.
ITALIANO
Grazie per la preferenza accordata al Flash elettronico Sigma
EF-630 (PER CANON). Per avere ottime fotografie e ottenere il
massimo dal flash, prima di iniziare a usarlo, leggete questo
manuale e quello della vostra macchina. Tenetelo poi a portata di
mano per poterlo consultare in caso di dubbio.
ATTENZIONE
Attenzione!!
C'è
e.
Attenzione!!
84
il
flash è sottoposto a sbalzi improvvisi di
Page 85

Se non intendete usare il flash per un lungo periodo, cercate
un luogo asciutto e fresco dove riporlo, preferibilmente con
una buona ventilazione. Fate scattare il flash più volte
nell'arco di un mese, affinché mantenga adeguate capacità di
funzionamento.
Non coprire la Parabola del flash con vestiti e panni in genere
perché il calore potrebbe bruciarli.
DESCRIZIONE DELLE PARTI(P.2)
1. Testa del flash
2.
3.
4.
5.
6.
7.
8.
9. Pulsante
10. Interruttore accensione
11.
12.
13.
14.
15.
16.
17.
18. Diffusore grandangolare
(Pulsante sinistro)
Flash automatico E-TTL II/ E-TTL per fotocamere EOS
BATTERIA
Questo flash usa batterie Ni-MH ricaricabili tipo “AA” oppure
alkaline.
Per assicurare contatti elettrici ottimali, pulite i terminali delle
batterie prima di installarle
Per evitare esplosioni delle batterie, perdite o surriscaldamento,
usate quattro batterie nuove della stessa marca. Non mischiate
batterie di marche diverse, vecchie e nuove insieme
Non mandate in corto le batterie, non smontatele, non esponetele
a fonti di calore o d'energia: potrebbero esplodere. Non ricaricare
batterie diverse da quelle ricaricabili al Ni-MH.
Se non si utilizza il flash per un periodo prolungato, togliere le
batterie per evitare danni o perdite
La funzionalità delle batterie decresce alle basse temperature.
Tenete quindi le batterie protette quando utilizzate il flash al
freddo.
Non usare batterie al Litio AA/R6. Potrebbero causare
malfunzionamento all’apparato.
Per le batterie usate seguire le disposizioni di conferimento del
vostro Paese.
Finestrella del ricevitore del
segnale wireless
Interruttore del segnale
acustico
Illuminatore AF
Coperchio delle batterie
Staffa
Display LCD
Interruttore retroilluminazione
Spia di pronto lampo /
pulsante TEST
Pulsante
Selettore
Levetta di blocco della slitta
contatti
Ghiera
Presa sincro
Pannello riflettente
SELETTORE (13)
In questo manuale le posizioni del selettore sono indicate come
segue / / / .
Pulsante
Usare i pulsanti come segue: per muovere su e giù : per muovere
sinistra/destra .
(Pulsante Su)
(Pulsante Destro)
(Pulsante Giù)
FOTOCAMERE COMPATIBILI
Il flash è compatibile con le seguenti fotocamere
85
Page 86

INSERIRE LE BATTERIE
1. Spostare l’interruttore da [SPENTO] e aprire il vano batterie
facendo scorrere il coperchio. P.3 -(1)
2. Seguire le indicazioni presenti nel vano batterie e inserire le
batterie rispettando la polarità + e - P.3-(2)
3. Chiudere il vano batterie . P.3-(3)
4. Riportare l’interruttore su [Acceso]. Quando le batterie hanno
raggiunto una carica sufficiente lampeggerà una spia verde.
Quando sono del tutto cariche lampeggerà una spia rossa.
Attenzione!!
Quando la carica della batteria è bassa nel LCD
comparirà l’icona . Quando la batteria
arriva a zero compare un avvertimento sulla
destra del pannello e il flash non funzionerà più
per molto. Cambiare le batterie.
INDICAZIONI DI ERRORE
Se nel pannello LCD compare l’icona il flash potrebbe avere
dei malfunzionamenti. Resettarlo e controllare le batterie. Se
l’indicazione rimane consultare il rivenditore
AUTO POWER OFF
Per risparmiare l'energia delle batterie, il flash si spegne
automaticamente quando non viene usato per oltre 90 secondi. Per
ripristinare il funzionamento, premete il pulsante TEST oppure
quello di scatto della macchina fino a metà. Lo spegnimento
automatico non funziona nelle modalità [WL SLAVE], [S-FL
NORMAL] e [S-FL SLAVE].
86
INSERIRE IL FLASH NELLA FOTOCAMERA
1. Spegnere l’alimentazione [OFF]
2. Assicurarsi che la levetta di blocco sia nella posizione di
[UNLOCK ►] . P.3-(4)
3. Inserire il flash nella slitta portaccessori fino a che si blocca.
Spostare la levetta di blocco nella posizione [◄LOCK] fino a
sentire un clic. P.3-(5)
Per togliere il flash spostare la levetta di blocco su [UNLOCK ►] fino
a che si arresta. Poi togliere il flash.
Attenzione!!
Se il flash è tolto con la levetta non sulla posizione di [UNLOCK ►]
potrebbe danneggiarsi o danneggiare l’innesto a slitta.
REGOLARE LA TESTA DEL FLASH
Nelle riprese normali lasciare la testa rivolta in avanti P.3-(6)
Attenzione!!
Dopo aver posto su ON, acceso, l’interruttore, se compare la scritta
o se l’indicazione della distanza lampeggia nel LCD,
vuol dire che la testa del flash non è posta correttamente verso
l’avanti.
Page 87

LIMITAZIONI
Modalità
Numero di esposizioni flash
TTL, M (1/1,1/2))
20 esposizioni continuate
M(1/4, 1/8)
25 esposizioni continuate
M(1/16-1/32)
40 esposizioni continuate
Multi
10 cicli
Schermata Principale
Menu di settaggio
Cambiare la Modalità Flash e
settare i particolari di ciascuna
modalità
Aggiungere funzioni alla ripresa
① Area Stato attuale
②
③ Area dettagli modalità
④ Area tabulazione
⑤
Per evitare il surriscaldamento, non usate il flash per almeno 10
minuti dopo una sequenza di scatti, come indicato nella tabella
QUANDO SI SCATTA IN SEQUENZA
Passare dalla Schermata principale al Menu di settaggio col
pulsante MENU. (Con l’interruttore su ON, acceso iniziare anche
dalla Schermata principale.)
Attenzione!!
Se compare nel display questa icona la emissione di luce
dev’essere ridotta per evitare il surriscaldamento dei circuiti del flash.
Prima di usare il flash attendere che l’icona scompaia.
PROCEDURE DI BASE DI REGOLAZIONE
Questa sezione descrive i principi fondamentali delle impostazioni.
Con EF-630, la maggior parte delle impostazioni possono essere
effettuate facilmente mediante le seguenti fasi.
Attenzione!!
Quando l’interruttore di accensione è posto sul segno di blocco [ ], i
settaggi non potranno essere cambiati. Bisogna spostarlo su ON,
acceso, se si desidera cambiarli.
[Impostazioni funzione Flash] e [Impostaz C.Fn flash] sebbene le
impostazioni del flash possano essere cambiate esse non sono
visualizzate nella schermata del Menu della fotocamera. Le
impostazioni si debbono effettuare direttamente nel menu del flash.
Area modalità flash
flash e fare i settaggi base.
Sottomenu
OPERAZIONI BASICHE NELLA FINESTRA PRINCIPALE
IMPOSTARE LA MODALITA’ FLASH
Impostare la modalità Flash con i
pulsanti e cambiare la modalità
con quelli oppure con la ghiera.
IMPOSTARE I DETTAGLI DELLA
MODALITA’
Impostare i dettagli usando pulsanti
e variare i valori di settaggio con i
pulsanti o con la ghiera.
87
Page 88

OPERAZIONI PRINICIPALI NEL
Velocità Otturatore
Apertura
Scelta automaticamente
(Velocità sincro flash* - 1/60 sec.)
Scelta
automaticamente
Scelta automaticamente
(Velocità sincro flash* - 30 sec.)
Consente di scegliere personalmente
il tempo di scatto purché non sia più
breve di quello di sincronizzazione*.
Scelto
automaticamente
M
Scelta personale.
*
Quando la modalità flash FP è attivata ON, il limite alla velocità di
scatto è disabilitato.
MENU DI SETTAGGIO
Ogni volta che si ruota la Ghiera si
passa a una tabulazione successiva.
(Impostata l’icona nello spazio di
tabulazione è possibile variare il menu
di settaggio premendo i pulsanti
Una volta nel Menu di settaggio
Usare pulsanti per impostare i vari
settaggi. Premere il pulsante o
per aprire i sottomenu. (In alcuni
settaggi si aprirà una schermata
dedicata o un messaggio)
Una volta nei sottomenu
Usare i pulsanti per impostare le
varie opzioni. Premere i pulsanti
per applicarle. (Premere il pulsante
per chiudere il sottomenu senza
applicare i cambiamenti)
E-TTL II / E-TTL AUTO FLASH
Uso del sistema automatic flash E-TTL II / E-TTL. Metodo da usare
nella maggior parte delle riprese.
1. Impostare la modalità Flash su [TTL]
2. Controllare nell’area di Stato che il
soggetto sia nella portata del flash.
88
3. Controllare lo stato delle batterie con la Spia Pronto e iniziare a
fotografare
Quando lo scatto è andato a buon fine nell’area di Stato comparirà,
per circa cinque secondi l’icona . Se non compare è perché la
luce emessa era insufficiente oppure troppa.Variare i parametri di
ripresa e riprovare.
VELOCITA OTTURATORE E APERTURA DIAFRAMMA
Le relazioni tra velocità dell’otturatore e aperture di diaframma in
differenti modalità d’esposizione sono illustrate sotto.
P
Av
Tv
Attenzione!!
Se si scatta quando i dati di velocità dell’otturatore e apertura del
diaframma lampeggiano, l’esposizione sarà errata. In tal caso
cambiare i parametri di ripresa.
Quando la modalità di ripresa della
fotocamera è impostata su [Basic] la
schermata cambia come si vede
nell’illustrazione Tutti I pulsanti sono
disabilitati, tranne quello TEST e
Scelta personale.
Page 89

COMPENSAZIONE ESPOSIZIONE FLASH
Primo scatto
Secondo scatto
Terzo scatto
(MODE WL TTL)
E’ possibile correggere solamente la
luce del flash e non quella ambiente.
Può essere usata nelle modalità flash
[TTL], [WL TTL], e [WL SLAVE].
Impostare il valore di compensazione
nell’area Modalità dettagli. Il valore di
compensazione varia di 1/3 (se la fotocamera offre variazioni di 1/2,
varierà di 1/2). Si può impostare un valore di compensazione
Massimo di ±3 stop.
Non impostare la compensazione dell’esposizione sulla fotocamera.
RIPRESE FEB (Bracketing Esposizione Flash)
Si possono scattare tre fotografie una
dopo l’altra con Potenza di flash variata.
Può essere usata nelle modalità flash
[TTL] e [WL TTL].
Impostare il valore di compensazione
nell’area Modalità dettagli. Il valore di
compensazione varia di 1/3 (se la
fotocamera offre variazioni di 1/2, varierà
di 1/2). Si può impostare un valore di
compensazione Massimo di ±3 stop.
Scatta tre fotografie seguendo l’avvertimento della spia pronto lampo.
Le tre foto avranno, in sequenza: giusta esposizione → sottoesposizione
→ sovraesposizione.
L’icona FEB cambia come indiciato sotto secondo il numero di scatti.
Scattate le tre fotografie la modalità FEB si disattiva automaticamente.
La modalità FEB si può combinare con la compensazione
dell’esposizione flash.
RIPRESA FE LOCK
La modalità con la quale si può correttamente esporre col flash
qualsiasi area dell’inquadratura.
It can be used with [TTL], and [WL TTL] flash modes.
1. Mettere a fuoco il soggetto
2. Inquadrare al centro della composizione l’area del soggetto che
desiderate sia esposta correttamente. Premere il pulsante [M-Fn]
della fotocamera
Il flash scatta lampi di preflash in modo da memorizzare la giusta
esposizione per il soggetto al centro dell’inquadratura.
[FEL] è visualizzato nello schermo per circa 0,5 secondi.
3. Comporre l’inquadratura desiderata e scattare la foto.
Se [ ] lampeggia nello schermo la luce flash è insufficiente.
Cambiare le impostazioni e rifare FE.
Il pulsante dove allocare FE Lock varia secondo il tipo di
fotocamera. Riferirsi al manuali d’uso della vostra fotocamera.
FLASH MANUALE
E’ possibile settare il flash secondo il giudizio personale
1. Impostare sul flash la Modalità
[MANUAL]
2. Impostare il valore flash nell’area
Modalità dettagli(Si può settare da
1/128 a 1/1, con gradini di 1/3 di EV
89
Page 90

WL TTL
E-TTL II / E-TTL auto flash
WL MANUAL
Wireless manual flash
WL MU LTI
Multi flash wireless
EF-630 ID flash secondario
A B C
EF-610 DG SUPER ID flash secondario
1 2 3
3. Controllare lo stato della batteria con la spia Pronto e poi scattare.
Nell’ Area di Stato, sezione visualizzazione distanza, è visualizzata
la distanza operativa. Anche con la medesima Potenza di flash la
esposizione corretta varierà, secondo la sensibilità ISO e l’apertura
di diaframma impostati sulla fotocamera.
La esposizione corretta nella modalità flash manuale si calcola con
la formula seguente. Numero Guida (NG)/Distanza di ripresa (m)=
Aperura diaframma
Per conoscere il NG (Numero Guida) di questo flash, leggere la
tabella alla fine di questo manuale [Tabella 1]
MULTI FLASH
E’ possibile ricreare l’immagine del movimento del soggetto
scattando una serie di flash con l’otturatore sempre aperto.
Impostare sulla fotocamera la modalità “M”, Manuale.
1. Impostare la modalità [MULT I]
2. Nell’area Modalità dettagli impostare
la Potenza del flash e il numero
dei lampi in “x”. (esempio: 10Hz
corrispondono a 10 lampi al secondo)
3. Impostare una velocità di scatto
inferiore a quella ricavata da “Numero flash”/”Frequenza dei flash”
4. Controllare la spia di carica del flash e iniziare a scattare.
Il numero di lampi che si possono scattare in sequenza dipende
dalla frequenza del lampeggiamento e il numero dei lampi.
Consultare [Tabella 2] alla fine di questo manuale.
90
FLASH TELECOMANDATO SENZA FILI
Se il flash è situato distante dalla fotocamera le possibilità creative
aumentano. Il EF-630 è pilotato a distanza dal flash incorporato alla
fotocamera o da un altro Flash con funzioni di Flash Pilota.
EF-630 possiede tre modalità wireless per applicazioni differenti.
Il flash inserito nella fotocamera è chiamato [Master], quello
distante è denominato [Secondario].
Posizionare il flash a entro una distanza compresa fra 0,5m e 5m
dal soggetto, e regolare la fotocamera per una distanza compresa
tra 1m e 5m
Quando sistemate il flash EF-630 separato dalla fotocamera,
usate la mini base, che possiede un foro filettato per il treppiede
Lo scatto del flash in wireless può esssere pilotato dal flash
integrato nella fotocamera (solo nel caso questo abbia le funzioni
di flash master per lo scatto a distanza wireless). Riguardo ai
settaggi da impostare nella fotocamera leggere il manuale
istruzioni della fotocamera.
Il modello EF-630 può anche essere usato assieme al EF-610 DG
SUPER EO-ETTL II. In questo caso si usa EF-610 DG SUPER
come flash secondario. Per il settaggio del EF-610 DG SUPER
leggere il relativo manuale (la procedura per settare EF-610 DG
SUPER come flash secondario ID è indicata nel relativo manuale)
(WIRELESS)
Page 91

PREPARAZIONE FLASH PER IL WIRELESS (MASTER)
ON
Funzione di controllo + emissione Flash*
OFF
Solamente funzione di controllo
SETTAGGIO FLASH SECONDARI
E’ possibile scattare foto con differenti
valori di luce flash dividendo I flash
secondari in due gruppi [A,B] oppure
tre [A,B,C]
1.
Una volta impostata la modalità flash
wireless desiderata e scelta l’area
che il flash deve illuminare, premere
il pulsante per aprire la finestra
di settaggio dei flash secondari.
2. Si può effettuare il settaggio del
gruppo secondario sia con il pulsante
sia con la ghiera. (Se s’imposta
OFF la ripresa non avviene con il rapporto d’illuminazione impostato)
3. Infine,
premere il pulsante
SETTAGGIO FLASH PRINCIPALE (MASTER)
Scegliere di settare il Master solamente
con funzioni di controllo oppure anche
d’illuminazione.
*Per riprese wireless il Flash Principale (MASTER) appartiene al
gruppo [A].
SETTAGGIO DEI CANALI
Se un altro fotografo utilizza flash
wireless, impostare un canale diverso
evita malfunzionamenti. (Possiamo settare
Quattro differenti canali da 1 a 4)
per tornare alla schermata normale
PREPARAZIONE FLASH PER IL WIRELESS (SECONDARIO)
1. Impostare la modalità [WL SLAV E]
2. Nello spazio dedicato alle Modalità
scegliere il medesimo canale del
Flash Principale
3. Quando si utilizza il flash dopo aver
settato la modalità wireless bisogna
impostare l’ID del flash secondario
secondo il gruppo desiderato nell’area dei dettagli delle modalità
(affinchè il flash funzioni correttamente è necessario che i flash
siano settati sul medesimo canale A, B o C)
WIRELESS E-TTL II / E-TTL AUTO FLASH
Nella modalità flash automatic E-TTL II/ E-TTL la fotocamera regola
automaticamente l’esposizione sul giusto valore.
.
Esposizione flash automatica con uno o più flash
secondari alla stessa potenza
SETTAGGI DEL MASTER
1. Settare il flash nella modalità [WL
2.
Quando necessario impostare nell’area
dettagli Modalità “Settare il canale” e
“Settare il flash principale (Master)”
SETTAGGI DEL SECONDARIO
3. Imposta i settaggi da “
(SECONDARIO)
4. Posizionare il flash secondario, attendere che sia pronto al lampo
e poi iniziare la ripresa (quando il flash è pronto al lampo
l’illuminatore AF emette una luce lampeggiante.)
”
TTL].
PREPARAZIONE FLASH PER IL WIRELESS
91
Page 92

Auto flash with flash ratio setting (two groups)
Il flash è predisposto affinchè la luce del Gruppo [A] assieme a
quella del gruppo [B] fornisca la corretta esposizione.
SETTAGGI DEL MASTER
1. Settare il gruppo di flash secondari
da [A:B] seguendo le istruzioni di
“PREPARAZIONE FLASH PER IL
WIRELESS (MASTER)”
2.
Impostare la Potenza del flash nell’area
dei dettagli Modalità (E’ possibile impostare da (8:1 a 1:8)
SETTAGGI DEL SECONDARIO
3. Imposta i settaggi da “PREPARAZIONE FLASH PER IL
WIRELESS (SECONDARIO)”.
Auto flash con settaggio della Potenza (tre gruppi)
Usare il gruppo [C] come sorgente di luce secondaria, ad esempio
per rischiarare lo sfondo dietro al soggetto.
SETTAGGI DEL MASTER
1. Settare il gruppo di flash secondari
da [A:B C] seguendo le istruzioni di
“PREPARAZIONE FLASH PER IL
WIRELESS (MASTER)”
2. Impostare la Potenza del flash da
[A:B] nell’area dei dettagli Modalità
(E’ possibile impostare da 8:1 a 1:8)
3. Impostare la compensazione dell’esposizione flash di [C] nell’area
dettagli Modalità.
SETTAGGI DEL SECONDARIO
4. Imposta i settaggi da “
(SECONDARIO)”.
PREPARAZIONE FLASH PER IL WIRELESS
92
FLASH MANUALE WIRELESS
Come è possibile scattare in luce flash manuale, così lo è scattare in
wireless. Regolare l’esposizione usando un esposimetro flash.
Flash manuale con uno o più flash secondari alla
medesima potenza.
SETTAGGI DEL MASTER
1. Settare il flash nella modalità [WL
MANUAL].
2.
Quando necessario impostare nell’area
dettagli Modalità “Settare il canale” e
“Settare il flash principale (Master)”
3. Impostare il valore flash nell’area Modalità dettagli(Si può settare
da 1/128 a 1/1, con gradini di 1/3 di EV
SETTAGGI DEL SECONDARIO
4. Settare il flash nella modalità [WL SLAVE].
5. Imposta i settaggi da
(SECONDARIO)”
6. Posizionare il flash secondario, attendere che sia pronto al lampo
e poi iniziare la ripresa (quando il flash è pronto al lampo
l’illuminatore AF emette una luce lampeggiante.)
Flash manuale con Potenza flash regolata per ciascun
gruppo
E’ possibile regolare manualemente la potenza per ciascun gruppo.
SETTAGGI DEL MASTER
1. Settare [settaggio gruppi flash] da
[A:B] o [A:B:C] secondo le istruzioni
di
“PREPARAZIONE FLASH PER IL
WIRELESS (MASTER)”
“PREPARAZIONE FLASH PER IL WIRELESS
Page 93

2. Settare la Potenza flash di ciascun gruppo nell’area dettagli
Modalità.
SETTAGGI DEL SECONDARIO
3. Imposta i settaggi da “PREPARAZIONE FLASH PER IL WIRELESS
(SECONDARIO)”.
WIRELESS MULTI FLASH
La modalità multi-flash è possibile sia con un solo flash sia con più
flash
Impostare sulla fotocamera la modalità “M”, Manuale.
Multi flash alla medesima Potenza con un solo flash o con
tutti i flash secondari
SETTAGGI DEL MASTER
1. Settare il flash nella modalità [WL
MULTI].
2.
Quando necessario impostare nell’area
dettagli Modalità “Settare il canale” e
“Settare il flash principale (Master)”
3. Nell’area Modalità dettagli impostare la Potenza del flash e il
numero dei lampi in “x”. (esempio: 10Hz corrispondono a 10 lampi
al secondo)
SETTAGGI DEL SECONDARIO
4. Imposta i settaggi da “PREPARAZIONE FLASH PER IL WIRELESS
(SECONDARIO)”
5. Impostare una velocità di scatto inferiore a quella ricavata da
“Numero flash”/”Frequenza dei flash”
6. Posizionare il flash secondario, attendere che sia pronto al lampo
e poi iniziare la ripresa (quando il flash è pronto al lampo
l’illuminatore AF emette una luce lampeggiante.)
.
Multi flash con settaggio potenza per ciascun gruppo
Il settaggio della Potenza in modalità multi-flash è possibile per due
o tre gruppi
SETTAGGI DEL MASTER
1. Impostare “Settaggio gruppi flash”
da [A:B] o [A:B:C] seguendo le
istruzioni di “PREPARAZIONE FLASH
PER IL WIRELESS (MASTER)”
2. Settare la Potenza del flash per ciascun gruppo nell’area dettagli
Modalità
3.
Nell’area Modalità dettagli impostare la Potenza del flash e il numero
dei lampi in “x”. (esempio: 10Hz corrispondono a 10 lampi al secondo)
SETTAGGI DEL SECONDARIO
4. Imposta i settaggi da
(SECONDARIO)”
Per scattare la foto continuare la procedura dal precedente punto 5.
“PREPARAZIONE FLASH PER IL WIRELESS
.
FLASH AUSILIARIO
Il EF-630 possiede una funzione che gli permette di scattare in
seguito al lampo di un altro flash. Ciò permette di scattare con il
flash distante dalla fotocamera. In questa modalità l’emissione del
lampo non è regolata automaticamente.
FLASH AUSILIARIO NORMALE
Il flash principale Master inserito nella fotocamera può essere usato
per far partire in sincronismo un lampo con il EF-630, anche se
questo è distante dalla fotocamera.
Il flash incorporato nella fotocamera emette pre flash, ciò
93
Page 94

impedisce di usarlo in questa maniera.
Impostare il flash Master in modalità Manuale e regolare la potenza
su 1/16
Impostare la modalità di esposizione della fotocamera su M e il
tempo di scatto su 1/30 o inferiore. ISO e apertura diaframma
secondo il vostro giudizio.
1.
Impostare il flash in Modalità Secondario
EF-630 to [S-FL NORMAL].
2. Nell’area Modalità dettagli impostare
ISO e valori di diaframma uguali a
quelli impostati sulla fotocamera.
3. Regolare il flash nell’area Modalità dettagli in modo che la
distanza tra flash secondario e soggetto sia simile a quella
indicate dell’area di Stato.
4. Controllare lo stato di carica e iniziare a scattare.
SCEGLIERE I FLASH SECONDARI
Se si usano due o più flash EF-630 è possibile stabilire quali flash
debbano scattare insieme mediante la selezione dei canali. In
questo modo un flash funge da flash principale e gli altri da
secondari.
Impostare sulla fotocamera l’esposizione manuale M, il tempo di
scatto su 1/30 o più breve e un valore ISO secondo il proprio
giudizio
IMPOSTARE IL FLASH MASTER
1. Impostare la modalità Flash su [S-FL
CTRL].
2. Impostare il canale desiderato.
(Nell’area Modalità dettagli scegliere
dal canale 1 al canale 3)
94
IMPOSTARE IL FLASH SECONDARIO
3. Impostare la modalità Flash su [S-FL SLAVE]
4.
Nell’area Modalità dettagli impostare il
medesimo canale del Flash Principale.
5. Nell’area Modalità dettagli impostare
il medesimo valore ISO e aperture di
diaframma del Flash Principale.
6.
Regolare la potenza del flash nell’area
Modalità dettagli in modo che la distanza tra flash secondario e
soggetto sia, approssimativamente la stessa indicata nell’Area di Stat o.
7. Controllare lo stato di carica e iniziare a scattare.
Nella modalità Flash Secondario questo flash può essere usato
assieme a EF-630 e / o EF-610 DG SUPER. (Maggiori dettagli sul
settaggio consultare questo manuale)
FUNZIONI AGGIUNTIVE
Il capitolo descrive le funzioni aggiuntive che possono essere
aggiunte al Menu di Settaggio.
SINCRONIZZAZIONE SULLA SECONDA TENDINA (MENU 1)
Il flash scatta appena prima della chiusura dell’otturatore. Sono
registrate quindi le luci dietro il soggetto e l’eventuale scia di luce
che questo lascia; la fotografia mostra il movimento del soggetto.
Può essere usata nelle modalità di esposizione P, Av, Tv, e M
Può essere usata con le modalità flash [TTL], [MANUAL], e [WL]
1. Impostare [MENU 1] → [REAR CURTAIN SYNC] → [ON].
2. Tornare alla Finestra principale (Comparirà nell’area di stato
l’icona
Page 95

NORMAL
Regolazione di default
Irraggiamento a priorità numero guida
perciò il numero guida è più alto.
Luce diffusa
uniforme su tutto il campo inquadrato.
1 TIME (1 VO LTA)
Regolazione di default
Modeling flash
ombre.
Attenzione!!
Questa funzione non può essere impostata su “ON” nelle modalità
flash perché incompatibile
FLASH FP (Sincro ad Alta Velocità) (MENU 1)
Il flash FP emette una serie di lampi mentre scorrono le tendine
dell’otturatore. Perciò è possibile usare tempi di scatto più veloci di
quelli di sincronizzazione.
Può essere usato con le modalità di esposizione P, Av, Tv, e M
Può essere usato con le modalità Flash [TTL], [MANUAL], [WL TTL]
e [WL MANUAL]
1. Impostare [MENU 1] → [FP] → [ON].
2. Tornare alla Finestra principale. (Nell’area di stato comparirà
l’icona )
Se siete nella modaltà TTL controllate che il soggetto sia nel raggio
d’illuminazione controllando la distanza indicata nell’area di Stato,
poi iniziate a scattare.
Nella modalità [MANUAL] regolate l’apertura del diaframma ecc…
prima di iniziare a scattare, in modo che la distanza dal soggetto e
quella indicata nell’area di Stato coincidano.
Il Numero Guida varia secondo la velocità dell’otturatore.
(Consultare la tabella 3 dell'ultima pagina)
Attenzione!!
La funzione non può essere settata su “ON” perché non compatibile
con il flash FP.
MODALITÀ IRRAGGIAMENTO LUCE (MENU 1)
Il flash EF-630 ha tre modalità di irraggiamento della luce, da
scegliere secondo il soggetto.
[MENU 1] → [LIGHT DISTRIBUTION]
-
GN
DIFFUSE
Irraggiamento normale
Riprese generiche
L’angolo di emissione è più ristretto,
Fornisce una illuminazione diffusa e
TEST FLASH (MENU 2)
EF-630 possiede due modalità Test. Una delle due può essere
allocata nel pulsante Test.
[MENU 2] → [TEST FLASH]
Test flash
Esegue un solo lampo test.
Può essere usato con le modalità Flash
MODELING
[TTL], [MANUAL] e [MULT I].
Quando il pulsante TEST è tenuto premuto,
per circa 1,5 secondi vengono emessi lampi
continui così che si possano controllare le
95
Page 96

Dopo 8 secondi di inattività l’illuminazione si
spegne.Quando si aziona un comando
l’illuminazione si riaccende.
Che sia stato usato il pulsante o la ghiera dopo
spegne.
ON
L’illuminazione rimane sempre accesa
Attenzione!!
I settaggi per l’illuminazione di riempimento [MODELING] non
possono essere impostati in nessun gruppo perché tale modalità
non è possibile.
Quando fotocamera e flash comunicano non è possibile azionare il
pulsante TEST. (Premendo il pulsante della Profondità di campo si
emette un flash di riempimento, indipendentemente dalla allocazione
del tasto TEST)
MODALITA PERSONALIZZATA (MENU 3)
E’ possibile memorizzare e richiamare
settaggi personalizzati.
(Possono essere memorizzate due
serie di settaggi personalizzati)
MEMORIZZARE E RICHIAMARE
SETTAGGI PERSONALIZZATI
1. Impostare la Modalità Flash, Modalità area dettagli, e menu di
Settaggio come desiderato.
2. Da [MENU 3] → [CUSTOM MODE SETTING], scegliere [C1] o
[C2] e premere il pulsante .
3. Scegliere [OK] e confermare con il pulsante
Le variazioni saranno aggiunte alle modalità Flash come Modalità
Personalizzate. (La modalità Personalizzata è indicata con le icone
o nell’area Modalità Flash.)
CANCELLARE LE MODALITA PERSONALIZZATE
1. Da [MENU 3] → [CUSTOM MODE DELETE], scegliere [C1] o
[C2] premere il pulsante .
2. Impostare [OK] e confermare con il pulsante .
96
ILLUMINATORE AF (MENU 4)
L’illuminatore AF si attiva automaticamente quando si mette a fuoco
in condizioni di luce scarsa. La portata dell’illuminatore AF va da
circa 0.7 a circa 10 metri.
Quando non è necessario l’illuminatore AF impostare [MENU 4]
→ [AF ASSIST LIGHT] → [OFF].
ILLUMINAZIONE DEL PANNELLO LCD (MENU 4)
Quando si accende l’alimentazione il pannello LCD s’illumina. I
settaggi ON/OFF possono essere cambiati.
[MENU 4] → [LCD LIGHT]
AUTO
Regolazione di default
8 SEC
Secondo il settaggio l’illuminazione può essere accesa/ spenta
con il pulsante
8 secondi dall’accensione l’illuminazione
si
REGOLAZIONE SCHERMO LCD (MENU 4)
Contrasto e luminosità dello schermo LCD possono essere regolati
[MENU 4] → [DISPLAY SETTING]
Page 97

LUMINOSITA
Regolare la luminosità usando i pulsanti
CONTRASTO
Regolare il contrasto con i pulsanti
M (Default)
Indicazioni in metri
FEET
Indicazioni in piedi
MODEL
Nome del modello
SERIAL No.
Numero di serie
VERSION
Versione firmware
BRIGHTNESS
CONTRAST
Per terminare la regolazione impostare [OK] e premere il pulsante
Per cancellare la regolazione impostare [CANCEL] e confermare
con il pulsante
CAMBIARE L’UNITA DI MISURA (MENU 4)
L’unità di misura nell’area di Stato può essere variata
[MENU 4] → [M / FEET]
INFORMAZIONI SUL FLASH (MENU 5)
Si possono vedere le seguenti informazioni
[MENU 5] → [INFORMATION]
INIZIALIZZAZIONE DEI SETTAGGI (MENU 5)
E’ possibile resettare il flash ai valori di default
[MENU 5] → [RESET SETTINGS]
Per inizializzare i settaggi scegliere [OK] e premere il pulsante .
Compiuto
il
reset tutte le personalizzazioni risulteranno cancellate.
ALTRE FUNZIONI DI USO CORRENTE
REGOLARE LA TESTA DEL FLASH
Con la regolazione automatica della
testa del flash (Auto),
automaticamente questa regola
l’angolo di emissione della luce
secondo la focale dell’obiettivo.
La testa del flash si regola sulle
dimensioni del sensore per questo la focale visualizzata nello
schermo del flash potrebbe essere diversa da quella realmente
usata.
Secondo le modalità flash la regolazione della testa va fatta
secondo la focale dell’obiettivo.
I settaggi relativi alla testa del flash possono essere cambiati
manualmente. Premere i pulsanti nell’area Modalità dettagli.
AUTO ⇔ 24 ⇔ 28 ⇔ 35 ⇔ 50 ⇔ 70 ⇔ 85 ⇔ 105 ⇔ 135 ⇔ 200mm
A seconda della regolazione della parabola del flash, la sua
potenza può variare
97
Page 98

DIFFUSORE GRANDANGOLARE
Il flash incorpora un filtro diffusore grandangolare che assicura la
copertura fino alla focale del supergrandangolare da 17mm.
Estrarre il pannello diffusore assieme al pannello riflettente dalla
testa del flash. (Estrarre i pannelli lentamente, con delicatezza.) Poi
spingere il pannello riflettente nel suo alloggiamento. P.3-(7)
L’area del flash nel quale sono indicati dettagli delle modalità
d’uso riporterà l’icona quando lo schermo grandangolare è
in uso.
FLASH INDIRETTO
Volgendo il flash verso il soffitto o una parete è possibile ottenere
immagini con luce diffusa e ombre poco marcate.
La testa del flash può essere ribaltata verso l’alto di 90°, in basso di
7° e ruotata a destra e sinistra di 180° P.3-(8)
Usando il flash modalità Luce Riflessa nell’area di Stato comparirà
la scritta
L’immagine sarà influenzata dal colore dalla superficie riflettente.
Meglio se pareti e soffitto sono bianchi.A causa della riflettanza
della superficie, della distanza del soggetto e di altri fattori,
l’effettiva distanza per la modalità TTL AUTO può variare.
ESPOZISIONE CLOSE-UP
Inclinando verso il basso di 7° la testa si illuminerà meglio, nelle foto
a distanza ravvicinata, la parte bassa del fotogramma.
Quando la testa è inclinata verso il basso di 7° nell’area di Stato
l’indicazione della distanza si metterà a lampeggiare.
98
PANNELLO RIFLETTENTE
Il flash incorpora un pannello riflettente che contribuisce a creare il
punto di luce di luce negli occhi del soggetto quando si usa il flash
nella modalità di lampo riflesso. Estrarre il pannello diffusore e
quello riflettente e riposizionare il diffusore nel suo alloggiamento.
(Estrarre diffusore e pannello con la massima delicatezza.) P.3-(9)
Per utilizzare nel modo migliore il pannello diffusore, ribaltare di
90° gradi in alto la testa del flash e riprendere il soggetto da breve
distanza. P.3-(10)
PRESA SINCRO
EF-630 possiede una presa sincro che permette di collegare la
fotocamera ai cavetti sincro.
Quando si fotografa con il cavetto sincro si deve usare il flash in
modalità [MANUAL ]
Tramite [MENU 2] → [ISO] [F-NUMBER], impostare ISO e valore
di diaframma (F) come sulla fotocamera. Regolare la Potenza del
flash nella area Modalità finchè la distanza visualizzata nell’area di
Stato sia simile a quella tra flash e soggetto.
Attenzione!!
La modalità E-TTL II / E-TTL auto non è attiva quando si usa con il
cavetto sincro.
La presa Sincro EF-630 ha il contatto + al centro e quello – alla
periferia. Se il cavetto ha polarità invertita usare un comune
convertitore di polarità.
Page 99

SICUREZZA CONTRO OPERAZIONI INDESIDERATE
Un beep corto
Indica che la ricarica è terminata
Due corti beep
Indica che la regolazione della luce è OK
Un lungo beep (2 sec.)
Attenzione: errore
Quando l’interruttore è nella posizione di blocco [ ], tutti i comandi
sono disabilitati, tranne quello TEST e quello dell’illuminazione ,
ciò per evitare variazioni di settaggi accidentali.
Quando
il
flash è bloccato nell’area di Stato apparirà questa icona .
BEEP SONORO
Certi stati d’uso del flash sono indicati anche con un beep sonoro
che evita di controllare il pannello LCD.
Spostare l’interruttore del BEEP presente sul frontale dell’apparecchio
su [ON]. (Una volta spostato su ON nell’ area di Stato comparirà
l’icona )
SPECIFICHE
MODELLO: Flash con slitta a contatto caldo, auto zoom, TTL
NUMERO GUIDA: 63 (ISO 100, posizione parabola su focale 200mm)
ALIMENTAZIONE: Quattro batterie alcaline AA, oppure quattro
batterie Nickel-Metal Hydride
TEMPO DI CARICA: circa 3.0 secondi (batterie alcaline);
circa 1.8 secondi con batterie Nickel-Metal Hydride)
NUMERO LAMPI: circa 120 (con batterie alcaline); circa 185 (con
batterie Nickel-Metal Hydride)
DURATA DEL LAMPO circa 1/700 (a piena potenza)
COPERTURA FOCALI: 24-200mm, con spostamento motorizzato
della parabola;
17mm con diffusore incorporato
PESO: 490 gr DIMENSIONI: 79.4x148.4x121.5mm
Questo è il marchio di conformità alle direttive della comunità Europea (CE).
SIGMA (Deutschland) GmbH
Carl Zeiss Str. 10/2, D 63322 Roedermark, Germany
Verkauf:01805-90 90 85-0
Service:01805-90 90 85-85 Fax(Service):01805-90 9 0 85-35
Smaltimento domestico dei rifiuti elettrici ed elettronici
Smaltimento dei rifiuti elettrici ed elettronici (Per gli Stati UE e dell’Europa con
raccolta differenziata dei rifiuti)
Il simbolo indica che questo prodotto non deve essere considerato un normale
rifiuto domestico. Perciò deve essere raccolto separatamente, in modo da
permettere il riciclo dei suoi componenti elettrici ed elettronici. Quando si
sostituisce con un nuovo prodotto, deve essere consegnato al distributore o al
centro di raccolta per lo smaltimento dei rifiuti elettrici ed elettronici. Assicuratevi
che il prodotto sia smaltito correttamente, a iuterete a prevenire negative
conseguenze per l’ambiente e per la salute umana, che potrebbero essere
causate dal suo inappropriato smaltimento. S e questo prodotto è smaltito
contrariamente a quanto prescrive la legge, si può andare incontro a sanzioni.
99
Page 100

For at undgå at forvolde skade, læs venligt denne indstruktions
manual grundigt før brugen af blitzen. Læg venligst især mærke til
de følgende to symboler.
Tilsidesættelse af dette advarsels symbol under
vendelse af produktet, kan afstedkomme
alvorlig tilskadekomst eller anden alvorlig tilstand
Anvender man produktet og tilsidesætter dette
advarsels symbol, kan man risikere tilskadekomst
eller anden alvorlig tilstand.
Dette symbol understreger en advarsel eller punkt, hvor
forsigtighed tilrådes.
Dette Symbol indeholder information om de handlinger der
skal undgås.
Denne Blitz indeholder et højspændingskredsløb. For at
undgå elektrisk stød eller forbrændinger, forsøg aldrig at skille
blitzen ad. Hvis produktets skal er ødelagt eller revnet rør
aldrig ved mekanismen inden i.
Udlad ikke blitz lyset tæt på øjnene. Det kraftige blitzlys kan
beskadige øjnene. Hold minimum 1m/100cm afstand mellem
blitz og ansigt.
Rør ikke ved kameraets syncrostik når blitzen er monteret I
kameraets blitz-sko. Højspændings kredsløbet kan forårsage
elektrisk stød.
Anvend aldrig dit kamera på steder hvor letantændelige
gasser, flydende brændstof eller kemekalier e.t.c er
opbevaret, der kan være fare for eksplotion.
Dæk ikke for blitzhovedet med dine hænder, og undlad at
udløse blitzen tæt på din hud, det kan afstedkomme brændsår.
Undlad at udløse blitzen mod bilister da det kan være skyld I
ulykke.
Anvend ikke denne blitz enhed på andre kameraer end
Canon
serie kameraer, Ellers kan blitzen beskadige
kameraets kredsløb.
Denne blitz enhed er ikke vandtæt. Når blitzen og kameraet
anvendes i regn, sne eller tæt på vand, sørg for at udstyret
ikke bliver vådt. Det er ofte ikke muligt at reparere elektriske
komponenter der har været beskadiget af vand.
Udsæt aldrig blitz og kamera for stød, høje temperature, støv
eller fugtighed. Disse faktorer kan muligvis udløse brand eller
fejlfunktioner på udstyret.
Når blitzen udsættes for pludselige temperaturskift,som når
blitzen flyttes fra f.eks koldt udendørs til et varmt indendørs
miljø, dannes der kondens fugt på indersiden. I disse tilfælde,
placer
bruge
udstyret til det har nået almindelig indendørs rumtemperatur.
Opbevar ikke din blitz I en skuffe eller skab med naftalin
kamfor eller andre insektmidler. Disse kemikalier vil have en
negativ effect på produktet.
Brug aldrig Fortynder, Benzin eller andre rensevæsker for at
fjerne skit eller finger aftryk fra komponenterne. Rens i stedet
DANSK
Mange tak for dit køb af Sigma`s elektroniske blitz EF-630 til Canon.
For at gøre din nydelse ved fotografering endnu større har denne
blitz fået tilføjet flere nye funktioner. For at udnytte disse funktioner
og få maksimal udbytte af din nye blitz, læs da venligst
instruktionsbogen sammen med manualen til dit kamera, og hav
dem altid i nærheden for ekstra referencer.
SIKKERHEDS FORHOLDSREGLER
Advarsel !!
Forsigtighed !
Advarsel !!
100
an
!
Forsigtighed !!
EOS
dit udstyr I en forseglet plastik pose, og vent med at
 Loading...