

Page 1

T
T
用戶手冊
A
K
文
E L E C T R O N I C F L A S H
F18E10081
EF-610
BEDIENUNGSANLEITUNG
ISTRUZIONI PER L’USO
BRUGSANVISNING
GEBRUIKSAANWIJZING
PУКOВOДCТВO ПO ЭКСПЛУАТАЦИИ
MANUAL DE INSTRUÇÕES
EO-E
使用説明書
INSTRUCTIONS
MODE D’EMPLOI
INSTRUCCIONES
사용자 설명서
L II
DG SUPER
日本語
ENGLISH
DEUTSCH
FRANÇ
ESPAÑOL
ITALIANO
DANS
NEDERLANDS
中
한 국 어
РУCCКИЙ
PORTUGUÊS
2~14
15~27
28~42
43~56
IS
57~70
71~83
84~95
96~
108~118
119~130
131~144
145~157
107
Page 2
1
3
5
6
4
2
7
8
9
10
11
13 14 15 16
17
12
19
18
ENGLISH
The CE Mark is a Directive conformity mark of the European Community (EC).
DEUTSCH
Die CE-Kennzeichnung ist eine Konformitätserklärung des Herstellers, die dokumentiert, daß das betreffende
Produkt die Anforderungen von EG-Richtlinien einhält.
FRANÇAIS
Le label CE garantit la conformité aux normes établies par la Communauté Européenne.
NEDERLANDS
Het CE teken is een aanduiding voor de Europese Gemeenschap (EC).
ESPAÑOL
El logotipo CE es una directiva de conformidad con la Comunidad Europea (CE).
ITALIANO
Questo è il marchio di conformità alle direttive della comunità Europea (CE).
SVENSKA
CE-märket betyder att varan blivit godkänd av EU:s gemensamma kvalitetsnorm.
DANSK
CE-mærket er i overensstemmelse med de gældende regler i EU.
PORTUGUÊS
A marca CE garante a conformidade com as normas estabelecidas pela Comunidade Europeia.
SIGMA (Deutschland) GmbH
Carl-Zeiss-Str. 10/2, D-63322 Rödermark, F.R.GERMANY
Verkauf: 01805-90 90 85-0 Service: 01805-90 90 85-85 Fax: 01805-90 90 85-35
1
20
21
Page 3
日本語
このたびは、シグマエレクトロニックフラッシュ EF-610 DG SUPER EO-TTL II をお買い上げいただ
きありがとうございます。このフラッシュはキヤノン EOS シリーズ用として開発したフラッシュです。
キヤノン EOS シリーズの AF 一眼カメラに使用できます。カメラにより、使用できる機能や操作方法
が異なりますので、ご使用カメラに該当する箇所を選んでお読みください。本説明書をご精読の上、
フラッシュの機能、操作、取り扱い上の注意点を正しく理解して、写真撮影をお楽しみください。な
お、ご使用のカメラの説明書の、フラッシュの使用方法に関する項目もあわせてご覧ください。お読
みになった後は、お使いになる方がいつでも見られる所に必ず保管してください。
安全上のご注意
人的損害や物的損害を未然に防止するため、ご使用の前にこの項目の内容を十分ご理解いただくよう
お願いします。
この表示を無視して、誤った取り扱いをすると、人が死亡または重傷を負う可能性が想定され
警告
る内容を示しています
この表示を無視して、誤った取り扱いをすると、人が障害を負う可能性が想定される内容およ
注意
び物的損害の発生が想定される内容を示しています。
記号は注意、もしくは警告を促す内容を告げています。
記号は行為を禁止する内容を告げています。
。
警 告
フラッシュ内部には、高電圧回路が組み込まれています。感電や火傷のおそれがありますので、分解、
改造等は絶対にしないでください。また、万一落下等で破損した場合には、内部の部品に手を触れぬ
よう十分注意して下さい。
フラッシュを人の目に近づけて撮影しないでください。目の近くでフラッシュを発光すると視力障害
を起こす危険性があります。特に、乳幼児を撮影するときは 1m 以上離れてください。
カメラのホットシューにフラッシュを接続して使用するときには、カメラのシンクロターミナルに手
を触れないでください。高電圧がかかり感電することがあります。
可燃性のガスが大気中に存在するおそれのある場所では、使用しないでください。火災の原因となり
ます。
注 意
このフラッシュをキヤノン EOS シリーズ以外のカメラには使用しないでください。誤動作やカメラ
の電子回路に悪影響を及ぼす可能性があります。
このフラッシュは防水構造になっていません。雨天や水辺で使用するときは、濡らさないように注意
して下さい。水が内部に入り込みますと故障の原因になります。
ホコリの多い場所や、高温、多湿になる場所に放置しないでください。故障や火災の原因となります。
急激な温度変化により、フラッシュ内部に結露が生じることがあります。寒い屋外から暖かい室内に
入るときなどは、ケースやビニール袋に入れ、周囲の温度になじませてから使用してください。
防虫剤はフラッシュに悪影響を与えます。タンスや押入などに保管しないでください。
シンナー、ベンジン等の有機溶剤で拭かないでください。変色、変形等の原因となります。
フラッシュは使用せずに放置すると性能が劣化します。1ヶ月に1度を目安に発光テストを数回行っ
てください。
2
Page 4

各部の名称(1 ページ)
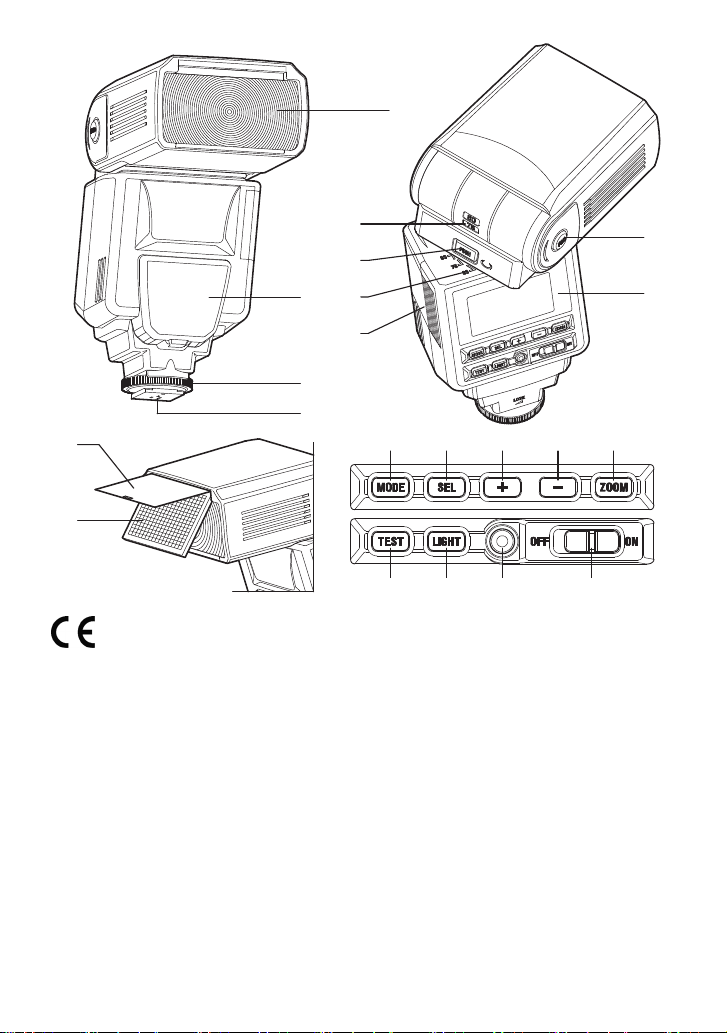
1.発光部 2.AF補助光発光部 3.上下バウンス角度表示 4.左右バウンス角度表示
5.上下バウンスロック解除ボタン 6.左右バウンスロック解除ボタン 7.液晶パネル
外観部
8.電池室カバー 9.シュー締付けリング 10.取付けシュー 11.キャッチライトパネル
12.ワイドパネル
13.MODE ボタン 14.SEL ボタン 15. + ボタン 16. - ボタン 17.ZOOM ボタン
操作部
18.TEST ボタン 19.LIGHT ボタン 20.レディライト 21.電源スイッチ
機能の制限について
このフラッシュは様々な機能を備えていますが、装着するカメラのタイプにより使用できる機能が限
定されます。ご使用のカメラがどのタイプに該当するか下表を参照してください。各機能説明のタイ
トル、もしくは本文中に、カメラ名、カメラタイプが明記されていない項目は、どの EOS カメラでも
使用できる機能です。
A タイプカメラ E-TTL(E-TTL II)対応の EOS 一眼レフカメラ
B タイプカメラ 上記以外のすべての EOS カメラ
電池について
このフラッシュには電源として、単三形のアルカリ乾電池、もしくはニッカド電池、ニッケル水素電
池を 4 本使用します。レディライトの点灯まで 30 秒以上かかるときは、電池を 4 本とも新しいものと
交換してください。
◆ 電池や電池室カバーの接点は、常にきれいにしてください。
◆ 単三形ニッカド電池を使用する場合は、電池側の接点の形状が規格で統一されていませんので、使
用できることを確認してからお買い求めください。
◆ 交換するときには 4 本とも同じメーカーの同じ種類のものを使用してください。誤った使い方は、
液漏れ、発熱、破裂等のおそれがあります。
◆ 電池を分解したり、火中、水中への投下、ショート等は破裂のおそれがありますので、絶対にしな
いでください。また、ニッカド電池以外は充電しないでください。
◆ 撮影が済みましたら、電池を取り出して保管してください。電池を入れたまま長期間放置しますと、
液漏れが生じてフラッシュ内部を損傷するおそれがあります。
◆ 長期間の旅行、寒冷地での撮影、または大量に撮影するときには、予備の電池をご用意ください。
◆ 寒冷地では電池の性能が極端に低下します。電池を保温しながら使用してください。寒冷地での撮
影にはニッカド電池の使用をおすすめします。
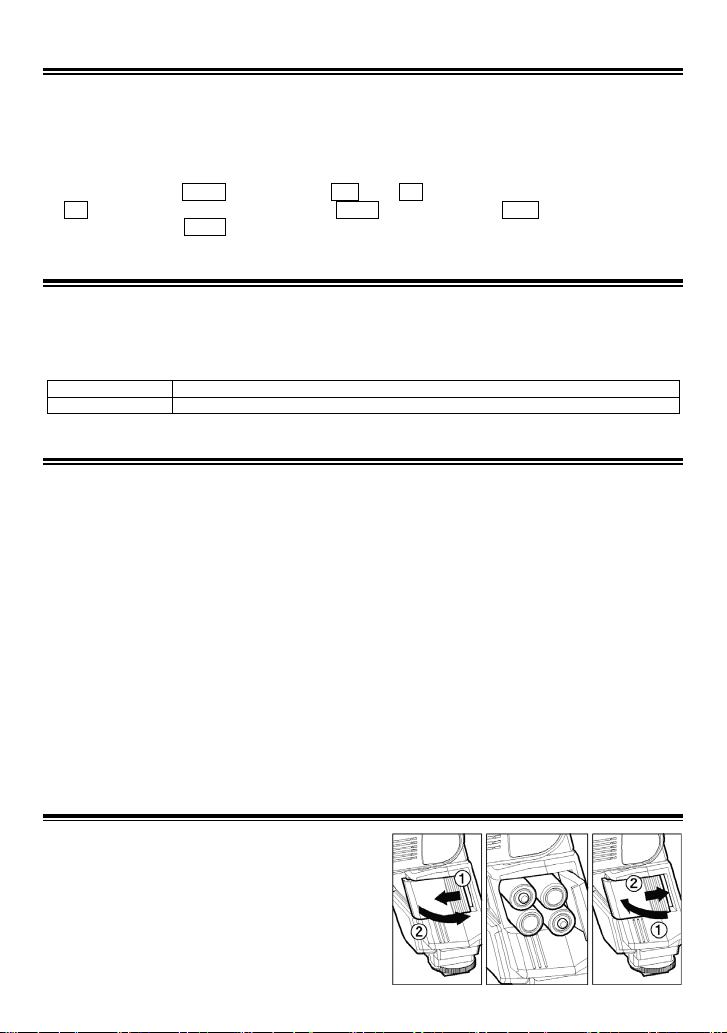
電池の入れ方
① 電源スイッチが OFF になっているのを確認して、
電池室カバーを図のように開きます。
② 単三形電池 4 本を電池室カバー内面の表示に従い、
電池の+-の向きを間違えないように入れます。
③ 電池室カバーを戻して閉じます。
④ 電源スイッチを ON にすると充電が開始され、発光
可能な状態まで充電されるとレディライトが点灯
します。
⑤ TEST ボタンを押して、発光するか確認します。
3
Page 5
オートパワーオフ機構について
このフラッシュにはオートパワーオフ機構がついています。電源スイッチが ON の状態で、約 90 秒間
フラッシュの操作がないと、電池の消耗を防ぐため自動的に電源が OFF になります。TEST ボタンを
押すか、カメラ本体のシャッターボタンを半押しすると再度電源が ON になります。ただし、ワイヤ
レスのスレーブモード、通常スレーブモード、指定スレーブモードでは、オートパワーオフ機構は働
きません。
エラー表示について
電池が消耗したり、電気信号に異常が生じた場合、液晶パネルの照射角表示が点滅することがありま
す。このエラー表示が出た場合には、電源スイッチを一旦 OFF にしてから、再度 ON にしてください。
それでも表示が消えない場合には電池を点検してください。
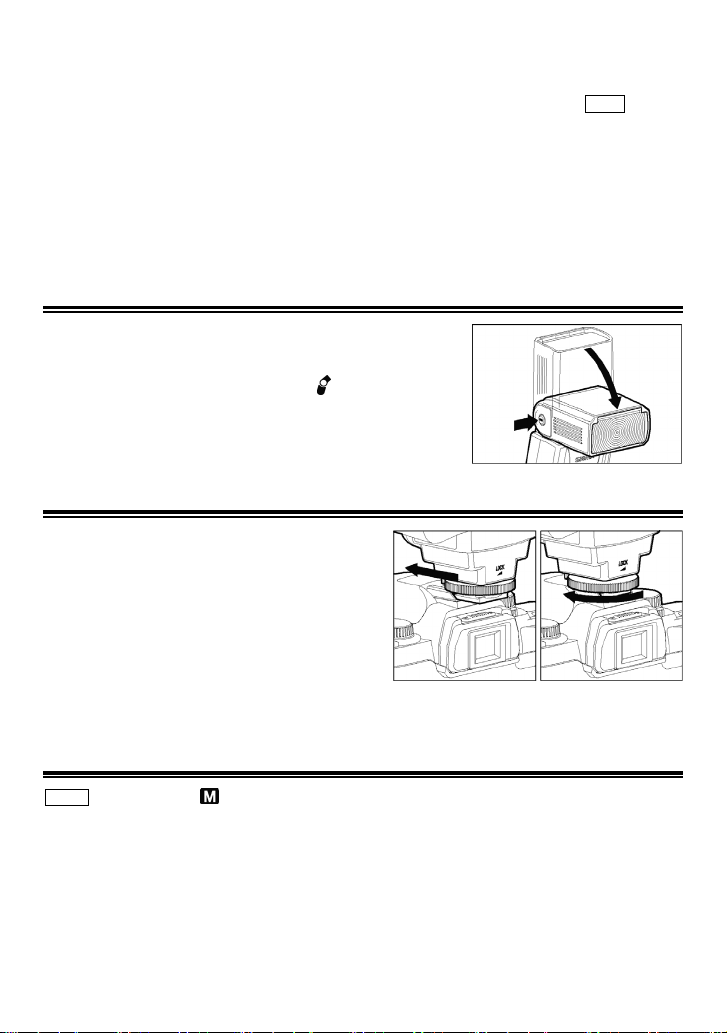
発光部のセット
上下バウンスロック解除ボタンを押しながら、発光部を正面方向に
セットします。
◆ 電源スイッチを ON にし、液晶パネルに マークが点灯、もし
くは点滅表示された場合、発光部は正しく正面方向にセットされ
ていませんのでご注意ください。
カメラへの取り付け方
電源スイッチが OFF になっているのを確認してから、
カメラのホットシューに止まるまで差し込みます。シ
ュー締付けリングを回し固定してください。
◆ カメラへの着脱はフラッシュの下部を持って行い、
取付けシューやカメラのホットシューに無理な力が
加わらないように注意してください。
◆ フラッシュ内蔵のカメラでは、必ず内蔵フラッシュ
を収納した状態で取り付けてください。
◆ 取り外す際には、シュー締め付けリングを◄LOCK と反対方向に最後まで回してからカメラから外
してください。
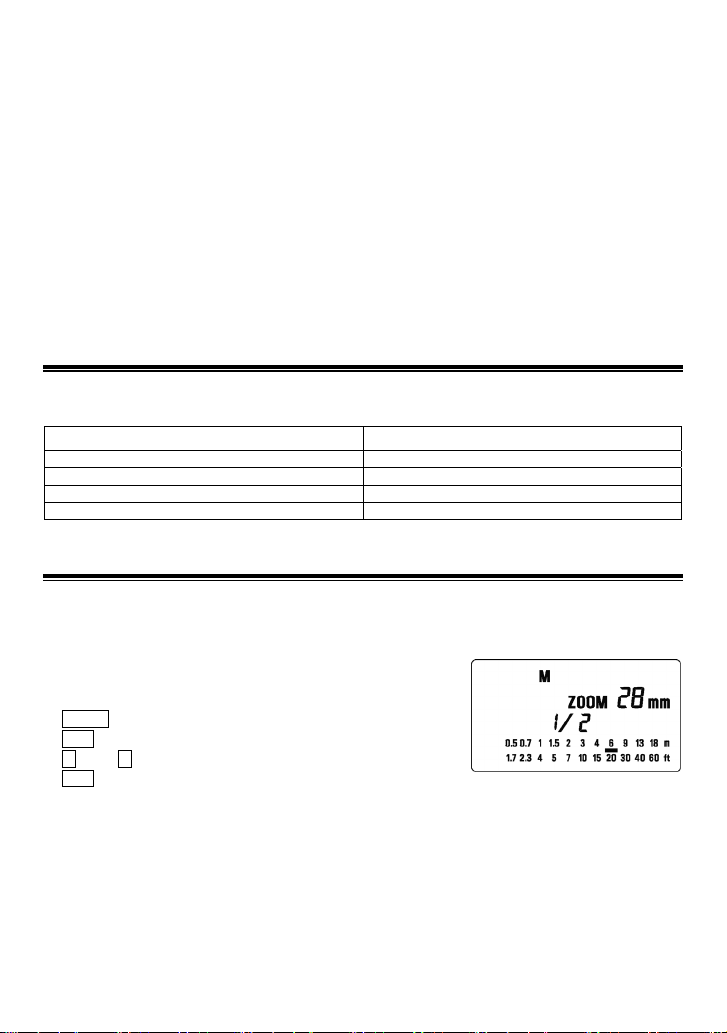
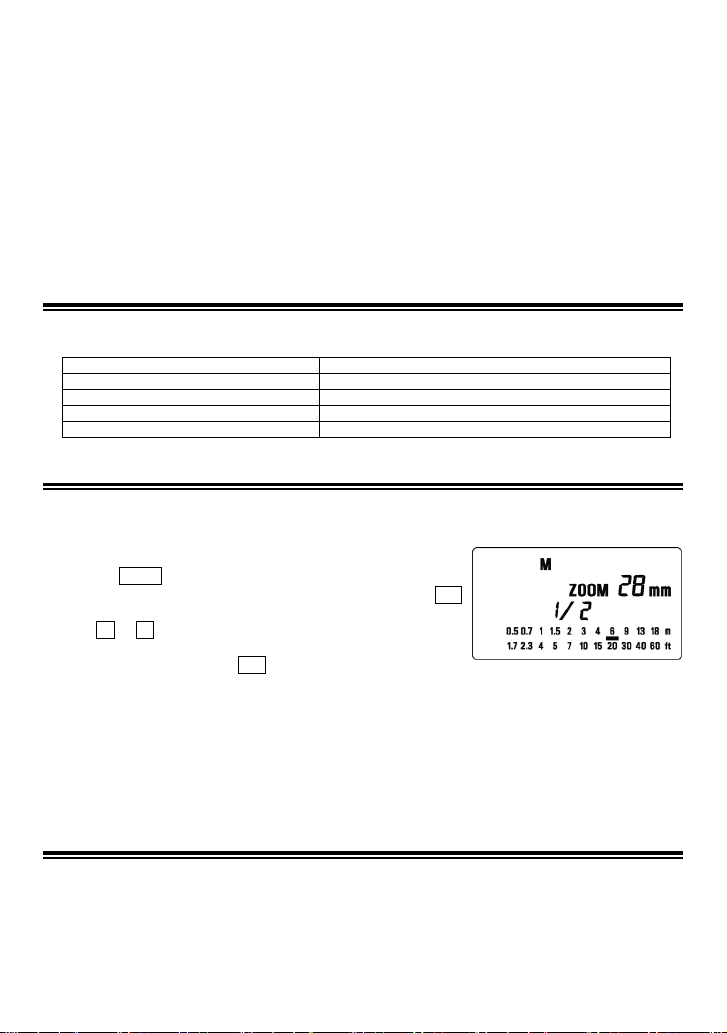
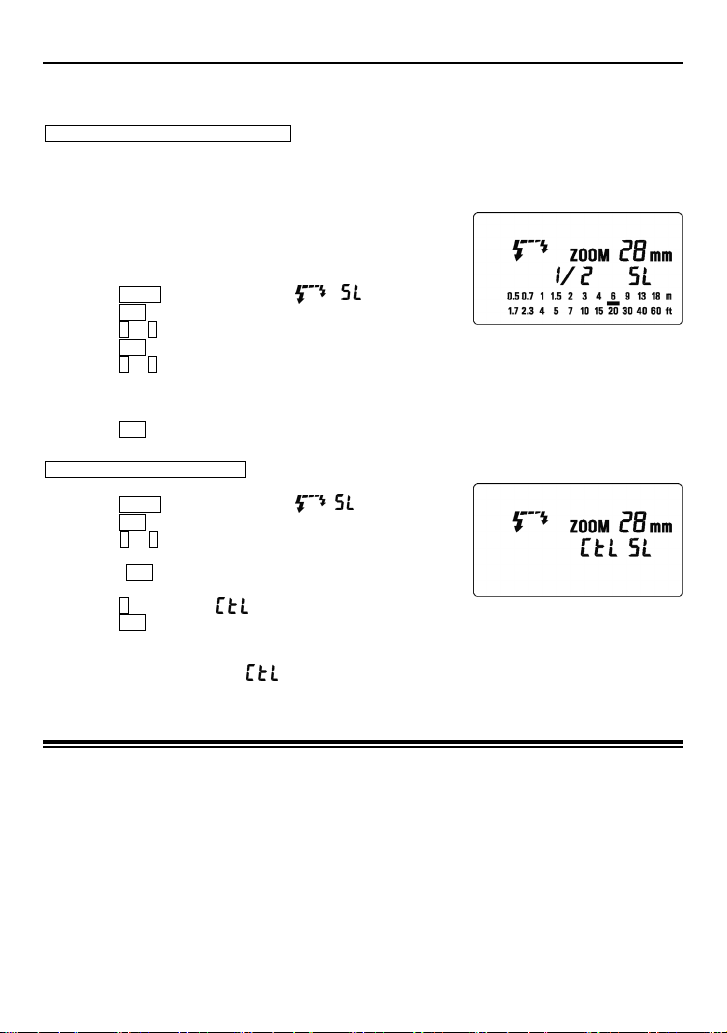
照射角のセット
ZOOM ボタンを押すと の表示が出て、ボタンを押すごとに照射角が次のように切り換わります。
24mm → 28mm → 35mm → 50mm → 70mm → 85mm → 105mm →(自動)
通常は、ETTL(TTL)モードにセットしておくと、使用レンズの焦点距離に合った照射角に自動的に
セットされます。
◆ 電源を ON にすると
◆ レンズの焦点距離よりも望遠側
◆ 照射角が変わると、ガイドナンバーも変化します。
、
自動的に前回使用した照射角にセットされますので、表示を確認してください。
(
数値の大きい方)にセットした場合は、画面の四隅が暗くなります。
4
Page 6

ワイドパネルについて
このフラッシュは通常状態で 24mm の画角をカバー
します。17mm までの広角レンズを使用するときには、
ワイドパネル+キャッチライトパネルを止まるまで引
き出します (強く引っ張らないでください)。 キャッ
チライトパネルは元の位置に収納してください。照射
角は自動的に 17mm 画角対応にセットされます。
事故などによりワイドパネルが外れると、ZOOM ボ
◆
タンが機能しなくなります。ご購入店、もしくは弊
社営業所に修理をお申しつけください。
液晶パネルの照明
LIGHT ボタンを押すと、約 8 秒間液晶パネルが照明されます。照明中に再度 LIGHT ボタンを押すと、
その時点から更に 8 秒間照明が継続します。
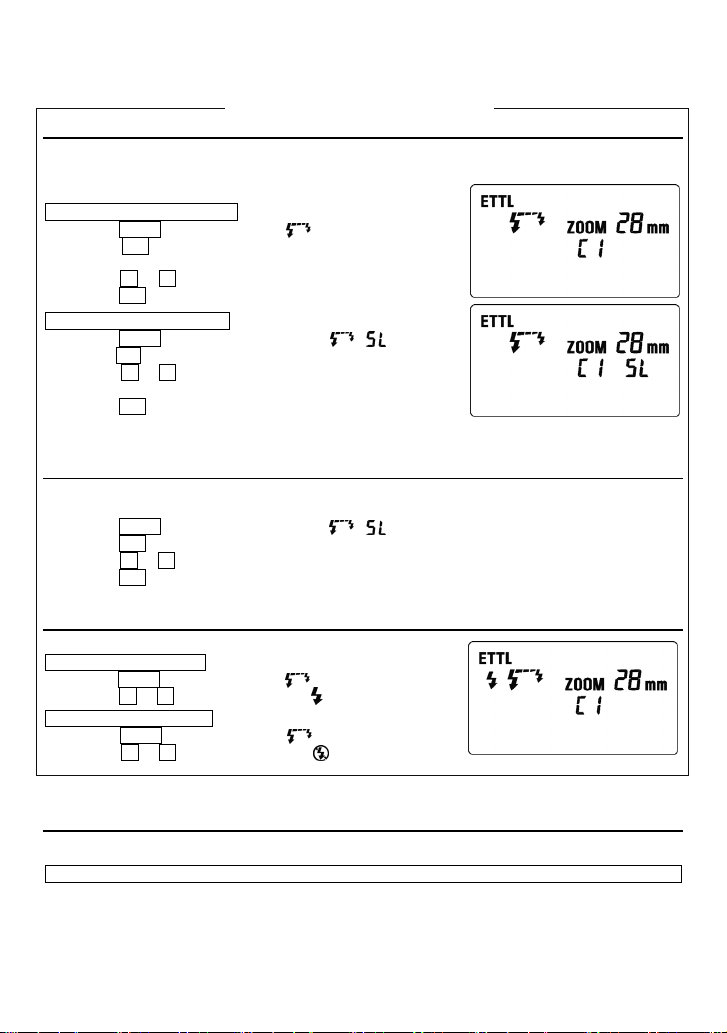
ETTL(TTL)撮影
ETTL (TTL)モードでは、被写体が適正露出になるように、フラッシュの発光量をカメラが制御します。
◆ A タイプカメラでは ETTL モード、B タイプカメラでは TTL モードに設定されます。
① カメラを全自動モードにセットします。
(通常は、
② フラッシュの電源スイッチを ON にすると、ETTL(TTL)の表
③ 被写体にピントを合わせます。
④ 被写体が撮影可能範囲にあるか、液晶パネルの距離表示で確認し
⑤ 充電完了を確認してから、シャッターボタンを押して撮影します。
◆ フラッシュ撮影が正常に行われると、フラッシュの液晶パネルの ETTL(TTL)の表示が 5 秒間点滅
◆ 暗い場所ではオートフォーカスの作動を助けるために、AF 補助光が照射されます(有効範囲・約 0.7m
◆ カメラがクリエイティブゾーンにセットされていると、前回使用したモードにセットされます。
◆ 充電が完了すると、ファインダー内にフラッシュマークが点灯します。充電が完了していないと、
各撮影モードでのフラッシュ撮影(EOS700、750、850 では使用できません。)
シャッター速度を任意にセットしたいとき
カメラを Tv モードにセットすると、カメラの同調速度~30 秒の間でシャッター速度を任意に選択で
きます。シャッター速度を任意にセットすると、バックが最適となる絞りを選びます。明るい場面や
暗い場面で絞りが連動できる範囲を超えてしまうと、絞りの表示が点滅して警告します。そのまま撮
影すると、背景が露出オーバーまたはアンダーとなりますが、被写体は適正となります。シャッター
速度を調整して絞りの表示が点灯するように調整すると、明るい場面ではデーライトシンクロに、暗
い場面ではスローシンクロとなり、被写体とバックが共に適正露出になる絞りが選ばれ自動調光され
ます。
5
□
モード。□モードの無いカメラでは、P モード)
示が液晶パネルに出て、充電が始まります。
ます。
します。点滅しないときは、光量が不足していますので被写体に近づき撮影し直してください。
~9m)。シャッターボタンを半押ししてファインダーのフォーカスマークが点滅しているときは、
AF 補助光がとどいていませんので、シャッターボタンから指をはなし、近づいて撮影してください。
シャッターはフラッシュ無しの状態で適正露出となるように、スローシャッターとなりますので、
ご注意ください。
Page 7
絞りを任意にセットしたいとき
カメラを Av モードにセットすると絞りを任意に選択できます。絞りを任意にセットすると、バックが
最適となるシャッター速度を選びます。選ばれるシャッター速度は、カメラの同調速度~30 秒の間で
す。明るい場面や暗い場面でシャッター速度が連動できる範囲を超えてしまうと、シャッター速度の
表示が点滅して警告します。そのまま撮影すると、背景が露出オーバーまたはアンダーとなりますが、
被写体は適正となります。絞りを調整してシャッター速度の表示が点灯するように調整すると、明る
い場面ではデーライトシンクロに、暗い場面ではスローシンクロとなり、被写体とバックが共に適正
露出になる絞りが選ばれ自動調光されます。暗い場所ではシャッター速度が遅くなりますので注意し
てください。
M モードのとき
シャッター速度と絞りを自分で選べます。選べるシャッター速度は、カメラの同調速度~30 秒の間で
す。カメラの露出計の表示に合わせて適正露出をセットすれば、簡単にデーライトシンクロやスロー
シンクロが行えます。求めた適性露出をもとに、意図的に露出を変化させたいときに便利です。
連続撮影時のご注意
連続発光による加熱での劣化を防止するため、以下の表に示す回数以下で止めて 10 分以上休ませてく
ださい。
モード 最大連続発光回数
TTL, M(1/1, 1/2)
M(1/4, 1/8)
M(1/16~1/32) 40 回
MULTI
20 回
25 回
10 サイクル
マニュアル発光撮影
被写体条件によっては、ETTL(TTL)での露出では意図した画面と異なってしまうことがあります。
この様なときに、自分の意図を反映させることのできる方法として、マニュアル発光があります。マ
ニュアルの発光量はボタンを押すたびに切り換わり、1/1~1/128 の範囲で設定できます。
◆
EOS700、750、850 では使用できません。
① カメラの撮影モードを M にセットします。
② MODE ボタンで M を選択します。
③ SEL ボタンを押して発光量表示を点滅させます。
④ +或いは-ボタンを押して発光量を設定します。
⑤ SEL ボタンを押して表示を点灯させます。
⑥ ピントを合わせ、レンズの距離目盛の示す撮影距離とフラッシュの液晶パネル上に表示されている
適正撮影距離がおおむね一致するように、フラッシュの発光量もしくは絞り値を変えます。
⑦ 充電完了を確認して撮影します。
マニュアル発光での適正露出は、次の計算式で割り出せます。
◆
フラッシュの発光量(ガイドナンバー)/撮影距離(m)=絞り値(F)
(このフラッシュは、上記の計算より適正露出となる撮影距離を算出して表示します。ガイドナンバ
ーは巻末の[表 1]を参照してください。)
6
Page 8
後幕シンクロ撮影
スローシンクロで、動いている被写体を撮影すると、通常は被写体の軌跡が動く被写体の前方に写し
込まれます。これは、シャッター幕が全開したときにフラッシュが発光するため、フラッシュ発光後
~シャッター幕が閉じるまでの軌跡が写し込まれるためです(先幕シンクロ)。後幕シンクロモードを
使用すると、シャッター幕が全開した後、閉じるときにフラッシュが発光するため、シャッター幕全
開~フラッシュ発光までの軌跡が、動く被写体の後方に写し込まれ、自然な動きが表現できます。
EOS700、750、850 では、使用できません。
◆
① カメラの撮影モードをセットします。
② +或いは
③ ピントを合わせ、充電完了を確認して撮影します。
◆
◆ カメラが全自動モードにセットされていると、設定できません。
◆ 解除するには、 の表示を消します。
-ボタンを押して液晶パネルに を表示させます。
が消灯している時は、先幕シンクロに設定されています。
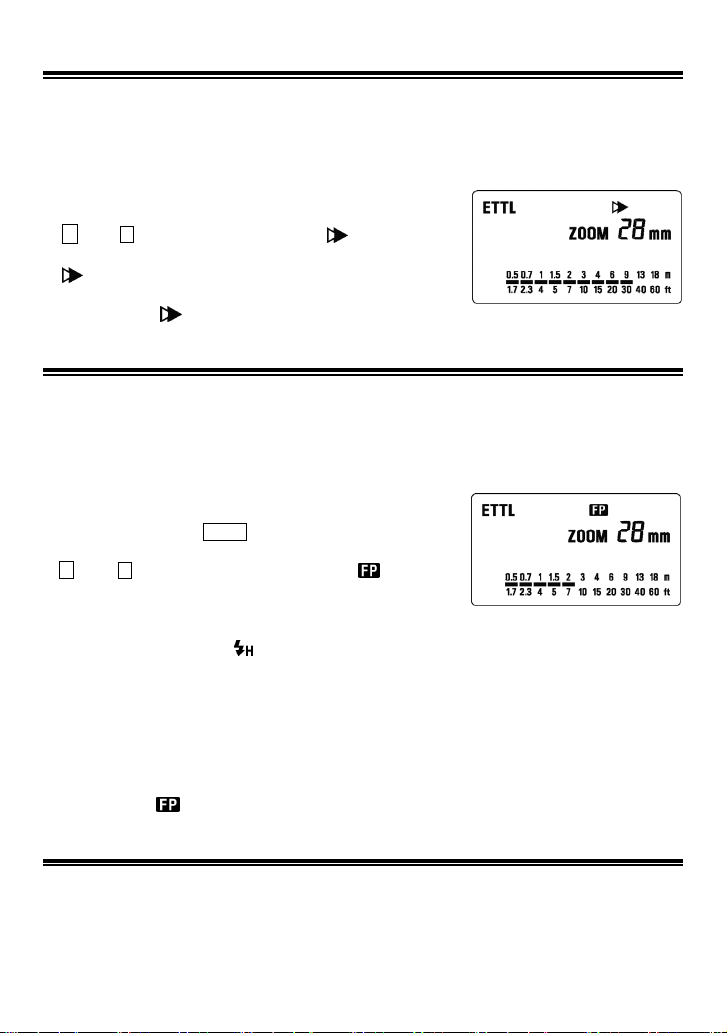
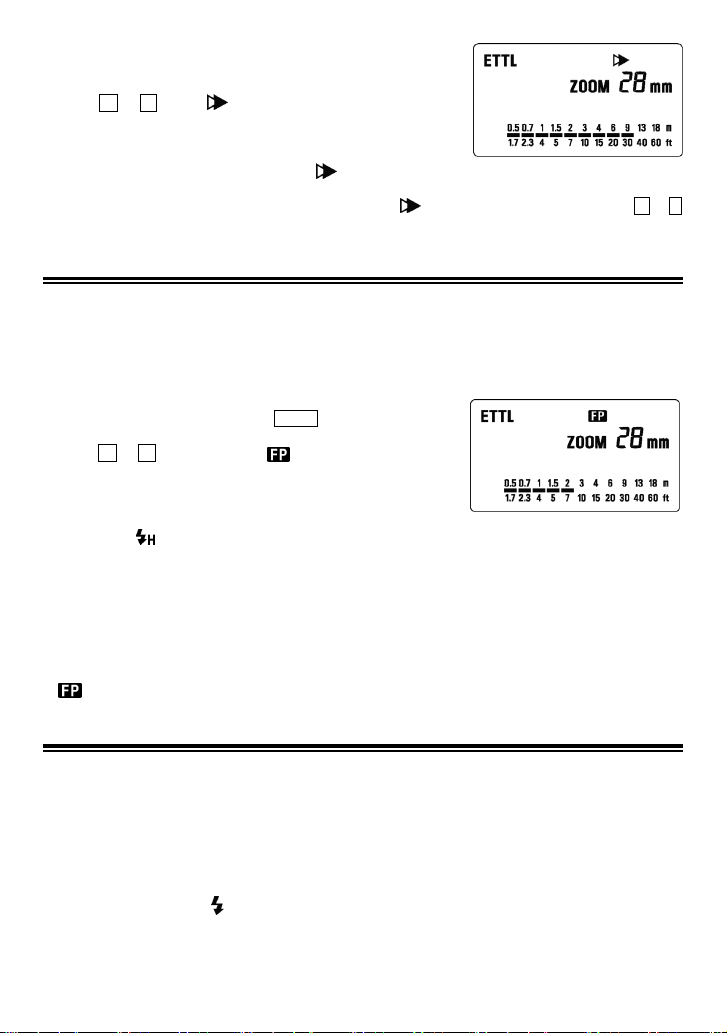
ハイスピードシンクロ撮影(FP 発光) (A タイプカメラのみ)
通常のフラッシュ撮影は、シャッター幕が全開になったときにフラッシュを光らせます。このため、
同調速度より高速のシャッターは使用できませんでした。ハイスピードシンクロはフラッシュを連続
発光させて、シャッターの走行開始から終了まで発光を維持することにより、同調速度より高速のシ
ャッターの使用を可能にしました。
① カメラの撮影モードをセットします。(Tv、M のモードで使用できます。)
② カメラのシャッター速度を同調速度より速い速度に設定します。
③ フラッシュの電源を ON にします。
④ フラッシュのモードを MODE ボタンで選択します。(ETTL、M
のモードで使用できます。)
⑤
+或いは- ボタンを数回押して液晶パネルに を表示させ
ます。
⑥ 被写体にピントを合わせます。
⑦ 被写体が撮影可能範囲にあるか、液晶パネルの距離表示で確認します。
⑧ カメラのファインダー内で
◆ ハイスピードシンクロ撮影では、フラッシュのガイドナンバーがシャッター速度によって変化し、
光の到達距離が短くなりますのでご注意ください。ガイドナンバーは巻末の[表 2]を参照してくだ
さい。
◆ ハイスピードシンクロは、同調速度以下では設定できません。同調速度以下になるとハイスピード
シンクロは解除され、自動的に ETTL に切り換わります。再度ハイスピードシンクロ撮影を行いた
い場合は、初めから設定をやり直してください。
◆ ハイスピードシンクロ撮影時でも露出補正は可能です。
◆ 解除するには、 の表示を消します。
の点灯を確認してから撮影します。
FE ロック撮影 (A タイプカメラのみ)
FE ロック撮影は、ファインダーの任意の部分に適正露光させるフラッシュ撮影です。
① カメラの撮影モードをセットします。(P、Tv、Av、M、DEP モードで使用できます。)
② フラッシュを ETTL、もしくはハイスピードシンクロの発光モードにセットします。
③ 被写体にピントを合わせます。
④ 被写体を中央の AF フレームに合わせてカメラの FEL ボタンを押します。
7
Page 9
◆ フラッシュがプリ発光し、被写体に必要な露光量を記憶します。
◆ ファインダー内に FEL の文字が 0.5 秒間表示され、適正な露光量が固定されます。
◆ ファインダー内の
③からやり直してください。
⑤ 構図を決めて撮影します。
◆ 使用するカメラによって、若干使用方法が異なります。詳しくはご使用カメラの取扱説明書の「FE
ロック撮影」の項目をご覧ください。
マークが点滅したときは、光量が不足していますので、被写体に近づいて手順
モデリング発光
フラッシュ撮影による被写体の影の出かたや多灯発光によるライティングのバランスを確認すること
ができます。(カメラがモデリング発光に対応する機種に限ります。詳しくはご使用のカメラの使用説
明書をご覧ください。)
カメラ側でモデリング発光の設定がされると、液晶パネルに
が表示されます。
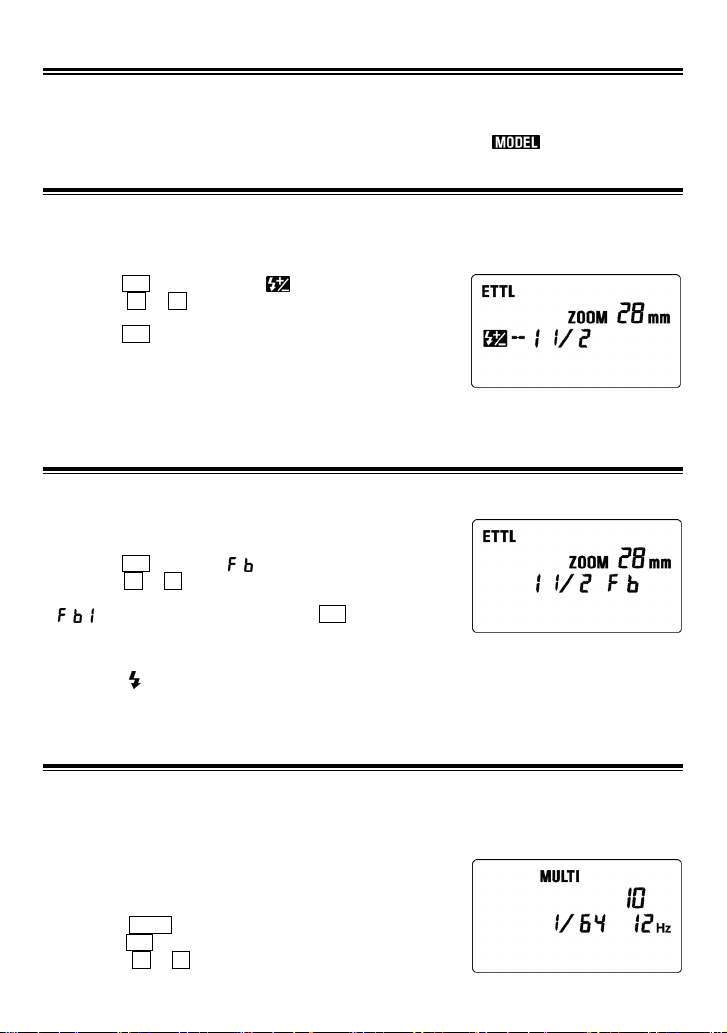
調光補正
意図的にオーバーやアンダーに露出をずらして撮影したいときに使用します。フラッシュの発光量の
みを補正できます。補正ステップと範囲は、1/3 段ステップ(カメラが 1/2 段ステップの場合は 1
/2 段ステップ)で-3 段~+3 段です。
◆ EOS620、650、700、850、1000 では使用できません。
① SEL
ボタンを押して を点滅させます。
② +或いは- ボタンを押して補正量の設定をします。
③ SEL ボタンを数回押して表示を点灯させます。
④ 被写体にピントを合わせます。
⑤ 被写体が撮影可能範囲にあるか、液晶パネルの距離表示で確認します。
⑥ 充電が完了したのを確認してから、シャッターボタンを押して撮影します。
◆ 解除するには、上記の手順で補正量を+0 に戻してください。
FB 撮影
背景の露出を変えずに、主要被写体にあたるフラッシュの光量を変えて、標準→アンダー→オーバー
の順で撮影することができます。補正ステップと範囲は、1/3 段ステップ(カメラが 1/2 段ステッ
プの場合は 1/2 段ステップ)で-3 段~+3 段です。
① SEL ボタンを数回押して
② +或いは-ボタンを押して補正量を設定します。
③ SEL ボタンを押して表示を点灯させます。 と表示され
ます。
④ 被写体にピントを合わせます。
⑤ 被写体が撮影可能範囲にあるか、液晶パネルの距離表示で確認
します。
⑥ ファインダー内で
⑦ 手順④からの動作を 2 回繰り返します。
◆ 撮影が終了すると自動的に解除されます。
を点滅させます。
マークの点灯を確認してから撮影します。
8
Page 10
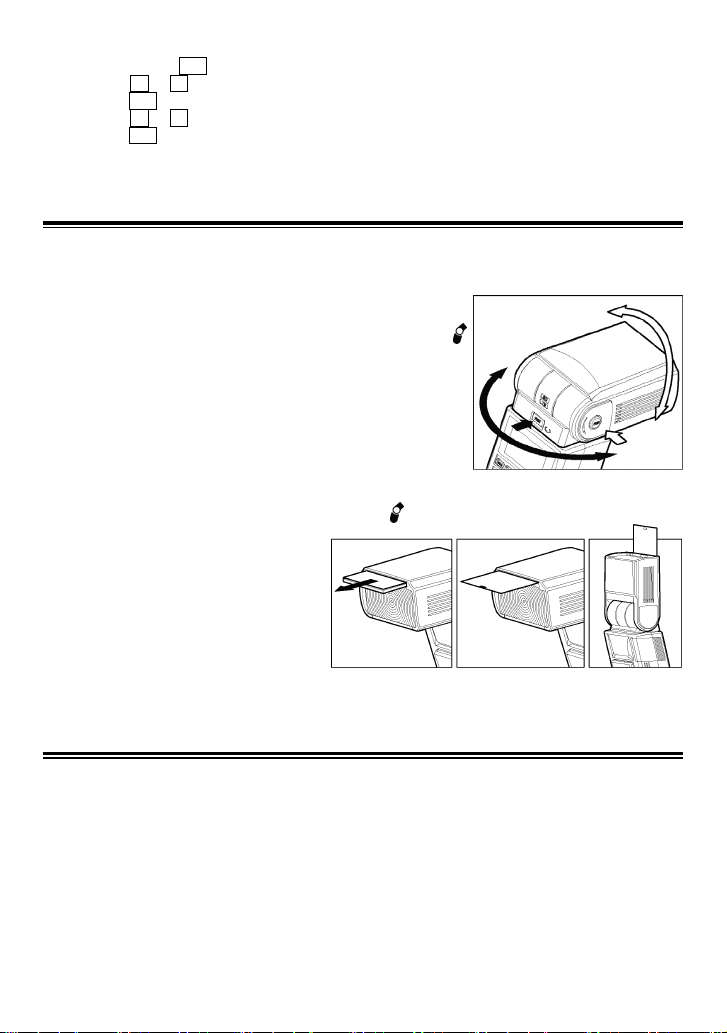
マルチ発光撮影
シャッターの開いている間にフラッシュを連続発光して、被写体の動きを1コマの画面に連続分解写
真のように写し込むことができます。背景が暗く、被写体が明るい方がより効果的です。
マルチ発光の発光周波数はボタンを押すたびに切り換わり、1~199Hz の範囲で設定できます。また、
連続発光可能回数は 100 回までとなっていますが、発光量と発光周波数によって変わります。最大連
続発光回数は巻末の[表 3]を参照してください。
◆ EOS700、750、850 では使用できません。
① カメラの撮影モードを M にセットし、任意の絞り値を設定します。
② MODE ボタンで MULTI を選択します。
③ SEL ボタンを押して発光周波数表示を点滅させます。
④ +或いは-ボタンを押して発光周波数を設定します。
⑤ SEL ボタンを押して発光量表示を点滅させます。
⑥ +或いは-ボタンを押して発光量を設定します。
⑦ SEL ボタンを押して発光回数表示を点滅させます。
⑧ +或いは-ボタンを押して発光回数を設定します。
⑨ SEL ボタンを押して表示を点灯させます。
⑩ ピントを合わせ、充電完了を確認して撮影します。
(発光回数)÷(発光周波数) 以上のシャッター速度を設定してください。
バウンス撮影
室内でフラッシュ撮影すると壁などの背景に強い影が出ることがあります。フラッシュの発光部を上
へ向けて発光し、天井などに反射させることにより、影の少ない柔らかな写真が撮影できます。
バウンスはロックボタンを解除し回転させることで、
上:0°60°75°90° 下:0° 7°
右:0°60°75°90°
に切り換えが出来ます。バウンス撮影時には液晶パネルに
示されます。
バウンスさせる反射面の色が写真全体にあらわれますので、なるべ
く白い面を選んでください。また、バウンスさせる反射面の状況や
撮影距離などの撮影条件によって調光できる範囲が変化しますの
で、撮影後に液晶パネルの表示で撮影できたかどうか確認してくだ
さい。
近接撮影
発光部を下に 7°傾けることで、近接撮影において画面下部に十分に光ををまわすことができます。こ
の機能は、被写体までの距離が約 0.5~2m 以内で有効です。
下方に 7°バウンスさせている時は
キャッチライトパネル
バウンス撮影時に、人物の目にキャッチライ
トを入れることができる、キャッチライトパ
ネルを内蔵しています。ワイドパネル+キャ
ッチライトパネルを止まるまで引き出しま
す (強く引っ張らないでください)。ワイド
パネルは元の位置に収納してください。
◆ バウンス角度を上方 90°にし、被写体から近い距離での撮影が効果的です。
9
左:0°60°75°90°120°150°180°
が表
表示が点滅します。
Page 11
ワイヤレス撮影
フラッシュをカメラから取り外して置く位置を工夫すると、陰影をつけた立体感のある写真や自然な
陰影をつけた写真にすることができます。このような撮影をしたいときには、カメラとフラッシュを
コードで接続しなければならないことが多いのですが、EF-610 DG SUPER では、カメラとフラッシ
ュの信号の伝達をフラッシュの光を利用して行うため、コードがなくても撮影することができます。
ワイヤレス撮影を行うには 2 台以上の EF-610 DG SUPER が必要です。
◆B タイプカメラでは、ワイヤレスマニュアル発光撮影とワイヤレスマルチ発光撮影のみ使用できます。EOS750
と EOS850 ではワイヤレス撮影はできません。
◆ここではカメラに取り付けるフラッシュを「マスター」、カメラから離して置くフラッシュを「スレーブ」と
表記します。
◆カメラから離して使用するときは、付属のミニスタンド(三脚ねじ穴付)を取り付けると便利です。
◆画面内にフラッシュが入らないよう注意してください。
◆被写体よりフラッシュは約 0.5m~5m、カメラは約 1m~5m の範囲内にセットしてください。
チャンネル設定
他の人がワイヤレス撮影をしていると、その信号光によりお使いのフラッシュが発光してしまうことがありま
す。このような場合には、他の人とは違うチャンネルを設定します。
マスターのチャンネル設定
① MODE ボタンで を選択します。
② SEL ボタンを数回押してチャンネル表示を点滅させます。
③ + 或いは- ボタンを押してチャンネル番号を設定します。(C1~C4
のいずれかにセットします。)
④ SEL ボタンを数回押して表示を点灯させます。
スレーブのチャンネル設定
① MODE ボタンで ETTL/ /
② SEL ボタンを数回押してチャンネル表示を点滅させます。
③ +或いは-ボタンを押してチャンネル番号を設定します。(C1~C4
のいずれかにセットします。)
④ SEL ボタンを数回押して表示を点灯させます。
◆ マスターとスレーブのチャンネル番号が異なると、スレーブは発光しません。同じ番号を設定してください。
スレーブ ID の設定
複数のスレーブを配置し、光量比を設定したワイヤレス発光撮影を行う場合には、メインとサブの識別をするた
めの ID を設定します。
MODE ボタンで ETTL/ / を選択します。
①
② SEL ボタンを数回押してスレーブ ID 表示を点滅させます。
③ + 或いは-ボタンを押して ID 番号を設定します。(1、2、3 のいずれかにセットします。)
④ SEL ボタンを押して表示を点灯させます。
◆ 複数のスレーブの光量比設定を行わず、同一光量で発光させる場合は、スレーブ ID の設定は不要です。
マスター発光の設定
マスター自体を発光させるか、発光させないかを設定できます。
マスター発光 ON に設定
①MODE ボタンで を選択します。
②+或いは -ボタンを押して液晶パネルに を表示させます。
◆マスター発光 ON の場合、スレーブ ID は自動的に 1 に設定されます。
マスター発光 OFF に設定
「マスター発光 ON に設定」と同じ手順で+ 或いは- ボタンを数回押して、液晶パネルに を表示させます。
ワイヤレス撮影の準備
を選択します。
10
Page 12
ワイヤレス ETTL 自動調光撮影
(A タイプカメラのみ)
ワイヤレス ETTL 自動調光撮影では、カメラが自動的に適正露出になるように制御します。
全てのスレーブを同一光量で発光させる多灯撮影
全てのスレーブが同一光量で発光し、総光量の和が適正露出になるように制御されます。スレーブ ID
の設定は 1、2、3 のいずれでも構いません。
マスター発光 ON+スレーブの組合せ
◆マスターを以下のように設定します。
MODE ボタンで ETTL/ を選択します。
①
②+或いは-ボタンを押して液晶パネルに を表
示させます。
SEL ボタンを数回押して光量比の表示が
③
/
◆光量比の表示が
④スレーブを決めておいた位置にセットします。
⑤マスターとスレーブの充電完了を確認します。
になっていることを確認してください。
きには、「スレーブ ID、光量比を設定した多灯撮影
(2 灯)」または「スレーブ ID、光量比を設定した
多灯撮影(3 灯)」の項目を参照して
/ に設定し直してください。
または になっていると
◆EF-610 DG SUPER は、マスター側はレディラ
イトが点灯して、スレーブ側は AF 補助光が点滅し
て充電完了を知らせます。
⑥ 被写体にピントを合わせて撮影します。
マスター発光 OFF+スレーブの組合せ
◆ マスターを以下のように設定します。
「マスター発光 ON+スレーブの組合せ」と同じ手順
で、以下の表示になるように設定してください。
ETTL /
/
スレーブを決めておいた位置にセットし、マスター
とスレーブの充電完了を確認したら、被写体にピン
トを合わせて撮影します。
スレーブID、
ここでは、マスター発光 OFF とスレーブ 2 灯を組み
合わせ、光量比を設定した多灯撮影を説明します。
光量比を設定すると、設定した比率で総和が適正露
出になるように制御されます。
◆ EOS-1V、3 のみで使用できます。
◆ 光量比は 8:1~1:1~1:8 の間で設定すること
ができます。
◆ 2 灯のスレーブの ID 番号を各々1 と 2 に設定しま
す。
マスターを以下のように設定します。
①マスター発光 OFF に設定します。
②
MODE ボタンで ETTL/ を選択します。
③
SEL
④+ 或いは- ボタンを押して を選択します。
(点滅状態)
⑤
SEL
⑥+或いは -ボタンを押して光量比を設定します。
⑦SEL ボタンを押して表示を点灯させます。
⑧スレーブを決めておいた位置にセットします。
⑨マスターとスレーブの充電完了を確認します。
⑩被写体にピントを合わせて撮影します。
◆ 設定をやり直す場合は、③からやり直します。
光量比を設定した多灯撮影(2灯)
ボタンを数回押して光量比表示を点滅させます。
ボタンを押して光量比値表示を点滅させます。
◆ 設定のキャンセルは④で / に戻します。
11
スレーブID、
ここでは、マスター発光 OFF とスレーブ 3 灯を組み
合わせ、2 灯の光量比を設定し、さらに残りの 1 灯
の調光補正を設定した多灯撮影を説明します。
◆ EOS-1V、3 のみで使用できます
◆ 3 灯のスレーブの ID 番号を各々1、2、3 に設定し
ます。
マスターを以下のように設定します。
①マスター発光 OFF に設定します。
②
MODE ボタンで ETTL/ を選択します。
③
SEL
④+ 或いは- ボタンを押して を選択します。
(点滅状態)
⑤
SEL
⑥+或いは -ボタンを押して光量比を設定します。
⑦
SEL
⑧+或いは-ボタンを押して調光補正量を設定しま
す。
⑨
SEL ボタンを押して表示を点灯させます。
⑩スレーブを決めておいた位置にセットします。
⑪マスターとスレーブの充電完了を確認します。
⑫被写体にピントを合わせて撮影します。
◆設定をやり直す場合は、③からやり直します。
光量比を設定した多灯撮影(3灯)
ボタンを数回押して光量比表示を点滅させます。
ボタンを押して光量比値表示を点滅させます。
ボタンを押して調光補正量表示を点滅させます。
◆ 設定のキャンセルは④で / に戻します。
Page 13
ワイヤレスハイスピードシンクロ(FP発光)
①ワイヤレス撮影の設定をします。
②
+或いは-ボタンを押して / (マスター発
光 ON)或いは / (マスター発光 OFF)を
表示させます。
③以下の操作はハイスピードシンクロ(FP 発光)撮
影の手順に準じます。
◆スレーブ側の操作は必要ありません。
ワイヤレス調光補正撮影
①ワイヤレス撮影の設定をします。
②SEL ボタンを押して
③+或いは- ボタンを押して補正量を設定します。
④SEL ボタンを数回押して表示を点灯させます。
⑤以下の操作は調光補正撮影の手順に準じます。
◆スレーブ側の操作は必要ありません。
◆スレーブ側で個別に調光補正を行うこともできま
す。マスター側とスレーブ側の両方で調光補正を
行った時には、合計した補正量で撮影されます。
を点滅させます。
撮影
ワイヤレス FE ロック撮影
① ワイヤレス撮影の設定をします。
② 被写体にピントを合わせ、カメラの FEL ボタンを
押します。
③ 以下の操作は FE ロック撮影の手順に準じます。
◆ スレーブ側の操作は必要ありません。
ワイヤレス FB 撮影
① ワイヤレス撮影の設定をします。
② SEL ボタンを数回押して
③ +或いは-ボタンを押して補正量を設定します。
④ SEL ボタンを数回押して表示を点灯させます。
⑤ 以下の操作は、FB 撮影の手順に準じます。
◆ スレーブ側の操作は必要ありません。
を点滅させます。
ワイヤレスのモード切換
マスターを以下のように設定します。
①
MODE ボタンで ETTL/ を選択します。
②SEL ボタンを 2 秒以上押し続け、発光モード表示を点滅させます。
③MODE ボタンで ETTL、M、MULTI のいずれかを選択します。
④ SEL ボタンを押して発光モード表示を点灯させます。
ワイヤレスマニュアル発光撮影
マスターで発光量を設定するだけでワイヤレスマニュアル発光撮影ができます。露出は市販のフラッ
シュメーターで決定してください。
全てのスレーブが同一光量で発光する多灯撮影
マスターを以下のように設定します。
① 「ワイヤレスのモード切換」の手順で M/
② SEL ボタンを数回押して発光量表示を点滅させます。
③ + 或いは-ボタンを押して発光量を設定します。
④ SEL ボタンを数回押して表示を点灯させます。
スレーブ ID、各スレーブごとの光量を設定した多灯撮影
ここではスレーブを 3 灯使用した多灯撮影を説明します。マスターを以下のように設定します。
① 「ワイヤレスのモード切換」の手順で M/
SEL ボタンを数回押して を点滅させます。
②
③ + 或いは-ボタンを押して を選択します。(点滅状態)
④ SEL ボタンを押して発光量表示と を点滅させます。
⑤ + 或いは-ボタンを押して発光量を設定します。
⑥ SEL ボタンを押して発光量表示と を点滅させます。
⑦ + 或いは-ボタンを押して発光量を設定します。
⑧ SEL ボタンを押して発光量表示と を点滅させます。
⑨ +或いは-ボタンを押して発光量を設定します。
⑩ SEL ボタンを押して表示を点灯させます。
にします。
◆ マスター発光 ON にすると、マスターも発光します。
にします。
◆2 灯の場合は、③で を選択し、⑧で操作完了です。
12
Page 14
ワイヤレスマルチ発光撮影
◆ マスターを以下のように設定します。
① 「ワイヤレスのモード切換」の手順で MULTI /
② SEL ボタンを押して発光周波数表示を点滅させます。
③ +或いは- ボタンを押して発光周波数を設定します。
④ SEL ボタンを押して発光量表示を点滅させます。
⑤ +或いは- ボタンを押して発光量を設定します。
⑥ SEL ボタンを押して発光回数表示を点滅させます。
⑦ +或いは- ボタンを押して発光回数を設定します。
⑧ SEL ボタンを押して表示を点灯させます。◆発光周波数と発光回数は全てのスレーブで同一になります。
にします。
スレーブ発光
◆ MODE ボタンで選択するときには、液晶パネルの発光モード表示(ETTL、M、MULTI)が消灯していること
を確認してください。点灯した状態ではワイヤレスフラッシュ撮影のモードに設定されます。
通常スレーブ発光
フラッシュをカメラ本体から離して、カメラの内蔵フラッシュや他のフラッシュを使用して、同調発光させるこ
とができます。
◆ ETTL、ETTL II 方式で制御される内蔵フラッシュは使用できません。
◆ カメラに取り付けるフラッシュは TTL、もしくはマニュアル発光モードにセットしてください。
① フラッシュをカメラに取り付けます。
② カメラの撮影モードをセットします。
③ フラッシュの電源をONにし、カメラのシャッターボタンを半押しします。
◆ ISO 感度と絞り値がフラッシュに記憶されます。
④ フラッシュをカメラから外します。
⑤ MODE ボタンで
⑥ SEL ボタンを数回押して発光量表示を点滅させます。
⑦ + 或いは-ボタンを押して発光量を設定します。
◆ あらかじめ決めておいたフラッシュの設置場所から被写体までの距離と、フラッシュの距離表示がおおむね一
致するように発光量を設定します。一致しない場合は、絞りの設定を変更してください。
◆ フラッシュ単体でも ISO 感度や絞り値の変更ができます。
ISO 感度は MODE ボタンで
を押して数値を設定し、再度 SEL ボタンを押して表示を点灯させます。
絞り値はスレーブに設定された状態のときに、SEL ボタンを押して絞り値を点滅させてから、+或いは-ボ
タンを押して数値を設定し、再度 SEL ボタンを押して表示を点灯させます。
⑧ SEL ボタンを数回押して表示を点灯させます。
⑨ フラッシュを決めておいた位置にセットします。画面内にフラッシュが入らないよう注意してください。
⑩ カメラの内蔵フラッシュ、またはカメラに取り付けてあるフラッシュと、設置してあるフラッシュの充電完
了を確認して撮影します。
◆ EF-610 DG SUPER は充電完了を AF 補助光が点滅して知らせます。
◆ スレーブ発光を設定した状態では、カメラに取り付けても連動しませんので、スレーブ発光を解除してから
取り付けてください。
/ を選択します。
を選択し、SEL ボタンを押して表示を点滅させてから、+或いは-ボタン
指定スレーブ発光
複数の EF-610 DG SUPER を使用すると、設定したチャンネルが一致するフラッシュのみを同調発光
させることができます。1 台を制御用としてカメラに取り付けて、他を発光用として使用します。
発光用フラッシュの設定
① フラッシュをカメラに取り付けます。
② カメラの撮影モードを設定します。(Tv、M モードで使用できます。)
◆ 指定スレーブモードでは発光する前に信号を送受信しますので、シャッター速度を 1/30 以下にセットして
ください。
13
Page 15
③ フラッシュの電源を ON にし、カメラのシャッターボタンを半押しします。
◆ ISO 感度と絞り値がフラッシュに記憶されます。
④ フラッシュをカメラから外します。
⑤ MODE ボタンで
⑥ SEL ボタンを押してチャンネル表示を点滅させます。
⑦ + 或いは- ボタンを押してチャンネル番号を設定します。(C1 か、C2
のいずれかにセットします。)
⑧ SEL ボタンを押して発光量表示を点滅させます。
⑨ + 或いは-ボタンを押して発光量を設定します。
◆ あらかじめ決めておいたフラッシュの設置場所から被写体までの距離と、フラッシュの距離表示がおおむね一
致するように発光量を設定します。一致しない場合は、絞りの設定を変更してください。
⑩ SEL ボタンを数回押して表示を点灯させます。
⑪ フラッシュを決めておいた位置にセットします。画面内にフラッシュが入らないよう注意してください。
/ を選択します。
制御用フラッシュの設定
⑫ フラッシュをカメラに取り付けます。
⑬ MODE ボタンで
⑭ SEL ボタンを押してチャンネル表示を点滅させます。
⑮ + 或いは- ボタンを押して発光用フラッシュと同じチャンネル番号
を設定します。
⑯ SEL ボタンを押して発光量表示を点滅させます。
⑰ + ボタンを押して
⑱ SEL ボタンを押して表示を点灯させます。
⑲ 全てのフラッシュの充電完了を確認して撮影します。
◆ 発光用の EF-610 DG SUPER は充電完了を AF 補助光が点滅して知らせます。
◆ 発光量の設定で
設定はできなくなります。
◆ 制御用のフラッシュ光は信号の送信用です。主撮影は発光用フラッシュで行われます。
/ を選択します。
を表示させます。
を選択すると指定スレーブ発光の制御用に設定され、SEL ボタンを押しても絞り値の
主要諸元
形 式:クリップオン式直列制御 TTL オートズームフラッシュ
ガイドナンバー:61(ISO 100/m、105mm 位置)
使用電源:単三形アルカリ乾電池 4 本又は、単三形ニッカド電池 4 本、単三形ニッケル水素電池 4 本
充電時間:約 7 秒(アルカリ乾電池使用)、約 5 秒(ニッカド電池又は、ニッケル水素電池使用)
発光回数:約 120 回(アルカリ乾電池使用)、約 160 回(ニッカド電池又は、ニッケル水素電池使用)
閃光時間:約 1/700 秒(フル発光時)
照射角度:24~105mm の使用レンズに合わせて自動セット(ワイドパネル使用で 17mm レンズの画角をカバー)
オートパワーオフ/オートパワーオン:内蔵 質量:330g 寸法(幅×高×長):77×139×11 7m m
品質保証とアフターサービスについて
保証の詳細とアフターサービスに関しては、別紙の≪保証規定≫をご参照ください。
電話でのお問い合わせは・・・ シグマ カスタマーサービス部 フリーコール:
(携帯電話・PHS をご利用の方は 044-989-7436 にご連絡ください)
受付時間
:
株式会社シグマ 本社
〒215-8530 神奈川県川崎市麻生区栗木 2 丁目 4 番 16 号 (044) 989-7430
大阪営業所 〒541-0059 大阪市中央区博労町 1-7-2 堺筋トラストビル 8F 06(6271)1548
工 場 〒969-3395 福島県耶麻郡磐梯町大字大谷字日知坂 6594 0242(73)2771(代)
インターネットホームページアドレス http://www.sigma-photo.co.jp
月~金 9:00-18:00(土日祝日および年末年始弊社休業日はお休みさせていただきます)
0120-9977-88
(代) FAX: (044) 989-7451
14
Page 16
r
r
t
r
t
r
r
ENGLISH
Thank you very much for purchasing the Sigma EF-610 DG SUPER EO-TTL II Electronic Flash. This
product is specifically developed for the Canon EOS series SLR cameras. Depending on the camera
model, functions and operation may vary. Please read this instruction booklet carefully. To add to your
enjoyment of photography, the flash has a variety of features. To make the most of all these features
and to get the maximum performance and enjoyment from your flash, please read this instruction
booklet together with your camera’s instruction manual before using the flash, and also keep it handy
for your future reference.
PRECAUTIONS
In order to avoid causing any damage or injury, please read this instruction manual very carefully,
paying attention to the cautionary signs below, before using the flash.
Please take special note of the two cautionary signs below.
Warning !!
Caution !!
Symbol denotes the important points, where warning and caution are required.
Symbol contains information regarding the actions that must be avoided.
This flash contains high voltage circuits. To avoid electric shock or burns, do not attempt to
disassemble the flash. If the outside shell of the unit is broken or cracked, do not touch the
mechanism inside.
Do not fire the flash close to eyes. Otherwise the bright light could damage the eyes. Keep at
least 1m/3feet distance between face and the flash unit when taking a picture with flash.
Do not touch the synchro terminal of your camera when the flash is attached to the hot shoe.
High voltage circuitry could cause an electric shock.
Never use your camera in an environment where flammable, burnable, gas, liquids or chemicals,
etc, exist. Otherwise it might cause fire or explosion.
Using the product disregarding this warning sign might cause serious injury o
other dangerous results.
Using the product disregarding this caution sign might cause injury or damage.
Warning !!
Caution !!
Do not use this flash unit on any camera other than the Canon EOS series cameras, otherwise
the flash may damage the circuitry of these cameras.
This flash unit is not waterproof. When using the flash and camera in the rain or snow or nea
water, keep it from getting wet. It is often impractical to repair internal electrical components
damaged by water.
Never subject the flash and camera to shock, dust, high temperature or humidity. These factors
might cause fire or malfunctioning of your equipment.
When the flash is subjected to sudden temperature change, as when the flash unit is brough
from a cold exterior to warm interior, condensation might form inside. In such a case, place you
equipment in a sealed plastic bag before such a change, and do not use the flash unit until i
reaches room temperature.
Do not store your flash in a drawer or cupboard etc. containing naphthalene, camphor or othe
insecticides. These chemicals will have a negative effects on the flash unit.
Do not use a thinner, Benzene or other cleaning agents to remove dirt or finger prints from the
component. Clean with a soft, moistened cloth.
For extended storage, choose a cool dry place, preferably with good ventilation. It is
recommended that the flash be charged and fired several times a month, to maintain prope
capacitor functioning.
15
Page 17
DESCRIPTION OF THE PARTS
EXTERNAL
PAR TS
CONTROLS
1.Flash Head 2.AF Auxiliary Light 3.Bounce Angle; Up and Down
4.Bounce Angle; Right and Left 5.Bounce Lock and Release Button; Up and Down
6.Swivel Lock and Release Button; Right and Left 7.LCD Panel 8.Battery Cover
9.Shoe Ring 10.Shoe 11.Catch Light Panel 12.Wide Panel
13.MODE Button 14.SEL SELECT Button 15.
16. -
Decrement Button 17.ZOOM Button 18.TEST Button
19.LIGHT Button 20.Ready Light 21.Power Switch
+ Increment Button
CAMERA MODELS AND FUNCTIONS
Although this Flash unit has been equipped with numerous functions, depending on the camera model
being used some functions may have some limitations. Please confirm the type camera you have from
the list below. Please refer to explanations of each function through the instruction manual; If no
model information is specified, it means that this function of flash can be used with all type of EOS
cameras.
A type camera E-TTL(E-TTL II) Compatible EOS SLR cameras
B type camera All other EOS cameras except those listed above
ABOUT THE BATTERY
This flash unit uses four “AA” type Alkaline dry cell batteries, Ni-Cad or Ni-MH rechargeable batteries.
Manganese batteries can also be used but as they have a shorter life than Alkaline batteries, we do
not recommend using them. Please replace batteries if it takes more than 30seconds to light the
Ready Lamp.
◆ To assure proper electrical contact, clean the battery terminals before installing the batteries.
◆ Ni-Cad or Ni-MH batteries do not have standardized contacts. If you use Ni-Cad or Ni-MH batteries,
please confirm that the battery contacts touch the battery compartment properly.
◆ To prevent battery explosion, leakage or overheating, use four new AA batteries of the same type
and brand. Do not mix the type or new and used batteries.
◆ Do not disassemble or short-circuit the batteries, or expose them fire or water; they may explode.
Do not recharge the batteries other than Ni-Cad or Ni-MH rechargeable batteries.
◆ When the flash will not be used for an extended period of time, remove the batteries from the flash
to avoid the possibility of damage from leakage.
◆ Battery performance decreases at low temperatures. Keep batteries insulated when using the flash
in cold weather.
◆ As with any flash, it is recommended you carry spare batteries when on a long trip or when
photographing outdoors in cold weather.
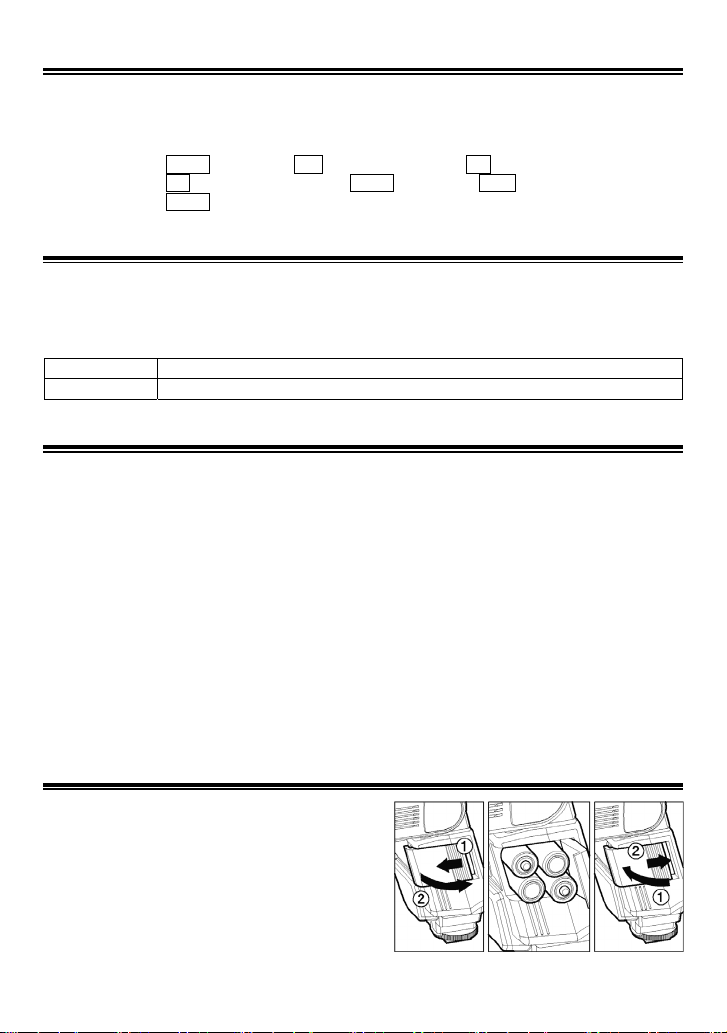
BATTERY LOADING
1. Be sure to set the Power Switch to the off position
then slide the battery cover in the direction of the
arrow to open.
2. Insert four AA size batteries into the battery
chamber. Be sure the + and – ends of the batteries
are aligned according to the diagram in the chamber.
3. Close the cover.
4. Slide the Power Switch to the ON position. After few
seconds the Ready Lamp will light, indicating that
the flash unit can be fired.
5. Please press the “Test Button” to be sure that the flash is working properly.
16
Page 18
AUTO POWER OFF
To conserve battery power, the flash unit automatically turns itself off when the flash is not used within
approximately 90 seconds. To turn the flash on again, depress the TEST button or the camera shutter
button halfway. Please note that the “Auto Power Off” mechanism does not work with wireless TTL
flash mode, normal slave flash, and designated slave flash modes.
ERROR INDICATION
If the battery power is not sufficient or there is an electric information error between the camera and
flash unit, the “Flash Coverage Angle” will blink on the LCD panel. When this occurs, turn the power
switch off and on.
If it still blinks after this procedure, check the battery power.
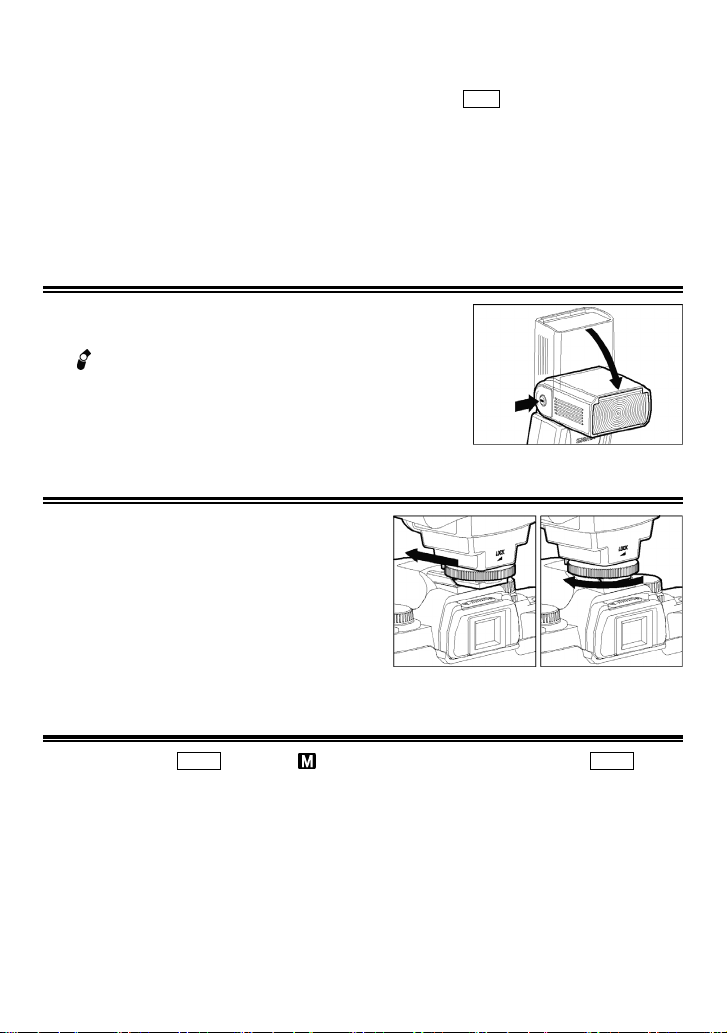
ADJUSTING THE FLASH HEAD
Depress the Bounce “Up and Down” Lock and Release Button and
adjust the flash head to the desired position.
appears on the LCD panel when you turn on the flash, and
◆ If
if this mark blinks, then the flash head is adjusted to an incorrect
position.
ATTACHING AND REMOVING THE FLASH TO AND FROM THE CAMERA
Be sure to turn off the Power Switch, then insert the
Shoe Base into the hot shoe on the camera and turn
the Shoe Locking Ring until it is tight.
◆ When you attach or remove the flash, grasp the
bottom of the flash to prevent damage to the shoe
foot and the camera’s hot shoe.
◆ If the camera’s built-in flash is set in up position,
please close it before you attach the flash unit.
◆ To remove the flash, rotate the shoe-locking ring in
the opposite direction of ◄LOCK mark, until it stops.
SETTING OF FLASH COVERAGE ANGLE
When you press the ZOOM button,
the LCD panel display will change and indicate the zoom position in sequence as follows.
24mm → 28mm → 35mm → 50mm → 70mm → 85mm → 105mm → (Auto)
Generally, in the ETTL (TTL) mode, the flash will automatically set the zoom position according to the
focal length of your lens.
◆ When you turn on the main switch, the flash will memorize and set the zoom head position to the
last setting used.
◆ If you use a lens wider than the flash head setting, there may be under exposed areas around the
edge of the picture.
◆ Depending on the flash head setting, the flash’s Guide Number will be changed.
the
symbol appears. Each time you press the ZOOM button,
17
Page 19
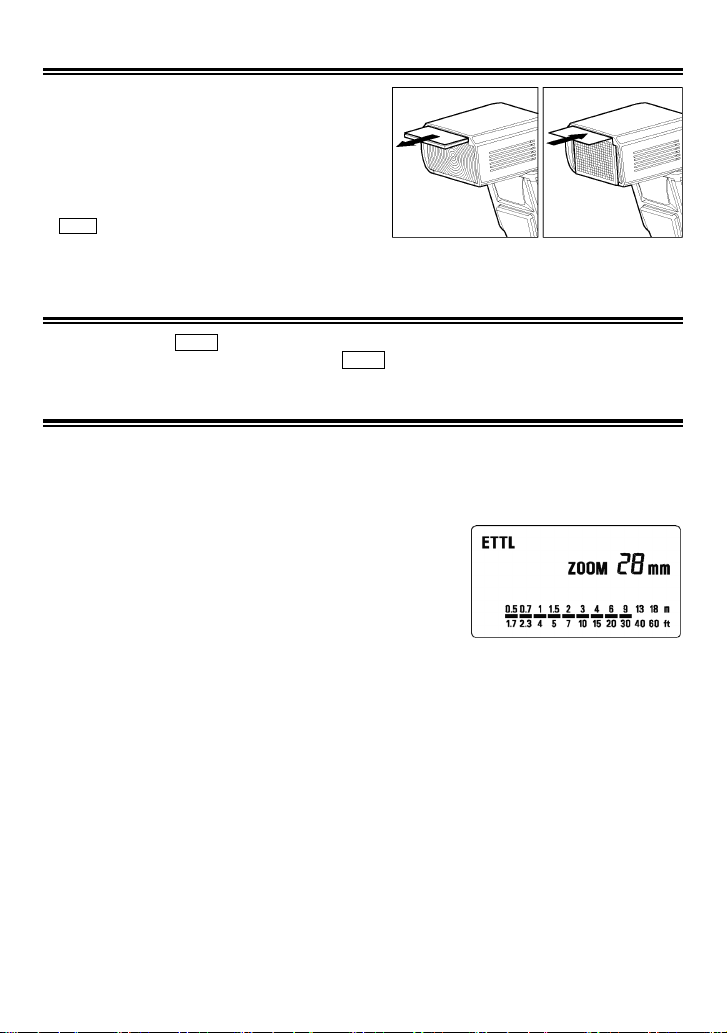
WIDE PANEL
This flashgun is equipped with a built-in wide panel,
which can provide an ultra wide 17mm angle of
coverage. Slide out the wide panel and catch light
panel and flip it down to cover the flash’s head. (Be
careful to slide the panels out smoothly.) Then put the
catch light panel back in its place. The coverage angle
setting of the flash will be set to 17mm automatically.
◆ If the built-in wide panel comes off accidentally, the
ZOOM button will not function. In this case please
contact the store where the flash was purchased or
a Sigma service station.
LCD PANEL ILLUMINATION
When you press the LIGHT button, the LCD panel will illuminate for about 8 seconds. The illumination
stays on longer than 8 seconds if you press the LIGHT button once again.
ETTL (TTL) AUTO FLASH
In the TTL AUTO Mode, the camera will control the amount of flash lighting to get the appropriate
exposure for the subject.
◆ “A” type cameras can be set in ETTL mode. “B” type cameras can be set in TTL mode.
1. Set the camera’s mode to Full-AUTO Mode. ( Usually
Mode, set to P Mode.)
2. Turn on the power switch of the flash, the ETTL (TTL) mark will
appear on the LCD panel and
3. Focus on your subject.
4. Check that the subject is located within the effective distance
range indicated on the LCD panel.
5. Press the shutter button, after the flash is fully charged.
Note: When the flash is fully charged, the ready light in the
viewfinder appears.
◆ When the camera receives the appropriate exposure, the ETTL (TTL) mark on the LCD panel will
appear for 5 seconds. If this indication does not appear, the flash illumination is not sufficent for
that situation. Please re-take the picture at a closer distance.
◆ The AF Auxiliary Light will turn on automatically as you focus on a dark area. Note: Effective
distance is up to about 0.7 to 9 meters (2.3-29.5 feet).
◆ When the camera is set to ‘Creative Zone’, the flash will be set to TTL / ETTL mode.
◆ When the flash is fully charged, the flash mark will appear in the finder. If the shutter is released
before the flash is fully charged, the camera will take the picture at a slow shutter speed with no
flash.
the
flash will start charging.
USING FLASH IN OTHER CAMERA MODES (Except EOS700, 750, 850)
Shutter Speed Priority Setting
By selecting the Tv mode of the camera, you can set the shutter speed from 30sec. to 1/X sync speed.
When you set the desired shutter speed, the camera will select the appropriate aperture value for the
scene. If the subject is too light or too dark, the aperture value indicator will blink and show the limit
values (maximum or minimum aperture). In such as case, the camera proceeds to take a flash
photograph at the limit value. Thus, the main subject in the picture should be exposed correctly, but
the background may become under or over exposed.
□
Mode. If the camera does not have □
18
Page 20
Aperture Priority Setting
By selecting the Av mode of your camera, the camera will select the appropriate shutter speed for the
scene. If the subject is too bright or too dark, the shutter speed indicator will blink and show the limit
(highest or slowest shutter speed) value. The highest shutter speed will be limited to the camera’s
normal flash synchronization speed. In such a case, the camera proceeds to take a flash photograph
at the limit value. Thus, the main subject in a picture should be exposed correctly, but the background
may become under or overexposed.
When used with M Mode
You can set the desired aperture value and shutter speed from 30 seconds to the camera’s flash sync
speed. If the camera’s exposure requires more light to achieve correct exposure for the inputted
values, the flashgun will provide sufficient light to give the correct exposure, within the working range
of the flashgun.
LIMITS OF CONTINUOUS SHOOTING
To prevent overheating of the flashgun’s circuitry, do not use your flash unit for at least 10 minutes
after continuously firing the flash for the number of exposures shown in the table below.
Mode Number of Flash Exposures
TTL, M(1/1,1/2) 20 Continuous Flash Shots
M(1/4, 1/8) 25 Continuous Flash Shots
M(1/16-1/32) 40 Continuous Flash Shots
Multi 10 Cycle
MANUAL FLASH OPERATION
Manual flash is provided for shooting subjects when the correct exposure is difficult to obtain in the
TTL mode. In the manual flash mode, you can set the flash power level from 1/1 (full) to 1/128 power
in one step increments.
1. Set the camera’s exposure mode to M.
2. Press the MODE button on the flash unit to select M.
3. The flash power output value blinks when you press the SEL
button.
4. Press
+ or -
5. The manual flash output display will stop blinking and remain
displayed after you press the SEL button again.
6. Adjust the focusing by pressing the shutter button, note the subject distance on the focus ring on the
lens. Then adjust the lens’ aperture value or flash power level until the distance indicated on the LCD
panel of the flashgun is equal to the subject distance.
7. When the Ready Light of the flash is illuminated, the unit is ready for use.
◆ You can calculate the correct exposure by using the following formula:
Guide Number “GN” / Flash to Subject Distance = F-stop
This flash unit will automatically calculate and indicate the appropriate subject distance according to
the above formula.(Please refer to table1 on the last page)
button to set the desired flash power output.
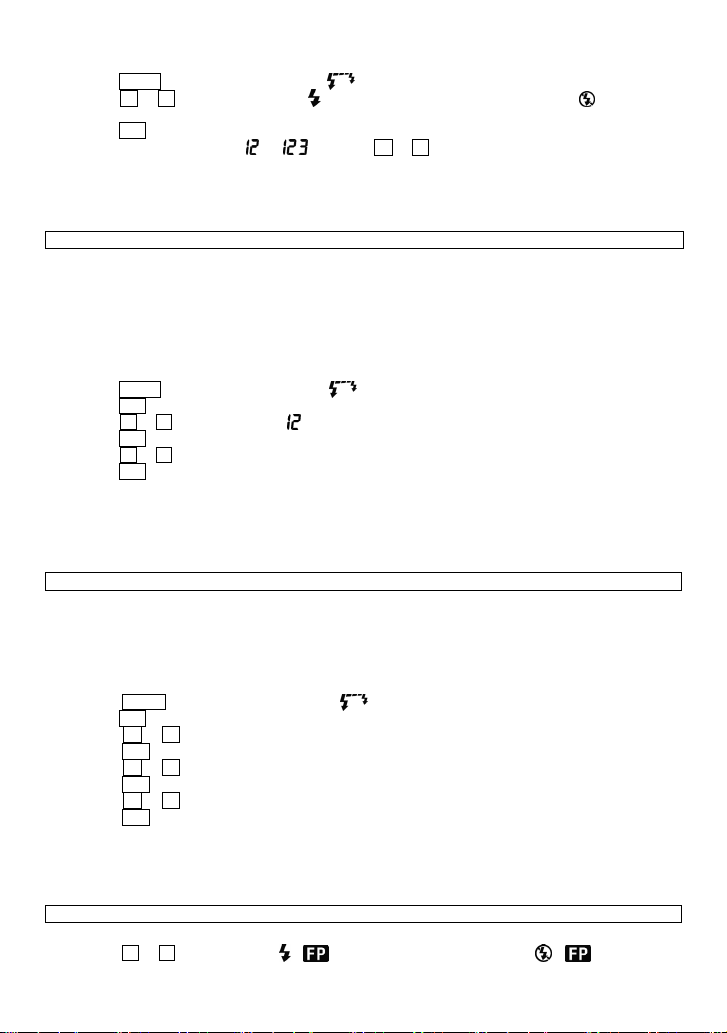
SECOND CURTAIN SYNCHRONIZATION
When you photograph a moving subject with slow synchronization, usually the furrow of the subject
will be exposed in front of the subject. The ordinary flash light will fire when the first shutter curtain is
fully opened, thus the subject will be exposed from the time flash is fired to the time the shutter is
closed (First curtain synchronization). When you use second curtain synchronization, the flash will fire
just before the second curtain begins to close and the subject will be exposed by ambient light from
the time the shutter opens until the flash fires. As a result the furrow of the subject will be recorded
behind the subject. This is a more natural effect.
19
Page 21
◆ This mode cannot be used with EOS 700, 750, 850 cameras.
1. Set the desired picture-taking mode of the camera.
2. Press
+ or -
panel.
3. Adjust the focus and take the picture after confirming the ready
light.
◆ First curtain synchronization will be set if
◆ If the camera is set to Full Auto Mode this function cannot be used.
◆ To cancel second curtain synchronization, turn off the mark on the LCD panel by using
buttons.
button mark will be displayed on the LCD
mark is not displayed.
+ or -
HIGH SPEED SYNC (FP) FLASH, A TYPE CAMERAS ONLY
When you take a picture with an ordinary flash, you cannot use a shutter speed faster than the
camera’s synchronized speed because the flash must fire when the shutter curtain is fully open. When
using the High Speed Sync mode, the flash keeps firing while the shutter curtain is running, thus you
can use a shutter speed faster than the shutter’s normal synchronization speed.
1. Select the camera’s exposure mode. (“Tv” or “M” modes can be used)
2. Select a shutter speed faster than the camera’s normal synchronization speed.
3. Slide the Power Switch of the flash to the ON position.
4. Choose the Flash Mode by using MODE button (“ETTL” or “M”
modes can be used).
5. Press
+ or -
LCD panel.
6. Focus on the subject
7. Check that the subject is located within the effective distance,
indicated on the LCD panel.
8. Confirm the
◆ With high-speed sync, the Guide Number changes depending on the shutter speed. The flash range
will be shorter (ie Guide Number will be smaller) when the shutter speed is faster. (Refer to table 2
on the last page).
◆ Selecting shutter speeds slower than the camera’s normal synchronization speed cancels Hi-speed
sync. Then the flash will automatically set to normal ETTL operation. To activate FP flash again,
follow the procedure above from point 1.
◆ It is possible to use the exposure compensation function with high speed synchronization operation.
To do so, please refer to your camera’s instruction manual regarding “exposure correction”.
◆ will disappear when Hi-speed sync (FP Flash) is cancelled.
button until the mark is displayed on the
mark is in the viewfinder of the camera and then you can take the picture.
FE LOCK
“FE” lock mode allows you to choose and lock the exposure before taking the picture.
1. Set the camera’s exposure mode (“P”, “Tv”, “Av”, “M” or “DEP”).
2. Set the flash’s mode to the E-TTL or the High Speed Sync.
3. Focus on the subject
4. Focus on the subject in the center AF frame of the viewfinder, and depress FE lock button.
◆ The flash unit will make a pre-flash, then calculate and memorize the amount of light necessary for
the correct exposure.
◆ The camera’s viewfinder will display “FEL” for 0.5 sec and the correct exposure will be set.
◆ If the viewfinder shows mark, it means that power is not sufficient for correct exposure. Please
get closer to the subject and repeat from step 3.
5. After composing the picture, press the shutter button.
◆ This function may vary depending on camera model. For more details please refer to “FE lock”
instructions of your camera manual.
20
Page 22
MODELING FLASH
If useing the Modeling flash, you can check the lighting and shadow effects before taking the picture.
(This function is limited to cameras which are compatible with modeling flash. For more details, please
refer to the instruction manual of your camera)
When the camera is set to modeling flash, the Flash panel will display the symbol automatically.
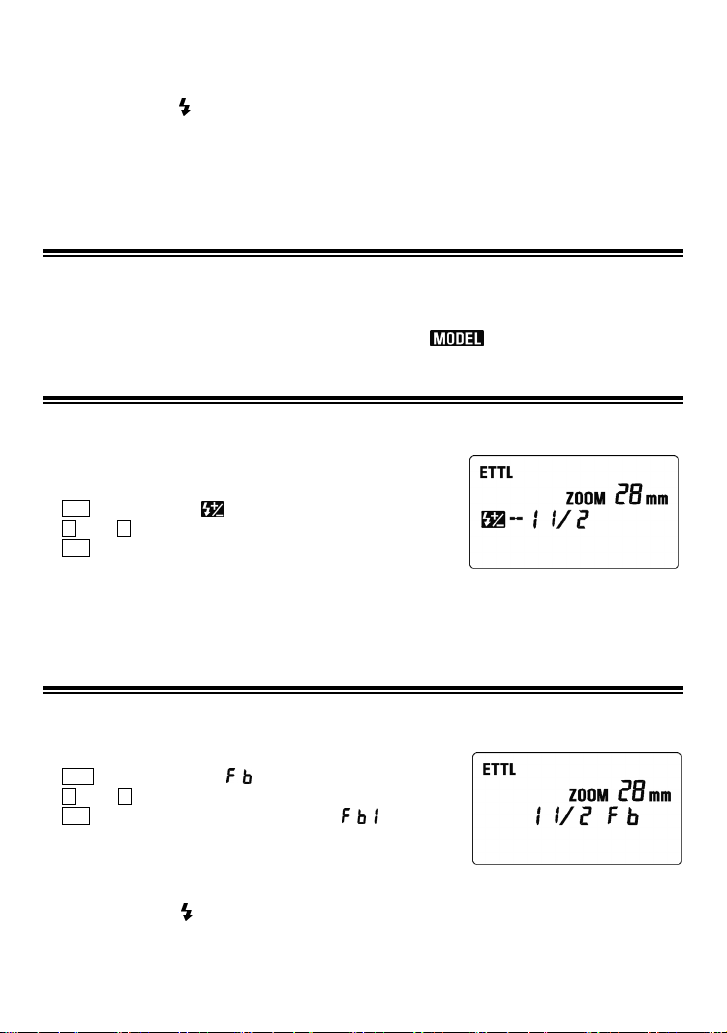
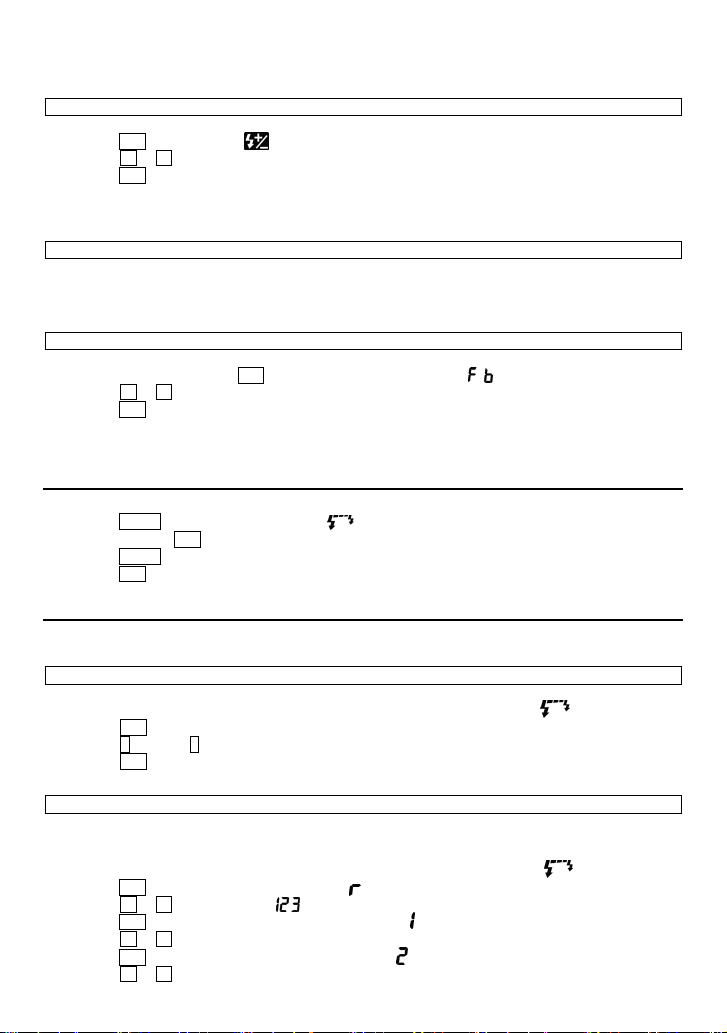
EXPOSURE COMPENSATION
You can use flash exposure compensation in combination with normal exposure compensation to
control the background exposure level. Flash exposure compensation can be set to ±3 stops in 1/3
stop increments (or in 1/2 stop increments with some cameras).
◆ This mode cannot be used with EOS 620, 650, 700, 850 and 1000 cameras.
1. Press the SEL button and select .
2. Press the
compensation amount.
3. Press the SEL button until the display stops blinking.
4. Focus on the subject.
5. Check that the subject is within the flash range as displayed on
the EF 610 DG Super’s LCD panel.
6. You can take the picture after confirming that the Ready Light of the flash is illuminated.
◆ To cancel exposure compensation, please start from step 1 and choose + 0 on display.
+ or -
button to set the desired flash exposure
FB (Flash Exposure Bracketing)
With FB, you can get bracketed flash shots of the subject while the ambient exposure level remains
constant. The bracketed flash shots can be taken in the sequence of correct exposure, under
exposure and over exposure, up to ± 3 stops in 1/3EV
increments (or 1/2EV increments with some cameras).
1. Press the SEL button until blinks.
2. Press the
amount.
3.
4. Adjust the focusing.
5. Please check that the subject is within the flash range displayed on the EF- 610 DG Super’s LCD
panel.
6. Check the mark is displayed in the virefinder and take the picture.
7. If it is necessary, repeat steps 4 to 6.
◆ This function will be cancelled automatically after making the third exposure.
+ or -
will be displayed after pressing the SEL button again.
button to set the flash exposure bracketing
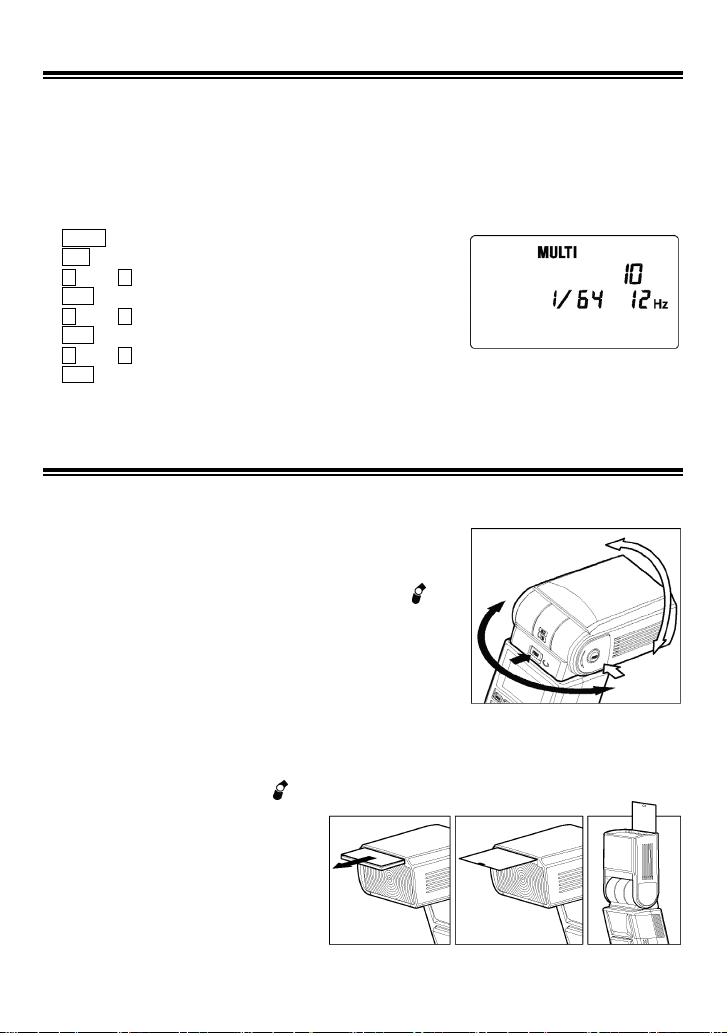
MULTI FLASH MODE
While the shutter is open, the flash will fire repeatedly. By doing so a series of images of the subject
will be exposed in one frame. A bright subject with a dark background shows more effectively in this
mode. It is possible to set the firing frequency between 1Hz and 199Hz. Up to 100 flashes can be fired
continuously. The maximum number of flashes varies, depending on the flash’s power output and firing
frequency settings. (Please refer to table 3 on the last page).
◆ This function cannot be used with EOS 700, 750, 850 cameras.
1. Set the camera’s exposure mode to M mode and set the F
number.
2. Press the MODE button until the Multi-flash mode appears.
3.
Press the SEL button until the flash firing frequency starts to blink.
4. Press the
value.
21
+ or -
button to set the desired flash frequency
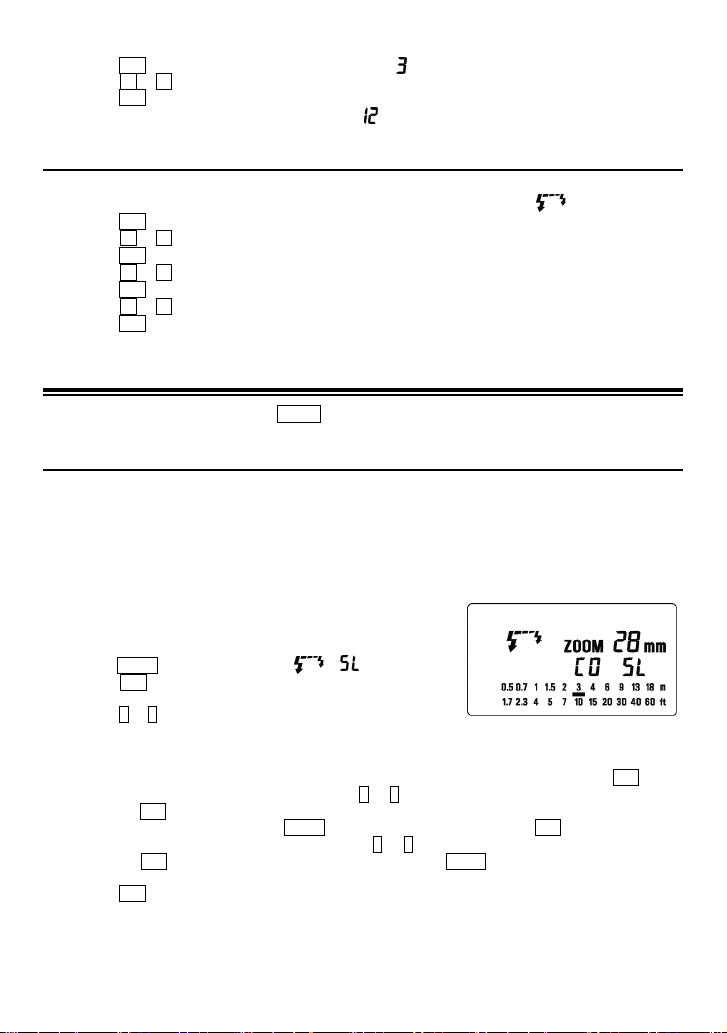
Page 23
5. After pressing the SEL button again, the flash power level will blink.
6. Press the
7. Press the SEL button again, the number of flashes will blink.
8. Press the
9. Press the SEL button again, the display will stop blinking.
10. When the ready light of the flash is illuminated, the unit is ready to use.
+ or -
+ or -
Note: Please set the shutter speed longer than; Number of Flashes you want ÷ Firing Frequency
button to set the desired power level.
button to set the desired number of flashes.
BOUNCE FLASH
When you take a photo with flash in a room, sometimes a strong shadow will appear behind the subject,
if you point the flash head upwards or sideways to reflect the light off the ceiling, wall etc. the subject
will be illuminated softly. Press the lock button and adjust the flash head to set the bounce angle.
UP: 0°, 60°, 75°, 90° DOWN: 0°,7°
RIGHT: 0°, 60°, 75°, 90°
When the bounce flash mode is activated, a bounce indicator
will appear on the LCD panel.
Choose a white surface for bouncing the flash, otherwise the
image’s colour may be incorrect.
Depending on the reflecting surface, the subject distance and other
factors, the effective distance range for the TTL AUTO may change.
Please check for correct exposure confirmation (ETTL or TTL mark
on the LCD panel) after releasing the shutter.
LEFT: 0°, 60°, 75°,90°, 120°, 150°, 180°
CLOSE-UP EXPOSURES
Bounce flash can be tilted 7° downward for close-ups. The Flash will be effective only for the subjects
0.5 meter to 2 meters. When the flash head is tilted 7°,
will blink.
CATCH LIGHT PANEL
This flash is equipped with a built-in catch
light panel, which can create a catch light in
the eyes of the subject when the bounce
flash mode is activated. Slide out the wide
panel and catch light panel, and then put
wide panel back in its place. (Be careful to
slide the panels out smoothly.)
◆ To create a catch light effectively, tilt the flash head upward 90 degrees and take pictures at a close
distance.
WIRELESS FLASH
When using the “Wireless Flash” mode, you can take pictures with a more three-dimensional feeling,
or make natural images by using shadowing depending on the flash position. This can be done without
any extension cord connecting the camera body and flash. In case of the EF-610 DG SUPER,
communication between the camera body and the flash will be achieved by the light produced by the
flash. In the “Wireless Flash” mode, the camera will calculate the correct exposure automatically.
◆The type A camera models can be used with “Wireless Manual Flash” and “Wireless Multi Flash”
functions only. The EOS750 and EOS850 cannot be used with “Wireless Flash”.
In this instruction we call the flash unit which is attached to the camera body the “Master unit ” and
◆
we call a flash unit at a remote position a “Slave unit”.
◆
When setting a slave unit at the desired position, you can use the mini-stand provided. This
mini-stand has a screw hole for a tripod.
◆
Place the slave flash unit at the desired location. Do not place the slave unit within the picture area.
22
Page 24
Set the flash unit within the range of 0.5m/1.5ft~5m/16ft from the subject and set the camera body
◆
within the range of 1m/3ft~5m/16ft from the subject.
Preparation for Wireless Flash
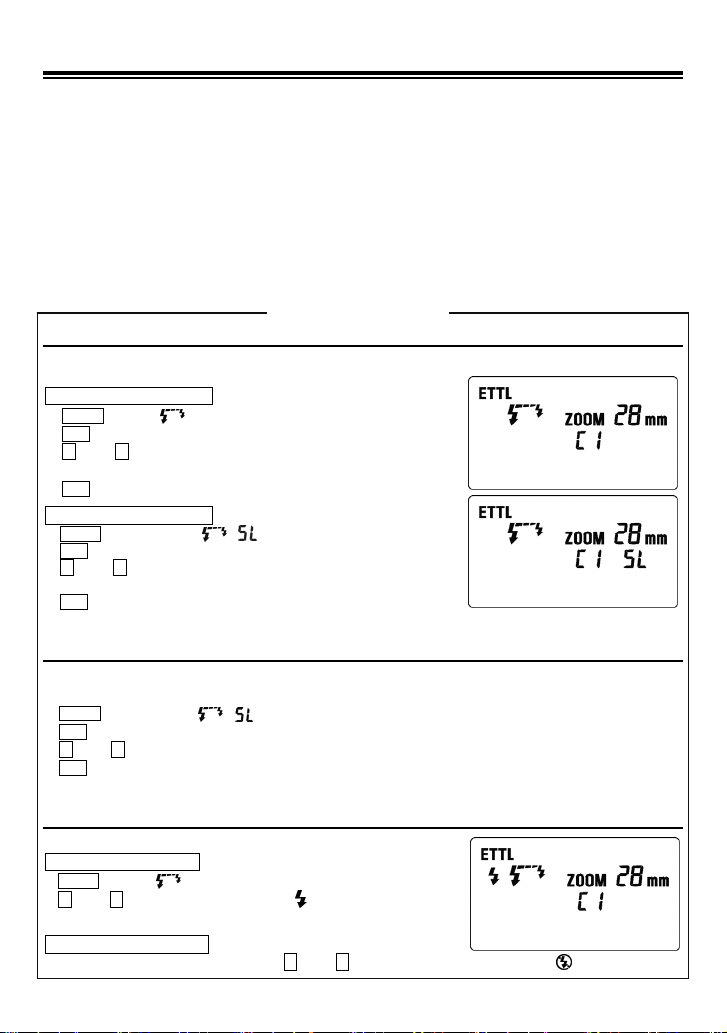
Channel Setting
When other people are using Wireless Flash mode near you, your flash may be connected with the
other person’s flash and your flash may fire. In this circumstance, please set a different channel for
your flash from that of the other person’s.
Channel setting for Master unit
1. Press the MODE button to Select the
2. Press the SEL button several times to make the channel indicator
blink.
+ or -
3. Press the
4. Press the SEL button several times to stop the blinking.
Channel setting for Slave unit
1. Press the MODE button to Select the ETTL/ /
2.
Press the SEL button several times to make the channel indicator blink.
3. Press the + or - button to set the channel to the same number.
(C1 ~ C4) as the master unit.
4. Press the SEL button several times to stop the blinking.
◆ If the channel number of the Master and Slave flashguns are different, the Slave will not fire. Please set
the same number for Master and Slave.
button to set the channel number. (C1~C4)
mark.
mark.
Slave Unit ID Setting
When you use several Slave units, the Slave ID can be set to distinguish a Slave unit from Main flash.
◆ If you want to all Slave units to fire at the same flash output, this setting is not necessary.
1. Press the MODE button to Select the ETTL/
2. Press the SEL button three times to make the Slave ID indicator blink.
3. Press the + or - button and set the ID number. (1, 2 or 3)
4. Press the SEL button again so the display stops blinking.
◆ Repeat this process for each slave unit you are using, giving each one a different ID number.
/
mark.
Master Flash ON/OFF Setting
You can set the Master flash unit firing ON or OFF.
Master Flash unit firing ON
1. Press the MODE button to Select the
2. Press the + or - button to indicate the mark.
Master Flash unit firing OFF
1. Press the MODE button to Select the
2. Press the + or - button to indicate the mark.
mark.
mark.
WIRELESS ETTL AUTOFLASH (type A cameras only)
In this Wireless ETTL Autoflash function, the camera automatically calculates the correct exposure.
Wireless ETTL Autoflash with Flash Ratio OFF
If you require an equal power ratio for each flash unit, the slave ID setting is not necessary. You can set 1, 2
or 3 for each Slave Unit in use.
All the Slave flash units will fire at the same flash output and the ETTL autoflash system controls the total
flash amount automatically, to obtain a correct flash exposure.
The instructions below show how to reset the flashgun so no flash ratio is used and therefore equal power
is emmited from each flashgun.
23
Page 25
◆ Please set the Master Flash unit as follows:
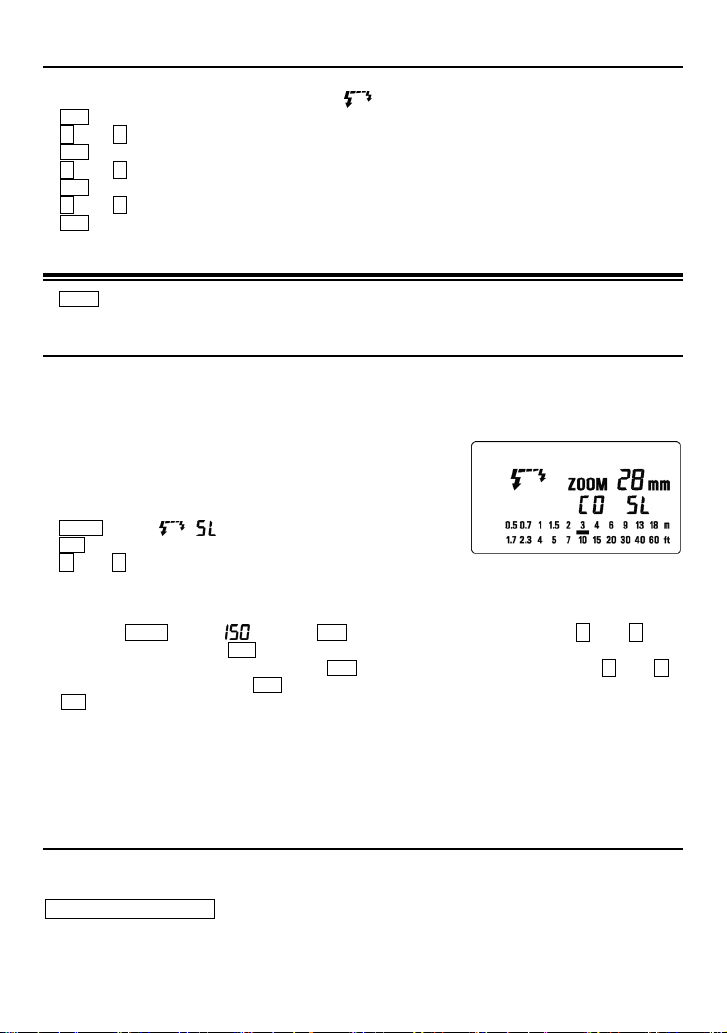
1. Press the MODE button to select the ETTL/
2. Press the + or - button to display the mark (Master Flash will fire) or the shows (Master Flash
will not fire) in the LCD display.
3. Press the SEL button several times and confirm that the flash ratio is 1:1.
◆ If the flash ratio is indicated as or , press the
4. Place the Slave Unit at the desired position.
5. Make sure that the Master Unit and Slave Unit have both been charged.
◆ Master Unit’s Ready Light is lit and Slave Unit’s AF Auxiliary Light is blinking.
6. Focus on the subject and take the picture.
mark.
+ or -
button until 1:1 is displayed.
Slave ID, Wireless ETTL Autoflash With Flash Ratio (Two Slave Units)
The Wireless ETTL autoflash system, described as an example, consists of a master unit on the camera,
which will not fire, and two slave units. When you set the flash ratio, the ETTL autoflash system then
controls the total flash amount according to the flash ratio, to obtain a correct exposure.
◆ Only EOS-1V, EOS-3 cameras can use this function.
◆ The flash ratio can be set between 8 : 1 ~ 1 : 1 ~ 1 : 8.
◆ Please set the Slave ID to 1 and 2 for each Slave unit.
Set the Master unit as follow.
1. Please set the Master Flash unit firing mode to OFF (see Mater Flash ON / OFF setting).
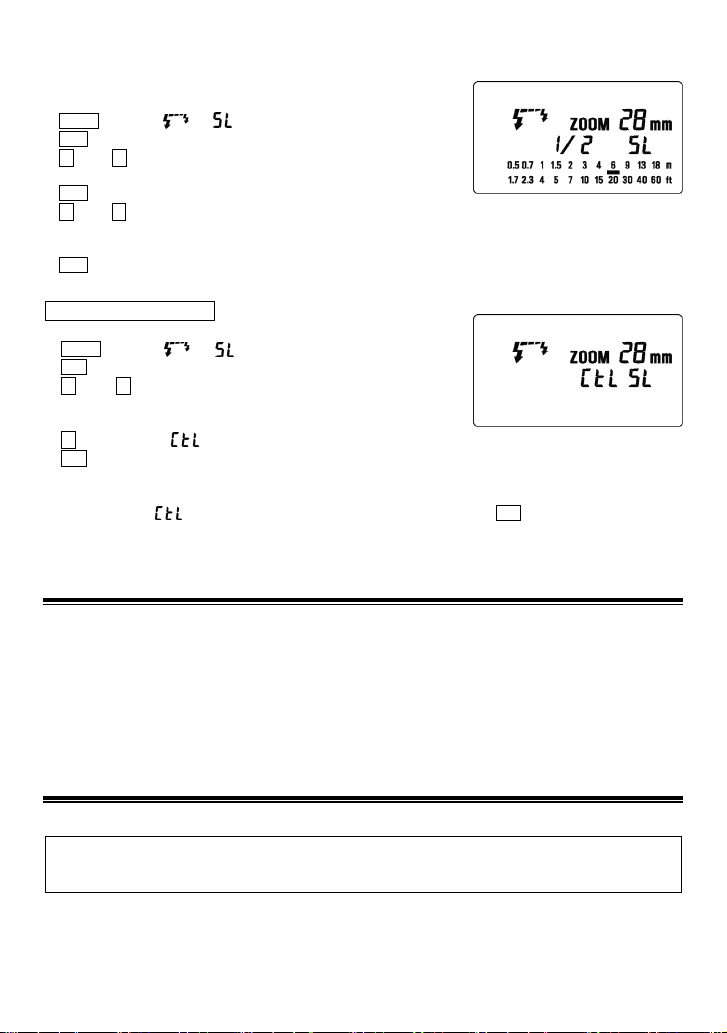
2. Press the MODE button to Select the ETTL
3. Press the SEL button several times to make the flash ratio indicator blink.
4. Press the
5. Press the SEL button to make flash ratio value blink.
6. Press the
7. Press the SEL button to make the Flash Ratio indicator stop blinking.
8. Place the Slave Unit at the desired position.
9.
10. Focus on the subject and take the picture.
◆ If you want to change the settings, you can start from step 3.
◆ If you want to cancel the setting, please set the flash ratio 1:1. (refer to step 4)
+ or -
button and select . (Blinking)
+ or -
button to set the flash ratio.
Confirm that both the master and slave units are charged.
/
mark.
Slave ID, Wireless ETTL Autoflash With Flash Ratio (Three Slave Units)
The following wireless ETTL autoflash procedure is for a master unit with three (3) slave units. This procedure
sets the flash ratio for two Slave Units and the flash exposure compensation amount for other slave unit.
◆ Only EOS-1V and EOS-3 camera can use this function.
◆ Please set the Slave ID 1, 2 and 3 for each Slave unit (See Slave ID Setting).
Set the Master unit as follow.
1. Please set the Master Flash unit firing mode to OFF (See Master Flash ON / OFF Settings).
2. Press the MODE button to Select the ETTL/ mark.
3. Press the SEL button several times to make the flash ratio indicator display blink.
4. Press the
5. Press the SEL button to make the flash ratio value blink.
6. Press the
7. Press the SEL button to make the flash exposure compensation display blink.
8. Press the
9. Press the SEL button to make the indicator stop blinking.
10. Place the Slave Units at the desired position.
11. Confirm that both the master and slave units are charged.
12. Focus on the subject and take the picture.
◆ If you want to change the settings or cancel the flash ratio settings, you can start from step 3.
Wireless High-Speed Sync (FP Flash)
1. Please set the master flash to Wireless Flash mode. (Refer to Page 21)
2. Press the
unit firing OFF).
+ or -
+ or -
+ or -
+ or -
button to select the 1 2 3. (Blinking)
button to set the flash ratio.
button and set the flash exposure compensation amount.
button to set to / (Master Flash unit firing ON) or / (Master Flash
24
Page 26
3.
The remainder of the procedure for setting wireless high-speed sync, is the same as for normal high-speed sync.
◆It is not necessary to make any additional settings on the Slave units.
Wireless Flash Exposure Compensation
1. Please set master flash unit to the Wireless Flash Mode.
2. Press the SEL button to make
3. Press the
4. Press the SEL button several times to make exposure compensation indicator appear.
◆It is not necessary to make any additional setting on the Slave units.
◆You can also set the flash exposure compensation individually for each slave unit. (If using more than
one slave, you will need to apply steps 2-4 to each slave unit.)
Wireless FE Lock
1. First please set the flashgun to Wireless Flash mode.
2. Focus on the subject and press the FEL button on the camera.
3. The procedure for setting wireless EF lock is the same as for normal FE lock.
◆ It is not necessary to make any change to the settings on the Slave units.
Wireless Flash Exposure Bracketing (FB)
1. First set the flash to the Wireless Flash Mode.
2. On the Master Unit, press the SEL button several times to make the
3. Press the
4. Press the SEL button several times to make the indicator stop blinking.
5. The remainder of procedure for setting wireless FB is the same as for normal FB.
◆It is not necessary to change any settings on the Slave units.
+ or -
button to set the flash exposure compensation amount.
+ or -
button and set the flash exposure compensation amount.
mark blink.
mark blink.
CHANGING THE WIRELESS MODE
Please set the flash as follows.
1. Press the MODE button to select the ETTL /
2. Press and hold the SEL button more than 2 seconds to make the mode indicator blink.
3. Press the MODE button and select the ETTL, M, or MULTI mode.
4. Press the SEL button to make the mode of indicator stop blinking.
mark.
WIRELESS MANUAL FLASH
You can manually set the slave unit’s flash output, with the master unit. The flash output among the slave
units can be uniform or varied. To determine the proper flash exposure, use a hand-held flash meter.
Wireless Manual Flash With Uniform Flash Output
Please set the Master flash unit as described below.
1. Please follow the procedure of Changing the Wireless Mode and set to the M/
2. Press the SEL button several times to make the flash output amount indicator blink.
3. Press the + button or – button to set the flash output amount.
4. Press the SEL button several times until the display stops blinking.
◆If the master flash unit ON function is set, the master unit will also fire, at the same flash output.
Wireless Manual Flash With Varied Flash Output
You can set a different flash output for each slave unit(s) (the following explains the procedure for using
three slave flash units). Set the slave units to normal Wireless Flash mode.
Please set the master flash unit as follows.
1. Please follow the procedure for Changing the Wireless Mode and set to the M/
2. Press the SEL button several times to make the
3. Press the
4. Press the SEL button, making the flash output display and blink.
5. Press the
6. Press the SEL button make the flash output display and blink.
7. Press the
25
+ or -
button to select indicator. (blinking)
+ or -
button to set the flash output amount for ID 1.
+ or -
button to set the flash output amount for ID 2.
mark blink.
mark.
mark.
Page 27
8. Press the SEL button make the flash output display and
9. Press the
10. Press the SEL button to make the indicator stop blinking.
◆ If there are only two slave units, please select the indicator at step 3 ( step 9 and step 10 should be
omitted).
+ or -
button to set the flash output amount for ID 3.
blink.
WIRELESS MULTI FLASH
Set the master flash unit as follows.
1. Follow the procedure for Changing the Wireless Mode, and set to the MULTI/
2. Press the SEL button to make the firing frequency display blink.
3. Press the
4. Press the SEL button to make the flash output amount display blink.
5. Press the
6. Press the SEL button to make the flash count display blink.
7. Press the
8. Press the SEL button to make the display stop blinking.
◆ The firing frequency and flash count will be the same for all slave units.
+ or -
button to set the firing frequency.
+ or -
button to set the flash output amount.
+ or -
button to set the flash count.
mark.
SLAVE FLASH
◆ When selecting this mode with the MODE button, make sure that the flash indicator mode (ETTL, M,
MULTI) is not displayed.
NORMAL SLAVE FLASH
Even if the EF-610 DG SUPER is not attached to the camera body, you can fire the flash by using another
flash unit.
◆ Built-in flash (E-TTL, E-TTL II) cannot be used.
◆ Please set your Master Flash unit to TTL autoflash (E-TTL, E-TTL II autoflash cannot be used) or Manual
flash mode.
1. Attach the flash unit to the camera’s hot shoe.
2.
Set the camera’s exposure mode to the desired mode. If you use A or M mode, also set the desired aperture value
3. Turn on the flash unit and press the shutter button half way.
◆ Now, the aperture value and film speed are automatically
transmitted to the flash unit.
4. Remove the flash unit from the camera.
5.
Press the MODE button and select the / (Slave) mode.
6. Press the SEL button several times to make the flash output value
indicator blink.
7. Press the + or – button to set the flash output amount.
◆ Determine the appropriate flash output by setting the distance indicator on the LCD panel to coincide as
closely as possible with the actual distance from the slave flash to the subject. If the actual distance is
out of range, you will need to change the aperture value or film speed.
a. To change the aperture value: When the flash unit is set to the Slave mode, press the SEL button
until the aperture value blinks, then press the + or – button to set the desired aperture value. Then
press the SEL button to stop the display blinking.
b. To change the film speed: Press
indicator for the aperture value blink. Press the + or – button and set the desired film speed, then
press the SEL button once again. You will need to press the
the slave mode.
8. Press the SEL button several times to make the display stop blinking.
9. Place the slave unit in the desired location. Do not place the slave unit within the picture area.
10. After confirming that all flash units are fully charged, press the shutter button to take the picture.
◆ When the EF-610 DG SUPER is fully charged, the AF Auxiliary Light will blink.
◆ The flash will not fire if the EF-610 DG SUPER is attached to the camera body while it is in the Slave
Mode setting.
MODE
to select the ISO, then press the SEL button to make the
MODE
button several times to return to
.
26
Page 28
DESIGNATED SLAVE FLASH
If using two or more EF-610 DG Super flash units, you can designate which flash will fire together by using
the channel settings. In this mode, one flash unit will be used as the Slave Controller and the others for
firing as Slaves.
Setting the Slave Flash unit(s) for firing
1. Attach the slave unit to the camera body.
2. Set the camera’s exposure mode to S or M.
3. Set the shutter speed to 1/30 or slower. (The slave controller unit (Master Flash) will transmit the
designated signal before the others fire. Thus if you use a shutter speed faster than 1/30, the firing flash
units will not be synchronized.)
4. Switch “ON” the flash unit and press the camera’s shutter button
halfway. (The aperture value and film speed are now automatically
transmitted to the slave flash unit.)
5. Remove the slave flash unit from the camera.
6. Press the MODE button and select the
7. Press the SEL button to make the channel display indicator blink.
8. Press the + or – button to set the channel number. (C1 or C2)
9. Press the SEL button to make the output amount display indicator of the flash blink.
10. Press the + or – button to set the flash output amount.
◆ Set the flash power by setting the distance indicator on the LCD panel to coincide as closely as possible
with the actual distance from the slave flash to the subject. If the actual distance is out of range, you
need to change the aperture value.
11. Press the SEL button several times to make the display stop blinking.
12. Place the slave unit in the desired location. Do not place the slave unit within the picture area.
Setting for Slave Controller unit
13. Attach the Slave Controller flash unit to the camera body.
14. Press the MODE button and select the
15. Press the SEL button to make the channel display indicator blink.
16. Press the + or – button to set the same channel number as that set
on the firing flash unit.
17. Press the SEL button to make the flash output amount display
indicator blink.
18. Press the + button so the
19. Press the SEL button twice to make the display stop blinking.
20. After confirming that all flash units are fully charged, press the shutter button to take the picture.
◆ When the firing flash unit of EF-610 DG Super is fully charged, the AF Auxiliary Light will blink.
◆ As the slave control using is in mode, the aperture on the slave control unit can not be changed.
◆ The Slave Controller unit functions only to control the slave unit.
mark is displayed and blinking.
/ . (Slave Mode)
/ (Slave Mode).
SPECIFICATIONS
TYPE : Clip-on type serial-controlled TTL auto zoom electric flash
GUIDE NUMBER : 61 (ISO 100/m, 105mm head position)
POWER SOURCE : Four AA type alkaline batteries or Four AA type Ni-Cd batteries or,
RECYCLING TIME : about 7.0 sec. (Alkaline batteries)
NUMBER OF FLASHES : about 120 flashes (Alkaline batteries)
FLASH DURATION : about 1 / 700 sec. (full power firing)
FLASH ILLUMINATE ANGLE : 24~105mm motor powered control (17mm with Built-in Wide Panel)
AUTO POWER OFF : Available
WEIGHT : 330g / 11.6oz.
DIMENSIONS : 77mm (W) / 3.0in. x 139mm (H) / 5.5in. x 117mm (L) / 4.6in.
27
: Four AA type Ni-MH Nickel-Metal Hydride batteries
: about 5.0 sec. (Ni-Cd, Ni-MH Nickel-Metal Hydride)
: about 160 flashes (Ni-Cd, Ni-MH Nickel-Metal Hydride)
Page 29
r
r
A
r
DEUTSCH
Vielen Dank, dass Sie sich für ein SIGMA EF-610 DG Super EO-TTL II Blitzgerät entschieden haben.
Dieses Produkt wurde speziell für den Einsatz an Spiegelreflexkameras der Canon EOS-Serie
entwickelt. Abhängig von dem jeweiligen Kameramodell können Funktionen und Handhabung
differieren. Bitte lesen Sie diese Gebrauchsanleitung bezogen auf Ihr Kameramodell sorgfältig durch.
Um Ihre Freude an der Fotografie zu steigern, besitzt dieses Gerät eine Vielzahl von
Ausstattungsmerkmalen. Sie sollten diese Gebrauchsanleitung im Zusammenhang mit Ihrer
Kamerabedienungsanleitung studieren und für zukünftiges Nachschlagen griffbereit halten, um die
Funktionen in vollem Umfang nutzen und die maximale Leistung des Gerätes ausschöpfen zu können.
VORSICHTSMAßNAHMEN
Um Verletzungen oder Beschädigungen zu verhindern, lesen Sie diese Bedienungsanleitung vor dem
ersten Einsatz Ihres Blitzgerätes bitte sehr sorgfältig und vollständig durch und beachten Sie unbedingt
die untenstehenden Warnzeichen. Bitte beachten Sie speziell die beiden folgenden Warnzeichen.
Warnung!!
Achtung!!
Dieses Symbol verweist auf die wichtigen Punkte, an denen Vorsicht geboten ist.
Dieses Symbol enthält Informationen bezüglich zu unterlassender Handlungen.
Dieses Blitzgerät enthält hochspannungsführende Schaltkreise. Um elektrische Schläge ode
Verbrennungen zu vermeiden, versuchen Sie nicht, das Gerät zu öffnen. Sollte das äußere Gehäuse
gebrochen oder zersprungen sein, berühren Sie keine inneren Geräteteile.
Blitzen Sie nicht aus kurzer Entfernung direkt in die Augen. Andernfalls kann das grelle Licht die
ugen verletzen. Halten Sie beim Fotografieren zumindest einen Abstand von einem Meter zwischen
Gesicht und Blitzgerät ein.
Berühren Sie nicht einen eventuell zusätzlich vorhanden Blitzkontakt (X) Ihrer Kamera, wenn das
Blitzgerät im Zubehörschuh steckt. Hochspannungsführende Stromkreise könnten einen elektrischen
Stromschlag verursachen.
Benutzen Sie Ihre Ausrüstung nie in der Umgebung entflammbarer, brennbarer Gase, Flüssigkeiten
oder Chemikalien etc. Andernfalls könnte dies zu einem Brand oder einer Explosion führen.
Benutzen Sie dieses Blitzgerät nicht an einer anderen Kamera als an einer der Canon EOS-Serie;
andernfalls könnte der Blitz die Schaltkreise der Kamera beschädigen.
Dieses Blitzgerät ist nicht wasserdicht. Wenn Sie die Ausrüstung im Regen, Schnee oder in der Nähe
von Wasser verwenden, bewahren Sie sie davor, nass zu werden. Es ist häufig unmöglich,
Wasserschäden interner elektrischer Komponenten zu reparieren.
Setzen Sie das Blitzgerät niemals Stößen, Staub, Hitze oder Feuchtigkeit aus. Diese Faktoren
könnten einen Brand oder Fehlfunktionen Ihrer Ausrüstung verursachen.
Wenn das Gerät plötzlichen Temperaturschwankungen ausgesetzt, etwa aus einer kalten Umgebung
in einen warmen Innenraum gebracht wird, kann sich Kondensniederschlag im Inneren des Gerätes
bilden. In solchen Fällen stecken Sie das Gerät bitte vor dem Temperaturwechsel in eine zu
verschließende Plastiktasche und benutzen Sie es erst wieder, wenn es sich der Raumtemperatu
angepasst hat.
Bewahren Sie das Gerät nicht in einer Schublade oder einem Schrank auf, wo es schädlichen
Dämpfen wie derer von Naphthalin, Kampfer oder Insektiziden ausgesetzt ist.
Verwenden Sie weder Verdünner, Benzin noch andere Reinigungsmittel, um Schmutz oder Fingerabdrücke
von dem Gerät zu entfernen. Benutzen Sie ein weiches, gegebenenfalls angefeuchtetes, fusselfreies Tuch.
Bewahren Sie das Blitzgerät an einem trockenen, kühlen und gut belüfteten Ort auf. Lösen Sie den
Blitz von Zeit zu Zeit aus, um seine volle Leistungsfähigkeit langfristig zu erhalten.
Wenn Sie die entsprechenden Hinweise nicht befolgen, kann dies zu ernsthaften
Verletzungen oder anderen gefährlichen Folgen führen.
Wenn Sie die entsprechenden Hinweise nicht befolgen, können Verletzungen ode
Schäden entstehen.
Warnung!!
Achtung!!
28
Page 30
BESCHREIBUNG DER TEILE
Externe Teile
1.Blitzkopf 2.AF-Hilfsilluminator 3.Verstellwinkel vertikal 4.Schwenkwinkel horizontal
5.Verstellver –u. entriegelung vertikal 6.Schwenkver –u. entriegelung horizontal
7.Flüssigkeitskristallanzeige 8.Batteriefachdeckel 9.Klemmrad 10.Aufsteckfuß
11. Reflektorfolie 12. Weitwinkelstreuscheibe
Bedienungselemente
13.Betriebsartentaste MODE 14.Wahltaste SEL 15. + Steigerungstaste
16. - Reduzierungstaste 17.ZOOM Taste ZOOM 18.Testauslöser TEST
19.Beleuchtungstaste LIGHT 20.Bereitschaftslampe 21.Hauptschalter
KAMERAMODELLE UND FUNKTIONEN
Obgleich dieses Gerät mit einer Vielzahl von Funktionen ausgestattet ist, können sich je nach
Kameramodell, an dem es verwendet wird, Einschränkungen ergeben. Bitte entnehmen Sie der
nachstehenden Tabelle, in welche Kategorie Ihre Kamera einzustufen ist. Bitte beachten Sie die
Erklärungen der jeweiligen Funktionen in dieser Bedienungsanleitung; wenn kein spezielles
Kameramodell erwähnt wird, steht diese Funktion für alle EOS Kameras zur Verfügung.
Gruppe A E-TTL(E-TTL II) kompatible EOS SLR Kameras
Gruppe B Alle anderen EOS-Kameras, die nicht unter Gruppe A gelistet sind
BATTERIEHINWEISE
Dieses Blitzgerät benötigt vier „AA“ Alkaline Trockenbatterien oder wiederaufladbare Ni-Cad oder Ni-MH
Akkus. Wechseln Sie den kompletten Batteriesatz aus, wenn die Aufladezeit mehr als 30 Sekunden beträgt.
◆ Um einwandfreien elektrischen Kontakt zu gewährleisten, reinigen Sie die Batteriekontakte, bevor
Sie die Batterien einsetzen.
◆ NiCad Akkus besitzen keine standardisierten Kontakte. Falls Sie NiCad Akkus verwenden,
vergewissern Sie sich, dass die Batteriekontakte jene des Batteriefaches einwandfrei berühren.
◆ Verwenden Sie ausschließlich vier frische „AA“ Mignonzellen einer Marke und eines Typs, um die
Gefahr des Platzens einer Batterie, des Austritts von Batteriesäure oder der Überhitzung
vorzubeugen. Mischen Sie keinesfalls frische und gebrauchte Batterien.
◆ Batterien dürfen weder geöffnet, noch kurzgeschlossen bzw. ins Feuer geworfen werden, da sie
explodieren können. Zur Wiederaufladung dürfen nur hierfür geeignete Zellen verwendet werden,
wie etwa NiCad.
◆ Wenn Sie das Blitzgerät längere Zeit nicht benutzen wollen, entnehmen Sie bitte die Batterien, um
Schäden durch austretende Batteriesäure zu verhindern.
◆ Bei niedrigen Temperaturen lässt die Leistung jeder Batterie nach. Bewahren Sie die Batterien
daher bei kalter Witterung bis zur Aufnahme getrennt vom Blitzgerät möglichst körperwarm auf.
◆ Wie bei jedem Blitzgerät empfiehlt sich die Mitnahme von Ersatzbatterien auf einer Reise oder für
Außenaufnahmen bei winterlichen Temperaturen.
EINLEGEN DER BATTERIEN
1. Vergewissern Sie sich, dass der Hauptschalter auf
OFF steht und öffnen Sie den Batteriefachdeckel
durch Schieben in Pfeilrichtung und klappen Sie ihn
nach oben.
2.
Setzen Sie vier Mignonzellen Typ „AA“ entsprechend
der Markierung der Polung (+ und
Batteriefach ein.
3. Schließen Sie den Batteriefachdeckel.
29
-
) in das
Page 31

4. Schalten Sie das Gerät am Hauptschalter ein. Nach
Blitzbereitschaftslampe
5. Um sich von der Funktionsfähigkeit durch einen Probeblitz zu überzeugen, genügt ein Druck auf
den Testauslöser.
Automatische Abschaltung
Um Strom zu sparen, schaltet sich das Gerät 90 Sekunden nach der letzten Betätigung automatisch
ab. Zur Wiedereinschaltung genügt ein Druck auf den Testauslöser oder das Antippen des
Kameraauslösers. Die automatische Abschaltung steht nicht im kabellosen Blitzbetrieb zur Verfügung.
Fehleranzeige
Bei ungenügender Batteriespannung bzw. fehlerhaftem Informationsaustausch zwischen Kamera und
Blitzgerät blinkt die Anzeige des Leuchtwinkels auf dem Display. Schalten Sie das Gerät in diesem Fall
kurzfristig aus und wieder ein. Führt dies nicht zum Erlöschen der Anzeige, prüfen Sie bitte die
Batteriespannung.
auf und zeigt somit an, dass das Gerät nunmehr zündbereit ist.
einigen Sekunden leuchtet die
EINSTELLEN DES BLITZKOPFES
Drücken Sie die Verstellwinkelver- und -entriegelungstaste,
während Sie den Blitzkopf in die gewünschte Position neigen.
◆ Wenn Sie das Gerät einschalten, erscheint auf dem LCD.
Sollte das Symbol blinken, befindet sich der Blitzkopf in einer
unzulässigen Position.
ANBRINGEN UND ABNEHMEN DES BLITZGERÄTES
Vergewissern Sie sich, dass das Gerät ausgeschaltet ist. Schieben Sie dann den Aufsteckfuß des
Blitzes in den Zubehörschuh der Kamera und drehen Sie das Klemmrad handfest an.
◆ Fassen Sie das Gerät zum Ansetzen bzw.
Abnehmen ausschließlich an seinem Unterteil an,
um Beschädigungen am Steckfuß oder am
Zubehörschuh der Kamera zu vermeiden.
◆ Falls der eingebaute Blitz der Kamera ausgeklappt
sein sollte, muss er vor dem Anbringen des EF-610
DG Super eingeklappt werden.
◆ Um den Blitz abzunehmen, drehen Sie das
Klemmrad in entgegengesetzter Richtung der
◄LOCK - Markierung bis zum Anschlag.
EINSTELLEN DES AUSLEUCHTWINKELS
Nach Druck auf die ZOOM-Taste erscheint das Symbol . Durch wiederholtes Drücken der
ZOOM-Taste ändert sich die Einstellung des ZOOMreflektors und der Anzeige in der LCD wie folgt:
24mm → 28mm → 35mm → 50mm → 70mm → 85mm → 105mm →(Auto)
In der Betriebsart E-TTL (TTL) reguliert das Gerät die Einstellung des Zoomreflektors innerhalb des
Einstellbereiches automatisch entsprechend der Brennweite des verwendeten Objektives.
◆
Beim Einschalten des Blitzes stellt sich der Zoomreflektor automatisch auf die zuletzt benutzte
Einstellung.
◆ Sofern Sie eine kürzere Objektivbrennweite benutzen, als am Zoomreflektor eingestellt wurde,
werden die Bildecken abgedunkelt wiedergegeben.
◆ Die Blitzleistung ändert sich in Abhängigkeit von der Zoomreflektoreinstellung.
(ZOOMREFLEKTOR)
30
Page 32

WEITWINKELSTREUSCHEIBE
Das Blitzgerät ist mit einer eingebauten Weitwinkelstreuscheibe ausgestattet, die die Ausleuchtung
des Bildwinkels eines 17mm Objektivs ermöglicht. Ziehen Sie die Weitwinkelstreuscheibe gemeinsam
mit der eingebauten Reflektorfolie vorsichtig heraus und klappen Sie ausschließlich die
Weitwinkelstreuscheibe vor den Blitzkopf. Anschließend
schieben Sie nur die Reflektorfolie wieder zurück. Der
Ausleuchtwinkel des Blitzgeräts stellt sich nun
automatisch auf 17mm.
◆
Sollte die eingebaute Weitwinkelstreuscheibe
versehentlich abgerissen werden, funktioniert die
ZOOM-Taste nicht mehr. In diesem Fall wenden
Sie sich bitte an Ihren Händler oder direkt an einen
autorisierten SIGMA Service.
BELEUCHTUNG DER LCD
Beim Druck auf die LIGHT Taste wird das Display für ca. acht Sekunden lang beleuchtet. Durch
erneuten Druck auf die LIGHT Taste bleibt die Beleuchtung für länger als acht Sekunden aktiviert.
E-TTL (TTL) BLITZAUTOMATIK
Im TTL-Blitzautomatikbetrieb kontrolliert die Kamera die abgeblitzte Lichtmenge, so- dass sich daraus
die korrekte Belichtung des Hauptobjektes ergibt.
◆ Kameras der Gruppe A unterstützen die E-TTL Betriebsart, jene der Gruppe B die TTL-Betriebsart.
1. Stellen Sie die Kamera auf Vollautomatik. (Für gewöhnlich
Einstellung verfügen, stellen Sie sie auf P-Automatik.)
2. Schalten Sie das Blitzgerät am Hauptschalter ein. Das TTL
Symbol erscheint auf dem LCD und das Gerät beginnt, sich
aufzuladen.
3. Stellen Sie scharf.
4. Vergewissern Sie sich, dass sich das Hauptobjekt innerhalb der
in dem LCD angezeigten Blitzreichweite befindet.
5. Nachdem der Blitz vollständig aufgeladen ist, betätigen Sie den
Auslöser. Die Blitzbereitschaftsanzeige im Sucher informiert Sie über den Ladezustand des Blitzes.
◆ Wenn die Kamera ausreichende Belichtung ermittelt hat, erscheint das E-TTL (TTL) Symbol für fünf
Sekunden auf dem Display. Sollte diese Anzeige nicht erscheinen, war die Blitzbelichtung nicht
ausreichend. Wiederholen Sie in diesem Fall die Aufnahme aus kürzerer Entfernung.
◆ Das AF-Hilfslicht schaltet sich automatisch ein, wenn Sie ein Motiv im Dunkeln anvisieren. Seine
Reichweite beträgt ca. 0,7 bis 9 Meter.
◆ Sofern sich die Kamera in einem Kreativprogramm befindet, beachten Sie bitte, dass das Blitzgerät
jeweils in die zuletzt gewählte Einstellung zurückkehrt.
◆ Sobald das Blitzgerät die volle Ladekapazität erreicht hat, erscheint die Bereitschaftsanzeige im
Sucher. Wenn der Auslöser vor Erreichen der Zündbereitschaft betätigt wird, löst die Kamera
entsprechend der Lichtverhältnisse mit langer Verschlusszeit aus.
Einsatz des Blitzgerätes in anderen Betriebseinstellungen (außer EOS 700, 750, 850)
Einsatz mit Blendenautomatik
Bei Wahl der Blendenautomatik kann an der Kamera eine Verschlusszeit innerhalb deren
Einstellbereich zwischen 30 Sekunden und 1/x (Synchronzeit) eingestellt werden. Je nach gewählter
Verschlusszeit ermittelt die Kamera die passende Blende entsprechend der Helligkeit des
Hintergrundes.
31
□
. Sollte die Kamera nicht über diese
Page 33

A
Bei zu hellen oder dunklen Motiven blinkt die Blendenanzeige mit dem jeweiligen Grenzwert (größte
oder kleinste Blende). In diesem Fall belichtet die Kamera die Blitzaufnahme mit dem Grenzwert,
wobei das Hauptobjekt richtig belichtet sein mag, der Hintergrund jedoch unter- bzw. überbelichtet
wird.
Einsatz mit Zeitautomatik
Bei Wahl der Zeitautomatik ermittelt die Kamera zur vorgewählten Blende die passende
Verschlusszeit zur Helligkeit des Hintergrundes. Bei zu hellen oder dunklen Motiven blinkt die
Verschlusszeitenanzeige mit dem jeweiligen Grenzwert. In diesem Fall belichtet die Kamera die
Blitzaufnahme mit dem Grenzwert, wobei das Hauptobjekt richtig belichtet sein mag, der Hintergrund
jedoch unter- bzw. überbelichtet wird.
Einsatz mit manueller Einstellung
In dieser Betriebsart können Sie sowohl die Blende als auch die Verschlusszeit in dem Bereich
zwischen der Synchronzeit und 30 Sekunden vorwählen. Sofern Sie sich dabei nach den Angaben
des Belichtungsmessers richten, arbeitet die Kamera wie beim Aufhellblitzen bzw. bei der
Langzeitsynchronisation.
GRENZEN DER SERIENAUSLÖSUNG
Um ein Überhitzen des Gerätes zu verhindern, legen Sie eine 10minütige Pause nach dem
Absolvieren der im folgenden genannten Aufnahmeserien ein.
Betriebsart
TTL, M (1/1, ½) 20 Serienauslösungen
M (1/4, 1/8) 25 Serienauslösungen
M (1/16-1/32) 40 Serienauslösungen
Multi 10 Sequenzen
nzahl der Blitzaufnahmen
MANUELLER BLITZBETRIEB
Der manuelle Blitzbetrieb empfiehlt sich immer dann, wenn Motive geblitzt werden, deren korrekte
Belichtung mittels TTL-Betriebsart nur schwierig zu erreichen ist. In der manuellen Betriebsart lässt
sich die Blitzleistung von 1/1 (voll) bis zu 1/128 in einstufigen Schritten wählen.
1. Schalten Sie die Kamera auf M.
2. Drücken Sie am Blitzgerät die Betriebsartentaste MODE, um M
zu wählen.
3. Der Wert der Blitzleistung blinkt, wenn Sie die Wahltaste SEL
drücken.
4. Drücken Sie die Taste + oder - , um die gewünschte
Blitzleistung einzustellen.
5. Nach dem erneuten Drücken der Wahltaste SEL stoppt das Blinken des Blitzleistungswertes und
die Anzeige bleibt bestehen.
6. Stellen Sie Ihr Motiv durch Antippen des Kameraauslösers scharf und lesen Sie die Entfernung von
der Einstellskala des Objektives ab. Verändern Sie anschließend die Blendeneinstellung oder die
Blitzleistung so lange, bis die angezeigte Blitzreichweite auf dem LCD des Blitzgerätes der
tatsächlichen Entfernung zum Motiv entspricht.
7. Sobald die Bereitschaftslampe aufleuchtet, ist das Gerät zündbereit.
◆Die korrekte Belichtung kann nach der folgenden Formel ermittelt werden:
Leitzahl (GN)
Das Blitzgerät ermittelt und indiziert die Entfernung zum Hauptobjekt automatisch entsprechend der
obigen Formel. Bitte beachten Sie die Tabelle 1.
/ Abstand Blitz zum Motiv (in m) = Arbeitsblende
32
Page 34

SYNCHRONISATION AUF DEN ZWEITEN VERSCHLUSSVORHANG
Bei Blitzaufnahmen bewegter Objekte mit längerer Verschlusszeit werden vom Objektiv ausgehende
Leuchtspuren vor
Verschlussvorhang das Bildfenster vollständig freigegeben hat. Das Objekt wird somit belichtet vom
Moment des Blitzes an bis zum Schließen des Bildfensters am Ende der Verschlusszeit. Wird der Blitz
hingegen auf den zweiten Verschlussvorhang synchronisiert, so zündet der Blitz erst kurz bevor der
zweite Vorhang das Bildfenster wieder verschließt. Hierdurch wird das Motiv zunächst durch das
vorhandene Licht und erst am Ende des Verschlussablaufes vom Blitzlicht belichtet, sodass die
Leuchtspuren des Objektes hinter ihm erscheinen, was weitaus natürlicher wirkt. Aufgrund der für
diesen Effekt notwendigen längeren Verschlusszeit empfiehlt sich der Einsatz eines Statives.
◆ Diese Betriebsart ist an den Kameras EOS 700, 750 und 850
nicht verfügbar.
1. Stellen Sie die Kamera auf die gewünschte Betriebsart.
2. Drücken Sie die Taste
LCD erscheint.
3. Stellen Sie Ihr Motiv scharf und lösen aus, nachdem die
Bereitschaftslampe aufleuchtet.
◆ Die Synchronisation auf den ersten Verschlussvorhang ist eingestellt, wenn das Symbol nicht
angezeigt wird.
◆ Um die Synchronisation auf den zweiten Verschlussvorhang auszuschalten, schalten Sie das
Symbol auf dem LCD durch Drücken der
◆ Diese Funktion steht nicht zur Verfügung, wenn die Kamera auf Vollautomatik geschaltet ist.
FP-KURZZEITBLITZSYNCHRONISATION,
Wenn Sie mit einem gewöhnlichen Blitzgerät arbeiten, können Sie keine kürzere Verschlusszeit als die
Synchronzeit der Kamera verwenden, da der Blitz in dem Moment gezündet werden muss, in dem das
Bildfenster von den Verschlussvorhängen vollständig freigegeben ist. Bei der Kurzzeitsynchronisation
sendet das Gerät ununterbrochen Blitze, während der Verschluss abläuft. Hierdurch kann eine kürzere
Verschlusszeit als die eigentliche Synchronzeit verwendet werden.
1. Wählen Sie an der Kamera die Belichtungsfunktion („Tv“ und
„M“ ist verfügbar)
2. Wählen Sie eine kürzere Verschlusszeit als die eigentliche
Synchronzeit der Kamera.
3. Schalten Sie das Blitzgerät am Hauptschalter ein.
4. Wählen Sie die Betriebsart mittels der MODE Taste.
(„E-TTL“ und „M“ ist verfügbar)
5. Drücken Sie die Taste + oder -, bis das Symbol
6. Stellen Sie das Objekt scharf
7. Prüfen Sie, ob sich das Objekt innerhalb des auf dem LCD angezeigten Entfernungsbereiches
befindet.
8. Vergewissern Sie sich des
◆ Bei Verwendung der Kurzzeitsynchronisation verändert sich die Leitzahl des Blitzes in Abhängigkeit
von der eingestellten Verschlusszeit. Die Blitzreichweite wird umso kürzer, je schneller die gewählte
Verschlusszeit ist. Bitte beachten Sie die Tabelle 2.
◆ Die Einstellung einer längeren Verschlusszeit als die Synchronzeit der Kamera löscht die
Kurzzeitsynchronisation. Das Blitzgerät schaltet in diesem Fall automatisch in den normalen E-TTL
Betrieb. Um in den FP-Betrieb zurückzukehren, befolgen Sie die beschriebene Prozedur von Schritt
Nr. 1 an.
◆ Es ist möglich, die Kurzzeitsynchronisation mit einer Belichtungskorrektur zu kombinieren. Bitte
schlagen Sie hierzu in der Bedienungsanleitung Ihrer Kamera unter „Belichtungskorrektur“ nach.
◆ erlischt, wenn die Kurzzeitsynchronisation gelöscht wird.
ihm abgebildet, denn der Blitz zündet im Normalfall, sobald der erste
+
oder -, bis das Symbol auf dem
+
oder - Taste aus.
NUR AN KAMERAS DER GRUPPE A
auf dem LCD erscheint.
Symbols im Sucher der Kamera und lösen dann aus.
33
Page 35

BLITZBELICHTUNGSSPEICHERUNG (FE-LOCK)
Die FE-Speicherung gestattet es Ihnen, die Blitzbelichtung präzise auf ein bestimmtes Motivdetail
abzustimmen und zu speichern, bevor Sie Ihr Bild aufnehmen.
1. Wählen Sie die Betriebsart an der Kamera („P“, „Tv“, „Av“, „M“ oder „Dep“)
2. Wählen Sie am Blitz die Betriebsart E-TTL oder Kurzzeitsynchronisation und warten Sie das
Aufleuchten der Bereitschaftslampe ab.
3. Stellen Sie auf das Objekt scharf
4. Richten Sie die Kamera mit dem mittleren AF-Messfeld auf das für die Blitzbelichtung relevante
Detail und drücken sie die FEL-Taste.
◆ Das Blitzgerät sendet einen Vorblitz, anhand dessen es die notwendige Lichtmenge für das
Erreichen der korrekten Belichtung errechnet und speichert.
◆ In der Sucheranzeige erscheint für 0,5 Sekunden „FEL“ und die korrekte Belichtung wird eingestellt.
◆ Wenn das Blitzsymbol blinken sollte, reicht die Blitzleistung für die korrekte Belichtung nicht aus.
Verkürzen Sie in diesem Fall den Aufnahmeabstand und wiederholen die obigen Schritte von Punkt 3 an.
5. Wählen Sie den endgültigen Bildausschnitt und drücken Sie den Auslöser durch.
◆ Bei mehreren, aufeinanderfolgenden Aufnahmen muss die Prozedur jeweils wiederholt werden.
Abhängig von dem verwendeten Kameramodell ergeben sich einige Unterschiede in der
Verwendung der FE-Speicherung. Bitte schlagen Sie in der Bedienungsanleitung Ihrer Kamera
Einzelheiten nach.
EINSTELLLICHT
Mit dem Einstelllicht können Sie die Lichtwirkung und den Schattenverlauf vor der Aufnahme
überprüfen.
(Diese Funktion ist auf Kameras beschränkt, die das Lesitungsmerkmal Einstelllicht unterstützen.
Weitere Einzelheiten schlagen Sie bitte in der Bedienungsanleitung Ihrer Kamera nach.) Wenn die
Kamera auf diese Funktion eingestellt wird, zeigt das Blitz-LCD automatisch das
Symbol.
BELICHTUNGSKORREKTUR
Sie können die Blitzbelichtungskorrektur mit der normalen Belichtungskorrektur in Ihren
Blitzaufnahmen kombinieren, um die Hintergrundhelligkeit zu kontrollieren. Die Korrektur kann in dem
Bereich von +/- 3 Stufen in 1/3 Schritten (bei einigen Kameramodellen in 1/2 Schritten) erfolgen.
◆ Diese Funktion steht an den Modellen EOS 620, 650, 700, 850 und 1000 nicht zur Verfügung.
1. Drücken Sie die Wahltaste SEL und wählen Sie
2. Drücken Sie die Tasten + oder - , um die gewünschte
Blitzbelichtungskorrektur zu wählen.
3. Nach dem erneuten Druck auf die Wahltaste SEL stoppt das
Blinken und die Anzeige erscheint permanent.
4. Stellen Sie Ihr Motiv scharf.
5. Vergewissern Sie sich bitte, dass sich das Objekt innerhalb der
auf dem LCD des EF 610 DG Super angezeigten Reichweite befindet.
6. Nachdem die Bereitschaftslampe Zündbereitschaft signalisiert, können Sie die Aufnahme machen.
◆ Um die Belichtungskorrektur zu löschen, beginnen Sie bitte von Schritt 1 an und wählen den Wert
„±0“ auf dem Display.
FB
(BLITZ-BELICHTUNGSREIHEN)
NUR KAMERAS DER GRUPPE A
Mittels der Blitz-Belichtungsreihe können Sie von einem Motiv unter Beibehaltung der
Hintergrundbelichtung eine Streuung der Blitzbelichtung in 1/3 Stufen (einige Modelle ½) um bis zu +/3 Blenden vornehmen.
34
Page 36

1. Drücken Sie die Wahltaste SEL; beginnt zu blinken.
2. Drücken Sie die Tasten + oder - , um die gewünschte
Belichtungsstreuung zu wählen.
3. Nach dem erneuten Druck auf die Wahltaste SEL wird
angezeigt.
4. Stellen Sie Ihr Motiv scharf.
5. Vergewissern Sie sich bitte, dass sich das Objekt innerhalb der
auf dem LCD des EF 610 DG Super angezeigten Reichweite befindet.
6. Nachdem die Bereitschaftslampe Zündbereitschaft signalisiert können Sie die Aufnahme anfertigen.
7. Wiederholen Sie die Schritte 4 bis 6 für die weiteren Aufnahmen.
◆ Nach der dritten Aufnahme wird die Funktion automatisch beendet.
STROBOSKOPBETRIEB
Während der Verschluss geöffnet ist, sendet das Blitzgerät eine Serie von Blitzen aus. Hierdurch
entsteht auf einem Bild eine Sequenz von Aufnahmen eines Motivs. Ein helles Motiv vor dunklem
Hintergrund ist am effektivsten für diese Funktion. Die Blitzfrequenz kann zwischen 1 Hz und 199 Hz
eingestellt werden. Bis zu 100 Blitze können kontinuierlich abgegeben werden. Die maximale Anzahl
von Blitzen variiert in Abhängigkeit von der Leitzahl und der eingestellten Frequenz. Bitte beachten Sie
die Tabelle 3.
◆ Diese Funktion steht an den Modellen EOS 700, 750 und 850 nicht zur Verfügung.
1. Stellen Sie die Belichtungsfunktion der Kamera auf M und
stellen Sie eine Blende ein.
2. Drücken Sie wiederholt die Betriebsartentaste MODE, bis die
Stroboskopanzeige MULTI erscheint.
3. Drücken Sie die Wahltaste SEL, bis die Blitzfrequenzanzeige zu
blinken beginnt.
4. Drücken Sie die Taste + oder -, um den gewünschten Wert
einzustellen.
5. Nach dem erneuten Druck auf die Wahltaste SEL beginnt die Angabe der Blitzleistung zu blinken.
6. Drücken Sie die Taste + oder -, um den gewünschten Wert einzustellen.
7. Nach dem erneuten Druck auf die Wahltaste SEL beginnt der Wert der Blitzanzahl zu blinken.
8. Drücken Sie die Taste + oder -, um die gewünschte Anzahl von Blitzen einzustellen.
9. Nach dem erneuten Druck auf die Wahltaste SEL stellt die Anzeige das Blinken ein.
10. Sobald die Bereitschaftslampe aufleuchtet, ist der Blitz einsatzbereit.
Achtung: Bitte wählen Sie eine längere Verschlusszeit als:
Anzahl der eingestellten Blitze / Blitzfrequenz in Hz
INDIREKTES BLITZEN
Bei Blitzaufnahmen in Innenräumen erscheint häufig ein harter Schlagschatten hinter Ihrem direkt
angeblitzten Objekt. Wenn Sie den Blitzreflektor jedoch nach oben neigen und das Blitzlicht somit
indirekt über eine Decke auf ihr Motiv fällt, erreichen Sie eine
wesentlich weichere Ausleuchtung. Drücken Sie die Entriegelungstaste
und neigen Sie den Blitzkopf in den gewünschten Winkel.
Vertikal
aufwärts: 0,60,75 und 90°
Horizontal
rechts: 0,60,75 und 90° links: 0,60,75,90,120,150 und 180°
Wenn indirektes Blitzen gewählt wurde, erscheint das Neigesymbol
auf dem LCD.
35
abwärts: 0 und 7°
Page 37

Das Motiv wird in die Farbe der reflektierenden Oberfläche getaucht. Wählen Sie deshalb bitte eine
weiße Oberfläche für das indirekte Blitzen. Abhängig von der reflektierenden Oberfläche, der
Motiv-Entfernung und anderen Faktoren kann sich die effektive Distanz für die TTL-Automatik
verändern. Deshalb vergewissern Sie sich bitte immer der Blitzkontrollanzeige (E-TTL oder
TTL-Anzeige auf dem LCD) nach dem Auslösen.
NAHAUFNAHMEN
Der Blitzkopf kann für Nahaufnahmen um 7° nach unten geneigt werden. Die effektive Ausleuchtung
ist in diesem Fall nur für Motive in einem Abstand zwischen 0,5 und 2 Metern gegeben. Wenn der
Blitzkopf um 7° nach unten geneigt ist, blinkt das Neigesymbol
EINGEBAUTE REFLEKTORFOLIE
.
Das Blitzgerät ist mit einer eingebauten
Reflektorfolie ausgestattet, die eine dezente
frontale Aufhellung beim indirekten Blitzen
gestattet (bspw. ein Lichtreflex im Auge des
Models). Ziehen Sie die Weitwinkelstreuscheibe
gemeinsam mit der eingebauten Reflektorfolie
vorsichtig heraus und schieben Sie nur die
Weitwinkelstreuscheibe wieder zurück.
◆ Neigen Sie für eine natürliche Ausleuchtung mit dezenter frontaler Aufhellung den Blitzkopf um 90
Grad nach oben und fotografieren Sie aus kurzer Entfernung.
KABELLOSES BLITZEN
Durch den Einsatz der kabellosen Blitzauslösung haben Sie die Möglichkeit, in Ihren Bildern durch die
Lichtführung einen räumlichen Eindruck zu vermitteln, oder ihnen eine besonders natürliche
Lichtstimmung durch den gezielten Schattenverlauf in Abhängigkeit der Blitzgeräteposition zu
verleihen. Hierzu bedarf es keiner Kabelverbindung zwischen Kamera und Blitzgerät, da die
Kommunikation zwischen beiden Geräten mittels des Blitzlichtes vorgenommen wird. In dieser
Betriebsart ermittelt die Kamera die korrekte Belichtung automatisch.
◆ Die Kameras der Gruppe B können lediglich in den Betriebsarten „Manuelles Kabelloses-Blitzen“ und
„Drahtloses Stroboskop-Blitzen“ verwendet werden. An den Modellen EOS 750 und 850 steht die
Funktion „Kabelloses Blitzen“ nicht zur Verfügung.
◆ In dieser Bedienungsanleitung wird das Blitzgerät, welches mit der Kamera verbunden ist, als
„Master“ bezeichnet und das entsprechend platzierte fernausgelöste Gerät als „Slave“.
◆ Wenn der „Slave“ an der gewünschten Stelle platziert werden soll, leistet ein Blitzgeräteständer, der
auch über ein Stativgewinde verfügt, gute Dienste.
◆
Wenn Sie den „Slave“ an der gewünschten Stelle platzieren, achten Sie darauf, dass er im Bild nicht zu sehen ist.
◆ Bitte platzieren Sie den „Slave“ in einem Abstand zwischen 0,5m und 5m zum Motiv und die Kamera
zwischen 1m bis 5m zum Motiv.
Kanalwahl
Für den Fall, dass andere Personen in Ihrer Nähe die kabellose Blitzauslösung nutzen und Ihr eigenes
Gerät auf diese Blitze reagieren sollte, stellen Sie bitte an Ihrem Gerät einen anderen Kanal als die
anderen Fotografen ein.
Kanaleinstellung am „Master“-Gerät
1. Drücken Sie die Betriebsartentaste MODE und wählen Sie das
Symbol.
2.
Drücken Sie mehrmals die Wahltaste SEL, bis die Kanalwahlanzeige
blinkt.
3. Drücken Sie + oder -, um den Kanal (C1 – C4) einzustellen.
4. Drücken Sie mehrmals die Wahltaste SEL, bis das Blinken endet.
Vorbereitung für das kabellose Blitzen
36
Page 38

Kanaleinstellung am „Slave“-Gerät
1. Drücken Sie die Betriebsartentaste MODE und wählen Sie das
E-TTL/ / Symbol.
2. Drücken Sie mehrmals die Wahltaste SEL, bis die
Kanalwahlanzeige blinkt.
3. Drücken Sie + oder -, um den gleichen Kanal (C1 – C4) wie
am „Master“ einzustellen.
4. Drücken Sie mehrmals die Wahltaste SEL, bis das Blinken endet.
◆ Sollten „Master“ und „Slave“ auf unterschiedliche Kanäle eingestellt sein, wird der „Slave“ nicht
ausgelöst.
Slave Identifikation ID Einstellung
Wenn Sie mehrere „Slave“ Geräte einsetzen, kann eine Slave Identifikation (ID) eingestellt werden,
sodass der Hauptblitz die „Slave“-Geräte untereinander unterscheiden kann.
1. Drücken Sie die Betriebsartentaste MODE und wählen Sie das E-TTL/ /
2. Drücken Sie mehrmals die Wahltaste SEL, bis die ID Anzeige blinkt.
3. Drücken Sie + oder -, um die ID Nummer (1,2 oder3) einzustellen.
4. Drücken Sie die Wahltaste SEL, damit das Blinken endet.
◆ Falls Sie alle „Slave“ Geräte gleichzeitig blitzen lassen möchten, ist diese Einstellung nicht
notwendig.
Symbol.
Master Blitz AN/AUS Einstellung
Sie können den „Master“ Blitz AN oder AUS schalten.
Master Blitz Einstellung AN
1. Drücken Sie die Betriebsartentaste MODE und wählen Sie das
Symbol.
2. Drücken Sie + oder -, um das Blitzsymbol einzustellen.
Master Blitz Einstellung AUS
1. Drücken Sie die Betriebsartentaste MODE und wählen Sie das
2. Drücken Sie + oder -, um das Symbol einzustellen.
Symbol.
KABELLOSE E-TTL AUTOMATIK (nur mit Kameras der Gruppe A)
In der kabellosen E-TTL Automatik ermittelt die Kamera automatisch die korrekte Belichtung.
Kabellose E-TTL Automatik mit Blitzerkennung AUS
Wenn die Blitzerkennung nicht gewünscht ist, ist die ID Einstellung des „Slave“ nicht notwendig. Es
kann sowohl 1, 2 oder 3 eingestellt sein. Alle „Slave“ Geräte blitzen gleichzeitig und die E-TTL
Blitzautomatik kontrolliert die Gesamtblitzmenge automatisch, um die korrekte Blitzbelichtung zu
gewährleisten.
Master Blitzgerät EIN + Slave Blitzgerät(e)
◆ Bitte stellen Sie den „Master“ ein wie folgt:
1. Drücken Sie die Betriebsartentaste MODE und wählen Sie das E-TTL/ Symbol.
2. Drücken Sie + oder -, um die Anzeige
3. Drücken Sie mehrmals die Wahltaste SEL und vergewissern Sie sich, dass das Blitzverhältnis auf
/ eingestellt ist.
einzustellen.
37
Page 39

◆ Wenn das Blitzverhältnis als oder angezeigt wird, lesen Sie bitte unter der Rubrik
„Kabellose E-TTL Blitzautomatik mit Blitzbelichtungsverhältnis EIN (zwei „Slave“ Geräte) oder (drei
„Slave“ Geräte)“ nach und stellen Sie das Blitzverhältnis auf
4. Platzieren Sie das „Slave“ Gerät an der gewünschten Position.
5. Vergewissern Sie sich, dass beide Geräte aufgeladen und blitzbereit sind.
◆ Am „Master“ Gerät leuchtet die Blitzbereitschaftslampe und beim „Slave“ Gerät blinkt der
AF-Hilfsilluminator.
6. Stellen Sie auf das Objekt scharf und lösen Sie aus.
/ .
Master Blitzgerät AUS + Slave Blitzgerät(e)
* Bitte stellen Sie den „Master“ ein wie folgt:
1. Befolgen Sie die Schritte unter Master Blitzgerät EIN + Slave Blitzgerät(e) und stellen Sie das
folgende Icon ein.
E-TTL /
/
2. Platzieren Sie das „Slave“ Gerät an der gewünschten Position.
3. Vergewissern Sie sich, dass beide Geräte aufgeladen und blitzbereit sind.
4. Stellen Sie auf das Objekt scharf und lösen Sie aus.
Slave ID, Kabellose E-TTL Blitzautomatik mit Blitz-Belichtungs-Verhältnis (2 „Slave“ Geräte)
Die kabellose E-TTL Blitzautomatik, die hier als Beispiel beschrieben wird, besteht aus einem
„Master“ Gerät an der Kamera, auf „Master“ Blitzgerät AUS geschaltet, und 2 „Slave“ Geräten. Wenn
Sie das Blitz-Belichtungsverhältnis einstellen, kontrolliert die E-TTL Blitzautomatik die
Gesamtlichtmenge entsprechend der eingestellten Verhältnisse, um die korrekte Belichtung zu
erzielen.
◆ Diese Funktion steht nur an der EOS 1V und EOS 3 zur Verfügung.
◆ Das Blitz-Belichtungsverhältnis kann eingestellt werden zwischen 8:1~1:1~1:8
◆ Bitte stellen sie die „Slave“ ID 1 und 2 an dem jeweiligen „Slave“ Gerät ein.Set the Master unit as follow.
Stellen Sie das „Master“ Gerät wie folgt ein:
1. Bitte stellen Sie den „Master“ auf Blitzen AUS.
2. Drücken Sie die Betriebsartentaste MODE und wählen Sie das E-TTL/ Symbol.
3. Drücken Sie mehrmals die Wahltaste SEL, bis die Verhältnisanzeige blinkt.
4. Drücken Sie + oder -, um die Anzeige zu wählen. (blinkt)
5. Drücken Sie die Wahltaste SEL, sodass der Verhältniswert blinkt.
6. Drücken Sie + oder -, um das Blitzverhältnis einzustellen.
7. Drücken Sie die Wahltaste SEL, sodass das Verhältnis angezeigt wird.
8. Platzieren Sie das „Slave“ Gerät an der gewünschten Position.
9. Vergewissern Sie sich, dass beide Geräte aufgeladen und blitzbereit sind.
10. Stellen Sie auf das Objekt scharf und lösen Sie aus.
◆ Wenn Sie das Blitzverhältnis ändern möchten, verfahren Sie von Schritt 3 an.
◆ Wenn Sie die Einstellungen löschen wollen, stellen Sie das Blitzverhältnis auf / (entsprechend
Schritt 4).
Slave ID, Kabellose E-TTL Blitzautomatik mit Blitz-Belichtungs-Verhältnis (3 „Slave“ Geräte)
Das nachfolgend beschriebene E-TTL Blitzautomatik-Verfahren gilt für ein „Master“ Gerät in
Verbindung mit 3 „Slave“ Geräten. Dieses Verfahren stellt die beiden Blitzbelichtungsverhältnisse und
die Blitzbelichtungskorrektur für das andere „Slave“ Gerät ein.
◆ Diese Funktion steht nur an der EOS 1V und EOS 3 zur Verfügung.
◆ Stellen Sie bitte die Slave ID auf 1, 2 und 3 für die jeweiligen Geräte.
38
Page 40

Stellen Sie das „Master“ Gerät ein wie folgt:
1. Bitte stellen Sie den „Master“ auf Blitzen AUS.
2. Drücken Sie die Betriebsartentaste MODE und wählen Sie das E-TTL/ Symbol.
3. Drücken Sie mehrmals die Wahltaste SEL, bis die Verhältnisanzeige blinkt.
4. Drücken Sie + oder -, um die Anzeige zu wählen. (blinkt)
5. Drücken Sie die Wahltaste SEL, sodass der Verhältniswert blinkt.
6. Drücken Sie + oder -, um das Blitzverhältnis einzustellen.
7. Drücken Sie die Wahltaste SEL, sodass die Blitzbelichtungskorrektur blinkt.
8. Drücken Sie + oder -, um den Korrekturfaktor einzustellen.
9. Drücken Sie die Wahltaste SEL, sodass eine Anzeige erscheint.
10. Platzieren Sie das „Slave“ Gerät an der gewünschten Position.
11. Vergewissern Sie sich, dass beide Geräte aufgeladen und blitzbereit sind.
12. Stellen Sie auf das Objekt scharf und lösen Sie aus.
◆ Wenn Sie das Blitzverhältnis ändern möchten, verfahren Sie von Schritt 3 an.
Wenn Sie die Einstellungen löschen wollen, stellen Sie das Blitzverhältnis auf
◆
/
(entsprechend
Schritt 4).
Kabellose Kurzzeitsynchronisation (FP)
1. Stellen wählen Sie die Funktion kabelloses Blitzen (entsprechend Seite 34)
2. Drücken Sie + oder - und stellen Sie / (Master Berät Blitz AN) oder / (Master Gerät
Blitz AUS) ein.
3. Das Verfahren für das Einstellen der kabellosen Kurzzeitsynchronisation erfolgt analog zu dem
Einstellen der normalen Kurzzeitsynchronisation.
◆ Es ist nicht notwendig, Einstellungen an dem „Slave“ Gerät vorzunehmen.
Kabellose Blitzbelichtungskorrektur
1. Stellen Sie bitte die Funktion kabelloses Blitzen ein.
2. Drücken Sie die Wahltaste SEL, sodass das Symbol blinkt.
3. Drücken Sie + oder -, um den Blitzbelichtungskorrekturfaktor einzustellen.
4. Drücken Sie mehrmals die Wahltaste SEL, bis die Blitzbelichtungskorrektur-anzeige erscheint.
5. Das Verfahren für das Einstellen der kabellosen Blitzbelichtungskorrektur gleicht dem Einstellen der
normalen Blitzbelichtungskorrektur.
◆Es ist nicht notwendig, Einstellungen an dem „Slave“ Gerät vorzunehmen.
◆Sie können die Blitzbelichtungskorrektur jedoch auch individuell an jedem „Slave“ Gerät einstellen.
Kabellose Blitzbelichtungsspeicherung (FE-Lock)
1. Als erstes stellen Sie bitte die Betriebsart kabelloses Blitzen ein.
2. Stellen Sie Ihr Motiv scharf und drücken Sie die Blitzbelichtungsspeicherungs-taste an der Kamera
(FEL)
3. Das Verfahren für das Einstellen der kabellosen Blitzbelichtungsspeicherung gleicht dem Einstellen
der normalen Blitzbelichtungsspeicherung.
◆ Es ist nicht notwendig, Einstellungen an den „Slave“ Geräten zu verändern.
Kabellose Blitzbelichtungsreihenautomatik (FB)
1. Als erstes stellen Sie bitte die Betriebsart kabelloses Blitzen ein.
2. Drücken Sie mehrmals die Wahltaste SEL, bis das Fb Symbol blinkt.
3. Drücken Sie + oder -, um den Blitzbelichtungskorrekturfaktor einzustellen.
4. Drücken Sie die Wahltaste SEL, sodass eine Anzeige erscheint.
5. Das Verfahren für das Einstellen der kabellosen Blitzbelichtungsreihenautomatik gleicht dem
Einstellen der normalen Blitzbelichtungsreihenautomatik.
◆Es ist nicht notwendig, Einstellungen an den „Slave“ Geräten zu verändern.
39
Page 41

WECHSELN DER KABELLOSEN BLITZBETRIEBSART
Bitte nehmen Sie die folgende Einstellungen vor:
1. Drücken Sie die Betriebsartentaste MODE und wählen Sie das E-TTL/ Symbol.
2. Drücken und halten Sie die Wahltaste SEL für mehr als 2 Sekunden, bis die Betriebsartentaste
blinkt.
3. Drücken Sie die Betriebsartentaste MODE und wählen Sie die E-TTL, M, MULTI Betriebsart.
4. Drücken Sie die Wahltaste SEL, sodass die Betriebsartenanzeige erscheint.
KABELLOSES, MANUELLES BLITZEN
Sie können die Blitzleistung des „Slave“ Gerätes manuell durch das „Master“ Gerät steuern. Die
Blitzleistung der „Slave“ Geräte untereinander kann gleich oder verschieden sein. Um die korrekte
Blitzbelichtung festzulegen, benutzen Sie einen Handblitzbelichtungsmesser.
Kabelloses manuelles Blitzen mit gleicher Blitzleistung
Bitte stellen Sie das „Master“ Gerät wie im folgenden beschrieben ein:
1. Folgen Sie der Anleitung unter Wechseln der kabellosen Blitzbetriebsart und stellen Sie das M/
Symbol ein.
2. Drücken Sie mehrmals die Wahltaste SEL, bis die Anzeige für die Blitzleistung blinkt.
3. Drücken Sie + oder -, um die Blitzleistung einzustellen.
4. Drücken Sie mehrmals die Wahltaste SEL, bis die Blitzleistung dauerhaft angezeigt wird.
◆ Wenn sich das „Master“ Gerät in der Funktion AN befindet, wird es selber ebenfalls mit der
eingestellten Leistung abblitzen.
Kabelloses manuelles Blitzen mit unterschiedlicher Blitzleistung
Sie können unterschiedliche Blitzleistungen für jedes „Slave“ Gerät einstellen. (Folgend hierzu die
Anleitung für 3 „Slave“ Geräte). Bitte stellen Sie das „Master“ Gerät folgendermaßen ein:
1. Folgen Sie der Anleitung unter Wechseln der kabellosen Blitzbetriebsart und stellen Sie das M/
Symbol ein.
2. Drücken Sie mehrmals die Wahltaste SEL, bis das Symbol blinkt.
3. Drücken Sie + oder - und wählen Sie die Einstellung (blinkt).
4. Drücken Sie die Wahltaste SEL sodass die Blitzleistung angezeigt wird und blinkt.
5. Drücken Sie + oder -, um die Blitzleistung einzustellen.
6. Drücken Sie die Wahltaste SEL, sodass die Blitzleistung angezeigt wird und blinkt.
7. Drücken Sie + oder -, um die Blitzleistung einzustellen.
8. Drücken Sie die Wahltaste SEL, sodass die Blitzleistung angezeigt wird und blinkt.
9. Drücken Sie + oder -, um die Blitzleistung einzustellen.
10. Drücken Sie die Wahltaste SEL, um das Blinken der Anzeige zu beenden.
◆ Sollten Sie lediglich 2 „Slave“ Geräte einsetzen, wählen Sie die bei Schritt 3 (Schritt 8 und 9
werden übergangen)
KABELLOSER STROBOSKOPBETRIEB
Bitte stellen Sie das „Master“ Gerät folgendermaßen ein:
1. Folgen Sie der Anleitung unter Wechseln der kabellosen Blitzbetriebsart und wählen Sie die
Anzeige MULTI/
2. Drücken Sie die Wahltaste SEL, sodass die Blitzfrequenzanzeige blinkt.
3. Drücken Sie + oder -, um die Blitzfrequenz einzustellen.
4. Drücken Sie die Wahltaste SEL, sodass die Anzeige der Blitzleistung blinkt.
5. Drücken Sie + oder -, um die Blitzleistung einzustellen.
6. Drücken Sie die Wahltaste SEL, sodass der Wert der Blitzanzahl blinkt.
7. Drücken Sie + oder -, um die Anzahl der Blitze einzustellen.
8. Drücken Sie die Wahltaste SEL, um das Blinken der Anzeige zu beenden.
◆ Die Blitzfrequenz und Blitzanzahl ist für alle „Slave“ Geräte die gleiche.
.
40
Page 42

„SLAVE“ GERÄT
◆ Wenn Sie die Auswahl über die Betriebsartentaste MODE vornehmen, vergewissern Sie sich bitte,
dass die Betriebsartenanzeige (E-TTL, M, MULTI) nicht angezeigt wird.
NORMALER „SLAVE“ GERÄTE BETRIEB
Selbst wenn der EF-610 DG SUPER nicht an die Kamera angesetzt ist, können Sie ihn durch ein
anderes Blitzgerät auslösen.
◆ Eingebauter Blitz (E-TTL, E-TTL II) kann nicht verwendet werden.
◆ Bitte stellen Sie Ihr Master Blitzgerät auf TTL Blitzautomatik (E-TTL, E-TTL II Blitzautomatik kann
nicht verwendet werden) oder manuellen Blitzbetrieb.
1. Verbinden sie das Blitzgerät mit dem Kameragehäuse.
2.
Stellen Sie die Kamera auf die gewünschte Belichtungsautomatik.
Falls Sie A oder M wählen, stellen Sie bitte auch die gewünschte
Blende ein.
3. Schalten Sie das Blitzgerät ein. Anschließend drücken Sie den
Kameraauslöser halb durch.
◆ Nun wird der Blendenwert und die Filmempfindlichkeit automatisch
an das Blitzgerät übertragen.
4.
Entfernen Sie das Blitzgerät von der Kamera.
5. Drücken Sie die Betriebsartentaste MODE und wählen Sie die / (Slave) Betriebsart.
6. Drücken Sie mehrmals die Wahltaste SEL, bis die Anzeige der Blitzleistung blinkt.
7. Drücken Sie + oder – um die Blitzleistung einzustellen.
◆ Legen Sie die korrekte Blitzbelichtung durch übereinstimmendes Einstellen der Entfernungsanzeige auf
dem Display mit der tatsächlichen Entfernung zwischen „Slave“ Gerät und Motiv fest. Sollte sich die
tatsächliche Entfernung außerhalb der Blitzreichweite befinden, wählen Sie bitte eine größere Blendenöffnung.
◆ Sie können Filmempfindlichkeit und Blendenwert, falls gewünscht, auch am Blitz manuell einstellen.
a. Für die Filmempfindlichkeit ... drücken Sie MODE und wählen Sie ISO, drücken Sie danach SEL,
sodass die Anzeige blinkt. Drücken Sie + oder -, um die gewünschte Filmempfindlichkeit
einzustellen und drücken Sie danach die SEL Taste noch einmal.
b. Für den Blendenwert ... Wenn das Blitzgerät auf Slave Betriebsart steht, drücken Sie die SEL Taste,
sodass die Blendenanzeige blinkt und drücken Sie + oder - , um den gewünschten Wert
einzustellen. Drücken Sie danach noch einmal die SEL Taste.Press the SEL button several times to
make the display stop blinking.
8.
Drücken Sie mehrmals die Wahltaste SEL, sodass die Anzeige dauerhaft erscheint.
9. Platzieren Sie den Blitz an der gewünschten Position und achten Sie darauf, dass er nicht auf dem
Bild zu sehen ist.
10. Nachdem Sie sich vergewissert haben, dass alle Blitzgeräte aufgeladen und blitzbereit sind,
betätigen Sie den Auslöser und nehmen das Bild auf.
◆ Wenn der EF-610 DG Super voll aufgeladen ist, beginnt das AF-Hilfslicht zu blinken.
◆ Der EF-610 DG Super wird nicht auslösen, wenn er an der Kamera angeschlossen ist, während er sich
im Slave Betrieb befindet.
KABELLOSE ZÜNDUNG BESTIMMTER „SLAVE“ GERÄTE
Falls Sie 2 oder mehr EF-610 DG Super Blitzgeräte einsetzen, können Sie durch den Einsatz der
Kanalwahl bestimmen, welche Geräte gleichzeitig blitzen sollen. In dieser Betriebsart wird ein Gerät
als Slave Controller und die anderen werden als blitzende „Slave“ Geräte eingesetzt.
Einstellung der blitzenden Geräte
1. Verbinden Sie das blitzende Gerät mit dem Kameragehäuse.
2. Stellen Sie die Belichtungsfunktion der Kamera auf TV oder M.
◆ Stellen Sie die Verschlusszeit auf 1/30s oder länger. Der Slave
Controller sendet das entsprechende Signal, bevor die anderen
Blitze auslösen. Wenn Sie daher den Verschluss auf eine kürzere
Zeit als eine 1/30s einstellen, sind die blitzenden Geräte nicht
synchronisiert.
41
Page 43

3. Schalten Sie das Blitzgerät ein und drücken Sie den Auslöser halb durch.
◆ Nun werden Filmempfindlichkeit und Blendenwert automatisch an das Blitzgerät übertragen.
4. Entfernen Sie das Blitzgerät von der Kamera.
5. Drücken Sie die Betriebsartentaste MODE und wählen Sie die / (Slave) Betriebsart.
6. Drücken Sie die Wahltaste SEL, sodass die Anzeige der Kanalwahl blinkt.
7. Drücken Sie + oder -, um den Kanal einzustellen. (C1 oder C2)
8. Drücken Sie die Wahltaste SEL, sodass die Anzeige der Blitzleistung blinkt.
9. Drücken Sie + oder -, um die Blitzleistung einzustellen.
◆ Legen Sie die korrekte Blitzbelichtung durch übereinstimmendes Einstellen der Entfernungsanzeige
auf dem Display mit der tatsächlichen Entfernung zwischen „Slave“ Gerät und Motiv fest. Sollte sich
die tatsächliche Entfernung außerhalb der Blitzreichweite befinden, wählen Sie bitte eine größere
Blendenöffnung.
10. Drücken Sie mehrmals die Wahltaste SEL, sodass die Anzeige dauerhaft erscheint.
11. Platzieren Sie den Blitz an der gewünschten Position und achten Sie darauf, dass er nicht auf dem
Bild zu sehen ist.
Einstellung des Slave Controllers
12. Verbinden Sie den Slave Controller mit dem Kameragehäuse.
13. Drücken Sie die Betriebsartentaste MODE und wählen Sie die
/ (Slave) Betriebsart.
14. Drücken Sie die Wahltaste SEL, sodass die Anzeige der
Kanalwahl blinkt.
15. Drücken Sie + oder -, und stellen Sie den gleichen Kanal
ein wie an der blitzenden Einheit.
16. Drücken Sie die Wahltaste SEL, sodass die Anzeige der Blitzleistung blinkt.
17. Drücken Sie +, um das Symbol einzustellen.
18. Drücken Sie die Wahltaste SEL, um das Blinken der Anzeige zu beenden.
19. Nachdem Sie sich vergewissert haben, dass alle Blitzgeräte aufgeladen und blitzbereit sind,
betätigen Sie den Auslöser und nehmen das Bild auf.
◆ Wenn der EF-610 DG Super voll aufgeladen ist, beginnt das AF-Hilfslicht zu blinken.
◆ Sie können den Blendenwert nicht durch die SEL Taste einstellen, sofern das
Blitzleistung gewählt wurde.
◆ Die Slave Controller Einheit kontrolliert ausschließlich die blitzenden Geräte.
Symbol bei der
TECHNISCHE DATEN
Type Systemblitzgerät, Aufsteck-Type, serienmäßige TTL-Messung, mit
Auto-Zoomreflektor
Leitzahl 61 (ISO 100/m, 105mm Blitzkopfeinstellung)
Energieversorgung 4 AA Type Alkaline Batterien oder
4 AA Type Ni-Cd Akkus oder
4 AA Type Ni-MH Nickel-Metall Hydrid Akkus
Aufladezeit ca. 7,0 s mit Alkaline Batterien
ca. 5,0 s mit Ni-Cd oder Ni-MH Akkus
Blitzanzahl ca. 120 mit Alkaline Batterien
ca. 160 mit Ni-Cd oder Ni-MH Akkus
Blitzdauer ca. 1/700 s bei voller Leistung
Ausleuchtwinkel
24mm~105mm motorgesteuert
17mm mit eingebauter Weitwinkelstreuscheibe
Automatische Abschaltung Vorhanden
Gewicht 330 Gramm
Abmessungen 77mm (B) x 139mm (H) x 117mm (T)
42
Page 44

g
î
r
FRANÇAIS
Nous vous remercions d'avoir choisi le flash électronique Sigma EF-610 DG SUPER EO-TTL II. Ce
produit a été conçu spécifiquement pour être utilisé avec les boîtiers reflex Canon EOS. Les fonctions
et le mode opératoire pouvant varier d'un appareil à l'autre, nous vous recommandons de vous référer
au mode d'emploi de votre boîtier. Ce flash dispose d'une grande diversité de fonctions qui vous
augmenteront le plaisir que vous éprouvez à faire de la photographie. Pour profiter au mieux de ses
possibilités et en tirer le meilleur parti, nous vous suggérons de lire attentivement ce mode d'emploi
avant toute utilisation, en ayant sous la main celui de votre appareil. Nous vous conseillons également
de le garder toujours à portée de main.
PRECAUTIONS
Pour éviter tout dommage ou erreur de manipulation, nous vous demandons de lire attentivement
ce mode d’emploi avant d’utiliser votre appareil.
Nous attirons particulièrement votre attention sur les deux signes d’avertissement ci-dessous.
Mise en garde !!
Avertissement !!
Ce symbole marque un point important où la plus grande prudence est requise
Ce symbole correspond à une information qu’il convient de respecter
Ce flash comprend des circuits électriques à haut voltage. N'essayez jamais de démonter le
produit, ceci pouvant entraîner une électrocution ou une brûlure. Si la coque est cassée ou fêlée,
ne touchez pas les composants internes.
Ne déclenchez jamais d'éclair à proximité des yeux. L'intensité lumineuse pourrait créer des
dommages irréversibles. Laissez toujours une distance d'au moins 1m/3 pieds entre le visage et
l'appareil lorsque vous photographiez avec le flash.
Ne touchez pas la griffe lorsque le flash est monté sur l'appareil. Vous pourriez subir une
décharge à haute tension.
N'utilisez jamais le flash dans un environnement de produits inflammables tels que gaz, produits
chimiques, solvants, etc…en raison de risques d'incendie ou d'explosion.
N'utilisez ce flash que sur un bo
endommager les circuits électriques et électroniques de l'appareil.
Ce flash n'est pas étanche. Tenez-le à l'abri en cas d'utilisation sous la pluie, la neige ou les
embruns. Des circuits endommagés par l'eau sont souvent irréparables.
N'exposez pas votre flash, ni l'appareil, à un choc, à la poussière, à de très hautes températures
ou à l'humidité. Ces éléments pourraient causer des dégâts ou un dysfonctionnement.
Si le flash est soumis à un brusque contraste de température, comme de passer d'un extérieu
froid à un intérieur bien chauffé, une condensation peut se former à l'intérieur. Dans une telle
circonstance, placez le flash dans un sac plastique fermé et ne l'utilisez pas tant qu'il n'a pas
atteint la température de la pièce.
Ne rangez pas le flash dans un tiroir ou une armoire contenant de la naphtaline, du camphre ou
tout autre insecticide. Ceci pourrait provoquer des dysfonctionnements.
N'employez pas de dissolvant, de benzène ou tout autre agent chimique pour nettoyer votre flash
ou enlever des traces de doigts. N'utilisez qu'un chiffon doux et humide.
En cas de stockage prolongé, placez le flash dans un endroit sec et tempéré, de préférence
ventilé. Faites le fonctionner plusieurs fois par mois pour entretenir le condensateur.
43
La non prise en compte de cette mise en garde pourrait entraîner un
accident grave ou un dommage sérieux au produit.
Le non respect de cet avertissement pourrait entraîner un accident ou
endomma
er le produit.
Mise en garde !!
Avertissement !!
tier Canon de la série EOS. Tout autre emploi pourrait
Page 45

DESCRIPTION DES ELEMENTS
ELEMENTS
EXTERNES
CONTROLS
1.Tête Flash 2.Illuminateur d'assistance AF 3.Angle d'inclinaison : Haut et Bas
4.Angle de rotation: Droite et Gauche 5.Verrouillage de la tête orientable Haut et Bas
6.Verrouillage du pivotement Droite et Gauche 7.Ecran LCD
8.Couvercle du compartiment piles 9.Vis de blocage du sabot 10.Sabot
11.Réflecteur de lumière 12.Elargisseur d'angle
13.Bouton de MODE 14.Bouton SELECT SEL 15.Touche d'incrément +
16.Touche de décrément – 17.Bouton ZOOM 18.Bouton TEST
19.Bouton de rétro éclairage LIGHT 20.Lampe témoin de charge 21.Interrupteur
FONCTIONS ET TYPE DE BOITIER
Ce flash est pourvu de très nombreuses fonctions dont certaines peuvent être limitées ou
inaccessibles selon le boîtier utilisé. Nous vous demandons de vous reporter à la liste ci-dessous pour
valider la catégorie de votre appareil. Veuillez vous référer au mode d'emploi pour la mise en œuvre
de chaque fonction. Si aucun type d'appareil n'est mentionné, c'est que la fonction concernée est
accessible pour n'importe quel boîtier EOS.
Boîtiers type A Boîtiers EOS compatibles E-TTL (E-TTL II)
Boîtiers type B Tous les autres boîtiers EOS
ALIMENTATION ELECTRIQUE
Ce flash fonctionne avec quatre piles alcalines ou quatre accus rechargeables Ni-Cd ou Ni-MH de
type “AA”. Des piles au manganèse peuvent aussi être utilisées, mais leur durée d'utilisation est plus
courte que celle des piles alcalines, et leur usage n'est donc pas conseillé. Remplacez les piles dès
que le temps de charge excède 30 secondes.
◆ Nettoyez les contacts des piles avant installation pour assurer une bonne conductivité
◆ Les accus Ni-Cd n'étant pas standardisés, vérifiez les contacts avec les extrémités du compartiment
de piles.
◆ Afin d'éviter tout risque d'explosion, d'écoulement ou de surchauffe, utilisez toujours quatre piles AA
neuves de même type et de la même marque. Ne mélangez ni différents types, ni des piles neuves
avec des piles usagées.
◆ Ne cherchez pas à démonter les piles, ni à les décharger. Ne les exposez ni au feu, ni à l'eau : il y
aurait danger d'explosion. De même, ne cherchez pas à recharger des piles, ou des accumulateurs
autres que des accus Ni-Cd ou Ni-Mh.
◆ Si vous n'utilisez pas le flash pendant une longue période, ôtez les piles afin d'éviter tout risque
d'écoulement.
◆ La performance des piles diminue sous de basses températures. Protégez-les du froid lorsque vous
utilisez le flash par temps froid.
◆ Il est toujours recommandé d'emmener des piles de rechange lors d'un long voyage ou en cas
d'utilisation par grand froid.
MISE EN PLACE DES PILES
1. Assurez-vous que le flash est éteint (interrupteur
principal en position "OFF"). Ouvrez alors le
compartiment de piles en faisant glisser le
couvercle dans le sens de la flèche.
2. Insérez quatre piles AA dans le compartiment de
piles, en respectant les polarités + et – comme
indiqué sur les parois.
3. Refermez le couvercle
44
Page 46

4. Allumez le flash en plaçant l'interrupteur en position "ON". Après quelques secondes, la lampe
témoin de charge s'allume, indiquant que le flash est prêt à fonctionner.
5. Appuyez sur le bouton TEST pour vous assurer que le flash fonctionne correctement.
MISE EN VEILLE AUTOMATIQUE
Le flash se met en veille automatiquement après environ 90 secondes de non-activation, afin de
préserver la puissance des piles. Pour le remettre en route, appuyez sur le bouton TEST ou appuyez
à mi-course sur le déclencheur de l'appareil. Le système de mise en veille automatique ne fonctionne
pas en mode de flash à distance sans cordon, de mode flash asservi normal ou de mode flash asservi
désigné.
INDICATEUR D'ANOMALIE
Si la puissance des piles est insuffisante, ou s'il y a un problème d'information électrique entre le flash
et le boîtier, le témoin de couverture d'angle clignote sur l'écran LCD. Dans ce cas, éteignez le flash et
rallumez-le. Si le témoin clignote encore, vérifiez la puissance des piles.
AJUSTEMENT DE LA TETE FLASH
Appuyez sur le bouton de verrouillage "Haut et Bas" et relâchez-le
ensuite en orientant la tête dans la position souhaitée.
apparaît sur l'écran LCD lorsque vous l'allumez. Si cette
◆
icône clignote, c'est que la tête est placée sur une mauvaise
position.
MISE EN PLACE ET RETRAIT DU FLASH
Assurez-vous que le flash est éteint. Placez ensuite le sabot du flash dans la griffe porte flash de
l'appareil et tournez la vis de verrouillage pour bloquer
le sabot.
◆ Lorsque vous attachez ou retirez le flash, tenez
bien le corps du flash afin d'éviter d'endommager le
sabot ou la griffe porte flash.
◆ Si le flash intégré du boîtier est relevé, rabaissez-le
avant de mettre en place le flash sur la griffe.
◆ Pour retirer le flash, débloquez le sabot en tournant
la vis de verrouillage dans le sens inverse au
symbole ◄LOCK jusqu'en butée.
REGLAGE DE L'ANGLE DE COUVERTURE
Si vous appuyez sur le bouton ZOOM, le symbole apparaît sur l'écran LCD. Chaque fois que vous
appuyez sur le bouton ZOOM, l'écran LCD affiche la position de la tête zoom selon la séquence
suivante :
24mm → 28mm → 35mm → 50mm → 70mm → 85mm → 105mm →(Auto)
En général, en mode ETTL (TTL), le flash ajuste automatiquement la position de la tête zoom en
fonction de la focale de l'objectif.
◆ Lorsque vous rallumez le flash, la tête zoom se mettra sur la dernière position utilisée, qui aura été
mémorisée.
◆ Si vous utilisez un objectif dont l'angle de champ est supérieur à l'angle couvert par le flash, les
angles de l'image pourront être sous-exposés. La portée de l'éclair du flash varie en fonction de la
position de la tête zoom.
45
Page 47

ELARGISSEUR D'ANGLE
Ce flash est pourvu d'un élargisseur d'angle intégré
qui procure une couverture d'angle pour une focale de
17mm. Pour l'utiliser, veuillez extraire avec précaution
l'élargisseur et le réflecteur et les rabattre devant la
tête flash. Remettez ensuite le réflecteur dans son
logement.
La couverture d'angle se règle automatiquement sur
la focale 17mm.
◆ Si l'élargisseur d'angle est arraché accidentellement, la tête zoom automatique ne fonctionne plus.
Contactez alors votre revendeur pour faire réparer le flash.
RETRO ECLAIRAGE DE L'ECRAN LCD
Si vous appuyez sur le bouton LIGHT , l'écran LCD est éclairé pendant environ 8 secondes. Ce rétro
éclairage peut être prolongé en appuyant à nouveau sur le bouton LIGHT .
FLASH AUTOMATIQUE ETTL (TTL)
En mode TTL AUTO, l'appareil assure le contrôle de la quantité de lumière nécessaire pour assurer
une exposition correcte du sujet.
◆ Les appareils de type A peuvent fonctionner en mode ETTL mode. Les appareils de type B peuvent
fonctionner en mode TTL.
1. Réglez le boîtier en mode tout automatique. (Généralement le
mode
□
en mode P.)
2. Mettez le flash sous tension. Le symbole TTL apparaît sur
l'écran LCD et le flash se met en charge.
3. Faites la mise au point sur le sujet.
4. Vérifiez que le sujet est bien situé dans la zone de distances indiquée sur l'écran LCD.
5. Déclenchez dès que le flash est chargé.
Le témoin de flash apparaît dans le viseur dès que le flash est à pleine charge.
◆ Si l'appareil a reçu une quantité de lumière suffisante, le symbole ETTL (TTL) apparaît 5 secondes
sur l'écran LCD. Si cette indication n'apparaît pas, c'est que l'éclairage est insuffisant. Refaites alors
la photo à plus faible distance.
◆ Le faisceau d'assistance AF s'active automatiquement si vous photographiez dans le noir. Il est
opérant jusqu'à une distance de 0.7~9 mètres (2.3~29.5 pieds).
◆ Si l'appareil est dans un programme "Résultats", notez que le flash sera toujours configuré tel que
lors du dernier mode choisi.
◆ Lorsque le flash est à pleine charge, le témoin de flash apparaît dans le viseur. Si l'obturateur est
activé avant la pleine charge, la photo se prendra à une vitesse d'obturation lente.
. Si l'appareil ne possède pas le mode □,
UTILISATION DU FLASH DANS LES AUTRES MODES (sauf EOS700, 750, 850)
Mode de priorité à la vitesse
Lorsque le mode Tv est sélectionné sur l'appareil, vous pouvez choisir une vitesse d'obturation
comprise entre 30 sec. et la vitesse 1/X de synchronisation. Après que vous ayez sélectionné une
vitesse, l'appareil choisira l'ouverture appropriée pour une exposition correcte du fond. Si le sujet est
trop lumineux ou trop sombre, le témoin de valeur d'ouverture clignotera, indiquant les valeurs
(ouverture maximale ou minimale). Dans ce cas, l'appareil fait en sorte de prendre la photo à la valeur
limite. De ce fait, le sujet pourra être correctement exposé, mais l'arrière-plan pourra être surexposé
ou sous-exposé.
mettez-le
46
Page 48

Mode de priorité à l'ouverture
Lorsque le mode Av est sélectionné, l'appareil détermine la vitesse d'obturation appropriée pour une
exposition correcte de l'arrière-plan. Si le sujet est trop lumineux ou trop sombre, le témoin de
vitesse clignotera, indiquant ainsi les vitesses minimales ou maximales. Dans ce cas, l'appareil fait en
sorte de prendre la photo à la valeur limite. De ce fait, le sujet pourra être correctement exposé, mais
l'arrière-plan pourra être surexposé ou sous-exposé.
Utilisation avec le mode manuel M
Vous pouvez choisir la vitesse et l'ouverture. La vitesse peut être comprise entre la vitesse de
synchronisation X du boîtier jusque 30 sec. Si vous ajustez l'exposition en fonction des indications du
posemètre de l'appareil, celui-ci prendra la photo en synchronisation lumière du jour ou en
synchronisation lente.
LIMITES DES PRISES DE VUE CONSECUTIVES AU FLASH
Pour éviter une surchauffe, laissez le flash au repos au moins 10 minutes après des séquences de
prises de vues consécutives en respectant le tableau ci-dessous.
Mode Nombre d'éclairs
TTL, M(1/1,1/2) 20 éclairs consécutifs
M(1/4, 1/8) 25 éclairs consécutifs
M(1/16-1/32) 40 éclairs consécutifs
Stroboscopique 10 Cycles
MODE OPERATOIRE EN FLASH MANUEL
1. Sélectionnez le mode M sur le boîtier.
2. Appuyez sur le bouton MODE du flash pour sélectionner le
mode M.
3. La valeur du Nombre Guide clignote si vous appuyez sur le
bouton SEL
4. Appuyez alors sur le bouton + ou - pour choisir la
puissance désirée.
5. L'indication de puissance du flash cessera de clignoter et demeurera affichée après que vous aurez
à nouveau appuyé sur SEL .
6. Faites alors la mise au point en appuyant à mi-course sur le déclencheur, et vérifiez la distance sur
la bague de mise au point de l'objectif. Ajustez alors le diaphragme (valeur F) ou la puissance du
flash jusqu'à faire coïncider la distance indiquée sur l'écran LCD et la distance réelle du sujet.
7. Le flash est prêt à fonctionner dès que la lampe témoin de charge s'allume.
◆Vous pouvez calculer vous-même l'exposition correcte en utilisant la formule ci-dessous :
Nombre Guide “NG” / Distance du Flash au Sujet = Valeur d'ouverture F
Le flash détermine automatiquement et affiche la distance appropriée en utilisant cette formule. (voir le
tableau 1 en dernière page)
SYNCHRONISATION AU DEUXIEME RIDEAU
Lorsque vous photographiez un sujet en mouvement en synchronisation lente, l'écho du sujet apparaît
devant lui. Ceci est dû au fait que l'éclair est normalement activé lorsque le rideau est entièrement
ouvert, ce qui fait que le sujet demeure exposé jusqu'à la fermeture du rideau (synchronisation sur le
premier rideau). Avec la synchronisation au deuxième rideau, le flash est activé juste avant la
fermeture du rideau, et le sujet est donc exposé entre l'ouverture de l'obturateur et le moment de
l'éclair. L'écho du sujet se retrouve alors à l'arrière du sujet sur l'image, ce qui donne un effet de
mouvement plus naturel.
◆ Ce mode n'est pas accessible aux boîtiers EOS 700, 750, 850.
47
Page 49

1. Sélectionnez le mode d'exposition souhaité sur l'appareil
2. Appuyez sur les touches + ou - jusqu'à ce que le symbole
s'affiche sur l'écran LCD.
3. Faites la mise au point et prenez la photo dès que le témoin de
charge s'allume.
◆ La synchronisation sur le premier rideau est rétablie dès que le
symbole
◆ Ce mode ne fonctionne pas si l'appareil est en mode "Full Auto"
◆ Pour annuler la synchronisation au deuxième rideau, faites disparaître le symbole de l'écran
LCD en appuyant sur les touches
SYNCHRONISATION GRANDE VITESSE (FP)
Lorsque vous photographiez au flash, vous ne pouvez pas, normalement, utiliser une vitesse plus
rapide que la vitesse de synchronisation car le flash ne peut fonctionner que durant la pleine ouverture
de l'obturateur. La synchronisation rapide (Grande Vitesse) permet d'émettre alors même que le
rideau de l'obturateur est en mouvement. Vous pouvez donc utiliser une vitesse d'obturation plus
rapide que la vitesse de synchronisation.
1. Sélectionnez le mode d'exposition sur l'appareil. (vous pouvez utiliser les modes “Tv” ou “M”)
2. Sélectionnez une vitesse d'obturation supérieure à la vitesse de synchronisation normale.
3. Mettez le flash sous tension en plaçant l'interrupteur sur "ON".
4. Choisissez le mode flash en appuyant sur le bouton MODE (les
modes “ETTL” et “M” peuvent être utilisés).
5. Appuyez sur les touches + ou - pour faire apparaître le
symbole sur l'écran LCD.
6. Faites la mise au point sur le sujet.
7. Vérifiez que le sujet se trouve effectivement dans la plage de
distance indiquée sur l'écran LCD.
8. Vérifiez que l'icône s'affiche dans le viseur et prenez la photo.
◆ En synchronisation rapide, le Nombre Guide diminue avec la vitesse. Plus la vitesse est rapide,
moins le flash est puissant. (voir le tableau 2 en dernière page)
◆ La sélection d'une vitesse plus lente que la vitesse de synchronisation annule la synchronisation
Grande Vitesse, et le flash revient automatiquement en mode normal ETTL. Pour réactiver la
synchronisation Grande Vitesse, reprenez la procédure depuis le début.
◆ Il est possible d'utiliser un correction d'exposition en combinaison avec la synchronisation rapide.
Pour ce faire, reportez-vous au chapitre "correction d'exposition" du mode d'emploi de l'appareil.
◆ Le symbole
n'est plus affiché.
+ ou -.
disparaît dès que la synchronisation Grande Vitesse est annulée.
(BOITIERS TYPE A)
MEMORISATION D'EXPOSITION AU FLASH (FE LOCK)
Le mode de mémorisation d'exposition au flash (“FE” lock) permet de sélectionner l'exposition d'une
partie seulement du viseur et de la verrouiller, avant de prendre la photo.
1. Choisissez le mode d'exposition sur le boîtier ("P”, “Tv”, “Av”, “M” ou “DEP”).
2. Sélectionnez le mode flash E-TTL ou la synchronisation rapide
3. Faites la mise au point sur le sujet
4. Placez le sujet à mémoriser au centre du viseur et appuyez sur le bouton FEL du boîtier.
◆ Le flash envoie un pré-éclair et calcule la puissance nécessaire du flash, qu'il mémorise ensuite.
◆ Le viseur de l'appareil affiche “FEL” pendant 0,5 sec. et l'exposition correcte est déterminée.
◆ Si le symbole clignote dans le viseur, cela signifie que le flash n'est pas assez puissant pour une
exposition correcte. Rapprochez-vous du sujet et reprenez depuis le point 3.
5. Prenez la photo après avoir recadré l'image. .
◆ Les modalités de la fonction FEL peuvent varier selon le boîtier utilisé. Nous vous conseillons de
vous reporter au mode d'emploi de votre appareil.
48
Page 50

FLASH PREDICTIF
Le flash prédictif permet de visualiser l'éclairage et les effets d'ombres avant de prendre la photo.
(cette fonction de flash d'essai n'est accessible qu'avec certains boîtiers. Pour plus de détails, veuillez
vous reporter au mode d'emploi de votre appareil). Lorsque l'appareil est en mode de flash d'essai, le
symbole
apparaît automatiquement sur l'écran LCD du flash.
CORRECTION D'EXPOSITION
Vous pouvez opérer une correction d'exposition au flash en association avec une correction
d'exposition normale (destinée à contrôler le niveau d'exposition de l'arrière-plan). La correction
d'exposition au flash peut être paramétrée à ±3 IL par valeur
entière (ou par palier d'1/2 valeur avec certains boîtiers).
◆ Ce mode n'est pas disponible avec les appareils EOS 620, 650,
700, 850 et 1000.
1. Appuyez sur le bouton SEL et sélectionnez l'icône
2. Appuyez sur + ou - pour déterminer le niveau de correction
d'exposition souhaité.
3.
La valeur choisie cesse de clignoter et demeure affichée après une nouvelle pression sur le bouton
4. Faites la mise au point sur le sujet
5. Assurez-vous que le sujet se trouve à l'intérieur de la plage de distance affichée sur l'écran LCD du
flash.
6. Vous pouvez prendre la photo dès que la lampe témoin de charge est allumée.
SEL
.
"FB" Bracketing d'exposition au flash
Cette fonction permet de prendre trois vues consécutives avec trois niveaux d'expositions différents du
sujet avec une exposition constante de l'arrière-plan. Les photos
seront prises selon la séquence d'exposition normale,
sous-exposition et surexposition, jusque ±3 valeurs par incréments
de 1/3 de valeur (ou par 1/2 valeur pour certains boîtiers).
1. Appuyez sur le bouton SEL ; le symbole clignote.
2. Appuyez sur + ou - pour déterminer la valeur de bracketing
au flash.
s'affiche après une nouvelle pression sur le bouton
3.
4. Faites la mise au point
5.
Assurez-vous que le sujet se trouve dans la plage de distance affichées sur l'écran LCD du flash EF-610 DG
Super.
6. Vérifiez que le témoin de flash est affiché dans le viseur, et prenez la photo.
7. Si nécessaire, reprenez les étapes 4 à 6.
◆ Cette fonction s'annule automatiquement après la troisième vue
SEL .
MODE DE FLASH STROBOSCOPIQUE (MULTI FLASH)
Dans ce mode créatif, le flash émet une série d'éclairs pendant l'ouverture de l'obturateur, générant
ainsi une série d'images du sujet sur la même vue. Le sujet sera particulièrement mis en valeur si
l'arrière-plan est sombre. La fréquence des éclairs peut être choisie entre 1Hz et 199Hz. Il est possible
de produire jusqu'à 100 éclairs en continu. Le nombre maximal d'éclairs dépend du nombre guide du
flash et de la fréquence retenue. (voir le tableau 3 en dernière page)
◆ Cette fonction n'est pas disponible avec les boîtiers EOS 700, 750 et 850.
1. Sélectionnez le mode M sur le boîtier et choisissez l'ouverture.
2. Appuyez sur le bouton MODE jusqu'à ce que le symbole du mode multi-flash apparaisse.
49
Page 51

3. Appuyez sur SEL jusqu'à ce que la fréquence se mette à
clignoter
4. Appuyez sur
5. Après une nouvelle pression sur SEL , la puissance du flash
clignote
6. Appuyez sur + ou - pour choisir la puissance souhaitée.
7. Appuyez sur SEL , le nombre d'éclairs clignote
8. Appuyez sur + ou - pour sélectionner le nombre d'éclairs souhaité.
9. Appuyez à nouveau sur SEL , l'affichage cesse de clignoter.
10. Dès que la lampe témoin de charge s'allume, le flash est prêt
Nota: Utilisez toujours une vitesse d'obturation plus lente que la valeur ci-dessous :
[Intervalle entre deux éclairs] / [Nombre d'éclairs]
+ ou -
pour sélectionne la fréquence souhaitée
.
FLASH INDIRECT
Lors d'une prise de vue au flash en intérieur, il est fréquent qu'une
ombre indésirable apparaisse derrière le sujet. Si vous orientez le
réflecteur vers le plafond ou sur le côté vers un mur, l'éclairage du
sujet sera plus doux. Déverrouillez la tête orientable et orientez le
réflecteur pour réaliser un éclairage indirect. Les angles suivants
sont possibles :
Vers le haut : 0°, 60°, 75°, 90° Vers le bas : 7°
A droite : 0°, 60°, 75°, 90°
Lorsque la tête est en position de flash indirect, l'icône
La lumière prenant la teinte de la surface sur laquelle elle se réfléchit, il est recommandé de choisir
une surface blanche. Selon les propriétés réfléchissantes de la surface, la distance du sujet et
d'autres facteurs, l'intensité et la distance réelle parcourue par l'éclair peuvent varier. Nous vous
conseillons de vérifier la confirmation de l'exposition correcte (témoin ETTL ou TTL sur l'écran LCD)
après la prise de vue.
PRISE DE VUE RAPPROCHEE
La tête peut être orientée de 7° vers le bas pour la prise de vue rapprochée. Cette position ne doit être
utilisée que pour des distances comprises entre 0,5 et 2 mètres. Lorsque le réflecteur est incliné de 7°
vers le bas, l'icône
REFLECTEUR DE LUMIERE
Ce flash est pourvu d'un réflecteur de
lumière intégré qui permet de créer un effet
de lumière harmonieux dans les yeux du
sujet en mode d'éclairage indirect. . Pour
l'utiliser, veuillez extraire avec précaution
l'élargisseur et le réflecteur et les rabattre
devant la tête flash. Remettez ensuite le
diffuseur dans son logement.
◆ Pour tirer le meilleur parti du diffuseur, orientez la tête à 90° vers le haut et photographiez à faible
distance.
A gauche : 0°, 60°, 75°, 90°, 120°, 150°, 180°
s'affiche sur l'écran LCD.
clignote.
FLASH DISTANT SANS FIL
En mode "flash à distance sans fil", il est possible de créer librement des effets d'éclairage
tridimensionnel en jouant avec les ombres et obtenir des éclairages très élaborés selon la position
choisie pour le flash, sans la contrainte d'une liaison filaire entre le flash et le boîtier. La
communication entre le flash EF-610 DG Super et le boîtier se fait par l'intermédiaire d'un éclair codé
émis par le flash.
En mode distant sans fil, la cellule du boîtier calcule automatiquement l'exposition correcte.
50
Page 52

◆Avec les boîtiers du type B, seules les fonctions de "flash sans fil manuel" et "multi flash sans fil"
sont accessibles. Les boîtiers EOS 750 et EOS 850 ne permettent pas le flash sans fil.
◆
Dans les instructions qui suivant, nous appellerons "flash maître" le flash installé sur le boîtier, et
"flash asservi" le ou les flashes placés à distance de l'appareil.
◆
Lorsque vous installez un flash asservi à un endroit donné, vous pouvez utiliser le support livré avec
le flash. Ce support comporte un pas de vis pour trépied.
Placez le flash asservi à l'endroit désiré. Prenez garde qu'il ne soit pas dans le champ de l'image.
◆
Le flash asservi doit être situé entre 0,5m (1.5 pieds) et 5m (16 pieds) du sujet. L'appareil doit se
◆
situer entre 1m (3 pieds) et 5 m (16 pieds) du sujet.
Préparation pour le flash distant sans fil
Choix du canal d'information
Si d'autres photographes utilisent le mode flash sans fil à proximité, il y a un risque que votre flash soit
activé par le flash d'un autre et se déclenche inopinément. Dans un tel contexte, vous pouvez chacun
paramétrer un canal de communication qui vous soit propre afin d'éviter les interférences.
Réglage du canal du flash maître
1. Appuyez sur le bouton MODE et sélectionnez le signe
2. Appuyez sur le bouton SEL plusieurs fois jusqu'à ce que
l'indicateur de canal clignote.
3. Appuyez sur les touches + ou - pour choisir un canal (C1 à
C4)
4. Appuyez à nouveau sur SEL plusieurs fois jusqu'à ce que le
témoin cesse de clignoter.
Réglage du canal du flash asservi
1. Appuyez sur le bouton MODE et sélectionnez le signe ETTL /
2. Appuyez sur le bouton SEL plusieurs fois jusqu'à ce que
/
l'indicateur de canal clignote.
3. Appuyez sur les touches + ou - et choisissez le même
canal que pour le flash maître
4. Appuyez à nouveau sur SEL plusieurs fois jusqu'à ce que le témoin cesse de clignoter.
◆ Si les canaux des flashes maître et asservi sont différents, le flash asservi ne déclenchera pas.
Veillez donc à bien paramétrer le même canal.
Pondération (ID) des flashes asservis
Si vous utilisez plusieurs flashes asservis, il est possible d'attribuer à chacun un numéro ID qui
permettra de répartir la puissance entre eux selon une pondération particulière.
1. Appuyez sur le bouton MODE et sélectionnez le témoin ETTL/ / .
2. Appuyez sur le bouton SEL plusieurs fois jusqu'à ce que la mention Slave ID clignote.
3. Appuyez sur les touches + ou - et sélectionnez un numéro ID (1, 2 ou 3)
4. Appuyez sur SEL pour faire cesser le clignotement.
◆ Si vous souhaitez que tous les flashes asservi déclenchent à la même puissance, il n'est pas
nécessaire de programmer une identification ID.
Programmation du flash maître ON/OFF
Vous pouvez décider que le flash maître participera ou non à l'éclairage de la scène en programmant la
position ON ou OFF (actif ou non actif).
51
Page 53

Flash maître avec éclairage actif : ON
1. Appuyez sur le bouton MODE et sélectionnez l'indicateur .
2. Appuyez sur + ou - pour sélectionner le symbole .
Flash maître avec éclairage non actif : OFF
1. Appuyez sur le bouton MODE et sélectionnez l'indicateur .
2. Appuyez sur + ou - pour sélectionner le symbole .
FLASH DISTANT SANS FIL AUTOMATIQUE ETTL (boîtiers de type A seulement)
Dans le mode sans fil ETTL, l'appareil calcule automatiquement l'exposition correcte.
Flash sans fil ETTL sans pondération
Si l'on ne souhaite pas pondérer les puissances de chaque flash asservi, il n'est pas utile de
paramétrer une identification ID. Elle peut être indifféremment de 1, 2 ou 3. Tous les flashes asservi se
déclencheront avec une puissance égale lors du signal et le système d'exposition automatique ETTL
détermine la quantité de lumière totale nécessaire à une exposition correcte.
Flash maître actif ON + Flash(es) asservi(s)
◆Il faut programmer le flash maître comme suit :
1. Appuyez sur le bouton MODE et sélectionnez la marque ETTL/ .
2. Appuyez sur les touches + ou - pour afficher le signe
3. Appuyez sur SEL à plusieurs reprises pour confirmer le ratio 1:1.
◆ Si les ratios ou sont affichés, ceci concerne le paragraphe "Flash sans ETTL avec pondération
(Deux flashes asservis ou trois flashes asservis)” ; programmez le ratio 1:1.
4. Placez le flash asservi à l'endroit désiré.
5. Assurez-vous que le flash maître et le flash asservi sont chargés.
◆ Le témoin de flash maître est allumé, et le faisceau d'assistance AF du flash asservi clignote.
6. Faites la mise au point et prenez la photo.
Flash maître non actif + Flash(es) asservi(s)
◆Programmez le flash maître comme suit :
1. Procédez comme pour Flash maître actif ON + Flash(es) asservi(s) mais en sélectionnant les icônes
suivantes :
ETTL /
/
2. Placez le flash esclave à l'endroit désiré.
3. Assurez-vous que le flash maître et le flash esclave sont chargés.
4. Faites la mise au point et prenez la photo
Flash sans fil ETTL avec pondération (deux flashes asservis)
Le système sans fil ETTL décrit ci-dessous comme un exemple consiste en un flash maître attaché
sur le boîtier, paramétré comme non actif (OFF) fonctionnant avec deux flashes asservis.
Lorsque vous réglez le ratio de répartition de la lumière, le système automatique ETTL contrôle la
quantité totale de lumière en fonction des proportions choisies pour obtenir l'exposition correcte.
◆ Cette fonction n'est accessible qu'avec les boîtiers EOS-1V et EOS-3.
◆ Les ratios peuvent être paramétrés entre 8 : 1 ~ 1 : 1 ~ 1 : 8.
◆ Entrez les numéros d'identification ID 1 et 2 pour chaque flash asservi.
Réglez le flash maître comme suit :
1. Placez le flash maître en mode d'éclairage non actif (OFF).
2. Appuyez sur le bouton MODE afin de sélectionner le symbole ETTL/
3. Appuyez sur le bouton SEL à plusieurs reprises jusqu'à faire clignoter l'indicateur de pondération.
52
Page 54

4. Appuyez sur la touche + ou - et sélectionnez . (affichage clignotant)
5. Appuyez à nouveau sur SEL pour faire clignoter la valeur de ratio
6. Appuyez sur la touche + ou - pour afficher le ratio de pondération voulu.
7. Appuyez sur SEL pour confirmer le ratio qui s'affiche en continu.
8. Placez les flashes asservis aux emplacements souhaités.
9. Vérifiez que les flashes maître et asservis sont chargés.
10. Faites la mise au point et prenez la photo.
◆ Si vous souhaitez changer les pondérations, repartez de l'étape 3
◆ Si vous souhaitez annuler la pondération, choisissez le ratio 1:1. (à l'étape 4)
Flash sans fil ETTL avec pondération (Trois flashes asservis)
La procédure de flash sans fil ETTL suivante est celle d'un système avec un flash maître avec trois
flashes asservis. La pondération de lumière concerne deux flashes asservis et le troisième est utilisé
pour une correction d'exposition.
◆ Cette fonction n'est accessible qu'avec les boîtiers EOS-1V et EOS-3.
◆ Entrez les numéros d'identification ID 1, 2 et 3 pour chacun des flashes asservis.
Réglez le flash maître comme suit :
1. Placez le flash maître en mode d' éclairage non actif (OFF).
2. Appuyez sur le bouton MODE pour sélectionner la marque ETTL/ .
3. Appuyez sur le bouton SEL à plusieurs reprises jusqu'à faire clignoter l'indicateur de pondération.
4. Appuyez sur + ou - et sélectionnez 1 2 3 (affichage clignotant)
5. Appuyez sur SEL pour faire clignoter l'indicateur de valeur de ratio.
6. Appuyez sur + ou - pour choisir le ratio de pondération.
7.
Appuyez sur le bouton SEL jusqu'à faire apparaître l'indicateur de compensation d'exposition (il clignote).
8. Appuyez sur la touche + ou - et réglez la correction d'exposition.
9. Appuyez sur SEL pour confirmer l'indication.
10. Placez les flashes asservis aux emplacements souhaités.
11. Assurez-vous que tous les flashes, maître et asservis, sont chargés.
12. Faites la mise au point et prenez la photo.
◆ Si vous souhaitez changer les pondérations, repartez de l'étape ③
◆ Si vous souhaitez annuler la pondération, choisissez le ratio 1:1. (à l'étape ④)
Synchronisation Grande vitesse sans fil (Flash FP)
1. Placez-vous en mode de flash distant sans fil .
2. Appuyez sur la touche + ou - et choisissez / (Flash maître en mode d'éclairage actif
ON) ou / (Flash maître en mode d'éclairage non actif OFF).
3.
La procédure pour la synchronisation à grande vitesse sans fil est la même qu'en mode flash FP normal
◆Aucun réglage particulier n'est nécessaire au niveau des flashes asservis.
Correction d'exposition au flash sans fil
1. Placez-vous en mode de flash distant sans fil.
2. Appuyez sur le bouton SEL pour faire clignoter le symbole .
3. Appuyez sur la touche + ou - pour déterminer la valeur de la correction d'exposition souhaitée.
4. Appuyez sur le bouton SEL à plusieurs reprises pour confirmer la correction d'exposition retenue.
◆ Aucun réglage particulier n'est nécessaire au niveau des flashes asservis.
◆
Vous pouvez aussi régler la correction d'exposition individuellement au niveau de chaque flash esclave.
Mémorisation d'exposition au flash sans fil (FE Lock)
1. Mettez-vous d'abord en mode de flash sans fil
2. Faites la mise au point sur le sujet, et appuyez ensuite sur le bouton FEL du boîtier en plaçant le
sujet dont l'exposition est à mémoriser.
3. La procédure du flash FE sans fil est la même que le flash FE normal.
◆ Aucun réglage particulier n'est nécessaire au niveau des flashes asservis.
53
Page 55

Bracketing d'exposition au flash (FB)
1. Mettez-vous d'abord en mode de flash sans fil.
2. Appuyez sur le bouton SEL à plusieurs reprises jusqu'à ce que le symbole clignote.
3. Appuyez sur la touche + ou - pour déterminer la valeur de bracketing au flash.
4. Appuyez sur SEL à plusieurs reprises pour valider la valeur de bracketing.
5. La procédure pour le bracketing FB sans fil est identique à celle du bracketing au flash normal
◆Aucun réglage particulier n'est nécessaire au niveau des flashes asservis.
CHANGEMENT DU MODE DE FLASH SANS FIL
Il s'opère selon la procédure qui suit :
1. Appuyez sur le bouton MODE pour sélectionner le symbole ETTL/
2. Appuyez sur le bouton SEL plus de 2 secondes pour faire clignoter l'indicateur de mode.
3. Appuyez à nouveau sur le bouton MODE et sélectionnez le mode ETTL, M ou MULTI.
4. Appuyez sur SEL pour confirmer le mode choisi.
FLASH MANUEL SANS FIL
Vous pouvez régler la puissance du flash asservi manuellement à partir du flash maître.
La puissance peut être identique ou différente selon les flashes asservis.
Il faut utiliser une cellule indépendante pour déterminer l'exposition correcte.
Flash manuel sans fil avec puissance identique pour chaque flash asservi
Réglez le flash maître comme suit :
1. Suivez la procédure de changement de mode flash sans fil et sélectionnez le symbole M/ .
2.
Appuyez sur le bouton SEL à plusieurs reprises jusqu'à faire clignoter le symbole de puissance de flash.
3. Appuyez sur la touche + ou - pour régler la puissance.
4. Appuyez sur SEL à plusieurs reprises pour valider la puissance retenue.
◆ Si le flash maître est en mode d'éclairage actif (ON), il participera à l'éclairage à la même puissance
que les flashes asservis.
Flash manuel sans fil avec puissance différente selon chaque flash asservi
Vous pouvez paramétrer une puissance spécifique pour chacun des flashes asservis.
(Les instructions ci-dessous sont données pour un ensemble de trois flashes asservis).
Le flash maître doit être paramétré comme suit :
1. Suivez la procédure de changement de mode flash sans fil et sélectionnez le symbole M/ .
2. Appuyez sur le bouton SEL à plusieurs reprises jusqu'à faire clignoter le symbole .
3. Appuyez sur + ou - pour sélectionner . (affichage clignotant)
4. Appuyez sur SEL pour afficher la puissance avec le chiffre clignotant.
5. Appuyez sur + ou - pour choisir la puissance.
6. Appuyez sur SEL pour afficher la puissance avec le chiffre clignotant.
7. Appuyez sur + ou - pour choisir la puissance.
8. Appuyez sur SEL pour afficher la puissance avec le chiffre clignotant.
9. Appuyez sur + ou - pour choisir la puissance.
10. Appuyez sur SEL pour faire cesser le clignotement.
◆ Si vous n'utilisez que deux flashes asservis, sélectionnez à l'étape ③ (les étapes ⑧ et ⑨
doivent alors être supprimées).
MULTI FLASH (STROBOSCOPIQUE) SANS FIL
Veuillez paramétrer le flash maître comme suit :
1.
Suivez la procédure de changement de mode flash sans fil et sélectionnez le symbole
2. Appuyez sur le bouton SEL pour faire clignoter la fréquence d'éclairs.
MULTI
/.
54
Page 56

3. Appuyez sur la touche + ou - pour sélectionner la fréquence souhaitée.
4. Appuyez sur SEL pour faire clignoter la puissance.
5. Appuyez sur + ou - pour déterminer la puissance souhaitée.
6. Appuyez sur SEL pour faire clignoter le nombre d'éclairs.
7. Appuyez sur + ou - pour déterminer le nombre d'éclairs.
8. Appuyez sur SEL pour valider; l'affichage cesse de clignoter.
◆ La fréquence et le nombre des éclairs sera le même pour chaque flash asservi.
FLASH ESCLAVE
◆ Appuyez sur le bouton MODE et veillez à ce que l'indicateur de mode flash (ETTL, M, MULTI) ne soit
pas affiché.
FLASH ESCLAVE NORMAL
Cette fonction permet d'utiliser le flash EF-610 DG SUPER à distance du boîtier, en utilisant un autre
flash pour l'activer.
◆ Le flash intégré (E-TTL, E-TTL II) ne peut pas être utilisé en
flash maître.
◆ Veuillez placer le flash maître en mode automatique TTL (le
mode E-TTL, E-TTL II ne peut pas être utilisé) ou en Mode
Manuel.
1. Commencez par placer le flash sur la griffe de l'appareil.
2. Choisissez le mode d'exposition. Si vous utilisez le mode A ou M,
fixez également la valeur d'ouverture.
3. Mettez le flash sous tension. Appuyez ensuite à mi-course sur le déclencheur.
◆ Les valeurs d'ouverture et la sensibilité du film ont ainsi été transmises automatiquement au flash.
4. Retirez le flash de l'appareil.
5. Appuyez sur le bouton MODE et sélectionnez le symbole / .
6. Appuyez sur le bouton SEL à plusieurs reprises jusqu'à faire clignoter l'indicateur de puissance.
7. Appuyez sur + ou - pour déterminer la puissance souhaitée.
◆ La puissance doit être déterminée en faisant coïncider au mieux l'indicateur de distance de l'écran
LCD avec la distance réelle existant entre le flash esclave et le sujet. Si la distance réelle est en
dehors de la plage indiquée sur l'écran LCD, il faut changer la valeur d'ouverture.
◆ Vous pouvez régler la sensibilité du film ou la valeur d'ouverture manuellement si vous le souhaitez.
a. Pour régler la sensibilité du film… Appuyez sur MODE pour sélectionner le symbole
appuyez ensuite sur SEL jusqu'à ce que l'indicateur clignote. Appuyez sur + ou - pour
paramétrer la sensibilité, et appuyez à nouveau sur SEL pour valider.
b. Pour régler la valeur d'ouverture… Après avoir positionné le flash en mode esclave, appuyez sur
SEL pour faire clignoter l'indicateur de valeur d'ouverture et appuyez sur + ou - pour
déterminer l'ouverture. Appuyez ensuite sur SEL .
8. Appuyez sur SEL à plusieurs reprises pour valider la puissance.
9. Placez le flash à l'emplacement désiré. Prenez garde qu'il ne soit pas dans le champ de l'image.
10. Après avoir vérifié que tous les flashes sont chargés, prenez la photo.
◆ Lorsque le flash EF-610 DG Super est en pleine charge, la lumière d'assistance AF clignote.
◆ Le flash EF-610 DG Super ne fonctionnera pas s'il est attaché sur l'appareil lorsqu'il est en mode de
Flash esclave.
FLASH ESCLAVE DESIGNE
Si vous utilisez deux ou plus de deux flashes EF-610 DG Super, vous pouvez désigner quels flashes
se déclencheront ensemble en paramétrant des canaux de communication. Dans ce mode, un flash
servira de flash esclave de contrôle, et les autres de flashes esclaves d'éclairage.
, et
55
Page 57

Préparation du ou des flashes d'éclairage
1. Attachez le flash sur la griffe de l'appareil.
2. Choisissez le mode d'exposition S ou M.
◆ Sélectionnez une vitesse d'obturation de 1/30 ou moins rapide.
Le flash de contrôle enverra un signal codé avant le
déclenchement des éclairs d'éclairage. Si vous utilisez une
vitesse plus rapide que 1/30 sec., les flash d'éclairage ne seront
pas synchronisées.
3. Mettez le flash sous tension et appuyez à mi-course sur le déclencheur.
◆ Les valeurs d'ouverture et la sensibilité du film ont ainsi été transmises automatiquement au flash.
4. Retirez le flash de l'appareil.
5. Appuyez sur le bouton MODE et sélectionnez le symbole / . (Mode de flash esclave)
6. Appuyez sur le bouton SEL pour faire clignoter l'indicateur de canal.
7. Appuyez sur la touche + ou - pour sélectionner le canal. (C1 ou C2)
8. Appuyez sur SEL pour faire clignoter l'indicateur de puissance.
9. Appuyez sur la touche + ou - pour choisir la puissance souhaitée.
◆ La puissance doit être déterminée en faisant coïncider au mieux l'indicateur de distance de l'écran
LCD avec la distance réelle existant entre le flash esclave et le sujet. Si la distance réelle est en
dehors de la plage indiquée sur l'écran LCD, il faut changer la valeur d'ouverture.
10. Appuyez sur SEL à plusieurs reprises pour afficher les paramètres sélectionnés.
11. Placez le flash à l'emplacement désiré. Prenez garde qu'il ne soit pas dans le champ de l'image.
Préparation du flash de contrôle
12. Attachez le flash esclave de contrôle sur l'appareil.
13. Appuyez sur le bouton MODE et sélectionnez le symbole / (Mode de flash esclave).
14. Appuyez sur le bouton SEL pour faire clignoter l'indicateur de
canal.
15. Appuyez sur la touche + ou - et sélectionnez le même
canal que celui retenu pour les flashes d'éclairage.
16. Appuyez sur SEL pour faire clignoter l'indicateur de puissance.
17. Appuyez sur la touche + pour faire apparaître l'icône .
18. Appuyez sur SEL pour confirmer et faire cesser le clignotement.
19. Après vous être assuré que tous les flashes sont chargés, prenez la photo.
◆ Lorsque les flashes d'éclairage sont chargés, leur lumière d'assistance AF clignote.
◆ Vous ne pouvez pas régler l'ouverture avec le bouton SEL lorsque vous avez sélectionné l'icône
lors du réglage de la puissance, le flash étant en mode de flash esclave de contrôle.
◆ Le flash esclave de contrôle ne sert qu'au contrôle du déclenchement des flashes d'éclairage.
CARACTERISTIQUES TECHNIQUES
TYPE : Flash électronique à tête zoom automatique et orientable à contrôle TTL
NOMBRE GUIDE : 61 (100 ISO/m, avec réflecteur en position 105mm)
ALIMENTATION : Quatre piles alcalines de type AA ou : Quatre accumulateurs Ni-Cd de type AA ou
: Quatre accumulateurs Ni-Mh de type AA
TEMPS DE RECYCLAGE : environ 7,0 sec. (avec piles alcalines)
: environ 5,0 sec. (accus Ni-Cd et Ni-Mh)
NOMBRE D'ECLAIRS : environ 120 éclairs (piles alcalines)
: environ about 160 éclairs (accus Ni-Cd et Ni-Mh)
DUREE DE L'ECLAIR : environ 1 / 700 sec. (à pleine puissance)
ANGLE D'ECLAIRAGE : 24~105mm avec motorisation automatique
17mm avec l'élargisseur d'angle intégré.
MISE EN VEILLE AUTOMATIQUE : oui
POIDS : 330 g
DIMENSIONS : 76mm(l) x 138mm(H) x 116mm(L)
56
Page 58

r
r
ESPAÑOL
Muchas gracias por comprar el Flash electrónico Sigma EF-610 DG SUPER EO-TTL II. Este producto
ha sido desarrollado específicamente para cámaras SLR de Canon EOS. Dependiendo del modelo de
cámara, las funciones serán diferentes. Por favor lea este manual de instrucciones detenidamente
para el cuerpo de su cámara. Para disfrutar de la fotografía, el flash tiene una variedad de
características. Para utilizar la mayoría de estas características, y obtener el máximo rendimiento y
disfrutar de su flash, por favor lea este libro de instrucciones junto con el manual de su cámara antes
de utilizar el flash, y guárdelo a mano para próximas consultas.
PRECAUCIONES
Para evitar posibles daños o perjuicios. Por favor lea el manual de instrucciones muy atentamente,
y preste atención a los símbolos de precaución que vienen a continuación antes de utilizar el flash.
Por favor tome nota de los dos símbolos de precaución que aparecen a continuación.
Advertencia
Cuidado!!
Este símbolo significa puntos importantes, que se requiere cuidado o advertencia.
O Este símbolo contiene información con respecto a acciones que deben prevenir.
Este flash contiene circuitos de alto voltaje. Para evitar quemaduras no intente desmontar el
flash. Si la carcasa exterior se rompe no toque los mecanismos interiores.
No dispare el flash cerca de los ojos. El brillo del destello podría dañar los ojos. Mantenga una
distancia de al menos 1m entre la cara y la cámara, cuando realice fotografías con flash.
No toque el terminal sincro de la cámara cuando el flash está conectado a la zapata. El circuito
de alto voltaje podría causar un shock eléctrico.
Nunca utilice el equipo en ambientes inflamables, con llamas, gases, líquidos o químicos, etc.
Podría causar un incendio o una explosión.
Ignorar el símbolo de Advertencia al utilizar este producto, puede causar serio
!!
perjuicios o otros daños.
Ignorar el símbolo de Advertencia al utilizar este producto, puede causa
daños o perjuicios.
Advertencia!!
Cuidado!!
No utilice esta unidad de flash en ninguna otra cámara que las Canon de la serie EOS; De otro
modo el flash podría dañar el circuito de esas cámaras.
Esta unidad de flash no es resistente al agua. Cuando utilice el flash y la cámara con lluvia,
nieve o cerca del agua, cuide que no se humedezca. A menudo es imposible repara
componentes eléctricos internos estropeados a causa del agua.
Nunca deje la cámara en un lugar con polvo, alta temperatura o húmedo. Estos factores pueden
causar fuego o estropear su equipo.
Cuando el flash está sujeto a cambios bruscos de temperatura, como cuando transporta la
unidad de flash de un lugar frío exterior a uno cálido interior. En este caso, ponga su equipo en
una bolsa de plástico sellada y no utilice la unidad de flash hasta que alcance la temperatura de
ola habitación.
No almacene el flash en un armario, cajón, etc., si contiene naftalina, o otros insecticidas. Esto
podría producir efectos negativos en la unidad de flash.
No utilice gasolina o otros agentes de limpieza para sacar el polvo o huellas dactilares. Límpiese
con un trapo de ropa suave.
Para un almacenamiento prolongado, escoja un lugar frío y seco, preferiblemente con buena ventilación.
Dispare el flash unas cuantas veces al mes para mantener en buen estado sus funciones.
57
Page 59

DESCRIPCIÓN DE LAS PARTES
1. Cabezal de flash 2. Luz auxiliar AF 3. Angulo de basculación; Arriba y abajo
PARTES
EXTERIORES
CONTROLES
4. Angulo de giro; Derecha e izquierda 5. Botón de bloqueo y desbloqueo de la
basculación; Arriba y abajo 6. Botón de bloqueo y desbloqueo del giro; Derecha
e izquierda 7. Pantalla LCD 8. Tapa de las pilas 9. Anillo de la zapata
10. Zapata 11. Panel de luz rebotada 12. Panel angular
13. Botón de MODO 14. <SEL> Botón SELECTOR
15. <+> Botón de Incremento 16. Botón de Disminución 17. Botón de ZOOM
18. Botón de TEST 19. Botón de LUZ 20. Luz de preparado
21. Interruptor de encendido
MODELOS DE CÁMARAS Y FUNCIONES
Aunque esta unidad de Flash está equipado con numerosas funciones, depende del modelo de la
cámara algunas funciones están limitadas. Por favor confirme el tipo de cámara que tiene con la lista
a continuación. Por favor consulte la explicación de cada una de las funciones en el manual de
instrucciones; Si no se especifica información del modelo, significa que esta función del flash se
puede utilizar con todas las cámaras de tipo EOS.
Tipo de cámara A E-TTL(E-TTL II) Compatible con cámaras EOS SLR
Tipo de cámara B Todas las otras cámaras EOS excepto los mencionados arriba
ACERCA DE LAS PILAS
Esta unidad de flash utiliza cuatro pilas Alcalinas de tipo “AA” o pilas recargables Ni-Cad. Las pilas de
Magnesio también se pueden utilizar aunque tienen una vida más corta que las alcalinas. No
recomendamos utilizarlas. Por favor cambie las pilas si la Luz de Preparado tarda más de 30
segundos en iluminarse.
◆ Para asegurar un buen contacto eléctrico, limpie las terminales de las pilas antes de instalarlas.
◆ Las pilas NiCad Ni-MH, no tienen contactos estandarizados. Si utiliza las pilas Ni-Cad, por favor
confirme que los contactos de las baterías coinciden correctamente con el compartimento de las pilas.
◆ Para prevenir la explosión de las pilas, una fuga o recalentamiento, utilice cuatro pilas nuevas AA
del mismo tipo y de la misma marca. No mezcle diferentes tipos ni pilas nuevas y usadas.
◆ No desmonte o haga un corto circuito con las pilas, o las exponga al fuego o al agua; podrían
explotar. Tampoco intente recargar pilas que no sean Ni-Cd recargables.
◆ Cuando el flash no se vaya a utilizar en un periodo largo, saque las pilas del flash, para evitar
posibles daños o roturas.
◆ La vida de las pilas decrece a temperaturas bajas. Guarde las pilas en un lugar cálido cuando utilice
el flash con un tiempo frío.
◆ Como con ningún flash, se recomienda que se lleven pilas de recambio cuando se realice un viaje
largo o se fotografíe al exterior con temperaturas bajas.
CARGA DE LAS PILAS
1. Asegúrese de ajustar el flash a la posición off,
entonces deslice la tapa de las pilas en dirección de
la flecha para abrir el compartimento.
2. Inserte cuatro pilas del tamaño AA en el
compartimento de las pilas. Asegúrese que el + y el
– de las pilas coincide con el dibujo del
compartimento.
3. Cierre la tapa.
58
Page 60

4. Deslice el interruptor de encendido a la posición ON. Después de unos segundos la luz de
preparado se iluminará, indicando que la unidad de flash ya está a punto.
5. Por favor presione el “botón de Test “ para estar seguro de que el flash funciona correctamente.
DESACTIVACIÓN AUTOMÁTICA
Para conservar las pilas , la unidad de flash se desactiva automáticamente cundo no se ha utilizado
en aproximadamente 90 segundos. Para volver activar el flash, presione el botón de TEST o el
disparador de la cámara levemente. El mecanismo de “desactivado automático” no funciona con el
modo esclavo.
AJUSTE DEL CABEZAL DEL FLASH
Presione el botón de bloqueo y desbloqueo del movimiento arriba y abajo, mientras ajusta el cabezal
a la posición deseada. Aparecerá en la pantalla LCD cuando ponga en marcha el flash, y si esta
marca parpadea entonces el cabezal del flash no está ajustado a una posición correcta.
AJUSTE DEL CABEZAL DEL FLASH
Presione el botón de bloqueo y desbloqueo del movimiento arriba
y abajo, mientras ajusta el cabezal a la posición deseada.
◆ Aparecerá en la pantalla LCD cuando ponga en marcha el
flash, y si esta marca parpadea entonces el cabezal del flash no
está ajustado a una posición correcta.
MONTAR Y DESMONTAR EL FLASH A LA CAMARA
Asegúrese que el flash está desconectado. Entonces
inserte ola base de la zapata en la zapata de la
cámara y gire el anillo de la zapata hasta que esté
ajustado.
◆ Cuando coloque o desmonte el flash, agarre el
botón del flash para prevenir daños en el pie de la
zapata y la zapata de la cámara.
◆ Si el flash incorporado de la cámara esta alzado,
por favor ciérrela antes de montar la unidad de
flash.
◆ Para desmontar el flash de la cámara, gire el anillo de la zapata en la dirección opuesta a la marca
hasta el final.
AJUSTAR EL ANGULO DE COBERTURA DEL FLASH
Cuando presione el botón ZOOM, aparece el símbolo , cada vez que presiona el botón Zoom, en
la pantalla LCD cambiará y indicará la posición de Zoom en secuencia, tal y como se muestra a
continuación.
24mm → 28mm → 35mm → 50mm → 70mm → 85mm → 105mm →(Auto)
Generalmente, en el modo ETTL (TTL), el flash ajustará automáticamente la posición del zoom de
acuerdo con la focal del objetivo.
◆ Cuando pone en conecta el interruptor principal, el flash memorizará y ajustará el cabezal zoom a la
última posición ajustada.
◆ Si utiliza un objetivo más angular que el cabezal del flash, puede que surjan zonas subexpuestas
alrededor de la fotografía.
◆ Dependiendo del ajuste del cabezal del flash, la potencia del flash puede cambiar.
59
Page 61

PANTALLA ANGULAR
Este flash está equipado con un panel angular, que
proporciona un ángulo de cobertura ultra angular de
17mm. Extraiga el panel angular y el panel de luz
rebotada y déjelo caer hasta cubrir el cabezal del
flash. (Sea cuidadoso a la hora de deslizar los
paneles). Después recoja el panel de luz rebotada a
su lugar. El ángulo de cobertura del flash se ajustará
automáticamente a 17mm.
Si la pantalla angular incorporada, sale
◆
póngase en contacto con el establecimiento dónde compró el flash o con el servicio técnico.
accidentalmente
, el botón Zoom no funcionará. En este caso
ILUMINACIÓN DE LA PANTALLA LCD
Cuando presiona el botón Light, la pantalla LCD se iluminará acerca de 8 segundos. La iluminación se
prolongará si vuelve a presionar el botón light otra vez.
FLASH AUTOMÁTICO ETTL (TTL)
En el modo TTL AUTO, la cámara controlará la cantidad de luz para obtener la exposición correcta del sujeto.
En el tipo A de cámaras se ajustará el modo ETTL. En el tipo B se ajustará el modo TTL.
◆
1. Seleccione el modo AUTO (Normalmente Modo
cámara no tiene el Modo
2. Conecte el flash, la marca TTL aparecerá en la pantalla LCD y el
flash empezará a cargarse.
3. Enfoque el sujeto.
4. Compruebe que el sujeto está localizado en el rango efectivo de
distancia que se indica en la pantalla LCD
5. Presione el botón de disparo después que el flash esté completamente cargado.
Cuando el flash está completamente cargado , la luz de preparado aparecerá en el visor.
◆ Cuando la cámara recibe la exposición adecuada, la marca ETTL (TTL) en la pantalla LCD
aparecerá durante 5 segundos. Si esta indicación no aparece, la iluminación del flash no es
suficiente para esta situación. Por favor vuelva a realizar la fotografía a una distancia menor.
◆ La luz auxiliar AF se activará automáticamente como cuando enfoca en un lugar oscuro. Nota: La
distancia efectiva es aproximadamente de 0.7 a 9 metros.
◆ Cuando la cámara se ajusta a la Zona Creativa, por favor recuerda que el flash se ajustará cada
vez al último modo escogido.
◆ Cuando el flash está completamente cargado, la marca del flash aparecerá en el visor. Si se realiza
el disparo antes de que el flash esté completamente cargado, la cámara realizará la fotografía a la
velocidad más lenta.
□
, ajústelo al Modo P)
UTILIZACIÓN DEL FLASH CON OTROS MODELOS DE CÁMARAS
Ajuste para la prioridad de velocidad
Seleccionando el modo de la Tv de la cámara, se puede seleccionar la velocidad desde 30seg. a 1/X
de velocidad sincro. Cuando seleccione la velocidad de obturación deseada, la cámara seleccionará
el diafragma apropiado para el fondo. Si el sujeto es demasiado oscuro o demasiado claro, el
diafragma parpadeará y mostrará el valor límite. ( Máximo o mínimo diafragma). En este caso la
cámara procede a tomar fotografías con flash al valor límite. De esta manera, el sujeto principal de la
imagen se expondrá correctamente, pero el fondo quedará sub o sobreexpuesto.
□
. Si la
(Excepto EOS700, 750, 850)
60
Page 62

Ajuste para prioridad de diafragma.
Seleccionando el modo Av de la cámara, la cámara seleccionará la velocidad apropiada para el fondo.
Si el sujeto es demasiado oscuro o claro, el indicador de velocidad parpadeará y mostrará el límite
del valor máximo o mínimo.
( Máximo o mínimo diafragma). En este caso la cámara procede a tomar fotografías con flash al valor
límite. De esta manera, el sujeto principal de la imagen se expondrá correctamente, pero el fondo
quedará sub o sobreexpuesto.
Cuando se utiliza con el Modo M
Usted puede ajustar el diafragma y la velocidad deseada. Puede ajustar la velocidad desde la mayor
hasta 30 seg. de velocidad sincro.Si ajusta la exposición de acuerdo con la exposición que le indica el
fotómetro, la cámara trabajará como sincronización del flash para luz día o sincronización lenta.
LIMITACIONES DEL DISPARO CONTINUO
Para prevenir recalentamientos, por favor no utilice la unidad de flash por lo menos 10 minutos
después de utilizar el número de exposiciones que se muestran en la tabla a continuación.
Modo Número de exposiciones con Flash
TTL, M(1/1,1/2) 20 Disparos continuos de flash
M(1/4, 1/8) 25 Disparos continuos de flash
M(1/16-1/32) 40 Disparos continuos de flash
Multi Ciclo 10
OPERACIÓN CON EL FLASH MANUAL
El flash manual es aconsejable cuando la correcta exposición de los sujetos es difícil de obtener con
el modo TTL. En el modo de flash manual, se puede ajustar el nivel de potencia del flash que va
desde 1/1 (completamente cargado) a 1/128, con incrementos de 1 paso.
1. Ajuste la exposición de la cámara al modo M.
2.
Presione el botón MODE en la unidad de flash para seleccionar M.
3. El número guía parpadeará cuando presione el botón SEL
4. Presione el botón + o
deseada.
5. El display del flash manual dejará de parpadear y permanecerá
activo después de presionar el botón SEL otra vez.
6. Ajuste el enfoque presionando el disparador, compruebe la distancia a que se encuentra el sujeto en
el anillo de enfoque del objetivo. Ajuste el nºf o la potencia del flash hasta que la distancia indicada
en la pantalla LCD del flash y la distancia del sujeto se aproxime.
7. Cuando se ilumine la Luz de Preparado en el flash, la unidad está a punto para disparar.
◆ Se puede calcular la correcta exposición utilizando la siguiente fórmula:
Número Guía “NG” / La distancia del sujeto al flash= Nº F
Esta unidad de flash calculará e indicará automáticamente la Distancia al Sujeto apropiada según la
fórmula mencionada. (Por favor mire Cuadro 1 de la última página)
-
para seleccionar la potencia de flash
SINCRONIZACIÓN CON LA SEGUNDA CORTINILLA
Cuando se fotografía un sujeto en movimiento con sincronización lenta, normalmente el efecto
movimiento se reflejará por delante del sujeto. La luz del flash ordinario, se dispara en el momento
que la primera cortinilla está totalmente abierta, de modo que el sujeto se expondrá desde el
momento que se dispare el flash hasta que se cierre el obturador (Sincronización con la primera
cortinilla). Cuando se utiliza la sincronización con la segunda cortinilla, el flash se dispara justo antes
que empiece a cerrarse la segunda cortinilla, y la exposición captará la luz ambiente desde el
momento que se obre el obturador hasta que se dispara el flash. El efecto movimiento del sujeto se
expondrá detrás del sujeto. Será un efecto más natural.
61
Page 63

◆
Esta modo no se puede utilizar con las cámaras EOS 700, 750, 850.
1. Ajuste el modo de realizar la fotografía deseado en la cámara
2.
Presione el botón + o - y la marca aparecerá en la pantalla
LCD.
3. Ajuste el foco, y realice la fotografía una vez confirmada la Luz
de Preparado.
◆ La sincronización a la primera cortinilla estará ajustada si desaparece la marca .
◆ Si la cámara está ajustada al modo totalmente Automático esta función no funcionará.
◆ Para cancelar la sincronización a la segunda cortinilla, desactive la marca en la pantalla LCD
utilizando los botones + o
SINCRONIZACIÓN DEL FLASH A ALTA VELOCIDAD (FP),
Cuando toma una fotografía con el flash ordinario, no se puede utilizar una velocidad superior a la
velocidad de sincronización de la cámara porque el flash se disparará cuando el obturador esté
completamente abierto. La sincronización del flash a alta velocidad se dispara mientras corren las
cortinillas. De esta manera se puede utilizar una velocidad más rápida que la velocidad de
sincronización.
1. Seleccione el modo de exposición de la cámara. (Puede utilizar el modo “Tv” y “M”)
2. Seleccione una velocidad más rápida que la velocidad de sincronización normal de la cámara
3. Active el flash.
4. Escoja el modo del flash presionando el botón MODE (Puede
utilizar los modos “ETTL” o “M”)
5. Presione el botón + o - para que aparezca la marca en la
pantalla LCD.
6. Enfoque el sujeto.
7. Compruebe que el sujeto está localizado a la distancia indicada
en la pantalla LCD
8. Confirme que la marca está en el visor de la cámara y entonces ya puede disparar la fotografía
◆ Con la sincronización a alta velocidad, el Número Guía dependiendo de la velocidad de obturación.
El rango del flash será más corto cuando la velocidad de obturación sea más rápida. (Por favor mire
Cuadro 2 de la última página)
◆ Seleccionando una velocidad más lenta que la sincronización normal de la cámara se cancela la
sincronización a alta velocidad. Entonces el flash se ajustará automáticamente a la operación
normal ETTL. Para volver activar el flash FP, siga el procedimiento (Nº 1) para la sincronización a
alta velocidad ( flash FP) que se describe en este manual de instrucciones.
◆
Es posible utilizar la compensación de exposición, con la sincronización a alta velocidad. Para hacerlo
por favor mire el manual de instrucciones de su cámara en el apartado “Compensación de exposición”.
◆
La marca desaparecerá cuando se cancele la función de sincronización a alta velocidad (flash FP)
-
.
SOLO PARA EL TIPO A
BLOQUEO FE (sólo para cámaras de tipo B)
,
El modo de bloqueo “FE” le permite escoger la exposición en el visor y bloquearlo, antes de tomar la
fotografía.
1. Ajuste el modo de exposición de la cámara ( s.a “P”, “Tv”, “Av”, “M”, o “DEP”)
2. Ajuste el modo del flash a E-TTL o a sincronización a alta velocidad.
3. Enfoque el sujeto.
4. Enfoque el sujeto en el centro del visor, y presione el botón de bloqueo FE.
◆ La unidad de flash realizará un pre-disparo y calcular y memorizar la cantidad de luz necesaria para
la correcta exposición.
◆ En el visor de la cámara aparecerá “FEL” durante 0.5seg y se ajustará la correcta exposición
◆ Si en el visor observa la marca , significa que la potencia no es suficiente para la correcta
exposición. Por favor sitúese más cerca del sujeto y repita el procedimiento desde el punto 3
5. Presione el disparador después de componer la fotografía.
62
Page 64

◆ Dependiendo del modelo de la cámara, hay algunas diferencias en el uso del bloqueo FE. Por favor
mire en el apartado “Modo de bloqueo FE” en el manual de instrucciones de su cámara.
LUZ DE MODELADO
Si utiliza el flash de modelado, podrá comprobar el efecto de luces y sombras antes de disparar la
fotografía.
más detalles, por favor consulte el manual de instrucciones de su cámara).
ajusta a la luz de modelado, en la pantalla del flash aparecerá el símbolo
(Esta función está limitada con cámaras que sean compatibles con flash de modelado. Para
Cuando la cámara se
automáticamente.
COMPENSACIÓN DE EXPOSICIÓN
Puede utilizar la compensación de exposición del flash combinado la compensación de exposición
normal (para controlar la exposición del fondo) en las fotografías con flash. La compensación de
exposición del flash se puede ajustar 1/3pasos en +/- 3 pasos (o en algunas cámaras en pasos de ½).
◆ Este modo no se puede utilizar con las cámaras EOS 620, 700, 850 ni 1000.
1. Presione el botón SEL y seleccione .
2. Presione los botones + o - para ajustar la compensación de
exposición del flash deseada.
3. La marca dejará de parpadear y quedará fija hasta que vuelva a
presionar el botón SEL.
4. Enfoque el sujeto.
5. Por favor compruebe que el sujeto está dentro del rango del
flash que aparece en la pantalla LCD del flash.
6. Puede realizar la fotografía después de confirmar que la Luz de Preparado del flash está iluminada.
◆ Para cancelar la compensación de exposición, por favor empiece desde el paso 1 y escoja +0 en el
dispositivo.
FB (Bracketing del Flash)
Con el FB, se pueden obtener bracketing con los disparos del flash en el sujeto, mientras la
exposición del ambiente permanecerá constante. Los disparos del bracketing se pueden realizar en la
secuencia de la correcta exposición, subexpuesto o sobreexpuesto +/- 3 pasos en incrementos de 1/3
( o en algunas cámaras con incrementos de ½).
1. Presione el botón SEL; la marca parpadeará.
2.
Presione el botón + o - para ajustar la compensación de exposición.
aparecerá después de presionar el botón SEL otra vez.
3.
4. Ajuste el foco.
5. Por favor compruebe que el sujeto está dentro del rango del flash
que aparece en la pantalla LCD del flash.
6. Compruebe a través del visor que está la marca , y realice la fotografía.
7. Si es necesario repita los pasos del 4 al 6.
◆ Esta función se cancelará automáticamente después de realizar la tercera exposición.
MODO DE MULTI FLASH (Estroboscópico)
Mientras el obturador está abierto, el flash puede disparar repetidamente. Para realizar una serie de
imágenes del sujeto en un solo fotograma. En un fondo oscuro con el sujeto iluminado, este modo es
más efectivo. Es posible ajustar la frecuencia de disparos entre 1Hz y 199Hz. Superior a 100 disparos
continuados. El máximo números de disparos varía dependiendo del número guía del flash y de la
frecuencia de disparos. (Por favor mire Cuadro 3 de la última página)
63
Page 65

◆ Esta función no se puede utilizar con las cámaras EOS 700, 750,
y 850.
1. Ajuste la cámara al modo M y seleccione el número F.
2. Presione el botón MODE hasta que aparezca el modo multi-flash.
3. Presione el botón SEL hasta que parpadee el flash de frecuencia.
4. Presione el botón + o
5. Después de presionar el botón SEL otra vez, el nivel de la potencia del flash parpadeará.
6. Presione el botón + o
7. Presione el botón SEL para que parpadee el número de disparos
8. Presione los botón + o
9. Vuelva a presionar el botón SEL para que deje de parpadear.
10. Cuando se ilumine la Luz de Preparado del flash, la unidad está lista para utilizarlo.
Nota: Por favor seleccione una velocidad de obturación superior a;
Número de disparos que quiere / Frecuencia de disparo
-
para ajustar el valor deseado.
-
para ajustar el nivel de la potencia del flash deseado
-
para seleccionar el número de disparos deseados
FLASH REFLEJADO
Cuando realice una fotografía con flash en interior, a veces puede
aparecer una fuerte sombra detrás del sujeto, si apunta el cabezal
de flash hacia arriba para reflejar la luz del techo, de la pared etc.
El sujeto se iluminará más suavemente. Presione el botón de
bloqueo y gire el cabezal del flash al ángulo deseado.
Hacia arriba: 0°, 60°, 75°, 90° Derecha: 0°,7°
Derecha: 0°, 60°, 75°, 90
Cuando el modo de flash reflejado está activado, aparecerá en la
pantalla LCD la marca
La fotografía recibirá el color de la superficie reflectante. Por favor escoja una superficie blanca para
reflejar el flash. Dependiendo de la superficie reflejada, de la distancia del sujeto y de otros factores,
la distancia efectiva para el TTL AUTO puede cambiar. Por favor compruebe la confirmación de la
correcta exposición (la marca ETTL o TTL en la pantalla LCD) después de realizar el disparo.
EXPOSICIONES DE APROXIMACIÓN
El cabezal de flash puede inclinarse 7º hacia abajo para las aproximaciones. El flash será efectivo
solo para sujetos de 0.5 metros a 2 metros. Cuando el cabezal del flash está inclinado a 7º la marca
parpadeará.
PANEL DE LUZ REBOTADA
Este flash está equipado con un panel de
luz rebotada, que permite iluminar los ojos
del sujeto cuando el flash esta con el
cabezal basculado (en posición de luz
rebotada). Extraiga los dos paneles
simultáneamente, y después recoja el panel
angular a su lugar. (Sea cuidadoso a la
hora de deslizar los paneles.)
◆ Para crear una luz de captura efectiva, incline el cabezal del flash 90º hacia arriba y tome las
fotografías a una distancia cercana.
° Izquierda: 0°, 60°, 75°,90°,120°,150°,180°
.
64
Page 66

CONTROL REMOTO DEL FLASH
Cuando utilice el modo “Control remoto del flash”, Puede realizar fotografías con sensación de imagen
tridimensional con sombra o puede realizar imágenes naturales con sombra dependiendo de la
exposición del flash sin ningún cable de conexión entre el flash y la cámara. En el caso del EF-610
DG Super, la señal de comunicación entre la cámara y el flash se tiene que realizar con la luz del
flash. En el modo de control remoto del flash, la cámara calculará la correcta exposición
automáticamente.
◆
Los modelos de cámara de tipo B, solo se puede utilizar con función “Control remoto del flash” y la función
“Control remoto Multi flash”. La EOS750 y EOS850 no se puede utilizar el control remoto del flash.
◆ En esta instrucción, llamamos unidad de flash, lo que esta adjunto al cuerpo de la cámara “Unidad
Master” y llamamos a la unidad de flash por control remoto “unidad esclava” la cual está localizada
en la correcta posición.
◆ Cuando se ajusta la unidad esclava en la posición deseada, se puede utilizar un mini-soporte.
◆ Este soporte incorpora una rosca para el trípode.
◆ Coloque la unidad de flash esclava al lugar deseado. No coloque la unidad de flash dentro del área
de la foto.
◆ Por favor coloque la unidad de flash a 0.5m a 5m del sujeto y coloque la cámara a una distancia de
1m a 5m del sujeto.
Selección de canales.
En el caso de que otra gente utilice la unidad de flash por control remoto cerca de usted, se pueden
crear interferencias con su flash y se podría disparar sin desearlo. En estas circunstancias, por favor
seleccione un canal diferente para su flash que el de la persona
próxima.
Ajustes del canal para la unidad Master
1. Presione el botón MODE y seleccione la marca .
2. Presione el botón SEL diversas veces para que el indicador del
canal parpadee.
3.
Presione el botón + o - para seleccionar el número del canal. (C1~
C4)
4. Presione el botón SEL repetidas veces para que deje de parpadear.
Ajuste del canal para la unidad Esclava
1. Presione el botón MODE y seleccione la marca ETTL/ / .
2. Presione el botón SEL diversas veces para que el indicador del
canal parpadee.
3.
Presione el botón + o - para seleccionar el número del canal. (C1
C4)
4. Presione el botón SEL repetidas veces para que deje de
parpadear.
◆ Si el número seleccionado del Master y de la unidad Esclava son diferentes, la unidad esclava no
se disparará. Por favor seleccione el mismo número para el Master y la Unidad esclava.
Ajuste de la ID Esclava
Cuando se utiliza diferentes unidades Esclava, el ID esclava le servirá para distinguir la unidad
esclava del flash principal.
1. Presione el botón MODE y seleccione la marca ETTL/ / .
2. Presione el botón SEL diversas veces para que el indicador ID esclavo parpadee.
3. Presione el botón + o - para seleccionar el número ID. (1, 2 o 3)
4. Presione el botón SEL, dejará de parpadear.
◆ Si quiere que todas las unidades esclavas se disparen al mismo tiempo, no es necesario este
ajuste.
Preparación para el flash por control remoto
~
65
Page 67

Ajustes del Master flash conectado/ desconectado
Puede ajustar la unidad de la unidad Master flash para que dispare o no.
Disparo con la unidad Master flash conectado
1. Presione el botón MODE y seleccione la marca .
2. Presione el botón + o - para indicar la marca
Disparo con la unidad de flash Master desconectado
1. Presione el botón MODE y seleccione la marca .
2. Presione el botón + o - para indicar la marca .
.
FLASH AUTO ETTL POR CONTROL REMOTO (sólo para cámaras de tipo A)
En esta función de flash Auto ETTL por control remoto, la cámara calcula automáticamente la correcta
exposición.
Flash Auto ETTL por control remoto con el ratio del flash desconectado
Si no se desea el ratio del flash, la identificación del esclavo no es necesario. Puede ajustar 1, 2 o 3.
Todas las unidades de flash esclavo y el sistema de control ETTL controlará la cantidad de luz para
obtener una correcta exposición.
Unidad de Master flash conectada + unidad (s) de flash esclavo.
◆ Por favor ajuste la unidad de Master flash siguiendo los pasos:
1. Presione el botón MODE y seleccione la marca ETTL
2. Presione el botón + o – para indicar la marca
3. Presione el botón SEL repetidamente para que el ratio del flash es 1:1
◆ Si el ratio del flash indica o , por favor consulte con la columna del flash auto de control
remoto con el ratio de flash activado (2 unidades esclavas) o (3 unidades esclavas) y reajuste el
ratio del flash 1:1
4. Ajuste la unidad esclava a la posición deseada
5. Asegúrese que la unidad Master y la unidad esclava están ambas cargadas.
6. Enfoque el sujeto y haga la fotografía.
Unidad de flash Master desconectada + unidad (s) de flash esclavo
◆ Por favor ajuste la unidad de Master flash siguiendo los pasos:
1. El mismo procedimiento que Unidad de flash Master desconectada + unidad (s) de flash esclavo y
ajuste los siguientes iconos tal y como se indica.
2. Coloque la unidad Esclava a la posición deseada.
ETTL /
/
3. Asegúrese que la unidad Master y la unidad esclava están ambas cargadas.
4. Enfoque el sujeto y haga la fotografía.
ID (Identificadora) esclava, Flash Auto ETTL por control remoto con el ratio del flash
(dos unidades esclavas)
El sistema de flash auto ETTL de control remoto, descrita como ejemplo , consiste en una unidad
Master en la cámara, con el Master flash desconectado, y dos unidades esclavas. Cuando ajuste el
ratio del flash, el sistema flash auto TTL, controla la cantidad de luz de acuerdo con el ratio del flash,
para obtener la correcta exposición.
◆
Sólo las cámaras EOS-1V, EOS-3 se puede realizar esta función.
◆ El ratio del flash se puede ajustar entre 8:1 1:1 1:8.
◆ Por favor ajuste la ID esclava 1 y 2 por cada unidad esclava.
Ajuste la unidad Master como se explica a continuación
1. Por favor desconecte la unidad de flash Master.
/ .
66
Page 68

2. Presione el botón MODE para seleccionar la marca ETTL/ .
3. Presione el botón SEL repetidas veces para que el indicador de ratio parpadee.
4. Presione el botón + o - y seleccione el número . (Parpadeará)
5. Presione el botón SEL para que el valor de ratio parpadee
6. Presione el botón de + o – para ajustar el ratio del flash
7. Presione el botón SEL para que el indicador del Ratio del flash aparezca en la pantalla.
8. Coloque la unidad esclava a la posición deseada.
9. Confirme que ambas unidades están cargadas.
10. Enfoque el sujeto y haga la foto.
◆ Si quiere cambiar algún ajuste, puede empezar desde el punto 3.
◆ Si quiere cancelar el ajuste, ajuste el flash al ratio 1:1. ( Siga desde el paso 4)
ID esclava, Flash Auto ETTL por control remoto con el ratio del flash (tres unidades esclavas)
El siguiente procedimiento es para una unidad Master con tres unidades esclavas. Este procedimiento
ajusta dos ratios de flash y la cantidad de compensación de exposición la controla la tercera unidad.
◆ Esta función solo se puede utilizar con las cámaras EOS 1V y EOS-3.
◆ Por favor ajuste el ID esclavo 1, 2 y 3 para cada unidad esclava.
Ajuste la unidad Master como se explica a continuación
1. Por favor desconecte la unidad de flash Master.
2. Presione el botón MODE para seleccionar la marca ETTL/ .
3. Presione el botón SEL repetidas veces para que el indicador de ratio parpadee.
4. Presione el botón + o - y seleccione el número . (Parpadeará)
5. Presione el botón SEL para que el indicador de ratio parpadee
6. Presione el botón de + o – para ajustar el ratio del flash
7.
Presione el botón SEL para que el indicador de compensación de exposición aparezca en la pantalla.
8. Presione el botón + o – y ajuste la compensación de exposición del flash.
9. Presione el botón SEL para activar el indicador.
10. Coloque la unidad esclava a la posición deseada.
11. Confirme que ambas unidades están cargadas.
12. Enfoque el sujeto y haga la foto.
◆ Si quiere cambiar algún ajuste, puede empezar desde el punto 3.
◆ Si quiere cancelar el ajuste, ajuste el flash al ratio 1:1. ( Siga desde el paso 4)
Sincronización a alta velocidad (Flash FP) con control remoto
1. Por favor ajuste el control remoto del flash. (vea la pagina 61)
2. Presione el botón + o – y ajuste a
/
( Unidad de flash Master conectado) o
/
(Unidad de flash Master desactivado).
3. El procedimiento para ajustar la Sincronización a alta velocidad con control remoto es la misma que
la sincronización a alta velocidad normal.
◆ No es necesario hacer ningún ajuste en la unidad Esclava.
Compensación de exposición del flash con control remoto
1. Por favor ajuste el Modo de Control remoto del Flash.
2. Presione el botón SEL para hacer parpadear la marca
3. Presione el botón + o – para ajustar la compensación de exposición
4.
Presione el botón SEL repetidas veces para que aparezca el indicador de compensación de exposición.
5. El procedimiento para ajustar la compensación de exposición del flash por control remoto es igual
que la compensación de exposición del flash normal.
◆ No es necesario hacer ningún ajuste en la unidad Esclava
◆ También se puede ajustar la compensación de exposición individualmente para cada una de las
unidades esclavas.
Bloqueo FE del control remoto
1. Primero seleccione el modo control remoto del flash.
2. Enfoque el sujeto y presione el botón FEL en la cámara
3. El procedimiento para ajustar el bloqueo EF de control remoto, es el mismo que el bloqueo normal.
◆ No es necesario hacer ningún cambio en los ajustes de las unidades esclavas.
67
Page 69

Bracketing del flash con control remoto (FB)
1. Primero seleccione el modo control remoto del flash.
2. Presione el botón SEL repetidas veces hasta que parpadee la marca .
3. Presione el botón + o – y ajuste la compensación de exposición.
4. Presione el botón SEL repetidas veces para que aparezca el indicador.
5. El procedimiento para ajustar el FB con control remoto, es el mismo que FB normal.
◆ No es necesario hacer ningún cambio en los ajustes de las unidades esclavas.
CAMBIAR EL MODO DE CONTROL REMOTO
Por favor ajústelo cómo se indica a continuación.
1. Presione el botón MODE y seleccione la marca ETTL / .
2. Presione y mantenga presionado el botón SEL durante dos segundos para que el indicador de modo
parpadee.
3. Presione el botón MODE y seleccione los modos ETTL, M, MULTI.
4. Presione el botón SEL para que aparezca el indicador de modo
FLASH MANUAL CON CONTROL REMOTO
Se puede ajustar manualmente la unidad esclava del flash con la unidad Master. La unidad externa
puede estar uniformada o variar entre las unidades esclavas. Para determinar la correcta exposición
del flash, utilice un fotómetro de mano.
Flash Manual con Control Remoto con flash externo uniformado
Por favor ajuste la unidad de flash Master como se describe a continuación.
1. Siga el procedimiento de Cambiar el Modo de Control Remoto y seleccione la marca M/ .
2. Presione el botón SEL diversas veces hasta que parpadee el indicador de flash externo.
3. Presione el botón + o – y ajuste la cantidad de flash externa.
4. Presione el botón SEL repetidas veces y aparecerá el indicador de flash externo.
◆ Si la unidad de flash Master está conectado, la unidad Master también se disparará al igual que el
flash externo.
Flash Manual con Control Remoto con variación del flash externo
Usted puede ajustar diferentes flashes externos para cada unidad (s) esclava.
( a continuación se explica con tres unidades esclavas de flash)
Por favor ajústese la unidad de flash Master cómo se explica a continuación.
1.
Por favor siga el procedimiento de
2. Presione el botón SEL repetidas veces hasta que parpadee la marca .
3. Presione el botón + o – para seleccionar .
4. Presione el botón SEL para que el flash externo aparezca y parpadee el .
5. Presione el botón + o – para seleccionar la potencia del flash externo.
6. Presione el botón SEL para que el flash externo aparezca y parpadee el .
7. Presione el botón + o – para seleccionar la potencia del flash externo.
8. Presione el botón SEL para que el flash externo aparezca y parpadee el .
9. Presione el botón + o – para seleccionar la potencia del flash externo
10. Presione el botón SEL para que deje de parpadear.
◆ Si únicamente hay dos unidades esclavas, por favor seleccione y el paso 3 ( y prescinda de los
pasos 9 y 10).
Cambio del Modo de Control Remoto,
y ajuste la marca M/.
MULTI FLASH CON CONTROL REMOTO
Por favor ajuste el flash Master como se indica a continuación
1.
Siga el procedimiento de Cambiar el Modo de Control remoto y ajuste la marca MULTI/ .
2. Presione el botón SEL para que la frecuencia de disparo parpadee.
3. Presione el botón + o – para ajustar la frecuencia de disparo.
4. Presione el botón SEL para que parpadee la marca de flash externo.
5. Presione el botón + o – para ajustar la cantidad de flash externo.
68
Page 70

6. Presione el botón SEL para que parpadee la marca del contador de disparos.
7. Presione el botón + o – para ajustar la cantidad de disparos.
8. Presione el botón SEL para que deje de parpadee el indicador.
◆ La frecuencia de disparo y el contador del flash será el mismo para todas las unidades esclavas.
FLASH ESCLAVO
◆ Cuando selecciona con el botón MODE, por favor asegúrese que el indicador del modo del flash
(ETTL, M, MULTI) no están activadas.
FLASH ESCLAVO NORMAL
Puede disparar el flash EF-610 SUPER DG incluso si no se monta al cuerpo de la cámara, mediante
el uso de otra unidad de flash.
◆ No se puede utilizar el flash integrado (E-TTL, E-TTL II).
◆ Por favor, fije la unidad de flash maestro en Auto TTL (no podrá usar los modos auto E-TTL, E-TTL
II) o en modo flash manual.
1. Monte la unidad de flash en la cámara.
2. Ajuste el modo de exposición de la cámara al modo deseado. Si utiliza el modo A o M, seleccione el
diafragma deseado también.
3. Conecte la unidad de flash. Presione el disparador levemente.
◆ Ahora el diafragma y la sensibilidad de la película se transmite
automáticamente a la unidad de flash.
4. Desmonte la unidad de flash de la cámara.
5. Presione el botón MODE y seleccione el modo /
(Esclavo).
6. Presione el botón SEL repetidas veces para que el indicador de
flash externo parpadee.
7. Presione el botón + o – para ajustar la potencia del flash externo.
◆ Determine la potencia apropiada del flash ajustando la distancia que aparece en la pantalla LCD
que coincida la más cerca posible con la actual distancia entre el flash esclavo y el sujeto. Si al
distancia actual está fuera del rango, necesitará cambiar el diafragma.
◆ Puede ajustar la sensibilidad de la película o el diafragma en la unidad de flash manualmente, si lo
desea.
a. Para la sensibilidad de la película… Presione el botón MODE y seleccione
presione el botón SEL para que parpadee el indicador.
Presione el botón + o – y ajuste la sensibilidad deseada, luego presione el botón SEL una vez más.
b. Para el diafragma …Cuando la unidad de flash se ajusta al modo esclavo, presione el botón
SEL para que el indicador de diafragma parpadee, y presione el botón + o – para ajustar el
diafragma deseada, luego presione el botón SEL.
8. Presione el botón SEL repetidas veces para que aparezca el dispositivo.
9. Coloque la unidad de flash en el lugar deseado. No lo coloque dentro del área de la fotografía.
10. Después de comprobar que la unidad de flash está totalmente cargada, presione el disparador para
realizar la fotografía.
◆ Cuando el EF-610 DG Super está totalmente cargado, la luz auxiliar AF parpadeará.
◆ El flash no se disparará si el EF-610 DG Super está conectado a la cámara y está ajustado al Modo
Esclavo.
DESIGNACIÓN DEL FLASH ESCLAVO
Si utiliza dos o más unidades EF-610 DG Super, puede desganar cual de los flashes se dispararán
juntos utilizando los ajustes del canal. En este modo una unidad de flash se utilizará como controlador
esclavo y el resto para disparar como esclavos.
, entonces
69
Page 71

Ajustar los disparos de las unidades de flash
1. Coloque la unidad de flash en la cámara.
2. Ajuste la exposición de la cámara al modo S o M.
◆ Ajuste la velocidad a 1/30 o inferior. El Controlador esclavo transmitirá la señal de designación
antes que a los otros flashes. Aunque si utiliza una velocidad más rápida que 1/30 las unidades de
flash no estarán sincronizadas.
3. Conecte la unidad de flash “ON”, y presione el disparador levemente.
◆ Ahora, el diafragma y la sensibilidad se transmiten automáticamente a la unidad de flash.
4. Saque la unidad de flash de la cámara.
5. Presione el botón MODE y seleccione / (Modo esclavo)
6. Presione el botón SEL para que el indicador de canal parpadee.
7. Presione el botón + o – para ajustar el número de canal. ( C1 o
C2)
8. Presione el botón SEL para que el indicador de flash externo
parpadee en la pantalla.
9. Presione el botón + o – para ajustar el flash externo.
◆ Ajuste la potencia del flash haciendo coincidir el indicador de distancia en la pantalla LCD lo más
aproximado posible con la distancia entre la unidad de flash esclavo y el sujeto. Si la distancia se
encuentra fuera del rango, necesitará cambiar el diafragma.
10. Presione el botón SEL repetidas veces para que aparezca la señal.
11. Coloque la unidad de flash en el lugar deseado. No lo coloque dentro del área de la foto.
Ajustes para la unidad Controladora Esclava
12. Coloque la unidad de flash controlador en la cámara.
13. Presione el botón MODE y seleccione / .(Modo esclavo)
14. Presione el botón SEL para que el indicador de canal parpadee.
15. Presione el botón + o – y ajuste el mismo número de canal
para todas las unidades.
16. Presione el botón SEL para que el indicador de flash externo
parpadee en la pantalla.
17. Presione el botón + para que aparezca la marca .
18. Presione el botón SEL para que deje de parpadear.
19. Después de comprobar que la unidad de flash está totalmente cargada, presione el disparador para
realizar la fotografía.
◆ Cuando el flash EF-610 DG Super está totalmente cargado, la luz auxiliar AF parpadeará.
◆ Si selecciona la marca en el ajuste de flash externo, no se puede ajustar el diafragma con el
botón SEL, la unidad de flash se tiene que ajustar al modo Controlador Esclavo.
◆ Las funciones del Controlador Esclavo sólo controla la unidad de disparo.
ESPECIFICACIONES
TIPO: Flash electrónico automático zoom TTL tipo Clip-on con controlador de serie.
NUMERO GUIA: 61 ( 100 ISO/m, posición del cabezal 105 mm)
ALIMENTACION: Cuatro pilas alcalinas de tipo AA
cuatro pilas Ni-Cd de tipo AA, cuatro pilas Niquel-hidrógeno de tipo AA.
TIEMPO DE RECICLAJE: acerca de 7.0 seg. (pilas alcalinas),
acerca de 5.0 seg. (con pilas Ni-Cd o Niquel-hidrógeno)
NÚMERO DE DISPAROS: acerca de 120 disparos (pilas alcalinas),
acerca 160 disparos (con pilas Ni-Cd o Niquel-hidrógeno)
DURACIÓN DEL DISPARO: acerca de 1/ 700 seg.( disparo a máxima potencia)
ANGULO DE ILUMINACION DEL FLASH: 24mm a 105mm controlador de motor de potencia
17mm con la pantalla angular incorporada.
AUTODESCONECTABLE: disponible
PESO: 330 g. DIMENSIONES: 77mm x 139mm x 117mm
70
Page 72

ITALIANO
Grazie per la preferenza accordata al Flash elettronico Sigma EF-610 DG Super EO-TTL II. Questo
prodotto è stato studiato specificatamente per le reflex Canon Eos. A seconda del modello della
macchina, funzioni e operatività possono variare. Leggete attentamente questo manuale quando
usate il flash con la vostra macchina. Il flash dispone di molte funzioni per ottimizzare la vostre riprese.
Per avere ottime fotografie e ottenere il massimo dal flash, prima di iniziare a usarlo, leggete questo
manuale e quello della vostra macchina. Tenetelo poi a portata di mano per poterlo consultare in caso
di dubbio.
ATTENZIONE
Per evitare danni o ferite a terzi, leggete attentamente il manuale di istruzioni e fate attenzione ai
segni di allerta riportati di seguito prima di usare il flash. In particolar modo, fate attenzione a questi
due segnali:
Attenzione!!
Attenzione!!
Questo denota punti rilevanti, per i quali attenzione e cautela sono particolarmente richiesti
Il simbolo contiene informazioni su ciò che non si deve fare
Il flash contiene circuiti ad alto voltaggio. Per evitare di prendere la corrente o di bruciarsi, non
cercate di smontare il flash. Se la carrozzeria è rotta o incrinata, non toccate le parti interne.
Non scattate flash vicino agli occhi. La luce molto intensa può provocare danni alla vista. Tenete
almeno 1 metro di distanza tra il flash e il viso quando fotografate.
Non toccate il terminale syncro della macchina quando il flash è collegato. Il circuito ad alto
voltaggio può causare scosse elettriche.
Non usate la macchina in ambienti con materiali infiammabili, gas, agenti chimici o infiammabili
liquidi. C'è il rischio di causare un'esplosione.
Usare questo prodotto nell'inosservanza del presente segnale di pericolo può
causare serie ferite o mettervi in serio pericolo
Usare questo prodotto nell'inosservanza del presente segnale di pericolo può
causare serie ferite o danni.
Attenzione!!
Attenzione!!
Non utilizzate altri apparecchi fotografici che non siano della serie Canon Eos. In caso contrario, il
flash potrebbe danneggiare i circuiti della macchina.
Questo flash teme l'acqua. Se usato sotto pioggia, neve o vicino all'acqua va protetto. Spesso
non è possibile riparare componenti interni danneggiati dall'acqua.
Flash e apparecchio fotografico non vanno esposti a urti, polvere, alte temperature e umidità.
Questi fattori possono causare malfunzionamento o incendio dell'apparecchiatura.
Quando il flash è sottoposto a sbalzi improvvisi di temperatura (es. dal freddo di un esterno al
caldo di un ambiente interno) può formarsi della condensa. In questi casi, riponete l'attrezzatura
in un sacchetto di plastica e non usatela fino a quando non è a temperatura ambiente.
Non riponete il flash in un cassetto o armadietto con naftalina, canfora o altro insetticida. Possono
avere un effetto negativo sul suo funzionamento.
Non utilizzate un lucidante, Benzene o altro agente di pulizia per rimuovere sporco o impronte.
Pulite solamente con un panno morbido appena inumidito.
Se non intendete usare il flash per un lungo periodo, cercate un luogo asciutto e fresco dove
riporlo, preferibilmente con una buona ventilazione. Fate scattare il flash più volte nell'arco di un
mese, affinché mantenga adeguate capacità di funzionamento.
71
Page 73

DESCRIZIONE DELLE PARTI
PARTI
ESTERNE
CONTROLLI 13.pulsante per la selezione dei modi 14.pulsante di selezione (sel)
1.testa del flash 2.Luce ausiliaria AF 3.Angolo di rotazione per flash indiretto; su e giù
5.Angolo di rotazione per flash indiretto; destra e sinistra 6.Blocco della rotazione e
pulsante di sblocco: su e giù 7.Blocco SWIVEL e pulsante di sblocco: destra e sinistra
8.Display LCD 9.Coperchio delle batterie 10.Anello della staffa 11.Staffa
11. Pannello riflettente 12. Diffusore grandangolare
-
15.pulsante di incremento (+) 16.pulsante di decremento (
18.pulsante TEST 19.pulsante d'illuminazione LIGHT 20.spia di pronto lampo
21.interruttore accensione
) 17.pulsante zoom
MODELLI E FUNZIONI
Nonostante questo flash sia equipaggiato con numerose funzioni, talune potrebbero non essere
disponibili, a seconda del modello della macchina con la quale viene abbinato. Si raccomanda di
accertarsi che il proprio apparecchio fotografico sia tra quelli indicati nell'elenco qui sotto. Si
raccomanda inoltre di far riferimento alle spiegazioni di ogni singola funzione contenute nel manuale.
Se non è specificata alcuna informazione sul modello, significa che quella particolare funzione può
essere utilizzata solo con macchine Eos
Macchina di tipo A E-TTL(E-TTL II) Compatibile con le fotocamere EOS SLR
Macchina di tipo B Tutte le altre Eos tranne quelle elencate sopra
BATTERIA
Questo flash usa quattro pile AA di tipo alcalino o batterie ricaricabili Ni-Cad e Ni-MH. Anche le batterie
al Manganese possono essere usate ma hanno una durata più ridotta rispetto alle alcaline. Se la spia
di pronto lampo impiega più di 30 secondi ad illuminarsi, le pile vanno sostituite
◆ Per assicurare contatti elettrici ottimali, pulite i terminali delle batterie prima di installarle
◆ Le batterie NiCad non hanno contatti standard. Se le utilizzate, verificate che i contatti delle batterie
siano correttamente allocati
◆ Per evitare esplosioni delle batterie, perdite o surriscaldamento, usate quattro batterie nuove della
stessa marca. Non mischiate batterie di marche diverse, vecchie e nuove insieme
◆ Non mandate in corto le batterie, non smontatele, non esponetele a fonti di calore o d'energia:
potrebbero esplodere. Non ricaricate altre batterie se non quelle ricaricabili al Ni-Cd
◆ Se non si utilizza il flash per un periodo prolungato, togliere le batterie per evitare danni o perdite
◆ La funzionalità delle batterie decresce alle basse temperature. Tenete quindi le batterie protette
quando utilizzate il flash al freddo.
CARICAMENTO DELLE BATTERIE
1. Accertatevi che il pulsante d'accensione sia su off,
quindi facendolo scivolare nel verso indicato dalla
freccia, aprite il coperchio del vano batterie
2. Inserite quattro batterie AA nel vano apposito.
Accertatevi che i poli + e
corrispondano a quelli segnati all'interno del vano.
3. Chiudete il coperchio
4. Spostate il pulsante d'accensione su ON. Dopo
qualche secondo la spia di pronto lampo si
illuminerà, indicando che il flash è pronto.
5. Per essere sicuri del corretto funzionamento del flash, premere il pulsante test
-
sulle batterie
72
Page 74

AUTO POWER OFF
Per risparmiare l'energia delle batterie, il flash si spegne automaticamente quando non viene usato
per oltre 90 secondi. Per ripristinare il funzionamento, premete il pulsante test oppure quello di scatto
della macchina fino a metà. La funzione Auto Power Off non funziona quando il flash è in modalità
flash ausiliario a distanza senza fili, flash ausiliario normale e nelle modalità flash prestabiliti
INDICAZIONI D'ERRORE
Se la potenza delle batterie non è sufficiente o c'è un'indicazione di errore tra la macchina e l'unità del flash, la
spia che indica l'angolo di copertura del flash lampeggerà sul display LCD. Se ciò avviene, portate l'interruttore
acceso/spento su OFF e quindi su ON. Se l'indicatore lampeggia ancora, controllate lo stato delle batterie.
REGOLAZIONE DELLA TESTA DEL FLASH
Premere il pulsante di blocco e rilascio "su e giù" della testa mobile,
mentre ne regolate la posizione.
appare sul display LCD quando girate il flash e se questa
◆
spia continua a lampeggiare dopo aver sistemato la testa del
flash, significa che non è stata posizionata correttamente.
COLLEGARE E SEPARARE IL FLASH DALLA MACCHINA
Accertatevi che il flash sia spento. Inserite quindi la
slitta del flash in quella della macchina e ruotate
l'anello di bloccaggio saldamente
◆ Quando attaccate o staccate il flash, afferratelo
saldamente dal basso per evitare danni all'innesto.
◆ Se il flash incorporato della macchina è estratto,
chiudetelo prima di attaccare l'unità flash esterna
◆ Per rimuovere il flash, ruotate l'anello di ancoraggio
in direzione opposta rispetto al segno ◄LOCK, fino
a quando si ferma.
REGOLAZIONE DELL'ANGOLO DI COPERTURA DEL FLASH
Quando si preme il pulsante dello ZOOM appaiono dei simboli e il display LCD cambia e indica la
posizione dello ZOOM in sequenza, come segue
24mm → 28mm → 35mm → 50mm → 70mm → 85mm → 105mm →(Auto)
Nel modo “AUTO”, il flash predisporrà automaticamente il comando per effetto zoom secondo la focale
effettiva dell’obiettivo applicato.
◆ Quando accendete l'interruttore principale, il flash memorizza e regola nuovamente lo zoom
mettendo l'ultima regolazione davanti a quella precedente
◆ Se usate obiettivi con un angolo di ripresa più ampio di quello permesso dalla parabola del flash,
potrebbero esserci delle aree sotto-esposte verso i margini dell'inquadratura
◆ A seconda della regolazione della parabola del flash, la sua potenza può variare
DIFFUSORE GRANDANGOLARE
Il flash incorpora un filtro diffusore grandangolare che
assicura la copertura fino alla focale del supergrandangolare
da 17mm. Estrarre il pannello diffusore assieme al
pannello riflettente dalla testa del flash. (Estrarre i
pannelli lentamente, con delicatezza.) Poi spingere il
pannello riflettente nel suo alloggiamento. L’angolo di
copertura del flash diventa automaticamente pari alla
focale da 17mm.
73
Page 75

◆ Se il pannello si stacca accidentalmente, il pulsante dello ZOOM non funzionerà. In questo caso,
contattate il negozio dove avete acquistato il flash o un centro di assistenza.
ILLUMINAZIONE DEL DISPLAY LCD
Quando premete il pulsante LIGHT, il display LCD si illumina per circa 8 secondi. Se premete
nuovamente il pulsante LIGHT il display rimane illuminato più a lungo.
ETTL (TTL) AUTO FLASH
In modalità TTL AUTO, la macchina emette la quantità di luce
necessaria per una esposizione corretta del soggetto.
◆ Macchine di tipo A possono usufruire del funzionamento in
modalità ETTL. Macchine di tipo B possono usufruire del
funzionamento in modalità TTL.
1. Regolate la macchina in modalità Full-Auto (Generalmente
Se la macchina non dispone di
2. Accendete il flash, la spia TTL comparirà nel LCD e il flash inizierà a caricarsi
3. Mettete a fuoco il soggetto
4. Verificate che il soggetto sia realmente alla distanza indicata sul display LCD
5. Scattate quando il flash è completamente carico
Il Flash è completamente carico quando appare la spia di pronto lampo
◆ Quando la macchina riceve l'esposizione appropriata, sul display LCD appare per 5 secondi il
simbolo ETTL (TTL). Se questa indicazione non appare significa che l'illuminazione del flash non è
sufficiente. Ripetete lo scatto a una distanza inferiore.
◆ La luce ausiliaria AF si accende automaticamente se la luce a disposizione non è sufficiente. La sua
distanza utile va da 7 a 9 metri circa..
◆ Quando la macchina è regolata in modalità Creative Zone, ricordate che il flash è impostato sulla
sua ultima regolazione.
◆ Quando il flash è completamente carico, compare un segnale lampeggiante. Se si scatta prima che
il flash sia totalmente carico, la macchina esporrà con un tempo lungo
□
, usate la modalità P)
UTILIZZO DEL FLASH CON ALTRI MODI DI FUNZIONAMENTO DELLA FOTOCAMERA
(ad eccezione dei modelli Eos700, 750, 850)
REGOLAZIONE A PRIORITÀ DEI TEMPI
Selezionando la modalità Tv della macchina, possiamo regolare la velocità dell'otturatore da 30
secondi a quella di sincro flash. Una volta selezionata la velocità, la macchina selezionerà a sua volta
un valore di diaframma. Se il soggetto è troppo scuro o troppo chiaro, l'indicatore di apertura
lampeggerà e indicherà i valori limite (apertura massima e minima). In questo caso, la macchina
procede all'utilizzo del flash ai valori limite. Quindi, il soggetto principale di una foto può avere la
corretta esposizione e tuttavia lo sfondo potrebbe essere sovra o sotto esposto.
REGOLAZIONE A PRIORITÀ DI DIAFRAMMI
Selezionando la modalità Av della macchina, l'apparecchio sceglierà la velocità di scatto adeguata per
lo sfondo. Se il soggetto è troppo luminoso o troppo scuro, l'indicatore della velocità lampeggerà e
mostrerà i valori minimi e massimi. Quindi, il soggetto principale di una foto può avere la corretta
esposizione e tuttavia lo sfondo potrebbe essere sovra o sotto esposto.
IN MODALITÀ' M
Potete regolare diaframmi e tempi di esposizione. Potete impostare qualsiasi velocità di scatto
compresa tra il tempo di sincronizzazione e 30 secondi. Se regolate l'esposizione a seconda delle
indicazioni dell'esposimetro, la macchina lavorerà con il flash col suo tempo di sincronizzazione
oppure con uno più lento.
□
.
74
Page 76

LIMITAZIONI QUANDO SI SCATTA IN SEQUENZA
Per evitare il surriscaldamento, non usate il flash per almeno 10 minuti dopo una sequenza di scatti,
come indicato nella tabella
TTL, M (1/1,1/2)) 20 esposizioni continuate
M(1/16-1/32) 40 esposizioni continuate
Modalità Numero di esposizioni flash
M(1/4, 1/8) 25 esposizioni continuate
Multi 10 cicli
FLASH MANUALE
La regolazione manuale del flash è conveniente quando le
con,dizioni sono tali che il sistema TTL non funzionerebbe bene.
Nel modo di funzionamento manuale è possibile regolare vari livelli
di potenza, da (piena potenza) a 1/128 di potenza, con incremento
di uno stop.
1. Regolate la macchina in modalità A oppure M
2. Premete il pulsante MODE sul flash fino a selezionare M
3.
Quando premete il pulsante SEL, il valore del numero guida lampeggia
4. Premete il pulsante +. o -. per regolare la potenza del flash
5. Il display d'uscita del flash manuale cesserà di lampeggiare premendo nuovamente SEL
6. Quando la spia Ready si illumina, il flash è pronto per funzionare
◆ La corretta esposizione si può calcolare usando la seguente formula
NG (Numero Guida): distanza flash-soggetto = valore di diaframma
Il flah calcola la distanza flash soggetto che compare nel display LCD proprio con questa formula.
(Consultare la tabella 1 dell'ultima pagina)
SINCRONIZZAZIONE DELLA SECONDA TENDINA
Quando si fotografa un soggetto in movimento con sincronizzazione lenta, davanti a lui comparirà la
sua scia. Infatti la luce del flash scatterà quando la prima tendina è completamente aperta, quindi il
soggetto rimarrà esposto da quando partirà il flash a quando si chiuderà la tendina (sincronizzazione
della prima tendina). Quando si utilizza la sincronizzazione della seconda tendina, il flash scatterà
appena prima della chiusura della seconda tendina, così che la scia del soggetto esposto alla luce
ambiente sarà dietro il soggetto stesso, con un effetto più naturale.
Questa modalità non può essere adottata con apparecchi Eos
◆
700, 750, 850
1. Scegliete la modalità di ripresa della macchina
2.
Premete + o -, il pulsante verrà visualizzato sul display LCD
3.
Regolate il fuoco e scattate quando la spia pronto allo scatto e accesa
◆ Se l'indicazione di seconda tendina viene spenta, la
macchina si regolerà automaticamente sulla prima tendina
◆ Se la macchina è regolata in modalità Full-Auto questa funzione non è disponibile
◆ Per cancellare la sincronizzazione sulla seconda tendina, spegnete il relativo segnale sul
display LCD usando i pulsanti
+
o -
SINCRONIZZAZIONE DEL FLASH AD ALTA VELOCITÀ’ FP
(SOLO PER TIPO A)
Quando si fotografa con un normale flash, non si può utilizzare una velocità maggiore di quella di
sincronizzazione perché il flash deve scattare quando la tendina è completamente aperta. La
sincronizzazione ad alta velocità consente invece al flash di scattare mentre la tendina sta ancora aprendosi.
Di contro è possibile usare una velocità di scatto della macchina superiore a quella di sincronizzazione.
75
Page 77

1. Selezionate la modalità di esposizione della macchina (possono essere usate le modalità Tv o M)
2. Selezionate una velocità dell’otturatore superiore a quella di sincronizzazione
3. Portate il tasto di accensione del flash in posizione ON
4. Selezionate la modalità del flash intervenendo sul pulsante MODE (possono essere usate le
modalità ETTL o M)
5. Premete
6. Mettete a fuoco
7. Accertatevi che il soggetto sia all’effettiva distanza indicata sul display LCD
8. Confermate il segnale nel mirino della macchina e quindi scattate
◆ Con la sincronizzazione high-speed, il Numero Guida cambia in relazione alla velocità di ripresa. Il
+
o - La segnalazione apparirà sul display LCD
campo d’azione del flash sarà inferiore quando la velocità è alta. Fate riferimento alla tabella 2
◆ Selezionando una velocità inferiore rispetto a quella di sincronizzazione si cancella la
sincronizzazione high-speed. Il flash si risetta automaticamente alla normale operatività ETTL. Per
riattivare il flash FP, seguite la procedura (n. 1) per la sincronizzazione ad alta velocità (FP flash)
illustrata in questo manuale.
◆
E’ possibile usare la compensazione di esposizione con la sincronizzazione high-speed. Per farlo,
fate riferimento al manuale del vostro apparecchio fotografico, alla voce ‘correzione dell' esposizione’
◆ Scomparirà quando la sincronizzazione Hi-speed (Fp flash) viene cancellata
BLOCCO FE
La modalità di blocco FE consente di scegliere l’esposizione nel mirino e bloccarla prima dello scatto
1. Regolate la modalità di esposizione della macchina (P, Tv; Av, M o DEP)
2. Regolate la modalità del flash su ETTL o sincronizzazione High Speed
3. Mettete a fuoco il soggetto
4.
Mettete a fuoco il soggetto nel centro della cornice AF del mirino, premete il pulsante di bloccaggio FE
◆ Il flash compirà un pre-scatto, calcolerà e memorizzerà la quantità di luce necessaria a
un’esposizione corretta;
◆ Il mirino della macchina mostrerà per 0,5 secondi la scritta FEL e setterà la corretta esposizione
◆ Se il mirino mostrerà il segno significa che la potenza non è sufficiente per una corretta
esposizione. Avvicinatevi al soggetto e ripetete le operazioni dal punto 3
◆ Premete il pulsante di scatto dopo aver composto l’immagine
◆ A secondo del modello di fotocamera possono esserci delle differenze nell’impiego del blocco FE.
Fate riferimento al manuale di istruzioni della macchina, alla voce Modalità di blocco FE
FLASH DI RIEMPIMENTO
Se si usa la funzione Flash di riempimento è possibile controllare gli effetti di luce e ombra, prima di
scattare la foto. (La funzione è disponibile solamente con le fotocamere abilitate alla modalità flash
modeling. Consultate il manuale della vostra fotocamera) Quando la macchina è regolata per operare
con la funzione flash di riempimento, il display del flash indicherà automaticamente il simbolo
COMPENSAZIONE DELL’ESPOSIZIONE
Si può usare la compensazione dell' esposizione del flash in abbinamento con la normale
compensazione di esposizione (per controllare il livello di esposizione dello sfondo). La
compensazione di esposizione del flash può essere regolata di +/- 3 valori d'esposizione con
incrementi di 1/3 di stop (o di 1/2 valore con alcune macchine).
◆ Questa modalità non è prevista per i modelli Eos 620, 650, 700,
850 e 1000
1. Premete il pulsante SEL e la spia lampeggerà
2. Premete il pulsante
esposizione del flash desiderata
3. L'indicazione smetterà di lampeggiare e rimarrà fissa dopo aver
nuovamente premuto il pulsante SEL
+
o - 3 per impostare la correzione di
76
Page 78

4. Impostare la messa a fuoco
5. Controllate che il soggetto sia compreso nel raggio d’azione che compare sul display LCD
dell’EF610 Super
◆ Potete scattare la foto dopo che s'illumina la spia di conferma sul flash. Per cancellare la
compensazione dell'esposizione, riferitevi al punto 1 e impostate + 0 sul display
6. La funzione è automaticamente cancellata dopo aver scattato la terza esposizione
FB (Esposizione Bracketing del flash)
Con la funzione FB, potete ottenere l’illuminazione bracketing utilizzando anche la luce ambiente.
L’illuminazione del flash in modalità bracket può essere realizzata con una sequenza di sovra
sottoesposizioni di +/-3 stop incrementati di 1/3 EV (o 1/2 EV con alcuni apparecchi).
1. Premete il pulsante SEL; il segnale lampeggerà
2.
Premete + o - per impostare il valore di bracketing desiderato
3. Verrà visualizzato dopo aver nuovamente premuto il
pulsante SEL verrà
4. Regolate il fuoco
5. Controllate che il soggetto sia compreso nel raggio d’azione del
flash che compare sul display LCD dell’EF610 Super
6. Controllate attraverso il mirino il segnale di conferma . Scattate la foto Se necessario ripetete le
operazioni dal punto 4 al 6
◆ Questa funzione verrà cancellata automaticamente realizzando una terza esposizione.
MODALITÀ MULTI FLASH
Mentre l’otturatore è aperto, il flash scatterà ripetutamente e una serie di immagini del soggetto verrà
esposta sul medesimo fotogramma.. Uno sfondo scuro con un soggetto chiaro ottimizza l’impiego di
questa modalità. E’ possibile regolare la frequenza degli scatti del flash tra 1Hz e 199 Hz. Si possono
raggiungere fino a 100 scatti di seguito. Il numero massimo di scatti varia a seconda del numero guida
del flash e della frequenza di scatto. Fate riferimento alla tabella 3
◆ Questa funzione non può essere usata con i modelli Eos 700, 750, 850
1. Regolate la modalità di esposizione della macchina su M e impostate anche il valore di diaframma
2. Premete il pulsante Mode fino a quando appare l’opzione
Multi-flash
3. Premete SEL fino a quando la frequenza di scatto del flash
comincia a lampeggiare
4. Premete il pulsante + o - per impostare il valore desiderato
5. Dopo aver premuto nuovamente il pulsante SEL, la spia del
livello di potenza del flash inizierà a lampeggiare
6. Premete il pulsante + o - per regolare il livello di potenza
7. Premete il pulsante SEL e il numero di scatti inizierà a lampeggiare
8. Premete il pulsante + o - per impostare il numero dei lampi che si vuole ottenere
9. Premete il pulsante SEL e il display cesserà di lampeggiare
10. Quando la spia READY del flash è illuminata, il flash è pronta per l’uso
Nota: regolate la velocità dell’otturatore maggiore di; (Numero dei lampi desiderati-Frequenza dei
lampi)
FLASH INDIRETTO
Quando, in una stanza, si scatta una foto con il flash, a volte una pesante ombra appare dietro al
soggetto. Se si punta la parabola del flash verso l’alto, facendo riflettere la luce dal soffitto o dalle
pareti, il soggetto avrà un’illuminazione più morbida. Premete il pulsante di blocco e ruotate la testa
del flash in modo da regolare il suo angolo d'inclinazione nelle varie direzioni.
77
Page 79

In alto: 0, 60, 75, 90 In basso; 0,7
Destra: 0, 60, 75, 90
Quando la modalità Flash Indiretto è attiva, l'apposito simbolo
apparirà sul display LCD.
L’immagine sarà influenzata dal colore dalla superficie riflettente.
Meglio se pareti e soffitto sono bianchi.
A causa della riflettanza della superficie, della distanza del
soggetto e di altri fattori, l’effettiva distanza per la modalità TTL
AUTO può variare. Controllate che l'esposizione sia corretta
(simboli ETTL o TTL sul display LCD) prima di scattare.
Sinistra: 0, 60, 75,90, 120, 150, 180
ESPOZISIONE CLOSE-UP
Per il flash indiretto può essere acceso al 7° per close-up. Il Flash sarà operativo solo per soggetti da
0,5 a 2 m. Quanto la testa del flash si attiva 7° si accende il simbolo
PANNELLO RIFLETTENTE
Il flash incorpora un pannello riflettente che
contribuisce a creare il punto di luce di luce
negli occhi del soggetto quando si usa il
flash nella modalità di lampo riflesso.
Estrarre il pannello diffusore e quello
riflettente e riposizionare il diffusore nel suo
alloggiamento. (Estrarre diffusore e pannello
con la massima delicatezza.)
◆ Per utilizzare nel modo migliore il pannello diffusore, ribaltare di 90° gradi in alto la testa del flash e
riprendere il soggetto da breve distanza.
FLASH TELECOMANDATO SENZA FILI (WIRELESS)
Se usate il modo di funzionamento " wireless flash" potete scattare fotografie con qualsiasi effetto di
luci e ombre, a seconda della posizione del flash, collegato alla fotocamera senza cavetti di
sincronizzazione. Il flash EF-610 DG Super comunica con la fotocamera mediante la sua stessa luce e
la fotocamera calcola automaticamente la corretta esposizione.
◆ Le fotocamere del tipo B possono venire usate solamente nei modi "Wireless Manual Flash" e
"Wireless Multi Flash". Le EOS 750 e EOS 850 non possono venire usate con il modo "wireless flash"
◆ In questo libretto viene chiamato flash principale (Master Flash) quello attaccato alla fotocamera e
flash secondario (Slave Flash) quello sistemato a distanza, nella posizione desiderata.
◆
Quando sistemate il flash secondario usate la mini base, che possiede un foro filettato per il treppiede.
◆
Sistemate il flash secondario nella posizione che avete stabilito, ma non all'interno dell'area inquadrata.
◆ Il flash va sistemato a una distanza dal soggetto compresa tra 0,5 e 5 metri. Anche la fotocamera va
messa a una distanza dal soggetto compresa tra 0,5 e 5 metri.
Selezionare il canale
Se altri fotografi usano, vicino a voi, il modo di funzionamento "flash senza fili", può accadere che il
vostro flash scatti senza il vostro intervento. In tal caso è necessario impostare un canale di
trasmissione diverso da quello del flash dell'altro fotografo.
Impostare il canale del flash principale ( Master)
1. Premere il pulsante MODE e impostare il segnale
2. Premere il pulsante SEL alcune volte fino a far lampeggiare la
spia del canale di trasmissione
3. Premere il pulsante
canale (C1~C4)
4. Premere il pulsante SEL alcune volte, fino a far cessare il lampeggiamento della spia
Preparazione per lo scatto a distanza
+
o - per impostare il numero del
78
Page 80

Impostare il canale del flash secondario
1.
Premere il pulsante MODE e selezionare il segnale
2. Premere il pulsante SEL alcune volte fino a far lampeggiare la
spia del canale di trasmissione
3. Premere il pulsante
numero di canale ( C1~C4)
4. Premere il pulsante SEL alcune volte, fino a far cessare il lampeggiamento della spia
◆ Se i numeri impostati sul flash principale e quello secondario sono diversi, il flash secondario non
s'accenderà. Perciò bisogna fare attenzione a impostare lo stesso numero su tutti e due i flash.
+
o - fino a far comparire il medesimo
ETTL
/ /
Impostare la ID flash secondari
Se si usa più di un flash secondario si può impostare la ID di ciascuno, per non confondere tra flash
secondario e flash principale.
1. Premere il pulsante MODE e impostare il segnale ETTL/ /
2. Premere il pulsante SEL alcune volte per far lampeggiare la spia ID del flash secondario
3. Premere il pulsante + o - per impostare il numero ID ( 1, 2 o 3)
4. Premere il pulsante SEL, la spia smetterà di lampeggiare
◆ Se si desidera che tutti i flash secondari lampeggino contemporaneamente, non è necessario
impostare il numero ID
Impostare acceso e spento ( ON-OFF) sul flash principale
É possibile impostare su acceso (ON) e spento (OFF) il flash
principale
Flash principale su ON
1 Premere il pulsante MODE per impostare il segnale
2 Premere il pulsante + o - per selezionare il segnale
Flash principale su OFF
1 Premere il pulsante MODE per impostare il segnale
2 Premere il pulsante + o - per selezionare il segnale
FLASH AUTOMATICO A DISTANZA ETTL ( solamente per le fotocamere tipo A)
In questo modo di funzionamento a distanza ETTL, la macchina fotografica imposta automaticamente
la corretta esposizione.
Flash automatico ETTL con interruttore sequenziale spento
Se non si desidera uno scatto di flash in sequenza, non è necessario impostare l'ID per i flash
accessori. Si può indifferentemente impostare 1, 2 o 3. Tutti i flash accessori s'accenderanno nello
stesso momento e il sistema ETTL automatico fornirà la corretta esposizione flash.
Flash principale su ON + flash accessori
◆ Regolare il flash principale nel modo seguente
1. Premere il pulsante MODE e impostare il segnale ETTL/
2. Premere il pulsante
3. Premere il pulsante SEL più volte e confermare che la sequenza flash è 1:1
◆ Se la sequenza flash è indicata come
automatico ETTL a distanza con sequenza flash ON ( Due flash secondari) oppure (Tre flash
secondari).e impostare la sequenza flash
4. Sistemare il flash secondario nella posizione desiderata
5. Assicurarsi che il flash principale e quello secondario siano pronti alla emissione del lampo
◆ La spia pronto lampo del flash principale è accesa e quella del flash secondario lampeggia
6. Mettere a fuoco il soggetto e scattare la foto
Flash principale OFF + Flash secondari
◆ Impostare il flash principale come descritto sotto
1.
Stessa procedura del flash principale ON + flash secondari, poi impostare i seguenti simboli come indicato
79
+
o - per selezionare il segnale
o , riferirsi alle istruzioni del paragrafo Flash
/ .
Page 81

ETTL /
2. Sistemare il flash ausiliario nella posizione desiderata
3. Assicurarsi che flash principale e flash secondari siano pronti al lampo
4. Mettere a fuoco il soggetto e scattare la foto
/
ID secondario, flash ETTL automatico con flash in sequenza ( Due flash secondari)
Il sistema automatico di flash a distanza ETTL, preso a esempio, consiste in un flash principale sulla
fotocamera, con regolazione su OFF, a due flash secondari. Quando si regola la sequenza, il sistema
automatico ETTL tiene conto della quantità totale di luce, per consentire una corretta esposizione.
Regolare il flash principale nel modo seguente
1.
Regolare l'accensione del flash principale su OFF
2. Premere il pulsante MODE per impostare il simbolo ETTL/
3. Premere il pulsante SEL più volte per far lampeggiare la spia dello scatto flash in sequenza;
4. Premere il pulsante
5. Premere il pulsante SEL per far lampeggiare la spia che indica gli scatti dei flash
6. Premere il pulsante
7. Premere il pulsante SEL e far apparire l'indicazione di flash in sequenza
8. Sistemare il flash secondario nella posizione desiderata
9. Assicurarsi che flash principale e flash secondari siano pronti al lampo
10. Mettere a fuoco il soggetto e scattare la foto
+
o - e impostare ( lampeggia)
+
o - per impostare la sequenza flash
◆ Se desiderate variare la regolazione, potete partire dal punto 3
◆ Se volete cancellare l'impostazione, regolate la sequenza flash / ( vedi punto 4)
ID secondario, flash ETTL automatico con flash in sequenza ( Tre flash secondari)
La procedura autoflash ETTL seguente si riferisce all'uso di un flash principale e tre flash secondari.
La procedura consente due (2) flash in sequenza e la compensazione del valore di esposizione per gli
altri flash accessori
◆ Solamente per EOS-1V e EOS-3 che possono impiegare queste funzioni
◆ Impostare la ID 1,2 e 3 per ciascun flash accessorio
Impostare il flash principale come descritto
1. Regolare l'interruttore del flash principale su OFF
2. Premere il pulsante MODE per impostare il simbolo ETTL/
3. Premere il pulsante SEL alcune volte e far lampeggiare la spia della sequenza flash
4. Premere il pulsante
5. Premere il pulsante SEL e far lampeggiare l'indicazione della sequenza flash
6. Premere il pulsante
7. Premere il pulsante SEL per far lampeggiare l'indicatore di compensazione dell'esposizione
8. Premere il pulsante
9. Premere il pulsante SEL per far apparire l'indicazione
10. Sistemare i flash secondari nelle posizioni desiderate
11. Assicurarsi che il flash principale e quelli secondari siano pronti al lampo
12. Mettere a fuoco il soggetto e scattare la foto
+
o - e impostare 1 2 3 ( lampeggiano)
+
o - per impostare la sequenza
+
o - e impostare il valore di compensazione del flash
◆ Se desiderate cambiare l'impostazione, partire dal punto 3
◆ Se desiderate eliminare l'impostazione, impostare la sequenza 1:1 ( vedi punto 4)
Sincronizzazione a distanza con flash ad alta velocità ( High Speed Sync) ( Flash FP)
1. Impostare lo scatto a distanza ( vedi pag 73)
2.
Premere il pulsante + o - e impostare
/
( Interruttore del flash principale su ON) oppure
( Interruttore del flash principale su OFF)
3. La procedura per impostare il flash ad alta velocità a distanza è la medesima impiegata per
impostare normalmente il flash ad alta velocità.
◆ Non è necessario fare tutte le regolazioni su ciascun flash
Compensazione dell'esposizione con il flash a distanza
1. Impostare il modo di scatto flash a distanza
2. Premere il pulsante SEL e far lampeggiare il segnale
/
80
Page 82

3. Premere il pulsante
4. Premere il pulsante SEL alcune volte per visualizzare il segnale di compensazione dell'esposizione.
5. La procedura per impostare la compensazione dell'esposizione con il flash a distanza è la
+
o - per impostare il valore di compensazione dell'esposizione
medesima che si effettua normalmente.
◆ Non è necessario ripetere tutte le regolazioni sul flash ausiliario
◆ Si può anche impostare la compensazione dell'esposizione su ciascun flash ausiliario
FE Lock a distanza
1. Impostare il modo di funzionamento a distanza
2. Mettere a fuoco il soggetto e premere il pulsante FEL della fotocamera
3. La procedura per impostare il blocco EF ( EF Lock) a distanza è la medesima impiegata per il normale blocco
◆ Non è necessario cambiare le impostazioni dei flash ausiliari
Esposizione bracketing a distanza (FB)
1. Impostare il modo di funzionamento a distanza
2. Premere il pulsante SEL alcune volte per far lampeggiare il segnale
3. Premere il pulsante
4. Premere il pulsante SEL alcune volte per far apparire l'indicatore
5. La procedura da seguire per impostare il modo FB a distanza è la medesima impiegata per il
+
o - e impostare il valore di compensazione d'esposizione
normale FB
◆ Non è necessario cambiare le impostazioni dei flash ausiliari
CAMBIO DEI MODI WIRELESS
Seguire la procedura indicata sotto
Premere il pulsante MODE e selezionare il segnale ETTL/
1.
2. Tenere premuto il pulsante SEL per più di 2 secondi per far lampeggiare il segnale relativo
3. Premere il pulsante MODE e impostare i modi ETTL, M, MULTI
4. Premere il pulsante SEL per far lampeggiare l'indicatore di fine procedura
FLASH MANUALE A DISTANZA
E' possibile regolare manualmente, a distanza, le impostazioni del flash ausiliario agendo sui comandi del
flash principale. I valori impostati sui flash ausiliari possono essere tutti uguali, o variare da flash a flash.
Per stabilire con esattezza i migliori valori di esposizione, usare un esposimetro flash manuale.
Regolazione manuale, con impostazioni uguali per tutti i flash
Regolare il flash principale come descritto sotto
1. Seguire la procedura Cambio dei Modi Wireless e selezionare il segnale M/
2. Premere il pulsante SEL alcune volte per far lampeggiare il segnale dei valori di uscita
3. Premere il pulsante + o - alcune volte per far apparire i valori di uscita
4. Premere il pulsante SEL alcune volte, fino a far cessare il lampeggiamento della spia
◆ Se l'interruttore del flash principale è su ON, anche questo scatterà allo stesso comando degli altri
Flash manuale a distanza e flash ausiliari con impostazioni diverse
E' possibile impostare valori differenti per ciascun flash ausiliario ( La procedura illustrata sotto
riguarda tre flash ausiliari) Regolare il flash principale nel modo seguente
1. Seguire la procedura Cambio dei modi Wireless e impostare il segnale M/
2. Premere il pulsante SEL alcune volte e far lampeggiare il segnale
3. Premere il pulsante + o - per impostare ( lampeggia)
4. Premere il pulsante SEL, per far apparire il canale d'uscita e lampeggiare il numero
5. Premere il pulsante + o - per impostare il valore d'uscita
6. Premere il pulsante SEL, per far apparire il canale d'uscita e lampeggiare il numero
7. Premere il pulsante + o - per impostare il valore d'uscita
8. Premere il pulsante SEL, per far apparire il canale d'uscita e lampeggiare il numero
9. Premere il pulsante + o - per impostare il valore d'uscita
81
Page 83

10. Premere il pulsante SEL per far lampeggiare l'indicatore di fine procedura
◆ Se si debbono regolare solamente due flash ausiliari, impostare al punto 3 (i punti 9 e 10 debbono
venire trascurati)
MULTI FLASH A DISTANZA
Regolare il flash principale secondo le seguenti istruzioni
1. Seguire la procedura per il cambio Modo Wireless e selezionare il segnale MULTI/
2. Premere il pulsante SEL e far lampeggiare il segnale di multi-flash
3. Premere il pulsante + o - per impostare la frequenza dei lampi
4. premere il pulsante SEL per far lampeggiare l'indicazione dei valori d'uscita
5. Premere il pulsante + o - per impostare i valori d'uscita
6. Premere il pulsante SEL per far lampeggiare il conteggio dei lampi
7. Premere il pulsante + o - per impostare il conteggio dei lampi
8. Premere il pulsante SEL per far lampeggiare l'indicazione di fine procedura
◆ La frequenza dei lampi e il loro numero possono essere i medesimi per tutti i flash
FLASH SECONDARIO
◆ Quando selezionate mediante il pulsante MODE badate che non compaia il segnale del modo di
funzionamento del flash ( ETTL, M, MULTI)
FLASH AUSILIARIO NORMALE
Il flash può essere fatto scattare, mediante un altro flash anche quando non è collegato alla
fotocamera.
◆ Il flash incorporato (E-TTL, E-TTL II) non può essere usato in questa modalità.
◆ Settare il Flash Principale su flash automatico TTL oppure Manuale (gli automatismi E-TTL, E-TTL II
non possono essere usati)
1.
Collegare il flash alla macchina fotografica
2. Impostare sulla fotocamera il modo di esposizione desiderato. Se impostate A oppure M, dovete
impostare anche l'apertura di diaframma desiderata.
3. Accendere l'interruttore del flash. Premere il pulsante della fotocamera a metà corsa.
◆ Da questo momento l'apertura del diaframma e la sensibilità
della pellicola sono automaticamente trasmessi al flash.
4. Scollegare il flash dalla fotocamera
5.
Premere il pulsante MODE e impostare il modo / (ausiliario)
6. Premere il pulsante SEL alcune volte e far lampeggiare
l'indicatore dei valori d'uscita del flash
7. Premere il pulsante + o -per selezionare i valori d'uscita
◆ Determinare la potenza del flash selezionando, sul pannello LCD, una distanza che sia la più vicina
possibile a quella tra il flash accessorio e il soggetto
◆ Potete anche impostare manualmente sul flash la sensibilità della pellicola o il valore di diaframma
a. Per la sensibilità della pellicola...premere MODE e selezionare ISO, poi premere il pulsante
SEL per far lampeggiare l'indicatore. Premere il pulsante + o - e impostare la sensibilità della
pellicola, infine premere ancora il pulsante SEL
b. Per il valore di diaframma....se il flash è regolato sul modo Slave, premere il pulsante SEL per
far lampeggiare l'indicatore del valore di diaframma, poi premere il pulsante + o - per impostare il
valore di diaframma desiderato. Infine premere il pulsante SEL
8. Premere il pulsante SEL alcune volte per far apparire l'indicazione
9. Sistemare il flash secondario nel punto desiderato. Ricordarsi di non sistemare il flash secondario
all'interno della inquadratura
10. Dopo esservi assicurati che tutti i flash siano pronti al lampo, premete il pulsante di scatto per
realizzare la fotografia
◆ Quando il flash EF-610 DG Super è pronto al lampo, la luce ausiliaria AF si mette a lampeggiare
◆ Il flash non scatterà se il flash EF-610 DG Super è collegato al corpo macchina mentre è regolato
sul modo Slave
82
Page 84

STABILIRE I FLASH SECONDARI
Se si usano due o più flash EF-610 DG Super è possibile stabilire quali flash debbano scattare
insieme mediante la selezione dei canali. In questo modo un flash funge da flash principale e gli altri
da secondari.
Impostare i flash per lo scatto
1. Collegare il flash che deve scattare alla fotocamera
2. Impostare la fotocamera sul modo di funzionamento S o M
◆ Impostare la velocità dell'otturatore su 1/30 o un tempo più lungo.Il flash principale trasmetterà le
informazioni prima che gli altri flash scattino a loro volta. Se si usa un tempo di sincronizzazione più
veloce di 1/30 i vari flash non scatteranno in sincronia l'uno con l'altro.
3. Mettete su ON l'interruttore del flash e premete a metà corsa il pulsante di scatto.
◆
In questo modo l'apertura del diaframma e la sensibilità del film saranno automaticamente trasferiti al flash
4. Staccare il flash dalla fotocamera
5. Premere il pulsante MODE e impostare / ( Modo slave)
6.
Premere il pulsante SEL per far lampeggiare l'indicatore del canale
7.
Premere il pulsante
8. Premere il pulsante SEL per far lampeggiare l'indicazione del
+
o -
per impostare il numero del canale (C1 o C2)
valore d'uscita del flash
9. Premere il pulsante
◆ Stabilire la potenza del flash impostando, sul pannello LCD, una distanza che sia la più vicina
+
o - per impostare il valore d'uscita
possibile a quella che intercorre tra il flash secondario e il soggetto. Se la distanza è fuori dalla
portata, cambiare l'apertura del diaframma.
10. Premere il pulsante SEL alcune volte per far apparire l'indicazione
11. Mettere il flash nella posizione voluta. Attenzione a non inserire il flash nella inquadratura.
Impostare il flash principale
12. Collegare il flash principale alla fotocamera
13. Premere il pulsante MODE e impostare / (Modo slave)
14. Premere il pulsante SEL per far lampeggiare l'indicatore del
canale
15. Premere il pulsante + o - e impostare lo stesso numero di
canale dei flash che debbono scattare
16. Premere il pulsante SEL per far lampeggiare l'indicazione del valore d'uscita del flash
17. Premere il pulsante + per far comparire la segnalazione
18. Premere il pulsante SEL per far cessare il lampeggiamento della indicazione
19. Dopo esservi assicurati che tutti i flash siano pronti al lampo, premete il pulsante di scatto per
realizzare la fotografia
◆
Quando il flash principale EF-610 DG Super è pronto al lampo, la luce ausiliaria AF si metterà a lampeggiare
◆ Non è possibile impostare il diaframma con il pulsante SEL, se viene impostata l'indicazione
quando s'imposta il valore d'uscita del flash. Il flash va regolato nel modo Slave Controller
◆ Il flash principale Slave Controller ha solamente la funzione di pilotare l'accensione dei flash
SPECIFICHE
MODELLO: Flash con slitta a contatto caldo, auto zoom, TTL
NUMERO GUIDA: 61 ( ISO 100, posizione parabola su focale 105mm)
ALIMENTAZIONE: Quattro batterie alcaline AA, oppure quattro batterie AA Ni-Cd,
oppure quattro batterie Nickel-Metal Hydride
TEMPO DI CARICA: circa 7.0 secondi (batterie alcaline);
circa 5.0 secondi con batterie Ni-Cd e Nickel-Metal Hydride)
NUMERO LAMPI: circa 120 (con batterie alcaline); circa 160 (con batterie Ni-Cd e Nickel-Metal Hydride)
DURATA DEL LAMPO circa 1/700 ( a piena potenza)
COPERTURA FOCALI: 24-105mm, con spostamento motorizzato della parabola;
17mm con diffusore incorporato
SPEGNIMENTO AUTOMATICO: Sì PESO: 330 gr DIMENSIONI: 77x139x117mm
83
Page 85

A
r
A
A
r
v
A
DANSK
Tillykke med dit valg af Sigma EF-610 DG SUPER EO-TTL II Flash. Denne flash er udviklet specielt til
Canon EOS-modellerne. Afhængig af kameramodel kan funktioner og betjening variere. For at få det
fulde udbytte af flashen anbefaler vi, at du læser denne vejledning. Brugsanvisningen til kameraet
indeholder også informationer om flashfotografering. Vi anbefaler, at du også læser disse
informationer
BEMÆRK
For at undgå uheld, bør du læse brugsanvisningen grundigt og bemærke de advarsler der er
angivet herunder, inden flashen tages i brug.
Advarsel !!
Bemærk !!
Symbol der markerer vigtige punkter hvor forsigtighed er påkrævet.
Symbol der markerer information om handlinger der bør undgås.
Denne flash indeholder højspændingskomponenter. Adskil ikke flashen, da det kan medføre
elektrisk stød eller forbrændinger. Hvis flashens kabinet går i stykker så de indvendige
komponenter blotlægges, må de ikke berøres.
ffyr ikke flashen tæt på en persons øjne. I så fald kan flashens kraftige lys give øjenskader. Hold mindst
1 meters afstand mellem flashen og en persons øjne når flashen anvendes.
Berør ikke kameraets synkrostik mens flashen er påmonteret kameraets flashsko, da der e
risiko for elektrisk stød.
nvend aldrig flashen i omgivelser med brændbare gasser eller kemikalier etc. Da det kan
medføre brand eller eksplosion.
Brug af produktet i modstrid med disse advarsler kan medføre alvorlig
personskade eller anden skade
Brug af produktet i modstrid med disse advarsler kan medføre personskade.
Advarsel !!
Bemærk !!
nvend ikke flashen på andre kameraer end Canon EOS modellerne, da flashen kan beskadige
de elektriske kredsløb i andre kameratyper.
Denne flash er ikke vandtæt. Hvis flashen anvendes i regn, sne eller fugtige omgivelser skal
den beskyttes mod fugt. Det er ofte umuligt at reparere elektriske komponenter der e
beskadigede af fugt.
Udsæt ikke flashen for stød eller slag, høj temperatur, støv eller fugtighed. Det kan medføre at
flashen ikke fungerer.
Hvis flashen udsættes for pludselige temperaturudsving, f.eks. hvis flashen bringes fra en la
udendørs temperatur til en høj indendørs temperatur, kan der dannes kondens indvendig i
flashen. For at modvirke dette bør flashen anbringes i en taske eller pose og den bør ikke
anvendes før den har opnået rumtemperatur.
Flashen bør ikke opbevares på steder hvor den udsættes for dampe fra kemikalier f.eks. fra
møbler fremstillet af spånplader.
nvend ikke benzin eller andet der indeholder opløsningsmidler til rengøring af flashen. Anvend
en blød klud til at aftørre flashen.
Hvis flashen skal opbevares i længere tid bør det ske på et køligt sted med god ventilation.
Batterierne bør tages ud af flashen – og flashen bør afprøves et par gange hver måned, for at
sikre optimal funktion.
84
Page 86

BESKRIVELSE AF FLASHENS DELE
UDVENDIGE DELE
1.Flashhoved 2.AF-hjælpelys 3.Vinkel; Op og ned 4.Vinkel; Højre og venstre
5.Lås; Op og ned 6.Lås; Højre og venstre 7.LCD-display 8.Batteridæksel 9.Låseskrue
10.Monteringsfod 11. Reflektorpanel 12. Vidvinkelforsats
BETJENIGNSKNAPPER
13.MODE KNAP 14.<SEL> SELECT knap 15.< + > Indstillingsknap 16.< - > Indstillingsknap
17.ZOOM knap 18.TEST knap 19.LIGHT knap 20.Klar-lampe 21.Tænd/sluk
KAMERAMODELLER OG FUNKTIONER
Selv om denne flash har mange funktioner, kan der være visse begrænsninger i funktionerne med
visse kameramodeller. Se funktionerne for de forskellige modeller i listen herunder. Se forklaringen på
de enkelte funktioner i brugsanvisningen. Hvis der ikke er angivet nogen model betyder det, at denne
funktion kan anvendes med alle EOS-modeller.
Type A kamera E-TTL(E-TTL II) Kompatible EOS SLR kameraer
Type B kamera Alle andre EOS modeller end de ovennævnte
VEDR: BATTERIER
Denne flash anvender fire type ”AA” Alkaline eller genopladelige Ni-Cad og Ni-MH batterier.
Manganese batterier kan også anvendes, men da de har en kortere levetid end Alkaline batterier kan
de ikke anbefales. Udskift batterierne hvis flashen er mere end 30 sekunder om at lade op.
◆ For at sikre ordentlig elektrisk kontakt, bør batteripolerne aftørres inden batterierne sættes i.
◆ Ni-Cad og Ni-MHbatterier har ikke standardiserede kontaktpunkter. Hvis du anvender Ni-Cad eller Ni-MH
batterier bør du kontrollere at batteriets poler har kontakt med kontaktpunkterne i batterikammeret.
◆ Anvend altid 4 batterier af samme fabrikat og type. Bland ikke nye og brugte batterier.
◆ Forsøg ikke at adskille eller kortslutte batterierne, eller at kaste dem i åben ild eller vand, da det kan få
dem til at eksplodere. Forsøg ikke at oplade batterier der ikke er konstrueret til genopladning.
◆
Hvis flashen ikke skal anvendes i en længere periode, bør batterierne fjernes for at undgå beskadigelse eller lækage.
◆
Batteriernes ydeevne nedsættes ved lave temperaturer. Hold batterierne varme hvis flashen skal bruges i koldt vejr.
◆ Det anbefales at medbringe ekstra batterier på rejser eller ved fotografering ved lave temperaturer.
ISÆTNING AF BATTERIER
1. Kontroller at flashen er slukket. Skub batteridækslet
i pilens retning for at åbne det.
2. Isæt 4 stk. ”AA” batterier. Vær opmærksom på at
vende batterierne som angivet i batterikammeret.
3. Luk batteridækslet.
4. Skub Tænd/Sluk-knappen hen på ”ON” for at tænde
flashen. Efter få sekunder vil klar-lampen lyse som
tegn på at flashen er klar til brug.
5. Tryk på Test-knappen for at afprøve flashen.
AUTOMATISK SLUK
For at spare batterier vil flashen automatisk slukke hvis den ikke bruges i ca. 90 sekunder. Tryk på
Test-knappen, eller tryk kameraets udløserknap halvt ned, for at aktivere flashen igen. Bemærk at
automatisk sluk ikke fungerer når Slave-flash funktionerne anvendes.
FEJLINDIKATIONER
Hvis batteristyrken er for lav eller der er en fejl i de elektriske informationer mellem kamera og flash,
vil ”Flash Cover Angle” blinke på LCD-displayet. Sluk og tænd flashen hvis dette sker. Hvis
indikationen derefter stadig blinker bør batterispændingen kontrolleres.
85
Page 87

JUSTERING AF FLASHHOVEDET
Tryk på ”Op/ned” låseknappen mens flashhovedet justeres til den
ønskede vinkel.
◆ vises på LCD-displayet når du tænder flashen. Hvis dette
symbol blinker, er flashens hoved indstillet til en forkert vinkel.
MONTERING OG AFMONTERING AF FLASHEN
Sluk for flashen. Skub flashfoden ind i kameraets flashsko
og spænd låseskruen.
◆ Når du monterer eller afmonterer flashen bør du
holde i flashens nederste del for at undgå at
beskadige flashfoden eller kameraets flashsko.
◆ Hvis kameraets indbyggede flash er vippet op, bør
den skubbes ned inden EF-610 DG flashen
monteres.
◆ Før flashen afmonteres skal låseskruen løsnes.
INDSTILLING AF FLASHENS UDLYSNINGSVINKEL
Når du trykker på ZOOM-knappen vises symbolet. Hver gang du trykker på ZOOM-knappen vil
LCD-displayet skifte og vise zoompositionen i følgende rækkefølge:
24mm → 28mm → 35mm → 50mm → 70mm → 85mm → 105mm →(Auto)
Ved almindelig brug på ETTL (TTL) funktion vil flashen automatisk indstille zoompositionen i
overensstemmelse med objektivets brændvidde.
◆ Når du tænder for flashen vil den indstille sig på den sidst valgte zoomposition.
◆ Hvis du anvender et objektiv med større billedvinkel end flashens udlysningsvinkel, vil billederne
blive underbelyst i siderne. Flashen styrke vil variere afhængig af indstillingen af flashhovedet.
VIDVINKELFORSATS
Denne flash er forsynet med en indbygget
vidvinkelforsats, der giver en udlysningsvinkel
svarende til et 17mm vidvinkelobjektiv. Træk
vidvinkelforsatsen og reflektorpanelet ud og vip
forsatsen ned så den dækker flashhovedet. (Vær
forsigtig når du trækker panelerne ud.) Skub derefter
reflektorpanelet tilbage på plads. Flashens
udlysningsvinkel vil automatisk blive indstillet på
17mm.
◆
Hvis vidvinkelforsatsen ved et uheld brækkes af, kan flashens zoom ikke fungere og flashen skal
repareres.
LCD-DISPLAY BELYSNING
Når du trykker på LIGHT-knappen vil LCD-displayet lyse i ca. 8 sekunder. Belysningen kan forlænges
ved at trykke på LIGHT-knappen igen.
86
Page 88

ETTL (TTL) AUTO FLASH
A
På TTL AUTO funktion vil kameraet styre flashlyset for at opnå den korrekte eksponering af motivet.
◆ Type A kameraer kan indstilles på ETTL. Type B kameraer kan indstilles på TTL.
1. Indstil kameraet til Full-AUTO funktion. (Sædvanligvis
indstilling, stilles det på P.)
2. Tænd for flashen, TTL indikatoren vil ses på LCD-displayet og
flashen vil begynde at lade op.
3. Fokuser på motivet.
4. Kontroller at motivet er indenfor rækkevidden angivet på
LCD-displayet.
5. Tryk på udløserknappen når flashen er fuldt opladet. Når flashen
er opladet vises klarsignalet i søgeren.
◆ Når kameraet opnår den korrekte eksponering vil ETTL (TTL) vises på LCD-displayet i 5 sekunder. Hvis
denne indikation ikke vises, er flashlyset ikke kraftigt nok til de pågældende forhold. Tag billedet igen på
en kortere afstand.
◆ AF-hjælpelyset tændes automatisk hvis du fokuserer på et mørkt motiv. Den effektive rækkevidde er fra
ca. 0,7meter til ca. 9 meter.
◆ Hvis kameraet er indstillet på Creative Zone skal du huske, at flashen automatisk indstilles på den sidst
valgte funktion hver gang.
◆ Hvis flashen ikke er fuldt opladet, vil flashmarkeringen vises i søgeren. Hvis kameraet udløses inden
flashen er fuldt opladet, vil kameraet tage billedet på en langsom lukkertid.
BRUG AF FLASHEN MED ANDRE KAMERAFUNKTIONER
Lukkertidsprioriteret indstilling
Ved at vælge Tv indstillingen på kameraet kan du indstille lukkertiden fra 30 sek. til 1/X synkroniseringstiden.
Når du indstiller den ønskede lukkertid vil kameraet vælge en passende blændeværdi til eksponering af
baggrunden. Hvis motivet er for lyst eller for mørkt vil blændeindikatoren blinke og vise grænseværdierne
(største eller mindste blænde). I dette tilfælde vil kameraet fortsat tage billeder med den viste blænde.
Selv om hovedmotivet vil blive korrekt eksponeret kan baggrunden blive over- eller undereksponeret.
Blændeprioriteret indstilling
Ved at vælge Av indstillingen på kameraet kan du indstille den ønskede blænde og kameraet vil vælge
en passende lukkertid til korrekt eksponering af baggrunden. Hvis motivet er for lyst eller for mørkt vil
lukkertidsindikatoren blinke og vise grænseværdierne (langsomste eller hurtigste lukkertid). I dette
tilfælde vil kameraet fortsat tage billeder med den viste lukkertid. Selv om hovedmotivet vil blive
korrekt eksponeret kan baggrunden blive over- eller undereksponeret.
Manuel indstilling (M)
Du kan indstille den ønskede blænde og lukkertid. Du kan vælge en lukkertid mellem kameraets
synkroniseringstid og 30 sekunder. Hvis du indstiller eksponeringen korrekt i forhold til lysmålerens indikation
vil kameraet fungere på samme måde som med Flash i dagslys eller Flash med langsom lukkertid.
□
indstilling. Hvis kameraet ikke har denne
(UNDTAGEN EOS700, 750 OG 850)
KONTINUERLIG OPTAGELSE
For at forhindre overophedning bør flashen hvile i mindst 10 minutter efter brug af de antal
flasheksponeringer der er angivet i skemaet herunder.
Funktion
TTL, M(1/1,1/2) 20 kontinuerlige flashoptagelser
M(1/4, 1/8) 25 kontinuerlige flashoptagelser
M(1/16-1/32) 40 kontinuerlige flashoptagelser
Multi 10 optagelser
ntal flasheksponeringer
MANUEL INDSTILLING AF FLASH
Manuel indstilling kan anvendes hvis det er vanskeligt at opnå korrekt eksponering med TTL
funktionen. Ved manuel indstilling kan flashens lysstyrke indstilles fra 1/1 (fuld styrke) til 1/128 styrke i
trin svarende til 1 blænde.
87
Page 89

1. Sæt kameraet på M indstilling.
2. Tryk på MODE-knappen på flashen for at vælge M.
3. Værdien for lysstyrken (ledetallet) blinker når du trykker på
SEL-knappen.
4. Tryk på + eller – knappen for at vælge flashens lysstyrke.
5. Displayet vil holde op med at blinke og i stedet lyse konstant når
du trykker på SEL-knappen.
6. Fokuser på motivet ved at trykke på kameraets udløserknap og aflæs afstanden på objektivet.
Indstil derefter blænden eller flashens lysstyrke indtil den afstand der vises i LCD-displayet svarer til
afstanden til motivet.
7. Når flashens klarlampe lyser er den klar til brug.
◆Du kan beregne den korrekte eksponering efter følgende formel:
Ledetal (GN) divideret med afstanden = blændeværdi.
Flashen vil automatisk kalkulere og vise afstanden til motivet efter denne formel. (se tabel 1 på sidste side)
SYNKRONISERING MED ANDET LUKKERGARDIN
Når du tager flashbilleder af et motiv i bevægelse med en langsom lukkertid, vil lyssporene fra motivet
almindeligvis ses foran motivet. Flashen vil blive affyret når det første lukkergardin er helt åbent, men
motivet vil blive eksponeret i tidsrummet fra flashen affyres og indtil det andet lukkergardin lukker
(synkronisering med første lukkergardin). Når du anvender synkronisering med andet lukkergardin, vil
flashen først blive affyret lige inden andet lukkergardin lukker, så motivet eksponeres i tidsrummet fra
lukkeren åbner og indtil flashen affyres. På denne måde vil lyssporene fra motivet ses bagved motivet
og derved virke mere naturlige.
◆ Denne funktion kan ikke anvendes med EOS 700, 750 og 850
modellerne.
1. Vælg den ønskede eksponeringsfunktion på kameraet.
2. Tryk på + eller – knappen,
LCD-displayet.
3. Fokuser på motivet og tag billedet når flashens klarlampe lyser.
◆ Synkronisering med første lukkergardin er valgt hvis symbolet ikke vises.
◆ Hvis kameraet indstilles på Full Auto Mode kan denne funktion ikke anvendes.
◆ Annuller synkronisering med andet lukkergardin ved at slukke symbolet i LCD-displayet ved
hjælp af + eller - knappen.
SYNKRONISERING PÅ HURTIGE LUKKERTIDER (FP),
symbolet vil vises i
KUN MED TYPE A KAMERAER
Når du tager billeder med en almindelig flash kan du ikke anvende hurtigere lukkertider end kameraets
synkroniseringstid, da flashen skal affyres mens lukkerens gardiner er helt åbne. Med synkronisering
på hurtige lukkertider (High Speed Sync) affyres flashen gentagne gange mens lukkeren arbejder. På
denne måde kan du tage flashbilleder med en hurtigere lukkertid end synkroniseringstiden.
1. Vælg kameraets eksponeringsfunktion (”Tv” og ”M” indstilling kan anvendes).
2. Vælg en hurtigere lukkertid end kameraets almindelige synkroniseringstid.
3. Tænd for flashen.
4. Vælg flashfunktion ved at trykke på MODE-knappen (”ETTL”
og ”M” funktion kan anvendes).
5. Tryk på + eller – knappen så
LCD-displayet.
6. Fokuser på motivet.
7. Kontroller at motivet er indenfor flashens effektive rækkevidde
angivet på LCD-displayet.
8. Kontroller at
◆ Ved optagelser med synkronisering på hurtige lukkertider varierer flashens lysstyrke afhængig af
lukkertiden. Flashens rækkevidde vil være kortere med hurtigere lukkertider. (se tabel 2 på sidste
side)
vises i søgeren og du er klar til at tage billedet.
symbolet vises i
88
Page 90

◆ Valg af lukkertider der er langsommere end kameraets almindelige synkroniseringstid annullerer
High Speed Sync. og flashen indstilles automatisk til den almindelige ETTL funktion. For igen at
aktivere High Speed Sync. følges ovenstående fremgangsmåde. Det er muligt at anvende
eksponeringskorrektion sammen med High Speed Sync. Se venligst kameraets brugsanvisning vedr.
eksponeringskorrektion.
◆ Symbolet vil forsvinde fra LCD-displayet når High Speed Sync. annulleres.
FE LÅS
”FE” lås giver dig mulighed for at vælge hvilken del af søgeren der skal afgøre eksponeringen og låse
dette valg inden billedet tages.
1. Vælg kameraets eksponeringsfunktion (”P”, ”Tv”, ”Av”, ”M” eller ”DEP”).
2. Vælg flashfunktion: enten E-TTL eller High Speed Sync.
3. Fokuser på motivet.
4. Sigt på de ønskede del af motivet med søgerens AF-ramme og tryk på FE låseknappen.
◆ Flashen affyres én gang og kalkulerer og gemmer oplysningerne om den nødvendige lysmængde
for korrekt eksponering.
◆ I kameraets søger vil ”FEL” vises i ca. 0,5 sek. og den korrekte eksponering vil blive indstillet.
◆ Hvis vises i søgeren betyder det at der ikke er tilstrækkeligt lys til at opnå korrekt eksponering.
Gå tættere på motivet og gentag ovennævnte fra trin 3.
5. Tryk på udløserknappen for at tage billedet.
◆ Fremgangsmåden for brug af ”FE” låsen varierer for de forskellige kameramodeller. Se venligst
kameraets brugsanvisning for yderligere oplysninger.
PILOT-LYS
Hvis du bruger funktionen til pilot-lys, kan du kontrollere lysfordelingen samt skygger og reflekser
inden billedet tages. (Denne funktion er begrænset til kameraer der er kompatible med pilot-lys. Se
betjeningsvejledningen til kameraet for flere oplysninger) Når flashen indstilles til pilot-lys vil symbolet
vises i LCD-displayet.
EKSPONERINGSKORREKTION
Du kan bruge flash-eksponeringskorrektion sammen med alm. eksponeringskorrektion for at korrigere
forskellen mellem eksponeringen af baggrunden og forgrunden. Flash-eksponeringskorrektionen kan
indstilles til +/-3 blænder i 1/3 blændetrin (i halve blændetrin på visse kameramodeller).
◆ Denne funktion kan ikke anvendes med EOS 620, 650, 700, 850 og
1000 modellerne.
1. Tryk på SEL-knappen og vælg
2. Tryk på + eller – knappen for at vælge den ønskede faktor for
flash-eksponeringskorrektion.
3. Displayet holder op med at blinke når du trykker på
SEL-knappen.
4. Fokuser på motivet.
5. Kontroller at motivet er indenfor flashens rækkevidde angivet på LCD-displayet.
6. Tryk på udløserknappen for at tage billedet.
◆ Annuller eksponeringskorrektionen ved at starte fra trin 1 og vælge ”0” som korrektionsfaktor.
FB (FLASH BRACKETING)
Med FB kan du tage 3 billeder med forskellig flasheksponering, mens eksponeringen for det
eksisterende lys er uforandret. Billederne tages i rækkefølge: korrekt eksponeret, undereksponeret og
overeksponeret op til 3 blænder med justering i 1/3 blændetrin (eller ½ blændetrin for visse
kameramodeller).
89
Page 91

1. Tryk på SEL-knappen og vælg
2. Tryk på + eller – knappen for at vælge den ønskede faktor for
bracketing.
3. Displayet vil vise
4. Fokuser på motivet.
5. Kontroller at motivet er indenfor flashens rækkevidde angivet på
LCD-displayet.
6. Kontroller at symbolet
7. Tryk på udløserknappen for at tage billedet. Om nødvendigt gentages trin 4 – 6.
◆ Denne funktion annulleres automatisk efter eksponeringen af det 3. billede.
når du trykker på SEL-knappen.
vises i søgeren.
MULTI-FLASH FUNKTION
Mens lukkeren er åben affyres flashen gentagne gange. Herved eksponeres en serie optagelser af
motivet på samme billede. En mørk baggrund med et lyst motiv giver det bedste resultat. Flashens
affyringsfrekvens kan indstilles mellem 1Hz og 199Hz. Op til 100 flashglimt kan affyres i en serie. Det
maksimale antal flashglimt varierer afhængig af flashens ledetal (lysstyrke) og affyringsfrekvensen. (se
tabel 2 på sidste side).
◆ Denne funktion kan ikke anvendes med EOS 700, 750 og 850 modellerne.
1. Indstil kameraets eksponeringsfunktion på ”M” og vælg blænden.
2. Tryk på MODE-knappen indtil Multi-flash vises.
3. Tryk på SEL-knappen indtil affyringsfrekvensen blinker.
4. Tryk på + eller – knappen for at vælge den ønskede frekvens.
5. Når der trykkes på SEL-knappen vil flash lysstyrken blinke.
6. Tryk på + eller – knappen for at vælge den ønskede lysstyrke.
7. Når der trykkes på SEL-knappen vil antallet af flashglimt blinke.
8. Tryk på + eller – knappen for at vælge det ønskede antal
flashglimt.
9. Når der trykkes på SEL-knappen vil displayet holde op med at blinke.
10. Når flashens klarlampe lyser er den klar til brug.
Bemærk: Vælg en længere lukkertid end: (Antallet af flashglimt) divideret med (affyringsfrekvens)
BOUNCE FLASH (INDIREKTE FLASH)
På flashbilleder vil der ofte optræde kraftige skygger fra motivet.
Hvis du drejer flashhovedet og anvender indirekte flashlys fra loftet
eller væggene vil lyset blive blødere.
Tryk på låseknappen og drej flashhovedet for at indstille vinkelen.
OP: 0, 60, 75, 90 NED: 0, 7
HØJRE: 0, 60, 75, 90 VENSTRE: 0, 60, 75,90, 120, 150, 180
Når bounce flash anvendes vil symbolet vises i LCD-displayet.
Farverne på billedet vil blive påvirket af farven på det reflekterede
lys. Vælg en hvid flade til at reflektere lyset. Afhængig af den
reflekterende flade, afstanden til motivet og andre faktorer, vil
flashens effektive rækkevidde blive formindsket. Kontroller om korrekt eksponering er opnået (ETTL
eller TTL markering i LCD-displayet) efter optagelsen.
NÆROPTAGELSER
Til brug ved næroptagelser kan flashhovedet vippes 7º nedad. Flashen kan kun anvendes på afstande
mellem 0,5 og 2 meter. Når flashhovedet vippes nedad vil symbolet
blinke.
90
Page 92

REFLEKTORPANEL
Denne flash er forsynet med et indbygget
reflektorpanel, der kan give en lysrefleks i
motivets øjne (catch light) når flashen
anvendes som indirekte lyskilde. Træk
reflektorpanelet ud. Hvis vidvinkelforsatsen
følger med ud, skubbes den tilbage på
plads. (Vær forsigtig når du trækker
panelerne ud.)
◆ For at opnå effekten med lysrefleks i øjnene, skal flashhovedet vippes op i en vinkel på 90 grader og
billederne skal tages på kort afstand.
TRÅDLØS FLASH
Når du anvender trådløs flash kan du tage billeder med en bedre dybdevirkning, da du kan anbringe
flashen hvor du ønsker, uden at skulle tage hensyn til kabelforbindelse mellem kamera og flash. Med
EF-610 DG Super sker kommunikationen mellem kamera og flash ved hjælp af flashlyset. Når ”Wireless
Flash” (trådløs flash) anvendes vil kameraet automatisk kalkulere den korrekte eksponering.
◆ Type B kameramodellerne kan kun anvendes med ”Wireless Manual Flash” og med ”Wireless Multi Flash”
funktionerne. EOS750 og EOS850 modellerne kan ikke anvendes med ”Wireless Flash”.
◆ I instruktionerne kalder vi en flash der er monteret på kameraet for ”Master flash” og en flash der er placeret
et andet sted i rummet for ”Slave flash”.
◆ Når du skal placere Slave-flashen kan du anvende en mini-stand der er forsynet med stativgevind.
◆ Placer Slave-flashen på det ønskede sted. Undgå at placere Slave-flashen indenfor billedfeltet.
◆ Placer Slave-flashen mellem 0,5m til 5m fra motivet og placer kameraet mellem 1m og 5m fra motivet.
Valg af kanal
Hvis andre anvender trådløs flash i nærheden af dig, kan de to
flashudstyr affyre hinanden. For at undgå dette kan du vælge en anden
kanal for din flash.
Valg af kanal for Master-flashen
1. Tryk på MODE-knappen og vælg markeringen.
2. Tryk på SEL-knappen indtil kanalindikatoren blinker.
3. Tryk på + eller – knappen for at vælge kanal (C1 – C4)
4. Tryk på SEL-knappen indtil displayet holder op med at blinke.
Valg af kanal for Slave-flashen
1. Tryk på MODE-knappen og vælg ETTL/ / markeringen.
2. Tryk på SEL-knappen indtil kanalindikatoren blinker.
3. Tryk på + eller – knappen for at vælge samme kanal (C1 – C4)
4. Tryk på SEL-knappen indtil displayet holder op med at blinke.
◆ Hvis der ikke vælges samme kanal til både Master- og Slave-flash vil
Slave-flashen ikke blive affyret.
Slave ID indstilling
Hvis du anvender flere Slave-flash kan du give dem forskellige ID-numre for at adskille dem fra hinanden.
1. Tryk på MODE-knappen og vælg ETTL/ /
2. Tryk på SEL-knappen indtil Slave ID indikatoren blinker.
3. Tryk på + eller – knappen for at vælge ID-nummer (1, 2 eller 3).
4. Tryk på SEL-knappen indtil displayet holder op med at blinke.
◆Hvis du ønsker at alle Slave-flashenhederne affyres på samme tid, er denne indstilling ikke nødvendig.
Master-flash ON/OFF indstilling
Du kan vælge om Master-flashen skal affyres.
Forberedelser til trådløs flash
markeringen.
91
Page 93

Master-flash affyres
1. Tryk på MODE-knappen for at vælge
2. Tryk på + eller – knappen for at vælge symbolet.
Master-flash affyres ikke
1. Tryk på MODE-knappen for at vælge markeringen.
markeringen.
2. Tryk på + eller – knappen for at vælge symbolet.
TRÅDLØS ETTL AUTOFLASH (KUN MED TYPE A KAMERAER)
Med denne trådløse ETTL Autoflash funktion vil kameraet automatisk kalkulere den korrekte eksponering.
Trådløs ETTL Autoflash uden indstilling af lysstyrken
Hvis indstilling af lysstyrken ikke er påkrævet, er indstilling af Slave-flashen ID-nummer unødvendig. Du
kan bruge både ID-nummer 1, 2 og 3. Alle slave-flash vil blive affyret på samme tid og ETTL systemet vil
styre flashlyset automatisk for at opnå korrekt eksponering.
Master-flash affyres + Slave-flashenhed(er)
◆ Indstil Master-flashen som følger:
1. Tryk på MODE-knappen og vælg ETTL/
2. Tryk på + eller – knappen for at vælge markeringen.
3. Tryk på SEL-knappen og kontroller at lysstyrkeforholdet (ratio) er / .
◆ Hvis lysstyrken (ratio) angives som
indstilling af lysstyrken (to slave-flash) eller (tre slave-flash)” og indstil lysstyrkeforholdet til
4. Placer Slave-flashen på det ønskede sted.
5. Kontroller at både Master-flash og Slave-flash er opladede (Master-flashen klarlampe er tændt og
Slave-flashens AF-hjælpelys blinker).
6. Fokuser på motivet og tag billedet.
Master-flash affyres ikke - kun Slave-flashenhed(er) affyres
◆ Indstil Master-flashen som følger:
1. Tryk på MODE-knappen og vælg ETTL/
2. Tryk på + eller – knappen for at vælge
3. Tryk på SEL-knappen og kontroller at lysstyrkeforholdet (ratio) er
◆ Hvis lysstyrken (ratio) angives som eller , se venligst afsnittet om ”Trådløs ETTL Autoflash med
indstilling af lysstyrken (to slave-flash) eller (tre slave-flash)” og indstil lysstyrkeforholdet til
4. Placer Slave-flashen på det ønskede sted.
5. Kontroller at både Master-flash og Slave-flash er opladede (Master-flashens klarlampe er tændt og Slaveflashens AF-hjælpelys blinker).
6. Fokuser på motivet og tag billedet.
Slave-flash ID, Trådløs ETTL Autoflash med indstilling af lysstyrken (to Slave-flash)
Det trådløse ETTL autoflash system i dette eksempel består af en Master-flash på kameraet (indstillet til ikke
at blive affyret) og to Slave-flashenheder. Når du vælger lysstyrkeforholdet vil ETTL systemet styre den
totale mængde flashlys i overensstemmelse med det forhold du har valgt, for at opnå korrekt eksponering.
◆ Kun EOS-1V og EOS-3 kameraerne kan anvendes med denne funktion.
◆ Lysstyrkeforholdet kan justeres fra 8:1 ~ 1:1 ~ 1:8.
◆ Vælg henholdsvis ID-nummer 1 og 2 til Slave-flashenhederne.
Indstil Master-flashen som følger:
1. Indstil Master-flashen til ikke at blive affyret (OFF).
2. Tryk på MODE-knappen og vælg ETTL / markeringen.
3. Tryk på SEL-knappen indtil lysstyrkeindikatoren (ratio) blinker.
4. Tryk på + eller – knappen og vælg (blinker).
5. Tryk på SEL-knappen så lysstyrkeindikatoren blinker.
6. Tryk på + eller – knappen for at vælge det ønskede lysstyrkeforhold.
7. Tryk på SEL-knappen så lysstyrkeindikatoren lyser konstant.
8. Placer Slave-flashenhederne på det ønskede sted.
9. Kontroller at både Master-flash og Slave-flash er opladede.
10. Fokuserer på motivet og tag billedet.
◆ Hvis du ønsker at ændre indstillingerne kan du starte fra punkt 3.
markeringen.
eller , se venligst afsnittet om ”Trådløs ETTL Autoflash med
markeringen.
markeringen.
/ .
/ .
/ .
92
Page 94

◆ Hvis du ønsker at annullere indstillingerne, bør du indstille lysstyrkeforholdet til
/ (se punkt 4).
Slave-flash ID, Trådløs ETTL Autoflash med indstilling af lysstyrken (tre Slave-flash)
Det trådløse ETTL autoflash system i dette eksempel består af en Master-flash på kameraet (indstillet til
ikke at blive affyret) og tre Slave-flashenheder. Ved denne fremgangsmåde indstilles lysstyrkeforholdet
mellem 2 Slave-flashenheder og flash-eksponeringskorrektionen for den tredje Slave-flash.
◆ Kun EOS-1V og EOS-3 kameraerne kan anvendes med denne funktion.
◆ Vælg henholdsvis ID-nummer 1, 2 og 3 til Slave-flashenhederne.
Indstil Master-flashen som følger:
1. Indstil Master-flashen til ikke at blive affyret (OFF).
2. Tryk på MODE-knappen og vælg ETTL/ markeringen.
3. Tryk på SEL-knappen indtil lysstyrkeindikatoren (ratio) blinker.
4. Tryk på + eller – knappen og vælg (blinker).
5. Tryk på SEL-knappen så lysstyrkeindikatoren blinker.
6. Tryk på + eller – knappen for at vælge det ønskede lysstyrkeforhold.
7. Tryk på SEL-knappen så indikatoren for eksponeringskorrektion blinker
8. Tryk på + eller – knappen og vælg den ønskede korrektionsfaktor.
9. Tryk på SEL-knappen for at gemme indstillingen.
10. Placer Slave-flashenhederne på det ønskede sted.
11. Kontroller at både Master-flash og Slave-flash er opladede.
12. Fokuserer på motivet og tag billedet.
◆ Hvis du ønsker at ændre indstillingerne kan du starte fra punkt 3.
◆ Hvis du ønsker at annullere indstillingerne, bør du indstille lysstyrkeforholdet til
Trådløs High-Speed synkronisering (FP Flash)
1. Foretag indstillingerne til trådløs flash.
2. Tryk på + eller – knappen og vælg / (Master-flash ON) eller / (Master-flash OFF).
3. Fremgangsmåden for indstilling af trådløs High-speed synkronisering er den samme som for almindelig
High-speed synkronisering.
◆ Det er ikke nødvendigt at foretage nogen indstilling af Slave-flashen.
Trådløs Flash-eksponeringskorrektion
1. Vælg trådløs flashfunktion.
2. Tryk på SEL-knappen for at få
3. Tryk på + eller – knappen for vælge den ønskede korrektionsfaktor.
4. Tryk på SEL-knappen for at få korrektionsindikatoren til at lyse konstant.
5. Fremgangsmåden for indstilling af trådløs flash-eksponeringskorrektion er den samme som for almindelig
flash-eksponeringskorrektion.
◆ Det er ikke nødvendigt at foretage nogen indstilling af Slave-flashen.
◆ Du kan også indstille eksponeringskorrektionen individuelt for hver Slave-flash.
Trådløs FE lås
1. Vælg trådløs flashfunktion.
2. Fokuser på motivet og tryk på FE-låseknappen på kameraet.
3. Fremgangsmåden for indstilling af trådløs FE-lås er den samme som for almindelig FE-lås.
◆ Det er ikke nødvendigt at foretage nogen indstilling af Slave-flashen.
Trådløs Flash-bracketing (FB)
1. Vælg trådløs flashfunktion.
2. Tryk på SEL-knappen for at få markeringen til at blinke.
3. Tryk på + eller – knappen for vælge den ønskede korrektionsfaktor.
4. Tryk på SEL-knappen for at få korrektionsindikatoren til at lyse konstant.
5. Fremgangsmåden for indstilling af trådløs flash-bracketing er den samme som for almindelig flash-bracketing.
◆ Det er ikke nødvendigt at foretage nogen indstilling af Slave-flashen.
markeringen til at blinke.
/ (se punkt 4).
ÆNDRING AF TRÅDLØS FUNKTION
Foretag følgende indstillinger:
1. Tryk på MODE-knappen og vælg ETTL/ markeringen.
2. Hold SEL-knappen nedtrykket i mere end 2 sekunder så mode-indikatoren blinker.
3. Tryk på MODE-knappen for at vælge ETTL, M eller MULTI funktion.
4. Tryk på SEL-knappen for gemme valget.
93
Page 95

TRÅDLØS MANUEL FLASH
Du kan manuelt indstille Slave-flashens lysstyrke fra Master-flashen. Lysstyrken kan varieres for de enkelte
Slave-flashenheder. Brug et flashmeter for at måle den korrekte eksponering.
Trådløs manuel flash med ens lysstyrke
Foretag følgende indstillinger:
1. Følg proceduren for ændring af trådløs funktion og vælg M/ markeringen.
2. Tryk på SEL-knappen for at få indikatoren for lysstyrke til at blinke.
3. Tryk på + eller – knappen for at vælge lysstyrken.
4. Tryk på SEL-knappen for gemme valget af lystyrke.
◆ Hvis Master-flashen er indstillet til at blive affyret (ON) vil den også blive affyret med den valgte lysstyrke.
Trådløs manuel flash med forskellig lysstyrke
Du kan vælge forskellig lysstyrke for hver Slave-flash. (I det følgende eksempel anvendes 3 Slave-flashenheder).
Indstil Master-flashen som følger:
1. Følg proceduren for ændring af trådløs funktion og vælg M/ markeringen.
2. Tryk på SEL-knappen for at få markeringen til at blinke.
3. Tryk på + eller – knappen for at vælge .
4. Tryk på SEL-knappen for at få lysstyrken (output) og til at blinke.
5. Tryk på + eller – knappen for at vælge den ønskede lysstyrke.
6. Tryk på SEL-knappen for at få lysstyrken (output) og til at blinke.
7. Tryk på + eller – knappen for at vælge den ønskede lysstyrke.
8. Tryk på SEL-knappen for at få lysstyrken (output) og til at blinke.
9. Tryk på + eller – knappen for at vælge den ønskede lysstyrke.
10. Tryk på SEL-knappen for at få indikatoren til at holde op med at blinke.
◆ Hvis der kun anvendes 2 Slave-flash skal du vælge
i trin 3 (trin 9 og 10 springes over).
TRÅDLØS MULTI-FLASH
Indstil Master-flashen som følger:
1. Følg proceduren for ændring af trådløs funktion og vælg MULTI/ markeringen.
2. Tryk på SEL-knappen for at få markeringen for affyringsfrekvens til at blinke.
3. Tryk på + eller – knappen for at vælge den ønskede affyringsfrekvens.
4. Tryk på SEL-knappen for at få lysstyrken (output) til at blinke.
5. Tryk på + eller – knappen for at vælge den ønskede lysstyrke.
6. Tryk på SEL-knappen for at få antal flashglimt til at blinke
7. Tryk på + eller – knappen for at vælge det ønskede antal flashglimt.
8. Tryk på SEL-knappen for at få indikatoren til at holde op med at blinke.
◆ Affyringsfrekvensen og antal flashglimt vil være ens for alle Slave-flash.
SLAVE-FLASH
◆ Når du vælger indstilling med MODE-knappen skal du kontrollere at indikatoren for flashfunktion (ETTL, M
eller MULTI) ikke vises.
NORMAL SLAVE-FLASH
Selv når EF-610 DG SUPER ikke er monteret på kameraet, kan flashen affyres ved hjælp af en anden flashenhed.
◆ Indbygget flash (E-TTL, E-TTL II) kan ikke anvendes.
◆
Indstil Master Flash enheden til TTL autoflash (E-TTL, E-TTL II autoflash kan ikke anvendes) eller Manuel flash funktion.
1. Monter flashen på kameraet.
2. Indstil kameraet på den ønskede eksponeringsfunktion. Hvis du vælger
A eller M skal du også indstille den ønskede blænde.
3. Tænd for flashen og tryk kameraets udløserknap halvt ned.
Nu overføres blændeværdien og filmfølsomheden automatisk til flashen
◆
4. Fjern flashen fra kameraet.
5. Tryk på Mode-knappen og vælg / (Slave) funktionen.
6. Tryk på SEL-knappen for at få indikatoren for lysstyrke til at blinke.
7. Tryk på + eller – knappen for at vælge den ønskede lysstyrke.
◆ Indstil den fornødne lysstyrke ved at indstille afstanden på LCD-displayet i overensstemmelse med afstanden
til motivet. Hvis den aktuelle afstand er uden for flashens rækkevidde, må du vælge en anden blænde.
.
94
Page 96

◆ Du kan manuelt indstille filmfølsomheden og blændeværdien på flashen hvis du ønsker det. For at indstille
filmføsomhed: Tryk på MODE-knappen og vælg
blinke. Tryk på + eller – knappen for at vælge den ønskede filmfølsomhed. Tryk igen på SEL-knappen. For at
at
indstille blændeværdien: Når flashen er indstillet på Slave-funktion – tryk på på SEL-knappen for at få indikatoren for
blændeværdi til at blinke. Tryk på + eller – knappen for at vælge den ønskede blænde. Tryk igen på SEL-knappen.
8. Tryk på SEL-knappen gentagne gange for at få vist displayet.
9. Placer Slave-flashen på det ønskede sted. Undgå at placere Slave-flashen indenfor billedfeltet.
10. Når du har kontrolleret at alle flashenheder er klar, kan du tage billedet.
◆ Når EF-610 DG Super er opladet vil AF-hjælpelyset blinke.
◆
Flashen fungerer ikke hvis EF-610 DG Super er monteret på kameraet mens den er indstillet på Slave-flash funktionen.
og tryk derefter på SEL-knappen for at få indikatoren til
UDVALGTE SLAVE-FLASH
Hvis du anvender to eller flere EF-610 DG Super flash, kan du udvælge hvilke flashenheder der skal
affyres samtidig ved hjælp af kanalindstillingen. Med denne funktion vil en flash fungere som kontrolenhed
og de andre som Slave-flash.
Indstilling af Slave-flashenheder
1. Monter flashen på kameraet.
2. Indstil kameraet på S eller M funktion.
◆ Vælg en lukkertid på 1/30 eller langsommere. Kontrol-flashen vil transmittere kontrolsignalet inden
flashenhederne affyres. Hvis du vælger en lukkertid hurtigere end 1/30 vil flashenhederne ikke synkronisere.
3. Tænd for flashen og tryk kameraets udløserknap halvt ned. Nu
overføres blændeværdi og filmfølsomhed automatisk til flashen.
4. Fjern flashen fra kameraet.
5. Tryk på MODE-knappen og vælg / (Slave-funktionen).
6. Tryk på SEL-knappen for at få kanalindikatoren til at blinke.
7.
Tryk på + eller – knappen for at vælge kanalnummeret (C1 eller C2).
8.
Tryk på SEL-knappen for at få indikatoren for lysstyrke til at blinke.
9. Tryk på + eller – knappen for at vælge den ønskede lysstyrke.
◆ Indstil den fornødne lysstyrke ved at indstille afstanden på LCD-displayet i overensstemmelse med afstanden
til motivet. Hvis den aktuelle afstand er uden for flashens rækkevidde, må du vælge en anden blænde.
10. Tryk på SEL-knappen gentagne gange for at få vist displayet.
11. Placer Slave-flashen på det ønskede sted. Undgå at placere Slave-flashen indenfor billedfeltet.
Indstilling af kontrol-enhed
12. Monter kontrol-flashen på kameraet.
13.
Tryk på MODE-knappen og vælg / (Slave-funktionen)
14. Tryk på SEL-knappen for at få kanalindikatoren til at blinke.
15. Tryk på + eller – knappen for at vælge samme kanalnummer som for
Slaveflashen (C1 eller C2).
16. Tryk på SEL-knappen for at få indikatoren for lysstyrke til at blinke.
17. Tryk på + knappen for at vise markeringen.
18. Tryk på SEL-knappen for at få displayet til at holde op med at blinke.
19. Når du har kontrolleret at alle flashenheder er klar, kan du tage billedet.
◆ Når Slaveflashenhederne er fuldt opladede vil AF-hjælpelyset blinke.
◆ Du kan ikke indstille blændeværdien ved hjælp af SEL-knappen hvis du vælger markeringen ved
indstilling af lysstyrken. Flashen vil blive indstillet til Slave-kontrolfunktion.
◆ Kontrol-enheden fungerer kun som styreenhed for Slave-flashenhederne.
.
SPECIFIKATIONER
TYPE: Kompakt seriekontrolleret TTL flash med auto-zoom.
LEDETAL: 61 (ISO 100/m ved 105mm zoom-indstilling)
STRØMFORSYNING: Fire type AA alkaline batterier eller, Fire type AA Ni-Cd batterier eller, Fire type AA Ni-MH batterier
GENOPLADNINGSTID: Ca. 7 sekunder med Alkaline batterier Ca. 5 sekunder med Ni-Cd eller Ni-MH batterier
ANTAL FLASHGLIMT: Ca. 120 flashglimt med Alkaline batterier Ca. 160 flashglimt med Ni-Cd eller Ni-MH batterier
FLASHGLIMTETS VARIGHED: Ca. 1/700 sek. ved fuld styrke.
UDLYSNINGSVINKEL: Dækker synsvinkelen for 24mm~105mm automatisk zoom
AUTOMATISK SLUK: Mulig VÆGT: 330 g MÅL: 77X139X117mm
95
Dækker synsvinkelen for 17mm med indbygget vidvinkelforsats
Page 97

r
t
k
r
r
t
NEDERLANDS
Hartelijk dank voor de aankoop van de Sigma EF-610 DG Super EO-TTL II electronenflitser. Dit
product is speciaal ontworpen voor de Canon EOS SLR camera’s. Afhankelijk van het gebruikte
cameramodel kunnen de diverse functies afwijken. Wij adviseren u deze gebruiksaanwijzing
aandachtig te lezen. De talloze aantrekkelijke extra’s van deze flitser vormen een welkome uitbreiding
van uw fotografische mogelijkheden. Om uw flitser op de juiste wijze in te stellen en optimaal gebruik
te maken van de mogelijkheden, raden wij u aan deze gebruiksaanwijzing aandachtig door te lezen en
tevens de gebruiksaanwijzing van uw camera naast deze instructies te gebruiken.
VOORZORGSMAATREGELEN
Ter voorkoming van ongelukken en beschadiging, raden wij u aan deze gebruiksaanwijzing
aandachtig te lezen en te letten op de speciale waarschuwingssymbolen. Let u vooral op de twee
onderstaande waarschuwingssymbolen:
Waarschuwing!!
Let Op!!
Dit symbool duidt op een belangrijke aanwijzing wanneer verwondingen en/of schade kunnen worden veroorzaakt.
Dit symbool duidt op welke handelingen vermeden moeten worden
Wanneer u tijdens het gebruik van deze flitser deze waarschuwingen
negeert, loopt u het risico van ernstige verwondingen en/of schade.
Wanneer u tijdens het gebruik van deze flitser deze waarschuwingen
negeert, loopt u het risico van verwondingen en/of schade.
Waarschuwing!!
De electronische circuits in deze flitser hebben een hoog voltage. Maak de flitser niet open om
electrische schokken of brandwonden te voorkomen. Indien de behuizing van de flitse
gescheurd of kapot is, raak de delen binnenin dan niet aan.
Gebruik de flitser niet vlakbij de ogen. Het zeer felle licht zou de ogen kunnen beschadigen.
Houdt minimaal 1 meter afstand van het gezicht als u een flitsopname maakt.
Raak de flitscontacten van uw camera niet aan als de flitser op het flitsschoentje is bevestigd. Dit kan
een electrische schok geven.
Gebruik uw flitser nooit in een omgeving waar zich licht ontvlambare stoffen bevinden, dit zou to
brand of ontploffing kunnen leiden.
Let Op!!
Gebruik deze electronenflitser niet voor andere camera’s dan de Canon EOS serie, aangezien
anders de electronische circuits van de camera beschadigd kunnen raken.
De flitser is niet waterdicht. Indien u de flitser in regen of in de nabijheid van water gebruikt, zorg e
dan voor dat deze niet nat wordt. Vaak is het vrijwel onmogelijk om waterschade aan electrische
circuits te repareren.
Stel u camera en flitser niet bloot aan schokken, stoten, stof, hoge temperaturen of vochtigheid. Deze
factoren kunnen tot storingen leiden in uw apparatuur.
Indien de flitser een sterke temperatuurswisseling ondergaat, kan er kon condensatie in he
binnenwerk optreden. Wacht in dit geval tot uw flitser de omgevingstemperatuur heeft aangenomen.
Bewaar uw flitser niet in een ruimte waar zich chemische stoffen, kamfer of insecticides
bevinden. Deze stoffen kunnen de flitser beschadigen.
Gebruik geen thinner, benzine of andere schoonmaakmiddelen om de flitser te reinigen. Gebrui
alleen een schone, eventueel iets vochtige, doek.
Bewaar de flitser op een koele, goed geventileerde, droge plaats. Het is aan te raden om de
flitser enkele keren per maand op te laden en te ontsteken. Dit zal de levensduur van de flitse
ten goede komen.
96
Page 98

OMSCHRIJVING VAN DE ONDERDELEN
Externe
onderdelen
Instelknoppen /
toetsen
1.Flitskop 2.AF hulplicht 3.Flitshoek bij indirect flitsen 4.Rotatiehoek, links/rechts
5.Vergrendelknop indirect flitsen 6.Vergrendelknop rotatie links/rechts
7.LCD display 8.Batterijdeksel 9.Vastzetring 10.Flitsvoetje
11. Vanglichtpaneel 12. Groothoek adapter
13.Functietoets 14.<SEL> keuzetoets 15.<+> plustoets 16.<
17.Zoomtoets 18.Test toets 19. Lichttoets 20. OK lampje
21. Aan/uit schakelaar
-
> mintoets
CAMERA MODELLEN EN FUNCTIES
Deze flitser is voorzien van veel extra functies. Bij sommige cameratypes zullen echter niet alle
functies gebruikt kunnen worden. Raadpleeg de onderstaande gegevens voor verdere details. Indien
in de verdere tekst niet over een specifiek camera type wordt gesproken kunt u er van uit gaan dat de
betreffende functies op alle EOS camera’s kunnen worden gebruikt.
Type A camera E-TTL (E-TTL II) compatibele EOS SLR camera’s
Type B camera Alle overige EOS camera’s met uitzonering van bovengenoemde typen
BATTERIJEN
Als stroombron voor deze flitser dienen 4 “AA” Alkaline batterijen van 1,5 Volt te worden gebruikt. Ook
kunnen oplaadbare Ni-Cad of Ni-MH worden gebruikt. Hoewel mangaan batterijen eveneens bruikbaar
zijn, raden wij vanwege hun korte levensduur het gebruik hiervan niet aan. Wanneer het OK-lampje
pas na 30 sec. oplicht dient u de batterijen te vervangen of op te laden.
◆
Om zeker te zijn van een goed electrisch contact kunt de batterijpolen schoonmaken voor u de batterijen inlegt.
◆ Ni-Cad batterijen hebben geen gestandaardiseerde contacten. Indien u Ni-Cad batterijen gebruikt dient u er
op te letten dat de polen goed contact maken met de contactpunten van de flitser.
◆ Gebruik altijd 4 batterijen van hetzelfde merk en type en gebruik geen oude en nieuwe batterijen door elkaar,
anders bestaat het risico van explosie, lekkage over oververhitting.
◆
Sluit de batterijen niet kort en haal ze niet uit elkaar. Stel ze ook niet bloot aan vuur of water, want dan kunnen ze
exploderen. Probeer geen normale batterijen op te laden; dit is alleen mogelijk met Ni-CD (oplaadbare) batterijen.
◆ Verwijder de batterijen wanneer de flitser gedurende langere tijd niet zal worden gebruikt om eventuele
lekkage te voorkomen.
◆ Bij lage temperaturen zal de werking van de batterijen achteruitgaan. Bewaar de batterijen goed beschermd
wanneer u de flitser bij koud weer gaat gebruiken.
◆ Het is aan te bevelen extra batterijen mee te nemen wanneer U voor langere tijd weg gaat of bij opnamen bij
koud weer.
HET INLEGGEN VAN DE BATTERIJEN
1. Overtuig u ervan dat de flitser middels de hoofdschakelaar is uitgeschakeld en schuif vervolgens het
batterijdeksel open.
2. Plaats vier AA batterijen in het batterijcompartiment.
Let er op dat de plus- en minpolen op de juiste wijze
worden geplaatst volgens de aanduiding in het
batterijcompartiment.
3. Sluit vervolgens het deksel.
Schakel de flitser in met behulp van de hoofdschakelaar.
4.
5. Na enkele seconden zal het OK-lampje oplichten
als teken dat de flitser voor gebruik gereed is.
6. Druk op de testknop om u ervan te overtuigen dat
de flitser goed werkt.
97
Page 99

Automatische uitschakeling
Indien de flitser enige tijd niet wordt gebruikt zal hij zich na ongeveer 90 sec. automatisch uitschakelen
om energie te sparen. Om de flitser weer in te schakelen drukt u op de testknop of de ontspanknop
van de camera half in. Let op: het automatische uitschakelen zal niet werken als de flitser in de “slave”
stand staat.
Foutmeldingen
Indien de batterijspanning onvoldoende is, of wanneer de electrische informatieoverdracht tussen
camera en flitser niet correct geschiedt, zal op het LCD display de aanduiding “Er” knipperen.
Wanneer dit gebeurt dient u de flitser uit te schakelen en meteen weer aan. Indien de “Er” aanduiding
wederom verschijnt dient u de batterijen te controleren.
HET AFSTELLEN VAN DE FLITSKOP
Depress the Bounce “Up and Down” Lock and Release Button,
and adjust the flash head to the desired position.
Druk de vergrendelknop (6) in en plaats de flitskop in de
◆
gewenste positie.
flitser inschakelt en de flitsknop in een niet correcte positie staat.
verschijnt op het LCD display indien u de
HET BEVESTIGEN EN VERWIJDEREN VAN DE FLITSER
Schakel de flitser met de hoofdschakelaar uit. Schuif
vervolgens het flitsvoetje van de flitser in het
flitsschoentje van de camera. Draai de vastzetring van
het voetje vast.
◆ Wanneer u de flitser bevestigt of verwijdert pak
deze dan bij de onderzijde vast om beschadiging
van het flitsvoetje of flitsschoentje te voorkomen.
◆ Indien de ingebouwde flitser van de camera
omhoog staat, klap deze dan in vóór u de flitser op
de camera aanbrengt.
◆ Om de flitser te verwijderen draait u de vastzetring in de tegenovergestelde richting van de
Lock-markering. Verwijder de flitser van de camera.
HET INSTELLEN VAN DE ZOOMREFLECTOR
Indien u op de zoomtoets drukt zal het symbool verschijnen, iedere keer dat u de zoomtoets
indrukt zal het LCD display een oplopende waarde aangeven, zoals onderstaand wordt vermeld.
24mm → 28mm → 35mm → 50mm → 70mm → 85mm → 105mm →(Auto)
Normaal gesproken zal in de ETTL (DDL) mode de zoom zich automatisch aanpassen aan het
brandpunt van het gebruikte objectief
◆ Wanneer u de flitser inschakelt zal de reflector terugkeren naar de laatst gekozen stand; deze wordt
automatisch in het geheugen opgeslagen.
◆ Indien u een objectief gebruikt met een kortere brandpuntsafstand dan 24 mm is het mogelijk dat de
randen en/of hoeken onderbelicht worden.
◆ Afhankelijk van de zoominstelling zal het richtgetal van de flitser veranderen.
98
Page 100

GROOTHOEK ADAPTER
De flitser is voorzien van een ingebouwde groothoek
adapter, waarmee het mogelijk is om met ultra
groothoek-objectieven tot 17 mm te werken. Trek de
groothoek adapter samen met het vanglichtpaneel uit
de houder en draai het voor de flitskop. (Trek beiden
voorzichtig en gelijkmatig naar buiten) Druk het
vanglichtpaneel hierna terug in de houder. De
belichtingshoek zal automatisch op 17 mm worden
ingesteld.
◆ Als de ingebouwde groothoekdiffusor ongewenst wordt ingeschakeld zal het correctie mechanisme
van de ingestelde flitshoek niet functioneren. In dit geval dient u contact op te nemen met de
handelaar waar u de flitser heeft gekocht.
VERLICHTING VAN HET LCD DISPLAY
Wanneer u de LIGHT toets indrukt, zal het LCD display voor ca. 8 sec. worden verlicht. Het LCD
display zal langer dan 8 sec. worden verlicht indien u de LIGHT knop nogmaals indrukt.
ETTL (DDL) AUTO MODE
De ETTL (DDL) Auto mode voorziet de opname van de correcte
belichting en controleert de hoeveelheid flitslicht.
◆ Camera’s van het type A kunnen met de ETTL mode en met de
camera’s van het type B kunnen met de DDL mode worden
gebruikt.
1. Stel de camera op de AUTO mode.
(Normaliter de
2. Schuif de hoofdschakelaar van de flitser op ON en de ETTL (TTL) markering zal op het LCD display
zichtbaar worden
3. Stel het beeld scherp.
4. Stel vast dat het te fotograferen object zich in het effectieve bereik bevindt
hetgeen in de LCD display staat weergegeven.
5. Als de indicator aangeeft dat de flitser klaar is, kunt u de ontspanknop indrukken.
◆ Als de belichting juist is zal de ETTL (TTL) markering gedurende 5 sec. op het LCD display
zichtbaar zijn. Als deze markering niet verschijnt is er te weinig flitslicht beschikbaar en dient u de
opname opnieuw te maken op een kortere afstand van het te fotograferen onderwerp.
◆ Het AF hulplicht zal automatisch gaan branden wanneer u scherpstelt op een object in een donkere
omgeving. NB. Het effectieve bereik is tussen de 0,7 tot 9 meter.
◆ Indien de camera is ingesteld op “Creatieve Zone” dient u er rekening mee te houden steeds de
laatst gebruikte instelling zal onthouden.
◆ Als de flitser geheel opgeladen is, verschijnt het flitsklaarlampje in de zoeker.
Indien de camera wordt ontspannen voor dat deze markering verschijnt zal de camera een lange
sluitertijd kiezen en de flitser niet afgaan.
Het gebruik van de flitser bij andere camera instellingen (behalve EOS700, 750, 850)
Sluitertijd voorkeuze
Door de Tv mode op uw camera te gebruiken kunt u sluitertijden van 30 sec. tot 1/X synchronisatie
gebruiken. Indien u de gewenste sluitertijd heeft ingesteld zal de camera de juiste diafragmawaarde
voor de achtergrond kiezen. Indien het onderwerp te donker of te licht is zal de diafragma-indicatie
knipperen en zal de begrensde diafragmawaarden tonen (maximale of minimale waarde). In dit geval
zal de camera de begrensde waarde kiezen en zal het hoofdonderwerp correct worden belicht maar
bestaat de kans dat de achtergrond wordt onder- of overbelicht.
99
□
mode. Indien de camera deze instelling niet heeft gebruikt u de P mode).
 Loading...