

Page 1

www.orphancameras.com
This manual is for reference and historical purposes, all rights reserved.
This creation is copyright© by M. Butkus, NJ, U.S.A.
These creations may not be sold or distributed without the expressed permission of the producer
I have no connection with any camera company
On-line camera manual library
If you find this manual useful, how about a donation of $2 to:
M. Butkus, 29 Lake Ave., High Bridge, NJ 08829-1701
and send your e-mail address so I can thank you.
Most other places would charge you $7.50 for a electronic copy or
$18.00 for a hard to read Xerox copy.
This will allow me to continue this site, buy new manuals and pay their shipping costs.
It'll make you feel better, won't it?
If you use Pay Pal, go to my web site
www.orphancameras.com and choose the secure PayPal donation icon.
Page 2
SIGMA
www.orphancameras.com
I
ELETTROI'|IT
FLASH
EFE43O
@
Page 3
lt,
www.orphancameras.com
*
'',,N
Page 4
Thank
www.orphancameras.com
Sigma
This
your
of all
Sigma
camera's
booklet.
this
EF-430
is
unit
specifically
enjoyment
features,
these
products,
instruction
you
photography,
of
and
please
book also
very
much
Electric
the
get
to
the
read this
contains
for
developed
Flash.
the Canon
has a
flash
maximum
instruction
using
on
purchasing
for
series SLR cameras.
EOS
variety of
performance
booklet
flashes.
features.
and enjoyment
before
Please refer to
To make the
using the
To
from
flash.
it
along
the
to
add
most
your
Your
with
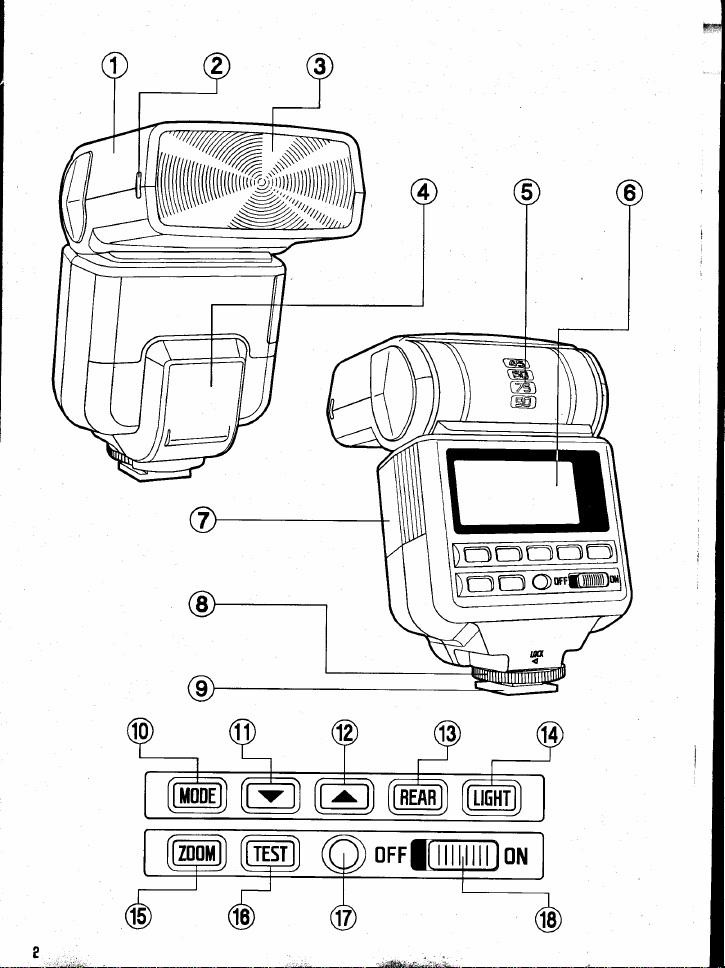
DESCRIPTION
ZOOM HEAD
o
@
@
@
@
@
@
@
@
PANEL ATTACHMENT
WIDE
WINDOW
FLASH
AF AUXILIARY
BOUNCE
LCD
BATTERY
SHOE
SHOE
ANGLE
PANEL
COVER
RING
r
LIGHT
..-n
PARTS
OF
@
@
@
@
@
@
@
@
@
MODE BUTTON
DOWN BUTTON
BUTTON
UP
REAR BUTTON
BUTTON
LIGHT
BUTTON
ZOOM
TEST BUTTON
READY LAMP
POWER SWITCH
yJ.;"i*:r
Page 5
Wj*
www.orphancameras.com
'*CAUTION
[r.ur,
Read this section
This flash unit
camera,
your
camera body.
.
This flash unit contains
not
do
or cracked,
*
not use this
Do
cameras,
unit.
function
*
This
near water, keep
or
electrical
can be used with Canon
the operation and usable
attempt
The flash unit
flash
to disassemble the
not touch the mechanism
do
flash
which has special contact
properly.
is not waterproof. When using the
unit
components damaged by
EOS series cameras. Depending
feature may different.
high voltage circuitry. To avoid electric shock or burns,
unit on any camera
may
damage
it from
flash. lf the
getting
inside.
pins
the
circuitry of
wet. lt is
water.
outside
other than the Canon EOS series
on the
often
Please read
shell of the unit
hot
shoe
these cameras, or
flash
and
impractical to
carefully
for
dedicated
camera in the rain
repair internal
is
may not
the
on
for
broken
flash
I
I
,8
Page 6
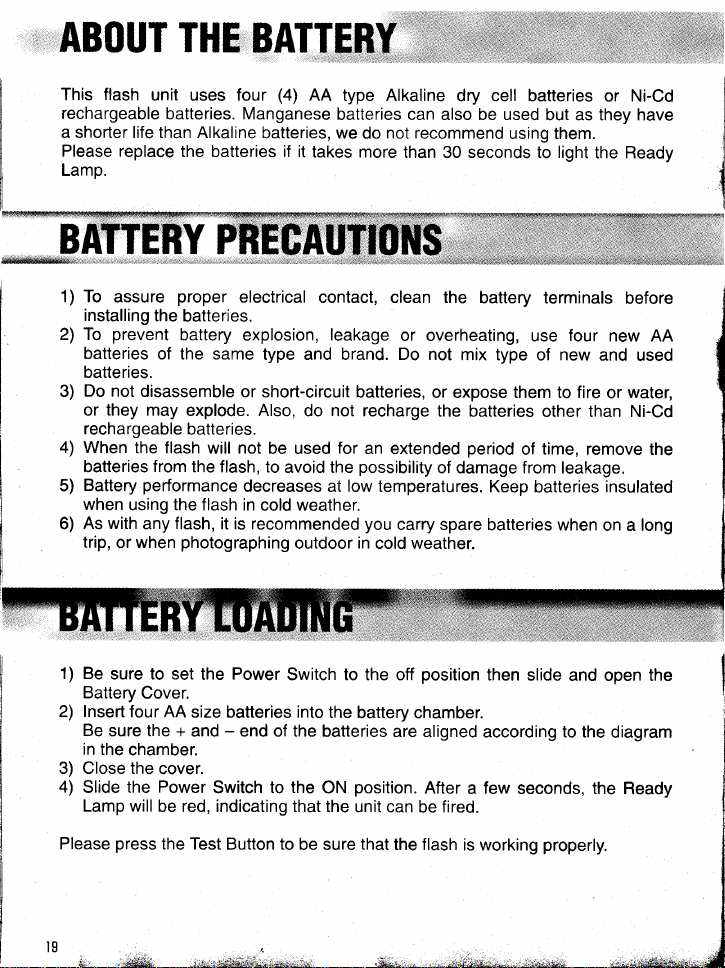
This flash
www.orphancameras.com
rechargeable
a shorter life than Alkaline
Please replace
Lamp.
unit uses four
batteries. Manganese
the batteries if it
(4)
AA
batteries,
takes more
type Alkaline
batteries can also be used
we do not recommend
dry cell batteries
using them.
than 30 seconds to light
or Ni-Cd
but as they have
the Ready
1) To
assure
installing
prevent
2) To
batteries
batteries.
Do not
3)
disassemble
or they may
rechargeable
4) When
the flash
batteries
performance
Battery
5)
when
using the flash
As with
6)
any
trip, or when
1) Be
sure to set
Battery
Cover.
Insert
2)
3)
4)
Please
four AA
Be
sure the +
in
the
chamber.
Close the
the Power
Slide
Lamp will
press
proper
the
battery
of the same
electrical
batteries.
explosion,
type and brand. Do
or short-circuit
explode. Also,
do not recharge
batteries.
from
the flash, to
will not
be used
avoid the
decreases at
in cold weather.
flash,
it is recommended
photographing
the Power
outdoor
Switch to the off
size batteries into
and - end of the
cover.
be red, indicating that
the Test Button to
Switch
to the
be sure
contact, clean
leakage
the battery
or overheating,
not mix type
batteries,
or expose them to fire
the batteries
for
an extended
possibility
low
temperatures.
you
carry spare
in
cold weather.
period
of
damage
r:
position
the
battery chamber.
batteries are aligned
position.
ON
the unit can
that
After a few
fired.
be
the flash
is working
terminals
four
use
new
of
other than Ni-Cd
time,
of
from
Keep
remove the
leakage.
batteries
batteries when
then slide
and open the
according to the
seconds,
properly.
before
new AA
and
used
water,
or
insulated
on a long
diagram
l9
.,*A*'
'};l
Page 7

: ; ii a E let i:-i !..t
www.orphancameras.com
l:
.:l il tel Lr ii: iil
:i
E: .lilalle.rllt 9:r:::
;i;:;6 E e
;n:ri;6iE@@
;;: ;ir;6.ir
4.r
i.i o I
q
t::l
9.t
i9.r !9:l
::lr'.:
!.:l
q9
9::
@
:1:
To
conserve
battery
flash is not used for
depress the
Test
power,
the flash
approximately
button or shutter button
ERROR
lf the battery
the
camera and
occurs, turn the
check the battery
Be sure to turn off the Power
insert the Shoe Base into the hot
the camera and turn the
Ring
until
*
When
grasp
damage to the shoe leg and
hot
*
lf
the camera's built-in
pop-up position, please
you
power
is not
flash
unit, the LCD
power
switch
power.
it is tight.
you
attach or
the bottom
remove
the flash
of
shoe.
attach the flash unit.
sufficient or there is electric information
off and on.
Switch.
Shoe
the
to
flash is
close
unit automatically turn itself
five minutes.
the camera halfway.
of
panel
will show the
lf
To turn the flash
"Err"
"Err"
the
Then
shoe on
Locking
flash,
prevent
camera's
set at
it
before
off
error between
indication. When
indication
still appears,
when
the
on again
this
Page 8

the TTL AUTO Mode,
www.orphancameras.com
On
get
the appropriate
the camera will
control
exposure on the subject.
the
amount of
flash
lighting to
1. Set the
2.
camera's
(Usually
Turn
lf the
E
on the
camera's
the flash will
settings
Focus
3.
4.
Check that the
the
LCD
Press
5.
When
When
6.
panel
last
onto the subject.
effective distance indicated
panel.
the shutter
the flash is fully
the camera receives
will
lf this indication
situation.
Please
mode
Mode.
power
mode is
set the all of the mode
used.
subject
button after
appear for a few
does not
re-take
to Full-AUTO Mode.
lf the
camera does
switch of the flash.
set on M mode.
is located within
on
the flash is fully
charged, the
the appropriate exposure, the C mark
seconds.
appear, the
at a closer distance.
not have E Mode,
IID
AITTO
the
charged.
ready light in
flash
the
power
set to P Mode.)
view
finder will light-on.
is not
enough
on the LCD
for
that
!fi
Page 9

When used
www.orphancameras.com
mode can
This
Tv mode
with
be used with EOS
not
7OOn5Ol850
cameras.
you
When
aperture
aperture
In such a case,
Thus, the
become under
When
This mode can
When
shutter
shutter
In such a case,
Thus,
become
When used
This
You can set
according
synchronization
set the desired
value for
indicator
value
the camera
main
subject
or over
with Av mode
used
not be used
you
the desired aperture
set
for the background.
speed
indicator
speed
the camera
the main subject
under or
over exposed.
with
mode can
not
the desired
to the exposure
flash or
the
background.
will
blink
and
proceeds
shutter
picture
in a
exposed.
$
with EOS
will
blink.and
proceeds
picture
in a
M mode
with EOS
used
be
shutter speed
meter indication,
slow synchronization.
the camera
speed,
lf
subject
the
limit values.
show
to take a
is
exposed
7OO75OB50
is
photograph
flash
correctly
cameras
value, the camera
lf the subject
limit values.
show
to take a
is
exposed
is too bright or
photograph
flash
correctly
7OOn5Ol850 cameras.
and aperture
value.
the camera
will select
bright or
too
the background
but,
will
select
the background
but,
you
lf
works as for
will
the
appropriate
too dark,
the
with limit values.
will
the appropriate
too dark,
limit values.
with
the
will
adjust exposure
Daylight
*.d&i**#^dri
I
Page 10

This mode
www.orphancameras.com
You
Guide
can
can calculate the
Number "GN"/Flash
not
be used
correct exposure
with EOS
to Subject Distance = F-stop
700n501850
by using this formula.
cameras.
This flash
formula.
above
1.
Set the camera's
mode.
2. Press the mode
Flash
When
3.
power
1/16.
ate subject
will
unit
mode
is indicated.
press
you
changes to 1/1 , 1/2, 114,
On the LCD
distance
w
1/1
4. Read-out
the F-stop
flash
the
subject distance from
flash
or
and subject
calculate
exposure
button until the Manual
the
V
panel,
will
1/2
power
distance becomes
indicate
and
Mode
to M
button, the flash
the appropri-
indicated.
be
118,
1/4
until the distance indicated
the
close.
the
Subject Distance
-a
+
'*
,l,ll
1/8
focus
ring
on
following
by
g-
osru@ t'
Frf
the lens.
on the LCD
Then,
1/16
panel
the
adjust
the
of
..-r;c
Page 11

mm 43 30
www.orphancameras.com
80
70 mm
50 mm
mm
35
28 mm 30
With 18 mm
Wide Panel
The film speed and
body. lt can
not
be
111 1/2
1t4 1/8 1/16
22 15 11
40 28
36
32
25
22 16
21
21
15
20 14
18
15
10 7 5
F-stop information is automatically
changed by
flash.
10
12
11
'10
I
I
I
received from the camera
CONTINUOUS
you
When
willfire with the
FLASHING
take a
camera
Flash Power
Number
Data is based
of
Flash
on
picture
with the
indicated in the
as
1/16
8
our standard
motor
procedure.
test
drive or continuous
below:
chart
1/8 1/4
42
.r*;;r-.
mode, the flash
shoot
1/2
1
1/1
1
SF
Page 12

Each time
www.orphancameras.com
indicate
the
press
you
zoom
28 mm + 35 mm
ZOOM
the
position
as
button,
follows:
-)
mm
50
the
-+
70 mm
LCD
panel
-+
80 mm
display
-+
AUTO.
will
change
and
Mt/
9)
28
mm
In the AUTO mode, the flash
the focal
*
When
position
you
lf
exposed areas around the
Depending
The flash
you
When
should be
you
When
with the TTL AUTO mode. The
the LCD
M
/
I
t>
9(;
35rm
length
you
use a
covers
placed
panel
your
of
lens.
turn
to the last setting used.
on the
use
take a flash
the main
on
lens wider
zoom head
picture
the full
with a lens
over the Flash Window.
by
about
between
photograph
1 segment.
will automatically set the zoom
than
m
Ir)
I
m
,!-r
tt0
70mm
position
switch, the
the zoom
edge of
setting, the flash
flash will memorize
head setting, there may
picture.
the
power
will be
and set
changed.
tl
with lenses
area
18 mm
with the Wide Panel, we recommended
effective distance
28 mm and longer
28
and
mm, the Optional Wide Panel
will
be shorter than indicated
/
_Y;
9)
AUTO
according to
the head
be under
using
on
t.""*k*t
-.,,,,.,,;M*,;,,,.
,:.,*-i*l
Page 13

This mode can not be used
www.orphancameras.com
with EOS
7OOl75Ol850 cameras.
the
While
movement
of
A dark background
1.
the camera's exposure
Set
mode.
Press the mode button until
2.
Flash mode is
Press the Y button
3.
power
4.
When
interval time of the
0.1 sec., 0.2 sec.,
1.0 sec.
Read-out the subject
5.
F-stop
the
flash
and subject
When the Ready Lamp of
6.
Please set
is
shutter
will
be exposed
with
indicated.
in
as
you press
Manual
the
flash
or
the
shutter
(interval
the
open,
a bright
to set the
the A button,
flash will change to
0.3 sec., 0.5
distance
power
distance becomes close.
speed
time setting)
flash will
in
Flash mode.
until the distance
the flash
fire
frame.
one
subject shows
Mode to
longer than
M
Multi
the
flash
the
sec. or
from the focus ring on
is illuminated, the
(number
x
repeatedly, so
more effectively
-..
+-
''
fffl
indicated on the
flash
of
that the subject's
in this mode.
F<
ortn.@l'
ILJ'"FY
@@@
the lens. Then, adjust
is
unit
you
want)
panel
LCD
ready for
use.
series
the
of
.u&k.
fi
Page 14

This mode
www.orphancameras.com
can
not
be
used with EOS
700n50/850
cameras.
This mode is
is fixed
when
a subject is in rapid
The maximum
very
1164
at
and the interval
number
similar to the Multi
Flash Power
Number
Data is
Even
when
if
or
a strong
Flash
of
based
on our standard test
you
take
shadow
correct exposure for
you
mode,
This mode
when
will
shutter
exposure for
When
can easily
can not be
you
use a
flash
become very dark
speed to take a flash
person
a
you
use
Av mode,
time
action.
of Multi Flash
1/1 1/2
1
1
procedure.
picture
a
both
obtain daylight
used
in
appears in
to
a bright
an unsuitable
the
subject and background.
with
EOS
photography
because the flash
photograph,
night
and
you
scene.
can
easily obtain
Flash mode.
also should
ln this mode,
fixed
be
1/4 1t8
2
place,
4 7
and the subject is
position,
synchronization.
7OO75O/850
person
a
cameras.
in
a dark
light
will not reach.
you
can
slow synchronization.
at 0.02
1/16
use the flash
you
When
Fd1:I9':1:1
n:n:9
i; i: aa i
!lql@q
6t iitr
.t
.j::i
a!
::,:l,i
i:r a
li
4..
,: - .a ,:. ,r ,a 1 E
".:1
i a:
place,
obtain the
lir
,6@
:
the flash
sec. lt is
power
useful
\
Sports
18
strongly
ittr
ler ::i lir :!!i
a:il ElqqEq a a:,4q4@9ej:.ree:.1
the
By
back lit
to obtain
use Full-Auto
11: ::11"::: ::'
aaaaaa aa aaai: alan t F 4 !,:6 aa aaa aa al9 a
a!:: i
t aa!:6 :r. 1 !1r:96
iaa
i9:
i9
@
j.q:9.1@.tr:9:r
@
aa.r l: i:t
i:t
background
using a slow
appropriate
i:!:q
6
aaa
l:
e
i:r
:: ::
::
In
order to avoid shaking when
tripod
steady
27
is recommended.
shooting
*rlia*,sl*gn*a#fu*: ,: .L 1#ibrr. -*;*-u#*i,
at a slow
shutter
speed, the
use of
a
Page 15

This mode can not be used with EOS 7OOl75Ol850 cameras.
www.orphancameras.com
you
When
the subject
shutter
shutter closed.
take a motion
will
be exposed ahead. The ordinary flash
subject
with
slow synchronization, usually
curtain is fully opened, thus the subject will
(First
curtain synchronization)
light
exposed from flash fired to
be
will fire
the furrow
when
the first
of
you
When
use second curtain synchronization, the flash will fire
second curtain closes, thus the subject
flash fired. The furrow of the
subject
will be exposed
natural effect.
When
press
lf the camera's mode is
set. When
synchronization
When
appear
on the
When
flash
the
the REAR
mode is set on the TTL AUTO Mode or Manual Flash Mode,
button.
you press
mode.
you
take a
flash
behind the
wall,
ceiling,
you
use the TTL AUTO
The REAR will
set on
appear on the
the Full-Auto mode, the REAR mode
the REAR button again, the flash mode is reset to normal
photograph
subject.
the
etc.,
lf
subject
in
point
you
will illuminate
mode,
a room, sometimes a strong shadow will
the camera will
flash lighting.
The flash head is
position.
panel
The
white
When
the
and
picture
surface
on
distance
will receive
for
bouncing.
Depending on the
effective distance
after
releasing
the shutter.
adjustable up to
the bounce flash mode,
indication
the color
reflecting
for the TTL AUTO may
125. There is
will disappear.
from
surface, subject distance and other
just
will
be exposed from shutter onened
behind.
lt will
LCD.
the flash head
upward
to reflect
softly.
the appropriate
60,
appear on the
Please choose a
a bounce
reflectingj
the
change.
calculate
a click stop at 45,
mark will
surface.
Please check the LCD
before
be a
not
can
the
75 and 90
factors,
panel
the
to
more
be
light
LCD
the
,.,r
ffi
Page 16

This mode
www.orphancameras.com
can
series cameras.
not
be used
with
EOS 620,650,700,750,850,
1000/Revel
and
You can compensate the
When the flash mode is
the camera's mode is
power
flash
increments
stop
When
finder will
1.
The flash
2.
Avoid
Especially,
Do not
3.
prints
4.
When the flash
condensation
such a case, do
For
5.
ventilation. Never store the flash in
naphthalene
will
be changed against the correct
from +2.0
you
extended storage,
with
use
indicated.
be
unit
exposure to extremely high
do not leave the flash
use a thinner, Benzine
from the component. Clean with
can
or camphor as
exposure by flash
set on the TTL AUTO Mode
P,
set at
Tv,
Av,
stops and
the
precision
is
a
is
unit
occur
not
use the flash unit until it has reached room temperature.
the exposure
instrument. Be very careful not to
or other
brought from a cold
the inside
on
choose a cool, dry
these will have negative
power.
Manual Flash Mode
or
M mode,
or
-2.0
stops.
or
in the
unit
cleaning
a soft,
of the flash unit and cause damage. In
press
the ! or I button. The
exposure.
compensation
low temperatures
car.
agents to
moistened
exterior
place, preferably
a drawer or cupboard containing
lt can
be set at
mark in the view
bump or
or to
remove
cloth.
to a warm interior,
effects on the
humidity.
dirt or
with
flash
and
1/2
drop it.
finger
good
unit.
Page 17

TYPE:
www.orphancameras.com
GUIDE NUMBER:
POWER
SOURCE:
RECYCLING
NUMBER
FLASH
FLASH
AUTO POWER
TIME:
FLASHES:
OF
,
DURATION:
ILLUMINATE ANGLE:
OFF:
COLOR TEMPERATURE:
WEIGHT:
DIMENSIONS:
Clip-on type
(lSO
43
Four
about 0.2-0.6
about 0.2-4.0 sec.
about 220-3,000 flashes
about
about
28 mm-80
1B mm with
Available
Suitable for Daylight
280
115.5
serial-controlled
100/m,80
AA type
100-1
,500
1/1
OO-1/30,000
mm motor
optionalWied
g (without
(W)x75.5
mm
mm head
alkaline
(Alkaline
sec.
(Ni-Cd
flashes
type
batteries)
mm
or Ni-Cd
sec.
powered
TTL
position)
batteries
batteries)
batteries)
(Alkaline
(Ni-Cd
control
Panel
COlor
(H)x107
auto zoom
batteries)
batteries)
Films
(L)
mm
electric flash
.
 Loading...