

Page 1
Sigma
Power Pack and Battery Charger
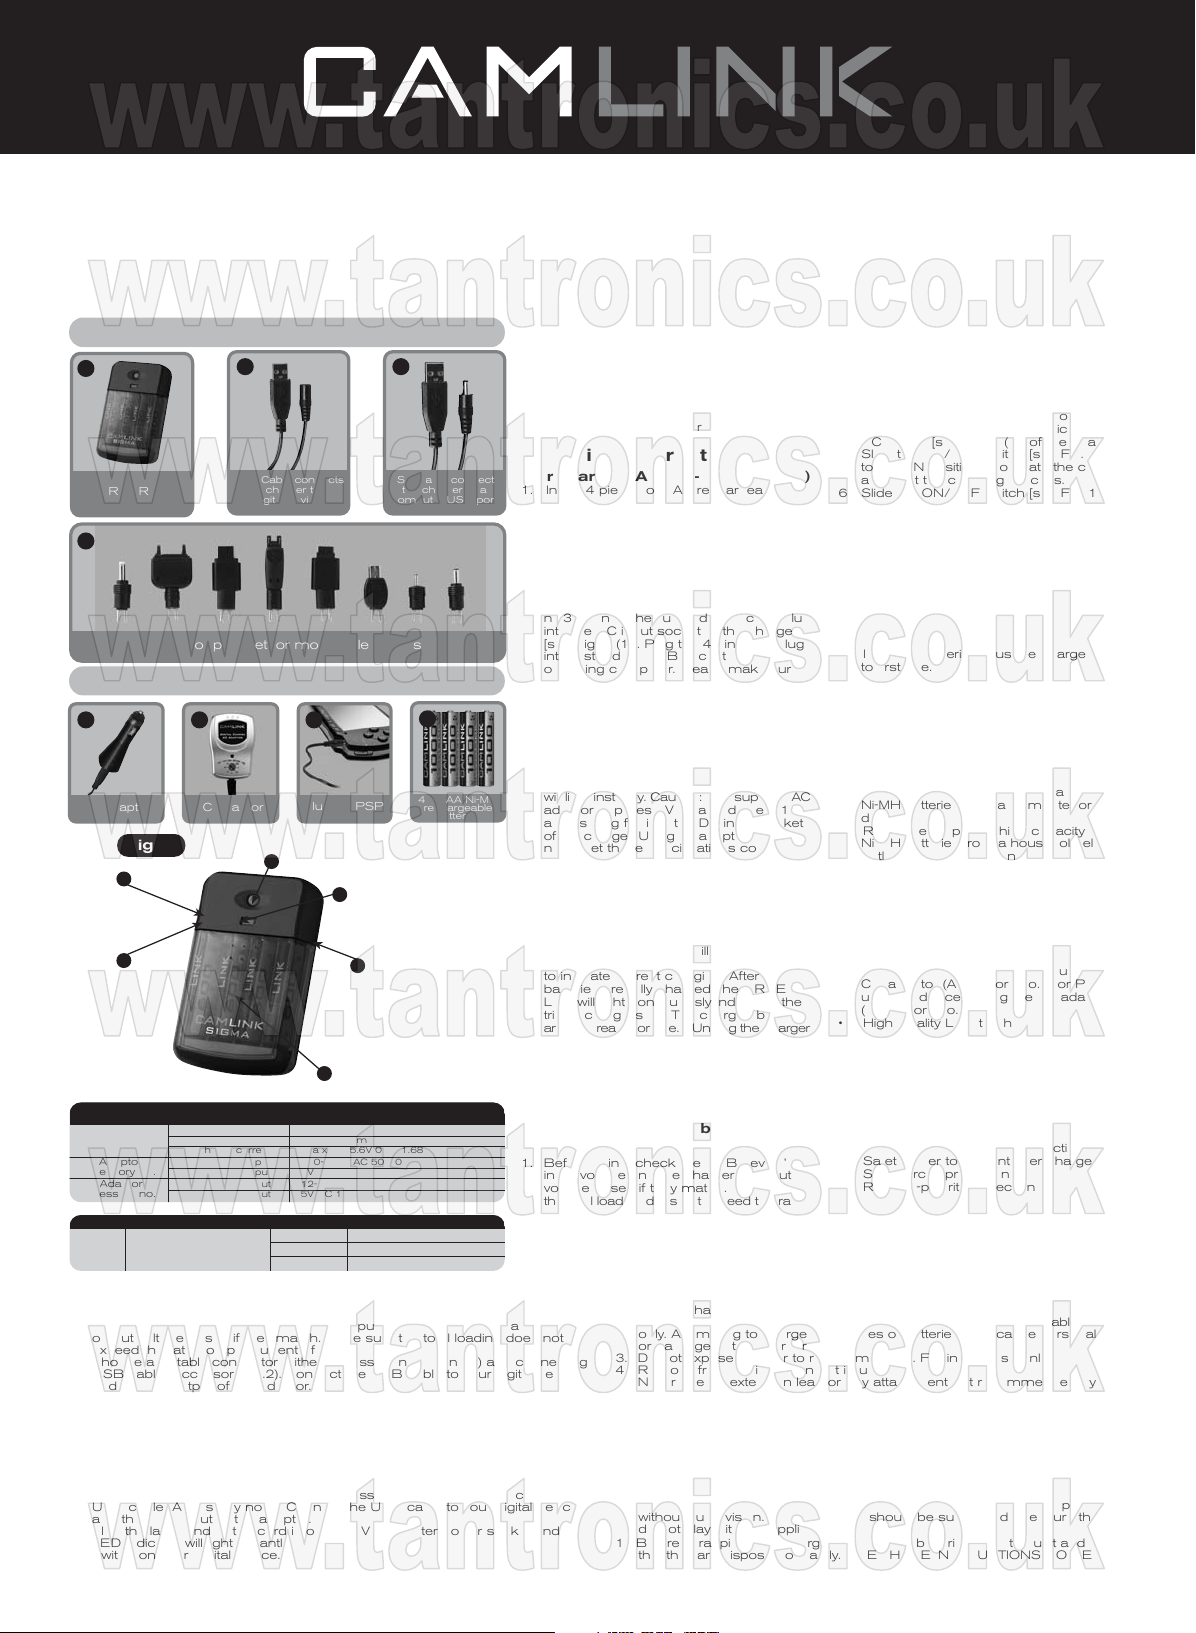
STANDARD ACCESSORIES
1
2
3
Owners Manual
Thank you for purchasing the Camlink Sigma
Power Pack and Battery Charger. Please read
this manual carefully. It contains important
operating instructions.
This unit is specially designed for charging
batteries or power up your USB devices with
a safe, multi-function power pack and torch.
Charging Instructions
CHARGE R UNIT
4
USB Cable connects
the charger to a
digital device
USB Cable connects
the charger to a
computer USB port
Adaptor plug set for mobile telephones
OTHER ACCESSORIES
5
DC adaptor
fig 1
(1) DC Input
2) ON/OFF
Specification
Charger Input 5v 0.5a (from usb port)
accessory no.1 USB output 5.5v 0.8 (from usb port of the charger)
AC Adaptor Input 100-240V AC 50/60Hz
accessory no.6 Output 5V DC 1A
DC Adaptor Input 12-24V DC
accessory no.5 Outut 5V DC 1A
Size Charging Current Ni-MH Charging Time
AAA 300mA
Charging your USB devices
(with AC adaptor - Accessory no. 6)
1. Before using, check the USB device’s input voltage and the AC adaptor’s
output voltage to see if they match. Make sure the total loading does not
exceed the rated output current of the AC adaptor.
2. Choose a suitable connector (either Accessory no.4 or no.7) and connecting
USB cable (Accessory no.2). Connect the US B cable to your digital device
and the DC output of the adaptor.
3. Plug the AC adaptor into household electric outlet (100-240V AC). The switching
power supply will adjust automatically and the LED indicator will light instantly.
4. Switch on your Digital device.
6
AC adaptor
switch
Charge current aaa x 4 : (5.6V 0.3A 1.68VA)
7
Plug for PSP
3) LED torch ON/OFF switch
(
(6) Cover & battery
compartment
600mAh 120minutes
800mAh 160minutes
1000mAh 200minutes
(
4) LED indicator
(
5) DC output
Charging your USB devices (with DC adaptor - Accessory no. 5)
1. Before using, check the USB device’s input voltage and the DC adaptor’s
output voltage to see if they match. Make sure the total loading does not
exceed the rated output current of the DC adaptor.
2. Choose a suitable connector (either Accessory no.4 or no.7) and connecting
USB cable (Accessory no.2). Connect the US B cable to your digital device
and the DC output of the adaptor.
3. Plug the large end of the cord into the 12V car lighter power socket and the
LED indicator will light instantly.
4. Switch on your Digital device.
Fuse Replacement for DC adaptor To check or replace fuse, simply
rotate the plastic tip at the end of the adaptor counterclockwise.Visually
inspect fuse element. If blown or if you are unsure, replace fuse (1AMP).
8
4 x AAA Ni-MH
rechargeable
batteries
(For charging AAA Ni-MH batteries)
1. Insert 4 pieces of AAA rechargeable NiMH batteries into the battery compartment,
ensuring correct polarity ( + and - ) in
accordance with the signs in the battery
compartment.
2. Slide the ON/OFF switch [see Fig. 1 (2)]
to the ON position to operate the charger
and start the charging process.
3. When using with a operating computer
(with Charger unit & USB cable - Accessory
no.3)Connect the supplied USB cable plug
into the DC input socket of the charger
[see Fig. 1 (1)]. Plug the 4-pin USB plug
into a standard USB socket on your
operating computer. Please make sure
your computer is installed with a standard
USB port with output 5VDC, 500mA.
4. When using indoors (with AC adaptor Accessory no. 6) Connect the supplied
AC adaptor plug into the DC input socket
of the charger [see Fig. 1 (1)]. Plug the AC
adaptor into household electric outlet (100240V AC). The switching power supply will
adjust automatically and the LED indicator
will light instantly. Caution: The supplied AC
adaptor supplies 5VDC and delivers 1A,
and its plug fits into the DC input socket
of the charger. Using an adaptor that does
not meet these specifications could
damage the charger.
5. When using in a vehicle (with DC adaptor
- Accessory no.5)
Connect the supplied DC adaptor plug
into the DC input socket of the charger
[see Fig. 1 (1)]. Plug the large end of the
cord into the 12V car lighter power socket
and the LED indicator will light instantly.
6. The GREEN LED [see Fig. 1 (4)] will flash
to indicate correct charging. After the
batteries are fully charged, the GREE N
LED will light continuously indicating the
trickle charge is on. The charged batteries
are now ready for use. 7.Unplug the charger
and remove the batteries from the charger
when not in use.
8. Begin again at Step 1 to charge the next
set of batteries.
Charging your USB devices
(with AAA rechargeable Ni-MH
batteries)
1. Before using, check the USB device’s
input voltage and the charger’s output
voltage to see if they match. Make sure
the total loading does not exceed the rated
output current of the charger.
2. Slide the ON/OFF switch [see Fig. 1 (2)]
to the OFF position before connecting the
charger to your Digital device.
3. Insert 4 pieces of AAA rechargeable NiMH into the battery compartment.
4. Choose the suitable connector (from
Accessory no.4 to no.7) and connecting
USB cable (Accessory no.2). Connect the
USB cable with your digital device and the
DC output [see Fig. 1 (5)] of the charger.
5. Slide the ON/OFF switch [see Fig. 1 (2)]
to the ON position to operate the charger
and start the charging process.
6. Slide the ON/OFF switch [see Fig. 1 (2)]
to the OFF position when the charger is
not in use.
Using as a Torch
1. Insert 4 pieces of A AA rechargeable NiMH batteries into the battery compartment.
2. Press the ON/OFF button [see Fig. 1 (3)]
to turn the torch on or off.
Warning
• Included batteries must be charged prior
to first use.
• Charge only Ni-MH batteries on this
charger.
• Batteries may leak or explode causing
personal injury if inserted improperly,
disposed of in fire, mixed with other battery
types, or short circuited.
Features
• Recharges 4 pieces high capacity AAA
Ni-MH batteries from a Computer or USB
device.
• Recharges 4 pieces high capacity AAA
Ni-MH batteries from a household electric
outlet (with Accessory no.6)
• Recharges 4 pieces high capacity AAA
Ni-MH batteries from a Vehicle (with
Accessory no.5)
• Power up your Digital devices using this
charger (such as mobile phone, iPod,
MP3, MP4, PDA/ DV/ DC/ PS P) please
see table A for compatible mobile phones
• Power up your Digital devices using the
Car adaptor (Accessory no.5) or Power
up USB devices using the AC adaptor
(Accessory no.6)
• High Quality LED torch
• Batteries life well protected by timer.
• Short-Circuit protection design against
damage for your USB devices
• Special design LED indicator :GR EEN
LED flashing - Rapid charge; GREEN LED
light ON – trickle charge
Safety Features
• Negative Delta V cut-off protection
• Safety timer to prevent over charge
• Short circuit protection
• Reverse-polarity protection
Important Safety Instructions
1. Before charging, read instructions
2. This charger is intended for use with Nickel-metal-hydride rechargeable batteries
only. Attempting to charge other types of batteries may cause personal injury
or damage to the charger.
3. Do not expose charger to rain or moisture. For indoor use only.
4. Remove from mains when not in use.
5. Never use an extension lead or any attachment not recommended by
manufacturer, otherwise this may result in a risk of fire, electric shock or injury
to persons.
6. Do not operate the charger if it has been subjected to shock or damage. Take
it to a qualified serviceman for repair.
7. Do not disassemble the charger. Incorrect reassembly may result in a risk of
electric shock or fire.
8. Unplug the charger from outlet before attempting any maintenance or cleaning.
9. This power unit is intended to be correctly orientated in a vertical or floor mount
position.
10.The appliance is not intended for use by young children or infirm persons
without supervision. Young children should be supervised to ensure that they
do not play with the appliance.
11.Before scrapping your charger, remove the batteries from the unit and ensure
that they are disposed of safely.SAVE THESE INSTRU CTIONS. TO REDUCE
THE RISK OF FIRE OR ELECTRIC SHOCK, CAREFULLY FOLLOW THESE
INSTRUCTIONS
.
 Loading...