

Page 1

Cat. No. 97000-18
Model 980 Flow Meter
Operating and Maintenance Manual
December 2002, Ed. 4
Page 2

Page 3

Cat. No. 97000-18
Model 980 Flow Meter
Operating and Maintenance Manual
© American Sigma, 2002. All rights reserved. Printed in the U.S.A. eac/dp 12/02 4ed
Page 4

Visit www.americansigma.com
Page 5

Table of Contents
Safety Precautions .................................................................................................................................................... 8
Specifications .......................................................................................................................................................... 12
Section 1 Introduction ...................................................................................................................................... 17
1.1 Instrument Description ...................................................................................................................................... 17
1.2 Front Panel Features and Controls ................................................................................................................... 18
1.3 Keypad Description ........................................................................................................................................... 19
1.4 Liquid Crystal Display ....................................................................................................................................... 19
1.5 Principle Operation ........................................................................................................................................... 20
INSTALLATION.................................................................................................................................................... 23
Section 2 Installation......................................................................................................................................... 25
2.1 Customer-supplied Equipment.......................................................................................................................... 25
2.2 Unpacking the Instrument ................................................................................................................................. 25
2.2.1 NEMA 4X Applications ............................................................................................................................ 25
2.3 Mounting Options .............................................................................................................................................. 27
2.3.1 Wall Mounting.......................................................................................................................................... 28
2.3.2 Rail/Pole Mounting................................................................................................................................... 29
2.4 Wiring Safety Information.................................................................................................................................. 31
Electrostatic Discharge (ESD) Considerations ................................................................................................. 31
2.5 Wiring the Controller ......................................................................................................................................... 31
2.5.1 Connecting ac Power to the 980 Flow Meter .......................................................................................... 32
2.6 Wiring Optional Devices.................................................................................................................................... 34
2.7 Wiring the 4–20 mA Output............................................................................................................................... 35
2.8 Wiring the Analog Input..................................................................................................................................... 36
2.9 Wiring the Mechanical Totalizer ........................................................................................................................ 38
2.10 Wiring the Alarm Relays ................................................................................................................................. 39
2.11 Wiring the Rain Gauge.................................................................................................................................... 41
2.12 Wiring the Sampler ........................................................................................................................................ 42
2.13 Wiring the RS232 ........................................................................................................................................... 44
2.14 Wiring the Modem Interface............................................................................................................................ 46
2.15 Wiring the pH Sensor...................................................................................................................................... 47
2.15.1 pH Junction Box to Instrument............................................................................................................... 47
2.15.2 pH Probe to Junction Box ...................................................................................................................... 49
2.16 Wiring the Downlook Ultrasonic Sensor.......................................................................................................... 49
2.17 Wiring the In-Pipe Ultrasonic Sensor .............................................................................................................. 51
2.18 Wiring the Velocity-Only Sensor...................................................................................................................... 51
2.18.1 Bare Lead Sensor Cables ..................................................................................................................... 51
2.18.2 Velocity-Only Sensor Cable Quick-Connect .......................................................................................... 52
2.19 Wiring the Submerged Area Velocity Sensor .................................................................................................. 53
2.19.1 Bare Lead Sensor Cables ..................................................................................................................... 53
2.19.1.1 Junction Box Connection Procedure ........................................................................................ 53
2.19.2 Submerged Area Velocity Sensor Cable Quick-Connect.......................................................................55
2.19.2.1 Desiccant Cartridge .................................................................................................................. 55
Page 3
970ESTOC.fm Table of Contents
Page 6

Table of Contents
OPERATION......................................................................................................................................................... 57
Section 3 Basic Programming Setup ........................................................................................................... 59
3.1 Initial Power-Up of Meter................................................................................................................................... 59
3.2 Basic Programming........................................................................................................................................... 59
Step 1 - Setup................................................................................................................................................... 59
Step 2 - Flow Units ........................................................................................................................................... 60
Step 3 - Level Units .......................................................................................................................................... 61
Step 4 - Primary Device.................................................................................................................................... 61
Step 5 - Program Lock...................................................................................................................................... 63
Step 6 - Sampler Pacing................................................................................................................................... 63
Step 7 - Site ID ................................................................................................................................................. 63
Step 8 - Total Flow Units .................................................................................................................................. 64
Step 9 - Velocity Direction (only when logging velocity) ................................................................................... 64
3.3 Starting and Stopping Programs....................................................................................................................... 65
Section 4 External Device Setup.................................................................................................................... 67
4.1 4–20 mA Output ................................................................................................................................................ 67
4.1.1 Programming the 4–20 mA Output ......................................................................................................... 67
4.1.2 Calibrating the 4–20 mA Output .............................................................................................................. 68
4.2 Analog Input ...................................................................................................................................................... 70
4.2.1 Programming the Analog Inputs .............................................................................................................. 70
4.3 Mechanical Totalizer.......................................................................................................................................... 71
4.3.1 Programming the Mechanical Totalizer.................................................................................................... 71
4.3.1.1 Modify Setup ............................................................................................................................... 71
4.3.1.2 Reset (Totalizer) ......................................................................................................................... 72
4.4 Alarm Relays..................................................................................................................................................... 73
4.4.1 Programming the Alarm Relays............................................................................................................... 73
4.4.1.1 Trouble Alarms ........................................................................................................................... 73
4.4.1.2 Set Point Alarms ......................................................................................................................... 74
4.5 Rain Gauge ....................................................................................................................................................... 74
4.5.1 Programming the Rain Gauge ................................................................................................................. 74
4.6 Sampler............................................................................................................................................................. 75
4.6.1 Programming a Sampler Connection ...................................................................................................... 75
4.7 RS232 ............................................................................................................................................................... 75
4.7.1 Programming the RS232 ......................................................................................................................... 75
4.8 Modem Interface ............................................................................................................................................... 76
4.8.1 Programming the Modem ........................................................................................................................ 76
4.9 pH Sensor ......................................................................................................................................................... 77
4.9.1 Programming the pH Sensor ................................................................................................................... 77
4.9.2 Calibrating the pH Sensor ....................................................................................................................... 77
4.10 Downlook Ultrasonic Sensor ........................................................................................................................... 78
4.10.1 Installing an Ultrasonic Sensor (Downlook) at a Primary Device .......................................................... 79
4.10.1.1 Choosing the Appropriate Sensor Height (Ultrasonic “Downlook” Sensor) .............................. 79
4.10.1.2 Mounting the Ultrasonic Sensor................................................................................................ 81
4.10.2 Ultrasonic Senor (Downlook) Installation Troubleshooting .................................................................... 83
4.10.3 Programming the Downlook Ultrasonic Sensor ..................................................................................... 84
4.10.4 Calibrating the Downlook Ultrasonic Sensor ......................................................................................... 84
4.10.4.1 Liquid Depth.............................................................................................................................. 84
Page 4
Table of Contents
970ESTOC.fm
Page 7

Table of Contents
4.10.4.2 Sensor Height ........................................................................................................................... 85
4.10.4.3 Setting the Invisible Range ....................................................................................................... 86
4.11 In-Pipe Ultrasonic Sensor ............................................................................................................................... 87
4.11.1 Mounting the In-Pipe Sensor ................................................................................................................. 87
4.11.2 Beam Angle ........................................................................................................................................... 88
4.11.3 Programming the In-Pipe Ultrasonic Sensor ......................................................................................... 88
4.11.4 Calibrating the In-Pipe Ultrasonic Sensor.............................................................................................. 88
4.11.4.1 Liquid Depth.............................................................................................................................. 89
4.11.4.2 Sensor Height ........................................................................................................................... 89
4.11.4.3 Setting the Invisible Range ....................................................................................................... 90
4.11.5 Protecting the In-Pipe Ultrasonic Sensor............................................................................................... 90
4.11.6 In-Pipe Ultrasonic Sensor Troubleshooting............................................................................................ 90
4.12 Velocity-Only Sensor....................................................................................................................................... 90
4.12.1 Programming the Velocity-Only Sensor................................................................................................. 91
4.12.2 Calibrating the Velocity-Only Sensor ..................................................................................................... 91
4.12.3 Installing the Velocity-Only Sensor in a Pipe ......................................................................................... 92
4.12.3.1 Important Guidelines for Velocity-Only Sensor Installation....................................................... 92
4.12.3.2 Choosing a Mounting Band ...................................................................................................... 92
4.12.3.3 Connecting the Sensor to the Mounting Bands ........................................................................ 92
4.12.3.4 Compensating for Velocity Direction......................................................................................... 94
4.12.3.5 Placing the Sensor and Mounting Band into the Pipe .............................................................. 94
4.13 Submerged Area Velocity Sensors ................................................................................................................. 95
4.13.1 Programming the Submerged Area/Velocity Sensor ............................................................................. 95
4.13.2 Calibrating the Submerged Area/Velocity Sensor.................................................................................. 96
4.13.3 Installing a Submerged Area/Velocity Sensor in a Pipe......................................................................... 97
4.13.3.1 Important Guidelines for Submerged Area/Velocity Sensor Installation ................................... 97
MAINTENANCE................................................................................................................................................... 99
Section 5 Maintenance ................................................................................................................................... 101
5.1 Routine Maintenance ...................................................................................................................................... 101
5.1.1 Calibration ............................................................................................................................................. 101
5.1.2 Cleaning the Case ................................................................................................................................. 101
5.2 Upgrades, Repairs, General Maintenance ...................................................................................................... 101
5.2.1 Internal Maintenance Items ................................................................................................................... 101
5.2.2 Opening the Front Panel........................................................................................................................ 101
5.3 Fuse Replacement .......................................................................................................................................... 102
5.4 Memory Batteries............................................................................................................................................ 103
5.5 Ultrasonic Sensor Maintenance ...................................................................................................................... 103
5.6 Cleaning and Maintaining Submerged Area/Velocity Sensors....................................................................... 104
5.6.1 Submerged Area/Velocity Sensor Cleaning Procedure ........................................................................ 104
5.6.2 Changing the Desiccant ....................................................................................................................... 105
5.6.3 Desiccant Replacement Procedure...................................................................................................... 105
5.6.4 Hydrophobic Filter Description ............................................................................................................. 106
5.6.5 Hydrophobic Filter Replacement Procedure......................................................................................... 107
Appendix A Working with Primary Devices ....................................................................................................... 109
Working with Primary Devices and Sensor Operation.................................................................................... 109
Setting an Offset (For Use in a Weir) ............................................................................................................. 109
Page 5
970ESTOC.fm Table of Contents
Page 8

Table of Contents
Types of Primary Devices............................................................................................................................... 109
Appendix B Troubleshooting Measurement Errors ........................................................................................... 115
Troubleshooting Measurement Errors From Electromagnetic Fields ............................................................. 115
Appendix C Programming Features .................................................................................................................. 117
Review All Items ............................................................................................................................................. 117
Displaying Data .............................................................................................................................................. 117
Selecting the Channel .................................................................................................................................... 117
Tabular or Graph Format ................................................................................................................................ 118
Graph Manipulation ........................................................................................................................................ 119
Graphic Display Averaging ............................................................................................................................. 119
Options Features ............................................................................................................................................ 119
Setting the Time and Date.............................................................................................................................. 120
Advanced Options .......................................................................................................................................... 120
Alarms ............................................................................................................................................................ 121
Data Log ......................................................................................................................................................... 122
Logging Intervals ............................................................................................................................................ 122
Data Logging Memory Allocation Options ...................................................................................................... 123
Datalogging Configurations ............................................................................................................................ 123
Diagnostics ..................................................................................................................................................... 124
Keypad Test ................................................................................................................................................... 124
LCD Test ........................................................................................................................................................ 125
Demonstration Graph ..................................................................................................................................... 125
Velocity Analysis............................................................................................................................................. 125
Event Log ....................................................................................................................................................... 125
Set Point Sampling ......................................................................................................................................... 126
Storm Water ................................................................................................................................................... 128
Appendix D Programming Worksheet ............................................................................................................... 129
Appendix E SCADA-Modbus® System Guidelines ........................................................................................... 133
Introduction to SCADA - Modbus Communications........................................................................................ 133
ASCII Transmission Mode .............................................................................................................................. 133
Address Field.................................................................................................................................................. 133
Function Field ................................................................................................................................................. 134
Data Field ....................................................................................................................................................... 134
LRC Field........................................................................................................................................................ 134
Communication Parameters ........................................................................................................................... 135
User Memory Customizing ............................................................................................................................. 135
Modbus ASCII Function Codes Supported..................................................................................................... 135
Query.............................................................................................................................................................. 137
Response ....................................................................................................................................................... 138
980 Flow Meter Response Time..................................................................................................................... 138
Complications with Floating Point Values....................................................................................................... 139
Port Expanders and Protocol Converters ....................................................................................................... 140
Other Reference Material ............................................................................................................................... 140
Troubleshooting Tips ...................................................................................................................................... 140
980 SCADA-Modbus “No Response” Troubleshooting Flow Chart (1 of 5) ................................................... 143
980 SCADA-Modbus “No Response” Troubleshooting Flow Chart (2 of 5) ................................................... 144
Page 6
Table of Contents
970ESTOC.fm
Page 9

Table of Contents
980 SCADA-Modbus “No-Response” Troubleshooting Flow Chart (3 of 5) ................................................... 145
980 SCADA-Modbus “No-Response” Troubleshooting Flow Chart (4 of 5) ................................................... 146
980 SCADA-Modbus “No Response” Troubleshooting Flow Chart (5 of 5) ................................................... 147
Appendix F 980 Quick-Start Guides .................................................................................................................. 149
Main Program Flow Chart............................................................................................................................... 149
980 Flow Meter Basic Programming Setup Flow Chart ................................................................................ 150
980 Flow Meter Advanced Options Flow Chart .............................................................................................. 151
980 Alarms Flow Chart ................................................................................................................................... 152
980 Flow Meter Calibration Flow Chart .......................................................................................................... 153
GENERAL INFORMATION .............................................................................................................................. 155
Parts and Accessories .......................................................................................................................................... 157
Ordering and Technical Support ........................................................................................................................... 159
Repair Service ...................................................................................................................................................... 160
Warranty ............................................................................................................................................................... 161
Certification ........................................................................................................................................................... 162
Index ..................................................................................................................................................................... 165
Page 7
970ESTOC.fm Table of Contents
Page 10
Safety Precautions
Please read this entire manual before unpacking, setting up, or operating this instrument.
Pay particular attention to all danger and caution statements. Failure to do so could result in serious injury to the
operator or damage to the equipment.
To ensure the protection provided by this equipment is not impaired, do not use or install this equipment in any
manner other than that which is specified in this manual.
Use of Hazard Information
If multiple hazards exist, this manual will use the signal word (Danger, Caution, Note) corresponding to the
greatest hazard.
DANGER
Indicates a potentially or imminently hazardous situation which, if not avoided, could result in
death or serious injury.
CAUTION
Indicates a potentially hazardous situation that may result in minor or moderate injury.
NOTE
Information that requires special emphasis.
Precautionary Labels
Read all labels and tags attached to the instrument. Personal injury or damage to the instrument could occur if
not observed.
This symbol, if noted on the instrument, references the instruction manual for operation
and/or safety information.
This symbol, when noted on a product enclosure or barrier, indicates that a risk of electrical shock
and/or electrocution exists and indicates that only individuals qualified to work with hazardous voltages
should open the enclosure or remove the barrier.
This symbol, when noted on the product, identifies the location of a fuse or current limiting device.
This symbol, when noted on the product, indicates that the marked item can be hot and should not be
touched without care.
This symbol, when noted on the product, indicates the presence of devices sensitive to Electro-static
Discharge and indicates that care must be taken to prevent damage to them.
Page 8
Safety Precautions
Safety.fm
Page 11
This symbol, when noted on the product, identifies a risk of chemical harm and indicates that only
individuals qualified and trained to work with chemicals should handle chemicals or perform
maintenance on chemical delivery systems associated with the equipment.
This symbol, if noted on the product, indicates the need for protective eye wear.
This symbol, when noted on the product, identifies the location of the connection for Protective Earth
(ground).
Confined Space Entry
Important Note: The following information is provided to guide users of 980 Flow
Meters on the dangers and risks associated with entry into confined spaces.
DANGER
Pour éviter les accidents mortels dans les espaces confinés, il faut
DANGER
Additional training in PreEntry Testing, Ventilation,
Entry Procedures,
Evacuation/Rescue
Procedures and Safety Work
Practices is necessary to
ensure against the loss of life
in confined spaces.
organiser des formations supplémentaires dans les matières suivantes:
Contrôle avant entrée, Ventilation, Procédures d'entrée, Procédures
d'évacuation et de secours et Méthodes de travail sûres.
PELIGRO
Para prevenir accidentes mortales en espacios reducidos se necesita
una formación adicional sobre Procedimientos de Comprobación previa
a la Entrada, Ventilación, Entrada y Evacuación/Rescate así como sobre
Buenas Prácticas para la Seguridad en el Trabajo.
Safety Precautions
GEFAHR
Die Arbeit unter beengten Verhältnissen in geschlossenen Behältern
bzw. völlig abgeschlossenen Räumlichkeiten ist nur mit spezieller
Ausbildung zulässig, da sie - zur Vermeidung lebensgefährlicher
Situationen - besondere Prüfungen vor dem Einstieg, Kontrollen der
Belüftungsverhältnisse, Einstiegverfahren, Ausstiegs/Flucht-
sicherungsmaßnahmen sowie weitere Sicherheits- und Arbeits-
schutzschritte voraussetzt!
PERICOLO
Attuare esercitazioni integrative prima di iniziare un'analisi, Corretta
Ventilazione dei locali, Procedure di Ingresso, Procedure di
Evacuazione/Sicurezza e Pratiche di Sicurezza sul Lavoro sono
necessarie per evitare incidenti mortali negli spazi adiacenti.
On April 15, 1993, OSHA's final ruling on CFR 1910.146, Permit Required
Confined Spaces, became law. This new standard directly affects more than
250,000 industrial sites in the United States and was created to protect the
health and safety of workers in confined spaces.
Page 9
Safety.fm Safety Precautions
Page 12

Safety Precautions
Definition of Confined Space
A Confined Space is any location or enclosure that presents or has the
immediate potential to present one or more of the following conditions:
• An atmosphere with less than 19.5% or greater than 23.5% oxygen
and/or more than 10 ppm Hydrogen Sulfide (H
• An atmosphere that may be flammable or explosive due to gases, vapors,
mists, dusts, or fibers
• Toxic materials which upon contact or inhalation, could result in injury,
impairment of health, or death
Confined spaces are not designed for human occupancy. They have restricted
entry and contain known or potential hazards.
Examples of confined spaces include manholes, stacks, pipes, vats, switch
vaults, and other similar locations.
Standard safety procedures must always be followed prior to entry into
confined spaces and/or locations where hazardous gases, vapors, mists,
dusts, or fibers may be present.
S)
2
Hazardous Locations
Before entering any confined space check with your employer for procedures
related to confined space entry.
The 980 Flow Meter is not approved for use in hazardous locations as defined
in the National Electrical Code.
Page 10
Safety Precautions
Safety.fm
Page 13

DANGER
Although some Sigma
products are designed and
certified for installation in
hazardous locations as
defined by the National
Electrical Code, many Sigma
products are not suitable for
use in hazardous locations. It
is the responsibility of the
individuals who are installing
the products in hazardous
locations to determine the
acceptability of the product
for the environment.
Additionally, to ensure safety,
the installation of
instrumentation in hazardous
locations must be per the
manufacturer's control
drawing specifications. Any
modification to the
instrumentation or the
installation is not
recommended and may result
in life threatening injury
and/or damage to facilities.
Safety Precautions
DANGER
Bien que certains produits Sigma soient conçus et certifiés pour être
installés dans des endroits dangereux tels que définis par le National
Electric Code, de nombreux produits Sigma ne conviennent pas pour de
tels endroits. Il relève de la responsabilité des personnes qui placent les
produits dans des endroits dangereux de déterminer s'ils sont adaptés à
cet environnement. En outre, à des fins de sécurité, le placement de
machines dans des endroits dangereux doit s'effectuer dans le respect
des consignes des schémas de contrôle du fabricant. Toute
modification apportée aux machines ou tout déplacement de celles-ci
est déconseillé, car susceptible de provoquer des accidents matériels
et/ou corporels.
PELIGRO
Aunque algunos productos Sigma están diseñados y homologados para
su instalación en entornos peligrosos, entendidos éstos conforme a la
definición del “National Electrical Code” (Reglamento Eléctrico
Nacional), muchos de los productos Sigma no son aptos para su
utilización en lugares peligrosos. Es responsabilidad de quienes
instalen los productos en entornos peligrosos el asegurarse de la
idoneidad de dichos productos para este tipo de entorno. Además, para
garantizar la seguridad, la instalación de los instrumentos en lugares
peligrosos deberá realizarse conforme a las especificaciones del plano
del fabricante. Se desaconseja cualquier modificación de los
instrumentos o de la instalación, ya que podría provocar lesiones
corporales graves, e incluso fatales, y/o daños materiales a los equipos.
GEFAHR
Einige Sigma-Produkte sind für den Einbau in explosionsgefährdeten
Bereichen gemäß den Festlegungen des National Electrical Code
speziell geprüft und zugelassen. Dies gilt jedoch keineswegs für das
gesamte Sigma-Produktangebot. Die Entscheidung, ob ein Produkt für
den Einsatz in explosionsgefährden Bereichen geeignet ist oder nicht,
bleibt in die Verantwortung des jeweiligen Installateurs gestellt. Im
Interesse der Sicherheit ist es zudem erforderlich, dass ein etwaiger
Einbau des Geräts in explosionsgefährdeten Bereichen genau nach den
Steuerungsanlagen-Zeichnungen des Herstellers erfolgt. Von der
Vornahme von Änderungen an meß- bzw. regeltechnischen Geräten
bzw. abweichender Installation wird dringend abgeraten, da hierdurch
lebensbedrohliche Personen- und/oder Sachschäden verursacht werden
können!
PERICOLO
Nonostante alcuni prodotti Sigma, siano predisposti e certificati per
l'installazione in ambienti pericolosi, come previsto dal Codice
Normativo Nazionale che concerne l'elettricità, è sconsigliabile utilizzare
prodotti Sigma in ambienti considerati pericolosi. E' diretta
responsabilità della persona che installa lo strumento in un luogo
ritenuto “pericoloso” appurare se lo strumento è compatibile con tale
ambiente. Inoltre, per maggior sicurezza, l'installazione dello strumento
in ambienti pericolosi deve seguire le specifiche di progettazione del
produttore. Si deve evitare qualunque manomissione allo strumento o
all'installazione, tali modifiche possono rappresentare una minaccia per
la vita delle persone e creare guasti.
Page 11
Safety.fm Safety Precautions
Page 14
Specifications
980 Flow Meter
Specifications are subject to change without notice.
General
Dimensions 14.62" H x 11.88" W x 8.26" D
Weight 7.62 kg (16.80 lb)
Enclosure NEMA 4X, IP 66 with front cover closed, UV resistant
Mounting Wall mount and Rail/Pole mount
Graphics Display
Keypad
Tota lize rs
Measurement Modes
Graphics Display: Back-lit liquid crystal display (LCD). 8 line × 40 character in text
mode, 64 × 240 pixels in graphics mode. Displays level vs. time, flow vs. time, rainfall
vs. time, pH, and temperature.
Keypad: 19-position sealed-membrane switch including four “soft keys,” functions
defined by display.
8-digit resettable and 8-digit non-resettable software
Units: ft³, gal, m³, liter, acre-ft
Flumes: Parshall, Palmer Bowlus, Leopold-Lagco, H, HL, HS, Trapezoidal
Weirs: V-notch, Contracted/Non-contracted rectangular, Thel-mar, Compound
Cipolletti, Compound V-notch
Manning Equation: Round, U, Rectangular, and Trapezoidal Channels
Head vs. Flow: Two independent user-entered look-up tables of up to 100 points each.
Level only: Inches, feet, centimeters, meters
Area Velocity: Level-area table, circular pipe, U-shaped channel, trapezoidal channel,
rectangular channel.
Power Equation:
QK1H
n
1
K2H
±=
n
2
Data Logging
Electrical
Power Specifications 0.25 amp maximum
Power Requirements 100–230 V ac, 50/60 Hz, single phase, 15 W max (0.25 amp max)
Installation Category II
Electrical Connection Seven 0.5 in. hubs, One 1.0 in. hub
Sampler Output 15 V dc, 100 mA at 500 ms duration
Environmental (for Controller)
Temperature Ranges
Humidity 0–90%, Non-condensing
“Smart” Dynamic memory allocation automatically partitions memory to provide the
maximum logging time. No manual memory partitioning required.
Capacity: Up to 456k bytes, 402 days of level, velocity, and rainfall readings at
15 minute intervals plus 300 events.
Memory Mode: Wrap-around
Data Points: 116,000 data points
Daily statistics: Available for up to 32 days
Recording Intervals: 1, 2, 3, 5, 6, 10, 12, 15, 20, 30, 60 minutes
Time base accuracy: ± 6 seconds (0.007%) per day
Storage: -20 °C to 70 °C (-4 °F to 158 °F)
Operating: -20 °C to 50 °C (-4 °F to 122 °F)
Page 12
Specifications
Specs.fm
Page 15

Integral pH Meter
Control/Logging
pH Sensor
Measurement Range 2 to 12 pH
Specifications
Field selectable to log pH independent of flow or in conjunction with flow; also controls
sample collection in response to value of low/high stipends
Temperature compensated; impact resistant ABS plastic body
Combination electrode with porous Teflon junction.
Operating Temperature
Range
Dimensions 19.5 mm × 15.24 cm long (0.75 in. dia. × 6 in.) with 19.5 mm (0.75 in.) npt cable end
Rain Gauge Input
General Information
Analog Input Channels
General Information
4–20 mA Output
General Information Two isolated output signals available. User assignable.
Maximum Resistive Load 600 ohms
Output Voltage 24 V dc—no load
Alarm Relays
General Information
Relay Contact Ratings 5 amps, (30–230 V ac)
-18 to 80 °C (0 to 176 °F)
For use with Tipping Bucket Rain Gauge.
Flow measurement can be initiated upon field selectable rate of rain.
Flow meter records rainfall data.
Shielded cable, 100 ft length maximum
Each tip = 0.25 mm (0.01 in.) of rain.
Up to 7 additional data logging channels record data from external source(s)
Four channels with -4.5 to 4.5 V dc input with 1 meg ohm input impedance on each
channel and three channels with 4–20 mA input.*
4 intergral alarm relays; form C (common, normally open, normally closed), 5 amp.
Connection to instrument through terminal blocks.
Communications
General Information
RS-232—up to 19,200 baud
Modem—14400 bps., V.32 bis, V.42, MNP2-4 error correction. V.42 bis MNP5 data
compression. MNP 10-EC Cellular Protocol
Pager
®
SCADA–Modbus
communication protocol (standard) via RS232 or optional modem
Page 13
Specifications
Page 16

Specifications
Ultrasonic Transducer
Operating Frequency 75 kHz
Beam Angle ±12° (-10 dB)
Accuracy* ±0.03 ft over 2-ft change in head, @ 20 °C, still air, ideal target, 50 ft cable
Range
Operating Temperature
Range
Material PVC housing with acoustic window
Weight 1.5 lb
Cable Low-loss cable, coax cable RG 62/U
11.5 in. (minimum) to 10.7 ft (maximum), with ideal target @ 20° C, in still air with
50-ft cable.
-20 °C to 50 °C (-4 °F to 122 °F)
Cable Length
Mounting Permanent and Adjustable Mounting Brackets
Dimensions (transducer only) 12.7 cm x 5.7 cm (5.0" H x 2.25" D)
Connection Bare wire lead connection via terminal blocks
In-Pipe Ultrasonic Sensor
Operating Frequency 75 kHz
Accuracy
Range
Resolution 0.0075 inches
Operating Temperature
Range
Storage Temperature -20 to 60 °C (-4 to 140 °F)
Temperature Error 0.00005 meter/°C typical
Material Stat-Kon A-E ABS Plastic
Cable Length 7.6 m (25 ft) standard, custom lengths up to 200 m (500 feet)
25 ft (7.6 m) standard, custom lengths up to 500 ft (contact manufacturer for
performance information at custom lengths)
±0.014 ft for sensor to liquid distance between 2.86 inches and 13.5 ft at ±1 ft change
in head from calibration point, 20 °C still air, ideal target, 50 ft cable.
Distance from sensor to liquid: 0.64 inches (minimum) to 13.5 feet (maximum), @ 20
°C still air, ideal target, 50 ft cable.
-20 to 60 °C (-4 to 140 °F)
Dimensions (transducer only) 4.44 cm (1.75 in.) maximum diameter, 31.435 cm (12.375 in.) long
Mounting
Connection Bare lead connection via terminal blocks
Page 14
Specifications
Dedicated Mounting Rings, Permanent Mounting Bracket (installs directly to pipe wall),
Adjustable Mounting Band Kit.
Page 17

Specifications
Velocity Transducer
Method Doppler Principle
Accuracy* ±2% of reading; Zero Stability: ±1.52 cms (±0.05 fps)
Range -1.52 to 6.1 m (-5 to +20 fps)
Resolution 0.3 cms (0.01 fps)
Response Time 4.8 seconds
Profile Time 4.8 seconds
Probe Dimensions
Cable Urethane sensor cable, shielded
Cable Length 7.6 m (25 ft), custom cable lengths up to 100 ft
Mounting
Connection Sensor connector to Quick connect hub or bare leads connection via terminal block.
Length: 6.9 cm (2.7 in.)
Width: 3.81 cm (1.5 in.)
Height: 1.1 cm (0.44 in.)
Dedicated Mounting Rings (mounting clips recommended for pipe diameters 8 in. or
under), Mounting Plate (for permanent mounting—drills to pipe wall), Adjustable
Mounting Band Kit
Page 15
Specifications
Page 18

Specifications
Submerged Area Velocity Probe
Method Doppler Principle / Pressure Transducer
Material Polyurethane body, 316 series stainless steel diaphragm
Cable Urethane sensor cable with air vent, shielded
Cable Length 7.6 m (25 ft) standard, custom cable up to 100 ft
Probe Dimensions
Mounting
Connection
Velocity
Depth
Length: 12.7 cm (5 inches)
Width: 3.81 cm (1.5 inches)
Height: 2.03 cm (0.8 inches)
Dedicated Mounting Rings (mounting clips recommended for pipe diameters 8 in. or
under), Mounting Plate (for permanent mounting—drills to pipe wall) Adjustable
Mounting Band Kit.
Sensor connector to quick-connect hub, bare lead connection via terminal block or
bare lead connection to junction box with bare lead junction box via terminal block.
Velocity Accuracy: ± 2% of reading; Zero stability: <0.05 fps (<0.015 m/s)
Response Time: 4.8 sec.
Profile Time: 4.8 sec.
Range: -1.52 to 6.1 m/s (-5 to +20 fps)
Resolution: 0.0028 m/s (0.01 fps)
Operating Temperature: -18° to 60 °C (0° to 140 °F)
Depth Accuracy: ±2% of reading
Maximum Allowable Level: 3X over pressure
Operating Temperature Range: 0° to 71 °C (32° to 160 °F)
Compensated Temperature Range: 0 to 30 °C (32 to 86 °F)
Temperature Error:
0.005 to 3.5 m ±0.0022 m/°C (0.018 to 11.5 ft ±0.004 ft/°F)
0.005 to 10.5 m ±0.006 m/°C (0.018 to 34.6 ft ±0.012 ft/°F)
(maximum error within compensated temperature range - per degree of change)
Draw down correction**:
0 to 3.05 mps (0 to 10 fps) = 0.085% of reading
Air Intake: Atmospheric pressure reference is desiccant protected
* See Troubleshooting Measurement Errors on page 115.
** U.S. Patent 5,691,914
Page 16
Specifications
Page 19
Section 1 Introduction
980
1.1 Instrument Description
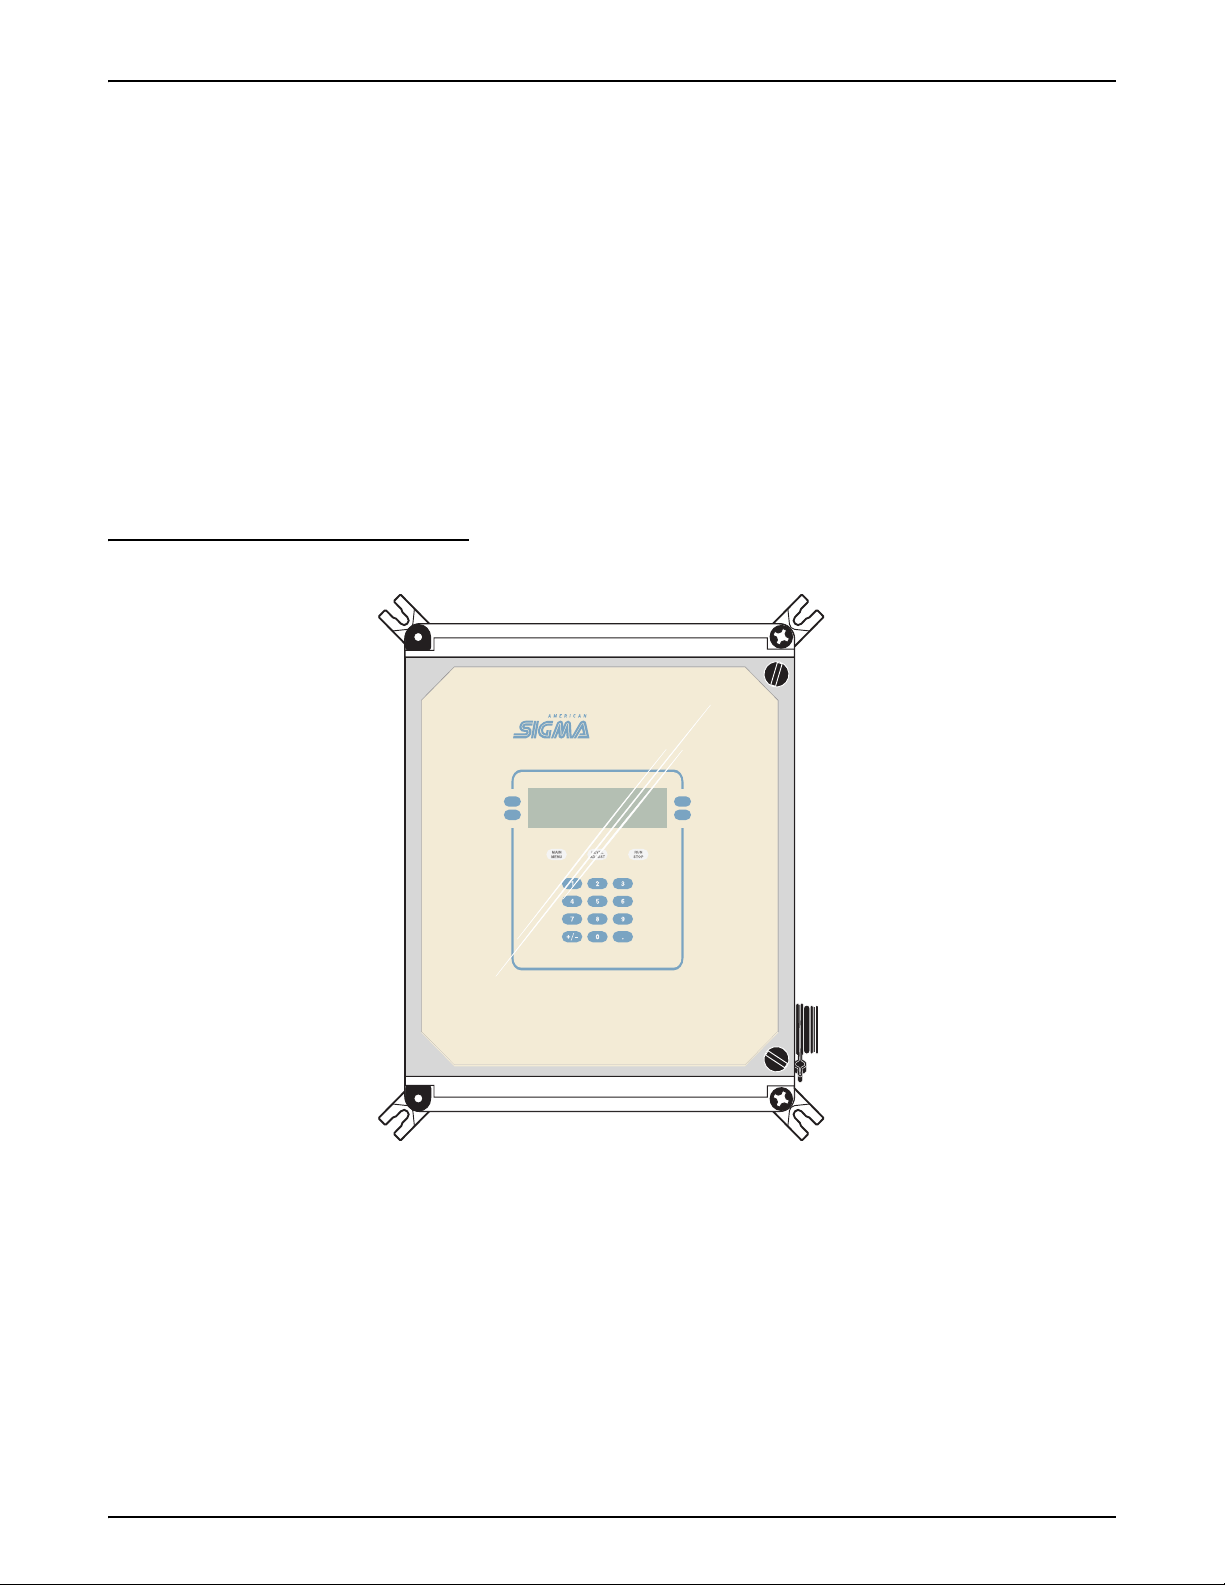
The 980 Flow Meter is an ultrasonic level detection meter with rugged,
NEMA 4X, IP66 construction. The 980 Flow Meter case has several unique
features, all designed to simplify installation, operation, and maintenance. All
controls are located within easy reach on the front panel behind a clear,
protective front cover.
The 980 Flow Meter has eight wiring holes located along the bottom of the
case. The one 1.38 in. and the seven 0.875 in. conduit holes provide easy
access for all power, sensor, control, and communications wiring.
Connections to the 980 Flow Meter are made in the wiring panel behind the
front cover. The interface connector ports are located on the bottom of the
instrument. The 980 Flow Meter comes standard with a quick-connect RS232
serial communications port.
Figure 1 980 Flow Meter
980980
In addition, the flow meter can connect to a wide variety of optional
peripheral devices:
• 4–20 mA Current Loop • Rain Gauge
• Up to three 4–20 mA Inputs • Sampler
• Up to four 4.5 V dc Inputs • pH Sensor
• Mechanical Totalizer • Modem
Page 17
Introduction
Page 20
Section 1
The 980 Flow Meter is available with one of the depth/velocity measurement
technologies:
• Ultrasonic Sensor • Area Velocity/Submerged Sensor
• Velocity Sensor
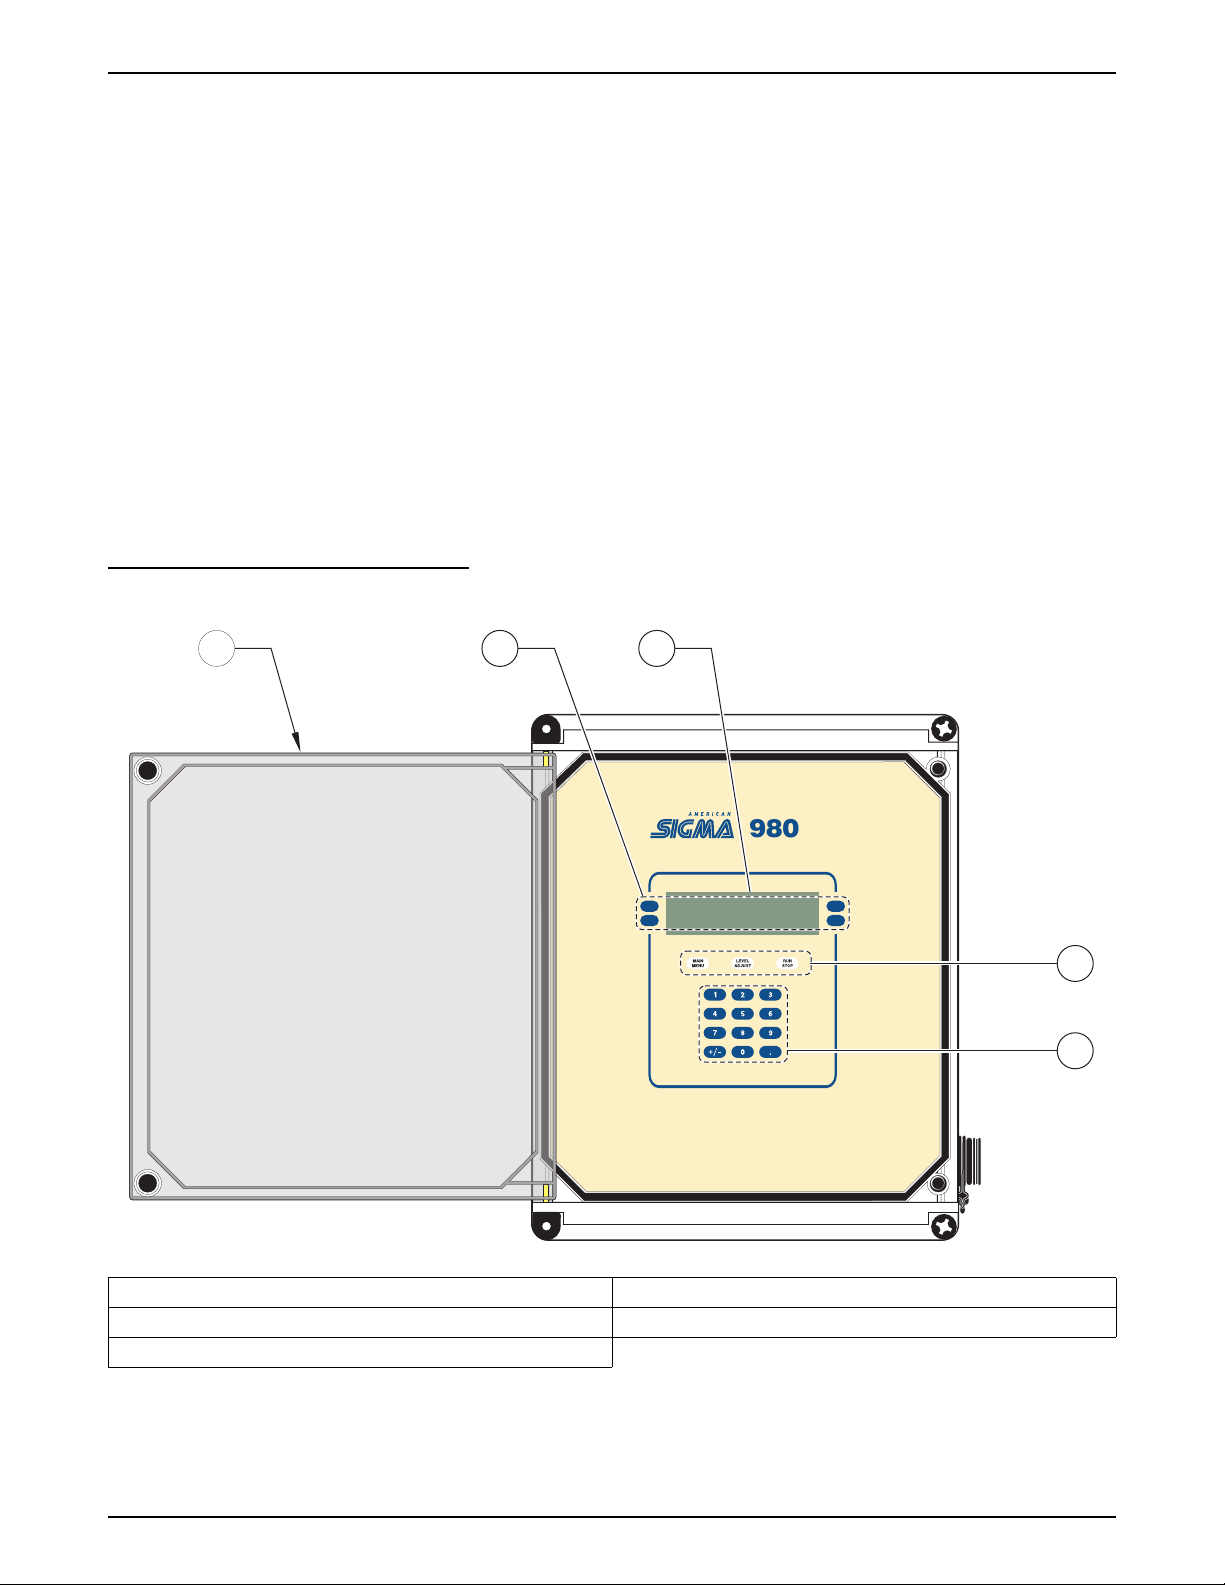
1.2 Front Panel Features and Controls
The 980 Flow Meter front panel features the keypad and the liquid crystal
display (LCD). The side of the 980 Flow Meter provides a connection for an
RS232 serial interface temporary connection.
The clear front cover of the instrument protects the control panel and display
window while providing a clear view of the flow meter status on the display.
The cover perimeter contains a gasket seal to keep moisture and dirt from
entering the front panel area. This seal is required to maintain the NEMA 4X
rating of the case.
Figure 2 Front Panel
123
980
4
5
1. Clear Front Cover 4. Function Keys
2. Soft Keys 5. Numeric Keypad
3. LCD Display
Page 18
Front Panel Features and Controls
Page 21

1.3 Keypad Description
Section 1
The 980 Flow Meter keypad has three components: numeric keypad, soft
keys, and function keys. (See Figure 2).
Numeric Keypad
The numeric keypad consists of the digits 0 through 9, a +/- key, and a
decimal key.
“Soft” Keys
Soft keys are blank, white keys located to the left and right of the display.
The appearance of each function key depends on the display. The soft key
labels appear on the display and point (with a straight line) to the proper soft
key to push for that action. If no function is shown for a specific key, that key is
not currently active.
In some cases during a programming step, an item from a list needs to be
selected. The soft keys on the right side of the display will change to display
“up” and “down” arrows. Us then to scroll up and down the list of choices.
When the desired choice is highlighted, press the
Function Keys
Three dedicated function keys are used to allow quick access to
frequently used functions. They are the white keys located just above
the numeric keypad.
SELECT soft key.
Function Key Description
Main Menu
This is the starting point to access any other point in the program. Press the Main Menu key at any time
during programming to return to the Main Menu Screen. The current action is cancelled if changes are not
yet accepted.
Level Adjust
Adjust the flow meter to match the current head (or level contributing flow) in the channel.
Run/Stop
Runs (or resumes) a program. Stops a currently running program.
1.4 Liquid Crystal Display
The 980 Flow Meter liquid crystal display (LCD) works in conjunction with
the four soft keys. When a soft key changes function, the display shows
the new function.
Menu Bar
The Menu Bar appears in a black band on the top edge of the display.
The upper left corner of the menu bar shows the time and date. The upper
right corner shows the name of the current menu.
Status Bar
The Status Bar appears along the bottom edge of the display.
The appearance of the status bar changes depending upon the
function performed.
Page 19
Keypad Description
Page 22

Section 1
1.5 Principle Operation
The lower left corner of the Status Bar indicates whether a program is
Running, Halted, or Ready To Start. If it is not needed during a programming
step, it disappears.
The lower right corner displays system alarm conditions, such as low memory
battery. For a list of possible alarms see Section 4.4 on page 73.
The status bar also lists the valid choices when entering certain programming
information. For example, when selecting the units of level measurement from
the Level Units menu, the status bar indicates that the valid choices are:
cm, ft, in. or m.
Measurement Capabilities
The 980 Flow Meter is often used to measure flow in conjunction with a
primary measuring device (flume, weir, pipe, etc.) that has a known
level-to-flow relationship. The 980 Flow Meter directly measures the level of
liquid in a channel that is contributing to flow (referred to as “head”) and
calculates the flow rate based on the head-to-flow relationship of the primary
device. (Refer to Appendix A on page 109).
The 980 Flow Meter can also simultaneously measure and record:
• Level • Velocity (AV version only)
• pH • Temperature
• Rainfall • Seven discrete analog inputs
(voltage and/or current)
The AV option can also measure the average velocity of the flow stream using
a submerged Doppler probe and calculate flow based on the current level and
the formula: Wetted Area × Velocity = Flow.
Communication Capabilities
A graphical display allows fast, on-site review of historical data.
In addition to its extensive data logging capabilities, the 980 Flow Meter is
capable of:
• Enabling a sampler
• Pacing a sampler
• Controlling four external devices with Normally Open/Normally
Closed relays
Page 20
Principle Operation
• Controlling two external devices with 4–20 mA current outputs
Communications capabilities include a standard RS232 port used for data
transfer and updating internal embedded program using state-of-the-art Flash
Memory technology.
The 980 Flow Meter also provides SCADA Communication Interface
functionality using the Modbus
communicates with the instrument via an RS232 or modem connection.
®
ASCII protocol. This software protocol
Page 23
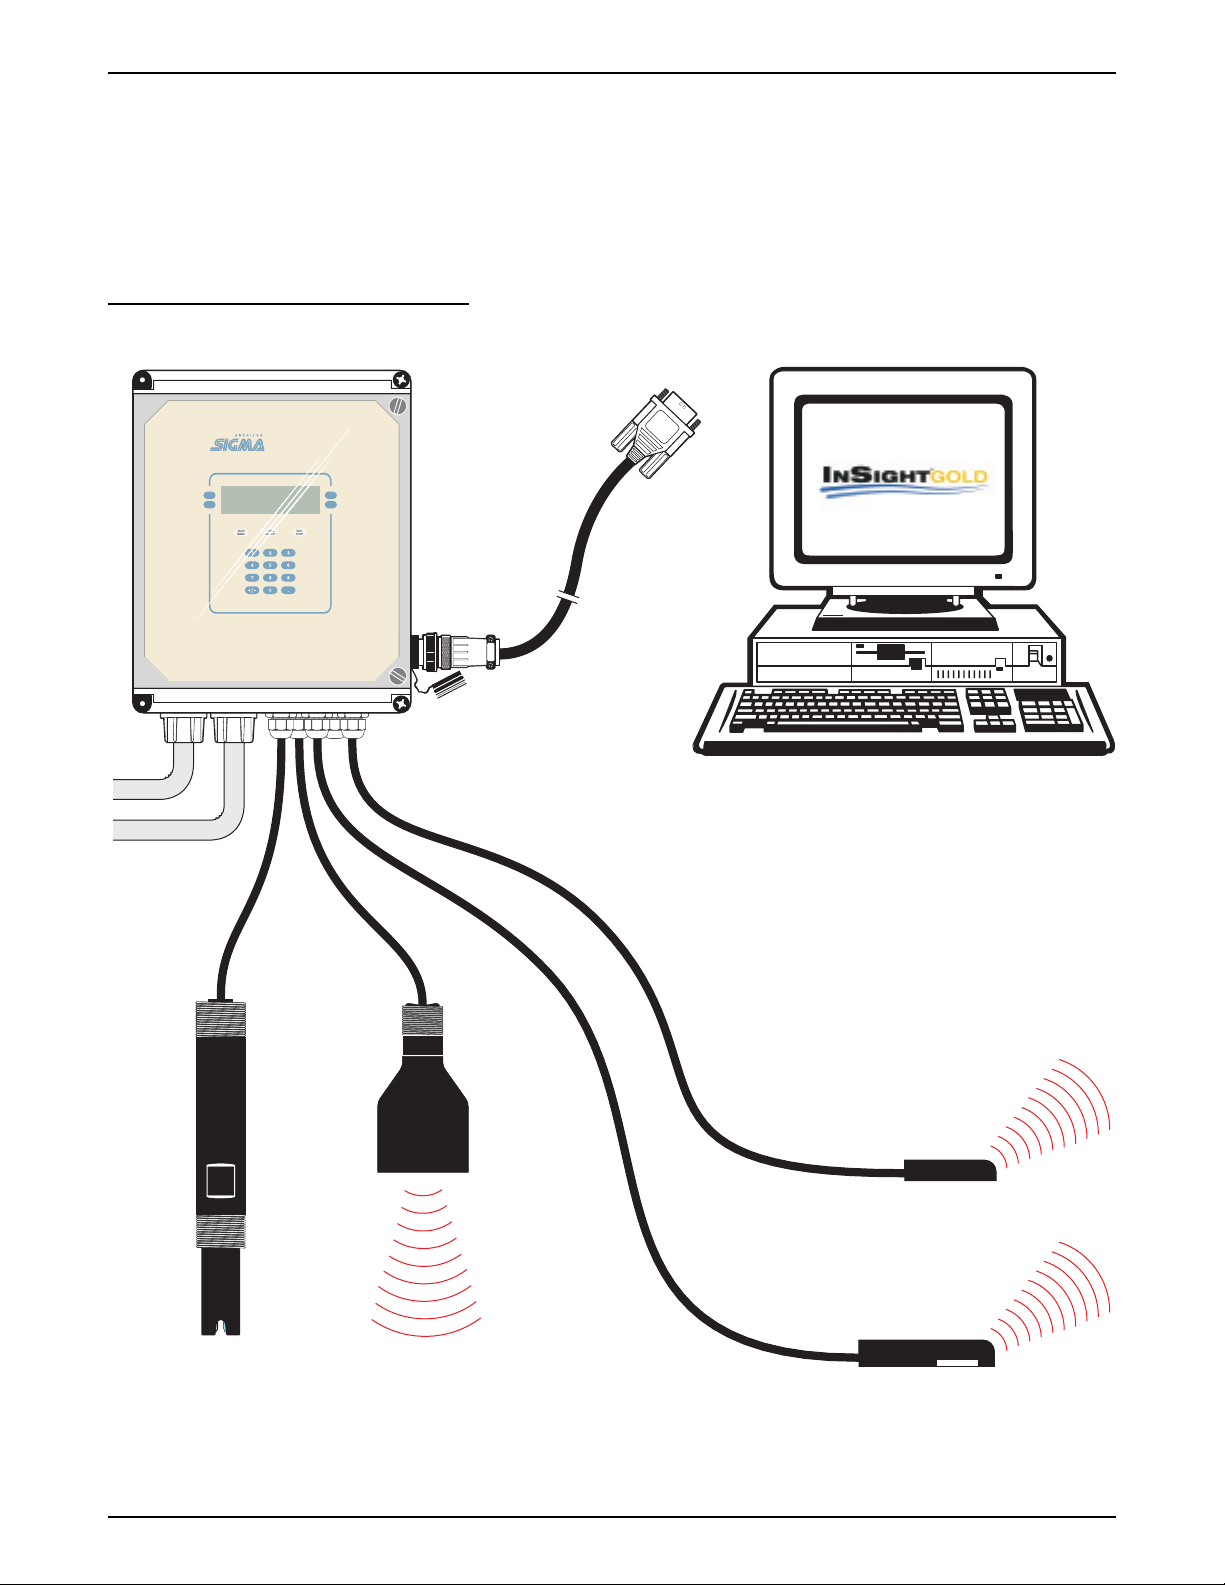
Using our InSight® Gold data analysis software, users can download,
980
remotely program, view real-time current status of logged parameters,
and conduct other data manipulation via RS232 connection or the
optional modem.
To protect the meter’s functionality and data, an operator may set up
password security access to the meter using the front-panel keypad.
Figure 3 Communication Capabilities
980980
Section 1
RS-232
Connector
pH
Velocity
Depth/Velocity
Ultrasonic/Level
Page 21
Principle Operation
Page 24

Visit www.americansigma.com
Page 25

INSTALLATION
DANGER
Some of the following manual sections contain information in the form of warnings, cautions and notes
that require special attention. Read and follow these instructions carefully to avoid personal injury and
damage to the instrument. Only personnel qualified to do so, should conduct the installation/maintenance
tasks described in this portion of the manual.
DANGER
Certains des chapitres suivants de ce mode d’emploi contiennent des informations sous la forme
d’avertissements, messages de prudence et notes qui demandent une attention particulière. Lire et suivre
ces instructions attentivement pour éviter les risques de blessures des personnes et de détérioration de
l’appareil. Les tâches d’installation et d’entretien décrites dans cette partie du mode d’emploi doivent être
seulement effectuées par le personnel qualifié pour le faire.
PELIGRO
Algunos de los capítulos del manual que presentamos contienen información muy importante en forma de
alertas, notas y precauciones a tomar. Lea y siga cuidadosamente estas instrucciones a fin de evitar
accidentes personales y daños al instrumento. Las tareas de instalación y mantenimiento descritas en la
presente sección deberán ser efectuadas únicamente por personas debidamente cualificadas.
GEFAHR
Einige der folgenden Abschnitte dieses Handbuchs enthalten Informationen in Form von Warnungen,
Vorsichtsmaßnahmen oder Anmerkungen, die besonders beachtet werden müssen. Lesen und befolgen
Sie diese Instruktionen aufmerksam, um Verletzungen von Personen oder Schäden am Gerät zu
vermeiden. In diesem Abschnitt beschriebene Installations- und Wartungsaufgaben dürfen nur von
qualifiziertem Personal durchgeführt werden.
PERICOLO
Alcune parti di questo manuale contengono informazioni sotto forma d’avvertimenti, di precauzioni e di
osservazioni le quali richiedono una particolare attenzione. La preghiamo di leggere attentivamente e di
rispettare quelle istruzioni per evitare ogni ferita corporale e danneggiamento della macchina. Solo gli
operatori qualificati per l’uso di questa macchina sono autorizzati ad effettuare le operazioni di
manutenzione descritte in questa parte del manuale.
Page 23
INSTALLATION
Page 26

Visit www.americansigma.com
Page 27

Section 2 Installation
DANGER
Cet appareil doit être installé par du personnel technique qualifié, afin d'assurer
le respect de toutes les normes applicables d'électricité.
DANGER
This instrument should be
installed by qualified technical
personnel to ensure adherence to
all applicable electrical codes.
2.1 Customer-supplied Equipment
PELIGRO
Este instrumento debe ser instalado por personal técnico capacitado para
asegurar el cumplimiento con todos los códigos eléctricos y de plomería
aplicables.
GEFAHR
Um zu gewährleisten, daß alle elektrischen VDE-Vorschriften und
gegebenenfalls die Zusatzvorschriften der zuständigen Elektrizitäts- und
Wasserwerke erfüllt werden, darf dieses Gerät nur von geschultem
Fachpersonal installiert werden.
PERICOLO
Lo strumento deve essere installato da personale tecnico qualificato per
garantire la conformità delle norme in materia di elettricità.
• Four ¼–20 mounting screws • Wire strippers
• Small flat-blade screwdriver • Diagonal wire cutters
• Phillips screwdriver • Nylon wire ties
• Needle-nose pliers •
• 110–230 V single phase switched power
2.2 Unpacking the Instrument
Remove the 980 Flow Meter from its shipping carton and inspect it for any
damage. If the shipment arrives damaged or incomplete contact: Technical
support at 1-800-635-1230 or send e-mail to techhelp@hach.com.
2.2.1 NEMA 4X Applications
To maintain the NEMA 4X, IP66 enclosure rating, use strain-relief or conduit
fittings that are a sealing type (not supplied, see note in left column). To make
Note: The 980 Flow Meter ships
with temporary push-in hole plugs
which are not acceptable for use
during operation. If circuit
connections are not required, plug
unused holes as shown in Figure 4.
wire connections, refer to the sections that follow. Standard off-the-shelf
NEMA-approved conduit hardware is available at most hardware and
electrical appliance stores. Take care to select the style of conduit hardware
that will seal to the enclosure wall when using flexible or rigid conduit. See
Figure 4 and Parts and Accessories on page 157.
5
/16 open-end wrench
Page 25
Installation
Page 28
Section 2
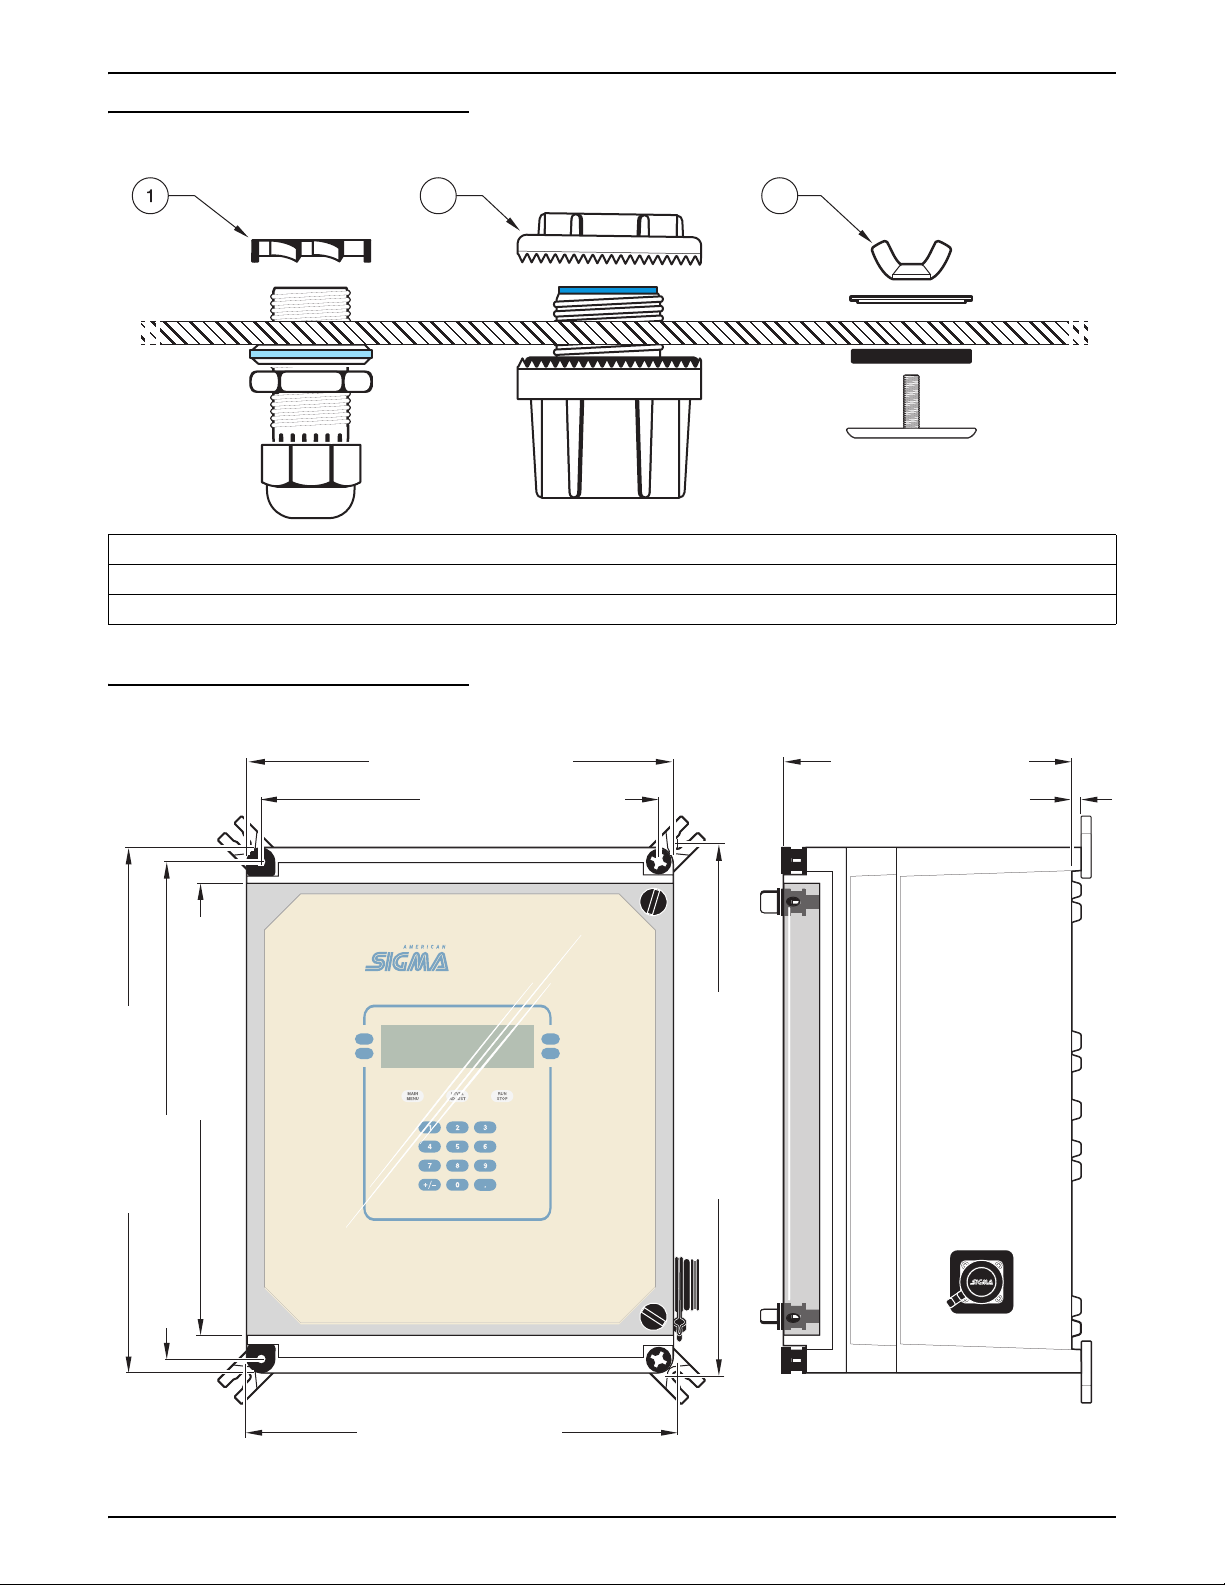
980
Figure 4 Sealing-type Strain Reliefs, Conduit Fittings, and Sealing Plugs
2
1. Sealing-type Strain Relief (Cat. No. 8773 0.20-0.35″ O.D. cable, Cat. No. 8786 0.23-0.47″ O.D. cable)
2. Conduit Fitting (½″ (Cat. No. 16483), 1” (Cat. No. 4913600))
3. Oil-tight Sealing Plug (Cat. No. 42210-00)
3
Figure 5 Mounting Dimensions (1 of 3)
11.88 inches (301.7 mm)
7.80 inches (198.1 mm)
12.45 inches (316.2 mm)
14.62 inches (371.3 mm)
13.86 inches (352.0 mm)
11.06 inches (280.9 mm)
980980
X.XX inches (XX.X mm)
.225 inches (5.7 mm)
14.80 inches (375.9 mm)
Page 26
Unpacking the Instrument
12.05 inches (306.7 mm)
Page 29
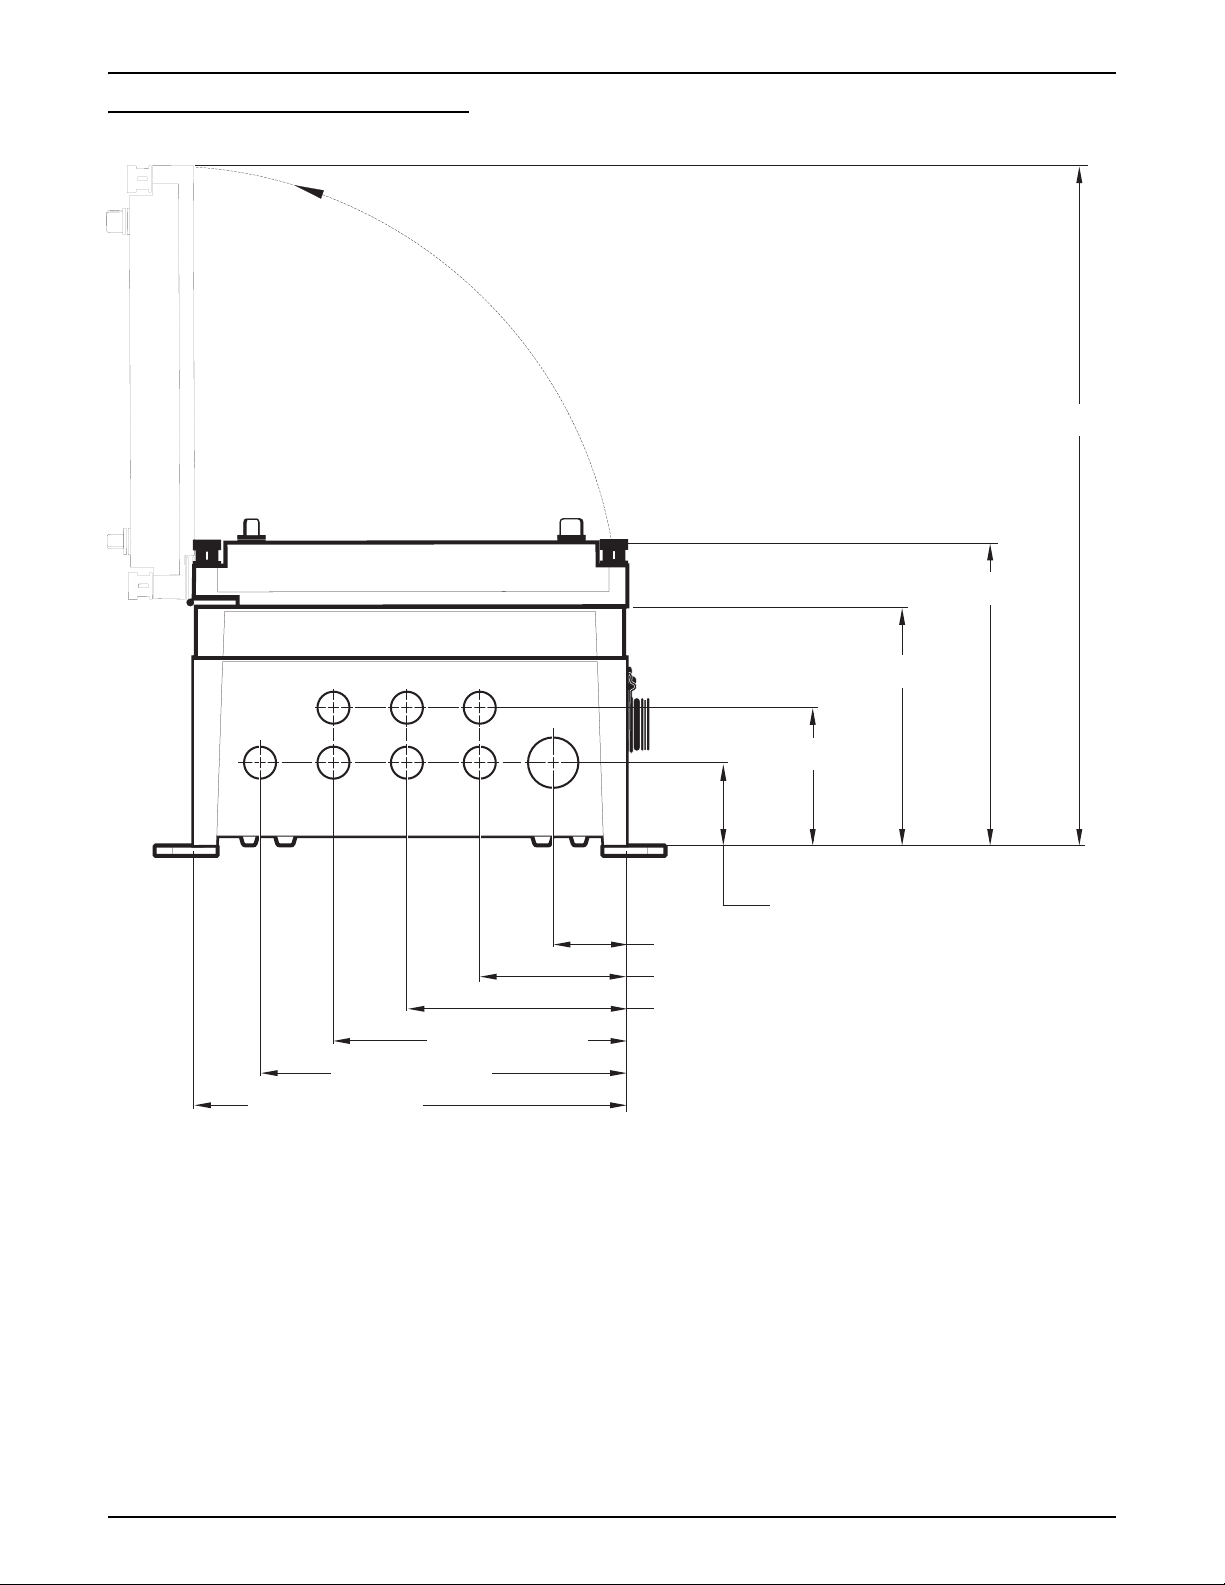
Figure 6 Mounting Dimensions (2 of 3)
Section 2
18.40 inches
(467.3 mm)
8.1 inches
(205.7 mm)
10.00 inches (254 mm)
11.88 inches (301.7 mm)
2.3 Mounting Options
6.50 inches
(165.1 mm)
3.60 inches
(91.4 mm)
2.10 inches (53.3 mm)
2.00 inches (50.8 mm)
4.00 inches (101.6 mm)
6.00 inches (152.4 mm)
8.00 inches (203.2 mm)
The 980 Flow Meter is designed for wall or rail/pole mounting. Wall mounting
dimensions and hole patterns are found in Figure 7. For optimal viewing of the
the front panel display, mount the instrument facing north to eliminate glare
from the sun.
Page 27
Mounting Options
Page 30
Section 2
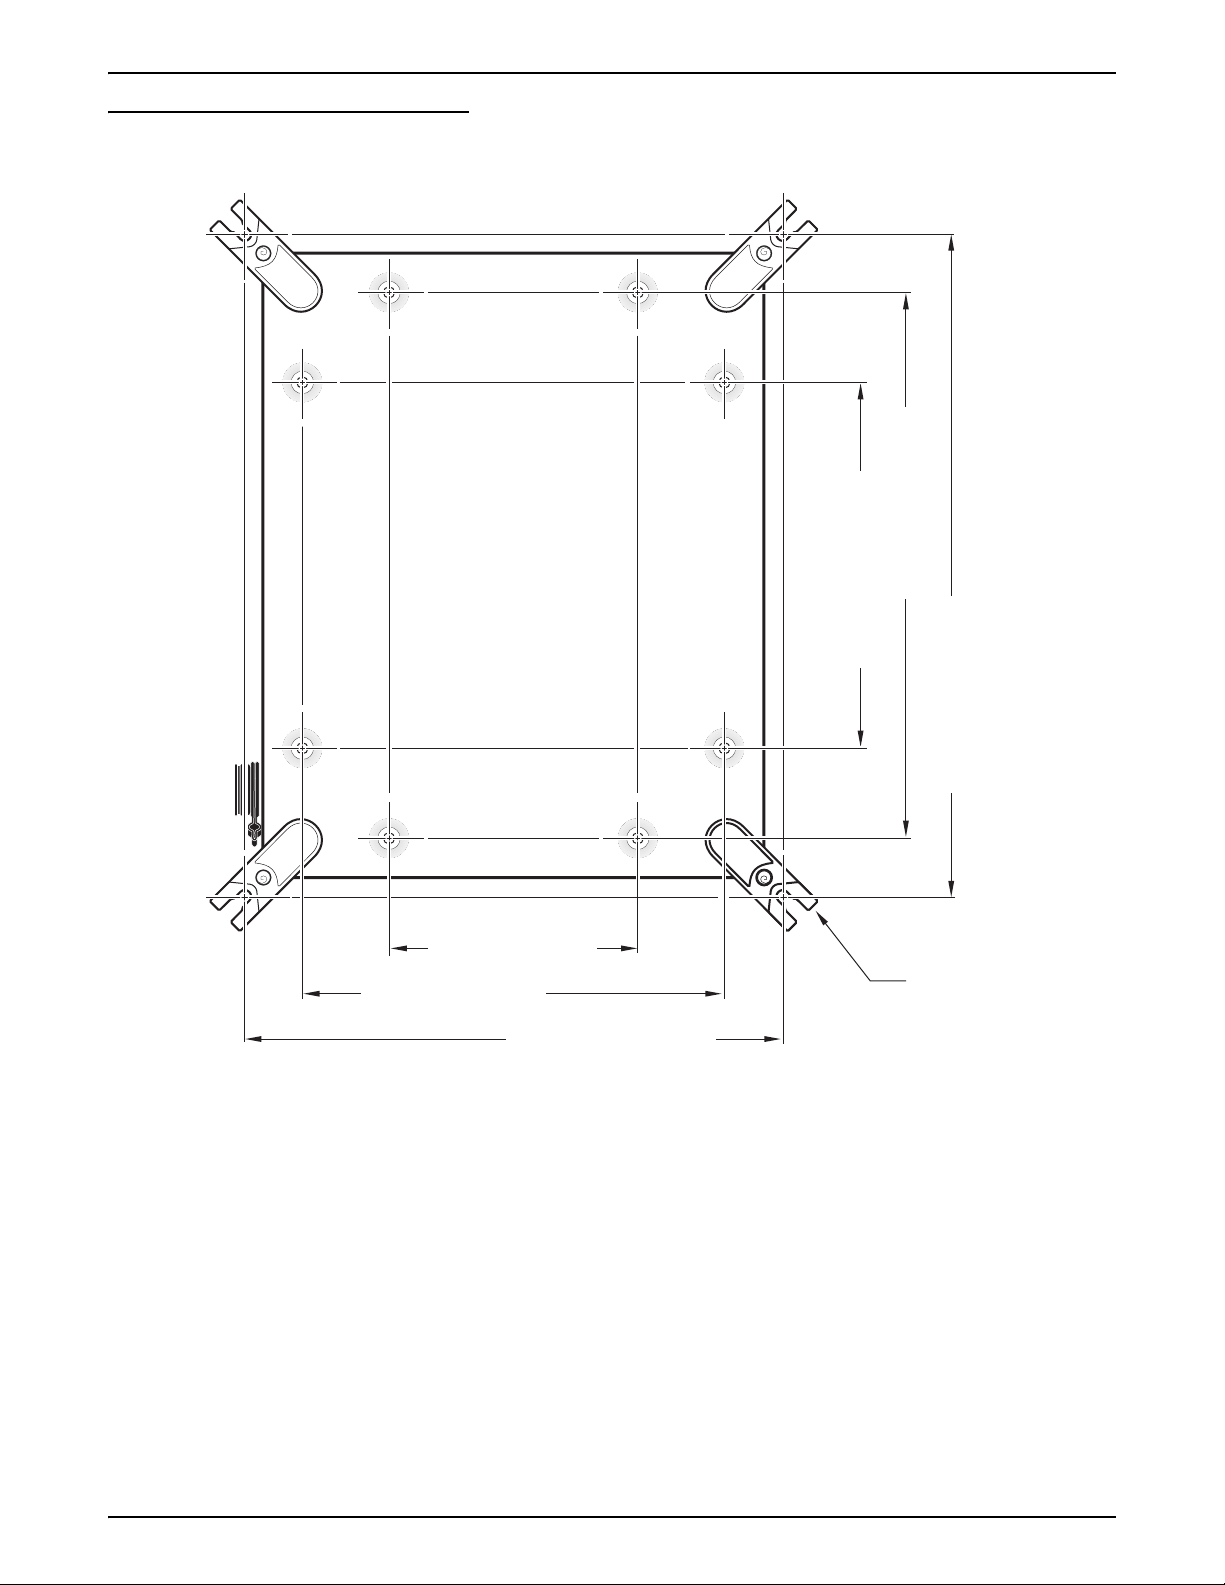
Figure 7 Mounting Dimensions (3 of 3)
309 mm (12.18 inches)
2.3.1 Wall Mounting
139 mm (5.5 inches)
240 mm (9.45 inches)
301.5 mm (11.87 inches)
Mount the 980 Flow Meter using the Wall Mounting Blocks that come installed
on the unit, see Figure 7. These brackets provide secure mounting for the
instrument. To wall mount the 980 Flow Meter use four ¼–20 screws. Refer to
Figure 8.
209.5 mm (8.25 inches)
376 mm (14.80 inches)
Mounting Blocks (4)
Page 28
Mounting Options
Page 31

Figure 8 Wall Mounting
980
Section 2
1
980980
1. ¼–20 screws (4)
2.3.2 Rail/Pole Mounting
Mount the 980 Flow Meter using the rail/pole mounting kit
(Cat. No. 97091-00).
1. Determine if the brackets need to be placed horizontally or vertically,
depending on the direction of the rail/pole. Refer to Figure 9.
2. Tap the four brass inserts flush with the four holes on the back of the
instrument. Refer to Figure 7.
3. Slide two adjustable clamps on each bracket. Adjust the clamps to
meet the approximate size of the rail/pole and secure by tightening the
clamp screw.
4. Match the screw holes on the bracket to the holes on the back of
the instrument. Mount the bracket to the instrument using four M4 x 8 mm.
screws. Refer to Figure 9.
5. Place a commercially–sold hose clamp through the bracket and clamps to
attach the instrument to the rail/pole.
Page 29
Mounting Options
Page 32

Section 2
Figure 9 Rail / Pole Mounting
1 2
1. For mounting on a vertical pipe or rail. 2. For mounting on a horizontal pipe or rail.
Page 30
Mounting Options
Page 33

2.4 Wiring Safety Information
When making any wiring connections to the 980 Flow Meter, the following
warnings and notes must be adhered to, as well as, any warnings and notes
found throughout the individual installation sections. For more safety
information refer to Safety Precautions on page 8.
DANGER
DANGER
Always disconnect power to the
instrument when making
electrical connections.
Electrostatic Discharge (ESD) Considerations
Débranchez toujours l'alimentation électrique de l'instrument en établissant les
rapports électriques.
PELIGRO
Desconectar siempre las fuentes de energía del instrumento al hacer eléctrico
conectado.
GEFAHR
Vor Durchführung von Arbeiten an der Elektrik ist das Gerät unbedingt
spannunsfrei zu machen.
PERIGO
Scollegare sempre l’alimentazione elettrica quando rendono elettrico collegato.
Section 2
Delicate internal electronic components can be damaged by static electricity,
resulting in degraded instrument performance or eventual failure.
To minimize hazards and ESD
risks, maintenance procedures
not requiring power to the
analyzer should be performed
with power removed.
The manufacturer recommends taking the following steps to prevent ESD
damage to your instrument:
• Before touching any instrument electronic components (such as
printed circuit cards and the components on them) discharge static
electricity from your body. This can be accomplished by touching an
earth-grounded metal surface such as the chassis of an instrument,
or a metal conduit or pipe.
• To reduce static build-up, avoid excessive movement. Transport
static-sensitive components in anti-static containers or packaging.
• To discharge static electricity from your body and keep it discharged, wear
a wrist strap connected by a wire to earth ground.
• Handle all static-sensitive components in a static-safe area. If possible,
use anti-static floor pads and work bench pads.
2.5 Wiring the Controller
The 980 Flow Meter is divided into two sections by a voltage isolation barrier.
The left side of the barrier contains the high voltage wiring and the right side
of the barrier contains the low voltage wiring. See Figure 10 for proper
placement of connectors.
Page 31
Wiring Safety Information
Page 34

Section 2
Figure 10 Enclosure Wiring Access
1
J3
4 AMP
F1
4 AMP
F2
23
SIZE AA
1
J7
20
1
J10
9
1
J9
9
1
J8
6
1
J11
6
1
J2
5
1
J6
TP1
ON
F2
F1
T, 1.0A 250V
HOT/ 1
J12
NEU/ 2
NO
COM RELAY 4
NC
NO
COM RELAY 3
NC
NO
COM RELAY 2
NC
COMMON
J3
J4 J1J1J2
pH
TB3TB3
SHIELD
REF
pH
RTD
–5V
+5V
485A
485B
485+NO
485GNDCOM RELAY 1
SHIELDNC
RS485
RAIN
123456789101112
TB6
1
RTD
RTD –
RTD
SHIELD
1
TOTAL +
TOTAL –
SHIELD
TB7
TOTALIZER
SIZE AA
SIZE AA
39
40
1
TB1
TB4
TB 9 ANALOG
TB10 4-20 mA
1
1
12
RAIN+
2
11
3
10
4
9
5
8
6
7
7
6
8
5
9
4
10
3
11
2
12
1
1
2
J11
AVTB11
SHEILD
RCV–
CH A+CH 4
RCV+
12
CH A–COMMONRAIN–
XMIT–
11
13 14 15 16
SHIELDSHIELDSHIELD
XMIT+
10
12
9
CH B+CH 5CH 1
COMMON
11
8
CH B–COMMONCOMMON
+12V
10
7
9
SHIELDSHIELDSHIELD
DEPTH–
6
8
STARTCH 6CH 2
DEPTH+
7
EVENTCOMMONCOMMON
SHIELD
5
6
4
COMMON
BOTTLESHIELDSHIELD
3
DSR
PULSECH 7CH 3
5
2
4
RXD
COMMONCOMMONCOMMON
1
3
DTR
SHIELDSHIELDSHIELD
RS232CRS232CRS232C
2
TXD
1
+12V
RS232C
4
5
8
7
6
1. Base, CPU, and 4–20 mA Circuit Boards 4. Voltage Isolation Barrier 7. High voltage wiring
2. Ribbon Cable Assembly 5. Pre-wired RS-232 connector 8. Power Supply
3. Batteries (3 AA-size) 6. Low voltage wiring
2.5.1 Connecting ac Power to the 980 Flow Meter
DANGER
Si du courant à haute tension doit être appliqué aux débitmètre, il est nécessaire
de prévoir un moyen de débrancher l'alimentation électrique externe du
débitmètre au cours de la maintenance.
DANGER
When high-voltage power is
applied to the flow meter,
provisions must be made for
disconnecting external power to
the flow meter during servicing.
PELIGRO
En caso de aplicarse una alimentación de alta tensión al medidor de flujo, deben
tomarse las precauciones necesarias para desconectar la potencia externa al
medidor al realizar el servicio.
GEFAHR
Soll den Strömungsmessern Hochspannungsstrom zugeführt werden, ist dafür
zu sorgen, daß während der Wartung die externe Stromversorgung
unterbrochen ist.
PERICOLO
Se l'alimentazione al misuratore di portata viene effettuata con alta tensione
deve essere installato un dispositivo di interruzione dell'alimentazione esterno
per scollegarlo quando è in servizio.
Page 32
Wiring the Controller
Page 35

Section 2
For process or industrial applications, the national electrical codes of most
countries require that ac service feeds be hard-wired and contained in conduit
systems. The 980 Flow Meter has been designed to conform to this
requirement.
The manufacturer recommends conduit for two reasons:
1. It is generally required by most local electrical codes, and
Note: If power cords are allowed
by local electrical code, a 125 V
UL/CSA–approved power cord
with an approved NEMA-style strain
relief and a standard 115 V North
American-style plug
(Cat. No. 4630600) or a 230 V
VDE-approved power cord with an
approved NEMA-style strain relief
and a Continental European-style
plug (Cat. No. 4630800) can be
ordered.
Note: The field wiring terminal
barrier for ac power will accept wire
between 18 and 12 gauge. The wire
gauge must not be less than
18 AWG.
2. Use of metal conduit can improve immunity to lightning surges and
ac power transients.
Additionally, electrical and instrumentation standards require a local means of
removing power from the product. Since the 980 Flow Meter does not have
an accessible ON/OFF switch, the customer must provide one. This may
be accomplished with a customer-supplied switch box or with a power
cord. See Figure 12. As previously stated, a power cord method is only
acceptable if local codes permit its use and the considerations outlined in the
previous paragraphs are addressed.
In hard-wired electrical applications the power and safety ground service
drops for the 980 Flow Meter should be no longer than 6 meters (20 feet)
unless metal conduit is used to shield the ac power wiring.
In applications where power cords are allowed by local electrical codes
and power surges and transients are not a great concern, an 18 gauge,
3-conductor power cord (including a safety ground wire) can be used, but its
length must not exceed 3 meters (10 feet).
Carefully read all of the warnings in this section, and refer to Figure 11
to ensure the connections are correctly installed.
1. Use a large flat-blade screwdriver to loosen the two screws securing the
980 Flow Meter cover. Open the cover.
2. Attach a NEMA-approved conduit or compression fitting to one of the
½ in. openings on the bottom of the instrument, and route the ac wires
through this opening. See Figure 6.
3. Strip the wire insulation back sufficiently enough to wrap around
terminal screws.
4. Connect the hot and neutral wires to the appropriate screw terminal
(TB 8). Refer to Ta bl e 1 . Do not leave any of the bare wire exposed.
5. Connect the green, green/yellow wire to the ground stud.
6. Use a
5/16 inch open-end wrench to tighten the ground stud.
Table 1 ac Power Connections
Location Power Wire Color Codes
International U.S.A.
TB8 White (North America) Blue (International) ∅ 2
TB8 Black (North America) Brown (International) ∅ 1 hot
Conduit Plate Green (North America) or green/yellow (International) ground
Circuit Board Marking
neutral
Wiring the Controller
Page 33
Page 36

Section 2
2
J12
J13
TB8
XMIT+
CH A+CH 4
RAIN+
1
1
1
XMIT–
RCV+
RCV–
SHEILD
AVTB11
TB10 4-20 mA
TB 9 ANALOG
TB4
RAIN
COMMON
CH A–GROUNDRAIN–
+12V
SHIELDSHIELDSHIELD
DEPTH–
CH B+CH 5CH 1
DEPTH+
CH B–GROUNDGROUND
SHIELD
SHIELDSHIELDSHIELD
COMMON
STARTCH 6CH 2
DSR
PULSEGROUNDGROUND
RXD
BOTTLESHIELDSHIELD
SHIELD
SHIELD
TOTALIZER
TB7
TB6
TB2
TB5
TOTAL –
RTD –
TIP
TIP
TOTAL +
1
1
MODEM
ULTRASONIC
RTD
RING
RING
RTD
DTR
EVENTCH 7CH 3
TXD
GROUNDGROUNDGROUND
+12V
SHIELDSHIELDSHIELD
RS232C
SAMPLERANALOGANALOG
1
1
1
1
2
2
2
2
3
3
3
3
4
4
4
4
5
5
5
5
6
6
6
6
7
7
7
7
8
8
8
8
9
9
9
9
10
10
10
10
11
11
11
11
12
12
12
12
13 14 15 16
SHIELD
TB3
pH
REF
pH
RTD
–5V
GROUND
+5V
485A
485B
485+NO
NO
NO
NO
485GNDCOM RELAY 1
COM RELAY 2
COM RELAY 3
COM RELAY 4
SHIELDNC
NC
NC
NC
RS485
1 2 3 4 5 6 7 8 9 10 11 12
F2
F1
HOT/ 1
NEU/ 2
T, 1.0A 250V
ON
Figure 11 Proper Wire Connection
32
TB8
HOT 1
1
1. Ground Stud 3. Seat insulation against connector.
2. 18–12 gauge wire 4. Strip wire ¼ inch
Figure 12 Connecting Power to the Instrument
pH
TB3
MODEM
1
ON
F1
T, 1.0A 250V
HOT/ 1
HOT/ 1
J12
NEU/ 2
NEU/ 2
NO
COM RELAY 4
NC
NO
F2
COM RELAY 3
NC
NO
COM RELAY 2
NC
J13
TB8
TB8
SHIELD
GROUND
485GNDCOM RELAY 1
SHIELDNC
1
1 2 3 4 5 6 7 8 9 10 11 12
REF
1
pH
RTD
ULTRASONIC
–5V
TB6
1
+5V
RTD
485A
485B
1
485+NO
RS485
TB7
TOTALIZER
TB2
RING
TIP
RING
TIP
RTD
RTD –
SHIELD
TOTAL +
TOTAL –
SHIELD
TB4
TB 9 ANALOG
RAIN
1
1
12
RAIN+
2
11
3
10
4
TB5
9
5
8
6
7
7
6
8
5
9
4
10
3
11
2
12
1
NEU
4
AVTB11
SHEILD
TB10 4-20 mA
12
11
10
9
8
7
6
5
4
3
2
1
SAMPLERANALOGANALOG
RCV–
CH A+CH 4
RCV+
CH A–GROUNDRAIN–
XMIT–
13 14 15 16
SHIELDSHIELDSHIELD
XMIT+
12
CH B+CH 5CH 1
COMMON
11
CH B–GROUNDGROUND
+12V
10
9
SHIELDSHIELDSHIELD
DEPTH–
8
STARTCH 6CH 2
DEPTH+
7
PULSEGROUNDGROUND
SHIELD
6
COMMON
BOTTLESHIELDSHIELD
DSR
EVENTCH 7CH 3
5
4
RXD
GROUNDGROUNDGROUND
3
DTR
SHIELDSHIELDSHIELD
2
TXD
1
+12V
RS232C
2
POWER
3
OFF
1. Power switch 2. Green wire to ground stud 3. Appropriate NEMA 4X Hardware.
2.6 Wiring Optional Devices
The flow meter can connect to a wide variety of optional peripheral devices:
• 4–20 mA Current Loop • Mechanical Totalizer • pH Sensor
• Up to three 4–20 mA Inputs • Rain Gauge • Modem
• Up to four 4.5 V dc Inputs • Sampler
Page 34
Wiring Optional Devices
Page 37

The 980 Flow Meter is available with one of the following depth/velocity
measurement technologies:
• Ultrasonic Sensor • Area Velocity/Submerged Sensor
• Velocity Sensor
After wiring the instrument and optional devices an operator must conduct the
basic programming setup (Refer to Section 3 on page 59), conduct individual
programming for the optional devices, and when necessary calibrate the
devices. (Refer to Section 4 on page 67 for operator’s setup).
2.7 Wiring the 4–20 mA Output
Two 4–20 mA dc outputs are available and may be independently assigned to
any data channel (level, flow, pH, etc.)
The maximum cable length for either 4–20 mA output is defined based on the
load of the instrument/device being connected and the gauge of wire being
used to connect the instrument/device to the 980 Flow Meter. The total
available load for either of the 4–20 mA outputs is 600 ohms.
Section 2
Note: To minimize electromagnetic
effects on the 980 Flow Meter,
performance shielded cable is
required. To ensure that ground
currents in inadequate ground
systems do not result in potential
shock hazards do not connect the
shields at both ends of the cable.
For example: If the device that is being connected has a load of 550 ohms,
this leaves 50 ohms available to define the maximum length of wire for
connecting the device to the 980 Flow Meter. Each wire has an inherent
resistance that can be obtained from the wire manufacturer. Divide the 50
ohms that is available for the wire by the resistance of wire (with units of
ohms/ft). The result is the maximum cable length that can be used in that
particular location. If an 18 gauge copper wire is being used, it has a
resistance of 6.39 ohms/1000 feet. Dividing 50 ohms by 6.39 ohms/1000 ft
results in a maximum cable length of 7,824 feet.
1. Disconnect all power to the 980 Flow Meter. See Wiring Safety
Information on page 31.
2. Use a large flat-blade screwdriver to loosen the two screws securing the
980 Flow Meter cover. Open the cover.
3. Strip insulation from 4–20 mA leads ¼ inch.
4. Attach a NEMA-approved conduit or compression fitting to one of the
½ in. openings on the bottom of the instrument, and route the 4–20 mA
cable wires through this opening.
5. Connect wires to the proper screw terminal block (TB10). Refer to Ta b le 2
and Figure 13.
Note: Use NEMA-approved conduit
hubs (Cat. No. 16483) to ensure
that water and dust do not enter the
enclosure.
6. When wiring the cable sheild, connect to protective earth (ground) at the
980 Flow Meter. Do not connect the cable shield at the remote end of the
cable. Cut the cable jacket far enough back to expose the conductors.
Remove the shield by cutting it even with the cable jacket. Insulate the
remaining exposed shield with tape or heat-shrink tubing.
Page 35
Wiring the 4–20 mA Output
Page 38

Section 2
J12
J13
TB8
XMIT+
CH A+CH 4
RAIN+
1
1
1
XMIT–
RCV+
RCV–
SHEILD
AVTB11
TB10 4-20 mA
TB 9 ANALOG
TB4
RAIN
COMMON
CH A–GROUNDRAIN–
+12V
SHIELDSHIELDSHIELD
DEPTH–
CH B+CH 5CH 1
DEPTH+
CH B–GROUNDGROUND
SHIELD
SHIELDSHIELDSHIELD
COMMON
STARTCH 6CH 2
DSR
PULSEGROUNDGROUND
RXD
BOTTLESHIELDSHIELD
SHIELD
SHIELD
TOTALIZER
TB7
TB6
TB2
TB5
TOTAL –
RTD –
TIP
TIP
TOTAL +
1
1
MODEM
ULTRASONIC
RTD
RING
RING
RTD
DTR
EVENTCH 7CH 3
TXD
GROUNDGROUNDGROUND
+12V
SHIELDSHIELDSHIELD
RS232C
SAMPLERANALOGANALOG
1
1
1
1
2
2
2
2
3
3
3
3
4
4
4
4
5
5
5
5
6
6
6
6
7
7
7
7
8
8
8
8
9
9
9
9
10
10
10
10
11
11
11
11
12
12
12
12
13 14 15 16
SHIELD
TB3
pH
REF
pH
RTD
–5V
GROUND
+5V
485A
485B
485+NO
NO
NO
NO
485GNDCOM RELAY 1
COM RELAY 2
COM RELAY 3
COM RELAY 4
SHIELDNC
NC
NC
NC
RS485
123456 789101112
F2
F1
HOT/ 1
NEU/ 2
T, 1.0A 250V
ON
HOT/ 1
NEU/ 2
TB8
1
4
7
10
2
5
8
11
3
6
9
12
J13
Table 2 4–20 mA Terminal Block Connections (TB10)
Pin Signal Description
7shield
8 channel B - (neg)
9 channel B + (pos)
10 shield
11 channel A - (neg)
12 channel A + (pos)
Figure 13 Locating TB10 for 4–20 mA Output Connections
ON
F1
T, 1.0A 250V
HOT/ 1
HOT/ 1
J12
NEU/ 2
NEU/ 2
No Connection
AVTB11
pH
12
11
10
9
F2
8
7
6
5
4
3
2
1
J13
J13
TB8
TB8
COM RELAY 4
NC
NO
COM RELAY 3
NC
NO
COM RELAY 2
NC
GROUND
485GNDCOM RELAY 1
REF
1
pH
RTD
ULTRASONIC
–5V
485A
485B
485+NO
SHIELDNC
TB6
1
+5V
RTD
1
RS485
TB7
TOTALIZER
TB3
MODEM
1
123456 789101112
SHIELD
NO
TB2
RING
TIP
RING
TIP
RTD
RTD –
SHIELD
TOTAL +
TOTAL –
SHIELD
TB4
TB 9 ANALOG
RAIN
1
1
RAIN+
2
3
4
TB5
5
6
7
8
9
10
11
12
TB10 4-20 mA
12
TB10 4-20 mA
11
10
9
8
7
6
5
4
3
2
1
12
11
10
9
8
7
6
5
4
3
2
1
SAMPLERANALOGANALOG
CH A+CH 4
CH A–GROUNDRAIN–
CH A+
SHIELDSHIELDSHIELD
CH B+CH 5CH 1
CH A–
CH B–GROUNDGROUND
SHIELDSHIELDSHIELD
SHIELD
STARTCH 6CH 2
PULSEGROUNDGROUND
CH B+
BOTTLESHIELDSHIELD
EVENTCH 7CH 3
CH B–
GROUNDGROUNDGROUND
SHIELD
SHIELDSHIELDSHIELD
START
EVENT
RS232C
SHEILD
RCV–
RCV+
XMIT–
13 14 15 16
XMIT+
12
COMMON
11
+12V
10
9
DEPTH–
8
DEPTH+
7
SHIELD
6
COMMON
DSR
5
4
RXD
3
DTR
2
TXD
1
+12V
BOTTLE
PULSE
GROUND
12345 6789101112
SHIELD
SAMPLER
POWER
OFF
2.8 Wiring the Analog Input
1. Disconnect all power to the 980 Flow Meter. Refer to Wiring Safety
Information on page 31.
Note: Use NEMA-approved conduit
hubs (Cat. No. 16483) to ensure
that water and dust do not enter. the
enclosure.
Note: 4–20 mA inputs must be
isolated. Input impedance is
200 ohms.
2. Use a large flat-blade screwdriver to loosen the two screws securing the
980 Flow Meter cover. Open the cover.
3. Strip insulation from analog input leads ¼ inch.
4. Attach a NEMA-approved conduit or compression fitting to one of the
5. Connect wires to the proper terminal block connection, TB4
½ in. openings on the bottom of the instrument, and route the analog
input cable wires through this opening.
for 4-20 mA dc wiring or TB9 for voltage wiring (See Figure 14). Refer to
Ta bl e 3 and Tab le 4 .
Page 36
Wiring the Analog Input
Page 39

Note: Input impedance for voltage
inputs is equal to 1 meg ohm.
Note: To minimize electromagnetic
affects on the 980 Flow Meter
performance, shielded cable is
required. To ensure that ground
currents in inadequate ground
systems do not result in potential
shock hazards, do not connect the
shields at both ends of the cable.
Section 2
6. When wiring the cable sheild, connect to protective earth (ground) at the
980 Flow Meter. Do not connect the cable shield at the remote end of the
cable. Cut the cable jacket far enough back to expose the conductors.
Remove the shield by cutting it even with the cable jacket. Insulate the
remaining exposed shield with tape or heat-shrink tubing.
There are a total of seven analog input channels available on the 980 Flow
Meter. These inputs accept 4–20 mA dc or -4.5 to +4.5 V dc analog signals.
They can be logged and graphed and can also be used to trigger alarms,
cause set point samples, and control 4–20 mA outputs.
Table 3 Analog Input 4–20 mA dc Terminal Block Connections (TB4)
Input Pin Signal Description
4 4–20 mA dc
Channel 1
Channel 2
Channel 3
5 common
6shield
7 4–20 mA dc
8 common
9shield
10 4–20 mA dc
11 common
12 shield
Table 4 Analog Input Voltage Terminal Block Connections (TB9)
Input Pin Signal Description
12 -4.5 to +4.5 V dc
Channel 4
Channel 5
Channel 6
Channel 7
11 common
10 shield
9 -4.5 to +4.5 V dc
8 common
7shield
6 -4.5 to +4.5 V dc
5 common
4shield
3 -4.5 to +4.5 V dc
2 common
1shield
Page 37
Wiring the Analog Input
Page 40

Section 2
J12
J13
TB8
XMIT+
CH A+CH 4
RAIN+
1
1
1
XMIT–
RCV+
RCV–
SHEILD
AVTB11
TB10 4-20 mA
TB 9 ANALOG
TB4
RAIN
COMMON
CH A–COMMONRAIN–
+12V
SHIELDSHIELDSHIELD
DEPTH–
CH B+CH 5CH 1
DEPTH+
CH B–COMMONCOMMON
SHIELD
SHIELDSHIELDSHIELD
COMMON
STARTCH 6CH 2
DSR
PULSECOMMONCOMMON
RXD
BOTTLESHIELDSHIELD
SHIELD
SHIELD
TOTALIZER
TB7
TB6
TB2
TB5
TOTAL –
RTD –
TIP
TIP
TOTAL +
1
1
MODEM
ULTRASONIC
RTD
RING
RING
RTD
DTR
EVENTCH 7CH 3
TXD
COMMONCOMMONCOMMON
+12V
SHIELDSHIELDSHIELD
RS232C
SAMPLERANALOGANALOG
1
1
1
1
2
2
2
2
3
3
3
3
4
4
4
4
5
5
5
5
6
6
6
6
7
7
7
7
8
8
8
8
9
9
9
9
10
10
10
10
11
11
11
11
12
12
12
12
13 14 15 16
SHIELD
TB3
pH
REF
pH
RTD
–5V
COMMON
+5V
485A
485B
485+NO
NO
NO
NO
485GNDCOM RELAY 1
COM RELAY 2
COM RELAY 3
COM RELAY 4
SHIELDNC
NC
NC
NC
RS485
123456 789101112
F2
F1
HOT/ 1
NEU/ 2
T, 1.0A 250V
ON
HOT/ 1
NEU/ 2
TB8
1
4
7
10
2
5
8
11
3
6
9
12
J13
Figure 14 Locating TB4 and TB9 for Analog Input Connections
12
11
10
T, 1.0A 250V
9
F2
8
7
6
5
4
3
2
1
J13
J13
TB8
TB8
No Connection
POWER
OFF
ON
F1
HOT/ 1
HOT/ 1
J12
NEU/ 2
NEU/ 2
NO
COM RELAY 4
NC
NO
COM RELAY 3
NC
NO
COM RELAY 2
NC
SHIELD
COMMON
485GNDCOM RELAY 1
SHIELDNC
AVTB11
pH
TB3
MODEM
1
123456 789101112
REF
1
pH
RTD
ULTRASONIC
–5V
485A
485B
485+NO
TB6
1
+5V
RTD
1
RS485
TB7
TOTALIZER
RAIN
TB2
RING
TIP
RING
TIP
RTD
RTD –
SHIELD
TOTAL +
TOTAL –
SHIELD
TB4
TB 9 ANALOG
RAIN
1
1
RAIN+
2
TB4
3
1
4
RAIN+
TB5
5
6
7
8
4
9
10
5
11
12
6
7
8
9
10
11
121 2 3
12
11
TB 9 ANALOG
10
9
12
8
11
7
6
10
5
4
9
3
8
2
1
7
6
5
1234
ANALOGANALOG
TB10 4-20 mA
12
11
10
CH 4
9
8
COMMONRAIN–
7
6
SHIELDSHIELD
5
4
CH 5CH 1
3
COMMONCOMMON
2
1
SHIELDSHIELD
SAMPLERANALOGANALOG
CH 6CH 2
COMMONCOMMON
SHIELDSHIELD
CH 7CH 3
COMMONCOMMON
SHIELDSHIELD
SHEILD
RCV–
CH A+CH 4
RCV+
CH A–COMMONRAIN–
XMIT–
13 14 15 16
SHIELDSHIELDSHIELD
XMIT+
12
CH B+CH 5CH 1
COMMON
11
CH B–COMMONCOMMON
+12V
10
9
SHIELDSHIELDSHIELD
DEPTH–
8
STARTCH 6CH 2
DEPTH+
7
PULSECOMMONCOMMON
SHIELD
6
COMMON
BOTTLESHIELDSHIELD
DSR
EVENTCH 7CH 3
5
4
RXD
COMMONCOMMONCOMMON
3
DTR
SHIELDSHIELDSHIELD
2
TXD
1
+12V
RS232C
2.9 Wiring the Mechanical Totalizer
1. Disconnect all power to the 980 Flow Meter. Refer to Wiring Safety
Information on page 31.
Note: Use NEMA-approved conduit
hubs (Cat. No. 16483) to ensure
that water and dust do not enter the
enclosure.
2. Use a large flat-blade screwdriver to loosen the two screws securing the
980 Flow Meter cover. Open the cover.
3. Strip the insulation from the mechanical totalizer leads ¼ inch.
4. Attach a NEMA-approved conduit or compression fitting to one of the
½ in. openings on the bottom of the instrument, and route the cable wires
through this opening.
5. Connect wires to the proper terminal block connection (TB7), shown in
Ta bl e 5 and Figure 15.
Table 5 Mechanical Totalizer Terminal Block Connections (TB7)
Pin Signal Description
1 Total +
2 Total -
3Shield
Page 38
Wiring the Mechanical Totalizer
Page 41

Figure 15 Locating TB7 for Mechanical Totalizer Connection
J12
J13
TB8
XMIT+
CH A+CH 4
RAIN+
1
1
1
XMIT–
RCV+
RCV–
SHEILD
AVTB11
TB10 4-20 mA
TB 9 ANALOG
TB4
RAIN
COMMON
CH A–GROUNDRAIN–
+12V
SHIELDSHIELDSHIELD
DEPTH–
CH B+CH 5CH 1
DEPTH+
CH B–GROUNDGROUND
SHIELD
SHIELDSHIELDSHIELD
COMMON
STARTCH 6CH 2
DSR
PULSEGROUNDGROUND
RXD
BOTTLESHIELDSHIELD
SHIELD
SHIELD
TOTALIZER
TB7
TB6
TB2
TB5
TOTAL –
RTD –
TIP
TIP
TOTAL +
1
1
MODEM
ULTRASONIC
RTD
RING
RING
RTD
DTR
EVENTCH 7CH 3
TXD
GROUNDGROUNDGROUND
+12V
SHIELDSHIELDSHIELD
RS232C
SAMPLERANALOGANALOG
1
1
1
1
2
2
2
2
3
3
3
3
4
4
4
4
5
5
5
5
6
6
6
6
7
7
7
7
8
8
8
8
9
9
9
9
10
10
10
10
11
11
11
11
12
12
12
12
13 14 15 16
SHIELD
TB3
pH
REF
pH
RTD
–5V
GROUND
+5V
485A
485B
485+NO
NO
NO
NO
485GNDCOM RELAY 1
COM RELAY 2
COM RELAY 3
COM RELAY 4
SHIELDNC
NC
NC
NC
RS485
123456 789101112
F2
F1
HOT/ 1
NEU/ 2
T, 1.0A 250V
ON
HOT/ 1
NEU/ 2
TB8
1
4
7
10
2
5
8
11
3
6
9
12
J13
ON
J12
F1
HOT/ 1
HOT/ 1
NEU/ 2
NEU/ 2
T, 1.0A 250V
F2
TB8
TB8
No Connection
POWER
OFF
Section 2
AVTB11
pH
TB3
MODEM
1
123456 789101112
SHIELD
NO
12
REF
GROUND
485GNDCOM RELAY 1
SHIELDNC
1
pH
RTD
ULTRASONIC
–5V
TB6
1
+5V
RTD
485A
485B
1
485+NO
1
RS485
TB7
TOTALIZER
COM RELAY 4
11
NC
10
NO
9
8
COM RELAY 3
NC
7
NO
6
COM RELAY 2
5
4
NC
3
2
1
J13
J13
TB2
RING
TIP
RING
TIP
RTD
RTD –
SHIELD
TOTAL +
TOTAL –
SHIELD
TB5
RAIN
TOTAL +
TB4
TB 9 ANALOG
1
1
RAIN+
2
3
4
5
6
7
8
9
10
11
12
TB10 4-20 mA
12
12
11
11
10
10
9
9
8
8
7
7
6
6
5
5
4
4
3
3
2
2
1
1
SAMPLERANALOGANALOG
TOTAL –
SHIELD
TOTALIZER
TB7
SHEILD
RCV–
CH A+CH 4
RCV+
CH A–GROUNDRAIN–
XMIT–
13 14 15 16
SHIELDSHIELDSHIELD
XMIT+
12
CH B+CH 5CH 1
COMMON
11
CH B–GROUNDGROUND
+12V
10
9
SHIELDSHIELDSHIELD
DEPTH–
8
STARTCH 6CH 2
DEPTH+
7
PULSEGROUNDGROUND
SHIELD
6
COMMON
BOTTLESHIELDSHIELD
DSR
EVENTCH 7CH 3
5
4
RXD
GROUNDGROUNDGROUND
3
DTR
SHIELDSHIELDSHIELD
2
TXD
1
+12V
RS232C
2.10 Wiring the Alarm Relays
DANGER
La zone de connexion des relais est prévue pour les connexions haute tension
(30-230 Vca) uni-quement. Un risque d'électrocution peut exister si des
DANGER
The relay connection area is
designed for only high voltage
(30-230 V ac) connections.
A shock hazard can exist if
low voltage (<30 V)
connections are made in the relay
connection area.
connexions basse tension (<30 V) sont effectuées dans la zone de connexion
des relais.
PELIGRO
El sector para conexiones del relé está diseñado solamente para voltajes altos
(30-230 Vca). Existe el peligro de una descarga eléctrica si se hacen conexiones
de bajo voltaje (<30V) en este sector.
GEFAHR
Relaisanschlüsse sind ausschließlich für Hochspannung (30-230 Vac)
ausgelegt. Wenn in diesem Bereich Niederspannungsanschlüsse (<30V)
durchgeführt werden, besteht die Gefahr eines Stromschlags.
PERICOLO
La zona dei relè è progettata solo per collegamenti ad alto voltaggio
(30-230 Vac).Rischio di scossa elettrica esiste quando collegamenti a
basso voltaggio (< 30 V) vengono effettuate nella zona dei relè.
Page 39
Wiring the Alarm Relays
Page 42

Section 2
Note: Current to the relay contacts
must be limited to 5 amps. A means
to remove power from the relays
locally in case of an emergency or
for servicing the product must be
provided by the user. This can be
accomplished with an external
switch and a 5-amp fuse or with a
switched 5-amp circuit breaker.
The alarm wiring can be sized according to the load being used. The relay
connector will accept wire sizes from 18 AWG to 12 AWG. Do not use wire
smaller than 18 AWG.
The alarm relays have unpowered contacts, and the power to operate the
load is supplied by the user. Figure 16 shows a typical wiring configuration.
The wires are routed through the conduit hole and are connected to the
circuit board. Voltage range is 30–230 V ac, 50/60 Hz. The alarm relays can
switch resistive loads of up to 5 A.
Table 6 Relay Terminal Block Connections (J13)
J13 Signal Description J13 Signal Description
1 normally closed 1 7 normally closed 3
2 common relay 1 8 common relay 3
3 normally open 1 9 normally open 3
4 normally closed 2 10 normally closed 4
5 common relay 2 11 common relay 4
6 normally open 2 12 normally open 4
Note: Use NEMA-approved
conduit hubs (Cat. No. 16483) to
ensure that water and dust do not
enter the enclosure.
1
2
3
1. With the power disconnected to the controller, use a large flat-blade
screwdriver to loosen the two screws securing the 980 Flow Meter cover.
Refer to Wiring Safety Information on page 31.
2. Open the cover.
3. Strip the insulation from alarm relay leads ¼ inch.
4. Attach a NEMA-approved conduit or compression fitting to one of the
½ in. openings on the bottom of the instrument, and route the cable wires
through this opening.
5. Pull out the twelve-pin removable terminal block. See Figure 16 for
terminal block position.
6. Insert each bare wire end into the supplied twelve-pin connector until the
wire insulation is seated against the connector. Do not leave any of the
bare wire exposed.
7. Plug the connector back onto the circuit board.
Page 40
Wiring the Alarm Relays
Page 43

Figure 16 Locating TB13 for Alarm Relay Connection
J12
J13
TB8
XMIT+
CH A+CH 4
RAIN+
1
1
1
XMIT–
RCV+
RCV–
SHEILD
AVTB11
TB10 4-20 mA
TB 9 ANALOG
TB4
RAIN
COMMON
CH A–GROUNDRAIN–
+12V
SHIELDSHIELDSHIELD
DEPTH–
CH B+CH 5CH 1
DEPTH+
CH B–GROUNDGROUND
SHIELD
SHIELDSHIELDSHIELD
COMMON
STARTCH 6CH 2
DSR
PULSEGROUNDGROUND
RXD
BOTTLESHIELDSHIELD
SHIELD
SHIELD
TOTALIZER
TB7
TB6
TB2
TB5
TOTAL –
RTD –
TIP
TIP
TOTAL +
1
1
MODEM
ULTRASONIC
RTD
RING
RING
RTD
DTR
EVENTCH 7CH 3
TXD
GROUNDGROUNDGROUND
+12V
SHIELDSHIELDSHIELD
RS232C
SAMPLERANALOGANALOG
1
1
1
1
2
2
2
2
3
3
3
3
4
4
4
4
5
5
5
5
6
6
6
6
7
7
7
7
8
8
8
8
9
9
9
9
10
10
10
10
11
11
11
11
12
12
12
12
13 14 15 16
SHIELD
TB3
pH
REF
pH
RTD
–5V
GROUND
+5V
485A
485B
485+NO
NO
NO
NO
485GNDCOM RELAY 1
COM RELAY 2
COM RELAY 3
COM RELAY 4
SHIELDNC
NC
NC
NC
RS485
123456 789101112
F2
F1
HOT/ 1
NEU/ 2
T, 1.0A 250V
ON
HOT/ 1
NEU/ 2
TB8
ON
J12
F1
HOT/ 1
HOT/ 1
NEU/ 2
NEU/ 2
T, 1.0A 250V
Section 2
AVTB11
pH
12
11
10
9
F2
8
7
6
5
4
3
2
1
J13
J13
TB8
TB8
COM RELAY 4
NC
NO
COM RELAY 3
NC
NO
COM RELAY 2
NC
GROUND
485GNDCOM RELAY 1
SHIELDNC
REF
1
pH
RTD
ULTRASONIC
–5V
+5V
485A
485B
485+NO
TB6
1
RTD
1
RS485
TB7
TOTALIZER
TB3
MODEM
1
123456 789101112
SHIELD
NO
TB2
RING
TIP
RING
TIP
RTD
RTD –
SHIELD
TOTAL +
TOTAL –
SHIELD
TB4
TB 9 ANALOG
RAIN
1
1
RAIN+
2
3
4
TB5
5
6
7
8
9
10
11
12
TB10 4-20 mA
12
12
11
11
10
10
9
9
8
8
7
7
6
6
5
5
4
4
3
3
2
2
1
1
SAMPLERANALOGANALOG
SHEILD
RCV–
CH A+CH 4
RCV+
CH A–GROUNDRAIN–
XMIT–
13 14 15 16
SHIELDSHIELDSHIELD
XMIT+
12
CH B+CH 5CH 1
COMMON
11
CH B–GROUNDGROUND
+12V
10
9
SHIELDSHIELDSHIELD
DEPTH–
8
STARTCH 6CH 2
DEPTH+
7
PULSEGROUNDGROUND
SHIELD
6
COMMON
BOTTLESHIELDSHIELD
DSR
EVENTCH 7CH 3
5
4
RXD
GROUNDGROUNDGROUND
3
DTR
SHIELDSHIELDSHIELD
2
TXD
1
+12V
RS232C
No Connection
3
2
POWER
OFF
1. Appropriate strain relief, or seal. 2. One relay connection shown. 3. J13, 12-pin terminal block
1
2.11 Wiring the Rain Gauge
An external “tipping bucket” rain gauge (such as Cat. No. 9708400) can be
connected to the rain gauge connector of the 980 Flow Meter. The rain gauge
provides a dry contact closure to the flow meter.
1. Disconnect all power to the 980 Flow Meter. See Wiring Safety
Information on page 31.
2. Use a large flat-blade screwdriver to loosen the two screws securing the
980 Flow Meter cover. Open the cover.
Note: Route wires through
NEMA-approved conduit hubs
(Cat. No. 16483) to ensure
that water and dust do not enter the
enclosure.
3. Strip insulation from the rain gauge leads ¼ inch.
4. Attach a NEMA-approved conduit or compression fitting to one of the
½ in. openings on the bottom of the instrument, and route the wires
through this opening.
5. Connect wires to the proper screw terminal block (TB4). Refer to Ta bl e 7
and Figure 17.
Table 7 Rain Gauge Terminal Block Connections (TB4)
Pin Signal Description
1 Rain + (pos)
2 Rain - (neg)
3Shield
Page 41
Wiring the Rain Gauge
Page 44

Section 2
J12
J13
TB8
XMIT+
CH A+CH 4
RAIN+
1
1
1
XMIT–
RCV+
RCV–
SHEILD
AVTB11
TB10 4-20 mA
TB 9 ANALOG
TB4
RAIN
COMMON
CH A–GROUNDRAIN–
+12V
SHIELDSHIELDSHIELD
DEPTH–
CH B+CH 5CH 1
DEPTH+
CH B–GROUNDGROUND
SHIELD
SHIELDSHIELDSHIELD
COMMON
STARTCH 6CH 2
DSR
PULSEGROUNDGROUND
RXD
BOTTLESHIELDSHIELD
SHIELD
SHIELD
TOTALIZER
TB7
TB6
TB2
TB5
TOTAL –
RTD –
TIP
TIP
TOTAL +
1
1
MODEM
ULTRASONIC
RTD
RING
RING
RTD
DTR
EVENTCH 7CH 3
TXD
GROUNDGROUNDGROUND
+12V
SHIELDSHIELDSHIELD
RS232C
SAMPLERANALOGANALOG
1
1
1
1
2
2
2
2
3
3
3
3
4
4
4
4
5
5
5
5
6
6
6
6
7
7
7
7
8
8
8
8
9
9
9
9
10
10
10
10
11
11
11
11
12
12
12
12
13 14 15 16
SHIELD
TB3
pH
REF
pH
RTD
–5V
GROUND
+5V
485A
485B
485+NO
NO
NO
NO
485GNDCOM RELAY 1
COM RELAY 2
COM RELAY 3
COM RELAY 4
SHIELDNC
NC
NC
NC
RS485
123456 789101112
F2
F1
HOT/ 1
NEU/ 2
T, 1.0A 250V
ON
HOT/ 1
NEU/ 2
TB8
1
4
7
10
2
5
8
11
3
6
9
12
J13
Figure 17 Connecting to a Rain Gauge
AVTB11
pH
TB3
MODEM
1
123456 789101112
SHIELD
NO
12
REF
GROUND
485GNDCOM RELAY 1
1
pH
RTD
ULTRASONIC
–5V
+5V
485A
485B
485+NO
SHIELDNC
TB6
1
RTD
1
RS485
TB7
TOTALIZER
COM RELAY 4
11
NC
10
NO
T, 1.0A 250V
9
F2
8
COM RELAY 3
NC
7
NO
6
COM RELAY 2
5
4
NC
3
2
1
J13
J13
TB8
TB8
ON
F1
HOT/ 1
HOT/ 1
J12
NEU/ 2
NEU/ 2
TB2
RING
TIP
RING
TIP
RTD
RTD –
SHIELD
TOTAL +
TOTAL –
SHIELD
TB4
TB4
TB 9 ANALOG
RAIN
RAIN
1
1
1
123456 789101112
RAIN+
RAIN+
2
RAIN–
3
SHIELD
4
CH 1
TB5
5
GROUND
6
SHIELD
7
CH 2
8
GROUND
9
SHIELD
10
CH 3
11
GROUND
12
SHIELD
ANALOG
TB10 4-20 mA
12
12
11
11
10
10
9
9
8
8
7
7
6
6
5
5
4
4
3
3
2
2
1
1
SAMPLERANALOGANALOG
SHEILD
RCV–
CH A+CH 4
RCV+
CH A–GROUNDRAIN–
XMIT–
13 14 15 16
SHIELDSHIELDSHIELD
XMIT+
12
CH B+CH 5CH 1
COMMON
11
CH B–GROUNDGROUND
+12V
10
9
SHIELDSHIELDSHIELD
DEPTH–
8
STARTCH 6CH 2
DEPTH+
7
PULSEGROUNDGROUND
SHIELD
6
COMMON
BOTTLESHIELDSHIELD
DSR
EVENTCH 7CH 3
5
4
RXD
GROUNDGROUNDGROUND
3
DTR
SHIELDSHIELDSHIELD
2
TXD
1
+12V
RS232C
No Connection
POWER
OFF
1. Strain Relief 2. Input from Rain Gauge
2.12 Wiring the Sampler
1. Disconnect all power to the 980 Flow Meter. See Wiring Safety
Information on page 31.
2. Use a large flat-blade screwdriver to loosen the two screws securing the
980 Flow Meter cover. Open the cover.
3. Strip insulation from the sampler leads ¼ inch.
Note: Route wires through
NEMA-approved conduit hubs
(Cat. No. 16483) to ensure
that water and dust do not enter the
enclosure.
4. Attach a NEMA-approved conduit or compression fitting to one of the
½ in. openings on the bottom of the instrument, and route the wires
through this opening.
5. Connect wires to the proper screw terminal block (TB10).
Refer to Ta bl e 8 and Figure 18 for wire connections.
1
2
Cable Required for Sampler Connections
• Multi-Purpose Half Cable Assembly, 10 ft (3.0 m), 6-pin connector on one
end, tinned wire leads on the other end (Cat. No. 9708700).
Page 42
Wiring the Sampler
Page 45

Figure 18 Locating TB10 for Sampler Connections
J12
J13
TB8
XMIT+
CH A+CH 4
RAIN+
1
1
1
XMIT–
RCV+
RCV–
SHEILD
AVTB11
TB10 4-20 mA
TB 9 ANALOG
TB4
RAIN
COMMON
CH A–GROUNDRAIN–
+12V
SHIELDSHIELDSHIELD
DEPTH–
CH B+CH 5CH 1
DEPTH+
CH B–GROUNDGROUND
SHIELD
SHIELDSHIELDSHIELD
COMMON
STARTCH 6CH 2
DSR
PULSEGROUNDGROUND
RXD
BOTTLESHIELDSHIELD
SHIELD
SHIELD
TOTALIZER
TB7
TB6
TB2
TB5
TOTAL –
RTD –
TIP
TIP
TOTAL +
1
1
MODEM
ULTRASONIC
RTD
RING
RING
RTD
DTR
EVENTCH 7CH 3
TXD
GROUNDGROUNDGROUND
+12V
SHIELDSHIELDSHIELD
RS232C
SAMPLERANALOGANALOG
1
1
1
1
2
2
2
2
3
3
3
3
4
4
4
4
5
5
5
5
6
6
6
6
7
7
7
7
8
8
8
8
9
9
9
9
10
10
10
10
11
11
11
11
12
12
12
12
13 14 15 16
SHIELD
TB3
pH
REF
pH
RTD
–5V
GROUND
+5V
485A
485B
485+NO
NO
NO
NO
485GNDCOM RELAY 1
COM RELAY 2
COM RELAY 3
COM RELAY 4
SHIELDNC
NC
NC
NC
RS485
1 2 3 4 5 6 7 8 9 10 11 12
F2
F1
HOT/ 1
NEU/ 2
T, 1.0A 250V
ON
HOT/ 1
NEU/ 2
TB8
1
4
7
10
2
5
8
11
3
6
9
12
J13
ON
No Connection
POWER
OFF
Section 2
AVTB11
pH
TB3
MODEM
1
1 2 3 4 5 6 7 8 9 10 11 12
SHIELD
NO
12
REF
GROUND
485GNDCOM RELAY 1
SHIELDNC
1
pH
RTD
ULTRASONIC
–5V
TB6
1
+5V
RTD
485A
485B
1
485+NO
RS485
TB7
TOTALIZER
COM RELAY 4
11
NC
10
NO
9
F2
T, 1.0A 250V
8
COM RELAY 3
NC
7
NO
6
COM RELAY 2
5
4
NC
3
2
1
J13
J13
TB8
TB8
F1
HOT/ 1
HOT/ 1
J12
NEU/ 2
NEU/ 2
TB2
RING
TIP
RING
TIP
RTD
RTD –
SHIELD
TOTAL +
TOTAL –
SHIELD
TB4
TB 9 ANALOG
RAIN
1
1
RAIN+
2
3
4
TB5
5
6
7
8
9
10
11
12
TB10 4-20 mA
12
TB10 4-20 mA
11
10
9
8
7
6
5
4
3
2
1
12
11
10
9
8
7
6
5
4
3
2
1
SAMPLERANALOGANALOG
12345 6789101112
SAMPLER
CH A+CH 4
CH A–GROUNDRAIN–
CH A+
SHIELDSHIELDSHIELD
CH B+CH 5CH 1
CH A–
CH B–GROUNDGROUND
SHIELDSHIELDSHIELD
SHIELD
STARTCH 6CH 2
PULSEGROUNDGROUND
CH B+
BOTTLESHIELDSHIELD
EVENTCH 7CH 3
CH B–
GROUNDGROUNDGROUND
SHIELD
SHIELDSHIELDSHIELD
START
EVENT
BOTTLE
PULSE
GROUND
SHIELD
RS232C
SHEILD
RCV–
RCV+
XMIT–
13 14 15 16
XMIT+
12
COMMON
11
+12V
10
9
DEPTH–
8
DEPTH+
7
SHIELD
6
COMMON
DSR
5
4
RXD
3
DTR
2
TXD
1
+12V
Table 8 Sampler Terminal Block Connections (TB10)
Signal
Pin
Description
1 shield — Noise Suppression N/A
2 common brown
flow pulse
3
output
bottle number
4
input
5 event input red
sampler start
6
output
Wire
Color
yellow
green
black
Purpose Rating
Provides the ground line used in conjunction with the other signals on
the connector.
Used in conjunction with common signal to notify that a pre-determined
amount of flow has accumulated.
Received from a wastewater sampler and used in conjunction with the
Event Input signal. It tells the flow meter which bottle was used when a
sample was taken. “Sample Times and Dates” information will appear
in the data printout when downloaded.
Received from a wastewater sampler and indicates that a sample has
been collected. “Sample Taken” information will appear in the data
printout when downloaded.
Used to “wake up” a wastewater sampler when a set point condition is
met so that it can begin its sampling program. Configure the flow meter
for this pin in Set Point Sampling on page 126.
Used in conjunction with common, this line is normally allowed to float
and is switched to ground (by transistor) for the entire period that the
set point condition exists.
N/A
12 to 15 V dc
0 to 5 V dc input
(10 K ohm pull up
to 5 V)
0 to 5 V dc input
(11 K ohm input
resistance)
12 V dc (max) at
100 mA (max) open
collector output
Page 43
Wiring the Sampler
Page 46

Section 2
2.13 Wiring the RS232
The quick-connect RS-232 connector is located on the side panel of the
980 Flow Meter housing. The RS232 is intended for temporary connection
Note: Do not connect the RS232
port to more than one external
device at the same time. Connecting
an external device to both the side
panel quick-connect fitting and the
terminal circuit board inside the 980
Flow Meter can cause instrument
failure and unreliable
communications.
between a PC and 980 Flow Meter using a serial interface cable
(Cat. No. 1727) or a DTU-II. The 980 Flow Meter also allows for a permanent
connection that is routed by an external communications cable to the
980 Flow Meter through a conduit opening.
Permanent Conduit Connection
1. With power to the controller off, use a large flat-blade screwdriver to
2. Disconnect the RS232 Quick-connect attached to the TB11 pins.
loosen the two screws securing the 980 Flow Meter cover. Open the
cover. See Wiring Safety Information on page 31.
No wires should remain in the socket.
Note: To minimize electromagnetic
affects on the 980 Flow Meter
performance shielded cable is
required. To ensure that ground
currents in inadequate ground
systems do not result in potential
shock hazards do not connect the
shields at both ends of the cable.
Note: Route wires through
NEMA-approved conduit hubs
(Cat. No. 16483) to ensure
that water and dust do not enter the
enclosure.
3. To prevent dangling wires from touching the circuit nodes, tape each
individual wire then bundle the wires and tape wires together.
See Figure 19.
4. Attach a NEMA-approved conduit or compression fitting to one of the
½ in. openings on the bottom of the instrument, and route the RS232
permanent connection 6-wire cable and five conductors with shield.
5. Strip the outer insulated jacket back 2 inches from the end of the RS232
cable. Use care when removing the outer jacket to ensure that the
insulation around the inner conductors is not nicked. Nicked insulation on
inner conductors can lead to shorting.
6. Strip insulation of the individual wires back ¼ inch.
7. Connect each bare wire end to the proper screw terminal block (TB11).
Refer to Tab le 9 and Figure 19. Do not leave any of the bare wire
exposed.
8. Connect the cable shield to protective earth (ground) at the 980 Flow
Meter. Do not connect the cable shield at the remote end of the cable. Cut
the cable jacket back far enough to expose the conductors and remove
the shield by cutting it even with the cable jacket. Insulate the remaining
exposed shield with tape or heat shrink tubing.
Page 44
Wiring the RS232
Table 9 Conduit RS232 Terminal Block Connections (TB11)
Pin Signal Description
2TXD
3DTR
4RXD
5DSR
6 common
7shield
Reconnecting the RS232 Quick-Connect
1. With the power to the controller off, use a flat-blade screwdriver to loosen
the two screws securing the 980 Flow Meter cover.
Page 47

Section 2
2. Disconnect the RS232 permanent conduit connection.
3. Connect RS232 side connector Quick-connect to the hub on the side
panel of the instrument.
4. Wire the RS232 side-connector. Refer to Ta b l e 1 0 and Figure 19.
Table 10 Side Connector RS232 Terminal Block Connections (TB11)
Pin Signal Description Wire Color
1 +12 V orange
2TXD green
3DTR red
4RXD black
5 DSR yellow
6 Common brown
This serial interface can be used for the SCADA-Modbus interface.
See Appendix E on page 133.
This port may be configured to communicate at 1200, 2400, 4800, 9600, or
19,200 baud.
Cable Required
RS232 Flow Meter to PC Cable Assembly, 10 ft (3.0 m) long, 6-pin connector
on one end, 9-pin connector on the other end (Cat. No. 1727).
Figure 19 RS232 Wiring Connections
No Connection
AVTB11
AVTB11
AV
TB11
SHEILD
SHEILD
pH
pH
TB3
TB3
MODEM
MODEM
1
1
12345678 9101112
12345678 9101112
SHIELD
SHIELD
NO
NO
12
12
REF
REF
1
COMMON
COMMON
1
pH
pH
RTD
RTD
ULTRASONIC
ULTRASONIC
–5V
–5V
1
1
+5V
+5V
RTD
RTD
485A
485A
485B
485B
1
1
485+NO
485+NO
485GNDCOM RELAY 1
485GNDCOM RELAY 1
SHIELDNC
SHIELDNC
RS485
RS485
TB7
TB7
TOTALIZER
COM RELAY 4
COM RELAY 4
11
11
NC
NC
10
10
NO
NO
9
F1
F1
HOT/ 1
HOT/ 1
HOT/ 1
HOT/ 1
NEU/ 2
NEU/ 2
NEU/ 2
NEU/ 2
T, 1.0A 250V
T, 1.0A 250V
9
F2
F2
8
8
COM RELAY 3
COM RELAY 3
NC
NC
7
7
NO
NO
6
6
COM RELAY 2
COM RELAY 2
5
5
4
4
NC
NC
3
3
2
2
1
1
J13
J13
J13
J13
TB8
TB8
TB8
TB8
ON
ON
J12
J12
TOTALIZER
TB4
TB4
TB 9 ANALOG
TB 9 ANALOG
RAIN
RAIN
TB2
TB2
1
1
RING
RING
TIP
TIP
2
2
3
3
RING
RING
TIP
TIP
4
4
TB5
TB5
5
5
6
6
TB6
TB6
7
7
RTD
RTD
8
8
RTD –
RTD –
SHIELD
SHIELD
9
9
10
10
11
11
TOTAL +
TOTAL +
12
12
TOTAL –
TOTAL –
SHIELD
SHIELD
TB10 4-20 mA
TB10 4-20 mA
1
1
12
12
RAIN+
RAIN+
11
11
10
10
9
9
8
8
7
7
6
6
5
5
4
4
3
3
2
2
1
1
SAMPLERANALOGANALOG
SAMPLERANALOGANALOG
SHEILD
RCV–
RCV–
RCV–
CH A+CH 4
CH A+CH 4
RCV+
RCV+
RCV+
12
12
CH A–COMMONRAIN–
CH A–COMMONRAIN–
XMIT–
XMIT–
XMIT–
11
11
13 14 15 16
13 14 15 16
SHIELDSHIELDSHIELD
SHIELDSHIELDSHIELD
XMIT+
XMIT+
XMIT+
10
10
12
12
9
9
CH B+CH 5CH 1
CH B+CH 5CH 1
COMMON
COMMON
COMMON
11
11
8
8
CH B–COMMONCOMMON
CH B–COMMONCOMMON
+12V
+12V
+12V
10
10
7
7
9
9
SHIELDSHIELDSHIELD
SHIELDSHIELDSHIELD
DEPTH–
DEPTH–
DEPTH–
6
6
8
8
STARTCH 6CH 2
STARTCH 6CH 2
DEPTH+
DEPTH+
DEPTH+
7
7
PULSECOMMONCOMMON
PULSECOMMONCOMMON
SHIELD
SHIELD
SHIELD
5
5
6
6
4
4
COMMON
COMMON
COMMON
BOTTLESHIELDSHIELD
BOTTLESHIELDSHIELD
3
3
DSR
DSR
DSR
EVENTCH 7CH 3
EVENTCH 7CH 3
5
5
2
2
4
4
RXD
RXD
RXD
COMMONCOMMONCOMMON
COMMONCOMMONCOMMON
1
1
3
3
DTR
DTR
DTR
SHIELDSHIELDSHIELD
SHIELDSHIELDSHIELD
2
2
TXD
TXD
TXD
1
1
1 2 3 4 5 6 7 8 9 10 11 12 13 14 15 16
+12V
+12V
+12V
RS232C
RS232C
RS232C
1
2
3
POWER
OFF
1. Disconnect wires and secure appropriately. 3. Conduit Hub
2. RS-232 Quick Disconnect (shown disconnected) 4. RS-232 Input/Output
4
Page 45
Wiring the RS232
Page 48

Section 2
2.14 Wiring the Modem Interface
DANGER
Soyez vigilant lorsque vous connectez le modem, car les fils du téléphone
peuvent présenter des tensions élevées.
DANGER
Use care when making modem
connections as high voltage may
be present on the phone wires!
PELIGRO
Vorsicht beim Anschluss des Modems. Telefonleitungen können hohe
Spannungen führen!
GEFAHR
Se debe actuar con sumo cuidado cuando se realizan las conexiones del
módem ya que los cables telefónicos pueden conducir altas tensiones
eléctricas.
PERICOLO
Fare attenzione quando si connette il modem poichè un alto voltaggio può
essere presente nei fili elettrici del telefono.
Use this connection with the internal modem and a standard dial-up public
telephone line. This interface can also be used for the SCADA-Modbus
interface. See Appendix E on page 133.
DANGER
Users should not attempt to make
electrical connections
themselves, but should contact
the appropriate electric
inspection authority, or
electrician, as appropriate
DANGER
Les utilisateurs ne doivent pas essayer d'établir eux-mêmes de telles
connexions, mais doivent contacter l'électricien ou l'organisme de vérification
électrique appropriée, selon le cas.
PELIGRO
El usuario no debe intentar efectuar tales conexiones por sí mismo, sino hacer
contacto con las autoridades adecuadas para inspección eléctrica o un
electricista, según sea el caso.
GEFAHR
Anschlüsse dieser Art sollten nicht vom Anwender selbst vorgenommen werden
- wenden Sie sich an einen qualifizierten Elektroinstallateur bzw. das zuständige
Stromversorgungsunternehmen.
PERICOLO
L'utilizzatore non deve effettuare collegamenti, ma deve contattare una apposite
autorità per l'ispezione o un elettricista come previsto dalle norme.
The Load Number (LN) assigned to each terminal device denotes the
percentage of the total load to be connected to a telephone loop which is used
by the device to prevent overloading. The termination on a loop may consist of
any combination of devices subject only to the requirement that the total of the
Load Numbers of all the devices does not exceed 100.
1. Disconnect all power to the 980 Flow Meter. See warning in Wiring Safety
Information on page 31.
Page 46
Wiring the Modem Interface
2. Use a large flat-blade screwdriver to loosen the two screws securing the
980 Flow Meter cover. Open the cover.
3. Use a Phillips screwdriver to remove the modem terminal
protective cover. See Figure 20.
Page 49

4. Attach a NEMA-approved conduit or compression fitting to one of the
Note: Route wires through
NEMA-approved conduit hubs
(Cat. No. 16483) to ensure
that water and dust do not enter
the enclosure.
5. Strip insulation ¼ in. from the modem leads.
6. Connect wires to the proper screw terminal block (TB2) as shown
7. To ensure protection against electrical shock, reinstall the protective cover
Figure 20 Modem Wiring Connections
Section 2
½ in. openings on the bottom of the instrument, and route the modem
cable wires through this opening.
in Ta bl e 1 1 and Figure 20.
(Cat. No. 49170-00) over the modem terminal connections.
Table 11 Modem Terminal Block Connections (TB2)
Pin Signal Description
1tip
2ring
pH
pH
TB3
TB3
MODEM
MODEM
MODEM
RAIN
RAIN
TB2
TB2
TB2
1
1
1
1
1
ULTRASONIC
ULTRASONIC
1
1
1
1
TOTALIZER
TOTALIZER
1
1
TIP
TIP
TIP
RING
RING
RING
2
2
3
3
RING
RING
TIP
TIP
4
4
TB5
TB5
5
5
6
6
TB6
TB6
7
7
RTD
RTD
8
8
RTD –
RTD –
SHIELD
SHIELD
9
9
10
10
11
11
TOTAL +
TOTAL +
12
12
TOTAL –
TOTAL –
SHIELD
SHIELD
1 2 3 4 5 6 7 8 9 10 11 12
1 2 3 4 5 6 7 8 9 10 11 12
SHIELD
SHIELD
NO
NO
12
12
REF
REF
COM RELAY 4
COM RELAY 4
11
11
pH
pH
NC
NC
10
10
RTD
RTD
NO
NO
9
F1
F1
HOT/ 1
HOT/ 1
HOT/ 1
HOT/ 1
NEU/ 2
NEU/ 2
NEU/ 2
NEU/ 2
T, 1.0A 250V
T, 1.0A 250V
9
–5V
F2
F2
TB8
TB8
TB8
TB8
–5V
8
8
COM RELAY 3
COM RELAY 3
COMMON
COMMON
NC
NC
7
7
+5V
+5V
NO
NO
6
6
COM RELAY 2
COM RELAY 2
5
5
4
4
NC
NC
3
3
2
2
1
1
J13
J13
J13
J13
RTD
RTD
485A
485A
485B
485B
485+NO
485+NO
485GNDCOM RELAY 1
485GNDCOM RELAY 1
SHIELDNC
SHIELDNC
RS485
RS485
TB7
TB7
ON
ON
J12
J12
No Connection
POWER
OFF
1. Protective Cover for TB2 2. Cable to Modem
2.15 Wiring the pH Sensor
The pre-amp junction box (Cat. No. 9708300) is used to connect the pH probe
to the 980 Flow Meter. The pH probe wires attach to a terminal strip in the
junction box.
AVTB11
AVTB11
SHEILD
SHEILD
RCV–
TB4
TB4
TB 9 ANALOG
TB 9 ANALOG
TB10 4-20 mA
TB10 4-20 mA
1
1
RAIN+
RAIN+
12
12
12
12
11
11
11
11
10
10
10
10
9
9
9
9
8
8
8
8
7
7
7
7
6
6
6
6
5
5
5
5
4
4
4
4
3
3
3
3
2
2
2
2
1
1
1
1
SAMPLERANALOGANALOG
SAMPLERANALOGANALOG
RCV–
CH A+CH 4
CH A+CH 4
RCV+
RCV+
CH A–COMMONRAIN–
CH A–COMMONRAIN–
XMIT–
XMIT–
13 14 15 16
13 14 15 16
SHIELDSHIELDSHIELD
SHIELDSHIELDSHIELD
XMIT+
XMIT+
12
12
CH B+CH 5CH 1
CH B+CH 5CH 1
COMMON
COMMON
11
11
CH B–COMMONCOMMON
CH B–COMMONCOMMON
+12V
+12V
10
10
9
9
SHIELDSHIELDSHIELD
SHIELDSHIELDSHIELD
DEPTH–
DEPTH–
8
8
STARTCH 6CH 2
STARTCH 6CH 2
DEPTH+
DEPTH+
7
7
PULSECOMMONCOMMON
PULSECOMMONCOMMON
SHIELD
SHIELD
6
6
COMMON
COMMON
BOTTLESHIELDSHIELD
BOTTLESHIELDSHIELD
DSR
DSR
EVENTCH 7CH 3
EVENTCH 7CH 3
5
5
4
4
RXD
RXD
COMMONCOMMONCOMMON
COMMONCOMMONCOMMON
3
3
DTR
DTR
SHIELDSHIELDSHIELD
SHIELDSHIELDSHIELD
2
2
TXD
TXD
1
1
+12V
+12V
RS232C
RS232C
1
2
2.15.1 pH Junction Box to Instrument
To connect the pH junction box to the 980 Flow Meter follow the steps below
and refer to Figure 21.
1. Disconnect ac power from the 980 Flow Meter. See warning information in
Wiring Safety Information on page 31.
Page 47
Wiring the pH Sensor
Page 50

Section 2
2. Use a large flat-blade screwdriver to loosen the two screws securing the
980 Flow Meter cover. Open the cover.
3. Strip the insulation from the pH junction box leads ¼ inch.
4. Route the cable (Cat. No. 9708800) from the pH junction box through a
NEMA-rated compression fitting (Cat. No. 16483) or conduit to one of the
½ in. openings on the bottom of the 980 Flow Meter.
5. Connect the wires to the proper screw terminal blocks (TB3). Refer to
Ta bl e 1 2 and Figure 21.
Table 12 pH Terminal Block Connections (TB3)
Pin Signal Description Wire Color
1 shield clear
2 reference black
3pHbrown
4RTDred
5 - 5 V dc orange
6 common yellow
7 + 5 V dc green
Figure 21 Junction Box to Instrument
No Connection
POWER
OFF
AVTB11
AVTB11
SHEILD
pH
pH
TB3TB3
TB3TB3
MODEM
MODEM
1
1
1 2 3 4 5 6 7 8 9 10 11 12
1 2 3 4 5 6 7 8 9 10 11 12
SHIELD
SHIELD
NO
NO
REF
REF
1
GROUND
GROUND
485GNDCOM RELAY 1
485GNDCOM RELAY 1
1
pH
pH
RTD
RTD
ULTRASONIC
ULTRASONIC
–5V
–5V
TB6
TB6
1
1
+5V
+5V
RTD
RTD
485A
485A
485B
485B
1
1
485+NO
485+NO
SHIELDNC
SHIELDNC
RS485
RS485
TB7
TB7
TOTALIZER
TOTALIZER
COM RELAY 4
COM RELAY 4
NC
NC
NO
ON
ON
F1
F1
T, 1.0A 250V
T, 1.0A 250V
HOT/ 1
HOT/ 1
HOT/ 1
HOT/ 1
J12
J12
NEU/ 2
NEU/ 2
NEU/ 2
NEU/ 2
NO
F2
F2
COM RELAY 3
COM RELAY 3
NC
NC
NO
NO
COM RELAY 2
COM RELAY 2
NC
NC
3
3
2
2
1
1
TB2
TB2
RING
RING
TIP
TIP
RING
RING
TIP
TIP
RTD
RTD
RTD –
RTD –
SHIELD
SHIELD
TOTAL +
TOTAL +
TOTAL –
TOTAL –
SHIELD
SHIELD
TB4
TB4
TB 9 ANALOG
TB 9 ANALOG
RAIN
RAIN
1
1
1
1
RAIN+
RAIN+
2
2
3
3
4
4
TB5
TB5
5
5
6
6
7
7
8
8
9
9
10
10
11
11
12
12
TB10 4-20 mA
TB10 4-20 mA
12
12
12
12
11
11
11
11
10
10
10
10
9
9
9
9
8
8
8
8
7
7
7
7
6
6
6
6
5
5
5
5
4
4
4
4
3
3
3
3
2
2
2
2
1
1
1
1
SAMPLERANALOGANALOG
SAMPLERANALOGANALOG
PREAMP INTERFACE
CH A+CH 4
CH A+CH 4
CH A–GROUNDRAIN–
CH A–GROUNDRAIN–
SHIELDSHIELDSHIELD
SHIELDSHIELDSHIELD
CH B+CH 5CH 1
CH B+CH 5CH 1
CH B–GROUNDGROUND
CH B–GROUNDGROUND
SHIELDSHIELDSHIELD
SHIELDSHIELDSHIELD
STARTCH 6CH 2
STARTCH 6CH 2
PULSEGROUNDGROUND
PULSEGROUNDGROUND
BOTTLESHIELDSHIELD
BOTTLESHIELDSHIELD
EVENTCH 7CH 3
EVENTCH 7CH 3
GROUNDGROUNDGROUND
GROUNDGROUNDGROUND
SHIELDSHIELDSHIELD
SHIELDSHIELDSHIELD
FOR USEW
W
IRING INSTR
INSIDE COVER
SHEILD
RCV–
RCV–
RCV+
RCV+
XMIT–
XMIT–
13 14 15 16
13 14 15 16
XMIT+
XMIT+
12
12
GROUND
GROUND
11
11
+12V
+12V
10
10
9
9
DEPTH–
DEPTH–
8
8
DEPTH+
DEPTH+
7
7
SHIELD
SHIELD
6
6
GROUND
GROUND
DSR
DSR
5
5
4
4
RXD
RXD
3
3
DTR
DTR
2
2
TXD
TXD
1
1
+12V
+12V
RS232C
RS232C
ITH PH PR
UCTION ARE ON
OBE
Page 48
Wiring the pH Sensor
3328 pH 0293 02
Page 51

2.15.2 pH Probe to Junction Box
To connect the pH Sensor to the pH Junction Box:
Section 2
Note: pH sensor wire connections
are found inside the junction
box cover.
2. Loosen the compression fitting and route the pH sensor cable through the
3. Connect the pH sensor wires to the screw terminals. Refer to Figure 22.
4. Replace the cover, the cover gasket, and the nylon taper seals on all
1. Remove the four hold-down screws and nylon taper seals on the cover of
Note: Pull excess slack cable out of
the junction box and tighten the
compression fitting on the box.
Figure 22 pH Probe to Junction Box
the pH junction box with a Phillips-head screwdriver. Remove the cover.
fitting. Pull the cable into the junction box.
four screws.
21
GND
REF
RTD
RTD
3
3328 pH 0293 02
GLASS
pH
SHLD
1. Pre-wired strain relief 2. Compression Fitting
(NEMA-approved strain relief)
2.16 Wiring the Downlook Ultrasonic Sensor
1. Disconnect all power to the 980. Refer to Wiring Safety Information on
page 31.
Note: To ensure protection against
electrical shock reinstall cover over
sensor terminal connection.
Note: Route wires through
NEMA-approved conduit hubs
(Cat. No. 16483) to ensure water
and dust do not enter the enclosure.
2. Use a large flat-blade screwdriver to loosen the two screws securing the
980 cover. Open the cover.
3. Remove the protective cover over the sensor terminal connection.
4. Attach a NEMA-approved conduit or compression fitting to one of the
½ in. openings on the bottom of the instrument, and route the ultrasonic
cable through the opening.
5. Install wires to the proper screw terminal block (TB5 and TB6). Refer to
Ta bl e 1 3 and Ta bl e 1 4 for connection pin assignments and Figure 23.
3. pH Probe Cable
Page 49
Wiring the Downlook Ultrasonic Sensor
Page 52

Section 2
6. To ensure protection against electrical shock reinstall the protective cover
over the Ultrasonic + and - terminal connections.
Table 13 Ultrasonic Terminal Block Connections (TB5)
Pin Signal Description Wire Type Wire Color
1 Ult + (pos) Coax Inner Conductor yellow
2 Ult - (neg) Coax Outer Conductor orange
Table 14 Ultrasonic Terminal Block Connections (TB6)
Pin Signal Description Wire Color
1 RTD + (pos) red
2 RTD - (neg) black
3 shield clear
Figure 23 Ultrasonic Transducer Connections
pH
pH
TB3
TB3
MODEM
MODEM
1
1
12345678 9101112
12345678 9101112
SHIELD
SHIELD
NO
NO
12
12
REF
REF
1
1
COMMON
COMMON
1
pH
pH
RTD
RTD
ULTRASONIC
ULTRASONIC
ULTRASONIC
–5V
–5V
1
1
1
+5V
+5V
RTD
RTD
RTD
485A
485A
485B
485B
1
1
485+NO
485+NO
485GNDCOM RELAY 1
485GNDCOM RELAY 1
SHIELDNC
SHIELDNC
RS485
RS485
TB7
TB7
TOTALIZER
TOTALIZER
COM RELAY 4
COM RELAY 4
11
11
NC
NC
10
10
NO
NO
9
F1
F1
HOT/ 1
HOT/ 1
HOT/ 1
HOT/ 1
NEU/ 2
NEU/ 2
NEU/ 2
NEU/ 2
T, 1.0A 250V
T, 1.0A 250V
9
F2
F2
8
8
COM RELAY 3
COM RELAY 3
NC
NC
7
7
NO
NO
6
6
COM RELAY 2
COM RELAY 2
5
5
4
4
NC
NC
3
3
2
2
1
1
J13
J13
J13
J13
TB8
TB8
TB8
TB8
ON
ON
J12
J12
TB4
TB4
TB 9 ANALOG
TB 9 ANALOG
RAIN
RAIN
TB2
TB2
1
1
1
1
RING
RING
RAIN+
RAIN+
TIP
TIP
2
2
3
3
RING
RING
RING
TIP
TIP
TIP
4
4
TB5
TB5
TB5
5
5
6
6
TB6
TB6
TB6
7
7
RTD
RTD
RTD
8
8
RTD –
RTD –
RTD –
SHIELD
SHIELD
SHIELD
9
9
10
10
11
11
TOTAL +
TOTAL +
12
12
TOTAL –
TOTAL –
SHIELD
SHIELD
TB10 4-20 mA
TB10 4-20 mA
12
12
12
12
11
11
11
11
10
10
10
10
9
9
9
9
8
8
8
8
7
7
7
7
6
6
6
6
5
5
5
5
4
4
4
4
3
3
3
3
2
2
2
2
1
1
1
1
SAMPLERANALOGANALOG
SAMPLERANALOGANALOG
No Connection
2
POWER
OFF
1. Protective Cover for TB5 and TB6 2. Cable to Ultrasonic Sensor
AVTB11
AVTB11
SHEILD
SHEILD
RCV–
RCV–
CH A+CH 4
CH A+CH 4
RCV+
RCV+
CH A–COMMONRAIN–
CH A–COMMONRAIN–
XMIT–
XMIT–
13 14 15 16
13 14 15 16
SHIELDSHIELDSHIELD
SHIELDSHIELDSHIELD
XMIT+
XMIT+
12
12
CH B+CH 5CH 1
CH B+CH 5CH 1
COMMON
COMMON
11
11
CH B–COMMONCOMMON
CH B–COMMONCOMMON
+12V
+12V
10
10
9
9
SHIELDSHIELDSHIELD
SHIELDSHIELDSHIELD
DEPTH–
DEPTH–
8
8
STARTCH 6CH 2
STARTCH 6CH 2
DEPTH+
DEPTH+
7
7
PULSECOMMONCOMMON
PULSECOMMONCOMMON
SHIELD
SHIELD
6
6
COMMON
COMMON
BOTTLESHIELDSHIELD
BOTTLESHIELDSHIELD
DSR
DSR
EVENTCH 7CH 3
EVENTCH 7CH 3
5
5
4
4
RXD
RXD
COMMONCOMMONCOMMON
COMMONCOMMONCOMMON
3
3
DTR
DTR
SHIELDSHIELDSHIELD
SHIELDSHIELDSHIELD
2
2
TXD
TXD
1
1
+12V
+12V
RS232C
RS232C
1
Page 50
Wiring the Downlook Ultrasonic Sensor
Page 53

2.17 Wiring the In-Pipe Ultrasonic Sensor
The in-pipe ultrasonic sensor is wired to the 980 Flow Meter the same way as
the ultrasonic downlook. Refer to section 2.16 Wiring the Downlook Ultrasonic
Sensor on page 49
Only install an ultrasonic downlook or an in-pipe ultrasonic sensor to the
instrument, they cannot be connected at the same time.
Figure 24 In-Pipe Ultrasonic Sensor
Section 2
2.18 Wiring the Velocity-Only Sensor
2.18.1 Bare Lead Sensor Cables
Bare lead sensor cables are used when the cable will be run through a
conduit. When conduit is used, it is recommended that the conduit be 1 in.
Note: Bare lead connections and
Quick-connections cannot be made
at the same time.
or larger.
Wiring Procedure
1. Disconnect all power to the 980. Refer to the Wiring Safety Information on
page 31.
2. Use a large flat-blade screwdriver to loosen the two screws securing the
980 cover. Open the cover.
3. Attach a NEMA-approved conduit or compression fitting to one of the
½ in. openings on the bottom of the instrument, and route the velocityonly cable wires through the opening
Page 51
Wiring the In-Pipe Ultrasonic Sensor
Page 54

Section 2
4. Connect the bare leads to the proper screw terminal block (TB11) as
shown in Ta bl e 1 5 .
Note: The velocity-only probe and
the submerged AV probe cannot be
Table 15 Velocity-Only Sensor Terminal Block Connections (TB11)
connected at the same time.
Disconnect all bare lead
Pin Signal Description
connections or submerged AV
quick-connect connections to TB11
before connecting a velocity-only
bare lead connection. To prevent
dangling wires from touching the
circuit nodes, tape each individual
wire then bundle the wires and tape
them together.
10 + 12 V dc red red
11 common green green
12 XMIT + (pos) gray gray
13 XMIT - (neg) violet violet
14 RCV + (pos) orange orange
15 RCV - (neg) yellow b/w shield
16 shield clear clear
* If the factory prepared cable end is cut off, the wire colors will no longer match. Use
the trimmed cable wire colors.
2.18.2 Velocity-Only Sensor Cable Quick-Connect
The quick-connect hub allows easy installation and removal of the
velocity-only sensor. Refer to Figure 25 on page 52. To connect the
velocity-only sensor cable to the quick-connect hub:
1. Remove the rubber cap on the quick-connect hub.
Factory Wire
Color*
Trimmed Cable
Wire Color
Figure 25 Quick-Connect Hub
No Connection
POWER
OFF
2. Place the connector-end of the cable to the quick-connect hub and tighten
the connection by turning the cable connector securement ring clockwise.
AVTB11
AVTB11
SHEILD
pH
pH
TB3
TB3
MODEM
MODEM
1
1
1 2 3 4 5 6 7 8 9 10 11 12
1 2 3 4 5 6 7 8 9 10 11 12
SHIELD
SHIELD
NO
NO
12
12
REF
REF
1
COMMON
COMMON
485GNDCOM RELAY 1
485GNDCOM RELAY 1
SHIELDNC
SHIELDNC
1
pH
pH
RTD
RTD
ULTRASONIC
ULTRASONIC
–5V
–5V
+5V
+5V
485A
485A
485B
485B
485+NO
485+NO
TB6
TB6
1
1
RTD
RTD
1
1
RS485
RS485
TB7
TB7
TOTALIZER
TOTALIZER
COM RELAY 4
COM RELAY 4
11
11
NC
NC
10
10
NO
NO
9
T, 1.0A 250V
T, 1.0A 250V
9
F2
F2
8
8
COM RELAY 3
COM RELAY 3
NC
NC
7
7
NO
NO
6
6
COM RELAY 2
COM RELAY 2
5
5
4
4
NC
NC
3
3
2
2
1
1
J13
J13
J13
J13
TB8
TB8
TB8
TB8
ON
ON
F1
F1
HOT/ 1
HOT/ 1
HOT/ 1
HOT/ 1
J12
J12
NEU/ 2
NEU/ 2
NEU/ 2
NEU/ 2
TB4
TB4
TB 9 ANALOG
TB 9 ANALOG
RAIN
RAIN
TB2
TB2
1
1
1
1
RING
RING
RAIN+
RAIN+
TIP
TIP
2
2
3
3
RING
RING
TIP
TIP
4
4
TB5
TB5
5
5
6
6
7
7
RTD
RTD
8
8
RTD –
RTD –
SHIELD
SHIELD
9
9
10
10
11
11
TOTAL +
TOTAL +
12
12
TOTAL –
TOTAL –
SHIELD
SHIELD
TB10 4-20 mA
TB10 4-20 mA
12
12
12
12
11
11
11
11
10
10
10
10
9
9
9
9
8
8
8
8
7
7
7
7
6
6
6
6
5
5
5
5
4
4
4
4
3
3
3
3
2
2
2
2
1
1
1
1
SAMPLERANALOGANALOG
SAMPLERANALOGANALOG
1
SHEILD
RCV–
RCV–
CH A+CH 4
CH A+CH 4
RCV+
RCV+
CH A–COMMONRAIN–
CH A–COMMONRAIN–
XMIT–
XMIT–
13 14 15 16
13 14 15 16
SHIELDSHIELDSHIELD
SHIELDSHIELDSHIELD
XMIT+
XMIT+
12
12
CH B+CH 5CH 1
CH B+CH 5CH 1
COMMON
COMMON
11
11
CH B–COMMONCOMMON
CH B–COMMONCOMMON
+12V
+12V
10
10
9
9
SHIELDSHIELDSHIELD
SHIELDSHIELDSHIELD
DEPTH–
DEPTH–
8
8
STARTCH 6CH 2
STARTCH 6CH 2
DEPTH+
DEPTH+
7
7
PULSECOMMONCOMMON
PULSECOMMONCOMMON
SHIELD
SHIELD
6
6
COMMON
COMMON
BOTTLESHIELDSHIELD
BOTTLESHIELDSHIELD
DSR
DSR
EVENTCH 7CH 3
EVENTCH 7CH 3
5
5
4
4
RXD
RXD
COMMONCOMMONCOMMON
COMMONCOMMONCOMMON
3
3
DTR
DTR
SHIELDSHIELDSHIELD
SHIELDSHIELDSHIELD
2
2
TXD
TXD
1
1
+12V
+12V
RS232C
RS232C
1. Quick-connect Hub
Page 52
Wiring the Velocity-Only Sensor
Page 55

2.19 Wiring the Submerged Area Velocity Sensor
2.19.1 Bare Lead Sensor Cables
Bare lead sensor cables are used in those cases when the cable will be run
through a conduit. When conduit is used, it is recommended that the conduit
be 1 in. or larger to the junction box and ½ in. to the instrument.
Note: Bare lead connections and
Quick-connections cannot be made
at the same time.
2.19.1.1 Junction Box Connection Procedure
Connect the bare leads to the flow meter using a junction box (Cat. No.
9702500). This junction box is a physical connection point for the sensor wires
and breather tubing.
1. Disconnect all power to the 980 Flow Meter. Refer to Wiring Safety
Information on page 31.
2. Loosen the four cover screws and remove the cover from the junction box.
Unscrew the cable-clamp hex nut on the box enough to allow insertion of
the sensor cable.
Section 2
Note: The submerged AV probe and
the velocity-only probe cannot be
connected at the same time.
Disconnect all bare lead
connections or submerged AV
quick-connect connections to TB11
before connecting a submerged AV
bare lead connection. Refer to
section 2.18 on page 51.
3. Insert the sensor cable into the box.
4. Refer to the wiring diagram on the inside cover of the box. Connect each
wire to its corresponding screw terminal in the upper row, according to the
wire colors listed in that diagram. See Figure 26 on page 54
5. Connect the cable tubing to the clear tubing that is connected to the exit
fitting in the junction box.
6. Create a strain relief by slipping the cable in or out of the box to
sufficiently create a slight loop in the wires and tubing. Tighten the cable
clamp hex nut.
7. Verify that the sealing gasket is in place in the cover, then replace the
cover on the junction box and tighten screws.
8. Connect clear tubing between the top tubing nipple on the desiccant
canister and the brass tubing nipple on the junction box.
9. Connect the short, bare wire cable to TB11. Refer to Ta bl e 1 6 and
Figure 27 on page 55.
Page 53
Wiring the Submerged Area Velocity Sensor
Page 56

Section 2
Table 16 Submerged Area Velocity Sensor Terminal Board Connections (TB11)
Pin Signal Description Wire Color
8 Depth + (pos) white
9 Depth - (neg) black
10 + 12 V dc red
11 common green
12 XMIT + (pos) gray
13 XMIT - (neg) violet
14 RCV + (pos) orange
15 RCV - (neg) yellow
16 shield clear/brown
Figure 26 Submerged Area Velocity Junction Box Connections
1. Sensor Cable Tubing 2. Brass Tubing Nipple 3. Cable Clamp Hex Nut
Page 54
Wiring the Submerged Area Velocity Sensor
Page 57

Figure 27 Junction Box, Probe, Cable Connection, and Desiccant Canister
Section 2
2.19.2 Submerged Area Velocity Sensor Cable Quick-Connect
The quick-connect hub allows easy installation and removal of the submerged
area velocity sensor. Connect the submerged area velocity sensor cable to
the quick-connect hub:
1. Remove the rubber cap on the quick-connect hub. See Figure 25.
2. Place the connector-end of the cable to the quick-connect hub and tighten
the connection by turning the cable connector securement ring clockwise.
2.19.2.1 Desiccant Cartridge
Make sure vinyl tubing is securely fastened at both fittings (Figure 27). Failure
to do so will allow fluid or moisture to pass down or block the pressure
transducers reference port. This will result in faulty readings and could lead to
sensor failure.
During installation, arrange the sensor so that the desiccant cartridge hangs
down as shown in the Figure 27.
Page 55
Wiring the Submerged Area Velocity Sensor
Page 58

Visit www.americansigma.com
Page 59

OPERATION
DANGER
Handling chemical samples, standards, and reagents can be dangerous. Review the necessary Material
Safety Data Sheets and become familiar with all safety procedures before handling any chemicals.
DANGER
La manipulation des échantillons chimiques, étalons et réactifs peut être dangereuse. Lire les Fiches de
Données de Sécurité des Produits (FDSP) et se familiariser avec toutes les procédures de sécurité avant
de manipuler tous les produits chimiques.
PELIGRO
La manipulación de muestras químicas, estándares y reactivos puede ser peligrosa. Revise las fichas
de seguridad de materiales y familiarícese con los procedimientos de seguridad antes de manipular
productos químicos.
GEFAHR
Das Arbeiten mit chemischen Proben, Standards und Reagenzien ist mit Gefahren verbunden. Es wird dem
Benutzer dieser Produkte empfohlen, sich vor der Arbeit mit sicheren Verfahrensweisen und dem richtigen
Gebrauch der Chemikalien vertraut zu machen und alle entsprechenden Materialsicherheitsdatenblätter
aufmerksam zu lesen.
PERICOLO
La manipolazione di campioni, standard e reattivi chimici può essere pericolosa. La preghiamo di prendere
conoscenza delle Schede Techniche necessarie legate alla Sicurezza dei Materiali e di abituarsi con tutte
le procedure di sicurezza prima di manipolare ogni prodotto chimico.
Page 57
OPERATION
Page 60

Visit www.americansigma.com
Page 61

Section 3 Basic Programming Setup
3.1 Initial Power-Up of Meter
After power is applied, the flow meter performs a complete diagnostic self-test
and displays the menu shown when the unit was last turned off. Set the
instrument programming features when the Main Menu is displayed. The Main
Menu is the starting point for all programming operations. The Main Menu
offers four choices:
• Setup—Basic programming
• Status—Lists all currently measured readings
• Display Data—Shows graphs and tables of logged data
(See Displaying Data on page 117)
• Options—Advanced programming
Setup and Options functions lead to sub-menus and will configure the basic
and advanced features of the flow meter. Refer to the Main Program Flow
Chart on page 149. The Display Data and Status lead to sub-menus and will
provide information only. Press the
channels that have enabled logging (flow, pH, temp., etc.).
STATUS soft key to display any data
3.2 Basic Programming
Note: To make changes to the
program entries after the basic
programming setup, press the
MAIN MENU key and select
SETUP>MODIFY SELECTED
ITEMS. Highlight the program
entry using the up and down arrow
soft keys.
11:00 AM 21 - APR - 01 * Main Menu*
DISPLAY DATA SETUP
OPTIONS STATUS
READY TO START
Basic programming setup must be performed, in its entirety, after the
instrument is installed. Refer to the 980 Flow Meter Basic Programming Setup
Flow Chart on page 150 for more information. The basic program setup will
modify all items:
• Flow Units • Site ID
• Primary Devices • Velocity Direction
• Program Lock • Velocity Units
• Sampler Pacing • Velocity Cutoff/Velocity Default
Step 1 - Setup
1-A. Press the SETUP soft key from the Main Menu to prepare the 980 Flow
Meter for use.
1-B. Press the
begin setting up the flow units.
MODIFY ALL ITEMS soft key and press the ACCEPT soft key to
Page 59
Basic Programming Setup
Page 62

Section 3
11:00 AM 21 - APR - 01 * Main Menu*
DISPLAY DATA SETUP
OPTIONS STATUS
READY TO START
11:00 AM 21 - APR - 01 * Main Menu*
Step 2 - Flow Units
Note: Different flow units can be
selected in the Sampler Pacing
programming section (see
section 4.6.1 on page 75).
LOGIN
REVIEW ALL
ITEMS
READY TO START
SELECTED ITEMS
MODIFY
ALL ITEMS
MODIFY
2-A. From the Modify All Items screen, highlight Flow Units using the up and
down arrow soft keys. Press the
2-B. Press the
CHANGE CHOICE soft key to cycle through the flow unit
SELECT soft key to continue.
choices. Refer to Ta bl e 1 7 for flow unit choices. The flow unit will be
used whenever a flow reading is displayed or logged.
2-C. When the desired choice is displayed press the
continue and set level units
11:00 AM 21 - APR - 01 FLOW UNITS
ACCEPT
FLOW UNITS
.
mdg CANCEL
ACCEPT soft key to
CHANGE
CHOICE
SELECT APPROPRIATE UNITS
Table 17 Flow Unit Choices
Abbreviation Flow Unit Abbreviation Flow Units
gps Gallons per second cfs Cubic feet per second
gpm Gallons per minute cfm Cubic feet per minute
gph Gallons per hour cfh Cubic feet per hour
lps Liters per second cfd Cubic feet per day
lpm Liters per minute cms Cubic meters per second
lph Liters per hour cmm Cubic meters per minute
mgd Million gallons per day cmh Cubic meters per hour
afd Acre-feet per day cmd Cubic meters per day
Page 60
Basic Programming
Page 63

Step 3 - Level Units
Section 3
3-A. From the Modify All Items screen, highlight Level Units, using the up
and down arrow soft keys and press the
3-B. Select the units of measure to use when displaying level readings
(Ta bl e 1 8 ). Level units of measure are used whenever a level reading is
displayed or logged.
Table 18 Level Units Choices
Abbreviation Level Unit
in. inches
ft feet
cm centimeters
M meters
SELECT soft key to continue.
Step 4 - Primary Device
3-C. Press the
level unit choices. Press the
CHANGE CHOICE soft key to cycle through each of the
ACCEPT soft key to continue to primary
device setup.
4-A. From the Modify All Items screen, highlight Primary Device using the up
and down arrow soft keys, and press
SELECT to continue.
4-B. Select the desired primary device, enter the calculation method, shape,
and pipe diameter for that primary device.
4-C. Press the
CHANGE CHOICE soft key to cycle through the primary device
choices (See Tabl e 19 ). Tab le 2 0, Ta bl e 2 1, and Ta bl e 2 2 show the
size and details required for each. Press the
continue to Program Lock.
11:00 AM 21 - APR - 01 PRIMARY DEVICE
ACCEPT
PRIMARY DEVICE:
WEIR
SELECT PRIMARY DEVICE
ACCEPT soft key to
CHANGE
CHOICE
Table 19 Primary Device Choices
Primary Device Description
None—Level Only No primary device installed. Level measurement only.
Weir
Flume Parshall, Trapezoidal, H-type, HL-type, HS-type, Leopold-Lagco, Palmer Bowlus (See Ta b le 2 1)
Nozzle California pipe
Power Equation
Compound, Cipolletti, Contracted rectangular, Non-contracted rectangular, Thel-mar, V-Notch
(22.5-120°), Compound V-Notch (See Ta b le 2 0 )
Enter variables K
, K2, n1 and n2
1
QK1H
n1
+=
K2H
n2
K1 (0–9999.99), K2 (+/- 0–9999.99), n1 and n2 (1–9.99)
Page 61
Basic Programming
Page 64

Section 3
Table 19 Primary Device Choices (continued)
Primary Device Description
Head vs. Flow Two independent user–entered look up tables of up to 100 points each (See Ta b l e 2 2 )
Manning Equation Rectangular channel, U-shaped channel, or Circular pipe (See Ta bl e 2 2 )
Area Velocity Circular pipe, U-shaped channel, Trapezoidal channel, Rectangular channel (See Ta b l e 2 2 )
Table 20 Weir Choices
Weir Description
Cipolletti Crest width is in. or cm (1–960 in. or 2.54– 2438 cm)
Contracted Rectangular Crest width is in. or cm (1–960 in. or 2.54– 2438 cm)
Non-Contracted Rectangular Crest Width is in. or cm (1–960 in. or 2.54– 2438 cm)
Thel-mar Size in inches. (6, 8, 10, 12 or 15 in.)
V-Notch Angle of notch in degrees (22.5 to 120°)
Compound V-Notch
Angle of notch in degrees (22.5–120°), notch depth in inches, rectangular width in inches
(0–120 in. or 0–304 cm), Contracted or non-contracted.
Table 21 Flume Choices
Flumes Description
Parshall Flume size in inches (1, 2, 3, 6, 9, 12, 18, 24, 30, 36, 48, 60, 72, 84, 96, 108, 120 or 144 in.)
Trapezoidal Flume size (60° S, 60° L, 60° XL, 45° 2", 45° 12")
H - Type Flume size in feet (0.5, 0.75, 1.0, 1.5, 2.0, 2.5, 3.0 or 4.5 ft)
HL - Type Flume size in feet 3.5’, 4.0'
HS -Type Flume size in feet (0.4, 0.6, 0.8 or 1.0 ft)
Leopold-Lagco Flume size in inches (4, 6, 8, 10, 12, 15, 18, 20, 21, 24, 27, 30, 36, 42, 48, 54, 60, 66 or 72 in.)
Palmer-Bowlus Flume size in inches (4, 6, 8, 10, 12, 15, 18, 21, 24, 27, 30, 36, 42, 48, 60 or 72 in.)
Table 22 Other Primary Devices
Device or Equation Description
Head Vs. Flow
(two head vs. flow
tables are provided)
Manning Equation
Area Velocity
Level vs. Area Table
(two level vs. area
tables are provided)
Nozzle Enter nozzle diameter
Enter up to two tables of up to 100 user-defined head vs. flow points.
Head: 0– 99.99 in feet or centimeters
Flow: 0–99999.99 in any desired units
Enter pipe diameter, slope & roughness coefficient.
Pipe dia.: 4–240 in. or 101–6096 cm
Percent Slope: 0.001–1.00 [1 unit per hundred units = 0.01 slope]
Example: 1 m of decline every 100 m = 0.01 slope.
Manning Roughness
Circular Pipe: Enter pipe dia., 4–240 in.(10–610 cm)
Rectangular Channel: Enter width, 4–999.99 in. (10– 2540 cm).
Trapezoidal Channel: Enter width of channel bottom, width of channel top and channel depth, range
for all: 4–999.99 in. (10– 2540 cm)
U-Shaped Channel: Enter channel width, 4–999.99 in. (10–2540 cm)
Enter up to two tables of up to 100 user-defined level vs. area points; Level: 0–999.9 in ft, in., m or cm
Area: 1–99999.99 in ft
2
, in.2, m2 or cm
2
Page 62
Basic Programming
Page 65

Step 5 - Program Lock
Section 3
Program Lock provides a protective passcode to keep unauthorized
personnel from tampering with the keyboard. When enabled and a user
attempts to change the program, a screen will ask them to enter a password.
The Program Lock password is set at the factory as 9800 and cannot
be changed.
The meter can also be password locked to prevent remote access via RS232
or modem. InSight® Gold software allows you to change this password.
5-A. From the Modify All Items screen, highlight Program Lock using the up
and down arrow soft keys. Press the
SELECT soft key to continue.
Step 6 - Sampler Pacing
5-B. Enable or Disable the program lock using the
Press
ACCEPT to continue to Sampler Pacing.
CHANGE CHOICE soft key.
6-A. From the Modify All Items screen, highlight Sampler Pacing, using the
up and down arrow soft keys. Press the
6-B. Enable Sampler Pacing using the
SELECT soft key to continue.
CHANGE CHOICE soft key.
6-C. Refer to Table 23 for flow unit choices for sampler pacing.
Table 23 Flow Unit Choices for Sample Pacing
Abbreviation Volume
gal gallons
ltr liters
6-D. Press
3
m
af acre-feet
cf cubic-feet
ACCEPT to continue with Site ID.
cubic meters
Step 7 - Site ID
11:00 AM 21 - APR - 01 SAMPLER PACING
CHANGE
ACCEPT
CLEAR
ENTRY
SAMPLER PACING
500 gal
(USE NUMERIC KEYPAD)
UNITS
CANCEL
Creates an 1–8 digit site identification number. The site ID will appear on all
data printouts. This feature is useful when multiple sites are monitored using a
single flow meter or if data readings from multiple flow meters are collected.
7-A. From the Modified All Items screen, highlight Site ID using the up and
down arrow soft keys. Press
SELECT to continue.
7-B. Enter the site ID using the numeric keypad.
7-C. Press the
ACCEPT soft key to continue to total flow units.
Page 63
Basic Programming
Page 66

Section 3
Step 8 - Total Flow Units
8-A. From the Modify All Items screen, highlight Total Flow Units using the
up and down arrow soft keys. Press the
SELECT soft key to continue.
8-B. Set the Total Flow Units using the
CHANGE CHOICE soft key. Total flow
units of measure are used whenever a total flow unit is displayed or
logged. Refer to Ta bl e 2 4.
Table 24 Total Flow Unit Choices
Abbreviation Flow Unit
gal gallons
ltr liters
3
m
af acre-feet
cf cubic feet
8-C. Press the
ACCEPT soft key to continue with velocity direction.
Step 9 - Velocity Direction (only when logging velocity)
9-A. From the Modify All Items screen, highlight Velocity Direction using the
up and down arrow soft keys. Press the
9-B. Set the Velocity Direction using the
The Velocity Direction feature adapts to a number of difficult sites that would
otherwise not be able to measure velocity properly (Upstream, Downstream,
and Always Positive).
CHANGE CHOICE soft key.
cubic meters
SELECT soft key to continue.
9-C. Press the
9-D. Set the velocity units using the
ACCEPT soft key to move to velocity units setup.
CHANGE CHOICE soft key. Refer to
Ta bl e 2 5 .
Table 25 Velocity Unit Choices
Abbreviation Velocity Unit
fps feet per second
m/s meters per second
9-E. Read the Velocity cutoff warning on the screen. Press any key to
continue.
9-F. Enter the Velocity Cutoff, using the numeric keypad. Press the
ACCEPT
soft key to continue.
9-G. Enter the Velocity Default using the numeric keypad. Press the
ACCEPT
soft key to end the basic programming setup.
Page 64
Basic Programming
Page 67

Example 1:
Velocity Cutoff = 0.20 fps
Velocity Default = 0 fps
If the velocity falls below 0.20 fps, the meter will store a value of 0 fps until
the velocity increases above 0.20 fps.
Example 2:
Velocity Cutoff = 0.20 fps
Velocity Default = 0.20 fps
If the velocity falls below 0.20 fps, the meter will store a value of 0.20 fps
until the velocity increases above 0.20 fps.
3.3 Starting and Stopping Programs
When basic programming setup is completed, “run” (or execute) the program
selections. Press the
Note: When selecting START FROM
BEGINNING,
cleared from memory. When saving
the logged data, make sure the data
is downloaded to a DTU or personal
computer prior to pressing the
START FROM BEGINNING soft key.
If a program is complete, the logger
can only be restarted from the
beginning (and will clear all logged
data).
all logged data will be
halted program, or stop a program.
If a program has been halted (and no changes to the program settings were
made while it was stopped), press the
previously running program (and retain all logged data) or Start From
Beginning (and clear all logged data).
Section 3
RUN/STOP key to run a program, resume a currently
RUN key. Select either resume to
Status Description
Program is Running
Data Logging, 4–20 mA outputs, sampler control and alarm checking are active.
Program is Halted
Logging stops unit the program is restarted. It continues with the last logged value when restarted.
4–20 mA outputs remain unchanged
Sampler control is disabled
Alarm checking is disabled
Program is Complete or Ready to Start
No data logging
4–20 mA outputs stay at last value
No sampler interface
No alarm checking
Program Complete
A logger has been off for longer than three hours
Page 65
Starting and Stopping Programs
Page 68

Visit www.americansigma.com
Page 69

Section 4 External Device Setup
After wiring the instrument and other devices and performing the basic
programming setup program and, when necessary, calibrate the devices. For
each sensor program, calibrate, and install the sensors in a pipe. Refer to the
980 Quick-Start Guides on page 149 for more information on programming
and calibration. The following external devices are explained in Section 4:
• 4–20 mA Outputs (section 4.1) • Modem Interface (section 4.8)
• Analog Connection (section 4.2) • pH Sensor (section 4.9)
• Mechanical Totalizer
(section 4.3)
• Alarm Relays (section 4.4) • In-Pipe Ultrasonic Sensor
• Rain Gauge (section 4.5) • Velocity-Only Sensor
• Sampler (section 4.6) • Submerged AV Sensor
• RS232 (section 4.7)
4.1 4–20 mA Output
4.1.1 Programming the 4–20 mA Output
Two 4–20 mA current loop outputs are available for the 980 Flow Meter. These
current outputs typically pace other process equipment, such as a wastewater
sampler, in proportion to the flow rate.
The dual isolated 4–20 mA current loop outputs on the 980 Flow Meter are
unique, they can be assigned to any of the available channels, not just flow. In
addition, the 4 mA and 20 mA current levels are programmed to any desired
minimum and maximum value for that channel.
• Downlook Ultrasonic Sensor
(section 4.10)
(section 4.11)
(section 4.12)
(section 4.13)
Note: When the 4–20 mA outputs
are disabled and not completely
turned off, they will continue to
output a steady 4 mA.
1. From the Main Menu, select
OUTPUTS > SELECT
2. Enable the 4–20 mA outputs by pressing the CHANGE CHOICE soft key
while in the 4-20 mA output menu.
3. When the display shows the outputs as enabled, press the
soft key.
4. Choose either
to highlight the choice then press the
11:00 AM 21 - APR - 01 4–20 mA OUTPUTS
SELECT
RETURN
OUTPUT A
OUTPUT B
.
OUTPUT A or OUTPUT B. Use the up and down arrow keys
OPTIONS > ADVANCED OPTIONS > 4–20 mA
ACCEPT
SELECT soft key.
Page 67
External Device Setup
Page 70

Section 4
5. Select an Input Channel (e.g., channel 1, 2, 3, or, flow, etc.) to assign to
that output. Press the
CHANGE CHOICE soft key to cycle through the
channel names. When the desired channel is displayed, press the
ACCEPT soft key to pick that channel.
11:00 AM 21 - APR - 01 4–20 mA OUTPUTS
CHANGE
ACCEPT
INPUT CHANNEL:
FLOW
CANCEL
SELECT APPROPRIATE UNITS
CHOICE
6. Assign a channel value to the 4 mA current value. This value is typically 0,
however any value can be set. In other words, enter the value of the input
needed to generate 4 mA of current at the output.
11:00 AM 21 - APR - 01 4–20 mA OUTPUTS
ACCEPT
4 mA INPUT VALUE
CLEAR
ENTRY
SELECT APPROPRIATE UNITS
0.00 mgd CANCEL
7. Assign an input value to the 20 mA current level.
8. Repeat this process to configure the other 4–20 mA output.
4.1.2 Calibrating the 4–20 mA Output
After wiring the 4–20 mA connection perform a 4–20 mA output calibration.
The 4–20 mA output calibration requires a multimeter and an interface or
access to the 4–20 mA current loop wiring. Two 4–20 mA outputs are
available and are designated Output A and Output B. Both outputs are
calibrated the same way and are isolated from each other.
Calibration may be performed while the 4–20 mA device is in the current loop,
as shown in Figure 28 or disconnected from the current loop as shown in
Figure 29. In either case, the multimeter must be set to a 20 milliamp dc range
or greater.
1. From the Main Menu, select
CALIBRATION > 4–20 mA OUTPUTS.
2. Connect a multimeter to the 4–20 mA current outputs per Figure 28 or
Figure 29.
3. Make sure that the 4–20 mA output is enabled. If it is not enabled, press
the
CHANGE CHOICE soft key so that the display shows ENABLED and
press the
OPTIONS > ADVANCED OPTIONS >
ACCEPT soft key.
Page 68
4–20 mA Output
4. Select the output (A or B) to calibrate.
5. Press any key to set the selected output to 4.00 mA dc.
Page 71

6. Measure the current on the selected output using the multimeter and
enter the measured value using the numeric keypad. Press the
soft key to proceed.
7. Press any key to set the output to 20.00 mA dc.
8. Measure the current on the selected output using the multimeter and
enter the measured value using the numeric keypad. Press the
soft key to complete the calibration.
By entering the measured current values, the microprocessor will
electronically adjust the outputs to compensate for the difference between the
measured values and the expected values.
Figure 28 Calibration with the Meter in the Loop
Section 4
ACCEPT
ACCEPT
circle chart recorder
multimeter
00.00
current
loop
Figure 29 Calibration with the 4–20 mA Device Disconnected from the Loop
multimeter
00.00
980
980
current
loop
Page 69
4–20 mA Output
Page 72

Section 4
4.2 Analog Input
4.2.1 Programming the Analog Inputs
Channels 1 through 7 are analog input channels that can accept a signal from
an external device. This signal may range from -4.5 V dc (min.) to +4.5 V dc
(max.) or from 4 to 20 mA dc depending on the input selected. In some cases,
input signals from certain devices may also fall somewhere within those
ranges. For that reason, each analog input channel must be mapped to the
minimum and maximum signal limits of the external device.
To map an external device to an analog input channel:
Select an analog input channel (1, 2, and 3 are current inputs and 4 through 7
are voltage inputs).
Note: If logging is enabled on any
channel, that channel will have an
arrow in front of the channel name
to signify that the channel is logged.
1. Select
2. Highlight
DATA LOG from the Advanced Options menu.
SELECT INPUTS using the up and down arrow soft keys and then
press the
SELECT soft key.
3. Highlight the analog channel to log using the up and down arrow soft
keys, then press the
4. Press the
CHANGE CHOICE soft key to cycle between “Logged” and “Not
Logged”, then press the
SELECT soft key.
ACCEPT soft key.
5. Enter a Logging Interval.
6. Select Unit of measurement (pH, ft, °C, °F, mV, gal, m
cm,%
, 5 H2S,%lel, V dc, cfh, ppm, ppb, afd, cfs, cfm, cfd, cms, cmm,
02
3
, cf, ltr, in., m,
cmh, cmd, gps, gpm, gph, lps, lpm, lph, or mgd).
7. Enter Low Point.
8. Enter High Point.
9. Select another channel to configure, or press the
back up one step, or press the
MAIN MENU function key to return to the
RETURN soft key to
Main Menu.
Page 70
Analog Input
Example:
A dissolved oxygen meter has an analog output signal that will connect to the
980 Flow Meter analog input channel 4. The DO meter puts out an analog
signal which ranges from +1 V dc to +3 V dc, which is equivalent to 0 to
500 ppm. The DO meter is connected to Channel 4 and logs readings from
the DO meter occur once per minute.
To configure data logging for this example, follow the steps below.
1. Select
2. Highlight
DATA LOG from the Advanced Options menu.
SELECT INPUTS using the up and down arrow soft keys and then
press the
SELECT soft key.
3. Highlight the analog channel to log (Channel 4) using the up and down
arrow soft keys, then press the
SELECT soft key.
Page 73

Section 4
4. Press the CHANGE CHOICE soft key to select “Logged,” then press the
ACCEPT soft key.
5. Enter a 1-minute logging interval using the numeric keypad, then press
the
ACCEPT soft key.
6. Press the
CHANGE CHOICE soft key to cycle through the units of measure
until ppm is displayed. Press the
7. Apply a voltage to the desired analog input which corresponds to 0 ppm
(or +1 V dc). Enter 0 ppm using the numeric keypad and then press the
ACCEPT soft key.
8. Apply a voltage to the same analog input that corresponds to 500 ppm or
+3 V dc. Enter 500 ppm using the numeric keypad and then press the
ACCEPT soft key to complete the analog channel setup.
4.3 Mechanical Totalizer
4.3.1 Programming the Mechanical Totalizer
The Mechanical Totalizer consists of two numeric counters that keep track
of the total flow being measured. The totalizers consist of a resettable
totalizer and a non-resettable totalizer. Both totalizers are set to zero upon
program start.
Scaling multipliers are provided to allow tailoring of the totalizer response to
meet the requirements of the application. Some applications with high flow
rates will require a high scaling factor, while low flow rates will require a low
scaling factor.
ACCEPT soft key.
4.3.1.1 Modify Setup
The scaling factor is displayed whenever a total flow number is displayed.
As indicated in the Status Screen below, the total flow is displayed as
“TOTAL (x1000): 465 gal.” Multiplying the displayed total flow by the scaling
factor (1000) gives an actual total flow of 465,000 gallons.
11:00 AM 21 - APR - 01 STATUS SCREEN
LEVEL: 8.688 in.
FLOW: 71.39 mgd
TOTAL (X1000): 465 gal
pH: 7.2 pH
BATTERY: 16.9 volts
RUNNING
1. From the Main Menu, select
TOTALIZER to display the Modify Setup, Reset, and View Total screen.
OPTIONS> ADVANCED OPTIONS > FLOW
Modify Setup selects a totalizer scaling factor and a flow unit of measure.
1. Highlight
2. Press the
MODIFY SETUP using the up and down arrow soft keys.
SELECT soft key to continue.
Page 71
Mechanical Totalizer
Page 74

Section 4
3. Set the Totalizer Scaling factor using the CHANGE CHOICE soft key. All
three totalizers are scaled with one of seven scaling factors: X1, X10,
X100, X1000, X10,000, X100,000 or X1,000,000. The selected scaling
factor always applies to all totalizers. Press the
CHANGE CHOICE soft key
to cycle through the available scaling choices.
4.3.1.2 Reset (Totalizer)
Note: The mechanical totalizer
cannot be reset manually.
Note: If any type of condition
occurs, both the resettable and the
non-resettable totalizers are reset.
The resettable totalizer can be used
to total flow over a finite period and
can be reset as often as desired
without affecting the other totalizers.
4. Press the
ACCEPT soft key to continue.
5. Set the Total Flow Units using the CHANGE CHOICE soft key to cycle
through the choices. Total Flow Units are independent of the flow units
selected in the Setup Menu. Flow units of measure include:
• Acre-feet • Liters • Gallons
• Cubic Feet • Cubic Meters
6. Press the
ACCEPT soft key to continue.
The non-resettable totalizer will only be reset if one of the following
conditions occur:
• Change in totalizer scaling • Change in primary device
• Change in totalizer units of
• Start of new program
measure
1. Select RESET from the TOTALIZER menu. A confirmation message
will appear.
2. Press the
YES soft key to reset the totalizer or press the NO soft key to not
reset the totalizer.
To reset both software totalizers at once, start a program with the
RUN/STOP key.
Page 72
Mechanical Totalizer
View Totals
To view the current totals of both the resettable and non-resettable totalizers,
press
VIEW TOTALS from the Totalizer menu. Both totalizer values will appear.
Page 75

4.4 Alarm Relays
4.4.1 Programming the Alarm Relays
Alarms can be programmed to activate based on certain conditions (low
battery, low memory, etc.). Refer to 980 Alarms Flow Chart on page 152.
When an alarm is tripped, an action is initiated (report via modem, dial a
pager, or set a relay). There are two types of alarms:
• Trouble Alarms
• Set Point Alarms
4.4.1.1 Trouble Alarms
Trouble Alarms initiate an action when a trouble condition occurs.
For example, a relay may close when the memory is full.
Set Point Alarms look for trip points to be reached (either high or low or both)
before initiating an action. For example an initiated action may be the closing
of a relay when the water level exceeds 24 in. (60 cm) or drops below 4 in.
(10 cm).
Section 4
1. From the Main Menu, select
OPTIONS> ADVANCED OPTIONS > ALARMS.
2. Select an action to occur when the alarm is activated. Tab l e 26 shows
each Trouble Condition and its cause.
3. Enable one of the trouble conditions.
Table 26 Trouble Alarms
Trouble Condition Cause
Low Memory Battery Internal memory battery voltage is too low. Change batteries.
U-Sonic Echo Loss (A pulse of
sound was sent but no echo was
received back)
Transducer Ringing Transducer is operating within the deadband.
U-Sonic Failure Transducer not plugged in. Cable damaged. Transducer thermal sensor damaged.
Modem Failure Unable to initialize modem
RS485 Timed Out
The echo has been temporarily deflected by a change in site conditions such as floating
debris or foam in the channel, wind, etc.
Problem with communications between the flow meter and a remote ultrasonic sensor.
May indicate open thermal sensor.
Alarm Action(s):
Set Relay #1
Set Relay #2
Set Relay #3
Set Relay #4
Report via Modem
Page 73
Alarm Relays
Page 76

Section 4
4.4.1.2 Set Point Alarms
Set Point Alarms activate when a user-definable high and/or low set point
is reached.
1. Select an action to occur when the alarm is activated.
2. Enable one of the alarm conditions.
3. Set either a High trip point or a Low trip point.
4. After entering the trip point enter the deadband value. The deadband is
the area between the alarm “turn on” and “turn off”. Refer to section on
page 121.
Set Point Alarm Conditions:
• Level • Flow
• Flow Rate of Change • pH
• Rainfall • Analog Channels 1–7
• Temperature • Ve locity
4.5 Rain Gauge
4.5.1 Programming the Rain Gauge
1. From the Main Menu Select OPTIONS>ADVANCED OPTIONS>DATALOG.
2. Highlight SELECT INPUTS using the up and down arrow soft keys and then
press the
Note: If logging is enabled on any
channel, that channel will have an
arrow in front of the channel name
to signify that the channel is logged.
3. Highlight Rainfall using the up and down arrow soft keys, then press the
SELECT soft key.
4. Press the
Logged”, then press the
5. Enter a logging interval using the numeric keypad, then press the
soft key. Valid logging intervals are shown on the status bar along the
bottom edge of the display.
6. Select Rainfall Units (in. or cm). Press the
7. Select another channel to configure, press the RETURN soft key to
back up one step, or press the
Main Menu.
SELECT soft key.
CHANGE CHOICE soft key to cycle between “Logged” and “Not
ACCEPT soft key.
ACCEPT
ACCEPT soft key to continue.
MAIN MENU function key to return to the
Page 74
Rain Gauge
Page 77

4.6 Sampler
980
4.6.1 Programming a Sampler Connection
1. From the MAIN MENU, select SETUP>MODIFY SELECTED ITEMS.
Section 4
2. Scroll down and highlight
3. Enable Sampler pacing using the
4. Set the Sampler Pacing using the numeric keypad and Change Units
5. Press the
4.7 RS232
4.7.1 Programming the RS232
1. From the Main Menu, select OPTIONS > ADVANCED OPTIONS >
Note: Long runs of cable,
especially if they are near large
motors or fluorescent lights, can
cause communication errors and
may require a slower baud rate. If
errors develop at high baud rates,
try lowering the baud rate one step
at a time until error-free
communications are achieved.
2. Select a baud rate for data communications by pressing the
The cable connection is shown in Figure 30.
SAMPLER PACING using the up and down arrow
soft keys. Press the
ACCEPT soft key to continue.
using the
COMMUNICATIONS SETUP > RS232 SETUP
CHOICE
CHANGE UNITS soft key.
ACCEPT soft key.
soft key to cycle through the possible choices; 1200, 2400, 4800,
SELECT soft key to continue.
CHANGE CHOICE soft key. Press the
.
CHANGE
9600, or 19,200 baud. The higher the baud rate setting, the faster data
will transfer. Set the baud rate to the highest setting allowed by the
computer. Press the
ACCEPT soft key.
Figure 30 PC to Flow Meter Cable Connection
980980
Page 75
Sampler
Page 78

Section 4
4.8 Modem Interface
4.8.1 Programming the Modem
1. From the Main Menu, select OPTIONS > ADVANCED OPTIONS >
2. To enable the modem power, press the CHANGE CHOICE key until
11:00 AM 21 - APR - 01 MODEM SETUP
COMMUNICATIONS SETUP > MODEM POWER.
“ENABLED” shows up in the center of the display. Press the
key to continue.
ACCEPT MODEM POWER:
ENABLED
RETURN
CHOICES: ENABLED, DISABLED
ACCEPT soft
CHANGE
CHOICE
3. Set the dial method, Tone or Pulse using the
Press the
ACCEPT soft key to continue.
CHANGE CHOICE soft key.
4. Enter the phone number of the PC that the unit will call if alarms
are enabled, using the numeric keypad. Press the
ACCEPT soft key
to continue.
5. Enable or Disable the Pager Option using the
Press the
ACCEPT key to continue.
CHANGE CHOICE soft key.
6. Enter the Pager Service Number using the numeric keypad. Press
ACCEPT to continue.
7. Enter the amount of pagers. Press
8. Enter up to three pager numbers. Press
ACCEPT to continue.
ACCEPT to continue.
9. Set the Reporting Order (Modem only, pager only, pager then modem,
modem then pager), using the
10. Press the
ACCEPT soft key to finish.
CHANGE CHOICE soft key.
Modem power must be enabled and the unit must be in running mode before
the meter can answer calls from InSight, InSight® Gold, or VISION software
to download data, access remote program, etc.
Page 76
Modem Interface
Page 79

4.9 pH Sensor
pH sensor function degrades over time, even under ideal conditions, and
therefore require periodic replacement. The pre-amplifier junction box is
provided to allow for fast, easy replacement of the pH sensor. For extra strain
relief the pH cable that leads to the instrument should pass through the watertight strain relief adapter.
Since the pH reading must be compensated for temperature variations, a
temperature sensor is built into every pH electrode. After installation, the pH
sensor must be programmed and calibrated.
4.9.1 Programming the pH Sensor
1. From the Main Menu Select OPTIONS>ADVANCED OPTIONS>DATALOG.
2. Highlight SELECT INPUTS using the up and down arrow soft keys and then
press the
3. Highlight pH / mV using the up and down arrow soft keys, then press the
Note: If logging is enabled on any
channel, an arrow in front of the
channel name will appear to signify
that the channel is logged.
SELECT soft key.
4. Select pH in the Item to Edit menu using the pH soft key.
5. Press the
Logged”, then press the
Section 4
SELECT soft key.
CHANGE CHOICE soft key to cycle between “Logged” and “Not
ACCEPT soft key.
6. Enter a logging interval using the numeric keypad, then press the
7. Select another channel to configure or press the
4.9.2 Calibrating the pH Sensor
Once the pH sensor is wired and programmed, calibrate the pH sensor.
Calibrating the pH sensor requires a thermometer and any two of the following
buffer solutions: 4, 7, or 10 pH.
The pH probe is an application sensitive device. When used in harsh
environments, the accuracy and life expectancy of pH probes can decrease
considerably.
Probes must be calibrated to the flow meter each time they are cleaned
or replaced. Regular inspection and comparison to a hand-held pH meter can
help determine the optimum cleaning and calibration schedule for your
application.
Note: Before calibrating the pH
probe make certain the probe and
buffers are at ambient temperature.
1. From the Main Menu, select OPTIONS > ADVANCED OPTIONS >
2. Place the pH probe into the first buffer solution, then press any key
ACCEPT
soft key. Valid logging intervals are shown on the status bar along the
bottom edge of the display.
RETURN soft key to
back up one step or press the
MAIN MENU function key to return to the
Main Menu.
CALIBRATION > pH.
to continue.
3. Enter the temperature of the first buffer solution using the numeric
keypad. Press the
ACCEPT soft key to continue.
pH Sensor
Page 77
Page 80

Section 4
4. Select the pH for the first buffer solution (4, 7, or 10 pH) using the
CHANGE CHOICE soft key, then press the ACCEPT soft key to continue.
5. Remove the probe from the first buffer solution, rinse it under distilled
water and place it into the second buffer solution (4, 7, or 10 pH, different
from the first buffer used). Press any key to continue.
6. Select the pH for the second buffer solution using the
soft key, then press the
is damaged and cannot be calibrated or if the buffer solutions do not fall
within an acceptable range, an error message will be displayed as
shown below.
11:00 AM 21 - APR - 01 ERROR MESSAGE
Another attempt at reading the second buffer solution will be made after
pressing a key. If this fails, it is likely that you have a bad pH probe or bad
buffer solutions. Try a new set of buffer solutions and if that fails try a
different pH probe.
4.10 Downlook Ultrasonic Sensor
Downlook ultrasonic level sensors are available with different beam angles
and deadbands. The 980 Flow Meter uses a 75 kHz Downlook Ultrasonic
Sensor. See Figure 31.
CHANGE CHOICE
ACCEPT soft key to continue. If the pH probe
pH CALIBRATION FAILED-GAIN
AND/OR OFFSET OUT OF RANGE
TRY AGAIN
(PRESS ANY KEY TO CONTINUE)
The ultrasonic transducer is mounted over the flow stream at the proper
location for head measurement. To determine the proper location for head
measurement refer to Working with Primary Devices on page 109. The
transducer emits a pulse of sound at a high frequency and awaits for the echo
to return from the surface of the water. The time it takes for this echo to return
is directly related to the distance between the transducer and the surface
water. As the level in the flow stream increases, the time it takes for the echo
to return to the transducer decreases (distance is shorter).
By continuously transmitting these pulses and timing the returning echoes,
the sensor measures the level of the liquid on the flow stream. After
measuring the level, the microprocessor converts the level reading to a flow
rate based on the user-defined characteristics of the primary device.
Page 78
Downlook Ultrasonic Sensor
Page 81

4.10.1 Installing an Ultrasonic Sensor (Downlook) at a Primary Device
Site selection can greatly enhance system performance. Several important
factors should be considered when installing the ultrasonic sensor at any
Note: Do not suspend the sensor by
the cable. Only use appropriate
mounting hardware.
Figure 31 Ultrasonic Sensor (Downlook)
primary device. Refer to Appendix A for more information on primary devices.
• Locate the ultrasonic sensor at the proper head measurement point for
that primary device.
• Determine the appropriate sensor height. Refer to Figure 33 on page 80.
• Suspend the ultrasonic sensor over the center of the flow stream where
there is the least surface turbulence.
• Mount the sensor to a stable, secure location, isolated from vibration.
Section 4
ULT +
ULT –
2080 ORP 0293 01
RTD+
RTD –
Shield
4.10.1.1 Choosing the Appropriate Sensor Height (Ultrasonic “Downlook” Sensor)
The beam angle is half the band width at -10 dB. The beam angle from the
bottom of the ultrasonic sensor spreads out at an angle of 12° for the 75 kHz
sensor as it travels away from the sensor. Therefore, if you mount the sensor
too high above a narrow channel, the beam may be wider than the channel
when it reaches it. This can cause false echoes from the tops of the channel
walls rather than from the water surface. To prevent false echoes, determine
the appropriate sensor height so that the entire beam falls within the channel
and does not strike any obstructions
To determine the appropriate sensor mounting height
1. Take the measurements described in Figure 32.
2. Calculate the angle of obstruction from the axis.
D
θ arcsin
-------
D
3
2
57.3 D
---------------------- -
≈=
3. Plot the measurements on the graph in Figure 33 to determine if the
beam width falls within the possible false echo or safe area.
3
D
is accurate within one degree.
2
Page 79
Downlook Ultrasonic Sensor
Page 82

Section 4
aaaaaaaaaaaaaaaaaaaaaaaaa
aaaaaaaaaaaaaaaaaaaaaaaaa
aaaaaaaaaaaaaaaaaaaaaaaaa
aaaaaaaaaaaaaaaaaaaaaaaaa
aaaaaaaaaaaaaaaaaaaaaaaaa
aaaaaaaaaaaaaaaaaaaaaaaaa
aaaaaaaaaaaaaaaaaaaaaaaaa
aaaaaaaaaaaaaaaaaaaaaaaaa
aaaaaaaaaaaaaaaaaaaaaaaaa
aaaaaaaaaaaaaaaaaaaaaaaaa
Figure 32 Ultrasonic Sensor Beam Angle
Measure
for D
This drawing is not to scale.
Figure 33 Choosing the Appropriate Sensor Height
100
100
10
10
1
Measure for D
Measure for D
Safe Area
2
3
Zero Flow Point
1
1
Possible False Echo
0.1
D2
0.1
D1
0 2 4 6 8 1012141618202224
Page 80
Downlook Ultrasonic Sensor
Maximum Distance from Sensor to Target
Distance from Sensor to Obstruction
θ : Angle of Obstruction from Axis
Page 83

4.10.1.2 Mounting the Ultrasonic Sensor
Several brackets are available for mounting the sensor to a fixed location such
as a wall or floor. See Figure 34 and Figure 35. For mounting options see
Note: To prevent mechanical
vibration ensure that the supplied
isolation washers are installed as
shown in Figure 34.
Figure 34 Bracket and Isolation Washers
Parts and Accessories on page 157. Each bracket utilizes the ¾ in. (1.9 cm)
NPT connector on the sensor to secure the sensor to the bracket. Always
level the sensor using a level. The maximum water level must be below the
deadband to ensure accurate readings.
The sensor is “blind” to anything closer than the deadband and will stop
reading level when the distance is shorter than that.
Section 4
1
23
4
1. Wall/Rail Mount Bracket (Cat. No. 2974) 3. Isolation Washers (Cat. No. 6820)
2. 1 inch x 0.25 Hex Nuts (Cat. No. 1429) 4. Ultrasonic Sensor
This surface must be level.
Page 81
Downlook Ultrasonic Sensor
Page 84

Section 4
Figure 35 Assembling the Mounting Bracket (Cat. No. 2904)
1
2
3
5
4
3
6
1. 14.75 inches (Cat. No. 3047) 4. Horizontal and vertical sections are fully adjustable*.
2. 15.25 inches (Cat. No. 3046) 5. Sensor Mounting Clamp
3. 16.625 inches (2) (Cat. No 3048) 6. 5.5 inches tall (Cat. No. 3108)
* Loosen the bolt, slide the section to the desired distance and re-tighten the bolt.
Sensor Mounting Clamp (with built-in bubble level) Sensor adjusts to any required level.
Page 82
Downlook Ultrasonic Sensor
Page 85

4.10.2 Ultrasonic Senor (Downlook) Installation Troubleshooting
Convection Currents
Convection components between the sensor and target will change the
velocity of sound. If these conditions are present, install a shield around the
sound beam to eliminate temperature variation due to convection currents.
The system is designed with averaging routines to help mitigate this problem.
The acoustical impedance of foam and oil is low relative to air. While the 980
is designed with an AGC (Automatic Gain Control) scheme to reduce these
factors it is recommended that sites without these anomalies be selected.
Obstructions
Through the use of an Invisible Range, the 980 Flow Meter can select targets
beyond peripheral obstructions. In establishing this exclusion zone, care must
be taken to set the exclusion zone higher than the maximum expected level.
Echo Loss
It is normal to report some temporary echo loss due to environmental effects
mentioned above. The 980 will determine if the sound intensity is below
recommended values and automatically initiate subsequent measurements to
provide an accurate reading. If echo loss events are in excess of two per hour,
site conditions should be reexamined for convection currents caused by
sunlight or thermal gradients at the water ambient interface. Foam on the
liquid’s surface may also cause echo loss.
Section 4
Transducer Ringing
Ringing can occur if the transducer is operating within the deadband.
Transducer ringing means that the transducer may not have finished
transmitting a pulse of sound when the echo returned. Sufficient distance
between the sensor and the target will eliminate transducer ringing.
Problem/Error Message Possible Causes and Solutions
Check the connection between the flow meter and the sensor.
Check the sensor cable. The cable may be cut or broken.
Ultrasonic Failure
(No signal from sensor)
Echo Loss
(Flow meter is not getting a
return signal from the sensor)
Recalibrate the sensor. Look for unusual temperature or the inability for a new calibrated level
to be read.
Try a different sensor on the same flow meter to rule out instrument problems and try a
different flow meter with the same sensor to rule out sensor problems.
Check for excessive foam on the water surface. Foam may cause sound waves to be
absorbed rather than reflected.
Check the sensor cable for cuts or nicks.
Check the connection between the flow meter and the sensor.
Make sure that the sensor is level. The sensor must be level for proper return of the signal.
Try shielding the transducer from convection currents.
Repeat the temperature calibration procedure. If the unit reads extreme high or low
temperatures, the sensor may have a bad temperature sensor.
Try a different sensor on the same flow meter to rule out instrument problems and try a
different flow meter with the same sensor to rule out sensor problems.
Page 83
Downlook Ultrasonic Sensor
Page 86

Section 4
Problem/Error Message Possible Causes and Solutions
Try moving the transducer farther from the liquid.
Check the area under the transducer for obstructions. This includes the area in front and to
the sides of the transducer.
Transducer Ringing
(False return echoes mask
“real” echoes)
RS485 Time Out
(Flow meter did not receive
data within the specified time)
Check the face of the transducer for a coating. This is rare, but cleaning the transducer face
may correct the problem. If this is a constant problem due to site conditions, coat the face of
the sensor with a thin film of silicone grease to keep debris from clinging.
Make sure that you are using the proper rubber isolation washers on the mounting bracket.
The transducer can resonate against steel mounting rails. See Mounting the Ultrasonic
Sensor on page 81.
If the CPU is having trouble communicating with the velocity board, RS485 time outs may
occur. Wait a few minutes and see if it goes away. If it continues, a problem with the ultrasonic,
velocity, or CPU board may exist.
May be caused by difficulty getting a good velocity reading. If the logging interval is 1 or 2
minutes, conditions are poor, and the problem continues indefinitely, try increasing the logging
interval to capture more signals.
This condition may occur occasionally. When using a combination of area velocity and
ultrasonic sensors, this condition may occur more frequently if site conditions are less than
ideal. This is not necessarily an indication of a defective sensor.
Check to see if wires were shorted. Check the RS485 fuse.
4.10.3 Programming the Downlook Ultrasonic Sensor
The downlook ultrasonic sensor does not require specific programming,
unless more than one sensor option is connected to the 980 Flow Meter.
When more than one sensor option is connected to the 980 Flow Meter:
1. From the Main Menu, select
2. Select Ultra-Sonic Sensor using the CHANGE CHOICE soft key, then press
the
ACCEPT soft key.
4.10.4 Calibrating the Downlook Ultrasonic Sensor
Calibrate the current water level via one of two methods; Liquid Depth or
Sensor Height. An Invisible Range can also be set which allows the
transducer to ignore reflections from obstructions between the sensor and the
water surface, such as ladder rungs, channel side walls, etc. Each method
has its own advantages and disadvantages; selecting the proper method will
depend upon the site conditions. Calibrate the ultrasonic sensor each time the
sensor is installed at a new site.
4.10.4.1 Liquid Depth
This method requires the “head” or depth of liquid in the channel that is
contributing to flow. In a round pipe, the entire depth typically contributes to
flow. In a weir, only the depth that is flow over the weir plate contributes to
flow. Many flumes have specific requirements, refer to Working with Primary
Devices on page 109. Level Depth calibration is primarily is used when:
OPTIONS > LEVEL SENSOR
Page 84
Downlook Ultrasonic Sensor
• Access is available to the primary device for a physical measurement of
the liquid depth, and
• When water is flowing during installation of the 980 Flow Meter (channel
is not dry).
Page 87

1. From the Main Menu, select OPTIONS>ADVANCED
OPTIONS>CALIBRATION>ULTRASONIC SENSOR.
Section 4
Note: Always re-check the
Level Adjust when re-installing the
flow meter.
2. Select Calibrate U-Sonic using the up and down arrow soft keys. Press
the
SELECT soft key.
3. Select Standard as the type of Ultrasonic Transducer using the
CHOICE
soft key. Press the ACCEPT soft key to continue.
CHANGE
Temperature Time Constant
The speed of sound in air varies with the temperature of the air. The ultrasonic
sensor is equipped with temperature compensation to help eliminate the
effect of temperature variation under normal site conditions. The transducer
must be equal to the ambient air temperature at the site prior to calibration for
optimum results. The manufacturer also recommends that sensors be
shielded from direct sunlight for this reason.
4. Enter the ambient air temperature at the transducer location. For optimum
results, allow enough time (100 minutes) to ensure that the sensor is at
equilibrium with the surrounding ambient temperature. Press the
ACCEPT
soft key to continue.
5. Select the Liquid Depth method and enter the new level.
6. Take a physical measurement of the liquid depth (head) and enter
the value.
4.10.4.2 Sensor Height
7. Press the
ACCEPT soft key when finished.
This method requires you to enter the distance between the face of the
ultrasonic sensor and the zero flow point in the primary device. The zero flow
point in a primary device is the level at which flow ceases. In a round pipe the
zero flow point would typically be the invert or bottom of the pipe. In a V-notch
weir the zero flow point occurs when the liquid behind the weir is level with the
bottom of the ‘V’. (There would still be liquid behind the weir plate but it would
not be contributing to flow). Sensor Height calibration is generally used when:
• Access to the primary device is difficult (such as confined space entry in a
manhole) or
• There is no liquid flowing during installation of the flow meter
1. From the Main Menu, select
OPTIONS>CALIBRATION>ULTRASONIC SENSOR.
OPTIONS>ADVANCED
2. Select Calibrate U-Sonic using the up and down arrow soft keys. Press
the
SELECT soft key.
3. Select Standard as the type of Ultrasonic Transducer using the
CHOICE
soft key. Press the ACCEPT soft key to continue.
CHANGE
The speed of sound in air varies with the temperature of the air. The
ultrasonic sensor is equipped with temperature compensation to help
eliminate the effect of temperature variation under normal site conditions.
Page 85
Downlook Ultrasonic Sensor
Page 88

Section 4
aaaaaaaaaaaaaaaaaaaaaaaaa
aaaaaaaaaaaaaaaaaaaaaaaaa
aaaaaaaaaaaaaaaaaaaaaaaaa
aaaaaaaaaaaaaaaaaaaaaaaaa
aaaaaaaaaaaaaaaaaaaaaaaaa
aaaaaaaaaaaaaaaaaaaaaaaaa
aaaaaaaaaaaaaaaaaaaaaaaaa
aaaaaaaaaaaaaaaaaaaaaaaaa
aaaaaaaaaaaaaaaaaaaaaaaaa
aaaaaaaaaaaaaaaaaaaaaaaaa
aaaaaaaaaaaaaaaaaaaaaaaaa
4. Enter the ambient air temperature at the transducer location. For optimum
results, allow enough time (100 minutes) to ensure that the sensor is at
equilibrium with the surrounding ambient temperature. Press the
ACCEPT
soft key to continue.
5. Select the Sensor Height method and enter the new level.
6. Enter the distance from the face of the transducer to the zero flow point of
the primary device.
7. Press the
4.10.4.3 Setting the Invisible Range
The 980 Flow Meter is equipped with an Invisible Range feature (adjustable
deadband) to prevent false echoes from tops of channel walls, ladder rungs,
shelves, etc. Refer to Figure 36. A user-selected range is defined which is
invisible to the flow meter. Extend the invisible range to where it meets or
overlaps the highest expected level in the channel. A gap of at least 2 in.
(5 cm) should be left between the invisible range and the highest expected
level. Only objects beyond the invisible range can be detected.
1. From the Main Menu, select
2. Select the Invisible Range option using the up and down arrow soft keys.
3. Enter the Distance to End of the Invisible Range using the numeric
4. Select either inches or centimeters using the
5. Press
ACCEPT soft key when finished.
OPTIONS>ADVANCED
OPTIONS>CALIBRATION>ULTRASONIC SENSOR.
Press
SELECT to continue.
keypad.
CHANGE UNITS soft key. The
distance must be greater than the minimum deadband of 11.5 in. (29 cm)
for the 75 kHz transducer. Refer to Figure 36.
ACCEPT soft key when finished.
Figure 36 Setting the Invisible Range
A
A. Minimum Distance (must be at least 11 inches (29 cm) C. Highest expected water level
B. Invisible Range (set to ignore tops of channel walls) D. Maximum Range
Page 86
Downlook Ultrasonic Sensor
B
D
C
Page 89

4.11 In-Pipe Ultrasonic Sensor
4.11.1 Mounting the In-Pipe Sensor
• Mount the sensor over the center of the flow stream where the surface
turbulence is minimized (Figure 37).
• Mount the sensor 2 m (82 in.) away from obstructions located in front of
the in-pipe senor to prevent inaccurate liquid level readings (Figure 38).
• Level the sensor using the built-in bubble level.
• Ensure the isolation gasket is in place and the mounting bracket
thumbscrews are finger-tight to avoid sensor ringing.
• Install the sensor within 4.12 m (13.5 ft) of the lowest expected level (the
maximum range of the sensor). The intensity of the echo decreases with
distance at a maximum of 1.31 dB/m (0.4 dB/ft)
Figure 37 End View of In-Pipe
Section 4
1. Pipe (size may vary) 5. Bracket Thumbscrew (3.17 cm (1.25 in.) long)
2. Mounting Clip 6. Bubble Level
3. Vibration Isolation Gasket 7. Sound Waves
4. Sensor 8. Flow
In-Pipe Ultrasonic Sensor
Page 87
Page 90

Section 4
Figure 38 Side View of In-Pipe
A. Minimum distance to reflecting obstruction (2 m (82 in.)) D. Ultrasonic Sensor
B. Distance from Sensor
(Range: 1.6 cm (0.64 in.) to 4.11 m (13.5 ft))
C. 45° Deflector
E. Internal Deadband (18.21 cm (7.17 inches))
4.11.2 Beam Angle
The narrow beam of sound that emanates from the bottom of the in-pipe
ultrasonic sensor spreads out at an angle of ±12° (-10 dB) as it travels away
from the sensor. This means that if the sensor is mounted too high above a
narrow channel, the beam may be too wide when it reaches the bottom of the
channel. This may cause false echoes from the sides on the channel walls.
4.11.3 Programming the In-Pipe Ultrasonic Sensor
The in-pipe ultrasonic sensor does not require operator programming, unless
more than one sensor option is connected to the 980 Flow Meter. When more
than one sensor option is connected:
1. From the Main Menu, select
2. Select Ultra-Sonic Sensor using the CHANGE CHOICE soft key, then press
the
ACCEPT soft key.
4.11.4 Calibrating the In-Pipe Ultrasonic Sensor
Calibrate the in-pipe sensor each time the sensor is installed at a new site.
Calibrate the in-pipe via one of two methods; Liquid Depth or Sensor Height.
Each method has its own advantages and disadvantages. Liquid Depth
calibration is the recommended calibration method, use the sensor height
method only when Liquid Depth calibration is not an option. An Invisible
Range can also be set which allows the transducer to ignore reflections from
obstructions between the sensor and the water surface, such as ladder rungs,
channel side walls, etc.
OPTIONS > LEVEL SENSOR
Page 88
In-Pipe Ultrasonic Sensor
1. From the Main Menu, select
OPTIONS > ADVANCED OPTIONS.
Page 91

Section 4
2. Highlight Calibration, using the up and down arrow soft keys. Press the
SELECT soft key to continue.
3. Highlight Ultra-Sonic Sensor, using the up and down arrow soft keys.
Press the
SELECT soft key to continue.
4.11.4.1 Liquid Depth
4. Highlight Calibrate U-Sonic Sensor and press the
5. Select the type of ultrasonic transducer (In-Pipe), using the
CHOICE
6. Press the
soft key.
ACCEPT soft key.
SELECT soft key.
CHANGE
7. Enter the ambient air temperature at the transducer location. For optimum
results, allow enough time (100 minutes) to ensure that the sensor is at
equilibrium with the surrounding ambient temperature.
The speed of sound in air varies with the temperature of the air. The ultrasonic
sensor is equipped with temperature compensation to help eliminate the
effect of temperature variation under normal site conditions.
8. Press the
ACCEPT soft key to continue.
Liquid depth requires knowing the level or depth of the liquid in the channel
that is contributing to flow. Liquid depth calibration is the recommended
calibration method for the in-pipe ultrasonic sensor.
Continue from Step 8, above:
1. Select the Liquid Depth method.
4.11.4.2 Sensor Height
2. Take a physical measurement of the liquid depth (head) and enter the
value.
3. Press the
ACCEPT soft key when finished.
Sensor height calibration is generally used when access to the primary device
is difficult (such as confined space entry in a manhole) or when there is no
liquid flowing during installation of the flow meter. This calibration method
requires compensation for the internal deadband in the sensor housing.
Measurement uncertainty increases to 0.85 m (0.028 ft) for a 60 cm (2 ft)
change in level from the calibration point. Use this method only if the Liquid
Depth method is not an option.
Continue from Step 8, above:
1. Measure the distance from the bottom of the sensor to the zero flow point.
Add 18.2 cm (7.17 in.) to the measured distance to obtain the total zero
flow distance for the in-pipe sensor. Refer to Manual Figure Side View of
In-Pipe on page 4 of this change notice.
2. Select the Sensor Height calibration method and enter the total zero flow
distance from Step 1.
3. Press the
ACCEPT soft key when finished.
Page 89
In-Pipe Ultrasonic Sensor
Page 92

Section 4
4.11.4.3 Setting the Invisible Range
The 980 Flow Meter is equipped with an invisible range feature to prevent
false echoes from tops of channel walls, ladder rungs, shelves, etc. A userselected range is defined that is invisible to the flow meter. Extend the
invisible range to where it meets or overlaps the highest expected level in the
channel. Have a gap of at least 2 in. (5 cm) between the invisible range and
the highest expected level. Only objects beyond the invisible range can be
detected.
Note: When programming the invisible range, 18.21 cm (7.17 in.) must be added to the
desired range to compensate for the internal deadband distance between the sensor,
the reflector, and the bottom of the sensor housing. See Manual Figure Side View of
In-Pipe on page 4 of this
change notice.
1. From the Main Menu, select OPTIONS>ADVANCED OPTIONS>
2. Select the Invisible Range option using the up and down arrow soft keys.
3. Enter the Distance to End of the Invisible Range using the numeric
CALIBRATION> ULTRASONIC SENSOR.
Press
SELECT to continue.
keypad.
4. Select either inches or centimeters using the
Press the
ACCEPT soft key when finished.
4.11.5 Protecting the In-Pipe Ultrasonic Sensor
Keep the sensor and the reflector free of grease and dirt. Since the logger
“listens” for the relatively faint sound of the returning echo, a heavy coated
sensor will not be able to detect the echo well and may not provide accurate
level measurement.
4.11.6 In-Pipe Ultrasonic Sensor Troubleshooting
During surcharged conditions, the ultrasonic level will give random depth
readings that will need to be edited in the application software.
Symptoms of this hydraulic condition occur when the level appears erratic
within 5.7 cm (2.25 in.) of the pipe diameter. The readings will first appear to
flat-line. Then the erratic readings (that in some cases exceed the pipe
diameter) will occur.
If the hydraulics are frequently in surcharge conditions, use a submerged level
sensor instead of an in-pipe ultrasonic sensor.
4.12 Velocity-Only Sensor
The Velocity-Only Sensor is an extremely low-profile velocity sensor. It does
not measure level. The streamlined shape of the wafer probe allows velocity
measurement in very low-flow conditions. When used in conjunction with a
level sensor (such as the Zero-Deadband Ultrasonic Level Sensor), the meter
can calculate flow. Refer to Figure 39.
CHANGE UNITS soft key.
Page 90
Velocity-Only Sensor
Page 93

Figure 39 Velocity-Only Sensor
Velocity Sensor
4.12.1 Programming the Velocity-Only Sensor
1. From the MAIN MENU, select SETUP>MODIFY SELECTED ITEMS
2. Highlight Velocity Direction using the up and down arrow soft keys. Press
the
SELECT soft key to continue.
3. Set the velocity direction (upstream, downstream, or always positive)
using the
Direction on page 94 for more information on velocity direction.
CHANGE CHOICE soft key. Refer to Compensating for Velocity
Section 4
Velocity Measurement
Sound Waves
4. Press the
ACCEPT soft key to continue.
5. Highlight Velocity Units using the up and down arrow soft keys. Press the
SELECT soft key to continue.
6. Set the Velocity Units (fps or m/s), using the up and down arrow soft keys.
Press the
ACCEPT soft key to continue.
7. Highlight Velocity Cutoff, using the up and down arrow soft keys. Press
SELECT to continue.
8. Read the Velocity Cutoff information screen. Press any key to continue.
9. Set the Velocity Cutoff using the numeric keypad. Press
to continue.
10. Set the Velocity Default, using the numeric keypad. Press the
soft key. Press the RETURN soft key to go back to the Setup Menu or the
Main Menu key to return to the beginning.
4.12.2 Calibrating the Velocity-Only Sensor
No calibration is required for the velocity sensor. The transmit frequency is
fixed with a highly accurate quartz crystal-controlled frequency generator that
cannot be adjusted.
ACCEPT soft key
ACCEPT
Page 91
Velocity-Only Sensor
Page 94

Section 4
4.12.3 Installing the Velocity-Only Sensor in a Pipe
4.12.3.1 Important Guidelines for Velocity-Only Sensor Installation
• Do not install more than one probe at a time in pipes less than 24 inches
in diameter (61 cm). Multiple probes in smaller pipes can create turbulent
or accelerated flows near the probes that may cause inaccurate
measurements.
• Mount the sensor as close as possible to the bottom of the pipe invert to
most accurately measure low velocity levels.
• Locate monitoring sites as far from inflow junctions as possible to avoid
interference caused by combined flows.
• Avoid any sites that contain flow obstacles within 2 to 4 pipe diameters in
front of the probe installation (rocks, stones, pipe joints, valve stems, etc.)
as these will contribute to turbulence and generate high speed flows in the
immediate vicinity of the obstruction.
• Avoid any sites with slow moving flows that will encourage the buildup of
silt in the invert or channel. Excessive silting around the probe may inhibit
the Doppler signal and decrease sensor accuracy, and may affect depth
measurement accuracy.
• Avoid sites with deep, rapid flows that will make it physically difficult or
dangerous to install the probe.
• Avoid sites with high velocity, low-depth flows. Splash-over and excessive
turbulence will be present around the probe and data may be inaccurate.
4.12.3.2 Choosing a Mounting Band
Mounting bands and rings for depth/velocity and velocity sensors are listed in
Parts and Accessories on page 157. A complete mounting band assembly for
pipe sizes less than 12 ft also requires one Depth/Velocity Sensor Mounting
Clip (Cat. No. 3263) and one Scissors Jack Assembly (for band set only)
(Cat. No. 1533).
4.12.3.3 Connecting the Sensor to the Mounting Bands
1. Attach the sensor to the sensor mounting clip using the two screws
provided. See Figure 40.
Note: If there is a large amount of
silt in the bottom of the pipe, rotate
the band until the sensor is out of
the silt (Figure 41), assuring that the
sensor remains below the minimum
expected water level at all times. Silt
should not be disturbed and must be
measured frequently if entered into
®
InSight
Adjust is required to offset level
sensors.
Gold software. A Level
2. Attach the clip to the mounting band. Mounting Rings come with predrilled holes for direct mounting of the sensor to the ring.
3. To reduce the likelihood of debris collecting on the cable and
mounting band, route the cable along the edge of the band and fasten the
cable to the mounting band with nylon wire ties. See Figure 40. The cable
should exit the tied area at, or near, the top of the pipe to keep it out of the
flow stream.
Page 92
Velocity-Only Sensor
Page 95

Figure 40 Attaching the Sensor Mounting Band
Section 4
2
1
1. Receptacle for Spring Clip 2. Velocity Sensor 3. Nylon Wire Ties
Figure 41 Avoiding Silt when Mounting the Sensor
3
1
4
3
2
1. Water 2. Silt 3. Pipe 4. Sensor
Page 93
Velocity-Only Sensor
Page 96

Section 4
4.12.3.4 Compensating for Velocity Direction
When programming the velocity sensors you may select one of three Velocity
Direction options and the velocity cutoff/velocity default:
Direction Description
Use this option at sites with fairly consistent velocities, and low to medium turbulence. The flow stream
Upstream
Downstream
Always Positive
Velocity Cutoff/
Velocity Default
over the sensor should be relatively straight, with no drops or turns near the measurement point.
Mount the sensor in the pipe, beveled edge facing into the flow, where the flow stream enters the
measurement area. (See Figure 42.)
Use this option when the sensor is installed downstream of the measurement point (where the flow stream
exits the site). This option is useful when more than one flow stream enters a site and the combined flow of
all streams at a single exit point is measured.
Mount the sensor in the downstream direction rather than the typical, upstream direction. Mounting the
sensor 'backwards' in this manner (see Figure 42) causes the velocity direction readings to be the
opposite of actual stream flow. By selecting the Downstream choice when programming, the logger
reverses the measured signal to show actual flow direction (beveled edge downstream).
Note: The maximum velocity obtained in this type of installation is 5 fps.
Extremely turbulent conditions can make it difficult to detect the flow direction. Particles in the flow stream
(particularly near the surface of the stream) may travel in several different directions, even though most of
the flow is moving in one general direction. Although the velocity magnitude is generally consistent in
these cases, reflections from the particles moving in a positive direction (same direction as the flow
stream), are so mixed up with those from particles moving in a negative direction (opposite direction as
flow stream) that determining actual direction is difficult.
The Always Positive option logs all readings as positive, regardless of the measured signal direction. Do
not select this option at sites where negative flows normally occur, such as tidal effects on ocean outfalls.
The Velocity Cutoff option compensates for problems encountered at sites with very low velocities and
extremely clean water. Flow is difficult to measure in these conditions because clean water contains very
few reflecting particles, and extremely low velocities lack the turbulence to add air bubbles (which also
make good reflecting targets) to the flow stream.
The Velocity Cutoff allows you to enter a default velocity value that is used when the Velocity Cutoff
set-point is reached, rather than report erratic velocities.
4.12.3.5 Placing the Sensor and Mounting Band into the Pipe
Point the front of the sensor (the side opposite the cable entrance) into
the flow. See Figure 42.
Slide the mounting band as far into the pipe as possible to eliminate
drawdown effects near the end of the pipe. Locate the sensor at the bottommost point, in the channel. If excessive silt is present on the bottom of the
pipe, rotate the band in the pipe until the sensor is out of the silt.
Page 94
Velocity-Only Sensor
Page 97

Figure 42 Placing the Sensor into the Flow
Section 4
ManholeManhole
Velocity Sensor
Upstream PositionNormal
4.13 Submerged Area Velocity Sensors
Submerged Area Velocity sensors can measure level and velocity
simultaneously. A submerged pressure transducer measures level. Velocity is
measured with sound waves, using the Doppler principle. Refer to Figure 43.
Figure 43 Submerged Area Velocity Sensor
Submerged Depth/Velocity Sensor
Velocity Sensor
Downstream Position
Velocity Measurement
Sound Waves
4.13.1 Programming the Submerged Area/Velocity Sensor
1. From the Main Menu, select OPTIONS > LEVEL SENSOR
2. Select Submerged Xducer using the CHANGE CHOICE soft key, then
press the
3. Follow Steps1-11 in section 4.12.1 on page 91.
ACCEPT soft key.
Pressure Transducer for Level Measurement
(Submerged Depth/Velocity Sensor Only)
Page 95
Submerged Area Velocity Sensors
Page 98

Section 4
Setting the Water Level
1. Take a physical measurement of the water level and enter the number
2. Measure from the surface water to the top of the pipe (B in Figure 44),
3. This method prevents disturbances to the flow stream that might affect the
Figure 44 Measuring the Water Level
A
using the Level Adjust function on the instrument display.
then subtract this from the pipe diameter (A in Figure 44) to get the water
level in the pipe (C in Figure 44).
measurement and keeps the tape measure or ruler clean.
B
4.13.2 Calibrating the Submerged Area/Velocity Sensor
Calibrating the submerged area/velocity sensor synchronizes the meter
electronics with the unique characteristics of each individual probe. In
addition, the calibration compensates for a drift in the output of the sensor that
may occur as the materials in the sensor age. To ensure optimum accuracy,
the manufacturer recommends calibrating the submerged area/velocity
sensor when:
• The sensor is first used.
• Installing a new or different sensor on a flow meter or input receptacle.
• The difference between the level reading of the flow meter and the
independent verification (measurement with a dipstick and ruler) is
increasing.
Note: The data is constant if the difference between the level reading of the flow meter
and the independent verification is constant; recalibration is not required.
Note: Errors can occur with the level reading of the flow meter and the independent
verification. Errors are caused by variation in site conditions and measurement
abilities. These errors may cause slight variations in the difference, therefore, not
indicating a true change in the difference.
C
Page 96
Submerged Area Velocity Sensors
This calibration requires a bucket with at least 7 in. (20 cm) of water and
a ruler.
1. From the Main Menu, select
CALIBRATION > SUBMERGED PROBE.
OPTIONS > ADVANCED OPTIONS >
Page 99

Always check the Level Adjust when
reinstalling the flow meter following
a calibration. (See Keypad
Description on page 19.)
Section 4
2. Place the sensor flat on a table top or floor with the sensor (the plate with
holes) facing down onto the surface (Figure 45).
3. Press any key.
4. Place the sensor face up in the bucket or liquid. Tap lightly to remove air
bubbles. If these bubbles are not removed you can receive false readings
from the sensor during calibration (Figure 45).
5. Place the sensor face down under at least 7 in. (20 cm) of water. Make
sure the water surface is calm and the probe is stable.
6. Press any key.
7. Measure the depth from the bottom of the bucket to the surface of the
water and enter the value using the numeric keypad (Figure 45).
8. Press the
Figure 45 Calibrating the Submerged Area/Velocity Sensor
ACCEPT soft key.
4.13.3 Installing a Submerged Area/Velocity Sensor in a Pipe
4.13.3.1 Important Guidelines for Submerged Area/Velocity Sensor Installation
Installing the submerged area/velocity sensor follows the same instruction as
the velocity-only sensor. Refer to Installing the Velocity-Only Sensor in a Pipe
on page 92.
Submerged Area Velocity Sensors
Page 97
Page 100

Visit www.americansigma.com
 Loading...