

Page 1

SVA1000X
Spectrum Analyzer
Programming Guide
PG0701X-E01A
Page 2

SIGLENT
Contents
1. Programming Overview ........................................................... 3
1.1 Remotely Operating the Analyzer ......................................................... 3
1.2 Build Communication ................................ ................................ ............ 5
1.3 Remote Control Capabilities ................................................................. 8
2. SCPI Overview ........................................................................ 12
2.1 Command Format................................................................................. 12
2.2 Symbol Instruction ............................................................................... 12
2.3 Parameter Type ..................................................................................... 13
2.4 Command Abbreviation ....................................................................... 14
3. System Commands ................................................................ 15
3.1 IEEE Common Commands .................................................................. 15
3.2 System Subsystem .............................................................................. 17
3.3 Instrument Subsystem ......................................................................... 22
3.4 Initiate Subsystem................................................................................ 23
3.5 Sense Subsystem................................................................................. 23
3.6 Calculate Subsystem ........................................................................... 39
3.7 Measurement Subsystem .................................................................... 54
3.8 Trigger Subsystem ............................................................................... 62
3.9 TG Subsystem ...................................................................................... 64
3.10 Demod Subsystem ............................................................................... 66
3.11 Memory Subsystem ............................................................................. 67
4. Programming Examples ........................................................ 69
4.1 Examples of Using VISA ...................................................................... 69
4.2 Examples of Using Sockets/Telnet ..................................................... 79
2 SVA1000X Programming Guide
Page 3
SIGLENT
1.Programming Overview
The Siglent SVA1000X series spectrum analyzers features LAN, USB Device, and SIGLENT
GPIB_USB module interfaces. By using a computer with these interfaces, and a suitable
programming language (and/or NI-VISA software), users can remotely control the analyzer
based on SCPI (Standard Commands for Programmable Instruments) command set,
Labview and IVI (Interchangeable Virtual Instrument), to interoperate with other
programmable instruments.
This chapter introduces how to build communication between the spectrum analyzer and a
controller computer with these interfaces.
1.1 Remotely Operating the Analyzer
The analyzer provides both the USB and LAN connection which allows you to set up a
remote operation environment with a controller computer. A controller computer could be a
personal computer (PC) or a minicomputer. Some intelligent instruments also function as
controllers.
1.1.1 USB: Connecting the Analyzer via the USB Device port
Refer to the following steps to finish the connection via USB-Device:
1. Install NI-VISA on your PC for USB-TMC driver.
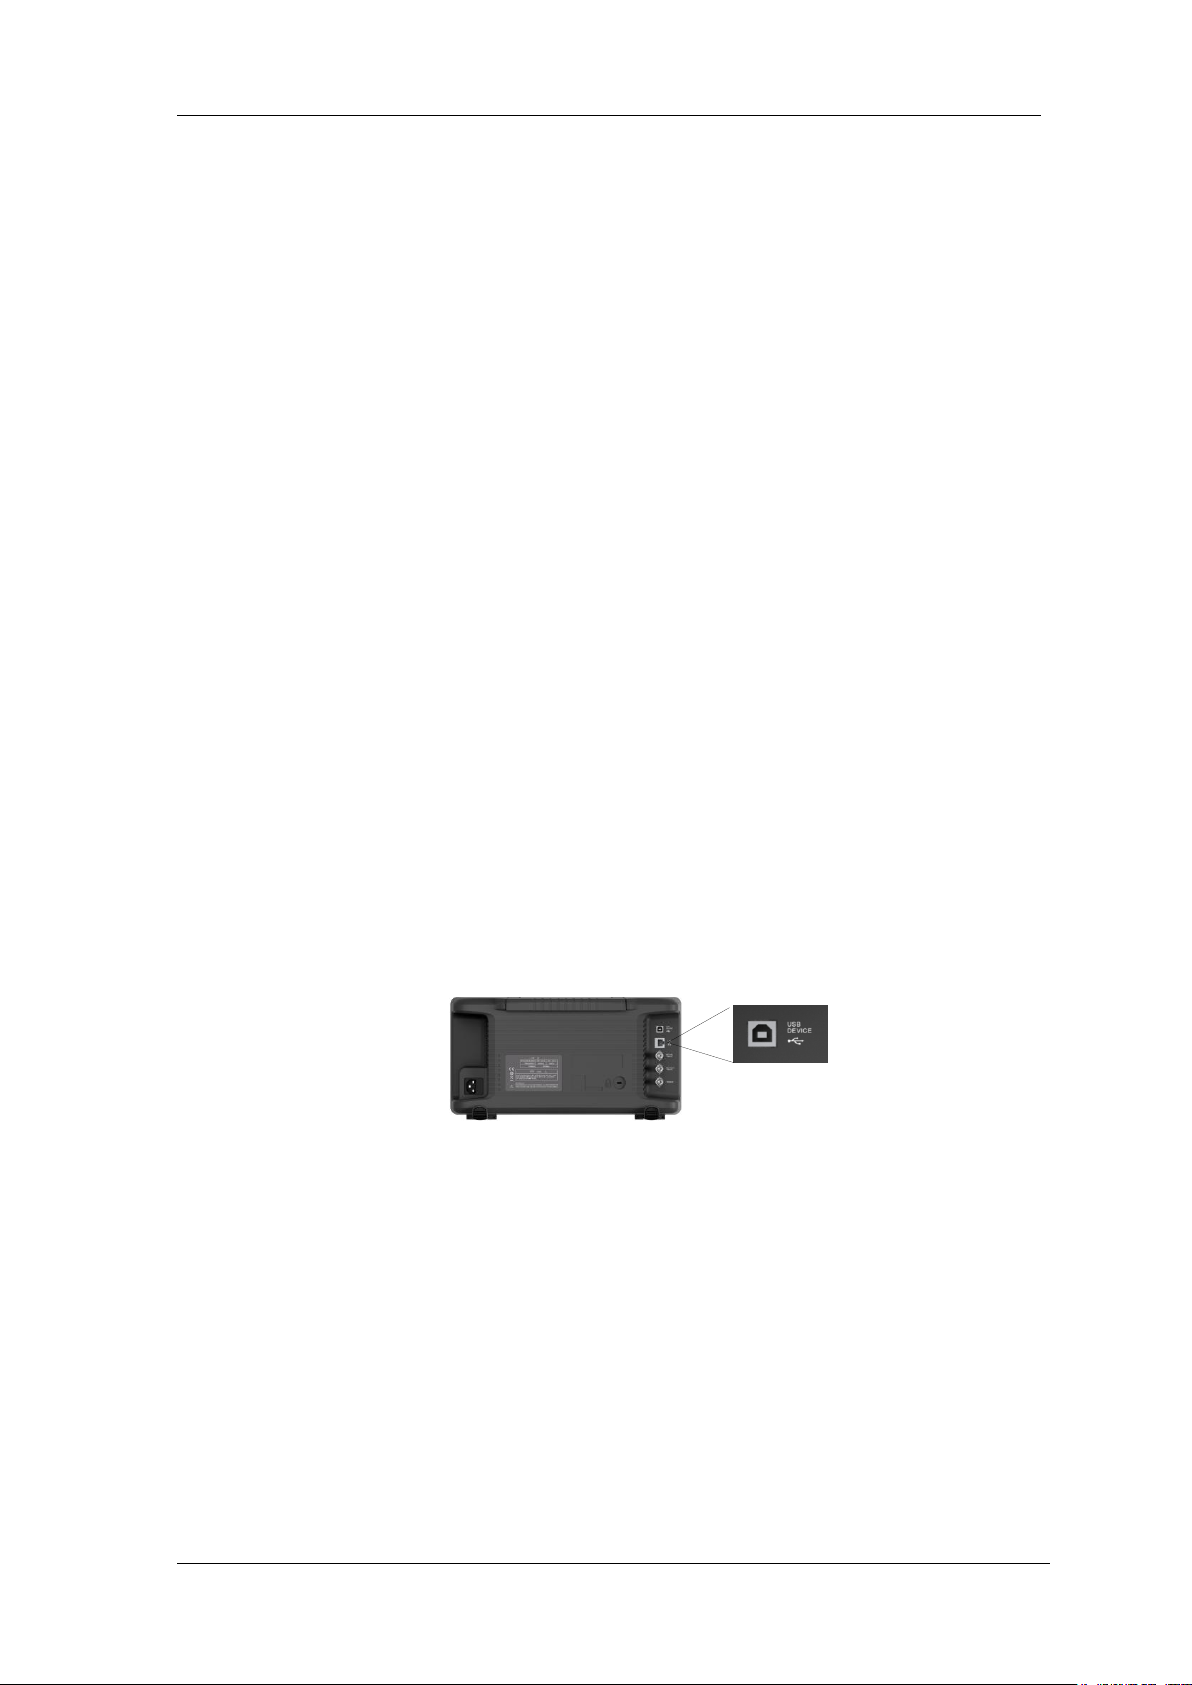
2. Connect the analyzer USB Device port to a PC with a USB A-B cable.
Figure 1-1 USB Device
3. Switch on the analyzer
The analyzer will be detected automatically as a new USB hardware.
1.1.2 LAN: Connecting the Analyzer via the LAN port
Refer to the following steps to finish the connection via LAN:
1. Install NI-VISA on your PC for VXI driver. Or without NI-VISA, using socket or telnet
in your PC’s Operating System.
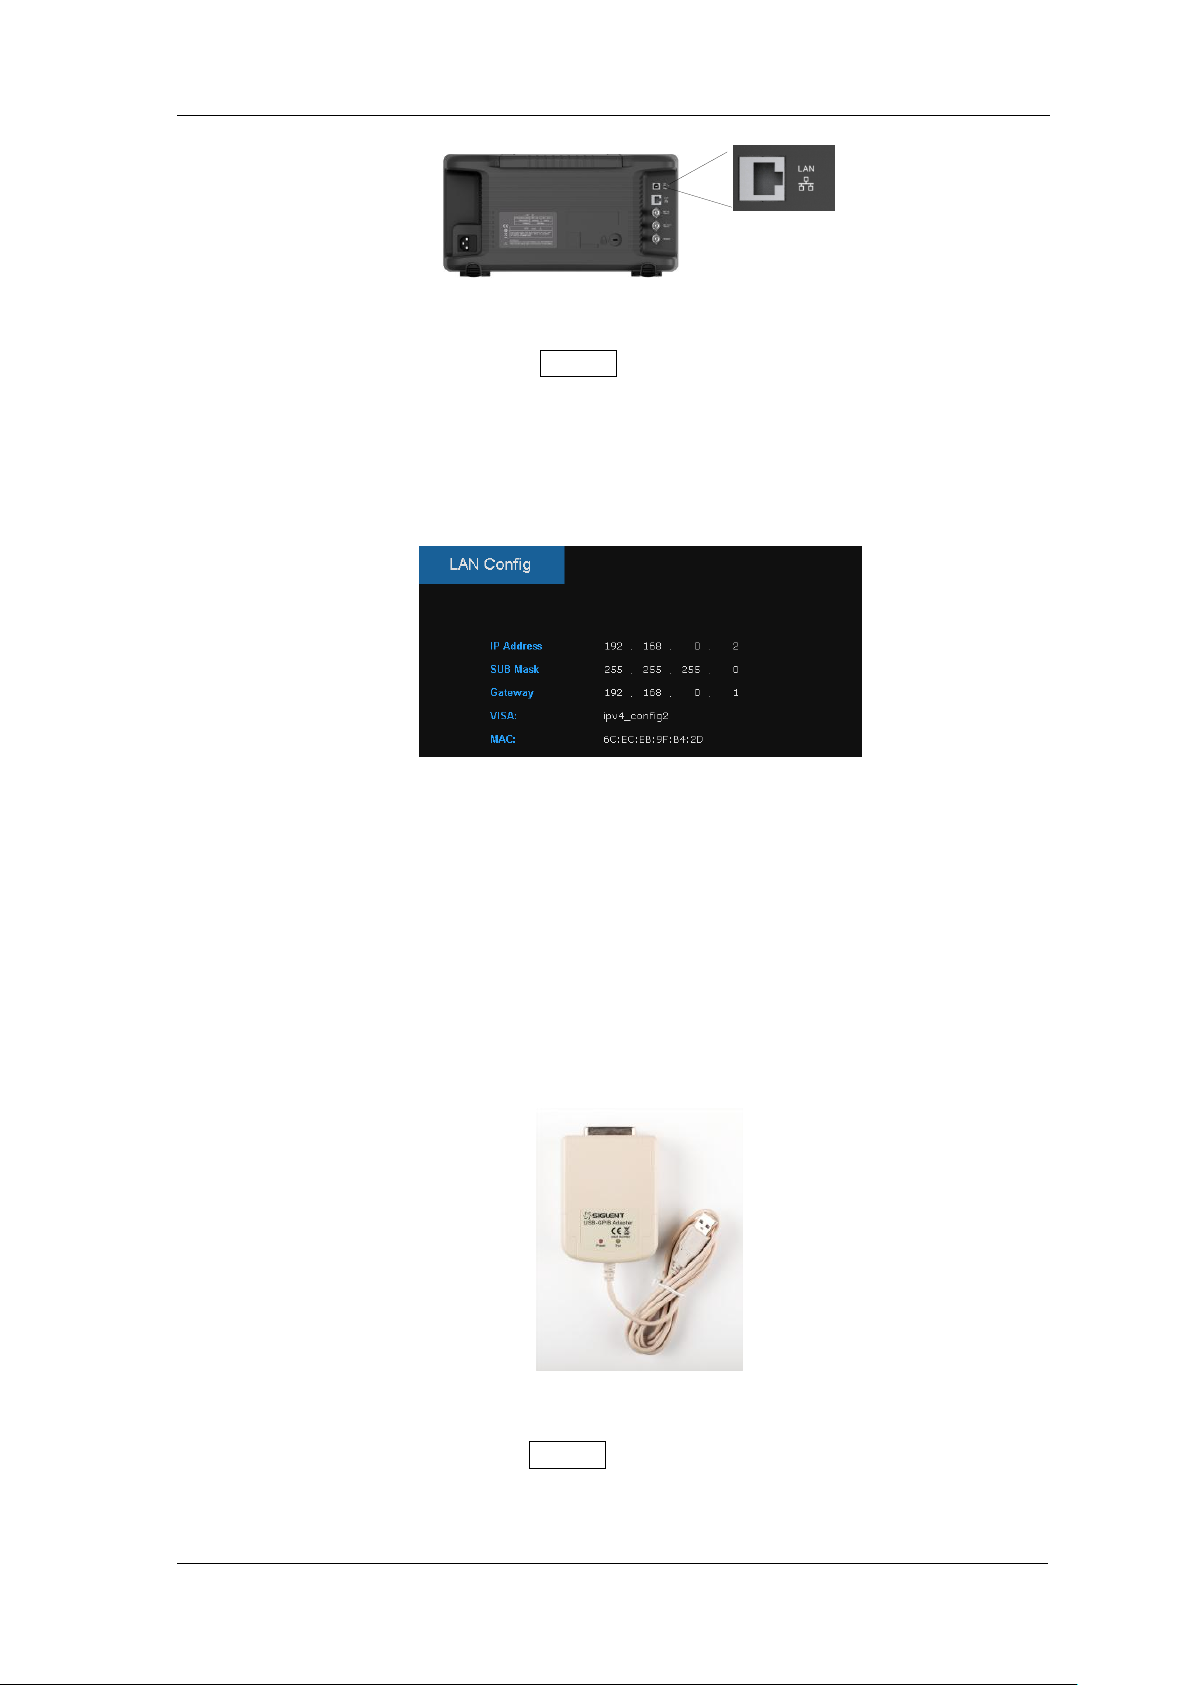
2. Connect the analyzer to PC or the local area network with a LAN cable
SVA1000X Programming Guide 3
Page 4
SIGLENT
Figure 1-2 LAN
3. Switch on the analyzer
4. Press button on the front panel System →Interface→LAN to enter the LAN Config
function menu.
5. Select the IP Config between Static and DHCP
DHCP: the DHCP server in the current network will assign the network parameters
automatically (IP address, subnet mask, gate way) for the analyzer.
Static: you can set the IP address, subnet mask, gate way manually. Press Apply.
Figure 1-3 LAN Config
The analyzer will be detected automatically or manually as a new LAN point.
1.1.3 GPIB: Connecting the Analyzer via the USB Host port
Refer to the following steps to finish the connection via USB:
1. Install NI-VISA on your PC for GPIB driver.
2. Connect the analyzer USB Host port to a PC’s GPIB card port, with SIGLENT USBGPIB adaptor.
Figure 1-4 SIGLENT USB-GPIB Adaptor
3. Switch on the analyzer
4. Press button on the front panel System→Interface→GPIB to enter the GPIB number.
The analyzer will be detected automatically as a new GPIB point.
4 SVA1000X Programming Guide
Page 5
SIGLENT
1.2 Build Communication
1.2.1 Build Communication Using VISA
NI-VISA includes a Run-Time Engine version and a Full version. The Run-Time Engine
version provides NI device drivers such as USB-TMC, VXI, GPIB, etc. The full version
includes the Run-Time Engine and a software tool named NI MAX that provides a user
interface to control the device.
You can get NI-VISA full version from:
http://www.ni.com/download/.
After download you can follow the steps below to install it:
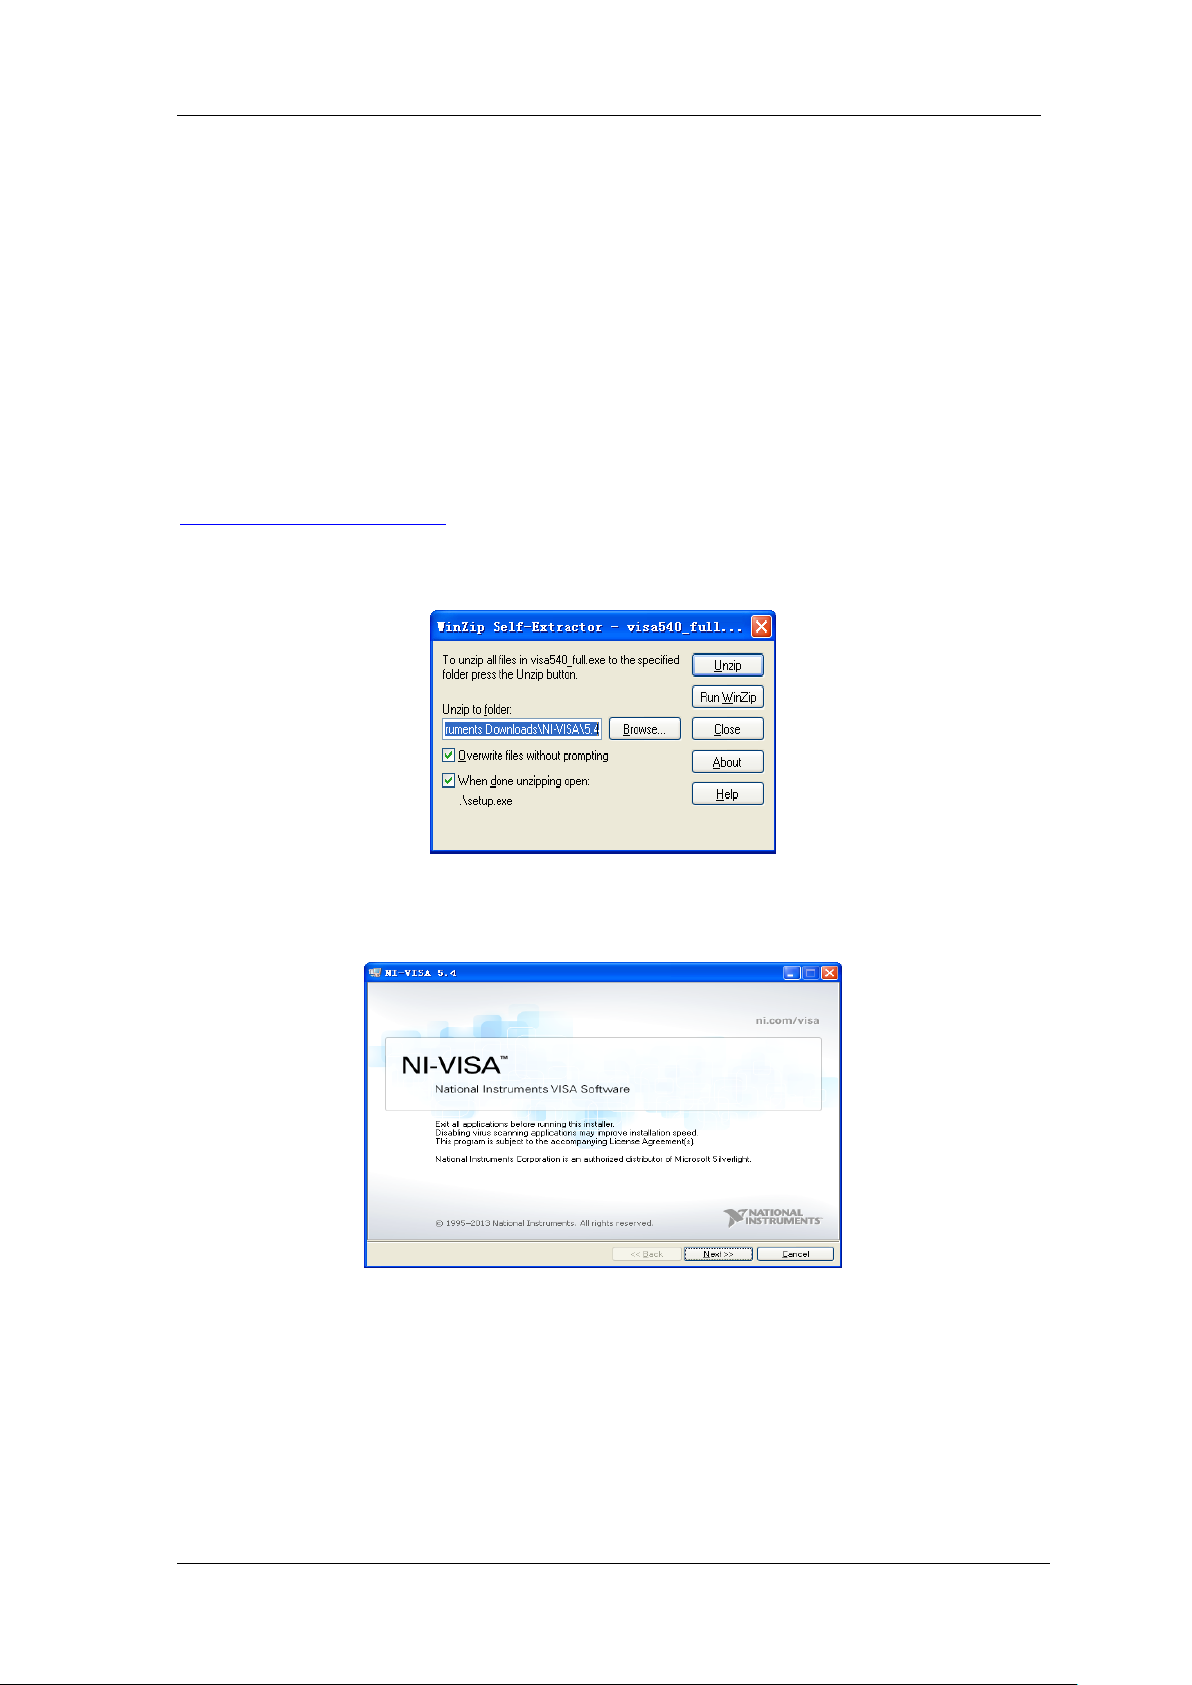
a. Double click the visa_full.exe, dialog shown as below:
b. Click Unzip, the installation process will automatically launch after unzipping files. If your
computer needs to install .NET Framework 4, its setup process will auto start.
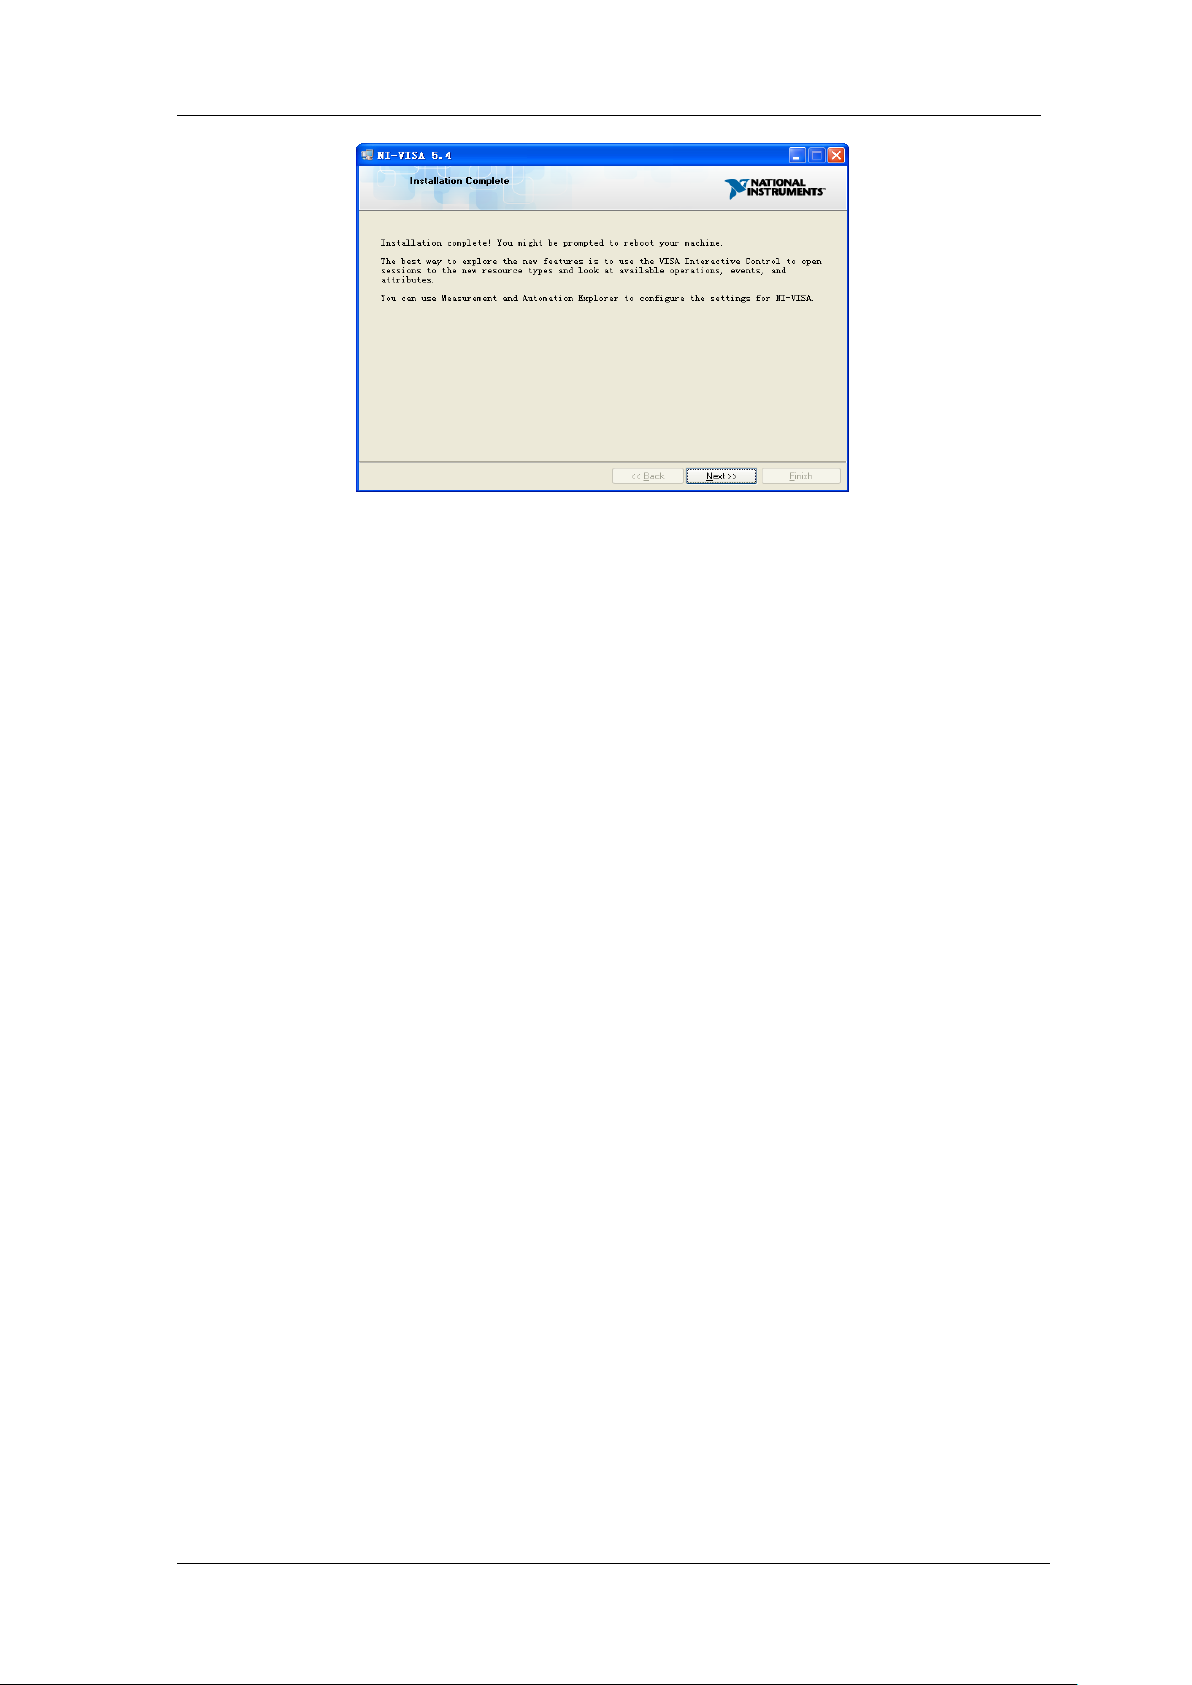
c. The NI-VISA installing dialog is shown above. Click Next to start the installation process.
SVA1000X Programming Guide 5
Page 6
SIGLENT
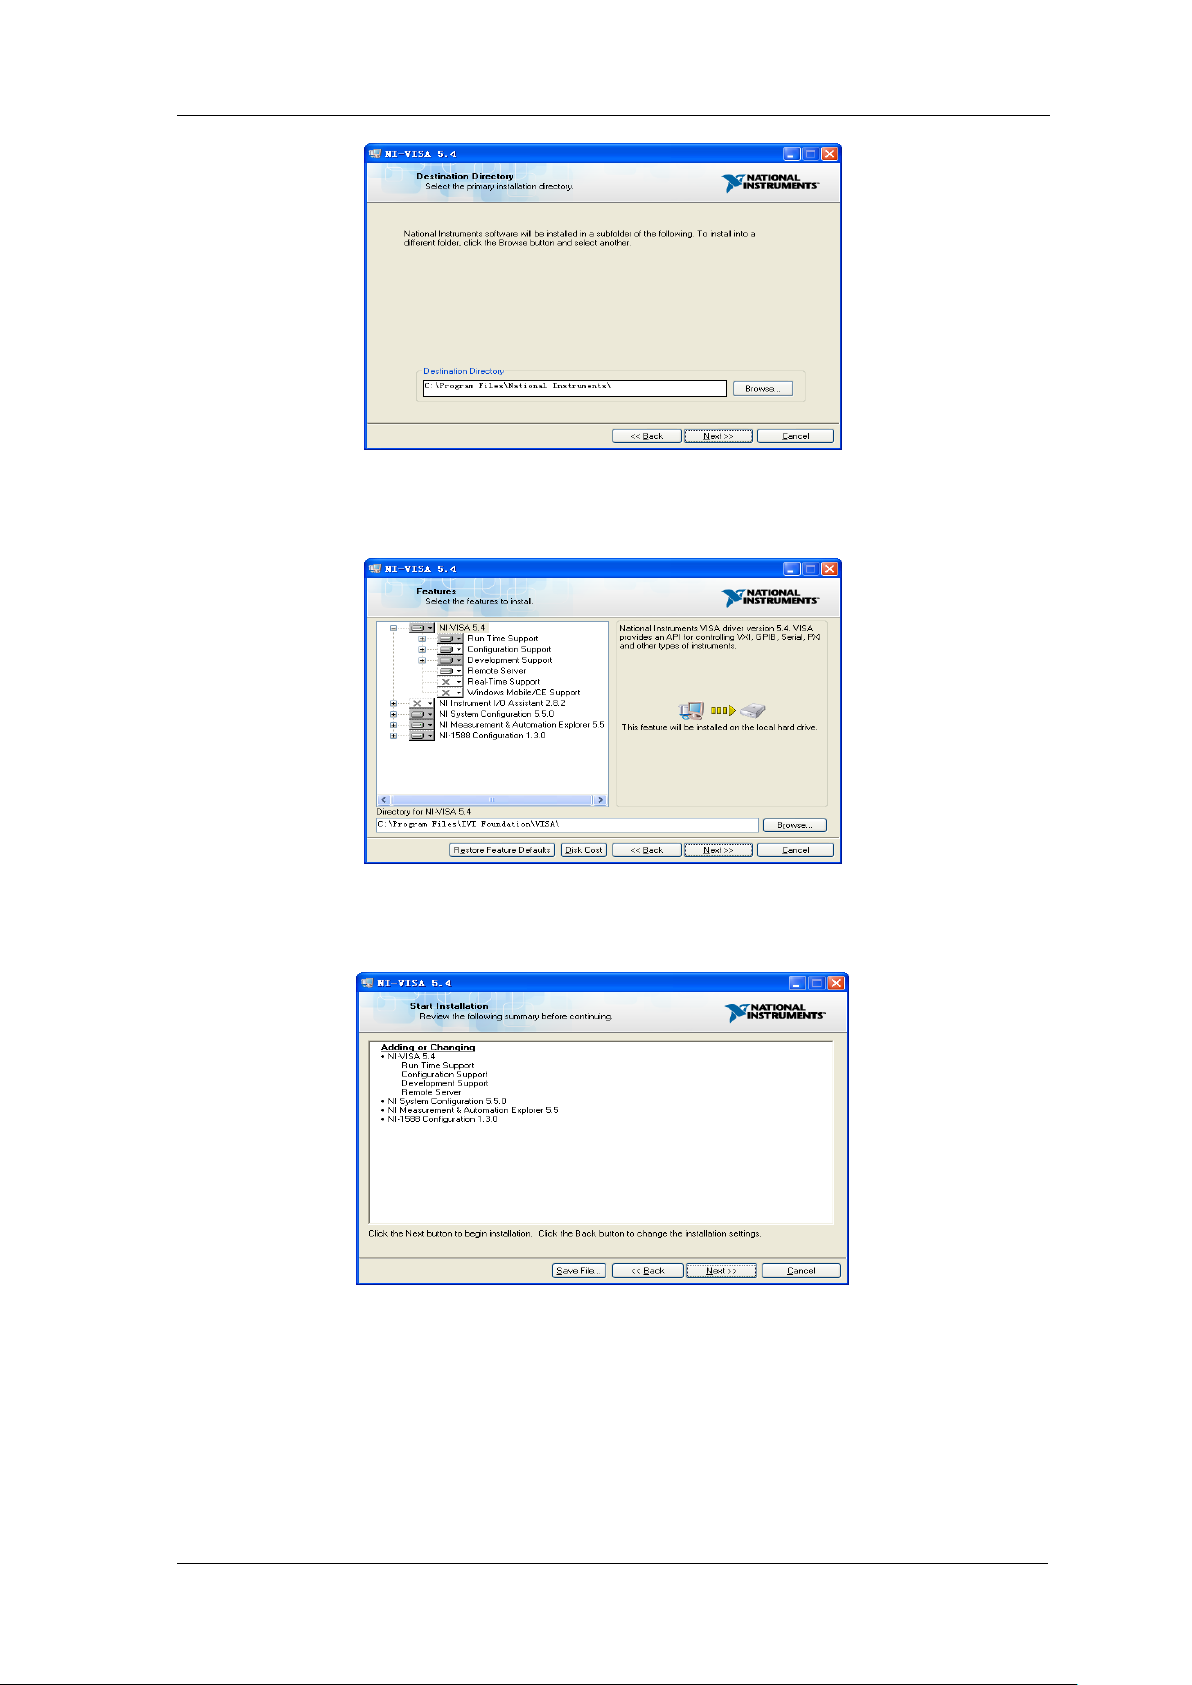
Set the install path, default path is “C:\Program Files\National Instruments\”, you can
change it. Click Next, dialog shown as above.
d. Click Next twice, in the License Agreement dialog, select the “ I accept the above 2 License
Agreement(s).” ,and click Next, dialog shown as below:
e. Click Next to run installation.
6 SVA1000X Programming Guide
Page 7
SIGLENT
Now the installation is complete, reboot your PC.
1.2.2 Build Communication Using Sockets/Telnet
Through the LAN interface, VXI-11, Sockets and Telnet protocols can be used to
communicate with the spectrum analyzer. VXI-11 is provided in NI-VISA, while Sockets and
Telnet are commonly included in PC’s OS initially.
Socket LAN is a method used to communicate with the spectrum analyzer over the LAN
interface using the Transmission Control Protocol/Internet Protocol (TCP/IP). A socket is a
fundamental technology used for computer networking and allows applications to
communicate using standard mechanisms built into network hardware and operating systems.
The method accesses a port on the spectrum analyzer from which bidirectional
communication with a network computer can be established.
Before you can use sockets LAN, you must select the analyzer’s sockets port number to use:
Standard mode. Available on port 5025. Use this port for programming.
Telnet mode. The telnet SCPI service is available on port 5024.
SVA1000X Programming Guide 7
Page 8
SIGLENT
1.3 Remote Control Capabilities
1.3.1 User-defined Programming
Users can use SCPI commands to program and control the spectrum analyzer. For details,
refer to the introductions in “Programming Examples”.
1.3.2 Send SCPI Commands via NI MAX
Users can control the spectrum analyzer remotely by sending SCPI commands via NI-MAX
software. NI_MAX is National Instruments Measurement and Automation Explorer. It is an
executable program that enables easy communication to troubleshoot issues with
instrumentation.
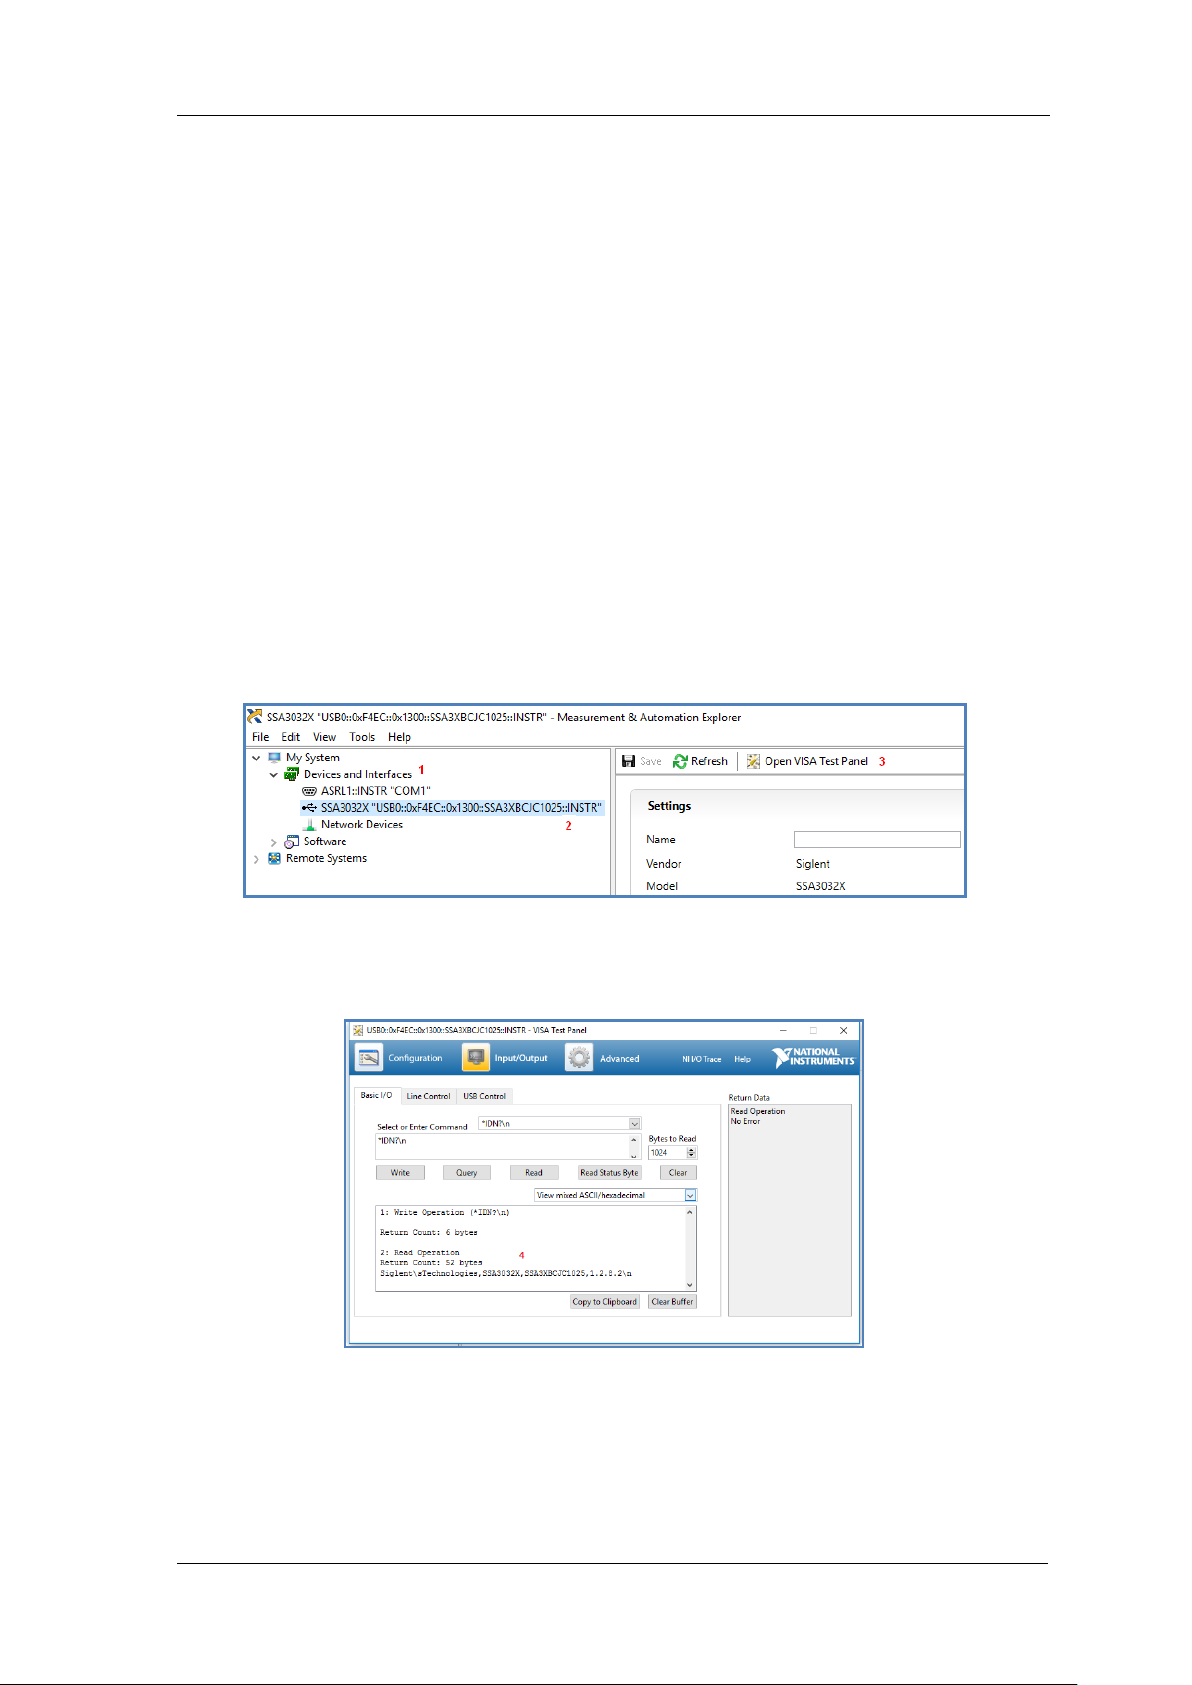
1.3.2.1 Using USB
Run NI MAX software.
1. Click “Device and interface” at the upper left corner of the software;
2. Find the “USBTMC” device symbol
3. Click “Open VISA Test Panel” option button, then the following interface will appear.
4. Click the “Input/Output” option button and click the “Query” option button in order to view
the operation information.
NOTE: The *IDN? command (known as the Identification Query) returns the instrument
manufacturer, instrument model, serial number, and other identification information.
1.3.2.2 Using LAN
Select, Add Network Device, and select VISA TCP/IP Resource as shown:
8 SVA1000X Programming Guide
Page 9
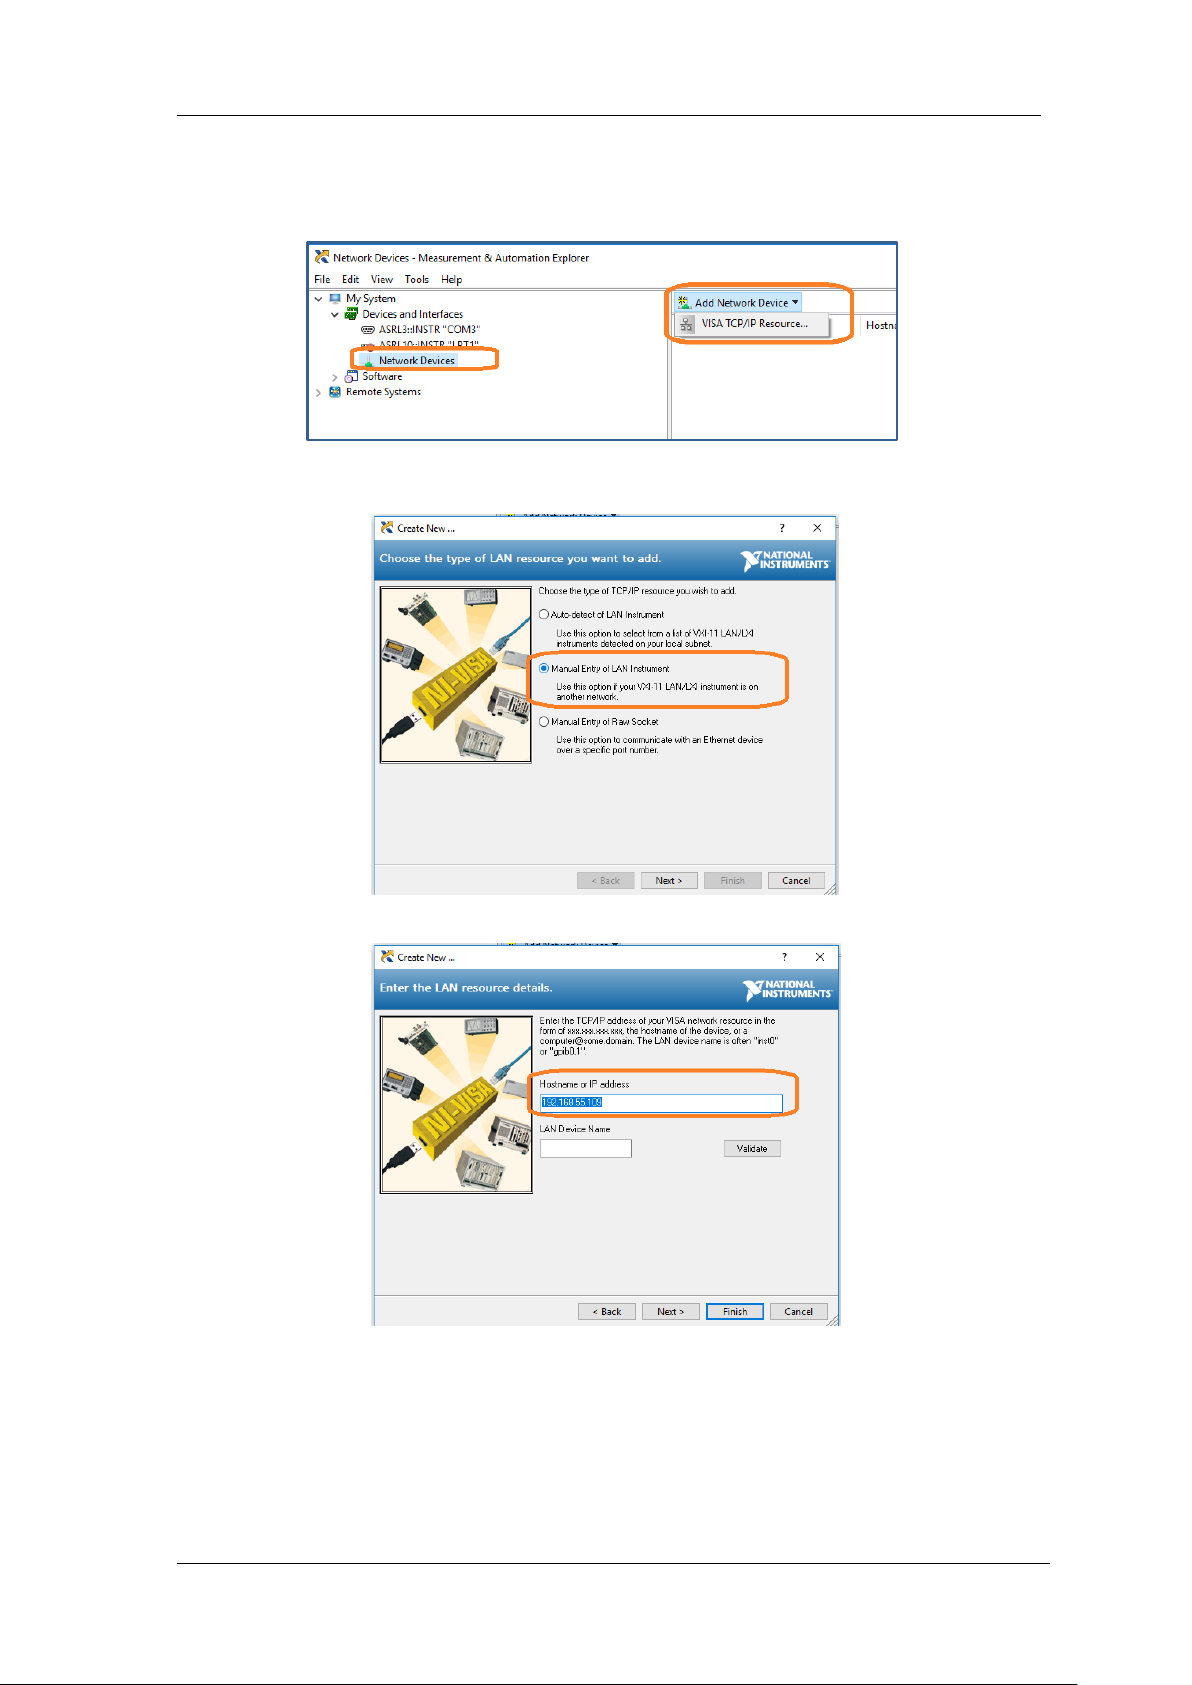
Run NI MAX software.
1. Click “Device and interface” at the upper left corner of the software;
2. Find the “Network Devices” symbol , click “Add Network Devices”;
SIGLENT
3. Select Manual Entry of LAN instrument, select Next, and enter the IP address as shown.
Click Finish to establish the connection:
NOTE: Leave the LAN Device Name BLANK or the connection will fail.
4. After a brief scan, the connection should be shown under Network Devices:
SVA1000X Programming Guide 9
Page 10
SIGLENT
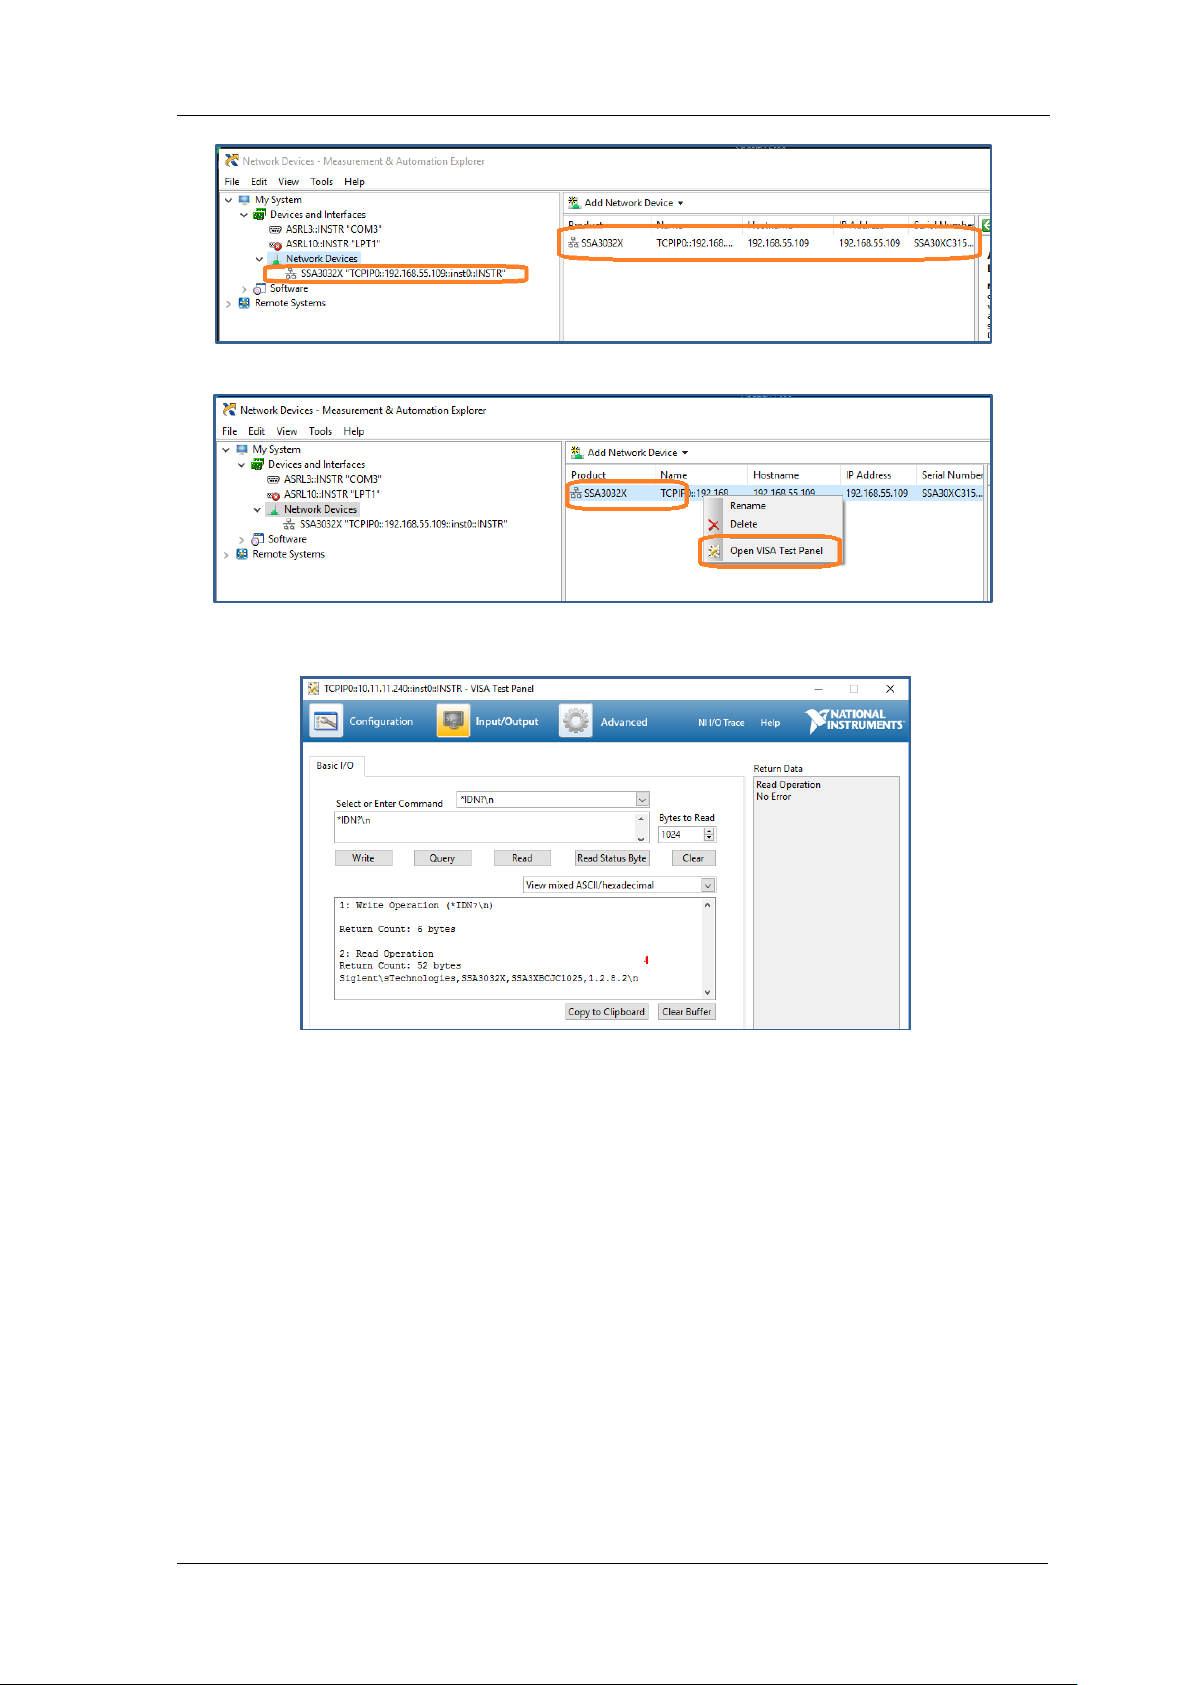
5. Right-click on the product and select Open NI-VISA Test Panel:
6. Click “Input/Output” option button and click “Query” option button. If everything is OK,
you will see the Read operation information returned as shown below.
1.3.3 EasySpectrum Software
Users can control the spectrum analyzer remotely by EasySpectrum. PC software
EasySpectrum is an easy-to-use, PC-Windows-based remote control tool for Siglent’s
spectrum analyzer. You can download it from Siglent’s website. To connect the analyzer via
the USB/LAN port to a PC, you need install the NI VISA first.
It is able to be used as:
A monitor to display and control the trace scans simultaneously with the analyzer;
A file maker to get user defined Limit/Correction files, and load them to the analyzer;
An EMI receiver to perform EMI Pre-compliance test including prescan, peak search,
finalscan and report generating.
For the further description of the software, please refer to the online help embedded in this
software.
10 SVA1000X Programming Guide
Page 11
SIGLENT
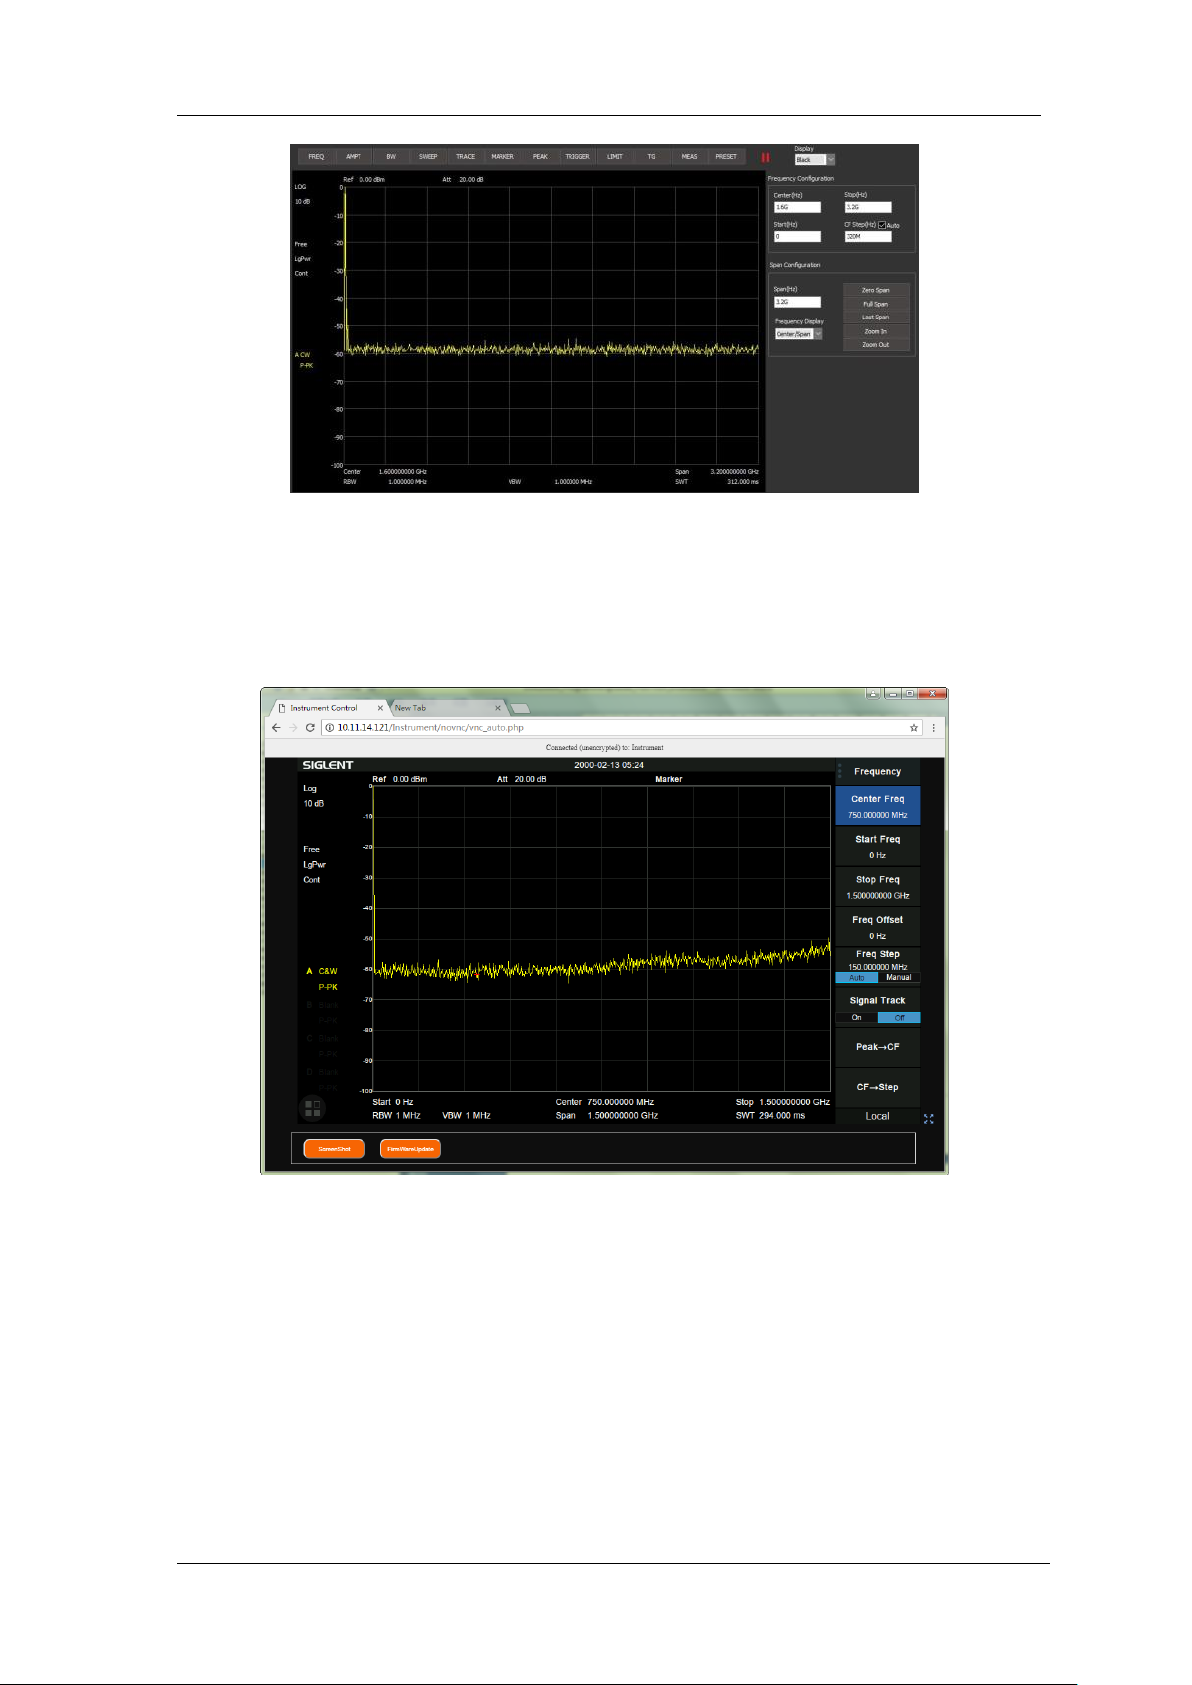
1.3.4 Web Control
With the embedded web server, the analyzer can be controlled through LAN from a web
browser* on PC and mobile terminals, without any extra driver be installed. This provides
remote controlling and monitoring capabilities. Screenshot and firmware update are also
supported.
*Web browser with HTML5 supported like Google Chrome or Firefox are recommended.
SVA1000X Programming Guide 11
Page 12

SIGLENT
2.SCPI Overview
2.1 Command Format
SCPI commands present a hierarchical tree structure containing multiple subsystems, each
of the subsystems is made up of a root keyword and several subkeywords. The command
string usually starts with “:”, the keywords are separated by “:” and the followed parameter
settings are separated by space. Query commands add “?” at the end of the string.
For example:
:SENSe:FREQuency:CENTer <freq>
:SENSe:FREQuency:CENTer?
SENSe is the root key of the command, FREQuency and CENTer are second and third
keywords. The command begins with “:”, and separates the keywords at the same time,
<freq> separated by space and represents the parameter available for setting; “?” represents
a query.
2.2 Symbol Instruction
The following four symbols are not the content of SCPI commands and cannot be sent with
the commands, but are usually used in the commands.
1. Triangle Brackets < >
The parameter in the triangle brackets must be replaced by an effective value. For example:
Send the “:DEMod:VOLume <value>” command in “:DEMod:VOLume 5”.
2. Square Brackets [ ]
The content in the square brackets can be ignored. When the parameter is ignored, the
instrument will set the parameter to its default. For example,
In the “[:SENSe]:POWer[:RF]:ATTenuation?” command, sending any of the four commands
below can generate the same effect:
:POWer:ATTenuation?
:POWer:RF:ATTenuation?
:SENSe:POWer:ATTenuation?
:SENSe:POWer:RF:ATTenuation?
3. Vertical Bar |
The vertical bar is used to separate multiple parameters and when sending the command,
you can choose one of the parameters. For example,
12 SVA1000X Programming Guide
Page 13

SIGLENT
In the “[:SENSe]:FREQuency:CENTer:STEP:AUTO OFF|ON|0|1” command, the parameters
available are “OFF”, “ON”, “0” or “1”.
4. Braces { }
The parameters in the braces are optional which can be ignored or set for one or more times.
For example:
:CALCulate:LLINe[1]|2:DATA <x-axis>,<ampl>{,<x-axis>, <ampl>}, in the command, the {,<x-
axis>, <ampl>} parameters can be ignored or set for one or more times.
2.3 Parameter Type
The parameters in the commands introduced in this manual include 6 types: boolean,
enumeration, integer, float, discrete and string.
1. Boolean
The parameters in the commands could be “OFF”, “ON”, “0” or “1”. For example:
[:SENSe]:FREQuency:CENTer:STEP:AUTO OFF|ON|0|1
2. Enumeration
The parameter could be any of the values listed. For example:
[:SENSe]:AVERage:TYPE LOGPower|POWer|VOLTage
The parameter is “OGPower”, “POWer” or “VOLTage”.
3. String
The parameter should be the combinations of ASCII characters. For example:
:SYSTem:COMMunicate:LAN:IPADdress <“xxx.xxx.xxx.xxx”>
The parameter can be set as “192.168.1.12” string.
4. Integer
Except other notes, the parameter can be any integer within the effective value range. For
example:
[:SENSe]:DEMod:VOLume <value>
The parameter < value > can be set to any integer between 0 and 10.
5. Float
The parameter could be any value within the effective value range according to the accuracy
requirement (the default accuracy contains up to 9 digits after the decimal points). For example:
:CALCulate:BANDwidth:NDB <value>
The parameter < value > can be set to any real number between -100 and 100.
SVA1000X Programming Guide 13
Page 14

SIGLENT
6. Discrete
The parameter could only be one of the specified values and these values are discontinuous. For
example:
[:SENSe]:BWIDth:VIDeo:RATio <number>
The parameter <number> could only be one of 0.001, 0.003, 0.01, 0.03, 0.1, 0.3, 1.0, 3.0, 10.0,
30.0, 100.0, 300.0, 1000.0.
2.4 Command Abbreviation
All of the commands are not case sensitive, so you can use any of them. But if abbreviation
is used, all the capital letters in the command must be written completely. For example:
:DISPlay:WINDow:TRACe:Y:DLINe:STATe?
Can be abbreviated to:
:DISP:WIND:TRAC:Y:DLIN:STAT?
14 SVA1000X Programming Guide
Page 15
SIGLENT
Command
Format
*IDN?
Instruction
Returns an instrument identification information string. The string will contain
the manufacturer, model number, serial number, software number, FPGA
number and CPLD number.
Menu
None
Example
*IDN?
Return: Siglent,SVA1015,1234567890,100.01.01.06.01
Command
Format
*RST
Instruction
This command presets the instrument to a factory defined condition that is
appropriate for remote programming operation. *RST is equivalent to
performing the two commands :SYSTem:PRESet and *CLS. This command
always performs a factory preset.
Menu
None
Example
*RST
Command
Format
*CLS
Instruction
Clears the status byte register. It does this by emptying the error queue and
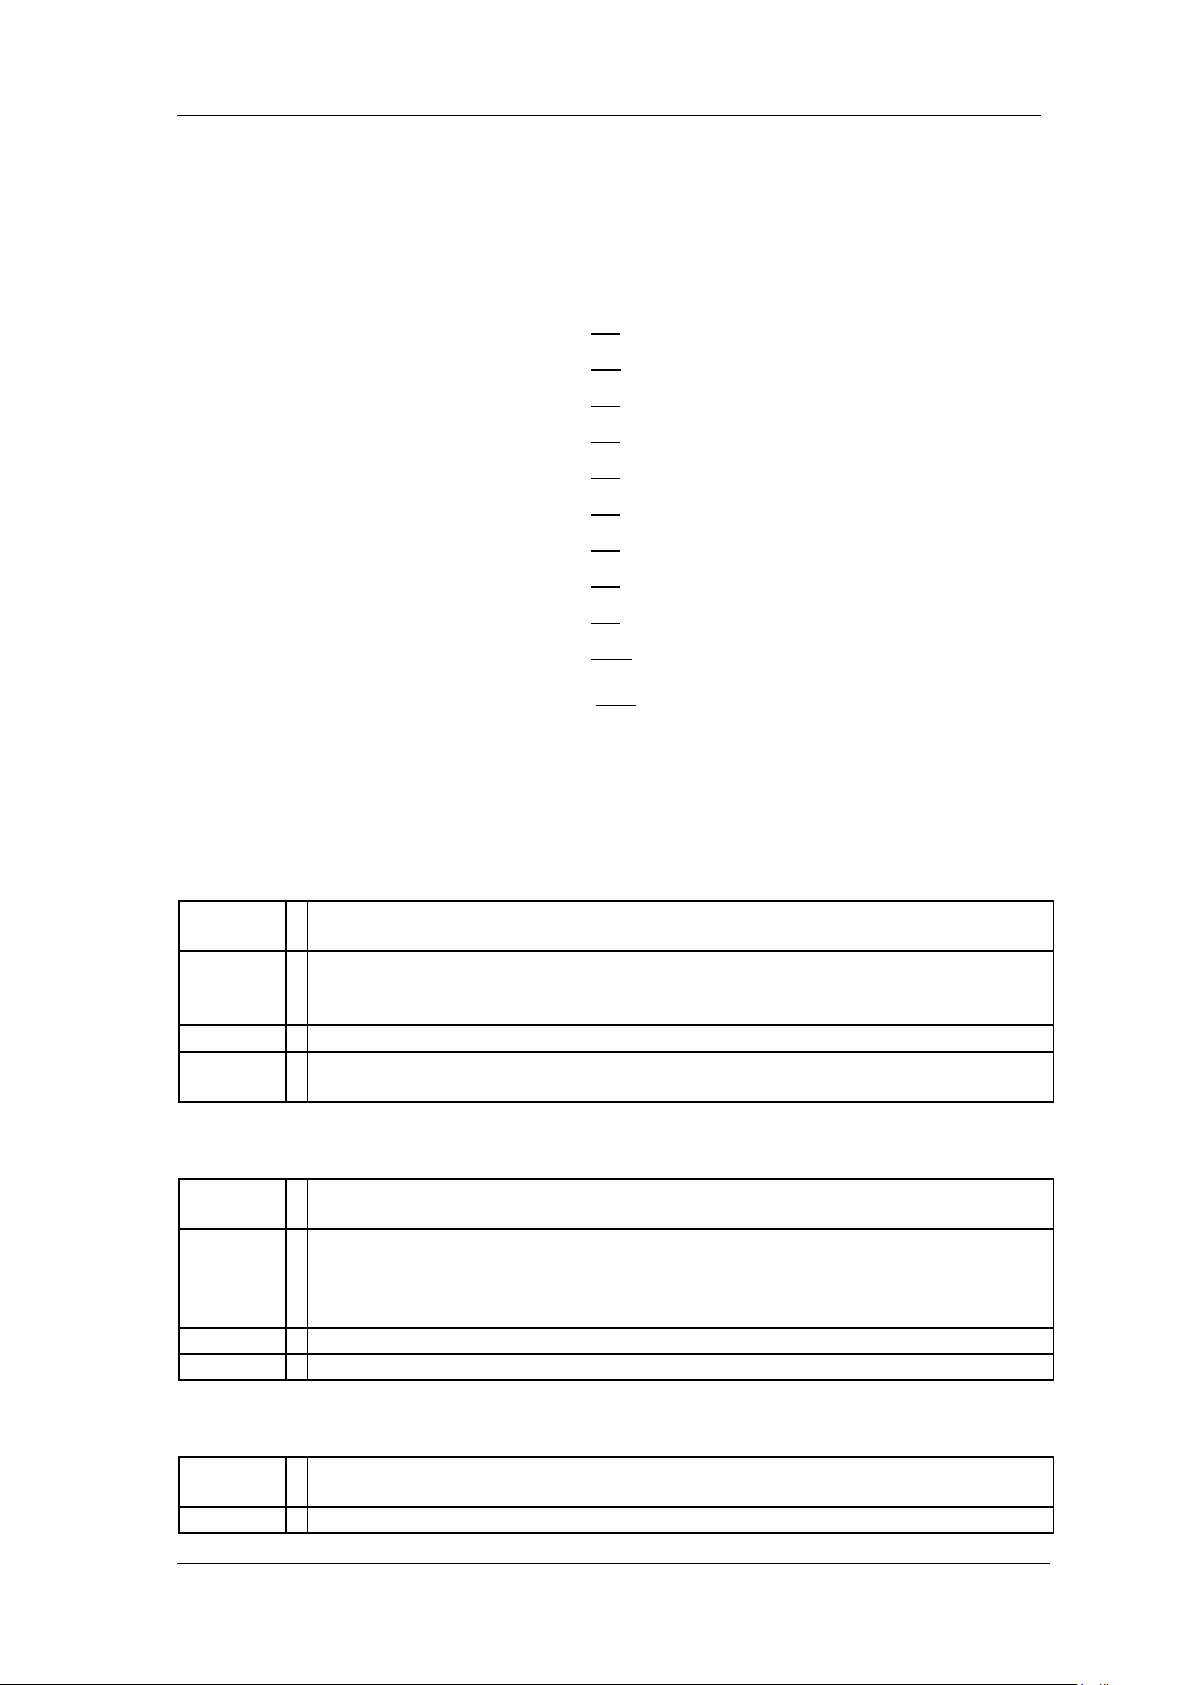
3.System Commands
This chapter introduces the Siglent Technologies SVA1000X SCPI commands, include:
IEEE Common Commands 3.1
System Subsystem 3.2
Instrument Subsystem 3.3
Initiate Subsystem 3.4
Sense Subsystem 3.5
Calculate Subsystem 3.6
Measurement Subsystem 3.7
Trigger Subsystem 3.8
TG Subsystem 3.9
Demod Subsystem 3.10
Memory Subsystem 3.11
3.1 IEEE Common Commands
3.1.1 Identification Query (*IDN)
3.1.2 Reset (*RST)
3.1.3 Clear Status (*CLS)
SVA1000X Programming Guide 15
Page 16
SIGLENT
clearing all bits in all of the event registers. The status byte register summarizes
the states of the other registers. It is also responsible for generating service
requests.
Menu
None
Example
*CLS
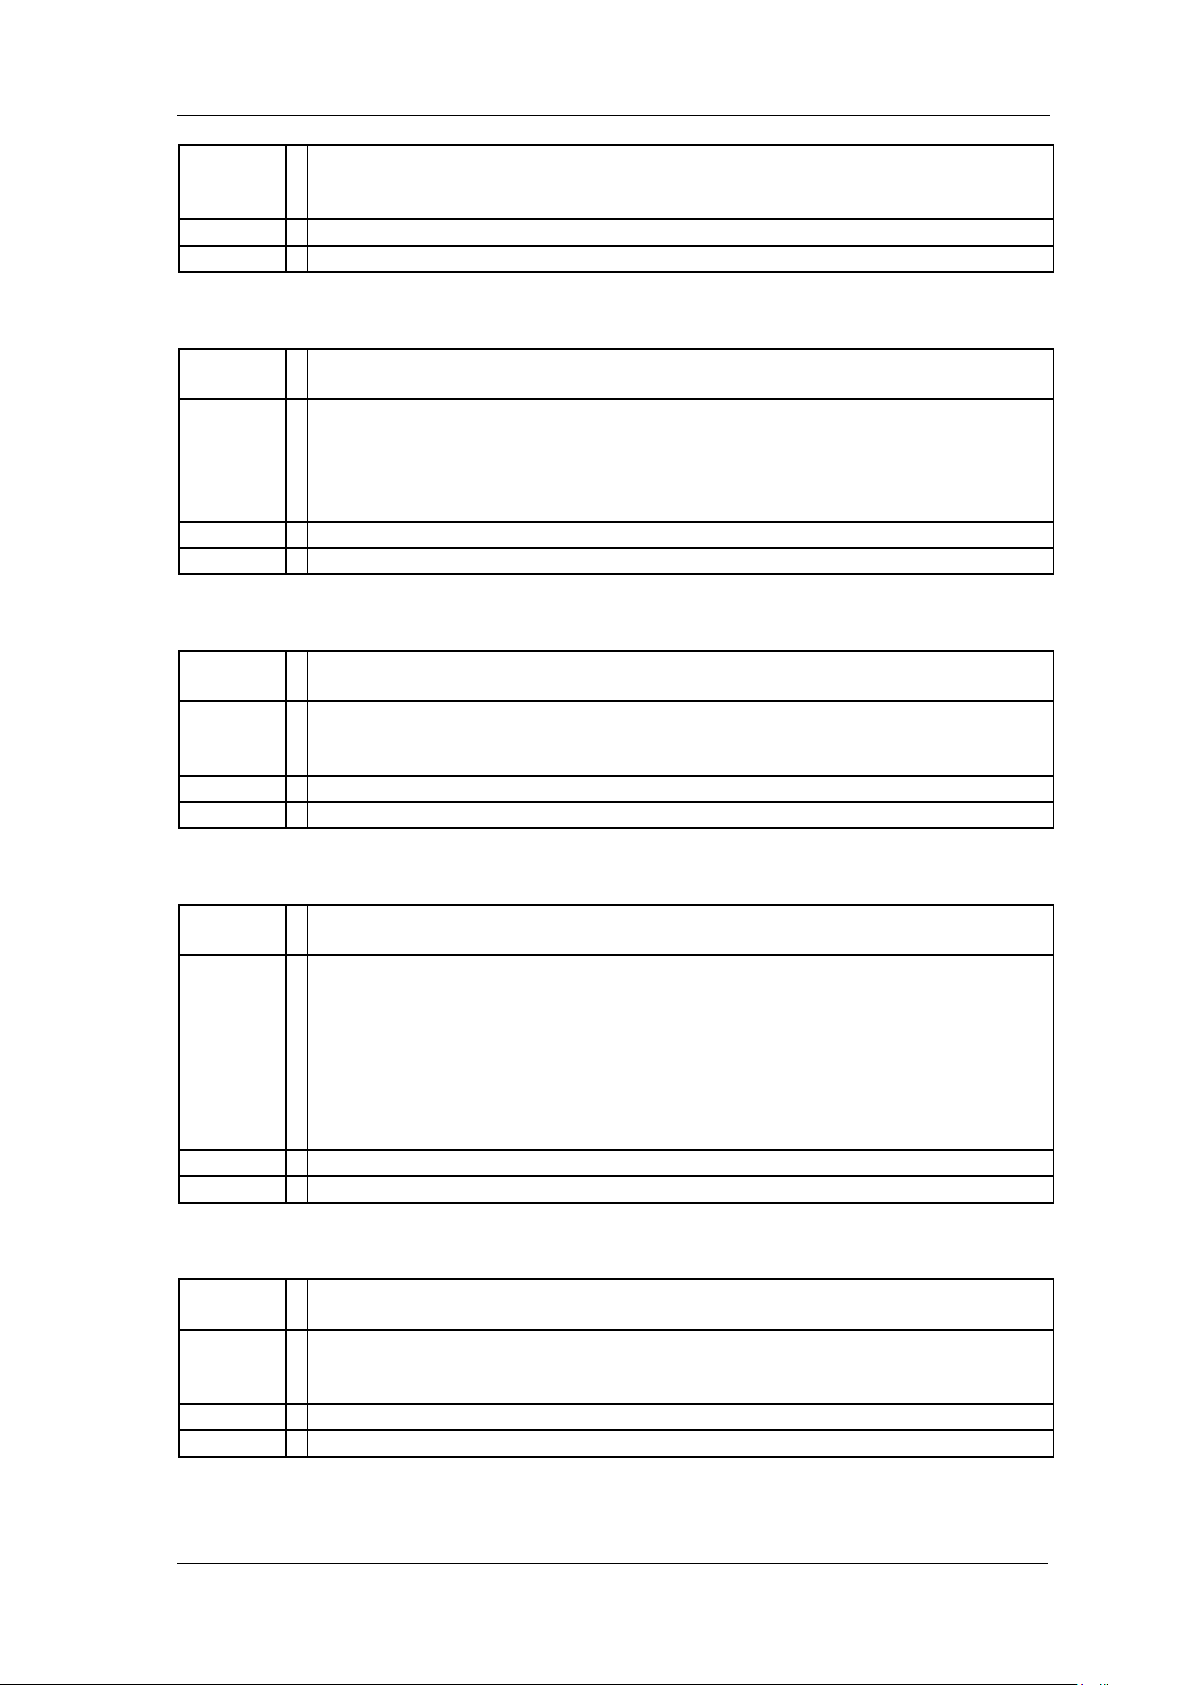
Command
Format
*ESE <number>
*ESE?
Instruction
Set the bits in the standard event status enable register. This register monitors
I/O errors and synchronization conditions such as operation complete, request
control, query error, device dependent error, execution error, command error
and power on. A summary bit is generated on execution of the command.
The query returns the state of the standard event status enable register.
Menu
None
Example
*ESE 16
Command
Format
*ESR?
Instruction
Queries and clears the standard event status event register. (This is a
destructive read.) The value returned reflects the current state (0/1) of all the
bits in the register.
Menu
None
Example
*ESR?
Command
Format
*OPC
*OPC?
Instruction
Set bit 0 in the standard event status register to “1” when all pending operations
have finished.
The query stops any new commands from being processed until the current
processing is complete. Then it returns a “1”, and the program continues. This
query can be used to synchronize events of other instruments on the external
bus.
Returns a “1” if the last processing is complete. Use this query when there’s a
need to monitor the command execution status, such as a sweep execution.
Menu
None
Example
*OPC?
Command
Format
*SRE <integer>
*SRE?
Instruction
This command enables the desired bits of the service request enable register.
The query returns the value of the register, indicating which bits are currently
enabled. The default value is 255.
Menu
None
Example
*SRE 1
3.1.4 Standard Event Status Enable (*ESE)
3.1.5 Standard Event Status Register Query (*ESR)
3.1.6 Operation Complete Query (*OPC)
3.1.7 Service Request Enable (*SRE)
16 SVA1000X Programming Guide
Page 17
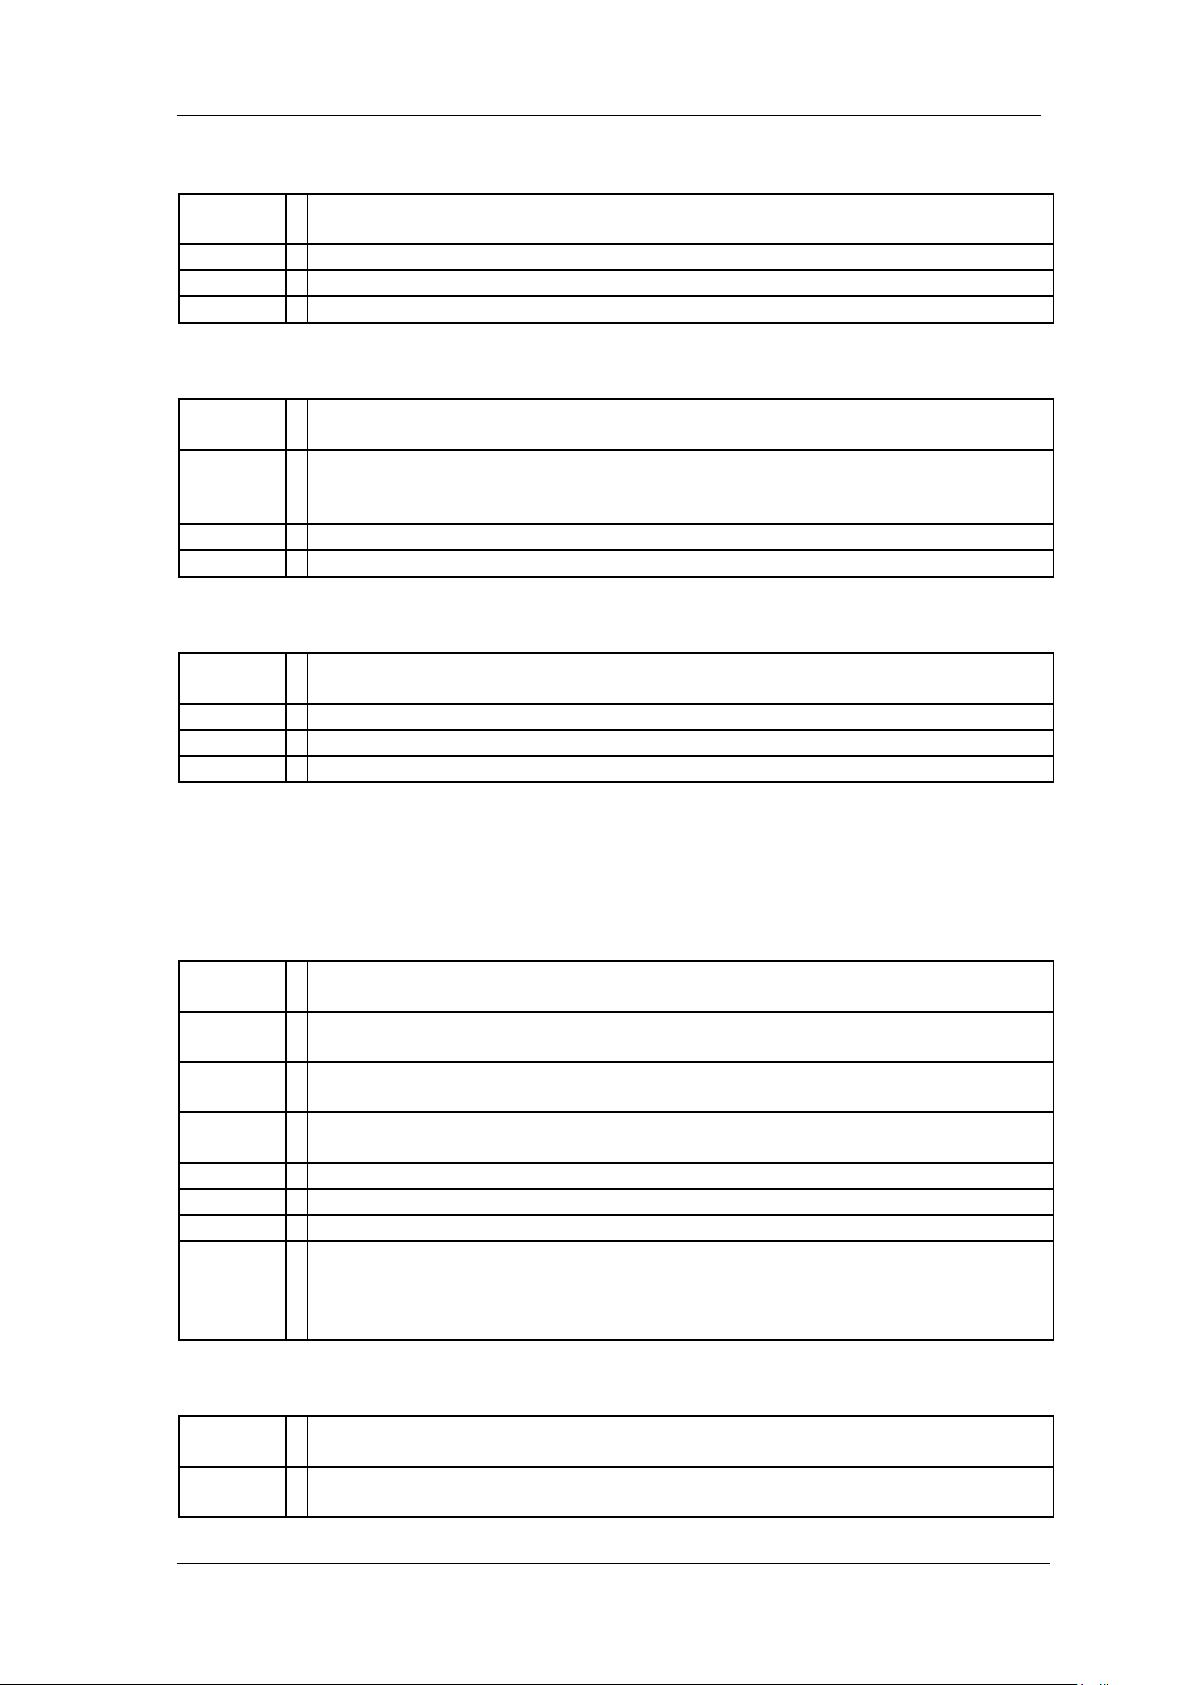
3.1.8 Status Byte Query (*STB)
Command
Format
*STB
Instruction
This query is used by some instruments for a self test.
Menu
None
Example
*STB
Command
Format
*WAI
Instruction
This command causes the instrument to wait until all pending commands are
completed before executing any additional commands.
There is no query form to the command.
Menu
None
Example
*WAI
Command
Format
*TST?
Instruction
This query is used by some instruments for a self test.
Menu
None
Example
*TRG
Command
Format
:SYSTem:TIME <hhmmss>
:SYSTem:TIME?
Instruction
Sets System time.
Gets System time.
Parameter
Type
String
Parameter
Range
hour(0~23), minute(0~59), second(0~59)
Return
String
Default
None
Menu
System > date & time
Example
Sets System time:
:SYSTem:TIME 182559
Gets System time:
:SYSTem:TIME?
Command
Format
:SYSTem:DATE <yyyymmdd>
:SYSTem:DATE?
Instruction
Sets system date.
Gets system date.
3.1.9 Wait-to-Continue (*WAI)
3.1.10 Self Test Query (*TST)
SIGLENT
3.2 System Subsystem
3.2.1 System Time (:SYSTem:TIME)
3.2.2 System Date (:SYSTem:DATE)
SVA1000X Programming Guide 17
Page 18
SIGLENT
Parameter
Type
String
Parameter
Range
year(four digits), month(1~12), date(1~31)
Return
String
Default
None
Menu
System > date&time
Example
Sets System date:
:SYSTem:DATE 20050101
Gets System date:
:SYSTem:DATE?
Command
Format
:SYSTem:COMMunicate:LAN:IPADdress <“xxx.xxx.xxx.xxx”>
:SYSTem:COMMunicate:LAN:CONFig:APPLy
:SYSTem:COMMunicate:LAN:IPADdress?
Instruction
Sets a host name for the analyzer in network.
IP Address command will be effective after using this “APPLy” command.
Gets IP address.
Parameter
Type
String
Parameter
Range
Conform to the IP Sets standard(0-255:0-255:0-255:0-255)
Return
IP address String
Default
None
Menu
System > Interface > LAN > IP Address
Example
:SYSTem:COMMunicate:LAN:IPADdress “192.168.1.12”
:SYSTem:COMMunicate:LAN:IPADdress?
Command
Format
:SYSTem:COMMunicate:LAN:GATeway <“xxx.xxx.xxx.xxx”>
:SYSTem:COMMunicate:LAN:CONFig:APPLy
:SYSTem:COMMunicate:LAN:GATeway?
Instruction
Sets the gateway for the analyzer in the network. The gateway will be fetched
automatically if the IP assignment is set to DHCP.
Gateway command will be effective after using this “APPLy” command.
Gets gateway.
Parameter
Type
String
Parameter
Range
Conform to the IP standard (0-255:0-255:0-255:0-255)
Return
Gateway string.
Default
None
Menu
System > Interface > LAN > Gateway
Example
:SYSTem:COMMunicate:LAN:GATeway “192.168.1.1”
:SYSTem:COMMunicate:LAN:GATeway?
Command
:SYSTem:COMMunicate:LAN:SMASk <“xxx.xxx.xxx.xxx”>
3.2.3 IP Address
(:SYSTem:COMMunicate:LAN:IPADdress)
3.2.4 Gateway (:SYSTem:COMMunicate:LAN:GATeway)
3.2.5 Subnet Mask
(:SYSTem:COMMunicate:LAN:SMASk)
18 SVA1000X Programming Guide
Page 19
SIGLENT
Format
:SYSTem:COMMunicate:LAN:CONFig:APPLy
:SYSTem:COMMunicate:LAN:SMASk?
Instruction
Sets the subnet mask according to the PC network Settings. The subnet mask
will be set automatically if the IP assignment is set to DHCP.
Subnet Mask commands will be effective after using this “APPLy” command.
Gets Subnet Mask.
Parameter
Type
String
Parameter
Range
Conform to the IP standard (0-255:0-255:0-255:0-255)
Return
Subnet mask string
Default
None
Menu
System > Interface > LAN > Subnet Mask
Example
:SYSTem:COMMunicate:LAN:SMASk?
Command
Format
:SYSTem:COMMunicate:LAN:TYPE STATIC|DHCP
:SYSTem:COMMunicate:LAN:TYPE?
Instruction
Toggles the IP assignment Setting between static (manual) and DHCP
(dynamic assignment) mode.
Gets IP config.
Parameter
Type
Enumeration
Parameter
Range
STATIC|DHCP
Return
Enumeration
Default
None
Menu
System > Interface > LAN > IP Config
Example
:SYSTem:COMMunicate:LAN:TYPE DHCP
:SYSTem:COMMunicate:LAN:TYPE?
Command
Format
:SYSTem:LANGuage SCHINESE|ENGLISH
:SYSTem:LANGuage?
Instruction
Sets language.
Gets language.
Parameter
Type
Enumeration
Parameter
Range
SCHINESE: Chinese
ENGLISH: English
Return
Enumeration
Default
None
Menu
System > Language
Example
Sets language
:SYSTem:LANGuage SCHINESE
Gets language
:SYSTem:LANGuage?
Command
Format
:SYSTem:PON:TYPE DFT|LAST|USER
:SYSTem:PON:TYPE?
3.2.6 IP Config (:SYSTem:COMMunicate:LAN:TYPE)
3.2.7 Language (:SYSTem:LANGuage)
3.2.8 Power On Type (:SYSTem:PON:TYPE)
SVA1000X Programming Guide 19
Page 20
SIGLENT
Instruction
Uses command to set analyzer to power on in default, user, or last state.
Gets power on type.
Parameter
Type
Enumeration
Parameter
Range
DFT: Default
LAST: Last
USER: Custom Configuration
Return
Enumeration
Default
DFT
Menu
System > Pwr/Preset > Power On
Example
SYSTem:PON:TYPE DFT
Command
Format
:SYSTem:PRESet
Instruction
Use this command to preset the instrument. The preset type is based on the
Setting of Preset Type: DFT, User or Last.
Parameter
Type
None
Parameter
Range
None
Return
None
Default
None
Menu
None
Example
:SYSTem:PRESet
Command
Format
:SYSTem:RESTart
Instruction
Use this command to restart the instrument (part of machine may not support).
Parameter
Type
None
Parameter
Range
None
Return
None
Default
None
Menu
None
Example
:SYSTem:RESTart
Command
Format
:SYSTem:PRESet:TYPE DFT|LAST|USER
:SYSTem:PRESet:TYPE?
Instruction
Uses this command to preset the analyzer to default, user, or last state.
Gets preset type.
Parameter
Type
Enumeration
Parameter
Range
DFT: Default
LAST: Last
USER: Custom Configuration
Return
Enumeration
Default
DFT
3.2.9 System Preset (:SYSTem:PRESet)
3.2.10 System Restart (:SYSTem:RESTart)
3.2.11 Preset Type (:SYSTem:PRESet:TYPE)
20 SVA1000X Programming Guide
Page 21
Menu
System > Pwr/Preset > Preset
Example
:SYSTem:PRESet:TYPE DFT
3.2.12 Factory ReSet (:SYSTem:FDEFault)
Command
Format
:SYSTem:FDEFault
Instruction
Sets both the measure and setting parameters to factory preset parameters.
Parameter
Type
None
Parameter
Range
None
Return
None
Default
None
Menu
System > Pwr/Preset > Factory Reset
Example
:SYSTem:FDEFault
Command
Format
:SYSTem:LKEY <“option”>,<“license key”>
Instruction
Use this command to enable the specified option with the license key, please
restart the instrument to make license active.
Parameter
Type
“option”: Enumeration
“ license key”: String
Parameter
Range
“option”: Meas|EMI |TG|DMA|DTF|VNA
“ license key”: provided by Siglent Technologies, 16 bits String.
Return
None
Default
None
Menu
System > System Info > Load Option
Example
:SYSTem:LKEY EMI,fjbdajffnklmgwno
Command
Format
:SYSTem:OPTions?
Instruction
This command returns a list of the options that are installed.
Parameter
Type
None
Parameter
Range
None
Return
Meas|EMI |TG|DMA|DTF|VNA
Default
None
Menu
System > System Info
Example
:SYSTem:OPTions?
Command
Format
:SYSTem:POWer:OFF
Instruction
Use this command to turn off the instrument.
Parameter
Type
None
Parameter
None
3.2.13 Enable Option (:SYSTem:LKEY)
SIGLENT
3.2.14 Installed Options Query (:SYSTem:OPTions?)
3.2.15 Power Off (:SYSTem:POWer:OFF)
SVA1000X Programming Guide 21
Page 22
SIGLENT
Range
Return
None
Default
None
Menu
None
Example
:SYSTem:POWer:OFF
Command
Format
:SYSTem:CONFigure:SYSTem?
Instruction
Use this command to query the system message of the instrument.
Parameter
Type
None
Parameter
Range
None
Return
String
Default
None
Menu
System > System Info
Example
:SYSTem:CONFigure:SYSTem?
Command
Format
:INSTrument[:SELect] SA |DMA|DTF|VNA
:INSTrument[:SELect]?
Instruction
Sets instrument mode.
Parameter
Type
Enumeration
Parameter
Range
SA: Spec Analyzer
DMA: Modulation Analysis
DTF:Distance To Fault
VNA:Vector Network Analysis
Return
Enumeration
Default
SA
Menu
mode
Example
:INSTrument DTF
Command
Format
:INSTrument:MEASure
OFF|ACPR|CHPower|OBW|TPOWer |SPECtrogram|TOI
:INSTrument:MEASure?
Instruction
Sets measure mode.
Gets measure mode.
Parameter
Type
Enumeration
Parameter
Range
OFF: measure off
ACPR: ACPR
CHPower: Channel Power
OBW: Occupied BW
TPOWer: T-POWer
3.2.16 System Info (:SYSTem:CONFigure:SYSTem?)
3.3 Instrument Subsystem
3.3.1 Instrument Mode (:INSTrument[:SELect])
3.3.2 Measure Mode (:INSTrument:MEASure)
22 SVA1000X Programming Guide
Page 23
SPECtrogram: Spectrogram Monitor
TOI: Third-order Intercept Point
Return
Enumeration
Default
OFF
Menu
Measure
Example
:INSTrument:MEASure ACPR
3.4 Initiate Subsystem
Command
Format
:INITiate[:IMMediate]
Instruction
Sets single sweep.
Parameter
Type
None
Parameter
Range
None
Return
None
Default
None
Menu
Sweep > Single
Example
:INITiate:IMMediate
Command
Format
:INITiate:CONTinuous OFF|ON|0|1
:INITiate:CONTinuous?
Instruction
Sets continuous sweep mode on-off.
Gets continuous sweep mode state.
Parameter
Type
Boolean
Parameter
Range
OFF|ON|0|1
Return
0|1
Default
ON
Menu
Sweep > Sweep Mode
Example
:INITiate:CONTinuous OFF
Command
Format
[:SENSe]:FREQuency:CENTer <freq>
[:SENSe]:FREQuency:CENTer?
Instruction
Sets the center frequency of the spectrum analyzer.
3.4.1 Single Sweep (:INITiate[:IMMediate])
SIGLENT
3.4.2 Continuous or Single Sweep
(:INITiate:CONTinuous)
3.5 Sense Subsystem
3.5.1 Frequency Subsection
3.5.1.1 Center Frequency ([:SENSe]:FREQuency:CENTer)
SVA1000X Programming Guide 23
Page 24
SIGLENT
Gets the center frequency.
Parameter
Type
Float, unit: Hz, KHz, MHz, GHz
Parameter
Range
50 Hz~1.499999950 GHz
Zero Span: 0~1.5 GHz
Return
Float, unit: Hz
Default
750 MHz
Menu
Frequency > Center Frequency
Example
:FREQuency:CENTer 0.2 GHz
Command
Format
[:SENSe]:FREQuency:STARt <freq>
[:SENSe]:FREQuency:STARt?
Instruction
Sets the start frequency of the spectrum analyzer.
Gets the start Frequency.
Parameter
Type
Float, unit: Hz, KHz, MHz, GHz
Parameter
Range
50 Hz~1.499999950 GHz
Zero Span: 0~1.5 GHz
Return
Float, unit: Hz
Default
0 Hz
Menu
Frequency > Start Frequency
Example
:FREQuency:STARt 100 Hz
Command
Format
[:SENSe]:FREQuency:STOP <freq>
[:SENSe]:FREQuency:STOP?
Instruction
Sets the stop frequency of the spectrum analyzer.
Gets the stop frequency.
Parameter
Type
Float, unit: Hz, KHz, MHz, GHz
Parameter
Range
50 Hz~1.499999950 GHz
Zero Span: 0~1.5 GHz
Return
Float, unit: Hz
Default
1.5 GHz
Menu
Frequency > Stop Frequency
Example
:FREQuency:STOP 1.0 GHz
Command
Format
[:SENSe]:FREQuency:CENTer:STEP[:INCRement] <freq>
[:SENSe]:FREQuency:CENTer:STEP[:INCRement]?
Instruction
Specifies the center frequency step size.
Gets the center frequency step.
Parameter
Type
Float, unit: Hz, KHz, MHz, GHz
Parameter
Range
1 Hz~1.5 GHz
Return
Float, unit: Hz
3.5.1.2 Start Frequency ([:SENSe]:FREQuency:STARt)
3.5.1.3 Stop Frequency ([:SENSe]:FREQuency:STOP)
3.5.1.4 Center Frequency Step
([:SENSe]:FREQuency:CENTer:STEP[:INCRement])
24 SVA1000X Programming Guide
Page 25
Default
150 MHz
Menu
Frequency > Freq Step
Example
:FREQuency:CENTer:STEP 2 MHz
3.5.1.5 Center Frequency Step Mode
Command
Format
[:SENSe]:FREQuency:CENTer:STEP:AUTO OFF|ON|0|1
[:SENSe]:FREQuency:CENTer:STEP:AUTO?
Instruction
Specifies whether the step size is set automatically based on the span.
Gets center frequency step mode.
Parameter
Type
Boolean
Parameter
Range
OFF|ON|0|1
Return
0|1
Default
ON
Menu
Frequency > Freq Step
Example
:FREQuency:CENTer:STEP:AUTO OFF
Command
Format
[:SENSe]:FREQuency:CENTer:SET:STEP
Instruction
Sets step value equal to center frequency.
Parameter
Type
None
Parameter
Range
None
Return
None
Default
None
Menu
Frequency > CF→Step
Example
:FREQuency:CENTer:SET :STEP
Command
Format
[:SENSe]:FREQuency:SPAN <freq>
[:SENSe]:FREQuency:SPAN?
Instruction
Sets the frequency span. Setting the span to 0 Hz puts the analyzer into zero
span.
Gets span value.
Parameter
Type
Float, unit: Hz, KHz, MHz, GHz
Parameter
Range
0 Hz, 100 Hz ~ 1.5GHz
Return
Float, unit: Hz
Default
1.5 GHz
Menu
Span > Span
Example
:FREQuency:SPAN 1 GHz
([:SENSe]:FREQuency:CENTer:STEP:AUTO)
SIGLENT
3.5.1.6 Sets CF→Step ([:SENSe]:FREQuency:CENTer:SET:STEP)
3.5.1.7 Frequency Span ([:SENSe]:FREQuency:SPAN)
SVA1000X Programming Guide 25
Page 26
SIGLENT
Command
Format
[:SENSe]:FREQuency:SPAN:FULL
Instruction
Sets the frequency span to full scale.
Parameter
Type
None
Parameter
Range
None
Return
None
Default
None
Menu
Span > Full Span
Example
:FREQuency:SPAN:FULL
Command
Format
[:SENSe]:FREQuency:SPAN:ZERO
Instruction
Sets the frequency span to zero span.
Parameter
Type
None
Parameter
Range
None
Return
None
Default
None
Menu
Span > Zero Span
Example
:FREQuency:SPAN:ZERO
Command
Format
[:SENSe]:FREQuency:SPAN:PREVious
Instruction
Sets the frequency span to the previous span setting.
Parameter
Type
None
Parameter
Range
None
Return
None
Default
None
Menu
Span > Last Span
Example
:FREQuency:SPAN:PREVious
Command
Format
[:SENSe]:FREQuency:SPAN:HALF
Instruction
Sets the frequency span to half of the previous span setting.
Parameter
Type
None
Parameter
Range
None
Return
None
3.5.1.8 Full Span ([:SENSe]:FREQuency:SPAN:FULL)
3.5.1.9 Zero Span ([:SENSe]:FREQuency:SPAN:ZERO)
3.5.1.10 Last Span ([:SENSe]:FREQuency:SPAN:PREVious)
3.5.1.11 Zoom In ([:SENSe]:FREQuency:SPAN:HALF)
26 SVA1000X Programming Guide
Page 27
SIGLENT
Default
None
Menu
Span> Zoom In
Example
:FREQuency:SPAN:HALF
Command
Format
[:SENSe]:FREQuency:SPAN:DOUBle
Instruction
Sets the frequency span to double the previous span setting.
Parameter
Type
None
Parameter
Range
None
Return
None
Default
None
Menu
Span> Zoom Out
Example
:FREQuency:SPAN:DOUBle
Command
Format
[:SENSe]:FREQuency:TUNE:IMMediate
Instruction
Auto tune the spectrum analyzer parameter to display the main signal.
Parameter
Type
None
Parameter
Range
None
Return
None
Default
None
Menu
Auto Tune
Example
:FREQuency:TUNE:IMMediate
Command
Format
:DISPlay:WINDow:TRACe:Y[:SCALe]:RLEVel <value>
:DISPlay:WINDow:TRACe:Y[:SCALe]:RLEVel?
Instruction
This command sets the reference level for the Y-axis.
Gets reference level.
Parameter
Type
Float, unit: dBm, dBmV, dBuV, V, W
Parameter
Range
Unit is dBm: -100 dBm ~ 30 dBm
Unit is dBmV: -53.01 dBmV ~ 76.99 dBmV,
Unit is dBuV: 6.99 dBuV ~ 136.99 dBuV,
Unit is Volts: 2.24 uV ~ 7.07 V
Unit is Watts: 100 fW ~ 1 W
3.5.1.12 Zoom Out ([:SENSe]:FREQuency:SPAN:DOUBle)
3.5.2 Auto Tune Subsection
3.5.2.1 Auto Tune ([:SENSe]:FREQuency:TUNE:IMMediate)
3.5.3 Amplitude Subsection
3.5.3.1 Reference Level
(:DISPlay:WINDow:TRACe:Y[:SCALe]:RLEVel)
SVA1000X Programming Guide 27
Page 28
SIGLENT
Return
Float, unit: dBm
Default
0 dBm
Menu
Amplitude > Ref Level
Example
:DISPlay:WINDow:TRACe:Y:RLEVel 20 DBM
Command
Format
[:SENSe]:POWer[:RF]:ATTenuation <value>
[:SENSe]:POWer[:RF]:ATTenuation?
Instruction
Sets the input attenuator of the spectrum analyzer.
Gets the input attenuator.
Parameter
Type
Integer
Parameter
Range
0 dB ~ 31 dB
Return
Integer, unit: dB
Default
20 dB
Menu
Amplitude > Attenuator
Example
:POWer:ATTenuation 10
Command
Format
[:SENSe]:POWer[:RF]:ATTenuation:AUTO OFF|ON|0|1
[:SENSe]:POWer[:RF]:ATTenuation:AUTO?
Instruction
This command turns on/off auto input port attenuator state.
Gets input port attenuator state.
Parameter
Type
Boolean
Parameter
Range
OFF|ON|0|1
Return
0|1
Default
ON
Menu
Amplitude > Attenuator
Example
:POWer:ATTenuation:AUTO?
Command
Format
[:SENSe]:POWer[:RF]:GAIN[:STATe] OFF|ON|0|1
[:SENSe]:POWer[:RF]:GAIN[:STATe]?
Instruction
Turns the internal preamp on/off.
Gets preamp on-off state.
Parameter
Type
Boolean
Parameter
Range
OFF|ON|0|1
Return
0|1
Default
OFF
Menu
Amplitude > Preamp
Example
:POWer:GAIN ON
3.5.3.2 Input Attenuator ([:SENSe]:POWer[:RF]:ATTenuation)
3.5.3.3 Attenuator Auto Mode
([:SENSe]:POWer[:RF]:ATTenuation:AUTO)
3.5.3.4 Preamp on-off ([:SENSe]:POWer[:RF]:GAIN[:STATe])
28 SVA1000X Programming Guide
Page 29
3.5.3.5 Amplitude OffSets
Command
Format
:DISPlay:WINDow:TRACe:Y:SCALe:RLEVel:OFFSet <value>
:DISPlay:WINDow:TRACe:Y:SCALe:RLEVel:OFFSet?
Instruction
Sets reference offsets.
Gets reference offsets.
Parameter
Type
Float
Parameter
Range
-300dB~300dB
Return
Float, unit: dB
Default
0dB
Menu
Amplitude > Ref OffSets
Example
:DISPlay:WINDow:TRACe:Y:SCALe:RLEVel:OFFSet 2
Command
Format
:UNIT:POWer DBM|DBMV|DBUV|V|W
:UNIT:POWer?
Instruction
Specifies amplitude units for the input, output and display.
Gets amplitude units.
Parameter
Type
Enumeration
Parameter
Range
DBM|DBMV|DBUV|DBUA|V|W,
Return
Enumeration
Default
DBM
Menu
Amplitude > Units
Example
:UNIT:POWer DBMV
Command
Format
:DISPlay:WINDow:TRACe:Y[:SCALe]:SPACing LINear|LOGarithmic
:DISPlay:WINDow:TRACe:Y[:SCALe]:SPACing?
Instruction
Toggles the vertical graticule divisions between logarithmic unit and linear unit.
The default logarithmic unit is dBm, and the linear unit is V.
Gets scale type.
Parameter
Type
Enumeration
Parameter
Range
LINear|LOGarithmic
Return
Enumeration
Default
LOGarithmic
Menu
Amplitude > Scale Type
Example
:DISPlay:WINDow:TRACe:Y:SPACing LINear
Command
:DISPlay:WINDow:TRACe:Y[:SCALe]:PDIVision <integer>
(:DISPlay:WINDow:TRACe:Y:SCALe:RLEVel:OFFSet )
3.5.3.6 Amplitude Units (:UNIT:POWer)
SIGLENT
3.5.3.7 Scale Type
(:DISPlay:WINDow:TRACe:Y[:SCALe]:SPACing)
3.5.3.8 Scale/Div (:DISPlay:WINDow:TRACe:Y[:SCALe]:PDIVision)
SVA1000X Programming Guide 29
Page 30
SIGLENT
Format
:DISPlay:WINDow:TRACe:Y[:SCALe]:PDIVision?
Instruction
This command sets the per-division display scaling for the y-axis when scale
type of Y axis is set to Log.
Gets Scale/Div when scale type of Y axis is set to Log.
Parameter
Type
Float
Parameter
Range
1 dB ~ 10 dB
Return
Float, unit: dB
Default
10 dB
Menu
Amplitude > Scale/Div
Example
:DISPlay:WINDow:TRACe:Y:PDIVision 10 dB
Command
Format
[:SENSe]:CORRection:OFF
Instruction
Turn off the amplitude correction function off and all of the correction sets are
off.
Parameter
Type
None
Parameter
Range
None
Return
None
Default
None
Menu
None
Example
:SENSe:CORRection:OFF
Command
Format
[:SENSe]:CORRection:CSET:ALL[:STATe] OFF|ON|0|1
[:SENSe]:CORRection:CSET:ALL[:STATe]?
Instruction
Turns on or off the amplitude corrections.
When turned on, only the correction sets that were turned on are enabled.
When turned off, all of the correction Sets are disabled. If there is no correction
enabled, state cannot be set to on.
Parameter
Type
Boolean
Parameter
Range
OFF|ON|0|1
Return
0|1
Default
OFF
Menu
Amplitude > Corrections > Apply Corrections
Example
:SENSe:CORRection:CSET:ALL:STATe OFF
Command
Format
[:SENSe]:CORRection:CSET[1]|2|3|4:OFF
[:SENSe]:CORRection:CSET[1]|2|3|4[:STATe]?
Instruction
Turns the amplitude correction function on/off.
3.5.3.9 Correction Off ([:SENSe]:CORRection:OFF)
3.5.3.10 Correction Apply State
([:SENSe]:CORRection:CSET:ALL[:STATe])
3.5.3.11 Sets Correction X State Off
([:SENSe]:CORRection:CSET[1]|2|3|4:OFF)
30 SVA1000X Programming Guide
Page 31
Gets the amplitude correction function state.
Parameter
Type
None
Parameter
Range
None
Return
0|1
Default
OFF
Menu
Amplitude > Corrections > Correction1|2|3|4
Example
:CORRection:CSET2:OFF
3.5.3.12 Set Correction Data
Command
Format
[:SENSe]:CORRection:CSET[1]|2|3|4:DATA <x1,y1,x2,y2;…>
[:SENSe]:CORRection:CSET[1]|2|3|4:DATA?
Instruction
Set correction X data 1|2|3|4
Read correction X data.
Parameter
Type
None
Parameter
Range
None
Return
String
Default
None
Menu
None
Example
:CORRection:CSET2:DATA?
Command
Format
[:SENSe]:CORRection:IMPedance[:INPut][:MAGNitude] OHM50 |OHM75
[:SENSe]:CORRection:IMPedance[:INPut][:MAGNitude]?
Instruction
Set the input impedance for voltage-to-power conversions.
Get the input impedance.
Parameter
Type
Enumeration
Parameter
Range
OHM50 |OHM75
Return
OHM50 |OHM75
Default
OHM50
Menu
Amplitude > Corrections
Example
CORRection:IMPedance?
Command
Format
[:SENSe]:BWIDth[:RESolution] <freq>
[:SENSe]:BWIDth[:RESolution]?
Instruction
Specifies the resolution bandwidth. For numeric entries, all RBW types choose
the nearest (arithmetically, on a linear scale, rounding up) available RBW to the
value entered.
([:SENSe]:CORRection:CSET[1]|2|3|4:DATA)
SIGLENT
3.5.3.13 Input Impedance
([:SENSe]:CORRection:IMPedance[:INPut][:MAGNitude])
3.5.4 Bandwidth Subsection
3.5.4.1 Resolution Bandwidth ([:SENSe]:BWIDth[:RESolution])
SVA1000X Programming Guide 31
Page 32
SIGLENT
Parameter
Type
Discrete
Parameter
Range
1Hz, 3Hz, 10 Hz, 30 Hz, 100 Hz, 300 Hz, 1 KHz, 3 KHz, 10 KHz, 30 KHz, 100
KHz, 300 KHz, 1 MHz
Return
Float, unit: Hz
Default
1 MHz
Menu
BW > RBW
Example
:BWIDth 1 KHz
Command
Format
[:SENSe]:BWIDth[:RESolution]:AUTO OFF|ON|0|1
[:SENSe]:BWIDth[:RESolution]:AUTO?
Instruction
Turns on/off auto resolution bandwidth state.
Parameter
Type
Boolean
Parameter
Range
OFF|ON|0|1
Return
0|1
Default
ON
Menu
BW > RBW
Example
:BWID:AUTO On
Command
Format
[:SENSe]:BWIDth:VIDeo <freq>
[:SENSe]:BWIDth:VIDeo?
Instruction
Specifies the video bandwidth.
Parameter
Type
Discrete
Parameter
Range
1 Hz, 3 Hz, 10 Hz, 30 Hz, 100 Hz, 300 Hz, 1 KHz, 3 KHz, 10 KHz, 30 KHz, 100
KHz, 300 KHz, 1 MHz
Return
Float, unit: Hz
Default
1 MHz
Menu
BW > VBW
Example
:BWIDth:VIDeo 10 KHZ
Command
Format
[:SENSe]:BWIDth:VIDeo:AUTO OFF|ON|0|1
[:SENSe]:BWIDth:VIDeo:AUTO?
Instruction
This command turns on/off auto video bandwidth state.
Parameter
Type
Boolean
Parameter
Range
OFF|ON|0|1
Return
0|1
Default
ON
Menu
BW > VBW
Example
BWIDth:VIDeo:AUTO OFF
3.5.4.2 Resolution Bandwidth Auto Mode
([:SENSe]:BWIDth[:RESolution]:AUTO)
3.5.4.3 Video Bandwidth ([:SENSe]:BWIDth:VIDeo)
3.5.4.4 Auto Video Bandwidth State
([:SENSe]:BWIDth:VIDeo:AUTO)
32 SVA1000X Programming Guide
Page 33
3.5.4.5 Video to Resolution Bandwidth Ratio
Command
Format
[:SENSe]:BWIDth:VIDeo:RATio <number>
[:SENSe]:BWIDth:VIDeo:RATio?
Instruction
Specifies the ratio of the video bandwidth to the resolution bandwidth.
Parameter
Type
Discrete, Float
Parameter
Range
0.001, 0.003, 0.01, 0.03, 0.1, 0.3, 1.0, 3.0, 10.0, 30.0, 100.0, 300.0, 1000.0
Return
Float
Default
1.0
Menu
BW > VBW/RBW
Example
:BWIDth:VIDeo:RATio 30
Command
Format
[:SENSe]:BWIDth:VIDeo:RATio:CONfig?
Instruction
This command turns on/off auto video to resolution bandwidth ratio.
Parameter
Type
None
Parameter
Range
None
Return
0|1
Default
1
Menu
None
Example
:BWIDth:VIDeo:RATio:CONfig?
Command
Format
[:SENSe]:FILTer:TYPE EMI|GAUSS
[:SENSe]:FILTer:TYPE?
Instruction
Sets filter type
Gets filter type
Parameter
Type
Enumeration
Parameter
Range
EMI|GAUSS
Return
Enumeration
Default
GAUSS
Menu
BW > Filter Type
Example
:FILTer:TYPE EMI
Command
Format
:TRACe[1]|2|3|4:MODE WRITe|MAXHold|MINHold|VIEW|BLANk|AVERage
:TRACe[1]|2|3|4:MODE?
([:SENSe]:BWIDth:VIDeo:RATio)
3.5.4.6 Auto Video to Resolution Bandwidth Ratio State
([:SENSe]:BWIDth:VIDeo:RATio:CONfig?)
SIGLENT
3.5.4.7 Filter Type ([:SENSe]:FILTer:TYPE)
3.5.5 Trace Subsection
3.5.5.1 Trace mode (:TRACe[1]|2|3|4:MODE)
SVA1000X Programming Guide 33
Page 34
SIGLENT
Instruction
Selects the display mode for the selected trace.
Parameter
Type
Enumeration
Parameter
Range
WRITe: puts the trace in the normal mode, updating the data.
MAXHold: displays the highest measured trace value for all the data that has
been measured since the function was turned on.
MINHold: displays the lowest measured trace value for all the data that has
been measured since the function was turned on.
VIEW: turns on the trace data so that it can be viewed on the display.
BLANk: turns off the trace data so that it is not viewed on the display.
AVERage: averages the trace for test period.
Return
Enumeration
Default
Trace1: WRITe, Trace2|3|4: BLANk
Menu
Trace
Example
:TRAC1:MODE VIEW
Command
Format
:TRACe[:DATA]? 1|2|3|4
Instruction
This query command returns the current displayed data.
Parameter
Type
Enumeration
Parameter
Range
1|2|3|4
Return
String
Default
1 Menu
None
Example
:TRACe:DATA? 1
Command
Format
:FORMat[:TRACe][:DATA] ASCii|REAL
:FORMat[:TRACe][:DATA]?
Instruction
Sets trace data type.
Gets trace data type.
Parameter
Type
Enumeration
Parameter
Range
ASCii|REAL
Return
String
Default
REAL
Menu
None
Example
:FORMat ASCii
Command
[:SENSe]:DETector:TRACe[1]|2|3|4[:FUNCtion]
3.5.5.2 Query Trace Data (:TRACe[:DATA]?)
3.5.5.3 Trace Data Format(:FORMat[:TRACe][:DATA])
3.5.6 Detector Subsection
3.5.6.1 Type of Detection
([:SENSe]:DETector:TRACe[1]|2|3|4[:FUNCtion])
34 SVA1000X Programming Guide
Page 35

SIGLENT
Format
NEGative|POSitive|SAMPle|AVERage|NORMAL|QUASi
[:SENSe]:DETector:TRACe[1]|2|3|4[:FUNCtion]?
Instruction
Specifies the detection mode. For each trace interval (bucket), average
detection displays the average of all the samples within the interval.
Parameter
Type
Enumeration
Parameter
Range
NEGative: Negative peak detection displays the lowest sample taken during the
interval being displayed.
POSitive: Positive peak detection displays the highest sample taken during the
interval being displayed.
SAMPle: Sample detection displays the sample taken during the interval being
displayed, and is used primarily to display noise or noise-like signals.
In sample mode, the instantaneous signal value at the present display point is
placed into memory. This detection should not be used to make the most
accurate amplitude measurement of non noise-like signals.
AVERage: Average detection is used when measuring the average value of the
amplitude across each trace interval (bucket). The averaging method used by
the average detector is set to either video or power as appropriate when the
average type is auto coupled.
NORMAL: Normal detection selects the maximum and minimum video signal
values alternately. When selecting Normal detection,”Norm”appears in the
upper-left corner.
QUASi: Quasipeak detection is a form of detection where a signal level is
weighted based on the repetition frequency of the spectral components making
up the signal. That is to say, the result of a quasi-peak measurement depends
on the repetition rate of the signal.
Return
Enumeration
Default
POSitive
Menu
Detect
Example
:DETector:TRAC1 AVERage
Command
Format
[:SENSe]:AVERage:TYPE LOGPower|POWer|VOLTage
[:SENSe]:AVERage:TYPE?
Instruction
Toggle the average type between Log power, power and voltage.
Parameter
Type
Enumeration
Parameter
Range
LOGPower|POWer|VOLTage
Return
Enumeration
Default
LOGPower
Menu
BW > Avg Type
Example
AVERage:TYPE VOLTage
Command
Format
[:SENSe]:AVERage:TRACe[1]|2|3|4:COUNt <integer>
[:SENSe]:AVERage:TRACe[1]|2|3|4:COUNt?
Instruction
Specifies the number of measurements that are combined.
3.5.7 Average Subsection
3.5.7.1 Average Type ([:SENSe]:AVERage:TYPE)
3.5.7.2 Average Number
([:SENSe]:AVERage:TRACe[1]|2|3|4:COUNt)
SVA1000X Programming Guide 35
Page 36
SIGLENT
Parameter
Type
Integer
Parameter
Range
1 ~ 999
Return
Integer
Default
1 Menu
Trace > Avg Times
Example
:AVERage:TRACe1:COUNt 10
Command
Format
[:SENSe]:AVERage:TRACe[1]|2|3|4:CLEar
Instruction
Restarts the trace average. This command is only available when average is
on.
Parameter
Type
None
Parameter
Range
None
Return
None
Default
None
Menu
None
Example
:AVERage:TRAC1:CLEar
Command
Format
[:SENSe]:SWEep:MODE AUTO|FFT|SWEep
[:SENSe]:SWEep: MODE?
Instruction
Sets sweep mode.
Gets sweep mode.
Parameter
Type
Enumeration
Parameter
Range
AUTO|FFT|SWEep
Return
Enumeration
Default
SWEep
Menu
Sweep
Example
:SWEep:MODE SWEep
Command
Format
[:SENSe]:SWEep:TIME <time>
[:SENSe]:SWEep:TIME?
Instruction
Specifies the time in which the instrument sweeps the display. A span value of 0
Hz causes the analyzer to enter zero span mode. In zero span the X-axis
represents time rather than frequency.
Parameter
Type
Float, unit: ks, s, ms, us
3.5.7.3 Average Restart
([:SENSe]:AVERage:TRACe[1]|2|3|4:CLEar)
3.5.8 Sweep Subsection
3.5.8.1 Sweep Mode ([:SENSe]:SWEep:MODE)
3.5.8.2 Sweep Time ([:SENSe]:SWEep:TIME)
36 SVA1000X Programming Guide
Page 37
Parameter
Range
450us ~ 1500 s
Return
Float, unit: s
Default
312.416ms(216.288ms, 192.256ms, 168.224ms, 120.160ms)
Menu
Sweep > Sweep Time
Example
:SWEep:TIME 5s
3.5.8.3 Sweep Time State ([:SENSe]:SWEep:TIME:AUTO)
Command
Format
[:SENSe]:SWEep:TIME:AUTO OFF|ON|0|1
[:SENSe]:SWEep:TIME:AUTO?
Instruction
This command turns on/off auto sweep time state.
Parameter
Type
Boolean
Parameter
Range
OFF|ON|0|1
Return
0|1
Default
ON
Menu
Sweep > Sweep Time
Example
:SWEep:TIME:AUTO ON
Command
Format
[:SENSe]:SWEep:SPEed NORMal|ACCUracy
[:SENSe]:SWEep:SPEed?
Instruction
Toggles the sweep speed between normal and accuracy.
Parameter
Type
Enumeration
Parameter
Range
ACCUracy|NORMal
Return
Enumeration
Default
NORMal
Menu
Sweep > Sweep Rule
Example
:SWEep: SPEed NORMal
Command
Format
[:SENSe]:SWEep:COUNt <integer>
[:SENSe]:SWEep:COUNt?
Instruction
Sets sweep numbers, when single sweep on.
Gets sweep numbers, when single sweep on.
Parameter
Type
Integer
Parameter
Range
1 ~ 99999
Return
Integer
Default
1 Menu
Sweep > Numbers
Example
:SWEep:COUNt 10
SIGLENT
3.5.8.4 Sweep Speed ([:SENSe]:SWEep:SPEed)
3.5.8.5 Sweep Numbers ([:SENSe]:SWEep:COUNt)
SVA1000X Programming Guide 37
Page 38
SIGLENT
Command
Format
[:SENSe]:QPD:DWELl:TIME < time >
[:SENSe]:QPD:DWELl:TIME?
Instruction
Sets QPD Time
Gets QPD Time
Parameter
Type
Float,unit: s、ms、us
Parameter
Range
0us ~ 10s(qusai-peak: 900us ~ 30ks)
Return
Float,unit: s
Default
50ms
Menu
Sweep > QPD Time
Example
:QPD:DWELl:TIME 10s
Command
Format
:DISPlay:WINDow:TRACe:GRATicule:GRID:BRIGhtness <value>
:DISPlay:WINDow:TRACe:GRATicule:GRID:BRIGhtness?
Instruction
Sets grid brightness.
Gets grid brightness.
Parameter
Type
Integer
Parameter
Range
0 ~ 100
Return
Integer
Default
30%
Menu
Display > Grid Brightness
Example
:DISPlay:WINDow:TRACe:GRATicule:GRID:BRIGhtness 50
Command
Format
:DISPlay:WINDow:TRACe:Y:DLINe:STATe OFF|ON|0|1
:DISPlay:WINDow:TRACe:Y:DLINe:STATe?
Instruction
Toggles the display line between on and off.
Gets the display line state.
Parameter
Type
Enumeration
Parameter
Range
OFF|ON|0|1
Return
0|1
Default
OFF
Menu
Display > Display Line
Example
:DISPlay:WINDow:TRACe:Y:DLINe:STATe ON
3.5.8.6 QPD Time([:SENSe]:QPD:DWELl:TIME)
3.5.9 Display Subsection
3.5.9.1 Grid Brightness
(:DISPlay:WINDow:TRACe:GRATicule:GRID:BRIGhtness)
3.5.9.2 Display Line on-off
(:DISPlay:WINDow:TRACe:Y:DLINe:STATe)
38 SVA1000X Programming Guide
Page 39
3.5.9.3 Display Line (:DISPlay:WINDow:TRACe:Y:DLINe)
Command
Format
:DISPlay:WINDow:TRACe:Y:DLINe <value>
:DISPlay:WINDow:TRACe:Y:DLINe?
Instruction
Sets the amplitude value for the display line.
Gets the amplitude value for the display line.
Parameter
Type
Float, unit: dBm
Parameter
Range
Ref Level ~ Ref Level - 100 dBm
Return
Float, unit: dBm
Default
0 dBm
Menu
Display > Display Line
Example
:DISPlay:WINDow:TRACe:Y:DLINe -10
Command
Format
:CALCulate:MARKer[1]|2|3|4|5|6|7|8:STATe OFF|ON|0|1
:CALCulate:MARKer[1]|2|3|4|5|6|7|8:STATe?
Instruction
This command toggles the selected marker status between on and off.
Gets marker state.
Parameter
Type
Boolean
Parameter
Range
OFF|ON|0|1
Return
0|1
Default
OFF
Menu
Marker
Example
:CALCulate:MARK1:STATe ON
Command
Format
:CALCulate:MARKer:AOFF
Instruction
Turn all the markers off.
Parameter
Type
None
Parameter
Range
None
Return
None
Default
None
Menu
None
Example
:CALCulate:MARKer:AOFF
3.6 Calculate Subsystem
3.6.1 Marker Subsection
SIGLENT
3.6.1.1 Marker On/Off
(:CALCulate:MARKer[1]|2|3|4|5|6|7|8:STATe)
3.6.1.2 Marker All Off (:CALCulate:MARKer:AOFF)
SVA1000X Programming Guide 39
Page 40
SIGLENT
Command
Format
:CALCulate:MARKer[1]|2|3|4|5|6|7|8:MODE POSition|DELTa|BAND|OFF
:CALCulate:MARKer[1]|2|3|4|5|6|7|8:MODE?
Instruction
Selects the type of markers that you want to activate.
Gets the type of markers.
Parameter
Type
Enumeration
Parameter
Range
POSition: selects a normal marker that can be positioned on a trace and from
which trace information will be generated.
DELTa: activates a pair of markers, one of which is fixed at the current marker
location. The other marker can then be moved around on the trace. The marker
readout shows the marker value which moves.
BAND: activates a pair of markers, one of which is fixed at the current marker
location. The two marker can then be moved around on the trace. The marker
readout shows the difference between the two markers.
OFF: turns the designated marker off. If a marker is not active when the mode
is queried, “off” will be returned.
Return
Enumeration
Default
OFF
Menu
Marker
Example
:CALCulate:MARK1:MODE POSition
Command
Format
:CALCulate:MARKer[1]|2|3|4|5|6|7|8:TRACe 1|2|3|4
:CALCulate:MARKer[1]|2|3|4|5|6|7|8:TRACe?
Instruction
This command assigns the specified marker to the designated trace 1, 2, 3 or 4.
Gets the specified marker to which trace.
Parameter
Type
Enumeration
Parameter
Range
MARKer:1|2|3|4|5|6|7|8
TRACe:1|2|3|4
Return
Enumeration
Default
1 Menu
Marker > Select Trace
Example
CALCulate:MARK1:TRAC 1
Command
Format
:CALCulate:MARKer[1]|2|3|4|5|6|7|8:RELative:TO:MARKer 1|2|3|4|5|6|7|8
:CALCulate:MARKer[1]|2|3|4|5|6|7|8:RELative:TO:MARKer?
Instruction
Sets marker relative to.
Gets marker relative to.
Parameter
Type
Enumeration
Parameter
Range
1|2|3|4|5|6|7|8
Return
Enumeration
Default
1 Menu
Marker > Relative To
3.6.1.3 Marker Mode (:CALCulate:MARKer[1]|2|3|4|5|6|7|8:MODE)
3.6.1.4 Marker to Trace
(:CALCulate:MARKer[1]|2|3|4|5|6|7|8:TRACe)
3.6.1.5 Marker Relative To
(:CALCulate:MARKer[1]|2|3|4|5|6|7|8:RELative:TO)
40 SVA1000X Programming Guide
Page 41
SIGLENT
Example
:CALCulate:MARKer1:RELative:TO:MARK 3
Command
Format
:CALCulate:MARKer[1]|2|3|4|5|6|7|8:X <para>
:CALCulate:MARKer[1]|2|3|4|5|6|7|8:X?
Instruction
This command positions the designated marker on its assigned trace at the
specified trace X value.
The value is in the X-axis units, which can be a frequency or time.
The query returns the current X value of the designated marker.
When the readout mode is frequency, the query returns the X value of the span
of the marker in integer and the unit is “Hz”.
When the readout mode is time or period, the query returns the X value of the
span of the marker in scientific notation and the unit is “s”.
Reference Command:
:CALCulate:MARKer[1]|2|3|4|5|6|7|8:X:READout
Parameter
Type
Frequency: Float, unit: Hz, KHz, MHz, GHz, Default “Hz”
Time: Float, unit: us, ms, s, ks, Default “s”
Parameter
Range
0 Hz ~ 1.5 GHz or 10 ms ~ 1000 s
Return
Float
Default
750 MHz or 312.64 ms
Menu
Marker > Normal
Example
:CALCulate:MARKer4:X 0.4 GHz
:CALCulate:MARKer4:X 200 ms
:CALCulate:MARKer4:X?
Command
Format
:CALCulate:MARKer[1]|2|3|4|5|6|7|8:Y?
Instruction
This command reads the current Y value for the designated marker.
This command can be used to read the results of noise marker.
Make sure that Marker is on, Reference Command:
:CALCulate:MARKer[1]|2|3|4|5|6|7|8:STATe
:CALCulate:MARKer[1]|2|3|4|5|6|7|8:MODE
Parameter
Type
None
Parameter
Range
None
Return
Float, unit: dBm
Default
None
Menu
Marker > Normal
Example
:CALCulate:MARKer1:Y?
Return: -25
Command
Format
:CALCulate:MARKer:TABLe ON|OFF|0|1
:CALCulate:MARKer: TABLe?
Instruction
Toggles the marker table between on and off.
Gets the status of the marker table.
3.6.1.6 Marker X Value (:CALCulate:MARKer[1]|2|3|4|5|6|7|8:X)
3.6.1.7 Query Marker Y Value
(:CALCulate:MARKer[1]|2|3|4|5|6|7|8:Y?)
3.6.1.8 Marker Table (:CALCulate:MARKer:TABLe)
SVA1000X Programming Guide 41
Page 42
SIGLENT
Parameter
Type
Boolean
Parameter
Range
ON|OFF|0|1
Return
0|1
Default
0 Menu
Marker > Marker Table
Example
:CALCulate:MARKer:TABLe ON
Command
Format
:CALCulate:MARKer[1]|2|3|4|5|6|7|8[:SET]:START
Instruction
Sets the start frequency to the value of the specified marker frequency. This
command is not available in zero span.
If the Marker is OFF, it will set the marker on center.
Parameter
Type
None
Parameter
Range
None
Return
None
Default
None
Menu
Marker > M→Start Freq
Example
:CALCulate:MARKer1:START
Command
Format
:CALCulate:MARKer[1]|2|3|4|5|6|7|8[:SET]:STOP
Instruction
Sets the stop frequency to the value of the specified marker frequency. This
command is not available in zero span .
This command is valid when the Marker is on.
Parameter
Type
None
Parameter
Range
None
Return
None
Default
None
Menu
Marker > Marker→Stop Freq
Example
:CALCulate:MARKer1:STOP
Command
Format
:CALCulate:MARKer[1]|2|3|4|5|6|7|8[:SET]:CENTer
Instruction
This command sets the center frequency equal to the specified marker
frequency, which moves the marker to the center of the screen. This command
is not available in zero span.
This command is valid when the Marker is on.
3.6.1.9 Marker to Start Frequency
(:CALCulate:MARKer[1]|2|3|4|5|6|7|8[:SET]:START)
3.6.1.10 Marker to Stop Frequency
(:CALCulate:MARKer[1]|2|3|4|5|6|7|8[:SET]:STOP)
3.6.1.11 Marker to Center Frequency
(:CALCulate:MARKer[1]|2|3|4|5|6|7|8[:SET]:CENTer)
42 SVA1000X Programming Guide
Page 43
Parameter
Type
None
Parameter
Range
None
Return
None
Default
None
Menu
Marker > M→CF
Example
:CALCulate:MARKer1:CENTer
3.6.1.12 Marker to Center Frequency Step
Command
Format
:CALCulate:MARKer[1]|2|3|4|5|6|7|8[:SET]:STEP
Instruction
This command sets the center frequency step equal to the specified marker
frequency. This command is not available in zero span.
This command is valid when the Marker is on.
Parameter
Type
None
Parameter
Range
None
Return
None
Default
None
Menu
Marker > M→CF Step
Example
:CALCulate:MARKer1:STEP
Command
Format
:CALCulate:MARKer[1]|2|3|4|5|6|7|8[:SET]:RLEVel
Instruction
This command sets the reference level equal to the specified marker frequency.
This command is valid when the Marker is on.
Parameter
Type
None
Parameter
Range
None
Return
None
Default
None
Menu
Marker > M→Ref Level
Example
:CALCulate:MARKer2:RLEVel
Command
Format
:CALCulate:MARKer[1]|2|3|4|5|6|7|8:DELTa[:SET]:SPAN
Instruction
This command sets the span equal to the specified delta marker frequency.
This command can be only used in DELTa|BAND marker mode, Reference
Command:CALCulate:MARKer[1]|2|3|4|5|6|7|8:MODE
Parameter
Type
None
(:CALCulate:MARKer[1]|2|3|4|5|6|7|8[:SET]:STEP)
SIGLENT
3.6.1.13 Marker to Reference Level
(:CALCulate:MARKer[1]|2|3|4|5|6|7|8[:SET]:RLEVel)
3.6.1.14 Marker Delta to Span
(:CALCulate:MARKer[1]|2|3|4|5|6|7|8:DELTa[:SET]:SPAN)
SVA1000X Programming Guide 43
Page 44
SIGLENT
Parameter
Range
None
Return
None
Default
None
Menu
Marker > △ M→Span
Example
:CALCulate:MARKer2:DELTa:SPAN
Command
Format
:CALCulate:MARKer[1]|2|3|4|5|6|7|8:DELTa[:SET]:CENTer
Instruction
This command sets the center frequency equal to the specified delta marker
frequency.
This command can be only used in DELTa|BAND marker mode, Reference
Command:CALCulate:MARKer[1]|2|3|4|5|6|7|8:MODE
Parameter
Type
None
Parameter
Range
None
Return
None
Default
None
Menu
Marker > △ M→CF
Example
:CALCulate:MARKer3:DELTa:CENTer
Command
Format
:CALCulate:MARKer:PEAK:SEARch:MODE MAXimum|MINimum
:CALCulate:MARKer:PEAK:SEARch:MODE?
Instruction
This is for the analyzer’s internal peak identification routine to recognize a
signal as a peak.
Parameter
Type
Enumeration
Parameter
Range
MAXimum|MINimum
Return
Enumeration
Default
MAXimum
Menu
Peak > Search Config > Peak Type
Example
:CALCulate:MARKer:PEAK:SEARch:MODE MINimum
Command
Format
:CALCulate:MARKer:PEAK:THReshold <value>
:CALCulate:MARKer:PEAK:THReshold?
Instruction
Specifies the minimum signal level for the analyzers internal peak identification
routine to recognize a signal as a peak. This applies to all traces and all
windows.
Gets the minimum signal level for the analyzers internal peak identification
routine to recognize a signal as a peak.
Parameter
Float, unit: dBm
3.6.1.15 Marker Delta to Center Frequency
(:CALCulate:MARKer[1]|2|3|4|5|6|7|8:DELTa[:SET]:CENTer)
3.6.1.16 Peak Search Type
(:CALCulate:MARKer:PEAK:SEARch:MODE)
3.6.1.17 Peak Threshold (:CALCulate:MARKer:PEAK:THReshold)
44 SVA1000X Programming Guide
Page 45
SIGLENT
Type
Parameter
Range
-200.0 dBm~ 200.0 dBm
Return
Float, unit: dBm
Default
-160.0 dBm
Menu
Peak > Search Config > Peak Threshold
Example
:CALCulate:MARKer:PEAK:THReshold -50
Command
Format
:CALCulate:MARKer:PEAK:EXCursion <value>
:CALCulate:MARKer:PEAK:EXCursion?
Instruction
Specifies the minimum signal excursion above the threshold for the internal
peak identification routine to recognize a signal as a peak.
Parameter
Type
Float, unit: dB
Parameter
Range
0 ~ 200.0dB
Return
Float, unit: dB
Default
0 dB
Menu
Peak > Search Config > Peak Excursion
Example
:CALCulate:MARKer:PEAK:EXCursion 10
Command
Format
:CALCulate:MARKer:PEAK:TABLe ON|OFF|0|1
:CALCulate:MARKer:PEAK:TABLe?
Instruction
Toggles the peak table between on and off.
Gets the status of the peak table.
Parameter
Type
Boolean
Parameter
Range
ON|OFF|0|1
Return
0|1
Default
0 Menu
Peak > Peak Table
Example
:CALCulate:MARKer:PEAK:TABLe ON
Command
Format
:CALCulate:MARKer[1]|2|3|4|5|6|7|8:CPEak[:STATe] OFF|ON|0|1
:CALCulate:MARKer[1]|2|3|4|5|6|7|8:CPEak[:STATe]?
Instruction
Toggles the continuous peak search function between on and off.
Gets the continuous peak search function state.
Parameter
Type
Boolean
Parameter
Range
OFF|ON|0|1
Return
0|1
Default
None
Menu
Peak > Cont Peak
3.6.1.18 Peak Excursion (:CALCulate:MARKer:PEAK:EXCursion)
3.6.1.19 Peak Table (:CALCulate:MARKer:PEAK:TABLe)
3.6.1.20 Continuous Peaking Marker
(:CALCulate:MARKer[1]|2|3|4|5|6|7|8:CPEak[:STATe])
SVA1000X Programming Guide 45
Page 46
SIGLENT
Example
:CALCulate:MARKer1:CPEak ON
Command
Format
:CALCulate:MARKer[1]|2|3|4|5|6|7|8:MAXimum
Instruction
Performs a peak search based on the search mode settings.
(based on the search mode settings, include: peak search mode, peak
threshold and peak excursion, Reference Commands:
:CALCulate:MARKer:PEAK:SEARch:MODE
:CALCulate:MARKer:PEAK:THReshold
:CALCulate:MARKer:PEAK: EXCursion)
Parameter
Type
None
Parameter
Range
None
Return
None
Default
None
Menu
Peak
Example
:CALCulate:MARKer4:MAXimum
Command
Format
:CALCulate:MARKer[1]|2|3|4|5|6|7|8:MAXimum:NEXT
Instruction
Places the selected marker on the next highest signal peak of the current
marked peak.
(based on the search mode settings, include: peak search mode, peak
threshold and peak excursion, Reference Commands:
:CALCulate:MARKer:PEAK:SEARch:MODE
:CALCulate:MARKer:PEAK:THReshold
:CALCulate:MARKer:PEAK: EXCursion)
Parameter
Type
None
Parameter
Range
None
Return
None
Default
None
Menu
Peak > Next Peak
Example
:CALCulate:MARKer1:MAXimum:NEXT
Command
Format
:CALCulate:MARKer[1]|2|3|4|5|6|7|8:MAXimum:LEFT
Instruction
Places the selected marker on the next highest signal peak to the left of the
current marked peak.
(based on the search mode settings, include: peak search mode, peak
threshold and peak excursion, Reference Commands:
3.6.1.21 Peak Search
(:CALCulate:MARKer[1]|2|3|4|5|6|7|8:MAXimum)
3.6.1.22 Next Peak Search
(:CALCulate:MARKer[1]|2|3|4|5|6|7|8:MAXimum:NEXT)
3.6.1.23 Marker Peak Left Search
(:CALCulate:MARKer[1]|2|3|4|5|6|7|8:MAXimum:LEFT)
46 SVA1000X Programming Guide
Page 47
:CALCulate:MARKer:PEAK:SEARch:MODE
:CALCulate:MARKer:PEAK:THReshold
:CALCulate:MARKer:PEAK: EXCursion)
Parameter
Type
None
Parameter
Range
None
Return
None
Default
None
Menu
Peak > Next Left Peak
Example
:CALCulate:MARKer1:MAXimum:LEFT
3.6.1.24 Marker Peak Right Search
Command
Format
:CALCulate:MARKer[1]|2|3|4|5|6|7|8:MAXimum:RIGHt
Instruction
Places the selected marker on the next highest signal peak to the right of the
current marked peak.
(based on the search mode settings, include: peak search mode, peak
threshold and peak excursion, Reference Commands:
:CALCulate:MARKer:PEAK:SEARch:MODE
:CALCulate:MARKer:PEAK:THReshold
:CALCulate:MARKer:PEAK: EXCursion)
Parameter
Type
None
Parameter
Range
None
Return
None
Default
None
Menu
Peak > Next Right Peak
Example
:CALCulate:MARKer1:MAXimum:RIGHt
Command
Format
:CALCulate:MARKer[1]|2|3|4|5|6|7|8:PTPeak
Instruction
Positions a pair of delta markers on the highest and lowest points on the trace.
Parameter
Type
None
Parameter
Range
None
Return
None
Default
None
Menu
Peak > Peak Peak
Example
:CALCulate:MARKer1:PTPeak
Command
:CALCulate:MARKer[1]|2|3|4|5|6|7|8:FUNCtion OFF|FCOunt|NOISe|NDB
(:CALCulate:MARKer[1]|2|3|4|5|6|7|8:MAXimum:RIGHt)
SIGLENT
3.6.1.25 Peak to Peak Search
(:CALCulate:MARKer[1]|2|3|4|5|6|7|8:PTPeak)
3.6.1.26 Marker Function
(:CALCulate:MARKer[1]|2|3|4|5|6|7|8:FUNCtion)
SVA1000X Programming Guide 47
Page 48
SIGLENT
Format
:CALCulate:MARKer[1]|2|3|4|5|6|7|8:FUNCtion?
Instruction
This command selects the marker function for the designated marker.
Gets the selected marker function for the designated marker.
Parameter
Type
Enumeration
Parameter
Range
OFF: refers to the normal function.
FCOunt: refers to the frequency counter function.
NOISe: refers to the noise measurement function.
NDB: refers to the N dB bandwith function.
Return
Enumeration
Default
OFF
Menu
Marker Fn
Example
:CALCulate:MARK1:FUNCtion FCOunt
Command
Format
:CALCulate:MARKer:FCOunt[:STATe] ON|OFF|0|1
Instruction
To set the frequency counter status
Parameter
Type
Boolean
Parameter
Range
ON|OFF|0|1
Return
0|1
Default
0 Menu
Marker Fn > Freq Counter
Example
:CALCulate:MARK:FCOunt 1
Command
Format
:CALCulate:MARKer:FCOunt:X?
Instruction
To query the frequency counter
Parameter
Type
None
Parameter
Range
None
Return
None
Default
None
Menu
Marker Fn > Freq Counter
Example
:CALCulate:MARK:FCOunt:X?
Command
Format
:CALCulate:MARKer[1]|2|3|4|5|6|7|8:BANDwidth:RESult?
Instruction
Gets the result of N dB bandwidth measurement.
Parameter
Type
None
3.6.1.27 Frequency Counter
(:CALCulate:MARKer:FCOunt[:STATe])
3.6.1.28 Query Frequency Counter
(:CALCulate:MARKer:FCOunt:X?)
3.6.1.29 N dB Bandwidth Result
(:CALCulate:MARKer:BANDwidth:RESult?)
48 SVA1000X Programming Guide
Page 49
Parameter
Range
None
Return
Float
Default
None
Menu
Marker Fn > N dB BW
Example
:CALCulate:MARK1:BANDwidth:RESult?
3.6.1.30 N dB Bandwidth Reference Value
Command
Format
:CALCulate:MARKer[1]|2|3|4|5|6|7|8:BANDwidth:NDB <value>
:CALCulate:MARKer[1]|2|3|4|5|6|7|8:BANDwidth:NDB?
Instruction
Sets the reference value of N dB bandwidth measurement.
Gets the reference value of N dB bandwidth measurement.
Parameter
Type
Float
Parameter
Range
-100dB ~ 100dB
Return
Float
Default
-3 dB
Menu
Marker Fn > N dB BW
Example
:CALCulate:MARK1:BANDwidth:NDB 10
Command
Format
:CALCulate:MARKer[1]|2|3|4|5|6|7|8:X:READout FREQuency|TIME|PERiod
:CALCulate:MARKer[1]|2|3|4|5|6|7|8:X:READout?
Instruction
Toggles the marker X-Axis readout between frequency, time and period.
Gets the marker X-Axis readout type.
Parameter
Type
Enumeration
Parameter
Range
FREQuency|TIME|PERiod
Return
Enumeration
Default
FREQuency
Menu
Marker Fn > Read Out
Example
:CALCulate:MARKer1:X:READout FREQuency
Command
Format
:CALCulate:LLINe:TEST:STARt
Instruction
Sets limit test start.
Parameter
Type
None
Parameter
Range
None
(:CALCulate:MARKer[1]|2|3|4|5|6|7|8:BANDwidth:NDB?)
SIGLENT
3.6.1.31 Marker X-Axis Read Out
(:CALCulate:MARKer[1]|2|3|4|5|6|7|8:X:READout)
3.6.2 Limit Subsection
3.6.2.1 Limit Test Start (:CALCulate:LLINe:TEST:STARt)
SVA1000X Programming Guide 49
Page 50
SIGLENT
Return
None
Default
None
Menu
Limit > Test
Example
:CALCulate:LLINe:TEST:STARt
Command
Format
:CALCulate:LLINe:TEST:STOP
Instruction
Sets limit test stop.
Parameter
Type
None
Parameter
Range
None
Return
None
Default
None
Menu
Limit > Test
Example
:CALCulate:LLINe:TEST:STOP
Command
Format
:CALCulate:LLINe:TEST:STATe?
Instruction
Gets limit test state.
Parameter
Type
None
Parameter
Range
None
Return
0|1
Default
OFF
Menu
Limit > Test
Example
:CALCulate:LLINe:TEST:STAT?
Command
Format
:CALCulate:LLINe[1]|2:STATe OFF|ON|0|1
:CALCulate:LLINe[1]|2:STATe?
Instruction
Sets limit line state.
Gets limit line state.
Parameter
Type
Boolean
Parameter
Range
OFF|ON|0|1
Return
0|1
Default
OFF
Menu
Limit > Limit1|2
Example
:CALCulate:LLINe1:STATe OFF
Command
Format
:CALCulate:LLINe[1]|2:TYPE UPPer|LOWer
:CALCulate:LLINe[1]|2:TYPE?
3.6.2.2 Limit Test Stop (:CALCulate:LLINe:TEST:STOP)
3.6.2.3 Gets Limit Test State (:CALCulate:LLINe:TEST:STATe?)
3.6.2.4 Limit Line State (:CALCulate:LLINe[1]|2:STATe)
3.6.2.5 Limit Type (:CALCulate:LLINe[1]|2:TYPE)
50 SVA1000X Programming Guide
Page 51
Instruction
Mode sets a limit line to be either an upper or lower type limit line. An upper line
will be used as the maximum allowable value when comparing with the data.
Gets limit type.
Parameter
Type
Enumeration
Parameter
Range
UPPer|LOWer
Return
Enumeration
Default
The default setting of LINe1 is UPPer, the default setting of LINe2 is LOWer
Menu
Limit > Limit1|2 Edit > Type
Example
:CALCulate:LLINe1: TYPE LOWer
3.6.2.6 Limit Mode (:CALCulate:LLINe[1]|2:MODE)
Command
Format
:CALCulate:LLINe[1]|2:MODE LINE|POINt
:CALCulate:LLINe[1]|2:MODE?
Instruction
Sets limit mode
Gets limit mode
Parameter
Type
Enumeration
Parameter
Range
LINE|POINt
Return
Enumeration
Default
LINE
Menu
Limit > Limit1|2 Edit > Mode
Example
:CALCulate:LLINe1: MODE POINt
Command
Format
:CALCulate:LLINe[1]|2:Y <value>
:CALCulate:LLINe[1]|2:Y?
Instruction
Sets the Y-axis value of a limit line. Limit line Y-axis value is set independently
and is not affected by the X-axis units.
Gets the Y-axis value of a limit line.
Parameter
Type
Float
Parameter
Range
-400 dBm~330 dBm
Return
Float
Default
0dBm
Menu
Limit > Limit1|2 Edit > Amplitude
Example
:CALCulate:LLINe1:Y 5dBm
Command
Format
:CALCulate:LLINe[1]|2:DATA <x-axis>,<ampl>{,<x-axis>, <ampl>}
:CALCulate:LLINe[1]|2:DATA?
Instruction
Use this command to define the limit points.
Gets the defined limit points.
Parameter
Type
X-axis: Float
Amplitude: Float
Parameter
Range
X-axis: 0~1.5GHz
Amplitude: -400 dBm~330 dBm
SIGLENT
3.6.2.7 Limit Line Y-axis Value (:CALCulate:LLINe[1]|2:Y)
3.6.2.8 Define Limit Points Data (:CALCulate:LLINe[1]|2:DATA)
SVA1000X Programming Guide 51
Page 52
SIGLENT
Return
X-axis: Float
Amplitude: Float
Default
X-axis: -1Hz
Amplitude: 0 dBm
Menu
Limit > Limit1|2 Edit
Example
:CALC:LLINe1:DATA 10000000,-20,20000000,-30
Command
Format
:CALCulate:LLINe[1]|2:ADD <x-axis>,<ampl>
Instruction
Add limit point data
Parameter
Type
X-axis: Float
Amplitude: Float
Parameter
Range
X-axis: 0~1.5GHz
Amplitude: None
Return
X-axis: Float
Amplitude: Float
Default
X-axis: -1Hz
Amplitude: 0 dBm
Menu
Limit > Limit1|2 Edit
Example
:CALCulate:LLINe1:ADD 10000000,-20
Command
Format
:CALCulate:LLINe[1]|2:DELete <number>
Instruction
Use this command to delete the assigned limit point.
Parameter
Type
Integer
Parameter
Range
None
Return
None
Default
None
Menu
Limit > Limit1|2 Edit > Del Point
Example
:CALCulate:LLINe1:DELete 2
Command
Format
:CALCulate:LLINe[1]|2:ALL:DELete
Instruction
Use this command to define all the limits points.
Parameter
Type
None
Parameter
Range
None
Return
None
Default
None
Menu
Limit > Limit1|2 Edit > Del All
Example
:CALCulate:LLINe2:ALL:DELete
3.6.2.9 Add Limit Point Data (:CALCulate:LLINe[1]|2:DATA)
3.6.2.10 Delete Assigned Limit Point
(:CALCulate:LLINe[1]|2:DELete)
3.6.2.11 Delete All Limit Points (:CALCulate:LLINe:ALL:DELete)
52 SVA1000X Programming Guide
Page 53
SIGLENT
Command
Format
:CALCulate:LLINe:CONTrol:DOMain FREQuency|TIME
:CALCulate:LLINe:CONTrol:DOMain?
Instruction
Toggles the limit X-axis value between frequency and time.
Gets the limit X-axis unit.
Parameter
Type
Enumeration
Parameter
Range
FREQuency|TIME
Return
Enumeration
Default
FREQuency
Menu
Limit > Setup > X Axis
Example
:CALCulate:LLINe:CONTrol:DOMain FREQuency
Command
Format
:CALCulate:LLINe:CONTrol:BEEP OFF|ON|0|1
:CALCulate:LLINe:CONTrol:BEEP?
Instruction
Use this command to turn on/off the limit beep status.
Gets limit beep state.
Parameter
Type
Boolean
Parameter
Range
OFF|ON|0|1
Return
0|1
Default
ON
Menu
Limit > Setup > Buzzer
Example
:CALCulate:LLINe:CONTrol:BEEP OFF
Command
Format
:CALCulate:LLINe:FAIL?
Instruction
This query returns the limits pass/failed result. If the test result fails, this
command will get result FAIL. If the test result passes, it will get result PASS.
Parameter
Type
None
Parameter
Range
None
Return
PASS|FAIL
Default
None
Menu
None
Example
:CALCulate:LLINe:FAIL?
Command
Format
:CALCulate:LLINe:FAIL:STOP OFF|ON|0|1
:CALCulate:LLINe:FAIL:STOP?
Instruction
Sets whether to stop the test if the test fails.
Gets whether to stop the test if the test fails.
Parameter
Boolean
3.6.2.12 Limit X-axis Unit (:CALCulate:LLINe:CONTrol:DOMain)
3.6.2.13 Limit Beep State (:CALCulate:LLINe:CONTrol:BEEP)
3.6.2.14 Query Limits Result (:CALCulate:LLINe:FAIL?)
3.6.2.15 Limit Fail to Stop (:CALCulate:LLINe:FAIL:STOP)
SVA1000X Programming Guide 53
Page 54
SIGLENT
Type
Parameter
Range
OFF|ON|0|1
Return
0|1
Default
OFF
Menu
Limit > Setup > Fail to stop
Example
:CALCulate:LLINe:FAIL:STOP OFF
Command
Format
[:SENSe]:ACPRatio:BWIDth:INTegration <freq>
[:SENSe]:ACPRatio:BWIDth:INTegration?
Instruction
Specifies the range of integration used in calculating the power in the main
channel.
Gets the range of integration used in calculating the power in the main channel.
Parameter
Type
Float, unit: Hz, KHz, MHz, GHz
Parameter
Range
100 Hz~1.5 GHz
Return
Float, unit: Hz
Default
1MHz
Menu
Meas > ACPR > Meas Setup > Main Channel
Example
INSTrument:MEASure ACPR
:ACPRatio:BWIDth:INTegration 20 MHz
Command
Format
[:SENSe]:ACPRatio:OFFSet:BWIDth[:INTegration] <freq>
[:SENSe]:ACPRatio:OFFSet:BWIDth[:INTegration]?
Instruction
Specifies the bandwidth used in calculating the power in the adjacent channel.
Gets the bandwidth used in calculating the power in the adjacent channel.
Parameter
Type
Float, unit: Hz, KHz, MHz, GHz
Parameter
Range
100 Hz~1.5 GHz
Return
Float, unit: Hz
Default
1MHz
Menu
Meas > ACPR > Meas Setup > Adjacent Chn
Example
:ACPRatio:OFFSet:BWIDth 20 MHz
Command
[:SENSe]:ACPRatio:OFFSet[:FREQuency] <freq>
3.7 Measurement Subsystem
3.7.1 ACPR Subsection
3.7.1.1 Main Channel ([:SENSe]:ACPRatio:BWIDth:INTegration)
3.7.1.2 Adjacent Channel Bandwidth
([:SENSe]:ACPRatio:OFFSet:BWIDth[:INTegration])
3.7.1.3 Channel Space
([:SENSe]:ACPRatio:OFFSet[:FREQuency])
54 SVA1000X Programming Guide
Page 55
SIGLENT
Format
[:SENSe]:ACPRatio:OFFSet[:FREQuency]?
Instruction
Sets the space value between the center frequency of main channel power and
that of the adjacent channel power.
Gets adjacent channel space
Parameter
Type
Float, unit: Hz, KHz, MHz, GHz
Parameter
Range
100 Hz~700 MHz
Return
Float, unit: Hz
Default
3MHz
Menu
Meas > ACPR > Meas Setup > Adj Chn Space
Example
:ACPRatio:OFFSets 20 MHz
Command
Format
:MEASure:ACPRatio:MAIN?
Instruction
Return the main channel power of ACPR measurement.
Parameter
Type
None
Parameter
Range
None
Return
Float, unit: dBm
Default
None
Menu
Meas > ACPR
Example
:MEASure:ACPRatio:MAIN?
Command
Format
:MEASure:ACPRatio:LOWer:POWer?
Instruction
Return the lower adjacent channel power of ACPR measurement.
Parameter
Type
None
Parameter
Range
None
Return
Float, unit: dBm
Default
None
Menu
Meas > ACPR
Example
:MEASure:ACPRatio:LOWer:POWer?
Command
Format
:MEASure:ACPRatio:LOWer?
Instruction
Return the lower adjacent channel power to main channel power ratio.
Parameter
Type
None
Parameter
Range
None
3.7.1.4 Query Main Channel Power (:MEASure:ACPRatio:MAIN?)
3.7.1.5 Query Lower Adjacent Channel Power
(:MEASure:ACPRatio:LOWer:POWer?)
3.7.1.6 Query Lower Adjacent Channel Power Ratio
(:MEASure:ACPRatio:LOWer?)
SVA1000X Programming Guide 55
Page 56
SIGLENT
Return
Float, unit: dBm
Default
None
Menu
Meas > ACPR
Example
:MEASure:ACPRatio:LOWer?
Command
Format
:MEASure:ACPRatio:UPPer:POWer?
Instruction
Return the upper adjacent channel power of ACPR measurement.
Parameter
Type
None
Parameter
Range
None
Return
Float, unit: dBm
Default
None
Menu
Meas > ACPR
Example
:MEASure:ACPRatio:UPPer:POWer?
Command
Format
:MEASure:ACPRatio:UPPer?
Instruction
Return the upper adjacent channel power to main channel power ratio.
Parameter
Type
None
Parameter
Range
None
Return
Float
Default
None
Menu
Meas > ACPR
Example
:MEASure:ACPRatio:UPPer?
Command
Format
[:SENSe]:CHPower:BWIDth:INTegration <freq>
[:SENSe]:CHPower:BWIDth:INTegration?
Instruction
Specifies the integration bandwidth to calculate the power.
Gets the integration bandwidth.
Parameter
Type
Float, unit: Hz, KHz, MHz, GHz
Parameter
Range
100 Hz~1.5 GHz
Zero Span: 0~1.5 GHz
Return
Float, unit: Hz
Default
2 MHz
Menu
Meas > Ch Power > Meas Setup > Integration BW
Example
:CHPower:BWIDth:INTegration 1.0 GHz
3.7.1.7 Query Upper Adjacent Channel Power
(:MEASure:ACPRatio:UPPer:POWer?)
3.7.1.8 Query Upper Adjacent Channel Power Ratio
(:MEASure:ACPRatio:UPPer?)
3.7.2 CHP Subsection
3.7.2.1 Integration BW ([:SENSe]:CHPower:BWIDth:INTegration)
56 SVA1000X Programming Guide
Page 57
SIGLENT
Command
Format
[:SENSe]:CHPower:FREQuency:SPAN:POWer
Instruction
Sets the analyzer span for the channel power measurement. Be sure the span
is set larger than the integration bandwidth.
Parameter
Type
None
Parameter
Range
None
Return
None
Default
None
Menu
Meas > Ch Power > Meas Setup > Span
Example
:CHPower:FREQuency:SPAN:POWer
Command
Format
:MEASure:CHPower?
Instruction
This command returns scalar results of main channel power, and power density.
Parameter
Type
None
Parameter
Range
None
Return
Float, Channel Power unit: dBm
Float, Density unit: dBm/Hz
Default
None
Menu
Meas > Ch Power
Example
:MEASure:CHPower?
Command
Format
:MEASure:CHPower:CHPower?
Instruction
This command returns the value of the channel power in dBm units.
Parameter
Type
None
Parameter
Range
None
Return
Float
Default
None
Menu
Meas > Ch Power
Example
:MEASure:CHPower:CHPower?
Command
Format
:MEASure:CHPower:DENSity?
3.7.2.2 Channel Span
([:SENSe]:CHPower:FREQuency:SPAN:POWer)
3.7.2.3 Query Channel Power and Power Spectral Density
(:MEASure:CHPower?)
3.7.2.4 Query Channel Power (:MEASure:CHPower:CHPower?)
3.7.2.5 Query Power Spectral Density
(:MEASure:CHPower:DENSity?)
SVA1000X Programming Guide 57
Page 58
SIGLENT
Instruction
This command returns the value of the channel power density in dBm/Hz.
Parameter
Type
None
Parameter
Range
None
Return
Float
Default
None
Menu
Meas > Ch Power
Example
:MEASure:CHPower:DENSity?
Command
Format
[:SENSe]:OBWidth:METHod PERCent|DBC
[:SENSe]:OBWidth:METHod?
Instruction
This command toggles the method of OBW measurement between percent and
dBc.
Gets the method of OBW measurement.
Parameter
Type
Enumeration
Parameter
Range
PERCent|DBC
Return
Enumeration
Default
PERCent
Menu
Meas > Occupied BW > Meas Setup > Method
Example
:OBW:METHod PERCent
Command
Format
[:SENSe]:OBWidth:PERCent <para>
[:SENSe]:OBWidth:PERCent?
Instruction
Edit the percentage of signal power used when determining the occupied
bandwidth. Press {%} to set the percentage ranging from 10.00% to 99.99%.
Gets the percentage of signal power.
Parameter
Type
Float
Parameter
Range
10~99.99
Return
Float
Default
99
Menu
Meas > Occupied BW > Meas Setup > %
Example
:OBW:PERCent 50
Command
Format
[:SENSe]:OBWidth:XDB <value>
[:SENSe]:OBWidth:XDB?
Instruction
Specify the power level used to determine the emission bandwidth as the
number of dB down from the highest signal point, within the occupied bandwidth
3.7.3 OBW Subsection
3.7.3.1 Select the Method of OBW ([:SENSe]:OBWidth:METHod)
3.7.3.2 Set Percentage(%) Method of OBW
([:SENSe]:OBWidth:PERCent)
3.7.3.3 Set dBc Method of OBW ([:SENSe]:OBWidth:XDB)
58 SVA1000X Programming Guide
Page 59
span.
Gets dBc value.
Parameter
Type
Float
Parameter
Range
0.1~100
Return
Float
Default
26
Menu
Meas > Occupied BW > Meas Setup > dBc
Example
:OBWidth:XDB 3
3.7.3.4 Query OBW and Centroid (:MEASure:OBWidth?)
Command
Format
:MEASure:OBWidth?
Instruction
Use this command to query the occupied bandwidth and bandwidth centroid
according to the method you set.
Parameter
Type
None
Parameter
Range
None
Return
Float, unit: Hz
Default
None
Menu
Meas > Occupied BW
Example
:MEASure:OBW?
Command
Format
:MEASure:OBWidth:OBWidth?
Instruction
Use this command to query the occupied bandwidth according to the method
you set.
Query Centroid Result.
Parameter
Type
None
Parameter
Range
None
Return
Float, unit: Hz
Default
None
Menu
Meas > Occupied BW
Example
:MEASure:OBW:OBW?
Command
Format
:MEASure:OBWidth:CENTroid?
Instruction
Use this command to query the occupied bandwidth according to the method
you set.
Parameter
Type
None
Parameter
Range
None
Return
Float, unit: Hz
SIGLENT
3.7.3.5 Query OBW (:MEASure:OBWidth:OBWidth?)
3.7.3.6 Query OBW Centroid (:MEASure:OBWidth:CENTroid?)
SVA1000X Programming Guide 59
Page 60
SIGLENT
Default
None
Menu
Meas > Occupied BW
Example
: MEASure:OBW:CENTroid?
Command
Format
:MEASure:OBWidth:OBWidth:FERRor?
Instruction
Uses this command to query transmit frequency error.
Parameter
Type
None
Parameter
Range
None
Return
Float, unit: Hz
Default
None
Menu
Meas > Occupied BW
Example
:MEASure:OBWidth:OBWidth:FERRor?
Command
Format
[:SENSe]:TPOWer:FREQuency:CENTer <freq>
[:SENSe]:TPOWer:FREQuency:CENTer?
Instruction
Sets T-power center frequency.
Gets T-power center frequency.
Parameter
Type
Float, unit: Hz, KHz, MHz, GHz
Parameter
Range
50 Hz~1.499999950 GHz
Zero Span: 0~1.5 GHz
Return
Float, unit: Hz
Default
750MHz
Menu
Meas > T-power > Meas Setup > Center Freq
Example
:TPOWer:FREQuency:CENTer 15KHz
Command
Format
[:SENSe]:TPOWer:LLIMit <time>
[:SENSe]:TPOWer:LLIMit?
Instruction
Sets T-power start line.
Gets T-power start line.
Parameter
Type
Float, unit: s
Parameter
Range
0 ~ 1000 s
Return
Float, time unit: s
Default
0 Menu
Meas > T-power > Meas Setup > Start Line
Example
:TPOWer:LLIMit 0.01
3.7.3.7 Query Transmit Frequency Error
(:MEASure:OBWidth:OBWidth:FERRor?)
3.7.4 SubsectionT-power(T-Power)
3.7.4.1 T-power Center Frequency
([:SENSe]:TPOWer:FREQuency:CENTer)
3.7.4.2 T-power Start Line ([:SENSe]:TPOWer:LLIMit)
60 SVA1000X Programming Guide
Page 61
3.7.4.3 T-power Stop Line ([:SENSe]:TPOWer:RLIMit)
Command
Format
[:SENSe]:TPOWer:RLIMit <time>
[:SENSe]:TPOWer:RLIMit?
Instruction
Sets T-power stop line.
Gets T-power stop line.
Parameter
Type
Float, unit: s
Parameter
Range
0 ~ 1000 s
Return
Float, time unit: s
Default
20ms
Menu
Meas > T-power > Meas Setup > Stop Line
Example
:TPOWer:RLIMit 0.02
Command
Format
:MEASure:TPOWer?
Instruction
Query the result of T-power measurement.
Parameter
Type
Float, unit: dBm
Parameter
Range
None
Return
Float, unit: dBm
Default
None
Menu
Meas > T-power
Example
:MEASure:TPOWer?
Command
Format
[:SENSe]:SPECtrogram:STATe RUN|PAUSe
[:SENSe]:SPECtrogram:STATe?
Instruction
Sets spectrogram state.
Gets spectrogram state.
Parameter
Type
Enumeration
Parameter
Range
RUN: Start
PAUSe: Pause
Return
RUN|PAUSe
Default
RUN
Menu
Meas > Spectrum Monitor > Meas Setup > Spectrogram
Example
:SPECtrogram:STATe PAUSe
Command
Format
[:SENSe]:SPECtrogram:RESTart
Instruction
Restart spectrogram.
3.7.4.4 Query T-power (:MEASure:TPOWer?)
SIGLENT
3.7.5 Spectrum Monitor(SPECtrogram)
3.7.5.1 Spectrogram state([:SENSe]:SPECtrogram:STATe)
3.7.5.2 Spectrogram Restart ([:SENSe]:SPECtrogram:RESTart)
SVA1000X Programming Guide 61
Page 62
SIGLENT
Parameter
Type
None
Parameter
Range
None
Return
None
Default
None
Menu
Meas > Spectrum Monitor > Meas Setup > Restart
Example
:SPECtrogram:RESTart
Command
Format
:MEASure:TOI?
Instruction
Gets the result of Third-order Intercept Point
Parameter
Type
None
Parameter
Range
None
Return
Float
Default
None
Menu
Meas > TOI
Example
:MEASure:TOI?
Command
Format
:MEASure:TOI:IP3?
Instruction
Gets the min intercept of the Lower TOI(Lower 3rd) and the Upper TOI(Upper
3rd)
Parameter
Type
None
Parameter
Range
None
Return
Float
Default
None
Menu
Meas > TOI
Example
:MEASure:TOI:IP3?
Command
Format
:TRIGger[:SEQuence]:SOURce IMMediate|VIDeo|EXTernal
:TRIGger[:SEQuence]:SOURce?
Instruction
Specifies the source (or type) of triggering used to start a measurement.
Gets trigger type.
Parameter
Type
Enumeration
3.7.6 Third-order Intercept Point(TOI)
3.7.6.1 Query Third-order Intercept Point result(:MEASure:TOI?)
3.7.6.2 Query Third-order Intercept Point(:MEASure:TOI:IP3?)
3.8 Trigger Subsystem
3.8.1 Trigger Type (:TRIGger[:SEQuence]:SOURce)
62 SVA1000X Programming Guide
Page 63
Parameter
Range
IMMediate: free-run triggering.
VIDeo: triggers on the video signal level.
EXTernal: allows you to connect an external trigger source.
Return
Enumeration
Default
IMMediate
Menu
Trigger
Example
:TRIGger:SOURce IMMediate
3.8.2 Video Trigger Level
Command
Format
:TRIGger[:SEQuence]:VIDeo:LEVel <value>
:TRIGger[:SEQuence]:VIDeo:LEVel?
Instruction
Specifies the level at which a video trigger will occur. Video is adjusted using
this command, but must also be selected using the command.
Gets video Trigger Level.
Parameter
Type
Float, unit: dBm, dBmV, dBuV, V, W
Parameter
Range
Unit is dBm: -300 dBm ~ 50 dBm
unit is dBmV: -253.01 dBmV ~ 96.99 dBmV
unit is dBuV: -193.01 dBuV ~ 156.99 dBuV
unit is Volts: 223E-16V ~ 70.71 V
unit is Watts: 1.00E-33 W ~ 100 W
Return
Float, unit: dBm, dBmV, dBuV, V, W
Default
0 dBm
Menu
Trigger > Video Level
Example
:TRIGger:VIDeo:LEVel 0.5 dBm
Command
Format
:TRIGger[:SEQuence]:RFBurst:SLOPe POSitive|NEGative
:TRIGger[:SEQuence]:RFBurst:SLOPe?
Instruction
This command activates the trigger condition that allows the next sweep to start
when the external voltage (connected to EXT TRIG IN connector) passes
through approximately 1.5 volts. The external trigger signal must be a 0V to
+5V TTL signal. This function only controls the trigger polarity (for positive or
negative-going signals).
Gets Trigger edge.
Parameter
Type
Enumeration
Parameter
Range
POSitive: positive edge.
NEGative: negative edge.
Return
Enumeration
Default
POSitive
Menu
Trigger > External Trigger
Example
:TRIGger:RFBurst:SLOPe POSitive
(:TRIGger[:SEQuence]:VIDeo:LEVel)
SIGLENT
3.8.3 Trigger Edge
(:TRIGger[:SEQuence]:RFBurst:SLOPe)
SVA1000X Programming Guide 63
Page 64
SIGLENT
Command
Format
:OUTPut[:STATe] OFF|ON|0|1
:OUTPut[:STATe]?
Instruction
Sets TG on-off.
Gets TG state.
Parameter
Type
Boolean
Parameter
Range
OFF|ON|0|1
Return
0|1
Default
0 Menu
TG > TG
Example
:OUTPut ON
Command
Format
:SOURce:POWer[:LEVel][:IMMediate][:AMPLitude] <value>
:SOURce:POWer[:LEVel][:IMMediate][:AMPLitude]?
Instruction
Sets TG level.
Gets TG level.
Parameter
Type
Float, unit: dBm
Parameter
Range
0 dBm ~ -20 dBm
Return
Float
Default
0 dBm
Menu
TG > TG Level
Example
:SOURce:POWer -20
Command
Format
:SOURce:CORRection:OFFSet <value>
:SOURce:CORRection:OFFSet?
Instruction
Sets TG level offsets.
Gets TG level offsets.
Parameter
Type
Float, unit: dBm
Parameter
Range
200 dBm ~ -200 dBm
Return
Float
Default
0 dBm
Menu
TG > Lel OffSets
Example
:SOURce:CORRection:OFFSet 1
Command
Format
:CALCulate:NTData[:STATe] OFF|ON|0|1
:CALCulate:NTData[:STATe]?
3.9 TG Subsystem
3.9.1 TG On-off (:OUTPut[:STATe])
3.9.2 TG Level
(:SOURce:POWer[:LEVel][:IMMediate][:AMPLitude])
3.9.3 TG Level OffSets (:SOURce:CORRection:OFFSet )
3.9.4 TG Normalize on-off (:CALCulate:NTData[:STATe])
64 SVA1000X Programming Guide
Page 65
Instruction
Sets TG normalize on-off.
Gets TG normalize state.
Parameter
Type
Boolean
Parameter
Range
OFF|ON|0|1
Return
0|1
Default
0 Menu
TG > Normalize > Normalize
Example
:CALCulate:NTData ON
3.9.5 TG Normalize Reference Level
Command
Format
:DISPlay:WINDow:TRACe:Y[:SCALe]:NRLevel <value>
:DISPlay:WINDow:TRACe:Y[:SCALe]:NRLevel?
Instruction
Sets TG normalize reference level.
Gets TG normalize reference level.
Parameter
Type
Float, unit: dB
Parameter
Range
-200 dB ~ 200 dB
Return
Float, unit: dB
Default
0 dB
Menu
TG > Normalize > Ref Lvl
Example
:DISPlay:WINDow:TRACe:Y:NRLevel 10
Command
Format
:DISPlay:WINDow:TRACe:Y[:SCALe]:NRPosition <integer>
:DISPlay:WINDow:TRACe:Y[:SCALe]:NRPosition?
Instruction
Sets TG normalize reference position.
Gets TG normalize reference position.
Parameter
Type
Integer
Parameter
Range
0 ~ 100%
Return
Float
Default
100%
Menu
TG > Normalize > Position
Example
:DISPlay:WINDow:TRACe:Y:NRPosition 10
Command
Format
:DISPlay:WINDow:NTTRace[:STATe] OFF|ON|0|1
:DISPlay:WINDow:NTTRace[:STATe]?
Instruction
Sets TG normalize reference trace on-off.
Parameter
Type
Boolean
Parameter
Range
OFF|ON|0|1
(:DISPlay:WINDow:TRACe:Y[:SCALe]:NRLevel)
SIGLENT
3.9.6 TG Normalize Reference Position
(:DISPlay:WINDow:TRACe:Y[:SCALe]:NRPosition)
3.9.7 TG Normalize Reference Trace on-off
(:DISPlay:WINDow:NTTRace[:STATe])
SVA1000X Programming Guide 65
Page 66
SIGLENT
Return
0|1
Default
0 Menu
TG > Normalize > Ref Trace
Example
:DISPlay:WINDow:NTTRace ON
Command
Format
[:SENSe]:DEMod AM|FM|OFF
[:SENSe]:DEMod?
Instruction
Sets demod mode.
Gets demod mode.
Parameter
Type
Enumeration
Parameter
Range
AM|FM|OFF
Return
Enumeration
Default
OFF
Menu
Demod
Example
:DEMod AM
Command
Format
[:SENSe]:DEMod:TIME <time>
[:SENSe]:DEMod:TIME?
Instruction
Sets demod time.
Gets demod time.
Parameter
Type
Float, unit: ms, us, s
Parameter
Range
5 ms ~1000 s
Return
Float, unit: s
Default
5 ms
Menu
Demod
Example
DEMod:TIME 5 ms
Command
Format
[:SENSe]:DEMod:EPHone OFF|ON|0|1
[:SENSe]:DEMod:EPHone?
Instruction
Sets earphone on-off.
Gets earphone on-off.
Parameter
Type
Boolean
Parameter
Range
OFF|ON|0|1
Return
0|1
Default
OFF
Menu
Demod > Earphone
Example
:DEMod:EPHone ON
3.10 Demod Subsystem
3.10.1 Demod Mode ([:SENSe]:DEMod)
3.10.2 Demod Time ([:SENSe]:DEMod:TIME)
3.10.3 Earphone ([:SENSe]:DEMod:EPHone)
66 SVA1000X Programming Guide
Page 67
3.10.4 Volume ([:SENSe]:DEMod:VOLume)
Command
Format
[:SENSe]:DEMod:VOLume <value>
[:SENSe]:DEMod:VOLume?
Instruction
Sets volume value.
Gets volume value.
Parameter
Type
Integer
Parameter
Range
0 ~ 10
Return
Integer
Default
6 Menu
Demod > Volume
Example
:DEMod:EPHone ON
Command
Format
:MMEMory:STORe STA|TRC|COR|CSV|LIM|JPG|BMP|PNG,<file>
Instruction
Store file
Parameter
Type
String
Parameter
Range
None
Return
None
Default
None
Menu
File > Save
Example
:MMEMory:STORe STA,ABC.sta
Command
Format
:MMEMory:LOAD STA|TRC|COR|LIM,<file>
Instruction
Load file
Parameter
Type
String
Parameter
Range
None
Return
None
Default
None
Menu
File > Open/Load
Example
:MMEMory:LOAD STA,ABC.sta
Command
Format
:MMEMory:DELete <file>
Instruction
Delete file or folder
3.11 Memory Subsystem
3.11.1 Store File (:MMEMory:STORe)
SIGLENT
3.11.2 Load File (:MMEMory:LOAD)
3.11.3 Delete File (:MMEMory:DELete)
SVA1000X Programming Guide 67
Page 68

SIGLENT
Parameter
Type
String
Parameter
Range
None
Return
None
Default
None
Menu
File > Operate > Delete
Example
:MMEMory:DELete ABC.sta
68 SVA1000X Programming Guide
Page 69
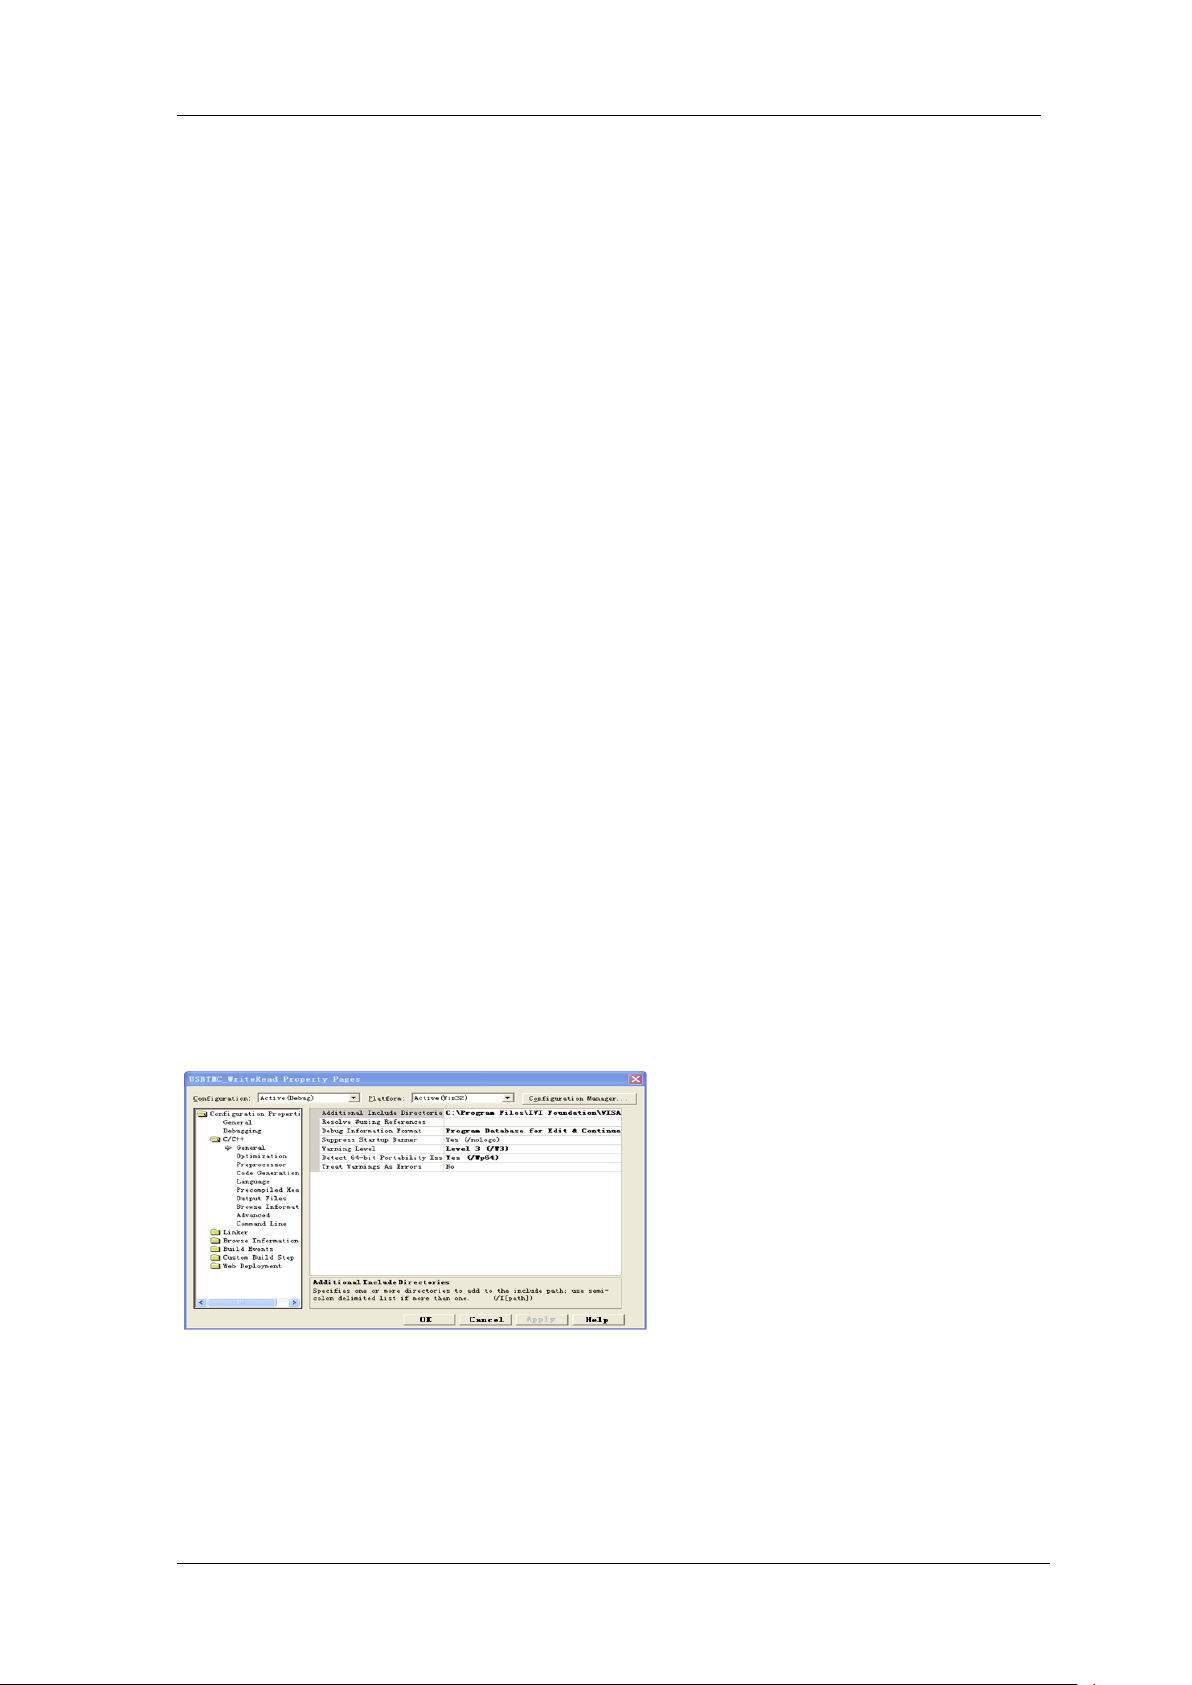
SIGLENT
4.Programming Examples
This chapter gives some examples for the programmer. In these examples you can see how
to use the VISA or sockets, in combination with the commands have been described above
to control the spectrum analyzer. By following these examples, you can develop many more
applications.
4.1 Examples of Using VISA
4.1.1 Example of VC++
Environment: Win7 32bit system, Visual Studio
The functions of this example: use the NI-VISA, to control the device with USBTMC or
TCP/IP access to do a write and read.
Follow the steps to finish the example:
1、 Open Visual Studio, create a new VC++ win32 console project.
2、 Set the project environment to use the NI-VISA lib, there are two ways to use NI-VISA,
static or automatic:
1) Static: find files: visa.h, visatype.h, visa32.lib in NI-VISA install path. Copy them to your
project, and add them into project. In the projectname.cpp file, add the follow two lines:
#include "visa.h"
#pragma comment(lib,"visa32.lib")
2) Automatic:
Set the .h file include directory, the NI-VISA install path, in our computer we set the path is:
C:\Program Files\IVI Foundation \VISA\WinNT\include. Set this path to project---properties--c/c++---General---Additional Include Directories: See the picture.
Set lib path set lib file:
Set lib path: the NI-VISA install path, in our computer we set the path is: C:\Program Files\IVI
Foundation\VISA\WinNT
\lib\msc. Set this path to project---properties---Linker---General---Additional Library
Directories: as seen in the pictures below.
SVA1000X Programming Guide 69
Page 70
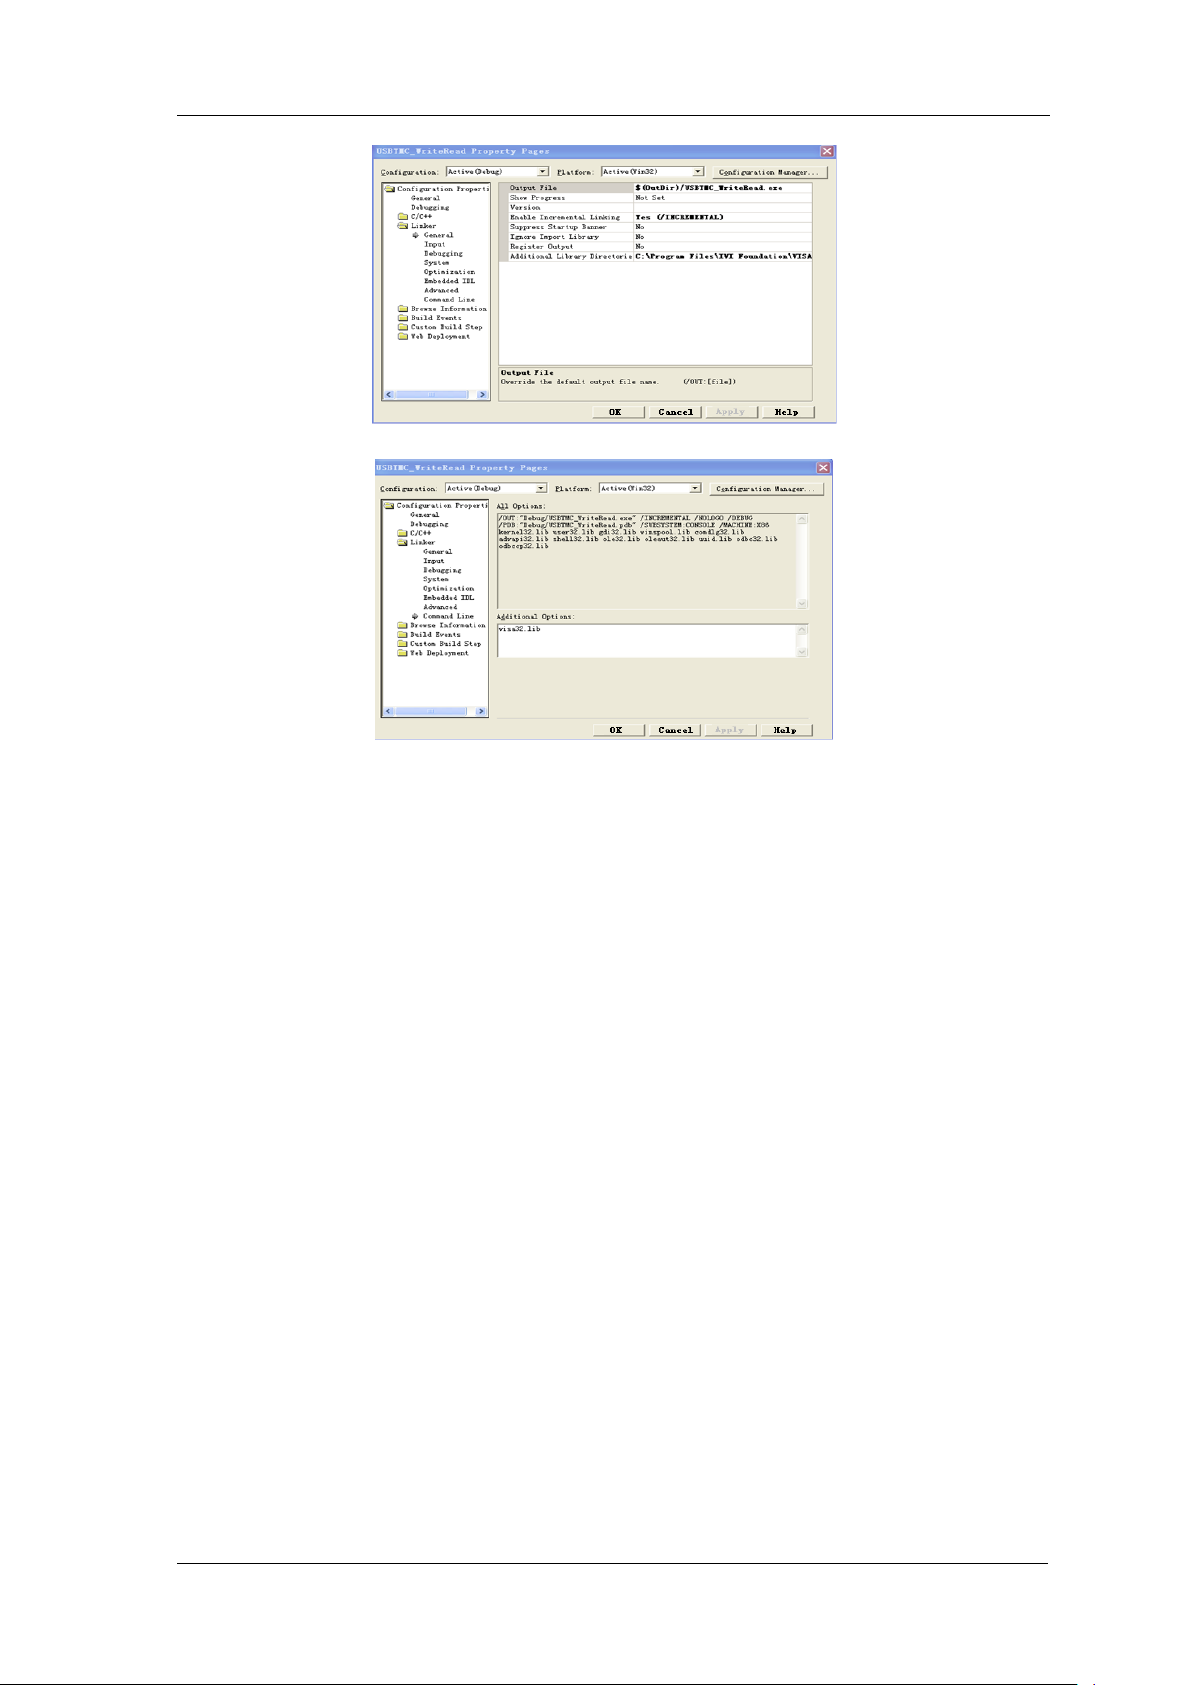
SIGLENT
Set lib file:project---properties---Linker--- Command Line---Additional Options: visa32.lib
Include visa.h file: In the projectname.cpp file:
#include <visa.h>
3、 Add codes:
1) USBTMC access code:
Write a function Usbtmc_test:
int Usbtmc_test()
{
/* This code demonstrates sending synchronous read & write commands */
/* to an USB Test & Measurement Class (USBTMC) instrument using */
/* NI-VISA */
/* The example writes the "*IDN?\n" string to all the USBTMC */
/* devices connected to the system and attempts to read back */
/* results using the write and read functions. */
/* The general flow of the code is */
/* Open Resource Manager */
/* Open VISA Session to an Instrument */
/* Write the Identification Query Using viPrintf */
/* Try to Read a Response With viScanf */
/* Close the VISA Session */
/***********************************************************/
ViSessiondefaultRM;
ViSessioninstr;
ViUInt32numInstrs;
ViFindListfindList;
ViStatus status;
char instrResourceString[VI_FIND_BUFLEN];
unsigned char buffer[100];
int i;
/** First we must call viOpenDefaultRM to get the manager
* handle. We will store this handle in defaultRM.*/
status=viOpenDefaultRM (&defaultRM);
if (status<VI_SUCCESS)
{
printf ("Could not open a session to the VISA Resource Manager!\n");
return status;
}
70 SVA1000X Programming Guide
Page 71

SIGLENT
/* Find all the USB TMC VISA resources in our system and store the number of resources in the system in
numInstrs.*/
status = viFindRsrc (defaultRM, "USB?*INSTR", &findList, &numInstrs, instrResourceString);
if (status<VI_SUCCESS)
{
printf ("An error occurred while finding resources.\nPress 'Enter' to continue.");
fflush(stdin);
getchar();
viClose (defaultRM);
return status;
}
/** Now we will open VISA sessions to all USB TMC instruments.
* We must use the handle from viOpenDefaultRM and we must
* also use a string that indicates which instrument to open. This
* is called the instrument descriptor. The format for this string
* can be found in the function panel by right clicking on the
* descriptor parameter. After opening a session to the
* device, we will get a handle to the instrument which we
* will use in later VISA functions. The AccessMode and Timeout
* parameters in this function are reserved for future
* functionality. These two parameters are given the value VI_NULL.*/
for (i=0; i<int(numInstrs); i++)
{
if (i> 0)
{ viFindNext (findList, instrResourceString);
} status = viOpen (defaultRM, instrResourceString, VI_NULL, VI_NULL, &instr);
if (status<VI_SUCCESS)
{
printf ("Cannot open a session to the device %d.\n", i+1);
continue;
}
/* * At this point we now have a session open to the USB TMC instrument.
* We will now use the viPrintf function to send the device the string "*IDN?\n",
* asking for the device's identification. */
char * cmmand ="*IDN?\n";
status = viPrintf (instr, cmmand);
if (status<VI_SUCCESS)
{
printf ("Error writing to the device %d.\n", i+1);
status = viClose (instr);
continue;
}
/** Now we will attempt to read back a response from the device to
* the identification query that was sent. We will use the viScanf
* function to acquire the data.
* After the data has been read the response is displayed.*/
status = viScanf(instr, "%t", buffer);
if (status<VI_SUCCESS)
{ printf ("Error reading a response from the device %d.\n", i+1);
} else
{ printf ("\nDevice %d: %s\n", i+1, buffer);
}status = viClose (instr);
}
/** Now we will close the session to the instrument using
* viClose. This operation frees all system resources. */
status = viClose (defaultRM);
printf("Press 'Enter' to exit.");
fflush(stdin);
getchar();return 0;
}
int _tmain(int argc, _TCHAR* argv[])
{
Usbtmc_test();
return 0;
}
SVA1000X Programming Guide 71
Page 72

SIGLENT
2) TCP/IP access code:
Write a function TCP_IP_Test:
int TCP_IP_Test(char *pIP)
{
char outputBuffer[VI_FIND_BUFLEN];
ViSessiondefaultRM, instr;
ViStatusstatus;
/* First we will need to open the default resource manager. */
status = viOpenDefaultRM (&defaultRM);
if (status<VI_SUCCESS)
{
printf("Could not open a session to the VISA Resource Manager!\n");
}
/* Now we will open a session via TCP/IP device */
char head[256] ="TCPIP0::";
char tail[] ="::INSTR";
strcat(head,pIP);
strcat(head,tail);
status = viOpen (defaultRM, head, VI_LOAD_CONFIG, VI_NULL, &instr);
if (status<VI_SUCCESS)
{
printf ("An error occurred opening the session\n");
viClose(defaultRM);
}
status = viPrintf(instr, "*idn?\n");
status = viScanf(instr, "%t", outputBuffer);
if (status<VI_SUCCESS)
{
printf("viRead failed with error code: %x \n",status);
viClose(defaultRM);
}else
{ printf ("\nMesseage read from device: %*s\n", 0,outputBuffer);
} status = viClose (instr);
status = viClose (defaultRM);
printf("Press 'Enter' to exit.");
fflush(stdin);
getchar(); return 0;
}
int _tmain(int argc, _TCHAR* argv[])
{
printf("Please input IP address:");
char ip[256];
fflush(stdin);
gets(ip);
TCP_IP_Test(ip);
return 0;
}
4.1.2 Example of VB
Environment: Win7 32bit system, Microsoft Visual Basic 6.0
The function of this example: Use the NI-VISA, to control the device with USBTMC and
TCP/IP access to do a write and read.
Follow the steps to complete the example:
1、 Open Visual Basic, build a standard application program project (Standard EXE)
2、 Set the project environment to use the NI-VISA lib, Click the Existing tab of Project>>Add
72 SVA1000X Programming Guide
Page 73
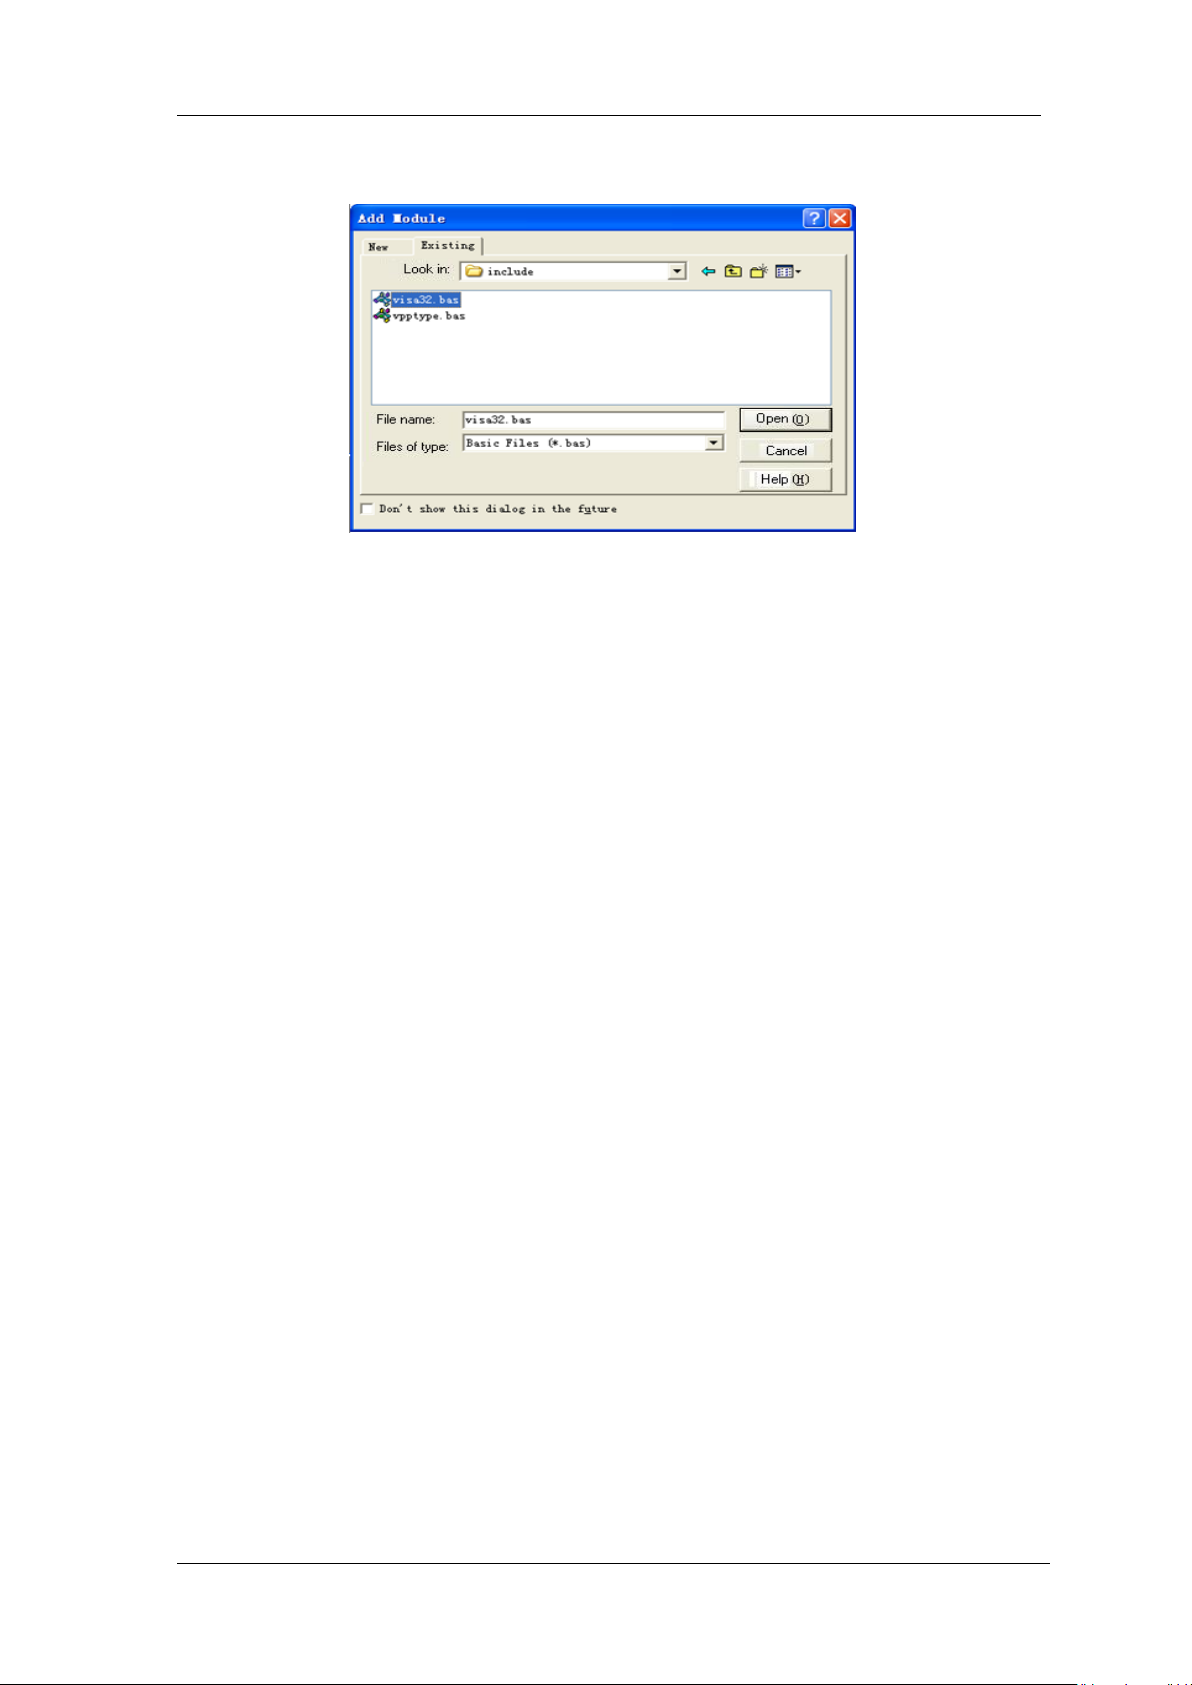
SIGLENT
Existing Item. Search for the visa32.bas file in the include folder under the NI-VISA
installation path and add the file.
This allows the VISA functions and VISA data types to be used in a program.
3、 Add codes:
1) USBTMC access code:
Write a function Usbtmc_test:
Private Function Usbtmc_test() As Long
' This code demonstrates sending synchronous read & write commands
' to an USB Test & Measurement Class (USBTMC) instrument using
' NI-VISA
' The example writes the "*IDN?\n" string to all the USBTMC
' devices connected to the system and attempts to read back
' results using the write and read functions.
' The general flow of the code is
' Open Resource Manager
' Open VISA Session to an Instrument
' Write the Identification Query Using viWrite
' Try to Read a Response With viRead
' Close the VISA Session
Const MAX_CNT = 200
Dim defaultRM As Long
Dim instrsesn As Long
Dim numlnstrs As Long
Dim findList As Long
Dim retCount As Long
Dim status As Long
Dim instrResourceString As String * VI_FIND_BUFLEN
Dim Buffer As String * MAX_CNT
Dim i As Integer
' First we must call viOpenDefaultRM to get the manager
' handle. We will store this handle in defaultRM.
status = viOpenDefaultRM(defaultRM)
If (status < VI_SUCCESS) Then
resultTxt.Text = "Could not open a session to the VISA Resource Manager!"
Usbtmc_test = status
Exit Function
End If
' Find all the USB TMC VISA resources in our system and store the
' number of resources in the system in numInstrs.
SVA1000X Programming Guide 73
Page 74

SIGLENT
status = viFindRsrc(defaultRM, "USB?*INSTR", findList, numlnstrs, instrResourceString)
If (status < VI_SUCCESS) Then
resultTxt.Text = "An error occurred while finding resources."
viClose (defaultRM)
Usbtmc_test = status
Exit Function
End If
' Now we will open VISA sessions to all USB TMC instruments.
' We must use the handle from viOpenDefaultRM and we must
' also use a string that indicates which instrument to open. This
' is called the instrument descriptor. The format for this string
' can be found in the function panel by right clicking on the
' descriptor parameter. After opening a session to the
' device, we will get a handle to the instrument which we
' will use in later VISA functions. The AccessMode and Timeout
' parameters in this function are reserved for future
' functionality. These two parameters are given the value VI_NULL.
For i = 0 To numInstrs
If (i > 0) Then
status = viFindNext(findList, instrResourceString)
End If
status = viOpen(defaultRM, instrResourceString, VI_NULL, VI_NULL, instrsesn)
If (status < VI_SUCCESS) Then
resultTxt.Text = "Cannot open a session to the device " + CStr(i + 1)
GoTo NextFind
End If
' At this point we now have a session open to the USB TMC instrument.
' We will now use the viWrite function to send the device the string "*IDN?",
' asking for the device's identification.
status = viWrite(instrsesn, "*IDN?", 5, retCount)
If (status < VI_SUCCESS) Then
resultTxt.Text = "Error writing to the device."
status = viClose(instrsesn)
GoTo NextFind
End If
' Now we will attempt to read back a response from the device to
' the identification query that was sent. We will use the viRead
' function to acquire the data.
' After the data has been read the response is displayed.
status = viRead(instrsesn, Buffer, MAX_CNT, retCount)
If (status < VI_SUCCESS) Then
resultTxt.Text = "Error reading a response from the device." + CStr(i + 1)
Else
resultTxt.Text = "Read from device: " + CStr(i + 1) + " " + Buffer
End If
status = viClose(instrsesn)
Next i
' Now we will close the session to the instrument using
' viClose. This operation frees all system resources.
status = viClose(defaultRM)
Usbtmc_test = 0
End Function
2) TCP/IP access code:
Write a function TCP_IP_Test:
Private Function TCP_IP_Test(ByVal ip As String) As Long
Dim outputBuffer As String * VI_FIND_BUFLEN
Dim defaultRM As Long
Dim instrsesn As Long
Dim status As Long
74 SVA1000X Programming Guide
Page 75

SIGLENT
Dim count As Long
' First we will need to open the default resource manager.
status = viOpenDefaultRM (defaultRM)
If (status < VI_SUCCESS) Then
resultTxt.Text = "Could not open a session to the VISA Resource Manager!"
TCP_IP_Test = status
Exit Function
End If
' Now we will open a session via TCP/IP device
status = viOpen(defaultRM, "TCPIP0::" + ip + "::INSTR", VI_LOAD_CONFIG, VI_NULL, instrsesn)
If (status < VI_SUCCESS) Then
resultTxt.Text = "An error occurred opening the session"
viClose (defaultRM)
TCP_IP_Test = status
Exit Function
End If
status = viWrite(instrsesn, "*IDN?", 5, count)
If (status < VI_SUCCESS) Then
resultTxt.Text = "Error writing to the device."
End If
status = viRead(instrsesn, outputBuffer, VI_FIND_BUFLEN, count)
If (status < VI_SUCCESS) Then
resultTxt.Text = "Error reading a response from the device." + CStr(i + 1)
Else
resultTxt.Text = "read from device:" + outputBuffer
End If
status = viClose(instrsesn)
status = viClose(defaultRM)
TCP_IP_Test = 0
End Function
3) Button control code:
Private Sub exitBtn_Click()
End
End Sub
Private Sub tcpipBtn_Click()
Dim stat As Long
stat = TCP_IP_Test(ipTxt.Text)
If (stat < VI_SUCCESS) Then
resultTxt.Text = Hex(stat)
End If
End Sub
Private Sub usbBtn_Click()
Dim stat As Long
stat = Usbtmc_test
If (stat < VI_SUCCESS) Then
resultTxt.Text = Hex(stat)
End If
End Sub
4.1.3 Example of MATLAB
Environment: Win7 32bit system, MATLAB R2013a
The function of this example: Use the NI-VISA, to control the device with USBTMC or
TCP/IP access to do a write and read.
Follow the steps to complete the example:
1、 Open MATLAB, modify the current directory. In this demo, the current directory is
SVA1000X Programming Guide 75
Page 76

SIGLENT
modified to D:\USBTMC_TCPIP_Demo.
2、 Click File>>New>>Script in the Matlab interface to create an empty M file
3、 Add codes:
1) USBTMC access code :
Write a function Usbtmc_test.
function USBTMC_test()
% This code demonstrates sending synchronous read & write commands
% to an USB Test & Measurement Class (USBTMC) instrument using
% NI-VISA
%Create a VISA-USB object connected to a USB instrument
vu = visa('ni','USB0::0xF4ED::0xEE3A::sdg2000x::INSTR');
%Open the VISA object created
fopen(vu);
%Send the string "*IDN?",asking for the device's identification.
fprintf(vu,'*IDN?');
%Request the data
outputbuffer = fscanf(vu);
disp(outputbuffer);
%Close the VISA object
fclose(vu);
delete(vu);
clear vu;
end
2) TCP/IP access code:
Write a function TCP_IP_Test:
function TCP_IP_test()
% This code demonstrates sending synchronous read & write commands
% to an TCP/IP instrument using NI-VISA
%Create a VISA-TCPIP object connected to an instrument
%configured with IP address.
vt = visa('ni',['TCPIP0::','10.11.13.32','::INSTR']);
%Open the VISA object created
fopen(vt);
%Send the string "*IDN?",asking for the device's identification.
fprintf(vt,'*IDN?');
%Request the data
outputbuffer = fscanf(vt);
disp(outputbuffer);
%Close the VISA object
fclose(vt);
delete(vt);
clear vt;
end
76 SVA1000X Programming Guide
Page 77
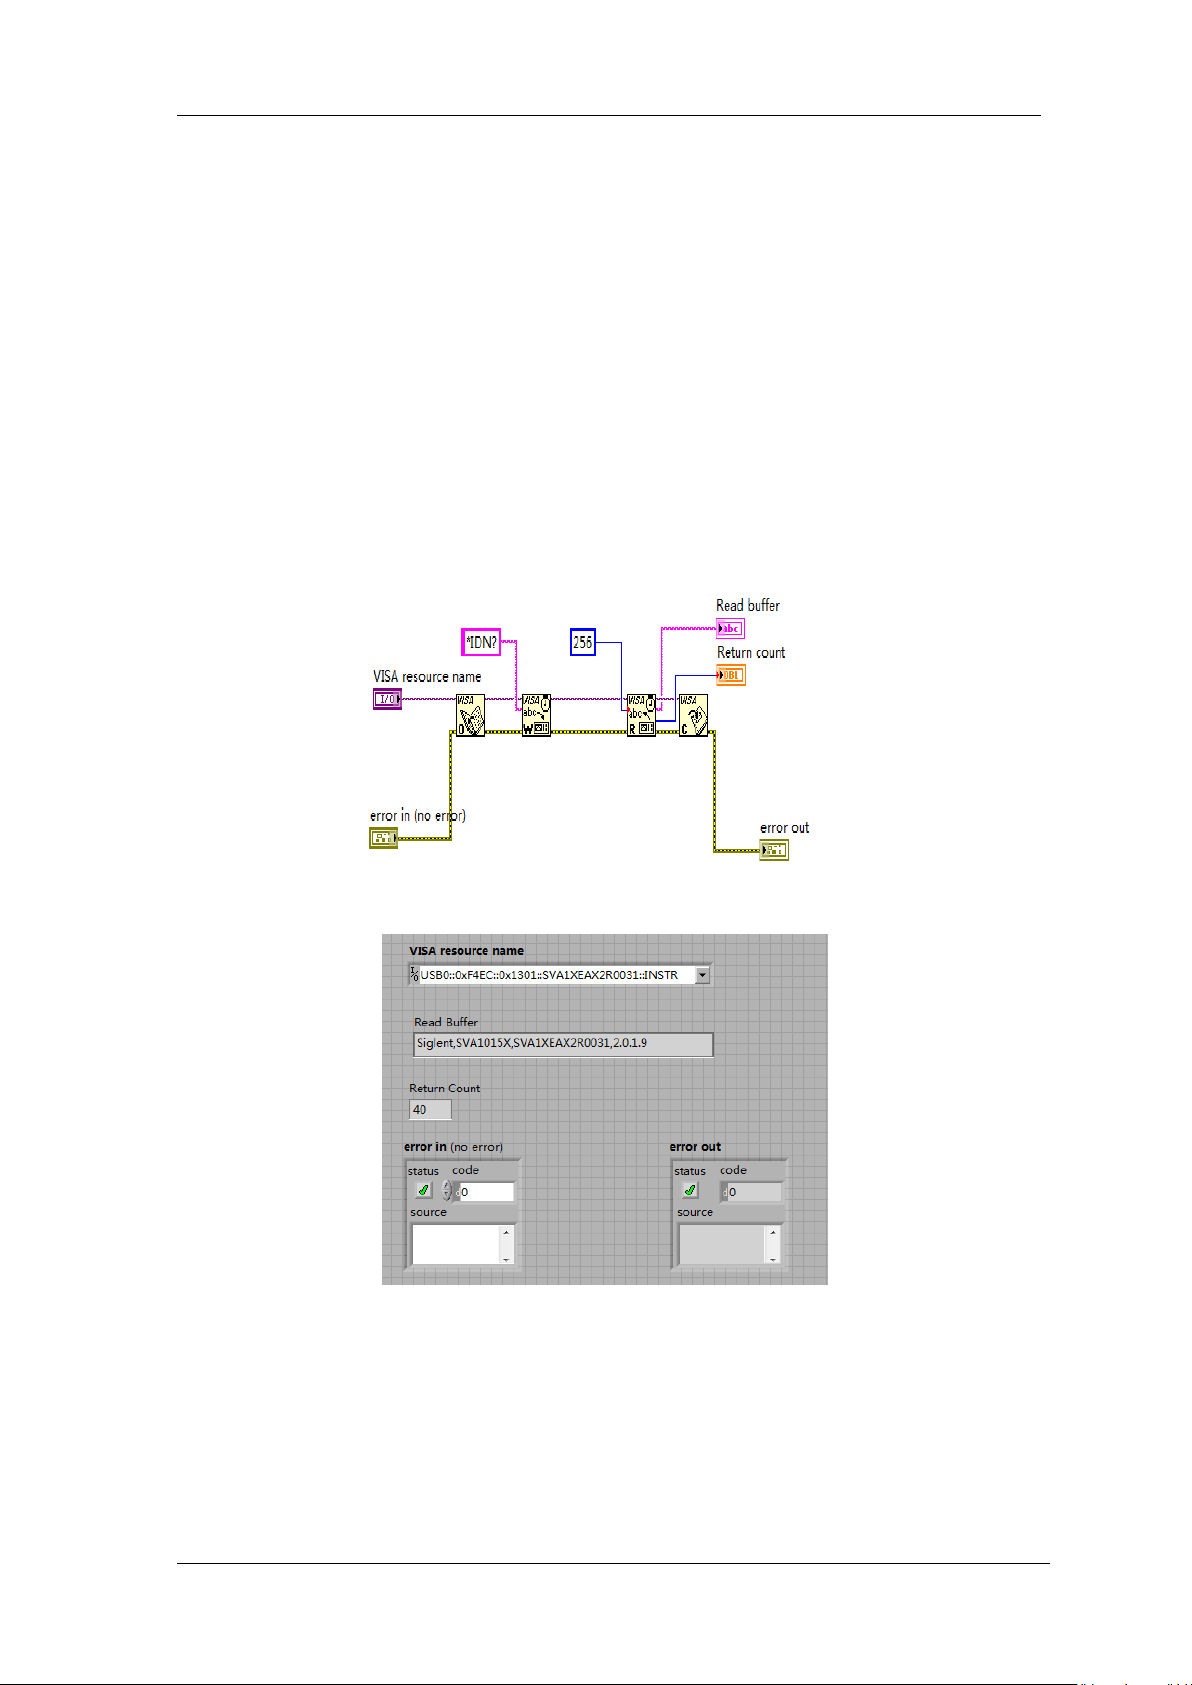
SIGLENT
4.1.4 Example of LabVIEW
Environment: Win7 32bit system, LabVIEW 2011
The functions of this example: use the NI-VISA, to control the device with USBTMC and
TCP/IP access to do a write and read.
Follow the steps to complete the example:
1、 Open LabVIEW, create a VI file.
2、 Add controls. Right-click in the Front Panel interface, select and add VISA resource
name, error in, error out and some indicators from the Controls column.
3、 Open the Block Diagram interface. Right-click on the VISA resource name and you can
select and add the following functions from VISA Palette from the pop-up menu: VISA Write,
VISA Read, VISA Open and VISA Close.
4、 Connect them as shown in the figure below
5、 Select the device resource from the VISA Resource Name list box and run the program.
In this example, the VI opens a VISA session to a USBTMC device, writes a command to the
device, and reads back the response. In this example, the specific command being sent is
the device ID query. Check with your device manufacturer for the device command set. After
all communication is complete, the VI closes the VISA session.
6、 Communicating with the device via TCP/IP is similar to USBTMC. But you need to
change VISA Write and VISA Read Function to Synchronous I/O. The LabVIEW default
is asynchronous I/O. Right-click the node and select Synchronous I/O
Mod>>Synchronous from the shortcut menu to write or read data synchronously.
SVA1000X Programming Guide 77
Page 78
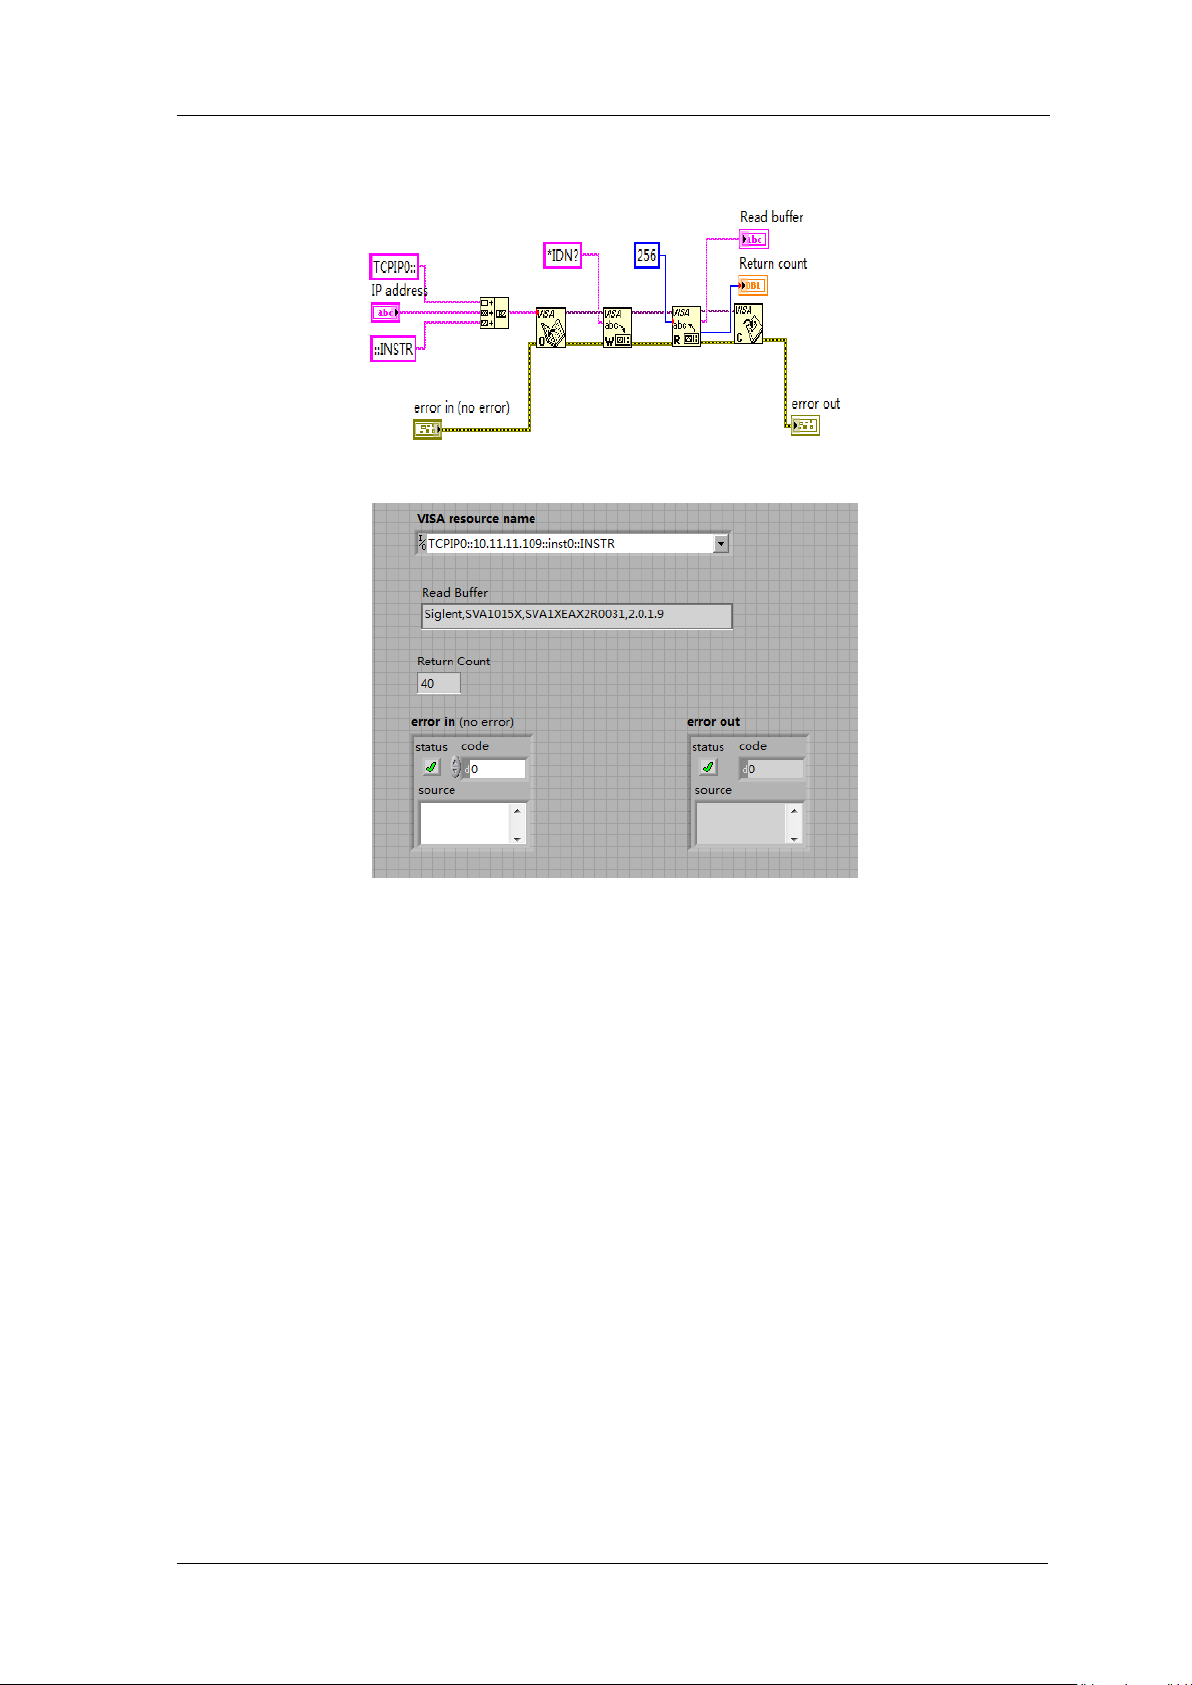
SIGLENT
7、 Connect them as shown in the figure below
8、 Input the IP address and run the program.
78 SVA1000X Programming Guide
Page 79

SIGLENT
4.2 Examples of Using Sockets/Telnet
4.2.1 Example of Python
Python is an interpreted programming language that lets you work quickly and is very
portable.Python has a low-level networking module that provides access to the socket
interface.Python scripts can be written for sockets to do a variety of test and measurements
tasks.
Environment: Win7 32bit system, Python v2.7.5
The functions of this example: Open a socket, sends a query, and closes the socket. It
does this loop 10 times.
Below is the code of the script:
#!/usr/bin/env python
#-*- coding:utf-8 –*#----------------------------------------------------------------------------# The short script is a example that open a socket, sends a query,
# print the return message and closes the socket.
#----------------------------------------------------------------------------import socket # for sockets
import sys # for exit
import time # for sleep
#-----------------------------------------------------------------------------
remote_ip = "10.11.13.32" # should match the instrument’s IP address
port = 5025 # the port number of the instrument service
count = 0
def SocketConnect():
try:
#create an AF_INET, STREAM socket (TCP)
s = socket.socket(socket.AF_INET, socket.SOCK_STREAM)
except socket.error:
print ('Failed to create socket.')
sys.exit();
try:
#Connect to remote server
s.connect((remote_ip , port))
info = s.recv(4096)
print (info)
except socket.error:
print ('failed to connect to ip ' + remote_ip)
return s
def SocketQuery(Sock, cmd):
try :
#Send cmd string
Sock.sendall(cmd)
Sock.sendall(b'\n')
time.sleep(1)
except socket.error:
#Send failed
print ('Send failed')
sys.exit()
reply = Sock.recv(4096)
return reply
def SocketClose(Sock):
#close the socket
Sock.close()
SVA1000X Programming Guide 79
Page 80
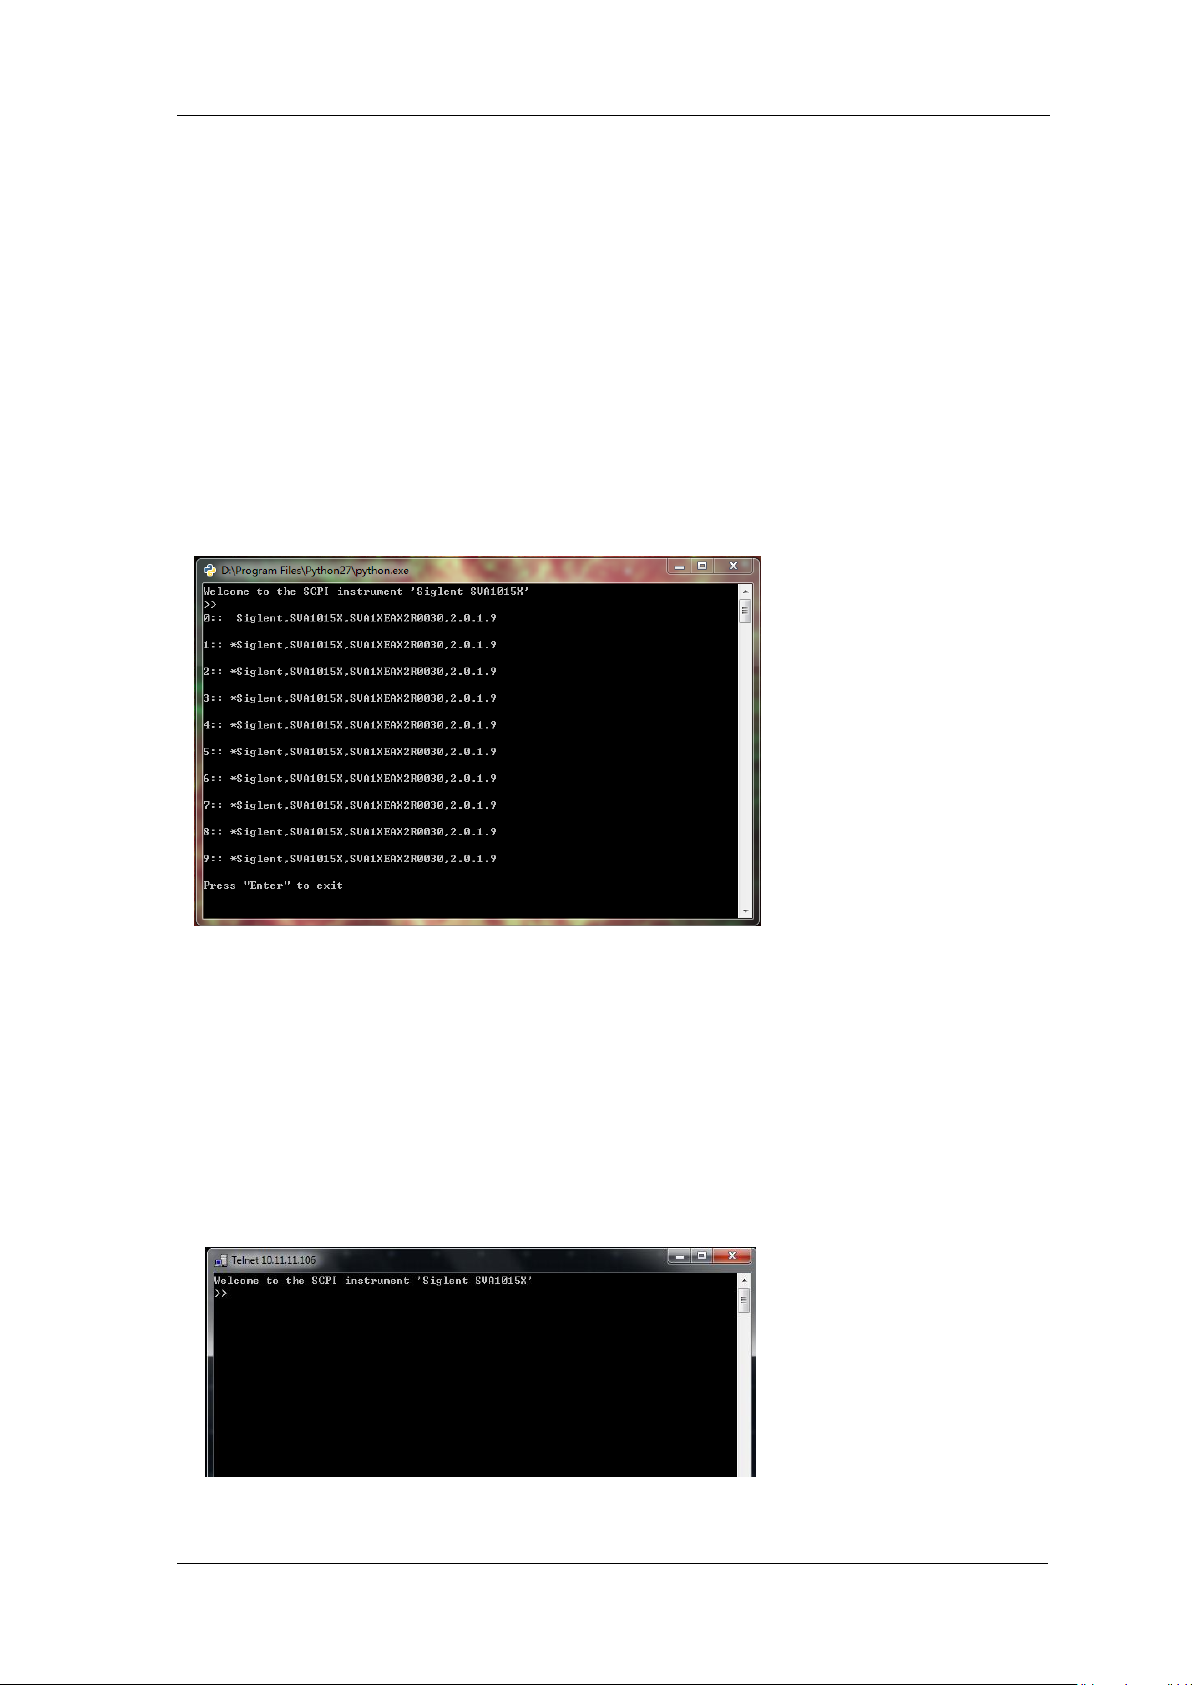
SIGLENT
time.sleep(.300)
def main():
global remote_ip
global port
global count
# Body: send the SCPI commands *IDN? 10 times and print the return message
s = SocketConnect()
for i in range(10):
qStr = SocketQuery(s, b'*IDN?')
print (str(count) + ":: " + str(qStr))
count = count + 1 SocketClose(s)
input('Press "Enter" to exit')
if __name__ == '__main__':
proc = main()
Run result:
4.2.2 Example of Telnet
Telnet SCPI: Provides the ability to send single SCPI commands from a remote PC to the
analyzer using LAN port number 5024.
How to send single SCPI commands using Telnet:
1. On the remote PC, click Start, then Run
2. Type: telnet <ip address> 5024
3. A Telnet window with a >> prompt should appear on the remote PC screen.
4. From the SCPI prompt:
80 SVA1000X Programming Guide
Page 81
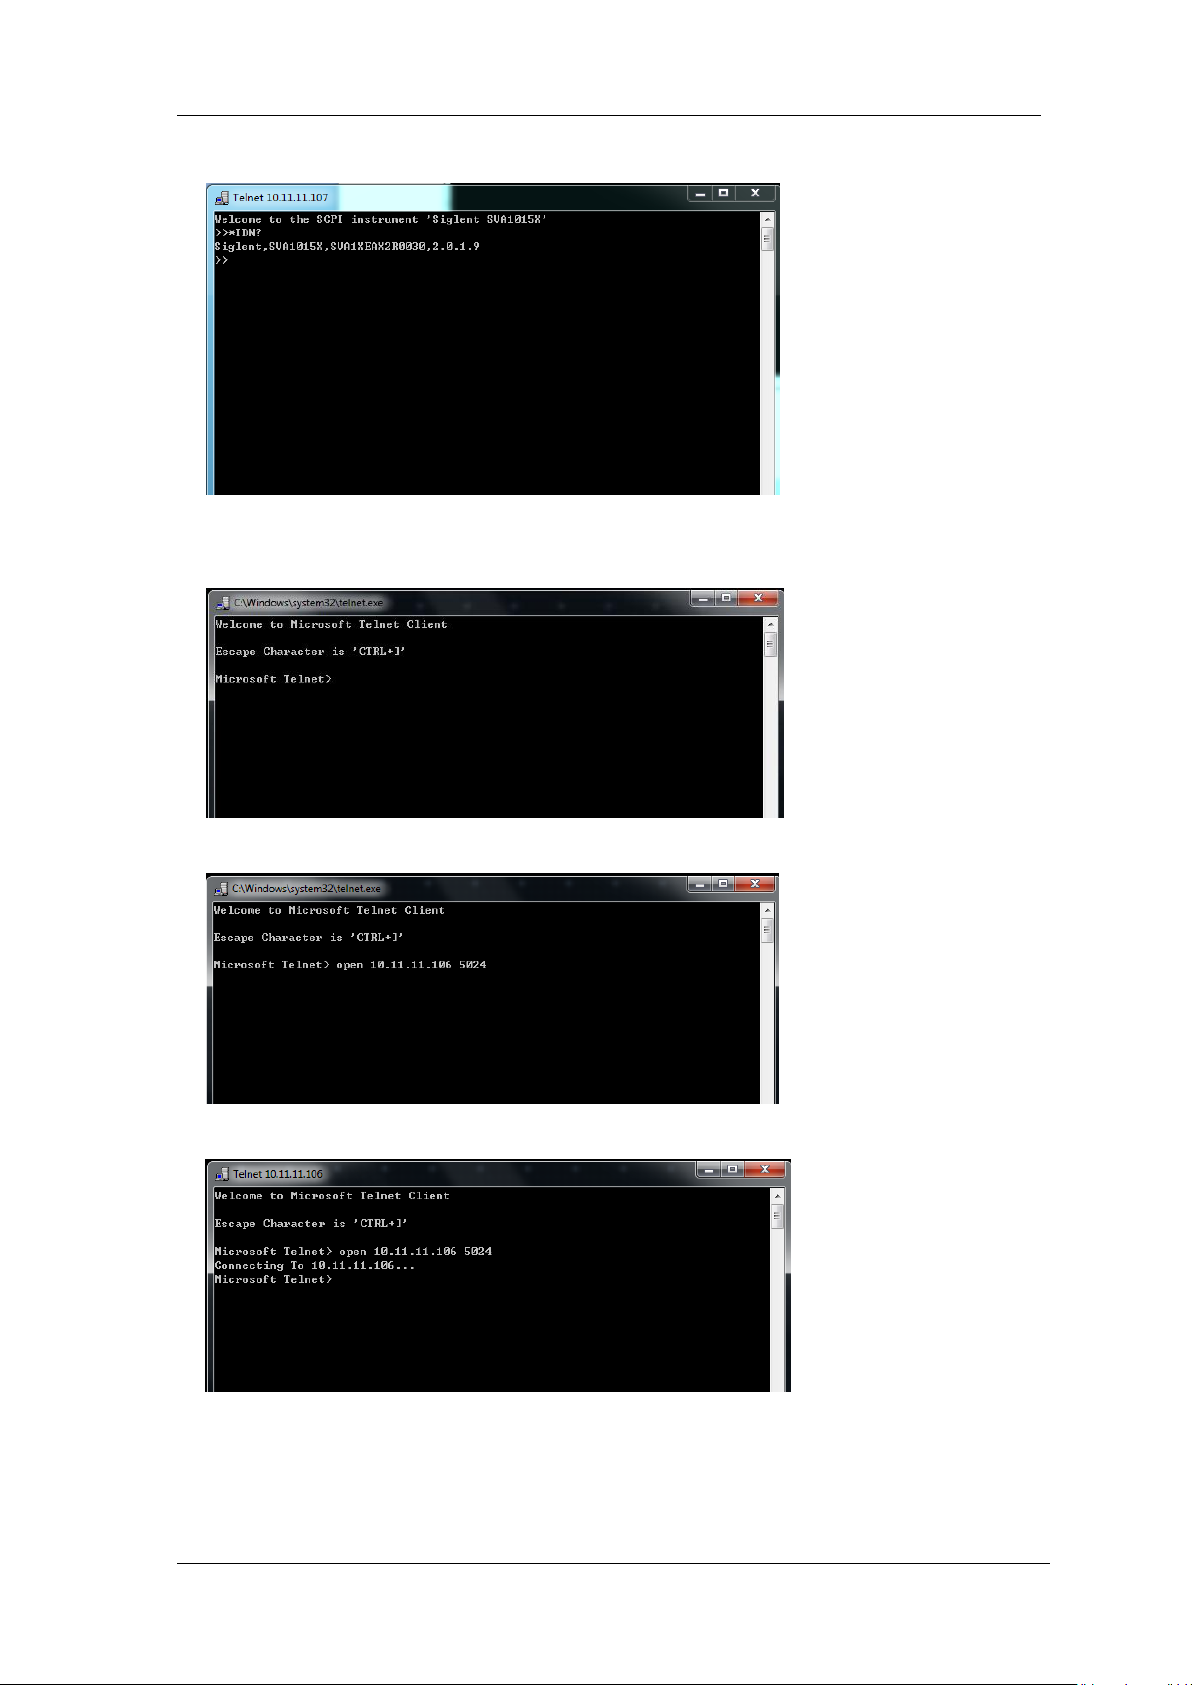
Type single SCPI commands. Press Enter to send the command.
To exit the telnet window click X in the upper-right corner.
To get a normal telnet prompt, press Ctrl ] (closing bracket).
SIGLENT
To get SCPI prompt again, type open <ip Address> 5024.
Press Enter:
To close the normal telnet window, type Quit and press Enter.
SVA1000X Programming Guide 81
 Loading...