

SIGLENT SHS1000 Series, SHS1062 Quick Start Manual

Quick Start
SHS1000 Series
Handheld Digital Oscilloscope
QS03010-E02B
2015 SIGLENT TECHNOLOGIES CO., LTD


SHS1000 快速指南 I
Guaranty and Declaration
Copyright
SIGLENT TECHNOLOGIES CO., LTD. All Rights Reserved.
Trademark Information
SIGLENT is the registered trademark of SIGLENT TECHNOLOGIES CO., LTD
Declaration
SIGLENT products are protected by patent law in and outside of
P.R.C.
SIGLENT reserves the right to modify or change parts of or all the
specifications or pricing policies at company’s sole decision.
Information in this publication replaces all previously corresponding
material.
Any way of copying, extracting or translating the contents of this
manual is not allowed without the permission of SIGLENT.
SIGLENT will not be responsible for losses caused by either
incidental or consequential in connection with the furnishing, use or
performance of this manual as well as any information contained.
Product Certification
SIGLENT guarantees this product conforms to the national and
industrial standards in china as well as the ISO9001: 2008 standard
and the ISO14001: 2004 standard. Other international standard
conformance certification is in progress.

II SHS1000 快速指南
General Safety Summary
Carefully read the following safety precautions to avoid personal
injury and prevent damage to the instrument or any products
connected to it. To avoid potential hazards, please use the
instrument as specified.
Only qualified technician should perform service procedures
Use Proper Power Line
Use only the special power line of the instrument that approved by
local state.
Ground the Instrument
The instrument grounds through the protective terra conductor of
the power line. To avoid electric shock, the ground conductor must
be connected to the earth. Make sure the instrument is grounded
correctly before connect its input or output terminals.
Connect the Signal Wire correctly
The potential of the signal wire is equal to the earth, so do not
connect the signal wire to a high voltage. Do not touch the exposed
contacts or components.
Look Over All Terminals’ Ratings
To avoid fire or electric shock, please look over all ratings and sign
instruction of the instrument. Before connecting the instrument,
please read the manual carefully to gain more information about the
ratings.
Not Operate with Suspected Failures
If you suspect that there is a damage of the instrument, please let a
qualified service personnel check it.
SHS1000 快速指南 III
Avoid Circuit or Components Exposed
Do not touch exposed contacts or components when the power is
on
Do not Operate in Wet/Damp Conditions
Do not Operate in an Explosive Atmosphere
Keep the Surface of the Instrument Clean and Dry
Safety Terms and Symbols
Terms on the product. These terms may appear on the product:
DANGER: Indicates direct injuries or hazards that may happen.
WARNING: Indicates potential injuries or hazards that may happen.
CAUTION: Indicates potential damages to the instrument or other
property that may happen.
Symbols on the product. These symbols may appear on the
product:
Hazardous Protective Warning Earth Ground Power
Voltage Earth Ground Switch

IV SHS1000 快速指南
General Care and Cleaning
Care:
Do not store or leave the instrument in direct sunshine for long
periods of time.
Notice:
To avoid damages to the instrument or probe, please do not
leave them in fog, liquid, or solvent.
Cleaning:
Please perform the following steps to clean the instrument and
probe regularly according to its operating conditions.
1. Disconnect the instrument from all power sources, and then
clean it with a soft wet cloth.
2. Clean the loose dust on the outside of the instrument and probe
with a soft cloth. When cleaning the LCD, take care to avoid
scarifying it.
Notice:
To avoid damages to the surface of the instrument and probe,
please do not use any corrosive liquid or chemical cleanser.
Make sure that the instrument is completely dry before
restarting it to avoid short circuits or personal injuries.
SHS1000 快速指南 V
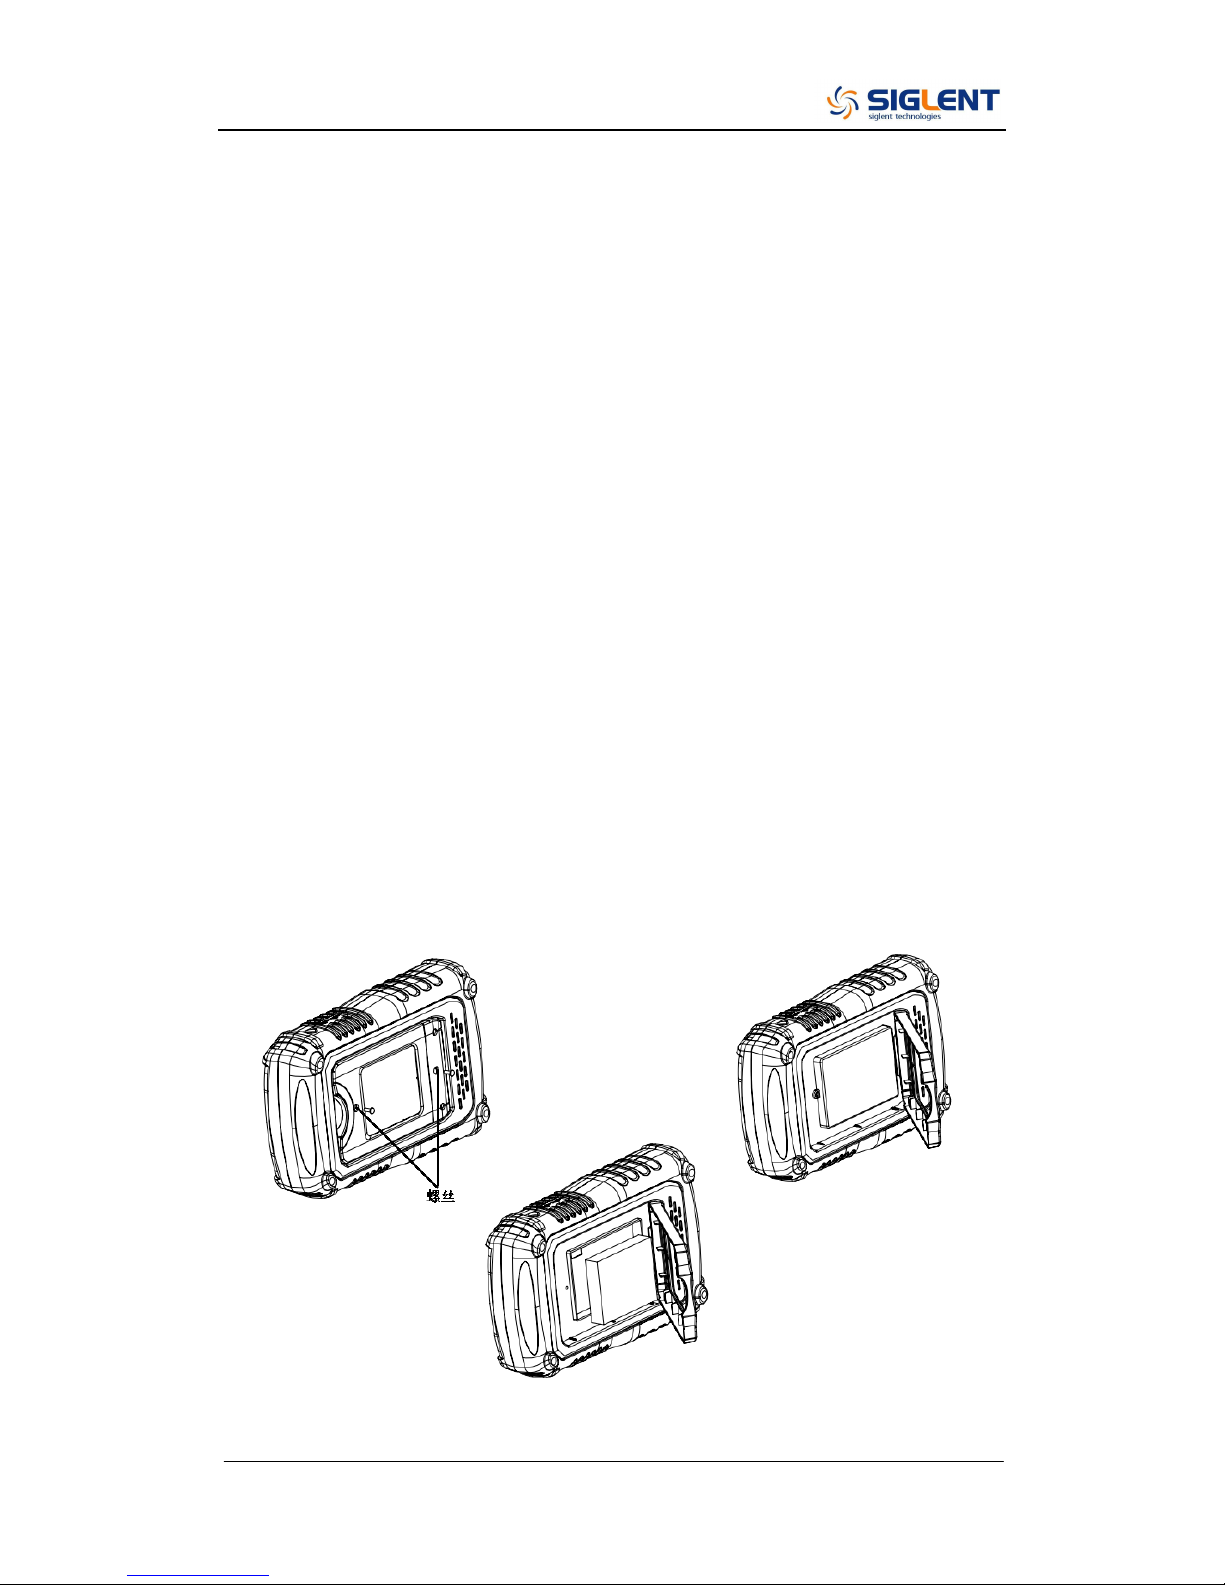
Installation of Battery
The instrument is not installed with battery. To complete the
installation, please operate as the following steps:
1. Remove the two screws on the battery cover using a screwdriver.
As shown in figure 1.
2. Pull out the supporting leg and remove the battery cover. As
shown in figure 2.
3. Put battery into the battery box and cover it tightly. As shown in
figure3.
4. Tighten the screws using a screwdriver and turn on the
instrument to check if it’s successfully installed.
Notices:
Connect the battery cable lightly due to its anti-reverse design.
If the instrument fails to startup after successful installation of
the battery, it is likely due to exhausting of the battery power,
please charge the battery timely.
In the case of not working, battery must be charged once every
three months.
Figure 1 Figure 2
Figure 3

VI SHS1000 快速指南
Contents
Guaranty and Declaration ................................................................................. I
General Safety Summary ................................................................................. II
Safety Terms and Symbols ............................................................................. III
General Care and Cleaning ........................................................................... IV
Installation of Battery....................................................................................... V
Quick Start ....................................................................................................... 1
General Inspection .................................................................................... 1
Appearance and Size................................................................................ 2
Preparation for Use ................................................................................... 3
Adjusting the Supporting Leg ............................................................. 3
Measurement Connection .................................................................. 4
Power-on Inspection .......................................................................... 6
Function Inspection............................................................................ 7
Probe Compensation ......................................................................... 8
Front Panel Introduction............................................................................ 9
Side Panel Introduction ........................................................................... 11
Oscilloscope Function Summary .................................................................... 12
User Interface ......................................................................................... 12
Function Introduction .............................................................................. 16
Function Menu ................................................................................. 16
Trigger setting .................................................................................. 17
System setting ................................................................................. 17
Storage setting ................................................................................. 17
Cursor measurement ....................................................................... 17
Run setting ...................................................................................... 17
Auto setting ...................................................................................... 18
Menu setting .................................................................................... 18
Multimeter Function Summary ....................................................................... 19
User Interface ......................................................................................... 19
Measurement Parameters ...................................................................... 21
Recorder Function Summary ......................................................................... 22
Scope Trend Plot .................................................................................... 22
Scope Recorder ...................................................................................... 24
Meter Trend Plot ..................................................................................... 26
Troubleshooting ............................................................................................. 28
Contact SIGLENT .......................................................................................... 31

SHS1000 快速指南 1
Quick Start
General Inspection
1. Inspect the shipping container.
Keep the damaged shipping container or cushioning material
until the contents of the shipment have been completely
checked and the instrument has passed both electrical and
mechanical tests.
The consigner or carrier will be responsible for damages to the
instrument resulting from shipment. SIGLENT would not provide
free maintenance or replacement.
2. Inspect the instrument.
If there are instruments found damaged, defective or failure in
electrical and mechanical tests, please contact SIGLENT.
3. Check the accessories.
Please check the accessories according to the packing list. If the
accessories are incomplete or damaged, please contact your
SIGLENT sales representative.
2 SHS1000 快速指南
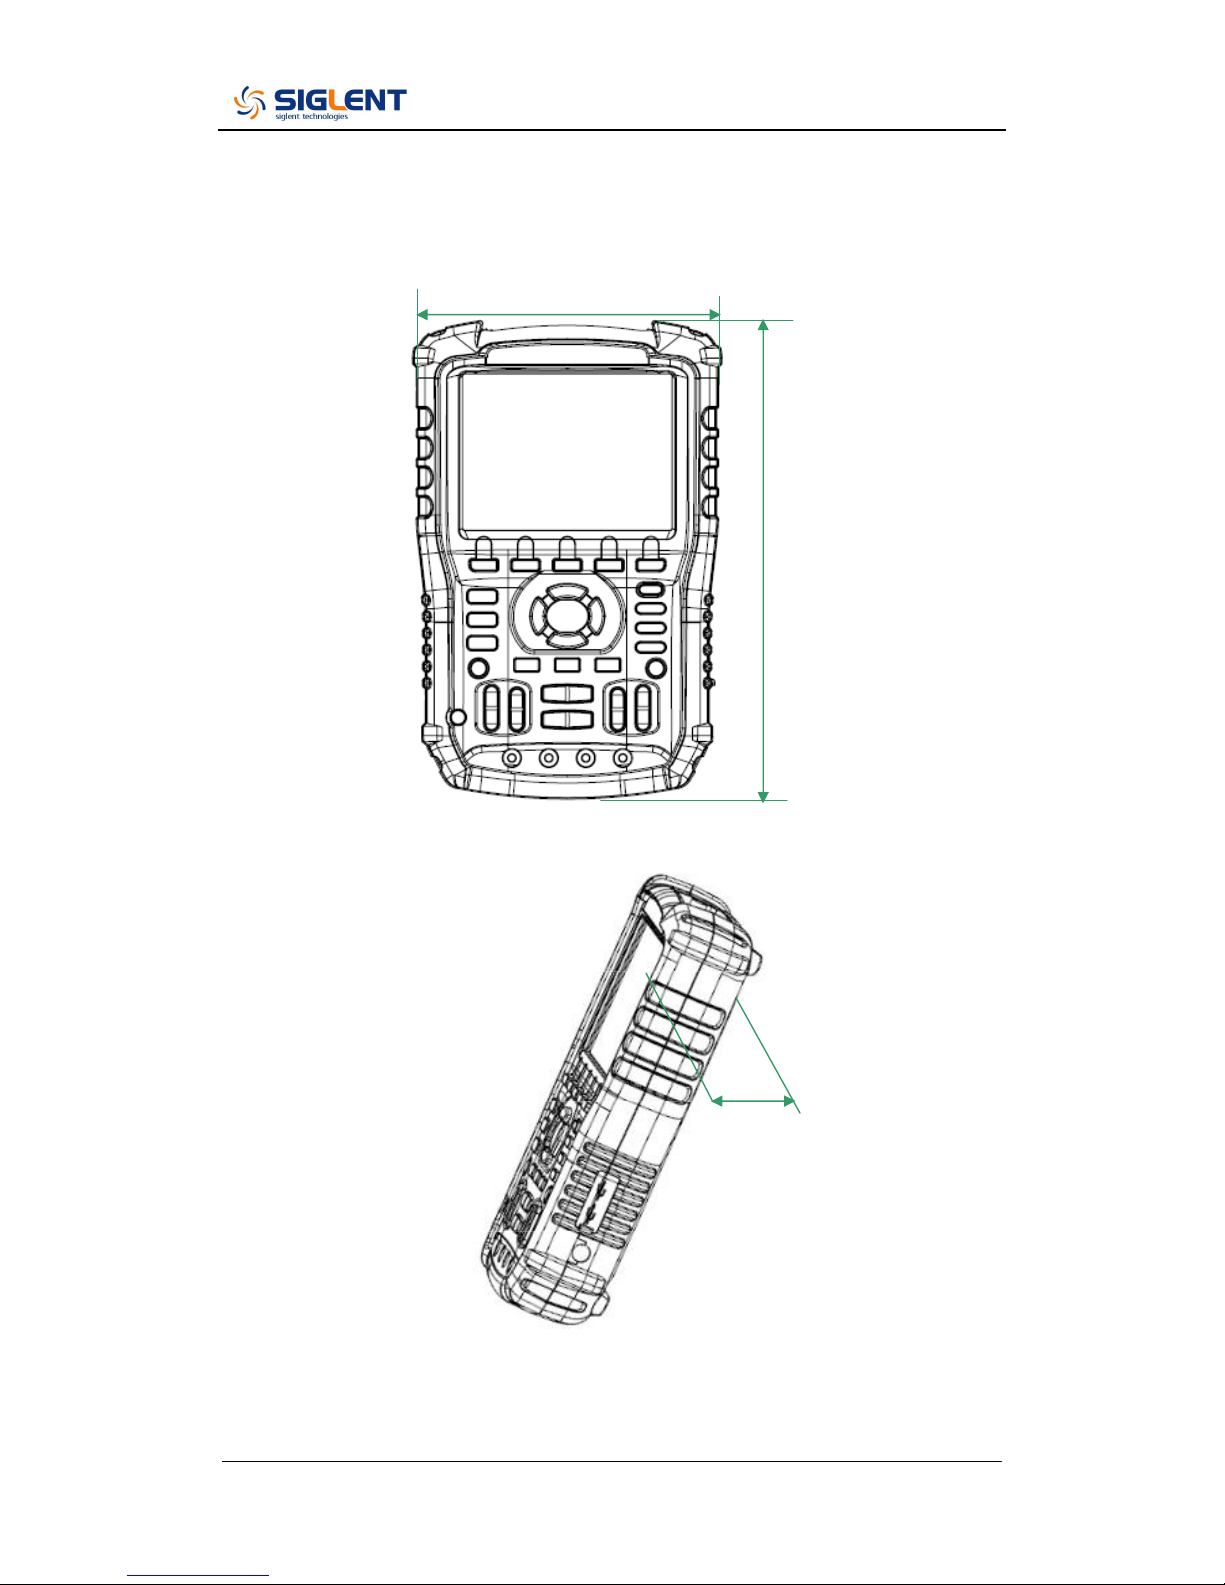
Appearance and Size
163.2mm
Front view
53.3mm
Side view
259.5mm

SHS1000 快速指南 3
Preparation for Use
Adjusting the Supporting Leg
Adjust the supporting leg properly to use them as stands to tilt the
instrument upwards for stable placement as well as easier
operation and observation of the instrument.
Adjust the supporting leg
4 SHS1000 快速指南
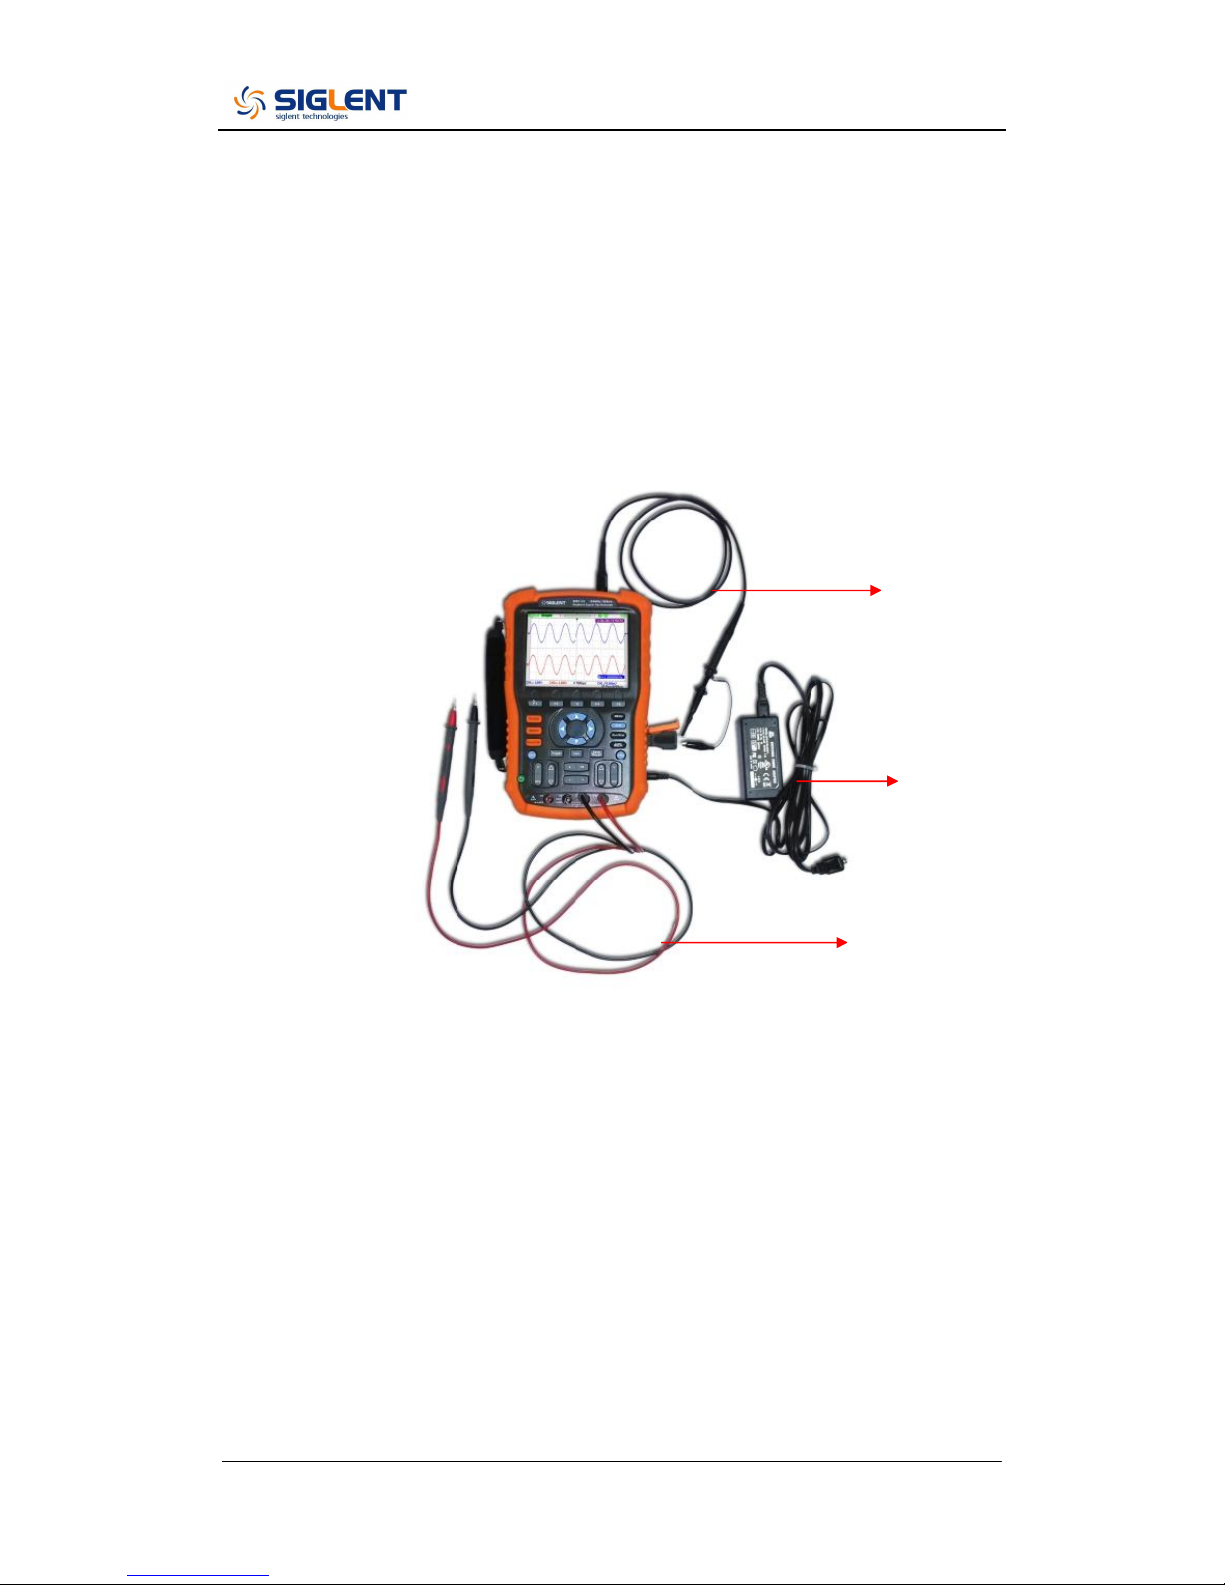
Measurement Connection
Accessories of SHS1000 Handheld Digital Oscilloscope consist of
a power supply adapter, a probe adapter plug, a USB cable, two
multimeter probes and two oscilloscope probes. The acceptable AC
power supply is: 100~240V, 45~440Hz.
1. Oscilloscope Probe
Connect the BNC end of the probe to the instrument BNC
connector firstly, then connect the grounding alligator clip and
probe of another end to the grounding end and signal
compensation terminal of the probe adapter plug, which is
connected to the BNC port of the instrument, for square
waveform checking.
1
2
3
 Loading...