

Page 1

ThinkPad® Regulatory Notice for Wireless WAN adapter
Read first — regulatory information
Please read this document before you use the ThinkPad computer. Be sure to
also read ThinkPad Regulatory Notice, included with your computer.
ThinkPad computer complies with the radio frequency and safety standards
of any country or region in which it has been approved for wireless use. You
must install and use your computer in strict accordance with the instructions
as described hereafter.
You cannot use the Wireless WAN Adapter Model: MC5725 and a Wireless
LAN adapter simultaneously. If one of the adapters has established the
connection to the network, the other will be disconnected automatically. To
confirm the status of the network connection, check the power status
indicators of your computer. For more information about the power status
indicators, see the “Power status indicators” section in Access Help.
Part Number: 42X3528
USA — Federal Communications Commission (FCC)
If your computer integrates the Wireless WAN adapter Model: MC5725, you
may connect it to the radiocommunication Public Network in the USA.
I. FCC ID of the wireless module
The Wireless WAN adapter (Model: MC5725) was certified under the FCC ID:
N7N-MC5725-L, but there is no FCC ID for the card shown on the enclosure
of your ThinkPad computer. Instead you will find an indicator pointing to the
location of the FCC ID on the bottom side of your ThinkPad computer. For
the location of the FCC ID indicator, see the "Location of the FCC ID and IC
Certification number label" in Access Help. The FCC ID is affixed on the
approved module installed in the Mini PCI Express Card slot.
For the location of the slot, see the "PCI Express Mini Card slots" section in
Access Help.
II. Installation of the approved wireless module
If no integrated wireless WAN Mini PCI Express Card has been preinstalled in
your ThinkPad computer, you can install one, provided by Lenovo as an
option. Plug the wireless card option into the Mini PCI Express Card slot.
For the installation procedure, see the "Replacing the PCI Express Mini Card
for wireless WA N connection" section in Access Help.
© Copyright Lenovo 2006 1
Page 2

Attention: The ThinkPad computers contain an authentication mechanism.
you install an unauthorized wireless WA N Mini PCI Express Card that is
If
not approved for use in your ThinkPad computer, the computer will not start,
but only displays an error message and emits beeps.
III. RF safety compliance
The total radiated energy from the antenna connected to the Wireless WAN
adapter (Model: MC5725), the Bluetooth module with its built-in antenna on
card (Model: J07H081), and the Wireless USB Card (Model: T60H990)
conforms to the FCC limit of the SAR (Specific Absorption Rate) requirement
regarding 47 CFR Part 2 section 1093. The maximum SAR values measured
for your ThinkPad computer were less 0.XXXW/Kg at 800MHz band and
0.XXXW/Kg at 1.9GHz band, when the ThinkPad computer was operated in a
conventional setting. The FCC limit is 1.6W/Kg.
For the location of the antenna, see the "About your computer" section in
Access Help.
IV. Emergency Calls
The Wireless WAN adapters embedded in the ThinkPad computer do not
support voice calls, hence their use for essential communication is not
possible, including emergency calls regarding the E911 rule.
V. Simultaneous use of RF transmitters
If your ThinkPad computer contains the Bluetooth module (Model: J07H081,
FCC ID: MCLJ07H081) or the Wireless USB Card (Model: T60H990, FCC ID:
MCLT60H990), the Wireless WAN module Model: MC5725 is approved for
simultaneous use with these radio devices.
Please make sure of the following conditions on use of these wireless features:
1. When you use any other RF option device, all other wireless features
including the above integrated devices in your ThinkPad computer are
required to be turned off.
2. Users must follow the RF Safety instructions on wireless option devices
that are included in the RF option device’s user’s manual.
Electronic emission notices
Federal Communications Commission (FCC) Statement
v Model: MC5725
This equipment has been tested and found to comply with the limits for a
Class B digital device, pursuant to Part 15 of the FCC Rules. These limits are
designed to provide reasonable protection against harmful interference in a
residential installation. This equipment generates, uses, and can radiate radio
frequency energy and, if not installed and used in accordance with the
instructions, may cause harmful interference to radio communications.
However, there is no guarantee that interference will not occur in a particular
2
Page 3

installation. If this equipment does cause harmful interference to radio or
television reception, which can be determined by turning the equipment off
and on, the user is encouraged to try to correct the interference by one or
more of the following measures:
v Reorient or relocate the receiving antenna.
v Increase the separation between the equipment and receiver.
v Connect the equipment into an outlet on a circuit different from that to
which the receiver is connected.
v Consult an authorized dealer or service representative for help.
Lenovo is not responsible for any radio or television interference caused by
unauthorized changes or modifications to this equipment. Unauthorized
changes or modifications could void the user’s authority to operate the
equipment.
This device complies with Part 15 of the FCC Rules. Operation is subject to
the following two conditions: (1) this device may not cause harmful
interference, and (2) this device must accept any interference received,
including interference that may cause undesired operation.
Responsible Party:
Lenovo (United States) Inc.
5241 Paramount Parkway
Morrisville, NC 27650
Telephone: (919) 254-0532
FOR HOME OR OFFICE USE
Trademarks
The following terms are trademarks of Lenovo in the United States, other
countries, or both:
Lenovo
ThinkPad
Other company, product, and service names may be trademarks or service
marks of others.
Tested To Comply
With FCC Standards
3
Page 4
Page 5

Location of the FCC ID and IC Certification number label
There is no FCC ID or IC Certification number for the PCI Express Mini Card shown on the enclosure of
your ThinkPad® computer. Instead you will find an indicator pointing to the location of the FCC ID and the
IC Certification number for the installed transmitter card on the bottom side of your ThinkPad as shown
below. The FCC ID and IC Certification number label is affixed on the card installed in the Mini PCI Express
Card slot of your ThinkPad computer.
The wording of the label may vary depending on the model.
Note:
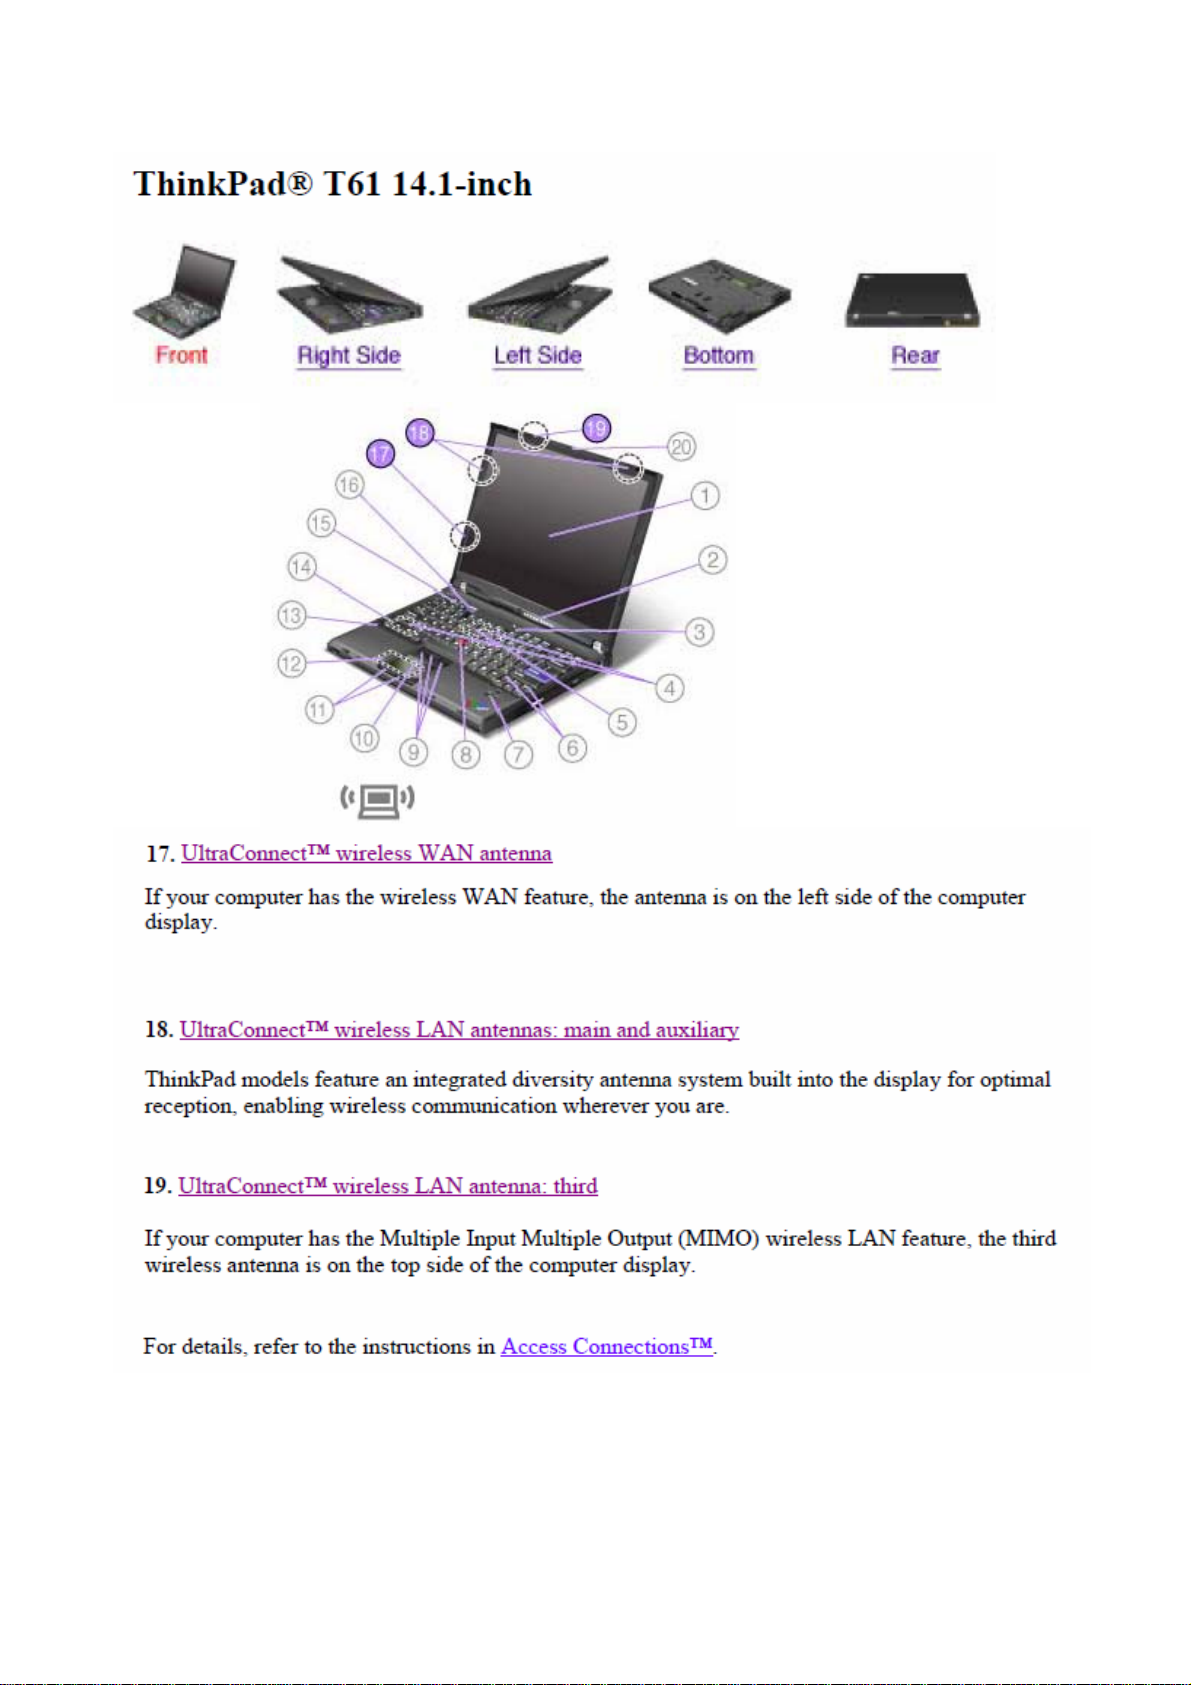
For ThinkPad T61 14.1-inch, click here
For ThinkPad T61 15.4-inch widescreen, click here
For ThinkPad T61 14.1-inch widescreen and ThinkPad R61 14.1-inch widescreen, click here
For ThinkPad R61 15.4-inch widescr e en , click here
ThinkPad T61 14.1-inch
.
.
.
.
ThinkPad T61 15.4-inch widescreen
ThinkPad T61 & R61 14.1-inch widescreen
ThinkPad R61 15.4-inch widescreen
If no integrated wireless PCI Express Mini Card has been preinstalled in your ThinkPad computer, you can
install one. To do this, follow the procedure in Installing and replacing the PCI Express Mini Card for
wireless LAN connection or Replacing the PCI Express Mini Card for wireless WAN connection.
Page 6

Replacing the PCI Express Mini Card for wireless WAN connection
(3)
Before you start, print these instructions.
Some ThinkPad models have a PCI Express Mini Card slot for connection to a wireless WAN. To replace
the PCI Express Mini Card with a new one, follow the procedure below.
To find the position of the PCI Express Mini Card for wireless WAN connection in your computer, click here
.
Danger:
During electrical storms, do not connect the cable to or disconnect it from the the telephone
outlet on the wall.
Danger:
Electric current from power, telephone, and communication cables is hazardous. To avoid
shock hazard, disconnect the cables before opening the cover of this slot.
Attention:
Before you start installing a PCI Express Mini Card, touch a metal table or a grounded
metal object. This action reduces any static electricity from your body. The static electricity could damage
the card.
z To replace the PCI Express Mini Card in a ThinkPad T61 14.1-inch model, a ThinkPad T6 1 14.1-
inch widescreen model, and a ThinkPad R61 14.1-inch widescreen model, click here
z To replace the PCI Express Mini Card in a ThinkPad T61 15.4-inch widescreen model, click here.
.
For the ThinkPad T61 14.1-inch, ThinkPad T61 14.1-inch widescreen, and ThinkPad R61 14.1-inch
widescreen models
To replace the PCI Express Mini Card, do as follows:
Turn off the computer; then disconnect the ac adapter and all cables from the computer. Wait for a few
1.
minutes, till the inside of the computer cools, before you start the following procedures.
Close the computer display, and turn the computer over.
2.
Remove the battery
3.
Remove the keyboard
4.
.
.
14.1-inch widescreen model, you must lift up the bracket first, as shown in the drawing.
If your computer is either a ThinkPad T61 14.1-inch widescreen model or a ThinkPad R61
Note:
If a tool for removing connectors is included in the package with the new card, use it to disconnect the
5.
cables from the card
connectors with your fingers and gently unplugging them. Remove the screws
.
. If no such tool is included, disconnect the cables
(1)
by picking up the
(1)
. The card pops up
(2)
Page 7

connector.
Remove the card
6.
Align the contact edge of the new PCI Express Mini Card with the corresponding socket
7.
Pivot the card until you can snap it into place by pressing the upper side of each connector
8.
the card with the two screws
Depending on the system configuration of your computer, the card may have only one
Note:
(4).
. Connect the cables to the new PCI Express Mini Card
(3)
(1).
(4).
. Secure
(2)
connector.
14.1-inch widescreen model, be sure to pu t th e br acket back in place, as shown in the drawing.
Depending on the system configuration of your computer, the card may have only one
Note:
If your computer is either a ThinkPad T61 14.1-inch widescreen model or a ThinkPad R61
Note:
Page 8

(1)
Reinstall the keyboard
9.
Reinstall the battery
10.
Turn the computer over again. Connect the ac adapter and cables to the computer; then turn it on.
11.
For the ThinkPad ThinkPad T61 15.4-inch widescreen model
To replace the PCI Express Mini Card, do as follows:
Turn off the computer; then disconnect the ac adapter and all cables from the computer. Wait for a few
1.
minutes, till the inside of the computer cools, before you start the following procedures.
Close the computer display, and turn the computer over.
2.
Remove the battery
3.
Remove the keyboard
4.
If a tool for removing connectors is included in the package with the new card, use it to disconnect the
5.
cables from the card
connectors with your fingers and gently unplugging them. Remove the screws
(3).
.
.
.
.
. If no such tool is included, disconnect the cables
(1)
by picking up the
(1)
. The card pops up
(2)
Note:
connector.
Remove the card
6.
Remove the screw
7.
Depending on the system configuration of your computer, the card may have only one
(4).
from the keyboard bezel.
Page 9

Lift up the front of the keyboard bezel, as shown in the drawing
8.
computer.
Align the contact edge of the new PCI Express Mini Card with the corresponding socket
9.
Pivot the card until you can snap it into place by pressing the upper side of each connector
10.
the card with the two screws
Connect the cables to the new PCI Express Mini Card
(5)
, to reveal the socket contact of the
(2)
(3).
(6).
. Secure
(4)
connector.
Press the keyboard bezel in the area marked in the drawing
11.
from being pinched by the bezel.
Depending on the system configuration of your computer, the card may have only one
Note:
Make sure that the cables are secured properly as shown in the drawing, to prevent them
Note:
until it clicks into place.
(7)
Page 10

Secure the keyboard bezel with the screw
12.
Reinstall the keyboard
13.
Reinstall the battery
14.
Turn the computer over again. Connect the ac adapter and cables to the computer; then turn it on.
15.
.
.
(8).
Page 11

Power-status indicators
The computer has status indicators that show the mode (sleep/standby, hibernation, or normal), ac power
status, and the status of the battery. The following shows the location and the meaning of the indicators:
1. Sleep (Standby in Windows® XP and Windows 2000) status
z
Green:
z
Blinking green:
The computer is in sleep (standby) mode.
The computer is entering sleep (standby) or hibernation mode, or is resuming
normal operation.
2. Status of ac power
z
Green:
The ac adapter is connected and the computer is operating on ac power. If a battery is
installed on the computer, it is charged when this indicator is green.
z
The computer is operating on battery power.
Off:
3. Battery status
z
Green:
z
Orange:
z
Fast blinking orange:
z
Slow blinking orange:
The battery has more than 20% charge.
The battery has between 5% and 20% charge
The battery has less than 5% charge.
The battery may be charging.
Note:
The battery is being charged. When it reaches 20%, the blinking color
changes to green.
z
Slow blinking green:
The battery has between 20% and 80% charge, and charging is
continuing. When the battery reaches 80% charge, blinking stops, but the charging may continue
until the battery is 100% charged.
If the computer is operating on battery power, the Battery status indicator does not work
Note:
while the computer is turned off or is in sleep (standby) mode or hibernation mode.
Page 12

If your computer is shipped with a wireless WAN feature, a
wireless LAN feature, you can use the following indicators:
Bluetooth
feature, a Wireless USB, and a
4. Wireless WAN status
z
Green:
z
Blinking green:
The wireless WAN feature is on, and the radio link is ready for use.
Bluetooth
5.
z
z
status
Green:
Blinking green:
or
The feature is on, and the radio link is ready for use.
6. Wireless LAN status
z
Green:
The wireless LAN feature (the IEEE 802.11 standard) is on, and the radio link is ready for
use.
z
Blinking green:
Data is being transmitted.
Bluetooth
/Wireless USB status
Data is being transmitted.
Data is being transmitted.
Page 13

Wireless connections
You can connect to the Internet without connecting a wire to your computer by setting up a wireless access
point or residential gateway. A wireless access point does not connect you to the Internet directly. Instead,
it connects to a wired connection such as a cable modem, a DSL modem, or a phone line.
Certain types of wireless connections, such as wireless LAN (the IEEE 802.11 standard), are being used to
connect to an access point.
To connect to an access point, you will need several pieces of information. You will need to know the
network name (obtain this from your administrator), and your MAC address (which should have come with
your computer or wireless networking card). You may also need to set up encryption. Contact your
administrator for your network name and encryption settings. You may need to register your MAC address
with your network administrator before connecting to your company network. A residential gateway is the
consumer version of an access point. Consult your residential gateway instructions for setup.
Be careful to disable the wireless function when you are not using it because it uses power even when you
are not connected to the network. Some models have an integrated Wireless LAN antenna and hardware.
If your computer did not come with integrated wireless, you can purchase a PC Card as an option. Wireless
LAN gives you a high-speed connection to an access point.
If your computer comes with the built-in wireless LAN or wireless WAN card, refer to Making wireless LAN
connections and Using wireless WAN connections for more information. If your computer has the
Integrated
and Using Certified Wireless USB
Bluetooth
features and/or is equipped with the Certified Wireless USB, refer to Using
for more information.
Bluetooth
Page 14

Making wireless LAN connections
You can stay connected to your network while you are in the office, in a meeting room, or at home, with no
need for a wired connection. Some ThinkPad® models come with a built-in wireless networking card and a
configuration utility to help you make wireless connections and monitor the status of your connection.
Attention:
need to disable it before boarding. To disable it, refer to the instructions in Enabling or disabling the
wireless feature.
Wireless networking setup
Wireless security features
Checking wireless connection status
Enabling or disabling the wireless feature
Wireless upgradeable ThinkPad models
Note:
in. If your computer does not come with these features, you can purchase the wireless networking card as
an option. For more information, refer to Finding ThinkPad options.
Note:
possible between the wireless LAN access point and the computer. Also for the best connection of the
wireless LAN feature, open your computer display to an angle of slightly more than 90 degrees.
If you carry your ThinkPad computer with the wireless LAN feature into an airplane, you
Some models come with a wireless networking card and a wireless LAN configuration utility built
If you use the wireless LAN feature, place your computer so that there are as few obstacles as
Page 15

Wireless networking setup
To use the built-in wireless networking card (the IEEE 802.11 standard) to communicate, start Access
Connections™
To start the Access Connections wizard, click
ThinkVantage
Note:
a Network Name (SSID) and your encryption information from your network administrator.
Access Connections, a connectivity assistant program, can easily enable one network adapter and disable
the other adapters on demand. After setting up your wireless networking connection, you can use the
program to quickly switch the network settings.
-->
Access Connections
Before you start setting up wireless networking connections by using Access Connections, obtain
, and follow the instructions on the screen.
Start
-->
All Programs
(in Windows® 2000,
Programs
) -->
Page 16

Wireless security features
Advances in wireless technology require that we manage your security more reliably than ever. Therefore,
Lenovo has extended its Embedded Security Subsystem to encompass virtually all of our ThinkPad® and
desktop computer lines. This security subsystem helps protect data, hardware, network access and
communications - both wired and wireless - on select ThinkPad and desktop PCs.
The Embedded Security Subsystem provides hardware-based protection of critical security information,
including passwords, encryption keys, and electronic credentials. It also helps identify computer users
involved in transactions, and helps establish that data transmissions are authentic, confidential and intact.
Security and Privacy Services for wireless risk assessment and wireless solution design can help you
assess the risks based on your business needs, identify your information risk position, and integrate
security strategies, policies, and architectures to help you achieve your wireless e-business objectives. To
effectively manage risk on an ongoing basis, organizations must have a sound security strategy. By
understanding threats and vulnerabilities at an early stage, we can help define the necessary scope and
features of your wireless e-business security infrastructure.
For more information on wireless security offerings, click the following link:
http://www.pc.ibm.com/us/think/thinkvantagetech/security.html
Page 17

Checking wireless connection status
You can check the signal strength and status of your wireless connection either by opening Access
Connections™, or by double-clicking the
The Access Connections wireless status icon displays the signal strength and status of your wireless
connection as follows:
No link or a very poor one
Usable but weak link
Strong link
Wireless radio is disabled
If you have trouble in making a connection, try moving your computer closer to your wireless
Note:
access point.
Access Connections wireless status
icon in the system tray.
Page 18

Enabling or disabling the wireless feature
To enable or disable the wireless feature, press Fn+F5. A list of wireless features is displayed. You can
turn the feature on and off with a single click.
You can also enable or disable the feature by the following procedures.
To enable the wireless feature, do as follows:
Click the Access Connections wireless icon in the system tray.
1.
Click
2.
To disable the wireless feature, do as follows:
1.
2.
Note:
Note:
your computer.
Power On Wireless Radio.
Click the Access Connections wireless icon in the system tray.
Click
Power Off Wireless Radio.
To enable the wireless radio, do as follows:
1. Select
2. Select the On position of the wireless radio switch on the computer.
3. Click the Access Connections wireless icon in the system tray and select
On
Enabled
. Or press Fn+F5, and then turn the feature on.
You can use the wireless radio switch to disable the wireless radio of all the wireless devices on
for the Internal Wireless Device in the BIOS Setup Utility
.
Turn Wireless Radio
Page 19

8 Wireless upgradeable ThinkPad models
Depending on the model, your ThinkPad® computer might be wireless upgradeable. This means that your
computer has an antenna that can support wireless LAN access when wireless LAN access points are
available. Wireless devices are available from Lenovo: Finding ThinkPad options
.
 Loading...