

Page 1
AirCard 710 Wireless Network Card - User Guide
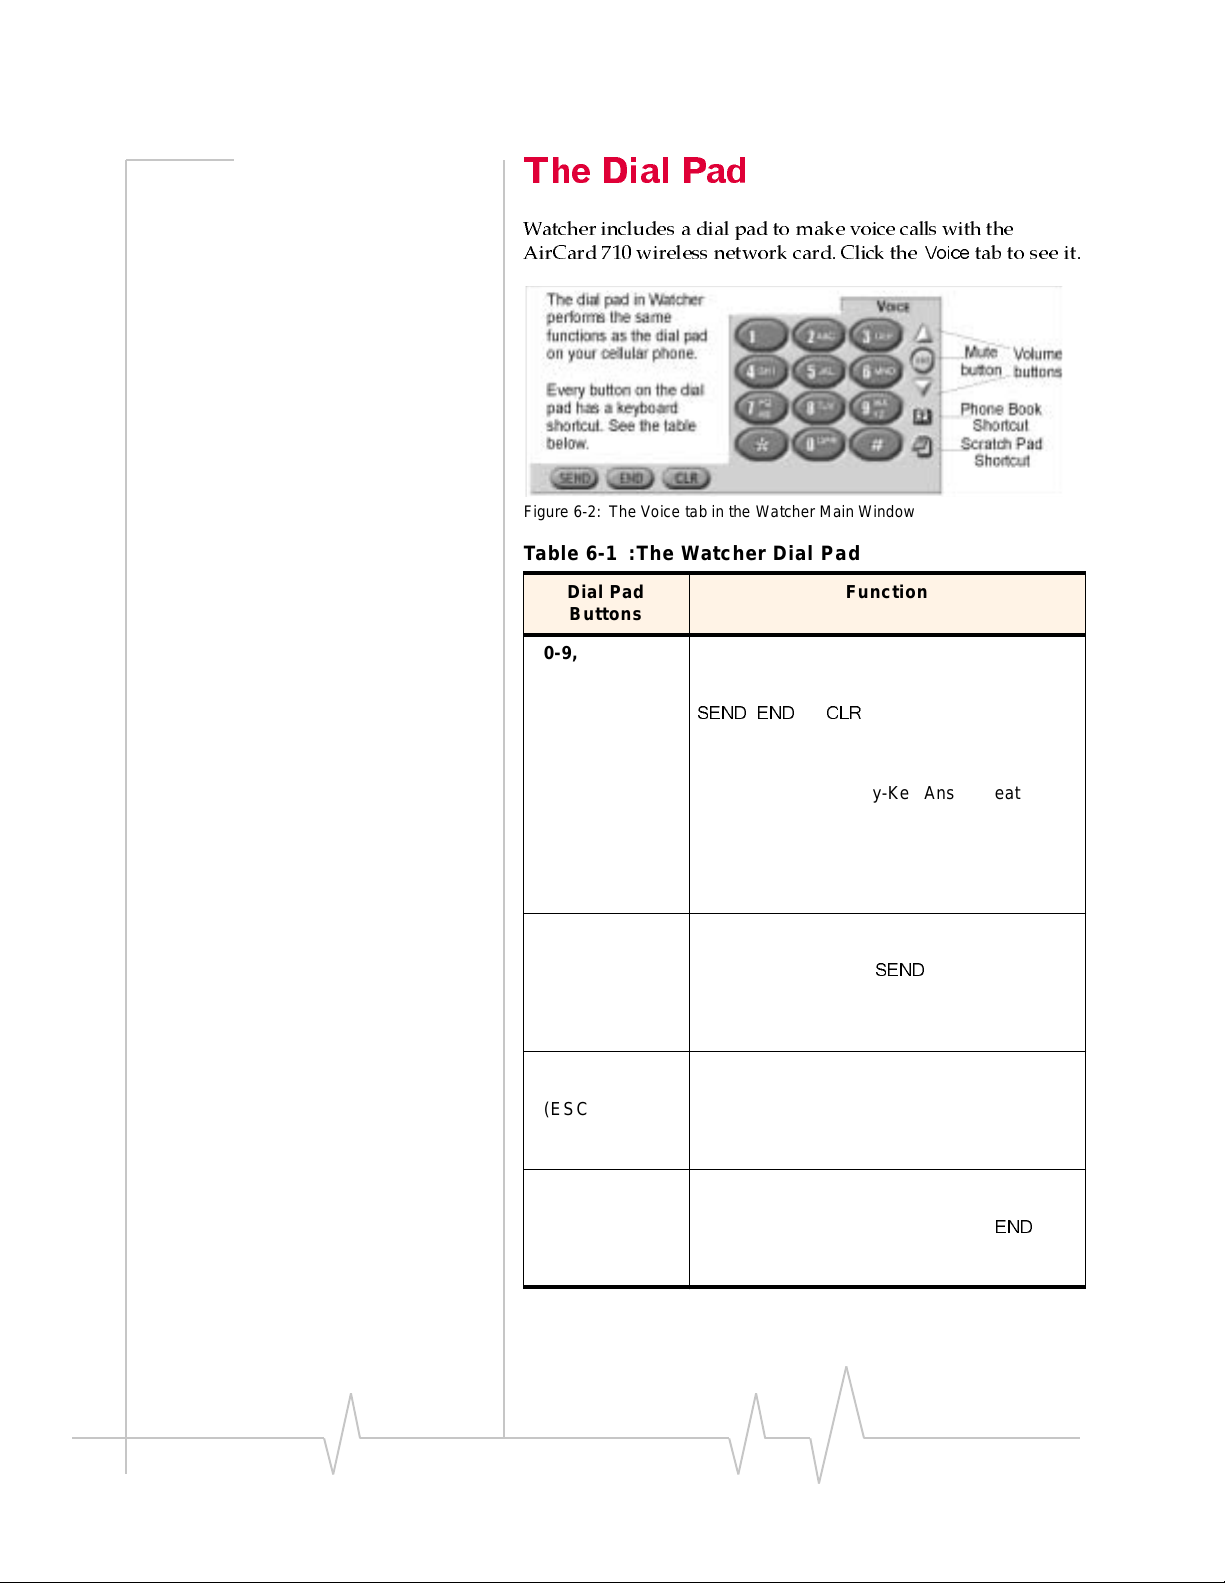
TheDialPad
Watcher includes a dial pad to make voice calls with the
AirCard 710 wireless network card. Click the
Figure 6-2: The Voice tab in the Watcher Main Window
Table 6-1 :The Watcher Dial Pad
Voice
tab to see it.
Dial Pad
Buttons
0-9, # , *
(or the sa me
keys on your
keyboard)
SEND
(ENTER on
your keyboard)
END
(ESC on your
keyboard)
Function
Use these buttons to enter the digits (and other
characters) you want to dial. The numbers are
displayed in the call status area until you press
SEND, END
incomin g call.
Any of these buttons can be used to answer an
incoming call if the Any-Key Answer feature is
enable d (see “Voice Tab” on page 77).
If you click these buttons during a call, the
AirCard network card beeps and the characters
are displayed in the Call Status area.
Use this button to dial numbers and to answer
incoming calls. When you are not receiving an
incoming call, clicking
in th e call statu s area. If no numb ers are
displayed, Wa tcher r e-dial s the l ast number yo u
dialed.
Use this button to hang up or end a call, or to
clear all the digits and characters in the Call
Status area (i.e. to cancel a call that you’ve
started to enter). This button also clears status
messages.
, or
CLR
, or you receive an
SEND
dials the numbers
CLR
(BACKSPACE
on your
keyboard)
Use this button to clear the last number you’ve
entered. If you hold this button down for one
second, it has the same effect as the
key—so this button can al so be used to hang up
or end a call.
END
46 2130135
Page 2
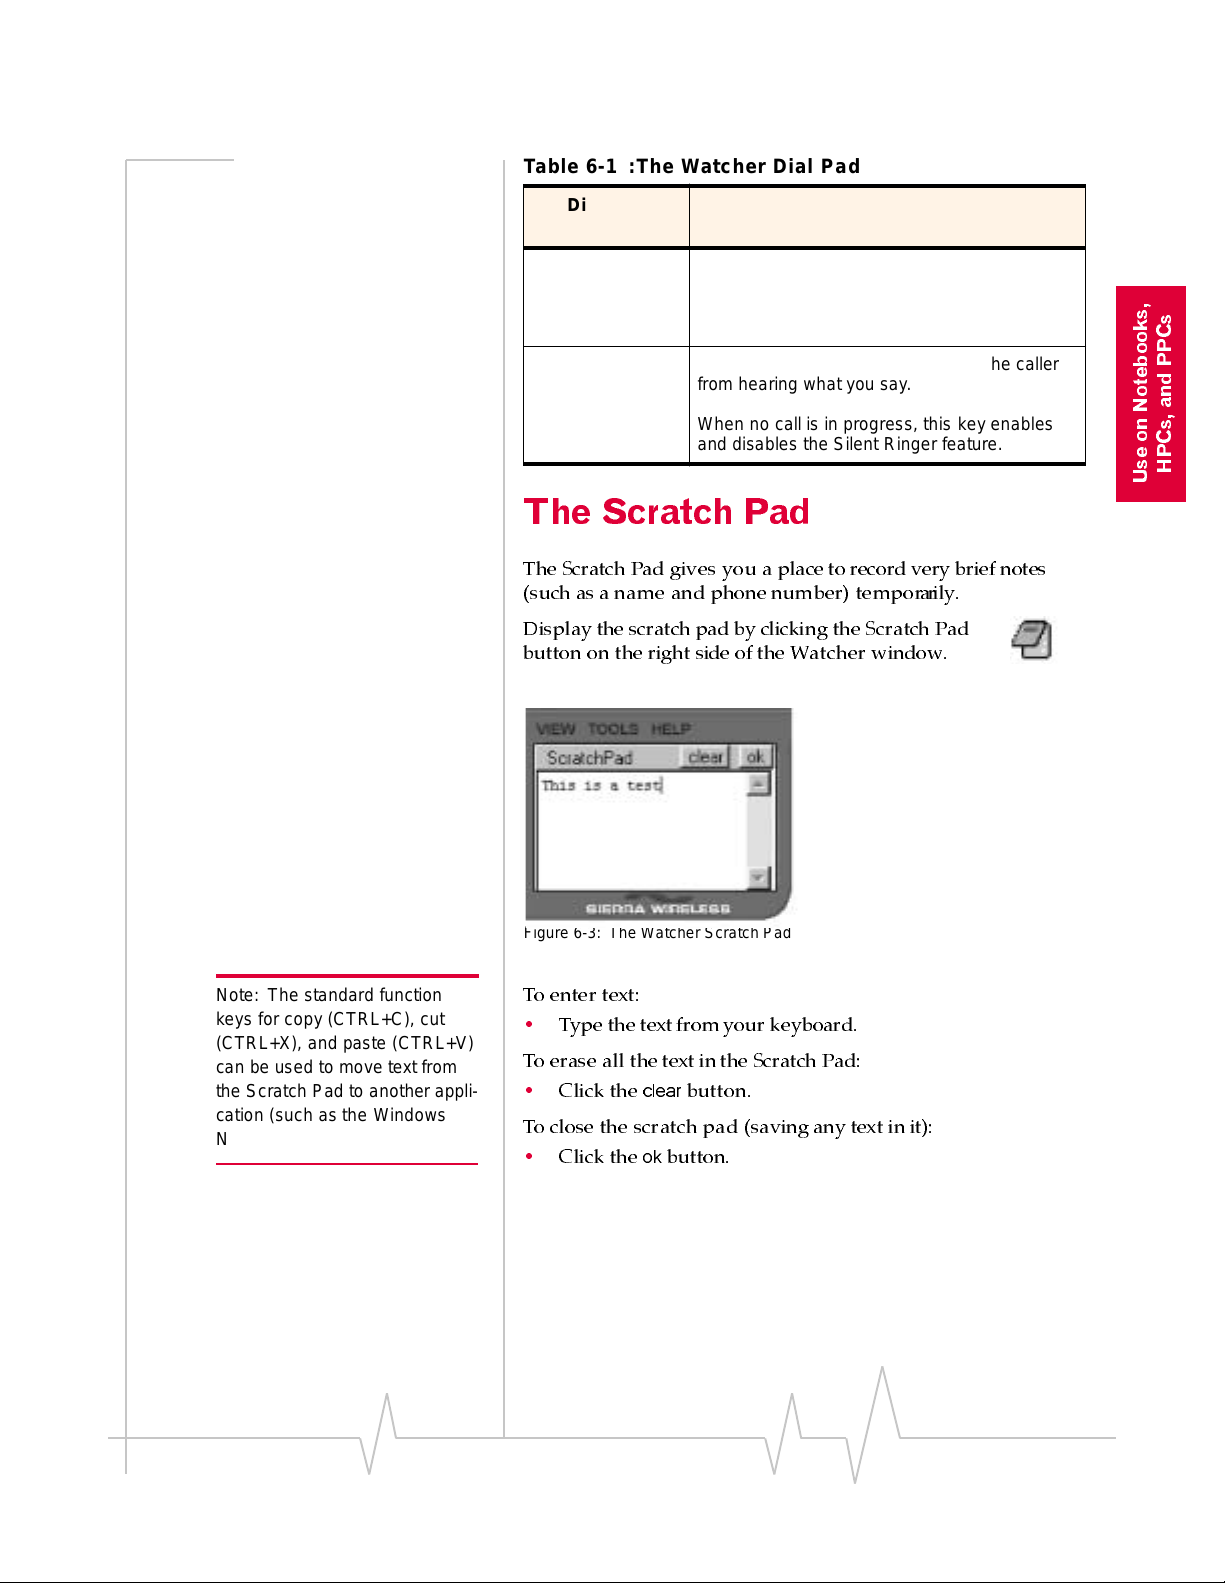
Table 6-1 :The Watcher Dial Pad
Voice Connections
Dial Pad
Buttons
Vo lum e K e y s
(Up and Down
arrows on your
keyboard)
Mute Key
Use the Up arrow to increase the volume of
what you hear in the headset. Use the Down
arrow to decrease the volume.
Use this key during a call to prevent the caller
from hearing what you say .
When no call is in progress, this k e y enables
and disables the Silent Ringer feature.
Function
The Scratch Pad
The Scratch Pad gives you a place to record very brief notes
(such as a name and phone number) temp o rari ly.
Display the scratch pad by clicking the Scratch Pad
button on the right side of the Watcher window.
PCs, and PPCs
H
Use on Notebooks,
Figure 6-3: The Watcher Scratch Pad
Note: The standard function
keys for copy (CTRL+C), cut
(CTRL+X), and paste (CTRL+V)
can be used to move text from
the Scratch Pad to another application (such as the Windows
Notepad or a word processor).
To enter text:
•
Type the text from your keyboard.
To erase all the text in the Scratch Pad:
clear
•
Click the
button.
To close the scratch pad (saving any text in it):
ok
•
Click the
button.
Rev B Oct. 2001 47
Page 3
AirCard 710 Wireless Network Card - User Guide
Making a Voice Call
Making a voice call using Watcher and the AirCard network
card is very similar to using a cellular telephone handset.
Initiating a Voice Call
1.
Plug in a headset to the AirCard connector, if one is not
already connected, and put it on.
Note: If you click the
button without entering a
number , Watcher redials the
most recent number you dialed.
Note: The Options window,
displayed wh en y ou sele ct Tools
> Options, allows you to
customize the sound played
when you receive an incoming
call and to enable and disable
the Silent Ringer feature. See
“Options…” on page 63.
SEND
2.
Enter the number you want to dial by either clicking the
number buttons on the dial pad or typing the numbers on
your keyboard.
3.
Click the
As the call is being dialed, Watcher displays “
SEND
button.
Dialing
” and the
phone number.
You can also initiatea callfrom the Call Log. The Call Log is
displayed when you select
Tools > Call Log
(see “Call Log” on
page 59).
Answering a Voice Call
Depending on how certain features are configured, when you
receive an incoming call the following occurs:
•
A sound is played, unless the Silent Ringer feature is
enabled.
•
If Watcher is in compact view when you receive the call,
the Watcher window maximizes.
To answer a call:
1.
Plug in a headset to the AirCard connector, if one is not
already connected, and put it on.
2.
Click the
is enabled, click any key except
SEND
button. (Or, if the Any-Key Answer feature
ENDorCLR
.)
Ending a Voice Call
To end a voice call:
END
•
Click the
button on the dial pad or press
keyboard.
or
•
Click and hold the
BACKSPACE
CLR
button on the dial pad (or the
key on your keyboard)for more than one
second.
48 2130135
ESC
on your
Page 4

Voice Connections
HPCs, and PPCs
Use on Notebooks,
Rev B Oct. 2001 49
Page 5

AirCard 710 Wireless Network Card - User Guide
50 2130135
Page 6
7: Watcher Menu Options
• The View Menu
• The Tools Menu
• The Help Menu
This chapter is primarily for your reference. It describes each
option in each of the Watcher menus.
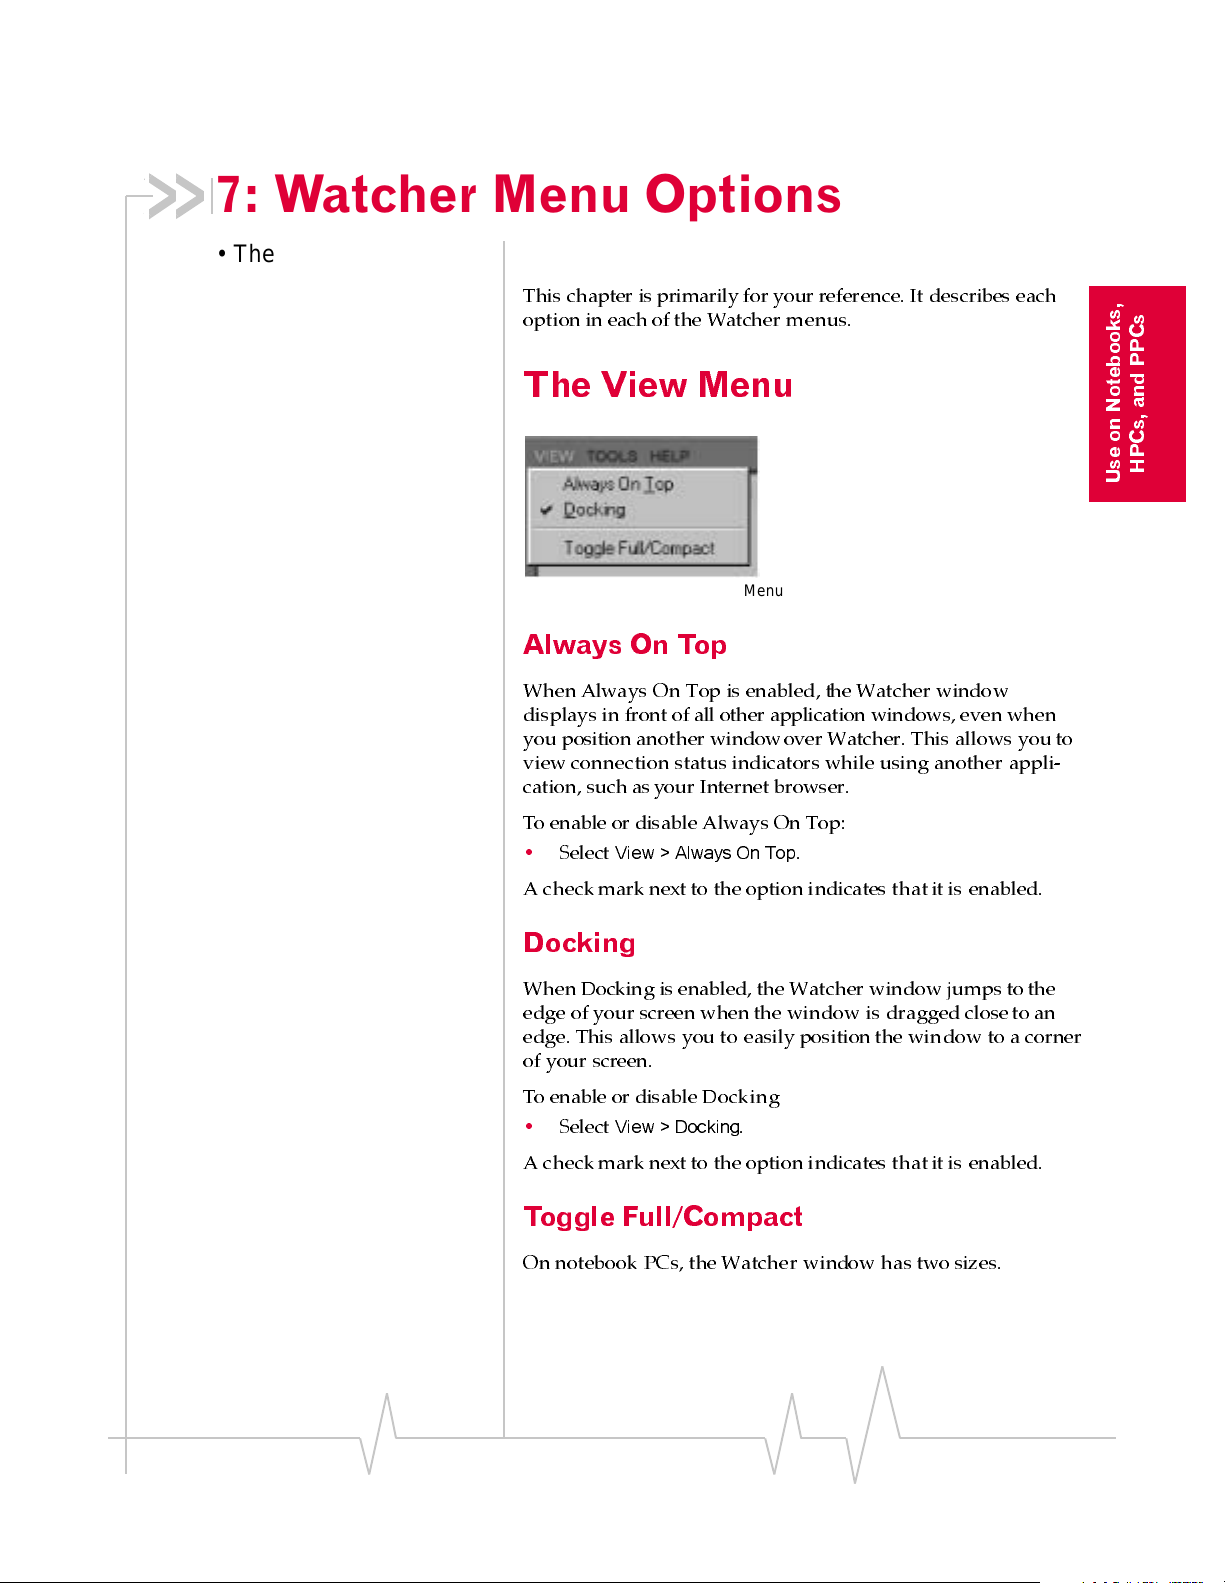
The View Menu
Figure 7- 1 : The Watche r View Men u
Always On Top
When Always On Top is enabled, the Watcher window
displays in front of all other application windows, even when
you position another windowover Watcher. This allows you to
view connection status indicatorswhile using another appli-
cation, such as your Internet browser.
HPCs, and PPCs
Use on Notebooks,
To enable or disable Always On Top:
•
A check mark next to the option indicates that it is enabled.
View > Always On Top
Select
.
Docking
When Docking is enabled, the Watcher windowjumps to the
edge of your screen when the window is dragged closeto an
edge. This allows you to easily position the win dow to a corner
of your screen.
To enable or disable Docking
Select
View > Docking
.
•
A check mark next to the option indicates that it is enabled.
Toggle Full/Compact
On notebook PCs, the Watcher window has two sizes.
Rev B Oct. 2001 51
Page 7
AirCard 710 Wireless Network Card - User Guide
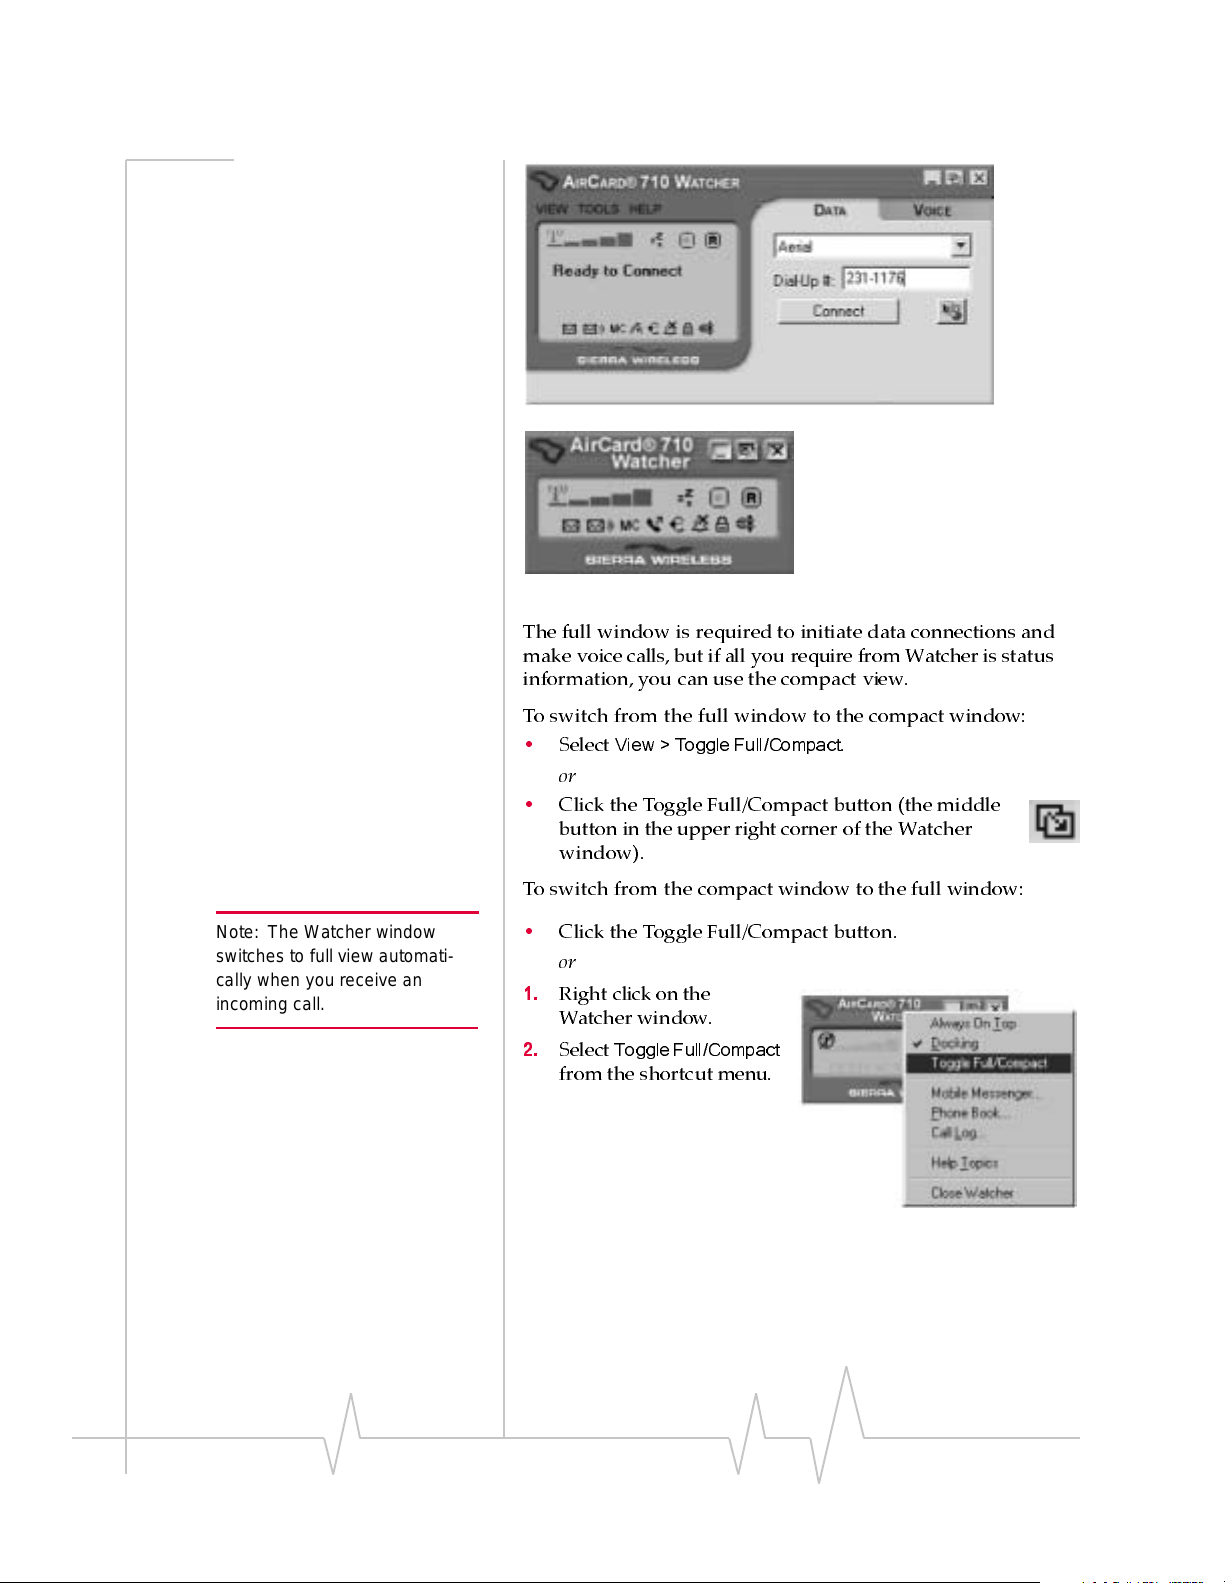
Figure 7- 2 : Watcher in Fu ll Vi ew (Top) and C o mp ac t View (Bottom)
The full window is requiredto initiatedata connections and
make voice calls, but if all you require from Watcher is status
information,you can use the compact view.
Note: The Watcher window
switches to full view automatically when you receive an
incomin g call.
To switch from the full window to the compact window:
•
View > Toggle Full/Compact
Select
.
or
•
Click the Toggle Full/Compact button (the middle
button in the upper right corner of the Watcher
window).
To switch from the compact window to the full window:
•
Click the Toggle Full/Compact button.
or
1.
Right click on the
Watcher window.
2.
Select
Toggle Full/Compact
from the shortcut menu.
52 2130135
Page 8
The Tools Menu
Watcher Menus
Note : C heck w ith your service
provider to see if you have a
subscription to SMS service.
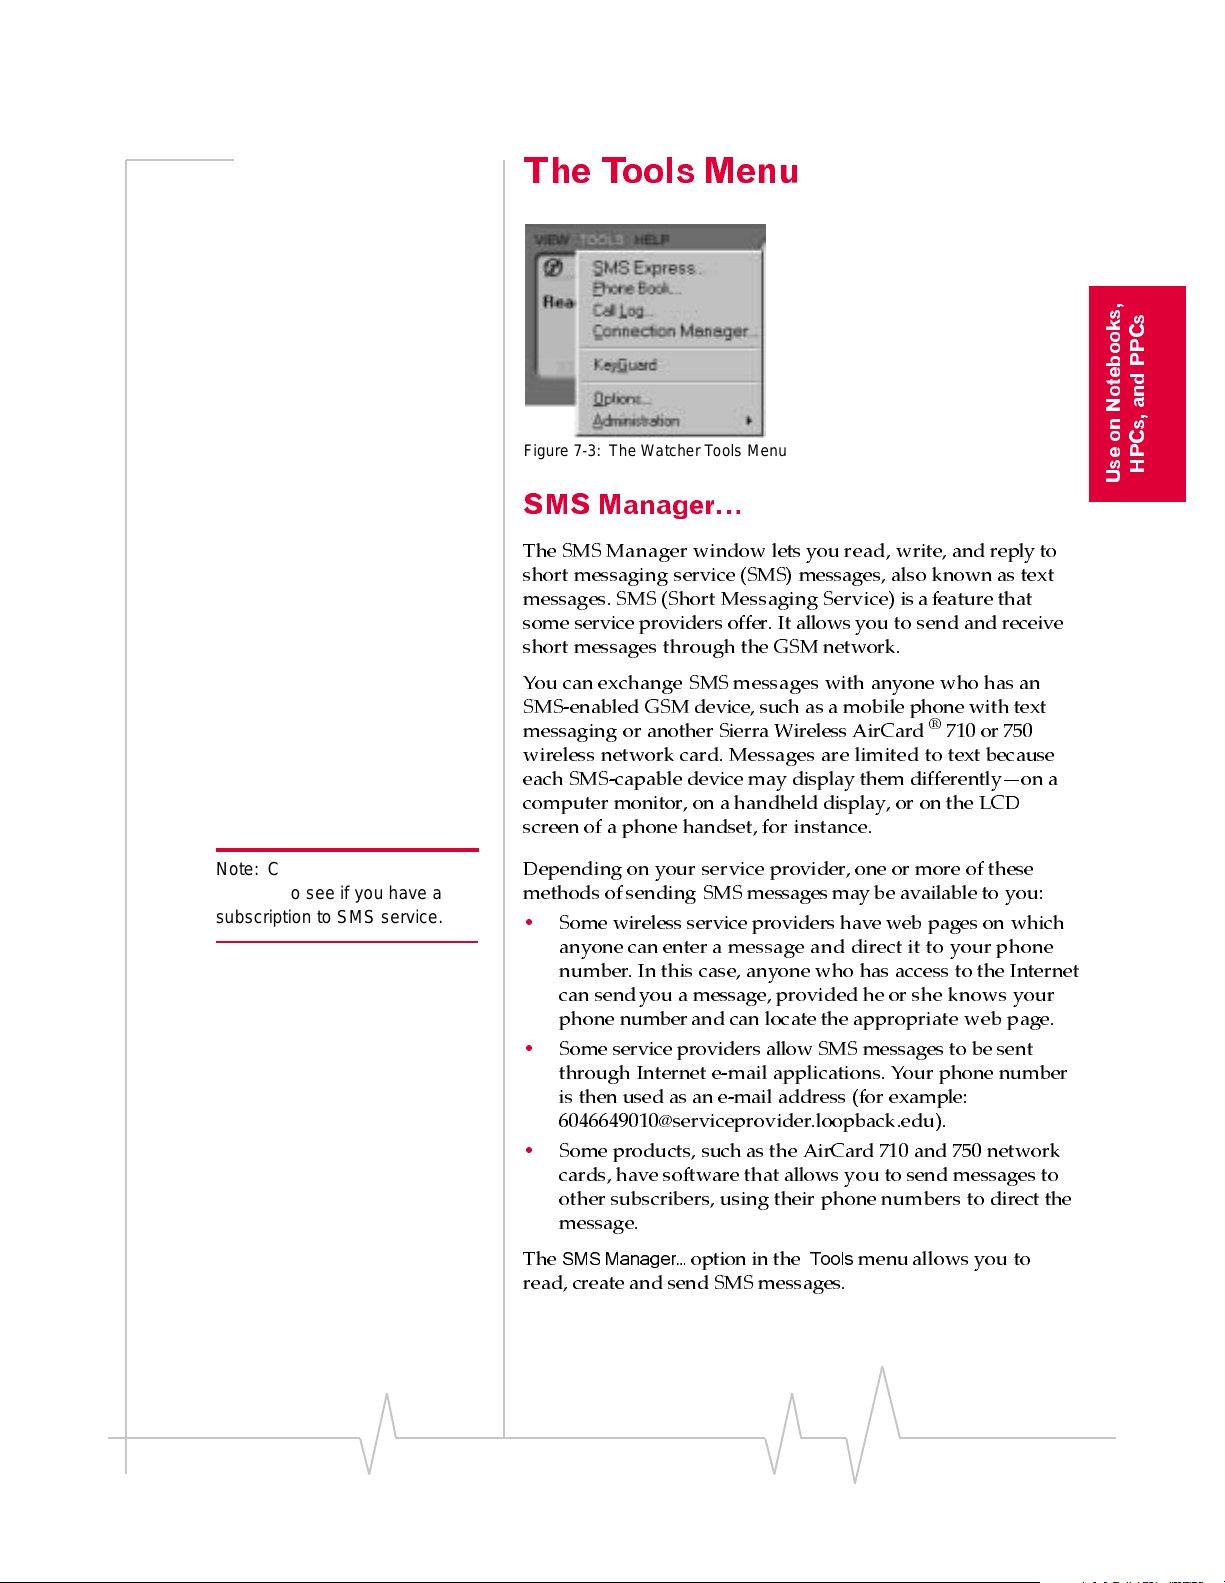
Figure 7- 3 : The Watche r Tools Men u
SMS Manager…
The SMS Manager window lets you read, write, and reply to
short messaging service (SMS) messages, also known as text
messages. SMS (Short Messaging Service) is a feature that
some service providers offer. It allows you to send and receive
short messages through the GSM network.
You can exchange SMSmessages with anyone who has an
SMS-enabled GSM device, such as a mobi le phone with text
messaging or another Sierra Wireless AirCard
wireless network card. Messages are limited to text because
each SMS-capable device may display them differently—on a
computer monitor, on a handheld display, or on the LCD
screen of a phone handset, for instance.
Depending on your service provider, one or more of these
methods of sending SMS messages may be available to you:
•
Some wireless service providers haveweb pages on which
anyone can enter a message and direct it to your p h one
number. In this case, anyone who has access to the Internet
can sendyou a message, provided he or she knows your
phone number and can locate the appropriate web p age.
•
Some service providers allow SMS messages to be sent
through Internet e-mail applications. Your phone number
is then used as an e-mail address (for example:
6046649010@serviceprovider.loopback.edu).
•
Some products, such as the AirCard 710 and 750 network
cards, have software that allows you to send messages to
other subscribers, using their phone numbers to direct the
message.
®
710 or 750
HPCs, and PPCs
Use on Notebooks,
The
SMS Manager…
read, create and send SMS messages.
Rev B Oct. 2001 53
option in the
Tools
menu allows you to
Page 9
AirCard 710 Wireless Network Card - User Guide
Reading SMS Messages: The Inbox
Incoming messages are stored in the Inbox until you delete
them or until they expire (depending on your settings in the
Options window—see “SMS Tab” on page 70).
The SMS indicator notifies you when new messages are
received by displaying the icon below. The ToolTip
(displayed when you position the mouse pointer on top
of the icon) identifies how many unread messages you have. If
the icon is flashing, one or more of the messages is urgent.
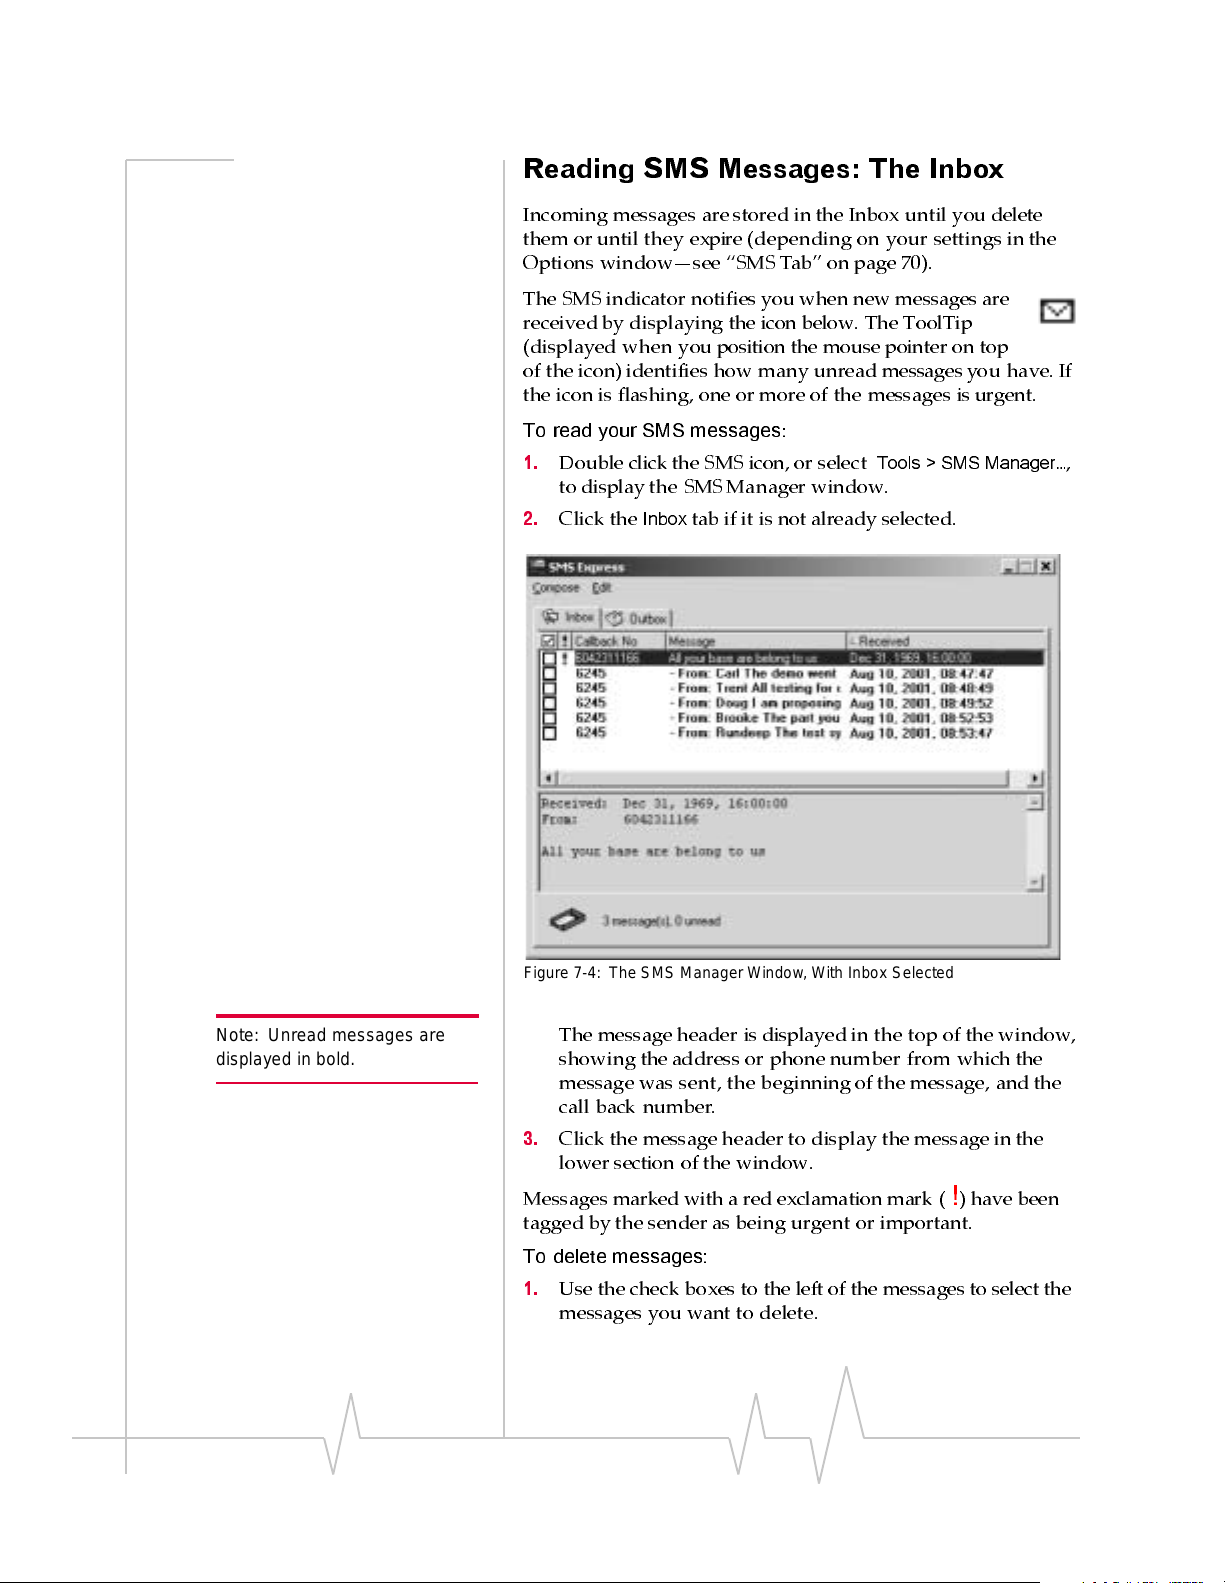
To read your SMS messages
1.
Double click the SMS icon, or select
to display the SMSManager window.
2.
Click the
Figure 7-4: The SMS Manager Window, With Inb ox Selected
Inbox
tab if it is not already selected.
:
Tools > SMS Manager…
,
Note: Unread messages are
displayed in bold.
54 2130135
The message header is displayed in the top of the window,
showing the address or phone number from which the
message was sent, the beginning of the message, and the
call back number.
3.
Click the message header to display the message in the
lower section of the window.
Messages marked with a red exclamation mark (
tagged by the sender as being urgent or important.
To delete messages:
1.
Use the check boxes to the left of the messages to select the
messages you want to delete.
!
) have been
Page 10
Watcher Menus
Note: Both Delete All and the
message expiry features do not
actually delete all
messages—they only delete
those y ou ha ve not yet read.
Note: The Reply to Sender
menu option is only available if
the e-mail address of the person
who sent you the message is
included in the message. This
won’t be available if, for
example, the message was sent
from a web site.
available
2.
3.
Edit > Delete
Select
.
Confirm that you want to delete the messages by clicking
Yes
.
To delete all read messages:
1.
2.
Edit > Delete All
Select
Confirm that you want to delete the messages by clicking
Yes
.
.
Watcher also has a feature that allows you setan expiry period
after which messages are automatically deleted. This is set in
the Options window. (Select
window, then click the
SMS
Tools > Options
tab. See “SMSTab ” on page 70.)
to display the
To forward a message:
1.
Select the message header.
2.
File > Forward Message…
Select
to open the Message
window.
3.
In the Message window you can edit themessage, append
text to the message, and send it. (See “ Sending SMS
Messages: The Outbox” on page 56.)
To reply to a message:
1.
Select the message header.
2.
Select
File > Reply to Sender…
3.
In the Message window you can edit themessage, append
to open the Message window.
text to the message, and send it. (See “ Sending SMS
Messages: The Outbox” on page 56.)
HPCs, and PPCs
Use on Notebooks,
Note: The Call Back Sender
menu option is only available if
the message incl udes a valid
call-back number.
To phone the sender of a message:
1.
Select the message header.
2.
File > Call Back Sender
Select
.
Watcher then dials andattempts to connect to the call-back
number.
To exit the SMS Manager window:
Select
File > Close
1.
or click theclose box in the upper right
corner.
Rev B Oct. 2001 55
Page 11
AirCard 710 Wireless Network Card - User Guide
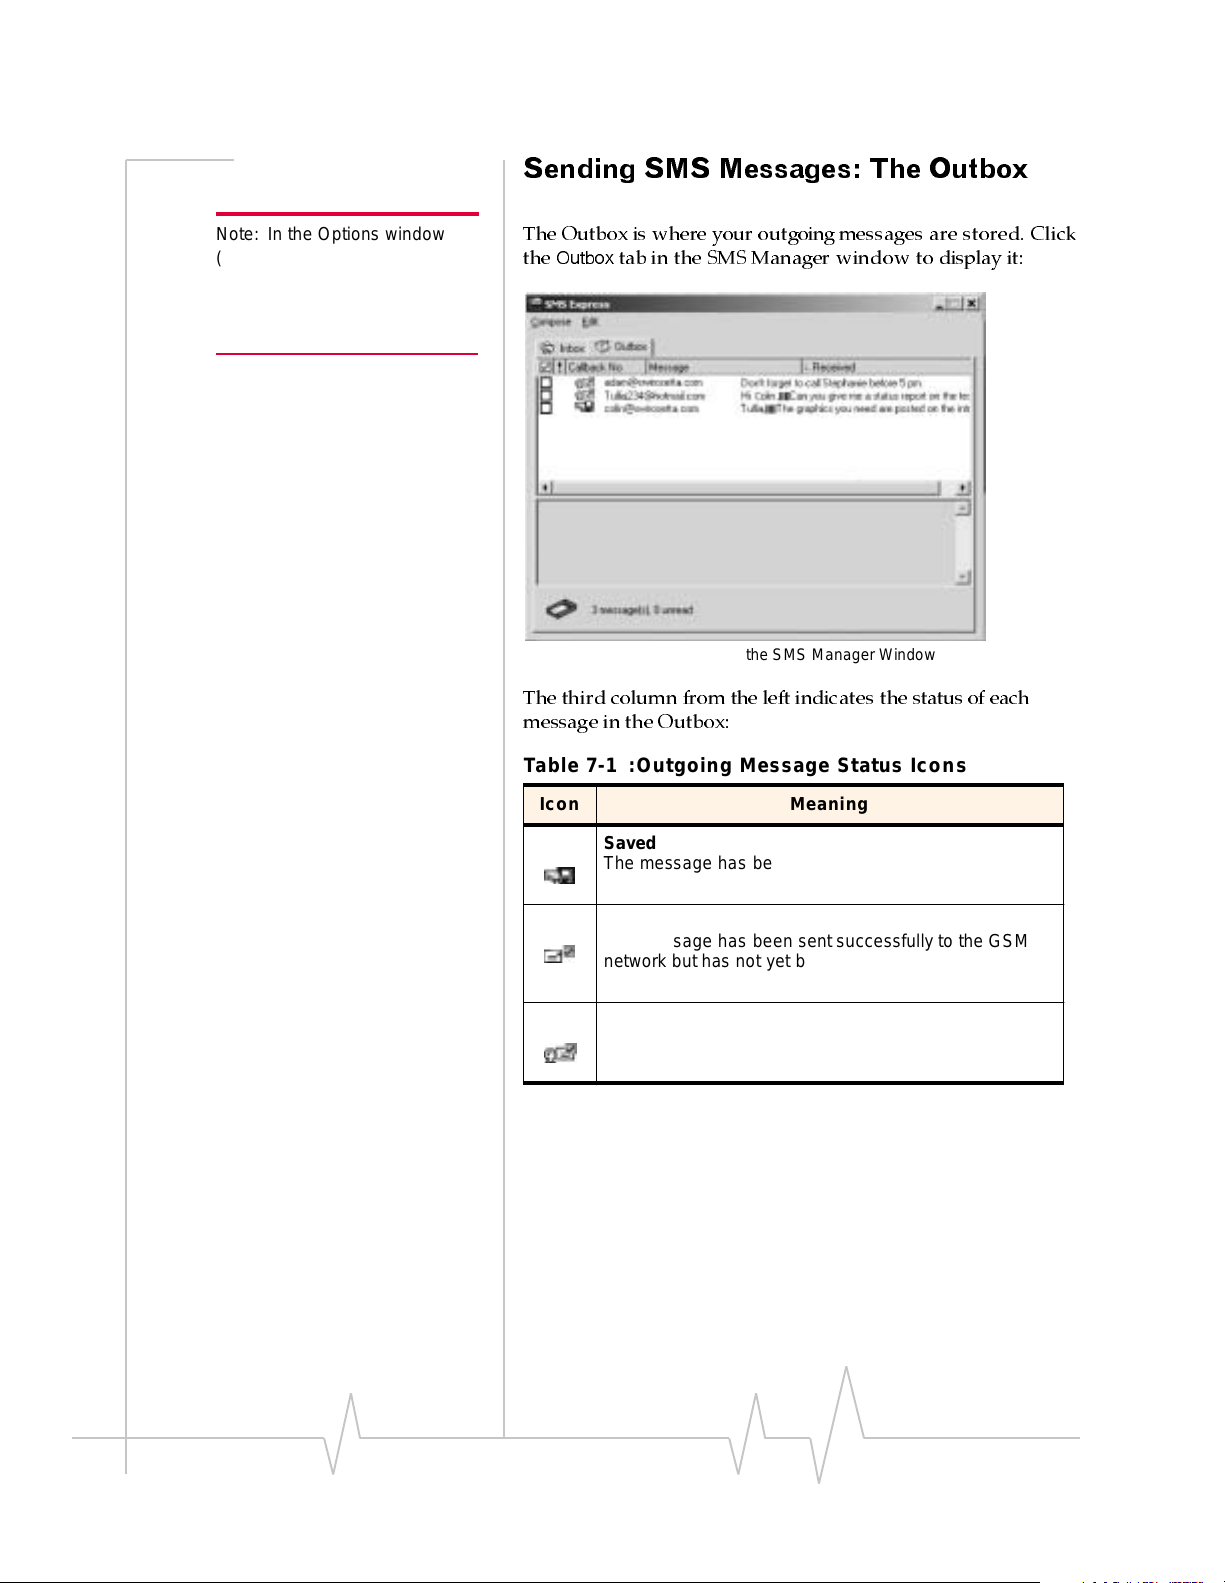
Sending SMS Messages: The Outbox
Note: In the Options window
(see “SMS Manager…” on page
53) you can e nable and d isable
the option to save outgoing
messages to the Outbox.
The Outbox is where your outgoing messages are stored. Click
Outbox
the
Figure 7- 5 : The Outb ox Tab of the SMS Manager Window
tab in the SMS Manager window to display it:
The third column from the left indicates the status of each
message in the Outbox:
Table 7-1 :Outgoin g Message Status Icon s
Icon Meaning
Saved
The message has been saved in the Outbox but not yet
sent.
Sent
The message has been sent successfully to the GSM
network but has not yet been delivered to the
recipient(s).
Delivered
The message has been deliv ered to the recipient (s)’ mail
box(es).
56 2130135
Page 12
Watcher Menus
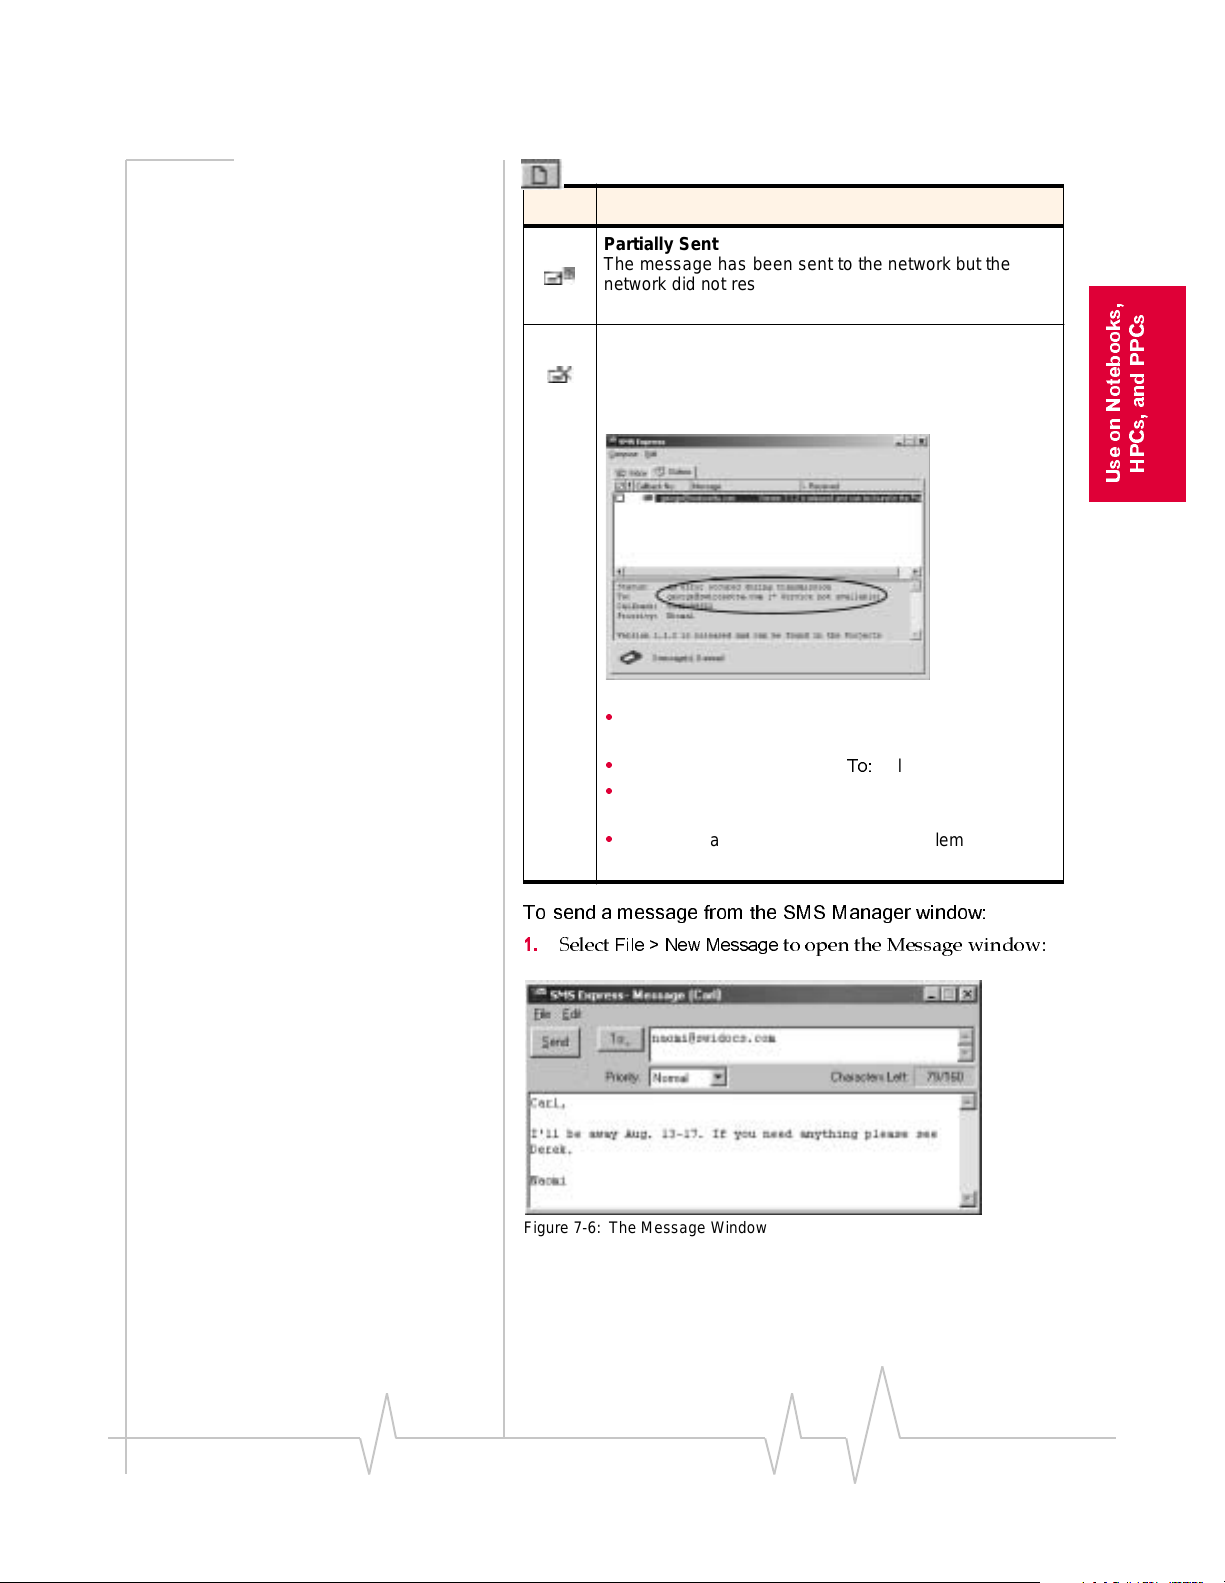
Table 7-1 :Outgoin g Message Status Icon s
Icon Meaning
Partia ll y S e n t
The message has been sent to the network but the
network did not respond. (This may indicate a network
problem.)
Not Sent
The message was sent to t he network and the network
responded with an error. The error message is shown in
the Status field when you display the message.
HPCs, and PPCs
Use on Notebooks,
Some possible reasons for a failure to send are:
You d o not have a subscrip tion to a serv ic e tha t
•
allows you to send SMS messages.
The e-mail address in the
•
•
The message exceeded the maximum length for
SMS messages.
•
There is a network problem or a problem with your
account.
To:
field is not valid.
To send a message from the SMS Manager window:
1.
Figure 7-6: The Message Window
File > New Message
Select
to open the Message window:
Rev B Oct. 2001 57
Page 13
AirCard 710 Wireless Network Card - User Guide
Note: A message can have up
to 16 r ecipients.
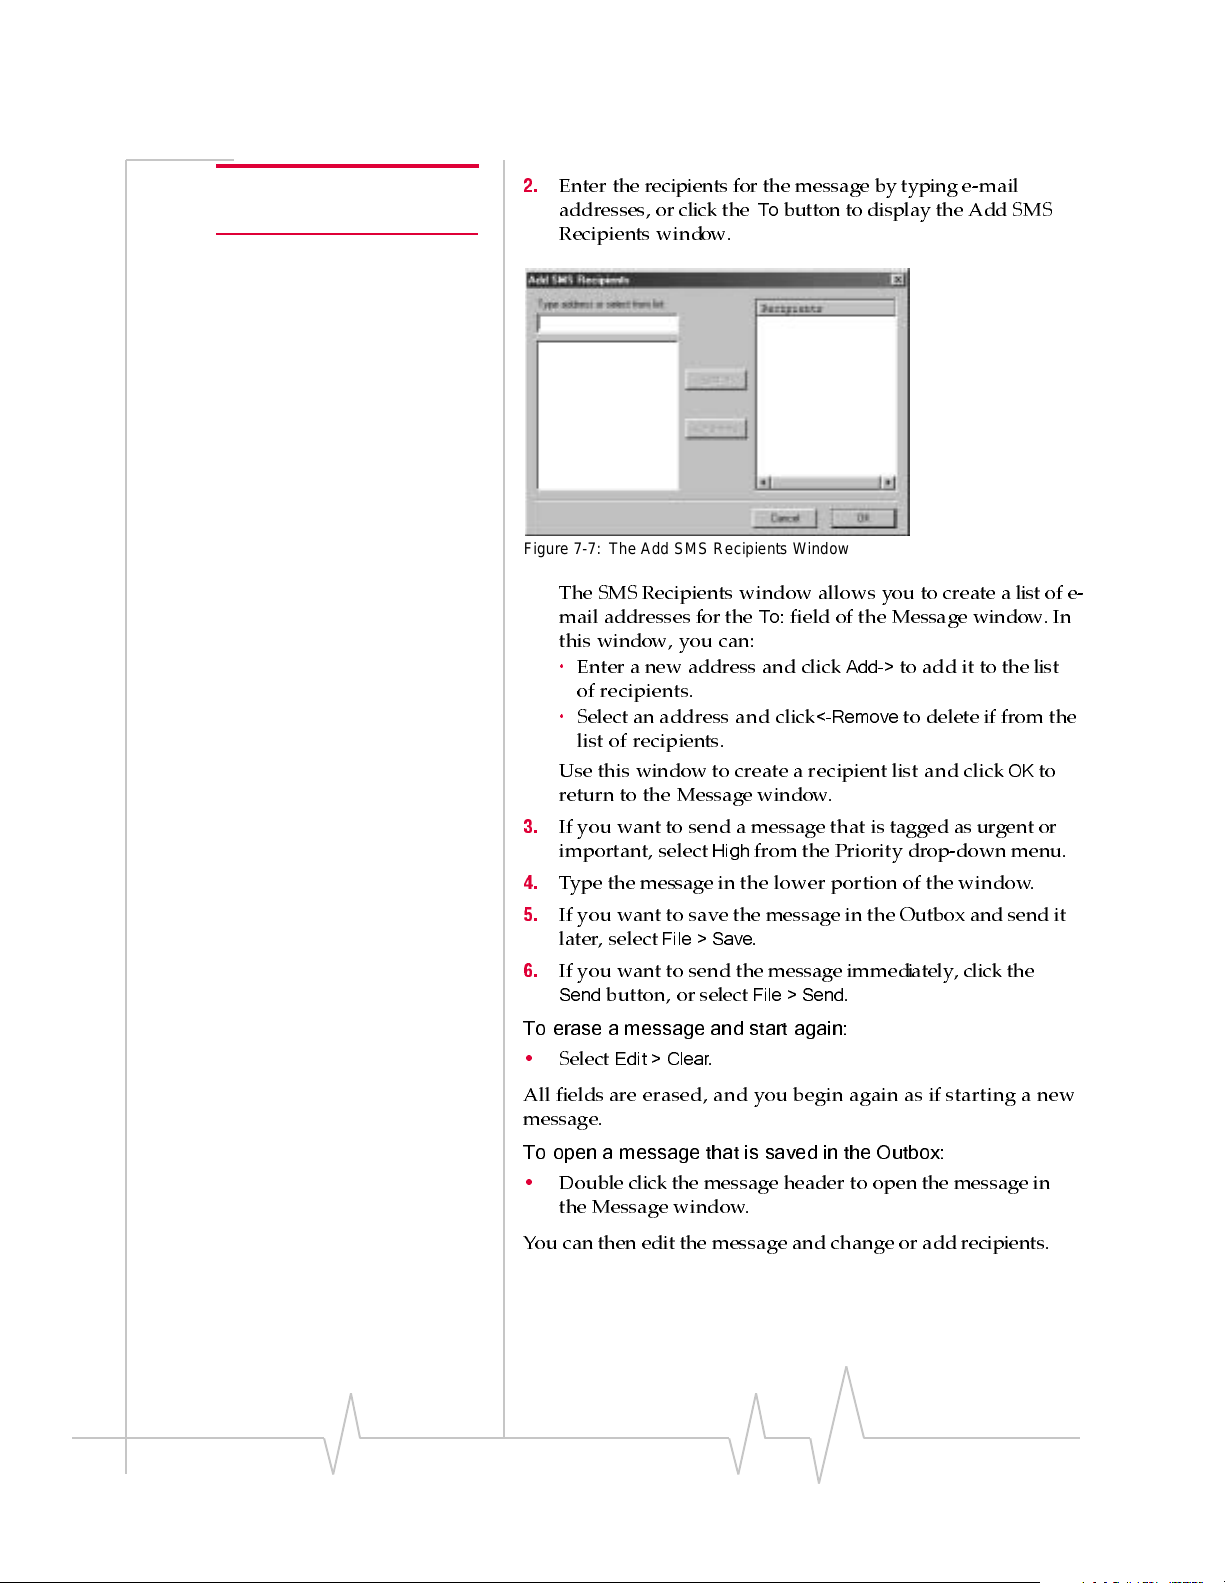
2.
Enter the recipients for the message by typing e-mail
addresses, or click the
To
button to display the Add SMS
Recipients window.
Figure 7- 7 : The Add SM S Re c ip ie nts Window
The SMS Recipients window allows you to create a list of e-
mail addresses for the
To:
field of the Message window. In
this window, you can:
·
Enter a new address and click
Add->
to add it to the list
of r e c ipients.
·
Select an address and click
<-Remove
to delete if from the
list of recipients.
Use this window to create a re c ipient list and click
return to the Message window.
3.
If you want to send a message that is tagged as urgent or
important, select
4.
Type the message in the lower portion of the window.
5.
If you want to save the message in the Outbox and send it
later, select
6.
If you want to send the message immediately, click the
Send
button, or select
High
File > Save
from the Priority drop-down menu.
.
File > Send
.
To erase a message and start again:
Select
Edit > Clear
.
•
OK
to
All fields are erased, and you begin again as if starting a new
message.
To open a message that is saved in the Outbox:
•
Double click the message header to open the message in
the Message window.
You can then edit the message and change or add recipients.
58 2130135
Page 14
Watcher Menus
Exiting the SMS Manager Window
To exit from the SMS Manager window and return to the main
Watcher window:
•
•
If there are any unsaved messages, Watcher asks whether you
want to save them.
File > Close.
Select
or
Click the Close box in the upper right corner of the SMS
Manager window.
tebooks,
Phone Book
This feature is not yet available.
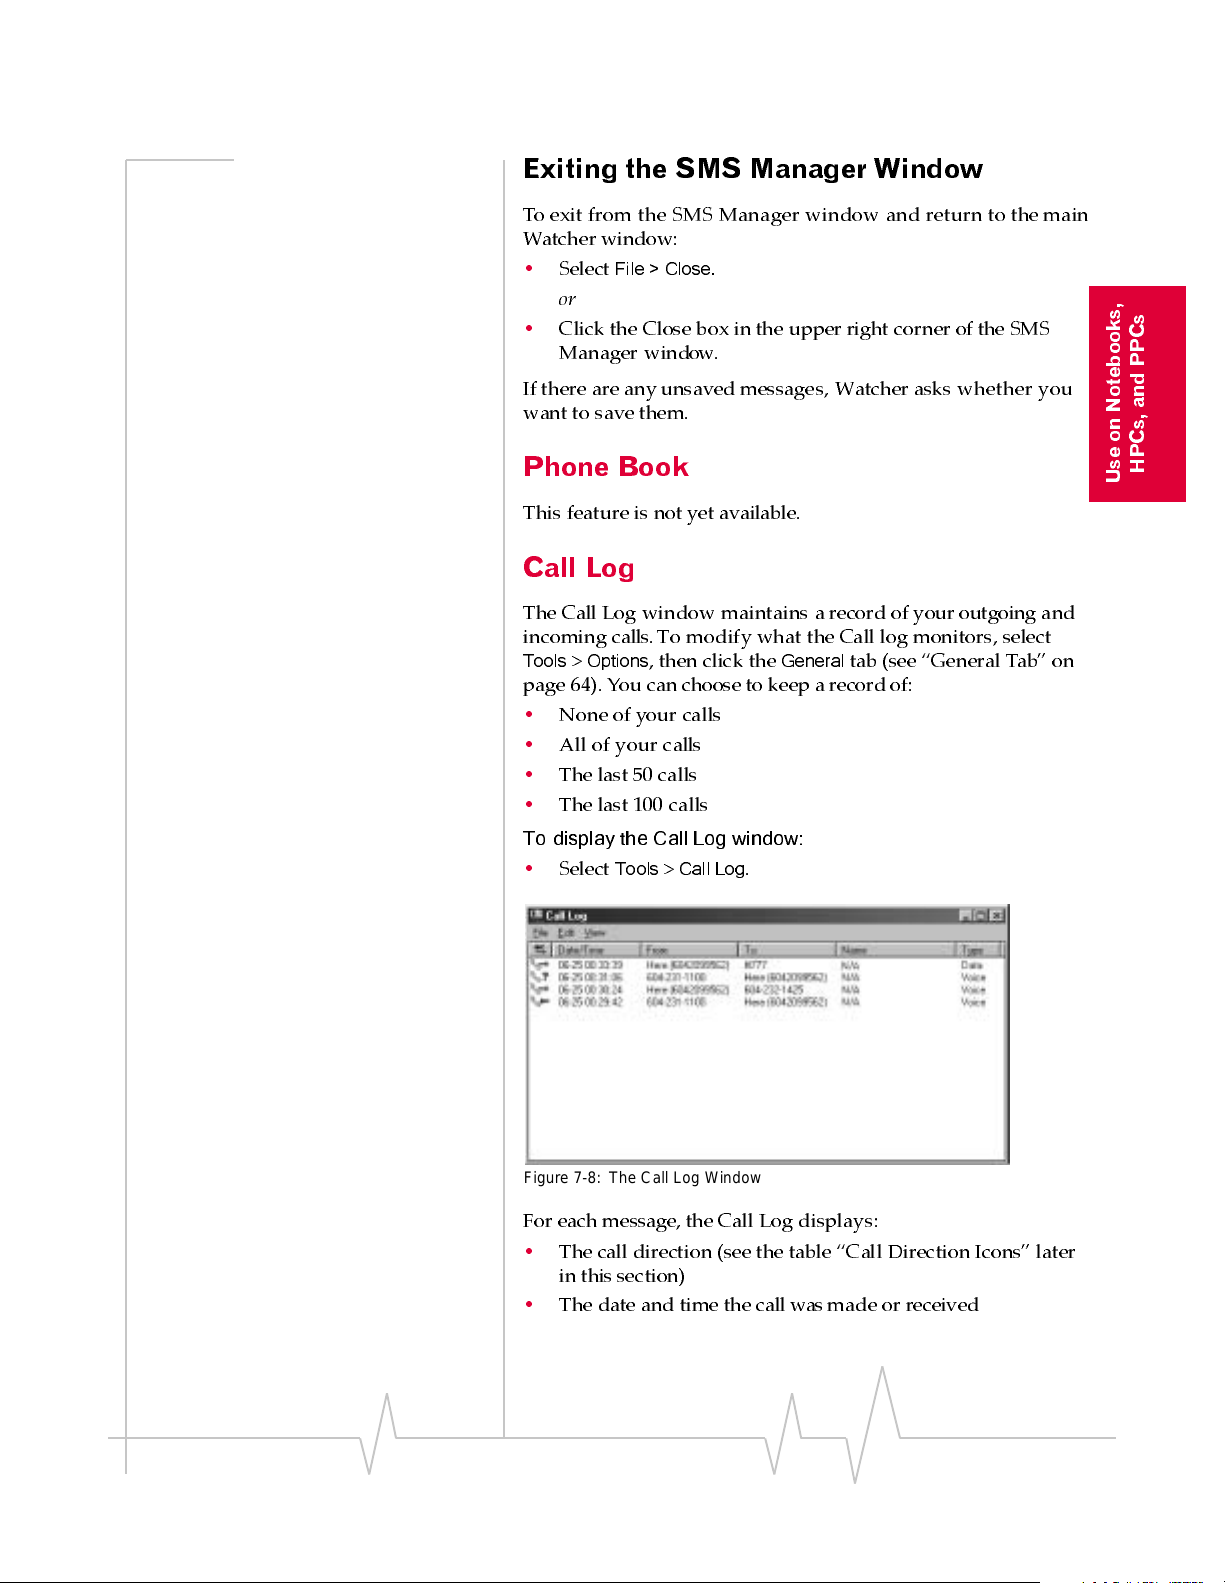
Call Log
The Call Log window maintains a record of your outgoing and
incoming calls.To modify what the Call log monitors, select
Tools>Options
page 64). You can choose to keep a record of:
•
None of your calls
•
All of your calls
•
The last 50 calls
•
The last 100 calls
To display the Call Log window:
•
Select
, then click the
Tools>Call Log
.
General
tab (see “General Tab” on
Use on No
HPCs, and PPCs
Figure 7-8: The Call Log Window
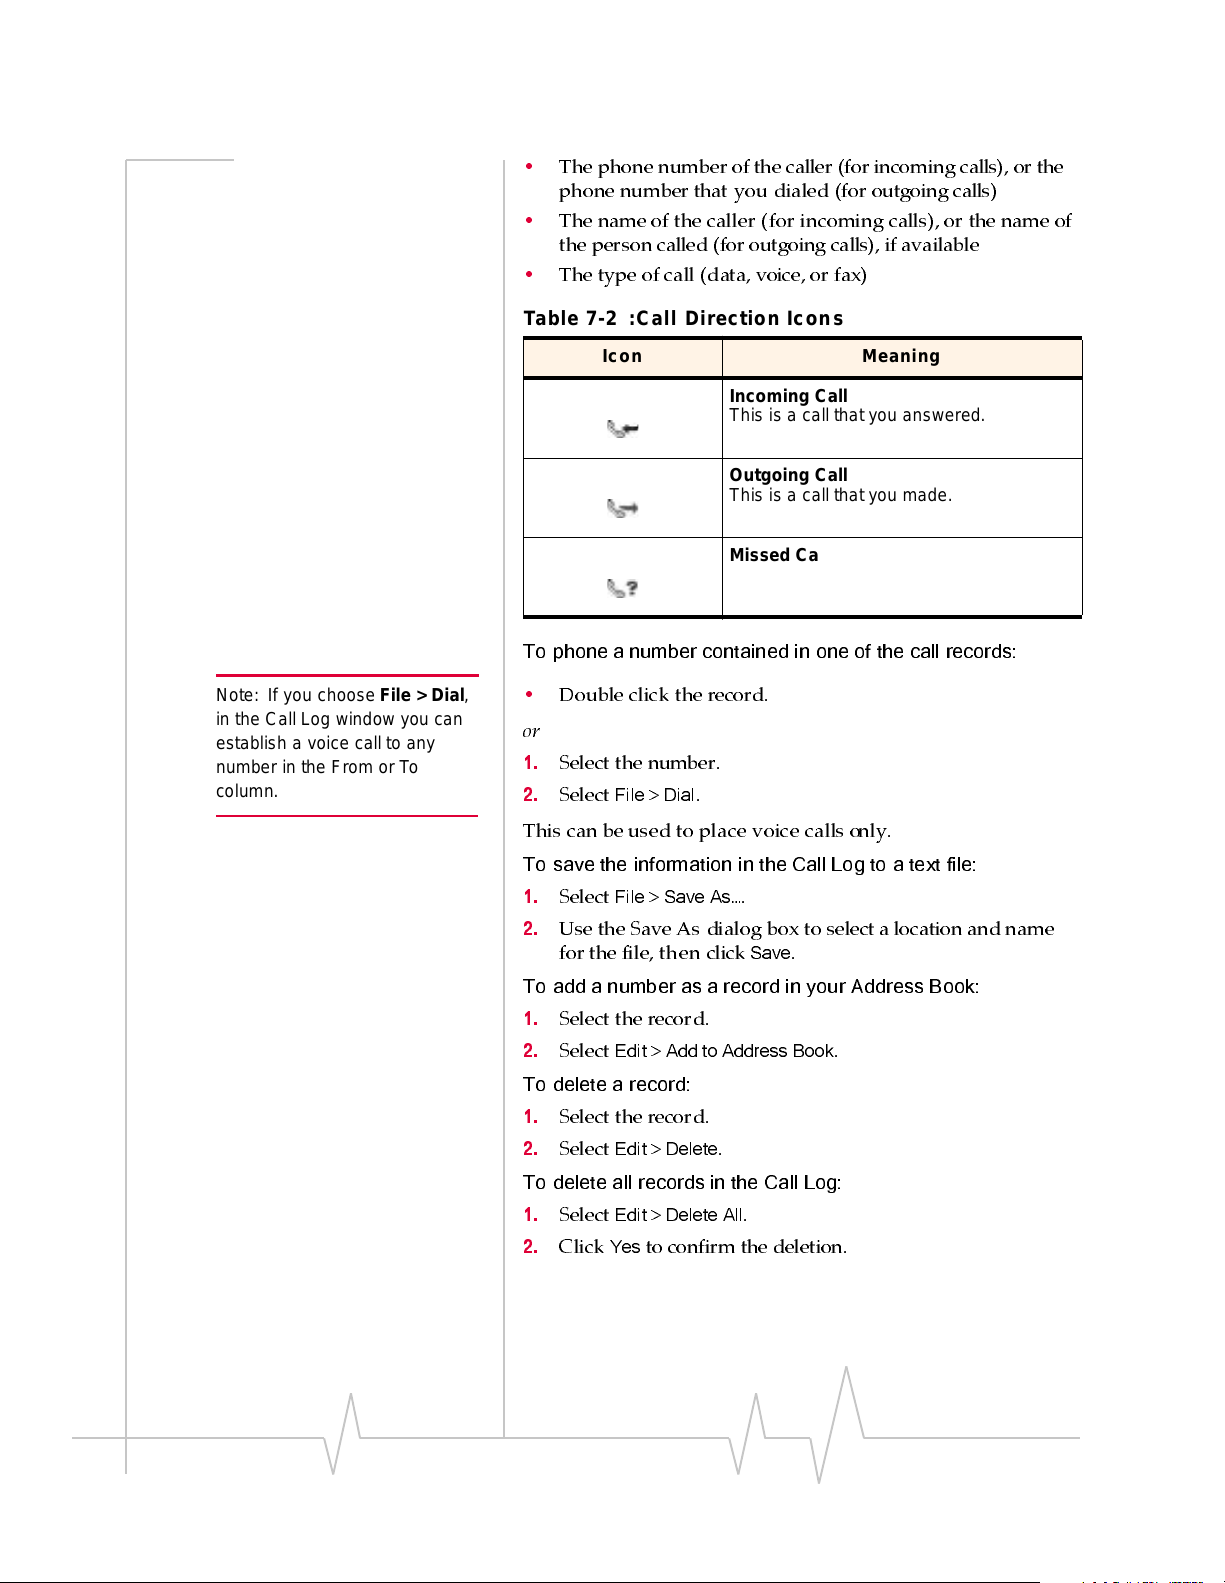
For each message, the Call Log displays:
•
The call direction (see the table “Call Direction Icons” later
in this section)
•
The date and time the call was made or received
Rev B Oct. 2001 59
Page 15
AirCard 710 Wireless Network Card - User Guide
•
The phone number of the caller (for incoming calls), or the
phone number that you dialed (for outgoing calls)
•
The name of the caller (for incoming calls), or the name of
the person called (for outgoing calls), if available
•
The type of call (data, voice, or fax)
Table 7-2 :Call Direction Icons
Icon Meaning
To phone a number contained in one of the call records:
Incoming Call
This is a call that you answered.
Outgoing Call
This is a call that you made.
Missed Call
This is a call you received but did not
answer.
Note: If you choose File > Dial,
in the Call Log window you can
establish a voice call to any
number in the From or To
column.
•
Double click the record.
or
1.
Select the number.
2.
Select
File>Dial
.
This can be used to place voice calls only.
To save the information in the Call Log to a text file:
1.
2.
File>Save As…
Select
Use the Save As dialog box to select a location and name
for thefile, then click
.
Save
.
To add a number as a record in your Address Book:
1.
Select the record.
2.
Edit>Add to Address Book
Select
.
To delete a record:
1.
Select the record.
Select
Edit>Delete
.
2.
To delete all records in the Call Log:
Select
Click
Yes
Edit>Delete All
to confirm the deletion.
1.
2.
.
60 2130135
Page 16
To select what type of calls are displayed:
Watcher Menus
Note: Choosing View > All
displays all call types in the Call
Log window.
When
When
View
menu to select the call types:
Voice logs
Data logs
is checked, all voice calls are displayed.
is checked, all dial-up data calls are
•
Use the
·
·
displayed. (Packet mode connections have no phone
numbers associated with them, and do not appear in the
Call Log.)
·
When
Fax logs
To sort the calls
1.
Click any column heading to sort by that column in
is checked, all fax calls are displayed.
:
ascending order.
2.
Click the same column heading again to sort by the same
column in descending order.
For example, to sort the calls by name, click the
Name
column
heading. This sorts the records from A to Z. If you click the
Name
column heading again,the records will be sorted from Z
to A.
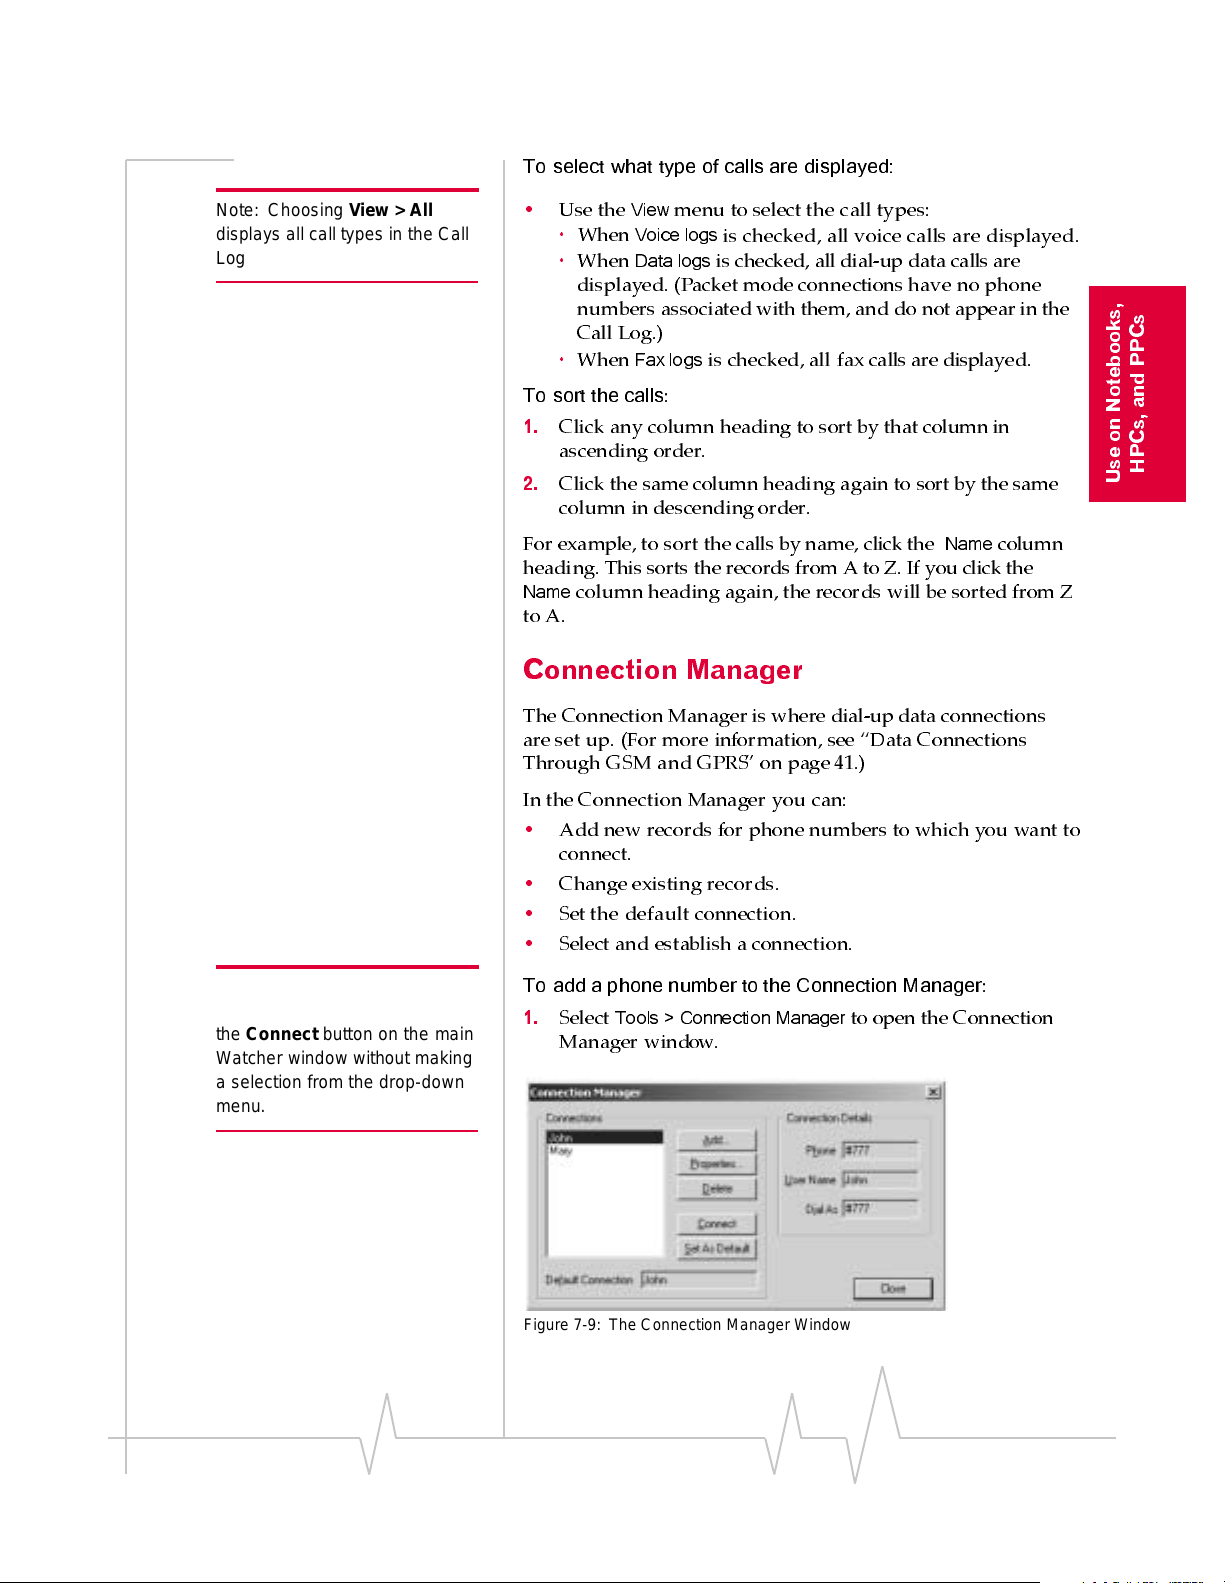
Connection Manager
The Connection Manager is where dial-up data connections
are set up. (For more information, see “Data Connections
Through GSM and GPRS” on page41.)
HPCs, and PPCs
Use on Notebooks,
Note: The default connection is
the one established if you click
the Connect button on the main
Watcher window without making
a selection from the drop-down
menu.
In the Connection Manager you can:
•
Add new records for phone numbers to which you want to
connect.
•
Change existing records.
•
Set the default connection.
•
Select and establisha connection.
To add a phone number to the Connection Manager
1.
Select
Tools > Connection Manager
to open the Connection
:
Manager window.
Figure 7- 9 : The Connection M anager Wind ow
Rev B Oct. 2001 61
Page 17

AirCard 710 Wireless Network Card - User Guide
2.
Click the
Add…
button to open the Connection Properties
window.
Figure 7-10: The Connection Properties Window
3.
Enter a name for the connectionand complete the
remaining fields noting the following:
·
If the phone number must be preceded with an area
code, click the
code. Click the
Use area code
Use 1
check box if the phone number
check box and enter the area
must be prefixed with a 1.
·
Ifdialing intoa systemthat requires you to enter a user
name and password, enter this information. If you want
to save the information so that it is not necessary to enter
it each time you connect, click the
Save password
box.
4.
OK
Click
to close the window and save the information
you entered, or
Cancel
to close the window without saving.
check
To edit a Connection Manager record
1.
Click the connection to select it and click the
:
Properties…
button to open the Connection Properties window.
2.
Enter the new information in theappropriate fields. (The
Connection Name
cannot be changed.To rename a
connection record, you can create a new one and re-enter
the connection information, then delete the old record.)
3.
Click
OK
to close the window and save the information
you entered, or
Cancel
to close the window without saving.
To delete a Connection Manager record:
Delete
Yes
button.
.
1.
Click the connection to select it and click the
2.
When prompted to confirm the deletion,click
62 2130135
Page 18

Note: Use the KeyGuard feature
if you are concerned that you
might inadvertently press SEND
and dial a number.
Watcher Menus
To connect to a number in the Connection Manager window:
•
Click the connection to select it and click the
button.
The AirCard network card then attempts a connection to the
phone number you selected.
To set the default connection:
•
Click the connection to select it, then click the
button.
Connect
Set as Default
KeyGuard
The KeyGuard feature, like its equivalent on cellular telephone
handsets, is designed to prevent accidental dialing. When the
feature is enabled, clicking the
button on the dial pad, has no effect.
To enable or disable KeyGuard:
1.
A check mark next to the option indicates that it is enabled.
Tools > KeyGuard
Select
SEND
button, or any other
.
HPCs, and PPCs
Use on Notebooks,
Options…
The Options window allows you to co nfigure Watcher and the
AirCard 710 wireless network card to your preferences. In the
Options window you can:
•
Enable and disable several features, including: Auto-
Answer, Any-Key Answer, the Inactivity Time-Out, Auto-
Connect, SMS Message Expiry, and the Lock Code.
•
Select whether certain warning messages are displayed to
warn you of circumstances such as your data connection
being lost.
•
Configure options related to Call Logging, the Watcher
window, the call-back number in SMS messaging, sounds
that notify you of incoming calls, new SMS messages, and
new voicemail.
Using the Options Window
Inthe Options window, buttons,drop-down menus, andcheck
boxes are provided to allow you to select your preferences.
OK
•
Use
you’ve made, or
•
Click
Options window open in order to change more settings
to exit the Options window, saving any changes
Cancel
to exit without saving.
Apply
to save changes you have made, but keep the
Rev B Oct. 2001 63
Page 19

AirCard 710 Wireless Network Card - User Guide
•
Restore Defaults
The
button causes all thefieldson all the
tabs to revert to the settings they had at installation.
General Tab
Figure 7- 11: The General Tab of the Opti on s Window
Table 7-3 :General Tab Options
Field Description
Data Call
Inactivity
Timeout:
Disconnect
The Inactivity Timeout terminates your
connection to the GSM network
automatically when the AirCard network
card is inactive for the amount of time you
specify here. (The AirCard network card is
inactive when no data transmission is
occurring.) Select
feat ure. Oth e r w ise, sele ct the numb e r of
minutes after which you want to
automatically disconnect.
Never
to disable the
64 2130135
Page 20

Table 7-3 :General Tab Options
Field Description
Watcher Menus
Incoming Cal ls
Answer
Call Logging
Retain
By default the AirCard network card is set
to answer all calls as voice calls. To receive
a fax or data call, you must set this field
appropriately, before the call is answered.
This means that anyone wanting to send a
fax, or establish a data connection with the
AirCard network card, must notify you in
advance so that you can change this field
before the call is made.
This setting reverts to “all ca lls as Voice”
whenever Watcher is restarted.
If you select “next call as Fax” or “next call
as Data”, the AirCard network card
maintains the sett ing for one call, or until
Watcher is restarted.
If you select “all ca lls as Fax” or “a ll cal ls as
Data”, the AirCard network card maintains
the setting until you select another option.
You have the option o f ma intaining record s
of your outgoing and incoming calls in the
Call Log. (The Call Lo g is displayed when
you select
described above.)
This field allows you to specify the number
of calls retai ned. Select
calls
menu.
Tools > Call Log
, or
last 100 calls
, and is
none, all, last 50
from the drop-down
HPCs, and PPCs
Use on Notebooks,
Rev B Oct. 2001 65
Page 21

AirCard 710 Wireless Network Card - User Guide
Table 7-3 :General Tab Options
Field Description
Active NAM*
Profile
The AirCard network card allows you to
confi gure and use up to two a ccounts (with
two diff eren t phone numbers). This may be
useful to users who want, for example, to
hav e o ne account fo r business calls and
one for personal calls.
This drop-down menu lists these items:
Auto-Select, NAM 1
account has b een activated, NAM 1 has a
phone number next to it, and if two
accounts have been activated, NAM 1 and
NAM 2 have phone numbers.
When
Auto-Select
network card uses the account most
appropriate to your location, based on the
cove rage of your acc o un ts.
T o configure a second account (where only
one account has been activated):
Select the option
1.
drop-down menu and click OK.
Stop, eject and re-insert the AirCard
2.
PC Card.
Launch Watcher; the Activation
3.
Wizard should launch. You can then
configure a second account.
, and
NAM 2
. If one
is in effect, the AirCard
NAM 2
from this
If two accounts are configured, both phone
numbers s hould be d isplayed in t his dropdown menu. To switch from one account to
the other:
Select the phone number from the
1.
drop-down menu.
Stop, eject and reinsert the AirCard
2.
PC Card.
*NAM stands for Number Assignment Module and is information stored in
the flash memory of your SIM card. The information includes your phone
number parameters specific to your service provider.
66 2130135
Page 22

Network Tab
Figure 7-12: The Network Tab of the Options Window
Table 7-4 :Network Tab Option s
Field Description
Watcher Menus
HPCs, and PPCs
Use on Notebooks,
Automa tica lly
establish a
network session
when available
The AirCard network card can try to
establish a packet mode connect ion
whenever the AirCard PC Card is inserted,
where GPRS service is available. (See
“Packet Mode Connections” on page 43.)
Display Tab
Figure 7-13: The Display Tab of the Options Window
Rev B Oct. 2001 67
Page 23

AirCard 710 Wireless Network Card - User Guide
Table 7-5 :Display Tab Option s
Field Description
Rest ore pr e vious
position on
startup
Remember
Compact View
position
This field determines where the full
Watcher window appears when launched.
(The full and co mpact vie ws of the W atche r
window are shown under the Toggle Full/
Compact heading above.)
If this feature is disabled, Watcher always
displays in the cent er of your screen.
If you enable this feature and move the
Watcher window, the window will re-appear
in its new position if you close and re-open
it, or change the view to compact and then
full again.
Use t he ch eck bo x to enable and disable
the feature. (The feature is enabled when
checked.)
This field determines where the compact
Watcher window appears.
If this feature is enabled, when you switch
from the full view to the compact view, the
Watcher window remains in the same
place.
If this feature is disabled, when you switch
from the full view to the compact view, the
Watcher window displays in the position it
last occupi ed.
Use t he ch eck bo x to enable and disable
this feature. (The feature is enabled when
checked.)
Enable Docking
When Docking is enabled, the Watcher
window jumps to the edge of your screen
when the window is dragged close to an
edge. This allows you to easily pos ition the
window in a corner of your screen.
Use t he ch eck bo x to enable and disable
this feature. (The feature is enabled when
checked.) You can also enable and disable
this feature by selecting
View > Docking
.
68 2130135
Page 24

Table 7-5 :Display Tab Option s
Field Description
Watcher Menus
Always on Top
GPRS premium
serv ice cha rge
(for nonsubscribers)
When Always On Top is enabled, the
Watcher window displays in front of all
other application windows, even when you
position another window over Wa tcher.
This allows you to view connection status
indicators while using another application,
such as your Internet browser.
Use t he ch eck bo x to enable and disable
this feature. (The feature is enabled when
checked.) You can also enable and disable
this feature by selecting
Top
.
When this feature is enabled, a warning
message is displayed any time you select
GPRS from the drop-down menu on the
main Watcher window, to remind you that
you may be charged extra for this service.
(Depending on your billing plan, your
service provider may apply a s urcharge to
GPRS service.)
Use t he ch eck bo x to enable and disable
this feature. (The feature is enabled when
checked.)
View > Always on
HPCs, and PPCs
Use on Notebooks,
Rev B Oct. 2001 69
Page 25

AirCard 710 Wireless Network Card - User Guide
Table 7-5 :Display Tab Option s
Field Description
Data connection
lost
IP re-a ssigne d
When this feature is enabled, a warning
message is displayed any time you lose
your connection to the GSM network.
Use t he ch eck bo x to enable and disable
this feature. (The feature is enabled when
checked.)
All devices connected to the Internet
require an IP (Inter net Protocol) address . In
some technologies, a device is assigned a
permanent IP address and that IP address
can never be used by another device.
Where DHCP (Dynamic Host Configuration
Protocol) is used, the network maintains a
pool of IP addr esses and assigns them to
devices as needed. The AirCard 710
network card uses DHCP so that it is
assigned an IP address by the network.
This means that the IP address for your
AirCard network card changes each time
you connect, and sometimes during a
connection.
When this feature is enabled, a warning
message is displayed each time the
network assigns a new IP address to the
AirCard network card.
SMS Tab
Use t he ch eck bo x to enable and disable
this feature. (The feature is enabled when
checked.)
70 2130135
Page 26

Ta ble 7-6 :SMS Tab Options
Field Description
Watcher Menus
SMS Messages:
Expire
Override
Callback #
This feature allows for the automatic
deletion of SM S messages that have been
in your Inbox for a specified amount of
time. The SMS messaging feature is
described in detail under the heading
Mobile Messaging… above.
T o d is able aut omat ic delet ion of messages,
select
Never
from the drop-down menu.
To enable automatic deletion of messages,
select a number of days from the dropdown menu.
Only messages that have been “read”
(displayed in the SMS Manager window)
are deleted by t his f eature . Man ual del etio n
of messages is covered in the section on
Mobile Messaging… above.
When you send SMS messages, you have
the option of specifying a call back number
so that the message recipient will know
how to reach you. By default, your call back
number is your AirCard phone number.
This featu re allows you to u se a dif ferent
number than the AirCard phone number.
To set a new call back number, click the
check box to e nabl e the fe ature and e nter a
number in the field. (Leav e the field blank if
you prefer to have no call back number on
your messages.)
HPCs, and PPCs
Use on Notebooks,
T o di sable the feat ure (and use t he AirCard
phone number as your call back number),
click the chec k box so that it is not
checked.
Rev B Oct. 2001 71
Page 27

AirCard 710 Wireless Network Card - User Guide
Ta ble 7-6 :SMS Tab Options
Field Description
Save to Outbox
You have the option o f retaining, in the
Outbox, a copy of messages that you send.
See the SMS Manager… section f or detai ls
about the Outbox.
This feature allows you to specify whether
outgoing messages are saved in the
Outbox. If you d o not want to save any
messages, select
prompted as you send each message, as
to whether you want t o retai n a copy, select
askfirst
messages you send, select
Note that if you do not save messages to
the outbox you do not receive status
messages, such as the one that notifies
you of a successful delivery.
. If you want to retain a copy of all
never
. If you want to be
automatically
.
72 2130135
Page 28

Security Tab
Table 7-7 :Security Ta b O ption s
Field Description
Watcher Menus
HPCs, and PPCs
Use on Notebooks,
Lock modem
Lock Modem Now
The Lock Code feature can be used to
prevent others from using your AirCard
netw o rk car d and your account. When the
Lock Code is enabled, you are prom pted to
enter a code any time W at cher i s laun ched,
and if the wrong code is entered, Watcher
closes. (This makes it impossible to use the
AirCard network card without kn o w i ng the
lock code. ) By defa u l t the lock cod e is t h e
last four digits of y our phone number.
To disable the feature, select
the drop-down menu. To enable the
feature, so that you ar e promp ted for a lock
code the next time you launch Watcher,
select
on power up
menu. (The Lock Code feature will then
remain enab led until you d isable it by
selecting
This field allows you to enable the Lock
Code feature immediately. (If you select
power up
down menu, you need to close Watcher
befo re the l ock code comes into effect.)
When you click th e button, Watc he r
prompts, “Lock the modem now?”. Click
Yes
network card.
never
in the previously described drop-
at this prompt to lock the AirCard
from the drop-down
in this field.)
never
from
on
Rev B Oct. 2001 73
Page 29

AirCard 710 Wireless Network Card - User Guide
Table 7-7 :Security Ta b O ption s
Field Description
Change Lock
Code
Sounds Tab
This button allows you to set a new lock
code.
To change the lock code:
Click the
1.
Enter your existing lock code (the last
2.
four d i g its of you r p h on e n u mber
unless you have changed it) at the
prompt.
Enter a ne w l ock code.
3.
Enter your new lock code for confir-
4.
mation.
Click OK.
5.
Change Lock Code
button.
74 2130135
Page 30

Table 7-8 :Sounds T ab Op tio n s
Field Description
Watcher Menus
Enable
Call Alert
This f ie ld allow s you to enable and disable
all sounds.
When this box is checked, you have the
option of indivi dually ena bling and d isabling
the Call Alert, Incoming Call, New SMS
Message, and New Voice mail sounds.
When the box is not checked, there are no
sounds to notify you of any of these events.
Use the check box to indicate whether you
want all sounds enabled or disabled.
Depending on your billing plan, you may
have a feature called Call Alert. When you
are on a call, this feature notifies you when
you have another incoming call. You can
then ignore the new incoming call or put
your current caller on hold and answer the
new call. (Contact your service provider if
you require more information about Call
Alert.)
If you have Call Alert, you can use this field
to select whether a sound is played to
notify you of another incoming call when
you are already on a voice call.
Use t he ch eck bo x to enable and disable
the sound assigned to Call Alert. The play
button (with the arrow head on it) allows
you to hear the sound assigned to this
feature. If y ou have another sound file you
would prefer to play for call alerts, you can
use the
*.wav file can be used.)
Browse
button to select it. (Any
HPCs, and PPCs
Use on Notebooks,
Rev B Oct. 2001 75
Page 31

AirCard 710 Wireless Network Card - User Guide
Table 7-8 :Sounds T ab Op tio n s
Field Description
Incoming Call
New SMS
Message
This field allows you to select whether a
sound is played when you receive a call.
When this is disabled, the Silent Ringer
icon is displayed in the indi cator area of the
main Wat cher wi ndow. The only notification
you will then have of an incoming voice cal l
is the “Voi ce Call From …” or “Roam Call
From …” message displayed in the call
status ar ea.
Use the check box to enable or disable the
sound. The play button (with the arrow on
it) allows you to hear the sound assign ed to
incoming calls. If you have another sound
file you would prefer to use, you can use
the
Browse
file can be used.)
This field allows you to select whether a
sound is played when your receive a new
SMS message.
When this is enabled, a sound is played
each time a message arrives. When
disabled no sound is played .
Use the check box to enable or disable the
sound. The play button (with the arrow on
it) allows you to hear the sound assign ed to
new SMS messages. If you have another
sound file you would prefer to use, you can
use the
*.wav file can be used.)
button to select it. (Any *.wav
Browse
button to select it. (Any
New Voic emai l
This field allows you to select whether a
sound is played when a new voice mail
message arrives.
When this is enabled, a sound is played
when voice mail arrives . When disabled, no
sound is played.
Use the check box to enable or disable the
sound. The play button (with the arrow
head on it) a llows you to hear the sound
assigned to new voice mail. If you have
another sound file you would prefer to use,
you can use the
(Any *.wav file can be used.)
Browse
button to select it.
76 2130135
Page 32

Table 7-8 :Sounds T ab Op tio n s
Field Description
Watcher Menus
Headset Volume
Voice Tab
This slider allows you to adjust the volume
of the ear piece on your headset. This
affects o nly t he volume o f what you hear.
(That is, it does not adjust the volume of
the speaker.) This performs the same
function as the volume controls on the main
Watcher window.
To increase the volume, drag the slider to
the right. To decrease the volume, drag the
slider to the left.
HPCs, and PPCs
Use on Notebooks,
Table 7- 9 :Voice Tab Option s
Field Description
Auto-An sw er
Incoming Calls
This f ie ld allow s you to enable and disable
the Auto-Answer feature, and when
enabled to select the number o f rings after
which a voice call is answered.
To disable the feature, select
drop-down menu. To enable the feature,
select the number of rings after which
Watcher automatically answers the call.
off
from the
Rev B Oct. 2001 77
Page 33

AirCard 710 Wireless Network Card - User Guide
Table 7- 9 :Voice Tab Option s
Field Description
Auto-Re try
Any-Key Answer
This f ie ld allow s you to enable and disable
the Auto-Retry feature, and when enabled
to select the interval between retrys.
At times when a large number of users are
connected to a single base station on the
GSM network, you may be unable to make
a network co nnection on your first attemp t .
When enabled, Auto-Retry attempts the
connection up to five times at the interval
you select. When disabled, the AirCard
netw o rk car d does not retry automatically.
To disable the feature, select
Otherwise, select the interval at which you
want automatic r etrys to occur.
This f ie ld allow s you to enable and disable
the Any-Key Answer feature.
When enabled, you can answer an
incomin g call by clicking any button on the
dial pad except
disabled, y ou must click the
answer incoming calls.
Use t he ch eck bo x to enable and disable
the feature. (The feature is enabled when
checked.)
End
and
Clr
. When
off
Send
.
key to
AutoHyphenation
This f ie ld allow s you to enable and disable
the Auto-Hyphenation feature.
When enabled, a hyphen is automatically
inserted after the area code, and between
the first thr ee and last f our digits of a phone
number, as you enter the number. (This
has no effect on what is dialed.) W hen
disabled, no hyphen is inserted as you
ente r a phone number.
Use t he ch eck bo x to enable and disable
the feature. (The feature is enabled when
checked.)
78 2130135
Page 34

Table 7- 9 :Voice Tab Option s
Field Description
Watcher Menus
Tone Length
Mute
Minute Alert
DTMF (Dual Tone Multi-Frequency) is the
system used by touch tone phones under
which a specific frequency or tone is
assigned to each key. There is a standard
length for these tones. However, some
voice mail syst ems require a shorter or
longer than normal length tone.
This field allows you to set the AirCard
network card to us e a shorter or longer
tone for systems that require it.
The recommendation is to select
unles s you r s e rv ic e pr o vi der indi cates that
a different tone is required.
When DTMF mute is enabled, there is no
audible tone while the AirCard network
card dials.
Use t he ch eck bo x to enable and disable
the feature. (The feature is enabled when
checked.)
This f ie ld allow s you to enable and disable
the Minute Alert feature.
When enabled, the AirCard network card
beeps at one minute inte rvals while you are
on voice calls. This allows you to keep
track of the duration of your call.
normal
HPCs, and PPCs
Use on Notebooks,
Service Alert
Use t he ch eck bo x to enable and disable
the feature. (The feature is enabled when
checked.)
The field allows you to enable and disable
the Service Alert feature.
When enabled, the AirCard network card
emits a tone whenever it goes from being
out of service to being in service, and
whenever it goes from being in service to
being out of s ervice.
Use t he ch eck bo x to enable and disable
the feature. (The feature is enabled when
checked.)
Rev B Oct. 2001 79
Page 35

AirCard 710 Wireless Network Card - User Guide
Table 7- 9 :Voice Tab Option s
Field Description
Voice Mail
Change …
Profile Tab
Depending on your billing plan, you may
have a Voice Mail feature that allows
callers to leave you a message when you
don’t answer a call. If you have this feature,
then you access your voice messages by
dialing a number specific to your service
provider.
When the AirCard network card is
configured, the phone number your service
provider uses for voic e mail is autom atically
set up for you. If th is number should
change, you can change the number here.
To change the number:
Click
1.
2.
3.
Change…
Enter the new phone number in the
window that appears.
Click OK.
Figure 7- 1 4: The Pr o fil e Tab of th e Op ti on s Window
The Profile tab allows you to configure multiple GSM accounts
to use with your AirCard network card—such as if you travel
frequently to another city and have established a GSM account
with a serviceprovider there. Youm ight to do so to avoid
roaming charges when using your AirCard network card in
the other city.
How these settings are configured depends on information
from your service provider(s). Please contact them for details
and assistance.
80 2130135
Page 36

Watcher Menus
Administration > Activation Wizard…
The Activation Wizard is used to configure the AirCard to use
your account. An overview of this process is provided in
“Account Activation and Configuration” on page 7, with
details in the installation chapters for your particular computer
platform.
Figure 7- 1 5: The A c ti va t io n Wiz ar d Wi ndow
HPCs, and PPCs
Use on Notebooks,
Administration > Modem Update…
This option enables you to update the firmware inside the
AirCard 710 wireless network card’s flash memory. See the
instructions provided with your firmware upgrade or by
appropriate technical support personnel for information on
how to perform an update.
The Help Menu
Figure 7- 1 6: The H e lp Me n u
Help Topics…
The AirCard 710 network card comes with complete online
help for notebook PCs. To get help on any topic:
•
If the topic you want to display has a link on the main window,
click the link.
Help > Help Topics…
Select
.
Rev B Oct. 2001 81
Page 37

AirCard 710 Wireless Network Card - User Guide
Note: Help is also available in
most Watcher windows by
clicking the Help button or by
pressing the F1 key on your
keyboard.
If you do not see the topic you want todisplay, use the
Find
Help Topics
,or
buttons to display the corresponding
Index
,
window:
The Contents Tab
The Contents tab shows how information in the help system is
organized, and lets you browse by topic.
Figure 7- 1 7: The Help Windo w, With Contents D is pl ay e d
Use the scroll bar in the Contents tab to locate a topic of
interest. Topics that have a book icon next to them can be
expanded by double clicking theicon. Double click a topic to
display its window.
The Index Tab
The Index tab presents the help contents in another way,
sorting them by subject keyword:
Figure 7-18: The Index Tab of the Help Window
82 2130135
Page 38

Watcher Menus
In the Index tab, a list of topics is displayed in the lower
portion of the window. Search for an index entry by either
typing the first few letters in the field at the top, or use the
scroll bars to scan the list of entries. When you locate an entry
you want to display, click the entry and click
Display
.
The Find Tab
The Find tab uses a computer-generated databaseof words in
the help system to let you search. If you are looking for a
particular word not i n the index or contents, click the
then select a radio button in the wizard to generate a database.
Then use the word matching options to locatethe help section
you want to display
Find
tab,
HPCs, and PPCs
Use on Notebooks,
Figure 7- 19: T he Find Se tup Wizard
About Watcher…
Figure 7- 2 0: The Ab out Watche r Wi nd ow
Rev B Oct. 2001 83
Page 39

AirCard 710 Wireless Network Card - User Guide
When you choose
Help > About
, you see a window which
displays:
•
The phone number of your account
•
The Electronic Serial Number (ESN), a number assigned to
each AirCard 710 network card when it is manufactured
•
The IP (Internet Protocol) Address currently assigned to
the AirCard network card
•
The version of Watcher in use
•
The version of the AirCard driver (software that forms the
interface between the AirCard and your operating system)
in use
•
The hardware version of the card itself
•
The version of firmware (software that resides in the flash
memory of the AirCard) in use
•
The version of the bootloader (a component of the
firmware) in use
If you have an Internet connection, you can go to the Sierra
Wireless web site by clicking the
www.sierrawireless.com
button.
84 2130135
Page 40

8: Network Adapter Manager (for
Multiple Network Cards)
• How Windows® Wor ks
With Network Interface
Cards
• Windows 95, 98, NT
and Me
• Windows 2000 and XP
• Pop-Up Menu Items
On notebook PCs, the AirCard®710 wireless network card
comes with an application, called the Network Adapter
Manager, designed to manage multiple network interface
cards.
The Network Adapter Manager is necessary because the
AirCard behaves differently for each type of connection. The
AirCard 710 behaves as:
Note: If you later install software
for another AirCard network
card, such as the AirCard 300,
400, 510, or 555 models, you
should re-install the Network
Adapter Manager from the
AirCard 710 CD. Earlier version s
of the Network Adapter Manager
do not support the AirCard 710
network card.
•
A modem during dial-up data connections
•
A phone during voice connections
•
A network interface card during packet mode data connec-
tions
It is only while the AirCard 710is behaving as a network
interface card (when there is an active GPRS connection),
when you have another type of network connection present,
that the Network Adapter Manager may be necessary.
The Network Adapter Manager launches automatically
whenever Windows is started. Unless you manually exit the
application, itremains running fromthe time you start
Windows until you shut down.Generally, the only evidence
that the Network Adapter Manager is running is the status
area icon. It has no control windows, only menus available
from the status area icon (see Figure 8-1: “The Network
Adapter Manager Icon for the AirCard 710 PC Card” on
page 86).
and
How Windows®Works With
Network Interface Cards
When you have more than one network interface card inserted,
Windows routes the data traffic through only one of the cards.
This means that when you have a packet mode connection
with the AirCard 710 network card, and you have another
Rev B Oct. 2001 85
PCs only
Use on Notebook
Page 41

AirCard 710 Wireless Network Card - User Guide
network interface card (such as an Ethernet or Token Ring
LAN card) inserted, data traffic is routed through either the
AirCard 710 or the LAN card—not both. The card through
which data traffic is being routed is the “primary” card. The
Network Adapter Manager shows you which card is primary
by displaying an icon in the status area (usually locatedin the
lower right corner of your screen).
Figure 8-1: The Network Adapter Manager Icon for the AirCard 710 PC Card
Depending on which card is primary, the Network Adapter
Manager displays one of these icons:
Figure 8-2: Status Area Icons for Network Adapter Manager
The ToolTip, displayed when you position the pointer over the
Network Adapter Manager icon in the status area, identifies
the primary card:
Figure 8-3: Th e S tatus Are a ToolTip Show ing a LAN Card as Prim ary
How Network Adapter Manager works depends on your
operating system.
Windows 95, 98, NT and Me
In Windows 95, 98, NT, and Me, the Network Adapter
Manager can be used to switch between the AirCard 710
network card and other network interface cards.
Switching Primary Cards
If you initiate a packetmode connection with the AirCard 710
network connectionwhile a LAN card is primary, the Network
Adapter Manager automatically makes the AirCard network
card the primary card, rerouting data traffic from the wired
LAN card to the AirCard 710 wireless network card.
86 2130135
Page 42

Network Adapter Manag er
Note : Swi tchin g betw een ca rds while using a n etwo rk progr am (such
as a browser) is not
strangely when its network connection changes. Close network applications, switch cards, t hen launch the applications again.
The Network Adapter Manager also has a menu through
which you can switch primary cards.To switch cards:
1.
Right click the Network Adapter Manager icon in the
status area to display the shortcut menu.
2.
Select the card you want to use as the primary card from
the menu.
or
Select
Show Options
appears, use the radio buttons to select thecard you want
to use as the primary card and click
recommended, since the program may behave
from the menu. In the window that
OK
.
Windows 2000 and XP
Windows 2000 and XP have more advanced device handling
capabilities than Windows 95, 98, NT, and Me. If more than
one network card is detected, Windows 2000 and XP automati-
cally route network traffic through the card that provides the
highest transmission speed.
Generally, a wireline LAN card (such as an Ethernet card)
provides faster transmission speed than a wireless card (such
as the AirCard 710network card). If, for example, you have an
AirCard and an Ethernet card installed and active on your
Rev B Oct. 2001 87
PCs only
Use on Notebook
Page 43

AirCard 710 Wireless Network Card - User Guide
laptop, Windows routes network traffic through the Ethernet
card because it offers the higher transmission speed. If you
then want to take the computer to another location, you can
stop the Ethernet card (as described in “Stopping a Network
Card”, later in this section), disconnect the cable to the
Ethernet card,and Windows will automatically begin routing
network traffic through the AirCard wireless card instead.
Since Windows 2000 and XP have this enhanced method of
handling multiple PC Cards, the Network Adapter Manager
does not allow you to switch cards from the shortcut menu.
You can control which card is the primary card by stopping the
cards you do not want to use.
Stopping a Network Card
1.
Click the PC Card icon in the status area.
2.
A listing of active cards is displayed.
3.
Click the card you want to stop in the listing.
Windows 2000 and XP reroute traffic to the fastest of the
remaining network cards. You can eject the stopped card if you
wish.
Pop-Up Menu Items
Online Help
To display online help for the Network Adapter Manager,
right click the Network Adapter Manager status area icon,
then select
Version Information
To display version information for the Network Adapter
Manager, right click the Network Adapter Manager status area
icon, then select
Closing the Network Adapter Manager
To close the Network Adapter Manager:
1.
Right click the Network Adapter Manager status area icon.
2.
Select
Help
from the shortcut menu.
About Network Adapter Manager
Exit
from the shortcut menu.
from the menu.
88 2130135
Page 44

Network Adapter Manag er
Rev B Oct. 2001 89
PCs only
Use on Notebook
Page 45

AirCard 710 Wireless Network Card - User Guide
90 2130135
Page 46

9: AirCard 710 PC Card:
Technical Specifications
• LED Operation
• Radio Frequency and
Electrical
Specifications
• Environmental
Specifications
This chapter describes the function of the AirCard 710 LED
indicator, and provides technical product data for the AirCard
710 wireless network card.
LED Operation
The AirCard 710 housing has a single red/green light-emitting
diode (LED) on the antenna end of the card, near the headset
connector. It indicates the status of the card.
LED Indicator
Figure 9-1: Location of the AirCard 710 LED Status Indicator
The LED operates as follows:
Reference
Information
Table 9- 1 :LED Operation
LED Behavior Indicates
Solid amber*
Blinking am ber
Solid green
Blinking green
Solid red
* Amber i s us ed to describe t h e color of the LED wh en both red and
green are lit.
The AirCard is powering up.
The AirCard is searching for a channel.
A call is in progress.
The AirCard has acquired a channel and is
in idle mode (no call is in progress).
An error has occurred.
Rev B Oct. 2001 91
Page 47

AirCard 710 Wireless Network Card - User Guide
Radio Frequency and Electrical
Specifications
Table 9-2 :Radio Frequenc y & Electrical
Specifications
Approvals
Voltage
Current
Transmit
Receive
Channel Spacing
Freq. Sta bility
Compliant with:
GPRS GSM Release 97 SMG 31 Phase 2+
FCC Parts 15, and 24
Industry Canada
+5Vdc from PCMCIA slot
Typical requirement:
4 TX slots on 1.20A peak, 0.80A average
2 TX slots on 0.77A peak, 0.40A average
1 TX slots on 0.55A peak, 0.22A average
Standby 15mA
PCS:
1850 to 1910 MHz
PCS:
1930 to 1990 MHz
200kHz
0.1ppm
Environmental Specifications
Table 9-3 :Environmental Sp ecification s
Operating Temp.
-20 ° C t o +60 °C ( ambient, outsid e
PCMCIA enclosure)
Storage Temp.
Humidity
Vibra ti on
Drop
-30 ° C t o +85 °C
95% (non-condensing)
15 g peak 10 to 2000Hz ( non-operating)
30” (76 cm) onto vinyl covered concrete
92 2130135
Page 48

10: AirCard 710 PC Card:
Regulatory Information
This devicecomplies with Parts 2, 15 and 24 of the FCC Rules.
Operation is subject to the condition that this device does not
cause harmful interference. FCC guidelines stipulate that the
antenna should be more than 20mm (0.8”) from all persons.
FCC ID: N7NAC710
Industry Canada #: PENDING
Where appropriate, the use of the equipment is subject to the
following conditions:
CAUTION Unauthorized modifications or changes not
expressly approved by Sierra Wireless, Inc. could void
compliance with regulatory rules, and thereby your authority
to use this equipment.
WARNING (EMI) – United States FCC Information – This
equipment has been tested and found to comply with the
limits pursuant toPart 15 of the FCC Rules. These limits are
designed to provide reasonable protection against harmful
interference in an appropriate installation. This equipment
generates, uses, and can radiate radio frequency energy and, if
not installed and used in accordance with the instructions,
may cause harmfu l i nterference to radio communication.
However, there is no guarantee that interference will not occur
in a particular installati on.
Reference
Information
If this equipment does cause harmful interference to radio or
television reception, which can be determined by turning the
equipment off and on, the user is encouragedto try to correct
the interference by one or more of the following measures:
•
Reorient or relocate the receiving antenna
•
Increase the separation between the equipment and
receiver
•
Connect the equipment into an outlet on a circuit different
from that to which the receiver is connected
•
Consult the dealer or an experienced radio/TV technician
for help
WARNING (EMI) – Canada – This digital apparatus does not
exceed the Class B limits for radio noise emissions from digital
apparatus as set out in the interference causing equipment
standard entitled “Digital Apparatus”, ICES-003 of the
Department of Communications.
Rev B Oct. 2001 93
Page 49

AirCard 710 Wireless Network Card - User Guide
Cet appareil numérique respecte les limites de bruits radioélec-
triques applicables aux appareils numériques de Classe B
prescrites dans la norme sur le matériel brouilleur: “Appareils
Numériques”,NMB-003 édictée par le ministre des Communi-
cations.
If you have purchased this product under a United States
Government contract, it shall be subject to restrictions as set
forth in subparagraph (c)(1)(ii) of Defense Federal Acquisitions
Regulations (DFARs) Section 252.227-7013 for Department of
Defense contracts, and as set forth in Federal Acquisitions
Regulations (FARs) Section 52.227-19 for civilianagency
contracts or any successor regulations. If further government
regulations apply, it is your responsibility to ensure
compliance with such regulations.
94 2130135
Page 50

Index
Index
Rev B Oct.01 1
Page 51

AirCard 710 Wireless Netw ork Card User Guide
2 2130142
Page 52

Page 53

 Loading...