

Page 1

Sierra Wireless AirCard 763S
Mobile Hotspot
User Guide
4112126, Rev 1
Page 2

Page 3

Preface
Important
Notice
Safety and
Hazards
Due to the nature of wireless communications, transmission and reception of data
can never be guaranteed. Data may be delayed, corrupted (i.e., have errors) or be
totally lost. Although significant delays or losses of data are rare when wireless
devices such as the Sierra Wireless modem are used in a normal manner with a
well-constructed network, the Sierra Wireless modem should not be used in
situations where failure to transmit or receive data could result in damage of any
kind to the user or any other party, including but not limited to personal injury,
death, or loss of property. Sierra Wireless accepts no responsibility for damages
of any kind resulting from delays or errors in data transmitted or received using
the Sierra Wireless modem, or for failure of the Sierra Wireless modem to
transmit or receive such data.
Do not operate the Sierra Wireless modem in areas where blasting is in progress,
where explosive atmospheres may be present, near medical equipment, near life
support equipment, or any equipment which may be susceptible to any form of
radio interference. In such areas, the Sierra Wireless modem MUST BE
POWERED OFF. The Sierra Wireless modem can transmit signals that could
interfere with this equipment.
Do not operate the Sierra Wireless modem in any aircraft, whether the aircraft is
on the ground or in flight. In aircraft, the Sierra Wireless modem MUST BE
POWERED OFF. When operating, the Sierra Wireless modem can transmit
signals that could interfere with various onboard systems.
Limitation of
Liability
Note: Some airlines may permit the use of cellular phones while the aircraft is on the
ground and the door is open. Sierra Wireless modems may be used at this time.
The driver or operator of any vehicle should not operate the Sierra Wireless
modem while in control of a vehicle. Doing so will detract from the driver or
operator's control and operation of that vehicle. In some states and provinces,
operating such communications devices while in control of a vehicle is an offence.
The information in this manual is subject to change without notice and does not
represent a commitment on the part of Sierra Wireless. SIERRA WIRELESS AND
ITS AFFILIATES SPECIFICALLY DISCLAIM LIABILITY FOR ANY AND ALL
DIRECT, INDIRECT, SPECIAL, GENERAL, INCIDENTAL, CONSEQUENTIAL,
PUNITIVE OR EXEMPLARY DAMAGES INCLUDING, BUT NOT LIMITED TO,
LOSS OF PROFITS OR REVENUE OR ANTICIPATED PROFITS OR REVENUE
ARISING OUT OF THE USE OR INABILITY TO USE ANY SIERRA WIRELESS
PRODUCT, EVEN IF SIERRA WIRELESS AND/OR ITS AFFILIATES HAS BEEN
ADVISED OF THE POSSIBILITY OF SUCH DAMAGES OR THEY ARE
FORESEEABLE OR FOR CLAIMS BY ANY THIRD PARTY.
Notwithstanding the foregoing, in no event shall Sierra Wireless and/or its
affiliates aggregate liability arising under or in connection with the Sierra Wireless
product, regardless of the number of events, occurrences, or claims giving rise to
liability, be in excess of the price paid by the purchaser for the Sierra Wireless
product.
3
Page 4

AirCard 763S Mobile Hotspot User Guide
Patents This product may contain technology developed by or for Sierra Wireless Inc. This
product includes technology licensed from QUALCOMM
manufactured or sold by Sierra Wireless Inc. or its affiliates under one or more
patents licensed from InterDigital Group.
®
. This product is
Copyright © 2012 Sierra Wireless. All rights reserved.
Trademarks AirCard
Watcher and the Sierra Wireless logo are trademarks of Sierra Wireless.
Windows
Corporation. Macintosh
registered in the U.S. and other countries. QUALCOMM
trademark of Qualcomm Incorporated. Used under license. Other trademarks are
the property of their respective owners.
MiniUPnPd
Copyright (c) 2006-2011, Thomas BERNARD. All rights reserved.
Redistribution and use in source and binary forms, with or without modification,
are permitted provided that the following conditions are met:
®
is a registered trademark of Sierra Wireless. Sierra Wireless,
®
and Windows Vista® are registered trademarks of Microsoft
· Redistributions of source code must retain the above copyright notice,
this list of conditions and the following disclaimer.
· Redistributions in binary form must reproduce the above copyright notice,
this list of conditions and the following disclaimer in the documentation
and/or other materials provided with the distribution.
· The name of the author may not be used to endorse or promote products
derived from this software without specific prior written permission.
®
and Mac OS X® are registered trademarks of Apple Inc.,
®
is a registered
THIS SOFTWARE IS PROVIDED BY THE COPYRIGHT HOLDERS AND
CONTRIBUTORS "AS IS" AND ANY EXPRESS OR IMPLIED WARRANTIES,
INCLUDING, BUT NOT LIMITED TO, THE IMPLIED WARRANTIES OF
MERCHANTABILITY AND FITNESS FOR A PARTICULAR PURPOSE ARE
DISCLAIMED. IN NO EVENT SHALL THE COPYRIGHT OWNER OR
CONTRIBUTORS BE LIABLE FOR ANY DIRECT, INDIRECT, INCIDENTAL,
SPECIAL, EXEMPLARY, OR CONSEQUENTIAL DAMAGES (INCLUDING, BUT
NOT LIMITED TO, PROCUREMENT OF SUBSTITUTE GOODS OR SERVICES;
LOSS OF USE, DATA, OR PROFITS; OR BUSINESS INTERRUPTION)
HOWEVER CAUSED AND ON ANY THEORY OF LIABILITY, WHETHER IN
CONTRACT, STRICT LIABILITY, OR TORT (INCLUDING NEGLIGENCE OR
OTHERWISE) ARISING IN ANY WAY OUT OF THE USE OF THIS SOFTWARE,
EVEN IF ADVISED OF THE POSSIBILITY OF SUCH DAMAGE.
4
Page 5

Contact
Information
Sales Desk: Phone: 1-604-232-1488
Hours: 8:00
E-mail: sales@sierrawireless.com
AM to 5:00 PM Pacific Time
Preface
Post: Sierra Wireless
Fax: 1-604-231-1109
Web: www.sierrawireless.com
13811 Wireless Way
Richmond, BC
Canada V6V 3A4
Consult our website for up-to-date product descriptions, documentation,
application notes, firmware upgrades, troubleshooting tips, and press releases:
www.sierrawireless.com
5
Page 6

AirCard 763S Mobile Hotspot User Guide
6
Page 7

Contents
Get Started . . . . . . . . . . . . . . . . . . . . . . . . . . . . . . . . . . . . . . . . . . . . . . . . . . . .11
Know Your Device . . . . . . . . . . . . . . . . . . . . . . . . . . . . . . . . . . . . . . . . . . . . 11
Manage your Device and Settings . . . . . . . . . . . . . . . . . . . . . . . . . . . . . .11
Mobile Hotspot Buttons and Keys . . . . . . . . . . . . . . . . . . . . . . . . . . . . . .12
Lock / Unlock all Keys . . . . . . . . . . . . . . . . . . . . . . . . . . . . . . . . . . . . . . .12
LCD . . . . . . . . . . . . . . . . . . . . . . . . . . . . . . . . . . . . . . . . . . . . . . . . . . . . .13
Accessories . . . . . . . . . . . . . . . . . . . . . . . . . . . . . . . . . . . . . . . . . . . . . . .15
Power Sources . . . . . . . . . . . . . . . . . . . . . . . . . . . . . . . . . . . . . . . . . . . . .15
Set Up and Connect to the Internet . . . . . . . . . . . . . . . . . . . . . . . . . . . . . . . 16
Insert the SIM Card . . . . . . . . . . . . . . . . . . . . . . . . . . . . . . . . . . . . . . . . .16
Connect to the Internet . . . . . . . . . . . . . . . . . . . . . . . . . . . . . . . . . . . . . .17
AirCard Watcher App for Smartphones and Tablets . . . . . . . . . . . . . . . .18
Homepage . . . . . . . . . . . . . . . . . . . . . . . . . . . . . . . . . . . . . . . . . . . . . . . .18
Security Credentials . . . . . . . . . . . . . . . . . . . . . . . . . . . . . . . . . . . . . . . . .19
Use Your Mobile Hotspot . . . . . . . . . . . . . . . . . . . . . . . . . . . . . . . . . . . . . . . . .21
Set Auto Connect and Network Options. . . . . . . . . . . . . . . . . . . . . . . . . . . . 21
View Data Usage . . . . . . . . . . . . . . . . . . . . . . . . . . . . . . . . . . . . . . . . . . . . . 22
Select a Language . . . . . . . . . . . . . . . . . . . . . . . . . . . . . . . . . . . . . . . . . . . . 23
Enable / Disable Wi-Fi . . . . . . . . . . . . . . . . . . . . . . . . . . . . . . . . . . . . . . . . . 23
View / Block Connected Users. . . . . . . . . . . . . . . . . . . . . . . . . . . . . . . . . . . 24
Add a Wireless Device to your Wi-Fi Network . . . . . . . . . . . . . . . . . . . . . . . 25
View Messages / Alerts . . . . . . . . . . . . . . . . . . . . . . . . . . . . . . . . . . . . . . . . 26
Use the GPS Feature. . . . . . . . . . . . . . . . . . . . . . . . . . . . . . . . . . . . . . . . . . 27
Battery Settings . . . . . . . . . . . . . . . . . . . . . . . . . . . . . . . . . . . . . . . . . . . . . . 28
Extend Battery Life . . . . . . . . . . . . . . . . . . . . . . . . . . . . . . . . . . . . . . . . . .28
Set Audio Alerts . . . . . . . . . . . . . . . . . . . . . . . . . . . . . . . . . . . . . . . . . . . . . . 30
Change Device Security Settings. . . . . . . . . . . . . . . . . . . . . . . . . . . . . . . . . 31
View Details About Your Mobile Hotspot . . . . . . . . . . . . . . . . . . . . . . . . . . . 32
7
Page 8

AirCard 763S Mobile Hotspot User Guide
Use the microSD Card to Share Files over Wi-Fi . . . . . . . . . . . . . . . . . . . . 33
Before you Begin . . . . . . . . . . . . . . . . . . . . . . . . . . . . . . . . . . . . . . . . . . . 33
Share or Access Files over Wi-Fi . . . . . . . . . . . . . . . . . . . . . . . . . . . . . . 35
Recharge the Battery. . . . . . . . . . . . . . . . . . . . . . . . . . . . . . . . . . . . . . . . . . 37
Update the Firmware. . . . . . . . . . . . . . . . . . . . . . . . . . . . . . . . . . . . . . . . . . 38
Advanced Settings . . . . . . . . . . . . . . . . . . . . . . . . . . . . . . . . . . . . . . . . . . . . . . 43
Show Help for Advanced Settings. . . . . . . . . . . . . . . . . . . . . . . . . . . . . . . . 43
Do not Automatically Install Driver for USB Tethering. . . . . . . . . . . . . . . . . 44
Export / Import Router Options . . . . . . . . . . . . . . . . . . . . . . . . . . . . . . . . . . 45
Set Display Options. . . . . . . . . . . . . . . . . . . . . . . . . . . . . . . . . . . . . . . . . . . 46
Lock or Unlock Device Keys . . . . . . . . . . . . . . . . . . . . . . . . . . . . . . . . . . . . 46
View WAN Information. . . . . . . . . . . . . . . . . . . . . . . . . . . . . . . . . . . . . . . . . 47
Set Connection Preferences . . . . . . . . . . . . . . . . . . . . . . . . . . . . . . . . . . . . 48
Enable SIM Security . . . . . . . . . . . . . . . . . . . . . . . . . . . . . . . . . . . . . . . . . . 48
View Wi-Fi Status and List of Connected Devices. . . . . . . . . . . . . . . . . . . . 49
Set Wi-Fi Network Options . . . . . . . . . . . . . . . . . . . . . . . . . . . . . . . . . . . . . 50
Set Wi-Fi Security Options. . . . . . . . . . . . . . . . . . . . . . . . . . . . . . . . . . . . . . 51
Set MAC Filter Mode . . . . . . . . . . . . . . . . . . . . . . . . . . . . . . . . . . . . . . . . . . 52
Enable Port Forwarding. . . . . . . . . . . . . . . . . . . . . . . . . . . . . . . . . . . . . . . . 53
Enable Port Filtering . . . . . . . . . . . . . . . . . . . . . . . . . . . . . . . . . . . . . . . . . . 53
Enable VPN Passthrough . . . . . . . . . . . . . . . . . . . . . . . . . . . . . . . . . . . . . . 54
Enable DMZ. . . . . . . . . . . . . . . . . . . . . . . . . . . . . . . . . . . . . . . . . . . . . . . . . 55
Enable Universal Plug and Play . . . . . . . . . . . . . . . . . . . . . . . . . . . . . . . . . 56
Set Router LAN Options . . . . . . . . . . . . . . . . . . . . . . . . . . . . . . . . . . . . . . . 56
Frequently Asked Questions . . . . . . . . . . . . . . . . . . . . . . . . . . . . . . . . . . . . . 59
Troubleshooting . . . . . . . . . . . . . . . . . . . . . . . . . . . . . . . . . . . . . . . . . . . . . . . . 63
Reset the Mobile Hotspot . . . . . . . . . . . . . . . . . . . . . . . . . . . . . . . . . . . . . . 65
Alerts . . . . . . . . . . . . . . . . . . . . . . . . . . . . . . . . . . . . . . . . . . . . . . . . . . . . . . 66
8
Page 9

Contents
Specifications . . . . . . . . . . . . . . . . . . . . . . . . . . . . . . . . . . . . . . . . . . . . . . . . . .69
Mechanical Specifications . . . . . . . . . . . . . . . . . . . . . . . . . . . . . . . . . . . . . . 69
Environmental Specifications. . . . . . . . . . . . . . . . . . . . . . . . . . . . . . . . . . . . 69
Regulatory and Safety Information . . . . . . . . . . . . . . . . . . . . . . . . . . . . . . . . .71
Notice. . . . . . . . . . . . . . . . . . . . . . . . . . . . . . . . . . . . . . . . . . . . . . . . . . . . . . 71
Safety and Hazards . . . . . . . . . . . . . . . . . . . . . . . . . . . . . . . . . . . . . . . . . . . 71
Regulatory Information for North America . . . . . . . . . . . . . . . . . . . . . . . .72
Index . . . . . . . . . . . . . . . . . . . . . . . . . . . . . . . . . . . . . . . . . . . . . . . . . . . . . . . . . 75
9
Page 10

AirCard 763S Mobile Hotspot User Guide
10
Page 11
1: Get Started
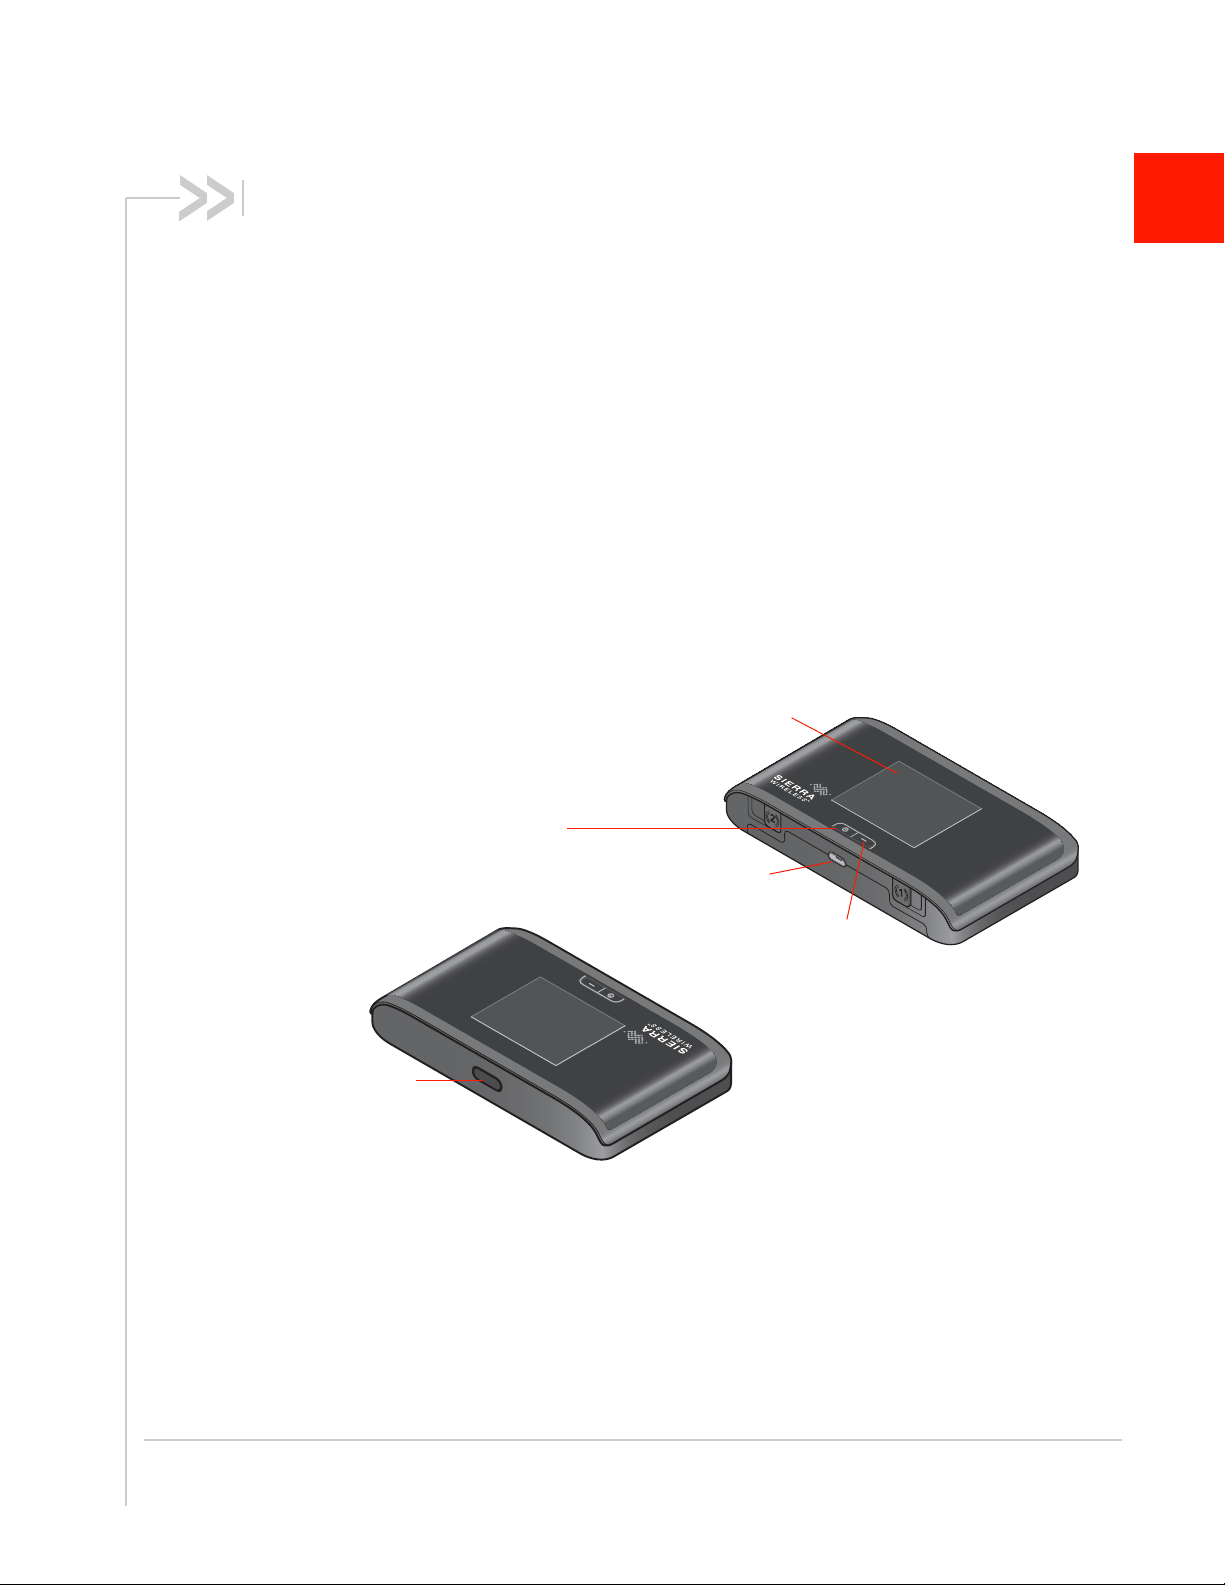
LCD screen
Power key
Navigation key
Micro USB connector
WPS button
Flashes when device is powered on
This chapter provides an overview of AirCard® 763S Mobile Hotspot
features, and instructions on how to set up your mobile hotspot and
connect to the Internet.
Know Your Device
Your mobile hotspot enables you to create a Wi-Fi access point
anywhere there is cellular network coverage. You can use that Wi-Fi
access point to connect your laptop and other Wi-Fi capable devices
to your service provider’s mobile broadband network and connect to
the Internet.
You can also use your mobile hotspot in tethered mode by connecting
it to your laptop with the USB cable to access the Internet.
Additional features include:
• GPS
• Wi-Fi Protected Setup (WPS)
1
Manage your Device and Settings
You can manage your device and change settings using:
• Mobile Hotspot Buttons and Keys (see page 12)
• The device LCD (see page 13)
• The Homepage (see page 18)
11
Page 12

AirCard 763S Mobile Hotspot User Guide
• AirCard Watcher App for Smartphones and Tablets (see page 18)
Mobile Hotspot Buttons and Keys
The mobile hotspot has a Power key, Navigation key and a WPS button. Press
these buttons or keys alone or in combination to activate various functions. Here’s
a summary of how to use them.
Button / Key Action Result / Indicates More details
Power
Navigation
—
WPS Press and hold for 2 seconds Enter WPS mode (used to add
WPS + Navigation Press and hold for 3 seconds Mute / enable audio on the
WPS + Power Press and hold for 5 seconds Reset the mobile hotspot to
Press and hold for 2 seconds Power on / off.
Press and release Select or save an option when
prompted on the LCD screen.
Flashing blue slowly Mobile hotspot is powered on.
Flashing blue quickly Firmware is being updated. Do
not disconnect or power down
the mobile hotspot until the
firmware update is complete.
Press and release • Enter dashboard mode.
• Select an option when
prompted on the LCD
screen.
Press and hold for 3 seconds Lock / unlock all keys. Provided this feature is
WPS-enabled Wi-Fi devices to
your Wi-Fi network).
mobile hotspot.
factory settings.
Dashboard mode on page 13
enabled on the homepage
(See Lock or Unlock Device
Keys on page 46.)
Add a Wireless Device to your
Wi-Fi Network on page 25
Set Audio Alerts on page 30
Reset the Mobile Hotspot on
page 65
Lock / Unlock all Keys
The mobile hotspot’s keys and buttons can be locked to prevent selection of
hotspot features when the hotspot buttons or keys are accidentally pressed (for
example, when in a bag).
If this feature is enabled, you can lock / unlock the device keys by pressing the
Navigation key (—) for 3 seconds. For information on enabling this feature, see
Lock or Unlock Device Keys on page 46.
12
Page 13

Get Started
Mute or Enable Audio
To mute or enable audio:
1. Do one of the following:
· Press and hold the WPS button + Navigation key for 3 seconds.
· Press the Navigation key repeatedly until you see the Alerts LCD screen.
Press the Power key to mute or enable audio alerts.
2. Optional: On the Web UI, you can select the events for which the mobile
hotspot will beep. For more information, see Set Audio Alerts on page 30.
LCD
As well as providing setup information (SSID and Wi-Fi Passphrase) the mobile
hotspot LCD displays:
• Instructions during setup
• Status messages such as “Searching for network”, “Connected”, etc.
• Status icons (See Icons on the LCD Screen on page 14 for details.)
• Data usage information
• SSID (Network name)
• Error messages (See Alerts on page 66 for troubleshooting suggestions.)
Dashboard mode
Press and release the Navigation key to cycle through the Dashboard screens.
The information and instructions available on the Dashboard varies depending on
your device and your service provider. Information available may include:
• Connect information (SSID and Wi-Fi Passphrase) and homepage URL.
From this screen, you can press the Power key to connect the mobile hotspot
to your service provider’s mobile broadband network.
• WPS (Wi-Fi Protected Setup) — A fast, easy way to connect WPS-enabled
devices to your Wi-Fi network
• Messages and alerts
• Billing information
• Information about the mobile hotspot such as the Wi-Fi network range,
network preference, firmware version, etc.
13
Page 14
AirCard 763S Mobile Hotspot User Guide
Network
AirCard-xxxx
Wi-Fi Passphrase: 12345678
To conĮŐƵre yŽƵƌŚŽƚƐƉŽƚ
ŐŽƚŽŚƩƉĂŝƌĐĂƌĚŚŽƚƐƉŽƚ
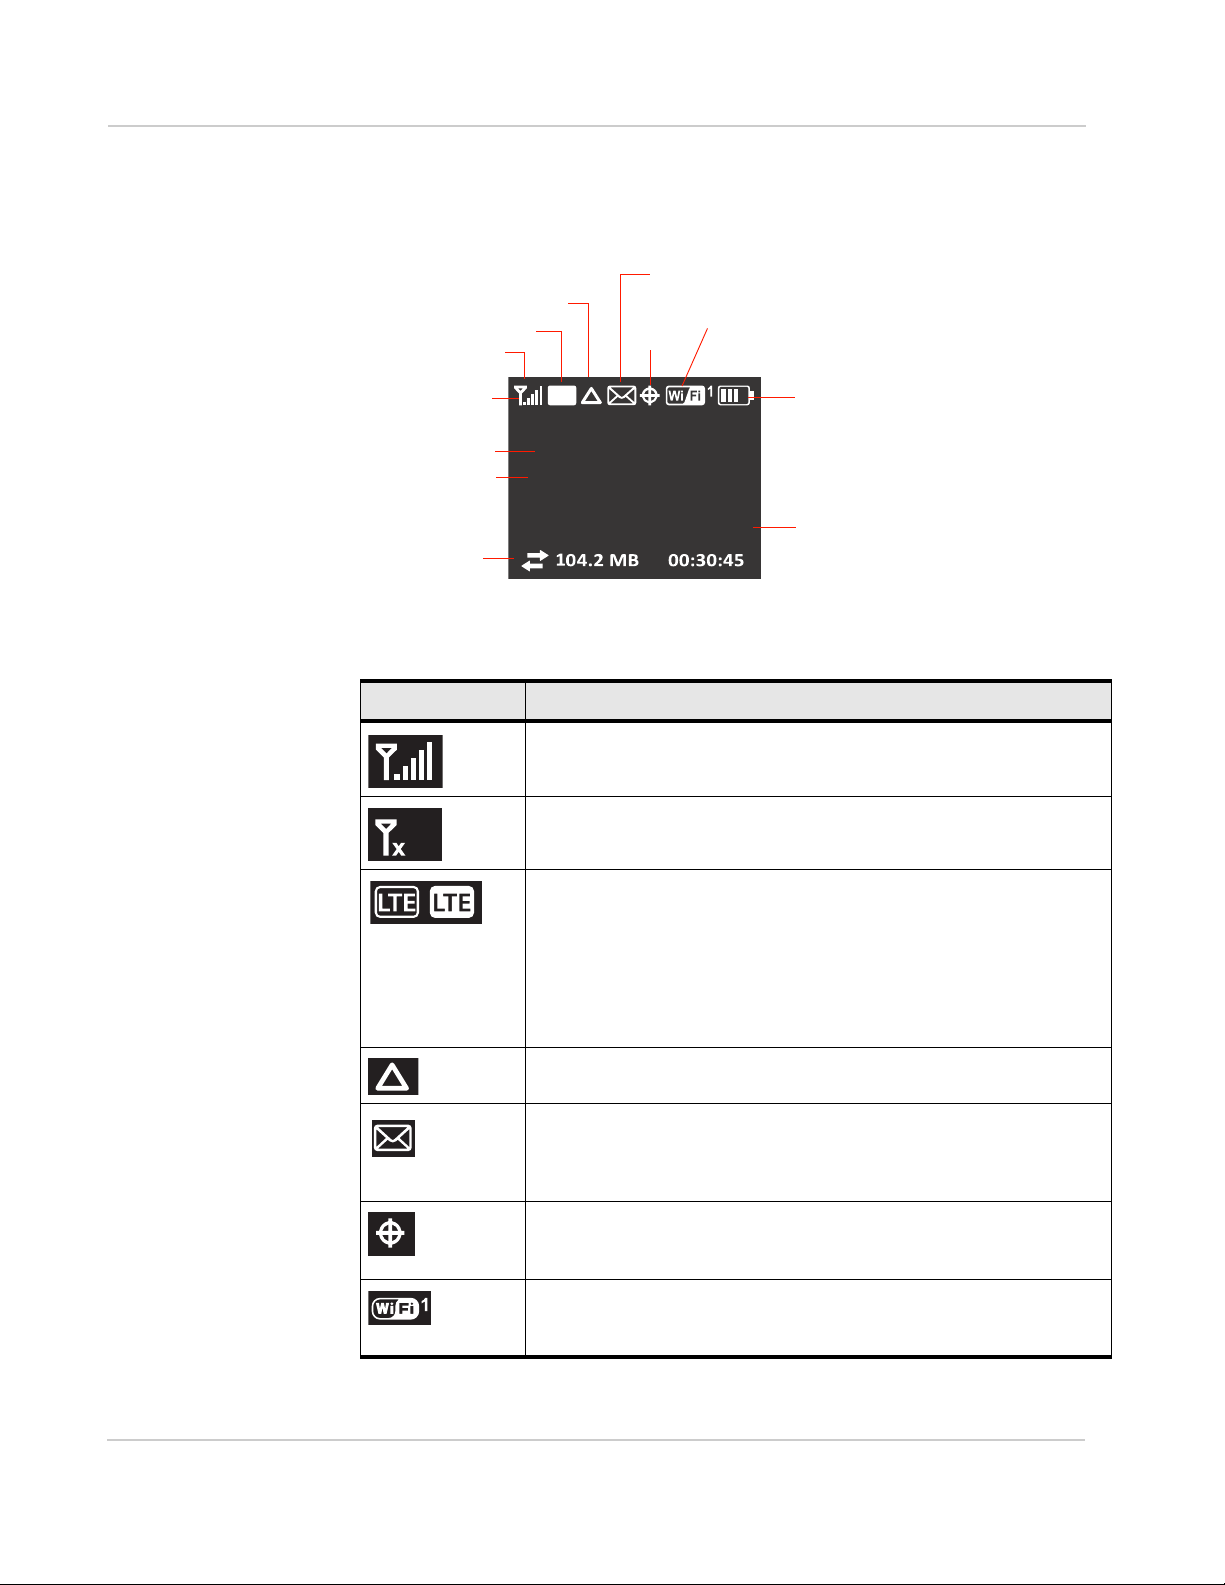
LT E
Signal strength
Network indicator
GPS
Wi-Fi
Battery
SSID
Wi-Fi Passphrase
Session data usage
Messages and alerts
View at http://aircard.hotspot
Status icons
Wi-Fi on/off
Number of connected devices
Device homepage
Default admin password is swiadmin
Home Screen
To enter Dashboard mode and access additional LCD screens, press the Navigation key.
Roaming indicator
Icons on the LCD Screen
The icons on the LCD screen indicate the status of the mobile hotspot.
Icon Indicates
Signal strength
The more bars the stronger the cellular signal.
No signal
Network type (The icons that may appear depend on your service
provider and device.)
A Network icon with a black background indicates that service is
available, but the mobile hotspot is not connected to the network.
A network icon with a white background indicates that the mobile
hotspot is connected to the network.
Roaming
Messages / Alerts
Y ou have messages (from your service provider) or alerts (device status
messages) . To view your messages / alerts, go to the homepage and
click the Messages / Alerts icon.
GPS
When the GPS icon flashes, the mobile hotspot is trying to obtain a
satellite fix or is tracking a location.
Wi-Fi users
The number beside the Wi-Fi icon shows the number of users (devices)
connected to your Wi-Fi network.
14
Page 15

Icon Indicates
Wi-Fi radio disabled or device is in standby mode
To adjust the standby timer, see Extend Battery Life on page 28.
For information on enabling Wi-Fi, see page 63. (The Wi-Fi radio is
disabled icon appears on the LCD screen.)
Battery status
Indicates the charge status of the battery
4 bars — 80 – 100%
1 bar — 10 – 29%
Battery outline (no bars) — 0 – 9%
Recharge immediately.
Battery charging
No battery
The mobile hotspot is powered on and connected to the AC charger.
The battery is charging through a USB connection.
Get Started
The mobile hotspot is in the AirCard Hub.
Accessories
Depending on your service provider, the following accessories may be included:
• Micro USB cable — Used mainly for recharging the battery, although you can
also use it to tether the mobile hotspot to your computer
• AC adapter — Used with the USB cable to recharge the battery or to power
the mobile hotspot from a wall socket
• Charging cradle
• Extended battery
Additional accessories are available from
www.sierrawireless.com/wheretobuy/onlinestore/default.aspx.
Power Sources
You can power your mobile hotspot from:
• Rechargeable battery included with the mobile hotspot
• USB port on your computer
• Wall socket using the AC adapter and USB cable
15
Page 16

AirCard 763S Mobile Hotspot User Guide
Battery
Gold contacts
Default
security credentials
Set Up and Connect to the Internet
Insert the SIM Card
Depending on your service provider, the SIM card may already be inserted. If you
need to insert it:
1. Slide the SIM card under the cover.
Install the Battery
1. Insert the battery as shown in the illustration. Ensure that the gold contacts
on the battery are lined up with the gold contacts on the device.
2. Replace the back cover.
Note: Depending on your service provider, the battery may come partially-charged and
ready to go. When the battery needs recharging, follow the instructions in Recharge the
Battery on page 37.
16
Page 17

Get Started
Connect to the Internet
Note: Your mobile hotspot does not need to be connected to the computer with the USB
cable to connect to the Internet. The USB cable is used mainly for recharging the battery.
(If you want to connect to the Internet with the mobile hotspot tethered to the laptop with
the USB cable, see Tethered mode before connecting for the first time.)
To connect to the Internet:
1. Press and hold the Power key for a few seconds to turn on the mobile
hotspot.
The first time you turn on the mobile hotspot, you’ll be asked to select a language on the LCD. After that, you can change the language on the homepage. (See Select a Language on page 23.)
The mobile hotspot automatically searches for and connects to your service
provider’s mobile broadband network. You can also connect to your service
provider’s network from the dashboard. See Dashboard mode on page 13.
The LCD screen displays the message “Connect your computer to Wi-Fi network”. The SSID and the Wi-Fi Passphrase are shown on the LCD screen.
Note: The LCD screen may go into sleep mode to save power. To wake up the LCD
screen, press any button or key.
2. Connect your computer or other device to your Wi-Fi network.
a. On your computer, view the list of available Wi-Fi networks.
b. Select the SSID displayed on the mobile hotspot LCD screen, and
connect to it.
c. When prompted, enter your Wi-Fi Passphrase as it appears on the mobile
hotspot LCD screen.
3. Launch your browser to surf the Internet.
Optional: To personalize the mobile hotspot and change the settings, go to the
homepage http://aircard.hotspot.
Note: To make changes to the mobile hotspot settings on the homepage, you must first log
in as Administrator. Type swiadmin in the Admin Password field.
Tethered mode
The first time you use your mobile hotspot in tethered mode (connected to a
computer using the USB cable):
1. Ensure that the mobile hotspot is powered off.
2. Use the USB cable to connect the mobile hotspot to your computer.
The mobile hotspot automatically powers on and installs the necessary driver.
3. Once the driver is installed, you can surf the net or go to the homepage
http://aircard.hotspot to customize your mobile hotspot.
17
Page 18
AirCard 763S Mobile Hotspot User Guide
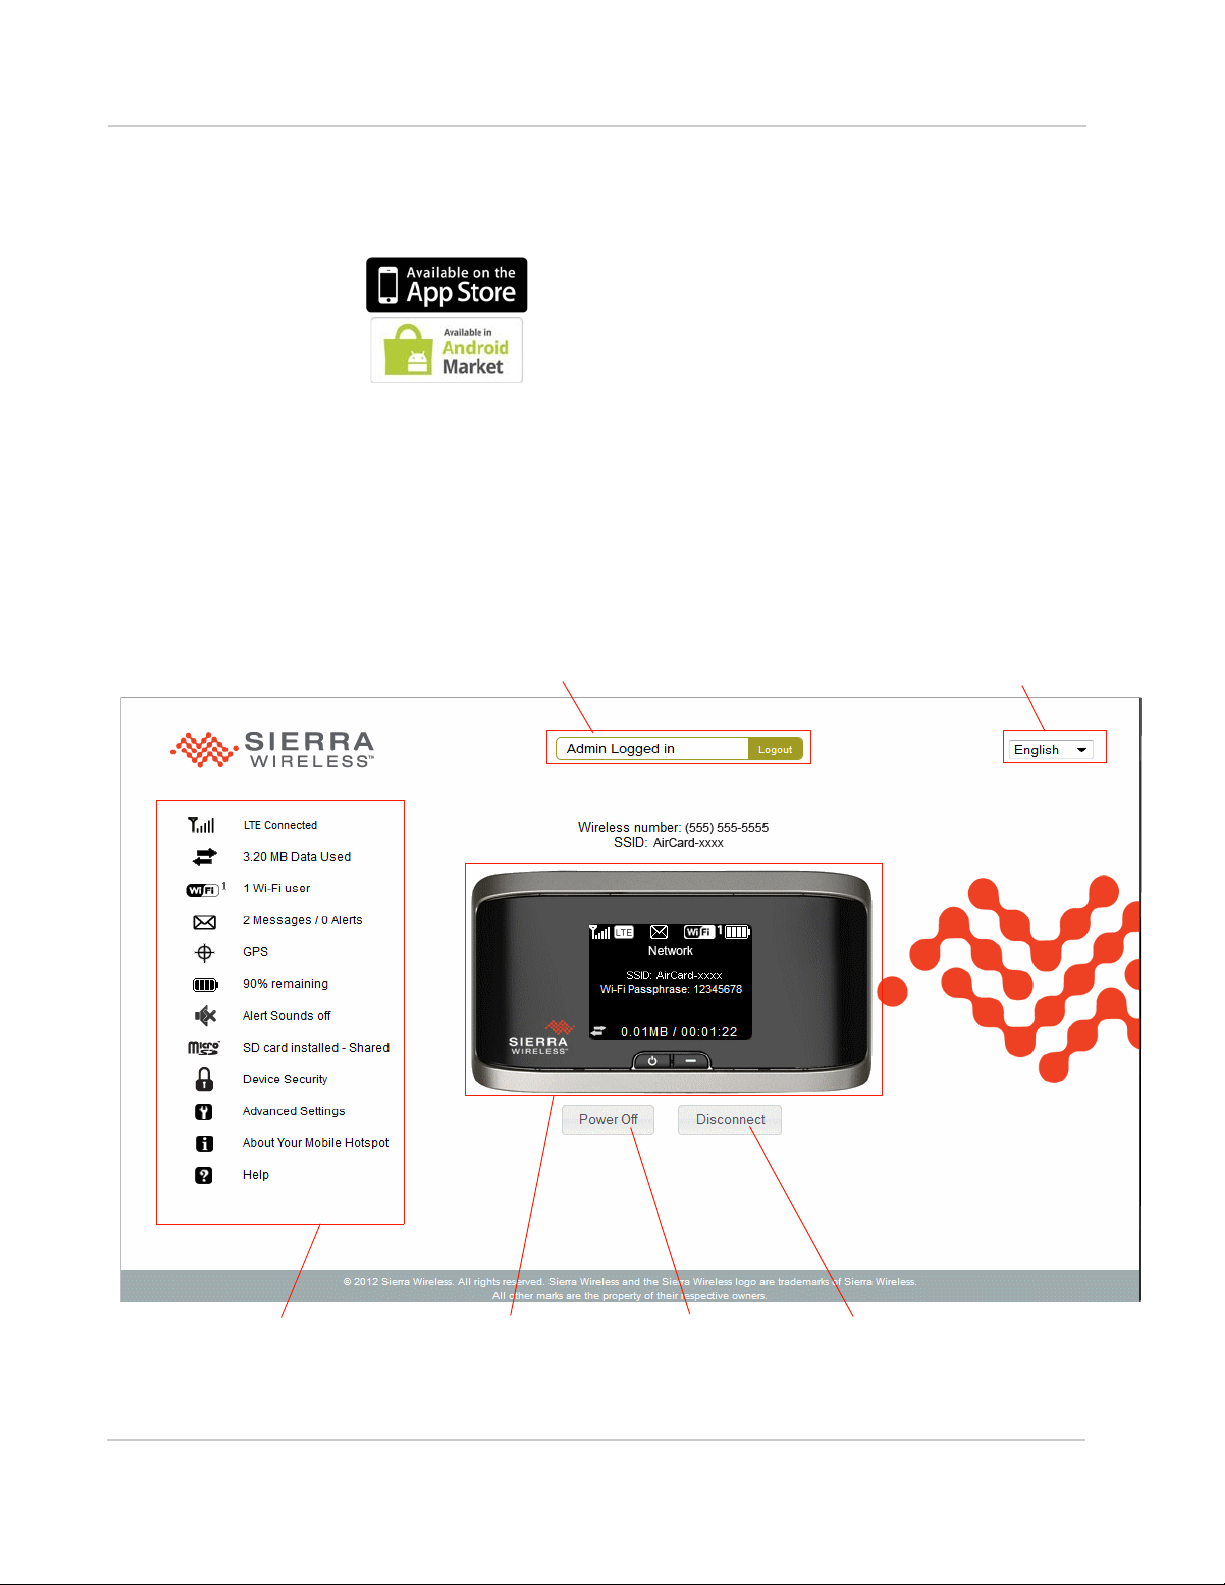
Status and settings Virtual image of the device Connect / DisconnectPower off
Admin Password
Change Web UI language*
* Changes the language used for the current session. To change the language used for subsequent sessions as well, see Select a Language on
page 23.
AirCard Watcher App for Smartphones and Tablets
Homepage
Your mobile hotspot comes configured, perfectly secure, and ready to use, but if
you want to change the security settings, the SSID, and other settings, go to your
mobile hotspot’s homepage.
The homepage URL http://aircard.hotspot is shown on the LCD during setup. You
can also find it in the Quick Start Guide that came with your mobile hotspot.
To make changes to the settings on the homepage, you must be logged in as
Administrator (default Admin Password is swiadmin).
Download the complimentary AirCard Watcher™ app from
www.sierrawireless.com/AirCardApps. Use this app to view
your connection, settings, and data usage from your
smartphone or tablet. To manage all hotspot settings, go to
the homepage http://aircard.hotspot.
18
Page 19

Get Started
You can view some information about the device without being logged in as
Administrator, but to view detailed information and to change any settings and use
some features, you must be logged in as Administrator.
To log in as Administrator:
1. Place your cursor in the Admin Password field and type swiadmin (the
default Admin Password).
2. Click Login.
The first time you log in, you will be asked to accept the terms and conditions.
Click Agree to accept.
Once you are logged in with the default Admin Password, you can view detailed
information and change mobile hotspot settings, such as:
• Change the SSID, Wi-Fi Passphrase, Admin Password, and Wi-Fi encryption
• Set autoconnect options
• Set GPS options
• Use GPS to track or map your location and find nearby amenities
• Set battery options
• View data usage
• Set audio alerts
• Change advanced settings such as security settings and router options
Security Credentials
Two passwords are associated with the mobile hotspot:
• Wi-Fi Passphrase — Used to connect your computer or other Wi-Fi device to
your mobile hotspot network. This character string is unique to your device. It
is displayed on the main mobile hotspot LCD screen. If the screen is blank (a
power-saving feature), press and release any button or key to wake up the
LCD screen. The default Wi-Fi Passphrase is also printed on a label under
the battery.
• Admin Password — Used to log into the homepage as Administrator. You
must be logged in as Administrator to use certain features and to make
changes to your mobile hotspot settings. The default Admin Password,
swiadmin, is printed on a label under the battery. The Admin Password can
be 5–31 characters.
You can change both of these passwords on the homepage,
http://aircard.hotspot. For more information, see Change Device Security Settings
on page 31.
19
Page 20

AirCard 763S Mobile Hotspot User Guide
20
Page 21
2: Use Your Mobile Hotspot
This chapter provides information on how to use your mobile hotspot.
Note: To change settings you need to be logged in as Administrator. See
Homepage on page 18.
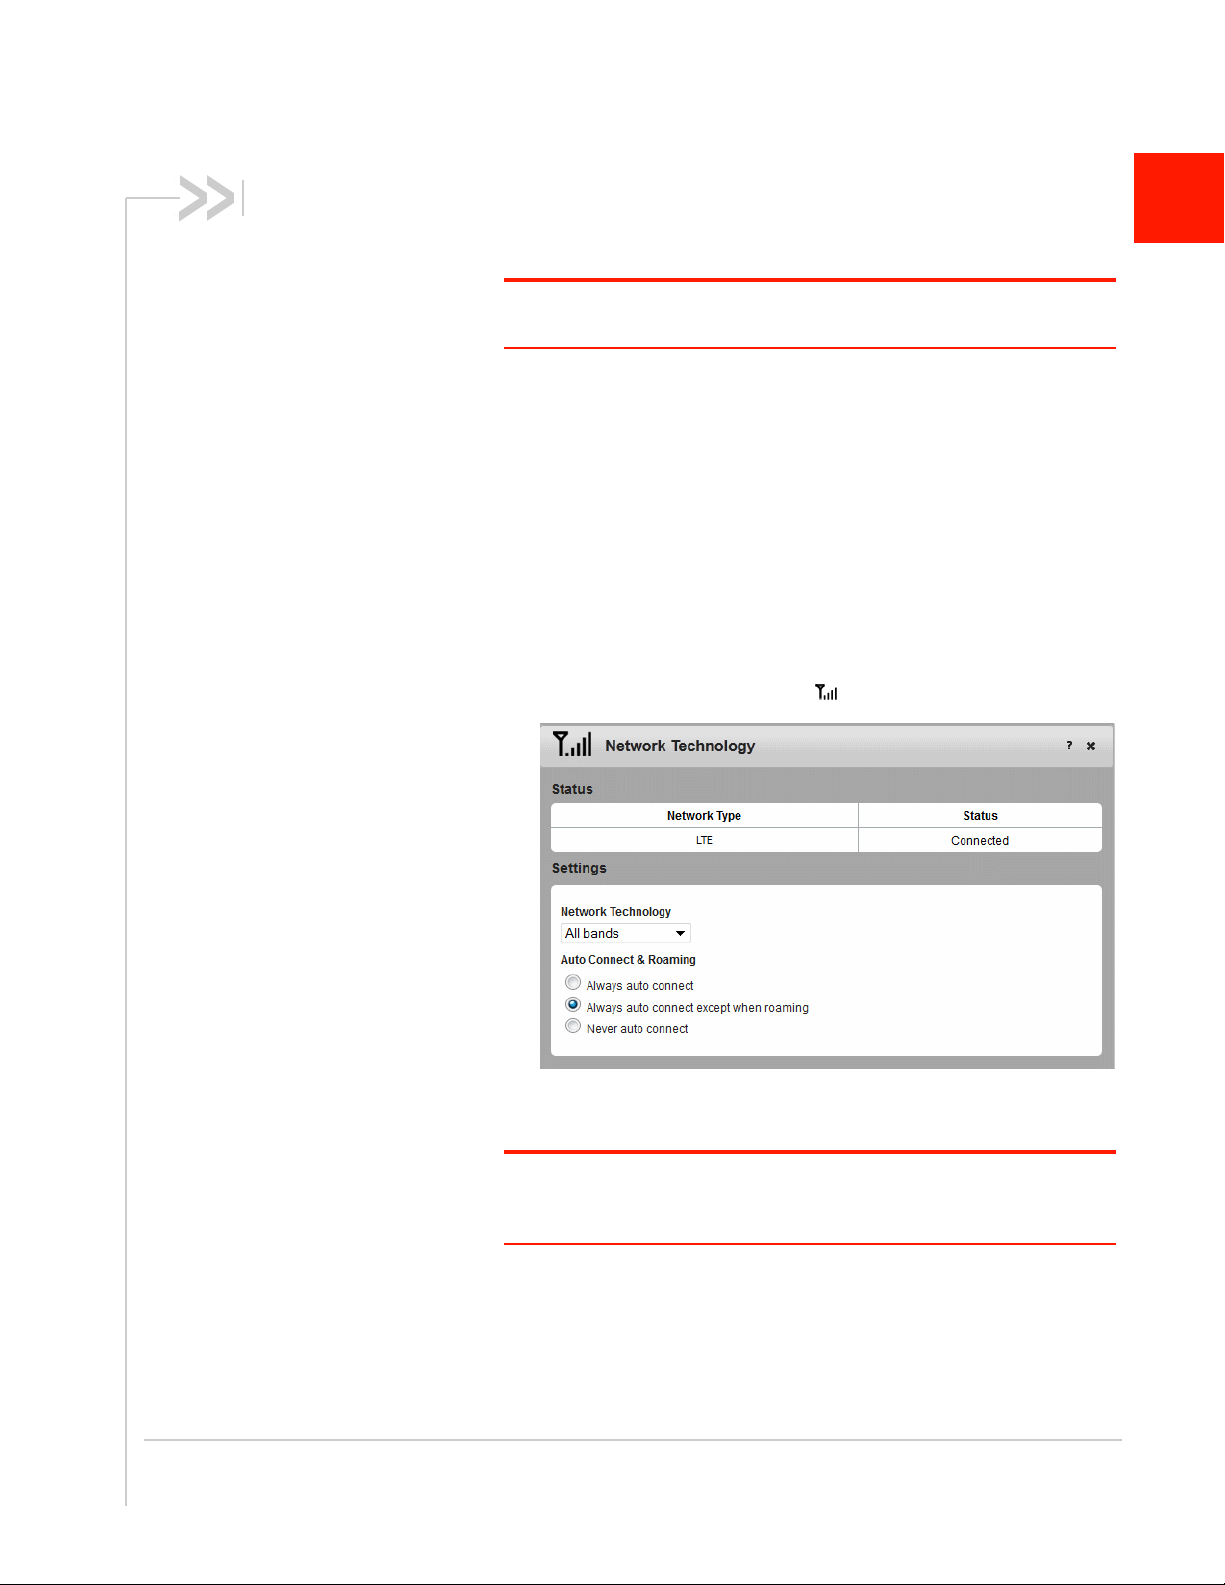
Set Auto Connect and Network Options
By default, the mobile hotspot automatically connects to your service
provider’s mobile broadband network. You can change this feature so
that the mobile hotspot automatically connects to another network
when you are roaming, or never auto connects.
To select the auto connect and network technology options:
1. On the homepage, log in as Administrator.
2. Click the Signal Strength icon ( ).
2
3. Under Network Technology, select the desired option from the
drop-down menu.
Note: For most users, it is best to leave the default setting (All bands). If you
choose a network technology that is not available, you will be unable to
connect to a mobile broadband network.
4. Under Auto Connect & Roaming, select the desired option:
· Always auto connect — The mobile hotspot automatically
attempts to connect to the mobile broadband network when
powered on. You may incur additional roaming charges if you
are outside of your service provider’s coverage area.
21
Page 22
AirCard 763S Mobile Hotspot User Guide
Data usage
Network
AirCard-xxxx
Wi-Fi Passphrase: 12345678
To c onĮŐƵre yŽƵƌŚŽƚƐƉŽƚ
ŐŽƚŽŚƩƉĂŝƌĐĂƌĚŚŽƚƐƉŽƚ
LT E
Billing Info
Data used from: 2011/06/18
Data transferred: 24.23 MB*
Cycle restarts: 2011/07/01
ĂLJƐůĞŌϭϮĚĂLJƐ
(4/5)
* approximate
On the
On the Dashboard:
Press the Navigation
key until the Billing
Info screen appears.
main screen
(current session)
· Always auto connect except when roaming — The mobile hotspot automatically attempts to connect only to your service provider’s mobile broadband
network when powered on (default).
· Never auto connect — The mobile hotspot will not attempt to automatically
connect to the mobile broadband network when powered on.
If you choose this option, press the Power key and follow the instructions on
the LCD screen to connect, or go to the homepage
http://aircard.hotspot and click Connect. See page 16 for more information.
5. Click Save.
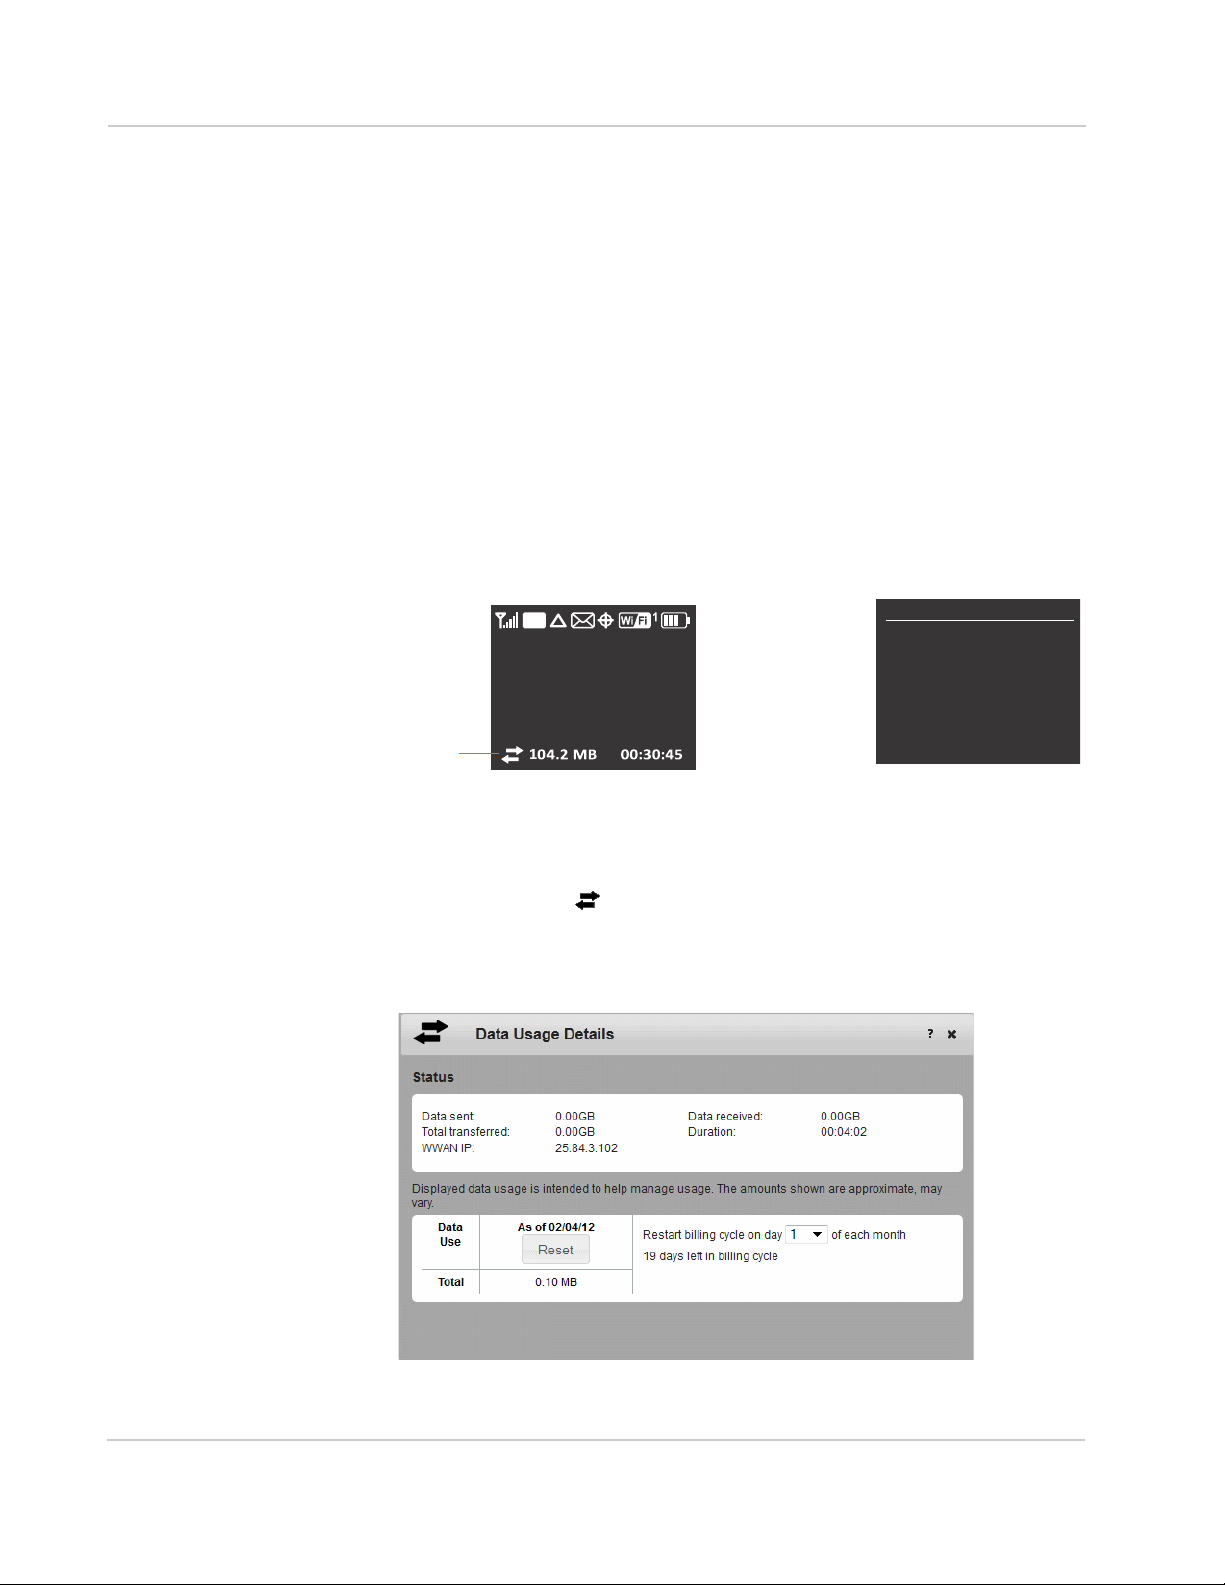
View Data Usage
You can view an estimate of your data usage (not accurate for billing purposes)
on the homepage and on the LCD screen.
On the LCD screen:
On the homepage:
1. On the homepage, log in as Administrator.
2. Click the Data icon ( ).
3. From the drop-down list, select the day of the month your billing cycle starts
(typically the first of the month). This information is available on your service
provider’s bill.
22
To reset the data counter manually, click Reset.
Page 23
Use Your Mobile Hotspot
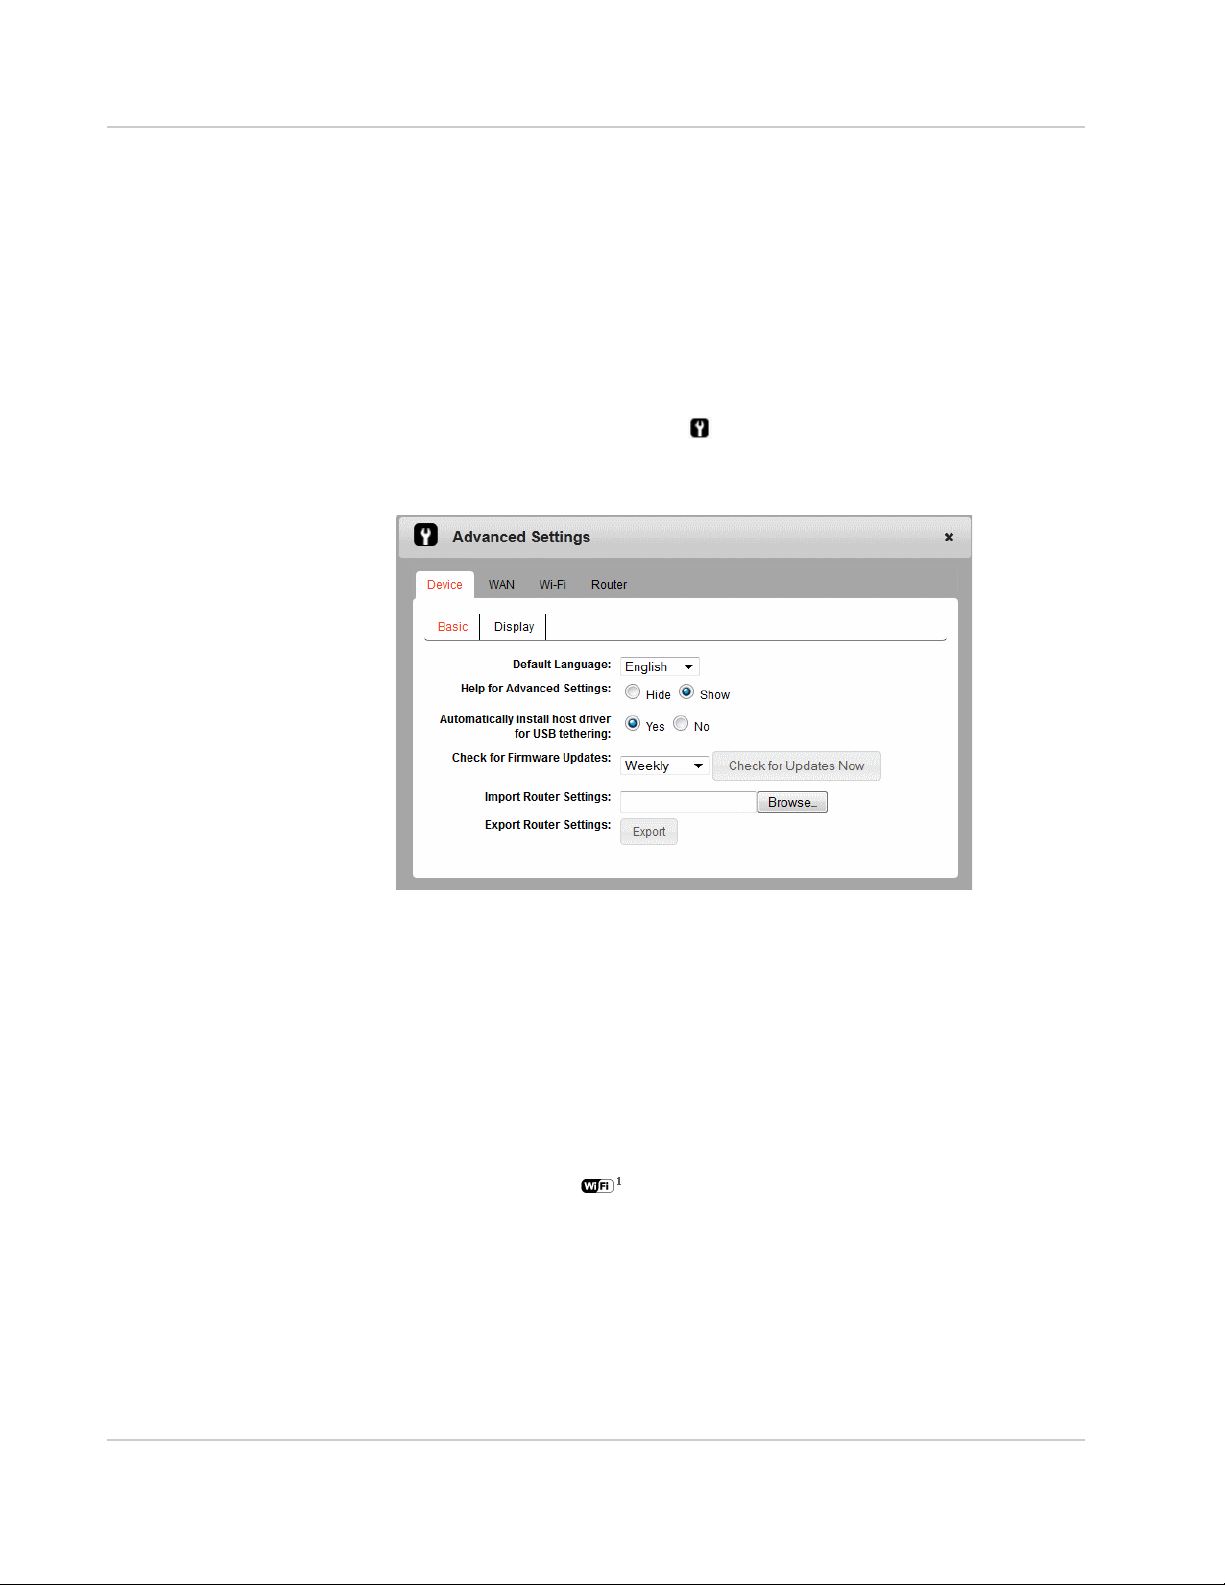
Select a Language
The first time you power on the mobile hotspot, you can choose the desired
language. Press the Navigation key to cycle through the available languages and
press the Power key to select a language. The selected language is used for the
homepage and the LCD.
To change the language used in the current session only, select the desired
language from the drop-down menu in the upper right corner of the homepage.
To change the language used in the current and subsequent sessions:
1. Click the Advanced Setting icon ( ).
2. On the Device Basic page, select the desired language from the drop-down
menu.
3. Click Save.
Enable / Disable Wi-Fi
By default, Wi-Fi is enabled, but if your place of business does not allow Wi-Fi or
for any reason you want to disable Wi-Fi and use the mobile hotspot only in
tethered mode, the mobile hotspot gives you that option.
To enable / disable your Wi-Fi network:
1. On the homepage, log in as Administrator.
2. Click the Wi-Fi icon ( ).
23
Page 24
AirCard 763S Mobile Hotspot User Guide
3. To disable the Wi-Fi radio, beside Enable Wi-Fi, select Off.
4. Click Ok to confirm.
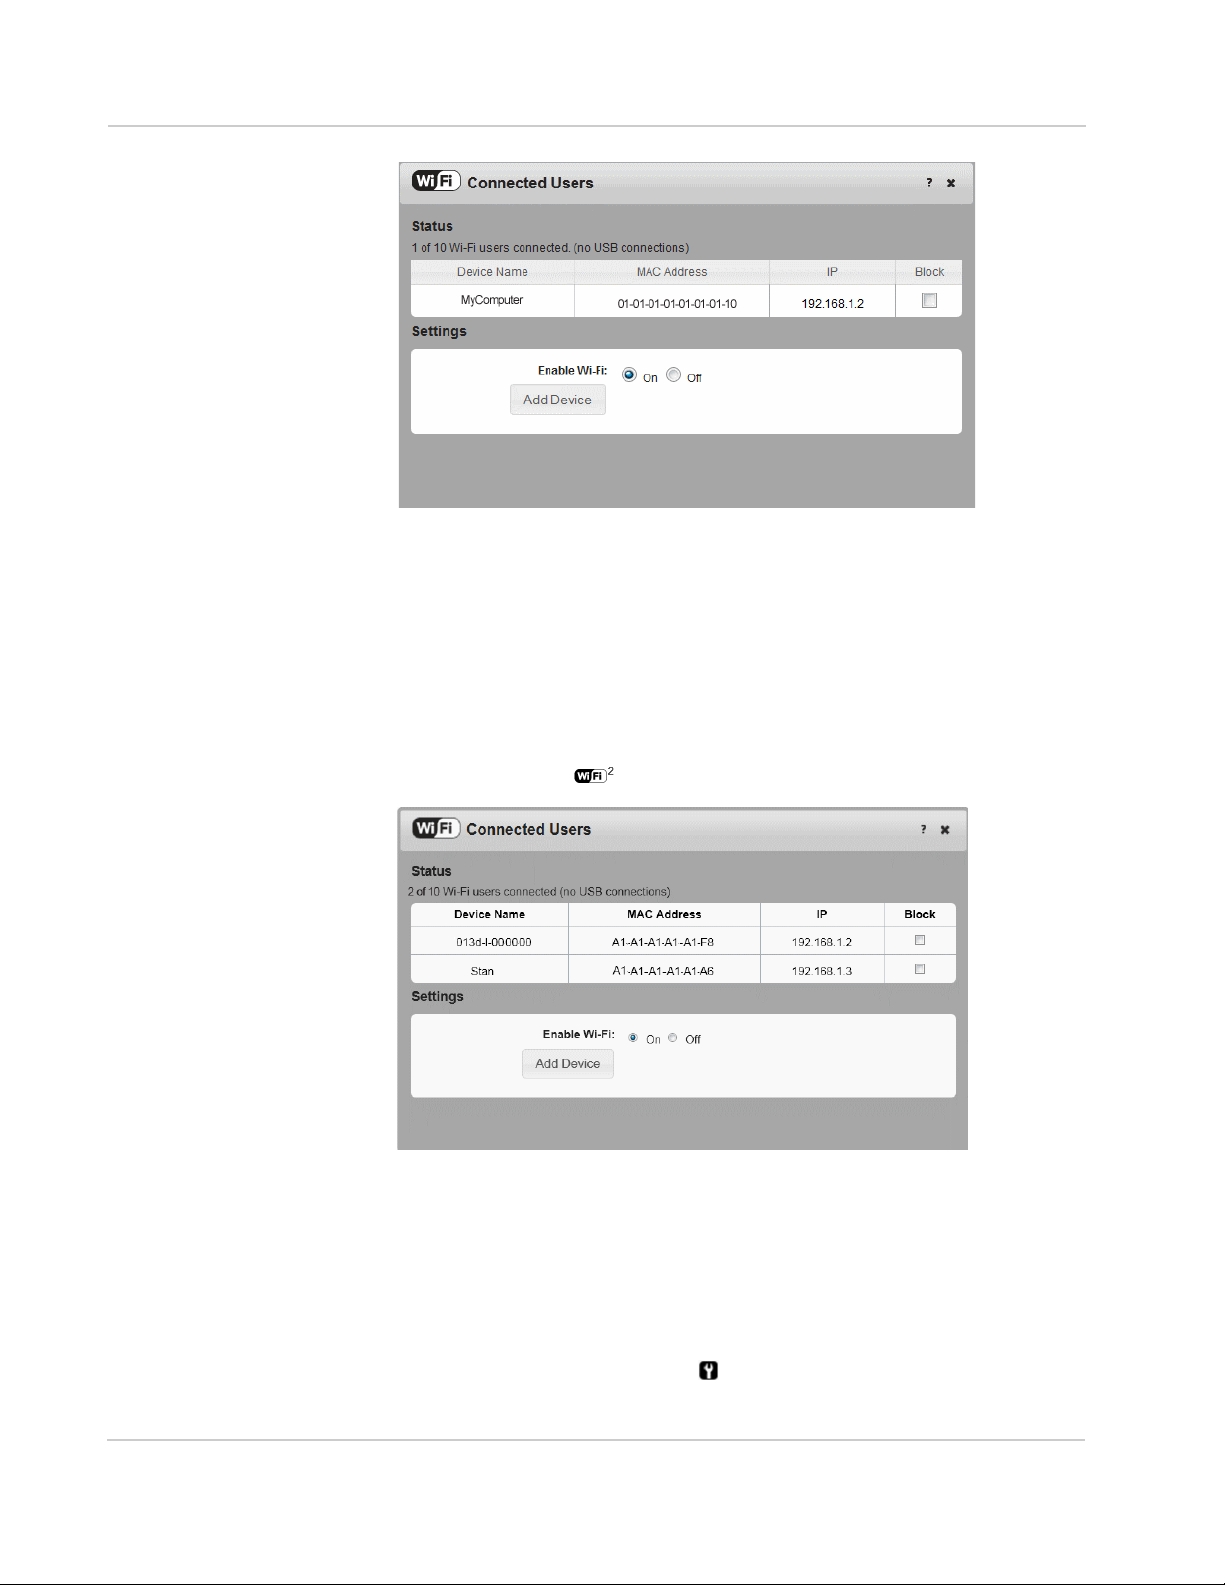
View / Block Connected Users
To view a list of devices connected to your mobile hotspot and block undesired
users:
1. On the homepage, log in as Administrator.
2. Click the Wi-Fi icon( ).
If you notice a user or Wi-Fi device that you do not recognize, you can block that
device from connecting to your Wi-Fi network.
To block a user (or device):
1. Select the box beside the device in the Block column.
2. Click Save.
To unblock a user and allow that device access to your network:
1. Click the Advanced Settings icon ( ).
2. Select Wi-Fi > Mac Filter.
24
Page 25

Use Your Mobile Hotspot
3. Click List of connected devices.
4. Clear the box beside the device in the Block column.
5. Click Save.
Add a Wireless Device to your Wi-Fi Network
You can connect up to ten wireless devices such as smart phones, laptops,
tablets, digital cameras, printers, gaming consoles, and digital picture frames to
your mobile hotspot network.
You can add a wireless device to your Wi-Fi network manually, or if the device you
are adding is Wi-Fi Protected Setup (WPS) enabled, you can use the WPS
method.
Manually (works for any Wi-Fi device)
1. On the wireless device you want to add to your network, view the list of
available Wi-Fi networks.
2. Connect to the network that corresponds to your mobile hotspot network, as
displayed on the LCD.
3. When prompted, enter the Wi-Fi Passphrase for your mobile hotspot network.
The Wi-Fi Passphrase is displayed on the mobile hotspot LCD screen. (If the
screen has turned off to save power, press and quickly release any button or
key to wake up the screen.)
WPS (works for WPS-enabled devices)
You can add a WPS-enabled Wi-Fi device to your Wi-Fi network using the device
or the mobile hotspot homepage.
Using the mobile hotspot:
1. On your mobile hotspot, do one of the following:
· Press the WPS button.
· Press the Navigation key repeatedly until you see the WPS Setup screen.
When the WPS Setup screen appears, press the Power key to enable
WPS.
2. Within 2 minutes, press the WPS button on the wireless device you want to
connect.
Your mobile hotspot and the wireless device will communicate and establish the
connection.
Using the mobile hotspot homepage:
1. On the homepage, log in as Administrator.
2. Click the Wi-Fi icon ( ).
3. Click Add Device.
4. Select the WPS tab.
25
Page 26

AirCard 763S Mobile Hotspot User Guide
• If the Wi-Fi device you are adding to your Wi-Fi network does not have a PIN
associated with it:
a. Select WPS button method.
b. Click Connect.
c. Within 2 minutes, press the WPS button on the wireless device you want
to connect.
Your mobile hotspot and the wireless device will communicate and establish
the connection.
• If the Wi-Fi device you are adding to your Wi-Fi network has a PIN associated
with it:
a. Select WPS PIN method.
b. When prompted, enter the PIN for your Wi-Fi device.
c. Click the Connect button.
d. Within 2 minutes, press the WPS button on the wireless device you want
to connect.
Your mobile hotspot and the wireless device will communicate and establish
the connection.
View Messages / Alerts
Your mobile hotspot can display messages from your service provider and alerts
to advise you of the device status. The Messages / Alerts icon ( ) on the device
LCD indicates that you have a message or an alert.
To view the message or alert:
1. On the homepage, log in as Administrator.
2. Click the Messages / Alerts icon ( ).
26
Page 27

Use Your Mobile Hotspot
3. Click the alert or message subject line to view the entire alert / message.
To delete messages, select the box beside the message and click Delete
selected.
Alerts are deleted automatically when the device status changes.
Note: By default, you receive an audio alert when the mobile hotspot receives an alert. For
more information on Audio alerts, see Set Audio Alerts on page 30.
Use the GPS Feature
1. On the homepage, log in as Administrator.
2. Click the GPS icon ( ).
27
Page 28

AirCard 763S Mobile Hotspot User Guide
3. Optional: Select the desired mapping service from the drop-down menu and
click Save.
4. Select the desired option:
· Get GPS Location (One-time satellite fix)
· Start GPS Tracking (Continuous tracking)
A new window with an animated GPS satellite opens to indicate that the
mobile hotspot is attempting to get a GPS fix.
If you have trouble obtaining a fix, ensure that the device has an unobstructed
view of the sky and you are not near tall buildings or other barriers that could
be blocking the GPS satellite signal.
5. Optional: Click the Map Me button on the top of the main homepage window
to view your location on a map and search for nearby amenities.
Battery Settings
The mobile hotspot, by default, is configured to optimize battery life. Battery life is
affected by:
• Standby time
• Data throughput
• GPS option (GPS tracking uses more power than getting a single GPS
location fix.)
• Mobile Broadband signal strength (the better the signal, the longer the battery
life)
• Wi-Fi range:
· Short Wi-Fi range — Slightly improved battery life
· Medium Wi-Fi range — Intermediate Wi-Fi range
· Long Wi-Fi range — Enables you to have your laptop (or other Wi-Fi device)
further from your mobile hotspot and still connect to your Wi-Fi network, but
the battery life is slightly shorter.
Extend Battery Life
There are several methods you can use to extend the battery life.
If the computer and other devices you are connecting to your Wi-Fi network are
always close to the mobile hotspot device, you can increase the battery life by
shortening the Wi-Fi range.
1. On the homepage, log in as Administrator.
2. Click the battery icon ( ).
28
Page 29

Use Your Mobile Hotspot
3. In the drop-down list beside Standby Timer on Battery, select the desired
time. (The shorter the time, the longer the battery life.)
The Standby Timer sets the length of time the mobile hotspot remains active
when no devices are connected to the Wi-Fi network.
4. Select the desired Wi-Fi range:
· Short Wi-Fi Range — Slightly improved battery life (default)
· Medium Wi-Fi Range — Intermediate Wi-Fi range
· Long Wi-Fi Range — Enables you to have your laptop (or other Wi-Fi
device) further from your mobile hotspot and still connect to your Wi-Fi
network, but battery life is slightly shorter.
5. Click Save.
You can also extend the battery life by adjusting the Power LED and LCD
backlight settings.
1. On the homepage, log in as Administrator.
2. Click the Advanced Settings icon ( ).
3. Select the Device tab and then select Display.
29
Page 30
AirCard 763S Mobile Hotspot User Guide
4. Set the desired options. For example, you can:
· Turn the Power LED and LCD backlight off.
· Set the time after which the LCD backlight turns off. (The shorter the time,
the longer the battery life.)
· Set the LCD backlight settings to Dim.
5. Click Save.
For more details, see Set Display Options on page 46.
Set Audio Alerts
You can configure your mobile hotspot to sound an audio alert (beep) when the
status changes. For example:
• When the connection status changes
• When you receive an alert
• When the battery is low
• When the mobile hotspot enters standby mode
To set the audio alerts:
1. Press the Navigation key to cycle through the LCD screens. On the
Messages / Alerts screen, ensure the Audio is enabled. (If Audio is disabled,
follow the instructions on the LCD screen to enable it.)
2. On the homepage, log in as Administrator.
3. Click the Sounds icon ( ).
30
Page 31

4. Select the desired options.
5. Click Save.
Use Your Mobile Hotspot
Change Device Security Settings
To change security settings such as Admin Password, SSID, Wi-Fi encryption,
and Wi-Fi Passphrase:
1. On the homepage, click the Device Security icon ( ).
2. Change the desired options.
· Admin Password: Length 5 – 31 characters
· Wi-Fi Passphrase: Length 5 – 31 characters
· By default, the Network name and Wi-Fi Passphrase are shown on the LCD
screen. If you do not want these to appear on your LCD screen, clear the
31
Page 32

AirCard 763S Mobile Hotspot User Guide
boxes beside Wi-Fi Passphrase visible on device and Show SSID on
device.
The Wi-Fi encryption options are:
· WPA2 Personal AES — Strong security supported by newer Wi-Fi devices
(default)
· WPA/WPA2 Personal — Strong security supported by most Wi-Fi devices
(Use this if you want to connect Wi-Fi devices that do not support WPA2
Personal AES.)
· None — Not recommended. Anyone can access your Wi-Fi network without
a password and you are responsible for charges incurred.
The encryption options available depend on the Basic rate. To change the
Basic rate and select another encryption option, go to Advanced Settings >
Wi-Fi > Security. For details, see Set Wi-Fi Security Options on page 51.
3. Click Save.
4. You may need to reconnect your Wi-Fi devices using the new Wi-Fi creden-
tials. See Set Up and Connect to the Internet on page 16.
View Details About Your Mobile Hotspot
To view details about your device such as the model number, software version,
IMEI, etc.:
1. Go to the homepage.
2. Click the About Your Mobile Hotspot icon ( ).
3. For additional information and to save a file that you can forward to your
service provider, click View Details. (If your service provider is troubleshooting
an issue, they may ask you to save this information and email the file to
them.)
32
Page 33

4. Click Save to File.
The file is saved in your Downloads folder as a text file.
Use Your Mobile Hotspot
Use the microSD Card to Share Files over Wi-Fi
Your mobile hotspot is equipped with a microSD reader. You can use this feature
to share music, photos, data files, etc. over your Wi-Fi network or in tethered
mode. The mobile hotspot supports microSD cards with up to 32 GB capacity.
Before you Begin
1. Remove the back cover.
2. Insert the microSD card as shown in the illustration.
33
Page 34

AirCard 763S Mobile Hotspot User Guide
3. Replace the back cover.
4. On the homepage, click the microSD icon ( ).
5. Choose the File Sharing option:
· Network — For sharing files over your Wi-Fi network
· USB Tethered — For sharing files using the USB cable to connect the
mobile hotspot to the computer.
6. Optional — If you select Network, you have the option of adding a password
that users must enter before viewing your files.
1
To enable the password option:
a. Select the box beside Enable File Sharing Password.
b. Type the password in the Password field and click Save.
Users will be asked to enter this password before they can access the
shared folder.
1. There is a Windows-related bug associated with using a password to access shared
files. If the computer being used to access the shared files has this bug, the Windows credentials dialog reappears after the password is entered, and the user must
reboot the computer and reconnect to the Wi-Fi network before accessing the files.
For more information, view our knowledge base articles at
www.sierrawireless.com/SupportCenter.aspx.
34
Page 35

Use Your Mobile Hotspot
Share or Access Files over Wi-Fi
If you want to upload, as well as view and download shared files, see View,
upload and download files on page 35.
If you only want to view and download files, see View and download only on
page 36.
View, upload and download files
To upload files over Wi-Fi, you need to map a network drive. The method used to
map a network drive depends on your computer's operating system.
Windows 7
1. Go to Computer.
2. Click Map network drive on the toolbar.
3. Select an available drive letter.
4. In the Folder field, type http://aircard.hotspot/dav.
5. Click Finish.
The network drive created appears as a shared drive under Computer.
6. Drag and drop (or copy and paste) files to the shared drive.
7. If you are asked for a user name and password, leave the user name blank
and enter the password (if password-protection has been set up). Otherwise,
leave the password field blank.
Windows XP
1. Go to Start > My Network Places.
2. Click Add Network Place.
The Add Network Place Wizard opens.
3. Click Next.
4. Highlight Choose another network location..., and click Next.
5. In the Internet or network address field, type http://aircard.hotspot/dav/ and
click Next.
6. Leave the default network place name or enter a new one of your choice.
7. Click Next.
8. Click Finish.
The network drive appears as a folder in Explorer under My Network Places.
9. Drag and drop (or copy and paste) files to the shared folder.
10. If you are asked for a user name and password, leave the user name blank
and enter the password (if password-protection has been set up). Otherwise,
leave the password field blank.
Mac OS X
1. Open Finder.
2. Select Go > Connect to Server....
3. Type http://aircard.hotspot/dav/.
35
Page 36

AirCard 763S Mobile Hotspot User Guide
4. Click Connect.
If you are asked for a user name and password, leave the user name blank,
and enter a password (if password-protection has been set up), and click OK.
Otherwise, leave the password blank and click Cancel.
5. Drag and drop (or copy and paste) files to the aircard.hotspot shared drive
that appears in Finder.
Smart phones and tablets
Complimentary apps are available for iOS/Android smartphones and tablets to
share and access files over your Wi-Fi network.
View and download only
Anyone connected to your Wi-Fi network can view or download files.
To view or download files:
1. Connect to the Wi-Fi network.
2. Launch your browser and enter http://aircard.hotspot/dav/.
If you are asked for a user name and password, leave the user name blank
and enter the password (if password-protection has been set up). Otherwise,
leave the password field blank.
Note: You can also access the shared folder from the Web UI. From the homepage, log in
as Administrator, click the microSD icon, and then click View Folder.
Using the microSD card in Tethered mode:
You can also upload, download, and view shared files in Tethered mode.
To share files in Tethered mode:
1. Use the USB cable to connect the mobile hotspot to a USB port on your
computer.
2. On the homepage, log in as Administrator, and then click the microSD icon.
3. Select USB Tethered as the File Sharing option.
4. The shared folder appears in Windows Explorer (Windows) and in Finder
(Mac).
36
Page 37

Use Your Mobile Hotspot
Recharge the Battery
The battery comes partially charged. You can recharge the battery from a wall
socket or from the USB port on your computer.
To recharge the battery from a wall socket (fastest option):
1. Attach one end of the micro USB cable to the mobile hotspot and attach the
other end to the AC adapter.
2. Plug the AC adapter into a wall socket. An animated battery icon on the LCD
screen indicates that the battery is charging.
The battery icon on the LCD screen indicates when the battery is fully
charged.
Note: The LCD goes into sleep mode after a set time to extend battery life. To wake up the
LCD screen, press and quickly release any button or key.
To recharge the battery from the USB port on your computer:
1. Attach one end of the micro USB cable to the mobile hotspot and plug the
other end into the USB port on your computer. An animated battery icon
indicates that the battery is charging.
The battery icon on the LCD screen indicates when the battery is fully
charged.
37
Page 38

AirCard 763S Mobile Hotspot User Guide
Firmware Update Available
;ĚĞǀŝĐĞǁŝůůƐƟůůďĞƵƐĂďůĞͿ
Press to download
ŽLJŽƵǁĂŶƚƚŽĚŽǁŶůŽĂĚŝƚ
Update the Firmware
New firmware is available from time to time. Updating the firmware may add new
features to the device LCD or the homepage, or improve the performance of your
mobile hotspot.
Note: You cannot use the mobile hotspot during the firmware installation, which may take
up to 5 minutes. Updating the firmware does not change your personal settings.
Check for updates
By default, the mobile hotspot checks for updates weekly. To change the
frequency:
1. On the homepage, log in as Administrator.
2. Click the Advanced Settings icon ( ).
38
3. Select the desired frequency from the drop-down menu beside Check for
Firmware Updates.
4. Click Save.
5. Optional: Click Check for Updates Now to check for updates immediately.
Update the firmware from the LCD screen
When new firmware is available for downloading, you will receive a message on
the LCD screen. (The message remains on the screen for 1 minute.)
Page 39

Use Your Mobile Hotspot
Firmware Update Available
(device may be unusable for
about 5 minutes)
Press to install
1. While the message is on the LCD screen, press the Power key to download
the firmware. You can continue to use the mobile hotspot while the firmware
is being downloaded.
If the battery is low, you will be instructed to use the AC adapter to plug the
mobile hotspot into a wall socket before continuing.
2. When the firmware download is complete, you’ll be given the option to install
the firmware.
If you do not update the firmware, either from the LCD or the homepage, this
message repeats three times, 8 hours apart, and then after a further 8 hours
the firmware automatically updates the next time you turn the mobile hotspot
on.
Note: You cannot use the mobile hotspot during the firmware installation, which may take
up to 5 minutes.
3. Press the Power key to install the firmware.
4. When the firmware update is complete, reconnect your laptop or other Wi-Fi
devices to your mobile hotspot Wi-Fi network.
Update the firmware from the homepage
When new firmware is available for downloading, you will receive an alert on the
LCD screen.
1. On the homepage, log in as Administrator, and click the Messages icon ( ).
2. Click More Details.
39
Page 40

AirCard 763S Mobile Hotspot User Guide
3. Click Download Now. You can continue to use the mobile hotspot while the
firmware is being downloaded.
Once the download is complete, you are given the option to install the firmware.
4. Click More Details.
40
Page 41

Use Your Mobile Hotspot
5. Click Install Now, or click Cancel if you want to install the firmware later.
If you do not install the firmware within 32 hours of downloading it, it installs
automatically the next time you log into the homepage.
Note: You cannot use the mobile hotspot during the firmware installation, which may take
up to 5 minutes.
6. When the firmware update is complete, reconnect your laptop or other Wi-Fi
devices to your mobile hotspot Wi-Fi network.
41
Page 42

AirCard 763S Mobile Hotspot User Guide
42
Page 43

3: Advanced Settings
Online Help
This chapter provides information on how to change advanced
settings. The advanced settings enable you to configure various
aspects of the device such as Wi-Fi settings, WAN settings, router
settings, etc.
Show Help for Advanced Settings
The Advanced Settings section of the homepage comes with built-in
context-sensitive online help to assist you in configuring the mobile
hotspot.
By default, online help appears when you mouse-over a field in the
Advanced Settings windows.
3
To hide the online help:
1. On the homepage, click the Advanced Settings icon ( ).
2. On the Device > Basic tab, beside Help for Advanced Settings,
select Hide.
43
Page 44

AirCard 763S Mobile Hotspot User Guide
3. Click Save.
Do not Automatically Install Driver for USB Tethering
By default, a host driver is installed the first time you connect your mobile hotspot
to the computer via the USB cable. This driver enables the mobile hotspot to
connect to the Internet when it is tethered to a USB port on the computer via the
USB cable instead of using the Wi-Fi network.
If you do not want to use this feature and want to use the USB cable only to
charge the mobile hotspot battery, you can set the host driver not to install.
To set the host driver not to install:
1. On the homepage, click the Advanced Settings icon ( ).
2. On the Device > Basic tab, beside Automatically install host driver for USB
tethering, select No.
3. Click Save.
44
Page 45

Advanced Settings
Export / Import Router Options
You can export and import hotspot (router) settings. This is useful if you have
more than one device and you want the same settings on both, or to save your
settings before doing a factory reset or changing the settings.
To export router settings:
1. On the Device > Basic tab, beside Export Router Settings, click Export.
2. Save the file to the desired location.
By default, the file (export.cfg) is saved to your Downloads folder.
To import router settings:
1. On the homepage, click the Advanced Settings icon ( ).
2. On the Device > Basic tab, beside Import Router Settings, type the path or
use the Browse button to navigate to the file you want to import. (By default,
router setting files are saved to your Downloads folder.)
3. Click Open, and then click OK to confirm restart.
45
Page 46
AirCard 763S Mobile Hotspot User Guide
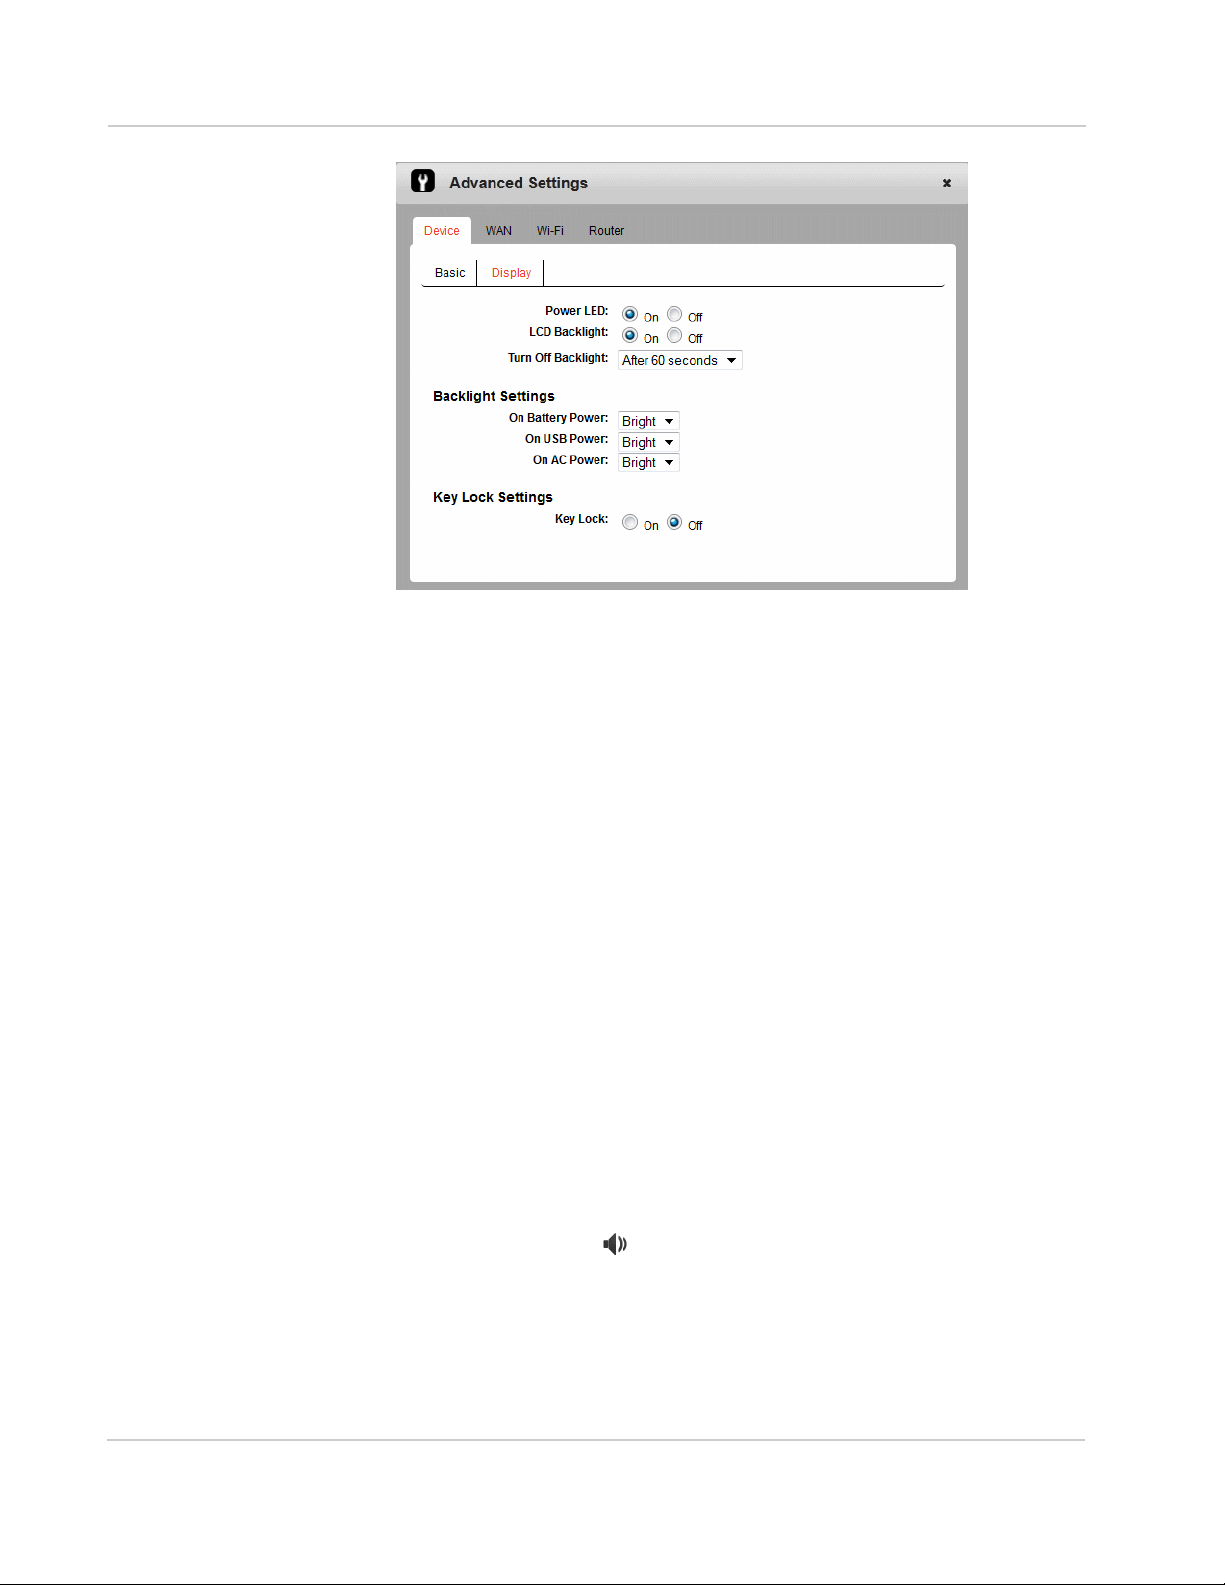
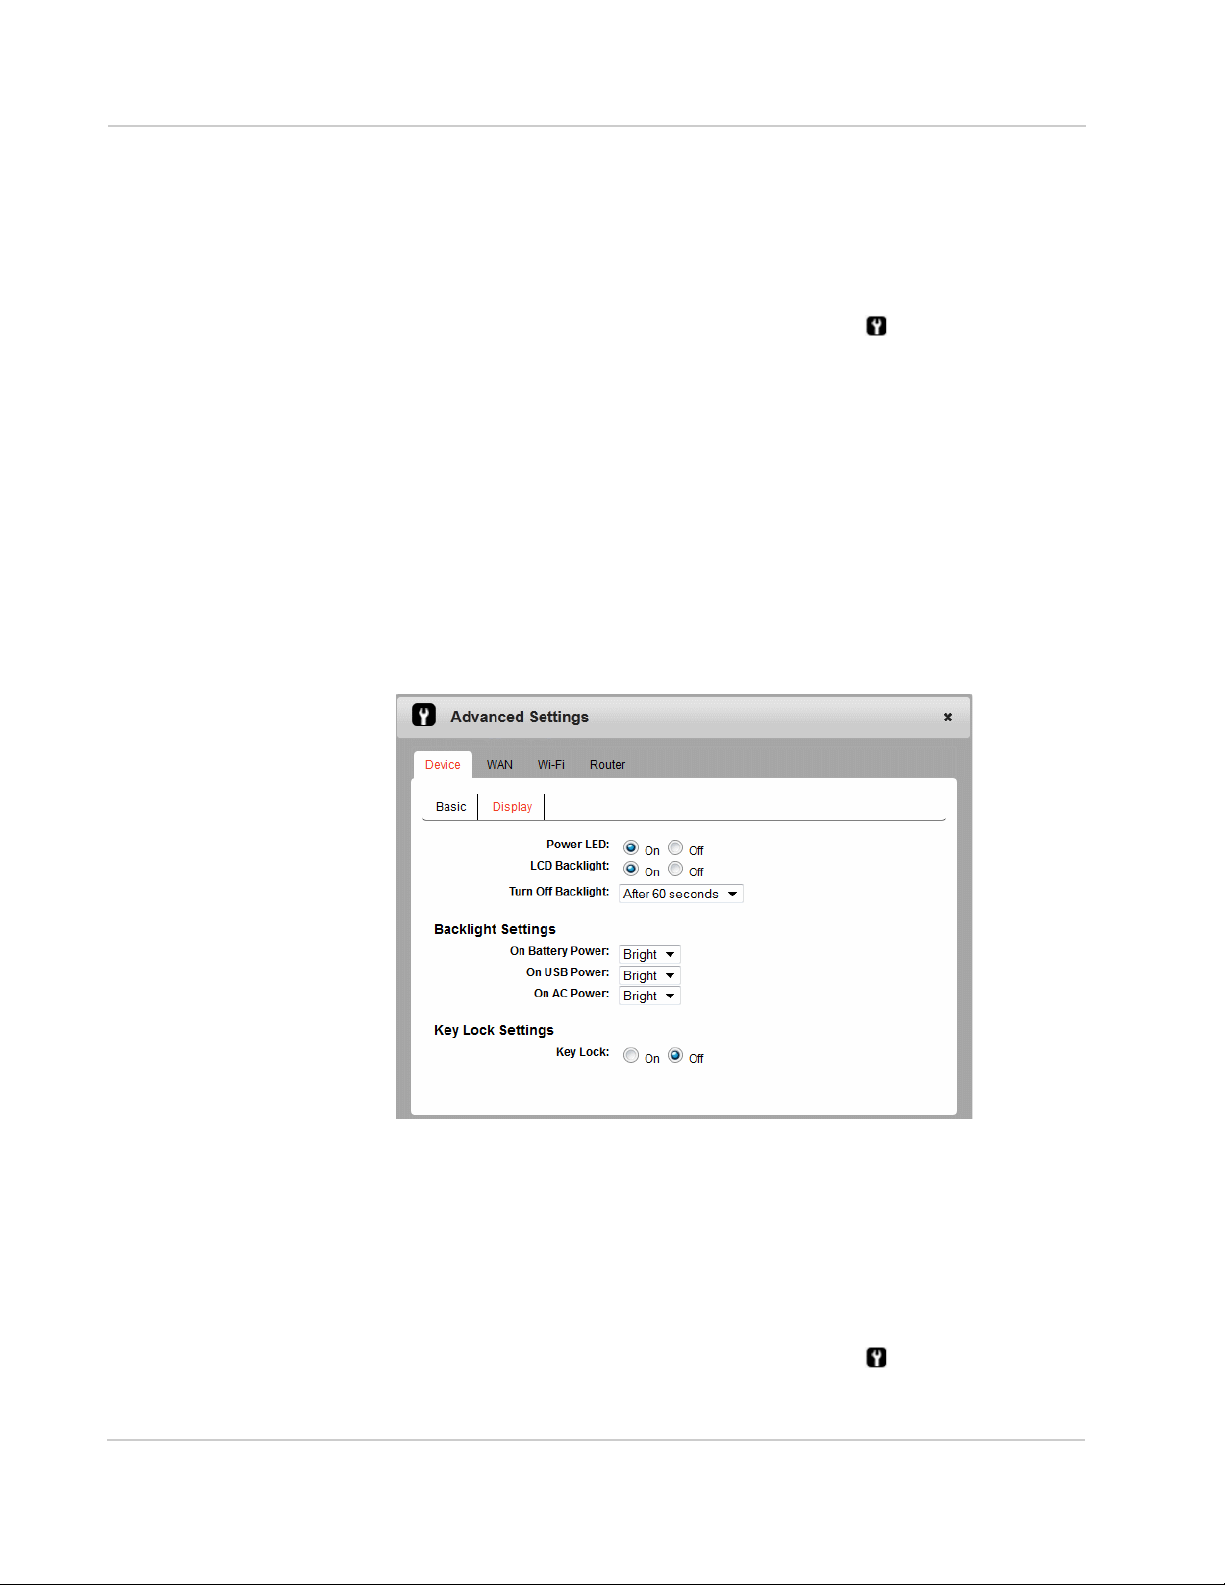
Set Display Options
You can use the display options to customize the mobile hotspot display and to
conserve battery power.
To set the display options:
1. On the homepage, click the Advanced Settings icon ( ).
2. On the Device > Display tab, select the desired options:
· Power LED
The Power LED (located under the Power key) flashes to confirm that the
mobile hotspot is powered on. Turning it off can extend battery life.
· LCD Backlight
You can control how long the LCD backlight is on before going into sleep
mode. You can set the LCD backlight to turn off after 10, 30 or 60 seconds,
or to never turn off. (Default is 60 seconds.) To wake up the LCD, press and
release any button or key.
· Backlight settings
You can control the brightness of the backlight settings when the mobile
hotspot is powered by battery, USB port, or AC power. The options are off,
dim, or bright.
3. Click Save.
Lock or Unlock Device Keys
You can lock the device keys and buttons so you do not accidently select an
option you did not intend.
To enable the lock / unlock keys feature:
1. On the homepage, click the Advanced Settings icon ( ).
2. Go to Device > Display tab.
46
Page 47

3. Under Key Lock Settings, select On.
Advanced Settings
4. Click Save.
Once this feature is enabled, click Key Lock Now to lock the device keys, or
press and hold the Navigation key for 3 seconds to lock / unlock the keys.
View WAN Information
To view network information, such as the active network, connection status, signal
strength, etc.:
1. On the homepage, click the Advanced Settings icon ( ).
2. Click the WAN tab.
47
Page 48

AirCard 763S Mobile Hotspot User Guide
Set Connection Preferences
To set the connection preferences:
1. On the homepage, click the Advanced Settings icon ( ).
2. Go to WAN > Setup.
3. Select the desired options.
You can use the manual network selection mode to select a mobile network
other than your service provider’s when roaming. When a network is manually
selected, the device does not automatically connect to your service provider’s
mobile network when you re-enter your service provider’s coverage area. In
this case, go to the homepage and reset this option to use your service provider’s mobile network.
We recommend that you leave it set to “Auto”.
4. Click Save.
Enable SIM Security
If desired, you can create another level of security by setting up a PIN number
that must be entered before you can view the information available to an
Administrator or change the mobile hotspot settings on the homepage.
If you set up a PIN number, when you go to the homepage and log in as
Administrator, you will be asked to enter the PIN number before you can access
the homepage as an Administrator.
To enable SIM security:
1. On the homepage, click the Advanced Settings icon ( ).
2. Go to WAN > SIM.
48
Page 49

3. Select Enable and click Save.
Advanced Settings
4. Enter your PIN and click Submit.
You are allowed 5 attempts to enter the correct PIN. If you run out of available
attempts the PIN will be locked. If this happens, contact your service provider
to receive a PUK number to unlock the PIN.
View Wi-Fi Status and List of Connected Devices
To view Wi-Fi status and a list of connected devices:
1. On the homepage, click the Advanced Settings icon ( ).
2. Go to Wi-Fi > Status.
49
Page 50

AirCard 763S Mobile Hotspot User Guide
3. If desired, click the button to view a list of connected devices.
Set Wi-Fi Network Options
To set the Wi-Fi network options:
1. On the homepage, click the Advanced Settings icon ( ).
2. Go to Wi-Fi > Network.
3. Select the desired options.
· SSID Broadcast — If you select Enable, your SSID (network name) will be
broadcast to everyone nearby. (Select Disable to not broadcast the SSID.)
· Max Wi-Fi users — From the drop-down menu, select the number of users
(devices) you want to allow to connect to your Wi-Fi network, up to a
maximum of 10.
· RTS Threshold — The smallest packet size (in bytes) used by the Request
to Send / Clear to Send handshaking protocol. The recommended value is
50
Page 51

Advanced Settings
2347. If you are experiencing inconsistent data flow, you can make minor
changes to this value to try to alleviate the problem.
· Fragmentation Threshold — The largest allowable size (in bytes) for a
packet. If the packet is larger than this, it is sent in multiple packets, which
can affect network performance. It is recommended to keep this value as
large as possible (up to 2346).
4. Click Save.
Set Wi-Fi Security Options
To set the Wi-Fi security options:
1. On the homepage, click the Advanced Settings icon ( ).
2. Go to Wi-Fi > Security.
3. Select the desired options and click Save.
The options available depend on the Wi-Fi rate. If you want to choose a Wi-Fi
encryption other than WPA2 Personal AES or WPA / WPA2 Personal:
1. Change the Basic Rate to 802.11b/g compatibility.
2. Select the desired encryption options.
Mouse-over the options for more information. (Be sure you have the Help set
to Show. See Show Help for Advanced Settings on page 43.)
It is recommended that you use WPA2 Personal AES whenever possible.
Note: The Wi-Fi Passphrase length depends on the Wi-Fi encryption selected. Mouseover the field for details.
51
Page 52

AirCard 763S Mobile Hotspot User Guide
Set MAC Filter Mode
MAC (Media Access Control) filtering enables you to block unauthorized Wi-Fi
devices from accessing your Wi-Fi network (black list), or to create a list of only
those devices that are allowed to connect to your Wi-Fi network (white list), based
on each device’s MAC address.
Only one list at a time can be active, either a Black List or a White List.
Black List
To block devices from connecting to your Wi-Fi network (black list):
1. On the homepage, click the Advanced Settings icon ( ).
2. Go to Wi-Fi > MAC Filter.
3. In the drop-down menu, select Block all in list.
4. Either:
· Enter the MAC address of the device and click Add, or
· Click List of connected devices and select the box beside the device in the
Block column.
5. Click Save.
To unblock a device so it can connect to your Wi-Fi network:
1. Click List of connected devices.
2. Clear the box beside the device in the Block column.
3. Click Save.
52
Page 53

Advanced Settings
White List
To create a list of devices that are allowed to connect to your Wi-Fi network (white
list):
1. In the drop-down menu, select Allow only those in list.
2. Enter the MAC address for each device and click Add.
3. Click Save.
Enable Port Forwarding
If your computer is hosting a server, you can enable port forwarding so that other
users can access the server.
To enable port forwarding:
1. On the homepage, click the Advanced Settings icon ( ).
2. Go to Router > Port Forward.
3. Select Enable beside Port Forwarding.
Incoming traffic is forwarded to specific ports and devices on your network
(using their local IP addresses).
Note: Port forwarding creates a security risk. When not required, port forwarding should be disabled.
4. Enter the Port Forwarding information and click Save.
Enable Port Filtering
Port filtering enables you to select which applications (for example, http, ftp, email
servers) can access the Internet. Used in conjunction with other security
measures such as firewall, port filtering can enhance network security.
53
Page 54

AirCard 763S Mobile Hotspot User Guide
To enable port filtering:
1. On the homepage, click the Advanced Settings icon ( ).
2. Go to Router > Port Filter.
3. Select the Port Filtering Mode:
· Black List — To select applications not allowed to access the Internet
· White List —To select applications allowed to access the Internet
Note: Only one list at a time can be active, either a Black List or a White List.
4. Once you have selected the desired applications, click Save.
Enable VPN Passthrough
If you want to connect to a corporate network using a VPN, you first need to
enable VPN connections (passthrough).
To enable VPN passthrough:
1. On the homepage, click the Advanced Settings icon ( ).
2. Go to Router > LAN.
54
Page 55

3. Select Enable beside VPN Passthrough, and click Save.
Enable DMZ
Advanced Settings
In a DMZ (demilitarized zone) network configuration, a computer runs outside the
firewall in the DMZ. This computer intercepts incoming Internet traffic, providing
an extra layer of protection for the rest of the network.
To enable DMZ and designate a computer to screen incoming traffic:
1. On the homepage, click the Advanced Settings icon ( ).
2. Go to Router > DMZ.
3. Select Enable.
4. In the Destination IP Address field, enter the IP address of the computer you
want to have in the DMZ.
For tips on finding a computer’s IP address, see How do I find my computer’s
IP address? on page 61.
5. Click Save.
55
Page 56

AirCard 763S Mobile Hotspot User Guide
Enable Universal Plug and Play
Universal Plug and Play (UPnP) is a set of protocols that enables seamless
communication between UPnP devices on the network. It enables automatic
device configuration and peer-to-peer data transfer over an IP network.
Note: If UPnP is enabled, there are potential security risks.
To enable UPnP:
1. On the Mobile Wi-Fi Homepage, log in as Administrator.
2. Click the Advanced Settings icon ( ).
3. Go to Router > UPnP.
4. Select Enable.
5. Click Save.
Set Router LAN Options
To set the router LAN options:
1. On the homepage, click the Advanced Settings icon ( ).
2. Go to Router > LAN.
56
Page 57

Advanced Settings
3. Enter the desired information.
If the DHCP Server is enabled, it automatically assigns an IP address to each
device on the network and manages their configuration information.
The DNS Mode setting specifies how the DNS servers are obtained. If you
select Auto, the servers use the DNS relay specified by the Internet provider.
4. Click Save.
57
Page 58

AirCard 763S Mobile Hotspot User Guide
58
Page 59

4: Frequently Asked Questions
This chapter provides answers to questions you may have about your
mobile hotspot. (Also see Troubleshooting on page 63.)
What do I do if I forget my Wi-Fi Passphrase
or Admin Password?
The Wi-Fi Passphrase appears on the LCD, unless you have
configured it not to show.
The default Admin Password (swiadmin) is printed on a label under
the battery.
If you have changed either of these and then forgotten them:
1. Reset the device to the factory settings. (See Reset the Mobile
Hotspot on page 65.)
2. Use the default SSID (displayed on the LCD screen) and default
Admin Password (swiadmin) to connect to the Wi-Fi network and
log in as Administrator. See Set Up and Connect to the Internet
on page 16.
How do I connect / disconnect from the
mobile broadband network?
4
Do one of the following:
• On the homepage, click Connect / Disconnect
mobile hotspot).
• From the Connect Info dashboard screen, press and release the
Power key.
• Press and hold the Power key for a few seconds to turn the
mobile hotspot on / off.
(below the virtual
I can’t see the Connect / Disconnect button on
the homepage.
The Connect / Disconnect button is only visible when you are logged
in as Administrator.
To log in as Administrator:
1. Place your cursor in the Admin Password field on the homepage
and type the Admin Password (swiadmin).
2. Click Login.
How can I extend the life of the battery?
For information on extending the life of the battery, see Extend
Battery Life on page 28.
59
Page 60

AirCard 763S Mobile Hotspot User Guide
How do I turn the mobile hotspot off?
Press and hold the Power key for a few seconds, or click the Power off button on
the homepage.
How do I find out how many users are connected to
my mobile hotspot network?
The number beside the Wi-Fi icon ( ) on the mobile hotspot LCD shows the
number of users (or devices) connected to your Wi-Fi network. For more details
about the devices or users connected to your network, go to the homepage, log in
as Administrator, and click the Wi-Fi icon ( ).
Note: You can also use the options on the homepage to block particular users from
connecting to your network. See View / Block Connected Users on page 24.
The LCD screen is not lit. How do I know if the mobile
hotspot is still powered on?
The LCD screen dims to save energy. The Power key continues to flash (provided
you have not turned this feature off) to indicate that the mobile hotspot is powered
on. To wake up the LCD, press and quickly release any button or key.
How do I access information on the microSD card?
See Use the microSD Card to Share Files over Wi-Fi on page 33.
How do I stop the mobile hotspot from beeping?
The mobile hotspot beeps to notify you of changes in its status or to notify you
that you are roaming, you have a new message, etc.
To mute the mobile hotspot, press and hold the WPS button and Navigation key
for 3 seconds.
Where can I find more information?
• View the Online Help:
1. Go to the homepage. (See Homepage on page 18.)
2. Click the Help icon ( ).
• Go to www.sierrawireless.com/support and select your service provider and
product.
From the Sierra Wireless Web site, you can:
· Update the firmware on your device
· View product documentation
• Refer to the Quick Start Guide that came with your mobile hotspot.
60
Page 61

Frequently Asked Questions
How do I find my computer’s IP address?
The steps for finding your computer’s IP address depend on the operating
system.
Windows
1. Open the command prompt window.
a. Click Start > Run.
b. Type cmd or command and click OK.
2. At the command prompt, type ipconfig and press Enter.
3. Write down the IP address for the entry that relates to the wireless network
connection. (The IP address may be listed under “IPv4 Address” or
something similar.)
Mac OS X
1. From the Apple menu, select System Preferences > Network.
2. Select the wireless adapter. The IP address is displayed in the right pane.
Other operating systems
Refer to the user documentation for your operating system or computer.
How do I find a device’s MAC address?
You’ll need to know the MAC address for a device when:
• Assigning an IP address based on a MAC address (when using DHCP)
• Allowing or denying devices access to your Wi-Fi network (MAC filtering)
Tip: To display a list of connected devices, including the MAC address of each
device, click the Wi-Fi icon ( ).
The steps for finding a device’s MAC address depend on the operating system.
Windows
1. Open the command prompt window.
a. Click Start > Run.
b. Type cmd or command and click OK.
2. At the command prompt, type ipconfig/all and press Enter.
3. Write down the Physical address for the entry that relates to the wireless
network connection. (It appears as a series of numbers and letters. This is the
MAC address of your wireless adapter.)
Mac OS X
1. From the Apple menu, select System Preferences > Network.
2. Select the wireless adapter that is connecting to the routing hardware.
3. Select Advanced.
4. Select Ethernet. The Ethernet ID is displayed. This is the same as the MAC
address.
61
Page 62

AirCard 763S Mobile Hotspot User Guide
Linux
Refer to the user documentation for the Linux distribution.
Other operating systems
Refer to the user documentation for your operating system or computer.
62
Page 63

5: Tr oubleshooting
0
x
x
This chapter provides suggestions for troubleshooting problems that
may arise when using your mobile hotspot.
The mobile hotspot network name does not
appear in the list of networks.
1. Refresh the list of networks.
2. Ensure that the Wi-Fi setting on your laptop (or other device) is
turned on.
3. Ensure that Wi-Fi is enabled on the mobile hotspot. The Wi-Fi
icon on the LCD should have a “0” beside it (not an
“x” ).
If you need to enable Wi-Fi on the mobile hotspot:
1. Use the USB cable to tether the mobile hotspot to your laptop.
(The first time you do this, it will take a few moments for the
drivers to install.)
2. Launch your browser and go to the homepage
http://aircard.hotspot.
3. Click the Wi-Fi users icon ( ).
4. Under Enable Wi-Fi, select On.
5. Click Save.
5
The No Signal icon appears on the LCD
screen.
If the No Signal icon ( ) appears on the LCD screen:
• Make sure you are in your service provider’s coverage area.
• Check the network technology setting (see Set Auto Connect and
Network Options on page 21). Under Network Technology,
ensure that Auto is selected in the drop-down menu.
The Wi-Fi radio is disabled icon appears on
the LCD screen.
If the Wi-Fi radio is disabled icon ( ) appears on the LCD screen,
it could be because:
• The mobile hotspot is in standby mode. Press the Navigation key
or WPS button. If the “x” is still there, ensure that Wi-Fi is
enabled.
• The Wi-Fi is disabled. To enable Wi-Fi:
a. Use the USB cable to tether the mobile hotspot to your
laptop.
63
Page 64

AirCard 763S Mobile Hotspot User Guide
b. Launch your browser and go to the homepage.
c. Click the Wi-Fi users icon ( ).
d. Under Enable Wi-Fi, select On.
e. Click Save.
Unable to connect to the Internet in Tethered mode
If you are unable to connect to the Internet when the mobile hotspot is connected
to the computer using the USB cable, it may be because the device driver is not
installed. (You may also see a message that says the operating system could not
find the driver for this device, and if you look in Device Manager, the mobile
hotspot will be listed under other devices with an exclamation mark beside it.)
For the driver to install properly, the mobile hotspot should be powered off the first
time you plug it into a computer using the USB cable.
To correct this problem, follow the steps in Tethered mode on page 17.
Unable to access the homepage when connected to a
VPN
If you are using your mobile hotspot while connected to a VPN, you may not be
able to access the mobile hotspot using http://aircard.hotspot.
To access the homepage, enter the address http://192.168.1.1 in your browser.
This directly accesses the homepage hosted on the device.
Unable to connect a computer running Windows
Vista
Microsoft has a known issue whereby computers running Windows Vista cannot
obtain an IP address from certain routers. More information and a fix are available
at http://support.microsoft.com/kb/928233 or go to the Microsoft support Web site
and search for knowledge base article 928233.
®
to the Mobile Hotspot
®
64
Page 65

Troubleshooting
Power key
WPS button
Reset the Mobile Hotspot
You can reset the Mobile hotspot to the factory setting on the device or on the
homepage. This is useful if you have lost your Wi-Fi Passphrase.
To reset the mobile hotspot on the device:
1. Press and hold the WPS button and Power key for 5 seconds.
2. Reconnect Wi-Fi devices.
To reset the mobile hotspot on the homepage:
1. On the homepage, click the About Your Mobile Hotspot icon ( ).
2. Click Reset Device to Factory Defaults.
3. Click OK to confirm.
4. Reconnect Wi-Fi devices.
65
Page 66

AirCard 763S Mobile Hotspot User Guide
Alerts
SIM not installed
Ensure that the SIM card is installed correctly. See Insert the SIM Card on
page 16.
SIM Error — Check SIM
Ensure that the SIM card inserted in your mobile hotspot is from your service
provider. If there is still a problem, contact your service provider. (The SIM may be
damaged and need replacing.)
SIM Locked
1. Contact your service provider for the PIN to unlock the SIM.
2. Go to the homepage. (See Homepage on page 18.)
3. Log in as Administrator. (See Security Credentials on page 19.)
4. Enter the SIM PIN when prompted.
5. Click Save.
SIM MEP Locked
1. Contact your service provider for the MEP unlock codes and a tool to unlock
your Mobile Hotspot.
Temperature-related alerts
The mobile hotspot is designed to work over a wide temperature range. (See
Environmental Specifications on page 69 for details.) If you are outside that
temperature range, the mobile hotspot issues an alert.
Move the device to an area where the temperature is more suitable and, if the
mobile hotspot is too warm, make sure the area is well-ventilated and air can
circulate around the device.
Note: The battery may not recharge if the mobile hotspot is outside the operating temperature range.
WPS Setup Failed; Device not connected!
The device you are trying to connect may not be WPS-enabled. Use the manual
method to connect the Wi-Fi device to your Wi-Fi network.
1. Open the Wi-Fi menu on the device you are trying to connect to the Wi-Fi
network.
2. Select your SSID (network name) from the list of available Wi-Fi networks.
3. Select Connect and when prompted, enter your Wi-Fi Passphrase.
66
Page 67

Troubleshooting
Connection Alerts
If you receive any of the following connection alerts, contact your service provider.
Table 5-1: Connection alerts
Alert Description
8 Operator Determined Barring
25 LLC or SNDCP failure
26 Insufficient resources
27 Missing or unknown APN
28 Unknown PDP address or type
29 User authentication failed
30 Activation rejected by GGSN
32 Service Option not supported
33 Service Option not subscribed
34 Service Option temporarily out of order
36 Regular deactivation
37 QOS not accepted
38 Network failure
39 Reactivation required
40 Feature not supported
41 Semantic error in the TFT operation
42 Syntactical error in the TFT operation
43 Unknown PDP context
44 PDP context without TFT already activated
45 Semantic errors in packet filter(s)
46 Syntactical errors in packet filter(s)
67 Connection error
81 Invalid transaction identifier value
95 Semantically incorrect message
96 Invalid mandatory information
97 Message type non-existent or not implemented
98 Message type not compatible with the protocol state
99 Information element non-existent or not implemented
100 Conditional IE error
67
Page 68

AirCard 763S Mobile Hotspot User Guide
Table 5-1: Connection alerts (Continued)
Alert Description
101 Message not compatible with the protocol state
111 Protocol error, unspecified
256 Invalid Connection ID
257 Invalid NSAPI
258 Invalid PRI NSAPI
259 Invalid Field
260 SNDCP Failure
261 RAB Setup Failure
262 No GPRS Context
263 PDP Establish Max Timeout
264 PDP Activate Max Timeout
265 PDP Modify Max Timeout
266 PDP Inactivate Max Timeout
267 PDP Lower layer Error
268 PDP Duplicate
269 UE RAT Change
68
Page 69

6: Specifications
Mechanical Specifications
Weight 108 g (3.8 oz.)
Length 97.4 mm (3.8 in.)
Width 57.1 mm (2.25 in.)
Thickness 15.7 mm (0.6 in.)
Environmental Specifications
Operating temperature 0° C to 35° C
Storage temperature -10° C to +65° C, 96 hours
6
(32° F to 95° F)
(14° F to 149° F)
69
Page 70

AirCard 763S Mobile Hotspot User Guide
70
Page 71

7: Regulatory and Safety Information
Notice
Because of the nature of wireless communications, transmission and
reception of data can never be guaranteed. Data may be delayed,
corrupted (that is, have errors), or be totally lost. Although significant
delays or losses of data are rare when wireless devices such as the
AirCard 763S Mobile Hotspot are used in a normal manner with a
well-constructed network, the AirCard 763S Mobile Hotspot should
not be used in situations where failure to transmit or receive data
could result in damage of any kind to the user or any other party,
including but not limited to personal injury, death, or loss of property.
Sierra Wireless and its affiliates accept no responsibility for damages
of any kind resulting from delays or errors in data transmitted or
received using the AirCard 763S Mobile Hotspot, or for failure of the
AirCard 763S Mobile Hotspot to transmit or receive such data.
Safety and Hazards
The mobile hotspot MUST BE POWERED OFF in all areas that may
be susceptible to radio interference, in particular:
• Prohibited areas
Obey all signs and notices and follow all rules and regulations.
Power off the mobile hotspot when instructed to do so or when
you suspect that it may cause interference or danger.
• In areas where blasting is in progress
• Where explosive atmospheres may be present
Areas with a potentially explosive atmosphere are not always
clearly marked. Such areas include gas stations, fuel depots,
chemical transfer or storage facilities, areas where blasting is in
progress, areas where the air contains chemicals or particles
such as grain, dust, or metal powders, and any other area where
you would normally be advised to turn off your cellular phone or
vehicle engine.
• Near medical or life-support equipment
Medical equipment may be susceptible to any form of radio interference. In such areas the mobile hotspot can transmit signals
that could interfere with this equipment.
• On board aircraft
In addition to Federal Aviation Authority (FAA) requirements,
many airline regulations state that you must suspend wireless
operations before boarding an aircraft. The mobile hotspot is
capable of transmitting signals that could interfere with various
onboard systems and controls.
7
71
Page 72

AirCard 763S Mobile Hotspot User Guide
Failure to observe this instruction may lead to suspension or denial of cellular
telephone services to the offender, legal action, or both.
Some airlines may permit the use of cellular phones while the aircraft is on the
ground and the door is open. The mobile hotspot may be used normally at this
time.
• While operating a vehicle
The driver or operator of any vehicle should not use a wireless data device
while in control of a vehicle. Doing so detracts from the driver or operator's
ability to control and operate the vehicle. In some countries, using such communications devices while in control of a vehicle is an offence.
Caution: Unauthorized modifications or changes not expressly approved by Sierra
Wireless, Inc. could void compliance with regulatory rules, and thereby your authority to
use this device.
Proper Battery Use and Disposal
Note: Improper battery use may result in a fire, explosion, or other hazard.
To ensure safe and responsible battery use:
• Do not open, disassemble, puncture, crush, bend, or shred.
• Do not expose to water or other liquids, fire, explosion, or other hazards.
• Use the battery only in the mobile hotspot.
• If using with a charger, use only the charger supplied with the mobile hotspot.
• Do not short circuit the battery.
• When replacing a battery, use the same model of battery that was supplied
with the mobile hotspot.
• Follow local regulations when disposing of a used battery.
• Avoid dropping the mobile hotspot or the battery. If dropped and you suspect
damage, take it to a service center for inspection.
Regulatory Information for North America
Caution: The AirCard 763S Mobile Hotspot must be 1 cm or more from users during
operation, to satisfy FCC / IC RF exposure requirements.
This device complies with part 15 of the FCC Rules. Operation is subject to the
following two conditions:
(1) This device may not cause harmful interference, and
(2) this device must accept any interference received, including interference
that may cause undesired operation.
72
Page 73

Regulatory and Safety Information
If this equipment does cause harmful interference to radio or television reception,
which can be determined by turning the equipment off and on, the user is
encouraged to try to correct the interference by one or more of the following
measures:
• Increase the separation between the equipment and receiver
• Connect the equipment into an outlet on a circuit different from that to which
the receiver is connected
• Consult the dealer or an experienced radio/TV technician for help
If you have purchased this product under a United States Government contract, it
shall be subject to restrictions as set forth in subparagraph (c)(1)(ii) of Defense
Federal Acquisitions Regulations (DFARs) Section 252.227-7013 for Department
of Defense contracts, and as set forth in Federal Acquisitions Regulations (FARs)
Section 52.227-19 for civilian agency contracts or any successor regulations. If
further government regulations apply, it is your responsibility to ensure
compliance with such regulations.
This device complies with Industry Canada licence-exempt RSS standard(s).
Operation is subject to the following two conditions:
(1) this device may not cause interference, and
(2) this device must accept any interference, including interference that may
cause undesired operation of the device.
73
Page 74

AirCard 763S Mobile Hotspot User Guide
74
Page 75

Index
A
accessories
included, 15
purchasing optional accessories, 15
add a wireless device, 25
Admin Password, 19
Admin Password, forgot, 59
AirCard Watcher App, 18
alerts, 26, 30
audio, mute / enable, 13
auto connect options, 21
B
battery, 28
inserting, 16
recharging, 37
battery life, 59
black list, 52, 54
block users, 24
buttons, description, 12
C
connect / disconnect button, 59
connect to Internet, unable to, 64
connect to the Internet, 16, 17
connected devices, view, 49
connected users, 24
connection preferences, 48
I
icons on the LCD screen, 14
IP address, finding, 61
K
keys
description, 12
lock / unlock, 12, 46
L
LAN options, 56
language selection, 23
LCD
function, 13
screen not lit, 60
M
MAC address, finding, 61
MAC filter, 52
manage your device, 11
messages, 26
microSD card
accessing information on, 60
inserting, 33
sharing files on, 33
mobile broadband network, connect / disconnect, 59
mobile hotspot, turn off, 60
D
data usage, 22
display options, 46
DMZ, 55
driver for USB tethering, do not automatically install, 44
F
firmware, update, 38, 39
frequently asked questions, 59
G
GPS, 27
H
Help for advanced settings, 43
homepage
accessing, 18
cannot access, 64
75
N
network name does not appear in the list of networks, 63
no signal icon, 63
P
port filtering, 53
port forwarding, 53
power key, 12
power source, 15
R
regulatory information, 71
reset mobile hotspot, 65
router options, import, export, 45
S
safety information, 71
security credentials, described, 19
Page 76

AirCard 763S Mobile Hotspot User Guide
security, change settings, 31
share files over Wi-Fi, 33
SIM card, inserting, 16
SIM security, enable, 48
specifications, 69
T
tethered mode
first time you use it, 17
unable to connect to the Internet, 64
troubleshooting, 63
U
Universal Plug and Play (UPnP), 56
USB tethering, 44
V
VPN passthrough, 54
W
WAN information, view, 47
white list, 53, 54
Wi-Fi network options, 50
Wi-Fi Passphrase, 19
Wi-Fi Passphrase, forgot, 59
Wi-Fi radio is disabled, 63
Wi-Fi range, 28
Wi-Fi security options, 51
Wi-Fi status, view, 49
Wi-Fi, enable/disable, 23
Windows Vista, unable to connect to mobile hotspot, 64
WPS, 25
76
Page 77

Page 78

 Loading...