

Page 1
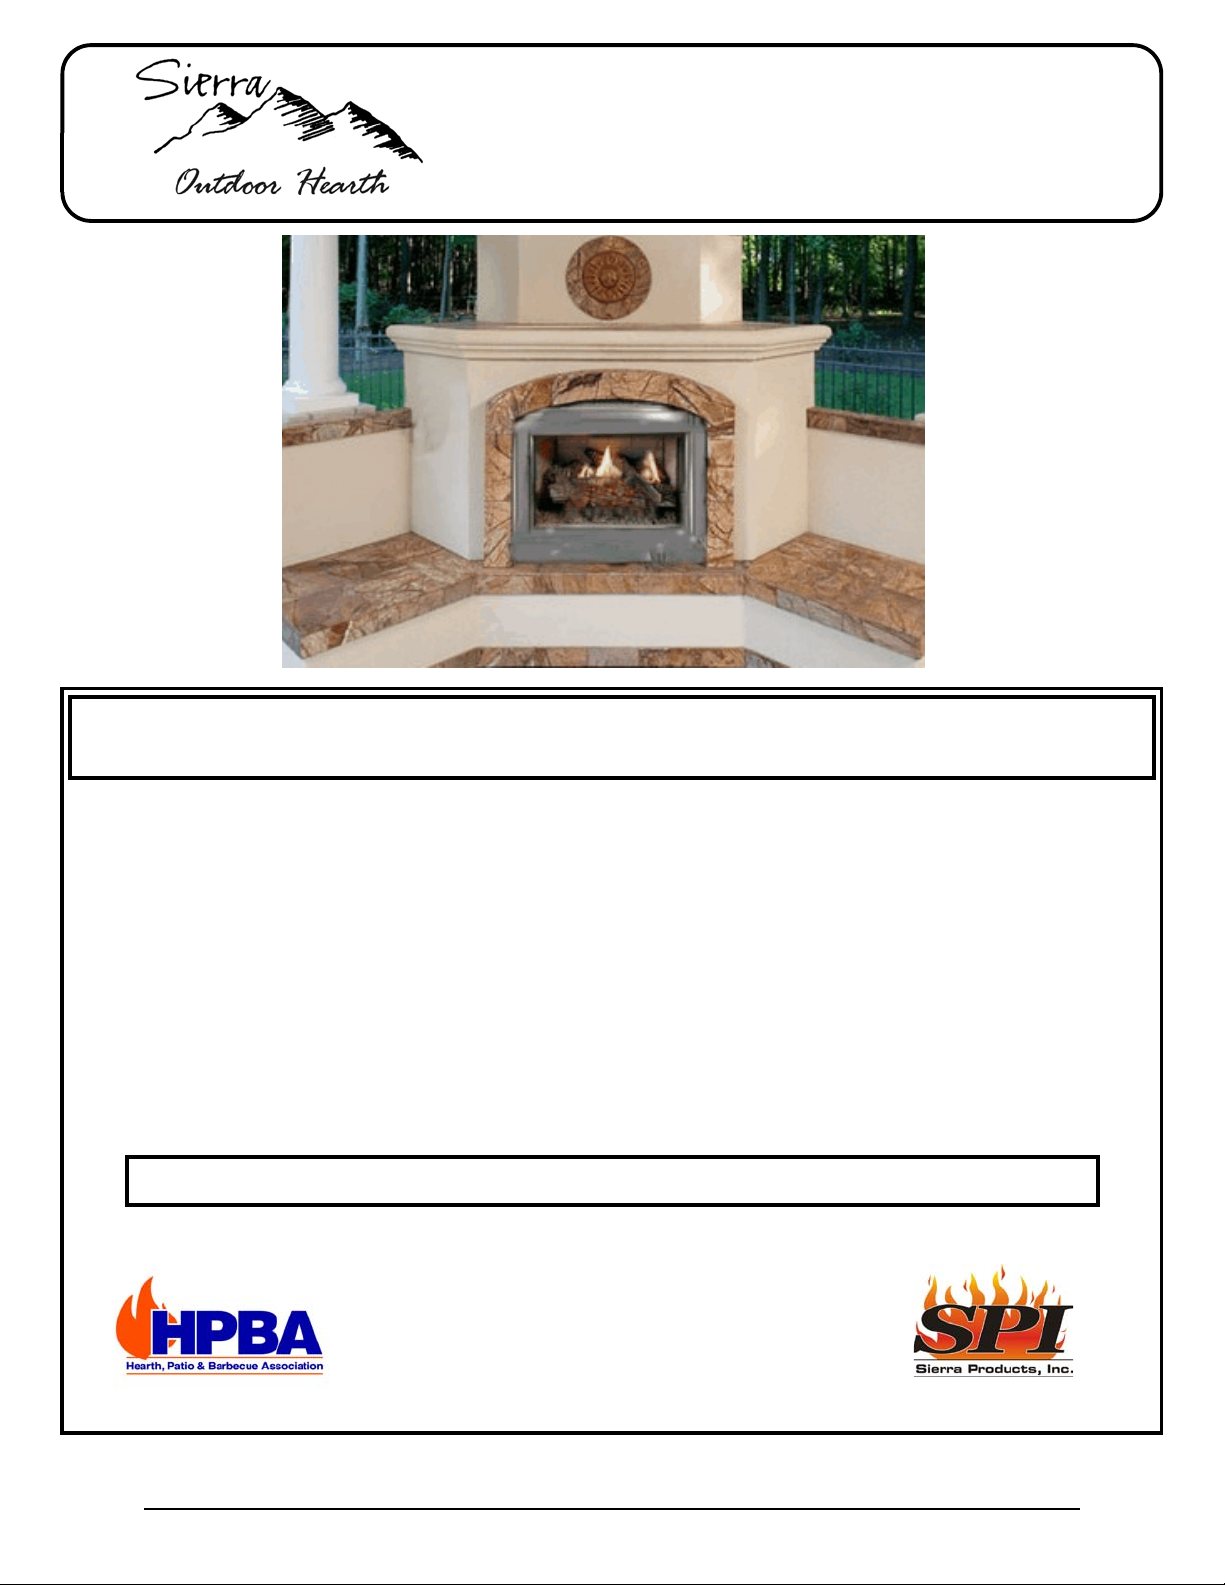
SIERRA UV36OFP
OUTDOOR GAS
FIREPLACE
INSTALLATION AND OPERATING INSTRUCTIONS
WARNING: If the information in this manual is not followed exactly, a fire or
explosion may result causing property damage, personal injury, or loss of life.
- Do not store gasoline or other flammable vapors and liquids in the
vicinity of this or any other appliance.
- WHAT TO DO IF YOU SMELL GAS
C Do not try to light any appliance.
C Do not touch any electrical switch; do not use any phone
in your building.
C Immediately call your gas supplier from a neighbor’s phone.
Follow the gas supplier’s instructions.
C If you cannot reach your gas supplier, call the fire department.
- Installation and service must be performed by a qualified installer,
service agency, or the gas supplier.
WARNING: This gas fireplace is approved for outdoor installation only.
DESIGN CERTIFIED TO CSA 4.96 U.S. (2nd ED.)
OUTDOOR GAS FIREPLACE
Save this manual for future reference.
Sierra Products, Inc. 5061 Brooks St., Ste B Montclair, CA 91763 P/N 140790r2 03/2007
Page 2

SAFETY INFORMATION
Appliance for Use with Propane Gas: Propane gas has
no odor. An odor-making agent is added to the gas. The
odor aids you in detecting a gas leak. However, the odor
added to the gas can fade. Gas may be present even
though no odor exists.
Use only propane gas. Do not convert the fireplace to use
different fuel type.
Do not place propane supply tank(s) inside any structure.
Locate propane supply tank(s) outdoors.
Make certain you read and understand all Warnings. Keep
this manual for reference. It is your guide to safe and
proper operation of this fireplace
WARNING: Any changes to this fireplace or its
controls can be dangerous.
General Safety Concerns
1. If you smell gas
C shut off gas supply
C do not try to light any appliance
C do not touch any electrical switch; do not use any
phone in your building
C immediately call your gas supplier from a
neighbor’s phone. Follow the gas supplier’s
instructions
C if you cannot reach your gas supplier, call the fire
department
2. This fireplace shall not be installed inside a home
3. Never install the fireplace
C in a recreational vehicle
C where curtains, furniture, clothing, or other
flammable objects are less than 36 inches from
the front, top, or sides of the fireplace.
C in high traffic areas
C in windy or drafty areas
4. Do not use this fireplace as a wood-burning fireplace.
This will void all warranties.
5. Do not add extra logs or ornaments such as pine
cones, vermiculite, or rock wool. Using these added items
can cause sooting.
6. You must operate this fireplace with the fireplace
screen fully closed. Make sure fireplace screen is in place
before operating the fireplace.
11. Do not use this fireplace to cook food or burn paper
or other objects.
12. Never place any objects in the fireplace or on logs.
13. Fireplace front and screen become very hot when
running fireplace. Keep children and adults away from hot
surfaces to avoid burns or clothing ignition. The fireplace
will remain hot for a time after shut down. Allow surfaces
to cool before touching.
14. Carefully supervise young children when they are
near the fireplace.
15. Do no use fireplace if any part has been exposed to
or under water. Immediately call a qualified service
technician to inspect the fireplace and to replace any par
of the control system and gas control which has been
under water.
16. Turn fireplace off and let cool before servicing. Only
a qualified service person should service and repair the
fireplace.
17. Operating the fireplace above elevations of 2,500
feet may require derating for proper operation. Contact
your local dealer for additional information.
UNPACKING
1. Remove trim kit and prefab firebox from the
carton. Remove protective plastic wrap and
separately wrapped items. You may not want to
remove protective plastic on brass plated front
components of the fireplace until after installing.
2. Check all items for any shipping damage. If
damaged, promptly inform the dealer where
you bought the fireplace.
3. Be sure to account for all parts as followed:
Qty.
1 Pre-built Fireplace
1 Burner Assembly (Installed)
1 Bag lava rock
1 Carton Logs - 6 pcs.
Description
7. This fireplace is designed to be smokeless. If logs
appear to smoke, turn off fireplace and call a qualified
service person. Note: During initial operation, slight
smoking will occur due to log curing and fireplace burning
manufacturing residues.
8. Avoid operating fireplace in high wind conditions. This
will alter flames and cause sooting and improper burning.
Sooting can discolor surfaces outside the fireplace.
9. This fireplace needs fresh air ventilation to run
properly. Do not limit fresh air to front of fireplace.
10. Do not run fireplace where flammable liquids or
vapors are used or stored
WARNING: If the area in which the heater may be
operated is smaller than that defined as an unconfined
space, provide adequate combustion and ventilation air
by one of the methods described in the National Fuel
Gas Code, ANSI Z223.1 Section 5.3 or applicable local
codes.
Follow the National Fuel Gas Code NFPA 54/ANSI
Z223.1. regarding gas piping and connections. Local
codes may have stricter requirements. Check with local
building officials for specifics.
INSTALLING
2
Page 3
Installation and repair should be done by a qualified
service person. The appliance should be inspected
before use and at least annually by a professional
service person. More frequent cleaning may be
required due to excessive lint from carpeting,
bedding material, etc. It is imperative that control
compartments, burners and circulating air passageways of the appliance be kept clean.
WARNING: Never install the fireplace
C in a recreational vehicle
C where curtains, furniture, clothing, or other
flammable objects are less than 36 inches
from the front, top, or sides of the fireplace.
C in high traffic areas
C excessively windy or drafting areas
SELECTING LOCATION
To determine the safest and most efficient location for
your fireplace, you must take into consideration the
following guidelines:
1. The location must allow proper
clearances (see Installation Clearances
section)
2. Consider a location where burner would
be least effected by high winds and away
from doors and windows.
3. Select a location away from high traffic areas. Be
sure to take into consideration access to the
fireplace for service and repair.
for area separation and can also be ideal as an addition to
an existing wall.
IMPORTANT: Make sure the fireplace is level. If the
fireplace is not level moisture may collect in areas causing
corrosion.
CHECK GAS TYPE
Verify the gas type used in your home. Make certain your
gas log is marked for the proper gas type. If the gas type
is incorrect, call the dealer where you bought the fireplace
for a proper type gas log.
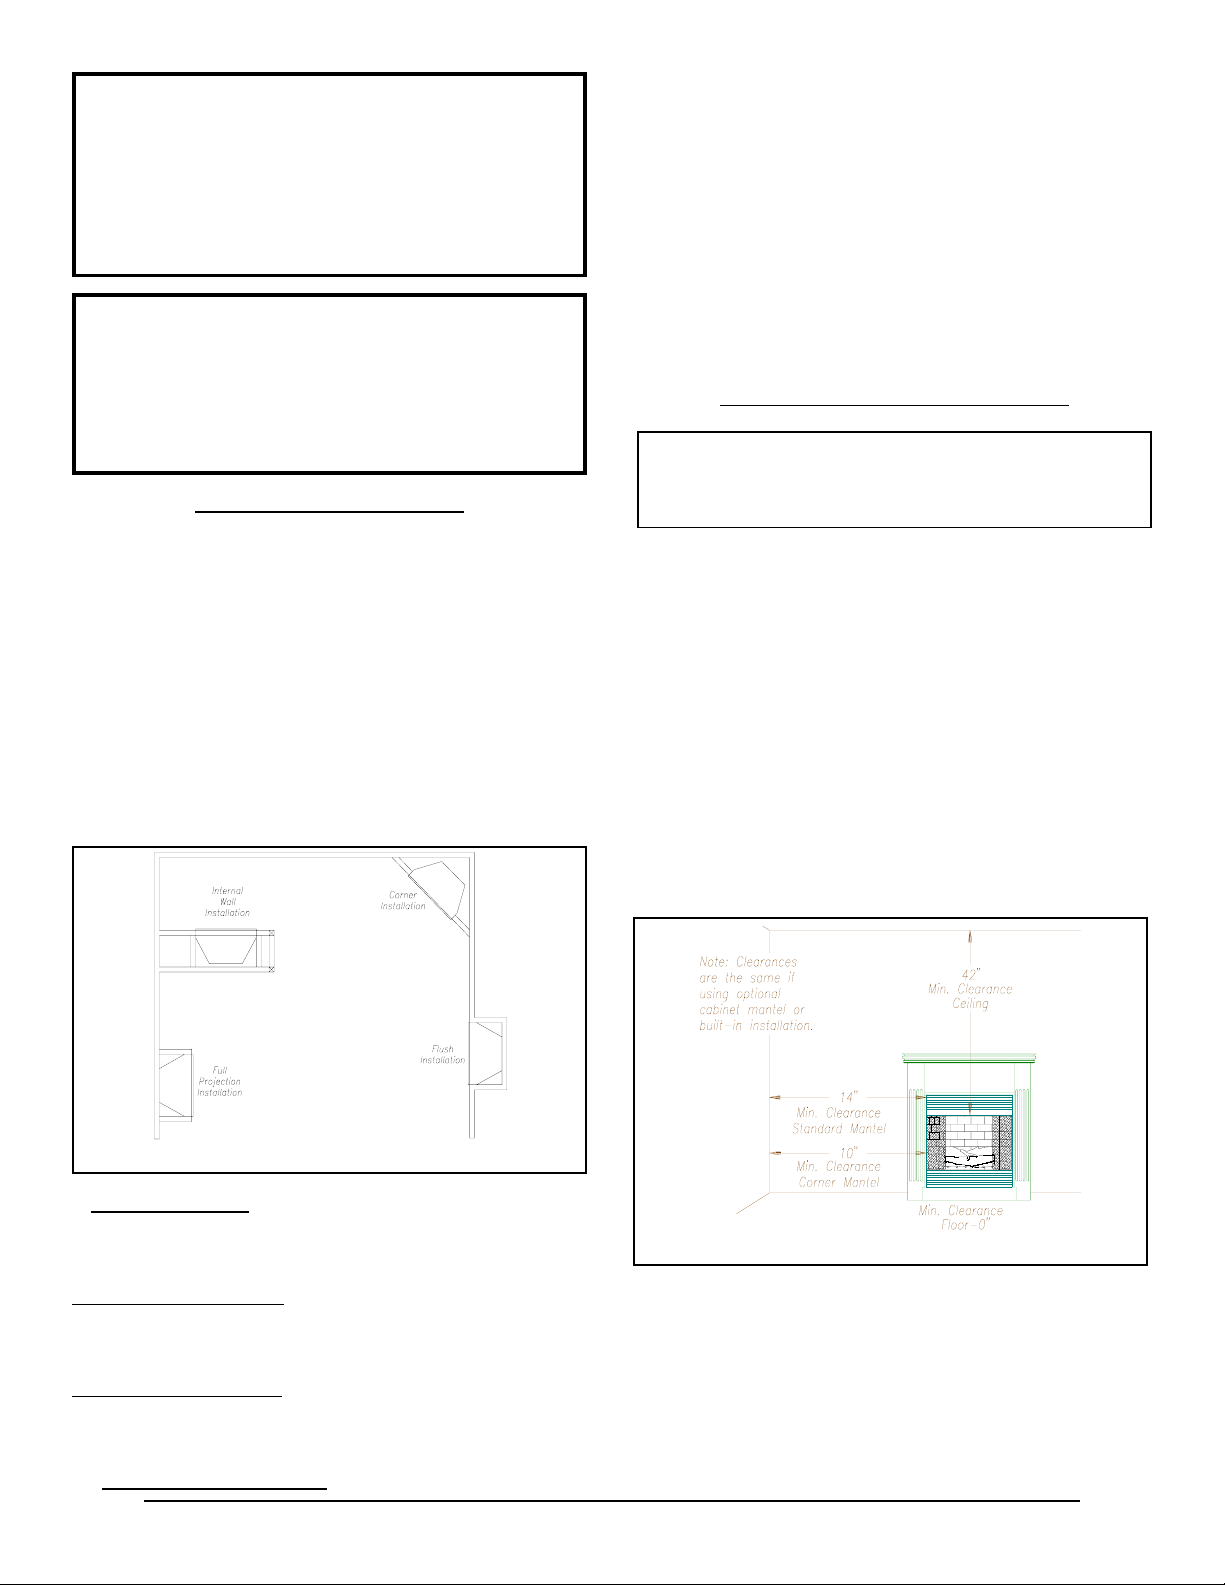
INSTALLATION CLEARANCES
WARNING: Maintain the minimum clearances. If
you can, provide greater clearances from floor,
ceiling, and adjoining wall.
Carefully follow the instructions below. This will ensure
safe installation.
Minimum Wall and Ceiling Clearances
A. Clearances from the back and sides of outer
surround of the fireplace to any combustible
area should not be less than ½ inches.
B. Clearances from the side of the fireplace
opening to any combustible wall should not be
less than 14 inches for a standard mantel or 12
inches for a corner installation.
C. Clearances from the top of the fireplace
opening to the ceiling should not be less than
42 inches.
Figure 1 - A Few Common Locations
A flush installation
limited or at a premium. Check local codes for any
restrictions.
Projected installations
room. A projection may be ideal for a new addition on an
existing, finished wall.
Cornered installations
normally be used and provides a wider and more efficient
range for heat dispersement.
An internal wall installation
is recommended where space is
can extend any distance into the
make use of space that may not
provides a discreet option
Figure 2 - Minimum Clearances
Clearances and projections front of fireplace
Woodwork, such as wood trims, mantels and other
combustible material, must be installed as tested per
figures 7 and 8, page 8.
3
Page 4

Figure 3 - Projection Clearance
Figure 4 - Side Projection Clearance
ATTACHING OPTIONAL TRIM
1. Attach the top SS trim piece onto fireplace cabinet by
loosening existing (3) #8 Phillips screws, slide trim into
place, then tightening down screws.
2. Attach the (2) side SS trim pieces onto the fireplace in
the same manner as the top piece. Note: Be sure the
angled edges fit against top trim piece.
FIG. 6 - Optional Remote (MV only)
OPTIONAL REMOTE CONTROL UNIT
Note: Be sure to read the instructions included with
remote control unit prior to installing.
1. Install the remote control unit into remote control
bracket and using (2)#8 Phillips screws. Be sure that the
word "TOP" is on the left-hand side of the unit. Tighten
screws to a point where 2-3 threads are visible from the
rear of the bracket. This will allow enough clearance for
the remote cover to slide onto unit. If unit is loose, tighten
screws slightly until unit is snug with cover on. (Fig 6.)
2. Install remote switch onto remote unit.
3. Open hinged lower panel by releasing catch. Attach
remote assembly to inside left side of the fireplace.
Remote assembly can be secured to wall using (2)#8
Phillips screws ( Fig 7).
Figure 5 - Attaching Optional Trim
Figure 7- Mounting remote face plate
Figure 8 - Control Assembly
4
Page 5

BUILT-IN FIREPLACE INSTALLATION
Built-in installation of this fireplace involves installing a
fireplace into a framed-in enclosure. This makes the front
of the fireplace flush with the wall. Best outdoor
enclosure construction includes metal stud with tile or
concrete board as an overlay. Additions of ceramic tile
and acrylic stucco finishes provide good service. To
install the fireplace in this manner, use the following
instructions:
Framing
1. Construct framing using dimensions, shown in
figures 13 through 15, depending on your particular
installation.
UV36OFP Fireplace Actual Framing
Height 32
Front Width 36" 36
Depth 18
If the fireplace is to be installed directly on carpeting, tile
(other than ceramic), or any combustible material other
than wood flooring; the fireplace must be installed upon a
metal or wood panel extending the full width and depth of
the fireplace.
3/8" 33"
½"
½" 19"
Figure 10 - Rough opening for
Installing in Corner
3. Carefully set fireplace in front of rough opening with
back of fireplace inside wall opening.
4. Attach flexible gas line to fireplace gas valve. See
Connecting Fireplace to Gas Supply, page 6.
5. Carefully insert fireplace into rough opening.
6. (Optional) Attach fireplace to framing using wood
screws through holes located on interior sides of the
fireplace (See Figure 11).
7. Check all gas connections for leaks. See Checking
Gas Connections, page 6.
Fig. 9 - Rough Opening for Floor
Installation in Wall
If a raised platform is to be constructed, ceiling
clearances must be maintained (refer to section on
clearances, page 4).
If installing in a corner, use dimensions shown in figure 9
for the rough opening. The height is 33" which is the
same as the wall openings, page 5.
2. Install gas piping to fireplace location. This
installation includes an approved flexible gas line (if
allowed by local codes) after the manual shutoff valve.
The flexible gas line must be the last item installed on the
gas piping. See Installing Gas piping to Fireplace
Location, page 6.
Figure 11 - Framing/Cabinet Mounting Holes
INSTALLING GAS PIPING TO
FIREPLACE LOCATION
NOTICE: A qualified person must connect fireplace
to gas supply. Follow all local codes.
CAUTION: Never connect heater directly to the
propane supply. This heater requires an external
regulator(not supplied). Install the external
regulator between the heater and propane supply.
Installation Items Needed
Before installing the fireplace, make sure you have the
items listed below.
5
Page 6

C external regulator LP gas only (supplied by installer)
C piping (check local codes)
C sealant (resistant to propane gas)
C manual shutoff valve*
C test gauge connection*
C sediment trap
C tee joint
C pipe wrench
C approved flexible gas line with gas connector (if
allowed by local codes) (not provided)
* An CSA design-certified manual shutoff valve with
1/8" NPT tap is an acceptable alternative to test gauge
connection. Purchase the optional CSA design-certified
manual shutoff valve from your dealer.
For LP gas installations, the Installer must supply an
external regulator. The external regulator will reduce
incoming gas pressure. You must reduce incoming gas
pressure to between 11 and 14 inches of water. Of you
do not reduce incoming gas pressure, heater regulator
damage could occur. Install external regulator with the
vent pointing down as shown in figure 12. Pointing the
vent down protects it from freezing rain or sleet.
CAUTION: Use only new, black iron or steel pipe.
Internally-tinned copper tubing may be used in
certain areas. Check your local codes. Use pipe
of ½” diameter or greater to allow proper gas
volume to fireplace. If pipe is too small, undue
loss of pressure will occur.
Figure 12 - External Regulator with
Vent Pointing Down
Installation must include a manual shutoff valve, union,
and plugged 1/8" NPT tap. Locate NPT tap within reach
for test gauge hook up. NPT tap must be upstream from
fireplace (see figure 13).
Check your building codes for any special requirements
for locating manual shutoff valve to fireplaces.
Apply pipe joint sealant lightly to male threads. This will
prevent excess sealant from going into pipe. Excess
sealant in pipe could result in clogged fireplace valves.
CAUTION: Use only pipe joint sealant that is
resistant to liquid petroleum (LP) gas.
Install sediment trap in supply line as shown in figure 13.
locate sediment trap where it is within reach for cleaning.
Locate sediment trap where trapped matter is not likely
to freeze. A sediment trap traps moisture and
contaminants. This keeps them from going into fireplace
gas controls. If sediment trap is not installed or is
installed wrong, the fireplace may not run properly.
Figure 13 - Gas Connection
CONNECTING FIREPLACE TO GAS
SUPPLY
NOTE: Before you proceed, make sure gas supply
if turned off.
Installation Items Needed
C Pipe wrenches
C sealant (resistant to propane gas, not provided)
1. Open front access panel and locate gas shut off
valve upstream from control valve.
2. Prepare to route incoming gas line into firebox
(Figure 13).
6
Page 7

Figure 14 - Accessing burner assembly
1. Disconnect the fireplace and its individual manual
shutoff valve from gas supply piping system. Pressures
in excess of ½ psig will damage the fireplace gas
regulator.
2. Cap off the open end of gas pipe where manual
shutoff valve was connected.
3. Pressurize supply piping system by either using
compressed air or opening main gas valve located on or
near gas meter.
4. Check all joints of gas supply piping system. Apply a
mixture of liquid soap and water to gas joints. Bubbles
forming show a leak.
5. Correct all leaks at once.
6. Re-connect fireplace and manual shutoff valve to
gas supply. Check re-connected fittings for leaks.
Test Pressures Equal to or Less Than ½ PSIG
1. Close manual shutoff valve (see Figure 16)
2. Pressurize supply piping system by either using
compressed air or opening propane supply tank valve.
3. Remove the gas line cover plate from the fireplace’s
outer surround at the location to be used. Remove
insulation from inside the gas line conduit sleeve. Run
gas line through until the regulator can be reached.
4. Apply pipe sealant lightly to male threads of gas
connector attached to flexible gas line (see figure 15).
Connect flexible gas line to flexible gas line attached to
gas inlet gas valve of fireplace. (Fig 14).
Figure 15 - Attaching Flexible Gas Lines Together
5. Check all gas connections for leaks. See Checking
Gas Connections, below.
6. Place log base assembly completely into the
fireplace.
CHECKING GAS CONNECTIONS
WARNING: Test all gas piping and connections for
leaks after installing or servicing. Correct all leaks
at once.
3. Check all joints from propane supply tank (see fig
24). Apply a mixture of liquid soap and water to gas
joints. Bubbles forming show a leak.
4. Correct all leaks at once.
Pressure Testing Fireplace Gas Connections
1. Open manual shutoff valve (see figure 16).
2. Open propane supply tank valve.
3. Make sure control knob of fireplace is in OFF
position.
Figure 16 - Manual Shutoff Valve
4. Check all joints from manual shutoff valve to gas
valve (see Figure 17). Apply a mixture of liquid soap and
water to gas joints. Bubbles forming show a leak.
5. Correct all leaks at once.
6. Light the fireplace (see Operating Instructions).
Check all other internal joints for leaks.
7. Turn off the fireplace (see Operating Instructions).
WARNING: Never use an open flame to check for a
leak. Apply a mixture of liquid soap and water to
all joints. Bubbles forming show a leak. Correct all
leaks at once.
Pressure Testing Gas Supply Piping System
Test Pressures in Excess of ½ PSIG
Figure 17 - Checking Gas Joints
7
Page 8

Figure 18 - Setting logs and lava rock
PLACING LOGS AND LAVA ROCKS
Assemble ceramic logs by placing the large base log to
the rear of grate assembly (Figure 18). Add front logs
with “burned through” features to front left and right.
Place lava rocks on center of burner. Stack top logs
vertically in center of log stack. Adjust as required to
provide realistic flame.
(Warning: If flames get trapped under logs the result
will be black soot on logs and front face of fireplace.
Take extra care to adjust logs to correct this
condition).
Figure 18A- Finished log & rock placement
OPERATING YOUR NEW APPLIANCE
When the appliance is being operated for the first time,
allow for a supervised burn of 30 minutes. Then shut the
appliance off and let it cool completely before relighting.
This allows proper curing time for the logs. (After several
hours the logs will discolor slightly, this is normal.)
MAINTENANCE
It is recommended that a competent serviceman perform
the following procedures at least annually;
WARNING: Any change to this fireplace or its components can be dangerous. Any safety screen or guard
removed from fireplace for servicing must be replaced
prior to operating the heater. At the beginning of each
heating season, have a qualified technician inspect the
Figure 19 - Control and Ignitor Access
burner and pilot burner area for dust or carbon build-up.
This may be removed from the burner or logs with a soft
bristle brush. A visual inspection of the pilot burner and
main burner flame should be performed to verify proper
operation, refer to operating instructions for proper
adjustment. Care should be taken when cleaning and
handling logs since they become brittle with use. Small
heat cracks in the logs do not affect the operation of the
log set.
Cleaning Stainless Steel
General cleaning may be accomplished by using a
household cleaning solution and warm water. The
exterior may be cleaned using the same method. Badly
soiled or tarnished areas can be clean using a “scotch
brite” pad. Always scrub in same direction of material
finish.
Do not use caustic cleaners on fireplace as it may cause
damage to control and electric components.
CUSTOMER SERVICE& PARTS
REPLACEMENT:
Parts and accessories may be purchased from your local
dealer or directly from Sierra Products, Inc. Orders will
be accepted by mail, or you may call your order in Monday through Friday from 1:00 p.m. to 5:00 p.m. (Pacific
Standard Time) at: (909) 399-3355.
Please, fill in the following information for future
reference and warranty verification;
Date of Purchase ____________________20____
Model # ________________
Serial # ___________________________________
TROUBLE SHOOTING
If pilot or main burner will not light:
1) Make certain gas supply is turned "ON.”
2) Make certain all air is bled from system.
3) Make certain you have followed the safety and
operating instructions.
4) Call a qualified repair person to inspect the appliance.
5) When high winds are present, as a safety feature the
pilot burner will not stay lit. Do not operate in high
winds.
8
Page 9

OPERATING INSTRUCTIONS FOR MANUAL SAFETY VALVE
FOR YOUR SAFETY READ BEFORE LIGHTING
WARNING: If you do not follow these instructions exactly, a fire or explosion may result causing property
damage, personal injury or loss of life.
A. This appliance has a pilot which must be lighted by hand. When lighting pilot follow these instructions
exactly.
B. BEFORE LIGHTING smell all around the appliance area for gas. Be sure to smell next to the floor because
some gas is heavier than air and will settle on the floor.
WHAT TO DO IF YOU SMELL GAS;
M Do not try to light any appliance.
M Do not touch any electric switch; do not use any phone in your building.
M Immediately call your gas supplier from a neighbor's phone. Follow the gas supplier's instructions.
M If you cannot reach your gas supplier, call the fire department.
C. Use only your hand to push in or turn the gas control knob, NEVER use tools. If the knob will not push in
or turn by hand don't try to repair it, call a qualified service technician. Force or attempted repair may
result in fire or explosion.
D. Do not use this appliance if any part has been under water. Immediately call a qualified service technician
to inspect the appliance and to replace any part of the control system and any gas control which has been
underwater.
LIGHTING INSTRUCTIONS
1. STOP! Read the safety information above before proceeding.
2. Push in gas control knob slightly and turn clockwise to "OFF".
NOTE: Knob cannot be turned unless pushed in slightly. Do not force.
3. Wait five (5) minutes to clear out any gas. If you then smell gas, STOP!
Follow "B" in the safety information above. If you don't smell gas, go to next
step.
4. Locate the pilot burner on the back side of burner.
5. Turn knob counter clockwise to Pilot. Push control knob all the way in and
hold in, immediately lighting the pilot with a match. Continue to hold the
control knob in for about 1-1/2 minutes after the pilot is lit. Release knob
and it will pop back up. Pilot should remain lit. If it goes out, repeat steps 2 through 5.
M If knob does not pop up when released, stop and immediately call your service technician or gas
supplier.
M If the pilot will not stay lit after several tries, turn the gas control knob to "OFF" and call your service
technician or gas supplier.
6. Turn gas control knob counterclockwise to "HI".
FOR YOUR SAFETY, KEEP FIRE SCREENS CLOSED WHILE IN OPERATION .
TO TURN OFF APPLIANCE
1. Push in gas control knob slightly and turn clockwise to"OFF". Do not force.
2. Close access door.
9
Page 10

Item Qty Description P/N Item Qty Description P/N
1 1 Outer Surround 202181 11 1 Venturi w/ gasket 110299
2 1 Firebox 202183 12 1 Fireplace Hood SS 200740
3 1 SS Optional Trim (top piece) 200760 13 1 Access Door SS 202185
4 1 SS Optional Trim (left hand) 200761 14 2 Fireplace Screen 110388
5 1 SS Optional (right hand) 200762 15 2 Fireplace Screen Rod 200746
6 1 Refractory Left Side 200749 16 1 Remote Control - (MV Assy) 10649
7 1 Refractory Right Side 200753 17a 1 Natural Gas Control Assy. 300518
8 1 Refractory Hearth 202184 17b 1 LPG Gas Control Assy. 300519
9 1 Refractory Rear 200754 NS 1 Access Door Catch Assy. 110516
10 1 SS Burner 300517 .
10a 1 Large Lava Rocks -3 lbs 300520
10b 1 Log Set - 6 pcs 300521
5061 Brooks St., Ste B Montclair, CA 91763
www.sierraproductsinc.net
10
Page 11

SIERRA OUTDOOR GAS FIREPLACE LIMITED THREE & ONE, YEAR LIMITED WARRANTY
Sierra Products, Inc. (SPI), warrants to the original consumer this stove will be free of defective materials and workmanship
for the following periods: Outer structure - Outer Structure, Interior metal construction - Three Years, All other items - One
Year from the date of purchase. This warranty does not extend to any parts worn or damaged through normal ware, abuse,
accident, or neglect or warpage due to over-firing; nor does it apply if the stove has been repaired or modified unless by SPI
written authorization. If the stove proves to be defective in material or workmanship within the warranty period, SPI will, at
no charge, repair or replace (at its option) any defective parts, if the purchaser ships the parts or the stove, freight prepaid, to
SPI or the nearest authorized service center. SPI may require the consumer to supply reasonable proof of the stoves purchase
date.
This warranty is in lieu of any other express warranty. Any implied warranties, including but not limited to any
implied warranty of merchantability or fitness for a particular purpose shall not extend beyond one year from the
date of purchase.
The purchaser's sale and exclusive remedy shall be for the repair or replacement of defective parts, as provided for in this
warranty. No other remedy (including but not limited to incidental or consequential damages for lost profits, lost sales, injury
to person or property, or other incidental or consequential loss) shall be available to the purchaser.
Some states do not allow limitations on how long an implied warranty lasts and some states do not allow the exclusion or
limitation of incidental or consequential damages, so the above limitations or exclusions may not apply to you.
SPI's warranty obligation and the purchaser's rights under it can be altered only by a subsequent written agreement
between SPI and the purchaser.
The remedies provided in this warranty are void unless the attached warranty registration card is received by SPI within
30 days from the date of purchase.
If you have a warranty claim or questions about the performance of your stove, you are requested to contact your dealer.
This warranty gives you specific legal rights, and you may also have other rights which vary from state to state.
Please fill out and return the
bottom half of the page to:
Fill out &
SIERRA PRODUCTS, INC.
5061 Brooks St, Ste. B
return within
Montclair, CA 91763
30 days.
Sierra Outdoor Gas
Fireplace
Warranty Card
Date Purchased _______/________/_______
Name __________________________________________ Dealer Name____________________________________
Address ________________________________________ City/State __________________________Zip _________
City/State __________________________Zip _________ Mail form to: Sierra Products, Inc.
5061 Brooks St., Ste. B
I have read and understand the above warranty agreement. Montclair, CA 91763
Att: Customer Service
Owner’s Signature _______________________________________
Model #____________
Serial #_____________
11
\\Empire-01\eng01\Instructions\UV36\140790 UV36OFPr2.wpd
 Loading...