

Page 1
Model
954 4-Channel MFC Power Supply/Controller
INSTRUCTION MANUAL
954
October
Sierra Instruments, Inc., Headquarters
Sierra Europe, European Headquarters
Sierra Asia, Asia-Pacific Headquarters
Page 2

TABLE OF CONTENTS
PRODUCT DESCRIPTION ------------------------------------------------------------------------------
SPECIFICATIONS -----------------------------------------------------------------------------------------
FRONT PANEL ---------------------------------------------------------------------------------------------
REAR PANEL -----------------------------------------------------------------------------------------------
CONNECTOR PIN DESIGNATIONS
Transducer Connector (J1, J2, J3, J4) ---------------------------------------------------
Analog Output (J5) ----------------------------------------------------------------------------
Alarms (J8) --------------------------------------------------------------------------------------
RS232 (J6) --------------------------------------------------------------------------------------
RS485 (J7, J9) ---------------------------------------------------------------------------------
Model 954 Configuration ------------------------------------------------------------------
STARTUP ----------------------------------------------------------------------------------------------------
MANUAL SETUP
Selecting Display (Flow or Total) ----------------------------------------------------------
Selecting Valve Override (Open, Close or Run) ---------------------------------------
Selecting Setpoint (Control Voltage) -----------------------------------------------------
Selecting Units of Measure and Gas Identifiers --------------------------------------
Selecting Filter (-3dB A/D Converter Filter Frequency ------------------------------
Selecting Input (0-5Vdc, 0-10Vdc or 4-20mA Signal Input -------------------------
Selecting Alarms (High and Low with Hysteresis) ------------------------------------
Selecting Ratio (Master/Slave Operation) ----------------------------------------------
MANUAL CAL/RANGE
Calibrate (Zero Only) -------------------------------------------------------------------------
Calibrate (Range Only) ----------------------------------------------------------------------
Calibrate (Zero & Range) -------------------------------------------------------------------
Range (Changing Range) ------------------------------------------------------------------
Calibrate (Multiplier) --------------------------------------------------------------------------
RS232/485 HOOKUP ------------------------------------------------------------------------------------
RS232/485 COMMANDS
Setting/Reading Setpoint & Flow Alarms -----------------------------------------------
Setting/Reading Alarm Hysteresis, Units of Measure & Gas ID ------------------
Setting/Reading Signal Input & Filter ----------------------------------------------------
Setting/Reading Multiplier ------------------------------------------------------------------
Setting/Blanking/Reading Display --------------------------------------------------------
Resetting Total ---------------------------------------------------------------------------------
Setting/Reading Range Value -------------------------------------------------------------
Enable Master/Slave Channels & Setting Local/Remote Operation -------------
UNITS OF MEASURE TABLE -------------------------------------------------------------------------
GAS IDENTIFICATION TABLE
Gas #1 thru 66 --------------------------------------------------------------------------------
Gas #67 thru 130 -----------------------------------------------------------------------------
Gas #131 thru 180 ---------------------------------------------------------------------------
APPENDIX A, PCA SCHEMATIC DRAWING
1
2
3
4
5
5
6
6
6
6B
7
9
9
10
10
11
11
12
13
14
14
15
15
16
17
18
19
20
21
21
22
22
22
23
24
25
26
Page 3

PRODUCT DESCRIPTION
The Model 954 is a high performance, microprocessor-based 4-channel power
supply/controller designed for use with Mass Flow Controllers (MFC) or Mass Flow Meters
(MFM).
A linear regulator provides a low noise, foldback current limited, thermal overload protected
+15Vdc and -15Vdc power supply for each of the (4) Channels. The Model 954 accepts
user selectable 0-5Vdc, 0-10Vdc or 4-20mA input signals. It also supplies 0-5Vdc, 0-10Vdc
or 4-20mA setpoint signals, for each channel, for flow control in MFCʼs.
The firmware utilizes a Real Time Operating Sytem (RTOS) for real time multitasking
capabilities. This allows continuous monitoring of each channel's flow rates, total flow and
setpoints regardless of the task being performed. A 16-bit multi-channel, high speed,
sigma-delta analog-to-digital converter provides accurate flowrate data. A 32K x 8 battery
backed RAM stores more than 90 Units of Measure and 190 Gas Identifiers selectable by
the user. All pertinent data, required by the microprocessor at power-up to re-initialize the
system, is also stored in the same RAM.
The Model 954 utilizes a 4-line by 20 character back lighted LCD display. A built in
Totalizer, for each channel automatically recognizes the units of measure selected and
adjusts the time base for the integrator accordingly. The user can select either Flow or
Total to be displayed for each channel. When selected, the setpoint signal is displayed and
can be altered via the front panel switches. Override controls for opening or closing the
MFC valves are also available for each channel. Annunciator LED's display the selected
valve override conditions.
Ratio control is user selectable for master/slave operation. Channel 1 is always the master
and any of the other 3 channels may be selected as slaves. This master/slave
arrangement utilizes the actual flow of Channel 1 as the master signal.
Both RS232 and RS485 serial communications are available. All functions selectable from
the front panel switches are also accessible via the RS232/RS485 serial ports. Only one,
either RS232 or RS485, serial port is active at any one time. Selection, including a baud
rate of 9600 or 19.2K, is made via the front panel switches.
Each flow channel has a high and low user programmable alarm. The alarms activate an
opto-isolated open collector transistor output capable of switching 25Vdc @ 10ma.
The unit can be rack mounted using standard half-rack hardware or can be bench mounted
using the retractable stand provided. Input power is selectable, via the rear panel power
selector for 100, 115 or 230 Vac, 50-60 Hz.
PAGE 1
Page 4

SPECIFICATIONS
Signal Input
Number of Channels ----------------------- Signal Type ----------------------------------- Input Resistance
Voltage -------------------------------- Current ---------------------------------
Setpoint Output (Control Signal)
Signal Type ------------------------------------ Accuracy (typ) ---------------------------------
Analog-to-Digital Converter
Inputs ------------------------------------------- Technique ------------------------------------- Resolution ------------------------------------- Speed (max) -----------------------------------
Totalizer (Each Channel)
Technique ------------------------------------- Time Base (Quartz Crystal) -------------- Accuracy (typ) --------------------------------
4
0-5Vdc, 0-10Vdc, 4-20mA , user selectable
>10 Megohm
120 ohms
0-5Vdc, 0-10Vdc, 4-20mA (user selectable)
+/-0.05% FS (Voltage), +/-0.1% FS (Current)
4
Sigma-Delta
16-bit (bi-polar)
100 Hz
Integrated (Riemann Sum) Value
20MHz
+/- 30ppm
Microprocessor
Type -------------------------------------------- Speed ------------------------------------------ Operating System --------------------------- Non-volatile memory ------------------------
Serial Communications
RS232 ------------------------------------------ RS485 ------------------------------------------ Baud Rate --------------------------------------
Transducer Power Supply (Each Channel)
Voltage ----------------------------------------- Current (min) --------------------------------- Current (max) ----------------------------------
Input Power
Voltage ----------------------------------------- Current (typ) ---------------------------------- Fuse ---------------------------------------------
80C31
20MHz
RTOS with multitasking capabilities
32K x 8 Battery backed Ram
Bi-directional (user-slectable)
Full-duplex (user-selectable)
9600 or 19.2K baud (user-selectable)
+/-15Vdc, +/-0.75Vdc
250mA
400MA
100/115/230 Vac, +/-10% (switch selectable)
500 mA
1 amp SLO BLO (Time Delay)
PAGE 2
Page 5
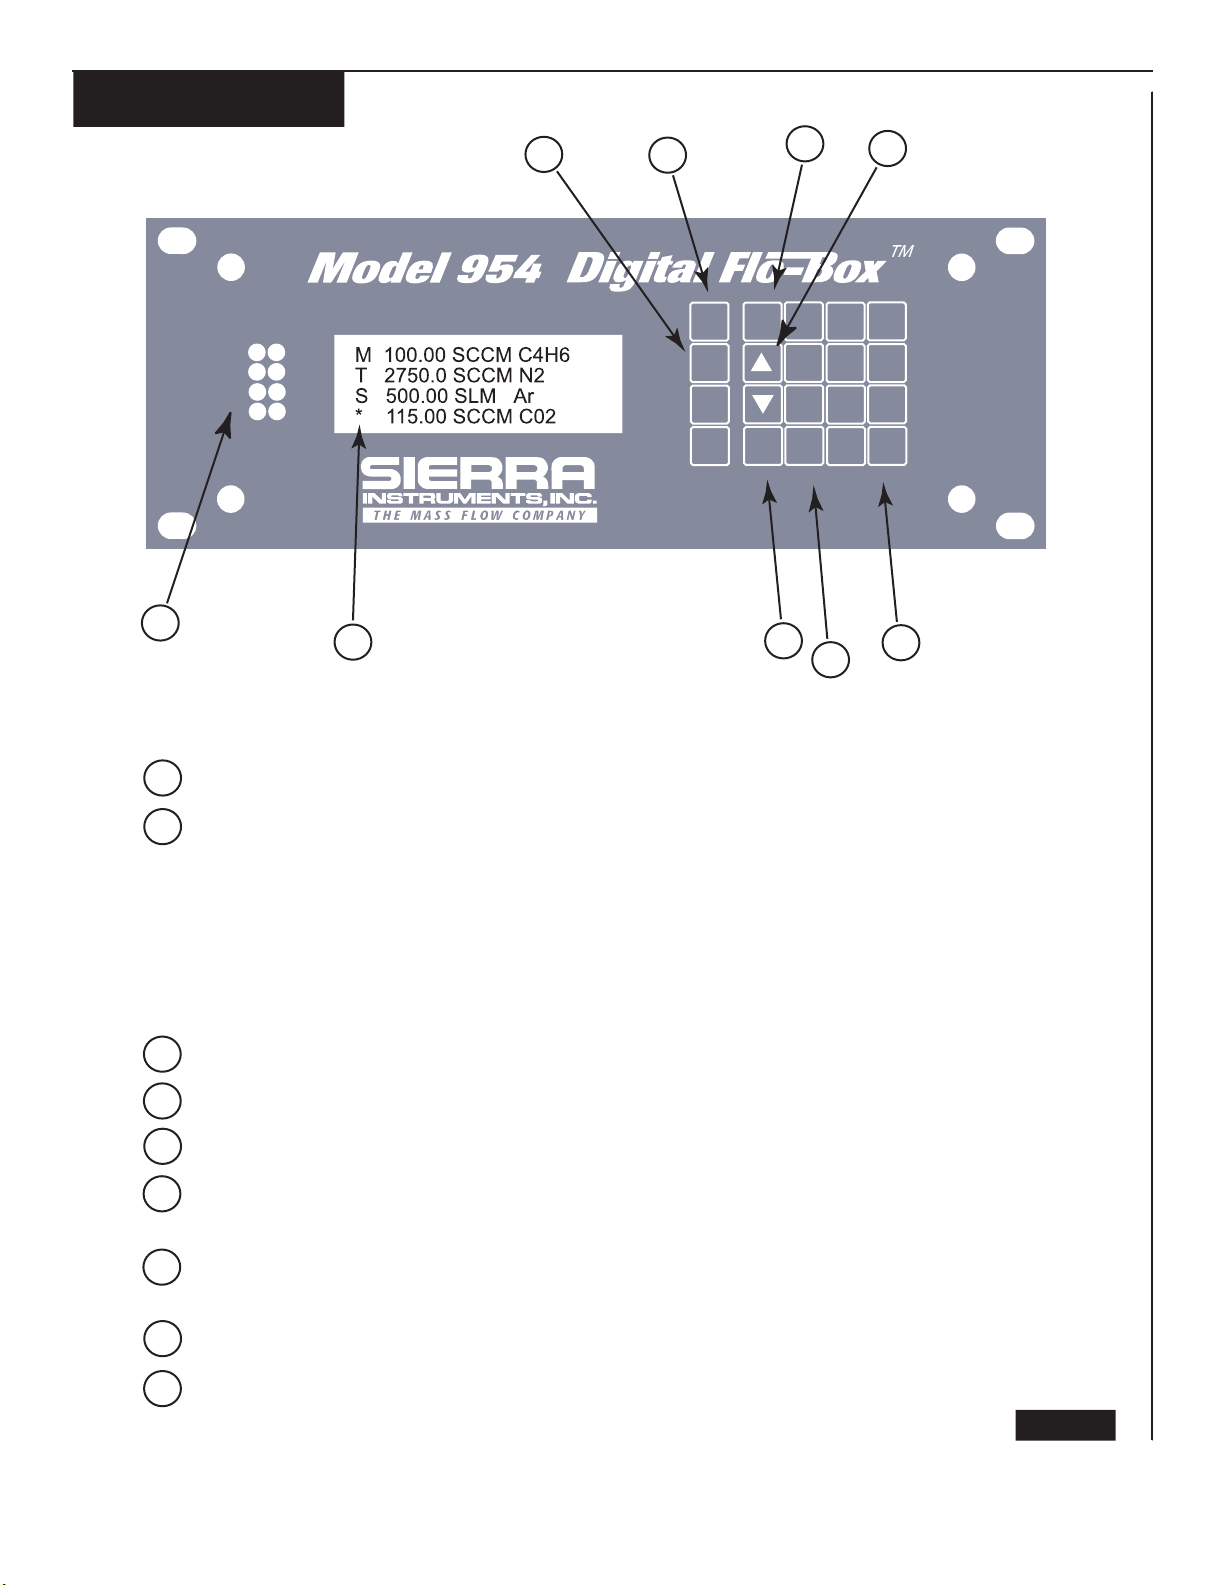
FRONT PANEL
OPEN
CLOSE
CH1
CH2
CH3
CH4
MENU
ESC
8
1
4 5
7
ENTER
6
7
CH
SELECT
PURGE
CLOSE
RUN
2 3
8 9
0
9
6
.
1
2
3
5
4
ANNUNCIATORS: Displays OVERRIDE signal status of each channel. If annunciators are not
illuminated, the Setpoint (Control) voltage is active.
DISPLAY AREA
Column 1: Reserved for displaying (*) Active Channel, (M) Master Channel, (S) Slave Channel or (T) totalizer.
Column 2: Reserved for polarity indicator (minus sign for negative signal, none for positive).
Col's 3 - 8: Actual scaled value of input signal. Displays FLOW or TOTAL in normal display mode. Displays
the Setpoint (Control) value when CH SEL is depressed.
Column 9: Space
Col's 10-14: Units of Measure
Column 15: Space
Col's 16-20: Gas Identifier
ESC: Escape key used to exit MENU sequence without updating current settings.
ENTER: Key used to enter new settings.
KEYPAD: Used to quickly enter new settings.
OVERRIDE: Used with CH SEL to override Setpoint (Control) voltage inputs with valve OPEN or valve
CLOSE signals. RUN disables OPEN or CLOSE selection.
CH SEL: Used to scroll through Channels 1, 2, 3 and 4 to update the selected Channel's
Setpoint (Control) voltage or to send the selected OVERRIDE signal.
MENU: Key used to enter MENU or manual setup sequence.
1
2
3
4
5
6
7
8
SCROLL: Used to scroll MENU selections UP or DOWN
9
PAGE 3
Page 6
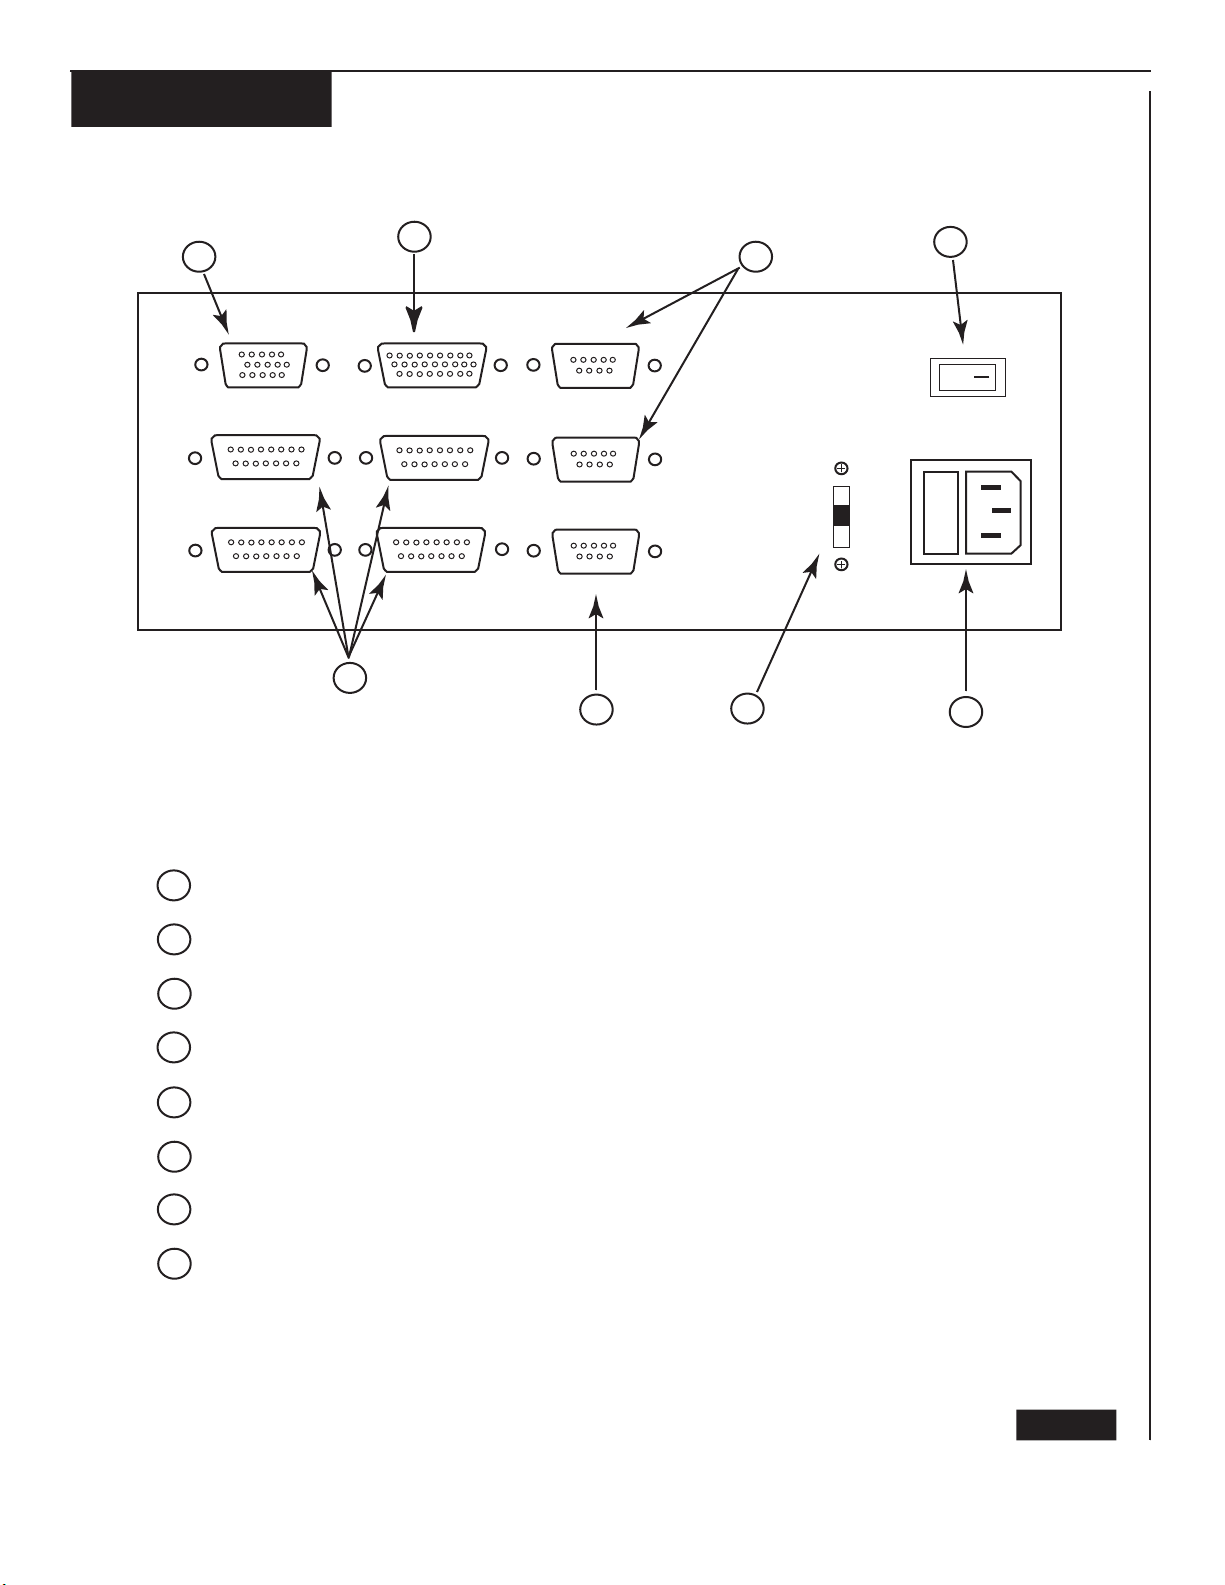
REAR PANEL
5
5
10
15
ANALOG OUT
8
15
CHANNEL 1
8
15
CHANNEL 3
6
7
J5
1
6
11
J1
1
9
J3
1
9
J8
9
18
26
ALARMS
J2
8
15
CHANNEL 2
J4
8
15
CHANNEL 4
1
10
19
1
9
1
9
5
RS485
5
RS485
5
RS232
J9
1
69
J7
1
69
VAC
230
J6
1
69
115
100
8
O
T250 1A
4
3
2
1
POWER INLET WITH FUSE (1 amp TIME DELAY or SLO BLO)
1
2
POWER SELECTOR SWITCH
3
RS232 SERIAL PORT (J6)
TRANSDUCER CONNECTORS (J1, J2, J3, J4)
4
ANALOG OUTPUT (J5)
5
6
ALARMS (J8)
RS-485 SERIAL PORT (J7, J9)
7
POWER ON/OFF SWITCH
8
PAGE 4
Page 7
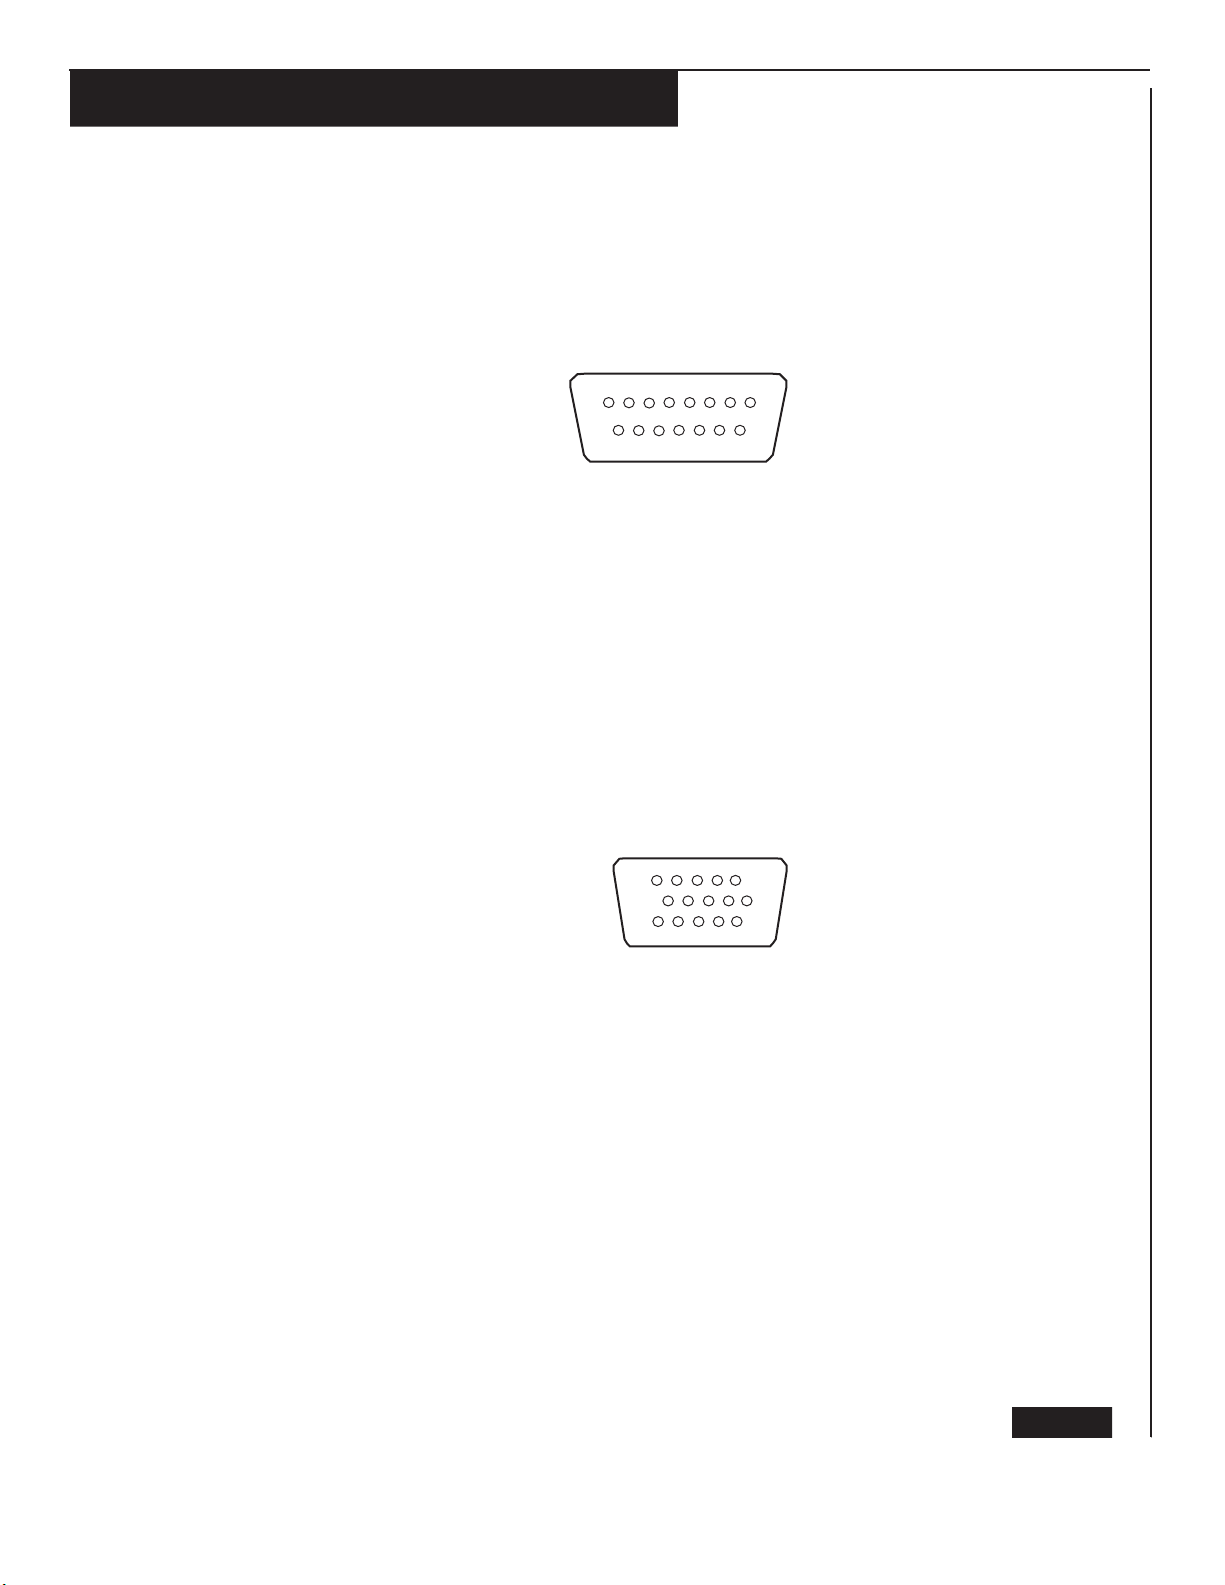
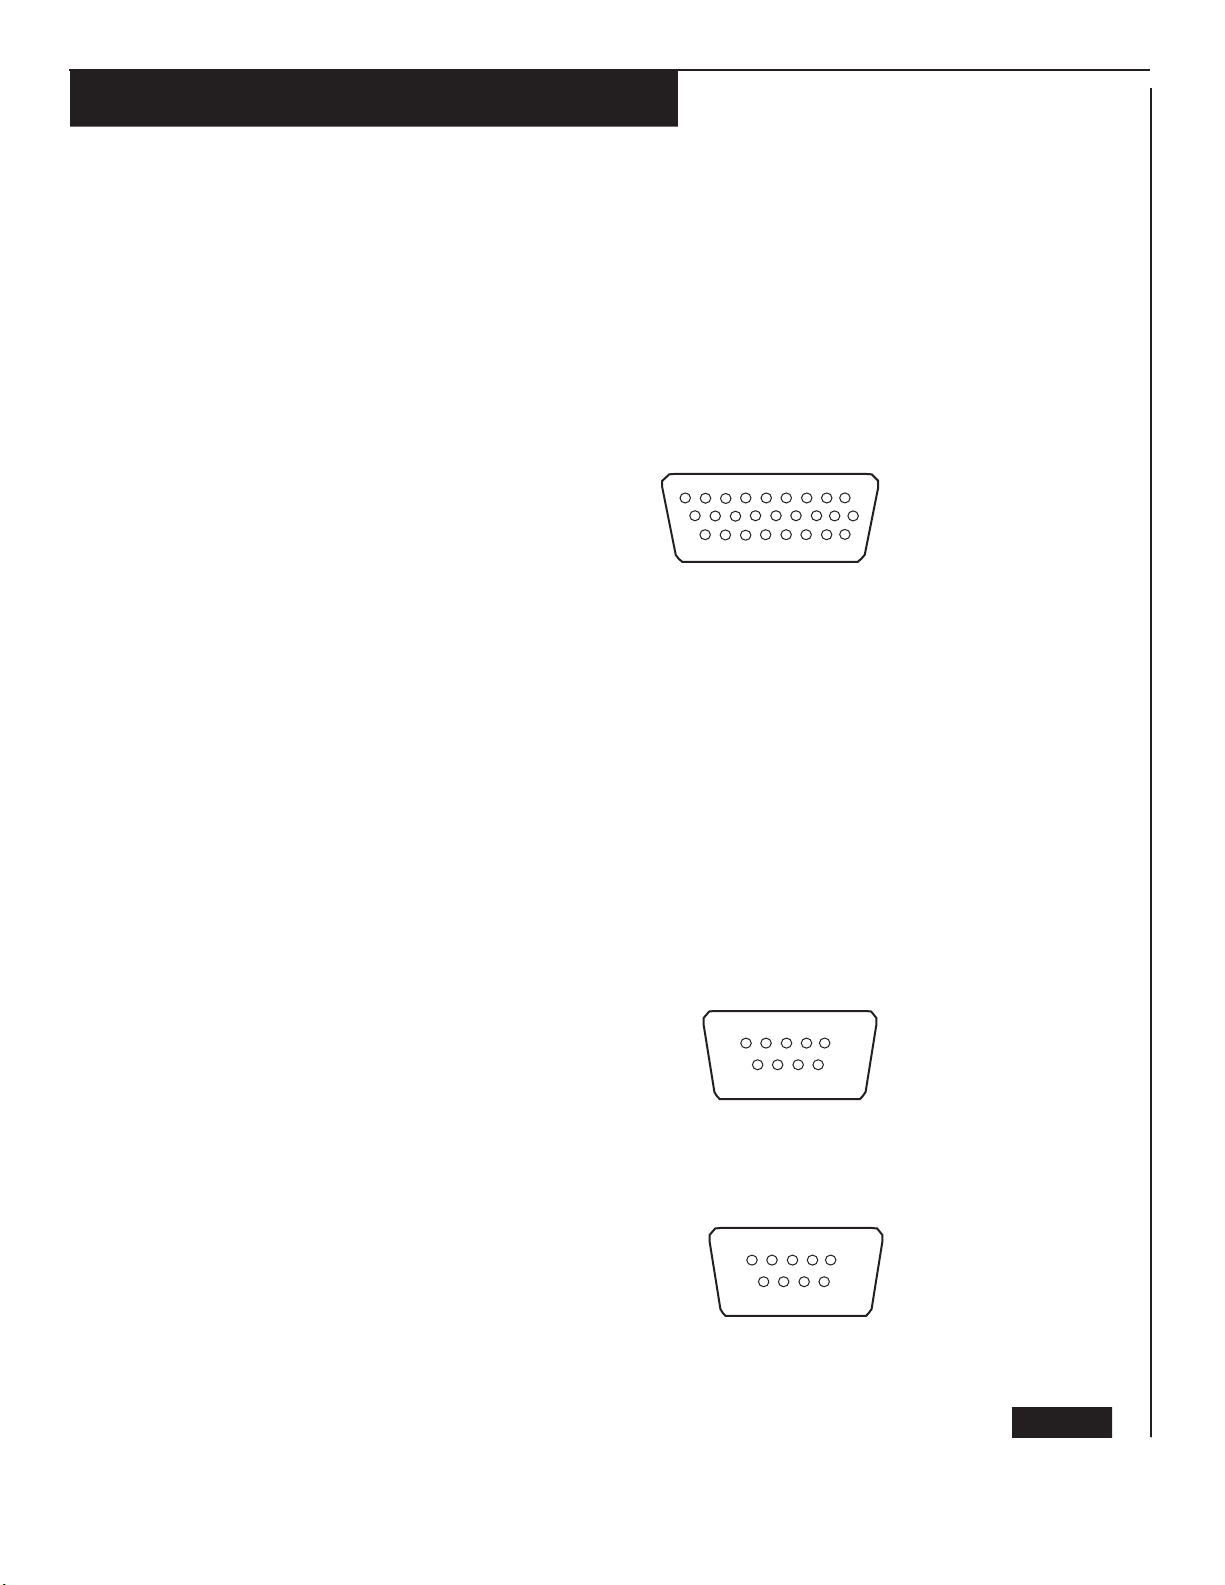
CONNECTOR PIN DESIGNATIONS
TRANSDUCER CONNECTORS (J1, J2, J3, J4)
1 SIGNAL COMMON
2 SIGNAL INPUT
3 GROUND
4 VALVE OPEN
5 GROUND
6 -15Vdc
7 NC
8 SETPOINT SIGNAL
9 GROUND
10 GROUND
11 NC
12 VALVE OFF
13 +15Vdc
14 NC
15 CHASSIS GROUND
8
15
Transducer Connector (Female)
Rear Panel View
1
9
ANALOG OUTPUT (J5)
1 SIGNAL CH 1
2 SIGNAL COMMON CH 1
3 SIGNAL CH2
4 SIGNAL COMMON CH2
5 NC
6 NC
7 NC
8 NC
9 NC
10 NC
11 SIGNAL CH3
12 SIGNAL COMMON CH3
13 SIGNAL CH4
14 SIGNAL COMMON CH4
15 NC
5
10
15
Analog Output Connector (Female)
Rear Panel View
1
6
11
PAGE 5
Page 8
CONNECTOR PIN DESIGNATIONS
ALARMS (J8)
1 CH1 HIGH ALARM
2 CH 1 LOW ALARM
3 CH1 ALARM COMMON
4 CH2 HIGH ALARM
5 CH2 LOW ALARM
6 CH2 ALARM COMMON
7 NC
8 NC
9 NC
10 NC
11 NC
12 NC
13 NC
14 NC
15 NC
16 NC
17 NC
18 NC
19 CH3 HIGH ALARM
20 CH3 LOW ALARM
21 CH3 ALARM COMMON
22 CH4 HIGH ALARM
23 CH4 LOW ALARM
24 CH4 ALARM COMMON
25 NC
26 NC
9
18
26
Alarm Connector (Female)
Rear Panel View
1
10
19
RS232 (J6)
1 NC 6 DSR
2 RXD 7 NC
3 TXD 8 NC
4 DTR 9 NC
5 DIGITAL GROUND
RS485 (J7, J9)
1 NC 6 NC
2 RXD(-) 7 RXD(+)
3 TXD(+) 8 TXD(-)
4 DIGITAL GROUND 9 NC
5 NC
5
RS232 Connector (Female)
Rear Panel View
5
RS485 Connector (Female)
Rear Panel View
1
69
1
69
PAGE 6
Page 9

MODEL 954 CONFIGURATION
As Sierra Instrument supplies mass flow instruments with two different valve circuits (15 Vdc and 30 Vdc),
our Model 954 is designed to accommodate both types. This is accomplished by moving 4 jumpers
(one per channel) on the Model 954 PCA (inside the housing). Please refer to the PCA schematic in
Appendix A for the location of these jumpers. All Model 954 units come factory set for 15 Vdc valve circuit
operation (unless ordered new with a 30 Vdc instrument).
Determining which valve circuit you have inside your Sierra flow instrument.
The following Sierra instruments have 15 Vdc valve circuits:
All Model 830 mass flow meters
All Model 840 mass flow controllers with plastic electronics cover
All Model 840 mass flow controllers with full-scale flow below 1.0 slpm
Model 840L mass flow controllers with metal electronics cover having a plug in the rear of the cover (upper right)
The following Sierra instruments have 30 Vdc valve circuits:
All Model 840M mass flow controllers
Model 840L Mass flow controllers with metal electronics cover having a screw in the rear of the cover (upper right)
The following Sierra instruments should never be used with the Model 954:
Any 840H mass flow controller. Contact Sierra Instruments for information on operating the Model 840H.
Jumper verification and adjustment
Select which one of the Model 954ʼs four channels is to be used with each of your instruments.
With the power disconnected, remove the top 2 large screws on the rear of Model 954. With the screws
removed, carefully slide the top cover to the rear exposing the PCA inside (see Appendix A for PCA
schematic). Locate the jumpers numbered 3 to 10. They are selected as follows:
Jumper position 3 Channel 1 30 Vdc valve
Jumper position 4 Channel 1 15 Vdc valve
Jumper position 5 Channel 2 30 Vdc valve
Jumper position 6 Channel 2 15 Vdc valve
Jumper position 7 Channel 3 30 Vdc valve
Jumper position 8 Channel 3 15 Vdc valve
Jumper position 9 Channel 4 30 Vdc valve
Jumper position 10 Channel 4 15 Vdc valve
Move the jumpers if needed, close the cover, replace the 2 screws.
PAGE 6B
Page 10

START-UP
The Model 954 has a 100 Vac, 115 Vac or 230 Vac, 50/60 Hz power selector switch located at the rear of the
instrument. Please refer to page 4 to locate this switch. Verify the power selector switch is in the proper position
prior to connecting the power cable to the unit. Verify power ON/OFF switch is in the OFF position. Then perform
the following steps.
1. Connect the power cable to the instrument and apply the proper input power. Do not make any other
connections to the instrument.
2. Turn power ON/OFF switch ON.
3. The display will momentarily display the current version of the firmware utilized, If you purchase the model
954 separately, it will show the following
126.72 SCCM #1
126.72 SCCM #2
126.71 SCCM C3H6O
126.72 SCCM C2H3N
If your model 954 was purchased with Sierra MFM or MFC instruments, each channel will be set to the
proper calibration for that unit.
Note: All 4 channels should have the CLOSE annunciators illuminated. The values 126.71 and 126.72
are approximate and is the display for an open signal input . It may not correspond exactly to the
display shown on this unit.
factory default display:
4. Change the Units of Measure and Gas Identifiers as desired. Please refer to page 10. To blank the Units
of Measure select "00" then "ENT". To blank the Gas Identifier select "000" then "ENT". To blank the
entire line, please refer to RS232/485 Commands, Selecting/Blanking/Reading Display on page 21.
5. The Model 954 is factory calibrated at 0.000 and 5.000Vdc to display 0.00 and 100.00 for each channel.
To change the display range, without recalibration, see MANUAL CAL/RANGE, Range(Changing
Range) on page 15. To enter a Gas Correction Factor or Multiplier, refer to MANUAL CAL/RANGE,
Calibrate (Multiplier) on page 16. The factory Multiplier setting is 1.0000.
6. The Model 954 can accept 0-5Vdc, 0-10Vdc or 4-20mA input signals. If either 0-10Vdc or 4-20mA is
required, the instrument needs to be recalibrated. Select the proper signal input for the Transducer to be
used for each channel. Please refer to MANUAL SETUP, Selecting Input on page 11. Do not attempt to
recalibrate the instrument at this time. The factory Input setting is 0-5Vdc.
7. Select Filter to optimize reading stability and conversion speed. The factory Filter setting is 15Hz.
8. Allow 30 minutes warm-up time.
9. Turn power ON/OFF switch OFF.
10 . Connect MFC/MFM #1 to J1 on the Model 954 using the Connector Pin Designation information on
page 5. Connect all ground connections available to the transducer. Example: If the
ground pins, connect all four ground pins shown on J1. All ground pins on J1, J2, J3 and J4 are
common but are routed on separate wires from the connector to a ground plane on the instrument
motherboard.
11
provide +/-15Vdc @ 250-400 mA to each transducer. Do not use a Transducer that requires more than
+/-15Vdc @ 500mA on any channel.
12. Verify the display illuminates and the transducer readings are essentially correct. If the selected signal
input for a channel is 0-5Vdc proceed to Step 13 for that channel. If the selected signal input for a
channel is 0-10Vdc or 4-20mA, that channel needs to be recalibrated. Refer to MANUAL CAL/RANGE,
Calibrate section pages 14 and 15 to recalibrate that channel.
. Connect MFC/MFM #2, 3 and 4 to the instrument. The Power Supply inside The 954 is designed to
MFC/MFM has 4
PAGE 7
Page 11

START-UP
13. To utilize the Setpoint (Control) voltage for MFC's, set the Setpoint voltage for each channel to the
desired setting. Please refer to MANUAL SETUP, Selecting Setpoint (Control Voltage) on page 10.
The factory Setpoint default is 0.0000 for all 4 channels.
The Setpoint voltage, for a 0-5Vdc signal input, is calculated as follows.
Setpoint Voltage = (Setpoint Value/Range Value) * 5.000Vdc
Example: If the Setpoint Value = 120.00 SCCM and the Range Value is 250.00 SCCM,
the Setpoint Voltage = (120.00/250.00)*5.000 = 2.400Vdc.
For a 0-10Vdc signal input
the Setpoint Voltage= (120.00/250.00)*10.000Vdc = 4.800Vdc
For a 4-20mA signal input
the Setpoint Current = (120.00/250.00)*16mA + 4mA = 11.68mA.
14. The Flowrate Alarms are used to monitor the flowrate of the MFC. If the flow rate is not within the
selected HIGH and LOW Alarm values, an opto-isolated open collector output is activated. This output
can be used to illuminate warning lights to alert the user if the Flow Controller's Setpoint (Control)
voltage is not controlling the flow within a desired window. Refer to MANUAL SETUP, Selecting Alarms
on page 12. The factory default is HIGH Alarm set at 75.000, LOW Alarm at 25.000 and HYSTERESIS
at 010 counts.
15. To activate the Setpoint (Control) voltage to the MFC, select RUN for the desired channel. Reference
MANUAL SETUP, Selecting Valve Override (Open, Close or Run) on page 9. The default at power-up
is Valve Close.
16. If the Units of Measure are in flow units, The Model 954 automatically calculates TOTAL flow using a
Riemann Sum Integration method. To display TOTAL or to reset the TOTAL display, refer to
MANUAL/SETUP, Selecting Display (Flow or Total) on page 9. If the Units of Measure are not in flow
units, the TOTAL is not calculated or displayed.
17. The Model 954 has both RS232 and RS485 serial communications ports. Only one port is active at any
one time and is user selectable. The RS232 port has (1) 9-pin D-sub connector, while the RS485 port
has (2) 9-pin D-sub connectors. All Setups described earlier can be performed using the serial
communications ports. Reference RS232/485 Hookup and Commands on pages 17 through 26.
PAGE 8
Page 12

MANUAL SETUP
Selecting Display (Flow or Total)
MENU
--
MENU: 1=DISPLAY
2=SETUP
3=CAL/RANGE
4=COMM
-- --
1
DISPLAY: 1=FLOW
2=TOTAL
-- --
1
--
2
|
|
|
|
|
----
FLOW: 1=Chnl 1
2=Chnl 2
3=Chnl 3
4=Chnl 4
TOTAL: 1=Chnl 1
2=Chnl 2
3=Chnl 3
4=Chnl 4
-------------------------------------------- --
RESET TOTAL?
-- --
2
1=NO
2=YES
1
-- --
2
500.0 SCCM Ar
1000 SCCM H2
50.00 SCCM CF4
950.0 SCCM CH4
500.0 SCCM Ar
T 0000 SCC H2
50.00 SCCM CF4
950.0 SCCM CH4
If Flow is selected, the most significant digit location will be left blank. If Total is selected, a "T" appears in
this location and the Unit of Measure changes accordingly. If the Unit of Measure selected is not a flow
rate unit of measure, Total will not be displayed.
Selecting Valve Overide (Open, Close or Run)
OPEN
CLOSE
CH1 500.0 SCCM Ar
CH2 1000 SCCM H2
CH3 50.00 SCCM CF4
CH4 950.0 SCCM CH4
OPEN
CLOSE
CH1 500.0 SCCM Ar
CH2 1000 SCCM H2
CH3 50.00 SCCM CF4
CH4 950.0 SCCM CH4
OPEN
CLOSE
CH1 500.0 SCCM Ar
CH2 1000 SCCM H2
CH3 50.00 SCCM CF4
CH4 950.0 SCCM CH4
CH SEL
--
* 500.0 SCCM Ar
1000 SCCM H2
50.00 SCCM CF4
950.0 SCCM CH4
--------------- -----OPEN
|
|
|
|
|
|
|
|
|
------ ------
CLOSE
|
|
|
|
|
|
|
|
|
------ ------
RUN
Channel 1 is shown selected above. An asterisk appears to signify the Channel selected. To select
Channel 2, depress CH SEL switch twice, then select OPEN, CLOSE or RUN. If OPEN is selected,
ground is applied to the appropriate channel connector pin-4. This ground is at the same potential as
pin-9. If CLOSE is selected, ground is applied to pin-12. Both pin-4 and pin-12 are grounded with an
open collector transistor capable of sinking 250mA at 25V. If RUN is selected, no override signals are
sent and the MFC Setpoint control is activated. If the valve override does not appear to function correctly,
you may need to re-configure The Model 954 using the 15/30 VDC jumpers on the PCA. Refer to page 6B
to verify valve circuit configuration of The 954 is correct for your MFM or MFC.
PAGE 9
Page 13

MANUAL SETUP
Selecting Setpoint (Control Voltage)
CH SEL
--
* 575.0 SCCM Ar
1000 SCCM H2
50.00 SCCM CF4
950.0 SCCM CH4
-- --
CH SEL
500.0 SCCM Ar
*1250.0 SCCM H2
50.00 SCCM CF4
950.0 SCCM CH4
-- -- -- -- -- -- -- --
1
7
5
0
0
.
ENT
500.0 SCCM Ar
*1575.0 SCCM H2
50.00 SCCM CF4
950.0 SCCM CH4
The example above shows how the setpoint for Channel 2 is changed. When CH SEL is depressed an
asterisk points to the channel selected. To select Channel 4, depress CH SEL switch 4 times.
The value displayed after the asterisk is the current setpoint value. Typing in a new value overrides the
old value. If ESC is depressed instead of ENT, the old value is retained.
Selecting Units of Measure and Gas Identifiers
MENU
--
MENU: 1=DISPLAY
2=SETUP
3=CAL/RANGE
4=COMM
-- --
2
SETUP:
1=BRIGHTNESS
2=UNITS/GASID
3=FILTER
-- --
2
UNITS: 1=Chnl 1
2=Chnl 2
3=Chnl 3
4=Chnl 4
-- --
1
UNITS:
1=SCCM
2=SLM
3=%
-- -- --
ENT
1
:
-------------------------------------------------------------------------------------------------------------------------------------------------------------------------------------------------------
4=INPUT
5=ALARM
6=RATIO
:
66=PSI
--------------
--------
GASID:
1=#1
2=#2
3=C3H60
:
191=C8H10
The bold characters shown in the above flow chart indicate the updated Units of Measure and Gas
Identifier selected. Note: When the Units of Measure and Gas Identifiers are selected, ENT must
be depressed before the selection is made. This is because it may require the inputting of more than 1
digit to make the desired selection.
-- -- --
ENT
3
500.0 SCCM C3H60
1000 SCCM H2
50.00 SCCM CF4
950.0 SCCM CH4
PAGE 10
---------------------------------------
Page 14

MANUAL SETUP
Selecting Filter (-3db A/D Converter Filter Frequency)
MENU
-MENU: 1=DISPLAY
2=SETUP
3=CAL/RANGE
4=COMM
-- --
2
SETUP:
1=BRIGHTNESS
2=UNITS/GASID
3=FILTER
:
4=INPUT
5=ALARM
6=RATIO
3
-- --
FILTER: 1=Chnl 1
2=Chnl 2
3=Chnl 3
4=Chnl 4
-- --
1
FILTER: 1=4Hz
2=15Hz
CHANNEL 1 3=30Hz
15Hz 4=100Hz
-- --
1
500.0 SCCM N2
1000 SCCM H2
50.00 SCCM CF4
950.0 SCCM CH4
The Filter selection sets the output word rate which in turn sets the corner frequency for the sigma-delta A/D
converter. With an output word rate of 15Hz, the filter's corner frequency is typically 12.7Hz. The filters are
optimized to settle to full accuracy every conversion and yield better than 80dB rejection for both 50 and 60Hz
with output word rates at or below 15Hz. The last filter output word rate setting for the selected channel is
displayed for user convenience. Each channel may be set to a different filter output word rate. The factory
default is15Hz for each channel to optimize response time and noise rejection.
Selecting Input (0-5Vdc, 0-10Vdc or 4-20mA Signal Input)
MENU
--
MENU: 1=DISPLAY
2=SETUP
3=CAL/RANGE
4=COMM
-- --
2
SETUP:
1=BRIGHTNESS
2=UNITS/GASID
3=FILTER
:
4=INPUT
5=ALARM
6=RATIO
-- --
4
INPUT: 1=Chnl 1
2=Chnl 2
3=Chnl 3
4=Chnl 4
-- --
2
ANALOG: 1=0-5V
2=0-10V
CHANNEL 2 3=4-20mA
0-5V
-- --
1
500.0 SCCM N2
1000 SCCM H2
50.00 SCCM CF4
950.0 SCCM CH4
The Input selection sets the full scale input signal and the full scale setpoint (control) signal for the selected
channel. The selected channel and the input signal setting that was previously selected is displayed during
selection. The factory default is 0-5V for each channel. Any input may be selected for any channel. The
instrument compensates for any incompatibilities even in the Master/Slave configuration.
Example: If the full scale input selected is 0-10V, then the full scale setpoint output is also 0-10V. If the
Master Channel is 0-10V and the Slave Channel is 4-20mA, the instrument compensates for the
incompatibility and sends a 0-10V setpoint signal for the Master and a 4-20mA setpoint signal proportional to
the 0-10V input signal for the Slave.
Note: For most MFC's the full scale input is 0-5V.
PAGE 11
Page 15

MANUAL SETUP
Selecting Alarms (High and Low with Hysteresis)
MENU
-MENU: 1=DISPLAY
2=SETUP
3=CAL/RANGE
4=COMM
-- --
2
SETUP:
1=BRIGHTNESS
2=UNITS/GASID
3=FILTER
:
4=INPUT
5=ALARM
6=RATIO
5
-- --
ALARM: 1=Chnl 1
2=Chnl 2
3=Chnl 3
4=Chnl 4
----------------------------------------------------------------------------------------------------
ALARMS: 1=HIGH LIMIT
----
----
2=LOW LIMIT
---------
3=HYSTERESIS
4=EXIT
-------------------- -----
-------------- -------
-------- -------
-- ---
4
1
2
3
ALARM:
CHANNEL 1
HIGH LIMIT
--ALARM:
----------------
CHANNEL 1
LOW LIMIT
---------
ALARM:
-----------------------------------
CHANNEL 1
HYSTERESIS 010
75.000
25.000
5
-- -- -- -- -- -- -- --
-- -- -- -- -- -- -- --
1
----------------------- -- -- -- --
0
0
-- -------
1
.
0
.
0
0
-------------------------------
0
0 ENT
0
0 ENT
0
1
ENT
------------------
----------------------------------------------------
500.0 SCCM C3H60
1000 SCCM H2
50.00 SCCM CF4
950.0 SCCM CH4
--------------------------------------------------------------------------------------------------------------------
---------------------------------------------------------------------------
-----------------------------------------------------------------------------
Each channel has a HIGH and LOW alarm to monitor the flow rate signal. If the flow rate is higher than
the HIGH alarm or less than the LOW alarm, an optically isolated open collector output is turned
on. This alarm may be used as a warning that the flow rate is not within the limits set by
the setpoint (control) signal. A programmable HYSTERESIS of 1 to 999 counts provide a
deadband for the alarms. To exit the alarm setup a
"4" to exit must be selected.
In the above example, the HIGH alarm limit was changed from 75.000 to 50.000, the LOW alarm limit
from 25.000 to 10.000 and HYSTERESIS from 010 to 001. The factory default is 75.000, 25.000 and
010 for the HIGH, LOW and HYSTERESIS settings, respectively.
PAGE 12
Page 16

MANUAL SETUP
Selecting Ratio (Master/Slave Operation)
MENU
-MENU: 1=DISPLAY
2=SETUP
3=CAL/RANGE
4=COMM
-- --
2
SETUP:
1=BRIGHTNESS
2=UNITS/GASID
3=FILTER
:
4=INPUT
5=ALARM
6=RATIO
-- --
6
RATIO:
1=DISABLE MASTER
2=ENABLE MASTER
3=EXIT
------ -------
-- -----
--------------------------------------------------------------------------------------------------------
SLAVE A:
----
1=DISABLED
---------
2=CHAN 2
3=EXIT
---------------- ---
------------ ----
--- ---
3
1
2
SLAVE B:
1=DISABLED
2=CHAN 3
3=EXIT
SLAVE B:
-- 1=DISABLED
--------------------------------
2=CHAN 3
3=EXIT
-------- -----
-- -------
2
-------- -----
--- -------
2
SLAVE C:
1
1=DISABLED
2=CHAN 4
3=EXIT
SLAVE C:
-- 1=DISABLED
------------
2=CHAN 4
3=EXIT
SLAVE C:
1
1=DISABLED
2=CHAN 4
3=EXIT
1
500.0 SCCM C3H60
1000 SCCM H2
2
50.00 SCCM CF4
950.0 SCCM CH4
--------------------------
--- ---
1
--- ---
1
--- ---
1
-- --
2
500.0 SCCM C3H60
1000 SCCM H2
50.00 SCCM CF4
950.0 SCCM CH4
M 500.0 SCCM C3H60
1000 SCCM H2
S 50.00 SCCM CF4
950.0 SCCM CH4
M 500.0 SCCM C3H60
S 1000 SCCM H2
50.00 SCCM CF4
950.0 SCCM CH4
M 500.0 SCCM C3H60
--S 1000 SCCM H2
------------
50.00 SCCM CF4
S 950.0 SCCM CH4
---
SLAVE C:
1=DISABLED
------------------------------
2=CHAN 4
3=EXIT
----------------------------------------------------------------------------------------------------------------
--------------------------------------------------------------------------------------------------
M 500.0 SCCM C3H60
--- ---
1
S 1000 SCCM H2
S 50.00 SCCM CF4
-- --
2
950.0 SCCM CH4
M 500.0 SCCM C3H60
--S 1000 SCCM H2
------------
S 50.00 SCCM CF4
S 950.0 SCCM CH4
500.0 SCCM C3H60
1000 SCCM H2
50.00 SCCM CF4
950.0 SCCM CH4
PAGE 13
Page 17

MANUAL CAL/RANGE
Calibrate (Zero only)
MENU
SCREEN 1
-MENU: 1=DISPLAY
2=SETUP
3=CAL/RANGE
4=COMM
-- --
3
CAL/RANGE
1=CALIBRATE
2=RANGE
SCREEN 2
-- --
1
SCREEN 3
CALIBRATE: 1=Chnl1
2=Chnl2
3=Chnl3
4=Chnl4
-- ---
1
-------------------------------------------------------------------------------------------------------
---------------
----
------------
SCREEN 4
CALIBRATE:
1=ZERO ONLY
2=ZERO & RANGE
3=RANGE ONLY
:
4=MULTIPLIER
-- --
1
ZERO:
CHANNEL 1
SIGNAL
ENTER TO ACCEPT
SCREEN 5
9
--- ----
ENT
SCREEN 6
0.0 SCCM C3H60
1000 SCCM H2
50.00 SCCM CF4
950.0 SCCM CH4
The "Zero only" sequence shown above is used to zero the MFC. Verify the input signal is at or
close to zero prior to performing this sequence. In SCREEN 5, the data shown after "SIGNAL" is the raw
analog-to-digital data corresponding to the input signal applied. This data is live and will change as the
input signal is changed. It should be close to zero, unless the MFC is being zeroed at a point other than
zero. If ENT is depressed during SCREEN 5, the value present at the input will be zeroed on the display,
as shown in SCREEN 6. If ESC is entered, the previous zeroed value applies.
Calibrate (Range only)
MENU
SCREEN 1
-MENU: 1=DISPLAY
2=SETUP
3=CAL/RANGE
4=COMM
-- --
3
CAL/RANGE
1=CALIBRATE
2=RANGE
SCREEN 2
-- --
1
SCREEN 3
CALIBRATE: 1=Chnl1
2=Chnl2
3=Chnl3
4=Chnl4
-- ---
1
SCREEN 4
CALIBRATE:
1=ZERO ONLY
2=ZERO & RANGE
3=RANGE ONLY
:
4=MULTIPLIER
-- --
3
-------
----
------------
SCREEN 5
RANGE VALUE:
CHANNEL 1
VALUE 100.00
ENTER TO ACCEPT
1
5
-- -- -- -- -- -- -- --
Entering 0150.0 instead of 150.00
will result in a full scale display
of 150.0 instead of 150.00
.0
0
0
ENT
SCREEN 6
RANGE VALUE:
CHANNEL 1
SIGNAL
ENTER TO ACCEPT
25963
-- --
ENT
SCREEN 7
150.00 SCCM C3H60
1000 SCCM H2
50.00 SCCM CF4
950.0 SCCM CH4
-------------------
The Range only sequence is used to calibrate the full scale reading of the MFC. Apply a full scale input
signal, typically 5Vdc to the signal input prior to performing this sequence. At SCREEN 5, the user has 2
alternatives. The first is to accept the display RANGE value shown by depressing ENT. The second is to
enter a new RANGE value, as shown above, prior to completing the RANGE sequence. The Signal
displayed on SCREEN 6 is the live, un-scaled analog-to-digital converter data, and will change as the
input changes. The value present when ENT is depressed will be used in the full scale calibration
calculations. If ESC is entered instead of ENT, the previous calibration applies. NOTE: DO NOT USE
THE RANGE ONLY SEQUENCE TO CHANGE RANGES. USE SELECTION 2 SHOWN IN SCREEN 2.
PAGE 14
Page 18

MANUAL CAL/RANGE
Calibrate (Zero & Range)
MENU
SCREEN 1
-MENU: 1=DISPLAY
2=SETUP
3=CAL/RANGE
4=COMM
-- --
3
CAL/RANGE
1=CALIBRATE
2=RANGE
SCREEN 2
-- --
1
SCREEN 3
CALIBRATE: 1=Chnl1
2=Chnl2
3=Chnl3
4=Chnl4
-- ---
1
-------------------------------------------------------------------------------------------------------
----------------
SCREEN 4
CALIBRATE:
----
1=ZERO ONLY
-----------
2=ZERO & RANGE
3=RANGE ONLY
:
4=MULTIPLIER
-- 2 --
1
SCREEN 5
ZERO:
CHANNEL 1
VALUE
ENTER TO ACCEPT
9
-- --
ENT
SCREEN 6
RANGE VALUE:
CHANNEL 1
VALUE 100.00
ENTER TO ACCEPT
1
5
-- -- -- -- -- -- -- --
.0
0
0
ENT
---------
---------------------
SCREEN 7
RANGE VALUE:
----
CHANNEL 1
-----------
SIGNAL
ENTER TO ACCEPT
25963
-- --
ENT
SCREEN 8
150.00 SCCM C3H60
1000 SCCM H2
50.00 SCCM CF4
950.0 SCCM CH4
The Zero & Range calibration allows both zero and full scale calibrations to be performed in the same
sequence. The input signal needs to be changed from a zero to a full scale value during the calibration
sequence. The same rules apply as previously mentioned in the Zero only and Range only procedures.
Range (Changing Range)
SCREEN 2
CAL/RANGE
1=CALIBRATE
2=RANGE
-- --
2
MENU
SCREEN 1
-MENU: 1=DISPLAY
2=SETUP
3=CAL/RANGE
4=COMM
-- --
3
-------------------------------------------------------------------------------------------------------
SCREEN 4
----
-----------
RANGE VALUE:
CHANNEL 1
VALUE
ENTER TO ACCEPT
100.00
1
5
-- -- -- -- -- -- -- --
.0
0
0
ENT
SCREEN 3
RANGE: 1=Chnl1
2=Chnl2
3=Chnl3
4=Chnl4
SCREEN 5
150.00 SCCM C3H60
1000 SCCM H2
50.00 SCCM CF4
950.0 SCCM CH4
-- ---
1
----------------
The Range sequence is not a calibration sequence. Changing the Range value simply replaces the
Range value used during the previous full scale calibration. The analog-to-digital converter data used
during the previous full scale calibration is still valid. Ranging is a simple way to change ranges when
changing MFC's. It assumes the full scale output voltage of the new MFC is the same as the previous
MFC.
PAGE 15
Page 19

MANUAL CAL/RANGE
Calibrate (Multiplier)
MENU
SCREEN 1
-MENU: 1=DISPLAY
2=SETUP
3=CAL/RANGE
4=COMM
-- --
3
CAL/RANGE
1=CALIBRATE
2=RANGE
SCREEN 2
-- --
1
SCREEN 3
CALIBRATE: 1=Chnl1
2=Chnl2
3=Chnl3
4=Chnl4
-- ---
1
-------------------------------------------------------------------------------------------------------
----------------
SCREEN 4
CALIBRATE:
----
1=ZERO ONLY
-----------
2=ZERO & RANGE
3=RANGE ONLY
:
4=MULTIPLIER
-- --
4
SCREEN 5
MULTIPLIER
CHANNEL 1
FACTOR 1.0000
1
.
0
5
-- -- -- -- -- -- -- --
0
0
ENT
SCREEN 6
105.00 SCCM C3H60
1000 SCCM H2
50.00 SCCM CF4
950.0 SCCM CH4
Entering a MULTIPLIER value changes the display by that multiplier factor. All data values are multiplied
by the MULTIPLIER prior to display. The MULTIPLIER is sometimes referred to as a GAS
CORRECTION factor when used with MFC's. If the MFC is calibrated with nitrogen and
another gas is used with the MFC, a GAS CORRECTION factor can be entered to recalibrate
the MFC to the gas used.
PAGE 16
Page 20

RS232/485 HOOKUP
BI-DIRECTIONAL RS-232 CONNECTION
PC1
COM1/COM2
TXD ---------------------------- RXD --------------------------- GND -----------------------------
IC-232
J6-3
2
5
KDT-4000
RXD
TXD
DIGITAL GND
IC-232
RS232/485 data is transmitted at 9600 or 19.2K baud (user-selectable)
in the following format:
One Start Bit
Eight Data Bits in ASCII Format
No Parity Bit
One Stop Bit
Note: All commands and queries are case sensitive and require an upper
case character.
Reading Display
RS232 Query:
C1 Response: "CH1<>sddd.dd<>eeeee<>xxxxx<>z
where: <>= blank (ASCII 20)
s= polarity sign (blank for +, ASCII 2E for -)
ddd.dd= data in ASCII format with decimal in
displayed position.
eeeee= unit of measure
xxxxx= gas id
z= carriage return (ASCII 0D)
C5 Response: "CH1<>sddd.dd<>eeeee<>xxxxx<>z
CH2<>sddd.dd<>eeeee<>xxxxx<>z
CH3<>sddd.dd<>eeeee<>xxxxx<>z
CH4<>sddd.dd<>eeeee<>xxxxx<>z"
MULTIDROP/4-WIRE FULL DUPLEX
RS-485 CONNECTION
PC1
COM1/COM2
TXD(+) ----------------------------TXD(-) ----------------------------RXD(+) ----------------------------RXD(-) -----------------------------
IC-485
PC2
COM1/COM2
TXD(+) ----------------------------TXD(-) ----------------------------RXD(+) ----------------------------RXD(-) -----------------------------
IC-485
--------------------- RXD(+)
------------------ RXD(-)
---------------- TXD(+)
-------------- TXD(-)
--------------------- RXD(+)
------------------ RXD(-)
---------------- TXD(+)
------------- TXD(-)
--------------------- RXD(+)
------------------ RXD(-)
---------------- TXD(+)
------------- TXD(-)
:
:
:
--------------------- RXD(+)
------------------ RXD(-)
---------------- TXD(+)
------------- TXD(-)
:
:
:::
:
:
------------ -----------------------------------------------------------------------------------------------------
---------------- -------------------------------------------------------------------------------------------------
-------------------- --------------------------------------------------------------------------------------------
------------------------ ----------------------------------------------------------------------------------------
RXD(+)
RXD(-)
TXD(+)
TXD(-)
J7-7
2
3
8
J9-7
2
3
8
J7-7
2
3
8
J9-7
2
3
8
J7-7
2
3
8
J9-7
2
3
8
KDT-4000 #01
RXD(+)
RXD(-)
TXD(+)
TXD(-)
IC-485
KDT-4000 #02
IC-485
KDT-4000 #nn
IC-485
RS485 Query:
*aaC1 Response: "CH1<>sddd.dd<>eeeee<>xxxxx<>z
*aaC5 Response: "CH1<>sddd.dd<>eeeee<>xxxxx<>z
CH2<>sddd.dd<>eeeee<>xxxxx<>z
CH3<>sddd.dd<>eeeee<>xxxxx<>z
CH4<>sddd.dd<>eeeee<>xxxxx<>z"
where: aa= KDT-4000 address
Reference: Checking/Changing RS485 Address on pg 19.
Note: nn=32 maximum (drivers and receivers)
PAGE 17
Page 21

RS232/485 COMMANDS
Checking Model 954 RS485 Address Setting
RS485 Query:
*00X Response: "MULTIDROP ADDRESS: 01"
Note: All Model 954's will respond to * 0 0 X. To prevent bus
contention, connect only 1 Model 954 to the RS485
port for this check.
Setting Setpoint (Control) Voltage
RS232 Command:
SP1<dd.ddd> Set CH1 Setpoint to dd.ddd
SP2<dd.ddd> Set CH2 Setpoint to dd.ddd
SP3<dd.ddd> Set CH3 Setpoint to dd.ddd
SP4<dd.ddd> Set CH4 Setpoint to dd.ddd
Example: Send S P 1 1 0 0 . 0 0
CH1 Setpoint (Control) Voltage setting will be
100.00.
Note: < > must contain 5 digits and 1 decimal point.
<ddddd.> is a valid entry. Setpoint is always positive.
RS485 Command:
*aaSP1<dd.ddd> Set CH1 Setpoint at Address 01 to dd.ddd
*aaSP2<dd.ddd> Set CH2 Setpoint at Address 01 to dd.ddd
*aaSP3<dd.ddd> Set CH3 Setpoint at Address 01 to dd.ddd
*aaSP4<dd.ddd> Set CH4 Setpoint at Address 01 to dd.ddd
Example: Send * 0 1 S P 2 2 5 0 0 . 0
Model 954 with Address 01 will have CH2 Setpoint
(Control) Voltage set to 2500.0
Changing Model 954 RS485 Address Setting
RS485 Command:
*00x<aa> Set 954 Address to aa
Example: Send * 0 0 x 2 2
Model 954 will respond with a "spade" character
to
acknowledge receipt of this command and
change its Address to "22"
Reading Setpoint (Control) Voltage
RS232 Query:
SP1 Response: "SP1ddd.dd"
SP2 Response: "SP2ddd.dd"
SP3 Response: "SP3ddd.dd"
SP4 Response: "SP4ddd.dd"
RS485 Query:
*aaSP1 Response: "SP1ddd.dd"
*aaSP2 Response: "SP2ddd.dd"
*aaSP3 Response: "SP3ddd.dd"
*aaSP4 Response: "SP4ddd.dd"
Setting Alarms
RS232 Command:
A1H<dd.ddd> Set CH1 High Alarm to dd.ddd
A2L<dd.ddd> Set CH1 Low Alarm to dd.ddd
A2H<dd.ddd> Set CH2 High Alarm to dd.ddd
A2L<dd.ddd> Set CH2 Low Alarm to dd.ddd
A3H<dd.ddd> Set CH3 High Alarm to dd.ddd
A3L<dd.ddd> Set CH3 Low Alarm to dd.ddd
A4H<dd.ddd> Set CH4 High Alarm to dd.ddd
A4L<dd.ddd> Set CH4 Low Alarm to dd.ddd
Example: Send A 4 L 3 5 . 0 0 0
CH4 Low Alarm Setpoint will be 35.000
RS485 Command:
*aaA1H<dd.ddd> Set CH1 High Alarm at Address 02 to dd.ddd
*aaA1L<dd.ddd> Set CH1 Low Alarm at Address 02 to dd.ddd
*aaA2H<dd.ddd> Set CH2 High Alarm at Address 02 to dd.ddd
*aaA2L<dd.ddd> Set CH2 Low Alarm at Address 02 to dd.ddd
*aaA3H<dd.ddd> Set CH3 High Alarm at Address 02 to dd.ddd
*aaA3L<dd.ddd> Set CH3 Low Alarm at Address 02 to dd.ddd
Example: Send *02A3H500.00
Model 954 with Address 02 will have CH3 High
Alarm set to 500.00
Reading Alarms
RS232 Query:
A1H Response: A1H ddd.dd
A1L Response: A1L ddd.dd
A2H Response: A2H ddd.dd
A2L Response: A2L ddd.dd
A3H Response: A3H ddd.dd
A3L Response: A3L ddd.dd
A4H Response: A4H ddd.dd
A4L Response: A4lL ddd.dd
RS485 Query:
*aaA1H Response: A1H ddd.dd
*aaA1L Response: A1H ddd.dd
*aaA2H Response: A2H ddd.dd
*aaA2L Response: A2L ddd.dd
*aaA3H Response: A3H ddd.dd
*aaA3L Response: A3L ddd.dd
*aaA4H Response: A4H ddd.dd
*aaA4L Response: A4L ddd.dd
PAGE 18
Page 22

RS232/485 COMMANDS
Setting Alarm Hysteresis
RS232 Command:
HY1<ddd> Set CH1 Alarm Hysteresis to ddd
HY2<ddd> Set CH2 Alarm Hysteresis to ddd
HY3<ddd> Set CH3 Alarm Hysteresis to ddd
HY4<ddd> Set CH4 Alarm Hysteresis to ddd
where 000<ddd<250
Example: Send HY1010
CH1 Alarm Hysteresis set to 10 counts.
RS485 Command:
*aaHY1<ddd> Set CH1 Hysteresis at Address aa to ddd
*aaHY2<ddd> Set CH2 Hysteresis at Address aa to ddd
*aaHY3<ddd> Set CH3 Hysteresis at Address aa to ddd
*aaHY4<ddd> Set CH4 Hysteresis at Address aa to ddd
Example: Send * 0 1 HY3100
Model 954 with Address 01 will have CH3 Alarm
Hysteresis set to 100
Setting Units of Measure
RS232 Command:
UM1<dd> Set CH1 Unit of Measure to selection dd
UM2<dd> Set CH2 Unit of Measure to selection dd
UM3<dd> Set CH3 Unit of Measure to selection dd
UM4<dd> Set CH4 Unit of Measure to selection dd
Reference Units of Measure Table on pg 14 for selection
Example: Send UM101
CH1 Unit of Measure will be SCCM
RS485 Command:
*aaUM1<dd> Set CH1 Unit of Measure at Address 02 to
selection dd
*aaUM2<dd> Set CH1 Unit of Measure at Address 02 to
selection dd
*aaUM3<dd> Set CH3 Unit of Measure at Address 02 to
selection dd
*aaUM4<dd> Set CH2 Unit of Measure at Address 02 to
selection dd
Example: Send *03UM366
Model 954 with Address 02 will have CH3 Unit of
Measure set to PSI
Reading Alarm Hysteresis
RS232 Query:
HY1 Response: HY1ddd
HY2 Response: HY2ddd
HY3 Response: HY3ddd
HY4 Response: HY4ddd
Example: Send IN3 Response: IN3
RS485 Query:
*aaHY1 Response: HY1ddd
*aaHY2 Response: HY2ddd
*aaHY3 Response: HY3ddd
*aaHY4 Response: HY4ddd
Reading Units of Measure
RS232 Query:
UM1 Response: UM1dd
UM2 Response: UM2dd
UM3 Response: UM3dd
UM4 Response: UM4dd
Example: Send UM1
Response: UM11 if CH1 Unit of Measure was
SCCM
RS485 Query:
*aaUM1 Response: UM1dd
*aaUM2 Response: UM2dd
*aaUM3 Response: UM3dd
*aaUM4 Response: UM4dd
Setting Gas Idenfifier
RS232 Command:
GS1<ddd> Set CH1 Gas Identifier to selection dd
GS2<ddd> Set CH2 Gas Identifier to selection dd
GS3<ddd> Set CH3 Gas Identifier to selection dd
GS4<ddd> Set CH4 Gas Identifier to selection dd
Reference Gas Identifier Table on pgs 15, 16 and 17 for
selection
Example: Send GS1050
CH1 Gas Identifier will be C2H6O
Reading Gas Identifier
RS232 Query:
GS1 Response: GS1ddd
GS2 Response: GS2ddd
GS3 Response: GS3ddd
GS4 Response: GS4ddd
Example: Send GS3
Response: GS3050 if CH1 Gas Identifier was
C2H60
PAGE 19
Page 23

RS232/485 COMMANDS
Setting Signal Input
RS232 Command:
IN1<d> Set CH1 Signal Input to selection d
IN2<d> Set CH2 Signal Input to selection d
IN3<d> Set CH3 Signal Input to selection d
IN4<d> Set CH4 Signal Input to selection d
where d=1 Signal Input = 0-5V
d=2 Signal Input = 0-10V
d=3 Signal Input = 4-20mA
Example: Send IN33
CH3 Signal Input selection is 4-20mA. This also
sets CH3 Setpoint (Control) signal to 4-20mA.
RS485 Command:
*aaIN1<d> Set CH1 Signal Input at Address aa to selection d
*aaIN2<d> Set CH2 Signal Input at Address aa to selection d
*aaIN3<ddd> Set CH3 Signal Input at Address aa to selection d
*aaIN4<ddd> Set CH4 Signal Input at Address aa to selection d
Example: Send *01IN31
Model 954
with Address 01 will have CH3 Signal
Input set for 0-5V.
Setting Filter
RS232 Command:
FL1<d> Set CH1 Filter selection to d
FL2<d> Set CH2 Filter selection to d
FL3<d> Set CH3 Filter selection to d
FL4<d> Set CH4 Filter selection to d
Where d=1 Filter = 4Hz
d=2 Filter = 15Hz
d=3 Filter = 30Hz
d=4 Filter =100Hz
Example: Send FL12
CH1 Filter f(-3dB) will be 15Hz
RS485 Command:
*aaFL1<d> Set CH1 Filter at Address aa to selection d
*aaFL2<d> Set CH1 Filter at Address aa to selection d
*aaFL3<d> Set CH3 Filter at Address aa to selection d
*aaFL4<d> Set CH2 Filter at Address aa to selection d
Example: Send *03FL13
Model 954 with Address 03 will have CH1 Filter
selection set for 30Hz.
Reading Signal Input Selection
RS232 Query:
IN1 Response: IN1<>d<>zzzzz
IN2 Response: IN2<>d<>zzzzz
IN3 Response: IN3<>d<>zzzzz
IN4 Response: IN4<>d<>zzzzz
Where zzzzz = 0-5V for d=1
zzzzz = 0-10V for d=2
zzzzz = 4-20mA for d=3
Example: Send IN3 Response: IN3 3 4-20mA
RS485 Query:
*aaIN1 Response: IN1<>d<>zzzzz
*aaIN2 Response: IN2<>d<>zzzzz
*aaIN3 Response: IN3<>d<>zzzzz
*aaIN4 Response: IN4<>d<>zzzzz
Example: Send *10IN2 Response: IN2 1 0-5V
Reading Filter
RS232 Query:
FL1 Response: FL1<>d<>zzzzz
FL2 Response: FL2<>d<>zzzzz
FL3 Response: FL3<>d<>zzzzz
FL4 Response: FL4<>d<>zzzzz
Where zzzzz = 4Hz for d=1
zzzzz = 15Hz for d=2
zzzzz = 30Hz for d=3
zzzzz = 100Hz for d=4
Example: Send FL1
Response: FL1 2 15Hz if CH1 Filter selection
was 2.
RS485 Query:
*aaFL1 Response: FL<>1<>zzzzz
*aaFL2 Response: FL<>2<>zzzzz
*aaFL3 Response: FL<>3<>zzzzz
*aaFL4 Response: FL4<>4<>zzzzz
PAGE 20
Page 24

RS232/485 COMMANDS
Setting Multiplier
RS232 Command:
ML1<d.dddd> Set CH1 Multiplier to d.dddd
ML2<d.dddd> Set CH2 Multiplier to d.dddd
ML3<d.dddd> Set CH3 Multiplier to d.dddd
ML4<d.dddd> Set CH4 Multiplier to d.dddd
Example: Send ML31.1375
CH3 Multiplier=1.1375
RS485 Command:
*aaML1<d.dddd> Set CH1 Multiplier at Address aa to d.dddd
*aaML2<d.dddd> Set CH2 Multiplier at Address aa to d.dddd
*aaIN3<d.dddd> Set CH3 Multiplier at Address aa to d.dddd
*aaIN4<d.dddd> Set CH4 Multiplier at Address aa to d.dddd
Example: Send *05ML31.0000
Model 954 with Address 05 will have CH3
Multiplier set to 1.0000.
Setting/Blanking Display (Flow or Total)
RS232 Command:
D1<d> Set CH1 Display to selection d
D2<d> Set CH2 Display to selection d
D3<d> Set CH3 Display to selection d
D4<d> Set CH4 Display to selection d
Where d=1 sets Display for TOTAL
d=2 sets Display for FLOW
d=3 blanks Display for selected Channel
Example: Send D11
CH1 Display shows TOTAL
RS485 Command:
*aaD1d Set CH1 Display at Address aa to selection d
*aaD2d Set CH2 Display at Address aa to selection d
*aaD3d Set CH3 Display at Address aa to selection d
*aaD4d Set CH4 Display at Address aa to selection d
Example: Send *03D12
Model 954 with Address 03 will display FLOW on
CH1
Reading Multiplier
RS232 Query:
ML1 Response: ML1<><>d.dddd
ML2 Response: ML2<><>d.dddd
ML3 Response: ML3<><>d.dddd
ML4 Response: ML4<><>d.dddd
Example: Send ML3 Response: ML3 1.1375
RS485 Query:
*aaML1 Response: ML1<><>d.dddd
*aaML2 Response: ML2<><>d.dddd
*aaML3 Response: ML3<><>d.dddd
*aaML4 Response: ML4<><>d.dddd
Reading Display (Selection)
RS232 Query:
D1 Response: D1d
D2 Response: D2d
D3 Response: D3d
D4 Response: D4d
Example: Send D1
RS485 Query:
Response: D12 indicates d=2 for FLOW on CH1
*aaD1 Response: D1d
*aaD2 Response: D2d
*aaD3 Response: D3d
*aaD4 Response: D4d
PAGE 21
Page 25

RS232/485 COMMANDS
Resetting Total
RS232 Command:
T1R Reset CH1 Total to zero
T2R Reset CH2 Total to zero
T3R Reset CH3 Total to zero
T4R Reset CH4 Total to zero
Example: Send T3R
CH3 Total reset to zero
RS485 Command:
*aaT1R Reset CH1 Total at Address aa to zero
*aaT2R Reset CH2 Total at Address aa to zero
*aaIT3R Reset CH3 Total at Address aa to zero
*aaIT4R Reset CH4 Total at Address aa to zero
Example: Send *01T1R
Model 954 with Address 01 CH1 Total reset to zero
Setting Range Value
RS232 Command:
SN1<d.dddd> Set CH1 Range value to d.dddd
SN2<d.dddd> Set CH2 Range value to d.dddd
SN3<d.dddd> Set CH3 Range value to d.dddd
SN4<d.dddd> Set CH4 Range value to d.dddd
Example: Send SN1150.00
CH1 Range value set to 150.00
RS485 Command:
*aaSN1<d.dddd> Set CH1 Range value at Address aa to d.dddd
*aaSN2 <d.dddd> Set CH2 Range value at Address aa to d.dddd
*aaSN3 <d.dddd> Set CH3 Range value at Address aa to d.dddd
*aaSN4 <d.dddd> Set CH4 Range value at Address aa to d.dddd
Example: Send *03SN35000.0
Model 954 with Address 03 will have CH3 Range
value set to 5000.0.
Enable Master Channel (CH1)
RS232 Command:
R11 Enable Master Channel (CH1)
R12 Disable Master Channel (CH1)
Note: Master Channel must be enabled before
enabling Slave Channel(s)
Setting Local or Remote Operation
RS232 Command:
RE1 Local Operation (Front Panel Enabled)
RE2 Remote Operation (Front Panel Disabled)
RS485 Command:
*aaRE1 Local Operation (Front Panel Enabled)
*aaRE2 Remote Operation (Front Panel Disabled)
Reading Range Value
RS232 Query:
SN1 Response: SN1d.dddd
SN2 Response: SN2d.dddd
SN3 Response: SN3d.dddd
SN4 Response: SN4d.dddd
Example: Send SN1
Response: SN1150.00
RS485 Query:
*aaSN1 Response: SN1d.dddd
*aaSN2 Response: SN2d.dddd
*aaSN3 Response: SN3d.dddd
*aaSN4 Response: SN4d.dddd
Enable Slave Channels (CH2, CH3 and CH4)
RS232 Command:
R21 Enable Slave A (CH2)
R22 Disable Slave A (CH2)
R31 Enable Slave B (CH3)
R32 Disable Slave B (DH3)
R41 Enable Slave C (CH4)
R42 Disable Slave C (CH4)
RS485 Command;
*aaR21 Enable Slave A (CH2)
*aaR22 Disable Slave A (CH2)
*aa R31 Enable Slave B (CH3)
*aaR32 Disable Slave B (CH3)
*aaR41 Enable Slave C (CH4)
*aa R42 Disable Slave C (CH4)
PAGE 22
Page 26

UNITS OF MEASURE TABLE
# Description Abbrev Total
1 Standard Cubic Centimeters per Minute SCCM SCC
2 Standard Liters per Minute SLM SL
3 Percent % NA
4 Volts V NA
5 Millivolts MV NA
6 Counts CNT NA
7 Normal Liters per Minute NLM NL
8 Standard Liters per Second SLS SL
9 Normal Liters per Second NLS NL
10 Standard Liters per Hour SLH SL
11 Normal Liters per Hour NLH NL
12 Standard Milliliters per Minute SMLM SML
13 Normal Milliliters per Minute NMLM NML
14 Standard Milliliters per Second SMLS SML
15 Normal Mililiters per Second NMLS NML
16 Standard Milliliters per Hour SMLH SML
17 Normal Milliliters per Hour NMLH NML
18 Normal Cubic Centimeters per Minute NCCM NCC
19 Standard Cubic Centimeters per Second SCCS SCC
20 Normal Cubic Centimeters per Second NCCS NCC
21 Standard Cubic Centimeters per Hour SCCH SCC
22 Normal Cubic Centimeters per Hour NCCH NCC
23 Standard Cubic Feet per Minute SCFM SCF
24 Normal Cubic Feet per Minute NCFM NCF
25 Standard Cubic Feet per Second SCFS SCF
26 Normal Cubic Feet per Second NCFS NCF
27 Standard Cubic Feet per Hour SCFH SCF
28 Normal Cubic Feet per Hour NCFH NCF
29 Standard Cubic Meters per Minute SCMM SCM
30 Normal Cubic Meters per Minute NCMM NCM
31 Standard Cubic Meters per Second SCMS SCM
32 Normal Cubic Meters per Second NCMS NCM
33 Standard Cubic Meters per Hour SCMH SCM
34 Normal Cubic Meters per Hour NCMH NCM
35 Standard Cubic Meters per Hour SCMH SCM
36 Normal Cubic Inches per Minute NCIM NCI
37 Standard Cubic Inches per Second SCIS SCI
38 Normal Cubic Inches per Second NCIS NCI
39 Standard Cubic Inches per Hour SCIH SCI
40 Normal Cubic Incher per Hour NCIH NCI
41 Pounds per Minute LBM LB
42 Pounds per Second LBS LB
43 Pounds per Hour LBH LB
44 Kilograms per Minute KgM Kg
45 Kilograms per Second KgS Kg
46 Kilograms per Hour KgH Kg
47 Grams per Minute GRM GR
48 Grams per Second GRS GR
49 Grams per Hour GRH GR
50 Moles per Minute MolM Mol
51 Moles per Second MolS Mol
52 Moles per Hour MolH Mol
53 Kilomoles per Minute KMolM KMol
54 Kilomoles per Second KMolS KMol
55 Kilomoles per Hour KMolH KMol
56 Watts W NA
57 Bits per Second BPS BP
58 Seconds S NA
59 Minutes M NA
60 Hours H NA
61 Watt*Hours WH W
62 Torr TORR NA
63 Bar BAR NA
64 Pascals Pa NA
65 Inches of Water inH20 NA
66 Pounds per Square Inch PSI NA
PAGE 23
Page 27

GAS IDENTIFICATION TABLE
# GAS GAS ID DISPLAY
1 Acetic Acid C2H4F2 #1
2 Acetic Acid, Anhydride C4H603 #2
3 Acetone C3H60 C3H60
4 Acetonitryl C2H3N C2H3N
5 Acetylene C2H2 C2H2
6 Air Air Air
7 Allene C3H4 C3H4
8 Ammonia NH3 NH3
9 Argon Ar Ar
10 Arsine AsH3 AsH3
11 Benzene C6H6 C6H6
12 Boron Trichloride BCl3 BCl3
13 Boron Triflouride BF3 BF3
14 Bromine Br2 Br2
15 Bromochlorodifluoromethane CBrClF2 #15
16 Bromodifluoromethane CHBrF2 #16
17 Bromotrifluormethane CBrF3 CBrF3
18 Butane C4H10 C4H10
19 Butanol C4H10O C4H10O
20 Butene C4H8 C4H8
21 Carbon Dioxide CO2 CO2
22 Carbon Disulfide CS2 CS2
23 Carbon Monoxide CO CO
24 Carbon Tetrachloride CCl4 CCl4
25 Carbonyl Sulfide COS COS
26 Chlorine Cl2 Cl2
27 Chlorine Trifluoride ClF3 ClF3
28 Chlorobenzene C6H5Cl #28
29 Chlorodifluoroethane C2H3ClF2 #29
30 Chloroform CHCl3 CHCl3
31 Chloropentafluoroethane C2ClF5 #31
32 Chloropropane C3H7Cl #32
33 Cisbutene C4H8 C4H8
34 Cyanogen C2N2 C2N2
35 Cyanogen Chloride ClCN ClCN
36 Cyclobutane C4H8 C4H8
37 Cyclopropane C3H6 C3H6
38 Deuterium H22 H22
39 Diborane B2H6 B2H6
40 Dibromodifluoromethane CBr2F2 #40
41 R21 CHCl2F R21
42 Dichloromethane CH2Cl2 #42
43 Dichloropropane C3H6Cl2 #43
44 Dichlorosilane H2SiCl2 #44
45 Diethyl Amine C4H11N #45
46 Diethyl Ether C4H10O #46
47 Diethyl Sulfide C4H10S #47
48 Difluoroethylene C2H2F2 #48
49 Dimethylamine C2H7N C2H7N
50 Dimethyl Ether C2H6O C2H6O
51 Dimethyl Sulfide C2H6S C2H6S
52 Divinyl C4H6 C4H6
53 Ethane C2H6 C2H6
54 Ethane, 1-chloro-1,1,2,2-tetraflouro- C2HClF4 #54
55 Ethane, 1-chloro-1,2,2,2-tetrafluoro- C2HClF4 #55
56 Ethanol C2H6O C2H6O
57 Ethylacetylene C4H6 C4H6
58 Ethyl Amine C2H7N C2H7N
59 Ethylbenzene C8H10 C8H10
60 Ethyl Bromide C2H5Br #60
61 Ethyl Chloride C2H5Cl #61
62 Ethyl Fluoride C2H5F C2H5F
63 Ethylene C2H4 C2H4
64 Ethylene Dibromide C2H4Br2 #64
65 Ethylene Dichloride C2H4Cl2 #65
66 Ethylene Oxide C2H4O C2H4O
PAGE 24
Page 28

GAS IDENTIFICATION TABLE
# GAS GAS ID DISPLAY
67 Ethyleneimine C2H4N C2H4N
68 Ethylidene Dichloride C2H4Cl2 #68
69 Ethyl Mercaptan C2H6S C2H6S
70 Fluorine F2 F2
71 Formaldehyde CH2O CH2O
72 Freon 11 CCl3F CCl3F
73 Freon 12 CCl2F2 #73
74 Freon 13 CClF3 CClF3
75 Freon 14 CF4 CF4
76 Freon 22 CHClF2 #76
77 Freon 23 CHF3 CHF3
78 Freon 114 C2Cl2F4 #78
79 Furan C4H4O C4H4O
80 Helium He He
81 Heptafluoropropane C3HF7 C3HF7
82 HMDS C6H19NSi2 HMDS
83 Hexamethyldisiloxane C6H18OSi2 #83
84 Hexane C6H14 C6H14
85 Hexafluorobenzene C6F6 C6F6
86 Hexene C6H12 C6H12
87 Hydrazine N2H4 N2H4
88 Hydrogen H2 H2
89 Hydrogen Bromide HBr HBr
90 Hydrogen Chloride HCl HCl
91 Hydrogen Cyanide CHN CHN
92 Hydrogen Fluoride HF HF
93 Hydrogen Iodide HI HI
94 Hydrogen Selenide H2Se H2Se
95 Hydrogen Sulfide H2S H2S
96 Isobutane C4H10 C4H10
97 Isobutanol C4H10O #97
98 Isobutene C4H8 C4H8
99 Isopentane C5H12 C5H12
100 Isopropyl Alcohol C3H8O C3H8O
101 Isoxazole C3H3NO #101
102 Ketene C2H2O C2H2O
103 Krypton Kr Kr
104 Methane CH4O CH4O
105 Methanol CH4O CH4O
106 Methyl Acetate C3H6O2 #106
107 Methyl Acetylene C3H4 C3H4
108 Methylamine CH5N CH5N
109 Methyl Bromide CH3Br CH3Br
110 Methyl Chloride CH3Cl CH3Cl
111 Methylcyclohexane C7H14 C7H14
112 Methyl Ethyl Amine C3H9N C3H9N
113 Methyl Ethyl Ether C3H8O C3H8O
114 Methyl Ethyl Sulfide C3H8S C3H8S
115 Methyl Fluoride CH3F CH3F
116 Methyl Formate C2H4O2 #116
117 Methyl Iodide CH3I CH3I
118 Methyl Mercaptan CH4S CH4S
119 Methylpentene C6H12 C6H12
120 Methyl Vinyl Ether C3H6O C3H6O
121 Neon Ne Ne
122 Nitric Oxide NO NO
123 Nitrogen N2 N2
124 Nitrogen Dioxide NO2 NO2
125 Nitrogen Tetroxide N2O4 N2O4
126 Nitrogen Trifluoride NF3 NF3
127 Nitromethane CH3NO2 #127
128 Nitrosyl Chloride NOCl NOCl
129 Nitrous Oxide N2O N2O
130 n-Pentane C5H12 C5H12
PAGE 25
Page 29

GAS IDENTIFICATION TABLE
# GAS GAS ID DISPLAY
131 Octane C8H18 C8H18
132 Oxygen O2 O2
133 Oxygen Difluoride F2O F2O
134 Ozone O3 O3
135 Pentaborane B5H9 B5H9
136 Pentane C5H12 C5H12
137 Perchloryl Fluoride ClFO3 CLFO3
138 Perfluorocyclobutane C4F8 C4F8
139 R116 C2F6 C2F6
140 Perfluoropropane C3F8 C3F8
141 Phenol C6H6O C6H6O
142 Phosgene COCl2 COCl2
143 Phosphine PH3 PH3
144 Phosphorus Trifluoride PF3 PF3
145 Propane C3H8 C3H8
146 Propyl Alcohol C3H8O C3H8O
147 Propyl Amine C3H9N C3H9N
148 Propylene C3H6 C3H6
149 Pyradine C5H5N C5H5N
150 R32 CH2F2 CH2F2
151 R123 C2HCl2F3 R123
152 R123A C2HCl2F3 R123A
153 R125 C2HF5 C2HF5
154 R134 C2H2F4 R134
155 R134A C2H2F4 R134A
156 R143 C2H3F3 R143
157 R143A C2H3F3 R143A
158 R152A C2H4F2 R152A
159 R218 C3F8 C3F8
160 R1416 C2H3Cl2F R1416
161 Radon Rn Rn
162 Sec-butanol C4H10O #162
163 Silane SiH4 SiH4
164 Silicone Tetrafluoride SiF4 SiF4
165 Sulfur Dioxide SO2 SO2
166 Sulfur Hexafluoride SF6 SF6
167 Sulfur Tetrafluoride SF4 SF4
168 Sulfur Trifluoride SF3 SF3
169 Sulfur Trioxide SO3 SO3
170 Tetrachloroethylene C2Cl4 #170
171 Tetrafluoroethylene C2F4 C2F4
172 Tetrahydrofuran C4H8O C4H8O
173 Tert-butanol C4H10O #173
174 Thiophene C4H4S C4H4S
175 Toluene C7H8 C7H8
176 Transbutene C4H8 C4H8
177 Trichloroethane C2H3Cl3 #177
178 Trichloroethylene C2HCl4 #178
179 R113 C2Cl3F3 R113
180 Triethylamine C6H15N #180
181 Trimethyl Amine C3H9N C3H9N
182 Tungsten Hexafluoride WF6 WF6
183 Uranium Hexafluoride UF6 UF6
184 Vinyl Bromide C2H3Br #184
185 Vinyl Chloride C2H3Cl #185
186 Vinyl Fluoride C2H3F C2H3F
187 Water Vapor H2O H2O
188 Xenon Xe Xe
189 Xylene, m- C8H10 C8H10
190 Xylene, 0- C8H10 C8H10
191 Xylene, p- C8H10 C8H10
PAGE 26
Page 30

per channel
Appendix A
Model 954
Internal Circuit Assembly Board
Page 31

Display Assembly
Appendix A
Model 954
Zero Adj
10V Range
(CH4)
FS Adj
10V Range
(CH4)
20mA Adj
(CH4)
4mA Adj
(CH4)
Input Offset Adj
for 4-20mA Signal
Zero Adj
10V Range
(CH3)
R32
R12
R5
20mA Adj
(CH3)
R76
4mA Adj
(CH3)
FS Adj
10V Range
(CH3)
R8
R75
4mA Adj
(CH2)
R83
Zero Adj
10V Range
(CH2)
R31
R11
FS Adj
10V Range
(CH2)
20mA Adj
(CH2)
R74
Zero Adj
10V Range
(CH1)
R30
R10
FS Adj
10V Range
R7
Reference
Voltage Adj
(5.000V)
(CH2)
20mA Adj
(CH1)
4mA Adj
(CH1)
FRONT
R29
R9
R6
U67U67
R73
R126
C84C84
C85C85
C86C86
C87C87
C88C88
Adjustment Potentiometer Locations
 Loading...