

Siemens ZU-35, ZU-35TS, ZU-35DS Installation Instructions Manual

Installation Instructions
Models ZU-35/-35DS/-35TS
Dual Zone Module
Description
ZU-35
The Dual Zone Module Model ZU-35, is designed to provide
two independent initiating circuits. Up to thirty standard
Siemens ionization and photoelectric detectors or flame detectors (except model DF-3, DF-3A and DF-30) are supported by these modules.
Additionally, any quantity of shorting type contact devices
such as manual stations and thermal detectors also can be
accommodated and intermixed on each initiating circuit.
Screw Terminals are provided for each power limited circuit,
in either NFPA Class A (Style D) or Class B (Style B.)
ZU-35DS
In addition to all the same features of the ZU-35, each zone is
provided with a disconnect switch which will disable the zone.
This action will cause a zone trouble and a system trouble
signal until the switch is returned to normal.
ZU-35TS
The ZU-35TS is furnished with a 3 position momentary contact test switch for each zone. The normal switch position is
in the center, one side position will test the zone trouble signal and the other will test a zone alarm signal. This is a requirement for US Coast Guard approval for use on marine
systems, and the module is Coast Guard approved.
Electrical Ratings
Supervisory: 31mA @ 24VDC
Alarm: 272mA @ 24VDC
Operation
Upon operation of a detector or shorting type device installed
on the initiating circuit, the module will lock into an alarm condition, initiating the start of the sequential functions designed
into the system. These functions may include sounding audible devices, operating alarm transmitters, closing doors,
shutting down fans and equipment, recalling elevators, and
other similar functions required for life and property safety.
In addition to the system alarm, a red Alarm LED, on the face
of the dual zone module will be illuminated for that particular
detection circuit. A trouble on either detection circuit will be
similarly annunciated with a yellow LED, one for each circuit.
The module supplies a current limited output signal for the
circuit in alarm providing for activation of supplementary
modules or annunciators.
The dual zone module occupies one module space in the
System 3 rail structure and is interconnected via a ten-pin
plug and harness assembly.
Installation
1. Mount the module to the horizontal mounting brackets in
the control enclosure.
2. Install the Model JA-5 (5 in long) bus connector cable
assembly between receptacle P2 of the module and
receptacle P1 of the module or control panel
immediately preceding it in the bus.
Note: If the preceding module is on another row in the
enclosure, a JA-24 (24 in long) bus connector cable
assembly will be required.
3. Modules are to be bus-connected from right to left. For
two-row enclosures, the modules in the lower row are to
be connected from left to right. Succeeding rows are to be
alternately connected, right to left, left to right, etc.
4. If a module is the last module in the system, install either
a JS-30 (30 in long) or JS-64 (64 in long) bus connector
assembly from the unused receptacle of the last module
to terminal 41 of the CP-35 control panel. This completes
the module supervision circuit.
5. Wire the circuit(s) as described in the CP-35 Control Panel
Instruction Manual (P/N 315-085063) Installation and
Wiring. Refer to the Wiring illustration.
Note: If a zone is not used, the EOL device should be
connected to the alarm initiating circuit terminals 2 and 3
(Zone 1) or 4 and 5 (Zone 2) of the module.
6. If a supplementary relay module, annunciator, or other
output module is used, then the alarm outputs, terminals
1 (Zone 1) and 7 (Zone 2), should be connected to these
units.
Wiring Test
Refer to the CP-35 Control Panel Instruction Manual,
Installation and Wiring.
Siemens Industry, Inc.
Building Technologies Division
Florham Park, NJ
P/N 315-083222-18
Siemens Building Technologies, Ltd.
Fire Safety & Security Products
2 Kenview Boulevard
Brampton, Ontario
L6T 5E4 Canada
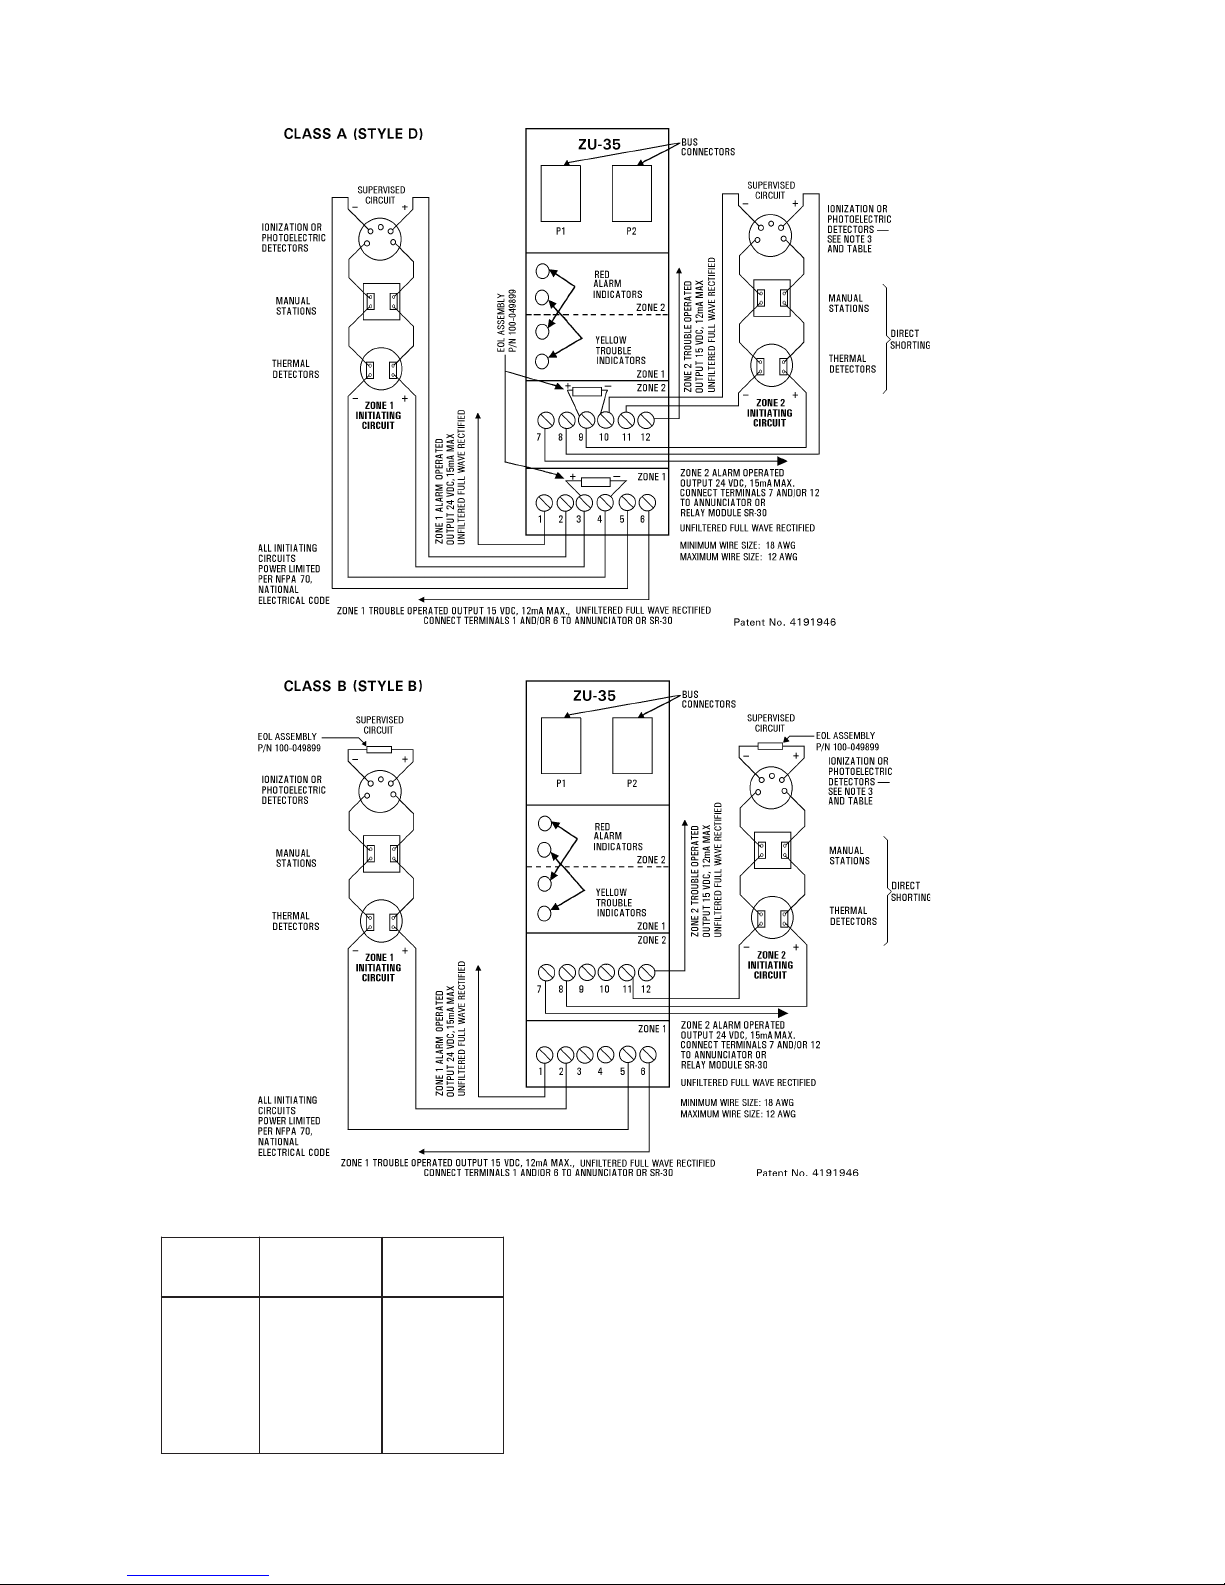
Typical Wiring
SROTCETEDELBITAPMOC
ROTCETED
YTILIBITAPMOC
REIFITNEDI
H3/3-ID
H3A-/3A-ID
H3B-/3B-ID
11-TD
T11-/11-EP
/53-UZ
ESAB
S3-BD
S3-BD
PLI3/I3-DA
PR3/IR3-DA
P3/I3-AS
11-BD
S3-BD
11-BD
I/NOITALLATSN
YTILIBITAPMOC
REIFITNEDI
ISNOITC
/P
TPDA-BDhtiw
TPDA-BDhtiwS3-BD
P/N 315-083222-18
INITIATING CIRCUITS
GNIRIW
URTSN
81-349180-513N/P
81-349180-513N/P
6-432390-513N/P
7-195680-513N/P
6-395680-513N
3-924590-513N/P
3-924590-513N/P
9-891490-513N/P
9-891490-513N/P
reifitnediytilibitapmocehtsiST53-/SD53-
Rated: 18.1–23.5 VDC, Unfiltered Full Wave Rectified
Supv: 9mA
Alarm: 275mA
1. Total zone initiating circuit resistance is 36 ohms max (9 ohms per line).
2. Unused (spare) zones must have an EOL device connected.
3. See individual detector for actual terminal connection numbers. Maximum
of 30 detectors (any combination of those listed on the table at the right)
are allowed per circuit. Also may use optional detector remote lamp or
detector relay as indicated on the applicable detector instructions.
4. Positive and negative ground fault impedance threshold ≤
40K ohms.
 Loading...