

Page 1

SIMATIC NET
Operating Instructions for
SCALANCE X-400
Industrial Ethernet Switches
Preface, Contents
Introduction to
Industrial Ethernet Switches
System Description of
SCALANCE X-400
Product Description of
SCALANCE X-400
Media Modules, Covers,
Dummy Cover
Extender Modules
1
2
3
4
5
C79000-G8976-C186-03
Release 11/2005
Installation and
Commissioning
Technical Specifications
Approvals, Certificates
Glossary, Index
6
7
Page 2

y
r
Classification of Safety-Related Notices
This document contains notices which you should observe to ensure your own personal safety, as well as to protect the product and connected equipment. These notices are highlighted in the manual by a warning triangle and are marked as follows
according to the level of danger:
!
!
!
Danger
indicates that death or severe personal injury will result if proper precautions are not
taken.
Warning
indicates that death or severe personal injury can result if proper precautions are not
taken.
Caution
with warning triangle indicates that minor personal injury can result if proper precautions are not taken.
Caution
without warning triangle indicates that damage to property can result if proper precautions are not taken.
Notice
indicates that an undesirable result or status can occur if the relevant notice is ignored.
Note
highlights important information on the product, using the product, or part of the documentation that is of particular importance and that will be of benefit to the user.
© Copyright Siemens AG, 1998 to 2005 - All rights reserved
The reproduction, transmission or use of this document or its
contents is not permitted without express written authority.
Offenders will be liable for damages. All rights, including rights
created by patent grant or registration of a utility model or design,
are reserved.
Siemens AG
Automation and Drives
Industrial Communication
Postfach 4848, D-90327 Nürnberg
Siemens Aktiengesellschaft Printed in the Federal Republic of Germany 2
Disclaimer
We have checked the contents of this manual for agreement with
the hardware and software described. Since deviations cannot be
precluded entirely, we cannot guarantee full agreement. However,
the data in this manual are reviewed regularly and any necessar
corrections included in subsequent editions. Suggestions fo
improvement are welcome.
C79000-G8976-C186-03
Technical data subject to change.
Page 3

Trademarks
SIMATIC®, SIMATIC NET®, SCALANCE® and SIMATIC NET Networking for Industry® are registered trademarks of Siemens AG.
Third parties using for their own purposes any other names in this document which refer to trademarks might infringe upon the rights of the trademark owners.
Safety Instructions Regarding your Product
Before you use the product described here, read the safety instructions below thoroughly.
Notice
When using a SCALANCE X-400 in the ring (HSR, High Speed Redundancy), check
the RM DIL switch before closing the ring cable. If the SCALANCE X-400 adopts the
function of a redundancy manager, the switch must be set to ON. If the SCALANCE
X-400 is not being used as a redundancy manager, the switch must be set to OFF.
Notice
When using a SCALANCE X-400 in redundancy manager mode (RM = ON), check
whether the DIL switches R1 and R2 select the required ring ports before closing the
ring. If ports other than those set are connected to the ring, they cause a ring shortcircuit and overload the network.
Notice
When supplied, the DIL switches R1 and R2 are set to OFF. This means that the gigabit ports on slot 5 are defined as ring ports and ring redundancy is activated. In this
case, you cannot activate rapid spanning tree / spanning tree.
Notice
If a device is replaced, remember the following points relating to a SCALANCE X-400
switch:
● Make the same settings on the DIL switches as they were on the old device.
● Make sure that you use a media module and extender configuration that is iden-
tical to that of the old device.
● Use the C-PLUG of the old device in the new one so that your device configuration is adopted.
Operating Instructions for SCALANCE X-400 Industrial Ethernet Switches
C79000-G8976-C186-03
3
Page 4

Personnel Qualification Requirements
Only qualified personnel should be allowed to install and work on this equipment.
Qualified personnel as referred to in this manual or in the warning notes are defined
as persons who are familiar with the installation, assembly, startup and operation of
this product and who possess the relevant qualifications for their work, e.g.:
● Training in or authorization for connecting up, grounding or labeling circuits and
devices or systems in accordance with current standards in safety technology
● Training in or authorization for the maintenance and use of suitable safety equip-
ment in accordance with current standards in safety technology
● First aid qualification
Correct Usage of Hardware Products
Please note the following regarding the correct usage of hardware products:
Caution
This device may only be used for the applications described in the catalog or the technical description and only in connection with devices or components from other
manufacturers which have been approved or recommended by Siemens.
This product can only function correctly and safely if it is transported, stored, set up,
and installed correctly and operated and maintained as recommended.
Before you use the supplied sample programs or programs you have written yourself,
make certain that no injury to persons nor damage to equipment can result in your
plant or process.
EU Directive: Do not start up until you have established that the machine on which
you intend to run this component complies with the directive 89/392/EEC.
Operating Instructions for SCALANCE X-400 Industrial Ethernet Switches
4 C79000-G8976-C186-03
Page 5

Correct Usage of Software Products
Please note the following regarding the correct usage of software products:
Caution
This software may only be used for the applications described in the catalog or the
technical description and only in connection with software products, devices, or components from other manufacturers which have been approved or recommended by
Siemens.
Before you use the supplied sample programs or programs you have written yourself,
make certain that no injury to persons nor damage to equipment can result in your
plant or process.
Operating Instructions for SCALANCE X-400 Industrial Ethernet Switches
C79000-G8976-C186-03
5
Page 6

Operating Instructions for SCALANCE X-400 Industrial Ethernet Switches
6 C79000-G8976-C186-03
Page 7

Preface
Purpose of the Operating Instructions
These operating instructions describe the functions of the SCALANCE X-400
product line of modular Industrial Ethernet switches and support you during installation, commissioning and troubleshooting on site. You will find information on configuration in the separate SCALANCE X-400 Configuration Manual.
Validity of the Operating Instructions
These operating instructions are valid for the following products:
● Industrial Ethernet Switches SCALANCE X414-3E
order number: 6GK5 414-3FC00-2AA2
● Media module MM491-2
order number: 6GK5 491-2AB00-8AA2
● Media module MM491-2LD
order number: 6GK5 491-2AC00-8AA2
● Media module MM492-2
order number: 6GK5 492-2AL00-8AA2
● Media module MM492-2LD
order number: 6GK5 492-2AM00-8AA2
● Extender module EM495-8
order number: 6GK5 495-8BA00-8AA2
● Extender module EM496-4
order number: 6GK5 496-4MA00-8AA2
Operating Instructions for SCALANCE X-400 Industrial Ethernet Switches
C79000-G8976-C186-03
7
Page 8

Preface
Further Documentation
For help on configuration and diagnostics using Web-based management, the CLI
command line, or SNMP, refer to the following documentation:
● SCALANCE X-400 Configuration Manual
C79000-G8976-C187-01
This documentation is available on the Internet at
http://support.automation.siemens.com/WW/view/en/19625108
● SIMATIC NET Twisted Pair and Fiber-Optic Networks
C79000-G8976-C125-02
This documentation is available on the Internet at
http://support.automation.siemens.com/WW/view/en/8763736
Standards and Approvals
The devices of the SCALANCE X-400 product line meet the requirements for CE
marking. For more detailed information, refer to the appendix of these Operating
Instructions.
Operating Instructions for SCALANCE X-400 Industrial Ethernet Switches
8 C79000-G8976-C186-03
Page 9

Contents
1 Introduction to Industrial Ethernet Switches ............................................................ 11
1.1 Basic Information ............................................................................................... 11
1.2 Topologies ......................................................................................................... 13
1.2.1 Ring with Redundancy Manager ....................................................................... 13
1.2.2 Star Structure..................................................................................................... 16
1.2.3 Line Structure .................................................................................................... 18
1.2.4 Redundant Linking of Network Segments ......................................................... 19
2 System Description of SCALANCE X-400.................................................................. 21
2.1 Properties, Functionality and Features of SCALANCE X-400 .......................... 21
2.2 Ports of SCALANCE X-400 ............................................................................... 24
2.2.1 10Base-T / 100Base-TX .................................................................................... 24
2.2.2 1000Base-TX ..................................................................................................... 26
2.2.3 100Base-FX ....................................................................................................... 27
2.2.4 1000Base-SX..................................................................................................... 29
2.2.5 1000Base-LX ..................................................................................................... 30
2.3 Compatibility of SCALANCE X-400 ................................................................... 31
3 Product Description of SCALANCE X-400................................................................. 33
3.1 SCALANCE X414-3E Basic Device .................................................................. 33
3.1.1 Power Module .................................................................................................... 39
3.1.2 Digital Inputs ...................................................................................................... 41
3.1.3 Switch CPU........................................................................................................ 42
3.1.4 C-PLUG (Configuration Plug) ............................................................................ 44
3.1.5 Ports................................................................................................................... 47
4 Media Modules, Covers, Dummy Cover ..................................................................... 49
4.1 Media Modules .................................................................................................. 49
4.1.1 Fast Ethernet Media Module MM491-2 (100Base-FX) ..................................... 51
4.1.2 Fast Ethernet Media Module MM491-2LD (100Base-FX) ................................. 52
4.1.3 Gigabit Media Module MM492-2 (1000Base-SX) ............................................. 53
4.1.4 Gigabit Media Module MM492-2LD (1000Base-LX) ......................................... 54
4.2 Covers, Dummy Cover ...................................................................................... 55
4.2.1 Covers ............................................................................................................... 55
4.2.2 Dummy Cover .................................................................................................... 59
5 Extender Modules......................................................................................................... 61
5.1 Twisted Pair Extender EM495-8........................................................................ 61
5.2 Media Module Extender EM496-4 ..................................................................... 63
6 Installation and Commissioning ................................................................................. 67
6.1 Installing / Removing the SCALANCE X414-3E................................................ 67
6.1.1 Installing / Uninstalling with an S7-300 Rail ...................................................... 68
6.1.2 Installing / Uninstalling with a 35 mm Standard Rail ......................................... 70
6.2 Installing / Removing the Media Modules, Covers and Dummy Cover............. 72
Operating Instructions for SCALANCE X-400 Industrial Ethernet Switches
C79000-G8976-C186-03
9
Page 10

Contents
6.2.1 Installing / Removing a Media Module .............................................................. 72
6.2.2 Fitting / Removing the Covers ........................................................................... 74
6.2.3 Fitting / Removing a Dummy Cover................................................................... 75
6.3 Installing / Removing Extender Modules ........................................................... 76
6.3.1 Installing / Removing the Twisted Pair Extender ............................................... 76
6.3.2 Installing / Removing the Media Module Extender ............................................ 82
6.4 Slot Numbers of the Modules and Covers......................................................... 88
6.5 Factory Defaults................................................................................................. 89
6.6 Ports................................................................................................................... 90
6.6.1 Power Supply Connectors (X1) ......................................................................... 90
6.6.2 Connectors of the Signaling Contact and Grounding Strap (X2) ...................... 91
6.6.3 Digital Input Connectors (X1) ............................................................................ 92
6.6.4 Digital Input Connectors (X2) ............................................................................ 93
6.6.5 Connectors for the Twisted Pair Cables ............................................................ 94
6.6.6 Connectors for Fiber-Optic Cables .................................................................... 99
6.7 Operator Controls ............................................................................................ 101
6.7.1 DIL Switches .................................................................................................... 101
6.7.2 SELECT / SET Button ..................................................................................... 105
6.8 LED Display ..................................................................................................... 106
6.8.1 Startup Behavior of the SCALANCE X414-3E ................................................ 107
6.8.2 Selecting the Display Modes ........................................................................... 108
6.8.3 LED Display - Power Module........................................................................... 109
6.8.4 LED Display - DI Module ................................................................................. 111
6.8.5 LED Display - Switch CPU .............................................................................. 112
6.8.6 LED Display of the Ports (DMode A through DMode D) ................................. 113
6.9 Replacing the C-PLUG .................................................................................... 117
6.10 Show Location ................................................................................................. 118
7 Technical Specifications ........................................................................................... 119
7.1 SCALANCE X414-3E ...................................................................................... 119
7.2 Media Module MM491-2 (100Base-FX) .......................................................... 123
7.3 Media Module MM491-2LD (100Base-FX)...................................................... 124
7.4 Media Module MM492-2 (1000Base-SX) ........................................................ 125
7.5 Media Module MM492-2LD (1000Base-LX).................................................... 126
7.6 Extender Module EM495-8.............................................................................. 127
7.7 Extender Module EM496-4.............................................................................. 129
8 Approvals, Certificates .............................................................................................. 131
9 Glossary ...................................................................................................................... 139
10 Index ............................................................................................................................ 145
Operating Instructions for SCALANCE X-400 Industrial Ethernet Switches
10 C79000-G8976-C186-03
Page 11

Introduction to Industrial Ethernet Switches
1.1 Basic Information
Switching
With switching technology, data packets are forwarded directly from the input port
to the appropriate output port during data exchange based on the address information. Switches operate on a direct delivery basis.
Essentially, switches have the following functions:
● Connection of Collision Domains / Subnets
Since repeaters and star couplers (hubs) operate at the physical level, their use
is restricted the span of a collision domain. Switches connect collision domains.
Their use is therefore not restricted to the maximum span of a repeater network.
On the contrary, switches allow extremely large networks with spans of 150 km
to be set up and when using LD modules, even up to 1300 km.
1
● Containing Load
By filtering the data traffic based on the Ethernet (MAC) addresses, local data
traffic remains local. In contrast to repeaters or hubs, which distribute data unfiltered to all ports / network nodes, switches operate selectively. Only data intended for nodes in other subnets is switched from the input port to the appropriate output port of the switch. To make this possible, a table assigning
Ethernet (MAC) addresses to output ports is created by the switch in a “teachin" mode.
● Limitation of Errors to the Network Segment Affected
By checking the validity of a data packet on the basis of the checksum which
each data packet contains, the switch ensures that bad data packets are not
transported further. Collisions in one network segment are not passed on to
other segments.
Operating Instructions for SCALANCE X-400 Industrial Ethernet Switches
C79000-G8976-C186-03
11
Page 12

Introduction to Industrial Ethernet Switches
The Need for Industrial Ethernet Switches
With over 80% of LANs based on Ethernet, this is the most commonly used technology. The use of switches is particularly important: They allow extensive networks with large numbers of nodes to be set up, increase the data throughput and
simplify network expansion.
The modular SCALANCE X-400 Industrial Ethernet switches from SIMATIC NET
are designed for use in high-performance networks that will also meet future requirements. Thanks to their modular design, the switches can be adapted to the
task in hand in terms of number of ports and transmission medium. Support of Office standards makes the smooth integration of automation networks in existing office networks possible.
The devices are designed for use in switching cubicles and cabinets.
Technical Options (network topologies)
The modularity of SCALANCE X-400 switches simplifies the expansion of a network regardless of the network topology.
You can use a SCALANCE X-400 in the following network topologies:
● Ring with redundancy manager
● Star structure
● Line structure
The maximum cable length is 26 km for single mode fast Ethernet transmission
and 10 km for single mode gigabit transmission. Mixed operation within the topology, for example between SCALANCE X414-3E and OSMs/ESMs is possible regardless of the structure being used (ring with redundancy manager, star, or line
structure).
Using the SCALANCE X-400 as the redundancy manager in a ring with redundancy manager provides greater availability. If there is an interruption on the connection between these switches, the SCALANCE X-400 used as redundancy manager acts like a switch and in a very short time creates a line from the ring with redundant manager. As a result, a functional, end-to-end structure is restored.
Operating Instructions for SCALANCE X-400 Industrial Ethernet Switches
12 C79000-G8976-C186-03
Page 13

1.2 Topologies
1.2.1 Ring with Redundancy Manager
To increase the availability, optical or electrical line topologies of up to 50 switches
(SCALANCE X-400, SCALANCE X-200, or OSM/ESM) can be closed with a
SCALANCE X414-3E to form a ring.
Functional Description
With a SCALANCE X414-3E operating as a redundancy manager, the two ends
are closed to form a ring with redundancy manager. The redundancy function is
activated or deactivated by switches on the Switch CPU.
In contrast to the ring ports of the other switches, the ring ports of the redundancy
manager are disconnected when the network is operating problem-free. The
SCALANCE X414-3E working in redundancy manager mode monitors the connected line over its ring ports and connects the ring ports if there is an interruption
on the connected line; in other words, it restores a functioning line over this substitute path. Reconfiguration is achieved within 0.3 s. As soon as the problem is
eliminated, the original topology is restored; in other words, the ring ports in the redundancy manager are disconnected from each other again.
Introduction to Industrial Ethernet Switches
In a ring with redundancy manager, there can only be one switch configured as a
redundancy manager.
Connection of Other Network Segments or End Devices
At all ports of slots 9 to 11 or at the ports of a twisted pair extender module of the
SCALANCE X414-3E as well as at all other switches in the ring with redundancy
manager, further end devices or entire subnets can be attached using twisted pair
cable (TP cable).
The use of a media module extender in the redundancy manager and in all other
switches in this network structure provides the option of connecting further end devices or complete subnets with FO cable.
Operating Instructions for SCALANCE X-400 Industrial Ethernet Switches
C79000-G8976-C186-03
13
Page 14

Introduction to Industrial Ethernet Switches
Electrical Ring
A redundant electrical ring with redundancy manager can be set up without media
modules since the basic device provides two RJ-45 jacks on slot 5 that allow connection of electrical (twisted pair) connections (10, 100, 1000 Mbps). The factory
setting defines the two ports on slot 5 as ring ports.
Optical Ring
An optical ring with redundancy manager is only possible with media modules.
Which slots or ports should be used, depends on the selected transmission rate.
The ports that can be used as ring ports are located on the media modules that
can be used in slots 5, 6 and 7. As an alternative to optical gigabit transmission,
the two ports on slot 6 or the first ports of slot 6 and 7 can be configured as ring
ports for an optical fast Ethernet connection.
● Slot 5
equipped with MM492-2 or with MM492-2LD allows the ring to be operated as
an optical gigabit ring with redundancy manager.
● Slot 6 / slot 6 and 7 (in each case only port 1)
equipped with MM491-2 or with MM491-2LD allows operation of an optical fast
Ethernet ring with redundancy manager.
Operating Instructions for SCALANCE X-400 Industrial Ethernet Switches
14 C79000-G8976-C186-03
Page 15
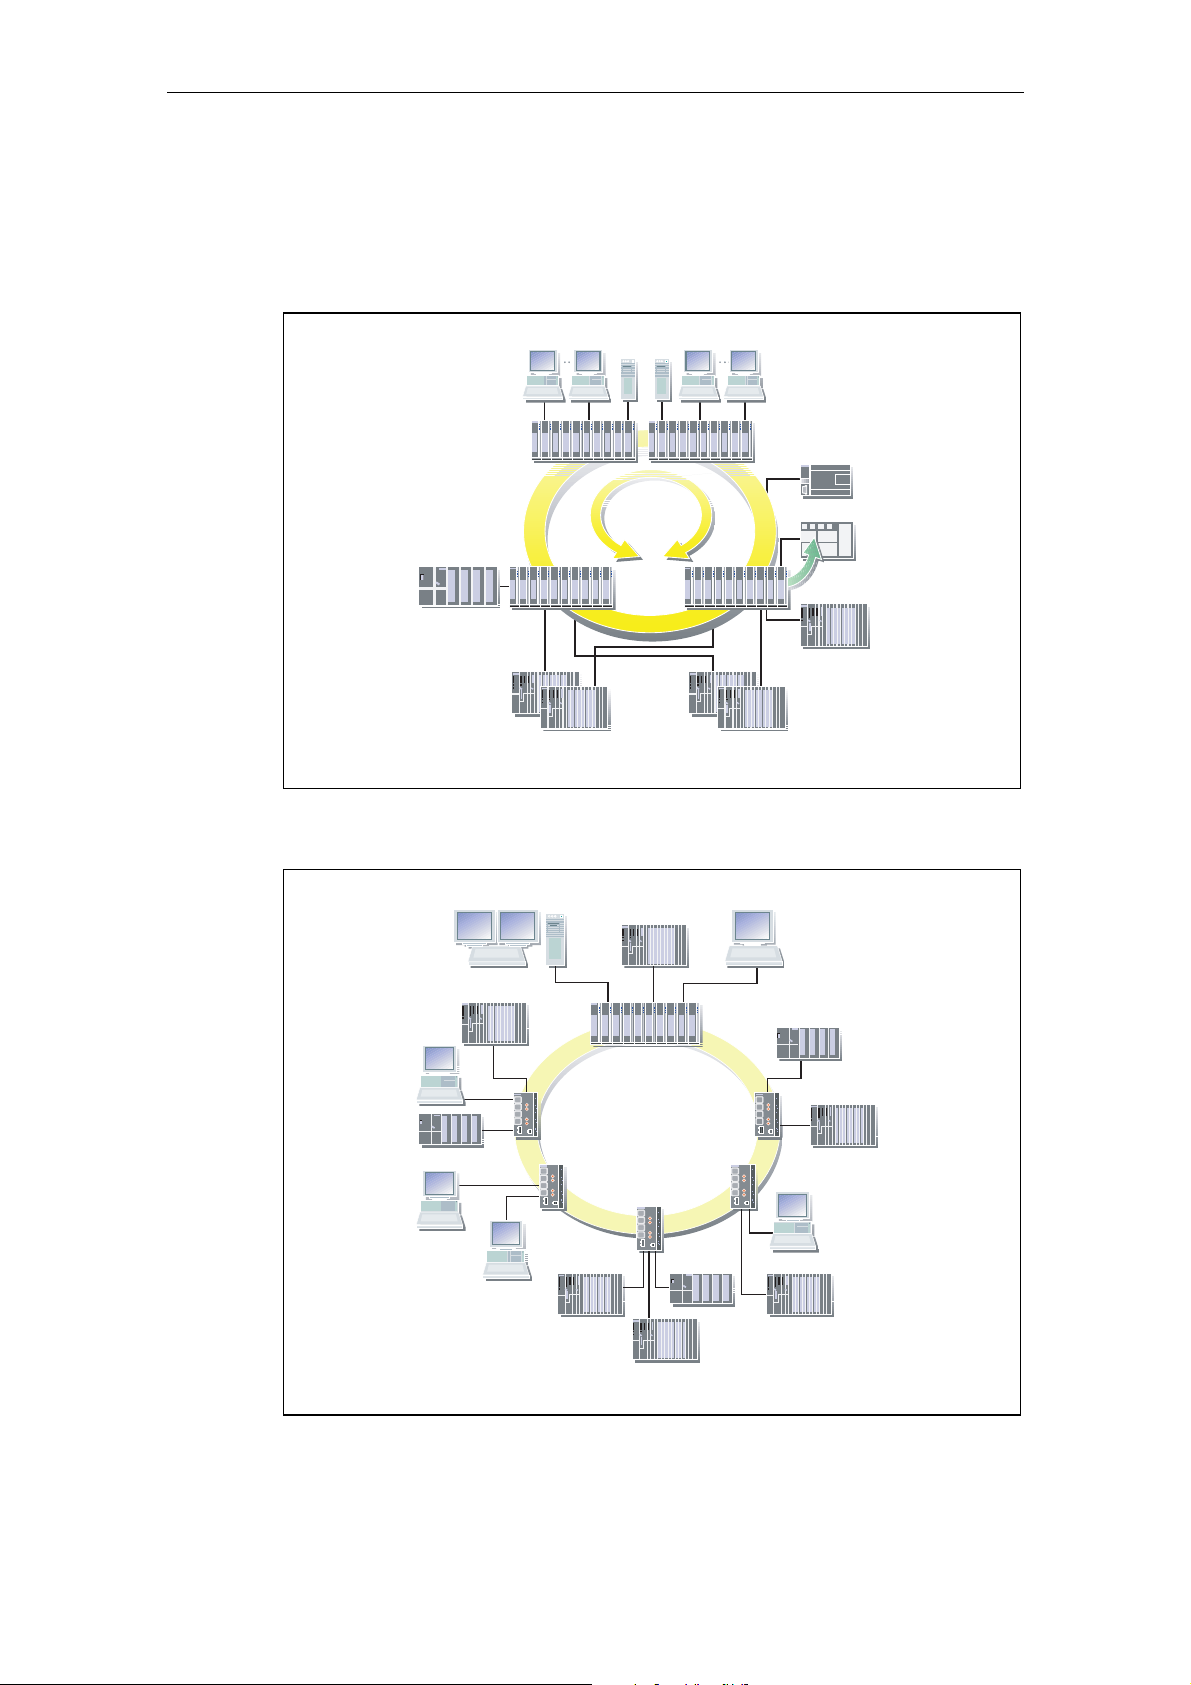
Configuration Example
Sample configurations with SCALANCE X414-3E, SIMATIC S7-200/300/400, operator control and monitoring system, H system and PC as end devices.
Introduction to Industrial Ethernet Switches
SCALANCE X-400
RM
S7-300
H-System H-System
1000
Mbit/s
SCALANCE
X-400
SCALANCE X-400
S7-200
10/100
Mbit/s
S7-400
Figure 1-1 Gigabit ring with redundancy manager (RM)
S7-400
S7-400
PC
PC
Switch
SCALANCE
X-400
S7-300
Fiber Optic
S7-300
PC
S7-300
PC
S7-400
S7-400
Figure 1-2 Ring with FO cable and redundancy manager
Operating Instructions for SCALANCE X-400 Industrial Ethernet Switches
C79000-G8976-C186-03
Switch
SCALANCE
X204-2
S7-400
PC
S7-400
15
Page 16

Introduction to Industrial Ethernet Switches
1.2.2 Star Structure
Functional Description
Star structures can be implemented with the SCALANCE X414-3E. The cascading
depth and total span of a network are limited only by the signal propagation times
of the communication connections.
Properties of a Star Structure
Each SCALANCE X414-3E communicates over a TP or FO cable with a central
switch with which all other switches are also connected within a star structure.
Communication is possible over the optical ports in slots 5, 6, or 7 or over the electrical ports in slots 5 and 9 to 11. With the fault mask, it is possible to monitor the
port states using the signaling contact. In addition to connecting the switches to the
central SCALANCE X414-3E, it is also possible to connect one or more end devices.
Operating Instructions for SCALANCE X-400 Industrial Ethernet Switches
16 C79000-G8976-C186-03
Page 17
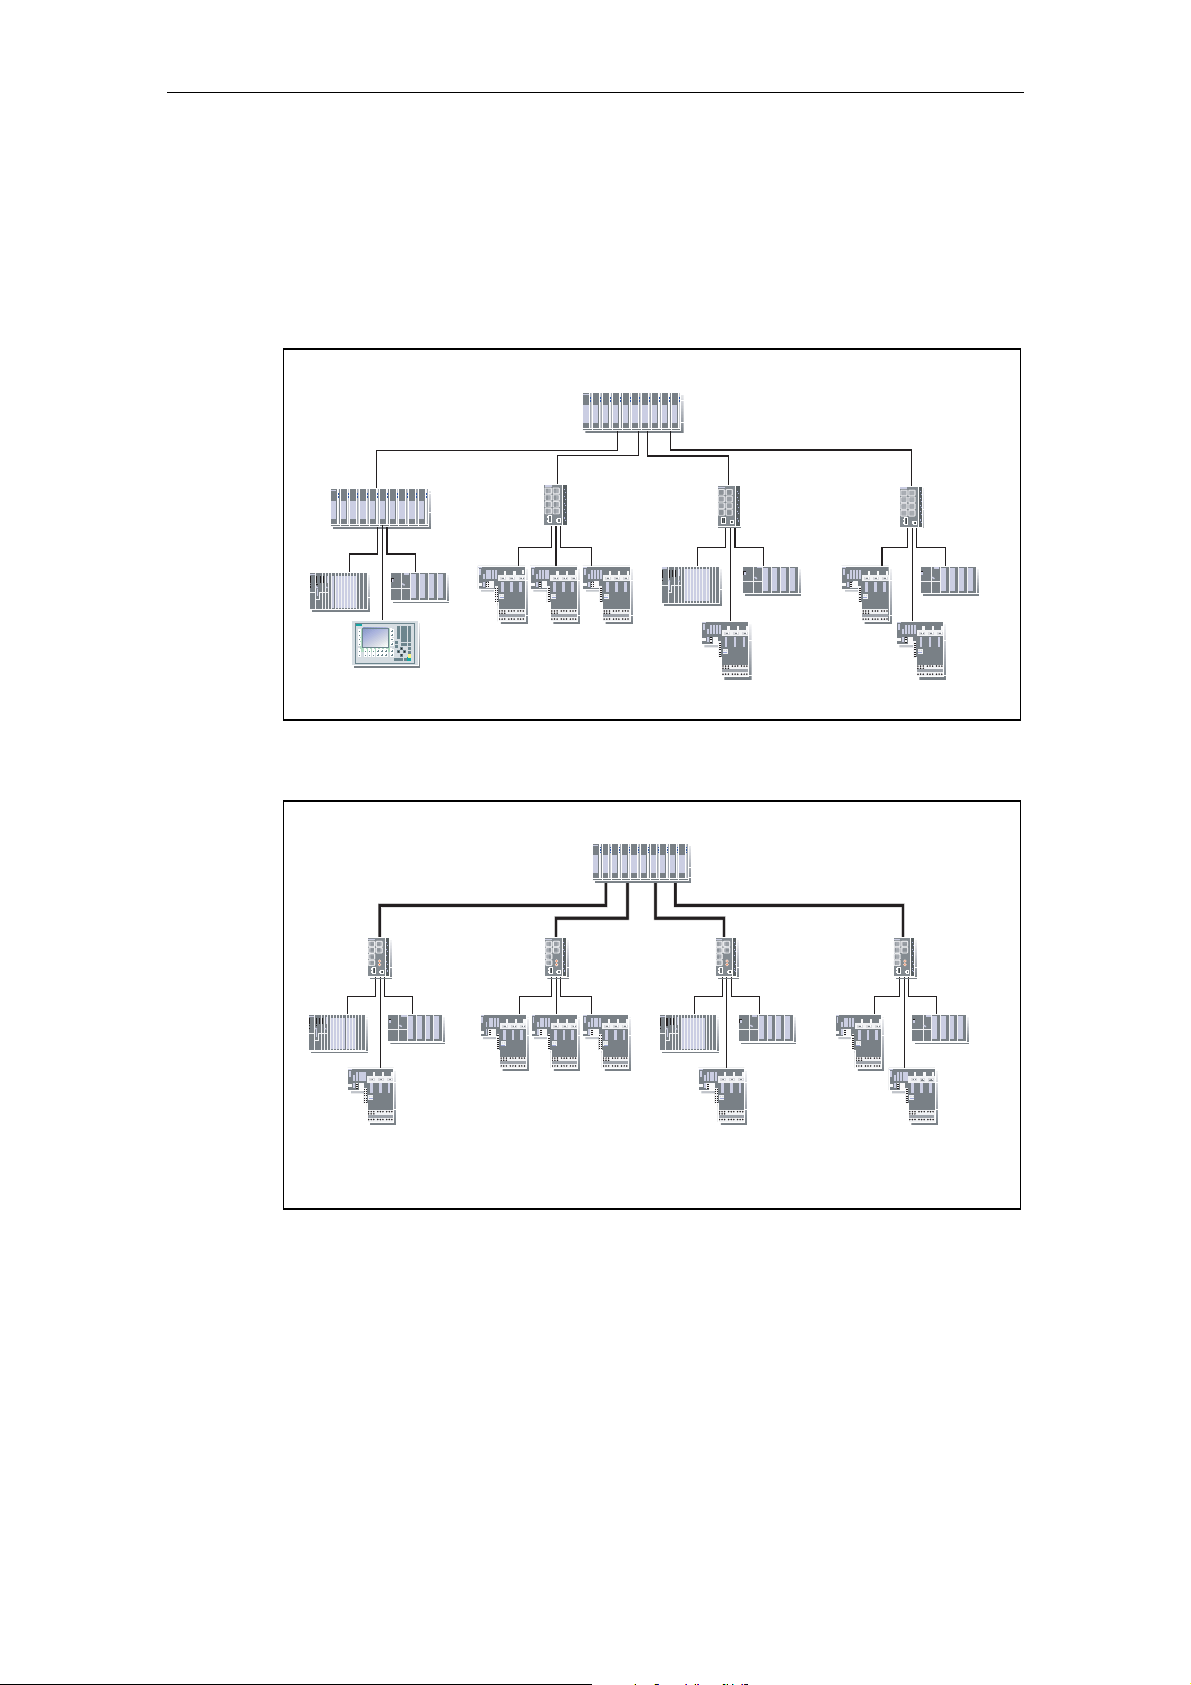
Configuration Example
Sample configurations electrical / optical with SCALANCE X-400,
SCALANCE X-200, SIMATIC S7-300/400, SIMATIC ET 200 and operator panel as
end devices.
Introduction to Industrial Ethernet Switches
SCALANCE X414-3E
SCALANCE
X414-3E
S7-300S7-400
SCALANCE
X208
ET 200S ET 200S ET 200S
S7-400 S7-300 S7-300
ET 200S
SCALANCE
X208
ET 200S
SCALANCE
X208
ET 200S
Figure 1-3 Star structure (Electrical)
SCALANCE X-400
Fiber Optic
SCALANCE
X206-1
S7-300S7-400 ET 200S
SCALANCE
X206-1
S7-400 S7-300 S7-300
SCALANCE
X206-1
SCALANCE
X206-1
ET 200S ET 200S ET 200S
ET 200S
Figure 1-4 Star structure (Optical)
Operating Instructions for SCALANCE X-400 Industrial Ethernet Switches
C79000-G8976-C186-03
ET 200S ET 200S
17
Page 18
Introduction to Industrial Ethernet Switches
1.2.3 Line Structure
Functional Description
Line structures can be implemented with the SCALANCE X414-3E. The cascading
depth and total span of a network are limited only by the signal propagation times
of the communication connections.
Properties of the Line Structure
Each SCALANCE X414-3E communicates over a TP or FO cable with a neighboring switch. Communication is possible over the optical ports in slots 5, 6, or 7 or
over the electrical ports in slots 5 and 9 to 11. With the fault mask, it is possible to
monitor the port states using the signaling contact. In addition to interconnecting
the switches, it is also possible to connect one or more end devices to every
SCALANCE X414-3E.
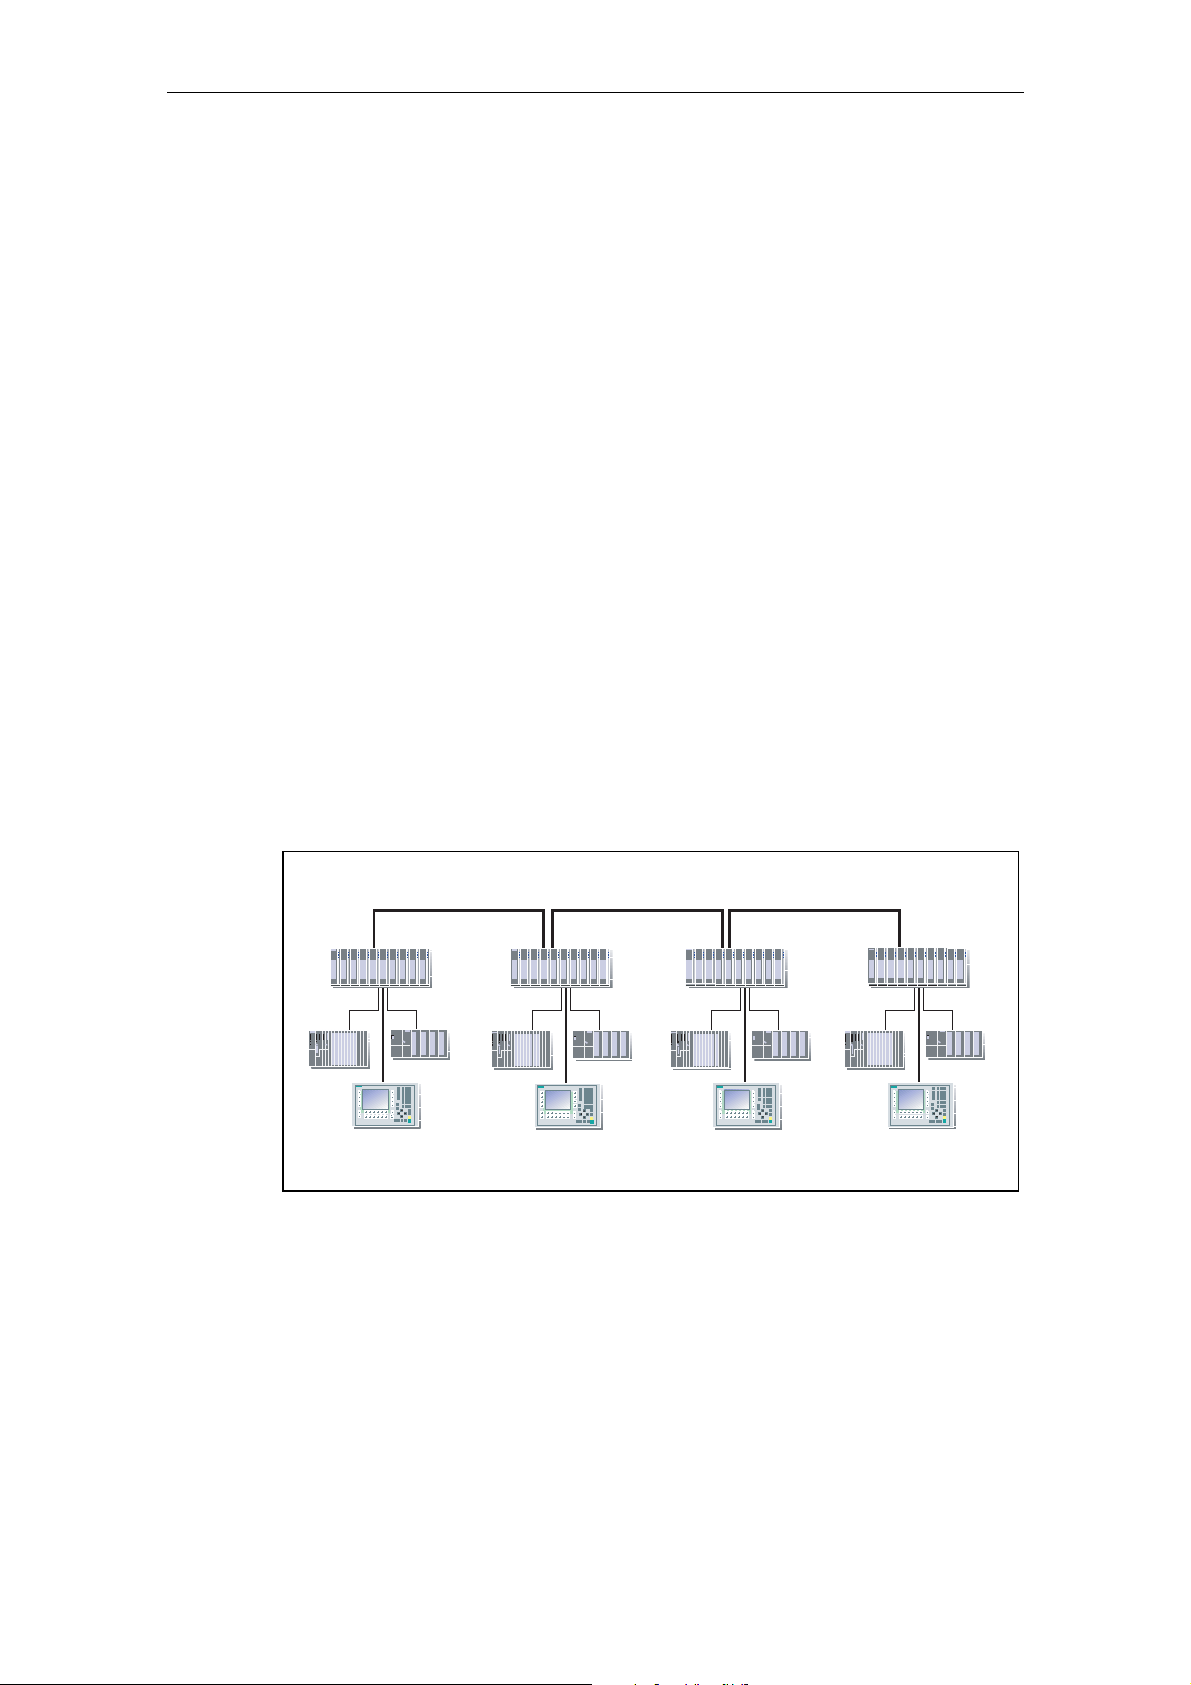
Configuration Example
Sample configuration with SCALANCE X414-3E, SIMATIC S7-300/400 and operator panel as end devices.
Fiber Optic
SCALANCE
X414-3E
Figure 1-5 Line structure (Optical)
SCALANCE
X414-3E
S7-300S7-400 ET 200SS7-400 S7-300 S7-300
S7-300S7-400
ET 200SET 200S ET 200S ET 200S
SCALANCE
X414-3E
SCALANCE
X414-3E
Operating Instructions for SCALANCE X-400 Industrial Ethernet Switches
18 C79000-G8976-C186-03
Page 19
Introduction to Industrial Ethernet Switches
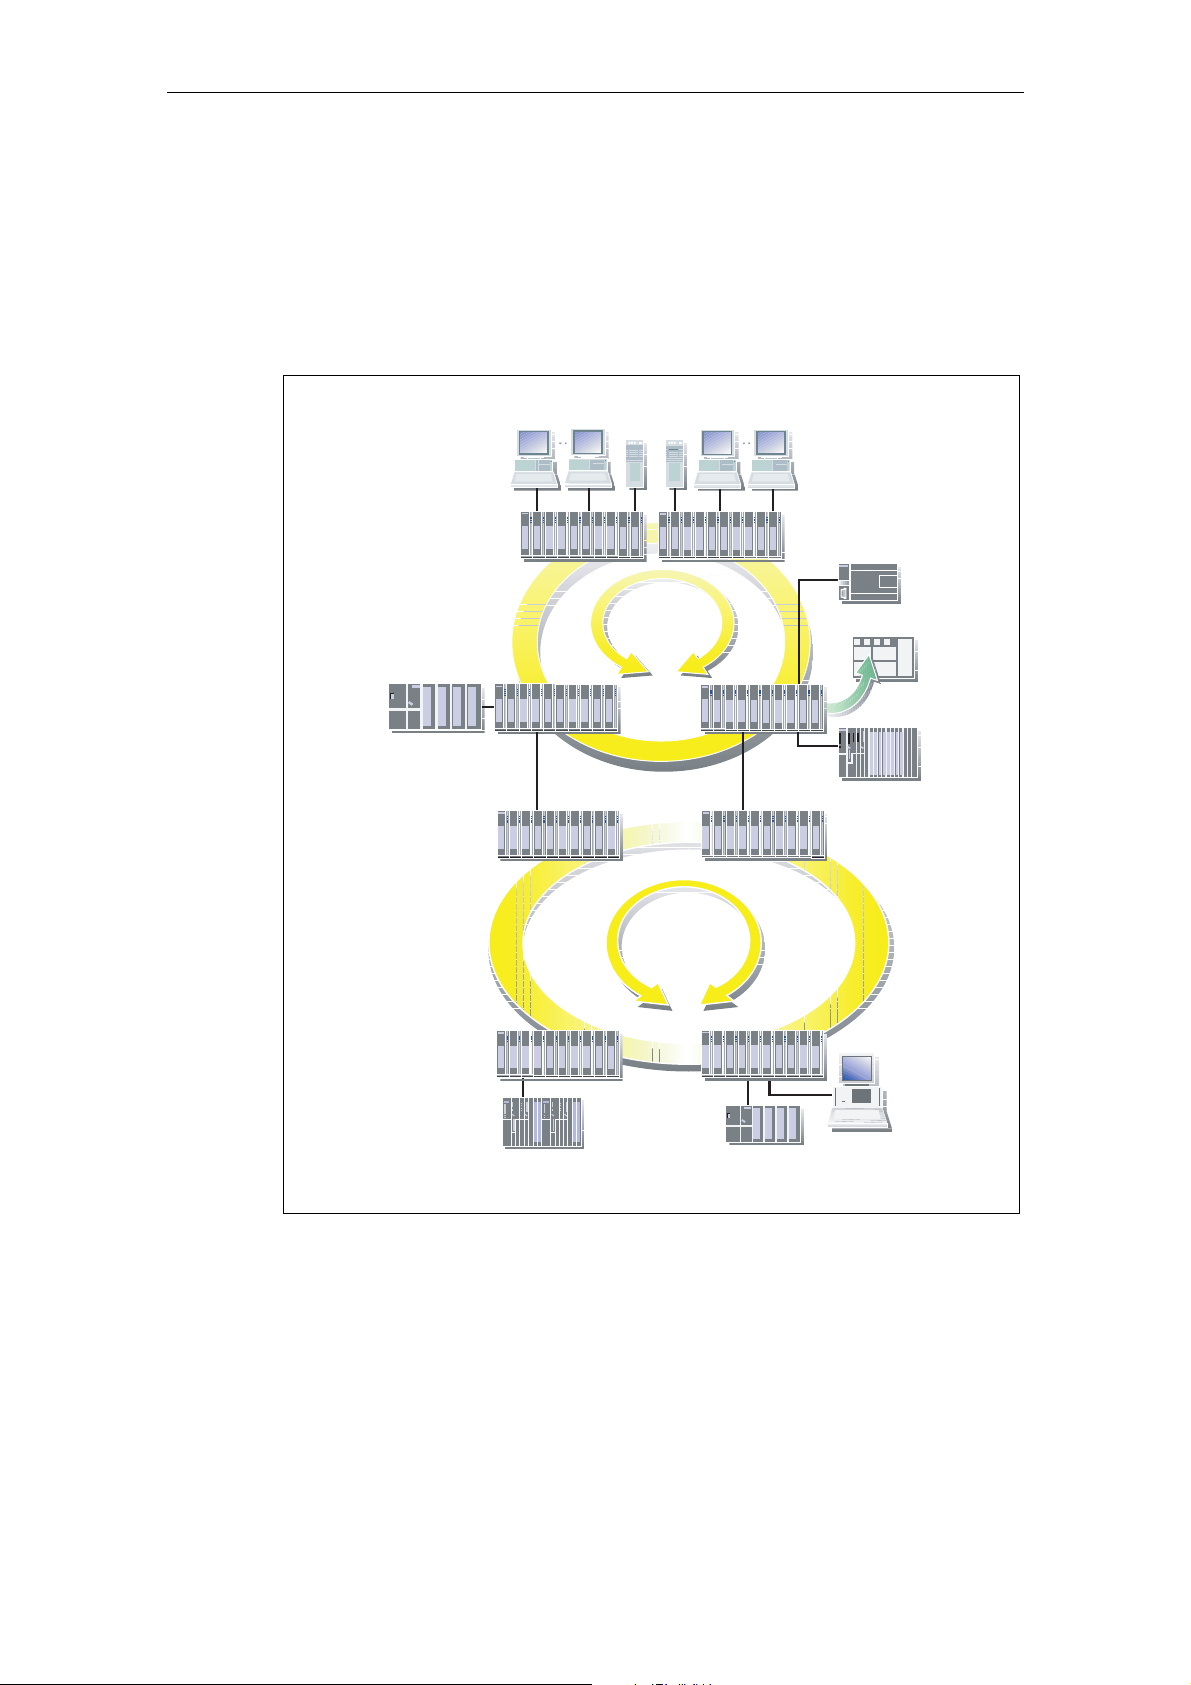
1.2.4 Redundant Linking of Network Segments
The example of redundant linking of two network segments as shown here is possible only when linking between X414 because the standby function of the X414 is
required.
RM
SCALANCE X414-3ESCALANCE X414-3E
S7-300
RM
1000
Mbit/s
SCALANCE
X-414-3E
SCALANCE
X-414-3E
1000
Mbit/s
SCALANCE
X-414-3E
S7-200
10/100
Mbit/s
S7-400
Figure 1-6 Redundant linking of two subnets
In this case, network segments are rings with a redundancy manager (RM). The
rings can also be interrupted at one point (linear topology).
For a redundant link as shown in the figure, two devices must be configured within
a network segment. This configuration is set in Web Based Management, Command Line Interface or using SNMP access. For more detailed information, refer to
the Configuration Manual SCALANCE X-400 Industrial Ethernet Switches.
Operating Instructions for SCALANCE X-400 Industrial Ethernet Switches
C79000-G8976-C186-03
19
Page 20

Introduction to Industrial Ethernet Switches
The two devices connected in the configuration exchange data frames with each
other to synchronize their operating statuses (one device is master and the other
slave). If there are no problems, only the link from the master to the other network
segment is active. If this link fails (for example due to a link-down or a device failure), the slave activates its link as long as the problem persists.
Operating Instructions for SCALANCE X-400 Industrial Ethernet Switches
20 C79000-G8976-C186-03
Page 21

System Description of SCALANCE X-400
2.1 Properties, Functionality and Features of SCALANCE X-400
This chapter explains special properties, features and options available to you with
the SCALANCE X-400 product line.
2
The basic device consists of the frame, the power supply, digital inputs and a
Switch CPU.
SCALANCE X-400 provides a modular structure for the required ports. This modularity simplifies setup and subsequent expansion of complex network topologies to
meet current needs.
● Gigabit technology
The basic device has ports with a transmission rate of 1 Gbps for electrical cables (twisted pair) or by adding a gigabit media module for fiber-optic cables
(FO).
● With SCALANCE X-400, it is possible to split the ring ports into two different
slots (fast Ethernet module - slots 6 and 7). If one of the media modules fails,
operation can be maintained as a line structure. A defective module can be replaced during operation.
● Diagnostics
Remote diagnostic options are available with Web-based management, TelNet,
or SNMP.
● The basic device has a signaling contact for local operator control.
● An Ethernet interface is available for diagnostics and management purposes.
Operating Instructions for SCALANCE X-400 Industrial Ethernet Switches
C79000-G8976-C186-03
21
Page 22

System Description of SCALANCE X-400
● C-PLUG
When replacing a device, the C-PLUG can be removed and inserted in the new
device so that the configuration can be retained.
● VLAN
SCALANCE X-400 has port-based support of virtual networks (VLAN). A physical network can be divided into several virtual networks. This results in less network load compared with other defined VLANs.
● Spanning Tree / Rapid Spanning Tree
SCALANCE X-400 can process both the Spanning Tree Protocol (STP) and the
Rapid Spanning Tree Protocol (RSTP). This prevents circulating packets and, in
the event of a link going down, quickly provides an alternative path. With the
spanning tree protocol, the reconfiguration time is between 20 and 30 seconds,
with rapid spanning tree, it is approximately one second. Spanning tree / rapid
spanning tree is disabled as default.
Operating Instructions for SCALANCE X-400 Industrial Ethernet Switches
22 C79000-G8976-C186-03
Page 23

Components of SCALANCE X-400
The following table shows the components of SCALANCE X-400:
Component Function Figure
Basic device consisting
of
Backplane
Power module
DI module
Switch CPU
Two 1000BaseTX
interfaces
Twelve 100BaseTX
interfaces
Extender interface
Media module fiberoptic 1000 Mbps
The power module converts the 24 V input power
into the internal operating
voltage of the basic device.
There are eight digital inputs for feeding in external signals.
The Switch CPU manages the data traffic. The
CPU also has a serial and
an Ethernet port.
Expands the basic device
by two gigabit fiber-optic
ports.
System Description of SCALANCE X-400
S I E M E N S
S C A L A N C E
X -4 0 0
X 4 14 - 3E
S W ITC H C P U
F
L 1
L 2
R M
IN 1 /I N 5
IN 2 /I N 6
S T B Y
IN 3 /I N 7
D M 1
D M 2
IN 4 /I N 8
S EL E CT /S ET
For example SCALANCE X414-3E
M M 4 9 2 - 2
F O 2 x 1 00 0
P 1
P 2
C V 4 90
C OV E R
Media module
100 Mbps
Expands the basic device
by two fast Ethernet fiberoptic ports.
Twisted pair extender Expands the basic device
by eight fast Ethernet
ports with RJ-45 jacks.
Media module extender Expands the basic device
by four slots for fast
Ethernet media modules.
For example MM492-2
M M 4 9 2 - 2
F O 2 x 1 00 0
P 1
P 2
For example MM491-2
EM495-8
EM496-4
Operating Instructions for SCALANCE X-400 Industrial Ethernet Switches
C79000-G8976-C186-03
23
Page 24

System Description of SCALANCE X-400
2.2 Ports of SCALANCE X-400
SCALANCE X-400 provides you with electrical ports that can be used as gigabit
and ring ports. The expansion with media modules provides you with additional optical ports. By using an extender module, you can increase the number of ports by
a maximum of eight ports.
2.2.1 10Base-T / 100Base-TX
Transmission Rate
The transmission rate of the electrical ports is 10 Mbps or as fast Ethernet ports
100 Mbps.
Transmission Mode
The transmission mode for 10Base-T / 100Base-TX is specified in the IEEE 802.3i
/ IEEE 802.3u standards of the Institute of Electrical and Electronic Engineers.
Autonegotiation (automatic detection of the best transmission modes) is standard.
The order in which they are selected is:
● 100Base-TX full duplex
● 100Base-TX half duplex
● 10Base-T full duplex
● 10Base-T half duplex
Two communication modes are possible:
● Half duplex mode
two-way alternate - it is only possible to either send or receive over the interfaces at any one time.
● Full duplex mode
two-way simultaneous - both communication partners can send and receive at
the same time.
Operating Instructions for SCALANCE X-400 Industrial Ethernet Switches
24 C79000-G8976-C186-03
Page 25

Connections to other switches can use half or full duplex; connections to hubs are
possible only in half duplex mode.
Transmission medium
Data transmission at 10 Mbps and at 100 Mbps is over two wire pairs (pin 1, 2, 3,
6) of the twisted pair cable. For 10 Mbps, at least a category 3 (Cat 3) and for 100
Mbps, at least a four wire cable (2x2) is necessary.
Transmission range
The maximum transmission distance (segment length) is 100 m.
Connectors
System Description of SCALANCE X-400
The connectors used are 8-pin RJ-45 jacks with securing collars.
The securing collar in conjunction with the cover ensures a flush fit and the locking
mechanism with the PROFINET-compliant male connector IE FC RJ-45 Plug 180
provides a rugged node attachment suitable for an industrial environment that provides strain and bending relief for the RJ-45 jack.
Operating Instructions for SCALANCE X-400 Industrial Ethernet Switches
C79000-G8976-C186-03
25
Page 26

System Description of SCALANCE X-400
2.2.2 1000Base-TX
Transmission Rate
The transmission rate of the electrical gigabit ports is 1 Gbps.
Transmission Mode
The transmission mode for 1000Base-TX is specified in the IEEE 802.3ab standard.
At 1 Gbps, autonegotiation is optional.
Two communication modes are possible:
● Half duplex
● Full duplex
Transmission Medium
Data is transmitted over an 8-wire twisted pair cable.
Notice
For data transmission at 1 Gbps, at least Cat 5e twisted-pair cabling with 4x2 wires
is required. With a four wire cable (2x2), the maximum possible data rate is 100
Mbps.
Transmission Range
The maximum transmission distance (segment length) is 100 m.
Connectors
The connectors used are 8-pin RJ-45 jacks.
Operating Instructions for SCALANCE X-400 Industrial Ethernet Switches
26 C79000-G8976-C186-03
Page 27

2.2.3 100Base-FX
Transmission Rate
The transmission rate of the optical fast Ethernet ports is 100 Mbps.
Transmission Mode
Transmission with 100Base-FX is defined in the IEEE 802.3u standard and is
specified as 100 Mbps transmission rate and full duplex.
Transmission Medium
Data transmission is over multimode or single mode fiber-optic cable (FOC). The
wavelength is 1310 nm.
System Description of SCALANCE X-400
Two FOC types can be used:
● Multimode FOC
The core diameter is 50 µm; the light source is an LED. Many modes (light
beams) are used for signal transmission. The propagation times of the light
pulses (dispersion) restrict the maximum range considerably.
● Single mode FOC
The core diameter is 9 or 10 µm; the light source is a laser diode. To transmit a
signal, only one mode (light beam) is used greatly reducing dispersion. As a result, the maximum range of single mode FOC is greater than that of multimode
FOC.
Regardless of the type used, the outer diameter of the FOC is 125 µm.
Operating Instructions for SCALANCE X-400 Industrial Ethernet Switches
C79000-G8976-C186-03
27
Page 28

System Description of SCALANCE X-400
Transmission Range
The maximum transmission range (segment length) depends on the module selected and the FOC. The range is as follows:
● 100Base-FX module and multimode GFOC: 3 km
● 100Base-FX-LD module and single mode FOC: 26 km
Connectors
BFOC connectors are used.
Operating Instructions for SCALANCE X-400 Industrial Ethernet Switches
28 C79000-G8976-C186-03
Page 29

2.2.4 1000Base-SX
Transmission Rate
The transmission rate of the optical gigabit ports is 1 Gbps.
Transmission Mode
Transmission with 1000Base-FX is defined in the IEEE 802.3z standard and is
specified as 1000 Mbps transmission rate and full duplex.
Transmission Medium
Data is transmitted over multimode FOC. The wavelength is 850 nm.
System Description of SCALANCE X-400
The core diameter of the multimode FOC is 50 µm; the light source is an LED.
Many modes (light beams) are used for signal transmission. The propagation times
of the light pulses (dispersion) restrict the maximum range considerably.
Transmission Range
The maximum transmission range (segment length) is 750 m when using SIMATIC
NET fiber-optic multimode FOC with SC duplex connectors.
Connectors
SC duplex female connectors are used.
Operating Instructions for SCALANCE X-400 Industrial Ethernet Switches
C79000-G8976-C186-03
29
Page 30

System Description of SCALANCE X-400
2.2.5 1000Base-LX
Transmission Rate
The transmission rate of the optical gigabit ports is 1 Gbps.
Transmission Mode
Transmission with 1000Base-LX is defined in the IEEE 802.3z standard and is
specified as 1000 Mbps transmission rate and full duplex.
Transmission Medium
Data is transmitted over single mode FOC. The wavelength is 1310 nm.
The core diameter of the single mode FOC is 9 or 10 µm; the light source is a laser
diode. To transmit a signal, only one mode (light beam) is used greatly reducing
dispersion. As a result, the maximum range of single mode FOC is greater than
that of multimode FOC.
Transmission Range
The maximum transmission range (segment length) is 10 km for single mode FOC.
Connectors
SC duplex female connectors are used.
Operating Instructions for SCALANCE X-400 Industrial Ethernet Switches
30 C79000-G8976-C186-03
Page 31

System Description of SCALANCE X-400
2.3 Compatibility of SCALANCE X-400
Compatibility List
The following products and devices are compatible with SCALANCE X-400:
● End devices
All SIMATIC NET products with a TP port can be connected to the ports of
SCALANCE X-400 Industrial Ethernet Switches.
● Network components in a line or star structure
- ESM/OSM
- OMC (TP cable max. 6 m long)
- SCALANCE X-100
- SCALANCE X-200
- SCALANCE X-200IRT
- SCALANCE W-700
● Network components in a ring structure with SCALANCE X-400 as RM
- ESM/OSM
- SCALANCE X-200
- SCALANCE X-200IRT
● Redundant linking of 100 Mbps networks over FO cable.
The redundant optical linking of networks is allowed only with the devices ITP
53 with order number 6GK1 105-2AD10 and the OSM BC 08 with order number
6GK1 105-4AA00 (using the ESM/OSM function standby master and standby
slave).
Note
All compatibility information assumes the correct use of the TP and FOC cables.
Operating Instructions for SCALANCE X-400 Industrial Ethernet Switches
C79000-G8976-C186-03
31
Page 32

System Description of SCALANCE X-400
Operating Instructions for SCALANCE X-400 Industrial Ethernet Switches
32 C79000-G8976-C186-03
Page 33

Product Description of SCALANCE X-400
3.1 SCALANCE X414-3E Basic Device
Overview
The SCALANCE X-400 product line consists of modular Industrial Ethernet
switches, media modules and extenders. 100 Mbit and 1000 Mbit technology is
supported for different transmission media (twisted pair, fiber-optic) and increased
port requirements. The main areas of application are high-performance plant networks. Due to its modular structure, the X-400 product line is designed to meet future demands and can be adapted to meet the requirements of a particular task.
3
The SCALANCE X414-3E switch has two integrated gigabit Ethernet twisted pair
ports (100 or 1000 Mbps) to interconnect multiple switches. The nodes are connected over 12 fast Ethernet ports integrated in the switch (10 or 100 Mbps).
The integrated redundancy manager allows fast medium redundancy both for gigabit Ethernet and for fast Ethernet even in large networks.
To set up optical gigabit networks, both integrated gigabit Ethernet ports can be
converted to fiber-optic cable over a 2-port gigabit Ethernet module. Module variants for multimode (up to 750 m) and single mode (up to 10 km) are available.
Operating Instructions for SCALANCE X-400 Industrial Ethernet Switches
C79000-G8976-C186-03
33
Page 34

Product Description of SCALANCE X-400
Figure 3-1 Basic device without media modules, protective caps and covers
Figure 3-2 Basic device with media modules and covers
Operating Instructions for SCALANCE X-400 Industrial Ethernet Switches
34 C79000-G8976-C186-03
Page 35

Components of the Product
The following components are supplied with the SCALANCE X414-3E:
● Basic device with power module in slot 2,
DI module with eight digital inputs in slot 3
Switch CPU including C-PLUG in slot 4
Protective caps for media module terminal strips in slots
5, 6 and 7.
● 1 CV490 2x1000, cover of media module slot 5
2 CV490 2x100, cover of media module slots 6 and 7
1 CV490 Cover, dummy cover for slot 8
3 CV490 4x100, cover for slots 9 to 11
● SIMATIC NET Manual Collection CD
● Slot labels for slots 1 through 18
● 1 connector for power supply (4-pin)
Product Description of SCALANCE X-400
● 1 connector for signaling contact (4-pin)
● 2 connectors for digital inputs (5-pin)
● 1 sheet with 15 labeling strips
Operating Instructions for SCALANCE X-400 Industrial Ethernet Switches
C79000-G8976-C186-03
35
Page 36

Product Description of SCALANCE X-400
Spares
● 1 C-PLUG (order number: 6GK1 900-0AB00)
● 7 covers for slots (order number: 6GK5 490-0AA00-0AA2)
- 1 cover for slot 5 (1 Gbps - TP)
- 2 covers for slots 6 and 7
- 1 dummy cover for slot 8
- 3 covers for slots 9 to 11 (100 Mbps - TP)
● Terminal set (order number: 6GK5 498-1AA00-0AA0)
- 10 connecting terminals for PS and signaling contact 4-pin
- 10 connecting terminals digital inputs 5-pin
● 1 location label (order number: 6ES7 912-0AA00-0AA0)
● 10 sheets of labels (A4) each with 15 labeling strips
(order number: 6GK5 498-0AA00-0AA0)
Slots
The SCALANCE X414-3E basic device consists of a backplane with three permanently installed modules in slots 2, 3 and 4.
Figure 3-3 Basic device without media modules with existing ports
2
Power Module
3
Digital Inputs
Switch CPU
2 x RJ45
4
5
10/100/1000 MBit/s
Twisted Pair
6
7
4 x RJ45
10/100/ MBit/s
Twisted Pair
4 x RJ45
10/100/ MBit/s
Twisted Pair
4 x RJ45
10/100/ MBit/s
Twisted Pair
8
9
10
11
Operating Instructions for SCALANCE X-400 Industrial Ethernet Switches
36 C79000-G8976-C186-03
Page 37

Product Description of SCALANCE X-400
The modules in the individual slots have the following function (slot 1 is reserved
for a power supply unit):
● Slot 2
Power module
The input voltage of 24 V DC is transformed to the internal supply voltage. The
module has two 4-pin sockets for connecting a redundant power supply and for
connecting the signaling contact and protective earth.
● Slot 3
Digital input module
The input module has two 5-pin sockets for connecting eight digital inputs that
allow different signaling modes.
● Slot 4
CPU module
- Contains the processor that provides the management functionality.
- C-PLUG for storage of parameter assignment.
- DIL switch for the redundancy manager function and to specify the ring
ports.
- SELECT/SEL button for switching over the display modes, for resetting to
the factory default settings and to define the fault mask.
- LED display of the display modes DMode A through DMode D.
● Slot 5
Contains two RJ-45 jacks allowing attachment of electrical (twisted pair) connections (10, 100, 1000 Mbps).
As an option, slot 5 allows the use of an optical gigabit module with two ports
(1000Base-SX or 1000Base-LX).
● Slots 6 and 7
Optional use of two optical fast Ethernet modules (100 Mbps) each with two
ports (100Base-FX).
● Slot 8
No function in system.
● Slot 9 through 11
Each contains four RJ-45 jacks allowing attachment of 12 electrical (twisted
pair) connections in total (10, 100 Mbps).
These cannot be used by media modules.
Operating Instructions for SCALANCE X-400 Industrial Ethernet Switches
C79000-G8976-C186-03
37
Page 38

Product Description of SCALANCE X-400
The basic version of the SCALANCE X414-3E without expansion with media modules provides 14 ports. The two ports in slot 5 can be used as ring ports.
I N 1 / I N 5
F
I N 2 / I N 6
L 1
I N 3 / I N 7
L 2
I N 4 / I N 8
2 3 4 1 18 9 1 0765
R M
S T B Y
D M 1
D M 2
P 1
P 2
P 1
P 2
P 3
P 4
P 1
P 2
P 3
P 4
P 1
P 2
P 3
P 4
Figure 3-4 Ports of the SCALANCE X414-3E
By inserting media modules in slots 6 and 7, you have 4 further optical ports available either as ring ports or as end device ports.
By docking an extender module to the right of slot 11, you can extend the basic
device by a further 8 ports. There are two types of extender available, one for
twisted pair ports and one for fiber-optic ports. The twisted pair extender is double
the width of a media module and the media module extender is four times the
width.
Operating Instructions for SCALANCE X-400 Industrial Ethernet Switches
38 C79000-G8976-C186-03
Page 39

3.1.1 Power Module
The power module is inserted in slot 2.
The power can be fed into the power module redundantly over two inputs. The two
power inputs are isolated from each other, there is no power distribution. If redundant power feed-in is used, the switch is supplied solely by the section of the
power module with the higher output voltage.
The front 4-pin connector is used for the power supply. The input voltage is 24 V
DC (20.4 – 28.8 V). The signaling contact supplies the fault status at the rear 4-pin
connector. If there is a fault, the contact opens.
Product Description of SCALANCE X-400
F
I N 1 / I N 5
L 1
I N 2 / I N 6
L 2
I N 3 / I N 7
I N 4 / I N 8
2 3 4 1 18 9 1 0765
S T B Y
D M 1
D M 2
R M
P 1
P 2
Figure 3-5 Slot of the power module
P 1
P 2
P 3
P 4
P 1
P 2
P 3
P 4
P 1
P 2
P 3
P 4
Operating Instructions for SCALANCE X-400 Industrial Ethernet Switches
C79000-G8976-C186-03
39
Page 40

Product Description of SCALANCE X-400
Signaling Contact
The following can be signaled over a floating signaling contact:
● Failure of the power supply.
The power supply monitored is selected in the fault mask.
● Bad link status of a port.
(wrong connector or no connection to partner device). The port monitored is selected in the fault mask.
● Change to the DIL switch during operation.
Possible inconsistency between the switch setting and the actual operating
state, The switch setting is adopted only after a restart.
If the SCALANCE X414-3E is set as the redundancy manager, the following errors
are also reported:
● Bad link status of the ring ports, regardless of the status of the fault mask.
● Configuration of a second SCALANCE X414-3E as redundancy manager in the
same ring.
Operating Instructions for SCALANCE X-400 Industrial Ethernet Switches
40 C79000-G8976-C186-03
Page 41

3.1.2 Digital Inputs
DI Module
The digital input module is located in slot 3 and provides the user with eight digital
inputs. The cables are connected to the bottom of the module by two 5-pin connectors.
I N 1 / I N 5
F
I N 2 / I N 6
L 1
I N 3 / I N 7
L 2
I N 4 / I N 8
S T B Y
D M 1
D M 2
Product Description of SCALANCE X-400
R M
P 1
P 2
P 1
P 2
P 3
P 4
P 1
P 2
P 3
P 4
P 1
P 2
P 3
P 4
2 3 4 1 18 9 1 0765
Figure 3-6 LEDs of the digital input module
Depending on the configuration, the states of the digital inputs can be used to send
E-mails and/or entries to the logbook of the SCALANCE X414-3E.
It is also possible to read the statuses over SNMP.
Operating Instructions for SCALANCE X-400 Industrial Ethernet Switches
C79000-G8976-C186-03
41
Page 42

Product Description of SCALANCE X-400
3.1.3 Switch CPU
The Switch CPU is in slot 4.
The CPU has four DIL switches for configuring the device. This module also has
four LEDs for displaying parameter assignments that can be modified by the user
with the DIL switch and a SELECT / SET button.
I N 1 / I N 5
F
L 1
I N 2 / I N 6
L 2
I N 3 / I N 7
I N 4 / I N 8
R M
S T B Y
D M 1
D M 2
P 1
P 2
P 1
P 2
P 3
P 4
P 1
P 2
P 3
P 4
P 1
P 2
P 3
P 4
2 3 4 1 18 9 1 0765
Figure 3-7 LEDs on the Switch CPU
Operating Instructions for SCALANCE X-400 Industrial Ethernet Switches
42 C79000-G8976-C186-03
Page 43

Serial Port
Product Description of SCALANCE X-400
The Switch CPU of the SCALANCE X414-3E has an RS-232 port. This is used for
the following purposes:
● Firmware updates
● Management with the aid of the command interpreter (Command Line Inter-
preter, CLI) including setting of the IP address information.
Input to the command interpreter is over command lines.
For more detailed information, refer to the
ual
Figure 3-8 Pin assignment
Ethernet Port
SCALANCE X-400 Configuration Man-
.
P i n 6
P i n 7
P i n 8
P i n 9
P i n 1
P i n 2 R D
P i n 3 T D
P i n 4
P i n 5 S G
On the bottom panel of the SCALANCE X414-3E , there is an 8-pin RJ-45 jack.
This Ethernet interface can be used for productive communication with other
switches or end devices. This is used for the following purposes:
● Configuration
● Commissioning
The SCALANCE X414-3E can be configured either locally or over a network.
For more detailed information, refer to the
ual
.
Operating Instructions for SCALANCE X-400 Industrial Ethernet Switches
C79000-G8976-C186-03
SCALANCE X-400 Configuration Man-
43
Page 44

Product Description of SCALANCE X-400
3.1.4 C-PLUG (Configuration Plug)
Area of Application
The C-PLUG is an exchangeable medium for storage of the configuration data of
the modular switch and ships with the product. This means that the configuration
data remains available if the basic device is replaced.
Notice
The C-PLUG must only be removed or inserted when the power supply to the device is turned off.
How It Works
Power is supplied by the basic device. The C-PLUG retains all data permanently
when the power is turned off.
If an empty C-PLUG (factory settings or deleted with the Clean function) is inserted, all the configuration data of the SCALANCE X414-3E is saved to it automatically when the device starts up. Changes to the configuration during operation
are saved on the C-PLUG without operator intervention if this is in the
status.
ACCEPTED
Figure 3-9 C-PLUG
Operating Instructions for SCALANCE X-400 Industrial Ethernet Switches
44 C79000-G8976-C186-03
Page 45

Product Description of SCALANCE X-400
A device with an accepted C-PLUG (ACCEPTED status) inserted uses the configuration data of the C-PLUG automatically when it starts up. Acceptance is possible
only when the data was written by a compatible device type.
This allows a basic device to be replaced quickly and simply. The C-PLUG is taken
from the failed component and inserted in the replacement. The first time it is
started up, the replacement device has the same configuration as the failed device
except for the MAC address set by the vendor.
Notice
If the SCALANCE X414-3E is replaced, the settings of the DIL switches on the
Switch CPU and the configuration with media modules or extender modules must
be duplicated.
Diagnostics
Inserting a C-PLUG that does not contain the configuration of a compatible device
type, accidentally removing the C-PLUG or general malfunctions of the C-PLUG
are signaled by the diagnostics mechanisms of the device (LEDs, WEB-based
management, SNMP and CLI).
Operating Instructions for SCALANCE X-400 Industrial Ethernet Switches
C79000-G8976-C186-03
45
Page 46

Product Description of SCALANCE X-400
Startup Behavior
C-PLUG X414-3E Startup
1 not found with internal configuration (if it exists)
2 empty with internal configuration, immediately
or with factory defaults.
copies this automatically to the CPLUG.
3 written with own X414-3E configu-
with C-PLUG configuration.
ration data.
4 written with third-party X414-3E
with third-party C-PLUG configuration.
configuration data.
5 written with configuration data of a
different device type.
with internal configuration, red LED on
power module and log entry.
6 defective with internal configuration, red LED on
power module and log entry.
In cases 1 and 2, the configuration data on the Switch CPU and the C-PLUG is
identical. In cases 3 and 5 the configuration data is different and can be synchronized manually. In case 6, you can attempt to reformat the C-PLUG with the clean
function. If problems persist, replace the C-PLUG.
Notice
In case 4 (replacing the switch), the DIL switch settings of the C-PLUG and not the
physical switch settings are adopted. A deviation is signaled by the diagnostic options.
For more detailed information, refer to the SCALANCE X-400 Configuration Man-
ual
.
Operating Instructions for SCALANCE X-400 Industrial Ethernet Switches
46 C79000-G8976-C186-03
Page 47

3.1.5 Ports
The SCALANCE X414-3E basic device provides two gigabit ports on slot 5 and
four fast Ethernet ports on each of slots 9 through 11. The two ports on slot 5 can
be used as ring ports.
Product Description of SCALANCE X-400
I N 1 / I N 5
F
I N 2 / I N 6
L 1
I N 3 / I N 7
L 2
I N 4 / I N 8
S T B Y
D M 1
D M 2
R M
P 1
P 2
P 1
P 2
P 3
P 4
P 1
P 2
P 3
P 4
P 1
P 2
P 3
P 4
2 3 4 1 18 9 1 0765
Figure 3-10 Ports on the basic device
Figure 3-11 Basic device with gigabit fiber-optic cable, fast Ethernet fiber-optic cable
and fast Ethernet twisted pair cable
Operating Instructions for SCALANCE X-400 Industrial Ethernet Switches
C79000-G8976-C186-03
47
Page 48

Product Description of SCALANCE X-400
Operating Instructions for SCALANCE X-400 Industrial Ethernet Switches
48 C79000-G8976-C186-03
Page 49

Media Modules, Covers, Dummy Cover
4.1 Media Modules
Available Module Types
The following media modules are available to expand the basic device:
4
● MM491-2 (100 Mbps)
order number: 6GK5 491-2AB00-8AA2
● MM491-2LD (100 Mbps)
order number: 6GK5 491-2AC00-8AA2
● MM492-2 (1000 Mbps)
order number: 6GK5 492-2AL00-8AA2
● MM492-2LD (1000 Mbps)
order number: 6GK5 492-2AM00-8AA2
By using media modules, you can increase the number of available ports in the
basic device SCALANCE X414-3E from 14 to 18. On six ports, data transmission is
also possible over fiber-optic cable instead of TP cable.
Module
Type
MM491-2 100Base-FX Multimode BFOC 3 km 1310 nm
MM491-2LD 100Base-FX Single
MM492-2 1000Base-SX Multimode SC
Procedure Cabling Connec-
tor
BFOC 26 km 1310 nm
mode
duplex
Segment
Length
750 m 850 nm
Wavelength
MM492-2LD 1000Base-LX Single
mode
Operating Instructions for SCALANCE X-400 Industrial Ethernet Switches
C79000-G8976-C186-03
SC
duplex
10 km 1310 nm
49
Page 50

Media Modules, Covers, Dummy Cover
Note
It is possible to insert and remove the media modules during operation. Before
inserting a media module, remove the cover and cap from the slot. Please put
these away for safe keeping. If you remove a media module, close the the terminal
strip with the cap and and the slot with the cover.
Options for Slot 5
Slot 5 of the basic device has two RJ-45 jacks for connecting TP cables. The possible data transmission rates on electrical connections are 10, 100, or 1000 Mbps.
An optical gigabit module in slot 5 allows data transmission with multimode or single mode FOC. In this case, the two RJ-45 jacks can no longer be used.
Options for Slots 6 and 7
Slots 6 and 7 do not have any ports but allow two optical fast Ethernet modules to
be inserted each with ports. This gives you the opportunity of data transmission at
a data transmission rate of 100 Mbps over multimode or single mode FOC.
I N 1 / I N 5
F
I N 2 / I N 6
L 1
I N 3 / I N 7
L 2
I N 4 / I N 8
2 3 4 1 18 9 1 0765
S T B Y
D M 1
D M 2
R M
P 1
P 2
P 1
P 2
Figure 4-1 Slots for the media modules
P 1
P 2
P 1
P 2
P 3
P 4
P 1
P 2
P 3
P 4
P 1
P 2
P 3
P 4
Operating Instructions for SCALANCE X-400 Industrial Ethernet Switches
50 C79000-G8976-C186-03
Page 51

Media Modules, Covers, Dummy Cover
4.1.1 Fast Ethernet Media Module MM491-2 (100Base-FX)
The fast Ethernet media module MM491-2 can be used optionally in slots 6 and 7
of the basic device and when using the media module extender EM496-4, it can
also be used in slots 12 through 15. Mixed operation with the fast Ethernet media
module MM491-2LD is possible.
Properties
The fast Ethernet media module provides two ports for connecting the multimode
FOC. The signal is transmitted by LED with a wavelength of 1310 nm. The maximum cable length is 3 km.
Connector
The connectors are 2x2 BFOC sockets.
LED Display of the Fast Ethernet Media Module
The LED displays of the module are the same as the LEDs of the basic device.
With optical transmission, a fixed transmission rate of 100 Mbps and full duplex
mode is set. The display in display modes B and C is analogous.
● In display mode A, the current connection status is displayed.
● In display mode B, the fixed transmission rate is displayed.
● In display mode C, the full duplex mode is displayed.
● In display mode D, you can see whether or not the port is monitored.
I N 1 / I N 5
F
I N 2 / I N 6
L 1
I N 3 / I N 7
L 2
I N 4 / I N 8
S T B Y
D M 1
D M 2
R M
P 1
P 2
P 1
P 2
P 1
P 2
P 1
P 2
P 3
P 4
P 1
P 2
P 3
P 4
P 1
P 2
P 3
P 4
2 3 4 1 18 9 1 0765
Figure 4-2 Slots of the MM491-2 media module
Operating Instructions for SCALANCE X-400 Industrial Ethernet Switches
C79000-G8976-C186-03
51
Page 52

Media Modules, Covers, Dummy Cover
4.1.2 Fast Ethernet Media Module MM491-2LD (100Base-FX)
The fast Ethernet media module MM491-2LD can be used optionally in slots 6 and
7 of the basic device and when using the media module extender EM496-4, it can
also be used in slots 12 through 15. Mixed operation with the fast Ethernet media
module MM491 is possible.
Properties
The fast Ethernet media module provides two ports for connecting the single mode
FOC. The signal is transmitted by laser diode with a wavelength of 1310 nm. The
maximum cable length is 26 km.
Connector
The connectors are 2x2 BFOC sockets.
LED Display of the Fast Ethernet Media Module
The LED displays of the module are the same as the LEDs of the basic device.
With optical transmission, only a fixed transmission rate and full duplex mode are
possible. The display in display modes B and C is analogous.
● In display mode A, the current connection status is displayed.
● In display mode B, the fixed transmission rate is displayed.
● In display mode C, the full duplex mode is always displayed.
● In display mode D, you can see whether or not the port is monitored.
I N 1 / I N 5
F
I N 2 / I N 6
L 1
I N 3 / I N 7
L 2
I N 4 / I N 8
S T B Y
D M 1
D M 2
R M
P 1
P 2
P 1
P 2
P 1
P 2
P 1
P 2
P 3
P 4
P 1
P 2
P 3
P 4
P 1
P 2
P 3
P 4
2 3 4 1 18 9 1 0765
Figure 4-3 Slots of the MM491-2LD media module
Operating Instructions for SCALANCE X-400 Industrial Ethernet Switches
52 C79000-G8976-C186-03
Page 53

Media Modules, Covers, Dummy Cover
4.1.3 Gigabit Media Module MM492-2 (1000Base-SX)
The MM492-2 gigabit media module can be inserted as an option in slot 5.
Properties
The gigabit media module provides two ports for connecting the multimode FOC.
The signal is transmitted using an LED at a wavelength of 850 nm. Both ports of
the module can be configured as ring ports. The maximum cable length is 750 m
when using SIMATIC NET fiber-optic cables.
Connector
SC duplex female connectors are used.
LED Display of the Gigabit Media Module
The LED displays of the module are the same as the LEDs of the basic device.
With optical transmission, only a fixed transmission rate and full duplex mode are
possible. The display in display modes B and C is analogous.
● In display mode A, the current connection status is displayed.
● In display mode B, the fixed transmission rate is displayed.
● In display mode C, the full duplex mode is always displayed.
● In display mode D, you can see whether or not the port is monitored.
I N 1 / I N 5
F
I N 2 / I N 6
L 1
I N 3 / I N 7
L 2
I N 4 / I N 8
S T B Y
D M 1
D M 2
R M
P 1
P 2
P 1
P 2
P 3
P 4
P 1
P 2
P 3
P 4
P 1
P 2
P 3
P 4
2 3 4 1 18 9 1 0765
Figure 4-4 Slot of the MM492-2 media module
Operating Instructions for SCALANCE X-400 Industrial Ethernet Switches
C79000-G8976-C186-03
53
Page 54

Media Modules, Covers, Dummy Cover
4.1.4 Gigabit Media Module MM492-2LD (1000Base-LX)
The MM492-2LD gigabit media module can be inserted as an option in slot 5.
Properties
The media module provides two ports for connecting the single mode FOC. Signal
transmission uses a laser diode at a wavelength of 1310 nm. Both ports of the
module can be configured as ring ports. The maximum cable length is 10 km when
using SIMATIC NET fiber-optic cables.
Connector
SC duplex female connectors are used.
LED Display of the Gigabit Media Module
The LED displays of the module are the same as the LEDs of the basic device.
With optical transmission, only a fixed transmission rate and full duplex mode are
possible. The display in display modes B and C is analogous.
● In display mode A, the current connection status is displayed.
● In display mode B, the fixed transmission rate is displayed.
● In display mode C, the full duplex mode is always displayed.
● In display mode D, you can see whether or not the port is monitored.
I N 1 / I N 5
F
I N 2 / I N 6
L 1
I N 3 / I N 7
L 2
I N 4 / I N 8
S T B Y
D M 1
D M 2
R M
P 1
P 2
P 1
P 2
P 3
P 4
P 1
P 2
P 3
P 4
P 1
P 2
P 3
P 4
2 3 4 1 18 9 1 0765
Figure 4-5 Slot of the MM492-2LD media module
Operating Instructions for SCALANCE X-400 Industrial Ethernet Switches
54 C79000-G8976-C186-03
Page 55

4.2 Covers, Dummy Cover
4.2.1 Covers
Slots of the Covers
Note
The protective caps for the media module terminal strips and the covers must be
fitted in all slots that do not contain media modules.
For slots for twisted pair (9 through 11), the covers are recommended to protect
the RJ-45 jacks.
Media Modules, Covers, Dummy Cover
I N 1 / I N 5
F
I N 2 / I N 6
L 1
I N 3 / I N 7
L 2
I N 4 / I N 8
2 3 4 1 18 9 1 0765
Figure 4-6 Possible slots of the covers
Available Cover Types
To cover slots not used for media modules or slots for twisted pair, the following
types of cover are available:
● CV490 2x1000
● CV490 2x100
S T B Y
D M 1
D M 2
R M
P 1
P 2
P 1
P 2
P 3
P 4
P 1
P 2
P 3
P 4
P 1
P 2
P 3
P 4
● CV490 4x100
Operating Instructions for SCALANCE X-400 Industrial Ethernet Switches
C79000-G8976-C186-03
55
Page 56

Media Modules, Covers, Dummy Cover
CV490 2x1000
When using the gigabit ports for electrical cables (twisted pair), use cover type
CV490 2x1000 on slot 5.
I N 1 / I N 5
F
I N 2 / I N 6
L 1
I N 3 / I N 7
L 2
I N 4 / I N 8
2 3 4 1 18 9 1 0765
Figure 4-7 Slot 5 for cover CV490 2x1000
R M
S T B Y
D M 1
D M 2
P 1
P 2
P 1
P 2
P 3
P 4
P 1
P 2
P 3
P 4
P 1
P 2
P 3
P 4
Displays of the Cover
The port status of the two electrical gigabit ports 1 and 2 are displayed on the front
panel of the cover by two LEDs.
Operating Instructions for SCALANCE X-400 Industrial Ethernet Switches
56 C79000-G8976-C186-03
Page 57

CV490 2x100
Slots 6 and 7 are solely for the fast Ethernet media modules MM491-2 and
MM491-2LD. The basic device does not provide any ports on these slots.
Figure 4-8 Slots 6 and 7 for cover CV490 2x100
I N 1 / I N 5
F
I N 2 / I N 6
L 1
I N 3 / I N 7
L 2
I N 4 / I N 8
R M
S T B Y
D M 1
D M 2
2 3 4 1 18 9 1 0765
Media Modules, Covers, Dummy Cover
P 1
P 2
P 1
P 2
P 3
P 4
P 1
P 2
P 3
P 4
P 1
P 2
P 3
P 4
Displays of the Cover
The LEDs of the CV490 2x100 cover have no function.
Further Slots for the CV490 2x100 Cover
Use the CV490 2x100 cover not only for the SCALANCE X414-3E but also for slots
12 through 15 of the media module extender EM496-4 if no media modules are inserted.
F
L 1
L 2
2 3 4 1 18 9 1 0765
Figure 4-9 Slots 12 through 15 for cover CV490 2x100 on
I N 1 / 5
I N 2 / 6
I N 3 / 7
I N 4 / 8
R M
D M 1
D M 2
P 1
P 2
S T B Y
media module extender EM496-4
P 1
P 1
P 2
P 3
P 4
P 1
P 2
P 2
P 3
P 3
P 4
P 4
1 5
1 2 1 3
1 4
Operating Instructions for SCALANCE X-400 Industrial Ethernet Switches
C79000-G8976-C186-03
57
Page 58

Media Modules, Covers, Dummy Cover
CV490 4x100
The SCALANCE X414-3E provides you with four electrical fast Ethernet ports on
slots 9 through 11.
I N 1 / I N 5
F
I N 2 / I N 6
L 1
I N 3 / I N 7
L 2
I N 4 / I N 8
2 3 4 1 18 9 1 0765
Figure 4-10 Slots 9 through 11 for cover CV490 4x100
R M
S T B Y
D M 1
D M 2
P 1
P 2
P 1
P 2
P 3
P 4
P 1
P 2
P 3
P 4
P 1
P 2
P 3
P 4
Displays of the Cover
The status of each of the four fast Ethernet ports 1 through 4 is displayed on the
front panel of the CV490 4x100 cover by four LEDs.
Further Slots for the CV490 4x100 Cover
The CV490 4x100 cover can not only be used with the SCALANCE X414-3E but
also for slots 12 and 13 of the twisted pair extender EM495-8.
F
L 1
L 2
2 3 4 1 18 9 1 0765
Figure 4-11 Slots 12 and 13 for the CV490 4x100 cover on the
I N 1 / 5
I N 2 / 6
I N 3 / 7
I N 4 / 8
R M
P 1
P 1
S T B Y
D M 1
D M 2
P 2
P 1
P 2
P 2
twisted pair extender module EM495-8
P 1
P 1
P 2
P 3
P 4
P 1
P 2
P 2
P 3
P 3
P 4
P 4
P 1
P 2
P 3
P 4
1 2 1 3
P 1
P 2
P 3
P 4
Operating Instructions for SCALANCE X-400 Industrial Ethernet Switches
58 C79000-G8976-C186-03
Page 59

4.2.2 Dummy Cover
Slot of the Dummy Cover
The dummy cover with the name CV490 COVER is located in slot 8 of the
SCALANCE X414-3E. Due to system requirements, this slot has no function.
I N 1 / I N 5
F
L 1
I N 2 / I N 6
L 2
I N 3 / I N 7
I N 4 / I N 8
S T B Y
D M 1
D M 2
Media Modules, Covers, Dummy Cover
R M
P 1
P 2
P 1
P 2
P 3
P 4
P 1
P 2
P 3
P 4
P 1
P 2
P 3
P 4
2 3 4 1 18 9 1 0765
Figure 4-12 Slot 8 of the dummy cover
Displays of the Dummy Cover
The LEDs of the dummy cover have no function and there is therefore no port information on the front panel of the dummy cover.
Operating Instructions for SCALANCE X-400 Industrial Ethernet Switches
C79000-G8976-C186-03
59
Page 60

Media Modules, Covers, Dummy Cover
Operating Instructions for SCALANCE X-400 Industrial Ethernet Switches
60 C79000-G8976-C186-03
Page 61

Extender Modules
5.1 Twisted Pair Extender EM495-8
Eight Additional 100Base-TX Ports
The extender module for twisted pair transmission provides an additional eight
ports for connecting twisted pair cables. The TP cable is attached to an 8-pin RJ45 jack with securing collar.
5
Note
The twisted pair extenders can also be installed during operation.
The transmission rate of the Ethernet ports is 10 Mbps or as a fast Ethernet port
100 Mbps. No media module is required for data transfer with this extender module.
F
L 1
L 2
2 3 4 1 18 9 1 0765
Figure 5-1 Basic device with twisted pair extender module
I N 1 / 5
I N 2 / 6
I N 3 / 7
I N 4 / 8
S T B Y
D M 1
D M 2
R M
P 1
P 1
P 2
P 1
P 2
P 2
P 1
P 1
P 2
P 3
P 4
P 1
P 2
P 2
P 3
P 3
P 4
P 4
P 1
P 2
P 3
P 4
1 2 1 3
P 1
P 2
P 3
P 4
Operating Instructions for SCALANCE X-400 Industrial Ethernet Switches
C79000-G8976-C186-03
61
Page 62

Extender Modules
Figure 5-2 Twisted pair extender EM495-8
Covers
For slots 12 and 13 of the twisted pair extenders EM495-8, you can use the cover
that can be used on slots 9 through 11 on the basic device. Two CV490 4x100
covers are supplied with the twisted pair extender.
Operating Instructions for SCALANCE X-400 Industrial Ethernet Switches
62 C79000-G8976-C186-03
Page 63

5.2 Media Module Extender EM496-4
Four Additional Slots for Media Modules
By adding the media module extender, the basic device is extended by four slots
that you can equip with the following modules as required:
● MM491-2
● MM491-2LD
If you use all slots, you have an additional eight optical fast Ethernet ports available
(100 Mbps).
Extender Modules
Connector
Note
Installation of the media module extender and removal or insertion of the media
modules is possible during operation.
You require at least one media module for data transfer over this extender module.
Mixed operation in slots 12 through 15 with MM491-2 and MM491-2LD modules is
possible. The media module plug connectors are protected by protective caps.
The connectors are 2x2 BFOC sockets.
F
L 1
L 2
2 3 4 1 18 9 1 0765
I N 1 / 5
I N 2 / 6
I N 3 / 7
I N 4 / 8
S T B Y
D M 1
D M 2
R M
P 1
P 1
P 2
P 1
P 2
P 2
P 1
P 1
P 2
P 3
P 4
P 1
P 2
P 2
P 3
P 3
P 4
P 4
P 1
P 2
1 2 1 3
P 1
P 2
P 1
P 1
P 2
P 2
1 5
1 4
Figure 5-3 Basic device with media module extender
Operating Instructions for SCALANCE X-400 Industrial Ethernet Switches
C79000-G8976-C186-03
63
Page 64

Extender Modules
Covers
Figure 5-4 Empty media module extender EM496-4 without protective caps for the
media module plug connectors and without cover
Four CV490 2x100 covers are supplied with the media module extender EM496-4.
The media module plug connectors are also protected from damage by protective
caps.
Operating Instructions for SCALANCE X-400 Industrial Ethernet Switches
64 C79000-G8976-C186-03
Page 65

Extender Modules
Figure 5-5 Media module extender EM496-4 with media module MM491-2 in slot 12
and with cover
Operating Instructions for SCALANCE X-400 Industrial Ethernet Switches
C79000-G8976-C186-03
65
Page 66

Extender Modules
Operating Instructions for SCALANCE X-400 Industrial Ethernet Switches
66 C79000-G8976-C186-03
Page 67

Installation and Commissioning
6.1 Installing / Removing the SCALANCE X414-3E
!
Warning
SCALANCE X-400 is designed for operation with safety extra-low voltage (SELV).
This means that only safety extra-low voltages (SELV) complying with
IEC950/EN60950/ VDE0805 can be connected to the power supply terminals.
The power supply unit for the 24 V DC supply must comply with NEC Class 2
(voltage range 20.4 - 28.8 V DC, current requirement max. 2 A). If the device is
supplied with power redundantly, both power supply units together must comply
with NEC Class 2.
Exceptions:
6
● Power supply with PELV (according to VDE 0100-410) is also possible if the
generated rated voltage does not exceed the voltage limits 25 V AC or 60 V
DC.
● Power supply by a SELV power source (according to IEC 60950) or PELV
power source (according to VDE 0100-410) without limited power is also permitted if suitable fire protection measures are taken by:
- Installation in a cabinet or suitable enclosure
- Installation in a suitably equipped, closed room
!
Caution
The subject unit must be located in a Restricted Access Location where access
can only be gained by SERVICE PERSONNEL or by USERS who have been instructed about the reasons for the restrictions applied to the location and about any
precautions that shall be taken when operated in an air ambient of 50°C - 60°C
Operating Instructions for SCALANCE X-400 Industrial Ethernet Switches
C79000-G8976-C186-03
67
Page 68

Installation and Commissioning
6.1.1 Installing / Uninstalling with an S7-300 Rail
Installing on an S7-300 Rail
For installation, you require a slotted screwdriver with a 5.5 mm wide blade.
Notice
When installing the SCALANCE X414-3E, hold it by the backplane and not by the
modules, otherwise the device may be damaged.
To install the device, follow the steps below:
1. Tilt the basic device slightly towards the back with the upper groove on the
edge of the S7-300 rail and push in towards the bottom. In this position, the
basic device should not slip off but it can be adjusted horizontally to the left or
right until the required position is achieved.
2. Remove the covers from slots 7 and 9 (see section 6.2.2) and the dummy
cover from slot 8 (see section 6.2.3). If media modules are inserted, remove
the fast Ethernet media module instead of the cover from slot 7 (see section
6.2.1).
3. Using a screwdriver with a 5.5 mm wide blade, tighten the two captive screws
in the backplane at slot 7 and between slots 8 and 9 until the basic device can
no longer be moved to the side.
Note
Only horizontal installation permitted (ventilation slit top/bottom).
Operating Instructions for SCALANCE X-400 Industrial Ethernet Switches
68 C79000-G8976-C186-03
Page 69

Installation and Commissioning
Figure 6-1 Installation on an S7-300 rail
Removing from the S7-300 rail
To remove the device, you require a slotted screwdriver with a 5.5 mm wide blade.
Notice
When removing the SCALANCE X414-3E, hold it by the backplane and not by the
modules, otherwise the device may be damaged.
To remove the device, follow the steps below:
1. Remove the covers from slots 7 and 9 (see section 6.2.2) and the dummy
cover from slot 8 (see section 6.2.3). If media modules are inserted, remove
the fast Ethernet media module instead of the cover from slot 7 (see section
6.2.1).
2. Using a screwdriver with a 5.5 mm wide blade, loosen the two captive screws
in the backplane at slot 7 and between slots 8 and 9.
3. Pull out the lower part of the basic device slightly towards the front and lift it
from the S7-300 rail.
Operating Instructions for SCALANCE X-400 Industrial Ethernet Switches
C79000-G8976-C186-03
69
Page 70

Installation and Commissioning
6.1.2 Installing / Uninstalling with a 35 mm Standard Rail
Installation on a 35 mm Standard Rail
!
Caution
If the SCALANCE X-400 is liable to severe vibration (> 10 g), use the S7-300 rail
for installation. The 35 mm standard rail does not provide adequate support for the
SCALANCE X-400 with vibration greater than 10 g.
Since the two captive screws in slot 7 and between slots 8 and 9 are not used to
secure the device when installing on a 35 mm standard rail, it is not absolutely necessary to remove the covers and the blind cover, although this does make it easier
to handle the basic device.
Notice
When installing the SCALANCE X414-3E, hold it by the backplane and not by the
modules, otherwise the device may be damaged.
To install the device, follow the steps below:
1. Place the central groove containing two spring clips on the back of the basic
device on the upper edge of the standard rail with the device tilted slightly towards the back. Make sure that the two spring clips are located behind the
edge and are visible from the rear of the installation frame.
2. Press the basic device down and push in the lower part until you hear it click
into place in the standard rail.
3. Adjust the basic device to the right or left until it is in the required position.
Note
Only horizontal installation permitted (ventilation slit top/bottom).
Operating Instructions for SCALANCE X-400 Industrial Ethernet Switches
70 C79000-G8976-C186-03
Page 71

Installation and Commissioning
Figure 6-2 Installation on a 35 mm standard rail
Removing from the 35 mm Standard Rail
Since the two captive screws in slot 7 and between slots 8 and 9 are not used to
secure the device, when removing it from a 35 mm standard rail, it is not absolutely
necessary to remove the covers and the blind cover, although this does make it
easier to handle the basic device.
Notice
When removing the SCALANCE X414-3E, hold it by the backplane and not by the
modules, otherwise the device may be damaged.
To remove the device, follow the steps below:
1. Push the basic device down until the lower part can be pulled away from the
standard rail to the front.
2. Lift the SCALANCE X414-3E up and off the standard rail.
Operating Instructions for SCALANCE X-400 Industrial Ethernet Switches
C79000-G8976-C186-03
71
Page 72

Installation and Commissioning
6.2 Installing / Removing the Media Modules, Covers and Dummy Cover
6.2.1 Installing / Removing a Media Module
Installing a Media Module
For installation, you require a slotted screwdriver with a 2.8 mm wide blade.
Note
Installing a fast Ethernet media module is the same in the SCALANCE X414-3E
and in the media module extender.
1. Remove the cover (see section 6.2.2) from the slot of the media module and
remove the protective cap from the module terminal strip from the backplane of
the basic device.
Note
Keep these parts in a safe place in case you want to remove the media module later.
2. Remove the inserted labeling strip from the front of the media module.
3. Place the two lower guides of the media module into the recesses at the lower
edge of the basic device. It should no longer be possible to move the media
module to the side.
4. Tilt the media module at an angle towards the back until the two plastic pins at
the back top edge of the media module jut into the recesses in the basic device. The terminal strip of the media module must fit into the guide in the backplane.
5. Press the upper part of the media module onto the basic device until the fluted
middle section of the media module is heard to click into place.
6. Tighten the captive screw on the front of the media module with a slotted
screwdriver with a 2.8 mm wide blade.
7. Secure the labeling strip on the front of the media module.
Operating Instructions for SCALANCE X-400 Industrial Ethernet Switches
72 C79000-G8976-C186-03
Page 73

Installation and Commissioning
Figure 6-3 Inserting a media module
Removing a Media Module
To remove the device, you require a slotted screwdriver with a 2.8 mm wide blade.
Note
Removing a fast Ethernet media module is the same in the SCALANCE X414-3E
and in the media module extender.
1. Remove the inserted labeling strip from the front of the media module.
2. Release the captive screw on the front of the media module as far as it will go
with a slotted screwdriver with a 2.8 mm wide blade.
3. Press on the fluted middle section of the top of the media module next to the
backplane.
4. At the same time, tilt the media module down at an angle, the two guides initially remain in the recesses at the lower edge of the basic device.
5. Remove the media module by pulling it upwards.
6. Fit the protective cap on the module terminal strip on the backplane of the basic device. Fit the appropriate cover (see section 6.2.2) to the slot of the media
module.
Operating Instructions for SCALANCE X-400 Industrial Ethernet Switches
C79000-G8976-C186-03
73
Page 74

Installation and Commissioning
6.2.2 Fitting / Removing the Covers
Variants of the Covers
There are three variants of the covers
● CV490 2x1000
1 Gbps, electrical transmission, 2 port displays
possible slot: 5
● CV490 2x100
4 blind displays (no port displays connected to front)
possible slots: 6, 7 and extender module EM496-4 slots 12 through 15
● CV490 4x100
10/100 Mbps, electrical transmission, 4 port displays
possible slots: 9 through 11 and extender module EM495-8 slots 12, 13
Fitting a Cover
To fit a cover, you do not require any tools.
1. Place the two lower guides of the cover into the recesses at the lower edge of
the basic device. It should no longer be possible to move the cover to the side.
2. Tilt the cover at an angle towards the back until the two plastic pins at the back
top edge of the cover jut into the recesses in the basic device.
3. Press the upper part of the cover onto the basic device until the fluted middle
section of the cover is heard to click into place.
4. Secure the labeling strip on the front of the cover.
Removing a Cover
To remove a cover, you do not require any tools.
1. Press on the fluted middle section of the top of the cover next to the backplane.
2. At the same time, tilt the cover down at an angle, the two guides initially remain
in the recesses at the lower edge of the basic device.
3. Remove the cover by pulling it upwards.
Operating Instructions for SCALANCE X-400 Industrial Ethernet Switches
74 C79000-G8976-C186-03
Page 75

6.2.3 Fitting / Removing a Dummy Cover
Fitting a Dummy Cover
There is only one dummy cover (no port displays connected to the front) on slot 8.
To fit a cover, you do not require any tools.
1. Place the two lower guides of the dummy cover into the recesses at the lower
edge of the basic device. It should no longer be possible to move the dummy
cover to the side.
2. Tilt the dummy cover at an angle towards the back until the two plastic pins at
the back top edge of the dummy cover jut into the recesses in the basic device.
3. Press the upper part of the dummy cover onto the basic device until the fluted
middle section of the dummy cover is heard to click into place.
Installation and Commissioning
4. Secure the labeling strip on the front of the dummy cover.
Removing a Dummy Cover
To remove a cover, you do not require any tools.
1. Press on the fluted middle section of the top of the dummy cover next to the
backplane.
2. At the same time, tilt the dummy cover down at an angle, the two guides initially remain in the recesses at the lower edge of the basic device.
3. Remove the dummy cover by pulling it upwards.
Operating Instructions for SCALANCE X-400 Industrial Ethernet Switches
C79000-G8976-C186-03
75
Page 76

Installation and Commissioning
6.3 Installing / Removing Extender Modules
6.3.1 Installing / Removing the Twisted Pair Extender
Installing the Twisted Pair Extender on the S7-300 Rail
You require the following tools:
● slotted screwdriver with a 2.8 mm wide blade
● slotted screwdriver with a 5.5 mm wide blade
Note
Make sure that in addition to the extender width of 87 mm, there is a clearance of
20 mm to the right of the basic device on the S7-300 rail to be able to align the
guide bolts of the extender with the holes in the basic device during installation.
When installing a twisted pair extender on an S7-300 rail, the basic device remains
in position. Follow the steps below:
1. Remove the cover from slot 11 of the basic device.
2. Remove the right-hand side panel of the basic device. To do this, use a slotted
screwdriver with a 2.8 mm wide blade to loosen the two captive slug screws on
slot 11 in the upper and lower recesses as far as they will go.
3. Remove the side panel of the basic device from the basic device to the right.
Note
Keep the panel in a safe place in case the extender needs to be removed
again later.
4. Remove the two covers from the extender.
5. Place the extender module on the edge of the S7-300 rail with the upper
groove angled slightly towards the back and tilt the extender towards the back.
Make sure that there is adequate clearance between the guide bolts of the extender module and the basic device. In this position, the extender module
should not be able to slip off, however it can be moved horizontally in both directions.
Operating Instructions for SCALANCE X-400 Industrial Ethernet Switches
76 C79000-G8976-C186-03
Page 77

Installation and Commissioning
6. Push the extender module slowly to the left while keeping it straight and without skewing and check that the two guide bolts on the extender fit into the
holes in the basic device. Then push the extender module to the left as far as it
will go so that it is flush with the right side of the basic device.
7. Using a slotted screwdriver with a 5.5 mm wide blade, tighten the captive
screw between slots 12 and 13 in the lower part of the extender module.
8. Using a slotted screwdriver with a 2.8 mm wide blade, tighten the two captive
slug screws on slot 11. The screws lock the two guide bolts, so do not use excessive force when tightening them.
9. Fit the CV490 4x100 cover to slot 11 of the basic device and slots 12 and 13 of
the twisted pair extender.
Figure 6-4 Installing the twisted pair extender on the S7-300 rail
Operating Instructions for SCALANCE X-400 Industrial Ethernet Switches
C79000-G8976-C186-03
77
Page 78

Installation and Commissioning
Removing the Twisted Pair Extender from the S7-300 Rail
You require the following tools:
● slotted screwdriver with a 2.8 mm wide blade
● slotted screwdriver with a 5.5 mm wide blade
When removing a twisted pair extender from an S7-300 rail, the basic device remains in position. Follow the steps below:
1. To remove an extender module, remove the two covers on the extender.
2. Using a slotted screwdriver with a 5.5 mm wide blade, open the captive screw
between slots 12 and 13 in the lower part of the extender module.
3. Remove the cover from slot 11 of the basic device.
4. Use a slotted screwdriver with a 2.8 mm wide blade to loosen the two captive
slug screws on slot 11 of the basic device in the upper and lower recesses as
far as they will go.
5. Push the extender module slowly to the right while keeping it straight until the
two guide bolts of the extender module are completely outside the holes in the
basic device.
6. Pull out the lower part of the extender module slightly towards the front and lift
it from the S7-300 rail.
7. Replace the right side panel of the basic device so that the guide bolts fit into
the two holes in the basic device.
8. Using a slotted screwdriver with a 2.8 mm wide blade, tighten the two captive
slug screws on slot 11. The screws lock the two guide bolts, so do not use excessive force when tightening them.
9. Fit a suitable cover on slot 11 of the basic device.
Note
The basic device must not be used permanently without the right side panel.
Operating Instructions for SCALANCE X-400 Industrial Ethernet Switches
78 C79000-G8976-C186-03
Page 79

Installation and Commissioning
Installing the Twisted Pair Extender on the 35 mm Standard Rail
!
Caution
If the SCALANCE X-400 with extender is liable to severe vibration (> 10 g), use the
S7-300 rail for installation. The 35 mm standard rail does not provide adequate
support for the twisted pair extender with vibration greater than 10 g.
For installation, you require a slotted screwdriver with a 2.8 mm wide blade.
Although the captive screw in the lower part between slots 12 and 13 of the extender module is not used when installing on a 35 mm standard rail, it is nevertheless advisable to remove the media modules.
Note
Make sure that in addition to the extender width of 87 mm, there is a clearance of
20 mm to the right of the basic device on the 35 mm standard rail to be able to
align the guide bolts of the extender with the holes in the basic device during
installation.
When installing a twisted pair extender on a 35 mm standard rail, the basic device
remains in position. Follow the steps below:
1. Remove the cover from slot 11 of the basic device.
2. Remove the right-hand side panel of the basic device. To do this, use a slotted
screwdriver with a 2.8 mm wide blade to loosen the two captive slug screws on
slot 11 in the upper and lower recesses as far as they will go.
3. Remove the side panel of the basic device from the basic device to the right.
Note
Keep the panel in a safe place in case the extender needs to be removed
again later.
4. Place the central groove containing a spring clip on the back of the extender
module on the upper edge of the 35 mm standard rail with the module tilted
slightly towards the back. Make sure that there is adequate clearance between
the guide bolts of the extender module and the basic device.
5. The spring clip must be located behind the edge of the standard rail so that it is
visible from the rear of the frame.
Operating Instructions for SCALANCE X-400 Industrial Ethernet Switches
C79000-G8976-C186-03
79
Page 80

Installation and Commissioning
6. Press the extender module down and push in the lower part until you hear it
click into place in the 35 mm standard rail.
7. Push the extender module slowly to the left while keeping it straight and without skewing and check that the two guide bolts on the extender fit into the
holes in the basic device. Then push the extender module to the left as far as it
will go so that it is flush with the right side of the basic device.
8. Using a slotted screwdriver with a 2.8 mm wide blade, tighten the two captive
slug screws on slot 11. The screws lock the two guide bolts, so do not use excessive force when tightening them.
9. Fit the CV490 4x100 cover to slot 11 of the basic device and slots 12 and 13 of
the twisted pair extender.
Figure 6-5 Installing the twisted pair extender on the 35 mm standard rail
Operating Instructions for SCALANCE X-400 Industrial Ethernet Switches
80 C79000-G8976-C186-03
Page 81

Installation and Commissioning
Removing the Twisted Pair Extender from the 35 mm Standard Rail
To remove the device, you require a slotted screwdriver with a 2.8 mm wide blade.
The captive screw in the lower part of the extender module between slot 12 and 13
is not used for mounting on an 35 mm standard rail. When removing a twisted pair
extender from a 35 mm standard rail, the basic device remains in position. Follow
the steps below:
1. Remove the cover from slot 11 of the basic device.
2. Use a slotted screwdriver with a 2.8 mm wide blade to loosen the two captive
slug screws on slot 11 of the basic device in the upper and lower recesses as
far as they will go.
3. Push the extender module slowly to the right while keeping it straight until the
two guide bolts of the extender module are completely outside the holes in the
basic device.
4. Push the twisted pair extender down until the lower part can be pulled away
from the standard rail to the front.
5. Lift the extender module up and off the 35 mm standard rail.
6. Replace the right side panel of the basic device so that the guide bolts fit into
the two holes in the basic device.
7. Using a slotted screwdriver with a 2.8 mm wide blade, tighten the two captive
slug screws on slot 11. The screws lock the two guide bolts, so do not use excessive force when tightening them.
8. Fit a suitable cover on slot 11 of the basic device.
Note
The basic device must not be used permanently without the right side panel.
Operating Instructions for SCALANCE X-400 Industrial Ethernet Switches
C79000-G8976-C186-03
81
Page 82

Installation and Commissioning
6.3.2 Installing / Removing the Media Module Extender
Installing the Media Module Extender on the S7-300 Rail
You require the following tools:
● slotted screwdriver with a 2.8 mm wide blade
● slotted screwdriver with a 5.5 mm wide blade
Note
Make sure that in addition to the extender width of 155 mm, there is a clearance of
20 mm to the right of the basic device on the S7-300 rail to be able to align the
guide bolts of the extender with the holes in the basic device during installation.
Note
Protective caps and CV490 2x100 covers must be fitted to all slots without media
modules.
When installing a media module extender on an S7-300 rail, the basic device remains in position. Follow the steps below:
1. Remove the cover from slot 11 of the basic device.
2. Remove the right-hand side panel of the basic device. To do this, use a slotted
screwdriver with a 2.8 mm wide blade to loosen the two captive slug screws on
slot 11 in the upper and lower recesses as far as they will go.
3. Remove the side panel of the basic device from the basic device to the right.
Note
Keep the panel in a safe place in case the extender needs to be removed
again later.
4. Remove the four covers from the extender.
5. Place the extender module on the edge of the S7-300 rail with the upper
groove angled slightly towards the back and tilt the extender towards the back.
Make sure that there is adequate clearance between the guide bolts of the extender module and the basic device. In this position, the extender module
should not be able to slip off, however it can be moved horizontally in both directions.
Operating Instructions for SCALANCE X-400 Industrial Ethernet Switches
82 C79000-G8976-C186-03
Page 83

Installation and Commissioning
6. Push the extender module slowly to the left while keeping it straight and without skewing and check that the two guide bolts on the extender fit into the
holes in the basic device. Then push the extender module to the left as far as it
will go so that it is flush with the right side of the basic device.
7. Using a slotted screwdriver with a 5.5 mm wide blade, tighten the captive
screw between slots 13 and 14 in the lower part of the extender module.
8. Using a slotted screwdriver with a 2.8 mm wide blade, tighten the two captive
slug screws on slot 11. The screws lock the two guide bolts, so do not use excessive force when tightening them.
9. Fit the CV490 4x100 cover on slot 11 of the basic device. Make sure that the
media module terminal strips of slots not occupied by media modules have
protective caps fitted and that the CV490 2x100 covers are in place.
Figure 6-6 Installing the media module extender on the S7-300 rail
Operating Instructions for SCALANCE X-400 Industrial Ethernet Switches
C79000-G8976-C186-03
83
Page 84

Installation and Commissioning
Removing the Media Module Extender from the S7-300 Standard Rail
You require the following tools:
● slotted screwdriver with a 2.8 mm wide blade
● slotted screwdriver with a 5.5 mm wide blade
Note
To remove the extender, remove the media modules from slots 13 and 14.
When removing a media module extender from an S7-300 rail, the basic device
remains in position. Follow the steps below:
1. To remove an extender module, use a slotted screwdriver with a 5.5 mm wide
blade, to open the captive screw between slots 13 and 14 in the lower part of
the extender module.
2. Remove the cover from slot 11 of the basic device.
3. Use a slotted screwdriver with a 2.8 mm wide blade to loosen the two captive
slug screws on slot 11 of the basic device in the upper and lower recesses as
far as they will go.
4. Push the extender module slowly to the right while keeping it straight until the
two guide bolts of the extender module are completely outside the holes in the
basic device.
5. Pull out the lower part of the extender module slightly towards the front and lift
it from the S7-300 rail.
6. Replace the right side panel of the basic device so that the guide bolts fit into
the two holes in the basic device.
7. Using a slotted screwdriver with a 2.8 mm wide blade, tighten the two captive
slug screws on slot 11. The screws lock the two guide bolts, so do not use excessive force when tightening them.
8. Fit a suitable cover on slot 11 of the basic device.
Note
The basic device must not be used permanently without the right side panel.
Operating Instructions for SCALANCE X-400 Industrial Ethernet Switches
84 C79000-G8976-C186-03
Page 85

Installation and Commissioning
Installing the Media Module Extender on the 35 mm Standard Rail
!
Caution
If the SCALANCE X-400 with extender is liable to severe vibration (> 10 g), use the
S7-300 rail for installation. The 35 mm standard rail does not provide adequate
support for the media module extender with vibration greater than 10 g.
For installation, you require a slotted screwdriver with a 2.8 mm wide blade.
Although the captive screw in the lower part between slots 13 and 14 of the extender module is not used when installing on a 35 mm standard rail, it is nevertheless advisable to remove the media modules.
Note
Make sure that in addition to the extender width of 155 mm, there is a clearance of
20 mm to the right of the basic device on the 35 mm standard rail to be able to
align the guide bolts of the extender with the holes in the basic device during
installation.
Note
Protective caps and CV490 2x100 covers must be fitted to all slots without media
modules.
When installing a media module extender on a 35 mm standard rail, the basic device remains in position. Follow the steps below:
1. Remove the cover from slot 11 of the basic device.
2. Remove the right-hand side panel of the basic device. To do this, use a slotted
screwdriver with a 2.8 mm wide blade to loosen the two captive slug screws on
slot 11 in the upper and lower recesses as far as they will go.
3. Remove the side panel of the basic device from the basic device to the right.
Note
Keep the panel in a safe place in case the extender needs to be removed
again later.
4. Place the central groove containing a spring clip on the back of the extender
module on the upper edge of the 35 mm standard rail with the module tilted
slightly towards the back. Make sure that there is adequate clearance between
the guide bolts of the extender module and the basic device.
Operating Instructions for SCALANCE X-400 Industrial Ethernet Switches
C79000-G8976-C186-03
85
Page 86

Installation and Commissioning
5. The spring clip must be located behind the edge of the 35 mm standard rail so
that it is visible from the rear of the frame.
6. Press the extender module down and push in the lower part until you hear it
click into place in the standard rail.
7. Push the extender module slowly to the left while keeping it straight and without skewing and check that the two guide bolts on the extender fit into the
holes in the basic device. Then push the extender module to the left as far as it
will go so that it is flush with the right side of the basic device.
8. Using a slotted screwdriver with a 2.8 mm wide blade, tighten the two captive
slug screws on slot 11. The screws lock the two guide bolts, so do not use excessive force when tightening them.
9. Fit the CV490 4x100 cover on slot 11 of the basic device. Make sure that the
media module terminal strips of slots not occupied by media modules have
protective caps fitted and that the CV490 2x100 covers are in place.
Figure 6-7 Installing the media module extender on the 35 mm standard rail
Operating Instructions for SCALANCE X-400 Industrial Ethernet Switches
86 C79000-G8976-C186-03
Page 87

Installation and Commissioning
Removing the Media Module Extender from the 35 mm Standard Rail
To remove the device, you require a slotted screwdriver with a 2.8 mm wide blade.
Although the captive screw in the lower part between slots 13 and 14 of the extender module is not used on a 35 mm standard rail, it is nevertheless advisable to
remove the media modules. When removing a media module extender from a 35
mm standard rail, the basic device remains in position. Follow the steps below:
1. Remove the cover from slot 11 of the basic device.
2. Use a slotted screwdriver with a 2.8 mm wide blade to loosen the two captive
slug screws on slot 11 of the basic device in the upper and lower recesses as
far as they will go.
3. Push the extender module slowly to the right while keeping it straight until the
two guide bolts of the extender module are completely outside the holes in the
basic device.
4. Push the media module extender down until the lower part can be pulled away
from the standard rail to the front.
5. Lift the extender module up and off the 35 mm standard rail.
6. Replace the right side panel of the basic device so that the guide bolts fit into
the two holes in the basic device.
7. Using a slotted screwdriver with a 2.8 mm wide blade, tighten the two captive
slug screws on slot 11. The screws lock the two guide bolts, so do not use excessive force when tightening them.
8. Fit a suitable cover on slot 11 of the basic device.
Note
The basic device must not be used permanently without the right side panel.
Operating Instructions for SCALANCE X-400 Industrial Ethernet Switches
C79000-G8976-C186-03
87
Page 88

Installation and Commissioning
6.4 Slot Numbers of the Modules and Covers
Specifying the Slot Number
The three preinstalled modules, the media modules, the covers for unused slots
and the dummy cover for slot 8 must be labeled with the slot number using the slot
number tabs supplied. Since the power supply unit is not located on the basic device and has slot number 1, start with number 2 for the power module. The order
for the other modules is in ascending order to the right. The applies to any extender modules that may be used, starting from the left with number 12.
Applying the Slot Numbers
1. Place the required slot number in front of the module.
2. Place the tongue in the opening on the module.
3. Press the slot number into the recess on the front of the housing with your finger. The slot number breaks out of the wheel.
1 8
1 7
1 6
1
2
3
4
1 5
5
1 4
6
1 3
1 2
1 1
9
1 0
7
8
Figure 6-8 Slot number tabs
Operating Instructions for SCALANCE X-400 Industrial Ethernet Switches
88 C79000-G8976-C186-03
Page 89

6.5 Factory Defaults
DIL Switches
When supplied, the four DIL switches on the switch are set to OFF as default.
Installation and Commissioning
Notice
Before starting up for the first time, check the switch settings.
● RM
is set to
● STBY
is set to
rently have any function.
● R1, R2
are set to
OFF. This means that the redundancy manager function is disabled.
OFF. This switch is intended for future applications and is does not cur-
OFF. Both (electrical) gigabit ports on slot 5 are defined as ring ports.
Further Device Properties
With R1 and R2, ring redundancy is enabled when the device ships.
Notice
In this mode, RSTP / STP cannot be activated.
C-PLUG
When delivered, the C-PLUG is empty and is initialized with the factory settings
when first started up. All subsequent configuration changes are automatically
adopted in the internal memory of the SCALANCE X414-3E and in the C-PLUG.
Operating Instructions for SCALANCE X-400 Industrial Ethernet Switches
C79000-G8976-C186-03
89
Page 90

Installation and Commissioning
6.6 Ports
6.6.1 Power Supply Connectors (X1)
Polarity Reversal Protection X1, X2
The two 4-pin male connectors (X1, X2) for the power supply and the signaling
contact have no polarity reversal protection. If the connectors are accidentally
swapped over, this does not cause damage or destroy circuits. Normal functionality
is, however, not available while the connectors are swapped over.
The redundant power supply is connected over a 4-pin connector at the front terminal block on the power module.
X 2
Figure 6-9 Pin assignment of connector X1
Conn. 1 L1+ + 24 V power supply 1
M1 Ground
M2 Ground
L2+ + 24 V power supply 2
X 1
L 2
M 2 M 1
L 1
Operating Instructions for SCALANCE X-400 Industrial Ethernet Switches
90 C79000-G8976-C186-03
Page 91

Installation and Commissioning
6.6.2 Connectors of the Signaling Contact and Grounding Strap (X2)
The signaling contact is connected by contacts MK1 and MK2 on the 4-pin connector to the rear terminal block on the PS module.
X 1
X 2
M 3
M K 2
Figure 6-10 Pin assignment of connector X2
G N D
M K 1
By inserting a strap between protective earth P and M3, the SCALANCE X414-3E
switch can be operated with grounded reference potential.
When the device ships, no strap is fitted (non-grounded reference potential).
Conn. 2 MK1 Floating signaling contact relay connector 1
M3 Ground
GND Protective earth
MK2 Floating signaling contact relay connector 2
Operating Instructions for SCALANCE X-400 Industrial Ethernet Switches
C79000-G8976-C186-03
91
Page 92

Installation and Commissioning
6.6.3 Digital Input Connectors (X1)
Polarity Reversal Protection X1, X2
The two 5-pin male connectors (X1, X2) of the digital inputs 1 through 8 have no
polarity reversal protection. If the connectors are accidentally swapped over, this
does not cause damage or destroy circuits. In display modes A and C or B and D,
incorrect inputs are displayed during the time the connectors are swapped over.
Digital inputs 1 through 4 are connected using a 5-pin connector at the front terminal block on the DI module.
X 1
X 2
I N 3I N 4
M 4
I N 2
I N 1
Figure 6-11 Pin assignment of connector X1 (Inputs 1 through 4)
Conn. 1 IN1 Digital input 1
IN2 Digital input 2
M4 Ground
IN3 Digital input 3
IN4 Digital input 4
!
Warning
The input voltage must not exceed + 30 V and must not fall below – 30 V, otherwise the DI module will be destroyed.
Operating Instructions for SCALANCE X-400 Industrial Ethernet Switches
92 C79000-G8976-C186-03
Page 93

6.6.4 Digital Input Connectors (X2)
Digital inputs 5 through 8 are connected using a 5-pin connector at the rear terminal block on the DI module.
X 2
Installation and Commissioning
X 1
I N 5I N 8 I N 7 M 5 I N 6
Figure 6-12 Pin assignment of connector X1 (Inputs 5 through 8)
Conn. 2 IN5 Digital input 5
IN6 Digital input 6
M5 Ground
IN7 Digital input 7
IN8 Digital input 8
Operating Instructions for SCALANCE X-400 Industrial Ethernet Switches
C79000-G8976-C186-03
93
Page 94

Installation and Commissioning
6.6.5 Connectors for the Twisted Pair Cables
The FastConnect Cabling System
With the IE FC RJ-45 Plug and the FastConnect cables (FC), you can achieve a
segment length up to 100 m without patching. In this case, the IE FC standard cable 2x2 is connected directly to the SCALANCE X414-3E and other components
on the network.
Two FastConnect cable types are available, the eight-wire IE FC standard cable
4x2 and the four-wire IE FC standard cable 2x2.
The diameter of the IE FC standard cable 4x2 does not allow connection to an RJ45 plug so that only the IE FC standard cable 2x2 as a four-wire cable is suitable
for RJ-45 plugs. This means that the maximum transmission rate is 100 Mbps.
The flexible eight-wire patch cable (TP cord) for gigabit transmission allows a maximum cable length of 10 m.
X 4 1 4 - 3 E
BA
B
P C
X 2 0 8
B
S 7 - 4 0 0
B
A = 1 0 m
B = 1 0 0 m
Figure 6-13 FastConnect Cabling
A TP cord (1 Gbps)
B IE FC Standard Cable 2x2 (100 Mbps)
Operating Instructions for SCALANCE X-400 Industrial Ethernet Switches
94 C79000-G8976-C186-03
Page 95

Connecting TP Cord to FC Cable
To connect TP Cord to FC cables, two IE FC RJ-45 modular outlet insert types are
available:
● IE FC RJ-45 modular outlet insert 1GE
1 R-J45 jack with 4x2 wire cable for 1 Gbps
● IE FC RJ-45 modular outlet insert 2FE
2 RJ-45 jacks each with 2x2 wire cable for 100 Mbps
With the IE FC RJ-45 modular outlet insert 1GE, the eight-wire FastConnect cable
allows a transmission rate of 1 Gbps.
Installation and Commissioning
Figure 6-14 IE FC RJ-45 Modular Outlet Insert 1GE
Operating Instructions for SCALANCE X-400 Industrial Ethernet Switches
C79000-G8976-C186-03
95
Page 96

Installation and Commissioning
With the IE FC RJ-45 modular outlet insert 2FE, the eight-wire FastConnect cable
is split over two RJ-45 jacks and allows a transmission rate of 2 x 100 Mbps.
Figure 6-15 IE FC RJ-45 Modular Outlet Insert 2FE
Operating Instructions for SCALANCE X-400 Industrial Ethernet Switches
96 C79000-G8976-C186-03
Page 97

Installation and Commissioning
The maximum segment length of 100 m also applies when using the FastConnect
cabling with TP cord. Normally, FastConnect cable with a length of 90 m is used.
The remaining 10 m is then available for TP cord at both ends (total of 10 m).
X 4 1 4 - 3 E
A 1
A 1
A 1
X 2 0 8
A 2
S 7 - 4 0 0
I E F C R J 4 5
M o d u l a r
O u t l e t I n s e r t
1 G E
BB
I E F C R J 4 5
M o d u l a r
O u t l e t I n s e r t
2 F E
A 1 + A 2 = 1 0 m
A 1 + B + A 2 = 1 0 0 m
Figure 6-16 FastConnect Cabling
A1 TP Cord 4x2
A2 TP Cord 4x2
B IE FC Standard Cable 4x2
B
I E F C R J 4 5 M o d u l a r
O u t l e t I n s e r t 2 F E
B
I E F C R J 4 5 M o d u l a r
O u t l e t I n s e r t 1 G E
A 2 A 2
A 2
X 4 1 4 - 3 E
Operating Instructions for SCALANCE X-400 Industrial Ethernet Switches
C79000-G8976-C186-03
97
Page 98

Installation and Commissioning
Removing the FC Cable from SCALANCE X414-3E
Under some circumstances, a screwdriver is necessary to remove the twisted pair
cables with RJ-45 plugs because it may not be possible to reach the connector
with your hand due to neighboring media modules, covers, or the dummy cover.
If this is the situation, do the following:
1. Press the catch on the RJ-45 plug to the left with a small screwdriver.
2. Remove the cable.
Figure 6-17 Releasing the FastConnect RJ-45 plug
Operating Instructions for SCALANCE X-400 Industrial Ethernet Switches
98 C79000-G8976-C186-03
Page 99

6.6.6 Connectors for Fiber-Optic Cables
Gigabit Transmission with FOC
Data transmission at 1 Gbps is over multimode FOC or single mode FOC. In both
cases, the fiber-optic cable is plugged into the SC duplex socket with the SC duplex plug. The connectors have polarity reversal protection mechanisms.
When a media module is inserted, port 1 is to the front and port 2 to the rear.
Notice
Fiber-optic cable connectors are susceptible to contamination and mechanical
damage to the face. Protect open connections with the supplied dust caps.
Installation and Commissioning
Figure 6-18 SC Duplex plug with gigabit media module MM492-2LD
Operating Instructions for SCALANCE X-400 Industrial Ethernet Switches
C79000-G8976-C186-03
99
Page 100

Installation and Commissioning
Fast Ethernet Transfer with FOC
Data transmission at 100 Mbps is over multimode FOC or single mode FOC. In
both cases, the BFOC plug on the fiber-optic cable is plugged into the BFOC
socket.
When a media module is inserted, the two front sockets belong to port 1 and the
two rear sockets to port 2. The front socket is the input and the rear socket is the
output socket of the particular port. Behind the labeling strip on the front of the media module, you will see the relevant symbols.
Notice
Fiber-optic cable connectors are susceptible to contamination and mechanical
damage to the face. Protect open connections with the supplied dust caps.
Figure 6-19 BFOC plug with fast Ethernet media module MM491-2
Operating Instructions for SCALANCE X-400 Industrial Ethernet Switches
100 C79000-G8976-C186-03
 Loading...