

Page 1

Siemens Medical Solutions USA, Inc. 10658982-02
10658982-ABS-001-02-02 BZSB 1 / 18
ACUSON X300
ACUSON X300 PE
ACUSON X150
Supplement to the User and Reference Manuals
Page 2

2 / 18 Supplement to User and Reference Manuals
©2012 Siemens Medical Solutions USA, Inc.
All Rights Reserved.
December 2012
Printed in the Republic of Korea.
ACUSON is a trademark of Siemens Medical Solutions
USA, Inc.
All other product names are trademarks or registered
trademarks of their respective companies.
Siemens reserves the right to change system
specifications at any time.
CE Declaration
This product is provided with a CE marking in
accordance with the regulations stated in Council
Directive 93/42/EEC of June 14, 1993 concerning
Medical Devices. The CE marking only applies to
medical devices that have been put on the market
according to the above referenced Council
Directive.
Unauthorized changes to this product are not
covered by the CE marking and the related
Declaration of Conformity.
EU Authorized Representative
Siemens AG
Medical Solutions
Henkestrasse 127
91052 Erlangen
Germany
Global Business Unit and Legal Manufacturer
Siemens Medical Solutions USA, Inc.
Ultrasound
1230 Shorebird Way
Mountain View, CA 94043
U.S.A.
Phone: +1-888-826-9702
www.siemens.com/healthcare
Siemens Global Headquarters
Siemens AG
Wittelsbacherplatz 2
80333 Muenchen
Germany
Global Siemens Healthcare Headquarters
Siemens AG
Healthcare Sector
Henkestrasse 127
91052 Erlangen
Germany
Phone: +49 9131 84-0
www.siemens.com/healthcare
Page 3

Supplement to User and Reference Manuals 3 / 18
Contents
Supplement to the User and Reference Manuals.............................................4
About this Supplement .................................................................................. 4
Compatible Systems and Product Versions ........................................... 4
Wireless Network Connections ......................................................................... 5
Approved Wireless Adapters ......................................................................... 5
Connecting the Wireless Adapter to the System ...........................................6
Informational Icons for the Wireless Adapter.......................................... 6
Wireless Network Selections (System Configuration) .................................... 7
Network Profile Settings ................................................................................8
Internet Protocol Properties ........................................................................... 9
Configuring a Connection to a Wireless Network ........................................ 10
Ultrasound System Security (Virus Protection)..................................... 11
Viewing Patient Reports with Qview ............................................................... 12
Report Option — Configuration Selections .................................................. 13
QuickStart Battery-Powered Standby Mode................................................... 14
BP9-4 Transducer Imaging ..............................................................................14
Imaging with the BP9-4 Transducer ............................................................ 14
Updates to the System Controls .................................................................. 15
Needle Guide Brackets..................................................................................... 16
BP9-4 Disposable Endocavity Biopsy Straight Needle Guide Kit 1 ............. 16
BP9-4 Disposable Endocavity Biopsy Straight Needle Guide Kit 2 ............. 16
BP9-4 Reusable Endocavity Biopsy Straight Needle Guide ........................ 16
Tissue Harmonic Imaging (THI) Frequencies................................................. 17
Standards Compliance..................................................................................... 18
Quality Standards ........................................................................................ 18
Design Standards ........................................................................................ 18
Acoustic Output Standards .......................................................................... 18
Radio and Telecommunications Standards ................................................. 18
Page 4

4 / 18 Supplement to User and Reference Manuals
Supplement to the User and Reference Manuals
About this Supplement
This is a supplement to your existing user and reference manuals for the devices listed within
this publication.
This supplement provides new information about features, accessories, settings, and
standards.
Refer to the user and reference manuals for a complete set of operating instructions for your
ultrasound system.
Compatible Systems and Product Versions
ACUSON X300 PE (7.5)
ACUSON X300 (2.5)
SONOVISTA X300 (2.5, 7.5)
ACUSON X150 (2.5)
Page 5

Supplement to User and Reference Manuals 5 / 18
Wireless Network Connections
(Supplement to System Set Up, Chapter 3, Instructions for Use)
(Requires the wireless option license)
The ultrasound system can send data, such as studies, images, and clips, to a network location
over a wireless network.
Use the system presets to configure wireless network connections.
Wireless
When the ultrasound system is connected to a wireless network, the system displays an icon
indicating the connection to the wireless network and the signal strength on the status bar.
Note: Siemens recommends connecting the ultrasound system to wireless networks that use only
the 5 GHz frequency bandwidth to reduce potential radio interference from the 2.4 GHz frequency
bandwidth.
Approved Wireless Adapters
Caution: Use of wireless adapters not tested for use and approved by Siemens can damage the
ultrasound system. Do not connect any wireless adapters to the system except the wireless
adapters listed below.
Note: Use of an unapproved wireless adapter may cause loss of data transferred over a wireless
network.
The following wireless adapters have been tested for use and approved by Siemens.
Linksys AE1000
ASUS USB-N53
For information on the transmission and reception frequencies used by the wireless adapter,
refer to the manufacturer's operating instructions included with the wireless adapter.
You must abide by the regulatory requirements of your country to use a wireless adapter. Refer
to the manufacturer's operating instructions for information regarding certified use of the
wireless adapter in your country.
Page 6
6 / 18 Supplement to User and Reference Manuals
Connecting the Wireless Adapter to the System
Caution: Maintain a distance of at least 25 cm of radius between the wireless adapter and
possible sources of interference. Possible sources of interference can be other medical devices
and systems, including devices and systems in compliance with CISPR emission standards.
Caution: Ultrasound systems operate in the range of radio frequencies (RF) and are susceptible
to electromagnetic interference generated by other RF energy sources. To prevent this
interference, increase the distance between the ultrasound system and the interfering RF energy
source.
Siemens recommends connecting the wireless adapter to the leftmost USB port on the
Input/Output panel of the ultrasound system.
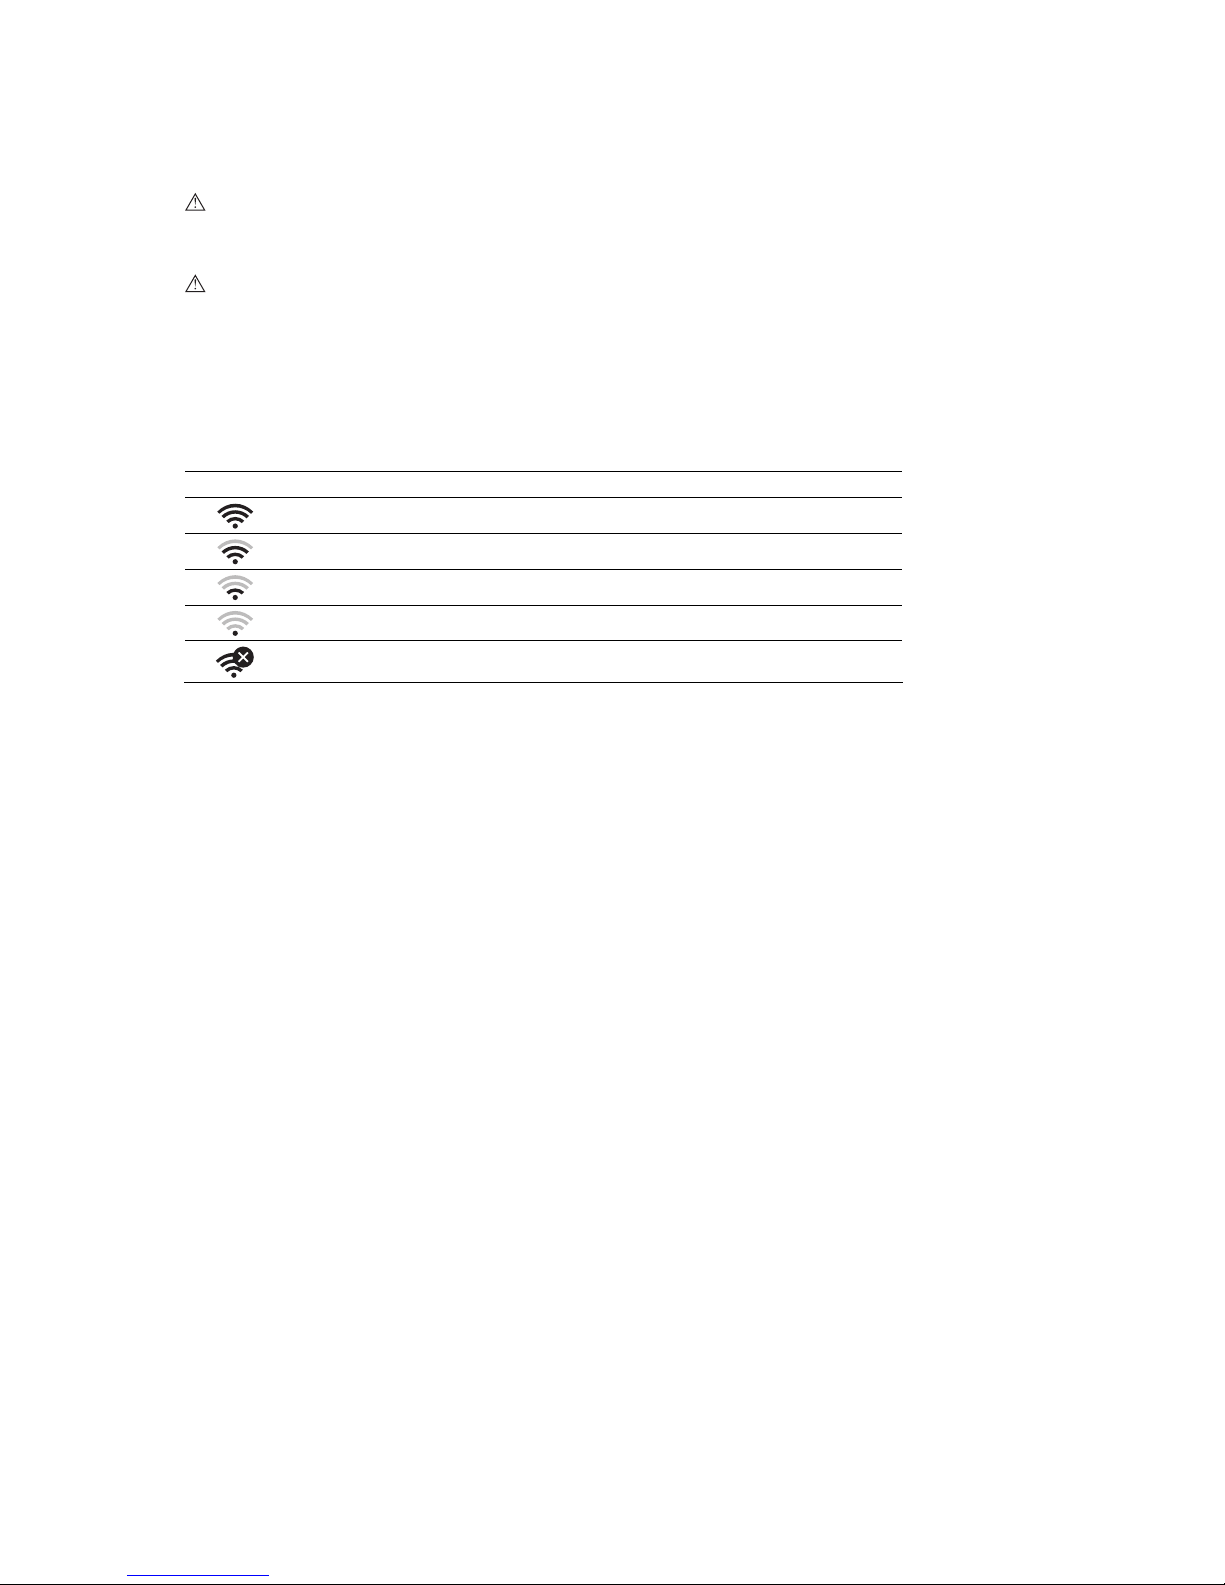
Informational Icons for the Wireless Adapter
Icon Explanation
Connected to a wireless network, strong signal strength
Connected to a wireless network, good signal strength
Connected to a wireless network, weak signal strength
Connected to a wireless network, poor signal strength
Cannot connect to a wireless network, no signal
Page 7

Supplement to User and Reference Manuals 7 / 18
Wireless Network Selections (System Configuration)
(Supplement to System Configuration, Chapter 1, System Reference)
Use the system presets to enable and disable a wireless network adapter connected to the
ultrasound system. You can require a password to prevent unauthorized changes to the
wireless network selections.
Wireless
Selection Option(s) Allows you to...
Wireless Network Enabled
Disabled
Activate or deactivate wireless connectivity.
(available selections) Select a wireless adapter that is connected to the ultrasound
system.
[…]
Update the list of wireless adapters that are connected to the
ultrasound system.
Network Settings Available Network List
Select a wireless network for the ultrasound system to use.
New
Edit
Access the Network Profile Settings dialog box to configure
the network profile. The ultrasound system uses the network
profile to connect to the selected wireless network.
See also: Network Profile Settings, p. 8
Co
nnect
Connect to the selected wireless network.
Disconnect
Disconnect from the selected wireless network.
Scan
Refresh the list of available wireless networks.
Connection
Information
--- ---
SSID (Service Set
Identification)
--- View the name of the connected wireless network.
Signal Strength
--- View the strength of the connection to the wireless networks:
86 to 100 (Strong)
51 to 85 (Good)
26 to 50 (Weak)
1 to 25 (Poor)
0 (No Signal)
Link Speed
--- View the speed of the wireless network connection.
Refresh
--- Update the information of the connected wireless network.
Properties
---
Access the Internet Protocol Properties dialog box to enter
the IP address and the DNS (Domain Name System) server
address for the selected wireless network.
See also:
Internet Protocol Properties, p. 9
Lock
---
Enable and disable password protection to restrict changes to
the wireless network options.
Page 8

8 / 18 Supplement to User and Reference Manuals
Network Profile Settings
Wireless > Network Settings > New
Wireless > Network Settings > Edit
Selection Option(s) Allows you to...
Network Name
(SSID)
(text entry) Enter the name of a wireless network.
Non-broadcast
network
on, off Configure the network profile for a wireless network that
broadcasts its name (off) or does not broadcast its name (on).
Security Type OPEN
Shared
WPA
WPAPSK
WPA2
WPA2PSK
Specify the network security method for the connection to a
wireless network.
Note: The options for the security method are dependent on
the wireless network.
Encryption Type None
WEP
TKIP
AES
Select the encryption method for the connection to a wireless
network.
Note: The options for the encryption method are dependent
on the wireless network.
Security Key
(text entry) Enter the security key for the connection to a wireless
network.
EAP Authentication
--- ---
Note: EAP authentication options are enabled only when you
select WPA or WPA2 for the security type.
EAP Type PEAP
Select the EAP (Extensible Authentication Protocol)
authentication method for the connection to a wireless
network.
Note: The options for the EAP authentication method are
dependent on the wireless network.
Username
(text entry) Specify the user name for EAP (Extensible Authentication
Protocol) authentication.
Password
(text entry) Specify the password for EAP (Extensible Authentication
Protocol) authentication.
Page 9

Supplement to User and Reference Manuals 9 / 18
Internet Protocol Properties
Wireless > Connection Information > Properties
Selection Option(s) Allows you to...
Obtain an IP address automatically (DHCP)
on, off Configure the ultrasound system to use dynamic
IP addresses assigned by a DHCP (Dynamic
Host Configuration Protocol) server (on) or to
use a static IP (Internet Protocol) address (off).
Use the following IP address
--- ---
IP Address
(text entry) Specify a static IP address.
Subnet Mask
(text entry) Specify the subnet mask for a LAN (Local Area
Network).
Default Gateway
(text entry) Specify the gateway for the LAN.
Obtain DNS server address automatically
on, off Configure the ultrasound system to use the
address of the DNS (Domain Name Server)
sent by the DNS service (on) or to use the
address specified in the Use the following
DNS server address selection.
Use the following DNS server address
--- ---
Preferred DNS Server
(text entry) Configure the ultrasound system to use the
DNS address
Page 10

10 / 18 Supplement to User and Reference Manuals
Configuring a Connection to a Wireless Network
You can enable and disable connections to wireless networks without a password even when
changes to the wireless network options are protected by a password.
Note: If the ultrasound system is connected to both a wireless network and a local area network
(LAN), the system uses the LAN connection for sending files to network locations.
To configure a connection:
Prerequisite: The wireless adapter is connected to the leftmost USB port on the Input/Output panel
of the ultrasound system.
1. Access the system presets.
2. Select Wireless.
3. Enter a password, if required.
To: Do This:
Activate a connection to a wireless
network
Note: Siemens recommends using secured networks to ensure data security.
Select Enabled.
Deactivate the connection to a
wireless network
Select Disabled.
Connect to the selected network
1. Click Scan to refresh the list of wireless networks.
Note: The wireless adapter must remain connected to the ultrasound system
while refreshing the list.
2. Select a network from the list.
3. Click Connect.
4. If the system displays the Network Profile Settings dialog box, enter the
required profile settings and then click OK.
The ultrasound system displays the wireless icon indicating a connection to
a wireless network and the signal strength on the status bar.
See also: Informational Icons for the Wireless Adapter, p. 6
Disconnect from the selected
wireless network
1. Select the connected network from the list.
2. Click Disconnect.
The ultrasound system disconnects from the wireless network. If connected
to a LAN, the system reverts to using the LAN connection for sending files to
network locations.
Page 11

Supplement to User and Reference Manuals 11 / 18
To: Do This:
Create a network profile
1. Click New.
The ultrasound system displays the Network Profile Settings dialog box.
2. Enter the required network profile settings and then click OK.
The ultrasound system displays the new network profile.
Change network profile settings 1. Select a wireless network.
2. Click Edit.
3. Enter the required network profile settings and then click OK.
4. To delete the existing profile setting, click Remove.
Enable password protection to
restrict changes to the wireless
network options
1. Click Lock.
2. Enter a new password and then click OK.
Disable password protection to
provide unrestricted access to the
wireless network options
1. Click Unlock.
2. Enter the password and then click OK.
Change a password
1. Click Change.
2. Enter the password.
3. Reenter the new password and then click OK.
Display characters of a password
as you enter the password
Select Show password.
Ultrasound System Security (Virus Protection)
Ultrasound System Security is virus protection software that Siemens recommends for
ultrasound systems connected to a LAN or wireless network. To enable Ultrasound System
Security, contact your Siemens service representative.
Page 12

12 / 18 Supplement to User and Reference Manuals
Viewing Patient Reports with Qview
(Supplement to the Features and Applications Reference)
Refer to the manufacturer's user manual for information and instructions about the Qview
software program.
You must configure the ultrasound system for use with the Qview software program.
Use the system presets to enable the system to use the patient report layout provided by
Qview.
Report Option
Use the system presets to configure storage for DICOM-formatted data. The Autostore to
DICOM setting must be selected to transfer images and clips to a format supported by Qview.
DICOM
Ensure the ultrasound system is connected to a network to use the patient report with Qview.
To: Do This:
View the patient report using the
layout provided by Qview
Prerequisite: The Telexy (Qview) Only selection must be enabled in the
system presets.
1. Press Report.
The system displays the patient report using the layout provided by Qview.
2. Press Report to exit the report page. Or, for the ACUSON X300 PE system
and the ACUSON X150 system, press the Exit soft key.
View the patient report using the
layout provided by Qview and the
patient report layout provided by
the ultrasound system
Prerequisite: The Both selection must be enabled in the system presets.
1. Press Report.
The system displays the patient report provided by the ultrasound system.
2. Access the patient report in Qview.
– For the ACUSON X300 PE system, press the Qview soft key.
– For the ACUSON X300 system, press Report.
– For the ACUSON X150 system, press ROW and then press the Qview
soft key.
3. To exit the patient report in the layout provided by Qview and redisplay the
patient report in the layout provided by the ultrasound system:
– For the ACUSON X300 PE system, press the Report soft key.
– For the ACUSON X300 system, press ESCAPE.
– For the ACUSON X150 system, press the Report soft key.
View images or clips in Qview from
the Review screen
Press CALIPER and then press Report. Or, press Report and then access
the patient report in Qview.
Page 13

Supplement to User and Reference Manuals 13 / 18
Report Option — Configuration Selections
Report Option
Selection Option(s) Allows you to...
Report Type System Report Only
Telexy (Qview) Only
Both
Select the layout the ultrasound system uses to display
patient reports.
System Report Only enables only the layout provided
by the ultrasound system.
Telexy (Qview) Only enables only the layout provided
by Qview.
Both enables the layouts provided by the ultrasound
system and by Qview.
Note: The patient report provided by the ultrasound
system displays by default when you press Report.
Login Information
--- ---
Address
(text) Enter the address of the Qview server.
User Name
(text) Enter the required user name.
Password
(text) Enter the required password.
Page 14

14 / 18 Supplement to User and Reference Manuals
QuickStart Battery-Powered Standby Mode
(Available only on the ACUSON X300 PE 7.5 system)
(Supplement to QuickStart Feature (Battery-Powered Standby Mode), System Setup,
Chapter 3, Instructions for Use)
The QuickStart battery pack charges whenever the ultrasound system is connected to a power
outlet, including when the system is powered on, powered off, or in standby mode. The Battery
LED on the Input/Output panel blinks when the battery is charging.
BP9-4 Transducer Imaging
(Available only on the ACUSON X300 PE system)
Imaging with the BP9-4 Transducer
(Replaces this topic in the Instructions for Use, Chapter 7, page 7-7)
The BP9-4 transducer supports the functions and controls that are available in 2D-mode,
M-mode, Color, and Doppler. The BP9-4 also supports SieScape panoramic imaging.
You can activate the live dual format during 2D imaging with the BP9-4 transducer. Live dual
format displays both the transverse image and the sagittal image in real-time.
When you have acquired an image, you can change the orientation of the image, make
measurements and calculations, annotate with pictograms or text, or perform a biopsy or
puncture procedure.
Note: During live dual format, you cannot change the orientation of the image.
To Do This
Select the active scan plane
(sagittal or transverse)
Note: This action is not available during live dual format.
Press the toggle switch on the handle of the transducer.
The ultrasound system identifies the active scan plane of the transducer with a
graphical icon (a scan plane symbol) on the image screen.
Example of the scan plane symbol for the sagittal (S) plane.
Example of the scan plane symbol for the transverse (T) plane.
Activate live dual format
Press the LiveBiPlane soft key.
The sagittal plane always displays on the left side of the screen.
Deactivate live dual format
Press the LiveBiPlane soft key.
The system displays the transverse image as a full-screen 2D image.
Page 15

Supplement to User and Reference Manuals 15 / 18
To Do This
Display or hide the
reference line indicating the
intersection of the sagittal
and transverse planes on
each image
Press the toggle switch on the handle of the transducer.
Reposition the sagittal
image during live dual
format
Press the STEER control on the control panel.
S
T
Example of live dual format before the sagittal image is repositioned.
S
T
Example of live dual format when the STEER control is pushed to the left.
T
S
Example of live dual format when the STEER control is pushed to the right.
Updates to the System Controls
(Supplement to the Instructions for Use, Appendix B, page B-15)
For the BP9-4 transducer, the STEER control repositions the sagittal image during live dual
format.
Page 16

16 / 18 Supplement to User and Reference Manuals
Needle Guide Brackets
(Supplement to Safety and Care, Chapter 2, Instructions for Use and Transducer Accessories
and Biopsy, Chapter 5, Instructions for Use)
BP9-4 Disposable Endocavity Biopsy Straight Needle Guide Kit 1
The disposable endocavity needle guide is a single-use item. Refer to the in-box instructions for
attachment and care procedures, including cleaning, sterilization, and disposal.
BP9-4 Disposable Endocavity Biopsy Straight Needle Guide Kit 2
The disposable endocavity needle guide is a single-use item. Refer to the in-box instructions for
attachment and care procedures, including cleaning, sterilization, and disposal.
BP9-4 Reusable Endocavity Biopsy Straight Needle Guide
The stainless steel endocavity needle guide is a reusable item. Refer to the in-box instructions
for attachment and care procedures, including cleaning, disinfection, and sterilization.
Page 17

Supplement to User and Reference Manuals 17 / 18
Tissue Harmonic Imaging (THI) Frequencies
(Available only on the ACUSON X300 PE 7.5 system)
(Replaces the frequency settings for only the following three transducers for THI, Imaging
Functions, Technical Description, Appendix A, Instructions for Use; the frequencies for other
compatible transducers are unchanged)
CH5-2: 1.5 MHz, 1.8 MHz, 2.2 MHz
C8-5: 3.1 MHz, 3.6 MHz
P5-1: 1.5 MHz, 1.7 MHz (for TCD exam only)
P5-1: 1.7 MHz, 2.0 MHz, 2.2 MHz (for Cardiac and Ped Echo exams)
P5-1: 1.7 MHz, 2.0 MHz (for Abdomen exam only)
Page 18

18 / 18 Supplement to User and Reference Manuals
Standards Compliance
(For ACUSON X300 PE 7.5: replaces the Standards Compliance, Technical Description,
Appendix A, Instructions for Use; the Acoustic Output Standards and CE Declaration are
unchanged.)
(For ACUSON X300 2.5: replaces the Standards Compliance, Technical Description,
Chapter 6, [1] Instructions for Use; the Acoustic Output Standards and CE Declaration are
unchanged.)
(For ACUSON X150 2.5: replaces the Standards Compliance, Technical Description,
Appendix A, Instructions for Use; the Acoustic Output Standards and CE Declaration are
unchanged.)
Quality Standards
FDA QSR 21 CFR Part 820
ISO 13485 (Canadian), CMDR regulation
EN ISO 9001:2008
Design Standards
UL 60601-1
CAN/CSA-C22.2 No. 601.1
EN 60601-1 and IEC 60601-1 (2nd and 3rd Ed.)
EN 60601-1-1 and IEC 60601-1-1
EN 60601-1-2 and IEC 60601-1-2
EN 60601-1-4 and IEC 60601-1-4
EN 62304 and IEC 62304
EN 60601-1-6 and IEC 60601-1-6
EN 62366 and IEC 62366
EN 60601-2-18 and IEC 60601-2-18
EN 60601-2-25 and IEC 60601-2-25
EN 60601-2-37 and IEC 60601-2-37
EN ISO 14971
EN ISO 10993-1
Acoustic Output Standards
IEC 61157 (Declaration of Acoustic Power)
AIUM/NEMA UD 2, Acoustic Output Measurement Standard for Diagnostic Ultrasound
AIUM/NEMA UD 3, Standard for Real-Time Display of Thermal and Mechanical Acoustic
Output Indices on Diagnostic Ultrasound Equipment
IEC 62359 (Test methods for the determination of thermal and mechanical indices, 2005)
Radio and Telecommunications Standards
(The Radio and Telecommunications Standards is an addition to the Standards Compliance
section.)
CFR 47 FCC Part 15.247
CFR 47 FCC Part 15.107
CFR 47 FCC Part 15.109
ETSI EN 300 328
ETSI EN 301 489-1
ETSI EN 301 489-17
 Loading...