

Page 1
Page 2

2
Contents
In addition, the following symbols indicate:
safety measures (for you, the machine or the laundry) that must be carried out without
fail,
electrical danger,
tips and important information.
Page
Safety instructions .................................................................................................... 4
Protection of the environment/Hints and tips........................................................ 4
Disposal information .................................................................................................. 4
Introducing your washing machine ........................................................................ 5
1 - Installation instructions
Transportation protection devices .......................................................................... 6 and 7
Moving the washing machine .................................................................................. 7
Connections - Water-inlet .......................................................................................... 8
Connections - Water drainage .................................................................................. 8
Electrical connections .............................................................................................. 9
Installation .................................................................................................................. 9
2 - Operating instructions
International laundry care symbols.......................................................................... 10
Before the first wash .................................................................................................. 10
Treating stubborn stains............................................................................................ 11
Preparing the laundry ................................................................................................ 12
Loading the laundry.................................................................................................... 13
Putting in detergent.................................................................................................... 13
Setting the programme / Adding wash + Changing programme........................ 14
and 15
Choosing programme ................................................................................................ 16
Spin speed selector.................................................................................................... 17
Additional function buttons ...................................................................................... 18
Safety features ............................................................................................................ 19
3 - Cleaning and care
Cabinet ........................................................................................................................ 20
Control panel, base, etc. interior components ...................................................... 20
Detergent dispenser .................................................................................................. 20
Replacement of mains cable .................................................................................... 20
Cleaning the filter........................................................................................................ 21
and 22
4 - Display lights.............................................................................................................. 23
5 - What to do if .............................................................................................................. 25
6 - Customer Service .................................................................................................... 26
7 - Programme chart ...................................................................................................... 28
Page 3

3
The new washing machine that you have just purchased is a modern, high-quality
household appliance.
Your washing machine is distinguished by its economical consumption of energy, water
and detergent.
Every washing machine that leaves our factory is carefully checked to ensure that it is
functioning properly and is free of defects. If there are any questions - especially
in regards to installing and connecting your washing machine - please do not hesitate
to contact our Customer Service department.
Further information as well as a selection of our products may be found on our Internet
site: http://www.siemens.de/hausgeraete
Please read and follow these operating and installation instructions and all other
information supplied.
Differences in installation and operating instructions for different models are noted
in the appropriate places.
Retain all documentation for subsequent use or for the next owner of the appliance.
Page 4

4
Safety Instructions
Protection of the environment/Hints and tips
Your washing machine uses water, energy
and detergent efficiently.This protects our
environment and reduces your household
costs.
To use your washing machine in an
efficient and environmentally friendly
manner:
•
Do not exceed maximum load.
Cottons and coloureds 5.0 kg
Easy-Care 2.5 kg
Delicates/Silk 1.0 kg
Woollens 1.5 kg
With smaller amounts of laundry, the load
adjust reduces the water and energy
consumption.
•
Where possible, use the ”60°C” +
”Intensive Stains” programme instead of
the ”Cottons+Linens 90°C
” programme.
The extended washing time of this 60°C
programme achieves a cleaning result
comparable to that of the 90°C
programme, but uses considerably less
energy.
•
Do not use Prewash* for lightly to
normally soiled washing.
•
Add detergent according to the degree
of soiling, amount of laundry and water
hardness, and observe the detergent
manufacturer's instructions.
* Depending upon the model.
Intended use
Introducing your washing machine
•
for household use only
•
for washing machine-washable fabrics in
a detergent and water solution
•
operation with cold tap water and
commercially available detergents and
cleaning products which are suitable for
use in washing machines.
Safety Instructions
Do not leave children unsupervised near
the washing machine.
Keep pets away from the washing machine.
Do not insert/pull out the mains plug with
wet hands.
Do not pull out the mains plug by tugging
on the cable.
Caution when draining hot water.
Do not climb onto the washing machine.
Observe the notes on installation.
Danger of suffocation!
Keep children away from shipping
carton and packaging components.
Danger of suffocation from folding
cartons and plastic film.
Danger of fatal injury!
On out-of-service appliances, unplug
mains plug. Cut off power chord and
discard with mains plug. Destroy the
lock on the appliance cover. This will
prevent children from locking
themselves in and suffocating.
Packaging and discarded appliances
Environmentally friendly disposal
• Dispose of packaging in an environmentally
friendly manner.
• This appliance meets European guideline
2002/96/EG for discarded electrical and
electronic appliances (waste electrical and
electronic equipment - WEEE).
• The guideline provides an EU wide valid
framework for recycling of discarded
appliances. .
Page 5
5
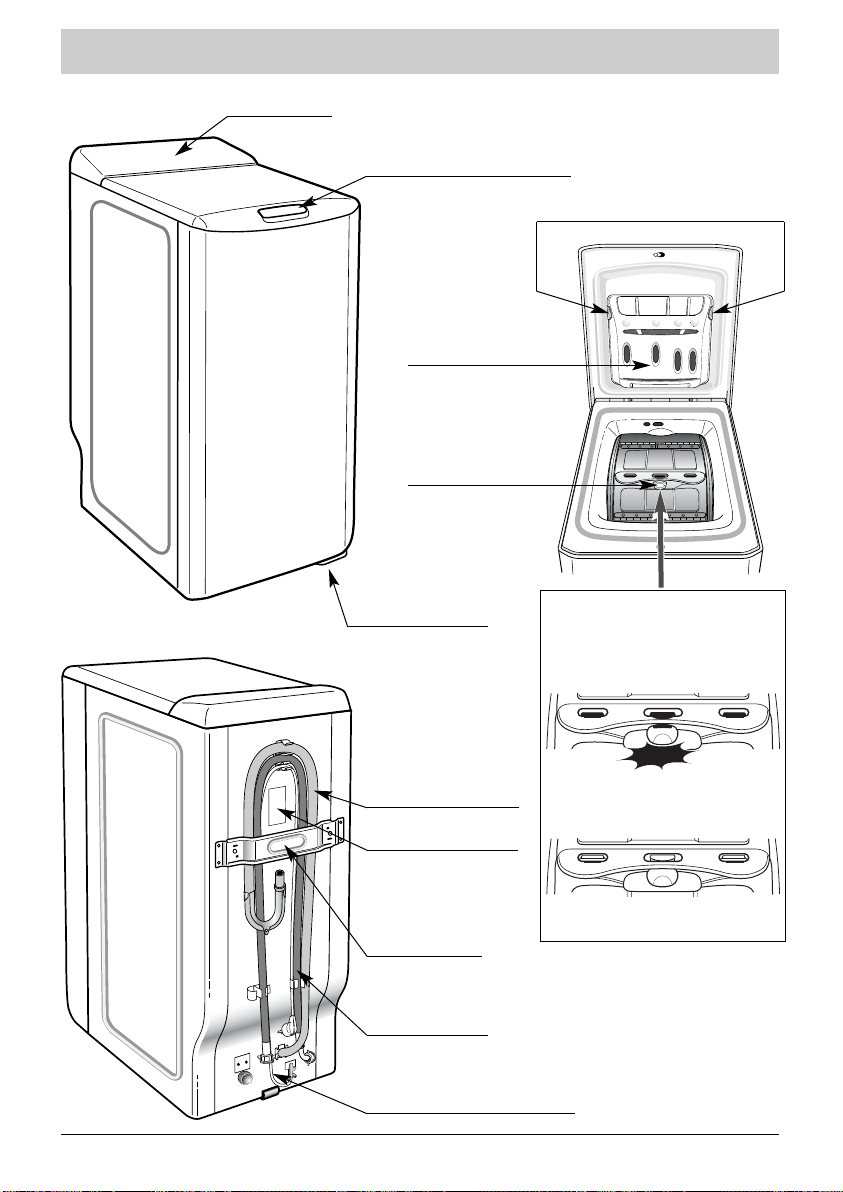
Close drum lid properly!
Introducing your washing machine
Control Panel
Lid handle (remains locked
during the programme)
Unlocking of detergent
dispenser
Removable detergent
dispenser
Button for opening
the lid
Locking lever
(depending upon
model)
Water drainage hose
Water-inlet hose
(not connected)
Mains connection with plug
Transportation
protection
Nameplate
(product and
production number)
YYYYEEEESS
SS
NNNNOO
OO
CLAC
Page 6
6
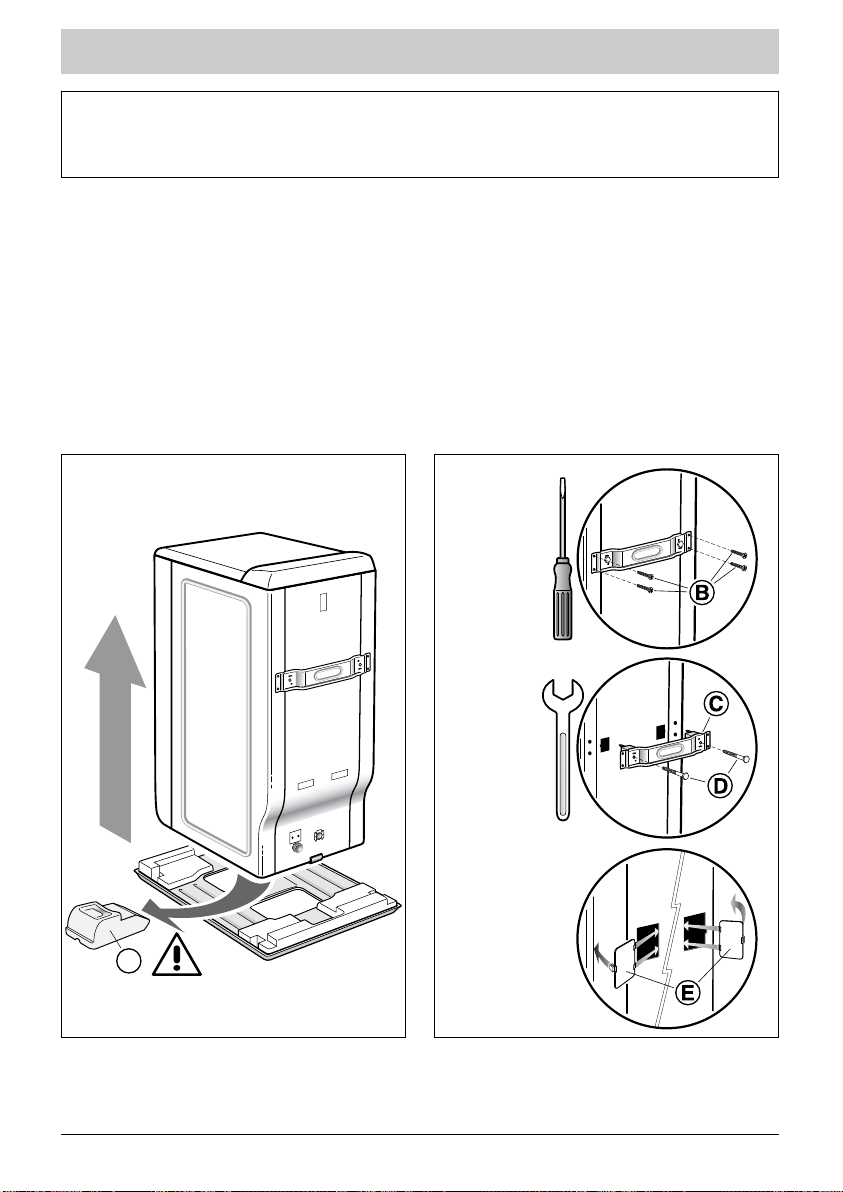
Removing the transportation protection devices
Figure 1 Figure 2.1
Figure 2.2
Figure 2.3
13
1
1
2
2
A
1 Remove the machine from the transport
base. Remove
wedge
(Figure 1
).
2
Remove the 4 screwswith
a screwdriver
(Figure 2.1
).
3 Remove transportation protection
devices
: Both bolts
are for this
purpose
(Figure 2.2
)
remove with
a 10 mm or 13 mm spanner (depending
upon model).
Check to see that both plastic inserts
on the connecting carrier have also
been removed.
Refasten the screwsat their original
locations.
4
Close off both holes with the
provided caps
(found in the
accessories package).
(
Figure 2.3
)
Before the machine is used for the first time, all transportation protection devices
from the back of the appliance must be removed and stored for any later transport
(i.e., relocation).
Page 7
7
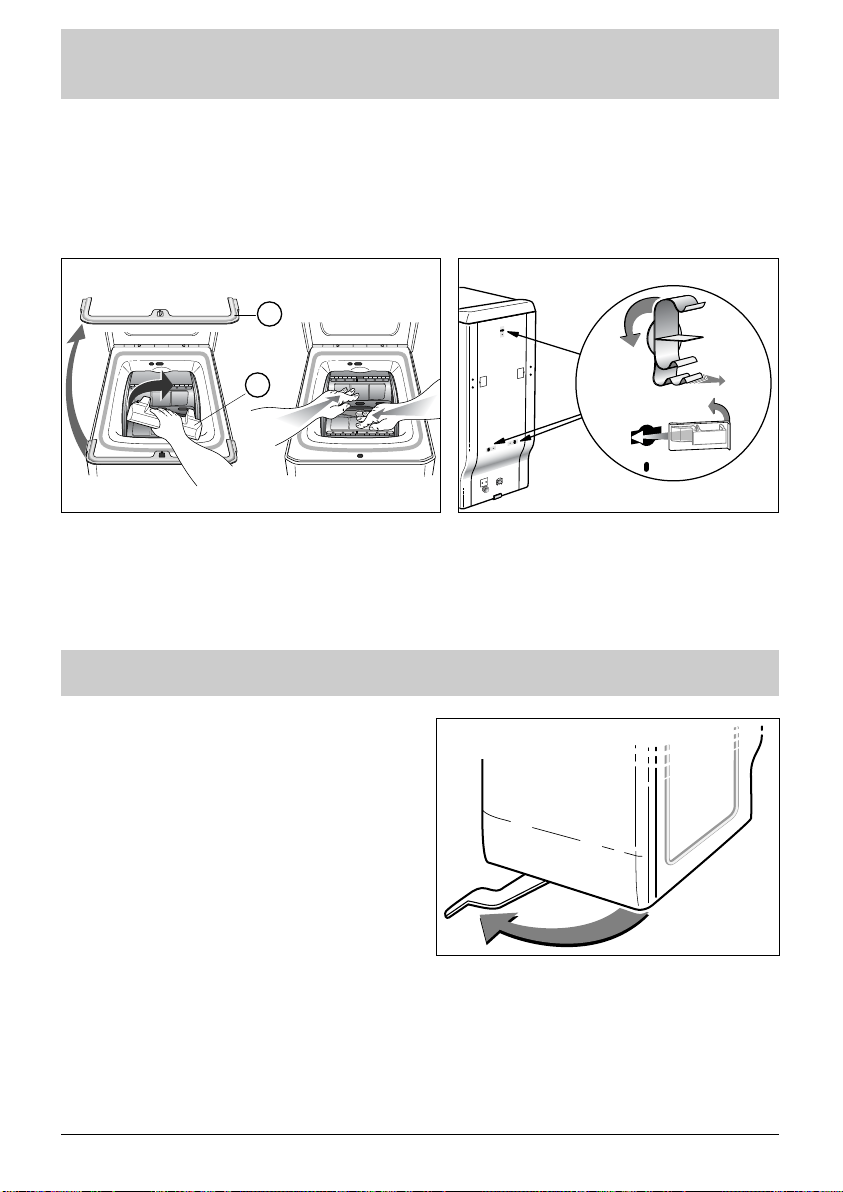
Removing the transportation protection
devices
5
Remove theprotection devices
(Figure 3)
.
To do this:
- Remove
protective strip
- With a quarter turn,
remove protection
device
6
Remove hose retainers➀and cover
the holes with the caps provided
➁
(found in the accessories package)
(Figure 4)
.
a
b
a
b
➀
➁
Figure 4
Figure 3
F
G
We suggest saving all transportation
protection devices because this must
be reinstalled in case of possible later
transport.
Before leaving the factory, this
appliance was carefully checked
.
There may be some water in the tub
or in the detergent chambers
because of testing that took place.
(depending upon model)
If the machine is fitted with hidden castors,
it can easily be moved.
To set the machine on the castors, turn the
lever below the appliance to the left until it
encounters a stop
(Figure 5
).
The appliance must always be stood
firmly on its feet before it is used for
washing (lever to the right).
Figure 5
Moving the appliance
Page 8
8
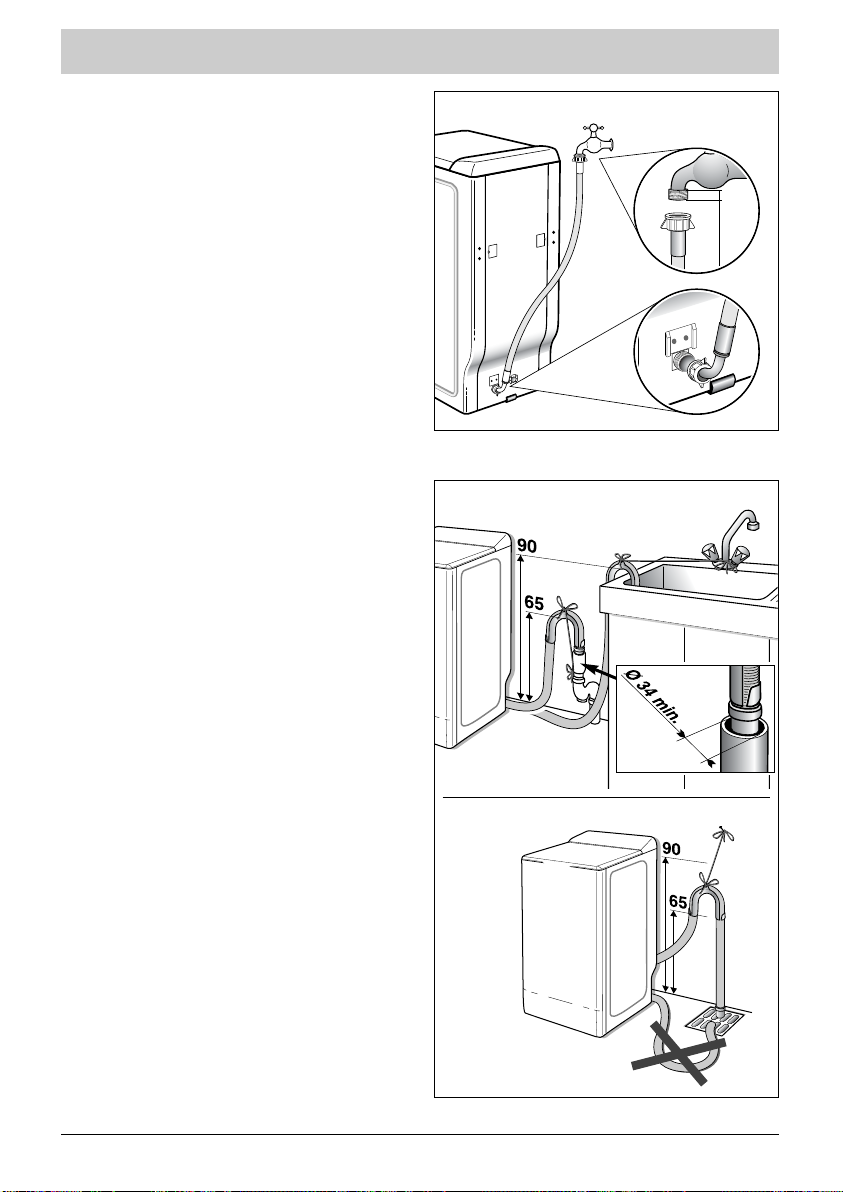
Connections
Figure 6
Figure 7.1
Figure 7.2
Drain
Mount drain hose with the supplied elbow,
connect to a vented drain
(Figure 7.1 / 7.2)
.
The elbow must be between 65 and 90 cm
above the floor.
Secure drain hose against slipping off.
Replacing the water-inlet hose
After replacement, check to ensure
connections are tight and that there are
seals on both ends.
Regularly check the condition of the
water-inlet and drain hose. Replace
damaged hoses only with original
replacement parts which are available
through Customer Service.
Cold water supply
Connect water-inlet hose
(Figure 6).
- Minimum water pressure: 0.1 MPa or 1 bar
- Maximum water pressure: 1 MPa or 10 bar
min. 10 mm
3/4”
Page 9
9
Connections
Electrical connections
Connect the washing machine only to
alternating current via a properly installed
earthed socket.
The mains voltage must correspond to the
voltage specification on the washing
machine (nameplate).
Connection specifications as well as the
required fuses are stipulated on the
appliance nameplate.
Ensure that:
• The mains plug and socket are compatible,
• The cable cross-section is adequate,
• The earthing system has been installed
correctly.
The mains cable may be changed
(if required) by an electrician only.
Replacement mains cable available from
Customer Service.
Do not use multiple plugs/sockets or
extension cables.
In the event that an earth-leakage circuit
breaker is to be used, only use types
marked with the following symbol:
.
Only this symbol can guarantee
compliance with all current regulations.
Do not insert/pull out the mains plug with
wet hands.
Do not pull out the mains plug by tugging
the cable.
Installation
Safety Instructions
Risk of injury!
The washing machine is very heavy.
Take care when lifting it.
Frozen hoses may tear or burst. Do
not install the washing machine in an
area where there is a risk of frost or
outdoors.
The washing machine may be damaged.
Do not lift the washing machine by any
projecting parts (e.g., filler opening).
In addition to the safety information listed
here, the local water and electricity
supplier may have special requirements.
If in doubt, have the appliance connected
by a specialist.
Installation surface
Appliance stability is important so that the
washing machine does not ”wander”
during the spin cycles. The installation
surface must be solid and level. Soft floor
coverings, e.g. carpets or floor coverings
with a foam backing are not suitable.
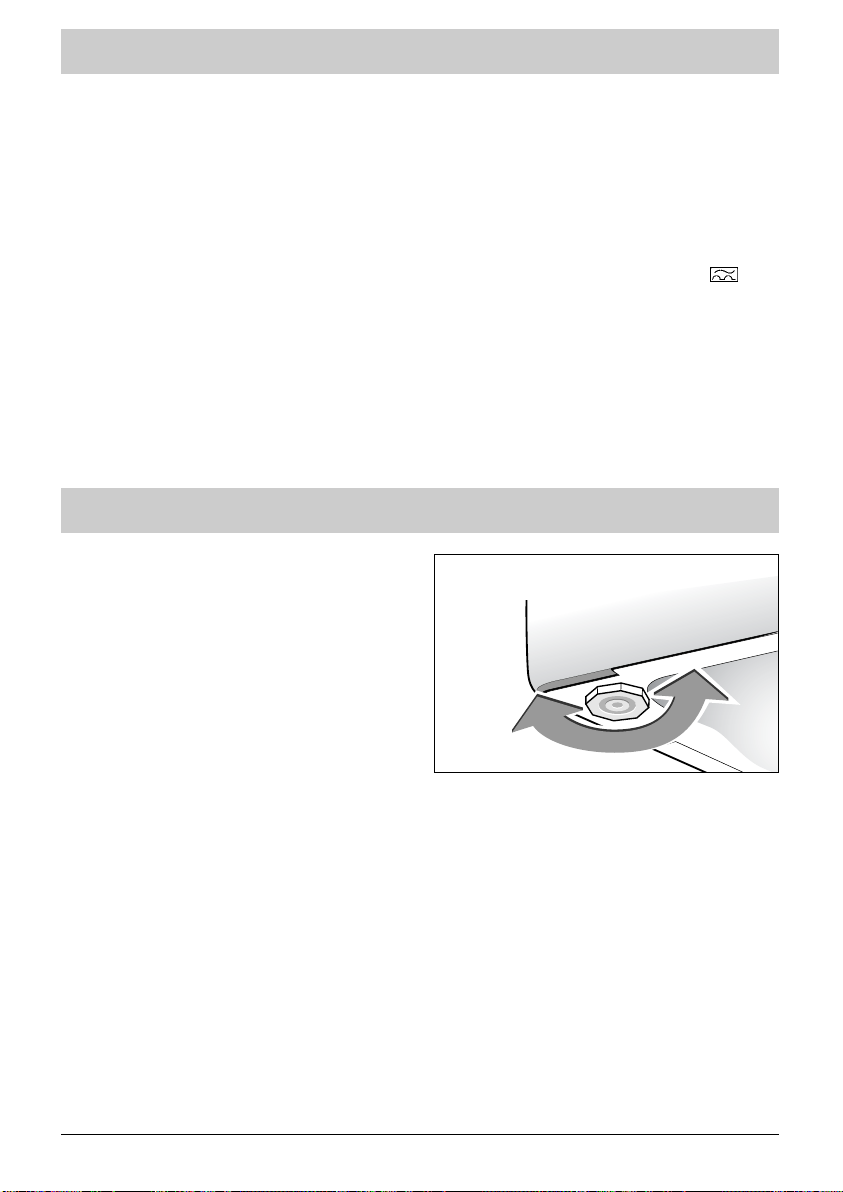
Adjustable feet:
(depending upon model)
Some appliances have two adjustable feet
available at the front with can be used to
correct for surface unevenness. Level and
stabilise the machine in the following
manner:
- Place the appliance on the transport
castors and gently tip backwards.
- Depending upon the condition of the
floor, either unscrew or screw in the foot
or feet
(Figure 8)
.
- Check the stability of the washing
machine.
Figure 8
Page 10
10
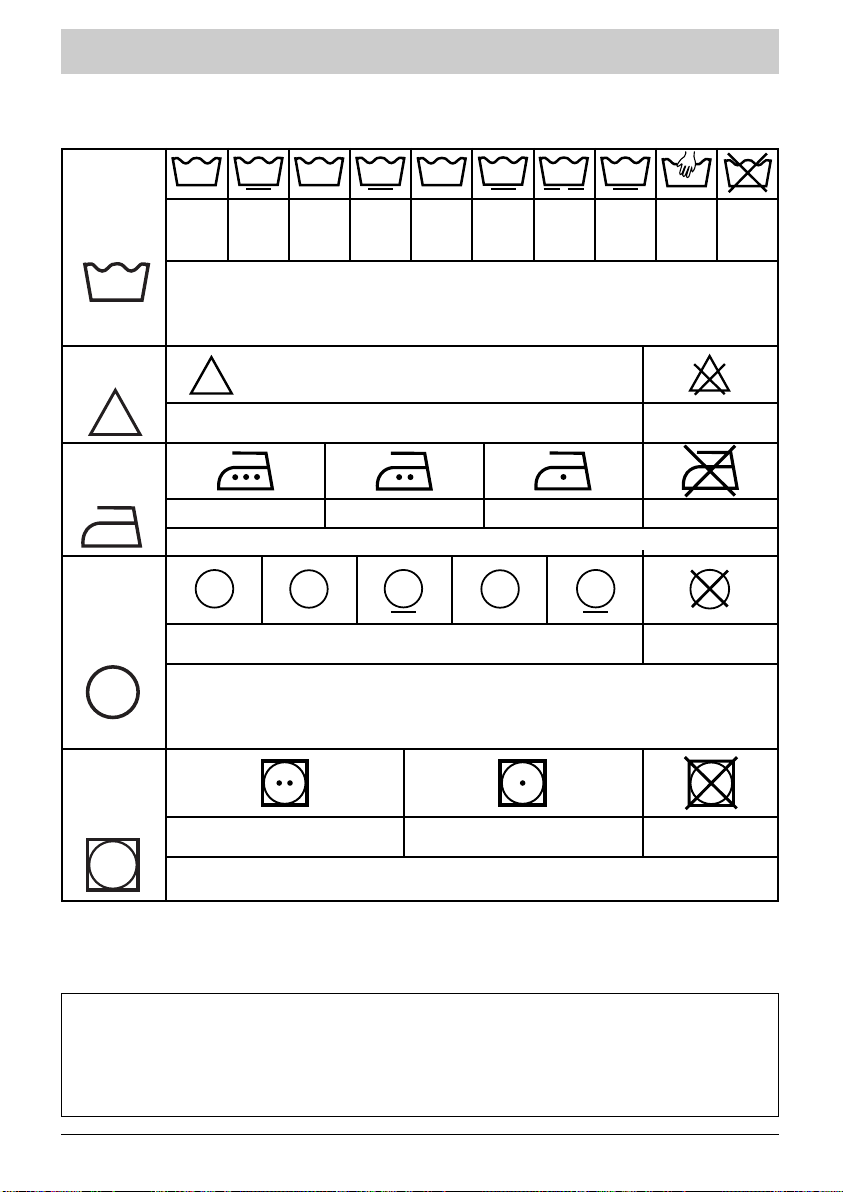
International Laundry Care Symbols
In order to assist you in taking care of your textiles, these contain a label with the
necessary information. The information is given by the following symbols:
©
COFREET
Before the first washing - wash once without laundry articles
Before you wash laundry for the first time, we suggest running the ”COTTONS 90° without
Prewash” wash cycle without laundry and with 1/2 measuring cup of detergent. In this
way, any water left over from testing the machine will be removed.
The dots indicate the drying levels of the tumbler (laundry dryer).
The letters are for dry cleaning. They provide information in regards to solvents.
The line below the circle indicates that a reduction of mechanical action, humidity and temperature is
required during cleaning.
The dots indicate the temperature ranges of the automatically controlled iron.
The values in the washtub correspond to the maximum water temperatures that are not to be exceeded.
A line below the washtub indicates gentle (mechanical) handling (for example, washing with slow
rhythmn). It denotes wash cycles that are suitable, for example, for Easy-Care and delicate articles.
Chlorine bleach may be used
Normal
washing
prog.
Gentle
washing
prog.
Normal
washing
prog.
Gentle
washing
prog.
Normal
washing
prog.
Gentle
washing
prog.
Gentle
washing
prog.
Hand
washing
do not
wash
WASHING
(Washtub)
CHLORINE
(Triangle)
IRONING
(Flatiron)
DRY
CLEANING
(Cleaning
drum)
TUMBLER
DRYING
(Drying drum)
Chlorine bleach may
not be possible
medium iron cold iron no ironing
no dry
cleaning
Drying with reduced
thermal loading
no drying
not possible
cl
95
95
60
F
A
P
F
60
40
40
40
30
P
Special
Gentle
washing
prog.
hot iron
Drying with normal
thermal loading
Page 11

11
Treating stubborn stains
USING STAIN REMOVERS:
To avoid the danger of a fire or explosion:
(*) When using the solutions mentioned above, rinse the articles thoroughly before
putting them into the washing machine.
- Strictly follow the manufacturer's instructions when using common stain removers.
Perspiration, blood, fruit, wine and chocolate stains are generally removed by using detergents
with biologically active ingredients. Other stains however require special treatment before washing.
First test on an inconspicuous area of the article and then rinse thoroughly. When applying
stain remover, always start from the outside to avoid forming a border.
After stained fabrics have been washed and then dried in the dryer or ironed, the stains
can no longer be removed.
GRASS: Dab the stain with clear vinegar or 90
percent alcohol* (if the material permits), rinse
out and wash.
BALL-POINT PEN - FELT TIP: Dab the stain
with paper towels to absorb as much ink as
possible. Put a white, clean cloth under the
stain and then dab it with another cloth. For
synthetics, the second cloth should be
moistened with clear vinegar, for other fibres
with 90 percent alcohol* (in so far as the
material allows).
RUST: Sprinkle light stains with salt. Sprinkle
the salt with lemon juice and let work overnight.
Next day, rinse thoroughly and wash. For larger
stains, use a special rust remover, paying
especial attention to the manufacturer´s
instructions.
CHEWING GUM: Cool down with an ice cube.
As soon as it is hard enough, remove using
your fingernails. Remove the border that
remains using a grease remover*.
AUTOMOBILE GREASE - TAR: Use a stain
remover*. If none is available, smear the stain
with some fresh butter, let work and then dab
with oil of turpentine*.
PAINT: Do not allow paint stains to dry;
immediately treat with the solvent indicated on the
paint can (water, turpentine*, light petrol*) . Soap
and rinse out.
CANDLE WAX: Scrape off most of the stain.
Finally, put paper towels on both sides of the
item and melt the remaining wax using an iron.
MAKE-UP: Lay the side of the material with the
stain on a piece of paper towel and moisten the
other side of the article with 90 percent alcohol
* insofar as the item permits and the stain is
not greasy. Otherwise, use a grease solvent
(e.g. trichloroethylene*).
COFFEE - TEA:
-
on white cottons: dab the stain with hydrogen
peroxide* and afterwards wash as usual.
-
on coloured cottons: dab the stain with
a vinegar solution (2 tablespoons of clear
vinegar in ¼ litre of water) and afterwards
wash as usual.
-
on woollens: dab the stain with a mixture of
equal parts of alcohol* and clear vinegar and
afterwards wash the article.
CHOCOLATE - FRUIT - FRUIT JUICE - WINE:
Dab the stain with a vinegar solution
(2 tablespoons of clear vinegar in ¼ litre of
water). Rinse thoroughly and wash as usual.
GREASE: Immediately sprinkle talcum powder
on the material. Let dry and gently brush off the
talcum powder. Then dab with a grease solvent,
such as gasoline*. Rinse out and wash as usual
BLOOD: Immerse the stained item in cold salt
water as quickly as possible; afterwards wash
as usual.
KETCHUP - TOMATO SAUCE: Prepare
a solution of equal parts glycerine and warm
water. Soak the item for an hour and afterwards
wash as usual.
Page 12

12
Preparing the laundry
Average weight of several dry, ”heavy” laundry items
Average weight of several dry, ”light” laundry items
Bed linen for 1 person . . . . . . . . . . 400 to 500 g
Bed linen for 2 persons . . . . . . . . . . . . . . . 800 g
Pillow cover . . . . . . . . . . . . . . . . . . . . . . . . . 200 g
Light night-gown . . . . . . . . . . . . . . . . . . . . 150 g
Children's cloth pants . . . . . . . . . . . . . . . . 120 g
Cloth trousers . . . . . . . . . . . . . . . . . . . . . . . 500 g
Man's shirt cotton/polyester . . . . . . . . . . . 200 g
Cotton T-shirt, large . . . . . . . . . . . . . . . . . .150 g
Tea towel . . . . . . . . . . . . . . . . . . . . . . . . . . .100 g
Table cloth . . . . . . . . . . . . . . . . . . . . . . . . . 250 g
Delicate lady's items . . . . . . . . . . . . . . . . . . . 50 g
Children's knitted synthetics . . . . . . . . . . . 50 g
Socks . . . . . . . . . . . . . . . . . . . . . . . . . . . . . . . 20 g
Cloth pyjamas . . . . . . . . . . . . . . . . . . . . . . . 250 g
Jeans . . . . . . . . . . . . . . . . . . . . . . . . 800 g to 1 kg
Terry cloth bath towel . . . . . . . . . . . . . . . . 700 g
Terry cloth hand towel . . . . . . . . . . . . . . . . 300 g
Jogging pants . . . . . . . . . . . . . . . . . . . . . . . 350 g
Children's terry cloth pyjamas . . . . . . . . . .100 g
Bathrobe . . . . . . . . . . . . . . . . . . . . . . . . . .1.200 g
Sweatshirt . . . . . . . . . . . . . . . . . . . . . . . . . . 250 g
Duvet case . . . . . . . . . . . . . . . . . . . . . . . . .1.500 g
Do not exceed the following load limits:
COTTONS / COLOUREDS / MIXED: .................................................................................... 5 kg
EASY-CARE: .......................................................................................................................... 2.5 kg
WOOLLENS: ............................................................................................................................1.5 kg
DELICATES / SILK: ..................................................................................................................1 kg
To prepare the laundry
Foreign objects (e.g. coins, paperclips,
needles, nails) may damage laundry
items or washing machine components
(the drum for example).
• Empty the pockets of the laundry items.
• Brush sand out of pockets and
cuffs/turn-ups.
• Close zips, fasten pillow cases/cushion
covers.
• Remove curtain runners or tie up in
a net/bag.
• In a net/cushion cover, wash:
- delicates e.g. pantyhose, curtains
- small laundry items, e.g. socks or
handkerchiefs
- underwired bras (underwires may
become detached during washing and
cause damage).
• Trousers, knitwear and knitted textiles,
e.g. jersey garments, T-shirts or
sweatshirts, should be turned inside out.
Page 13
13
Loading the wash
Danger of explosion!
If laundry treated with cleaning agents
containing solvents, e.g. stain removers,
benzene, is loaded into the washing
machine, an explosion may
result.Thoroughly rinse out laundry items in
advance by hand.
Foreign objects in the washing drum
may damage laundry. Check the drum
for foreign objects before putting in the
laundry.
Opening the washing machine
• Lift handle to open
• Press button to open the drum lid
• Unfold pre-sorted laundry items and
loosely load into the washing drum.
Mix large and small items.
Laundry items of different sizes distribute
themselves better during the spin cycle.
Do not exceed suggested loads (see
also PROGRAMME CHART). Overfilling
reduces washing efficiency and
promotes creasing.
Water and energy consumption by the
washing machine is automatically reduced
for smaller loads.
• Close drum lid.
Do not wedge laundry items between the
drum and the drum lid.
Ensure that the drum lid is properly
closed.
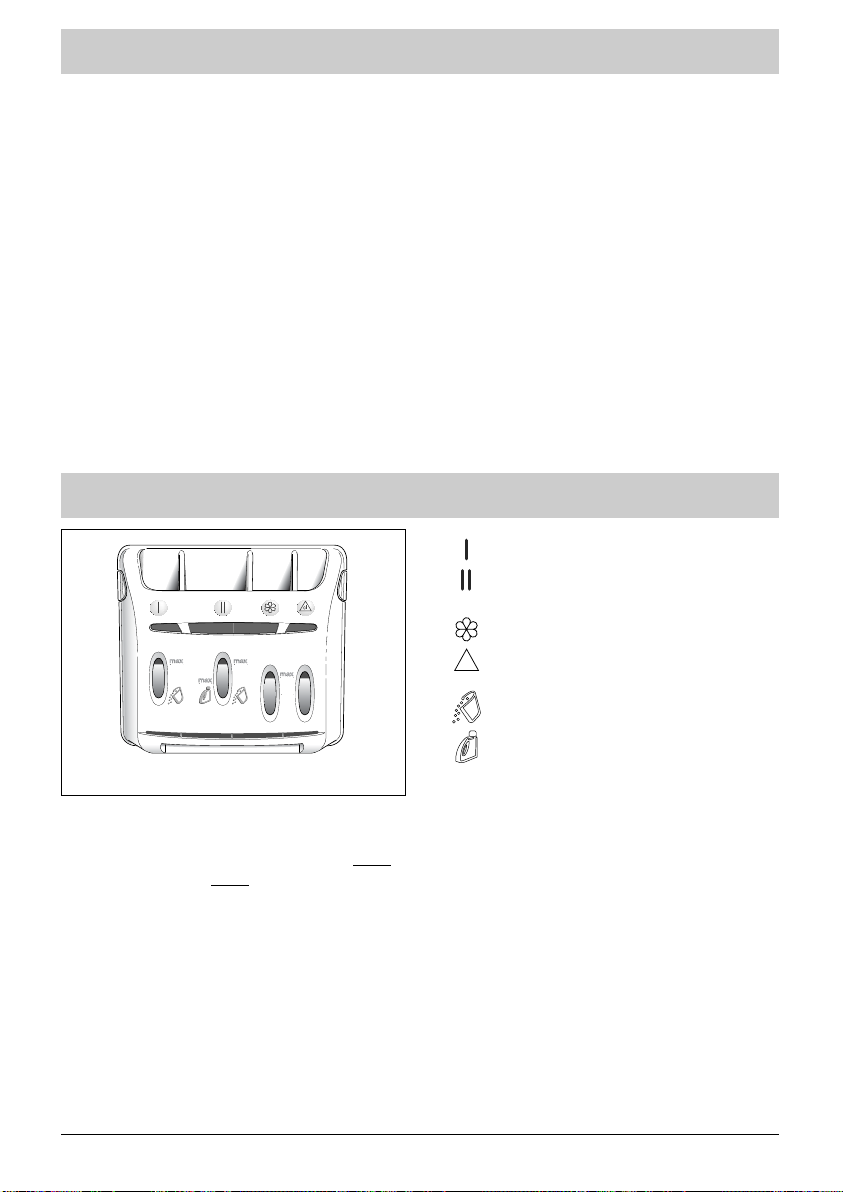
Putting in detergent
➀
➁
➃➂
:
WASHING POWDER
:
LIQUID DETERGENT
➀
Prewash compartment (powder)
➁
Main wash compartment
(powder or liquid)
➂
Fabric softener
➃
Bleaching agent
cl
The main wash compartment can hold
powder as well as liquid. However, do not
use liquid detergent for the program WITH
Prewash and/or WITH ”Delayed Start”
(depending upon the model).
Concentrated fabric softener must be
diluted with warm water.
It is essential to dilute concentrated
bleaching agents.
Do not exceed the level indicated by MAX.
Do not put detergent directly into the drum.
Loading detergent
Use the proper amount of detergent
appropriate for
- the hardness of the water. The hardness of
the water can be found from the water utility
company.
- the size of the load.
- the degree of soiling.
- the specifications of the detergent
manufacturer.
Use liquid detergent in the appropriate
compartment.
Risk of poisoning!
Keep detergents and additives out of the
reach of children.
Figure 9
Page 14
14
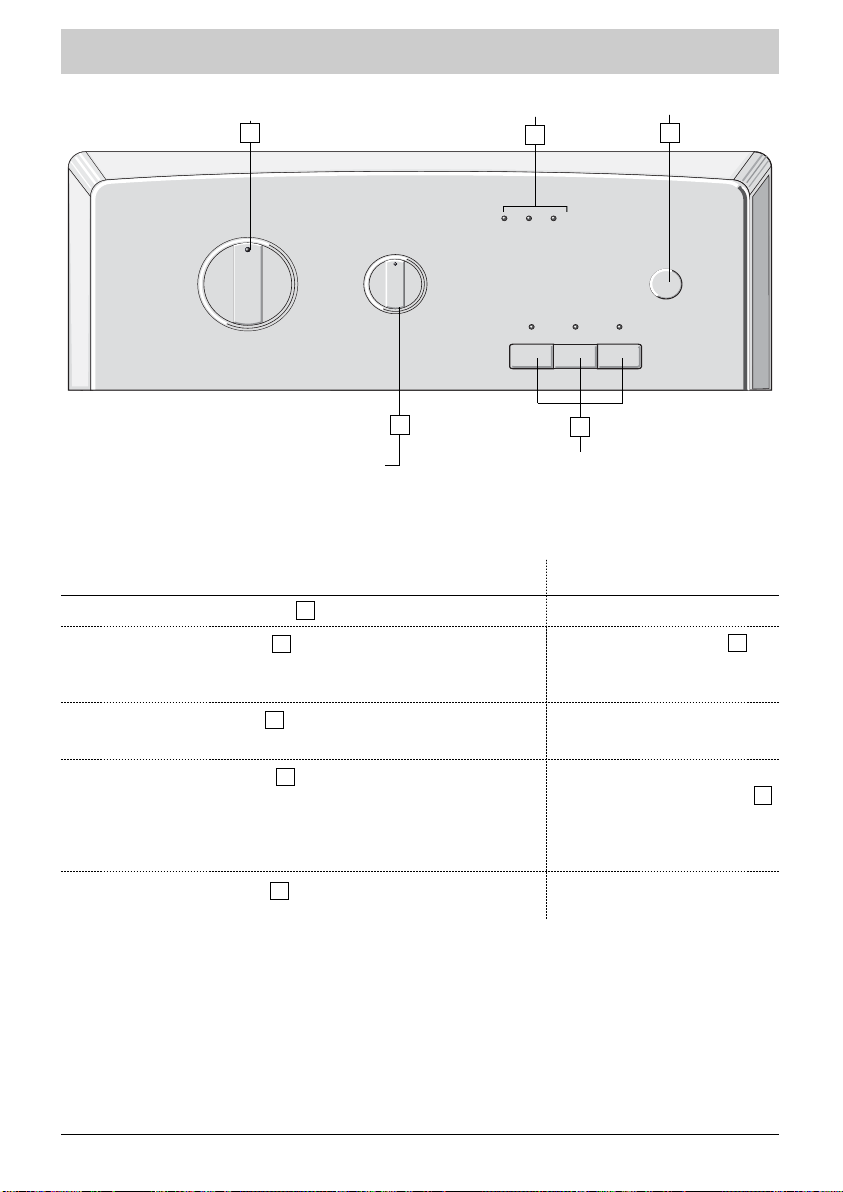
Setting the programme
Start/Pause buttonStatus indicatorProgramme selector
4
A
1
Spin speed selector
(depending upon model)
2
Additional function buttons
3
Selecting the programme:
Display lights and the position of
the spin speed selector
•Select the desired programme using the programme selector.
•
Set the desired spin speed using the spin speed selector (see
chart, page 18).
• If applicable, select options using the additional function buttons.
• Start the programme using
the ”Start/Pause“
button.
• Turn programme selector
to ”Stop“
.
Open lid and remove laundry.
1
4
3
2
1
”Washing“ display light blinks.
Set spin speed selector to
desired position (for example
”800“).
The display light for the
selected option lights up.
Display light for ”Washing“
lights up,
(the display lights
light up successively until the
end of the programme is
reached).
Display light for ”End“ lights
up.
A
2
Page 15

15
Topping up laundry +changing programmes
Before switching on the machine,
check that the mains cable is connected and the tap is open.
Ensure that all lids are properly closed.
For purposes of safety, it is suggested that the mains cable be unplugged and the tap closed
when the programme has ended.
After a power cut, the programme resumes from the point at which it was broken off.
Changing the programme
If you have chosen the wrong programme:
• Turn programme selector to
”Off”.
• Set programme selector to the desired
programme.
Display light lights up.
• Press
”Start” if applicable.
The spin speed may be changed at
any time during the programme.
As long as they are still active, all
options may be terminated at any
time during the course of the
programme.
Terminating the programme
If you would like to terminate a programme
before it is completed:
• Set programme selector to
”Off”.
• Set programme selector to ”Spin”.
Display light lights up.
Select desired spin speed for ”Spin” (but not
Rinse Stop).
• Press
”Start” button.
AA
Page 16

16
Selecting the programme
Basic programme
Select the desired programme - also see the
programme chart.
For the maximum spin speed of the
programme, see the chart on the next page.
Cottons+Linens y 90°C
Energy intensive programme for heatresistant textiles, e.g. made of cotton or
linen.
To protect the wastewater pipes, the hot
wash water is mixed with cold water and
cooled before being drained.
Cottons+Linens y 60°C + ”Intensive”*
button
For stained, heavily soiled textiles, e.g.
cotton or linen.
Energy saving programme. The extended
washing time achieves a cleaning result
comparable to that of the 90°C programme,
but uses considerably less energy.
Cottons+Linens y 60°C + Prewash
For heavily soiled, hard-wearing textiles,
Cottons+Linens y cold*,
30, 40, 60°C
For hard-wearing textiles.
Easy-Care A cold*, 30, 40, 60°C
For Easy-Care textiles, e.g. made of cotton,
linen, synthetic or blended fabrics.
Delicates q cold* 30, 40°C
For delicate, washable textiles, e.g. made of
cotton, synthetic or blended fabrics (e.g.
curtains).
No spin between rinse cycles.
Woollens U cold, 30, 40°C*
For hand and machine washable wool or
wool-rich textiles, e.g. cashmere, mohair or
angora.
Also suited for hand washable
u silk.
Quick 40 I
For a load of lightly soiled laundry items up to
2.5 kg. To freshen up cottons, linens, coloureds
or hard-wearing synthetics.
Washing temperature automatically set to
40°C. Time limited to 30 minutes.
For this programme, reduce the amount
of detergent by half!
Optional programme selections
Rinse K
Separate rinse cycle with subsequent spin
for Easy-Care textiles.
Spin B
Separate spin cycle. Wash or rinse water is
pumped out before the spin cycle.
* Depending upon the model.
Page 17
17
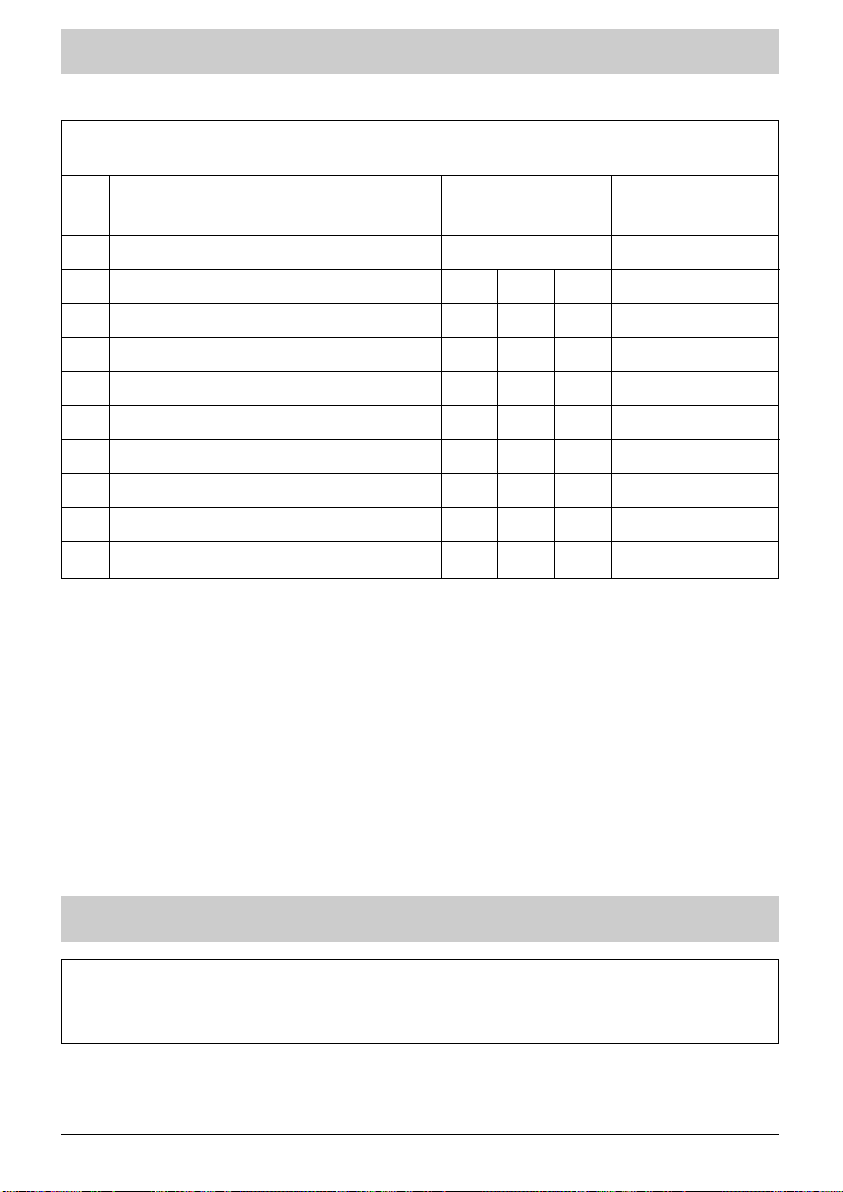
Spin speed selector
Programme setting for testing in accordance with or following EN 60 456 and IEC 60 456.
PROGRAMME FOR STANDARD AND COMPARISON TESTS
Programme ......................................................................................................COTTONS 60°C
Load ...................................................................................................................................... 5 kg
Programme
COTTONS / COLOUREDS
COLOUREDS with Prewash
Easy-Care
WOOLLENS
DELICATES
HAND WASHABLE TEXTILES
GENTLE SPIN**
RINSE STOP***
with
spin speed selection*
6008009001000
600
600
600
600
600
—
————
8009001000
6008009001000
8009001000
800800
600
600
800
600600
600600
QUICK 40 600900 8001000
100 100100
without spin speed
selection*
Spin speed (depending upon model)
* In the ”Woollens” and ”Delicates” programmes, the spin speed is automatically limited. Gentle
Spin
** Gentle reduced spin cycle at 100 rpm. Rinse Stop
*** Laundry remains in the last rinse water.
y
y
A
U
q
u
I
Q
D
Page 18

18
Additional function buttons
PREWASH P (depending upon model)
For heavily soiled, hard-wearing textiles,
e.g. from cotton or linen.
The Prewash washing temperature is
30°C. Prewash not available for Woollens
or Delicates programme.
If the Prewash programme is aborted,
the washing water is drained and the
programme continues with the main
washing cycle.
Detergent must be put into detergent
dispenser ”I“.
INTENSE RINSE K
(depending upon model)
Especially for sensitive skin and for areas
with very soft water.
Adds an additional rinse cycle.
ANTI-CREASE wf
(depending upon model)
Gentle, reduced final spin with
subsequent slackening.
INTENSIVE X (depending upon model)
For heavily soiled laundry, the washing
times are increased for the Cottons,
Coloureds and Easy-Care programmes.
By selecting 30--60°C, the wash
temperature is increased 4°C,
RINSE STOP D
For delicate textiles and curtains. The
laundry remains in the final rinse water.
The laundry goes through an in-between
spin except for the programme for
”
Delicates“. In this way, better rinsing
takes place.
To end the programme:
• For models equipped with a spin
speed selector
Display light for ”Rinse/Spin“ lights up.
Subsequently:
-
Machine is drained and the laundry
is spun dry.
Using the spin speed selector,
choose one of the
spin speeds appropriate for the type
of laundry. The programme then ends
automatically.
- Machine is only to be drained.
Using the spin speed selector,
choose the
”Gentle Spin” function. The laundry will
be gently spun dry,
• For models equipped with optional
function buttons
Display light for ”Rinse/Spin” lights
up.
To end the programme, press the
button ”Rinse Stop” again.
3
4
2
2
2
Page 19

Safety features
Lid opening safeguards:
After the programme starts, the appliance
lid is locked.
After the programme ends or during
”Rinse Stop”, the lid is unlocked.
Depending upon the model, if a ”Delayed
Start” was programmed, the lid remains
unlocked during the entire waiting period
before the start of the programme.
If the lid is to be opened during the
programme, quickly push the
”Start/Pause”
- button and wait
approximately 1 to 2 minutes until the lid
safety unlocks.
In order to avoid scalding, the lid
remains locked until the wash water has
cooled down somewhat.
Water safeguards:
During operation, the constant water level
control prevents possible overflows.
Spin safeguards:
The washing machine is equipped with
a safety feature that can reduce the spin
speed if imbalanced loading occurs.
In this case, the laundry may be
insufficiently spun dry. Evenly distribute
the laundry in the drum and programme
a new spin cycle..
Safeguards against excess
foaming:
Too much foam may be produced in your
washing machine during spinning.
In this case, the spinning is stopped and
the machine is drained.
The programme continues. The spin
speed is adjusted and an additional rinse
cycle is performed.
19
Page 20
20
Cleaning and care
Danger of electric shock!
Completely disconnect the washing
machine from the mains.
Never clean the washing machine with a
jet of water.
Danger of explosion!
Never use solvents for cleaning.
Danger of freezing
If there is danger of freezing, remove the
water-inlet hose from the tap and empty
the water from the drain hose and the
machine
.
Cabinet
Use only soap and water.
Control panel, base, etc.:
Use only a moist towel.
Do not use:
• Scouring powder
• Metal pads or plastic sponges
• Alcohol-based products (alcohol, diluents,
etc.)
Interior components
It is suggested:
• To leave the lid open for some time after
washing.
• To clean the plastic and rubber parts of
the washtub inlet about once a month with
soapy water.Rinse thoroughly to remove
all traces of this cleaning material.
• It is suggested that the 90°C washing
programme be run at regular intervals.
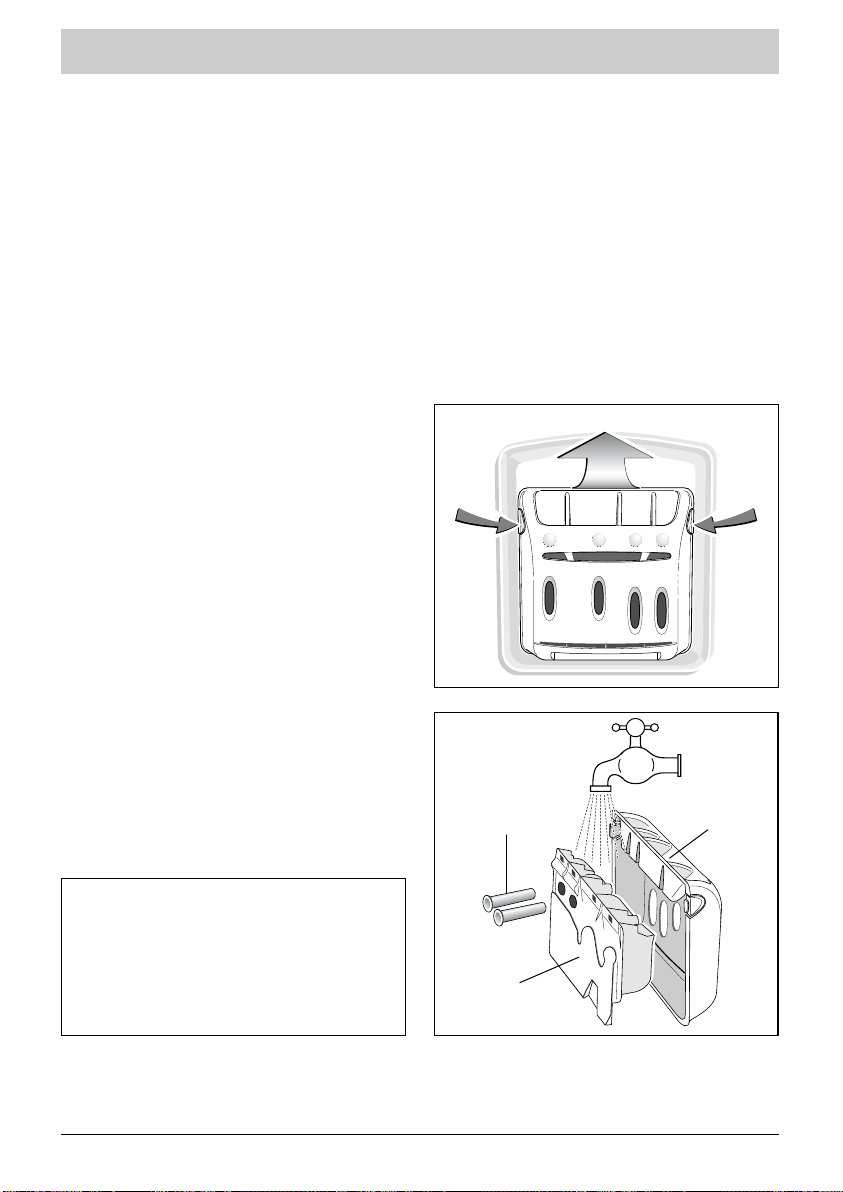
Detergent dispenser
Clean the detergent dispenser regularly. For
this purpose:
- To remove the detergent dispenser,
squeeze both pressure points
simultaneously (
Figure 10
). The dispenser
then detaches itself from the chamber
(Figure 10)
.
- Remove components
at the rear of the
dispenser and separate from the front cover
(Figure 11)
.
- Rinse the parts under running water.
Completely empty the dispenser.
- Reassemble all components in the proper order.
Snap the detergent chamber into place under
the lid of the washing machine.
Figure 10
Figure 11
Replacement of mains cable
Caution: For reasons of safety, it is essential that
the mains cable or, depending upon the model,
the entire electrical assembly along with the cable,
be replaced by the service department of the
manufacturer or a qualified specialist .
Page 21
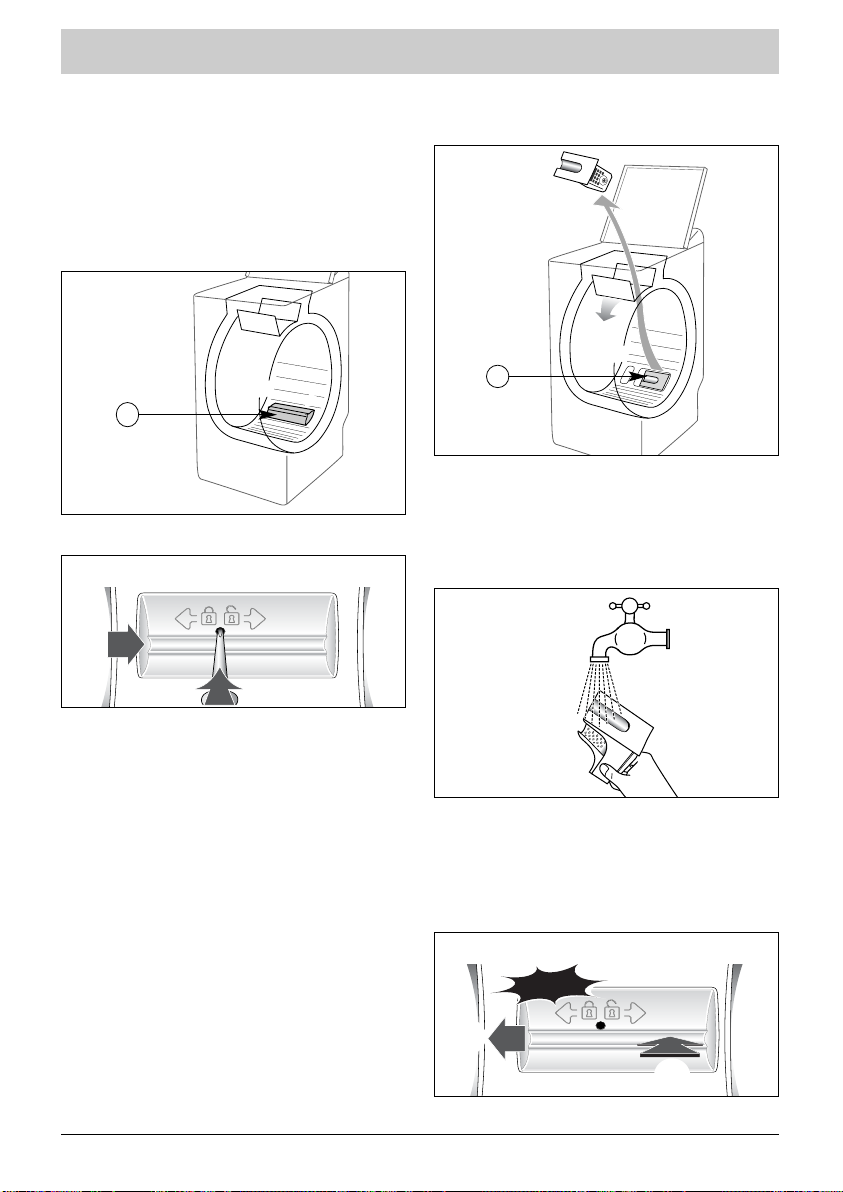
Cleaning the pump filter
This filter collects bits of fluff and small
objects, i.e. detached buttons that have
fallen into the container.
To clean, proceed as follows:
• Open the drum lid.
On the floor of the drum, there is
a laundry agitator
(Figure 12)
.
Unfasten this part
(Figure 13)
.
For this purpose:
• Insert a dowel (for example, a pencil
or a screwdriver) in the hole in part
.
• Press this dowel downwards and
simultaneously slide
towards the right
until it releases
.
• Remove .
• Gently turn the drum with the open lid to
front side of the machine
(Figure 14)
.
• Remove pump filter from its holder
(Figure 14)
.
• Remove foreign objects and fluff.
• Clean filter under running water
(Figure 15)
.
• Press filter back into its holder up to the
stop.
• Reinstall part
. Slide the laundry agitator
to the left until it engages audibly
(Figure 16)
.
Cleaning the filter
(depending upon model)
A
Figure 12
Figure 13
➀
➁
Figure 14
B
Figure 15
CLANG
Figure 16
➀
➁
21
Page 22
22
Cleaning the filter
(depending upon model)
Cleaning the pump filter
This filter collects bits of fluff and small
objects, i.e. detached buttons that have fallen
into the container.
To clean, proceed as follows:
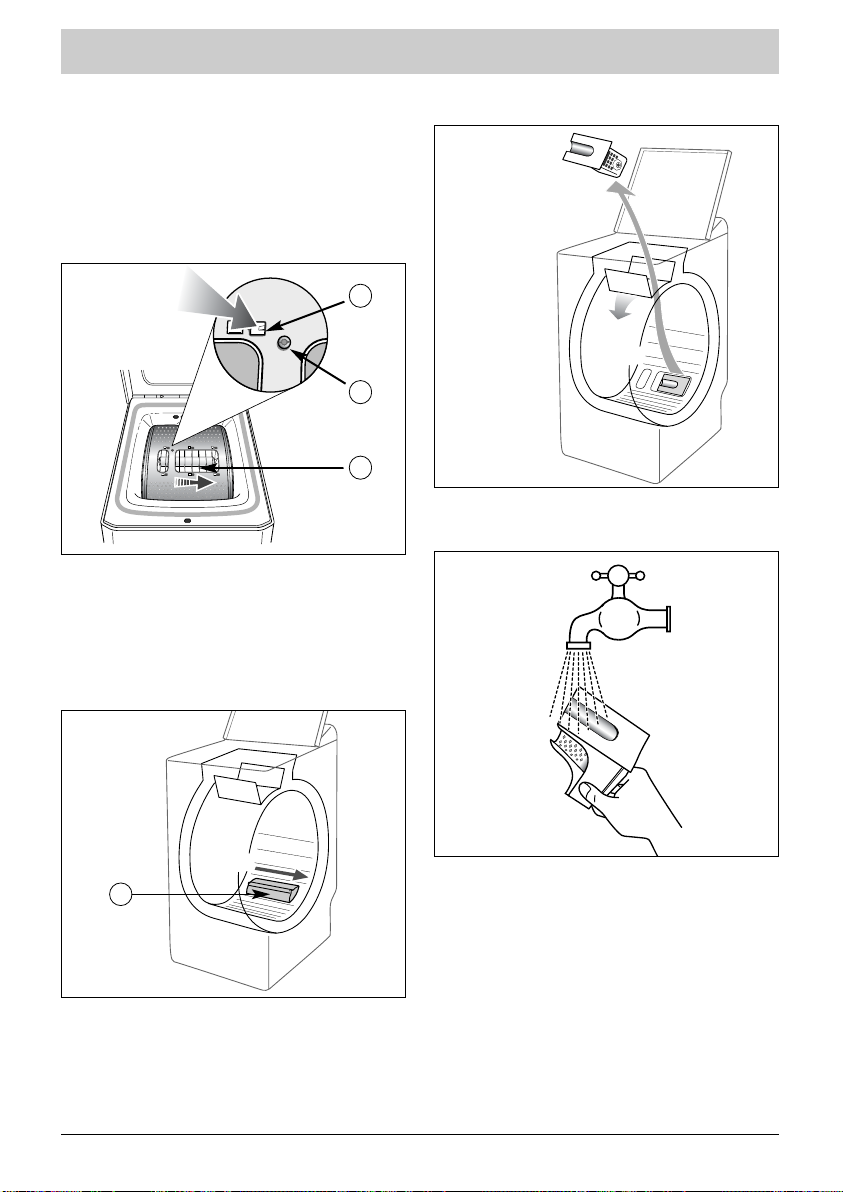
- Turn the drum so that the closed drum lid is on
the bottom: A plastic part
can be seen
(Figure 17).
- Remove screw .*
- Press to release retainer
and slide part
to the right to unlatch.
- Turn the drum so that the lid points upwards.
Open the drum lid, slide part
in the
direction of the arrow and remove
(Figure 18).
•Gently turn the drum with open doors to
front side of the machine
(Figure 19)
.
Access to the pump filter is accomplished
by removing part
.
- Remove this part from its holder
(Figure 19).
-
Remove foreign objects and fluff.
- Clean filter under running water
(Figure 20)
.
- Press filter back into its holder up to the
stop.
* Depending upon the model.
Figure 17
Figure 19
C
B
A
A
Figure 18
Figure 20
Page 23
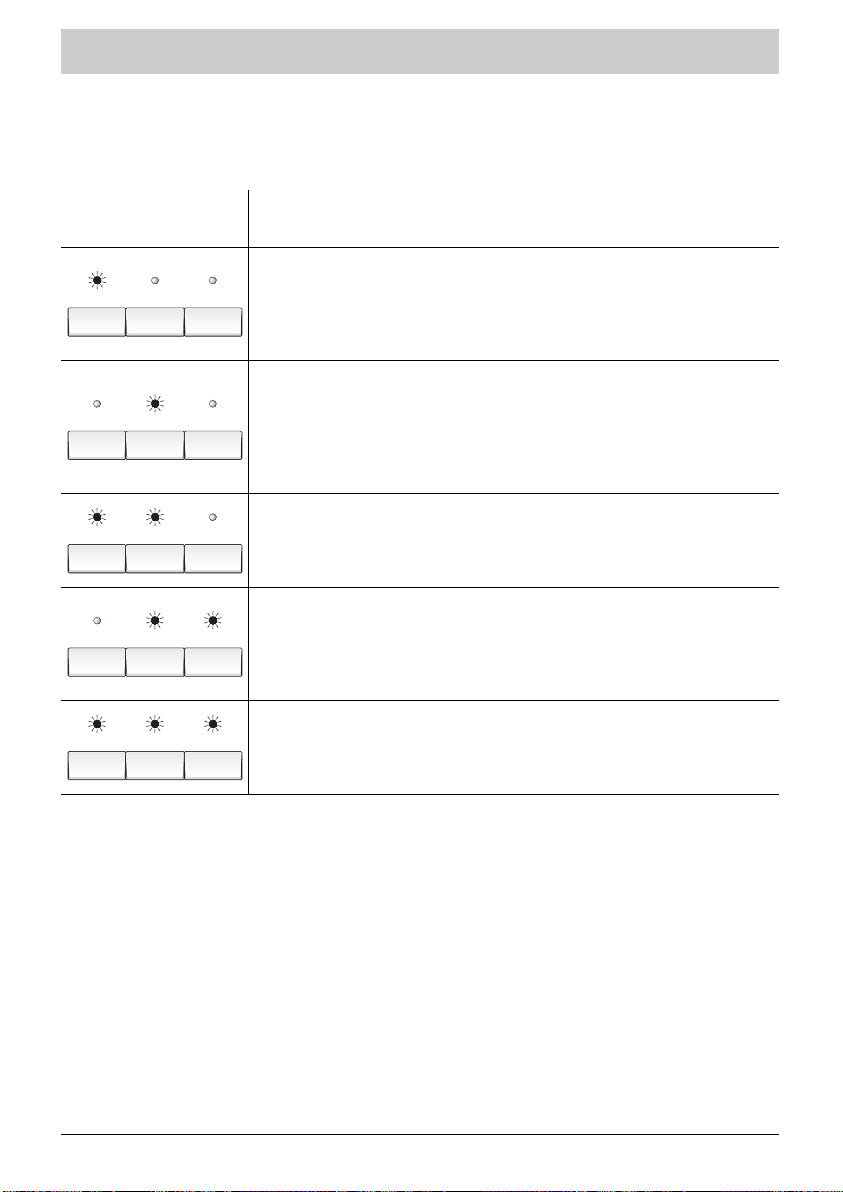
Troubleshooting minor faults
The washing machine indicates malfunctions via blinking indicator lights.
23
Blinking
indicator lights
Cause / Remedial action
Drain hose condition : The connection must not be blocked (see
chapter ”APPLIANCE CONNECTIONS: Water drainage”).
Drum blocked. Check if a small laundry item (e.g. handkerchief,
sock...) has got between the detergent dispenser and drum. For
access to the bottom of the dispenser, refer to the chapter
”CLEANING THE FILTER”.
lid improperly closed. Check if the lid is closed and start the
programme using the ”Start/Pause” button.
No water flows in. Open tap and press the ”Start/Pause” again. This
malfunction may be caused by an improper water supply hose
connection (see chapter "APPLIANCE CONNECTIONS: Water-inlet
hose“).
Pump filter blocked. Clean the pump filter (see chapter ”CLEANING
THE FILTER”) and restart the program with the ”Start/Pause” button.
Check drain hose : The connection must not be blocked (see
chapter ”APPLIANCE CONNECTIONS: Water drainage”).
Page 24

24
Faults that require repair service
Three simultaneously blinking display lights indicate that the service department is needed.
If this happens,
- Set programme selector on ”Stop”
- Pull out mains plug for 10 s
- Reinsert mains plug
- Select programme and start again.
If the indicated fault remains, the service department is to be notified.
SUGGESTION:
Disconnect washing machine from mains and turn off tap.
Page 25
25
What to do if...
Problem
The programme does
not start
Severe vibrations during
the spin cycle
The laundry was not or
was insufficiently spun
dry
Water runs out from the
appliance
The machine does not
drain out
The lid does not open
The drum lid opens too
slowly
Depending upon the model.
Possible cause / Remedial action
• The selection of the programme was not fully completed:
- The ”Start/Pause” button has not been pressed.
- Programme selector remains in the Stop position.
• The washing machine is not supplied with power:
- Check if the mains cable is connected.
- Check protection devices.
• The tap is closed.
• The inlet hose is torn
• The lid is not properly closed.
• The transportation protection devices for the appliance have not been
completely removed:
- Check if all the transportation protection devices were removed.
(see chapter ”REMOVING THE TRANSPORTATION PROTECTION
DEVICES”)
• The floor is not level.
• The appliance rests on the two "front" castors (depending upon
model).
- Push the locking lever towards the right.
• You have chosen a programme without a spin cycle, i.e. ”Gentle Spin”.
• The imbalance control system has detected an improper distribution
of laundry in the drum:
- Re-sort the laundry and again select ”Spin”.
• the drain hose is improperly inserted into the drainage line.
• the water-inlet hose leaks at the machine and at the tap:
- Check the gaskets and connections.
• ”Rinse Stop” was chosen.
• The drain pump filter is blocked:
- clean the filter (see chapter
”CLEANING THE FILTER”)
• The drain hose is broken or crimped.
• The programme has not yet ended.
The lid remains locked during the entire time of the programme.
• The washing machine has not been used for a long time.
• The washing machine is in a room that is too cold.
• Residual detergent (powder) is blocking the hinges.
- Remove residual detergent.
If a malfunction can not be remedied with the assistance of the following charts
•Turn programme selector to ”Off”.
• Disconnect washing machines from mains.
• Turn off tap.
Danger of electric shock!
Have repairs carried out only through the service department or by authorised specialists.
Page 26
26
Customer Service
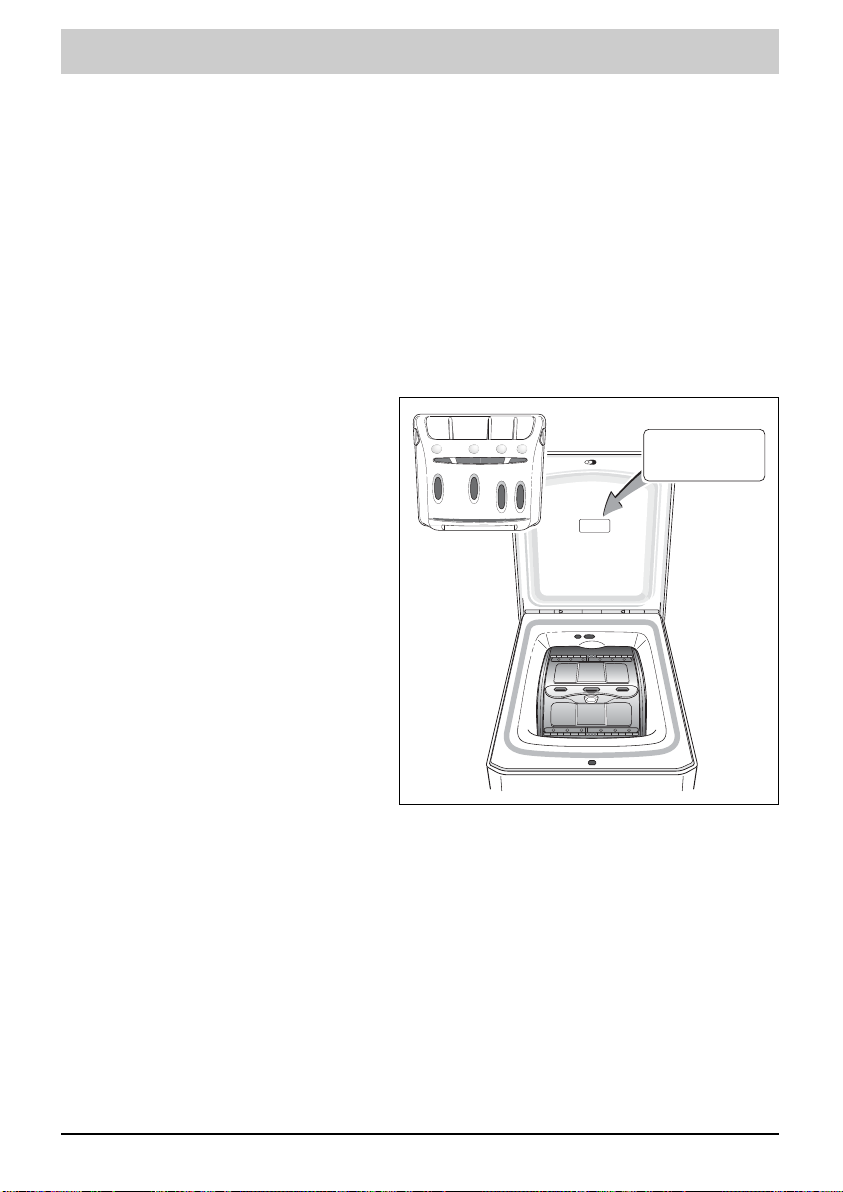
The product number (E-Nr) may be
found behind the detergent dispenser.
Directions for removal may be found in
the chapter entitled ”Cleaning and
Care“.
Every washing machine that leaves our factory is carefully checked to ensure that it is functioning
properly and is free of defects. If there are any questions - especially in regards to setting up
and connecting the washing machine - our Customer Service is at your disposal.
Before calling Customer Service, please make sure that you can not eliminate the fault yourself
(see chapter ”hat to do if...” and ”Fixing small malfunctions by yourself”). This is because consultation
provided by our technicians, even within the warranty period, will lead to costs being incurred by
yourself. Your nearest Customer Service centre can be found in the index supplied. When calling
Customer Service, please specify the product number (E-No.) and production number (FD-No.)
of your appliance. This information can be found on the identification plate.
By specifying the product number and production number of your appliance, you help us in our
attempts to prevent unnecessary travelling. You save the associated extra costs.
Further information as well as a selection of our products may be found on our web site:
http://www.siemens.de/hausgeraete
E-Nr
FD
Page 27

27
Page 28
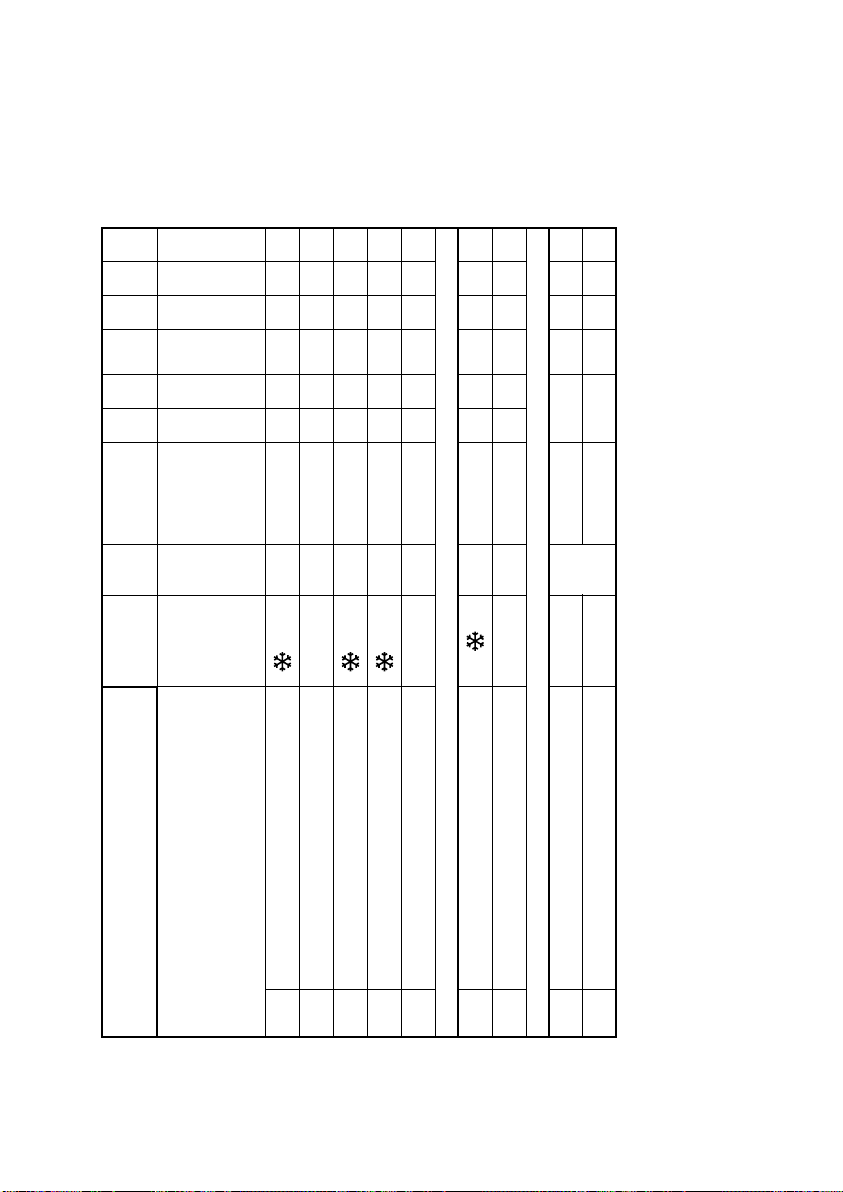
0905 en
G0080-02
To select the most suitable programme, follow directions on the labels that are found in most pieces of laundry.
(*)
The programme length was given as an average value ”Without Options” It can vary depending
upon wash load and temperature.
- If a programme with”.
Prewash" is selected, the programme is extended from 18 - 25 minutes.
- If a programme with ”
Intensive" is selected, the programme is extended from 10 - 17 minutes.
- If a programme with ”Intensive Rinse” is selected, the programme is extended for 17 minutes.
*Functions or options depending upon model
Gentle Spin*
●●●
1.5
1.0
●●●
Programme Chart
Laundry type
Maximum load
(kg)
Depending
upon
textile type
Temperature
(°C) *
Prewash *
Intensive
Rinse *
Anti-Crease*
Rinse Sop
COTTONS / COLOUREDS
- 90°
- 60°
60°
- 40°
30°- -40°
40° 2.5
5.0
●● ●●
●● ●●
●●
●
●
●● ●●●
●●
●●●●
●
2.5
5.0
1.0
Easy-Care
COLOUREDS with PREWASH*
DELICATES
WOOLLENS
HAND WASHABLE TEXTILES
Rinse only
QUICK 40
SPIN DRY only
Additional programmes
Programme
length*
30
min
28
min
28 - 33
min
30 - 40
min
1:19 - 1:40 hrs
2:13 - 2:30 hrs
2
:
03 - 2
:
20 hrs
17
min
8
min
Intensive *
●
●
Special programmes
w f
Q
D
X
K
P
y
y
A
q
U
u
K
B
I
SIEMENS ELECTRONIC APPLIANCES
GMBH
Robert Bosch Hausgeräte GmbH
Carl-Wery-Straße 34
81739 MÜNCHEN
DEUTSCHLAND
 Loading...