

Page 1

Installation instructions
Installatieaanwijzingen
en
nl
Page 2

2
en
page 03–07
nl
pagina 08–12
Page 3

Important installation Properly dispose of packaging materials.
notes Do not use oven door handle for
transporting or handling the unit during
installation.
WARNING: Connection and first start of the
appliance may only be performed by an
authorised specialist.
Connection have to be made using a mains
connection cable not lighter than H05RR-F
300 V / 500 V Rubber Flexible Cable or H05VV-F
300V / 500V PVC Flexible Cable.
Rated consumption, rated voltage and type
no. of the appliance:
See appliance nameplate behind the oven door
to the left beneath the side edge of the oven.
The unit's nameplate is located at on the
sidewall of the unit.
Electrical safety of the appliance can be ensured
only if the equipment earth in the building
installation has been installed according to
regulations.
A separator must be installed in the household
circuit. A suitable separator is a switch that has a
The connection diagramm is contact gap of more than 3 mm and interrupts all
located on the rear panel of the poles. Other examples are LS switches, fuses
appliance. and contactors.
In the case of repairs interrupt all power
connections to the unit.
The properly installed appliance must be covered
on all sides in such a fashion that not even
components with rough insulation are exposed to
the touch.
The cover must be removable with tools only.
3
Assembly Instructions
For the installer
and kitchen expert!
~
380-400V2N
~
220-230V
~
380-400V3N
L1
N
L2
L3
N
N
L3
123455
544332211
L1
L1
Page 4
4
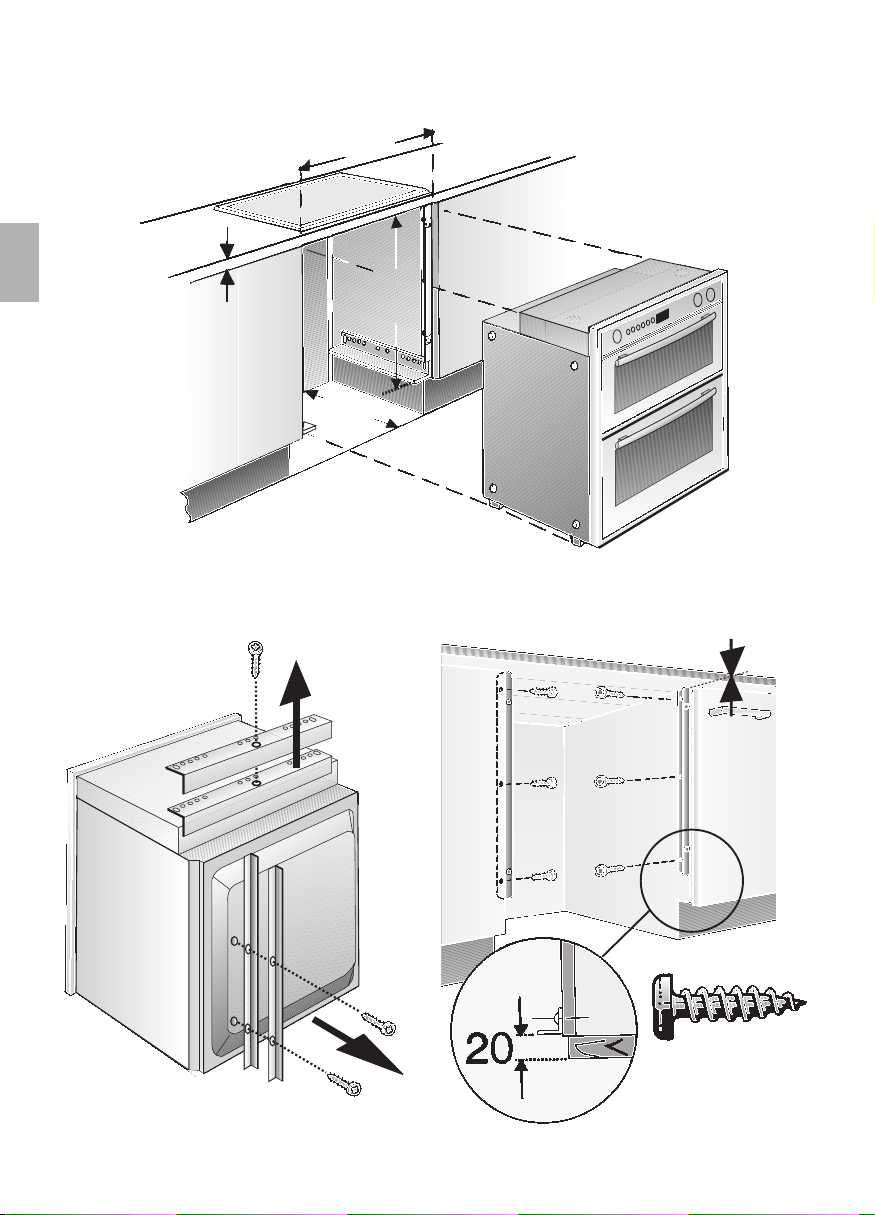
Installation without cupboard
1. 2.
600
min. 38
550
min.
720
min.
0
Page 5
5
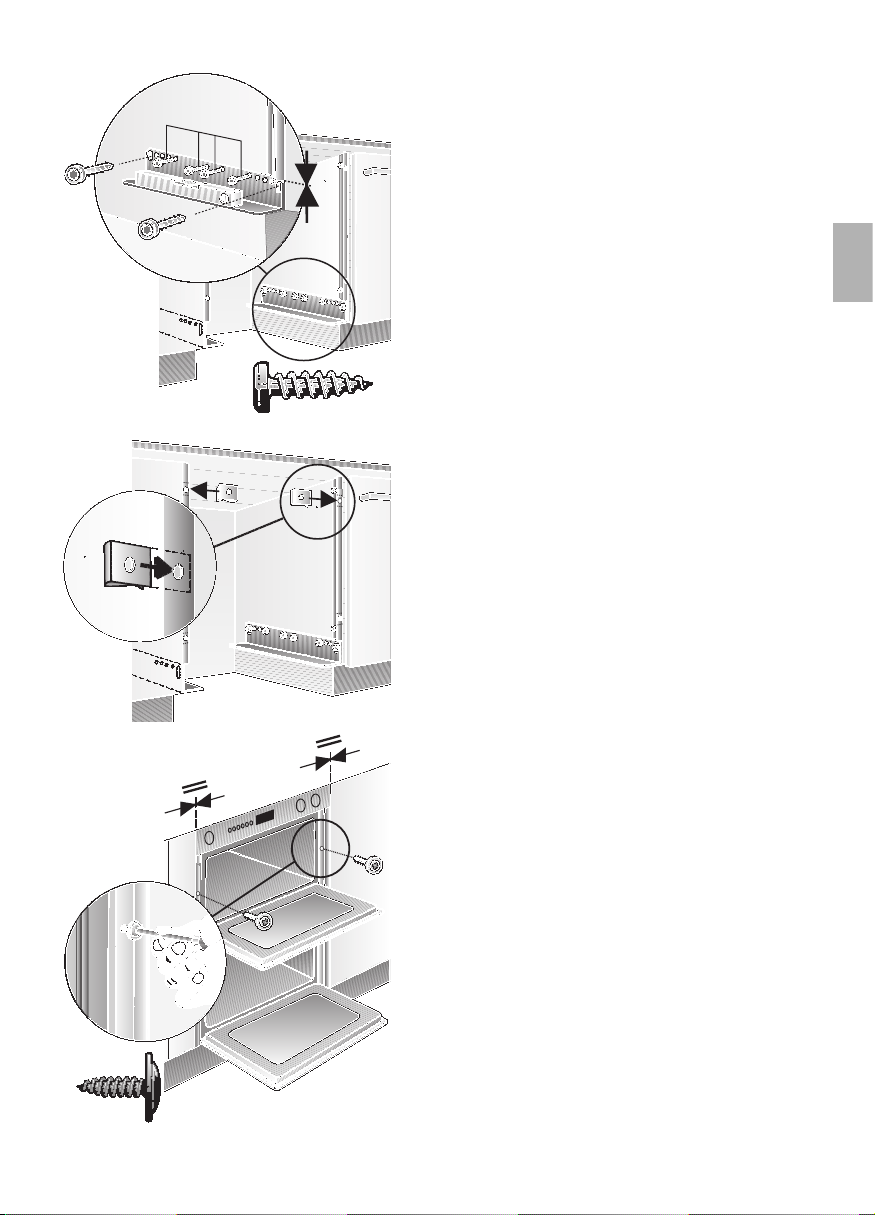
Installation of the
build-in oven
To burn-in the insulation, heat up the oven
prior to installing the unit.
Push the built-in oven into the housing unit
and align the unit until it is in a level
position.
Open the oven door and, using one screw
on each side, fasten the built-in oven to the
side strips of the housing unit
(see illustration).
The two screws (supplied with the built-in
oven) must be started slightly outward.
Verify that the built-in oven is positioned
securely and in a level position, and that
the required installation dimensions have
been maintained.
The properly installed appliance must be
covered on all sides in such a fashion that
not even components with rough insulation
are exposed to the touch.
The cover must be removable with tools
only.
Kitchen furniture
Oven housing units from virtually all lines of
kitchen furniture are suitable for installing the
built-in oven.
However, the veneers or plastic laminates
on the housing unit must be applied with
heat-resistant glue (90 °C).
If plastic laminate or glue are not sufficiently
heat-resistant, warping, bubbling or
detachment of the finish may result.
4.
5.
3.
2.
1.
3.
0
Page 6

6
Installation with cupboard
1.
560-
570
min. 38
min. 3
720
min.
550
Page 7

7
Installation of the
build-in oven
To burn-in the insulation, heat up the oven
prior to installing the unit.
Push the built-in oven into the housing unit
and align the unit until it is in a level
position.
Open the oven door and, using one screw
on each side, fasten the built-in oven to the
side strips of the housing unit
(see illustration).
When screwing in the two screws (enclosed
in a bag with the built-in oven), ensure that
they are pointing outwards at a slight angle.
Please use these screws only.
Verify that the built-in oven is positioned
securely and in a level position, and that
the required installation dimensions have
been maintained.
The properly installed appliance must be
covered on all sides in such a fashion that
not even components with rough insulation
are exposed to the touch.
The cover must be removable with tools
only.
Kitchen furniture
Oven housing units from virtually all lines of
kitchen furniture are suitable for installing the
built-in oven.
However, the veneers or plastic laminates
on the housing unit must be applied with
heat-resistant glue (90 °C).
If plastic laminate or glue are not sufficiently
heat-resistant, warping, bubbling or
detachment of the finish may result.
2.
Page 8

Belangrijke
Verpakking op correcte wijze afvoeren.
aanwijzingen Deurgreep van het fornuis niet gebruiken bij het
transporteren of het inbouwen van het apparaat.
Let op: de aansluiting en inbedrijfstelling mogen
uitsluitend door een erkend vakman worden
uitgevoerd.
Voor de aansluiting dient een stroomkabel
H05RR-F te worden gebruikt.
Nominaal opgenomen vermogen, nominale
spanning en typenummer van het apparaat:
Zie het typeplaatje achter de ovendeur, linksonder
op de zijrand van de oven.
Het typeplaatje bevindt zich op de zijkant van
het apparaat.
De elektrische veiligheid van het apparaat is
slechts gewaarborgd indien de elektrische
installatie in uw woning volgens de voorschriften
is geaard.
In de installatie moet een scheidingsvoor-ziening
worden aangebracht. Als scheidingsvoorzieningen
gelden schakelaars met een contactopening van
meer dan 3 mm en uitschakeling met alle polen.
Daarbij horen geaarde schakelaars, zekeringen en
beveiligingen.
Bij reparaties het apparaat altijd van het
stroomnet scheiden.
Het volgens de voorschriften ingebouwde
apparaat moet aan alle zijden zo zijn
afgeschermd dat er geen onderdelen kunnen
worden aangeraakt, ook geen geïsoleerde.
De afscherming mag uitsluitend met behulp van
gereedschap kunnen worden verwijderd.
8
Montagevoorschrift
Voor de installateur
en keukenvakman!
Het aansluitschema bevindt
zich op de achterzijde van het
apparaat.
~
380-400V2N
~
220-230V
~
380-400V3N
L1
N
L2
L3
N
N
L3
123455
544332211
L1
L1
Page 9

9
Installatie zonder kast
1. 2.
600
min. 38
550
min.
720
min.
0
Page 10

10
Installatie van de
inbouwoven
Om de isolatie in te branden, moet de oven
worden verwarmd voordat het apparaat
wordt geïnstalleerd.
Duw de inbouwoven in de behuizing en zorg
ervoor dat de oven in horizontale positie
staat.
Open de ovendeur en gebruik de schroef
aan beide zijden om de inbouwoven te
bevestigen aan de zijkantstrips van de
behuizing (zie afbeelding).
De twee schroeven (bijgevoegd bij de
inbouwoven) moeten iets schuin naar buiten
worden aangezet.
Controleer of de inbouwoven stevig is
aangebracht en in horizontale positie
staat, en dat de vereiste installatieafmetingen zijn nageleefd.
Het correct geïnstalleerde apparaat moet
aan alle zijden zodanig zijn afgeschermd dat
zelfs onvolledig geïsoleerde componenten
niet aangeraakt kunnen worden.
De afscherming moet alleen met behulp van
gereedschap verwijderd kunnen worden.
Keukenmeubels
Ovenbehuizingen van vrijwel alle soorten
keukenmeubels zijn geschikt voor installatie
van de inbouwoven.
Het vernis of het plasticlaminaat van de
behuizing moeten echter zijn behandeld met
hittebestendige lijm (90 °C).
Indien het plasticlaminaat of de lijm
onvoldoende hittebestendig zijn, kan de
deklaag kromtrekken, opbollen of loslaten.
4.
5.
3.
2.
1.
3.
0
Page 11

11
Installatie met kast
1.
560-
570
min. 38
min. 3
720
min.
550
Page 12

12
Installatie van de
inbouwoven
Om de isolatie in te branden, moet de oven
worden verwarmd voordat het apparaat
wordt geïnstalleerd.
^ Duw de inbouwoven in de behuizing en zorg
ervoor dat de oven in horizontale positie
staat.
Open de ovendeur en gebruik de schroef
aan beide zijden om de inbouwoven te
bevestigen aan de zijkantstrips van de
behuizing (zie afbeelding).
De twee schroeven (deze vindt u in een
zakje in de inbouwoven) moeten bij het
vastdraaien iets schuin naar buiten worden
aangezet. Gebruik a.u.b. uitsluitend deze
schroeven.
Controleer of de inbouwoven stevig is
aangebracht en in horizontale positie
staat, en dat de vereiste installatieafmetingen zijn nageleefd.
Het correct geïnstalleerde apparaat moet
aan alle zijden zodanig zijn afgeschermd dat
zelfs onvolledig geïsoleerde componenten
niet aangeraakt kunnen worden.
De afscherming moet alleen met
gereedschap verwijderd kunnen worden.
Keukenmeubels
Ovenbehuizingen van vrijwel alle soorten
keukenmeubels zijn geschikt voor installatie
van de inbouwoven.
Het vernis of het plasticlaminaat van de
behuizing moeten echter zijn behandeld met
hittebestendige lijm (90 °C).
Indien het plasticlaminaat of de lijm
onvoldoende hittebestendig zijn, kan de
deklaag kromtrekken, opbollen of loslaten.
2.
Page 13

13
Notes
Page 14

14
Notes
Page 15

15
Notities
Page 16

9000 209 223
Printed in Germany 0906 Es.
 Loading...