

Page 1
Fully automatic espresso machine
EQ.700 classic
TP7.....
User manual
en
Manuel d'utilisation
fr
Gebruikershandleiding
nl
Instrukcja obsługi
pl
Návod kobsluze
cs
Руководство пользователя
ru
Керівництво з експлуатації
uk
Gebrauchsanleitung
de
Register your product on My Siemens and discover
exclusive services and offers.
siemens-home.bsh-group.com/welcome
The future moving in.
Siemens Home Appliances
Page 2
A B C D E F G H
I
1
1
2
3
4 5 6
7
8
9
10
11
12
13
15
14
2
Page 3
3
5 6
7 8
4
9 10
Page 4
11 12
13 14
15 16
17 18
Page 5

Table of contents
en
1 Safety............................................7
1.1 General information....................7
1.2 Intended use...............................7
1.3 Restriction on user group...........7
1.4 Safety information.......................7
2 Environmental protection and
saving energy.............................11
2.1 Disposing of packaging ...........11
2.2 Tips for saving energy..............11
3 Installation and connection.......11
3.1 Scope of delivery......................11
3.2 Installing and connecting the
appliance..................................11
4 Familiarising yourself with
your appliance............................12
4.1 Appliance .................................12
4.2 Controls ....................................12
5 Accessories................................13
6 Before using for the first time ...13
6.1 Preparing and cleaning the
appliance..................................13
6.2 Checking the water hard-
ness..........................................13
6.3 Performing initial start-up .........14
6.4 General information..................14
7 Basic operation ..........................15
7.1 Switching the appliance on
or off .........................................15
7.2 Dispensing beverages .............15
7.3 doubleShot and tripleShot........15
7.4 Dispensing a coffee bever-
age with milk ............................15
7.5 Dispensing two cups at once...16
8 Grinder........................................16
8.1 Adjusting the grinding level......16
9 Water filter ..................................17
9.1 Inserting the water filter............17
9.2 Changing or removing the
water filter.................................17
10 Childproof lock.........................17
10.1 Activating the child-proof
lock.........................................17
10.2 Deactivating the childproof
lock.........................................18
11 Cup heater1...............................18
11.1 Activating and deactivating
the cup heater1.......................18
12 Favourites.................................18
12.1 Saving beverages from the
beverage selection.................18
12.2 Saving the beverage in the
menu ......................................18
12.3 Changing beverage set-
tings........................................18
12.4 Deleting favourites..................18
12.5 Sorting favourites ...................19
13 HomeConnect .........................19
13.1 HomeConnect settings..........19
13.2 Data protection.......................20
14 Basic settings...........................20
14.1 Changing the basic set-
tings........................................20
14.2 Overview of the basic set-
tings........................................21
15 Cleaning and servicing............22
15.1 Dishwasher-safe compon-
ents.........................................22
15.2 Cleaning agent.......................22
15.3 Cleaning the appliance ..........23
15.4 Cleaning the drip tray and
coffee dregs container ...........24
15.5 Service programmes..............24
1
Depending on the appliance specifications
5
Page 6

en
16 Troubleshooting.......................26
17 Transportation, storage and
disposal ....................................31
17.1 Activating frost protection ......31
17.2 Disposing of old appliance ....31
18 Customer Service.....................31
18.1 Product number (E-Nr.),
production number (FD)
and consecutive numbering
(Z-Nr.) .....................................32
18.2 Warranty conditions................32
19 Technical specifications..........32
20 Declaration of Conformity .......32
6
Page 7

Safety en
1 Safety
Observe the following safety instructions.
1.1 General information
¡ Read this instruction manual carefully.
¡ Keep the instruction manual and the product information safe
for future reference or for the next owner.
¡ Do not connect the appliance if it has been damaged in transit.
1.2 Intended use
Only use this appliance:
¡ for preparing hot drinks.
¡ In private households and in enclosed spaces in a domestic en-
vironment.
¡ Up to an altitude of max. 2000m above sea level.
1.3 Restriction on user group
This appliance may be used by children aged 8 or over and by
people who have reduced physical, sensory or mental abilities or
inadequate experience and/or knowledge, provided that they are
supervised or have been instructed on how to use the appliance
safely and have understood the resulting dangers.
Children must not play with the appliance.
Children must not perform cleaning or user maintenance unless
they are at least 8 years old and are being supervised.
Keep children under the age of 8 years away from the appliance
and power cable.
1.4 Safety information
WARNING‒Risk of suffocation!
Children may put packaging material over their heads or wrap
themselves up in it and suffocate.
▶
Keep packaging material away from children.
▶
Do not let children play with packaging material.
7
Page 8

en Safety
Children may breathe in or swallow small parts, causing them to
suffocate.
▶
Keep small parts away from children.
▶
Do not let children play with small parts.
WARNING‒Risk of electric shock!
Improper installation is dangerous.
▶
Connect and operate the appliance only in accordance with the
specifications on the rating plate.
▶
Connect the appliance to a power supply with alternating current only via a properly installed socket with earthing.
▶
The protective conductor system of the domestic electrical installation must be properly installed.
If the appliance or the power cord is damaged, this is dangerous.
▶
Never operate a damaged appliance.
▶
Never operate an appliance with a cracked or fractured surface.
▶
Never pull on the power cord to unplug the appliance. Always
unplug the appliance at the mains.
▶
If the appliance or the power cord is damaged, immediately unplug the power cord or switch off the fuse in the fuse box.
▶
Call customer services. →Page31
Incorrect repairs are dangerous.
▶
Repairs to the appliance should only be carried out by trained
specialist staff.
▶
Only use genuine spare parts when repairing the appliance.
▶
If the power cord of this appliance is damaged, it must be replaced by the manufacturer, the manufacturer's Customer Service or a similarly qualified person in order to prevent any risk.
An ingress of moisture can cause an electric shock.
▶
Never immerse the appliance or the power cord in water.
▶
Liquids must not be spilled on the appliance plug connection.
▶
Only use the appliance in enclosed spaces.
▶
Never expose the appliance to intense heat or humidity.
▶
Do not use steam- or high-pressure cleaners to clean the appliance.
8
Page 9
Safety en
WARNING‒Risk of fire!
The appliance will become hot.
▶
Ventilate the appliance adequately.
▶
Never operate the appliance in a cupboard.
It is dangerous to use an extended power cord and non-approved
adapters.
▶
Do not use extension cables or multiple socket strips.
▶
If the power cord is too short, contact Customer Service.
▶
Only use adapters approved by the manufacturer.
WARNING‒Risk of burns!
Some parts of the appliance become very hot.
▶
Never touch hot appliance parts.
▶
Allow hot appliance parts to cool down before touching.
WARNING‒Risk of scalding!
Freshly prepared drinks are very hot.
▶
Leave drinks to cool down if necessary.
▶
Do not let escaping liquids or steam come into contact with
your skin.
A remote start via the Home Connect app while the appliance is
unattended may cause scalding to third parties.
▶
Do not reach under the coffee outlet during the dispensing of
drinks.
▶
Keep other persons, in particular children, away from the appli-
ance.
WARNING‒Risk of injury!
Improper use of the appliance may endanger the user.
▶
To avoid injuries, only use the appliance for its intended pur-
pose.
Trapped fingers when closing the appliance door.
▶
Be careful of your fingers when closing the appliance door.
The grinder rotates.
▶
Never reach into the grinder.
9
Page 10
en Safety
WARNING‒Danger: Magnetism!
The appliance contains permanent magnets. These may affect
electronic implants, e.g. pacemakers or insulin pumps.
▶
People with electronic implants must stand at least 10 cm away
from the appliance.
▶
This minimum distance of 10 cm must also be observed for the
water tank when removed.
WARNING‒Risk of harm to health!
Soiling on the appliance may be harmful to health.
▶
To ensure hygiene, follow the cleaning instructions for the appli-
ance.
10
Page 11
Environmental protection and saving energy en
A
B
C
D
E
F
G
H
I
Environmental protection and saving energy
2 Environmental protec-
tion and saving energy
Environmental protection and saving energy
2.1 Disposing of packaging
The packaging materials are environmentally compatible and can be recycled.
▶
Sort the individual components by
type and dispose of them separ-
ately.
2.2 Tips for saving energy
If you follow these instructions, your
appliance will use less power.
Set the interval for automatic switchoff to the smallest value.
a
If the appliance is not being used,
it will switch itself off earlier.
→"Basic settings", Page20
Do not interrupt the dispensing process prematurely.
a
The amount of water or milk that is
heated is used optimally.
Descale the appliance regularly.
a
Limescale deposits increase the
appliance's energy consumption.
Installation and connection
3 Installation and con-
nection
Installation and connection
You can find out where and how best
to install your appliance here. You
will also learn how to connect your
appliance to the power supply.
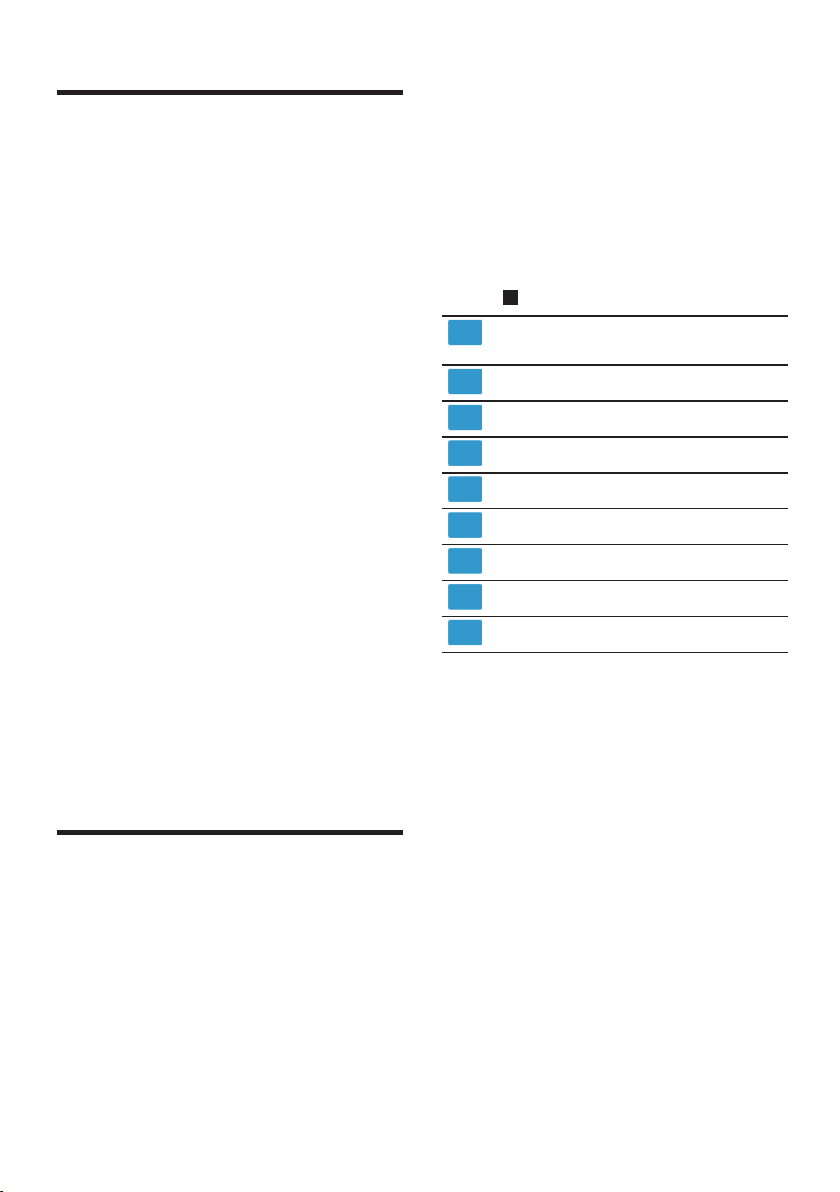
3.1 Scope of delivery
After unpacking all parts, check for
any damage in transit and completeness of the delivery.
Note:Different accessories are enclosed depending on the appliance
model. This accessory is shown in a
frame with a dashed line.
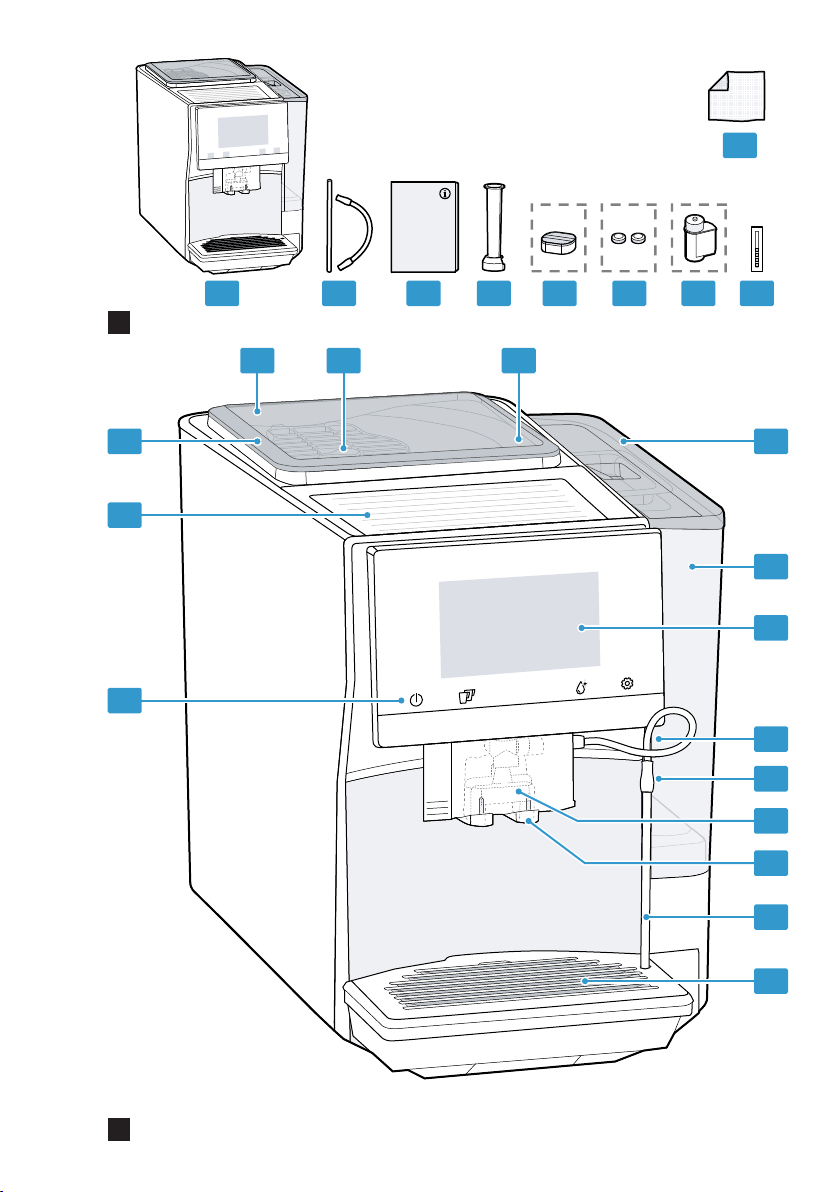
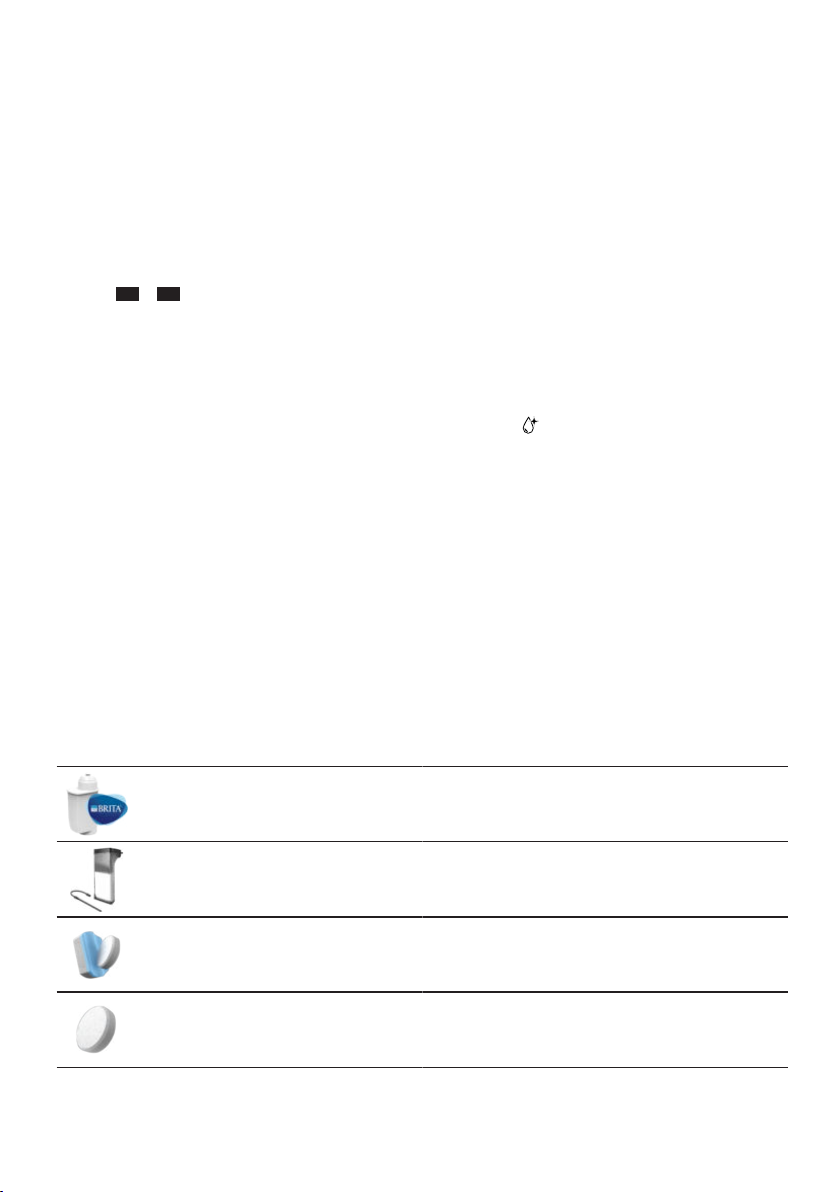
→Fig.
1
Fully automatic coffee machine
Milk tube and suction pipe
Instruction manual
Insertion aid for water filter
Descaling tablets
Cleaning tablets
Water filter
1
1
1
Water hardness testing strip
Microfibre cloth
1
Depending on the appliance specifications
3.2 Installing and connecting the appliance
ATTENTION!
Risk of damage to the appliance. If
the appliance is not started up correctly, it may be damaged.
▶
Use the appliance in frost-free
rooms only.
▶
If the appliance has been transported or stored below 0°C, wait
3hours at room temperature before starting it up.
▶
After plugging in, always wait approx.5seconds.
11
Page 12
en Familiarising yourself with your appliance
1
2
3
4
5
6
7
8
9
10
11
12
13
14
15
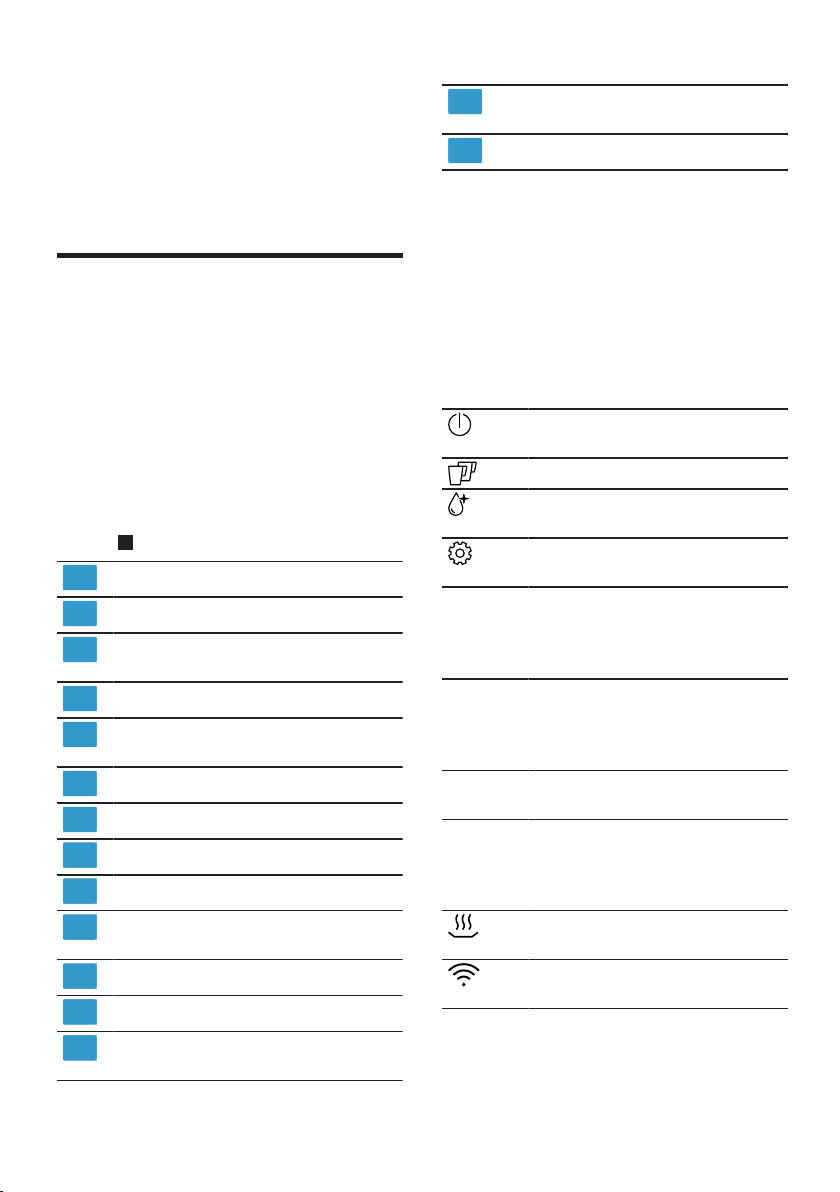
1. Place the appliance on a level, wa-
ter-resistant surface that is capable
of bearing its weight.
2. Using the mains plug, connect the
appliance to an earthed socket
that has been correctly installed.
Familiarising yourself with your appliance
4 Familiarising yourself
with your appliance
Familiarising yourself with your appliance
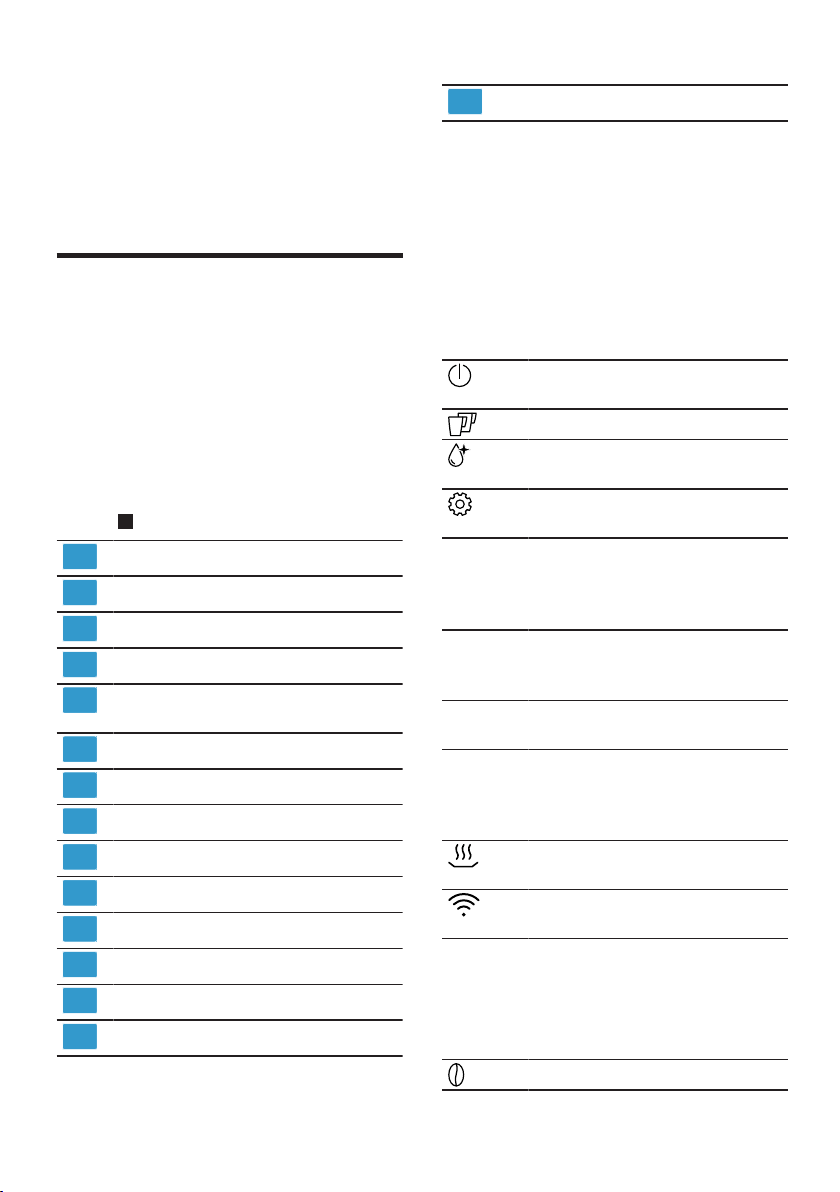
4.1 Appliance
You can find an overview of the parts
of your appliance here.
Note:Individual details and colours
may differ, depending on the appliance model.
→Fig.
2
Touch fields
Cup heater
Aroma lid
Bean container
Rotary selector for grinder
setting
Tablet compartment
Cover for water tank
Water tank
Touch display
Brewing chamber door
Rating plate
Milk system
Beverage outlet cover
Milk hose and suction pipe
1
Depending on the appliance specifications
1
Drip tray
1
Depending on the appliance specifications
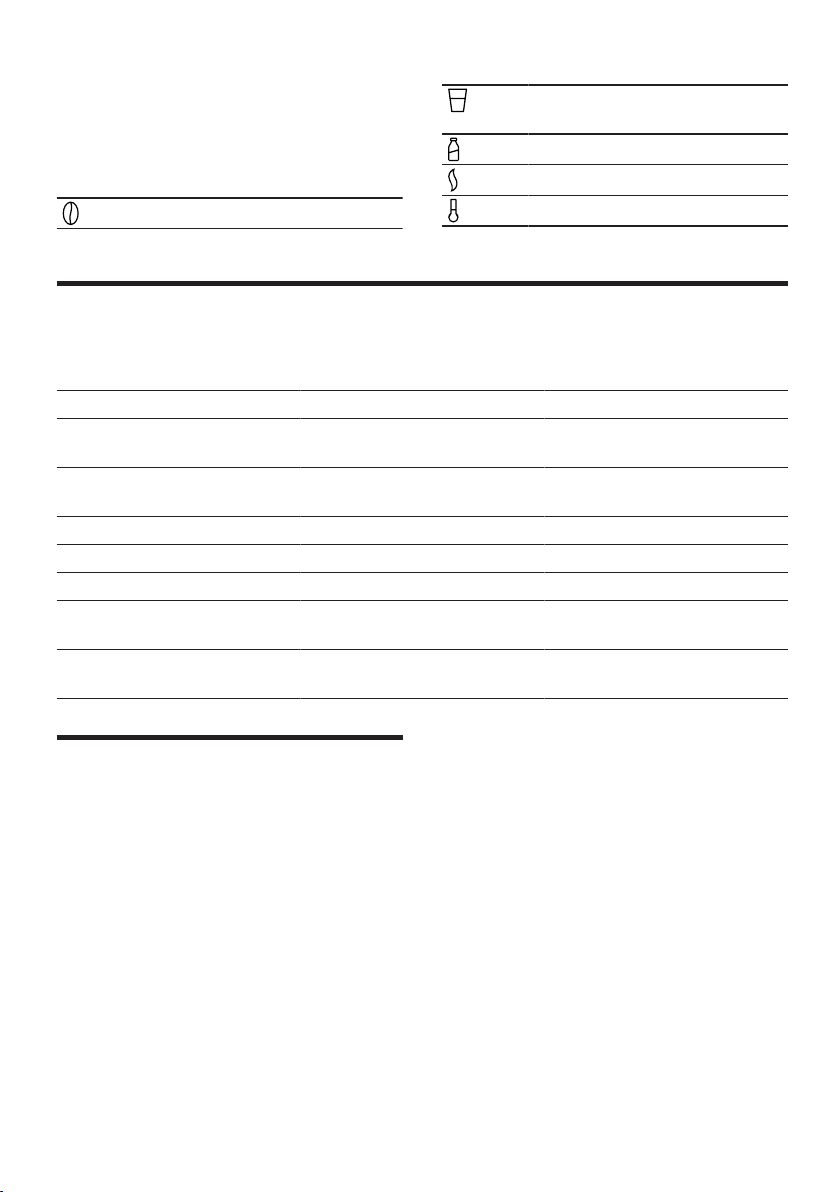
4.2 Controls
You can find an overview of the controls for your appliance here.
Touch fields
Here you can find an overview of the
symbols that are always visible.
Switch the appliance on or
off.
Dispense two cups.
Open or close the service
programmes.
Open or close the set-
tings.
Touch display
The touch display functions both as a
display and a control.
Favourites
Classics
coffeeWorld
Note:When the appliance is
switched on, you have additional operating options with relevant displays
and messages, e.g. beverage settings.
Select saved beverages
with personal settings.
→Page18
Select standard beverages.
Select basic beverages
which can be extended in
conjunction with
Home Connect.
Cup warmer is switched
on.
Appliance is connected to
Home Connect.
Set strength.
12
Page 13
Accessories en
Set per-cup quantity.
Set milk ratio.
Accessories
Set aroma.
Set temperature.
5 Accessories
Accessories
Use original accessories. These have been made especially for your appliance.
Accessories Retail Customer service
Cleaning tablets TZ80001A
TZ80001B
Descaling tablets TZ80002A
TZ80002B
Water filter TZ70003 00575491
Water filter pack of 3 TZ70033A Microfibre cloth - 00460770
Care set TZ80004A
TZ80004B
Adapter for milk contain-
TZ70001 17006005
ers
Before using for the first time
6 Before using for the
first time
Before using for the first time
Prepare the appliance for use.
▶
Do not use glazed coffee beans.
▶
Do not use caramelised coffee
beans.
▶
Do not use coffee beans that have
been treated with additives containing sugar.
▶
6.1 Preparing and cleaning the appliance
Remove the protective foil and clean
the appliance and individual parts.
Note:Fill the water tank each day
with fresh, cold, non-carbonated water.
Do not add ground coffee.
Tip:To keep the coffee beans at
their best, store them in a sealed
container in a cool place.
You can keep the coffee beans in the
bean container for several days
without them losing their aroma.
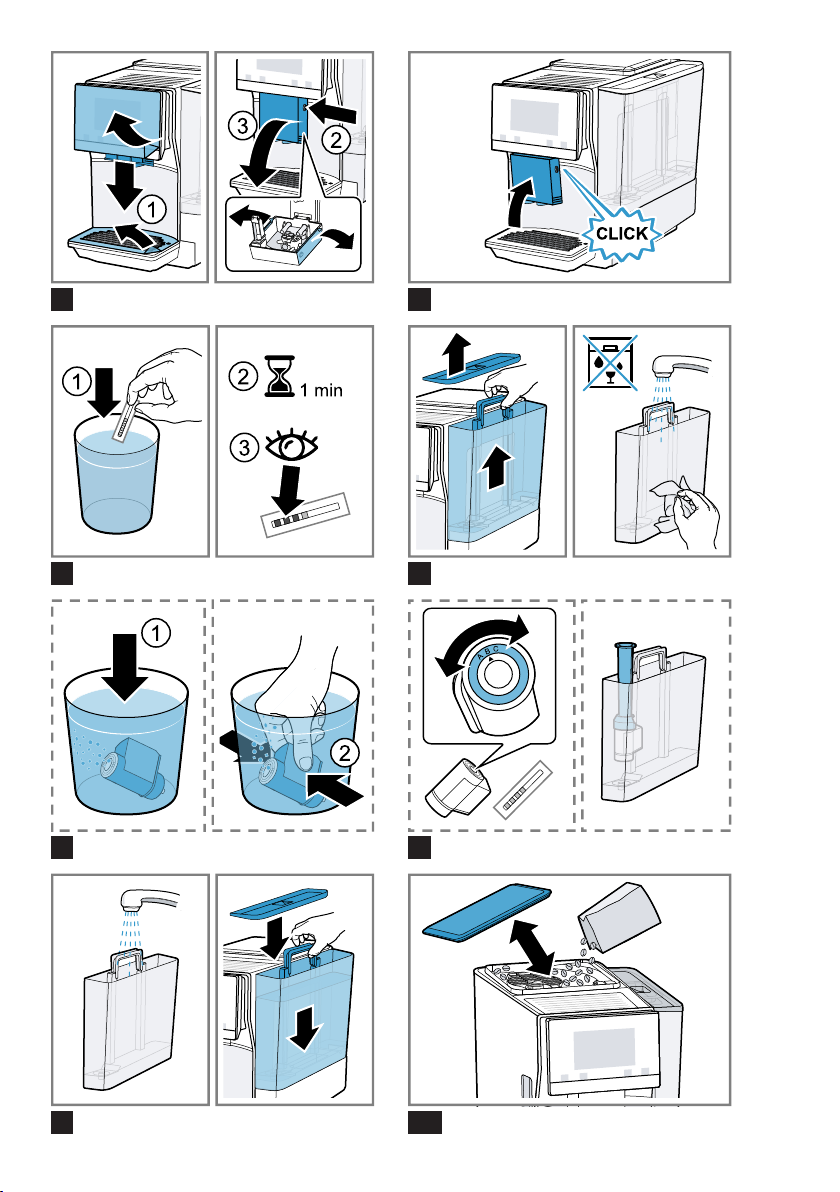
→Fig.
ATTENTION!
Unsuitable beans can block up the
grinder.
▶
Only use pure, roasted bean mixes
that are suitable for use in fully
automatic coffee or espresso machines.
6.2 Checking the water hardness
It is important to set the water hardness correctly so that your appliance
indicates in good time that it needs
3
16
-
00312097
00312098
00312094
00312095
00312105
00312106
13
Page 14
en Before using for the first time
descaling. You can use the enclosed
test strip to check the water hardness
or ask your local water company.
1. Briefly dip the test strip in fresh tap
water.
2. Allow the water to drip off the test
strip.
3. Read the water hardness off the
test strip after 1minute.
The table shows allocation of the
levels to the different degrees of
water hardness:
Level German
degrees in
°dH
Total hardness in mmol/
l
1 1-7 0.18-1.25
2 8-14 1.42-2.49
3 15-21 2.67-3.74
1
4
1
22-30 3.92-5.34
Factory setting
Note:If a water softening system is
installed in your house, you can select "Softening device".
Tip:You can change the settings at
any time.
→"Basic settings", Page20
6.3 Performing initial start-up
After connecting the appliance to the
power supply, configure the settings
for initial start-up. Initial start-up only
appears when switching on for the
first time.
1. Press
on.
2. Follow the instructions on the dis-
play.
a The display will guide you through
the programme.
Notes
¡ To set up Home Connect, refer to
the documents on Home Connect
supplied with the appliance.
to switch the appliance
¡ If "Demo mode" is selected, only
the display screens will work. You
can not dispense a beverage or
run a programme.
6.4 General information
Please bear this information in mind
so that you can get the best out of
your appliance.
Notes
¡ The appliance has been pro-
grammed at the factory with standard settings for optimum operation.
¡ The grinder has been factory-set
for optimum operation. If coffee is
only dispensed drop by drop or is
too thin and with too little crema,
you can adjust the grinding level
when the grinder is running.
→"Adjusting the grinding level",
Page16
¡ If you do not perform any actions
on the appliance for a certain
period, it will switch off automatically. You can change the duration
in the basic settings. →Page20
¡ During operation water droplets
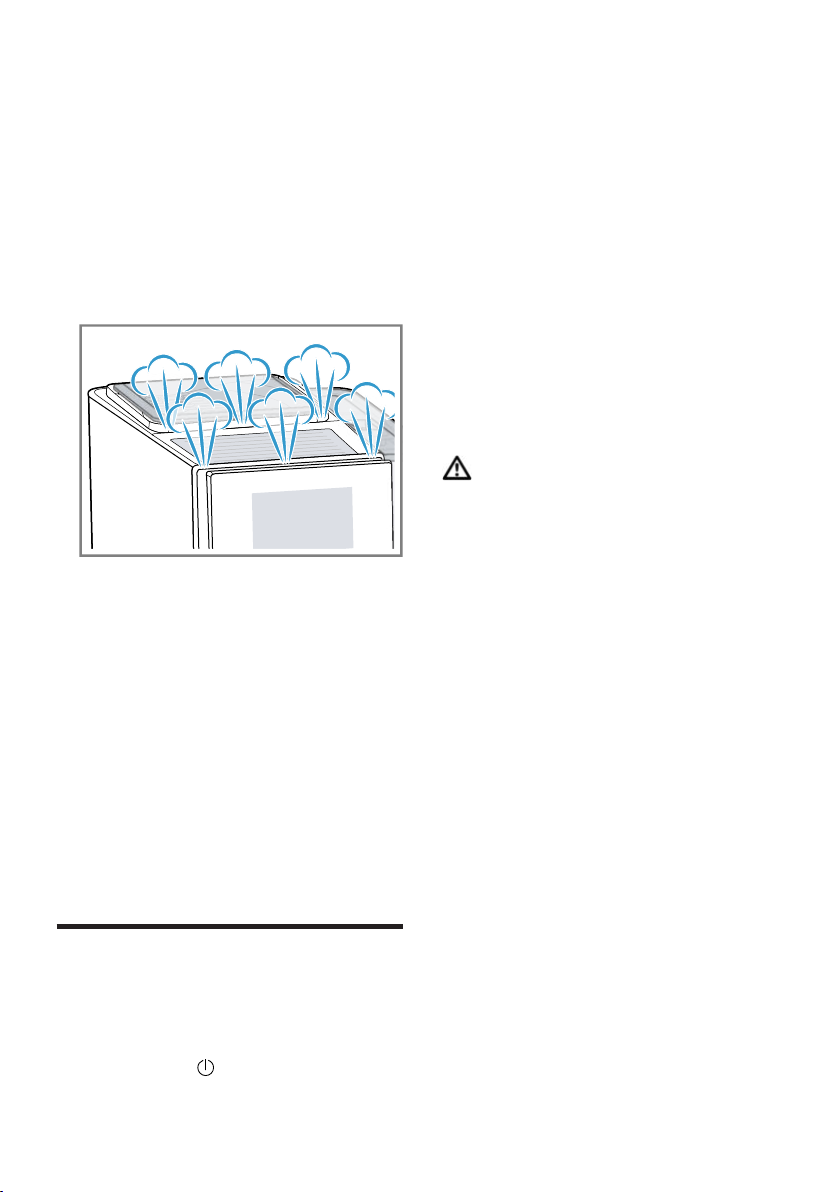
may form at the ventilation slits
and on the lid of the tablet compartment.
¡ For technical reasons steam can
escape from the appliance.
14
Page 15

Basic operation en
¡ The first beverage will not yet have
its full aroma if:
– You are using the appliance for
the first time.
– You have run a service pro-
gramme.
– You have not used the appli-
ance for a long time.
Do not drink the beverage.
Tip:You will get a stable, fine-pored
crema after you have started up your
appliance and dispensed a few cups.
Basic operation
7 Basic operation
Basic operation
7.1 Switching the appliance on or off
▶
Press
When the appliance switches on,
the display shows the Siemens
logo. When the appliance is
switched on or off, it will rinse itself
automatically. When switched off,
the appliance will emit steam into
the drip tray for cleaning. The appliance does not rinse itself if the
appliance is still warm when
switched on or if no beverage was
dispensed before it was switched
off.
7.2 Dispensing beverages
Find out how to prepare a drink of
your choice.
Risk of scalding!
Freshly prepared drinks are very hot.
▶
Leave drinks to cool down if necessary.
▶
Do not let escaping liquids or
steam come into contact with your
skin.
.
WARNING
Notes
¡ With a number of settings your cof-
fee is prepared in several steps.
Wait until the process is fully completed.
¡ If you are dispensing a beverage
with milk, always connect a container filled with milk to the milk
hose and suction pipe.
¡ If the milk system has not been
cleaned, small amounts of milk
may escape when hot water is dispensed.
Tips
¡ You can also use plant-based al-
ternatives to milk, e.g. soya milk.
¡ The quality of the milk foam de-
pends on the type of milk or the
plant-based alternative used.
7.3 doubleShot and tripleShot
The longer coffee brews, the more
bitter substances and undesirable
aromas are released. These bitter
substances and undesirable aromas
affect the taste and digestibility of
coffee.
To ensure that only pleasant-tasting
and easily digestible aromatic substances are released, coffee beans
are freshly ground and brewed by the
appliance.
Note:The functions "doubleShot" and
"tripleShot" depend on the beverage
strength and beverage size selected.
7.4 Dispensing a coffee beverage with milk
An example explains how to make a
latte macchiato.
15
Page 16
en Grinder
WARNING
Risk of burns!
The milk system can become extremely hot.
▶
Never touch the milk system when
it is hot.
▶
Allow the hot milk system to cool
down before touching it.
Requirements
¡ The milk hose with the suction
pipe is connected to the milk system.
¡ The suction pipe is immersed in
milk.
1. Place a glass underneath the
beverage outlet.
2. Press "Classics".
3. Select and press the beverage
symbol for latte macchiato.
‒ To change the strength, press
‒ To change the per-cup quantity,
press
‒ To change the milk ratio, press
.
.
4. Press "Start" and wait until the pro-
cess is complete.
‒ To completely stop dispensing
the beverage, press "Stop".
‒ To only stop the current dis-
pensing step, press "Skip".
After preparing the beverage, the
milk system will automatically
clean itself with a short jet of
steam.
Notes
¡ If you do not change any settings
for approx. 30seconds, the appliance will exit settings mode.
¡ The appliance saves the settings
automatically.
Tip:You can also pre-heat cups before dispensing using hot water or
the cup heater1.
7.5 Dispensing two cups at once
Depending on the appliance model,
you can make two cups at the same
time for certain beverages.
Note:If the "doubleShot" or
"tripleShot" function is active, the
function for dispensing two cups at
once is not possible.
1. Press the symbol for your desired
drink.
2. Press
.
a The setting is shown on the dis-
play.
3. Place two cups on the left and
right underneath the beverage outlet.
4. Press "Start".
.
The beverage is prepared in 2
steps. The beans are ground in 2
grinding operations.
a The beverage is brewed and then
runs into the cup.
5. Wait until the process is complete.
Grinder
8 Grinder
Grinder
Your appliance has an adjustable
grinder, which you can use to customise the grinding level of your coffee beans.
8.1 Adjusting the grinding level
Set the desired grinding level while
the coffee beans are being ground.
WARNING
Risk of injury!
The grinder rotates.
▶
Never reach into the grinder.
1
Depending on the appliance specifications
16
Page 17
Water filter en
ATTENTION!
Risk of damage to the grinder. The
grinder may be damaged if the grinding level is not set properly.
▶
Only set the grinding level when
the grinder is running.
▶
Select the grinding level using the
rotary selector step by step.
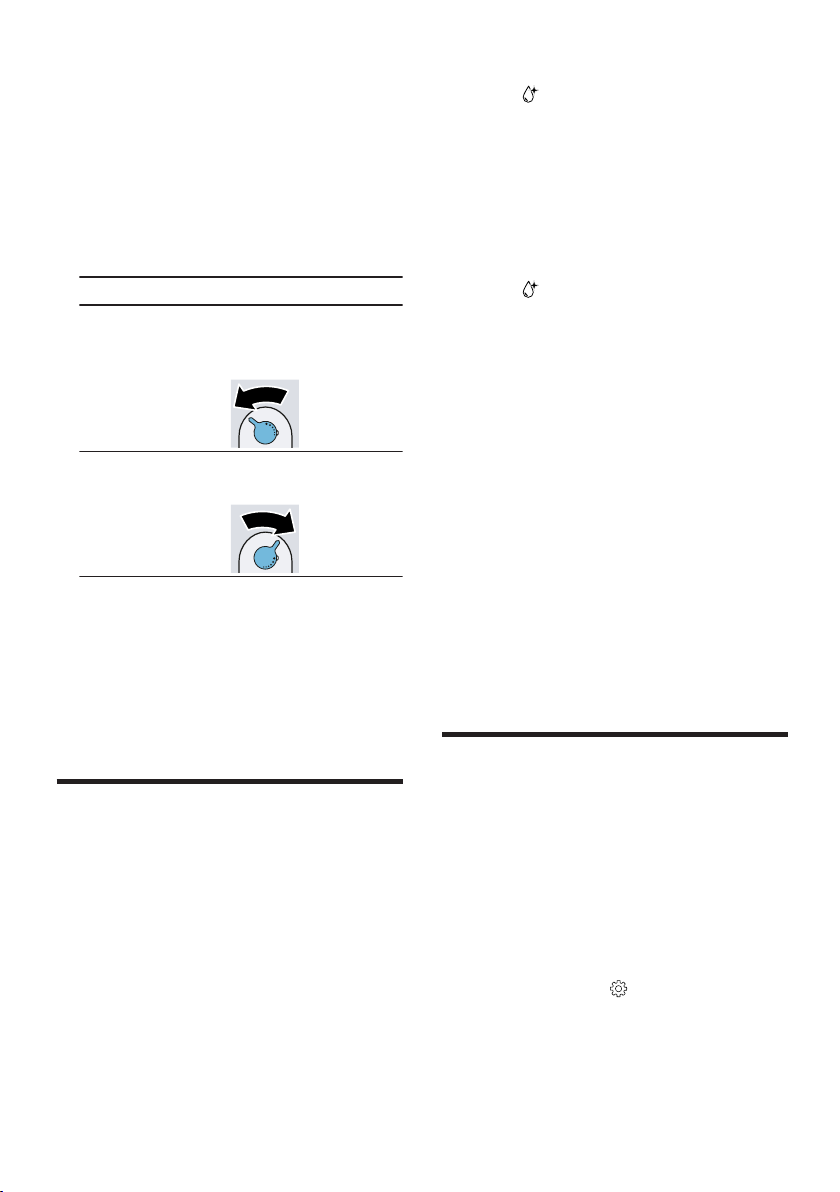
Grinding level Setting
Fine grinding
level for darkroasted
Turn rotary selector counterclockwise.
beans.
Coarse grinding level for
Turn rotary se-
lector clockwise.
light-roasted
beans.
The setting only has an effect after
the second cup of coffee.
Tip:If the coffee is only dispensed
drop by drop, set a coarser grinding
level.
If the coffee is too thin with too little
crema, set a finer grinding level.
Water filter
9 Water filter
Water filter
You can use a water filter to minimise
limescale deposits and reduce impurities in the water.
9.1 Inserting the water filter
ATTENTION!
Possible damage to the appliance
due to limescale build-up.
▶
Change the water filter in good
time.
▶
Change the water filter after
2months at the latest.
1. Press
2. Press "INTENZA filter" and follow
.
the instructions on the display.
9.2 Changing or removing the water filter
You can also operate your appliance
without a water filter.
1. Press
2. Press "INTENZA filter".
3. Press "Replace" or "Remove" and
.
follow the instructions on the display.
Tips
¡ You should also change your wa-
ter filter for reasons of hygiene.
¡ With a water filter you need to de-
scale your appliance less frequently.
¡ If your appliance has not been
used for a long time, for example if
you were on holiday, you should
rinse the water filter before use by
dispensing a cup of hot water.
¡ The water filter can be purchased
from retailers or customer service.
→"Accessories", Page13
Childproof lock
10 Childproof lock
Childproof lock
You can lock the appliance, to protect children against scalding and
burns.
10.1 Activating the child-
proof lock
Requirement:The appliance is
switched on.
▶
Press and hold
3seconds.
a The display shows "Child-proof
lock active. To unlock, please
press the settings button for 3
seconds."
for at least
17
Page 18
en Cup heater
10.2 Deactivating the childproof lock
▶
Press and hold
for at least
3seconds.
a The display shows "Child-proof
lock has been deactivated."
Cup heater
11 Cup heater
Cup heater
You can use the cup heater to pre-
1
heat your cups.
11.1 Activating and deactivating the cup heater
WARNING
Risk of burns!
The cup heater1 can become very
hot.
▶
Never touch the cup heater1 while
hot.
▶
Allow the hot cup heater1 to cool
down before touching it.
Tip:Place the cups with their base
on the cup heater to heat the cups to
optimum effect.
▶
You can activate or deactivate the
cup heater1 in the basic settings.
→"Overview of the basic settings",
Page21
Favourites
1
12 Favourites
Favourites
Save beverages with your personal
settings as a favourite.
You can mark your favourites with a
colour. A favourite is a beverage with
personal settings. You can change
the settings at any time.
Note:To exit the settings, press
12.1 Saving beverages from the beverage selection
1. Select a beverage from "Classics"
or "coffeeWorld".
2. Select the personal beverage set-
tings.
3. Press "Favourite".
4. Select the required colour for the
beverage.
5. Press "Save".
12.2 Saving the beverage in the menu
1. Press "Favourites".
2. Press
.
a The display shows all available
beverages.
3. Select the required beverage.
4. Select the personal beverage set-
tings.
5. Press "Next".
6. Select the required colour for the
beverage.
7. Press "Save".
12.3 Changing beverage settings
1. Press "Favourites".
2. Select the beverage and press
briefly.
3. Change the beverage settings.
4. Press "Apply".
a The new settings are saved.
12.4 Deleting favourites
1. Press "Favourites".
2. Select the beverage.
3. Press "Delete".
.
4. Confirm "Delete".
1
Depending on the appliance specifications
18
Page 19

HomeConnect en
12.5 Sorting favourites
1. Press "Settings".
2. Press "Personalisation".
3. Press "Sort favourites".
4. Sort favourites, e.g. by name or
colour.
HomeConnect
13 HomeConnect
HomeConnect
This appliance is network-capable.
Connecting your appliance to a mobile device lets you control its functions via the HomeConnect app, adjust its basic settings and monitor its
operating status.
The HomeConnect services are not
available in every country. The availability of the HomeConnect function
depends on the availability of
HomeConnect services in your country. You can find information about
this at: www.home-connect.com.
To be able to use HomeConnect,
you must first set up the connection
to the WLAN home network (Wi-Fi1)
and to the HomeConnect app.
The HomeConnect app guides you
through the entire login process. Follow the instructions in the HomeConnect app to configure the settings.
Tips
¡ Please consult the documents sup-
plied by HomeConnect.
¡ Please also follow the instructions
in the HomeConnect app.
Notes
¡ Please note the safety precautions
in this instruction manual and
make sure that they are also observed when operating the appliance via the HomeConnect app.
→"Safety", Page7
¡ Operating the appliance on the ap-
pliance itself always takes priority.
During this time it is not possible
to operate the appliance using the
HomeConnect app.
13.1 HomeConnect settings
Adapt HomeConnect to your needs.
You can find the HomeConnect settings in the basic settings for your appliance. Which settings the display
shows will depend on whether
HomeConnect has been set up and
whether the appliance is connected
to your home network.
Overview of the Home Connect settings
Here you can find an overview of the "Home Connect" settings and network settings.
Basic setting Selection Description
WiFi connection On
Off
Switch off the wireless module with
prolonged absence or to save energy.
Note:In networked standby mode
your appliance requires max. 2W.
1
Wi-Fi is a registered trademark of the Wi-Fi Alliance.
19
Page 20
en Basic settings
Basic setting Selection Description
Remote start On
Off
Switch remote start on the appliance
on and off.
Note:With the "Home Connect" app
only switch-off is possible.
Add mobile
device
- Connect the appliance to "Home Connect" or additional "Home Connect"
accounts.
Network information
Delete network
settings
- Display network information and appliance information.
- Note:You cannot operate your appliance via the "Home Connect" app
without a network connection.
Software update - Note:This setting is only available
with a software update.
13.2 Data protection
Please see the information on data
protection.
The first time your appliance is
registered on a home network
connected to the Internet, your
appliance will transmit the following
types of data to the HomeConnect
server (initial registration):
¡ Unique appliance identification
(consisting of appliance codes as
well as the MAC address of the
Wi-Fi communication module installed).
¡ Security certificate of the Wi-Fi
communication module (to ensure
a secure data connection).
¡ The current software and hardware
version of your appliance.
¡ Status of any previous reset to
factory settings.
This initial registration prepares the
HomeConnect functions for use and
is only required when you want to
use the HomeConnect functions for
the first time.
Note:Please note that the
HomeConnect functions can only be
utilised with the HomeConnect app.
Information on data protection can be
retrieved in the HomeConnect app.
Basic settings
14 Basic settings
Basic settings
You can configure your appliance to
meet your needs and call up additional functions.
14.1 Changing the basic settings
1. Press
a The display shows the list of basic
settings.
2. Select the required basic setting.
a The appliance saves the basic set-
ting automatically.
3. To exit the basic settings, press
.
.
20
Page 21

Basic settings en
14.2 Overview of the basic settings
You can find an overview of the basic settings here.
Beverage setting Brewing temperature Set the brewing temper-
ature.
Milk sequence Select the sequence for
milk and coffee.
Latte macchiato pause Select the pause
between milk and coffee.
Reset beverage parameters
Appliance setting Cup heater
1
Automatic standby Set the time after which
Display brightness Set the brightness in
Sounds ¡ Switch sounds on and
Water hardness Set the water hardness.
Language Set the language.
Factory settings Reset the appliance to
Personalisation Brand logo Show or hide the brand
Operation after switch-on Set the display screen
Sort favourites Set the sequence of fa-
Home Connect Information on
Home Connect
Appliance information Beverage counter. Display the number of
1
Depending on the appliance specifications
Reset the beverage settings.
Switch the cup heater
on or off.
the appliance automatically switches off.
levels.
off.
¡ Set the volume.
the factory settings.
logo on the display.
for "Favourites", "Classics" or "coffeeWorld".
vourites.
To start, scan the QR
code.
→"HomeConnect set-
tings", Page19
beverages dispensed.
1
21
Page 22
en Cleaning and servicing
Cleaning information Time until the water filter
should next be changed
or a service programme
started.
Version information Display network informa-
tion and appliance information.
Licence information Display FOSS licence
text.
Mode Mode for demonstration
purposes
1
Depending on the appliance specifications
Cleaning and servicing
Switch "Demo mode" on
or off.
15 Cleaning and servicing
Cleaning and servicing
To keep your appliance working efficiently for a long time, it is important to
clean and maintain it carefully.
15.1 Dishwasher-safe components
Here you can find an overview of the components you can clean in the dishwasher.
ATTENTION!
Some components are sensitive to
heat and may be damaged if they are
cleaned in a dishwasher.
▶
Follow the operating instructions of
the dishwasher.
Suitable:
¡ Drip tray
– Drip pan
– Coffee dregs container
– Mechanical fill level indicator
¡ Milk system with adapter
¡ Milk container with lid
15.2 Cleaning agent
Only use suitable cleaning agents.
22
▶
Only put dishwasher-safe components in the dishwasher.
▶
Only use programmes that do not
heat the water above 60°C.
Not suitable:
¡ Water tank
¡ Water tank lid
¡ Aroma lid
¡ Brewing unit
¡ Beverage outlet cover
ATTENTION!
Unsuitable cleaning products may
damage the surfaces of the appliance.
▶
Do not use harsh or abrasive detergents.
Page 23
▶
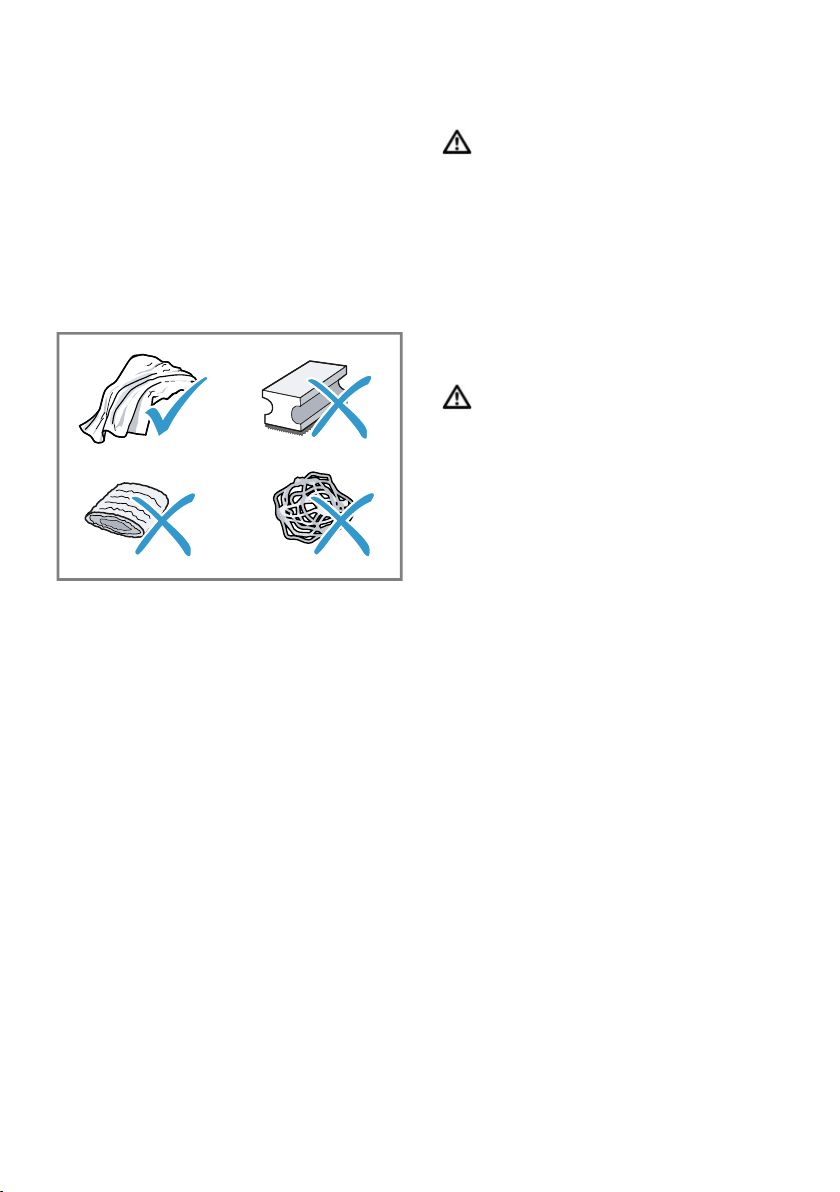
Do not use cleaning agents containing alcohol or spirits.
▶
Do not use hard scouring pads or
cleaning sponges.
▶
Do not use citric acid, vinegar or
any vinegar-based agents to descale the appliance.
▶
Only use suitable tablets for cleaning and descaling.
▶
Do not use descaling agent with
phosphoric acid.
Tips
¡ Use descaling and cleaning tablets
that have been specially developed for your appliance. You
can buy tablets from our customer
service.
→"Accessories", Page13
¡ Wash new sponge cloths thor-
oughly to remove any salt adhering to them. Salt can cause rust
film to develop on stainless steel
surfaces.
¡ Always remove any residues of
limescale, coffee, milk, cleaning
and descaling solutions immediately to prevent corrosion.
Cleaning and servicing en
15.3 Cleaning the appliance
WARNING
Risk of electric shock!
An ingress of moisture can cause an
electric shock.
▶
Never immerse the appliance or
the power cord in water.
▶
Liquids must not be spilled on the
appliance plug connection.
▶
Do not use steam- or high-pressure cleaners to clean the appliance.
WARNING
Risk of burns!
Some parts of the appliance become
very hot.
▶
Never touch hot appliance parts.
▶
Allow hot appliance parts to cool
down before touching.
1. Clean the housing, the high-gloss
surfaces and the control panel with
the enclosed microfibre cloth.
2. Clean the outlet system with a soft,
damp cloth after beverages have
been dispensed.
3. If the appliance has not been used
for a long time, for example due to
holiday, clean the entire appliance
including the outlet system, milk
system, trays and brewing unit.
Note:The appliance will rinse itself
automatically if you switch it on when
it is cold or switch it off after it has
dispensed coffee. The system is
therefore self-cleaning.
23
Page 24
en Cleaning and servicing
15.4 Cleaning the drip tray
and coffee dregs container
Clean and empty the drip tray and
coffee dregs container every day to
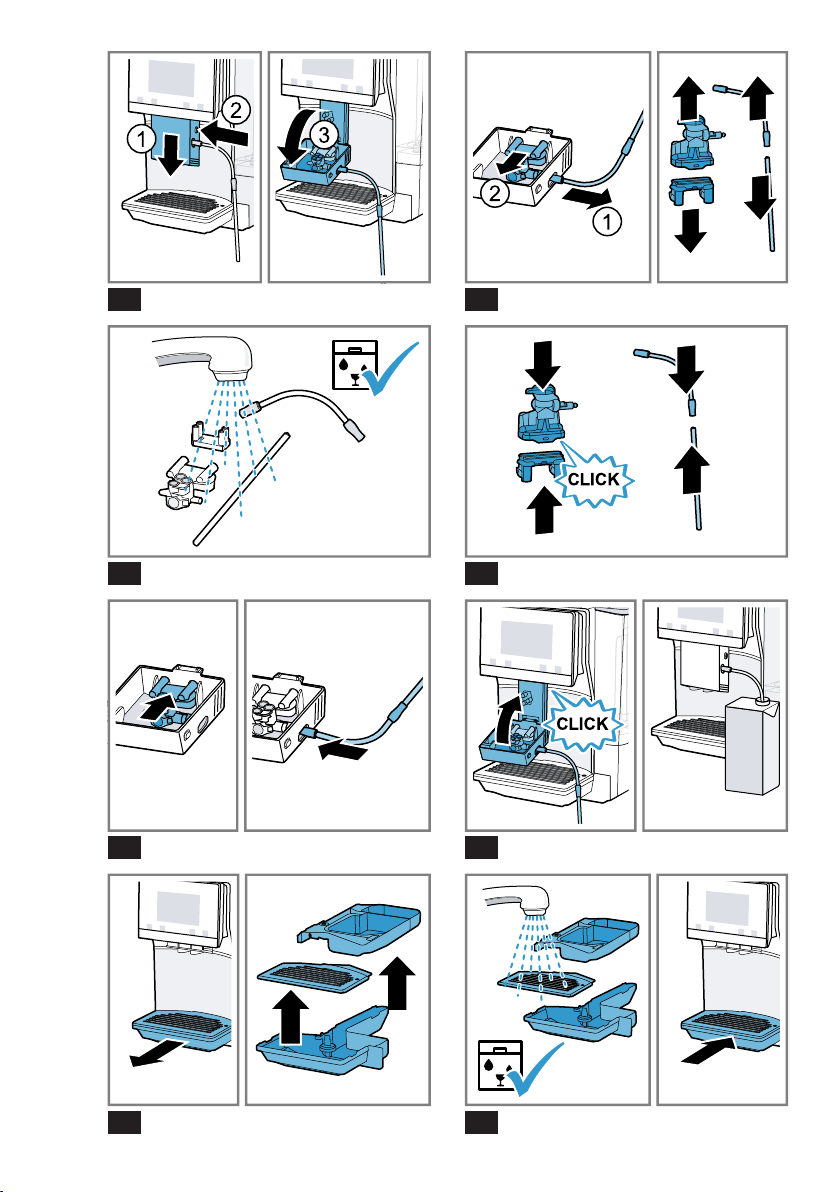
prevent deposits. Follow the illustrated instructions at the beginning of
this manual.
17
18
→Fig.
-
15.5 Service programmes
Use the service programmes if you
insert or remove a water filter or in
order to clean your appliance thoroughly.
ATTENTION!
Improper cleaning and descaling or a
delay in doing so may damage the
appliance.
▶
Immediately perform the descaling
process in accordance with the instructions.
▶
Only use cleaning tablets in the
tablet compartment.
▶
Do not put descaling tablets or
other products in the tablet compartment.
Notes
¡ The display indicates the progress
of the descaling or cleaning process.
¡ If your appliance has been locked,
you can only operate it again once
the descaling process has been
carried out.
Using the service programmes
1. Press
2. Press the symbol for the required
.
programme.
a The display will guide you through
the programme.
Overview of service programmes
You can find an overview of the service programmes here.
Note:The start image shows the remaining number of beverages that can be
dispensed until running the programme and the duration.
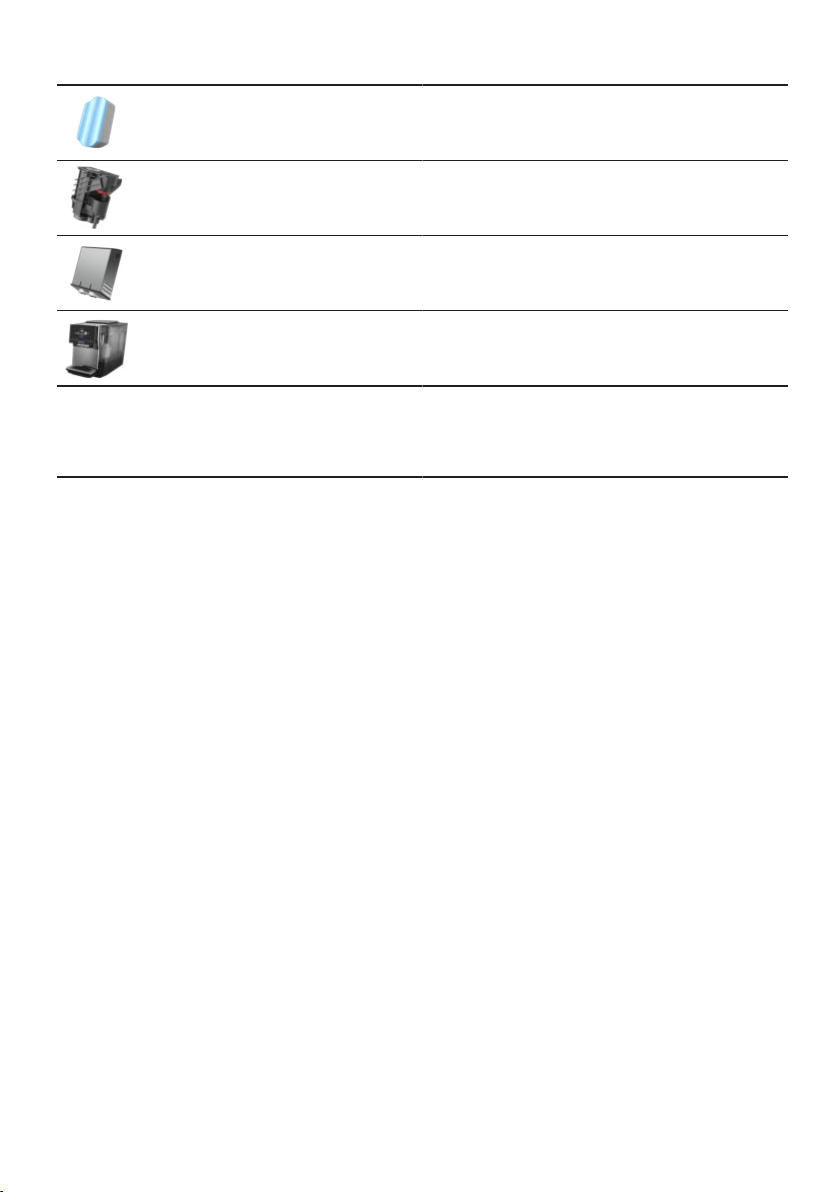
INTENZA filter Insert, replace or remove the water fil-
ter.
Milk system cleaning Rinse the milk system automatically.
calc'nClean Combine cleaning and descaling. Re-
move residues of limescale and coffee from the pipes.
Cleaning Remove residues of coffee from the
pipes.
24
Page 25
Cleaning and servicing en
Descaling Remove residues of limescale from
the pipes.
Brewing unit cleaning The display shows optimum cleaning
of the brewing unit step by step.
Beverage outlet cleaning
Frost protection Drain the pipes to protect the appli-
Special rinsing If a service programme is interrupted,
Tips
¡ If you are starting the "Descaling"
or "calc'nClean" programmes,
keep a container with a capacity of
min. 0.5l ready.
¡ If you use a water filter, this will
prolong the time until you have to
run a service programme.
¡ You can combine "Descaling" and
"Cleaning" with the "calc'nClean"
service programme.
The display shows optimum cleaning
of the outlet step by step.
ance during transport or storage.
e.g. due to a power failure, it will rinse
itself automatically. The appliance is
then ready for use again.
25
Page 26

en Troubleshooting
Troubleshooting
16 Troubleshooting
Troubleshooting
You can rectify minor faults on your appliance yourself. Read the troubleshooting information before contacting after-sales service. This will avoid unnecessary costs.
WARNING
Risk of electric shock!
Incorrect repairs are dangerous.
▶
Repairs to the appliance should only be carried out by trained specialist
staff.
▶
Only use genuine spare parts when repairing the appliance.
▶
If the power cord of this appliance is damaged, it must be replaced by the
manufacturer, the manufacturer's Customer Service or a similarly qualified
person in order to prevent any risk.
Fault Cause and troubleshooting
Appliance no longer
responds.
HomeConnect is not
working correctly.
Appliance only dispenses water, not coffee.
Appliance is not dispensing milk froth.
Appliance has a fault.
1. Pull out the mains plug and wait 10seconds.
2. Re-insert the mains plug.
Different causes are possible.
▶
Go to www.home-connect.com.
Empty bean container is not detected by the appliance.
▶
Pour in coffee beans.
Coffee shaft on brewing unit is blocked.
▶
Clean the brewing unit.
Beans are too oily and are not falling into thegrinder.
▶
Gently tap the bean container.
▶
Change the coffee variety.
Do not use oily beans.
▶
Clean the empty bean container with a damp cloth.
Brewing unit is not inserted properly.
1. Check whether the brewing unit is inserted correctly
and is securely locked.
2. Push the red lever up to the left.
3. Insert the brewing unit cover.
Milk system is soiled.
▶
Clean the milk system in the dishwasher.
Milk tube not immersed in milk.
▶
Use more milk.
26
Page 27

Fault Cause and troubleshooting
▶
Appliance is not dispensing milk froth.
Check whether the milk tube is immersed in the
milk.
Heavy build-up of limescale in the appliance.
▶
Descale the appliance.
No milk intake by the
milk system.
The milk system is assembled incorrectly.
▶
Assemble the milk system correctly.
Milk tube not immersed in milk.
▶
Use more milk.
▶
Check whether the milk tube is immersed in the
milk.
Milk froth is too cold. Milk is too cold.
▶
Use lukewarm milk.
Appliance is not dispensing hot water.
Appliance is not dispensing drinks.
Milk system is soiled.
▶
Clean the milk system in the dishwasher.
Air is in the water filter.
1. Immerse the water filter in water with the opening
facing upwards until no more air bubbles escape.
2. Reinsert the filter.
▶
Firmly press the water filter straight down into the
tank connection.
Residues of limescale remover are blocking the water
tank.
1. Remove the water tank.
2. Clean the water tank thoroughly.
There is dripping water on the inner floor
of the appliance.
Brewing unit cannot
be removed.
Drip tray was removed too soon.
▶
Wait a few seconds after the last drink was dispensed before removing the drip tray.
Locking device cannot be released, brewing unit is
jammed.
▶
Switch the appliance off and back on after
3minutes.
Grinder won't start. Appliance is too hot.
1. Disconnect the appliance from the mains.
2. Wait 1hour so the appliance can cool down.
Grinder is not grinding
any coffee beans despite full bean container.
Beans are too oily and are not falling into thegrinder.
▶
Gently tap the bean container.
▶
Change the coffee variety.
Do not use oily beans.
▶
Clean the empty bean container with a damp cloth.
Troubleshooting en
27
Page 28

en Troubleshooting
Fault Cause and troubleshooting
Coffee or milk froth
quality varies widely.
Milk froth quality varies widely.
Build-up of limescale in the appliance.
▶
Descale the appliance.
Milk froth quality depends on the type of milk or plantbased alternative used.
▶
Optimise the result through the selection of the milk
or vegetable-based drink type.
Coffee is not dispensed or has slowed
to a trickle.
Set quantity is not
reached.
Grinding level is set too fine.
▶
Set a coarser grinding level.
→"Adjusting the grinding level", Page16
Heavy build-up of limescale in the appliance.
▶
Descale the appliance.
Air is in the water filter.
1. Immerse the water filter in water with the opening
facing upwards until no more air bubbles escape.
2. Reinsert the filter.
Appliance is soiled.
▶
Clean the brewing unit.
▶
Descale and clean the appliance.
Coffee has no crema. Type of coffee is not optimal.
▶
Use a coffee variety with a higher proportion of Robusta beans.
▶
Use beans with a darker roast.
Beans are no longer fresh.
▶
Use fresh beans.
Grinding level is not appropriate for coffee beans.
▶
Adjust the grinder to a finer setting.
→"Adjusting the grinding level", Page16
Coffee is too acidic. Grinding level is set too coarse.
▶
Adjust the grinder to a finer setting.
→"Adjusting the grinding level", Page16
Type of coffee is not optimal.
▶
Use a coffee variety with a higher proportion of Robusta beans.
▶
Use beans with a darker roast.
Coffee is too bitter. Grinding level is set too fine.
▶
Set a coarser grinding level.
→"Adjusting the grinding level", Page16
Type of coffee is not optimal.
▶
Change the coffee variety.
28
Page 29

Fault Cause and troubleshooting
Coffee tastes burnt. Grinding level is set too fine.
▶
Set a coarser grinding level.
→"Adjusting the grinding level", Page16
Type of coffee is not optimal.
▶
Change the coffee variety.
Coffee temperature setting is too high.
▶
Set the coffee temperature lower.
Coffee grounds are
not compact and are
too wet.
The grinding level is not set optimally.
▶
Adjust the grinder to a coarser or finer setting.
→"Adjusting the grinding level", Page16
Beans are too oily.
▶
Use a different type of bean.
Display shows "Please
insert brewing unit.".
Cover is wrongly inserted.
1. Check whether the brewing unit is inserted correctly
and is securely locked.
2. Push the red lever up to the left.
3. Insert the brewing unit cover.
Display shows "Please
fill water tank." despite
the fact that the water
tank is full.
Water tank is wrongly inserted.
▶
Insert the water tank correctly.
Carbonated water is in the water tank.
▶
Fill the water tank with fresh tap water.
Float is stuck in the water tank.
1. Remove the water tank.
2. Clean the water tank thoroughly.
New water filter was not rinsed as per instructions.
1. Rinse the water filter according to the instructions.
2. Place the water filter into operation.
Air is in the water filter.
1. Immerse the water filter in water with the opening
facing upwards until no more air bubbles escape.
2. Reinsert the filter.
Water filter is old.
▶
Insert a new water filter.
Limescale deposits in the water tank are blocking the
system.
1. Clean the water tank thoroughly.
2. Start the descaling programme.
Display shows "Please
clean brewing unit.".
Brewing unit is soiled.
▶
Clean the brewing unit.
Troubleshooting en
29
Page 30

en Troubleshooting
Fault Cause and troubleshooting
Display shows "Please
clean brewing unit.".
Display shows "Overvoltage or under-
Mechanism of brewing unit is stiff.
▶
Clean the brewing unit.
There are problems with the power supply.
▶
Only operate the appliance at 220-240V.
voltage".
Display shows "Error
in water system.
Please restart appli-
Appliance has a fault.
1. Pull out the mains plug and wait 10seconds.
2. Re-insert the mains plug.
ance.".
Display very frequently
shows "Please run
calc'nClean programme!".
Decalcified water still contains small amounts of lime.
1. Insert a new water filter.
2. Set the corresponding water hardness.
Incorrect or too little descaling agent used.
▶
When descaling, only use suitable tablets.
Service programme has not been carried out in its entirety.
▶
Start the "Special rinsing" service programme.
→"Service programmes", Page24
30
Page 31
Transportation, storage and disposal en
Transportation, storage and disposal
17 Transportation, stor-
age and disposal
Transportation, storage and disposal
You can find out here how to prepare
your appliance for transportation and
storage. You will also find out how to
dispose of old appliances.
17.1 Activating frost protection
Protect your appliance from frost during transport and storage.
ATTENTION!
Residues of liquid in the appliance
may damage it during transport or
storage.
▶
Empty the pipe system before
transport or storage.
1. Run the "Frost protection" pro-
gramme.
→"Basic settings", Page20
2. Disconnect the appliance from the
mains power supply.
17.2 Disposing of old appliance
Valuable raw materials can be reused by recycling.
1. Unplug the appliance from the
mains.
2. Cut through the power cord.
3. Dispose of the appliance in an en-
vironmentally friendly manner.
Information about current disposal
methods are available from your
specialist dealer or local authority.
This appliance is labelled in accordance
with European Directive
2012/19/EU concerning
used electrical and elec-
tronic appliances (waste
electrical and electronic
equipment - WEEE).
The guideline determines the framework for
the return and recycling
of used appliances as
applicable throughout
the EU.
Customer Service
18 Customer Service
Customer Service
If you have any queries, are unable to
rectify faults on the appliance yourself or if your appliance needs to be
repaired, contact Customer Service.
Function-relevant genuine spare parts
according to the corresponding Ecodesign Order can be obtained from
Customer Service for a period of at
least 7 years from the date on which
your appliance was placed on the
market within the European Economic Area.
Note:Under the terms of the manufacturer's warranty the use of Customer Service is free of charge.
Detailed information on the warranty
period and terms of warranty in your
country is available from our aftersales service, your retailer or on our
website.
If you contact Customer Service, you
will require the product number (ENr.), the production number (FD) and
the consecutive numbering (Z-Nr.) of
your appliance.
The contact details for Customer Service can be found in the Customer
Service directory at the end of the
manual or on our website.
31
Page 32
en Technical specifications
18.1 Product number (E-Nr.),
production number (FD)
and consecutive numbering (Z-Nr.)
You can find the product number (ENr.), the production number (FD) and
the consecutive numbering (Z-Nr.) on
the appliance's rating plate.
Make a note of your appliance's details and the Customer Service telephone number to find them again
quickly.
18.2 Warranty conditions
You can make warranty claims for
your appliance under the following
conditions.
The guarantee conditions for this appliance are as defined by our representative in the country in which it is
sold. Details regarding these conditions can be obtained from the dealer
from whom the appliance was purchased. The bill of sale or receipt
must be produced when making any
claim under the terms of this guarantee.
Technical specifications
19 Technical specifica-
tions
Technical specifications
Facts and figures for your appliance
can be found here.
Voltage 220–
240V∼
Frequency 50Hz
Connection rating 1500W
Maximum static pump
20bar
pressure
Maximum capacity of
1.8l
water tank (without filter)
Maximum capacity of
350g
bean container
Length of the power
100cm
cable
Appliance height 38.2cm
Appliance width 24.5cm
Appliance depth 43.5cm
Weight, empty 9kg
Type of grinder Ceramic
Declaration of Conformity
20 Declaration of Con-
formity
Declaration of Conformity
BSH Hausgeräte GmbH hereby declares that the appliance with Home
Connect functionality meets the essential requirements and other relevant provisions of the Directive
2014/53/EU.
A detailed RED Declaration of Conformity can be found online at
www.siemens-home.bsh-group.com
among the additional documents on
the product page for your appliance.
2.4GHz band: 100mW max.
5GHz band: 100mW max.
BE BG CZ DK DE EE IE EL
ES FR HR IT CY LV LT LU
HU MT NL AT PL PT RO SI
SK FI SE UK NO CH TR
5GHz WLAN (Wi-Fi): For indoor use only.
32
Page 33

Table des matières
fr
1 Sécurité.......................................35
1.1 Indications générales ...............35
1.2 Conformité d’utilisation.............35
1.3 Restrictions du périmètre uti-
lisateurs ....................................35
1.4 Consignes de sécurité .............36
2 Protection de l'environne-
ment et économies d'énergie ....39
2.1 Élimination de l'emballage .......39
2.2 Économies d’énergie ...............39
3 Installation et branchement.......39
3.1 Contenu de la livraison ............39
3.2 Installer et raccorder l’appa-
reil.............................................39
4 Description de l'appareil............40
4.1 Appareil ....................................40
4.2 Éléments de commande ..........40
5 Accessoires................................41
6 Avant la première utilisation .....41
6.1 Préparer et nettoyer l‘appa-
reil.............................................41
6.2 Déterminer la dureté de
l’eau..........................................42
6.3 Première mise en service.........42
6.4 Indications générales ...............42
7 Utilisation de base .....................43
7.1 Allumer ou éteindre l‘appa-
reil.............................................43
7.2 Préparation de boisson............43
7.3 doubleShot et tripleShot...........44
7.4 Préparer une boisson à
base de café avec du lait.........44
7.5 Préparer deux tasses à la
fois............................................44
9 Filtre à eau..................................45
9.1 Mettre en place le filtre à
eau............................................45
9.2 Changer ou retirer le filtre à
eau............................................46
10 Sécurité enfants .......................46
10.1 Activer la sécurité enfants......46
10.2 Désactiver la sécurité en-
fants........................................46
11 Chauffage pour tasses1...........46
11.1 Activer et désactiver le
chauffe-tasses1.......................46
12 Favoris ......................................47
12.1 Enregistrer une boisson à
partir de la sélection des
boissons .................................47
12.2 Enregistrer la boisson dans
le menu...................................47
12.3 Modifier les réglages des
boissons .................................47
12.4 Effacer un favori .....................47
12.5 Trier les favoris.......................47
13 HomeConnect .........................47
13.1 Réglages HomeConnect.......48
13.2 Protection des données.........49
14 Réglages de base.....................49
14.1 Modifier les réglages de
base........................................49
14.2 Aperçu des réglages de
base........................................49
15 Nettoyage et entretien .............51
15.1 Nettoyage au lave-vaisselle....51
15.2 Produits de nettoyage............51
15.3 Nettoyer l'appareil ..................52
8 Moulin .........................................45
8.1 Régler le degré de mouture.....45
1
Selon l'équipement de l'appareil
33
Page 34

fr
15.4 Nettoyer la cuvette d‘égouttage et le bac à marc de
café.........................................52
15.5 Programmes d‘entretien.........53
16 Dépannage ...............................55
17 Transport, stockage et éli-
mination....................................61
17.1 Activer la protection contre
le gel.......................................61
17.2 Mettre au rebut un appareil
usagé......................................61
18 Service après-vente .................61
18.1 Numéro de produit (E-Nr.),
numéro de fabrication (FD)
et numéro de série (Z-Nr.)......62
18.2 Conditions de garantie...........62
19 Données techniques ................62
20 Déclaration de conformité .......62
34
Page 35

Sécurité fr
1 Sécurité
Respectez les consignes de sécurité suivantes.
1.1 Indications générales
¡ Lisez attentivement cette notice.
¡ Conservez la notice ainsi que les informations produit en vue
d’une réutilisation ultérieure ou pour un futur nouveau propriétaire.
¡ Ne branchez pas l’appareil si ce dernier a été endommagé du-
rant le transport.
1.2 Conformité d’utilisation
Utilisez l‘appareil uniquement:
¡ pour préparer des boissons chaudes.
¡ pour un usage privé et dans les pièces fermées d’un domicile.
¡ à une hauteur maximale de 2000m au-dessus du niveau de la
mer.
1.3 Restrictions du périmètre utilisateurs
Les enfants de 8 ans et plus, les personnes souffrant d’un handicap physique, sensoriel ou mental ou ne détenant pas l’expérience et/ou les connaissances nécessaires pourront utiliser cet
appareil à condition de le faire sous surveillance, ou que son utilisation sûre leur ait été enseignée et qu’ils aient compris les dangers qui en émanent.
Les enfants ne sont pas autorisés à jouer avec l'appareil.
Les enfants ne doivent en aucun cas s’occuper du nettoyage et
de la maintenance utilisateur, sauf s’ils sont âgés de 8ans et plus
et agissent sous surveillance.
Les enfants de moins de 8ans doivent être tenus à distance de
l’appareil et du cordon d’alimentation secteur.
35
Page 36
fr Sécurité
1.4 Consignes de sécurité
AVERTISSEMENT‒Risque d'asphyxie!
Les enfants risquent de s’envelopper dans les matériaux d’emballage ou de les mettre sur la tête et de s’étouffer.
▶
Conserver les matériaux d’emballage hors de portée des enfants.
▶
Ne jamais laisser les enfants jouer avec les emballages.
Les enfants risquent d'inhaler ou d'avaler des petits morceaux et
s'étouffer.
▶
Conserver les petites pièces hors de portée des enfants.
▶
Ne pas laisser les enfants jouer avec les petites pièces.
AVERTISSEMENT‒Risque d'électrocution!
Les installations non conformes sont dangereuses.
▶
Pour le raccordement et l’utilisation de l’appareil, respectez im-
pérativement les indications figurant sur la plaque signalétique.
▶
L’appareil doit être branché uniquement à une source d'alimen-
tation avec courant alternatif à l'aide d'une prise murale correc-
tement installée et reliée à la terre.
▶
Le système à conducteur de protection de l’installation élec-
trique de la maison doit être conforme.
Un appareil endommagé ou un cordon d’alimentation secteur endommagé est dangereux.
▶
N'utilisez jamais un appareil endommagé.
▶
Ne jamais faire fonctionner l’appareil avec une surface fissurée
ou cassée.
▶
Ne tirez jamais sur le cordon d'alimentation secteur pour dé-
brancher l'appareil du secteur. Débranchez toujours la fiche du
cordon d'alimentation secteur.
▶
Si l'appareil ou le cordon d'alimentation secteur est endomma-
gé, débranchez immédiatement le cordon d'alimentation secteur
ou coupez le fusible dans le boîtier à fusibles.
▶
Appelez le service après-vente. →Page61
Les réparations non conformes sont dangereuses.
▶
Seul un personnel dûment qualifié peut entreprendre des répa-
rations sur l'appareil.
36
Page 37
Sécurité fr
▶
Seules des pièces de rechange d'origine peuvent être utilisées
pour réparer l'appareil.
▶
Afin d’écarter tout danger quand le cordon d’alimentation sec-
teur de cet appareil est endommagé, seul le fabricant ou son
service après-vente ou toute autre personne de qualification
équivalente est habilité à le remplacer.
L’infiltration d’humidité peut occasionner un choc électrique.
▶
Ne jamais plonger l’appareil ou le cordon d’alimentation secteur
dans l’eau.
▶
Veiller à ce qu’aucun liquide ne coule sur le raccordement de
l’appareil.
▶
Utiliser l’appareil uniquement dans des pièces fermées.
▶
Ne jamais exposer l’appareil à une forte chaleur ou humidité.
▶
Ne pas utiliser de nettoyeur vapeur ou haute pression pour net-
toyer l’appareil.
AVERTISSEMENT‒Risque d'incendie!
L’appareil devient chaud.
▶
Aérer suffisamment l’appareil.
▶
Ne jamais utiliser l’appareil dans une armoire.
Un cordon d’alimentation secteur prolongé ainsi qu’un adaptateur
non agréé sont dangereux.
▶
Ne pas utiliser de rallonge ni de bloc multiprise.
▶
Si le cordon d’alimentation secteur est trop court, contacter le
service après-vente.
▶
Utiliser uniquement des adaptateurs agréés par le fabricant.
AVERTISSEMENT‒Risque de brûlures!
Certaines pièces de l’appareil deviennent très chaudes.
▶
Ne touchez jamais les pièces chaudes de l’appareil.
▶
Laisser refroidir les pièces chaudes de l’appareil après utilisa-
tion et avant de les toucher.
AVERTISSEMENT‒Risque de brûlure!
Les boissons fraîchement préparées sont très chaudes.
▶
Si nécessaire, laisser refroidir les boissons.
▶
Éviter tout contact entre la peau et les liquides et vapeurs qui
s'échappent.
37
Page 38
fr Sécurité
Un démarrage à distance sans surveillance via l'appli Home
Connect peut occasionner des brûlures à d'autres personnes.
▶
Ne pas mettre la main sous la buse d'écoulement du café pen-
dant la distribution de la boisson.
▶
Les personnes, notamment les enfants, doivent être tenues à
distance de l'appareil.
AVERTISSEMENT‒Risque de blessure!
Une utilisation inappropriée de l‘appareil peut être dangereuse
pour l‘utilisateur.
▶
Pour éviter des blessures, utiliser l‘appareil uniquement confor-
mément à son emploi prévu.
Pincement des doigts lors de la fermeture de la porte de l'appareil.
▶
Attention à ne pas se coincer les doigts à la fermeture de la
porte.
Le moulin tourne.
▶
Ne jamais mettre les mains dans le moulin.
AVERTISSEMENT‒Danger: magnétisme!
L’appareil contient des aimants permanents. Ceux-ci peuvent influer sur des implants électroniques, p.ex. les stimulateurs cardiaques ou les pompes à insuline.
▶
Les personnes portant un implant électronique doivent donc
respecter une distance minimum de 10cm par rapport à l’ap-
pareil.
▶
Une distance minimale de 10cm doit également être respectée
par rapport au réservoir d'eau retiré.
AVERTISSEMENT‒Risque de préjudice pour la santé!
Les salissures sur l’appareil peuvent nuire à la santé.
▶
Respecter les consignes de nettoyage relatives à l‘hygiène.
38
Page 39
Protection de l'environnement et économies d'énergie fr
A
B
C
D
E
F
G
H
I
Protection de l'environnement et économies d'énergie
2 Protection de l'environ-
nement et économies
d'énergie
Protection de l'environnement et économies d'énergie
2.1 Élimination de l'emballage
Les emballages sont écologiques et
recyclables.
▶
Veuillez éliminer les pièces déta-
chées après les avoir triées par
matière.
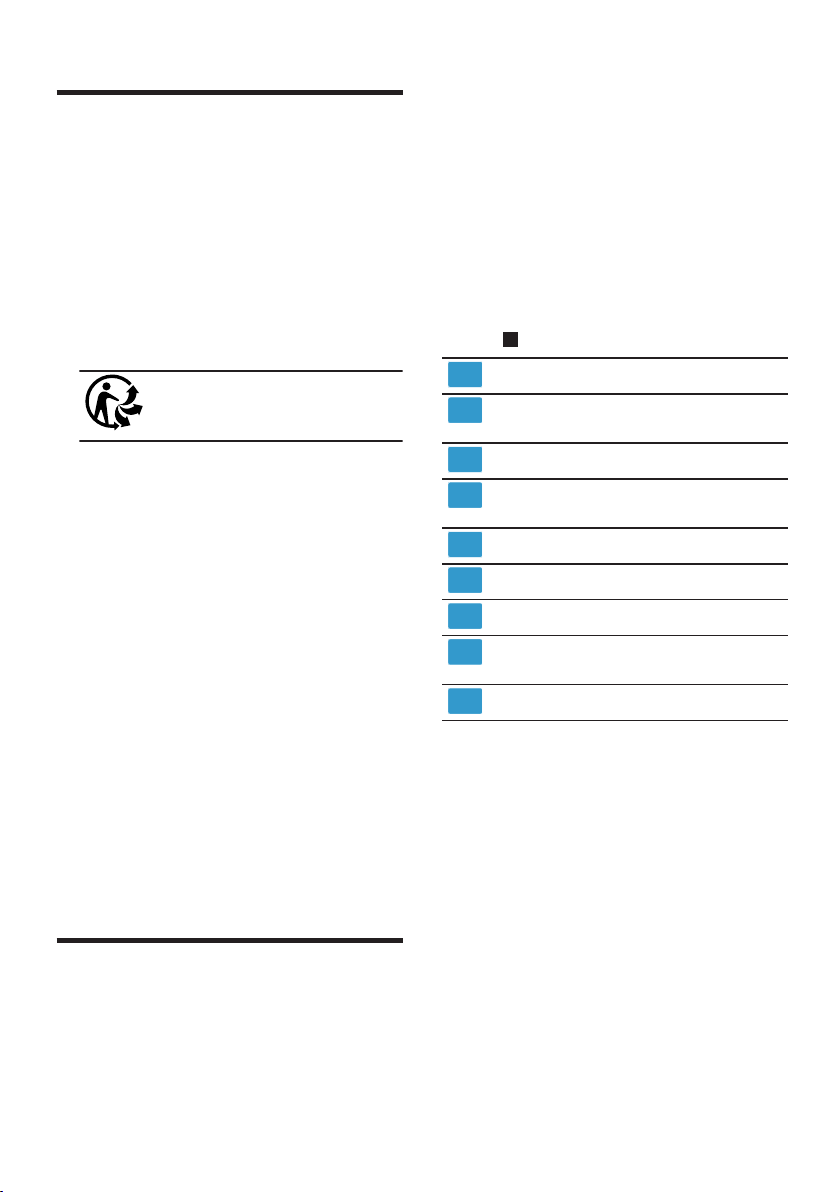
Eliminez l'emballage en
respectant l'environnement.
2.2 Économies d’énergie
Si vous respectez les instructions suivantes, votre appareil consommera
moins de courant.
Régler l'intervalle d'arrêt automatique
sur la plus petite valeur.
a
Si l'appareil n'est pas utilisé, il
s'éteint plus tôt.
→"Réglages de base", Page49
Ne pas interrompre prématurément
la préparation de boisson.
a
La quantité d'eau ou de lait chauf-
fée est utilisée de façon optimale.
Détartrer régulièrement l’appareil.
a
Les dépôts de tartre augmentent
la consommation d'énergie.
Installation et branchement
3 Installation et branche-
ment
Installation et branchement
Apprenez où et comment installer
votre appareil. Apprenez également
comment brancher votre appareil sur
le secteur.
3.1 Contenu de la livraison
Après avoir déballé le produit, inspectez toutes les pièces pour détecter d’éventuels dégâts dus au transport et pour vous assurer de l'intégralité de la livraison.
Remarque:Selon le modèle, différents accessoires sont fournis. Cet
accessoire est marqué par un cadre
en pointillés.
→Fig.
1
Machine à café automatique
Tuyau à lait et tube d’aspira-
tion
Notice d'utilisation
Outil de mise en place du
filtre à eau
Pastilles de détartrage
Pastilles de nettoyage
Filtre à eau
1
1
1
Bandelette pour déterminer la
dureté de l’eau
Chiffon microfibres
1
Selon l'équipement de l'appareil
3.2 Installer et raccorder l’appareil
ATTENTION!
Risque d'endommagement de l'appareil. L'appareil peut être endommagé
en cas de mise en service non
conforme.
▶
Utiliser l’appareil uniquement dans
des locaux hors gel.
▶
Si l'appareil a été transporté ou entreposé à moins de 0°C, attendre
3heures à température ambiante
avant de le mettre en service.
▶
Après chaque branchement, attendre env.5secondes.
39
Page 40
fr Description de l'appareil
1
2
3
4
5
6
7
8
9
10
11
12
13
14
15
1. Poser l’appareil sur une surface
plane, solide et résistante à l’eau.
2. Brancher la fiche secteur de l’ap-
pareil sur une prise de courant réglementairement raccordée à la
terre.
Description de l'appareil
4 Description de l'appa-
reil
Description de l'appareil
4.1 Appareil
Cette section contient une vue d'ensemble des composants de votre appareil.
Remarque:Des variations de détails
et de couleurs sont possibles selon
le type d’appareil.
→Fig.
2
Champs tactiles
Chauffage pour tasses
Couvercle préservateur
d’arôme
Réservoir pour café en grains
Sélecteur du réglage de finesse de la mouture
Compartiment à pastille
Couvercle du réservoir d’eau
Réservoir d'eau
Écran tactile
Porte du compartiment de
percolation
Plaque signalétique
Mousseur de lait
1
Tuyau à lait et tube d’aspiration
Cuvette d’égouttage
1
Selon l'équipement de l'appareil
4.2 Éléments de commande
Vous trouverez ici un aperçu des éléments de commande de votre appareil.
Champs tactiles
Vous trouverez ici un aperçu des
symboles qui sont toujours visibles.
Allumer ou éteindre l'appareil.
Préparer deux tasses.
Ouvrir ou quitter les pro-
grammes d‘entretien.
Ouvrir ou quitter les ré-
glages.
Écran tactile
L’écran tactile sert aussi bien d’affichage que d’élément de commande.
Favoris Sélectionner les boissons
enregistrées avec des réglages personnels.
→Page47
Classiques
coffeeWorld
Sélectionner des boissons
standard.
Sélectionner des boissons
de base qui peuvent être
adaptées en liaison avec
Home Connect.
Le chauffe-tasses est activé.
L‘appareil est connecté
avec Home Connect.
Couvercle de la buse d‘écoulement
1
Selon l'équipement de l'appareil
40
Page 41
Accessoires fr
Remarque:Lorsque l‘appareil est en
marche, vous disposez d‘autres possibilités de commande avec affichages et messages correspondants,
p.ex. les réglages de boissons.
Régler l‘intensité.
Accessoires
Régler la quantité de remplissage.
Régler la part de lait.
Régler l‘arôme.
Régler la température.
5 Accessoires
Accessoires
Utilisez uniquement des accessoires d'origine. Ils ont été spécialement conçus
pour votre appareil.
Accessoires Commerce Service après-vente
Pastilles de nettoyage TZ80001A
TZ80001B
Pastilles de détartrage TZ80002A
TZ80002B
Filtre à eau TZ70003 00575491
Pack de 3 filtres à eau TZ70033A Chiffon microfibres - 00460770
Kit d'entretien TZ80004A
TZ80004B
Adaptateur pour réser-
TZ70001 17006005
voir de lait
00312097
00312098
00312094
00312095
00312105
00312106
Avant la première utilisation
6 Avant la première
utilisation
Avant la première utilisation
Préparez l’appareil pour l’utilisation.
6.1 Préparer et nettoyer l‘appareil
Retirez les films protecteurs et nettoyez l‘appareil et ses différents composants.
Remarque:Remplissez quotidiennement le réservoir d‘eau fraîche froide,
non gazeuse.
ATTENTION!
Les grains inadaptés peuvent boucher le moulin.
▶
Utiliser exclusivement un mélange
de café en grains torréfiés pour expresso ou percolateur.
▶
Ne pas utiliser de grains de café
enrobés d'un glaçage.
▶
Ne pas utiliser de grains de café
caramélisés.
▶
Ne pas utiliser de grains de café
traités avec un additif contenant du
sucre.
▶
Ne pas utiliser de café en poudre.
41
Page 42

fr Avant la première utilisation
Conseil:Stockez le café en grains
dans un endroit frais, à l’abri de l’air,
pour conserver toute sa qualité.
Vous pouvez laisser le café en grains
dans le réservoir pour café en grains
plusieurs jours sans que le café ne
perde son arôme.
3
16
→Fig.
-
6.2 Déterminer la dureté de l’eau
Le réglage correct de la dureté de
l’eau est important, car il permet à la
machine d’indiquer le moment où un
détartrage est nécessaire. Vous pouvez déterminer la dureté de l‘eau
avec la bandelette de test jointe ou la
demander à la compagnie locale de
distribution d‘eau.
1. Plonger brièvement la bandelette
de test dans l'eau fraîche du robinet.
2. Laisser la bandelette de test
s‘égoutter.
3. Lire la dureté de l‘eau après 1mi-
nute sur la bandelette de test.
Le tableau indique les équiva-
lences entre les niveaux et les différents degrés de dureté de l’eau:
Niveau
1 1-7 0,18-1,25
2 8-14 1,42-2,49
3 15-21 2,67-3,74
4
1
Remarque:Si la maison est équipée
d‘un adoucisseur d‘eau, vous pouvez
régler "Adoucisseur".
Conseil:Vous pouvez modifier les
réglages à tout moment.
→"Réglages de base", Page49
Dureté allemande
en °dH
1
22-30 3,92-5,34
Réglage usine
Dureté totale
en mmol/l
6.3 Première mise en service
Après le raccordement électrique, effectuer les réglages pour la première
mise en service de l‘appareil. La première mise en service n‘apparaît que
lors de la première mise en marche.
1. Allumer l‘appareil avec
2. Suivre les instructions figurant à
.
l’écran.
a L‘écran guide l‘utilisateur à travers
le programme.
Remarques
¡ Pour configurer Home Connect, se
référer aux documents
Home Connect fournis.
¡ Lorsque "Mode démo" est sélec-
tionné, seuls les affichages fonctionnent. Vous ne pouvez préparer
aucune boisson ni effectuer aucun
programme.
6.4 Indications générales
Respectez les indications pour utiliser votre appareil de manière optimale.
Remarques
¡ À la fabrication, l’appareil a été
programmé sur des réglages standard lui permettant de fonctionner
de façon optimale.
¡ Le moulin est réglé en usine en
vue d‘un fonctionnement optimal.
Si le café est distribué uniquement
goutte par goutte, s‘il n‘est pas assez corsé et s‘il a trop peu de
«crème», vous pouvez adapter le
degré de mouture pendant que le
moulin tourne.
→"Régler le degré de mouture",
Page45
¡ Si vous n‘utilisez pas l‘appareil
pendant un certain laps de temps,
l‘appareil s‘éteint automatique-
42
Page 43
Utilisation de base fr
ment. Vous pouvez modifier la durée dans les réglages de base.
→Page49
¡ Pendant le fonctionnement, des
gouttes d‘eau peuvent se former
au niveau des fentes d‘aération et
sur le couvercle du compartiment
à pastille.
¡ Pour des raisons techniques, de la
vapeur peut s'échapper de l'appareil.
¡ La première boisson servie n‘a pas
encore développé son plein arôme
lorsque:
– Vous utilisez l‘appareil pour la
première fois.
– Vous avez effectué un pro-
gramme d‘entretien.
– Vous n‘avez pas utilisé l‘appareil
pendant une période prolongée.
Ne pas boire la boisson.
Conseil:Une «crème» fine et
consistante sera obtenue lorsque
vous aurez préparé quelques tasses
après la mise en service de votre appareil.
Utilisation de base
7 Utilisation de base
Utilisation de base
7.1 Allumer ou éteindre l‘appareil
▶
Appuyer sur
.
Lors de l‘allumage, l‘écran affiche
le logo Siemens. Lors de l‘allumage et de l‘extinction, l‘appareil
effectue un rinçage automatique.
Lors de sa mise hors tension, l’appareil éjecte de la vapeur dans la
cuvette d’égouttage pour le nettoyer. Si l‘appareil est encore
chaud au moment de l‘allumage
ou si aucune boisson n‘a été préparée avant l‘extinction, l‘appareil
n‘effectue pas de rinçage.
7.2 Préparation de boisson
Apprenez comment préparer la boisson de votre choix.
AVERTISSEMENT
Risque de brûlure!
Les boissons fraîchement préparées
sont très chaudes.
▶
Si nécessaire, laisser refroidir les
boissons.
▶
Éviter tout contact entre la peau et
les liquides et vapeurs qui
s'échappent.
Remarques
¡ Avec certains réglages, le café est
préparé en plusieurs étapes. Attendez que l’opération soit entièrement terminée.
¡ Si vous préparez une boisson à
base de lait, fermez toujours le réservoir rempli de lait avec tuyau à
lait ou tube d‘aspiration.
¡ Si le système de lait n‘est pas
propre, de petits résidus de lait
risquent de se mélanger à l‘eau
lors du prélèvement d‘eau chaude.
Conseils
¡ Vous pouvez aussi utiliser des
boissons végétales au lieu de lait,
p.ex. du lait de soja.
¡ La qualité de la mousse de lait est
fonction de la nature du lait ou de
la boisson végétale utilisée.
43
Page 44

fr Utilisation de base
7.3 doubleShot et tripleShot
Plus la percolation du café dure longtemps, plus les substances amères
et les arômes indésirables sont libérés. Les substances amères et les
arômes indésirables altèrent le goût
et la digestibilité du café.
Afin de ne libérer que les arômes
agréables et digestes, la machine
moud de nouveau du café et effectue
une nouvelle percolation.
Remarque:Les fonctions "doubleShot" et "tripleShot" dépendent de
l‘intensité et de la taille de la boisson
sélectionnée.
7.4 Préparer une boisson à base de café avec du lait
Apprenez comment préparer un Latte
Macchiato à l‘aide d‘un exemple.
AVERTISSEMENT
Risque de brûlures!
Le système de lait devient très
chaud.
▶
Ne jamais toucher le système de
lait chaud.
▶
Laisser le système de lait refroidir
avant de le toucher.
Conditions
¡ Le tuyau à lait avec tube d‘aspira-
tion est raccordé au système de
lait.
¡ Le tube d‘aspiration est plongé
dans le lait.
1. Placer un verre sous la buse
d’écoulement.
2. Appuyer sur "Classiques".
3. Sélectionner le symbole de bois-
son Latte Macchiato et appuyer
dessus.
‒ Pour modifier l‘intensité, appuyer
sur
.
‒ Pour modifier la quantité, ap-
puyer sur .
‒ Pour modifier la part de lait, ap-
puyer sur .
4. Appuyer sur "Démarrer" et attendre
la fin de l‘opération.
‒ Pour arrêter la préparation de
boisson complète, appuyer sur
"Arrêter".
‒ Pour arrêter uniquement l‘étape
de préparation actuelle, appuyer
sur "Sauter".
Le système de lait se nettoie automatiquement après la préparation
avec un bref jet de vapeur.
Remarques
¡ Si vous ne modifiez aucun réglage
pendant env. 30secondes, l‘appareil quitte le mode réglage.
¡ L’appareil mémorise automatique-
ment les réglages.
Conseil:Vous pouvez préchauffer
les tasses en prélevant de l‘eau
chaude ou en utilisant le chauffetasses 1.
7.5 Préparer deux tasses à la fois
Selon le type d’appareil, vous pouvez
préparer simultanément deux tasses.
Remarque:Si la fonction "doubleShot" ou "tripleShot" est active, la
fonction de préparation simultanée
de deux tasses n‘est pas disponible.
1. Appuyer sur le symbole de la bois-
son souhaitée.
2. Appuyer sur
a L’écran indique le réglage.
.
1
Selon l'équipement de l'appareil
44
Page 45
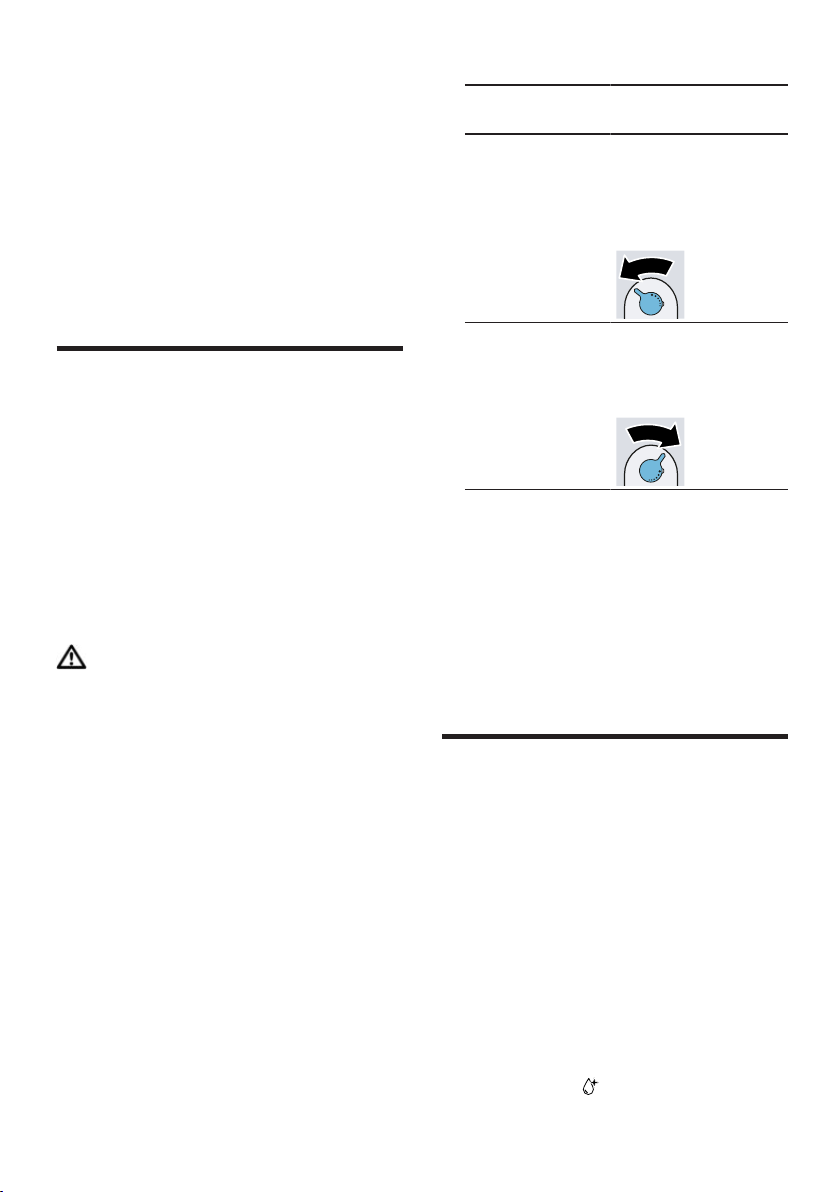
Moulin fr
3. Placer deux tasses, une à gauche
et une à droite, sous la buse
d‘écoulement.
4. Appuyer sur "Démarrer".
La boisson est préparée en 2
étapes. Les grains de café sont
moulus en 2 étapes.
a L’appareil effectue la percolation et
la boisson s’écoule dans la tasse.
5. Attendre la fin de l’opération.
Moulin
8 Moulin
Moulin
Votre appareil possède un moulin réglable avec lequel vous pouvez
adapter individuellement le degré de
mouture des grains de café.
8.1 Régler le degré de mouture
Pendant la mouture des grains de
café, réglez le degré de mouture souhaité.
AVERTISSEMENT
Risque de blessure!
Le moulin tourne.
▶
Ne jamais mettre les mains dans
le moulin.
ATTENTION!
Risque d'endommagement du moulin. Un mauvais réglage du degré de
mouture peut endommager le moulin.
▶
Ne régler le degré de mouture que
lorsque le moulin tourne.
▶
Régler le degré de mouture graduellement à l'aide du sélecteur rotatif.
Degré de
Réglage
mouture
Degré de
mouture fin
pour du café
en grains torréfié foncé.
Degré de
mouture grossier pour du
café en grains
Tourner le sélecteur dans le sens
inverse des aiguilles d’une
montre.
Tourner le sélecteur dans le sens
des aiguilles
d'une montre.
torréfié clair.
Le réglage du degré de mouture
est pris en compte seulement
après la seconde tasse de café.
Conseil:Si le café est distribué uniquement goutte par goutte, réglez un
degré de mouture plus grossier.
Si le café n'est pas assez corsé et s'il
présente trop peu de «crème», réglez un degré de mouture plus fin.
Filtre à eau
9 Filtre à eau
Filtre à eau
Avec un filtre à eau, vous réduisez
les dépôts de tartre et les salissures
dans l'eau.
9.1 Mettre en place le filtre à eau
ATTENTION!
Endommagement possible de l'appareil par l'entartrage.
▶
Changer le filtre à eau à temps.
▶
Remplacer le filtre à eau au plus
tard après 2mois.
1. Appuyer sur
.
45
Page 46
fr Sécurité enfants
2. Appuyer sur "Filtre INTENZA" et
suivre les instructions figurant à
l’écran.
9.2 Changer ou retirer le filtre à eau
▶
Appuyer sur
pendant au moins
3secondes.
a L’écran indique "Sécurité enfants
activée. Pour déverrouiller, appuyer sur le bouton de réglage
pendant 3 secondes.".
Vous pouvez également utiliser votre
appareil sans filtre à eau.
1. Appuyer sur
2. Appuyer sur "Filtre INTENZA".
3. Appuyer sur "Remplacer" ou sur
.
"Retirer" et suivre les instructions figurant à l’écran.
Conseils
¡ Changez le filtre à eau également
pour des raisons d’hygiène.
¡ Avec un filtre à eau, le détartrage
de l’appareil est moins souvent nécessaire.
¡ Rincez le filtre à eau avant utilisa-
tion en préparant une tasse d’eau
chaude, lorsque votre appareil n’a
pas été utilisé pendant longtemps,
p.ex. pendant les vacances.
¡ Le filtre à eau est disponible dans
le commerce ou auprès du Service
après-vente.
→"Accessoires", Page41
Sécurité enfants
10 Sécurité enfants
Sécurité enfants
Afin d’éviter que les enfants se
brûlent ou s’ébouillantent, il est possible de verrouiller l'appareil.
10.1 Activer la sécurité en-
fants
Condition:L’appareil est allumé.
10.2 Désactiver la sécurité enfants
▶
Appuyer sur
pendant au moins
3secondes.
a L’écran indique "La sécurité en-
fants a été désactivée.".
Chauffage pour tasses
11 Chauffage pour
tasses
Chauffage pour tasses
Vous pouvez chauffer vos tasses
avec le chauffe-tasses.
11.1 Activer et désactiver le chauffe-tasses
AVERTISSEMENT
Risque de brûlures!
Le chauffe-tasses1 devient très
chaud.
▶
Ne jamais toucher le chauffetasses1 très chaud.
▶
Laisser le chauffe-tasses1 refroidir
avant de le toucher.
Conseil:Pour bien chauffer les
tasses, placez-les avec le fond sur le
chauffe-tasses.
▶
Activer et désactiver le chauffetasses1 dans les réglages de base.
→"Aperçu des réglages de base",
Page49
1
1
1
Selon l'équipement de l'appareil
46
Page 47

Favoris fr
Favoris
12 Favoris
Favoris
Enregistrez les boissons contenant
des réglages personnels sous forme
de favori.
Vous pouvez identifier chaque favori
avec une couleur. Un favori contient
une boisson nécessitant des réglages personnels. Vous pouvez modifier les réglages à tout moment.
Remarque:Appuyer sur pour
quitter les réglages.
12.1 Enregistrer une boisson à partir de la sélection des boissons
1. Sélectionner une boisson à partir
de "Classiques" ou "coffeeWorld".
2. Effectuer les réglages de boissons
personnels.
3. Appuyer sur "Favori".
4. Sélectionner la couleur souhaitée
pour la boisson.
5. Appuyer sur "Enregistrer".
12.2 Enregistrer la boisson dans le menu
1. Appuyer sur "Favoris".
2. Appuyer sur
a L‘écran indique toutes les bois-
sons disponibles.
3. Sélectionner la boisson souhaitée.
4. Effectuer les réglages de boissons
personnels.
5. Appuyer sur "Suivant".
6. Sélectionner la couleur souhaitée
pour la boisson.
7. Appuyer sur "Enregistrer".
.
2. Sélectionner la boisson et appuyer
brièvement dessus.
3. Modifier les réglages des bois-
sons.
4. Appuyer sur "Reprendre".
a Les nouveaux réglages sont mé-
morisés.
12.4 Effacer un favori
1. Appuyer sur "Favoris".
2. Sélectionner la boisson.
3. Appuyer sur "Effacer".
4. Confirmer "Effacer".
12.5 Trier les favoris
1. Appuyer sur "Réglages".
2. Appuyer sur "Personnalisation".
3. Appuyer sur "Classement des favo-
ris".
4. Trier les favoris, p.ex. d‘après leur
nom ou leur couleur.
HomeConnect
13 HomeConnect
HomeConnect
Cet appareil peut être mis en réseau.
Connectez votre appareil à un appareil mobile pour le commander via
l'application HomeConnect, en modifier les réglages de base ou pour
surveiller son état de fonctionnement.
Les services HomeConnect ne sont
pas proposés dans tous les pays. La
disponibilité de la fonction
HomeConnect dépend de l’offre des
services HomeConnect dans votre
pays. Vous trouverez de plus amples
informations à ce sujet à l’adresse:
www.home-connect.com.
12.3 Modifier les réglages des boissons
1. Appuyer sur "Favoris".
47
Page 48

fr HomeConnect
Pour utiliser HomeConnect, configurez d'abord la connexion à votre réseau domestique WLAN (Wi-Fi1) et à
l'application HomeConnect.
L’application HomeConnect vous
guide tout au long du processus de
connexion. Suivez les étapes recommandées par l’application
HomeConnect pour procéder aux ré-
lement respectées si vous utilisez
l’appareil via l’application
HomeConnect.
→"Sécurité", Page35
¡ Les commandes directement effec-
tuées sur l’appareil sont toujours
prioritaires. Pendant ce temps, la
commande via l'application
HomeConnect n'est pas possible.
glages.
Conseils
¡ Pour ce faire, veuillez consulter les
documents HomeConnect fournis.
¡ Suivez également les consignes
dans l’applicationHomeConnect.
Remarques
¡ Suivez les consignes de sécurité
de la présente notice d’utilisation
et assurez-vous qu’elles sont éga-
13.1 Réglages HomeConnect
Ajustez HomeConnect à vos besoins
personnels.
Vous trouverez les réglages
HomeConnect dans les réglages de
base de votre appareil. Les réglages
qui s’affichent dépendent de la configuration de HomeConnect et de la
connexion de l’appareil au réseau
domestique.
Aperçu des réglages de Home Connect
Vous trouverez ici un aperçu des réglages de "Home Connect" et des réglages
du réseau.
Réglage de base Sélection Description
Connexion WiFi Marche
Arrêt
Éteindre le module radio en cas d‘absence prolongée ou pour économiser
l‘énergie.
Remarque:En mode de veille avec
maintien de la connexion au réseau,
votre appareil consomme 2W max.
Démarrage à distance
Marche
Arrêt
Activer et désactiver le démarrage à
distance sur l‘appareil.
Remarque:La désactivation est possible uniquement par le biais de l‘application "Home Connect".
Ajouter un terminal mobile
- Connecter l‘appareil à "Home
Connect" ou à des comptes "Home
Connect" supplémentaires.
Informations réseau
- Afficher des informations sur le réseau et l‘appareil.
1
Wi-Fi est une marque déposée de la société Wi-Fi Alliance.
48
Page 49

Réglage de base Sélection Description
Effacer les réglages réseau
- Remarque:Sans connexion au réseau, la commande via l‘application
"Home Connect" est impossible.
Mise à jour du logiciel
- Remarque:Ce réglage est disponible
uniquement lors d‘une mise à jour logicielle.
Réglages de base fr
13.2 Protection des données
Suivez les consignes de protection
des données.
Lors de la première connexion de
votre appareil à un réseau
domestique branché à Internet, votre
appareil transmet les catégories de
données suivantes au serveur
HomeConnect (premier
enregistrement):
¡ Identifiant unique de l'appareil
(constitué de codes d’appareil ainsi que de l’adresse MAC du module de communication Wi-Fi intégré).
¡ Certificat de sécurité du module de
communication Wi-Fi (pour la protection des informations de la
connexion).
¡ La version actuelle du logiciel et
du matériel de l'électroménager.
¡ État d’une éventuelle restauration
précédente des réglages d’usine.
Ce premier enregistrement prépare
l’utilisation des fonctions
HomeConnect et ne s’avère nécessaire qu’au moment où vous voulez
utiliser les fonctions HomeConnect
pour la première fois.
Remarque:Veuillez noter que les
fonctions HomeConnect ne sont utilisables qu'avec l'application
HomeConnect. Vous pouvez consulter les informations sur la protection
des données dans l’application
HomeConnect.
Réglages de base
14 Réglages de base
Réglages de base
Vous pouvez régler votre appareil en
fonction de vos besoins et sélectionner des fonctions additionnelles.
14.1 Modifier les réglages de base
1. Appuyer sur
a L’écran indique la liste des ré-
glages de base.
2. Effectuer le réglage de base dési-
ré.
a L‘appareil mémorise le réglage de
base automatiquement.
3. Appuyer sur
glages de base.
.
pour quitter les ré-
14.2 Aperçu des réglages de base
Vous trouverez ici un aperçu des réglages de base de l’appareil.
Réglage pour boissons Température de percola-
tion
Séquence du lait Régler l‘ordre lait et café.
1
Selon l'équipement de l'appareil
Régler la température de
percolation.
49
Page 50

fr Réglages de base
Latte Macchiato Pause Régler la pause entre lait
et café.
Réinitialiser les paramètres boisson
Réglage de l‘appareil Chauffe-tasses
1
Réinitialiser les réglages
de boissons.
Activer ou désactiver le
chauffe-tasses1.
Arrêt automatique Régler la durée après la-
quelle l‘appareil s‘éteint.
Luminosité de l‘écran Régler la luminosité par
étapes.
Tonalité ¡ Allumer et éteindre les
tons.
¡ Régler le volume.
Dureté de l’eau Régler la dureté de
l’eau.
Langue Régler la langue.
Réglages d‘usine Remettre l‘appareil aux
réglages usine.
Personnalisation Logo de la marque Afficher ou ne pas affi-
cher le logo de la
marque sur l‘écran.
Fonctionnement après la
mise en service
Régler l‘écran pour "Fa-
voris", "Classiques" ou
"coffeeWorld".
Tri des favoris Déterminer l‘ordre des
favoris.
Home Connect Informations sur
Home Connect
Pour démarrer, scanner
le QR code.
→"Réglages
HomeConnect",
Page48
Infos sur l‘appareil Compteur de boissons. Afficher le nombre des
boissons prélevées.
Information de nettoyage Afficher la durée jus-
qu‘au prochain change-
ment de filtre à eau ou
démarrage du pro-
gramme d‘entretien.
Information sur la version Afficher des informations
sur le réseau et l‘appa-
reil.
1
Selon l'équipement de l'appareil
50
Page 51

Nettoyage et entretien fr
Information sur la licence Afficher le texte de la li-
cence FOSS.
Mode d‘opération Mode d‘opération à des
fins de démonstration
1
Selon l'équipement de l'appareil
Nettoyage et entretien
Activer ou désactiver
"Mode démo".
15 Nettoyage et entretien
Nettoyage et entretien
Pour que votre appareil reste longtemps opérationnel, nettoyez-le et entretenezle avec soin.
15.1 Nettoyage au lave-vaisselle
Vous trouverez ici un aperçu des composants qui peuvent être lavés au lavevaisselle.
▶
ATTENTION!
Certains composants ne sont pas résistants aux températures élevées et
peuvent être endommagés lors du
nettoyage en lave-vaisselle.
▶
Respectez la notice d’utilisation du
lave-vaisselle.
Nettoyer au lave-vaisselle uniquement les composants adaptés.
▶
Utiliser uniquement des programmes qui ne chauffent pas
l’eau à plus de 60°C.
Adapté:
¡ Cuvette d‘égouttage
– Égouttoir
– Bac à marc de café
– Indicateur mécanique de niveau
de remplissage
¡ Système de lait avec adaptateur
¡ Réservoir de lait avec couvercle
15.2 Produits de nettoyage
Utilisez uniquement des produits de
nettoyage appropriés.
ATTENTION!
Des produits nettoyants inappropriés
peuvent endommager les surfaces
de l’appareil.
▶
Ne pas utiliser de produits de nettoyage agressifs ou récurants.
Non adapté:
¡ Réservoir d‘eau
¡ Couvercle du réservoir d’eau
¡ Couvercle préservateur d’arôme
¡ Unité de percolation
¡ Couvercle de la buse d‘écoule-
ment
▶
Ne pas utiliser de produit nettoyant
contenant de l’alcool ou de l’alcool
à brûler.
▶
Ne pas utiliser de tampon en paille
métallique ni d’éponge à dos récurant.
▶
Ne pas utiliser d’acide citrique, de
vinaigre ou de produit à base de
vinaigre pour le détartrage.
▶
Pour le détartrage et le nettoyage,
utiliser exclusivement les pastilles
appropriées.
51
Page 52
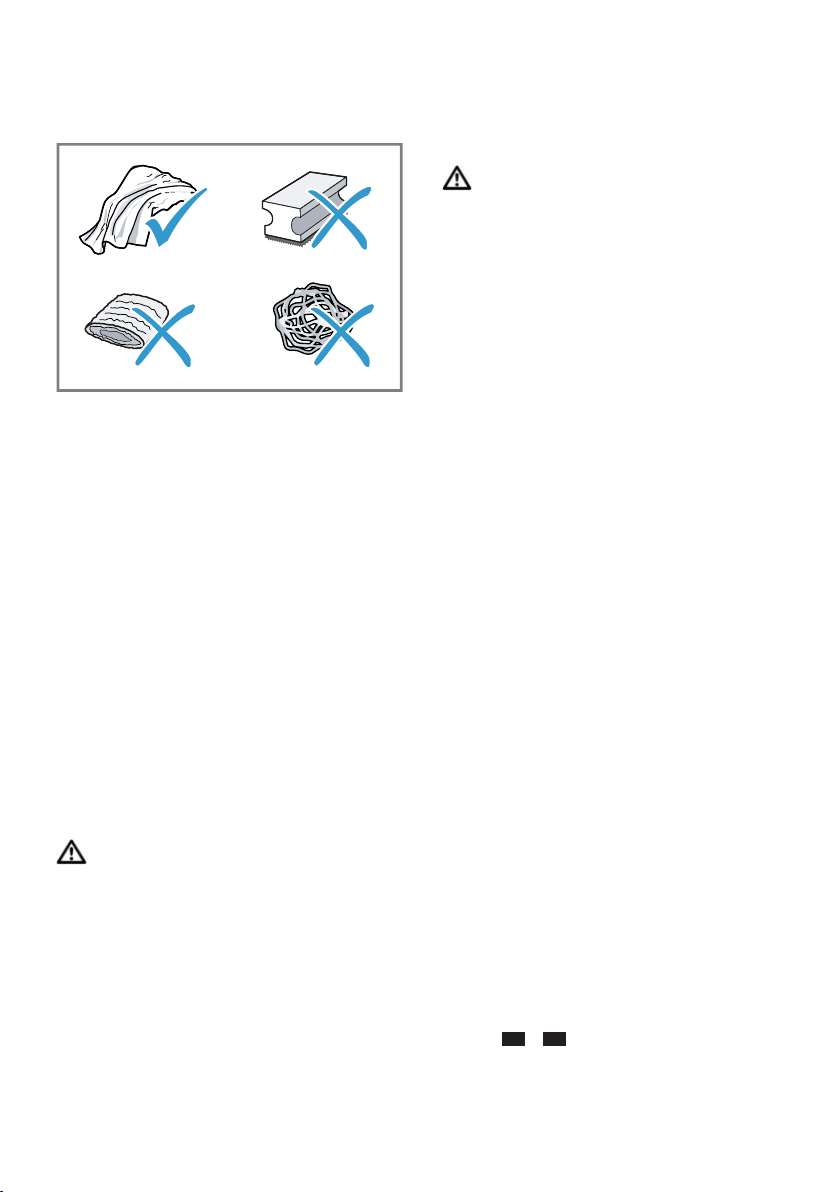
fr Nettoyage et entretien
▶
Ne pas utiliser de détartrant contenant de l‘acide phosphorique.
Conseils
¡ Utilisez des pastilles de détartrage
et de nettoyage spécialement
conçues pour votre appareil. Les
pastilles sont disponibles auprès
du Service après-vente.
→"Accessoires", Page41
¡ Lavez soigneusement les chiffons
éponges neufs, pour retirer les
sels qui y adhèrent éventuellement. Les sels peuvent occasionner une rouille superficielle sur les
surfaces en acier inox.
¡ Enlevez toujours immédiatement
les résidus de tartre, de café, de
lait, de produit de nettoyage et de
produit de détartrage afin d‘éviter
la formation de corrosion.
15.3 Nettoyer l'appareil
▶
Ne pas utiliser de nettoyeur vapeur
ou haute pression pour nettoyer
l’appareil.
AVERTISSEMENT
Risque de brûlures!
Certaines pièces de l’appareil deviennent très chaudes.
▶
Ne touchez jamais les pièces
chaudes de l’appareil.
▶
Laisser refroidir les pièces
chaudes de l’appareil après utilisation et avant de les toucher.
1. Nettoyer le boîtier, les surfaces
brillantes et le bandeau de commande avec le chiffon en microfibres fourni.
2. Nettoyer le système verseur après
la préparation de boisson avec un
chiffon doux et humide.
3. Si l’appareil n’a pas été utilisé pen-
dant une période prolongée, p.ex.
pendant les vacances, nettoyer
tout l’appareil, y compris le système d’écoulement, le système de
lait, les bols et l’unité de percolation.
Remarque:L’appareil effectue un
rinçage automatique lorsque vous
l’allumez à froid ou lorsque vous
l’éteignez après la préparation de café. L‘appareil se nettoie ainsi de luimême.
AVERTISSEMENT
Risque d'électrocution!
L’infiltration d’humidité peut occasionner un choc électrique.
▶
Ne jamais plonger l’appareil ou le
cordon d’alimentation secteur
dans l’eau.
▶
Veiller à ce qu’aucun liquide ne
coule sur le raccordement de l’appareil.
52
15.4 Nettoyer la cuvette d‘égouttage et le bac à marc de café
Nettoyez et videz quotidiennement la
cuvette d’égouttage et le bac à marc
de café pour éviter les dépôts. Suivre
les instructions de la figure située au
début de la présente notice.
→Fig.
17
-
18
Page 53
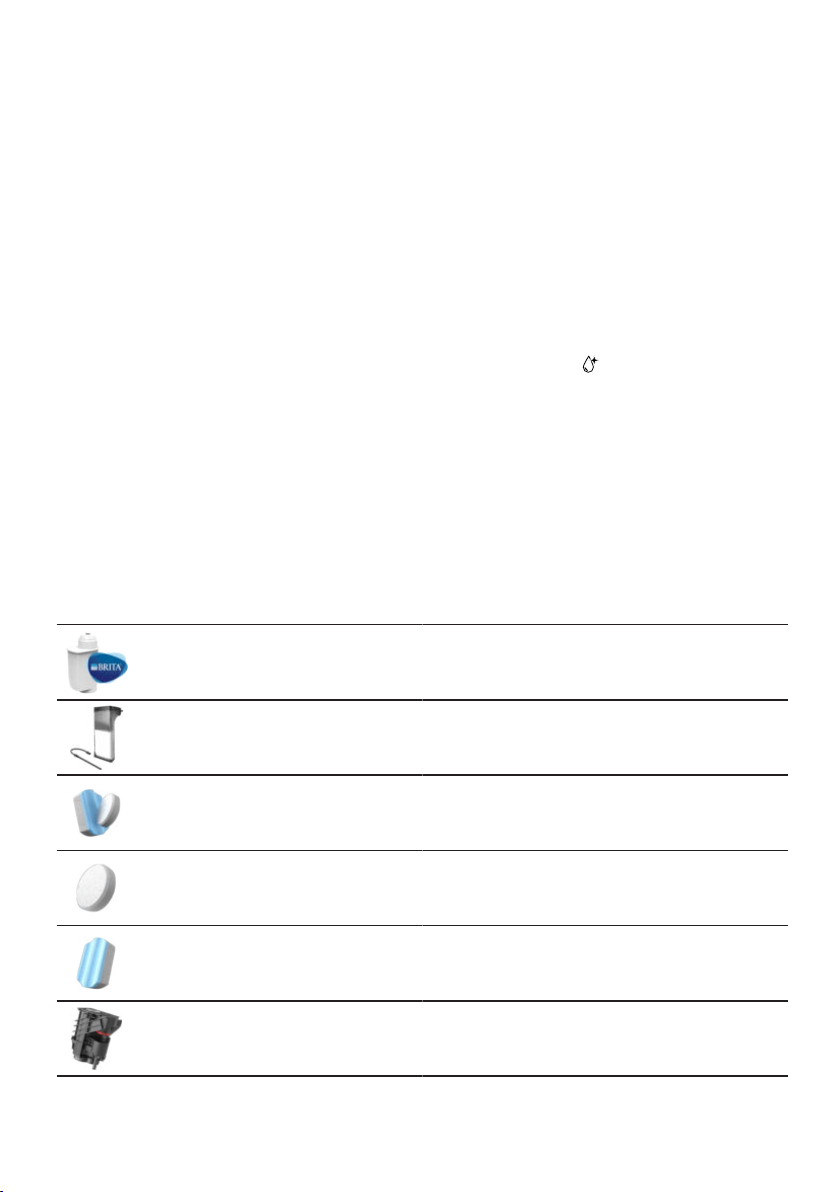
Nettoyage et entretien fr
▶
15.5 Programmes d‘entretien
Ne jamais placer de pastilles de
détartrage ni autres produits dans
Utilisez les programmes d‘entretien
le compartiment à pastilles.
pour insérer ou retirer un filtre à eau
ou nettoyer soigneusement votre appareil.
Remarques
¡ L'écran indique où en est l'opéra-
tion.
ATTENTION!
Un nettoyage ou un détartrage effectué de manière incorrecte ou retar-
¡ Si l’appareil est verrouillé, il ne
peut être réutilisé qu'une fois le détartrage effectué.
dée peut endommager l’appareil.
▶
Effectuer le processus de détartrage immédiatement après l‘apparition de la consigne.
▶
Placer des pastilles de nettoyage
uniquement dans le compartiment
prévu à cet effet.
Utiliser les programmes d‘entretien
1. Appuyer sur
2. Appuyer sur le symbole du pro-
.
gramme souhaité.
a L‘écran guide l‘utilisateur à travers
le programme.
Aperçu des programmes d‘entretien
Vous trouverez ici un aperçu des programmes d'entretien.
Remarque:L‘écran de démarrage indique les préparations de boisson res-
tantes jusqu‘à l‘exécution du programme et la durée.
Filtre INTENZA Mettre en place, retirer ou remplacer
le filtre à eau.
Nettoyage du système
à lait
Rincer automatiquement le système
de lait.
calc'nClean Combiner nettoyage etdétartrage. Éli-
miner les résidus de café et de calcaire des conduites.
Nettoyage Éliminer les restes de café des
conduites.
Détartrage Éliminer les restes de calcaire des
conduites.
Nettoyage de l'unité
de percolation
L‘écran indique, étape par étape, le
nettoyage optimal de l‘unité de percolation.
53
Page 54
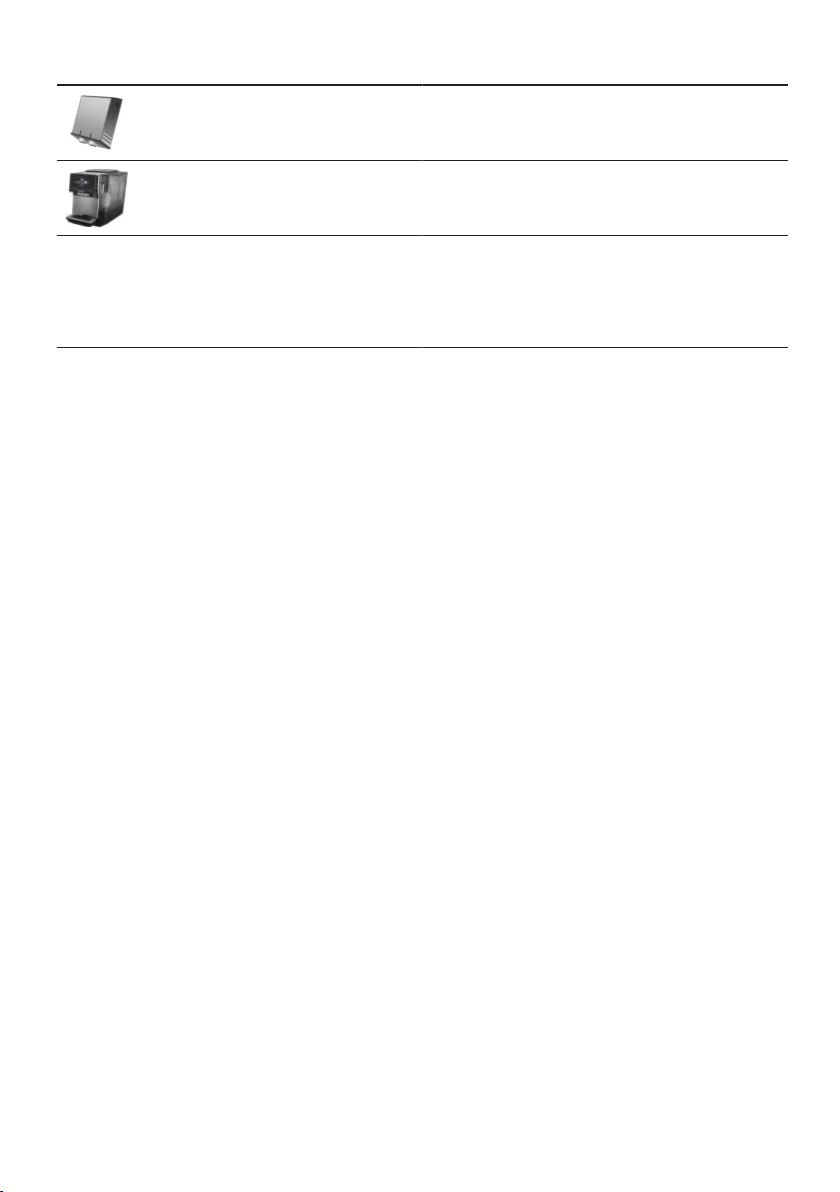
fr Nettoyage et entretien
Nettoyage de la buse
d'écoulement
Protection contre le
gel
Rinçage spécial Si un programme d‘entretien est inter-
Conseils
¡ Quand vous lancez le programme
"Détartrage" ou "calc'nClean" démarrer, tenir à disposition un récipient d‘une contenance d‘au moins
0,5litre.
¡ Si vous utilisez un filtre à eau, la
durée avant l‘exécution d‘un programme d‘entretien est allongée.
¡ Vous pouvez regrouper le "Détar-
trage" et le "Nettoyage" avec le
programme d‘entretien
"calc'nClean".
L‘écran indique, étape par étape, le
nettoyage optimal de la buse d‘écoulement.
Vider les conduites pour protéger l‘appareil pendant le transport et le stockage.
rompu, p.ex. par une coupure de
courant, l‘appareil rince automatiquement. Ce n‘est qu‘ensuite que l‘appareil est de nouveau prêt à fonctionner.
54
Page 55
Dépannage fr
Dépannage
16 Dépannage
Dépannage
Vous pouvez corriger par vous-même les petits défauts de votre appareil. Lisez
les renseignements de dépannage avant de contacter le service consommateurs. Vous vous épargnerez ainsi des dépenses inutiles.
AVERTISSEMENT
Risque d'électrocution!
Les réparations non conformes sont dangereuses.
▶
Seul un personnel dûment qualifié peut entreprendre des réparations sur
l'appareil.
▶
Seules des pièces de rechange d'origine peuvent être utilisées pour réparer
l'appareil.
▶
Afin d’écarter tout danger quand le cordon d’alimentation secteur de cet appareil est endommagé, seul le fabricant ou son service après-vente ou toute
autre personne de qualification équivalente est habilité à le remplacer.
Défaut Cause et dépannage
L’appareil ne réagit
plus.
Home Connect ne
fonctionne pas correctement.
L'appareil délivre uniquement de l'eau,
mais pas de café.
L'appareil présente un dérangement.
1. Débranchez la fiche secteur et attendez 10se-
condes.
2. Branchez la fiche secteur.
Différentes causes sont possibles.
▶
Allez sur www.home-connect.com.
L’appareil ne détecte pas que le réservoir pour café
en grains est vide.
▶
Versez du café en grains.
La cuve à café de l’unité de percolation est obstruée.
▶
Nettoyez l’unité de percolation.
Les grains sont huileux et ne tombent pas dans le
moulin.
▶
Tapotez légèrement sur le réservoir pour café en
grains.
▶
Changez de variété de café.
N'utilisez pas de grains huileux.
▶
Nettoyez le réservoir pour café en grains vide avec
un chiffon humide.
L’unité de percolation n’est pas insérée correctement.
1. Vérifiez si l‘unité de percolation est correctement
mise en place et bien verrouillée.
2. Poussez le levier rouge situé en haut vers la
gauche.
55
Page 56

fr Dépannage
Défaut Cause et dépannage
L'appareil délivre uniquement de l'eau,
3. Remettez en place le cache de l‘espace de perco-
lation.
mais pas de café.
L’appareil de fournit
pas de mousse de
lait.
Le système de lait est sale.
▶
Nettoyez le système de lait au lave-vaisselle.
Le tube à lait ne plonge pas dans le lait.
▶
Utilisez plus de lait.
▶
Vérifiez si le tube à lait plonge dans le lait.
L'appareil est fortement entartré.
▶
Détartrez l’appareil.
Le système de lait
n’aspire pas de lait.
Le système de lait n’est pas assemblé correctement.
▶
Assemblez correctement le système de lait.
Le tube à lait ne plonge pas dans le lait.
▶
Utilisez plus de lait.
▶
Vérifiez si le tube à lait plonge dans le lait.
La mousse de lait est
trop froide.
L'appareil ne délivre
pas d'eau chaude.
L'appareil de délivre
pas de boisson.
Le lait est trop froid.
▶
Utilisez du lait tiède.
Le système de lait est sale.
▶
Nettoyez le système de lait au lave-vaisselle.
Le filtre à eau contient de l'air.
1. Plongez le filtre à eau dans de l'eau, ouverture vers
le haut, jusqu'à ce que plus aucune bulle d'air ne
s'échappe.
2. Remettez le filtre en place.
▶
Placez le filtre à eau bien droit et appuyez fortement pour l’enfoncer dans le raccordement au réservoir.
Des résidus de détartrant obstruent le réservoir à eau.
1. Retirez le réservoir d'eau.
2. Nettoyez soigneusement le réservoir d'eau.
Il y a des gouttes
d'eau sur le fond de
l'appareil.
La cuvette d'égouttage a été retirée trop tôt.
▶
Attendez quelques secondes après la préparation
de la dernière boisson avant de retirer la cuvette
d’égouttage.
L'unité de percolation
ne peut pas être retirée.
Impossible de débloquer le verrouillage, unité de percolation bloquée.
▶
Mettez l’appareil hors, puis sous tension après
3minutes.
56
Page 57

Défaut Cause et dépannage
Le moulin ne démarre
pas.
Le moulin ne moud
pas de grains alors
que le réservoir pour
café en grains est
plein.
L'appareil est trop chaud.
1. Débranchez l’appareil du secteur.
2. Attendez 1heure pour que l’appareil refroidisse.
Les grains sont huileux et ne tombent pas dans le
moulin.
▶
Tapotez légèrement sur le réservoir pour café en
grains.
▶
Changez de variété de café.
N'utilisez pas de grains huileux.
▶
Nettoyez le réservoir pour café en grains vide avec
un chiffon humide.
Qualité très variable
du café ou de la
L'appareil est entartré.
▶
Détartrez l’appareil.
mousse de lait.
Qualité variable de la
mousse de lait.
La qualité de la mousse de lait est fonction de la nature de la boisson végétale ou du lait utilisé.
▶
Optimisez le résultat par le choix du lait ou de la
boisson végétale.
Le café n'est pas versé ou uniquement
goutte à goutte.
La quantité réglée
n'est pas atteinte.
Le degré de mouture réglé est trop fin.
▶
Réglez un degré de mouture plus grossier.
→"Régler le degré de mouture", Page45
L'appareil est fortement entartré.
▶
Détartrez l’appareil.
Le filtre à eau contient de l'air.
1. Plongez le filtre à eau dans de l'eau, ouverture vers
le haut, jusqu'à ce que plus aucune bulle d'air ne
s'échappe.
2. Remettez le filtre en place.
L’appareil est encrassé.
▶
Nettoyez l’unité de percolation.
▶
Détartrez et nettoyez l’appareil.
Le café ne présente
pas de «crème».
La variété de café n'est pas optimale.
▶
Utilisez un café contenant une proportion plus importante de Robusta.
▶
Utilisez des grains de café présentant une torréfaction plus foncée.
Les grains ne sont pas fraîchement torréfiés.
▶
Utilisez des grains frais.
Le degré de mouture est inadapté aux grains de café.
Dépannage fr
57
Page 58

fr Dépannage
Défaut Cause et dépannage
▶
Le café ne présente
pas de «crème».
Réglez un degré de mouture plus fin.
→"Régler le degré de mouture", Page45
Le café est trop acide. Le degré de mouture réglé est trop grossier.
▶
Réglez un degré de mouture plus fin.
→"Régler le degré de mouture", Page45
La variété de café n'est pas optimale.
▶
Utilisez un café contenant une proportion plus importante de Robusta.
▶
Utilisez des grains de café présentant une torréfaction plus foncée.
Le café est trop amer. Le degré de mouture réglé est trop fin.
▶
Réglez un degré de mouture plus grossier.
→"Régler le degré de mouture", Page45
La variété de café n'est pas optimale.
▶
Changez de variété de café.
Le café a un goût de
brûlé.
Le degré de mouture réglé est trop fin.
▶
Réglez un degré de mouture plus grossier.
→"Régler le degré de mouture", Page45
La variété de café n'est pas optimale.
▶
Changez de variété de café.
La température réglée du café est trop élevée.
▶
Réduisez la température du café.
Le marc de café n'est
pas compact et est
trop humide.
Le degré de mouture réglé n'est pas optimal.
▶
Réglez un degré de mouture plus grossier ou plus
fin.
→"Régler le degré de mouture", Page45
Les grains de café sont trop huileux.
▶
Utilisez une autre variété de grains.
Le message "Mettre
en place l'unité de
percolation." apparaît.
Le couvercle est mal mis en place.
1. Vérifiez si l‘unité de percolation est correctement
mise en place et bien verrouillée.
2. Poussez le levier rouge situé en haut vers la
gauche.
3. Remettez en place le cache de l‘espace de perco-
lation.
Le message "Remplir
le réservoir d'eau."
s‘affiche alors que le
réservoir d‘eau est
plein.
Le réservoir d’eau est mal mis en place.
▶
Mettez correctement en place le réservoir d'eau.
Le réservoir d’eau contient de l’eau gazeuse.
▶
Remplissez le réservoir d’eau avec de l’eau fraîche
du robinet.
58
Page 59

Défaut Cause et dépannage
Le message "Remplir
le réservoir d'eau."
s‘affiche alors que le
réservoir d‘eau est
plein.
Le flotteur qui se trouve dans le réservoir d'eau est
grippé.
1. Retirez le réservoir d'eau.
2. Nettoyez soigneusement le réservoir d'eau.
Le filtre à eau neuf n’a pas été rincé conformément
aux instructions.
1. Rincez le filtre à eau d'après les instructions.
2. Mettez le filtre à eau en service.
Le filtre à eau contient de l'air.
1. Plongez le filtre à eau dans de l'eau, ouverture vers
le haut, jusqu'à ce que plus aucune bulle d'air ne
s'échappe.
2. Remettez le filtre en place.
Le filtre à eau est trop vieux.
▶
Mettez en place un nouveau filtre à eau.
Des dépôts de tartre dans le réservoir d'eau bouchent
le système.
1. Nettoyez soigneusement le réservoir d'eau.
2. Démarrez le programme de détartrage.
Le message "Nettoyer
l'unité de percolation."
apparaît.
Le message "Surtension ou sous-tension"
L’unité de percolation est sale.
▶
Nettoyez l’unité de percolation.
Le mécanisme de l'unité de percolation est grippé.
▶
Nettoyez l’unité de percolation.
Problèmes associés à l‘alimentation électrique.
▶
Ne faites fonctionner l'appareil que sur 220-240V.
apparaît.
Le message "Défaut
dans le circuit d'eau.
Redémarrer l'appareil." apparaît.
Le message "Effectuer
le programme
calc'nClean !" s‘affiche
très fréquemment.
L'appareil présente un dérangement.
1. Débranchez la fiche secteur et attendez 10se-
condes.
2. Branchez la fiche secteur.
L‘eau déminéralisée contient encore de faibles quantités de calcaire.
1. Mettez en place un nouveau filtre à eau.
2. Réglez la dureté de l'eau en conséquence.
Produit détartrant incorrect ou trop peu de produit utilisé.
▶
Pour le détartrage, utilisez exclusivement les pastilles appropriées.
Programme d’entretien pas entièrement réalisé.
Dépannage fr
59
Page 60

fr Dépannage
Défaut Cause et dépannage
▶
Le message "Effectuer
le programme
calc'nClean !" s‘affiche
Démarrez le programme d‘entretien "Rinçage spécial".
→"Programmes d‘entretien", Page53
très fréquemment.
60
Page 61
Transport, stockage et élimination fr
Transport, stockage et élimination
17 Transport, stockage et
élimination
Transport, stockage et élimination
Apprenez comment préparer votre
appareil pour le transport et le stockage. Apprenez également comment éliminer les appareils usagés.
17.1 Activer la protection contre le gel
Protégez l’appareil contre le gel durant le transport et le stockage.
ATTENTION!
Les résidus de liquide risquent d’endommager l’appareil pendant le
transport et le stockage.
▶
Avant le transport ou le stockage,
vider le circuit.
1. Exécuter le programme "Protection
contre le gel" .
→"Réglages de base", Page49
2. Débrancher l‘appareil de l‘alimen-
tation électrique.
17.2 Mettre au rebut un appareil usagé
La destruction dans le respect de
l’environnement permet de récupérer
de précieuses matières premières.
1. Débrancher la fiche du cordon
d’alimentation secteur.
2. Couper le cordon d’alimentation
secteur.
3. Éliminez l’appareil dans le respect
de l’environnement.
Vous trouverez des informations
sur les circuits actuels d'élimination auprès de votre revendeur
spécialisé ou de l’administration
de votre commune/ville.
Cet appareil est marqué
selon la directive européenne 2012/19/UE relative aux appareils électriques et électroniques
usagés (waste electrical
and electronic equipment - WEEE).
La directive définit le
cadre pour une reprise
et une récupération des
appareils usagés applicables dans les pays de
la CE.
Service après-vente
18 Service après-vente
Service après-vente
Contactez notre service après-vente
si vous avez des questions, si vous
n'arrivez pas à corriger un défaut de
l'appareil ou si ce dernier doit être réparé.
Les pièces de rechange relatives au
fonctionnement de l’appareil et
conformes à l’ordonnance d’écoconception correspondante sont disponibles auprès de notre service aprèsvente pour une durée d’au moins 7
ans à partir de la mise sur le marché
de l'appareil dans l’espace économique européen.
Remarque:Dans le cadre des
conditions de la garantie, le recours
au service après-vente est gratuit.
Pour plus d'informations sur ladurée
etles conditions de la garantie dans
votre pays, adressez-vous à notre
service après-vente, à votre revendeur ou consulteznotre site Web.
Lorsque vous contactez le service
après-vente, vous avez besoin du numéro de produit (E-Nr.), du numéro
de fabrication (FD) et du numéro de
série (Z-Nr.) de votre appareil.
61
Page 62

fr Données techniques
Vous trouverez les coordonnées du
service après-vente dans la liste figurant à la fin de cette notice d’utilisation ou sur notre site internet.
18.1 Numéro de produit (ENr.), numéro de fabrication (FD) et numéro de
série (Z-Nr.)
Le numéro de produit (E-Nr.), le numéro de fabrication (FD) et le numéro de série (Z-Nr.) sont indiqués sur
la plaque signalétique de l’appareil.
Pour retrouver rapidement les données de votre appareil et le numéro
de téléphone du service consommateurs, n'hésitez pas à les recopier
ailleurs.
18.2 Conditions de garantie
Les conditions de garantie de votre
appareil sont les suivantes.
Les conditions de garantie applicables sont celles publiées par notre
distributeur dans le pays où a été effectué l’achat. Le revendeur chez qui
vous vous êtes procuré l’appareil
fournira les modalités de garantie sur
simple demande de votre part. En
cas de recours en garantie, veuillez
toujours vous munir de la preuve
d’achat.
Données techniques
19 Données techniques
Données techniques
Vous trouverez ici les chiffres et données concernant votre appareil.
Tension 220–
240V∼
Fréquence 50Hz
Tension/puissance
1500W
raccordée
Pression statique maxi-
20bar
male de la pompe
Contenance maximale
2,6l
du réservoir d’eau
(sans filtre)
Contenance maximale
350g
du réservoir pour café
en grains
Longueur du cordon
100cm
d’alimentation
Hauteur de l’appareil 38cm
Largeur de l’appareil 30cm
Profondeur de l’appa-
46,7cm
reil
Poids à vide 9kg
Type de moulin Céramique
Déclaration de conformité
20 Déclaration de confor-
mité
Déclaration de conformité
BSH Hausgeräte GmbH déclare par
la présente que l’appareil doté de la
fonction Home Connect est conforme
avec les exigences fondamentales et
les autres dispositions adaptées de
la directive 2014/53/EU.
Vous trouverez une déclaration de
conformité RED détaillée sur Internet
à l’adresse www.siemens-home.bshgroup.com sur la page de votre appareil dans les documents supplémentaires.
Bande de 2,4GHz: 100mW max.
Bande de 5GHz: 100mW max.
62
BE BG CZ DK DE EE IE EL
ES FR HR IT CY LV LT LU
Page 63

Déclaration de conformité fr
HU MT NL AT PL PT RO SI
SK FI SE UK NO CH TR
WLAN (Wi-Fi) de 5GHz: uniquement destiné à un usage intérieur.
63
Page 64

nl
Inhoudsopgave
1 Veiligheid....................................66
1.1 Algemene aanwijzingen ...........66
1.2 Bestemming van het appa-
raat ...........................................66
1.3 Inperking van de gebruikers ....66
1.4 Veiligheidsaanwijzingen ...........66
2 Milieubescherming en bespa-
ring..............................................70
2.1 Afvoeren van de verpakking ....70
2.2 Energie besparen.....................70
3 Opstellen en aansluiten.............70
3.1 Leveringsomvang .....................70
3.2 Apparaat opstellen en aan-
sluiten .......................................70
4 Uw apparaat leren kennen.........71
4.1 Apparaat...................................71
4.2 Bedieningselementen...............71
5 Accessoires................................72
6 Voor het eerste gebruik .............72
6.1 Apparaat voorbereiden en
reinigen.....................................72
6.2 Waterhardheid bepalen............73
6.3 Eerste keer in gebruik ne-
men...........................................73
6.4 Algemene aanwijzingen ...........73
9 Waterfilter ...................................76
9.1 Waterfilter plaatsen...................76
9.2 Waterfilter vervangen of ver-
wijderen ....................................76
10 Kinderslot .................................77
10.1 Kinderslot inschakelen...........77
10.2 Kinderslot uitschakelen..........77
11 Kopjesverwarming1..................77
11.1 Kopjesverwarming active-
ren en deactiveren1................77
12 Favorieten.................................77
12.1 Drank uit drankkeuze op-
slaan.......................................77
12.2 Drank in het menu opslaan....78
12.3 Drankinstellingen wijzigen......78
12.4 Favoriet wissen.......................78
12.5 Favorieten sorteren ................78
13 HomeConnect .........................78
13.1 HomeConnect instellingen....79
13.2 Bescherming persoonsge-
gevens....................................79
14 Basisinstellingen .....................80
14.1 Basisinstellingen wijzigen.......80
14.2 Overzicht van de basisin-
stellingen ................................80
7 De Bediening in essentie...........74
7.1 Apparaat in- of uitschakelen ....74
7.2 Drankafname............................74
7.3 doubleShot en tripleShot..........74
7.4 Koffiedrank met melk afne-
men...........................................75
7.5 Twee kopjes tegelijk afne-
men...........................................75
8 Maalwerk.....................................76
8.1 Maalgraad instellen ..................76
1
Afhankelijk van de apparaatuitvoering
64
15 Reiniging en onderhoud ..........81
15.1 Vaatwasserbestendigheid ......82
15.2 Reinigingsmiddelen................82
15.3 Apparaat reinigen...................83
15.4 Lekschaal en koffiedikre-
servoir reinigen.......................83
15.5 Serviceprogramma's ..............83
Page 65

16 Storingen verhelpen ................85
17 Transporteren, opslaan en
afvoeren....................................90
17.1 Vorstbeveiliging activeren ......90
17.2 Afvoeren van uw oude ap-
paraat .....................................90
18 Servicedienst............................90
18.1 Productnummer (E-Nr.),
productienummer (FD) en
volgnummer (Z-Nr.) ................91
18.2 Garantievoorwaarden.............91
19 Technische gegevens..............91
20 Conformiteitsverklaring...........91
nl
65
Page 66

nl Veiligheid
1 Veiligheid
Neem de volgende veiligheidsvoorschriften in acht.
1.1 Algemene aanwijzingen
¡ Lees deze gebruiksaanwijzing zorgvuldig door.
¡ Bewaar de gebruiksaanwijzing en de productinformatie voor la-
ter gebruik of voor volgende eigenaren.
¡ Sluit het apparaat in geval van transportschade niet aan.
1.2 Bestemming van het apparaat
Gebruik het apparaat uitsluitend:
¡ om hete drank te bereiden.
¡ voor huishoudelijk gebruik en in gesloten ruimtes binnen de hui-
selijke omgeving.
¡ tot een hoogte van 2000m boven zeeniveau.
1.3 Inperking van de gebruikers
Dit apparaat kan worden bediend door kinderen vanaf 8 jaar en
door personen met fysieke, sensorische of geestelijke beperkingen of met gebrekkige ervaring en/of kennis, indien zij onder toezicht staan of zijn geïnstrueerd in het veilige gebruik van het apparaat en de daaruit resulterende gevaren hebben begrepen.
Kinderen mogen niet met het apparaat spelen.
Reiniging en gebruikersonderhoud mogen niet worden uitgevoerd
door kinderen, tenzij ze 8jaar of ouder zijn en onder toezicht
staan.
Zorg ervoor dat kinderen die jonger zijn dan 8 jaar niet bij het apparaat of de aansluitkabel kunnen komen.
1.4 Veiligheidsaanwijzingen
WAARSCHUWING‒Kans op verstikking!
Kinderen kunnen verpakkingsmateriaal over het hoofd trekken en
hierin verstrikt raken en stikken.
▶
Verpakkingsmateriaal uit de buurt van kinderen houden.
66
Page 67

Veiligheid nl
▶
Laat kinderen niet met verpakkingsmateriaal spelen.
Kinderen kunnen kleine onderdelen inademen of inslikken en hierdoor stikken.
▶
Kleine onderdelen uit de buurt van kinderen houden.
▶
Kinderen niet met kleine onderdelen laten spelen.
WAARSCHUWING‒Kans op elektrische schok!
Ondeskundige installaties zijn gevaarlijk.
▶
Het apparaat uitsluitend aansluiten en gebruiken volgens de ge-
gevens op het typeplaatje.
▶
Het apparaat uitsluitend via een volgens de voorschriften geïn-
stalleerd stopcontact met randaarde op een stroomnet met wis-
selstroom aansluiten.
▶
Het randaardesysteem van de elektrische huisinstallatie moet
conform de elektrotechnische voorschriften zijn geïnstalleerd.
Een beschadigd apparaat of een beschadigd netsnoer is gevaarlijk.
▶
Nooit een beschadigd apparaat gebruiken.
▶
Nooit een apparaat met gescheurd of gebroken oppervlak ge-
bruiken.
▶
Nooit aan het netsnoer trekken, om het apparaat van het elektri-
citeitsnet te scheiden. Altijd aan de stekker van het netsnoer
trekken.
▶
Wanneer het apparaat of het netsnoer is beschadigd, dan direct
de stekker van het netsnoer uit het stopcontact halen of de ze-
kering in de meterkast uitschakelen.
▶
Contact opnemen met de servicedienst. →Pagina90
Ondeskundige reparaties zijn gevaarlijk.
▶
Alleen daarvoor geschoold vakpersoneel mag reparaties aan
het apparaat uitvoeren.
▶
Er mogen uitsluitend originele reserveonderdelen worden ge-
bruikt voor reparatie van het apparaat.
▶
Als het netsnoer van dit apparaat beschadigd raakt, moet het
ter vermijding van risico's worden vervangen door de fabrikant,
de servicedienst of een andere gekwalificeerde persoon.
Binnendringend vocht kan een elektrische schok veroorzaken.
▶
Nooit het apparaat of het netsnoer in water dompelen.
67
Page 68
nl Veiligheid
▶
Op de stekkerverbinding van het apparaat mag geen vloeistof
overlopen.
▶
Gebruik het apparaat alleen in gesloten ruimtes.
▶
Stel het apparaat nooit bloot aan grote hitte en vochtigheid.
▶
Geen stoomreiniger of hogedrukreiniger gebruiken om het ap-
paraat te reinigen.
WAARSCHUWING‒Kans op brand!
Het apparaat wordt heet.
▶
Het apparaat goed ventileren.
▶
Het apparaat nooit in een kast gebruiken.
Het gebruik van een verlengd netsnoer en niet-toegestane adapters is gevaarlijk.
▶
Geen verlengsnoeren of meervoudige stopcontacten gebruiken.
▶
Als het netsnoer te kort is, contact opnemen met de service-
dienst.
▶
Alleen door de fabrikant goedgekeurde adapters gebruiken.
WAARSCHUWING‒Kans op brandwonden!
Enkele apparaatonderdelen worden zeer heet.
▶
Nooit hete apparaatonderdelen aanraken.
▶
Na het gebruik de hete apparaatonderdelen laten afkoelen voor-
dat u deze aanraakt.
WAARSCHUWING‒Kans op brandwonden!
Vers bereide dranken zijn zeer heet.
▶
De dranken indien nodig laten afkoelen.
▶
Huidcontact met naar buiten tredende vloeistoffen en dampen
vermijden.
Als het apparaat op afstand via de Home Connect app zonder direct toezicht wordt gestart, kan dat brandwonden bij derden tot
gevolg hebben.
▶
Houd uw handen tijdens de drankafgifte niet onder de koffie-uit-
loop.
▶
Houd personen en vooral kinderen uit de buurt van het appa-
raat.
68
Page 69
Veiligheid nl
WAARSCHUWING‒Kans op letsel!
Onjuist gebruik van het apparaat kan de gebruiker in gevaar brengen.
▶
Het apparaat uitsluitend conform de bestemming gebruiken om
letsel te voorkomen.
Gevaar voor beknelling van uw vingers bij het sluiten apparaatdeur.
▶
Bij het sluiten van de apparaatdeur op uw vingers letten.
Het maalwerk roteert.
▶
Nooit in het maalwerk grijpen.
WAARSCHUWING‒Gevaar: magnetisme!
Het apparaat bevat permanente magneten. Deze kunnen elektronische implantaten, zoals pacemakers, of insulinepompen beïnvloeden.
▶
Personen met elektronische implantaten dienen een afstand van
minstens 10cm tot het apparaat aan te houden.
▶
De minimale afstand van 10cm ook ten opzichte van de verwij-
derde watertank aanhouden.
WAARSCHUWING‒Kans op gevaar voor de gezondheid!
Verontreinigingen in het apparaat kunnen de gezondheid schaden.
▶
De reinigingsinstructies voor de hygiëne van het apparaat in
acht nemen.
69
Page 70
nl Milieubescherming en besparing
A
B
C
D
E
F
G
H
I
Milieubescherming en besparing
2 Milieubescherming en
besparing
Milieubescherming en besparing
2.1 Afvoeren van de verpak-
king
De verpakkingsmaterialen zijn milieuvriendelijk en kunnen worden hergebruikt.
▶
De afzonderlijke componenten op
soort gescheiden afvoeren.
2.2 Energie besparen
Als u deze aanwijzingen opvolgt, verbruikt uw apparaat minder stroom.
Het interval voor de automatische uitschakeling op de kleinste waarde instellen.
a
Als het apparaat niet wordt ge-
bruikt, wordt het eerder uitgescha-
keld.
→"Basisinstellingen", Pagina80
De drankafname niet voortijdig onderbreken.
a
De verwarmde hoeveelheid water
of melk wordt optimaal gebruikt.
Het apparaat regelmatig ontkalken.
a
Kalkafzettingen verhogen het ener-
gieverbruik.
Opstellen en aansluiten
3 Opstellen en aansluiten
Opstellen en aansluiten
Waar en hoe u het apparaat het beste opstelt, komt u hier te weten. Bovendien komt u te weten hoe u het
apparaat op het elektriciteitsnet aansluit.
3.1 Leveringsomvang
Controleer na het uitpakken alle onderdelen op transportschade en de
volledigheid van de levering.
Opmerking:Afhankelijk van het apparaattype worden verschillende accessoires meegeleverd. De betreffende accessoires zijn gemarkeerd met
een gestreept kader.
→Fig.
1
Volautomatische espressomachine
Melkslangetje en aanzuigbuisje
Gebruiksaanwijzing
Aanbrenghulp voor waterfilter
Ontkalkingstabs
Reinigingstabs
Waterfilter
1
1
1
Teststrip voor de hardheid
van het water
Microvezeldoekje
1
Afhankelijk van de apparaatuitvoering
3.2 Apparaat opstellen en aansluiten
LET OP!
Gevaar voor schade aan het apparaat. Bij een ondeskundige ingebruikneming kan het apparaat worden beschadigd.
▶
Gebruik het apparaat alleen in
vorstvrije ruimten.
▶
Als het apparaat bij temperaturen
onder 0°C is getransporteerd of
opgeslagen, het apparaat vóór ingebruikneming 3uur op kamertemperatuur laten komen.
70
Page 71
▶
1
2
3
4
5
6
7
8
9
10
11
12
13
14
15
Na het aansluiten telkens ca.5seconden wachten.
1. Het apparaat op een waterbesten-
dig horizontaal oppervlak met voldoende draagkracht plaatsen.
2. Het apparaat met de stekker op
een reglementair geïnstalleerd, geaard stopcontact aansluiten.
Uw apparaat leren kennen
4 Uw apparaat leren ken-
nen
Uw apparaat leren kennen
4.1 Apparaat
Hier vindt u een overzicht van de onderdelen van uw apparaat.
Opmerking:Afhankelijk van het apparaattype zijn kleur- en detailafwijkingen mogelijk.
→Fig.
2
Touch-velden
Kopjesverwarming
Aromadeksel
Bonenreservoir
Draaischakelaar voor instel-
ling maalfijnheid
Tabschacht
Deksel watertank
Watertank
Touch-display
Deur van zetkamer
Typeplaatje
Melksysteem
1
Afhankelijk van de apparaatuitvoering
1
Uw apparaat leren kennen nl
Afdekking uitloop
Melkslangetje en aanzuigbuis-
je
Lekschaal
1
Afhankelijk van de apparaatuitvoering
4.2 Bedieningselementen
Hier vindt u een overzicht van de bedieningselementen van het apparaat.
Touch-velden
Hier vindt u een overzicht van de
symbolen die altijd zichtbaar zijn.
Apparaat in- of uitschakelen.
Twee kopjes afnemen.
Serviceprogramma's ope-
nen of verlaten.
Instellingen openen of ver-
laten.
Touch-display
Het touch-display is zowel weergaveals bedieningselement.
Favorieten
Klassiekers
coffeeWorld
Opgeslagen dranken met
persoonlijke instellingen
kiezen. →Pagina77
Standaarddranken kiezen.
Basisdranken kiezen, die
in combinatie met
Home Connect kunnen
worden uitgebreid.
Kopjesverwarming is ingeschakeld.
Apparaat is met
Home Connect verbonden.
71
Page 72
nl Accessoires
Opmerking:Bij ingeschakeld appa-
raat heeft u verdere bedieningsmogelijkheden met bijbehorende weergaven en meldingen, bijv. drankinstellingen.
Sterkte instellen.
Accessoires
Hoeveelheid per kopje instellen.
Melkaandeel instellen.
Aroma instellen.
Temperatuur instellen.
5 Accessoires
Accessoires
Gebruik alleen originele accessoires. Deze zijn op het apparaat afgestemd.
Accessoires Handel Servicedienst
Reinigingstabs TZ80001A
TZ80001B
Ontkalkingstabs TZ80002A
TZ80002B
Waterfilter TZ70003 00575491
Waterfilterpakket met 3
TZ70033A filters
Microvezeldoekje - 00460770
Verzorgingsset TZ80004A
TZ80004B
Adapter voor het melkre-
TZ70001 17006005
servoir
00312097
00312098
00312094
00312095
00312105
00312106
Voor het eerste gebruik
6 Voor het eerste gebruik
Voor het eerste gebruik
Bereid het apparaat voor voor het gebruik.
6.1 Apparaat voorbereiden en reinigen
Verwijder de beschermingsfolies en
reinig het apparaat en de onderdelen.
Opmerking:Vul de watertank dagelijks met vers, koud water zonder
koolzuur.
72
LET OP!
Ongeschikte bonen kunnen het maalwerk verstoppen.
▶
Alleen zuivere, gebrande espressobonen of bonenmengsels voor volautomaten gebruiken.
▶
Geen geglaceerde koffiebonen gebruiken.
▶
Geen gekarameliseerde koffiebonen gebruiken.
▶
Geen koffiebonen gebruiken die
met suikerhoudende additieven
zijn behandeld.
▶
Het reservoir niet met gemalen koffie vullen.
Page 73

Voor het eerste gebruik nl
Tip:Om de kwaliteit optimaal te houden bewaart u de koffiebonen koel
en afgesloten.
U kunt de koffiebonen meerdere dagen in het bonenreservoir bewaren
zonder dat het aroma verloren gaat.
3
16
→Fig.
-
6.2 Waterhardheid bepalen
De juiste instelling van de waterhardheid is van belang, opdat het apparaat tijdig meldt dat het moet worden
ontkalkt. U kunt de waterhardheid bepalen met behulp van het bijgevoegde teststrookje of opvragen bij uw
waterleidingbedrijf.
1. Het teststrookje kort in schoon lei-
dingwater dopen.
2. Het teststrookje laten uitlekken.
3. De waterhardheid na 1minuut op
het teststrookje aflezen.
De tabel toont de toekenning van
de niveaus aan de graden van waterhardheid:
StandDuitse
hardheid
in °dH
1 1-7 0,18-1,25
2 8-14 1,42-2,49
3 15-21 2,67-3,74
1
4
1
22-30 3,92-5,34
Fabrieksinstelling
Opmerking:Als in het huis een wateronthardingsinrichting is geïnstalleerd, kunt u "Onthardinstallatie" instellen.
Tip:U kunt de instellingen op elk gewenst moment wijzigen.
→"Basisinstellingen", Pagina80
Totale hardheid in mmol/
l
6.3 Eerste keer in gebruik nemen
Geef na aansluiting op het lichtnet de
instellingen voor de eerste ingebruikneming op. De eerste ingebruikneming verschijnt automatisch, alleen
bij de eerste inschakeling.
1. Schakel het apparaat in met
2. Volg de aanwijzingen op het dis-
.
play.
a Op het display ziet u de nodige
aanwijzingen.
Opmerkingen
¡ Neem voor het instellen van
Home Connect de meegeleverde
documentatie over Home Connect
in acht.
¡ Als de "Demomodus" actief is,
functioneren alleen de displaymeldingen. U kunt geen drank afnemen of programma's uitvoeren.
6.4 Algemene aanwijzingen
Neem de aanwijzingen in acht om
het apparaat optimaal te kunnen gebruiken.
Opmerkingen
¡ Het apparaat is in de fabriek inge-
steld op de standaardinstellingen
voor optimaal gebruik.
¡ Het maalwerk is in de fabriek inge-
steld op een optimale werking.
Wanneer de koffie er slechts druppelend uit komt of te dun is en te
weinig crema heeft, kunt u de
maalgraad aanpassen.
→"Maalgraad instellen",
Pagina76
¡ Wanneer u het apparaat een be-
paalde tijd niet bedient, gaat het
apparaat automatisch uit. U kunt
de duur in de basisinstellingen wijzigen. →Pagina80
73
Page 74
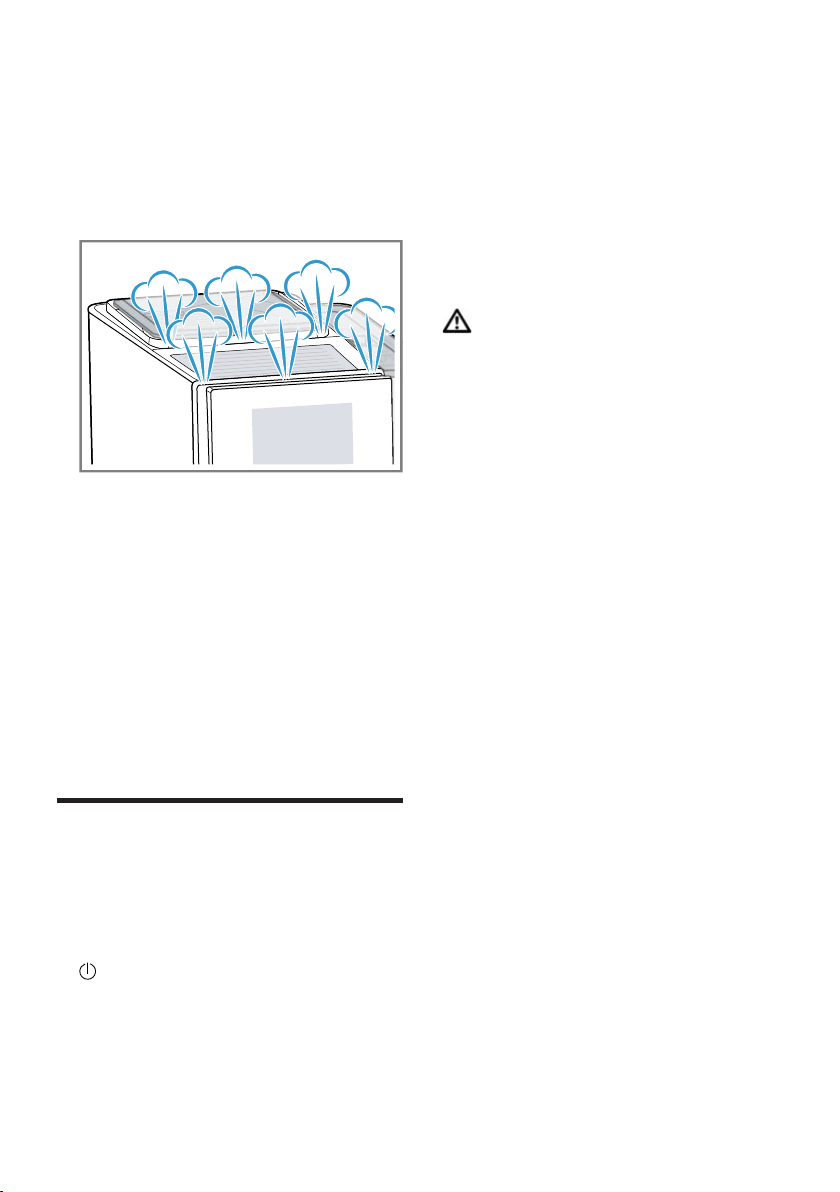
nl De Bediening in essentie
¡ Tijdens de werking kunnen zich
waterdruppels voordoen bij de
ventilatiesleuven en het deksel van
de tabschacht.
¡ Om technische redenen kan er
stoom uit het apparaat ontsnappen.
¡ De eerste drank heeft nog niet het
volle aroma wanneer:
– U het apparaat voor het eerst
gebruikt.
– U een serviceprogramma heeft
uitgevoerd.
– U het apparaat langere tijd niet
heeft gebruikt.
De drank niet drinken.
Tip:Na de ingebruikneming van het
apparaat verkrijgt u pas een langdurig fijnporige cremalaag nadat u een
paar kopjes heeft afgenomen.
De Bediening in essentie
7 De Bediening in essen-
tie
De Bediening in essentie
7.1 Apparaat in- of uitschakelen
▶
indrukken.
Na het inschakelen toont het display het Siemens-logo. Bij het inen uitschakelen wordt het apparaat
automatisch gespoeld. Bij uitschakeling dampt het apparaat af in de
lekschaal om deze te reinigen. Als
het apparaat bij het inschakelen
nog warm is of vóór het uitschakelen geen drank is afgenomen,
wordt het apparaat niet gespoeld.
7.2 Drankafname
In het navolgende leert u hoe u de
drank van uw keuze kunt bereiden.
WAARSCHUWING
Kans op brandwonden!
Vers bereide dranken zijn zeer heet.
▶
De dranken indien nodig laten afkoelen.
▶
Huidcontact met naar buiten tredende vloeistoffen en dampen vermijden.
Opmerkingen
¡ Bij enkele instellingen wordt de
koffie in meerdere stappen bereid.
Wacht tot de bereiding helemaal
voltooid is.
¡ Als u een drank met melk wilt afne-
men, moet u altijd een met melk
gevuld reservoir met melkslangetje
en aanzuigbuisje aansluiten.
¡ Als het melksysteem niet is gerei-
nigd, kunnen bij afname van heet
water geringe hoeveelheden melk
meekomen.
Tips
¡ In plaats van melk kunt u ook
plantaardige dranken zoals sojamelk gebruiken.
¡ De kwaliteit van het melkschuim is
afhankelijk van het soort gebruikte
melk of plantaardige drank.
7.3 doubleShot en tripleShot
Hoe langer het koffiezetten duurt, des
te meer bittere stoffen en ongewenste aroma's vrijkomen. Bittere stoffen
en ongewenste aroma's beïnvloeden
de smaak en maagvriendelijkheid
van de koffie.
74
Page 75

De Bediening in essentie nl
Om alleen lekkere en maagvriendelijke aroma's te verkrijgen maalt en bereidt het apparaat opnieuw koffiebonen.
Opmerking:De functies "doubleShot"
en "tripleShot" zijn afhankelijk van de
gekozen sterkte en grootte van de
drank.
7.4 Koffiedrank met melk afnemen
Ervaar bijvoorbeeld hoe u een latte
macchiato bereidt.
WAARSCHUWING
Kans op brandwonden!
Het melksysteem wordt erg warm.
▶
Nooit het hete melksysteem aanraken.
▶
Het hete melksysteem laten afkoelen voordat u het aanraakt.
Vereisten
¡ Het melkslangetje met het aanzuig-
buisje is op het melksysteem aangesloten.
¡ Het aanzuigbuisje is in de melk ge-
doopt.
1. Plaats een glas onder de uitloop.
2. Op "Klassiekers" drukken.
3. Het dranksymbool voor latte mac-
chiato kiezen en hierop drukken.
‒ Op
‒ Op drukken om de hoeveel-
‒ Op drukken om het melkaan-
4. Op "Start" drukken en wachten tot
het proces beëindigd is.
‒ Op "Stop" drukken om de drank-
drukken om de sterkte te
wijzigen.
heid per kopje te wijzigen.
deel te wijzigen.
bereiding volledig te stoppen.
‒ Op "Overslaan" drukken om al-
leen de actuele afnamestap te
stoppen.
Het melksysteem wordt na de bereiding automatisch gereinigd met
een korte straal stoom.
Opmerkingen
¡ Als u ca. 30seconden lang geen
instelling wijzigt, verlaat het apparaat de instelmodus.
¡ Het apparaat slaat de instellingen
automatisch op.
Tip:U kunt de kopjes vóór de afname ook met heet water of de
kopjesverwarming1 voorverwarmen.
7.5 Twee kopjes tegelijk afnemen
Afhankelijk van het apparaattype kunt
u twee kopjes tegelijk bereiden.
Opmerking:Als de functie "doubleShot" of "tripleShot" actief is, is het
niet mogelijk om twee kopjes tegelijk
af te nemen.
1. Op het symbool voor de gewenste
drank drukken.
2.
indrukken.
a Het display geeft de instelling aan.
3. Plaats twee kopjes links en rechts
onder de uitloop.
4. "Start" indrukken.
De drank wordt in 2 stappen bereid. De bonen worden in 2 maalgangen gemalen.
a De drank wordt bereid en loopt
vervolgens in het kopje.
5. Wacht tot het proces volledig is
beëindigd.
1
Afhankelijk van de apparaatuitvoering
75
Page 76
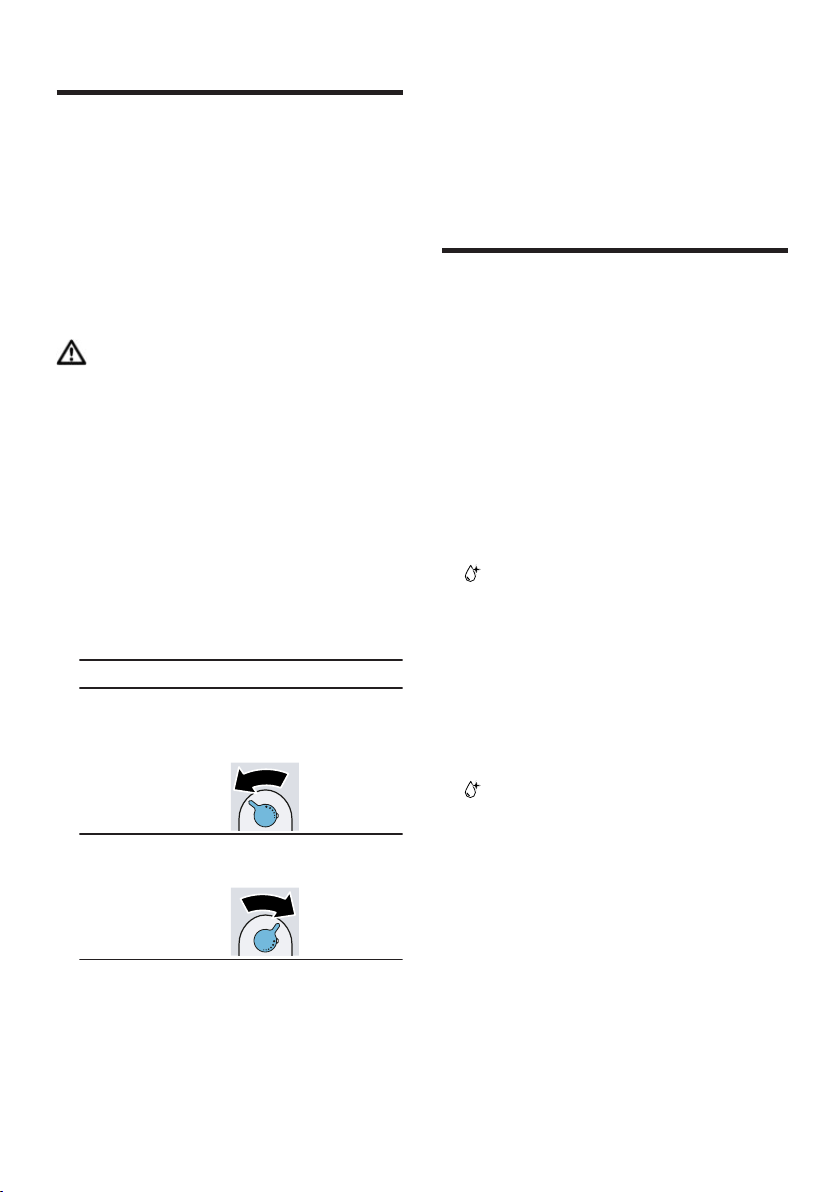
nl Maalwerk
Maalwerk
8 Maalwerk
Maalwerk
Uw apparaat heeft een instelbaar
maalwerk, waarmee u de maalgraad
van de koffiebonen individueel kunt
aanpassen.
8.1 Maalgraad instellen
Stel tijdens het malen van de koffiebonen de gewenste maalgraad in.
WAARSCHUWING
Kans op letsel!
Het maalwerk roteert.
▶
Nooit in het maalwerk grijpen.
LET OP!
Gevaar voor schade aan het maalwerk. Bij ondeskundige instelling van
de maalgraad kan het maalwerk worden beschadigd.
▶
De maalgraad alleen bij een draaiend maalwerk instellen.
▶
De maalgraad met de draaiknop
trapsgewijs instellen.
Maalgraad Instelling
Fijne maalgraad voor
donker gebrande bonen.
Grove maalgraad voor
licht gebrande
bonen.
De instelling van de maalgraad is
pas merkbaar vanaf het tweede
kopje koffie.
Draaiknop tegen
de klok in draaien.
Draaiknop met de
klok mee draaien.
Tip:Wanneer de koffie er slechts
druppelend uit komt, stel de maalgraad dan grover in.
Wanneer de koffie te dun is en te
weinig crema heeft, stel de maalgraad dan fijner in.
Waterfilter
9 Waterfilter
Waterfilter
Met een waterfilter vermindert u de
kalkafzettingen en vermindert u de
verontreinigingen in het water.
9.1 Waterfilter plaatsen
LET OP!
Mogelijke apparaatschade door verkalking.
▶
Het waterfilter bijtijds vervangen.
▶
Het waterfilter uiterlijk na 2maanden vervangen.
1.
indrukken.
2. Op "INTENZA-filter" drukken en de
aanwijzingen op het display volgen.
9.2 Waterfilter vervangen of verwijderen
U kunt het apparaat ook zonder waterfilter gebruiken.
1.
indrukken.
2. "INTENZA-filter" indrukken.
3. Op "Vervangen" of "Verwijderen"
drukken en de aanwijzingen op het
display volgen.
Tips
¡ Verwissel het waterfilter ook om
hygiënische redenen.
¡ Met een waterfilter hoeft u het ap-
paraat minder vaak te ontkalken.
76
Page 77

Kinderslot nl
¡ Spoel het geplaatste waterfilter
vóór gebruik door een kopje heet
water af te nemen, wanneer u het
apparaat bijvoorbeeld tijdens een
vakantie langere tijd niet hebt gebruikt.
¡ Het waterfilter is verkrijgbaar in de
handel of via de servicedienst.
→"Accessoires", Pagina72
Kinderslot
10 Kinderslot
Kinderslot
Om kinderen tegen verbrandingen te
beschermen kunt u het apparaat
blokkeren.
10.1 Kinderslot inschakelen
Vereiste:Het apparaat is ingescha-
keld.
▶
ten minste 3seconden indruk-
ken.
a Op het display wordt "Kinderbevei-
liging actief. Om te deblokkeren
3seconden op de instellingstoets
drukken." weergegeven.
10.2 Kinderslot uitschakelen
▶
ten minste 3seconden indruk-
ken.
a Op het display wordt "Kinderbevei-
liging is gedeactiveerd." weergegeven.
Kopjesverwarming
11 Kopjesverwarming
Kopjesverwarming
U kunt de kopjes met de kopjesverwarming voorverwarmen.
1
11.1 Kopjesverwarming acti-
veren en deactiveren
WAARSCHUWING
Kans op brandwonden!
De kopjesverwarming1 wordt heel
heet.
▶
Nooit de hete kopjesverwarming
aanraken.
▶
De hete kopjesverwarming1 laten
afkoelen voordat u het aanraakt.
Tip:Om de kopjes optimaal te verwarmen plaatst u deze met de bodem op de kopjesverwarming.
▶
De kopjesverwarming1 in de basisinstellingen activeren of deactiveren.
→"Overzicht van de basisinstellin-
gen", Pagina80
Favorieten
1
1
12 Favorieten
Favorieten
U kunt dranken met persoonlijke instellingen onder een favoriet opslaan.
U kunt favorieten met een kleur markeren. Een favoriet bevat een drank
met persoonlijke instellingen. U kunt
de instellingen op elk moment wijzigen.
Opmerking:Op drukken om de
instellingen te verlaten.
12.1 Drank uit drankkeuze op-
slaan
1. Een drank uit "Klassiekers" of "cof-
feeWorld" kiezen.
2. De persoonlijke drankinstellingen
opgeven.
3. "Favoriet" indrukken.
4. De gewenste kleur voor de drank
kiezen.
1
Afhankelijk van de apparaatuitvoering
77
Page 78

nl HomeConnect
5. "Opslaan" indrukken.
12.2 Drank in het menu opslaan
1. "Favorieten" indrukken.
2.
indrukken.
a Op het display worden alle be-
schikbare dranken weergegeven.
3. De gewenste drank kiezen.
4. De persoonlijke drankinstellingen
opgeven.
5. "Volgende" indrukken.
6. De gewenste kleur voor de drank
kiezen.
7. "Opslaan" indrukken.
12.3 Drankinstellingen wijzigen
1. "Favorieten" indrukken.
2. De drank kiezen en er kort op
drukken.
3. De drankinstellingen wijzigen.
4. "Toepassen" indrukken.
a De nieuwe instellingen zijn opge-
slagen.
12.4 Favoriet wissen
1. "Favorieten" indrukken.
2. De drank kiezen.
3. "Wissen" indrukken.
4. "Wissen" bevestigen.
12.5 Favorieten sorteren
1. "Instellingen" indrukken.
2. "Personalisering" indrukken.
3. "Sortering favorieten" indrukken.
4. De favorieten sorteren, bijv. op
naam of kleur.
HomeConnect
13 HomeConnect
HomeConnect
Dit apparaat is geschikt voor netwerken. Verbind uw apparaat met een
mobiel eindapparaat om functies te
kunnen bedienen via de HomeConnect app, basisinstellingen aan te
passen of de actuele gebruikstoestand te bewaken.
De HomeConnect diensten zijn niet
in elk land beschikbaar. De beschikbaarheid van de functie HomeConnect is afhankelijk van de beschikbaarheid van de HomeConnect diensten in uw land. Informatie hierover
vindt u op: www.home-connect.com.
Om HomeConnect te kunnen gebruiken, dient u eerst de verbinding met
het WLAN-thuisnetwerk (Wi-Fi1) en
met de HomeConnect app te configureren.
De HomeConnect app leidt u door
het gehele aanmeldingsproces. Volg
de aanwijzingen in de HomeConnect
app om de instellingen aan te brengen.
Tips
¡ Neem de meegeleverde documen-
ten vanHomeConnect in acht.
¡ Neem ook de aanwijzingen in
deHomeConnectapp in acht.
Opmerkingen
¡ Houd u aan de veiligheidsinstruc-
ties in deze gebruiksaanwijzing en
zorg ervoor dat deze ook worden
nageleefd wanneer u het apparaat
via de HomeConnect app bedient.
→"Veiligheid", Pagina66
¡ De bediening aan het apparaat
heeft altijd voorrang. Gedurende
deze tijd is de bediening via de
HomeConnectapp niet mogelijk.
1
Wi-Fi is een geregistreerd handelsmerk van de Wi-Fi Alliance.
78
Page 79
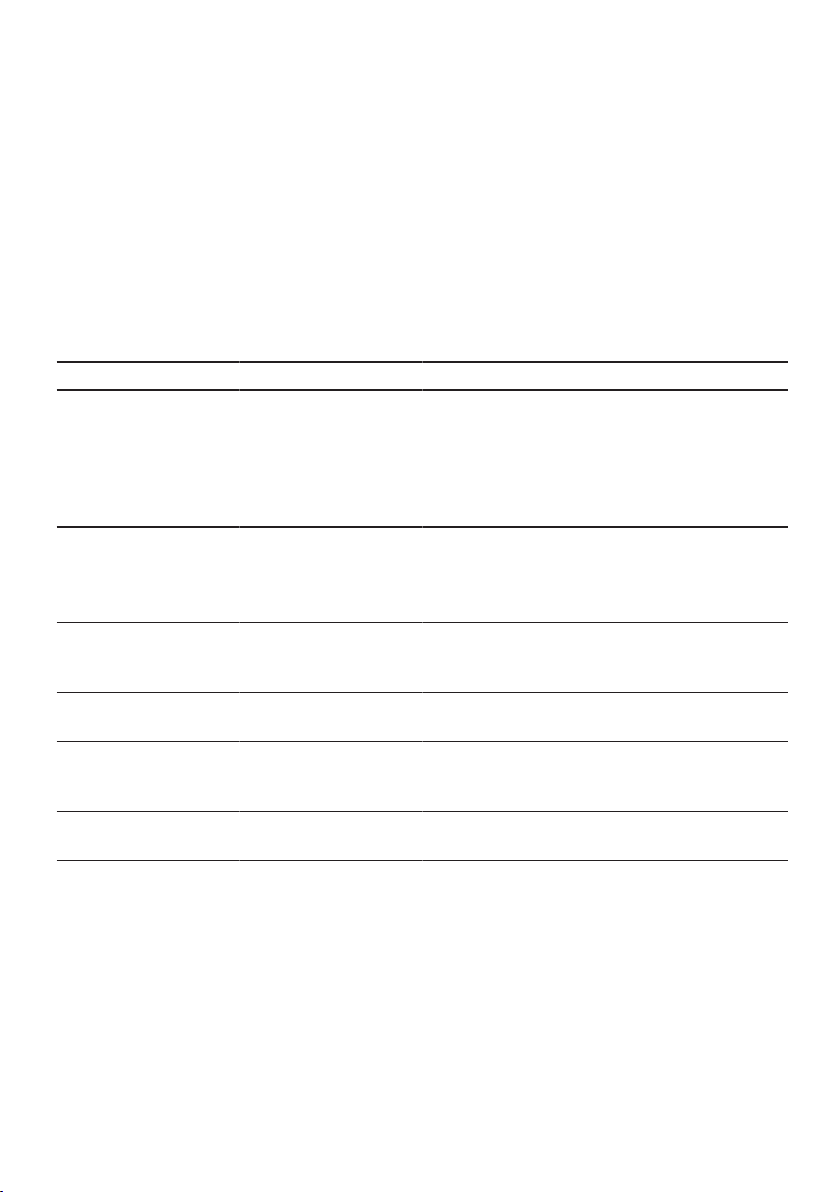
HomeConnect nl
13.1 HomeConnect instellingen
Pas HomeConnect aan uw behoeften aan.
U vindt de HomeConnect instellingen in de basisinstellingen van uw
apparaat. Welke instellingen het display toont, hangt ervan af of HomeConnect geïnstalleerd is en of het
apparaat met het thuisnetwerk is verbonden.
Overzicht van de Home Connect instellingen
Hier vindt u een overzicht van de "Home Connect" instellingen en netwerkinstellingen.
Basisinstelling Keuze Beschrijving
WLAN-verbinding Aan
Uit
Start op afstand Aan
Uit
Mobiel apparaat
toevoegen
Netwerkinformatie - Netwerkinformatie en apparaatinfor-
Netwerkinstellingen wissen
Software-update - Opmerking:Deze instelling is alleen
- Apparaat verbinden met "Home Con-
- Opmerking:Zonder netwerkverbin-
Schakel de draadloze module uit bij
lange afwezigheid of om energie te
besparen.
Opmerking:In de netwerkgebonden
standby heeft uw apparaat max.2W
nodig.
Start op afstand in- en uitschakelen op
het apparaat.
Opmerking:Met de "Home Connect"
app is alleen uitschakelen mogelijk.
nect" of met extra "Home Connect" accounts.
matie weergeven.
ding is geen bediening via de "Home
Connect" app mogelijk.
beschikbaar bij een software-update.
13.2 Bescherming persoonsgegevens
Neem de aanwijzingen m.b.t. de bescherming van de persoonsgegevens
in acht.
Wanneer uw apparaat voor de eerste
keer wordt verbonden met een
thuisnetwerk dat op het internet is
aangesloten, geeft het de volgende
gegevenscategorieën door aan de
HomeConnect server(eerste
registratie):
¡ Eenduidige identificatie van het ap-
paraat (bestaande uit apparaatsleutels en het MAC-adres van de
ingebouwde
Wi-Ficommunicatiemodule).
79
Page 80
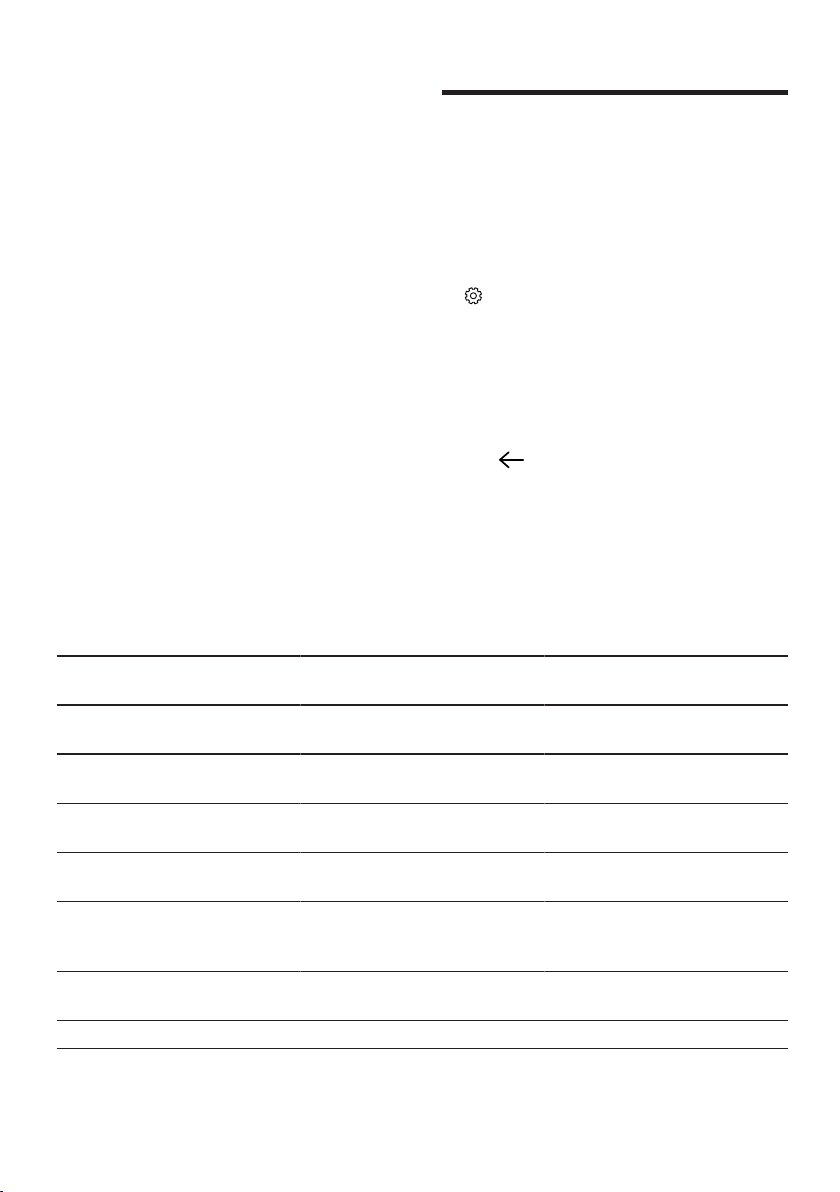
nl Basisinstellingen
¡ Veiligheidscertificaat van de Wi-Fi
communicatiemodule (voor de informatietechnische beveiliging van
de verbinding).
¡ De actuele software- en hardware-
versie van uw huishoudapparaat.
¡ Status van een eventuele eerdere
reset naar de fabrieksinstellingen.
Bij de eerste registratie wordt het gebruik van de HomeConnect functionaliteiten voorbereid. Deze registratie
dient pas te worden uitgevoerd op
het moment dat u voor het eerst van
de HomeConnect functionaliteiten
gebruik wilt maken.
Opmerking:Let erop dat de HomeConnect functionaliteiten alleen
kunnen worden gebruikt in combinatie met de HomeConnect app. Infor-
Basisinstellingen
14 Basisinstellingen
Basisinstellingen
U kunt het apparaat aan uw behoeften aanpassen en extra functies opvragen.
14.1 Basisinstellingen wijzigen
1.
indrukken.
a Op het display wordt de lijst met
basisinstellingen weergegeven.
2. De gewenste basisinstelling uitvoe-
ren.
a Het apparaat slaat de basisinstel-
ling automatisch op.
3. Op
lingen te verlaten.
matie over gegevensbescherming
kan worden opgeroepen in de HomeConnect app.
14.2 Overzicht van de basisinstellingen
Hier vindt u een overzicht van de basisinstellingen.
drukken om de basisinstel-
Drankinstellingen Bereidingstemperatuur Bereidingstemperatuur
instellen.
Melkvolgorde Volgorde van melk en
koffie instellen.
Latte macchiato pauze Pauze tussen melk en
koffie instellen.
Drankparameters resetten
Apparaatinstellingen Kopjesverwarming
1
Drankinstellingen terugzetten.
Kopjesverwarming1 in- of
uitschakelen.
Automatisch uitschakelen
Tijdsduur waarna het apparaat wordt uitgeschakeld, instellen.
Displayhelderheid Lichtsterkte in stappen
instellen.
1
Afhankelijk van de apparaatuitvoering
80
Page 81

Reiniging en onderhoud nl
Geluiden ¡ Geluidssignalen in- en
uitschakelen.
¡ Geluidssterkte instel-
len.
Waterhardheid Waterhardheid instellen.
Taal Taal instellen.
Fabrieksinstellingen Apparaat op fabrieksin-
stelling terugzetten.
Personalisering Merklogo Merklogo wel of niet in
het display weergeven.
Werking na inschakelen Displaymelding voor "Fa-
vorieten", "Klassiekers"
of "coffeeWorld" instellen.
Sortering favorieten Volgorde van de favorie-
ten vastleggen.
Home Connect Informatie over
Home Connect
De QR-code scannen
om te starten.
→"HomeConnect instel-
lingen", Pagina79
Apparaatinformatie Drankenteller. Aantal afgenomen dran-
ken weergeven.
Reinigingsinformatie Tijdsduur tot de volgen-
de vervanging van het
waterfilter of de start van
een serviceprogramma
weergeven.
Versie-informatie Netwerkinformatie en ap-
paraatinformatie weergeven.
Licentie-informatie Tekst van FOSS-licentie
weergeven.
Bedrijfsmodus Bedrijfsmodus voor de-
monstratiedoeleinden
1
Afhankelijk van de apparaatuitvoering
"Demomodus"in- of uitschakelen.
Reiniging en onderhoud
15 Reiniging en onderhoud
Reiniging en onderhoud
Reinig en onderhoud uw apparaat zorgvuldig om er voor te zorgen dat het lang
goed blijft werken.
81
Page 82
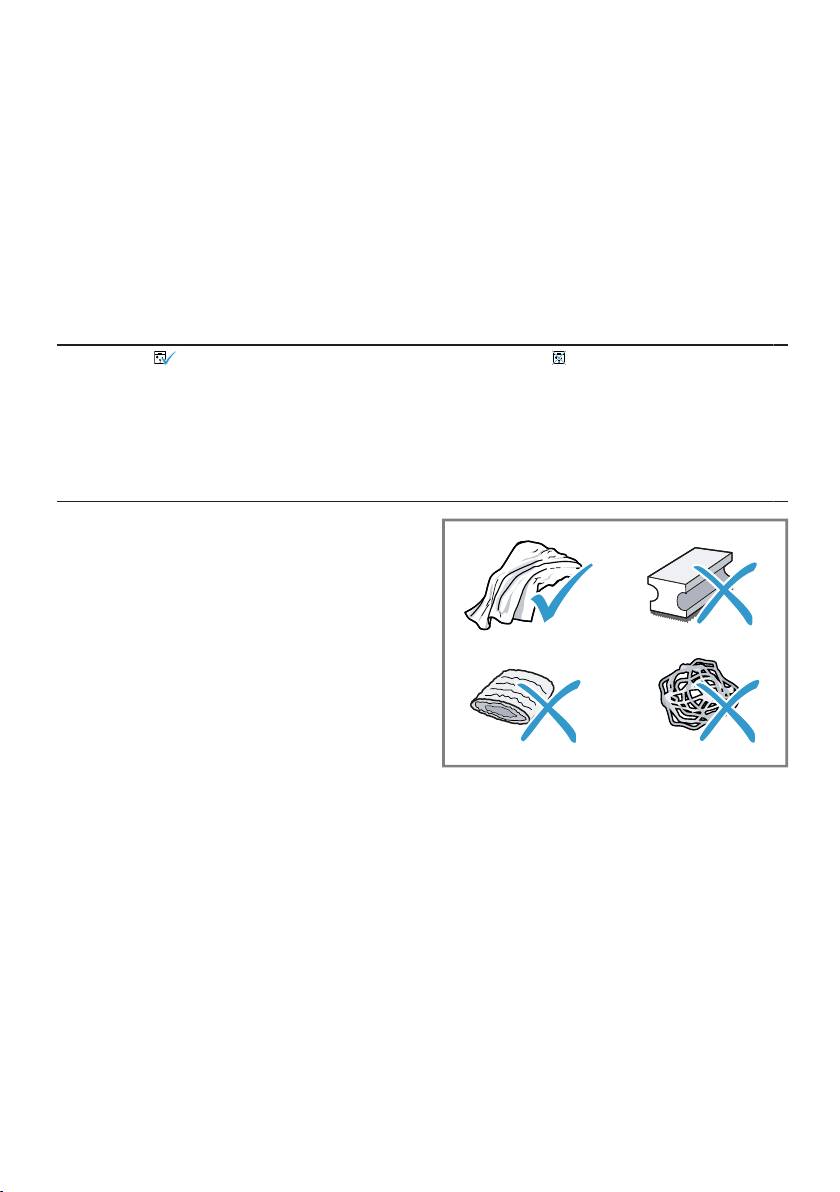
nl Reiniging en onderhoud
15.1 Vaatwasserbestendigheid
Hier vindt u een overzicht van de onderdelen die u in de vaatwasser kunt reinigen.
▶
LET OP!
Sommige componenten zijn temperatuurgevoelig en kunnen bij de reiniging in de vaatwasser worden beschadigd.
▶
De gebruiksaanwijzing van de
vaatwasser in acht nemen.
Alleen vaatwasserbestendige componenten in de vaatwasser reinigen.
▶
Alleen programma's gebruiken die
het water niet tot boven 60°C verhitten.
Geschikt:
¡ Lekschaal
– Lekplaat
– Koffiedikreservoir
– Mechanische vulindicatie
¡ Melksysteem met adapter
¡ Melkreservoir met deksel
15.2 Reinigingsmiddelen
Gebruik alleen geschikte reinigingsmiddelen.
LET OP!
Ongeschikte reinigingsmiddelen kunnen de oppervlakken van het apparaat beschadigen.
▶
Geen scherpe of schurende reinigingsmiddelen gebruiken.
▶
Gebruik geen reinigingsmiddelen
die alcohol of spiritus bevatten.
▶
Geen harde schuur- of afwassponsjes gebruiken.
▶
Voor het ontkalken geen citroenzuur, azijn of middelen op azijnbasis gebruiken.
▶
Voor het ontkalken en reinigen uitsluitend geschikte tabs gebruiken.
▶
Geen ontkalkingsmiddel met fosforzuur gebruiken.
Niet geschikt:
¡ Watertank
¡ Deksel van watertank
¡ Aromadeksel
¡ Zetgroep
¡ Afdekking uitloop
Tips
¡ Gebruik ontkalkings- en reini-
gingstabs die speciaal voor het apparaat zijn ontwikkeld. U kunt deze
tabs via de servicedienst aanschaffen.
→"Accessoires", Pagina72
¡ Was nieuwe sponsdoekjes grondig
uit om eventuele zouten hieruit te
verwijderen. Deze zouten kunnen
een roestlaagje op roestvrijstalen
oppervlakken veroorzaken.
82
Page 83

Reiniging en onderhoud nl
¡ Verwijder resten van kalk, koffie,
melk, reinigings- en ontkalkingsoplossingen altijd zo snel mogelijk
om corrosievorming te voorkomen.
15.3 Apparaat reinigen
WAARSCHUWING
Kans op elektrische schok!
Binnendringend vocht kan een schok
veroorzaken.
▶
Nooit het apparaat of het netsnoer
in water dompelen.
▶
Op de stekkerverbinding van het
apparaat mag geen vloeistof overlopen.
▶
Geen stoomreiniger of hogedrukreiniger gebruiken om het apparaat te reinigen.
WAARSCHUWING
Kans op brandwonden!
Enkele apparaatonderdelen worden
zeer heet.
▶
Nooit hete apparaatonderdelen
aanraken.
▶
Na het gebruik de hete apparaatonderdelen laten afkoelen voordat
u deze aanraakt.
1. De behuizing, de hoogglansopper-
vlakken en het bedieningspaneel
met het meegeleverde microvezeldoekje reinigen.
2. Het uitloopsysteem na de drankaf-
name met een zachte, vochtige
doek reinigen.
3. Als het apparaat, bijvoorbeeld tij-
dens een vakantie, langere tijd niet
is gebruikt, moet het volledige apparaat inclusief uitloopsysteem,
melksysteem, schalen en zetgroep
worden gereinigd.
Opmerking:Het apparaat wordt automatisch gespoeld als u het in koude
toestand inschakelt of na afname van
koffie uitschakelt. Zo reinigt het systeem zichzelf.
15.4 Lekschaal en koffiedikreservoir reinigen
Leeg en reinig de lekschaal en het
koffiedikreservoir dagelijks om afzettingen te voorkomen. Volg de geïllustreerde instructies aan het begin van
deze gebruiksaanwijzing.
17
18
→Fig.
-
15.5 Serviceprogramma's
Gebruik de serviceprogramma's wanneer u een waterfilter aanbrengt of
verwijdert, of het apparaat grondig
wilt reinigen.
LET OP!
Een ondeskundige of niet bijtijds uitgevoerde reiniging en ontkalking kan
het apparaat beschadigen.
▶
Voer het ontkalken onmiddellijk
volgens de instructies uit.
▶
Alleen reinigingstabs in de tabschacht aanbrengen.
▶
Geen ontkalkingstabs of andere
middelen in de tabschacht aanbrengen.
Opmerkingen
¡ Op het display wordt aangegeven
hoe ver het proces is voortgeschreden.
¡ Als het apparaat is geblokkeerd,
kan dit pas weer na het ontkalken
worden bediend.
Serviceprogramma's gebruiken
1.
indrukken.
2. Op het symbool voor het gewenste
programma drukken.
a Op het display ziet u de nodige
aanwijzingen.
83
Page 84
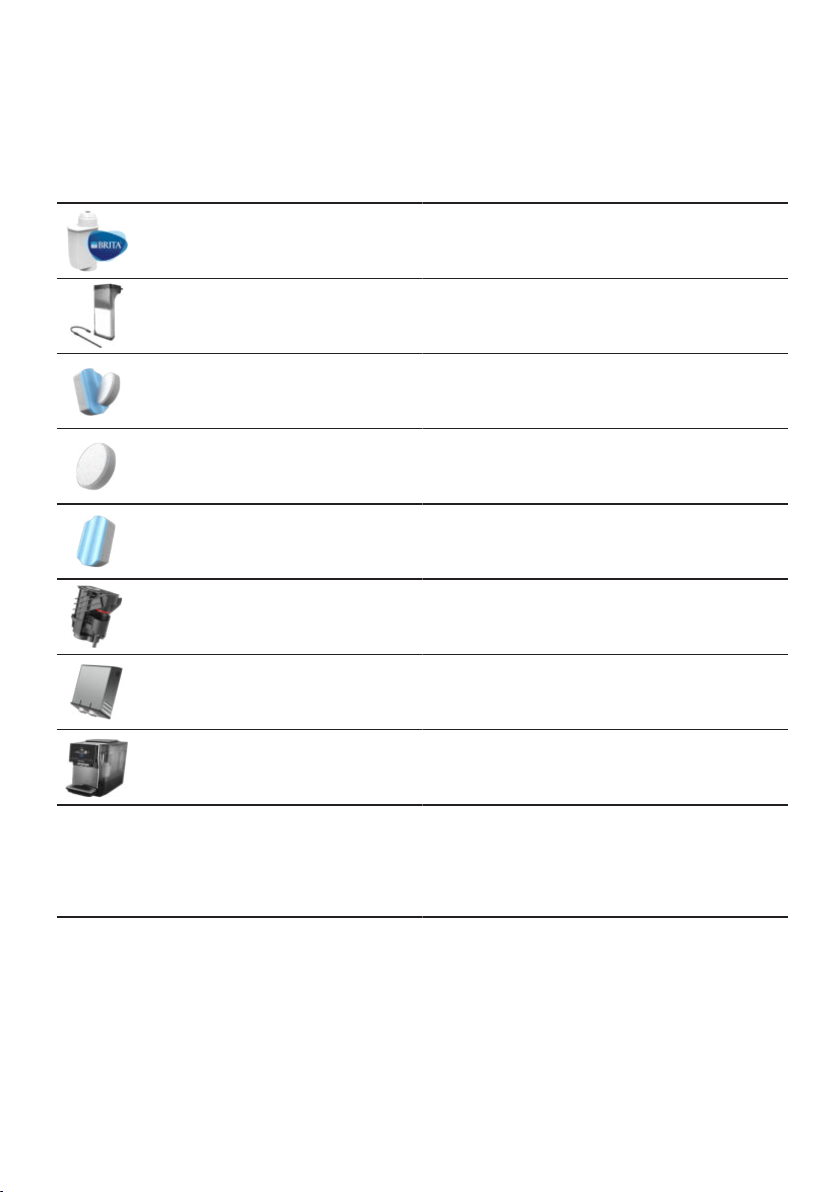
nl Reiniging en onderhoud
Overzicht serviceprogramma's
Hier vindt u een overzicht van de serviceprogramma's.
Opmerking:Het startbeeld toont het resterende aantal af te nemen dranken tot
de uitvoering van het programma en de tijdsduur.
INTENZA-filter Waterfilter aanbrengen, vervangen of
verwijderen.
Melksysteemreiniging Melksysteem automatisch spoelen.
calc'nClean Reinigen en ontkalken combineren.
Leidingen van kalk- en koffieresten
ontdoen.
Reiniging Leidingen van koffieresten ontdoen.
Ontkalken Leidingen van kalkresten ontdoen.
Reiniging zetgroep Op het display worden de stappen
voor een optimale reiniging van de
zetgroep weergegeven.
Reiniging drankuitloop Op het display worden de stappen
voor een optimale reiniging van de uitloop weergegeven.
Vorstbescherming Leidingen legen om het apparaat tij-
dens transport of opslag te beschermen.
Speciaal spoelen Als een serviceprogramma wordt on-
derbroken, bijv. door een stroomuitval,
wordt het apparaat automatisch gespoeld. Daarna is het apparaat weer
bedrijfsklaar.
Tips
¡ Als u het programma "Ontkalken"
of "calc'nClean" start, plaatst u een
kan met een capaciteit van minimaal 0,5l.
84
¡ Als u een waterfilter gebruikt,
wordt het interval voor uitvoering
van het serviceprogramma verlengd.
¡ Het "Ontkalken" en "Reiniging" zijn
in het serviceprogramma
"calc'nClean" tot één functie gecombineerd.
Page 85
Storingen verhelpen nl
Storingen verhelpen
16 Storingen verhelpen
Storingen verhelpen
Kleinere storingen aan het apparaat kunt u zelf verhelpen. Raadpleeg voordat u
contact opneemt met de klantenservice de informatie over het verhelpen van
storingen. Zo voorkomt u onnodige kosten.
WAARSCHUWING
Kans op elektrische schok!
Ondeskundige reparaties zijn gevaarlijk.
▶
Alleen daarvoor geschoold vakpersoneel mag reparaties aan het apparaat
uitvoeren.
▶
Er mogen uitsluitend originele reserveonderdelen worden gebruikt voor reparatie van het apparaat.
▶
Als het netsnoer van dit apparaat beschadigd raakt, moet het ter vermijding
van risico's worden vervangen door de fabrikant, de servicedienst of een andere gekwalificeerde persoon.
Storing Oorzaak en probleemoplossing
Apparaat reageert niet
meer.
Home Connect functioneert niet correct.
Apparaat geeft alleen
water af, geen koffie.
Apparaat geeft geen
melkschuim af.
Apparaat heeft een storing.
1. Trek de stekker uit het stopcontact en wacht 10se-
conden.
2. Steek de stekker in het stopcontact.
Verschillende oorzaken zijn mogelijk.
▶
Ga naar www.home-connect.com.
Leeg bonenreservoir wordt niet door het apparaat herkend.
▶
Vu koffiebonen bij.
Koffieschacht op de zetgroep is verstopt.
▶
Reinig de zetgroep.
Bonen zijn te vettig en vallen niet in het maalwerk.
▶
Tik licht tegen het bonenreservoir.
▶
Gebruik een andere koffiesoort.
Gebruik geen vettige bonen.
▶
Reinig het lege bonenreservoir met een vochtige
doek.
Zetgroep is niet correct aangebracht.
1. Controleer of de zetgroep correct is aangebracht
en stevig is vergrendeld.
2. Schuif de rode hendel bovenaan naar links.
3. Plaats de afdekking van de bereidingsruimte.
Melksysteem is verontreinigd.
▶
Reinig het melksysteem in de vaatwasser.
85
Page 86

nl Storingen verhelpen
Storing Oorzaak en probleemoplossing
Apparaat geeft geen
melkschuim af.
Melkbuisje bereikt de melk niet.
▶
Gebruik meer melk.
▶
Controleer of het melkbuisje zich in de melk bevindt.
Het apparaat is sterk verkalkt.
▶
Ontkalk het apparaat.
Melksysteem zuigt
geen melk aan.
Melksysteem is niet juist in elkaar gezet.
▶
Zet het melksysteem correct in elkaar.
Melkbuisje bereikt de melk niet.
▶
Gebruik meer melk.
▶
Controleer of het melkbuisje zich in de melk bevindt.
Melkschuim is te
koud.
Apparaat geeft geen
heet water af.
Apparaat geeft geen
drank af.
Melk is te koud.
▶
Gebruik lauwe melk.
Melksysteem is verontreinigd.
▶
Reinig het melksysteem in de vaatwasser.
Er zit lucht in het waterfilter.
1. Dompel het waterfilter met de opening naar boven
zo lang in water tot er geen luchtbellen meer ontsnappen.
2. Breng het filter hierna aan.
▶
Druk het waterfilter stevig en recht in de tankaansluiting.
Resten ontkalkingsmiddel verstoppen watertank.
1. Verwijder de watertank.
2. Reinig de watertank grondig.
Op binnenste apparaatbodem bevindt
zich lekwater.
De zetgroep kan niet
worden verwijderd.
Lekschaal is te vroeg uitgenomen.
▶
Verwijder de lekschaal pas enkele seconden na de
laatste drankafname.
Vergrendeling kan niet worden ontgrendeld, zetgroep
klemt.
▶
Schakel het apparaat uit en na 3minuten opnieuw
in.
Maalwerk start niet. Apparaat is te heet.
1. Koppel het apparaat los van het stroomnet.
2. Wacht 1uur om het apparaat te laten afkoelen.
86
Page 87

Storing Oorzaak en probleemoplossing
Maalwerk maalt geen
bonen ondanks gevuld bonenreservoir.
Bonen zijn te vettig en vallen niet in het maalwerk.
▶
Tik licht tegen het bonenreservoir.
▶
Gebruik een andere koffiesoort.
Gebruik geen vettige bonen.
▶
Reinig het lege bonenreservoir met een vochtige
doek.
Sterk wisselende koffie- of melkschuim-
Het apparaat is verkalkt.
▶
Ontkalk het apparaat.
kwaliteit.
Wisselende melk-
schuimkwaliteit.
Melkschuimkwaliteit is afhankelijk van gebruikte soort
melk of plantaardige drank.
▶
Optimaliseer het resultaat via de keuze van de
soort melk of plantaardige drank.
Koffie wordt niet of
slechts druppelsgewijs afgegeven.
Ingestelde inhoud
wordt niet bereikt.
Maalgraad is te fijn ingesteld.
▶
Stel de maalgraad grover in.
→"Maalgraad instellen", Pagina76
Het apparaat is sterk verkalkt.
▶
Ontkalk het apparaat.
Er zit lucht in het waterfilter.
1. Dompel het waterfilter met de opening naar boven
zo lang in water tot er geen luchtbellen meer ontsnappen.
2. Breng het filter hierna aan.
Apparaat is verontreinigd.
▶
Reinig de zetgroep.
▶
Ontkalk en reinig het apparaat.
Koffie heeft geen cremalaag.
Koffiesoort is niet optimaal.
▶
Gebruik een koffiesoort met een hoger aandeel Robusta-bonen.
▶
Gebruik een donkerder gebrande soort bonen.
De bonen zijn niet meer brandvers.
▶
Gebruik verse bonen.
Maalgraad is niet op koffiebonen afgestemd.
▶
Stel de maalgraad fijner in.
→"Maalgraad instellen", Pagina76
Koffie is te zuur. Maalgraad is te grof ingesteld.
▶
Stel de maalgraad fijner in.
→"Maalgraad instellen", Pagina76
Koffiesoort is niet optimaal.
Storingen verhelpen nl
87
Page 88

nl Storingen verhelpen
Storing Oorzaak en probleemoplossing
▶
Koffie is te zuur.
Gebruik een koffiesoort met een hoger aandeel Robusta-bonen.
▶
Gebruik een donkerder gebrande soort bonen.
De koffie is te bitter. Maalgraad is te fijn ingesteld.
▶
Stel de maalgraad grover in.
→"Maalgraad instellen", Pagina76
Koffiesoort is niet optimaal.
▶
Gebruik een andere koffiesoort.
Koffie smaakt verbrand.
Maalgraad is te fijn ingesteld.
▶
Stel de maalgraad grover in.
→"Maalgraad instellen", Pagina76
Koffiesoort is niet optimaal.
▶
Gebruik een andere koffiesoort.
Koffietemperatuur is te hoog ingesteld.
▶
Stel de koffietemperatuur lager in.
Het koffiedik is niet
compact en te nat.
Maalgraad is niet optimaal ingesteld.
▶
Stel de maalgraad grover of fijner in.
→"Maalgraad instellen", Pagina76
Bonen zijn te vettig.
▶
Gebruik een andere bonensoort.
Displaymelding "Zetgroep plaatsen." verschijnt.
Displaymelding "Watertank vullen." verschijnt ondanks volle
watertank.
Afdekking is onjuist aangebracht.
1. Controleer of de zetgroep correct is aangebracht
en stevig is vergrendeld.
2. Schuif de rode hendel bovenaan naar links.
3. Plaats de afdekking van de bereidingsruimte.
Watertank is onjuist aangebracht.
▶
Breng de watertank juist aan.
Er is koolzuurhoudend water in de watertank aanwezig.
▶
Vul de watertank met schoon leidingwater.
Vlotter in de watertank zit vast.
1. Verwijder de watertank.
2. Reinig de watertank grondig.
Nieuw waterfilter is niet volgens de gebruiksaanwijzing
gespoeld.
1. Spoel het waterfilter volgens de gebruiksaanwijzing.
2. Neem het waterfilter in gebruik.
Er zit lucht in het waterfilter.
88
Page 89

Storing Oorzaak en probleemoplossing
Displaymelding "Watertank vullen." verschijnt ondanks volle
watertank.
1. Dompel het waterfilter met de opening naar boven
zo lang in water tot er geen luchtbellen meer ontsnappen.
2. Breng het filter hierna aan.
Waterfilter is oud.
▶
Breng een nieuw waterfilter aan.
Door kalkafzettingen in de watertank raakt het systeem verstopt.
1. Reinig de watertank grondig.
2. Start het ontkalkingsprogramma.
Displaymelding "Zetgroep reinigen." verschijnt.
Displaymelding "Spanning te hoog of te
Zetgroep is verontreinigd.
▶
Reinig de zetgroep.
Mechanisme van zetgroep beweegt stroef.
▶
Reinig de zetgroep.
Problemen bij de spanningsvoorziening houden aan.
▶
Gebruik het apparaat alleen bij 220-240V.
laag" verschijnt.
Displaymelding "Fout
in het watersysteem.
Apparaat opnieuw
starten." verschijnt.
Displaymelding
"calc'nClean programma uitvoeren!" verschijnt erg vaak.
Apparaat heeft een storing.
1. Trek de stekker uit het stopcontact en wacht 10se-
conden.
2. Steek de stekker in het stopcontact.
Onthard water bevat nog geringe hoeveelheden kalk.
1. Breng een nieuw waterfilter aan.
2. Stel de waterhardheid juist in.
Onjuist of onvoldoende ontkalkingsmiddel gebruikt.
▶
Gebruik uitsluitend geschikte tabs voor het ontkalken.
Serviceprogramma is niet volledig uitgevoerd.
▶
Start het serviceprogramma "Speciaal spoelen".
→"Serviceprogramma's", Pagina83
Storingen verhelpen nl
89
Page 90
nl Transporteren, opslaan en afvoeren
Transporteren, opslaan en afvoeren
17 Transporteren, op-
slaan en afvoeren
Transporteren, opslaan en afvoeren
Hier krijgt u uitleg over de manier
waarop u het apparaat voorbereidt
voor transport en opslag. Daarnaast
leggen we u uit hoe u oude apparaten dient af te voeren.
17.1 Vorstbeveiliging activeren
Bescherm het apparaat tijdens transport en opslag tegen de inwerking
van vorst.
LET OP!
Vloeistofresten in het apparaat kunnen het apparaat tijdens transport of
opslag beschadigen.
▶
Voorafgaand aan transport of opslag het leidingsysteem leegmaken.
1. Het programma "Vorstbescher-
ming" uitvoeren.
→"Basisinstellingen", Pagina80
2. Haal de stekker van het apparaat
uit het stopcontact.
17.2 Afvoeren van uw oude apparaat
Door een milieuvriendelijke afvoer
kunnen waardevolle grondstoffen opnieuw worden gebruikt.
1. De stekker van het netsnoer uit het
stopcontact trekken.
2. Het netsnoer doorknippen.
3. Voer het apparaat milieuvriendelijk
af.
Bij uw dealer en uw gemeente- of
deelraadskantoor kunt u informatie
verkrijgen over de actuele afvoermethoden.
Dit apparaat is gekenmerkt in overeenstemming met de Europese
richtlijn 2012/19/EU betreffende afgedankte
elektrische en elektronische apparatuur (waste
electrical and electronic
equipment - WEEE).
De richtlijn geeft het kader aan voor de in de
EU geldige terugneming
en verwerking van oude
apparaten.
Servicedienst
18 Servicedienst
Servicedienst
Als u vragen hebt, een storing aan
het apparaat niet zelf kunt verhelpen
of als het apparaat moet worden gerepareerd, neem dan contact op met
onze servicedienst.
Originele vervangende onderdelen
die relevant zijn voor de werking in
overeenstemming met de desbetreffende Ecodesign-verordening kunt u
voor de duur van ten minste 7 jaar
vanaf het moment van in de handel
brengen van het apparaat binnen de
Europese Economische Ruimte bij
onze servicedienst verkrijgen.
Opmerking:Het inschakelen van de
servicedienst in het kader van de fabrieksgarantievoorwaarden is gratis.
Gedetailleerde informatie over de garantieperiode en garantievoorwaarden in uw land kunt u opvragen bij
onze servicedienst, uw dealer of op
onze website.
Als u contact opneemt met de servicedienst, hebt u het productnummer
(E-Nr.), het productienummer (FD) en
het volgnummer (Z-Nr.) van het apparaat nodig.
90
Page 91
Technische gegevens nl
De contactgegevens van de servicedienst vindt u in de servicedienstlijst
aan het einde van de gebruiksaanwijzing of op onze website.
18.1 Productnummer (E-Nr.), productienummer (FD) en volgnummer (Z-Nr.)
Het productnummer (E-Nr.), het productienummer (FD) en het volgnummer (Z-Nr.) vindt u op het typeplaatje
van het apparaat.
Om uw apparaatgegevens en de servicedienst-telefoonnummers snel terug te kunnen vinden, kunt u de gegevens noteren.
18.2 Garantievoorwaarden
U heeft voor het apparaat recht op
garantie volgens de volgende voorwaarden.
Voor dit apparaat gelden de garantievoorwaarden die worden uitgegeven
door de vertegenwoordiging van ons
bedrijf in het land van aankoop. De
leverancier, bij wie u het apparaat
heeft gekocht, geeft u hierover graag
meer informatie. Om aanspraak te
maken op de garantie heeft u altijd
uw aankoopbewijs nodig.
Technische gegevens
19 Technische gegevens
Technische gegevens
Cijfers en feiten over het apparaat
vindt u hier.
Spanning 220–
240V∼
Frequentie 50Hz
Aansluitwaarde 1500W
Maximale pompdruk,
20bar
statisch
Maximale capaciteit,
2,6l
watertank (zonder filter)
Maximale capaciteit,
350g
bonenreservoir
Lengte netsnoer 100cm
Apparaathoogte 38cm
Apparaatbreedte 30cm
Apparaatdiepte 46,7cm
Gewicht, leeg 9kg
Type maalwerk Keramisch
Conformiteitsverklaring
20 Conformiteitsverkla-
ring
Conformiteitsverklaring
Hierbij verklaart BSH Hausgeräte
GmbH dat het apparaat met Home
Connect functionaliteit voldoet aan de
fundamentele vereisten en de overige
toepasselijke bepalingen van de
richtlijn 2014/53/EU.
Een uitvoerige RED conformiteitsverklaring vindt u op het internet onder
www.siemens-home.bsh-group.com
op de productpagina van uw apparaat bij de aanvullende documenten.
2,4 GHz band: 100 mW max.
5 GHz band: 100 mW max.
BE BG CZ DK DE EE IE el
ES FR HR IT CY LV LT LU
HU MT NL AT PL PT RO SI
SK FI SE UK NO CH TR
5GHz WLAN (WiFi): alleen voor het gebruik binnenshuis.
91
Page 92

pl
Spis treści
1 Bezpieczeństwo .........................94
1.1 Wskazówki ogólne ...................94
1.2 Użytkowanie zgodne zprze-
znaczeniem...............................94
1.3 Ograniczenie grupy użytkow-
ników ........................................94
1.4 Zasady bezpieczeństwa ...........95
2 Ochrona środowiska i
oszczędność...............................98
2.1 Usuwanie opakowania .............98
2.2 Oszczędzanie energii ...............98
3 Ustawianie i podłączanie...........98
3.1 Zakres dostawy ........................98
3.2 Ustawianie i podłączanie
urządzenia ................................98
4 Poznawanie urządzenia .............99
4.1 Urządzenie................................99
4.2 Elementy obsługi......................99
5 Akcesoria..................................100
6 Przed pierwszym użyciem .......100
6.1 Przygotowywanie i czyszcze-
nie urządzenia ........................100
6.2 Ustalanie twardości wody.......101
6.3 Pierwsze uruchomienie urzą-
dzenia .....................................101
6.4 Wskazówki ogólne .................101
7 Podstawowy sposób obsługi ..102
7.1 Włączanie lub wyłączanie
urządzenia ..............................102
7.2 Przyrządzanie napojów...........102
7.3 doubleShot i tripleShot...........103
7.4 Przyrządzanie napoju kawo-
wego z mlekiem .....................103
7.5 Pobieranie dwóch filiżanek
jednocześnie ..........................104
8 Młynek.......................................104
8.1 Ustawianie stopnia zmielenia .104
9 Filtr wody..................................104
9.1 Montaż filtra wody ..................105
9.2 Wymiana lub wyjmowanie fil-
tra wody..................................105
10 Zabezpieczenie przed dzieć-
mi ............................................105
10.1 Aktywacja zabezpieczenia
przed dziećmi.......................105
10.2 Dezaktywacja zabezpiecze-
nia przed dziećmi .................105
11 Podgrzewacz filiżanek1..........105
11.1 Aktywacja i dezaktywacja
podgrzewacza filiżanek1.......106
12 Ulubione .................................106
12.1 Zapisywanie napoju z me-
nu wyboru napojów ..............106
12.2 Zapisywanie napoju w me-
nu..........................................106
12.3 Zmiana ustawień napoju......106
12.4 Usuwanie ulubionego napo-
ju...........................................106
12.5 Porządkowanie ulubionych
napojów................................106
13 HomeConnect .......................107
13.1 Ustawienia HomeConnect...107
13.2 Ochrona danych...................108
14 Ustawienia podstawowe ........108
14.1 Zmiana ustawień podsta-
wowych.................................109
14.2 Przegląd ustawień podsta-
wowych.................................109
15 Czyszczenie ipielęgnacja......110
15.1 Możliwość mycia w zmy-
warkach do naczyń ..............110
1
Zależnie od wyposażenia urządzenia
92
Page 93

15.2 Środki czyszczące................111
15.3 Czyszczenie urządzenia .......111
15.4 Czyszczenie pojemnika na
skropliny i pojemnika na fu-
sy ..........................................112
15.5 Programy serwisowe............112
16 Usuwanie usterek...................114
17 Transport, przechowywanie
i utylizacja...............................119
17.1 Aktywacja zabezpieczenia
przed mrozem ......................119
17.2 Utylizacja zużytego urzą-
dzenia ...................................119
18 Serwis .....................................120
18.1 Numer produktu (E-Nr.), numer fabryczny (FD) i numer
porządkowy (Z-Nr.)...............120
18.2 Warunki gwarancji................120
19 Dane techniczne.....................120
20 Deklaracja zgodności ............121
pl
93
Page 94

pl Bezpieczeństwo
1 Bezpieczeństwo
Przestrzegać poniższych wskazówek bezpieczeństwa.
1.1 Wskazówki ogólne
¡ Należy dokładnie przeczytać niniejszą instrukcję.
¡ Instrukcję należy zachować i starannie przechowywać jako źró-
dło informacji, a także z myślą o innych użytkownikach.
¡ Jeżeli w trakcie transportu urządzenie zostało uszkodzone, nie
wolno go podłączać.
1.2 Użytkowanie zgodne zprzeznaczeniem
Urządzenia należy używać wyłącznie:
¡ do przygotowywania gorących napojów.
¡ w prywatnym gospodarstwie domowym i zamkniętych pomiesz-
czeniach domowych.
¡ do wysokości 2000 metrów nad poziomem morza.
1.3 Ograniczenie grupy użytkowników
To urządzenie może być obsługiwane przez dzieci powyżej lat 8
oraz przez osoby oograniczonych zdolnościach fizycznych, sensorycznych lub umysłowych albo osoby nieposiadające wymaganego doświadczenia i/lub wiedzy tylko pod warunkiem, że znajdują się one pod nadzorem lub zostały dokładnie poinformowane o
sposobie bezpiecznej obsługi urządzenia oraz zrozumiały wynikające stąd zagrożenia.
Dzieciom nie wolno bawić się urządzeniem.
Dzieciom nie wolno wykonywać żadnych przewidzianych dla użytkownika czynności z zakresu czyszczenia i konserwacji urządzenia, chyba że są wieku co najmniej 8 lat i wykonują te czynności
pod nadzorem.
Urządzenie i jego przewód sieciowy należy trzymać poza zasięgiem dzieci poniżej 8 roku życia.
94
Page 95
Bezpieczeństwo pl
1.4 Zasady bezpieczeństwa
OSTRZEŻENIE‒Ryzyko uduszenia się!
Dzieci mogą sobie naciągnąć materiały opakowania na głowę lub
zawinąć się w nie i udusić się.
▶
Materiały z opakowania należy trzymać poza zasięgiem dzieci.
▶
Nie pozwalać dzieciom na zabawę opakowaniem, aszczególnie
folią.
Dzieci mogą połknąć drobne części lub zadławić się nimi, co może doprowadzić do uduszenia.
▶
Drobne części należy trzymać poza zasięgiem dzieci.
▶
Nie należy pozwalać dzieciom na zabawę drobnymi częściami.
OSTRZEŻENIE‒Ryzyko porażenia prądem!
Nieprawidłowo przeprowadzony montaż stanowi poważne zagrożenie.
▶
Urządzenie należy podłączyć iużytkować zgodnie zinformacja-
mi podanymi natabliczce znamionowej.
▶
Urządzenie musi być podłączone do sieci elektrycznej prądu
przemiennego przez prawidłowo zainstalowane gniazdo z ele-
mentem uziemiającym.
▶
Układ przewodów ochronnych domowej instalacji elektrycznej
musi być wykonany zgodnie zprzepisami.
Uszkodzone urządzenie lub uszkodzony przewód przyłączeniowy
stanowią zagrożenie.
▶
Nigdy nie włączać uszkodzonego urządzenia.
▶
Nigdy nie używać urządzenia, jeżeli jego powierzchnia jest pęk-
nięta lub złamana.
▶
Nigdy nie ciągnąć za przewód przyłączeniowy, aby odłączyć
urządzenie od sieci. Zawsze ciągnąć za wtyczkę przewodu przy-
łączeniowego.
▶
W przypadku uszkodzenia urządzenia lub przewodu przyłącze-
niowego należy natychmiast wyciągnąć wtyczkę przewodu przy-
łączeniowego lub wyłączyć bezpiecznik w skrzynce bezpieczni-
kowej.
▶
Wezwać serwis. →Strona120
95
Page 96
pl Bezpieczeństwo
Nieprawidłowo przeprowadzane naprawy stanowią poważne zagrożenie.
▶
Naprawy urządzenia mogą być wykonywane wyłącznie przez
wykwalifikowany personel.
▶
Do naprawy urządzenia należy używać wyłącznie oryginalnych
części zamiennych.
▶
W przypadku uszkodzenia przewodu sieciowego tego urządze-
nia należy zlecić jego wymianę wymieniony przez producenta,
jego serwis lub przez odpowiednio wykwalifikowaną osobę, co
jest koniecznym warunkiem wykluczenia zagrożeń.
Wnikająca wilgoć może prowadzić do porażenia prądem.
▶
Nigdy nie zanurzać urządzenia lub przewodu sieciowego w wo-
dzie.
▶
Na złącze wtykowe urządzenia nie mogą się dostawać ciecze.
▶
Używać urządzenia wyłącznie w zamkniętych pomieszczeniach.
▶
Nigdy nie narażać urządzenia na działanie wysokiej temperatury
i wilgoci.
▶
Nie używać do czyszczenia urządzenia myjek parowych ani ci-
śnieniowych.
OSTRZEŻENIE‒Ryzyko pożaru!
Urządzenie silnie się rozgrzewa.
▶
Zapewnić dostateczną wentylację urządzenia.
▶
Nigdy nie używać urządzenia w szafce.
Używanie przedłużonego przewodu sieciowego i niezaaprobowanych adapterów stanowi poważne zagrożenie.
▶
Nie używać przedłużaczy ani rozgałęźników wielogniazdowych.
▶
Jeżeli przewód sieciowy jest za krótki, należy się skontaktować
się z serwisem.
▶
Używać tylko zaaprobowanych przez producenta adapterów.
OSTRZEŻENIE‒Ryzyko oparzeń!
Niektóre napoje są bardzo gorące.
▶
Nigdy nie dotykać gorących części urządzenia.
▶
Po użyciu zaczekać, aż gorące części urządzenia wystygną.
96
Page 97
Bezpieczeństwo pl
OSTRZEŻENIE‒Ryzyko oparzenia!
Świeżo przygotowane napoje są bardzo gorące.
▶
W razie potrzeby ostudzić napoje.
▶
Unikać kontaktu wydobywających się z urządzenia cieczy i par
ze skórą.
Zdalne uruchomienie urządzenia bez nadzoru za pośrednictwem
aplikacji Home Connect może spowodować oparzenie innej osoby.
▶
Nie wkładać rąk i palców wylot napoju podczas pobierania na-
poju.
▶
Uniemożliwić innym osobom, a w szczególności dzieciom, do-
stęp do urządzenia.
OSTRZEŻENIE‒Ryzyko odniesienia obrażeń!
Nieprawidłowa obsługa urządzenia może stanowić zagrożenie dla
użytkownika.
▶
Urządzenia należy używać tylko w sposób zgodny z przeznacze-
niem, pozwoli to uniknąć szkód i obrażeń.
Przytrzaśnięcie palców przy zamykaniu drzwiczek urządzenia.
▶
Przy zamykaniu drzwiczek należy uważać na palce.
Młynek szybko się obraca.
▶
Nigdy nie wkładać palców ani rąk do młynka.
OSTRZEŻENIE‒Niebezpieczeństwo: oddziaływanie magne-
tyczne!
Urządzenie zawiera magnesy trwałe. Mogą one mieć wpływ na
działanie implantów elektronicznych, np. rozruszników serca lub
pomp insulinowych.
▶
Osoby posiadające implanty elektroniczne muszą zachowywać
odstęp co najmniej 10 cm od urządzenia.
▶
Należy też zachowywać minimalny odstęp 10 cm od wyjętego
pojemnika na wodę.
OSTRZEŻENIE‒Ryzyko uszczerbku na zdrowiu!
Zanieczyszczenia urządzenia mogą zagrażać zdrowiu.
▶
Przestrzegać wskazówek dotyczących czyszczenia i higieny
urządzenia.
97
Page 98
pl Ochrona środowiska i oszczędność
A
B
C
D
E
F
G
H
I
Ochrona środowiska i oszczędność
2 Ochrona środowiska i
oszczędność
Ochrona środowiska i oszczędność
2.1 Usuwanie opakowania
Materiały opakowaniowe są przyjazne
dla środowiska i nadają się do recyklingu.
▶
Poszczególne elementy utylizować
zgodnie z rodzajem materiału.
2.2 Oszczędzanie energii
Urządzenie użytkowane zgodnie z tymi wskazówkami zużywa mniej prądu.
Ustawić interwał automatycznego wyłączania na najmniejszą możliwą wartość.
a
Jeżeli urządzenie nie jest używane,
wyłącza się wcześniej.
→"Ustawienia podstawowe",
Strona108
Nie przerywać przedwcześnie pobierania napoju.
a
Podgrzana ilość wody lub mleka
jest optymalnie wykorzystywana.
Urządzenie należy regularnie odkamieniać.
a
Osad kamienia zwiększa zużycie
energii.
Ustawianie i podłączanie
3 Ustawianie i podłącza-
nie
Ustawianie i podłączanie
W tym miejscu można znaleźć informacje o optymalnym miejscu i sposobie ustawienia urządzenia. Można
tu też znaleźć opis sposobu podłączania urządzenia do sieci elektrycznej.
3.1 Zakres dostawy
Po rozpakowaniu należy sprawdzić
wszystkie części pod kątem ewentualnych uszkodzeń podczas transportu.
Uwaga:Do urządzenia dołączone są
różne akcesoria, zależne od modelu.
Akcesoria te są oznaczone kreskowaną ramką.
→Rys.
1
Automatyczny ekspres do kawy
Rurka do mleka i rurka ssąca
Instrukcja obsługi
Przyrząd ułatwiający wkłada-
nie filtra wody
Tabletki odkamieniające
Tabletki czyszczące
Filtr wody
1
1
1
Pasek do mierzenia poziomu
twardości wody
Ściereczka z mikrofazy
1
Zależnie od wyposażenia urządzenia
3.2 Ustawianie i podłączanie urządzenia
UWAGA!
Niebezpieczeństwo uszkodzenia
urządzenia. Nieprawidłowe uruchamianie może spowodować uszkodzenie urządzenia.
▶
Urządzenie użytkować wyłącznie w
pomieszczeniach, w których nie
występują temperatury ujemne.
▶
Jeżeli urządzenie było transportowane lub przechowywane poniżej
0°C, to przed jego uruchomieniem
należy odczekać 3 godziny w temperaturze pokojowej.
98
Page 99
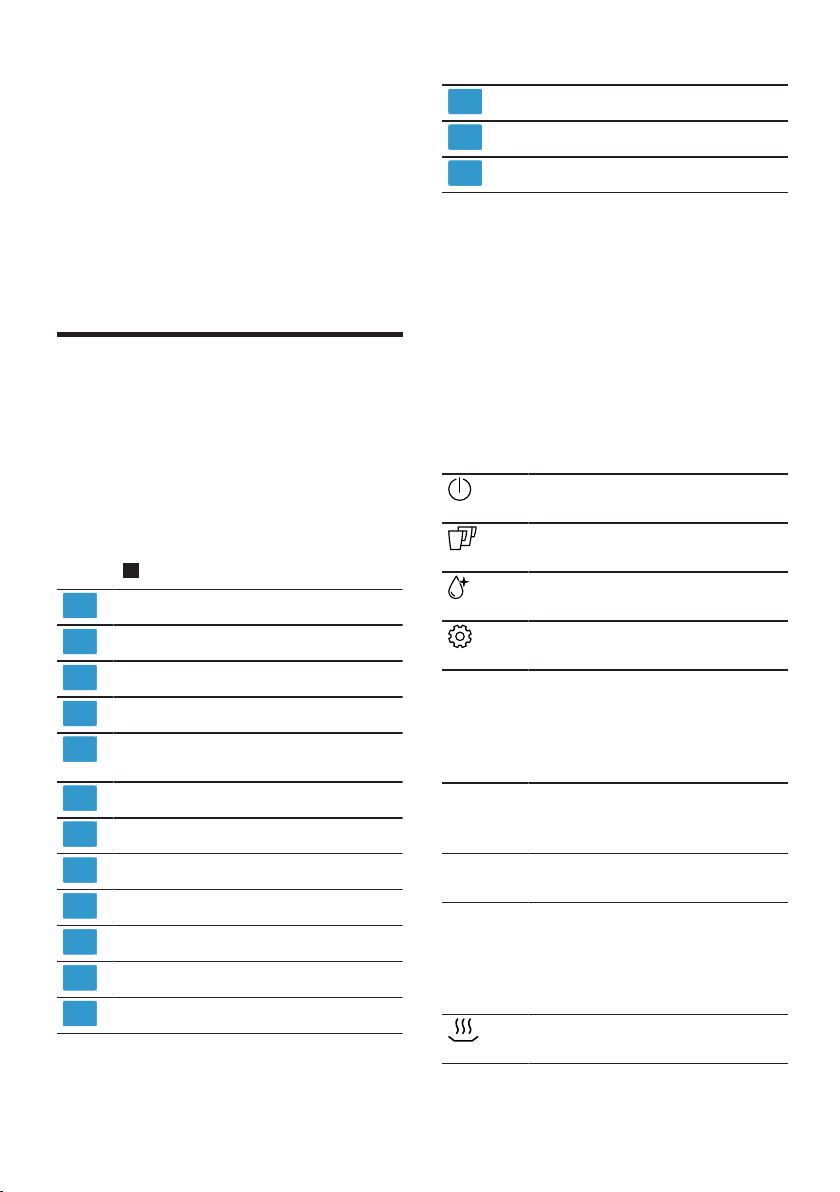
▶
1
2
3
4
5
6
7
8
9
10
11
12
13
14
15
Po każdym podłączeniu odczekać
ok.5 sekund.
1. Ustawić urządzenie na równej, do-
statecznie wytrzymałej i wodoodpornej powierzchni.
2. Połączyć urządzenie wtyczką sie-
ciową z przepisowo zainstalowanym gniazdem sieciowym z uziemieniem.
Poznawanie urządzenia
4 Poznawanie urządzenia
Poznawanie urządzenia
4.1 Urządzenie
W tym miejscu można znaleźć przegląd części urządzenia.
Uwaga:W zależności od typu urządzenia możliwe są niewielkie odchylenia koloru i cech budowy.
→Rys.
1
2
Pola dotykowe
Podgrzewacz filiżanek
Pokrywa aromatyzująca
Pojemnik na kawę ziarnistą
Pokrętło do ustawiania stop-
nia zmielenia
Kanał na tabletki
Pokrywa zbiornika na wodę
Zbiornik na wodę
Wyświetlacz dotykowy
Drzwiczki komory zaparzacza
Tabliczka znamionowa
System spieniania mleka
Zależnie od wyposażenia urządzenia
1
Poznawanie urządzenia pl
Pokrywa wylotu napojów
Rurka do mleka i rurka ssąca
Pojemnik na skropliny
1
Zależnie od wyposażenia urządzenia
4.2 Elementy obsługi
W tym miejscu można znaleźć przegląd elementów obsługi posiadanego
urządzenia.
Pola dotykowe
W tym miejscu można znaleźć przegląd zawsze widocznych symboli
urządzenia.
Włączanie lub wyłączanie
urządzenia.
Pobieranie dwóch filiżanek
jednocześnie.
Otwieranie i zamykanie
programów serwisowych.
Otwieranie i zamykanie
ustawień.
Wyświetlacz dotykowy
Ekran dotykowy stanowi zarówno element wskazujący, jak i element obsługi urządzenia.
Ulubio-neWybieranie napojów zapi-
sanych z ustawieniami
osobistymi. →Strona106
Klasyczne
coffeeWorld
Wybieranie napojów standardowych.
Wybieranie napojów podstawowych, których lista
może być rozszerzana w
połączeniu z funkcją
Home Connect.
Podgrzewacz filiżanek jest
włączony.
99
Page 100
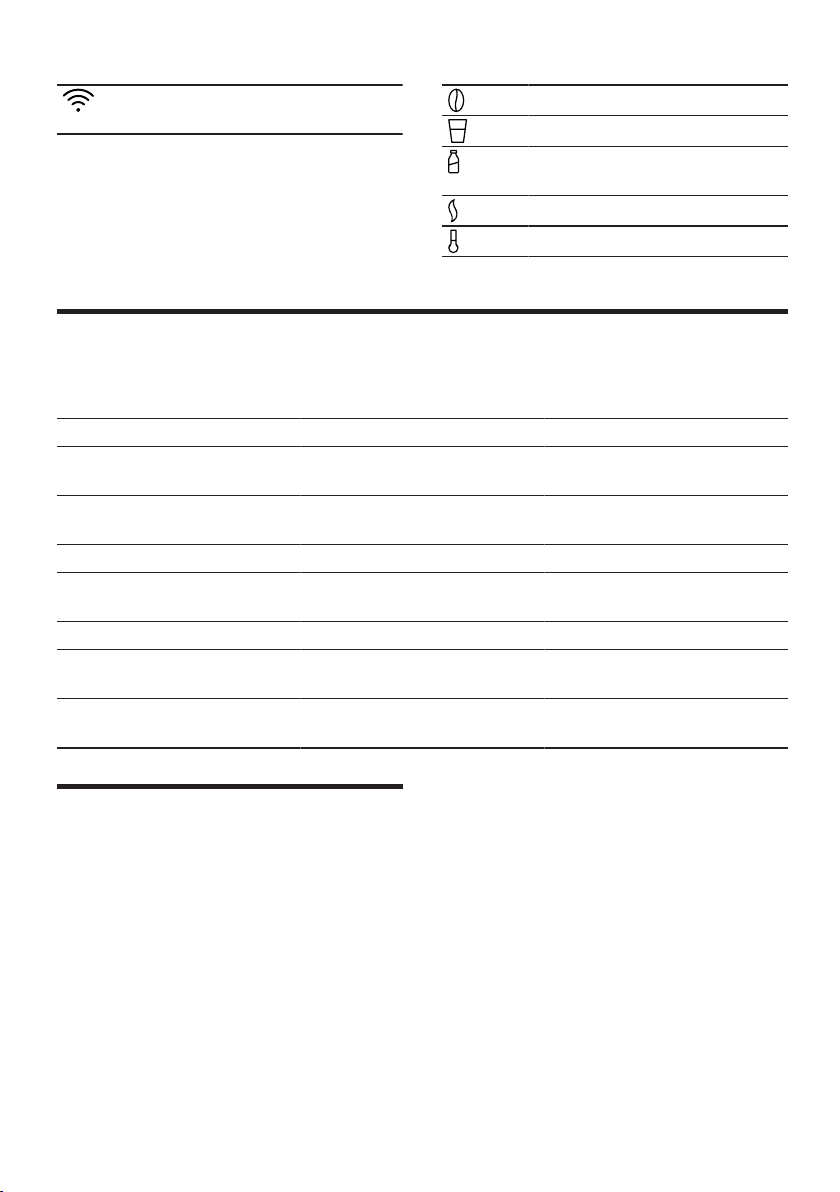
pl Akcesoria
Urządzenie jest połączone
z funkcją Home Connect.
Uwaga:Przy włączonym urządzeniu
dostępne są dodatkowe możliwości
obsługi wraz z odpowiednimi wskazaniami i informacjami, np. ustawienia
napojów.
Akcesoria
Ustawianie mocy napoju.
Ustawianie ilości napoju.
Ustawianie procentowego
udziału mleka.
Ustawianie aromatu.
Ustawianie temperatury.
5 Akcesoria
Akcesoria
Używać oryginalnych elementów wyposażenia. Są one dokładnie dostosowane
do urządzenia.
Akcesoria Sprzedaż detaliczna Serwis
Tabletki czyszczące TZ80001A
TZ80001B
Odkamieniacz w tabletkach
TZ80002A
TZ80002B
Filtr wody TZ70003 00575491
Filtr wody, opakowanie 3
TZ70033A szt.
Ściereczka z mikrofazy - 00460770
Zestaw pielęgnacyjny TZ80004A
TZ80004B
Adapter pojemnika na
TZ70001 17006005
mleko
00312097
00312098
00312094
00312095
00312105
00312106
Przed pierwszym użyciem
6 Przed pierwszym
użyciem
Przed pierwszym użyciem
Przygotować urządzenie do użycia.
6.1 Przygotowywanie i czyszczenie urządzenia
Zdjąć folie ochronne i wyczyścić
urządzenie oraz jego części.
Uwaga:Zbiornik na wodę należy codziennie napełniać świeżą niegazowaną wodą.
100
UWAGA!
Nieodpowiednia kawa ziarnista może
zatkać młynek.
▶
Używać wyłącznie czystej, palonej
kawy espresso lub mieszanek
przeznaczonych do automatycznych ekspresów ciśnieniowych.
▶
Nie używać lukrowanej kawy ziarnistej.
▶
Nie używać karmelizowanej kawy
ziarnistej.
▶
Nie używać kawy ziarnistej z dodatkami zawierającymi cukier.
▶
Nie wsypywać kawy zmielonej ani
sproszkowanej.
 Loading...