

Page 1
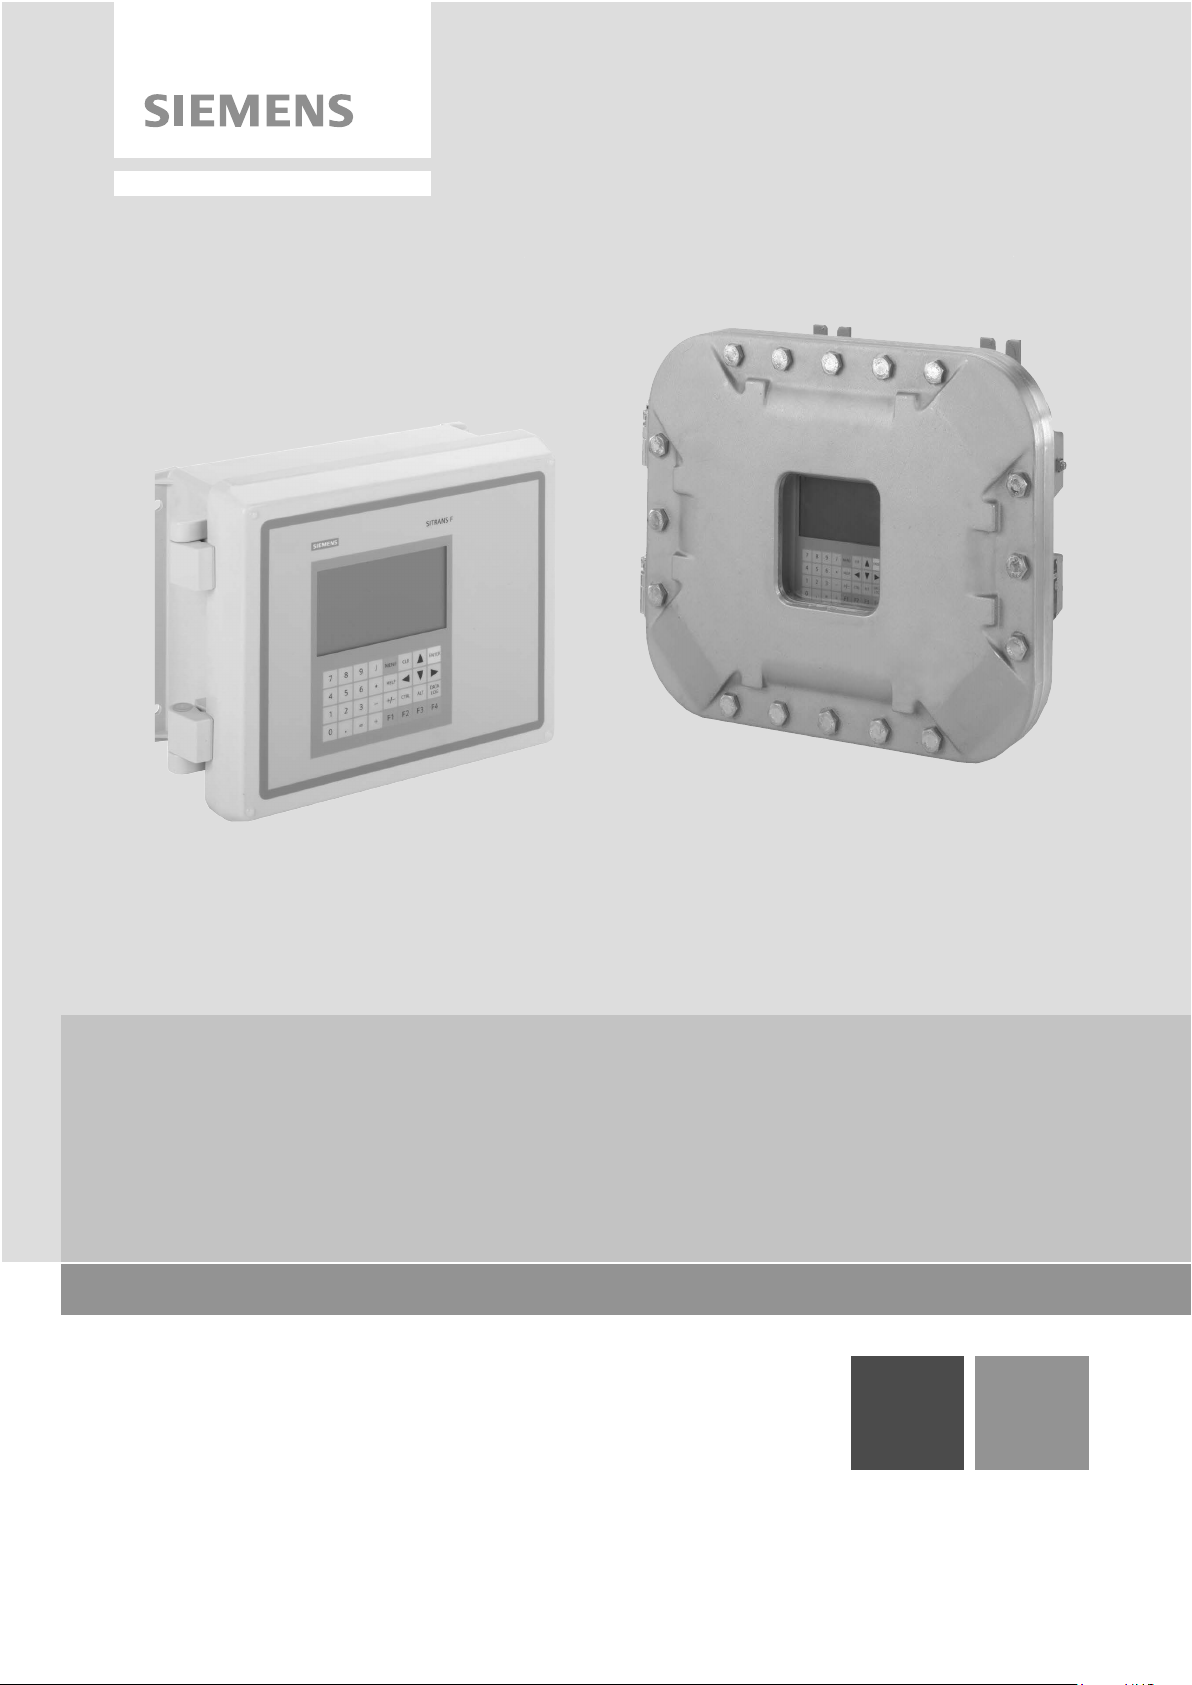
SITRANS F US
Clamp-on Ultrasonic Flowmeters
Communications Protocol Manual
11/2015Edition
Answers for industry.
Page 2

Page 3

SITRANS F US
Clamp-on Ultrasonic Flowmeters
F US Clamp-on Communications
Protocol Manual
Hardware Installation Manual
11/2015
A5E34981613
Introduction
1
Installing/Mounting
2
BACnet Communications
3
HART Communications
4
Consolidated Modbus
Registers
5
WEB Configuration Utility
6
Appendix A
A
-AC
Page 4

Siemens
Division Process Industries and Drives
Postfach 48 48
90026 NÜRNBERG
GERMANY
Order number: A5E34981613
Ⓟ
Copyright © Siemens 2015.
All rights reserved
Legal information Warning notice system
DANGER
indicates that death or severe personal injury will result if proper precautions are not taken.
WARNING
indicates that death or severe personal injury may result if proper precautions are not taken.
CAUTION
indicates that minor personal injury can result if proper precautions are not taken.
NOTICE
indicates that property damage can result if proper precautions are not taken.
Qualified Personnel
personnel qualified
Proper use of Siemens products
WARNING
Siemens products may only be used for the applications described in the catalog and in the relevant technical
maintenance are required to ensure that the products operate safely and without any problems. The permissible
ambient conditions must be complied with. The information in the relevant documentation must be observed.
Trademarks
Disclaimer of Liability
This manual contains notices you have to observe in order to ensure your personal safety, as well as to prevent
damage to property. The notices referring to your personal safety are highlighted in the manual by a safety alert
symbol, notices referring only to property damage have no safety alert symbol. These notices shown below are
graded according to the degree of danger.
If more than one degree of danger is present, the warning notice representing the highest degree of danger will
be used. A notice warning of injury to persons with a safety alert symbol may also include a warning relating to
property damage.
The product/system described in this documentation may be operated only by
task in accordance with the relevant documentation, in particular its warning notices and safety instructions.
Qualified personnel are those who, based on their training and experience, are capable of identifying risks and
avoiding potential hazards when working with these products/systems.
Note the following:
documentation. If products and components from other manufacturers are used, these must be recommended
or approved by Siemens. Proper transport, storage, installation, assembly, commissioning, operation and
All names identified by ® are registered trademarks of Siemens AG. The remaining trademarks in this publication
may be trademarks whose use by third parties for their own purposes could violate the rights of the owner.
We have reviewed the contents of this publication to ensure consistency with the hardware and software
described. Since variance cannot be precluded entirely, we cannot guarantee full consistency. However, the
information in this publication is reviewed regularly and any necessary corrections are included in subsequent
editions.
for the specific
11/2015 Subject to change
Page 5

Table of contents
1 Introduction ............................................................................................................................................. 7
2 Installing/Mounting .................................................................................................................................. 9
3 BACnet Communications ...................................................................................................................... 29
4 HART Communications ......................................................................................................................... 37
5 Consolidated Modbus Registers ............................................................................................................ 53
6 WEB Configuration Utility ...................................................................................................................... 61
A Appendix A ........................................................................................................................................... 67
1.1 History ....................................................................................................................................... 7
2.1 Items Supplied .......................................................................................................................... 9
2.2 F US Clamp-on Communications Module Installation .............................................................. 9
2.3 Flowmeter Setup ..................................................................................................................... 17
3.1 BACnet Communications ........................................................................................................ 29
3.2 BACnet Protocol Implementation Conformance Statement ................................................... 31
3.3 BACnet Alarms ....................................................................................................................... 34
4.1 Universal HART Commands ................................................................................................... 37
4.2 Common Practice HART Commands ..................................................................................... 43
4.3 Device Specific HART Commands ......................................................................................... 45
4.4 HART F US1010 Setup........................................................................................................... 46
4.5 Troubleshooting Diagnostics .................................................................................................. 52
5.1 Consolidated Modbus Registers ............................................................................................. 53
6.1 WEB Configuration Utility ....................................................................................................... 61
A.1 Modbus, EIP, HART & N2 Profile Mappings .......................................................................... 67
A.1.1 Introduction ............................................................................................................................. 67
A.1.2 Profile 1 ................................................................................................................................... 68
A.1.3 Profile 2 ................................................................................................................................... 69
A.1.4 Profile 3 ................................................................................................................................... 70
A.1.5 Profile 4 ................................................................................................................................... 71
A.1.6 Profile 5 ................................................................................................................................... 72
A.1.7 Profile 6 ................................................................................................................................... 74
A.1.8 Profile 7 ................................................................................................................................... 76
A.1.9 Profile 8 ................................................................................................................................... 78
A.1.10 Profile 9 ................................................................................................................................... 80
A.1.11 Profile 10 ................................................................................................................................. 81
A.1.12 Profile 11 ................................................................................................................................. 83
A.1.13 Profile 12 ................................................................................................................................. 85
A.1.14 Profile 13 ................................................................................................................................. 87
A.1.15 Profile 14 ................................................................................................................................. 90
A.1.16 Profile 15 .................................................................................................................................
A.1.17 Profile 16 ................................................................................................................................. 95
A.1.18 Profile 17 ................................................................................................................................. 97
92
F US Clamp-on Communications Protocol Manual
Hardware Installation Manual, 11/2015, A5E34981613-AC
3
Page 6

Table of contents
Glossary .............................................................................................................................................. 183
Index ................................................................................................................................................... 189
Tables
A.1.19 Profile 18 .............................................................................................................................. 101
A.1.20 Profile 19 .............................................................................................................................. 104
A.1.21 Profile 20 .............................................................................................................................. 107
A.1.22 Profile 21 .............................................................................................................................. 111
A.1.23 Profile 22 .............................................................................................................................. 115
A.1.24 Profile 23 .............................................................................................................................. 119
A.1.25 Profile 24 .............................................................................................................................. 120
A.1.26 Profile 25 .............................................................................................................................. 122
A.1.27 Profile 26 .............................................................................................................................. 124
A.1.28 Profile 27 .............................................................................................................................. 128
A.1.29 Profile 28 .............................................................................................................................. 131
A.1.30 Profile 29 .............................................................................................................................. 133
A.1.31 Profile 30 .............................................................................................................................. 135
A.1.32 Profile 31 .............................................................................................................................. 138
A.1.33 Profile 32 .............................................................................................................................. 141
A.1.34 Profile 33 .............................................................................................................................. 145
A.1.35 Profile 34 ..............................................................................................................................
148
A.1.36 Profile 35 .............................................................................................................................. 150
A.1.37 Profile 36 .............................................................................................................................. 152
A.1.38 Profile 37 .............................................................................................................................. 155
A.1.39 Profile 38 .............................................................................................................................. 157
A.1.40 Profile 39 .............................................................................................................................. 159
A.1.41 Profile 40 .............................................................................................................................. 161
A.1.42 Profile 41 .............................................................................................................................. 164
A.1.43 Profile 42 .............................................................................................................................. 167
A.1.44 Profile 43 .............................................................................................................................. 171
A.1.45 Profile 44 .............................................................................................................................. 173
A.1.46 Profile 45 .............................................................................................................................. 175
A.1.47 Profile 46 .............................................................................................................................. 177
Table 2- 1 Mounting Kit ................................................................................................................................. 11
Table 2- 2 Profile Selection: 1 - 46 ................................................................................................................ 16
Table 4- 1 RS-485 Connector J1 ................................................................................................................... 38
Table 4- 2 Command 0 - Read Unique Identifier .......................................................................................... 38
Table 4- 3 Command 1 - Read Primary Variable .......................................................................................... 38
Table 4- 4 Command 2 - Read Loop Current and Percent of Range ........................................................... 39
Table 4- 5 Command 3 - Read Dynamic Variable and Loop Current ........................................................... 39
Table 4- 6 Command 6 - Writing Polling Address ......................................................................................... 39
Table 4- 7 Command 7 - Read Loop Configuration ...................................................................................... 39
Table 4- 8 Command 8 - Read Dynamic Variable Classifications ................................................................ 39
Table 4- 9 Command 9 - Read Device Variable with Status ......................................................................... 40
Table 4- 10 Command 11 - Read Unique identifier Associated with Tag ....................................................... 40
Table 4- 11 Command 12 - Read Message .................................................................................................... 41
Table 4- 12 Command 13 - Read Tag, Descriptor, Date ................................................................................ 41
F US Clamp-on Communications Protocol Manual
4 Hardware Installation Manual, 11/2015, A5E34981613-AC
Page 7

Table of contents
Figures
Table 4- 13 Command 14 - Read Primary Variable Transducer Information ................................................. 41
Table 4- 14 Command 15 - Read Device Information .................................................................................... 41
Table 4- 15 Command 16 - Read Final Assembly Number ............................................................................ 41
Table 4- 16 Command 17 - Write Message .................................................................................................... 42
Table 4- 17 Command 18 - Write Tag, Descriptor, Date ................................................................................ 42
Table 4- 18 Command 19 - Write Final Assembly Number ............................................................................ 42
Table 4- 19 Command 20 - Read Log Tag ..................................................................................................... 42
Table 4- 20 Command 21 - Read Unique Identifier Associated with Long Tag .............................................. 42
Table 4- 21 Command 22 - Write Long Tag .................................................................................................... 43
Table 4- 22 Command 38 - Reset Configuration Changed Flag..................................................................... 43
Table 4- 23 Command 48 - Read Additional Device Status ........................................................................... 43
Table 4- 24 Command 35 - Write Primary Range Values ............................................................................... 43
Table 4- 25 Command 40 - Enter/Exit Fixed Current Mode ............................................................................ 43
Table 4- 26 Command 44 - Write Primary variable Units ............................................................................... 43
Table 4- 27 Command 45 - Trim Loop Current Zero ...................................................................................... 44
Table 4- 28 Command 46 - Trim Loop Current Gain ...................................................................................... 44
Table 4- 29 Command 50 - Read Dynamic Variable Assignments................................................................. 44
Table 4- 30 Command 51 - Write Dynamic Variable Assignments ................................................................. 44
Table 4- 31 Command 53 - Write Device Variable Units ................................................................................ 44
Table 4- 32 Request ........................................................................................................................................ 45
Table 4- 33 Response ..................................................................................................................................... 45
Table 4- 34 Request ........................................................................................................................................ 45
Table 4- 35 Response ..................................................................................................................................... 45
Table 4- 36 Request ........................................................................................................................................ 45
Table 4- 37 Response ..................................................................................................................................... 45
Table 4- 38 Request ........................................................................................................................................ 46
Table 4- 39 Response ..................................................................................................................................... 46
Table 4- 40 F_US1010 Clamp-on Communications Module - HART Device Variables ................................ 48
Figure 2-1 New Communications Module Installation ................................................................................... 11
Figure 2-2 SITRANS F US Clamp-on Communications Module A5E31949269 ........................................... 12
Figure 2-3 New Communications Module Installation ................................................................................... 13
Figure 2-4 DIP Switches SW1-A and SW2-B ................................................................................................ 14
Figure 2-5 Communications Cable Installation.............................................................................................. 19
Figure 2-6 FieldServer Toolbox Tour ............................................................................................................ 20
Figure 2-7 User Messages ............................................................................................................................ 27
F US Clamp-on Communications Protocol Manual
Hardware Installation Manual, 11/2015, A5E34981613-AC
5
Page 8

Table of contents
Figure 3-1 Typical F US Clamp-on Flowmeter BACnet Application .............................................................. 29
Figure 4-1 HART Connections ...................................................................................................................... 37
Figure 4-2 Typical Connection of F US flowmeter with HART F_US1010 Option ........................................ 47
Figure 4-3 Process Variables View ............................................................................................................... 49
Figure 4-4 Dynamic Variables Changes View ............................................................................................... 50
Figure 4-5 Dynamic Variables View .............................................................................................................. 51
Figure 4-6 Device Information ....................................................................................................................... 52
Figure 6-1 Tool Box Utility ............................................................................................................................. 62
Figure 6-2 BACnet Parameters ..................................................................................................................... 63
Figure 6-3 Modbus Settings .......................................................................................................................... 64
Figure A-1 Profile Example ............................................................................................................................ 67
F US Clamp-on Communications Protocol Manual
6 Hardware Installation Manual, 11/2015, A5E34981613-AC
Page 9

1
Note
It is the responsibility of the customer that the instructions and directions provided are read,
understood and followed by the relevant personnel before installing the device.
Note
For complete Safety Considerations and Ratings, refer
included with the flowmeter.
1.1
History
Edition
Remarks
12/2014
First edition of the SITRANS F US Communication Protocol Operating Instructions.
These SITRANS F US Clamp-on Communications Protocol installation instructions are for
Siemens SITRANS F US clamp-on ultrasonic flow meters equipped with the communication
option.
The instructions are aimed at persons that mechanically install the device, connect it
electronically, configure the parameters and commission it as well as service and
maintenance engineers.
to the Operating Instructions manual
The contents of these instructions are regularly reviewed and corrections are included in
subsequent editions. We welcome all suggestions for improvement.
The following table shows the most important changes in the documentation compared to
each previous edition.
5/2015 Second edition of the SITRANS F US Communication Protocol Operating Instructions.
The most important changes are as follows:
• Front and back manual cover updates to system designation text (i.e. From:
SITRANS F - To: SITRANS F US).
11/2015 Third edition of the SITRANS F US Communication Protocol Operating Instructions. This
document replaces all previous instructions for use. The most important changes are as
follows:
• Revised Flowmeter Setup and Communications Card Setup procedures.
• Revised Web Configuration Utility Setup procedure.
• Troubleshooting Diagnostic procedures have been added.
F US Clamp-on Communications Protocol Manual
Hardware Installation Manual, 11/2015, A5E34981613-AC
7
Page 10

Introduction
1.1 History
F US Clamp-on Communications Protocol Manual
8 Hardware Installation Manual, 11/2015, A5E34981613-AC
Page 11
2
2.1
Items Supplied
2.2
F US Clamp-on Communications Module Installation
WARNING
Hazardous Voltage
NOTICE
Electrostatic Discharge, All Electronic Assemblies
Note
For proper installation, mounting, wiring, and menu configuration of the flowmeter please
refer to the Operating Instructions manual supplied with the flowmeter.
The following parts are provided when the Communications Module is purchased separately:
● SITRANS F US Clamp-on Communications Module A5E31949269
● Four captive screws
● Four captive standoffs
May cause death or serious personal injury.
Disconnect power before working on this product.
Take precautions against static discharge when handling circuit boards. Semiconductor
devices must be protected from electrostatic discharge. A properly grounded conductive
wrist strap must be worn whenever a circuit board assembly is handled or touched.
F US Clamp-on Communications Protocol Manual
Hardware Installation Manual, 11/2015, A5E34981613-AC
9
Page 12

Installing/Mounting
New Communications Module Installation.
Note
Refer to page 10 for the New Communications Module Installation
Mounting Kit
Meter Type
Meter Configuration
installed
only installed
Field Upgrade with New Communications Module.
2.2 F US Clamp-on Communications Module Installation
These Communications Module installation instructions address the three types of
installation procedures for the flowmeter:
1. Flowmeters purchased with the correct MLFB number that includes the Communications
Module will be installed by the factory and no installation of the Communications Module
is required.
2.
Procedure requires installation of Communications Module with the necessary mounting
kit:
procedure.
1015N-5M-MK1 All meter types that include
1010N-5 Analog Input module
(i.e. FUS, FUE, FUG, FUH
1010 Systems).
1015N-5M-MK2 FUS1010N/DN without 1010N-
5 Analog Input module.
3.
1010N-2 I/O Module with
1010N-5 Analog Input Module
1010N-7 Expanded I/O Module
with 1010N-5 Analog Input
Module installed
1010N-2 I/O Module only installed
1010N-7 Expanded I/O Module
Required installation procedures include:
● Removal of the existing communications module
● Installation of Communications Module (no mounting kit necessary)
F US Clamp-on Communications Protocol Manual
10 Hardware Installation Manual, 11/2015, A5E34981613-AC
Page 13
Installing/Mounting
New Communications Module Installation
Mounting Kit
Meter Type
Meter Configuration
1010N-2M Module installed
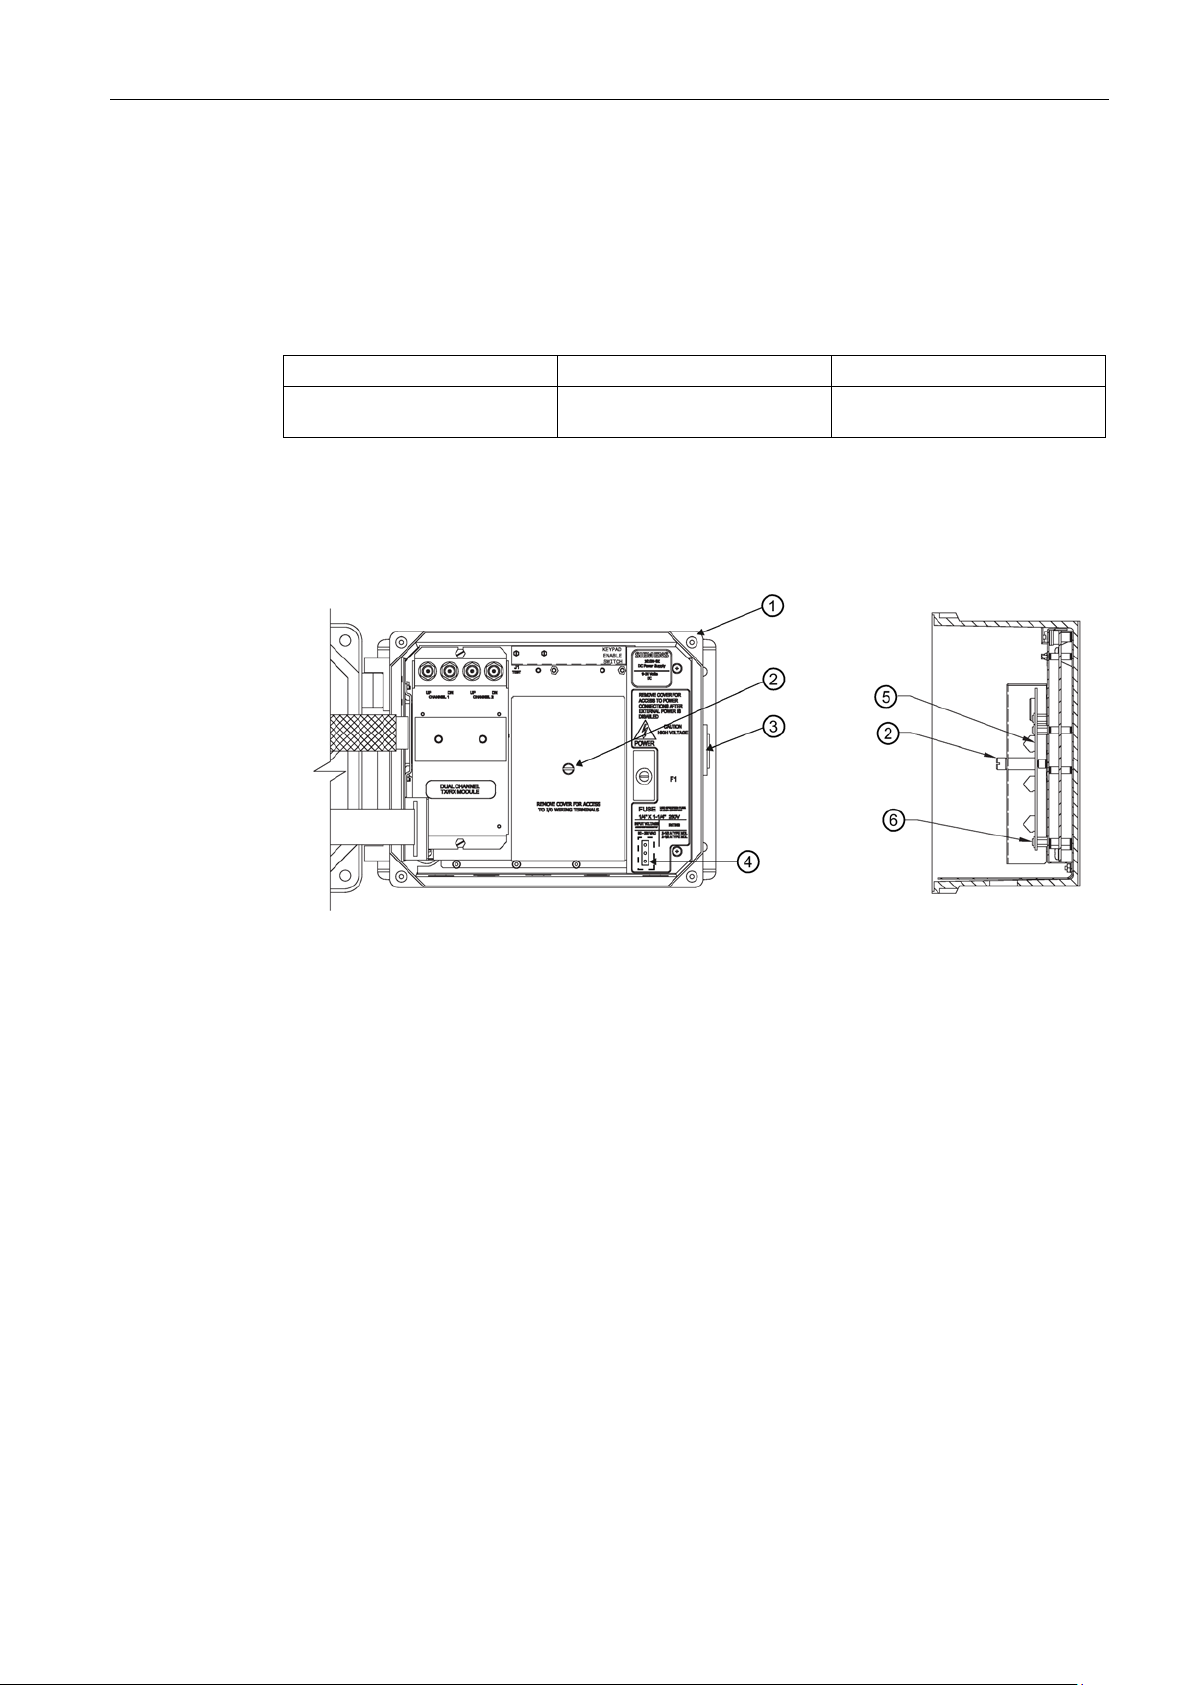
①
Flowmeter
④
Power Connector location
②
standoff
⑤
③
Flowmeter Cover Latch
⑥
I/O Module captive mounting screws
2.2 F US Clamp-on Communications Module Installation
This installation procedure is for flowmeters with an I/O Module installed but no Modbus
Communications Module previously installed. Mounting kits are also required for this
installation.
Table 2- 1 Mounting Kit
1015N-5M-MK3 1010MN 1010N-8M I/O Module with
1. Disconnect power to the unit.
2. Open the flowmeter cover by releasing the side cover latch
3. Loosen the I/O Module cover captive screw
standoff.
I/O Module cover, cover screw,
Figure 2-1 New Communications Module Installation
② and remove the cover, screw and
I/O Module
③.
4. Remove the four mounting screws and standoffs ⑥ that secure the I/O Module ⑤ and
5. Install the new standoffs supplied in the mounting kit in the vacant positions.
F US Clamp-on Communications Protocol Manual
Hardware Installation Manual, 11/2015, A5E34981613-AC
discard.
11
Page 14
Installing/Mounting
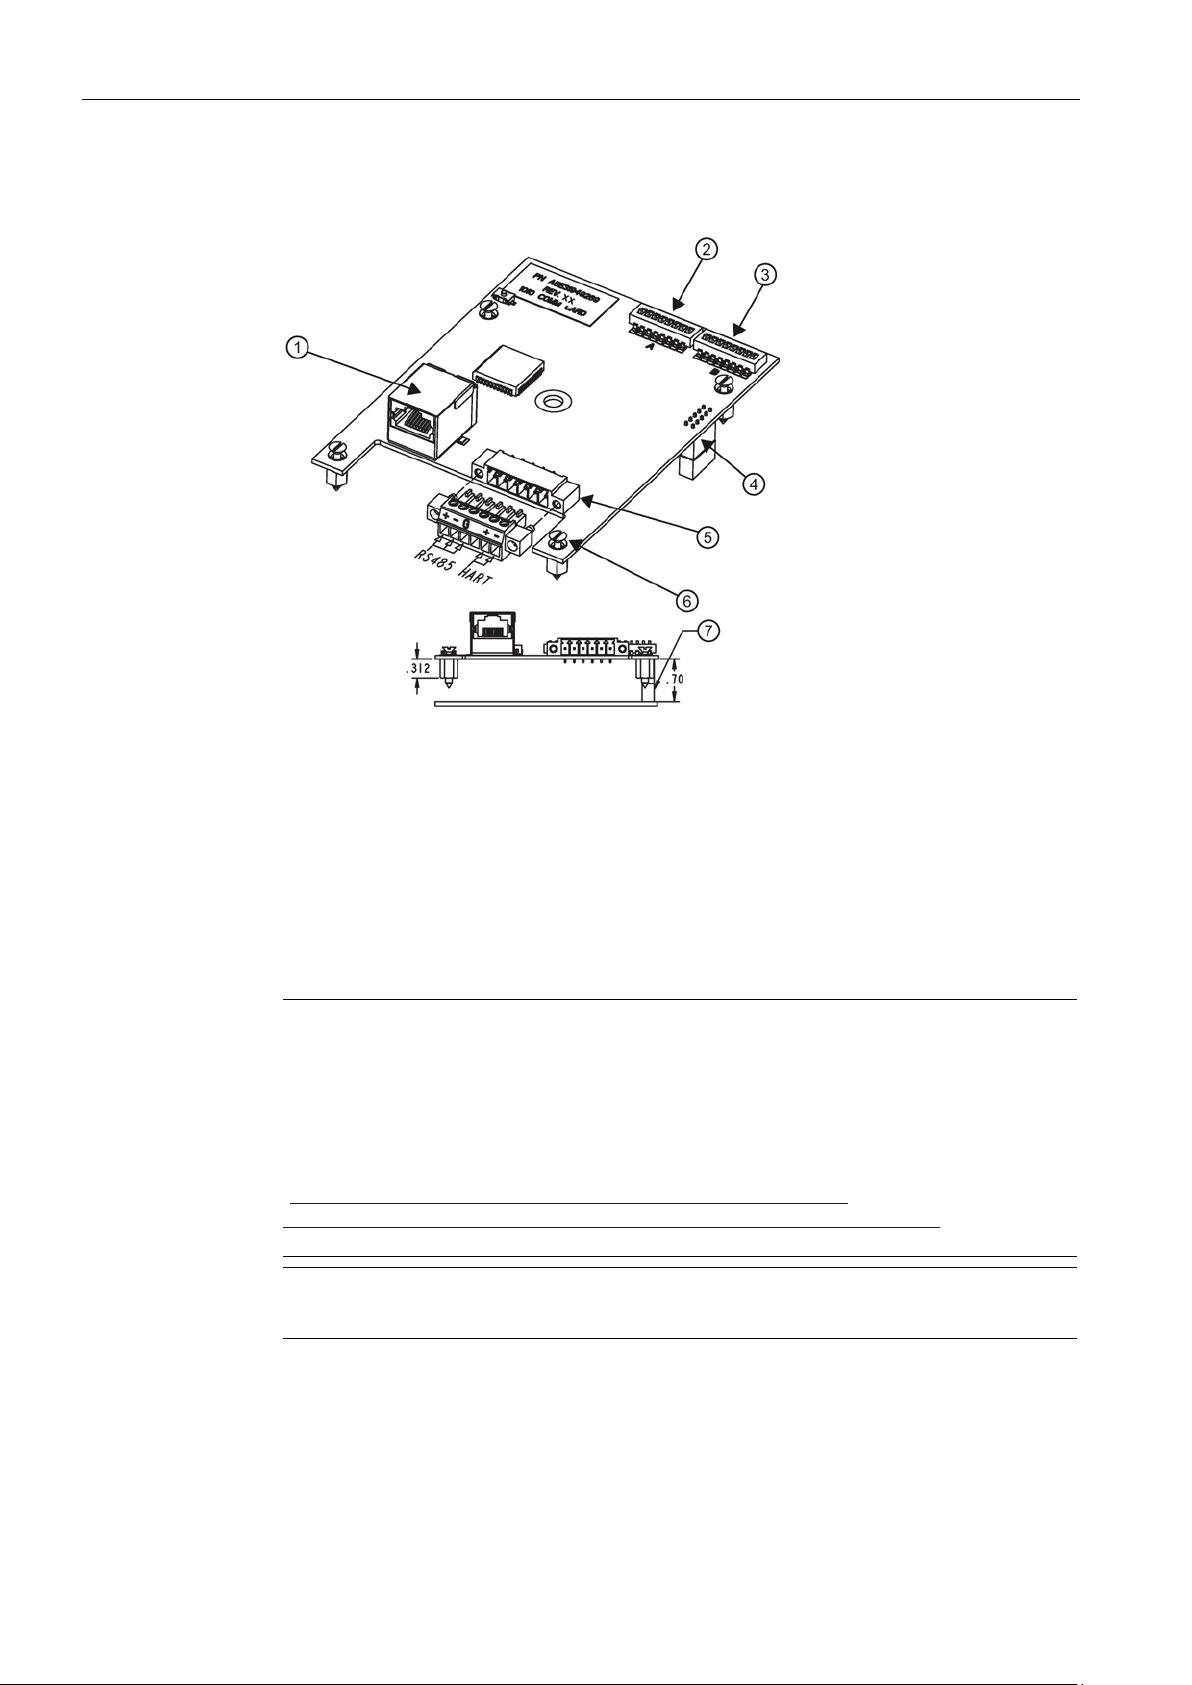
①
Ethernet Connector J5
⑤
RS-485 Connector J1
②
SW1
⑥
Captive Screw and Standoff
③
SW2
⑦
Standoff
④
J3
Note
Ethernet Web Utility Toolbox
This Web utility is used to change settings including IP addresses for multiple metes and
to locate
The web utility can be found at
http://www.fieldserver.com/techsupport/utility/downloads.php
(
XmlEditor.InternalXmlClipboard:6489c307
The default IP address is: 192.168.0.2
Note
RS-485 can be used for all communication protocols except HART.
2.2 F US Clamp-on Communications Module Installation
6. Place the Communications Module over the I/O Module and align connector J3 with P1 of
the I/O Module (figure 2-2).
Figure 2-2 SITRANS F US Clamp-on Communications Module A5E31949269
7. Gently press the Communications Module down to connect it to the I/O Module.
8. Tighten the captive screws to secure the Communications Module and I/O Module.
9. If using Ethernet IP, connect the Ethernet connector.
communications modules on the same network.
http://www.fieldserver.com/techsupport/utility/downloads.php. //
-3482-c2fd-cc08-262dd24d5093).
10.If using RS-485, connect RS-485 connector to J1.
11.Referring back to figure 2-1, after Communications Module installation is complete, place
the new Communications Module cover supplied in the mounting kit over the board and
tighten the captive screw
②.
12.Close the flowmeter cover and secure the side latch.
F US Clamp-on Communications Protocol Manual
12 Hardware Installation Manual, 11/2015, A5E34981613-AC
Page 15
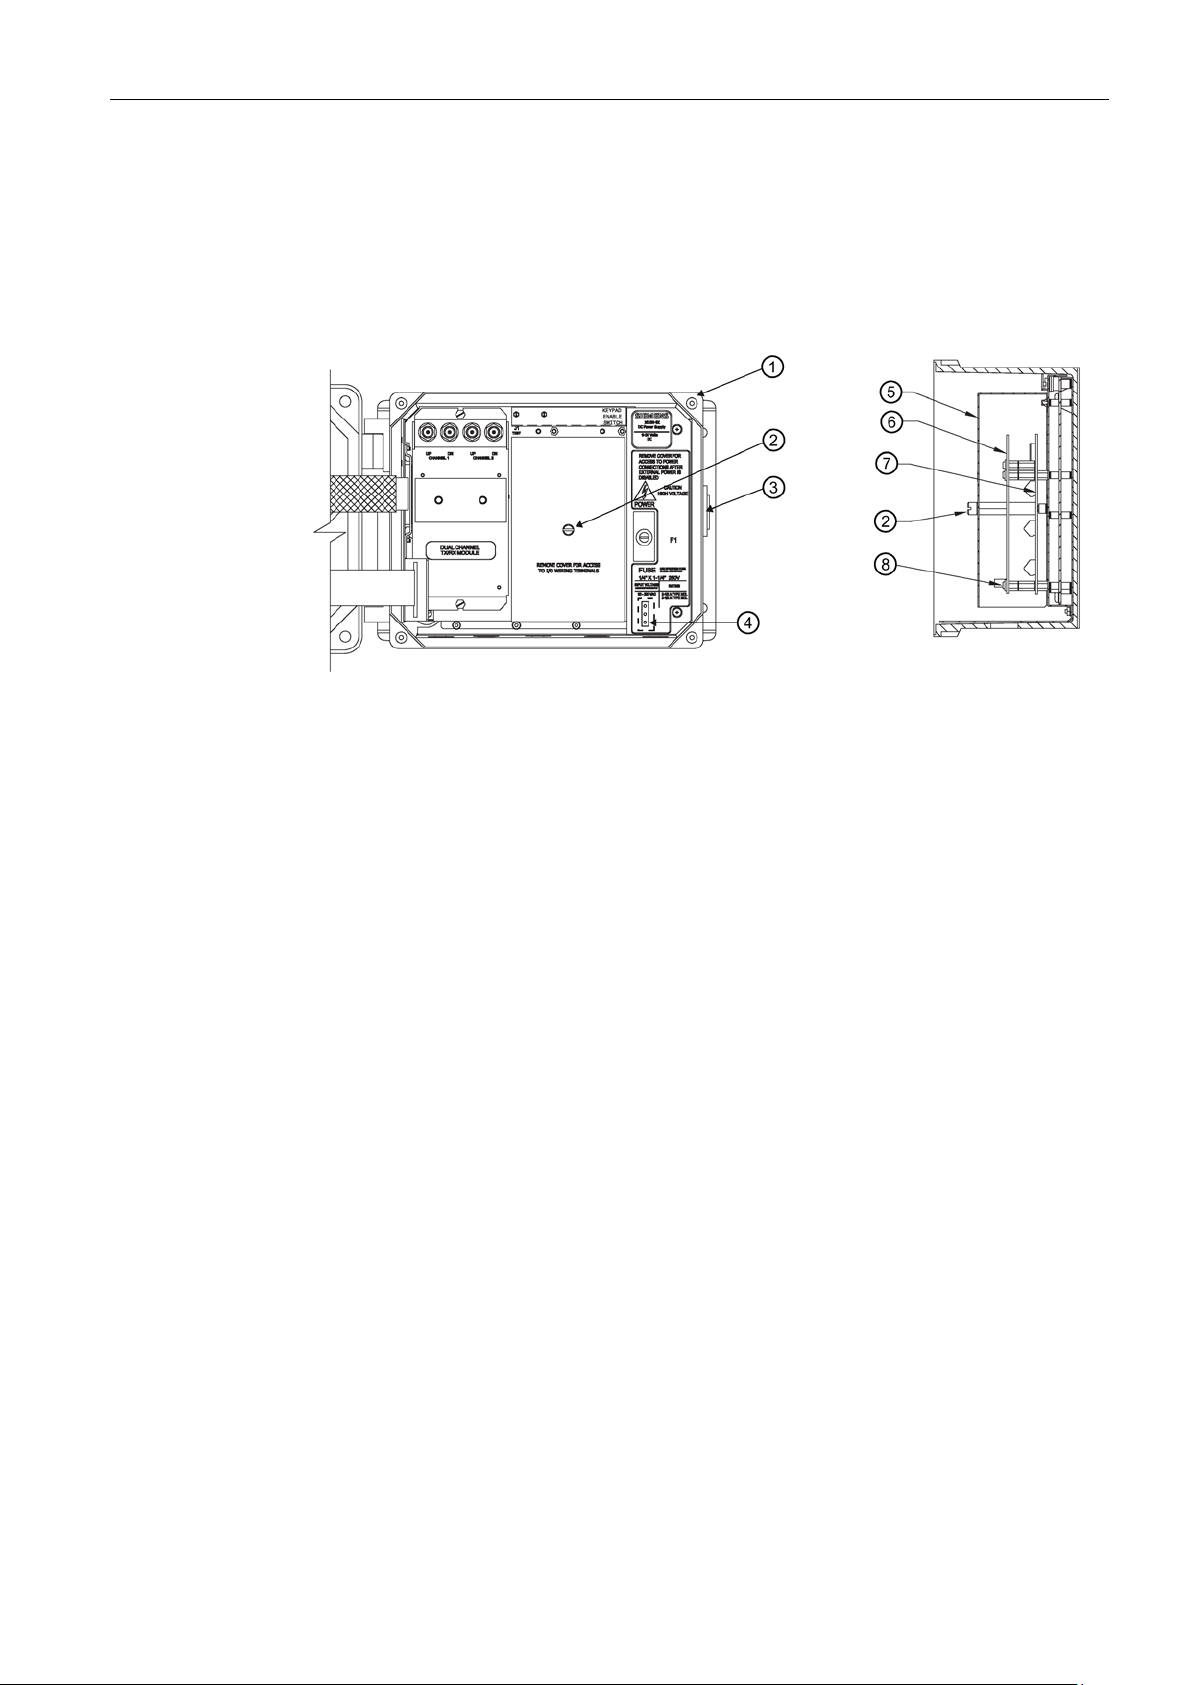
Installing/Mounting
Fielded Upgrade with New Communications Module
①
Flowmeter
⑤
Modbus Communications Module cover
②
cover screw and standoff
⑥
③
Flowmeter Cover Latch
⑦
I/O Module
④
Power Connector location
⑧
captive screws
2.2 F US Clamp-on Communications Module Installation
This installation procedure is intended for flowmeters that are to be upgraded from the
1015N-5M Modbus Communications Module to the new Communications Module.
1. Disconnect power to the unit.
2. Open the flowmeter cover by releasing the side cover latch
Modbus Communications Module
Figure 2-3 New Communications Module Installation
3. Loosen the I/O Module cover captive screw ② and remove the cover ⑤.
Modbus Communications Module
③.
4. Loosen the four mounting screws and standoffs
Communications Module.
5. Remove the Modbus Communications Module
6. Install the new standoffs supplied in the mounting kit in the vacant positions.
7. Place the Communications Module over the I/O Module and align connector J3 with P1 of
the I/O Module (figure 2-2).
8. Gently press the Communications Module down to connect it to the I/O Module.
9. Tighten the captive screws to secure the Communications Module and the I/O Module.
10.If using Ethernet IP, connect the Ethernet connector.
11.If using RS485, connect RS-485 connector to J1 (refer to RS-485 Connector J1 table
below).
12.After Communications Module installation is complete, replace the Communications
Module cover and tighten the captive screw.
13.Close the flowmeter cover and secure the side latch.
⑧ that secure the Modbus
⑥.
F US Clamp-on Communications Protocol Manual
Hardware Installation Manual, 11/2015, A5E34981613-AC
13
Page 16
Installing/Mounting
RS-485 Connector J1
Pin
Signal
Description
J1-1
RS-485+
Signal +
J1-2
RS-485-
Signal -
J1-3
RS-485 GND
Ground
J1-4
N/A
No Connection
J1-5
HART
No Connection
J1-6
HART
No Connection
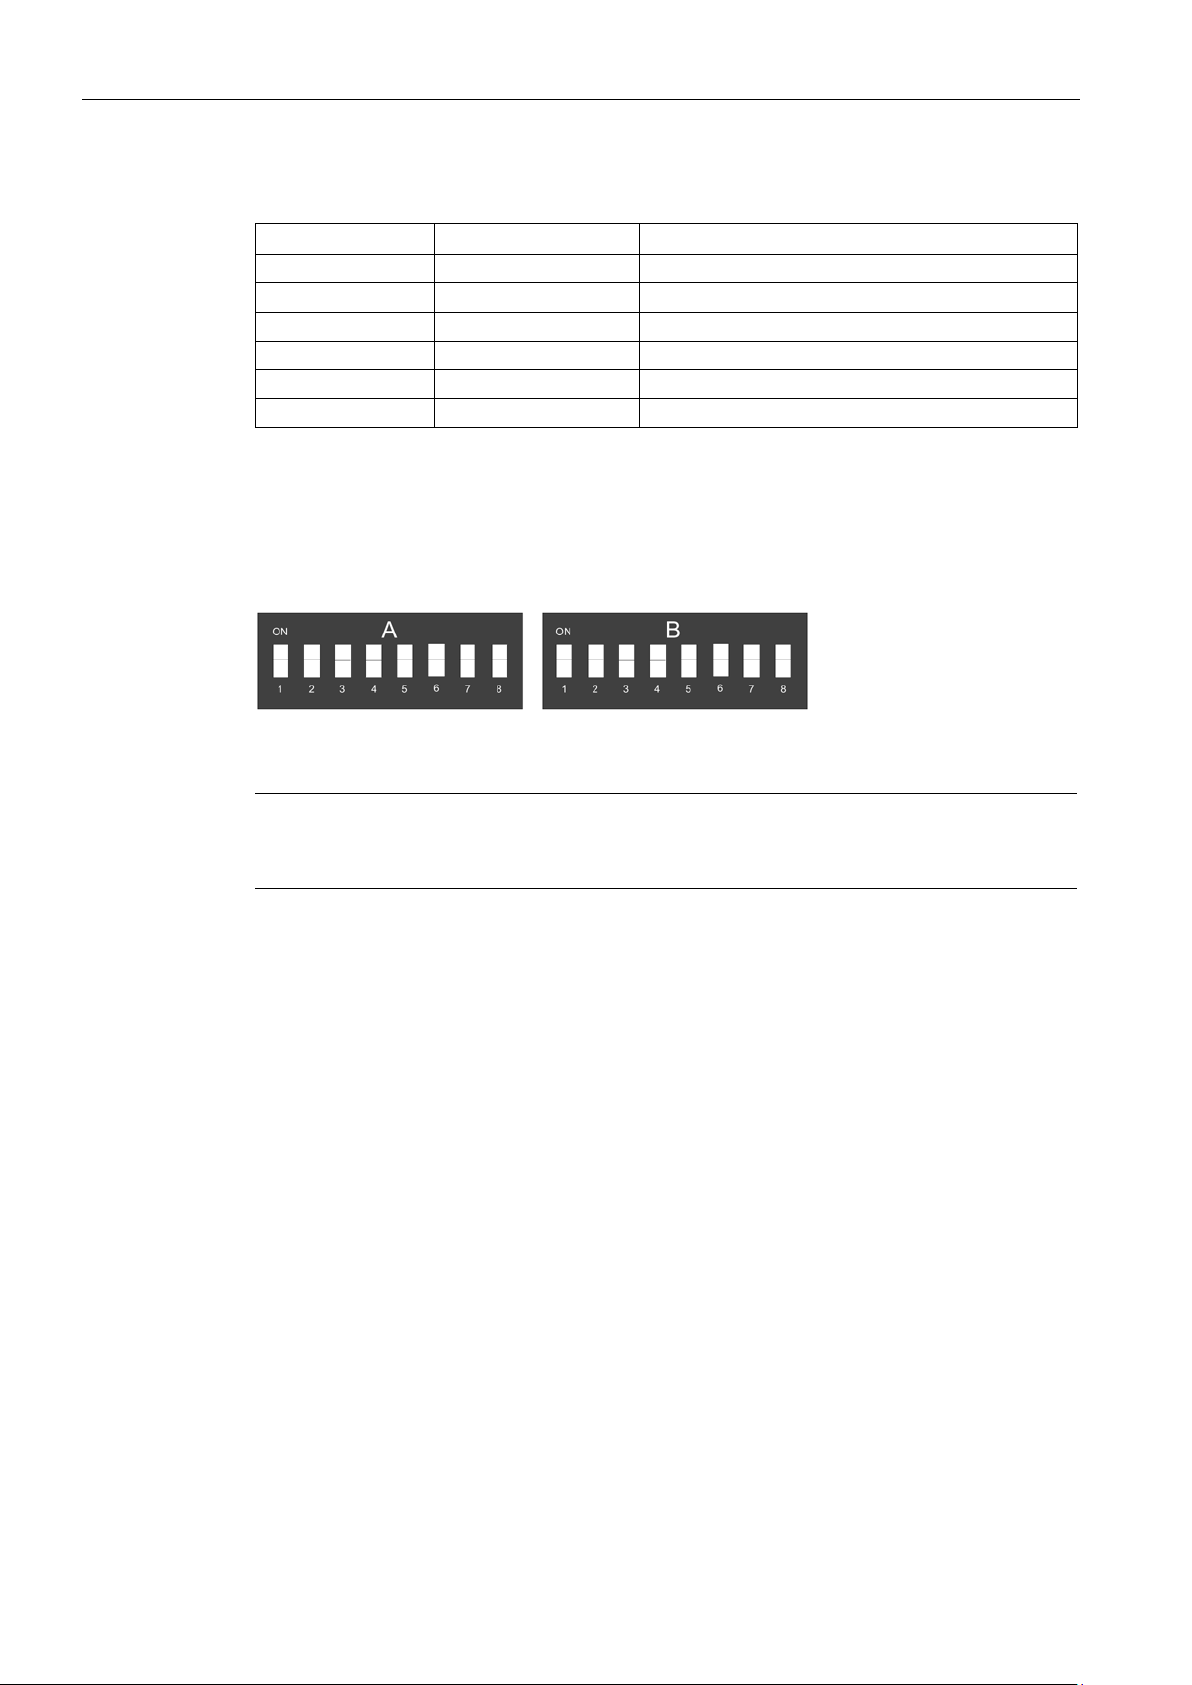
DIP Switch Settings - SW1-A and SW2-B
Note
Only SW2-B (1-6) are to be used for HART Communication. All other switch settings are set
to the OFF position.
Address Selection: SW1-A (1-6)
Switch Code: A1=1, A2=2, A3=4, A4=8, A5=16, A6=32
2.2 F US Clamp-on Communications Module Installation
There are two 8-position switches that are used to select protocols, baud rate, address and
profiles. These DIP switch settings refer to the communication module configuration file that
is used and the protocol and address that allow the required proper communications output.
Figure 2-4 DIP Switches SW1-A and SW2-B
These switches enable setting of the physical address on the RS485 network.
For example, to set address to equal 44 set switches to: A1 Off, A2 Off, A3 On, A4 On, A5
Off, A6 On
F US Clamp-on Communications Protocol Manual
14 Hardware Installation Manual, 11/2015, A5E34981613-AC
Page 17

Installing/Mounting
Baud Rate Selection: SW1-A (7-8) - To Network
9600
A7 OFF
A8 OFF
19200
A7 ON
A8 OFF
38400
A7 OFF
A8 ON
76800
A7 ON
A8 ON
Profile Selection: SW2-B (1-6)
Protocol Selection: SW2-B (7-8)
Hart
Modbus RTU/Modbus TCP/IP
B7 OFF
B8 OFF
BACnet IP/BACnet MSTP
B7 ON
B8 OFF
Ethernet /IP
B7 OFF
B8 ON
N2 Metasys
B7
B8
Note
When using the WEB utility there are
position of the DIP switches:
•
•
•
•
Determine Flowmeter Firmware Version
2.2 F US Clamp-on Communications Module Installation
See selection table 2-1.
is active at all times. (SW-2 B7 and B8 are not required for HART communication.)
ON
ON
parameters under View/Data Arrays/ that identify the
DA-DIP: All 16 positions of switches A & B are identified in decimal form
DA-DIP_A: All 8 positions of switch are identified in decimal form
DA-DIP_B: Positions 1-4 of switch B are identified in decimal form
DA-DIP_S: Positions 5-8 of switch B are identified in decimal form
To determine the firmware version of your flowmeter refer to the table below. The firmware
version is listed in the Meter Facilities menu of the flowmeter and can be located using the
following procedure:
1. At the meter, press the <MENU> key.
2. Press the <Down Arrow> and scroll to [Meter Facilities].
3. Press the <Right Arrow>.
4. Press the <Down Arrow> and scroll to [System Info].
5. Press the <Right Arrow> to read your flowmeter version.
F US Clamp-on Communications Protocol Manual
Hardware Installation Manual, 11/2015, A5E34981613-AC
15
Page 18

Installing/Mounting
Profile Selection
B1
B2
B3
B4
B5
B6
Profile
Flowmeter Firmware Version & Configuration
Off
Off
Off
Off
Off
Off
profile 1
5N01-5.04.05 CH1: Clamp-On
On
Off
Off
Off
Off
Off
profile 2
5N01-5.04.05 CH1: Reflexor
Off
On
Off
Off
Off
Off
profile 3
5N02-5.04.05 CH1: Clamp-On
On
On
Off
Off
Off
Off
profile 4
5N02-5.04.05 CH1: Reflexor
Off
Off
On
Off
Off
Off
profile 5
5N03-5.04.05 CH1: Clamp-On CH2: Clamp-On
On
Off
On
Off
Off
Off
profile 6
5N03-5.04.05 CH1: Reflexor CH2: Reflexor
Off
On
On
Off
Off
Off
profile 7
5N03-5.04.05 CH1: Clamp-on CH2: Reflexor
On
On
On
Off
Off
Off
profile 8
5N03-5.04.05 Dual Path: Clamp-On
Off
Off
Off
On
Off
Off
profile 9
5N03-5.04.05 CH1+2: Clamp-On
On
Off
Off
On
Off
Off
profile 10
5N03-5.04.05 CH1-2: Clamp-On
Off
On
Off
On
Off
Off
profile 11
5N04-5.04.05 CH1: Clamp-On CH2: Clamp-On
Off
Off
On
On
Off
Off
profile 13
5N04-5.04.05 CH1: Clamp-On CH2: Reflexor
Off
On
On
On
Off
Off
profile 15
5N04-5.04.05 CH1+2: Clamp-On
On
On
On
On
Off
Off
profile 16
5N04-5.04.05 CH1-2: Clamp-On
Off
Off
Off
Off
On
Off
profile 17
5MN01-5.04.05 4 Channel Flow: Clamp-On
On
Off
Off
Off
On
Off
profile 18
5MN01-5.04.05 CH5: Clamp-On
Off
On
Off
Off
On
Off
profile 19
5MN01-5.04.05 Quad Path: Clamp-On
On
On
Off
Off
On
Off
profile 20
5MN02-5.04.05 4 Channel Flow: Clamp-On
Off
Off
On
Off
On
Off
profile 21
5MN02-5.04.05 CH5: Clamp-On
On
Off
On
Off
On
Off
profile 22
5MN02-5.04.05 Quad Path: Clamp-On
Off
On
On
Off
On
Off
profile 23
5EN02-5.04.05 Ch1: Clamp-On
On
On
On
Off
On
Off
profile 24
5EN02-5.04.05 Ch1: Reflexor
Off
Off
Off
On
On
Off
profile 25
5EN03-5.04.05 Ch1: Clamp-On Ch2: Clamp-On
On
Off
Off
On
On
Off
profile 26
5EN03-5.04.05 Ch1:Reflexor Ch2: Reflexor
Off
On
Off
On
On
Off
profile 27
5EN03-5.04.05 Ch1: Clamp-On Ch2: Reflexor
On
On
Off
On
On
Off
profile 28
5EN03-5.04.05 Dual Path: Clamp-On
Off
Off
On
On
On
Off
profile 29
5EN03-5.04.05 Ch1+2: Clamp-On
On
Off
On
On
On
Off
profile 30
5EN04-5.04.05 Ch1: Clamp-On Ch2: Clamp-On
Off
On
On
On
On
Off
profile 31
5EN04-5.04.05 Ch1: Reflexor Ch2: Reflexor
On
On
On
On
On
Off
profile 32
5EN04-5.04.05 Ch1: Clamp On Ch2: Reflexor
On
Off
Off
Off
Off
On
profile 34
5EN04-5.04.05 Dual Path: Clamp-On
On
On
Off
Off
Off
On
profile 36
5PVN02-5.04.05 Dual Path: Clamp-On
Off
Off
On
Off
Off
On
profile 37
5PVN03-5.04.05 Dual Path: Clamp-On
On
Off
On
Off
Off
On
profile 38
5BN01-5.04.05 CH1: Clamp-On
Off
On
On
Off
Off
On
profile 39
5BN02-5.04.05 CH1: Clamp-On CH2: Clamp-On
On
On
On
Off
Off
On
profile 40
5DVN02-5.04.05 Dual Path: Clamp-On
Off
Off
Off
On
Off
On
profile 41
5DVN03-5.04.05 Dual Path: Clamp-On
On
Off
Off
On
Off
On
profile 42
5DVN04-5.04.05 Quad Path: Clamp-On
Off
On
Off
On
Off
On
profile 43
5GN03-5.04.05 CH1: Clamp-On
2.2 F US Clamp-on Communications Module Installation
Table 2- 2 Profile Selection: 1 - 46
On On Off On Off Off profile 12 5N04-5.04.05 CH1: Reflexor CH2: Reflexor
On Off On On Off On profile 14 5N04-5.04.05 Dual Path: Clamp-On
Off Off Off Off Off On profile 33 5EN04-5.04.05 Ch1+2: Clamp-On
Off On Off Off Off On profile 35 5PVN01-5.04.05 CH1: Clamp-On
F US Clamp-on Communications Protocol Manual
16 Hardware Installation Manual, 11/2015, A5E34981613-AC
Page 19

Installing/Mounting
On
On
Off
On
Off
On
profile 44
5GN04-5.04.05 Dual Path: Clamp-On
Off
Off
On
On
Off
On
profile 45
5GN05-5.04.05 Dual Path: Clamp-On
On
Off
On
On
Off
On
profile 46
5GN07-5.04.05 Quad Path: Clamp-On
2.3
Flowmeter Setup
Note
The Flowmeter Setup procedure must be done to every channel of the meter.
Configure RS-232 Setup
Configure Logger Setup
Note
This Logger Setup procedure must be done for both channels if it is configured as a dual
channel unit, or all channels, if a multi
manual for the FUS1010 flowmeter for menu details, if required.
2.3 Flowmeter Setup
In order for the Communications Module (P/N A5E31949269) to work properly, all of the
possible Logger configuration choices in the site setup must be correct.
In the [Meter Facilities] menu:
1. On the flowmeter keypad, press the <MENU> key.
2. Press <Left> arrow key until [Meter Type] appears then press <Down> arrow key to
[Meter Facilities].
3. Scroll to [RS-232 Setup] then press <Right> arrow key.
4. Set Baud: 9600
5. Set Parity: Odd
6. Set Data Bits: 7
7. Line Feed: NO
8. Network ID: 0
1. On the flowmeter keypad, press the <MENU> key.
-channel unit. Refer to the Operation Instructions
2. Press <Left> arrow key until [Meter Type] appears then press <Down> arrow key to
[Meter Facilities].
3. With [Meter Type] shown press <Right> arrow key until [Chan/Path Setup] appears.
4. Select [Channel 1] and the appropriate sensor type; we are setting up within the context
of the site setup that was created for this installation.
5. Use the <UP/DN> arrow keys and scroll to [Logger Setup]. Use the <Right> arrow key to
access the submenu.
6. Five menu choices will be shown. Since we have to check each one, the order in which
you change these is not important. Use the <UP/DN> arrow keys to select the main
F US Clamp-on Communications Protocol Manual
Hardware Installation Manual, 11/2015, A5E34981613-AC
17
Page 20

Installing/Mounting
DO NOT select
[Sonilocator]
Channel Setup
Note
If ALL channels are not [Enabled], the Modbus card will NOT provide valid data.
Note
For all 1010 flowmeters the site names must be
Card itself.
Please view the "Web Configuration Utility" at the end of this procedure and refer and follow
the instructions concerning "site_idx
2.3 Flowmeter Setup
choices. Use the <Right> arrow key to access the choices. Using the <UP/DN> arrow
keys, select the item desired as defined below. Pressing the <ENTER> key will select that
choice.
● Logger Mode: Set to RS-232 Output
● Logger Data ON: Select All Items (Note: If any FUH1010 system,
in the Logger Data drop down menu.)
● Log Interval Set: Set to 5 secs
● Logger Events: Set to NONE
Press the <Right> arrow to access. Highlight each Logger item using the <UP/DN> arrow
keys, and then press the <ENTER> key to set EVERY choice on. Each item will have [+]
sign to left of item when selected.
Use the <Left> arrow key to back out of the nested menu to return to the top menu. Use of
the <Left> arrow key intermediately saves the configuration information permanently. You
also must then Re-Save the site.
For each channel set the Logger to [On Demand.]
1. Set all Data elements: ON (denoted by +)
2. Set [Events]: Off
3. Set [display/Memory Datalogger: Off
4. Enable all Channels
duplicated on the Communications Module
"
F US Clamp-on Communications Protocol Manual
18 Hardware Installation Manual, 11/2015, A5E34981613-AC
Page 21
Installing/Mounting
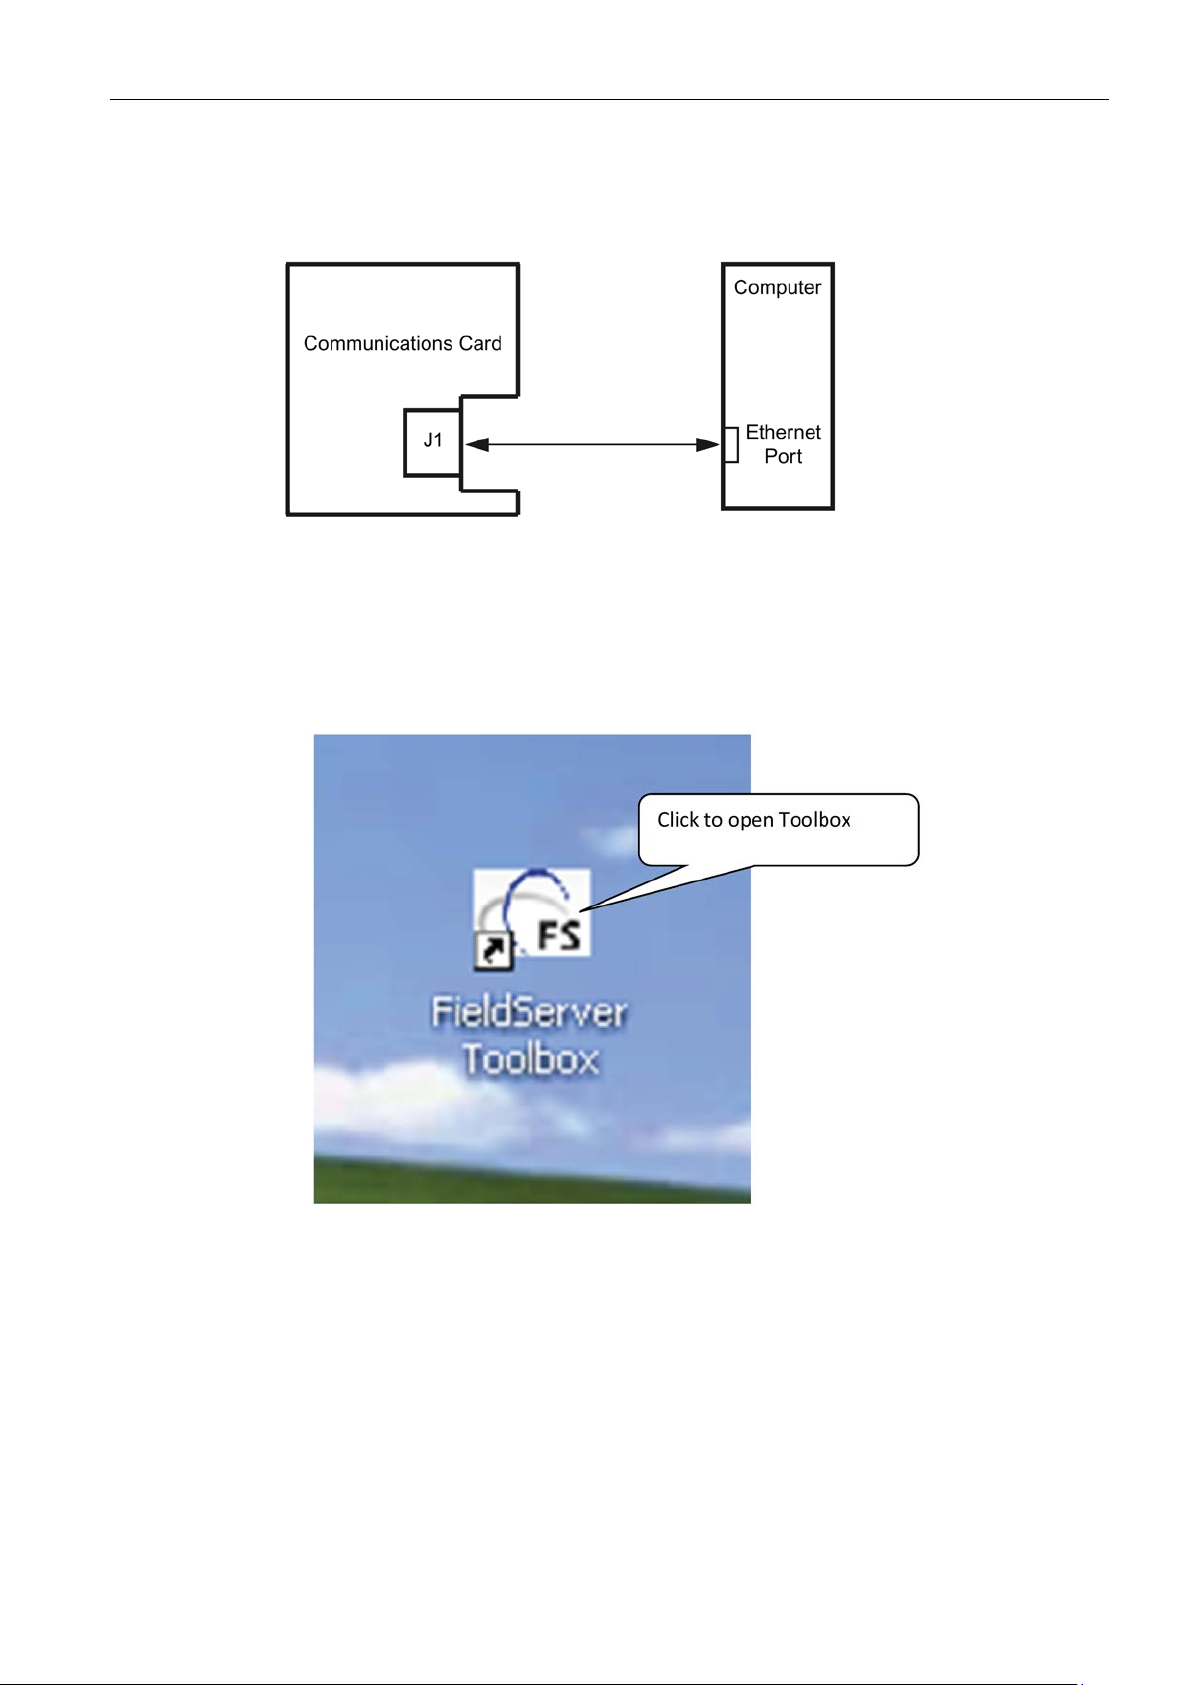
Communications Cable Installation
FieldServer Toolbox
2.3 Flowmeter Setup
Connect Communication cable (Cat5 type) from J1 to the Ethernet port of your PC.
Figure 2-5 Communications Cable Installation
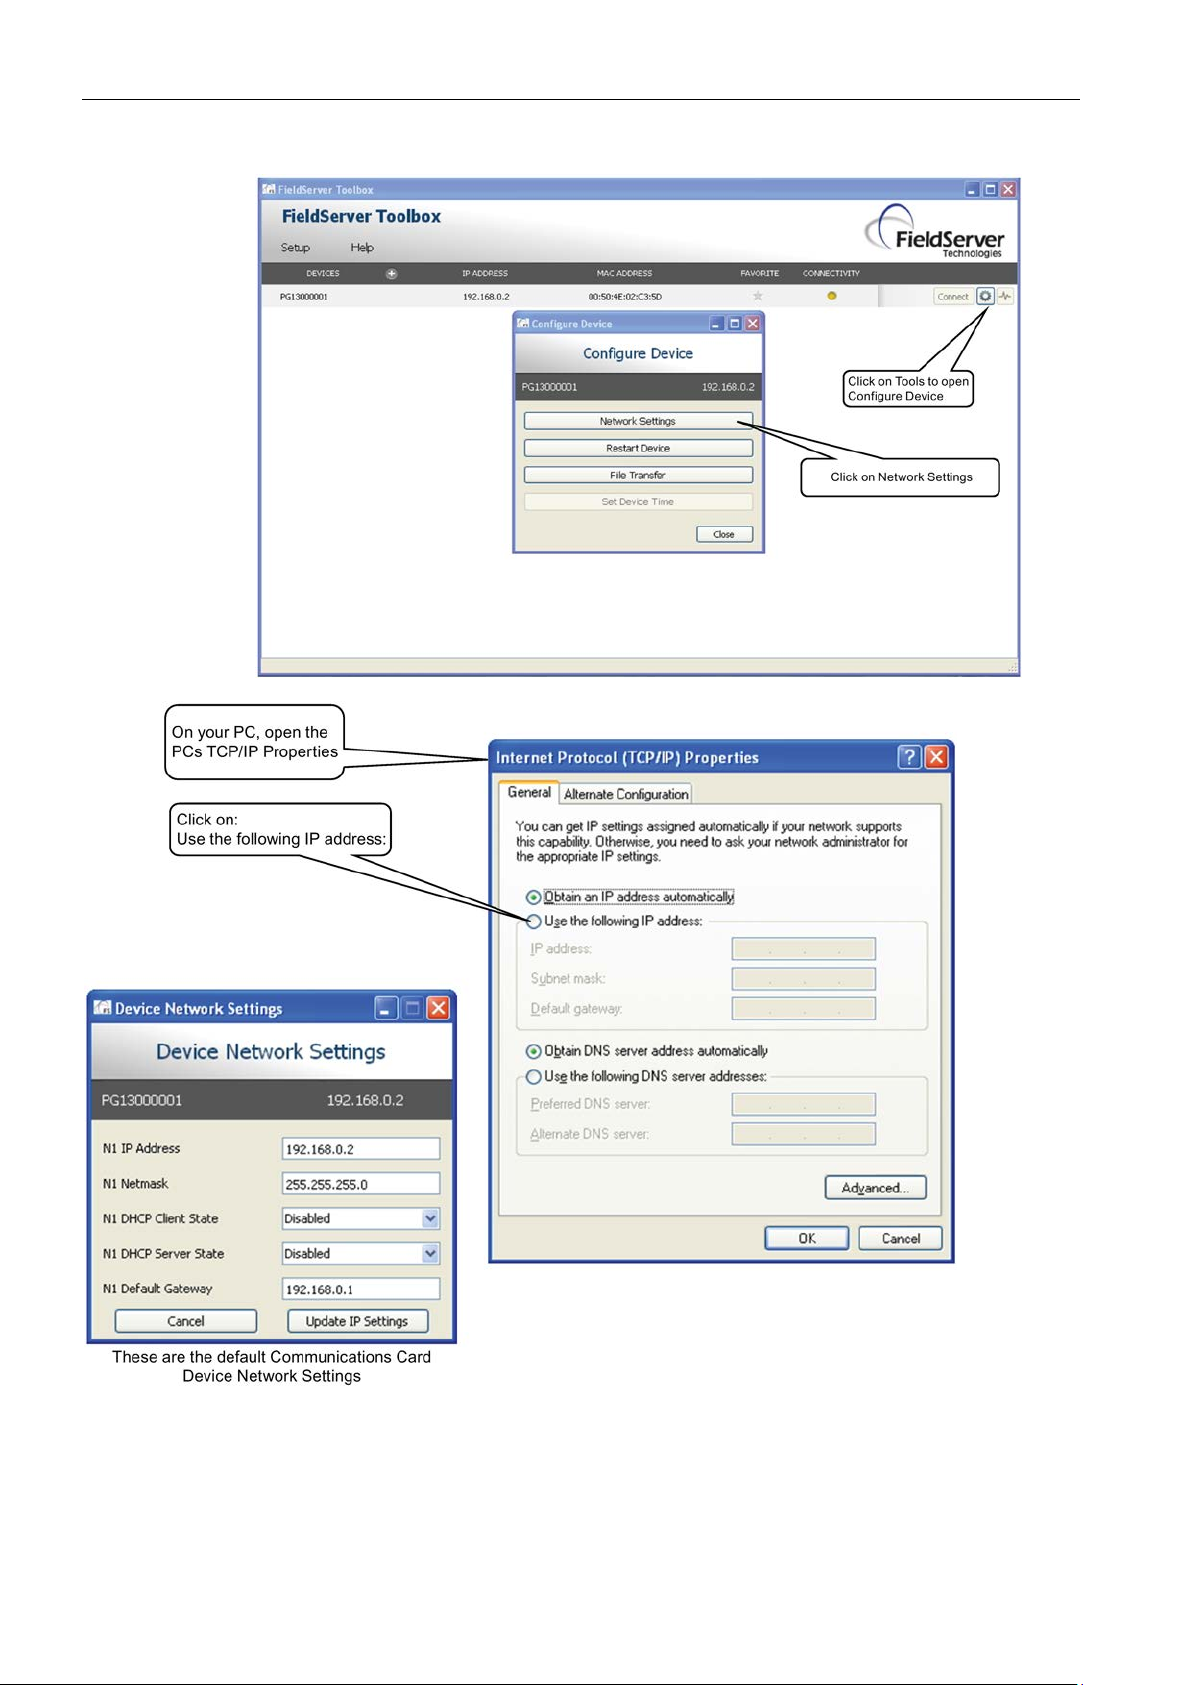
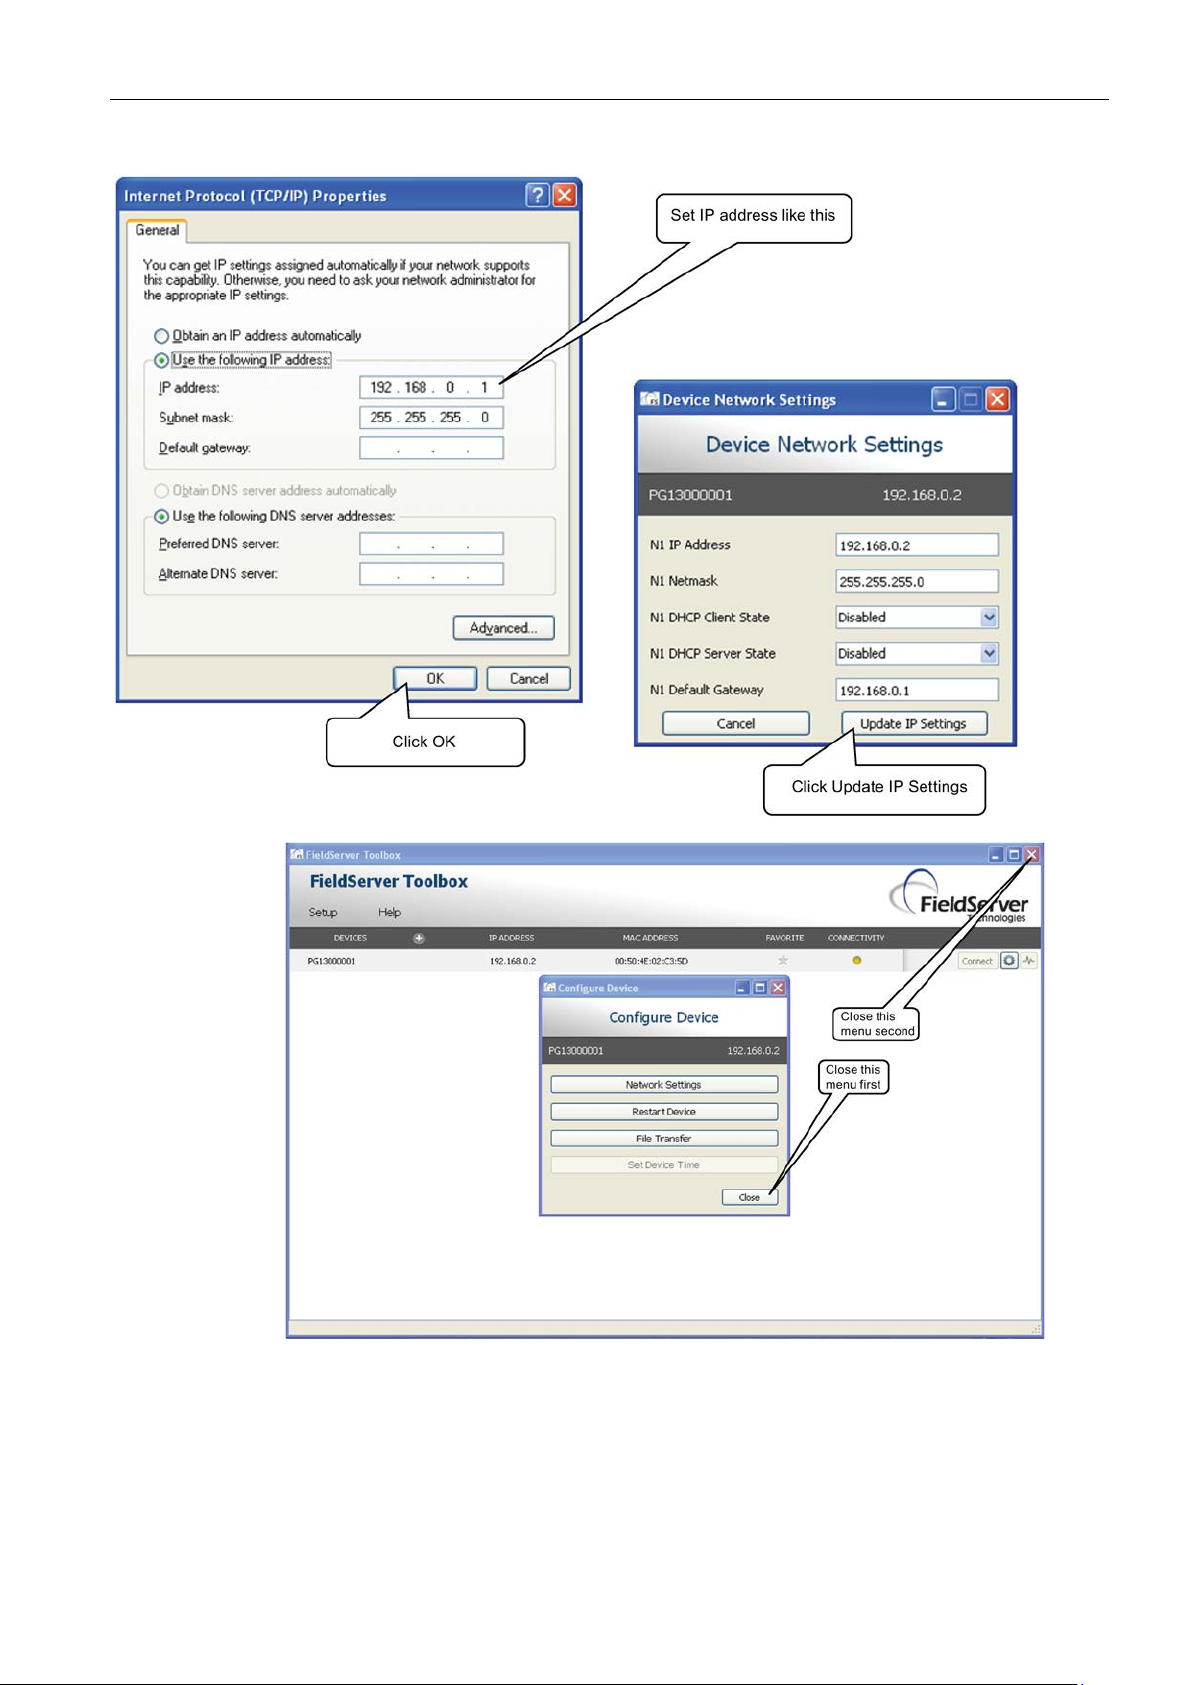
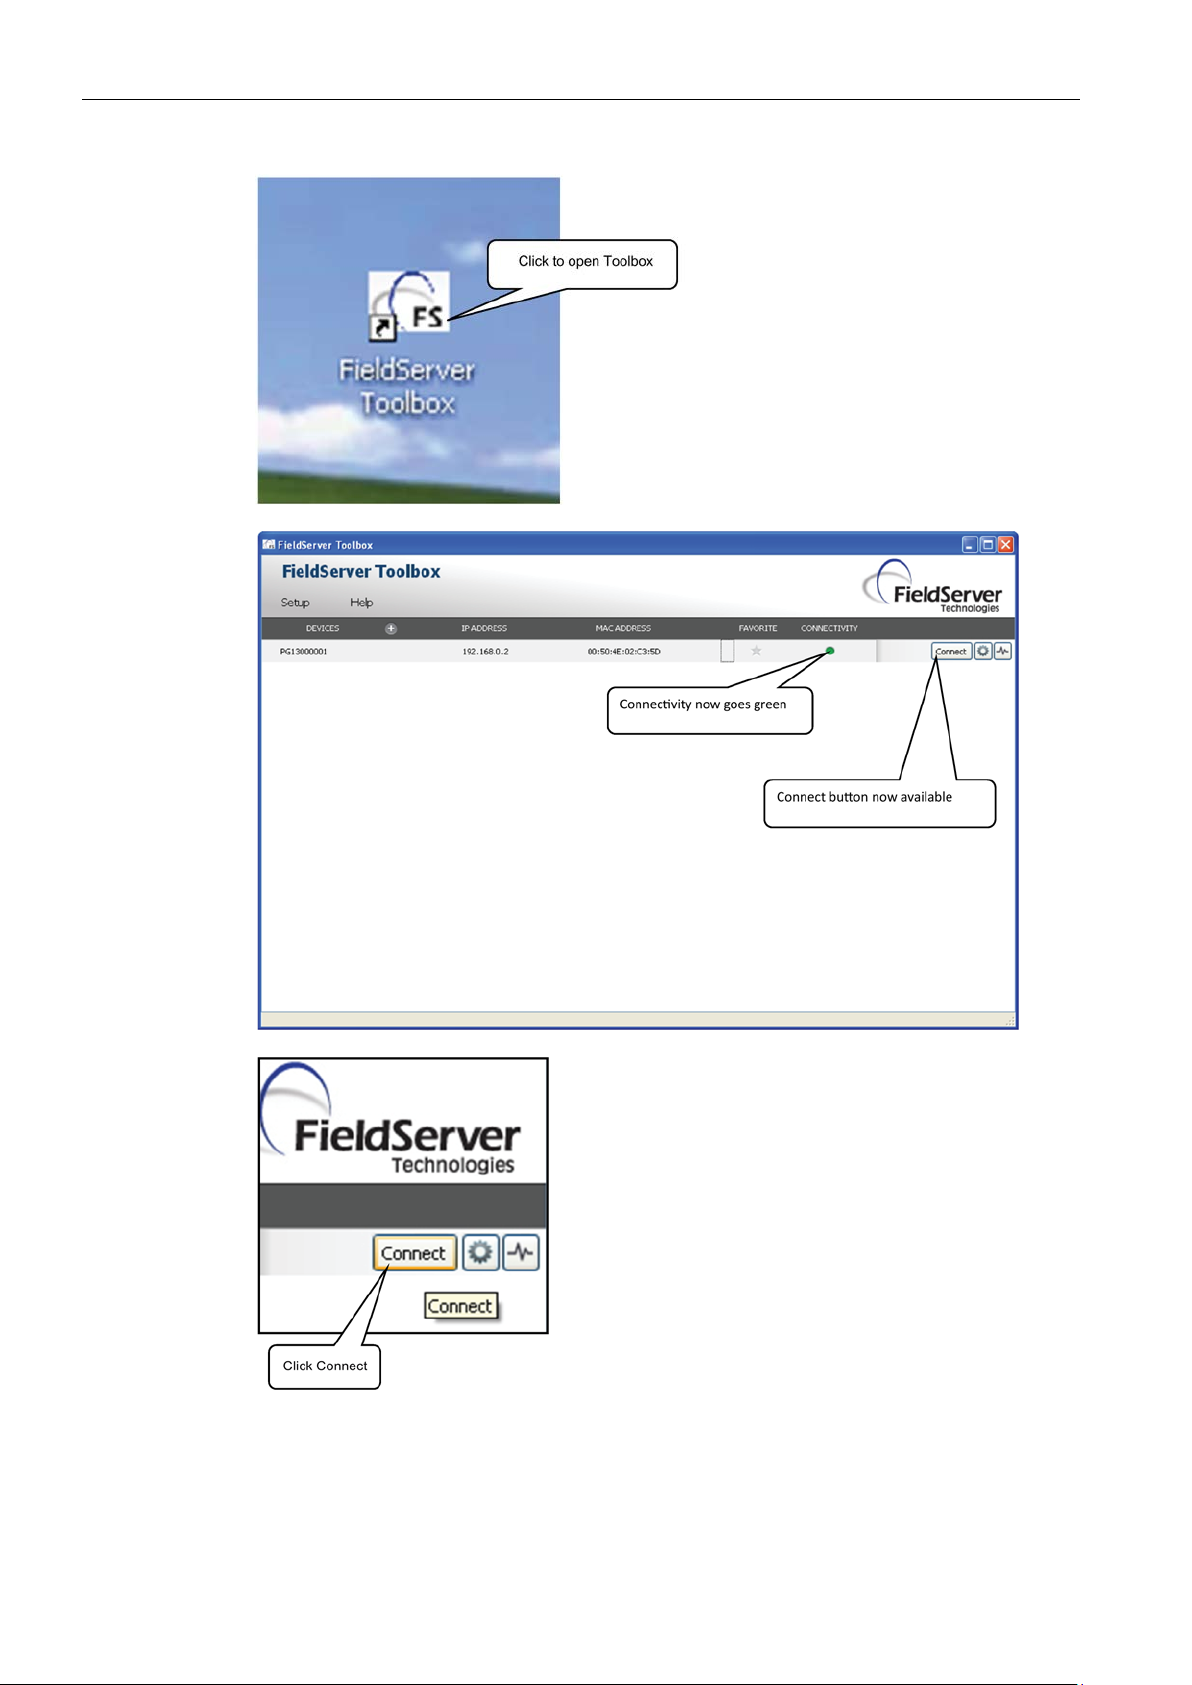
1. Download FieldServer Toolbox from here if you do not have it installed:
http://bit.ly/FStoolbox
2. After FieldServer Toolbox installs, click on the desktop icon.
F US Clamp-on Communications Protocol Manual
Hardware Installation Manual, 11/2015, A5E34981613-AC
19
Page 22

Installing/Mounting
2.3 Flowmeter Setup
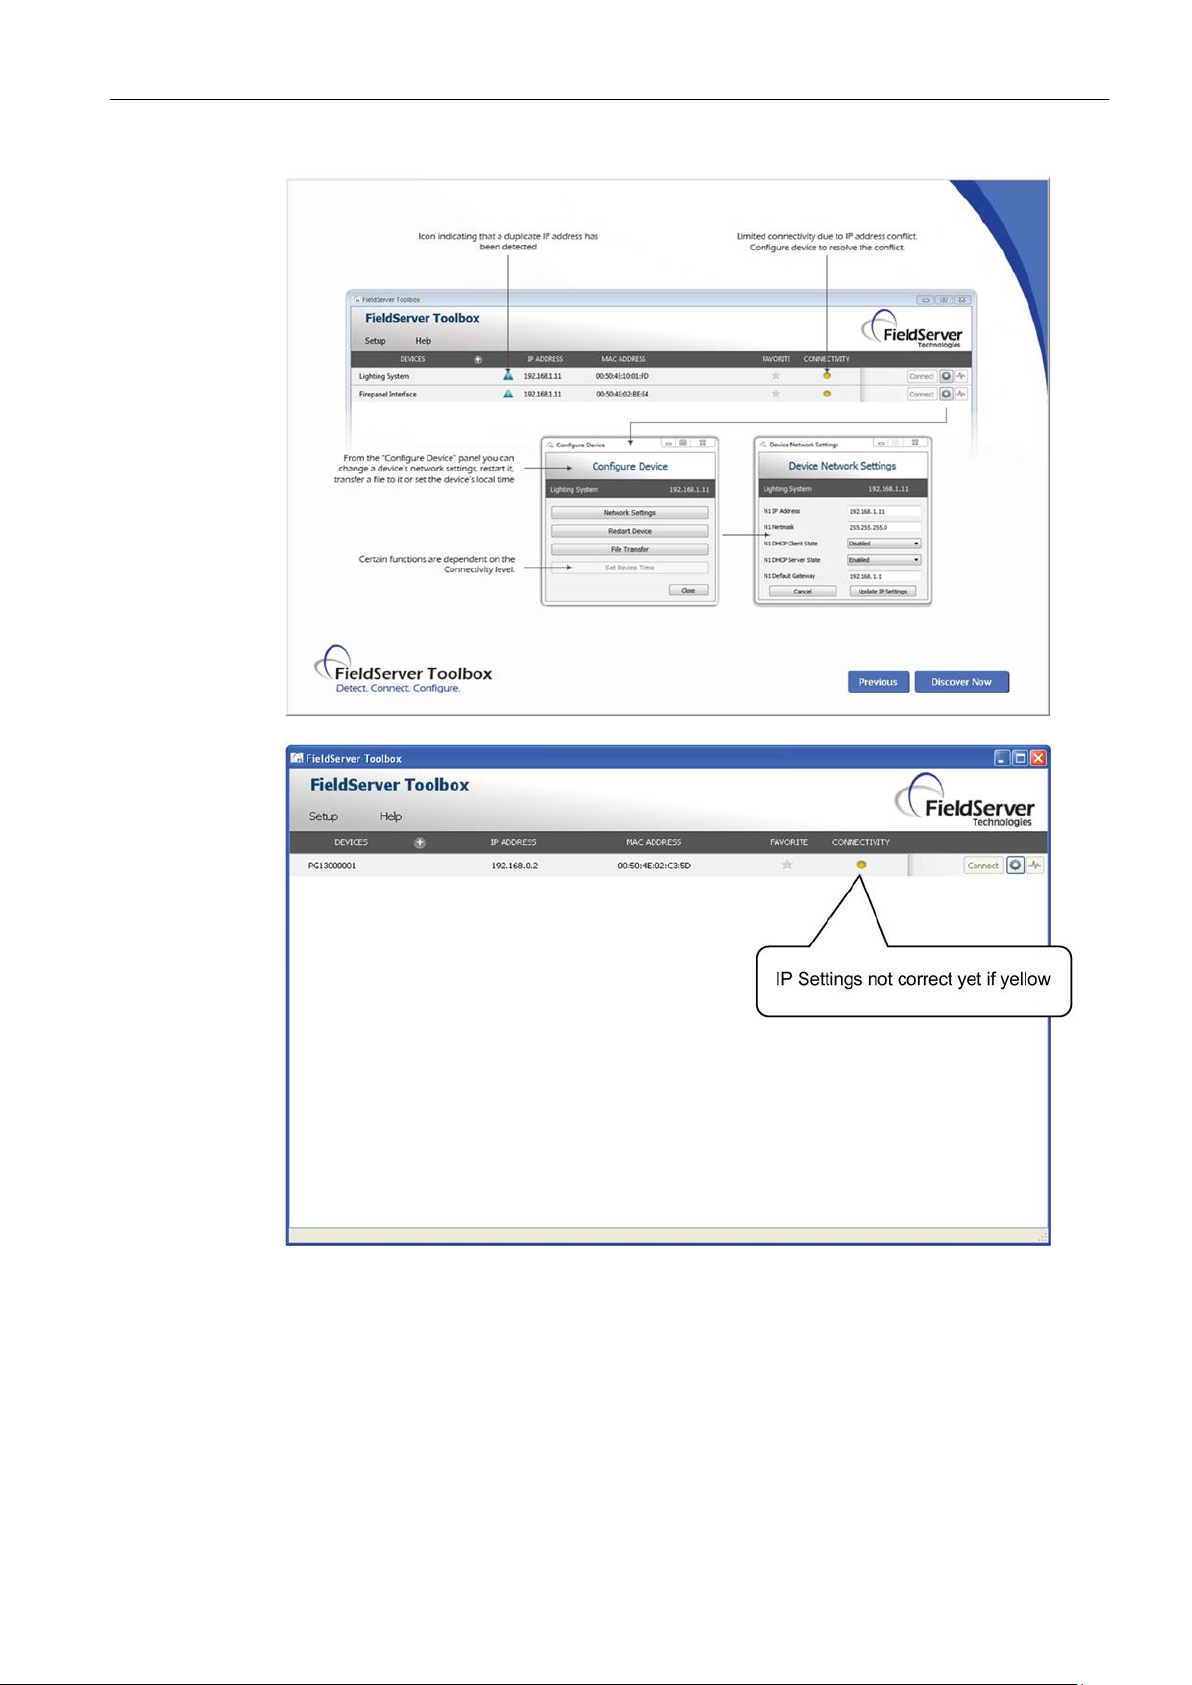
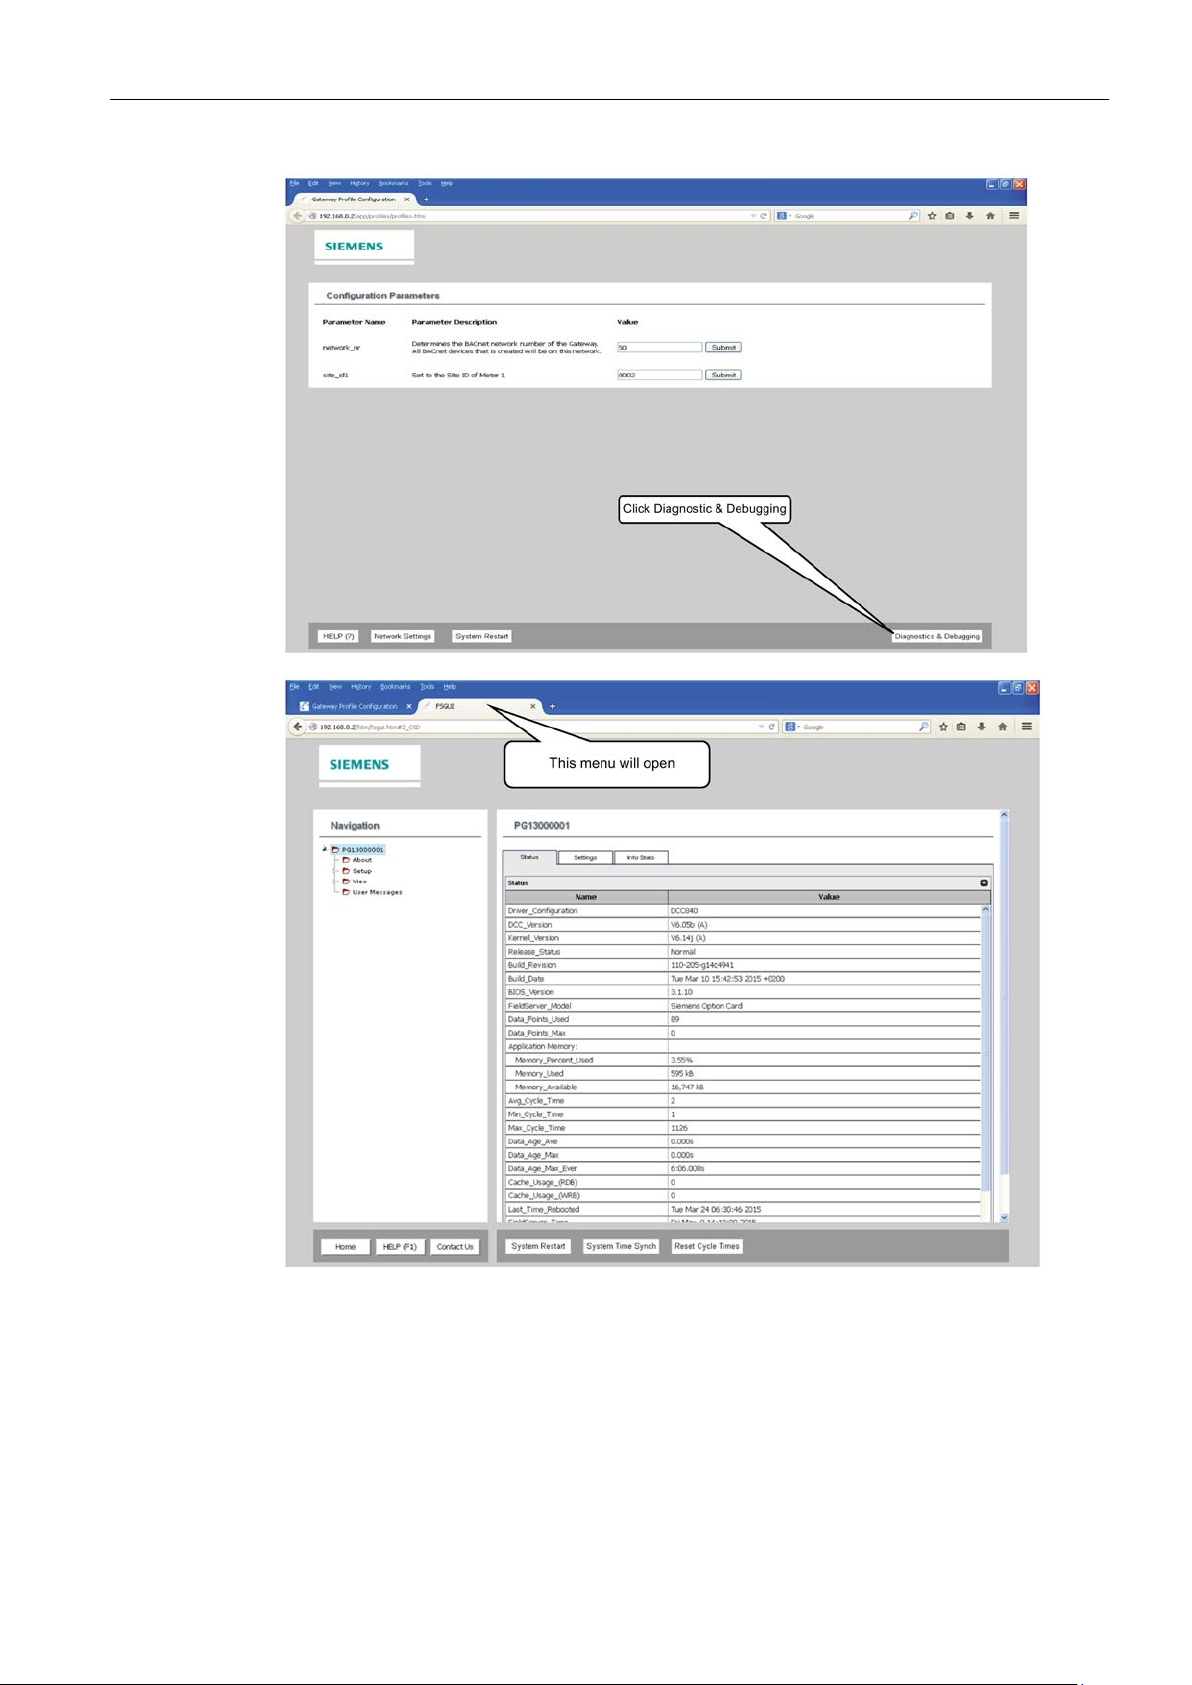
Figure 2-6 FieldServer Toolbox Tour
F US Clamp-on Communications Protocol Manual
20 Hardware Installation Manual, 11/2015, A5E34981613-AC
Page 23
Installing/Mounting
2.3 Flowmeter Setup
F US Clamp-on Communications Protocol Manual
Hardware Installation Manual, 11/2015, A5E34981613-AC
21
Page 24
Installing/Mounting
2.3 Flowmeter Setup
F US Clamp-on Communications Protocol Manual
22 Hardware Installation Manual, 11/2015, A5E34981613-AC
Page 25
Installing/Mounting
2.3 Flowmeter Setup
F US Clamp-on Communications Protocol Manual
Hardware Installation Manual, 11/2015, A5E34981613-AC
23
Page 26
Installing/Mounting
2.3 Flowmeter Setup
F US Clamp-on Communications Protocol Manual
24 Hardware Installation Manual, 11/2015, A5E34981613-AC
Page 27
Installing/Mounting
2.3 Flowmeter Setup
F US Clamp-on Communications Protocol Manual
Hardware Installation Manual, 11/2015, A5E34981613-AC
25
Page 28
Installing/Mounting
View - Data Arrays
Note
When using the WEB utility there are parameters under View - Data Arrays that identify the
position of the DIP switches in decimal form:
•
•
•
•
2.3 Flowmeter Setup
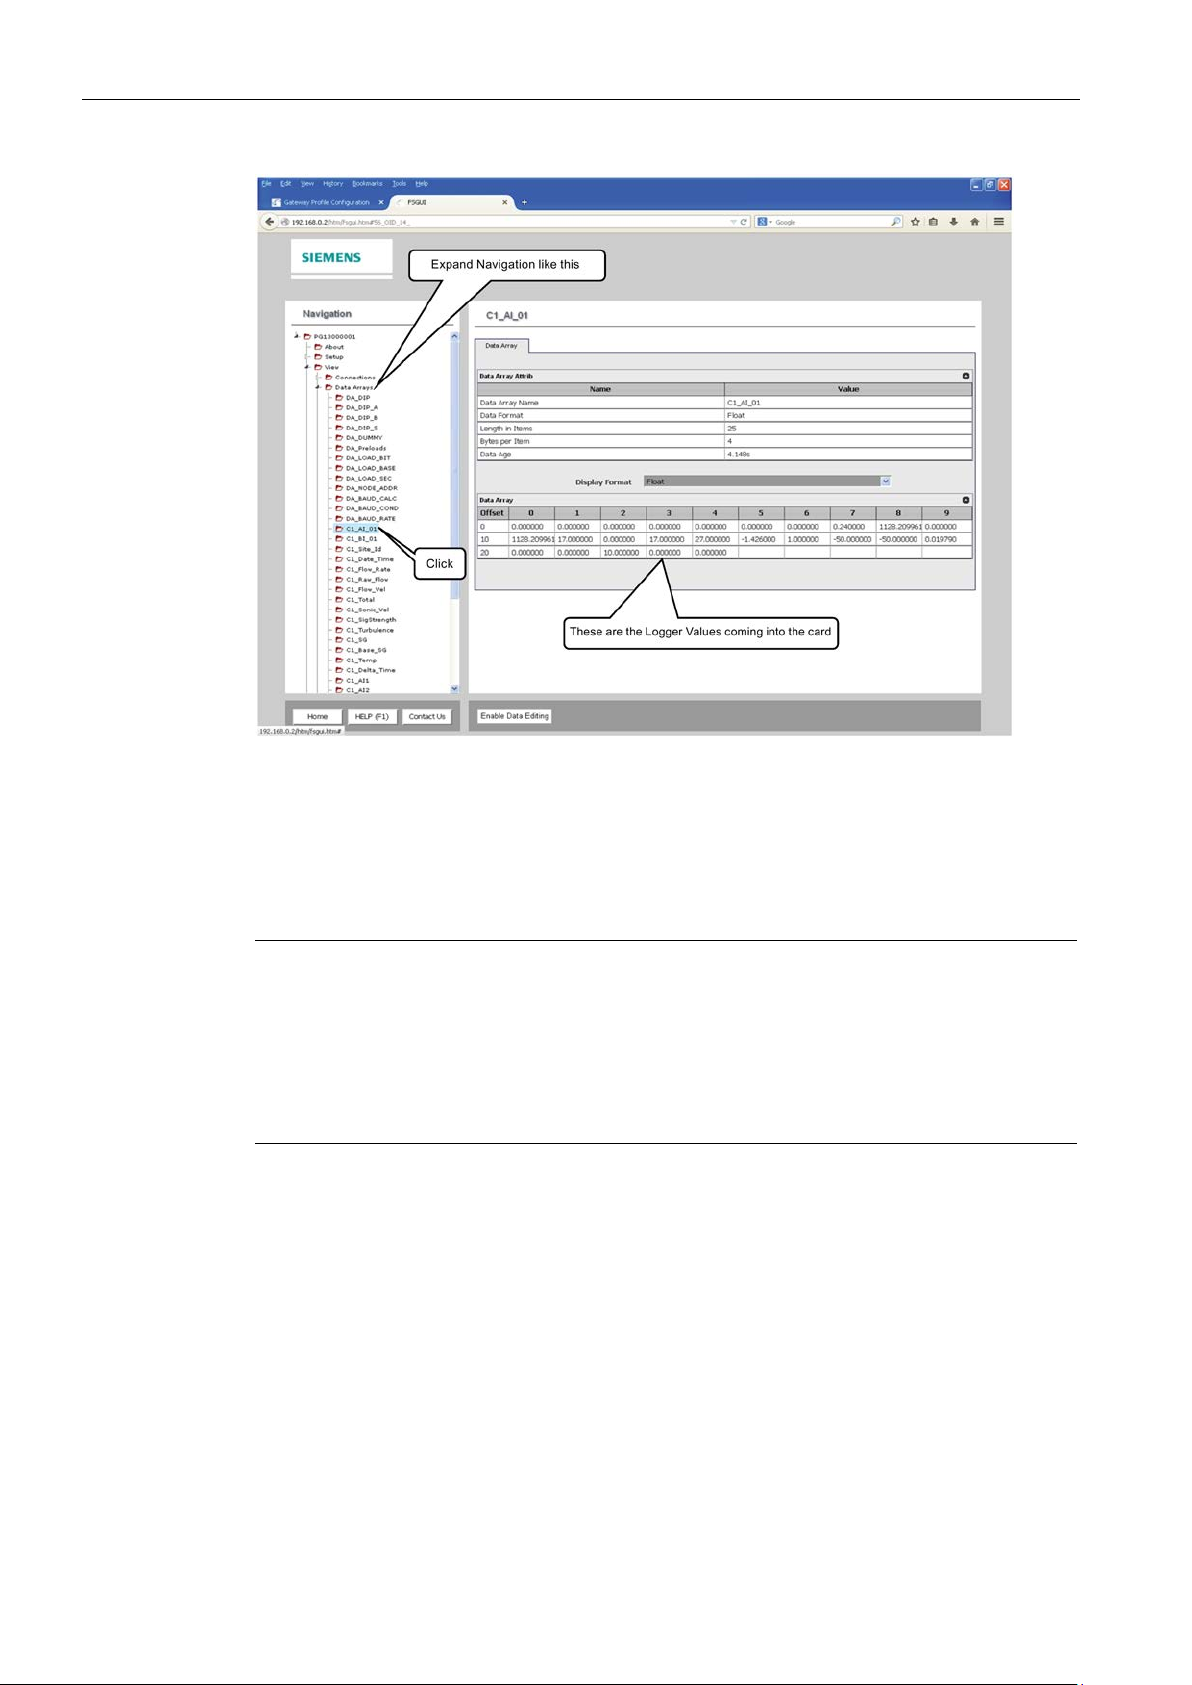
Here you can view the data coming from the meter as it is stored before being mapped to the
various protocol parameters. This may be useful to determine that the data is being received
by the Communications Module. Values being set to 0 may indicate a problem with the
configuration setup in the flowmeter.
DA-DIP: All 16 positions of switches A & B
DA-DIP_A: All 8 positions of switch A
DA-DIP_B: Positions 1-4 of switch B
DA-DIP_S: Positions 5-8 of switch B
F US Clamp-on Communications Protocol Manual
26 Hardware Installation Manual, 11/2015, A5E34981613-AC
Page 29
Installing/Mounting
User Messages
2.3 Flowmeter Setup
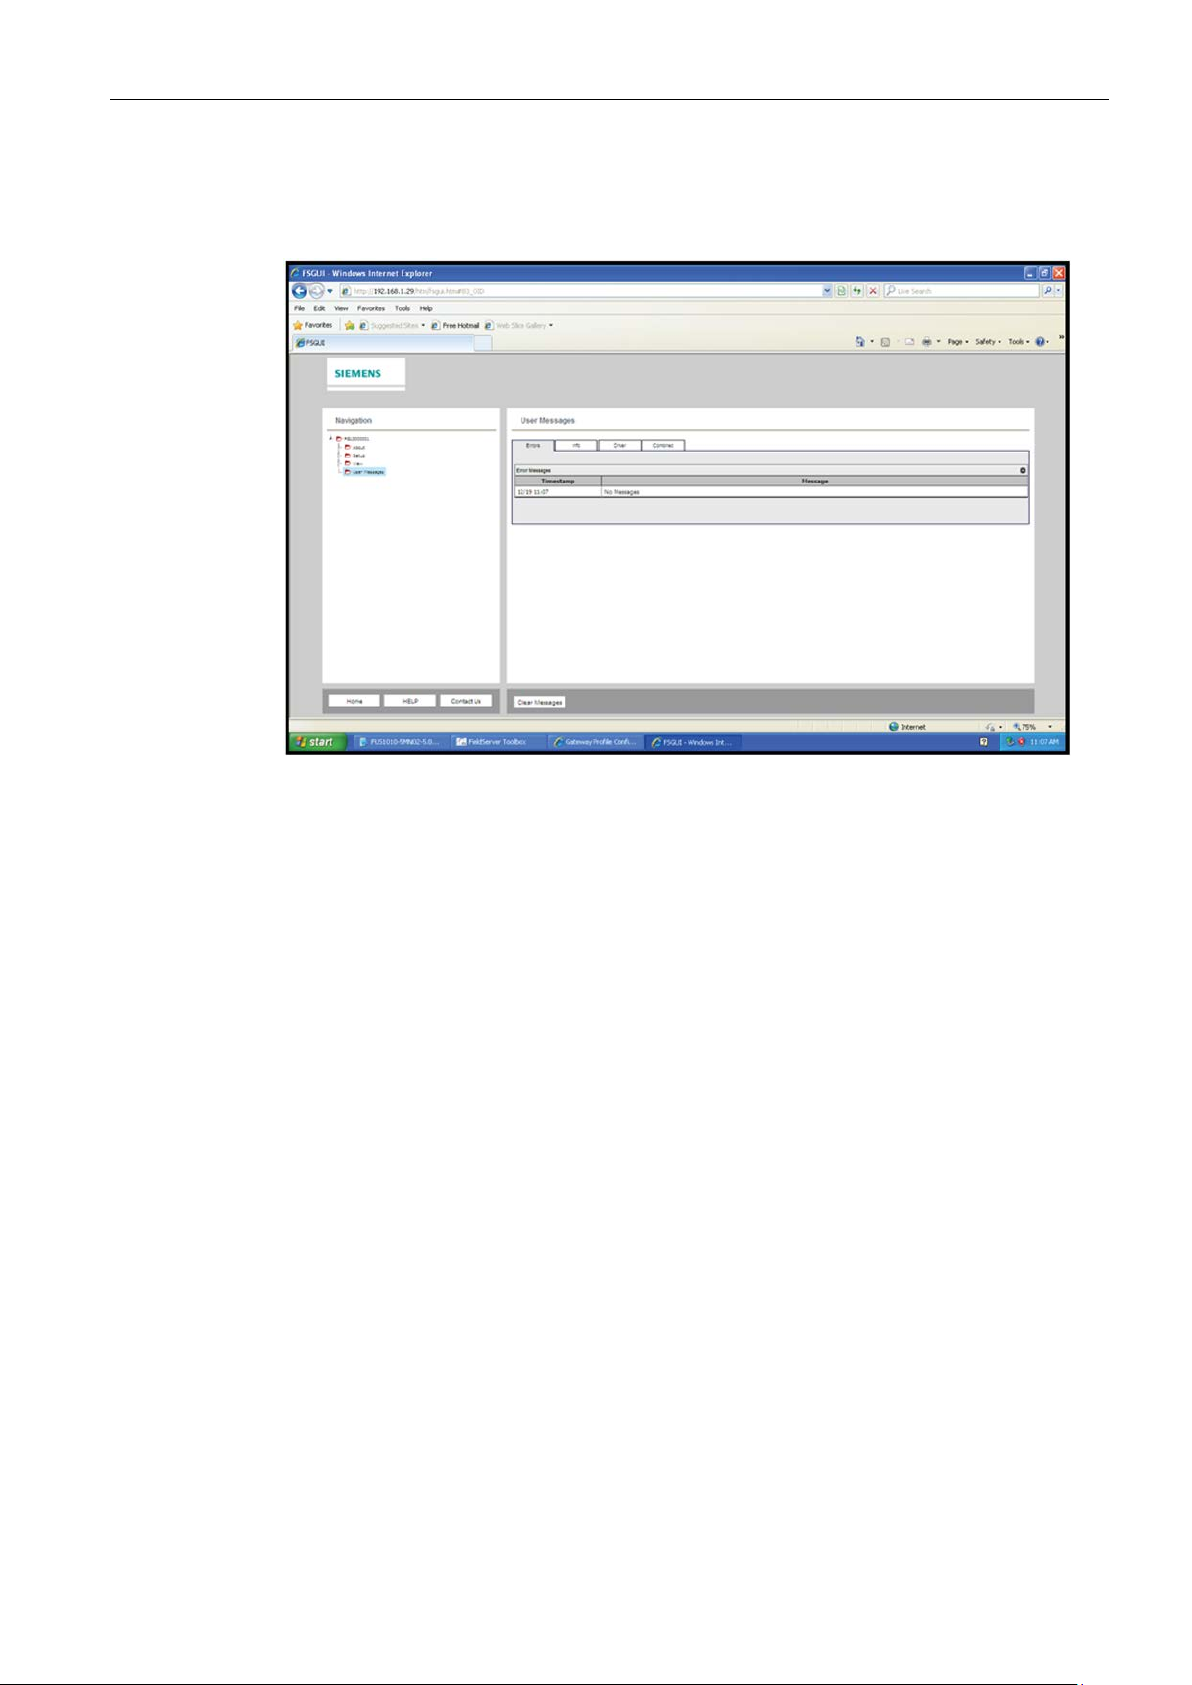
Here you can view any messages that may indicate an error.
Figure 2-7 User Messages
F US Clamp-on Communications Protocol Manual
Hardware Installation Manual, 11/2015, A5E34981613-AC
27
Page 30

Installing/Mounting
2.3 Flowmeter Setup
F US Clamp-on Communications Protocol Manual
28 Hardware Installation Manual, 11/2015, A5E34981613-AC
Page 31
3
3.1
BACnet Communications
Introduction
B
Net
BACnet Object Tables
BACnet is a standard communication protocol for
developed by the American Society of Heating, Refrigerating and Air-Conditioning Engineers
(ASHRAE). BACnet provides the communication infrastructure needed to integrate products
made by different vendors. BACnet communication is based on standard objects. Each
BACnet device includes a Device Object and other optional objects within the device. Each
object has associated properties.
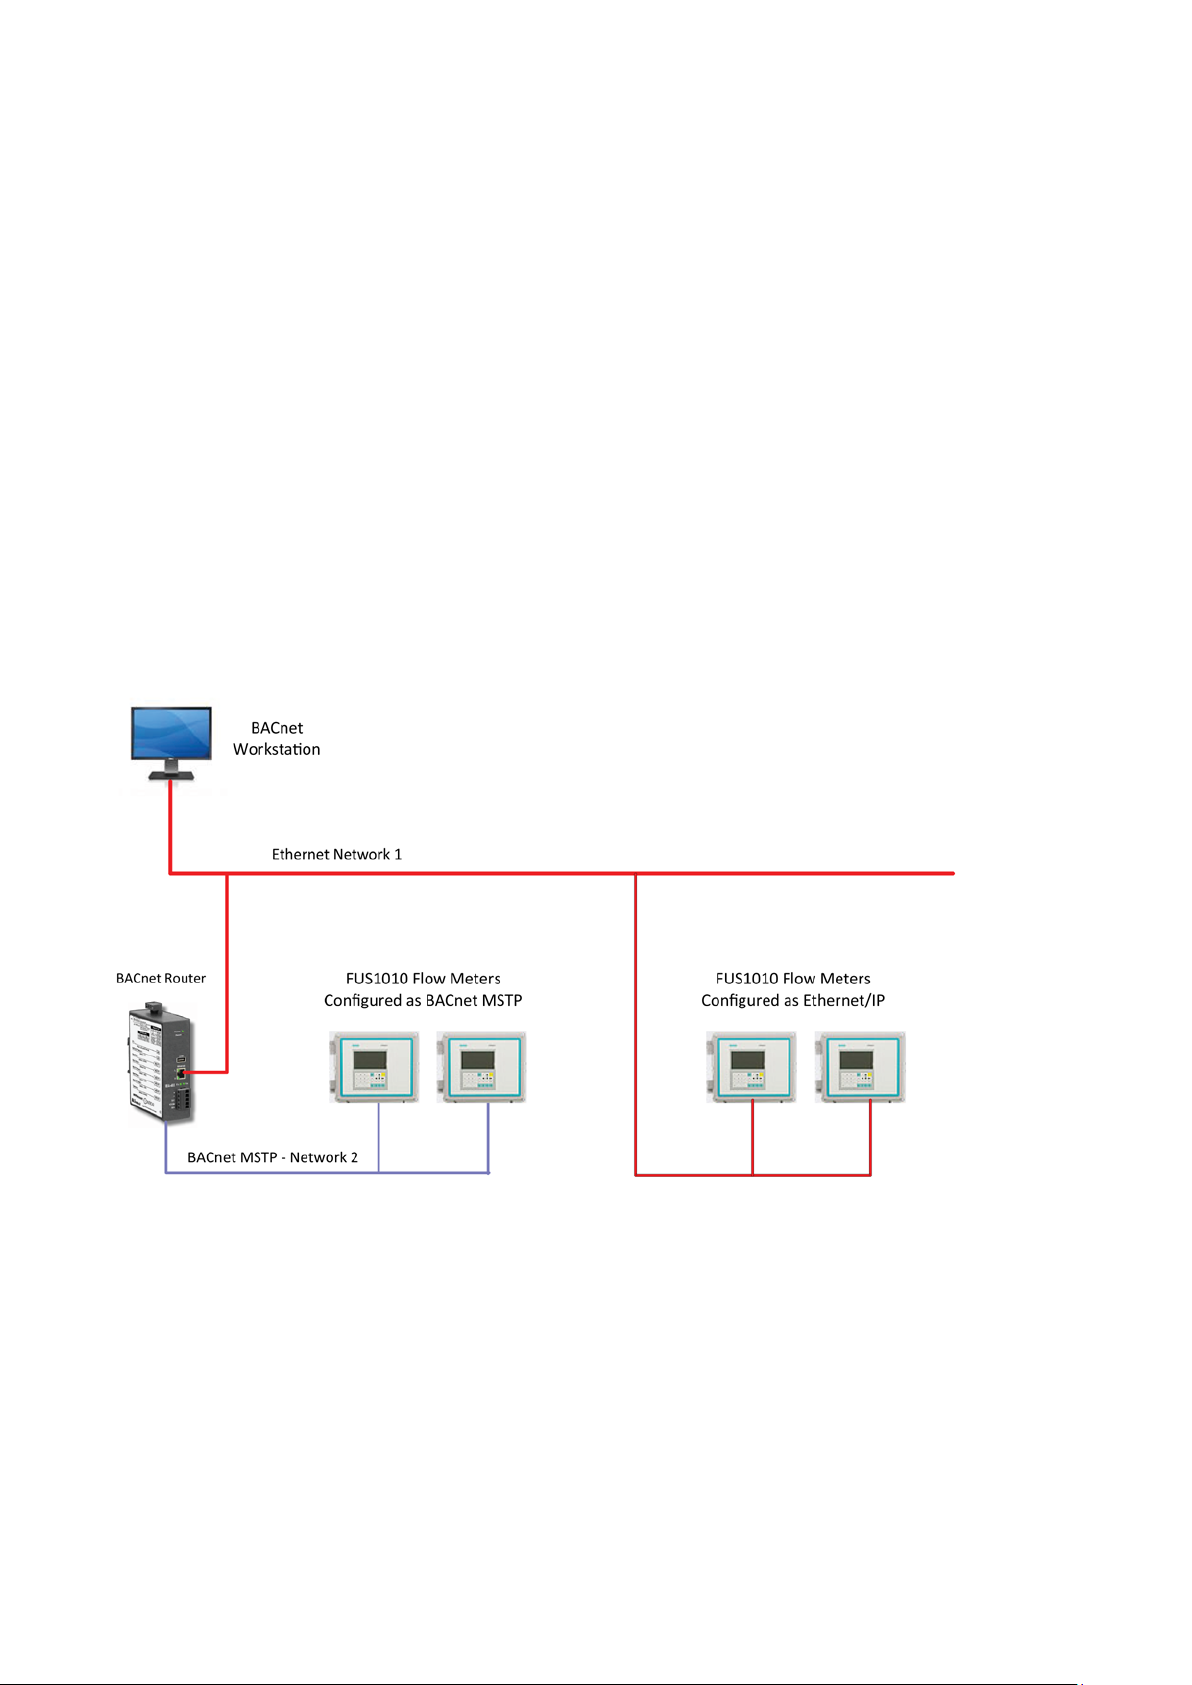
The A5E31949269 communications module functions as a BACnet master device on an
Ethernet or MSTP RS485 network. A typical illustration of how this might be configured in a
plant network is shown in the figure below.
uilding Automation and Control
works
Figure 3-1 Typical F US Clamp-on Flowmeter BACnet Application
The following tables list the Device Object and other optional objects that are used for setting
up BACnet communications.
F US Clamp-on Communications Protocol Manual
Hardware Installation Manual, 11/2015, A5E34981613-AC
29
Page 32

BACnet Communications
Device Object
Property Identifier
Description and/or Example Value
R/W
Object_Identifier
BACnetObjectIdentifier
W
Object_Name
{defined by profile selection}
R
Object_Type
DEVICE (8)
R
System_Status
OPERATIONAL (0)
R
Vendor_Name
Siemens Industry, Inc.
R
Vendor_Identifier
313 R Model_Name
Siemens Option Card
R
Firmware_Revision
2.04.04a
(or later)
R
Application_Software_Version
6.11b (A)
R
Protocol_Version
1 R Protocol_Revision
4
R
Protocol_Services_Supported
0000010000001011110010000000000011100000
R
Object_List
{defined by profile selection}
R
Max_APDU_Length_Accepted
1458
R
Segmentation_Supported
3 – no segmentation
R
Local_Time
10:36:13
R
Local_Date
1/21/2013
R
APDU_Timeout
10000
R
Number_Of_ADPU_Retries
3
R
Device_Address_Binding
{}
R
Database_Revision
49 R Active COV Subscriptions
{}
R
UTC Offset
0
R
Description
- R Location
-
R
Analog Input Object
Property Identifier
Description and/or Example Value
Object_Identifier
Unique Identifier (e.g. 8388608)
R
Object_Name
{see Profile List}
(e.g. C1_Ins_Flow_Rate)
R
Object_Type
0 - Analog Input
R
Present_Value
REAL (e.g. 402.3467)
R
Description
Character String (e.g. GAL/MIN)
R
(e.g. 0000)
Event_State
0 - Normal
R
Out_Of_Service
0 - False
R
Reliability
0
R
3.1 BACnet Communications
Protocol_Object_Types_Supported
Device , Analog Input, Binary Input R
Status_Flags IN_ALARM,FAULT,OVERRIDDEN,OUT_OF_SERVICE
F US Clamp-on Communications Protocol Manual
30 Hardware Installation Manual, 11/2015, A5E34981613-AC
R
Page 33

BACnet Communications
Binary Input Object
Property Identifier
Description and/or Example Value
Object_Identifier
Unique Identifier (e.g. 20971525)
R
Object_Name
(see list of Binary Input objects)
(e.g. C1_Pipe_Empty)
R
Object_Type
3 – Binary Input
R
Present_Value
R
Description
Character String (e.g. C1_Pipe_Empty)
R
(e.g. 0000)
Event_State
0 - Normal
R
Out_Of_Service
0 - False
R
Reliability
0
R
Active Text
Active
R
3.2
BACnet Protocol Implementation Conformance Statement
Typical BACnet Conformance Statement
Date:
January, 2012
Vendor Name:
Siemens Industry, Inc.
Product Name:
SITRANS F US Clamp
Flowmeters
Product Model Number:
Siemens Option Card
Application Software Version:
V6.11b (A)
Firmware Revision:
2.04.06
BACnet Protocol Revision:
1
Product Description:
Clamp-on ultrasonic flowmeter
BACnet Standardized Device Profile (Annex L):
☐ BACnet Operator Workstation (B-OWS)
☐
AWS)
☐ BACnet Operator Display (B-OD)
☐ BACnet Building Controller (B-BC)
☐
AAC)
☑ BACnet Application Specific Controller (B-ASC)
☐ BACnet Smart Sensor (B-SS)
☐ BACnet Smart Actuator (B-SA)
List all BACnet Interoperability Building Blocks Supported (Annex K):
3.2 BACnet Protocol Implementation Conformance Statement
Status_Flags IN_ALARM,FAULT,OVERRIDDEN,OUT_OF_SERVICE
Inactive Text Inactive R
A BACnet Conformance Statement is included with each communications module. It is a
reference for the installer that lists the applicable specifications for each individual BACnet
communications setup.
R
-On Ultrasonic
BACnet Advanced Operator Workstation (B-
BACnet Advanced Application Controller (B-
F US Clamp-on Communications Protocol Manual
Hardware Installation Manual, 11/2015, A5E34981613-AC
31
Page 34

BACnet Communications
☑ K.1.2 BIBB – Data Sharing – ReadProperty-B (DS-RP-B)
☑ K.1.4 BIBB – Data Sharing – ReadPropertyMultiple-B (DS-RPM-B)
☑ K.1.8 BIBB – Data Sharing – WriteProperty-B (DS-WP-B)
☑ K.1.10 BIBB – Data Sharing – WritePropertyMultiple-B (DS-WPM-B)
☑ K.1.12 BIBB – Data Sharing – COV-B (DS-COV-B)
☐ K.2.2 BIBB – Alarm and Event Notification Internal – B (AE-N-I-B)
☐ K.2.5 BIBB – Alarm and Event ACK – B (AE-ACK-B)
☐
☑ K.5.1 BIBB – Device Management – Dynamic Device Binding – A (DM-DDB-A)
☑ K.5.2 BIBB – Device Management – Dynamic Device Binding – B (DM-DDB-B)
☑ K.5.4 BIBB – Device Management – Dynamic Object Binding – B (DM-DOB-B)
☑ K.5.6 BIBB – Device Management – Device Communication Control – B (DM-DCC-B)
☑ K.5.12 BIBB – Device Management – Time Synchronization – B (DM-TS-B)
☑ K.5.22 BIBB – Device Management – List Manipulation – B (DM-LM-B)
Segmentation Capability:
Segmented is not supported
Standard Object Types Supported:
☑ Device Object
☑ Binary Value Object
☑ Analog Value Object
Dynamically Creatable Object:
None
Dynamically Deletable Object:
None
Optional Properties Supported:
Device Object:
PROP_LOCAL_TIME
PROP_LOCAL_DATE
PROP_DESCRIPTION
PROP_LOCATION
PROP_UTC_OFFSET
PROP_ACTIVE_COV_SUBSCRIPTIONS
Binary Value Object:
PROP_DESCRIPTION
PROP_RELIABILITY
PROP_ACTIVE_TEXT
PROP_INACTIVE_TEXT
Analog Value Object:
PROP_DESCRIPTION
PROP_RELIABILITY
Operational Writable Properties:
None
Operational Conditional Writable Properties:
None
3.2 BACnet Protocol Implementation Conformance Statement
K.2.11 BIBB – Alarm and Event Information – B (AE-INFO-B)
F US Clamp-on Communications Protocol Manual
32 Hardware Installation Manual, 11/2015, A5E34981613-AC
Page 35

BACnet Communications
Proprietary Properties:
None
Range Restrictions:
None
Data Link Layer Options:
☑ BACnet IP, (Annex J)
☐ BACnet IP, (Annex J), Foreign Device
☐
☐ ATA 878.1, 2.5 Mb. ARCNET (Clause 8)
☐ ATA 878.1, EIA-485 ARCNET (Clause 8), baud rate(s)
☑ MS/TP master (Clause 9), baud rate(s):
☑ MS/TP slave (Clause 9), baud rate(s): 300, 1200, 2400, 4800, 9600, 38400
☐ Point-To-Point, EIA 232 (Clause 10), baud rate(s):
☐ Point-To-Point, modem, (Clause 10), baud rate(s):
☐ LonTalk, (Clause 11), medium:
☐ BACnet/ZigBee (ANNEX O)
☐ Other:
Device Address Binding:
Is static device binding supported? (This is currently necessary for two
with MS/TP slaves and certain other devices. ☐ Yes ☑ No
Networking Options:
☐
MS/TP,
etc.
☐ Annex H, BACnet Tunneling Router over IP
☐
(BBMD)
☐ Registration by Foreign Devices
Network Security Options:
☐ Non-secure Device - is capable of operating without BACnet Network Security
☐
☐
☐
☐ Key Server (NS-KS BIBB)
Character Sets Supported:
Indicating support for multi
simultaneously.
☐ ISO 10646 (UTF
☐ ISO 10646 (UCS-2) ☐ ISO 10646 (UCS-4) ☐ JIS X 0208 ☑ ANSI X3.4
If this product is a communication gateway, describe the types of non-BACnet equipment/networks(s) that the gateway supports:
Siemens F US Clamp-On Flowmeters.
3.2 BACnet Protocol Implementation Conformance Statement
ISO 8802-3, Ethernet (Clause 7)
-way communication
Router, Clause 6 - List all routing configurations, e.g., ARCNET-Ethernet, Ethernet-
BACnet/IP Broadcast Management Device
Secure Device - is capable of using BACnet Network Security (NS-SD BIBB)
Multiple Application-Specific Keys:
Supports encryption (NS-ED BIBB)
ple character sets does not imply that they can all be supported
-8) ☐ IBM™ / Microsoft™ DBCS ☐ ISO 8859-1
F US Clamp-on Communications Protocol Manual
Hardware Installation Manual, 11/2015, A5E34981613-AC
33
Page 36
BACnet Communications
3.3
BACnet Alarms
3.3 BACnet Alarms
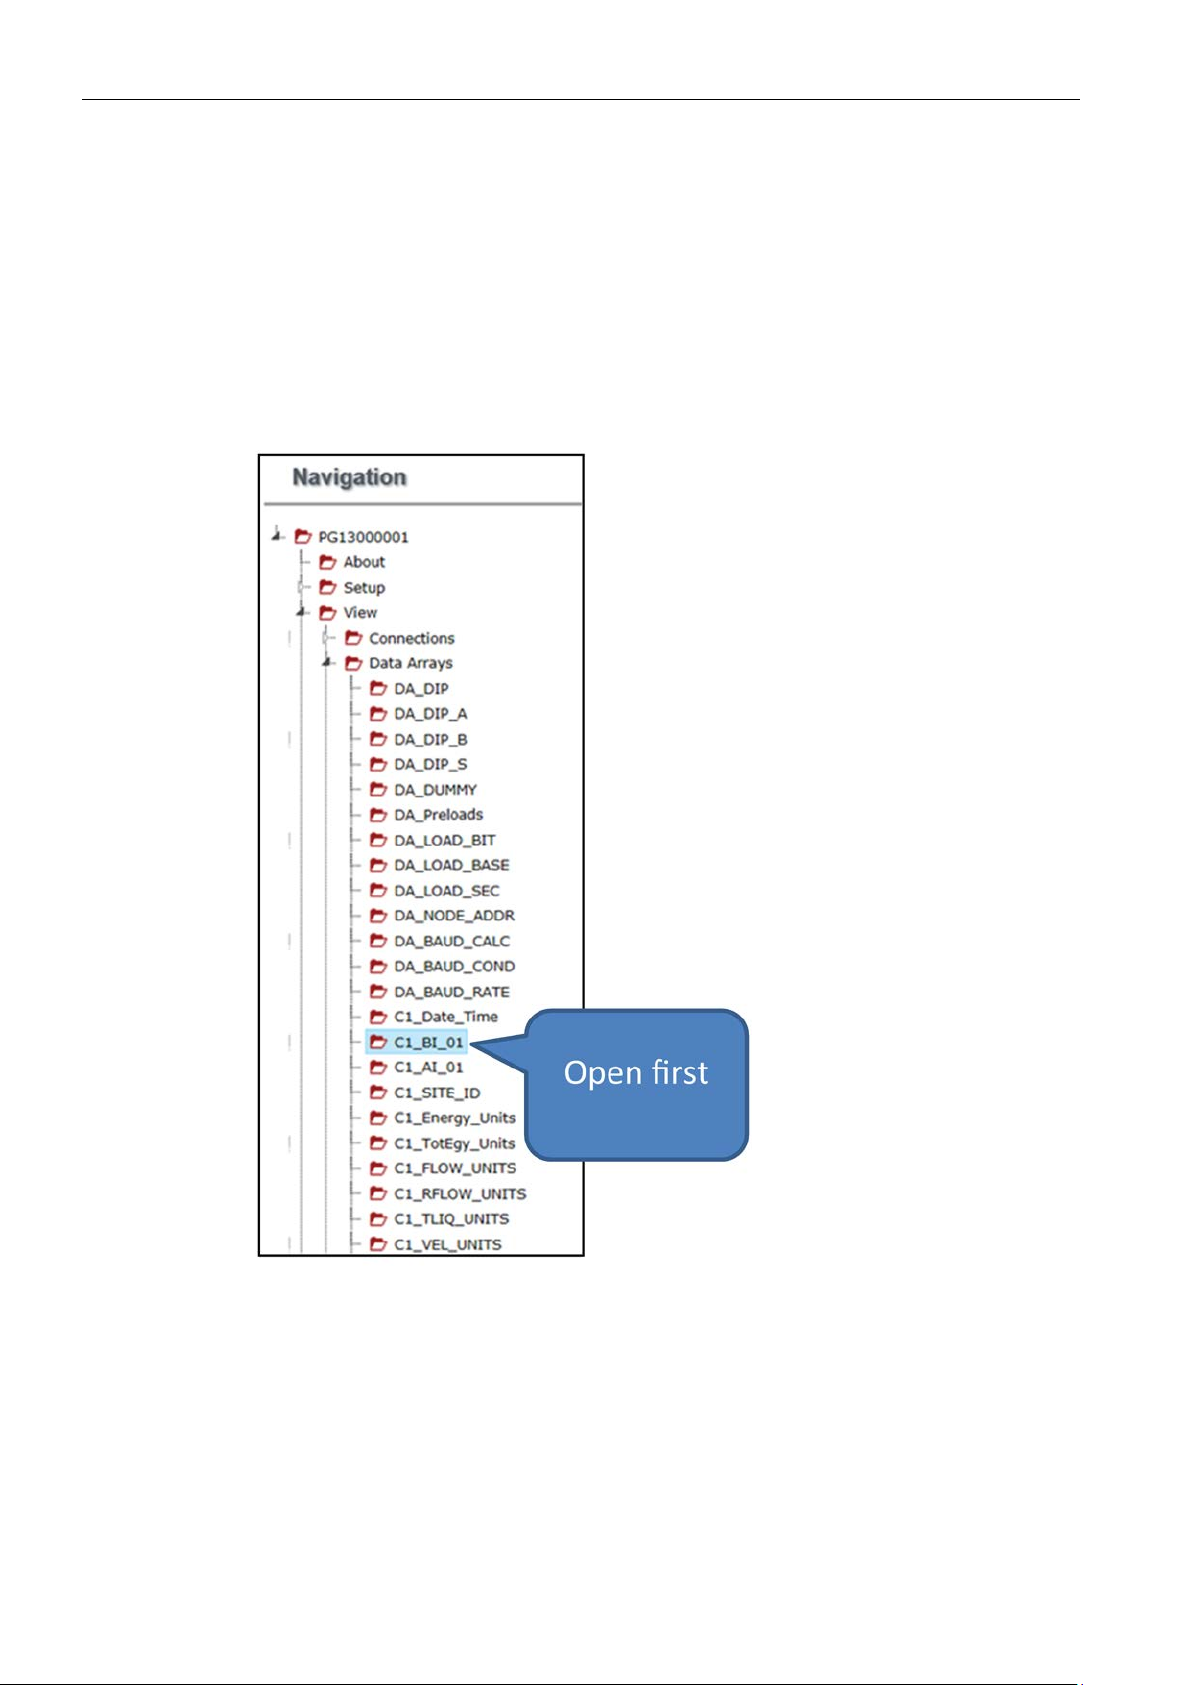
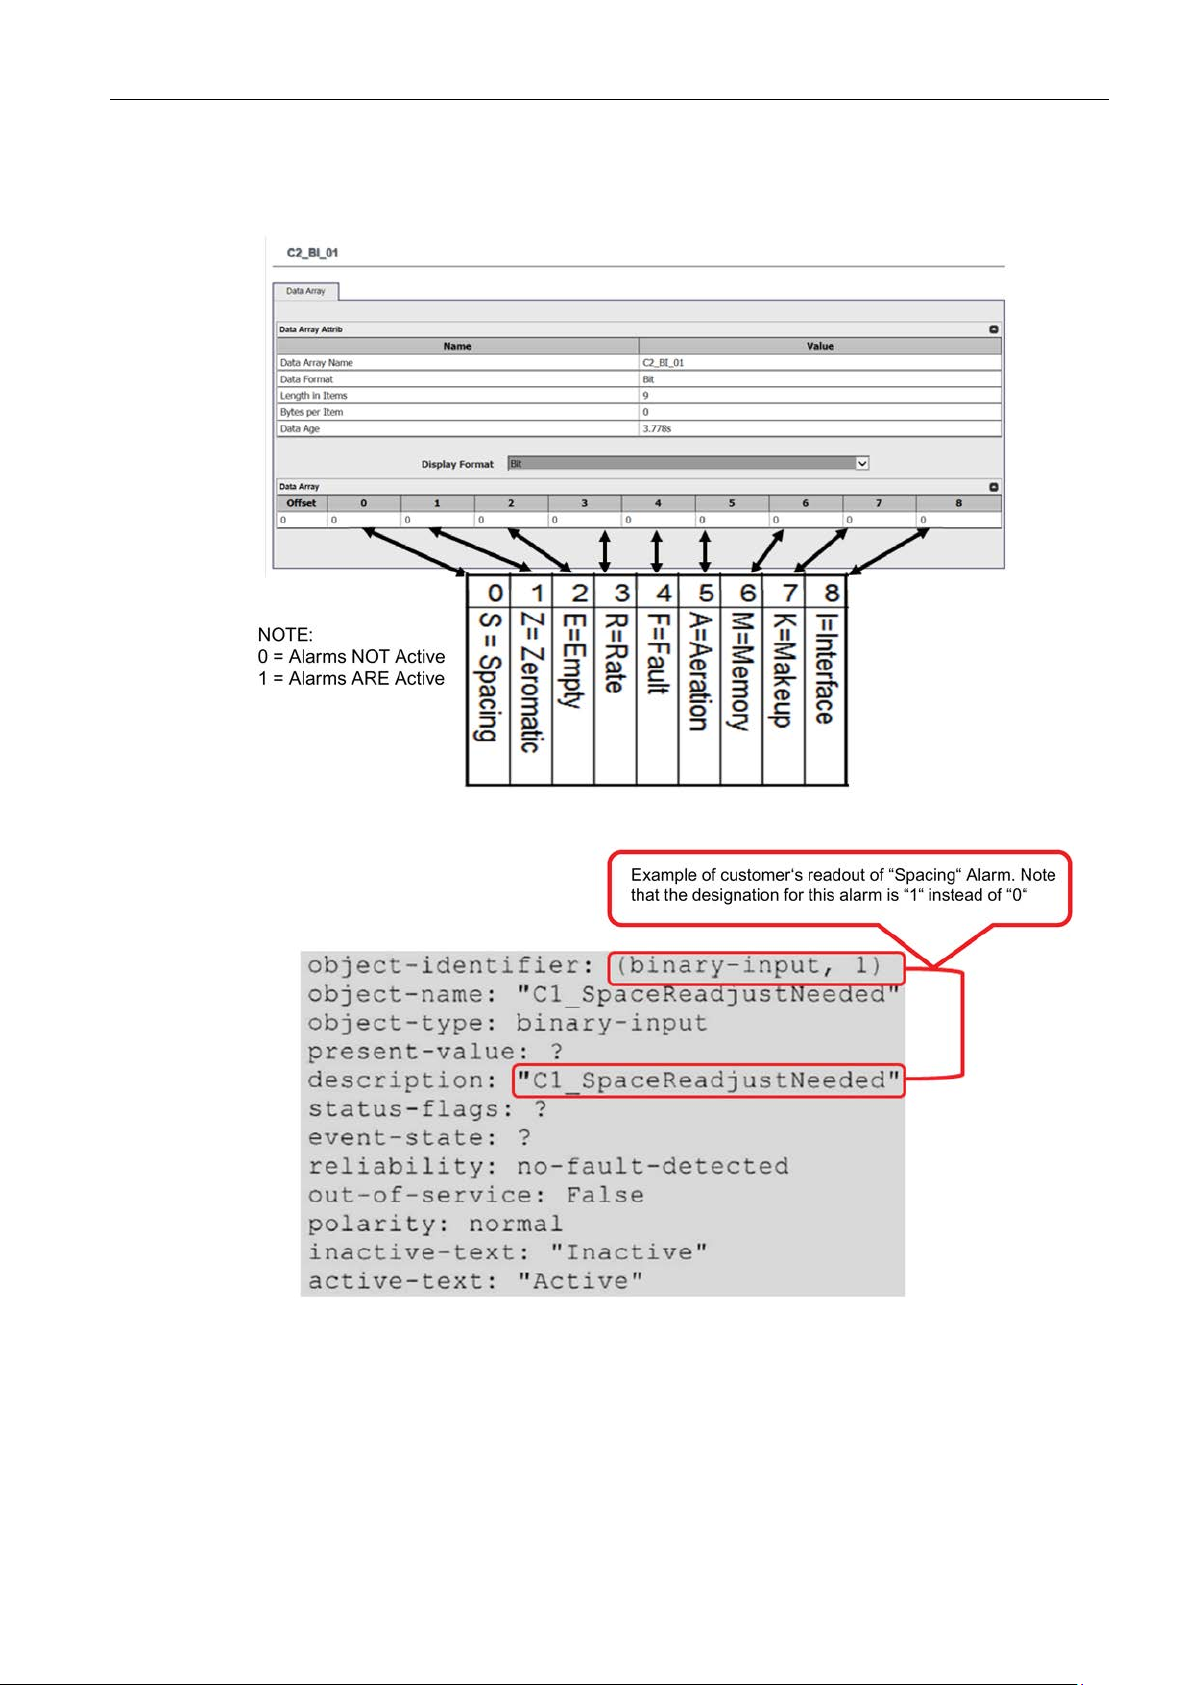
The BACnet Alarms can be read by using the FieldServer Toolbox.
1. At your desktop, click and open the FieldServer Toolbox.
2. Click on the [Connect] button.
3. Click on [Diagnostics & Debugging] and the menu will open.
4. Navigate - Scroll down to [View] and then click [Data Arrays].
5. Scroll to [C1_BI_01] and click to open.
F US Clamp-on Communications Protocol Manual
34 Hardware Installation Manual, 11/2015, A5E34981613-AC
Page 37
BACnet Communications
BACnet Object Identifiers: Alarms are Binary Inputs
3.3 BACnet Alarms
F US Clamp-on Communications Protocol Manual
Hardware Installation Manual, 11/2015, A5E34981613-AC
35
Page 38

Page 39
4
4.1
Universal HART Commands
Introduction
HART Installation
Note
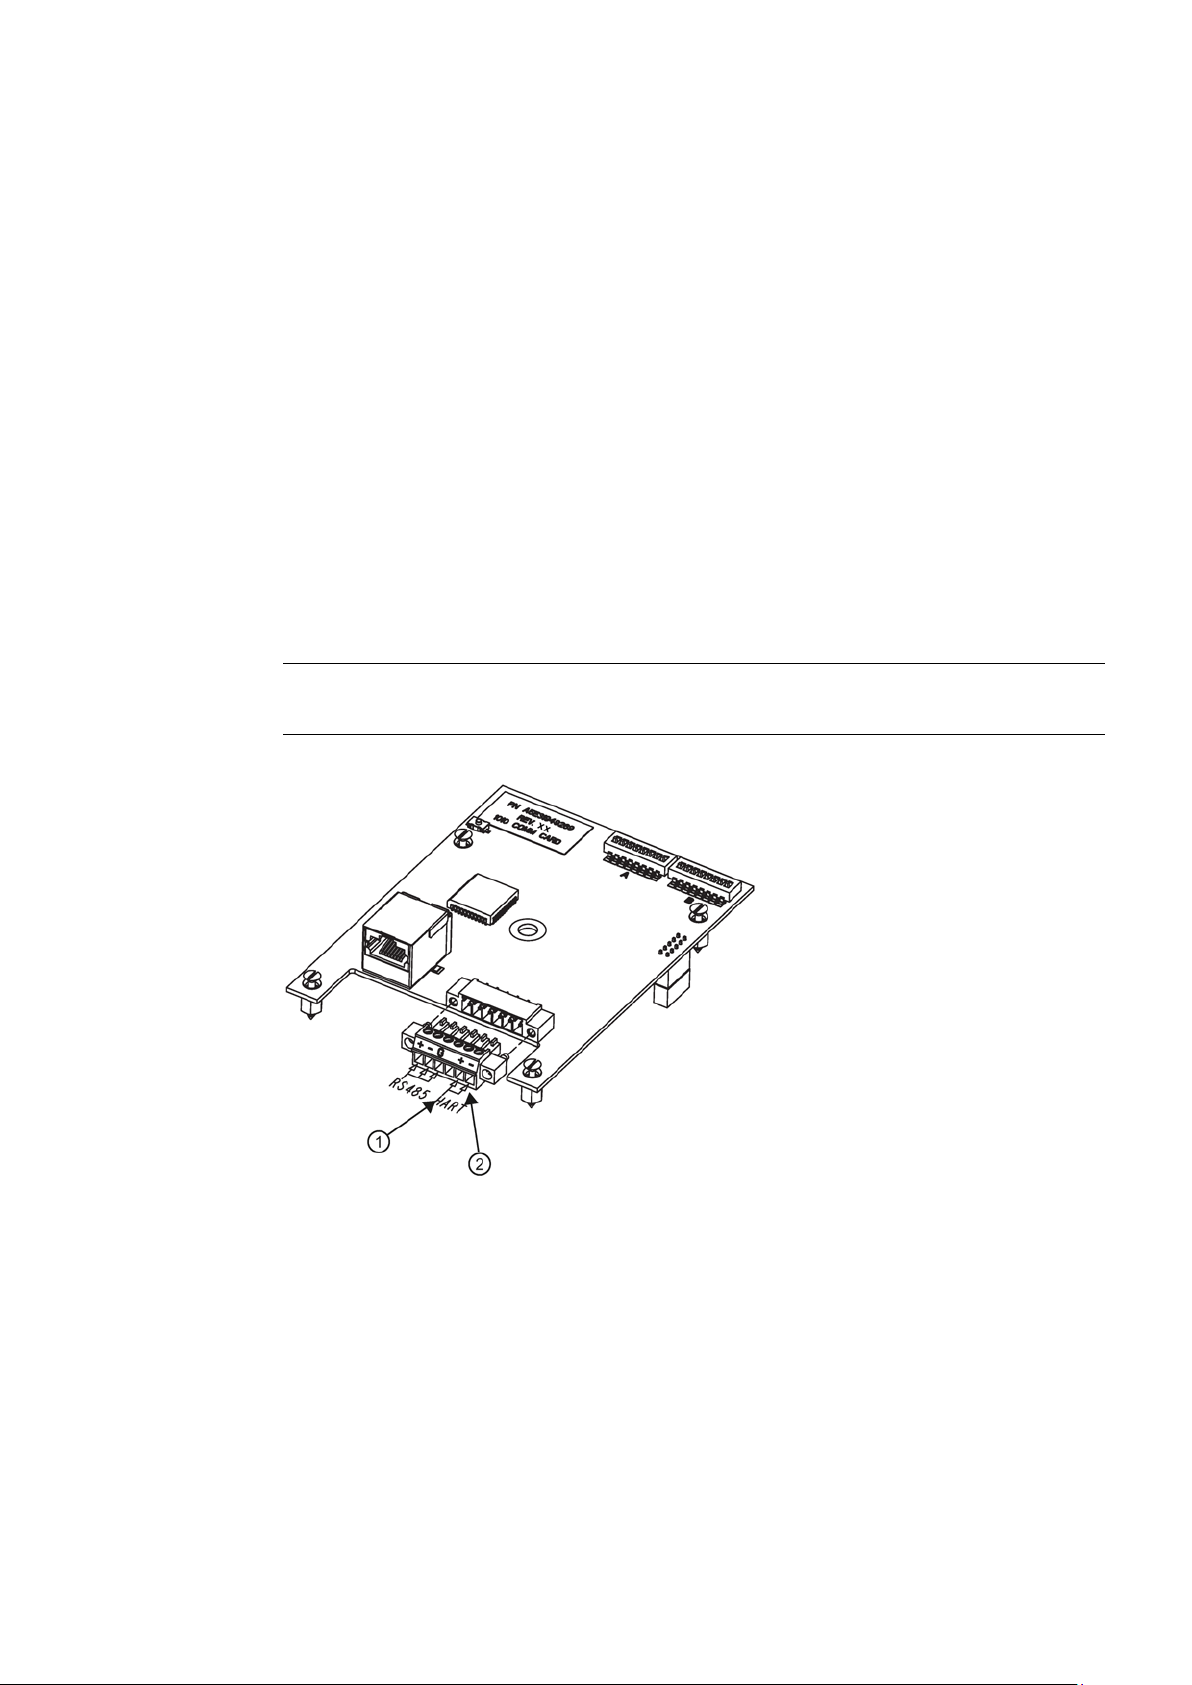
Set SW-2 B1-B6 for profile selection according to the flowmeter operating system.
①
HART +
②
HART -
The SITRANS F US Clamp-on Communication Module, in addition to providing various
communication protocols, including BACnet, Modbus, EIP, & N2, also includes a HART 4-20
mA output that is always active regardless of other protocols selected.
After the communications module is installed in the flowmeter, connect the HART wire
connections as shown in the figure below.
Figure 4-1 HART Connections
F US Clamp-on Communications Protocol Manual
Hardware Installation Manual, 11/2015, A5E34981613-AC
37
Page 40

HART Communications
Pin
Signal
Description
J1-1
RS-485+
No Connection
J1-2
RS-485-
No Connection
J1-3
RS-485 GND
No Connection
J1-4
N/A
No Connection
J1-5
HART
HART +
J1-6
HART
HART -
HART Commands
Commands
Description
Byte
Response
Comments/Value
“254”
0
FE Device Type
1-2
2Axx
Siemens FUS1010
Minimum number of Preambles
3 5
HART Protocol Major Revision Number
4 7
Device Revision Level
5
Software Revision Level
6
A5E31571875A
Flags
8
See Common table 11
Device ID
9-11
<unique ID for each >
Minimum number of preambles
12
Maximum number of Device Variables
13
Configuration Change Counter
14-15
<increments with each write>
Extended Field Device Status
16
See Common table 17
Manufacturer Identification Code
17-18
002A
Siemens
Private Label Distribution Code
19-20
002A
Siemens
Device Profile
21
01
Process Automation Device
Description
Byte
Format
Comments/Value
Primary Variable Units
0
Enum
< write units CMD 35 or 44>
Primary Variable
1-4
Float
<select PV variable CMD 160>
4.1 Universal HART Commands
Table 4- 1 RS-485 Connector J1
The following tables list the Universal HART Commands for the SITRANS F US Clamp-on
Communication Module.
Table 4- 2 Command 0 - Read Unique Identifier
Hardware Revision Level 7
Physical Signaling Code 7 0
<5 most significant bits>
<3 least significant bits>
Table 4- 3 Command 1 - Read Primary Variable
F US Clamp-on Communications Protocol Manual
38 Hardware Installation Manual, 11/2015, A5E34981613-AC
Page 41

HART Communications
Description
Byte
Format
Comments/Value
Primary Variable Loop Current
0-3
Float
<units in milli-amperes>
Primary Variable Percent of Range
4-7
Float
<range set in CMD 35>
Description
Byte
Format
Comments/Value
Primary Variable Loop Current
0-3
Float
<units in milli-amperes>
Primary Variable Units
4
Enum
< write units CMD 44 or 53>
Primary Variable
5-8
Float
<write PV variable CMD 51>
Secondary Variable Units
9
Enum
<write SV Units CMD 53>
Secondary Variable
10-13
Float
<write SV variable CMD 51>
Tertiary Variable Units
14
Enum
<write TV Units CMD 53>
Tertiary Variable
15-18
Float
<write TV variable CMD 51>
Quaternary Variable Units
19
Enum
<write QV Units CMD 53>
Description
Byte Format
Comments/Value
Polling Address of Device
0
U-8
Description
Byte Format
Comments/Value
Polling Address of Device
0
U-8 Loop Current Mode
1
Enum
0-disabled 1-enabled
Description
Byte
Format
Comments/Value
Primary Variable Classification
0
Enum
0-not classified
Secondary Variable Classification
1
Enum
0-not classified
Tertiary Variable Classification
2
Enum
0-not classified
Quaternary Variable Classification
3
Enum
0-not classified
4.1 Universal HART Commands
Table 4- 4 Command 2 - Read Loop Current and Percent of Range
Table 4- 5 Command 3 - Read Dynamic Variable and Loop Current
Quaternary Variable 20-23 Enum <write QV Variable CMD 51>
Table 4- 6 Command 6 - Writing Polling Address
Loop Current Mode 1 Enum 0-disabled 1-enabled
Table 4- 7 Command 7 - Read Loop Configuration
Table 4- 8 Command 8 - Read Dynamic Variable Classifications
F US Clamp-on Communications Protocol Manual
Hardware Installation Manual, 11/2015, A5E34981613-AC
39
Page 42

HART Communications
Description
Byte
Format
Comments/Value
Extended Field Device Status
0
Bits
<refer to common table 17>
Slot 0: Device Variable Code
1
U-8
246 <Primary Variable>
Slot 0: Device Variable Classification
2
Enum
0-not classified
Slot 0: Device Variable Units Code
3
Enum
< write units CMD 35 or 44>
Slot 0: Device Variable Value
4-7
Float
Slot 0: Device Variable Status
8
Bits
<Device Status Common Table>
Slot 1: Device Variable Code
9
U-8
247 <Secondary Variable>
Slot 1: Device Variable Classification
10
Enum
0-not classified
Slot 1: Device Variable Units Code
11
Enum
<select SV Units CMD 161>
Slot 1: Device Variable Value
12-15
Float
Slot 1: Device Variable Status
16
Bits
<Device Status Common Table>
Slot 2: Device Variable Code
17
U-8
248 <Tertiary Variable>
Slot 2: Device Variable Units Code
19
Enum
<select TV Units CMD 163>
Slot 2: Device Variable Status
24
Bits
<Device Status Common Table>
Slot 3: Device Variable Code
25
U-8
249 <Quaternary Variable>
Slot 3: Device Variable Classification
26
Enum
0-not classified
Slot 3: Device Variable Units Code
27
Enum
<select QV Units CMD 165>
Slot 3: Device Variable Value
28-31
Float
Slot 3: Device Variable Status
32
Bits
<Device Status Common Table>
Slot 0 data time stamp
33-36
Time
Description
Byte
Response
Comments/Value
“254”
0
FE Device Type
1-2
2A04
Siemens FUS
Minimum number of Preambles
3 5
HART Protocol Major Revision Number
4 7
Device Revision Level
5
Software Revision Level
6
Hardware Revision Level
7
<5 most significant bits>
A5E31571875A
Flags
8
See Common table 11
Minimum number of preambles
12
Maximum number of Device Variables
13
Configuration Change Counter
14-15
<increments with each write>
Extended Field Device Status
16
See Common table 17
Manufacturer Identification Code
17-18
002A
Siemens
Private Label Distribution Code
19-20
002A
Siemens
Device Profile
21
01
Process Automation Device
4.1 Universal HART Commands
Table 4- 9 Command 9 - Read Device Variable with Status
Slot 2: Device Variable Classification 18 Enum
Slot 2: Device Variable Value 20-23 Float
Table 4- 10 Command 11 - Read Unique identifier Associated with Tag
0-not classified
Physical Signaling Code 7 0
Device ID 9-11
F US Clamp-on Communications Protocol Manual
40 Hardware Installation Manual, 11/2015, A5E34981613-AC
<3 least significant bits>
<unique ID for each >
Page 43

HART Communications
Description
Byte
Format
Comments/Value
Message
0-23
Packed
<write Message CMD 17>
Description
Byte
Format
Comments/Value
Tag
0-5
Packed
<write Tag CMD 18>
Descriptor
6-17
Packed
<write Descriptor CMD 18>
Date
18-20
Date
<write Date CMD 18>
Description
Byte
Format
Comments/Value
Transducer Serial Number
0-2
U-24
Unique SN
Code
Upper Transducer Limit
4-7
Float
PV Upper Range Value
Lower Transducer Limit
8-11
Float
PV Lower Range Value
Description
Byte Format
Comments/Value
PV Alarm Selection Code
0
Enum
01 = Low
PV Transfer Function Code
1
Enum
00 =- Linear
PV Upper and Lower Range Units Codes
2
Enum
< write units CMD 35 or 44>
35>
35>
PV Damping Value (sec)
11-14
Float
< write Damping CMD 34>
Write Protect Code
15
Enum
251-none
Reserved
16
Enum
250
PV Analog Value Flags
17
Bits 0
Description
Byte
Format
Comments/Value
Final Assembly Number
0-2
U-24
<write FAN CMD 19>
4.1 Universal HART Commands
Table 4- 11 Command 12 - Read Message
Table 4- 12 Command 13 - Read Tag, Descriptor, Date
Table 4- 13 Command 14 - Read Primary Variable Transducer Information
Transducer Limits and Min Span Units
Minimum Span 12-15 Float
3 Enum
PV Units Code
PV Span
Table 4- 14 Command 15 - Read Device Information
PV Upper Range Value 3-6 Float
PV Lower Range Value 7-10 Float
< write PV Upper Range CMD
< write PV Lower Range CMD
Table 4- 15 Command 16 - Read Final Assembly Number
F US Clamp-on Communications Protocol Manual
Hardware Installation Manual, 11/2015, A5E34981613-AC
41
Page 44

HART Communications
Description
Byte
Format
Comments/Value
Message
0-23
Packed
<32 ASCII Characters>
Description
Byte
Format
Comments/Value
Tag
0-5
Packed
<8 ASCII Characters>
Descriptor
6-17
Packed
<16 ASCII Characters>
Date
18-20
Date
<Date Code>
Description
Byte
Format
Comments/Value
Final Assembly Number
0-2
U-24
Description
Byte
Format
Comments/Value
Long Tag
0-31
Latin-1
<write Long Tag CMD 22>
Description
Byte
Response
Comments/Value
Device Type
1-2
F9F9
Comm Card
Minimum number of Preambles
3 5
HART Protocol Major Revision Number
4 7
Device Revision Level
5
Software Revision Level
6
A5E31571875A
Flags
8
See Common table 11
Device ID
9-11
<unique ID for each >
Minimum number of preambles
12
Maximum number of Device Variables
13
Configuration Change Counter
14-15
<increments with each write>
Extended Field Device Status
16
See Common table 17
Manufacturer Identification Code
17-18
002A
Siemens
Private Label Distribution Code
19-20
002A
Siemens
Device Profile
21
01
Process Automation Device
4.1 Universal HART Commands
Table 4- 16 Command 17 - Write Message
Table 4- 17 Command 18 - Write Tag, Descriptor, Date
Table 4- 18 Command 19 - Write Final Assembly Number
Table 4- 19 Command 20 - Read Log Tag
Table 4- 20 Command 21 - Read Unique Identifier Associated with Long Tag
“254” 0 FE
Hardware Revision Level 7
Physical Signaling Code 7 0
<5 most significant bits>
<3 least significant bits>
F US Clamp-on Communications Protocol Manual
42 Hardware Installation Manual, 11/2015, A5E34981613-AC
Page 45

HART Communications
Description
Byte
Format
Comments/Value
Long Tag
0-31
Latin-1
Description
Byte
Format
Comments/Value
Configuration Change Counter
0-1
U-16
Description
Byte
Format
Comments/Value
Device Specific Status
0
<Profile Number>
Reserved for future use
1-8
0
4.2
Common Practice HART Commands
Introduction
Commands
Description
Byte
Format
Comments/Value
PV Upper and Lower Range Units Codes
0
Enum
<common tables>
PV Upper Range Value
1-4
Float
Description
Byte Format
Comments/Value
Fixed Current Level (milliamperes)
0-3
Float
<0 exits fixed current mode>
Description
Byte
Format
Comments/Value
4.2 Common Practice HART Commands
Table 4- 21 Command 22 - Write Long Tag
Table 4- 22 Command 38 - Reset Configuration Changed Flag
Table 4- 23 Command 48 - Read Additional Device Status
The following tables list the Common Practice HART Commands for the SITRANS F US
Clamp-on Communication Module.
Table 4- 24 Command 35 - Write Primary Range Values
PV Lower Range Value 5-8 Float
Table 4- 25 Command 40 - Enter/Exit Fixed Current Mode
Table 4- 26 Command 44 - Write Primary variable Units
Primary Variable Units Code 0 Enum
F US Clamp-on Communications Protocol Manual
Hardware Installation Manual, 11/2015, A5E34981613-AC
<common tables>
43
Page 46

HART Communications
Description
Byte
Format
Comments/Value
Measured Loop Current (milliamperes)
0-3
Float
<used with CMD 40 to trim 4>
Description
Byte
Format
Comments/Value
Measured Loop Current (milliamperes)
0-3
Float
<used with CMD 40 to trim 20>
Description
Byte
Format
Comments/Value
ber>
ber>
ber>
ber>
Description
Byte
Format
Comments/Value
ber>
ber>
ber>
ber>
Description
Byte
Format
Comments/Value
ber>
Device Variable Units Code
1
U-8
<common tables>
4.3 Device Specific HART Commands
Table 4- 27 Command 45 - Trim Loop Current Zero
Table 4- 28 Command 46 - Trim Loop Current Gain
Table 4- 29 Command 50 - Read Dynamic Variable Assignments
Primary Variable 0 U-8
Secondary Variable 0 U-8
Tertiary Variable 0 U-8
Quaternary Variable 0 U-8
Table 4- 30 Command 51 - Write Dynamic Variable Assignments
Primary Variable 0 U-8
Secondary Variable 0 U-8
Tertiary Variable 0 U-8
Quaternary Variable 0 U-8
<HART Device Variable Num-
<HART Device Variable Num-
<HART Device Variable Num-
<HART Device Variable Num-
<HART Device Variable Num-
<HART Device Variable Num-
<HART Device Variable Num-
<HART Device Variable Num-
Table 4- 31 Command 53 - Write Device Variable Units
Device Variable Code 0 U-8
F US Clamp-on Communications Protocol Manual
44 Hardware Installation Manual, 11/2015, A5E34981613-AC
<HART Device Variable Num-
Page 47

HART Communications
4.3
Device Specific HART Commands
Introduction
Commands
Command 28 - Read HART Variable Unit
Description
Byte
Format
Comments/Value
HART_Device_Variable_Number
0
U-8
0-243
Description
Byte
Format
Comments/Value
HART_Device_Variable_Number
0
U-8
0-243
Device Variable Value
1-2
U-16
Command 129 - Read HART Variable Float
Description
Byte
Format
Comments/Value
HART_Device_Variable_Number
0
U-8
0-243
Description
Byte
Format
Comments/Value
HART_Device_Variable_Number
0
U-8
0-243
Device Variable Value
1-4
Float
Command 130 Read HART Variable BIT
Description
Byte
Format
Comments/Value
Description
Byte Format
Comments/Value
HART_Device_Variable_Number
0
U-8
4.3 Device Specific HART Commands
The following tables list the Device Specific HART Commands.
Table 4- 32 Request
Table 4- 33 Response
Table 4- 34 Request
Table 4- 35 Response
F US Clamp-on Communications Protocol Manual
Hardware Installation Manual, 11/2015, A5E34981613-AC
Table 4- 36 Request
HART_Device_Variable_Number 0 U-8
Table 4- 37 Response
Device Variable Value 1 U-8
0/1
45
Page 48

HART Communications
Command 131 - Read HART Variable Units Description
Description
Byte
Format
Comments/Value
HART_Device_Variable_Number
0
U-8
0-243
Character Count requested
1
U-8
1-32
Description
Byte
Format
Comments/Value
HART_Device_Variable_Number
0
U-8
0-243
Character Count
1
U-8
1-32
Device Variable Description
2-n
Character
32 ASCII (Unpacked Characters)
4.4
HART F US1010 Setup
Introduction
4.4 HART F US1010 Setup
Table 4- 38 Request
Table 4- 39 Response
This section details the HART Device Variables and how to assign them to Dynamic
Variables (PV, SV, TV, & QV). Figure 4-1 illustrates a typical connection setup. Refer to
Section 2 for more details on the SITRANS F US Clamp-on Communication Module.
The SITRANS F US Clamp-on Communications Module, in addition to providing various
communication protocols, including BACnet, Modbus, EIP & N2, also includes a HART 4-20
mA output that is always active regardless of other protocols selected. This document details
the HART Device Variables and how to assign them to Dynamic Variables (PV, SV, TV and
QV). The figure below illustrates a typical connection setup.
F US Clamp-on Communications Protocol Manual
46 Hardware Installation Manual, 11/2015, A5E34981613-AC
Page 49
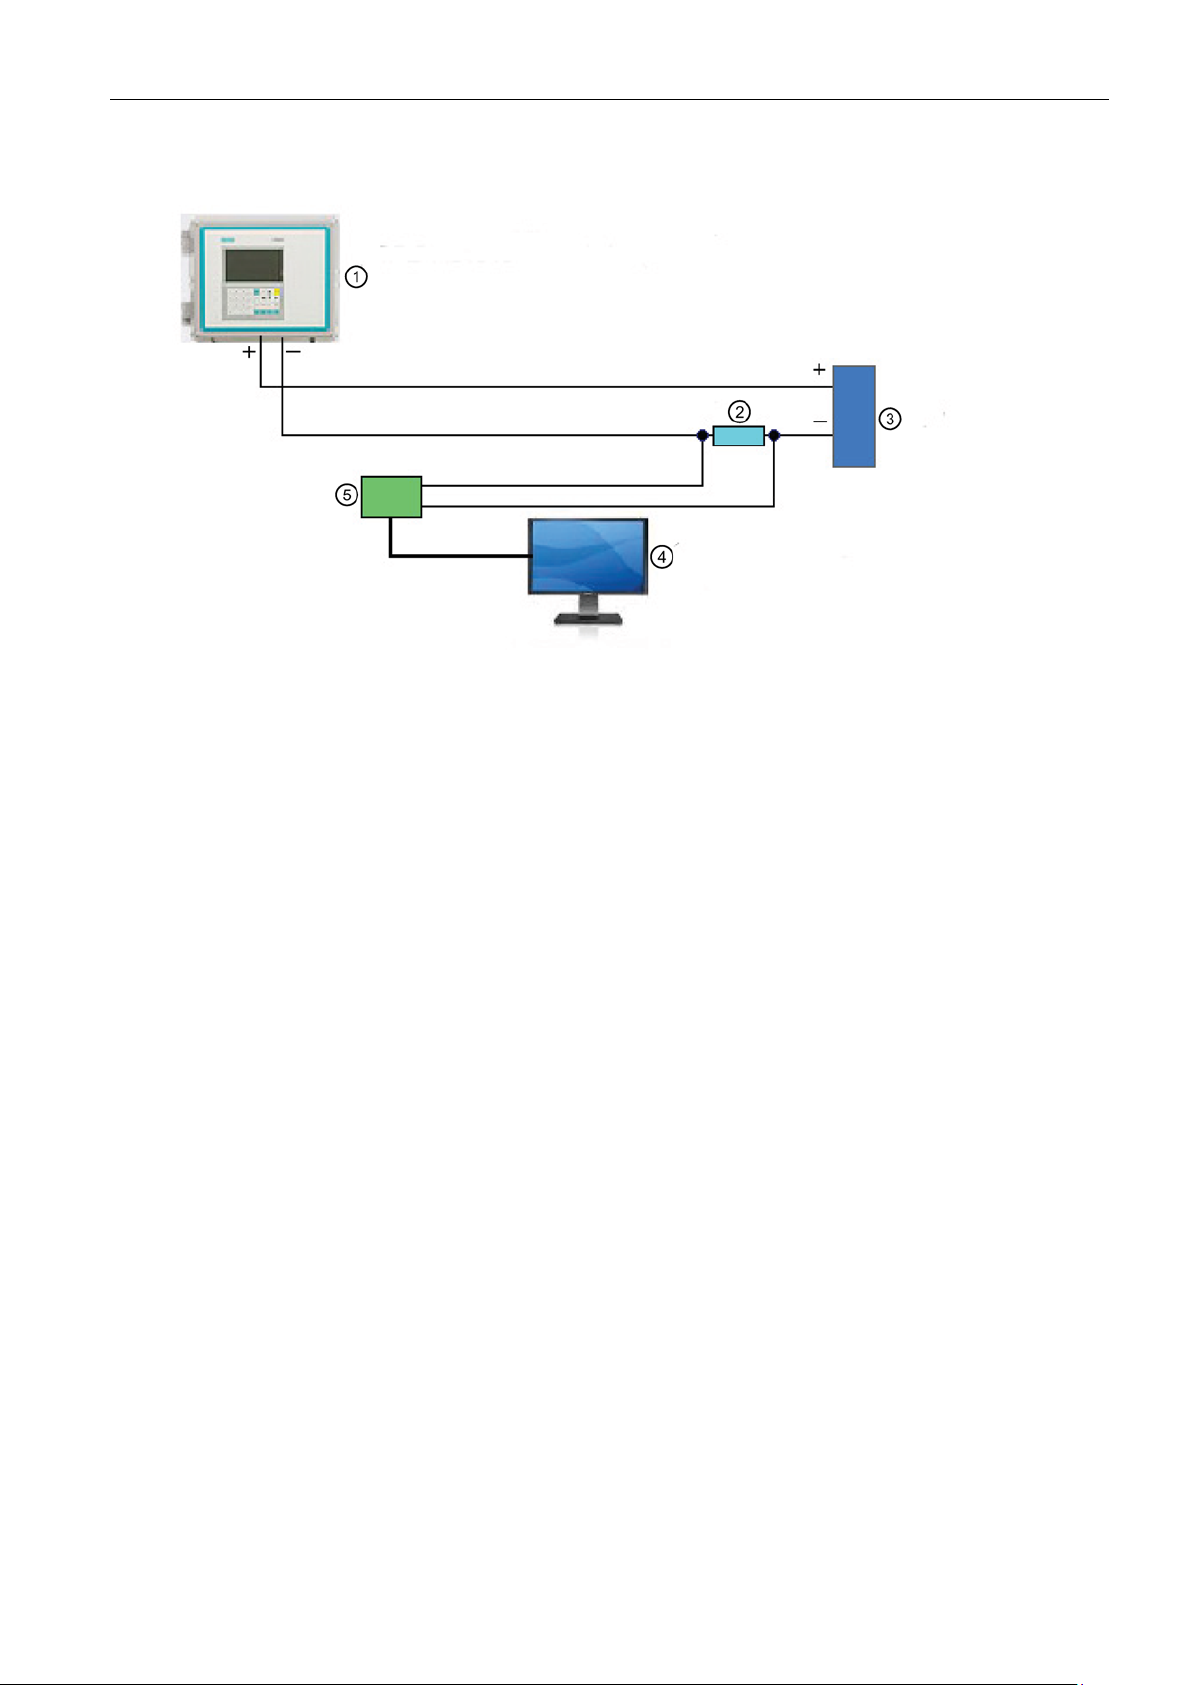
HART Communications
①
FUS Clamp-on Ultrasonic flowmeter with F_US1010 HART Option
②
Load - 250 ohms typical
③
Power Supply - 12.04 V minimum
④
Configuration Tool Siemens PDM 8.2
⑤
HART Modem
Typical Connection of F US flowmeter with HART F_US1010 Option
4.4 HART F US1010 Setup
Figure 4-2
Table 4-40 lists the Device Variables available with the SITRANS F_US1010 HART option.
Variables that are active & updating will depend on the meter profile. Appendix A provides a
complete profile listing and mappings of flowmeter variables for the various protocols
including HART. It also lists the variables that are assigned to the PV, SV, TV, & QV
Dynamic Variables as default settings. Profiles are selected using the DIP switches on the
card as illustrated in Section 2 (switch RS-485). For example Profile 23 which is a single
channel energy profile has Avg Flow Rate assigned to the PV, Total to SV, Avg Energy Rate
to TV, & Energy Total to QV. In some cases it may be desired to change the Dynamic
Variable selections. This can be done with a configuration tool such as Siemens PDM
software. PDM can also be used to monitor the active HART Device Variables in the
SITRANS F_US1010.
Figures 4-2 - 4-6 illustrate some typical configuration details using Siemens PDM 8.2. Older
versions of PDM may have a different look.
F US Clamp-on Communications Protocol Manual
Hardware Installation Manual, 11/2015, A5E34981613-AC
47
Page 50

HART Communications
HART Device Variable
Variable Date Description
Default Value
Default Units
00 (0x00)
Average Flow Rate
0.0
GAL/MIN
01 (0x01)
Channel 1 Average Flow Rate
0.0
GAL/MIN
03 (0x03)
Channel 3 Average Flow Rate
0.0
GAL/MIN
04 (0x04)
Channel 4 Average Flow Rate
0.0
GAL/MIN
05 (0x05)
Channel 5 Average Flow Rate
0.0
GAL/MIN
06 (0x06)
Channel 1 Instantaneous Flow Rate
0.0
GAL/MIN
07 (0x07)
Channel 2 Instantaneous Flow Rate
0.0
GAL/MIN
08 (0x08)
Channel 3 Instantaneous Flow Rate
0.0
GAL/MIN
09 (0x09)
Channel 4 Instantaneous Flow Rate
0.0
GAL/MIN
10 (0x0a)
Path 1 Instantaneous Flow Rate
0.0
GAL/MIN
11 (0x0b)
Path 2 Instantaneous Flow Rate
0.0
GAL/MIN
12 (0x0c)
Path 3 Instantaneous Flow Rate
0.0
GAL/MIN
13 (0x0d)
Path 4 Instantaneous Flow Rate
0.0
GAL/MIN
14 (0x0e)
Specific Gravity
0.0
SG
15 (0x0f)
Channel 1 Specific Gravity
0.0
SG
16 (0x10)
Channel 2 Specific Gravity
0.0
SG
17 (0x11)
API
0.0
API
18 (0x12)
Channel 1 API
0.0
API
19 (0x13)
Channel 2 API
0.0
API
20 (0x14)
Kg/m3
0.0
KGM3
21 (0x15)
Channel 1 Kg/m3
0.0
KGM3
22 (0x16)
Channel 2 Kg/m3
0.0
KGM3
23 (0x17)
Base Specific Gravity
0.0
BSG
24 (0x18)
Channel 1 Base Specific Gravity
0.0
BSG
26 (0x1a)
Base API
0.0
BAPI
28 (0x1c)
Channel 2 Base API
0.0
BAPI
29 (0x1d)
Base Kg/m3
0.0
BKGM3
30 (0x1e)
Channel 1 Base Kg/m3
0.0
BKGM3
31 (0x1f)
Channel 2 Base Kg/m3
0.0
BKGM3
32 (0x20)
Flow Velocity
0.0
F/S
33 (0x21)
Total
0.0
KGAL
34 (0x22)
Channel 1 Total
0.0
KGAL
35 (0x23)
Channel 2 Total
0.0
KGAL
36 (0x24)
Channel 3 Total
0.0
KGAL
37 (0x25)
Channel 4 Total
0.0
KGAL
38 (0x26)
Channel 5 Total
0.0
KGAL
39 (0x27)
Average Energy Rate
0.0
KBTU/HR
40 (0x28)
Channel 1 Average Energy Rate
0.0
KBTU/HR
41 (0x29)
Channel 2 Average Energy Rate
0.0
KBTU/HR
4.4 HART F US1010 Setup
Table 4- 40 F_US1010 Clamp-on Communications Module - HART Device Variables
02 (0x02) Channel 2 Average Flow Rate 0.0 GAL/MIN
25 (0x19) Channel 2 Base Specific Gravity 0.0 BSG
27 (0x1b) Channel 1 Base API 0.0 BAPI
F US Clamp-on Communications Protocol Manual
48 Hardware Installation Manual, 11/2015, A5E34981613-AC
Page 51
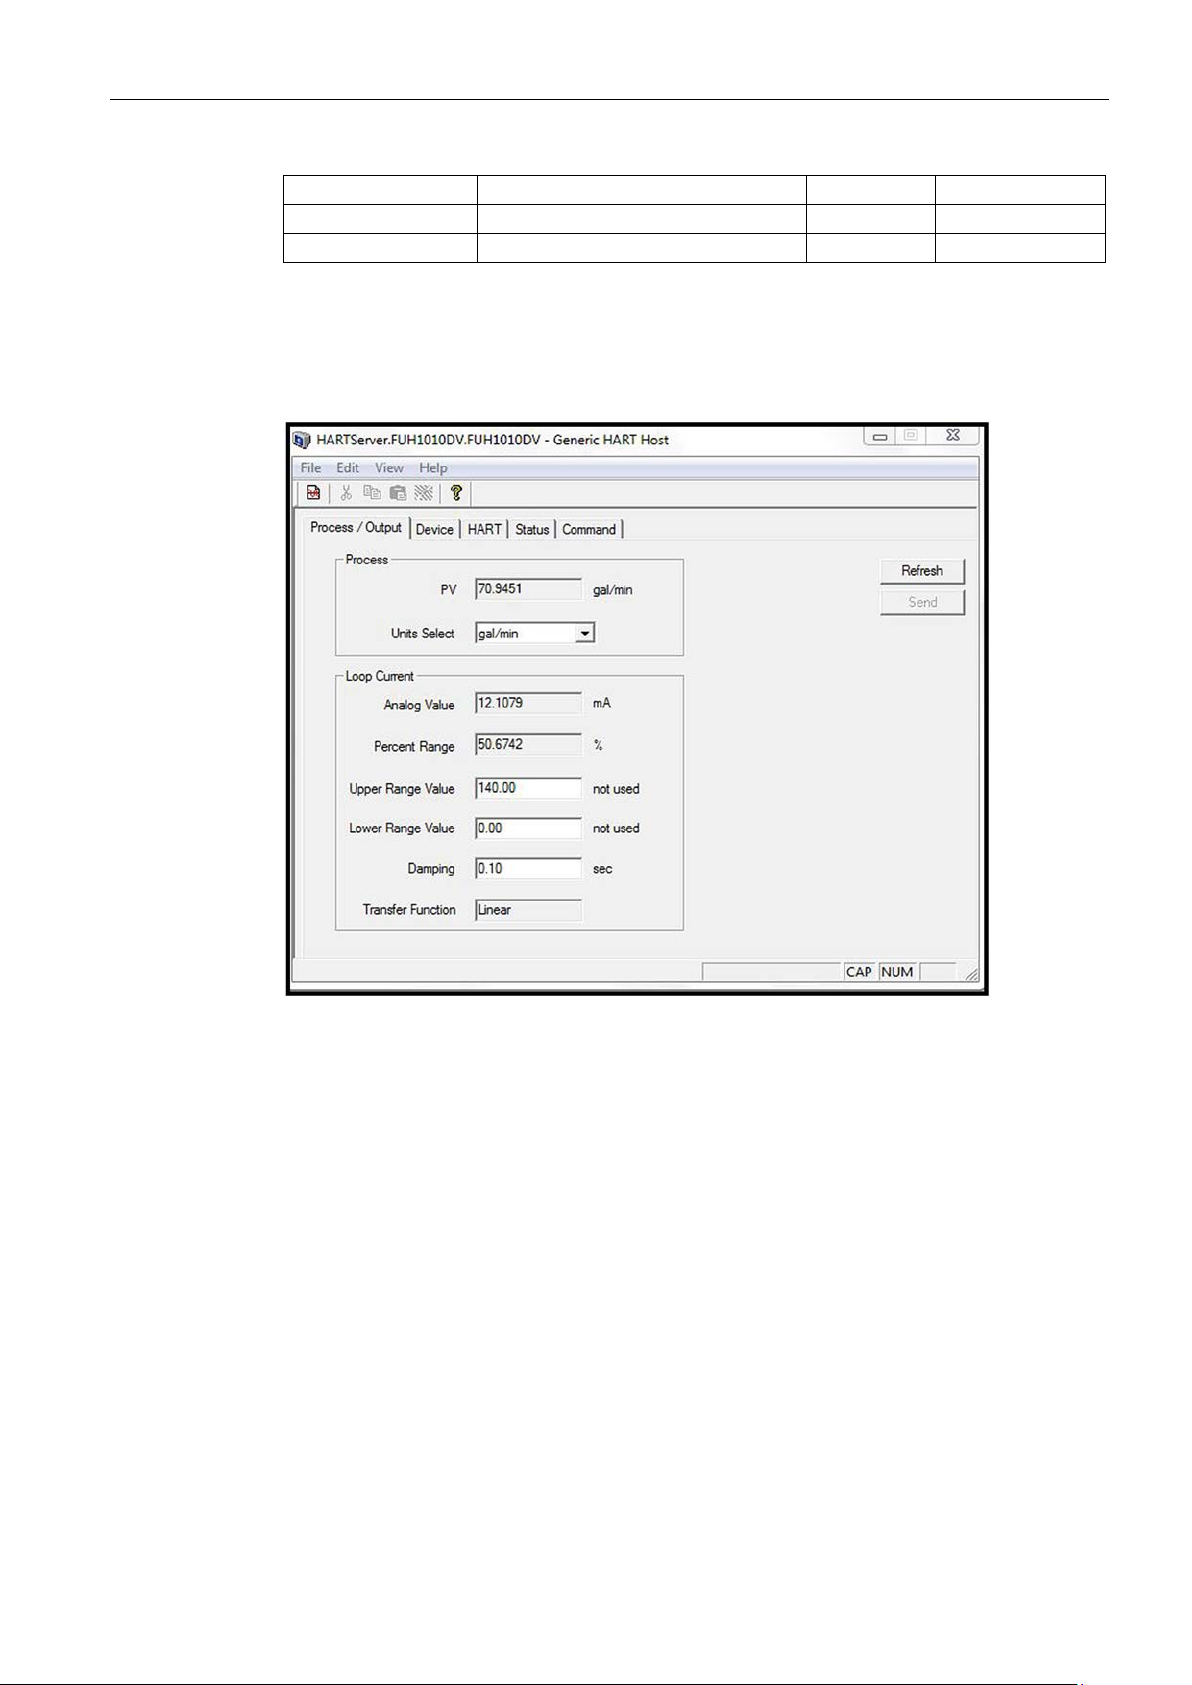
HART Communications
42 (0x2a)
Energy Total
0.0
KBTU
43 (0x2b)
Channel 1 Energy Total
0.0
KBTU
44 (0x2c)
Channel 2 Energy Total
0.0
KBTU
Process/Output View
4.4 HART F US1010 Setup
The Process/Output can be viewed and edited for desired upper and lower range values that
refer to the PV range.
Figure 4-3 Process Variables View
F US Clamp-on Communications Protocol Manual
Hardware Installation Manual, 11/2015, A5E34981613-AC
49
Page 52
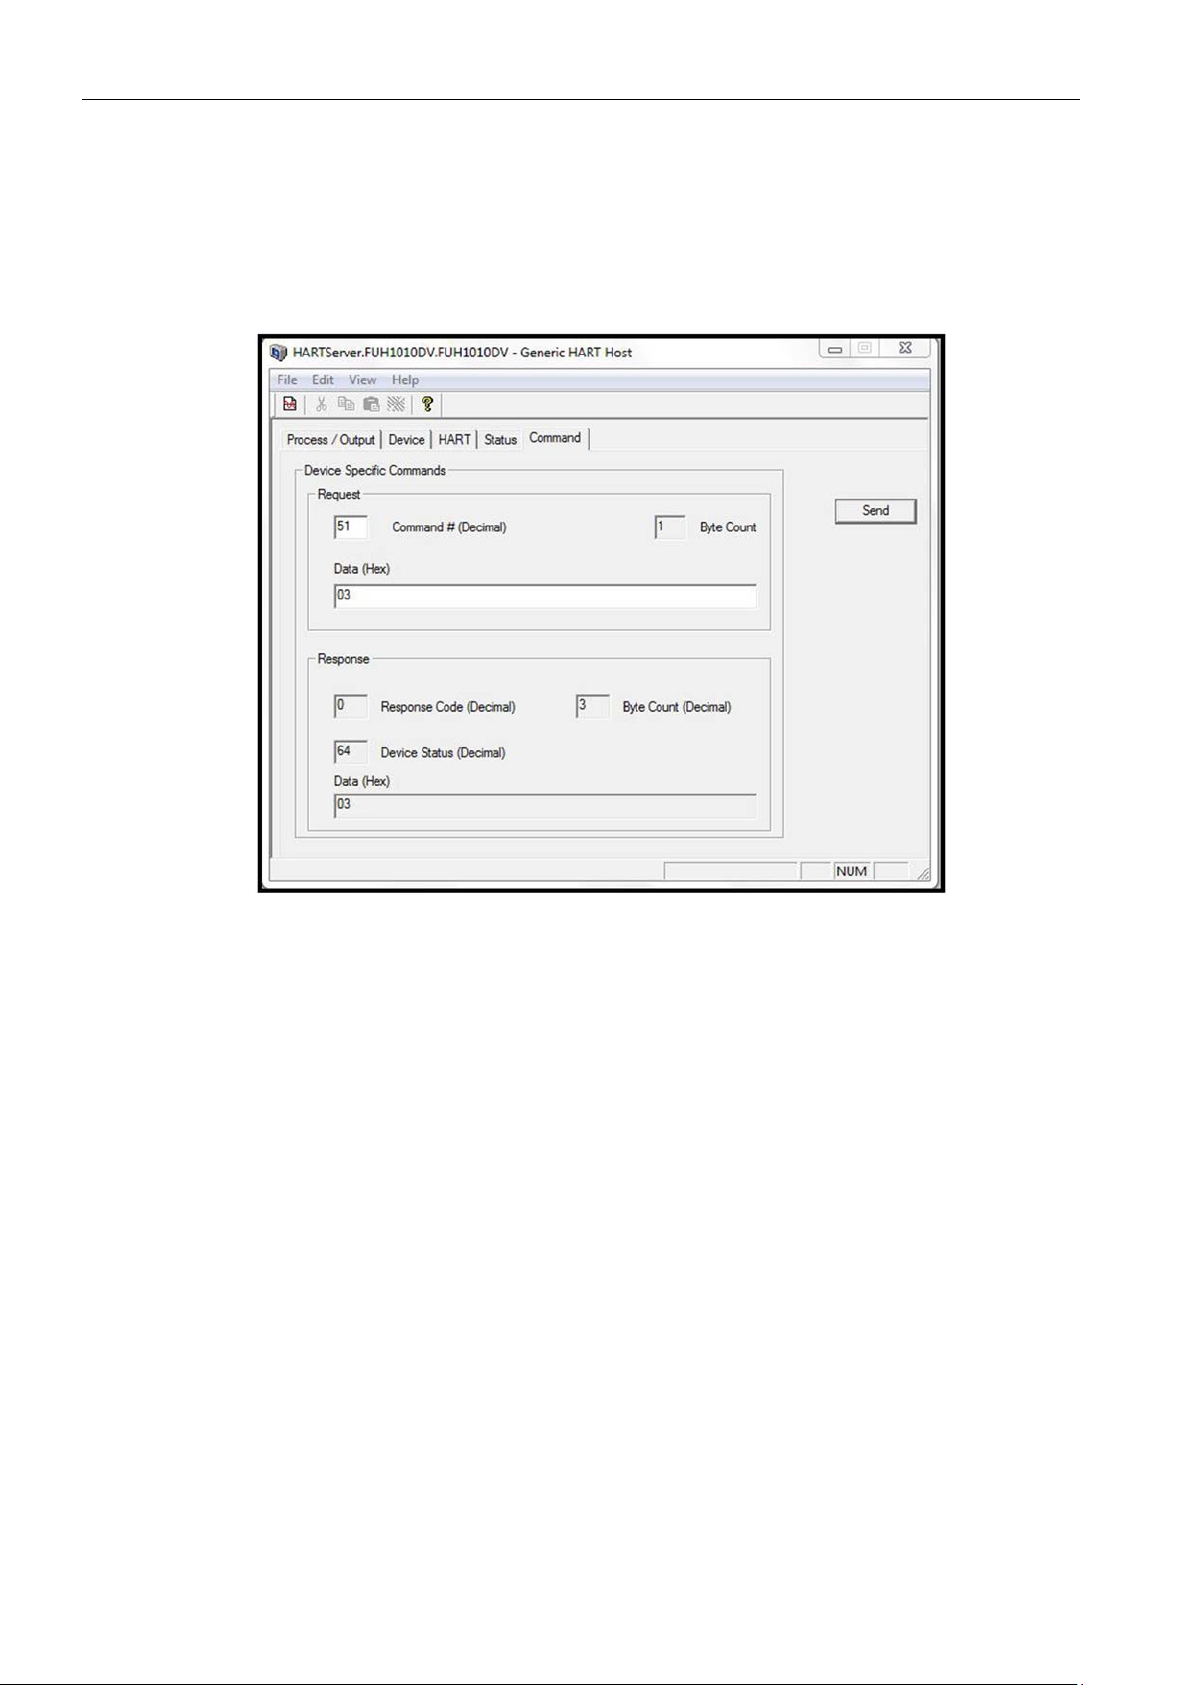
HART Communications
Dynamic Variables Changes
4.4 HART F US1010 Setup
The default Dynamic Variables can be changed and downloaded to the SITRANS
F_US1010. The Command tab can be selected and Command 51 entered followed by the
Hex code that corresponds to the variable desired. Only active variables for the current
profile should be selected.
Figure 4-4 Dynamic Variables Changes View
F US Clamp-on Communications Protocol Manual
50 Hardware Installation Manual, 11/2015, A5E34981613-AC
Page 53
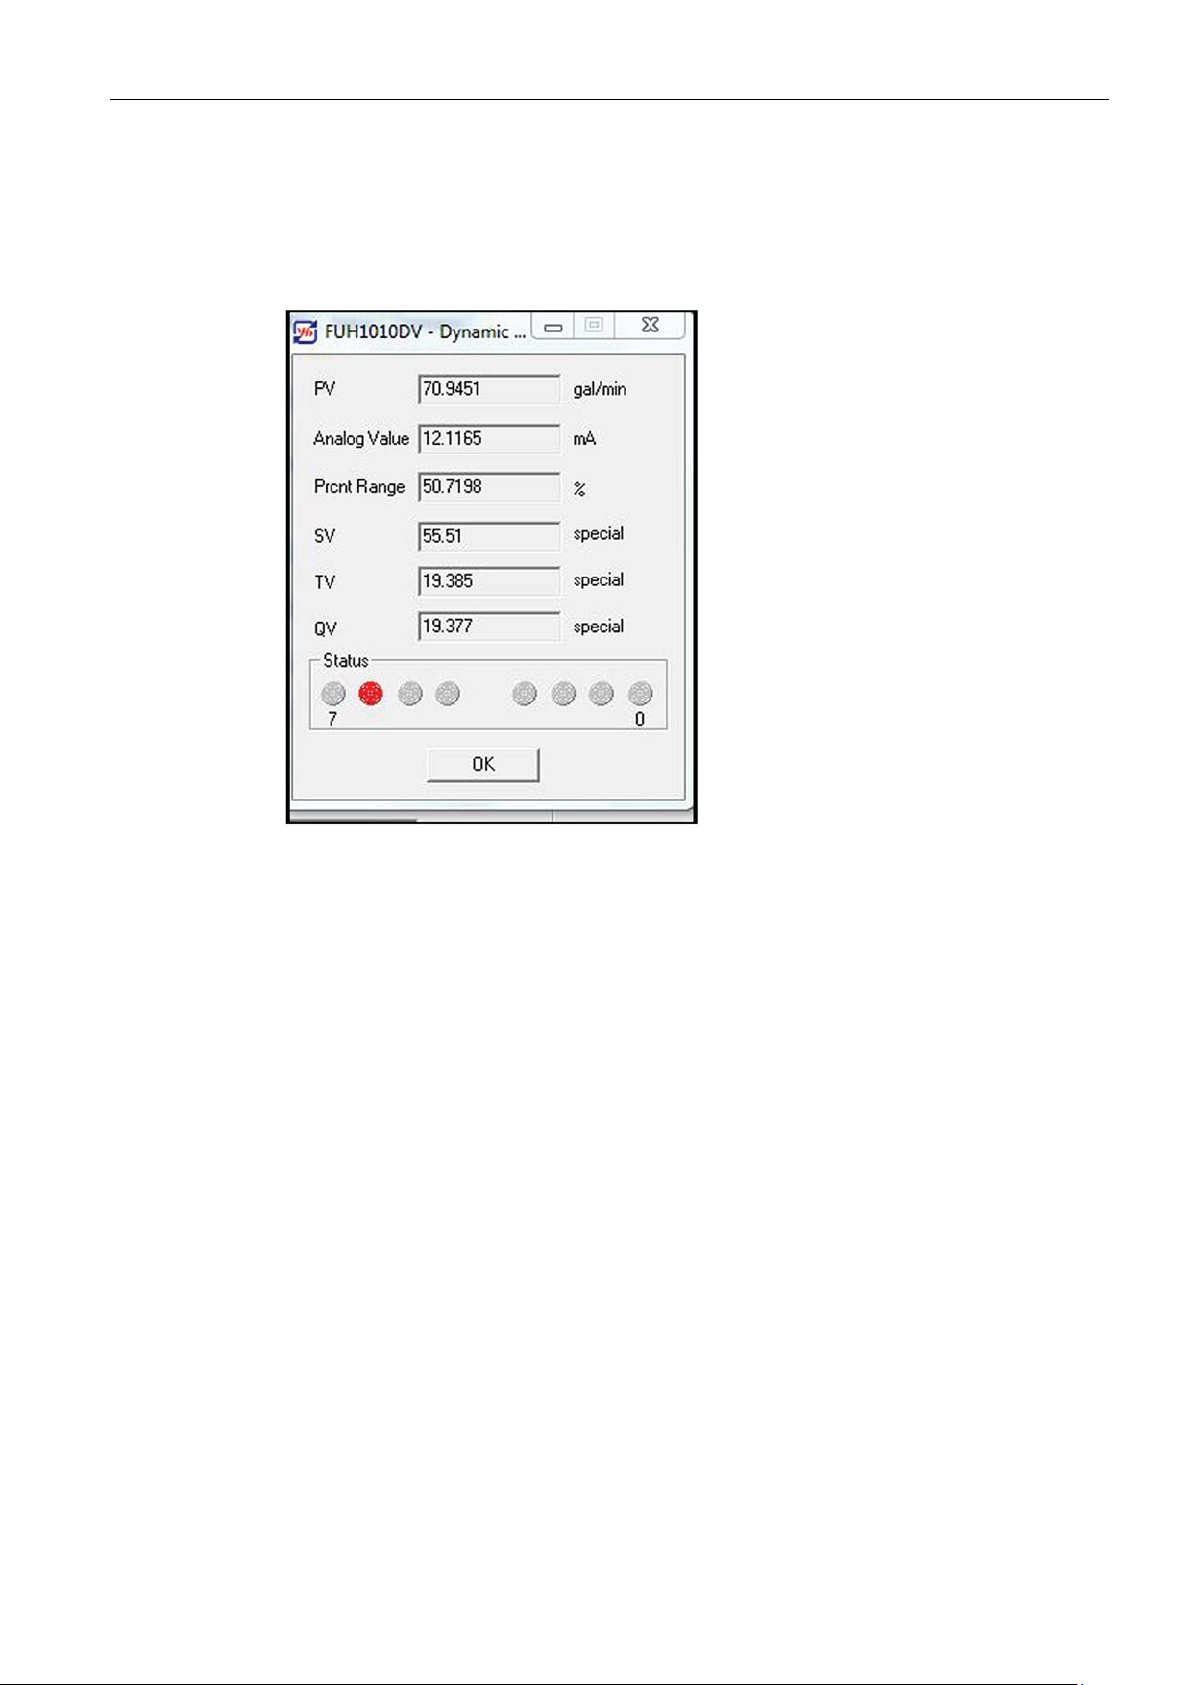
HART Communications
Dynamic Variables View
4.4 HART F US1010 Setup
Dynamic Variables (PV, SV, TV, & QV) can be viewed by selecting the View
tab/Dynamic/Variables. The four variables will be displayed and the PV will include the value
of the current output in both mA and % of range.
Figure 4-5 Dynamic Variables View
F US Clamp-on Communications Protocol Manual
Hardware Installation Manual, 11/2015, A5E34981613-AC
51
Page 54
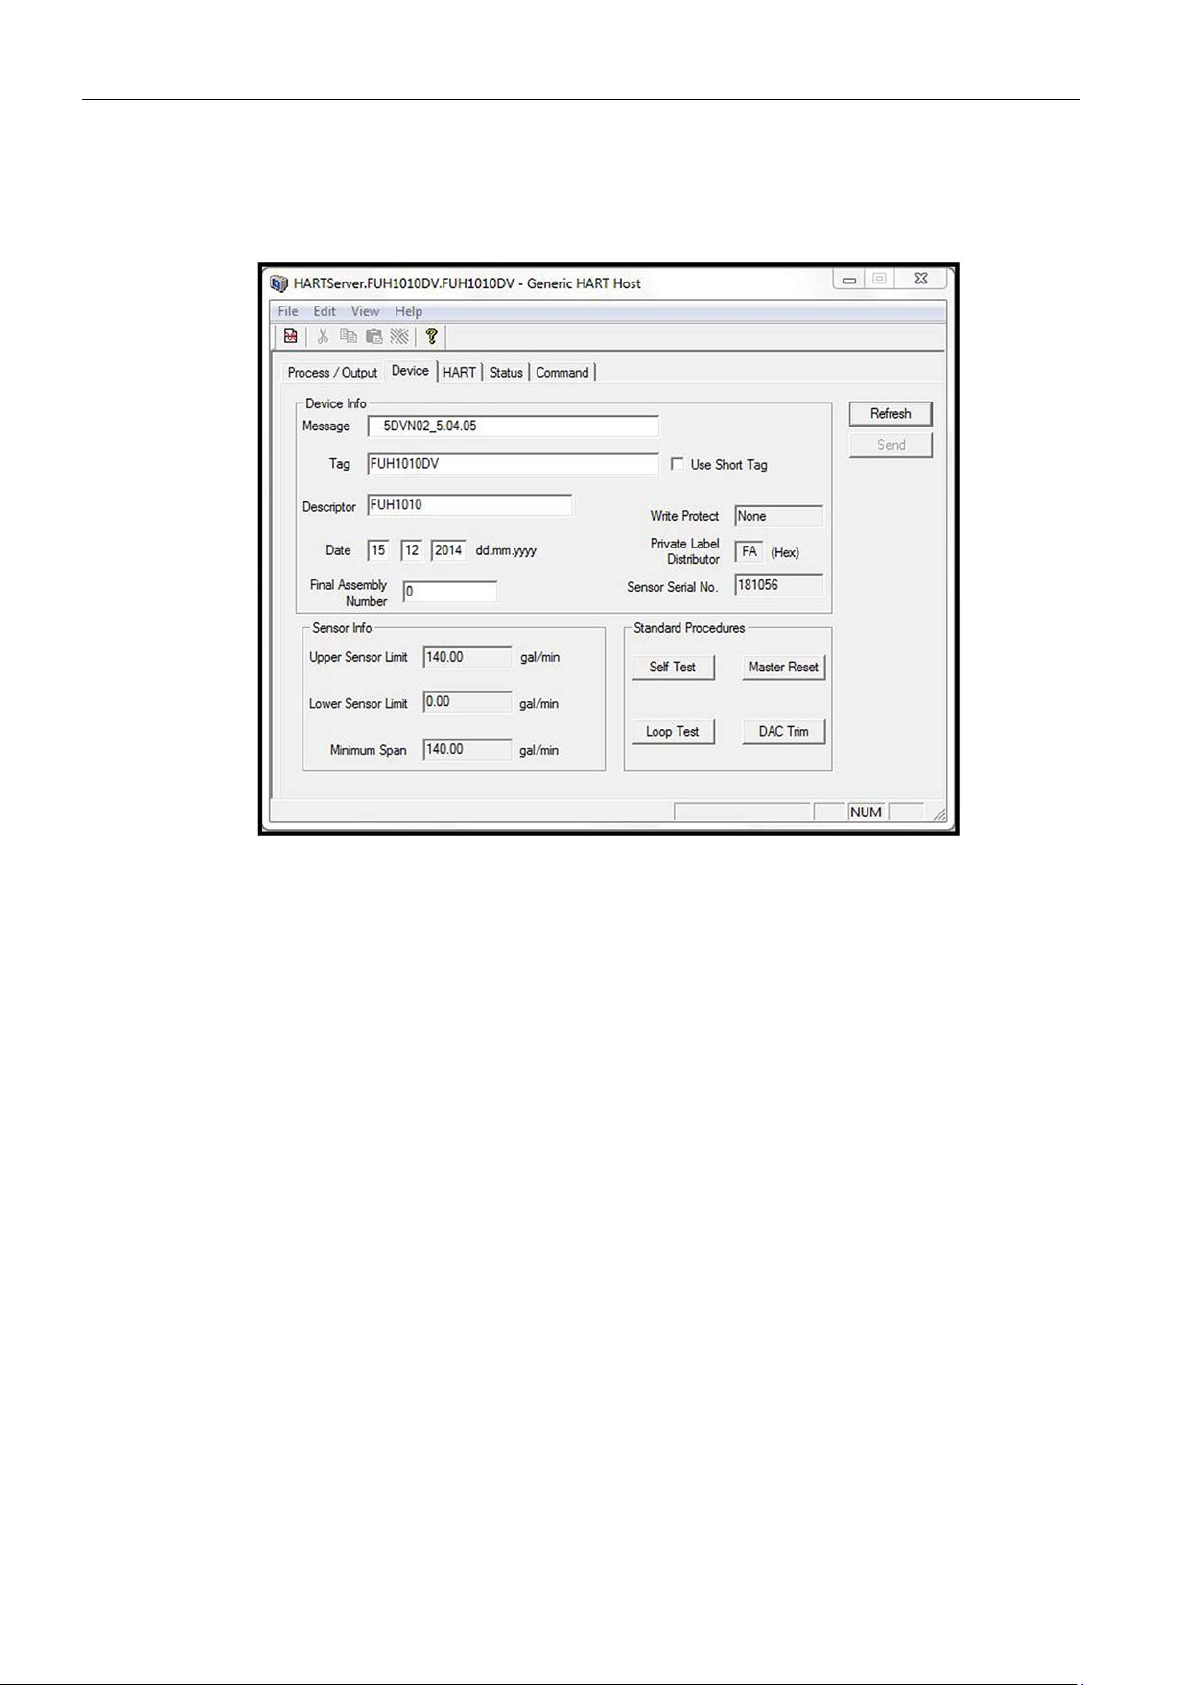
HART Communications
Device Information View
4.5
Troubleshooting Diagnostics
4.5 Troubleshooting Diagnostics
Device Information can be viewed and changed in an online mode by selecting Device tab.
Figure 4-6 Device Information
To take a full diagnostic capture using the FieldServer Toolbox:
1. If not installed, download the FieldServer Toolbox at: http://bit.ly/fstoolbox
2. Open the FieldServer Toolbox from the desktop icon.
3. Choose the [Diagnose] button on the right of the FieldServer you want to take a snapshot
of.
4. Choose [Full Diagnostic] from the Diagnostic Test pull down menu.
5. Set the capture time period to the desired length.
6. Select [Start Diagnostic].
7. When the full diagnostic capture is complete, select [Open Containing Folder] and e-mail
the Zip file with the current time stamp to: [email protected]
F US Clamp-on Communications Protocol Manual
52 Hardware Installation Manual, 11/2015, A5E34981613-AC
Page 55

5
5.1
Consolidated Modbus Registers
Introduction
Input Registers (Read Only)
Description
Address
Register Type
Bytes
Type
Example
Year
101
3xxxx Input Register
2
Integer
2012
Month
102
3xxxx Input Register
2
Integer
10
Day
103
3xxxx Input Register
2
Integer
26
Hour
104
3xxxx Input Register
2
Integer
15
Minute
105
3xxxx Input Register
2
Integer
36
Second
106
3xxxx Input Register
2
Integer
56
Inst Flow Rate
107
3xxxx Input Register
4
Real
299.45
Inst Flow Rate Chan1_Path1
109
3xxxx Input Register
4
Real
299.45
Inst Flow Rate Chan2_Path2
111
3xxxx Input Register
4
Real
250.33
Inst Flow Rate Chan4_Path4
115
3xxxx Input Register
4
Real
274.33
Inst Flow Rate Chan5
117
3xxxx Input Register
4
Real
274.33
Avg Flow Rate
119
3xxxx Input Register
4
Real
299.11
Avg Flow Rate Chan1
121
3xxxx Input Register
4
Real
250.22
Avg Flow Rate Chan2
123
3xxxx Input Register
4
Real
250.22
Avg Flow Rate Chan3
125
3xxxx Input Register
4
Real
264.52
Avg Flow Rate Chan4
127
3xxxx Input Register
4
Real
274.23
Avg Flow Rate Chan5
129
3xxxx Input Register
4
Real
274.23
Raw Flow
131
3xxxx Input Register
4
Real
1220.34
Raw Flow Chan1_Path1
133
3xxxx Input Register
4
Real
1224.21
Raw Flow Chan2_Path2
135
3xxxx Input Register
4
Real
1222.28
Raw Flow Chan3_Path3
137
3xxxx Input Register
4
Real
1221.16
Raw Flow Chan4_Path4
139
3xxxx Input Register
4
Real
1224.88
Flow Velocity
141
3xxxx Input Register
4
Real
4872.45
Total
143
3xxxx Input Register
4
Real
345.89
Total Chan1
145
3xxxx Input Register
4
Real
345.89
Total Chan2
147
3xxxx Input Register
4
Real
345.89
Total Chan3
149
3xxxx Input Register
4
Real
345.89
Total Chan4
151
3xxxx Input Register
4
Real
345.89
Total Chan5
153
3xxxx Input Register
4
Real
345.89
Sonic Vel
155
3xxxx Input Register
4
Real
1494.67
The following tables list the Consolidated Modbus Registers for the SITRANS F US
Communication Module.
Inst Flow Rate Chan3_Path3 113 3xxxx Input Register 4 Real 264,44
F US Clamp-on Communications Protocol Manual
Hardware Installation Manual, 11/2015, A5E34981613-AC
53
Page 56

Consolidated Modbus Registers
Sonic Vel Chan1_Path1
157
3xxxx Input Register
4
Real
1494.67
Sonic Vel Chan2_Path2
159
3xxxx Input Register
4
Real
1494.67
Sonic Vel Chan3_Path3
161
3xxxx Input Register
4
Real
1494.67
Sonic Vel Chan4_Path4
163
3xxxx Input Register
4
Real
1494.67
Signal Strength
165
3xxxx Input Register
2
Integer
75
Signal Strength Chan1_Path1
167
3xxxx Input Register
2
Integer
75
Signal Strength Chan2_Path2
168
3xxxx Input Register
2
Integer
75
Signal Strength Chan3_Path3
169
3xxxx Input Register
2
Integer
75
Signal Strength Chan4_Path4
170
3xxxx Input Register
2
Integer
75
Aeration
171
3xxxx Input Register
2
Integer
3
Aeration Chan1
172
3xxxx Input Register
2
Integer
3
Aeration Chan2
173
3xxxx Input Register
2
Integer
3
Aeration Chan3
174
3xxxx Input Register
2
Integer
3
Turbulence
176
3xxxx Input Register
2
Integer
3
Delta Time Chan1_Path1
179
3xxxx Input Register
4
Real
0.145
Delta Time Chan2_Path2
181
3xxxx Input Register
4
Real
0.145
Delta Time Chan3_Path3
183
3xxxx Input Register
4
Real
0.145
Delta Time Chan4_Path4
185
3xxxx Input Register
4
Real
0.145
Percent Deviation
187
3xxxx Input Register
4
Real
Percent Deviation Chan1
189
3xxxx Input Register
4
Real
Percent Deviation Chan2
191
3xxxx Input Register
4
Real
Inst Energy Rate
193
3xxxx Input Register
4
Real
Inst Energy Rate Chan1
195
3xxxx Input Register
4
Real
Inst Energy Rate Chan2
197
3xxxx Input Register
4
Real
Avg Energy Rate
199
3xxxx Input Register
4
Real
Avg Energy Rate Chan1
201
3xxxx Input Register
4
Real
Avg Energy Rate Chan2
203
3xxxx Input Register
4
Real
Energy Total
205
3xxxx Input Register
4
Real
Energy Total Chan1
207
3xxxx Input Register
4
Real
Energy Total Chan2
209
3xxxx Input Register
4
Real
Chiller Efficiency 1
211
3xxxx Input Register
4
Real
Chiller Efficiency 1 Chan1
213
3xxxx Input Register
4
Real
Chiller Efficiency 2
217
3xxxx Input Register
4
Real
Chiller Efficiency 2 Chan2
221
3xxxx Input Register
4
Real
Chiller Efficiency 3
223
3xxxx Input Register
4
Real
Chiller Efficiency 3 Chan1
225
3xxxx Input Register
4
Real
Chiller Efficiency 3 Chan2
227
3xxxx Input Register
4
Real
Liquident
229
3xxxx Input Register
4
Real
1901.087
Liquident Chan1
231
3xxxx Input Register
4
Real
1901.087
Liquident Chan2
233
3xxxx Input Register
4
Real
1901.087
Viscosity
235
3xxxx Input Register
4
Real
Specific Gravity
237
3xxxx Input Register
4
Real
0.987
5.1 Consolidated Modbus Registers
Aeration Chan4 175 3xxxx Input Register 2 Integer 3
Delta Time 177 3xxxx Input Register 4 Real 0.145
F US Clamp-on Communications Protocol Manual
54 Hardware Installation Manual, 11/2015, A5E34981613-AC
Chiller Efficiency 1 Chan2 215 3xxxx Input Register 4 Real
Chiller Efficiency 2 Chan1 219 3xxxx Input Register 4 Real
Page 57

Consolidated Modbus Registers
Specific Gravity Chan1
239
3xxxx Input Register
4
Real
0.987
Specific Gravity Chan2
241
3xxxx Input Register
4
Real
0.987
Specific Gravity Chan3
243
3xxxx Input Register
4
Real
0.987
Specific Gravity Chan4
245
3xxxx Input Register
4
Real
0.987
API
247
3xxxx Input Register
4
Real
10.00
API Chan1
249
3xxxx Input Register
4
Real
10.00
API Chan2
251
3xxxx Input Register
4
Real
10.00
Kg perm3
253
3xxxx Input Register
4
Real
991.012
Kg per m3 Chan1
255
3xxxx Input Register
4
Real
991.012
Kg per m3 Chan2
257
3xxxx Input Register
4
Real
991.012
Base SG
259
3xxxx Input Register
4
Real
0.954
Base SG Chan1
261
3xxxx Input Register
4
Real
0.954
Base SG Chan2
263
3xxxx Input Register
4
Real
0.954
Base API Chan1
267
3xxxx Input Register
4
Real
10.00
Base Kg per m3
271
3xxxx Input Register
4
Real
995.033
Base Kg per m3 Chan1
273
3xxxx Input Register
4
Real
995.033
Base Kg per m3 Chan2
275
3xxxx Input Register
4
Real
995.033
Analog Input 1
277
3xxxx Input Register
4
Real
Analog Input 2
279
3xxxx Input Register
4
Real
Analog Input 3
281
3xxxx Input Register
4
Real
Analog Input 4
283
3xxxx Input Register
4
Real
Aux Input 1
285
3xxxx Input Register
4
Real
Aux Input 2
287
3xxxx Input Register
4
Real
Aux Input 3
289
3xxxx Input Register
4
Real
Aux Input 4
291
3xxxx Input Register
4
Real
Temperature 1
293
3xxxx Input Register
4
Real
Temperature 2
295
3xxxx Input Register
4
Real
Temperature 3
297
3xxxx Input Register
4
Real
Temperature 4
299
3xxxx Input Register
4
Real
Supply Temp
301
3xxxx Input Register
4
Real
Supply Temp Chan1
303
3xxxx Input Register
4
Real
Supply Temp Chan2
305
3xxxx Input Register
4
Real
Return Temp Chan1
309
3xxxx Input Register
4
Real
Temp Difference
313
3xxxx Input Register
4
Real
Temp Difference Chan1
315
3xxxx Input Register
4
Real
Temp Difference Chan2
317
3xxxx Input Register
4
Real
5.1 Consolidated Modbus Registers
Base API 265 3xxxx Input Register 4 Real 10.00
Base API Chan2 269 3xxxx Input Register 4 Real 10.00
F US Clamp-on Communications Protocol Manual
Hardware Installation Manual, 11/2015, A5E34981613-AC
Return Temp 307 3xxxx Input Register 4 Real
Return Temp Chan2 311 3xxxx Input Register 4 Real
55
Page 58

Consolidated Modbus Registers
Input Status (Read Only)
Description
Address
Register Type
Bit
Data Type
Example
Spacing
1
1xxxx Input Register
1
Coil
1
Empty
2
1xxxx Input Register
1
Coil 1 Rate
3
1xxxx Input Register
1
Coil
1
Fault
4
1xxxx Input Register
1
Coil
1
Aeration
5
1xxxx Input Register
1
Coil
1
Memory
6
1xxxx Input Register
1
Coil 1 Makeup
7
1xxxx Input Register
1
Coil
1
Interface
8
1xxxx Input Register
1
Coil
1
Pig 9 1xxxx Input Register
1
Coil
1
ZeroMatic
10
1xxxx Input Register
1
Coil 1 Turbulence
11
1xxxx Input Register
1
Coil
1
Description
Address
Register Type
Bit Data Type
Example
Spacing Chan1_Path1
21
1xxxx Input Register
1
Coil
1
Rate Chan1_Path1
23
1xxxx Input Register
1
Coil
1
Fault Chan1_Path1
24
1xxxx Input Register
1
Coil 1 Aeration Chan1_Path1
25
1xxxx Input Register
1
Coil
1
Memory Chan1_Path1
26
1xxxx Input Register
1
Coil
1
Makeup Chan1_Path1
27
1xxxx Input Register
1
Coil
1
Interface Chan1_Path1
28
1xxxx Input Register
1
Coil 1 Pig Chan1_Path1
29
1xxxx Input Register
1
Coil
1
ZeroMatic Chan1_Path1
30
1xxxx Input Register
1
Coil
1
Turbulence Chan1_Path1
31
1xxxx Input Register
1
Coil
1
Description
Address
Register Type
Bit
Data Type
Example
Spacing Chan2_Path2
41
1xxxx Input Register
1
Coil
1
Empty Chan2_Path2
42
1xxxx Input Register
1
Coil 1 Rate Chan2_Path2
43
1xxxx Input Register
1
Coil
1
Fault Chan2_Path2
44
1xxxx Input Register
1
Coil
1
Aeration Chan2_Path2
45
1xxxx Input Register
1
Coil
1
Memory Chan2_Path2
46
1xxxx Input Register
1
Coil 1 Makeup Chan2_Path2
47
1xxxx Input Register
1
Coil
1
Pig Chan2_Path2
49
1xxxx Input Register
1
Coil
1
Turbulence Chan2_Path2
51
1xxxx Input Register
1
Coil
1
5.1 Consolidated Modbus Registers
Empty Chan1_Path1 22 1xxxx Input Register 1 Coil 1
Interface Chan2_Path2 48 1xxxx Input Register 1 Coil 1
F US Clamp-on Communications Protocol Manual
56 Hardware Installation Manual, 11/2015, A5E34981613-AC
ZeroMatic Chan2_Path2 50 1xxxx Input Register 1 Coil 1
Page 59

Consolidated Modbus Registers
Description
Address
Register Type
Bit
Data Type
Example
Spacing Chan3_Path3
61
1xxxx Input Register
1
Coil
1
Empty Chan3_Path3
62
1xxxx Input Register
1
Coil 1 Rate Chan3_Path3
63
1xxxx Input Register
1
Coil
1
Fault Chan3_Path3
64
1xxxx Input Register
1
Coil
1
Aeration Chan3_Path3
65
1xxxx Input Register
1
Coil
1
Memory Chan3_Path3
66
1xxxx Input Register
1
Coil 1 Makeup Chan3_Path3
67
1xxxx Input Register
1
Coil
1
Interface Chan3_Path3
68
1xxxx Input Register
1
Coil
1
Pig Chan3_Path3
69
1xxxx Input Register
1
Coil
1
ZeroMatic Chan3_Path3
70
1xxxx Input Register
1
Coil 1 Turbulence Chan3_Path3
71
1xxxx Input Register
1
Coil
1
Description
Address
Register Type
Bit Data Type
Example
Spacing Chan4_Path4
81
1xxxx Input Register
1
Coil
1
Empty Chan4_Path4
82
1xxxx Input Register
1
Coil
1
Rate Chan4_Path4
83
1xxxx Input Register
1
Coil
1
Fault Chan4_Path4
84
1xxxx Input Register
1
Coil 1 Aeration Chan4_Path4
85
1xxxx Input Register
1
Coil
1
Memory Chan4_Path4
86
1xxxx Input Register
1
Coil
1
Makeup Chan4_Path4
87
1xxxx Input Register
1
Coil
1
Interface Chan4_Path4
88
1xxxx Input Register
1
Coil 1 Pig Chan4_Path4
89
1xxxx Input Register
1
Coil
1
ZeroMatic Chan4_Path4
90
1xxxx Input Register
1
Coil
1
Turbulence Chan4_Path4
91
1xxxx Input Register
1
Coil
1
Description
Address
Register Type
Bit
Data Type
Example
Spacing Chan5
101
1xxxx Input Register
1
Coil
1
Empty Chan5
102
1xxxx Input Register
1
Coil 1 Rate Chan5
103
1xxxx Input Register
1
Coil
1
Fault Chan5
104
1xxxx Input Register
1
Coil
1
Aeration Chan5
105
1xxxx Input Register
1
Coil
1
Memory Chan5
106
1xxxx Input Register
1
Coil 1 Makeup Chan5
107
1xxxx Input Register
1
Coil
1
Pig Chan5
109
1xxxx Input Register
1
Coil
1
Turbulence Chan5
111
1xxxx Input Register
1
Coil
1
5.1 Consolidated Modbus Registers
Interface Chan5 108 1xxxx Input Register 1 Coil 1
ZeroMatic Chan5 110 1xxxx Input Register 1 Coil 1
F US Clamp-on Communications Protocol Manual
Hardware Installation Manual, 11/2015, A5E34981613-AC
57
Page 60

Consolidated Modbus Registers
Description
Address
Register Type
Bytes
Type
Example
Site ID Chan1
501
3xxxx Input Register
8
String
Chiller1
Site ID Chan2
505
3xxxx Input Register
8
String
Chiller2
Site ID Chan3
509
3xxxx Input Register
8
String
Chiller3
Site ID Chan4
513
3xxxx Input Register
8
String
Chiller4
Flow Rate Units Chan1
517
3xxxx Input Register
8
String
GAL/MIN
Flow Rate Units Chan2
521
3xxxx Input Register
8
String
GAL/MIN
Flow Rate Units Chan3
525
3xxxx Input Register
8
String
GAL/MIN
Flow Rate Units Chan4
529
3xxxx Input Register
8
String
GAL/MIN
Flow Rate Units Chan5
533
3xxxx Input Register
8
String
GAL/MIN
Raw Flow Units Chan1
537
3xxxx Input Register
8
String
I3/S
Raw Flow Units Chan2
541
3xxxx Input Register
8
String
I3/S
Raw Flow Units Chan3
545
3xxxx Input Register
8
String
I3/S
Raw Flow Units Chan4
549
3xxxx Input Register
8
String
I3/S
Flow Velocity Units
553
3xxxx Input Register
8
String
F/S
Total Units Chan2
561
3xxxx Input Register
8
String
KGAL
Total Units Chan3
565
3xxxx Input Register
8
String
KGAL
Total Units Chan4
569
3xxxx Input Register
8
String
KGAL
Total Units Chan5
573
3xxxx Input Register
8
String
KGAL
Sonic Vel Units Chan1
577
3xxxx Input Register
8
String
VS(M/S)
Sonic Vel Units Chan2
581
3xxxx Input Register
8
String
VS(M/S)
Sonic Vel Units Chan3
585
3xxxx Input Register
8
String
VS(M/S)
Sonic Vel Units Chan4
589
3xxxx Input Register
8
String
VS(M/S)
Sig. Strength Units Chan1
593
3xxxx Input Register
8
String
S
Sig. Strength Units Chan2
597
3xxxx Input Register
8
String
S
Sig. Strength Units Chan3
601
3xxxx Input Register
8
String
S
Sig. Strength Units Chan4
605
3xxxx Input Register
8
String
S
Aeration Units Chan1
609
3xxxx Input Register
8
String
A
Aeration Units Chan2
613
3xxxx Input Register
8
String
A
Aeration Units Chan3
617
3xxxx Input Register
8
String
A
Aeration Units Chan4
621
3xxxx Input Register
8
String
A
Turbulence Units
625
3xxxx Input Register
8
String
A
Delta Time Units Chan1
629
3xxxx Input Register
8
String
dt(uS)
Delta Time Units Chan3
637
3xxxx Input Register
8
String
dt(uS)
Delta Time Units Chan4
641
3xxxx Input Register
8
String
dt(uS)
Deviation Units Chan1
645
3xxxx Input Register
8
String
%
Deviation Units Chan2
649
3xxxx Input Register
8
String
%
Energy Rate Units Chan1
653
3xxxx Input Register
8
String
Energy Rate Units Chan2
657
3xxxx Input Register
8
String
Energy Total Units Chan1
661
3xxxx Input Register
8
String
Energy Total Units Chan2
665
3xxxx Input Register
8
String
CE Units Chan1
669
3xxxx Input Register
8
String
CE
CE Units Chan2
673
3xxxx Input Register
8
String
CE
Liquident Units Chan1
677
3xxxx Input Register
8
String
LI
5.1 Consolidated Modbus Registers
Total Units Chan1 557 3xxxx Input Register 8 String KGAL
F US Clamp-on Communications Protocol Manual
58 Hardware Installation Manual, 11/2015, A5E34981613-AC
Delta Time Units Chan2 633 3xxxx Input Register 8 String dt(uS)
Page 61

Consolidated Modbus Registers
Liquident Units Chan2
681
3xxxx Input Register
8
String
LI
Viscosity Units
685
3xxxx Input Register
8
String
CS
SG Units Chan1
689
3xxxx Input Register
8
String
SG
SG Units Chan2
693
3xxxx Input Register
8
String
SG
SG Units Chan3
697
3xxxx Input Register
8
String
SG
SG Units Chan4
701
3xxxx Input Register
8
String
SG
API Units Chan1
705
3xxxx Input Register
8
String
API
API Units Chan2
709
3xxxx Input Register
8
String
API
Kg per m3 Units Chan1
713
3xxxx Input Register
8
String
KGM3
Kg per m3 Units Chan2
717
3xxxx Input Register
8
String
KGM3
Base SG Units Chan1
721
3xxxx Input Register
8
String
BSG
Base SG Units Chan2
725
3xxxx Input Register
8
String
BSG
Base API Units Chan1
729
3xxxx Input Register
8
String
BAPI
Chan1
Chan2
Chan1
Chan2
Temp Units
753
3xxxx Input Register
8
String
F
Temp 1 Units
757
3xxxx Input Register
8
String
F
Temp 2 Units
761
3xxxx Input Register
8
String
F
Temp 3 Units
765
3xxxx Input Register
8
String
F
Temp 4 Units
769
3xxxx Input Register
8
String
F
Supply Temp Units Chan1
773
3xxxx Input Register
8
String
F
Supply Temp Units Chan2
777
3xxxx Input Register
8
String
F
Return Temp Units Chan1
781
3xxxx Input Register
8
String
F
Return Temp Units Chan2
785
3xxxx Input Register
8
String
F
Temp Diff Units Chan1
789
3xxxx Input Register
8
String
F
AI1 Units
797
3xxxx Input Register
8
String
OFF
AI3 Units
805
3xxxx Input Register
8
String
OFF
AI4 Units
809
3xxxx Input Register
8
String
OFF
Aux 1 Type
813
3xxxx Input Register
8
String
Aux 2 Type
817
3xxxx Input Register
8
String
Aux 3 Type
821
3xxxx Input Register
8
String
Aux 4 Type
825
3xxxx Input Register
8
String
5.1 Consolidated Modbus Registers
Base API Units Chan2 733 3xxxx Input Register 8 String BAPI
Base Kg per m3 Units
737 3xxxx Input Register 8 String BKGM3
Base Kg per m3 Units
Liquid Name
Liquid Name
Temp Diff Units Chan2 793 3xxxx Input Register 8 String F
AI2 Units 801 3xxxx Input Register 8 String OFF
741 3xxxx Input Register 8 String BKGM3
745 3xxxx Input Register 8 String GASOIL
749 3xxxx Input Register 8 String GASOIL
F US Clamp-on Communications Protocol Manual
Hardware Installation Manual, 11/2015, A5E34981613-AC
59
Page 62

Page 63

6
6.1
WEB Configuration Utility
Introduction
Note
Web Configuration through the Ethernet port is used for every protocol including Ethernet,
N2, BACnet and Modbus except HART.
Note
Ethernet Web Utility Toolbox
This Web utility is used
locate communications modules on the same network.
The web utility can be found at http://www.fieldserver.com/techsupport/utility/downloads.php.
The default IP address is: 192.168.0.2
Note
RS-485 is used for all communication protocols.
You can connect to the SITRANS F US Clamp-on Communications Module using a Web
browser (Chrome 19.0 or higher, Firefox 13.0 or higher, Opera 11.0 or higher, Internet
Explorer 8, 9, or 10). If the IP of the Communication Module is unknown, the Toolbox Utility
can be used to locate meters that have the Communication Module option installed and are
connected to the Ethernet network.
If using Ethernet IP, connect the Ethernet connector and refer to the following note.
to change settings including IP addresses for multiple meters and to
F US Clamp-on Communications Protocol Manual
Hardware Installation Manual, 11/2015, A5E34981613-AC
61
Page 64
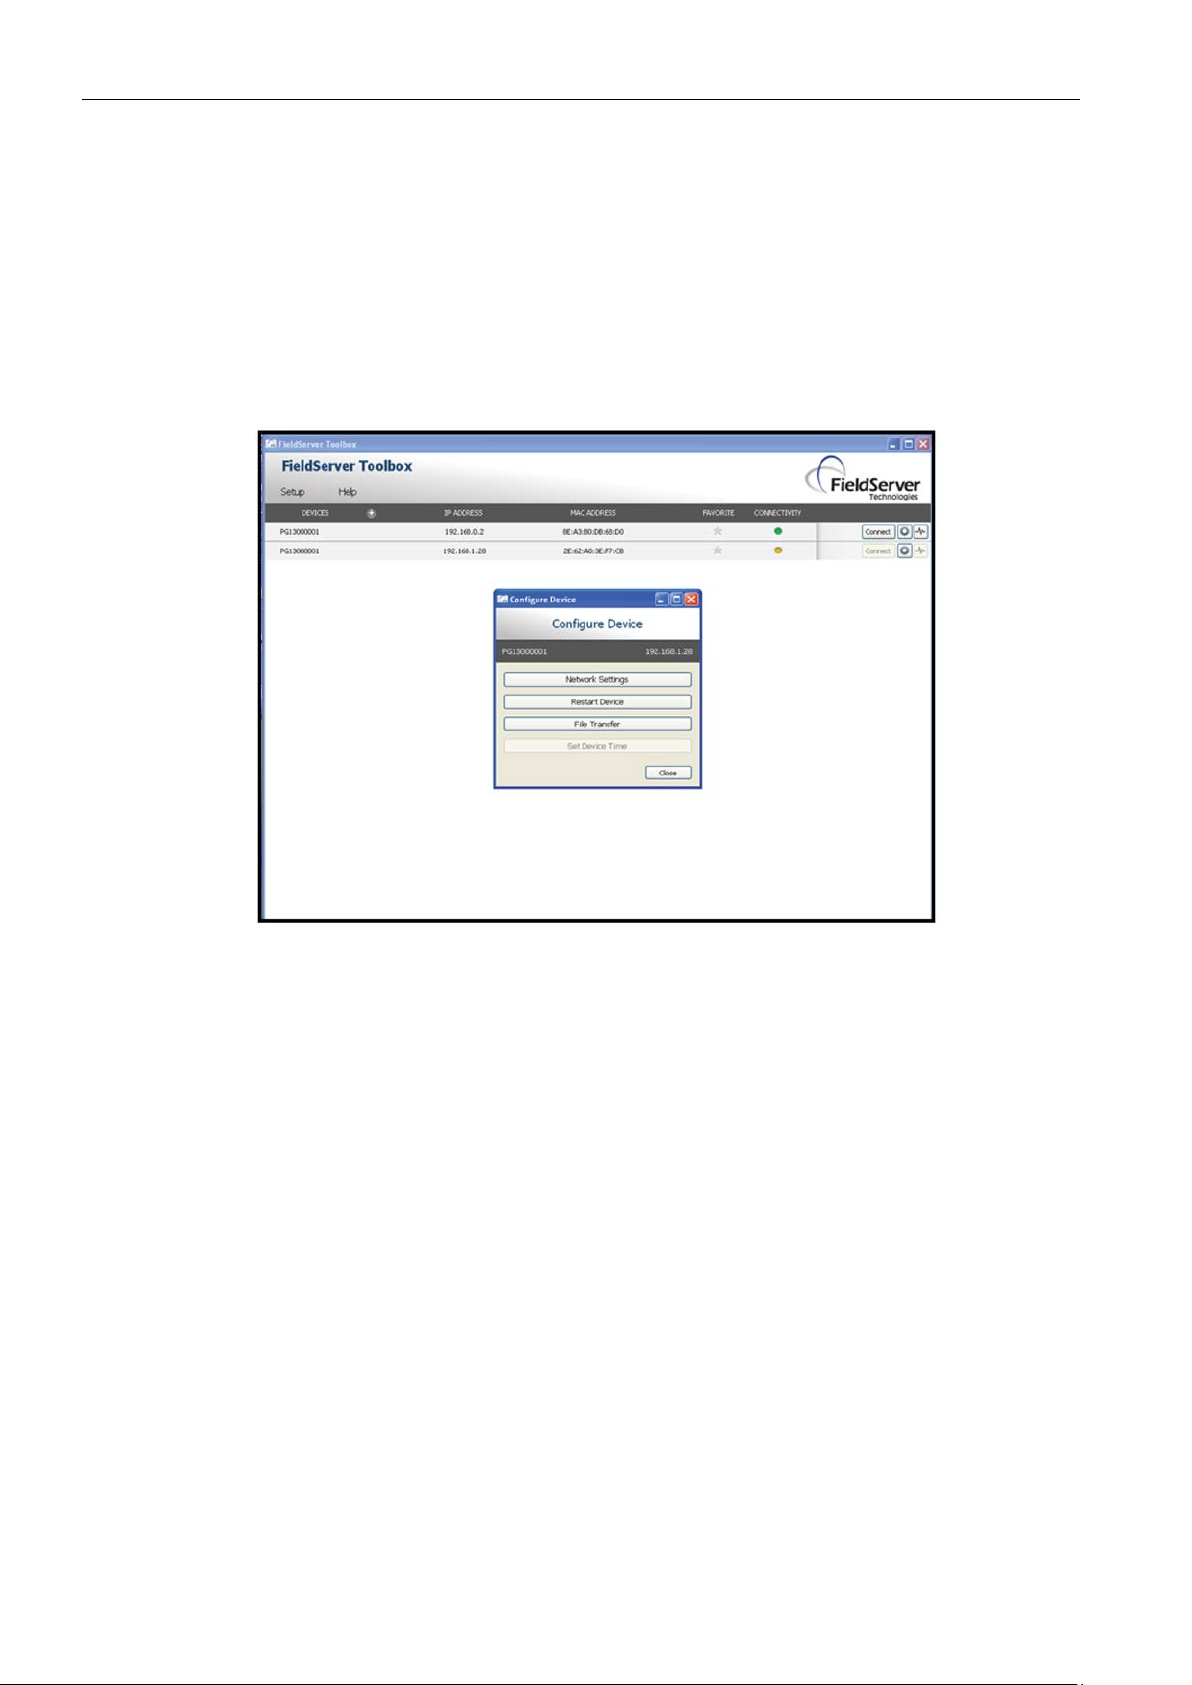
WEB Configuration Utility
Toolbox
Configuration Parameters
6.1 WEB Configuration Utility
The Toolbox utility will discover meters with communication modules on the Ethernet
network. The meters can be on the same or different subnet as the PC running the Toolbox
Utility. You can connect to the module that is on the same Ethernet subnet by using the
connect button which will open the default WEB Browser on the PC. The following sections
in this document then apply to changes that can be made using the WEB Browser.
However, the Toolbox utility has a few features that can be also used whether on the same
subnet or a different subnet. See Figure 6-1. For example, the network settings can be
changed and the module restarted which is necessary after changes are made.
Figure 6-1 Tool Box Utility
This is the opening screen when the WEB Browser connects to the Communications
Module. The number of parameters that appear will depend on the profile and protocol
selected. Figure 6-2 shows this screen for Profile 20 and the BACnet protocol. Figure 6-3
shows this screen for Profile 17 and the Modbus protocol.
F US Clamp-on Communications Protocol Manual
62 Hardware Installation Manual, 11/2015, A5E34981613-AC
Page 65
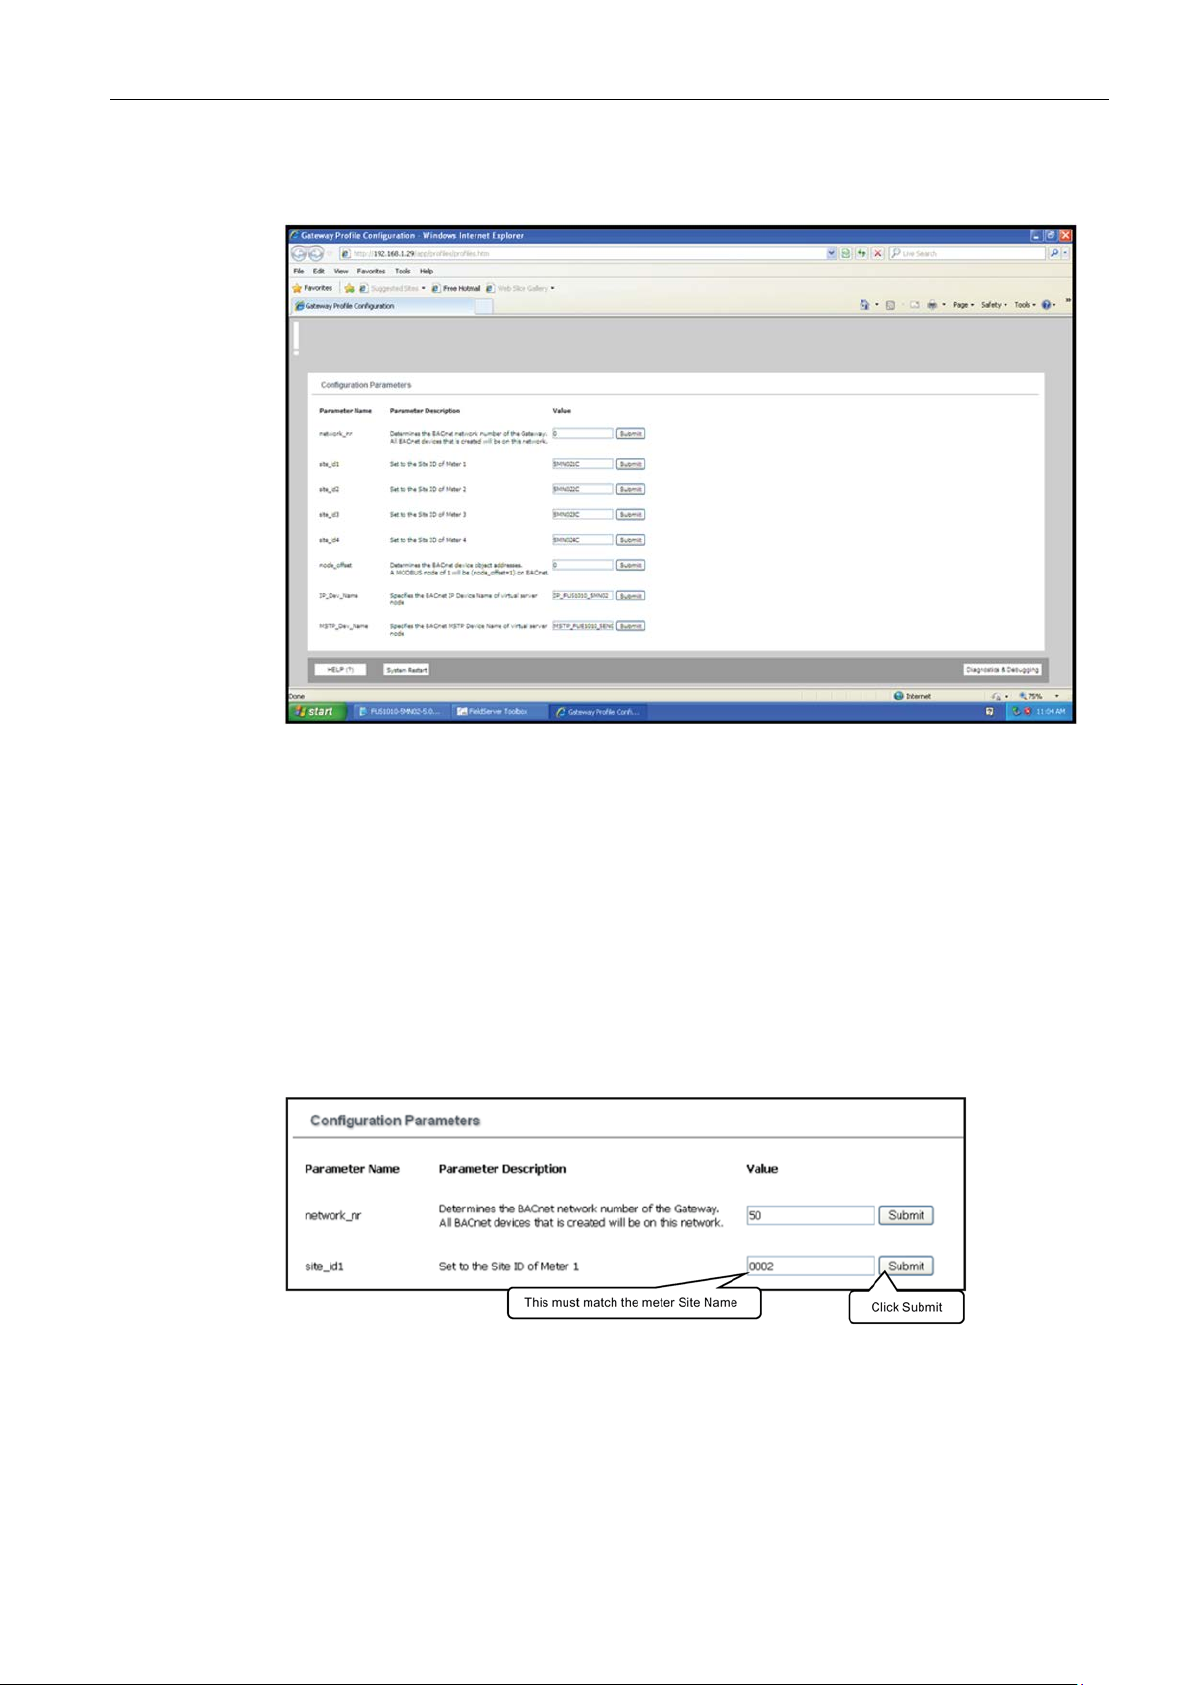
WEB Configuration Utility
BACnet Parameters
network_nr
site_idx
node_offset
6.1 WEB Configuration Utility
Figure 6-2 BACnet Parameters
This parameter sets the BACnet network number of the Gateway. All BACnet devices that
are created will be on this network. The default is 0 which may be satisfactory for most
simple applications.
This is the Site ID of the channel in the meter. For single channel applications it is not
necessary to change this parameter but when the meter has two or more channels it is
necessary for the Site ID to match the name of the meter SITE ID for ALL meter types.
This parameter sets the BACnet Device Object address. A Modbus node of 1 will be
(node_offset +1) on BACnet.
F US Clamp-on Communications Protocol Manual
Hardware Installation Manual, 11/2015, A5E34981613-AC
63
Page 66
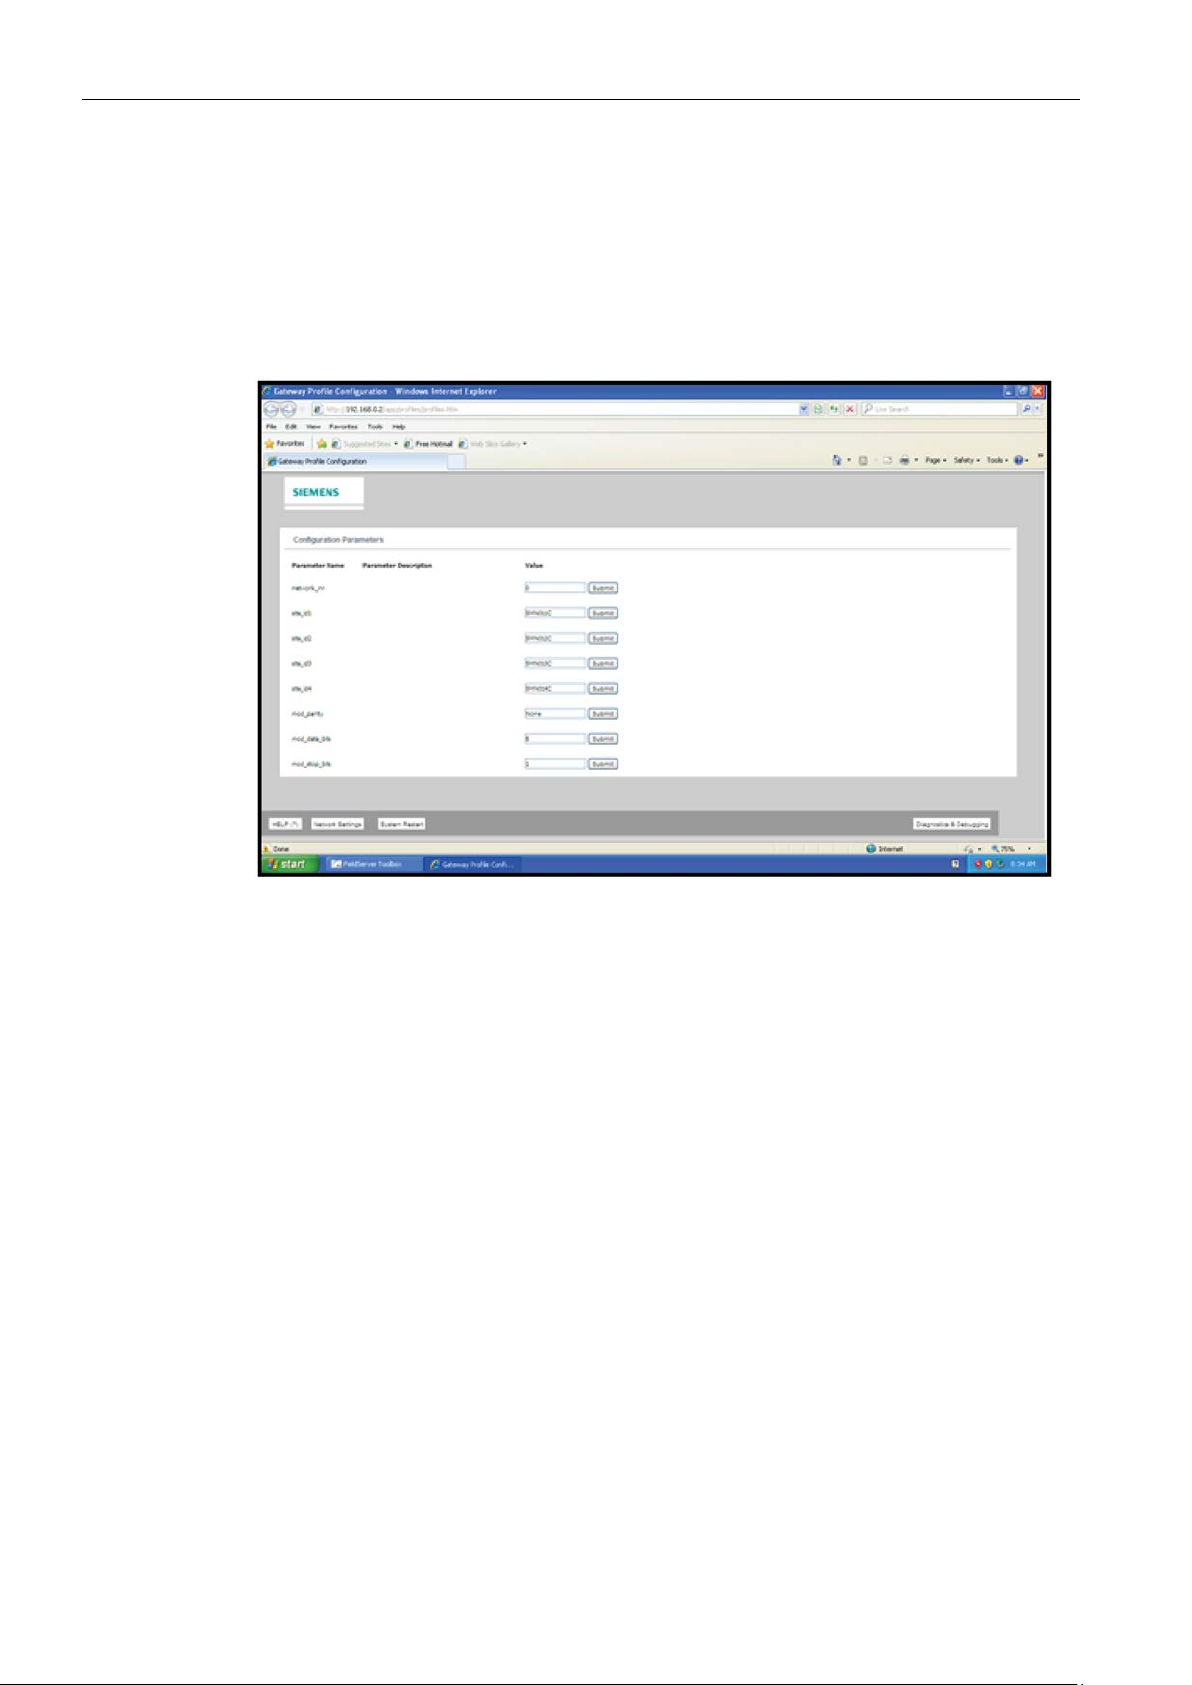
WEB Configuration Utility
__Dev_Name
Modbus Parameters
mod_parity
None, Odd, Even
mod_data_bits
8, 7
mod_stop_bits
1, 2
6.1 WEB Configuration Utility
This parameter can be used to change the default BACnet Device Name of the node. The
default names include the communication (IP or MSTP), the meter type, and the firmware
type. This name may have to be changed to make the name unique system wide.
Figure 6-3 Modbus Settings
This parameter sets the communication parity on the Modbus RS485 network. Acceptable
entries include “
current setting for Modbus RS485 communication.
This parameter sets the number of communication data bits on the Modbus RS485 network.
Acceptable entries include “
setting for the Modbus RS485 communication.
This parameter sets the number of communication stop bits on the Modbus RS485 network.
Acceptable entries include “
setting for the Modbus RS485 communication.
”. None is the default. This parameter will display the
”. 8 is the default. This parameter will display the current
”. 1 is the default. This parameter will display the current
F US Clamp-on Communications Protocol Manual
64 Hardware Installation Manual, 11/2015, A5E34981613-AC
Page 67

WEB Configuration Utility
6.1 WEB Configuration Utility
F US Clamp-on Communications Protocol Manual
Hardware Installation Manual, 11/2015, A5E34981613-AC
65
Page 68

Page 69
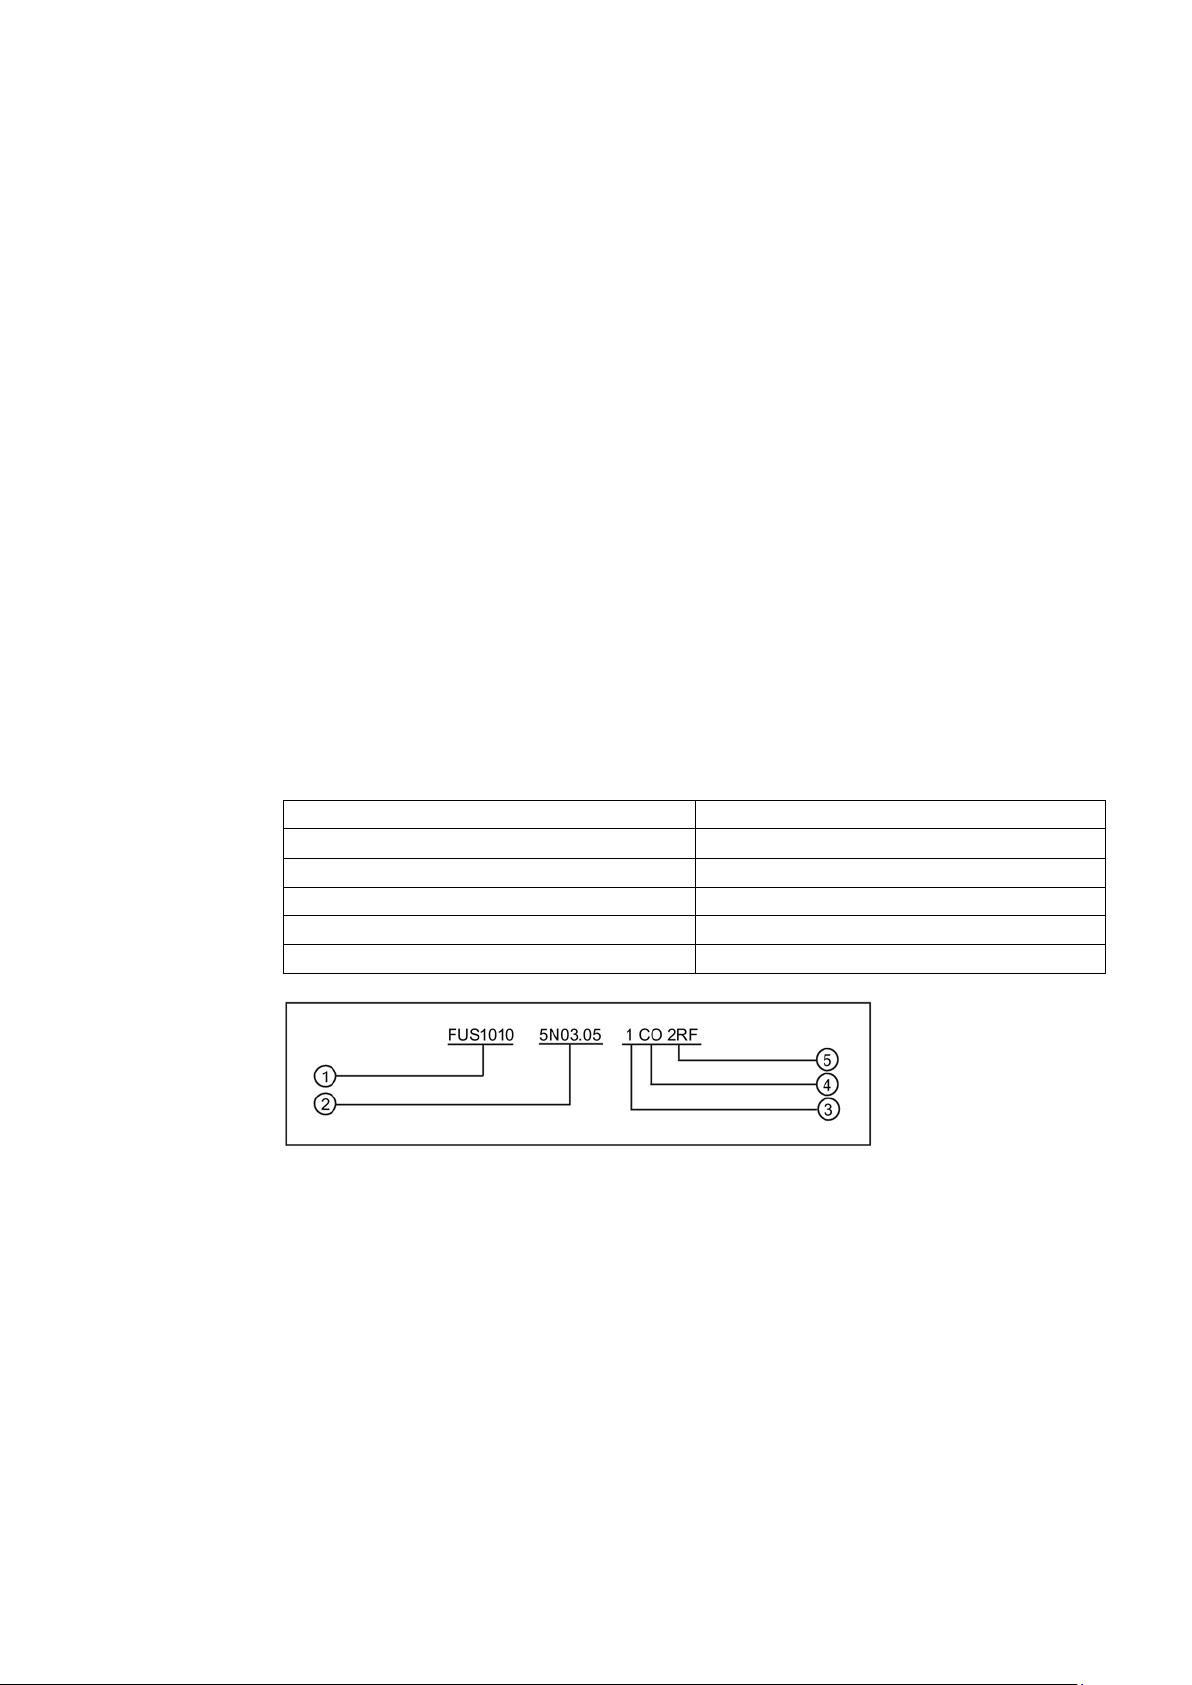
A
A.1
Modbus, EIP, HART & N2 Profile Mappings
A.1.1
Introduction
Profile Definitions
1 = Channel 1
CO = Clamp-On
2 = Channel 2
RF = Reflexor
3 = Channel 3
1+2+3+4 = 4 Channel Sum
4 = Channel 4
1+2 = Channel 1 + Channel 2
DP = Dual Path
1-2 = Channel 1 - Channel 2
QP = Quad Path
①
Flowmeter
④
Clamp-on
②
Channel
⑤
③
Channel 1
To determine the flowmeter firmware version operating system part number:
1. At the meter, press the <MENU> key.
2. At [Meter Type] press the <Down Arrow> and scroll to [Meter Facilities].
3. Press the Right Arrow>.
4. Press the <Down Arrow and scroll to [System Info].
5. Press the <Right Arrow>.
6. Press the <Down Arrow> and scroll to [Op System P/N] and read your flowmeter Op
System part number.
Dedicated Dual
Channel 2 Reflexor
F US Clamp-on Communications Protocol Manual
Hardware Installation Manual, 11/2015, A5E34981613-AC
Figure A-1 Profile Example
67
Page 70

Appendix A
A.1.2
Profile 1
Profile 1 (FUS1010-5N01-5.04.05-1CO)
Data Description
Modbus
Ethernet/IP
HART
N2
Reg
Bytes
Type
Tag Name
OS
Format
CMD
VAR
Type
Ad
Sz
Site ID
30501
8
String
String_In
0
UINT16
n/a
BD(Byte)
1
8
Date: Year
30101
2
Integer
Analog_In
0
Float
n/a
ADI(Int)
1
1
Date: Month
30102
2
Integer
Analog_In
1
Float
n/a
ADI(Int)
2 1 Date: Day
30103
2
Integer
Analog_In
2
Float
n/a
ADI(Int)
3
1
Time: Hour
30104
2
Integer
Analog_In
3
Float
n/a
ADI(Int)
4
1
Time: Minute
30105
2
Integer
Analog_In
4
Float
n/a
ADI(Int)
5
1
Time: Second
30106
2
Integer
Analog_In
5
Float
n/a
ADI(Int)
6 1 Inst.Flow Rate
30107
4
Real
Analog_In
6
Float
n/a
ADF(Float)
1
1
Flow Rate Units
30517
8
String
String_In
4
UINT16
131
0-00h
BD(Byte)
9 8 Raw Flow
30131
4
Real
Analog_In
6
Float
n/a
ADF(Float)
3
1
Raw Flow Units
30537
8
String
String_In
8
UINT16
n/a
BD(Byte)
17
8
Total
30143
4
Real
Analog_In
9
Float
129
33-21h S
ADF(Float)
4
1
Total Units
30557
8
String
String_In
12
UINT16
131
33-21h
BD(Byte)
25
8
Sonic Vel Units
30577
8
String
String_In
16
UINT16
n/a
BD(Byte)
33
8
Signal Strength
30165
2
Integer
Analog_In
11
Float
n/a
ADF(Float)
6
1
Sig Strength Units
30593
8
String
String_In
20
UINT16
n/a
BD(Byte)
41 8 Aeration
30171
2
Integer
Analog_In
12
Float
n/a
ADF(Float)
7
1
Aeration Units
30609
8
String
String_In
24
UINT16
n/a
BD(Byte)
57
8
Spacing
Empty
Rate
Fault
Aeration
Makeup
Interface
Zeromatic
Delta Time
30177
4
Real
Analog_In
13
Float
n/a
ADF(Float)
8
1
Delta Time Units
30629
8
String
String_In
28
UINT16
n/a
BD(Byte)
49
8
A.1 Modbus, EIP, HART & N2 Profile Mappings
Avg Flow Rate 30119 4 Real Analog_In 7 Float 129 0-00h P ADF(Float) 2 1
Sonic Vel 30155 4 Real Analog_In 10 Float n/a ADF(Float) 5 1
Status/Alarms:
Status/Alarms:
Status/Alarms:
Status/Alarms:
Status/Alarms:
Status/Alarms:
Memory
Status/Alarms:
Status/Alarms:
10001 1 Bit Coil Binary_In 0 UINT16 n/a DI(Dig In) 1 1
10002 1 Bit Coil Binary_In 0 UINT16 n/a DI(Dig In) 3 1
10003 1 Bit Coil Binary_In 0 UINT16 n/a DI(Dig In) 4 1
10004 1 Bit Coil Binary_In 0 UINT16 n/a DI(Dig In) 5 1
10005 1 Bit Coil Binary_In 0 UINT16 n/a DI(Dig In) 6 1
10006 1 Bit Coil Binary_In 0 UINT16 n/a DI(Dig In) 7 1
10007 1 Bit Coil Binary_In 0 UINT16 n/a DI(Dig In) 8 1
10008 1 Bit Coil Binary_In 0 UINT16 n/a DI(Dig In) 9 1
Status/Alarms:
F US Clamp-on Communications Protocol Manual
68 Hardware Installation Manual, 11/2015, A5E34981613-AC
10010 1 Bit Coil Binary_In 0 UINT16 n/a DI(Dig In) 2 1
Page 71

Appendix A
A.1.3
Profile 2
Profile 2 (FUS1010-5N01-5.04.05-1RF)
Data Description
Modbus
Ethernet/IP
HART
N2
Reg
Bytes
Type
Tag Name
OS
Format
CMD
VAR
Type
Ad
Sz
Site ID
30501
8
String
String_In
0
UINT16
n/a
BD(Byte)
1
8
Date: Year
30101
2
Integer
Analog_In
0
Float
n/a
ADI(Int)
1
1
Date: Month
30102
2
Integer
Analog_In
1
Float
n/a
ADI(Int)
2 1 Date: Day
30103
2
Integer
Analog_In
2
Float
n/a
ADI(Int)
3
1
Time: Hour
30104
2
Integer
Analog_In
3
Float
n/a
ADI(Int)
4
1
Time: Minute
30105
2
Integer
Analog_In
4
Float
n/a
ADI(Int)
5
1
Time: Second
30106
2
Integer
Analog_In
5
Float
n/a
ADI(Int)
6 1 Inst.Flow Rate
30107
4
Real
Analog_In
6
Float
n/a
ADF(Float)
1
1
Flow Rate Units
30517
8
String
String_In
4
UINT16
131
0-00h
BD(Byte)
9 8 Total
30143
4
Real
Analog_In
8
Float
129
33-21h S
ADF(Float)
3
1
Total Units
30557
8
String
String_In
8
UINT16
131
33-21h
BD(Byte)
17
8
Empty
Rate
Fault
Aeration
Memory
Makeup
Interface
Zeromatic
Deviation Units
30645
8
String
String_In
12
UINT16
n/a
BD(Byte)
25
8
A.1 Modbus, EIP, HART & N2 Profile Mappings
Avg Flow Rate 30119 4 Real Analog_In 7 Float 129 0-00h P ADF(Float) 2 1
Status/Alarms:
Spacing
Status/Alarms:
Status/Alarms:
Status/Alarms:
Status/Alarms:
Status/Alarms:
Status/Alarms:
Status/Alarms:
Status/Alarms:
Percent
Deviation
10001 1 Bit Coil Binary_In 0 UINT16 n/a DI(Dig In) 1 1
10002 1 Bit Coil Binary_In 0 UINT16 n/a DI(Dig In) 3 1
10003 1 Bit Coil Binary_In 0 UINT16 n/a DI(Dig In) 4 1
10004 1 Bit Coil Binary_In 0 UINT16 n/a DI(Dig In) 5 1
10005 1 Bit Coil Binary_In 0 UINT16 n/a DI(Dig In) 6 1
10006 1 Bit Coil Binary_In 0 UINT16 n/a DI(Dig In) 7 1
10007 1 Bit Coil Binary_In 0 UINT16 n/a DI(Dig In) 8 1
10008 1 Bit Coil Binary_In 0 UINT16 n/a DI(Dig In) 9 1
10010 1 Bit Coil Binary_In 0 UINT16 n/a DI(Dig In) 2 1
30187 4 Real Analog_In 9 Float n/a ADF(Float) 4 1
F US Clamp-on Communications Protocol Manual
Hardware Installation Manual, 11/2015, A5E34981613-AC
69
Page 72

Appendix A
A.1.4
Profile 3
Profile 3 (FUS1010-5N02-5.04.05-1CO)
Data Description
Modbus
Ethernet/IP
HART
N2
Reg
Bytes
Type
Tag Name
OS
Format
CMD
VAR
Type
Ad
Sz
Site ID
30501
8
String
String_In
0
UINT16
n/a
BD(Byte)
1
8
Date: Year
30101
2
Integer
Analog_In
0
Float
n/a
ADI(Int)
1
1
Date: Month
30102
2
Integer
Analog_In
1
Float
n/a
ADI(Int)
2 1 Date: Day
30103
2
Integer
Analog_In
2
Float
n/a
ADI(Int)
3
1
Time: Hour
30104
2
Integer
Analog_In
3
Float
n/a
ADI(Int)
4
1
Time: Minute
30105
2
Integer
Analog_In
4
Float
n/a
ADI(Int)
5
1
Time: Second
30106
2
Integer
Analog_In
5
Float
n/a
ADI(Int)
6 1 Inst.Flow Rate
30107
4
Real
Analog_In
6
Float
n/a
ADF(Float)
1
1
Flow Rate Units
30517
8
String
String_In
4
UINT16
131
0-00h
BD(Byte)
9 8 Raw Flow
30131
4
Real
Analog_In
8
Float
n/a
ADF(Float)
3
1
Raw Flow Units
30537
8
String
String_In
8
UINT16
n/a
BD(Byte)
17
8
Total Units
30557
8
String
String_In
16
UINT16
131
33-21h
BD(Byte)
25 8 Sonic Vel
30155
4
Real
Analog_In
10
Float
n/a
ADF(Float)
5
1
Sonic Vel Units
30577
8
String
String_In
12
UINT16
n/a
BD(Byte)
33
8
Signal Strength
30165
2
Integer
Analog_In
11
Float
n/a
ADF(Float)
6
1
Units
Aeration
30171
2
Integer
Analog_In
12
Float
n/a
ADF(Float)
7
1
Aeration Units
30609
8
String
String_In
24
UINT16
n/a
BD(Byte)
49
8
S.G. Units
30689
8
String
String_In
28
UINT16
131
14-0Eh
BD(Byte)
57
8
Spacing
Empty
Rate
Aeration
Memory
Makeup
Interface
Zeromatic
Temperature 1
30293
4
Real
Analog_In
14
Float
n/a
ADF(Float)
9
1
A.1 Modbus, EIP, HART & N2 Profile Mappings
Avg Flow Rate 30119 4 Real Analog_In 7 Float 129 0-00h P ADF(Float) 2 1
Total 30143 4 Real Analog_In 9 Float 129 33-21h S ADF(Float) 4 1
Sig Strength
Specific Gravity 30237 4 Real Analog_In 13 Float 129 14-0Eh T ADF(Float) 8 1
Status/Alarms:
Status/Alarms:
Status/Alarms:
Status/Alarms:
Fault
Status/Alarms:
30593 8 String String_In 20 UINT16 n/a BD(Byte) 41 8
10001 1 Bit Coil Binary_In 0 UINT16 n/a DI(Dig In) 1 1
10002 1 Bit Coil Binary_In 0 UINT16 n/a DI(Dig In) 3 1
10003 1 Bit Coil Binary_In 0 UINT16 n/a DI(Dig In) 4 1
10004 1 Bit Coil Binary_In 0 UINT16 n/a DI(Dig In) 5 1
10005 1 Bit Coil Binary_In 0 UINT16 n/a DI(Dig In) 6 1
Status/Alarms:
Status/Alarms:
Status/Alarms:
Status/Alarms:
F US Clamp-on Communications Protocol Manual
70 Hardware Installation Manual, 11/2015, A5E34981613-AC
10006 1 Bit Coil Binary_In 0 UINT16 n/a DI(Dig In) 7 1
10007 1 Bit Coil Binary_In 0 UINT16 n/a DI(Dig In) 8 1
10008 1 Bit Coil Binary_In 0 UINT16 n/a DI(Dig In) 9 1
10010 1 Bit Coil Binary_In 0 UINT16 n/a DI(Dig In) 2 1
Page 73

Appendix A
Temperature 2
30295
4
Real
Analog_In
15
Float
n/a
ADF(Float)
10
1
Temp Units
30753
8
String
String_In
32
UINT16
n/a
BD(Byte)
65
8
Delta Time
30177
4
Real
Analog_In
16
Float
n/a
ADF(Float)
11 1 Delta Time Units
30629
8
String
String_In
36
UINT16
n/a
BD(Byte)
73
8
Analog Input 1
30277
4
Real
Analog_In
17
Float
n/a
ADF(Float)
12
1
AI1 Units
30797
8
String
String_In
40
UINT16
n/a
BD(Byte)
81
8
Analog Input 2
30279
4
Real
Analog_In
18
Float
n/a
ADF(Float)
13 1 AI2 Units
30801
8
String
String_In
44
UINT16
n/a
BD(Byte)
89
8
Analog Input 3
30281
4
Real
Analog_In
19
Float
n/a
ADF(Float)
14
1
AI3 Units
30805
8
String
String_In
48
UINT16
n/a
BD(Byte)
97
8
Analog Input 4
30283
4
Real
Analog_In
20
Float
n/a
ADF(Float)
15 1 AI4 Units
30809
8
String
String_In
52
UINT16
n/a
BD(Byte)
105
8
A.1.5
Profile 4
Profile 4 (FUS1010-5N02-5.04.05-1RF)
Data Description
Modbus
Ethernet/IP
HART
N2
Reg Bytes
Type
Tag Name
Format
CMD
VAR Type
Ad Sz
Site ID
30501
8
String
String_In
0
UINT16
n/a
BD(Byte)
1 8 Date: Year
30101
2
Integer
Analog_In
0
Float
n/a
ADI(Int)
1
1
Date: Month
30102
2
Integer
Analog_In
1
Float
n/a
ADI(Int)
2
1
Date: Day
30103
2
Integer
Analog_In
2
Float
n/a
ADI(Int)
3 1 Time: Hour
30104
2
Integer
Analog_In
3
Float
n/a
ADI(Int)
4
1
Time: Minute
30105
2
Integer
Analog_In
4
Float
n/a
ADI(Int)
5
1
Time: Second
30106
2
Integer
Analog_In
5
Float
n/a
ADI(Int)
6
1
Inst.Flow Rate
30107
4
Real
Analog_In
6
Float
n/a
ADF(Float)
1
1
Avg Flow Rate
30119
4
Real
Analog_In
7
Float
129
0-00h P
ADF(Float)
2 1 Flow Rate Units
30517
8
String
String_In
4
UINT16
131
0-00h
BD(Byte)
9
8
Total Units
30557
8
String
String_In
8
UINT16
131
33-21h
BD(Byte)
17
8
Spacing
Empty
Rate
Fault
Aeration
Memory
Makeup
Interface
A.1 Modbus, EIP, HART & N2 Profile Mappings
OS
Total 30143 4 Real Analog_In 8 Float 129 33-21h S ADF(Float) 3 1
Status/Alarms:
Status/Alarms:
Status/Alarms:
Status/Alarms:
Status/Alarms:
Status/Alarms:
Status/Alarms:
Status/Alarms:
F US Clamp-on Communications Protocol Manual
Hardware Installation Manual, 11/2015, A5E34981613-AC
10001 1 Bit Coil Binary_In 0 UINT16 n/a DI(Dig In) 1 1
10002 1 Bit Coil Binary_In 0 UINT16 n/a DI(Dig In) 3 1
10003 1 Bit Coil Binary_In 0 UINT16 n/a DI(Dig In) 4 1
10004 1 Bit Coil Binary_In 0 UINT16 n/a DI(Dig In) 5 1
10005 1 Bit Coil Binary_In 0 UINT16 n/a DI(Dig In) 6 1
10006 1 Bit Coil Binary_In 0 UINT16 n/a DI(Dig In) 7 1
10007 1 Bit Coil Binary_In 0 UINT16 n/a DI(Dig In) 8 1
10008 1 Bit Coil Binary_In 0 UINT16 n/a DI(Dig In) 9 1
71
Page 74

Appendix A
Zeromatic
Temperature 1
30293
4
Real
Analog_In
9
Float
n/a
ADF(Float)
4
1
Temperature 2
30295
4
Real
Analog_In
10
Float
n/a
ADF(Float)
5
1
Temp Units
30753
8
String
String_In
12
UINT16
n/a
BD(Byte)
25 8 Analog Input 1
30277
4
Real
Analog_In
11
Float
n/a
ADF(Float)
6
1
AI1 Units
30797
8
String
String_In
16
UINT16
n/a
BD(Byte)
33
8
Analog Input 2
30279
4
Real
Analog_In
12
Float
n/a
ADF(Float)
7 1 AI2 Units
30801
8
String
String_In
20
UINT16
n/a
BD(Byte)
41
8
Analog Input 3
30281
4
Real
Analog_In
13
Float
n/a
ADF(Float)
8
1
AI3 Units
30805
8
String
String_In
24
UINT16
n/a
BD(Byte)
49
8
Analog Input 4
30283
4
Real
Analog_In
14
Float
n/a
ADF(Float)
9
1
Deviation
Deviation Units
30645
8
String
String_In
32
UINT16
n/a
BD(Byte)
65
8
A.1.6
Profile 5
Profile 5 (FUS1010-5N03-5.04.05-1CO2CO)
Data Description
Modbus
Ethernet/IP
HART
N2
Reg
Bytes
Type
Tag Name
OS
Format
CMD
VAR
Type
Ad
Sz
C1 Site ID
30501
8
String
String_In
0
UINT16
n/a
BD(Byte)
1
8
C1 Date: Year
30101
2
Integer
Analog_In
0
Float
n/a
ADI(Int)
1
1
C1 Date: Month
30102
2
Integer
Analog_In
1
Float
n/a
ADI(Int)
2 1 C1 Date: Day
30103
2
Integer
Analog_In
2
Float
n/a
ADI(Int)
3
1
C1 Time: Hour
30104
2
Integer
Analog_In
3
Float
n/a
ADI(Int)
4
1
C1 Time: Minute
30105
2
Integer
Analog_In
4
Float
n/a
ADI(Int)
5
1
C1 Time: Second
30106
2
Integer
Analog_In
5
Float
n/a
ADI(Int)
6
1
Rate
Rate
Units
C1 Raw Flow
30133
4
Real
Analog_In
8
Float
n/a
ADF(Float)
3
1
Units
C1 Total Units
30557
8
String
String_In
12
UINT16
131
34-22h
BD(Byte)
25
8
C1 Sonic Vel
30157
4
Real
Analog_In
10
Float
n/a
ADF(Float)
5
1
Units
Strength
Units
A.1 Modbus, EIP, HART & N2 Profile Mappings
Status/Alarms:
AI4 Units 30809 8 String String_In 28 UINT16 n/a BD(Byte) 57 8
Percent
10010 1 Bit Coil Binary_In 0 UINT16 n/a DI(Dig In) 2 1
30187 4 Real Analog_In 15 Float n/a ADF(Float) 10 1
C1 Inst.Flow
C1 Avg Flow
C1 Flow Rate
C1 Raw Flow
C1 Total 30145 4 Real Analog_In 9 Float 129 34-22h S ADF(Float) 4 1
C1 Sonic Vel
C1 Signal
C1 Sig Strength
F US Clamp-on Communications Protocol Manual
72 Hardware Installation Manual, 11/2015, A5E34981613-AC
30109 4 Real Analog_In 6 Float 129 6-06h ADF(Float) 1 1
30121 4 Real Analog_In 7 Float 129 1-01h P ADF(Float) 2 1
30517 8 String String_In 4 UINT16 131 1-01h BD(Byte) 9 8
30537 8 String String_In 8 UINT16 n/a BD(Byte) 17 8
30577 8 String String_In 16 UINT16 n/a BD(Byte) 33 8
30167 2 Integer Analog_In 11 Float n/a ADF(Float) 6 1
30593 8 String String_In 20 UINT16 n/a BD(Byte) 41 8
Page 75

Appendix A
C1 Aeration
30172
2
Integer
Analog_In
12
Float
n/a
ADF(Float)
7
1
C1 Aeration Units
30609
8
String
String_In
24
UINT16
n/a
BD(Byte)
49
8
/Alarms: Spacing
/Alarms: Empty
/Alarms: Rate
/Alarms: Fault
/Alarms: Aeration
/Alarms: Memory
/Alarms: Makeup
tic
C1 Delta Time
30179
4
Real
Analog_In
13
Float
n/a
ADF(Float)
8
1
Units
C2 Site ID
30505
8
String
String_In
32
UINT16
n/a
BD(Byte)
65 8 C2 Date: Year
30101
2
Integer
Analog_In
0
Float
n/a
ADI(Int)
1
1
C2 Date: Month
30102
2
Integer
Analog_In
1
Float
n/a
ADI(Int)
2
1
C2 Date: Day
30103
2
Integer
Analog_In
2
Float
n/a
ADI(Int)
3 1 C2 Time: Hour
30104
2
Integer
Analog_In
3
Float
n/a
ADI(Int)
4
1
C2 Time: Minute
30105
2
Integer
Analog_In
4
Float
n/a
ADI(Int)
5
1
C2 Time: Second
30106
2
Integer
Analog_In
5
Float
n/a
ADI(Int)
6
1
Rate
Rate
C2 Raw Flow
30135
4
Real
Analog_In
16
Float
n/a
ADF(Float)
11
1
Units
C2 Total
30147
4
Real
Analog_In
17
Float
129
35-23h Q
ADF(Float)
12 1 C2 Total Units
30561
8
String
String_In
44
UINT16
131
35-23h
BD(Byte)
89
8
C2 Sonic Vel
30159
4
Real
Analog_In
18
Float
n/a
ADF(Float)
13
1
Units
Strength
Units
A.1 Modbus, EIP, HART & N2 Profile Mappings
C1 Status
C1 Status
C1 Status
C1 Status
C1 Status
C1 Status
C1 Status
C1 Status
/Alarms: Interface
C1 Status
/Alarms: Zeroma-
C1 Delta Time
10021 1 Bit Coil Binary_In 0 UINT16 n/a DI(Dig In) 1 1
10022 1 Bit Coil Binary_In 0 UINT16 n/a DI(Dig In) 3 1
10023 1 Bit Coil Binary_In 0 UINT16 n/a DI(Dig In) 4 1
10024 1 Bit Coil Binary_In 0 UINT16 n/a DI(Dig In) 5 1
10025 1 Bit Coil Binary_In 0 UINT16 n/a DI(Dig In) 6 1
10026 1 Bit Coil Binary_In 0 UINT16 n/a DI(Dig In) 7 1
10027 1 Bit Coil Binary_In 0 UINT16 n/a DI(Dig In) 8 1
10028 1 Bit Coil Binary_In 0 UINT16 n/a DI(Dig In) 9 1
10030 1 Bit Coil Binary_In 0 UINT16 n/a DI(Dig In) 2 1
30629 8 String String_In 28 UINT16 n/a BD(Byte) 57 8
C2 Inst.Flow
C2 Avg Flow
C2 Flow Rate
Units
C2 Raw Flow
C2 Sonic Vel
C2 Signal
C2 Sig Strength
F US Clamp-on Communications Protocol Manual
Hardware Installation Manual, 11/2015, A5E34981613-AC
30111 4 Real Analog_In 14 Float 129 7-07h ADF(Float) 9 1
30123 4 Real Analog_In 15 Float 129 2-02h T ADF(Float) 10 1
30521 8 String String_In 36 UINT16 131 2-02h BD(Byte) 73 8
30541 8 String String_In 40 UINT16 n/a BD(Byte) 81 8
30581 8 String String_In 48 UINT16 n/a BD(Byte) 97 8
30168 2 Integer Analog_In 19 Float n/a ADF(Float) 14 1
30597 8 String String_In 52 UINT16 n/a BD(Byte) 105 8
73
Page 76

Appendix A
C2 Aeration
30173
2
Integer
Analog_In
20
Float
n/a
ADF(Float)
15
1
C2 Aeration Units
30613
8
String
String_In
56
UINT16
n/a
BD(Byte)
113
8
/Alarms: Spacing
/Alarms: Empty
/Alarms: Rate
/Alarms: Fault
/Alarms: Aeration
/Alarms: Memory
/Alarms: Makeup
tic
C2 Delta Time
30181
4
Real
Analog_In
21
Float
n/a
ADF(Float)
16
1
Units
A.1.7
Profile 6
Profile 6 (FUS1010-5N03-5.04.05-1RF2RF)
Data Description
Modbus
Ethernet/IP
HART
N2
Reg
Bytes
Type
Tag Name
OS
Format
CMD
VAR
Type
Ad
Sz
C1 Site ID
30501
8
String
String_In
0
UINT16
n/a
BD(Byte)
1
8
C1 Date: Year
30101
2
Integer
Analog_In
0
Float
n/a
ADI(Int)
1
1
C1 Date: Month
30102
2
Integer
Analog_In
1
Float
n/a
ADI(Int)
2 1 C1 Date: Day
30103
2
Integer
Analog_In
2
Float
n/a
ADI(Int)
3
1
C1 Time: Hour
30104
2
Integer
Analog_In
3
Float
n/a
ADI(Int)
4
1
C1 Time: Minute
30105
2
Integer
Analog_In
4
Float
n/a
ADI(Int)
5 1 C1 Time: Second
30106
2
Integer
Analog_In
5
Float
n/a
ADI(Int)
6
1
C1 Avg Flow Rate
30121
4
Real
Analog_In
7
Float
129
1-01h P
ADF(Float)
2
1
C1 Flow Rate Units
30517
8
String
String_In
4
UINT16
131
1-01h
BD(Byte)
9
8
C1 Total Units
30557
8
String
String_In
8
UINT16
131
34-22h
BD(Byte)
17
8
Spacing
A.1 Modbus, EIP, HART & N2 Profile Mappings
C2 Status
C2 Status
C2 Status
C2 Status
C2 Status
C2 Status
C2 Status
C2 Status
/Alarms: Interface
C2 Status
/Alarms: Zeroma-
C2 Delta Time
10041 1 Bit Coil Binary_In 1 UINT16 n/a DI(Dig In) 10 1
10042 1 Bit Coil Binary_In 1 UINT16 n/a DI(Dig In) 12 1
10043 1 Bit Coil Binary_In 1 UINT16 n/a DI(Dig In) 13 1
10044 1 Bit Coil Binary_In 1 UINT16 n/a DI(Dig In) 14 1
10045 1 Bit Coil Binary_In 1 UINT16 n/a DI(Dig In) 15 1
10046 1 Bit Coil Binary_In 1 UINT16 n/a DI(Dig In) 16 1
10047 1 Bit Coil Binary_In 1 UINT16 n/a DI(Dig In) 17 1
10048 1 Bit Coil Binary_In 1 UINT16 n/a DI(Dig In) 18 1
10050 1 Bit Coil Binary_In 1 UINT16 n/a DI(Dig In) 11 1
30633 8 String String_In 60 UINT16 n/a BD(Byte) 121 8
C1 Inst.Flow Rate 30109 4 Real Analog_In 6 Float 129 6-06h ADF(Float) 1 1
C1 Total 30145 4 Real Analog_In 8 Float 129 34-22h S ADF(Float) 3 1
C1 Status/Alarms:
10021 1 Bit Coil Binary_In 0 UINT16 n/a DI(Dig In) 1 1
F US Clamp-on Communications Protocol Manual
74 Hardware Installation Manual, 11/2015, A5E34981613-AC
Page 77

Appendix A
Empty
Rate
Fault
Aeration
Memory
Makeup
Interface
Zeromatic
C1 Percent Deviation
30189
4
Real
Analog_In
9
Float
n/a
ADF(Float)
4 1 C1 Deviation Units
30645
8
String
String_In
12
UINT16
n/a
BD(Byte)
25
8
C2 Site ID
30505
8
String
String_In
16
UINT16
n/a
BD(Byte)
33
8
C2 Date: Year
30101
2
Integer
Analog_In
0
Float
n/a
ADI(Int)
1
1
C2 Date: Month
30102
2
Integer
Analog_In
1
Float
n/a
ADI(Int)
2 1 C2 Date: Day
30103
2
Integer
Analog_In
2
Float
n/a
ADI(Int)
3
1
C2 Time: Hour
30104
2
Integer
Analog_In
3
Float
n/a
ADI(Int)
4
1
C2 Time: Minute
30105
2
Integer
Analog_In
4
Float
n/a
ADI(Int)
5
1
C2 Time: Second
30106
2
Integer
Analog_In
5
Float
n/a
ADI(Int)
6 1 C2 Inst.Flow Rate
30111
4
Real
Analog_In
10
Float
129
7-07h
ADF(Float)
5
1
C2 Avg Flow Rate
30123
4
Real
Analog_In
11
Float
129
2-02h T
ADF(Float)
6
1
C2 Flow Rate Units
30521
8
String
String_In
20
UINT16
131
2-02h
BD(Byte)
41
8
C2 Total Units
30561
8
String
String_In
24
UINT16
131
35-23h
BD(Byte)
49
8
Empty
Rate
Fault
Aeration
Memory
Makeup
Interface
Zeromatic
C2 Percent Deviation
30191
4
Real
Analog_In
13
Float
n/a
ADF(Float)
8
1
C2 Deviation Units
30649
8
String
String_In
28
UINT16
n/a
BD(Byte)
57
8
A.1 Modbus, EIP, HART & N2 Profile Mappings
C1 Status/Alarms:
C1 Status/Alarms:
C1 Status/Alarms:
C1 Status/Alarms:
C1 Status/Alarms:
C1 Status/Alarms:
C1 Status/Alarms:
C1 Status/Alarms:
10022 1 Bit Coil Binary_In 0 UINT16 n/a DI(Dig In) 3 1
10023 1 Bit Coil Binary_In 0 UINT16 n/a DI(Dig In) 4 1
10024 1 Bit Coil Binary_In 0 UINT16 n/a DI(Dig In) 5 1
10025 1 Bit Coil Binary_In 0 UINT16 n/a DI(Dig In) 6 1
10026 1 Bit Coil Binary_In 0 UINT16 n/a DI(Dig In) 7 1
10027 1 Bit Coil Binary_In 0 UINT16 n/a DI(Dig In) 8 1
10028 1 Bit Coil Binary_In 0 UINT16 n/a DI(Dig In) 9 1
10030 1 Bit Coil Binary_In 0 UINT16 n/a DI(Dig In) 2 1
C2 Total 30147 4 Real Analog_In 12 Float 129 35-23h Q ADF(Float) 7 1
C2 Status/Alarms:
Spacing
C2 Status/Alarms:
C2 Status/Alarms:
C2 Status/Alarms:
C2 Status/Alarms:
C2 Status/Alarms:
C2 Status/Alarms:
C2 Status/Alarms:
C2 Status/Alarms:
10041 1 Bit Coil Binary_In 1 UINT16 n/a DI(Dig In) 10 1
10042 1 Bit Coil Binary_In 1 UINT16 n/a DI(Dig In) 12 1
10043 1 Bit Coil Binary_In 1 UINT16 n/a DI(Dig In) 13 1
10044 1 Bit Coil Binary_In 1 UINT16 n/a DI(Dig In) 14 1
10045 1 Bit Coil Binary_In 1 UINT16 n/a DI(Dig In) 15 1
10046 1 Bit Coil Binary_In 1 UINT16 n/a DI(Dig In) 16 1
10047 1 Bit Coil Binary_In 1 UINT16 n/a DI(Dig In) 17 1
10048 1 Bit Coil Binary_In 1 UINT16 n/a DI(Dig In) 18 1
10050 1 Bit Coil Binary_In 1 UINT16 n/a DI(Dig In) 11 1
F US Clamp-on Communications Protocol Manual
Hardware Installation Manual, 11/2015, A5E34981613-AC
75
Page 78

Appendix A
A.1.8
Profile 7
Profile 7 (FUS1010-5N03-5.04.05-1CO2RF)
Data Description
Modbus
Ethernet/IP
HART
N2
Reg
Bytes
Type
Tag Name
OS
Format
CMD
VAR
Type
Ad
Sz
C1 Site ID
30501
8
String
String_In
0
UINT16
n/a
BD(Byte)
1
8
C1 Date: Year
30101
2
Integer
Analog_In
0
Float
n/a
ADI(Int)
1
1
C1 Date: Month
30102
2
Integer
Analog_In
1
Float
n/a
ADI(Int)
2 1 C1 Date: Day
30103
2
Integer
Analog_In
2
Float
n/a
ADI(Int)
3
1
C1 Time: Hour
30104
2
Integer
Analog_In
3
Float
n/a
ADI(Int)
4
1
C1 Time: Minute
30105
2
Integer
Analog_In
4
Float
n/a
ADI(Int)
5
1
C1 Time: Second
30106
2
Integer
Analog_In
5
Float
n/a
ADI(Int)
6
1
Rate
Units
C1 Raw Flow
30133
4
Real
Analog_In
8
Float
n/a
ADF(Float)
3
1
Units
C1 Total
30145
4
Real
Analog_In
9
Float
129
34-22h S
ADF(Float)
4
1
C1 Total Units
30557
8
String
String_In
12
UINT16
131
34-22h
BD(Byte)
25
8
C1 Sonic Vel
30157
4
Real
Analog_In
10
Float
n/a
ADF(Float)
5
1
Units
Strength
Units
C1 Aeration
30172
2
Integer
Analog_In
12
Float
n/a
ADF(Float)
7
1
C1 Aeration Units
30609
8
String
String_In
24
UINT16
n/a
BD(Byte)
49
8
/Alarms: Spacing
/Alarms: Empty
/Alarms: Rate
/Alarms: Fault
/Alarms: Aeration
/Alarms: Memory
/Alarms: Makeup
/Alarms: Interface
A.1 Modbus, EIP, HART & N2 Profile Mappings
C1 Inst.Flow
C1 Avg Flow
Rate
C1 Flow Rate
C1 Raw Flow
C1 Sonic Vel
C1 Signal
C1 Sig Strength
C1 Status
30109 4 Real Analog_In 6 Float 129 6-06h ADF(Float) 1 1
30121 4 Real Analog_In 7 Float 129 1-01h P ADF(Float) 2 1
30517 8 String String_In 4 UINT16 131 1-01h BD(Byte) 9 8
30537 8 String String_In 8 UINT16 n/a BD(Byte) 17 8
30577 8 String String_In 16 UINT16 n/a BD(Byte) 33 8
30167 2 Integer Analog_In 11 Float n/a ADF(Float) 6 1
30593 8 String String_In 20 UINT16 n/a BD(Byte) 41 8
10021 1 Bit Coil Binary_In 0 UINT16 n/a DI(Dig In) 1 1
C1 Status
C1 Status
C1 Status
C1 Status
C1 Status
C1 Status
C1 Status
F US Clamp-on Communications Protocol Manual
76 Hardware Installation Manual, 11/2015, A5E34981613-AC
10022 1 Bit Coil Binary_In 0 UINT16 n/a DI(Dig In) 3 1
10023 1 Bit Coil Binary_In 0 UINT16 n/a DI(Dig In) 4 1
10024 1 Bit Coil Binary_In 0 UINT16 n/a DI(Dig In) 5 1
10025 1 Bit Coil Binary_In 0 UINT16 n/a DI(Dig In) 6 1
10026 1 Bit Coil Binary_In 0 UINT16 n/a DI(Dig In) 7 1
10027 1 Bit Coil Binary_In 0 UINT16 n/a DI(Dig In) 8 1
10028 1 Bit Coil Binary_In 0 UINT16 n/a DI(Dig In) 9 1
Page 79

Appendix A
tic
C1 Delta Time
30179
4
Real
Analog_In
13
Float
n/a
ADF(Float)
8
1
Units
C2 Site ID
30505
8
String
String_In
32
UINT16
n/a
BD(Byte)
65 8 C2 Date: Year
30101
2
Integer
Analog_In
0
Float
n/a
ADI(Int)
1
1
C2 Date: Month
30102
2
Integer
Analog_In
1
Float
n/a
ADI(Int)
2
1
C2 Date: Day
30103
2
Integer
Analog_In
2
Float
n/a
ADI(Int)
3
1
C2 Time: Minute
30105
2
Integer
Analog_In
4
Float
n/a
ADI(Int)
5
1
C2 Time: Second
30106
2
Integer
Analog_In
5
Float
n/a
ADI(Int)
6
1
Rate
Rate
Units
C2 Total
30147
4
Real
Analog_In
16
Float
129
35-23h Q
ADF(Float)
11
1
C2 Total Units
30561
8
String
String_In
40
UINT16
131
35-23h
BD(Byte)
81
8
/Alarms: Spacing
/Alarms: Empty
/Alarms: Rate
/Alarms: Fault
/Alarms: Aeration
/Alarms: Memory
/Alarms: Makeup
tic
Deviation
Units
A.1 Modbus, EIP, HART & N2 Profile Mappings
C1 Status
/Alarms: Zeroma-
C1 Delta Time
C2 Time: Hour 30104 2 Integer Analog_In 3 Float n/a ADI(Int) 4 1
C2 Inst.Flow
C2 Avg Flow
C2 Flow Rate
C2 Status
10030 1 Bit Coil Binary_In 0 UINT16 n/a DI(Dig In) 2 1
30629 8 String String_In 28 UINT16 n/a BD(Byte) 57 8
30111 4 Real Analog_In 14 Float 129 7-07h ADF(Float) 9 1
30123 4 Real Analog_In 15 Float 129 2-02h T ADF(Float) 10 1
30521 8 String String_In 36 UINT16 131 2-02h BD(Byte) 73 8
10041 1 Bit Coil Binary_In 1 UINT16 n/a DI(Dig In) 10 1
C2 Status
C2 Status
C2 Status
C2 Status
C2 Status
C2 Status
C2 Status
/Alarms: Interface
C2 Status
/Alarms: Zeroma-
C2 Percent
C2 Deviation
10042 1 Bit Coil Binary_In 1 UINT16 n/a DI(Dig In) 12 1
10043 1 Bit Coil Binary_In 1 UINT16 n/a DI(Dig In) 13 1
10044 1 Bit Coil Binary_In 1 UINT16 n/a DI(Dig In) 14 1
10045 1 Bit Coil Binary_In 1 UINT16 n/a DI(Dig In) 15 1
10046 1 Bit Coil Binary_In 1 UINT16 n/a DI(Dig In) 16 1
10047 1 Bit Coil Binary_In 1 UINT16 n/a DI(Dig In) 17 1
10048 1 Bit Coil Binary_In 1 UINT16 n/a DI(Dig In) 18 1
10050 1 Bit Coil Binary_In 1 UINT16 n/a DI(Dig In) 11 1
30191 4 Real Analog_In 17 Float n/a ADF(Float) 12 1
30649 8 String String_In 43 UINT16 n/a BD(Byte) 89 8
F US Clamp-on Communications Protocol Manual
Hardware Installation Manual, 11/2015, A5E34981613-AC
77
Page 80

Appendix A
A.1.9
Profile 8
Profile 8 (FUS1010-5N03-5.04.05-DPCO)
Data Description
Modbus
Ethernet/IP
HART
N2
Reg
Bytes
Type
Tag Name
OS
Format
CMD
VAR
Type
Ad
Sz
Site ID
30501
8
String
String_In
0
UINT16
n/a
BD(Byte)
1
8
Date: Year
30101
2
Integer
Analog_In
0
Float
n/a
ADI(Int)
1
1
Date: Month
30102
2
Integer
Analog_In
1
Float
n/a
ADI(Int)
2 1 Date: Day
30103
2
Integer
Analog_In
2
Float
n/a
ADI(Int)
3
1
Time: Hour
30104
2
Integer
Analog_In
3
Float
n/a
ADI(Int)
4
1
Time: Minute
30105
2
Integer
Analog_In
4
Float
n/a
ADI(Int)
5
1
Time: Second
30106
2
Integer
Analog_In
5
Float
n/a
ADI(Int)
6
1
Path 1
Inst.Flow Rate
30107
4
Real
Analog_In
8
Float
n/a
ADF(Float)
3
1
Flow Rate Units
30517
8
String
String_In
4
UINT16
131
0-00h
BD(Byte)
9
8
Raw Flow Path 1
30133
4
Real
Analog_In
10
Float
n/a
ADF(Float)
5
1
Raw Flow Path 2
30135
4
Real
Analog_In
11
Float
n/a
ADF(Float)
6
1
Raw Flow Units
30537
8
String
String_In
8
UINT16
n/a
BD(Byte)
17 8 Total
30143
4
Real
Analog_In
12
Float
129
33-21h S
ADF(Float)
7
1
Total Units
30557
8
String
String_In
12
UINT16
131
33-21h
BD(Byte)
25
8
Sonic Vel Path 1
30157
4
Real
Analog_In
13
Float
n/a
ADF(Float)
8 1 Sonic Vel Path 2
30159
4
Real
Analog_In
14
Float
n/a
ADF(Float)
9
1
Sonic Vel
30155
4
Real
Analog_In
15
Float
n/a
ADF(Float)
10
1
Sonic Vel Units
30577
8
String
String_In
16
UINT16
n/a
BD(Byte)
33
8
Path 1
Path 2
Signal Strength
30165
2
Integer
Analog_In
18
Float
n/a
ADF(Float)
13
1
Units
Aeration Units
30609
8
String
String_In
24
UINT16
n/a
BD(Byte)
49
8
Path 1
Path 1
Path 1
Path 1
Path 1
A.1 Modbus, EIP, HART & N2 Profile Mappings
Inst.Flow Rate
Inst.Flow Rate
Path 2
Avg Flow Rate 30119 4 Real Analog_In 9 Float 129 0-00h P ADF(Float) 4 1
Signal Strength
Signal Strength
Sig Strength
30109 4 Real Analog_In 6 Float 129 10-0Ah T ADF(Float) 1 1
30111 4 Real Analog_In 7 Float 129 11-0Bh Q ADF(Float) 2 1
30167 2 Integer Analog_In 16 Float n/a ADF(Float) 11 1
30168 2 Integer Analog_In 17 Float n/a ADF(Float) 12 1
30593 8 String String_In 20 UINT16 n/a BD(Byte) 41 8
Aeration 30171 2 Integer Analog_In 19 Float n/a ADF(Float) 14 1
Status: Spacing
Path 1
Status: Empty
Status: Rate
Status: Fault
Status: Aeration
Status: Memory
F US Clamp-on Communications Protocol Manual
78 Hardware Installation Manual, 11/2015, A5E34981613-AC
10021 1 Bit Coil Binary_In 1 UINT16 n/a DI(Dig In) 1 1
10022 1 Bit Coil Binary_In 1 UINT16 n/a DI(Dig In) 3 1
10023 1 Bit Coil Binary_In 1 UINT16 n/a DI(Dig In) 4 1
10024 1 Bit Coil Binary_In 1 UINT16 n/a DI(Dig In) 5 1
10025 1 Bit Coil Binary_In 1 UINT16 n/a DI(Dig In) 6 1
10026 1 Bit Coil Binary_In 1 UINT16 n/a DI(Dig In) 7 1
Page 81

Appendix A
Path 1
Path 1
Path 1
Path 2
Path 2
Path 2
Path 2
Path 2
Path 2
Path 2
Path 2
Path 2
Spacing
Empty
Rate
Fault
Aeration
Memory
Makeup
Interface
Zeromatic
Path 1
Delta Time Units
30629
8
String
String_In
28
UINT16
n/a
BD(Byte)
57
8
A.1 Modbus, EIP, HART & N2 Profile Mappings
Status: Makeup
Status: Interface
Status: Zeromatic
Status: Spacing
Status: Empty
Status: Rate
Status: Fault
Status: Aeration
Status: Memory
Status: Makeup
Status: Interface
Status: Zeromatic
10027 1 Bit Coil Binary_In 1 UINT16 n/a DI(Dig In) 8 1
10028 1 Bit Coil Binary_In 1 UINT16 n/a DI(Dig In) 9 1
10030 1 Bit Coil Binary_In 1 UINT16 n/a DI(Dig In) 2 1
10041 1 Bit Coil Binary_In 2 UINT16 n/a DI(Dig In) 10 1
10042 1 Bit Coil Binary_In 2 UINT16 n/a DI(Dig In) 12 1
10043 1 Bit Coil Binary_In 2 UINT16 n/a DI(Dig In) 13 1
10044 1 Bit Coil Binary_In 2 UINT16 n/a DI(Dig In) 14 1
10045 1 Bit Coil Binary_In 2 UINT16 n/a DI(Dig In) 15 1
10046 1 Bit Coil Binary_In 2 UINT16 n/a DI(Dig In) 16 1
10047 1 Bit Coil Binary_In 2 UINT16 n/a DI(Dig In) 17 1
10048 1 Bit Coil Binary_In 2 UINT16 n/a DI(Dig In) 18 1
10050 1 Bit Coil Binary_In 2 UINT16 n/a DI(Dig In) 11 1
Status/Alarms:
Status/Alarms:
Status/Alarms:
Status/Alarms:
Status/Alarms:
Status/Alarms:
Status/Alarms:
Status/Alarms:
Status/Alarms:
Delta Time
Delta Time Path 2 30181 4 Real Analog_In 21 Float n/a ADF(Float) 16 1
10001 1 Bit Coil Binary_In 0 UINT16 n/a DI(Dig In) 19 1
10002 1 Bit Coil Binary_In 0 UINT16 n/a DI(Dig In) 21 1
10003 1 Bit Coil Binary_In 0 UINT16 n/a DI(Dig In) 22 1
10004 1 Bit Coil Binary_In 0 UINT16 n/a DI(Dig In) 23 1
10005 1 Bit Coil Binary_In 0 UINT16 n/a DI(Dig In) 24 1
10006 1 Bit Coil Binary_In 0 UINT16 n/a DI(Dig In) 25 1
10007 1 Bit Coil Binary_In 0 UINT16 n/a DI(Dig In) 26 1
10008 1 Bit Coil Binary_In 0 UINT16 n/a DI(Dig In) 27 1
10010 1 Bit Coil Binary_In 0 UINT16 n/a DI(Dig In) 20 1
30179 4 Real Analog_In 20 Float n/a ADF(Float) 15 1
F US Clamp-on Communications Protocol Manual
Hardware Installation Manual, 11/2015, A5E34981613-AC
79
Page 82

Appendix A
A.1.10
Profile 9
Profile 9 (FUS1010-5N03-5.04.05-1+2CO)
Data Description
Modbus
Ethernet/IP
HART
N2
Reg
Bytes
Type
Tag Name
OS
Format
CMD
VAR
Type
Ad
Sz
Site ID
30501
8
String
String_In
0
UINT16
n/a
BD(Byte)
1
8
Date: Year
30101
2
Integer
Analog_In
0
Float
n/a
ADI(Int)
1
1
Date: Month
30102
2
Integer
Analog_In
1
Float
n/a
ADI(Int)
2 1 Date: Day
30103
2
Integer
Analog_In
2
Float
n/a
ADI(Int)
3
1
Time: Hour
30104
2
Integer
Analog_In
3
Float
n/a
ADI(Int)
4
1
Time: Minute
30105
2
Integer
Analog_In
4
Float
n/a
ADI(Int)
5
1
Time: Second
30106
2
Integer
Analog_In
5
Float
n/a
ADI(Int)
6 1 C1 Inst.Flow Rate
30109
4
Real
Analog_In
6
Float
129
6-06h S
ADF(Float)
1
1
C2 Inst.Flow Rate
30111
4
Real
Analog_In
7
Float
129
7-07h T
ADF(Float)
2 1 C2 Flow Rate Units
30521
8
String
String_In
8
UINT16
131
7-07h
BD(Byte)
17
8
C3 Inst.Flow Rate
30113
4
Real
Analog_In
8
Float
129
8-08h
ADF(Float)
3
1
C3 Avg Flow Rate
30125
4
Real
Analog_In
9
Float
129
3-03h P
ADF(Float)
4
1
C3 Flow Rate Units
30525
8
String
String_In
12
UINT16
131
3-03h
BD(Byte)
25
8
C1 Total Units
30557
8
String
String_In
16
UINT16
131
34-22h
BD(Byte)
33
8
C2 Total
30147
4
Real
Analog_In
11
Float
129
35-23h
ADF(Float)
6
1
C2 Total Units
30561
8
String
String_In
20
UINT16
131
35-23h
BD(Byte)
41
8
C3 Total Units
30565
8
String
String_In
24
UINT16
131
36-24h
BD(Byte)
49
8
C1 Sonic Vel
30157
4
Real
Analog_In
13
Float
n/a
ADF(Float)
8
1
C2 Sonic Vel
30159
4
Real
Analog_In
14
Float
n/a
ADF(Float)
9 1 Sonic Vel Units
30577
8
String
String_In
28
UINT16
n/a
BD(Byte)
57
8
Spacing
Empty
Rate
Fault
Memory
Makeup
Interface
Zeromatic
Spacing
A.1 Modbus, EIP, HART & N2 Profile Mappings
C1 Flow Rate Units 30517 8 String String_In 4 UINT16 131 6-06h BD(Byte) 9 8
C1 Total 30145 4 Real Analog_In 10 Float 129 34-22h ADF(Float) 5 1
C3 Total 30149 4 Real Analog_In 12 Float 129 36-24h Q ADF(Float) 7 1
C1 Status/Alarms:
C1 Status/Alarms:
C1 Status/Alarms:
C1 Status/Alarms:
C1 Status/Alarms:
Aeration
C1 Status/Alarms:
C1 Status/Alarms:
C1 Status/Alarms:
C1 Status/Alarms:
10021 1 Bit Coil Binary_In 0 UINT16 n/a DI(Dig In) 1 1
10022 1 Bit Coil Binary_In 0 UINT16 n/a DI(Dig In) 3 1
10023 1 Bit Coil Binary_In 0 UINT16 n/a DI(Dig In) 4 1
10024 1 Bit Coil Binary_In 0 UINT16 n/a DI(Dig In) 5 1
10025 1 Bit Coil Binary_In 0 UINT16 n/a DI(Dig In) 6 1
10026 1 Bit Coil Binary_In 0 UINT16 n/a DI(Dig In) 7 1
10027 1 Bit Coil Binary_In 0 UINT16 n/a DI(Dig In) 8 1
10028 1 Bit Coil Binary_In 0 UINT16 n/a DI(Dig In) 9 1
10030 1 Bit Coil Binary_In 0 UINT16 n/a DI(Dig In) 2 1
C2 Status/Alarms:
F US Clamp-on Communications Protocol Manual
80 Hardware Installation Manual, 11/2015, A5E34981613-AC
10041 1 Bit Coil Binary_In 1 UINT16 n/a DI(Dig In) 10 1
Page 83

Appendix A
Empty
Rate
Fault
Aeration
Memory
Makeup
Interface
Zeromatic
Spacing
Empty
Rate
Fault
Aeration
Memory
Makeup
Interface
Zeromatic
A.1.11
Profile 10
Profile 10 (FUS1010-5N03-5.04.05-1-2CO)
Data Description
Modbus
Ethernet/IP
HART
N2
Reg Bytes
Type
Tag Name
OS Format
CMD
VAR Type
Ad Sz Site ID
30501
8
String
String_In
0
UINT16
n/a
BD(Byte)
1
8
Date: Year
30101
2
Integer
Analog_In
0
Float
n/a
ADI(Int)
1
1
Date: Month
30102
2
Integer
Analog_In
1
Float
n/a
ADI(Int)
2
1
Date: Day
30103
2
Integer
Analog_In
2
Float
n/a
ADI(Int)
3 1 Time: Hour
30104
2
Integer
Analog_In
3
Float
n/a
ADI(Int)
4
1
Time: Minute
30105
2
Integer
Analog_In
4
Float
n/a
ADI(Int)
5
1
Time: Second
30106
2
Integer
Analog_In
5
Float
n/a
ADI(Int)
6
1
Rate
A.1 Modbus, EIP, HART & N2 Profile Mappings
C2 Status/Alarms:
C2 Status/Alarms:
C2 Status/Alarms:
C2 Status/Alarms:
C2 Status/Alarms:
C2 Status/Alarms:
C2 Status/Alarms:
C2 Status/Alarms:
C3 Status/Alarms:
C3 Status/Alarms:
C3 Status/Alarms:
C3 Status/Alarms:
10042 1 Bit Coil Binary_In 1 UINT16 n/a DI(Dig In) 12 1
10043 1 Bit Coil Binary_In 1 UINT16 n/a DI(Dig In) 13 1
10044 1 Bit Coil Binary_In 1 UINT16 n/a DI(Dig In) 14 1
10045 1 Bit Coil Binary_In 1 UINT16 n/a DI(Dig In) 15 1
10046 1 Bit Coil Binary_In 1 UINT16 n/a DI(Dig In) 16 1
10047 1 Bit Coil Binary_In 1 UINT16 n/a DI(Dig In) 17 1
10048 1 Bit Coil Binary_In 1 UINT16 n/a DI(Dig In) 18 1
10050 1 Bit Coil Binary_In 1 UINT16 n/a DI(Dig In) 11 1
10061 1 Bit Coil Binary_In 2 UINT16 n/a DI(Dig In) 19 1
10062 1 Bit Coil Binary_In 2 UINT16 n/a DI(Dig In) 21 1
10063 1 Bit Coil Binary_In 2 UINT16 n/a DI(Dig In) 22 1
10064 1 Bit Coil Binary_In 2 UINT16 n/a DI(Dig In) 23 1
C3 Status/Alarms:
C3 Status/Alarms:
C3 Status/Alarms:
C3 Status/Alarms:
C3 Status/Alarms:
10065 1 Bit Coil Binary_In 2 UINT16 n/a DI(Dig In) 24 1
10066 1 Bit Coil Binary_In 2 UINT16 n/a DI(Dig In) 25 1
10067 1 Bit Coil Binary_In 2 UINT16 n/a DI(Dig In) 26 1
10068 1 Bit Coil Binary_In 2 UINT16 n/a DI(Dig In) 27 1
10070 1 Bit Coil Binary_In 2 UINT16 n/a DI(Dig In) 20 1
C1 Inst.Flow
F US Clamp-on Communications Protocol Manual
Hardware Installation Manual, 11/2015, A5E34981613-AC
30109 4 Real Analog_In 6 Float 129 6-06h T ADF(Float) 1 1
81
Page 84

Appendix A
Units
Rate
Units
Rate
Rate
Units
C1 Total
30145
4
Real
Analog_In
10
Float
129
34-22h
ADF(Float)
5
1
C1 Total Units
30557
8
String
String_In
16
UINT16
131
34-22h
BD(Byte)
33 8 C2 Total
30147
4
Real
Analog_In
11
Float
129
35-23h
ADF(Float)
6
1
C3 Total Units
30565
8
String
String_In
24
UINT16
131
36-24h
BD(Byte)
49 8 C1 Sonic Vel
30157
4
Real
Analog_In
13
Float
n/a
ADF(Float)
8
1
C2 Sonic Vel
30159
4
Real
Analog_In
14
Float
n/a
ADF(Float)
9
1
Sonic Vel Units
30577
8
String
String_In
28
UINT16
n/a
BD(Byte)
57
8
/Alarms: Spacing
/Alarms: Empty
/Alarms: Rate
/Alarms: Fault
Aeration
/Alarms: Memory
/Alarms: Makeup
Interface
tic
/Alarms: Spacing
Alarms: Empty
/Alarms: Rate
A.1 Modbus, EIP, HART & N2 Profile Mappings
C1 Flow Rate
C2 Inst.Flow
C2 Flow Rate
C3 Inst.Flow
C3 Avg Flow
C3 Flow Rate
C2 Total Units 30561 8 String String_In 20 UINT16 131 35-23h BD(Byte) 41 8
C3 Total 30149 4 Real Analog_In 12 Float 129 36-24h S ADF(Float) 7 1
30517 8 String String_In 4 UINT16 131 6-06h BD(Byte) 9 8
30111 4 Real Analog_In 7 Float 129 7-07h Q ADF(Float) 2 1
30521 8 String String_In 8 UINT16 131 7-07h BD(Byte) 17 8
30113 4 Real Analog_In 8 Float 129 8-08h ADF(Float) 3 1
30125 4 Real Analog_In 9 Float 129 3-03h P ADF(Float) 4 1
30525 8 String String_In 12 UINT16 131 3-03h BD(Byte) 25 8
C1 Status
C1 Status
C1 Status
C1 Status
C1 Status
/Alarms:
C1 Status
C1 Status
C1 Status
/Alarms:
C1 Status
/Alarms: Zeroma-
C2 Status
10021 1 Bit Coil Binary_In 0 UINT16 n/a DI(Dig In) 1 1
10022 1 Bit Coil Binary_In 0 UINT16 n/a DI(Dig In) 3 1
10023 1 Bit Coil Binary_In 0 UINT16 n/a DI(Dig In) 4 1
10024 1 Bit Coil Binary_In 0 UINT16 n/a DI(Dig In) 5 1
10025 1 Bit Coil Binary_In 0 UINT16 n/a DI(Dig In) 6 1
10026 1 Bit Coil Binary_In 0 UINT16 n/a DI(Dig In) 7 1
10027 1 Bit Coil Binary_In 0 UINT16 n/a DI(Dig In) 8 1
10028 1 Bit Coil Binary_In 0 UINT16 n/a DI(Dig In) 9 1
10030 1 Bit Coil Binary_In 0 UINT16 n/a DI(Dig In) 2 1
10041 1 Bit Coil Binary_In 1 UINT16 n/a DI(Dig In) 10 1
C2 Status/
C2 Status
F US Clamp-on Communications Protocol Manual
82 Hardware Installation Manual, 11/2015, A5E34981613-AC
10042 1 Bit Coil Binary_In 1 UINT16 n/a DI(Dig In) 12 1
10043 1 Bit Coil Binary_In 1 UINT16 n/a DI(Dig In) 13 1
Page 85

Appendix A
/Alarms: Fault
/Alarms: Aeration
/Alarms: Memory
/Alarms: Makeup
/Alarms: Interface
/Alarms: Spacing
/Alarms: Rate
/Alarms: Fault
/Alarms: Aeration
/Alarms: Memory
/Alarms: Makeup
/Alarms: Interface
A.1.12
Profile 11
Profile 11 (FUS1010-5N04-5.04.05-1CO2CO)
Data Description
Modbus
Ethernet/IP
HART
N2
Reg Bytes
Type
Tag Name
OS Format
CMD
VAR Type
Ad Sz
C1 Site ID
30501
8
String
String_In
0
UINT16
n/a
BD(Byte)
1
8
Date: Year
30101
2
Integer
Analog_In
0
Float
n/a
ADI(Int)
1 1 Date: Month
30102
2
Integer
Analog_In
1
Float
n/a
ADI(Int)
2
1
Date: Day
30103
2
Integer
Analog_In
2
Float
n/a
ADI(Int)
3
1
Time: Hour
30104
2
Integer
Analog_In
3
Float
n/a
ADI(Int)
4
1
Time: Minute
30105
2
Integer
Analog_In
4
Float
n/a
ADI(Int)
5 1 Time: Second
30106
2
Integer
Analog_In
5
Float
n/a
ADI(Int)
6
1
A.1 Modbus, EIP, HART & N2 Profile Mappings
C2 Status
C2 Status
C2 Status
C2 Status
C2 Status
C2 Status
/Alarms: Zeroma-
tic
C3 Status
C3 Status
/Alarms: Empty
C3 Status
C3 Status
10044 1 Bit Coil Binary_In 1 UINT16 n/a DI(Dig In) 14 1
10045 1 Bit Coil Binary_In 1 UINT16 n/a DI(Dig In) 15 1
10046 1 Bit Coil Binary_In 1 UINT16 n/a DI(Dig In) 16 1
10047 1 Bit Coil Binary_In 1 UINT16 n/a DI(Dig In) 17 1
10048 1 Bit Coil Binary_In 1 UINT16 n/a DI(Dig In) 18 1
10050 1 Bit Coil Binary_In 1 UINT16 n/a DI(Dig In) 11 1
10061 1 Bit Coil Binary_In 2 UINT16 n/a DI(Dig In) 19 1
10062 1 Bit Coil Binary_In 2 UINT16 n/a DI(Dig In) 21 1
10063 1 Bit Coil Binary_In 2 UINT16 n/a DI(Dig In) 22 1
10064 1 Bit Coil Binary_In 2 UINT16 n/a DI(Dig In) 23 1
C3 Status
C3 Status
C3 Status
C3 Status
C3 Status/
Alarms:
Zeromatic
10065 1 Bit Coil Binary_In 2 UINT16 n/a DI(Dig In) 24 1
10066 1 Bit Coil Binary_In 2 UINT16 n/a DI(Dig In) 25 1
10067 1 Bit Coil Binary_In 2 UINT16 n/a DI(Dig In) 26 1
10068 1 Bit Coil Binary_In 2 UINT16 n/a DI(Dig In) 27 1
10070 1 Bit Coil Binary_In 2 UINT16 n/a DI(Dig In) 20 1
F US Clamp-on Communications Protocol Manual
Hardware Installation Manual, 11/2015, A5E34981613-AC
83
Page 86

Appendix A
C1 Inst.Flow Rate
30109
4
Real
Analog_In
6
Float
129
6-06h
ADF(Float)
1
1
C1 Avg Flow Rate
30121
4
Real
Analog_In
7
Float
129
1-01h P
ADF(Float)
2
1
C1 Flow Rate Units
30517
8
String
String_In
4
UINT16
131
1-01h
BD(Byte)
9 8 C1 Raw Flow
30133
4
Real
Analog_In
8
Float
n/a
ADF(Float)
3
1
C1 Raw Flow Units
30537
8
String
String_In
8
UINT16
n/a
BD(Byte)
17
8
C1 Total
30145
4
Real
Analog_In
9
Float
129
34-22h S
ADF(Float)
4
1
C1 Total Units
30557
8
String
String_In
12
UINT16
131
34-22h
BD(Byte)
25 8 C1 Sonic Vel
30157
4
Real
Analog_In
10
Float
n/a
ADF(Float)
5
1
C1 Sonic Vel Units
30577
8
String
String_In
16
UINT16
n/a
BD(Byte)
33
8
C1 Signal Strength
30167
2
Integer
Analog_In
11
Float
n/a
ADF(Float)
6
1
Units
C1 Aeration Units
30609
8
String
String_In
24
UINT16
n/a
BD(Byte)
49
8
C1 S.G. Units
30689
8
String
String_In
28
UINT16
131
15-0Fh
BD(Byte)
57
8
Spacing
Empty
Rate
Fault
Aeration
Memory
Makeup
Interface
Zeromatic
Temp 1 Units
30757
8
String
String_In
32
UINT16
n/a
BD(Byte)
65
8
C1 Delta Time
30179
4
Real
Analog_In
15
Float
n/a
ADF(Float)
10
1
Units
Aux Input 1
30285
4
Real
Analog_In
16
Float
n/a
ADF(Float)
11 1 Aux 1 Type
30813
8
String
String_In
40
UINT16
n/a
BD(Byte)
81
8
Aux Input 2
30287
4
Real
Analog_In
17
Float
n/a
ADF(Float)
12
1
Aux 2 Type
30817
8
String
String_In
44
UINT16
n/a
BD(Byte)
89
8
C2 Site ID
30505
8
String
String_In
48
UINT16
n/a
BD(Byte)
97 8 C2 Inst.Flow Rate
30111
4
Real
Analog_In
18
Float
129
7-07h
ADF(Float)
13
1
C2 Avg Flow Rate
30123
4
Real
Analog_In
19
Float
129
2-02h T
ADF(Float)
14
1
C2 Flow Rate Units
30521
8
String
String_In
52
UINT16
131
2-02h
BD(Byte)
105 8 C2 Raw Flow
30135
4
Real
Analog_In
20
Float
n/a
ADF(Float)
15
1
C2 Raw Flow Units
30541
8
String
String_In
56
UINT16
n/a
BD(Byte)
113
8
A.1 Modbus, EIP, HART & N2 Profile Mappings
C1 Sig Strength
C1 Aeration 30172 2 Integer Analog_In 12 Float n/a ADF(Float) 7 1
C1 Specific Gravity 30239 4 Real Analog_In 13 Float 129 15-0Fh ADF(Float) 8 1
C1 Status/Alarms:
C1 Status/Alarms:
C1 Status/Alarms:
C1 Status/Alarms:
C1 Status/Alarms:
C1 Status/Alarms:
C1 Status/Alarms:
C1 Status/Alarms:
C1 Status/Alarms:
30593 8 String String_In 20 UINT16 n/a BD(Byte) 41 8
10021 1 Bit Coil Binary_In 0 UINT16 n/a DI(Dig In) 1 1
10022 1 Bit Coil Binary_In 0 UINT16 n/a DI(Dig In) 3 1
10023 1 Bit Coil Binary_In 0 UINT16 n/a DI(Dig In) 4 1
10024 1 Bit Coil Binary_In 0 UINT16 n/a DI(Dig In) 5 1
10025 1 Bit Coil Binary_In 0 UINT16 n/a DI(Dig In) 6 1
10026 1 Bit Coil Binary_In 0 UINT16 n/a DI(Dig In) 7 1
10027 1 Bit Coil Binary_In 0 UINT16 n/a DI(Dig In) 8 1
10028 1 Bit Coil Binary_In 0 UINT16 n/a DI(Dig In) 9 1
10030 1 Bit Coil Binary_In 0 UINT16 n/a DI(Dig In) 2 1
Temperature 1 30293 4 Real Analog_In 14 Float n/a ADF(Float) 9 1
C1 Delta Time
F US Clamp-on Communications Protocol Manual
84 Hardware Installation Manual, 11/2015, A5E34981613-AC
30629 8 String String_In 36 UINT16 n/a BD(Byte) 73 8
Page 87

Appendix A
C2 Total
30147
4
Real
Analog_In
21
Float
129
35-23h Q
ADF(Float)
16
1
C2 Total Units
30561
8
String
String_In
60
UINT16
131
35-23h
BD(Byte)
121
8
C2 Sonic Vel
30159
4
Real
Analog_In
22
Float
n/a
ADF(Float)
17 1 C2 Sonic Vel Units
30581
8
String
String_In
64
UINT16
n/a
BD(Byte)
129
8
C2 Signal Strength
30168
2
Integer
Analog_In
23
Float
n/a
ADF(Float)
18
1
Units
C2 Aeration
30173
2
Integer
Analog_In
24
Float
n/a
ADF(Float)
19 1 C2 Aeration Units
30613
8
String
String_In
72
UINT16
n/a
BD(Byte)
145
8
C2 Specific Gravity
30241
4
Real
Analog_In
25
Float
129
16-10h
ADF(Float)
20
1
C2 S.G. Units
30693
8
String
String_In
76
UINT16
131
16-10h
BD(Byte)
153
8
Spacing
Empty
Rate
Fault
Aeration
Memory
Makeup
Interface
Zeromatic
Temperature 2
30295
4
Real
Analog_In
26
Float
n/a
ADF(Float)
21
1
Temp 2 Units
30761
8
String
String_In
80
UINT16
n/a
BD(Byte)
161 8 C2 Delta Time
30181
4
Real
Analog_In
27
Float
n/a
ADF(Float)
22
1
Units
Aux Input 3
30289
4
Real
Analog_In
28
Float
n/a
ADF(Float)
23
1
Aux 3 Type
30821
8
String
String_In
88
UINT16
n/a
BD(Byte)
177 8 Aux Input 4
30291
4
Real
Analog_In
29
Float
n/a
ADF(Float)
24
1
Aux 4 Type
30825
8
String
String_In
92
UINT16
n/a
BD(Byte)
185
8
A.1.13
Profile 12
Profile 12 (FUS1010-5N04-5.04.05-1RF2RF)
Data Description
Modbus
Ethernet/IP
HART
N2
Reg
Bytes
Type
Tag Name
OS
Format
CMD
VAR
Type
Ad
Sz
C1 Site ID
30501
8
String
String_In
0
UINT16
n/a
BD(Byte)
1
8
Date: Year
30101
2
Integer
Analog_In
0
Float
n/a
ADI(Int)
1
1
Date: Month
30102
2
Integer
Analog_In
1
Float
n/a
ADI(Int)
2
1
A.1 Modbus, EIP, HART & N2 Profile Mappings
C2 Sig Strength
C2 Status/Alarms:
C2 Status/Alarms:
C2 Status/Alarms:
C2 Status/Alarms:
C2 Status/Alarms:
C2 Status/Alarms:
C2 Status/Alarms:
C2 Status/Alarms:
C2 Status/Alarms:
30597 8 String String_In 68 UINT16 n/a BD(Byte) 137 8
10041 1 Bit Coil Binary_In 1 UINT16 n/a DI(Dig In) 10 1
10042 1 Bit Coil Binary_In 1 UINT16 n/a DI(Dig In) 12 1
10043 1 Bit Coil Binary_In 1 UINT16 n/a DI(Dig In) 13 1
10044 1 Bit Coil Binary_In 1 UINT16 n/a DI(Dig In) 14 1
10045 1 Bit Coil Binary_In 1 UINT16 n/a DI(Dig In) 15 1
10046 1 Bit Coil Binary_In 1 UINT16 n/a DI(Dig In) 16 1
10047 1 Bit Coil Binary_In 1 UINT16 n/a DI(Dig In) 17 1
10048 1 Bit Coil Binary_In 1 UINT16 n/a DI(Dig In) 18 1
10050 1 Bit Coil Binary_In 1 UINT16 n/a DI(Dig In) 11 1
C2 Delta Time
F US Clamp-on Communications Protocol Manual
Hardware Installation Manual, 11/2015, A5E34981613-AC
30633 8 String String_In 84 UINT16 n/a BD(Byte) 169 8
85
Page 88

Appendix A
Date: Day
30103
2
Integer
Analog_In
2
Float
n/a
ADI(Int)
3
1
Time: Hour
30104
2
Integer
Analog_In
3
Float
n/a
ADI(Int)
4
1
Time: Minute
30105
2
Integer
Analog_In
4
Float
n/a
ADI(Int)
5 1 Time: Second
30106
2
Integer
Analog_In
5
Float
n/a
ADI(Int)
6
1
C1 Inst.Flow Rate
30109
4
Real
Analog_In
6
Float
129
6-06h
ADF(Float)
1
1
C1 Avg Flow Rate
30121
4
Real
Analog_In
7
Float
129
1-01h P
ADF(Float)
2
1
C1 Flow Rate Units
30517
8
String
String_In
4
UINT16
131
1-01h
BD(Byte)
9
8
C1 Total Units
30557
8
String
String_In
8
UINT16
131
34-22h
BD(Byte)
17
8
Empty
Rate
Fault
Aeration
Memory
Makeup
Interface
Zeromatic
Temperature 1
30293
4
Real
Analog_In
9
Float
n/a
ADF(Float)
4
1
Temp 1 Units
30757
8
String
String_In
12
UINT16
n/a
BD(Byte)
25
8
Aux Input 1
30285
4
Real
Analog_In
10
Float
n/a
ADF(Float)
5 1 Aux 1 Type
30813
8
String
String_In
16
UINT16
n/a
BD(Byte)
33
8
Aux 2 Type
30817
8
String
String_In
20
UINT16
n/a
BD(Byte)
41
8
tion
C1 Deviation Units
30645
8
String
String_In
24
UINT16
n/a
BD(Byte)
49
8
C2 Site ID
30505
8
String
String_In
28
UINT16
n/a
BD(Byte)
57
8
C2 Inst.Flow Rate
30111
4
Real
Analog_In
13
Float
129
7-07h
ADF(Float)
8
1
C2 Avg Flow Rate
30123
4
Real
Analog_In
14
Float
129
2-02h T
ADF(Float)
9 1 C2 Flow Rate Units
30521
8
String
String_In
32
UINT16
131
2-02h
BD(Byte)
65
8
C2 Total Units
30561
8
String
String_In
36
UINT16
131
35-23h
BD(Byte)
73
8
Spacing
Empty
Rate
A.1 Modbus, EIP, HART & N2 Profile Mappings
C1 Total 30145 4 Real Analog_In 8 Float 129 34-22h S ADF(Float) 3 1
C1 Status/Alarms:
Spacing
C1 Status/Alarms:
C1 Status/Alarms:
C1 Status/Alarms:
C1 Status/Alarms:
C1 Status/Alarms:
C1 Status/Alarms:
C1 Status/Alarms:
C1 Status/Alarms:
Aux Input 2 30287 4 Real Analog_In 11 Float n/a ADF(Float) 6 1
10021 1 Bit Coil Binary_In 0 UINT16 n/a DI(Dig In) 1 1
10022 1 Bit Coil Binary_In 0 UINT16 n/a DI(Dig In) 3 1
10023 1 Bit Coil Binary_In 0 UINT16 n/a DI(Dig In) 4 1
10024 1 Bit Coil Binary_In 0 UINT16 n/a DI(Dig In) 5 1
10025 1 Bit Coil Binary_In 0 UINT16 n/a DI(Dig In) 6 1
10026 1 Bit Coil Binary_In 0 UINT16 n/a DI(Dig In) 7 1
10027 1 Bit Coil Binary_In 0 UINT16 n/a DI(Dig In) 8 1
10028 1 Bit Coil Binary_In 0 UINT16 n/a DI(Dig In) 9 1
10030 1 Bit Coil Binary_In 0 UINT16 n/a DI(Dig In) 2 1
C1 Percent Devia-
C2 Total 30147 4 Real Analog_In 15 Float 129 35-23h Q ADF(Float) 10 1
C2 Status/Alarms:
C2 Status/Alarms:
C2 Status/Alarms:
F US Clamp-on Communications Protocol Manual
86 Hardware Installation Manual, 11/2015, A5E34981613-AC
30189 4 Real Analog_In 12 Float n/a ADF(Float) 7 1
10041 1 Bit Coil Binary_In 1 UINT16 n/a DI(Dig In) 10 1
10042 1 Bit Coil Binary_In 1 UINT16 n/a DI(Dig In) 12 1
10043 1 Bit Coil Binary_In 1 UINT16 n/a DI(Dig In) 13 1
Page 89

Appendix A
Fault
Aeration
Memory
Makeup
Interface
Zeromatic
Temperature 2
30295
4
Real
Analog_In
16
Float
n/a
ADF(Float)
11
1
Temp 2 Units
30761
8
String
String_In
40
UINT16
n/a
BD(Byte)
81 8 Aux Input 3
30289
4
Real
Analog_In
17
Float
n/a
ADF(Float)
12
1
Aux Input 4
30291
4
Real
Analog_In
29
Float
n/a
ADF(Float)
13
1
Aux 4 Type
30825
8
String
String_In
18
UINT16
n/a
BD(Byte)
97
8
Deviation
C2 Deviation Units
30649
8
String
String_In
52
UINT16
n/a
BD(Byte)
105
8
A.1.14
Profile 13
Profile 13 (FUS1010-5N04-5.04.05-1CO2RF)
Data Description
Modbus
Ethernet/IP
HART
N2
Reg
Bytes
Type
Tag Name
OS
Format
CMD
VAR
Type
Ad
Sz
C1 Site ID
30501
8
String
String_In
0
UINT16
n/a
BD(Byte)
1 8 Date: Year
30101
2
Integer
Analog_In
0
Float
n/a
ADI(Int)
1
1
Date: Month
30102
2
Integer
Analog_In
1
Float
n/a
ADI(Int)
2
1
Date: Day
30103
2
Integer
Analog_In
2
Float
n/a
ADI(Int)
3
1
Time: Hour
30104
2
Integer
Analog_In
3
Float
n/a
ADI(Int)
4 1 Time: Minute
30105
2
Integer
Analog_In
4
Float
n/a
ADI(Int)
5
1
Time: Second
30106
2
Integer
Analog_In
5
Float
n/a
ADI(Int)
6
1
(Float)
Units
(Float)
Units
hS
(Float)
C1 Total Units
30557
8
String
String_In
12
UINT16
131
34-22h
BD(Byte)
25
8
A.1 Modbus, EIP, HART & N2 Profile Mappings
C2 Status/Alarms:
C2 Status/Alarms:
C2 Status/Alarms:
C2 Status/Alarms:
C2 Status/Alarms:
C2 Status/Alarms:
Aux 3 Type 30821 8 String String_In 44 UINT16 n/a BD(Byte) 89 8
C2 Percent
10044 1 Bit Coil Binary_In 1 UINT16 n/a DI(Dig In) 14 1
10045 1 Bit Coil Binary_In 1 UINT16 n/a DI(Dig In) 15 1
10046 1 Bit Coil Binary_In 1 UINT16 n/a DI(Dig In) 16 1
10047 1 Bit Coil Binary_In 1 UINT16 n/a DI(Dig In) 17 1
10048 1 Bit Coil Binary_In 1 UINT16 n/a DI(Dig In) 18 1
10050 1 Bit Coil Binary_In 1 UINT16 n/a DI(Dig In) 11 1
30191 4 Real Analog_In 19 Float n/a ADF(Float) 14 1
C1 Inst.Flow
Rate
C1 Avg Flow
Rate
C1 Flow Rate
C1 Raw Flow 30133 4 Real Analog_In 8 Float n/a ADF
C1 Raw Flow
30109 4 Real Analog_In 6 Float 129 6-06h ADF
30121 4 Real Analog_In 7 Float 129 1-01
hP
30517 8 String String_In 4 UINT16 131 1-01h BD(Byte) 9 8
30537 8 String String_In 8 UINT16 n/a BD(Byte) 17 8
ADF
(Float)
1 1
2 1
3 1
C1 Total 30145 4 Real Analog_In 9 Float 129 34-22
F US Clamp-on Communications Protocol Manual
Hardware Installation Manual, 11/2015, A5E34981613-AC
ADF
4 1
87
Page 90

Appendix A
(Float)
Units
(Float)
Units
(Float)
C1 Aeration Units
30609
8
String
String_In
24
UINT16
n/a
BD(Byte)
49
8
(Float)
/Alarms: Spacing
/Alarms: Empty
/Alarms: Rate
/Alarms: Fault
/Alarms: Aeration
/Alarms: Memory
/Alarms: Makeup
/Alarms: Interface
tic
(Float)
Temp 1 Units
30757
8
String
String_In
32
UINT16
n/a
BD(Byte)
65
8
(Float)
Units
(Float)
Aux 1 Type
30813
8
String
String_In
40
UINT16
n/a
BD(Byte)
81
8
(Float)
Aux 2 Type
30817
8
String
String_In
44
UINT16
n/a
BD(Byte)
89
8
C2 Site ID
30505
8
String
String_In
48
UINT16
n/a
BD(Byte)
97
8
A.1 Modbus, EIP, HART & N2 Profile Mappings
C1 Sonic Vel 30157 4 Real Analog_In 10 Float n/a ADF
C1 Sonic Vel
C1 Signal
Strength
C1 Sig Strength
C1 Aeration 30172 2 Integer Analog_In 12 Float n/a ADF
C1 Specific Gravity
C1 S.G. Units 30689 8 String String_In 28 UINT16 131 15-
C1 Status
C1 Status
C1 Status
C1 Status
30577 8 String String_In 16 UINT16 n/a BD(Byte) 33 8
30167 2 Integer Analog_In 11 Float n/a ADF
30593 8 String String_In 20 UINT16 n/a BD(Byte) 41 8
30239 4 Real Analog_In 13 Float 129 15-
0Fh
0Fh
10021 1 Bit Coil Binary_In 0 UINT16 n/a DI(Dig In) 1 1
10022 1 Bit Coil Binary_In 0 UINT16 n/a DI(Dig In) 3 1
10023 1 Bit Coil Binary_In 0 UINT16 n/a DI(Dig In) 4 1
10024 1 Bit Coil Binary_In 0 UINT16 n/a DI(Dig In) 5 1
ADF
BD(Byte) 57 8
5 1
6 1
7 1
8 1
C1 Status
C1 Status
C1 Status
C1 Status
C1 Status
/Alarms: Zeroma-
Temperature 1 30293 4 Real Analog_In 14 Float n/a ADF
C1 Delta Time 30179 4 Real Analog_In 15 Float n/a ADF
C1 Delta Time
Aux Input 1 30285 4 Real Analog_In 16 Float n/a ADF
10025 1 Bit Coil Binary_In 0 UINT16 n/a DI(Dig In) 6 1
10026 1 Bit Coil Binary_In 0 UINT16 n/a DI(Dig In) 7 1
10027 1 Bit Coil Binary_In 0 UINT16 n/a DI(Dig In) 8 1
10028 1 Bit Coil Binary_In 0 UINT16 n/a DI(Dig In) 9 1
10030 1 Bit Coil Binary_In 0 UINT16 n/a DI(Dig In) 2 1
30629 8 String String_In 36 UINT16 n/a BD(Byte) 73 8
9 1
10 1
11 1
Aux Input 2 30287 4 Real Analog_In 17 Float n/a ADF
F US Clamp-on Communications Protocol Manual
88 Hardware Installation Manual, 11/2015, A5E34981613-AC
12 1
Page 91

Appendix A
(Float)
hT
(Float)
Units
(Float)
C2 Total Units
30561
8
String
String_In
56
UINT16
131
35-23h
BD(Byte)
113
8
/Alarms: Spacing
/Alarms: Empty
/Alarms: Fault
/Alarms: Aeration
/Alarms: Memory
/Alarms: Makeup
/Alarms: Interface
tic
(Float)
Temp 2 Units
30761
8
String
String_In
60
UINT16
n/a
BD(Byte)
121
8
Aux 3 Type
30821
8
String
String_In
64
UINT16
n/a
BD(Byte)
129
8
(Float)
Aux 4 Type
30825
8
String
String_In
68
UINT16
n/a
BD(Byte)
137
8
Deviation
(Float)
Units
A.1 Modbus, EIP, HART & N2 Profile Mappings
C2 Inst.Flow
Rate
C2 Avg Flow
Rate
C2 Flow Rate
C2 Total 30147 4 Real Analog_In 20 Float 129 35-23h Q ADF
C2 Status
C2 Status
C2 Status
/Alarms: Rate
C2 Status
C2 Status
C2 Status
30111 4 Real Analog_In 18 Float 129 7-07h ADF
30123 4 Real Analog_In 19 Float 129 2-02
30521 8 String String_In 52 UINT16 131 2-02h BD(Byte) 105 8
10041 1 Bit Coil Binary_In 1 UINT16 n/a DI(Dig In) 10 1
10042 1 Bit Coil Binary_In 1 UINT16 n/a DI(Dig In) 12 1
10043 1 Bit Coil Binary_In 1 UINT16 n/a DI(Dig In) 13 1
10044 1 Bit Coil Binary_In 1 UINT16 n/a DI(Dig In) 14 1
10045 1 Bit Coil Binary_In 1 UINT16 n/a DI(Dig In) 15 1
10046 1 Bit Coil Binary_In 1 UINT16 n/a DI(Dig In) 16 1
ADF
13 1
14 1
15 1
C2 Status
C2 Status
C2 Status
/Alarms: Zeroma-
Temperature 2 30295 4 Real Analog_In 21 Float n/a ADF
Aux Input 3 30289 4 Real Analog_In 22 Float n/a ADF
Aux Input 4 30291 4 Real Analog_In 23 Float n/a ADF
C2 Percent
C2 Deviation
10047 1 Bit Coil Binary_In 1 UINT16 n/a DI(Dig In) 17 1
10048 1 Bit Coil Binary_In 1 UINT16 n/a DI(Dig In) 18 1
10050 1 Bit Coil Binary_In 1 UINT16 n/a DI(Dig In) 11 1
(Float)
30191 4 Real Analog_In 24 Float n/a ADF
30649 8 String String_In 72 UINT16 n/a BD(Byte) 145 8
16 1
17 1
18 1
19 1
F US Clamp-on Communications Protocol Manual
Hardware Installation Manual, 11/2015, A5E34981613-AC
89
Page 92

Appendix A
A.1.15
Profile 14
Profile 14 (FUS1010-5N04-5.04.05-DPCO)
Data Description
Modbus
Ethernet/IP
HART
N2
Reg
Bytes
Type
Tag Name
OS
Format
CMD
VAR
Type
Ad
Sz
Site ID
30501
8
String
String_In
0
UINT16
n/a
BD(Byte)
1
8
Date: Year
30101
2
Integer
Analog_In
0
Float
n/a
ADI(Int)
1
1
Date: Month
30102
2
Integer
Analog_In
1
Float
n/a
ADI(Int)
2 1 Date: Day
30103
2
Integer
Analog_In
2
Float
n/a
ADI(Int)
3
1
Time: Hour
30104
2
Integer
Analog_In
3
Float
n/a
ADI(Int)
4
1
Time: Minute
30105
2
Integer
Analog_In
4
Float
n/a
ADI(Int)
5
1
Time: Second
30106
2
Integer
Analog_In
5
Float
n/a
ADI(Int)
6
1
Path 1
Inst.Flow Rate
30107
4
Real
Analog_In
8
Float
n/a
ADF(Float)
3
1
Flow Rate Units
30517
8
String
String_In
4
UINT16
131
0-00h
BD(Byte)
9
8
Raw Flow Path 1
30133
4
Real
Analog_In
10
Float
n/a
ADF(Float)
5
1
Raw Flow Path 2
30135
4
Real
Analog_In
11
Float
n/a
ADF(Float)
6
1
Raw Flow Units
30537
8
String
String_In
8
UINT16
n/a
BD(Byte)
17 8 Total
30143
4
Real
Analog_In
12
Float
129
33-21h S
ADF(Float)
7
1
Total Units
30557
8
String
String_In
12
UINT16
131
33-21h
BD(Byte)
25
8
Sonic Vel Path 1
30157
4
Real
Analog_In
13
Float
n/a
ADF(Float)
8 1 Sonic Vel Path 2
30159
4
Real
Analog_In
14
Float
n/a
ADF(Float)
9
1
Sonic Vel
30155
4
Real
Analog_In
15
Float
n/a
ADF(Float)
10
1
Sonic Vel Units
30577
8
String
String_In
16
UINT16
n/a
BD(Byte)
33
8
Path 1
Path 2
Signal Strength
30165
2
Integer
Analog_In
18
Float
n/a
ADF(Float)
13
1
Units
Aeration Units
30609
8
String
String_In
24
UINT16
n/a
BD(Byte)
49
8
S.G. Units
30689
8
String
String_In
28
UINT16
131
14-0Eh
BD(Byte)
57
8
Path 1
Path 1
Path 1
Path 1
A.1 Modbus, EIP, HART & N2 Profile Mappings
Inst.Flow Rate
Inst.Flow Rate
Path 2
Avg Flow Rate 30119 4 Real Analog_In 9 Float 129 0-00h P ADF(Float) 4 1
30109 4 Real Analog_In 6 Float 129 10-0Ah T ADF(Float) 1 1
30111 4 Real Analog_In 7 Float 129 11-0Bh Q ADF(Float) 2 1
Signal Strength
Signal Strength
Sig Strength
Aeration 30171 2 Integer Analog_In 19 Float n/a ADF(Float) 14 1
Specific Gravity 30237 4 Real Analog_In 20 Float 129 14-0Eh ADF(Float) 15 1
Status: Spacing
Status: Empty
Status: Rate
Status: Fault
30167 2 Integer Analog_In 16 Float n/a ADF(Float) 11 1
30168 2 Integer Analog_In 17 Float n/a ADF(Float) 12 1
30593 8 String String_In 20 UINT16 n/a BD(Byte) 41 8
10021 1 Bit Coil Binary_In 0 UINT16 n/a DI(Dig In) 1 1
10022 1 Bit Coil Binary_In 0 UINT16 n/a DI(Dig In) 3 1
10023 1 Bit Coil Binary_In 0 UINT16 n/a DI(Dig In) 4 1
10024 1 Bit Coil Binary_In 0 UINT16 n/a DI(Dig In) 5 1
F US Clamp-on Communications Protocol Manual
90 Hardware Installation Manual, 11/2015, A5E34981613-AC
Page 93

Appendix A
Path 1
Path 1
Path 1
Path 1
Path 1
Path 2
Path 2
Path 2
Path 2
Path 2
Path 2
Path 2
Path 2
Path 2
Spacing
Empty
Rate
Fault
Aeration
Memory
Makeup
Interface
Zeromatic
Temperature 1
30293
4
Real
Analog_In
21
Float
n/a
ADF(Float)
16 1 Temperature 2
30295
4
Real
Analog_In
22
Float
n/a
ADF(Float)
17
1
Temp Units
30753
8
String
String_In
32
UINT16
n/a
BD(Byte)
65
8
Path 1
A.1 Modbus, EIP, HART & N2 Profile Mappings
Status: Aeration
Status: Memory
Status: Makeup
Status: Interface
Status: Zeromatic
Status: Spacing
Status: Empty
Status: Rate
Status: Fault
Status: Aeration
Status: Memory
Status: Makeup
10025 1 Bit Coil Binary_In 0 UINT16 n/a DI(Dig In) 6 1
10026 1 Bit Coil Binary_In 0 UINT16 n/a DI(Dig In) 7 1
10027 1 Bit Coil Binary_In 0 UINT16 n/a DI(Dig In) 8 1
10028 1 Bit Coil Binary_In 0 UINT16 n/a DI(Dig In) 9 1
10030 1 Bit Coil Binary_In 0 UINT16 n/a DI(Dig In) 2 1
10041 1 Bit Coil Binary_In 1 UINT16 n/a DI(Dig In) 10 1
10042 1 Bit Coil Binary_In 1 UINT16 n/a DI(Dig In) 12 1
10043 1 Bit Coil Binary_In 1 UINT16 n/a DI(Dig In) 13 1
10044 1 Bit Coil Binary_In 1 UINT16 n/a DI(Dig In) 14 1
10045 1 Bit Coil Binary_In 1 UINT16 n/a DI(Dig In) 15 1
10046 1 Bit Coil Binary_In 1 UINT16 n/a DI(Dig In) 16 1
10047 1 Bit Coil Binary_In 1 UINT16 n/a DI(Dig In) 17 1
Status: Interface
Status: Zeromatic
Status/Alarms:
Status/Alarms:
Status/Alarms:
Status/Alarms:
Status/Alarms:
Status/Alarms:
Status/Alarms:
Status/Alarms:
Status/Alarms:
10048 1 Bit Coil Binary_In 1 UINT16 n/a DI(Dig In) 18 1
10050 1 Bit Coil Binary_In 1 UINT16 n/a DI(Dig In) 11 1
10001 1 Bit Coil Binary_In 2 UINT16 n/a DI(Dig In) 19 1
10002 1 Bit Coil Binary_In 2 UINT16 n/a DI(Dig In) 20 1
10003 1 Bit Coil Binary_In 2 UINT16 n/a DI(Dig In) 22 1
10004 1 Bit Coil Binary_In 2 UINT16 n/a DI(Dig In) 23 1
10005 1 Bit Coil Binary_In 2 UINT16 n/a DI(Dig In) 24 1
10006 1 Bit Coil Binary_In 2 UINT16 n/a DI(Dig In) 25 1
10007 1 Bit Coil Binary_In 2 UINT16 n/a DI(Dig In) 26 1
10008 1 Bit Coil Binary_In 2 UINT16 n/a DI(Dig In) 27 1
10010 1 Bit Coil Binary_In 2 UINT16 n/a DI(Dig In) 21 1
F US Clamp-on Communications Protocol Manual
Hardware Installation Manual, 11/2015, A5E34981613-AC
Delta Time
30179 4 Real Analog_In 23 Float n/a ADF(Float) 18 1
91
Page 94

Appendix A
Path 2
Delta Time Units
30629
8
String
String_In
36
UINT16
n/a
BD(Byte)
73
8
Aux Input 1
30285
4
Real
Analog_In
25
Float
n/a
ADF(Float)
20
1
Aux 1 Type
30813
8
String
String_In
40
UINT16
n/a
BD(Byte)
81 8 Aux Input 2
30287
4
Real
Analog_In
26
Float
n/a
ADF(Float)
21
1
Aux 2 Type
30817
8
String
String_In
44
UINT16
n/a
BD(Byte)
89
8
Aux Input 3
30289
4
Real
Analog_In
27
Float
n/a
ADF(Float)
22 1 Aux 3 Type
30821
8
String
String_In
48
UINT16
n/a
BD(Byte)
97
8
Aux Input 4
30291
4
Real
Analog_In
28
Float
n/a
ADF(Float)
23
1
Aux 4 Type
30825
8
String
String_In
52
UINT16
n/a
BD(Byte)
105
8
A.1.16
Profile 15
Profile 15 (FUS1010-5N04-5.04.05-1+2CO)
Data Description
Modbus
Ethernet/IP
HART
N2
Reg
Bytes
Type
Tag Name
OS
Format
CMD
VAR
Type
Ad
Sz
Site ID
30501
8
String
String_In
0
UINT16
n/a
BD(Byte)
1
8
Date: Year
30101
2
Integer
Analog_In
0
Float
n/a
ADI(Int)
1
1
Date: Month
30102
2
Integer
Analog_In
1
Float
n/a
ADI(Int)
2
1
Time: Hour
30104
2
Integer
Analog_In
3
Float
n/a
ADI(Int)
4
1
Time: Minute
30105
2
Integer
Analog_In
4
Float
n/a
ADI(Int)
5
1
Time: Second
30106
2
Integer
Analog_In
5
Float
n/a
ADI(Int)
6
1
Rate
Units
Rate
Units
Rate
Rate
Units
C1 Total Units
30557
8
String
String_In
16
UINT16
131
34-22h
BD(Byte)
33 8 C2 Total
30147
4
Real
Analog_In
11
Float
129
35-23h
ADF(Float)
6
1
C2 Total Units
30561
8
String
String_In
20
UINT16
131
35-23h
BD(Byte)
41
8
C3 Total Units
30565
8
String
String_In
24
UINT16
131
36-24h
BD(Byte)
49 8 C1 Sonic Vel
30157
4
Real
Analog_In
13
Float
n/a
ADF(Float)
8
1
C2 Sonic Vel
30159
4
Real
Analog_In
14
Float
n/a
ADF(Float)
9
1
A.1 Modbus, EIP, HART & N2 Profile Mappings
Delta Time
30181 4 Real Analog_In 24 Float n/a ADF(Float) 19 1
Date: Day 30103 2 Integer Analog_In 2 Float n/a ADI(Int) 3 1
C1 Inst.Flow
C1 Flow Rate
C2 Inst.Flow
C2 Flow Rate
C3 Inst.Flow
C3 Avg Flow
C3 Flow Rate
C1 Total 30145 4 Real Analog_In 10 Float 129 34-22h ADF(Float) 5 1
30109 4 Real Analog_In 6 Float 129 6-06h T ADF(Float) 1 1
30517 8 String String_In 4 UINT16 131 6-06h BD(Byte) 9 8
30111 4 Real Analog_In 7 Float 129 7-07h Q ADF(Float) 2 1
30521 8 String String_In 8 UINT16 131 7-07h BD(Byte) 17 8
30113 4 Real Analog_In 8 Float 129 8-08h ADF(Float) 3 1
30125 4 Real Analog_In 9 Float 129 3-03h P ADF(Float) 4 1
30525 8 String String_In 12 UINT16 131 3-03h BD(Byte) 25 8
C3 Total 30149 4 Real Analog_In 12 Float 129 36-24h S ADF(Float) 7 1
F US Clamp-on Communications Protocol Manual
92 Hardware Installation Manual, 11/2015, A5E34981613-AC
Page 95

Appendix A
Sonic Vel Units
30577
8
String
String_In
28
UINT16
n/a
BD(Byte)
57
8
/Alarms: Spacing
/Alarms: Empty
/Alarms: Rate
/Alarms: Fault
/Alarms: Aeration
/Alarms: Memory
/Alarms: Interface
tic
/Alarms: Spacing
/Alarms: Empty
/Alarms: Rate
/Alarms: Fault
/Alarms: Aeration
/Alarms: Memory
/Alarms: Makeup
/Alarms: Interface
tic
/Alarms: Spacing
/Alarms: Empty
/Alarms: Rate
/Alarms: Fault
A.1 Modbus, EIP, HART & N2 Profile Mappings
C1 Status
C1 Status
C1 Status
C1 Status
C1 Status
C1 Status
C1 Status
/Alarms: Makeup
C1 Status
C1 Status
/Alarms: Zeroma-
C2 Status
10021 1 Bit Coil Binary_In 0 UINT16 n/a DI(Dig In) 1 1
10022 1 Bit Coil Binary_In 0 UINT16 n/a DI(Dig In) 3 1
10023 1 Bit Coil Binary_In 0 UINT16 n/a DI(Dig In) 4 1
10024 1 Bit Coil Binary_In 0 UINT16 n/a DI(Dig In) 5 1
10025 1 Bit Coil Binary_In 0 UINT16 n/a DI(Dig In) 6 1
10026 1 Bit Coil Binary_In 0 UINT16 n/a DI(Dig In) 7 1
10027 1 Bit Coil Binary_In 0 UINT16 n/a DI(Dig In) 8 1
10028 1 Bit Coil Binary_In 0 UINT16 n/a DI(Dig In) 9 1
10030 1 Bit Coil Binary_In 0 UINT16 n/a DI(Dig In) 2 1
10041 1 Bit Coil Binary_In 1 UINT16 n/a DI(Dig In) 10 1
C2 Status
C2 Status
C2 Status
C2 Status
C2 Status
C2 Status
C2 Status
C2 Status
/Alarms: Zeroma-
C3 Status
C3 Status
10042 1 Bit Coil Binary_In 1 UINT16 n/a DI(Dig In) 12 1
10043 1 Bit Coil Binary_In 1 UINT16 n/a DI(Dig In) 13 1
10044 1 Bit Coil Binary_In 1 UINT16 n/a DI(Dig In) 14 1
10045 1 Bit Coil Binary_In 1 UINT16 n/a DI(Dig In) 15 1
10046 1 Bit Coil Binary_In 1 UINT16 n/a DI(Dig In) 16 1
10047 1 Bit Coil Binary_In 1 UINT16 n/a DI(Dig In) 17 1
10048 1 Bit Coil Binary_In 1 UINT16 n/a DI(Dig In) 18 1
10050 1 Bit Coil Binary_In 1 UINT16 n/a DI(Dig In) 11 1
10061 1 Bit Coil Binary_In 2 UINT16 n/a DI(Dig In) 19 1
10062 1 Bit Coil Binary_In 2 UINT16 n/a DI(Dig In) 21 1
C3 Status
C3 Status
F US Clamp-on Communications Protocol Manual
Hardware Installation Manual, 11/2015, A5E34981613-AC
10063 1 Bit Coil Binary_In 2 UINT16 n/a DI(Dig In) 22 1
10064 1 Bit Coil Binary_In 2 UINT16 n/a DI(Dig In) 23 1
93
Page 96

Appendix A
/Alarms: Aeration
/Alarms: Memory
/Alarms: Makeup
/Alarms: Interface
Zeromatic
Temperature 1
30293
4
Real
Analog_In
15
Float
n/a
ADF(Float)
10
1
Temperature 2
30295
4
Real
Analog_In
16
Float
n/a
ADF(Float)
11
1
Temp Units
30753
8
String
String_In
32
UINT16
n/a
BD(Byte)
65 8 Aux Input 1
30285
4
Real
Analog_In
17
Float
n/a
ADF(Float)
12
1
Aux Input 2
30287
4
Real
Analog_In
18
Float
n/a
ADF(Float)
13
1
Aux 2 Type
30817
8
String
String_In
40
UINT16
n/a
BD(Byte)
81
8
A.1 Modbus, EIP, HART & N2 Profile Mappings
C3 Status
C3 Status
C3 Status
C3 Status
C3 Status
/Alarms:
Aux 1 Type 30813 8 String String_In 36 UINT16 n/a BD(Byte) 73 8
10065 1 Bit Coil Binary_In 2 UINT16 n/a DI(Dig In) 24 1
10066 1 Bit Coil Binary_In 2 UINT16 n/a DI(Dig In) 25 1
10067 1 Bit Coil Binary_In 2 UINT16 n/a DI(Dig In) 26 1
10068 1 Bit Coil Binary_In 2 UINT16 n/a DI(Dig In) 27 1
10070 1 Bit Coil Binary_In 2 UINT16 n/a DI(Dig In) 20 1
F US Clamp-on Communications Protocol Manual
94 Hardware Installation Manual, 11/2015, A5E34981613-AC
Page 97

Appendix A
A.1.17
Profile 16
Profile 16 (FUS1010-5N04-5.04.05-1-2CO)
Data Description
Modbus
Ethernet/IP
HART
N2
Reg
Bytes
Type
Tag Name
OS
Format
CMD
VAR
Type
Ad
Sz
Site ID
30501
8
String
String_In
0
UINT16
n/a
BD(Byte)
1
8
Date: Year
30101
2
Integer
Analog_In
0
Float
n/a
ADI(Int)
1
1
Date: Month
30102
2
Integer
Analog_In
1
Float
n/a
ADI(Int)
2 1 Date: Day
30103
2
Integer
Analog_In
2
Float
n/a
ADI(Int)
3
1
Time: Hour
30104
2
Integer
Analog_In
3
Float
n/a
ADI(Int)
4
1
Time: Minute
30105
2
Integer
Analog_In
4
Float
n/a
ADI(Int)
5
1
Time: Second
30106
2
Integer
Analog_In
5
Float
n/a
ADI(Int)
6
1
Rate
Rate
Units
Rate
Rate
Units
C1 Total
30145
4
Real
Analog_In
10
Float
129
34-22h
ADF(Float)
5
1
C1 Total Units
30557
8
String
String_In
16
UINT16
131
34-22h
BD(Byte)
33 8 C2 Total
30147
4
Real
Analog_In
11
Float
129
35-23h
ADF(Float)
6
1
C2 Total Units
30561
8
String
String_In
20
UINT16
131
35-23h
BD(Byte)
41
8
C3 Total
30149
4
Real
Analog_In
12
Float
129
36-24h S
ADF(Float)
7
1
C3 Total Units
30565
8
String
String_In
24
UINT16
131
36-24h
BD(Byte)
49 8 C1 Sonic Vel
30157
4
Real
Analog_In
13
Float
n/a
ADF(Float)
8
1
C2 Sonic Vel
30159
4
Real
Analog_In
14
Float
n/a
ADF(Float)
9
1
Sonic Vel Units
30577
8
String
String_In
28
UINT16
n/a
BD(Byte)
57
8
/Alarms: Empty
/Alarms: Rate
/Alarms: Fault
/Alarms: Aeration
/Alarms: Memory
A.1 Modbus, EIP, HART & N2 Profile Mappings
C1 Inst.Flow
C1 Flow Rate
Units
C2 Inst.Flow
C2 Flow Rate
C3 Inst.Flow
30109 4 Real Analog_In 6 Float 129 6-06h T ADF(Float) 1 1
30517 8 String String_In 4 UINT16 131 6-06h BD(Byte) 9 8
30111 4 Real Analog_In 7 Float 129 7-07h Q ADF(Float) 2 1
30521 8 String String_In 8 UINT16 131 7-07h BD(Byte) 17 8
30113 4 Real Analog_In 8 Float 129 8-08h ADF(Float) 3 1
C3 Avg Flow
C3 Flow Rate
C1 Status
/Alarms: Spacing
C1 Status
C1 Status
C1 Status
30125 4 Real Analog_In 9 Float 129 3-03h P ADF(Float) 4 1
30525 8 String String_In 12 UINT16 131 3-03h BD(Byte) 25 8
10021 1 Bit Coil Binary_In 0 UINT16 n/a DI(Dig In) 1 1
10022 1 Bit Coil Binary_In 0 UINT16 n/a DI(Dig In) 3 1
10023 1 Bit Coil Binary_In 0 UINT16 n/a DI(Dig In) 4 1
10024 1 Bit Coil Binary_In 0 UINT16 n/a DI(Dig In) 5 1
C1 Status
C1 Status
F US Clamp-on Communications Protocol Manual
Hardware Installation Manual, 11/2015, A5E34981613-AC
10025 1 Bit Coil Binary_In 0 UINT16 n/a DI(Dig In) 6 1
10026 1 Bit Coil Binary_In 0 UINT16 n/a DI(Dig In) 7 1
95
Page 98

Appendix A
/Alarms: Makeup
/Alarms: Interface
Zeromatic
/Alarms: Spacing
/Alarms: Empty
/Alarms: Fault
/Alarms: Aeration
/Alarms: Memory
/Alarms: Makeup
/Alarms: Interface
Zeromatic
cing
/Alarms: Empty
/Alarms: Rate
/Alarms: Fault
/Alarms: Memory
/Alarms: Makeup
/Alarms: Interface
Zeromatic
Temperature 1
30293
4
Real
Analog_In
15
Float
n/a
ADF(Float)
10
1
Temperature 2
30295
4
Real
Analog_In
16
Float
n/a
ADF(Float)
11
1
A.1 Modbus, EIP, HART & N2 Profile Mappings
C1 Status
C1 Status
C1 Status
/Alarms:
C2 Status
C2 Status
C2 Status
/Alarms: Rate
C2 Status
C2 Status
C2 Status
C2 Status
10027 1 Bit Coil Binary_In 0 UINT16 n/a DI(Dig In) 8 1
10028 1 Bit Coil Binary_In 0 UINT16 n/a DI(Dig In) 9 1
10030 1 Bit Coil Binary_In 0 UINT16 n/a DI(Dig In) 2 1
10041 1 Bit Coil Binary_In 1 UINT16 n/a DI(Dig In) 10 1
10042 1 Bit Coil Binary_In 1 UINT16 n/a DI(Dig In) 12 1
10043 1 Bit Coil Binary_In 1 UINT16 n/a DI(Dig In) 13 1
10044 1 Bit Coil Binary_In 1 UINT16 n/a DI(Dig In) 14 1
10045 1 Bit Coil Binary_In 1 UINT16 n/a DI(Dig In) 15 1
10046 1 Bit Coil Binary_In 1 UINT16 n/a DI(Dig In) 16 1
10047 1 Bit Coil Binary_In 1 UINT16 n/a DI(Dig In) 17 1
C2 Status
C2 Status
/Alarms:
C3 Status/Alarms: Spa-
C3 Status
C3 Status
C3 Status
C3 Status
/Alarms: Aeration
C3 Status
C3 Status
C3 Status
10048 1 Bit Coil Binary_In 1 UINT16 n/a DI(Dig In) 18 1
10050 1 Bit Coil Binary_In 1 UINT16 n/a DI(Dig In) 11 1
10061 1 Bit Coil Binary_In 2 UINT16 n/a DI(Dig In) 19 1
10062 1 Bit Coil Binary_In 2 UINT16 n/a DI(Dig In) 21 1
10063 1 Bit Coil Binary_In 2 UINT16 n/a DI(Dig In) 22 1
10064 1 Bit Coil Binary_In 2 UINT16 n/a DI(Dig In) 23 1
10065 1 Bit Coil Binary_In 2 UINT16 n/a DI(Dig In) 24 1
10066 1 Bit Coil Binary_In 2 UINT16 n/a DI(Dig In) 25 1
10067 1 Bit Coil Binary_In 2 UINT16 n/a DI(Dig In) 26 1
10068 1 Bit Coil Binary_In 2 UINT16 n/a DI(Dig In) 27 1
C3 Status
/Alarms:
F US Clamp-on Communications Protocol Manual
96 Hardware Installation Manual, 11/2015, A5E34981613-AC
10070 1 Bit Coil Binary_In 2 UINT16 n/a DI(Dig In) 20 1
Page 99

Appendix A
Temp Units
30753
8
String
String_In
32
UINT16
n/a
BD(Byte)
65
8
Aux Input 1
30285
4
Real
Analog_In
17
Float
n/a
ADF(Float)
12
1
Aux 1 Type
30813
8
String
String_In
36
UINT16
n/a
BD(Byte)
73 8 Aux Input 2
30287
4
Real
Analog_In
18
Float
n/a
ADF(Float)
13
1
Aux 2 Type
30817
8
String
String_In
40
UINT16
n/a
BD(Byte)
81
8
A.1.18
Profile 17
Profile 17 (FUS1010-5MN01-5.04.05-1CO2CO3CO4CO)
Data Description
Modbus
Ethernet/IP
HART
N2
Reg
Bytes
Type
Tag Name
OS
Format
CMD
VAR
Type
Ad
Sz
C1 Site ID
30501
8
String
String_In
0
UINT16
n/a
BD(Byte)
1
1
Date: Year
30101
2
Integer
Analog_In
0
Float
n/a
ADI(Int)
1
1
Date: Month
30102
2
Integer
Analog_In
1
Float
n/a
ADI(Int)
2
1
Date: Day
30103
2
Integer
Analog_In
2
Float
n/a
ADI(Int)
3
1
Time: Minute
30105
2
Integer
Analog_In
4
Float
n/a
ADI(Int)
5
1
Rate
Rate
Units
C1 Raw Flow
30133
4
Real
Analog_In
8
Float
n/a
ADF(Float)
3
1
Units
C1 Total
30145
4
Real
Analog_In
9
Float
129
34-22h
ADF(Float)
4 1 C1 Total Units
30557
8
String
String_In
12
UINT16
131
34-22h
BD(Byte)
25
8
C1 Sonic Vel
30157
4
Real
Analog_In
10
Float
n/a
ADF(Float)
5
1
Units
Strength
Units
C1 Aeration
30172
2
Integer
Analog_In
12
Float
n/a
ADF(Float)
7
1
C1 Aeration Units
30609
8
String
String_In
24
UINT16
n/a
BD(Byte)
49
8
/Alarms: Spacing
/Alarms: Empty
/Alarms: Rate
/Alarms: Fault
A.1 Modbus, EIP, HART & N2 Profile Mappings
Time: Hour 30104 2 Integer Analog_In 3 Float n/a ADI(Int) 4 1
Time: Second 30106 2 Integer Analog_In 5 Float n/a ADI(Int) 6 1
C1 Inst.Flow
C1 Avg Flow
C1 Flow Rate
C1 Raw Flow
30109 4 Real Analog_In 6 Float 129 6-06h ADF(Float) 1 1
30121 4 Real Analog_In 7 Float 129 1-01h P ADF(Float) 2 1
30517 8 String String_In 4 UINT16 131 1-01h BD(Byte) 9 8
30537 8 String String_In 8 UINT16 n/a BD(Byte) 17 8
C1 Sonic Vel
C1 Signal
C1 Sig Strength
C1 Status
C1 Status
C1 Status
C1 Status
F US Clamp-on Communications Protocol Manual
Hardware Installation Manual, 11/2015, A5E34981613-AC
30577 8 String String_In 16 UINT16 n/a BD(Byte) 33 8
30167 2 Integer Analog_In 11 Float n/a ADF(Float) 6 1
30593 8 String String_In 20 UINT16 n/a BD(Byte) 41 8
10021 1 Bit Coil Binary_In 0 UINT16 n/a DI(Dig In) 1 1
10022 1 Bit Coil Binary_In 0 UINT16 n/a DI(Dig In) 3 1
10023 1 Bit Coil Binary_In 0 UINT16 n/a DI(Dig In) 4 1
10024 1 Bit Coil Binary_In 0 UINT16 n/a DI(Dig In) 5 1
97
Page 100

Appendix A
/Alarms: Aeration
/Alarms: Memory
/Alarms: Makeup
/Alarms: Interface
tic
C1 Delta Time
30179
4
Real
Analog_In
13
Float
n/a
ADF(Float)
8
1
Units
Rate
Rate
Units
C2 Raw Flow
30135
4
Real
Analog_In
16
Float
n/a
ADF(Float)
11
1
Units
C2 Total
30147
4
Real
Analog_In
17
Float
129
35-23h
ADF(Float)
12 1 C2 Total Units
30561
8
String
String_In
44
UINT16
131
35-23h
BD(Byte)
89
8
C2 Sonic Vel
30159
4
Real
Analog_In
18
Float
n/a
ADF(Float)
13
1
Units
Strength
Units
C2 Aeration
30173
2
Integer
Analog_In
20
Float
n/a
ADF(Float)
15
1
Spacing
/Alarms: Empty
/Alarms: Rate
/Alarms: Fault
/Alarms: Aeration
/Alarms: Memory
A.1 Modbus, EIP, HART & N2 Profile Mappings
C1 Status
C1 Status
C1 Status
C1 Status
C1 Status
/Alarms: Zeroma-
C1 Delta Time
C2 Site ID 30505 8 String String_In 32 UINT16 n/a BD(Byte) 65 8
C2 Inst.Flow
C2 Avg Flow
C2 Flow Rate
10025 1 Bit Coil Binary_In 0 UINT16 n/a DI(Dig In) 6 1
10026 1 Bit Coil Binary_In 0 UINT16 n/a DI(Dig In) 7 1
10027 1 Bit Coil Binary_In 0 UINT16 n/a DI(Dig In) 8 1
10028 1 Bit Coil Binary_In 0 UINT16 n/a DI(Dig In) 9 1
10030 1 Bit Coil Binary_In 0 UINT16 n/a DI(Dig In) 2 1
30629 8 String String_In 28 UINT16 n/a BD(Byte) 57 8
30111 4 Real Analog_In 14 Float 129 7-07h ADF(Float) 9 1
30123 4 Real Analog_In 15 Float 129 2-02h S ADF(Float) 10 1
30521 8 String String_In 36 UINT16 131 2-02h BD(Byte) 73 8
C2 Raw Flow
C2 Sonic Vel
C2 Signal
C2 Sig Strength
C2 Aeration Units 30613 8 String String_In 56 UINT16 n/a BD(Byte) 113 8
C2 Sta-
tus/Alarms:
C2 Status
C2 Status
C2 Status
30541 8 String String_In 40 UINT16 n/a BD(Byte) 81 8
30581 8 String String_In 48 UINT16 n/a BD(Byte) 97 8
30168 2 Integer Analog_In 19 Float n/a ADF(Float) 14 1
30597 8 String String_In 52 UINT16 n/a BD(Byte) 105 8
10041 1 Bit Coil Binary_In 1 UINT16 n/a DI(Dig In) 10 1
10042 1 Bit Coil Binary_In 1 UINT16 n/a DI(Dig In) 12 1
10043 1 Bit Coil Binary_In 1 UINT16 n/a DI(Dig In) 13 1
10044 1 Bit Coil Binary_In 1 UINT16 n/a DI(Dig In) 14 1
C2 Status
C2 Status
F US Clamp-on Communications Protocol Manual
98 Hardware Installation Manual, 11/2015, A5E34981613-AC
10045 1 Bit Coil Binary_In 1 UINT16 n/a DI(Dig In) 15 1
10046 1 Bit Coil Binary_In 1 UINT16 n/a DI(Dig In) 16 1
 Loading...