

Siemens SIMATRIX NEO II, SIMNEOII-168 Quick Start Manual

English
Deutsch
Quick Start Manual for SIMATRIX NEO II
Kurzanleitung für SIMATRIX NEO II
Model number Part Code
Typen-Number Art.-Nr
SIMNEOII-168 S54567-C75-A1
Document / Dokument A24205-A336-H490
Edition / Ausgabe 10.2009
Supersedes / Ersetzt A24205-A336-H490 (03.2008)
C
B
A
D
H
E
G
F
Warning
To avoid electrical shock, do not open the cabinet. Refer servicing to qualified personnel only.
CAUTION: To reduce the risk of electric shock, do not remove cover (or back). No
user-serviceable parts inside. Servicing should only be carried out by qualified service
personnel.
Warnung
Zur Vermeidung von Elektroschocks darf das Gehäuse nicht geöffnet werden. Servicearbeiten
dürfen nur von qualifiziertem Personal ausgeführt werden.
VORSICHT: Um die Gefahr eines Elektroschocks zu verringern, darf das Gehäuse (oder die
Rückseite) nicht entfernt werden. Im Inneren befinden sich keine benutzerseitig zu wartenden
Teile. Servicearbeiten dürfen nur von qualifiziertem Kundendienstpersonal ausgeführt werden.
English
Important
This quick start manual is only intended for use by professional installers who have
an adequate working knowledge of video systems! This manual outlines the most
important information about the SIMATRIX NEO II video matrix system. It is,
however, vital that you also refer to the full operating instructions.
Legende
Illustration A:
Telemetry ports for dome camera types RJ9, RS422 / RS485
Port-No.
Protocol*
Interface parameters*
Telemetry Port 1
CCDA
9k6, 8n1
Telemetry Port 2
SCU
2k4, 8E1
Telemetry Port 3
Sivis Minidome
19k2, 8E1
Telemetry Port 4
Pelco D
9k6, 8N1
*changeable by control software
Pin allocation for the "Telemetry Port" 4-pin RJ11 sockets
Pin
Signal
Pin
Signal
1
+TX 3 +RX 2 -TX 4 -RX
Illustration B:
Keys and interfaces
1 Reset (red key):
In combination with the green Default key, this key restores the factory settings
and activates alarm program 2.
All user-defined settings will be overwritten
2 Default (green key), see Reset
3 COM2/3: Serial interfaces (with Y cable)
RS232 communication interface for data exchange with external computers and
other systems
Data exchange rate: 19200 Baud.
Pin
COM2/3
COM4
1, 4, 6, 7
N.C.
N.C.
2
RX COM2
RX COM2
3
TX COM2
TX COM2
5
GND
GND 8 RX COM3
N.C. 9 TX COM3
N.C.
4 COM4: Serial interface
RS232 communication interface for data exchange with external computers and
other systems
Data exchange rate: 19200 Baud.
5 Alarm 1-16 / TTY out:
37-pin socket for 16 alarm input signals and 8 camera head control signals
Note: the alarm signals must be presented for at least 100 ms.
Pin
Function
Pin
Function
1
Alarm input 1 / 17
20
–TX TTY 1 / 9
2
Alarm input 2 / 18
21
+TX TTY 1 / 9
3
Alarm input 3 / 19
22
–TX TTY 2 / 10
4
Alarm input 4 / 20
23
+TX TTY 2 / 10
5
Alarm input 5 / 21
24
–TX TTY 3 / 11
6
Alarm input 6 / 22
25
+TX TTY 3 / 11
7
Alarm input 7 / 23
26
–TX TTY 4 / 12
8
Alarm input 8 / 24
27
+TX TTY 4 / 12
9
Alarm input 9 / 25
28
–TX TTY 5 / 13
10
Alarm input 10 / 26
29
+TX TTY 5 / 13
11
Alarm input 11 / 27
30
–TX TTY 6 / 14
12
Alarm input 12 / 28
31
+TX TTY 6 / 14
13
Alarm input 13 / 29
32
–TX TTY 7 / 15
14
Alarm input 14 / 30
33
+TX TTY 7 / 15
15
Alarm input 15 / 31
34
–TX TTY 8 / 16
16
Alarm input 16 / 32
35
+TX TTY 8 / 16
17, 18, 19
GND
36, 37
GND
6 LAN
8P8C-socket (RJ45) for data exchange with external computers and other
systems via ethernet 10/100-Base-T
7 Syslink
RJ9 connection for an extension unit and /or alarm box.
8 Alarm Out
25-pin Sub-D socket with 8 Open-Collector outputs for external device control
and collector relay with 2 voltage-free signal switching contacts (alarms and/or
video signal interruption)
Pin
Function
Pin
Function
1
N.C.
14
Open Collector D0
2
N.C.
15
Open Collector D1
3
N.C.
16
Open Collector D2
4
Relay N.O. contact 1
17
Open Collector D3
5
Relay change-over
18
Open Collector D4
6
Relay N.C. contact 1
19
Open Collector D5
7
GND
20
Open Collector D6
8
Relay N.O. contact 2
21
Open Collector D7
9
Relay change-over
contact 2
22
Conform connection
diodes (D0-D7)(1)
10
Relay N.C. contact 2
23
GND
11, 12, 13
N.C.
24, 25
N.C.
9 Alarm 17-32 / TTY out: see 5, alarm 1-16 / TTY out
Illustration C:
Type plate and CE-mark
Illustration D:
Power supply / fuses
Fuses: 2 x 1.6 A (slow-blow)
To open, push the catch between the two fuses upwards.
Illustration E:
Status message after power up (front display)
Illustration F
Maximum of 128 BNC sockets for video input signals (75Ω)
Illustration G
Maximum of 32 BNC sockets for video output signals (75Ω)
Illustration H
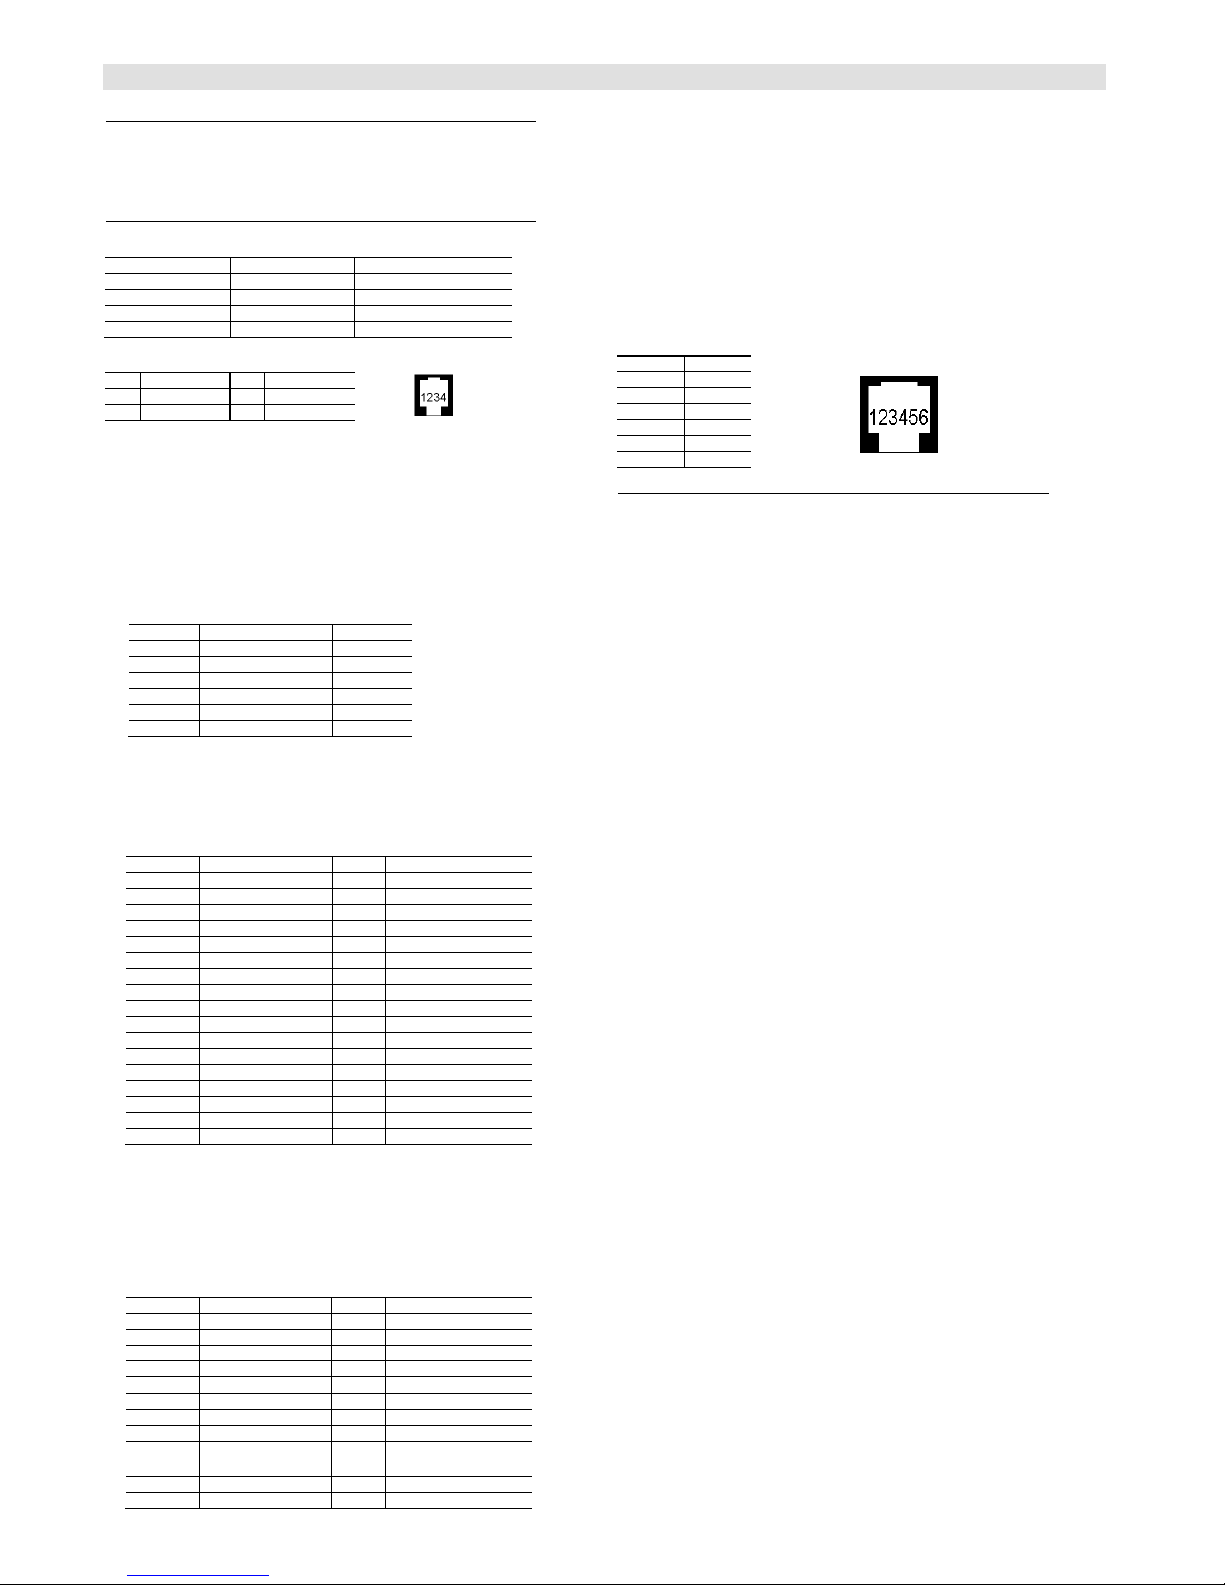
8 RJ12 sockets for operating devices, 6-pin
Pin
Function
1
GND 2 – RX 3 + RX
4
– TX 5 + TX
6
+12V
Installation and set-up
When installing the unit, ensure that the ventilation slots at the side are not
obstructed in any way! If necessary, feed cooling air from the right-hand side of the
housing (front/display side)
Step 1: Provisionally connect the SIMATRIX NEO II to the electrical supply
Required power supply: TN network (to VDE 0100, section 300 or EN 60950)
Voltage range: 115 / 230 Volt (+10% / -15%)
Once the system has been connected to the electrical supply, and assuming the
device is in good operating order, the following messages will appear in the front
display; "waiting for CPU" (start-up message) followed by "active", after this the
system time will be displayed.
To continue installation, you must now unplug the unit at the mains!
Step 2: additional video input / output modules (SIMNEO-IM / -SOM)
Open the chassis and install the additional video modules Please refer to the
detailled operation manual of SIMATRIX SYS for installation and setup.
Step 3: Connect the cameras
Step 4: Connect the monitors
Step 5: Connect the operating devices
Step 6: Connect any other devices
if applicable, connect system extensions and any other devices.
Step 7: Connect the control PC
Connect the control PC to COM2, COM4 or LAN using the null-modem cable.
Step 8: Connect the SIMATRIX NEO II to the electrical supply
Step 9: Install the control software and the LAN configurator
Use the CD supplied with the unit to install the control program. Then start up the
control program.
Step 10: LAN configuration
If the system will be configured via LAN, please start the net config tool at first and
enter the IP-address
Step 11: Set the system time in the SIMATRIX NEO II
You must start the system's real time clock if it is not active ("No Time!" appears in
the display),as otherwise a number of important system functions, such as alarm
sequencing, will not be available.
Control software: System real time clock / Permanent timers button
Step 12: Save base parameters
Control software: Base parameter button
Camera and monitor settings
Step 13: Save alarm base parameters
Control software:
Alarm base parameters button
Alarm sensor settings
Step 14: Save camera labels
Control software: Camera labels button
Step 15: Test cameras, monitors and operating devices
Control software: Controls/ signal reception button
Step 16: Alarm sensor to camera allocation
Control software: Sensors / Camera groups button
Step 17: Further programming
If applicable, enter further parameters in order to tailor the function of the SIMATRIX
NEO II to suit individual operating needs and the rest of the system.
Step 18: Make a back-up of the parameter settings and store the back-up close
to the system.
Data and design subject to change without notice © 2008 Siemens Building Technologies: Fire and Security Products
 Loading...