

Page 1

SIMATIC WinCC Unified
Tips and Tricks for Scripting
(JavaScript)
SIMATIC WinCC Unified (Engineering),
SIMATIC WinCC Unified (Runtime)
SIMATIC HMI Unified Comfort Panels
https://support.industry.siemens.com/cs/ww/en/view/109758536
Siemens
Industry
Online
Support
Page 2

Legal information
Tips and Tricks JavaScript
Article ID: 109758536, V3.0, 09/2020
2
© Siemens AG
2020 All rights reserved
Legal information
Use of application examples
Application examples illustrate the solution of automation tasks through an interaction of several
components in the form of text, graphics and/or software modules. The application examples are
a free service by Siemens AG and/or a subsidiary of Siemens AG (“Siemens”). They are nonbinding and make no claim to completeness or functionality regarding configuration and
equipment. The application examples merely offer help with typical tasks; they do not constitute
customer-specific solutions. You yourself are responsible for the proper and safe operation of the
products in accordance with applicable regulations and must also check the function of the
respective application example and customize it for your system.
Siemens grants you the non-exclusive, non-sublicensable and non-transferable right to have the
application examples used by technically trained personnel. Any change to the application
examples is your responsibility. Sharing the application examples with third parties or copying the
application examples or excerpts thereof is permitted only in combination with your own products.
The application examples are not required to undergo the customary tests and quality inspections
of a chargeable product; they may have functional and performance defects as well as errors. It is
your responsibility to use them in such a manner that any malfunctions that may occur do not
result in property damage or injury to persons.
Disclaimer of liability
Siemens shall not assume any liability, for any legal reason whatsoever, including, without
limitation, liability for the usability, availability, completeness and freedom from defects of the
application examples as well as for related information, configuration and performance data and
any damage caused thereby. This shall not apply in cases of mandatory liability, for example
under the German Product Liability Act, or in cases of intent, gross negligence, or culpable loss of
life, bodily injury or damage to health, non-compliance with a guarantee, fraudulent
non-disclosure of a defect, or culpable breach of material contractual obligations. Claims for
damages arising from a breach of material contractual obligations shall however be limited to the
foreseeable damage typical of the type of agreement, unless liability arises from intent or gross
negligence or is based on loss of life, bodily injury or damage to health. The foregoing provisions
do not imply any change in the burden of proof to your detriment. You shall indemnify Siemens
against existing or future claims of third parties in this connection except where Siemens is
mandatorily liable.
By using the application examples you acknowledge that Siemens cannot be held liable for any
damage beyond the liability provisions described.
Other information
Siemens reserves the right to make changes to the application examples at any time without
notice. In case of discrepancies between the suggestions in the application examples and other
Siemens publications such as catalogs, the content of the other documentation shall have
precedence.
The Siemens terms of use (https://support.industry.siemens.com) shall also apply.
Security information
Siemens provides products and solutions with industrial security functions that support the secure
operation of plants, systems, machines and networks.
In order to protect plants, systems, machines and networks against cyber threats, it is necessary
to implement – and continuously maintain – a holistic, state-of-the-art industrial security concept.
Siemens’ products and solutions constitute one element of such a concept.
Customers are responsible for preventing unauthorized access to their plants, systems, machines
and networks. Such systems, machines and components should only be connected to an
enterprise network or the Internet if and to the extent such a connection is necessary and only
when appropriate security measures (e.g. firewalls and/or network segmentation) are in place.
For additional information on industrial security measures that may be implemented, please visit
https://www.siemens.com/industrialsecurity.
Siemens’ products and solutions undergo continuous development to make them more secure.
Siemens strongly recommends that product updates are applied as soon as they are available
and that the latest product versions are used. Use of product versions that are no longer
supported, and failure to apply the latest updates may increase customer’s exposure to cyber
threats.
To stay informed about product updates, subscribe to the Siemens Industrial Security RSS Feed
at: https://www.siemens.com/industrialsecurity.
Page 3

Table of contents
Tips and Tricks JavaScript
Article ID: 109758536, V3.0, 09/2020
3
© Siemens AG
2020 All rights reserved
Table of contents
Legal information ..................................................................................................... 2
1 Introduction .................................................................................................... 5
1.1 Overview ........................................................................................... 5
1.2 Components used ............................................................................. 5
2 General............................................................................................................ 6
2.1 System function or script (a decision-making aid) ............................... 6
2.2 Trigger types ..................................................................................... 6
2.3 Access properties of a screen object .................................................. 8
2.4 Difference between synchronous and asynchronous script calls......... 8
2.5 Script threads .................................................................................. 10
3 Configuring scripts ...................................................................................... 11
3.1 Configuring local scripts ................................................................... 11
3.1.1 Dynamizing object properties via scripts .......................................... 12
3.1.2 Calling up scripts via events ............................................................. 13
3.1.3 Calling scripts via Scheduled tasks .................................................. 13
3.2 Configuring global script modules .................................................... 14
3.2.1 Add global module ........................................................................... 15
3.2.2 Creating a Global Definition Area ..................................................... 16
3.2.3 Edit global functions......................................................................... 17
3.2.4 Import and use content from global modules .................................... 19
4 Tips and tricks for creating scripts (JavaScript in general) ....................... 24
4.1 Strings in JavaScript ........................................................................ 24
4.1.1 Linking strings by script.................................................................... 24
4.1.2 Adding spaces to linked strings ........................................................ 24
4.1.3 Determining the length of a string .................................................... 25
4.1.4 Finding a sub-section of a string ...................................................... 25
4.1.5 Turning a string into an array ........................................................... 25
4.2 Arrays in JavaScript ......................................................................... 26
4.2.1 Creating arrays and accessing array elements ................................. 26
4.2.2 Extending and truncating arrays ....................................................... 27
4.2.3 Sorting arrays .................................................................................. 27
4.2.4 Turn arrays into strings .................................................................... 28
4.3 Math object in JavaScript ................................................................ . 28
4.3.1 Add constants .................................................................................. 29
4.3.2 Round off tag values ........................................................................ 29
4.3.3 Find square root .............................................................................. 29
4.3.4 Use exponent function ..................................................................... 29
4.3.5 Generate random number ................................................................ 30
4.3.6 Find minimum/maximum values ....................................................... 30
5 Tips and tricks for scripting (WinCC Unified specific)............................... 31
5.1 Script snippets ................................................................................. 31
5.2 Description of the "HMI Runtime" snippets ....................................... 32
5.3 Performance-optimized configuration ............................................... 34
5.3.1 Prefer system dialogs ...................................................................... 34
5.3.2 Read multiple tags with TagSet........................................................ 34
5.3.3 Avoid cyclic scripts .......................................................................... 35
5.3.4 Establish database connections once .............................................. 35
5.4 Screens and screen objects ............................................................. 36
5.4.1 Finding objects in screen windows with object paths ........................ 36
5.4.2 Screen change across multiple screen windows .............................. 39
5.4.3 Displaying screens as pop-ups ........................................................ 40
Page 4

Table of contents
Tips and Tricks JavaScript
Article ID: 109758536, V3.0, 09/2020
4
© Siemens AG
2020 All rights reserved
5.4.4 Determining the screen name .......................................................... 43
5.4.5 Change colors ................................................................................. 43
5.4.6 Counting screen objects and finding screen object names ............... 44
5.4.7 Read out touch area direction .......................................................... 44
5.5 Interconnect faceplate via script ....................................................... 47
5.5.1 Open faceplate as a pop-up ............................................................. 48
5.5.2 Modifying faceplate interconnection in the screen ............................ 51
5.5.3 Opening a faceplate from a faceplate ............................................... 53
5.5.4 Closing a faceplate ................................................................ .......... 53
5.6 Tags and UDTs ............................................................................... 58
5.6.1 Access to HMI UDT elements .......................................................... 58
5.6.2 Loop breakers ................................................................................. 58
5.6.3 Using client-internal tags via data set ............................................... 59
5.7 Starting programs from the runtime .................................................. 61
5.7.1 StartProgram in the Unified PC runtime ........................................... 61
5.7.2 StartProgram in the Unified Comfort Panel ....................................... 62
5.8 File handling ................................ .................................................... 63
5.8.1 Create folder.................................................................................... 63
5.8.2 Write values to a file and create file .................................................. 64
5.8.3 Read values from a file .................................................................... 65
5.9 Configuring time delays in a script.................................................... 67
5.10 Configuring access to databases ..................................................... 69
5.11 Configuring access to internet resources ......................................... 69
5.12 Filtering alarms and messages ........................................................ 70
5.13 Switching runtime language ............................................................. 71
5.14 "Math" object ................................................................................... 72
5.15 Configuring date and time ................................................................ 72
5.15.1 Working with local date/time ............................................................ 72
5.15.2 Editing user-defined date/time.......................................................... 73
5.15.3 Working with time stamps on a nanosecond basis ........................... 73
5.16 Script diagnostics ............................................................................ 75
5.16.1 "Alert()" notification window .............................................................. 75
5.16.2 Diagnostics via RTIL TraceViewer ................................................... 75
5.16.3 Debugging scripts in Chrome ........................................................... 77
5.16.4 Plan for responses in case of error................................................... 77
6 Useful information ................................................................ ........................ 78
7 Appendix ....................................................................................................... 79
7.1 Service and support ......................................................................... 79
7.2 Links and literature .......................................................................... 80
7.3 Change documentation .................................................................... 80
Page 5
1 Introduction
Tips and Tricks JavaScript
Article ID: 109758536, V3.0, 09/2020
5
© Siemens AG
2020 All rights reserved
1 Introduction
1.1 Overview
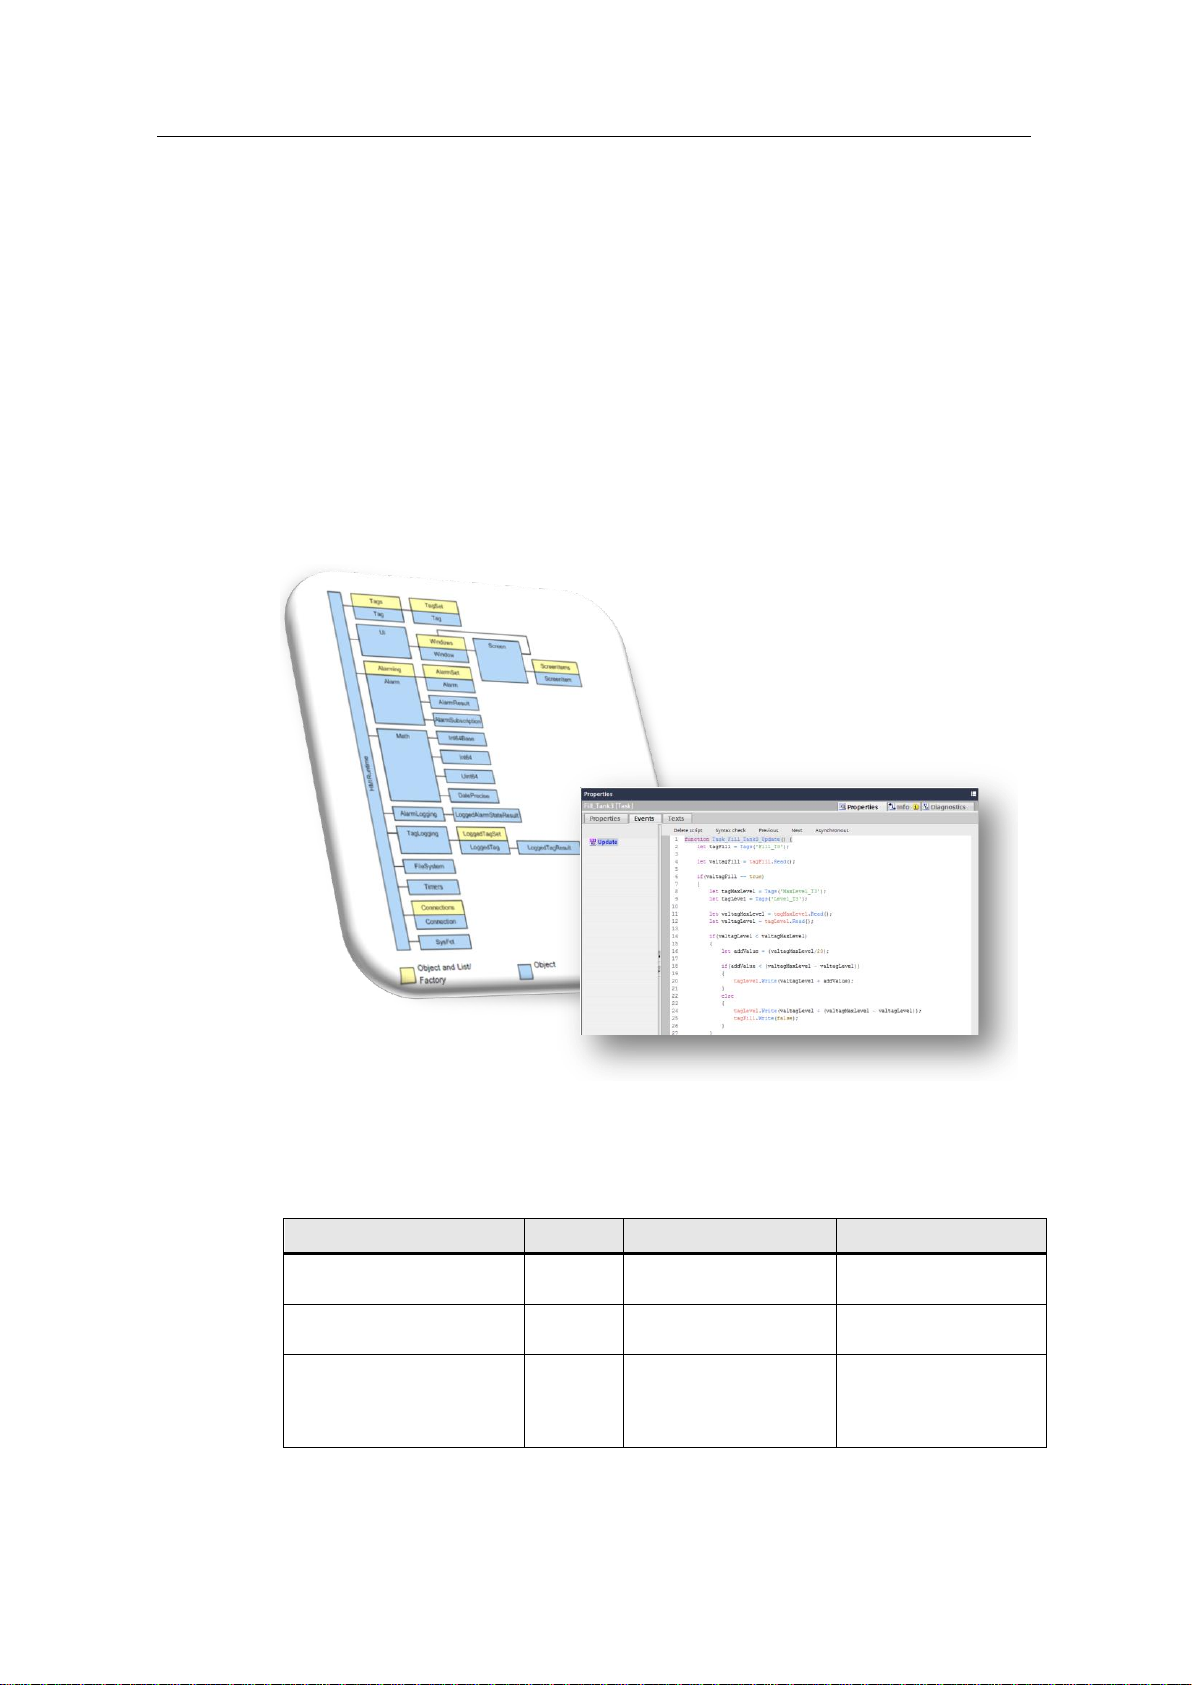
SIMATIC WinCC Unified uses JavaScript as a script language and therefore
provides a modern script environment, which you can typically use to automate
screens and objects.
The script environment maps individual elements of the system components via an
object model, e.g. screen of the graphic runtime system. You reference this object
model in your script languages, this allowing you to access different functions in an
object-oriented approach.
The application example will show you how to use scripts in SIMATIC WinCC
Unified. Selected examples will also serve to show you tips and tricks for manual
scripting, which you can use in your application.
Figure 1-1
1.2 Components used
The following hardware and software components were used to create this
application example:
Table 1-1
Components
Quantity
Item number
Comment
SIMATIC WinCC Unified
V16 (Engineering)
1
6AV2153-....1-6...
-
SIMATIC WinCC Unified
V16 (Runtime)
1
6AV2154-....1-6...
-
SIMATIC HMI Unified
Comfort Panel MTP700
1
6AV2128-3GB36-0AX0
Alternatively, you can
use any other SIMATIC
HMI Unified Comfort
Panel.
Page 6
2 General
Tips and Tricks JavaScript
Article ID: 109758536, V3.0, 09/2020
6
© Siemens AG
2020 All rights reserved
2 General
This chapter will familiarize you with general information surrounding the topic of
scripting in WinCC Unified.
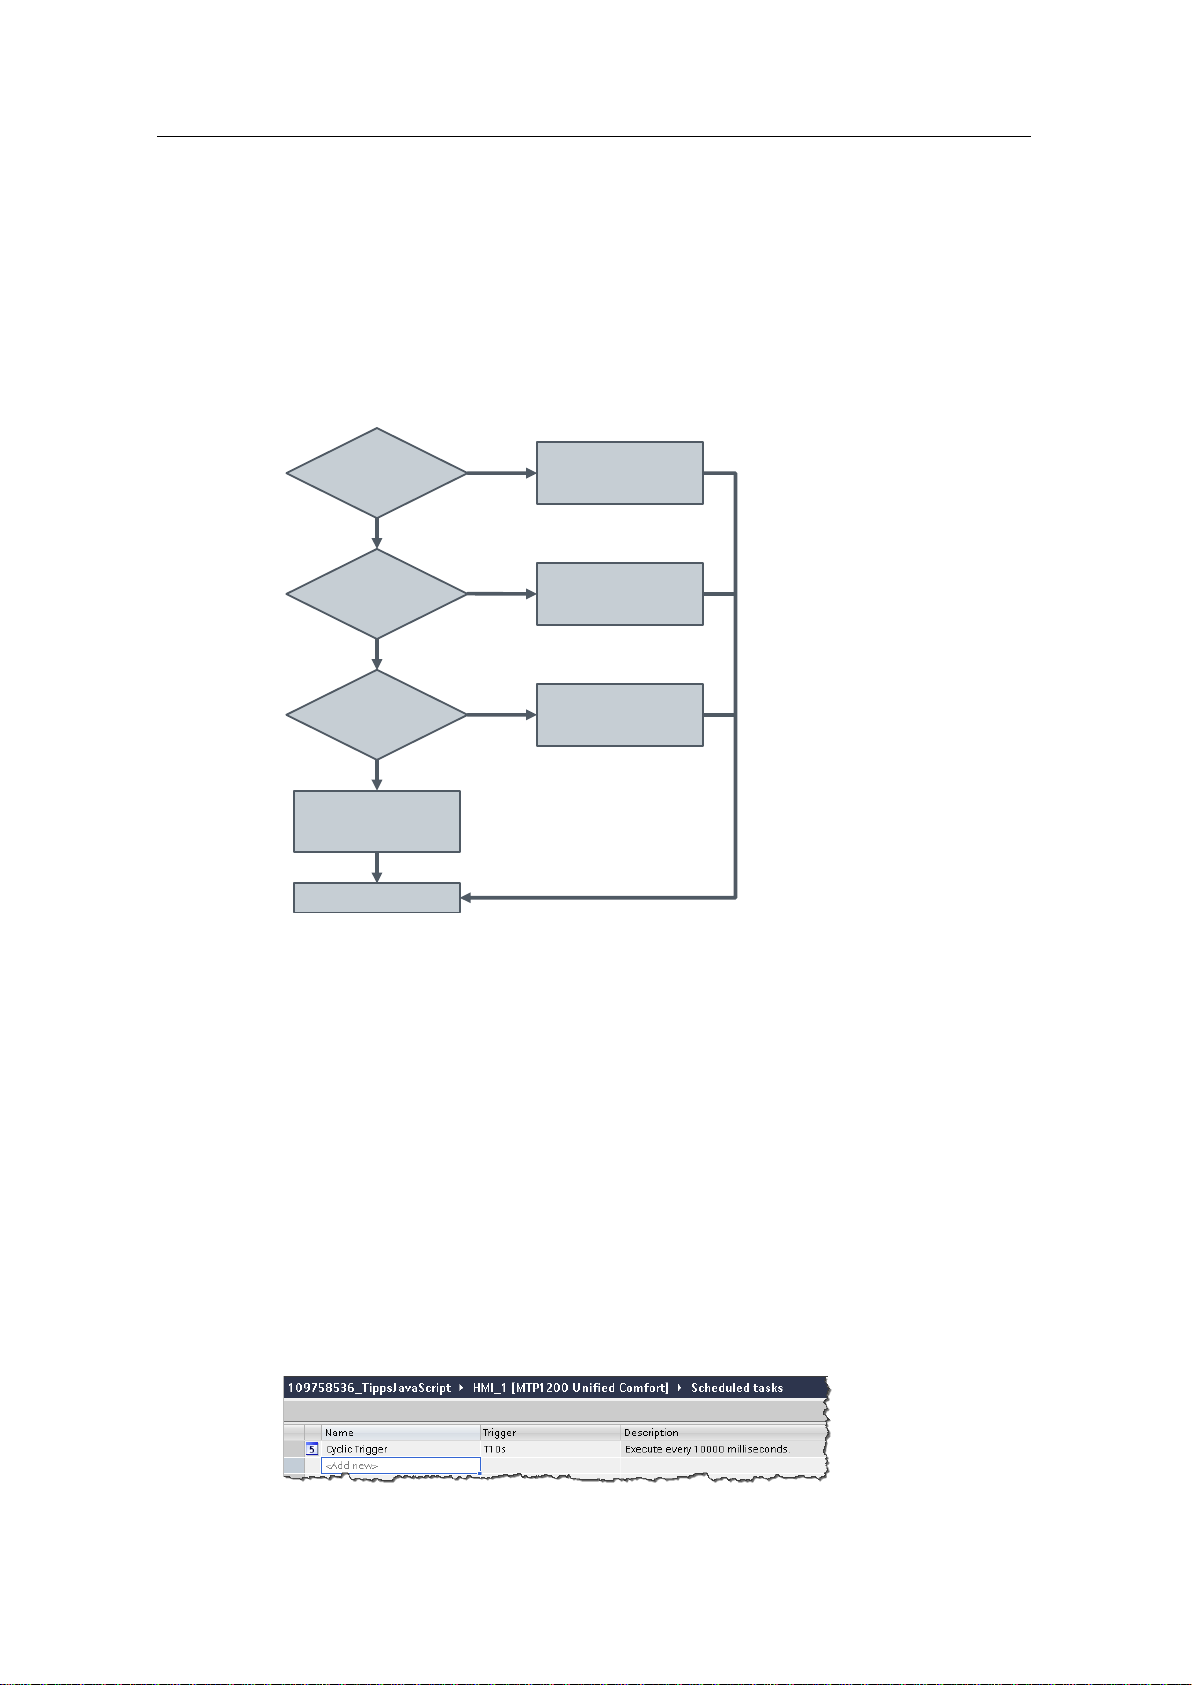
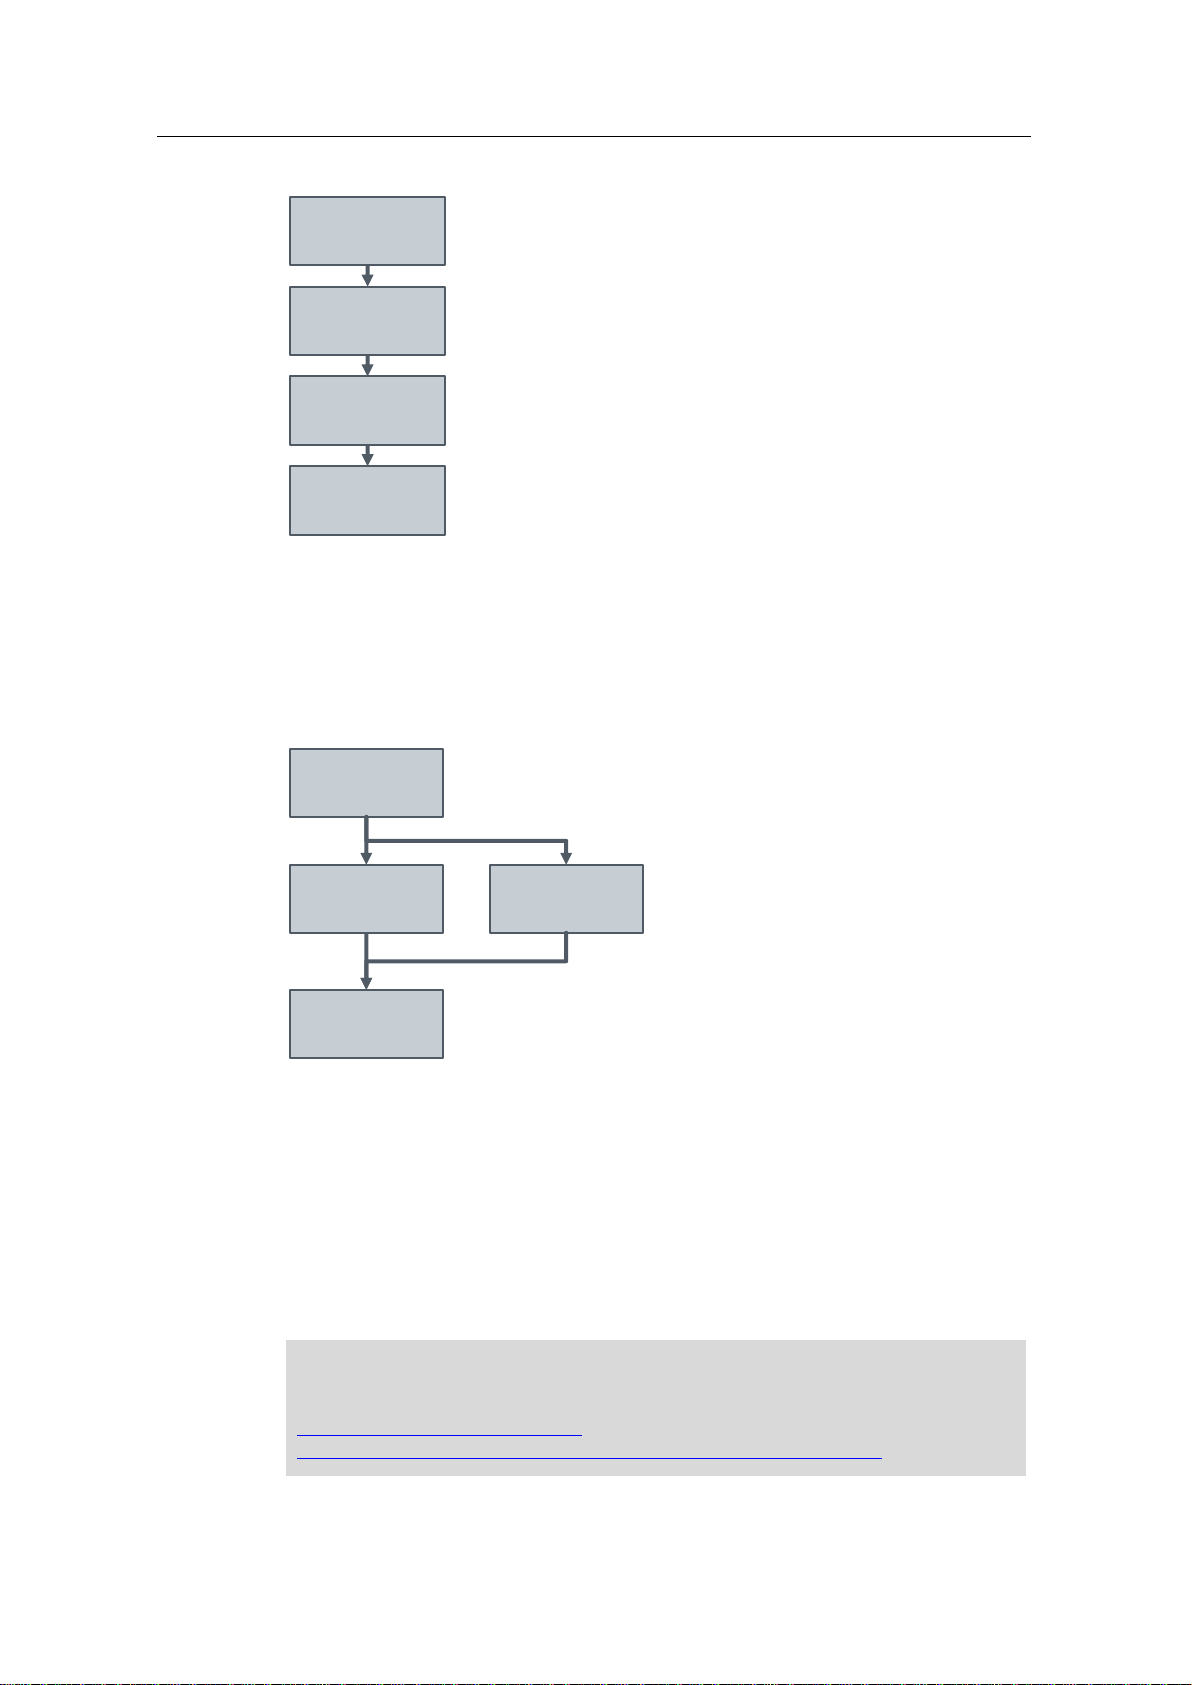
2.1 System function or script (a decision-making aid)
The chart below is a decision-making tool to help you determine when to use a
system function, a global module or local scripts.
Figure 2-1
Realizable in
AS?
Create local script
END
System function
available?
Recurring
functionality
needed
Yes
Yes
Yes
No
No
No
Create global module
Use system function
Modify PLC program
2.2 Trigger types
General information
There are various triggers to run a script in the runtime. Triggers are conditions.
There are three different types of trigger in WinCC Unified:
• Cyclic triggers
• Tag trigger
• Event-driven triggers
If no trigger is defined (e.g. in the task scheduler), the script is not run.
Cyclic triggers
Cyclical triggers are time-driven and are run repeatedly after a certain time, for
example every 10 seconds.
Figure 2-2
Page 7
2 General
Tips and Tricks JavaScript
Article ID: 109758536, V3.0, 09/2020
7
© Siemens AG
2020 All rights reserved
Note
Please note that the cycle time heavily influences the performance of the project.
All actions from a screen must be completed within their cycle time. Apart from
the runtimes of the actions, the times required for requesting the tag values and
the reaction times of the automation systems must also be taken into
consideration. You should only set trigger events with a cycle time of less than
one second when rapidly changing variables must be queried.
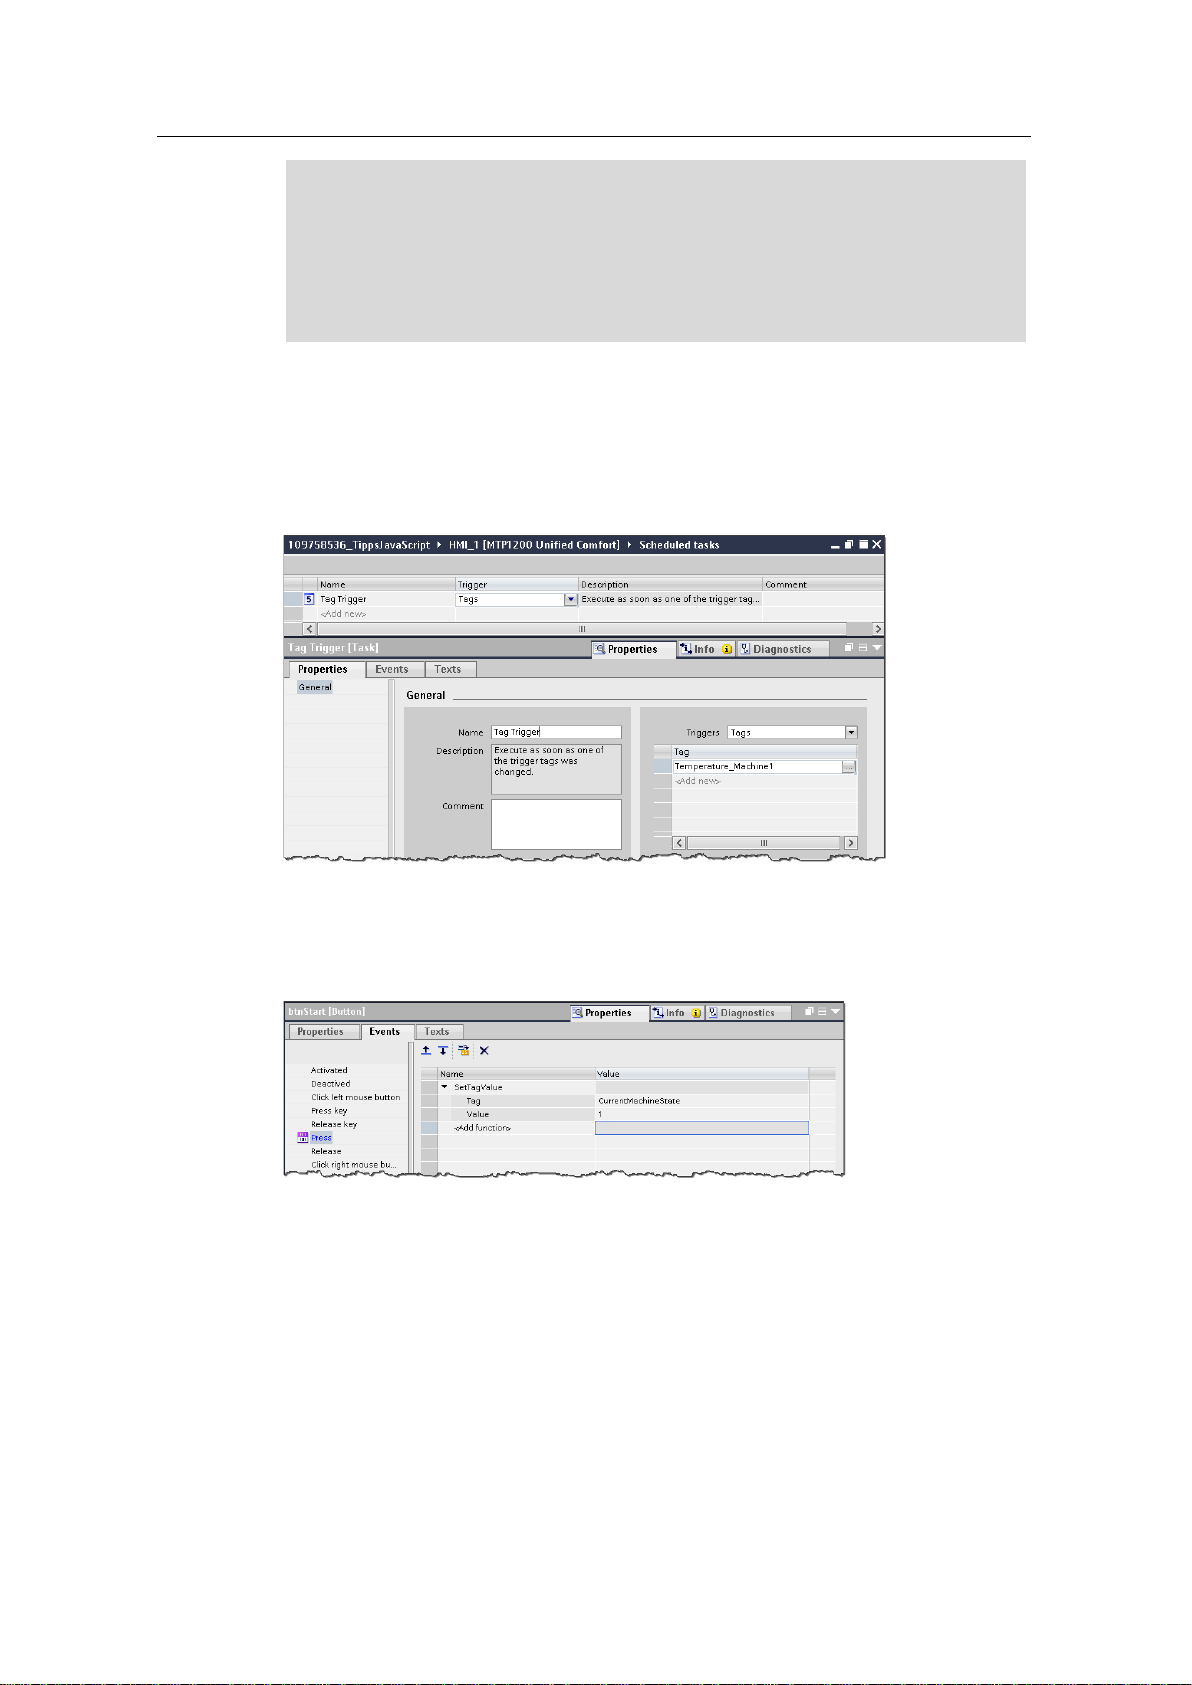
Tag trigger
For a tag trigger, one or more tags must be specified, also known as the trigger
tag.
Once the value of the trigger tag changes, the script is triggered and the function
inside it is executed.
Figure 2-3
Event-driven triggers
For event-driven triggers, the script is always run when this event occurs. Events
can be, for example, mouse clicks, keyboard operations or changes in focus.
Figure 2-4
Page 8
2 General
Tips and Tricks JavaScript
Article ID: 109758536, V3.0, 09/2020
8
© Siemens AG
2020 All rights reserved
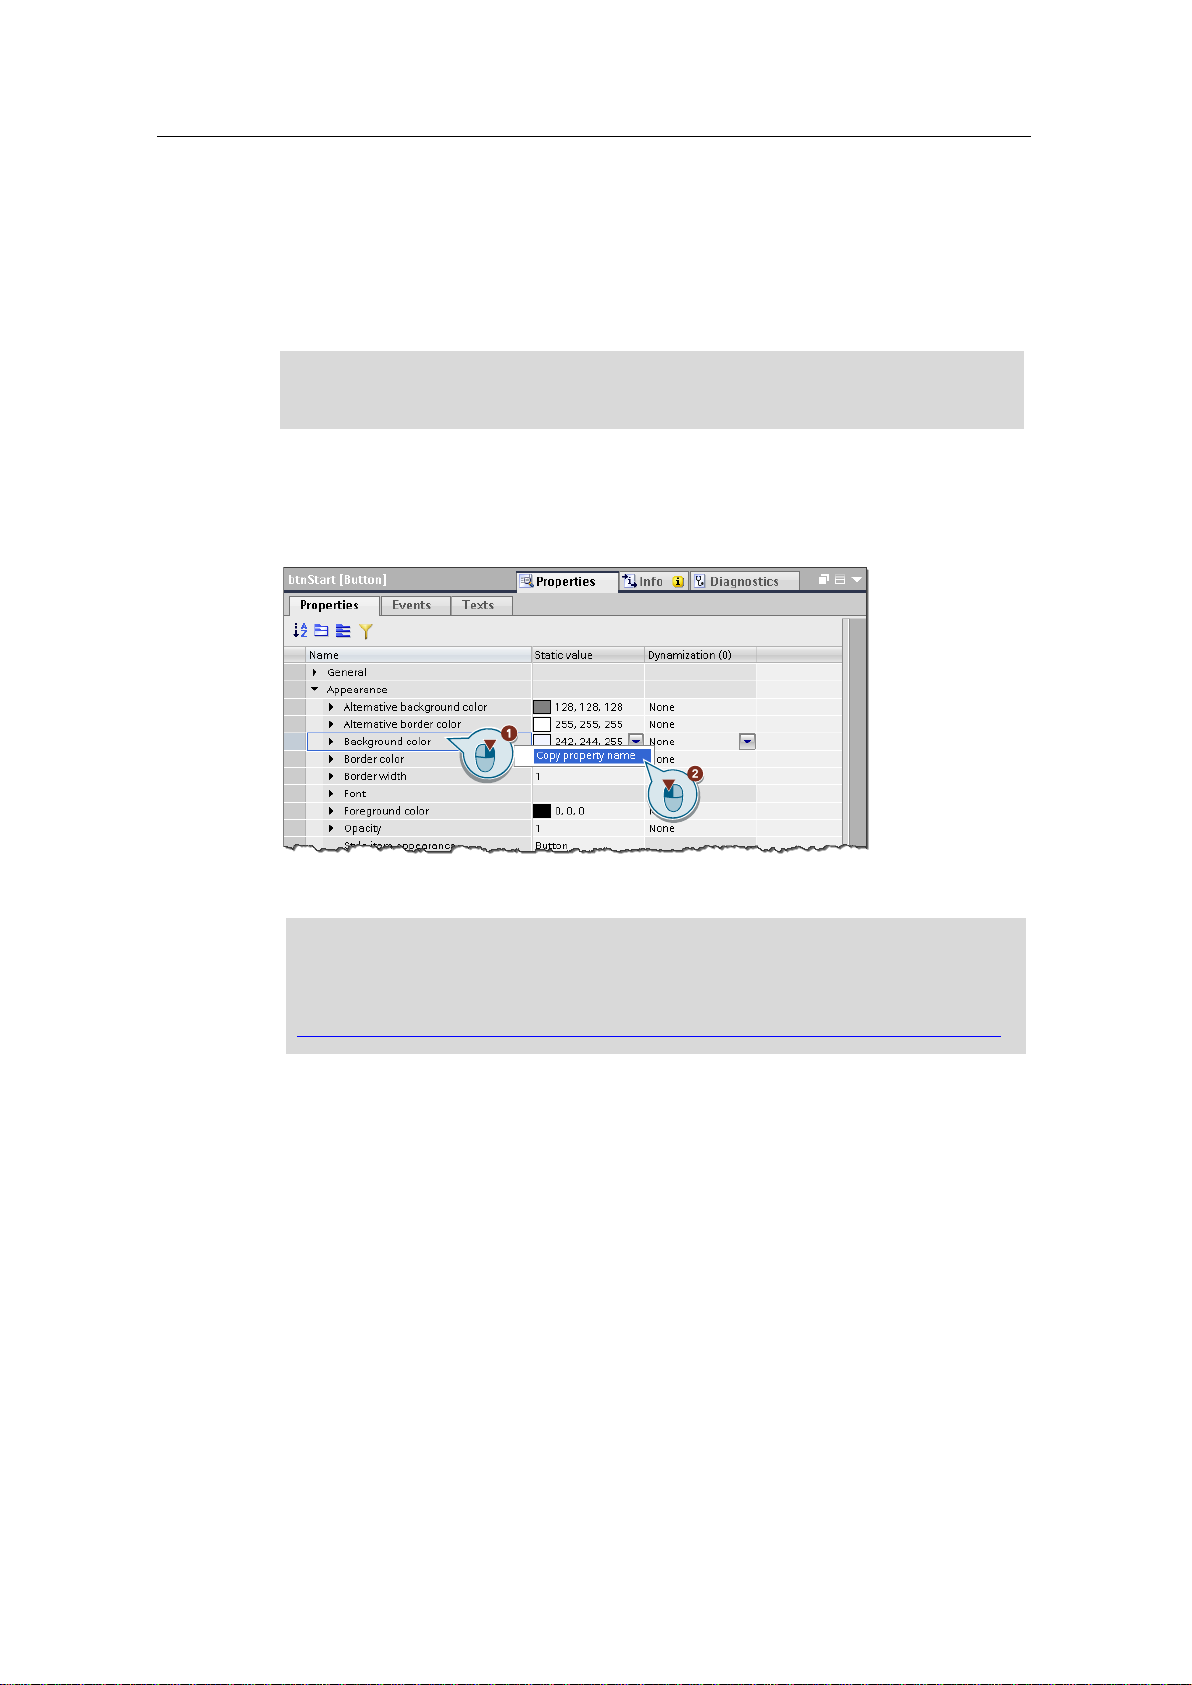
2.3 Access properties of a screen object
Using JavaScript, you can address each screen object and modify its properties.
Example
This example changes the background color of the object rectangle with the object
name "Rectangle1" to yellow.
Screen.FindItem('Rectangle1').BackColor = 0xFFFFFF00;
Find name of the property
You can find the name of the property by right-clicking on the property (1) and then
clicking "Copy property name" (2).
Figure 2-5
You can then paste the property name into the desired location with the keyboard
command "CTRL + V".
Note
Alternatively, you can find the properties listed in the manual "SIMATIC WinCC
Engineering V16 - Runtime Unified" in the "Objects" chapter under the respective
object:
https://support.industry.siemens.com/cs/ww/en/view/109773780/118272265099
2.4 Difference between synchronous and asynchronous script calls
Synchronous/asynchronous script call is a distinction that applied for JavaScript in
general.
Synchronous
In synchronous script calls, the functions in the script are executed in order. The
next function only begins when the one before it is complete.
Page 9
2 General
Tips and Tricks JavaScript
Article ID: 109758536, V3.0, 09/2020
9
© Siemens AG
2020 All rights reserved
Figure 2-6, simplified representation of synchronous script sequence
function A
function B
function C
function D
Asynchronous
In contrast to the above, there are also asynchronous script calls. In this case,
functions can be executed in parallel, thus allowing them to be processed more
rapidly.
Figure 2-7, simplified representation of asynchronous script sequence
function A
function B function C
function D
Typically, asynchronous script calls are used in the context of timers (e.g.
"HMIRuntime.Timers.SetTimeout()"), access to network files, or time-intensive
database queries.
When using asynchronous script calls, there are however other differences which
affect how the script runs. For example, you can use the "await" operator to wait for
the result of a function.
If you use multiple complex and therefore more time-intensive functions in a script
(for example if you want to read two network files and establish a database
connection), then it is recommended to use the Promise.all method.
Note
You can find more information about "await" and the Promise object in the
"Mozilla Developer Network".
https://developer.mozilla.org/enUS/docs/Web/JavaScript/Reference/Global_Objects/Promise/then
Page 10

2 General
Tips and Tricks JavaScript
Article ID: 109758536, V3.0, 09/2020
10
© Siemens AG
2020 All rights reserved
Note
You can find additional information about "Promise.all" in the "Mozilla Developer
Network":
https://developer.mozilla.org/enUS/docs/Web/JavaScript/Reference/Global_Objects/Promise/all
2.5 Script threads
SIMATIC WinCC Unified processes the scripts in Node.js processes. In this
context, a Node.js process is always single-threaded. This means that only one
CPU core is available to run the code to process the script, meaning that only one
script per process can be handled at a time.
In WinCC Unified itself, only two processes are available for script handling:
• one process for all scripts which are run by the user (all scripts in screens)
• and one process for all scripts which are running in the "Task Scheduler".
Both processes run on two separate CPU cores, thereby can working through
scripts in parallel.
Page 11
3 Configuring scripts
Tips and Tricks JavaScript
Article ID: 109758536, V3.0, 09/2020
11
© Siemens AG
2020 All rights reserved
3 Configuring scripts
3.1 Configuring local scripts
Supported objects
You can configure scripts to the following points of use in SIMATIC WinCC Unified:
• Screens
• Screen objects
• Tasks
Depending on the object for which you configure the scripts, you can execute
different functions.
Table 3-1
Execution context
of the editor
Script context and referencing
"Scripts" Editor in the
"Screens" Editor
Each process image has two independent scrip contexts:
• Context for dynamizing properties (chapter 3.1.1)
• Context for evaluating events (chapter 3.1.2)
Both script contexts of a process image reference the same
global modules.
However, each context receives its own copy of the tags defined
there.
"Scripts" Editor in the
task planner
All tasks are assigned to a script context. Different jobs can
access common global tags.
All tasks reference all global modules of a target system (chapter
3.1.3).
Page 12
3 Configuring scripts
Tips and Tricks JavaScript
Article ID: 109758536, V3.0, 09/2020
12
© Siemens AG
2020 All rights reserved
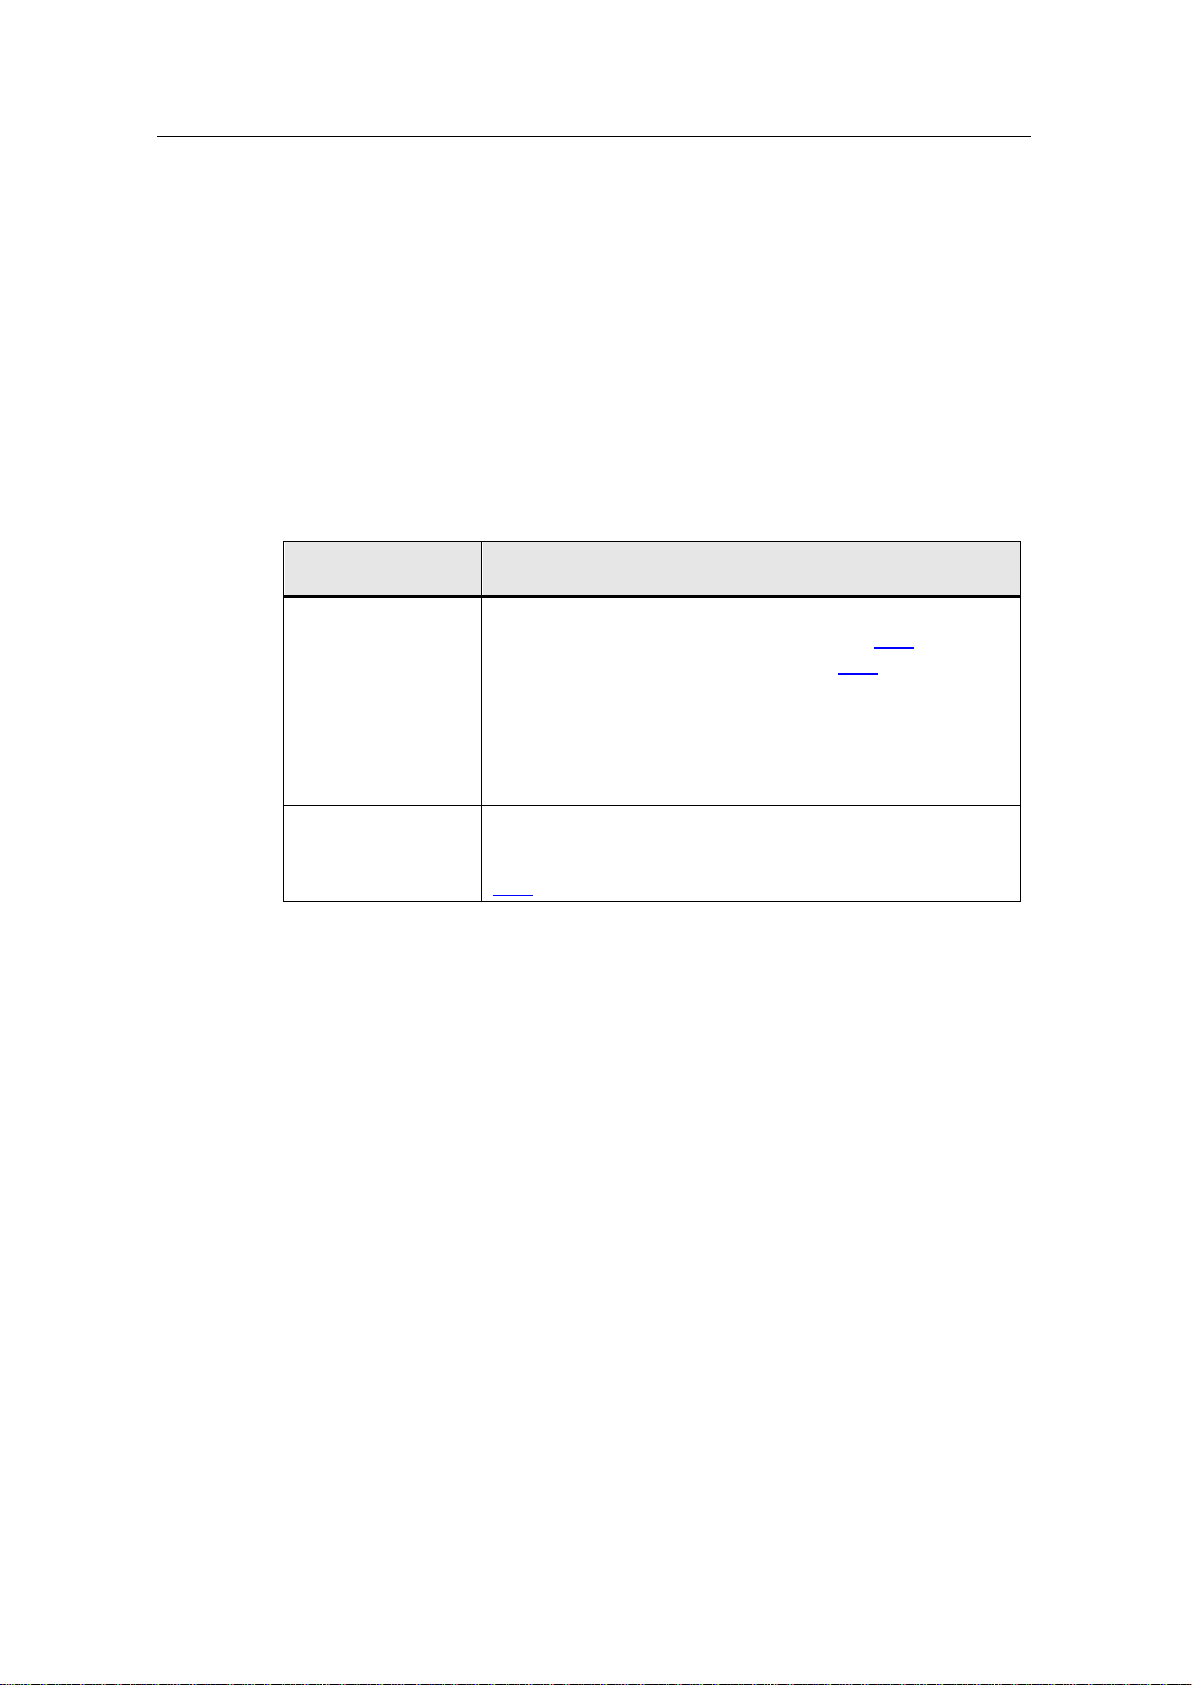
3.1.1 Dynamizing object properties via scripts
You can dynamize the relevant properties of screen and screen objects via script,
i.e. change the property for the runtime, e.g. change font color, show/hide visibility.
The following steps are required for dynamization by script:
1. Highlight the screen object on the screen.
2. Open the "Properties > Properties" tab of the screen object.
3. Change the property to be dynamized in the "Dynamization" column to "Script".
The Script Editor then opens in the Inspector window next to the object properties.
Page 13
3 Configuring scripts
Tips and Tricks JavaScript
Article ID: 109758536, V3.0, 09/2020
13
© Siemens AG
2020 All rights reserved
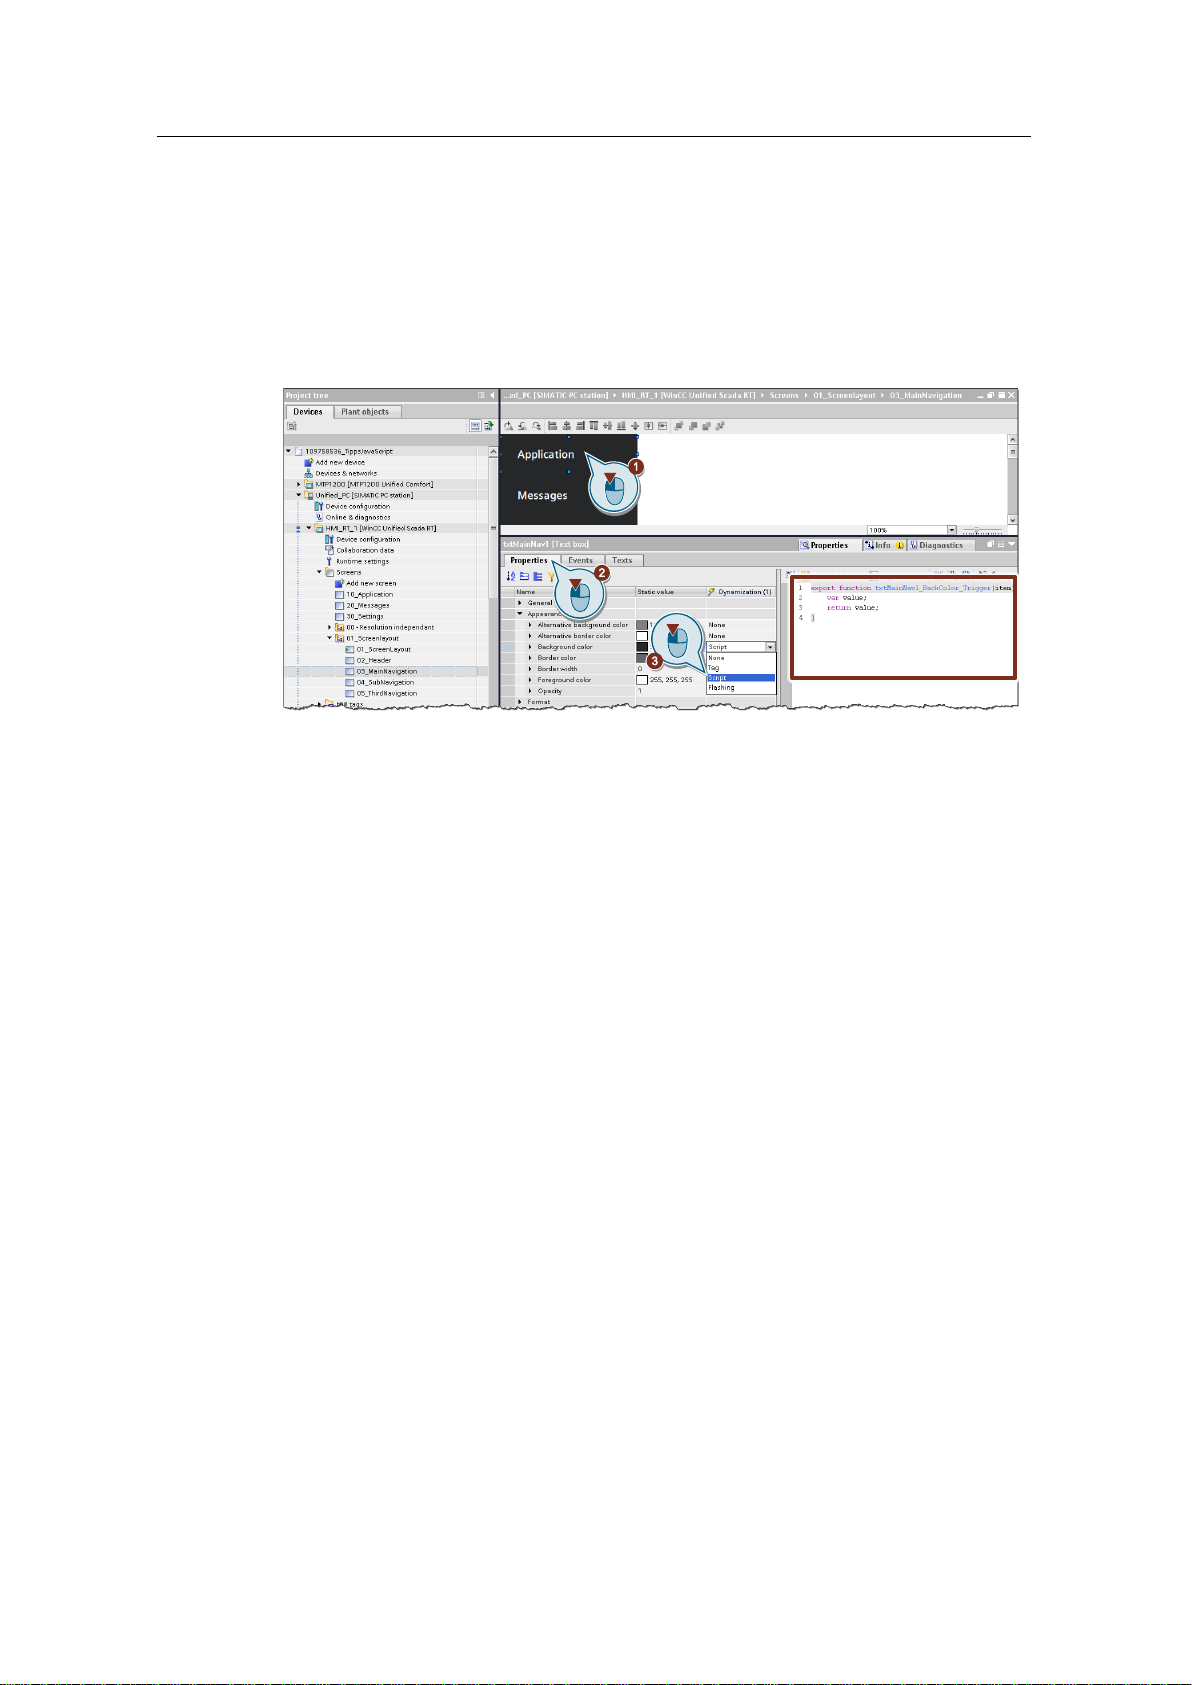
3.1.2 Calling up scripts via events
To execute certain functions in operation, e.g. invert a tag with a button or toggle
the language, SIMATIC WinCC Unified provides the option of calling up scripts via
events.
The following configuration steps are necessary to call up a script via an event at a
screen object (e.g. a button):
1. Highlight the screen object on the screen.
2. Open the "Properties > Events" tab of the screen object.
3. Select the event that calls the script in the local navigation.
4. Now create a new script with the "Convert to script" button.
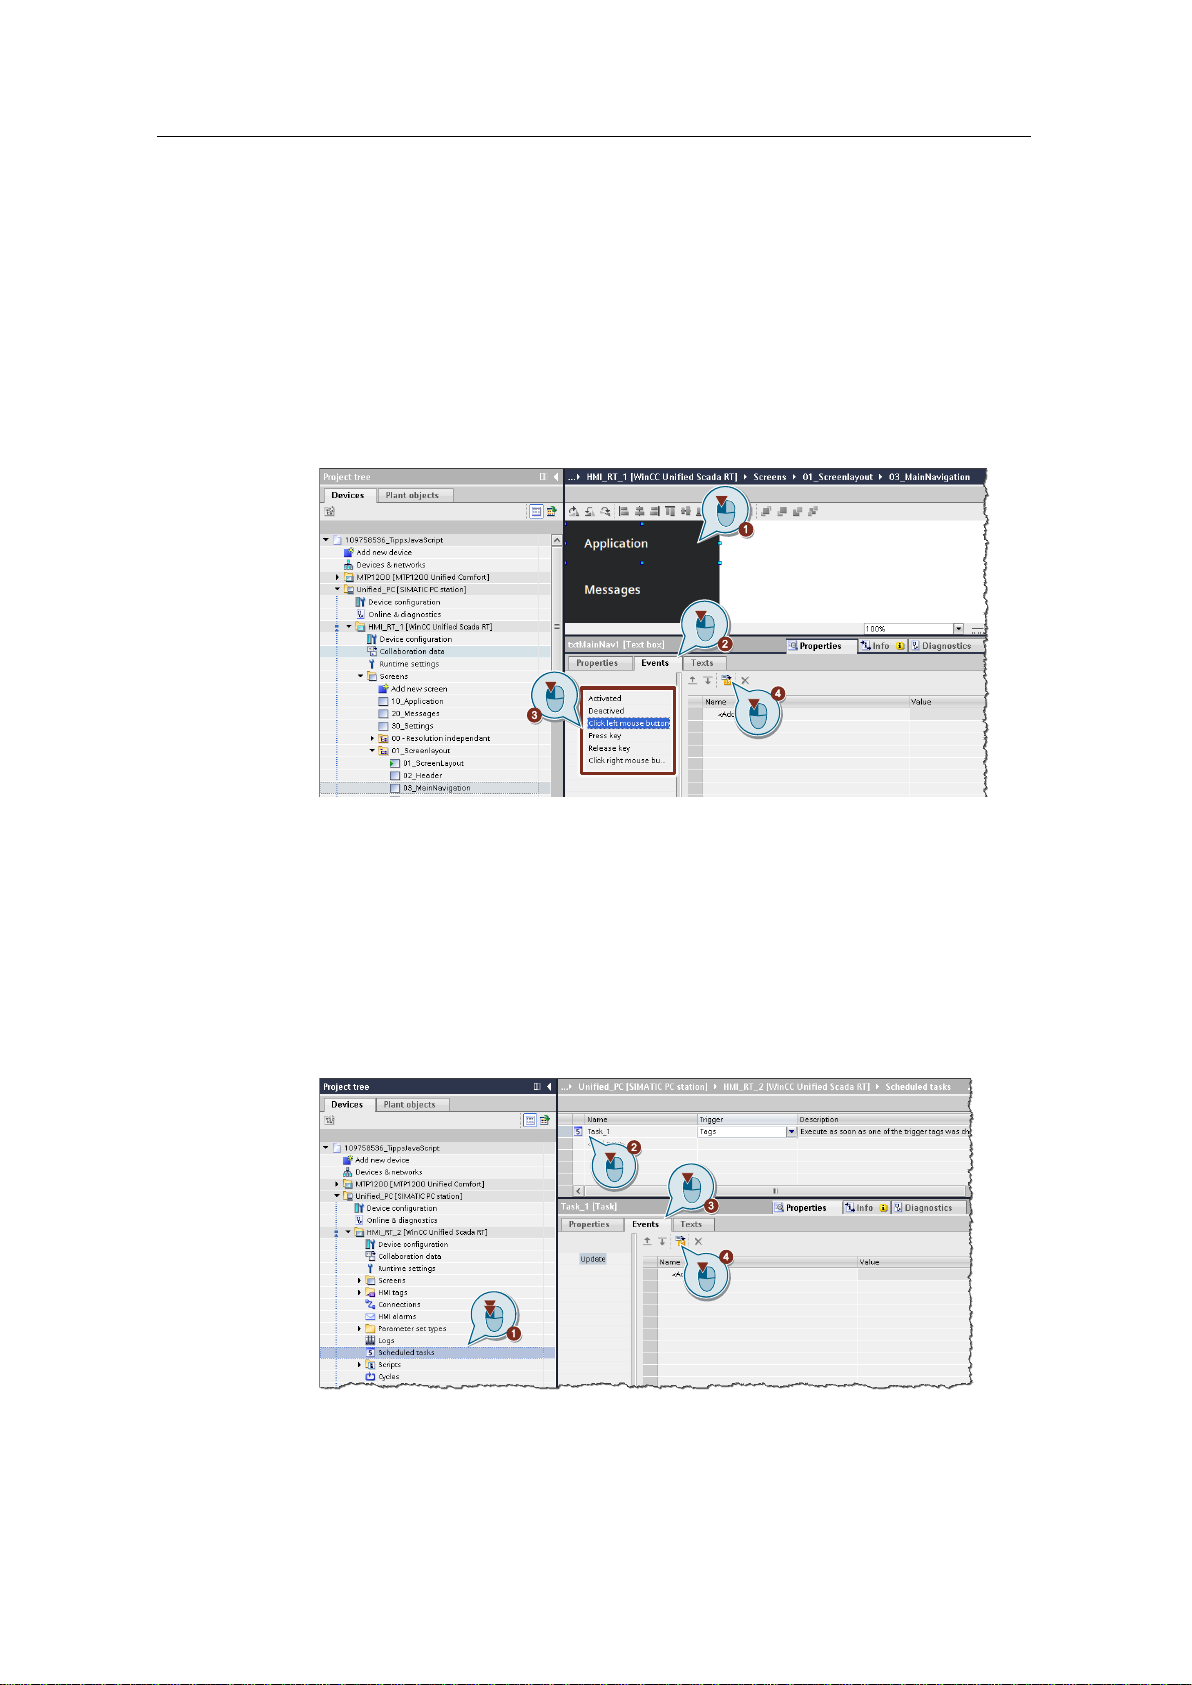
3.1.3 Calling scripts via Scheduled tasks
In addition to the "Events" at screen objects, you can also call up scripts in the
"Scheduled tasks".
The following steps are required for this:
1. In the project tree, open the "Scheduled tasks".
2. Add a new task or highlight the existing task.
3. Open "Properties > Events".
4. Now create a new script with the "Convert to script" button.
Page 14
3 Configuring scripts
Tips and Tricks JavaScript
Article ID: 109758536, V3.0, 09/2020
14
© Siemens AG
2020 All rights reserved
3.2 Configuring global script modules
With the version SIMATIC WinCC Unified V16.0 you have the possibility to use
global modules in the script context. These are appropriate for:
• Creating functions that are not directly linked to an image object, an image, or
a task and can therefore be used more than once.
• Triggering scripts cyclically in the background (e.g. task scheduler).
Term overview
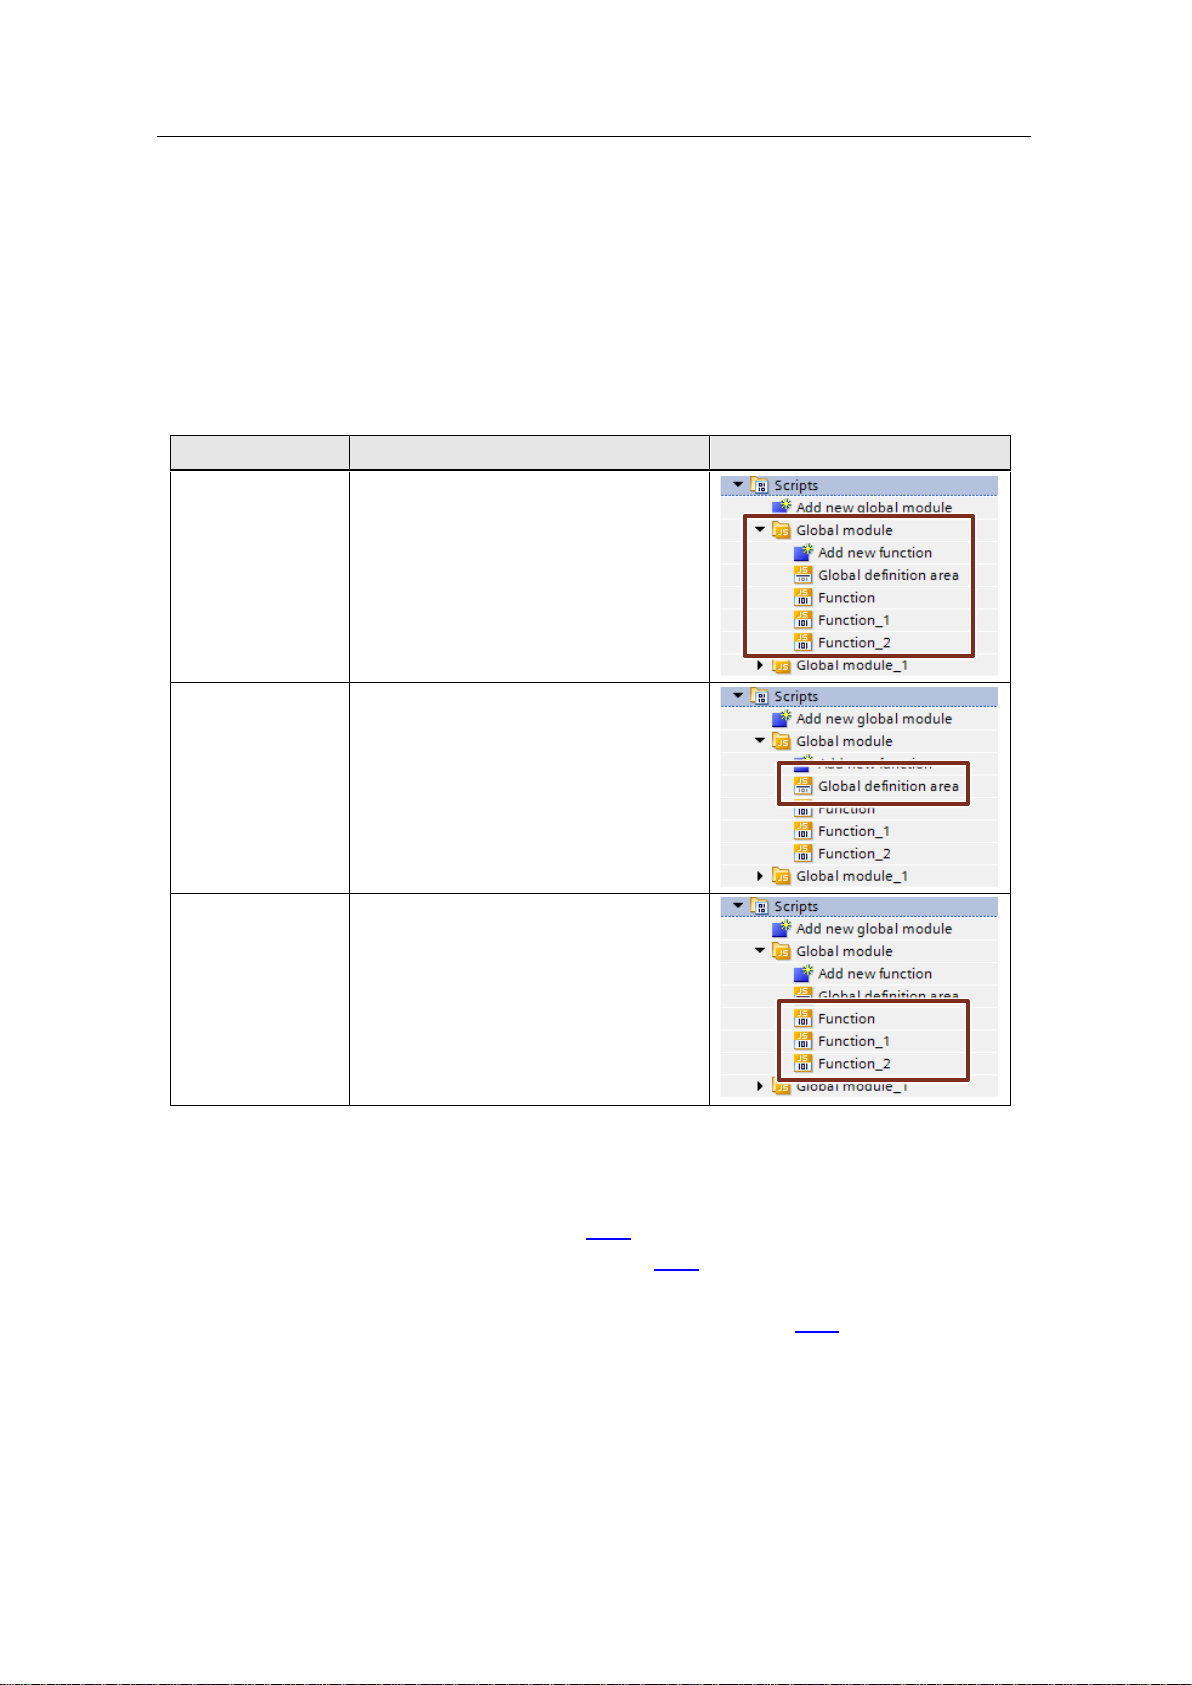
Table 3-2
Designation
Description
Image
Global module
• Global modules are stored in the
project tree under "Scripts".
• Each global module contains its own
definition area and one or more
functions.
• Global modules are very well suited
for grouping functions.
Global definition
area
• In the definition area of a global
module, you define local tags that you
can access in all functions of the
global module.
• You can also use these tags in local
scripts (such as image properties)
using the Export/Import command.
Global function
• Each global module can contain
several functions.
• You can define transfer parameters in
a function, which you can then
process in the script.
• Each function has a return value.
• You can also use the Import
command to use functions in local
scripts (e.g. image properties).
Configuration
If you want to use global modules, the general configuration procedure is as
follows:
1. Add a global module (chapter 3.2.1).
2. Create global definition area (chapter 3.2.2).
3. Edit global function (chapter 3.2.3).
4. Import and use content from global modules (chapter 3.2.4).
Page 15
3 Configuring scripts
Tips and Tricks JavaScript
Article ID: 109758536, V3.0, 09/2020
15
© Siemens AG
2020 All rights reserved
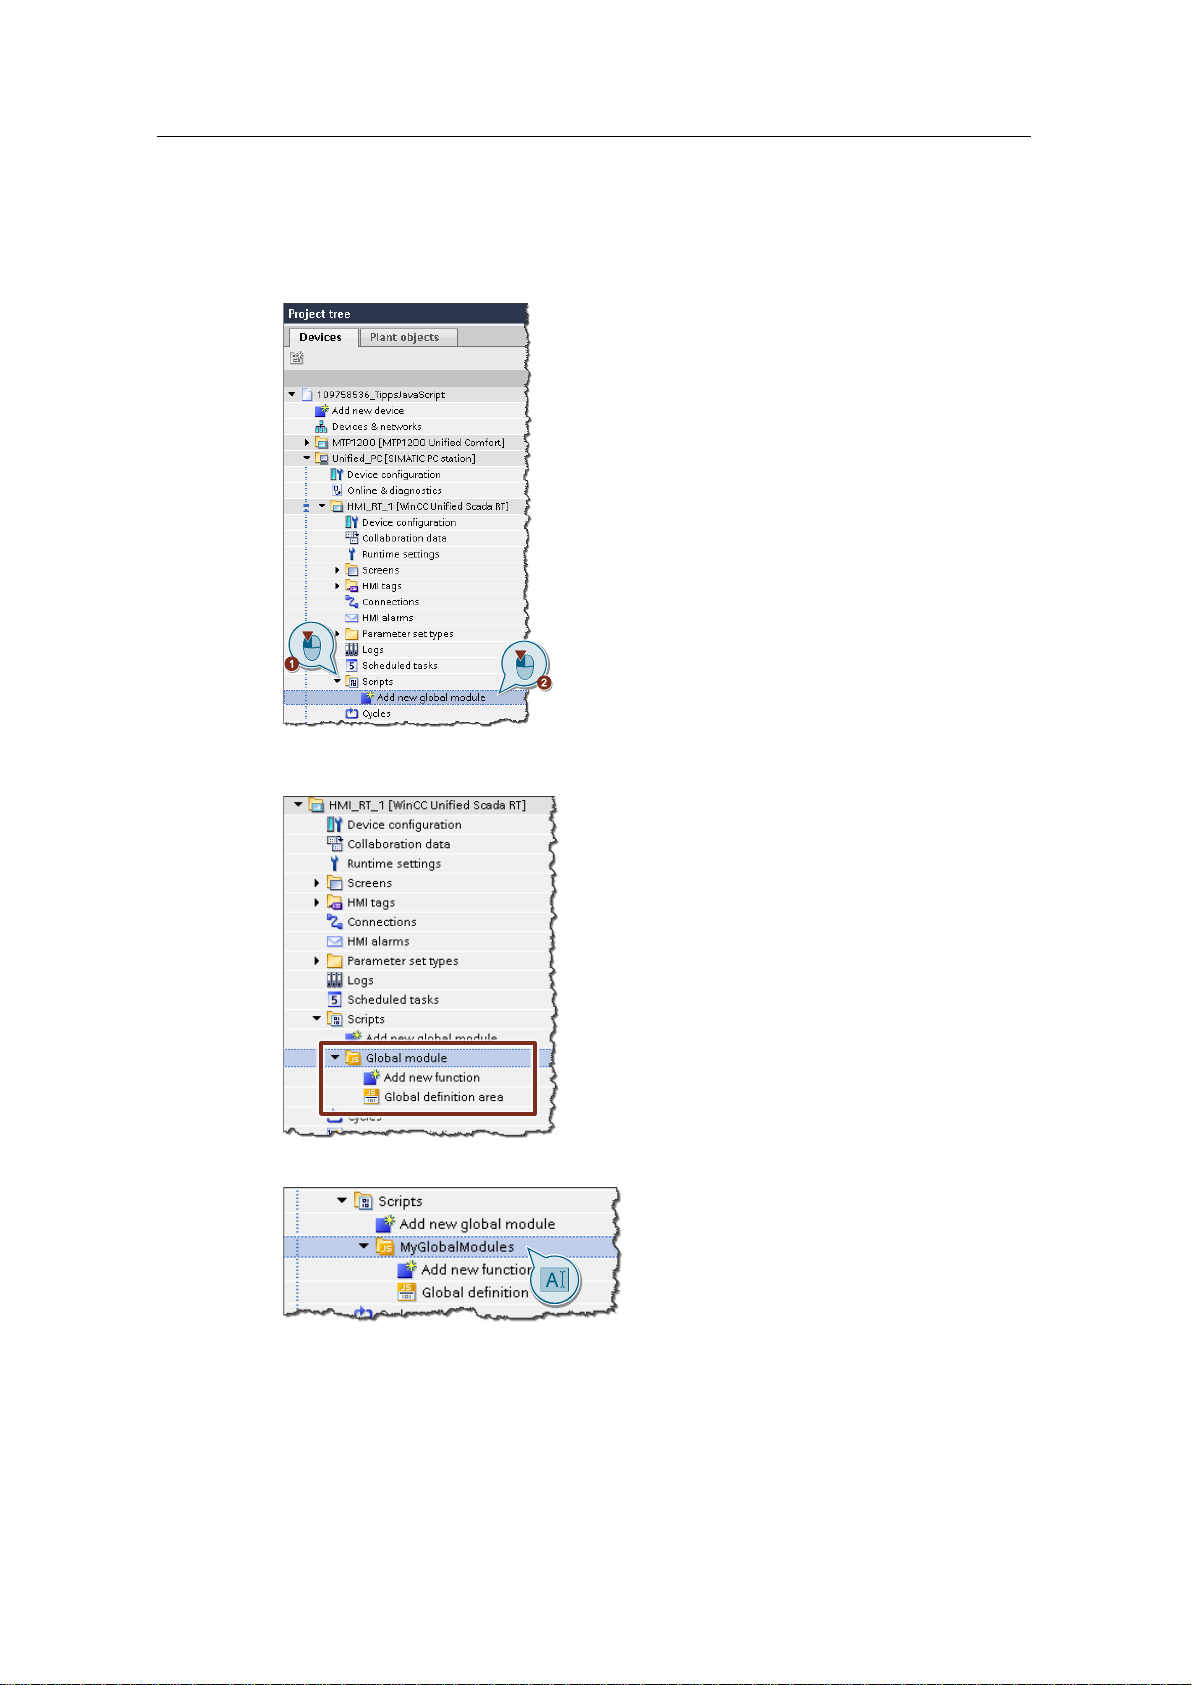
3.2.1 Add global module
To add a global module:
1. Open the "Scripts" folder in the project tree.
2. Click on "Add new global module".
A new folder "Global module" appears in the folder "Scripts". This already contains
a "Global definition area".
3. If necessary, rename the folder "Global modules", e.g. to "MyGlobalModules".
Page 16
3 Configuring scripts
Tips and Tricks JavaScript
Article ID: 109758536, V3.0, 09/2020
16
© Siemens AG
2020 All rights reserved
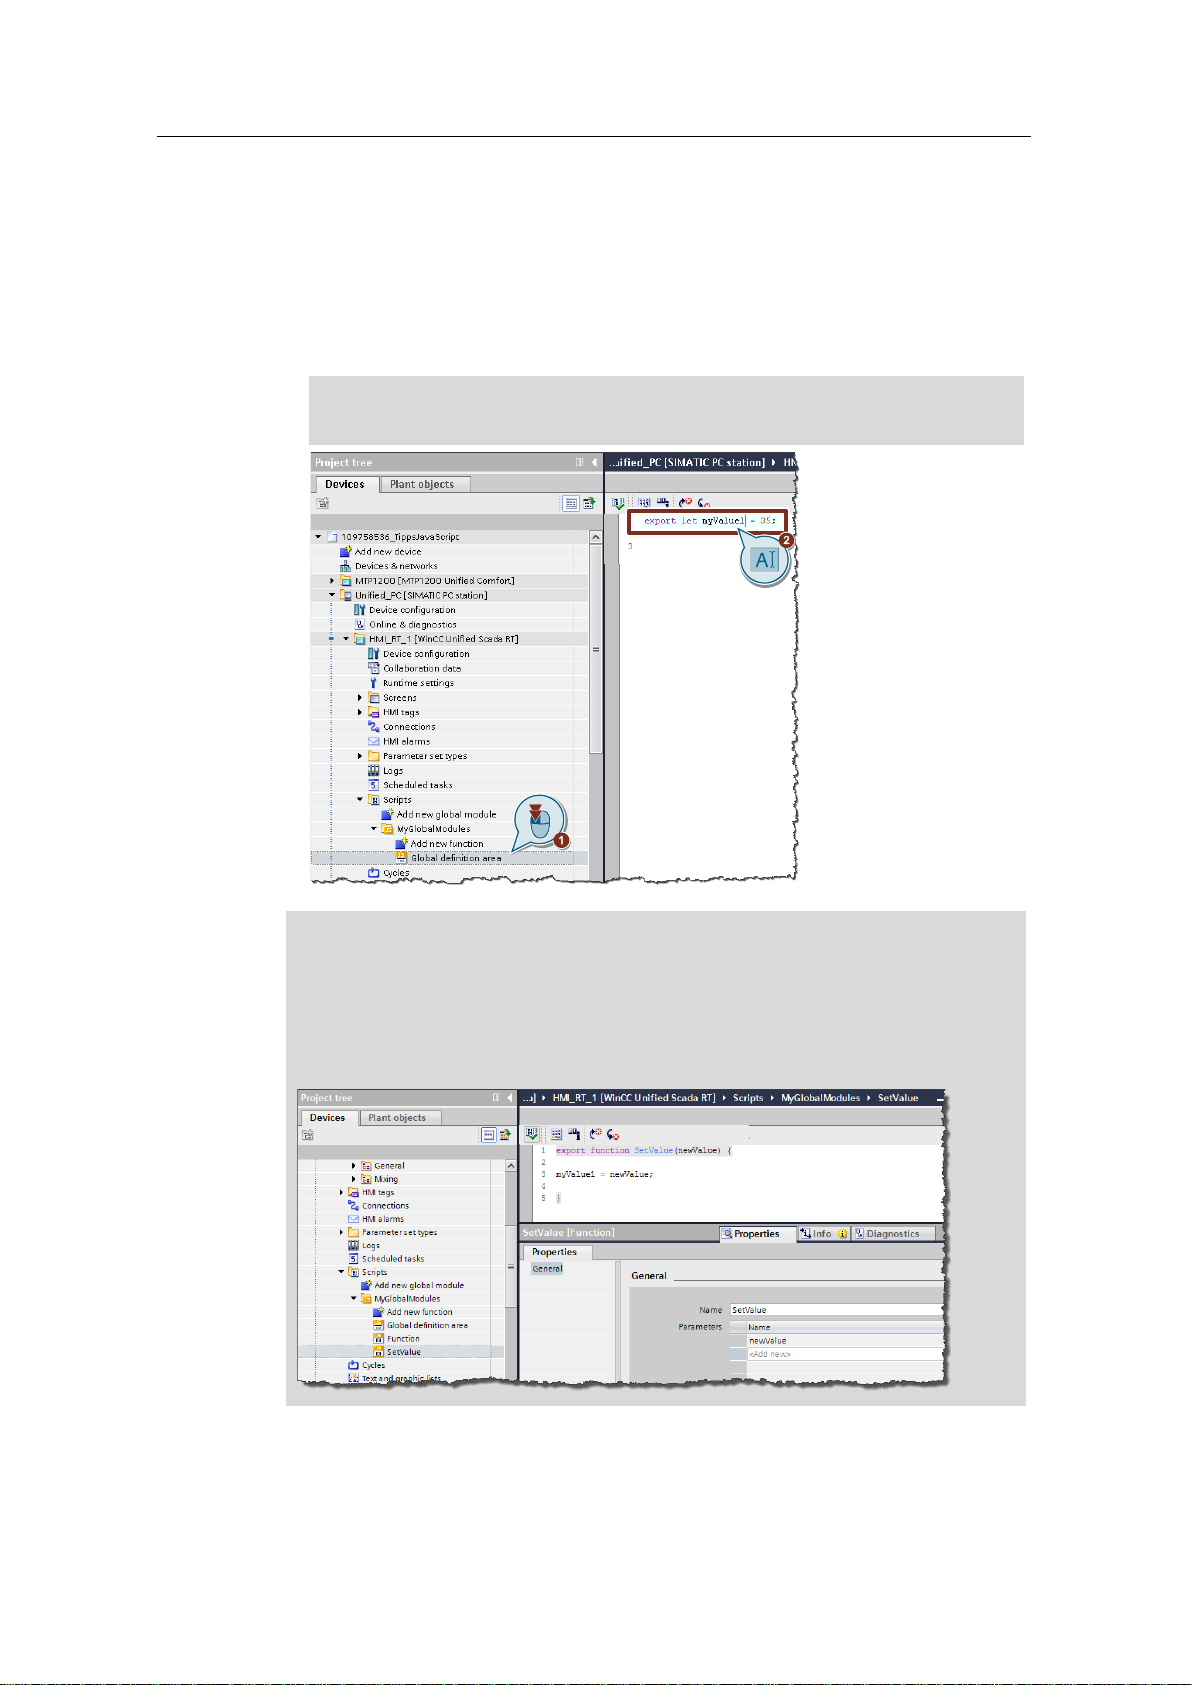
3.2.2 Creating a Global Definition Area
The definition area of a global module is used to access the same tag values in
several functions of the same global module.
Configuration
1. Open the "Global definition area" folder by double-clicking on it.
2. Add the code below to the working area.
export let myValue1 = 35;
Note
The value of tags within a global module can only be changed via its functions.
Other places of use (e.g. image properties) can only read these tags.
If you want to change the value of tags of a global module (here: "myValue1")
from a local usage location, you have to call a script of the same global module
(here: "SetValue") and enter the desired value via a parameter (here:
"newValue").
Page 17
3 Configuring scripts
Tips and Tricks JavaScript
Article ID: 109758536, V3.0, 09/2020
17
© Siemens AG
2020 All rights reserved
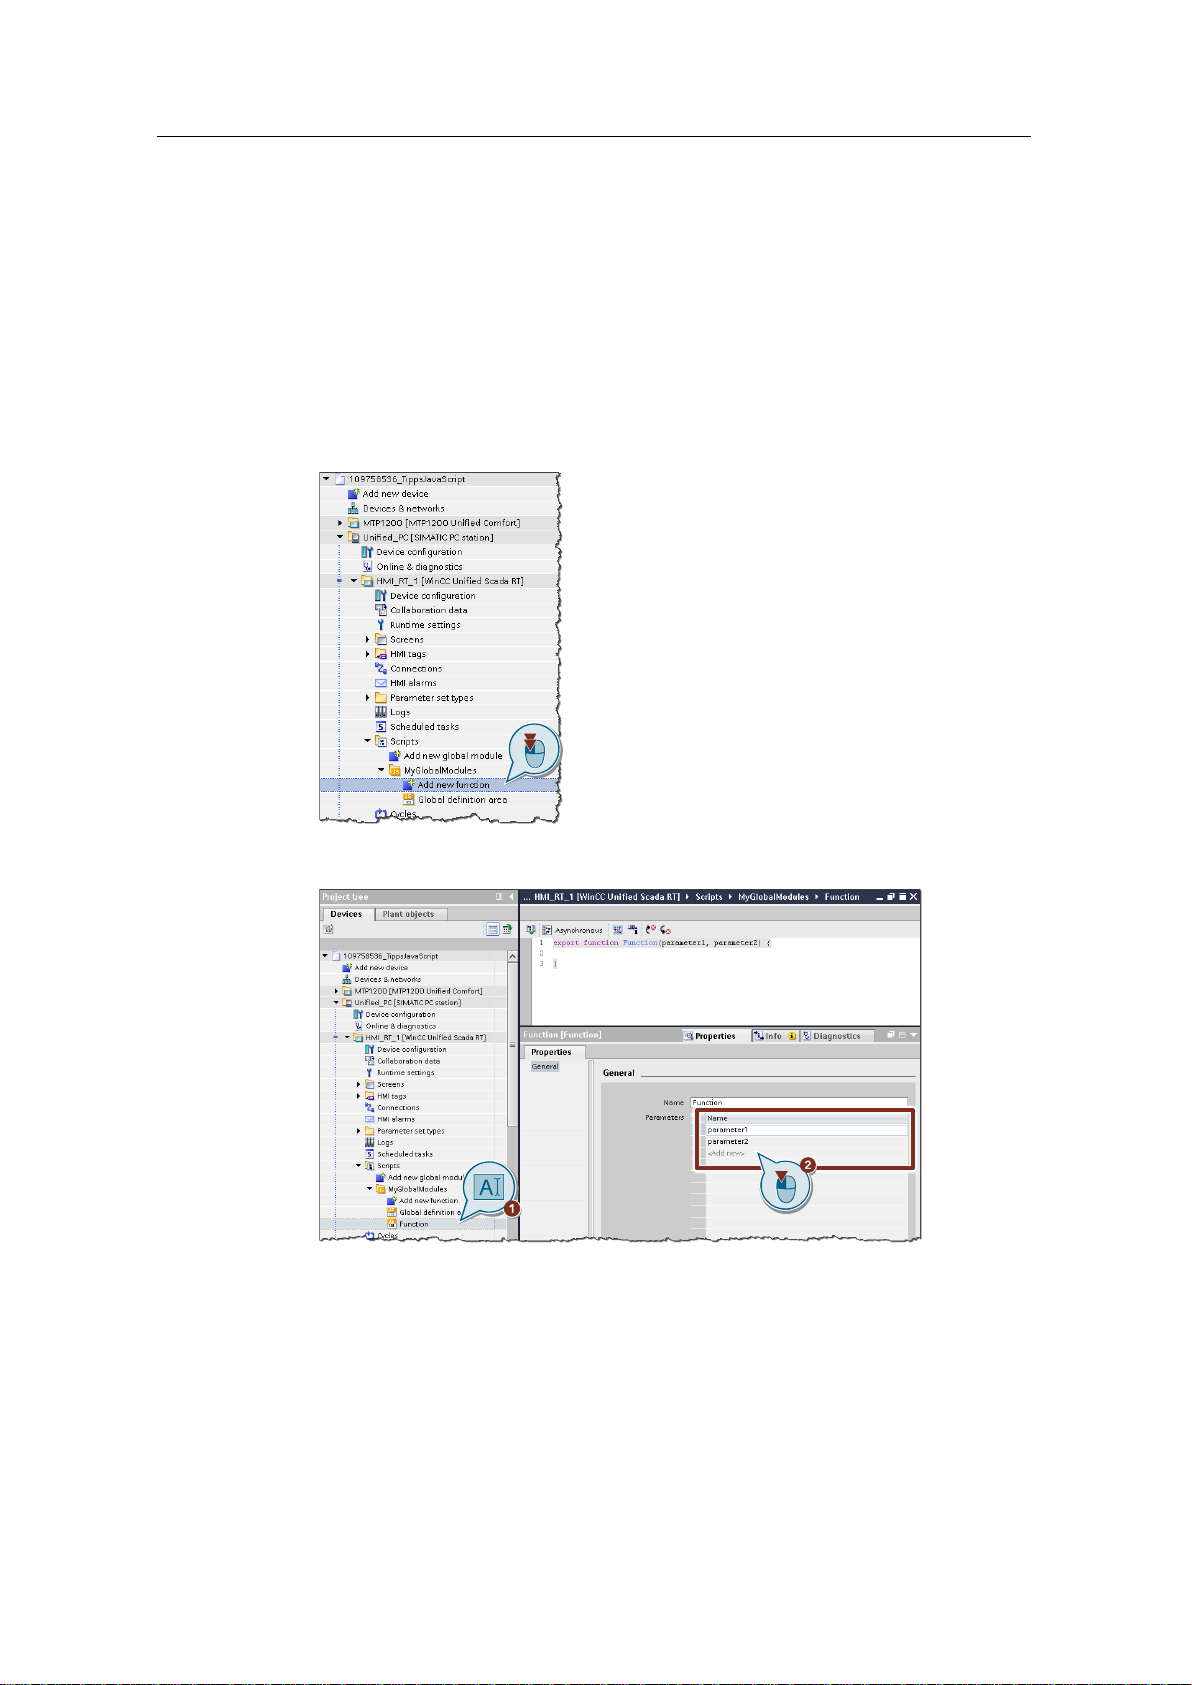
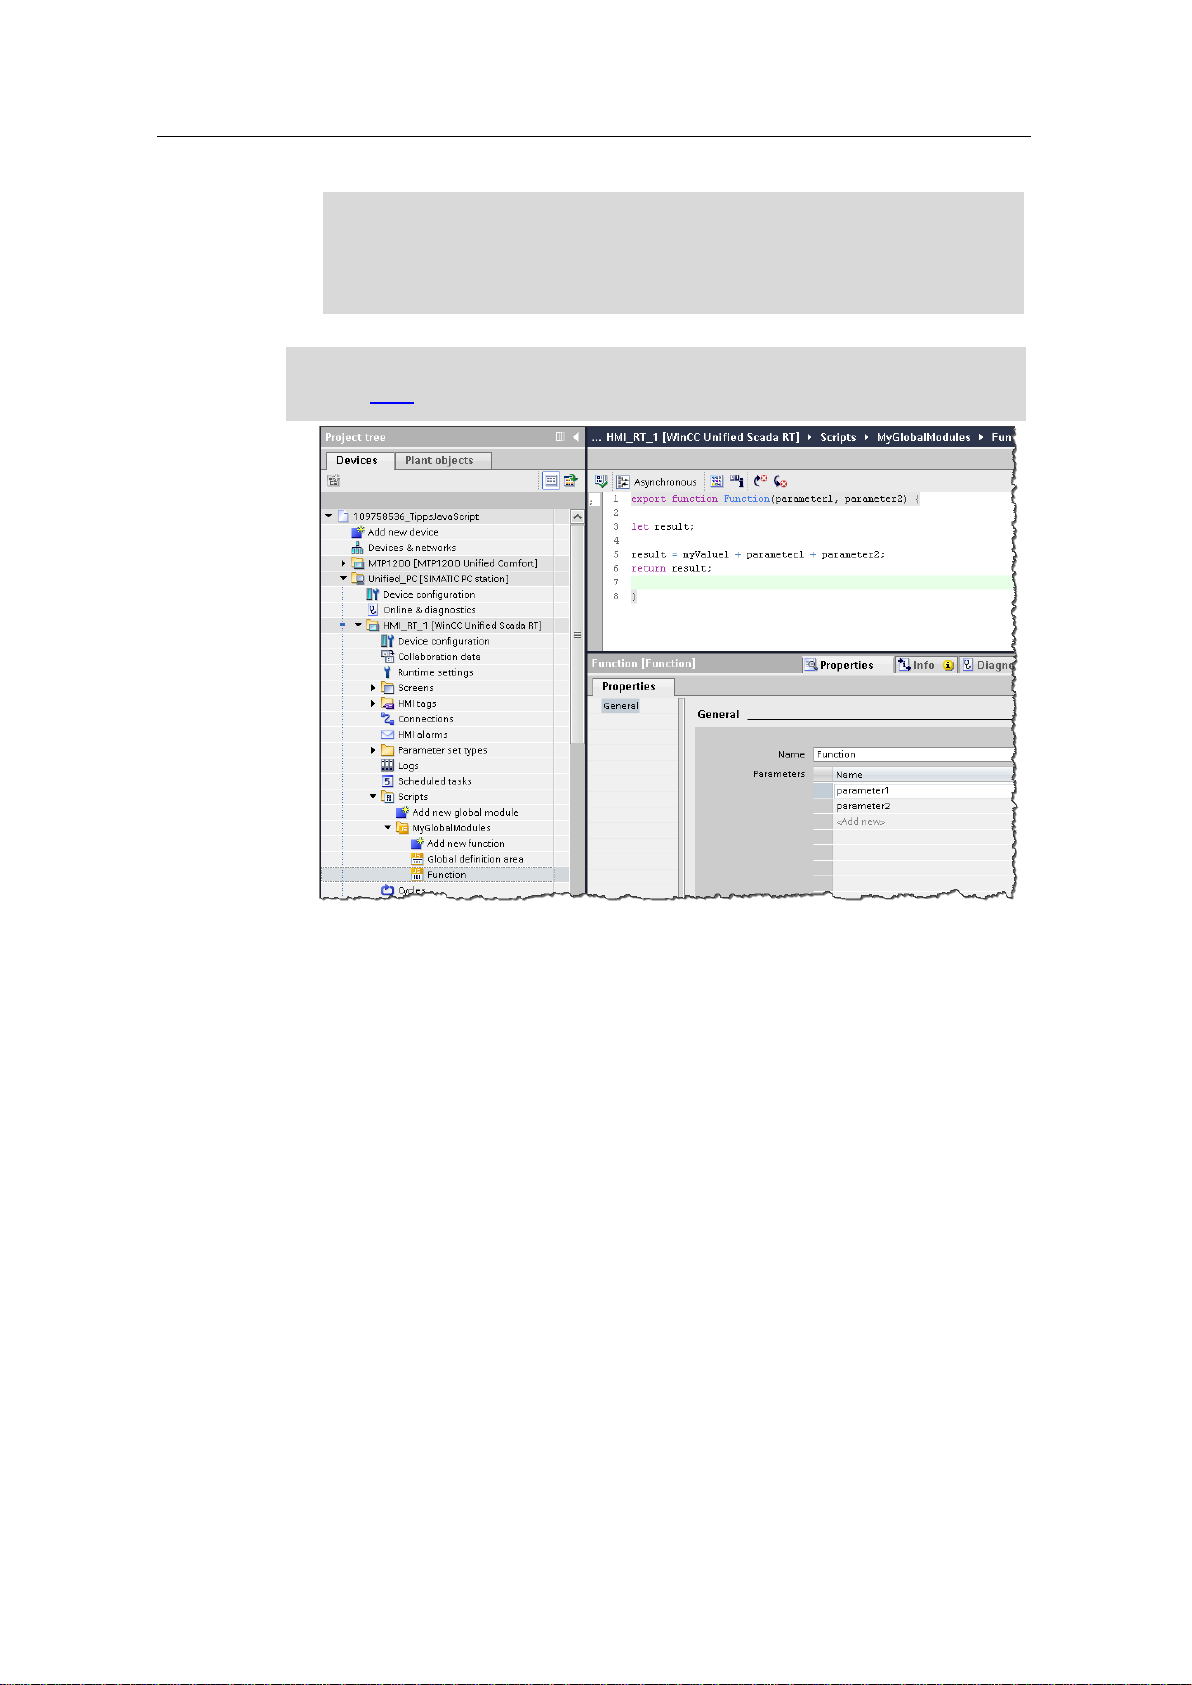
3.2.3 Edit global functions
You edit global functions like the global definition area within a global module.
Example
In this example, three values (a value from the global definition area and two
transfer parameters) are to be added together in a function. The return value of the
function should be the sum ("result") of the three values.
Configuration
1. Click on "Add new function" in the project tree in your Global Module
"MyGlobalModules".
2. If necessary, change the name of the function (1) and the number of transfer
parameters ("Parameters") in the properties (2).
Page 18
3 Configuring scripts
Tips and Tricks JavaScript
Article ID: 109758536, V3.0, 09/2020
18
© Siemens AG
2020 All rights reserved
3. Enter the following code in the function:
let result;
result = myValue1 + parameter1 + parameter2;
return result;
Note
The tag "myValue1" has been defined in the global definition area (see
chapter 3.2.2).
Page 19
3 Configuring scripts
Tips and Tricks JavaScript
Article ID: 109758536, V3.0, 09/2020
19
© Siemens AG
2020 All rights reserved
3.2.4 Import and use content from global modules
To be able to use the tags and functions of the global modules locally, you must
first declare them with the import command in the global definition of the local
script.
Requirement
In order to describe the import of the global module contents, the following
elements were planned in advance:
• an image ("Screen_Script")
• a button "Button_1" and an I/O field in the image ("Screen_Script")
• an internal tag "ScriptResult" of the data type "Int".
• the I/O field is connected with the process tag "ScriptResult".
Example 1
In this example, the value of the tag "myValue1" (as defined in chapter 3.2.2), must
be written from the global definition area of the global module "MyGlobalModul"
into the internal tag "ScriptResult" when the button "Button_1" is pressed.
The value of the internal tag must then be output to the I/O field.
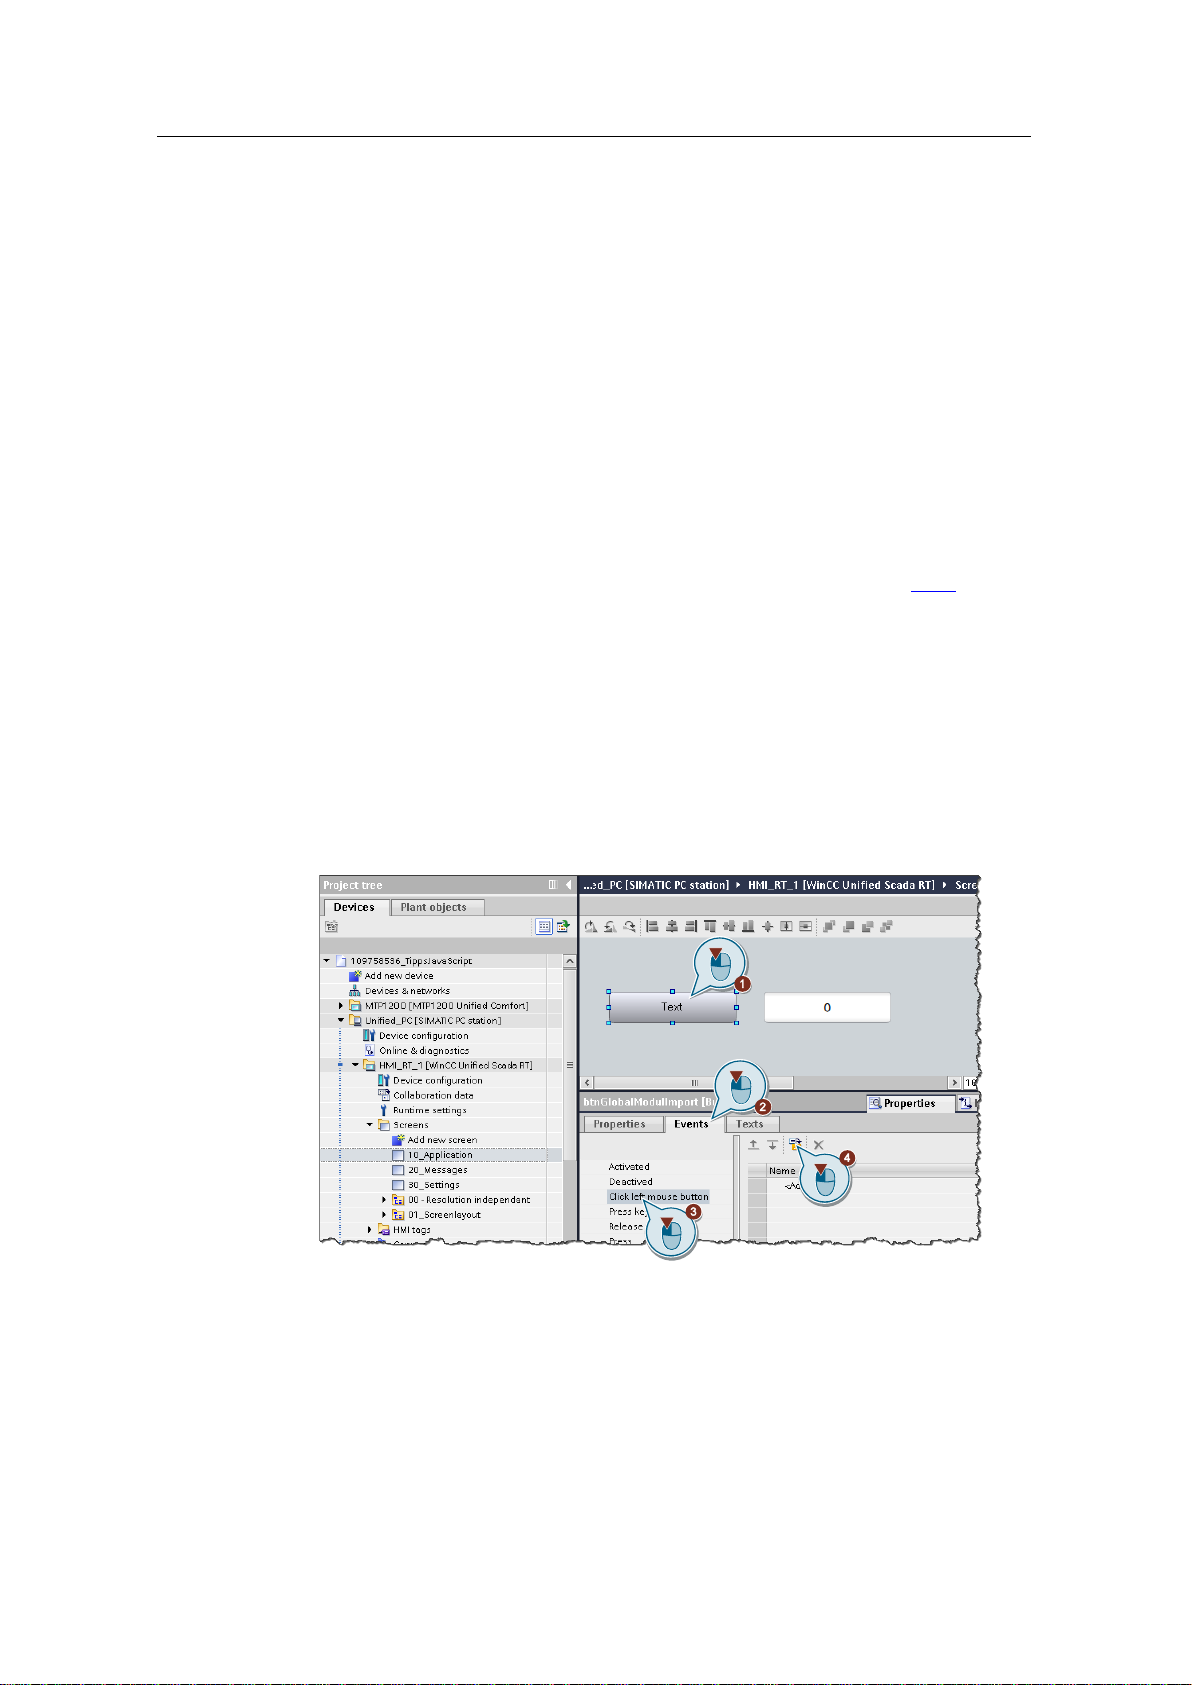
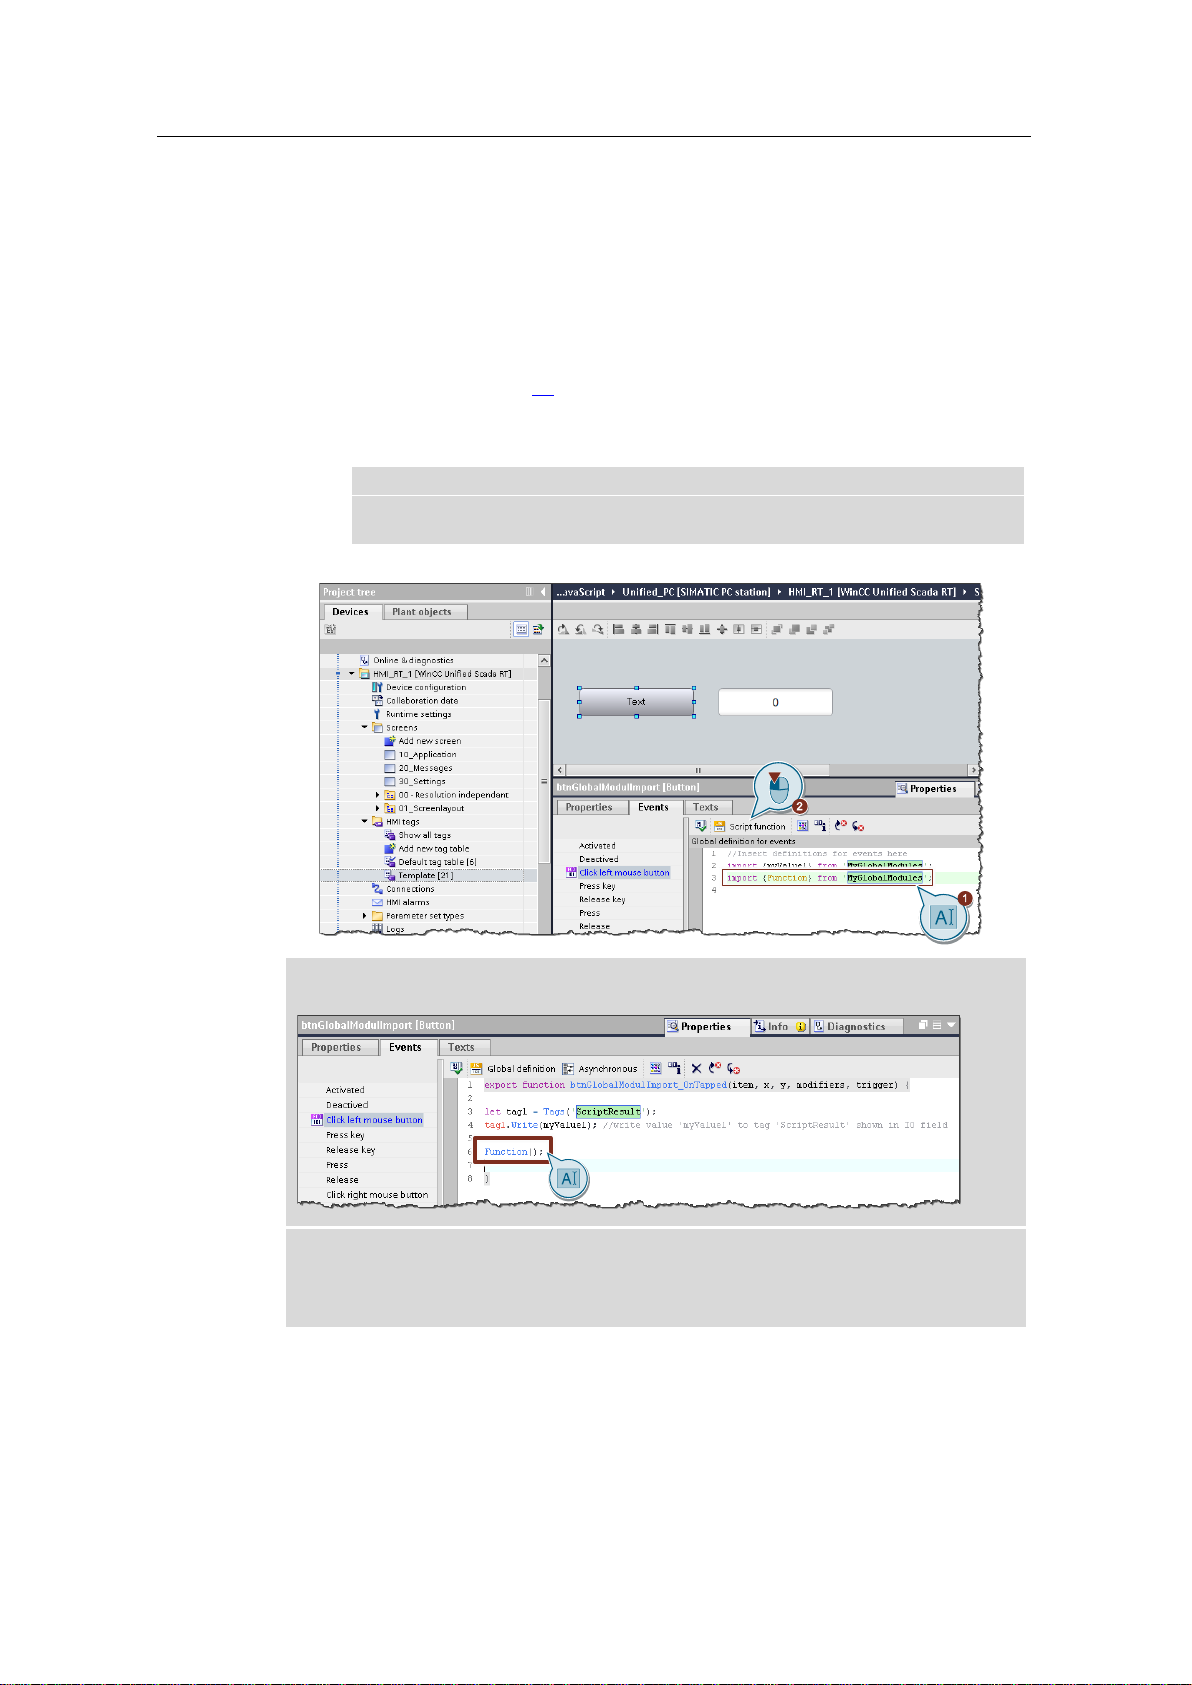
Configuration 1
1. Creating a script
– Mark the button (1) in the "Screen_Script" image.
– In the properties, open the "Events" tab (2).
– In the navigation area, select the trigger "Click left mouse button" (3) and
then click the button "Convert to script" (4).
Page 20
3 Configuring scripts
Tips and Tricks JavaScript
Article ID: 109758536, V3.0, 09/2020
20
© Siemens AG
2020 All rights reserved
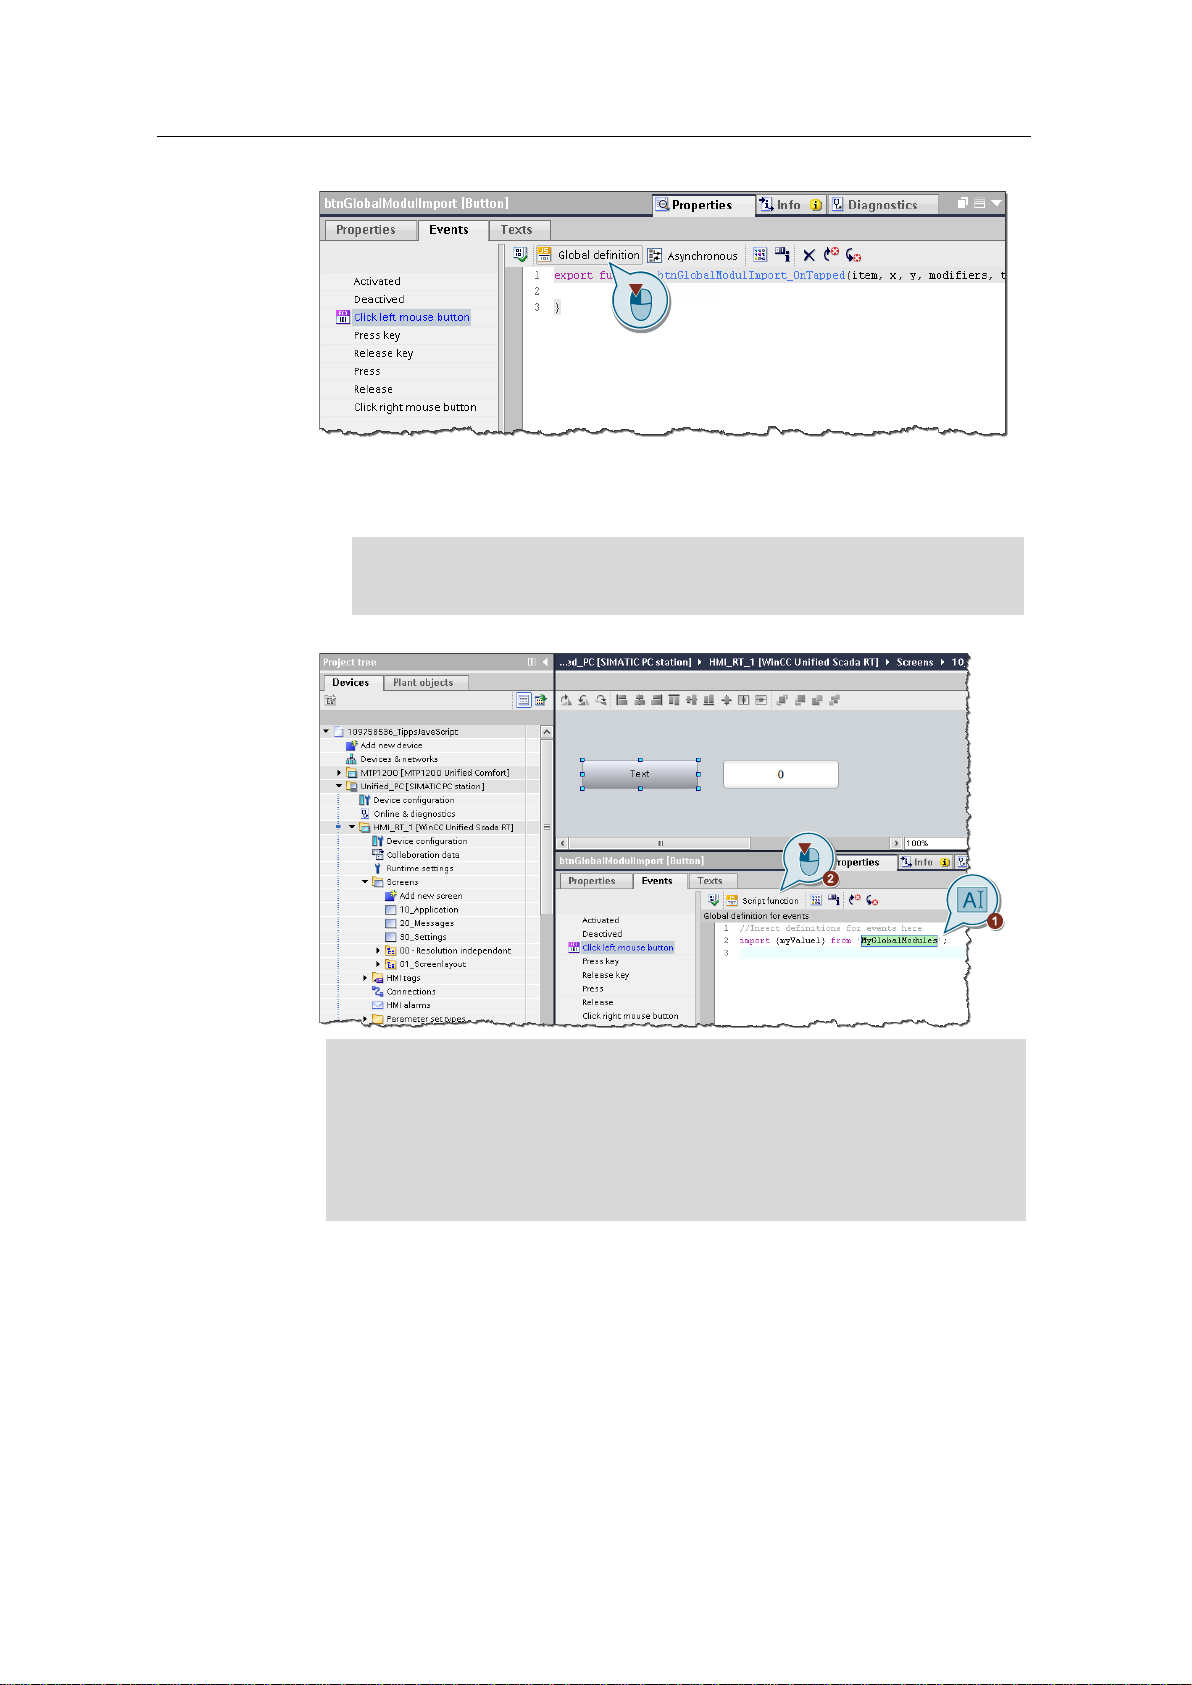
2. In the local script editor menu, click Global definition.
3. Import content from global definition area:
– Insert the following code to import the tag "myValue1" from the global
definition area of the global module (1).
import {myValue1} from 'MyGlobalModules';
– Then click on "Script function" in the menu of the local script editor (2).
Note
Once you have imported the tag in the global definition area (for example, in
the image properties), it is available in the entire image properties area of
the same image.
To use the tag in the Events pane of the image, you must re-import the tag.
You therefore have to declare the tag in the global definition area of the
events.
Page 21
3 Configuring scripts
Tips and Tricks JavaScript
Article ID: 109758536, V3.0, 09/2020
21
© Siemens AG
2020 All rights reserved
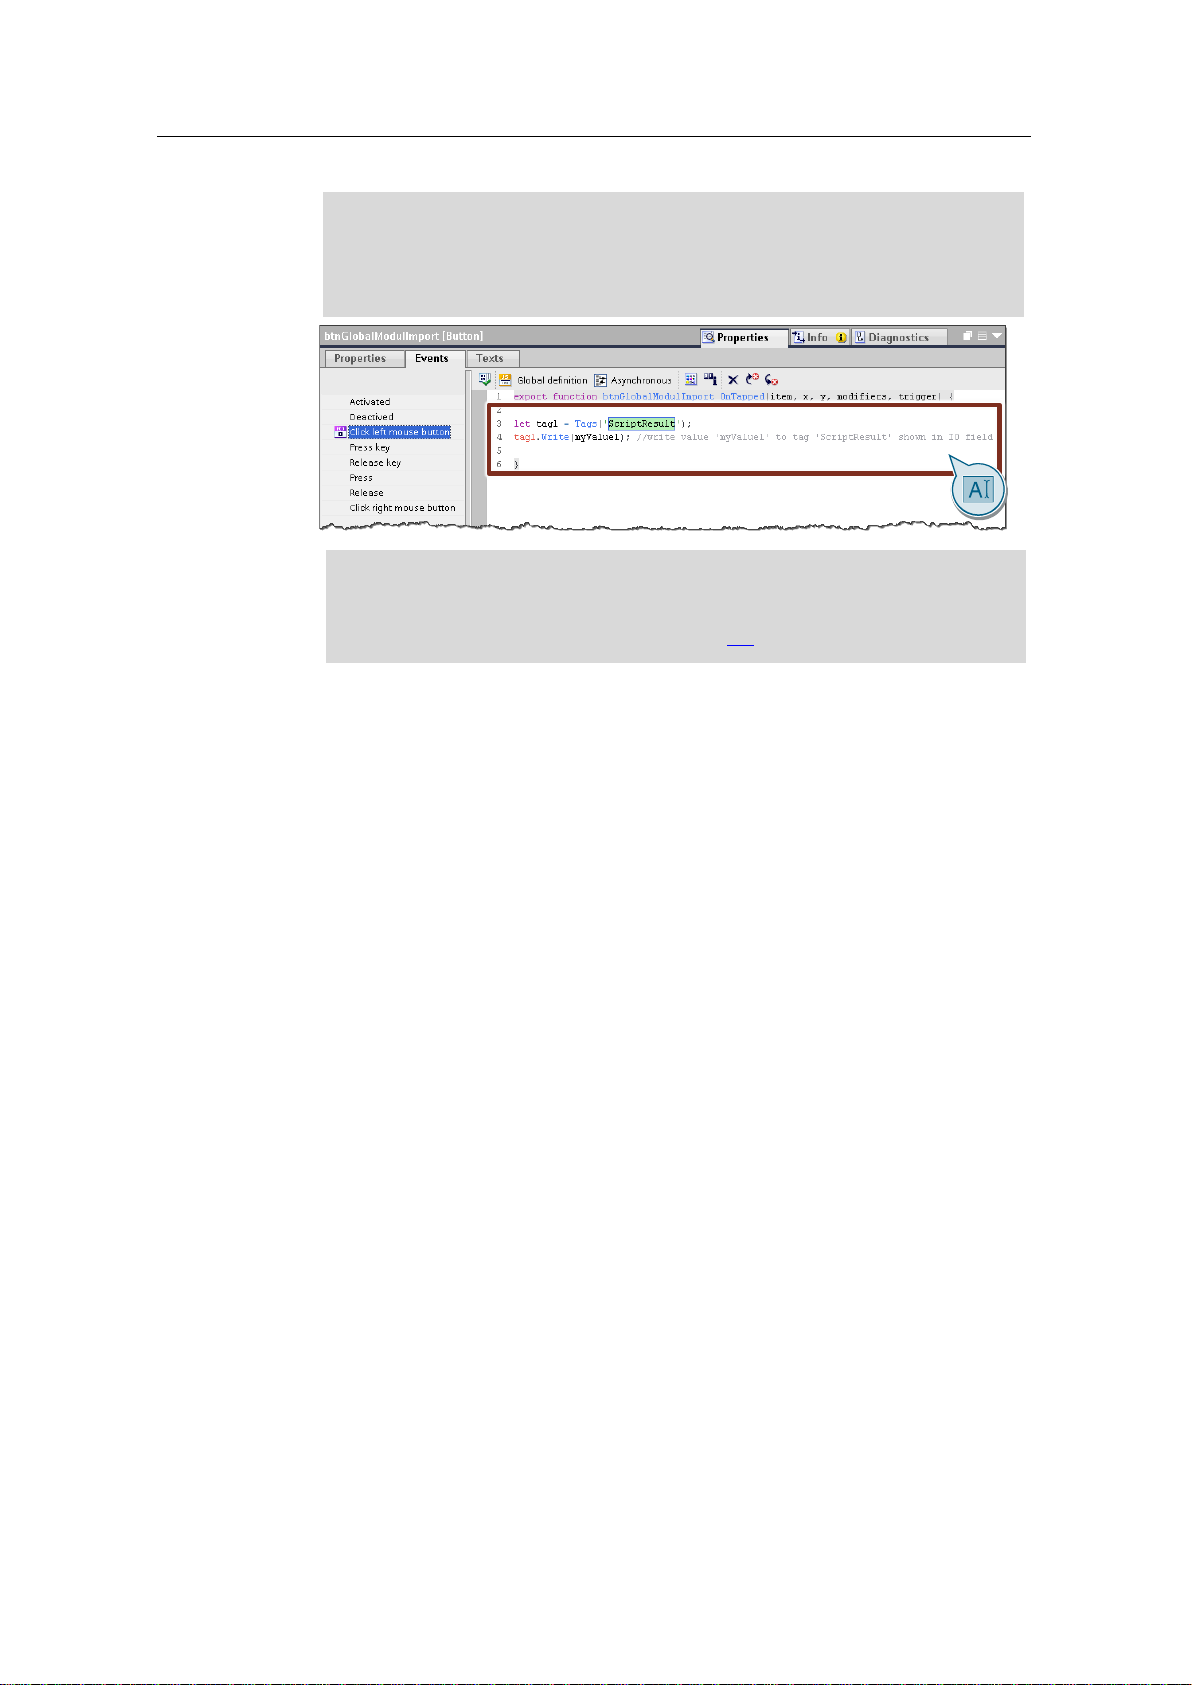
4. Insert the following code in the script editor of the event:
let tag1 = Tags('ScriptResult');
tag1.Write(myValue1); //write value 'myValue1' to tag
'ScriptResult' shown in IO field
Note
Optionally, you can also use the script snippet "HMI Runtime > Tag > Write
tag" to generate the code in the script editor.
Further information can be found in chapter 5.1.
5. Save your project.
Page 22
3 Configuring scripts
Tips and Tricks JavaScript
Article ID: 109758536, V3.0, 09/2020
22
© Siemens AG
2020 All rights reserved
Example 2
In the second example, the function "Function" of the global module
"MyGlobalModul" is to be executed by pressing the button "Button_1".
• The values 10 and 12 are to be passed to the function as transfer parameters.
• The return value of the function is then to be output as a trace message.
Configuration 2
1. Open the global definition area of the button "Button_1", as in step 1-3 with
"Configuration 1" (page 19).
2. Import function from global module:
– To additionally import the "Function" function, add the following code (2):
import {Function} from 'MyGlobalModules';
– Then click on "Script function" in the menu of the local script editor (2).
Note
If you do not want to pass values to a function of a global module, call the
function "Function" with "()" in the workspace of the script editor.
Note
You can also import tags from the global definition area and functions from the same
global module in a single command:
import {myValue1; Function} from 'MyGlobalModules';
Page 23
3 Configuring scripts
Tips and Tricks JavaScript
Article ID: 109758536, V3.0, 09/2020
23
© Siemens AG
2020 All rights reserved
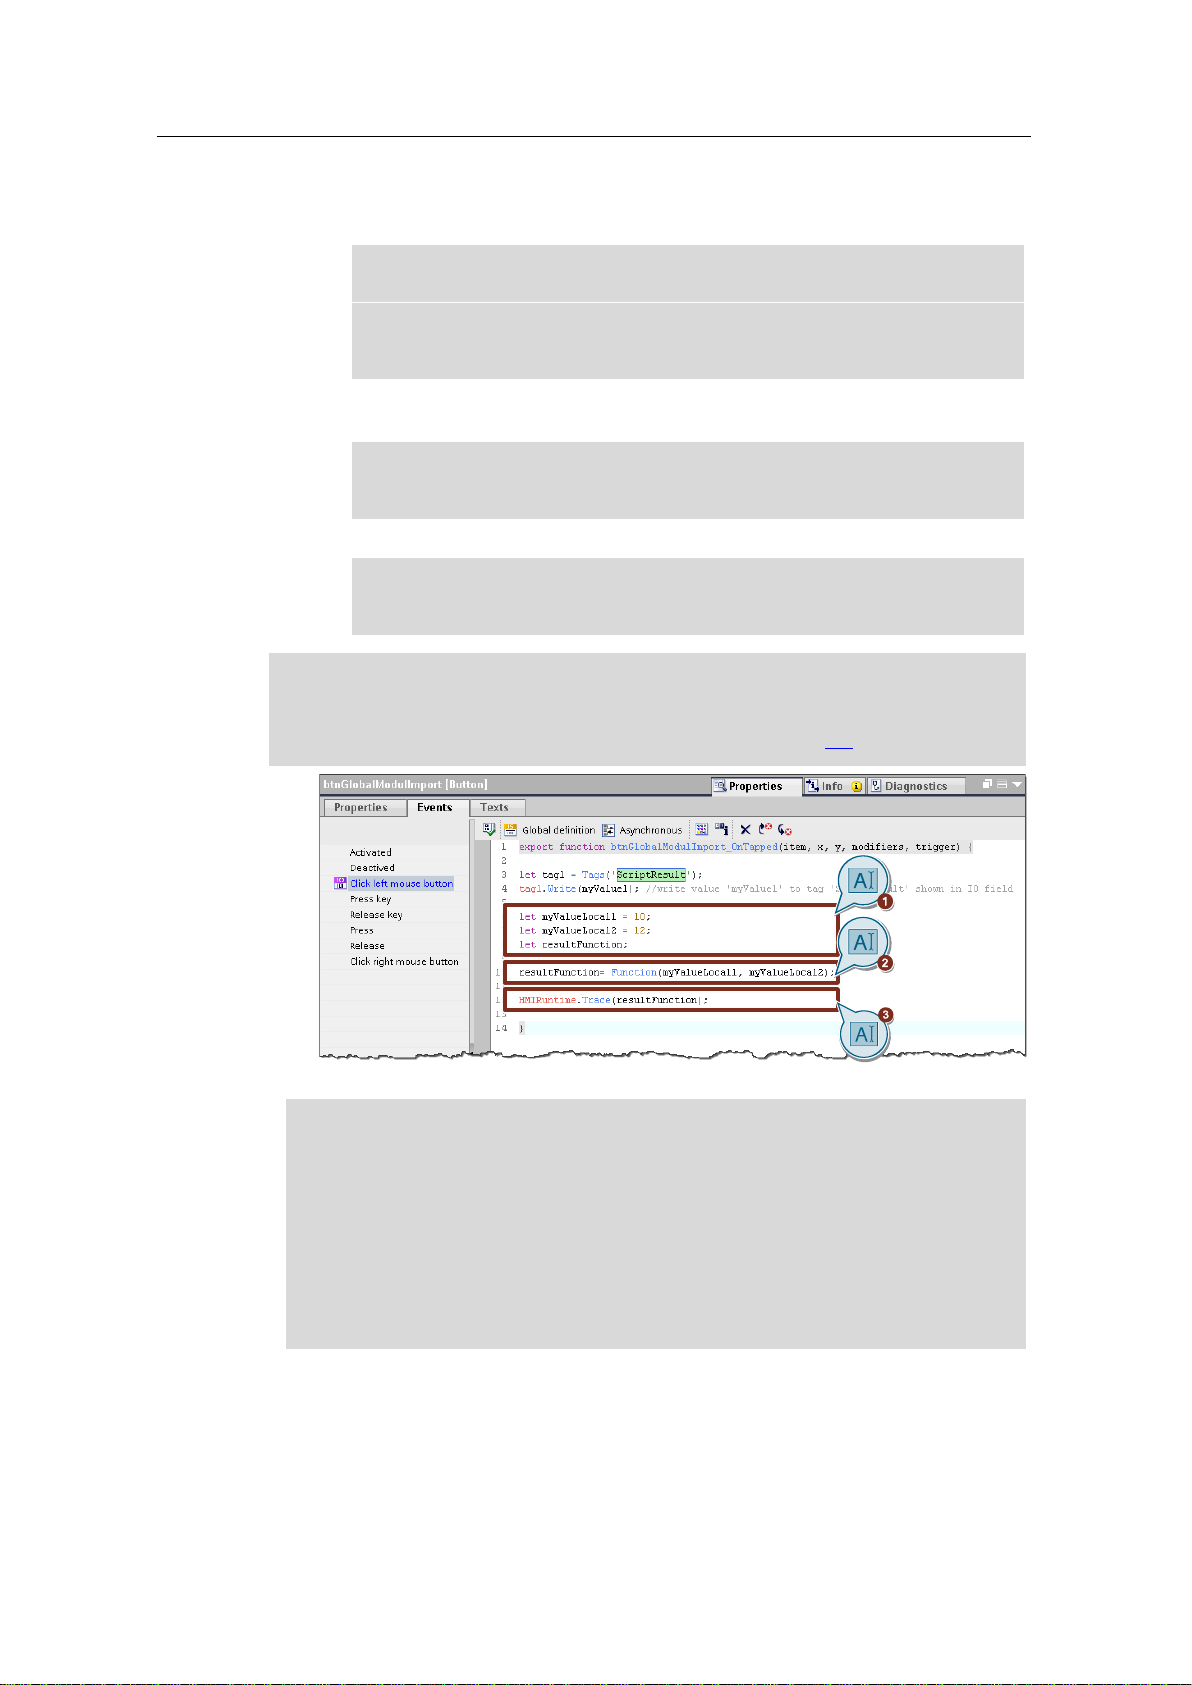
3. Transfer values
– Define three additional tags in the local script of the button event as shown
in the figure (1).
let myValueLocal1 = 10;
let myValueLocal2 = 12;
let resultFunction;
– Assign the return value of the "Function" function to the "resultFunction"
tag and pass the two tags ("myValueLocal1" and "myValueLocal2") (2).
resultFunction = Function(myValueLocal1, myValueLocal2);
– Output the value of the tag "resultFunction" as a trace message (3).
HMIRuntime.Trace(resultFunction);
Note
Optionally, you can also use the script snippet "Trace" to generate the code for the
trace message.
Further information to script snippets can be found in chapter 5.1.
Note
If you have a large number of tags in the global definition area or functions in
global modules, you can import them collectively with the following line of code:
import * as myGMs from 'MyGlobalModules';
You can call or use functions or tags from the global definition area of global
modules as follows:
myGMs.Function(); //call function from global modul
myGMs.myValue1; /*call tag from global definition area in
*/global module
Page 24
4 Tips and tricks for creating scripts (JavaScript in general)
Tips and Tricks JavaScript
Article ID: 109758536, V3.0, 09/2020
24
© Siemens AG
2020 All rights reserved
4 Tips and tricks for creating scripts
(JavaScript in general)
4.1 Strings in JavaScript
In the following sections (chapters 4.1.1-4.1.3), selected examples will show you
how to process strings.
Note
Further information on working with strings and JavaScript is available at the
following link:
https://developer.mozilla.org/enUS/docs/Web/JavaScript/Reference/Global_Objects/String
4.1.1 Linking strings by script
If you wish to link several strings in a script, this is possible with the concatenation
operator "+".
Example:
let Tag_01;
const Tag_Text_01 = 'Hello';
const Tag_Text_02 = 'my';
const Tag_Text_03 = 'world';
Tag_01 = Tag_Text_01 + Tag_Text_02 + Tag_Text_03;
// output Tag_01: 'Hellomyworld'
Note
The Object.prototype.toString() function allows corresponding expressions to be
converted to the "String" data type. This conversion before linking the strings
allows you to avoid runtime errors.
You can find further information on the "Object.prototype.toString()" method at
the following link:
https://developer.mozilla.org/enUS/docs/Web/JavaScript/Reference/Global_Objects/Object/toString
4.1.2 Adding spaces to linked strings
If you link strings together, it may occur that they are output as one coherent word.
This can consequently make the meaning and readability more difficult.
To separate the individual strings from each other, you can add additional
separators (e.g. spaces). These are added to the string in quotation marks (" ") and
via concatenation operator (+).
Example
let Tag_01, Tag_Text_01, Tag_Text_02, Tag_Text_03;
Tag_01 = Tag_Text_01 + " " + Tag_Text_02 + " " + Tag_Text_03;
Page 25

4 Tips and tricks for creating scripts (JavaScript in general)
Tips and Tricks JavaScript
Article ID: 109758536, V3.0, 09/2020
25
© Siemens AG
2020 All rights reserved
Note
The number of "spaces" determines the spaces between the quotation
marks " ".
Other options
Alternatively, so-called template strings can also be used. Back ticks (`) are used
here instead of double or single quotation marks. The tags are then written with
dollar sign and curly brackets "${Variable}".
Example
let Tag_01, Tag_Text_01, Tag_Text_02, Tag_Text_03;
Tag_01 = `${Tag_Text_01} ${Tag_Text_02} ${Tag_Text_03}`;
4.1.3 Determining the length of a string
You can use the length method to determine the length of a sting and further edit
it accordingly.
Example
const Tag_Text_01 = 'Hello';
HMIRuntime.Trace(Tag_Text_01.length); //output: 5
This can typically be necessary if a string must be further edited which exceeds a
determined minimum length.
4.1.4 Finding a sub-section of a string
The substring() method provides the option of determining and further
processing a certain part of a string. Both the beginning and the end position of the
partial string are defined in brackets.
Example
let Tag_Text_01 = 'WinCCUnified';
HMIRuntime.Trace(Tag_Text_01.substring(0,5)); //output: 'WinCC'
As a potential application case, it is conceivable that only strings having a certain
prefix would be processed further.
4.1.5 Turning a string into an array
The split() method uses the specified delimiter to split a string into child strings
and returns them as an array.
Example
let TagText = 'SIMATIC_WinCC_Unified'; //define tag and assign text
let arrayOfString =[]; //define array
arrayOfString = TagText.split('_'); //split string into array
Page 26

4 Tips and tricks for creating scripts (JavaScript in general)
Tips and Tricks JavaScript
Article ID: 109758536, V3.0, 09/2020
26
© Siemens AG
2020 All rights reserved
// Trace output:: 'SIMATIC'
HMIRuntime.Trace(arrayOfString[0]);
This method can be applied if you have read a CSV file and then further edit the
content of the individual columns separately.
4.2 Arrays in JavaScript
Arrays are a specific kind of data structure. This type of data structure helps when
using scripts in SIMATIC WinCC Unified, among other things.
This chapter will show you some properties and methods which you can apply in
connection with WinCC Unified.
Note
For a complete overview of which properties and methods are supported by the
array object, please refer to the Mozilla Developer Network at the following link:
https://developer.mozilla.org/enUS/docs/Web/JavaScript/Reference/Global_Objects/Array
4.2.1 Creating arrays and accessing array elements
Create array
Create an array in JavaScript by assigning multiple elements to the array name in
brackets.
Example:
//Create array
let array = ['SIMATIC','WinCC','Unified'];
// TraceViewer output: "Trace Message Array SIMATIC,WinCC,Unified"
HMIRuntime.Trace("Trace Message Array: " + array);
Access an array element
If you wish to access a single array element, first enter the name of the arrays
followed by the number of the array element that you want to access.
Example:
//TraceViewer output: "Trace Message 2. Array-Element: WinCC"
HMIRuntime.Trace("Trace Message 2. Array-Element: " + array[1]);
Determine the index of an array element
Using the indexof() method you can find which index the element first occurs at.
If the element is not in the array, "-1" will be returned.
Page 27

4 Tips and tricks for creating scripts (JavaScript in general)
Tips and Tricks JavaScript
Article ID: 109758536, V3.0, 09/2020
27
© Siemens AG
2020 All rights reserved
Example:
//Create array
let array = ['SIMATIC','WinCC','Unified'];
//define tag and assign index of WinCC to tag
let index = array.indexOf('WinCC');
// TraceViewer output: "Index of WinCC: 1"
HMIRuntime.Trace("Index of WinCC: " + index);
4.2.2 Extending and truncating arrays
Extend array
You can add one or more elements to the end of the array by using the push()
method.
Example:
//Create array
let array = ['SIMATIC','WinCC','Unified'];
// Add 'V16' to Array
array.push('V16');
// TraceViewer output: "New Array: SIMATIC,WinCC,Unified,V16"
HMIRuntime.Trace("New Array: " + array);
Truncate array
The pop() method is the inverse of the push() method. It removes the last
element of the array and returns it.
Example:
//Create array
let array = ['SIMATIC','WinCC','Unified'];
// TraceViewer output: "Unified"
HMIRuntime.Trace("Return value: " + array.pop());
// TraceViewer output: "New Array after pop(): SIMATIC,WinCC"
HMIRuntime.Trace("New Array after pop(): " + array);
4.2.3 Sorting arrays
To sort an array, you can use the sort() method. Is the reverse function to
the split() method.
Page 28

4 Tips and tricks for creating scripts (JavaScript in general)
Tips and Tricks JavaScript
Article ID: 109758536, V3.0, 09/2020
28
© Siemens AG
2020 All rights reserved
Example:
//Create array
let array = ['SIMATIC','WinCC','Unified'];
//Sort array
array.sort();
// TraceViewer output: "Sorted Array: SIMATIC,Unified,WinCC"
HMIRuntime.Trace("Sorted Array: " + array);
4.2.4 Turn arrays into strings
The join() method is the inverse function to the split() method (see
chapter 4.1.5). It compounds individual array elements into a string and returns this
as a value.
Example
//Create array and tag 'tagText' as string
let array = ['SIMATIC','WinCC','Unified'];
let tagText = '';
//convert array into string
tagText = arrayOfString.join('-');
// TraceViewer output: 'SIMATIC-WinCC-Unified'
HMIRuntime.Trace(tagText);
This method is useful when you assemble the contents of an array into a string and
then export it to CSV.
4.3 Math object in JavaScript
The "Math" object in JavaScript enables you to perform mathematical operations
on numbers. The following shows you how to:
• Add constants
• Round off tag values
• Find square root
• Use exponent function
• Generate random numbers
• Determine minimum/maximum values
Note
Besides the general JavaScript Math objects there is also a Math object specific
to SIMATIC WinCC Unified (see chapter 5.14).
Page 29

4 Tips and tricks for creating scripts (JavaScript in general)
Tips and Tricks JavaScript
Article ID: 109758536, V3.0, 09/2020
29
© Siemens AG
2020 All rights reserved
4.3.1 Add constants
You can access various constants in JavaScript via the "Math" object. The "Math"
provides corresponding properties for this.
Example:
In this example, the constant n is added.
let tag1 = Tags('HMI_Tag_PI');
tag1.Write(Math.PI); //Write value '3.141592653589793...'
The table below also shows which constants you can access.
Table 4-1
Return value
Syntax
Euler's number
(Math.E)
Square root of "2"
(Math.SQRT2)
Square root of "0.5"
(Math.SQRT1_2)
Natural logarithm of "2"
(Math.LN2)
Natural logarithm of "10"
(Math.LN10)
Logarithm "e" to base "2"
(Math.LOG2E)
Logarithm "e" to base "10"
(Math.LOG10E)
4.3.2 Round off tag values
Depending on requirements, it may be necessary to round off values of a tag. The
"Math" objects provides the method round() for this.
Example:
let tag1 = Tags('HMI_Tag_Round');
let tagValue1 = tag1.Read(); //Read value
tag1.Write(Math.round(tagValue1)); //round value e.g. 4.7 --> 5
4.3.3 Find square root
The sqrt() method the "Math" object finds the square root of a number in
JavaScript.
Example:
let tag1 = Tags('HMI_Tag_SQRT');
let tagValue1 = tag1.Read(); //Read value e.g. 9
tag1.Write(Math.sqrt(tagValue1)); //square root of "9" --> 3
4.3.4 Use exponent function
You can also calculate exponential functions in the script with the "Math" object.
The pow() method is available for this.
Page 30

4 Tips and tricks for creating scripts (JavaScript in general)
Tips and Tricks JavaScript
Article ID: 109758536, V3.0, 09/2020
30
© Siemens AG
2020 All rights reserved
Within the brackets you can pass the base and exponent parameters,
"Math.pow(Base, Exponent)".
Example:
let tag1 = Tags('HMI_Tag_Exponent');
let tagValue1 = tag1.Read(); //Read Value1(Exponent) e.g. 3
let tag2 = Tags('HMI_Tag_Base');
let tagValue2 = tag2.Read(); //Read Value2(Base) e.g. 2
tag2.Write(Math.pow(tagValue2, tagValue1));
// Math.pow(x, y) returns the value of x to the power of y:
// e.g. 2³ = 8
4.3.5 Generate random number
You can use the random() method of the "Math" object to generate random
numbers between 0 and 1.
Example:
let tag1 = Tags('HMI_Tag_random');
tag1.Write(Math.random()); //write random value to tag12
4.3.6 Find minimum/maximum values
You can also determine the minimum and maximum values from a numerical
sequence or multiple tags. You can use the min() and max() method of the "Math"
object for this.
Example:
let tag1 = Tags('HMI_Tag_min');
let tag2 = Tags('HMI_Tag_max');
tag1.Write(Math.min(3,5,4,86,2)); //write min-value ("2") to tag1
tag2.Write(Math.max(3,5,4,86,2)); //write max-value ("86") to tag2
Page 31

5 Tips and tricks for scripting (WinCC Unified specific)
Tips and Tricks JavaScript
Article ID: 109758536, V3.0, 09/2020
31
© Siemens AG
2020 All rights reserved
5 Tips and tricks for scripting
(WinCC Unified specific)
5.1 Script snippets
To make scripting easier for you, SIMATIC WinCC Unified provides the option of
adding frequently required code fragments, so-called snippets.
These code snippets can be used to add preformulated, task-specific code
fragments, which usually only have to be modified or supplemented slightly.
Example:
let tag1 = Tags('MyTag1');
tag1.Write(1234); //Write value '1234' to tag 'MyTag1'
Snippet types
There are type types of snippets in SIMATIC WinCC Unified:
1. "HMI Runtime" - Contains snippets for accessing the object model
2. "Logic" - Contains snippets for branches or loops
Adding snippets
To add a snippet, right-click on the corresponding point in the Script Editor (1) and
then select the corresponding snippet from the context menu (2).
Figure 5-1
Page 32

5 Tips and tricks for scripting
(WinCC Unified specific)
Tips and Tricks JavaScript
Article ID: 109758536, V3.0, 09/2020
32
© Siemens AG
2020 All rights reserved
5.2 Description of the "HMI Runtime" snippets
The following table gives you an overview of the "HMI Runtime" snippets and their
meaning.
Table 5-1
Snippet
Description
HMI
Runtime
Alarming
Alarm subscription
Displays a selection of active alarms
CreateSystemInformation
with monolingual Alarm text
Creates an alarm of the message class
"SystemInformation" in the message archive
with a monolingual message text.
CreateSystemInformation
with monolingual Alarm text
and Parameter value
Creates an alarm of the message class
"SystemInformation" in the message archive
with the alarm text from the specified text list
CreateSystemInformation
with monolingual Alarm text
and embedded Text List
Creates an alarm of the message class
"SystemInformation" in the message archive
with the alarm text and the message
parameter from the specified text lists
Alarm
logging
Read log
Reads message archive
Export alarm log as CSV
Exports message archive as CSV
Connections
Set connection mode
Sets the connection mode
Database
access
Select Statement
Select database entry
Create and Insert Statement
Create database entry and output
TraceViewer message
Data set
Screen DataSet
Generates and saves a data record within a
screen which can be accessed from
anywhere in the screen. If a screen change
is made, the data are deleted.
Session DataSet
Generates and saves a data record within a
session (browser tab) for the logged-on
user. The user can access the data within
the session.
Dataset with Database
Connection
Creates a database connection and saves it
in the session (browser tab).
File System
Read text file
Reads text file.
Read binary file (using
Int32Array)
Reads the contents of a binary file from the
file system (as an array in Int 32 format) 1)
Read binary file (using
DataView)
Reads the contents of a binary file from the
file system. (as DataView) 2)
Write text file
Writes text to a new file in the file system.
Write binary file
Adds binary data to the end of a binary file
(*.bin) in the file system.
Append to text file
Adds text to the end of a text file in the file
system.
Append to binary file
Appends value to a binary file (*.bin).
Create directory
Creates a new folder in the file system.
Delete directory
Deletes a folder in the file system with all
subfolders and data therein.
Delete file
Deletes a file in the file system.
Parameter
set
Load Parameter Set from
storage and write to PLC
Load parameter set from device storage and
write to the PLC.
Page 33

5 Tips and tricks for scripting
(WinCC Unified specific)
Tips and Tricks JavaScript
Article ID: 109758536, V3.0, 09/2020
33
© Siemens AG
2020 All rights reserved
Snippet
Description
Read Parameter Set from
PLC and save to storage
Read parameter set from the PLC and store
in the device storage.
Plant model
Read PlantObject properties
Reads property of a plant object.
Write PlantObject properties
Writes property of a plant object.
Get parent of PlantObject
Finds higher-level plant object.
Get child of PlantObject
Finds lower-level plant object.
Get all PlantObjects of
specific type
Finds all plant objects of a certain type.
Screen
Change base screen
Changes base screen.
Change screen in screen
window of current screen
Changes the screen in screen window
which is in the screen being displayed.
Change screen item property
in current screen
Changes property of a screen object which
is in the current screen.
Open faceplate in popup
Opens faceplate as a popup screen.
Tag
Read tag
Reads tag.
Write tag
Writes tag.
Write tag with operator
message
Writes tag with message to each tag to the
user.
Read tagset
Reads tagset.
Write tagset
Writes tagset.
Write tagset (short form)
Writes tagset (short form).
Write tagset with operator
message
Writes tagset with message to the user.
Linear scaling
Scale tag value linearly.
Inverse linear scaling
Inverted tag scaling.
Tag logging
Read log
Reads tag log.
Export tag log as CSV
Exports tag archive as CSV.
Add Comment to log tag
Adds comment to logged tag.
Correct logged tag values
Corrects logged tag value.
Trace
Create TraceViewer messages
Set language
Set language (ID)
1)
More information about "Int32Array" can be found at:
https://developer.mozilla.org/en-US/docs/Web/JavaScript/Reference/Global_Objects/Int32Array
2)
You can find additional information on the "DataView" view at:
https://developer.mozilla.org/en-US/docs/Web/JavaScript/Reference/Global_Objects/DataView
Page 34

5 Tips and tricks for scripting
(WinCC Unified specific)
Tips and Tricks JavaScript
Article ID: 109758536, V3.0, 09/2020
34
© Siemens AG
2020 All rights reserved
5.3 Performance-optimized configuration
If you want to focus on performance-optimized configuration in your WinCC Unified
project, then it is best to observe a few rules.
5.3.1 Prefer system dialogs
Always use the system functions and dialogs provided by TIA Portal before you
create a script. The functions that are implemented on the system side are
optimized for performance and thus place less of a load on your project's
performance.
Recommended
Figure 5-2
Not recommended
Figure 5-3
5.3.2 Read multiple tags with TagSet
If you wish to read multiple tag values in a script, it is recommended to employ the
"TagSet" object. You can use the code snippet "HMI Runtime > Tag > Read tagset"
for this purpose.
Reading multiple tag values with the TagSet object also increases the script
performance and thus places less of a load on your project.
Recommended
//Read values via TagSet
let ts = Tags.CreateTagSet(["MyTag1", "MyTag2"]);
ts.Read();
Page 35

5 Tips and tricks for scripting
(WinCC Unified specific)
Tips and Tricks JavaScript
Article ID: 109758536, V3.0, 09/2020
35
© Siemens AG
2020 All rights reserved
Not recommended
//Read values single
let tag1 = Tags("MyTag1");
let tagValue1 = tag1.Read();
let tag2 = Tags("MyTag2");
let tagValue2 = tag2.Read();
5.3.3 Avoid cyclic scripts
As far as possible, avoid scripts with cyclic triggers, as this burdens the
performance of the whole project.
If you nevertheless need cyclic scripts and the use case permits it (e.g. when
synchronizing data or for data exchange with databases), the configure the scripts
in the Task Scheduler. The Task Scheduler runs in a separate process in the
background and places less load on your project than if you had configured the
scripts in the screen.
5.3.4 Establish database connections once
If you wish to access the same database multiple times in your WinCC Unified
runtime, it is recommended to connect to the database once and save within the
session.
To do this, use the code snipper "HMI Runtime > Data set > Dataset with Database
Connection" (see also chapter 5.2).
In the case of repeat database access, this way you can access the connection
faster and you will not need to establish the connection again, which saves
resources in your project.
Note
While doing so, make sure that the connection is only available for the logged-on
user within a session (browser tab).
If the user changes or the session is ended, the saved database connection is
also lost.
Page 36

5 Tips and tricks for scripting
(WinCC Unified specific)
Tips and Tricks JavaScript
Article ID: 109758536, V3.0, 09/2020
36
© Siemens AG
2020 All rights reserved
5.4 Screens and screen objects
5.4.1 Finding objects in screen windows with object paths
Depending on the application case, it may occur that several screen windows are
nested within one another. The FindItem() method can be used to reference
objects within the screen window and change their properties dynamically.
Absolute and relative object paths
In the FindItem() method, the object path of the object to be changed is
expressed as an argument. This can be specified both relatively and absolutely.
• Relative object path
The relative object path is indicated based on the screen in which the script is
called up. The following table shows the required syntax for relative path
specification.
Table 5-2
Prefixes
Description
".."
References the superordinate screen window (Parent) from the viewpoint
of the current screen window
"."
References the own screen window (Self)
""
Without prefix, a screen object of the current screen window is referenced
• Absolute object path
The absolute object path is indicated based on the "RootScreenWindow". The
following table shows the required syntax for absolute path specification.
Table 5-3
Prefixes
Description
"/"
References a screen window on the highest level, followed by its name
Note
The "RootScreenWindow" does not have a name in the SIMATIC WinCC
Unified V16, therefore two slashes can follow one another.
"~"
References the screen window on the highest level in the own window
screen object hierarchy.
Note
The object path consists of the name of screen windows (Screen Windows) and
screen objects (Screen Items). Corresponding to the hierarchical arrangement,
the names are joined via a slash ("/"). Screens (Screens) and their names are
not used in the formulation.
Supported objects
The method is supported by the following objects:
• "UI" (user interface of the graphic runtime system)
• "Screen" (screen in runtime)
Note
Only "Window" objects (screen windows) have the property "Path", which returns
the absolute path to the "Window" in the total runtime.
Page 37

5 Tips and tricks for scripting
(WinCC Unified specific)
Tips and Tricks JavaScript
Article ID: 109758536, V3.0, 09/2020
37
© Siemens AG
2020 All rights reserved
Example
In the example, the color of the circle (Circle_1 - Circle_4) over the button "Button"
should be changed to yellow. Several screen windows ("Screen windows") are
used here, these thus representing a window screen object hierarchy.
Screen_1
Screen window_1
Circle_1
Circle_2
Circle_3
Button
Screen_2
Screen window_2
Screen_3
Screen window_3
Screen_4
Circle_4
"FindItem()" with relative object paths
In this example, the color must be changed with the FindItem() method and
specification of relative object paths.
//Change Background Color of 'Circle_3'
Screen.FindItem('Circle_3').BackColor = 0xFFFFFF00;
//Change Background Color of 'Circle_2'
Screen.FindItem('../Circle_2').BackColor = 0xFFFFFF00;
//Change Background Color of 'Circle_1'
Screen.FindItem('../../Circle_1').BackColor = 0xFFFFFF00;
//Change Background Color of 'Circle_4'
Screen.FindItem('./Screen window_3/Circle_4').BackColor =
0xFFFFFF00;
As an alternative to the FindItem() method, you can use the "ParentScreen"
property to navigate to screens that are located in the screen hierarchy over the
screen with the script execution.
//Change Background Color of 'Circle_2'
Screen.ParentScreen.Items('Circle_2').BackColor = 0xFFFFFF00;
//Change Background Color of 'Circle_1'
Screen.ParentScreen.ParentScreen.Items('Circle_1').BackColor =
0xFFFFFF00;
Page 38

5 Tips and tricks for scripting
(WinCC Unified specific)
Tips and Tricks JavaScript
Article ID: 109758536, V3.0, 09/2020
38
© Siemens AG
2020 All rights reserved
Screens that are located under the screen with the script execution in the window
screen object hierarchy cannot be referenced via "ParentScreen".
The relative object path is therefore composed as follows based on the button:
Screen.FindItem('../../Circle_1').BackColor = 0xFFFFFF00;
Screen.ParentScreen.ParentScreen.Items('Circle_1').BackColor =
0xFFFFFF00;
Screen window_2 Screen window_1 Circle_1
Further examples for indicating relative object paths:
Table 5-4
Object path
Description
'ItemX'
Object ItemX in same screen
'./ItemX'
Object ItemX in same screen
'./ScreenWindow1/ItemY'
Object ItemY from the child screen window
"ScreenWindow1"
'../ScreenWindow1/ItemY'
Object ItemY from the neighboring screen window
"ScreenWindow1"
'../ItemZ'
Object ItemZ from the superordinate screen window
Note
Only functions if the script is called up from a screen
window.
"FindItem()" with absolute object paths
The description below also changes the color of the circles, but the FindItem()
method is used with absolute object paths.
//Change Background Color of 'Circle_3'
UI.FindItem('Circle_3').BackColor = 0xFFFFFF00;
//Change Background Color of 'Circle_2'
UI.FindItem('~/Screen window_1/Circle_2').BackColor = 0xFFFFFF00;
//Change Background Color of 'Circle_1'
UI.FindItem('~/Screen window_1/Screen window_2/Circle_1'). BackColor
= 0xFFFFFF00;
//Change Background Color of 'Circle_4'
UI.FindItem('~/Screen window_1/Screen window_2/Screen window_3/
Circle_4').BackColor = 0xFFFFFF00;
The absolute object path is therefore composed as follows based on the button
"Button":
Page 39

5 Tips and tricks for scripting
(WinCC Unified specific)
Tips and Tricks JavaScript
Article ID: 109758536, V3.0, 09/2020
39
© Siemens AG
2020 All rights reserved
UI.FindItem('~/Screen window_1/Screen window_2/Circle_3').BackColor=
0xFFFFFF00;
Screen window_1 Screen window_2 Circle_3RootScreenWindow
Further examples for specifying absolute object paths:
Table 5-5
Syntax
Description
'~/ItemX'
ItemX of the highest screen currently visible ("Screen")
'//ItemX'
ItemX of the highest screen currently visible ("Screen")
5.4.2 Screen change across multiple screen windows
Oftentimes screen layouts are used which resemble the figure below.
Screen_1
Screen window_1
Circle_1
Button_1
Screen_2
Screen window_2
Screen_3
Button_2
In this case, two screen windows are placed side-by-side in the screen "Screen_1".
The screen window "Screen window_2" in turn contains two buttons with the
following functions:
• Button "Button_1" should show the screen "Screen_2" in the screen window
"Screen window_1".
• Button "Button_2" should change the color of the circle "Circle_1" to yellow in
the displayed screen "Screen_2".
Solution with "FindItem()" and relative object paths
Below you will find the JavaScript code for the specified example along with the
FindItem() method and relative object paths.
//Press "Button_1" to change Screen of 'Screen window_1'
Screen.FindItem('../Screen window_1').Screen = 'Screen_2';
// Press "Button_2" to change background color of 'Circle_1' in
'Screen window_1'
Screen.FindItem('../ Screen window_1/Circle_1').BackColor =
0xFFFFFF00;
Page 40

5 Tips and tricks for scripting
(WinCC Unified specific)
Tips and Tricks JavaScript
Article ID: 109758536, V3.0, 09/2020
40
© Siemens AG
2020 All rights reserved
Solution with "FindItem()" and absolute object paths
The following JavaScript code also shows you the solution with the FindItem()
method, but this time by specifying the absolute object paths.
//Press "Button_1" to change Screen of 'Screen window_1'
UI.FindItem('~/Screen window_1').Screen = 'Screen_2';
// Press "Button_2" to change background color of 'Circle_1' in
'Screen window_1'
UI.FindItem('~/ Screen window_1/Circle_1').BackColor = 0xFFFFFF00;
5.4.3 Displaying screens as pop-ups
In WinCC Unified, pop-up screens are created in the same manner as normal
process screens and called up on the screen as "PopupScreenWindow".
This chapter will show you how to open and close screens using the script system
functions "OpenScreenInPopup" and "ClosePopup". Please refer to chapter 5.5 on
how to open faceplates as pop-ups.
Note
For further information, refer to the "System manual - SIMATIC WinCC WinCC
Engineering V16 - Runtime Unified" at:
"OpenScreenInPopup" system functions
https://support.industry.siemens.com/cs/ww/en/view/109773780/129018860555
"ClosePopup" system functions:
https://support.industry.siemens.com/cs/ww/en/view/109773780/129018870155
Open screen as pop-up with a script
In order to open the process screen "Popup_Machine_State" as a pop-up via a
script, enter the following JavaScript code:
//Open the screen 'Popup_Machine_State' as a pop-up
HMIRuntime.UI.SysFct.OpenScreenInPopup("MachineState",
"Popup_Machine_State", false, "", 150, 200, false, undefined);
Figure 5-4
Page 41

5 Tips and tricks for scripting
(WinCC Unified specific)
Tips and Tricks JavaScript
Article ID: 109758536, V3.0, 09/2020
41
© Siemens AG
2020 All rights reserved
Note
Optionally, you can also use the system function "OpenScreenInPopup" and
then convert it to JavaScript.
Showing pop-up screen in runtime
The screen appears as a pop-up in the runtime. By default, each
"PopupScreenWindow" has a gray border and a header.
Figure 5-5, pop-up in the runtime
Note
If you want to show the "PopupScreenWindow" without a frame or header, you
must set the properties of "Window settings" to "0" using the system function
"SetPropertyValue".
HMIRuntime.UI.SysFct.SetPropertyValue("/MachineState", "WindowFlags", 0);
The parameter for "Popup window path" is composed of the "/" (reference to the
user's window) and the name of the pop-up window that you specify when
opening the pop-up with "OpenScreenInPopup" (see also chapter 5.4.1).
Note
For further information on "Popup window path" and the "SetPropertyValue"
system function, refer to the "System manual - SIMATIC WinCC WinCC
Engineering V16 - Runtime Unified" at:
"SetPropertyValue" system functions:
https://support.industry.siemens.com/cs/ww/en/view/109773780/122556599563
"PopupScreenWindow" object:
https://support.industry.siemens.com/cs/ww/en/view/109773780/118460062347
Page 42

5 Tips and tricks for scripting
(WinCC Unified specific)
Tips and Tricks JavaScript
Article ID: 109758536, V3.0, 09/2020
42
© Siemens AG
2020 All rights reserved
Close pop-up externally
In order to close the pop-up via script (i.e. via a button that is not part of the popup), you can use the system function "OpenScreenInPopup".
However, you must set the function's "toggleOpen" parameter to "True".
//Close the popup if it´s open
HMIRuntime.UI.SysFct.OpenScreenInPopup("MachineState",
"Popup_Machine_State", true, "", 150, 200, false, undefined);
Figure 5-6
Close pop-up internally
If the pop-up is open and you want to close it via a configured button (in the figure,
the "CLOSE" button), you can implement this with the system function
"ClosePopup".
For the parameter, specify the path of the pop-up window.
//Close popup from inside
HMIRuntime.UI.SysFct.ClosePopup("/MachineState");
Figure 5-7
Page 43

5 Tips and tricks for scripting
(WinCC Unified specific)
Tips and Tricks JavaScript
Article ID: 109758536, V3.0, 09/2020
43
© Siemens AG
2020 All rights reserved
5.4.4 Determining the screen name
Determining the screen name
To determine the name of a screen, you can output this with the following code line
as a message in TraceViewer.
HMIRuntime.Trace(Screen.Name);
Consecutively numbered screen names
If you name the screens correspondingly, e.g. Screen_01, Screen_02, you can
extract the number from the screen name using the split() method.
// screen name = "Screen_01"
HMIRuntime.Trace(Screen.Name.split('_')[1]);
For a screen name "Screen_01" in TraceViewer, "01" is output as a message.
5.4.5 Change colors
SIMATIC WinCC Unified lets you change colors (e.g. background color, text color,
frame color) of objects via JavaScript.
The color that you assigned to the object is made up as follows:
αRGB
Transparenz-Level
[0-255]
Rot-Anteil
[0-255]
Grün-Anteil
[0-255]
Blau-Anteil
[0-255]
Both the transparency value as well as the RGB value are indicated as a separate
value in hexadecimal form in the script.
//αRGB – α opacity[0-255] Red[0-255] Green[0-255] Blue[0-255];
Screen.Items('Rectangle1').BackColor = 0xFF00FF00;
Note
If you want to specify the RGB value instead of the hexadecimal value, you can
realize this with the "RGB" method of the WinCC Unified "Math" object.
HMIRuntime.Math.RGB(0,255,0);
Note
If you specify less than eight digits instead of the color code, the missing digits
are treated as "0" and added at the beginning.
For ex.: 0xFF00FF → 0x00FF00FF
The can lead to the color being displayed as transparent, as the transparency
level is "00".
Page 44

5 Tips and tricks for scripting
(WinCC Unified specific)
Tips and Tricks JavaScript
Article ID: 109758536, V3.0, 09/2020
44
© Siemens AG
2020 All rights reserved
5.4.6 Counting screen objects and finding screen object names
In this chapter you will find code examples for how to count screen objects and
output their names.
Counting screen objects
The following example will output the number of screen objects in the TraceViewer
which are configured in the current screen.
Note
If a screen object has been switched to invisible, it will still be counted as a
configured screen object.
Example
// amount of all screen items on the screen:
const items = Screen.Items;
HMIRuntime.Trace(items.Count);
Outputting names of the screen objects
The example below outputs each screen object name in a separate trace message
in the TraceViewer.
Example
// names of all screen items on the screen:
for(let i in Screen.Items) {
HMIRuntime.Trace(Screen.Items(Number(i)).Name);
}
5.4.7 Read out touch area direction
The screen object "Touch area" recognizes so-called swipe gestures in the
runtime. Therefore, if you swipe over the configured area in the runtime, it will be
detected and you can execute an action.
Direction-independent action (default setting)
By default, the screen object has the event "Gesture detected". In this setting, any
arbitrary direction is detected and the configured action will be carried out.
Page 45

5 Tips and tricks for scripting
(WinCC Unified specific)
Tips and Tricks JavaScript
Article ID: 109758536, V3.0, 09/2020
45
© Siemens AG
2020 All rights reserved
Figure 5-8
Direction-dependent action
However, if you want different actions to be run depending on the direction of the
swipe, you can implement this using JavaScript.
1. Click on the button to go to the "Script editor".
Figure 5-9
2. Select direction
– Double-click in the If instruction to select the "SwipeDown" area (1).
– Then press the key combination "CTRL + Space" (2).
– Then select the direction from the dropdown menu that will be recognized
as a swipe gesture to run the action (3).
Page 46

5 Tips and tricks for scripting
(WinCC Unified specific)
Tips and Tricks JavaScript
Article ID: 109758536, V3.0, 09/2020
46
© Siemens AG
2020 All rights reserved
Note
As an alternative, you can also select the direction of the gesture via the object
model.
e.g. UI.Enums.HmiGesture.SwipRight;
Note
For each touch area, you can add more If instructions and thereby define actions
for all the other directions.
Page 47

5 Tips and tricks for scripting
(WinCC Unified specific)
Tips and Tricks JavaScript
Article ID: 109758536, V3.0, 09/2020
47
© Siemens AG
2020 All rights reserved
5.5 Interconnect faceplate via script
Faceplates can be configured centrally in TIA Portal; you can later re-use them with
various process tags.
Overview
This chapter describes how you can:
• open a faceplate as a pop-up and interconnect via script → see chapter 5.5.1
• configure a faceplate in the screen and modify the interconnection in the
runtime → see chapter 5.5.2
• open a faceplate from a faceplate → see chapter 5.5.3
Example
For a better understanding, the interconnection will be explained below using the
example of the "fpMotor" faceplate. This contains:
• three tag interfaces ("MotorName" (1), "Speed" (2) and "Acceleration" (3)) and
• a properties interface ("Indicator" (4)).
1
2
3
4
This faceplate should be launched as a pop-up and interconnected with the UDT
"UDTMotor".
Figure 5-10, "UDTMotor"
Page 48

5 Tips and tricks for scripting
(WinCC Unified specific)
Tips and Tricks JavaScript
Article ID: 109758536, V3.0, 09/2020
48
© Siemens AG
2020 All rights reserved
5.5.1 Open faceplate as a pop-up
In this example, the intention is to open the faceplate "fpMotor" as a pop-up via a
button and; the interface must be interconnected accordingly.
Code snippet
The snippet "Open faceplate in popup" will help you open the faceplates.
let data = {TagProperty_1:{Tag:"Tag_1"}, ColorProperty:0xff00ff00};
let po = UI.OpenFaceplateInPopup("Faceplate type_1", "title", data);
po.Left = 100;
po.Top = 150;
po.Visible = true;
The interface of the faceplate is composed of the following parts:
1. the interface tag name of the faceplate
2. the tag name of the HMI tag to be passed
3. the name of the interface property
4. the value, which is passed, of the property
5. the faceplate name
6. the title of the pop-up window
7. the position of the pop-up window
8. the visibility of the pop-up window
Page 49

5 Tips and tricks for scripting
(WinCC Unified specific)
Tips and Tricks JavaScript
Article ID: 109758536, V3.0, 09/2020
49
© Siemens AG
2020 All rights reserved
let data = {TagProperty_1:{Tag:"Tag_1"}, ColorProperty:0xff00ff00};
let po = UI.OpenFaceplateInPopup("Faceplate type_1", "title", data);
po.Left = 100;
po.Top = 150;
po.Visible = true;
1 2 3 4
8
7
5 6
Note
You can find further information about the interface parameters and the optional
parameters "parentScreen" and "Visibility" in the manual under the method
"OpenFaceplateInPopup":
https://support.industry.siemens.com/cs/ww/en/view/109773780/125791208843
The following interconnection is the result from the "fpMotor" example and the
"UDTMotor" to be interconnected:
let data = {MotorName:{Tag:"Motor1.Name",Indicator:0xffffff00};
HMI tag table
Tag interface, faceplate "fpMotor" Properties interface, faceplate "fpMotor"
Page 50

5 Tips and tricks for scripting
(WinCC Unified specific)
Tips and Tricks JavaScript
Article ID: 109758536, V3.0, 09/2020
50
© Siemens AG
2020 All rights reserved
Note
If you pass a text list via the tag interface, you will also need another tag pass in
order to pass the value (index) of the text list.
The pass parameters for a text/graphic list are themselves composed of the
following two pieces of information:
• Name of the properties interface (here, "Textlist")
• Prefix ("@Default.") + name of the text list (here: "TLState")
let data={Index:{Tag:"TagListIndex", Textlist:"@Default.TLState"};
Properties interface, faceplate "fpMotor"
Prefix
Text list entry
Tag pass (text lists index)
Page 51

5 Tips and tricks for scripting
(WinCC Unified specific)
Tips and Tricks JavaScript
Article ID: 109758536, V3.0, 09/2020
51
© Siemens AG
2020 All rights reserved
Result
The following overview shows the fully configured code snippet.
let data={MotorName:{Tag:"Motor1.Name"},Speed:{Tag:"Motor1.Speed"},
Acceleration:{Tag:"Motor1.Acc"},Indicator:0xffffff00};
let po = UI.OpenFaceplateInPopup("fpMotor", "Motor 1", data);
po.Left = 100;
po.Top = 150;
po.Visible = true;
Once the button has been pressed in the runtime, the faceplate will appear as a
pop-up along with the data that was passed.
Figure 5-11
5.5.2 Modifying faceplate interconnection in the screen
In the second use case, the intent is to configure the faceplate "fpMotor" in the
screen. Using two buttons, the interface in the runtime must be switched from UDT
Motor 1 to UDT Motor 2.
Figure 5-12
Page 52

5 Tips and tricks for scripting
(WinCC Unified specific)
Tips and Tricks JavaScript
Article ID: 109758536, V3.0, 09/2020
52
© Siemens AG
2020 All rights reserved
Configuration
1. To do this, first place the faceplate "fpMotor" in the screen by dragging and
dropping.
2. Name the automatically generated faceplate container as "fpContainer".
3. Add the button for Motor 1 with the following script.
Screen.Items("fpContainer").Properties.MotorName.Tag = "Motor1.Name";
Screen.Items("fpContainer").Properties.Speed.Tag = "Motor1.Speed";
Screen.Items("fpContainer").Properties.Acceleration.Tag = "Motor1.Acc";
Screen.Items("fpContainer").Properties.Indicator = 0xff00ff08;
4. Then repeat Step 3 and replace "Motor1" with "Motor2".
Result in the runtime
Figure 5-13
Page 53

5 Tips and tricks for scripting
(WinCC Unified specific)
Tips and Tricks JavaScript
Article ID: 109758536, V3.0, 09/2020
53
© Siemens AG
2020 All rights reserved
5.5.3 Opening a faceplate from a faceplate
In WinCC Unified you also have the ability to open a second faceplate from an
already opened faceplate.
Code snippet
To achieve this, you also have the option within a faceplate of opening a second
faceplate by using the snippet "Open faceplate in popup".
Figure 5-14
let po = Faceplate.OpenFaceplateInPopup("Faceplate type_1", "title",
true, false);
po.Left = 100;
po.Top = 150;
po.Visible = true;
Note
If you launch or open a second faceplate (e.g. "Faceplate_2") from the current
faceplate (e.g. "Faceplate_1"), the linked interface tags will be passed
automatically to the faceplate that is being opened ("Faceplate_2"). No additional
configuration steps are necessary.
5.5.4 Closing a faceplate
This chapter will show you how you can close a faceplate by pressing a button in
the faceplate.
Add HMI tag
In the first step, add an HMI tag "CloseTag" of data type "Bool".
Note
If you have multiple faceplates that you wish to close in this way, you can also
create an "Array of Bool" with the number of faceplates that you want to close.
Modify faceplate
1. Open the faceplate that you wish to close with a configured button, in this
example, "fpSpeed".
Page 54

5 Tips and tricks for scripting
(WinCC Unified specific)
Tips and Tricks JavaScript
Article ID: 109758536, V3.0, 09/2020
54
© Siemens AG
2020 All rights reserved
2. In the tag interface, add the tag "Close" of data type "Bool".
3. Then switch to the visualization of the faceplate.
4. Configure a button.
5. Use the following code at the "Press" event.
Tags("Close").Write(1);
Page 55

5 Tips and tricks for scripting
(WinCC Unified specific)
Tips and Tricks JavaScript
Article ID: 109758536, V3.0, 09/2020
55
© Siemens AG
2020 All rights reserved
Modify faceplate call at the button
1. Select the button which will be used to open the faceplate "fpSpeed", and add
a script at the "Press" event. Then open the global definition area.
2. Add the following code to the definition area and then switch back to the script
function.
let faceplateSpeed;
3. Add the snippet "Open faceplate in popup" and link the two interfaces (see also
chapter 5.5.1), as follows:
– "ProcessValue" with "Motor1.Speed"
– "Close" with "CloseTag"
Page 56

5 Tips and tricks for scripting
(WinCC Unified specific)
Tips and Tricks JavaScript
Article ID: 109758536, V3.0, 09/2020
56
© Siemens AG
2020 All rights reserved
4. Then replace "po" with "faceplateSpeed" (from the global definition area) and
remove the "let" in line 4.
5. Finally, add the following code in order to reset the "CloseTag".
Tags("CloseTag").Write(0);
Close faceplate when tag value "CloseTag" is set
1. query "CloseTag"
– Switch to the "Properties" of the button (1).
– As dynamization, select "Script" for the property "Alternative background
color" (2).
– Enter the following code (3).
return Tags("CloseTag").Read();
– For the trigger for the script, select "Tags" and select the tag "CloseTags"
(4).
Page 57

5 Tips and tricks for scripting
(WinCC Unified specific)
Tips and Tricks JavaScript
Article ID: 109758536, V3.0, 09/2020
57
© Siemens AG
2020 All rights reserved
Note
In the place of the property "Alternative background color" you can also
dynamize a different unused property.
2. Close faceplate
– In the next step, for the property "Alternative background color", add
"Script" as dynamization for "Change" (1).
– Paste in the following code.
if (value==1) {
faceplateSpeed.Visible = false;
}
3. Save the changes and start the runtime.
Page 58

5 Tips and tricks for scripting
(WinCC Unified specific)
Tips and Tricks JavaScript
Article ID: 109758536, V3.0, 09/2020
58
© Siemens AG
2020 All rights reserved
5.6 Tags and UDTs
5.6.1 Access to HMI UDT elements
SIMATIC WinCC Unified lets you use HMI UDTs in tag tables. You can also access
the individual elements of the UDT via JavaScript with the keyword "Tags".
Figure 5-15
To be able to access the individual elements of the HMI_UDTs, the indication in
JavaScript is made with a prefix (name of the UDT and separation point, e.g.
"Let_1.") and suffix (name of the element, e.g. "Element_1").
Example:
// read value of "Element_1" in UDT "Let_1"
let tag1 = Tags('Let_1.Element_1').Read()
Note
This applies to the instances of the library type HMI-UDT that were created in the
project. The library type cannot be accessed directly.
5.6.2 Loop breakers
You can add scripts to internal tags which will be executed when a value changes.
Infinite loops can easily occur in the process, as shown by the example in the
following table.
Example:
Table 5-6
Tag
Data type
Goal of the exercise Script function
after value changes
"Tag_1"
Internal tag
Increment tag "Tag_2" by 2
"Tag_2"
Internal tag
Increment tag "Tag_1" by 2
If there are loops, SIMATIC WinCC Unified will detect and interrupt them.
Page 59

5 Tips and tricks for scripting
(WinCC Unified specific)
Tips and Tricks JavaScript
Article ID: 109758536, V3.0, 09/2020
59
© Siemens AG
2020 All rights reserved
5.6.3 Using client-internal tags via data set
In WinCC Unified V16, you are not yet able to declare tags as "Client internal tags".
This means that if you modify the tag value at a client, it will also be modified on
the server.
As an alternative solution, you can use the "DataSet" object (for more on this, see
the description of the DataSet snippet in chapter 5.2). There are two different types
here:
• "DataSet" local to the session (browser tab)
• "DataSet" local to the screen
You can find the complete code for both variants at the end of this chapter.
Restriction
The following constraints apply when using DataSets:
• Only simple types (Numbers, Strings, Bools) can be saved. JavaScript objects
or classes cannot be saved.
• Triggers on changes are not possible.
Code for session-local "DataSet"
/* Use the session local Dataset to store any kind of data (numbers,
strings, Booleans, structs …) within a session of a browsertab
(dataset is kept after changing basescreen, but deleted after
logout/login).*/
const ui = HMIRuntime.UI;
ui.DataSet.Add('UI_Tag_1',123);
ui.DataSet.Add('UI_Tag_2',1234);
for(let Index in ui.DataSet)
{
HMIRuntime.Trace("Key = " + ui.DataSet[Index].Name + " Value =" +
ui.DataSet[Index].Value);
}
for(let Data of ui.DataSet)
{
HMIRuntime.Trace("Key = " +Data.Name + " Value =" + Data.Value);
}
if(ui.DataSet.Exists('UI_Tag_2'))
{
ui.DataSet.Remove('UI_Tag_2');
HMIRuntime.Trace('UI_Tag_2 Removed');
}
ui.DataSet.Clear();
Page 60

5 Tips and tricks for scripting
(WinCC Unified specific)
Tips and Tricks JavaScript
Article ID: 109758536, V3.0, 09/2020
60
© Siemens AG
2020 All rights reserved
Code for screen-local "DataSet"
/*Use the screen local Dataset to store any kind of data (numbers,
strings, booleans, structs …) within a screen session (dataset is
deleted after changing basescreen).*/
const screen = Screen;
screen.DataSet.Add('Screen_Tag_1',123);
screen.DataSet.Add('Screen_Tag_2',1234);
for(let Index in screen.DataSet)
{
HMIRuntime.Trace("Key = " + screen.DataSet[Index].Name + " Value
=" + screen.DataSet[Index].Value);
}
for(let Data of screen.DataSet)
{
HMIRuntime.Trace("Key = " + Data.Name + " Value =" + Data.Value);
}
if(screen.DataSet.Exists('Screen_Tag_2'))
{
screen.DataSet.Remove('Screen_Tag_2');
HMIRuntime.Trace('Screen_Tag_2 Removed');
}
screen.DataSet.Clear();
Page 61

5 Tips and tricks for scripting
(WinCC Unified specific)
Tips and Tricks JavaScript
Article ID: 109758536, V3.0, 09/2020
61
© Siemens AG
2020 All rights reserved
5.7 Starting programs from the runtime
You can start programs from the runtime by using the function "StartProgram". You
can employ both of the following methods to do this:
• "StartProgram" via the system function
• "StartProgram" via script
Note
General information on the "StartProgram" function can be found in the system
manual "SIMATIC WinCC Engineering V16 - Runtime Unified" in the chapter
entitled "StartProgram".
https://support.industry.siemens.com/cs/ww/en/view/109773780/123798098187
The functional scope of "StartProgram" differs, however, between the PC runtime
and the runtime on the Unified Comfort Panel.
5.7.1 StartProgram in the Unified PC runtime
If you execute the "StartProgram" function in the WinCC Unified PC Runtime, then
the system function itself can only be used to start programs that have no user
interface.
If you want to start programs with user interfaces, you can only do so with the
runtime Open Development Kit (ODK) or Open Pipe.
Note
Additional information about the runtime ODK can be found in the
"Documentation" folder in the WinCC Unified installation folder:
C:\Program Files\Siemens\Automation\WinCCUnified\Documentation
Page 62

5 Tips and tricks for scripting
(WinCC Unified specific)
Tips and Tricks JavaScript
Article ID: 109758536, V3.0, 09/2020
62
© Siemens AG
2020 All rights reserved
5.7.2 StartProgram in the Unified Comfort Panel
You can start programs that have user interfaces on the Unified Comfort Panel
using the "StartProgram" function. In this manner, you can typically launch the preinstalled programs (such as Doc Viewer, PDF Viewer).
Program name
The following table shows you what you have to enter at the "Program name"
parameter for which program.
Table 5-7
Program to be launched
Input string for the parameter "Program name"
Doc Viewer
/opt/siemens/App_Restriction/runLibreoffice.sh
Email client
/opt/siemens/App_Restriction/runEvolution.sh
File Browser
/opt/siemens/App_Restriction/runThunar.sh
Media Player
/opt/siemens/App_Restriction/runVLC.sh
PDF Viewer
/opt/siemens/App_Restriction/runOkular.sh
Web Browser
/opt/siemens/App_Restriction/runChromium.sh
Page 63

5 Tips and tricks for scripting
(WinCC Unified specific)
Tips and Tricks JavaScript
Article ID: 109758536, V3.0, 09/2020
63
© Siemens AG
2020 All rights reserved
5.8 File handling
You can also access your computer's file system with WinCC Unified. There are
snippets in "HMI Runtime > File system" which can help you do this.
Figure 5-16
Note
All scripts are executed on the server in SIMATIC WinCC Unified.
When working with the file system (Snippet "File System"), you can only access
files on the server and not on the file system of the client on which the script was
triggered.
5.8.1 Create folder
Using the snippet "HMIRuntime > File System > Create Directory", you can create
a folder including subfolder in an already existing folder.
Creating folders on Unified PC
Based on the example of the snippet, the folder "mydatadir" is created in the folder
"C:\Users\Public" along with the subfolder "mysubdir". Once the folder has been
created, a trace message will be output.
HMIRuntime.FileSystem.CreateDirectory("C:\\Users\\Public\\mydatadir\
\mysubdir").then(
function() {
HMIRuntime.Trace("Directory successfully created");
});
Note
When specifying the directory, pay attention to the double backslash ("\\")
between the individual folders.
If you want to create a folder under "C:\\...", this may be rejected due to missing
access permissions.
Creating folder on Unified Comfort Panel
If you want to create a folder on your Unified Comfort Panel, you must change the
specified path to suit the Linux operating system.
HMIRuntime.FileSystem.CreateDirectory("/home/industrial/mydatadir/
mysubdir").then(
function() {
Page 64

5 Tips and tricks for scripting
(WinCC Unified specific)
Tips and Tricks JavaScript
Article ID: 109758536, V3.0, 09/2020
64
© Siemens AG
2020 All rights reserved
HMIRuntime.Trace("Directory successfully created");
});
Note
In your Unified Comfort Panel, you only have permission to create folders and
files in the directory "/home/industrial/".
However, you can also directly access external storage devices (USB drive or SD
card) and create a folder there.
To do so, you must specify the path as follows:
SD card: "media/simatic/X51/…"
USB: "media/simatic/X61/…"
Note
The specified path for USB drives depends on which USB port the USB drive is
connected to. The overview below explains the difference between the ports.
X61
X63
X62 X64
5.8.2 Write values to a file and create file
Using the method "WriteFile", you can create a file, "textfile.txt", in the specified
path (here, "C:\Users\Public\"). "Process value" is then written to this location.
Finally, one more message is output in TraceViewer as to whether the write job
was successful or if an error occurred.
HMIRuntime.FileSystem.WriteFile("C:\\Users\\Public\\textfile.txt",
"Process value: ", "utf8").then(
function() {
HMIRuntime.Trace("Write file finished successfully");
}).catch(function(errorCode) {
HMIRuntime.Trace("Write failed errorcode=" + errorCode);
});
Note
You can find further information in the system manual "SIMATIC WinCC WinCC
Engineering V16 - Runtime Unified" in the chapter entitled '"WriteFile" method
(FileSystem.WriteFile)':
https://support.industry.siemens.com/cs/ww/en/view/109773780/127923054859
Page 65

5 Tips and tricks for scripting
(WinCC Unified specific)
Tips and Tricks JavaScript
Article ID: 109758536, V3.0, 09/2020
65
© Siemens AG
2020 All rights reserved
Adding values to an existing file
If a file has already been created, you can add values to the end of the file with the
method "AppendFile".
Example
HMIRuntime.FileSystem.AppendFile("C:\\Users\\Public\\textfile.txt",
"Added Process value: ", "utf8").then(
function() {
HMIRuntime.Trace("Write file finished successfully");
});
If you previously read the tag value, you can then add it to the text file in a similar
manner.
Example
//Read process value
let tag1 = Tags("MyTag1").Read();
//Append process value to text file
HMIRuntime.FileSystem.AppendFile("C:\\Users\\Public\\textfile.txt",
"Added Process value: " + tag1 + "\n", "utf8").then(
function() {
HMIRuntime.Trace("Write file finished successfully");
});
Note
Start a new line with the command "\n". More commands can be found at the
following link:
https://developer.mozilla.org/enUS/docs/Web/JavaScript/Reference/Global_Objects/String
5.8.3 Read values from a file
You can also read values from a text file with the "ReadFile" method.
In this example, the content of the file "textfile.txt" in the directory "C:\Users\Puplic"
is read and then output in TraceViewer and in the text field "Textbox".
Example
HMIRuntime.FileSystem.ReadFile("C:\\Users\\Public\\textfile.txt",
"utf8").then(
function(text) {
HMIRuntime.Trace("Text=" + text);
Screen.Items('Textbox').Text = text;
});
Note
For security reasons, reading the contents of an entire folder is not supported.
Page 66

5 Tips and tricks for scripting
(WinCC Unified specific)
Tips and Tricks JavaScript
Article ID: 109758536, V3.0, 09/2020
66
© Siemens AG
2020 All rights reserved
Read binary file
You can read a binary file (".bin") in WinCC Unified with the method
"ReadFileBinary". The type of file to be read is divided into the following two
classes:
• Int32Array
More information about "Int32Array" can be found at:
https://developer.mozilla.org/enUS/docs/Web/JavaScript/Reference/Global_Objects/Int32Array
• DataView
You can find additional information on the "DataView" view at:
https://developer.mozilla.org/enUS/docs/Web/JavaScript/Reference/Global_Objects/DataView
Note
General information and a code example of how you can read binary data can be
found in the system manual "SIMATIC WinCC Engineering V16 - Runtime
Unified" in the chapter:
Method "ReadFileBinary"
https://support.industry.siemens.com/cs/ww/en/view/109773780/127923043595
"Reading and writing binary files"
https://support.industry.siemens.com/cs/ww/en/view/109773780/113420906507
Page 67

5 Tips and tricks for scripting
(WinCC Unified specific)
Tips and Tricks JavaScript
Article ID: 109758536, V3.0, 09/2020
67
© Siemens AG
2020 All rights reserved
5.9 Configuring time delays in a script
You can configure time delays in a script by using the "Timer" object.
Note
For further information, refer to the system manual "SIMATIC WinCC
Engineering V16 - Runtime Unified" in the chapter entitled '"Timers" object':
https://support.industry.siemens.com/cs/ww/en/view/109773780/118449156491
An example of the implementation of timers in WinCC Unified is the operation of
setting a signal while a button is pressed.
Example
In the following example, a button called "btnMove" is supposed to be pressed. As
long as the button is held down, a rectangle "Rectangle_1" should move
horizontally.
To do this, proceed as follows:
1. Add the following script to the button at the "Press" event:
timerId = HMIRuntime.Timers.SetInterval(function() {
Screen.Items('Rectangle_1').Left += 5;
}, 100);
2. Then add the following code line to the global definition area:
// Global definition area
let timerId;
Page 68

5 Tips and tricks for scripting
(WinCC Unified specific)
Tips and Tricks JavaScript
Article ID: 109758536, V3.0, 09/2020
68
© Siemens AG
2020 All rights reserved
3. In the last step, add the following script to the same button at the "Release"
event:
HMIRuntime.Timers.ClearInterval(timerId);
Note
Make sure not to configure the scripts at the "Press key" or "Release key"
events, because these triggers are not executed during touch operation
Page 69

5 Tips and tricks for scripting
(WinCC Unified specific)
Tips and Tricks JavaScript
Article ID: 109758536, V3.0, 09/2020
69
© Siemens AG
2020 All rights reserved
5.10 Configuring access to databases
SIMATIC WinCC Unified gives you the ability to connect with databases and
exchange data.
Two snippets will help you do this.
Figure 5-17
For how to access your SQL or SQLite database from WinCC Unified, please refer
to the FAQ "How do you access an SQLite / Microsoft SQL database via the
WinCC Unified PC Runtime?"
https://support.industry.siemens.com/cs/ww/en/view/109782859
CAUTION
Under no circumstances should you make manual changes to the database
from WinCC Unified, otherwise inconsistencies can occur and you will
have to completely reinstall your system.
5.11 Configuring access to internet resources
For security reasons, access to internet resources (e.g. REST API, Json files) via
JavaScript is not supported from the runtime.
If you still want to share data from the WinCC Unified runtime with other
applications, you have access to the runtime ODK functions or OpenPipe.
Note
Further information is available in:
• the chapter "Runtime API" in the system manual - "SIMATIC WinCC Engineering V16
- Runtime Unified":
https://support.industry.siemens.com/cs/ww/en/view/109773780/129370904843
• in the operating manual - "SIMATIC HMI WinCC Unified Open Pipe"
https://support.industry.siemens.com/cs/ww/en/view/109778823
Page 70

5 Tips and tricks for scripting
(WinCC Unified specific)
Tips and Tricks JavaScript
Article ID: 109758536, V3.0, 09/2020
70
© Siemens AG
2020 All rights reserved
5.12 Filtering alarms and messages
In WinCC Unified, you can output a selection of pending messages via the "Alarm
subscription". The snippet of the same name will help you do this.
Figure 5-18
Using the "Filter" property, you can specify filter criteria to filter the active alarms, in
this example the alarm class Warning.
Example
//Snippet "HMI Runtime > Alarming > Alarm subscription"
let subs = HMIRuntime.Alarming.CreateSubscription();
subs.Filter = "AlarmClassName=\"Warning\"";
subs.Language = 1033;
subs.OnAlarm = function(Errorcode, SystemNames, ResultSet) {
for (let index in ResultSet)
{
HMIRuntime.Trace("Alarm Name_" + (index+1) + " = " +
ResultSet[index].Name);
HMIRuntime.Trace(" Alarm State_" + (index+1) + "= " +
ResultSet[index].State);
}
};
subs.Start();
Note
Further information about the object "Alarm subscription" can be found in the
system manual "SIMATIC WinCC WinCC Engineering V16 - Runtime Unified" in
the chapter 'Object "AlarmSubscription"':
https://support.industry.siemens.com/cs/ww/en/view/109773780/117251940875
Note
You can find more options for filtering alarms and messages in the application
example "Filtering messages and alarms in SIMATIC WinCC Unified".
https://support.industry.siemens.com/cs/ww/en/view/109760056
Page 71

5 Tips and tricks for scripting
(WinCC Unified specific)
Tips and Tricks JavaScript
Article ID: 109758536, V3.0, 09/2020
71
© Siemens AG
2020 All rights reserved
5.13 Switching runtime language
You can configure a language change in SIMATIC WinCC Unified in two different
ways as follows:
• with the system function "ToggleLanguage"
• with the snippet "Set Language"
Changing language with the system function
Use the system function "ToggleLanguage" to switch between languages which are
configured in the runtime settings.
Note
The "ToggleLanguage" function is also available as the system function
"UmschalteSprache" in German.
Figure 5-19
Languages will be switched in the order in which they are configured in the runtime
settings in the "Order" column.
Setting the language with the snippet
You can set the runtime language with the snippet "HMIRuntime > Language > Set
Language". In the process you will enter a decimal ID for the respective language
in the script editor.
Note
The snippet is also available as a system function, "SetLanguage"
("SetzeSprache" in German).
The table below contains a selection of languages with the associated language
ID.
Table 5-8
Language
Language/region tag
Decimal language ID
German
de_DE
1031
English
en_US
1033
French
fr_FR
1036
Spanish
es_ES
3082
Italian
it_IT
1040
Chinese
zh-CN
2052
Note
Further language IDs are available at the following link:
https://msdn.microsoft.com/en-US/library/windows/hardware/dn898488(v=vs.85).aspx
Page 72

5 Tips and tricks for scripting
(WinCC Unified specific)
Tips and Tricks JavaScript
Article ID: 109758536, V3.0, 09/2020
72
© Siemens AG
2020 All rights reserved
5.14 "Math" object
By default, JavaScript does not allow editing of 64-bit data types. To operate on
these data types anyway WinCC Unified has the "Math" object.
The "Math" area has the following objects, properties and methods:
• "Int64" (property and object)
• "Int64Base" (property and object)
• "Uint64" (property and object)
• "DatePrecise" (property and object) → see also chapter 5.15.3
• "RGB" (method) → see also chapter 5.4.5
• "RGBWeb" (method)
5.15 Configuring date and time
5.15.1 Working with local date/time
The JavaScript "Date" object allows you to work with date and time in SIMATIC
WinCC Unified.
To crate a new object of the type Date, use "new Date ()".
Example:
let myDate = new Date(); // create a Date object
let localTime, localDate, localDateTime;
//get local date and time to script internal tag
localDateTime = myDate.toLocaleString();
//get local date to script internal tag
localDate = myDate.toLocaleDateString ();
//get local time to script internal tag
localTime = myDate.toLocaleTimeString();
Note
You can also indicate the two arguments "locales" and "options" to the "Date"
object. You can find further information on the toLocaleDateString() method and
arguments at the following link:
https://developer.mozilla.org/de/docs/Web/JavaScript/Reference/Global_Objects/
Date/toLocaleDateString
Note
Further information about the "Math" object and the associated properties and
methods can be found in the system manual "SIMATIC WinCC Engineering V16
- Runtime Unified":
https://support.industry.siemens.com/cs/ww/en/view/109773780/118272981259
Page 73

5 Tips and tricks for scripting
(WinCC Unified specific)
Tips and Tricks JavaScript
Article ID: 109758536, V3.0, 09/2020
73
© Siemens AG
2020 All rights reserved
5.15.2 Editing user-defined date/time
You can also assign an individual date to the "Date" object. For this, enter the time
in brackets when creating the date object.
Your can express the argument for the date and time indication as a string here, in
the following format.
• new Date ("Day month year hour:second:millisecond")
Example:
let myDate = new Date("02 03 2016 1:10"); // create a Date object
let strTime, strDate;
//write date (20.03.2016) to script internal tag
strDate = myDate.toLocaleDateString ();
//write time (1:10:00 AM) to script internal tag
strTime = myDate.toLocaleTimeString();
Alternatively, you can express the arguments for the date and time indication
separately.
• new Date (year, month, day, hour, second, millisecond)
Example:
let myDate = new Date(2016,2,20,1,10);
// create the date object 20.03.2016 1:10:00 GMT
Note
When indicating the month, note that the entry comprises 0 to 11. This results in:
• 0 = January
• 1 = February
…
• 11 = December
Note
If you only indicate year, month and day, the open time indications (hour,
minute…) are completed with 0.
Besides the options described here, there are further options for expressing the
date object argument.
5.15.3 Working with time stamps on a nanosecond basis
If you need a time stamp down to the nanosecond, then you can implement this
with the object "DatePrecise".
This object represents a highly granular time stamp with a resolution of 100 ns as a
64-bit integer value. This is particularly useful when logging data. Furthermore, the
SIMATIC controllers (e.g. S7-1516) also work on a nanosecond time basis,
whereby a consistent time basis can be established.
The object also contains methods for converting between various time stamp
formats.
Page 74

5 Tips and tricks for scripting
(WinCC Unified specific)
Tips and Tricks JavaScript
Article ID: 109758536, V3.0, 09/2020
74
© Siemens AG
2020 All rights reserved
Note
Further information about the "DatePrecise" object and the associated properties
and methods can be found in the system manual "SIMATIC WinCC Engineering
V16 - Runtime Unified":
https://support.industry.siemens.com/cs/ww/en/view/109773780/118277966603
Page 75

5 Tips and tricks for scripting
(WinCC Unified specific)
Tips and Tricks JavaScript
Article ID: 109758536, V3.0, 09/2020
75
© Siemens AG
2020 All rights reserved
5.16 Script diagnostics
5.16.1 "Alert()" notification window
The alert() method is available in JavaScript in order to output message in a
notice window. This is usually used for script diagnostics.
However, this function is not available in SIMATIC WinCC Unified for security
reasons. The following scenarios show by way of example what effects the
alert() method could have:
• The "Alert" notice window appears on top of operating elements and thus
prevents rapid operation of the system.
• The "Alert" notice window blocks the script and thus prevents further execution
of the script.
Alternative RTIL TraceViewer
To nevertheless output messages and check the correct execution of scrips, you
can create entries in the RTIL TraceViewer.
The following chapter shows you how to compose a message by script in the RTIL
TraceViewer.
5.16.2 Diagnostics via RTIL TraceViewer
To quickly rectify errors that have occurred in the configuration and scripts,
effective diagnostics are required. The TraceViewer for SIMATIC WinCC Unified
provides a diagnostic option for this.
The following description shows you how to create an entry in TraceViewer with
corresponding notice text.
Creating a message by script
If you wish to output a message via TraceViewer in the script, you need to enter
the following as syntax:
HMIRuntime.Trace('This is the text for the TraceViewer!');
If you wish to output the process value of a tag in addition to the notice text, this
must first be read.
Example:
let tag1 = Tags('MyTag1');
let tagValue1 = tag1.Read(); //read value of 'MyTag1' e.g. 9.87
// create TraceViewer notification: 'value of MyTag1: 9.87'
HMIRuntime.Trace('value of MyTag1: ' + tagValue1);
Note
If you use the snippet for reading a tag, a TraceViewer notice will be included.
Page 76

5 Tips and tricks for scripting
(WinCC Unified specific)
Tips and Tricks JavaScript
Article ID: 109758536, V3.0, 09/2020
76
© Siemens AG
2020 All rights reserved
Opening TraceViewer
1. Open "Windows-Explorer" ("File Explorer").
2. Open TraceViewer
– Open the path "C:/Program Files/Siemens/Automation/WinCCUnified/bin"
(1).
– Then double-click the application "RTILtraceViewer" to open the
TraceViewer.
TraceViewer is opened.
3. Filter according to messages
– Open the "Filter" menu (1) in the TraceViewer menu bar.
– Then open the category "Subsystem" (2).
– Select the ScriptFW module (3).
Only messages that you have created by script will now be displayed in
TraceViewer.
Note
Trace messages must be present in order to configure a filter.
Page 77

5 Tips and tricks for scripting
(WinCC Unified specific)
Tips and Tricks JavaScript
Article ID: 109758536, V3.0, 09/2020
77
© Siemens AG
2020 All rights reserved
Note
You can also integrate TraceViewer into TIA Portal as an external application
and thus access it more quickly. Consult the chapter entitled "Integrate RTIL
Trace Viewer as an external application" in the manual "SIMATIC WinCC
Engineering V16 – Runtime Unified" for how to integrate TraceViewer.
https://support.industry.siemens.com/cs/ww/en/view/109773780/112955745419
TraceViewer and Unified Comfort Panel
If you have deployed a SIMATIC HMI Unified Comfort Panel, you can similarly use
the RTIL TraceViewer. To do so, activate the "Trace forwarder" function in the
Unified Comfort Panel.
Further information on this topic can be found in the FAQ "How do you use the
Trace Viewer with the Unified Comfort Panel?"
https://support.industry.siemens.com/cs/ww/en/view/109777593
5.16.3 Debugging scripts in Chrome
As an additional diagnostic option (e.g. setting break points), you can use the
WinCC Unified script debugger together with the "Chrome" browser.
Additional information is available in the FAQ "How do you use the Script
Debugger with WinCC Unified and the Chrome browser?"
https://support.industry.siemens.com/cs/ww/en/view/109779192
Script debugger for Unified Comfort Panel
The script debugger function is available to you only for the WinCC Unified runtime
on a PC station.
In order to also use the script debugger function for the Unified Comfort Panel, you
must simulate your Unified Comfort Panel project on a PC station.
5.16.4 Plan for responses in case of error
Using the "try...catch" instruction, you can program an instruction (try) and the
associated response (catch) to be executed in case of an error.
Snippet
In WinCC Unified, you can insert the "try...catch" and the "try...catch...finally"
instruction into your code with the respective snippets. You can find them under
"Snippets > Logic > try…catch" or "Snippets > Logic > try…catch…finally".
Note
You can find further information on the "try...catch" instruction at the following
link:
https://developer.mozilla.org/en/docs/Web/JavaScript/Reference/Statements/try..
.catch
Page 78

6 Useful information
Tips and Tricks JavaScript
Article ID: 109758536, V3.0, 09/2020
78
© Siemens AG
2020 All rights reserved
6 Useful information
You can find further general information on JavaScript on the following websites,
among others:
• Mozilla Developer Network
https://developer.mozilla.org/en/docs/Web/JavaScript
• Introduction to JavaScript (SelfHTML)
https://wiki.selfhtml.org/wiki/JavaScript
• JavaScript collection (German resource)
http://www.jswelt.de/index.php
• JavaScript Tutorial
https://javascript.info/
Page 79

7 Appendix
Tips and Tricks JavaScript
Article ID: 109758536, V3.0, 09/2020
79
© Siemens AG
2020 All rights reserved
7 Appendix
7.1 Service and support
Industry Online Support
Do you have any questions or need assistance?
Siemens Industry Online Support offers round the clock access to our entire
service and support know-how and portfolio.
The Industry Online Support is the central address for information about our
products, solutions and services.
Product information, manuals, downloads, FAQs, application examples and videos
– all information is accessible with just a few mouse clicks: Error! Hyperlink
reference not valid.
Technical Support
The Technical Support of Siemens Industry provides you fast and competent
support regarding all technical queries with numerous tailor-made offers
– ranging from basic support to individual support contracts. Please send queries
to Technical Support via Web form:
www.siemens.com/industry/supportrequest
SITRAIN – Training for Industry
We support you with our globally available training courses for industry with
practical experience, innovative learning methods and a concept that’s tailored to
the customer’s specific needs.
For more information on our offered trainings and courses, as well as their
locations and dates, refer to our web page:
www.siemens.com/sitrain
Service offer
Our range of services includes the following:
• Plant data services
• Spare parts services
• Repair services
• On-site and maintenance services
• Retrofitting and modernization services
• Service programs and contracts
You can find detailed information on our range of services in the service catalog
web page:
Error! Hyperlink reference not valid.
Industry Online Support app
You will receive optimum support wherever you are with the "Siemens Industry
Online Support" app. The app is available for Apple iOS, Android and Windows
Phone:
Error! Hyperlink reference not valid.
Page 80

7 Appendix
Tips and Tricks JavaScript
Article ID: 109758536, V3.0, 09/2020
80
© Siemens AG
2020 All rights reserved
7.2 Links and literature
Table 7-1
No.
Subject
\1\
Siemens Industry Online Support
https://support.industry.siemens.com
\2\
Link to the article page of the application example
https://support.industry.siemens.com/cs/ww/en/view/109758536
\3\
System manual "SIMATIC WinCC Engineering V16 - Runtime Unified"
https://support.industry.siemens.com/cs/ww/en/view/109773780/117557346059
\4\
Working with strings in JavaScript
https://developer.mozilla.org/enUS/docs/Web/JavaScript/Reference/Global_Objects/Object/toString
\5\
Operating manual "SIMATIC HMI WinCC Unified Open Pipe"
https://support.industry.siemens.com/cs/ww/en/view/109778823
\6\
Configuring Logging for SIMATIC WinCC Unified Systems
https://support.industry.siemens.com/cs/ww/en/view/109782859
7.3 Change documentation
Table 7-2
Version
Date
Change
V1.0
09/2018
First version
V2.0
05/2019
• Description added to global modules
• Update to WinCC Unified V15.1
• Small spelling corrections
V3.0
09/2020
• Update to WinCC Unified V16
• Expanded use cases
 Loading...