

Page 1
Page 2

2
Page 3

Contents
Contents
Safety precautions . . . . . . . . . . . . . . . . . . . . . . . . . . . 6
Your contribution to the environment (ECO) . . . . . 6
The Gigaset SE551 WLAN dsl/cable . . . . . . . . . . . . . 7
Local networks with Gigaset products . . . . . . . . . . . . . . . . . . . . . . . . . . . . . . . . . . . . . . 8
Wired local network (Ethernet) . . . . . . . . . . . . . . . . . . . . . . . . . . . . . . . . . . . . . . . . 9
Wireless local network (WLAN) . . . . . . . . . . . . . . . . . . . . . . . . . . . . . . . . . . . . . . . 10
Linking a wireless network (WLAN) to an Ethernet (LAN) . . . . . . . . . . . . . . . . . . 12
Features and applications . . . . . . . . . . . . . . . . . . . . . . . . . . . . . . . . . . . . . . . . . . . . . . 13
Procedure for installation and configuration . . . . . . . . . . . . . . . . . . . . . . . . . . . . . . . 15
First Steps . . . . . . . . . . . . . . . . . . . . . . . . . . . . . . . . . 16
Contents . . . . . . . . . . . . . . . . . . . . . . . . . . . . . . . . . . . . . . . . . . . . . . . . . . . . . . . . . . . . 16
System requirements . . . . . . . . . . . . . . . . . . . . . . . . . . . . . . . . . . . . . . . . . . . . . . . . . . 16
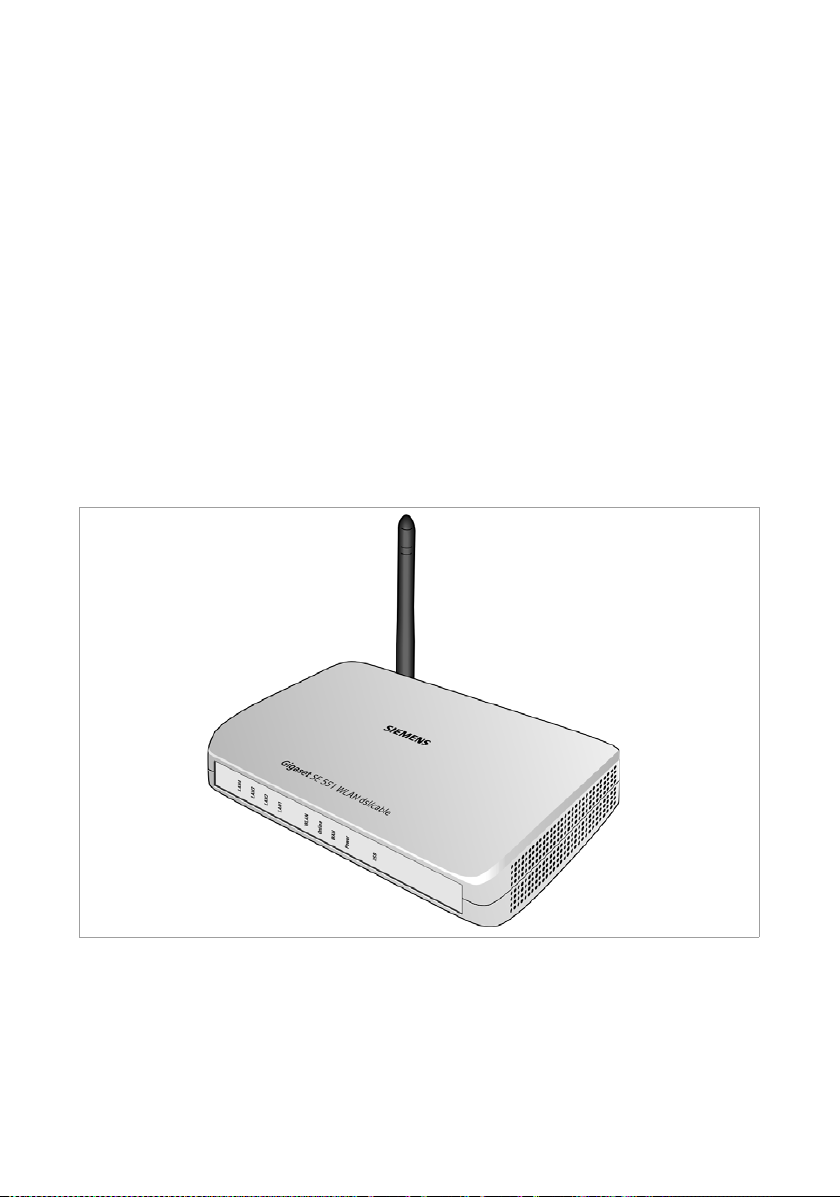
Operating displays and connections . . . . . . . . . . . . . . . . . . . . . . . . . . . . . . . . . . . . . . 17
Front panel . . . . . . . . . . . . . . . . . . . . . . . . . . . . . . . . . . . . . . . . . . . . . . . . . . . . . . . 17
Back panel . . . . . . . . . . . . . . . . . . . . . . . . . . . . . . . . . . . . . . . . . . . . . . . . . . . . . . . 18
Setting up the Gigaset SE551 WLAN dsl/cable . . . . . . . . . . . . . . . . . . . . . . . . . . . . . . 19
Connecting the Gigaset SE551 WLAN dsl/cable . . . . . . . . . . . . . . . . . . . . . . . . . . . . . 20
To the DSL or cable modem . . . . . . . . . . . . . . . . . . . . . . . . . . . . . . . . . . . . . . . . . . 20
To the PC . . . . . . . . . . . . . . . . . . . . . . . . . . . . . . . . . . . . . . . . . . . . . . . . . . . . . . . . 21
To the mains power supply . . . . . . . . . . . . . . . . . . . . . . . . . . . . . . . . . . . . . . . . . . 23
The user interface . . . . . . . . . . . . . . . . . . . . . . . . . . 24
Launching the user interface . . . . . . . . . . . . . . . . . . . . . . . . . . . . . . . . . . . . . . . . . . . . 24
The start screen . . . . . . . . . . . . . . . . . . . . . . . . . . . . . . . . . . . . . . . . . . . . . . . . . . . . . . 25
Selecting a language . . . . . . . . . . . . . . . . . . . . . . . . . . . . . . . . . . . . . . . . . . . . . . . . . . 27
Elements on the user interface . . . . . . . . . . . . . . . . . . . . . . . . . . . . . . . . . . . . . . . . . . 28
Basic Setup Wizard . . . . . . . . . . . . . . . . . . . . . . . . . . 29
Regional Options . . . . . . . . . . . . . . . . . . . . . . . . . . . . . . . . . . . . . . . . . . . . . . . . . . . . . 30
Configuring Internet connection . . . . . . . . . . . . . . . . . . . . . . . . . . . . . . . . . . . . . . . . . 31
Summary . . . . . . . . . . . . . . . . . . . . . . . . . . . . . . . . . . . . . . . . . . . . . . . . . . . . . . . . . . . 33
Security settings . . . . . . . . . . . . . . . . . . . . . . . . . . . 34
Assigning a Password . . . . . . . . . . . . . . . . . . . . . . . . . . . . . . . . . . . . . . . . . . . . . . . . . . 35
SSID . . . . . . . . . . . . . . . . . . . . . . . . . . . . . . . . . . . . . . . . . . . . . . . . . . . . . . . . . . . . . . . 36
Setting security functions for the wireless network . . . . . . . . . . . . . . . . . . . . . . . . . . 37
WPA2 / WPA with Pre-shared key (PSK) . . . . . . . . . . . . . . . . . . . . . . . . . . . . . . . . . 38
WEP encryption . . . . . . . . . . . . . . . . . . . . . . . . . . . . . . . . . . . . . . . . . . . . . . . . . . . 39
Access control within the wireless network . . . . . . . . . . . . . . . . . . . . . . . . . . . . . . . . 41
Saving settings . . . . . . . . . . . . . . . . . . . . . . . . . . . . . . . . . . . . . . . . . . . . . . . . . . . . . . . 42
3
Page 4

Contents
Configuring the Advanced Settings . . . . . . . . . . . . 43
Internet . . . . . . . . . . . . . . . . . . . . . . . . . . . . . . . . . . . . . . . . . . . . . . . . . . . . . . . . . . . .44
Internet Connection . . . . . . . . . . . . . . . . . . . . . . . . . . . . . . . . . . . . . . . . . . . . . . . . 44
DNS server . . . . . . . . . . . . . . . . . . . . . . . . . . . . . . . . . . . . . . . . . . . . . . . . . . . . . . . 48
MAC address . . . . . . . . . . . . . . . . . . . . . . . . . . . . . . . . . . . . . . . . . . . . . . . . . . . . . . 49
Traffic Control . . . . . . . . . . . . . . . . . . . . . . . . . . . . . . . . . . . . . . . . . . . . . . . . . . . . 50
Firewall . . . . . . . . . . . . . . . . . . . . . . . . . . . . . . . . . . . . . . . . . . . . . . . . . . . . . . . . . . . . .52
Attack detection . . . . . . . . . . . . . . . . . . . . . . . . . . . . . . . . . . . . . . . . . . . . . . . . . . . 53
Setting up access control to the Internet . . . . . . . . . . . . . . . . . . . . . . . . . . . . . . . . 56
Setting up the NAT function . . . . . . . . . . . . . . . . . . . . . . . . . . . . . . . . . . . . . . . . . . . . 61
Port Triggering . . . . . . . . . . . . . . . . . . . . . . . . . . . . . . . . . . . . . . . . . . . . . . . . . . . . 63
Port Forwarding . . . . . . . . . . . . . . . . . . . . . . . . . . . . . . . . . . . . . . . . . . . . . . . . . . . 64
Opening the firewall for selected PCs (Exposed Host) . . . . . . . . . . . . . . . . . . . . . 65
Dynamic DNS . . . . . . . . . . . . . . . . . . . . . . . . . . . . . . . . . . . . . . . . . . . . . . . . . . . . . 66
QoS (Quality of Service) . . . . . . . . . . . . . . . . . . . . . . . . . . . . . . . . . . . . . . . . . . . . 68
LAN configuration . . . . . . . . . . . . . . . . . . . . . . . . . . . . . . . . . . . . . . . . . . . . . . . . . . . . 69
Assigning static IP addresses to individual PCs . . . . . . . . . . . . . . . . . . . . . . . . . . . 70
Configuring wireless connections . . . . . . . . . . . . . . . . . . . . . . . . . . . . . . . . . . . . . . . . 71
Setting wireless security . . . . . . . . . . . . . . . . . . . . . . . . . . . . . . . . . . . . . . . . . . . . 74
WPA2-PSK and WPA2-PSK / WPA-PSK . . . . . . . . . . . . . . . . . . . . . . . . . . . . . . . . . . . 75
WEP encryption . . . . . . . . . . . . . . . . . . . . . . . . . . . . . . . . . . . . . . . . . . . . . . . . . . . 77
Allowed clients . . . . . . . . . . . . . . . . . . . . . . . . . . . . . . . . . . . . . . . . . . . . . . . . . . . . 79
Repeater function (WDS) . . . . . . . . . . . . . . . . . . . . . . . . . . . . . . . . . . . . . . . . . . . . 81
USB . . . . . . . . . . . . . . . . . . . . . . . . . . . . . . . . . . . . . . . . . . . . . . . . . . . . . . . . . . . . . . . . 82
File server . . . . . . . . . . . . . . . . . . . . . . . . . . . . . . . . . . . . . . . . . . . . . . . . . . . . . . . . 83
Web Server . . . . . . . . . . . . . . . . . . . . . . . . . . . . . . . . . . . . . . . . . . . . . . . . . . . . . . . 86
Printer server . . . . . . . . . . . . . . . . . . . . . . . . . . . . . . . . . . . . . . . . . . . . . . . . . . . . . 89
Administration and status information . . . . . . . . . 90
Connecting to the Internet manually . . . . . . . . . . . . . . . . . . . . . . . . . . . . . . . . . . . . . 90
Regional Options . . . . . . . . . . . . . . . . . . . . . . . . . . . . . . . . . . . . . . . . . . . . . . . . . . . . . 91
Internet Time . . . . . . . . . . . . . . . . . . . . . . . . . . . . . . . . . . . . . . . . . . . . . . . . . . . . . 92
System Password . . . . . . . . . . . . . . . . . . . . . . . . . . . . . . . . . . . . . . . . . . . . . . . . . . . . . 92
Setting up Remote Management . . . . . . . . . . . . . . . . . . . . . . . . . . . . . . . . . . . . . . . . . 93
Saving and restoring a configuration . . . . . . . . . . . . . . . . . . . . . . . . . . . . . . . . . . . . . 95
Saving configuration data . . . . . . . . . . . . . . . . . . . . . . . . . . . . . . . . . . . . . . . . . . . 95
Restoring the back-up . . . . . . . . . . . . . . . . . . . . . . . . . . . . . . . . . . . . . . . . . . . . . . 96
Resetting to the factory settings . . . . . . . . . . . . . . . . . . . . . . . . . . . . . . . . . . . . . . 96
Reboot . . . . . . . . . . . . . . . . . . . . . . . . . . . . . . . . . . . . . . . . . . . . . . . . . . . . . . . . . . . . .96
Updating firmware . . . . . . . . . . . . . . . . . . . . . . . . . . . . . . . . . . . . . . . . . . . . . . . . . . . . 97
System Log . . . . . . . . . . . . . . . . . . . . . . . . . . . . . . . . . . . . . . . . . . . . . . . . . . . . . . . . . . 98
Status information . . . . . . . . . . . . . . . . . . . . . . . . . . 99
Overview . . . . . . . . . . . . . . . . . . . . . . . . . . . . . . . . . . . . . . . . . . . . . . . . . . . . . . . . . . . 99
Security . . . . . . . . . . . . . . . . . . . . . . . . . . . . . . . . . . . . . . . . . . . . . . . . . . . . . . . . . . . 101
Internet . . . . . . . . . . . . . . . . . . . . . . . . . . . . . . . . . . . . . . . . . . . . . . . . . . . . . . . . . . . 103
Traffic Control . . . . . . . . . . . . . . . . . . . . . . . . . . . . . . . . . . . . . . . . . . . . . . . . . . . . . . 105
4
Page 5

Contents
Local Network . . . . . . . . . . . . . . . . . . . . . . . . . . . . . . . . . . . . . . . . . . . . . . . . . . . . . . 106
Wireless Network . . . . . . . . . . . . . . . . . . . . . . . . . . . . . . . . . . . . . . . . . . . . . . . . . . . . 107
Device . . . . . . . . . . . . . . . . . . . . . . . . . . . . . . . . . . . . . . . . . . . . . . . . . . . . . . . . . . . . . 108
Installing the printer port for network printers . 110
Introduction . . . . . . . . . . . . . . . . . . . . . . . . . . . . . . . . . . . . . . . . . . . . . . . . . . . . . . . . 110
Installing a standard TCP/IP printer port under Windows XP/2000 . . . . . . . . . . . . . . 111
Installing a printer on the TCP/IP port retrospectively . . . . . . . . . . . . . . . . . . . . . . . . 117
Installing a printer driver under Windows 98 SE or ME . . . . . . . . . . . . . . . . . . . . . . . 118
Instructions for setting up a printer on the PC . . . . . . . . . . . . . . . . . . . . . . . . . . . . . 119
Appendix . . . . . . . . . . . . . . . . . . . . . . . . . . . . . . . . . 120
Deactivating HTTP proxy and configuring pop-up blocker . . . . . . . . . . . . . . . . . . . . 120
Trouble shooting . . . . . . . . . . . . . . . . . . . . . . . . . . . . . . . . . . . . . . . . . . . . . . . . . . . . 122
Specifications . . . . . . . . . . . . . . . . . . . . . . . . . . . . . . . . . . . . . . . . . . . . . . . . . . . . . . . 125
Authorisation . . . . . . . . . . . . . . . . . . . . . . . . . . . . . . . . . . . . . . . . . . . . . . . . . . . . . . . 126
Disposal . . . . . . . . . . . . . . . . . . . . . . . . . . . . . . . . . . . . . . . . . . . . . . . . . . . . . . . . . . . 126
Service (Customer Care) . . . . . . . . . . . . . . . . . . . . . . . . . . . . . . . . . . . . . . . . . . . . . . 127
Guarantee Certificate (United Kingdom) . . . . . . . . . . . . . . . . . . . . . . . . . . . . . . . . . 127
Guarantee Certificate (Ireland) . . . . . . . . . . . . . . . . . . . . . . . . . . . . . . . . . . . . . . . . . 128
Glossary . . . . . . . . . . . . . . . . . . . . . . . . . . . . . . . . . 130
Index . . . . . . . . . . . . . . . . . . . . . . . . . . . . . . . . . . . . 142
5
Page 6

Safety precautions
Safety precautions
u Only use the mains adapter (12V 1A DC) that is supplied with the Gigaset SE551
WLAN dsl/cable. Comply with the connection values and ratings when connecting
the device to the mains power supply.
u Protect the device from damp.
u Never open the device. For reasons of electrical safety it may only be opened by
authorised service technicians.
u The device may affect medical equipment.
Your contribution to the environment (ECO)
We at Gigaset Communications GmbH make our products as environmentally compatible as possible. Our goal is a sustainable process that makes it
easier for us to comply with the strict stipulations of the ISO standard 14001
for international environmental management.
Further advantages for the ecology
u Thanks to a switched-mode power supply, all our routers and repeaters use up to
60% less power and so offer higher energy efficiency.
u You can reduce the WLAN's transmitting power for all routers and repeaters and
some WLAN clients – depending on the device in question and your PC's operating
system.
u You can turn off the WLAN completely.
Trademarks
Gigaset Communications GmbH is a trademark licensee of Siemens AG.
Microsoft, Windows 98 SE, Windows ME, Windows 2000, Windows XP and Internet
Explorer are registered trademarks of the Microsoft Corporation.
Mozilla Firefox is a registered trademark of the Mozilla Organization.
Super G is a registered trademark of Atheros Communications, Inc.
6
Page 7
The Gigaset SE551 WLAN dsl/cable
The Gigaset SE551 WLAN dsl/cable
Your Gigaset SE551 WLAN dsl/cable is a powerful but easily operated device for connecting your PC (WLAN) or your local network (LAN) to the Internet without the need for
wires (via a DSL or cable modem).
You can connect your PC wirelessly to the Gigaset SE551 WLAN dsl/cable and create a
wireless local network (WLAN). Thanks to Super G technology the transfer rate within
the local wireless network achieves up to 108 Mbps. For network security, wireless
transmission can be encrypted using the WPA standard or 64/128-bit WEP.
The Gigaset SE551 WLAN dsl/cable allows several users to access the Internet simultaneously. A single user account can be shared if your Internet Provider permits this.
If you want to surf the Internet at the lowest possible cost, then the Gigaset SE551
WLAN dsl/cable is a convenient and effective solution.
You can connect a DSL or cable modem to the WAN interface of your Gigaset SE551
WLAN dsl/cable.
Despite its extensive range of functions, the Gigaset SE551 WLAN dsl/cable is simple to
handle. It can be configured and operational within a few minutes.
7
Page 8
The Gigaset SE551 WLAN dsl/cable
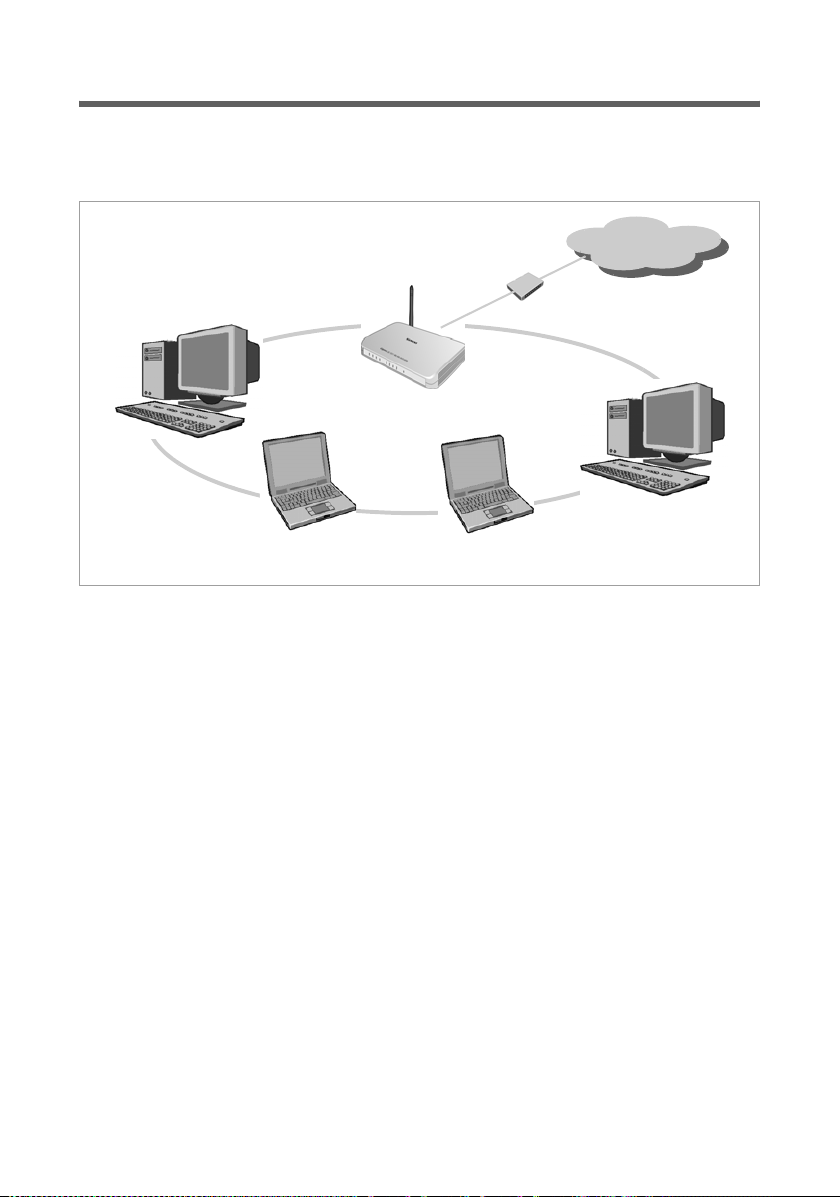
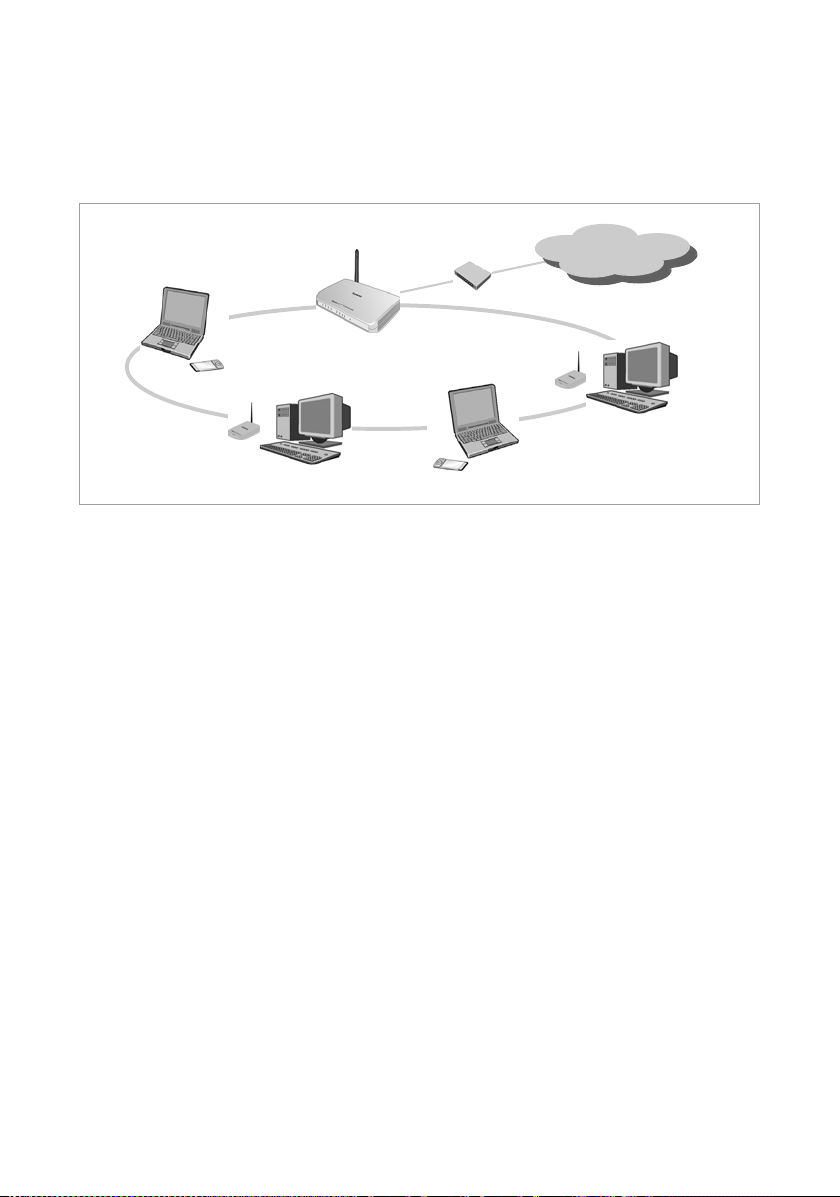
Local networks with Gigaset products
You can use the Gigaset SE551 WLAN dsl/cable to set up a local network, e.g. a home
network. All the PCs in this network can communicate with each other and have access
to the Internet.
Internet
Gigaset SE551 WLAN dsl/cable
Modem
Windows ME
Windows 2000
Local Area Network
Windows XP
Windows 98 SE
There are various ways in which you can set up the network with a Gigaset SE551 WLAN
dsl/cable. You can
u set up a wired local network (Ethernet) and allow the connected PCs access to the
Internet (see page 9).
u set up a wireless local network (WLAN) and allow the connected PCs access to the
Internet (see page 10).
u set up a local network comprising wireless and wired network components (see
page 12).
8
Page 9
The Gigaset SE551 WLAN dsl/cable
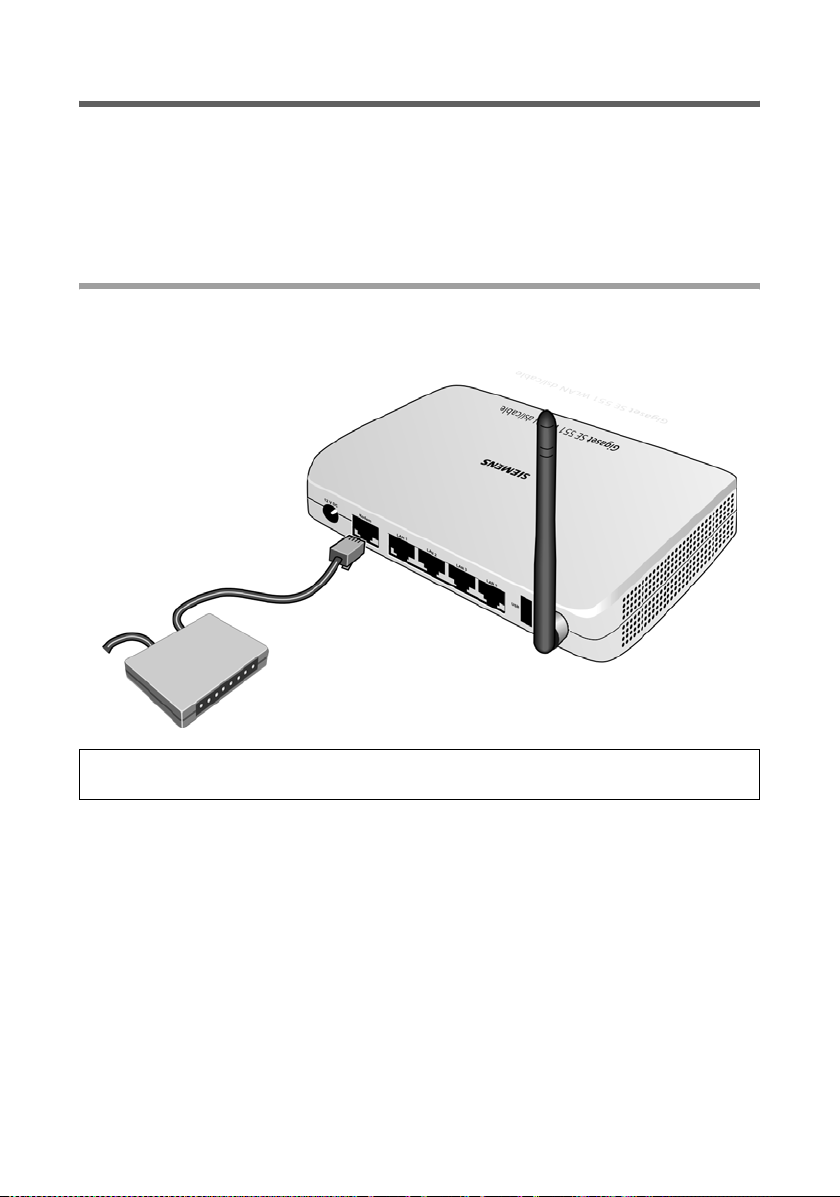
Wired local network (Ethernet)
In a wired local network, PCs communicate with one another via an Ethernet cable.
When the Gigaset SE551 WLAN dsl/cable is used, it establishes the connection between
the PCs. For this it has four Ethernet LAN ports for connecting four PCs. The PCs have to
be equipped with a network socket (Ethernet). New PCs frequently already have this
socket. For older PCs you need to install an Ethernet network card. The PC and the Ethernet LAN socket on the Gigaset SE551 WLAN dsl/cable are connected using an Ethernet
cable (CAT5). There is one supplied. You can obtain additional Ethernet cables from your
retailer.
The Gigaset SE551 WLAN dsl/cable allows all PCs to access the Internet simultaneously.
Gigaset SE551 WLAN dsl/cable
Ethernet
Internet
9
Page 10

The Gigaset SE551 WLAN dsl/cable
Wireless local network (WLAN)
In a wireless local network (WLAN) PCs are linked without wires. For this the PCs
have to be equipped with a wireless network adapter (WLAN adapter) such as a
Gigaset PC Card 108 or a USB Adapter 108.
We generally differentiate between two types of wireless network:
u Infrastructure mode
u Ad-hoc mode
Infrastructure mode
The infrastructure mode connects wireless and wired networks with one another. In
addition to the mobile stations, the infrastructure mode needs an access point such as
the Gigaset SE551 WLAN dsl/cable. In infrastructure mode the stations in the network
always communicate via this access point. Each station that wants to be part of the wireless network must first register with the access point before it can exchange data.
The access point establishes the connection between the mobile stations of a wireless
network and a wired LAN (Ethernet) or the Internet. In this case this is described as the
device's router functionality. The router sends data packets that are not addressed to stations within the network "outside" and forwards data packets originating from "outside"
to the appropriate station within the network.
You can use the Gigaset SE551 WLAN dsl/cable to connect
u wirelessly networked PCs to the Internet and
u wirelessly networked PCs to an Ethernet network.
Infrastructure mode is the default configuration of the Gigaset SE551 WLAN dsl/cable.
This configuration is described in the quick guide enclosed with the router.
Ad-hoc mode
An ad-hoc network is a wireless network set up without an access point or router.
The mobile network components that communicate with each other directly and without wire connections form the network "ad-hoc", i.e. as and when required. All the
stations in the network have the same rights. Ad-hoc networks are used wherever
communications networks have to be set up quickly and without any existing network
infrastructure, and where the participants are on the move.
10
Page 11
The Gigaset SE551 WLAN dsl/cable
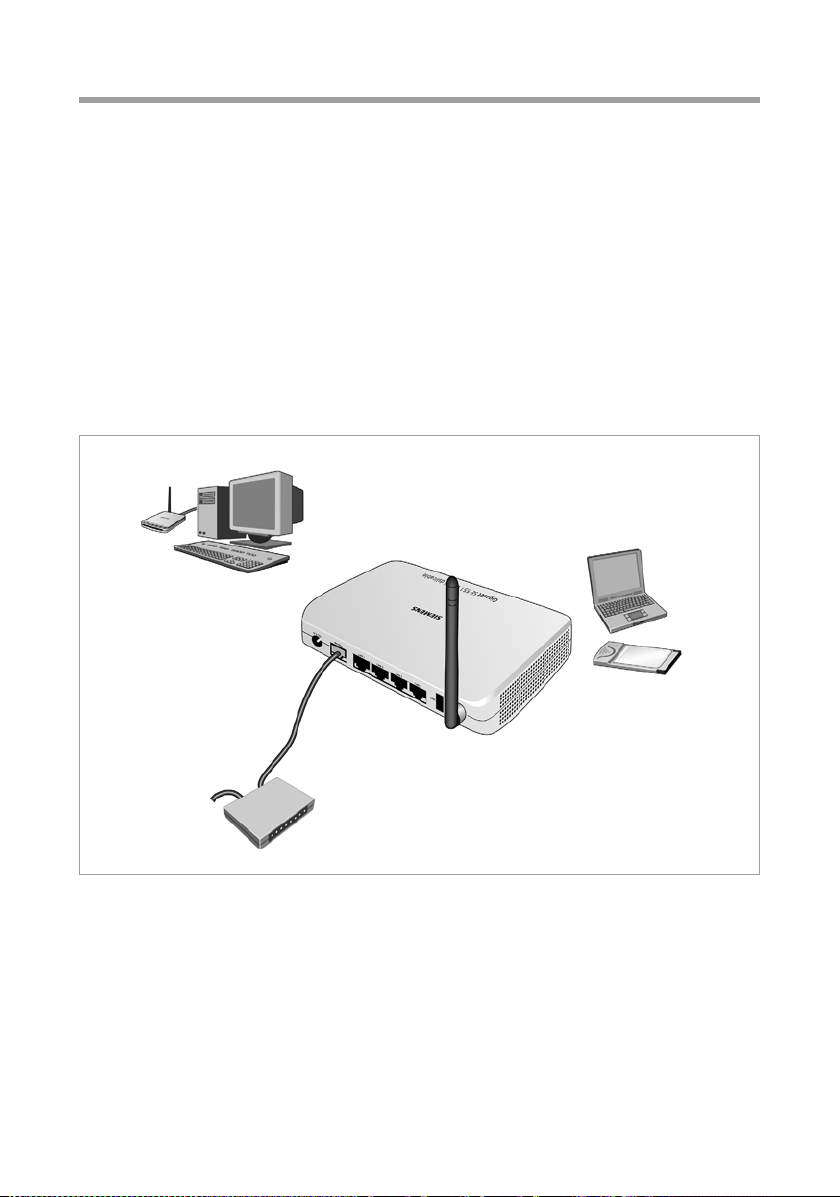
Linking wireless networks with the Internet
The Gigaset SE551 WLAN dsl/cable has an ADSL interface that permits all stations within
its local network to access the Internet simultaneously. To be able to use this functionality you need a DSL or cable connection obtainable from an Internet provider. Find out
whether your Internet Service Provider supports parallel access by several PCs.
Gigaset SE551 WLAN dsl/cable
)))(((
DSL or cable modem
Internet
(((
(((
(((
This illustration shows the commonest method of application. One or more PCs communicate wirelessly with the Gigaset SE551 WLAN dsl/cable in infrastructure mode. The
Gigaset SE551 WLAN dsl/cable forwards the data to the Internet via a DSL or cable
modem. Data from the Internet flows back to the PC along the same route.
(((
11
Page 12
The Gigaset SE551 WLAN dsl/cable
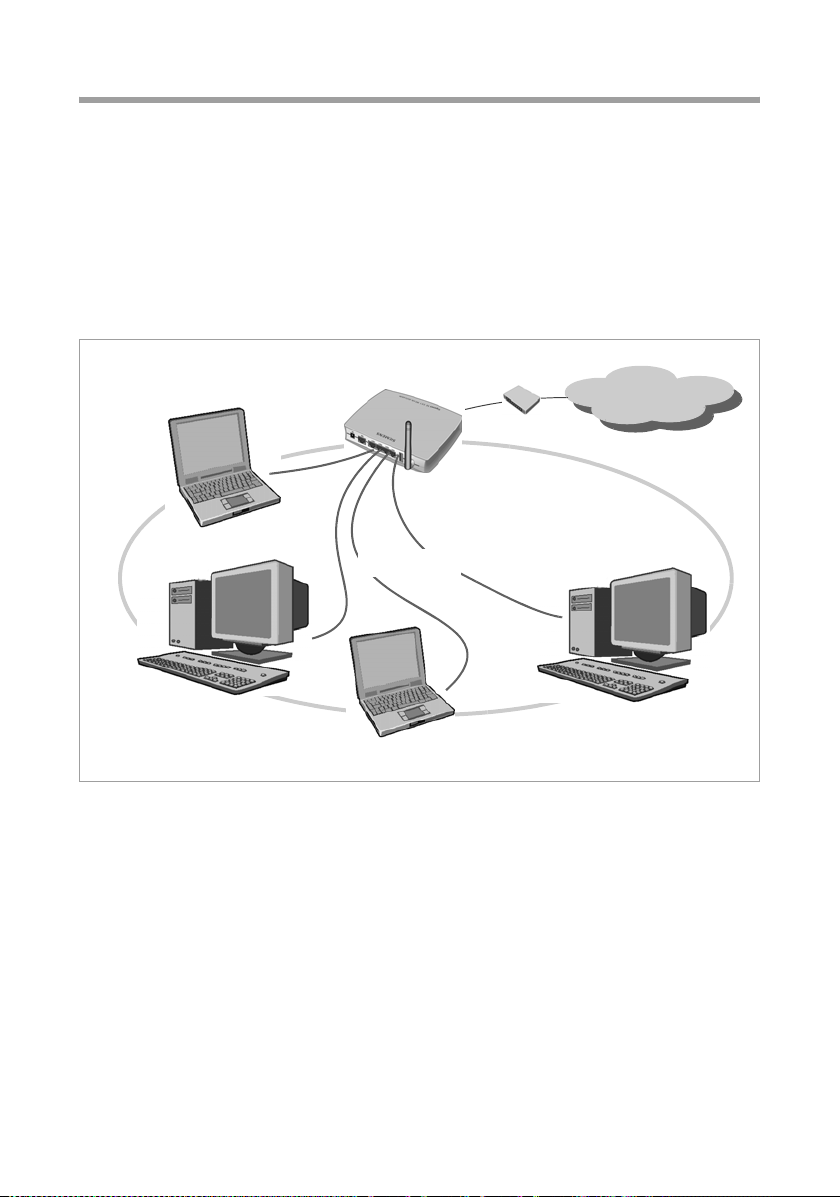
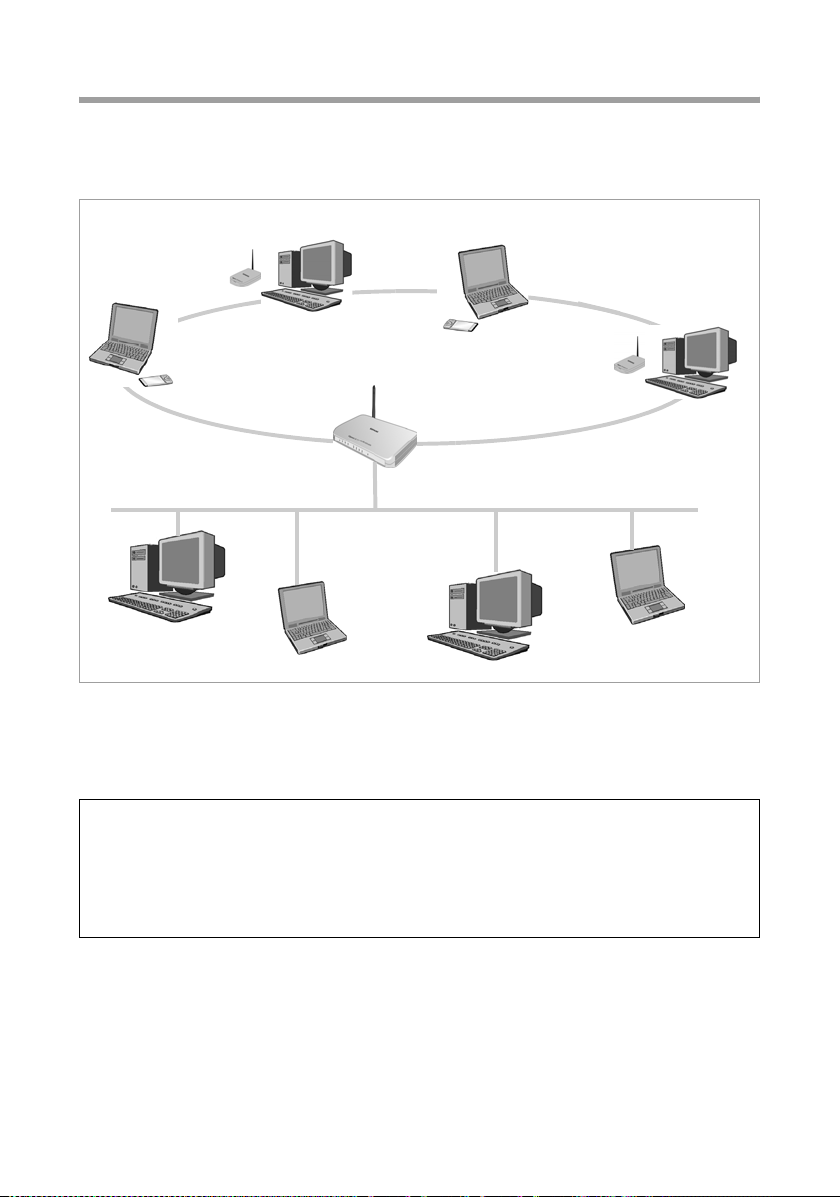
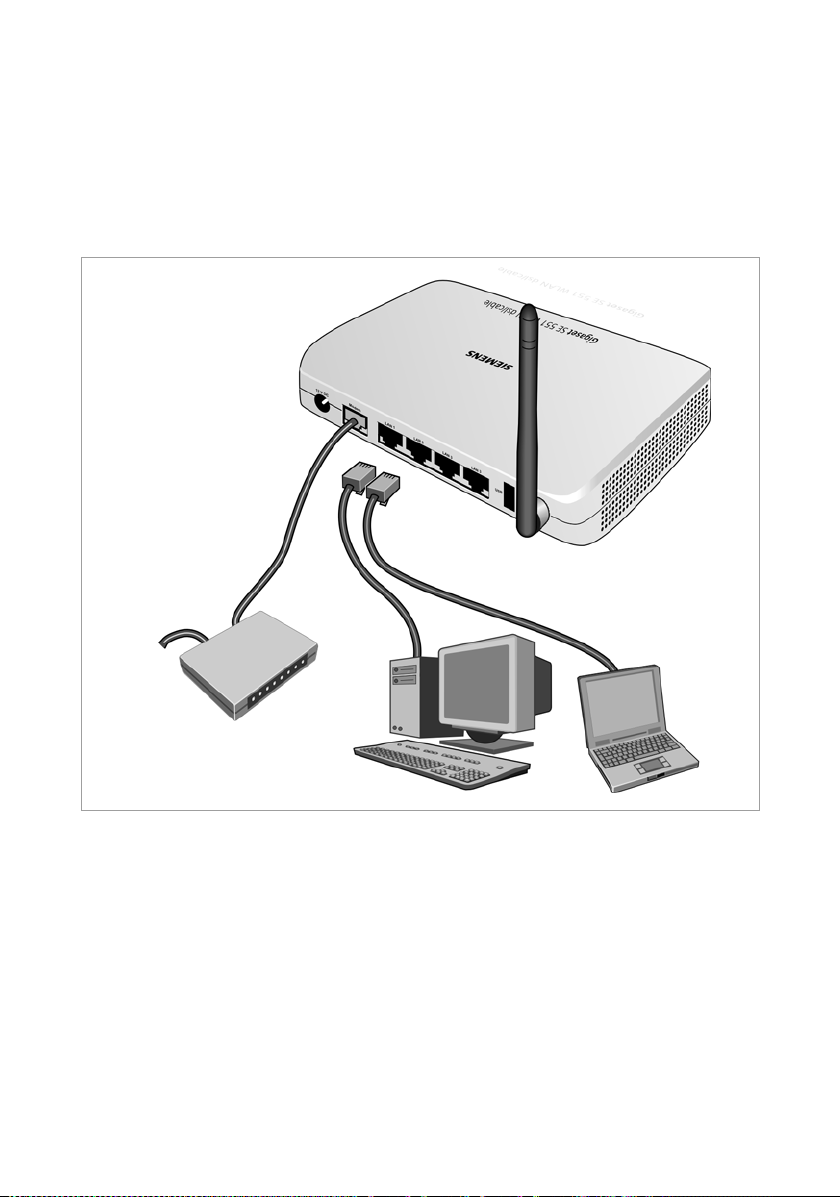
Linking a wireless network (WLAN) to an Ethernet (LAN)
Wireless networks can work easily together with existing Ethernet networks. If you wish
to connect mobile stations to an existing wired network, you must group together all
mobile stations into a wireless network in infrastructure mode.
(((
(((
Wireless local network (WLAN)
(((
)))(((
Access Point
(((
Ethernet
The Gigaset SE551 WLAN dsl/cable has four Ethernet interfaces (LAN ports). Up to four
PCs can be connected directly to these LAN ports.
All PCs can access the Internet via the Gigaset SE551 WLAN dsl/cable.
Please remember:
You can also connect an Ethernet router to a LAN port to access a larger Ethernet.
If you want to link the Gigaset WLAN network to an existing network, a large number
of settings have to be applied. Therefore we cannot provide a general example for this
use; the configuration depends greatly on the networks in question. We advise having
the configuration of such a network carried out by a specialist.
12
Page 13

The Gigaset SE551 WLAN dsl/cable
Features and applications
The Gigaset SE551 WLAN dsl/cable's wide range of features make it ideal for a large
number of applications, such as:
u Internet access
The Gigaset SE551 WLAN dsl/cable gives several users access to the Internet when a
DSL or cable modem is connected.
– As with many DSL providers the Internet is accessed via the PPPoE protocol, the
Gigaset SE551 WLAN dsl/cable contains an integrated PPPoE Client, which means
you no longer need to set up this service on your PC yourself.
– Shared Internet access
If your Internet provider permits this, the Gigaset SE551 WLAN dsl/cable supports
In tern et ac cess f or u p to 2 52 user s. In pr actice, multiple users in your network can
surf the Internet simultaneously using just one Internet account.
u Setting up a local network
The Gigaset SE551 WLAN dsl/cable permits connections
– for four devices via Ethernet ports with a transmission speed of 10 or 100 Mbps
(with automatic recognition).
– for up to 252 mobile terminals via a radio interface with a transmission speed of
up to 108 Mbps. It complies with Standard IEEE 802.11g and can work with all
products that satisfy Standard IEEE 802.11 b or 802.11g. The Super G technology
used enables a high transmission speed.
Using a Gigaset SE551 WLAN dsl/cable makes it easy to set up a network at home or
in small offices. For example, users can exchange data or share resources on the net-
work, such as a file server or printer. You can connect a USB hard disk, a USB stick or
a printer to the USB interface of the Gigaset SE551 WLAN dsl/cable and make them
available to all users in your network.
13
Page 14

The Gigaset SE551 WLAN dsl/cable
u Security functions
The Gigaset SE551 WLAN dsl/cable offers comprehensive security measures:
– Firewall protection against unauthorised access from the Internet
All the PCs in the local network use the Gigaset SE551 WLAN dsl/cable's Public IP
address for their Internet connections, which makes them 'invisible' on the Inter-
net. The Gigaset SE551 WLAN dsl/cable only allows access from the Internet if it
has been requested from the local network.
With the firewall the Gigaset SE551 WLAN dsl/cable also offers comprehensive
protection against hacker attacks.
– Service filtering and URL filtering
The Gigaset SE551 WLAN dsl/cable can filter Internet access. Here you determine
which PCs may access which Internet services.
In addition, you can deactivate access to certain Internet domains and sites
(URL filtering).
– Access control and encryption for the local network
You can use various encryption methods and authentication methods (WEP, WPA/
WPA2-PSK,WPA/WPA2, MAC access control) to prevent unauthorised access to
your wireless LAN or make data illegible to unauthorised parties.
u Offering your own services on the Internet
– If you want to offer your own services on the Internet, you can configure the
Gigaset SE551 WLAN dsl/cable as a virtual server without permitting further
access to the local network.
– Exposed Host
You can set up a PC on your local network to be a virtual server and release it for
unrestricted access from the Internet.
14
Page 15

The Gigaset SE551 WLAN dsl/cable
Procedure for installation and configuration
1. First install an Ethernet network card or a wireless Network adapter such as the
Gigaset PC Card 108 or the Gigaset USB Adapter 108 in the PCs you want to connect
to the Gigaset SE551 WLAN dsl/cable. The installation is described in the products'
user guide.
Please remember:
When installing wireless network adapters, use the default SSID for the Gigaset
SE551 WLAN dsl/cable: ConnectionPoint.
2. Then make the necessary connections (PCs, modem) to the Gigaset SE551 WLAN
dsl/cable and switch the device on (see section "Connecting the Gigaset SE551
WLAN dsl/cable" on page 20).
3. Before the PCs can communicate with the Gigaset SE551 WLAN dsl/cable and with
each other in a local network, you have to change their network settings. Configure
these network settings on one PC first so that it can establish a connection to the
Gigaset SE551 WLAN dsl/cable. You can then use this PC to configure the device.
To find out how to do this, read the document entitled “Network configuration” on
the CD.
4. In a wireless connection you establish the link from the PC's wireless network adapt-
er to the Gigaset SE551 WLAN dsl/cable. This is described in the user guide for the
network adapter.
5. Then configure the Gigaset SE551 WLAN dsl/cable to activate the device's Internet
access (refer to the section "Basic Setup Wizard" on page 29). This will require the
access data from your Internet service provider.
u If you want to connect more PCs to the Gigaset SE551 WLAN dsl/cable, configure
their network settings so as to set up the local network (refer to the document enti-
tled “Network configuration” on the CD).
u If you want to use the Gigaset SE551 WLAN dsl/cable's other functions e.g. the com-
prehensive security features, use the router's Security Setup (see page 34) or the
Advanced Settings menu (see page 43).
15
Page 16

First Steps
First Steps
Contents
The package contains the following items:
u one Gigaset SE551 WLAN dsl/cable,
u one mains adapter (220 V / 12V 1A DC),
u one cable with RJ-45 jacks (CAT5),
u one CD with full user guide and driver software for operating a network printer on
the Gigaset SE551 WLAN dsl/cable via Windows 98 SE / ME, plus the documents enti-
tled "Gigaset WLAN. Practical tips" and "Network configuration“,
u one Quick Start Guide
System requirements
To operate your Gigaset SE551 WLAN dsl/cable you need:
u a PC with
– an 802.11g or 802.11b-compatible wireless Network adapter.
In order to be able to use the superior range and increased data throughput
gained by using Super G technology, we recommend using a Gigaset PC Card 108
or a Gigaset USB Adapter 108.
Note:
The maximum data transfer rate for 802.11b-compatible network adapters is
11 Mbps, for 802.11g-compatible network adapters 54 Mbps, and for network
adapters that support Super G, 108 Mbps.
You can only achieve the transfer rate of 108 Mbps during operation if all network adapters registered in the wireless network support Super G.
or
–an Ethernet connection,
u a Web browser such as Microsoft Internet Explorer 6.0 or Mozilla Firefox 1.0 for
configuring your Gigaset SE551 WLAN dsl/cable
u for Internet access
– a DSL or cable modem and a splitter (for DSL),
– the access data for your Internet Providers.
16
Page 17
Operating displays and connections
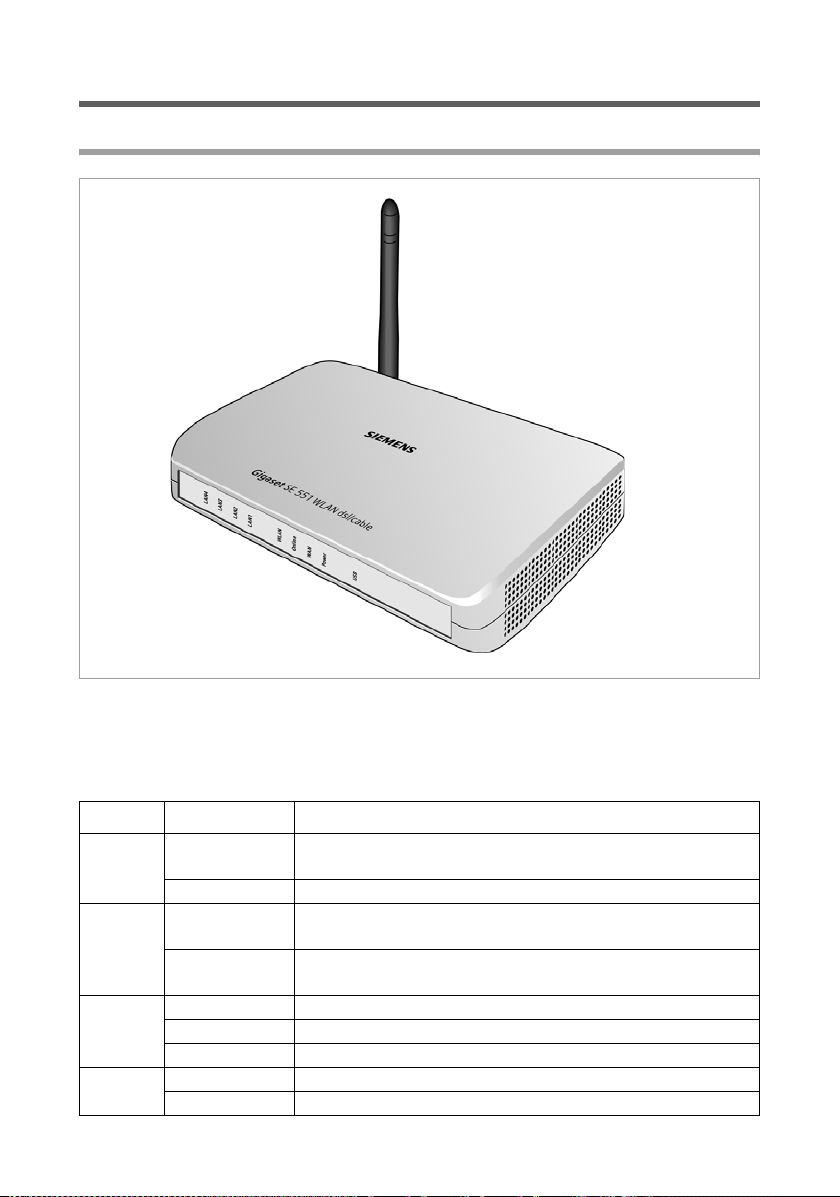
Front panel
First Steps
LED displays
The front panel of the device contains LED displays that show the operating state and
simplify installation and fault finding in the network.
The LEDs show the following (from right to left):
LED State Status
On A device is connected to the Gigaset SE551 WLAN dsl/
USB
Power
WAN
Online
Off There is no device connected.
On The Gigaset SE551 WLAN dsl/cable is connected to the
Off The Gigaset SE551 WLAN dsl/cable is not connected to the
On A DSL or cable modem is connected.
Flashing The WAN port is sending or receiving data (traffic).
Off There is no modem connected.
On Connection to the Internet has been established.
Off There is no Internet connection.
cable via the USB port.
power supply.
power supply.
17
Page 18
First Steps
LED State Status
On The radio interface is active.
Flashing The Gigaset SE551 WLAN dsl/cable is sending or receiving
WLAN
LAN1 –
LAN4
Off The radio interface has been deactivated or no radio sig-
On A device is connected to the relevant LAN port.
Flashing The LAN port is sending or receiving data (traffic).
Off There is no device connected.
data on the radio interface.
nal is being received.
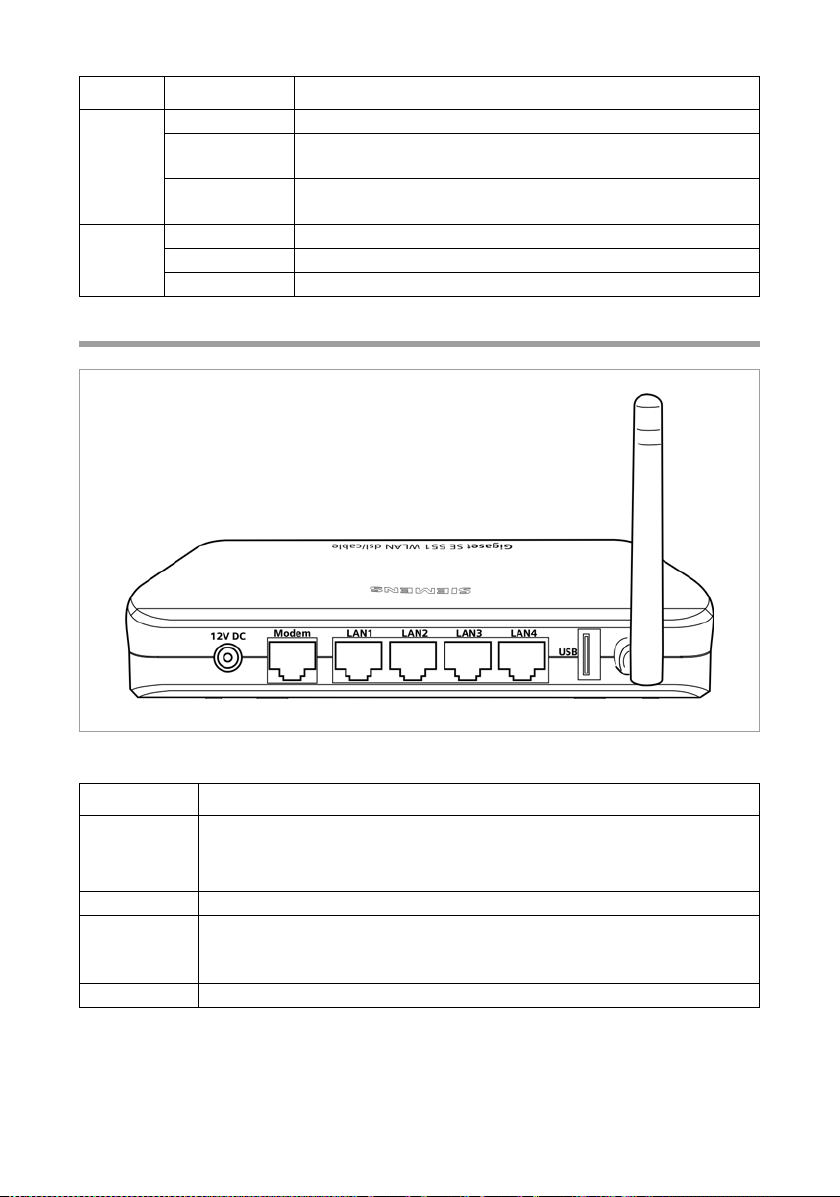
Back panel
The back panel of the Gigaset SE551 WLAN dsl/cable houses the sockets.
Element Description
12 V DC Socket for the mains adapter supplied (12V 1A DC).
Warning: Using the wrong power supply unit may damage the
Gigaset SE551 WLAN dsl/cable.
Modem Socket for connecting to the DSL or cable modem.
LAN1 –
LAN4
USB USB port for printer or USB bulk memory.
Reset
The reset button is located behind the small opening on the bottom of the device.
Four 10/100 Mbps switch sockets with automatic recognition (RJ-45).
You can connect up to four Ethernet devices (such as PCs, a Hub or
Switch).
18
Page 19

First Steps
u Reboot function: Press the button for longer than 1 second but less than 5 seconds
to reboot the device. This does not affect the configuration settings.
u Reset function: Press the button behind the small opening on the bottom of the
device for at least 5 seconds to return all settings to the factory settings.
Warning: This will clear all the configuration settings you have made.
Updated firmware will not be affected.
Setting up the Gigaset SE551 WLAN dsl/cable
The Gigaset SE551 WLAN dsl/cable can be set up in any suitable location in your home
or office. You do not need any special wiring. However you should comply with the following guidelines:
u Operate the Gigaset SE551 WLAN dsl/cable only indoors within a temperature range
of +5 to +40 °C. Do not position the Gigaset SE551 WLAN dsl/cable near sources of
heat. Do not cover the ventilation slots. High temperatures can damage the device.
u A mains socket for 220/240V~ and a connection socket for the modem or LAN must
be available where you set up the Gigaset SE551 WLAN dsl/cable.
u Do not site the device in the immediate vicinity of stereo equipment, TV sets or
microwave ovens. This may cause interference.
u Position the Gigaset SE551 WLAN dsl/cable so that it is as near to the centre of your
wireless network as possible. Make sure that where you position the Gigaset SE551
WLAN dsl/cable has optimum reception throughout the house or office. You can
improve the reception quality by aligning the antenna (turn and/or tilt).
u Position the Gigaset SE551 WLAN dsl/cable on a non-slip surface. The router feet do
not normally leave any traces on the surface they are on. However, some furniture
surfaces may contain substances that attack and soften the router's rubber feet.
Then the feet may well mark the furniture surface.
u Do not place the Gigaset SE551 WLAN dsl/cable on any furniture surface that could
be affected by the heat from the device.
u Position the Gigaset SE551 WLAN dsl/cable so that it cannot fall.
u Lay the cables so that nobody can trip over them.
u If you wish to mount the Gigaset SE551 WLAN dsl/cable on the wall, use flat-headed
or tallow-drop screws with a maximum thread diameter of 3.5mm. The screws are
not included in the scope of delivery.
19
Page 20
First Steps
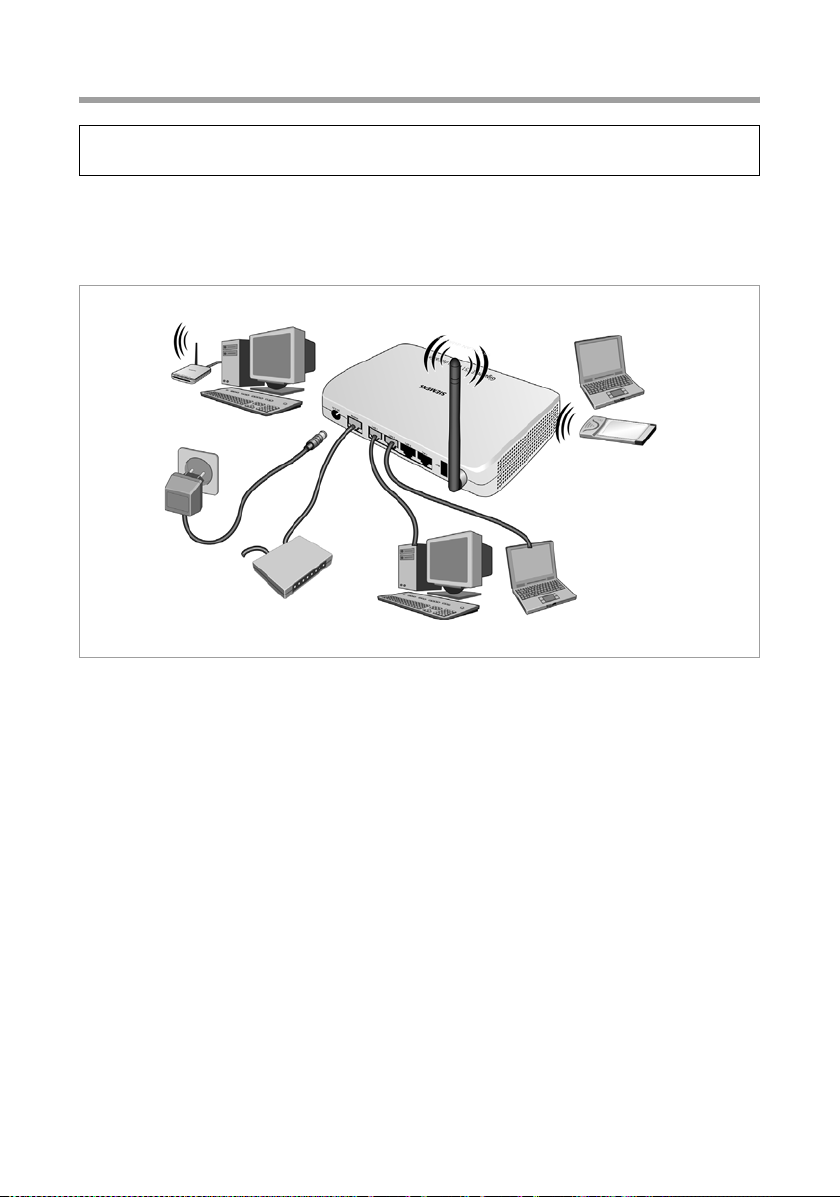
Connecting the Gigaset SE551 WLAN dsl/cable
Before starting to connect PCs to your Gigaset SE551 WLAN dsl/cable make sure that
u a wired or wireless Network adapter is connected to the PC. Please read the operat-
ing instructions that came with the adapter. The latest PCs and Notebooks have
wired adapters built in at the factory.
u ConnectionPoint has been entered as SSID on the network adapter.
To the DSL or cable modem
ì Connect the socket on the back of the router marked DSL and your DSL or cable
modem with an Ethernet cable.
DSL or cable modem
Please remember:
Use a category 5 Ethernet cable with RJ-45 jacks on both ends for all connections.
20
Page 21
First Steps
To t he PC
You can connect wired or wireless PCs to your Gigaset SE551 WLAN dsl/cable to create
a local network (LAN).
Wireless
A wireless connection is made using a wireless network adapter that must be installed
in your PC. This can be, for example, a Gigaset PC Card 108, a Gigaset USB Adapter 108
or another Super G, 802.11g or 802.11b-compatible wireless network adapter.
You def ine a Radio network by assigning all the devices an identical SSID. You should
therefore assign the SSID of the Gigaset SE551 WLAN dsl/cable to the network adapters.
The factory set SSID is ConnectionPoint.
If the correct SSID has been entered in your PC's wireless network adapter, the wireless
link will be established automatically once you connect your Gigaset SE551 WLAN dsl/
cable to the mains power supply (see page 20).
21
Page 22
First Steps
Wired
ì Connect one of the LAN sockets (LAN1 – LAN4) on the back of the Gigaset SE551
WLAN dsl/cable to the Ethernet connection on a PC. To do this, use an Ethernet cable
with RJ-45 jacks (CAT5). This can also be done with the supplied Ethernet cable.
The four LAN sockets can automatically set the transmission speed to 10 Mbps
Ethernet or 100 Mbps Fast Ethernet and the transmissions mode to Half duplex or
Full duplex depending on the performance of the network adapter in your PC.
22
Page 23
First Steps
To the mains power supply
Please remember:
Only use the router with the mains adapter (12V 1A DC) that is supplied.
ì Connect the mains adapter cable to the 12V DC socket on the Gigaset SE551 WLAN
dsl/cable.
ì Plug the mains adapter into a mains socket.
Your Gigaset SE551 WLAN dsl/cable is now ready for use.
u The power LED on the front lights up.
u The WLAN LED lights up to indicate that the Gigaset SE551 WLAN dsl/cable is ready
to open wireless connections.
The radio link to a PC that is connected by means of a wireless network adapter is
opened automatically provided the network adapter has been configured with the
same SSID as the Gigaset SE551 WLAN dsl/cable (see page 21). It can take a few seconds for the wireless connection to be established. The WLAN LED flashes when
data is sent or received via this connection.
u The LAN LEDs light up if a device is connected to the corresponding LAN connection
by means of an Ethernet cable.
In order to communicate via the Gigaset SE551 WLAN dsl/cable, the network must be
configured on the connected PC. This usually takes place automatically.
You will find information on how to operate devices on the USB port of the Gigaset
SE551 WLAN dsl/cable on page 110 for printers, on page 83 for external bulk memories,
and in the document "Gigaset WLAN. Practical tips" on the supplied CD.
23
Page 24
The user interface
The user interface
Once you have configured the network settings on a PC in your local network, you can
then use that PC to configure the Gigaset SE551 WLAN dsl/cable with the Gigaset SE551
WLAN dsl/cable's user interface. You can use any browser for the configuration,
e.g. Microsoft Internet Explorer 6.0 or higher, Mozilla Firefox 1.0 or higher.
Please remember:
To start the configuration environment you might need to deactivate the HTTP proxy
for your browser (see (page 120)).
If you use Mozilla Firefox or if you use Internet Explorer and Windows XP Service
Pack 2, you need to configure the popup blocker (see (page 120)).
Launching the user interface
To access the Gigaset SE551 WLAN dsl/cable's user interface:
ì Launch your Web browser.
ì Enter the IP address of the Gigaset SE551 WLAN dsl/cable in the browser's address
field.
http://se551 or http://192.168.2.1
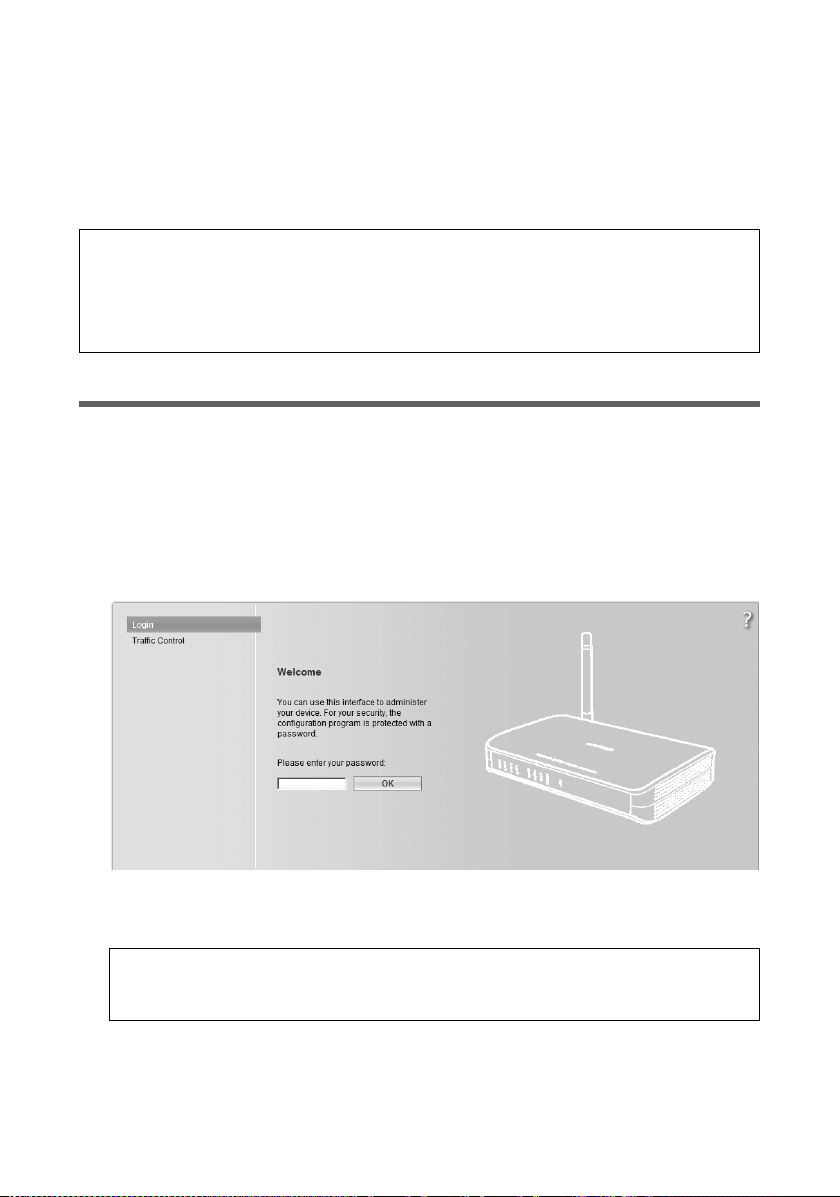
The login screen appears:
As supplied, the default password is admin.
ì Enter the password and click on OK.
Please remember:
For security reasons you should change the password at a later stage
(see page 35).
A screen with security information is displayed.
24
Page 25
The user interface
For the initial configuration you can skip this information. If you carry out all the basic
and security settings using the wizard as described below, then your device and network
are fully protected. If not, the next time you log on you will be informed of security gaps
in the configuration program.
ì Click on OK.
You will now see the start screen.
Note:
You will find information about the currently used and available time and data volume
for your Internet connection by clicking on Traffic Control. There is more detailed
information about this in the section entitled "Traffic Control" on page 105.
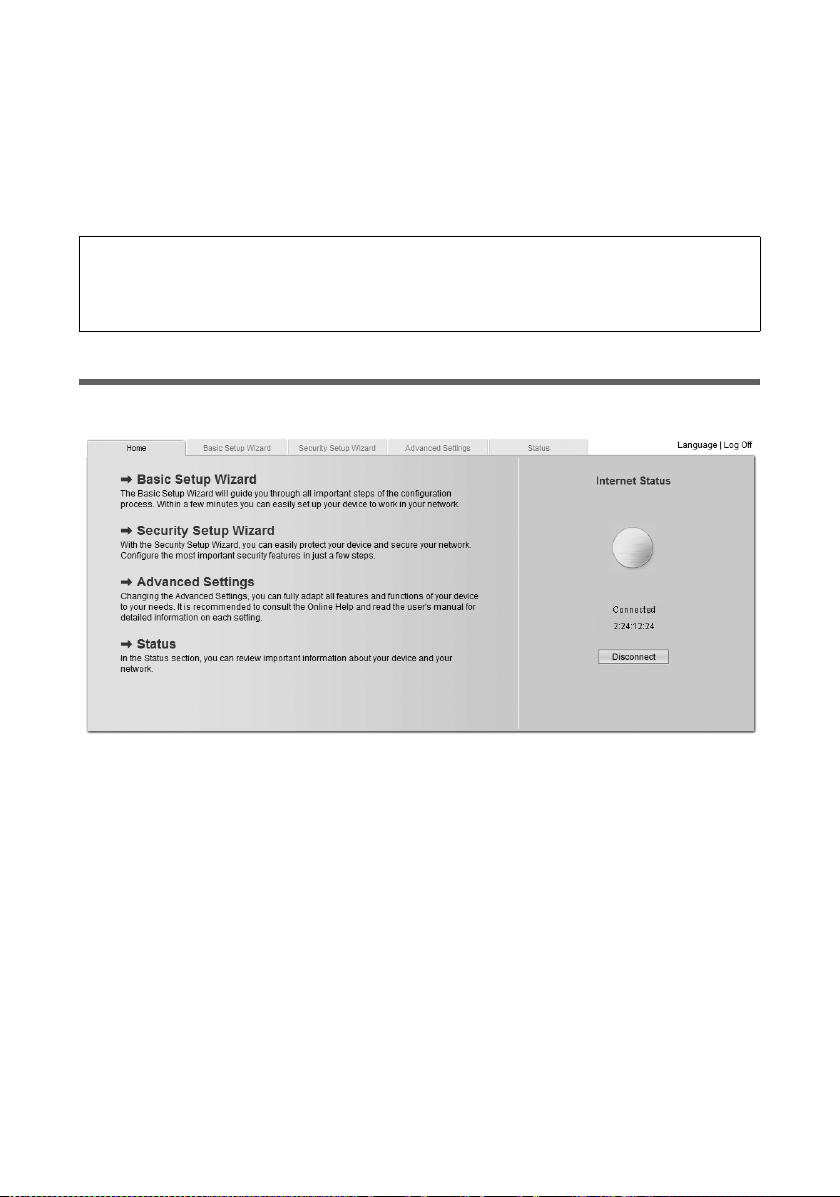
The start screen
The start screen is the starting point for all configuration and administration activities.
Start screen functions
On the start screen you can
u select the language for the user interface (see page 27),
u connect to the Internet (see page 95),
u open the Status menu to obtain status information about the Gigaset SE551 WLAN
dsl/cable (see page 90),
u call up the wizard for the basic configuration: Basic Setup Wizard (see page 29),
u call up the Security Setup Wizard (see page 34),
u open the Advanced Settings menu for additional configuration options
(see page 43).
You can call up the wizards, the Advanced Settings menu, and status information from
any other configuration program screen at any time via the tabs on the upper edge of
the user interface.
25
Page 26

The user interface
The configuration program offers you the following functions:
Basic Setup Wizard Use this wizard for the settings required for connecting to the
Internet You can also set data for your region. This is described
from page 29.
Security Setup Wizard This wizard allows you to take precautions against unauthor-
ised access to your Gigaset SE551 WLAN dsl/cable and the
local network. For example, you can assign a password and
set up encryption for wireless traffic. This is described from
page 34. For the protection of your network we recommend
that you carry out this setup.
Advanced Settings Additional functions are offered in the Advanced Settings
menu. For example, you can back up and restore your configuration data, set up your Gigaset SE551 WLAN dsl/cable as a
virtual server for your network, and much more. These configuration steps are optional and can be carried out at a later
stage. This is described from page 43.
Status You can view information about the configuration and status
of your Gigaset SE551 WLAN dsl/cable in the Status menu.
This is described from page 99.
Internet status You can view the status of your Internet connection and can
establish a manual connection to the Internet (see page 90).
Language You can select the language for the user interface
(see page 27).
26
Page 27
The user interface
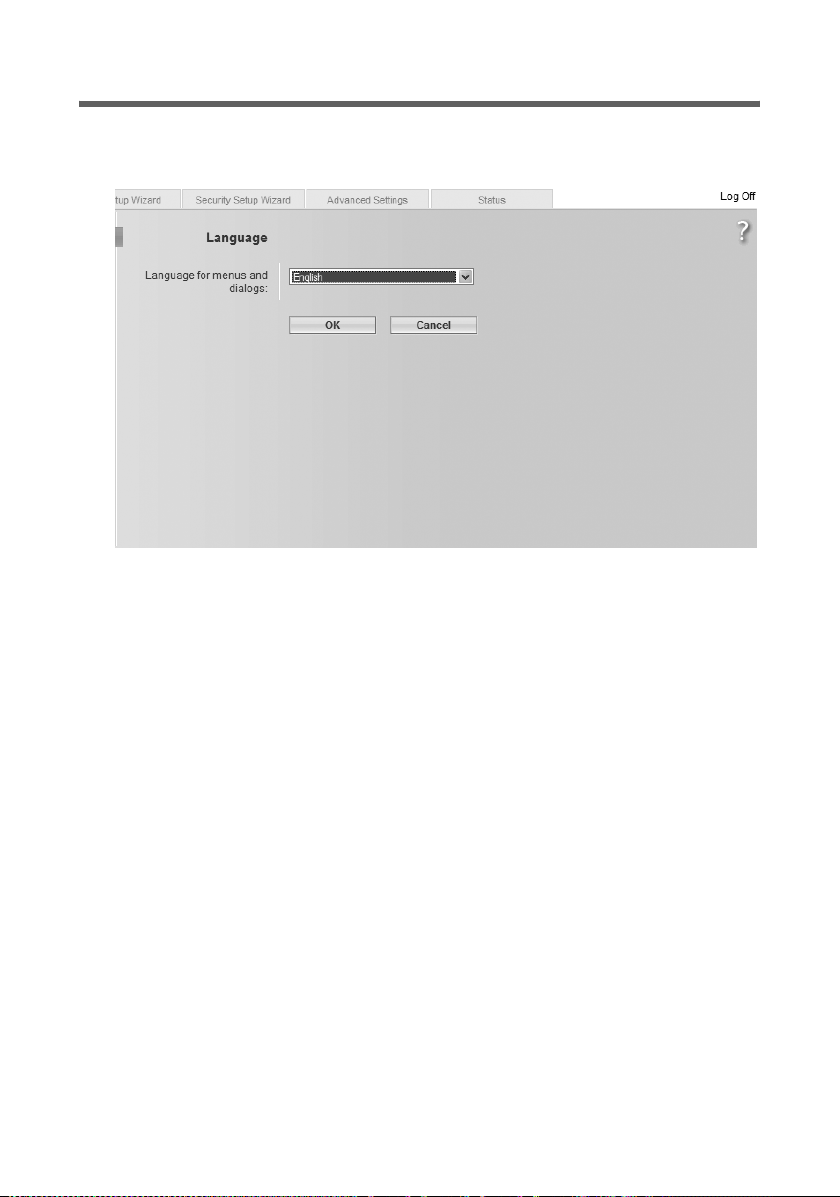
Selecting a language
The user interface can be presented in various languages.
ì Click on Language on the top right above the screen.
ì If you wish to change the preset language, select the required language from the
list.
ì Click OK to apply the setting.
You might have to load the file for the language you require. Follow the on-screen
instructions on the user interface.
Reboot the device to activate the change. Confirm the reboot in the dialogue field
shown.
Once the procedure has been concluded the start screen is shown again.
27
Page 28

The user interface
Elements on the user interface
The user interface pages contain the following elements:
Log Off button
The Log Off button is always present on the right above the user interface. If you click
on Log Off the session is terminated and the login screen appears again.
Help
Click on the question mark to display explanations about the current
user interface screen.
Buttons and symbols used by the wizards
The wizards use graphic symbols to show which steps you have
already carried out.
As soon as you have changed the configuration in a screen, you can activate the new
setting by clicking on Next > at the bottom of the screen. The Back button returns you
to the previous configuration step, and < Back returns you to the start screen.
Buttons in the Advanced Settings menu
OK Transfers the settings you have made to the Gigaset SE551 WLAN
dsl/cable configuration.
Cancel Deletes all the entries in a screen since the last time you clicked
on OK. This button is not available for the initial configuration of
the device.
Other buttons may be visible depending on the function in question. These are
described in the relevant sections.
28
Page 29
Basic Setup Wizard
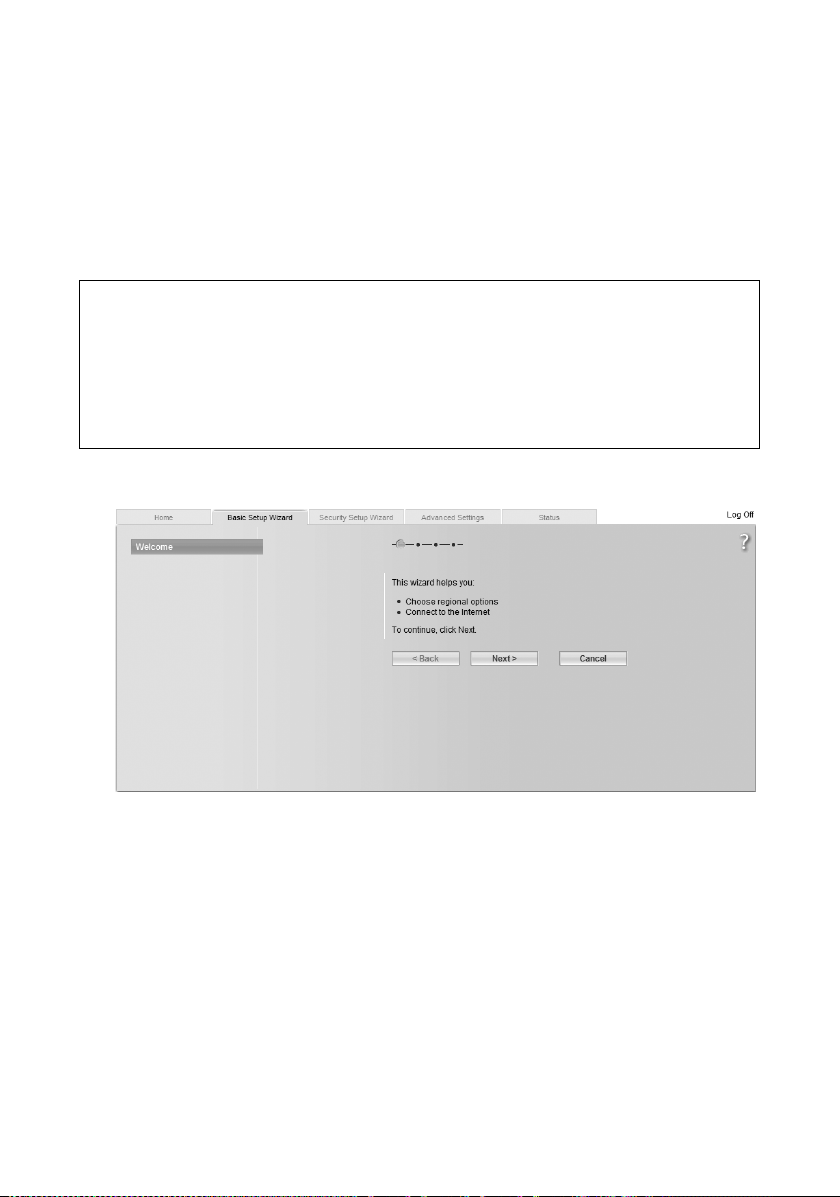
Basic Setup Wizard
The Basic Setup Wizard guides you step by step through the general configuration of the
Gigaset SE551 WLAN dsl/cable. This includes settings for your region and for your Internet access.
Connection to the Internet is established via the Gigaset SE551 WLAN dsl/cable for all
PCs connected to it. You need your Internet Provider's access data for the configuration.
Please have this data to hand.
Please remember:
The Basic Setup Wizard will reconfigure your Internet settings if this has already been
done previously. This does not affect the WLAN and LAN settings.
The access data is stored in the Gigaset SE551 WLAN dsl/cable during configuration.
Before passing the device on to somebody else or having your dealer replace it, you
should first restore the factory settings (see page 96). Otherwise unauthorised persons may use your Internet access data at your expense.
ì Select Basic Setup Wizard on the start screen to start the configuration.
ì Click on Next >.
29
Page 30
Basic Setup Wizard
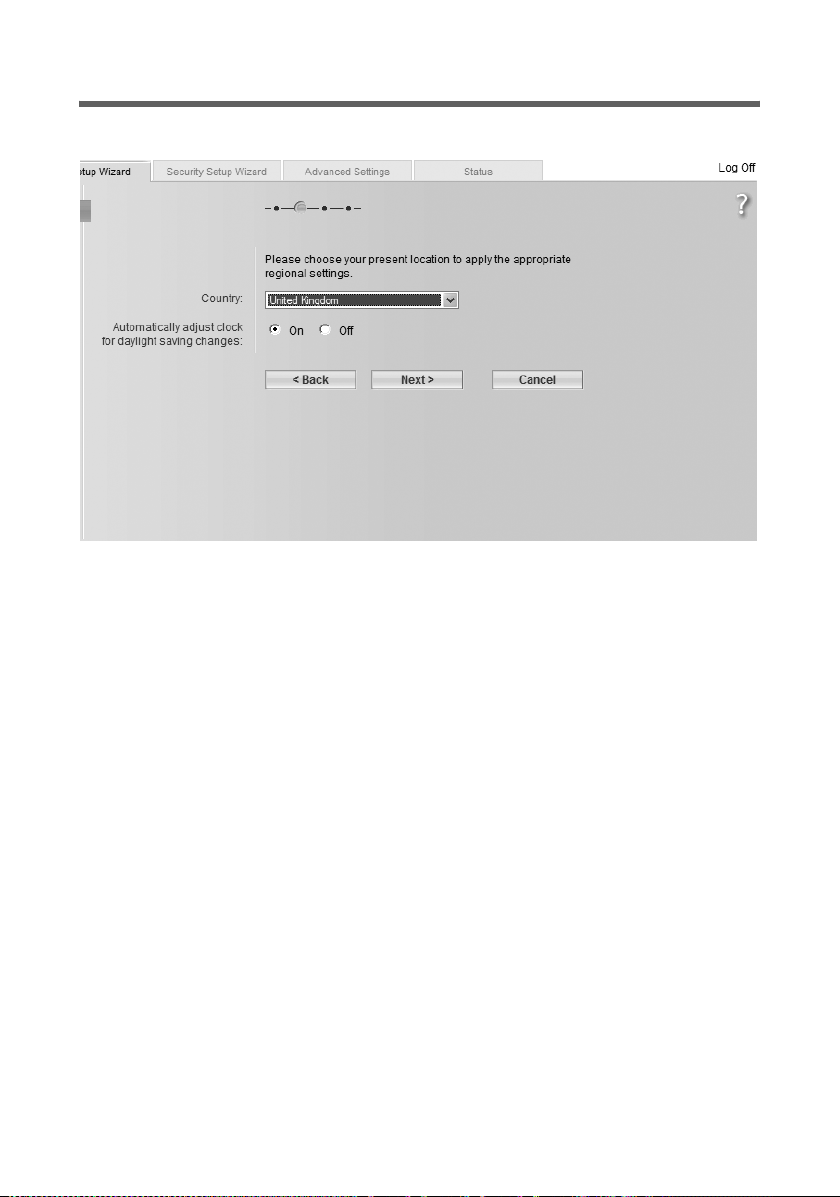
Regional Options
On this screen you select your present location for the regional options.
ì Select the country where you are currently located from the list. You can make the
settings for the clock to change automatically to summer time and/or to the time
zone as you wish.
ì Select the required option and/or select the time zone for your location.
30
Page 31

Basic Setup Wizard
Configuring Internet connection
You will find the access data you need for configuring the Internet connection in the
documentation received from your Internet Provider (ISP).
ì Select your service provider from the Service provider selection menu. If your Inter-
net provider is not included in the list, select the option Other.
ì Enter the data you have been given by your Internet provider.
Please remember:
Connection to the Internet is only possible if you have entered all the data
for your Internet provider correctly.
31
Page 32

Basic Setup Wizard
ì Select how Internet sessions are to be established via Connection mode:
–Select Always on if the connection is to exist at all times when the Gigaset SE551
WLAN dsl/cable is switched on.
Please remember:
If you have a time-based tariff this option can result in high connection
charges.
–Select Connect on demand if applications such as a Web browser or an e-mail
program are to connect to the Internet automatically.
–In the Idle time before disconnect field, enter a period of time after which the
Internet connection is to be automatically ended if no data is transmitted (default
setting: 3 minutes).
You can deactivate this function by entering "0". This means that the connection
wi ll c ont inu e to exi st even if n o da ta i s tra nsm itted. I f yo u have a ti me- bas ed t arif f
this can cause high charges. In this case you should enter a value other than "0".
This time setting only applies to the Connect on demand option.
–Select Connect manually if you always want to establish and end the connection
to the Internet manually. If you have a time-based tariff this will save you high
connection charges. How to establish a connection manually is described on
page 95.
ì Click on Test Settings to check the Internet connection. The router will attempt to
connect to the Internet. Any Internet connection already in existence will be closed
first.
You will find information about the test steps and results on the Internet Connec-
tion Test screen.
PPPoE pass-through
PPPoE pass-through enables you to use an additional Internet connection (with another
service provider) from one PC. You can find detailed information about this on page 49.
ì Activate PPPoE pass-through if you wish to use this function.
ì When you have entered the data, click on Next >.
Using UPnP (Universal Plug and Play)
PCs with UPnP (Universal Plug & Play) can offer their own network services and automatically use services offered on the network. You can find detailed information about this
on page 47.
ì Activate UPnP if you wish to use this function.
32
Page 33

Basic Setup Wizard
Summary
In the next step the basic settings you have made through the wizard are shown for you
to check.
ì If you want to make changes to the settings, click on < Back.
ì If you want to confirm the settings, click on Finish to close the basic setup wizard.
You will then be taken automatically to the start screen for the Security Setup Wizard.
If you want to carry this out at a later stage, deactivate the option I would like to run
the Security Setup Wizard now.
The Gigaset SE551 WLAN dsl/cable is now configured and ready to connect to the Internet.
33
Page 34

Security settings
Security settings
The Security Setup Wizard offers you additional settings for improving your network
security. You can
u assign a Password for configuring the Gigaset SE551 WLAN dsl/cable (see page 35),
u change the ID for your wireless network (SSID) (see page 36),
u set the Encryption for wireless traffic (see page 37),
u limit access to your wireless network to certain PCs (see page 49).
The Gigaset SE551 WLAN dsl/cable's user interface will guide you through the security
configuration step by step. Once you have completed a screen, click on Next >. If you
want to make any changes or check your entries, click on < Back.
ì Select Security Setup Wizard on the start screen or in the tab to start the security
configuration if you did not go straight to the start screen for the security settings
after making the basic settings.
ì Click on Next > to continue.
34
Page 35

Security settings
Assigning a Password
In the first step of the setup you can assign a Password for the user interface. When
supplied, the configuration of your Gigaset SE551 WLAN dsl/cable is not protected with
a Password. To prevent unauthorised changes to the configuration, you should set a
Password and change this Password from time to time.
ì If you have already set a Password, enter the old Password in the Current password
field.
ì Enter a new password in the New password field, and repeat it in the Confirm new
password field.
The Password can be up to 32 alphanumerical characters long. The SSID is case sensitive. Avoid proper names and all too obvious words. Mix letters and numbers
together.
Please remember:
If you ever forget your Password you will have to reset your Gigaset SE551 WLAN
dsl/cable (see page 18). Please bear in mind that this will restore all the settings to
the factory configuration. No Password will be active either.
ì To go to the next step, click on Next >.
35
Page 36

Security settings
SSID
Before the wireless network components can communicate with each other, you must
use the same SSID (Service Set Identifier).
The default SSID for the Gigaset SE551 WLAN dsl/cable is ConnectionPoint. For security
reasons you should change this SSID and deactivate SSID broadcast.
If this option is enabled, the Gigaset SE551 WLAN dsl/cable will send the SSID in all data
transmissions, and your Gigaset SE551 WLAN dsl/cable's SSID will be displayed on PCs
that have a wireless network adapter. In this case unauthorised persons could use the
SSID to gain access to your network.
ì Enter a character string of your choice in the SSID field. The SSID is case sensitive.
It can be up to 32 alphanumerical characters long.
Make a note of the SSID. You will need this to register your PC.
Please remember:
The connection to the wireless network adapters will be broken until the new SSID
has been entered in them as well.
By default SSID broadcast is inactive. For security reasons you should not change this
preconfiguration.
ì Click on Next > to proceed to the next step.
36
Page 37

Security settings
Setting security functions for the wireless network
In the next step you can set the encryption and authentication methods for your wireless network.
Wireless networks are even more strongly exposed to the risk of eavesdropping than
wired networks. With conventional network adapters an intruder only needs a device
with a WLAN adapter (e.g. a Notebook or a PDA (Personal Digital Assistant)) with an
appropriately configured network card in order to eavesdrop on every communication
made via a nearby wireless LAN.
The Gigaset SE551 WLAN dsl/cable makes use of effective encryption methods to prevent unauthorised eavesdropping as far as possible.
You can use the following security mechanisms:
u WPA2-PSK or WPA2-PSK / WPA-PSK (see below)
u WEP encryption (Wired Equivalent Privacy, see page 39)
We recommend using WPA2-PSK if it is supported by all components in your wireless
network.
You will find further options for setting data encryption and authentication in the
Advanced Settings menu (see page 74).
37
Page 38

Security settings
WPA2 / WPA with Pre-shared key (PSK)
WPA is a more advanced procedure than WEP for protecting wireless networks. Dynamic
keys based on TKIP (Temporal Key Integration Protocol) offer increased security. The
new standard WPA2 uses AES for the encryption.
WPA-PSK is a special WPA mode for users at home and in small companies without a
company authentication server. Encryption keys are automatically generated with the
Pre-shared key, automatically changed ( "rekeying") and authenticated between the
devices after a certain period of time (Rekey Interval).
Please remember:
Every PC (network adapter) that requires access to a wireless network protected by
WPA must also support WPA. To find out whether and how you can use WPA on your
PC, read your network adapter's operating instructions.
ì Select the option WPA2-PSK if it is supported by all components in your wireless
network.
or
ì Select the option WPA2-PSK / WPA-PSK if some or all components in your wireless
network support WPA with the TKIP protocol.
ì Enter a key of your choice in the Pre-shared key field (min. 8 to max. 63 characters)
and confirm it by repeating the entry.
You must also set the same Pre-shared key for all wirelessly connected PCs.
ì To go to the next step, click on Next >.
38
Page 39

Security settings
WEP encryption
WEP (Wired Equivalent Privacy) is an encryption procedure for radio signals in wireless
networks and meets the standard IEEE 802.11.
If you transmit data wirelessly and not all components in your wireless network support
the higher security standard WPA (see page 38), we recommend that you activate WEP-
Encryption on these network components.
You can choose either the standard 64-bit key or the more robust 128-bit key for encryption. The keys are generated in hexadecimal or in ASCII format. You must use the same
keys for encryption and decryption for the Gigaset SE551 WLAN dsl/cable and all your
wireless network adapters.
ì Select the Key length: 64 bit or 128 bit.
ì Select the Input type, i.e. whether you wish to enter the key manually or have it
generated automatically by means of a Passphrase.
39
Page 40

Security settings
Manual key entry
ì Select the Key type, Hex or ASCII.
.
If you select Hex you can use the characters 0 to 9 and A to F.
– With a 64-bit encryption depth the key is exactly 10 characters long.
An example of a valid key: 1234567ABC
– With a 128-bit encryption depth the key is exactly 26 characters long.
An example of a valid key: 234567ABC8912345DEF1234567
If you select ASCII you can use the characters 0 to 9, A to Z and a to z plus the special
characters in the ASCII character set.
– With a 64-bit encryption depth the key is exactly 5 characters long.
An example of a valid key: GIGA1
– With a 128-bit encryption depth the key is exactly 13 characters long.
An example of a valid key: GIGASET_SE551
ì Confirm the key by entering it again in the Confirm key field.
Generating the key by means of a Passphrase
ì Enter a Passphrase (up to 32 characters) and confirm it by entering it again. The key
is generated automatically.
Please remember:
u It is very important that you make a note of the key or passphrase. You will
need this information to configure the wireless network adapters properly.
u When you have concluded the Security Setup Wizard you must change the
WEP encryption on the wireless network adapters for the connected PCs in the
same way as they will not otherwise be given access to the Gigaset SE551
WLAN dsl/cable's wireless network.
40
Page 41

Security settings
ì To go to the next step in the Security Setup Wizard, click on Next >.
Access control within the wireless network
In this step you can specify which PCs will have wireless access to the Gigaset SE551
WLAN dsl/cable and hence to your LAN. The access control is based on the MAC address
of the PCs' network adapters. You can enter the MAC addresses for the PCs manually or
select them from the list of PCs that are currently logged in.
The default setting for access control is disabled. This means that all PCs that use the
correct SSID can log in.
ì Next to MAC address filter select the option On to activate the MAC filtering.
Entering MAC addresses manually
ì Enter the MAC address of the network adapter. You will find this address on the bot-
tom of the device.
ì Enter the name of the PC.
ì Click on the Add button to add the entry to the list.
Selecting from the list of logged-in PCs
ì Select the required PC from the Known wireless clients list. All PCs are displayed
that are currently logged in to the router with the correct SSID.
ì Click on the Add button to add the selected PC to the list.
41
Page 42

Security settings
Please remember:
If you activate MAC access control, you must at least enter the PC from which you
are configuring the Gigaset SE551 WLAN dsl/cable. Otherwise you will no longer
be able to access the user interface and a corresponding error message will be
shown.
If, by mistake, you have denied all PCs access to the Gigaset SE551 WLAN dsl/cable
you have two choices:
u You can completely reset the Gigaset SE551 WLAN dsl/cable (see page 18).
u You can connect a PC to the Gigaset SE551 WLAN dsl/cable using one of the
LAN connections (by cable). As MAC access control only applies to PCs that are
connected "wirelessly", you can use this PC to change the configuration.
ì To go to the next step, click on Next >.
Saving settings
On the next screen you conclude the wizard and save the settings. You will be informed
of any security risks that still exist.
ì Click on Finish to conclude the wizard.
The settings will now be active on your Gigaset SE551 WLAN dsl/cable.
Please remember:
You must now configure WEP or WPA key for your PC's wireless network adapter, if this
has been configured with other values. Once you have done this you can log in to your
Gigaset SE551 WLAN dsl/cable wirelessly again.
42
Page 43

Configuring the Advanced Settings
Configuring the Advanced Settings
In the Advanced Settings menu, you can configure all the options for the
Gigaset SE551 WLAN dsl/cable. If you want, you can also make changes to the settings
you made using the wizard. The following table shows the options in the menu.
Menu Description
Internet This menu comprises all the setting options relating to the
Internet. In particular, you can
u check and change the configuration for Internet access (see
page 44) or specify a preferred DNS server (see page 48),
u set up time and volume control for your Internet access (see
page 50),
u configure the firewall, i.e. a number of security and special
functions, e.g. access control for local PCs to the Internet or
blocking certain Internet sites (see page 52),
u make the NAT settings needed to provide your own services
on the Internet (see page 61).
u set up dynamic DNS for a static Internet address on your
device (see page 66),
u configure the Quality of Service (see page 68).
Local Network Here you can change the Private IP address of the Gigaset
SE551 WLAN dsl/cable and make settings on the DHCP server
(see page 69).
Wireless Network Here you can configure the options for wireless communication
(SSID and encryption) and restrict access to the Gigaset SE551
WLAN dsl/cable (see page 44).
USB Here you can make the settings for operating an external
data carrier, a Web server or a printer server on the USB port
(see page 82).
Administration Here you can make or change various system settings, e.g.
assign a password (see page 92), set the time (see page 91), or
activate remote management (see page 93).
You can also back up the data on your Gigaset SE551 WL AN dsl/
cable or load new firmware (see page 95).
43
Page 44

Configuring the Advanced Settings
Internet
If you have configured your Gigaset SE551 WLAN dsl/cable using the two wizards you
have also already configured the WAN connection (Internet access). You can check or
change these settings in the Internet menu.
This menu also offers you a wide range of possibilities for security settings and limiting
access to the Internet as well as for providing your own services on the Internet.
Via the Internet menu you can
u check and edit the Internet configuration of the Gigaset SE551 WLAN dsl/cable
(see below),
u enter the PC's registered MAC address for Internet access (WAN interface)
(for cloning the MAC address, see page 49),
u make DNS server settings (page 48),
u configure time and volume control for using the Internet (see page 50),
u protect your network against unauthorised access from outside (firewall) and limit
or block access to Internet sites (see page 52),
u provide your own services on the Internet (NAT, see page 61),
u set up dynamic DNS (see page 66),
u define QoS properties (priorities for data transfer) (see page 68).
Internet Connection
On this screen you can set up or change the configuration of your Internet connection.
Any settings you make here must coincide with the features your Internet provider
makes available to you. False information can lead to problems with your Internet connection.
ì If you wish to set up or change the settings for the Internet connection,
select Internet Connection in the Advanced Settings – Internet menu.
44
Page 45

Configuring the Advanced Settings
ì Select your Internet provider from the Service provider list.
ì Enter the data you have been given by your Service provider in the relevant fields.
Please remember:
To configure the Internet connection successfully all fields must be filled in with
the precise details given by your provider.
ì Select how Internet sessions are to be established via Connection mode:
–Select Always on if the connection is to exist at all times when the Gigaset SE551
WLAN dsl/cable is switched on.
Please remember:
If you have a time-based tariff this option can result in high connection
charges.
–Select Connect on demand if applications such as a Web browser or an e-mail
program are to connect to the Internet automatically.
–In the Idle time before disconnect field, enter a period of time after which the
Internet connection is to be automatically ended if no data is transmitted (default
setting: 3 minutes).
45
Page 46

Configuring the Advanced Settings
You can deactivate this function by entering "0". This means that the connection
wi ll c ont inu e to exi st even if n o da ta i s tra nsm itted. I f yo u have a ti me- bas ed t arif f
this can result in high charges. In this case you should enter a value other than
"0".
This time setting only applies to the Connect on demand option.
–Select Connect manually if you always want to establish and end the connection
to the Internet manually. If you have a time-based tariff this will save you high
connection charges. How to establish a connection manually is described on
page 90.
ì Click on Test Settings to check the Internet connection. The router will attempt to
connect to the Internet. Any Internet connection already in existence will be closed
first.
You will then be returned to the Internet Connection screen. If necessary, you can
now amend your entries.
ì If the test was successful, click on OK to apply the settings.
PPPoE pass-through
If you activate the PPPoE pass-through function a PC in the network can connect to the
Internet via its own connection ID. The router puts these connections through.
ì In the Advanced Settings – Internet menu, select Internet Connection.
ì Select the option On to activate PPPoE pass-through.
ì Click on OK to apply the settings.
46
Page 47

Configuring the Advanced Settings
Using UPnP (Universal Plug and Play)
PCs with UPnP (Universal Plug & Play) can offer their own network services and automatically use services offered on the network.
Please remember:
The PC must have Windows ME or Windows XP as its operating system. Check whether
the UPnP function has been installed in your PC's operating system. It may be necessar y to retrospectively install the UPnP components even on Windows XP or Windows
ME systems. Please consult your PC's operating instructions.
As soon as you have installed UPnP in the operating system of a PC and activated it on
the router, applications on this PC (e.g. Microsoft Messenger) can communicate via the
Internet without your needing to expressly authorise it. In this case, the router automatically implements port forwarding (Port Forwarding, see page 64), thereby facilitating
communication via the Internet.
You will see a symbol for your Gigaset SE551 WLAN dsl/cable on the task bar on the PC
on which UPnP is installed. Windows XP systems will also include the icon under network connections. Clicking on this icon opens the Gigaset SE551 WLAN dsl/cable's configuration screens.
ì In the Advanced Settings – Internet menu, select Internet Connection.
ì Select UPnP.
Please remember:
When the UPnP function is active, system applications can assign and use Ports on
a PC. This can be a security risk.
ì Click on OK to apply the settings.
47
Page 48

Configuring the Advanced Settings
DNS server
DNS is a decentralised service which assigns PC names or Internet addresses (Domain
names) and IP addresses to one another. A DNS server has to administer this information
for each server or each LAN with an Internet connection.
Normally your Internet provider provides you with a DNS server which makes this
assignment when connection is made to the Internet. If necessary you can define the
DNS server to be used for the Internet connections manually.
ì In the Advanced Settings – Internet menu, select DNS Servers.
ì Activate the Use custom DNS servers function via the option On.
ì Enter the IP addresses for your preferred DNS servers (Preferred DNS server and
Alternate DNS server).
ì Click OK to apply the settings.
48
Page 49

Configuring the Advanced Settings
MAC address
If you had Internet access through the same Internet provider before connecting the
Gigaset SE551 WLAN dsl/cable, then it is possible that the MAC address of one of your
PCs has been used for registration when the connection was being set up. You must
then either replace the current MAC address with the MAC address registered with the
Internet provider or ask your Internet provider to register a new MAC address for your
account.
Carry out the following steps:
ì Connect a PC to the Gigaset SE551 WLAN dsl/cable and open the configuration envi-
ronment.
ì In the Advanced Settings – Internet menu, select MAC Address.
ì Select which MAC address is to apply to the Internet connection:
– Use default device MAC address: You can leave this default setting if the
MAC address of the Gigaset SE551 WLAN dsl/cable is used for connecting to the
Internet.
– Use MAC address of this PC: Select this option if the MAC address of the cur-
rently connected PC has previously been registered for connecting to the Internet
or if you have re-registered the MAC address of the PC on which you are currently
working.
– Use custom MAC address: Select this option if you have asked your Internet pro-
vider to register a new MAC address and this is not the MAC address of the PC on
which you are currently carrying out the configuration.
ì Click on OK to apply the settings.
49
Page 50

Configuring the Advanced Settings
Traffic Control
Traffic Control allows you to control monthly Internet use in terms of online time and
transmitted data volume. You can specify general limits for your local network and individual ones for individual PCs.
Note:
Traffic Control is only possible if the Internet connection is established directly through
the Gigaset SE551 WLAN dsl/cable and not via a PC or a different router.
ì In the Advanced Settings – Internet menu, select Traffi c Control.
ì If you want to monitor and limit monthly Internet use within your network, select
the option On for Traf fic C ontrol.
ì In the Reset traffic counters field, enter the day of the month on which the
counters for the time and volume are automatically reset. Ask your Internet provider
about the relevant billing day.
ì Activate the option Automatically disconnect from the Internet, if the Internet
connection is no longer to be available when a time or volume limit is exceeded.
50
Page 51

Configuring the Advanced Settings
Global time limit
ì Activate or deactivate the time limit available to all users in your network for surfing
the Internet each month. This makes sense if your Internet tariff is time-based.
ì Enter the total amount of time available per month in hours.
Global volume limit
ì Activate or deactivate the limit on the data volume available to all users in your net-
work for surfing the Internet (download and upload) each month. This makes sense
if your Internet tariff is volume-based.
ì Enter the total volume of data available per month in megabytes (MB).
Individual limits
You can specify individual limits for data volumes for individual PCs within your network.
ì Select or deselect Individual limits.
ì Enter the MAC address of the PC and a device name for identification.
ì In the Volume limit field, enter the data volume available per month in megabytes
(MB). A standard volume limit is used for all non-listed clients.
ì Click on Delete to delete an entry.
ì Click on Add to create a new entry with the entered data or for the selected PC.
ì Click on OK to save and apply the changes.
You can check at any time how much time and volume is still available this month in the
Status – Traf f ic Control menu (see page 105) and on the login screen for the configuration program under Traffic Control (see page 24).
Please remember:
The values recorded by your device for online time and transmitted data volume are
only intended for your guidance and may differ from the exact values determined by
your Internet provider.
51
Page 52

Configuring the Advanced Settings
Firewall
The firewall functions of the Gigaset SE551 WLAN dsl/cable include various security
functions for your local network.
You can :
u protect your network against hacker attacks (see below),
u block individual PCs' access to selected services or Internet sites (see page 56) or
restrict them by means of a schedule rule (see page 59).
The firewall functions for Gigaset SE551 WLAN dsl/cable are activated and configured in
the factory. If you wish to deactivate the firewall, carry out the following steps:
ì In the Advanced Settings – Internet menu, select Firewall.
ì Select the required option.
ì Click OK to apply the settings.
52
Page 53

Configuring the Advanced Settings
Attack detection
If the firewall functions of your Gigaset SE551 WLAN dsl/cable are activated, the device
monitors and limits the access of incoming traffic via the DSL connection with a function called Stateful Packet Inspection (SPI). This allows the Gigaset SE551 WLAN dsl/
cable to identify and prevent certain types of attack from the Internet, such as Denialof-Service (DoS). DoS attacks are aimed at devices and networks with Internet connections. The aim is not so much to steal data but to paralyse the computer or network to
such an extent that the network resources are no longer available. A typical hacker
attack involves making a remote computer announce that it is acting for the paralysed
device, for example, and receive the data meant for it.
You can use the Attack Detection function to change the standard firewall settings and
arrange to be notified by email about any attempted hacker attacks.
ì In the Advanced Settings – Internet – Firewall menu, select Attack Detection.
ì Select the security level for the firewall.
The default setting is Medium, which combines a high degree of security with little
effect on functionality.
– The level High offers you maximum security with possibly limited functionality
for special applications.
– The level Low offers you maximum functionality with possibly reduced security.
53
Page 54

Configuring the Advanced Settings
–Select Custom to determine the criteria for defence against hacker attacks your-
self. Further setting options are then shown in the window.
E-mail notification of a hacker attack
You can choose to be informed by e-mail about a possible hacker attack.
ì Enter the following in the dialogue fields:
– Select the Notification interval, i.e. at what intervals you wish to be informed
about hacker attacks. If hacker attacks have been identified and blocked in the
intervening period, you will receive a summary about each event.
– E-mail address to notify: Enter the e-mail address to which the notifications are
to be sent.
– Outgoing mail server (SMTP): Enter the address of the outgoing mail server
through which your device can send you the notifications.
– Incoming mail server (POP3): If your outgoing mail server demands authentica-
tion via POP3 before e-mails can be sent, enter the address of the outgoing mail
server here.
–Enter your User name and the relevant Password.
ì Click on Test Settings to check the details for the e-mail notification.
54
Page 55

User-defined settings
Configuring the Advanced Settings
u Stateful Packet Inspection
Your device monitors and limits the access of incoming traffic from the Internet with
SPI (Stateful Packet Inspection). This allows it to identify and block certain types of
attack such as Denial-of-Service (DoS). A typical DoS attack involves a remote computer paralysing a system and announcing that it is acting for the paralysed device
in order to receive the data meant for it. For the level Custom you can specify yourself whether you wish to activate SPI on your device and which exceptions you wish
to make.
ì Activate or deactivate Stateful Packet Inspection for your device's Internet connec-
tion.
ì Select the services for which you also wish to allow incoming Traf fic if it has been
initiated by a client in your LAN. If you select the All option at the end of the list you
can allow all services.
ì Click OK to apply the settings.
55
Page 56

Configuring the Advanced Settings
Setting up access control to the Internet
The Access Control function allows you to block access to various Internet services for
one or more PCs. You can limit these blocks to certain days and hours with Schedule
Rules.
ì Select Access Control in the Advanced Settings – Internet – Firewall menu.
ì Activate the Access Control function via the option On.
56
Page 57

Configuring the Advanced Settings
You have the following setting options for Access Control:
Access Rules
You can limit access to the Internet for all or for certain clients in your local network. You
can assign a Schedule rule to each access rule and allow or block access to URLs and
services.
ì Click on Edit to create an access rule.
ì Select the Access rule type from the list:
– Apply to all clients: The rule applies to all PCs in your network.
– Specify IP address range: You select the PCs to which the rule is to apply by
entering an IP address block.
– Specify IP address or Specify MAC address: The rule applies to a PC you select
via the IP address or MAC address.
ì Select a Schedule rule: The default setting is Always. You can create more
Schedule Rules in the Access Control field (see page 59).
ì Enter a name for the Comment of the access rule.
ì Enter a name for the access rule in the Comment field.
ì Define the Access level.
You can apply Deny access to the Internet, Allow web browsing with URL filter,
Allow web browsing or make user-defined settings.
If you select the option Allow web browsing with URL filter, you must define the
URL filter (see page 59).
If you select Custom, you have the following options:
57
Page 58

Configuring the Advanced Settings
–In Filtering mode, determine whether the services you select are to be allowed
or blocked.
– Select the Services you wish to allow or block.
Select the Protocol and enter the appropriate Port (a single port number,
several individual port numbers separated by commas, port blocks consisting
of two port numbers separated by a dash, or any combination of these,
e.g. 80,90-140,180). The displayed Comment assists you to identify different
services.
– Activate the Filter option to use the service concerned for the service filter.
– You can also select services from the Predefined applications list.
– Click on Delete to delete an entry. Click on Add to create a new entry with the
entered data or for the selected, predefined application.
ì Click OK to apply the settings.
58
Page 59

Configuring the Advanced Settings
Schedule Rules
If you have set up an access rule (see page 57) for certain services in the Internet. you
can control it by means of a schedule rule. A schedule rule determines the period for
which a defined access control is active.
You can define several rules. A rule takes effect when you select Access Rules in the
menu and activate it.
ì In the Access Control field under Schedule Rules, click on Edit.
ì Assign a name to the new rule under Comment. This name will then appear in the
selection list on the screen for the menu entry Access Rules.
ì Click on Add to define a new rule.
ì Select the day of the week from the list or else the option Every day.
ì Enter the time for the rule to Begin and End.
ì Click OK to apply the settings.
URL filter
The URL filter allows you to block access to certain Internet sites or Internet domains or
to limit access to certain Internet sites. Once you have entered the relevant URLs you can
then create access rules that apply the URL filter for the selected clients in your network.
ì In the Advanced Settings – Internet – Firewall menu, select Access Control.
59
Page 60

Configuring the Advanced Settings
ì Select Filtering mode, i.e. whether you wish to allow or block access to the URLs in
the list.
ì Enter the required URL in the field.
ì Click on Delete to delete an entry. Click on Add to create a new entry.
ì Click OK to apply the settings.
60
Page 61

Configuring the Advanced Settings
Setting up the NAT function
Your Gigaset SE551 WLAN dsl/cable comes provided with the NAT (Network Address
Translation) function. With Address Mapping, several users on your local network can
access the Internet via one or more public IP addresses. In the default setting, all the
local IP address are mapped to your router's public IP address.
One feature of NAT is that data from the Internet is not allowed into your local network
unless it has been explicitly requested by one of the PCs on that network. Most Internet
applications run behind the NAT firewall without any problems. If you request Internet
pages, for example, or send and receive e-mails, the request for data from the Internet
comes from a PC on the local network and so the router allows the data through. The
router opens exactly one port for the application. A port is an internal PC address
through which the data is exchanged between a server on the Internet and a client on
a PC in the local network. Communicating via a port follows the rules of a particular protocol (TCP or UDP).
If an external application tries to send a call to a PC within the local network, the router
will block it. There is no open port via which the data could enter the local network.
Some applications, such as games on the Internet, require several links, i.e. several ports
so that the players can communicate with each other. In addition, these applications
must also be permitted to send requests from other users on the Internet to the user on
the local network. These applications cannot work if Network Address Translation (NAT)
has been activated.
Using port forwarding (the forwarding of requests to particular ports) you make the
router forward requests from the Internet for a certain service, e.g a game, to the appropriate port or ports on the PC on which the game is running.
Port triggering is a specific variant of port forwarding. Unlike port forwarding, in this
case the Gigaset SE551 WLAN dsl/cable forwards data from the set port block to the PC
which has previously sent data to the Internet via a certain port (trigger port). This
means that approval for the data transfer is not tied to one specific PC in your network,
but only to the port numbers of the required Internet service.
Where configuration is concerned, this means:
u You have to define a so-called trigger port for the application and also the protocol
(TCP or UDP) that this port uses. Then you assign to this trigger port the public ports
that have to be opened for the application.
u The router checks all outgoing data for the port number and protocol. If it recognises
a match of port and protocol to a defined trigger port, then it will open the assigned
public ports and notes the IP address of the PC that sent the data. If data comes back
from the Internet via one of these public ports, it allows the data through and directs
it to the right PC. A trigger event always comes from a PC within the local network.
If a trigger port is addressed from outside, it is simply ignored by the router.
61
Page 62

Configuring the Advanced Settings
Please remember:
u An application that is configured for port triggering can only be run by one user in
the local network at a time.
u As long as the public ports are open, they can be used by unauthorised persons to
gain access to a PC in the local network.
When the Gigaset SE551 WLAN dsl/cable is supplied, the NAT funct io n ( Net wo rk Add re ss
Translation) is activated, i.e. all IP addresses of PCs in the local network are converted to
the router's public IP address when accessing the Internet.
You can use the NAT settings for the Gigaset SE551 WLAN dsl/cable to
u set up port triggering for special applications (see page 63),
u set up the Gigaset SE551 WLAN dsl/cable as a virtual server by configuring Port For-
warding (see page 64),
u open the firewall for selected PCs (see page 65).
Please remember:
For the functions described below you must make sure that the IP addresses of the
PCs do not change. If the IP addresses of the PCs are assigned via the DHCP server
of the Gigaset SE551 WLAN dsl/cable, you must select the option Never expires
(see page 70) for the settings on the Local Network screen for Lease time or assign
static IP addresses for the PCs.
You can activate or deactivate the NAT function (default setting: NAT function is activated).
ì In the Advanced Settings – Internet menu, select Address Translation (NAT) and
select the required option.
62
Page 63

Configuring the Advanced Settings
Port Triggering
If you configure Port Triggering for a certain application, determine a so-called trigger
port and the protocol (TCP or UDP) this port uses. Then you assign to this trigger port
the public ports that have to be opened for the application.
You can select known Internet services for this or assign ports or blocks of ports manually.
ì To set up port triggering for a service, in the Address Translation (NAT) menu,
select Port Triggering.
ì Select the required application from the Predefined applications list.
ì Click the Add button. The data for the required service is entered on the screen.
ì Select the option in the Enabled column.
If the application you require is not in the list, then you must enter the relevant data on
the screen manually:
ì Local protocol: Select the protocol that is to be monitored for outgoing traffic.
ì Local port: Enter the port that is to be monitored for outgoing traffic.
ì Public protocol: Select the protocol that is to be allowed for incoming data traffic.
ì Public port: Enter the port that is to be opened for incoming traffic.
Note:
You can enter a single port number, several individual port numbers separated by
commas, port blocks consisting of two port numbers separated by a dash, or any
combination of these, e.g. 80,90-140,180).
ì Comment: Enter a description to help you identify different entries.
63
Page 64

Configuring the Advanced Settings
ì Select the option in the Enabled column.
ì Click on the Delete button to delete an entry. Click on the Add button to add a new
entry.
ì Apply the settings by clicking OK.
Port Forwarding
If you configure Port Forwarding, the Gigaset SE551 WLAN dsl/cable outwardly assumes
the role of the servers. It receives requests from remote users under its public IP address
and automatically redirects them to local PCs. The private IP addresses of the servers on
the local network remain protected.
Internet services are addressed via defined port numbers. The Gigaset SE551 WLAN dsl/
cable needs a mapping table of the port numbers to redirect the service requests to the
server that actually provides the service. For this, Port Forwarding has to be configured.
ì To set up port forwarding for a service, select Port Forwarding in the
Address Translation (NAT) menu.
ì Select the required application from the Predefined applications list.
ì Click the Add button. The data for the required service is entered on the screen.
ì Select the option in the Enabled column.
If the application you require is not in the list, then you must enter the relevant data on
the screen manually:
ì Select the protocol of the service you are providing from the Protocol list.
ì Under Public port, enter the port number of the service you are providing.
ì In the Local port field, enter the internal port number to which service requests are
to be forwarded.
64
Page 65

Configuring the Advanced Settings
ì In the Local IP address field, enter the IP address of the PC which provides the serv-
ice.
Example: the Web server has been configured to react to requests on port 8080.
However, the requests from websites enter by port 80 (standard value). If you add
the PC to the forwarding table and define port 80 as the public port and Port 8080
as an internal port, all requests from the Internet are diverted to the service with the
port number 80 on the Web server of the PC you have defined with port 8080.
Note:
You can enter a single port number, several individual port numbers separated by
commas, port blocks consisting of two port numbers separated by a dash, or any
combination of these, e.g. 80,90-140,180).
ì Click on Add.
ì Click on Delete if you wish to delete the data in the relevant line again.
ì Select the option in the Enabled column.
ì Click OK to apply the settings.
Opening the firewall for selected PCs (Exposed Host)
You can set up a client in your local network to be an exposed host. Your device will
them forward all incoming data traffic from the Internet to this client. You can then, for
example, operate your own Web server on one of the clients in your local network and
make it accessible to Internet users.
As the exposed host your local client is directly visible to the Internet and therefore particularly exposed to risk (e.g. from hacker attacks). You should only activate this function if it is absolutely necessary (e.g. to operate a Web server) and other functions
(e.g. port forwarding) are not adequate. In this case you should take appropriate measures on the clients concerned.
Please remember:
Only one PC per public IP address can be set up as Exposed Host (see also the section
"Port Forwarding" on page 64.
ì To set up a PC as Exposed Host, select Exposed Host in the Address Translation
(NAT) menu.
65
Page 66

Configuring the Advanced Settings
ì Enter the Local IP address of the PC that is to be enabled as Exposed Host.
ì Enter a name for the PC in the Comment field.
ì Activate the entry by selecting the option.
ì Click on the Add button to add the entry to the list.
ì Click on the Delete button to delete the entry from the list.
ì Apply the settings by clicking OK.
Dynamic DNS
Any service you provide on the Internet can be accessed by Domain names. Your router's
Public IP address is assigned to this domain name. If your Internet Service Provider for
your local network's WAN connection assigns the IP address dynamically, the IP address
of the router can change. The assignment to the domain name will no longer be valid
and your service will no longer be available.
In this case you must ensure that the assignment of the IP address to the domain name
is regularly updated. This is handled by the dynamic DNS service (DynDNS). You can use
the DynDNS service to assign your Gigaset SE551 WLAN dsl/cable an individual static
domain name on the Internet even if it does not have a static IP address.
There are various providers on the Internet offering free DynDNS service.
The Gigaset SE551 WLAN dsl/cable uses the DynDNS service from DynDNS.org
(http://www.DynDNS.org)
service can be reached on the Internet as a subdomain of one of the DynDNS.org
domains.
.If you use the service of this DynDNS provider, then your
66
Page 67

Configuring the Advanced Settings
If you have activated the device's DynDNS function, it will monitor its public IP address.
When this changes, it will open a connection to DynDNS.org and update its IP address
there.
Please remember:
You have to open an account with DynDNS.org before you can use the Gigaset SE551
WLAN dsl/cable's DynDNS function. Follow the instructions on the DynDNS.org. website. Then enter the user data when configuring the router.
ì To use the router's DynDNS function, select Dynamic DNS in the Advanced Set-
tings – Internet menu.
ì Activate the Dynamic DNS function.
ì From the Service provider list, select the service offering dynamic DNS
(DynDNS.org or TZO.com).
ì Enter Domain name, User name and Password. You will have received the neces-
sary information when registering with your Service provider.
ì Click on OK to apply the settings.
67
Page 68

Configuring the Advanced Settings
QoS (Quality of Service)
Many communication and multimedia applications require high speed and large bandwidths to transfer data between the local network and the Internet. However, for many
applications there is often only one Internet connection with limited capacity available.
QoS (Quality of Service) divides this capacity between the different applications and
provides undelayed, continuous data transfer where data packets with higher priority
are given transmission preference.
ì In the Advanced Settings – Internet menu, select the entry QoS.
ì Activate Differentiated services, i.e. the prioritisation of certain services for data
transfer between your network and the Internet.
ì In the field next to Upstream rate, enter the value for your DSL connection. The
value is determined in the contract with your Internet provider
You can determ ine via Priority which data packets are to be given preferential transmission. With the aid of PHB (Per Hop Behaviours) a decision is also made about whether
data packets are to be forwarded immediately before all others (EF, Expedited Forward-
ing), guaranteed and without data loss (AF, Assured Forwarding) or normally (BE, Best
Effort). If your application already supports QoS your application will determine the priority automatically, and this will be noted by your device for forwarding. In addition,
your device recognises certain Predefined applications and gives each data packet the
relevant priority. You can also determine which proportion of the bandwidth for your
Internet connection is to be made available for a certain class as Allocated bandwidth.
ì Select the Allocated bandwidth for the Predefined applications and for the line
(all other applications).
ì Click on OK to save and apply the changes.
68
Page 69

Configuring the Advanced Settings
LAN configuration
You can use the LAN configuration to define an IP address for the Gigaset SE551 WLAN
dsl/cable and configure the DHCP server.
ì Select Advanced Settings – Local Network.
Defining the private IP address for the Gigaset SE551 WLAN dsl/cable
You can change the device's IP address in this screen. The preset IP address is
192.168.2.1. This is the Private IP address of the Gigaset SE551 WLAN dsl/cable. This is
the address under which the device can be reached on the local network. It can be freely
assigned from the block of available addresses. The IP address under which the
Gigaset SE551 WLAN dsl/cable can be reached from outside is assigned by the Internet
Service Provider.
ì If you want to assign the Gigaset SE551 WLAN dsl/cable a different IP address, enter
it in the fields next to IP address.
ì Select a number from the Subnet mask list.
We recommend using an address from a block that is reserved for private use.
This address block is 192.168.1.1 – 192.168.255.254.
69
Page 70

Configuring the Advanced Settings
Please remember:
New settings can only be made after rebooting the Gigaset SE551 WLAN dsl/cable.
If necessary, reconfigure the IP address on your PC (including one that is statically
assigned) so that it matches the new configuration.
Configuring the DHCP server
The Gigaset SE551 WLAN dsl/cable has a DHCP Server for which the factory setting is
active. As a result, the IP addresses of the PCs are automatically assigned by the
Gigaset SE551 WLAN dsl/cable.
Please remember:
u If the DHCP server for the Gigaset SE551 WLAN dsl/cable is activated, you can con-
figure the network setting on the PC so that the option Obtain an IP address
automatically is set. To find out how to do this, please read the document enti-
tled “Network configuration” on the CD.
u If you deactivate the DHCP server, you will have to assign a static IP address for
the PCs using the network settings.
ì To activate the DHCP server, select On.
ì If the DHCP server is active, you can define a Lease time. The Lease time determines
the period for which the PCs keep the IP address assigned to them without changing
them.
Please remember:
If you select the Never expires option, the IP addresses are never changed.
You must select this option if you want to make NAT or firewall settings using the
IP addresses of the PCs, or else you must assign these PCs static IP addresses.
ì Define the range of IP addresses which the Gigaset SE551 WLAN dsl/cable should
use to automatically assign IP addresses to PCs. Define the First issued IP address
and the Last issued IP address.
ì You can define the name of a domain (Windows workgroup) in the Domain name
field.
Assigning static IP addresses to individual PCs
Even if you have activated the DHCP server you can still assign individual PCs a static
IP address (e.g. if you are setting up these PCs for NAT functions).
ì Enter the MAC address and the name of the PC in the Device name field.
ì Enter the IP address you wish to assign to the PC in the field below.
ì Click on the Add button to add the entry to the list.
ì Click on the Delete button to delete the entry from the list.
ì Apply the settings by clicking OK.
70
Page 71

Configuring the Advanced Settings
Configuring wireless connections
If PCs are communicating wirelessly via the Gigaset SE551 WLAN dsl/cable, you should
also take steps to enhance the security of your wireless network. You make this configuration via the Advanced Settings – Wireless Network menu. Here you can
u activate the Gigaset SE551 WLAN dsl/cable's wireless module (see below),
u set the channel and SSID (see page 71),
u set Encryption for wireless transmissions (see page 74), and
u restrict access to the Gigaset SE551 WLAN dsl/cable's LAN (see page 74),
u configure the repeater function on the Gigaset SE551 WLAN dsl/cable.
ì In the Advanced Settings menu, select Wireless Network.
ì Select the On option for Wireless Network (default setting).
Devices can only log in wirelessly if the Gigaset SE551 WLAN dsl/cable's wireless
module is activated.
You can now make the settings for your wireless network.
Channel
This function is only shown in the window if the Super G transmission mode is deactivated (see page 73).
The set radio channel is used by all clients in your network for wireless data transfer.
You can choose between various channels, depending on your current location.
ì Select Automatic so that the best channel for transmitting the data is used automat-
ically.
71
Page 72

Configuring the Advanced Settings
SSID
Before the wireless network components can communicate with each other, you must
use the same SSID (Service Set Identifier).
The default SSID for the Gigaset SE551 WLAN dsl/cable is ConnectionPoint. For security
reasons you should change this SSID and deactivate SSID broadcast (see below).
Enter a character string of your choice. The SSID is case sensitive. It can be up to
32 alphanumerical characters long.
Please remember:
The connection to the wireless network adapters will be interrupted until you enter
the new SSID on them as well.
SSID broadcast
If this option is enabled (default setting), the Gigaset SE551 WLAN dsl/cable will send
the SSID in all data transmissions, and your Gigaset SE551 WLAN dsl/cable's SSID will be
displayed on PCs that have a wireless network adapter. In this case eavesdroppers could
use the SSID to gain access to your network.
If you deactivate SSID broadcast, your Gigaset SE551 WLAN dsl/cable's SSID will not be
displayed. This increases the protection against unauthorised access to your wireless
network. However, you must make a note of the SSID. You will need this to log on your
PC.
ì Select the Off option to deactivate SSID broadcast.
Tra nsmission mo de
This function is only shown in the window if the Super G transmission mode is deactivated (see page 73).
The standard IEEE 802.11g permits data transfer up to 54 Mbit/s, IEEE 802.11b up
to 11 Mbit/s. For the best possible data transfer rates in your network select
IEEE 802.11g only. To operate clients with older wireless network adapters in your
network, select IEEE 802.11b/g (mixed).
ì Select the required transmission mode for your wireless network.
Sending power
ì Select the required sending power for your device.
We recommend that you select a sending power with a range to suit the spatial environment of your local network. A much greater range makes it easier to eavesdrop
on your wireless data transmission.
72
Page 73

Configuring the Advanced Settings
Super G (108 Mbit/s)
With the aid of channel bundling, the Super G transmission mode enables wireless data
transfer up to 108 Mbps. The channel for wireless data transfer cannot be changed. You
can only use Super G if this function is supported by at least one client in your wireless
network. For the best possible data transfer rates, all clients in your LAN should support
Super G.
Please remember:
If you activate Super G as the transmission mode, but it is not supported by all components in your wireless network, then for technical reasons the transfer rate in the network may be significantly lower than the possible maximum of 108 Mbit/s.
ì Select the mode for using Super G (108 Mbit/s) for your wireless network to incre-
ase the data transmission speed. You have a choice of two modes.
– Static: Wireless transmission is at a rate of just 108 Mbps. Clients that do not
support this speed cannot connect to Access Point.
– Dynamic: If you select this transmission mode, the router accepts subscribers
that communicate at different transfer rates and adjusts to the slowest client in
the network.
ì If you do not wish to use Super G (108 Mbit/s), select Disabled in the selection
menu.
XR (extended range)
Activating XR enables data transfer even in the peripheral areas of your wireless netwo rk, alb eit at very lo w da ta t rans fer rates. Conversion to XR mode occurs automatically
when the signal is weak enough and if the partner station is also XR capable.
ì Activate or deactivate XR for your wireless network to increase the range.
ì Click on OK to apply the settings.
73
Page 74

Configuring the Advanced Settings
Setting wireless security
If you are sending data over wireless channels, we recommend that you activate encryption (WEP or WPA) on your wireless network components. WPA offers greater security
than WEP. We therefore recommend that you choose WPA encryption if it is supported
by all components in your wireless network.
WPA is a more advanced procedure than WEP for protecting wireless networks. Dynamic
keys based on TKIP (Temporal Key Integration Protocol) offer increased security. The
new standard WPA2 is based on AES.
WPA also supports the use of an authentication server.
ì In the Wireless Network menu, select Encryption.
The following security mechanisms are currently available:
u WPA2-PSK and WPA2-PSK / WPA-PSK (see page 75)
u WAP2 and WPA2 / WPA with authentication server (see page 76)
u WEP encryption (Wired Equivalent Privacy) (see page 77)
74
Page 75

Configuring the Advanced Settings
WPA2-PSK and WPA2-PSK / WPA-PSK
WPA with Pre-shared key (WPA-PSK)
WPA-PSK is a special WPA mode that provides encryption protection for users at home
and in small companies without a company authentication server. Encryption keys
are automatically generated with the Pre-shared key, and automatically changed
(rekeying) and authenticated between the devices after a certain period of time (Rekey
Interval).
Which standard of encryption you can choose depends on the components in your wireless network. Every PC (network adapter) that requires access to a wireless network protected by WPA must also support WPA. To find out whether and how you can use WPA
on your PC, read your network adapter's operating instructions. If all components support WPA2, select option WPA2-PSK. If you are using network adapters that only support WPA, select the option WPA2-PSK / WPA-PSK. The entries described below are the
same for both options.
ì Select the required option in the Security field.
ì Enter a key in the Pre-shared key field (up to 32 alphanumerical characters) and
confirm it by entering it again.
ì Apply the settings by clicking OK.
75
Page 76

Configuring the Advanced Settings
WPA and WPA2 with authentication server
In large networks (e.g. in companies) WPA enables the use of an additional authentication service. In this case, user access is controlled by user accounts and passwords, in
addition to WPA encryption. A RADIUS server acts as an authentication server. You can
select the new standard WPA2 if this is supported by all components in your wireless
network, or select WPA2 / WPA if you are using devices that only support WPA.
ì Select the required option in the Security field.
ì Enter the IP address of the RADIUS server in the RADIUS server IP address field.
ì Enter the port of the RADIUS server in the RADIUS server port field.
ì In the RADIUS server secret key field, enter a keyword conforming to the conven-
tions of the RADIUS server, which is to be used by the server for authentication.
ì Click on OK to apply the settings.
76
Page 77

Configuring the Advanced Settings
WEP encryption
If WPA is not supported by all components in your wireless network, we advise you to
activate WEP-Encryption on your wireless network components.
ì In the Security field, select the option WEP.
ì Select the Authentication type:
–Select Shared to require that each client logs in to the network with a specified
key.
–Select Open to permit data transfer within your wireless network without the
need for a key.
You can choose either the standard 64 bit key or the more robust 128 bit key for encryption. The keys are generated in hexadecimal or in ASCII format. You must use the same
keys for encryption and decryption for both the Gigaset SE551 WLAN dsl/cable and all
your wireless network adapters.
ì Select the Key length: 64 bit or 128 bit.
ì Select the Input type, i.e. whether you wish to enter the key manually or have it
generated automatically by means of a Passphrase.
Generating the key by means of a Passphrase
ì Enter a Passphrase (up to 32 characters) and confirm it by entering it again. Four
keys are generated.
ì Select one of the four keys as Default key.
77
Page 78

Configuring the Advanced Settings
Manual key entry
ì Select the Key type, Hex or ASCII.
.
If you select Hex you can use the characters 0 to 9 and A to F.
– With a 64 bit encryption depth the key is exactly 10 characters long.
An example of a valid key: 1234567ABC
– With a 128 bit encryption depth the key is exactly 26 characters long.
An example of a valid key: 234567ABC8912345DEF1234567
If you select ASCII you can use the characters 0 to 9, A to Z and a to z plus the special
characters in the ASCII character set.
– With a 64 bit encryption depth the key is exactly 5 characters long.
An example of a valid key: GIGA1
– With a 128 bit encryption depth the key is exactly 13 characters long.
An example of a valid key: GIGASET_SE551
ì Enter up to four keys in fields Key 1 to Key 4 and confirm these keys by entering
them again in fields Confirm key 1 to Confirm key 4.
ì Select one of the four keys as Default key.
78
Page 79

Configuring the Advanced Settings
Please remember:
u It is very important that you make a note of the entered or generated key(s).
You will need this information to configure the wireless network adapters
properly.
u When you have concluded the configuration you must change the WEP
encryption on the wireless network adapters for the connected PCs in the
same way as they will not otherwise be given access to the Gigaset SE551
WLAN dsl/cable's wireless network.
ì Click on OK to apply the settings.
Allowed clients
In this screen you can specify which PCs will have wireless access to the Gigaset SE551
WLAN dsl/cable and hence to your LAN.
ì In the Wireless Network menu, select Allowed Clients.
The default setting for access control is disabled. This means that all PCs that use the
correct SSID can log in.
The access control is based on the MAC addresses of the PCs' network adapters.
ì Activate access control via the On option in the MAC address filter field.
79
Page 80

Configuring the Advanced Settings
Entering PCs manually:
ì Enter the required PCs with MAC address and Device name in the appropriate
fields.
ì Click on the Add button to add the entry to the list.
ì Click on the Delete button to delete the entry from the list.
ì Apply the settings by clicking OK.
Selecting from the list of logged-in PCs
ì From the Known wireless clients list (all PCs that currently have access to the
Gigaset SE551 WLAN dsl/cable), select the PC you want to add to the access control.
ì Click on the Add button to add the entry to the list.
ì Apply the settings by clicking OK.
Please remember:
If you activate MAC access control, you must at least enter the PC from which you
are configuring the Gigaset SE551 WLAN dsl/cable. Otherwise you will no longer
be able to access the user interface and a corresponding error message will be
shown.
If, by mistake, you have denied all PCs access to the Gigaset SE551 WLAN dsl/cable
you have two choices:
u You can completely reset the Gigaset SE551 WLAN dsl/cable (see page 18).
u You can connect a PC to the Gigaset SE551 WLAN dsl/cable using one of the
LAN connections. As MAC access control only applies to PCs that are connected wirelessly, you can use this PC to change the configuration.
80
Page 81

Configuring the Advanced Settings
Repeater function (WDS)
If you use a repeater in your wireless network to extend the range, you must activate the
Wireless Distribution System (WDS) function.
In the Wireless Network menu, select Repeater (WDS).
ì Next to Wireless distribution system, select the On option to activate WDS.
The name of the client is shown in the Comment field.
The MAC address of the repeater is shown in the MAC address field if there is a connec-
tion.
The SSID is shown in the SSID field if there is a connection with the repeater.
The radio channel used for data transfer is shown in the Channel field.
The Signal strength shows the strength of the connection to the repeater in percentage terms if there is a connection to the repeater.
ì Click on Refresh to update the display.
ì Apply the settings by clicking OK.
Note:
Depending on the status of the software in your device, it is possible that SuperG
might not function in conjunction with WDS. If necessary, check whether a software upgrade is offered on the Internet.
81
Page 82

Configuring the Advanced Settings
USB
You can use your device's USB port to share a USB bulk memory or a USB printer with
users in your local network and publish your data on the Internet.
Note:
Generally speaking only devices that support USB V2.0 may be connected. However,
some devices with the earlier standard USB V1.1 still work.
ì In the Advanced Settings menu, select USB.
ì Activate the USB port on your device.
If a USB device is connected, its Status is displayed.
Safely Remove Hardware
ì Click on this button and wait until any connected USB bulk memory or USB printer
is fully deactivated before disconnecting them from your device.
ì Click on OK to save the changes.
Note:
Depending on the status of the software in your device, it is possible that not all
USB functions will work exactly as described below. If necessary, check whether a
software upgrade is offered on the Internet.
82
Page 83

Configuring the Advanced Settings
File server
Your device's integrated file server allows you to make folders and files on a connected
USB bulk memory (e.g. USB stick or USB hard disk) available to all users in your local network.
ì Connect a USB data carrier to the Gigaset SE551 WLAN dsl/cable via the USB port.
Note:
The USB interface of the Gigaset SE551 WLAN dsl/cable supplies 500 –1000 mA
of power. This depends on which other lines are connected. Some hard disks need
more power. In this case the device must have its own mains adapter.
ì In the Advanced Settings menu, select File Server.
ì Select the On option for the File Server.
Enter a name for the file server in the Host name field. This is shown in the network
environment of each computer in your local network and allows users to find your
file server.
If you assign a name other than Server (e.g. the IP address of the Gigaset SE551
WLAN dsl/cable), then the file server will appear in the Windows director y Network
environment both under the name Server and under the name you have assigned.
ì You can enter a Description of the file server in the next field.
83
Page 84

Configuring the Advanced Settings
ì Enter the name of the Domain / workgroup (Workgroup is the standard name for
Windows) in which the file server is located. If you now search your network you will
find the file server within the stated domain / workgroup in the network environment.
The connected USB bulk memory is shown in the Device field.
Partitions list and sharing directories
Partitions shows all partitions for the connected data carrier.
ì Click on the Edit button next to the partition whose directory you want to release
for sharing.
A new window appears with a list of the existing shares.
ì Click on Add to set up a new share for the partition.
ì For an existing share, click on Edit to edit the share.
In both cases a window opens for the next steps (see below).
ì You can delete the required share by clicking on the Delete button.
ì Click on Delete All Shares if you wish to cancel all existing shares.
84
Page 85

Configuring the Advanced Settings
Setting up or editing a share
ì Enter a name for the share.
ì Select the directory you wish to release for sharing. You can enter the complete path
for the directory manually or click on the Browse button. A file menu is opened.
You can now set access protection for the directory.
ì First, select the On option for Security.
ì Select the required option from the list next to Access:
–Select Read only if you only wish to release the data for reading.
–Select Full control if you wish to release the data for reading and writing.
ì Select Depending on password if you wish to make access dependent on a pass-
word.
Depending on the access option chosen you can now enter in the relevant field a password for read only or a password for full control, or different passwords for both read
only and full control.
ì Now enter the password or words and confirm by entering it/them again.
ì Click on OK to save your settings.
85
Page 86

Configuring the Advanced Settings
Web Server
Your device's integrated Web server allows you to publish data on a connected USB bulk
memory (e.g. USB stick or USB hard disk) on the Internet.
Internet users can access your Web server by entering the public IP address in their Internet browser. As Internet providers often change this each time someone dials in, it is
worth using dynamic DNS (see page 66) in addition.
ì Connect a USB data carrier to the Gigaset SE551 WLAN dsl/cable via the USB port.
On the Advanced Settings – USB screen, you can check the status of the connection to the USB bulk memory.
ì In the Advanced Settings menu, select Web Server.
ì Activate your device's integrated Web server.
ì Select the Partition on the connected data carrier to which you wish to save the data
for the Web server.
Note:
Depending on the status of the software in your device, it is possible that not all
Web server functions will work exactly as described below. If necessary, check
whether a software upgrade is offered on the Internet.
86
Page 87

Configuring the Advanced Settings
HTTP
HTTP (Hypertext Transfer Protocol) is the standard protocol for transferring data on the
Internet. You can use it, for example, to publish your own homepage on the Internet.
ì Activate the HTTP service for your Web server.
ì You can change th e Port via which Internet users can access your data, for example,
to hide your data and protect it against unauthorised users.
For your security, it is only possible to publish data on the Internet via the HTTP service
if this is stored in the \gigaset_http directory.
87
Page 88

Configuring the Advanced Settings
FTP
FTP (File Transfer Protocol) is a protocol for exchanging files on the Internet. You can use
it, for example, to offer files for downloading, or to receive files from other users.
ì Activate the FTP service for your Web server.
ì You can change th e Port via which Internet users can access your data, for example,
to hide your data and protect it against unauthorised users.
For your security, it is only possible to publish data on the Internet via the FTP service if
this is stored in the \gigaset_ftp directory.
In addition – for example, if you wish to change your own homepage via the Internet –
you can also set up FTP access in the \gigaset_http directory. You can allow this access
generally or only allow it for selected users with a user name and password.
ì For Access (read only), select whether all users may read your data in Anonymous
mode, or only one Specified user.
ì Select whether Access (full control) to your data is disabled or whether a
Specified user may read, edit and delete your data.
ì Enter the name in the Specified user field. Define different user names for the dif-
ferent types of access and directory.
ì Enter the password for the user and confirm it by entering it again in the field below.
Please note when making the entry that the password is case sensitive. Avoid proper
names and all too obvious words. Instead, use upper and lower case letters, numbers and special characters.
ì Click on OK to apply the changes.
88
Page 89

Configuring the Advanced Settings
Printer server
Your device's integrated printer server allows you to offer a USB printer to all users in
your local network.
Note:
At present the printer server can only be used with selected printers. You can obtain
further information by contacting the hotline or else on the Internet (see page 127).
To be able to use th is fun ction, first c onnect a U SB printe r to the US B port o n your device
such that this device is shown on this screen. You can check the status of the connection
to the USB printer on the Advanced Settings – USB screen.
ì Activate your device's integrated printer server.
Users can set up the connected printer by entering the local IP address on your PC.
ì Click OK to accept the changes.
You will find information on setting up the printer connected to the Gigaset SE551
WLAN dsl/cable in the section entitled "Installing the printer port for network printers"
on page 110.
89
Page 90

Administration and status information
Administration and status information
The Gigaset SE551 WLAN dsl/cable user interface includes several helpful functions for
administration. You can
u open an Internet connection manually (see below),
u select regional options (see page 91),
u change the system password (see page 92),
u set up remote management (see page 93),
u save, and if necessary restore, configuration data (see page 95),
u reset the Gigaset SE551 WLAN dsl/cable to the factory settings (see page 96),
u reboot the device (see page 96),
u update the firmware (see page 97),
u make the settings for the system protocol (see page 98),
u view information about the configuration and status of the Gigaset SE551 WLAN
dsl/cable (see page 99).
Connecting to the Internet manually
You can connect to the Internet manually. If, for example, you deactivated the function
Auto Connect when configuring Internet access, then Internet applications (such
as your browser or e-mail application) will not automatically open a connection when
they are launched. In this case, you will have to open the connection manually when it
is required and also close it again when you are finished with it.
To open or close an Internet connection manually:
ì Open the Gigaset SE551 WLAN dsl/cable start screen as described on page 24.
If you have already started the configuration environment, click on the start screen
tab at the top left of the window.
If you have not yet started the configuration environment, start it now and log on.
ì Click on Connect to open a connection to the Internet.
90
Page 91

Administration and status information
Regional Options
To operate your Gigaset SE551 WLAN dsl/cable you can select the location, time zone,
and the format for entering the date and time, as well as configure the application for a
time server for the Internet time.
ì In the Advanced Settings – Administration menu, select the entry
Regional Options.
ì Select the country where you are currently located from the list. You can make
the settings for the clock to change automatically to summer time and/or to the
Time zone as you wish.
ì Select the required option and/or select the Time zone for your location.
ì Select the required format for entering the date and time from the Date format and
Time format lists respectively.
91
Page 92

Administration and status information
Internet Time
The System time for your device is automatically synchronised with the time server on
the Internet. The time of the Last synchronization with time server is displayed for
your information.
ì If you w ish to use yo ur ow n time s er ver, s elect the On op tion next t o the Use custom
time servers field.
ì Enter the Internet address for the time server in the Preferred time server and
Alternate time server fileds respectively.
ì Click on OK to apply the settings.
System Password
You can assign a System Password for the configuration environment of your
Gigaset SE551 WLAN dsl/cable, and specify the period after which a session is to end
automatically if no further entry is made.
ì In the Administration menu, select System Password.
After installation, the configuration of the Gigaset SE551 WLAN dsl/cable is not yet protected with a System Password. To prevent unauthorised changes to the configuration,
you should set a System Password and change this System Password from time to time.
You may have already set a System Password when setting up the Security Setup Wiz-
ard. If so, you can change it here.
ì If you have already set a System Password, enter the old System Password in the
Current password field.
ì Enter a new password in the New password field, and repeat it in the Confirm new
password field.
92
Page 93

Administration and status information
The password may contain up to 32 characters. The SSID is case sensitive. Avoid proper
names and all too obvious words. Use a combination of letters, numbers and special
characters.
Please remember:
If you ever forget your System Password you will have to reset your Gigaset SE551
WLAN dsl/cable (see page 18). Please bear in mind that this will restore all the settings
to the factory configuration. No System Password will be active either.
Setting Idle time before log off:
ì Enter the period in minutes after which the configuration program is to be aborted
if no entry is made. The default setting is 10 minutes. If you enter the value 0, the
program will never be aborted automatically.
ì Click OK to accept the settings.
Setting up Remote Management
Remote Management enables a PC that is not on your local network to be used to configure the Gigaset SE551 WLAN dsl/cable with a standard Web browser. You can permit
Remote Management for one particular PC or for any PCs.
For security reasons this function is only available if you have previously changed the
system password for your device (see page 92).
ì In the Administration menu, select Remote Management.
ì Select the On option for Remote Management if you wish to permit Remote Man-
agement.
93
Page 94

Administration and status information
You can start remote management by entering the public IP address in your Internet
browser. As Internet providers often change this each time you dial in, it is worth using
dynamic DNS (see page 66) in addition.
ì You can ch ange th e Port via which you can access the configuration program from
the Internet, for example in order to hide and protect the configuration program
against unauthorised access.
ì Allowed connections: You can specify one particular PC for Remote Management
or permit this function for any PCs. Select the required option from the list.
Please remember:
If you permit several PCs then anyone who finds out your password can access this
user interface and therefore also your network! If it is needed, then you should
only activate this option for a short time.
Remote Management for one particular PC:
ì In the Authorized client field, enter the IP address of the PC that is to have access
to the user interface of the Gigaset SE551 WLAN dsl/cable from outside your local
network.
Please remember:
u The Internet provider might assign the IP address to the PC dynamically.
This can then change the IP address. Make sure that the PC that is to access
the router from the Internet always has the same IP address.
u For access to the configuration environment via Remote Management, you
must enter in the browser the address of the Gigaset SE551 WLAN dsl/cable
to be managed using the following format: http://X.X.X.X:8080
(x.x.x.x stands for the IP address of the Gigaset SE551 WLAN dsl/cable).
ì Click OK to accept the settings.
94
Page 95

Administration and status information
Saving and restoring a configuration
Once you have co nfigured your Gigaset SE551 WLAN d sl/cable, it i s advisabl e to back up
the settings. Then you can restore them at any time, should they be accidentally deleted
or overwritten.
You can also reset the configuration to the factory settings. You should always do this
before passing your device on to any outsiders.
u In the Administration menu, select Save & Restore.
Saving configuration data
ì For Task , select the option Save configuration.
This opens a file selection window where you can specify the file you wish to store
in the backup file.
ì On your local PC select a directory where you wish to store the configuration file,
and enter a name for the file.
ì Click on Save.
Once the procedure has been completed, the current configuration data will have been
backed up in the specified file.
95
Page 96

Administration and status information
Restoring the back-up
ì For Task , select the option Restore configuration.
ì In your file system, select the backup file with which you wish to restore the config-
uration.
A window will appear prompting you to confirm the procedure.
ì Click on OK. The configuration will now be updated.
Resetting to the factory settings
You can reset the Gigaset SE551 WLAN dsl/cable to the factory settings. You should do
this before making the device available to others or exchanging it through the dealer.
Otherwise unauthorised persons may use your Internet access data at your expense.
ì Select the option Reset configuration to factory default settings and click on OK.
A window will appear prompting you to confirm the procedure.
.
Please remember:
You can restart your Gigaset SE551 WLAN dsl/cable if it is not working properly. It
should then be ready for use again (see page 18).
Please bear in mind that when the device is fully reset all configuration settings will
return to the factory settings. Th is means that you will have to completely reconfigure
the Gigaset SE551 WLAN dsl/cable.
Reboot
You can restart your Gigaset SE551 WLAN dsl/cable if it is not working properly. It should
then be ready for use again.
In the Administration menu, select Reboot.
Click on OK to restart the device.
96
Page 97

Administration and status information
Updating firmware
If Gigaset or your Internet provider make available a new version of the firmware, you
can update the firmware of the Gigaset SE551 WLAN dsl/cable. To do this you must first
download the new firmware into your PC.
Then proceed as follows:
ì Close down all network activities on your local network.
ì In the Administration menu, select Firmware Update.
The version of the firmware currently running on your device is displayed in the line
Current firmware version.
ì In the Firmware update file field, enter the file with the new firmware you have
downloaded from the Internet.
ì Click on OK.
The firmware will now be updated.
Please remember:
Do not switch off your Gigaset SE551 WLAN dsl/cable during the updating procedure.
Updating can take several minutes.
After successful updating, the device is automatically rebooted. This may take some
minutes. After successful updating, the login screen appears again.
Please remember:
You can check whether the upgrade process was in fact successful in the Status menu
on the start screen (see page 99). Here you should see the latest firmware version for
the Gigaset SE551 WLAN dsl/cable.
97
Page 98

Administration and status information
System Log
The System Log is displayed in the Status – Device menu. It can give you important
information about the functioning of your device and possible problems. You can also
have this information transmitted automatically on a system log server.
ì In the Administration menu, select System Log to make the settings for the log.
ì Log level: Select how much information is to be contained in the system log. You
can choose between four levels:
– Critical: logs the most important information concerning possible problems in
the functioning of your device
– Debugging:complete and detailed information about all your device's functions
– Warning and Informational are intermediate levels.
ì System log server
– Activate this function if you require automatic transmission of your device's sys-
tem log to a system log server in your local network.
– Server address:
Enter the IP address for the system log server.
– Server port:
Enter the port of the system log server that is to be used to transmit the system
log.
ì Click on OK to save and apply the changes.
98
Page 99

Status information
Status information
You can view information about the configuration and status of the Gigaset SE551
WLAN dsl/cable in the Status menu of the Gigaset SE551 WLAN dsl/cable. On the first
screen you will see an overview of the status of the Internet connection, the local and
wireless network, and of the device.
For detailed information you can view the following status screens:
u Security
u Internet
u Traffic Control
u Local Network
u Wireless Network
u Device
To display a status screen, proceed as follows:
ì Select Status on the start screen.
ì Select the entry with the information you require.
Overview
On the first screen you are given an overview of the current operating status and most
important data for your device.
99
Page 100

Status information
Internet
u Connection status
The status of the connection to the Internet and, if connected, the duration of the
connection.
u IP address
The public IP address of your device.
Local network
u IP address
The local IP address of your device.
u DHCP Server
The status of the DHCP server for your device and, if activated, the n umber of clients
in your network to which an IP address has been assigned.
Wireless network
u Status
The status of the wireless network connection for your device and, if activated, the
number of clients in your wireless network connected to your device.
u SSID
The identification of your wireless network.
Device
u System time
Your device's system time.
u Firmware version
The version of the firmware currently installed in your device.
ì Click on Refresh to refresh this screen and update the displayed data.
100
 Loading...