

Page 1
POLYMOBIL III
Start-up Instructions
SP
from Serial No. 3000
© Siemens AG 2005
The reproduction, transmission or
use of this document or its contents
is not permitted without express
written authority. Offenders will be
liable for damages. All rights,
including rights created by patent
grant or registration of a utility
model _or_ design,_are_ reserved.
English
Print No.: RXB8-115.034.02.03.02 Doc. Gen. Date: 04.05
Replaces: RXB8-115.034.02.02.02
Page 2

0 - 2 Revision
Chapter Page Rev.
All All 03
Document revision level
The document corresponds to the version/revision level effective at the time of system delivery.
Revisions to hardcopy documentation are not automatically distributed.
Please contact your local Siemens office to order current revision levels.
Disclaimer
The installation and service of equipment described herein is to be performed by qualified personnel
who are employed by Siemens or one of its affiliates or who are otherwise authorized by Siemens or
one of its affiliates to provide such services.
Assemblers and other persons who are not employed by or otherwise directly affiliated with or authorized by Siemens or one of its affiliates are directed to contact one of the local offices of Siemens or
one of its affiliates before attempting installation or service procedures.
POLYMOBIL III RXB8-115.034.02 Page 2 of 4 Siemens AG
Rev. 03 04.05 CS PS 24 Medical Solutions
Page 3

Contents 0 - 3
Page
1 _______Requirements__________________________________________________ 1 - 1
Emphasized texts . . . . . . . . . . . . . . . . . . . . . . . . . . . . . . . . . . . . 1 - 1
Icons. . . . . . . . . . . . . . . . . . . . . . . . . . . . . . . . . . . . . . . . . . . 1 - 1
Required tools and measurement devices . . . . . . . . . . . . . . . . . . . . . . . 1 - 2
Safety information and protective measures . . . . . . . . . . . . . . . . . . . . . . 1 - 2
Important start-up information . . . . . . . . . . . . . . . . . . . . . . . . . . . . . . 1 - 3
Notes on the protective conductor resistance test . . . . . . . . . . . . . . . . . . . 1 - 4
Notes on device leakage current measurement. . . . . . . . . . . . . . . . . . . . . 1 - 6
Replacement for damaged or lost screws . . . . . . . . . . . . . . . . . . . . . . . . 1 - 8
Cleaning . . . . . . . . . . . . . . . . . . . . . . . . . . . . . . . . . . . . . . . . .1 - 8
2 _______Unpacking ____________________________________________________ 2 - 1
3 _______Checking and adapting the line voltage ____________________________3 - 1
Checking the nominal line voltage. . . . . . . . . . . . . . . . . . . . . . . . . . . . 3 - 1
Adaptation of the nominal line voltage. . . . . . . . . . . . . . . . . . . . . . . . . . 3 - 1
4 _______Functional checks ______________________________________________ 4 - 1
Checking the control and display elements . . . . . . . . . . . . . . . . . . . . . . . 4 - 1
Checking the weight counterbalance . . . . . . . . . . . . . . . . . . . . . . . . . . 4 - 2
Readjustment of the weight counterbalance with affixed accessories . . . . . . . . . 4 - 2
Checking the control elements on the double slot diaphragm. . . . . . . . . . . . . . 4 - 3
Checking the exposure release with high-voltage . . . . . . . . . . . . . . . . . . . . 4 - 3
Checking coincidence of light field and radiation field. . . . . . . . . . . . . . . . . . 4 - 4
Checking the exposure switch-off . . . . . . . . . . . . . . . . . . . . . . . . . . . . 4 - 6
5 _______Final work steps _______________________________________________ 5 - 1
Protective conductor test . . . . . . . . . . . . . . . . . . . . . . . . . . . . . . . . 5 - 1
Device leakage current measurement. . . . . . . . . . . . . . . . . . . . . . . . . . 5 - 1
Reports . . . . . . . . . . . . . . . . . . . . . . . . . . . . . . . . . . . . . . . . .5 - 2
Last work steps . . . . . . . . . . . . . . . . . . . . . . . . . . . . . . . . . . . . . 5 - 2
6 _______Start-up report _________________________________________________ 6 - 1
POLYMOBIL III Start-up report . . . . . . . . . . . . . . . . . . . . . . . . . . . . . 6 - 1
7 _______Electrical safety / reports ________________________________________ 7 - 1
Protective conductor resistance / report. . . . . . . . . . . . . . . . . . . . . . . . . 7 - 1
Device leakage current / report . . . . . . . . . . . . . . . . . . . . . . . . . . . . . 7 - 3
8 _______Changes to previous version _____________________________________ 8 - 1
Siemens AG RXB8-115.034.02 Page 3 of 4 POLYMOBIL III
Medical Solutions Rev. 03 04.05 CS PS 24
Page 4

0 - 4 Contents
Page
This page intentionally left blank.
POLYMOBIL III RXB8-115.034.02 Page 4 of 4 Siemens AG
Rev. 03 04.05 CS PS 24 Medical Solutions
Page 5
Requirements 1
Emphasized texts 1
1 - 1
DANGER
WAR NING
CAUTION
NOTICE
DANGER indicates an immediate danger that if disregarded will
cause death or serious physical injury.
WARNING indicates a possible danger that if disregarded can
cause death or serious physical injury.
CAUTION used with the safety alert icon indicates a possible danger that if disregarded will or can lead to minor or moderate physical injury and/or damage to property.
NOTICE used without the safety alert icon indicates a possible
danger that if disregarded may or will lead to an undesirable
result or state other than death, physical injury or property damage.
NOTE
NOTE is used to indicate information which explains the proper
way to use devices or to carry out a process, i.e. which provides
hints and tips.
Icons 1
Tests and adjustments that must be performed with the radiation switched on are
indicated by this radiation warning icon.
This icon means "Dangerous electrical voltage".
Enter the result of tests marked with this icon in the test report at the end of these
instructions.
Siemens AG RXB8-115.034.02 Page 1 of 8 POLYMOBIL III
Medical Solutions Rev. 03 04.05 CS PS 24
Page 6
1 - 2 Requirements
Required tools and measurement devices 1
NOTE
All tools, measuring equipment and aids, with the exception of
those marked with "*", are listed and specified in the STC
(Service Tools Catalogue).
• Standard service tool kit*
• Ground wire tester
• Device leakage current measuring device
• Digital multimeter
Safety information and protective measures 1
WAR NING
Danger of injuries, death or material damage.
Note
- the product-specific safety notes in these instructions,
- the general safety information in the document
TD00-000.860.01...
and
- the safety information in accordance with ARTD Part 2.
WAR NING
Non-compliance can lead to death, to injuries or to
material damage.
X-ray radiation!
Non-compliance can lead to illnesses, irreversible damage to
body cells and the genotype, severe injuries and even death.
In work on the system in which radiation must be released, the
radiation protection directives and the rules for radiation protection according to ARTD 02.771.02 must be complied with.
Please note:
- Use available radiation protection devices.
- Wear radiation protection clothing (lead apron).
- Keep your distance from the radiation source as large as possible.
- Release radiation only if necessary.
- Set radiation activity as low as possible.
(Low kV and mAs values)
- Release radiation for as short a time as possible.
Checks in which radiation must be released are identified by the
radiation warning symbol.
POLYMOBIL III RXB8-115.034.02 Page 2 of 8 Siemens AG
Rev. 03 04.05 CS PS 24 Medical Solutions
Page 7
Requirements 1 - 3
DANGER
In work on the opened system there is a
! risk of electric shock !
• After the system is switched off around 300 V direct voltage are
present in the control console for the main inverter.
The yellow LED V35 on D920 lights up.
The voltage drops within approx. 1.5 minutes to approx. 12V; the
LED V35 goes out.
• Connect the POLYMOBIL III only to a mains supply (wall outlet) that corresponds in its
installation to the requirements according to VDE 0107 or the national regulations.
• Before any intervention switch the POLYMOBIL III off with the power OFF switch on the
control console and pull out the power plug!
• Install or remove components only with the generator switched off; when doing this,
observe ESD guidelines.
Important start-up information 1
• The POLYMOBIL III that has been completely tested and set up in the factory is ready for
use after start-up is completed.
• The POLYMOBIL III can be connected to a nominal line voltage of 110 V AC (± 10%) or
230 V AC (
exception is connection to a line voltage
+ 6 / - 10%). There is an automatic adaptation to the existing line voltage. An
≥ 240 V AC (see the "Adaptation of the nominal line voltage" section).
NOTE
• Observe the on-site fusing of the wall outlet:
- 10 A slow-blow (on-site) at 207 ... 243.8 V line voltage
- 16 A slow-blow (on-site) at 99 ... 121 V line voltage
• The power connection cable of the POLYMOBIL III is delivered
with a grounding type plug.
Fit national power connection plugs as required.
• After start-up, a test specified specifically for the country of use may have to be
performed; e.g. acceptance test according to RöV (Germany).
Acceptance test according to RöV (Germany):
Required measured values can be taken partially from the test report supplied with the
system.
Siemens AG RXB8-115.034.02 Page 3 of 8 POLYMOBIL III
Medical Solutions Rev. 03 04.05 CS PS 24
Page 8

1 - 4 Requirements
The following values measured in the factory are documented in the test report:
- Brightness of the light localizer
- Visual test of filter values
- Coincidence of light field and radiation field
- Accuracy of the X-ray tube voltage
- Checking the mAs values
- Reproducibility of radiation
Notes on the protective conductor resistance test 1
Observe the instructions in the safety rules for installation and repair
(ARTD-002.731.17 ...).
The protective conductor resistance of 0.2 ohms must not be exceeded.
Initial measurement
Perform the protective conductor test after completion of all work.
The measurement must be made according to DIN VDE 0751, Part 1 (see ARTD Part 2).
In this case the protective conductor resistance in the normal operating condition to all
conductive touchable parts of the system must be measured.
Make sure that control cables or data cables between the components of the system do
not imitate any protective conductor connection.
During the measurement, move the power cable and additional connection cables with
integrated protective conductor section by section to detect cable breaks.
The protective conductor resistance must not exceed 0.2 Ohms.
The values must be recorded as initial measurements in the report ’Protective conductor
resistance / report’ stating the measuring points.
Document the measuring procedure and the measuring instrument used (designation
and serial number).
POLYMOBIL III RXB8-115.034.02 Page 4 of 8 Siemens AG
Rev. 03 04.05 CS PS 24 Medical Solutions
Page 9
Requirements 1 - 5
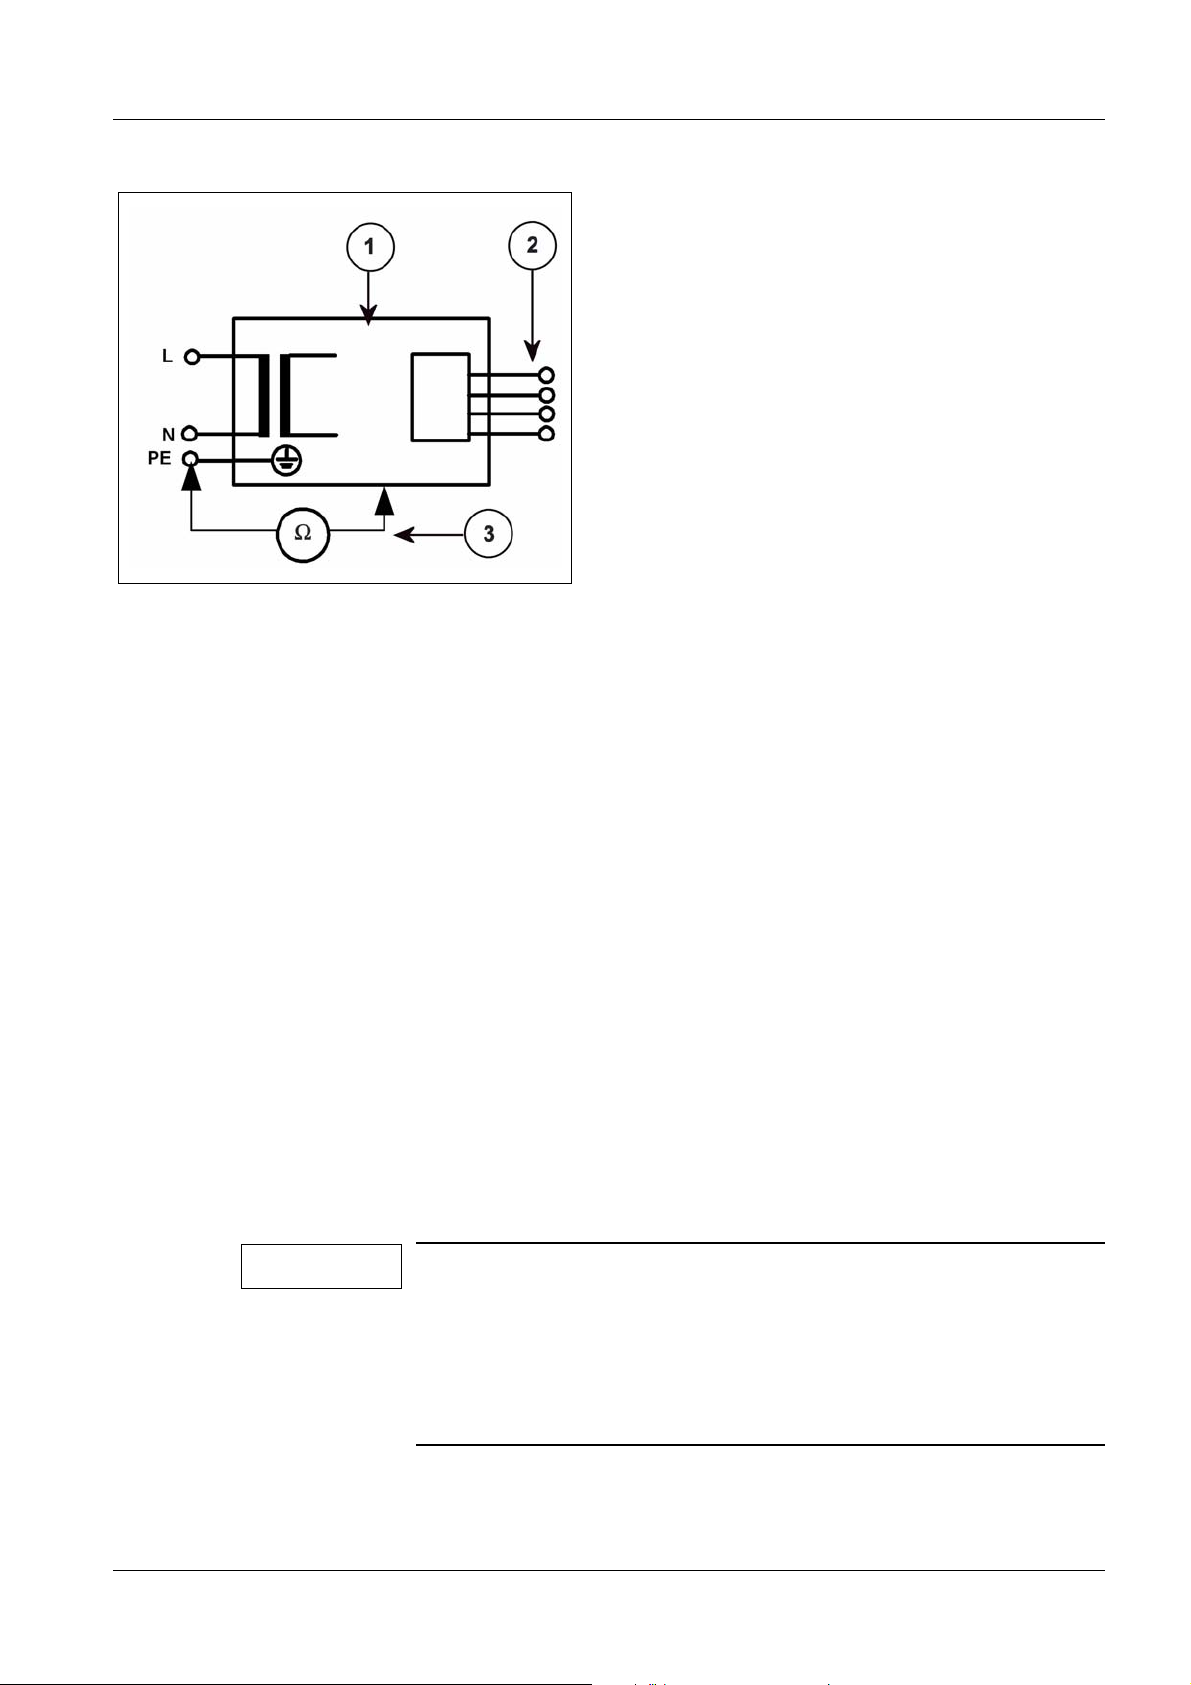
Fig. 1 Measuring circuit for measuring the protective conductor resistance in systems that are separated from the
power supply, according to DIN VDE 0751-1:2001-10, Fig. C2.
1 = System
2 = Application part (not present)
3 = Measuring arrangement (integrated in the measuring instrument)
Repeat measurement
In the case of maintenance or repair perform the protective conductor resistance measurement again.
Document and assess the values determined in the repeat measurement.
The measurement must be made according to DIN VDE 0751, Part 1
(see ARTD-002.731.17...). In this case the protective conductor resistance in the normal
operating condition to all conductive touchable parts of the system must be measured.
Make sure that control cables or data cables between the components of the system do
not imitate any protective conductor connection.
During the measurement, move the power cable and additional connection cables with
integrated protective conductor section by section to detect cable breaks.
The protective conductor resistance must not exceed 0.2 Ohms.
The values determined in the repeat measurement must be recorded and assessed in the
report ’Protective conductor resistance / report’, stating the measuring points.
Document the measuring procedure and the measuring instrument used (designation
and serial number).
NOTE
Evaluate the results by comparing the first measured value to the
corresponding values documented during preceding maintenance procedures or safety checks.
A sudden or unexpected increase of the measured values
may indicate a safety-relevant defect
- even if the limit value of 0.2 ohms is not exceeded
(protective ground wire or contacts).
Siemens AG RXB8-115.034.02 Page 5 of 8 POLYMOBIL III
Medical Solutions Rev. 03 04.05 CS PS 24
Page 10
1 - 6 Requirements
Notes on device leakage current measurement 1
Observe the instructions in the safety rules for installation and repair (ARTD-002.731.17).
WAR NING
Electrical voltage!
Non-compliance can lead to severe injuries and even death.
The device leakage current measurement may be
performed on systems of protection class I only after the
protective conductor test has been passed.
Initial measurement
Perform the device leakage current measurement after completion of all work.
Perform the measurement according to DIN VDE 0751, Part 1 (see ARTD-002.731.17...),
and record the determined value as the first measured value.
Measurement of the device leakage current according to the differential current method
(measuring arrangement according to Fig. 2) must be given preference, since no danger
for the person performing the measurement and other persons arises during the measurement.
However, please note the minimum resolution of the leakage current measuring instrument and any additional manufacturer's data restricting the use of the measuring instrument.
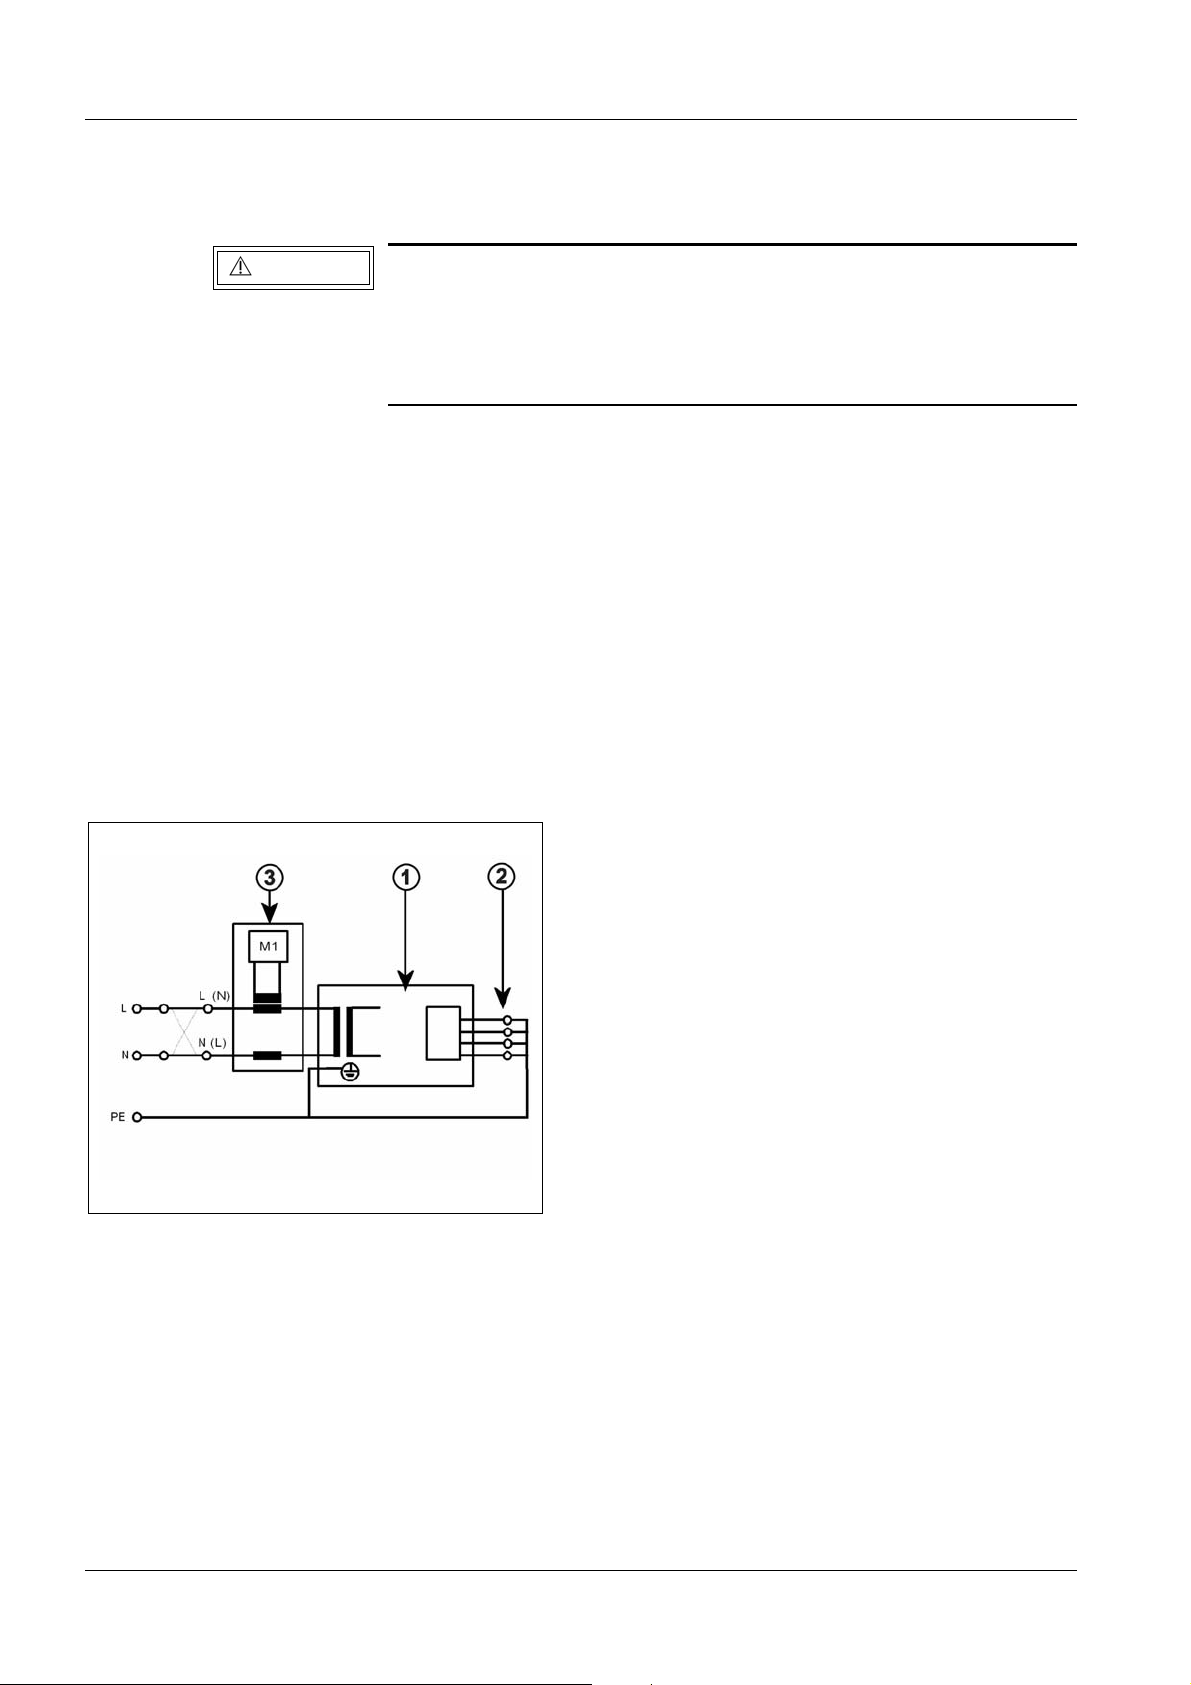
Fig. 2 Measuring circuit for measuring the device leakage current according to the differential current method
according to DIN VDE 0751-1:2001-10, Fig. C6 for protection class
1 = System
2 = Application part (not present)
3 = Measuring arrangement (integrated in the measuring instrument)
I.
If the direct measurement of the device leakage current is used
(measuring arrangement according to Fig. 3), then the system must be set up insulated
during the measurement and must not be touched during the measurement.
POLYMOBIL III RXB8-115.034.02 Page 6 of 8 Siemens AG
Rev. 03 04.05 CS PS 24 Medical Solutions
Page 11
Requirements 1 - 7
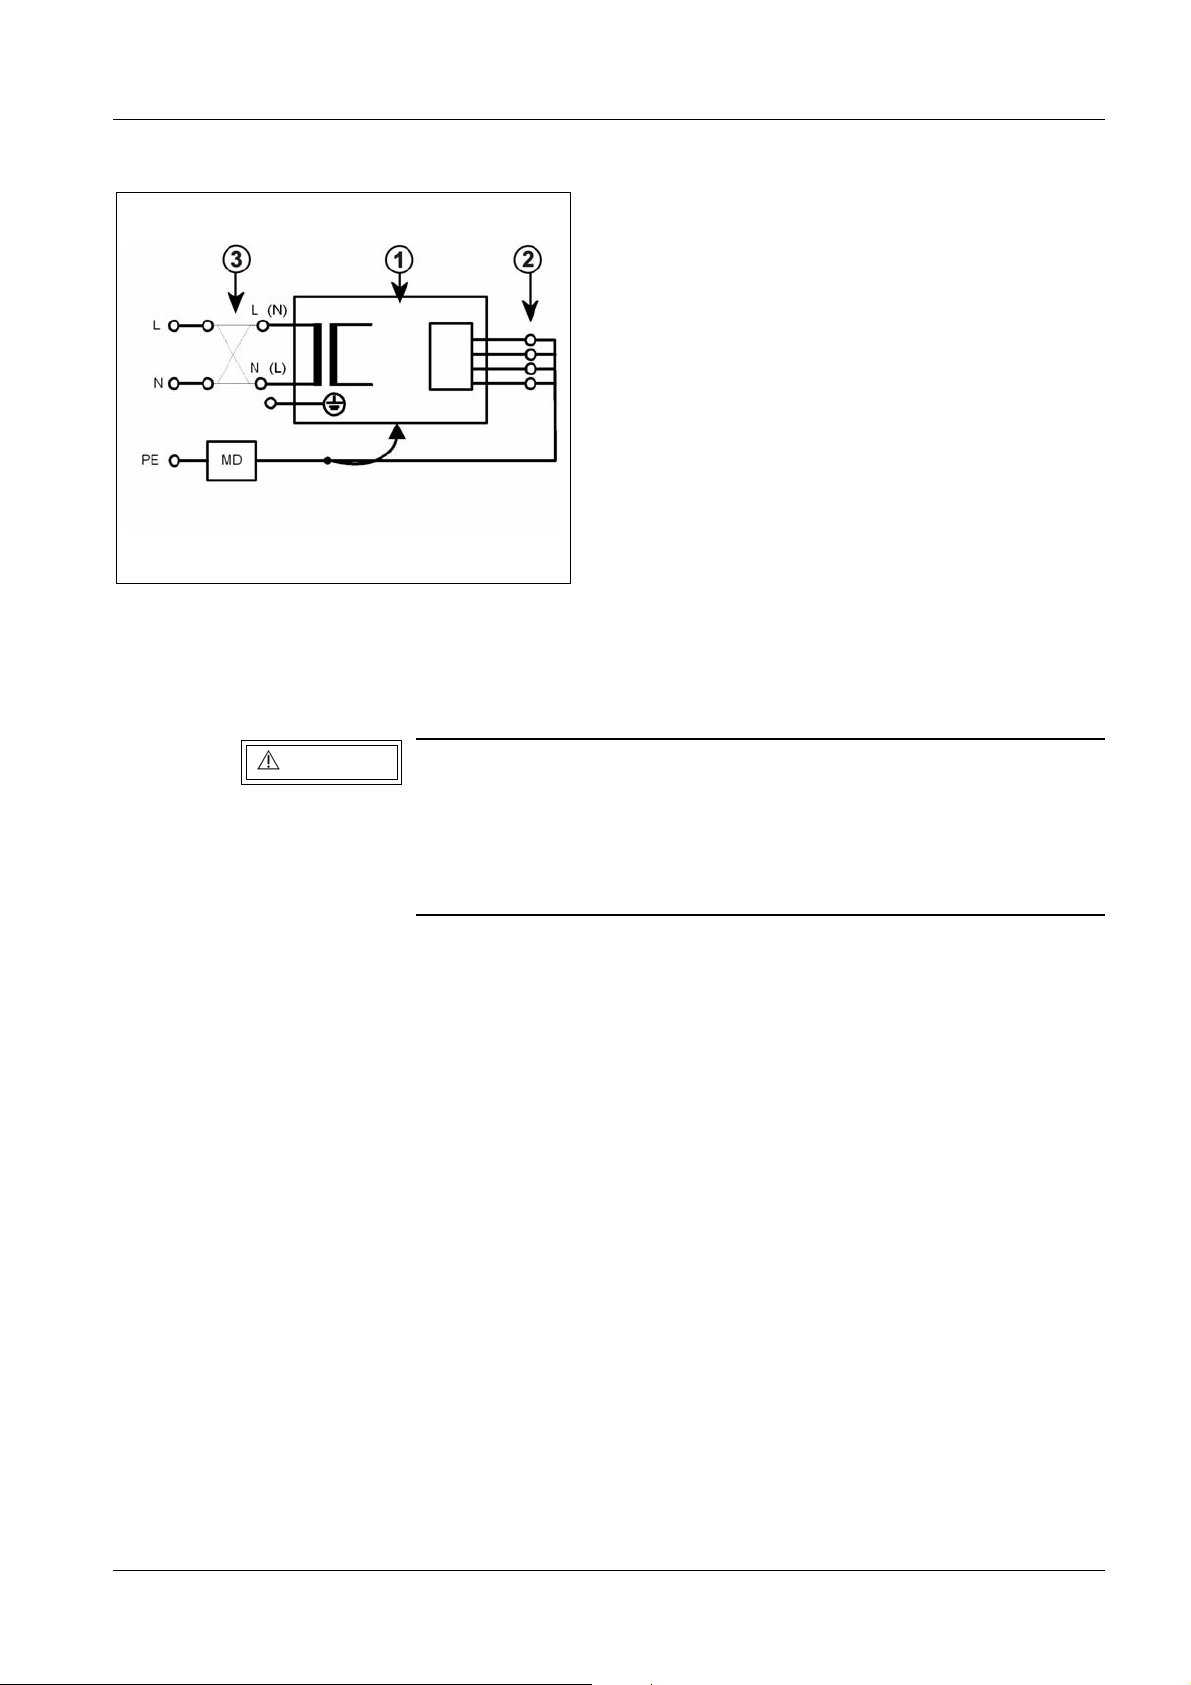
Fig. 3 Measuring circuit for the direct measurement of the device leakage current
according to DIN VDE 0751-1:2001-10, Fig. C5 for protection class
1 = System
2 = Application part (not present)
3 = Measuring arrangement (integrated in measuring instrument)
I.
WAR NING
Electrical voltage!
Non-compliance can lead to severe injuries and even death.
No housing parts of the system may be touched during the measurement in the direct measurement of the device leakage current
(measuring arrangement according to Fig. 3).
Third-person access to the system must be prevented.
The system must be switched on during the measurement. Measuring instruments with
automated measuring sequences must therefore be set to manual measurement.
Enter the highest value as first measured value in the report ’Device leakage current /
report’.
This value must not exceed the permissible leakage current values according to
DIN VDE 0751-1:2001-10, Table F.1, line "Device leakage current for devices according to
remarks 1 and 3", of 2.5 mA.
Measure and record the current line voltage. If the measured line voltage deviates from
the nominal voltage, then correct the measured value to the value corresponding to a
measurement at the nominal value of the line voltage. Document this in addition.
Document the measuring procedure (differential measurement or direct measurement)
and the measuring instrument used (designation and serial number).
Repeat measurement
When service or repair work is performed on the primary power supply circuit (e.g. repairs
to the power-on circuit or replacement of the line filter), the device leakage current test
must be repeated.
The same measuring conditions as in the first measurement apply.
Siemens AG RXB8-115.034.02 Page 7 of 8 POLYMOBIL III
Medical Solutions Rev. 03 04.05 CS PS 24
Page 12

1 - 8 Requirements
Record and assess the highest value determined in the repeat measurement in the existing report ’Device leakage current / report’.
This value must not exceed the permissible leakage current values according to
DIN VDE 0751-1:2001-10, Table F.1, line "Device leakage current for devices according to
remarks 1 and 3", of 2.5 mA.
Measure and record the current line voltage. If the measured line voltage deviates from
the nominal voltage, then correct the measured value to the value corresponding to a
measurement at the nominal value of the line voltage. Document this in addition.
Document the measuring procedure (differential measurement or direct measurement)
and the measuring instrument used (designation and serial number).
NOTE
Evaluate the results by comparing the first measured value to the
corresponding values documented during preceding maintenance procedures or safety checks.
A sudden or unexpected increase of the measured values may
indicate that a fault has occurred in the primary circuit of the
power supply (damaged insulation, damage caused by humidity,
defective interference suppressor, etc.) - even if the limit value of
2.5 mA is not exceeded.
Replacement for damaged or lost screws 1
• Damaged or lost screws may be replaced only with screw types that meet specifications,
made of steel per DIN 267 and that have the specified hardness rating.
CAUTION
Replacement of screws.
All Allen screws used must basically have the strength class 8.8.
Cleaning 1
• Prior to cleaning the unit, the unit must always be switched off or disconnected from line
power.
• Clean the unit with just water or with a lukewarm, aqueous solution of water and a
common household cleaning agent.
• Do not use souring powders and no organic solvents or cleaning agents, e.g. cleaning
fluid, alcohol, spot remover, etc.
• Water spraying is not permitted.
• For further information, see the operator manual "Cleaning/Disinfecting".
POLYMOBIL III RXB8-115.034.02 Page 8 of 8 Siemens AG
Rev. 03 04.05 CS PS 24 Medical Solutions
Page 13

Unpacking 2
Fig. 1
2 - 1
• Bend the straps on the crate cover upwards and lift off the crate cover.
• Bend open the straps of the side walls and lift off the side walls.
• Place the side wall with the integrated ramp (1/Fig. 1) in front of the pallet and hook in the
fastening straps.
• Remove the plastic cover.
Siemens AG RXB8-115.034.02 Page 1 of 2 POLYMOBIL III
Medical Solutions Rev. 03 04.05 CS PS 24
Page 14

2 - 2 Unpacking
Fig. 2 Fig. 3
• Remove the protective covers on the single tank and the collimator.
• Unscrew the 4 hexagonal head screws (2/Fig. 2, width across flats 17 mm) remove the
bow (3/Fig. 2) and the U-rail (4/Fig. 2).
• Bring the foot pedal from the locked position (5/Fig. 2) into the maneuvering position
(6/Fig. 3). For further foot pedal positions refer to the operator manual.
• Remove the 2 hexagonal head screws and the bow (7/Fig. 2, width across flats 17 mm)
on the left and right of the stand carriage.
• Push the POLYMOBIL III over the rail (8/Fig. 3) and move it over the ramp (9/Fig. 3)
away from the pallet.
POLYMOBIL III RXB8-115.034.02 Page 2 of 2 Siemens AG
Rev. 03 04.05 CS PS 24 Medical Solutions
Page 15

Checking and adapting the line voltage 3
3 - 1
7 6 5 4 3 2 1
Fig. 1 Fig. 2
Checking the nominal line voltage 3
240 V
220 V
200 V
125 V
T1
110 V
100 V
4
0 V
3
• Measure the line voltage with the digital multimeter on-site at the wall outlet.
Record the line voltage.
Adaptation of the nominal line voltage. 3
NOTE
If the measured line voltage is
line voltage adaptation at T1!
• At the bottom of the control console loosen the hand screw and the protective conductor
cable shoe (accessible through the cassette compartment).
• Loosen the corrugated hose from the holding clamps.
• Lift the control console at the handle recesses and set it down on a table or similar base.
• Loosen the 4 Allen screws (1/Fig. 1, wrench size 4mm) and lift the cover upwards.
• Loosen the cheese-head screw (2/Fig. 2) and the 2 nuts (3/Fig. 2) and hinge the control
unit to the side.
• At the terminal block of the transformer T1 change the conductor connection from T1.6
(220 V) to T1.7 (240 V) (4/Fig. 2).
• Then close the control console in the reverse order, set it on the mobile stand, fasten it
with the hand screw and connect the protective conductor cable shoe.
≥ 240 V AC, then make a nominal
Siemens AG RXB8-115.034.02 Page 1 of 2 POLYMOBIL III
Medical Solutions Rev. 03 04.05 CS PS 24
Page 16

3 - 2 Checking and adapting the line voltage
This page intentionally left blank.
POLYMOBIL III RXB8-115.034.02 Page 2 of 2 Siemens AG
Rev. 03 04.05 CS PS 24 Medical Solutions
Page 17

Functional checks 4
4 - 1
NOTE
If malfunctions occur during these checks, refer to the
service instructions.
Checking the control and display elements 4
• Plug the power connection plug into the grounding type wall outlet.
• Press the ON button on the control console (5/Fig. 4).
During power up the system runs through an initialization phase with the following
conditions:
Initialization - - - - - -
kV mAs
Line voltage L
measurement kV mAs
Line voltage L
display kV mAs
Preferred data 60 10
i n - - -
i n 226 e.g. 226 V AC
kV mAs
The POLYMOBIL III is ready after the acoustic signal stops.
• Go through the mAs values from 0.32 . . . 200 mAs by pressing the ± mAs buttons
• Go through the kV values from 40 . . . 100 kV by pressing the ± kV buttons
NOTE
Exceeding the permissible setting data is not possible.
Siemens AG RXB8-115.034.02 Page 1 of 6 POLYMOBIL III
Medical Solutions Rev. 03 04.05 CS PS 24
Page 18

4 - 2 Functional checks
3
4
2
1
Fig. 1 Fig. 2
Checking the weight counterbalance 4
• Unlock the support arm (1/Fig. 1) and loosen the knob (2/Fig. 1).
It should be possible to move the support arm easily without affixed accessories over the
entire range and it should come to rest in every position.
Readjustment of the weight counterbalance with affixed accessories
Should the support arm not come to rest in every position with affixed accessories, then
readjust the spring tension for the weight counterbalance.
• Remove the cover on the stand (3/Fig. 1).
• Release completely the additional brake on the support arm (2/Fig. 1).
• Move the support arm into the horizontal position.
• Tighten the screw (4/Fig. 2) with a 17 mm fork wrench.
Adjust the spring tension so that there is equilibrium in the horizontal support arm
position, i.e. so that the forces for raising and lowering the tube assembly are the same.
4
POLYMOBIL III RXB8-115.034.02 Page 2 of 6 Siemens AG
Rev. 03 04.05 CS PS 24 Medical Solutions
Page 19

Functional checks 4 - 3
7
8
Fig. 3 Fig. 4
Checking the control elements on the double slot diaphragm. 4
• Check the light localizer in each case at the control console and at the double slot
diaphragm.
To do this press the button (6/Fig. 4 or 7/Fig. 3); the light localizer lamp lights up for
20 s
± 1s.
• Check the turning ability of the double slot diaphragm ± 45°.
• By turning the diaphragm setting knobs (8/Fig. 3) check the easy movement and
uniformity of the format setting (leaf pairs).
Checking the exposure release with high-voltage 4
• Close the double slot diaphragm.
Set 60 kV, 10 mAs.
• Pull out the exposure release switch (9/Fig. 4) completely.
9
6
5
10
• Release exposure.
The radiation indicator (10/Fig. 4) lights up for the duration of the exposure, an acoustic
signal sounds at the same time.
• Check that the cable of the exposure release switch (9/Fig. 4) rolls back in without
difficulty after it is pulled out.
Siemens AG RXB8-115.034.02 Page 3 of 6 POLYMOBIL III
Medical Solutions Rev. 03 04.05 CS PS 24
Page 20

4 - 4 Functional checks
Length
Marker
Side marker
Fig. 5
Checking coincidence of light field and radiation field 4
Procedure:
• Load a 24 cm x 30 cm or 10" x 12" cassette with film and place it on a table or similar
support.
• Set vertical SID of 100 cm or 40" to the top edge of the cassette with tape measure,
• Set a format of 18 cm x 24 cm or 8" x 10" with the knobs.
• Switch the light localizer on and align the cassette.
• Place a radio-opaque marker (e.g. washer, coin) on the cassette as shown in Fig. 5.
Position a washer as a side marker.
• Release exposure (60 kV, 10 mAs) and process the film.
• Make a note on the processed film of the following data using a waterproof felt tip pen:
-SID set
- Film size
- Radiation field size
POLYMOBIL III RXB8-115.034.02 Page 4 of 6 Siemens AG
Rev. 03 04.05 CS PS 24 Medical Solutions
Page 21

Functional checks 4 - 5
Y
1
Film
Light
Fig. 6
X
2
X
1
Radiation
Y
2
Evaluation:
• Measure the deviations (X1, X2, Y1, Y2) between the edges of the light field and the edg-
es of the radiation field on all four sides as shown in Fig. 6.
• Calculate the overall deviations in the X and Y direction (without regard to the mathemat-
ical sign).
• The length deviation (Σ Y) as well as the width deviation (Σ X) must be less than 1.6 cm in
each case.
Siemens AG RXB8-115.034.02 Page 5 of 6 POLYMOBIL III
Medical Solutions Rev. 03 04.05 CS PS 24
Page 22

4 - 6 Functional checks
Fig. 7 Fig. 8
• If the deviation is greater, loosen the 4 Allen screws (arrow/Fig. 7/Fig. 8) and shift the
collimator correspondingly.
Then tighten the screws on the collimator (arrow/Fig. 7/Fig. 8) again.
• Repeat the test procedure and readjust the collimator until the light and radiation field lies
inside the permissible tolerance (< 1.6 cm).
Checking the exposure switch-off 4
• Check the exposure switch-off in the following settings:
40 kV, 200 mAs (max. mA)
100 kV, 80 mAs (min. mA)
To d o
this:
Release exposure. The radiation indicator (10/Fig. 4) lights up.
The exposure must switch off after 5 s + 3.5 s.
The radiation indicator goes out, the acoustic signal stops.
NOTE
The exposure time depends on the level of the line voltage and
the quality of the mains.
POLYMOBIL III RXB8-115.034.02 Page 6 of 6 Siemens AG
Rev. 03 04.05 CS PS 24 Medical Solutions
Page 23

Final work steps 5
Fig. 1
5 - 1
Protective conductor test 5
Observe the notes on the protective conductor test in these instructions.
• Perform the protective conductor test while the system is closed according to
ARTD-002.731.17...
The protective conductor resistance may not exceed 0.2 ohms.
• The values must be recorded as initial measurements in the report ’Protective conductor
resistance / report’ (chapter 7 of these instructions), stating the measuring points.
• In addition document the measuring procedure and the measuring instrument used
(designation and serial number).
Device leakage current measurement 5
Observe the notes on the device leakage current measurement in these instructions.
• Perform the device leakage current measurement while the system is closed according
to ARTD-002.731.17.
The limit of 2.5 mA must not be exceeded.
WAR NING
Electrical voltage!
Non-compliance can lead to severe injuries and even death.
In the direct measurement of the device leakage current no housing parts of the system may be touched during the measurement.
Third-person access to the system must be prevented.
Siemens AG RXB8-115.034.02 Page 1 of 2 POLYMOBIL III
Medical Solutions Rev. 03 04.05 CS PS 24
D
t
af
r
Page 24

5 - 2 Final work steps
• The system must be switched on during the measurement. Measuring instruments with
automated measuring sequences must therefore be set to manual measurement.
• Enter the highest value as first measured value in the report ’Device leakage current /
report’ (chapter 7 of these instructions).
• This value must not exceed the permissible leakage current values of 2.5 mA according
to DIN VDE 0751-1:2001-10, Table F.1, line "Device leakage current for devices
according to remarks 1 and 3".
• Transfer the current line voltage from the ’Start-up report’ into the report ’Device leakage
current / report’. If the current line voltage deviates from the nominal voltage, then correct
the measured value to the value corresponding to a measurement at the nominal value
of the line voltage. Document this in addition.
• Document the measuring procedure (differential measurement or direct measurement)
and the measuring instrument used (designation and serial number).
Reports 5
• Separate the completed 'Start-up report' (chapter 6 of these instructions) from these
instructions and file it in the system folder, "Certificates" register.
• Separate the completed reports 'Protective conductor resistance / report' and
’Device leakage current / report’ (chapter 7 of these instructions) from these instructions
and file them in the system folder , "Certificates" register.
• Complete the 'Installation Protocol' located on the system and send it (per fax) to the
address stated in the protocol.
Last work steps 5
• Wind the power connection cable onto the cable holder on the back of the control
console.
• Lock the support arm in the traveling position (Fig. 1) and check the forced locking of the
support arm.
POLYMOBIL III RXB8-115.034.02 Page 2 of 2 Siemens AG
Rev. 03 04.05 CS PS 24 Medical Solutions
D
t
af
r
Page 25

Start-up report 6
POLYMOBIL III Start-up report 6
The Start-up report is arranged analogously to these Start-up instructions.
Article number / type number / serial number: . . . . . . . . . . . . . . . .
Customer: . . . . . . . . . . . . . . . . . . . . Customer number: . . . . . . . . . . . . . . .
6 - 1
1. Check of the nominal line voltage . . . . . . . . . .V
Instrument type: . . . . . . . . . . . . . .
Serial No.: . . . . . . . . . . . . . .
Calibrated up to: . . . . . . . . . . . . . .
2. Adaptation of the nominal line voltage at >
3. Checking the control and display elements ok
4. Checking the weight counterbalance ok
5. Checking the control elements on the double slot diaphragm. ok
6. Checking the exposure release with high-voltage ok
7. Coincidence of light field and radiation field ok
AC
240 VAC on T1
n.a. ok
ΣX: . . . . . . . . . . . cm
ΣY: . . . . . . . . . . . cm
8. Checking the exposure switch-off. ok
9. Protective conductor test
(measured values in separate report
’Protective conductor resistance / report’)
10. Device leakage current measurement
(measured values in separate report
’Device leakage current / report’)
Date: . . . . . . . . . . . . . . Engineer . . . . . . . . . . . . . . . .
ok
ok
Siemens AG RXB8-115.034.02 Page 1 of 2 POLYMOBIL III
Medical Solutions Rev. 03 04.05 CS PS 24
D
t
af
r
Page 26

6 - 2 Start-up report
This page intentionally left blank.
POLYMOBIL III RXB8-115.034.02 Page 2 of 2 Siemens AG
Rev. 03 04.05 CS PS 24 Medical Solutions
D
t
af
r
Page 27

Electrical safety / reports 7
Protective conductor resistance / report 7
System:
Material number:
Serial number:
Customer-spec. ident number
Protective conductor resistance
First measured value Repeat measurements value
Meas. point 1:
_____________
Meas. point 2:
_____________
Meas. point 3:
_____________
Meas. point 4
_____________
7 - 1
Meas. point 5
_____________
Meas. point 6
____________
Meas. point 7
____________
Meas. point 8
____________
(*1) Meas. circuit:
Meas. inst.
type:
Meas. inst.
Ser. No.:
Meas. inst.
calibrated up to:
Assessment:
Date:
n.a.
Name:
Signature
(*1) Meas. circuit: see Fig. 1, next page
Siemens AG RXB8-115.034.02 Page 1 of 6 POLYMOBIL III
Medical Solutions Rev. 03 04.05 CS PS 24
Page 28

7 - 2 Electrical safety / reports
Measuring circuit
Fig. 1 Measuring circuit for measuring the protective conductor resistance in systems that are separated from the
power supply, according to DIN VDE 0751-1:2001-10, Fig. C2.
1 = Measuring arrangement (measuring instrument)
2 = System
3 = Application part (if present)
Remarks:
Date Remarks Name Signature
POLYMOBIL III RXB8-115.034.02 Page 2 of 6 Siemens AG
Rev. 03 04.05 CS PS 24 Medical Solutions
Page 29

Electrical safety / reports 7 - 3
Device leakage current / report 7
System:
Material number:
Serial number:
Customer-spec. ident number
Device leakage current
Device leakage current
(highest
measured value)
[mA]
Line voltage
during the measurement
[V~]
Device leakage current
(corrected value)
[mA]
(*1) Meas. circuit:
Meas. inst.
type:
Meas. inst.
Ser. No.:
Meas. inst.
calibrated up to:
Assessment:
First measured
value
Repeat measurements value
Date:
Name:
Signature:
(*1) Meas. circuit: See Fig. 2 to Fig. 3, next page
Siemens AG RXB8-115.034.02 Page 3 of 6 POLYMOBIL III
Medical Solutions Rev. 03 04.05 CS PS 24
Page 30

7 - 4 Electrical safety / reports
Measuring circuit
Direct measurement.
Fig. 2 Measuring circuit for the direct measurement of the device leakage
current according to DIN VDE 0751-1:2001-10, Fig. C5
for protective class
1 = System
2 = Application part (if present)
3 = Measuring arrangement (integrated in the measuring
instrument)
I.
Differential measurement
Fig. 3 Measuring circuit for the measurement of the device leakage
current according to the differential current method
complying with DIN VDE 0751-1:2001-10, Fig. C6
for protective class
1 = System
2 = Application part (if present)
3 = Measuring arrangement (integrated in the measuring
instrument)
I.
POLYMOBIL III RXB8-115.034.02 Page 4 of 6 Siemens AG
Rev. 03 04.05 CS PS 24 Medical Solutions
Page 31

Electrical safety / reports 7 - 5
Remarks:
Date Remarks Name Signature
Siemens AG RXB8-115.034.02 Page 5 of 6 POLYMOBIL III
Medical Solutions Rev. 03 04.05 CS PS 24
Page 32

7 - 6 Electrical safety / reports
Date Remarks Name Signature
POLYMOBIL III RXB8-115.034.02 Page 6 of 6 Siemens AG
Rev. 03 04.05 CS PS 24 Medical Solutions
Page 33

Changes to previous version 8
Chapter 0 Cover page, revision level, table of contents changed
Chapter 1 New section 'Notes on the protective conductor resistance test'
inserted.
New section 'Notes on device leakage current measurement'
Chapter 5 Section 'Protective conductor test' changed
New section 'Device leakage current measurement' inserted.
New section 'Reports' inserted.
New section 'Last work steps' inserted.
Chapter 6 Start-up report for protective conductor test and
device leakage current measurement adapted.
Chapter 7 New chapter 'Electrical safety / reports' inserted.
8 - 1
All chapters Editorial changes made.
Siemens AG RXB8-115.034.02 Page 1 of 2 POLYMOBIL III
Medical Solutions Rev. 03 04.05 CS PS 24
Page 34

8 - 2 Changes to previous version
This page intentionally left blank.
POLYMOBIL III RXB8-115.034.02 Page 2 of 2 Siemens AG
Rev. 03 04.05 CS PS 24 Medical Solutions
 Loading...