

Siemens HIPATH 8000, OpenStage 40 SIP, OpenStage 40 G SIP, OpenStage Key Module 40 User Manual
Page 1
Documentation
OpenScape Voice
OpenStage 40 SIP, OpenStage 40 G SIP
OpenStage Key Module 40
User Guide
Communication for the open minded
Siemens Enterprise Communications
www.siemens-enterprise.com
V1 R3.x
V1 R4.x
Page 2
Important information
Important information
Q
For safety reasons, the telephone should only be supplied
with power:
• using the original power supply unit.
Part number: L30250-F600-C14x (x: 1=EU, 2=US,
3=UK) or
• in a LAN with PoE (Power over Ethernet), which complies with the IEEE 802.3af standard.
Use only original Siemens accessories. The use of other accessories may be hazardous and will render the warranty
and the CE marking invalid.
Never open the telephone or a key module. Should you encounter any problems, contact your service personnel.
Trademarks
The device conforms to the EU directive 1999/5/EC as attested by the CE marking.
All electrical and electronic products should be disposed of
separately from the municipal waste stream via designated
collection facilities appointed by the government or the local authorities.
Proper disposal and separate collection of your old appliance will help prevent potential damage to the environment
and human health. It is a prerequisite for reuse and recycling of used electrical and electronic equipment.
For more detailed information about disposal of your old appliance, please contact your city office, waste disposal service, the shop where you purchased the product or your
sales representative.
The statements quoted above are only fully valid for equipment which is installed and sold in the countries of the European Union and is covered by the directive 2002/96/EC.
Countries outside the European Union may impose other
regulations regarding the disposal of electrical and electronic equipment.
2
Page 3

Important information
Location of the telephone
• The telephone should be operated in a controlled environment with an
ambient temperature between 5•C and 40•C.
• To ensure good speakerphone quality, the area in front of the microphone (front right) should be kept clear. The optimum speakerphone
distance is 50 cm.
• Do not install the telephone in a room where large quantities of dust
accumulate; this can considerably reduce the service life of the telephone.
• Do not expose the telephone to direct sunlight or any other source of
heat, as this is liable to damage the electronic components and the
plastic casing.
• Do not operate the telephone in damp environments such as bathrooms.
Product support on the internet
Information and support for our products can be found on the Internet at:
http://www.siemens-enterprise.com/.
Technical notes, current information about firmware updates, frequently
asked questions and lots more can be found on the Internet at:
http://wiki.siemens-enterprise.com/.
3
Page 4

Contents
Important information . . . . . . . . . . . . . . . . . . . . . . . . . .2
Trademarks . . . . . . . . . . . . . . . . . . . . . . . . . . . . . . . . . . . . . . . . . . . . . . . 2
Location of the telephone . . . . . . . . . . . . . . . . . . . . . . . . . . . . . . . . . . . . 3
Product support on the internet . . . . . . . . . . . . . . . . . . . . . . . . . . . . . . . 3
General information. . . . . . . . . . . . . . . . . . . . . . . . . . .11
About this manual . . . . . . . . . . . . . . . . . . . . . . . . . . . . . . . . . . . . . . . . . 11
Symbols used in the manual . . . . . . . . . . . . . . . . . . . . . . . . . . . . . . 11
Service. . . . . . . . . . . . . . . . . . . . . . . . . . . . . . . . . . . . . . . . . . . . . . . . . . 12
Intended use . . . . . . . . . . . . . . . . . . . . . . . . . . . . . . . . . . . . . . . . . . . . . 12
Telephone type . . . . . . . . . . . . . . . . . . . . . . . . . . . . . . . . . . . . . . . . . . . 12
Speakerphone quality and display legibility . . . . . . . . . . . . . . . . . . . . . . 12
Single-line telephone/multi-line telephone. . . . . . . . . . . . . . . . . . . . . . . 13
Getting to know your OpenStage phone . . . . . . . . .14
The user interface of your OpenStage 40/40 G. . . . . . . . . . . . . . . . . . . 14
Ports on the underside of the phone. . . . . . . . . . . . . . . . . . . . . . . . . . . 15
Using network ports more efficiently . . . . . . . . . . . . . . . . . . . . . . . 16
Key Module . . . . . . . . . . . . . . . . . . . . . . . . . . . . . . . . . . . . . . . . . . . . . . 17
OpenStage Key Module. . . . . . . . . . . . . . . . . . . . . . . . . . . . . . . . . . 17
OpenStage Key Module 15 . . . . . . . . . . . . . . . . . . . . . . . . . . . . . . . 18
Keys. . . . . . . . . . . . . . . . . . . . . . . . . . . . . . . . . . . . . . . . . . . . . . . . . . . . 19
Function keys. . . . . . . . . . . . . . . . . . . . . . . . . . . . . . . . . . . . . . . . . . 19
Audio keys . . . . . . . . . . . . . . . . . . . . . . . . . . . . . . . . . . . . . . . . . . . . 19
Navigator . . . . . . . . . . . . . . . . . . . . . . . . . . . . . . . . . . . . . . . . . . . . . 20
Programmable sensor keys . . . . . . . . . . . . . . . . . . . . . . . . . . . . . . . 21
Trunk keys (on multi-line phones only). . . . . . . . . . . . . . . . . . . . . . . 22
Keypad. . . . . . . . . . . . . . . . . . . . . . . . . . . . . . . . . . . . . . . . . . . . . . . 24
Display. . . . . . . . . . . . . . . . . . . . . . . . . . . . . . . . . . . . . . . . . . . . . . . . . . 26
Idle mode. . . . . . . . . . . . . . . . . . . . . . . . . . . . . . . . . . . . . . . . . . . . . 26
Idle-display view and icons . . . . . . . . . . . . . . . . . . . . . . . . . . . . . . . 26
Context-dependent displays . . . . . . . . . . . . . . . . . . . . . . . . . . . . . . 27
Telephony interface. . . . . . . . . . . . . . . . . . . . . . . . . . . . . . . . . . . . . . . . 29
Single-line view . . . . . . . . . . . . . . . . . . . . . . . . . . . . . . . . . . . . . . . . 29
Multi-line view . . . . . . . . . . . . . . . . . . . . . . . . . . . . . . . . . . . . . . . . . 30
Phonebooks. . . . . . . . . . . . . . . . . . . . . . . . . . . . . . . . . . . . . . . . . . . . . . 32
Personal phonebook . . . . . . . . . . . . . . . . . . . . . . . . . . . . . . . . . . . . 32
LDAP directory. . . . . . . . . . . . . . . . . . . . . . . . . . . . . . . . . . . . . . . . . 33
Messages . . . . . . . . . . . . . . . . . . . . . . . . . . . . . . . . . . . . . . . . . . . . . . . 34
Voicemail . . . . . . . . . . . . . . . . . . . . . . . . . . . . . . . . . . . . . . . . . . . . . 34
Calls . . . . . . . . . . . . . . . . . . . . . . . . . . . . . . . . . . . . . . . . . . . . . . . . . 35
4
Page 5

Telephone menu . . . . . . . . . . . . . . . . . . . . . . . . . . . . . . . . . . . . . . . . . . 37
Program/Service menu . . . . . . . . . . . . . . . . . . . . . . . . . . . . . . . . . . 37
User settings . . . . . . . . . . . . . . . . . . . . . . . . . . . . . . . . . . . . . . . . . . 37
Administration . . . . . . . . . . . . . . . . . . . . . . . . . . . . . . . . . . . . . . . . . 38
Control and monitoring function . . . . . . . . . . . . . . . . . . . . . . . . . . . . . . 38
Contributing to environmental protection by saving energy . . . . . . . . . 39
Basic functions . . . . . . . . . . . . . . . . . . . . . . . . . . . . . . 40
Secure voice transmission. . . . . . . . . . . . . . . . . . . . . . . . . . . . . . . . . . . 40
Answering a call . . . . . . . . . . . . . . . . . . . . . . . . . . . . . . . . . . . . . . . . . . 40
Answering a call via the handset . . . . . . . . . . . . . . . . . . . . . . . . . . . 41
Answering a call via the loudspeaker (speakerphone mode) . . . . . . 41
Answering a call via the headset . . . . . . . . . . . . . . . . . . . . . . . . . . . 42
Directed pickup . . . . . . . . . . . . . . . . . . . . . . . . . . . . . . . . . . . . . . . . . . . 43
Accept call . . . . . . . . . . . . . . . . . . . . . . . . . . . . . . . . . . . . . . . . . . . . 43
Picking up the held call . . . . . . . . . . . . . . . . . . . . . . . . . . . . . . . . . . 44
Switching from handset to speakerphone mode . . . . . . . . . . . . . . . . . 45
Switching from speakerphone mode to the handset . . . . . . . . . . . . . . 45
Switching from headset to speakerphone mode . . . . . . . . . . . . . . . . . 46
In standard mode. . . . . . . . . . . . . . . . . . . . . . . . . . . . . . . . . . . . . . . 46
In U.S. mode . . . . . . . . . . . . . . . . . . . . . . . . . . . . . . . . . . . . . . . . . . 46
Open listening . . . . . . . . . . . . . . . . . . . . . . . . . . . . . . . . . . . . . . . . . . . . 46
Activating/deactivating the microphone . . . . . . . . . . . . . . . . . . . . . . . . 47
Ending a call. . . . . . . . . . . . . . . . . . . . . . . . . . . . . . . . . . . . . . . . . . . . . . 47
Group call. . . . . . . . . . . . . . . . . . . . . . . . . . . . . . . . . . . . . . . . . . . . . . . . 48
Making calls. . . . . . . . . . . . . . . . . . . . . . . . . . . . . . . . . . . . . . . . . . . . . . 51
Off-hook dialing . . . . . . . . . . . . . . . . . . . . . . . . . . . . . . . . . . . . . . . . 51
On-hook dialing . . . . . . . . . . . . . . . . . . . . . . . . . . . . . . . . . . . . . . . . 52
Immediate dialing. . . . . . . . . . . . . . . . . . . . . . . . . . . . . . . . . . . . . . . 53
Dialing using the hot or warm line function . . . . . . . . . . . . . . . . . . . 54
Redial. . . . . . . . . . . . . . . . . . . . . . . . . . . . . . . . . . . . . . . . . . . . . . . . . . . 55
Consulting a second party . . . . . . . . . . . . . . . . . . . . . . . . . . . . . . . . . . . 56
Switching to the held party (alternating) . . . . . . . . . . . . . . . . . . . . . 57
Putting on hold and retrieving successively or simultaneously . . . . 58
Connecting parties. . . . . . . . . . . . . . . . . . . . . . . . . . . . . . . . . . . . . . 59
Call forwarding. . . . . . . . . . . . . . . . . . . . . . . . . . . . . . . . . . . . . . . . . . . . 60
Programming call forwarding. . . . . . . . . . . . . . . . . . . . . . . . . . . . . . 61
Activating/deactivating call forwarding. . . . . . . . . . . . . . . . . . . . . . . 63
Activating call forwarding for all calls . . . . . . . . . . . . . . . . . . . . . . . . 64
Call forwarding chain . . . . . . . . . . . . . . . . . . . . . . . . . . . . . . . . . . . . 65
Callback . . . . . . . . . . . . . . . . . . . . . . . . . . . . . . . . . . . . . . . . . . . . . . . . . 66
Requesting callback . . . . . . . . . . . . . . . . . . . . . . . . . . . . . . . . . . . . . 66
Responding to a callback . . . . . . . . . . . . . . . . . . . . . . . . . . . . . . . . . 67
Permitting callback on busy/no reply . . . . . . . . . . . . . . . . . . . . . . . . 68
Calling back missed calls . . . . . . . . . . . . . . . . . . . . . . . . . . . . . . . . . . . . 69
5
Page 6

Programmable sensor keys . . . . . . . . . . . . . . . . . . . .70
List of available functions . . . . . . . . . . . . . . . . . . . . . . . . . . . . . . . . . . . 70
Programming sensor keys. . . . . . . . . . . . . . . . . . . . . . . . . . . . . . . . . . . 71
Beginning programming . . . . . . . . . . . . . . . . . . . . . . . . . . . . . . . . . 71
Beginning programming . . . . . . . . . . . . . . . . . . . . . . . . . . . . . . . . . 72
Programming enhanced functions. . . . . . . . . . . . . . . . . . . . . . . . . . . . . 72
Repertory dial. . . . . . . . . . . . . . . . . . . . . . . . . . . . . . . . . . . . . . . . . . 72
Feature toggle . . . . . . . . . . . . . . . . . . . . . . . . . . . . . . . . . . . . . . . . . 74
Forwarding. . . . . . . . . . . . . . . . . . . . . . . . . . . . . . . . . . . . . . . . . . . . 75
Using sensor keys. . . . . . . . . . . . . . . . . . . . . . . . . . . . . . . . . . . . . . . . . 76
Example 1: Calling saved number . . . . . . . . . . . . . . . . . . . . . . . . . . 76
Example 2: Call Waiting toggle Activating/deactivating . . . . . . . . . . 76
Example 3: Immediate ring . . . . . . . . . . . . . . . . . . . . . . . . . . . . . . . 76
Resetting sensor keys. . . . . . . . . . . . . . . . . . . . . . . . . . . . . . . . . . . . . . 77
Enhanced phone functions. . . . . . . . . . . . . . . . . . . . .78
Incoming calls . . . . . . . . . . . . . . . . . . . . . . . . . . . . . . . . . . . . . . . . . . . . 78
Accepting calls via the headset . . . . . . . . . . . . . . . . . . . . . . . . . . . . 78
Deflecting a call . . . . . . . . . . . . . . . . . . . . . . . . . . . . . . . . . . . . . . . . 78
Rejecting a call. . . . . . . . . . . . . . . . . . . . . . . . . . . . . . . . . . . . . . . . . 80
Configuring call forwarding . . . . . . . . . . . . . . . . . . . . . . . . . . . . . . . 80
Placing a call on hold . . . . . . . . . . . . . . . . . . . . . . . . . . . . . . . . . . . . 82
Call waiting (second call) . . . . . . . . . . . . . . . . . . . . . . . . . . . . . . . . . 86
Transferring a call. . . . . . . . . . . . . . . . . . . . . . . . . . . . . . . . . . . . . . . 90
CTI calls . . . . . . . . . . . . . . . . . . . . . . . . . . . . . . . . . . . . . . . . . . . . . . 93
Making calls. . . . . . . . . . . . . . . . . . . . . . . . . . . . . . . . . . . . . . . . . . . . . . 95
Dialing with the DDS key . . . . . . . . . . . . . . . . . . . . . . . . . . . . . . . . . 95
Dialing from the local phonebook . . . . . . . . . . . . . . . . . . . . . . . . . . 95
Dialing from the LDAP database . . . . . . . . . . . . . . . . . . . . . . . . . . . 95
Dialing a phone number from a list . . . . . . . . . . . . . . . . . . . . . . . . . 96
Using autodial delay. . . . . . . . . . . . . . . . . . . . . . . . . . . . . . . . . . . . . 97
Conference . . . . . . . . . . . . . . . . . . . . . . . . . . . . . . . . . . . . . . . . . . . . . 100
Local conference . . . . . . . . . . . . . . . . . . . . . . . . . . . . . . . . . . . . . . 100
System-based conference . . . . . . . . . . . . . . . . . . . . . . . . . . . . . . . 103
Phonebooks and call lists . . . . . . . . . . . . . . . . . . . .105
Local phonebook . . . . . . . . . . . . . . . . . . . . . . . . . . . . . . . . . . . . . . . . . 105
Creating a new contact . . . . . . . . . . . . . . . . . . . . . . . . . . . . . . . . . 105
Editing a contact . . . . . . . . . . . . . . . . . . . . . . . . . . . . . . . . . . . . . . 105
Deleting a contact . . . . . . . . . . . . . . . . . . . . . . . . . . . . . . . . . . . . . 106
Deleting all contacts. . . . . . . . . . . . . . . . . . . . . . . . . . . . . . . . . . . . 106
Searching for a contact . . . . . . . . . . . . . . . . . . . . . . . . . . . . . . . . . 107
6
Page 7

LDAP database . . . . . . . . . . . . . . . . . . . . . . . . . . . . . . . . . . . . . . . . . . 108
Finding an LDAP entry . . . . . . . . . . . . . . . . . . . . . . . . . . . . . . . . . . 108
Extended LDAP editing . . . . . . . . . . . . . . . . . . . . . . . . . . . . . . . . . 109
Quick search . . . . . . . . . . . . . . . . . . . . . . . . . . . . . . . . . . . . . . . . . 110
Call lists . . . . . . . . . . . . . . . . . . . . . . . . . . . . . . . . . . . . . . . . . . . . . . . . 111
Editing entries . . . . . . . . . . . . . . . . . . . . . . . . . . . . . . . . . . . . . . . . 111
Delete all entries . . . . . . . . . . . . . . . . . . . . . . . . . . . . . . . . . . . . . . 111
Making calls with multiple lines . . . . . . . . . . . . . . 112
Incoming calls . . . . . . . . . . . . . . . . . . . . . . . . . . . . . . . . . . . . . . . . . . . 112
Accepting calls for the primary line . . . . . . . . . . . . . . . . . . . . . . . . 112
Accepting calls for secondary lines . . . . . . . . . . . . . . . . . . . . . . . . 112
Making calls. . . . . . . . . . . . . . . . . . . . . . . . . . . . . . . . . . . . . . . . . . . . . 113
Manual trunk seizure . . . . . . . . . . . . . . . . . . . . . . . . . . . . . . . . . . . 113
Automatic trunk seizure . . . . . . . . . . . . . . . . . . . . . . . . . . . . . . . . . 114
Dialing the last dialed number . . . . . . . . . . . . . . . . . . . . . . . . . . . . 114
Forwarding calls on primary line . . . . . . . . . . . . . . . . . . . . . . . . . . 114
During calls . . . . . . . . . . . . . . . . . . . . . . . . . . . . . . . . . . . . . . . . . . . . . 115
Making and receiving calls on a single line . . . . . . . . . . . . . . . . . . 115
Making and receiving calls with multiple lines. . . . . . . . . . . . . . . . 115
Putting a line on hold . . . . . . . . . . . . . . . . . . . . . . . . . . . . . . . . . . . 116
Lines with hot or warm line function . . . . . . . . . . . . . . . . . . . . . . . 117
Busy override. . . . . . . . . . . . . . . . . . . . . . . . . . . . . . . . . . . . . . . . . 118
Direct station selection keys . . . . . . . . . . . . . . . . . . . . . . . . . . . . . . . . 119
Calling a station directly . . . . . . . . . . . . . . . . . . . . . . . . . . . . . . . . . 119
Call pickup . . . . . . . . . . . . . . . . . . . . . . . . . . . . . . . . . . . . . . . . . . . 120
Deflecting a call to a DSS station . . . . . . . . . . . . . . . . . . . . . . . . . 121
LED display on DSS keys. . . . . . . . . . . . . . . . . . . . . . . . . . . . . . . . 121
Making calls in an executive-secretary team. . . . . . . . . . . . . . . . . . . . 122
Sample scenarios. . . . . . . . . . . . . . . . . . . . . . . . . . . . . . . . . . . . . . 122
Accepting a call . . . . . . . . . . . . . . . . . . . . . . . . . . . . . . . . . . . . . . . 124
Connecting a call . . . . . . . . . . . . . . . . . . . . . . . . . . . . . . . . . . . . . . 125
DSS keys can be used . . . . . . . . . . . . . . . . . . . . . . . . . . . . . . . . . . 127
Using line overview . . . . . . . . . . . . . . . . . . . . . . . . . . . . . . . . . . . . 127
Settings for MultiLine (keyset) . . . . . . . . . . . . . . . . . . . . . . . . . . . . . . 128
Displaying the line in the "Overview" tab . . . . . . . . . . . . . . . . . . . . 128
Setting the time for a delayed ringer . . . . . . . . . . . . . . . . . . . . . . . 129
Configuring the "Overview" tab display . . . . . . . . . . . . . . . . . . . . . 130
Line preview . . . . . . . . . . . . . . . . . . . . . . . . . . . . . . . . . . . . . . . . . 131
Rollover for a line . . . . . . . . . . . . . . . . . . . . . . . . . . . . . . . . . . . . . . 132
7
Page 8

Privacy/security . . . . . . . . . . . . . . . . . . . . . . . . . . . . .133
Deactivating the ringer . . . . . . . . . . . . . . . . . . . . . . . . . . . . . . . . . . . . 133
Do not disturb . . . . . . . . . . . . . . . . . . . . . . . . . . . . . . . . . . . . . . . . . . . 134
Enabling do not disturb via a key . . . . . . . . . . . . . . . . . . . . . . . . . . 134
Enabling do not disturb via the idle menu . . . . . . . . . . . . . . . . . . . 134
Allowing "Do not disturb" . . . . . . . . . . . . . . . . . . . . . . . . . . . . . . . . 135
Security . . . . . . . . . . . . . . . . . . . . . . . . . . . . . . . . . . . . . . . . . . . . . . . . 136
User password. . . . . . . . . . . . . . . . . . . . . . . . . . . . . . . . . . . . . . . . 136
Phone locking . . . . . . . . . . . . . . . . . . . . . . . . . . . . . . . . . . . . . . . . 138
Mobility . . . . . . . . . . . . . . . . . . . . . . . . . . . . . . . . . . . .140
Mobility scenarios . . . . . . . . . . . . . . . . . . . . . . . . . . . . . . . . . . . . . . . . 140
Logging on and off at the same phone . . . . . . . . . . . . . . . . . . . . . 140
Logging on and off at different phones . . . . . . . . . . . . . . . . . . . . . 140
Logging on and off at the same phone . . . . . . . . . . . . . . . . . . . . . . . . 141
Logging on to the phone . . . . . . . . . . . . . . . . . . . . . . . . . . . . . . . . 141
Logging off from the phone. . . . . . . . . . . . . . . . . . . . . . . . . . . . . . 142
Logging on at different telephones . . . . . . . . . . . . . . . . . . . . . . . . . . . 143
Logging on with forced logoff at a remote phone . . . . . . . . . . . . . 143
Logging on with forced, delayed logoff at a remote phone. . . . . . 144
OpenScape Voice functions. . . . . . . . . . . . . . . . . . .145
Feature toggle key. . . . . . . . . . . . . . . . . . . . . . . . . . . . . . . . . . . . . . . . 145
Making anonymous calls . . . . . . . . . . . . . . . . . . . . . . . . . . . . . . . . . . . 146
Deactivating. . . . . . . . . . . . . . . . . . . . . . . . . . . . . . . . . . . . . . . . . . 146
Activating. . . . . . . . . . . . . . . . . . . . . . . . . . . . . . . . . . . . . . . . . . . . 146
Temporarily activating anonymous calling for the next call . . . . . . 147
Temporarily deactivating anonymous calling for the next call . . . . 147
Creating a list for selective calls . . . . . . . . . . . . . . . . . . . . . . . . . . . . . 148
For call acceptance . . . . . . . . . . . . . . . . . . . . . . . . . . . . . . . . . . . . 148
For call rejection. . . . . . . . . . . . . . . . . . . . . . . . . . . . . . . . . . . . . . . 149
Anonymous calls . . . . . . . . . . . . . . . . . . . . . . . . . . . . . . . . . . . . . . . . . 150
Rejecting . . . . . . . . . . . . . . . . . . . . . . . . . . . . . . . . . . . . . . . . . . . . 150
Accepting. . . . . . . . . . . . . . . . . . . . . . . . . . . . . . . . . . . . . . . . . . . . 150
Using abbreviated dialing . . . . . . . . . . . . . . . . . . . . . . . . . . . . . . . . . . 151
Call tracing. . . . . . . . . . . . . . . . . . . . . . . . . . . . . . . . . . . . . . . . . . . . . . 151
Hunt group functions. . . . . . . . . . . . . . . . . . . . . . . . . . . . . . . . . . . . . . 152
Making a line busy . . . . . . . . . . . . . . . . . . . . . . . . . . . . . . . . . . . . . 152
Marking the last line in the hunt group chain. . . . . . . . . . . . . . . . . 153
Reachability . . . . . . . . . . . . . . . . . . . . . . . . . . . . . . . . . . . . . . . . . . . . . 154
Serial call . . . . . . . . . . . . . . . . . . . . . . . . . . . . . . . . . . . . . . . . . . . . 154
Parallel call . . . . . . . . . . . . . . . . . . . . . . . . . . . . . . . . . . . . . . . . . . . 155
Parking a call . . . . . . . . . . . . . . . . . . . . . . . . . . . . . . . . . . . . . . . . . . . . 157
Call park . . . . . . . . . . . . . . . . . . . . . . . . . . . . . . . . . . . . . . . . . . . . . 157
Unparking. . . . . . . . . . . . . . . . . . . . . . . . . . . . . . . . . . . . . . . . . . . . 157
8
Page 9

Silent Monitoring . . . . . . . . . . . . . . . . . . . . . . . . . . . . . . . . . . . . . . . . . 158
Active silent monitoring . . . . . . . . . . . . . . . . . . . . . . . . . . . . . . . . . 158
Muted silent monitoring. . . . . . . . . . . . . . . . . . . . . . . . . . . . . . . . . 159
Code table for OpenScape Voice functions. . . . . . . . . . . . . . . . . . . . . 160
Individual phone configuration . . . . . . . . . . . . . . . 161
Display. . . . . . . . . . . . . . . . . . . . . . . . . . . . . . . . . . . . . . . . . . . . . . . . . 161
Adjusting the display to a comfortable reading angle . . . . . . . . . . 161
Setting contrast . . . . . . . . . . . . . . . . . . . . . . . . . . . . . . . . . . . . . . . 161
Adjusting the brightness . . . . . . . . . . . . . . . . . . . . . . . . . . . . . . . . 162
Background lighting . . . . . . . . . . . . . . . . . . . . . . . . . . . . . . . . . . . . 163
Contrast for the OpenStage Key Module. . . . . . . . . . . . . . . . . . . . 164
Date and time . . . . . . . . . . . . . . . . . . . . . . . . . . . . . . . . . . . . . . . . . . . 165
Setting the time . . . . . . . . . . . . . . . . . . . . . . . . . . . . . . . . . . . . . . . 165
Setting the date . . . . . . . . . . . . . . . . . . . . . . . . . . . . . . . . . . . . . . . 165
Setting daylight saving time. . . . . . . . . . . . . . . . . . . . . . . . . . . . . . 166
Automatic daylight saving time . . . . . . . . . . . . . . . . . . . . . . . . . . . 167
Time display format . . . . . . . . . . . . . . . . . . . . . . . . . . . . . . . . . . . . 168
Date display format . . . . . . . . . . . . . . . . . . . . . . . . . . . . . . . . . . . . 168
Audio . . . . . . . . . . . . . . . . . . . . . . . . . . . . . . . . . . . . . . . . . . . . . . . . . . 169
Volumes. . . . . . . . . . . . . . . . . . . . . . . . . . . . . . . . . . . . . . . . . . . . . 169
Settings . . . . . . . . . . . . . . . . . . . . . . . . . . . . . . . . . . . . . . . . . . . . . 170
Tone and indication with an unsecured voice connection . . . . . . . 175
Key click. . . . . . . . . . . . . . . . . . . . . . . . . . . . . . . . . . . . . . . . . . . . . . . . 176
Setting the language and country . . . . . . . . . . . . . . . . . . . . . . . . . . . . 177
Selecting a language . . . . . . . . . . . . . . . . . . . . . . . . . . . . . . . . . . . 177
Country-specific setting . . . . . . . . . . . . . . . . . . . . . . . . . . . . . . . . . 179
Context menu . . . . . . . . . . . . . . . . . . . . . . . . . . . . . . . . . . . . . . . . . . . 181
Activating/deactivating automatic menu display . . . . . . . . . . . . . . 181
Setting the display time . . . . . . . . . . . . . . . . . . . . . . . . . . . . . . . . . 181
Network information . . . . . . . . . . . . . . . . . . . . . . . . . . . . . . . . . . . . . . 182
Resetting user data . . . . . . . . . . . . . . . . . . . . . . . . . . . . . . . . . . . . . . . 183
Initiating the reset . . . . . . . . . . . . . . . . . . . . . . . . . . . . . . . . . . . . . 183
Call recording. . . . . . . . . . . . . . . . . . . . . . . . . . . . . . . 184
Call recording modes . . . . . . . . . . . . . . . . . . . . . . . . . . . . . . . . . . . 184
Explanations of recording . . . . . . . . . . . . . . . . . . . . . . . . . . . . . . . . . . 185
Recordable calls. . . . . . . . . . . . . . . . . . . . . . . . . . . . . . . . . . . . . . . 185
Non-recordable calls . . . . . . . . . . . . . . . . . . . . . . . . . . . . . . . . . . . 185
Enhanced functions: . . . . . . . . . . . . . . . . . . . . . . . . . . . . . . . . . . . 186
9
Page 10

The following features are not supported:. . . . . . . . . . . . . . . . . . . 186
Recording tips . . . . . . . . . . . . . . . . . . . . . . . . . . . . . . . . . . . . . . . . 186
Multiline. . . . . . . . . . . . . . . . . . . . . . . . . . . . . . . . . . . . . . . . . . . . . 186
Recording calls . . . . . . . . . . . . . . . . . . . . . . . . . . . . . . . . . . . . . . . . . . 187
Using the call recording feature. . . . . . . . . . . . . . . . . . . . . . . . . . . 187
Automatic call recording . . . . . . . . . . . . . . . . . . . . . . . . . . . . . . . . 187
Manual call recording. . . . . . . . . . . . . . . . . . . . . . . . . . . . . . . . . . . 188
Call recording with AutoStart. . . . . . . . . . . . . . . . . . . . . . . . . . . . . 188
Controlling call recording . . . . . . . . . . . . . . . . . . . . . . . . . . . . . . . . 189
Consultation during call recording . . . . . . . . . . . . . . . . . . . . . . . . . 189
Second call during call recording . . . . . . . . . . . . . . . . . . . . . . . . . . 190
Call recording while alternating . . . . . . . . . . . . . . . . . . . . . . . . . . . 191
Your call is paused and reconnected during the recording. . . . . . . 191
Setting up a conference during recording . . . . . . . . . . . . . . . . . . . 192
Adding conference participants during the recording . . . . . . . . . . 192
Your call is included in a conference during the recording. . . . . . . 193
Putting a line on hold manually during the recording . . . . . . . . . . . 193
Web interface (WBM) . . . . . . . . . . . . . . . . . . . . . . . .195
General . . . . . . . . . . . . . . . . . . . . . . . . . . . . . . . . . . . . . . . . . . . . . . . . 195
Calling up the Web interface . . . . . . . . . . . . . . . . . . . . . . . . . . . . . . . . 195
Administrator Pages . . . . . . . . . . . . . . . . . . . . . . . . . . . . . . . . . . . 195
User pages. . . . . . . . . . . . . . . . . . . . . . . . . . . . . . . . . . . . . . . . . . . 196
User menu. . . . . . . . . . . . . . . . . . . . . . . . . . . . . . . . . . . . . . . . . . . 197
Fixing problems . . . . . . . . . . . . . . . . . . . . . . . . . . . . .201
Caring for your telephone . . . . . . . . . . . . . . . . . . . . . . . . . . . . . . . . . . 201
Troubleshooting. . . . . . . . . . . . . . . . . . . . . . . . . . . . . . . . . . . . . . . . . . 201
Contact partner in the case of problems. . . . . . . . . . . . . . . . . . . . . . . 202
Labeling keys. . . . . . . . . . . . . . . . . . . . . . . . . . . . . . . . . . . . . . . . . . . . 202
Local user menu . . . . . . . . . . . . . . . . . . . . . . . . . . . .203
Opening the user menu on the phone . . . . . . . . . . . . . . . . . . . . . . . . 203
User menu display. . . . . . . . . . . . . . . . . . . . . . . . . . . . . . . . . . . . . . . . 203
Key functions. . . . . . . . . . . . . . . . . . . . . . . . . . . . . . . . . . . . . . . . . 211
Index. . . . . . . . . . . . . . . . . . . . . . . . . . . . . . . . . . . . . . .213
10
Page 11

General information
General information
About this manual
This document contains general descriptions of the technical options,
which may not always be available in individual cases. The respective features must therefore be individually defined in the terms of the contract.
If a particular function on your phone is not available to you, this may be
due to one of the following reasons:
• The function is not configured for you or your telephone. Please con-
tact your system support representative.
• Your communications platform does not feature this function. Please
contact your Siemens sales partner for information on how to upgrade.
This user guide is intended to help you familiarize yourself with OpenStage
and all of its functions. It contains important information on the safe and
proper operation of your OpenStage phone. These instructions should be
strictly complied with to avoid operating errors and ensure optimum use of
your multifunctional telephone in the network.
These instructions should be read and followed by every person installing,
operating or programming an OpenStage phone.
For your own protection, please read the section dealing with safety
in detail. Follow the safety instructions carefully in order to avoid endangering yourself or other persons and to prevent damage to the
unit.
This user guide is designed to be simple and easy to understand, providing
clear step-by-step instructions for operating your OpenStage phone.
Administrative tasks are dealt with in a separate manual. The Quick Reference Guide contains quick and reliable explanations of frequently used
functions.
Symbols used in the manual
Settings
Operations and settings that can be made both at the phone and over the
Web interface are indicated by an icon and page reference.
V is a reference to an operation or setting performed directly on the
phone
z is a reference to an operation or setting performed via the Web in-
terface
11
Page 12

General information
Call recording
. Switch on recorder (standby mode)
~ Switch off recorder
/ Start recording
@ Stop recording
Service
If you experience problems or defects with the phone, please dial the service number for your country.
The Siemens service department can only help you if you experience problems or defects with the phone.
Should you have any questions regarding operation, your specialist
retailer or network administrator will gladly help you.
For queries regarding connection of the telephone, please contact
your network provider.
Intended use
The OpenStage phone is a desktop unit designed for voice transmission
and for connection to the LAN. It can also be used as a workstation device.
Any other use is regarded as unauthorized.
Telephone type
The phone name data can be found on the name plate on the base of the
device; The exact product name and serial number are specified here. Specific details concerning your communications platform can be obtained
from your service technician.
Please have this information ready when you contact our service department regarding faults or problems with the product.
Speakerphone quality and display legibility
• To ensure good speakerphone quality, the area in front of the telephone
(front right) should be kept clear).
The optimum handsfree distance is 20 in. (50 cm).
• Proceed as follows to optimize display legibility:
– Turn the phone to tilt the display. This ensures you have a frontal view
of the display while eliminating light reflexes.
– Adjust the contrast as required Æ page 161.
12
Page 13

General information
Single-line telephone/multi-line telephone
Your OpenStage 40 is a "multi-line telephone". This means that multiple
lines can be configured, which is not the case with single-line phones.
Each line is assigned an individual phone number which you can use to
make and receive calls.
The programmable sensor keys function as line keys on multi-line phones
Æ page 22.
The "Overview" tab on the telephony interface provides information about
the lines configured on your phone and the current status of each line
Æ page 30.
A number of specific features must be considered when using a multi-line
phone to make and receive calls Æ page 112.
13
Page 14
Getting to know your OpenStage phone
Getting to know your OpenStage phone
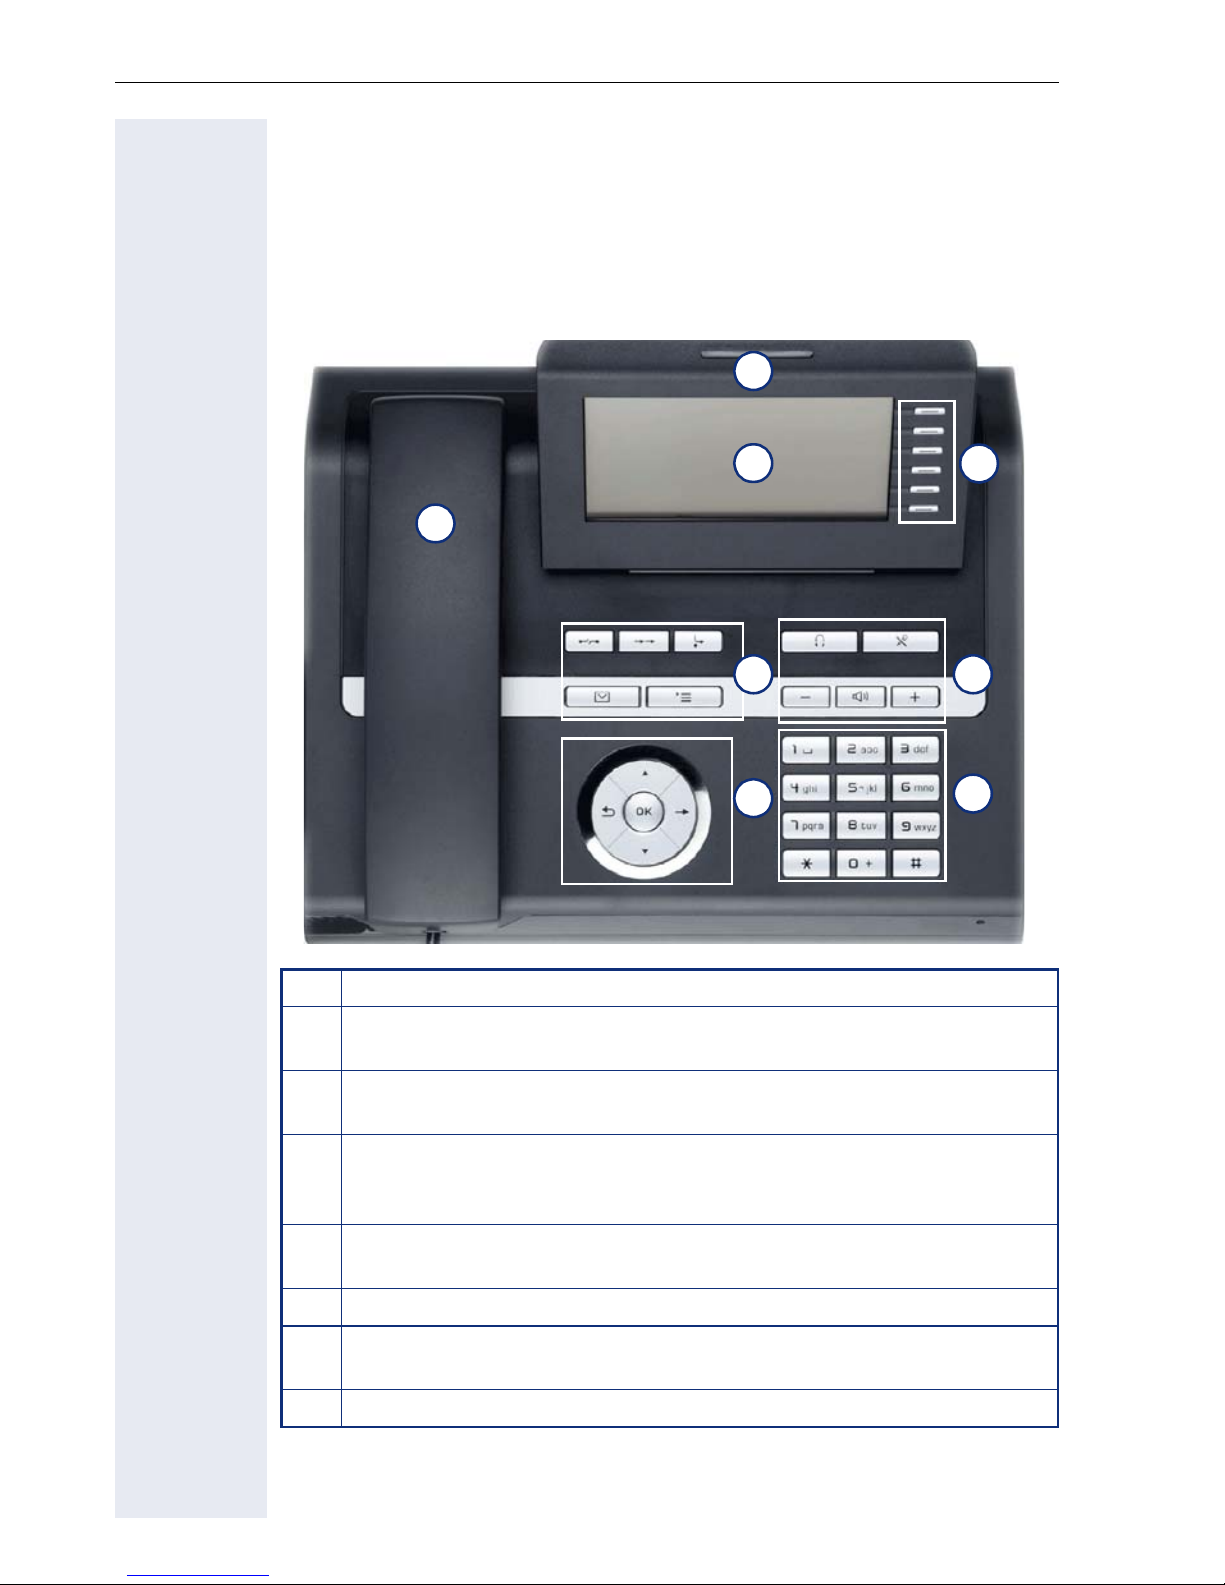
The following sections describe the most frequently used operating elements and the displays on your OpenStage phone.
The user interface of your OpenStage 40/40 G
8
2
1
4
6
1 You can make and receive calls as normal using the handset.
The graphic display permits intuitive operation of the phone
2
Æ page 26.
3
5
7
You can customize your telephone by assigning phone numbers and
3
functions to the programmable sensor keys Æ page 26.
You can use function keys when conducting a call to access fre-
4
quently used functions (such as, Disconnect) or to open the Program/Service menu and mailbox Æ page 19.
Audio keys are also available, allowing you to optimally configure
5
the audio features on your telephone Æ page 19.
6The 5-way navigator is a convenient navigation tool Æ page 20.
The keypad can be used to enter phone numbers and text
7
Æ page 24.
8 Incoming calls are visually signaled via the call display.
14
Page 15
Getting to know your OpenStage phone
Ports on the underside of the phone
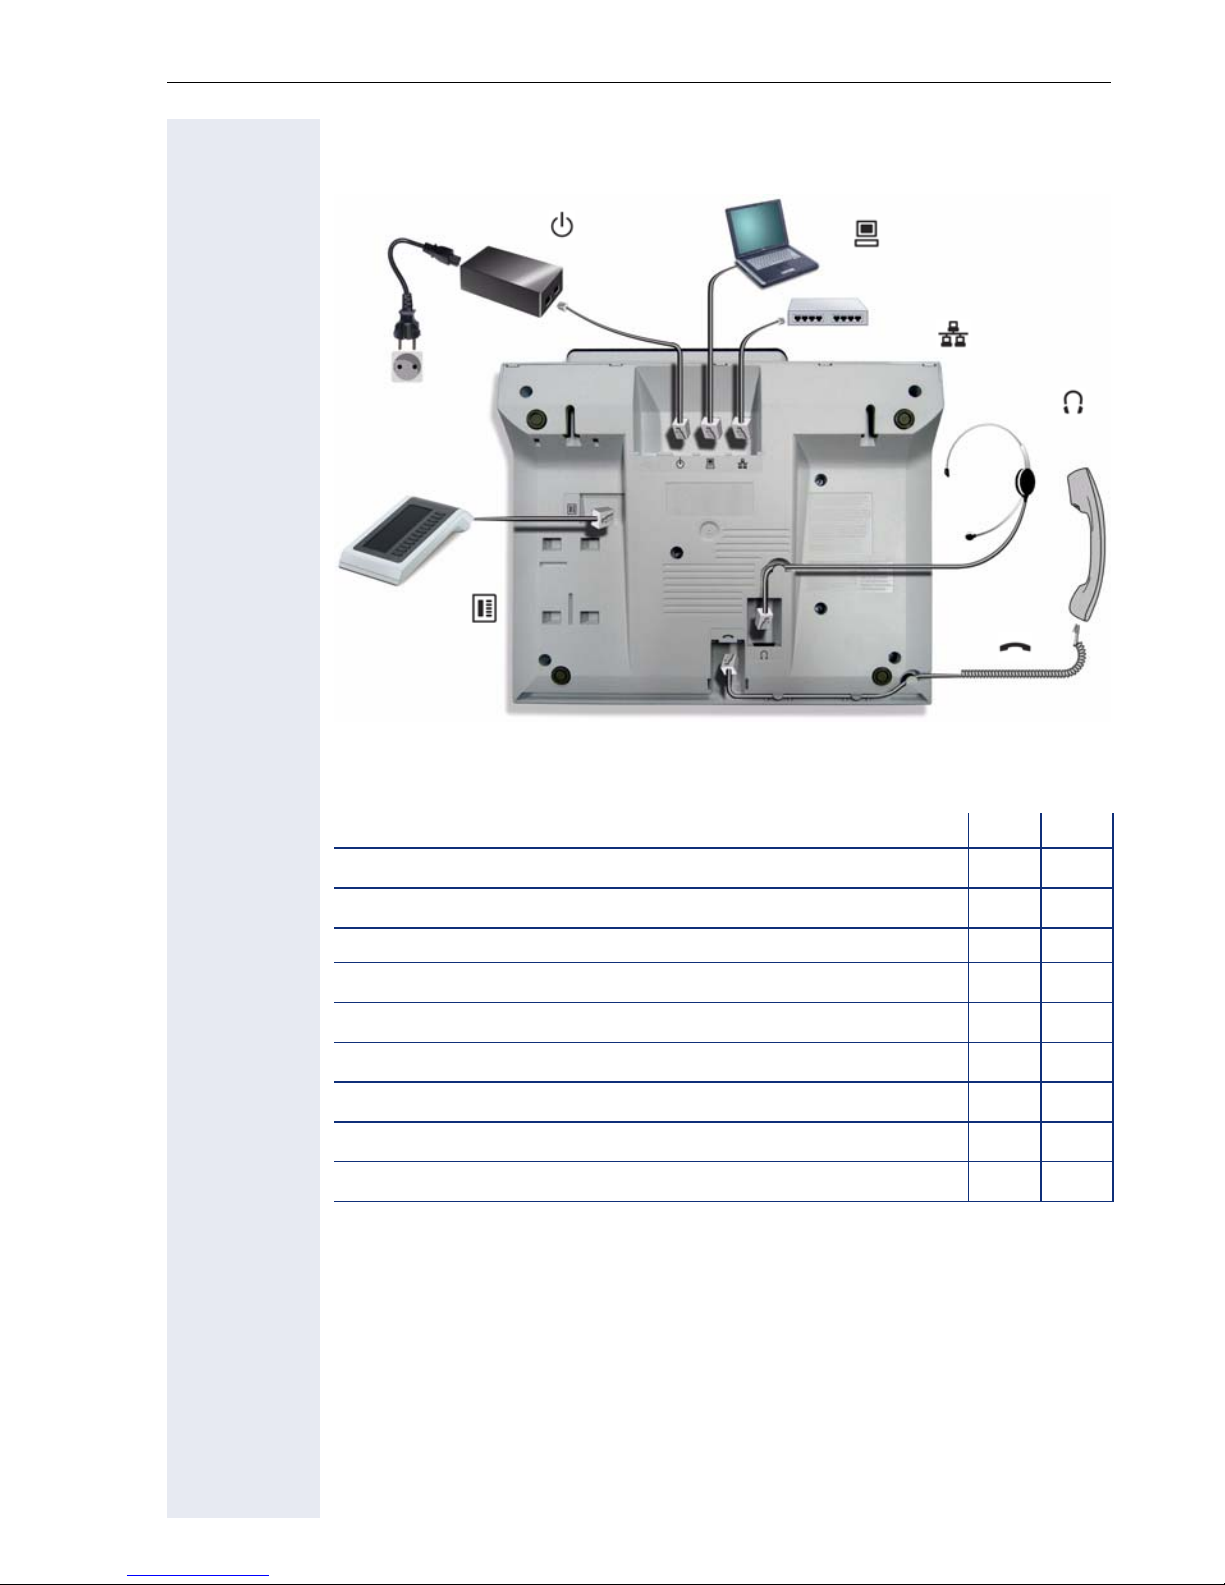
Power supply unit (if required)
Countryspecific
cable
Key Module
Properties of your OpenStage 40/40 G
PC
Network switch
Headset
Handset
OpenStage 40 40 G
LCD display, 40 x 6 characters
Illuminated display
Programmable sensor keys 6 6
Full-duplex speakerphone function
Headset
10/100 Mbps Ethernet switch Æ page 16
1000 Mbps Ethernet switch Æ page 16
Interface for key modules
Wall mounting
;;
;;
;;
;;
;
-
;
;;
;;
-
15
Page 16
Getting to know your OpenStage phone
Using network ports more efficiently
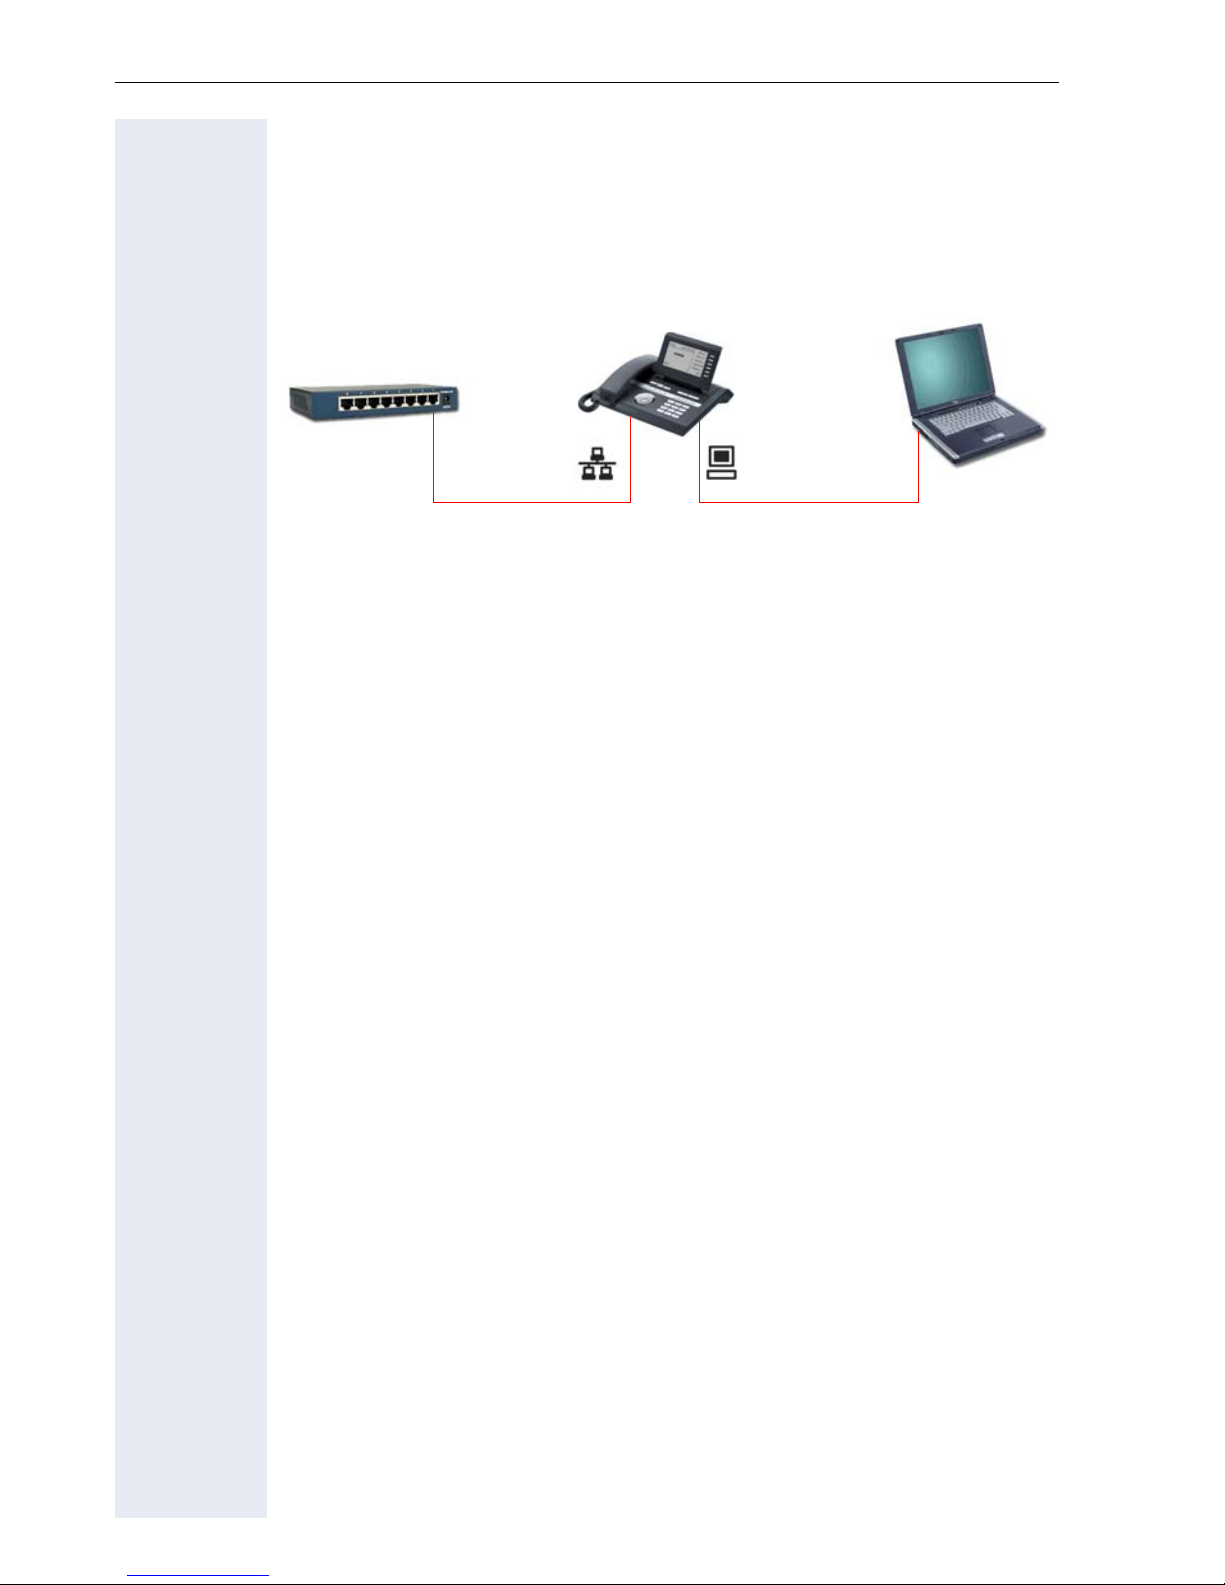
OpenStage 40 has a built-in 10/100 Mbps Ethernet switch.
OpenStage 40 G has a 1000 Mbps Ethernet switch. This means that you
can connect a PC to the LAN directly via the phone. The telephone-PC connection option must first be activated on the telephone by service personnel.
Using this connection option saves one network port for each switch used
and requires fewer or shorter network cables when arranged correctly.
OpenStage 40/40 GNetwork switch PC
16
Page 17

Getting to know your OpenStage phone
Key Module
OpenStage Key Module
The OpenStage Key Module is a key module attached to the side of the
phone that provides 12 additional illuminated, programmable keys.
Like keys on the phone, these keys can be programmed and used according to your needs Æ page 21.
You can attach up to two OpenStage Key Modules to your OpenStage 40.
To operate an OpenStage Key Module, you always require a power
supply unit Æ page 2.
17
Page 18

Getting to know your OpenStage phone
OpenStage Key Module 15
The OpenStage Key Module 15 is a key module attached to the side of the
phone that provides an additional 18 illuminated, programmable sensor
keys.
Like keys on the phone, these keys can be programmed and used according to your needs. Labeling keys see Æ page 202.
You can only attach one OpenStage Key Module 15 to your OpenStage 40.
Yo u cannot combine the OpenStage Key Module 15 with the
OpenStage Key Module.
18
Page 19
Getting to know your OpenStage phone
Keys
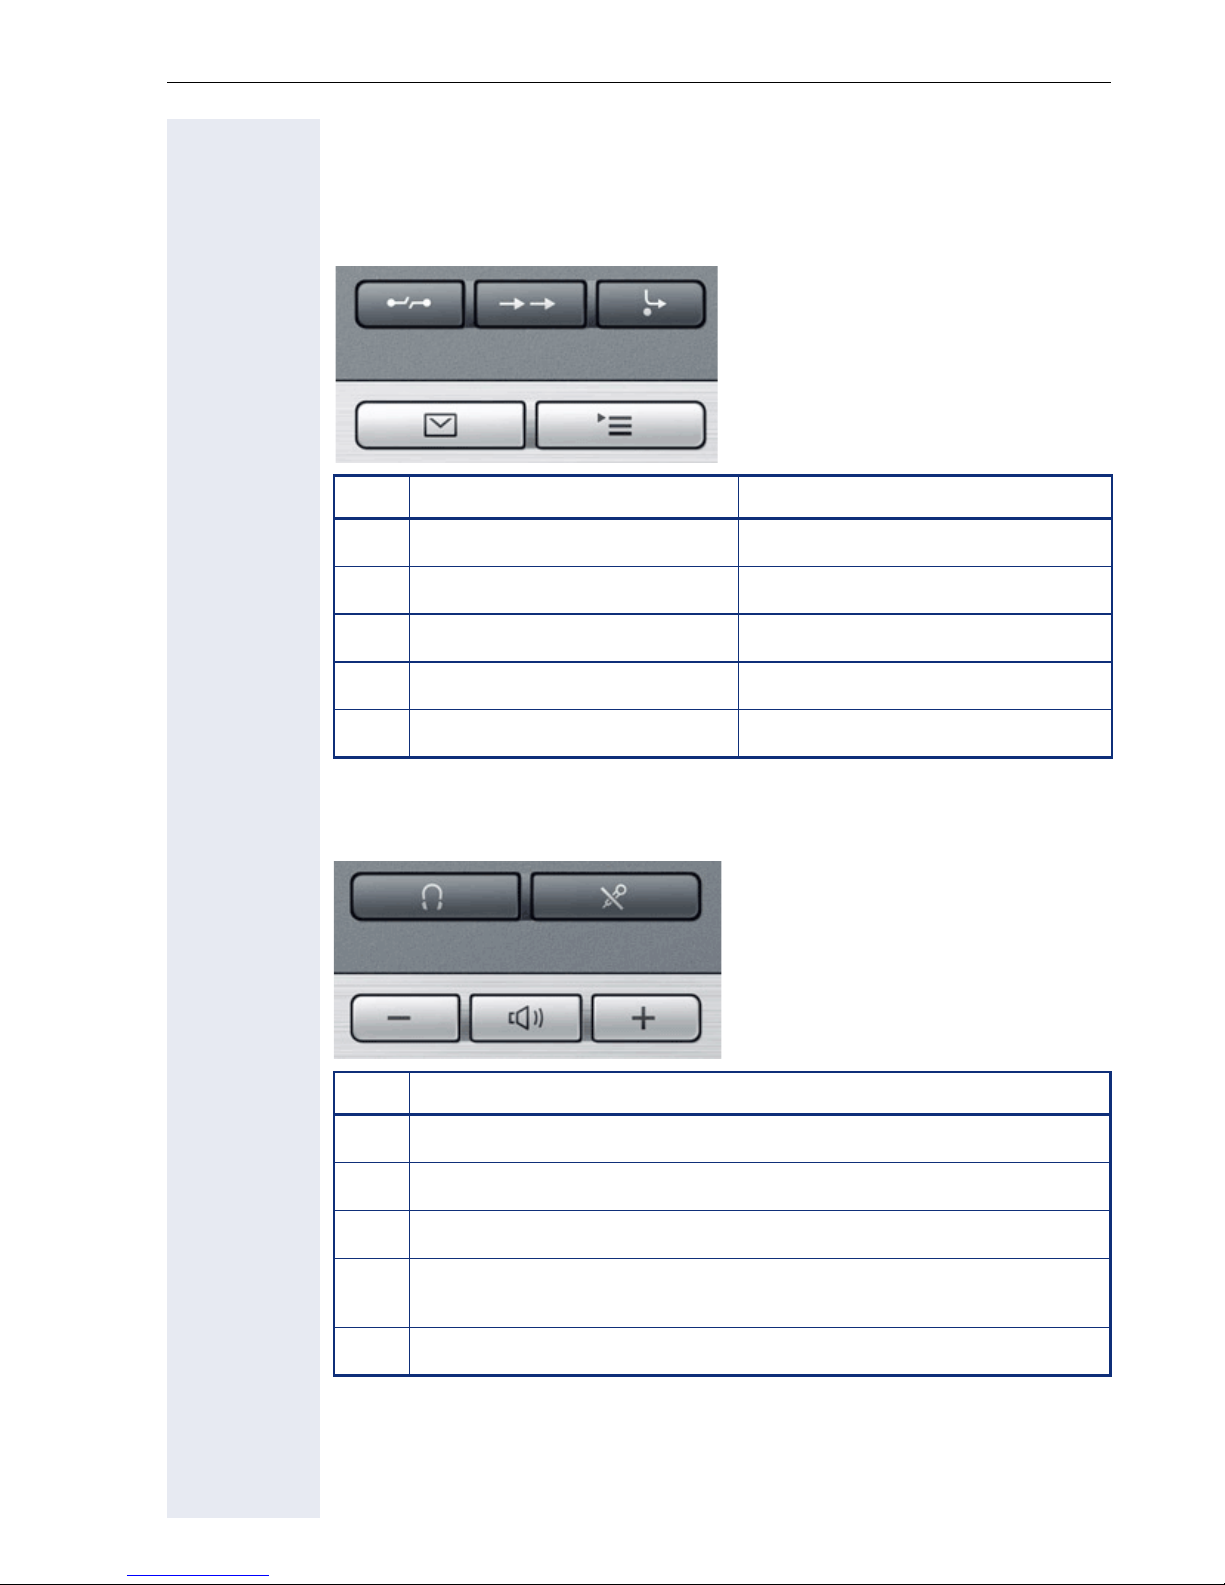
Function keys
Key Function when key is pressed LED display
s
,
r
N
O
End (disconnect) call. none
Open redial list none
Activate/deactivate forwarding Red: Call forwarding is activated
Open phone menu Æ page 37 Red: Menu is active
View messages Æ page 34 Red: New voicemail or missed calls
Audio keys
Key Function when key is pressed
p
o
n
+
Activate/deactivate microphone (also for speakerphone mode)
Activate/deactivate the headset.
Decrease the ring, handset, and loudspeaker volume.
Activate/deactivate loudspeaker for speakerphone mode and open
listening
Increase the ring, handset, and loudspeaker volume.
19
Page 20
Getting to know your OpenStage phone
Navigator
Before using the telephone, remove the protective covering from
the navigator surface.
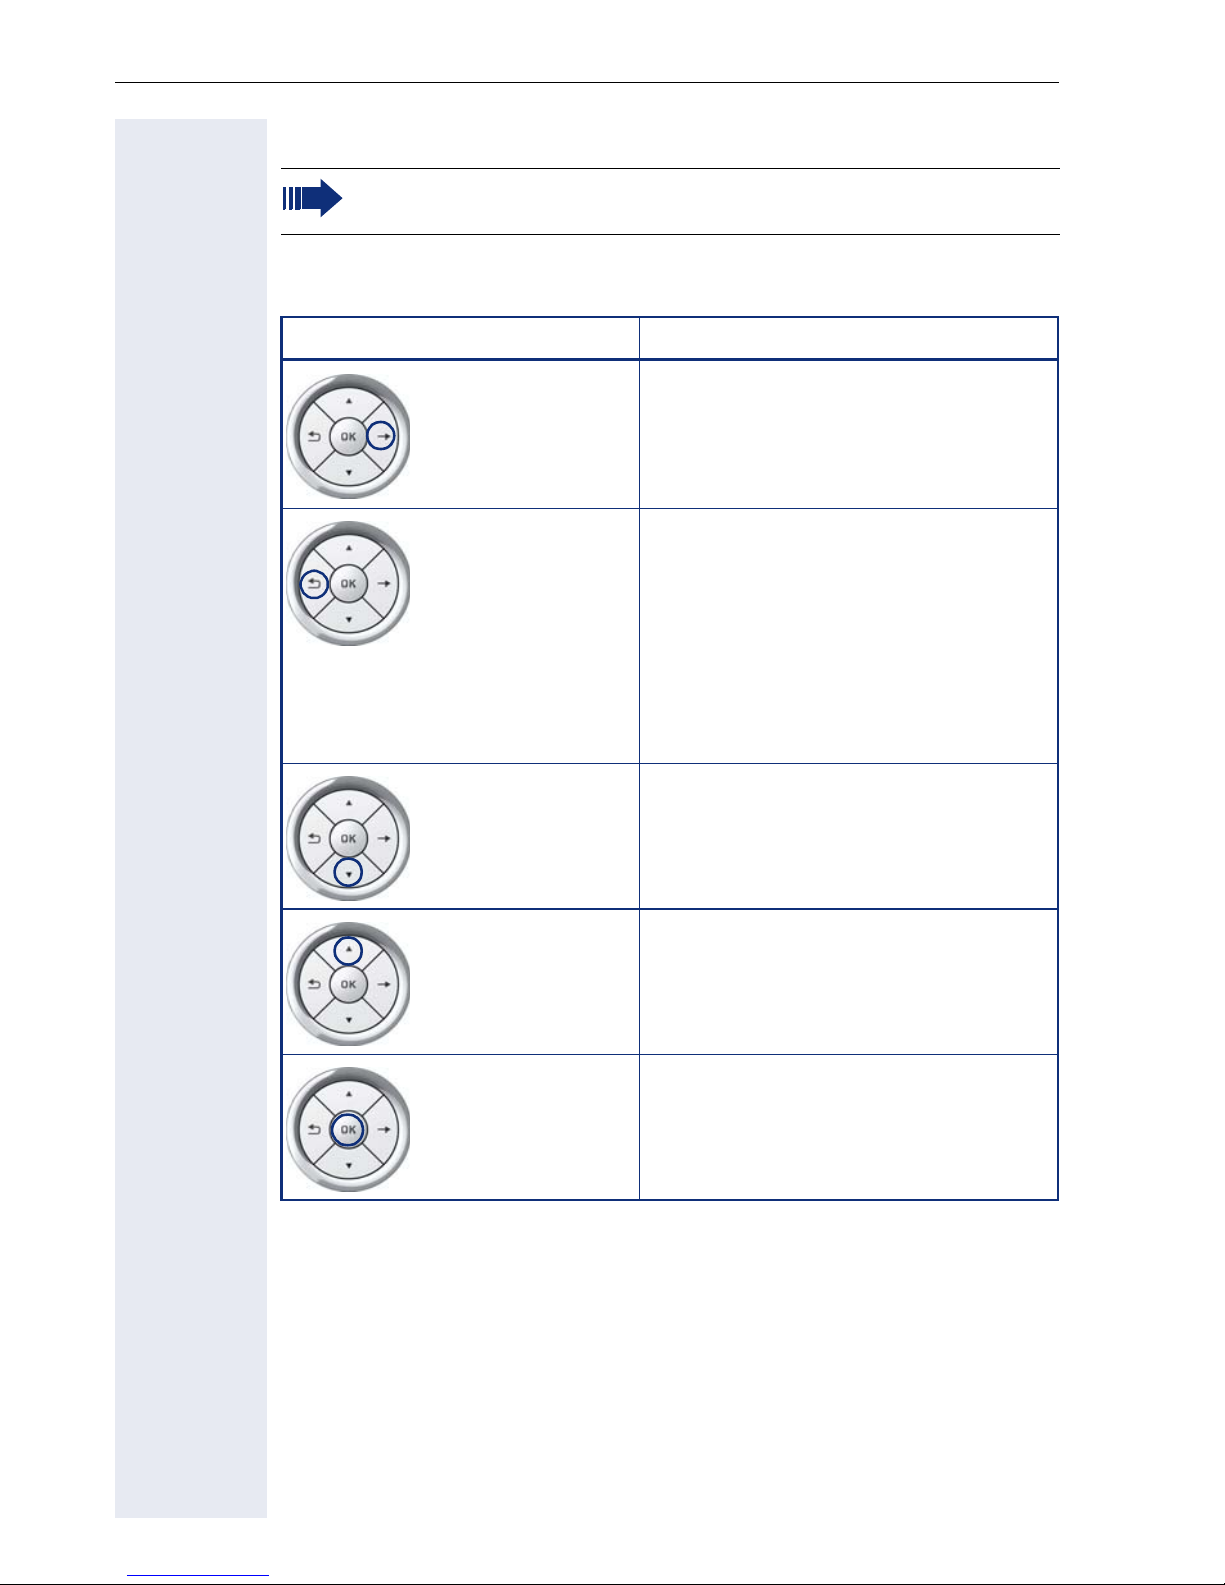
With this control, you can manage most of your phone’s functions, as well
as its displays.
Operation Functions when key is pressed
Press the
Press the
c key.
a key.
• Call up the context menu
• Perform action
•Go down a level
• Call up the context menu in the idle
display
• Short press: One level back
• Long press (held down): Go back to
the first level of the settings menu
• Cancel function
• Quit the context menu
• In input fields:
Delete character to the left of the
cursor
• Open line overview in idle mode
Press the
Press the
Press the i key.
d key.
b key.
•Scroll downwards
• Select element below
• Long press (held down): Jump to
the end of the list/menu
•Scroll upwards
• Select element above
• Long press (held down): Jump to
the start of the list/menu
• Confirm input
• Perform action
• Call up the context menu
20
Page 21
Getting to know your OpenStage phone
Programmable sensor keys
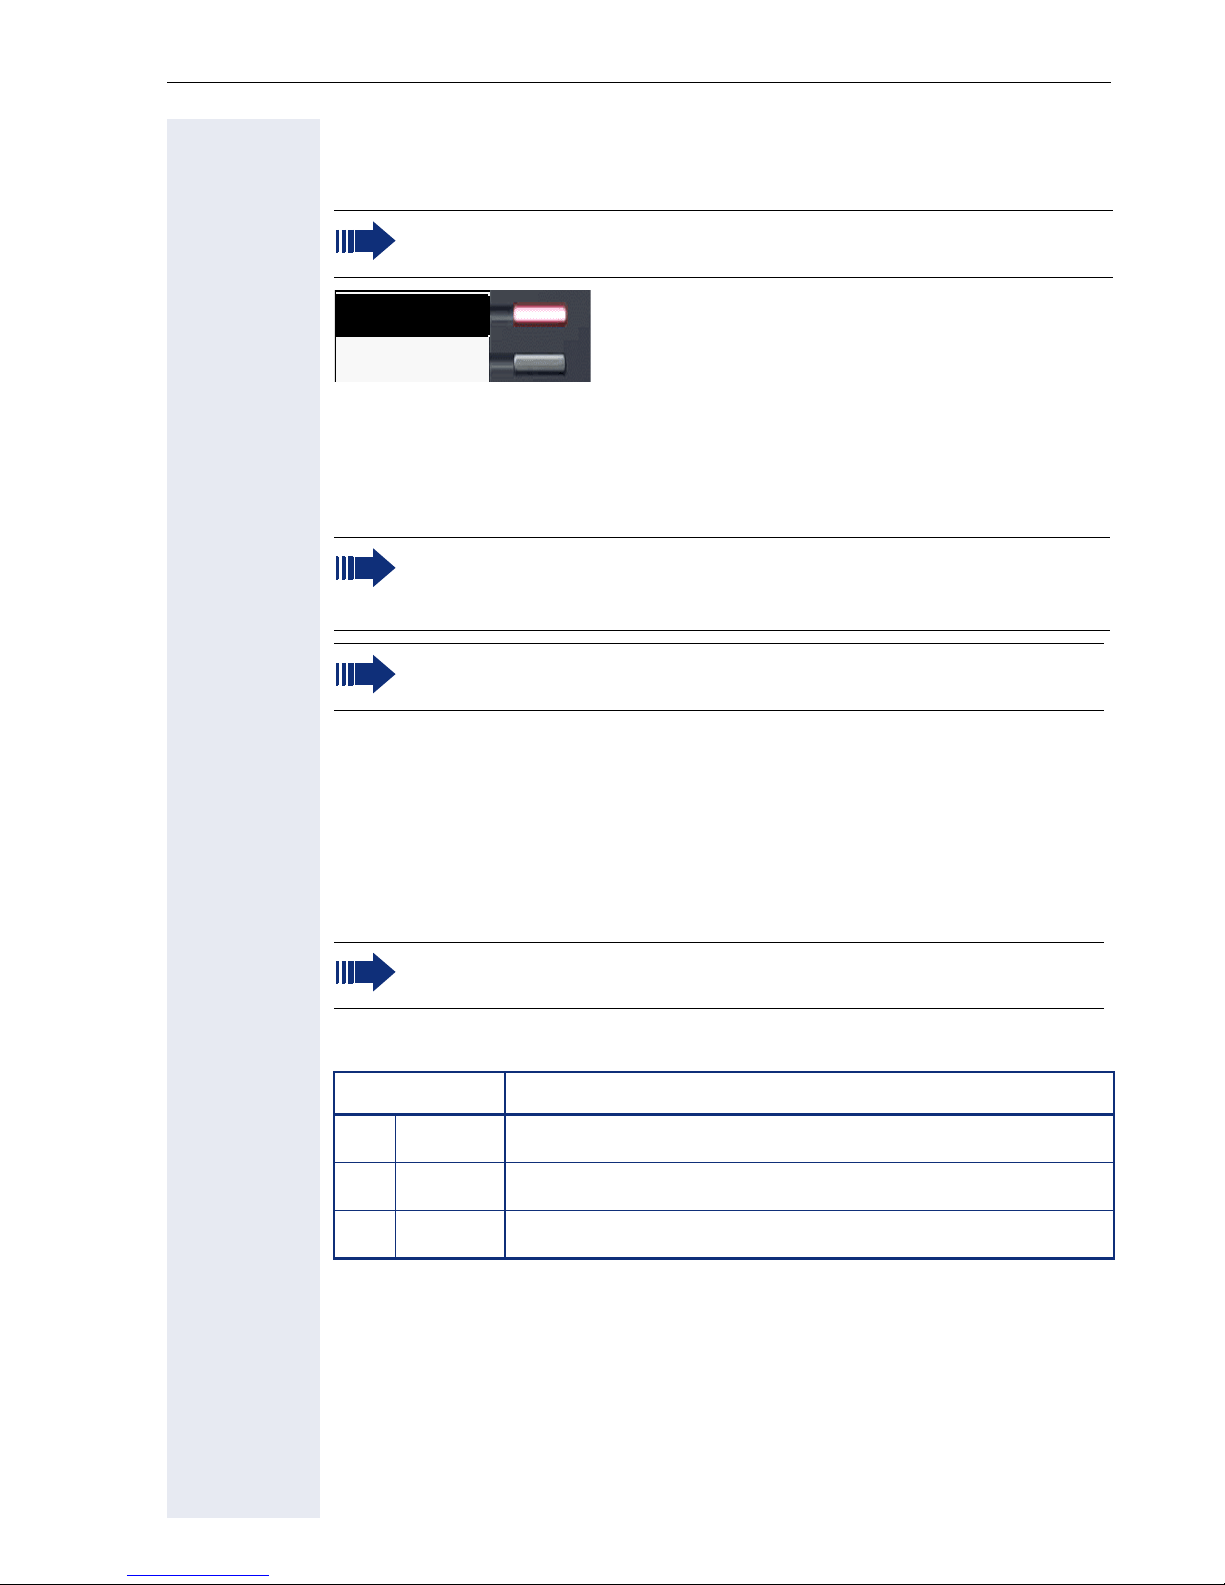
Your OpenStage 40 telephone features six programmable lit sensor keys.
Increase the number of programmable sensor keys by connecting a
key module Æ page 17.
Mirea, Ch.
Level 2
Touch the key briefly to activate the programmed function or dial the stored
number Æ page 76.
If you hold the key pressed, you are prompted as to whether to start programming this function key.
If the prompt is not displayed or a programmed function is not executed, then you can only launch key programming via the user menu
Æ page 71 (ask your service personnel about the current setting).
Only for repdial keys can you also program the second level for direct destination selection.
You can label these keys with internal and external phone numbers or frequently used functions (platform-dependent; please contact the responsible service personnel).
The configured phone number or function name is displayed next to the
key.
The status of a function is shown by the LED on the corresponding sensor
key.
Line and DDS keys can only be programmed by service personnel
via the service menu.
Meaning of LED displays on function keys
LED Meaning of function key
S
T
R
Off The function is deactivated.
Flashing
1
Indicates the function status.
On The function is activated.
[1] In this manual, flashing sensor keys are identified by this icon, regardless of the flashing in-
terval. The flashing interval represents different statuses, which are described in detail in
the corresponding sections of the manual.
21
Page 22

Getting to know your OpenStage phone
Trunk keys (on multi-line phones only)
The programmable sensor keys on multi-line phones function as trunk
keys. Each key programmed with the "Line" function is handled as a line.
This means up to five lines can be configured.
A distinction is drawn here between primary, secondary and phantom
lines. Each of these line types can be used on a private or shared basis
Æ page 22.
Primary line
All multi-line telephones have a primary line. This line can be reached in the
usual manner via your public phone number. Incoming calls are signaled on
this line.
To avoid conflict between individual multi-line phones, the functions
"Do not disturb" and "Call forwarding" can only be used for the primary line.
Secondary line
The secondary line on your phone is used as a primary line by another subscriber of the line trunk group. Your primary line, which is configured on another telephone in the line trunk group, simultaneously functions as the
secondary line on that telephone.
Phantom line
Phantom lines are not used as primary lines by any telephones in the line
trunk group. Phantom lines are established when the number of lines provided by a communications system exceeds the number of available
telephones.
Line utilization
• Private line: A line that is used by a single telephone. This line cannot
be used as a secondary line by another telephone.
• Shared line: A line that is configured on multiple telephones. The line
status (if configured) is displayed in the "Overview" tab for all telephones that share this line. If, for example, a shared line is being used
by a telephone, a status message indicating that this line is busy is displayed on all other telephones.
• Direct call line: A line with a direct connection to another telephone.
The line status is indicated by the LED in addition to the display in the
"Overview" tab Æ page 30.
22
Page 23

LED display
LED Explanation
Getting to know your OpenStage phone
S
T
R
Not lit The phone is in idle mode.
Flashing
Flickering
Fast blinking The line is on "Hold"
Blinking Call forwarding is activated
Illuminated The line is busy
• Incoming call on the line (Æ page 112)
• "Hold reminder" is activated (Æ page 83)
• Outgoing call on the line
• The incoming call was prioritized and selected in accordance with the "Automatic line selection for incoming calls" option
23
Page 24

Getting to know your OpenStage phone
Keypad
You can only use the digits 1 to 9 and 0 as well as the * and # characters
when dialing a number. The h navigation key is used to delete from right
to left.
In cases where text input is possible, you can use the keypad to input text,
punctuation and special characters in addition to the digits 0 to 9 and the
hash and asterisk symbols. To do this, press the numerical keys repeatedly.
Example: To enter the letter "h", press the number 4 key on the keypad
twice. When entering the text, all available characters for this key are displayed. After a short while, the character in focus is displayed in the input
field.
To speed up the input, you can confirm your entry by pressing "g"
on the navigator after you have selected the required character.
To enter a digit in an alphanumerical input field, press the relevant
key and hold it down. You no longer need to scroll through the entire
list of possible characters.
Character overview (depends on the current language setting)
Key 1x 2x 3x 4x 5x 6x
1
2
3
4
5
6
7
8
9
0
(
] 1
a b c 2 ä
d e f 3
g h i 4
j k l 5
m n o 6 ö
p q r s 7 ß
t u v 8 ü
w x y z 9
0
[1]
[2]
[1] Next letter in upper case (active for maxi-
mum one second)
[2] Switch to digit input
)
24
. , ? ! ’ " - ( ) @ / : _
Page 25

Getting to know your OpenStage phone
Multi-function keys
Key Function during text input Function when held down
)
(
Write special characters. Deactivate the ring tone
Switch between upper and
lower case
Activate the telephone lock.
Alphabetic labeling of dial keys is also useful when entering vanity numbers (letters associated with the phone number’s digits as indicated on the
telephone spell a name, e.g. 0700 - PATTERN = 0700 - 7288376).
Te x t e d i t o r
A function menu appears under the character selection field in certain situations (such as, when labeling programmable sensor keys). You can enter
punctuation marks and special characters and switch between the entry of
alphanumeric characters in lower and upper case and straightforward digit
entry.
You can select further editor functions via the navigator:
• OK – Confirm and terminate the entire input
• Cancel – Cancel your entries without saving
• Mode Configuration via the key
(
– 123 (# -> ABC) – Numerical entry
– ABC (# -> Abc) – Upper-case characters
– Abc (# -> abc) – Initial character upper case
– abc (# -> 123) – Lower-case characters
• Move cursor left to add or delete characters
• Move cursor right to add or delete characters
• Copy – Copy a visible character string
• Paste – Insert a copied a character string at a cursor position
25
Page 26
Getting to know your OpenStage phone
Display
Your OpenStage 40 comes with a tilt-and-swivel black-and-white LCD display. Adjust the tilt and contrast to suit your needs (Æ page 161).
Idle mode
If there are no calls taking place or settings being made, your
OpenStage 40 is in idle mode.
Press the
from a call list (Æ page 34). To return to the idle display again from
the phonebook (Æ page 37) or the Service menu (Æ page 37),
press the
screen" function however for both cases (see Æ page 70) to return
to the idle mode screen again.
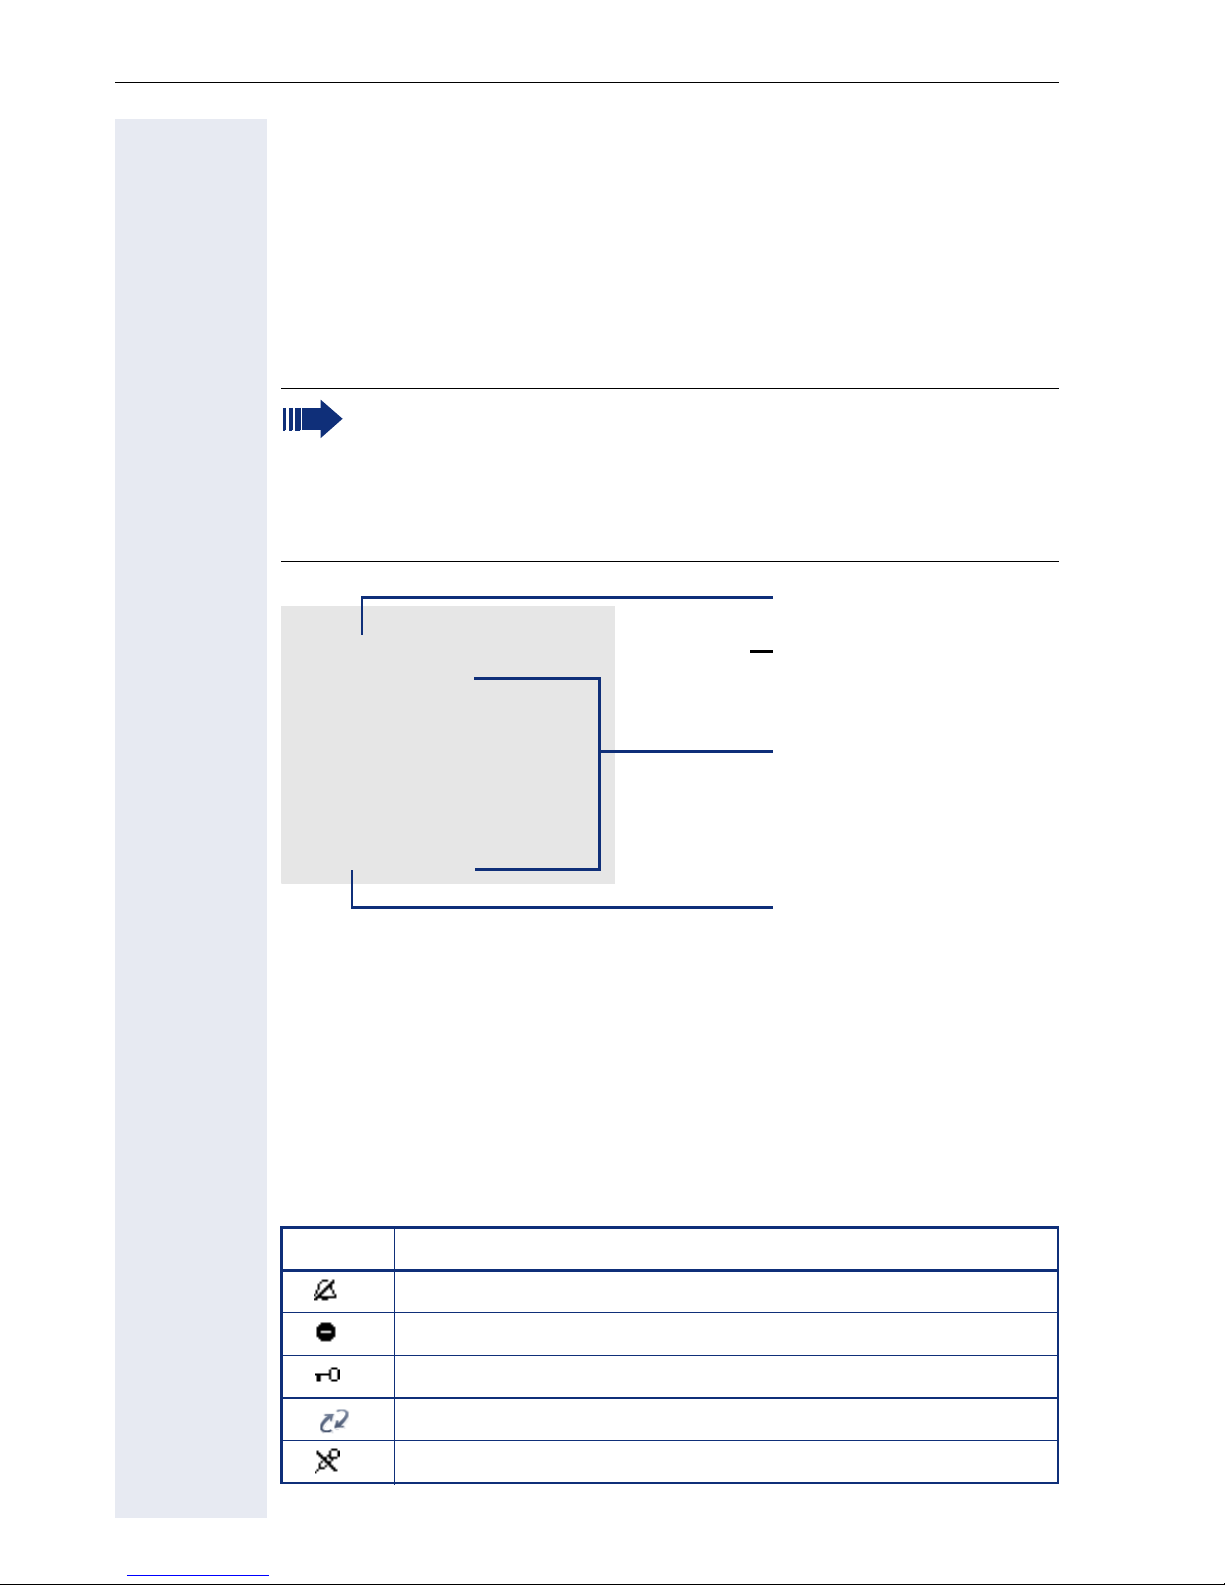
10:29 am Mon 17.11.06
S
07
01234567
The left area contains the status bar on the first line and is followed by a
five-line field for comprehensive context-specific displays. The right area is
used for labeling the programmable sensor keys.
key to return to the idle display again, for example,
O
N key. You can also configure a "Show telephone
Status bar
Level 2
Mirea, Ch.
Toussaint.
Rüscher
Stahl, Ing
Iller, Zin
Programmable sensor
key list Æ page 26
Context-dependent
displays Æ page 27
Own phone number
Idle-display view and icons
The time, weekday, and date are displayed in the status bar.
In addition, different icons represent different situations and switches:
Icon Explanation
The ring tone is deactivated.
The "Do not disturb" function is activated.
The phone lock is activated.
A mobile user is logged on to the telephone.
The microphone is deactivated.
26
Page 27
Getting to know your OpenStage phone
Context-dependent displays
Depending on the situation at hand, the graphic display on your OpenStage
phone displays different content, to which you can respond intuitively.
Information on actual events
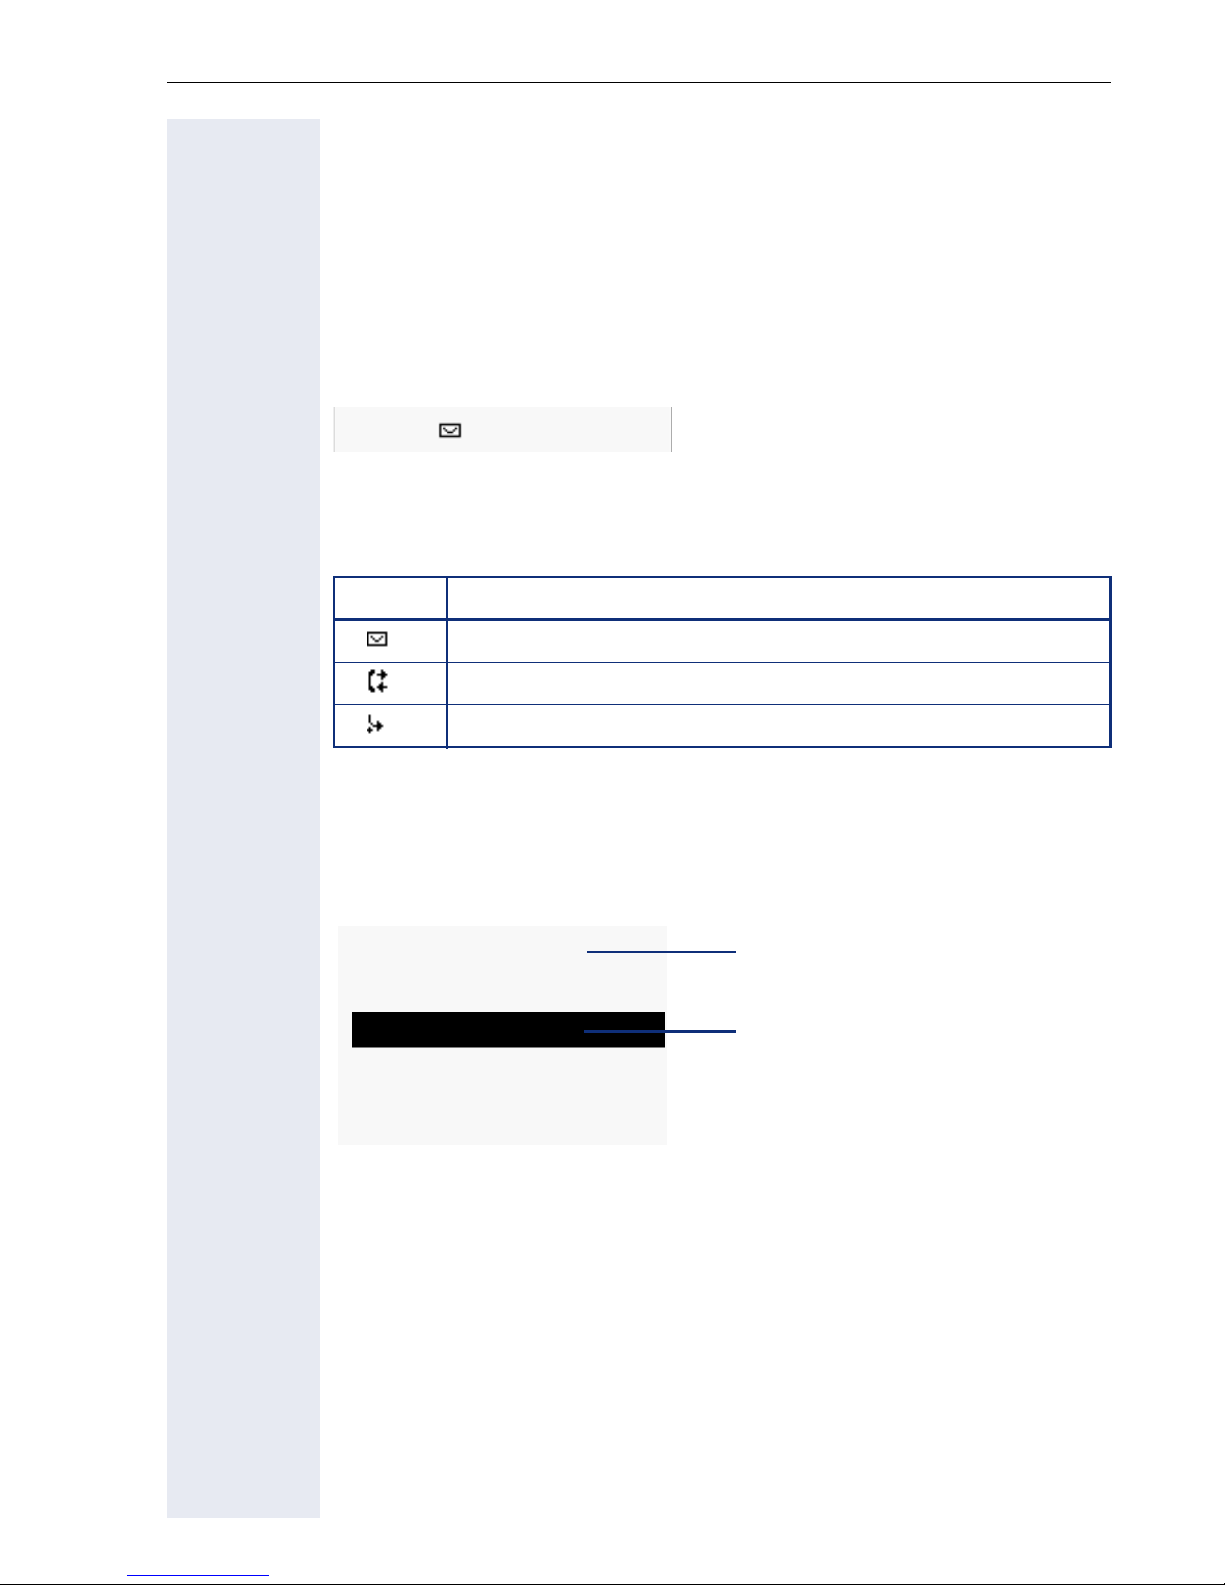
The following icons appear centered on the display when your phone is idle
and signal current properties or events.
Example: You missed two calls in your absence.
02
You have two new voice messages that you can open by pressing O
Æ page 34.
Icons for events
Icon Explanation
You received new voice messages.
New entries have been added to the call lists.
Local call forwarding is active.
Context menus
An arrow beside a selected entry indicates the existence of a context
menu that you can open by pressing the i or g buttons on the navigator
(Æ page 20). The range of functions available is situation-specific.
Consultation
Hold
Blind transfer call
Disconnect
After a connection is set up – you are called or you make call – the context
menu appears automatically under the current connection for the configured time (e.g. 20 seconds).
1st entry
(selected on callup)
Selected entry
You can define how long the context menu should be displayed. You can
deactivate the automatic display so that the g key on the navigator must
be pressed to see the context menu of the connection Æ page 181.
27
Page 28

Getting to know your OpenStage phone
Idle display context menu
The following functions (where released) can be accessed by pressing the
right key on the navigator:
Redial {1} 1234
First entry (selected when you call
up the menu, if you have already
Ringer off
Do not disturb off
Mobile logon
Cancel call backs
dialed a phone number)
Selected entry
Only available when configured to support mobility
Directed pickup
Pop-up menus
In many operating situations, suitable functions or information is offered in
an automatic pop-up window.
Example: You set up a consultation call. The pop-up menu opens and offers
suitable functions for selection with the navigator.
012345|
Dial
Level 2
Mirea, Ch.
Redial {1}
Retrieve held call
Toussaint.
Rüscher
Stahl, Ing
Iller, Zin
A pop-up window automatically closes as soon as you have performed an
action.
To suppress information pop-up windows, press i on the navigator.
28
Page 29
Getting to know your OpenStage phone
Telephony interface
Single-line view
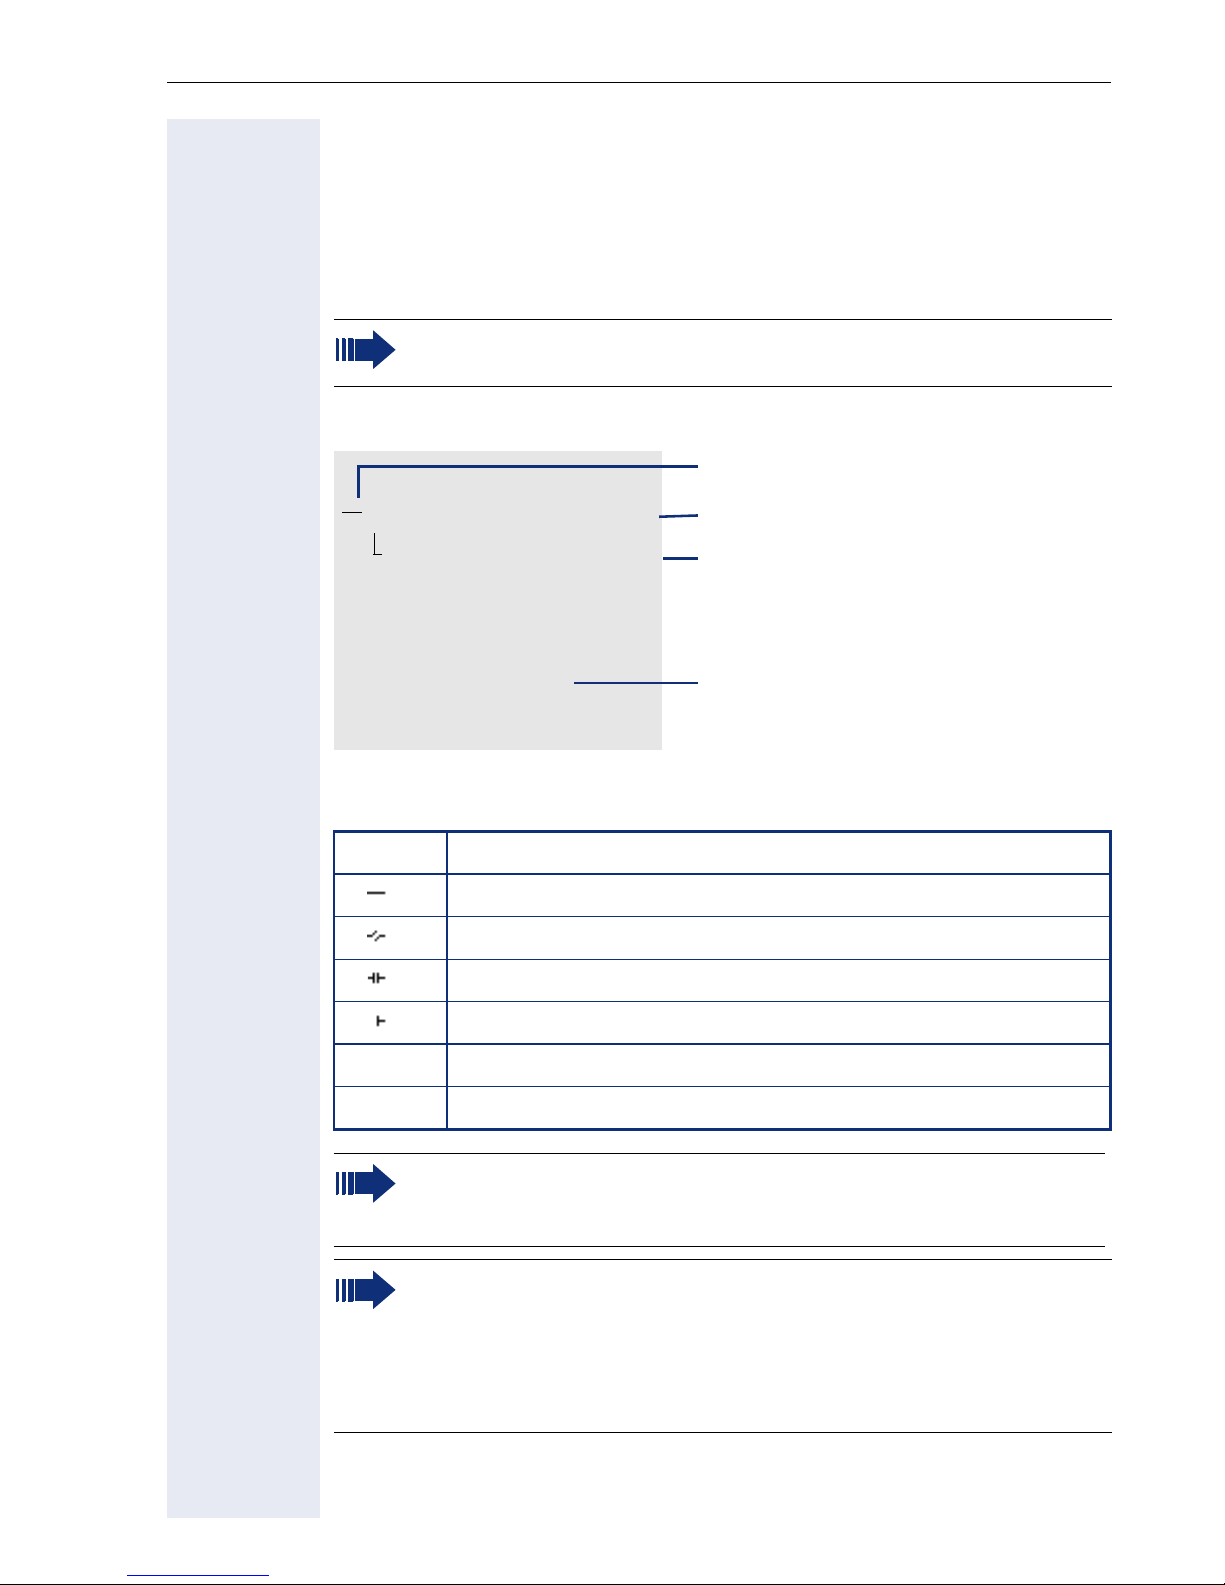
Additional information is displayed in the telephony interface when your
phone rings, when you dial a number or during a call, for instance.
The same information is available on multi-line telephones for the
selected line in the line overview.
Example:
Icon indicating call status
Smith Michael
08912345678
Consultation
Hold
Blind transfer call
Disconnect
Icons for frequent call states
Icon Explanation
The call is active
The call has been disconnected
You have placed the call on hold (e.g. consultation hold).
Your call partner has placed the call on hold
{
The voice connection is secure.
{
3:16
Call duration
Current call(s)
Context menu with situation-specific
options
}
Detailed descriptions of the various functions can be found in the
sections "Basic phone functions" Æ page 40 and "Enhanced phone
functions" Æ page 78.
Press the
example, from a call list (Æ page 34). To return to the telephony
interface again from the phonebook (Æ page 37) or the Service
menu (Æ page 37), press the
"Show telephone screen" function however for both cases (see
Æ page 70) to return to the telephony interface screen again.
The voice connection is not secure.
key to return to the telephony interface again, for
O
N key. You can also configure a
29
Page 30
Getting to know your OpenStage phone
Multi-line view
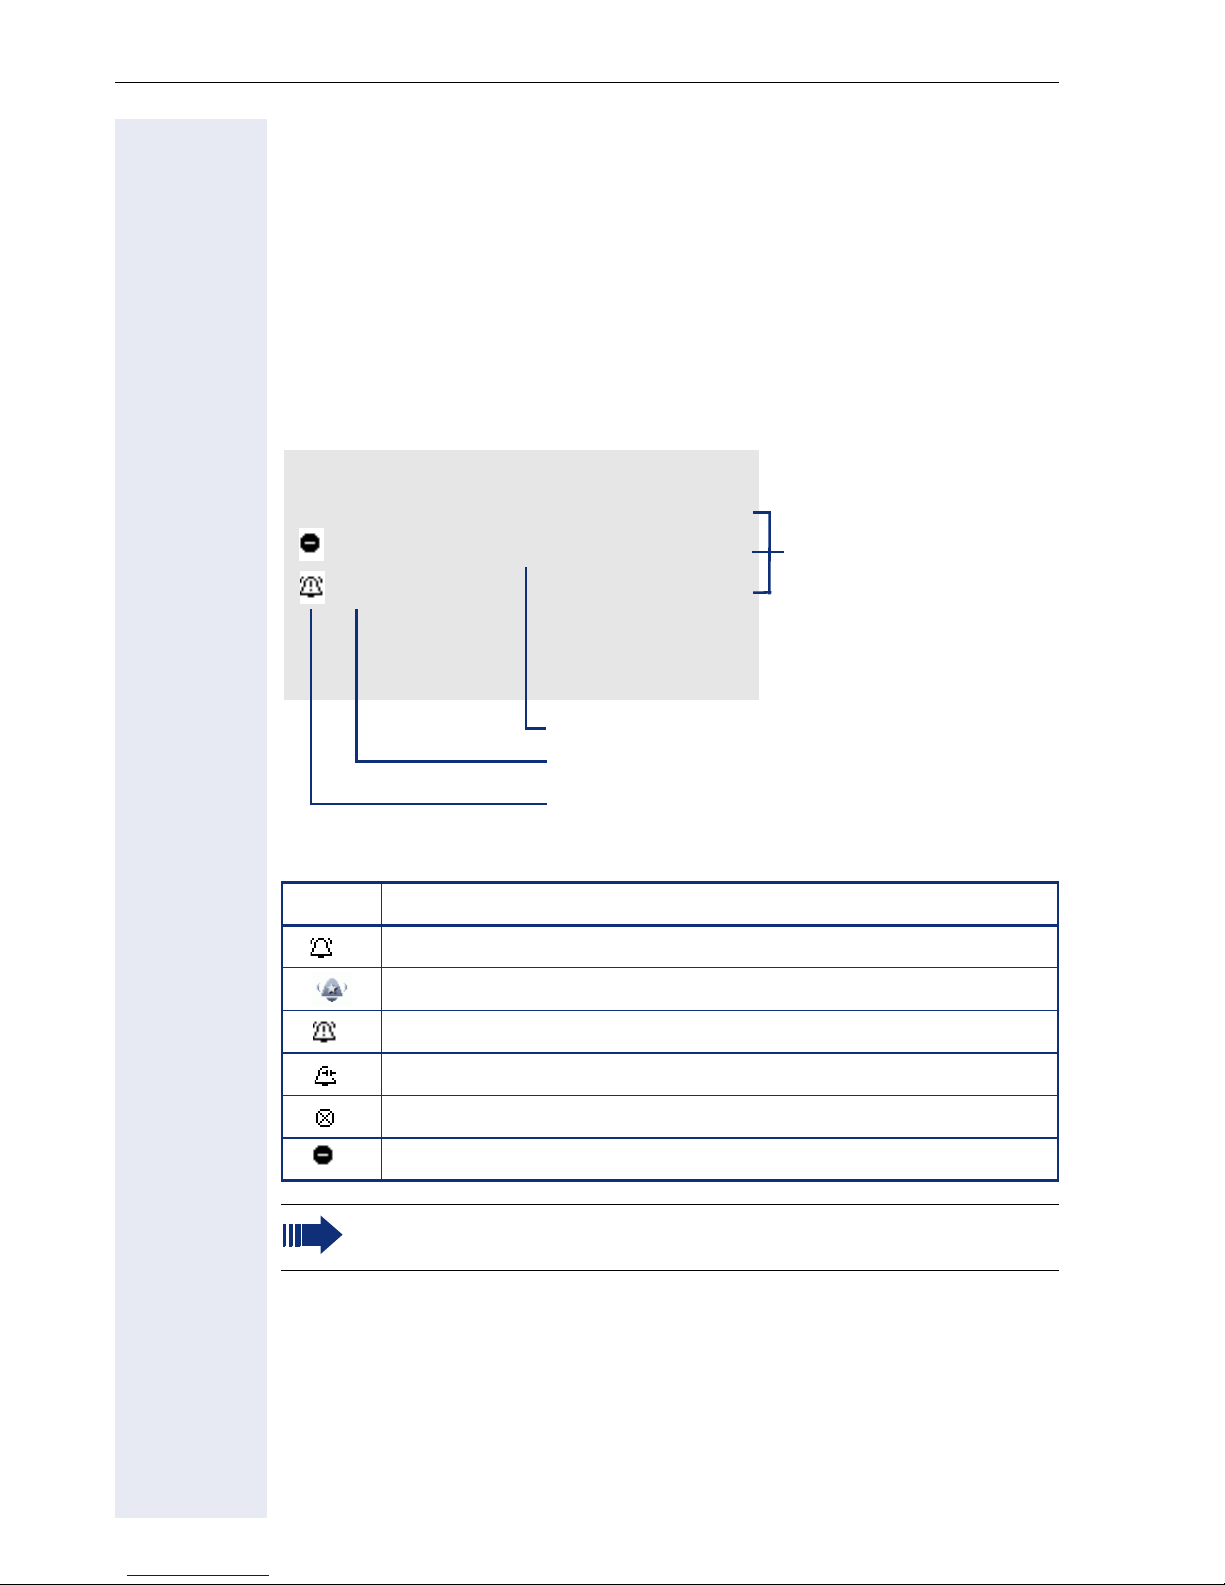
You can use the h key to switch between two tabs on the telephony in-
terface:
• "[My phone]" tab - represents the primary line or the line view of a selected line Æ page 29
• "Overview" tab - configurable overview of the secondary lines
Æ page 22
In idle mode: Press the h key:
Example:
Overview
[My phone] gBohr, Niels
Line 1 Line busy
Line 2
Line status
Line name
Status icon
The status icons provide information about the state of the relevant line.
Icon Explanation
Call for the corresponding line.
Call from a DSS line.
Call for a line with suppressed ring tone Æ page 132.
Level 2
My phone
Line 1
Line 2
Line key labeling
Æ page 22
"Hold reminder" is activated Æ page 83.
The line is currently not available.
The line is busy.
Please note the LED displays for the line keys Æ page 23.
30
Page 31

Getting to know your OpenStage phone
Context in the line overview
In the context menu of a selected line you have the following options with:
• Own free line
– Select
–View
• Own line with active call
–Hold
– Clear (replace handset)
–View
1
• Own line with held call
– Retrieve
–View
• Other free line
– Select
–View
• Other line with active call
–Hold
– Clear (replace handset)
–View
• Other line with held call
– Retrieve
–View
• Other line busy
–View
1 The telephony view is displayed as a preview after a period of time set by the service per-
sonnel.
31
Page 32

Getting to know your OpenStage phone
Phonebooks
In addition to a local phonebook, there is a connection to the LDAP corporate directory if service personnel have made the necessary settings.
Both phonebooks can be accessed via the telephone menu (Æ page 37).
You can configure a sensor key for the local phonebook.
Personal
Option
Bernoulli, Daniel
Bohr, Niels
Chadwick, James
Curie, Marie
Faraday, Michael
Search contacts
When in the phonebook or directory list view, press the keypad key that
corresponds to the first letter of your search term.
A field opens for you to enter the search term:
UK
K
JL5 (Abc)
The cursor jumps to the first entry in the list that matches the character you
entered in the search field.
Personal phonebook
You can store up to 100 private contacts in your personal phonebook.
These are displayed in alphabetical order in the phonebook list. How to create contacts is described in Æ page 105. A contacts consists of an entry
with a "Last name", "First name" and a number.
Managing contacts
All saved contacts are listed in alphabetical order on the "Personal" menu.
You can use the "Options" context menu to
• create new contacts Æ page 105
• delete the entire phonebook list Æ page 106
32
Page 33

Getting to know your OpenStage phone
Using contacts
The following functions are available via the context menu of a selected
contact:
• Calling a contact Æ page 95
• Editing a contact Æ page 105
• Deleting a contact Æ page 106
LDAP directory
If you have access to an LDAP directory (contact the responsible service
personnel), you can search contacts in a company-wide directory. A userfriendly, advanced search function is available for this.
Searching for a contact
• Simple search Æ page 108
• Quick searchÆ page 110.
Using a contact
Calling a contactÆ page 95
33
Page 34

Getting to know your OpenStage phone
Messages
Depending on the type and configuration of your communications platform
(contact the relevant service personnel), messages from services, such as,
HiPath Xpressions can be displayed in this list.
When new messages are received, a message appears (Æ page 27) on
the idle display and the LED on the O (Æ page 19) key lights up.
To a c c e s s t h e m e n u : Press the O key and use the navigator to select
and confirm the relevant submenu.
Records
Messages
Calls
Voicemail
You will find voicemails in the Messages directory.
Messages Directory:
The following default entry appears in the list: Voi c e mail
Voice mail
No new messages
Alternative call: Hold down the O key.
If your system is appropriately configured (contact the relevant service personnel), you can call the voice mailbox directly and immediately play back
the messages saved.
34
Page 35

Getting to know your OpenStage phone
Calls
This list appears as soon as you receive new missed calls if you select the
option Calls in the Records menu. You can then scroll back to the Calls
menu with the backspace key. The following calls or call attempts are
logged as call lists:
Calls
Missed
Dialed
Received
Forwarded
The number of missed calls and unchecked calls is shown on the idle display.
Call lists
All calls to your phone are time-stamped and logged in consecutive order
in the call lists.
Each call list may contain up to 30 entries. Once this limit is reached, the
oldest entry in the log is deleted.
Multiple calls from the same number are only listed once. The number of
call attempts is logged in the "Details" context menu and additionally in the
"Missed Calls" log in the list display.
The list contains the phone number as well as the time of the last call.
If you connected a call partner with his/her consultation or second
call partner, his/her phone number will be shown in the call list
"Received".
Callers with suppressed numbers are listed as "Unknown" in the call
lists.
Only calls to the primary line are received on multi-line phones
(Æ page 13).
35
Page 36

Getting to know your OpenStage phone
Example of the Missed call list:
Missed
Options g
Time of call
(Busch, Wilhelm 12:11
11178 (2)
(Benz, Karlg 10:25
Number of call attempts
Selected new entry with
context menu
235689 (1)
(Lessing, Ephraim 7:22
Old entry
2568900 (1)
Call list options
You can select the following function in the Options context menu:
Delete all Æ p ag e 111
Entry-specific context menu
You can select the following functions for an individual entry:
•Dial Æ page 96
•Details Æ p ag e 111
Call attempts with date and time (up to ten can be saved)
• Delete Æ p a ge 111
36
Page 37

Getting to know your OpenStage phone
Telephone menu
Open the telephone menu using the N key.
Settings
Personal
Phone book
Settings
Local phonebook
Company-wide
LDAP phonebook
Program/Service menu
Program/Service menu
You can make settings here as a user and use this menu to navigate to the
password-protected administration area.
Accessing the menu: Settings select and confirm and then select and
confirm the required menu using the navigator.
Settings
User
Admin
Settings for the user
Password-protected administration area
User settings
You can use the "User" menu to make local function settings for your OpenStage and to configure the appearance of your display to your personal requirements.
Select one of the following menus with the navigator (Æ page 20):
• "Date and time" Æ page 165
•"Audio" Æ page 169
• "Configuration" e.g. Æ page 79 or Æ pa ge 101
• "Phone" Æ page 70 Æ page 161
•"Locality" Æ page 165
•"Security" Æ page 136
• "Network information" Æ page 38
•"Reset" Æ page 183
37
Page 38

Getting to know your OpenStage phone
Network information
Information about the IP address or name which was assigned to the
phone in the network and therefore the HTML address of the web interface.
V
V
View information on the phone Æ page 182
Contact your service personnel or refer to the OpenStage Administration Manual for more on the network information values listed
here.
Perform reset
Personal settings made via the telephone menu or the web interface can
be reset to factory settings.Æ page 183
Administration
You can access the administration area via the "Admin" function and by entering the administration password.
Refer to the administration manual supplied with your phone for more detailed information on this topic.
Control and monitoring function
A control or monitoring function can be activated on your phone for service
purposes by remote maintenance.
Control function
Service personnel have the option to activate and deactivate features of
the phone via remote maintenance. During maintenance the handset, microphone, loudspeaker and headset are deactivated. You are additionally
informed on the display that the control function is active.
Monitoring function
In order to detect malfunctioning of a phone for example, the service personnel install a monitoring function. You can use your phone as normal during monitoring. However you will first be informed about the operation
with a message on the display and prompted to allow monitoring.
If service personnel have activated a function on your phone, which continuously transmits operating data to a server, you will see the flashing
icon in the upper display line.
38
Page 39

Getting to know your OpenStage phone
Contributing to environmental protection by saving
energy
The user can save energy actively using the energy settings on the
telephone and in this way contribute to protecting the environment.
To reduce energy consumption, you can
• reduce the brightness of the display (the default setting is 50 percent
and is preset Æ page 162).
• set the background lighting to switch off automatically after a certain
period of time. To save a large amount of energy, the time can be
reduced to one minute. The default value is 5 minutes (Æ page 163).
• reduce the ring volume (set by default to 50 % Æ page 169).
39
Page 40

Basic functions
Step by step
Basic functions
Please read carefully the introductory chapter
"Getting to know your OpenStage phone"
Æ page 14 before performing any of the steps de-
scribed here on your phone.
Secure voice transmission
Prerequisite: The secure voice communication option
must be activated by your service personnel.
If you call a party or receive a call from a party over a secure connection, a padlock icon
party’s row on your graphic display. You can opt to have
voice connections that are no longer secure indicated
by a brief alerting tone and a window with the message
"Unencrypted call" (see Æ page 175).
1
appears on the other
Answering a call
Your OpenStage phone rings with the tone signal set
when an incoming call is received. The call is also visually signaled on the call display.
If transmitted, calling party information (name, phone
number) appears on the graphic display.
If you have set a pattern melody or a ringtone
Æ page 171 on your phone, it is possible that service personnel have preset a different ringtone or
deactivated the ringtone, depending on the call
type (e.g. an external or internal call).
An incoming call will interrupt any ongoing telephone setting operations. When the call ends,
you can press the N key to return to the point
in the menu structure where you were interrupted.
40
1. Closed for secure or open for nonsecure voice communication
Page 41

Step by step
Basic functions
Answering a call via the handset
The phone is ringing. The caller is displayed.
^ Lift the handset.
Accept?
if nec.
if nec.
+- Set the call volume.
Answering a call via the loudspeaker
(speakerphone mode)
The phone is ringing. The caller is displayed.
The pop-up menu opens:
Select and confirm the option shown. The n key
lights up.
or
n Press the key shown. The key lights up.
The speakerphone function is activated.
+- Set the call volume.
Suggestions for using speakerphone mode:
• Tell the other party that speakerphone mode is active.
• Adjust the call volume while speakerphone mode is
active.
• The ideal distance between the user and the phone
in speakerphone mode is 50 cm.
41
Page 42

Basic functions
Step by step
Answering a call via the headset
Prerequisite: A headset is connected.
Make sure your headset port is set up properly
Æ page 174.
The phone is ringing. The o key flashes.
o Press the key shown.
if nec.
+- Set the call volume.
Answering calls automatically via the headset
Prerequisite: The service personnel have additionally
configured a key with the "Auto-Headset function (AICS
Zip tone) (Æ page 70).
S Press the "Auto-Headset" sensor key to activate auto-
matic call answering. This key and the headset key illuminate.
A short acoustic signal is heard on the headset for a call
and the connection is established.
If you want to manually answer calls again, deactivate
the automatic answering function using the "AutoHeadset" key. Both keys are off.
42
Page 43

Step by step
Basic functions
Directed pickup
You can pick up a call signaled at an absent coworker’s
phone. If a colleague has placed a call on hold on their
multi-line phone you can also pick up this call.
Accept call
Prerequisite: You know the coworker’s internal phone
number and the function is configured for you in OpenScape Voice.
A coworker’s phone rings.
Directed pickup?
Directed pickup?
Select and confirm the option shown in the idle phone’s
context menu.
or
^ Lift the handset.
or
n Press the key shown.
Select and confirm the option shown.
j Enter and confirm the relevant phone’s internal number.
You are connected to the calling party either via the
handset or in speakerphone mode.
43
Page 44

Basic functions
Step by step
Picking up the held call
Prerequisite: Your colleague has placed a call on hold
on their multiline phone Æ page 116.. You know the coworker’s internal phone number and the function is configured for you in OpenScape Voice.
Directed pickup?
Directed pickup? f
f
Select and confirm the option shown in the idle phone’s
context menu.
or
^ Lift the handset.
or
n Press the key shown.
Select and confirm the option shown.
j Enter and confirm the relevant phone’s internal number.
You are connected to your colleague’s held call either via
the handset or in speakerphone mode.
44
Page 45

Step by step
Basic functions
Switching from handset to speakerphone mode
Make note of the two different processes and activate your preferred setting as required
Æ page 173.
Prerequisite: You are conducting a call via the handset
and the microphone and loudspeaker functions have
been activated by service personnel.
Open listening in standard mode
n and \ Hold down the key and replace the handset. Then re-
lease the key and proceed with your call.
Open listening in US mode
If open listening is set to US mode, you do not have to
hold down the loudspeaker key when replacing the
handset to switch to speakerphone mode.
n Press the key shown.
\ Replace the handset. Proceed with your call.
{ or }
A secure voice communication is indicated by a
closed padlock icon on the graphic display; a nonsecure voice communication is indicated by an
open padlock icon on the graphic display (see
also Æ page 40)
Switching from speakerphone mode to
the handset
Prerequisite: You are conducting a call in speakerphone mode.
^ Lift the handset.
n The key shown goes out.
45
Page 46

Basic functions
Step by step
Switching from headset to speakerphone mode
In standard mode
n Press and hold the key (open listening ist activated),
o Press the key shown. Speakerphone mode is activated.
In U.S. mode
n Press the key shown.
o Press the key shown. Speakerphone mode is activated.
Open listening
You can let other people in the room join in on the call.
Let the other party know that you have turned on the
loudspeaker.
Prerequisite: You are conducting a call via the handset.
Activating
n Press the key shown.
Deactivating
n Press the lit key.
Switching to speakerphone mode
n \ Hold down the lit key and replace the handset.
46
Page 47

Step by step
Basic functions
Activating/deactivating the microphone
You can temporarily switch off the handset microphone
to prevent the other party from listening in while you
consult with someone in your office.
Prerequisite: You are conducting a call.
Deactivating the microphone
p Press the key shown.
Activating the microphone
p Press the lit key.
Disconnect?
Ending a call
s Press the key shown.
or
Select and confirm the option shown in the connections’s context menu.
or
\ Lit key pressed
or In speakerphone mode
n Press the lit key.
47
Page 48

Basic functions
Step by step
Group call
Your service personnel can incorporate multiple telephones in a call pickup group. If your telephone belongs
to a pickup group, you can also accept calls intended for
other members of the group.
A group call is displayed on the phone. Service personnel may have made the following settings for signaling:
Telephone status Ring on group call
= Yes
Ringer on Silent Ringtone
Loudspeaker
in
Connection
Ringer off Silent Nothing Nothing
in
Connection
Handset Ringtone
Loudspeaker
Handset
Open listening
Headset Ringtone
Headset
Open listening
Speakerphone mode
Handset Nothing Beep
Beep
Handset and loudspeaker
Loudspeaker
Beep
Headset and loudspeaker
Beep
Loudspeaker
Ring on group call
= No
Beep
Loudspeaker
Beep
Handset
Beep
Handset and loudspeaker
Beep
Headset
Beep
Headset and loudspeaker
Beep
Loudspeaker
Handset
48
Handset
Open listening
Headset Nothing Beep
Headset
open listening
Speakerphone mode
The volume settings can be found from Æ page 169.
Beep
Handset and loudspeaker
Beep
Headset and loudspeaker
Beep
Loudspeaker
Beep
Handset and loudspeaker
Headset
Beep
Headset and loudspeaker
Beep
Loudspeaker
Page 49

Step by step
Basic functions
Further service personnel settings for group calls:
• The group call can be picked up both by lifting the
handset and via the "Pickup call" menu option.
• The group call be picked up via the "Pickup call"
menu option but not by just lifting the handset.
• A key is programmed for call pickup.
• A pop-up menu is opened with the Call pickup key
when a group call is waiting.
Picking up a group call with the call pickup key
Prerequisite: The Call pickup key is configured. Your
service personnel have set up the group call such that it
is only displayed through flashing of the Call pickup key.
The phone can also ring when idle.
A group call is waiting. The Call pickup key flashes. The
group call is not shown on the display.
R Press the sensor key with the "Call pickup" function.
The group call is now shown on the display with
Pickup:
for:
The pop-up menu opens:
Picking up a group call immediately via the pop-up
menu
Prerequisite: Your service personnel have set up the
group call such that it will be shown immediately on the
display and the pop-up menu will open.
A group call is waiting and is shown on the display with
Pickup:
for:
Caller
Station
Caller
Station
49
Page 50

Basic functions
Step by step
Picking up a group call
The pop-up menu opens:
Pickup call?
Ignore?
Confirm.
or
^ Lift the handset (only if the appropriate function is set
by your service personnel)
or
R Press the sensor key with the "Call pickup" function or
press it again if call answering was initiated via the key.
The speakerphone function is activated.
Ignoring a group call
Select and confirm the option shown. The phone stops
signaling the group call.
50
Page 51
Step by step
Basic functions
Making calls
If you selected the option "Busy When Dialing"
Æ page 99, you will not be interrupted by an incoming call. In this case, the caller hears the busy
signal.
Off-hook dialing
^ Lift the handset.
j Enter the number if nec. Use the navigator Æ page 20
to correct entries as necessary.
In the pop-up menu:
Dial
Redial {1} S. Hawking
Confirm or wait until the dial delay expires (see
Æ page 97).
or In the pop-up menu:
Select and confirm the option shown.
The connection is set up.
If you are using a dial plan and Immediate dialing
is set (see Æ page 53), dialing is automatically
performed as soon as the character string entered matches an entry in the dial plan.
51
Page 52

Basic functions
Step by step
On-hook dialing
The connection is set up with on-hook dialing via the
loudspeaker (speakerphone mode) or via a connected
headset.
n Press the key shown.
or
o Press the key if a headset is connected.
and/or
j Enter the station number.
i Press or wait until the dial delay expires (see
Æ page 97).
Redial {1} S. Hawking
Dial
or In the pop-up menu:
Confirm.
First enter the number
First enter the number. The loudspeaker or headset key
illuminate when you enter the first digit.
j Enter the station number. If nec. Use the navigator
Æ page 20 to correct entries as necessary.
Confirm or wait until the dial delay expires (see
Æ page 97).
The connection is set up.
If you are using a dial plan and Immediate dialing
is set (see Æ page 53), dialing is automatically
performed as soon as the character string entered matches an entry in the dial plan.
52
Page 53

Step by step
Immediate dialing
Immediate dialing should only be activated if service
personnel has configured and approved a dial plan.
Immediate dialing is deactivated by default. For this reason after entering the number you must either confirm
the "Dial" option or wait until the dial delay expires to set
up the connection. If Immediate dialing is configured,
your call is automatically dialed as soon as the string entered matches an entry in the dial plan.
Activating or deactivating immediate dialing
z
You can also configure this setting via the Web interface
Æ page 195.
N Press the key shown.
Basic functions
Settings
User
Configuration
Outgoing calls
Immediate dialling
Yes
Save & Exit
if nec.
Select and confirm the option shown.
Select and confirm the option shown.
j Enter and confirm the User password.
Select and confirm the option shown.
Select and confirm the option shown.
Select and confirm the option shown.
Select and confirm the option shown in the context
menu.
Confirm
53
Page 54

Basic functions
Step by step
Dialing using the hot or warm line function
Your service personnel can configure a hot or warm line
for your phone.
If you lift the handset of the phone or press the loudspeaker key
• with a hot line immediately or
• with a warm line after a defined period of time,
• a number specified by service personnel is dialed.
Examples:
• The phone in the lift immediately dials the reception
number.
• The phone at a patient’s bed dials the ward number
e.g. after a minute if no other number is dialed.
54
Page 55

Step by step
Basic functions
Redial
Redialing from the call list
Only calls to the primary line are received on
multi-line phones (Æ page 13).
, Press the key shown.
You are automatically directed to the Dialed list in the
Calls menu.
Niels, Bohr 07:06 am
^ Lift the handset.
n Press the key shown.
Redial {1} S. Hawking
Redial {1} S. Hawking
{ or }
Select and confirm the entry you want.
The phone number associated with the list entry is dialed.
Redialing from the pop-up menu
or
Confirm.
The last phone number entered is dialed.
Redialing from the idle menu
Select and confirm from the idle display context menu
(Æ page 28). The last phone number entered is dialed.
A secure voice communication is indicated by a
closed padlock icon on the graphic display; a nonsecure voice communication is indicated by an
open padlock icon on the graphic display (see
also Æ page 40)
55
Page 56
Basic functions
Step by step
Consulting a second party
You can call a second party while a call is in progress.
The connection to the first party is placed on hold.
Prerequisite: You are conducting a call.
Consult
Konferenz starten
Disconnect & return
Select and confirm the option shown in the connections’s context menu.
or Start conference
Select and confirm the option shown in the context
menu for the call connection when you intend to set up
a conference with the new participant. You can also use
an already configured Conference key in this instance.
j Call the second party.
If you are using a dial plan and Immediate dialing
is set (see Æ page 53), dialing is automatically
performed as soon as the character string entered matches an entry in the dial plan.
Ending or canceling a consultation call
Select and confirm the option shown in the second party’s context menu.
The consultation call is disconnected. The call with the
first party is resumed.
Disconnect
56
Ending the first call
Select and confirm the option shown in the first call’s
context menu.
The connection to the second party remains active.
If you want to use the phonebook or a call list
for the consultation, select Hold in the context
menu instead of Consult or press the Hold key
and then select the required call list
(Æ page 105).
Alternatively you can select a phonebook or call
list without using the Hold functions - the active
call is automatically placed on Hold.
Page 57
Step by step
Basic functions
Switching to the held party (alternating)
Prerequisite: You are conducting a consultation call.
Alternate?
Disconnect?
Disconnect & return?
Select and confirm the option shown in the connection’s context menu.
It does not matter which context menu is open
when alternating. The "Alternate" function appears in both menus (active and passive connection).
You can switch back and forth between two subscribers by repeatedly selecting and confirming
"Alternate".
Ending an alternate operation
Disconnecting the held call:
Select and confirm the option shown in the held connection’s context menu.
The held call is disconnected. The active call continues.
Disconnecting the active call:
Select and confirm the option shown in the active connection’s context menu.
The active call is disconnected. The held call remains on
hold and can be managed via the context menu.
57
Page 58

Basic functions
Step by step
Putting on hold and retrieving successively or
simultaneously
Putting an active call on hold
Prerequisite: You are conducting a consultation call
Æ page 56 or have accepted a second call Æ page 86.
The "Hold" sensor key must be configured Æ page 70
S Press the "Hold" key. The key lights up. The consultation
or second call and the first call are put on hold.
Retrieving the first call
b Switch to the first call.
R Press the illuminated "Hold" key. You are connected
with the other party. The consultation or second call
continues on hold.
Retrieving the second call
d Switch to the held consultation or second call
R Press the illuminated "Hold" key. You are connected
with the other party. The first called is put on "Hold"
again.
58
Page 59

Step by step
Basic functions
Connecting parties
You can connect the first party with the party you consulted, clearing down your connection to both parties in
the process.
Prerequisite: You are conducting a consultation call
Æ page 56 and call joining must be allowed Æ page 59.
Complete Xfer?
Settings
User
Select and confirm the option shown in the active connection’s context menu.
The active and held calls are joined. The active call and
the consultation call are cleared down.
or Connect by hanging up
] or n Replace the handset or, if you are in speakerphone
mode, press the loudspeaker key. The other two parties
are now connected to one another.
Allowing call joining
z
You can also configure this setting via the Web interface
Æ page 195.
N Press the key shown.
Select and confirm the option shown.
Select and confirm the option shown.
if nec.
j Enter and confirm the User password.
Configuration
Connected calls
Allow call joining = Yes f
Yes l
Option = Save & Exit l
Select and confirm the option shown.
Select and confirm the option shown.
Select and confirm the option shown.
Select and confirm the option shown in the context
menu.
Confirm.
59
Page 60

Basic functions
Step by step
Call forwarding
You can forward calls for your phone to another phone.
On multi-line telephones (Æ page 13), you can
only configure call forwarding for the primary
line.
Three forwarding conditions can be programmed in the
forwarding menu:
• All Calls
•Busy
• On no reply
Because of its direct impact, "All Calls" call forwarding
has the highest priority followed by "No reply" and
"Busy".
If active, "All Calls" call forwarding is indicated on the
graphic display when the phone is idle.
Forwarded calls can be logged in a call list (see
Æ page 35).
The Edit call forwarding menu offers you three Destination options. These destination options are assigned
to the forwarding types.
All calls (off/on)
Destination
Busy (off/on)
Destination
No reply (off/on)
Destination
One phone number may already be assigned to each
destination. The destination option could then be Destination 12345, for instance.
60
Page 61
Step by step
Basic functions
Programming call forwarding
Configuring destination phone numbers for call forwarding
You can configure up to five destination phone numbers
for call forwarding. These destination phone numbers
can then be assigned different forwarding types. You
can then enable one of the forwarding types
(Æ page 63).
r Press the key shown.
The pop-up menu opens:
Edit call forwarding
Destination
Edit favourites
Destination 1
Select and confirm the option shown.
An overview of call forwarding settings appears.
You can also enter the call forwarding settings via
the user menu (Æ page 80).
Select the destination option for one of the following
forwarding types:
• All calls
•Busy
•No reply
Confirm the destination selected.
You can use each of the three Destination options to save destination phone numbers for the
relevant forwarding type.
Select and confirm the option shown in the context
menu.
Select and confirm the option shown.
Save & Exit
j Enter and confirm the destination phone number.
Define additional destination phone numbers for destination 2 to 5, as necessary.
Select and confirm the option shown.
61
Page 62
Basic functions
Step by step
Assigning a destination phone number to a call
forwarding type
r Press the key shown.
The pop-up menu opens:
Edit call forwarding
Destination
08972228596
Save & Exit
Select and confirm the option shown.
An overview of call forwarding settings appears.
Select the destination option for one of the following
forwarding types:
•All calls
•Busy
•No reply
Confirm the destination selected.
Select and confirm a destination number from the list.
Select and confirm the option shown.
Defin ing the r ing durat ion before cal l forwa rdin g on
no reply
You can define how often the phone should ring before
the "No reply" form of call forwarding activates.
This setting is only available if the "Server features" function was deactivated by the service
personnel.
r Press the key shown.
Edit call forwarding
Duration
Save & Exit
62
z
You can also configure this setting via the Web interface
Æ page 195.
Prerequisite: The phone is idle.
The pop-up menu opens:
Select and confirm the option shown.
An overview of call forwarding settings appears.
Select and confirm the option shown.
j Enter a value for the duration.
Select and confirm the option shown.
Page 63

Step by step
Activating/deactivating call forwarding
z
You can also configure this setting via the Web interface
Æ page 195.
Prerequisite: At least one destination phone number is
programmed (Æ page 62).
r Press the key shown.
The pop-up menu opens:
Basic functions
Edit call forwarding
All calls
Busy
No reply
On
Save & Exit
Select and confirm the option shown.
An overview of call forwarding settings appears.
Select and confirm the option shown.
or
Select and confirm the option shown.
or
Select and confirm the option shown.
Select and confirm "On" or "Off" in the context menu.
Select and confirm the option shown.
63
Page 64

Basic functions
Step by step
Activating call forwarding for all calls
Use the r function key to activate call forwarding for
all calls.
z
You can also configure this setting via the Web interface
Æ page 195.
Prerequisite: There is at least one forwarding destination programmed Æ page 61.
r Press the key shown.
The pop-up menu opens:
Accept
Accept
Select and confirm the option shown. The r key
lights up. Call forwarding is activated.
If the phone is idle, the call forwarding icon
on the graphic display with the destination phone number.
Deactivating call forwarding for all calls
r Press the lit key.
The pop-up menu opens:
The pop-up menu disappears after around five seconds
and the r key goes out.
or
Select and confirm the option shown.
Call forwarding is deactivated.
K appears
64
Page 65

Step by step
Basic functions
Call forwarding chain
Sometimes calls to a station are forwarded to another
station which also has call forwarding or DND activated.
This can create a call forwarding chain consisting of several telephones where the last member of the chain is
your phone.
A popup window opens on your phone’s screen with
the following information:
• Who is calling
• Who forwarded first or last.
• The reason for the forwarding is displayed by an
icon.
You can set whether the station that forwarded first or
last is displayed (see Æ page 81).
65
Page 66
Basic functions
Step by step
Callback
You can request a callback if the station called is busy or
if nobody answers.
You receive a callback when the other party’s line becomes free.
This option must be activated by your service
personnel.
On multi-line telephones Æ page 13, only the
callback requests for your primary line are
logged.
Requesting callback
Call back?
Cancel call backs?
Disconnect? m
Prerequisite: The station called is busy or nobody answers.
In the pop-up menu:
Select and confirm the option shown.
Deleting callback requests
You can delete scheduled callback requests if you no
longer need to return a call, for example, at the end of
the working day.
Prerequisite: At least one callback was requested.
Select and confirm the option shown in the idle display
(Æ page 28) context menu.
Confirm in the pop-up menu. All callback requests are
deleted.
66
Page 67

Step by step
Basic functions
Responding to a callback
Prerequisite: A callback was requested. Your phone
rings and station information appears on the graphic display.
The pop-up menu opens:
Accepting a callback
Accept?
Reject?
Deflect
Select and confirm the option shown.
Rejecting a callback
Select and confirm the option shown.
The callback request is deleted. The caller hears the
busy signal. The caller’s phone number is added to the
missed calls list.
Forwarding a callback
Select and confirm the option shown.
j Enter and confirm the phone number.
67
Page 68

Basic functions
Step by step
Permitting callback on busy/no reply
z
You can also configure this setting via the Web interface
Æ page 195.
N Press the key shown.
Settings
User
Configuration
Outgoing calls
Callback: busy
Callback: no reply
Yes
if nec.
Select and confirm the option shown.
Select and confirm the option shown.
j Enter and confirm the User password.
Select and confirm the option shown.
Select and confirm the option shown.
Select and confirm the option shown.
or
Select and confirm the option shown.
Select and confirm the option shown in the context
menu.
Save & Exit
68
Select and confirm the option shown.
Page 69

Step by step
Basic functions
Calling back missed calls
Calls received while you are absent are indicated by a
message on the idle display (Æ page 27). The O func-
tion key also lights up.
Missed calls are logged in the missed calls list. This list
provides information on the missed call and lets you call
back the number directly (call lists, see also Æ page 35).
On multi-line telephones Æ page 13, only the
calls missed on your primary line are logged.
O Press the key shown.
Calls
Niels, Bohr 20.05 10:06
Select and confirm the option shown.
Select and confirm the appropriate list entry. The phone
number associated with the list entry is dialed.
If no new calls are listed, the call list menu is offered under Calls Æ p ag e 111 .
69
Page 70

Programmable sensor keys
Step by step
Programmable sensor keys
The phone features a range of functions that can, if required, be stored on programmable sensor keys.
The phone comes with six sensor keys, all of which can
be programmed on two separate levels.
The "Shifted" sensor key, which allows you to switch between the two programmable sensor key levels, is preassigned. This sensor key should be maintained where
possible so you can switch between the two programmable sensor key levels.
The labels for the sensor keys are displayed on the right
edge of the display.
The sensor keys can also be programmed via the webinterface (Æ page 195).
List of available functions
1. Delete (not assigned.) 17. Group pickup
2. Selected dialling 18. Repertory dial
3. Repeat dialling 19. Feature toggle
4. Forward all calls 20. Show telephone
screen
5. Forward no reply 21. Mobility
6. Forward busy 22. Directed pickup
7. Ringer off 23. Callback
8. Hold 24. Cancel callbacks
9. Alternate 25. Consultation
10. Blind transfer call 26. Call Waiting toggle
11. Transfer call 27. Immediate ring
12. Deflecting 28. Preview
13. Shift 29.
14. Conference
15. Headset 31. Integ. Umleit
Call recording
30. Start application
70
16. Do not disturb 32. Start phonebook
Page 71
Step by step
Programmable sensor keys
Programming sensor keys
z
You can also configure this setting via the Web interface
Æ page 195.
Beginning programming
Directly via a sensor key
S Hold down the sensor key to which a function should be
assigned until the programming prompt is displayed.
If the prompt is not displayed or a programmed
function is not executed, then you can only
launch key programming via the user menu (ask
your service personnel about the current setting).
OK
Settings
User
Phone
Program keys
Confirm to begin programming. The sensor key illuminates continuously.
or Via the user menu
You can also program keys via the user menu.
N Press the key shown.
Select and confirm the option shown.
Select and confirm the option shown.
if nec.
j Enter and confirm the User password.
Select and confirm the option shown.
Select and confirm the option shown. You are prompted
to press the key you wish to program.
S Press the sensor key you want to program with a func-
tion. The sensor key illuminates continuously.
71
Page 72
Programmable sensor keys
Step by step
Beginning programming
Normal
Shifted
Do not disturb
Label
Save & Exit
Select and confirm the option shown to program the
first level.
or
Select and confirm the option shown to program the
second level.
Select and confirm the required function in the list (e. g.
Do not disturb).
Select and confirm the option shown if you want to
change the label on the graphic display.
j Enter and confirm the label you want.
Select and confirm the option shown.
Programming enhanced functions
Repertory dial
OK
Normal
Repertory dial
Label
S Hold down the sensor key to which a function should be
assigned until the programming prompt is displayed.
If the prompt is not displayed or a programmed
function is not executed, then you can only
launch key programming via the user menu (ask
your service personnel about the current setting).
Confirm to begin programming. The sensor key illuminates continuously.
z
You can also configure this setting via the Web interface
Æ page 195.
Select and confirm the option shown to program the
first level for instance.
Select and confirm the function in the context menu.
Select and confirm the option shown if you want to
change the label on the graphic display.
72
j Enter and confirm the label you want.
Page 73

Step by step
Programmable sensor keys
Setting
Select and confirm this option to enter a destination
phone number.
j Enter and confirm a stations’s destination phone num-
ber.
You can select and insert special characters in the dialing sequence:
« Clear call
~ Make consultation
» Make normal call
¬ Pause
The pop-up menu also offers the following functions:
• Move cursor right and left
•Copy
•Paste
• Mode selection
• Cancel
•OK
Save & Exit
Select and confirm the option shown.
The repertory dial can be up to 40 characters
long.
73
Page 74
Programmable sensor keys
Step by step
Feature toggle
Only available for Hunt group functions (Æ page 152).
S Hold down the sensor key to which a function should be
assigned until the programming prompt is displayed.
If the prompt is not displayed or a programmed
function is not executed, then you can only
launch key programming via the user menu (ask
your service personnel about the current setting).
OK
Normal
Feature toggle
Label
Setting
Save & Exit
Confirm to begin programming. The sensor key illuminates continuously.
z
You can also configure this setting via the Web interface
Æ page 195.
Select and confirm the option shown to program the
first level for instance.
Select and confirm the function in the context menu.
Select and confirm to change the key labeling.
j Enter and confirm the label you want.
Select and confirm this option to enter a code.
j Enter and confirm the code, for example: *96 (contact
your service personnel).
Select and confirm the option shown.
74
Page 75
Step by step
Programmable sensor keys
Forwarding
S Hold down the sensor key to which a function should be
assigned until the programming prompt is displayed.
If the prompt is not displayed or a programmed
function is not executed, then you can only
launch key programming via the user menu (ask
your service personnel about the current setting).
OK
Normal
Forward all calls
Label
Setting
Confirm to begin programming. The sensor key illuminates continuously.
z
You can also configure this setting via the Web interface
Æ page 195.
Select and confirm the option shown to program the
first level for instance.
Select a forwarding type:
• Forward all calls
• Forward no reply
•Forward busy
Select and confirm the function in the context menu.
Select and confirm the option shown if you want to
change the label on the graphic display.
j Accept or edit the label and confirm.
Select and confirm this option to enter the forwarding
destination.
j Enter and confirm the phone number of the forwarding
destination.
Save & Exit
Select and confirm the option shown.
75
Page 76

Programmable sensor keys
Step by step
Using sensor keys
The use of programmed functions depends on the
phone’s status. The relevant display appears once you
have pressed a sensor key.
Example 1: Calling saved number
Prerequisite: The idle menu is displayed on the graphic
display.
S Press the sensor key for a saved number. The connec-
tion is set up.
Example 2: Call Waiting toggle Activating/
deactivating
You can press a key to activate or deactivate call waiting
functionality, even during a call. The perquisite for this is
that a second call is permitted (Æ page 88). By default
a second call is permitted.
T Press the "Call Waiting toggle" sensor key. The sensor
key goes out. The second call function is deactivated.
The call is rejected or forwarded.
Example 3: Immediate ring
This function allows you to switch the preset delay
(Æ page 129) on and off for all line keys. By default the
delay is set, the key does not illuminate.
S Press the "Immediate ring" sensor key. The sensor key
illuminates. The delay ringtone is disabled. An incoming
call rings immediately regardless of what delay time is
configured.
76
Page 77
Step by step
Programmable sensor keys
Resetting sensor keys
You can reset sensor keys you configured to factory settings (see also Æ page 183).
N Press the key shown.
Settings
User
Reset
Function key data
Yes
Reset selected user data
if nec.
Select and confirm the option shown.
Select and confirm the option shown.
j Enter and confirm the user password.
Select and confirm the option shown to switch to the
Reset user data menu.
Select the option shown.
Select and confirm the option shown in the context
menu to delete the content of all sensor keys.
Select and confirm "Reset selected user data". The contents of the sensor keys you configured are deleted.
Sensor keys which can only be configured by service personnel remain unchanged
77
Page 78

Enhanced phone functions
Step by step
Enhanced phone functions
Incoming calls
Accepting calls via the headset
Prerequisite: The headset is connected.
o The LED flashes when a call is received.
Press the key shown. Conduct call.
Ending the call:
o Press the key shown. The LED goes out.
Deflect
Deflecting a call
Using call deflection
Prerequisite: An incoming call is displayed or signaled.
In the pop-up menu:
Select and confirm the option shown.
The call is immediately deflected if a destination phone
number is programmed (Æ page 79).
or If you did not set a phone number when programming
call deflection, a pop-up menu appears prompting you
to enter a destination phone number for call deflection.
j Enter and confirm the destination phone number.
The call is deflected.
78
Page 79
Step by step
Permitting call deflection
z
You can also configure this setting via the Web interface
Æ page 195.
N Press the key shown.
Enhanced phone functions
Settings
User
Configuration
Incoming calls
Deflecting
Allow deflection
Yes
Default destination
if nec.
Select and confirm the option shown.
Select and confirm the option shown.
j Enter and confirm the User password.
Select and confirm the option shown.
Select and confirm the option shown.
Select and confirm the option shown.
Select and confirm the option shown.
Select and confirm the option shown in the context
menu.
Select and confirm the option shown.
Deflect to DSS: Yes
j Enter and confirm the phone number to which the sta-
tion should be deflected.
Entering a destination phone number is not mandatory when call deflection is active. If you want
to deflect an incoming call, you are prompted to
enter a destination phone number if there is
none stored.
or Deflecting to a DSS number
A call can be deflected to a direct station selection
(DSS) subscriber using the DSS key, if the key is configured and the deflect function is activated by your service personnel Æ page 121.
Information only, as set by service personnel: Yes or No.
79
Page 80
Enhanced phone functions
Step by step
Rejecting a call
You can reject an incoming call.
In the pop-up menu:
Reject
Settings
User
Select and confirm the option shown.
The caller hears a busy signal.
If the rejected caller’s phone number is transmitted, it is saved in the call list. You can then call
this party back at a later time.
Configuring call forwarding
You can also enter the call forwarding settings via
the Forwarding key (Æ page 61).
N Press the key shown.
Select and confirm the option shown.
Select and confirm the option shown.
if nec.
j Enter and confirm the User password.
Configuration
Incoming calls
Forwarding
Settings
Select and confirm the option shown.
Select and confirm the option shown.
Select and confirm the option shown.
For a description of the settings, see the chapter "Call
forwarding" (Æ page 60).
Configuring forwarding
Select and confirm the option shown.
For a description of the settings, see the chapter "Call
forwarding" (Æ page 60).
80
Page 81

Step by step
Enhanced phone functions
Setting alerts
Use the Call forward alerts menu to enable and disable
visual and audible alerts for call forwarding (not possible
with the Forwarding key).
Alerts
Visual alerts= No
Yes
Audible alerts= No
Yes
Forwarding station... Last
Display last
Select and confirm the option shown.
Select the option shown.
Select and confirm the option shown in the Yes/No context menu.
or
Select the option shown.
Select and confirm the option shown in the Yes/No context menu.
or
Select the option shown.
Select and confirm Display last/Display first
Option = Save & Exit
Select and confirm the option shown.
81
Page 82

Enhanced phone functions
Step by step
Placing a call on hold
You can use this function to place an ongoing call on
hold, for instance, to prevent the other party overhearing a conversation with a colleague in the same room.
The held party hears music on hold if Music on hold is
active on this party’s phone (Æ page 85).
Prerequisite: You are conducting a call.
Hold
Reconnect
Select and confirm the option shown in the connections’s context menu.
or
S Press the "Hold" key. The key lights up. (The "Hold" sen-
sor key must be configured Æ page 70.)
Retrieving a held call:
Select and confirm the option shown in the connections’s context menu.
or
R Press the illuminated "Hold" key. (The "Hold" sensor key
must be configured Æ page 70.)
Using line keys
On multi-line telephones you can use the line keys to
place ongoing calls on hold.
R Press the corresponding line key. The line key LED
starts flickering. The call is now on hold.
T Press the corresponding line key. The line key LED
82
Retrieving a held call:
lights up. The call is retrieved.
The LED display Æ page 23 or status display on
the "Overview" tab Æ page 30 indicates to other
multi-line telephones on which this line is also
configured, that the call is on hold. These phones
can then pick up the call.
Held call wait status
After placing a call on hold, you can replace the handset
and then decide if the call should be retrieved or disconnected.
Page 83

Step by step
Enhanced phone functions
Prerequisite: You placed a call on hold and replaced the
handset.
In the pop-up menu:
Retrieve held call
Disconnect
Settings
User
Configuration
Select and confirm the option shown to resume the call
in speakerphone mode.
or
Select and confirm the option shown to disconnect the
call.
Activating/deactivating the hold reminder tone
z
You can also configure this setting via the Web interface
Æ page 195.
N Press the key shown.
Select and confirm the option shown.
Select and confirm the option shown.
if nec.
j Enter and confirm the User password.
Select and confirm the option shown.
Connected calls?
Allow hold rem.?
Yes
Save & Exit
Select and confirm the option shown.
Select and confirm the option shown.
Select and confirm the option shown in the context
menu.
Select and confirm the option shown.
83
Page 84

Enhanced phone functions
Step by step
Setting the hold reminder time
Use the "Hold reminder" function to set the length of
the timeout before an automatic reminder is issued
about a held call.
The minimum value is 1, that is, the reminder is output
after one minute. The maximum value is 15 minutes.
z
You can also configure this setting via the Web interface
Æ page 195.
N Press the key shown.
Settings
User
Configuration
Connected calls?
Hold rem. delay
Save & Exit
if nec.
Select and confirm the option shown.
Select and confirm the option shown.
j Enter and confirm the User password.
Select and confirm the option shown.
Select and confirm the option shown.
Select and confirm the option shown.
Enter a value between 3 and 15 and confirm.
j
Select and confirm the option shown.
84
Page 85

Step by step
Music on hold
Music on hold is played back when you are placed on
hold by another party, providing this option is active.
z
You can also configure this setting via the Web interface
Æ page 195.
N Press the key shown.
Enhanced phone functions
Settings
User
Configuration
Connected calls
Music on hold
Yes
Save & Exit
if nec.
Select and confirm the option shown.
Select and confirm the option shown.
Enter and confirm the User password.
j
Select and confirm the option shown.
Select and confirm the option shown.
Select and confirm the option shown.
Select and confirm the option shown in the context
menu.
Select and confirm the option shown.
85
Page 86

Enhanced phone functions
Step by step
Call waiting (second call)
You can accept a second incoming call in the course of
an ongoing call. The caller hears the on-hook signal
while you hear a call-waiting signal tone.
You can ignore or accept the second call. Before you accept the second call, you can end the first call or place
it on hold for subsequent retrieval.
You can block the second call or the signal tone
(Æ page 88).
Accepting a second call
Prerequisite: You are conducting a call and call waiting
is allowed (Æ page 88).
In the pop-up menu:
Accept
Select and confirm the option shown.
You can talk to the second party.
The connection to the first party is on hold.
You can still
• toggle between an initial and second call or
• put on hold and retrieve second and first call
successivelyÆ page 58
or
• initiate a conference
Consultation call from second call
If the second call is your active call you can initiate a
consultation call from it.
From a consultation call in the second call you can
• initiate a conference
• toggle between the second call and a consultation
call
• put on hold and retrieve second and first call successively Æ page 58
• transfer a call
• disconnect the calls again
Disconnect & return
86
During a consultation in the second call, the first call is
parked and can only be unparked when the consultation
or second call ends or these calls were connected.
Select and confirm the option shown in the second
call’s context menu. The call to this station is disconnected and the call to the first station is reconnected.
Page 87

Step by step
Enhanced phone functions
Ignoring second call
Prerequisite: You are conducting a call and call waiting
is allowed (Æ page 88).
In the pop-up menu:
Ignore
Reject
Select and confirm the option shown.
The caller still hears the on-hook signal. You can subsequently Accept, Reject or Deflect the second call.
While the ignored second call continues to wait, from
the active call you can:
• make a consultation call
• initiate a conference
• toggle between the consultation call and your call
party
• transfer a call
A third call would be rejected with the busy signal
If you have disconnected the first call, the ignored second call rings like a normal call.
Rejecting a second call
Prerequisite: You are conducting a call and call waiting
is allowed (Æ page 88).
In the pop-up menu:
Select and confirm the option shown.
Deflect
The second call is rejected. The caller hears the busy
signal. The caller’s phone number is added to the
missed calls list.
Deflecting a second call
Prerequisite: You are conducting a call and call waiting
is allowed (Æ page 88).
In the pop-up menu:
Select and confirm the option shown.
j Enter and confirm the phone number.
The second call is deflected to the destination specified. You are reconnected with the first party.
87
Page 88
Enhanced phone functions
Step by step
Connecting parties
Complete Xfer
Select and confirm the option shown in the active connection’s context menu. The other two parties are now
connected to one another. You can now hang up or dial
another number for instance.
or Connect by hanging up
Prerequisite: Connecting by hanging up is activated
(ask your service personnel) and "Switch assignment"
must be set to "Yes" (Æ page 89). Before you can be
connected by hanging up you must have toggled at
least twice (Æ page 57).
] or n Replace the handset or, if you are in speakerphone
mode, press the loudspeaker key. The other two parties
are now connected to one another.
Allowing call waiting
If the Call waiting (second call) function is deactivated, a caller hears the busy signal if you are already conducting a call.
Prerequisite: The option was programmed by your service personnel.
Settings
User
Configuration
Incoming calls
Handling
Allow call waiting
z
You can also configure this setting via the Web interface
Æ page 195.
N Press the key shown.
Select and confirm the option shown.
Select and confirm the option shown.
if nec.
j Enter and confirm the User password.
Select and confirm the option shown.
Select and confirm the option shown.
Select and confirm the option shown.
Select and confirm the option shown.
Yes
88
Select and confirm the option shown.
Page 89

Step by step
Enhanced phone functions
Save & Exit
Settings
User
Select and confirm the option shown.
Assuming Allow call waiting is generally activated,
you can toggle the configured sensor key to switch call
waiting on/off (Æ page 88).
Toggling associate
Set the "Toggle associate" function to Yes if you want to
connect to a second or pickup call by hanging up.
z
You can also configure this setting via the Web interface
Æ page 195.
N Press the key shown.
Select and confirm the option shown.
Select and confirm the option shown.
if nec.
j Enter and confirm the User password.
Configuration
Connected calls
Toggling associate
Yes
Save & Exit
Select and confirm the option shown.
Select and confirm the option shown.
Select and confirm the option shown.
Select and confirm the option shown in the context
menu.
Select and confirm the option shown.
89
Page 90
Enhanced phone functions
Step by step
Transferring a call
You can transfer your current call to another party with
or without consultation.
Blind transfer
Prerequisite: You are conducting a call. The options "Al-
low call transfer" and "Transfer on ring" were allowed
(Æ page 91).
Blind transfer
Consultation
Select and confirm the option shown in the connections’s context menu.
j Enter and confirm the phone number of the second par-
ty to whom you want to transfer the call.
The graphic display returns to idle following successful transfer.
Transferring with consultation
You can announce a call to a recipient before transferring it.
Prerequisite: You are conducting a call. The options "Allow call transfer" and "Transfer on ring" were allowed
(Æ page 91).
Select and confirm the option shown in the connections’s context menu. The call is placed on hold.
j Enter the phone number of the party to whom you want
to transfer the call.
Dial
Complete Xfer
Complete transfer
90
Confirm.
If the party answers:
Announce the call you want to transfer.
Select and confirm the option shown in the connections’s context menu.
If the party does not answer:
You do not have to wait for the second party to answer
before you can transfer the call.
Select and confirm the option shown in the connections’s context menu.
or Replace the handset or, if speakerphone mode is active,
press the lit n key to transfer the call.
Page 91

Step by step
If the party does not answer, you will be called back by
the first party.
Allowing call transfer
z
You can also configure this setting via the Web interface
Æ page 195.
N Press the key shown.
Enhanced phone functions
Settings
User
Configuration
Connected calls
Allow call transfer
Yes
Save & Exit
if nec.
Select and confirm the option shown.
Select and confirm the option shown.
j Enter and confirm the User password.
Select and confirm the option shown.
Select and confirm the option shown.
Select and confirm the option shown.
Select and confirm the option shown in the context
menu.
Select and confirm the option shown.
91
Page 92

Enhanced phone functions
Step by step
Allowing "Transfer on Ring"
If this option is allowed, you can activate call transfer by
replacing the handset even before the called party answers.
z
You can also configure this setting via the Web interface
Æ page 195.
N Press the key shown.
Settings
User
Configuration
Outgoing calls
Transfer on ring
Yes
Save & Exit
if nec.
Select and confirm the option shown.
Select and confirm the option shown.
j Enter and confirm the User password.
Select and confirm the option shown.
Select and confirm the option shown.
Select and confirm the option shown.
Select and confirm the option shown in the context
menu.
Select and confirm the option shown.
92
Page 93

Step by step
Enhanced phone functions
CTI calls
Beep on auto-answer
Speakerphone mode activates automatically on your
phone if you use a CTI application (such as Outlook) to
dial a number when Auto Answer is active. If Auto Answer is not active, the phone rings first and you have to
press the loudspeaker key or lift the handset to set up
the call. This setting also defines whether or not incoming calls are automatically accepted. If the function is
active, an alert beep sounds when an incoming call is
automatically accepted.
Information on the operation of the configured CTI application can be found in the corresponding user guide.
z
You can also configure this setting via the Web interface
Æ page 195.
Settings
User
Configuration
Incoming calls
CTI calls
Auto-answer
Yes
Prerequisite: The option was programmed by your service personnel.
N Press the key shown.
Select and confirm the option shown.
Select and confirm the option shown.
if nec.
j Enter and confirm the User password.
Select and confirm the option shown.
Select and confirm the option shown.
Select and confirm the option shown.
Select and confirm the option shown.
Select and confirm the option shown.
Beep on auto-answer
Yes
Save & Exit
Select and confirm the option shown.
Select and confirm the option shown.
Select and confirm the option shown.
93
Page 94

Enhanced phone functions
Step by step
Beep on auto-reconnect
You can reconnect a held call both via the CTI application and via the phone. A beep sounds when you toggle
between an active call and a held call when the function
is active.
Prerequisite: The option was programmed by your service personnel.
z
You can also configure this setting via the Web interface
Æ page 195.
N Press the key shown.
Settings
User
Configuration
Incoming calls
CTI calls
Beep on auto-unhold
Yes
Save & Exit
if nec.
Select and confirm the option shown.
Select and confirm the option shown.
j Enter and confirm the User password.
Select and confirm the option shown.
Select and confirm the option shown.
Select and confirm the option shown.
Select and confirm the option shown.
Select and confirm the option shown.
Select and confirm the option shown.
94
Page 95

Step by step
Enhanced phone functions
Making calls
If you want to dial a call from a phonebook or a call list,
you should not lift the handset or press the loudspeaker
or headset key before.
Dialing with the DDS key
You can program frequently used phone numbers on
programmable keys (Æ page 70). If you press a DSS
key, the associated contact or phone number appears
and dialing is initiated.
Prerequisite: A direct destination key is programmed
Æ page 70.
R Press the programmed DDS key. Dialing is initiated.
Personal
Niels, Bohr
Niels, Bohr
Dialing from the local phonebook
N Press the key shown.
Confirm.
or
S Press the configured sensor key "Personal" for the local
phonebook ( Æ page 70).
Select and confirm the entry you want. The phone number is dialed.
Extensive information on the local phonebook and on
searching for stations can be found from Æ page 105.
Dialing from the LDAP database
Prerequisite: You searched for and selected an entry in
the LDAP database (Æ page 108).
Select the entry you want.
Dial
Select and confirm the option shown in the context
menu. The connection is set up.
95
Page 96

Enhanced phone functions
Step by step
Dialing a phone number from a list
The following call lists are available in the "Calls" directory:
• Missed
• Dialed
•Received
• Forwarded
For a detailed description of the call lists, see
Æ page 35.
O Press the key shown.
Calls
Dialed
Niels, Bohr 07:06am
Select and confirm the option shown.
Select and confirm the required call list.
Select and confirm the entry you want. The phone number associated with the list entry is dialed.
96
Page 97

Step by step
Enhanced phone functions
Using autodial delay
A number is automatically dialed after a set delay starting from the entry of the number’s last digit. The autodial delay can be used:
• when dialing in idle mode
• when deflecting an incoming call
• Consultation
• when transferring an answered call.
The delay can be reduced by performing one of the following activities:
i • Press the key shown. This always works.
^ • Lift the handset (off-hook). This only works if the
phone number was entered when the phone was
idle or if it was entered for a consultation call when
the handset was off hook.
n • Press the key shown. This only works if the phone
number was entered when the phone was idle and
the loudspeaker key was not lit or if the phone number was entered for a consultation call and the loudspeaker key was not lit.
If an emergency number is preset by your service personnel, the autodial delay for this phone
number is reduced to one second.
Automatic dial delay does not work if you are using a dial plan and Immediate dialing is config-
ured (see Æ page 53). The number is automatically dialed as soon as the string entered
matches an entry in the dial plan.
97
Page 98

Enhanced phone functions
Step by step
Settings for autodial delay
z
You can also configure this setting via the Web interface
Æ page 195.
The setting does not affect automatic emergency
number dialing.
If you select Autodial delay, you must either confirm
the "Dial" option, press the loudspeaker key or wait until
the autodial delay expires to set up a call when dialing
with the handset on hook.
N Press the key shown.
Settings
User
Configuration
Outgoing calls
Autodial delay
Save & Exit
if nec.
Select and confirm the option shown.
Select and confirm the option shown.
j Enter and confirm the User password.
Select and confirm the option shown.
Select and confirm the option shown.
Select and confirm the option shown.
j Specify a value and confirm your entry.
Select and confirm the option shown.
98
Page 99
Step by step
Allowing "Busy When Dialling"
If you activate this function, an incoming call received
while you are performing dialing is rejected. The caller
then hears the busy signal.
z
You can also configure this setting via the Web interface
Æ page 195.
N Press the key shown.
Enhanced phone functions
Settings
User
Configuration
Outgoing calls
Busy when dialling
Yes
Save & Exit
if nec.
Select and confirm the option shown.
Select and confirm the option shown.
j Enter and confirm the User password.
Select and confirm the option shown.
Select and confirm the option shown.
Select and confirm the option shown.
Select and confirm the option shown in the context
menu.
Select and confirm the option shown.
This setup option can also be found under "Handling" in the "Incoming calls" menu.
99
Page 100

Enhanced phone functions
Step by step
Conference
Local conference
This type of conference is also referred to as a threeparty conference. It involves up to three participants.
Prerequisite: You are conducting a consultation call
Æ page 56 or have accepted a second call Æ page 86,
and the conference function is active Æ pag e 101.
Initiating a local conference
You can initiate a conference by calling the
"Conference" function in the context menu of
either the active or held call. Alternatively you can
press an already configured Conference key.
Conference?
User
Disconnect
{ or }
Select and confirm the option shown in the connection’s context menu. You are connected to both parties
at once.
Conducting one-on-one calls
Select the connection you want to clear down on the
display.
Select and confirm the option shown in the context
menu. You are now involved in a one-to-one call with the
remaining call party.
If you already are involved in a secure connection
with a party when you initiate a consultation call,
the original party is placed on hold. The new consultation connection can be either secure or nonsecure. However, the first connection remains
secure even if all three parties are now joined together in a conference.
The entire conference is nonsecure if the connection to at least one of the parties is not secure
(see also Æ page 40).
100
The relevant padlock icon appears on the "Conference" row.
 Loading...