Make: SIEMENS Optiset NI-1200 National ISDN Fixed To
Level: National Isdn Compliant
Terminal Exchange Support:
ISDN Basic Terminal
Multiline Hunt Group (MLHG)
Basic Electronic Kam Hontel Services (EKT)
CACH (Call Appearance Call Handling)
Other Interface:
12 programmable feature/line key
Display: 2 lines with 24 characters each
Menu Keys for Selection
Other Functionalities:
Features: Group calls features
Call Transfer features
Automatic Re-Call features
Call Data for Did Not Answer Calls
Speed Dial features
Call response on incoming calls (caller’s address)
Audio Settings:
Handset volume control, ringer volume and speaker volume
Protocol: RF Unit Microphone built into speaker for DI phone use.
Other Features:
Optional Headset with TA-TAPI terminal adapter
Programmable Password
Menu Overlay Settings
Choose the line select mode features
Quick Transfer and DMS quick transfer
Optional Auto answer
Frequently Asked Questions
Q1: What kind of services can please the Optiset NI-1200?
A1: Basic isdn terminal, Multiline hunt group (MLHG), basic electronic key telephone service (EKTS) and Call Appearance Call Handling (CACH) are all compatible with the Optiset NI-1200.
Q2: Is it possible to modify the ringer and speaker volume?
A2: Indeed, the ringer, the handset and the speaker volume can be adjusted using the designated Volume Up and Volume Down keys.
Q3: What is the capacity installed on the Optiset NI-1200 for simultaneous calls?
A3: With respect to the limits of the switching systems, the Optiset NI 1200 can accommodate up to twenty-eight (28) calls at the same time.
Q4: Is a hands-free calling microphone readily available?
A4: The answer is yes, the hands-free function is possible through the microphone which is embedded in the Optiset NI-1200.
Q5: Are there options for security on the terminal?
A5: Yes, such a feature is possible. For example, the terminal could be programmed to have password protection to restrict access to some configuration changes.
Q6: Is it possible to connect a headset to an Optiset Ni-1200?
A6: Absolutely, but only if the terminal has TA-TAPI terminal adapter, the device supports additional type of headsets which are the electret type.
Q7: How should I proceed if I get a busy signal over the phone while sending over a call?
A7: If the busy signal occurs while sending a call then you can choose to cancel the transfer as well as the conference call setup as instructed in the manual.
Q8: Explain to me how the auto answer option or service works on the device?
A8: This option can only be used when the configuration is done, like the name describes auto answer automatically attends calls which are sent and in case a call was sent the ring settings control whether one or no rings are to alert you.
Q9: What method should I employ in order to stop myself from answering a call coming in?
A9: You can use an option from the menu called "reject" this allows you to reject a call that is being received, another way is during the call waiting phase clicking the disconnect button.
Q10: Am I allowed to modify the call tonal settings and tonal pitch shifts?
A10: Indeed the model Optiset NI-1200 has the feature of modifying ringer settings that how loud it should ring and its pitch altering it according to the users needs.
This document
copied or reproduced without the prior written permission of Siemens
Information and Communication Networks.
Any
and
Siemens Information and Communication Networks from time
without notice.
by
Issued
900
Broken
is
provided with
all
Information or specifications are subject
Siemens Information and Communication Networks,
Sound
Parkway,
NW.,
Boca
the
Ralon,
and
Communication Networks,
understanding that
Florida
33487
it
shall
not
to
change by
to
time
Inc.
Printed In U.S.A.
be
Page 2
June
Issue 5,
Warning: Hackers who unlawfully gain access
criminals. Curronlly,
Iype
of
criminal aclivily. Siemens will nol acceplliabilily for any damages, including long dislance
charges, which resull from unauthorized use. Although Siemens has designed liecurity features
into ils
prodUCIS,
practices wilhin your company, including training, security awareness, and call auditing.
Siemens sales and service personnel, as welt as Siemens's business partners, are available
work wilh you to help you guard against unauthorized use
Warning: This equipment has been lesled and found
digilal device, pursuant to Part
reasonable protection against harmful Inlerference when the eqUipment is operated in a
residantial installalion. This equipment generales, uses, and can radiale radio frequency enorgy
and,
i/
nOI
10
radio communications. However, (here is no guarantee Ihet interlerence will not occur in a
particular installation.
reception, which can be dotermined by turning the equipment olf and on, the user is encouraged
to
try
10
correct
• Reorient or rolocale tho receiving antenna.
• Increase the separalion between the equipment and receiver.
• Connect the equipment into
connected.
• Consullthe dealer or
1999
10
we
do
nOl
know
of
any telecommunications system thaI is immune to this
Ills
your sole responsibility to use the security features and to establish securily
15
of the FCC Rules. These fimils are designed
installed and used In accordance with the inslructions,
If this equipment does cause harmful interlerence to radio or television
the
interference
by
one
or
more of lhe fol/owing measures:
an
outlel
an
experience{j radio/TV technician for help.
customer lelecommunlcalions systems are
01
your lelecommunlcations system.
10
comply wilh Ihe limits for a Class B
on
a circuil dilferenl Irom that
may
cause harmful interlerence
10
which Iha recoiver is
to
provide
10
ISSUE INFORMATION
Summary
Pages Issue
Cover 5
Issue Information
v through x
1 through 118
This document consists of 128 pages.
5
5
5
Issue
5,
June
1999
Changes or modilications
equipment.
This equipment does nol exceed Class B limils per radio noise emissions for digilal apparatus,
sel oul
in
rhe
Operation
requiring the owner or operator to lake whatever steps are necessa'Y
See
Inslruction manual.
Cat equipmenl
les appareils numeriques. tel/es que prescriles par
elabli par
paut anlrainer
I'operaleur
d'inslruclions.
June 1999
Document order number:
No
part
(orm
or by any means, mechanical, eleclronic, photocopying, recording, or otherwise, without
prior wrillen permission of Siemens Information and Communication Networks.
Reques' Siemens publicalions from your Siemens representative or the Siemens branch lierving
you.
Oplisel and Siemens are registered lrademarks of Siemens Akliangesellschaf1
®Siemens
Radio Interference Regulation
In
a residential area may cause unacceptable Interference
ne
depasse pas les limites de Classe B d'emission de bruils radioeleclriques pour
Ie
ministilro des Communications du Canada. l'exploitation faile
10
brouillage des receptions radio et teltt, ce qui obligerai\
iI
prendre los disposilions necessairos pour
01
this publication may be reproduced, slored in a retrieval syslam, or Iransmilled, in any
AG
1995, 1996, 1997, 1999. All rights reserved.
Ii
to
Ihis equipmanl coul{j voi{j the use,'s aUlhority
01
the
Canadian Departmenl of Communications.
Ie
Reg/emen' sur
en
1275·00030 Part Number: l30500·B76·X
to
10
Ie
brouil/age radioelaclrique
eliminer les causes. Voir
10
operato this
radio and
correclthe interference.
TV
en
milieu residentiel
Ie
proprielaire ou
SfW
Revision
receplion
Ie
GUide
406
1275·00030
Issue History
Issue
Issue 1
Issue 2
Issue 3
Issue 4
Issue 5
Date Issued
October 1995
June 1996
September 1996
July 1998
June 1999
Comments
Initial Issue
Updated cover
Updated to support firmware release
2.06
Updated to support firmware release
3,06
Reformatted and updated to support all
firmware releases through 4.06
1275·00030
III
Page 3
Issue
5,
June
1999
Issue
5,
June
1999
SUMMARY OF ISSUE ENHANCEMENTS
Issue 1
• Initial issue.
Issue 2
• Updated cover to remove implied exclusive EWSD product
association
Issue 3
• Updated cover to indicate that firmware releases through 2.06
are covered in the Operating Guide.
Issue 4
• Updated cover
are covered in the Operating Guide.
Issue 5
• Reformalled entire document.
• Added information regarding operation of the Optiset terminal
with the DCO switching system.
• Updated book to reflect firmware releases through 4.06.
to
indicate that firmware releases through 3.06
CONTENTS
1.
INTRODUCING YOUR OPTISET TERMINAL 1
Programming Requirements 2
Switching System
Operating Components
Basic ISDN Terminal 8
Multiline Hunt Group 8
Basic Electronic Key Telephone Service 8
Call Appearance Call-Handling 9
Additional Call Offering 9
Terms That May Be New to You 10
2.
BASIC CALL OPERATIONS
Place a Call (Using the Handset) 13
Place a Call (Using a Speed Dial Key) 14
Answer a Call (Using the Handset) 16
Answer a Call While Another Call Is Active
(Using a Line Key) 17
Place a Call On Hold (Using the HOLD Key) 1
Return to Any Held Call (Using the Associated
Line Key)
Transfer a Call (Using the Transfer Key) 19
NalionallSDN
UpNolume
Compliance Issues 2
Down Keys 7
..4
13
B
1B
Iv 1275·00030
1275-00030
v
Page 4
Issue
5,
June 1999
Establish a Conference Call (Using the
Conference Key)
Drop the Last Party Added to a Conference
(Using the Drop Last Party Key)
Back Out of a Transfer or Conference Setup
(Because of Busy Signal)
3. ALTERNATIVE
Originate a Call (No Other Calls Active)
Originate a Call (With Another Call Active)
Receive a Call (No Other Calls Active) 28
Receive a Call (With Another Call Active)
Receive All Calls Automatically
Reject a Call (No Other Calls Aclive) 30
Reject a Call (With Another Call Active) 30
Reject All Calls (Do Not Disturb)
Clear an Active/Connected Call
Clear
a Call On Hold 32
Hold a Call 32
Retrieve a Call (No Active Call Connected) 34
Retrieve a Call (With Another Active Call Connected) 34
Transfer a Call 36
Set Up Conference Call 37
Speaker Loudness 49
Key Click
Busy Alerting Type 52
Adjust Local Features 54
Menu Overlay Delay 54
Speaker Control. 55
Line Select Mode 56
Menu Setting 58
20
22
22
25
27
29
29
31
31
41
41
51
Issue
5, June 1999
Hot Keypad
Speaker Setting 62
Incoming Call Display 64
Off Hook Result 65
Fast Transfer 67
OMS Fast Transfer
Autoanswer Mute 70
Set Date 72
Set Time 72
61
69
5. OPTISET TERMINAL USED AS AN EKTS PHONE 75
CACH EKTS Directory Number Restrictions 75
EKTS Associated Calls 75
Multiple Call Appearances
logging
EKTS Functions On Your Optiset
6.
HEADSET OPERATION 83
Controlling the Headset Using the Plug 83
Controlling the Headset with the Headset Control Key 84
Controlling the Headset Using Keys or Menu Options 84
7.
FEATURES 87
Autoanswer 87
Automatic Callback 88
CACH EKTS Calls 76
Answering Incoming Calls 76
Incoming Calls on a Multiple CA Key 77
Automatic Callback Calls on a Multiple CA Key 78
Outgoing Calls
Bridge onto an EKTS Associated Call 79
EKTS Associated Calls on a Multiple CA Key 79
Privacy for EKTS Calls 79
ConferencefTransfer Call Appearance 80
Hold
Intercom
Plugging Headset In 83
Removing the Headset
Answering an ACB Call 88
Making
an
Outgoing Call While ACB is Alerting 88
on
a CACH EKTS Phone 75
TerminaL
on
a Multiple CA Key 78
P,ug
76
81
81
84
vi
1275-00030
1275·00030
vII
Page 5
Issue
5,
June 1999
Issue
5,
June 1999
Cancel Automatic Callback
Call Log
Conference/Large Conference
Date
Direct Station
Do
Not Disturb 92
Download 92
Fast Transfer/OMS Fast Transfer 93
Feature Indicator/Speed Dial 93
Feature Key Inspection 93
Local Feature Inspection 94
System Feature Inspection 94
Idle Line Inspection 94
Active Call Inspection 94
Group Pickup 95
Hold 95
Intercom 96
Line Status/Speed Dial. 97
Make Busy 97
Mute 97
Preview Mode 98
Redial 98
Ringer Off
Speaker 99
Speed Dial 99
Time 100
Transfer 100
User-to-User Information (UUI)
User-lo-User Signaling (UUS)
UUS Answering 102
UUS Originating 102
UUS Terminating 103
Select
89
89
89
91
91
99
101
101
Outgoing Call - Ringing
Connected Call
Call On Hold
Conferenceffransfer CA On Hold
Transfer - Dialing
Transfer - Ringing/Connected
Conference - Dialing
Conference - Ringing/Connected
Consultation - Dialing
Consultation - Ringing/Connected
Download Available
Call Log Accessed
Your Optiset terminal contains keys, indicator lights, faceplate
labels, and conventional telephone components that enable you
place and receive calls and operate the features that are available
through the terminal. These operating components are identified in
Figure
1.
....
....
~
)I"
. , I
..
..,.,
\0
t:n;!:
:-.
:b:;4ki:t{::~i1~;~:ii~,~~r'
iO
0
10
10
~
~(;J[&J
[&J[&J[&]
(;;J(;)(;l
l::J~UJ
[~:)cS:)(:~:XIJ
1.
Display
2.
Handset
3.
Volume
Volume
Keys
4.
Built·ln Speaker
(under hendsel)
5.
Diel
6.
Slelus lights
7.
Faceplates
8.
Feature/Line
Keys
9.
Buill·ln
Microphone
(under phone)
10.
Dialog
Up
Down
Keypad
Keys
to
end
x
1275·00030
Figure
Please take a few minutes to study this illustration and
1.
Optlset
ISDN
Terminal Operating Components
to
familiarize
yourself with the numbered components. This will help you to
beller understand the instructions and learn the procedures in this
guide.
1275·00030
1
Page 7
Issue
5,
June
1988
Programming Requirements
For the Optiset terminal to operate
as
described
in
this guide, il
must have been programmed with at least the following features:
• Line Hold Mode
• Off-hook answers any alerting call appearance
• Menu Active
• One Feature Key per Line Appearance
• Feature Keys for key operation of the following features:
-Conference
• Transfer
-Drop Last Party (Conference)
-Speed Dial
• Redial
-Hold
-Preview
- Connect
• Disconnect
• Speaker Key
• Fast Transfer active
If your terminal does not operate as described
with the person responsible for installing and setting
in
this guide, check
up
your
terminal to be sure your terminal has been programmed for these
reqUired features; or refer to document 1275-00050,
1200
National ISDN Desktop Terminal Installation,
Programming
Guide.
Optiset
Setup,
NI-
and
Switching System National ISDN Compliance Issues
The instructions
in
this guide are written for an Optiset terminal
served by a switching system that complies with National ISDN (N!)
Issue
5,
June 1999
standards. This includes the
EWSD@
switching system. The
Optiset terminal also can be used, with certain limitations, when
connected to a switching system that
Is
not fully NI-compliant.
Switch-based or combined local/switch-based features may operate
in
somewhat differently than described
variations
in
the compliance
of
the switching system to Nl
this guide because of
standards.
In
particular, Transfer procedures may vary from one switching
to
system
another.
In
this guide, the Transfer feature is invoked
by
pressing the Transfer feature key (or selecting the Transfer menu
option) while the call to be transferred is active, dialing the number
up
of the party to receive the call, and then simply hanging
to
complete the transfer. However, with some switching systems, one
be
of the following procedures must
used instead to transfer an
active call:
• Press the Transfer feature key; dial the number of the party to
receive the call; if you wish, announce the call to
the
receiving
party; and then press the Transfer feature key again to connect
the two parties.
• Press the Conference feature key; dial the number of the party
to receive the call; if you wish, announce the call to the
receiving party; and then press the Transfer feature key to
disconnect yourself and connect the other two parties.
• Press the Conference feature key; dial
to receive the call; if you wish, announce the call to
the
number of the party
the
receiving party; press the Conference feature key again to
establish a 3-way conference; and then hang
up
to leave the
other 2 parties connected.
In
addition, the way your Optiset terminal requests certain
based features may result
slightly from those described
of
those features should be substantially the same, and the
Instructions
in
this guide should suffice
in
visual and audible indicators that differ
in
this guide. However, the operation
to
direct you
sWitch-
in
the use of
those features.
2
1275-00030
1275-00030
3
Page 8
Issue 6,
Operating Components
June
1999
Issue
5,
June 1999
Display
on
The display
information of up to 24 characters each. The information presented
depends on the current state of
associated with the terminal.
At
appropriate times, the display presents menu selections that can
assist you
available to you, the display contains the
know that
t>
dialog keys at the bottom of the terminal, you can display each
of the available menu selections. When you find
want
to
activate, press the
In
Note:
You
displayed all the time,
key is pressed while the terminal
The menu displays described
assumption thaI the Oplisel terminal is connecled
ISDN (NI) compliant
among switch platforms, some actual displays on your terminal may
not be exactly as described. Still, the functionality should
similar, and the descriptions should apply sufficiently
operating your Opliset terminal.
Dialog Keys
Along
dialog keys labeled as follows:
the display examples Ihat appear
the instructions for operating your Optiset terminal, the
symbol is substituted for the ~ ..
can set your Optiset terminal so that the menu display
the
bottom edged of your Optiset terminal's faceplate are four
I I I
your Optiset terminal presents up to 2 lines of
the
terminal and of any calls
in
handling calls. When multiple menu selections are
~
..
symbol to let you
you
can scroll through the selections. Using
t/
dialog
key.
in
Ihis guide as part of
symbol.
is
disabled, or is activated only when a dialog
is
in
use.
in
this document are based on the
switCh.
t/
However, because of differences
<::]
t>
I
the
~
the
seleclion
to
a Nalional
to
guide you
I
<::]
and
you
<>
is
be
in
These keys are called dialog keys because they enable
communicate with the terminal
presented to you
symbol
available
scroll backward and forward, respectively, through
the item you want to activate is displayed. Then press the
key
without your having to make a selection.
Handset
Your Optiset terminal
handset. Basic call handling (placing and answering calls) can be
initiated by simply lifting the handset from its cradle.
Dial Pad
The dial key pad on your Optiset is a conventional telephone
keypad.
entering certain codes during setup of the terminal.
FeatureiLine Keys
Your Optiset terminal
feature/line keys, arranged
the
dial pad. Line and feature assignments for these keys already
should have been made by the person who set up your terminal.
However, if you must set up your own terminal, refer
1275-00050, Optiset N/·1200 National ISDN Desktop Terminal
Installation, Setup, and Programming Guide.
Status
Associated with each feature/line key
that are associated with line keys, by the way they light, indicate the
state of the line
in
Ihe lower right corner, Ihen a selection of menu options
to
to
select
It
dial pad; the other B keys appear
lights
in
the display. If the display contains the ~ ..
you. By using the
the
item. Pressing the ~ dialog key exits
is
equipped with a standard telephone
is
used for placing or forwarding calls, as well
is
in
as
follows:
in
response to menu oplions
<::]
and
t>
dialog keys, you can
the
equipped with 12 programmable
two banks. Four keys appear above
in
the bank to the right of the
is
a status light. The lights
you
menu until
t/
dialog
the
as
to
document
menu
for
to
is
4
1275·00030
1275·00030
5
Page 9
Issue
5,
June
1999
Issue
5,
June
1999
Line
Flash Rate
Off
On steady
Status
Available for call
Une in use, or Privacy invoked
on EKTS Associaled call
Wink
EKTS Associated line in use
Flash (faster than Wink) Ringing
Blink (fastest)
On
hold
Faceplate Labels
Associated with the featurelline keys are paper faceplate labels,
protected by removable plastic covers. The person who set up
your Optiset terminal should already have tilled
in
these labels with
the appropriate telephone numbers and tealure names.
However, should you need to change a label, insert a pin or paper
clip into the small hole at the bottom
ot
the plastic cover and lift the
cover off the terminal. After correcting the paper label. replace the
plastic cover by inserting the two small tabs at each end
cover into the corresponding slots in the tace
ot
the terminal.
ot
the
Speaker
Your Optiset terminal is equipped with a speaker, located in the
cradle under the handset. This speaker, together with the built-in
microphone, permits hands-free call handling and sharing of calls
with other persons in the immediate vicinity of the terminal. Calls
may be placed or answered, without lifting the handset, by simply
pressing either the Speaker key or the appropriate line key. To end
a speaker call, press the Speaker key at the end of the
conversation.
If
you are engaged in a handset call and you wish to share the call
with other persons in the vicinity while the far-end party hears only
If
you, press the Speaker key and continue using the handset.
want the far-end party to hear other persons
6
in
the vicinity of the
1275·00030
you
lerminal, hang up the handset while the speaker
is
activated. To
end the call, press the Speaker key again.
Microphone
A microphone is built into
the
bottom of your Optiset terminal.
Working in conjunction with the built-in speaker, the microphone
to
allows you
Be
sure that the terminal is placed
blocks the microphone. If your terminal
noisy environment,
the microphone from picking up local noise and making
place and receive calls without using the handset.
on
a hard surface so that nothing
is
used
in
an unusually
you
may have
to
use the Mute key
to
prevent
it
hard
hear the far-end party.
Volume UpNolume Down Keys
The two keys marked
"+"
and
"_"
are used
to
adjust the volume of
the ringer and of the sound received through the speaker and the
handset. To adjust the ringer volume, while an incoming call
ringing, press the key
1t+1t
to
increase the volume or the
It_"
key to
decrease the volume. The display indicates the current relative
as
volume level.
level. To save the indicated volume level, press the
To adjust the volume of the handset or speaker, during a call
while listening
or the
"_"
key
current relative volume level,
the indicated level. To save the indicated volume level, press the
dialog
key.
well as a menu option for saving the indicated
tI
dialog key.
to
dial tone, press the
to
decrease the volume. The display indicates the
as
well
"+"
key to increase the volume
as
a menu option for saving
or
tI
Optional Headset
If your Optiset terminal
an
adapter,
If
the terminal adapter and headset are equipped, one of the feature
keys
on
optional electret headset can be used with the terminal.
the Opliset terminal should also have been programmed
is
equipped with a TA-TAPI terminal
to
function as a Headset key. This key allows you to control the callhandling functions associated with the headset without having
to
continually plug into and unplug from the terminal adapter. (Other
headset systems are also available that do not require the TA-TAPI
1275·00030
7
to
is
Page 10
Issue
5,
June
1999
terminal adapter and, instead, plug into the handset jack. These
systems may include a key that controls the functions of
headset.)
3.
Throughout Chapter
headset is included
Chapter
functions associated with the headset.
Types
Your Optiset terminal can support any of the following types of
service provided by your telephone operating company:
• Basic ISDN terminal, with terminal-controlled call appearances
• Multiline Hunt Group (MLHG) call appearance
• Basic Electronic Key Telephone System (EKTS)
6. HEADSET OPERATION is devoted exclusively
of
Service Supported
ALTERNATIVE CALL OPERATIONS, the
in
instructions for handling calls.
In
the
addition,
to
the
Issue
5,
June
1999
many businesses.
multiple phones; each phone can be used to make or answer calls
on
any of the shared DNs. EKTS provides the additional features
of bridging into
and preventing other users from bridging into a call.
In
such a system, mUltiple DNs are shared
an
active call of another user of the EKTS group,
by
Call Appearance Call-Handling
Call appearance call-handling (CACH)
on
Each call appearance
Appearance
determine the
For detailed information and instructions that apply
EKTS
operation, refer
AS
AN
10
(CAID) that is used by the switching system
ON
that is being used
EKTS PHONE.
to
the terminal
Chapter 5. OPTISET TERMINAL USED
is
an extension of EKTS.
is
assigned a Call
to
place or receive a call.
to
the eACH
to
• Call appearance call-handling (CACH)
Baaic ISDN Terminal
When the Optiset terminal is connected
many line keys
by the switching system. These line keys can have the same or
different directory numbers (DNs).
number of calls up to the limit the switching system places
line, or
terminal can handle.
up
as
desired can be programmed,
to
the limit of 28 simultaneous calls that your Optiset
to
a plain ISDN line,
up
to the limit set
You
may make or receive any
on
as
your
Multiline Hunt Group
Your Optiset terminal can
arrangement
ON
by the central office.
presented
MLHG line.
in
which several phones are associated with the same
to
the first available phone that is associated with the
be
part of a Multiline Hunt Group,
An
incoming call to the MLHG
ON
an
is
Basic Electronic Key Telephone Service
The Optiset terminal, programmed for Electronic Key Telephone
Service (EKTS), emulates the typical key telephone system used
in
Additional
When
has a channel
a-channels is used for the call. However, if both B-channels
already are being used (either for connected calls or for ringing
calls), the switch sends
to
as
If the Optiset terminal
continuously will preview the active or alerting call, followed by the
longest waiting
in
Line Hold mode, pressing
hold and answer the next call.
An
ACO
have not been answered yet (an ISDN reqUirement).
attempts
reason for the beep is that if the phone attempts
call when non-ACO calls are still ringing, the ACO call
disconnected.
connected call and
answer the
hold.
Call Offering
an
incoming call
10
an
Additional Call Offering (ACO) call.
ACO
call cannot be answered if non-ACO calls are ringing and
is
received by the Optiset terminal,
assigned by the switch
the
is
in
call(s).
call with
Preview mode. pressing the line key
in
the
no
a cyclical fashion.
line key will put the current call on
to
define which of the two
channel
10.
This is referred
If
the
terminal
If
to
answer such an ACO call, the phone will beep. The
to
answer the
If
an
ACO call
no
ACO
call, which will cause the connected call
is
presented when the phone has a
other calls are presented, the user can
it
usually
the user
ACO
will
be
to
go
on
is
8
1275·00030
1275-00030
9
Page 11
Issue 5,
For CACH EKTS phones, an incoming call is not assigned a
channel. Therefore, the requirement
June
1999
to
answer non-ACO calls
B-
before answering ACO calls does not apply. To CACH EKTS
phones, all incoming calls look like ACO calls.
The Optiset terminal allows ACO calls to stack on the only line
defined or on the last line defined. This allows fewer call
bUsy
appearances to be programmed than the call reference
That
ON.
May
Be
New
to
You
the particular
Terms
limit of
The following terms appear in the descriptions and instructions
contained in this guide:
Issue
5,
June 1999
• Fast Transfer -
An
initial-setup feature that allows the user of
the Optiset terminal to complete a transfer operation by simply
hanging
• Hot Keypad Mode Optiset terminal
up
after dialing the second party.
An
initial-setup feature that causes the
to
automatically seize a line as soon as the
user begins dialing.
• Inactive Call - Any Iype of call that places a party on hold.
• Line Hold Mode - The default mode of operation,
in
pressing a line key on the Optiset terminal automatically puts
any other active call (on another line) on hold.
which
• Active Call - A call that is connected and in progress, involving
the Optiset terminal as one of the parties.
• Alerting - Any combination of ringing and flashing line status
lights that indicate an incoming call to the Optiset terminal.
Autoanswer·
•
A feature that permits the Optiset terminal
to
answer calls automatically with either no alerting or a single
alerting ring. The user of the terminal can begin conversing
immediately upon receipt of the call.
• Call Appearance - The particular line, line key, and line status
light associated with a call handled by the Optiset terminal.
• Conference - A call involving three or more parties,
in
which
each party can both talk to and hear all the other parties.
Call·
• Consultation
A call initially involving only two parties, in
which the controlling party places the second party on hold,
connects
to
and converses privately with a third party, and then
returns to the second party. The second party can neither
'he
hear nor participate in the consultation leg of
call.
• Dialog - Interaction between the user of the Optiset terminal,
via the dialog keys, and the menu system. The dialog keys are
used to scroll through the menu choices,
choice when
it
is displayed, and
to
select the desired
to
exit to a previously
displayed menu.
• Open Listening - A configuration in which both the handset or
the headset and the speaker are in use at the same time. This
configuration allows the user
to
talk and listen over the handset
or the headset while others in the room can hear the remote
party through the speaker.
• Preview Mode - A mode of operation in which the originating
phone number for an incoming call is displayed before you
either answer or reject the call.
• Prime (or Primary) Call Appearance - The line, line key, and
line status light associated with the main directory number on
the Optiset terminal. This is the line the terminal automatically
uses for an origination for which a line is not specified.
• TA-TAPI - A terminal adapter (TA) that provides the Telephony
to
Applications Programming Interface (TAPI)
to
terminal
and
Transfer·
•
to
be used with personal computer (PC) applications
accommodate an electret headset.
A feature that allows you to redirect an active call
allow the Optiset
to
another party and then drop out of the call.
10 1275-00030
1275-00030
11
Page 12
Issue
5,
June
1999
June
Issue 5,
1999
2. BASIC CALL OPERATIONS
Many of the functions of your Optiset ISDN terminal can be
accomplished
call·handling features can be accomplished using either a feature
key or the display/menu and dialog keys. Also, the terminal can be
used either as a handset phone or as a speaker phone.
To help you to begin using your Opliset terminal right away, this
section instructs you
your terminal. Meanwhile, by studying section
CALL OPERATIONS, you can learn other procedures that you may
prefer over the basic operations.
Place a Call (Using the Handset)
in
more than one way. For example, many of the
in
the most basic procedures for operating
3.
ALTERNATIVE
12
(This Page Intentionally Left Blank)
1275·00030
Procedure
Lift
the handsel.
The red status light
associated with the prime call
appearance lights.
Wait for dial tone.
Dial the number of the party
you want
to
call.
Use the handset to listen for
audible ringing and either
your party's answer or busy
tone.
1275·00030
Display
f1tU
FEB
04,
99
09:
35
AM
<>
0
i
1
aI : I
IDial: 5555555 I
1555-5555 I
Ringing
(>
13
Page 13
Issue 5,
June
1999
Issue
5,
June
1999
When your party answers,
use the handset to converse.
At the end of the call, return
the handset to its cradle.
The red status light
associated with the prime call
appearance is extinguished.
For alternative ways to place a call, refer to "Originate a Call (No
Other Calls Active)" and "Originate a Call (With Another Call
Active)" in section
Place a Call (Using a Speed Dial Key)
Procedure Display
Lift
the handset.
The red status light
associated with the prime call
appearance lights.
Wait for dial tone.
3.
ALTERNATIVE CALL OPERATIONS.
555-5555
Hold?
The call timer begins counting in
the upper right corner
display.
ITHU
FEB
04,
THU
FEB
04.
II
Oi
aI :
99
99
01: 00:
of
09:43
09:35
the
00
<>
~~
AM
<>
I
Press the speed-dial key
associated with the party you
want to call.
The Optiset terminal uses the
primary line to speed-dial the
of
number
the indicator light for the
primary line lights.
Use the handset to listen for
audible ringing and either
your party's answer or busy
tone.
When your party answers,
use the handset
At the end of the call, return
the handset to its cradle.
The
red status light
associated with the prime call
appearance is extinguished.
the called patty;
to
converse.
jOial:
555-5555
Ringing
555-5555
flo
The call timer begins counting in
the upper right corner
display.
THU
5555555 ,
01:00:00
ld?
FEB
04,
99
09:43
of
<>
<>
the
AM
<>
14
1276-00030
1275·00030
15
Page 14
Issue
5,
June
1999
Issue
5,
June
1999
Answer a
Procedure
The incoming call causes the
terminal ringer to sound.
The red status light
associated with the incoming
call appearance lights.
Liflthe
Use the handset to converse.
At
the end of the call, return
the handset to its cradle.
The
associated with the incoming
call appearance is
extinguished.
For alternative ways to answer a call, when no other calls are
active, refer to "Receive a Call (No Other Calls Active)" in section
ALTERNATIVE
handset.
red
status light
Can
(Using the Handset)
CAll
OPERATIONS.
Display
555-5555
Answer
Top line shows calling party's
number
subscribed
555-5555
1I0ld?
The call timer begins counting in
the upper right corner
display.
TIIU
call?
if
the terminal is
to
Caller
fEB
04,
99
10.
01
:00:00
of
09:43
<>
<>
the
AM
<>
3.
Answer a Call While Another Call Is
Active
Procedure Display
The incoming call causes the
red slatus light associated
with the incoming call
appearance to light.
Press Ihe line key associated
with the incoming second call.
The first call is placed on
and
automatic hold,
connection
incoming call.
The status light for the first
call blinks to indicate that it is
on hold.
When 'he second call has
been disposed
lirst call by pressing its
associated line key.
The status light for the
second call
and
the status light for the first
call goes on steady.
;s
is
a
made to the
01.
retrieve the
extinguished,
555-5545
Answer
Top line shows calling party's
number
subscribed to Caller
555-5555
Retrieve
555-5555
110
I
d?
(Using a Line Key)
call?
if
the terminal
10.
call
line
01
<>
;s
1?<>
:00:00
<>
16
1275·00030
At the end of the original call,
hang up.
The red status light
associated with the call
appearance is extinguished.
1275-00030
THU
FEB
04,
99
09:43
AM
<>
17
Page 15
188ue 5,
For alternative ways to answer a call when another call is active.
refer to "Receive a Call (With Another Call Active)" in section
Place a Call
Procedure Display
Lift
incoming call.
Use the handset to announce
that you are putting the calling
party on hold.
Press the HOLD key.
The
begins
held
June
1999
ALTERNATIVE CALL OPERATIONS.
On
Hold (Using the
the handset to answer the
HOLD
5SS-SS55
Hold?
555-5555 01:00:12
line
appearance light
to
flash,
indicating a
call.
Retrieve
The
call timer continues
while
the
Key)
call
Line
is
on
01
1?
hold.
:00:
to
3.
00
<>
(>
count
Issue
5,
June 1999
Press the line key associated
with the held call.
The
associated status light
goes
steady
Use the handset or the
microphone and speaker to
converse.
For other ways to retrieve a call on hold, refer to "Retrieve a Call
(No Active Call Connected)" and "Retrieve a Call (With Another
Active Call Connected)"
OPERATIONS.
Transfer a Call (Using the Transfer Key)
Procedure Display
on.
in
section
555-55!J5
Ilold?
The
call timer continues
count.
555-5555
Hold?
3.
ALTERNATIVE CALL
01:05:22
<>
to
01:05:25
<>
For alternative ways to place a call on hold, refer to "Hold a Call"
section 3.ALTERNATIVE CALL OPERATIONS.
Return to Any Held Call (Using the Associated Line Key)
Procedure
NOTE:
assumes
held
for
18
call.
that
This
that
line
procedure
Line 1
The
red
is
blinking.
is
the
status light
Display
555-5555 01:05:17
Retrieve
line
11
1275·00030
(>
in
A call is active.
Press the Transfer key.
The
active call
hold,
and a second
provides dial
Dial the number of the party
to whom you want to transfer
the call.
1275·00030
is
tone.
placed
line
on
555-5555
Hold?
I
Oi
aI :
555-5565
Cancel
Transfer?
01:05:22
<>
I
(>
19
Page 16
Issue
5,
June
1999
Issue
5,
June
1999
Lislen for audible ringing.
If a busy signal
encountered, refer
Oul of a Transfer or
Conference Setup (Because
of Busy Signal)
When the Iransferee answers,
hang up.
For alternative ways to transfer a call, refer to "Transfer a Call" in
section 3.ALTERNATIVE CALL OPERATIONS.
Establish a Conference Call (Using the Conference Key)
Procedure
A call is active.
Determine
parties you will join
conference.
Press the:
• Conference key (for a
Small Conference)
• Large Conference key
and then the
Conference key (for a
Large Conference)
The
active call
hold,
and a second
provides dial
the
tone.
is
to
number
to
is
placed on
line
Back
of
the
1555-5565 I
Ringing
THU
FEB
04,
99
09:43
AM
<>
Display
555-5555 01:05:22
1I01d?
0
1
\a1:
<>
Dial the number of the party
you want to add to the
conference call.
Listen for audible ringing.
/(
a busy signal is
encountered, refer
Out of a Transfer or
Conference Setup (Because
of Busy Signal)
When the conferee answers,
announce the call and then
press the Conference key
again.
When all parties are on the
line, conduct the conference.
When the conference is
finished and the other parties
have disconnected, hang up.
I
For alternative ways
Conference Call" in section
OPERATIONS.
to
Back
to
establish a conference call, refer to "Set Up
555~5565
Cancel Conference?
555-5565
Ringing
Iconference
Conference
Drop
last
TIIU
FEB
04,
3.
ALTERNATIVE CALL
party?
99
09:
43
<>
I
<>
AM
<>
20
1275-00030
1275·00030
21
Page 17
'••ue
5, June 1999
Drop the Last Party Added to a Conference (Using the Drop
La8t Party Key)
Procedure Display
Issue
555-5565
Cancel Conference?
5,
June 1999
<>
A conference call
progress.
To
drop
the
was
added
the
press
key.
The
a
2-party
At
the
Drop
conference
call.
end
of
is
last party
to
the
conference,
Lasl Party
call
the
call,
in
who
reverts
hang
up.
The red status light
associated with the call
appearance is extinguished.
Back Out
Signal)
Procedure
of
a Transfer
or
Conference
Drop
last
party?
1555-5555
Ho 1d?
--------------'
to
THU
FEB
04.
Conference Setup (Because
Display
01:05:22
99
09:
43
<>
<>
AM
<>
of
I
Busy
Press
the
t/
dialog
key.
The second call is released,
and
the first call is removed
from hold.
Use
the
handset
microphone
party
of
the
transfer/conference.
Retry
transfer/conference, or
hang
up.
or
the
to
inform
unsuccessful
the
first
555-5565
Conference?
81:12:14
<>
The
transferee or conferee
has
been
dialed.
Busy
tone
is
encountered.
22
15~5-~565
Rlnglng
555-5565
Busy
try again
later
1275·00030
I
1275-00030
23
Page 18
Issue 5,
June
1999
(This Page Intentionally
left
Blank)
Issue
5,
June
1999
3.
ALTERNATIVE
The following section describes alternative procedures to those
discussed in section
these alternative procedures are simply different ways to
accomplish the basic operations. However, this section also
introduces call-handling procedures that are more advanced than
those discussed
Some of the procedures that follow recommend using feature keys
that may not have been set
alternative procedure usually
system. By scrolling through the menu and selecting the
appropriate entry, you can still perform the operation.
Originate a Call (No Other Calls Active)
•
line
Key (Speaker)/Keypad
Press a line key. The speaker and microphone are activated,
and dial tone
the keypad. The Optiset terminal selects a primary line call
appearance for the call.
2.
in
section
is
heard. Dial the desired phone number using
CALL
BASIC CALL OPERATIONS. Some of
2.
BASIC CALL OPERATIONS.
up
is
OPERATIONS
on
your terminal. However,
given that uses the Optiset menu
an
24
1275·00030
• Speaker Key/Keypad
Press the Speaker key. The speaker and microphone are
activated, and dial tone
number using the keypad. The Optiset terminal selects a
primary line call appearance for the call.
• Keypad (Hot Keypad Mode)/Speaker
If
the terminal is
beginning
speaker and microphone are activated, but diat tone
heard because dialing has already begun. The Optiset
terminal selects a primary line call appearance for the call.
Dialing of the phone number must be completed within the
critical timing period allowed
1275·00030
to
in
dial the phone number, using the keypad. The
is
heard. Dial the desired phone
the Hot Keypad mode, originate a call
by
the switching system.
is
by
not
25
Page 19
'ssue 5, June 1999
• Keypad (Compose Number)/Menu and Dialog Keys/Speaker
Dial the phone number using the keypad, and then press the
dialog key. The speaker and microphone are activated, but
dial tone is not heard because dialing has already begun. The
Optiset terminal selects a primary line call appearance for the
call and initiates a call origination.
• Keypad (Compose Number)/Offhook
f/
Issue
5,
June 1999
Originate a Call (With Another Call Active)
• Une Key (Handset or Speaker)/Keypad
With a call already active, press a line key to originate another
call. The Optiset terminal places the active call on hold and
originates a new call to the selected line appearance. Use the
keypad to dial the phone number for the new call.
Dial the phone number using the keypad, and then lift the
handset. The speaker and microphone are activated, but dial
tone
is
not heard because dialing has already begun. The
Optiset terminal selects a primary line call appearance for the
call and initiates a call origination.
• Redial (Menu and Dialog Keys)
Use the dialog keys to find and select the Redial aptian from
the menu system. The terminal displays the last number
dialed and asks you if an origination attempt to that number
desired. Press the
switching system for call origination. Dial tone is not heard.
The Optiset terminal selects a primary line call appearance for
the call.
• Redial Key
Press the Redial key. The terminal displays the last number
dialed and sends that number to the sWitching system for call
origination. Dial tone
a primary line call appearance for the call.
• Speed Dial Key
Press the Speed Dial key for the party you are calling. The
terminal displays the phone number for that party and sends
the number to the switching system for call origination. Dial
tone is not heard. The Optiset terminal selects a primary line
call appearance for the call.
f/
dialog key to send the number to the
is
not heard. The Optiset terminal selects
is
• Hold (Key
and Dialog Keys)/Handset or Speaker
With an active call on hold, use the dialog keys to select the
Make Another Call option from the menu system. The Optiset
terminal selects a primary line call appearance for the new call.
Dial tone is heard. Use the keypad to dial the phone number
for the new call; use the handset or the microphone and
speaker to carry on your conversation.
• Consultation Call (Menu and Dialog Keys)
With
selecting the Consultation Call option from the menu system.
The Optiset terminal places the existing call on hold, selects a
prime line call appearance for the new call, and sends an
origination message to the switching system. Dial tone is
heard. Use the keypad to dial the phone number for the
consultation call.
• Conference (Key or Menu and Dialog Keys)
Hold)
While an active call
hold), originate a conference by selecting the Conference
option from the menu system or by pressing the Conference
key. The Optiset terminal marks the current call for conference
and places
the new call, and sends
switching system. Dial tone is heard. Use the keypad to dial
the phone number of the conferee. When the new call is
answered, use the menu system
retrieve the original party from hold.
an
active call
or
Menu and Dialog Keys)/Make Another Call (Menu
in
progress, originate a consultation call by
(No
Calls On
is
in
progress (and no other calls are
it
on hold, selects a primary line call appearance for
an
origination message to the
or
the Conference key to
on
26
1275·00030
1275·00030
27
Page 20
Issue
5,
June
1999
• Transfer (Key or Menu and Dialog Keys)
Issue
5,
June 1999
Transfer an active call
Transfer option from the menu system or by pressing the
Transfer key. The Optiset terminal marks the current call for
transfer by sending the Transfer feature activator (FA) to the
switching system. The terminal responds to the Hold message
and Transfer feature indicator (FI) returned by the switching
system, selects a primary line call appearance for the new call,
and sends
Dial tone is heard. Use the keypad
the party
the called party answers, announce the transfer and then hang
up.
Receive a Call (No Other Calls
• Answer Call (Menu and Dialog Keys)/Speaker
Use the menu system during incoming call alerting
the Answer Call option. This activates the microphone and
speaker.
• Speaker (Key)
Press the Speaker key during incoming call alerting. This
activates the microphone and speaker.
• Line Key/Speaker
Press the Line key associated with the incoming alerting call
(status light is flashing). This activates the microphone and
speaker.
• Connect Key/Speaker
Press the Connect key during incoming call alerting. This
activates the microphone and speaker.
• Headset Key/Headset
Press the Headset key during incoming call alerting. This
connects the call to the headset.
using the speaker, can be invoked after the call has been
picked up through the headset by pressing the Speaker key.
an
origination message to the switching system.
to
whom the original call is to be transferred. When
28
to
another party by selecting the
to
dial the phone number of
Active)
If
desired, open listening,
1275·00030
to
select
Receive a Call (With
• Answer Call (Menu and Dialog Keys)/Handset or Speaker
If alerting occurs for a new call while an another call
active, the menu system briefly displays the Incoming Call
Ringing menu. During the time this menu
menu system and dialog keys
The active call is placed
connected.
• Connect Key/Handset or Speaker
When incoming call alerting occurs while another call
press the Connect key. The active call is placed
the incoming call
• Line Key/Handset or Speaker
Press the Line key associated with the line
call alerting
the incoming call is connected.
• Preview (Key)/Une Key/Answer Call (Menu and Dialog Keys)
or Connect (Key)/Handset or Speaker
An
incoming alerting call that occurs while another call is active
can be accepted by first pressing the Preview key to place the
terminal in Preview mode, then pressing the Une key
associated with the incoming call, and then selecting
Answer Call option from the menu system or pressing the
Connect key. The active call is placed on hold, and the
incoming call
• Headset KeylHeadset
When incoming call alerting occurs while another call is active,
press the Headset key. The active call
the incoming call is connected to the headset. If desired, open
listening, using the speaker, can be invoked after the call has
been connected
Receive
• Autoanswer (Initial Terminal Setup)
1275·00030
All
Calls
Another
is
connected.
is
occurring. The active call is placed
is
connected.
to
the headset by pressing the Speaker
Automatically
Call
Active)
is
to
select the Answer Call option.
on
hold, and the incoming call is
is
placed
is
already
displayed, use the
is
active,
on
hold, and
on
which incoming
on
hold, and
on
hold, and
key.
the
29
Page 21
Illue
5,
June
1999
If, during initial setup of the Optiset terminal, a line was
configured for Autoanswer, then incoming calls on that line are
connected automatically. Depending on how the line was
configured, either no alerting or a single ring will occur for an
incoming call.
• Autoanswer Key
If no Optiset terminal lines were set up for Autoanswer. the
Autoanswer key can be used to initiate this feature. While this
feature is active. all incoming calls are answered automatically
without any action required by the user. Depending on how
the Line key ringing option was configured, and incoming call
may be accompanied either by no alerting or by a single ring.
Reject a Call
• Reject (Menu and Dialog Keys)
If
the calling-party information in the display indicates that the
incoming call is one you do not want
keys
Call alerting (ringing and status-light flashing) ceases.
• Disconnect (Key)
To reject an incoming alerting call, press the Disconnect key.
Alerting ceases immediately.
Reject a Call
• Reject (Menu and Dialog Keys)
If,
during an active call, alerting begins for another incoming
call, the menu system briefly displays the Incoming Call
Ringing menu. To reject the incoming alerting call, select the
Reject Call option from the menu. Alerting ceases
immediately.
(No
Other
to
select the Reject Call option from the menu system.
(With
Calls
Another
Active)
Call
Active)
to
receive, use the dialog
Issue
5,
June
1999
reject the alerting call by pressing the Disconnect key. Alerting
ceases immediately.
Note that if you press the Disconnect key after the Incoming
Call Ringing menu
call
is
disconnected!
• Preview (Key)/line Key/Reject (Menu and Dialog Keys) or
Disconnect (Key)
To reject an alerting incoming call that occurs while you have
another call active, you can press the Preview key to place the
terminal in the preview mode; then press the line key
associated with the alerting incoming call; finally, use the menu
to
system
Disconnect
All
Reject
•
Clear an Active/Connected Call
• On-hook (Handset)
• On-hook (Speaker Key)
Calls (Do
Do
Not Disturb (Key)
While no incoming calls are alerting, press the Do Not Disturb
key. The indicator next to the
future incoming calls are automatically rejected, and no
alerting occurs, until the Do Not Disturb feature is turned off.
Place the handset back in the cradle
connected call.
If
the microphone and speaker are being used, press the
Speaker key
select the Reject Call option, or press the
key.
to
is
no longer displayed, the existing active
Alerting ceases immediately.
Not
Disturb)
Do
Not Disturb key lights. All
clear
an
active, connected call.
to
clear
an
active,
• Disconnect (Key)
If,
during an active call, alerting begins for another incoming
call, the menu system briefly displays the Incoming Call
Ringing menu. While this menu is being displayed, you can
30
1275·00030
• Disconnect (Key or Menu and Dialog Keys)
Select the Disconnect Call option from the menu system or
press the Disconnect key to clear
the handset
switch is pressed and released, a call on hold is retrieved, or a
1275·00030
is
in use,
it
becomes idle until either the cradle
an
active, connected call. If
31
Page 22
Issue
5,
June
1999
call is originated by some other method than a handset offhook.
• Drop Last Party of Conference (Key or Menu and Dialog Keys)
Clear the last party added to a conference either by selecting
the Drop Last Party option from the menu system or by
pressing the Drop Last Party key.
• Release A Consultation Call (Menu and Dialog Keys)
Clear
an
active consultation call by selecting the Release This
Call option from the menu system. The active consultation call
is cleared, and the original party
Clear a
CaliOn
Hold
on
hold is retrieved.
• Preview (Key)/Line Key Associated with the Held
Call/Disconnect (Key)
on
To clear a call
progress, first press the Preview Key
mode; then press the Line key associated with the call
finally, press the Disconnect key. The call on hold
no
with
interruption of the active call.
hold while another call is active and
to
enter the Preview
on
hold;
is
released,
• Preview (Key)/Line Key Associated with the Held Party of a
Conference Call/Drop Last Party (Key or Menu and Dialog
Keys)
If the party on hold is the
first press the Preview key
press the Line key associated with the conference
tast
party added
to
enter the Preview mode; then
to
a conference call,
on
hold;
finally, either select the Drop Last Party option from the menu
system or press the Drop Last Party key. The last party added
to the conference
is
cleared, with
no
interruption of the active
call.
Hold a Call
• Hold (Key or Menu and Dialog Keys)
Place an active, connected call
Hold option from
32
the
menu system or pressing the Hold key.
on
hold by either selecting the
1275·00030
in
Issue
5,
June 1999
• Line Key (Other Than Line Key Associated with the Active Call)
Place
an
active, connected call
key for a different call appearance.
associated with that Line key
if
an
incoming alerting call was selected, the call is
answered/connected; if the call appearance was
call
is
retrieved.
on
hold by pressing the
If
the call appearance
was
idle, a new call
is
originated;
on
hold, the
• Preview (Key)/Line Key Associated with Another Incoming
Call/Answer Call (Menu and Dialog Keys) or Connect (Key)
Place
an
active, connected call on hold and accept
incoming call offering by first pressing the Preview key to enter
the Preview mode; then press the Line key associated with the
incoming alerting call; finally, either select the Answer Call
option from the menu system or press the Connect key. The
on
active call is placed
hold, and the selected incoming call is
connected.
• Consultation Call (Menu and Dialog Keys)
An
active, connected call is placed
Consultation Call
Is
invoked. Select the Consultation Call
on
hold when a
option from the menu system. The active call is placed on
the
hold, and
appearance for the new call. Dial tone occurs
Optiset terminal selects the prime line call
on
the
prime line
call appearance.
• Conference (Key or Menu and Dialog Keys)
An
active, connected call is placed
on
hold when a Conference
Call is invoked. Either select the Conference Call option from
the menu system or press
is marked for conference and placed
terminal selects a line for
you to Select a Line, after which dial tone occurs
the
Conference key. The active call
on
hold; the Opliset
the
new call appearance or prompts
on
selected line.
• Transfer (Key or Menu and Dialog Keys)
An
active, connected call
is
placed on hold when a Call
Transfer is invoked. Either select the Transfer option from
menu system or press the Transfer key. The active call
1275-00030
line
an
the
the
is
33
Page 23
'88U8
5, June 1999
marked for transfer and placed on hold while the terminal
selects a line for the new call or prompts you
Dial tone occurs
Retrieve a
CaU
• Retrieve Line
on
the
selected line.
(No Active
CaU
Connected)
x (Menu and Dialog Keys)
to
Select a Line.
'ssue
5,
June 1999
Retrieve an inactive call from hold while another call is active
by first pressing the Preview key
to
enter the Preview mode;
then press the Line key associated with the held call: finally,
press the Connect key. The active, connected call
is
placed
on
hold, and the selected call is retrieved.
Use the menu system to select the Retrieve Line
This option is displayed whenever there is a call on hold
no
other call is active.
X option.
and
• Line Key (Desired Call Appearance)
Press the Line key associaled with the held call.
During a consultation call, retrieve a held call by selecting the
Retrieve Line
consultation call is placed
X option from the menu system. The active
on
hold, and the selected call
retrieved.
• Preview (Key)/Line Key (Associated with Held
Call)/Conference (Key)
an
With
an
active call
inactive call on hold by first pressing the Preview key
in
progress, you can form a conference with
enter the Preview mode: then press the Line key associated
key.
with the held call; finally, press the Conference
is
retrieved and merged into
call
the
conference.
The held
• Conference (Key or Menu and Dialog Keys)/Select a Line
(Menu and Dialog Keys)/Conference (Key or Menu and Dialog
Keys)
If
you
invoke a conference (using either the menu system and
dialog keys or the Conference key) while one call
one or more calls
active call for conference
terminal prompts
corresponding
that call. Then complete
are
on
hold, the Optiset terminal marks the
and
moves
you
to
Select a Line. Press a Line key
to
one of the previously held calls to retrieve
the
conference by selecting the
it
to hold. Then
is
active and
the
Conference option from the menu or pressing the Conference
key.
• Cancel Conference (Menu
(Menu
and
Dialog Keys)
Abandoning
an
attempt to add a call
the original party, now
Cancel Conference option from the menu system if dialing
and
Dialog Keys)/Release This Call
to
a conference results
on
hold, being retrieved. Select the
has
is
to
in
34
1275-00030
1275-00030 35
Page 24
Issue
5,
June 1999
Issue
5,
June 1999
not been completed, or select the Release This Call oplion
ringback tone has begun. The new call attempt
the
and
held call
is
retrieved.
is
released,
• Cancel Transfer (Menu and Dialog Keys)/Release This Call
(Menu and Dialog Keys)
Abandoning
party, now
Transfer option from
completed, or select
tone has begun. The new call attempt
held call
an
on
is
retrieved.
attempt
to
transfer a call results
in
the
original
hold, being retrieved. Select the Cancel
the
menu system if dialing has not been
the
Release This Call option if ringback
is
released, and
Transfer a Call
• Transfer (Key or Menu
Transfer
from
an
active call by either selecting the Transfer option
the
menu system or pressing
Optiset terminal marks
on
hold, sends a Transfer
system, receives
switching system. and either selects a line or prompts you
Select a Line for
phone number of
transferred. The terminal connects the held call to
call and drops your connection.
• Preview While A Call Is On Hold (Key)/Line Key (Associated
with
the
Held Call)/Transfer (Key Only)
Transfer a call
on
enter the Preview mode. Then press the Line key associated
with
the
held call. Finally, press
terminal marks
message
the
to
the switching system,
message back from the switching system. When dial tone
heard, dial the phone number of the party
is
to
be transferred. The terminal connects
active call
and
drops your connection.
and
Dialog Keys)
the
Transfer key. The
the
current call for transfer
FA
message
the
Transfer
the
transfer. When dial tone is heard, dial the
the
party
to
FI
message back from
whom
the
original call
and
to
the switching
the
hold by first pressing
the
the
Transfer
Preview key
key.
The Opliset
held call for transfer. sends a Transfer
and
receives the Transfer
to
whom
the
the
held call
places
is
to
active
held call
to
the
the
10
be
to
FA
FI
is
the
if
• Conference (Key)/Transfer On Disconnect (Subscribed
Feature)
If
you are subscribed
by
provided
the switching system that serves your Optiset
terminal, establish a conference call with the party
to
a Transfer-On-Disconnect feature
to
whom
you intend to transfer the original call. Then disconnect from
the
call. The Transfer-On-Disconnect fealure maintains
connection between the other two parties
and
drops your
the
connection.
is
Note: The Transfer feature
feature,
compliance of
the
operation of which depends
the
connected switching system with National
ISDN standards. For a discussion of
suggested alternative Transfer procedures, refer
"Switching System National ISDN Compliance Issues"
Chapter
1.
INTRODUCING YOUR OPTISET TERMINAL.
a combined local/switch-based
on
the
degree of
this
issue
and
to
in
it
Set Up Conference Call
• Origination (Handset Off-hook or Speaker Key)/Conference
(Key)/Dial Two Successive DNs/Conference (Key or Menu
and
Dialog Keys)
With
the Optiset terminal
Speaker
key.
Then, for a small conference, press Ihe
Conference key; for a large conference, press
Conference key first and then
idle,
lift
the
handset or press
the
Conference key.
the
the
Large
At
the
sound of dial tone, dial the first phone number.
the
When the switching system has accepted
number, the Optiset terminal automatically places that call
hold and selects a line or prompts you to Select a Line for
second call origination. After selection of
the
second phone number. After the second call
the
first phone
on
the
second line, dial
is
accepted
by the switching system, select the Complete Conference
option from
The Optiset terminal retrieves the first call from
merges the second call into
the
menu system or press
the
the
conference.
Conference
hold
key.
and
36
1275·00030
1275-00030
37
Page 25
Issue
5,
June 1999
• Conference During One Active Call (Key or Menu and Dialog
Keys)/Dial Second ON/Conference (Key or Menu and Dialog
Keys)
Wilh one active call
dialog keys
Conference
to
key
in
progress, use the menu system
select the Conference option or press the
(or,
for a large conference, the Large
Conference key first and then the Conference key). The
Optiset terminal marks the active call for conference and
on
places it
you
to
After the terminal sends
switching system, dial tone
the second call. Once the second call
system
hold; then the terminal selects a line or prompts
Select a Line for the second call.
an
origination message
is
heard. Dial the phone number of
is
active, use the
to
select the Complete Conference option or press
to
menu
Conference key. The terminal retrieves the original, held call
and merges
the
second call into the conference.
and
the
the
'ssue
5,
June 1999
Complete Conference option from
the Conference
key.
The inactive call
the
menu
is
retrieved
system or press
and
merged,
with the active call, into the conference.
• Join Line x During Consultation Call (Menu and Dialog Keys)
While a consultation call
conference call by selecting
menu system. The inactive, held call
with
the
consultation call
to
is
active,
the
Join Line X option
is
form
a conference.
you
can convert
from
retrieved and merged
to
a
the
• Conference While One Call
are Inactive (Key or
Menu
Is
Active and One or More Calls
and Dialog Keys)/Line
Key
(Of Call
On Hold)/Conference (Key or Menu and Dialog Keys)
With
one call active and one or more calls inactive, use the
menu system
Conference key
to
select
the
Conference option or press the
(or.
for a large conference,
the
Large
Conference key first and then the Conference key). The
Optiset terminal marks the current call for conference and
places it
Line. Press the Line key associated with a call
Optiset terminat retrieves that call. Then use
to
Conference key. The retrieved call
on
hold. Then the terminal prompts you
to
on
hold; the
the
menu system
Select a
select the Complete Conference option, or press
and
the active call are
the
merged into the conference.
• Preview While One Call
Is
Active and One or More Calls are
Inactive (Key)/Line Key (Associated with Desired Inactive
Call)/Conference (Key Only)
With one call active and one or more calls inactive, press the
Preview key
to
enter the Preview mode. Then press
the
Line
key associated with the desired inactive line. Finally. select the
38 1275·00030
1275·00030
39
Page 26
Issue
5,
June 1999
4.
USER-CONTROLLED TERMINAL
SETTINGS
Issue
5,
June 1999
(This Page Intentionally Left Blank)
Using the instructions
on
your Optiset terminal that are not dependent
provided by the central office switching system. These include
audio settings (such
certain local terminal features (such
speaker control, and line select mode). Altering these settings
allows you to configure your terminal to operate according
needs and your environment.
Password Prompt
If your Optiset terminal has been programmed with password
protection of the Configure Phone functions,
enter a password in order
of the local features. If you are prompted for a password, proceed
as
follows:
Procedure
You
have attempted to
access the Phone
Configuration menu.
in
this section, you can alter certain settings
·on
features
as
ringer, handset, and speaker loudness) and
as
menu overlay delay,
you
will be prompted to
to
change audio settings,
Display
as
well as any
IE~t;~-~assword
to
your
I
40
1275-00030
1275·00030
41
Page 27
'ssue
5, June 1999
'ssue
5, June 1999
Use the keypad to enter the
1-
to 7-digit password
assigned to your terminal.
Use the <:J dialog key to
back-space if you need to
retype a character.
An
asterisk
display for
enter.
Press the tI' dialog key when
you have finished entering the
password.
Assign, Change,
You can protect the programmed configuration of your Optiset
terminal by assigning it a password. Or, if a password atready has
been assigned to your terminal and you know the password, you
can change
Procedure
Use the <:J and
keys to scroll through the
displays until "Configure
phone?" appears.
appears
each
it
or delete it. Proceed as follows:
in
the
character
or
I>-
you
Delete Password
dialog
*******
Enter password
Phone
1 -
Display
THU
Configure
configuration
Initial
FEO
04,
phone?
settings?
99
09:55
menu
<>
AM
<>
Press the tI' dialog key to
select the Phone
Configuration menu. "
prompted, use the keypad to
enter the currently assigned
password, and then press
tI' dialog key to continue
the
to the Phone Configuration
menu.
Use the
scroll to "Password?"
Press the tI' dialog key to
select the Password menu.
To assign a password
change the existing
password, use the keypad to
enter up to 7 digits (may
include "." and
<:J dialog key to back-space
if you need to retype a
character.
An
display for each character
enter.
To delete an existing
password, do not enter any
characters.
[:>
dialog key to
or
"n").
Use the
asterisk appears in the
to
you
Phone
1 -
Phone
5 -
IE~t~~-~ew
If
characters are entered:
*******
Enter
If
no characters are entered:
IE~t~~-~ew
configuration
Initial
settings?
configuration
Password?
password
new
password
password I
menu
<>
menu
<>
I
42
1275-00030
Press the
1275·00030
tI' dialog key.
l;;;~~;-new
password
I
43
Page 28
Issue
5,
June 1999
Issue
5,
June
1999
To verify the new or changed
password, re-enter
If you are deleting an existing
password, do not enter any
characters.
To store the password you
have entered or to complete
the deletion of the existing
password, press the
key.
To exit the Password menu
without making any changes,
press the
~
it.
t/
dialog key.
dialog
Adjust Audio Settings
Ringer Loudness
Procedure
Use the
keys to scroll through the
displays until "Configure
phone?" appears.
Press the
select the Phone
Configuration menu.
<]
and
V'
dialog key to
[:>
dialog
If characters are entered:
*******
Verify
If no characters are entered:
I~;;~;;-new
Phone
new
password
password I
configuration
menu
5 - Password?
Display
THU
FEB
84,
99
89:55
AM
Confi gure phone?
Phone
1 -
configuration
Initial
settinus?
menu
<>
<>
(>
Use the
scroll to "Audio sellings?"
Press the
select the Audio Settings
menu.
Press the
begin adjusting the loudness
of the ringer.
After selecting
Loudness? press the
dialog key to preserve the
current setting
Audio Settings menu.
Use the
dialog key to increase the
loudness of the ringer; use
the
key to reduce the loudness of
the ringer.
Press the
store the loudness setting, or
press the
return
setting.
[>
dialog key to
V'
dialog key to
V'
dialog key to
Ringer
and
"+"
key or the
"_"
key
or
the
<1
V'
dialog key to
~
dialog key to
to
the former loudness
J81
exit the
[>
dialog
Phone
3 -
Audio
1 - ninger loudness?
Audio
1 - Ringer loudness?
Continuous ringing occurs while
you adjust the loudness.
Audio
1 - ninger loudness?
The loudness
ringing changes
Audio
I - Ringer loudness?
configuration
Audio
seltings?
settings
settings
settings
of
the continuous
as
settings
lIlenu
<>
<>
<>
<>
you adjust
<>
it.
44
1275·00030
1275·00030
45
Page 29
Issue
5,
June 1999
Issue
5, June 1999
Ringer Pitch
Procedure
Use the <:J and
keys to scroll through the
displays unlil"Configure
phone?" appears.
Press the
select the Phone
Configuration menu.
Use the
scroll to "Ringer pitch?"
Press the
begin adjusting the pitch of
the ringer.
t>
After selecting Ringer
press
the ~ dialog
preserve
and exit
the
the
t>
t/
dialog key to
dialog key to
t/
dialog key to
key
current setting
Audio
Settings
dialog
Pitch?,
to
menu.
Use the
dialog key to raise the pitch
the ringer; use the "." key
the <:J dialog key to lower the
pitch of the ringer.
"+"
key
or
the
t>
of
or
Display
THU
FEB
84.
Configure
Phone
1 -
Aud10
configuration
Initial
settings
2 - Ringer
Audio
settings
99
phone?
settings?
pitch?
I - Ringer pitch?
Continuous
you adjust
Audio
1 - Ringer
The
pitch of
ringing
ringing
the
settings
the
changes
pitch.
pitch?
continuous
as
89:55
occurs
you
adjust
AM
<>
menu
<>
<>
<>
while
<>
it.
Press the
store the pitch setting, or
press the
return
setting.
Handset Loudness
Procedure
Use the <:J and
keys to scroll through the
displays until "Configure
phone?" appears.
Press the
select the Phone
Configuration menu.
Use the
scroll
Press the
select the Audio Settings
menu.
Use the
scroll to "Handset loudness?"
t/
dialog key to
~
dialog key to
to
the former pitch
t::>-
t/
dialog key to
t::>-
dialog key to
to
"Audio settings?"
t/
dialog key
t>
dialog key to
dialog
to
Aud
i 0
sett
1ngs
1 - Ringer pitch?
Display
THU
FEB
84,
99
Confi gure
Phone
1 -
Phone
3 -
Audio
configuration
Initial
configuration
Audio
settings
09:55
phone?
settings?
settings?
I - Ringer loudness?
Aud
i0
set
ti
J - lIandset loudness?
ngs
<>
AM
<>
menu
<>
menu
<>
<>
<>
46
1275-00030
1275-00030
47
Page 30
Issue
5,
June 1999
Issue
5,
June 1999
Press the
begin adjusting the loudness
of the handset.
II'
dialog key to
After selecting Handset
the
menu.
or
the
<:I
the
5
call.
~
the
the
l>
dialog
II'
or
for
the
or
Loudness? press
dialog
key
to
preserve
current setting and exit
Audio Settings
Use the
dialog key to increase the
loudness
the "." key or the
key to reduce the loudness
the handset.
Press the
store the loudness setting,
press the ~ dialog key to
return to the former loudness
setting.
If
~
seconds,
out and
remains
remainder
"+"
of
you
do
not press
dialog key
the
the
in
key
the handset; use
tI
dialog key to
within
display times
new setting
effect only
of
the
Audio
settings
3 - Handset loudness?
A continuous
ear piece
you adjust
Audio
of
the
the
settings
3 - Handset loudness?
The
loudness
tone
of
changes
Audio
settings
3 - Handset loudness?
tone
occurs
handset
loudness.
of
the
continuous
as
you
adjust
<>
in
the
while
<>
it.
<>
Speaker Loudness
Procedure
Use the
keys to scroll through the
displays until "Configure
phone?" appears.
Press the
select the Phone
Configuration menu.
Use the
scroll to "Audio settings?"
Press the
select the Audio Settings
menu.
Use the
scroll to "Speaker loudness?"
Press the
begin adjusting the loudness
of the speaker.
<:J
and
tI
dialog key to
t>
dialog key to
II'
dialog key to
t>
dialog key to
t/
dialog key to
t>
dialog
After selecting Speaker
the
Loudness? press
dialog
key
to
preserve
current selling and exit
Audio Settings
~
the
the
menu.
Display
TlIU
FEB
04.
99
09:
Configure phone?
Phone
I -
Phone
3 -
Audio
configuration
Initial
settings?
configuration
Audio
settings?
settings
1 - Ringer loudness?
Audio
settings
4 - Speaker loudness?
Audio
settings
4 - Speaker 1olldlless?
A continuous
through
adjust
the
tone
the
speaker
loudness.
occurs
while
55
AM
<>
menu
<>
menu
<>
<>
<>
<>
you
48
1275·00030
1275·00030
49
Page 31
'ssue 5, June 1999
Issue
5,
June 1999
Use the
dialog key to increase the
loudness of the speaker; use
the "." key or the
key to reduce the loudness of
the speaker.
Press
store the loudness setting, or
press the
return to the former loudness
setting.
If you do not press fI"
within 5 seconds, the display
times out and the new selling
remains
remainder
"+"
key
or
<I
the'"
dialog key to
J8l
dialog key to
in
effect only for the
of
the call.
the
[:>
dialog
or
~
Audio
settings
4 - Speaker loudness?
The
loudness
tone changes as you adjust
Audio
of
settings
the continuous
4 - Speaker loudness?
<>
it.
<>
Key
Click
Procedure
Use the
keys to scroll through the
displays until"Configure
phone?" appears.
Press
select the Phone
Configuration menu.
Use the
scroll to "Audio settings?"
Press
select the Audio Settings
menu.
Use the
scroll to "Key click setting?"
<J
the'"
[:>
the'"
[:>
and
[::>
dialog
dialog key
dialog key
dialog key to
dialog key to
to
to
Display
THU
FEB
04,
99
09:55
Configure phone?
Phone
1 -
Phone
3 -
Audio
configuration
Initial
settings?
configuration
Audio
settings?
settings
1 - Ringer loudness?
Audio
5 -
settings
Key
click
setting?<>
AM
()
menu
<>
menu
<>
<>
50
1275-00030
the'"
Press
begin changing the key click
setting.
1275-00030
dialog key to
If
key clicks are now off:
Key
clicks
Turn
on
If
key clicks are now on:
Key
clicks
Turn
off
key
key
Orf
clicks?
On
clicks?
51
Page 32
Issue
5,
June 1999
Issue
5,
June
1999
To change the key clicks
selling,
To leave the key clicks setting
as it is, press the
key.
Use a combination of the
and
to ~ dialog key
another setting
menu system.
press.,l
[:>
dialog keys and the
dialog key.
l8i
dialog
to
display
or
to exit the
<J
Busy Alerting Type
Procedure
Use the
keys to scroll through the
displays until "Configure
phone?" appears.
Press the
select the Phone
Configuration menu.
Use the
scroll to "Audio settings?"
<J
and
.,I
dialog key to
[>
dialog key to
[>
dialog
Audio
5 -
settings
Key
c1i
ck
Display
T1JU
FEB
04.
99
Configure phone?
Phone
1 -
Phone
3 -
configuration
Initial
settings?
configuration
Audio
settings?
sett ing?<>
09:
55
AM
<>
menu
<>
menu
<>
Use the
scroll
Press the
begin changing the busy
alerting type setting.
To change the busy alerting
type setting, press
key.
To leave the busy alerting
type setting as it is, press the
l8i
Use a combination of the
and
to
another setting or to exit the
menu system.
t::> dialog key to
to
"Busy alerting type?"
.,I
dialog key to
.,I
dialog key.
[:>
dialog keys and the
~
dialog key to display
dialog
<J
Audio
6-
If
muted ring is now selected:
Muted
Select
If
attention tone is now selected:
Attention
Select
Audio
6-
Busy
Busy
settings
alerting
ring
selected
attention
tone
muted
settings
alerting
type?<>
tone?
selected
ring?
type?<>
Press the
select the Audio Settings
menu.
52
.,I
dialog key to
Audio
settings
1 - Ringer loudness?
1275·00030
<>
1275-00030
53
Page 33
Issue 5, June 1999
Issue
5,
June 1999
Adjust Local Features
Menu
Overlay Delay
Procedure
Use the
keys to scroll through the
displays unlil"Configure
phone?" appears.
Press the
select the Phone
Configuration menu.
Use the
scroll to "Local features?"
Press the
select the Local Features
menu.
<I
and t::> dialog
V'
dialog key to
t>
dialog key to
V'
dialog key to
Display
THU
FEB
04.
99
Configure phone?
Phone
1 -
Phone
4 - local
Local
}-
configuration
Initial
settings?
configuration
features?
features
Menu
overlay delay?<>
09:55
AM
<>
menu
<>
menu
<>
To record the delay value
entered,presstheV'
key.
To revert to the existing delay
value, press the
key.
Use a combination of the
and
I>-
dialog keys and the
to
~
dialog key to display
another selting or to exil the
menu system.
~
dialog
dialog
<I
Speaker Control
Procedure
Use the <:J and
keys to scroll through the
displays until "Configure
phone?" appears.
I>-
dialog
Local
1-
features
Menu
overlay
Display
THU
FEB
04.
99
Configure phone?
delay?O
09:
55
AM
<>
V'
Press the
select the Menu Overlay
Delay menu.
Use the dial keypad to enter
the menu delay value (0 to 5
seconds)
54
dialog key to
X (0 to 5 seconds)
menu
Enter
delay
X (0 to 5 seconds)
menu
Enter
delay
1215-00030
Press the
select the Phone
Configuration menu.
Use the
scroll to "Local features?"
Press the
select the Local Features
menu.
1215-00030
V'
dialog key to
I>-
dialog key to
V'
dialog key to
Phone
1 -
Initial
I
Phone
4 - Local
local
1-
Menu
configuration
settings?
conf i
guration
features?
features
overlay delay?<>
menu
<>
menu
<>
55
Page 34
Issue
5,
June
1999
ISlue
5,
June 1999
Use the
scroll
Press the
select the Speaker Control
menu.
To
control setting, press
key.
To
setting as it is, press the
dialog key.
Use a combination of the
and
to
another setting
menu system.
[>
dialog key to
to
"Speaker control?"
t/
dialog key to
change the speaker
t/
dialog
leave the speaker control
~
[>
dialog keys and the
~
dialog key to display
or
to exit the
<J
loca I
2 - Speaker
If
speaker is enabled:
Speaker
features
control?
is
enabled
Oisable speaker?
If speaker is disabled:
Speaker
is
disabled
Enable speaker?
loca
I fea
tures
2- Speaker
control?
<)
<>
Press the
select the Phone
Configuration menu.
Use the
scroll to "Local features?"
Press the
select the Local Features
menu.
Use the
scroll to "Line select mode?"
Press the
select the Line Select Mode
menu.
t/
dialog key
[>
dialog key to
t/
dialog key to
[>
dialog key to
t/
dialog key to
to
Phone
I -
Phone
'1
local
1-
Local
4 -
If in Line Hold mode:
In
Change
If
in Line Preview mode:
In
Change
configuration
Initial
configliration
- local
features
Menu
overlay
features
line
select
line
hold
to
line
line
preview
to
line
settings?
features?
mode
menu
menu
de1ay?<>
mode?
preview?
mode
hold?
<>
<>
<)
Line Select Mode
Procedure
Use the
keys
displays until "Configure
phone?" appears.
56
<J
and
t:>
to
scroll through the
dialog
Display
THU
FEB
04,
99
Configure phone?
09:55
1275·00030
AM
<)
To
change the line select
mode setting, press
key.
To leave the line select mode
setting as
dialog key.
1275·00030
It is, press the
t/
dialog
~
local
features
4 - Line
select
mode?
<>
57
Page 35
Issue
5,
June
1999
Issue
5,
June 1999
Use a combination of the
and
[:>
dialog keys and the
to
~
dialog key to display
another setting
menu system.
or
to exit the
Menu Setting
Procedure
Use the
keys to scroll through the
displays until "Configure
phone?" appears.
Press the
select the Phone
Configuration menu.
Use the
scroll to "Local features?"
<1
and
t/
dialog key
[:>
dialog key to
[:>
dialog
to
<1
Display
THU
FEB
Configure
Phone
1 -
Initial
Phone
4 -
Local
04,
99
09:55
phone?
configuration
settings?
configuration
features?
AM
<>
menu
<>
menu
<>
Press the
select the Menu Setting
menu.
Use the
keys to scroll through the
displays until the setting you
want appears.
Then press the
to change the menu setting,.
To leave the menu setting as
it is, press the
t/
dialog key to
<1
and
~
[>
dialog
t/
dialog key
dialog key.
If menu is active:
Menu
is
Demand
If menu is in demand only mode:
Mellll
Disable
If menu is disabled:
Menu
Activate
active
only
is
demand
menu
Is
disabled
menu
mode?
Dilly
mode?
mode?
<>
()
()
Loca I features
5 -
Menu
setting?
<>
Press the
select the Local Features
menu.
Use the
scroll to "Menu setting?"
t/
dialog key to
[:>
dialog key to
58
Local
)-
Menu
Local
5 -
features
overlay delay?<>
features
Menu
setting?
()
1275·00030
Use a combination of the
and
[>
dialog keys and the
to
~
dialog key to display
or
to
another setting
menu system.
1275·00030
exit the
<J
59
Page 36
Ilsue
5,
June
1999
Hot Keypad
Issue
5,
June
1999
(This Page Intentionally Left Blank)
Procedure
Use the
keys to scroll through the
displays until "Configure
phone?" appears.
Press
select the Phone
Configuration menu.
Use the
scroll
Press
select the Local Features
menu.
Use the
scroll to "Hot keypad?"
<]
and
[>
the'"
dialog key
[>
dialog key to
10
"Local fealures?"
the'"
dialog key
[>
dialog key to
dialog
to
to
Display
THU
FEn
04,
Configure
Phone
1 -
Phone
t1
Local
}-
local
7-
configuration
Initial
configuration
- loca 1 features?
features
Menu
features
Hot
99
phone?
settings?
overlay delay?<>
keypad
09:55
sett
AM
<>
menu
<>
menu
<>
ing?<>
60
1275·00030
the'"
Press
select the Hot Keypad setting.
1275·00030
dialog key
to
If
hot keypad mode
In
hot
Select
If
composed dial mode is active:
'In
Activate
keypad
composed
composed
menu
mode
dial
mode?
is
active:
dial?
mode
I
61
Page 37
Illue
5,
June
1999
To
change
setting,
key.
To
leave
setting
dialog
Use
and
t>
to
J8l
another setting
menu
Speaker Setting
Procedure
Use
the
keys
displays until "Configure
phone?"
Press
select
Configuration
Use
the
scroll
the
keypad/dial
press
the
the
keypad/dial
as
it
is,
press
key.
a combination
dialog
keys
dialog
key
to
or
system.
<1
and
I>
to
scroll
through
appears.
the
tI' dialog
the
Phone
menu.
t>
dialog
to
"Local
features?"
tI' dialog
the
of
the
and
display
to
exit
dialog
the
key
key
to
to
~
<1
the
the
Loca I features
]-
Hot
keypad
Display
TIIU
FEB
04,9909:55
Configure
Phone
1 -
Phone
4 -
configuration
Initial
configuration
Local
setting1<>
phone?
settings?
features?
AM
<>
menu
<>
menu
<>
Use
the
scroll
to
Press
the
select
the
selections.
To
change
keys
the
leave
ills,
use
selling
press
selling,
dialog
desired
press
To
as
key.
[>-
dialog
"Speaker
V' dialog
Speaker
the
speaker
the
<1
to
scroll
and
V'
dialog
the
speaker selting
the ~ dialog
key
to
setting?"
key
to
Setting
and
t>
to
the
then
key.
Issue
Loca I features
8- Speaker
If
double
Speaker:
Double
If
echoic
active:
talk
mode
Double
talk?
double
setting?
is
talk
mode
Spker:Echoic double
Echoic double talk?
If
single
talk
mode
is
.
Speaker:
Single
Loca I features
8- Speaker
single
talk?
setting?
5,
June
active:
talk
talk
active:
talk
1999
<>
<>
is
<>
<>
<>
Press
select
menu.
62
the
tI' dialog
the
Local
key
to
Features
Local
1-
Menu
features
overlay delay?<>
1275-00030
Use a combination
and
t>
dialog
keys
to ~ dialog
another
menu
1275·00030
key
setting
system.
to
or
of
the
and
display
to
exit
<1
the
the
63
Page 38
Issue
5,
June
1999
Incoming Call Display
Procedure
Use the
keys to scroll through the
displays until "Con'igure
phone?" appears.
<J
and
[>
dialog
Display
THU
FEB
Configure
04,
phone?
99
09:55
AM
<>
To change the Incoming Call
Display selting, enter the
desired setting (0 to 9
seconds) and then press the
II'
dialog key.
To leave the selling as it is,
press the ~ dialog key.
Issue
Loca 1 features
9- Incoming
call
5,
June
disp?
1999
Press the
select the Phone
Configuration menu.
Use the
serollto "Local features?"
Press the
select the Local Features
menu.
Use the
scroll to "Incoming call disp?"
Press the
select the Incoming Call
Display selection.
t/
dialog key to
[>
dialog key to
t/
dialog key to
[>
dialog key to
t/
dialog key to
Phone
1 -
Phone
4 -
Local
1-
configuration
Initial
settings?
configuration
Local
features?
features
Menu
overlay delay?<>
menu
<>
menu
<>
Loca 1 features
9- Incoming
The current duration of an
incoming call display is shown:
i
x
(0
to 9 seconds)
Enter
call
call
display
disp?<>
time
Use a combination of the
and
[:>
dialog keys and the
to ~ dialog key to display
another selling or to exit the
menu system.
Off Hook Result
Procedure
Use the
keys to scroll through the
displays until "Configure
phone?" appears.
Press the
select the Phone
Configuration menu.
Use the
scroll to "Local features?"
<J
and
II'
dialog key to
[:>
dialog key to
[:>
<J
dialog
Display
THU
FEB
04,
99
Configure phone?
Phone
1 -
Phone
" -
configuration
Initial
settings?
configuration
Local
features?
09:55
AM
<>
menu
<>
menu
<>
64
1275-00030
Press the
select the Local Features
menu.
1275-00030
t/
dialog key
to
Loca 1 features
1-
Menu
overlay
de1ay?<>
65
Page 39
'ssue
5,
June 1999
Issue
5,
June
1999
Use the
scroll to "Off hook result?"
Press the
select the Off Hook Result
selection.
To change the Off Hook
Result press the
key.
To leave the setting as it is,
press the
C>
dialog key to
tI
dialog key to
l&
dialog key.
tI
dialog
Loca)
10- Off
One
be displayed, depending on
which is currently active:
Answers
Change
or
Answers
Change
features
hook
result?
of
the following settings will
prime
to
call
any
line
line?
on
only
any
to prime only?
line
Loca I features
10- Off
hook
result?
<>
<>
Fast Transfer
Procedure
Use the
keys to scroll through the
displays until "Configure
phone?" appears.
Press the
select the Phone
Configuration menu.
Use the
scroll to
Press the
select the
menu.
<I
and
tI
dialog key to
C>
dialog key to
"local
features?"
tI
dialog key to
local
C>
dialog
Features
Display
THU
FEB
0~,
99
Configure phone?
Phone
] -
Phone
4 - Local
Local
1-
configuration
Initial
settings?
configuration
features?
features
Menu
overlay delay?<>
09:55
AM
<>
menu
<>
menu
<>
Use a combination of the
and
C>
dialog keys and the
to
l&
dialog key to display
another setting or to exit the
menu system.
<J
66
1275·00030
C>
Use the
scroll to "Fast transfer?
Press the
select the Fast Transfer
selection.
1275·00030
dialog key to
tI
dialog key to
Local
11- Fast
One of the following settings will
be
which
Fast
Enable
or
Fast
Disable
features
transfer?
displayed. depending on
is
currently active:
transfer
fast
transfer
fast
disabled
transfer?
enabled
transfer?
<>
67
Page 40
Issue
5,
June
1999
To
change
setting,
key.
To
leave
press
Use a combination
and
I>
to
181
another setting or
menu
the
press
the
the
setting
the
181
dialog
dialog
dialog key
system
..
Fast
keys
to
Transfer
II'
dialog
as
key.
of
the
and
display
to
exit
it
the
the
is,
<.J
Local
features
11- Fast
transfer?
<>
OMS
Fast Transfer
Procedure
Use
the
<.J
keys
to
scroll
displays until
phone?"
Press
select
Configuration
Use
scroll
Press
select
menu.
the
the
the
to
the
the
appears.
II'
Phone
t>
"local
II'
local
and
I>
through
"Configure
dialog
key
menu.
dialog
key
features?"
dialog
key
Features
dialog
the
to
to
to
Issue
Display
THU
FEB
04,
99
Configure phone?
Phone
I -
Phone
-1
configuration
Initial
configuration
- Local
settings?
features?
Loca 1 features
1-
Menu
overlay delay?<>
5,
09:55
June
AM
menu
<>
menu
<>
1999
<>
68
1275·00030
Use
the
I>
scroll
to
"DMS
Press
the
select
the
selection.
1275·00030
dialog
Fast
II' dialog
DMS
Fast
key
to
transfer?
key
to
Transfer
Local
12-
One
be
which
OMS
Enable
features
OMS
Fast transfer?<>
of
the
following
displayed, depending
is
currently active:
fast
xfer
OMS
fast
or
OMS
fast
xfer
OMS
Disable
fast
settings
on
disabled
xfer?
enabled
xfer?
will
89
Page 41
laaue 5,
To
selling,
key.
To
press
Use
and
to ~ dialog
another setting or
menu
Autoanswer Mute
June
1999
change
leave
[>
the
press
the
the
setting
the ~ dialog
a combination
dialog
key
system.
Fast
keys
to
Transfer
t/
dialog
as
key.
of
the
and
display
to
exit
it
the
the
is,
<:]
Local
12-
features
OMS
Fast transfer?<>
Use
the
scroll
Press
select
setting.
[>
dialog
to
"Autoanswer
the
t/
dialog
the
Autoanswer
key
key
to
mute?
to
Mute
Issue
Local
features
13- Autoanswer
One
of
the
following settings
be
displayed,
which
is
Spkrphone
depending
currently active:
mute
Disable spkrphone
or
Spkrphone
mute
Enable spkrphone
5,
June 1999
mute?
on
enabled
mute?
disabled
mute?
<>
will
Procedure
Use
the
<3
and
[>
dialog
keys
to
scroll through
displays until "Configure
phone?"
Press
select
Configuration
Use
scroll
Press
select
menu.
70
appears.
the
t/
dialog key
the
Phone
menu.
the
[>
dialog key
to
"Local features?"
the
t/
dialog
the
Local
the
key
Features
to
to
to
Display
THU
fEB
Configure
Phone
1 -
Initial
Phone
4 -
configuration
Local
Local
1-
Menu
64,
99
69:55
phone?
configuration
settings?
features?
features
overlay delay?<>
1275·00030
AM
<>
menu
<>
menu
<>
To
change
Mute
dialog
To
leave
press
Use a combination
and
[::>
to ~ dialog
another setting
menu
1275·00030
the
setting.
key.
the
the
l8f
dialog
system.
Autoanswer
press
selling
dialog
keys
key
to
or
the
as
key.
of
the
and
display
to
exit
t/
it
is,
<:]
the
the
Local
features
13- Autoanswer
mute?
<>
71
Page 42
Issue
Set
5,
June 1999
Date
Issue
5,
June 1999
Procedure
Use the
keys
displays until "Set date?
appears.
Press the
select the Set Date option.
Enter
month, then
for the day, then 4 digits for
the year. The cursor
advances automatically to the
next field.
To save the new setting.
press the
To leave the setting as it was,
press the
<1
and
I:>
to
scroll through the
tI
dialog key to
2 digits
(01-12)
2 digits
t/
dialog key.
~
dialog key.
dialog
for the
(01-31)
Display
THU
fEB
Set date?
Mo
XX
Day
Enter date
Mo
05
Day
Enter date
L-
I
SAT
MAY
04,
22,
99
XX
22
99
09:55
Year
Year
69:
AM
<>
XXXX
1999
----'
55
AM
<>
I
Enter 2 digits (01-12) for the
hour, then
the minute, then • (AM) or
(PM). The cursor advances
automatically to the next field.
To save the new setting,
press the
To leave the setting as it was,
press the
2 digits (00-59) for
tI
dialog key.
~
dialog key.
#
]01 :
12
PM
[11
t er time.
'-------------
ISAT
MAY
*==AM
22.9901:12
lI=:pM
PM
()
I
I
Set
Time
Procedure Display
Use the
keys to scroll through the
displays until "Set time?
appears.
Press the
select the Set Time option.
72
<1
and
tI
dialog key to
[>
dialog
THU
FEB
Set
time?
XX:XX
Enter
04.
XX
time.
99
09:55
*==AM
1275·00030
AM
(>
#==PM
1275·00030
73
Page 43
Issue
5,
June 1999
Issue
5,
June 1999
(This Page Inlenlionally Lefl Blank)
5. OPTISET TERMINAL
USED
AS AN
EKTS PHONE
CACH EKTS Directory Number Restrictions
Because
(CAIO) instead of a
are different or unavailable for a CACH EKTS line. For instance,
because the switching system does not allow multiple calls
single CAIO, terminal functions that ordinarily would provide
slacking of calls
Also, any extended programming functions related to a
as the
by the switching system.
An
should have the same
one other line key
call appearances (such
initiating another call).
EKTS Associated Calls
An
answered by another terminal
on
a line appearance
not been invoked on
Light for the EKTS Associated Call line on your terminal winks
(refer
OPTISET TERMINAL for Status Light cadences).
involved
on your terminal is on steady to indicate that the line is
th~
switching system relies on a Call Appearance
ON
for call-handling, certain phone functions
on
one key do not work on a CACH EKTS line.
ON,
ON
itself, that are programmed into the terminal are ignored
Optiset terminal that
EKTS Associated call is one that has been originated or
to
Status Lights
in
the call has
is
being used
ON
assigned
to
accommodate functions that require multiple
as
placing
in
the EKTS group and is appearing
on
your terminal. If the Privacy feature
the
terminal involved in the call, the Status
in
Chapter
the
1.
Privacy feature invoked, the Status Ught
as
a CACH EKTS phone
to
the prime line and at least
an
existing call on hold and
INTRODUCING YOUR
If
the terminal
in
use.
as
10
on
well
has
a
74
1275-00030
Multiple Call Appearances
An
Opliset terminal that
have one or more feature/line keys programmed with
appearances each. A Multiple Call Appearance (CA) key operates
1275·00030
on
a CACH EKTS
is
operating as a CACH EKTS phone can
Ph~ne
up
to 16 call
75
Page 44
Issue
5,
June
1999
much like a CACH EKTS line key. Whereas a typical CACH EKTS
line key contains only one CACH
calls on this CACH
on any of jts defined CACH IDs.
A possible use of the Multiple CA key is in a group of users sharing
the same call appearances on a Multiple CA key on each phone.
When a call comes in to the group. the first person to answer the
call owns it, and the other phones are free to accept future calls or
make outgoing calls on the Mulliple CA key.
The'
Automatic privacy feature (refer to Privacy for EKTS Calls)
should have been enabled in the central office switch for all the
Multiple CA call appearances. With Automatic privacy set, when a
user answers a call on his Multiple CA key, the call automatically
disappears from Multiple CA keys on other phones in the group.
Logging
The Call Logging feature
EKTS phone logs only unanswered calls to the prime line.
EKTS
Answering
In
both Line Hold and Line Preview modes, you can answer a call
by lifting the handset; pressing the Speaker, Headset, or Connect
key; or selecting the Answer menu option. When multiple incoming
calls are alerting on a CACH EKTS terminat and no call is active,
calls will be answered according to one of the following priority
schemes:
• If Off Hook Result is set to Answer Any Call. calls are
CACH EKTS
Functions
Incoming
answered in the following order:
1.
The preselected call, if any.
2. The oldest call.
3. The oldest Automatic Callback (ACB) call.
10,
a Multiple CA key can make or answer calls
Calls
in
On
Your
Calls
10
and will only make or answer
an Optiset terminal used as a CACH
Optlset
Terminal
• If Off Hook Result is set to Answer Prime Line Only, calls are
answered in the following order:
Issue
5,
June
1999
1. The preselected call on the prime line, if any.
2.
The oldest call on the prime line.
3.
The oldest ACB
If
any call is active when incoming calls are received, lifting the
handset; pressing the Speaker, Headset, or Connect key; or
selecting the Answer menu option disconnects the active call.
Incoming
When an incoming call
MUltiple CA key, and a call
the new incoming call will not appear on the phone. The incoming
call will ring on other phones where a MUltiple CA key containing
this CACH
When the active call on the Multiple CA key becomes idle, if the
other call has not been answered by any other phone.
ringing on the Multiple CA key. If the other call was answered by
another phone without enabling Privacy, the Multiple CA Status light
will blink in the EKTS associated cadence.
If an incoming call is directed to a CACH
CA key, and this key
call will take priority over the EKTS associated call and alert on the
Multiple CA key.
If
an incoming call is directed to a CACH
CA key, and this key
priority over the
When an Incoming call is directed to a CACH
Multiple CA key, and the Multiple CA key
the new call will be treated like a regular incoming call to a CACH
EKTS line. The Status light next to the Multiple CA key will flash.
The ringing tone will be played unless the ringer is turned off for the
Multiple CA key or the global "Ringer off" feature
While the phone
answers this call, the Multiple CA Status light
call disappears from the phone. This is different from a CACH
EKTS line where the Status light would be set to the CACH EKTS
associated call cadence.
Calls
on a Multiple
10
is idle, or where a line key with this CACH
ACe
is
ringing, if another phone with a shared CACH
calion
is
is
showing an EKTS associated call, the new
is
showing an ACB call. the new call will take
call and alert on the Multiple CA key.
the prime line.
CA
Key
directed to a CACH
is
already active or alerting on this key,
10
10
10
contained
10
it
will start
contained
contained
is
idle (Status light off),
Is
is
in
a Multiple
in
a Multiple
10
contained
turned on.
turned off and the
in
is idle.
in
10
a
a
76
1275·00030
1275·00030
71
Page 45
Issue 5,
If
June
you attempt
1999
to
answer the call while
it
is ringing (or if autoanswer
is on), but another phone has just answered the call, the answer
attempt will fail. The Multiple CA key will become idle, and its Status
light will turn off.
When you successfully answer an incoming call on a Multiple CA
key, the Status light will turn
on
and you will not see future calls to
other CACH lOs on this Multiple CA until the current call goes away
from the Multiple CA key. This can happen in two ways:
• The call is disconnected.
Issue
5,
June 1999
Bridge
You
onto
an
EKTS Associated Call
can bridge onto
an
active EKTS Associated Call, if the Privacy
feature has not been invoked for that call, simply by pressing the
line key that is associated with the call. The status light for the line
key associated with the call is winking before you bridge onto the
call, and will change to steady on when bridging· has been
accomplished. When
you
are finished with the call, hang up
in
the
way you would for any normal call.
• The call is picked up by another shared CACH ID and
disconnected by the Multiple CA key.
Automatic
Callback
Calls
on a Multiple
CA
Key
Automatic Callback (ACB) calls will alert the Multiple CA key if it is
idle or if it has an EKTS associated call. Otherwise, the ACB
notification will be delayed until the Multiple CA key becomes idle or
EKTS associated. When an ACB call is presented on the Multiple
CA key, you can answer the ACB notification just as you would an
ACB notification on a normal line key.
Outgoing
You
Calls
on
8 MUltiple CA Key
can place outgoing calls on a Multiple CA key, when it is idle
(Status light is turned off), just as you would on a line key. The
CA
Multiple
when going off hook on the handset, headset,
defined
Multiple CA key, the first available CACH
phones with shared CACH
key will be automatically selected for outgoing calls
or
speaker, if
as
the prime line. When an outgoing call is attempted on a
10
(not used by other
10)
in its list will be used to place the
it
is
call. At this point the Multiple CA key Status light will not show
incoming calls until the current call goes away.
Note that the Multiple CA key can be configured as the prime line
from the initial setting menu, just like any line key. The only
difference is that the prime
this key does not have a
ON.
ON
will be blank in this case because
on
EKTS Associated Calls
EKTS associated calls will appear on an otherwise idle MUltiple
a Multiple CA Key
CA
key when a Key Hold Indication or a Key Release Indication is
received from the switch for the associated call. However, if a
Privacy Release Notification is received for the associated call, it
will nol be visible on the Multiple CA key.
When privacy is not enabled, the Multiple CA Status light is set
EKTS associated cadence and the associated call can be barged
to
in
by pressing the Multiple CA key (followed by pressing Connect if in
is
Preview mode). This
identical to barging in to an EKTS
associated call from a line key. When the Multiple CA Status light is
in the EKTS associated cadence, it will not display new incoming
call.
Nole that
on the Multiple CA key. The reason
the dialing state and the user cannot barge in to it. Therefore
an
associated call in the Key Setup state will not appear
is
because such a call is still in
it
is
best to keep the Multiple CA key available in this case to make
outgoing calls.
for
Privacy
If your Optiset terminal has been programmed with the Privacy
feature, one of the feature keys is assigned
EKTS Calls
as
the Privacy
key.
When you desire that no other EKTS group user be able to bridge
into your EKTS call, simply press the Privacy key. The status light
associaled with your call
on
all other EKTS terminals lights steady
on to indicate that your call is private.
78
1275-00030
1275·00030
79
Page 46
Issue 5,
If
on
automatically when
June
1999
the Automatic Privacy
your Optiset terminal,
you
on
Retrieve from Hold feature
the
Privacy feature
retrieve a
held
EKTS call. Because Privacy
is
is
enabled
invoked
is a switch-based rather than terminal-based feature, the interval
between retrieval of the call and invoking of the Privacy feature
could allow another user
Bridged-User Attention Tone (three short beeps)
your Optiset terminal when
to
bridge into your call. If that occurs, a
is
sounded by
the
retrieved call appearance becomes
active.
ConferencelTransfer Call Appearance
The Conferencerrransfer Call Appearance (Confrrransfer CA)
programmed as a fixed
CA
to
be used
as
the
consultation call of a
Conference or Transfer. This CA should be assigned only in a
CACH
When
terminal puts the active call
CA. If one
consultation call. If the Confffransfer CA does not appear
key and
beep and prompt
appears
another idle appearance of that line
terminal will beep and promt you
you are prompted
the
While setting
between
feature/line key,
pressing
menu option.
can toggle only to
CA?" or "Retrieve transfer CA?" menu option. If the call
Confffransfer CA is not part of a conference or transfer
hold,
can happen when the first party
up
EKTS
phone.
you
initiate a Transfer or a Conference call, Ihe Opliset
on
hold and checks for a Confffransfer
is
defined, the terminal will use it to initiate
is
bUsy
(used by another consultation call), the terminal
you
to
select a line. If
on
a line key and
to
select a line,
consultation
the
two calls.
up
cal/.
the
conference or transfer call, you can toggle
you
the
appropriate line keys or by using the "Retrieve line
If
the
ConffTransfer
the
the
"Retrieve conf/xfer CAT' menu option
is
busy, the terminal will search
If
the
Confffransfer CA
can toggle between the two parties
consultation call using the "Retrieve conf
in
or
an
incoming call
is
answered
the
Confffransfer CA
ON.
If none
to
select a line.
you
may select any idle line for
CA
is
not defined
the
conference or Iransfer hangs
on
the ConffTransfer
is
found,
In
either case, if
is
defined
on
a key,
is
displayed. This
CA.
on
and
a line
on
on
is
the
will
for
the
by
x?"
you
the
on
is
a
Issue
5,
June
1999
Note: The Confffransfer CA
switching system
is
is
performed.
cleared when a download
from
the
Hold
For EKTS calls,
against
EKTS
call legs
the
is
the
group means
on
outside call
recognized by
the
line Status indicator will indicate
EKTS group of
that
all
hold and nobody
at
this time. The
the
switch
the
the
selected call. Hold against the
EKTS
group members have put their
from
the EKTS group
hold
and
indicated
state against
to
the
Optiset by
is
connected
the
EKTS group
hold state
to
the
NI
value "call on hold" or "call retrieved from hold." The Optiset
terminal will change the line status to "pending". The Hold feature
an
will not retrieve
associated CACH EKTS call unless this call is
currently being previewed (by pressing the associated line in
Preview mode).
Intercom
The
Intercom feature, only supported on CACH lines,
is
used
to
generate and receive intercom calls. The intercom Status light
indicates incoming intercom calls and the status
call. Intercom
If
the
Intercom
will autodial the intercom destination.
programmed, pressing
you
can
keys
are
not
associated with any
key
contains a destination number, pressing
the
Intercom key will return dial tone, and
dial the number manually.
If
no
of
the
intercom
DNs.
this
destination number
key
is
80 1275-00030
1275·00030
81
Page 47
Issue 5,
June
1999
6. HEADSET OPERATION
Issue
5,
June
1999
(This Page Intentionally Left Blank)
The Optiset terminal supports a Headset.
can
be customized
to
your preferences.
the
operation of which
In
order
to
use
the
headset functions, your terminal must have a TA-TAPI adapter.
This adapter provides
An
optional Headset Control key can
an
electret headset connector.
be
defined
and
recommended for easy headset operation. However, the Headset
is
not
Control key
the
headset
mandatory.
can
be controlled by inserting
headset plug or through other keys or menus
Consult the person who maintains your Optiset terminal
determine how your headset interface
If
no
Headset Control
is
configured.
key
and
removing the
on
the terminal.
is
defined,
to
Controlling the Headset Using the Plug
How
the
terminal responds when the headset
removed
is
configurable under local settings. Note that
headsets, the plugging
on
the headset system.
and
removing actions are done with a key
is
plugged
on
in
or
some
Plugging Headset In
Plugging the headset
headset system)
in
(either manually or using the key
can
result
in
one
of the following actions,
on
the
depending on how your Optiset terminal has been programmed:
is
82
1275-00030
• No action.
• Call control - answers
generates dial tone if the phone
on
the speaker or handset
call·
• Answer a
call
on
the speaker or handset
results. Note
answers
that
incoming call is ringing
headset will result
1275·00030
in
no action.
an
incoming call; answers
is
idle; switches
to
the headset.
an
incoming call, or switches
to
the headset. No other action
If
"Answer prime only"
on
a secondary line, plugging
is
an
an
set
ACe call;
active call
an
active
and
an
in
the
83
Page 48
Issue
5,
June 1999
Removing
Unplugging the headset (either manually or using
headset system) can result
depending on how your Optiset terminal has been programmed:
• No action.
• Call control • disconnects an active call
switches an open listening call to speakerphone mode.
• Speaker on - causes
listening mode to
Controlling
When a Headset Control key is defined, the key acts like a hook
switch for the headset. When this key is pressed while an active
call is present on the handset or speaker, the call is picked
the headset. When
active call
pressed during headset open listening, the call is transferred to the
speaker. When the key is pressed during an incoming call. the call
is
answered
while the phone is idle or while all calls are
generated on a prime line appearance. The Status light next to the
key will indicate when a call is present on the headset (Status light
On) or when no calls are present on the headset (Status light Off).
the
Headset Plug
in
one
of the following actions,
on
an
active call
be
switched to
the Headset
on
the headset, the call is terminated. When
on
the headset. And, finally, when
with
the Headset
the
Headset Control key is pressed during an
the
on
the headset or
speaker.
Control
the
on
the
key on the
the headset, or
in
open
Key
up
the
key is
key is pressed
hold, dial tone
by
is
IS8ue 5,
behavior. Outgoing calls are automatically placed on the headset
through composed dialing. speed dial keys. Redial. hot keypad
dialing, or pressing a line key
You
can answer incoming calls
corresponding line key, selecting "Answer call" from the menu, or
pressing the Connect key. Incoming calls are placed
headset automatically
made or answered by pressing the Speaker key, the phone goes
into headset open listening mode. You can disconnect headset
calls
by
using either the Disconnect key or the Disconnect menu
option.
During a conversation using the headset, the Volume UpNolume
Down keys (marked
the headset. Pressing these keys during the conversation will
display the Audio Setting menu and allow you to set the desired
volume while visually observing the volume level. Then you can
press the
dialog key to change it back
headsets have their own independent volume control, which can be
used
'"
dialog key
to
modify the headset's volume level.
"+"
to
draw dial tone.
on
the headset by pressing the
in
the Autoanswer mode, When calls are
and
"0")
are used to change
to
store
the
new volume level or the
to
the
previous level. Note that some
June
the
volume of
on
1999
the
~
Even if a Headset key is programmed on your Optiset terminal, the
configurable options for plugging and unplugging the headset still
apply. Headset behavior with the key configured is similar to its
behavior when no headset key
Speaker key is pressed. When no headset key
the
Speaker invokes headset open listening; but with a Headset key
present, pressing the Speaker invokes Speakerphone mode. To
invoke headset open listening,
on
the call when the Speaker key is pressed.
Controlling
You have the option of using existing keys
Optiset terminal instead of the headset plug to control headset
84
the
Headset
Using
is
configured. except when the
is
defined, pressing
the
headset must already
Keys
or
Menu
Options
and
menus
be
active
on
the
1275·00030
1275·00030
85
Page 49
Illue
5,
June
1999
7. FEATURES
Issue
5,
June 1999
(This Page Intentionally Left Blank)
Three types of features are available
ISDN Terminal:
• Local features
• Switch-based features
• Combined local/switch-based features
Local features are based entirely
available
system that serves the terminal. Some examples of local features
are Mute, Redial,
Switch-based features are provided entirely by the central-office
switching system and are merely requested through the Optiset
terminal. Some examples of switch-based features are Automatic
Callback, Automatic Recall, and Group Call Pickup.
Combined local/switch-based features involve actions by both the
Optiset terminal and the central-office
shaking between the two. Examples of combined local/switchbased features are Conference, Hold, and Intercom.
Many of the features available through your Optiset terminal can be
invoked using dedicated function keys and programmed feature
keys. These same features also may be invoked using the menu
system. Other features for which feature keys have not been (or
cannot be) programmed also are available through the menu
system.
to
you irrespective of the kind of central-office switching
Do
Not Disturb, and Speed Dial.
to
you
as
a user of the Optiset
in
the Optiset terminal and are
sWitch,
as well as hand-
86
1275-00030
Autoanswer
Autoanswer is a local Optiset terminal feature that automatically
Is
answers incoming voice calls. When this feature
terminal is idle and
half a second and then answer the call and present
speaker, with the microphone muted. If the handset
when the call occurs, the terminal will answer the call without
activating Mute.
the call
1275·00030
on
the headset, without Mute.
an
incoming call occurs, the terminal will ring for
If a headset
is
connected, the terminal will answer
active, if the
it
through the
is
off the hook
87
Page 50
'ssue 5,
The
key.
status light associated with
turned off.
Note:
June
1999
Autoanswer feature
When
the
lines
the
feature
associated status light also
on
the Optiset terminal
is
controlled by a pre-programmed feature
has
been
turned
the
key lights. When
can
be
is
on
off.
set
individually enabled or disabled. If the global Autoanswer
feature
active,
even
lines with
the
is
disabled will answer calls automatically.
if
a line has
to
answer calls automatically even if
turned
off.
its
individual Autoanswer enabled, it will continue
Automatic Callback
Automatic Callback (ACB)
activated
been
party's
.
feature.
scrolling
dialog
by
a feature key
programmed). When
line
is
busy, you
You
also
can
to
the Auto callback?
key.
The
switching system will
called party's line becomes
An
ACB
alerting call that is not answered eventually will be timed
out by
and
that was being used
the
switching system. When
indicator flashing
to
is
a switch-based feature
on
the
Optiset terminal (if
you
make a call and
can
press
activate ACe
menu
the
from
option
then
ACB
the
call
idle.
the
feature times
on
your Optiset terminal will cease. The line
alert
you
goes idle,
and
to place regular outgoing calls.
Answering an
that
the
the
party
When
associated with
instructs
bUSy
party.
ACe
Call
sWitching
the
switching system
system
you
attempted
the
alerting indicator light. Pressing
rings
your Optiset terminal
to
call
is
available, press
to
retry
the
call
Making an Outgoing Call While ACB Is Alerting
You
can
place
an
outgoing
Optiset terminal by doing one of
call
while
the
an
ACe call
following:
using this
up
with Autoanswer
the
key.
feature
individual feature
On
the other hand,
the
global feature
that
the
key has
find
that
the
key
to
activate
menu
system by
and
pressing
you
back
when
out,
you
can
then use
to
alert
the
line key
the
line key
to
the
previously
is
alerting
on
the
can
be
called
the
the
the
ringing
you
your
t/
is
is
• Select a line with a different
Use
•
Redial, a
keypad
select
used
as a CACH
the
same line
to
an
place
Speed
the
Dial
outside call. These methods automatically
idle line, if available, or (unless
EKTS
phone)
as
the
ACB
alerting call.
ON
and place your call.
key.
or (if programmed)
stack
the
new
188ue 5,
the
June
terminal
outgoing
the
is
call
1999
hot
being
on
Cance' Automatic Callback
After
you
have activated the
your Optiset terminal
option.
the
your Optiset terminal.
Pressing
the
central office switch
will
t/
ACB
display
feature,
the
the
Cancel auto callback?
dialog key will cause
to
cancel operation
of
idle
the
the
menu
display
terminal
to
ACe feature
on
menu
request
with
Call Log
The
Call
log
is
a local (Optiset terminal based) feature
the
calling-party numbers of unanswered or rejected incoming calls.
For
each
such
call,
the date
From
the
idle
menu
display
to
the
Access
scroll through
call
log? menu option. This option allows
the
logged calls, display
occurred, and delete calls from
it
The Call
20
will
log
records
feature
is
reached,
will
display a message informing
Access call log? option will
the
log
and
delete records
and
time
on
your Optiset terminal
the
store
up
no
more calls will
be
offered
you
no
also are recorded.
the
date
log.
to
20
call records. If
be
logged.
you
that
the
to
encourage
longer want
10
and
log
keep.
you
time
The
is
you
full,
that
stores
can scroll
you
the
calls
the
limit of
idle
menu
and
to
review
to
the
Conference/Large Conference
Conference
you
to
conference sizes
Large Conference feature permits your terminal
two
different conference sizes.
If
your terminal
single Conference feature
include
is
a combined local/switch-based feature that allows
from 3 to
is
30 parties
to
which your Optlset terminal is subscribed.
subscribed
in
a single call, depending
to
be
to
only one conference size, there
key
programmed
on
your terminal.
subscribed
on
the
The
to
is
a
If
88
1275-00030
1275·00030
89
Page 51
Issue 5,
June
1999
Issue
5,
June 1999
your terminal is subscribed to two different conference sizes. both a
Conference key and a Large Conference key will have been
programmed. The specific number of parties you can add to each
size conference is determined by the service to which your terminal
is
SUbscribed. Consult the person responsible for installing and
up
setting
your terminal to obtain this information.
To activate the Conference feature, there already must be a call
active. Then. if you have the Large Conference feature available,
you must decide how many parties you are going to add
If
you will be adding no more than the maximum allowed by the
basic Conference feature, press the Conference key.
to
the call.
If you will
need to add more parties than the basic Conference feature allows,
first press the Large Conference key. then press the Conference
key. The Status light associated with each conference key pressed
will light.
The Conference feature will then place the existing call on hold and
ON
either select the next available line with the same
conference call
or
will prompt you to select the line on which to add
as the
the conferee. You may select either an idle line, to dial a third
party, or a line that is on hold, to add a held party to the conference.
to
After you have made your call
the third party or connected the
held party, you are in a consultation call with only that party. The
original party is still on hold. The Status light associated with the
Conference key is flashing to indicate that the consultation call can
now be joined to Ihe original called party to form a conference.
To
do this, simply press the Conference key. All three parties will now
be joined
in
a conference call, and the Conference key Status light
will change to steady on.
To add another party to the conference, again press the
Conference key, or the Large Conference key and then the
If
Conference key, and repeat the procedures just described.
you
reach the maximum number of parties for your Conference feature,
will be permitted to set up a consultation call, but the switching
you
If
system will not add the consultation call to the conference.
occurs, you must terminate
the conference call.
the
consultation call in order to return to
If
you wish, you may then drop one party from
this
the conference and repeat the preceding steps to reestablish the
consultation call and then add
it
to the conference.
Your Optiset terminal supports up to two simultaneous conferences.
If
an incoming call occurs while you have one conference active,
on
you may put the conference
Then, if you
Conference key,
Wish.
you may use the Conference key (and Large
if
necessary) to establish a second conference call
hold and answer the incoming call.
involving the new incoming call and yet another party. With two
conferences now operating on your terminal (one active and the
on
other
hold), you may toggle between the two conferences or
drop out of one and remain with the other.
Date
is
From the idle menu display you can set the date that
displayed
on your Optiset terminal by scrolling to the Set date? menu option.
t/
When this option is displayed, press the
Mo, Day, and Year fields. Then use the
cursor
displayed and then press the
any time prior
to
the fields. Enter the current date in the format already
II' dialog key to store your entry. At
to
storing your entry you can abort the Dale option
dialog key
<3
and
and retain the previous settings by pressing the
Direct
Station
Select
Direct Station Select (DSS) is assigned to a feature key
to
t>
dialog keys to
~
dialog key.
display the
in
support
of the ISDN Smart Attendant Services (ISAS) feature. Each DSS
key provides speed-dial access to another phone, as well
as
visual indication of the status of that phone through the associated
status light serving
as
a Busy Lamp Field (BLF) indicator.
Essentially, a DSS key is a Speed Dial feature key that has a
10
Feature
Number (FIN) assigned instead of a
The BLF indicator
is
used by an ISAS attendant to determine the
ON.
status of a specific terminal device. which may have multiple DNs
associated with
The attendant uses the DSS key to place calls
to
it.
the associated terminal device.
a
90
1275·00030
1275-00030
91
Page 52
Issue
5,
June
1999
Do
Not
Disturb
Do
Not Disturb is a local feature that causes the Optiset terminal
reject all incoming voice calls. A
Do
Not Disturb feature key will
to
have been programmed if this feature is available to you. The
Status light associated with the Do Not Disturb key lights when the
feature is activated. The Status light goes dark when the key
is
pressed again to turn the feature off.
If your Optiset terminal is being used
as
an
EKTS phone,
Do
Not
Disturb rejects only calls to your primary line appearance. Those
calls still will
be
presented to the other phones
in
the EKTS group.
If you have the Call Logging feature, unanswered and rejected
incoming calls still will be logged even if
If the terminal is used as
an
EKTS phone. only calls
Do
Not Disturb is activated.
on
the primary
call appearance will be logged.
Issue
5,
June 1999
Fast Transfer/OMS Fast Transfer
Fast Transfer, when enabled, allows you to complete the transfer of
a call by simply hanging
has answered. If the transfer fails after you hang
call
is
canceled, the Optiset terminal sounds
original call remains on hold.
up
after the party to receive the transfer
up,
the transfer
an
error tone, and the
You
may then reattempt the transfer
or retrieve the held call.
OMS
Fast Transfer is equivalent
feature but is designed to operate with
to
the generic Fast Transfer
OMS
switching systems.
Check with the person who installed your Optiset terminal, or the
one who maintains
enabled
on
your terminal.
it,
to determine which Fast Transfer feature
is
Feature Indicator/Speed Dial
Download
Your Optiset terminal is capable of receiving configuration updates
downloaded directly from the central-office switching system, if the
switching system supports such downloads. A download may
update Feature Identification Numbers (FIN) for various menu
features, as well as such CPE parameters as Call Appearance IDs
and the mapping of feature keys
on
your terminal, unless those key
assignments are protected.
If
your terminal should display the "New download available"
message. you can select the Clear download msg? menu option to
clear the message. Then, either consult the person responsible for
maintaining your Optiset terminal. or refer to document 1275-
programmed so that the associated status light represent another
function. For example,
if
your terminal is subscribed
to
a Message
Wailing feature provided by your local telephone operating
company, a status light can
be
a programmed
to
turn on when a
Message Waiting Feature Identification Number (FIN) is received
from the switching system. The associated Speed Dial key might
be
programmed to dial a message server
to
retrieve the message.
When you press the Feature Indicator/Speed Dial key, the Optiset
terminal places a call on
unlike a normal Speed Dial key, pressing this key will
an
idle prime line appearance. However,
not
turn
on
the associated status light.
Feature
If
Inspection (FKI)
definition
Inspection mode
FKI
the Inspection mode
When the Inspection mode is
or line key to display current information about that
Key
Inspection
your Optiset terminal
key,
of
a local or system feature key. The key toggles the
on
key
turns on and the message "Inspect is on" is displayed when
is
programmed with a Feature
this key allows you to inspect or verify
and off. The status light associated with
is
on.
on,
you
can press any other feature
key.
Key
the
the
Four types
92
1275·00030
1275·00030
93
Page 53
Issue 5,
June
1999
Issue
5,
June
1999
of inspection can be made, each depending
on
the status of the key
being inspected: Local Feature Inspection, System Feature
Inspection, Idle Line Inspection. and Active Call Inspection.
Local Feature Inspection
With Feature Key Inspection turned on (refer to Feature Key
to
Inspection), you can verify the feature assigned
any local feature
key by simply pressing that key. The Optiset terminal will display,
for 5 seconds, information about the assigned feature. The lower
line of the display will identify the feature (Speaker, Speed
Dial,
etc.). and the upper line will display appropriate additional
information, such as the name or
ON
associated with a Speed Dial
key.
System Feature 'nspection
With Feature Key Inspection turned on (refer to Feature Key
Inspection), you can verify the switching-system based feature
assigned to a feature key by simply pressing that key. The Optiset
terminal will send a Feature Inspection request to the switching
system, which will then return information about the feature
assigned to the key. The terminal will display the information for 5
seconds.
Idle Line Inspection
information about the call associated with
currently active call, the duration of the display is determined
switching system. If
the
call
is
a background call.
the
key. If the call
the
is
the
by
the
terminal will
display the information for 5 seconds.
Group Pickup
Group Pickup
call that
is
a switch-based feature that allows you to answer a
is
ringing on any of the phones
in
a group of phones that
have been listed with your telephone operating company as a
pickup group. If your Optiset terminal
is
available through the menu display when you
it
in
When you hear a phone
hook and press the
t/
Note: Group Pickup ceases
your pickup group ringing. simply
dialog key to answer the call.
to
be
is
subscribed
available
as
soon
to
this feature,
go
off-hook.
as
you begin
go
off-
dialing an out-going call.
Hold
Hold is a combined local/switch-based feature that
either a single party or a conference on hold so you
is
used
can
answer or
to
put
make another call. The feature can be activated either by pressing
the
Hold feature key or by selecting the Hold? menu option from the
menu display. Either action sends a Hold request
office
SWitching
system.
to
the central-
With Feature Key Inspection turned
Inspection), you can verify the
ON
on
(refer
to
Feature Key
assigned to an idle line key by
simply pressing that key. The Optiset terminal will send a Feature
Inspection request to the switching system, which will then return
the
ON
assigned to
the
key. The terminal will display the
ON
for 5
seconds.
Active Call Inspection
With Feature Key Inspection turned on (refer
to
Feature Key
Inspection), you can obtain switch-generated information about a
call that is active on a line assigned to a specific line key by simply
pressing that key. The Optiset terminal will send a Feature
to
Inspection request
94
the switching system, which will then return
1275·00030
When
a Hold Acknowledge is received from the switching system,
the
Optiset terminal will isolate the call from the terminal's acoustic
circuits, and the Hold status light will turn on. If the Hold request is
rejected by the switching system, the current call state of the
terminal will not change, and
an
error message may be sent
to
the
terminal by the switching system.
For non-EKTS calls, the line key status light indicates that a
particular call is
indicates
"that
condition must
on
hold. For EKTS calls, the line key status light
the call
be
is
on hold
in
the entire EKTS group. This
recognized and acknowledged by
the
switching
system before the Optiset terminal will cause the line key status
light
to
give the Hold indication.
1275·00030
95
Page 54
Issue
5,
June 1999
Issue
5,
June 1999
The Hold key status light indicates whether your Optiset terminal's
own
call leg is on hold and selected. This is achieved by the
switching system returning a Hold Acknowledge
to
the terminal for
the selected call.
When
you
want to retrieve a held call, press the line call associated
with the held call, or select the Retrieve menu option. This will
cause your Optiset terminal
to
send a retrieve request to the
central-office switching system. When the Retrieve Acknowledge
message is returned to your terminal by the swilching system, the
Hold status light will turn off, indicating that the call is
no
longer on
hold.
If
your Optiset terminal is in Preview mode rather than Line Hold
mode,
you
can select and review all held calls using the line keys.
After previewing a held call. press the Connect or Hold key, go offhook. or select the Retrieve menu option to send a retrieve request
to
the central-office switching system. The selected held call will be
retrieved after the Retrieve Acknowledge message has been sent
to your terminal by
be
turned off to indicate that the call is no longer on hold.
the
switching system. The Hold status light will
All
other
held calls will remain on hold.
If
the
switching system should reject your retrieve request. the call
will remain on hold. You may attempt
to
retrieve the call later.
Intercom
Intercom is a combined local/switch-based feature that is operates
only on
an
Optiset terminal used
as
a CACH EKTS phone. The
feature requires an Intercom feature key to have been programmed
on
your terminal.
The Intercom key will operate
programmed with
terminal
in
the intercom group, you can press the Intercom key to
an
intercom number associated with another
automatically ring that terminal.
in
one of two ways. If it has been
If
the Intercom key has not been
programmed with an intercom number, you will receive dial tone
when you press it. You can then dial the intercom number (up to 2
digits) of the terminal you want to call.
The status light associated with the Intercom key will alert you to
incoming intercom calls and will indicate the status
of
intercom
calls.
Line Status/Speed Dial
If
your Optiset terminal operates
as
a CACH EKTS phone.
the
Speed Dial feature keys can be programmed so that the associated
status lights represent some other function. One example of this is
the Line Status/Speed Dial key, which functions
Dial key when
represents activity
you
press
on
a programmed call appearance.
it,
while the associated status light
as
a normal Speed
When you press the Line Status/Speed Dial key. the Optiset
on
an
terminal places a call
unlike a normal Speed Dial key, pressing this key will not turn
idle prime line appearance. However,
on
the associated status light.
The status light associated with
lights whenever there is any activity on the line CACH
the
Line Status/Speed Dial key
10
or
ON.
However, the only cadence is steady on, regardless of the activity
(dialing, ringing, connnected, or held) on the line.
Make Busy
Make Busy
from being presented
been subscribed to this feature, the Make
be
available through the idle menu display. Simply press
dialog key
Is
a switch-based feature that prevents incoming calls
to
your Optiset terminal.
to
activate the feature. Thereafter,
If
your terminal has
bUSy?
menu option will
the
idle menu display
the
tI'
will present the Cancel make busy? option. Press the tI' dialog key
to
with this option displayed
cancel the Make Busy feature.
Mute
Mute
is
a local feature that blocks the outgoing speech circuits
the Optiset terminal.
microphone;
In
the handset or headset mode, Mute blocks the
mouthpiece. The feature
key. When Mute
In
the speaker mode, Mute blocks
is
activated by pressing the Mute feature
is
active, the status light next
to
the Mute key is
the
lighted.
in
96
1275-00030
1275-00030
97
Page 55
188ue 5,
If a muted call is placed on hold, the mute state goes away and the
status light goes dark. When the held call is retrieved,
muted.
Preview Mode
If your Optiset terminal has been programmed with a Line Preview
feature key, you can use this key
mode and the Line Preview mode. This feature allows you
selectively activate the Line Preview mode for a specific call, view
the calling
the call before connecting
If
then either the Line Preview mode or the Line Hold mode (default)
was selected during initial setup of your terminal.
to
your Optiset terminal or refer to document 1275-00050,
1200
June
1999
it
is
not
to
toggle between the Line Hold
to
ON
of the caller, and determine how you want to handle
to
it.
your terminal is not programmed with a Line Preview feature key,
If
you would like
have the mode changed, either consult the person who maintains
ISDN
Desktop
Terminal
Installation,
Setup,
Optiset
and
Programming
NI-
Guide.
Redial
Redial is a local feature that redia
your Optiset terminal. This feature can be invoked from the idle
menu display by scrolling
number you dialed will be displayed instead of
pressing the
pressing
programmed
If
the last number you dialed is greater than
14
digits of the number will be displayed. However, the entire
number will
If the Optiset terminal is unplugged or reset, the last number dialed
is lost and this feature will not work until after
been attempted.
tI' dialog key. The feature also can be invoked by
the
Redial feature key, if such a key has been
on
your Optiset terminal.
be
redialed when the feature is invoked.
to
Is
the last number you dialed
the Redial xxxxxxxxxx? option (the last
"XXXXXXXXXX")
14
digits, only the first
an
outgoing call has
on
and
Issue
5,
June
1999
Ringer
If
terminal, this local feature will mute the ringer so that incoming calls
are only announced by the display and the associated line key
status light. When the ringer is muted, the status light associated
with the Ringer Off key lights.
Note: Activating the Ringer Off key deactivates the ringer volume
Speaker
Your Optiset terminal should have been programmed with a
Speaker feature key. This key switches
loudspeaker
status light on the Speaker key lights to indicate that
in the hands-free/open listening mode.
If
on the prime line.
calls are active, you
Speed Dial
Speed Dial is a combined local/switch-based feature that allows
you
terminal is idle, pressing a Speed Dial key causes the terminal
automatically
to the key.
prime line, by pressing the associated line key, and then press
Speed Dial key to make the call
When you press a Speed Dial key, its status light turns on for about
half a second to acknowledge your request. The name of the party
you are calling
appear momentarily on the first line of the display, with the called
ON
Off
a Ringer Off feature key has been programmed on your Optiset
adjustment function.
while
an
incoming call
beep to remind
to
allow hands-free operation of the terminal. The
the terminal is idle, the Speaker key can
If
an incoming call is presented when
can
to make a call by pressing a single
10
select the prime line and dial the number assigned
As
an alternative,
(If
previously programmed into the terminal) will
displayed on the second line.
If
you
press the volume up/down
is
being presented, the terminal will
you
that this function is not available.
on
the microphone
the
terminal is
be
used to initiate a call
no
press the Speaker key to answer the call.
key.
When the Optiset
you
can select a line other than the
on
the
selected line.
keys
and
other
the
98
1275·00030
1275·00030
99
Page 56
Issue
Time
5,
June 1999
Issue
5,
June 1999
From the idle menu display you can set the time that is displayed
on your Optiset terminal by scrolling to the Set time? menu option.
t/
When this option is displayed, press the
xx:xx field. Enter the current time in the format already displayed,
and press
store your entry. At any time prior to storing your entry you can
abort the Time option and retain the previous settings by pressing
~
the
Transfer
Transfer is a combined local/switch-based feature that allows you
move a call from your Optiset terminal to another phone and
remove your terminal from the call. This feature may be invoked
with the Transfer feature key,
your terminal, or through the menu system. Invoking this feature
when a call is active causes the switching system to place the other
party on hold. The Optiset terminal then selects another call
appearance. When dial tone is occurs on the new call appearance,
you may dial the number of the party to whom you want
the call.
It
the Fast Transfer feature has been enabled on your Optiset
terminal, you can simply hang up when the party
transferring the call answers. The call will transfer automatically
the party you called.
select the Complete transfer? option from the menu system
transfer the call.
The menu system provides a number of options at different stages
of the transfer operation. While you are dialing the transfer number,
you may select either the Cancel transfer? option
dialing? option. The Cancel Transfer option allows you to stop the
transfer and retrieve the original call from hold. The Restart Dialing
option cancels the transfer call and allows you redial, while the
original call remains on hold. This option is helpful if you have
dialed an incorrect digit or have begun to dial the wrong party.
After you have finished dialing the transfer number and have the
new party on the line, you may select one of the following options:
* for AM or # for PM. Then press the
dialog key.
if
this key has been programmed on
It
the
Fast Transfer feature is not enabled,
dialog key to display the
t/
dialog key
to
to
transfer
to
whom you are
to
to
or
the Restart
to
Complete transfer?, Release this call?, Retrieve tine
x? The Complete Transfer option transfers the held call to the new
party. The Release This Call option disconnects from the transfer
call and reconnects to the held party. The Retrieve
allows you to toggle between the new party and the held call.
x"
(1
to 44) is the tine key number associated with the held call.
The Join
parties.
with the held
User-la-User
line
x option puts you
"line
x"
(1
call.
Information
to
44) again
(UUI)
in
a conference call with both other
is
the line key number associated
x?,
or Join line
line
x option
"line
If your Optiset terminal has been subscribed to a user-to-user
messaging feature through your telephone operating company
(TOC), and
feature key, you can use this key to read the last UUI message
received by your terminal for the currently active or selected call.
your terminal is idle, you can use the key to read the last
message that has not been read.
When a
UUI
the
end of the first column
key to read the UUI message for the incoming call. Then press the
UUI Read feature key again
the status light.
If
mUltiple calls are present, each call may have its own UUI
message available. You can use the Line Preview mode
specific line appearance and then press the
to view the message for that call. Then press the
key again to delete the message and extinguish the status light.
Select another line appearance and repeat the preceding steps if
you want to read the messages for other calls.
User-to-User
If
your Optiset terminal has been subscribed to a user-to-user
messaging feature through your telephone operating company
(TOC), and if your terminal has been programmed with the
if your terminal has been programmed with a UUI Read
UUI
message
Read feature key lights and
Signaling
is
available, the status light associated with
"UUI"
appears at the far right
of
the display. Press the
to
delete the message and extinguish
(UUS)
UUI
Read feature
UUI
Read feature key
UUI
Read feature
to
UUI
select a
If
100 1275-00030
1275·00030
101
Page 57
ISlue 5,
appropriate feature keys, you can activate features that send
prerecorded messages
• UUS Originating - sends a message to the called party when
• UUS Terminating· sends a message to the called party when
UUS
While the UUS Answering feature is active, your terminal
prerecorded message to the calling party every time
call
the feature. The associated status light will turn
the feature is active.
call, the prerecorded message will display for 5 seconds.
To deactivate the feature. press the UUS Answering feature key
again. The associated status light will go dark.
June
1999
to
other parties
• UUS Answering - sends a message to the calling party when
you answer a call.
you originate a call.
you terminate the call.
as
follows:
Answering
will
send a
an
incoming
is
answered. Press the UUS Answering feature key to activate
on
to indicate that
If
your Optiset terminal
is
idle or active with a
Issue
5,
June
1999
configuration. press the appropriate feature key to select
message that will
be
sent
to
originating calls.
the
UUS Terminating
While
the
UUS Terminating feature
a prerecorded message
terminate or reject a call. Press the UUS Terminating feature key to
the
activate
indicate that the feature
active with a call. the prerecorded message will display for 5
seconds.
To deactivate the feature, press
again. The associated status light will go dark.
Multiple UUS Terminating reature keys can
terminal. each with a separate message.
configuration, press the appropriate feature key
message that will be sent
feature. The associated status light will turn
to
is
active.
to
terminating calls.
is
active. your lerminal will send
the calling party every time you
on
to
Ir
your Optiset terminal is idle or
the
UUS Terminating feature key
be
programmed
If
you have this
to
select the
on
your
Multiple UUS Answering feature keys can be programmed on your
terminal, each with a separate message. If you have this
configuration, press the appropriate feature key to select the
message that will
be
sent to answered calls.
UUS Originating
While the UUS Originating feature is active, your terminal will send
to
a prerecorded message
a call. Press the UUS Answering feature key to activate the
feature. The associated status light will turn on
feature is active.
the prerecorded message will display for 5 seconds.
To deactivate the feature, press the UUS Originating feature key
again. The associated status light
Multiple UUS Originating feature keys can be programmed on your
termina', each with a separate message.
102
It
your Optiset terminal
the called party every time you originate
to
indicate that the
is
idle or active with a call,
will
go dark.
If you have this
1275·00030
1275·00030
103
Page 58
Issue
5,
June
1999
Issue
5,
June
1999
8. MENU TREES
This chapter presents the menu options that are available to you
during specific operating states of your Optiset terminal. For
descriptions of the dialog keys used to access the menu options,
refer
to
"Display" and "Dialog Keys"
YOUR OPTISET TERMINAL.
Idle Termlnel
in
Chapter 1.INTRODUCING
(This Page Intentionally Left Blank)
THU FEB 04. 99 09:35
AM
Redial xxxxxxxx
Cancel auto callback?
Make
bUsy?
Cancel make busy?
Set date?
Set time?
Access call log?
Refer to "Call
log
Accessed"
Configure phone?
Refer to document 1275-
00050.
Optiset NI-1200 ISDN
Desktop Terminal Installation,
Setup, and Programming
Guide
<>
<>
<>
<>
<>
<>
<>
<>
104
1275-00030
1275·00030
105
Page 59
Issue 5,
June
1999
Incoming Call Alerting
Issue
5,
June
1999
xxx-xxxx
Answer call? < >
Reject call?
< >
Auto Callback Call Alerting
xxx-xxxx
Cancel auto callback? < >
Outgoing Call - Offhook
Dial:
Group call pickup?
Disconnect call? < >
Outgoing
Dial: x
Disconnect call? < >
Call·
Dialing
< >
Connected Call
xxx-xxxx
Drop last party?
Activate/cancel privacy? < >
Hold?
Refer to "Call On Hold"
Transfer?
Refer to "Transfer - Dialing"
Conference?
Refer to "Conference· Dialing"
Consultation call?
Refer to "Consultation -
Dialing"
Disconnect call?
Call On Hold
<>
<>
<>
<>
<>
<>
xxx-xxxx
I
I
Outgoing
Dial: xxxxxxxx
Disconnect call?
Auto callback? < >
106 1275-00030
Call·
Ringing
<>
Retrieve line x? < >
Make ana/her call?
ConferencefTransfer
CA
<>
On Hold
xxx-xxxx
Retrieve conf/xfer CA? < >
Make another call?
1275·00030
< >
107
Page 60
Issue
5,
June
Transfer·
1999
Dialing
Issue
5,
June
1999
x
Cancel transfer?
Restart
Transfer·
xxxxxxxx
Complete transfer?
Release
Retrieve line
Join line
Conference·
x
Cancel conference?
Restart
dialing?
Ringing/Connected
this call?
x?
x?
Dialing
dialing? < >
<>
<>
<>
<>
<>
<>
<>
Consultation·
Dialing
x
Cancel
Restart
Consultation·
consultation?
dialing? < >
Ringing/Connected
xxxxxxxx
Retrieve
Release
Join
Download Available
New
Clear download
line
x?
this
call?
line
x?
download available
message?
<>
<>
<>
<>
< >
Conference·
Ringing/Connected
xxxxxxxx
Complete conference?
Release
Retrieve line
Transfer call?
108
this
call?
x?
<>
<>
<>
<>
1275-00030
Call Log Accessed
xxx-xxx-xxxx
Delete
Next
log
Previous
More
details?
1275·00030
this
entry?
log
(x)
entry?
entry?
<>
<>
<>
<>
109
Page 61
Illue
5,
June
1999
INDEX
"+"
Key, 7
Issue
5,
June
1999
(This Page Intentionally Left Blank)
"-" Key,
ACB Call, Answering, 88
ACO,9
Active Call, 10
Active Call Inspection, 94
Additional Call Offering,
Alerting, 10
ALTERNATIVE CALL OPERATIONS,
Answer a Call (Using the Handset),
Answer a Call While Another
Assign. Change, or Delete Password,
Audio Settings, 44
Autoanswer,
Autoanswer Mute, 70
Automatic Callback,
Automatic Callback, Cancel, 89
Back Out
CACH EKTS Directory Number Restrictions, 75
Call Appearance,
Call Appearance Call-Handling, 9
Call Log,
Clear a Call On Hold,
Clear an Active/Connected Call, 31
Combined local/switch-based features,
Conference,
Conferencellarge Conference,
Consultation Call, 10
Date, 72,91
Dial Pad, 5
Dialog,
Dialog Keys, 4
Direct Station Select,
Display, 4
Do Not Disturb,
Download,
Drop the Last Party Added to a Conference (Using the Drop Last
22
EKTS, 8
EKTS • Answering Incoming Calls,
EKTS - Automatic Callback Calls on a Multiple CA Key, 78
EKTS - Bridge onto an EKTS Associated Call, 79
EKTS - ConferencelTransfer Call Appearance,
EKTS - Hold, 81
89
10
92
10
32
87
10
89
91
92
76
80
P,
EKTS -Incoming Calls on a Multiple CA Key,
EKTS - Intercom,
EKTS·
EKTS - Privacy for EKTS Calls,
EKTS Associated Calls,
EKTS Associated Calls on a Multiple CA Key,
EKTS Functions
Electronic Key Telephone Service, 8
Establish a Conference Call (Using the Conference Key),
Faceplate Labels, 6
Fast Transfer,
Fast Transfer,
Fast Transfer/OMS Fast Transfer,
Feature Indicator/Speed Dial,
Feature Key Inspection,
Feature/Line Keys, 5
FEATURES,
Group Pickup,
Handset, 5
Handset Loudness,
Headset, 7
HEADSET OPERATION,
Headset, Controlling Using Keys or Menu Options, 84
Headset, Controlling Using the Plug,
Headset. Controlling with the Headset Control Key, 84
Hold,
Outgoing Calls on a Multiple CA Key, 78
95
",
OMS,
87
95
81
79
75
On
Your Optiset Terminal, 76
67
69,
93
93
93
93
47
83
83
77
79
20
112
1275·00030
1275·00030
113
Page 63
ISlue
5,
June 1999
Issue
5,
June 1999
Hold a Call,
Hot Keypad,
Hot Keypad Mode,
32
61
11
Idle Line Inspection, 94
Inactive Call,
11
Incoming Call Display, 64
Intercom,
Key Click,
96
51
Key Pad, 5
line
Hold Mode,
Line Select Mode,
line
Status/Speed Dial,
11
56
97
Local Feature Inspection, 94
Local Features, 54
Local features,
Logging CACH EKTS Calls,
Make Busy,
87
76
97
Menu - Auto Callback Call Alerting, 106
Menu - Call Log Accessed, 109
Menu - Call On Hold, 107
Menu - Conference - Dialing, 108
Menu - Conference - Ringing/Connected, 108
Menu - ConferencefTransfer CA On Hold, 107
Menu - Connected
CaU,
107
Menu - Consultation - Dialing, 109
Menu - Consultation - Ringing/Connected, 109
Menu - Download Available, 109
Menu
-Idle
Terminal, 105
Menu - Incoming Call Alerting, 106
Menu - Outgoing Call - Dialing, 106
Menu - Outgoing
Menu - Outgoing
Menu -
Menu·
Transfer·
Transfer·
Call-
Offhook, 106
Call-
Ringing, 106
Dialing, 108
Ringing/Connected, 108
Menu Overlay Delay, 54
Menu Setting,
58
MENU TREES, 105
Microphone, 7
Multiline Hunt Group, 8
Multiple Call Appearances on a CACH EKTS Phone, 75
Mute,
97
Off Hook Result,
Open Listening,
65
11
Operating Components, 4
OPTISET TERMINAL USED AS AN EKTS PHONE, 75
Originate a Call (No Other Calls Active),
Originate a Call (With Another Call Active),
Outgoing Call While ACB is Alerting,
Password, 41,
Password Prompt,
42
41
Place a Call (Using a Speed Dial Key),
25
27
88
14
Place a Call (Using the Handset), 13
114
1275·00030
1275·00030
115
Page 64
Issue
5,
June
1999
Place a Call On Hold (Using the HOLD Key), 18
11,
83
98
11
11
Plugging Headset In,
Preview Mode.
Primary Call Appearance.
Prime Call Appearance,
Programming Requirements, 2
Receive a Call (No Other Calls Active),
Receive a Call (With Another Call Active),
Receive All Calls Automatically,
29
28
29
Redial,98
Reject a Call (No Other Calls Active),
Reject a Call (With Another Call Active),
Reject All Calls (Do Not Disturb),
30
30
31
Removing the Headset Plug, 84
Retrieve a Call (No Active Call Connected). 34
Retrieve a Call (With Another Active Call Connected), 34
Return to Any Held Call (Using the Associated Line Key). 18
Ringer Loudness, 44
Ringer Off.
99
Issue
Status Lights, 5
Switch-based features,
87
Switching System National ISDN Compliance Issues, 2
System Feature Inspection, 94
TA-TAPI,
11
Terms That May Be New to You, 10
Time,
72,
100
Transfer,
Transfer a Call,
11,
100
36
Transfer a Call (Using the Transfer Key). 19
Types of Service Supported, 8
USER·CONTROLLED TERMINAL SETTINGS,
User-to-User Information (UUI),
User-to-User Signaling (UUS),
101
101
41
UUS Answering, 102
UUS Originating, 102
UUS Terminating, 103
Volume UpNolume Down Keys, 7
5,
June
1999
Ringer Pitch,
46
Set Up Conference Call,
Speaker,
6,
99
Speaker Control, 55
Speaker Loudness,
Speaker Setting,
49
62
Speed Dial, 99
116
37
1276-00030
1275·00030 117
Loading...
+ hidden pages
You need points to download manuals.
1 point = 1 manual.
You can buy points or you can get point for every manual you upload.


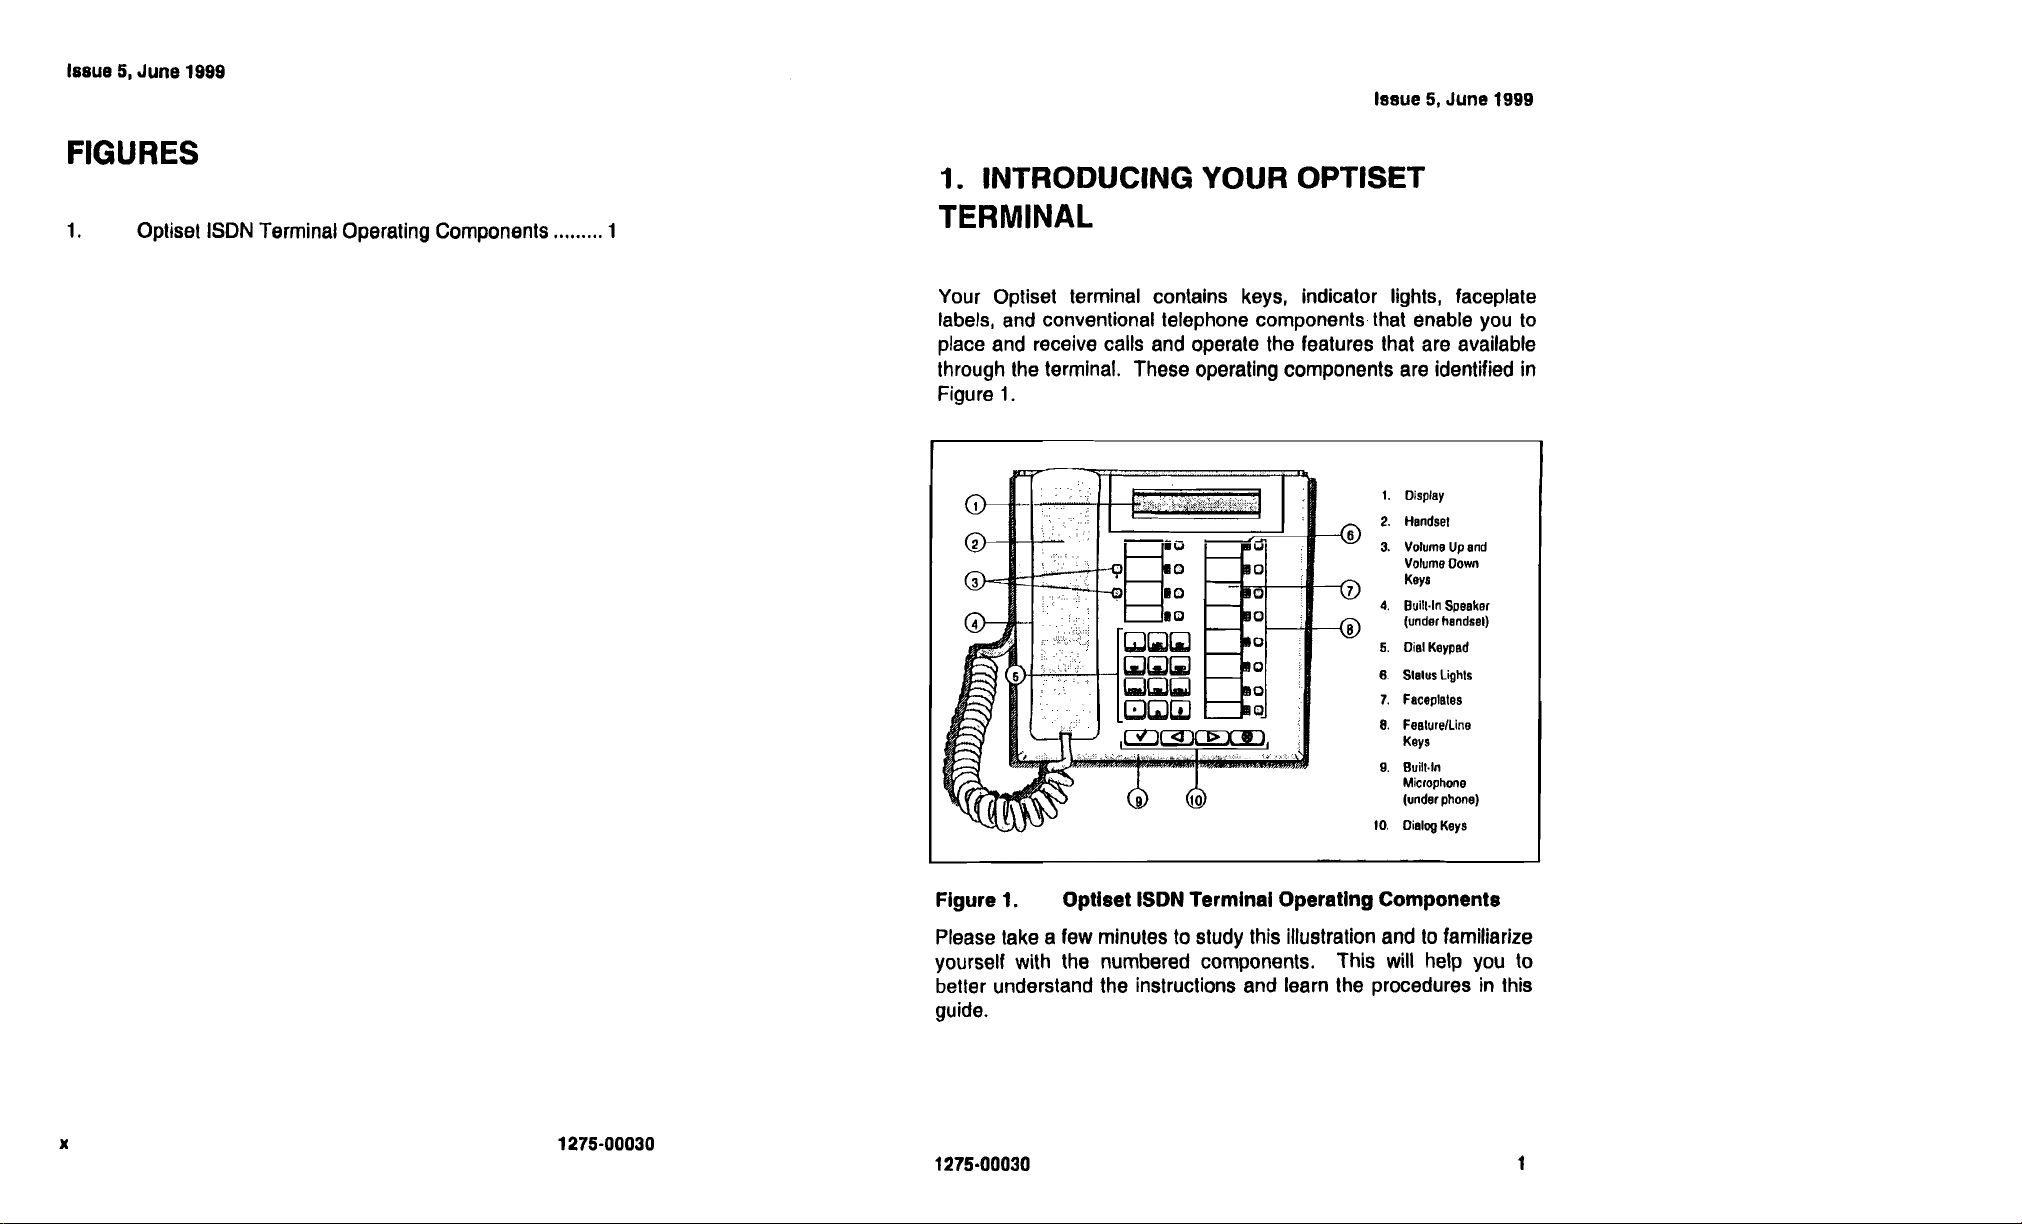
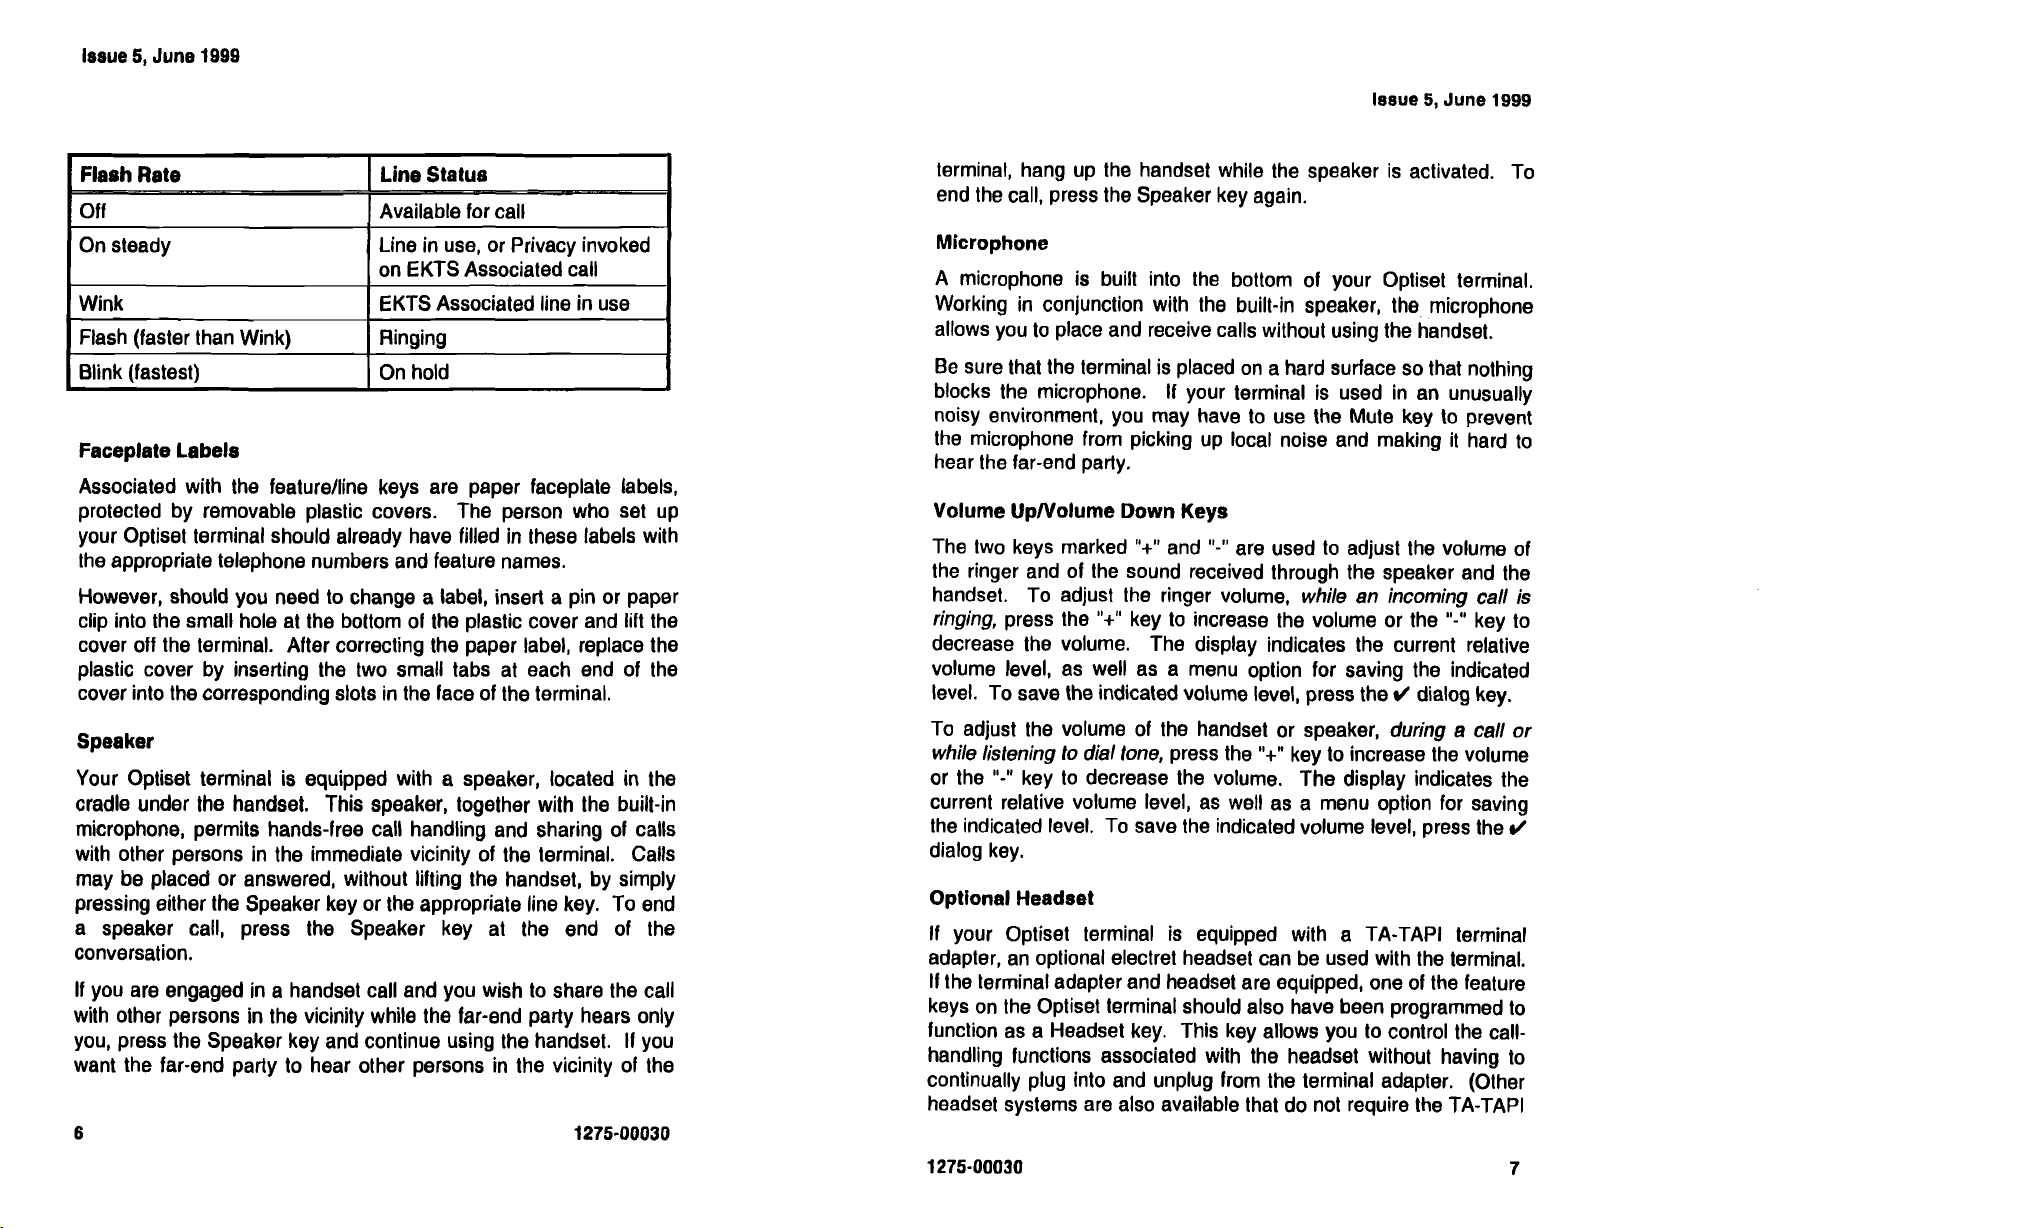

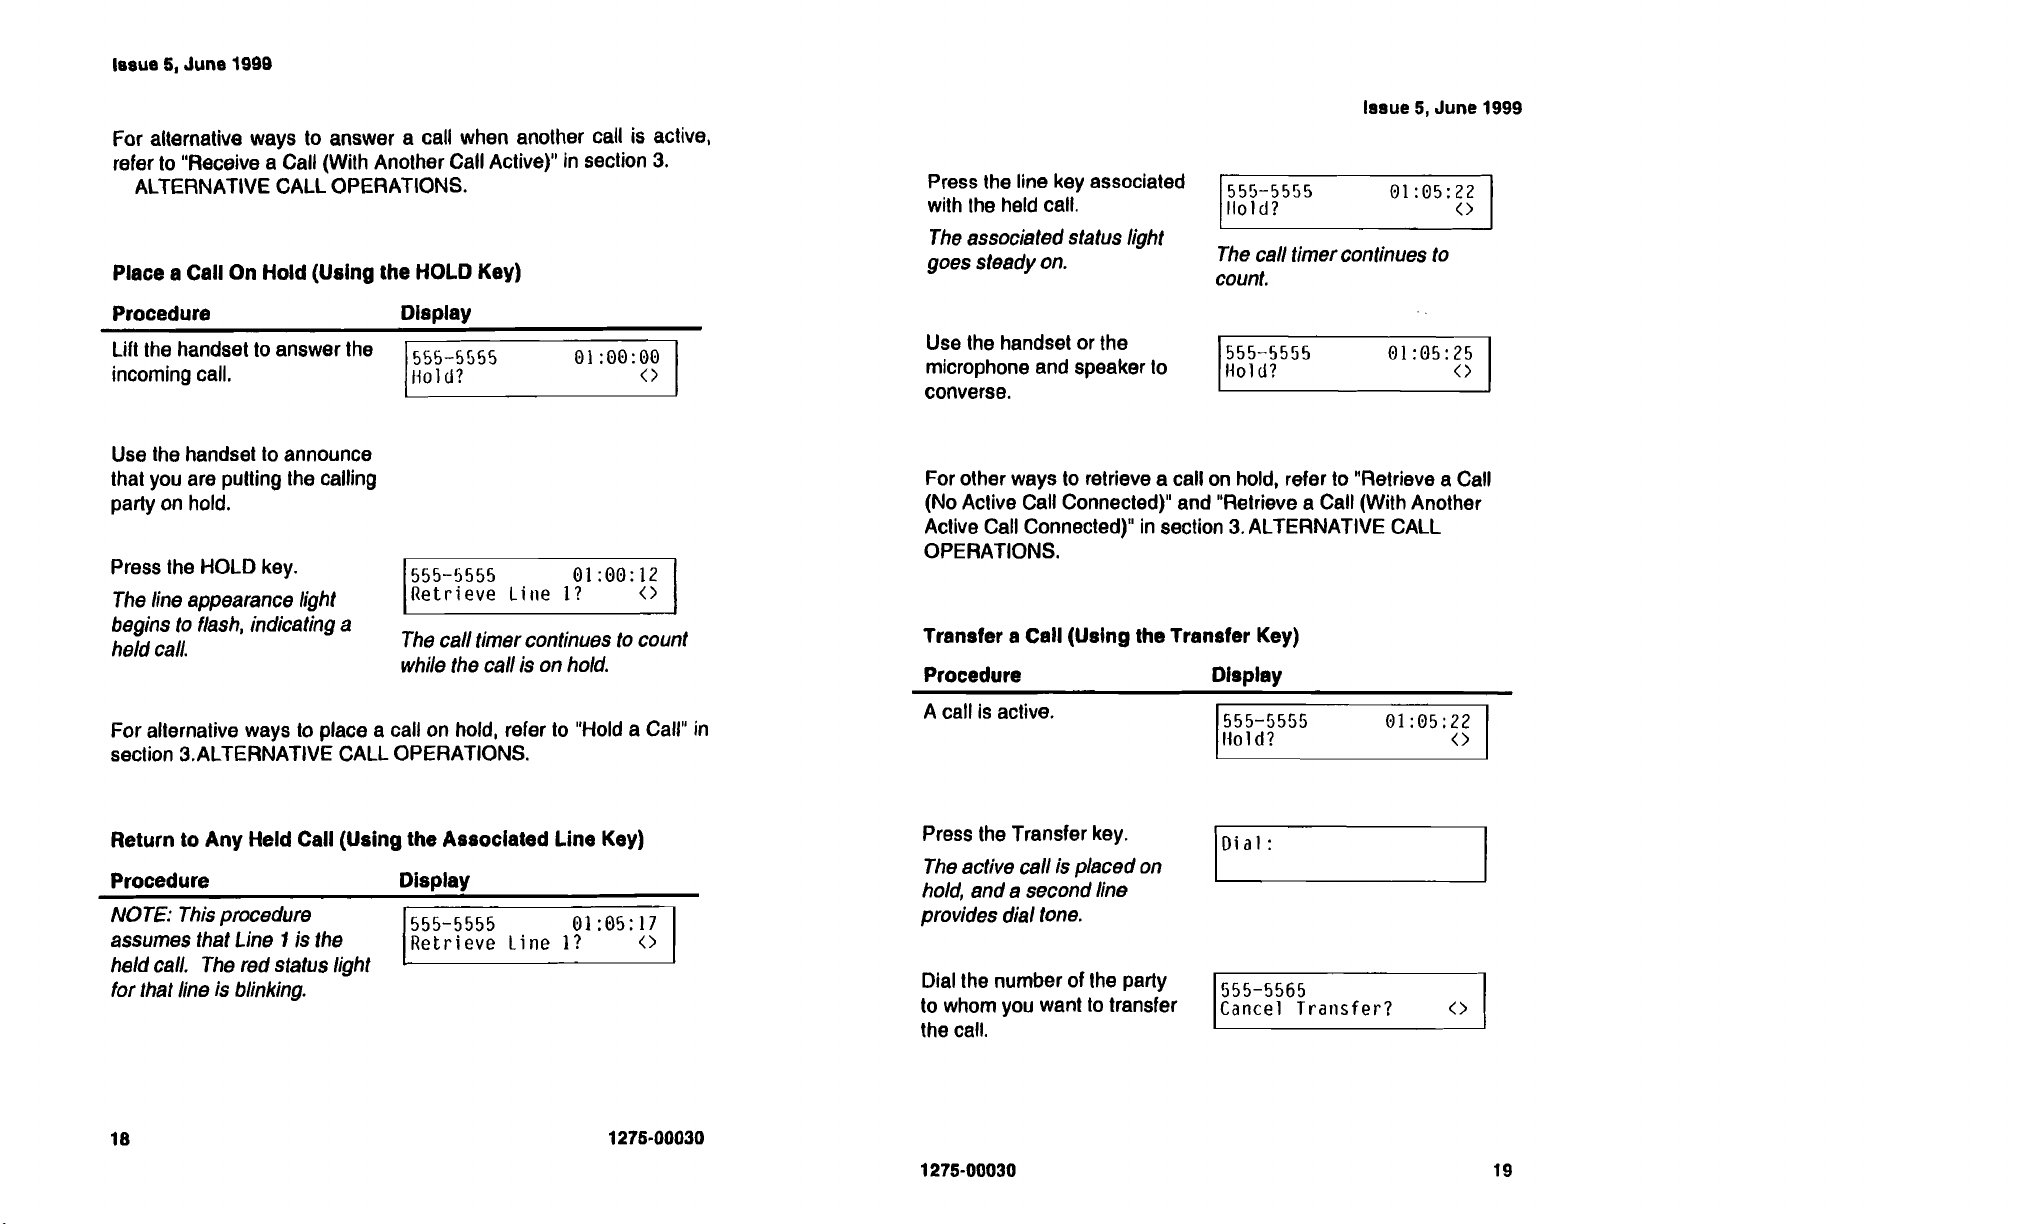
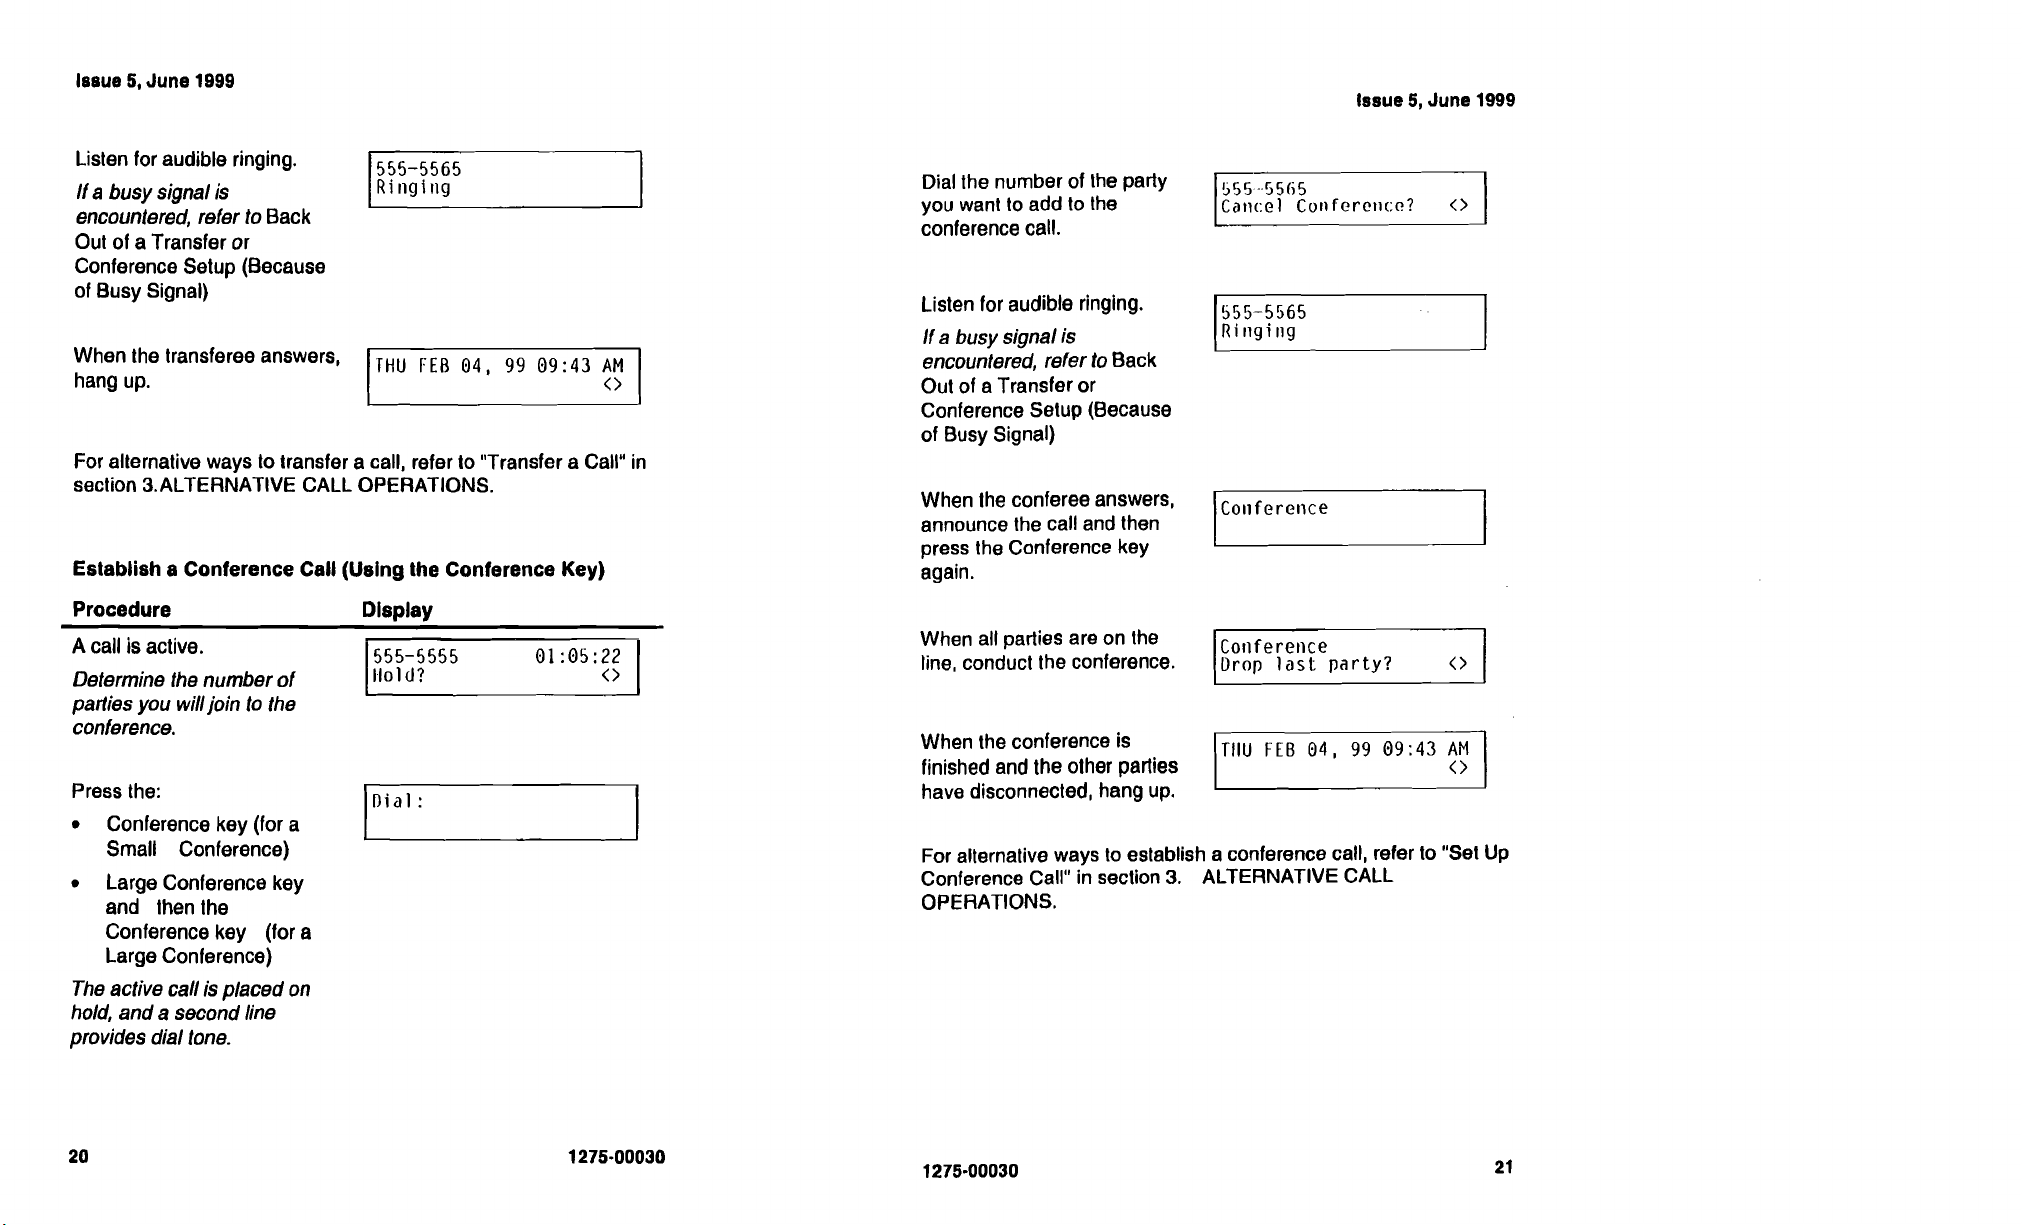
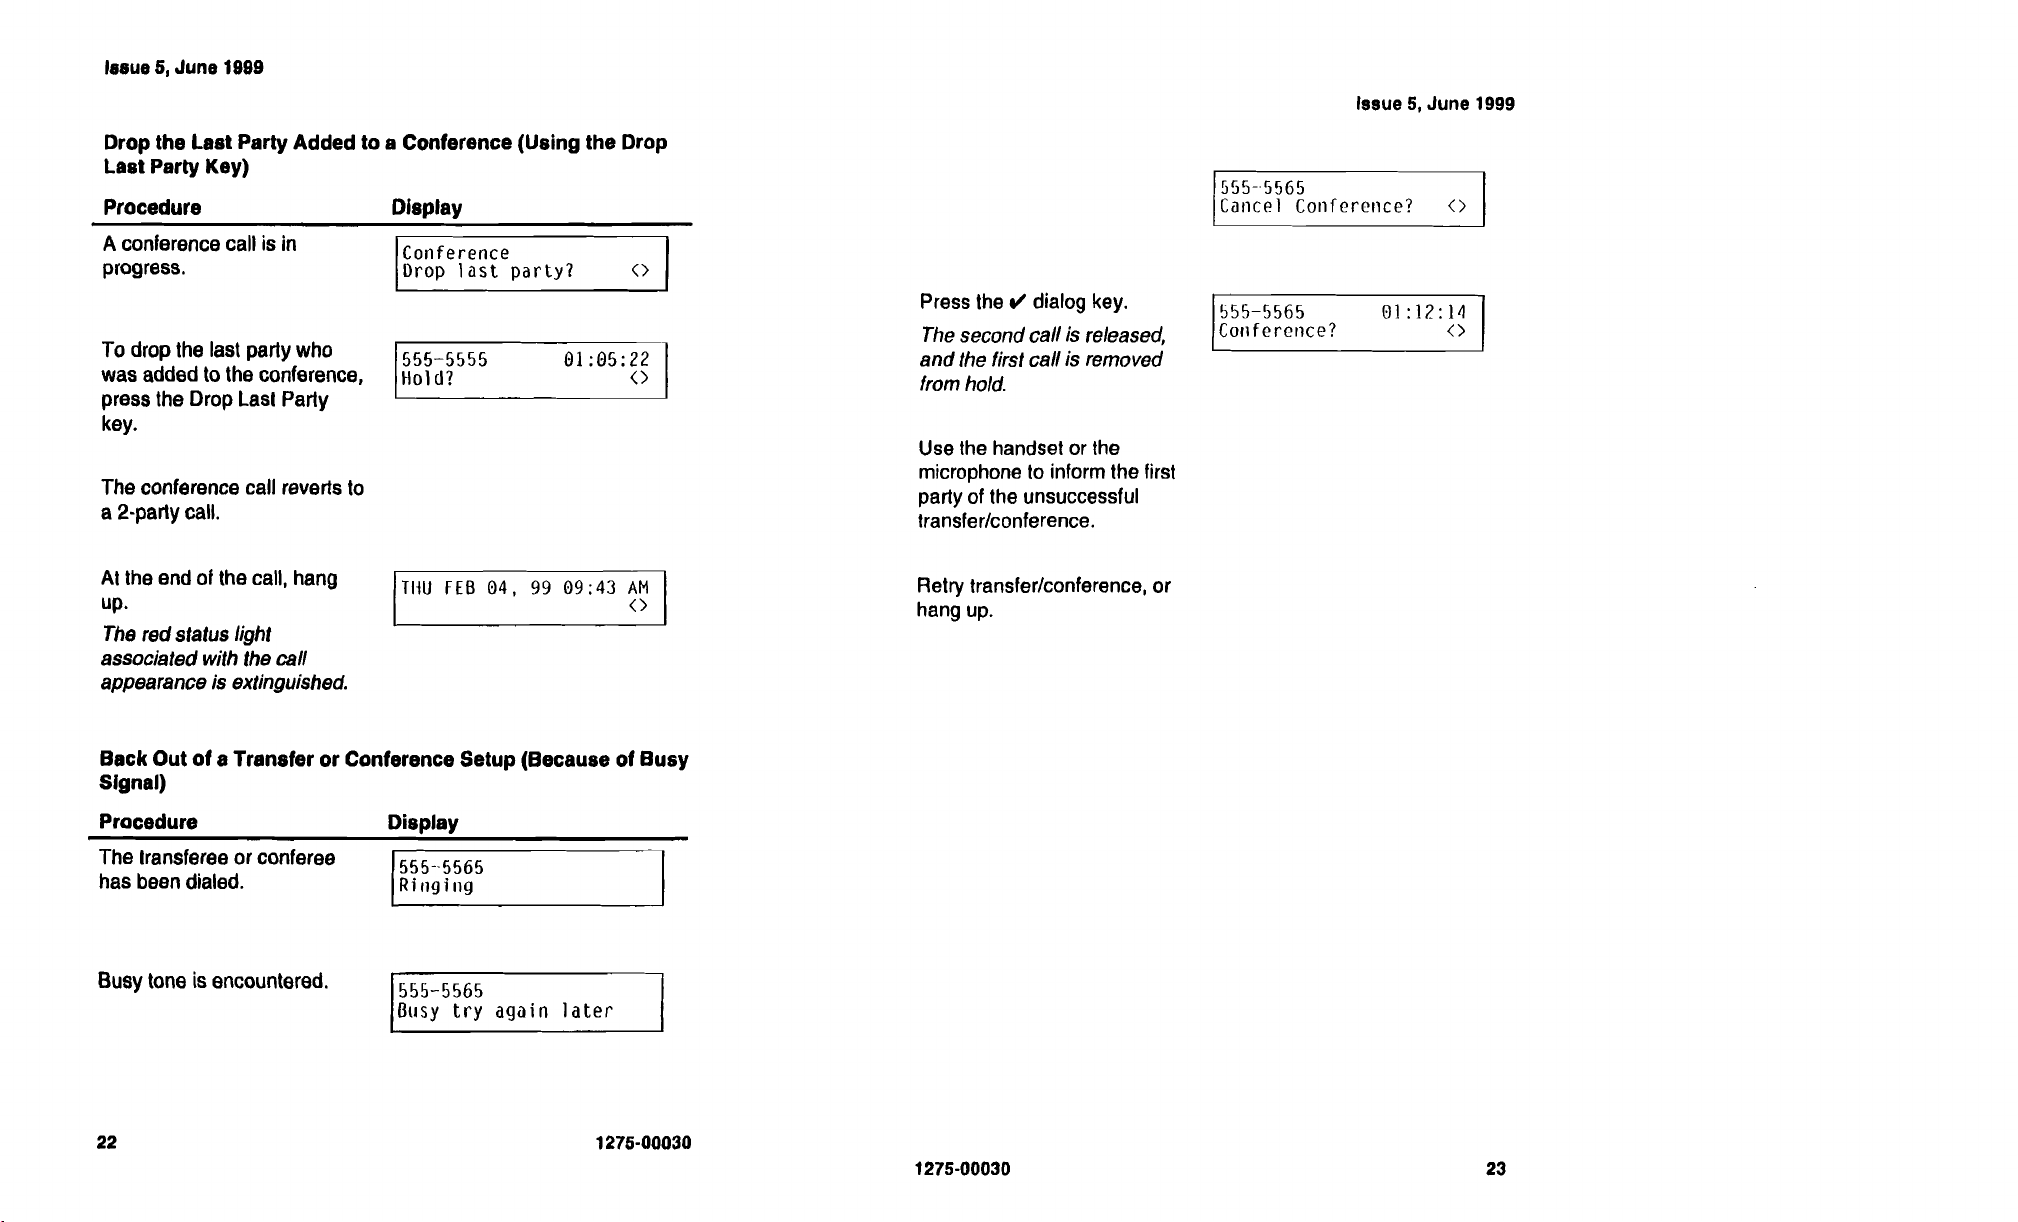


 Loading...