

Siemens Nespresso TK911 Repair Instructions

R
R
R
E
E
E
P
P
P
A
A
A
I
I
I
R
R
R
I
I
I
N
N
N
S
S
S
T
T
T
R
R
R
U
U
U
C
C
C
T
T
T
I
I
I
O
O
O
N
N
N
Nespresso capsule systems
1 SAFETY........................................................3 5 FUNCTIONS................................................27
1.1 Safety instructions.............................................................. 3 5.1 The perfect espresso........................................................ 27
1.2 Repair instructions .............................................................3 5.2 The brewing procedure.................................................... 27
2 INSTALLATION............................................4
5.3 Descaling cycle................................................................. 28
5.4 Brewing cycle sequence.................................................. 31
2.1 Installation........................................................................... 4
5.5 Temperature graph........................................................... 32
2.2 Scope of delivery ................................................................4
5.6 Fluid system...................................................................... 33
3 OPERATION.................................................5
5.7 Wiring and connecting diagram...................................... 34
3.1 Controls...............................................................................5
6 REPAIR.......................................................35
3.2 Window with opening sensor ............................................ 6
6.1 General disassembly........................................................ 35
3.3 NESPRESSO® capsules..................................................... 7
6.2 Replacing the display unit ............................................... 37
3.4 Preparing coffee.................................................................. 8
6.3 Replacing the PTC heating element................................ 38
3.5 Drawing hot water............................................................. 10
6.4 Removing the water tank holder ..................................... 39
3.6 Drawing steam .................................................................. 10
6.5 Installing the water tank holder....................................... 41
3.7 Frothing up or heating milk..............................................11
6.6 Replacing the heater ........................................................ 43
3.8 Preparing cappuccino and latte macchiato.................... 13
6.7 Replacing the NTC temperature sensor ......................... 45
3.9 Changing standard settings............................................. 14
6.8 Replacing pump................................................................ 46
3.10 Cleaning............................................................................. 17
6.9 Replacing the flowmeter.................................................. 47
3.11 Descaling........................................................................... 19
6.10 Replacing the electronics board ..................................... 48
4 COMPONENTS...........................................21
6.11 Measuring flow rate.......................................................... 50
4.1 Flowmeter.......................................................................... 21
6.12 Replacing capsule cage................................................... 51
4.2 Cup heater.........................................................................22
4.3 Heater and NTC-sensor....................................................23
4.4 Brewing unit ......................................................................25
4.5 Hot water / steam nozzle ..................................................26
58300000116013_en_a – 21.08.06 Seite 1 von 61

7 FAULT DIAGNOSTICS...............................52
7.1 Incoming goods inspection .............................................52
7.2 Service mode..................................................................... 54
7.3 Measuring the coffee temperature .................................. 55
7.4 Measuring the temperature of the cup heater ................56
7.5 Outgoing goods inspection .............................................57
8 TECHNICAL SPECIFICATIONS ................59
8.1 Rating plate .......................................................................59
8.2 Power.................................................................................60
8.3 Temperatures ....................................................................60
8.4 Dimensions and weight.................................................... 61
8.5 Filling amounts ................................................................. 61
58300000116013_en_a – 21.08.06 Seite 2 von 61

1 SAFETY
1.1 Safety instructions
Danger!
► Repairs may be carried out by a qualified electrician only!
► The user may be put at considerable risk and injured by
improper repairs!
► Electric shock may occur if live components are touched
inside the appliance!
► Do not touch components in the appliance. Even the modules
can be live!
► Before commencing repairs, ALWAYS disconnect the
appliance from the power supply!
► If tests have to be conducted while the appliance is live,
ALWAYS use a residual-current-operated circuit-breaker!
► The protective conductor connection must not exceed the
standardised values! This is essential for personal safety and
appliance function!
► When repairs are complete, perform a test in accordance with
VDE 0701 or the corresponding national regulations!
► Following each repair, conduct a leak and performance test.
1.2 Repair instructions
Caution!
► NEVER attempt repairs by randomly replacing components!
► ALWAYS proceed systematically and comply with the
technical documentation for the appliance!
► Components become hot during operation. Before
commencing repairs, leave the appliance to cool down.
► As a rule, printed-circuit boards are not repaired but are
completely replaced with original spare parts. Exceptions are
documented separately.
m Risk of injury!
Do not insert fingers through the door of the capsule infeed.
The cup heater becomes hot, do not touch.
Do not switch on the appliance without the coffee outlet and
capsule holder.
m Risk of scalding!
Hot water/steam nozzle and the CAPPUCCINO/
CAFFELATTE frothing-up nozzle become very hot. Take hold
of the nozzles by the plastic parts only and do not point
towards parts of the body.
58300000116013_en_a – 21.08.06 Seite 3 von 61
2 INSTALLATION
2.1 Installation
► The installation location must be level and dry.
► Protect the appliance from splash water.
► There must be a minimum filling height of 360 mm.
► Connect and operate the appliance only in accordance with
the specifications on the rating plate.
► Operate the appliance indoors and at room temperature only.
2.2 Scope of delivery
The following parts are included in delivery:
► Welcome box
► CAPPUCCINO / CAFFELATTE nozzle
► Hot water / steam nozzle
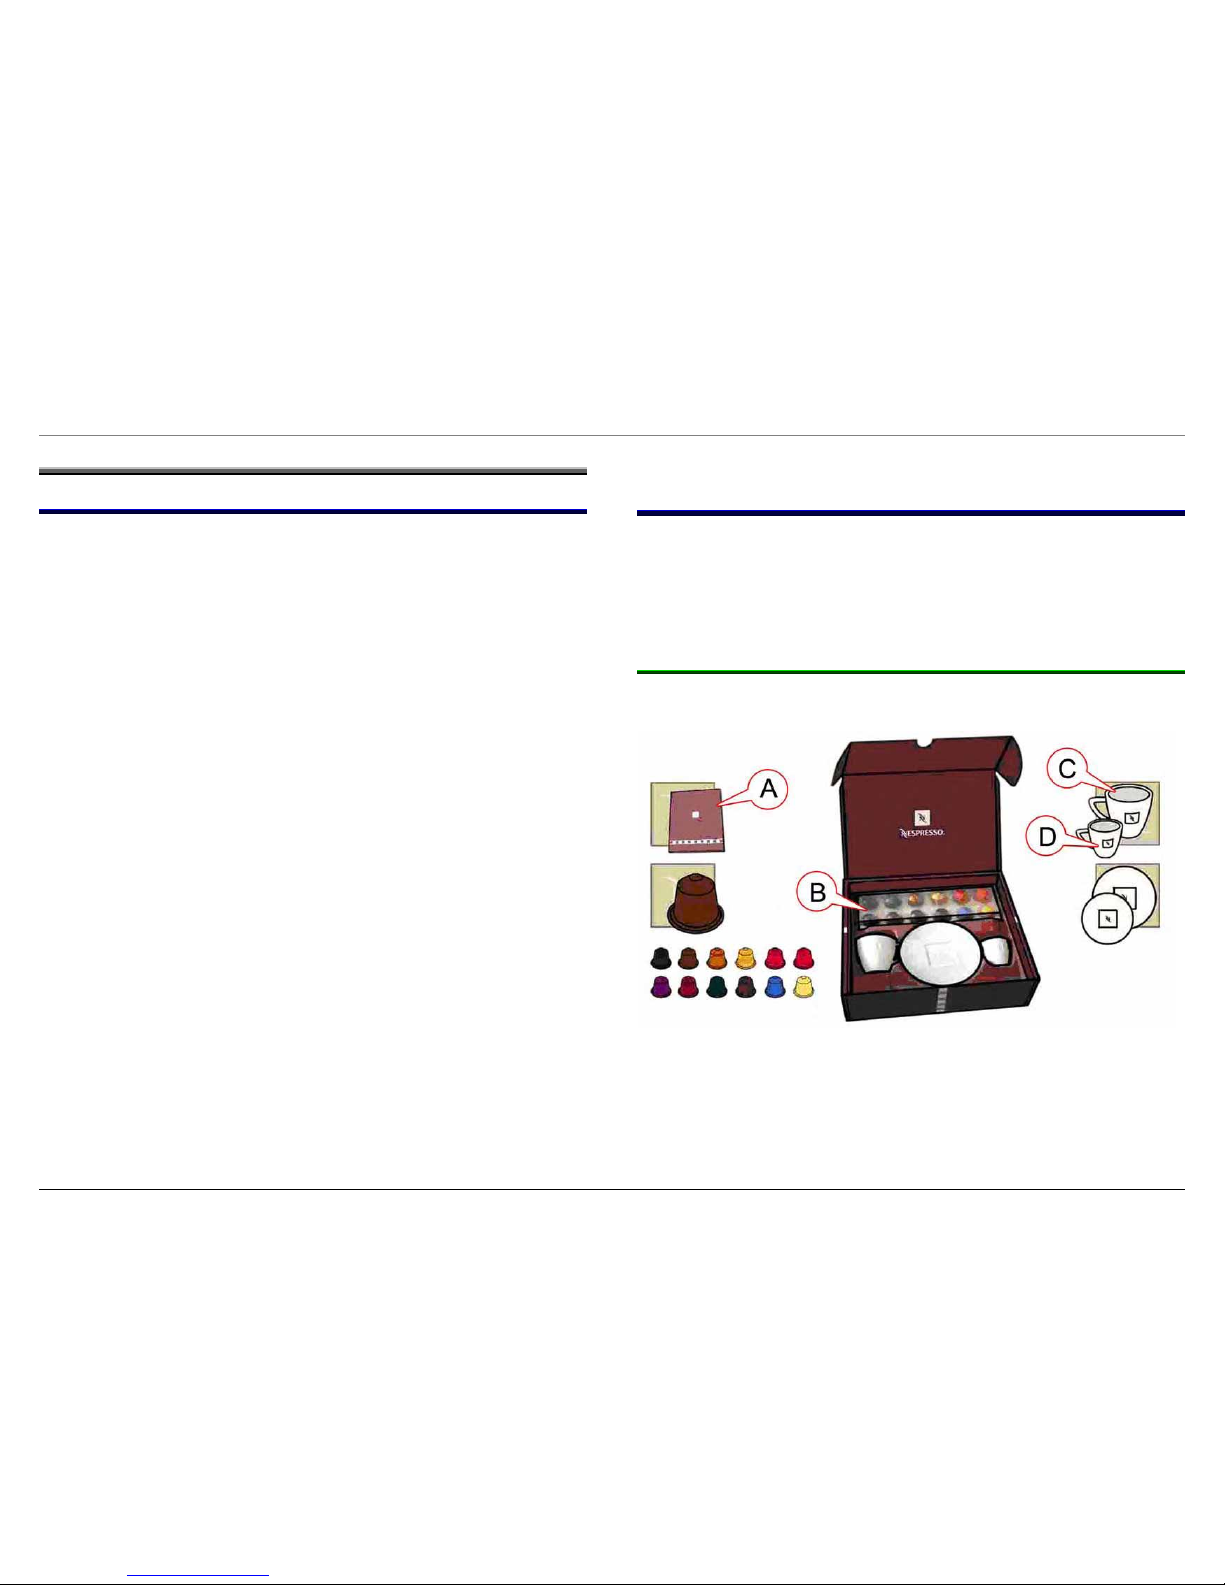
2.2.1 Welcome box
A Welcome box is included in delivery. This box contains all parts
required to start up the appliance.
(A) Ring binder with information on capsules, club and machine.
(B) 12 capsules in transparent box (1 capsule per coffee type).
(C) 1 lungo cup with saucer.
(C) 1 espresso cup with saucer.
58300000116013_en_a – 21.08.06 Seite 4 von 61

3 OPERATION
3.1 Controls
1
Control panel
a
On / Standby button
b
Illuminated ring
c
Cappuccino button
d
Latte macchiato button
e
Small cup button
f
Large cup button
g
Hot water button
h
Steam button
i
Display
2
Window with opening sensor
3
Cup heater for prewarming cups
4
Cover for water tank
5
Water tank, removable
6
Flap for steam pipe
7
Steam pipe
8
Adapter
9
Frother (for frothing and heating milk)
10
Nozzle for drawing hot water/steam
a
Nozzle holder
b
Sleeve
c
Nozzle tip
11
Drip tray, small (with float)
12
Drip tray, large (with float)
13
Capsule container
14
Coffee outlet
15
Capsule holder
16
Ledge with capsule insert and light
17
Mains switch I/O
58300000116013_en_a – 21.08.06 Seite 5 von 61
3.2 Window with opening sensor
Risk of damage!
Do not obstruct or remove the window!
Clean the window with a damp cloth. Do not use any
scouring agents.
► Set mains switch to I. The blue illuminated ring around the
Standby button lights up. The window (2) opens and closes
independently.
► Press the “Standby” button, the window (2) opens. The
appliance conducts a self-test and starts the heating-up
phase.
The window automatically closes approx. 2 min. after the last activity.
The appliance features a movement sensor. To open the window (2),
move hand in front of the window.
58300000116013_en_a – 21.08.06 Seite 6 von 61
3.3 NESPRESSO® capsules
For this appliance use NESPRESSO® capsules only. Capsules are
offered in 12 different flavours and strengths.
ATTENTION:
The NESPRESSO® capsules must not be damaged
before use.
Deformed or torn capsules may become jammed in the
appliance and damage it.
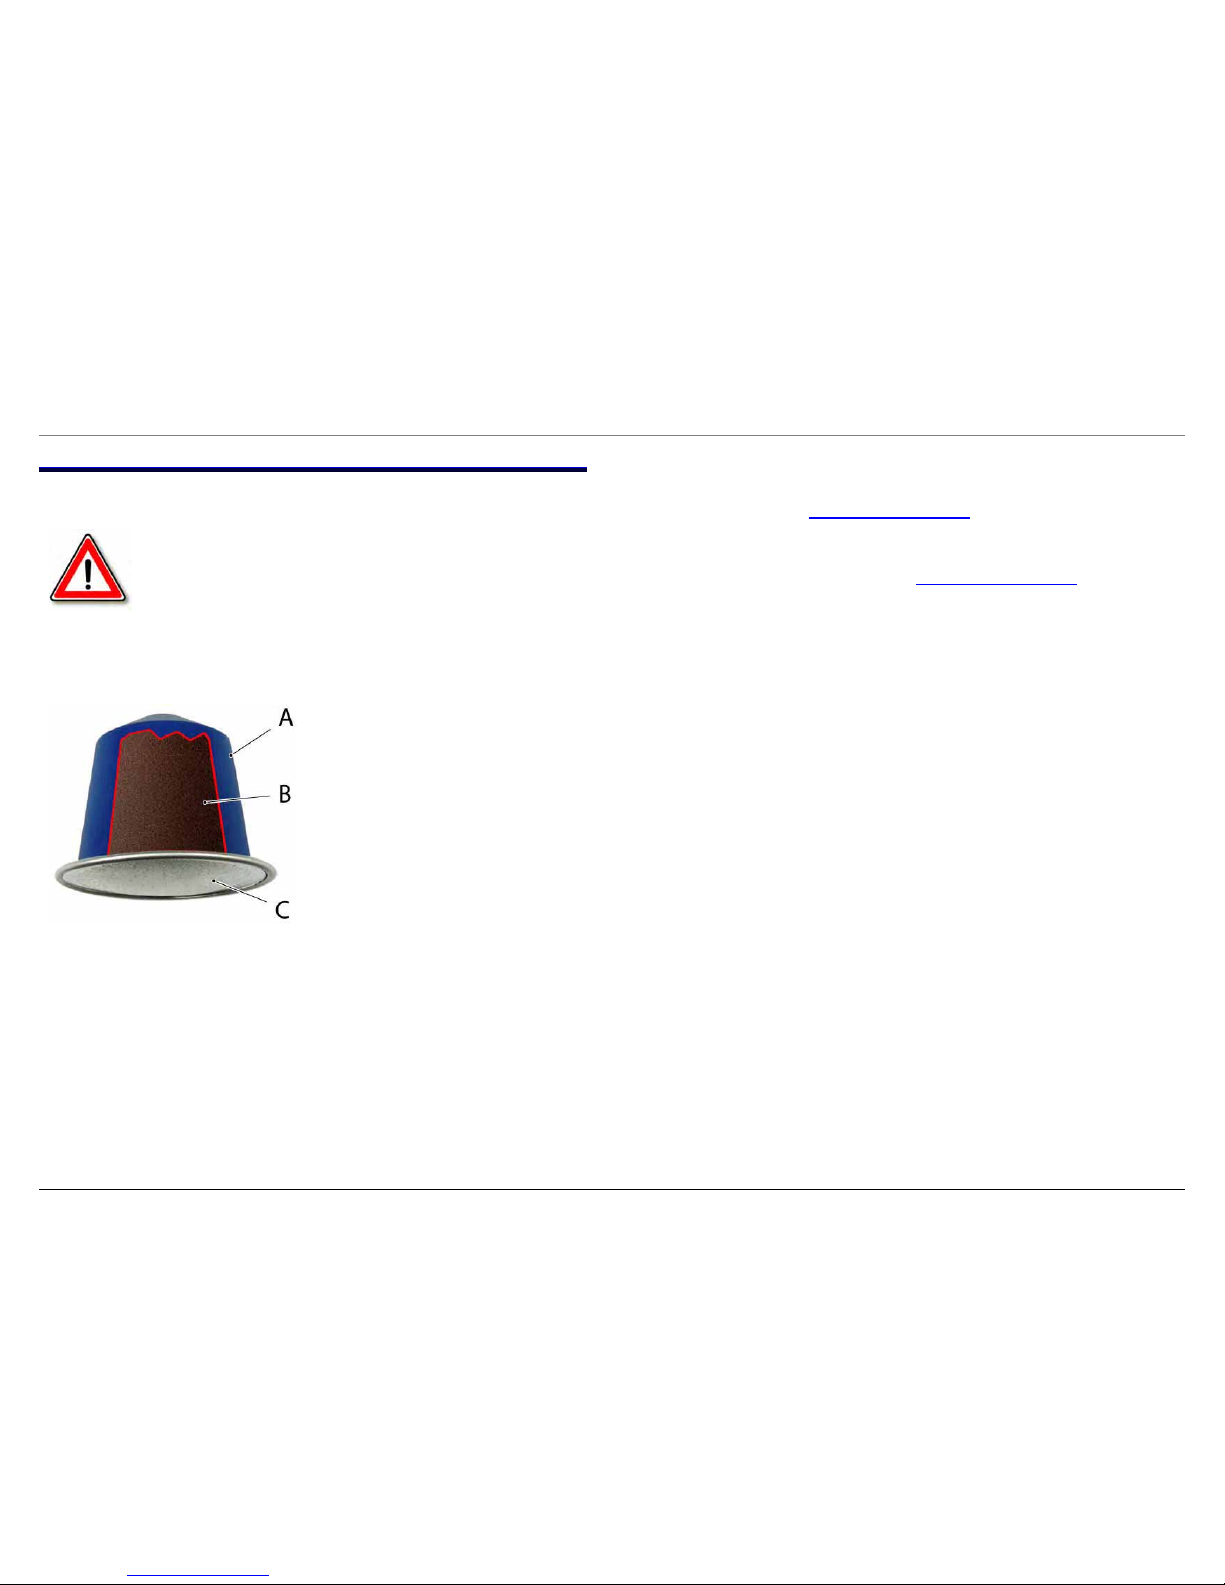
Each capsule contains exactly the correct amount of ground coffee
for one cup.
In the hermetically sealed aluminium capsule (A) all qualities
and flavours of the freshly
roasted coffee (B) are retained
for at least nine months.
A high-pressure pump (19 bar)
ensures that all the flavours of the
espresso develop and that a fine
crema forms.
Coffee is extracted through the membrane (C) directly to the coffee
outlet of the machine.
Order address is given in ring binder:
NESPRESSO®-Club, www.nespresso.com
Purchase capsules in Germany:
On the Internet: www.nespresso.com
By telephone 0800 1818 444 (freephone)
By fax 0800 1818 400 (freephone)
By post to Nespresso-Club
Postfach 19 01 61
D-40111 Düsseldorf
Germany
58300000116013_en_a – 21.08.06 Seite 7 von 61

3.4 Preparing coffee
To ensure a successful coffee, prewarm the cups on the cup heater or
fill the cups with hot water and rinse out.
The appliance must be switched
on and ready to use.
Ready is displayed.
► If the window is closed,
open by moving hand in
front of the window.
► Insert NESPRESSO®
c
apsule with the membrane face down into the
capsule infeed.
► Place a prewarmed cup
under the coffee outlet.
► Press “on” button
(e)
or
(f)
.
The cup is filled. The coffee
outlet is automatically stopped
when the programmed amount of
liquid has run through.
Then Ready is displayed again.
The used capsule is automatically emptied into the capsule container.
If the “on” buttons (e) or (f) are pressed during the infeed process or
during the ejection of a capsule, this has no effect on function.
3.4.1 Preparing coffee immediately after drawing steam
If coffee is drawn immediately
after drawing steam with the “on”
button (e) or (f), the appliance
automatically cools down
beforehand. The appliance gives
off steam in intervals and only
then does coffee run out of the
coffee outlet.
3.4.2 Stopping the coffee outlet prematurely
While coffee is being drawn,
press the “on” button (e) or (f)
again:
The coffee brewing process is
stopped.
3.4.3 Additional volume of liquid
Press the “on” button (e) or (f)
again within four seconds after
the coffee has stopped running
out:
The same amount of water is
conveyed a second time through
the same capsule.
58300000116013_en_a – 21.08.06 Seite 8 von 61

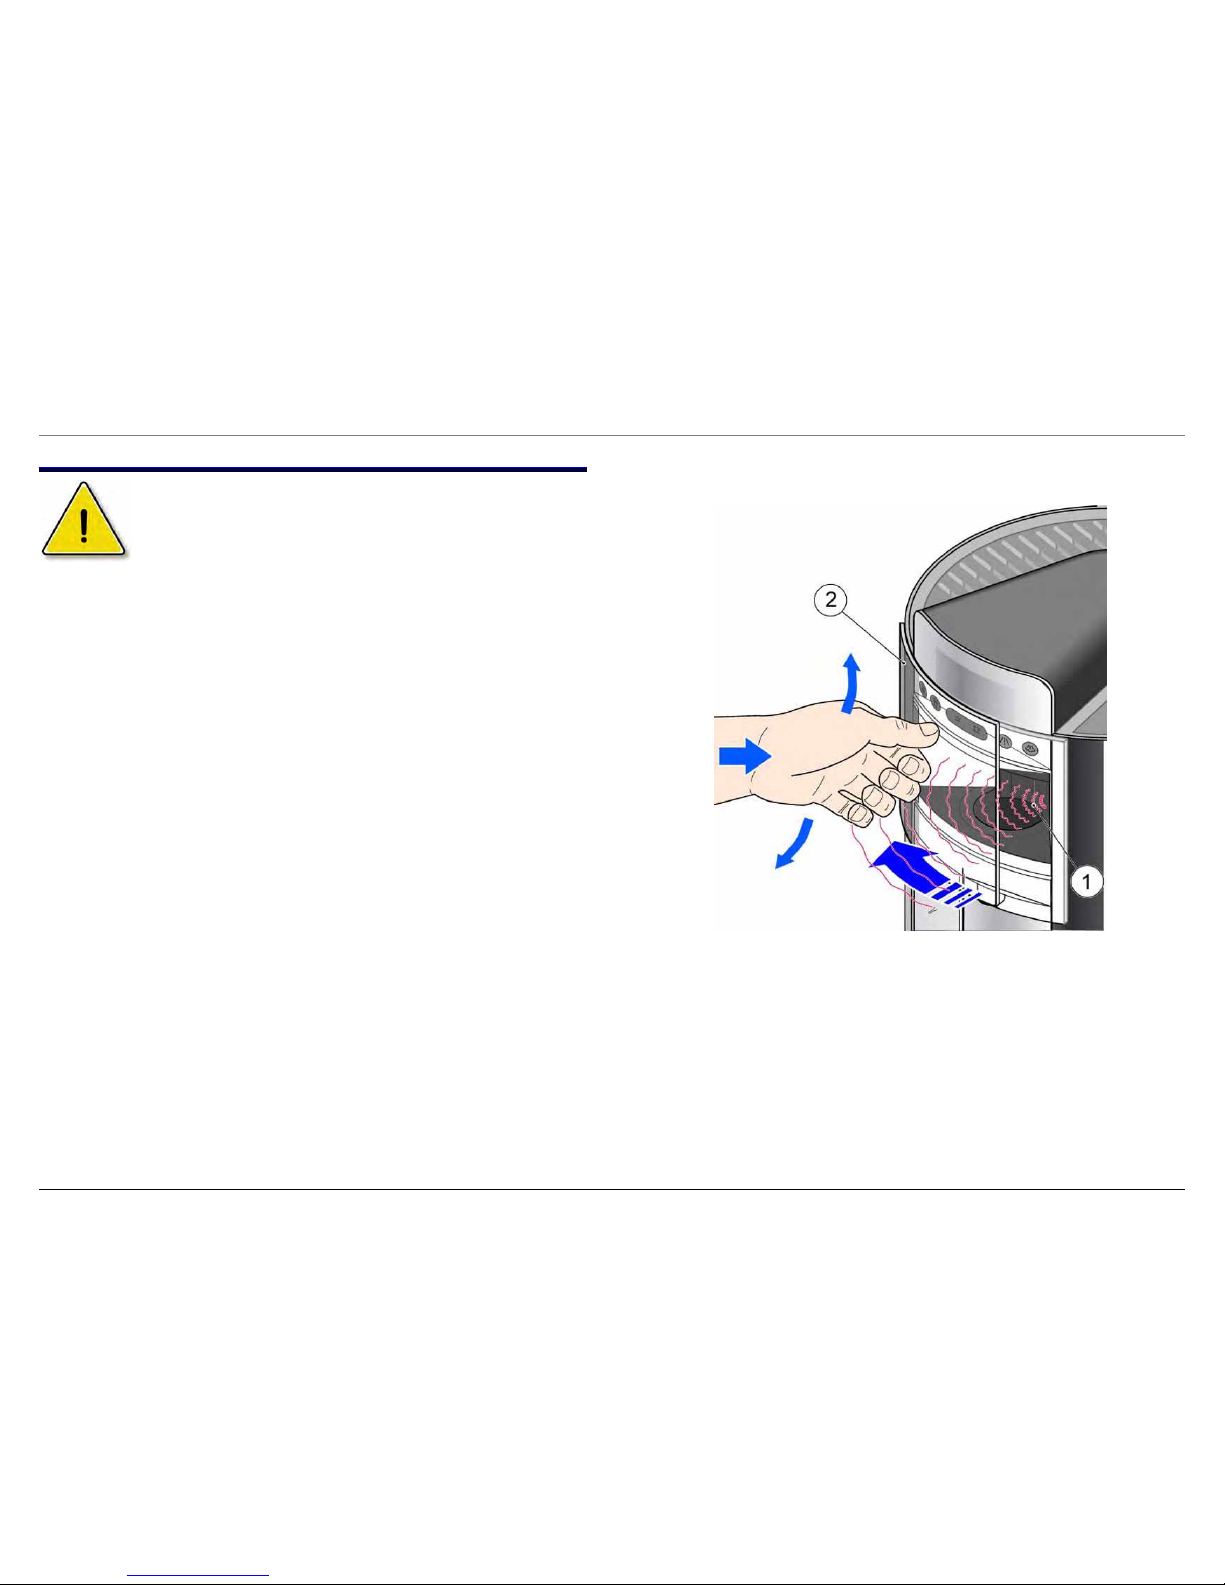
3.4.4 Capsule ejection
At the end of the brewing cycle the capsules are emptied into the
capsule container.
If the capsule container is filled up to the indicating limit, no more
coffee can be brewed. (Capacity approx. 10–12 capsules)
Empty capsules is displayed.
► Pull drip trays with
capsule container (A)
forwards out of the
appliance.
► Empty trays and capsule
container and reinsert.
When the drip tray is removed
and there is no capsule
container,
Check container
is
displayed.
Coffee brewing is not possible if
this display is indicated.
As long as Check container is displayed, the thermal block does
not heat. The solenoid valve remains closed.
3.4.5 Permanently changing the amount of liquid
The preset amount for a small or
a large coffee can be changed
permanently.
► Insert capsule with the
membrane face down into
the capsule infeed.
► Place a cup or glass
under the coffee outlet.
► Press “on” button (e) or (f)
for at least 3 sec. and
hold down until the
required amount has run
through.
The amounts of liquid can be
changed again at any time.
3.4.5.1 Standard filling amounts
Small cup 40 ml
Large cup 100 ml
Filling amounts between 20 ml and 300 ml can be programmed for
each cup.
58300000116013_en_a – 21.08.06 Seite 9 von 61
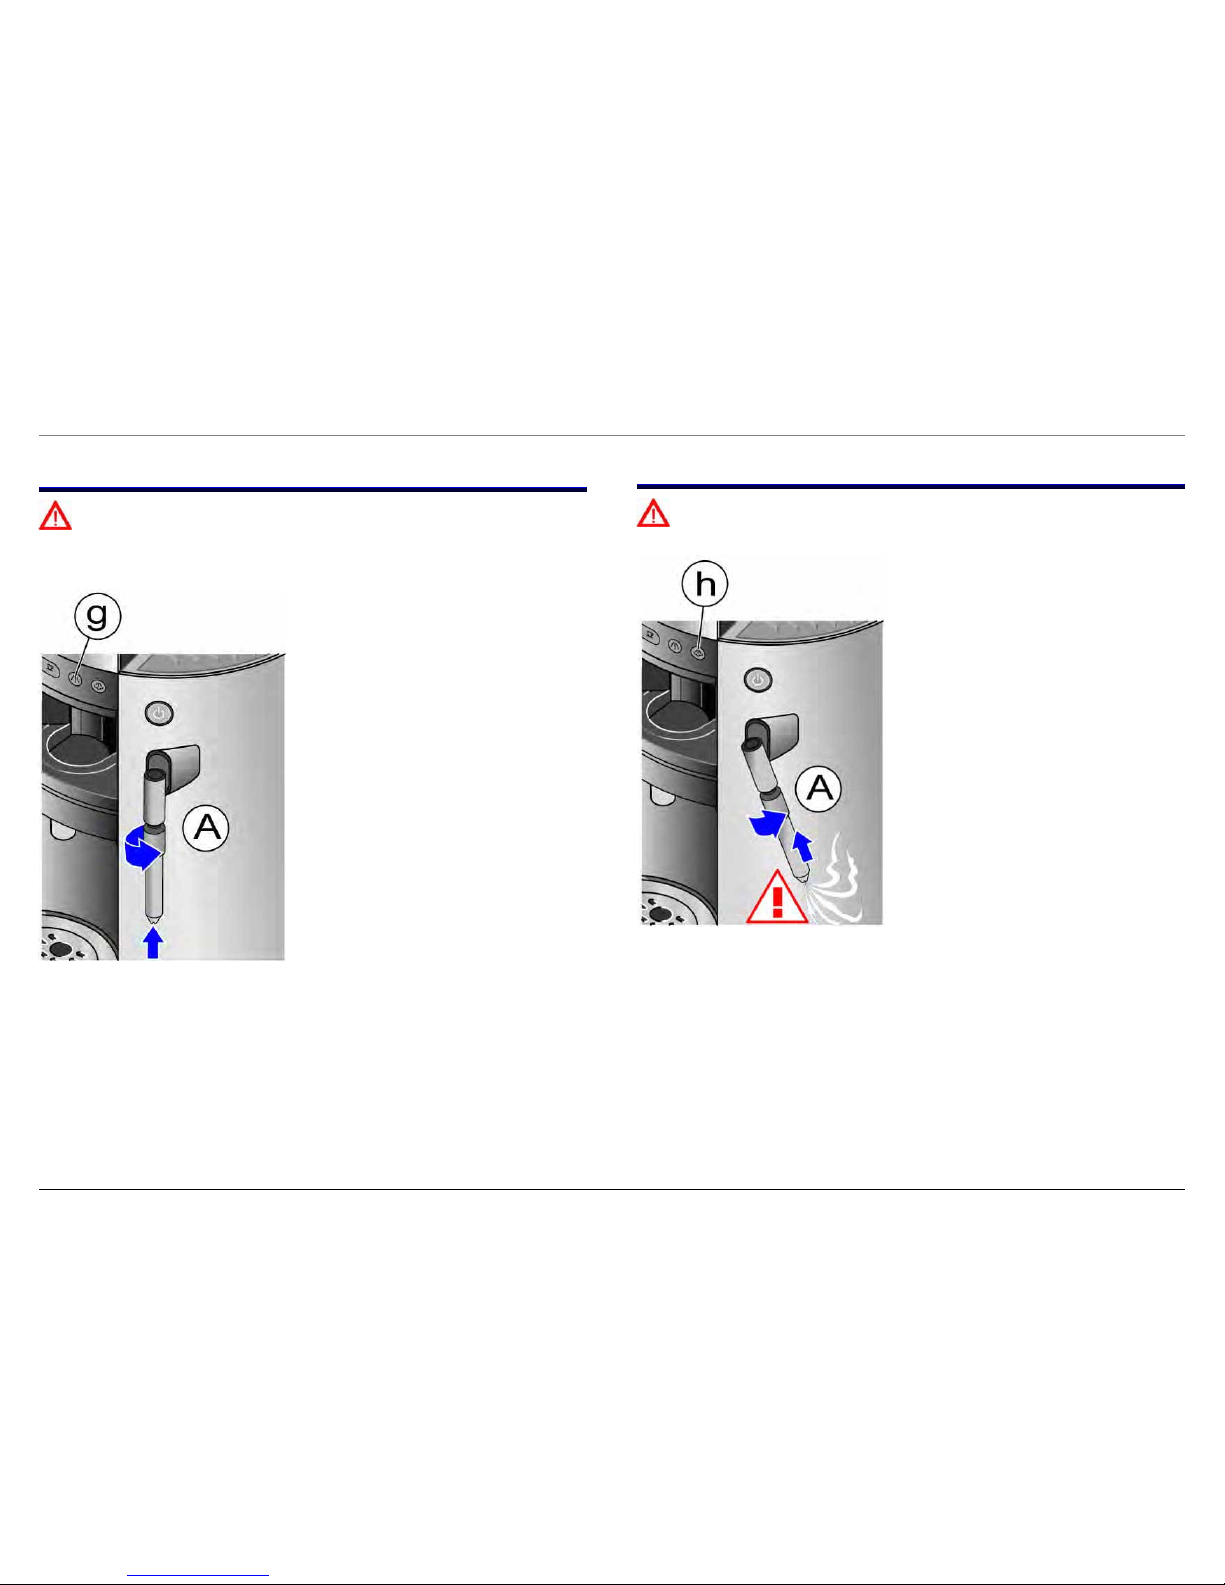
3.5 Drawing hot water
Risk of burns!
The nozzle becomes very hot. Take hold of the nozzle by
the plastic part only.
► Connect the steam nozzle
to the adapter (A) on the
steam pipe and lock the
nozzle by rotating it.
► Place a glass or a cup
under the steam nozzle.
► Press “hot water” button
(g).
Hot water runs out of the steam
nozzle. The hot water temperature
is at least 72 °C.
► To stop drawing hot water,
press the “hot water” button
(g) again.
Wait is displayed briefly and switches back to Ready after a cooling-
down phase.
3.6 Drawing steam
Risk of scalding!
Steam is very hot. It may cause liquid to splash.
► Screw the steam nozzle
onto the adapter (A) on the
steam pipe
► Press the steam button
(h).
The thermal block is heated to
steam temperature (~140 °C).
The display flashes alternately
between Steam and Wait.
As soon as the display flashes
alternately between Steam and
Ready, steam can be drawn.
► Insert the steam nozzle
deep into the liquid but do
not touch the bottom of the
vessel.
► Press the steam button (h) to start drawing steam.
► To stop drawing steam, press the steam button (h) again.
The appliance automatically cools down after approx. 2 minutes.
Then the appliance is ready to use.
58300000116013_en_a – 21.08.06 Seite 10 von 61

3.7 Frothing up or heating milk
Risk of scalding!
Steam is very hot.
Touch the frothing-up device by the plastic part only.
Note:
After frothing up milk, immediately clean frothing-up aids by drawing
hot water. Dried on milk residue is very difficult to remove and will
impair the formation of milk froth.
► Firmly assemble the
frothing-up device for
CAPPUCCINO /
CAFFELATTE. There
must be no gaps.
► The notched end of the
intake hose must be
inserted into the
receptacle containing
the milk.
Preferably use cold UHT milk (5°C – 10°C) which has a fat content
of 1.5%. Milk with a higher fat content, fresh full milk or nonhomogenised milk is not recommended.
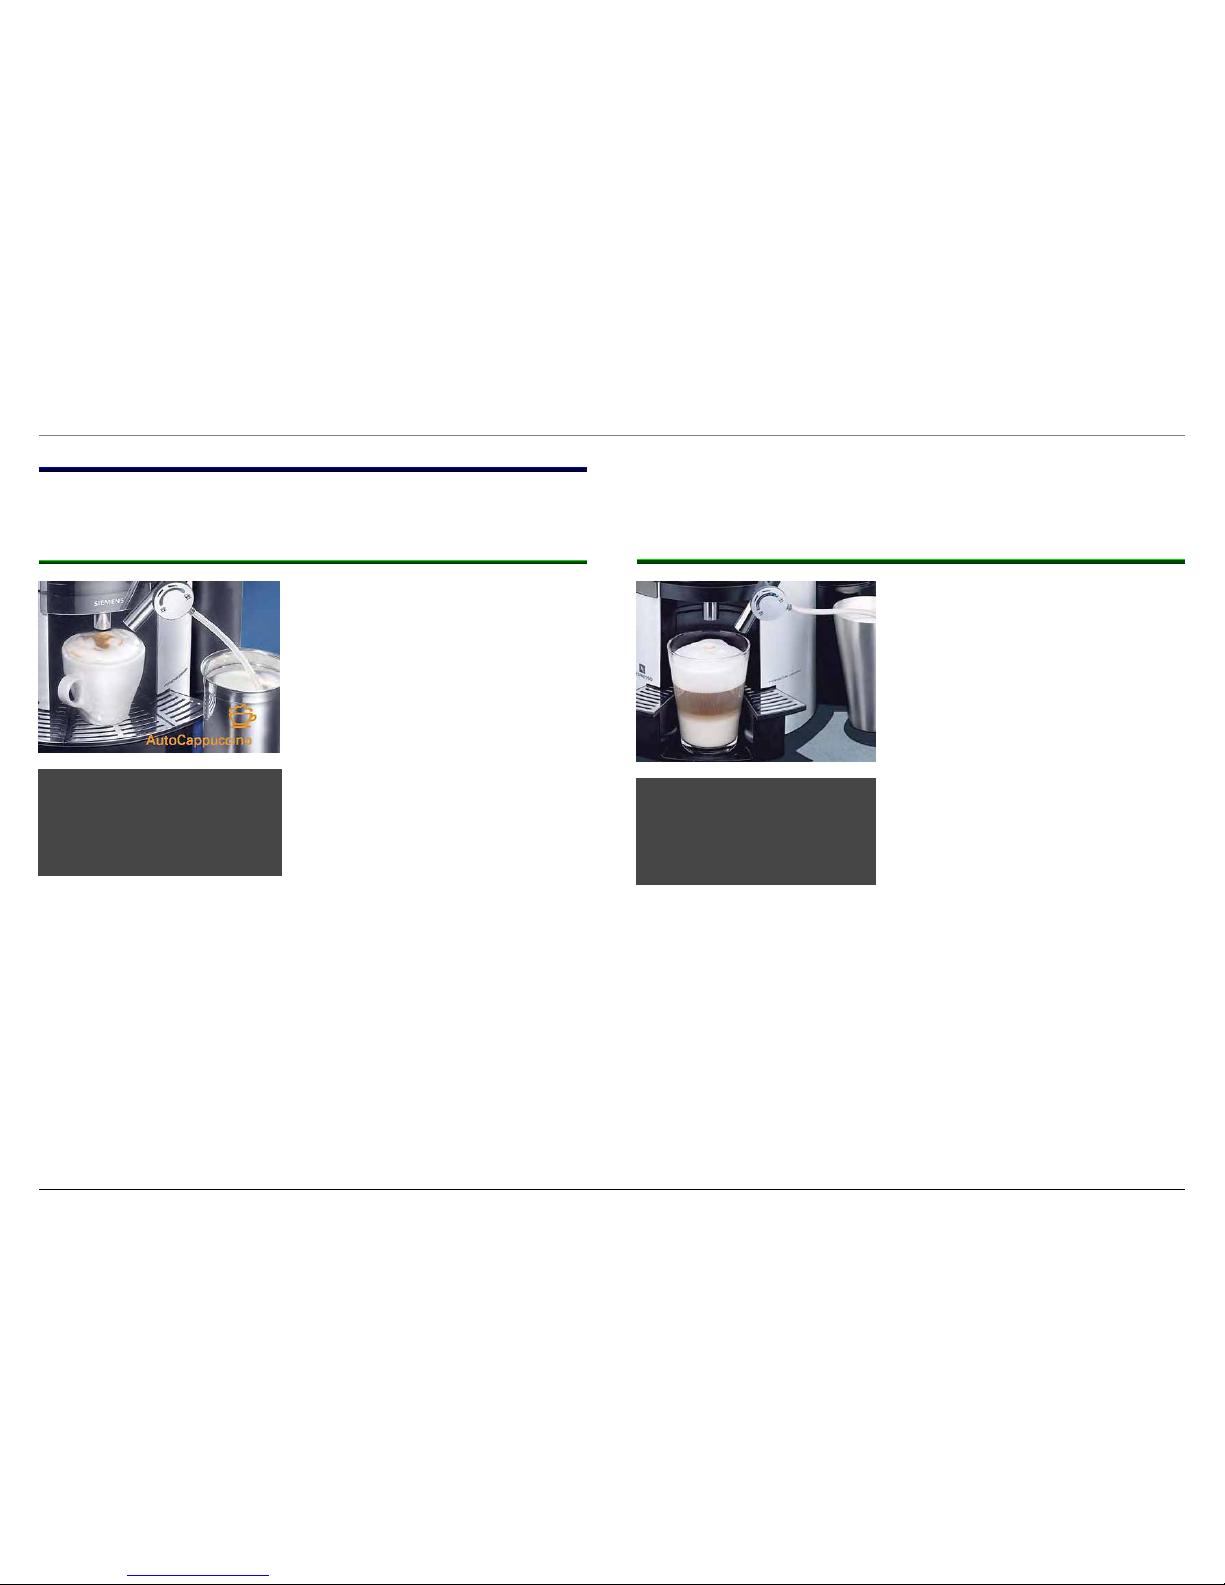
3.7.1 Procedure
► Firmly connect the frothing-
up device to the adapter on
the steam pipe.
► Insert the notched end of
the hose into a receptacle
containing milk.
► Place a cup or a glass under
the nozzle of the frothing-up
device.
► Set the selector on the
frothing-up device to
CAPPUCCINO or CAFFELATTE.
► Press steam button (h) to
heat up.
► As soon as the display
flashes alternately between
Steam and Ready,
steam can be drawn and
milk can be frothed up.
► Press steam button (h). Milk
is drawn in, heated and
frothed up.
58300000116013_en_a – 21.08.06 Seite 11 von 61
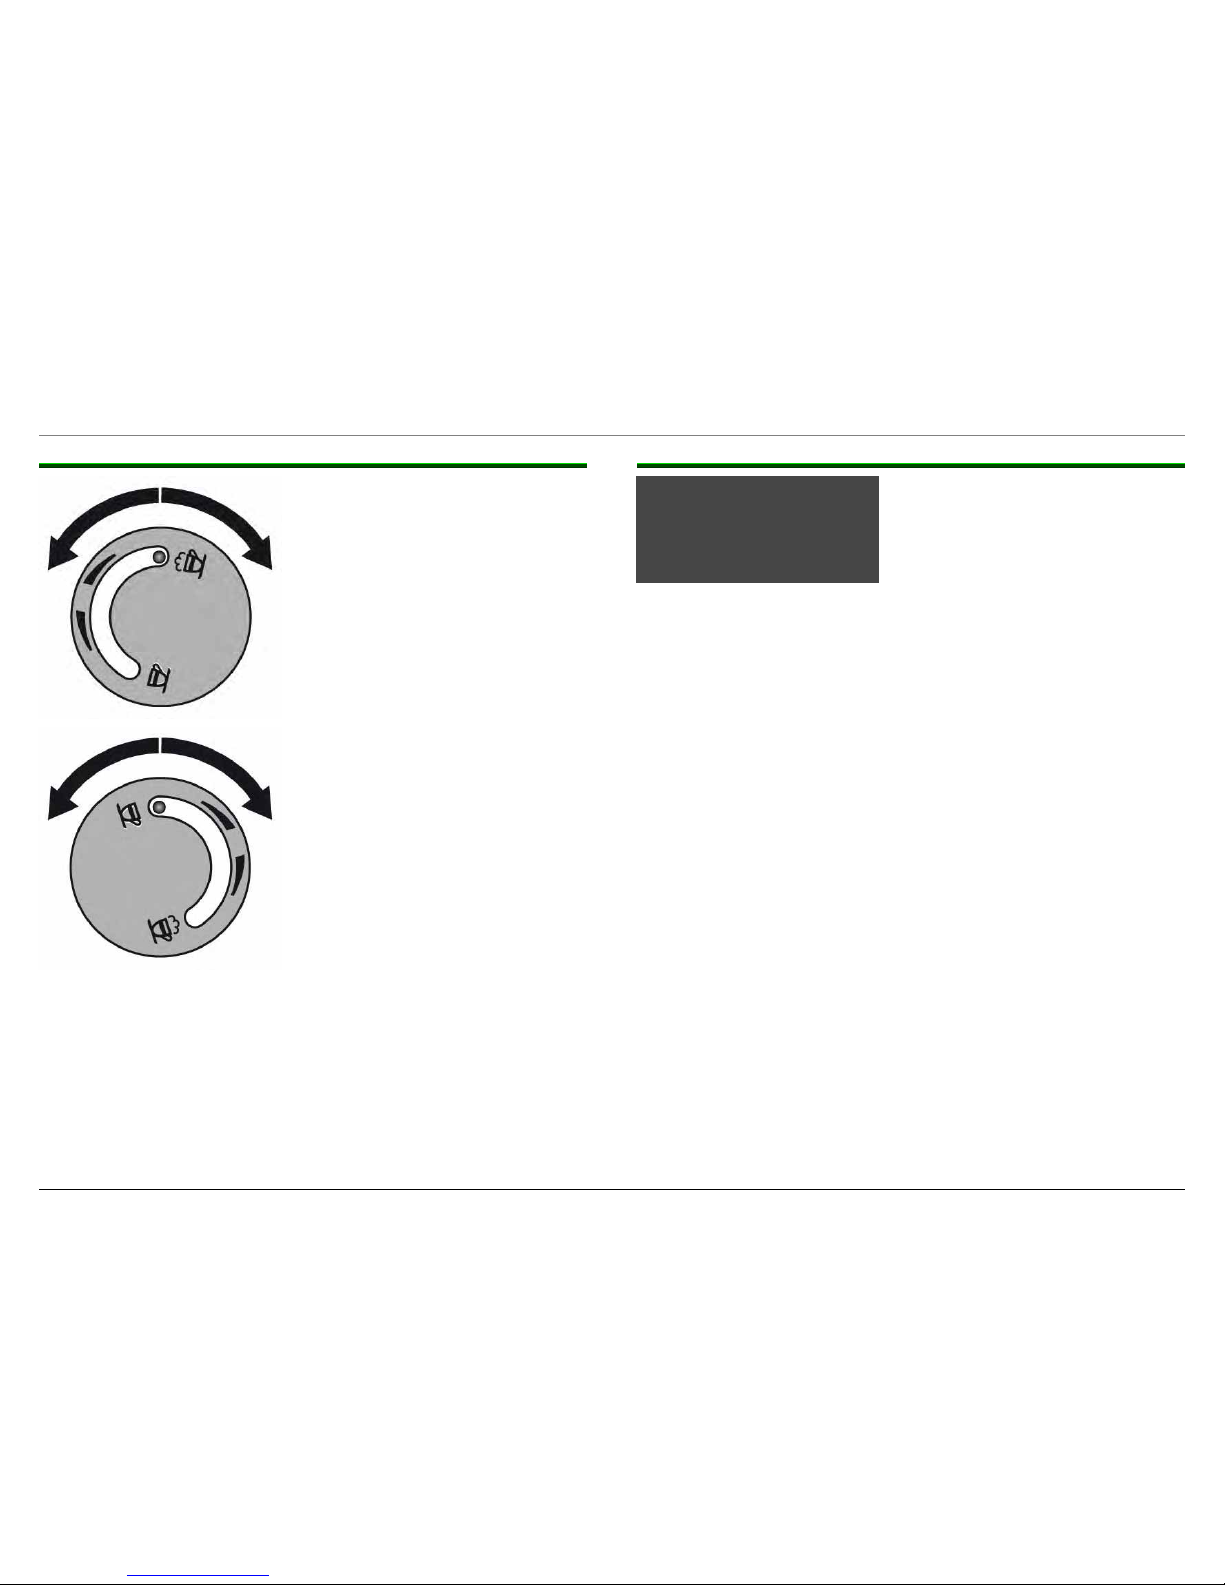
3.7.2 Settings
► Set the selector on the
frothing-up device to
CAPPUCCINO. Milk and
milk froth are conveyed.
The milk froth and the
temperature of the milk can be
varied in the CAPPUCCINO area
by rotating the selector.
► Set the selector on the
frothing-up device to
CAFFELATTE. Hot milk is
conveyed.
The temperature of the milk can
be varied between 50 °C and
75 °C in the CAFFELATTE area
by rotating the selector.
3.7.3 Stopping the steam
To stop drawing steam, press steam
button (h).
The display switches to Steam
and Ready.
The appliance remains in steam
mode for approx. one minute.
The appliance then cools down
automatically.
Ready is displayed again.
To cool the appliance manually,
press the steam button P (4). The
appliance gives off steam into the
drip tray.
58300000116013_en_a – 21.08.06 Seite 12 von 61
3.8 Preparing cappuccino and latte macchiato
With this appliance, preparing cappuccino or latte macchiato is
simplicity itself.
3.8.1 Preparing cappuccino
► Firmly connect the frothing-
up device to the adapter on
the steam pipe.
► Insert the notched end of
the hose into a receptacle
containing milk.
► Position a large cup under
the coffee outlet and direct
the nozzle of the frothing-up
device into the cup.
► Set the selector on the
frothing-up device to
CAPPUCCINO.
► Place the capsule on the balcony with the membrane
downwards.
► Press button (c) CAPPUCCINO.
After a short time an optimum mix of frothed milk and coffee will
automatically flow into the cup.
The despensing of milk or coffee can be interrupted at any time by
pressing the button CAPPUCCINO (c) or LATTE MACCHIATO (d).
3.8.2 Preparing latte macchiato
► Firmly connect the frothing-up
device to the adapter on the
steam pipe.
► Insert the notched end of the
hose into a receptacle
containing milk.
► Remove the small drip tray.
Place a large glass under the
coffee outlet.
► Direct the nozzle of the
frothing-up device into the
glass.
► Set the selector on the
frothing-up device to
CAPPUCCINO.
► Place the capsule on the balcony with the membrane
downwards.
► Press button (d) LATTE MACCHIATO.
After a short time an optimum mix of frothed milk and coffee will
automatically flow into the glass.
The despensing of milk or coffee can be interrupted at any time by
pressing the button CAPPUCCINO (c) or LATTE MACCHIATO (d).
58300000116013_en_a – 21.08.06 Seite 13 von 61

3.9 Changing standard settings
The appliance has been set at the factory so that coffee can be
brewed without any additional programming.
The standard settings can be changed and adjusted. For this purpose
the “Standby”, “Small cup”, “Large cup”, “Hot water” and “Steam”
buttons are assigned additional functions.
Button (a) Standby
=
Save settings
Button (e) Small cup
=
Selection button –
Button (f) Large cup
=
Selection button +
Button (g) Hot water
=
Selection button
Button (h) Steam
=
Access programming mode
The following settings can be changed:
► Displayed language
► Water hardness
► Energy-saving mode
► Cup heater
► Rinsing
► Reset
3.9.1 Programming
Before the programming can be changed, the appliance must be in
brewing mode.
Ready is displayed.
Press and hold down steam button (h) for at least three seconds. –
Programming mode is activated.
► Press the selection button (g) to select the required setting,
e.g. Hardness // Setting 3
► To change the setting, press button (e) or (f), e.g. Hardness
// Setting 2
► Press Standby button (a) once. The changed setting is saved.
Ready is displayed again.
58300000116013_en_a – 21.08.06 Seite 14 von 61

3.9.2 Changing the display language
Display languages which can be set:
English Français Italiano
Nederlands Espanol Português
Pyccкий English
Sprache / Deutsch (Language / German) has been set at the
factory.
To set another language, select the required language with button (e)
or (f) and save with the Standby (a) button.
3.9.3 Changing the water hardness
Determine the water hardness with the enclosed test strip or ask your
local water supplier.
Hardness setting 3 has been preselected.
The following settings are available:
Setting 1 Setting 2 Setting 3
Setting 4 Setting – -
Setting – – means that no water hardness has been set. The
appliance no longer automatically signals when it requires descaling.
To change the water hardness setting, press button (h) 1x in
programming mode. To change the water hardness, select the
required setting with button (e) or (f) and save with the Standby (a)
button.
Inputting the water hardness is important for the descaling
programme. If using external water softening systems or filtered water,
select water hardness setting – –.
3.9.3.1 Degree of water hardness
Setting German French
– –
None None
1 1–7 1–13
2 8–15 14–27
3 16–23 28–42
4 24–30 43–54
58300000116013_en_a – 21.08.06 Seite 15 von 61

3.9.4 Energy-saving mode
The appliance switches automatically to energy-saving mode if it was
not used for 1 hour.
When energy-saving mode is active, the heater switches off, the cup
heater remains active.
Energy-saving mode is displayed.
Energy-saving mode can be changed from
Energy-saving mode – on to Energy-saving mode – off.
When the appliance is switched on again from energy-saving mode,
first wait for the heating up phase.
3.9.5 Cup heater
The cup heater is heated by an active PTC element.
The function of the cup heater can be changed from
Cup heater – off to Cup heater– on.
For a successful coffee preheat the cups on the cup heater:
The temperature of the cup heater may increase to 50 °C.
3.9.6 Note
The functions
Start descaling cycle and
Reset descaling alarm
are required for the descaling programme.
3.9.7 Rinsing
One of two settings can be selected:
Automatic
Appliance automatically rinsed.
Manual
Each time the request is indicated by the
Rinsing? display text / Press button
► Check that all collecting pans have been inserted and press
the “Large cup” button; the appliance is rinsed.
3.9.8 Reset
If Yes, all settings changed here in programming mode and the
modified amounts of liquid can be reset to the original factory setting.
58300000116013_en_a – 21.08.06 Seite 16 von 61
3.10 Cleaning
m Risk of electric shock!
► Before cleaning the appliance, pull out the mains plug.
► Never immerse the appliance in water.
► Do not use a steam cleaner.
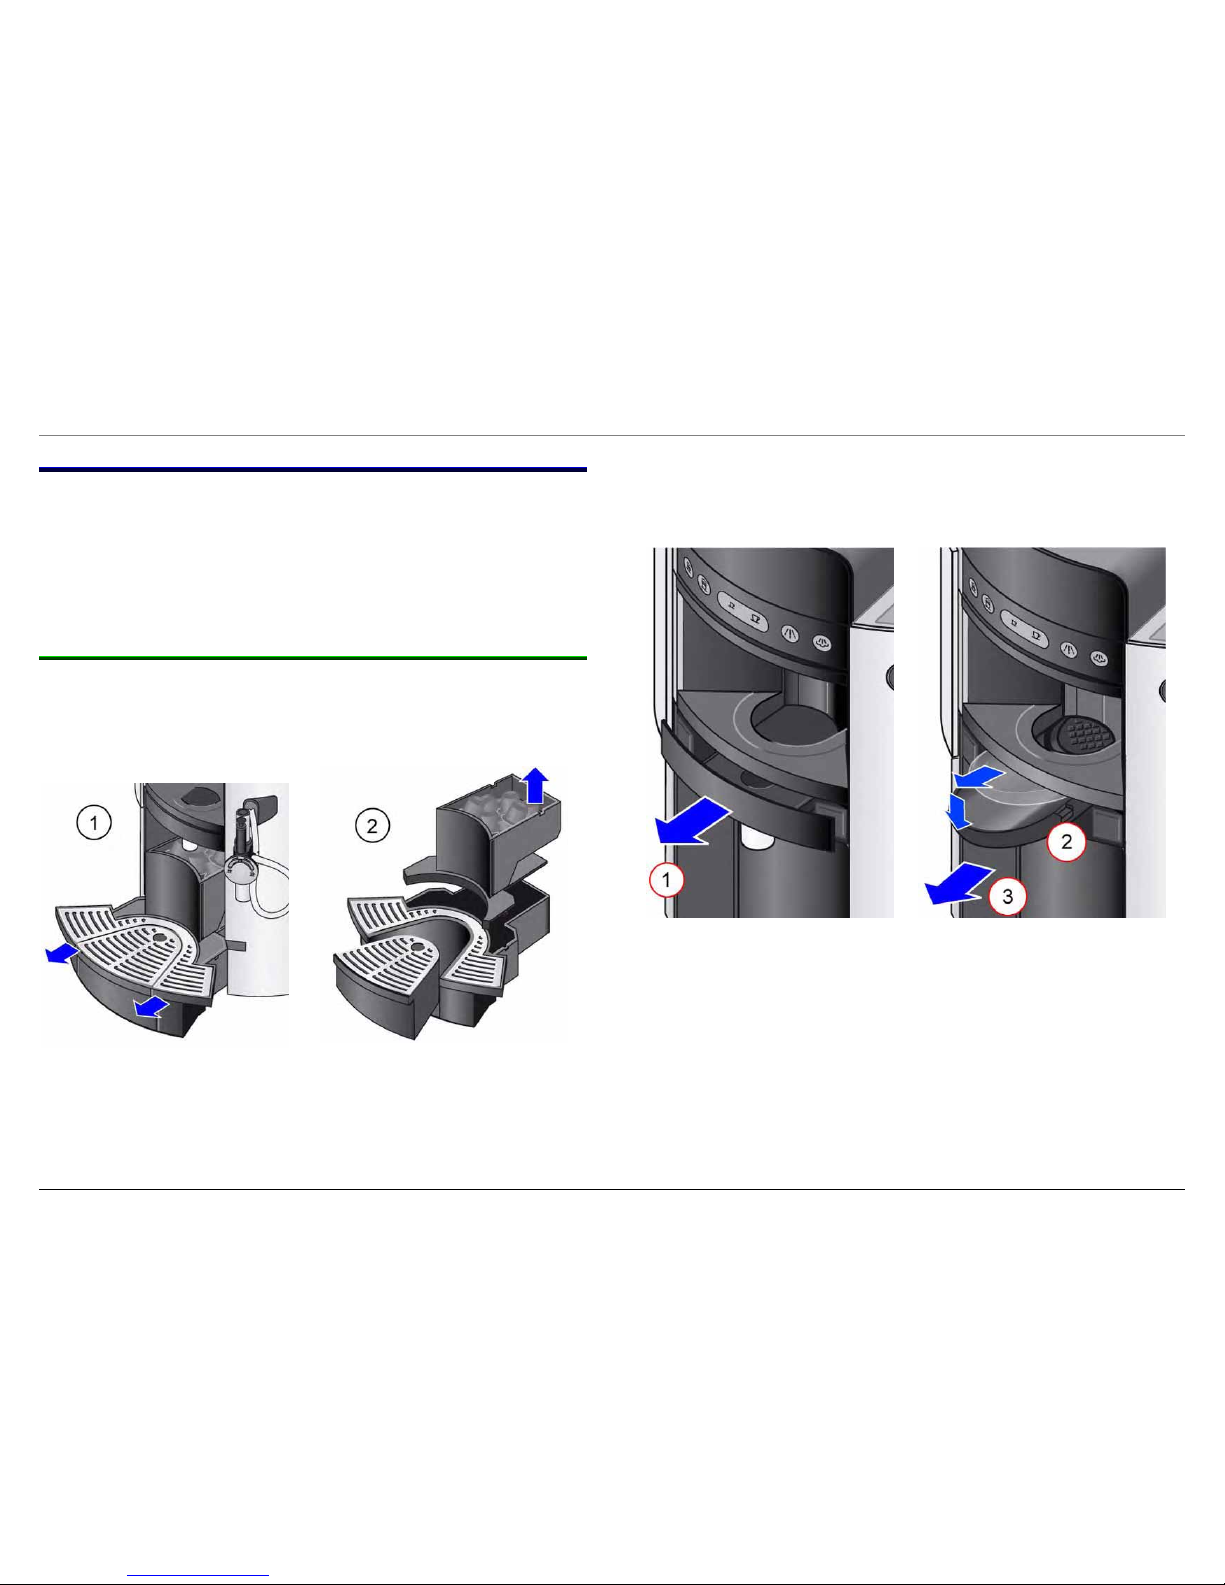
3.10.1 Daily cleaning of the appliance
► Rinse out the water tank and fill with fresh water.
► Pull the drip tray and capsule container forwards (1), empty
(2) and clean with a mild detergent solution. When re-inserting
the parts, ensure that they are fitted together correctly.
Pull out the coffee outlet (1) forwards and then the capsule holder (2).
Clean with a mild detergent solution (not dishwasher-proof).
First re-insert the capsule holder (2) and then the coffee outlet (1).
Note: If the appliance is cold when switched on, the appliance is
rinsed automatically.
58300000116013_en_a – 21.08.06 Seite 17 von 61
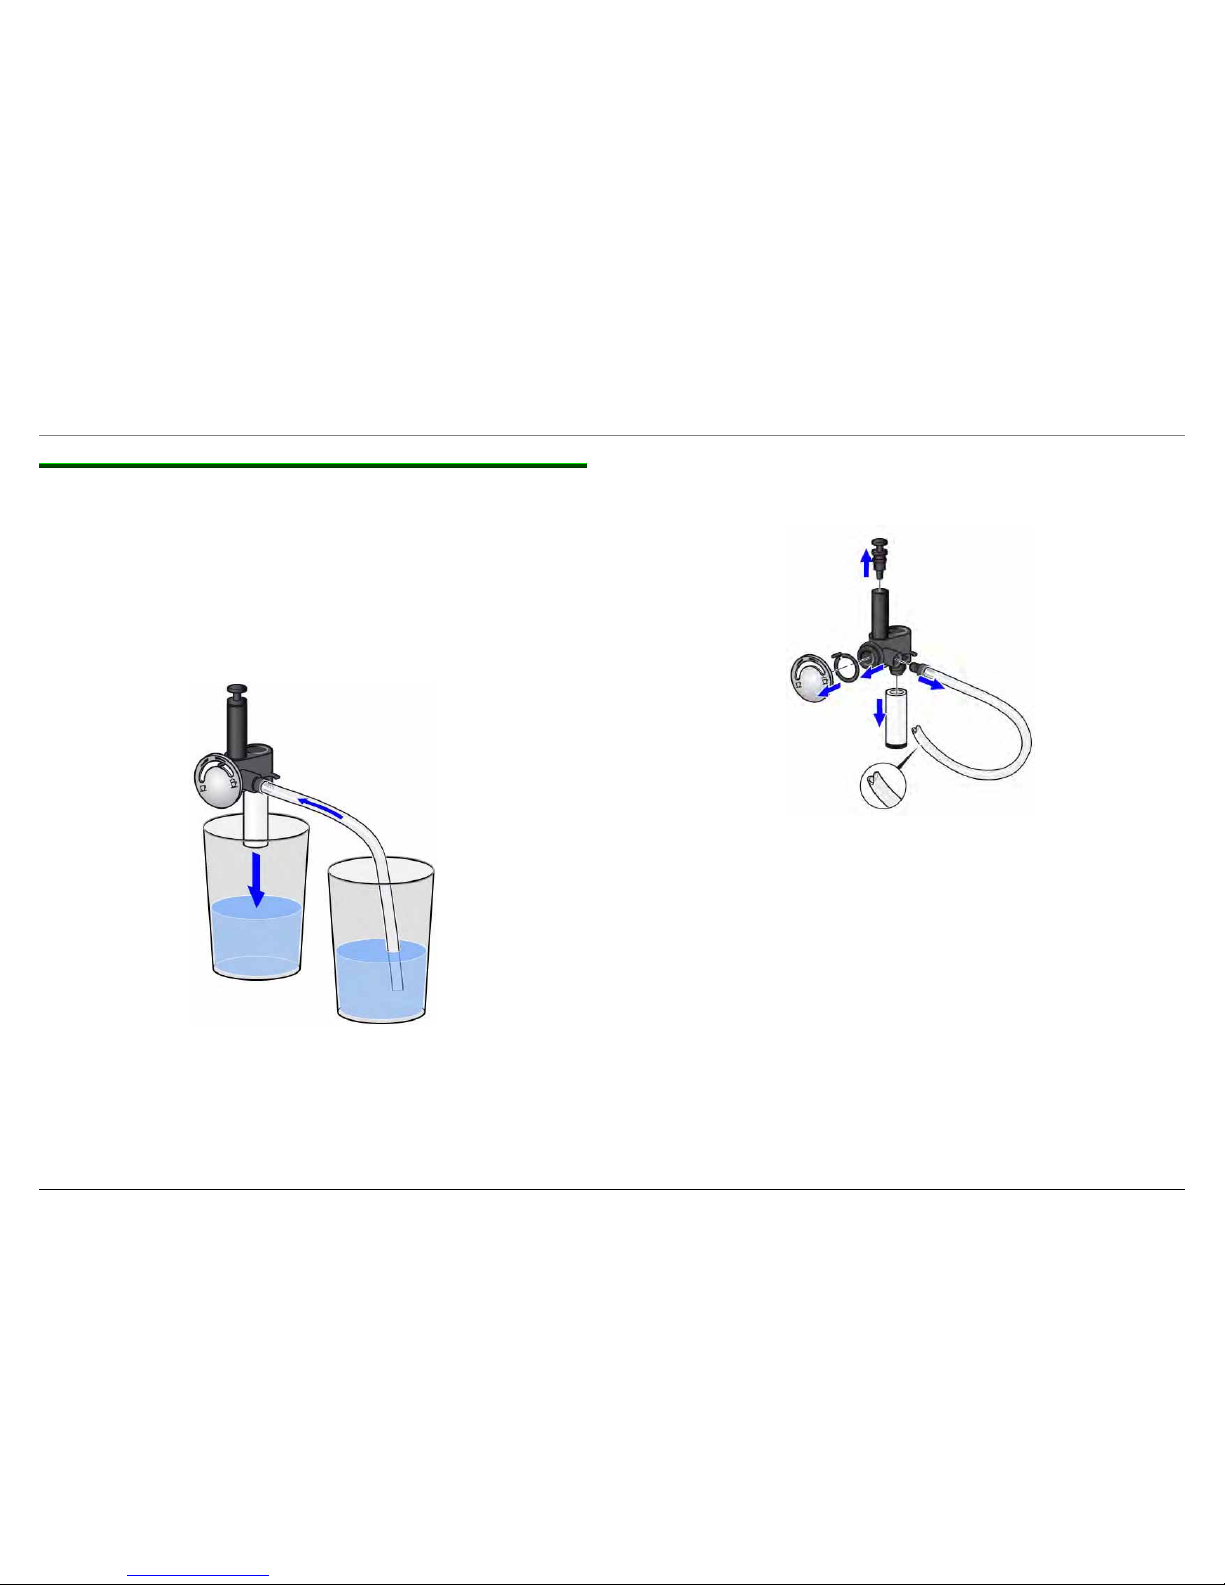
3.10.2 Cleaning the CAPPUCCINO / CAFFELATTE nozzle
The nozzle and valve must be cleaned immediately to ensure
optimum milk froth. Even the slightest milk residue will impair
the frothing up result!
► After each frothing up process, switch to Draw hot water and
flush the frothing up nozzle with hot water.
► Clean daily by placing the hose in a glass/receptacle
containing hot water and repeat the (frothing up) process –
except now with drawn in water. Milk residue is dissolved and
flushed out.
► To clean thoroughly, disassemble all parts and clean with a
soft brush in a mild detergent solution.
Clean particularly inaccessible locations with a blunt needle.
Rinse all parts with hot water and dry.
Parts are dishwasher-proof.
Attention: When re-assembling the parts, ensure that the smooth
end of the milk hose is connected to the frothing-up aid.
Insert the notched end (A) into the milk container.
Connect all parts firmly together. Ensure that there
are no gaps between the individual parts.
58300000116013_en_a – 21.08.06 Seite 18 von 61

3.11 Descaling
The lime content in drinking water causes calcification of the thermal
block in the appliance. This affects the flavour of the coffee and
reduces the service life of the appliance.
To ensure optimum quality, descale the appliance regularly.
If Needs to be descaled is displayed, the appliance must be
descaled immediately.
Descale the appliance according to the following instructions,
otherwise the appliance may be damaged.
Achtung!
► Never descale the appliance with vinegar or
vinegar-based substances!
► Do not interrupt the descaling programme!
► Never drink the liquid!
3.11.1 Descaling alarm
Der Entkalkungsalarm wird angezeigt bei eingestellter Wasserhärte
The descaling alarm is indicated with adjusted water hardness
1 after 120 L
2 after 90 L
3 after 60 L
4 after 30 L
Hardness - - means that no water hardness is adjusted. The
appliance does not announce any longer automatically, when must be
decalcified.
3.11.2 Manually resetting the descaling alarm
If the appliance is descaled manually, the Needs to be descaled
display can be deleted.
► Press and hold down steam button (h) for at least three
seconds.
► Select Descaling alarm reset? with steam button (h).
► Select Yes with button (e) or button (f).
► Press standby button (a).
Warning:
To prevent damage, descale appliance regularly.
58300000116013_en_a – 21.08.06 Seite 19 von 61
 Loading...