

Page 1

Erlwein
LITHOSTAR Multiline
Software
System
SP
Software generation, Operating PC
03127011
Print No.:
Replaces: RXL2-120.116.03.05.02
RXL2-120.816.02.01.02
© Siemens AG
The reproduction, transmission or use
of this document or its contents is not
permitted without express written
authority. Offenders will be liable for
damages. All rights, including rights
created by patent grant or registration
of a utility model or design, are
reserved.
English
Doc. Gen. Date: 12.05
1998
Page 2

2 Revision / Disclaimer
1Revision / Disclaimer
Document revision level
The document corresponds to the version/revision level effective at the time of system
delivery. Revisions to hardcopy documentation are not automatically distributed.
Please contact your local Siemens office to order current revision levels.
Disclaimer
The installation and service of equipment described herein is to be performed by qualified
personnel who are employed by Siemens or one of its affiliates or who are otherwise
authorized by Siemens or one of its affiliates to provide such services.
Assemblers and other persons who are not employed by or otherwise directly affiliated
with or authorized by Siemens or one of its affiliates are directed to contact one of the
local offices of Siemens or one of its affiliates before attempting installation or service procedures.
LITHOSTAR Multiline RXL2-120.816.02.01.02 Siemens AG
12.05 CS PS SP
Page 2 of 16
Medical Solutions
Page 3
Software generation 3
2Software generation
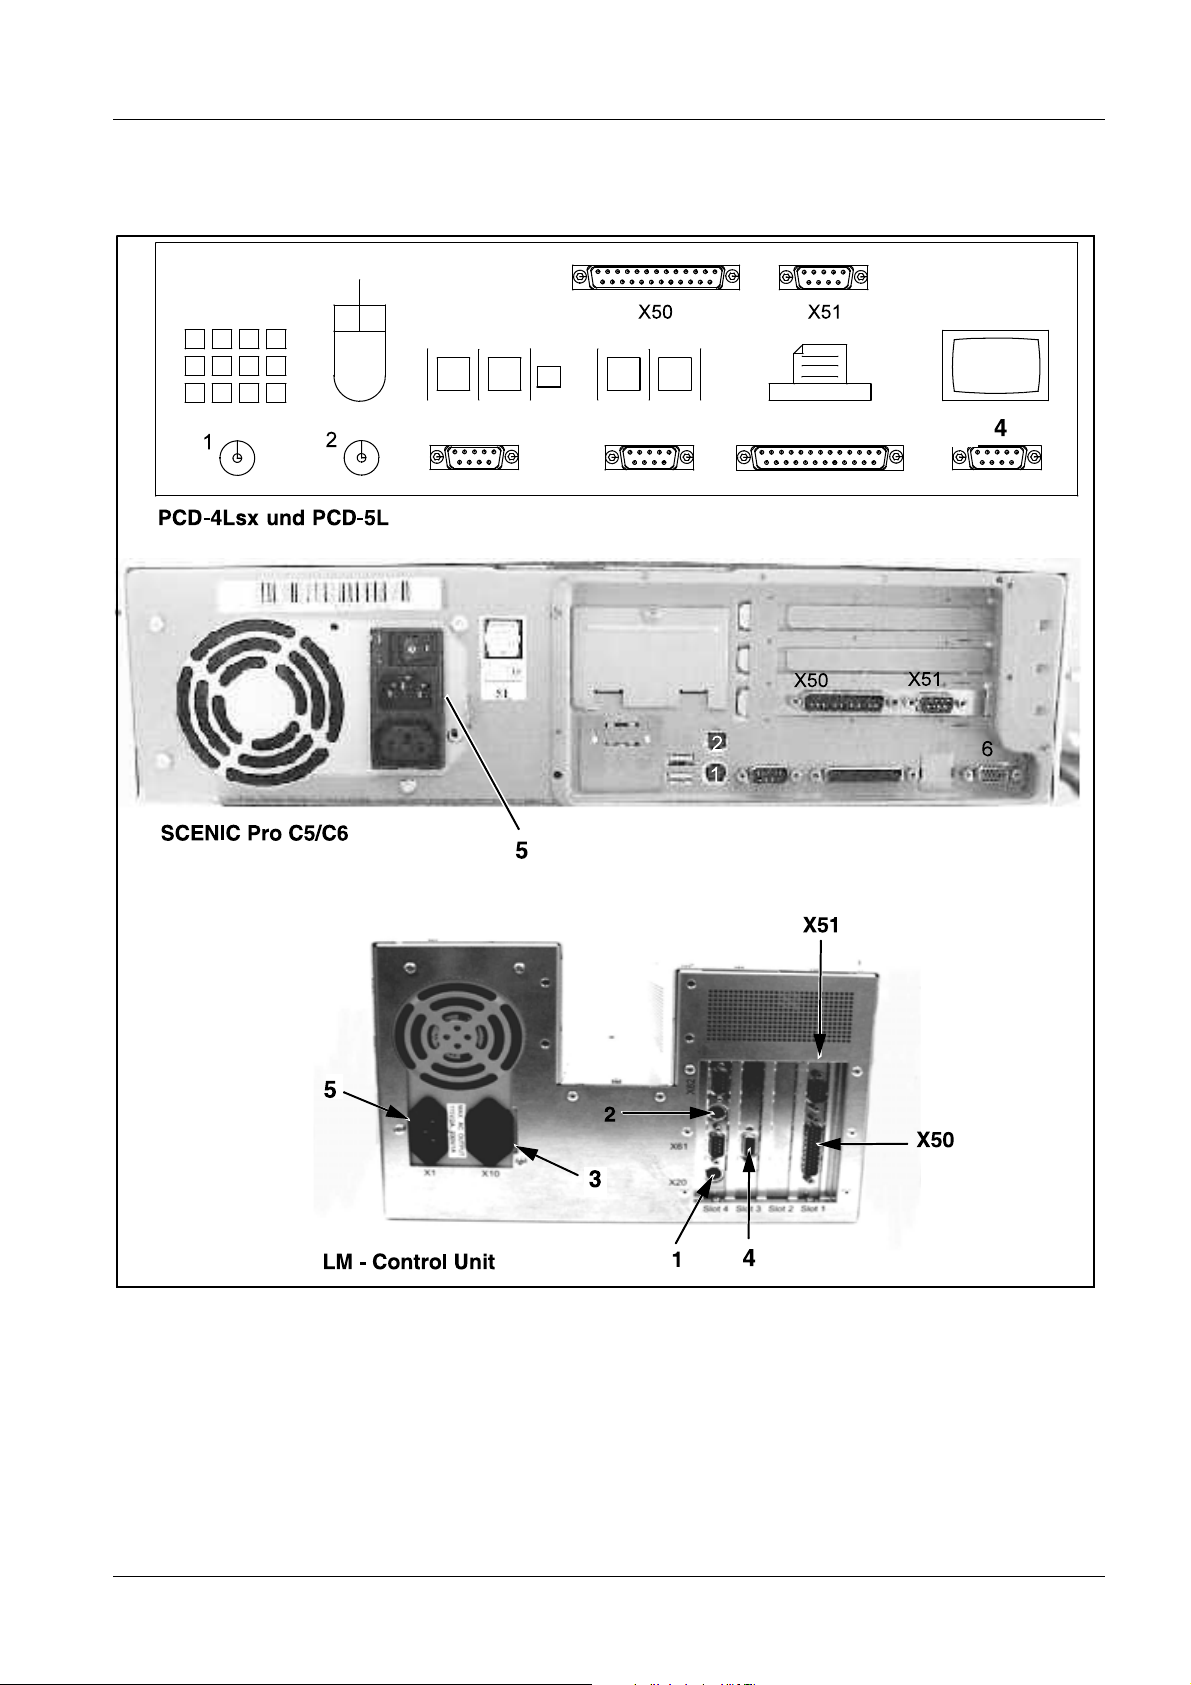
System units, rear view 0
Fig. 1: System units, rear view
Item 1: Keyboard connection Item 5: Power connection
Item 2: Mouse connection X50: Respiratory ECG signal connection
Item 3
: Power connection X51: DUEP connection
Item 4
: Monitor connection
Siemens AG RXL2-120.816.02.01.02 LITHOSTAR Multiline
Medical Solutions
12.05 CS PS SP
Page 3 of 16
Page 4

4 Software generation
Workflow 0
NOTE
During the software installation, German text appears. The reason
for this is the German-language operating system.
• Switch the system OFF.
• Disconnect the DUEP connection X51 at the rear of the system unit (PC).
• Open system unit (PC).
• Open the cover panel in front of the drive.
Change the keyboard
(from English to French or vice versa)
⇓ No ⇓
⇓ ⇐ ⇐ ⇐ ⇐ ⇐ ⇐ ⇐ ⇐ ⇐ ⇐ ⇐ ⇐ ⇐ ⇐ ⇐
⇓
Select a PC
⇒ Yes
Swap keyboard
(just disconnect the cable from the
old keyboard and plug it into the new
one)
(Activate the floppy on the PCD-4Lsx / p. 5)
(Activate the floppy on the PCD-5L / p. 6)
(Activate the floppy on the SCENIC Pro
C5/C6 / p. 7)
(Activate the floppy on the LM - Control
Unit/p.8)
(Deactivate the floppy on the PCD-4Lsx / p. 11)
(Deactivate the floppy on the PCD-5L / p. 12)
(Deactivate the floppy on the SCENIC Pro
C5/C6 / p. 13)
(Deactivate the floppy on the LM - Control
Unit/p.14)
LITHOSTAR Multiline RXL2-120.816.02.01.02 Siemens AG
12.05 CS PS SP
Page 4 of 16
Medical Solutions
Page 5

Software generation 5
Activate the floppy on the PCD-4Lsx 0
• Switch the system ON.
• During the display, press the "Ctrl", "Alt" und "INS" (or "Inser") keys.
• Enter the password "TDRX".
• Press the "ENTER" or "Entrée" key. The CMOS Setup Menu appears.
• Press the following key once:
"Page Up" or “↑" on the English or the French keyboard, as the case may be.
• With the "↓" or "↑" cursor key select “Diskette Ctrlr".
• With the"+" key on the number pad, select "ENABLED".
• Insert the boot disk into drive A of the operating PC.
• Press the "F10" key and then the "F5" key.
Siemens AG RXL2-120.816.02.01.02 LITHOSTAR Multiline
Medical Solutions
12.05 CS PS SP
Page 5 of 16
Page 6

6 Software generation
Activate the floppy on the PCD-5L 0
• Switch the system ON.
• During the display "Press F2 to enter SETUP", press the "F2" key.
• Enter the password "TDRX".
• Press the "ENTER" or "Entrée"key. The CMOS Setup Menu appears.
• Select the "Advanced" menu with the "← →" cursor keys.
• In the "Advanced" menu, using the "↑ ↓" cursor keys, select the "Peripheral Configura-
tion" sub-menu.
• Press the "ENTER" or "Entrée"key.
• In the "Peripheral Configuration" menu, use the cursor keys "↑ ↓" to select the "Diskette
Controller" menu.
• Using the "+/-" keys, set the "Diskette Controller" to "ENABLED".
• Insert the boot disk into drive A of the operating PC.
• Press the "Esc" or "Echap" key twice.
• Press the "ENTER" or "Entrée"key twice.
LITHOSTAR Multiline RXL2-120.816.02.01.02 Siemens AG
12.05 CS PS SP
Page 6 of 16
Medical Solutions
Page 7

Software generation 7
Activate the floppy on the SCENIC Pro C5/C6 0
• System ON.
• During the display "Press F2 to enter SETUP" , press the "F2" key.
• Enter the password "TDRX".
• Press the "ENTER" or "Entrée"key. The CMOS Setup Menu appears.
• Select the "Main" menu with the "← →" cursor keys.
• In the "Main" menu, using the "↑ ↓" cursor keys, select the "Boot Option" sub-menu.
• Select the "Boot Sequence" menu with the "↑ ↓" cursor keys.
• Set "Boot Sequence 1." to diskette using the "-" key on the number pad (diskette is 1;
hard disk is 2).
• Press the "Esc" or "Echap"key.
• Select the "Advanced" menu with the "← →" cursor keys.
• In the "Advanced" menu, using the "↑ ↓" cursor keys, select the "Peripheral Configura-
tion sub-menu.
• Press the "ENTER" or "Entrée"key.
• In the "Peripheral Configuration" menu, use the cursor keys "↑ ↓" to select the "Dis-
kette Controller" menu.
• Using the "+/-" keys, set the "Diskette Controller" to "ENABLED".
• Insert the boot disk into drive A of the operating PC.
• Press the "Esc" or "Echap"key twice.
• Press the "ENTER" or "Entrée"key twice.
Siemens AG RXL2-120.816.02.01.02 LITHOSTAR Multiline
Medical Solutions
12.05 CS PS SP
Page 7 of 16
Page 8

8 Software generation
Activate the floppy on the LM - Control Unit 0
NOTE
If "Auto-detect Harddisk" is mistakenly selected in the BIOS, all
settings are deleted without confirmation and the hard drive will no
longer be recognized. The settings for the hard drive will then have
to be entered manually.
• System ON.
• During boot-up, press the "Del" key.
• Enter the password "TDRX".
• Press the "Enter" or "Entrée”key. The CMOS Setup Menu appears.
• Select the "Standard CMOS Setup" menu with the "← →" cursor keys.
• In the "Standard CMOS Setup" menu, change the setting for floppy drive A from "Not in-
stalled" to "1,44 MB, 3,5 Zoll" (1.44 MB, 3.5 inch)
• Select the "Advanced" menu with the "← →" cursor keys.
• Use the "+/-" keys to change the 1st Boot device from "IDE-0" to "Floppy".
• Select 2nd Boot device with the "↑ ↓" cursor keys.
• Use the "+/-" keys to change the2nd Boot device from "DISABLED" to "IDE-0".
• Select "Floppy Access Control" with the "↑ ↓" cursor keys.
• Using the "+/-" keys, set the "Floppy Access Controll" from "Read-only" to "Read-write".
• Select the "Peripheral Setup" menu with the "← →" cursor keys.
• Select “On Board FDC” with the "↑ ↓" cursor keys.
• Use the "+/-" keys to change “On Board FDC” from "Disabled" to "Enabled".
• Select "Save settings and Exit" with the "← →" cursor keys.
• "Save current settings and exit (Y/N)?": make selection with "↑ ↓" cursor keys.
• Insert the boot disk into the drive of the operating PC.
• Enter "Y".
• After a time, the question appears:
User-Terminal-Software Installation?
NO: Press [Ctrl] + [C]
YES: Press any key, to continue
Eine beliebige Taste drücken, um fortzusetzen.
If the keyboard is swapped, the user terminal software must be reinstalled. Answer
accordingly
After a time, the message appears:
LITHOSTAR Multiline RXL2-120.816.02.01.02 Siemens AG
12.05 CS PS SP
Page 8 of 16
Medical Solutions
Page 9

Software generation 9
Hard-Disk will be formatted!
Please wait 5 sec. for next message and press “J” and
[ENTER]!
Warnung: Alle Daten auf der Festplatte in Laufwerk C:
werden gelöscht!
Formatieren durchführen (J/N)?
Press "J" and then the "Enter/Entrée" key.
• The question about the keyboard type appears.
Enter keyboard type:
E: englisch (international) keyboard
F: french keyboard
Press “E” or “F” according to keyboard type and press
[ENTER]:
• Answer "E" or "F" according to the keyboard type and press the "ENTER"/Entrée" key.
• After a time, the message appears:
Please insert “Backup-Disk 01 . . . 05” (Sicherungsdiskette 01 ...05)!
Press any key, to continue!
Sicherungsdiskette 01 in Laufwerk A: einlegen
Eine beliebige Taste drücken, um fortzusetzen
Remove the boot disk from drive A.
Insert backup disk 01 in drive A.
Press any key.
• When the backup on backup disk 01 is complete, the message appears:
Sicherungsdiskette 02 in Laufwerk A: einlegen
Eine beliebige Taste drücken, um fortzusetzen
Remove backup disk 01 from drive A.
Insert backup disk 02 in drive A.
• Do the same with the remaining backup disks.
• When all the backup disks have been installed, the following message appears:
Please insert disk: “User-Interface-SW”!
Press any key, to continue!
Eine beliebige Taste drücken, um fortzusetzen
Siemens AG RXL2-120.816.02.01.02 LITHOSTAR Multiline
Medical Solutions
12.05 CS PS SP
Page 9 of 16
Page 10

10 Software generation
Remove backup disk 05 from drive A.
Insert user interface SW disk in drive A.
• After a time, the message appears:
Please insert “Status-Disk”!
Press any key, to continue!
Eine beliebige Taste drücken, um fortzusetzen
Remove user interface SW disk from drive A.
Insert status disk in drive A.
NOTE
Since data will be written to the disk, the write-protect feature must
not be activated.
• After a time, the message appears:
Please insert “BOOT-Disk” again!
Press any key, to continue!
Eine beliebige Taste drücken, um fortzusetzen
Remove the status disk from drive A.
Insert boot disk in drive A.
• After a time, the message appears:
********ATTENTION: IMPORTANT NOTE ! ********
Modifiy CMOS-SETUP accroding to service-manual !
- CMOS-Setup-Lock by Password
- Disable Disk-Controller
See instructions!
Please remove disk!!
Now, switch off the PC and turn it on again for
CMOS-Setup-Modify!
Thank you!
• Switch the system OFF.
• Remove the boot disk from drive A.
LITHOSTAR Multiline RXL2-120.816.02.01.02 Siemens AG
12.05 CS PS SP
Page 10 of 16
Medical Solutions
Page 11

Software generation 11
Deactivate the floppy on the PCD-4Lsx 0
• Switch the system ON.
• During the display, press the "Ctrl", "Alt" und "INS" (or "Inser") keys.
• Enter the password "TDRX".
• Press the "ENTER" or "Entrée"key. The CMOS Setup Menu appears.
• Press the following key once:
"Page Up" or “↑" on the English or the French keyboard, as the case may be.
• With the "↓" or "↑" cursor key select “Diskette Ctrlr".
• With the"+" key on the number pad, select "DISABLED" .
• Press the "F10" key and then the "F5" key.
• Switch the system OFF.
• Reconnect the DUEP connection X51 at the rear of the system unit.
• System ON.
• Functional check
Siemens AG RXL2-120.816.02.01.02 LITHOSTAR Multiline
Medical Solutions
12.05 CS PS SP
Page 11 of 16
Page 12

12 Software generation
Deactivate the floppy on the PCD-5L 0
• Switch the system ON.
• During the display "Press F2 to enter SETUP", press the "F2" key.
• Enter the password "TDRX".
• Press the "ENTER" or "Entrée"key. The CMOS Setup Menu appears.
• Select the "Advanced" menu with the "← →" cursor keys.
• In the "Advanced" menu, using the "↑ ↓" cursor keys, select the "Peripheral Configura-
tion" sub-menu.
• Press the "ENTER" or "Entrée"key.
• In the "Peripheral Configuration" menu, use the "↑ ↓" cursor keys to select the "Diskette
Controller" menu.
• Using the "+/-" keys, set the"Diskette Controller" to "DISABLED".
• Press the "Esc" or "Echap" key twice.
• Press the "ENTER" or "Entrée"key twice.
• Switch the system OFF.
• Reconnect the DUEP connection X51 at the rear of the system unit.
• System ON.
• Functional check
LITHOSTAR Multiline RXL2-120.816.02.01.02 Siemens AG
12.05 CS PS SP
Page 12 of 16
Medical Solutions
Page 13

Software generation 13
Deactivate the floppy on the SCENIC Pro C5/C6 0
• Switch the system ON.
• During the display "Press F2 to enter SETUP", press the "F2" key.
• Enter the password "TDRX".
• Press the "ENTER" or "Entrée"key. The CMOS Setup Menu appears.
• Select the "Main" menu with the "← →" cursor keys.
• In the "Main" menu, using the "↑ ↓" cursor keys, select the "Boot Option" sub-menu.
• Select the "Boot Sequence" menu with the "↑ ↓" cursor keys.
• Set "Boot Sequence 1." to diskette using the "-" key on the number pad (diskette is 1;
hard disk is 2).
• Press the "Esc" or "Echap"key.
• Select the "Advanced" menu with the "← →" cursor keys.
• In the "Advanced" menu, use the "↑ ↓" cursor keys to select the "Peripheral Configura-
tion" sub-menu.
• Press the "ENTER" or "Entrée"key.
• In the "Peripheral Configuration" menu, use the "↑ ↓" cursor keys to select the "Diskette
Controller" menu.
• Using the "+/-" keys, set the"Diskette Controller" to "DISABLED" .
• Press the "Esc" or "Echap"key twice.
• Press the "ENTER" or "Entrée"key twice.
• Switch the system OFF.
• Reconnect the DUEP connection X51 at the rear of the system unit.
• System ON.
• Functional check
Siemens AG RXL2-120.816.02.01.02 LITHOSTAR Multiline
Medical Solutions
12.05 CS PS SP
Page 13 of 16
Page 14

14 Software generation
Deactivate the floppy on the LM - Control Unit 0
NOTE
If "Auto-detect Harddisk" is mistakenly selected in the BIOS, all
settings are deleted without confirmation and the hard drive will no
longer be recognized. The settings for the hard drive will then have
to be entered manually.
• Switch the system ON.
• During boot-up, press the "Del" key.
• Enter the password "TDRX".
• Press the "Enter" or "Entrée”key. The CMOS Setup Menu appears.
• Select the "Standard CMOS Setup" menu with the "← →" cursor keys.
• In the "Standard CMOS Setup" menu, change the setting for floppy drive A from "1,44
MB, 3.5 Zoll" (1.44 MB, 3.5 inch) to "Not installed".
• Select the "Advanced CMOS Setup" menu with the "← →" cursor keys.
• Use the "+/-" keys to change the 1st Boot device from "Floppy" to "IDE-0".
• Select 2nd Boot device with the "↑ ↓" cursor keys.
• Use the "+/-" keys to change the 2nd Boot device from "IDE-0" to "DISABLED".
• Select "Floppy Access Control" with the "↑ ↓" cursor keys.
• Using the "+/-" keys, set the "Floppy Access Controll" from "Read-write" to "Read-only".
• Select the "Peripheral Setup" menu with the "← →" cursor keys.
• Select “On Board FDC” with the "↑ ↓" cursor keys.
• Use the "+/-" keys to change “On Board FDC” from "Enabled" to "Disabled".
• Select "Save settings and Exit" with the "← →" cursor keys.
• "Save current settings and exit (Y/N)?: make selection with the "↑ ↓" cursor keys.
• Enter "Y".
• Switch the system OFF.
• Reconnect the DUEP connection X51 at the rear of the system unit.
• System ON.
• Functional check
LITHOSTAR Multiline RXL2-120.816.02.01.02 Siemens AG
12.05 CS PS SP
Page 14 of 16
Medical Solutions
Page 15

Software generation 15
Changes to previous version 0
Document type changed
The entire document was converted to the DMS document structure.
Siemens AG RXL2-120.816.02.01.02 LITHOSTAR Multiline
Medical Solutions
12.05 CS PS SP
Page 15 of 16
Page 16

16 Software generation
LITHOSTAR Multiline RXL2-120.816.02.01.02 Siemens AG
12.05 CS PS SP
Page 16 of 16
Medical Solutions
 Loading...