

Siemens Landis & Staefa RAV12 Series Operating Instructions Manual
Operating instructions
Landis & Staefa RAV12…
RAV12 - the temperature controller that allows you to set the ideal room temperature at the time you want.
You can either rely on the factory settings or make settings tailored to your personal needs.
Getting started
13
12
11
10
9
8
7
4
2
1
24
23
22
21
20
17
14
15
16
18
19
6
5
3
10
15
20
25
30
5
5
101520
25
30
°C
2226Z03E
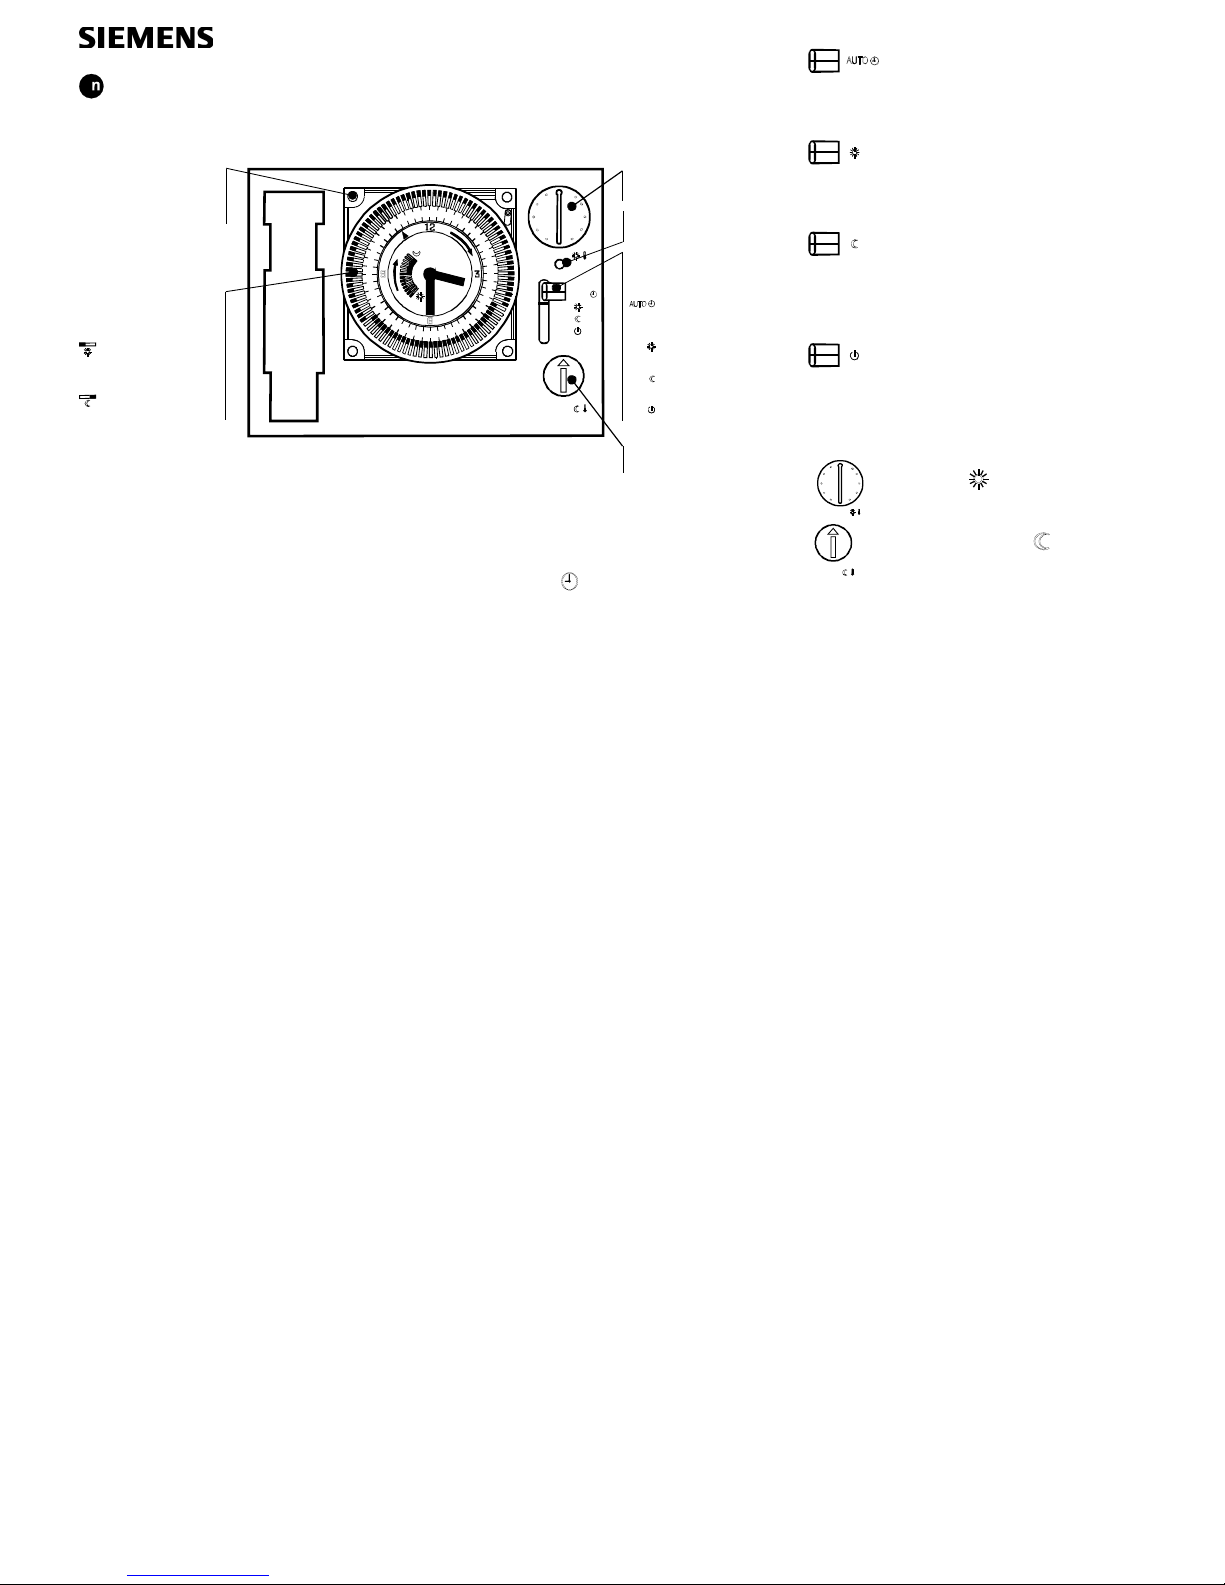
°C
AUTO
Position for 24-hour
time switch AUZ3.1
or weekly time switch
AUZ3.7
Tappet positions
on time switch
Tappet tilted
outward for
normal temperature
Tappet tilted
inward for
economy temperature
Setting knob for
normal temperature
Setting knob for
economy temperature
LED
Operating mode
selector
Heating periods
according to
tappet settings
on time switch
Continuous
normal temperature
Continuous
economy temperature
Standby with
frost pro tection
The controller is supplied with factory-set switching patterns, switching times and temperatures.
To commission it, proceed as follows:
• As soon as connected, the controller switches itself on. Caution: 230 V!
• Set the correct time of day
(with the weekly time switch check the weekday!)
. Make readjustments if
necessary.
• Set the operating mode selector to the required position (e.g. AUTO
).
• Fold up operating instructions again, place them back into position and close the cover again.
Do you want to use automatic operation?
Move the operating mode selector to
the position automatic mode. This
ensures heating according to the
patterns set on the time switch.
Do you require normal temperature?
Move the operating mode selector to
«Normal temperature». This ensures
continuous heating to the normal
temperature.
Do you require economy temperature?
Move the operating mode selector to
«Economy temperature». This ensures
continuous heating to the economy
temperature.
Do you require standby with frost
protection?
Move the operating mode selector to
«Standby». In that case, heating is
provided only when the room
temperature falls below the preset frost
protection limit (5 °C).
Do you feel too warm or too cold?
10
15
20
25
30
5
°C
With the upper setting knob the normal
temperature
can be adjusted from 5
to 30 °C in steps of approx. ±1 °C.
5
101520
25
30
°C
With the lower setting knob the
economy temperature
can be
adjusted from 5 to 30 °C in steps of
approx. ±1 °C.

CE1B2226E / 02.02.1999 Subject to alteration Siemens Building Technologies / Landis & Staefa Division
Do you want to enter your own heating
periods?
The switching dial is equipped with tappets that can
be tilted. The heating periods are entered by tilting
the tappets within the required period of time:
• Tappets tilted
outward
:
Normal
temperatur
• Tappets tilted
inward
:
Economy
temperatur
The factory settings are as follows:
6:00 to 22:00
22:00 to 6:00
To set the heating periods accrding to your needs,
proceed as follows:
⇒ The 24-hour time switch AUZ3.1 has a 24-hour
switching dial. It carries 96 tappets, which
means four tappets per hour, giving a
resolution of 15 minutes. The shortest possible
heating period also is 15 minutes.
⇒ The weekly time switch AUZ3.7 has a 7-day
switching dial. It carries 84 pairs of tappets,
which means 12 pairs of tappets or 24
individual tappets per day. The resolution is
thus one hour. However, since - for mechanical
reasons - at least two tappets need to be tilted
together to set one heating period, the shortest
possible heating period is two hours.
2462Z07
13
12
11
10
9
8
7
4
2
1
24
23
22
21
20
17
14
15
16
18
19
6
5
3
1
2
3
4
5
6
1 Time indicator
2 Switching dial
3 Setting aid
4 Hand
5 Tappet tilted
outward
6 Tappet tilted
inward
Do you want to set the clock?
The switching dial can only be turned in clockwise
direction.
1. First, make a coarse setting:
Turn the switching dial slowly in clockwise
direction until the current time of day reaches
the time indicator (with the weekly dial, also
observe the weekday).
2. Now make the correct setting:
Turn the large hand until the time of day is
correct.
The change from wintertime to summertime, and
vice versa, must be made manually.
Does the LED light up?
• If a remote control is connected and the LED
lights up, the controller indicates that the
override function (e.g. with a telephone remote
control) is activated.
• If no remote control is connected and the LED
lights up, the controller indicates an activated
relays (e.g. heater is switched on).
Energy saving tips without sacrificing
comfort
• Never allow room temperatures to exceed
21 °C.
• Air out the rooms for short periods of time only,
but properly, with the windows wide open.
 Loading...