

Page 1

de Montageanleitung
Standgerät
sv Monteringsanvisning
Fristående skåp
en Installation instructions
Free-standing appliance
fr Notice de montage
Appareil indépendant
it Istruzioni per il montaggio
Apparecchio indipendente
nl Montagevoorschrift
Vrijstaand apparaat
da Monteringsvejledning
Gulvmodel
no Monteringsanvisning
Frittstående apparat
fi Asennusohjeet
Vapaasti sijoitettava laite
es Instrucciones de montaje
Aparato de libre instalación
pt Instruções de montagem
Aparelho Solo
el Οδηγίες τοποθέτησης
Ανεξάρτητη συσκευή
tr Montaj kılavuzu
Solo cihaz
Page 2
de Inhaltsverzeichnis
Montageanleitung verwenden .............. 5
Aufstellort .................................................. 5
Geräte nebeneinander aufstellen ......... 6
Türanschlag wechseln ........................... 6
en Table of Contents
Using the installation instructions ........ 8
Installation location ................................. 8
Installing appliances next to
each other ................................................ 8
fr Table des matières
Utiliser la notice de montage ............. 10
Lieu d’installation ................................. 10
Installation côte à côte
des appareils ........................................ 11
it Indice
Uso delle istruzioni per il montaggio 13
Luogo d’installazione ........................... 13
Disposizione affiancata degli
apparecchi ............................................ 14
Inversione della porta .......................... 14
Türgriff wechseln ..................................... 7
Wandabstandshalter montieren ........... 7
Gerät ausrichten ..................................... 7
Changing over the door hinges ........... 9
Changing the door handle .................... 9
Fitting the wall spacer ............................ 9
Aligning the appliance ........................... 9
Inversion du sens d’ouverture
de porte ................................................. 11
Changer la poignée de porte ............ 12
Monter les écarteurs muraux ............ 12
Ajuster l’appareil .................................. 12
Sostituzione della maniglia
della porta ............................................. 14
Montaggio del distanziatore
murale .................................................... 15
Livellare l’apparecchio ........................ 15
nl Inhoud
Montagehandleiding gebruiken ........ 16
De juiste plaats ..................................... 16
Apparaten naast elkaar opstellen ..... 17
Verwisselen van de deurophanging . 17
Deurgreep verwisselen ....................... 18
Wandafstandhouder monteren ......... 18
Apparaat horizontaal zetten ............... 18
Page 3
da Indholdsfortegnelse
Monteringsvejledning anvendes ....... 19
Opstillingssted ...................................... 19
Opstilling af skabene ved siden af
hinanden ................................................ 19
no Innholdsfortegnelse
Bruk av monteringsveiledningen ...... 21
Plasseringssted .................................... 21
Oppstilling av apparatene ved
siden av hverandre .............................. 22
Omhengsling av døren ....................... 22
sv Innehållsförteckning
Använd monteringsanvisningen ........ 24
Platsen ................................................... 24
Ställa skåpen bredvid varandra ........ 25
Hänga om dörren ................................ 25
fi Sisällysluettelo
Näin käytät asennusohjetta ................ 27
Sijoituspaikka ........................................ 27
Laitteiden sijoitus vierekkäin .............. 27
Oven kätisyyden vaihto ....................... 28
Ændring af dørens åbningsretning .. 20
Udskiftning af dørgrebet ..................... 20
Vægafstandsholder monteres ........... 20
Justering af skabet .............................. 20
Skift av dørhåndtak ............................. 23
Montering av avstandsholderen til
veggen ................................................... 23
Innretting av apparatet ........................ 23
Flytta handtag ....................................... 26
Montera väggavståndshållare ........... 26
Ställa upp skåpet ................................. 26
Ovikahvan vaihto ................................. 28
Seinävälilevyn asennus ....................... 28
Laitteen suoristaminen ........................ 28
es Índice
Instalar el aparato de conformidad
con las instrucciones de montaje ..... 29
Lugar de emplazamiento .................... 29
Yuxtaposición de los aparatos .......... 30
Cambiar el sentido de apertura de
la puerta ................................................ 30
Cambiar la manilla de la puerta ....... 31
Montar los distanciadores ................. 31
Nivelar el aparato ................................ 31
Page 4
pt Índice
Utilizar as Instruções de montagem . 32
Local da instalação ............................. 32
Instalação dos aparelhos um ao
lado do outro ........................................ 33
el Πίνακας περιεχομένων
Χρήση των οδηγιών τοποθέτησης ..... 35
Τόπος τοποθέτησης ............................. 35
Εγκατάσταση των συσκευών ημία
δίπλα στην άλλη .................................... 36
Αλλαγή της φοράς της πόρτας .......... 36
tr İçindekiler
Montaj kılavuzunun kullanılması ........ 38
Cihazın kurulacağı yer ......................... 38
Cihazların yan yana kurulması ........... 39
Kapı menteşelerinin değiştirilmesi .... 39
Alteração do sentido de abertura da
porta ....................................................... 33
Alteração da localização
do puxador da porta ........................... 34
Montar o distanciador da parede ..... 34
Alinhar o aparelho ............................... 34
Αλλαγή της λαβής της πόρτας .......... 37
Τοποθέτηση του τεμαχίου διατήρησης
απόστασης από τον τοίχο .................. 37
Ευθυγράμμιση της συσκευής ............ 37
Kapı kolunun değiştirilmesi ................ 40
Duvar mesafesi koruyucunun
monte edilmesi ..................................... 40
Cihazın doğru konumlandırılması ..... 40
Page 5
deInhaltsverzeichnis
525 mm
160°
deMontageanleitung
S tand ge rät
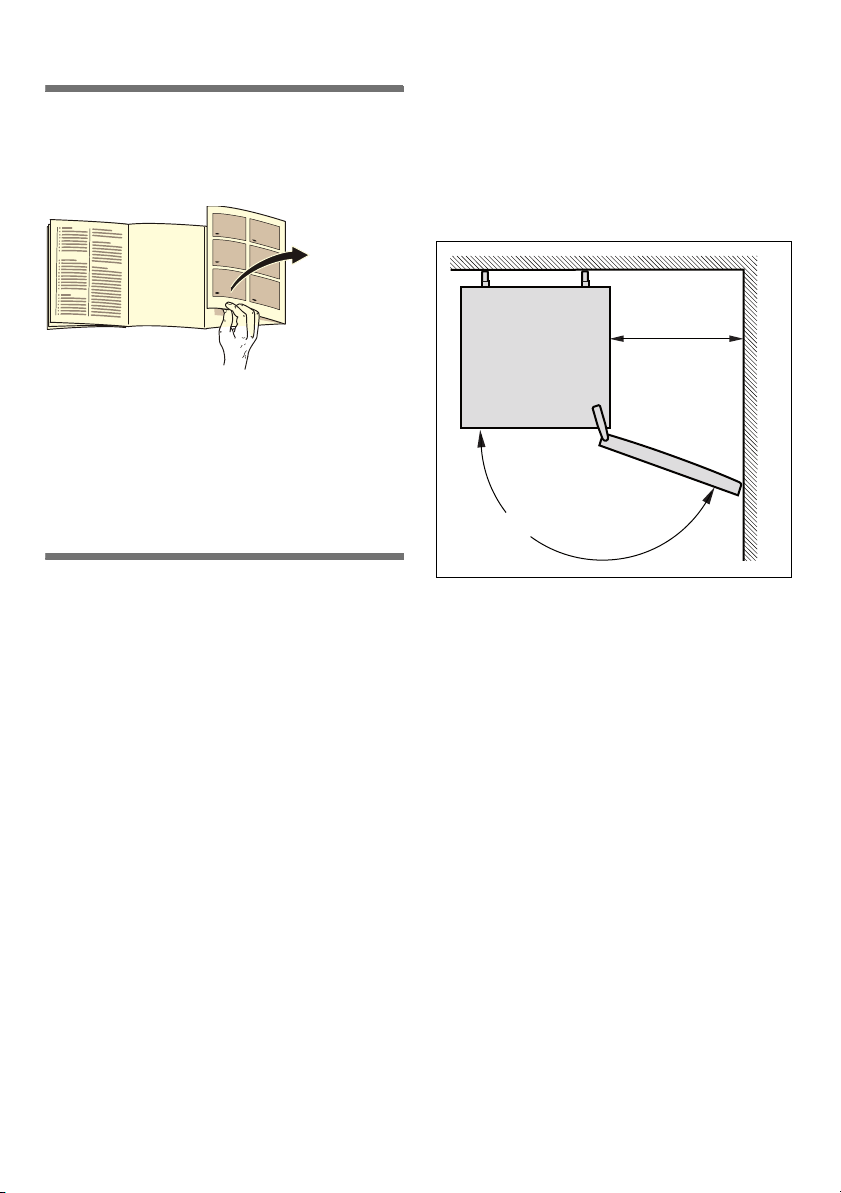
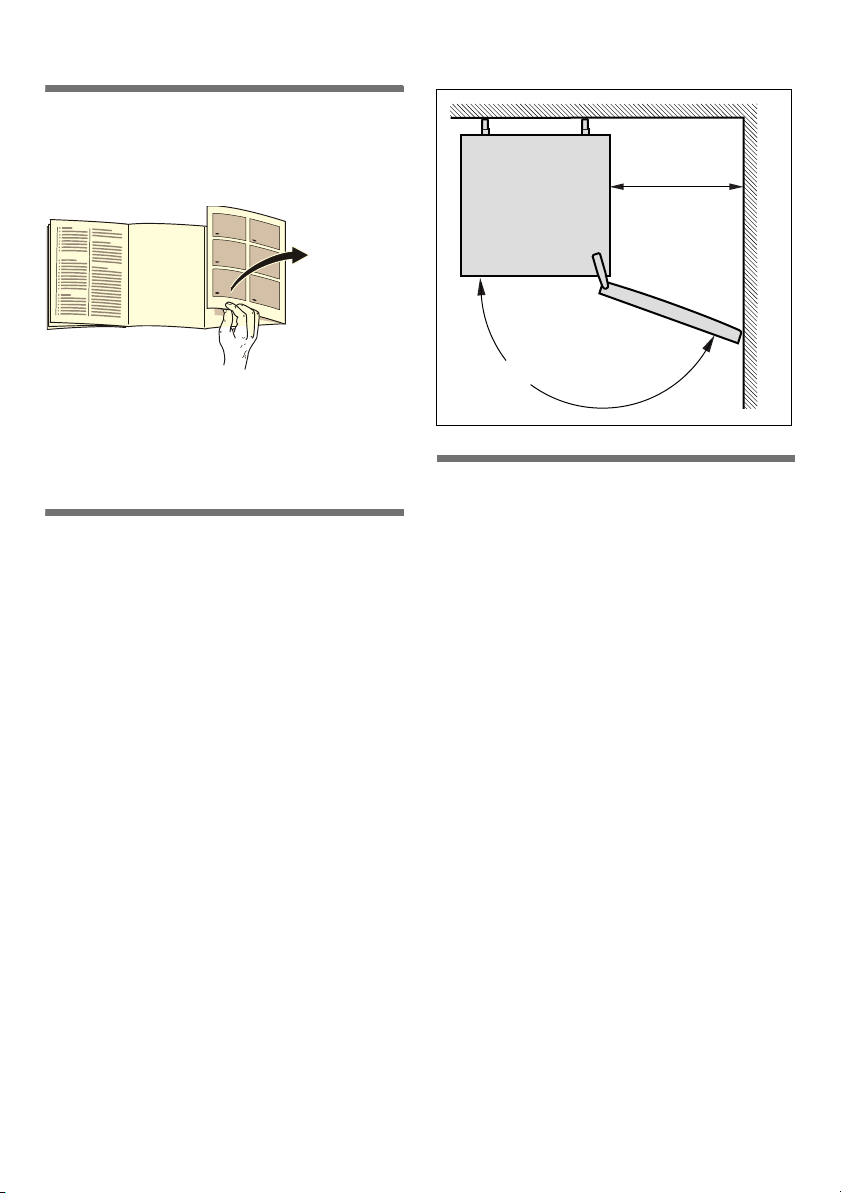
Montageanleitung verwenden
Bitte klappen Sie die letzte Seite mit den
Abbildungen aus.
Diese Montageanleitung gilt für mehrere
Modelle.
Abweichungen bei den Abbildungen sind
möglich.
Aufstellort
Als Aufstellort eignet sich ein trockener,
belüftbarer Raum. Der Aufstellort sollte
nicht direkter Sonnenbestrahlung
ausgesetzt und nicht in der Nähe einer
Wärmequelle wie Herd, Heizkörper etc.
sein. Wenn das Aufstellen neben einer
Wärmequelle unvermeidbar ist,
verwenden Sie eine geeignete
Isolierplatte oder halten Sie folgende
Mindestabstände zur Wärmequelle ein:
■ Zu Elektro- und Gasherden 3 cm.
■ Zu Öl- oder Kohleanstellherden
30 cm.
Der Boden am Aufstellort darf nicht
nachgeben. Boden eventuell verstärken.
Eventuelle Bodenunebenheiten mit
Unterlagen ausgleichen.
de
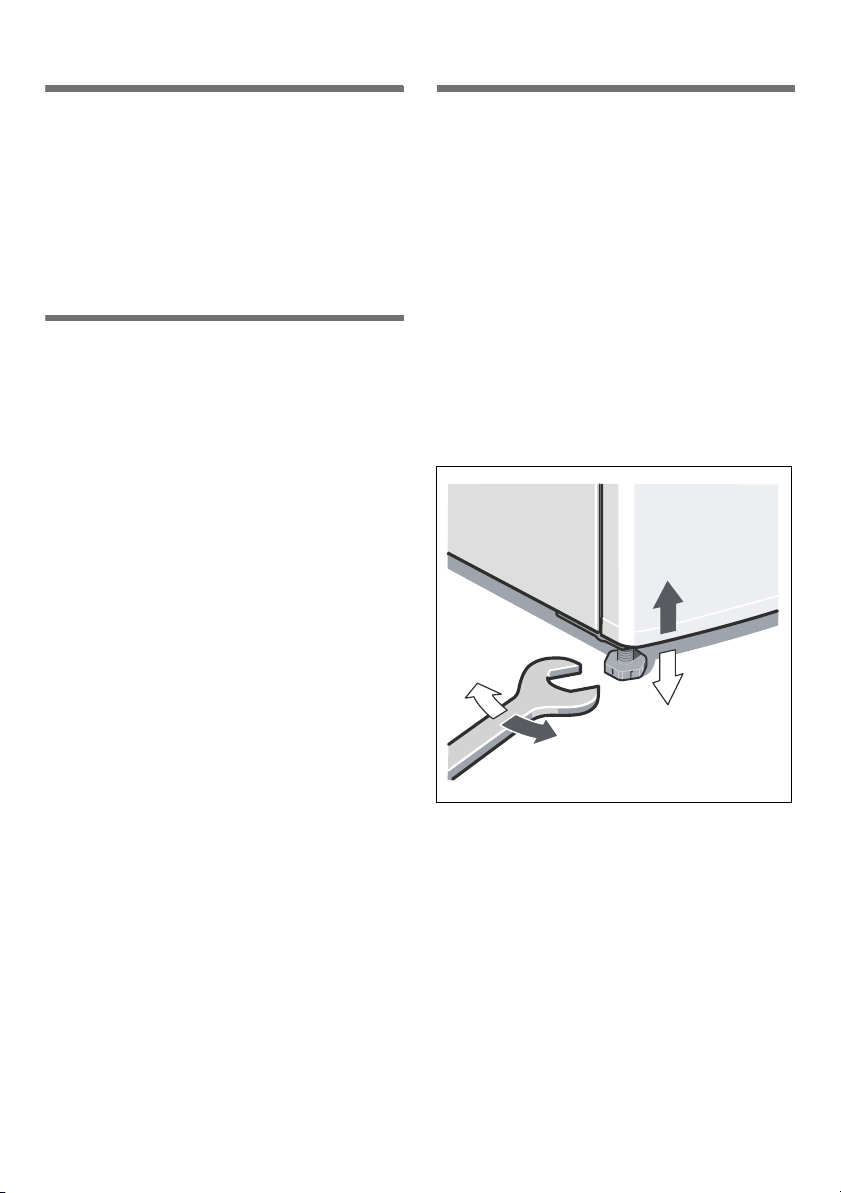
Wandabstand
Geräte mit aufgesetzten Griffen
benötigen auf der Anschlagseite
mindestens 525 mm Wandabstand,
damit die Tür um 160° geöffnet werden
kann.
5
Page 6

de
Geräte nebeneinander aufstellen
Bild 3
Achten Sie beim Aufstellen von zwei
Geräten darauf, dass das Kühlgerät links
und das Gefriergerät rechts steht.
Die rechte Seitenwand des Kühlgerätes
wird leicht beheizt. Dies verhindert
Schwitzwasserbildung zwischen den
Geräten.
Abstandshalter montieren
Bild 4
1. Auf der rechten Seite des Kühlgerätes
die Klebestellen mit Waschbenzin
oder Spiritus entfetten.
2. Abstandshalter in alle vier Ecken mit
einem Abstand von je 5 cm zu den
Seitenkanten kleben, damit ein
Mindestabstand zwischen den
Geräten gewährleistet ist.
Hinweis
Einen Verbindungssatz können Sie über
Ihren Händler beziehen.
Türanschlag wechseln
(falls erforderlich)
Wir empfehlen den Türanschlag durch
unseren Kundendienst wechseln zu
lassen. Die Kosten für einen
Türanschlagwechsel können Sie bei
Ihrem zuständigen Kundendienst
erfragen.
ã=Warnung
Während des Türanschlagwechsels darf
das Gerät nicht am Stromnetz
angeschlossen sein. Vorher Netzstecker
ziehen. Um die Geräterückseite nicht zu
beschädigen, ausreichend
Polstermaterial unterlegen. Gerät
vorsichtig auf die Rückseite legen.
Wechseln Sie den Türanschlag in
Reihenfolge der Zahlen. Bild 1
Hinweis
Wird das Gerät auf den Rücken gelegt,
darf der Wandabstandshalter nicht
montiert sein.
6
Page 7
de
SW 22
Türgriff wechseln
(falls erforderlich)
Bild 2 A/B
Wechseln Sie den Türgriff in Reihenfolge
der Zahlen.
Wandabstandshalter montieren
Bild 5
Falls vorhanden:
Wandabstandshalter montieren, um die
ausgewiesene Energieaufnahme des
Gerätes zu erreichen. Ein reduzierter
Wandabstand schränkt das Gerät in
seiner Funktion nicht ein. Die
Energieaufnahme kann sich dann
geringfügig erhöhen.
Abstand zur Rückwand
Ein Abstand von 75 mm darf nicht
überschritten werden.
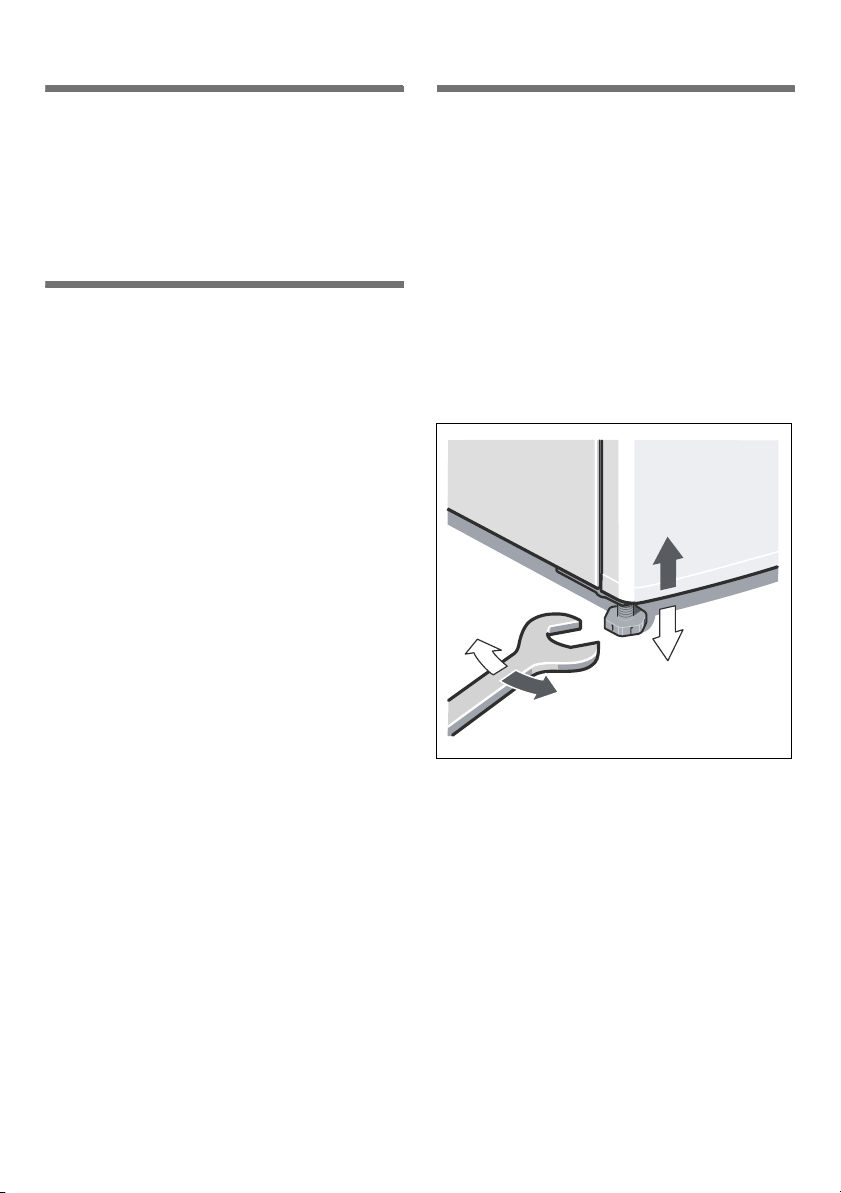
Gerät ausrichten
Gerät auf den vorgesehenen Platz stellen
und ausrichten. Es muss fest und eben
stehen. Unebenheiten des Bodens durch
die beiden vorderen Schraubfüße
ausgleichen. Zum Verstellen der
Schraubfüße einen Schraubenschlüssel
verwenden.
Hinweis
Das Gerät muss senkrecht stehen.
Richten Sie es mit Hilfe einer
Wasserwaage aus.
7
Page 8
en
enTable of Content s
enInstallation instructions
Free-standing appliance
Using the installation instructions
Please fold out the illustrated last page.
These installation instructions refer to
several models.
The diagrams may differ.
Installation location
A dry, well ventilated room is suitable as
an installation location. The installation
location should not be exposed to direct
sunlight and not placed near a heat
source, e.g. a cooker, radiator, etc. If
installation next to a heat source is
unavoidable, use a suitable insulating
plate or observe the following minimum
distances from the heat source:
■ 3 cm to electric or gas cookers.
■ 30 cm to an oil or coal-fired cooker.
The floor of the installation location must
not give way; if required, reinforce floor. If
the floor is uneven, compensate with
supports.
Distance from wall
Appliances with fitted handles must be
situated at least 525 mm from the wall
on the hinge side so that the door can
be opened by 160°.
525 mm
160°
Installing appliances next to each other
Fig. 3
When installing two appliances, ensure
that the refrigerator is on the left and the
freezer is on the right.
The right side panel of the refrigerator is
heated slightly. This prevents
condensation from forming between the
appliances.
Attaching spacers
Fig. 4
1. On the right side of the refrigerator
degrease the adhesive areas with
petroleum ether or spirit.
2. Stick spacers in all four corners at
a distance of 5 cm from the side
edges to ensure a minimum gap
between the appliances.
Note
You can purchase a connection set from
your dealer.
8
Page 9

en
Changing over the door hinges
(if required)
We recommend that you have the door
hinges changed over by our customer
service. You can find out the costs for
changing over the door hinges from your
appropriate customer service.
ã=Warning
While changing over the door hinges,
ensure that the appliance is not
connected to the power supply. Pull out
the mains plug beforehand. To prevent
damaging the back of the appliance,
place adequate padding underneath.
Carefully place the appliance on its back.
Change over the door hinges
in numerical sequence. Fig. 1
Note
If the appliance is placed on its back,
ensure that the wall spacer is not fitted.
Fitting the wall spacer
Fig. 5
If available:
Fit wall spacers to obtain the indicated
energy rating of the appliance. A
reduced wall gap will not restrict the
function of the appliance. The energy
rating may then increase slightly.
Distance to the back wall
The distance of 75 mm must not be
exceeded.
Aligning the appliance
Place the appliance in the designated
location and align. The appliance must
be level. If the floor is uneven, use the
front height-adjustable feet. Adjust the
height-adjustable feet with a wrench.
Note
The appliance must be upright. Please
align it with a spirit level.
Changing the door handle
(if required)
Fig. 2 A/B
Change the door handle in numerical
sequence.
SW 22
9
Page 10

fr
frTable des matières
frNotice de montage
Appareil indépendant
Utiliser la notice de montage
Veuillez déplier la dernière page,
illustrée, de la notice. Cette notice
de montage vaut pour plusieurs
modèles.
Selon le modèle, l’appareil peut différer
du contenu des illustrations.
Lieu d’installation
Un local sec et aérable convient comme
lieu d’installation. Il faudrait que le lieu
d’installation ne soit pas directement
exposé aux rayons solaires et pas
à proximité d’une source de chaleur
(cuisinière, radiateur, etc.).
Si l’installation à côté d’une source
de chaleur est inévitable, veuillez utiliser
un panneau isolant approprié ou
respecter les écarts minimums suivants
par rapport à la source de chaleur :
Sur l’emplacement, le sol ne doit pas
s’affaisser. Renforcez-le le cas échéant.
Placez des garnitures sous l’appareil
pour compenser les inégalités du sol
éventuelles.
Écart mural
Les appareils à poignée saillante
requièrent, sur le côté où la porte bute
contre le mur, un espace d’au moins
525 mm par rapport à ce dernier afin
que la porte puisse s’ouvrir à 160°.
525 mm
160°
■ 3 cm par rapport aux cuisinières
électriques ou à gaz.
■ 30 cm par rapport à un appareil
de chauffage au fuel ou au charbon.
10
Page 11

fr
Installation côte à côte des appareils
Fig. 3
Lorsque vous installez deux appareils,
placez le réfrigérateur à gauche
du congélateur.
Le réfrigérateur chauffe légèrement sa
paroi latérale droite. Ceci empêche
l’humidité dans l’air de se condenser
entre les appareils.
Montage de l’écarteur
Fig. 4
1. Dégraissez les emplacements
de collage visibles sur le côté droit
du réfrigérateur en utilisant
de l’essence à détacher ou de
l’alcool.
2. Collez les écarteurs aux quatre coins,
chacun à 5 cm des arêtes latérales,
afin de garantir un écart minimum
entre les appareils.
Remarque
Vous pouvez vous procurer un kit de
jonction par le biais de votre revendeur.
Inversion du sens d’ouverture de porte
(si nécessaire)
Nous recommandons de confier
l’inversion du sens d’ouverture de porte
à notre service après-vente. Pour
connaître le prix d’une inversion du sens
d’ouverture de porte, consultez votre
service après-vente compétent.
ã=Mise en garde
Pendant le changement du sens
d’ouverture de porte, l’appareil ne doit
pas être relié au secteur. Avant
le changement, débranchez la fiche
mâle de la prise de courant. Pour ne pas
endommager le dos de l’appareil, placez
en dessous suffisamment de matériau
amortisseur. Couchez prudemment
l’appareil sur le dos.
Inversez le sens d’ouverture de la porte
dans l’ordre des chiffres. Fig. 1
Remarque
Si l’appareil va être couché sur le dos, il
ne faut pas monter l’écarteur mural
latéral.
11
Page 12
fr
SW 22
Changer la poignée de porte
(si nécessaire)
Fig. 2 A/B
Changez la poignée de porte dans
l’ordre des chiffres.
Monter les écarteurs muraux
Fig. 5
Si présent :
Montez les écarteurs muraux pour
parvenir à la quantité mentionnée
d’énergie absorbée par l’appareil.
Un écart moins élevé par rapport au mur
ne restreint pas le fonctionnement
de l’appareil. Dans ce cas, l’énergie
absorbée peut augmenter légèrement.
L'écart par rapport à la paroi arrière
Il ne faut pas dépasser un écart
de 75 mm.
Ajuster l’appareil
Amenez l’appareil sur l’emplacement
prévu puis ajustez-le pour qu’il se
retrouve bien d’aplomb. Veillez à ce que
l’appareil repose parfaitement d’aplomb
sur un sol plan. Si le sol présente des
inégalités, compensez-les à l’aide des
deux pieds à vis situés à l’avant
de l’appareil. Pour modifier le réglage
des pieds à vis, servez-vous d’une clé
àfourche.
Remarque
L’appareil doit reposer à la verticale.
Ajustez-le à l’aide d’un niveau à bulle.
12
Page 13
itIndice
itIstruzio ni per il montaggio
Appare cch io ind i pe ndente
Uso delle istruzioni per il montaggio
Aprire l’ultima pagina con le figure. Il
presente manuale di montaggio vale
per più modelli.
Nelle illustrazioni sono possibili
differenze.
Luogo d’installazione
Il luogo d’installazione idoneo è un
locale asciutto, ventilabile. Il luogo
d’installazione non deve essere esposto
ad irraggiamento solare diretto e non
essere vicino ad una fonte di calore,
cucina, calorifero ecc. Se è inevitabile
l’installazione accanto ad una fonte
di calore, utilizzare un idoneo pannello
isolante, oppure rispettate le seguenti
distanze minime dalla fonte di calore:
it
Distanza dal muro
Gli apparecchi con maniglie sovrapposte
sul lato cerniere richiedono almeno
525 mm di distanza dal muro, per aprire
la porta a 160°.
525 mm
160°
■ Da cucine elettriche o a gas 3 cm.
■ Da stufe ad olio o a carbone 30 cm.
Il pavimento nel luogo d’installazione
non deve cedere, rinforzarlo se
necessario. Compensare gli spessori
le eventuali disuguaglianze
del pavimento.
13
Page 14
it
Disposizione affiancata degli apparecchi
Figura 3
Nella installazione di due apparecchi
prestare attenzione che il frigorifero sia
a sinistra ed il congelatore a destra.
La fiancata del frigorifero viene riscaldata
leggermente. Questo impedisce
la formazione di condensa fra gli
apparecchi.
Montaggio dei distanziatori
Figura 4
1. Sul lato destro del frigorifero
sgrassare i punti d’incollaggio con
benzina o alcol.
2. Per garantire una distanza minima fra
gli apparecchi, incollare i distanziatori
su tutti i quattro angoli ad una distanza
di 5 cm da ciascun bordo laterale.
Avvertenza
Un kit di collegamento può essere
acquistato presso il proprio fornitore.
Inversione della porta
(se necessario)
Consigliamo di fare invertire la chiusura
della porta dal nostro Servizio Assistenza
Clienti. Chiedere il costo per
un’inversione dell’apertura della porta
al servizio assistenza clienti competente
per la zona.
ã=Avviso
Durante l’inversione della porta
l’apparecchio non deve essere collegato
alla rete elettrica. Estrarre prima la spina
di alimentazione. Per non danneggiare la
parte posteriore dell’apparecchio,
mettere sotto sufficiente materiale
morbido. Deporre l’apparecchio
con cautela sul lato posteriore.
Cambiare il lato cerniere della porta
seguendo l'ordine numerico. Figura 1
Avvertenza
Il distanziatore murale non deve essere
montato se si depone l'apparecchio sul
dorso.
14
Sostituzione della maniglia della porta
(se necessario)
Figura 2 A/B
Sostituire la maniglia della porta
seguendo l'ordine numerico.
Page 15

it
SW 22
Montaggio del distanziatore murale
Figura 5
Se disponibile:
Per raggiungere l’assorbimento
di energia indicato dell’apparecchio
montare il distanziatore murale. Una
minore distanza dal muro non influisce
sulla funzionalità dell’apparecchio. Può
tuttavia causare una piccola
aumentazione di assorbimento
di energia.
Distanza dalla parete posteriore
Non superare la distanza di 75 mm.
Livellare l’apparecchio
Disporre e livellare l’apparecchio
nel luogo previsto. L’apparecchio deve
poggiare stabilmente sul pavimento
ed essere livellato. Compensare
le disuguaglianze del pavimento
per mezzo dei due piedini a vite anteriori.
Per regolare i piedini a vite utilizzare
un cacciavite.
Avvertenza
L’apparecchio deve essere verticale.
Livellarlo con una livella a bolla d'aria.
15
Page 16

nl
nlInhoud
nlMontagevoorschrift
Vrijstaand appa raat
Montagehandleiding gebruiken
De laatste bladzijde met de afbeeldingen
uitklappen. Dit montagevoorschrift is van
toepassing voor meerdere modellen.
Kleine afwijkingen in de afbeeldingen zijn
mogelijk.
De juiste plaats
Elke droge, goed te ventileren ruimte
is geschikt. Het apparaat niet in de zon
of naast een fornuis,
verwarmingsradiator of een andere
warmte bron plaatsen. Is plaatsing naast
een warmtebron niet te vermijden, maak
dan gebruik van een isolerende plaat of
neem de volgende minimumafstanden
tot de warmtebron in acht:
De vloer op de plaats van opstelling mag
niet meegeven, vloer eventueel
verstevigen. Eventuele oneffenheden
in de vloer opheffen door er iets onder te
leggen.
Afstand tot de wand
Bij apparaten met uitstekende
deurgrepen moet aan de kant van
de aanslag minimaal 525 mm afstand tot
de wand in acht worden genomen zodat
de deur 160° geopend kan worden.
525 mm
160°
■ Naast elektrische- of gasfornuizen
3cm.
■ Naast een CV-installatie 30 cm.
16
Page 17

nl
Apparaten naast elkaar opstellen
Afb. 3
Zorg er bij het opstellen van twee
apparaten voor dat de koelkast links
staat en de diepvriezer rechts.
De rechter zijwand van de koelkast wordt
licht verwarmd. Waardoor de vorming
van condenswater tussen de apparaten
wordt voorkomen.
Afstandhouders monteren
Afb. 4
1. Op de rechterzijde van de koelkast de
lijmplekken ontvetten met wasbenzine
of spiritus.
2. Op alle vier de hoeken een
afstandshouder vastlijmen op 5 cm
afstand van de zijkanten, om een
minimumafstand tussen de apparaten
te waarborgen.
Aanwijzing
Een verbindingsset is verkrijgbaar bij uw
leverancier.
Verwisselen van de deurophanging
(indien nodig)
Wij raden u aan de deurophanging door
de Servicedienst te laten verwisselen. De
kosten voor het verwisselen van de
deuraanslag kunt u opvragen bij de
Servicedienst in uw regio.
ã=Waarschuwing
Tijdens het verwisselen van
de deurophanging mag het apparaat niet
op het elektriciteitsnet zijn aangesloten.
Eerst de stekker uit het stopcontact
trekken. Leg voldoende zacht materiaal
op de grond, om te voorkomen dat
de achterkant van het apparaat
beschadigd raakt. Het apparaat
voorzichtig op zijn rug leggen.
Verwissel de deuraanslag in de volgorde
van de cijfers. Afb. 1
Aanwijzing
Wanneer het apparaat op de rug wordt
gelegd, mag de wandafstandhouder niet
gemonteerd zijn.
17
Page 18

nl
SW 22
Deurgreep verwisselen
(indien nodig)
Afb 2 A/B
Verwissel de deurgreep in de volgorde
van de cijfers.
Wandafstandhouder monteren
Afb. 5
Indien aanwezig:
Wandafstandhouder monteren om
de geplande energieopname van het
apparaat te bereiken. Een kleinere
afstand tot de muur heeft geen nadelige
invloed op de werking van het apparaat.
Het energieverbruik kan dan iets hoger
worden.
Afstand tot de achterwand
De afstand van 75 mm mag niet worden
overschreden.
Apparaat horizontaal zetten
Het apparaat op de daarvoor bestemde
plaats zetten en stellen. Het apparaat
moet waterpas en stevig op de vloer
staan. Oneffenheden in de vloer d.m.v.
de twee schroefvoetjes aan de voorkant
opheffen. Om de schroefvoetjes te
verstellen een steeksleutel gebruiken.
Aanwijzing
Het apparaat moet loodrecht staan. Zet
het apparaat in de juiste stand met
behulp van een waterpas.
18
Page 19

daIndholdsfortegne lse
daMonteringsvejl edning
Gu lvmo de l
Monteringsvejledning
da
anvendes
Klap de sidste sider med illustrationerne
ud. Denne monteringsvejledning gælder
for flere modeller.
Illustrationerne kan afvige fra modellerne.
Opstillingssted
Placér skabet i et tørt, godt ventileret
rum. Skabet bør ikke placeres et sted,
hvor det er udsat for direkte sollys, og
det må ikke være i nærheden af
en varmekilde som komfur, radiator osv.
Hvis det ikke kan undgås at placere
skabet ved siden af en varmekilde, skal
der anvendes en egnet isoleringsplade
eller følgende mindsteafstand skal
overholdes til varmekilden:
■ Til elektro- og gaskomfurer 3 cm.
■ Til brændeovn 30 cm.
Gulvet på opstillingsstedet må ikke
kunne give efter. Forstærk evt. gulvet.
Evt. ujævnheder udlignes ved at lægge
noget ind under.
Vægafstand
Skabe med påsatte greb skal
på anslagssiden anbringes mindst
525 mm fra væggen, så døren kan
åbnes 160°.
525 mm
160°
Opstilling af skabene ved siden af hinanden
Billede 3
Vær ved opstilling af to skabe
opmærksom på, at køleafdelingen står til
venstre og fryseafdelingen til højre.
Den højre sidevæg på skabet opvarmes
en smule. Dette forhindrer dannelse af
kondensvend mellem skabene.
Montering af afstandsholderen
Billede 4
1. Affedt klæbestederne med
rensebenzin eller sprit på den højre
side af køleafdelingen.
2. Klæb afstandsholdere i alle fire hjørner
med en afstand på 5 cm i forhold til
sidekanterne, så der er en mindste
afstand mellem skabene.
Bemærk
Et forbindelsessæt kan bestilles hos
forhandleren.
19
Page 20

da
SW 22
Ændring af dørens åbningsretning
(om nødvendigt)
Vi anbefaler at lade vor kundeservice
ændre dørens åbningsretning.
Omkostningerne for skift af et døranslag
kan du få oplyst hos den ansvarlige
kundeservice.
ã=Advarsel
Skabet må ikke være forbundet
med strømnettet, når dørhængslerne
flyttes. Træk stikket ud forinden. Læg
tilstrækkeligt polstermateriale ind under,
så bagsiden af skabet ikke beskadiges.
Læg skabet forsigtigt på ryggen.
Skift dørhængslet iht. tallenes
rækkefølge. Billede 1
Bemærk
Lægges skabet på ryggen, må
vægafstandsholderen ikke være
monteret.
Udskiftning af dørgrebet
Vægafstandsholder monteres
Billede 5
Hvis til stede:
Monter vægafstandsholdere for at opnå
apparatets dokumenterede
energiforbrug. En reduceret vægafstand
indskrænker ikke apparatets funktion.
Energiforbruget kan så øge sig minimalt.
Afstand til bagvæggen
Afstanden på 75 mm må ikke
overskrides.
Justering af skabet
Stil skabet det ønskede opstillingssted
og positionér det rigtigt. Skabet skal stå
fast på en lige undergrund. Ujævnheder i
gulvet udlignes med de to forreste
skruefødder. Skruefødderne justeres
med en skruetrækker.
Bemærk
Skabet skal stå lodret. Justér det vha. et
vaterpas.
(om nødvendigt)
Billede 2 A/B
Skift dørgrebet iht. tallenes rækkefølge.
20
Page 21

noInnholdsforteg nelse
525 mm
160°
noMonteringsanvisning
F ritts tående appar at
Bruk av monteringsveiledningen
Brett ut siden med bildene. Denne
monteringsanvisningen gjelder for flere
modeller.
Det er mulig med avvik på bildene.
Plasseringssted
Som plasseringssted egnes et tørt rom
som kan ventileres. Plasseringsstedet
bør ikke være utsatt for direkte sollys og
ikke være i nærheten av en varmekilde
som f. eks. komfyr, ovn etc. Dersom det
ikke kan unngås at apparatet blir
plassert i nærheten av en varmekilde,
må det brukes en isoleringsplate eller
det må overholdes følgende minste
avstander til varmekilden:
no
Gulvet på plasseringsstedet må ikke gi
etter, eventuelt må gulvet forsterkes.
Eventuelle ujevnheter i gulvet
må jevnes ut med å legge noe under.
Avstand fra veggen
Apparater med påsatt håndtak trenger
en minste avstand på anslagssiden til
veggen på 525 mm, slik at døren kan
åpnes 160°.
■ Til elektrisk eller gasskomfyr 3 cm.
■ Til olje- eller kullkomfyr 30 cm.
21
Page 22

no
Oppstilling av apparatene ved siden av hverandre
Bilde 3
Ved oppstilling av to apparater må det
passes på at kjøleapparatet står til
venstre og fryseapparatet står til høyre.
Den høyre sideveggen på kjøleskapet
blir lett oppvarmet. Dette forhindrer at det
danner seg kondensvann mellom
apparatene.
Montering av avstandsholder
Bilde 4
1. Fjern limflatene på høyre siden av
kjøleapparatet med lettbensin eller
med sprit.
2. Lim på avstandsholderen i alle fire
hjørnene med en avstand på 5 cm
hver til sidekantene, slik at det
overholdes en minste avstand til
apparatene.
Henvisning
En forbindelsessats kan fåes hos
forhandleren.
Omhengsling av døren
(dersom nødvendig)
Vi anbefaler at omhengslingen av døren
blir foretatt av vår kundeservice. Din
kundeservice vil gi deg informasjon
om kostnadene for en omhengsling
av døren.
ã=Advarsel
Under omhengslingen må apparatet ikke
være tilkoplet strømnettet. Trekk først ut
støpselet. For ikke å skade baksiden på
apparatet, må det legges tilstrekkelig
polstermaterial under. Legg apparatet
forsiktig ned på baksiden.
Omhengsling av døren foretas i tallenes
rekkefølge. Bilde 1
Henvisning
Dersom apparatet blir lagt på ryggen, må
avstandsholderen til veggen ikke være
montert.
22
Page 23

no
Skift av dørhåndtak
(dersom nødvendig)
Bilde 2 A/B
Skift dørhåndtaket i tallenes rekkefølge.
Montering av avstandsholderen til veggen
Bilde 5
Dersom dette finnes:
Monter avstandsholder til veggen, for
å oppnå det oppgitte energiopptaket til
apparatet. En redusert avstand til veggen
innskrenker ikke funksjonen til apparatet.
Energiopptaket kan forhøyes noe.
Avstand til bakveggen
Avstanden på 75 mm må ikke
overskrides.
Innretting av apparatet
Sett apparatet opp på den plassen det
skal stå og rett det inn. Apparatet må stå
fast og jevnt på gulvet. Ujevnheter
i gulvet kan utjevnes med hjelp av de to
skruføttene framme. For innstilling
av skruføttene må det brukes
en skrutrekker.
Henvisning
Apparatet må stå loddrett. Rett den inn
med et vaterpass.
SW 22
23
Page 24

sv
525 mm
160°
svInnehållsförtec kning
svMonterin gsanvisning
Fristående skåp
Använd monteringsanvisningen
Slå upp de sista sidorna med bilder.
Denna monteringsanvisning gäller
för flera modeller.
Avvikelser från bilderna kan förekomma.
Platsen
Placera skåpet i ett torrt rum med god
ventilation. Ställ den inte i direkt solljus
eller i närheten av en värmekälla som
spis, kamin etc. Om detta inte går
att undvika måste en lämplig isolerskiva
användas eller följande minsta avstånd
till värmekälla beaktas:
Golvet på uppställningsplatsen
får inte ge vika. Förstärk eventuellt
golvet. Ev. ojämnheter i golvet måste
utjämnas med mellanlägg.
Väggavstånd
Skåp med handtag behöver minst
525 mm avstånd till väggen
på anslagssidan för att dörren ska kunna
öppnas 160°.
■ Till elektriska spisar och gasspisar,
3cm.
■ Till annan värmekälla, 30 cm.
24
Page 25

sv
Ställa skåpen bredvid varandra
Bild 3
Se vid uppställning av två skåp till att
kylskåpet ställs till vänster och frysskåpet
till höger.
Kylskåpets högra sidovägg blir lätt
uppvärmd. Detta förhindrar
att kondensvatten bildas mellan de
skåpen.
Montera avståndshållare
Bild 4
1. Avfetta klisterställena på högra sidan
av kylskåpet med tvättbensin eller
sprit.
2. Klistra fast avståndshållare i alla fyra
hörnen med ett avstånd om vardera 5
cm till sidokanterna så att ett minsta
avstånd mellan skåpen garanteras.
Råd
En kopplingssats kan du köpa hos din
handlare.
Hänga om dörren
(vid behov)
Vi rekommenderar att ni vänder er till
service för att få hjälp med att hänga om
dörren. Hör dig för hos närmaste service
beträffande kostnaderna för att hänga
om dörrarna.
ã=Varning
När man hänger om dörren får inte
skåpet vara anslutet till elnätet. Dra först
ut nätkontakten ur vägguttaget. För att
inte produktens baksida ska skadas
måste tillräckligt med skyddande
material läggas under. Lägg försiktigt ner
skåpet med baksidan nedåt.
Häng om dörrarna i sifferordning. Bild 1
Råd
Om skåpet läggs med baksidan nedåt
får inte väggavståndshållaren vara
monterad.
25
Page 26

sv
Flytta handtag
(vid behov)
Bild 2 A/B
Flytta handtaget i sifferordning.
Montera väggavståndshållare
Bild 5
Om det finns:
Montera väggavståndshållare för att nå
den för apparaten redovisade
energiupptagningen. Ett reducerat
väggavstånd inskränker ej apparatens
funktion. Energiupptagningen kan då
höjas något.
Avstånd till bakre väggen
Avståndet på 75 mm får inte överskridas.
Ställa upp skåpet
Ställ upp skåpet på avsedd plats och se
till att det inte lutar. Skåpet måste stå på
plant och stadigt underlag. Justera
skåpet med de båda skruvfötterna i
skåpets framkant om golvet är ojämnt.
Använd en skruvmejsel för att ställa in
skruvfötterna.
Råd
Skåpet måste stå lodrätt. Rikta in det
med hjälp av ett vattenpass.
SW 22
26
Page 27

fiSisällysluettelo
fiAsennusohjeet
Vapaasti sijoitettava laite
Näin käytät asennusohjetta
Käännä esiin ohjeiden lopussa oleva
kuvasivu. Asennusohjeet pätevät eri
malleille.
Kuvissa saattaa olla laitemallikohtaisia
eroja.
Sijoituspaikka
fi
Etäisyys seinään
Kun kaapin ovikahvat on sijoitettu oven
päälle, on saranapuolen ja seinän välillä
oltava tilaa vähintään 525 mm, jotta oven
voi avata 160°.
525 mm
160°
Sijoituspaikaksi soveltuu kuiva tila, jossa
on hyvä ilmanvaihto. Sijoituspaikka ei
saa olla alttiina suoralle
auringonpaisteelle eikä
lämmönlähteiden, kuten lieden,
lämpöpattereiden tms. välittömässä
läheisyydessä. Jos laitteen sijoittamista
lämmönlähteiden viereen ei voi välttää,
käytä tarvittaessa sopivaa eristyslevyä tai
noudata seuraavia vähimmäisetäisyyksiä:
■ Sähkö- ja kaasulieteen 3 cm.
■ Öljy- tai hiililämmitteiseen uuniin
30 cm.
Sijoituspaikan lattia ei saa antaa myöten,
vahvista lattiaa tarvittaessa. Korjaa
lattiassa mahdollisesti olevat
epätasaisuudet asettamalla pakastimen
alle esim. tukeva levy.
Laitteiden sijoitus vierekkäin
Kuva 3
Kun asennat kaksi laitetta vierekkäin,
varmista että jääkaappi on vasemmalla
ja pakastin oikealla puolella.
Jääkaapin oikeanpuoleisen sivuseinän
lämmittämisellä estetään
kondenssiveden muodostuminen
kaappien väliselle alueelle.
Seinävälilevyjen asennus
Kuva 4
1. Poista rasva jääkaapin
oikeanpuoleisessa sivuseinässä
olevista kiinnityskohdista
pesubensiinillä tai talousspriillä.
27
Page 28

fi
SW 22
2. Kiinnitä seinävälilevy kaikkiin neljään
kulmaan aina 5 cm:n päähän
sivureunasta, jotta laitteiden välinen
vähimmäisetäisyys on varmistettu.
Huomautus
Liitossarjan voit hankkia jälleenmyyjältä.
Oven kätisyyden vaihto
(mikäli tarpeen)
On suositeltavaa jättää oven kätisyys
valtuutetun huoltopalvelun
vaihdettavaksi. Huoltoliikkeestä saat
tietää, mitä kuluja sinulle aiheutuu oven
kätisyyden vaihdosta.
ã=Varoitus
Kylmälaite ei saa olla kytkettynä
sähköverkkoon kätisyyttä vaihdettaessa.
Irrota ennen töihin ryhtymistä
verkkopistoke pistorasiasta. Laita
riittävästi pehmeää materiaalia suojaksi
laitteen alle, jotta sen takaseinä ei
vahingoitu. Aseta kylmälaite varovasti
selälleen.
Vaihda oven kätisyys
numerojärjestyksessä. Kuva 1
Seinävälilevyn asennus
Kuva 5
Mikäli laitteen mukana:
Asenna seinävälilevy, jotta kylmälaitteen
energiankulutus vastaa ilmoitettua. Jos
laitteen ja seinän välinen tila on
pienempi, se ei haittaa laitteen toimintaa.
Energiankulutus saattaa tällöin lisääntyä
jonkin verran.
Etäisyys takaseinään
Etäisyys ei saa olla yli 75 mm.
Laitteen suoristaminen
Aseta kaappi sille varattuun paikkaan ja
suorista. Kylmälaitteen on seistävä
tukevasti tasaisella alustalla. Jos lattia on
epätasainen, suorista laite sen
etureunassa olevien ruuvijalkojen avulla.
Säädä ruuvijalkojen korkeus ruuvitaltan
avulla.
Huomautus
Kaapin tulee olla pystysuorassa. Suorista
se vesivaa’an avulla.
Huomautus
Jos asetat kaapin selälleen, ei
seinävälilevy saa olla asennettuna.
Ovikahvan vaihto
(mikäli tarpeen)
Kuva 2 A/B
Vaihda ovikahva numerojärjestyksessä.
28
Page 29

esÍndice
esInstrucciones de montaje
Ap ara to de libr e in stalac ión
Instalar el aparato de conformidad con las instrucciones de montaje
Despliegue, por favor, la última página
con las ilustraciones. Las presentes
instrucciones de montaje son válidas
para varios modelos.
Por ello es posible que las ilustraciones
muestren detalles y características de
equipamiento que no concuerdan con
las de su aparato concreto.
es
■ Cocinas eléctricas y de gas, 3 cm.
■ Cocinas de gas-oil o de carbón,
30 cm.
El suelo en el lugar de emplazamiento
del aparato deberá poseer una suficiente
capacidad de sustentación. En caso
necesario deberá reforzarse
adecuadamente. Las posibles
irregularidades del suelo se pueden
compensar mediante calzos.
Distancia respecto a la pared
En los aparatos con manillas
superpuestas deberá observarse en el
lateral con el tope una distancia mínima
de 525 mm respecto a la pared, a fin de
poder abrir la puerta en un ángulo
de 160°.
525 mm
Lugar de emplazamiento
El lugar más adecuado para el
emplazamiento del aparato es una
habitación seca, dotada de una buena
ventilación. El aparato no debe instalarse
de forma que reciba directamente los
rayos del sol, ni tampoco encontrarse
próximo a focos activos de calor tales
como cocinas, calefacciones, etc. No
obstante, si esto último fuera inevitable,
se habrá de proteger la unidad con un
panel aislante adecuado, o bien
observar las siguientes distancias
mínimas de separación con respecto a
la fuente de calor en cuestión:
160°
29
Page 30

es
Yuxtaposición de los aparatos
Fig. 3
Al yuxtaponer los aparatos, colocar
siempre el frigorífico en el lado izquierdo
y la unidad congeladora, en el lado
derecho.
El panel lateral derecho del frigorífico
es calentado ligeramente. De esta
manera se evita la formación de agua
de condensación entre ambas unidades.
Montar los soportes distanciadores
Fig. 4
1. Desengrasar los puntos adhesivos
de los distanciadores en el lateral
derecho del aparato con gasolina
para limpieza de uso corriente
o alcohol de limpiar.
2. Pegar los distanciadores en las cuatro
esquinas a una distancia de 5 cm
respecto de los laterales, a fin de
observar la distancia mínima entre los
aparatos.
Nota
En el Servicio de Asistencia Técnica
Oficial de la marca se puede adquirir un
kit de unión.
Cambiar el sentido de apertura de la puerta
(en caso necesario)
Aconsejamos encargar los trabajos
necesarios para cambiar el sentido
de apertura de la puerta al Servicio
de Asistencia Técnica Oficial de
la marca. Los costes para cambiar
el sentido de apertura de la puerta los
puede consultar en el Servicio de
Asistencia Oficial de la marca de su
zona o localidad.
ã=Advertencia
El aparato no deberá estar conectado
a la red eléctrica durante la ejecución
de los trabajos para cambiar el sentido
e apertura de la puerta. Extraer a tal
efecto previamente el cable de conexión
del aparato de la toma de corriente. Con
objeto de no causar daños en la parte
posterior del aparato deberá colocarse
debajo de éste suficiente material
de acolchado. Volcar el aparato
cuidadosamente hasta hacerlo
descansar sobre su parte posterior.
Cambie el sentido de apertura de
la puerta ejecutando las operaciones
según el orden marcado por
los números. Fig. 1
Nota
En caso de volcar el aparato y colocarlo
sobre su parte posterior, el distanciador
respecto a la pared no deberá estar
montado.
30
Page 31

es
SW 22
Cambiar la manilla de la puerta
(en caso necesario)
Fig. 2 A/B
Ejecutar las operaciones según el orden
marcado por los números.
Montar los distanciadores
Fig. 5
En caso necesario:
Montar los elementos distanciadores
respecto a la pared para alcanzar
la absorción de energía indicada. Una
distancia reducida respecto a la pared
no influye negativamente en el
funcionamiento del aparato. Aunque
puede ocurrir que la absorción
de energía aumente ligeramente.
Distancia respecto a la pared
No se deberá superar la distancia
de 75 mm.
Nivelar el aparato
Colocar el aparato en su emplazamiento
definitivo y nivelarlo. El aparato deberá
asentarse firmemente sobre un piso
o base plana y horizontal. Las posibles
irregularidades del suelo se pueden
compensar con ayuda de los soportes
roscados del frontal del aparato. Para
enroscar o desenroscar los soportes se
requiere una llave inglesa.
Nota
El aparato tiene que montarse en
posición vertical. Utilice un nivel
de burbuja para su nivelación.
31
Page 32

pt
ptÍndice
ptInstruções de montagem
Ap a r el ho S ol o
Utilizar as Instruções de montagem
Favor desdobrar a última página com as
ilustrações. Estas Instruções
de montagem são válidas para vários
modelos.
São, por isso, possíveis diferenças nas
imagens.
Local da instalação
O pavimento no local da instalação não
pode ceder, se necessário, reforçá-lo.
Compensar as eventuais irregularidades
do chão com calços.
Distância em relação à parede
Os aparelhos com os puxadores
aplicados necessitam, no lado
do batente, de um mínimo de 525 mm
de distância em relação à parede, para
que a porta possa ser aberta 160°.
525 mm
Como local de instalação, recomenda-se
um local seco e com boa ventilação.
O local de instalação não deve sofrer
a irradiação directa dos raios solares,
nem estar próximo de uma fonte
de calor, como fogão, corpo
de aquecimento etc. Se a instalação
junto de uma fonte de calor for
inevitável, utilizar uma placa
de isolamento adequada ou manter as
seguintes distâncias mínimas em relação
à fonte de calor:
■ Em relação a fogões eléctricos e
agás 3cm.
■ Em relação a fogões a óleo ou
acarvão 30cm.
32
160°
Page 33

pt
Instalação dos aparelhos um ao lado do outro
Fig. 3
Ter atenção, durante a instalação dos
dois aparelhos, para que o frigorífico
fique à esquerda e o congelador
àdireita.
A parede lateral direita do frigorífico
é ligeiramente aquecida. Isto evita
a formação de água de condensação
entre os aparelhos.
Montagem dos suportes distanciadores
Fig. 4
1. No lado direito do frigorífico, limpar
bem a gordura do local de colagem,
utilizando benzina ou álcool.
2. Colar os suportes distanciadores em
todos os quatro cantos, cada um a
uma distância de 5 cm às arestas
laterais para que esteja assegurada
uma distância mínima entre os
aparelhos.
Indicação
Pode adquirir um conjunto de ligação
através do seu vendedor.
Alteração do sentido de abertura da porta
(se necessário)
Recomendamos que a alteração
do sentido de abertura da porta seja
efectuada pelos nossos Serviços
Técnicos. Junto dos Serviços Técnicos
poderá saber quais os custos da
alteração do sentido de abertura
da porta.
ã=Aviso
Durante a alteração do sentido
de abertura da porta o aparelho não
pode estar ligado à corrente eléctrica.
Desligar, primeiro, a ficha da tomada.
Para não danificar a parte traseira do
aparelho, colocar por baixo material
almofadado em quantidade suficiente.
Deitar, cuidadosamente, o aparelho
sobre a parte de trás.
Alterar o sentido de abertura da porta,
pela sequência dos números. Fig. 1
Indicação
Se o aparelho for assente pela parte
trazeira, o distanciador da parede não
pode ser montado.
33
Page 34

pt
SW 22
Alteração da localização do puxador da porta
(se necessário)
Fig. 2 A/B
Alterar a localização do puxador
da porta, pela sequência dos números.
Montar o distanciador da parede
Fig. 5
Se existente:
Montar o distanciador em relação à
parede, para atingir o consumo de
energia indicado para o aparelho. Uma
distância reduzida em relação à parede
não limita o aparelho quanto ao seu
funcionamento. O consumo de energia
pode aumentar insignificante.
Distância da parede traseira
A distância de 75 mm não deve ser
ultrapassada.
Alinhar o aparelho
Colocar o aparelho no local previsto e
alinhá-lo. Depois de instalado, o
aparelho tem que ficar firme e nivelado.
As irregularidades no chão devem ser
compensadas através dos dois pés
roscados existentes na parte frontal do
aparelho. Para ajustar os pés roscados,
utilizar uma chave de parafusos.
Indicação
O aparelho tem que ficar na vertical.
Alinhar o aparelho com a ajuda de um
nível de bolha de ar.
34
Page 35

elΠίνακας περιεχομ ένων
525 mm
160°
el Οδηγίες τοποθέτησης
Α ν ε ξ άρ τη τη συσκε υή
Χρήση των οδηγιών τοποθέτησης
Παρακαλούμε, ανοίξτε την τελευταία
σελίδα με τις απεικονίσεις. Αυτές οι
οδηγίες τοποθέτησης ισχύουν για
περισσότερα μοντέλα.
Οι απεικονίσεις είναι δυνατόν να
διαφέρουν.
Τόπος τοποθέτησης
Ως τόπος τοποθέτησης είναι κατάλληλος
κάθε στεγνός, αεριζόμενος χώρος.
Οχώρος τοποθέτησης δεν πρέπει να
είναι άμεσα εκτεθειμένος στην ηλιακή
ακτινοβολία ούτε να βρίσκεται κοντά σε
πηγή θερμότητας όπως κουζίνα,
καλοριφέρ κτλ. Αν η τοποθέτηση δίπλα
σε πηγή θερμότητας είναι αναπόφευκτη,
χρησιμοποιήστε κατάλληλη μονωτική
πλάκα ή τηρήστε τις ακόλουθες
ελάχιστες αποστάσεις από την πηγή
θερμότητας
:
el
Το δάπεδο στον τόπο τοποθέτησης δεν
επιτρέπεται να υποχωρεί, ενισχύστε
ενδεχομένως το δάπεδο. Αντισταθμίστε
ενδεχόμενες ανωμαλίες του δαπέδου
τοποθετώντας κάτω από τη συσκευή
κατάλληλο υπόθεμα.
Απόσταση από τον τοίχο
Οι συσκευές με πρόσθετες,
μη ενσωματωμένες λαβές χρειάζονται
στην πλευρά, στην οποία ανοίγει η πόρτα,
τουλάχιστον 525 mm απόσταση από τον
τοίχο, ώστε να μπορείτε να ανοίγετε την
πόρτα στις 160°.
■ Από ηλεκτρικές κουζίνες και κουζίνες
αερίου 3cm.
■ Από κουζίνες πετρελαίου ή κάρβουνου
30 cm.
35
Page 36

el
Εγκατάσταση των συσκευών ημία δίπλα στην άλλη
Εικόνα 3
Προσοχή κατά την εγκατάσταση δύο
συσκευών, το ψυγείο να στέκεται
αριστερά και ο καταψύκτης δεξιά.
Το δεξί πλευρικό τοίχωμα της ψυκτικής
συσκευής θερμαίνεται ελαφρά. Αυτό
εμποδίζει το σχηματισμό νερού
συμπύκνωσης μεταξύ των συσκευών.
Τοποθέτηση του τεμαχίου τήρησης απόστασης
Εικόνα 4
1. Από τη δεξιά πλευρά του ψυγείου
απομακρύνετε το λίπος από τα σημεία
κόλλησης με βενζίνη καθαρισμού ήμε
οινόπνευμα.
2. Κολλήστε τα τεμάχια διαχωρισμού και
στις τέσσερεις γωνίες με απόσταση
5cm από τις εκάστοτε πλαϊνές ακμές,
ώστε να διασφαλίζεται η ελάχιστη
απόσταση ανάμεσα στις συσκευές.
Υπόδειξη
Σετ σύνδεσης πωλούνται στα ειδικά
καταστήματα
.
Αλλαγή της φοράς της πόρτας
(αν χρειάζεται)
Σας συνιστούμε να αναθέσετε την
αλλαγή της φοράς της πόρτας στην
Υπηρεσία τεχνικής εξυπηρέτησης των
πελατών μας. Το κόστος για την αλλαγή
της φοράς της πόρτας μπορείτε να το
πληροφορηθείτε από την αρμόδια
Υπηρεσία τεχνικής εξυπηρέτησης
πελατών.
ã=Προειδοποίηση
Κατά την αλλαγή της φοράς της πόρτας
η συσκευή δεν επιτρέπεται να είναι
συνδεμένη στο δίκτυο του ρεύματος.
Βγάλτε προηγουμένως το φις από την
πρίζα. Για να αποφευχθούν ζημίες στην
οπίσθια πλευρά της συσκευής,
τοποθετήστε την επάνω σε επαρκή
ποσότητα υλικού συσκευασίας.
Αποθέτετε τη συσκευή προσεκτικά στην
πίσω μεριά της.
Αλλάξτε
με την ακολουθία των αριθμών.
Εικόνα 1
Υπόδειξη
Αν η συσκευή πρόκειται να τοποθετηθεί
στην οπίσθια πλευρά της, δεν επιτρέπεται
να είναι τοποθετημένο το τεμάχιο
διατήρησης απόστασης από τον τοίχο.
τη φορά της πόρτας σύμφωνα
36
Page 37

el
SW 22
Αλλαγή της λαβής της πόρτας
(αν χρειάζεται)
Εικόνα 2 A/B
Αλλάξτε τη λαβή της πόρτας σύμφωνα με
την ακολουθία των αριθμών.
Τοποθέτηση του τεμαχίου διατήρησης απόστασης από τον τοίχο
Εικόνα 5
Αν υπάρχει:
Τοποθετήστε το τεμάχιο διατήρησης
απόστασης από τον τοίχο, ώστε να
πετύχετε την αναφερόμενη
απορροφούμενη ενέργεια της συσκευής.
Η μειωμένη απόσταση από τον τοίχο δεν
περιορίζει τη λειτουργία της συσκευής. Η
απορρόφηση ενέργειας μπορεί να
αυξηθεί ελάχιστα στην περίπτωση αυτή.
Ευθυγράμμιση της συσκευής
Τοποθετήστε τη συσκευή στον
προβλεπόμενο χώρο και ευθυγραμμίστε
την. Η συσκευή πρέπει να στέκεται
σταθερά και επίπεδα. Αντισταθμίστε τις
ανωμαλίες του δαπέδου με τα δύο
εμπρόσθια βιδωτά πόδια. Για τη ρύθμιση
των βιδωτών ποδιών χρησιμοποιήστε
κατσαβίδι.
Υπόδειξη
Η συσκευή πρέπει να στέκεται κάθετα.
Παρακαλείσθε να ευθυγραμμίσετε τη
συσκευή με τη βοήθεια
αλφαδιού.
Απόσταση από το οπίσθιο τοίχωμα
Η απόσταση των 75 mm δεν επιτρέπεται
να υπερβληθεί.
37
Page 38

tr
trİçindekiler
trMontaj kılavuzu
So l o ci haz
Montaj kılavuzunun kullanılması
Lütfen önce resimlerin bulunduğu son
sayfayı açınız. Bu montaj kılavuyu birden
fazla model için geçerlidir.
Resimlerde farklılıklar olabilir.
Cihazın kurulacağı yer
Cihazın kurulacağı yerin kuru ve
havalandırılabilen bir yer olması gerekir.
Cihazın kurulduğu yer doğrudan güneş
ışınlarına maruz kalmamalı ve ocak,
radyatör vs. gibi bir ısı kaynağının
yanında olmamalıdır. Eğer cihazın bir ısı
kaynağının yanına kurulması
önlenemiyorsa, uygun bir izolasyon
levhası kullanılmalıdır veya ısı kaynağına
olan asgari mesafe aşağıdaki gibi
olmalıdır:
Cihazın kurulacağı yerdeki zemin
esnememelidir, gerekirse takviye ediniz.
Zeminin düzgün olmaması halinde,
uygun altlıklar kullanarak, dengesizliği
gideriniz.
Duvar mesafesi
Kolları cihaz üzerine takılan cihazlarda,
kapının 160° açılabilmesi için, menteşe
tarafında duvara 525 mm mesafeye
olması gerekir.
525 mm
160°
■ Elektrikli veya gazlı ocak ve fırınlarda:
3cm.
■ Gaz yağı ve kömür sobalarından:
30 cm.
38
Page 39

tr
Cihazların yan yana kurulması
Resim 3
İki cihaz kurulacağı zaman, soğutucunun
sol tarafa ve dondurucunun sağ tarafa
kurulmasına dikkat ediniz.
Cihazın sağ yan yüzü hafif ısıtılır. Bu
sayede cihazlar arasında terleme veya
kondanse su oluşması önlenmiş olur.
Mesafe koruma parçasının monte edilmesi
Resim 4
1. Soğutucunun sağ tarafındaki
yapıştırma yerlerinin yüzeyini
temizleme benzini veya ispirto ile silip
yağdan arındırınız.
2. Cihazlar arasında bir asgari mesafe
olmasının sağlanabilmesi için, her dört
köşeye yan kenarlara 5'er cm mesafe
olacak şekilde mesafe koruma
parçaları yapıştırınız.
Bilgi
Bir bağlantı setini satıcınız üzerinden
alabilirsiniz.
Kapı menteşelerinin değiştirilmesi
(gerekirse)
Cihazın menteşesini yetkili servisimize
değiştirtmenizi tavsiye ediyoruz. Cihaz
kapısı menteşelerinin değiştirilmesi için
geçerli masraflar hakkında bilgi almak
için, yetkili servisinize başvurabilirsiniz.
ã=Uyarı
Kapı menteşeleri değiştirilirken, cihaz
elektrik şebekesine bağlı olmamalıdır.
Elektrik fişini önceden çekip çıkarınız.
Cihazın arka yüzüne zarar vermemek
için, altına yeterli miktarda koruyucu
yumuşak malzeme yerleştiriniz. Cihazı
dikkatlice arka yüzü üzerine yatırınız.
Kapı menteşesini sayıların sırasına göre
değiştiriniz. Resim 1
Bilgi
Cihaz arka yüzü üzerine yatırılırsa, duvar
mesafesi koruyucu monte edilmemiş
olmalıdır.
39
Page 40

tr
SW 22
Kapı kolunun değiştirilmesi
(gerekirse)
Resim 2 A/B
Kapı kolunu sayıların sırasına göre
değiştiriniz.
Duvar mesafesi koruyucunun monte edilmesi
Resim 5
Eğer varsa:
Duvara mesafe koruma parçalarını
monte ederek, cihazın bildirilmiş enerji
alma gücüne ulaşmasını sağlayınız.
Duvara olan mesafenin azalması, cihazın
işlevini sınırlamaz veya düşürmez. Bu
durumda, cihazın çektiği enerji miktarı
biraz yükselebilir.
Arka duvara mesafe
75 mm mesafenin aşılmaması gereklidir.
Cihazın doğru konumlandırılması
Cihazı öngörülen yere yerleştiriniz ve bir
su terazisi ile seviyesini ayarlayınız. Cihaz
sağlam ve düzgün bir şekilde
kurulmalıdır. Zeminin düzgün olmaması
halinde, cihazın ön tarafındaki vida dişli
iki ayar ayağı ile bu yamuklukları
dengeleyiniz. Vida dişli ayakları
ayarlamak için uygun bir cıvata anahtarı
kullanınız.
Bilgi
Cihaz dik konumda durmalıdır. Bir su
terazisi yardımı ile ayarlayınız.
40
Page 41

1
4
6
3
2
7
5
8
10
1
9
11
Page 42

12
13
15
16
14
17
1
18
21
20
19
Page 43

2/A
Page 44

2/B
3
1
5
4
2
FP
34
5
Page 45

9000904567 (9305) de, en, fr, it, nl, da, no, sv, fi, es, pt, el, tr
*9000904567*
 Loading...