

Page 1
4 3 2 1
ºC
8super 642
ºC
-16-18-20-26-32
super alarm
567
DE
Hinweise zur Entsorgung 3
Hinweise zu Ihrer Sicherheit 3-4
Ihr neues Gerät 5
Bedienblende 5-6
Raumtemperatur und Belüftung beachten 7
Gerät anschließen 7
Gerät einschalten 8
Temperatur einstellen 8
Gerät ausschalten und stilllegen 9
Variable Gestaltung des Innenraums 9
Lebensmittel einordnen 9-10
Lebensmittel einfrieren 10-11
Gefrierraum abtauen 11-12
Gerät reinigen 12
Energie sparen 12
Betriebsgeräusche 13
Kleine Störungen selbst beheben 13-14
Kundendienst rufen 14
Inhaltsverzeichnis
1 - 9
A
18
10
11
19
super alarm
-32
-26
-20
-18
-16
ºC
super
2
4
6
8
ºC
electronic
13
14
SIEMENS
15
3
4
EN
Information concerning disposal 15
Safety information 15-16
General requirements 16
Your new appliance 17
Fascia 17-18
Observe ambient temperature and ventilation 19
Connecting the appliance 19
Switching on the appliance 20
Selecting the temperature 20
Switching off and disconnecting the appliance 21
Variable interior desing 21
Storing food in the appliance 21-22
Freezing food 22-23
Defrosting the freezer compartment 23-24
Cleaning the appliance 24
Tips for saving energy 25
Operating noises 25
Eliminating minor faults yourself 26
Calling customer service 27
FR
Conseils pour la mise au rebut 28
Consignes de sécurité 28-30
Votre nouvel appareil 31
Bandeau de commande 31-33
Contrôler la température ambiante et l’aération 33
Branchement de l’appareil 33-34
Enclenchement de l’appareil 34
Réglage de la température 34-35
Arrêt et remisage de l’appareil 35
Agencement variable du compartiment intérieur 35
Rangement des produits alimentaires 36
Congélation des aliments 36-38
Dégivrage du compartiment congélateur 38-39
Nettoyage de l’appareil 39
Economies d’énergie 40
Bruits de fonctionnement 40
Remédier soi-même aux petites pannes 41-42
Appeler le service après-vente 42
Table of contents
Tables de màteries
12
16
17
B
5 6
B A
1
2
7 8
7
Page 2

9 10
220-240V max. 15W, E14
A
B
C
Besuchen Sie uns im Internet:
http://www.siemens.de/hausgeraete
Gebrauchsanweisung
DE
EN
Operating Instructions
1
2
11 12
1
FR
Mode d’emploi
2
super alarm
-32
-26
-20
-18
-16
ºC
super
2
4
6
8
ºC
electronic
SIEMENS
DE
Änderungen vorbehalten
Subjetct to modification
EN
Tous de modificacion réservés
FR
SIEMENS ELECTROGERÄTE GMBH
Nº Código 5410002608 (8306)
Page 3
3
de
Hinweise zur
Entsorgung
Altgerät entsorgen
Bitte beachten, wenn Ihr neues Gerät ein
Altgerät ersetzt.
Altgeräte sind kein wertloser Abfall!
Durch umweltgerechte Entsorgung
können wertvolle Rohstoffe
wiedergewonnen werden.
Altgerät unbrauchbar machen:
1. Netzstecker ziehen,
2. Anschlusskabel durchtrennen und mit
dem Netzstecker entfernen,
3. Türschloss entfernen, damit
spielende Kinder sich nicht
einsperren und in Lebensgefahr
geraten.
Kältegeräte enthalten Kältemittel und in
der Isolierung Gase. Kältemittel und
Gase müssen fachgerecht entsorgt
werden. Rohre des KältemittelKreislaufes bis zur fachgerechten
Entsorgung nicht beschädigen.
Verpackung entsorgen
Achtung:
Verpackungsmaterial ist kein Spiel-
zeug für Kinder – Erstickungsgefahr
durch Faltkartons und Folien!
Ihr neues Gerät wurde auf dem Weg zu
Ihnen durch die Verpackung geschützt.
Alle eingesetzten Materialien sind
umwelt-verträglich und wieder
verwertbar. Bitte helfen Sie mit:
Entsorgen Sie die Verpackung
umweltgerecht.
Über aktuelle Entsorgungswege informieren Sie sich bitte bei Ihrem Fachhändler oder bei der Gemeindeverwaltung.
Hinweise zu Ihrer
Sicherheit
Bevor Sie das Gerät in
Betrieb nehmen
Lesen Sie Gebrauchs- und Montageanleitung aufmerksam durch! Sie enthalten
wichtige Informationen über Aufstellen,
Gebrauch und Wartung des Gerätes.
Der Hersteller haftet nicht, wenn Sie
die Hinweise und Warnungen der
Gebrauchsanweisung missachten.
Bewahren Sie Gebrauchs- und Montageanweisung für einen Nachbesitzer auf.
Warnungen
• Das Gerät enthält in geringer Menge
das umweltfreundliche, aber brennbare Kältemittel R600a. Achten Sie
darauf, dass die Rohre des KältemittelKreislaufes bei Transport oder
Montage nicht beschädigt werden.
Herausspritzendes Kältemittel kann zu
Augenverletzungen führen oder sich
entzünden.
Wenn Kältemittel austritt, darauf
achten:
– dass kein offenes Feuer oder Zünd-
quellen in der Nähe sind.
– Netzstecker ziehen, Raum für einige
Minuten gut durchlüften.
• Je mehr Kältemittel in einem Gerät ist,
umso größer muss der Raum sein,
in dem das Gerät steht. In zu kleinen
Räumen kann bei einem Leck ein
brennbares Gas-Luft-Gemisch entstehen.
• Pro 8 g Kältemittel muss der Raum
mindestens 1 m
3
groß sein. Die Menge
des Kältemittels Ihres Gerätes steht
auf dem Typschild im Inneren des
Gerätes.
DE.qxd 5/12/03 12:00 Page 3
Page 4
4
de
• Bei Notfällen
– Augen ausspülen und Arzt aufsuchen.
– Zündfunken und offenes Feuer vom
Gerät fernhalten.
– Netzstecker ziehen, Raum einige
Minuten gut lüften.
• In folgenden Fällen Netzstecker
ziehen oder Sicherung ausschalten
– Abtauen
– Reinigen
Am Netzstecker ziehen, nicht am Anschlusskabel.
• Beschädigte oder defekte Geräte nicht
in Betrieb nehmen. Im Zweifelsfall
beim Händler erkundigen.
• Nie elektrische Geräte innerhalb des
Gerätes verwenden (z. B. Heizgeräte,
elektrische Eisbereiter usw.)
• Keine Produkte mit brennbaren Treibgasen (z. B. Spraydosen) und keine
explosiven Stoffe lagern -
Explosionsgefahr!
• Das Gerät ist kein Spielzeug für Kinder!
• Nie das Gerät mit einem Dampfreinigungsgerät abtauen oder reinigen!
Der Dampf kann an elektrische Teile
gelangen und einen Kurzschluss oder
einen Stromschlag auslösen.
Beim Gebrauch beachten
• Be- und Entlüftungsöffnungen niemals
abdecken oder zustellen!
• Nur Fachkräfte dürfen Reparaturen
durchführen. Unsachgemäße Reparaturen können den Benutzer erheblich
gefährden.
• Sockel, Auszüge, Türen usw. nicht als
Trittbrett oder zum Abstützen missbrauchen.
• Hochprozentigen Alkohol nur dicht
verschlossen und stehend lagern.
• Bei Gerät mit Türschloss: Schlüssel
außer Reichweite von Kindern aufbewahren!
• Kunststoff-Teile und Türdichtung nicht
mit Öl oder Fett verschmutzen. Kunststoff-Teile und Türdichtung werden
sonst porös.
• Im Gefrierraum keine Flüssigkeiten in
Flaschen und Dosen lagern (besonders
kohlensäurehaltige Getränke).
Flaschen und Dosen platzen!
• Eis am Stiel und Eiswürfel nicht sofort
vom Gefrierraum in den Mund nehmen.
Gefrierverbrennungsgefahr durch
sehr tiefe Temperatur!
• Gefriergut nicht mit nassen Händen
berühren. Die Hände können daran
festfrieren!
• Reifschicht und festgefrorenes Gefriergut nicht mit Messer oder spitzem
Gegenstand abschaben. Sie könnten
damit die Kältemittelrohre
beschädigen. Herausspritzendes
Kältemittel kann sich entzünden oder
zu Augenverletzungen führen.
• Zum Beschleunigen des
Abtauvorgangs nur vom Hersteller
empfohlene Mittel benutzen.
Allgemeine
Bestimmungen
Das Gerät eignet sich
• zum Kühlen und Gefrieren von
Lebensmitteln,
• zur Eisbereitung.
Das Gerät ist für die Verwendung im
Haushalt bestimmt.
Beim gewerblichen Einsatz gelten die
entsprechenden Normen und Vorschriften.
Das Gerät ist funkentstört nach EURichtlinie 89/336/EEC.
Der Kältekreislauf ist auf Dichtheit geprüft.
Dieses Erzeugnis entspricht den
einschlägigen Sicherheitsbestimmungen
für Elektrogeräte (EXI 60335/2/24).
DE.qxd 5/12/03 12:00 Page 4
Page 5
5
de
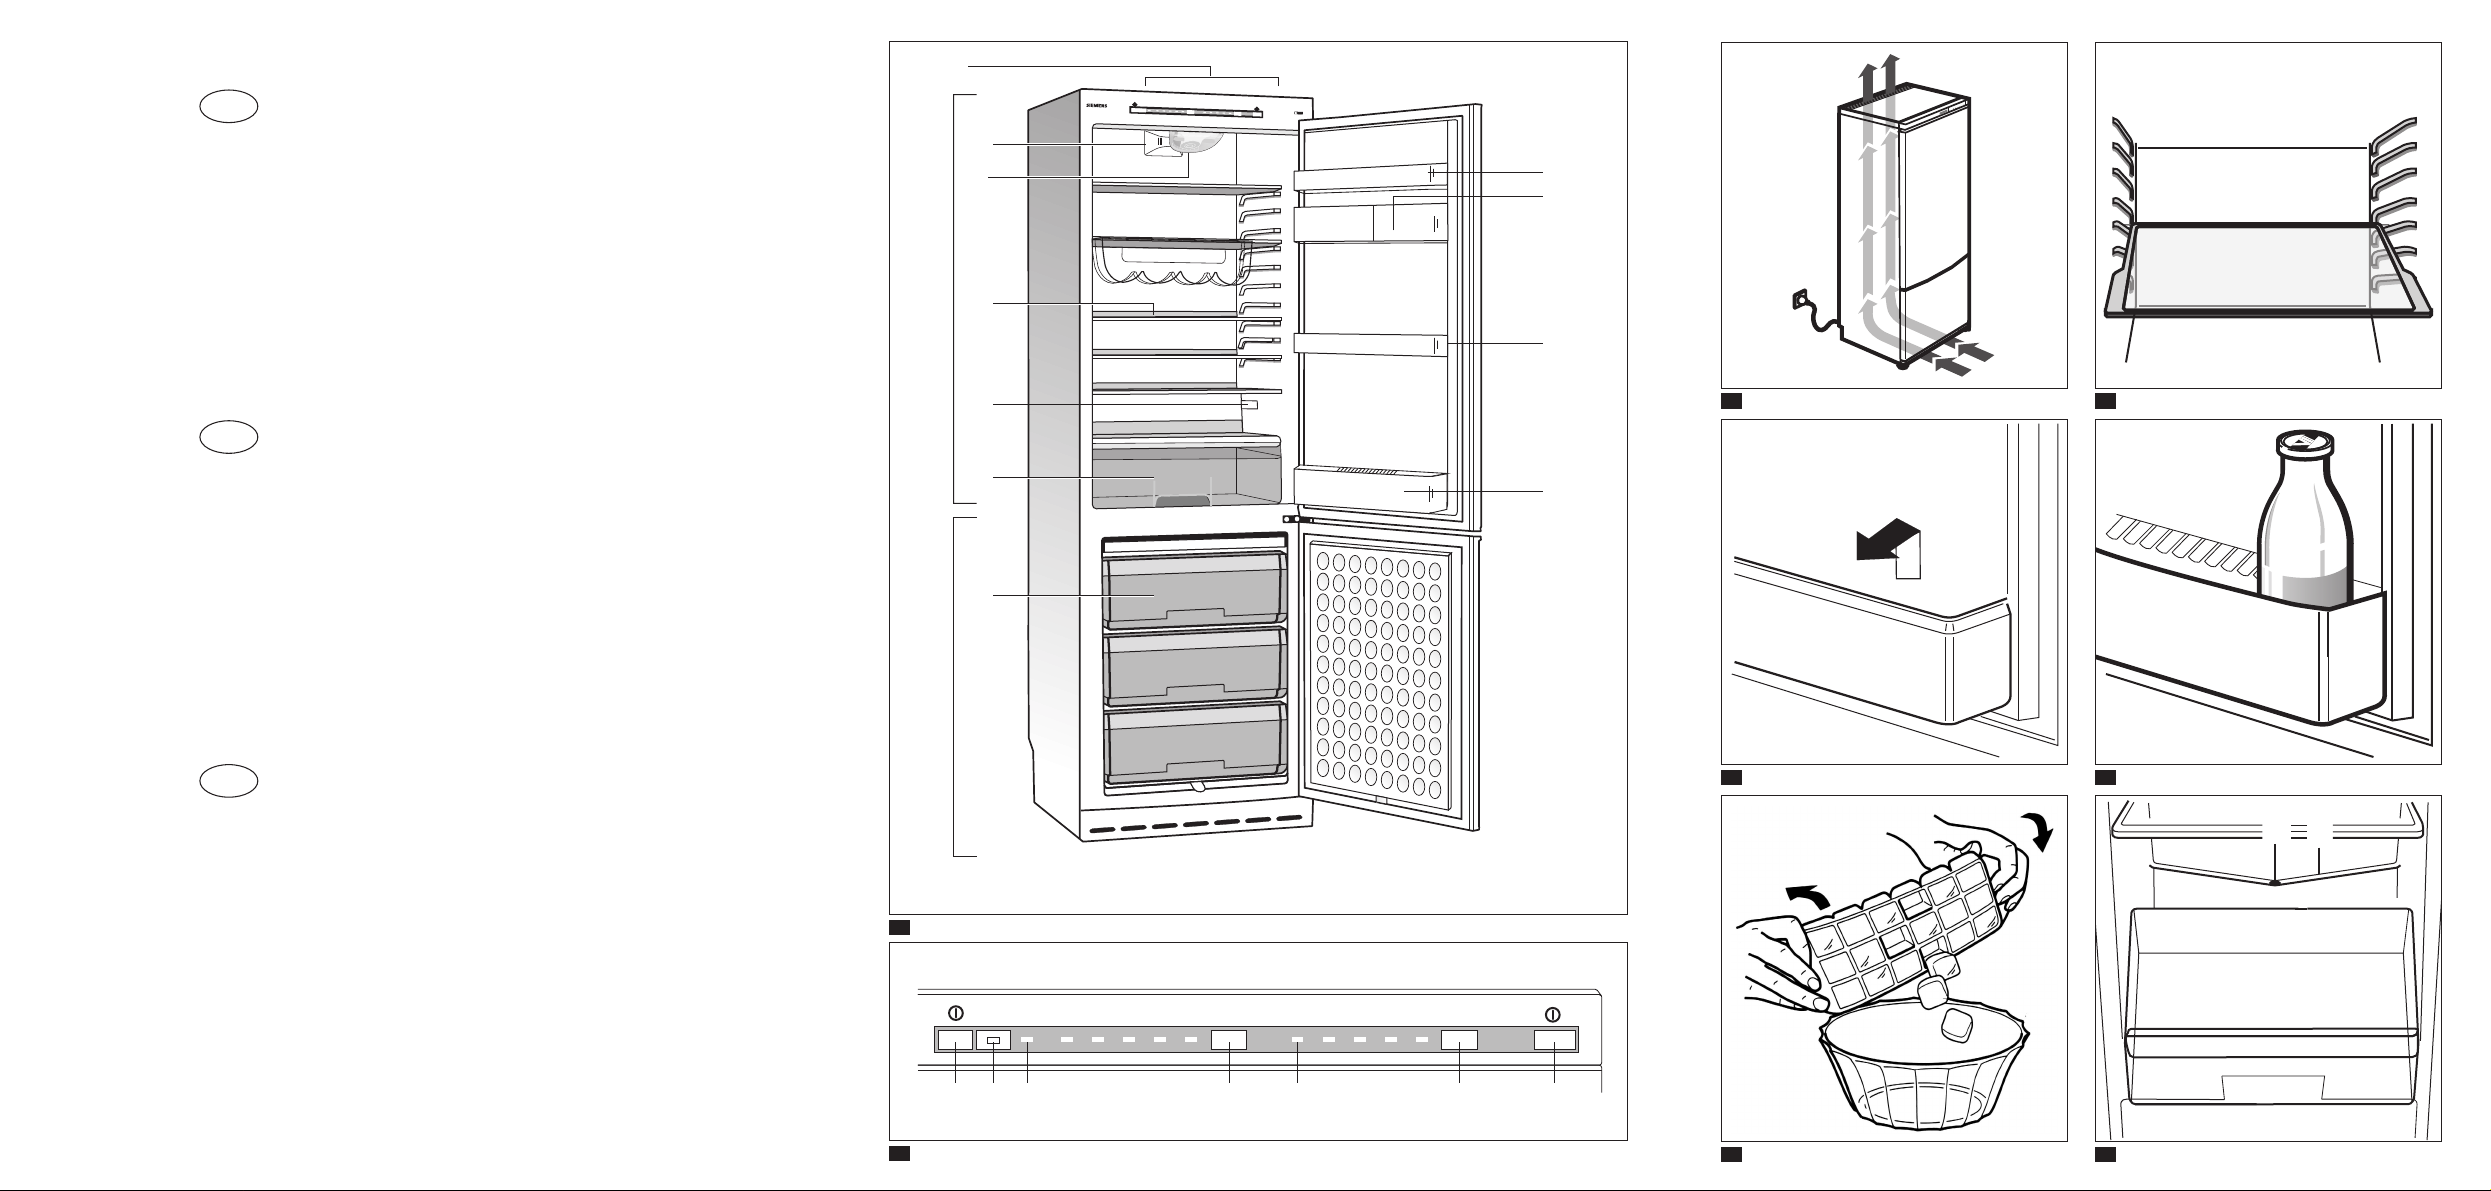
Ihr neues Gerät
Detailabweichungen – insbesondere bei
Ausstattungsmerkmalen – je nach
Gerätetyp.
Bild Q
A Kühlraum
B Gefrierraum
1–9 Bedienblende
10 Innenbeleuchtung
11 Ablage
12 Gemüsebehälter
13 Absteller
14 Butter- und Käsefach
15 Ablage für Eier
16 Flaschenabsteller
17 Gefriergutschale
18 Ventilator
19 Fühler Kühlraum
Bedienblende
Bild W
1 Ein/Aus-Taste Kühlraum
Zum separaten Ein- und
Ausschalten des Kühlraums.
2 ºC Einstelltaste für
Kühlraumtemperatur
Die Kühlraumtemperatur ist von
+2 ºC bis +8 ºC einstellbar.
Die Einstelltaste wiederholt oder
ständig drücken, bis die gewünschte
Temperatur durch Aufleuchten des
Lämpchens angezeigt wird.
+8 zeigt die höchste Temperatur des
Kühlraums (+8 ºC).
+2 zeigt die niedrigste Temperatur
des Kühlraums (+2 ºC).
3 „super“-Anzeige für Kühlraum
Beim „super“-Kühlen wird der
Kühlraum ca. 6 Stunden lang mit
der tiefsten Temperatur gekühlt.
Danach wird automatisch auf die
eingestellte Kühlraumtemperatur
umgeschaltet. Das „super“-Kühlen
ist ideal zum Schnellkühlen von
Getränken und beim Einlegen
größerer Mengen von
Lebensmitteln.
Einschalten des „super“-Kühlens:
Taste (2) wiederholt oder ständig
drücken, bis die „super“-Anzeige
aufleuchtet.
DE.qxd 5/12/03 12:00 Page 5
Page 6
6
de
6 „super“-Taste/Anzeige für
Gefrierraum
Zum Ein- und Ausschalten des
„super“-Gefrierens. Das leuchtende
Lämpchen zeigt die Inbetriebnahme
des „super“-Gefrierens an.
Das „super“-Gefrieren dient zum
Eingefrieren großer Mengen frischer
Lebensmittel und ist je nach Menge
bis zu 24 Stunden vor dem Einlegen
der frischen Lebensmittel
einzuschalten.
Die Kältemaschine arbeitet nach
dem Einschalten ständig, im
Gefrierraum wird eine sehr tiefe
Temperatur erreicht.
Das Supergefrieren schaltet sich
automatisch ab, wenn die frisch
eingelegten Lebensmittel durchgefroren sind (bei kleinen Mengen
Lebensmitteln nach einigen
Stunden, bei großen Mengen
nach bis zu zwei Tagen).
Durch wiederholtes Drücken der
Taste (6) wird das „super“-Gefrieren
bei Bedarf manuell ausgeschaltet.
7 Ein/Aus-Taste Gefrierraum
Zum separaten Ein- und
Ausschalten des Gefrierraums.
4 ºC Einstelltaste für
Gefrierraumtemperatur
Die Gefrierraumtemperatur ist von
–16 ºC bis –32 ºC einstellbar.
Die Einstelltaste wiederholt oder
ständig drücken, bis die gewünschte
Temperatur durch Aufleuchten des
Lämpchens angezeigt wird.
–16 zeigt die höchste Temper-atur
des Gefrierraums (–16 ºC).
–32 zeigt die niedrigste Temper-atur
des Gefrierraums (–32 ºC).
5 „ “ Warnanzeige
Warnanzeige für zu hohe
Gefrierraumtemperaturen. Gefahr
des Auftauens der eingefrorenen
Lebensmittel.
Ohne Gefahr für das Gefriergut
kann die Warnanzeige aufleuchten
• bei Inbetriebnahme des Gerätes
• beim Einlegen großer Mengen
frischer Lebensmittel
• und bei zu lange geöffneter Gefrierraumtür.
DE.qxd 5/12/03 12:00 Page 6
Page 7
7
de
Raumtemperatur und
Belüftung beachten
Die Klimaklasse steht auf dem
Typenschild (Bild !0). Sie gibt an,
innerhalb welcher Raumtemperaturen
das Gerät betrieben werden kann.
Klimaklasse zulässige Raum-
temperatur
SN +10 °C bis 32 °C
N +16 °C bis 32 °C
ST +18 °C bis 38 °C
T +18 °C bis 43 °C
Belüftung
Bild E
Die Luft an der Rückwand des Geräts
erwärmt sich. Die erwärmte Luft muss
ungehindert abziehen können. Die
Kühlmaschine muss sonst mehr leisten.
Dies erhöht den Stromverbrauch.
Daher: Nie Be- und
Entlüftungsöffnungen abdecken oder
zustellen!
Gerät anschließen
Nach dem Aufstellen des Gerätes sollte
man mind.
1
/2Std. warten, bis das Gerät
in Betrieb genommen wird. Während des
Transports kann es vorkommen, dass
sich das im Verdichter enthaltene Öl im
Kältesystem verlagert.
Vor der ersten Inbetriebnahme den
Innenraum des Gerätes reinigen
(siehe Reinigen).
Die Steckdose sollte frei zugänglich
sein. Das Gerät an 220–240 V/50 Hz
Wechselstrom über eine
vorschriftsmäßig installierte Steckdose
anschließen. Die Steckdose muss mit
einer 10-A-Sicherung oder höher
abgesichert sein.
Bei Geräten, die in nicht-europäischen
Ländern betrieben werden, ist auf dem
Typschild zu überprüfen, ob die angegebene Spannung und Stromart mit
den Werten Ihres Stromnetzes übereinstimmt. Das Typschild befindet
sich im Gerät links unten. Ein
eventuell notwendiger Austausch der
Netzanschlussleitung darf nur durch
einen Fachmann erfolgen.
Warnung!
Auf keinen Fall darf das Gerät an
elektronische Energiesparstecker
(z.B. Ecoboy; Sava Plug) und an
Wechselrichter, die Gleichstrom in
230 V Wechselstrom umwandeln,
angeschlossen werden (z.B. Solaranlagen, Schiffsstromnetze).
DE.qxd 5/12/03 12:00 Page 7
Page 8
8
de
• Während die Kühlmaschine läuft,
bilden sich Wasserperlen oder Reif an
der Rückseite des Kühlraumes, dieses
ist funktionsbedingt. Ein Abschaben
der Reifschicht oder Abwischen der
Wasserperlen ist nicht notwendig. Die
Rückwand taut automatisch ab. Das
Tauwasser wird in der Ablaufrinne
(Bild I/A) aufgefangen, zur Kühl-
maschine geleitet und dort verdunstet.
• Bei hoher Luftfeuchtigkeit kann sich
im Kühlraum, insbesondere auf den
Glasablagen, Kondens-wasser bilden.
Sollte dies der Fall sein, Lebensmittel
verpackt einlagern und eine kältere
Kühlraumtemperatur wählen.
• Sollte sich nach dem Schließen des
Gefrierraumes die Tür nicht sofort
wieder öffnen lassen, warten Sie bitte
zwei bis drei Minuten, bis sich der
entstandene Unterdruck ausgeglichen
hat.
• Bedingt durch das Kältesystem
können die Gefrierroste an manchen
Stellen schnell bereifen. Dies hat
keinen Einfluß auf Funktion oder
Stromverbrauch. Abtauen wird erst
erforderlich, wenn sich auf der
gesamten Oberfläche des
Gefrierrostes Reif oder Eis in einer
Stärke von mehr als 5 mm gebildet
hat.
• Vermeiden Sie, dass Fett und Öl mit
den Kunststoffinnenteilen des Geräts,
oder mit der Gummidichtung der Tür,
in Kontakt kommen. Der Kunstoff und
die Gummidichtung sind Stoffe, die
sehr leicht porös, und damit
Durchlässig werden.
• Legen Sie Keine Lebensmittel in die
Nähe der Sonde für das Gefrierfach
(Abb. Q/19). Dies gewährleistet ein
optimales Funktionieren Ihres Geräts.
Gerät einschalten
Bild W
Kühl- und Gefrierraum können
separat eingeschaltet werden.
• Für die Inbetriebnahme des
Kühlraums die Ein/Aus-Taste (1)
drücken. Die Innenbeleuchtung im
Kühlraum geht bei Öffnen der Tür an.
• Für die Inbetriebnahme des Gefrierraums die Ein/Aus-Taste (7)
drücken.
• Warnanzeige (Bild W/5) leuchtet, bis
Betriebstemperatur erreicht ist.
Temperatur einstellen
Bild W
Vom Werk aus hat das Gerät folgende
Grundeinstellungen:
Kühlraumtemperatur +4 ºC
Gefrierraumtemperatur –20 ºC
Die Einstellwerte können geändert
werden, siehe dazu Beschreibung der
Bedienblende:
2 Kühlraumtemperatur einstellen
4 Gefrierraumtemperatur einstellen
Hinweise zum Betrieb
• Der Ventilator (Bild Q/18), ist je nach
Bedart des Gefrierabteils an, oder aus.
• Die Stirnseiten des Gehäuses werden
teilweise leicht beheizt, dies verhindert
Schwitzwasserbildung im Bereich der
Türdichtung.
DE.qxd 5/12/03 12:00 Page 8
Page 9
9
de
Sonderausstattung
(nicht bei allen Modellen)
Flaschenhalter
Bild Y
Der Flaschenhalter verhindert ein
Kippen der Flaschen beim Öffnen und
Schließen der Tür.
Lebensmittel
einordnen
Kälte-Zonen im Kühlraum
beachten!
Durch die Luft-Zirkulation im Kühlraum
entstehen Zonen unterschiedlicher
Kälte:
• Kälteste Zonen
sind an der Rückwand und sind je nach
Modell zwischen dem seitlich eingeprägten Pfeil und der darunterliegenden
Glasablage (Bild !1) oder zwischen den
beiden Pfeilen (Bild !2).
Hinweis:
Lagern Sie in den kältesten Zonen
empfindliche Lebensmittel, (z. B. Fisch,
Wurst, Fleisch).
• Wärmste Zone
ist an der Tür ganz oben.
Hinweis: Lagern sie in der wärmsten
Zone z. B. Käse und Butter. Beim
Servieren behält der Käse sein Aroma,
die Butter bleibt streichfähig.
Gerät ausschalten
und stilllegen
Gerät ausschalten
Bild W
Kühl- und Gefrierraum können separat
ausgeschaltet werden.
• Zum Ausschalten des Kühlraums die
Ein/Aus-Taste (1) drücken. Die
Innenbeleuchtung im Kühlraum
erlischt.
• Zum Ausschalten des Gefrierraums
die Ein/Aus-Taste (7) drücken.
Gerät stillegen
Wenn das Gerät längere Zeit nicht
benutzt wird:
• Kühl- und Gefrierraum ausschalten
wie oben beschrieben.
• Netzstecker ziehen.
• Gerät abtauen und reinigen.
• Tür offen lassen.
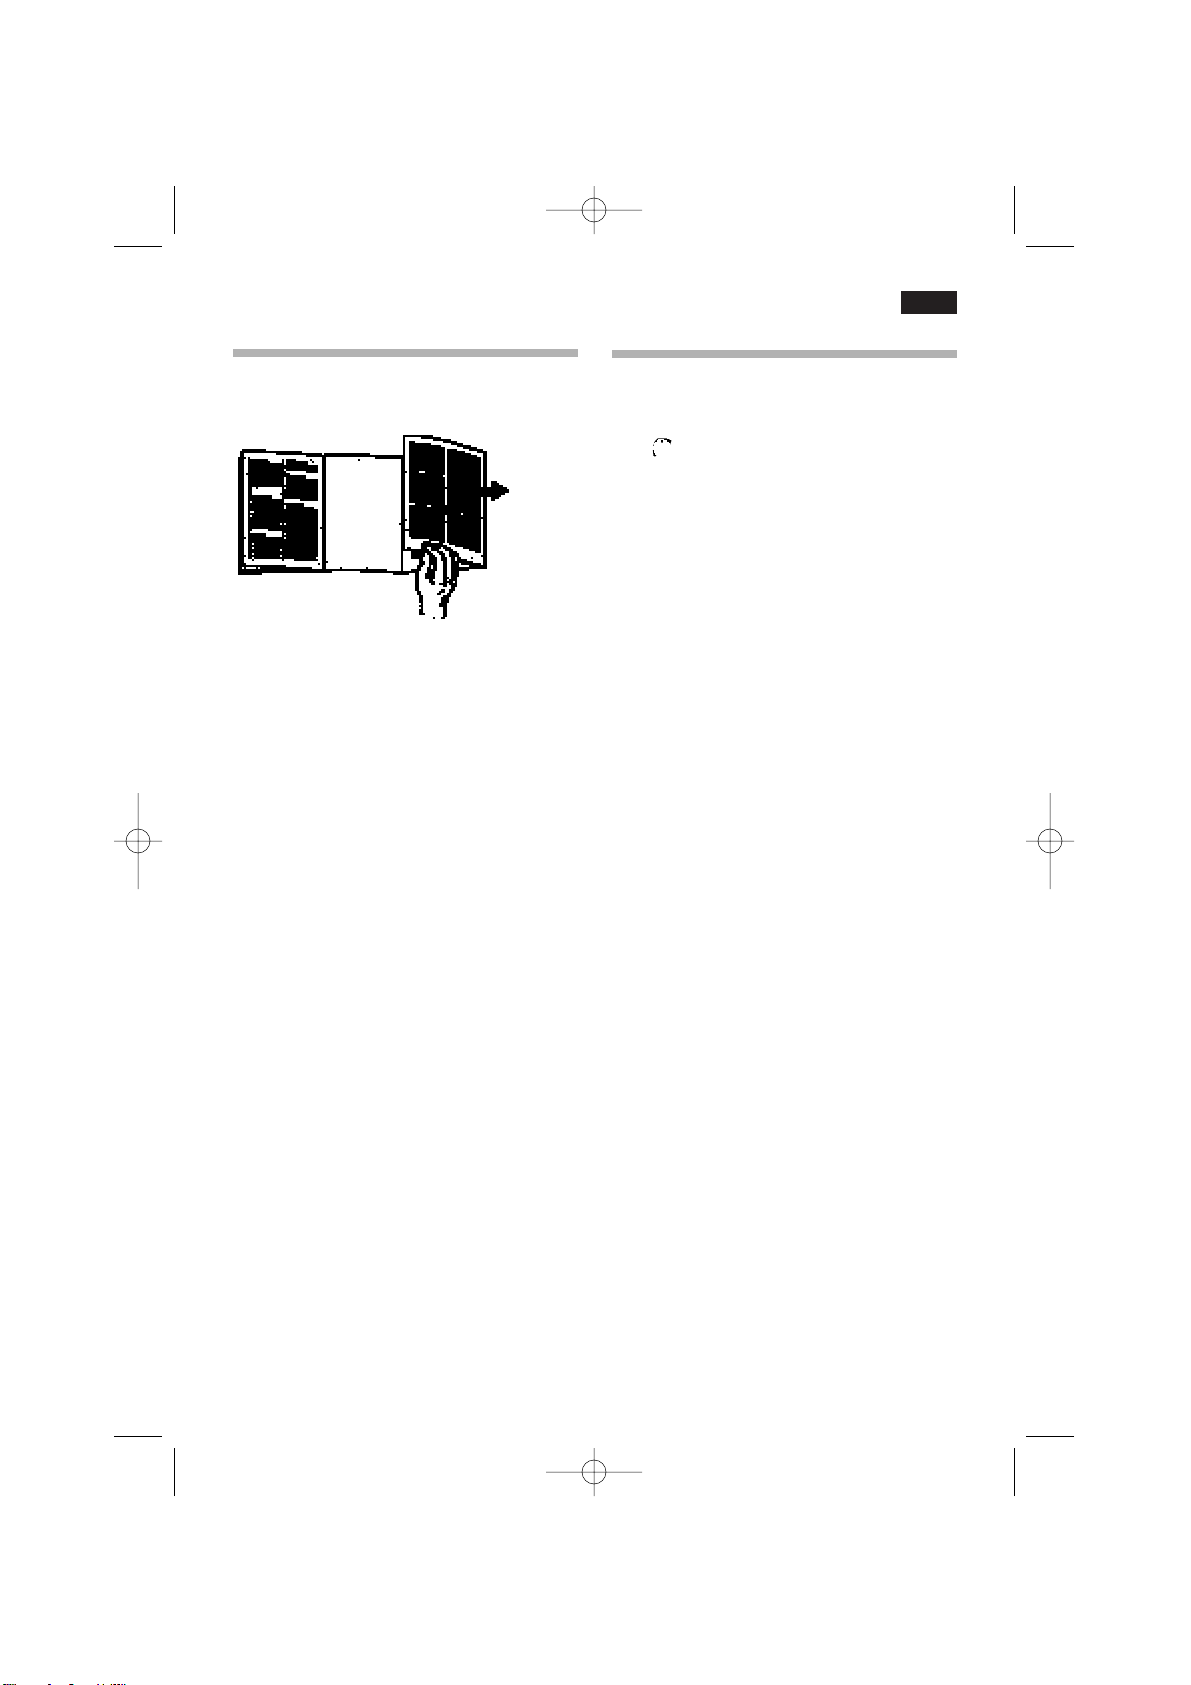
Variable Gestaltung
des Innenraums
Sie können die Ablagen des Innenraums
und Absteller in der Tür nach Bedarf
variieren:
Ablage nach vorne ziehen, absenken
und seitlich herausschwenken (Bild R).
Behälter anheben und herausnehmen
(Bild T).
DE.qxd 5/12/03 12:00 Page 9
Page 10
10
de
Frische Lebensmittel einfrieren
Lagern bereits Lebensmittel im Gefrierraum, ist einige Stunden vor dem
Einlegen frischer Lebensmittel das
„super“-Gefrieren einzuschalten.
Verwenden Sie zum Einfrieren nur
frische und einwandfreie Lebensmittel.
Lebensmittel luftdicht verpacken, damit
sie nicht den Geschmack verlieren oder
austrocknen.
So verpacken Sie richtig:
1. Lebensmittel in die Verpackung
einlegen.
2. Luft völlig herausdrücken.
3. Packung dicht verschließen.
4. Verpackung beschriften mit Inhalt und
Einfrier-Datum.
Als Verpackung ungeeignet sind:
Packpapier, Pergamentpapier,
Cellophan, Müllbeutel, gebrauchte
Einkaufstüten
Als Verpackung geeignet sind:
Kunststoff-Folien, Schlauch-Folien aus
Polyethylen, Alu-Folien, Gefrierdosen.
Sie finden diese Produkte im
Fachhandel.
Zum Verschließen geeignet sind:
Gummiringe, Kunststoff-Klipse, Bindfäden, kältebeständige Klebebänder o.
ä. Sie können Beutel und Schlauchfolien
aus Polyethylen mit einem FolienSchweiß- gerät verschweißen.
Beim Einordnen beachten
Lebensmittel gut verpackt oder abgedeckt einordnen. Dadurch bleiben
Aroma, Farbe und Frische erhalten.
Außerdem werden
Geschmacksübertragungen
und Verfärbungen der Kunststoffteile
vermieden.
Lebensmittel wie folgt
einordnen:
• Auf den Ablagen im Kühlraum
(von oben nach unten):
Backwaren, fertige Speisen, MolkereiProdukte, Fleisch und Wurst
• Im Gemüsebehälter: Gemüse, Salat,
Obst
• In der Tür (von oben nach unten):
Butter, Käse, Eier, Tuben, kleine
Flaschen, große Flaschen, Milch,
Safttüten.
Lebensmittel einfrieren
Gefriervermögen:
maximal 14 kg in 24 Stunden
(auf den Gefrierrosten).
Lebensmittel sollen möglichst schnell bis
zum Kern durchgefroren werden. Damit
Vitamine, Nährwerte, Aussehen und
Geschmack erhalten bleiben, max.
Gefriervermögen nicht überschreiten.
Beim Eingefrieren in den Gefriergutschalen verringert sich das max. Gefriervermögen geringfügig.
DE.qxd 5/12/03 12:00 Page 10
Page 11
11
de
Tiefkühlkost einkaufen
Verpackung darf nicht beschädigt sein.
Haltbarkeitsdatum beachten.
Temperatur in der Verkaufstruhe – 18 ºC
oder tiefer.
Tiefkühlkost möglichst in einer Isolier-
tasche transportieren und schnell in den
Gefrierraum legen.
Gefriergut lagern
• Wichtig für einwandfreie Luftzirkulation
im Gerät, Gefriergutschalen bis zum
Anschlag einschieben.
• Sind sehr viele Lebensmittel unterzubringen, kann man alle Gefriergutschalen bis auf die unterste aus dem Gerät
herausnehmen und die Lebensmittel
direkt auf den Gefrierrosten stapeln.
Zum Herausnehmen,
Gefriergutschalen bis zum Anschlag
herausziehen, vorn anheben und
herausnehmen.
Lagerdauer
Um Qualitätsminderungen des Gefriergutes zu vermeiden, sollte die zulässige
Lagerdauer bei –18 ºC nicht
überschritten werden.
Die Lagerdauer hängt von der Art des
Gefriergutes ab. Bei fertiger Tiefkühlkost,
die im Handel erhältlich ist, ist das Herstellungsdatum oder das Haltbarkeitsdatum zu beachten.
Fisch, Wurst,
fertige Speisen
und Backwaren bis zu 6 Monate
Käse, Geflügel,
Fleisch bis zu 8 Monate
Gemüse und Obst
bis zu 12 Monate
Eis herstellen
Achtung
Keine elektrischen Eisbereiter im
Gefrierraum verwenden.
Eiswürfel herstellen
(nicht bei allen Modellen)
Eisschalen sind im Fachhandel
erhältlich.
Eisschale
3
/4mit Wasser füllen und in
den Gefrierraum stellen. Oberste
Gefriergutschale benutzen, um den
Gefriervorgang zu beschleunigen.
Zum Lösen der Eiswürfel Eisschale kurz
unter fließendes Wasser halten oder
leicht verwinden (Bild U).
Stellen Sie die Eiswürfel-Formen in das
erste Schubfach, um den Gefriervorgang
zu beschleunigen (Bild Q/17)
Gefrierraum abtauen
Stromschlaggefahr
Keinen Dampfreiniger einsetzen.
Spannungsführende Teile können bei
Dampfniederschlag einen Kurzschluss
oder Stromschlag auslösen.
Zum Entfernen von Reif keine Messer
oder spitzen Gegenstände verwenden.
Rohre des Kältemittel-Kreislaufes nicht
beschädigen.
Herausspritzendes Kältemittel kann die
Augen verletzen und ist brennbar.
Keine elektrischen Geräte oder offenes
Feuer im Gerät benützen.
Hinweise
Größere Reif- und Eisanhäufungen auf
den Gefrierrosten beeinträchtigen die
Leistung des Geräts und lassen den
Stromverbrauch ansteigen.
DE.qxd 5/12/03 12:00 Page 11
Page 12
12
de
Gerät reinigen
• Netzstecker ziehen.
• Mit Wasser und wenig Handspülmittel
reinigen.
• Nach dem Reinigen Netzstecker
wieder einstecken, Sicherung einschalten.
Keine sandhaltigen oder säurehaltigen
Putz- und Lösungsmittel verwenden.
Türdichtung nur mit klarem Wasser
reinigen und gründlich trockenreiben.
Reinigungswasser darf nicht in die
Bedienblende oder Beleuchtung
kommen und auch nicht durch das
Ablaufloch der Tauwasser-Sammelrinne
(Bild I/B) laufen.
Die Ablagen, Absteller und Behälter sind
nicht spülmaschinenfest, sie können sich
verformen.
Energie sparen
• Gerät in einem trockenen, belüftbaren
Raum aufstellen; nicht direkt in der
Sonne oder in der Nähe einer Wärmequelle (z. B. Heizkörper, Herd). Sonst
eine Isolierplatte verwenden.
• Warme Speisen und Getränke außer-
halb des Gerätes abkühlen lassen.
• Das Gefriergut zum Auftauen in den
Kühlschrank geben. Die Kälte des
Gefriergutes zur Kühlung von Lebensmitteln nutzen.
• Gerätetür so kurz wie möglich öffnen.
• Die Geräterückseite sollte gelegentlich
mit einem Staubsauger oder Pinsel
gereinigt werden, um einen erhöhten
Stromverbrauch zu vermeiden.
Ist die Reifschicht ca.
1
/2cm dick, muss
abgetaut werden. Mindestens jedoch
ein- bis zweimal im Jahr. Am
zweckmäßigsten dann, wenn wenig oder
kein Gefriergut im Gerät lagert.
Ca. 4 Stunden vor dem Abtauen das
Supergefrieren einschalten, damit die
Lebensmittel eine sehr tiefe Temperatur
erreichen und somit längere Zeit bei
Raumtemperatur gelagert werden
können.
Gehen Sie wie folgt vor
• Netzstecker ziehen.
• Gefriergutschalen mit den Lebens-
mitteln an einem kühlen Ort lagern.
Kälteakku (wenn beiliegend) auf die
Lebensmittel legen.
• Zum Auffangen des Abtauwassers die
mittlere Schale ausräumen, aber im
Gerät belassen.
• Nach dem Abtauen das aufgefangene
Tauwasser ausleeren. Das restliche
Tauwasser auf dem Gefrierraumboden
mit einem Schwamm aufwischen.
• Gefrierraum wieder einschalten.
• Gefriergut wieder einlegen.
Abtau-Hilfe
Topf mit heißem Wasser auf Untersetzer
in den Gefrierraum stellen.
Abtau-Sprays
Angaben des Herstellers sind
maßgebend.
Achtung
Abtau-Sprays können explosive Gase
bilden, kunststoffschädigende Lösungsmittel oder Treibmittel enthalten oder
gesundheitsschädlich sein.
DE.qxd 5/12/03 12:00 Page 12
Page 13

Betriebsgeräusche
Ganz normale Geräusche
Brummen – Kälteaggregat läuft.
Blubbernde, surrende oder gurgelnde
Geräusche – Kältemittel fließt durch die
Rohre.
Klicken – Motor schaltet ein oder aus.
Geräusche, die sich
leicht beheben lassen
Das Gerät steht uneben
Bitte richten Sie das Gerät mit Hilfe einer
Wasserwaage eben ein. Verwenden Sie
dazu die Schraubfüße oder legen Sie
etwas unter.
Das Gerät „steht an“
Bitte rücken Sie das Gerät von anstehenden Möbeln oder Geräten weg.
Schubladen, Körbe oder
Abstellflächen wackeln oder klemmen
Prüfen Sie bitte die herausnehmbaren
Teile und setzen Sie sie eventuell neu
ein.
Gefäße berühren sich
Rücken Sie bitte die Flaschen oder
Gefäße leicht auseinander.
Abhilfe
Prüfen, ob Strom vorhanden ist, Sicherung muss
eingeschaltet sein.
Be- und Entlüftung sicherstellen.
Max. Gefriervermögen nicht überschreiten.
Tür schließen.
13
de
Kleine Störungen selbst beheben
Bevor Sie den Kundendienst rufen:
Überprüfen Sie, ob Sie die Störung aufgrund der folgenden Hinweise selbst beheben
können.
Sie müssen die Kosten für Beratung durch den Kundendienst selbst übernehmen –
auch während der Garantiezeit!
Mögliche Ursache
Stromausfall; die Sicherung hat
ausgelöst; der Netzstecker sitzt
nicht fest.
Störung – im Gefrierraum ist es
zu warm!
• Be- und Entlüftungsöffnungen
sind verdeckt.
• Es wurden zu viele
Lebensmittel auf einmal zum
Gefrieren eingelegt.
• Gefrierraumtür ist offen.
Störung
Keine Anzeige
leuchtet
Anzeige „ “
leuchtet
(Bild WW/5).
DE.qxd 5/12/03 12:00 Page 13
Page 14

14
de
Störung
Die Innenbeleuchtung
funktioniert nicht; die
Kältemaschine läuft.
Der Boden des
Kühlraums ist nass.
Mögliche Ursache
Nach Beheben der Störung
erlischt die Warnanzeige nach
einiger Zeit.
Die Glühlampe ist defekt.
Der Lichtschalter klemmt
(Bild O/A).
Das Tauwasser-Ablaufrohr ist
verstopft (Bild I/B).
Abhilfe
Glühlampe austauschen (Bild O)
1. Netzstecker ziehen bzw. Sicherung
ausschalten.
2. Scheibe (C) an der Innenbeleuchtung
gegen den Uhrzeigersinn drehen und
Abdeckung (B) abnehmen.
3. Glühlampe austauschen; Ersatzglühlampe
220–240 V Wechselstrom, Sockel E14,
Wattangabe siehe defekte Lampe.
Prüfen, ob er sich bewegen lässt.
Reinigen Sie die Tauwasserrinne und das
Ablaufrohr (Bild I/B).
Kundendienst rufen
Einen Kundendienst in Ihrer Nähe finden
Sie im Telefonbuch oder im Kundendienst-Verzeichnis. Geben Sie bitte dem
Kundendienst die Erzeugnisnummer
(E-Nr.) und die Fertigungsnummer
(FD-Nr.) des Gerätes an.
Sie finden diese Angaben auf dem
Typenschild (Bild !0).
Bitte helfen Sie durch Nennung der
Erzeugnis- und Fertigungsnummer mit,
unnötige Anfahrten zu vermeiden. Sie
sparen die damit verbundenen Mehrkosten.
DE.qxd 5/12/03 12:00 Page 14
Page 15

15
en
Information
concerning disposal
Disposal of your old
appliance
When replacing your old appliance with
a new one, please comply with the
following:
Old appliances are not worthless
rubbish! Valuable raw materials can be
reclaimed by recycling old appliances.
Render your old appliance unusable:
1. Pull out the mains plug.
2. Cut off the power cord and discard
with the mains plug.
3. Remove the lock to prevent
children from locking themselves in
the refrigerator and suffocating.
Refrigerators contain refrigerants and
the insulation contains gases.
Refrigerant and gases must be disposed
of properly. Ensure that tubing of the
refrigerant circuit is not damaged prior to
proper disposal.
Disposal of packaging
Warning:
Keep children away from packaging
materials. Danger of suffocation from
folding cartons and plastic film!
You received your new appliance in
a protective shipping carton. All
packaging materials are environmentally
friendly and recyclable. Please
contribute to a better environment by
disposing of packaging materials in an
environmentally-friendly manner.
Please ask your dealer or inquire at your
local authority about current means of
disposal.
Safety information
Before you switch ON the
appliance
Please read the operating and
installation instructions carefully. They
contain important information on how to
install, use and maintain the appliance.
The manufacturer is not liable if you fail
to comply with the instructions and
warnings. Please retain these operating
and installation instructions as they may
be required by a subsequent user of the
appliance.
Warnings
• This appliance contains a small
quantity of environmentally-friendly but
flammable R600a refrigerant. Ensure
that the tubing of the refrigerant circuit
is not damaged during transportation
and installation. Leaking refrigerant
may cause eye injuries or ignite.
If refrigerant is escaping, ensure that:
– there are no naked flames or ignition
sources in the vicinity.
– Pull out the mains plug and ventilate
the room for several minutes.
• The more refrigerant an appliance
contains, the larger the room must be.
Leaking refrigerant can form a flammable gas-air mixture in rooms which
are too small.
• The room must be at least 1 m
3
per 8
g of refrigerant. The amount of
refrigerant in your appliance is
indicated on the rating plate inside the
appliance.
EN.qxd 5/12/03 12:00 Page 15
Page 16

16
en
• In an emergency
– Rinse eyes and call a doctor.
– Keep ignition sources and naked
flames away from the appliance.
– Pull out the mains plug and ventilate
the room for several minutes.
• In the following cases pull out the
mains plug or switch off the fuse.
– Defrosting
– Cleaning
Do not pull out the mains plug by
tugging the cable.
• Do not switch on damaged or
defective appliances. If in doubt,
contact your dealer.
• Never use electrical appliances inside
the refrigerator (e.g. heater, electric ice
maker, etc.).
• Do not store products which contain
flammable propellants (e.g. spray
cans) or explosive substances in the
appliance – Risk of explosion!
• Do not allow children to play with the
appliance!
• NEVER use a steam cleaner to defrost
or clean the appliance. Steam may
come into contact with electrical
components and cause a short-circuit
or an electric shock.
When using the appliance, comply
with the following:
• Never cover or block the ventilation
openings!
• Repairs may be performed by qualified
technicians only. Improper repairs may
put the user in considerable danger.
• Do not stand or support yourself on
the base, drawers or doors, etc.
• Bottles which contain a high percen-
tage of alcohol must be sealed and
stored in an upright position.
• If the appliance features a lock, keep
the key out of the reach of children.
• Keep plastic parts and the door seal
free of oil and grease. Otherwise, parts
and door seal will become porous.
• Do not store bottled or canned drinks
(especially carbonated drinks) in the
freezer compartment. Bottles and cans
will explode.
• Do not put an ice lolly or ice cube
directly from the freezer compartment
into your mouth. Risk of burns from
very low temperatures!
• Never touch frozen food with wet
hands. Your hands could freeze to the
food!
• Do not scrape off hoarfrost or stuck
frozen food with a knife or pointed
object. You could damage the
refrigerant tubing. Leaking refrigerant
may ignite or cause eye injuries.
• Use only agents recommended
by the manufacturer to accelerate
the defrosting process.
General requirements
The appliance is suitable
• for refrigerating and freezing food,
• for making ice.
The appliance is designed for domestic
use.
If the appliance is used industrially, the
appropriate standards and regulations
shall apply.
The appliance has been interferencesuppressed in compliance with EU
Directive 89/336/EEC.
The refrigerant circuit has been tested
for leaks.
This product complies with the relevant
safety regulations for electrical
appliances (EXI 60335/2/24).
EN.qxd 5/12/03 12:00 Page 16
Page 17

17
en
Your new appliance
Details may differ according to the
appliance type, especially with respect
to features.
Fig. Q
A Refrigerator compartment
B Freezer compartment
1–9 Fascia
10 Interior light
11 Shelf
12 Vegetable container
13 Storage compartment
14 Butter and cheese compartment
15 Egg rack
16 Bottle storage compartment
17 Freezer drawer
18 Fan
19 Refrigerator compartment sensor
Fascia
Fig. Q
1 Refrigerator compartment
On/Off button
Switches the refrigerator
compartment on and off separately.
2 Refrigerator compartment
temperature selection button
The refrigerator compartment
temperature can be selected from
+2 ºC to +8 ºC.
Repeatedly press or hold down the
selection button until the desired
temperature is indicated by the lit
lamp.
+8 indicates the highest temperature in the refrigerator compartment
(+8 ºC).
+2 indicates the lowest temperature
in the refrigerator compartment
(+2 ºC).
3 „super“ display for refrigerator
compartment
„super“ cooling cools the refrigerator
compartment at the lowest
temperature for approx. 6 hours.
Then the appliance automatically
switches back to the selected
refrigerator compartment temperature. „super“ cooling is ideal for the
rapid cooling of drinks and refrigerating large quantities of food.
Used to switch on „super“ cooling:
Repeatedly press or hold down
button (2) until the „super“ display
lights up.
EN.qxd 5/12/03 12:00 Page 17
Page 18

18
en
4 °C selection button for freezer
compartment temperature
The freezer compartment temperature can be selected from –16 ºC to
–32 ºC.
Repeatedly press or hold down the
selection button until the desired
temperature is indicated by the lit
lamp.
–16 indicates the highest
temperature in the refrigerator
compartment (–16 ºC).
–32 indicates the lowest temperature in the refrigerator compartment
(–32 ºC).
5 „ “ Warning display
Warning display for excessively high
freezer compartment temperatures.
Risk of the frozen food thawing.
The warning display may light up
without any risk to the frozen food:
• when the appliance is switched on,
• when large quantities of fresh food
are placed in the appliance,
• and if the freezer compartment door
is open too long.
6 „super“ button/display for freezer
compartment
Switches „super“ freezing on and
off. The lit lamp indicates that
„super“ freezing is on.
„super“ freezing is used to freeze
large quantities of fresh food and
should be switched on up to
24 hours before the fresh food
is placed in the freezer compart-
ment.
When „super“ freezing has been
switched on, the refrigerating unit
runs constantly and the freezer
compartment drops to a very low
temperature.
„super“ freezing switches off
automatically when the fresh food
has frozen through (several hours
for small quantities of food, up to
two days for large quantities).
If required, „super“ freezing can be
switched off manually by repeatedly
pressing the button (6).
7 On/Off button for the freezer
compartment
Switches the freezer compartment
on and off separately.
EN.qxd 5/12/03 12:00 Page 18
Page 19

19
en
Observe ambient
temperature and
ventilation
The climatic class can be found on the
rating plate (Fig. !0) and indicates the
ambient temperatures at which the
appliance can be operated.
Climatic class Permitted ambient
temperature
SN +10 °C to 32 °C
N +16 °C to 32 °C
ST +18 °C to 38 °C
T +18 °C to 43 °C
Ventilation
Fig. E
The air on the rear panel of the
appliance heats up. The warm air must
be able to escape. Otherwise, the
refrigerator must work harder. This will
increase the power consumption.
Therefore: Never cover or block
ventilation openings!
Connecting the
appliance
After installing the appliance, wait at
least
1
/2hour until the appliance starts
up. During transportation the oil in the
compressor may have flowed into the
refrigeration system.
Before switching on the appliance for the
first time, clean the interior (see
Cleaning).
The socket should be easily accessible.
Connect the appliance to 220–240 V/
50 Hz alternating current via a correctly
installed earthed socket. The socket
must be fused with a 10 A fuse or higher.
If the appliance is to be operated in
a non-European country, check on the
rating plate whether the indicated voltage and current type correspond to
the values of your mains supply. The
rating plate is located in the appliance
at the bottom left-hand side. The
mains connection cable may be replaced by an electrician only.
Warning!
Never connect the appliance to electronic energy saver plugs (e.g.
Ecoboy: Sava Plug) or to power
inverters which convert the direct
current to 230 V alternating current
(e.g. solar equipment, power supplies
on ships).
EN.qxd 5/12/03 12:00 Page 19
Page 20

20
en
Switching on the
appliance
Fig. W
Refrigerator and freezer compartments
can be switched on separately.
• Press the On/Off button (1) to
switch on the refrigerator
compartment. The light inside the
refrigerator compartment switches on
when the door is open.
• Press the On/Off button (7) to
switch on the freezer compartment.
• Warning display, Fig. W/5, illuminates
until the operating temperature has
been reached.
Selecting the
temperature
Fig. W
The following standard settings have
been set at the factory:
Refrigerator compartment
temperature +4 ºC
Freezer compartment
temperature –20 ºC
The set values can be changed, see
Description of control panel:
2 Set refrigerator compartment
temperature
4 Set freezer compartment temperature
Operating tips
• The fan (Fig, Q/18) turns itself on and
off as required by the refrigrator
compartment.
• The sides of the housing are
sometimes heated slightly. This
prevents condensation in the area of
the door seal.
• While the refrigerating unit is running,
beads of water or hoarfrost form at the
back of the refrigerator compartment.
This is quite normal. It is not
necessary to scrape off the frost or
wipe off the beads of water. The rear
panel defrosts automatically. The
condensation is conveyed down the
drainage channel, Fig. I/A, to the
refrigerating unit where it evaporates.
• If the air humidity is high,
condensation may form in the
refrigerator compartment, especially
on the glass shelves. If this is the
case, pack or wrap the food and select
a lower temperature in the refrigerator
compartment.
• If you cannot open the freezer
compartment door immediately after
closing it, wait 2–3 minutes until the
partial vacuum has equalised.
• The refrigeration system may cause
several areas of the freezer shelves to
frost quickly. This does not affect
function or power consumption.
The appliance does not require
defrosting until the entire surface of
the freezer shelf is covered with more
than 5 mm of frost or ice.
• Do not allow grease or oil to come into
contact with plastic parts inside the
refrigerator or the door seal. Both this
plastic and the rubber door seal. Both
this plastic and the rubber door seal
are liable to perish.
• To enhance appliance performance to
the full, do not place foodstuff near to
refrigerator compartment sensor
(fig. Q/19).
EN.qxd 5/12/03 12:00 Page 20
Page 21

21
en
Switching off and
disconnecting the
appliance
Switching off the appliance
Fig. W
Refrigerator and freezer compartments
can be switched off separately.
• Press the On/Off button (1) to
switch off the refrigerator
compartment. The light inside the
refrigerator compartment goes out.
• Press the On/Off button (7) to
switch off the freezer compartment.
Disconnecting the
appliance
If the appliance is not used for
a prolonged period:
• Switch off the refrigerator and freezer
compartments as described above.
• Pull out the mains plug.
• Defrost and clean the appliance.
• Leave the appliance door open
Variable interior
design
If required, you can reposition the
shelves inside the appliance and the
storage compartments in the door.
Pull the shelf forwards, lower and swivel
out sideways (Fig. R). Raise the container and remove (Fig. T.
Special features
(not all models)
Bottle holder
Fig. Y
The bottle holder prevents bottles from
falling over when the door is opened and
closed.
Storing food in the
appliance
Note the refrigeration
zones in the refrigerator
compartment!
The air circulation in the refrigerator
compartment produce different
refrigerant zones:
• Coldest zones
are on the rear panel and, depending
on the model, between the arrow
stamped on the side and the glass shelf
below (Fig. !1) or between the two
arrows (Fig. !!2).
Note:
Store perishable food (e.g. fish, sausage,
meat) in the coldest zones.
• Warmest zone
is at the very top of the door.
Note: Store e.g. cheese and butter in the
warmest zone. When served, the cheese
will not have lost its flavour and the
butter will be easy to spread.
EN.qxd 5/12/03 12:00 Page 21
Page 22

22
en
Loading the appliance
Wrap or cover food before placing in the
appliance. This will retain the aroma,
colour and freshness of the food.
In addition, flavours will not be
transferred between foods and the
plastic parts will not become
discoloured.
Store food as follows:
• On the shelves in the refrigerator
compartment (from top to bottom):
cakes and pastries, ready meals, dairy
products, meat and sausage
• In the vegetable container:
vegetables, salad, fruit
• In the door (from top to bottom): butter,
cheese, eggs, tubes, small bottles,
large bottles, milk, juice cartons
Freezing food
Freezing capacity:
Maximum 14 kg in 24 hours (on the
wire shelves)
To retain the vitamins, nutritional value,
appearance and flavour, do not exceed
the max. freezing capacity.
If food is frozen in the freezer drawers,
the max. freezing capacity will be
reduced slightly.
Freezing fresh food
If there is already food in the freezer
compartment, switch on „super“ freezing
several hours before placing fresh food
in the freezer compartment.
Freeze fresh, undamaged food only. To
prevent food from losing its flavour or
drying out, place in airtight containers.
How to wrap food
correctly:
1. Place the food in the wrapping.
2. Press out all the air.
3. Seal the wrapping.
4. Label the wrapping with the contents
and date.
The following products are not
suitable for wrapping food:
Wrapping paper, greaseproof paper,
cellophane, refuse bags and used
shopping bags.
The following products are suitable
for wrapping food:
Plastic film, polyethylene blown film,
aluminium foil and freezer tins.
These products can be purchased from
your dealer.
The following products are suitable
for sealing the wrapped food:
Rubber bands, plastic clips, string, coldresistant adhesive tape or similar.
Bags and polyethylene blown film can
be sealed with a film sealer.
Purchasing deep-frozen
food
Packaging must not be damaged.
Use by the „best-before“ date.
Temperature in the supermarket freezer
–18 °C or lower.
If possible, transport deep-frozen food
in an insulated bag and place quickly
in the freezer compartment.
EN.qxd 5/12/03 12:00 Page 22
Page 23

23
en
Storing frozen food
• To ensure good air circulation in the
appliance, insert the freezer drawers
all the way.
• If large quantities of food are to be
stored in the freezer, all the freezer
drawers (except the bottom one) can
be taken out of the appliance and the
food stacked directly on the freezer
shelves. To remove a freezer drawer,
pull out all the way, lift at the front and
remove.
Storage duration
To prevent a reduction in the quality of
the frozen food, the permitted storage
duration at –18 ºC should not be exceed.
The storage period depends on the type
of produce. When purchasing frozen produce, observe the date of manufacture
or sell-by date.
Fish, sausage,
ready meals and
cakes and pastries up to 6 months
Cheese, poultry
and meat up to 8 months
Vegetables and
fruit up to 12 months
Making ice
Warning
Do not use electric ice makers in the
freezer compartment.
Making ice cubes
(not all models)
Ice cube trays are available from
specialist outlets.
Fill the ice cube tray
3
/4full of water and
place in the freezer compartment. Use
the top freezer drawer to accelerate the
freezing process.
To loosen the ice cubes, twist the ice
tray slightly or hold briefly under flowing
water (Fig. U).
Place the ice tray in the first drawer to
make ice cubes more quickly
(Fig. Q/17).
Defrosting the
freezer compartment
Risk of electric shock
Do not use a steam cleaner. Steam may
condense on live components and
cause a short-circuit or an electric
shock.
Do not scrape off frost with a knife or
pointed implement.
Do not damage the refrigerant circuit.
Leaking refrigerant may cause eye
injuries and is flammable.
Do not use electrical appliances or
naked flames in the appliance.
EN.qxd 5/12/03 12:00 Page 23
Page 24

24
en
Note:
Thick frost or ice on the freezer shelves
will impair the performance of the
appliance and increase the power
consumption.
If the layer of frost is approx.
1
/2cm
thick, the freezer compartment must be
defrosted. Nevertheless, defrost the
freezer compartment at least once or
twice a year. The best time to defrost is
when there is little or no food in the
appliance.
Approx. 4 hours before defrosting,
switch on „fast freeze“. The food will
then drop to a very low temperature and
can therefore be stored for a longer
period at room temperature.
Proceed as follows:
• Pull out the mains plug.
• Place the freezer drawers containing
the food in a cool location. Place the
ice block (if enclosed) on the food.
• Empty the middle drawer and leave in
the appliance to catch the water.
• When the freezer compartment has
defrosted, pour the water out of the
freezer drawer. Wipe any remaining
water off the bottom of the freezer
compartment with a sponge.
• Switch on the freezer compartment
again.
• Put the frozen food back in the freezer
compartment.
Defrosting aids
Place a pan of hot water on a base in
the freezer compartment.
Defrosting sprays
Observe the manufacturer‘s
specifications.
Attention!
Defrosting sprays may form explosive
gases and may contain solvents or
propellants which attack plastic or which
are a health hazard.
Cleaning
the appliance
• Pull out the mains plug.
• Clean the freezer compartment with
water and a little washing-up liquid.
• After cleaning the appliance, re-insert
the mains plug, switch on the fuse.
Do not use abrasive or acidic cleaning
agents and solvents.
Clean the door seal with water only and
then dry thoroughly!
Water used for cleaning must not drip
onto the fascia or light, or run through
the drainage hole in the condensation
collecting channel (Fig. I/B).
The shelves, storage compartments and
containers must not be washed in the
dishwasher as they may warp.
EN.qxd 5/12/03 12:00 Page 24
Page 25

25
en
Tips for saving
energy
• Install the appliance in a cool, well
ventilated room, but not in direct
sunlight and not near a heat source
(radiator, cooker, etc.). Otherwise, use
an insulating plate.
• Allow warm food and drinks to cool
down outside the appliance.
• When thawing frozen food, place it in
the refrigerator compartment. The low
temperature of the frozen food will
then cool the food in the refrigerator
compartment.
• Open the appliance door as briefly as
possible.
• Occasionally clean the rear of the
appliance with a vacuum cleaner or
paint brush to prevent an increased
power consumption.
Operating noises
Normal noises
Humming – refrigerating unit is running.
Bubbling, gurgling or whirring noises –
refrigerant is flowing through the tubing.
Clicking – motor is switching on or off.
Noises which can be
easily rectified
The appliance is not level
Please align the appliance with a spirit
level. Use the height-adjustable feet or
place something under the feet.
The appliance is touching adjacent
units or appliances
Please move the appliance away from
adjacent units or appliances.
Drawers, baskets or storage areas are
loose or sticking
Please check the removable parts and, if
required, reinsert them.
Receptacles are touching each other
Please move bottles or receptacles away
from each other.
EN.qxd 5/12/03 12:00 Page 25
Page 26

26
en
Eliminating minor faults yourself
Before you call customer service:
Please check whether you can eliminate the fault yourself based on the following
information. Customer service will charge you for advice, even if the appliance is still
under guarantee!
Fault
Displays do not
illuminate.
Display „ “
illuminates
(Fig.WW/5).
The interior light
does not function;
the refrigerating unit
is running.
The floor of the
refrigerator
compartment is wet.
Possible cause
Power failure; the fuse has been
switched off; the mains plug
has not been inserted properly.
Fault – the freezer
compartment is too warm!
• Ventilation openings have
been covered.
• Too much food was placed in
the freezer compartment at
once.
• Freezer compartment door is
open.
When the fault has been
eliminated, the warning display
switches off shortly afterwards.
The bulb is defective.
The light switch is sticking
(Fig. O/A).
The condensation drainage
pipe is blocked (Fig. I/B).
Remedial action
Check whether the power is on, the fuse must
be switched on.
Ensure that there is adequate ventilation.
Do not exceed max. freezing capacity.
Close the door.
Change the bulb (Fig. O)
1. Pull out the mains plug or switch off the fuse.
2. Rotate dial (C) on the interior light in an anti-
clockwise direction and remove the cover (B).
3. Change the bulb; replacement bulb,
220–240 V a.c., E14 lampholder, see
defective bulb for wattage.
Check whether it can be moved.
Clean the condensation channel and outlet
(Fig. I/B).
EN.qxd 5/12/03 12:00 Page 26
Page 27

27
en
Calling customer
service
You can find your local customer service
in the telephone directory or in the
customer service list. When calling
customer service, please quote the
product number (E-Nr.) and the
production number (FD) of the
appliance.
This information can be found on the
rating plate (Fig. !!0).
To prevent unnecessary call-outs, please
assist customer service by quoting the
product and production numbers. This
will save you additional costs.
EN.qxd 5/12/03 12:00 Page 27
Page 28

28
fr
Conseils pour la mise
au rebut
Mise au rebut de
l’ancien appareil
A respecter lorsque votre nouvel
appareil en remplace un ancien.
Les appareils usagés ne sont pas des
déchets sans valeur. Leur élimination
dans le respect de l’environnement
permet d’en récupérer de précieuses
matières premières.
Rendez l’ancien appareil inutilisable :
1. Débranchez la fiche mâle de la prise
de courant.
2. Sectionnez le cordon d’alimentation
puis enlevez-le avec la fiche mâle.
3. Démontez la serrure. Vous
empêcherez ainsi que des enfants
ne s’enferment dans l’appareil en
jouant et risquent leur vie.
Les appareils frigorifiques contiennent
des fluides frigorigènes et des gaz
isolants qui nécessitent une mise au
rebut adéquate. Veillez à ce que les
tuyaux du circuit frigorifique de votre
appareil ne soient pas endommagés
jusqu’à son élimination dans les règles
de l’art. Jusqu’à l’enlèvement de
l’appareil, veillez bien à ce que son
circuit frigorifique ne soit
pas endommagé.
Mise au rebut de
l’emballage
Attention :
Ne permettez pas aux enfants de
jouer avec les emballages et ses
pièces constitutives. Ils risquent de
s’étouffer avec les cartons pliants et
les feuilles de plastique.
Pour vous parvenir, votre nouvel
appareil a été conditionné dans un
emballage de protection. Tous les
matériaux qui le constituent sont
compatibles avec l’environnement et
recyclables. Aidez-nous à recycler
l’emballage en respectant
l’environnement.
Pour savoir comment vous débarrasser
de l’emballage, veuillez consulter votre
revendeur ou les services administratifs
de votre mairie.
Consignes
de sécurité
Avant de mettre l’appareil
en service
Veuillez lire attentivement et entièrement
les informations figurant dans les notices
d’utilisation et de montage.
Elle contiennent des remarques
importantes concernant l’installation,
l’utilisation et l’entretien de l’appareil.
Le fabricant décline toute responsabilité
si les consignes et mises en garde
contenues dans la notice d’utilisation ne
sont pas respectées. Conservez les
notices d’utilisation et de montage car
elles pourront servir ultérieurement si
l’appareil change de propriétaire.
FR.qxd 5/12/03 12:00 Page 28
Page 29

29
fr
Attention :
• Cet appareil contient une petite
quantité d’un fluide réfrigérant
écologique mais inflammable, le R
600a. Pendant le transport et la mise
en place de l’appareil, veillez à ne pas
endommager les tuyauteries du circuit
frigorifique. Si le fluide réfrigérant jaillit,
il peut provoquer des lésions oculaires
ou s’enflammer. Si du fluide réfrigérant
fuit, veuillez respecter les consignes
suivantes :
– Il ne doit y avoir aucune flamme
nue ni de source d’inflammation
à proximité du point de fuite.
– Débranchez l’appareil, aérez à fond
la pièce pendant quelques minutes.
• Plus l’appareil contient du fluide
réfrigérant et plus grande doit être la
pièce dans laquelle il se trouve. Dans
les pièces trop petites, un mélange
gaz-air inflammable peut se former en
cas de fuite.
• Comptez 1 m
3
de volume minimum de
la pièce pour 8g de fluide réfrigérant.
La quantité de fluide présente dans
l’appareil est indiquée sur la plaque
signalétique située à l’intérieur de ce
dernier.
• En cas d’urgence
– En cas de contact avec les yeux,
rincez-les abondamment et rendezvous chez un médecin.
– De l’appareil, éloignez toute source
d’étincelles et de flammes nues.
– Débranchez la fiche mâle de la prise
de courant. Aérez bien la pièce
pendant quelques minutes.
• Dans les cas suivants, débranchez la
fiche mâle de la prise de courant ou
défaites le fusible / coupez le
disjoncteur :
– Si vous dégivrez l’appareil.
– Si vous nettoyez l’appareil.
Pour débrancher l’appareil, tirez sur la
fiche mâle et non pas sur son cordon.
• Ne mettez pas en service un appareil
endommagé. Dans le doute,
renseignez-vous auprès du revendeur.
• N’utilisez pas d’appareils électriques à
l’intérieur de l’appareil (par ex.
appareils de chauffage, machine à
glaçons, etc.).
• Ne stockez dans l’appareil ni produits
contenant des gaz propulseurs
inflammables (par ex. bombes
aérosols) ni produits explosifs –
Risque d’explosion !
• L’appareil n’est pas un jouet, éloignez
les enfants.
• Ne dégivrez ni ne nettoyez jamais
l’appareil avec un nettoyeur à vapeur.
La vapeur pourrait atteindre des
pièces électroconductrices et
provoquer un court-circuit ou vous
faire électrocuter.
FR.qxd 5/12/03 12:00 Page 29
Page 30

30
fr
Consignes d’utilisation à respecter
• Pour cette raison, ne recouvrez et
n’obstruez en aucun cas les orifices
d’aération.
• Les réparations sont réservées à des
spécialistes. Des réparations
inexpertes s’accompagnent de risques
considérables pour l’utilisateur.
• Ne vous servez pas des socles,
clayettes et portes comme
marchepieds ou pour vous appuyer.
• Stockez les boissons fortement
alcoolisées en position verticale dans
des récipients bien fermés.
• Si l’appareil est équipé d’une serrure :
rangez la clé hors de portée des
enfants.
• L’huile et la graisse ne doivent pas
entrer en contact avec les parties en
matières plastiques et le joint de porte.
(ces derniers pourraient sinon devenir
poreux).
• Dans le compartiment congélateur, ne
stockez pas de boissons, gazeuses en
particulier, en bouteilles ou en boîtes
car elles éclateraient.
• Ne portez pas directement à la bouche
les esquimaux ou les glaçons qui
sortent du compartiment congélateur
(risque de brûlures dû à la
température très basse).
• Ne touchez pas les aliments congelés
avec les mains mouillées car elles
risqueraient de rester collées.
• Ne tentez jamais de racler le givre ou
la glace avec un couteau. Vous
risqueriez d’endommager les tuyaux
de fluide réfrigérant. Ce fluide, en
fuyant, pourrait s’enflammer et vous
blesser aux yeux.
• Pour accélérer le dégivrage, n’utilisez
que les moyens recommandés par le
fabricant.
Dispositions générales
L’appareil convient pour
• Réfrigérer et congeler des aliments.
• Préparer des glaçons.
Cet appareil est destiné à un usage
domestique.
Si l’appareil sert à des fins
professionnelles, les normes et
prescriptions correspondantes
s’appliqueront.
L’appareil a été antiparasité
conformément à la directive
UE 89/336/CEE.
Le circuit frigorifique a subi un contrôle
d’étanchéité.
Ce produit est conforme aux dispositions
de sécurité applicables aux appareils
électriques (EXI 60335/2/24).
FR.qxd 5/12/03 12:00 Page 30
Page 31

31
fr
Votre nouvel appareil
Selon le modèle, votre appareil peut
présenter des détails différents en
particulier quant à son équipement.
Fig. Q
A Compartiment réfrigérateur
B Compartiment congélateur
1–9 Bandeau de commande
10 Eclairage intérieur
11 Clayette
12 Bac à légumes
13 Support
14 Casier à beurre et à fromage
15 Balconnet à oeufs
16 Porte-bouteilles
17 Tiroir de congélation
18 Ventilateur
19 Capteur du compartiment
réfrigérateur
Bandeau de
commande
Fig. W
1 Touche Marche/Arrêt du
compartiment réfrigérateur
Elle sert à allumer et éteindre
séparément le compartiment
réfrigérateur.
2 °C Touche de réglage de la
température du compartiment
réfrigérateur
La température dans ce
compartiment se règle entre +2 ºC
et +8 ºC.
Appuyez répétitivement ou
constamment sur la touche de
réglage, jusqu’à ce que la
température voulue s’affiche par
allumage du voyant correspondant.
+8 représente la température la plus
élevée (+8 °C) dans le
compartiment réfrigérateur.
+2 représente la température la plus
basse (+2 °C) dans le compartiment
réfrigérateur.
FR.qxd 5/12/03 12:00 Page 31
Page 32

32
fr
3 Mention «super» du compartiment
réfrigérateur
Lors de la super-réfrigération, le
groupe frigorifique refroidit ce
compartiment pendant env.
6 heures jusqu’à la température
la plus basse. Ensuite, l’appareil
commute automatiquement sur
la température réglée pour le
compartiment réfrigérateur.
La super-réfrigération convient
idéalement pour refroidir rapidement
des boissons et pour ranger de
grandes quantités de produits
alimentaires.
Pour enclencher la super-réfrigération : appuyez répétitivement ou
constamment sur la touche (2),
jusqu’à ce que la mention «super»
s’allume.
4 °C Touche de réglage de la
température du compartiment
congélateur
La température du compartiment
congélateur se règle entre –16 ºC et
–32 ºC.
Appuyez répétitivement ou
constamment sur la touche de
réglage, jusqu’à ce que la
température voulue s’affiche par
allumage du voyant correspondant.
–16 indique la température la moins
froide du compartiment congélateur
(–16 °C).
–32 indique la température la plus
froide du compartiment congélateur
(–32 °C).
5 « » Voyant d’avertissement
Ce voyant signale des températures
trop élevées dans le compartiment
congélateur.
Risque que les produits
alimentaires surgelés dégèlent.
Le voyant d’avertissement peut
s’allumer – sans que cela signifie
qu’ils risquent de s’abîmer – dans
les cas suivants :
• Lors de la mise en service de
l’appareil.
• Lors du rangement de grandes
quantités de produits frais.
• Et lorsque la porte du compartiment
congélateur est restée trop
longtemps ouverte.
6 Touche / Mention «super» du
compartiment congélateur
Elle sert à enclencher / couper la
supercongélation. Le voyant
s’allume pour indiquer que la
supercongélation vient de
s’enclencher.
La supercongélation sert à congeler
de grandes quantités de produits
alimentaires frais. Suivant la
quantité, il faudra l’enclencher
jusqu’à 24 heures avant de ranger
les produits frais.
Après enclenchement de cette
fonction, le groupe frigorifique
fonctionne en permanence.
Le compartiment congélateur atteint
une température très basse.
FR.qxd 5/12/03 12:00 Page 32
Page 33

33
fr
La supercongélation s’éteint
automatiquement une fois que
les produits alimentaires frais
ont surgelé à coeur (au bout de
quelques heures en présence de
petites quantités, au bout de deux
jours maximum si vous avez
rangé de grandes quantités).
Le fait d’appuyer répétitivement sur
la touche (6) vous permet, suivant
besoins, d’éteindre manuellement
la supercongélation.
7 Touche Marche/Arrêt du
compartiment congélateur
Elle sert à enclencher et couper
séparément le compartiment
congélateur.
Contrôler la
température ambiante
et l’aération
La catégorie climatique de l’appareil
figure sur sa plaque signalétique (Fig. !0).
Elle indique les températures ambiantes
dans lesquelles l’appareil peut fonctionner.
Catégorie climatique Température
ambiante admissible
SN +10 °C à 32 °C
N +16 °C à 32 °C
ST +18 °C à 38 °C
T +18 °C à 43 °C
Aération
Fig. E
L’air entrant en contact avec la paroi
arrière de l’appareil se réchauffe. Cet air
chaud doit pouvoir s’échapper sans
obstacle. S’il ne le peut pas, le groupe
frigorifique doit fonctionner plus longtemps, ce qui augmente la
consommation de courant.
Pour cette raison, ne recouvrez ni
n’obstruez jamais les orifices d’aération
de l’appareil.
Branchement
de l’appareil
Après l’installation de l’appareil en
position verticale, attendez au moins une
demi-heure avant de le mettre en service.
Il peut en effet arriver, pendant le transport,
que l’huile présente dans le compresseur
se déplace vers le circuit frigorifique.
Avant la première mise en service,
nettoyez le compartiment intérieur de
l’appareil (voir Nettoyage).
La prise femelle doit être librement
accessible. Branchez la fiche mâle de
l’appareil dans une prise secteur en
220–240 V / 50 Hz, réglementairement
reliée à la terre. Cette prise doit être
protégée par un fusible supportant un
ampérage de 10 A minimum.
Sur les appareils destinés aux pays
non européens, vérifiez si la tension
de branchement et le type de courant
spécifiés sur la plaque signalétique
concordent bien avec ceux offerts par
le secteur du pays concerné.
La plaque signalétique se trouve en
bas à gauche dans l’appareil. S’il faut
changer le cordon d’alimentation
secteur, seul un spécialiste pourra
réaliser cette opération.
FR.qxd 5/12/03 12:00 Page 33
Page 34

34
fr
Attention !
Ne branchez en aucun cas l’appareil à
une «prise économie d’énergie»
électronique (par ex. Ecoboy ; Sava
Plug) ni à un ondulateur qui convertit
le courant continu (débité par par ex.
par des installations solaires, par les
réseaux de bord des bateaux) en
courant alternatif de 230 V.
Enclenchement de
l’appareil
Fig. W
Les compartiments réfrigérateur et
congélateur se laissent enclencher
séparément.
• Pour mettre le compartiment
réfrigérateur en service, appuyez
sur la touche Marche / Arrêt (1).
L’éclairage intérieur du compartiment
réfrigérateur s’allume lorsque vous
ouvrez la porte.
• Pour mettre le compartiment
congélateur en service, appuyez
sur la touche Marche / Arrêt (7).
• Le voyant d’avertissement (Fig. W/5)
s’allume jusqu’à ce que la température
de service soit atteinte.
Réglage de la
température
Fig. W
A la fabrication, l’appareil a reçu les
réglages de base suivants :
Température du compartiment
réfrigérateur : +4 ºC
Température du compartiment
congélateur : –20 ºC
Vous pouvez modifier les valeurs
réglées : voir la description sur le
bandeau de commande :
2 Réglage de la température du
compartiment réfrigérateur
4 Réglage de la température du
compartiment congélateur
Remarques concernant le
fonctionnement de
l’appareil
• Le ventilateur (Figure Q/18), fonctionne
ou est éteint suivant ce qui est requis
dans le compartiment réfrigérateur.
• L’appareil chauffe légèrement une
partie de ses surfaces frontales pour
empêcher une condensation d’eau
dans la zone du joint de porte.
• Pendant le fonctionnement du groupe
frigorifique, des gouttelettes d’eau ou
du givre se forment sur la paroi arrière
du compartiment réfrigérateur.
Ce phénomène est le résultat du
fonctionnement de l’appareil. Inutile de
gratter le givre ou d’essuyer les
gouttes d’eau. La paroi arrière se
dégivre automatiquement. La paroi
arrière se dégivre automatiquement.
L’eau de dégivrage est récupérée
dans la rigole d’écoulement, Fig. I/A,
puis coule jusqu’au groupe frigorifique
où elle s’évapore.
• Si l’air est très humide, de l’eau de
condensation peut se former dans le
compartiment réfrigérateur et
notamment sur les clayettes en verre.
Si ce devait être le cas, rangez les
aliments sans les déballer et abaissez
la température du compartiment
réfrigérateur.
FR.qxd 5/12/03 12:00 Page 34
Page 35

35
fr
• Si après avoir refermé le compartiment
congélateur la porte refuse de s’ouvrir
à nouveau, attendez s.v.p 2 à 3 minutes,
temps nécessaire à la dépression, dans
le compartiment, pour se résorber.
• En raison du système frigorifique
employé, les grilles de congélation
peuvent se couvrir rapidement de givre
en certains endroits. Ceci n’influe pas
sur leur fonction ni sur la consommation
d’électricité. Un dégivrage s’impose
uniquement lorsque le givre ou la glace
s’est accumulé(e) sur toute la surface
de la grille et qu’il ou elle fait plus de
5 mm d’épaisseur.
• Ne permettez pas que de la graisse ou
de l’huile entre en contact avec les
éléments en plastique de l’intérieur de
l’appareil ou du joint de la porte. Le
plastique et le joint en caoutchouc sont
des matériaux susceptibles de devenir
poreux.
• Ne pas situer des aliments à proximité
de la sonde du compartiment
réfrigérateur (fig. Q/19), afin d’obtenir
un fonctionnement optimum de
l’appareil.
Arrêt et remisage de
l’appareil
Coupure de l’appareil
Fig. W
Il est possible d’allumer et d’éteindre
séparément les compartiments
réfrigérateur et congélateur.
• Pour éteindre le compartiment
réfrigérateur, appuyez sur la touche
Marche / Arrêt (1).
L’éclairage intérieur du compartiment
réfrigérateur s’éteint.
• Pour éteindre le compartiment
congélateur, appuyez sur la touche
Marche / Arrêt (7).
Remisage de l’appareil
Si l’appareil doit rester longtemps sans
servir :
• Eteignez le compartiment réfrigérateur
et le compartiment congélateur
comme indiqué plus haut.
• Débranchez la fiche mâle de la prise
de courant.
• Dégivrez l’appareil et nettoyez-le.
• Laissez la porte de l’appareil ouverte.
Agencement variable
du compartiment
intérieur
Vous pouvez modifier suivant besoins
l’agencement des clayettes dans le
compartiment intérieur :
Tirez la clayette à vous, abaissez-la puis
faites la basculer latéralement pour
l’extraire (Fig. R). Soulevez le bac puis
sortez-le (Fig. T).
Equipement spécial
(selon le modèle)
Porte-bouteilles
Fig. Y
Le porte-bouteilles empêche ces
dernières de se renverser lorsque vous
ouvrez et refermez la porte.
FR.qxd 5/12/03 12:00 Page 35
Page 36

36
fr
Rangement des
produits alimentaires
Attention : différentes
zones froides dans le
compartiment réfrigérateur.
L’air circulant dans le compartiment
réfrigérateur fait que des zones
différemment froides apparaissent :
• Zones les plus froides
Elles se trouvent contre la paroi arrière
et, suivant le modèle, entre la flèche
imprimée latéralement et la clayette en
verre située en-dessous (Fig. !!1), ou
entre les deux flèches (Fig. !!2).
Remarque :
dans la zone la plus froide, rangez les
aliments délicats (par ex. le poisson, la
charcuterie, la viande).
• Zone la moins froide
Elle se trouve complètement en haut,
contre la porte.
Remarque : rangez dans la zone la
moins froide par ex. le fromage et le
beurre. Ainsi, au moment de servir, le
fromage conservera tout son arôme et le
beurre restera tartinable.
Consignes de rangement
Rangez les aliments si possible bien
emballés ou bien couverts. Ils garderont
ainsi arôme, couleur et fraîcheur.
Ceci empêche en outre que certains
aliments ne communiquent leur goût
à d’autres et que les pièces en plastique
changent anormalement de couleur.
Rangez les produits
alimentaires comme suit :
• Sur les clayettes du compartiment
réfrigérateur (de haut en bas) :
pâtisseries, plats précuisinés, produits
laitiers, viande et charcuterie
• Dans le bac à légumes : légumes,
salades, fruits
• En contre porte (de haut en bas) :
beurre, fromage, œufs, tubes, petites
bouteilles, grandes bouteilles, lait, jus
en sachets
Congélation des
aliments
Capacité de congélation
14 kg maximum en 24 heures
(sur les grilles de congélation)
Les aliments doivent congeler à coeur
aussi vite que possible pour qu’ils
conservent vitamines, valeur nutritive,
aspect et goût. Afin de préserver les
vitamines, la valeur nutritive, l’aspect
et le goût des aliments, ne dépassez
pas la capacité maximale de
congélation.
Si vous mettez les produits alimentaires
à congeler dans les tiroirs de
congélation, la capacité maximale de
congélation diminue légèrement.
FR.qxd 5/12/03 12:00 Page 36
Page 37

37
fr
Congélation de produits
frais
Si des produits alimentaires se trouvent
déjà dans le compartiment congélateur,
enclenchez la supercongélation
quelques heures avant de ranger de
nouveaux produits frais.
Pour congeler les aliments, n’utilisez que
des aliments frais et d’un aspect
impeccable. L’air ne doit pas pénétrer
dans l’emballage pour que les aliments
ne perdent pas leur goût ni ne sèchent
pas.
Pour emballer
correctement :
1. Placez les aliments dans l’emballage.
2. Chassez complètement l’air de
l’emballage.
3. Obturez l’emballage hermétiquement.
4. Inscrivez sur l’emballage le nom du
contenu et la date de congélation.
Emballages inadaptés :
Papier d’emballage, papier sulfurisé,
cellophane, sacs-poubelles, sacs
d’achat déjà utilisés.
Emballages corrects :
Feuilles en plastique, feuilles-boyaux en
polyéthylène, feuilles d’aluminium,
boîtes de congélation.
Ces produits sont en vente dans le
commerce spécialisé.
Pour obturer les emballages, utilisez
des :
Caoutchoucs, clips en plastique, ficelles,
rubans adhésifs résistants au froid, ou
assimilés.
Vous pouvez fermer les sachets et
feuilles-boyaux en polyéthylène au
moyen d’un appareil à souder.
Achat de produits
surgelés
Leur emballage doit être intact.
La date de conservation ne doit pas être
dépassée.
La température indiquée par le
thermomètre du congélateur commercial
doit être égale à –18 ºC ou encore plus
basse.
Utilisez de préférence un sac isotherme
pour le transport puis rangez les produits
le plus rapidement possible dans le
compartiment congélateur.
Rangement des produits
surgelés
• Enfoncez bien les tiroirs de
congélation jusqu’à la butée. C’est
important pour que l’air puisse bien
circuler.
• Si vous devez stocker beaucoup
d’aliments, vous pouvez sortir tous les
tiroirs de congélation de l’appareil sauf
le plus bas et entreposer les aliments
directement sur les grilles. Pour retirer
les tiroirs, tirez-les jusqu’à la butée;
levez-les à l’avant puis sortez-les.
FR.qxd 5/12/03 12:00 Page 37
Page 38

38
fr
Durée de stockage
Pour éviter que la qualité des produits
surgelés baisse, ne dépassez pas la
durée de stockage admise à –18 °C.
La durée de stockage dépend de la
nature de l’aliment. Dans le cas de
produits surgelés prêts à consommer,
tenez également compte de la date de
fabrication ou de la limite de
conservation recommandée.
Poisson,
charcuterie, plats
pré-cuisinés,
pâtisseries jusqu’à 6 mois
Fromage, volaille,
viande jusqu’à 8 mois
Fruits et légumes jusqu’à 12 mois
Préparation de glaçons
Attention
N’utilisez pas de sorbetière électrique
dans le compartiment congélateur.
Préparation de glaçons
(selon le modèle)
Des bacs à glaçons sont en vente dans
le commerce spécialisé.
Remplissez le bac à glaçons aux æ
avec de l’eau, puis placez-le dans le
compartiment congélateur. Utilisez le
tiroir de congélation du haut pour
accélérer la congélation.
Pour enlever les glaçons du bac,
passez-le brièvement sous l’eau du
robinet ou déformez légèrement le bac
(Fig. UU).
Afin que vos glaçons se fassent plus
rapidement, situez les bacs dans le
premier tiroir (Figure Q/17).
Dégivrage du
compartiment
congélateur
Risque d’électrocution
N’utilisez jamais de nettoyeur à vapeur
pour nettoyer l’appareil. Les pièces
électroconductrices peuvent, lorsque la
vapeur se condense dessus, provoquer
un court-circuit ou vous électrocuter.
Ne râclez jamais le givre ou la glace
avec un couteau ou un objet pointu.
Veillez à ne pas endommager les
tubulures du circuit de fluide réfrigérant.
Le fluide réfrigérant risque, en fuyant, de
provoquer des lésions oculaires ou de
s’enflammer.
Ne placez jamais d’appareil électrique ni
de flamme nue dans l’appareil.
Remarques
Les couches assez importantes de givre
et de glace sur les grilles de congélation
réduisent les performances de l’appareil
et augmentent la consommation
d’électricité.
Il faut dégivrer l’appareil une fois que la
touche de givre fait env. 0,5 cm
d’épaisseur, mais au minimum une ou
deux fois par an. Effectuez cette
opération de préférence lorsqu’il n’y a
que peu ou pas d’aliments surgelés dans
l’appareil.
Enclenchez la supercongélation env.
4 heures avant de procéder au
dégivrage pour que les aliments
atteignent une température très basse et
puissent rester ainsi un certain temps à
la température ambiante sans
décongeler.
FR.qxd 5/12/03 12:00 Page 38
Page 39

39
fr
Procédez comme suit :
• Débranchez la fiche mâle de la prise
de courant.
• Rangez les tiroirs remplis de produits
surgelés dans un endroit frais. Posez
les accumulateurs de froid (si fournis
avec l’appareil) sur ces produits.
• Pour récupérer l’eau de dégivrage,
videz le tiroir du milieu mais laissez-le
dans l’appareil.
• Après le dégivrage, videz l’eau de
dégivrage récupérée. A l’aide d’une
éponge, essuyez l’eau de dégivrage
restée au bas du compartiment de
congélateur.
• Réenclenchez le compartiment
congélateur.
• Rangez à nouveau les produits
surgelés dans les tiroirs.
Accélération du dégivrage
Posez une casserole remplie d’eau
chaude sur un dessous de plat et
introduisez-les dans le compartiment
congélateur.
Accélération du dégivrage
Les indications fournies par leurs
fabricant font foi.
Attention
Les aérosols de dégivrage peuvent
former des gaz explosifs, contenir des
solvants ou gaz propulseurs qui
endommagent le plastique, ou porter
préjudice à la santé.
Nettoyage de
l’appareil
• Débranchez la fiche mâle de la prise
de courant.
• Nettoyez avec de l’eau additionnée
d’un peu de produit à vaisselle.
• Après le nettoyage, débranchez la
fiche mâle de la prise de courant,
réarmez le disjoncteur / remettez le
fusible.
N’employez pas de produits de
nettoyage ou solvants contenant du
sable ou des acides.
Ne nettoyez le joint de porte qu’avec de
l’eau claire puis essuyez-le à fond avec
un chiffon sec.
L’eau de nettoyage ne doit pas pénétrer
dans le bandeau de commande ni dans
l’éclairage. Elle ne doit pas non plus
pénétrer dans l’orifice équipant la rigole
d’écoulement de l’eau de dégivrage
(Fig. I/B).
Les clayettes, supports et bacs ne vont
pas au lave-vaisselle : ils risqueraient de
se déformer.
FR.qxd 5/12/03 12:00 Page 39
Page 40

40
fr
Economies d’énergie
• Placez votre appareil dans un endroit
frais et bien aéré. Veillez à ce qu’il ne
soit pas exposé aux rayons solaires et
qu’il ne se trouve pas à proximité
d’une source de chaleur (radiateur
etc.). Laissez refroidir les boissons et
aliments chauds hors de l’appareil.
• Placez les produits à décongeler dans
le compartiment réfrigérateur.
• Vous pouvez utiliser le froid qu’ils ont
emmagasiné pour refroidir les aliments
stockés dans le réfrigérateur. N’ouvrez
la porte de l’appareil
• que le plus brièvement possible.
• De temps en temps, nettoyez le dos
de l’appareil avec un aspirateur ou un
pinceau, ceci pour éviter une hausse
de la consommation d’électricité.
Bruits de
fonctionnement
Bruits parfaitement
normaux
Bourdonnements étouffés : ces bruits
normaux se font entendre pendant que
le compresseur est en marche.
Gargouillis et clapotis légers : ils
proviennent de la circulation du fluide
réfrigérant dans les serpentins.
Cliquetis : ils sont audibles lorsque le
moteur se met en marche ou s’arrête.
Bruits faciles à supprimer
L’appareil ne repose pas d’aplomb
Vérifiez l’horizontalité de l’appareil à
l’aide d’un niveau à bulle. Ajustez
ensuite l’horizontalité par les pieds à vis
ou placez un objet dessous.
L’appareil touche quelque chose.
Eloignez l’appareil de meubles ou
d’appareils voisins.
Des tiroirs, paniers ou surfaces de
rangement vibrent ou se coincent
Vérifiez les pièces amovibles puis
remettez-les en place correctement.
Des récipients se touchent
Eloignez légèrement les bouteilles ou
récipients les uns des autres.
FR.qxd 5/12/03 12:00 Page 40
Page 41

41
fr
Remédier soi-même aux petites pannes
Avant d’appeler le service après-vente (SAV) :
Vérifiez svp si vous ne pouvez pas remédier vous-même au dérangement à l’aide des
instructions qui suivent.
Si vous faites venir le technicien, ses conseils vous seront facturés, même pendant la
période de garantie.
Dérangement
Aucun voyant ne
s’allume.
La mention « »
s’allume
(Fig. WW/5).
Cause possible
Coupure de courant ;
disjoncteur disjoncté ; fiche
mâle pas complètement
branchée dans la prise.
Dérangement : température
excessive dans le
compartiment congélateur.
• Orifices d’entrée et de sortie
d’air recouverts
• Vous avez mis d’un coup
trop de produits à congeler
• Porte du compartiment
congélateur ouverte
Une fois le dérangement
supprimé, la mention
d’avertissement s’éteint au
bout d’un certain temps.
Remède
Vérifiez si la prise est sous tension.
Le disjoncteur doit se trouver en position armée.
Veillez à ce que l’air puisse entrer et sortir
librement
Max. Ne dépassez pas la capacité de
congélation maximale.
Fermez la porte
FR.qxd 5/12/03 12:00 Page 41
Page 42

42
fr
Dérangement
L’éclairage ne
fonctionne pas ;
le groupe
frigorifique marche.
Le sol du
compartiment de
réfrigération est
mouillé.
Cause possible
L’ampoule est grillée.
Interrupteur d’éclairage coincé
(Fig. O/A).
Le tuyau d’écoulement de l’eau
de dégivrage est bouché (Fig.
I/B).
Remède
Changez l’ampoule (Fig. OO)
1. Débranchez la fiche mâle de la prise de courant
et/ou ramenez le disjoncteur en position éteinte.
2. Tournez le bandeau (C) de l’éclairage intérieur
en sens inverse des aiguilles d’une montre,
puis retirez le couvercle (B).
3. Changez l’ampoule ; montez ampoule de
rechange en 220–240 V alternatif, culot E14.
Puissance : voir l’inscription sur l’ampoule
défectueuse.
Vérifiez s’il se laisse bouger.
Nettoyez la rigole d’écoulement d’eau de
dégivrage et le tuyau d’écoulement
(Fig. II/B).
Appeler le service
après-vente
Pour connaître le service après-vente situé
le plus près de chez vous, consultez
l’annuaire téléphonique ou le répertoire des
services après-vente (SAV). Veuillez
indiquer au SAV le numéro de série (E-Nr.)
de l’appareil et son numéro de fabrication
(FD-Nr.).
Vous trouverez ces indications sur la plaque
signalétique (Fig.
!0
).
Aidez-nous à éviter des déplacements
inutiles : indiquez les numéros de série et de
fabrication. Vous économiserez ainsi des
suppléments de frais inutiles.
FR.qxd 5/12/03 12:00 Page 42
 Loading...