

Installation instructions
Instructions for use
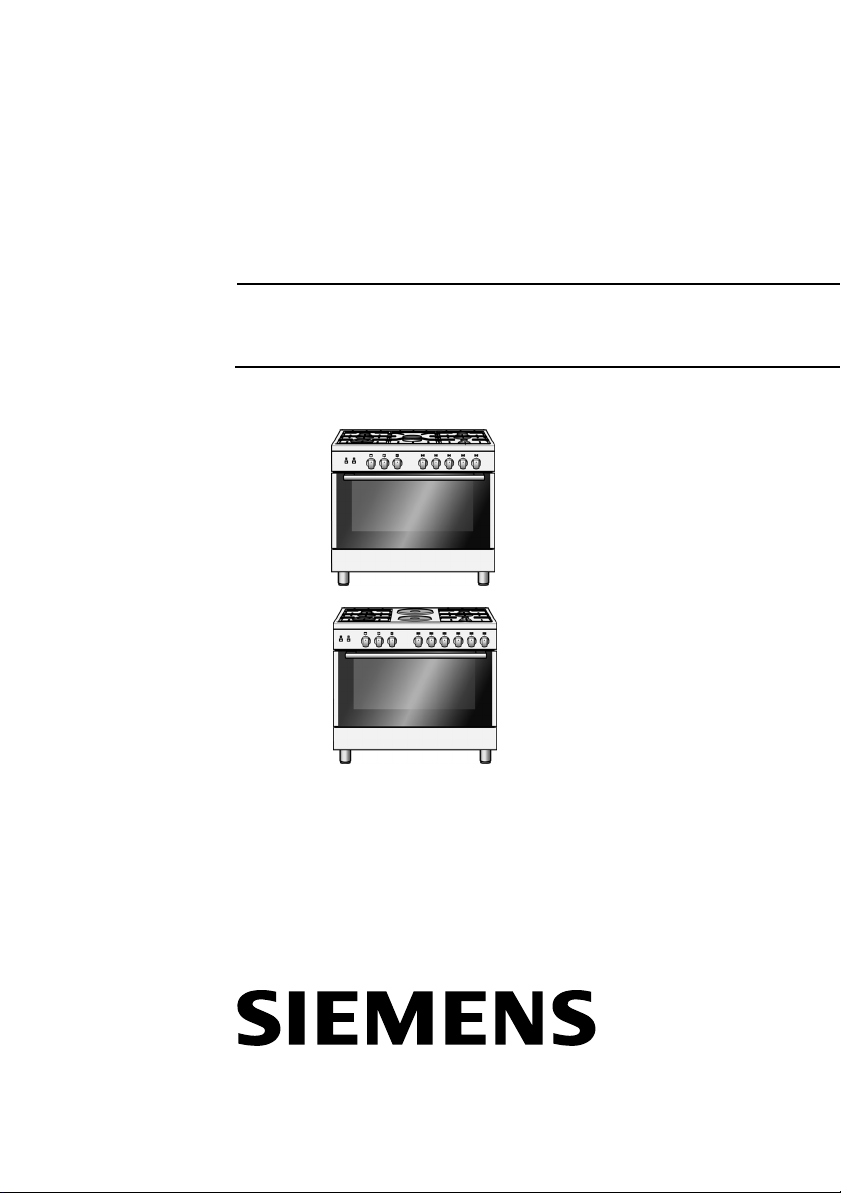
HG193510ME
HG195510ME
HG196510ME
HG197510ME
HG198210ME
HG198510ME
HG199210ME
HG199510ME
EN

...........

Installation instructions 1-22 | Instructions for use 23-90
Installation instructions
Safety precautions ___________________________________________ 3
Before installing _____________________________________________ 4
Appliance........................................................................................................ 4
Guideline for ventilation.................................................................................. 6
Installation __________________________________________________ 7
Fitting the adjustable feet ............................................................................... 7
Fitting the splash guard .................................................................................. 8
Electrical connection _________________________________________ 9
Gas connection _____________________________________________ 11
Converting the gas type ______________________________________ 15
Hotplate burners........................................................................................... 15
Oven burner ................................................................................................. 17
Grill burner.................................................................................................... 20
General nozzle table .................................................................................... 21
Positioning and levelling _____________________________________22
1

2

Safety precautions
This manual is valid for several models. Variations in
details for each cooker are possible.
The safe operation of this appliance can only be
guaranteed if it has been professionally assembled
and installed in accordance with these instructions.
The individual who assembled and installed the
appliance is liable for damage or faults resulting from
incorrect assembly or installation.
All installation and adjustment work, as well as the
conversion to a different type of gas must be
undertaken by an authorised expert and carried out in
accordance with the currently applicable rules and
regulations of the local gas and electricity supply
company.
Shut off the supply of electricity and gas before
carrying out any work.
Before installing the appliance, check that the local
conditions (type of gas and pressure) are compatible
with the appliance settings. The permissible
appliance settings can be found on the rating plate.
Electrical appliances must always be earthed.
If an extractor hood is to be fitted, it must be fitted
according to the associated assembly instructions.
Ensure that the hood is fitted at least 650 mm clear of
the hob.
3
Before installing
Read the following information about the appliance
and the guidelines for ventilation.
Appliance
Unpacking Check the condition of the appliance after unpacking
it. Do not connect the appliance if it has been
damaged in transport.
Dispose of packaging in an environmentally-friendly
manner.
The appliance is bolted to the pallet with two bolts.
To release the appliance, proceed as follows:
• Undo the bolts on the rear of the appliance.
• Screw the bolts back into the appliance without
the connecting brackets.
Appliance class This appliance corresponds to the following
appliance classes:
Appliance class Description
Class 1
Non flush-fitted cooker
Class 2 - subclass 1
Cooker immediately adjacent to two
units, consisting of a single unit.
Can also be installed so that the
side walls are accessible.
4
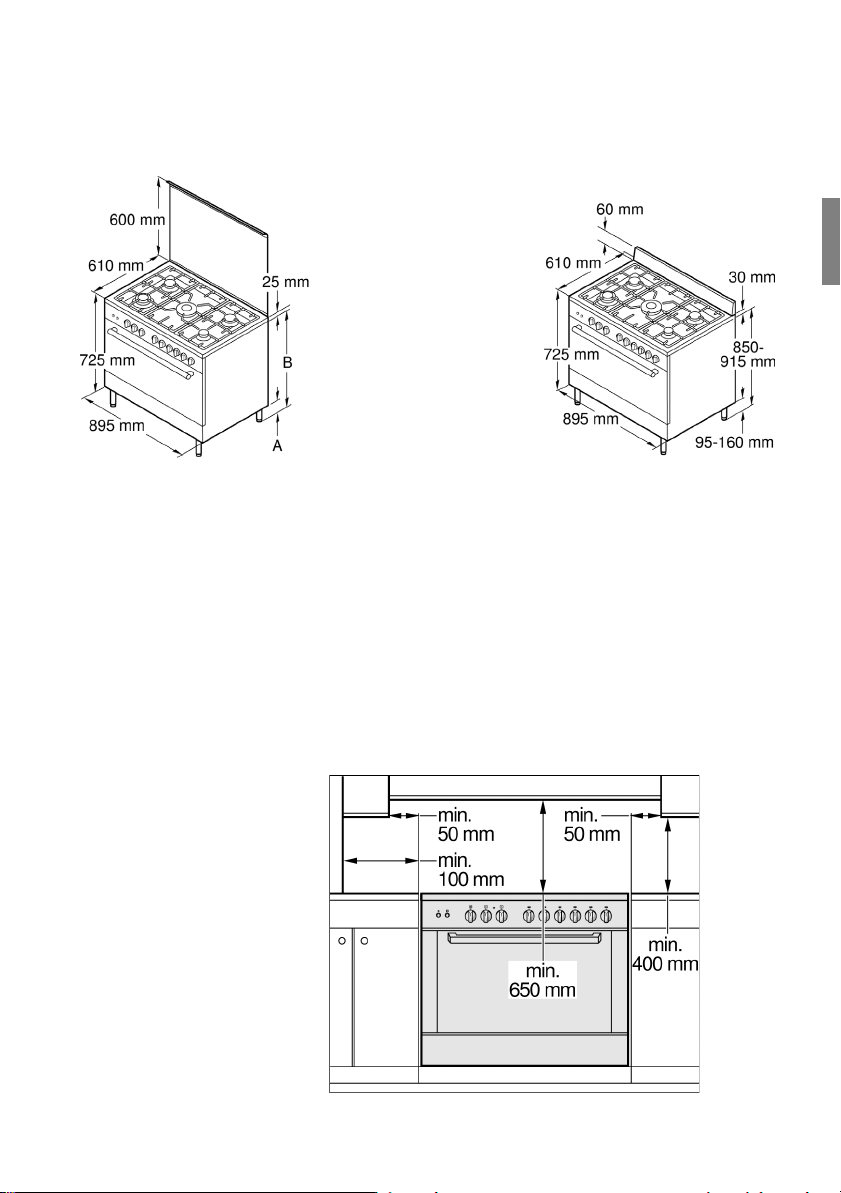
Appliance dimensions Note the specified dimensions.
HG193510ME, HG196510ME, HG197510ME,
HG198210ME, HG198510ME, HG199210ME,
HG199510ME
A = 95-160 mm
(HG193510ME, HG197510ME, HG198210ME,
HG199210ME: A= 90-145 mm)
B = 820-885 mm
(HG193510ME, HG197510ME, HG198210ME,
HG199210ME: B= 815-870 mm)
HG195510ME
Adjacent units Adjacent units must be made of non-combustible
material. The fronts of adjacent units must be
resistant to temperatures up to at least 90 °C. If the
appliance is fitted close to other units, the minimum
distances specified in the picture must be maintained.
5
Rating plate The technical data for the appliance can be found on
the rating plate on the inside of the storage
compartment flap.
Never remove the rating plate from the appliance.
The setting values are specified on a label on the
appliance packaging.
Use the table below to record the product number (E
no.),
production number (FD no.),
factory setting for type of gas and pressure and
if applicable, the type of gas and pressure
conversions.
E no. FD no.
After-sales service
Type of gas
Gas pressure
(factory setting)
Type of gas
Gas pressure
(conversion)
Guideline for ventilation
This appliance may only be set up in a sufficiently
ventilated room and according to the applicable
regulations and ventilation requirements.
Please note that the air volume required for
combustion must not be below 2 m
power (see kW total power on the rating plate).
6
3
/h per kW of
Installation
This appliance is always supplied with a set of
adjustable feet and, depending on the model, with a
splash guard.
The appliance may also be used without the splash
guard.
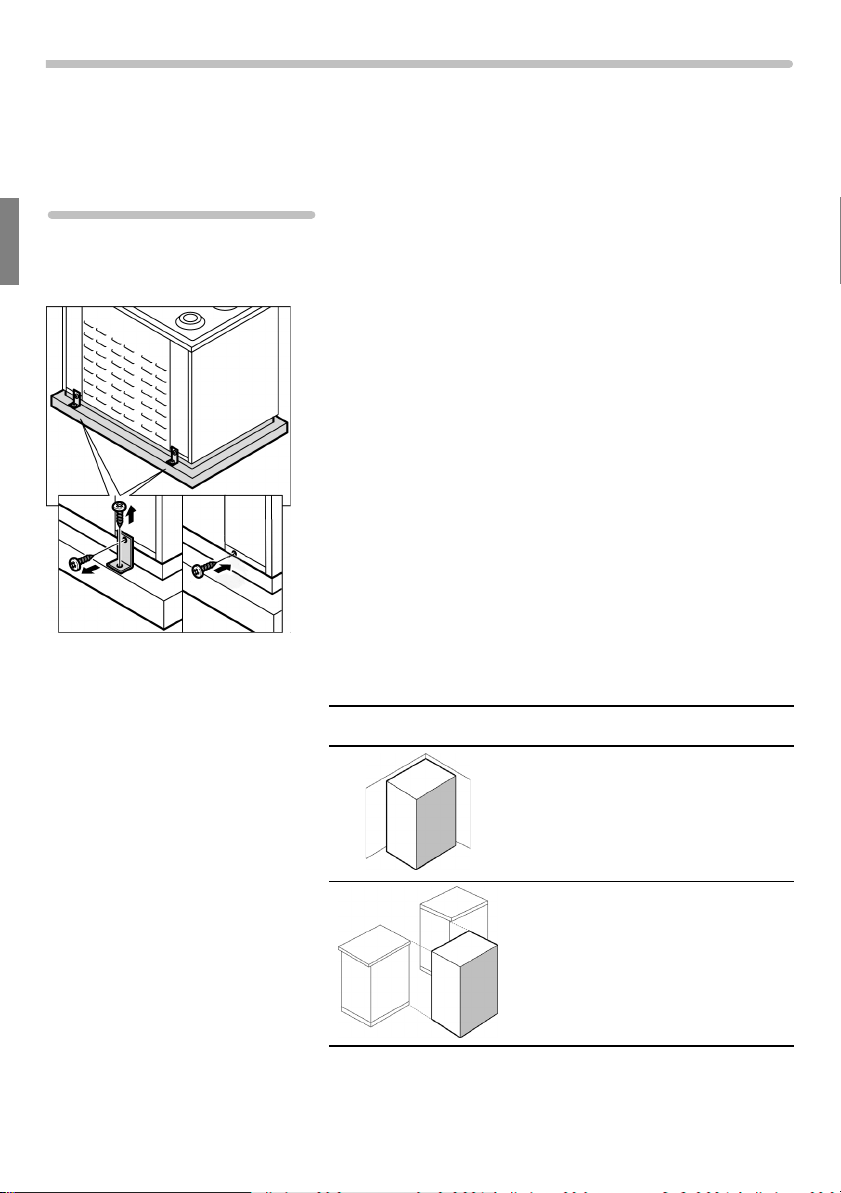
Fitting the adjustable feet
Beforehand:
• Remove all parts that are not permanently fixed,
especially the pan supports and burners.
• Remove the accessories from the oven.
Proceed as follows:
• Tilt the appliance by raising one side slightly from
the floor.
• With the plates in position, screw the adjustable
feet into the mounting holes on the underneath of
the appliance.
• Repeat the process on the other side.
You can make the final adjustments to the feet in
order to level the appliance once the gas and
electricity supply have been connected.
If it is necessary to pull the appliance, screw the
adjustable feet in fully. Make the final settings only
when the other installation tasks have been
completed.
7

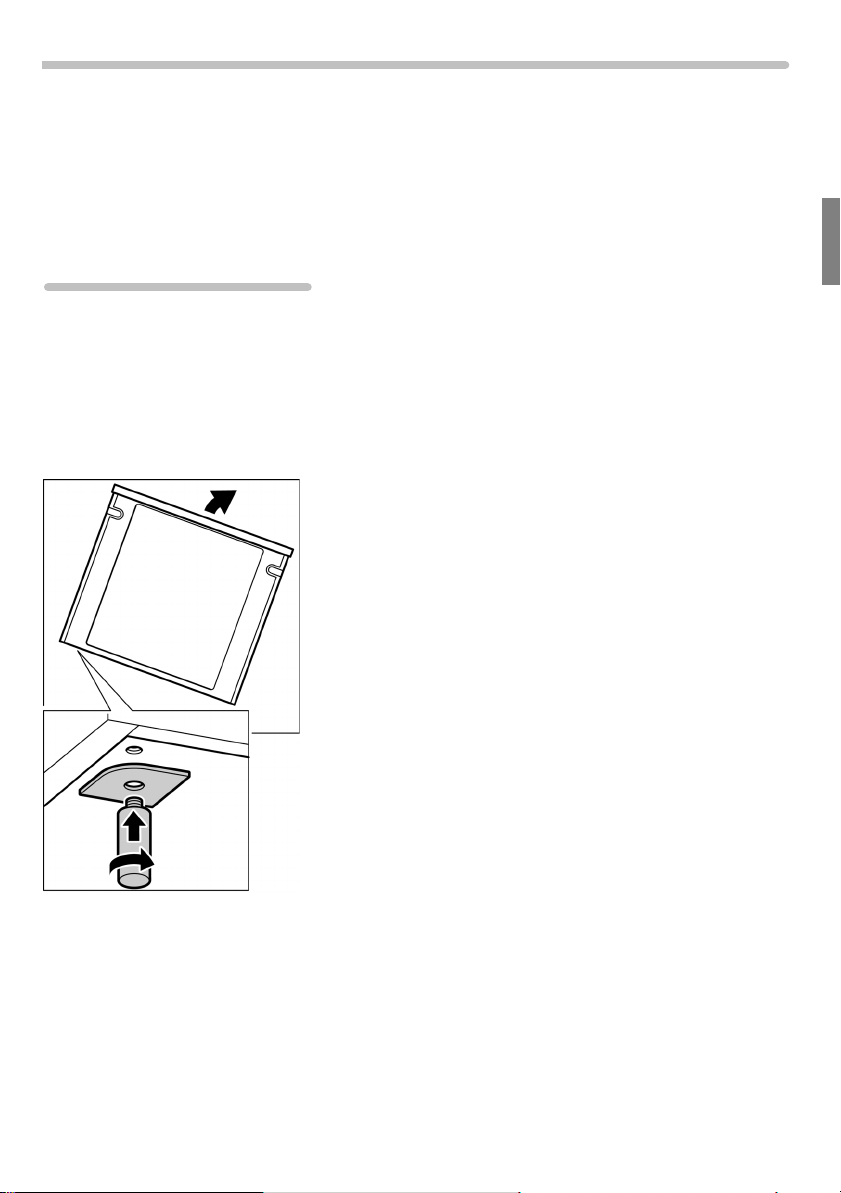
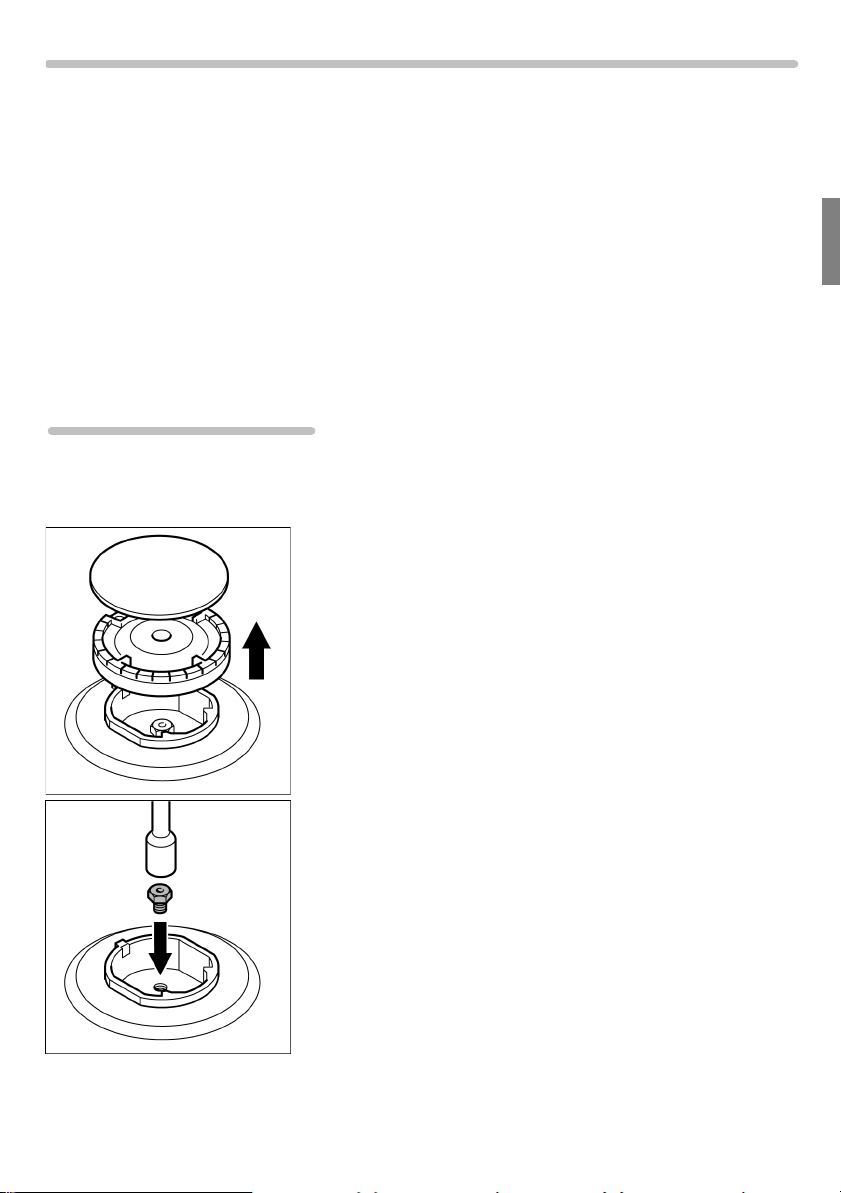
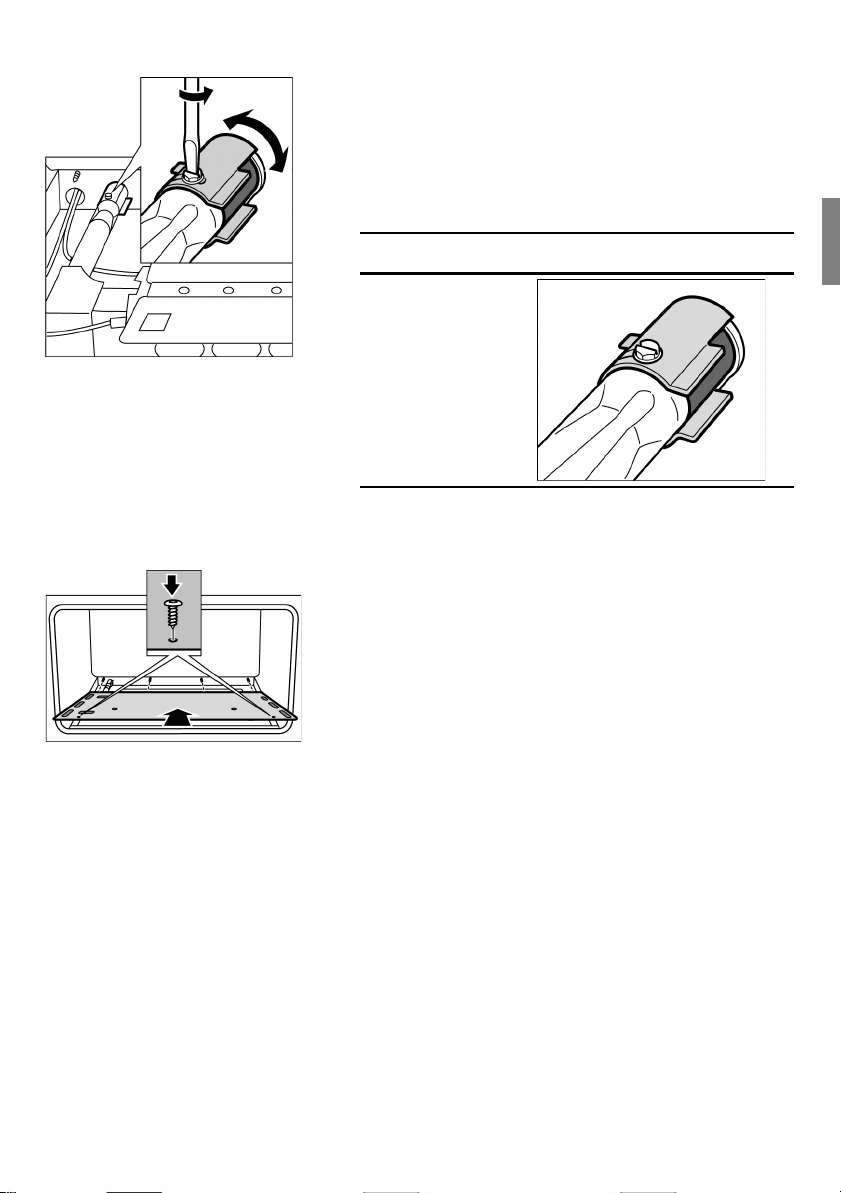
Fitting the splash guard
Depending on the model.
Proceed as follows:
• Remove the packaging and the protective film
• Screw the splash guard onto the rear of the
from the splash guard.
appliance using the 2 bolts, each with a washer,
retaining washer and nut.
8

Electrical connection
Only a licensed expert may connect the appliance.
The appliance must be installed according to the
most recent IEE regulations (Institute of Electrical
Engineers).
The appliance could become damaged if incorrectly
connected.
Make sure the voltage of the power supply
corresponds to the specified value on the rating plate.
The rating plate can be found on the inside of the
storage compartment flap.
Ensure that the power supply is properly earthed and
that the fuse and the wiring and piping system in the
building can withstand the load from the appliance.
It is recommended that you configure the circuit for
the appliance to 16 A.
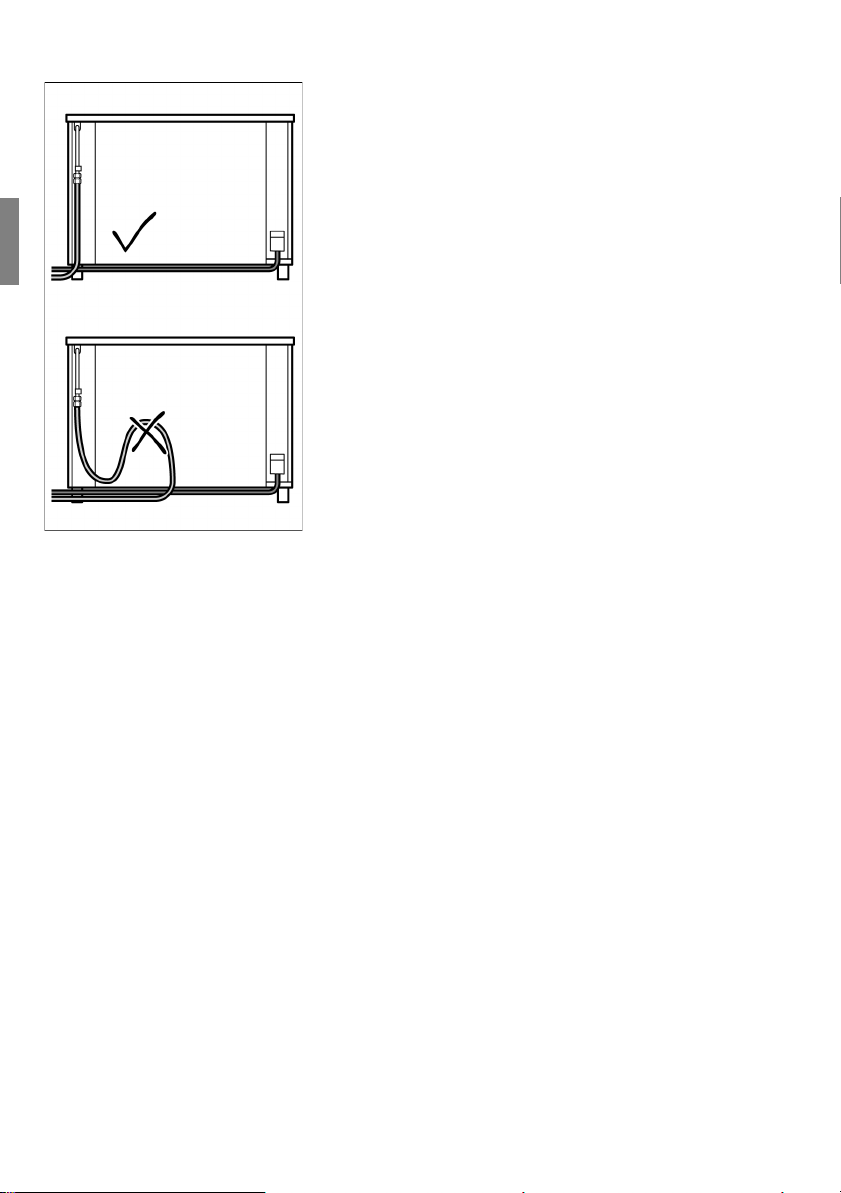
When you route the mains cable, make sure that:
• the cable is not trapped or squashed.
• the cable does not come into contact with sharp
edges or cutting edges.
• the cable does not come into contact with parts
that can reach temperatures of more than 50 °C
above room temperature.
9

Connecting the mains
cable
Replacing the mains cable The mains cable is replaced via the terminal block.
Where the appliance is directly connected to the
power supply, an all-pole isolating switch with a
contact gap is required.
Complete disconnection in compliance with the
conditions specified in overvoltage category III must
be guaranteed.
The earth cable is excluded from this.
The mains cable must be of the following type:
• H05RRF
• 3 x 0.75 mm²
• 230 V~
Leave the mains cable slightly overlong so that you
can pull out the appliance for cleaning purposes.
Proceed as follows:
• Open the terminal box.
• Undo the screw on the terminal block that fixes
the cable in place.
• Loosen the screw contacts and replace the cable
with a new one of the same length.
The cable must comply with the stipulated specifications.
• Connect the yellow-green wire to the < terminal.
This wire must be at least 10 mm longer than the
other wires.
• Connect the blue neutral wire to terminal N.
• Connect the brown power wire to
terminal L.
10
Gas connection
The appliance must be connected in accordance with
the currently applicable regulations.
Before installing the appliance, check that the local
conditions (type of gas and pressure) are compatible
with the appliance settings. The permissible
appliance settings can be found on the rating plate.
Connection to the gas lines and seal fitting must be
carried out professionally according to the currently
applicable standards.
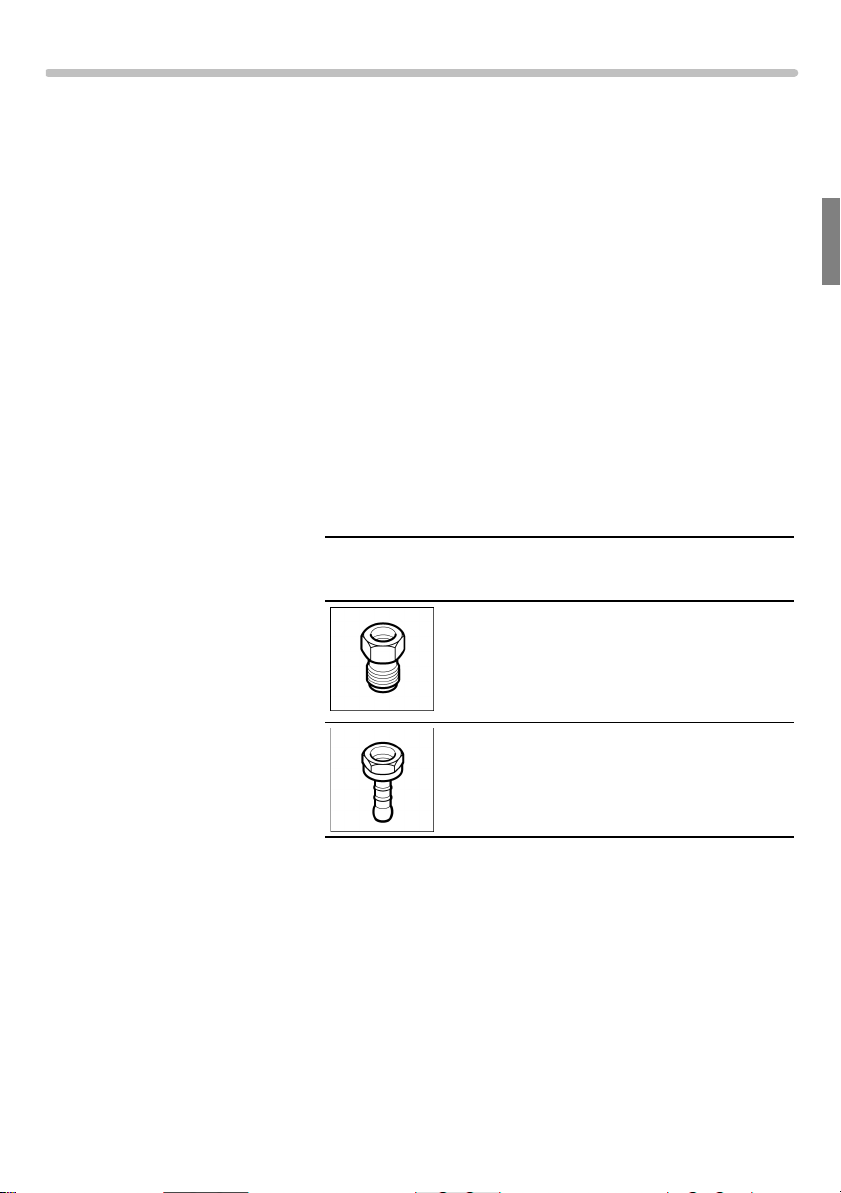
Gas connection on the
appliance
Default setting of the
burners
The gas connection (ISO 228-1, 1/2") is located at the
rear left of the appliance.
The following connections are provided with the
appliance:
Connecting
pieces Description
Connecting piece ISO 228-1/ISO
7-1
(and seal)
LPG corrugated tube union
(and seal)
The burners are set up for G30 liquefied gas (29
mbar) on delivery.
A nozzle set for G20 natural gas (20 mbar) is supplied
with the appliance.
11
Country-specific
connection
Corrugated tube
union
(liquefied gas)
AE X X
AF X X
BD X X
BH X X
DZ X X
EG X X
GH X X
IR X X
JO X X
KW X X
LB X X
LY X X
MA X X
OM X X
PK X X
QA X X
SA X X
SD X X
SY X X
TN X X
YE X X
ISO 7-1
(natural gas)
12
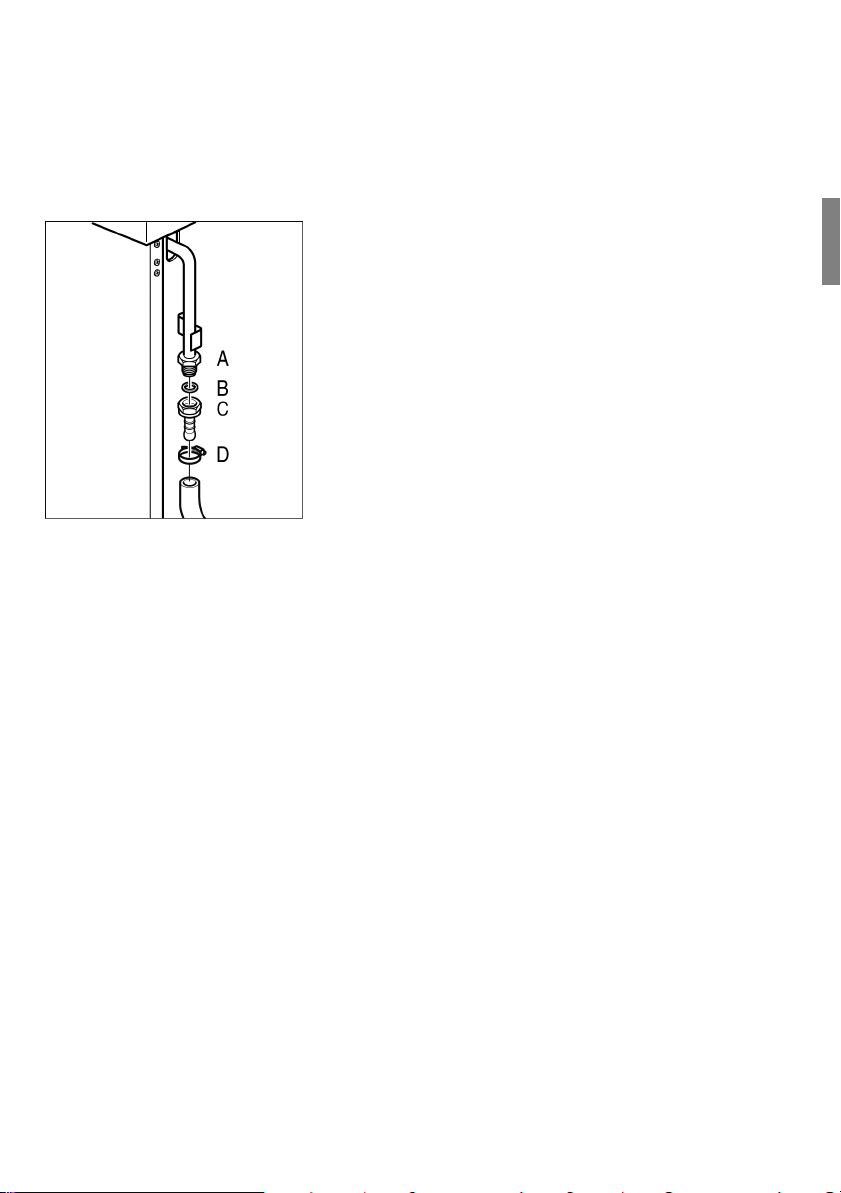
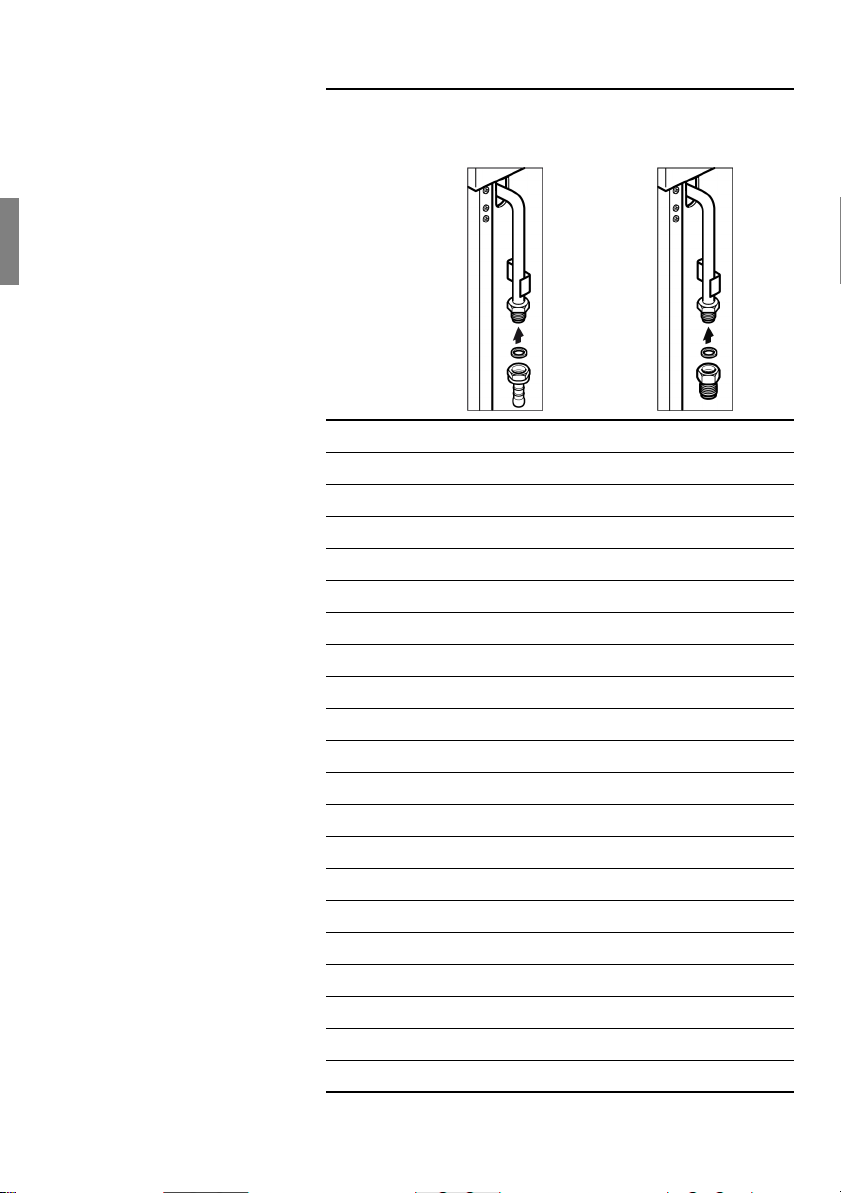
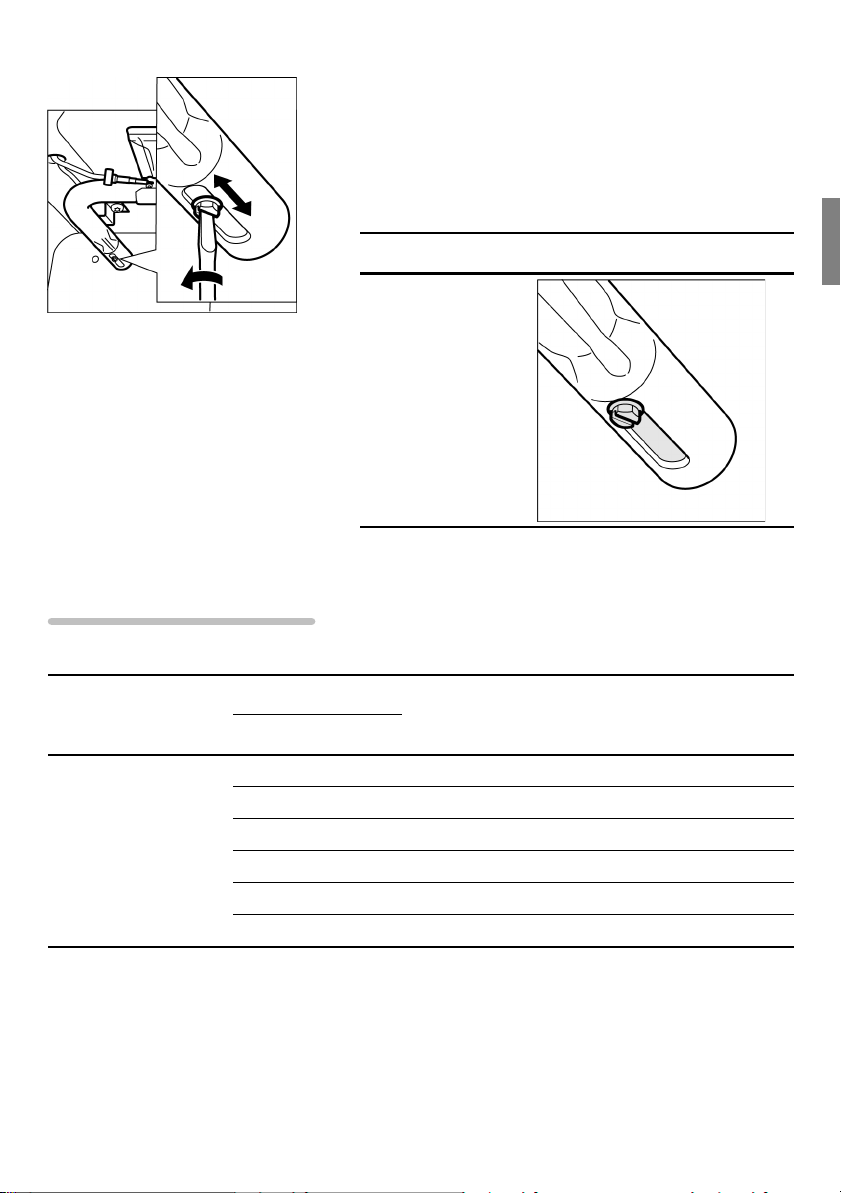
Connecting to liquefied gas If you connect the appliance to liquefied gas,
you must always install a suitable gas pressure
regulator.
Use the total gas consumption of the appliance stated
on the rating plate to select a suitable gas pressure
regulator.
Only use connecting lines or flexible hoses which
comply with the applicable regulations and which are
approved for this purpose.
Proceed as follows:
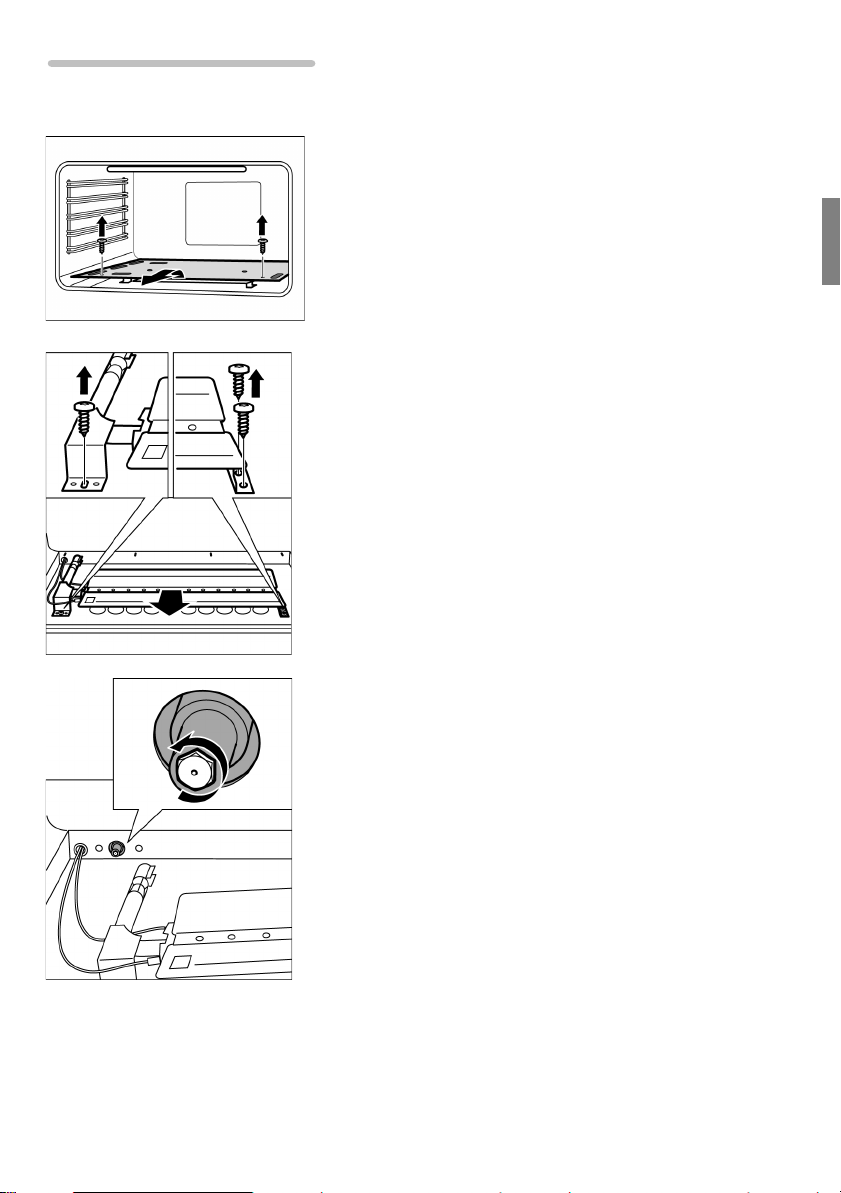
• Screw the corrugated tube union (C) and the seal
(B) to the gas connection (A).
• Hold the corrugated tube union (C) in place with a
spanner and screw the connecting piece to a
flexible gas connecting hose (E).
E
• Tighten the clamp (D).
Only use approved sealing compound to seal the
thread.
13
Flexible hose If you use flexible hoses, make sure that:
• the hoses do not become trapped or squashed.
• the hoses are not subject to twisting or pulling
forces.
• the hoses do not come into contact with sharp
edges or cutting edges.
• the hoses do not come into contact with parts that
could reach a temperature higher than 70 °C
above room temperature.
Ensure that the full length of the hoses are accessible
for inspection.
Safety valve The installation of a safety valve for opening and
closing the gas supply is a compulsory requirement.
Fit the safety valve between the gas connecting line
to the appropriate room and the hob. Ensure
unhindered access to this valve.
Checking for leaks After connecting the gas line, check the connections
for leaks using soapy water.
Initial use Switch the appliance on as described in the
instruction manual.
Light all the burners and check that the flames remain
stable at both the high and low settings.
14
Converting the gas type
If the appliance is not already set up for the existing
type of gas, the appliance must be converted.
The conversion to a different type of gas must be
carried out by an authorised expert in accordance
with the applicable regulations.
The type of gas and pressure that was preset at the
factory are indicated on the rating plate on the inside
of the storage compartment flap.
In order to convert to a different type of gas, the
nozzles must be replaced and the low flame and
primary air may have to be adjusted.
Hotplate burners
Replacing the nozzles
Proceed as follows:
A
B
• Remove the pan supports.
• Remove the burner lids (A) and burner cups (B)
from the burners (C).
C
• Remove the nozzle (D) and replace it with an
appropriate nozzle for the new type of gas (see
section “General nozzle table”).
D
• Replace the gas label with the new label that was
supplied with the nozzle set.
15
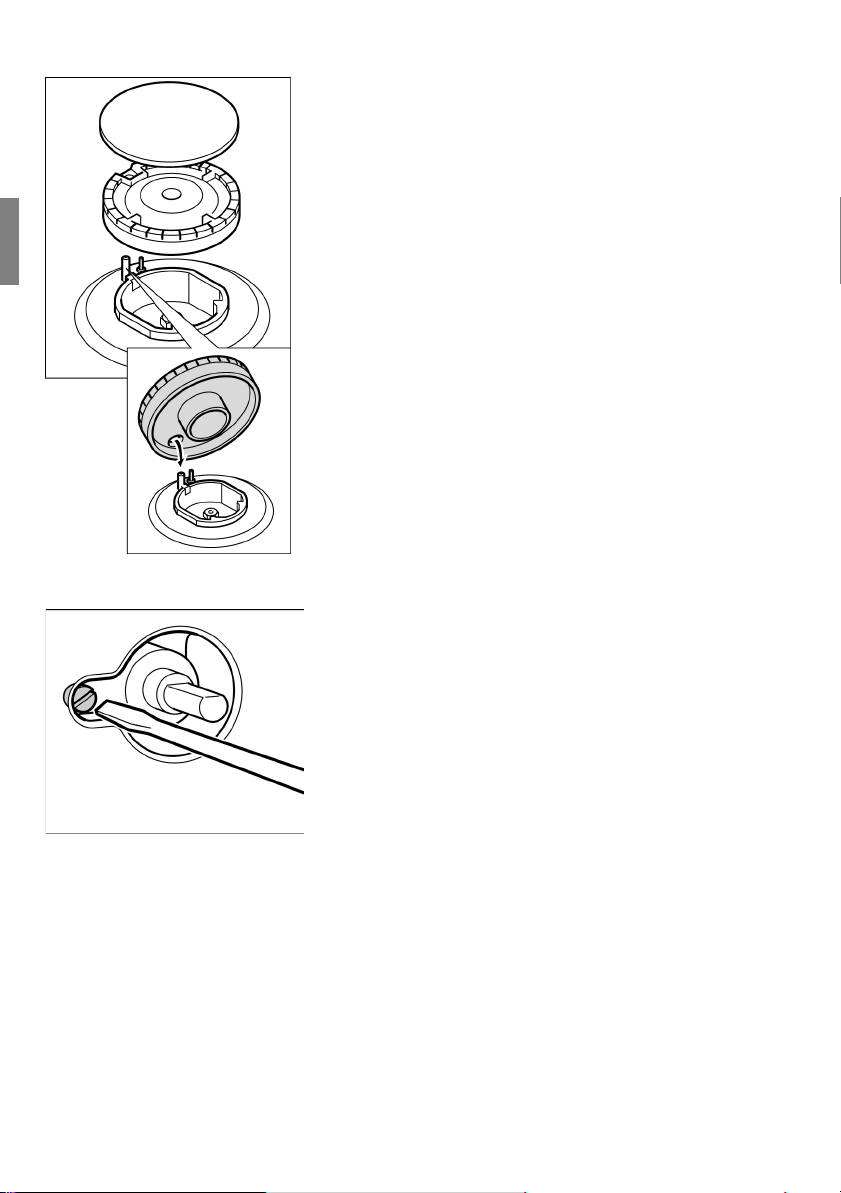
• Place each burner cup (B) on the burner (C).
A
B
C
Adjusting the low flame Proceed as follows:
• Position the relevant burner cap (A) exactly on
top of the cup.
• Refit the pan supports.
• Switch on the burner and turn the control knob
towards the small flame setting.
• Pull off the control knob.
• Adjust the inner setting screw through the gas tap
opening in the control panel until a stable flame is
burning correctly.
Loosen the setting screw to increase the gas flow
or tighten it to decrease the gas flow.
The setting is correct when the height of the small
flame is approx. 3 to 4 mm.
• Refit the control knob.
• Check that the flame does not go out when the
gas flow is quickly changed between maximum
and minimum and vice versa.
16
Oven burner
Replacing the nozzles Proceed as follows:
• Remove the removable floor of the oven by
undoing the 2 screws at the front and pulling the
floor out upwards and towards the front.
• Undo the 2 screws on the right and the screw on
the left of the oven burner and pull the burner
upwards and towards the front slightly.
• Unscrew the nozzle and replace it with a nozzle
which is suitable for the new type of gas (see
"General nozzle table" section).
• Replace the gas label with the new label that was
supplied with the nozzle set.
Reassembling the burner To reassemble the burner, proceed in the opposite
order.
17

Adjusting the low flame Proceed as follows:
• Open the appliance door. Press the control knob
for the oven in and turn it anti-clockwise to the
maximum setting
The gas burner will light. Hold the control knob
depressed for around 15 seconds and then
release it.
• Close the appliance door. Remove the control
knob.
• Through the gas tap opening in the control panel,
loosen the internal setting screw slightly.
• Replace the control knob and heat the oven for
15 minutes.
• Then turn the control knob to the minimum setting
140
.
• Remove the control knob again.
• Now, through the gas tap opening in the control
panel, adjust the internal setting screw until a
stable flame is burning correctly.
Loosen the setting screw to increase the gas flow
or tighten it to decrease the gas flow. The setting
is correct when the height of the small flame is
around 3 to 4 mm.
In the case of a connection to liquefied gas,
tighten the setting screw.
• Refit the control knob.
• Make sure that the flame does not go out when
the gas flow is changed quickly from maximum to
minimum and vice versa, and when the
appliance door is opened and closed.
250.
18
Regulating the primary air The primary air is correctly set when the flame is
stable and blue/green.
Proceed as follows:
• Undo the screw.
• Turn the cover clockwise or anticlockwise. The
table below shows the correct setting for the
cover.
Type of gas Setting values
G30/29 mbar
• Tighten the screws again.
Reassembling the floor To reassemble the floor, proceed in the opposite
order and pay attention to the 4 screws in the back
wall of the cooking compartment when inserting the
removable floor.
19

Grill burner
Replacing the nozzles Proceed as follows:
• Undo the 2 screws on the left and the 2 screws
on the right of the grill burner and pull the burner
downwards and towards the front slightly.
• Unscrew the nozzle and replace it with a nozzle
which is suitable for the new type of gas (see
"General nozzle table" section).
• Replace the gas label with the new label that was
supplied with the nozzle set.
• To reassemble, follow the instructions in the
reverse order.
20
Regulating the primary air The primary air is correctly set when the flame is
stable and blue/green.
Proceed as follows:
• Undo the screw.
• Slide the inner cover forwards or backwards. The
table below shows the correct setting for the
cover.
Type of gas Setting values
G30/29 mbar
• Tighten the screws again.
General nozzle table
Type of gas mbar
Liquefied
gas
Butane
Propane
G30/G31
28-30/
37
Nozzle no.
85 42
65 31
50 27
96 60
100 55
66 65
Type of burner Output
High output burner
Standard output burner
Economy burner
Wok burner
Oven burner
Grill burner
3,600 262 g/h
Consumpti
(W)
3,000 219 g/h
1,750 128 g/h
1,000 73 g/h
4,300 313 g/h
2,000 146 g/h
on max.Nozzle Bypass
21
Positioning and levelling
Positioning the appliance When installing the appliance, make sure that there is
enough space in the final installation location to pull
the appliance forwards for cleaning and maintenance
work.
The ground underneath must be hard and stable.
The wall immediately behind the appliance must be
made from non-flammable material, e.g. tiles.
If you need to pull the appliance in order to position it,
make sure that the adjustable feet are screwed in
fully.
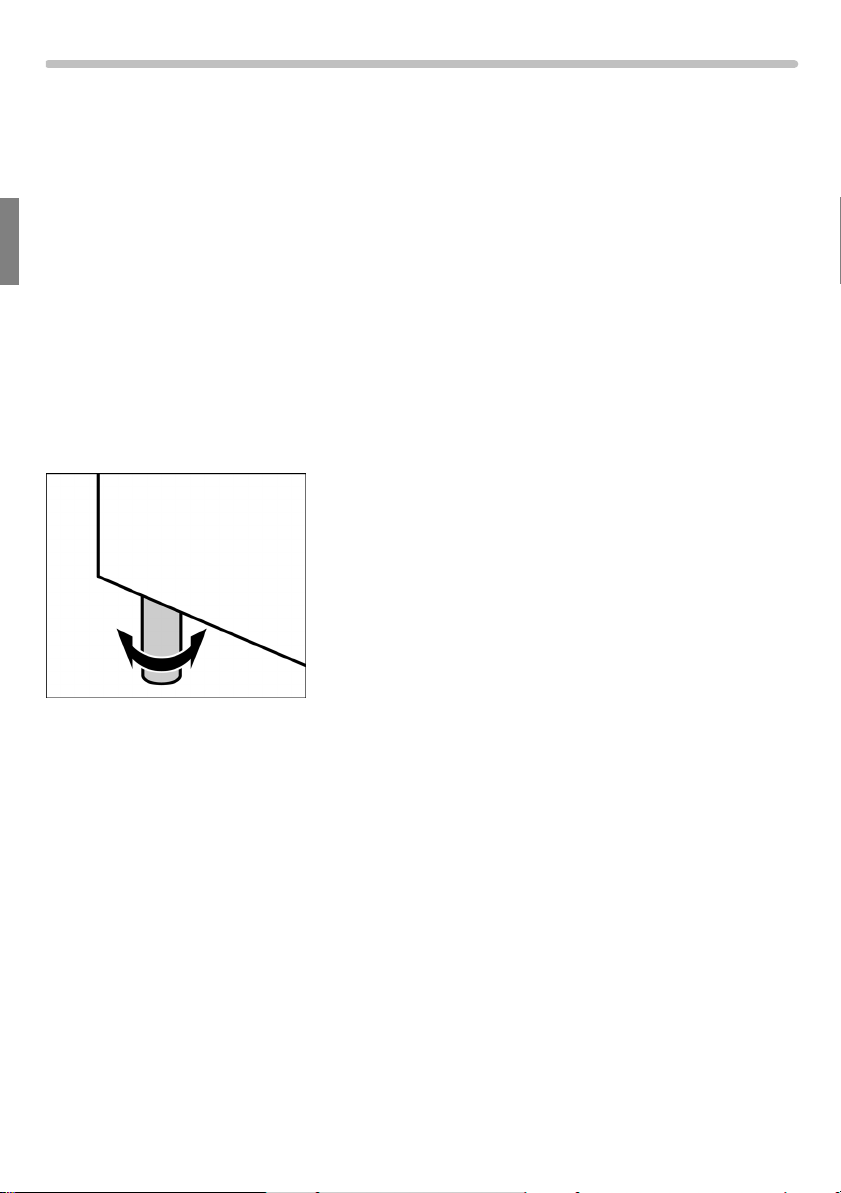
Levelling the appliance
Level the appliance once all other work has been
completed.
To do this, turn the adjustable feet.
22

Instructions for use
Important information________________________________________25
Safety precautions........................................................................................ 26
Property damage.......................................................................................... 28
Your new appliance:
HG197510ME, HG198210ME, HG198510ME, HG195510ME, HG199210ME,
HG199510ME _______________________________________________30
The control panel.......................................................................................... 31
The hob ........................................................................................................ 31
The oven ...................................................................................................... 33
The minute minder ....................................................................................... 36
The storage compartment ............................................................................ 36
Your new appliance:
HG196510ME _______________________________________________37
The control panel.......................................................................................... 37
The hob ........................................................................................................ 38
The oven ...................................................................................................... 40
The minute minder ....................................................................................... 43
The storage compartment ............................................................................ 43
Your new appliance:
HG193510ME _______________________________________________44
The control panel.......................................................................................... 44
The hob ........................................................................................................ 45
The oven ...................................................................................................... 47
The minute minder ....................................................................................... 50
The storage compartment ............................................................................ 50
Before using for the first time _________________________________ 51
Baking out the oven...................................................................................... 51
Cleaning the burner lids and cups................................................................ 53
Cleaning accessories ................................................................................... 53
How to operate your hob _____________________________________54
Operating gas burners.................................................................................. 54
Operating electric hotplates.......................................................................... 55
How to operate your oven:
HG196510ME, HG197510ME, HG198210ME, HG198510ME, HG195510ME,
HG199210ME, HG199510ME___________________________________ 56
Operating the oven gas burner..................................................................... 57
Operating the grill gas burner....................................................................... 58
Using the combination mode........................................................................ 59
Using the rotary spit ..................................................................................... 61
23

How to operate your oven:
HG193510ME _______________________________________________64
Operating the oven gas burner..................................................................... 65
Operating the grill gas burner....................................................................... 66
Using the rotary spit ..................................................................................... 67
Operating the minute minder __________________________________70
Cleaning and care ___________________________________________ 71
Catalytic cooking compartment panels......................................................... 71
Using the correct cleaning agent.................................................................. 72
Removing and fitting the appliance door ...................................................... 74
Removing and inserting the hook-in racks ................................................... 76
Faults and the after-sales service ______________________________ 78
Replacing the oven light bulb ....................................................................... 79
Aftersales service ......................................................................................... 80
Tips and tricks______________________________________________ 81
Tips for saving energy .................................................................................. 81
Tips on using the hob......................................................................... 81
Tips on using the oven ....................................................................... 82
Tips for using your appliance ....................................................................... 83
Boiling and frying................................................................................ 83
Baking ................................................................................................ 84
Roasting and grilling........................................................................... 86
24

Important information
Read the instructions for use carefully.
This will enable you to operate your appliance safely
and correctly.
This manual is valid for several models. Variations in
details for each cooker are possible.
Please keep the instruction manual, installation
instructions and the various accessories in a safe
place. Please pass on these manuals and
accessories to the new owner if you sell the
appliance.
Transport damage Check the appliance for damage after unpacking it.
Do not connect the appliance if it has been damaged
in transport.
Environmentally-friendly
disposal
Connections Have a licensed professional carry out the electric
Dispose of packaging in an environmentally-friendly
manner.
This appliance is labelled in accordance with
European Directive 2002/96/EC on Waste Electrical
¦
and Electronic Equipment WEEE.
and gas connection and the conversion to a different
type of gas.
Assembly instructions are supplied with the
appliance.
Any damage caused by the appliance being
incorrectly connected is not covered under the
guarantee. We assume no liability for damage and
faults caused by connection and setting errors.
25

Safety precautions
This appliance is intended for domestic use only.
This appliance must only be used for food
preparation.
Adults and children must not operate the appliance
without supervision if:
• they do not have the physical or mental ability;
• or they lack the knowledge and experience
required to operate the appliance safely and
correctly.
Never let children play with the appliance.
Hot surfaces Risk of burns.
Never touch the burners, the surfaces of the cooking
compartment, the heating elements or the oven
steam outlets when they are hot.
Children must be kept at a safe distance from the
appliance at all times.
Open the appliance door carefully. Hot steam may
escape.
If the burners are in operation for a prolonged period,
the areas between them can become hot.
Risk of fire.
Never leave flammable objects on the hob or in the
storage compartment, or keep them in the cooking
compartment.
Risk of short-circuit.
Never trap the mains cable of electrical appliances in
the appliance door when it is hot or pull the cable over
burners when they are hot. The cable insulation may
melt.
Overheated oil and fat Risk of fire.
Overheated oil or fat can ignite very quickly.
Never leave fat or oil to heat unattended. Should the
oil ignite, do not try to put it out by pouring water on it.
Cover the pan immediately with a lid or plate. Switch
off the gas burner. Allow the cookware to cool down
on the gas burner.
26

High-proof alcohol Be careful with food that is prepared using drinks with
a high alcohol content (e.g. cognac, rum).
Alcohol evaporates at high temperatures. In
unfavourable circumstances, the alcoholic vapours
could catch fire in the appliance.
Risk of burns.
Only use small quantities of drinks with a high alcohol
content and open the appliance door carefully.
Inadequate ventilation
when using gas burners
Repairs Risk of electrocution.
Never use the gas burners in unventilated rooms.
Cooking with gas burners releases extra heat and
moisture.
During prolonged cooking and baking times, switch
on the extractor hood or make sure that the area is
well ventilated.
Risk of fire.
Never switch on the extractor hood if the burners are
not covered by cookware.
Grease residue in the filter of the extractor hood may
ignite.
The intense heat may damage the extractor hood.
Incorrect repairs are dangerous.
Repairs may only be carried out by one of our
experienced after-sales engineers.
Risk of electrocution.
Never replace a damaged power cable yourself.
Power cables may only be replaced by one of our
experienced after-sales engineers.
Switch off the circuit breaker in the fuse box if the
appliance is faulty.
Shut off the gas supply.
Call the aftersales service.
27

Faults with the gas
installation/gas smell
Safety valve Close the safety valve on the gas supply line if the
If you can smell gas or identify faults with the gas
installation, you must
• shut off the gas supply and/or valve on the gas
cylinder immediately
• put out naked flames and cigarettes immediately
• switch off electrical appliances, even lamps
• open windows and ventilate the room well
• call the after-sales service or your gas supplier.
cooker will not be used for a prolonged period.
Property damage
Damage to the hob Only use the burners if cookware is placed on them.
Do not heat empty pots or pans. This will damage the
pan base.
Do not allow saucepans to boil dry, in particular
enamel and aluminium saucepans.
The pan base must be clean, dry and flat.
With electric hotplates, it is possible that not enough
heat is drawn off and the pans become red hot.
28
Please follow the manufacturer's instructions when
using special cookware. Aluminium foil and plastic
containers can melt and stick on hot burners.
Do not use a roasting dish which has to be heated
using two burners. This will cause heat to
accumulate. This could damage the appliance.
Please note that appliances with a hob cover may
only be used with the hob cover open.

Damage to the oven Never cook meals on the floor of the cooking
compartment. Do not leave the baking tray on the
cooking compartment floor. Do not cover it with
aluminium foil.
Do not place oven or cookware on the oven floor.
This will cause heat accumulation. The baking and
roasting times will no longer be correct and the
enamel will be damaged.
Never pour water directly into a hot oven. This will
damage the enamel.
When making very moist fruit flans, do not put too
much on the baking tray. Fruit juice dripping from the
baking tray leaves stains that cannot be removed.
Do not stand or sit on the open oven door.
Damage to the fronts of
adjacent units
Only leave the oven to cool down with the door
closed. The fronts of adjacent units may eventually
become damaged even if you only leave the oven
door open slightly.
If the oven door seal is very dirty, the appliance door
will no longer close properly during operation. The
fronts of adjacent units will become damaged over
time. Keep the seal clean.
29

Your new appliance
HG197510ME, HG198210ME, HG198510ME, HG195510ME,
HG199210ME, HG199510ME
Get to know your appliance. You will find information
about the control panel and hob, as well as the oven,
types of heating and accessories.
For the HG197510ME/HG198210ME/HG198510ME/
HG199210ME/HG199510ME model:
Hob cover
Steam outlet
Hob
Control panel
Oven
Storage
30
For the HG195510ME model:
Splash guard
Steam outlet
Hob
Control panel
Oven
Storage

The control panel
Control knob
Grill
Control knob
Oven
Control knobs
Gas burners
Function button
Rotary spit
Function button
Oven lighting
The hob
Steam outlet
Pan support
High output burner
(3.0 kW)
Control knob
Minute minder
Standard burner
(1.75 kW)
Economy burner
(1.0 kW)
Wok burner
(3.6 kW)
Gas burners
Gas burners Pot or pan diameter
Economy burner 8-16 cm
Standard output burner 12-20 cm
High output burner 20-23 cm
Wok burner 23-26 cm
31

Control knobs for gas
burners
Adjust the heat setting of the gas burners using the
control knobs.
The symbol above the control knob shows you to
which gas burner the control knob belongs.
Setting Meaning
>
Off
Gas supply open, the burner ignites.
J - Ÿ
Accessory
Accessory Description
Steam outlet Risk of burns.
Hot air from the oven escapes out of the steam outlet
on the hob.
Never touch the steam outlet.
Please note that, in the case of appliances with a hob
cover, the burners in the oven may also only be
switched on if the hob cover is open.
Burner power levels
Espresso attachment
Attachment for an espresso
pot, for attaching to the
economy burner.
32

The oven
Gas burners
Grill gas burner
(2.0 kW)
Oven gas burner
(4.3 kW)
Control knob for oven Use this control knob to set the heat output of the
oven gas burner.
Setting Meaning
0Off
140 - 250 Oven gas burner on, temperature
range in °C
0
There is a limit stop between settings 250 and
not turn the knob beyond this point.
. Do
Control knob for grill This control knob is used to adjust the heat setting of
the grill gas burner.
Setting Meaning
>
J - Ÿ
Burner power levels
There is a limit stop between settings
turn the knob beyond this point.
Off
Gas supply open, the burner ignites.
Ÿ
and > . Do not
33

Function button for oven
lighting
This function button is used to switch the oven
lighting on and off.
Setting Meaning
Off
On
Function button for rotary
spit
This function button is used to switch the rotary spit
on and off.
Setting Meaning
Off
On
34

Accessories The accessories can be inserted in the oven in 5
different shelf positions.
You can pull the accessories two-thirds of the way out
without them tipping. This allows meals to be
removed easily.
You can buy accessories from the after-sales service
or from specialist retailers.
Accessory Description
Baking and roasting shelf
For ovenware, cake tins,
roasts, grilling and frozen
meals.
Enamelled baking tray
For moist cakes, pastries,
frozen meals and large
roasts. Can also be
inserted underneath the
wire rack or rotary spit and
used as a drip tray to
collect fat.
Rotary spit
For roasts and large pieces
of poultry. Use only in
combination with the
enamelled baking tray.
35

The minute minder
The minute minder is a countdown
timer which emits an audible signal when
the cooking time has elapsed.
The minute minder runs independently of the oven.
Control knob for minute
minder
Use this control knob to set the cooking time.
Setting Meaning
>
1 - 59
The storage compartment
Open the storage compartment by folding down the
fascia panel.
This compartment can be used to store hob or oven
accessories.
Risk of fire.
Never leave combustible items in the storage
compartment.
Off
Cooking time in minutes
36

Your new appliance
HG196510ME
Get to know your appliance. You will find information
about the control panel and hob, as well as the oven,
types of heating and accessories.
Hob cover
Hob
Oven
The control panel
Control knob
Oven
Steam outlet
Control panel
Storage
Control knobs
Gas burners
Function button
Oven lighting
Function button
Rotary spit
Control knob
Minute minder
Control knobs
Electric hotplates
37

The hob
Steam outlet
Pan support
High output burner
Gas burners
Standard burner
(1.75 kW)
(3.0 kW)
Large hotplate
(1.5 kW)
Standard burner
(1.75 kW)
Economy burner
(1.0 kW)
Medium hotplate
(1.0 kW)
Gas burners Pot or pan diameter
Economy burner 8-16 cm
Standard output burner 12-20 cm
High output burner 20-23 cm
Control knobs for gas
burners
38
Adjust the heat setting of the gas burners using the
control knobs.
The symbol above the control knob shows you to
which gas burner the control knob belongs.
Setting Meaning
>
J - Ÿ
Burner power levels
Off
Gas supply open, the burner ignites.

Electric hotplates
Hotplate Diameter
Large hotplate 18.5 cm
Medium hotplate 15 cm
Control knobs for electric
hotplates
Accessory
Steam outlet Risk of burns.
The control knobs are used to adjust the heat setting
of the hotplates.
The symbol above the control knob shows you to
which gas burner the control knob belongs.
Setting Meaning
0Off
1 - 6 Burner power levels
Accessory Description
Hot air from the oven escapes out of the steam outlet
on the hob.
Never touch the steam outlet.
Espresso attachment
Attachment for an espresso
pot, for attaching to the
economy burner.
Please note that, in the case of appliances with a hob
cover, the burners in the oven may also only be
switched on if the hob cover is open.
39

The oven
Gas burners
Grill gas burner
(2.0 kW)
Oven gas burner
(4.3 kW)
Control knob for oven Use this control knob to set the heat output of the
oven gas burner.
Setting Meaning
0Off
140 - 250 Oven gas burner on, temperature
range in °C
There is a limit stop between settings 250 and
not turn the knob beyond this point.
Control knob for grill This control knob is used to adjust the heat setting of
the grill gas burner.
Setting Meaning
>
J - Ÿ
Burner power levels
There is a limit stop between settings
turn the knob beyond this point.
Off
Gas supply open, the burner ignites.
Ÿ
and > . Do not
0
. Do
40

Function button for oven
lighting
This function button is used to switch the oven
lighting on and off.
Setting Meaning
Off
On
Function button for rotary
spit
This function button is used to switch the rotary spit
on and off.
Setting Meaning
Off
On
41

Accessories The accessories can be inserted in the oven in 5
different shelf positions.
You can pull the accessories two-thirds of the way out
without them tipping. This allows meals to be
removed easily.
You can buy accessories from the after-sales service
or from specialist retailers.
Accessory Description
Baking and roasting shelf
For ovenware, cake tins,
roasts, grilling and frozen
meals.
Enamelled baking tray
For moist cakes, pastries,
frozen meals and large
roasts. Can also be
inserted underneath the
wire rack or rotary spit and
used as a drip tray to
collect fat.
Rotary spit
For roasts and large pieces
of poultry. Use only in
combination with the
enamelled baking tray.
42

The minute minder
The minute minder is a countdown
timer which emits an audible signal when
the cooking time has elapsed.
The minute minder runs independently of the oven.
Control knob for minute
minder
Use this control knob to set the cooking time.
Setting Meaning
>
1 - 59
The storage compartment
Open the storage compartment by folding down the
fascia panel.
This compartment can be used to store hob or oven
accessories.
Risk of fire.
Never leave combustible items in the storage
compartment.
Off
Cooking time in minutes
43

Your new appliance
HG193510ME
Get to know your appliance. You will find information
about the control panel and hob, as well as the oven,
types of heating and accessories.
Hob cover
Hob
Oven
The control panel
Function button
Rotary spit
Control knob
Oven
Function button
Oven lighting
Steam outlet
Control panel
Control knobs
Gas burners
Storage
44
Control knob
Minute minder

The hob
Steam outlet
Standard burner
(1.75 kW)
Pan support
High output burner
(3.0 kW)
Gas burners
Control knobs for gas
burners
Economy burner
(1.0 kW)
Wok burner
(3.6 kW)
Gas burners Pot or pan diameter
Economy burner 8-16 cm
Standard output burner 12-20 cm
High output burner 20-23 cm
Wok burner 23-26 cm
Adjust the heat setting of the gas burners using the
control knobs.
The symbol above the control knob shows you to
which gas burner the control knob belongs.
Setting Meaning
>
Off
Gas supply open, the burner ignites.
J - Ÿ
Burner power levels
45

Accessory
Accessory Description
Steam outlet Risk of burns.
Hot air from the oven escapes out of the steam outlet
on the hob.
Never touch the steam outlet.
Please note that, in the case of appliances with a hob
cover, the burners in the oven may also only be
switched on if the hob cover is open.
Espresso attachment
Attachment for an espresso
pot, for attaching to the
economy burner.
46

The oven
Gas burners
Grill gas burner
(2.0 kW)
Oven gas burner
(4.3 kW)
Control knob for oven Use this control knob to switch on the grill gas burner
and to set the heat output of the oven gas burner.
Setting Meaning
0Off
140 - 250 Oven gas burner on, temperature
range in °C
x
There is a limit stop between settings 250 and
not turn the knob beyond this point.
Grill gas burner on
x
. Do
47

Function button for oven
lighting
This function button is used to switch the oven
lighting on and off.
Setting Meaning
Off
On
Function button for rotary
spit
This function button is used to switch the rotary spit
on and off.
Setting Meaning
Off
On
48

Accessories The accessories can be inserted in the oven in 5
different shelf positions.
You can pull the accessories two-thirds of the way out
without them tipping. This allows meals to be
removed easily.
You can buy accessories from the after-sales service
or from specialist retailers.
Accessory Description
Baking and roasting shelf
For ovenware, cake tins,
roasts, grilling and frozen
meals.
Enamelled baking tray
For moist cakes, pastries,
frozen meals and large
roasts. Can also be
inserted underneath the
wire rack or rotary spit and
used as a drip tray to
collect fat.
Rotary spit
For roasts and large pieces
of poultry. Use only in
combination with the
enamelled baking tray.
49

The minute minder
The minute minder is a countdown
timer which emits an audible signal when
the cooking time has elapsed.
The minute minder runs independently of the oven.
Control knob for minute
minder
Use this control knob to set the cooking time.
Setting Meaning
>
1 - 59
The storage compartment
Open the storage compartment by folding down the
fascia panel.
This compartment can be used to store hob or oven
accessories.
Risk of fire.
Never leave combustible items in the storage
compartment.
Off
Cooking time in minutes
50

Before using for the first time
Please read the following instructions before using
your appliance for the first time.
Remove the appliance packaging and dispose of this
appropriately.
Baking out the oven
Cooking compartment
initial cleaning
Heating up the oven gas
burner
Remove the accessories from the cooking
compartment.
Completely remove any leftover packaging, e.g.
small pieces of polystyrene, from the cooking
compartment.
Some parts are covered with a protective film.
Remove this film.
1. Clean the outside of the appliance with a soft,
damp cloth.
2. If the hook-in racks have already been fitted,
unhook and remove them. For information on
removing the racks, see the section “Removing
and refitting hook-in racks.”
3. Clean the cooking compartment with warm soapy
water.
To remove the new cooker smell, heat up the oven
when it is empty and closed.
Please note that, in the case of appliances with a hob
cover, the burners in the oven may only be switched
on if the hob cover is open.
1. Open the hob cover and appliance door.
2. Press the control knob for the oven, turn it anti-
clockwise to position
knob pressed for a few seconds until the flame has
stabilised. Then close the appliance door.
250 °C
and hold the control
3. After 45 minutes, switch the oven off by turning the
control knob clockwise to position
0
.
51

Heating up the grill gas
burner
For the HG196510ME/HG197510ME/HG198210ME/
HG198510ME/HG195510ME/HG199210ME/
HG199510ME model:
1. Open the appliance door.
2. Press the control knob for the grill, turn it clockwise
to position
a few seconds until the flame has stabilised. Then
close the appliance door.
J
and hold the control knob pressed for
3. After 30 minutes, switch the grill off by turning the
control knob anti-clockwise to
position 0 .
For the HG193510ME model:
1. Open the appliance door.
2. Press the control knob for the oven in, turn it
clockwise to
in for a few seconds until the flame has stabilised.
Then close the appliance door.
x
and hold the control knob pressed
3. After 30 minutes, switch the grill off by turning the
control knob anti-clockwise until it reaches 0 .
Rinsing cooking
compartment after initial
cleaning
52
Clean the cooking compartment with hot soapy
water. Refit the hook-in racks.

Cleaning the burner lids and cups
Proceed as follows:
A
1. Clean the burner lids (A) and cups (B) with water
and washing-up liquid.
2. Dry the parts off well.
B
3. Place the burner cup in question (B)
on the burner (C).
4. Place the burner lid (A) exactly on top of
C
the burner cup (B).
Cleaning accessories
Before using the accessories, clean them thoroughly
using a cloth and warm soapy water.
53

How to operate your hob
Please note that, in the case of appliances with a hob
cover, the burners may only be switched on if the hob
cover is open.
Operating gas burners
Make sure that the burner lid always sits exactly on
top of the burner cup. The slots on the burner cup
must be open. All parts must be dry.
Switching on the gas
burner
Switching off the gas
burner
1. Press the control knob for the required burner and
turn it to position
The gas burner ignites.
Keep the control knob pressed for a few seconds
until the flame stabilises.
J
.
2. Adjust the burner to the desired flame setting.
Setting Meaning
Ÿ
J
The flame is not steady between position
>
and J . Therefore, always select a position
between
Turn the control knob for the required burner to
position
>
.
lowest flame setting
highest flame setting
J
and Ÿ .
54

If the flame goes out Switch off the control knob. Wait for one minute and
repeat steps 1 to 3.
If the flame goes out, gas will escape. Never leave
m
the gas burner unattended during operation. Ensure
that food does not boil over and that there are no
draughts when cooking.
If the gas burner does not
ignite
In the event of a power failure or damp ignition plugs,
light the gas burner with a gas lighter or a match.
Operating electric hotplates
For the HG196510ME model:
Make sure that the hotplates are dry before use.
Switching on the hotplate Turn the control knob for the required hotplate to the
desired power level.
Setting Meaning
1 lowest power setting
6 highest power setting
Switching off the hotplate Turn the control knob for the required hotplate
position 0
.
55

How to operate your oven
HG196510ME, HG197510ME, HG198210ME, HG198510ME,
HG195510ME, HG199210ME, HG199510ME
Please note that, in the case of appliances with a hob
cover, the burners in the oven may only be switched
on if the hob cover is open.
Switching on the oven
lighting
Switching off the oven
lighting
Operating modes
Operating mode Gas burners Use
ð
140 - 250 °C
Conventional heating
x J -
Ÿ
Grill
ð
140 - 250 °C and x J Combination
(conventional heating
plus grill)
Press down the function button for the oven lighting
until it locks into place.
The oven lighting switches on.
Press down the function button for the oven lighting
until it releases.
The oven lighting switches off.
Oven gas burner For cakes and pastries,
bakes, poultry, lean joints of
meat, e.g. beef, veal and
game.
Grill gas burner
Ÿ
Oven gas burner and
grill gas burner
For steaks, sausages, fish
and toast.
For cakes and pastries,
bakes and toast with
toppings, poultry and fish,
joints, sausages and
steaks.
56

Operating the oven gas burner
If you wish to heat your oven in the conventional way,
use the oven gas burner.
Switching on the oven gas
burner
1. Open the appliance door.
2. Press the control knob for the oven, turn it anti-
clockwise to position
knob pressed for a few seconds until the flame has
stabilised. Then carefully close the appliance
door.
250 °C
and hold the control
3. Set the required temperature using the control
knob. Do not turn the knob beyond 140.
Switching off the oven gas
burner
If the flame goes out Switch off the control knob. Wait one minute and
When the dish is ready, slightly depress the control
knob and turn it clockwise to position 0 .
switch the burner on again.
If the flame goes out, gas will escape. Never leave
m
the gas burner unattended during operation. Ensure
that there are no draughts.
57

Operating the grill gas burner
Please note that the appliance door must be closed
during grilling.
Switching on the grill gas
burner
1. Open the appliance door.
2. Press the control knob for the grill and turn it anti-
clockwise to position
The gas burner ignites.
Keep the control knob pressed for a few seconds
until the flame stabilises.
Do not turn the knob beyond this setting.
J .
3. Adjust the burner to the desired flame setting.
Setting Meaning
Ÿ
J
The flame is not steady between position
>
and J. Therefore, always select a position
between
lowest flame setting
highest flame setting
J
and Ÿ .
4. Carefully close the appliance door.
Switching off the grill gas
burner
If the flame goes out Switch off the control knob. Wait one minute and
When the dish is ready, turn the control knob
>
clockwise to position
switch the burner on again.
.
58
If the flame goes out, gas will escape. Never leave
m
the gas burner unattended during operation. Ensure
that there are no draughts.

Using the combination mode
Tips on using the
combination mode
Switching on combination
mode
Please note the following points when using the
combination mode:
• The temperature range marked on the control
knob for the oven only applies to conventional
heating. When the combination mode is used, the
temperature in the oven is higher than the
temperature which was set on the control knob.
• If you are operating the grill gas burner on the
lowest flame setting, you must also set the lowest
temperature for the oven gas burner.
1. Open the appliance door.
2. Switch on the grill gas burner by pressing the
control knob for the grill and turning it anticlockwise to position
The gas burner ignites.
Keep the control knob pressed for a few seconds
until the flame stabilises.
J
.
3. Carefully close the appliance door.
4. Open the appliance door after 10 minutes.
5. Press the control knob for the oven, turn it anti-
clockwise to position
knob pressed for a few seconds until the flame has
stabilised. Then carefully close the appliance
door.
250 °C
and hold the control
6. Using the control knob, set the desired
temperature and heat setting for both burners.
7. Allow the appliance to heat up for 15 minutes,
carefully open the appliance door and place the
dish inside.
59

Turning on the grill When using conventional heating, you can briefly turn
on the grill at the end of the cooking time for food and
baked goods which require more intense browning or
a crisped finish (e.g. crackling).
To turn on the grill, proceed as follows:
1. Carefully open the appliance door.
2. Turn on the grill gas burner and adjust to the
desired flame setting.
3. Carefully close the appliance door.
Switching off combination
mode
Turn off the grill and oven gas burners.
60

Using the rotary spit
The rotary spit can be used to cook joints such as
rolled joints and poultry with excellent results. The
meat is roasted thoroughly and evenly.
Use the rotary spit in conjunction with the grill or
combination mode.
Preparing joints Place the joint as centrally as possible on the rotary
spit and secure it at both ends with the retaining clips.
You can also truss the joint with string. With poultry,
bind the ends of the wings underneath the back and
the thighs against the body. This will prevent them
from becoming too dark.
Pierce the skin on the underside of the wings to allow
the fat to escape.
61

Inserting the rotary spit Insert the rotary spit as follows:
1. Hook the spit holder into the bracket on the ceiling
of the cooking compartment.
If you require to preheat the oven, hook in the
holder before preheating.
mRisk of burns
Never touch the hot surfaces of the cooking
compartment or the heating elements.
Children must be kept at a safe distance from the
appliance at all times.
Open the appliance door carefully. Hot steam may
escape.
2. If the oven has been preheated, only attach the
rotary spit if you are using an oven cloth or wearing
(thermal) oven gloves. To attach the spit, slide one
end into the recessed adapter in the left-hand side
panel of the cooking compartment.
3. Hook the other end into the holder.
4. Pour a little bit of water into the baking tray and
slide this into shelf position 1 to collect the run-off
fat.
Switching on the rotary spit Press the function button for rotary spit mode.
The button simply locks into place and operation
starts.
Switching off the rotary spit Press the function button for rotary spit mode.
The button releases and operation switches off.
62

Removing the rotary spit
Risk of burns.
m
Never touch the hot surfaces of the cooking
compartment or the heating elements.
Children must be kept at a safe distance from the
appliance at all times.
Open the appliance door carefully. Hot steam may
escape.
Risk of burns.
m
Never touch the rotary spit or other accessories
directly when they are hot.
Always wear oven gloves or heat-resistant gloves
when handling hot accessories.
Remove the rotary spit as follows:
1. Carefully open the appliance door. Carefully
remove the rotary spit from the holder.
2. Carefully withdraw the rotary spit from the
recessed adapter in the side panel and remove it
from the oven.
3. Take out the baking tray.
63

How to operate your oven
HG193510ME
Please note that, in the case of appliances with a hob
cover, the burners in the oven may only be switched
on if the hob cover is open.
Switching on the oven
lighting
Switching off the oven
lighting
Operating modes
Operating mode Gas burners Use
ð
140 - 250 °C
Conventional heating
x
Grill
Press down the function button for the oven lighting
until it locks into place.
The oven lighting switches on.
Press down the function button for the oven lighting
until it releases.
The oven lighting switches off.
Oven gas burner For cakes and pastries,
bakes, poultry, lean joints of
meat, e.g. beef, veal and
game.
Grill gas burner
For steaks, sausages, fish
and toast.
64

Operating the oven gas burner
If you wish to heat your oven in the conventional way,
use the oven gas burner.
Switching on the oven gas
burner
1. Open the appliance door.
2. Press the control knob for the oven, turn it anti-
clockwise to position
knob pressed for a few seconds until the flame has
stabilised. Then carefully close the appliance
door.
250 °C
and hold the control
3. Set the required temperature using the control
knob. Do not turn the knob beyond 140.
Switching off the oven gas
burner
If the flame goes out Switch off the control knob. Wait one minute and
When the dish is ready, slightly depress the control
knob and turn it clockwise to position 0 .
switch the burner on again.
If the flame goes out, gas will escape. Never leave
m
the gas burner unattended during operation. Ensure
that there are no draughts.
65

Operating the grill gas burner
Please note that the appliance door must be closed
during grilling.
Switching on the grill gas
burner
1. Open the appliance door.
2. Press the control knob for the oven in, turn it
clockwise to
in for a few seconds until the flame has stabilised.
Do not turn the knob beyond this setting.
x and hold the control knob pressed
3. Close the appliance door.
Switching off the burner When the meal is ready, turn the control knob anti-
clockwise until it reaches 0 .
If the flame goes out Turn the control knob to the off position. Wait one
minute and switch the burner on again.
If the flame goes out, gas will escape. Do not leave
m
the gas burners unattended while switched on.
Ensure that there are no draughts.
66

Using the rotary spit
The rotary spit can be used to cook joints such as
rolled joints and poultry with excellent results. The
meat is roasted thoroughly and evenly.
Use the rotary spit in conjunction with the grill.
Preparing joints Place the joint as centrally as possible on the rotary
spit and secure it at both ends with the retaining clips.
You can also truss the joint with string. With poultry,
bind the ends of the wings underneath the back and
the thighs against the body. This will prevent them
from becoming too dark.
Pierce the skin on the underside of the wings to allow
the fat to escape.
67

Inserting the rotary spit Insert the rotary spit as follows:
1. Hook the spit holder into the bracket on the ceiling
of the cooking compartment.
If you require to preheat the oven, hook in the
holder before preheating.
mRisk of burns
Never touch the hot surfaces of the cooking
compartment or the heating elements.
Children must be kept at a safe distance from the
appliance at all times.
Open the appliance door carefully. Hot steam may
escape.
2. If the oven has been preheated, only attach the
rotary spit if you are using an oven cloth or wearing
(thermal) oven gloves. To attach the spit, slide one
end into the recessed adapter in the left-hand side
panel of the cooking compartment.
3. Hook the other end into the holder.
4. Pour a little bit of water into the baking tray and
slide this into shelf position 1 to collect the run-off
fat.
Switching on the rotary spit Press the function button for rotary spit mode.
The button simply locks into place and operation
starts.
Switching off the rotary spit Press the function button for rotary spit mode.
The button releases and operation switches off.
68

Removing the rotary spit
Risk of burns.
m
Never touch the hot surfaces of the cooking
compartment or the heating elements.
Children must be kept at a safe distance from the
appliance at all times.
Open the appliance door carefully. Hot steam may
escape.
Risk of burns.
m
Never touch the rotary spit or other accessories
directly when they are hot.
Always wear oven gloves or heat-resistant gloves
when handling hot accessories.
Remove the rotary spit as follows:
1. Carefully open the appliance door. Carefully
remove the rotary spit from the holder.
2. Carefully withdraw the rotary spit from the
recessed adapter in the side panel and remove it
from the oven.
3. Take out the baking tray.
69

Operating the minute minder
The minute minder runs independently of the oven.
Setting a cooking time Turn the control knob once round clockwise, as far as
the limit stop, and then turn it anti-clockwise to set it
to the required time.
The cooking time has
elapsed
A signal sounds once the time has elapsed.
70

Cleaning and care
Never use high-pressure cleaners or steam jets. Risk
m
of short circuit.
Never use caustic or abrasive cleaning agents.
These could damage the surface. If such an agent
gets on the front of the appliance, wipe it off
immediately with water.
Do not clean any surfaces of the appliance while they
are hot.
Switching on the oven
lighting
To make it easier to clean the oven, you can switch
on the oven lighting.
To switch on the lighting, press the function button for
oven lighting until it locks into place.
Catalytic cooking compartment panels
For the HG195510ME, HG196510, HG199210ME or
HG199510ME model:
The catalytic cooking compartment panels are
coated with self-cleaning enamel.
The surfaces clean themselves while the oven is in
operation. Larger splashes will only be removed after
the oven has been used several times.
Self-cleaning surfaces The rear and side walls are protected with catalytic
panelling.
Never clean these surfaces with oven cleaner.
Slight discolouration of the enamel does not affect
automatic self-cleaning.
71

Using the correct cleaning agent
Do not use cleaning agents that contain abrasive
substances or acids, or cleaning aids such as steel
wool or stainless steel sponges. These could damage
the surfaces.
Appliance parts Cleaning agent and cleaning aid
Appliance door glass panel
Control panel and knobs
Seal
(on the cooking
compartment)
Hook-in racks
Cooking compartment
Enamelled surfaces
Gas burners
Burners
Gas burners
Oven and grill
Appliance exterior
Stainless steel surfaces
Glass cover
(in front of the oven lighting)
Pan support
• Use glass cleaner.
Risk of injury.
The lower edge of the door may have sharp edges.
Clean the door and glass panels with care.
• Do not use a glass scraper.
• Wipe with a damp, soft cloth.
• Use warm soapy water.
• Use warm soapy water.
• Use warm soapy water; Dry off with a soft cloth.
• Remove the burner cups and lids; use soapy water;
allow to dry well.
• Clean the ignition plugs and thermocouple with a
damp cloth or a small, soft brush; allow to dry well.
• When refitting: Place the burner cup onto the burner.
Position the burner lid exactly on the burner cup.
• The burner lids are coated with black enamel. Over
time they will change colour. This does not affect the
function.
• Never clean the gas burners in the cooking
compartment yourself.
• Use warm soapy water; Dry off with a soft cloth.
• Always remove flecks of limescale, grease, starch
and albumin (e.g. egg white) immediately.
• Special stainless steel cleaners are available from
the after-sales service or specialist shops.
• Use warm soapy water.
• Use warm soapy water.
• Do not clean the pan supports in the dishwasher.
72

Appliance parts Cleaning agent and cleaning aid
Accessory
• Soak in hot soapy water. Clean with a brush or
sponge.
73

Removing and fitting the appliance door
You can remove the appliance door for easier
cleaning.
The hinges of the appliance door are each secured
by a locking lever.
When the locking lever is folded in (A), the appliance
door is secured. It cannot be unhinged.
If the locking lever is open (B), only the hinge is
secured, and you can remove the appliance door.
Risk of injury.
Do not reach inside the hinge.
Removing the appliance
door
Proceed as follows:
1. Open the appliance door.
2. Lift up the locking levers on both sides.
3. Close the appliance door until you feel resistance
at an angle of around 15° (in relation to the closed
appliance door).
4. Grip the door on either side with both hands.
5. Close the appliance door a little further.
6. Lift the door upwards and at an angle to remove it.
Do not disassemble the door.
74

Fitting the appliance door Proceed as follows:
1. Hold the appliance door at an angle.
2. Insert both hinges, left and right, into the supports.
3. Position the door so that the hinge grooves
engage on both sides.
4. Open the appliance door.
5. Fold in the locking levers on both sides.
6. Close the appliance door.
75

Removing and inserting the hook-in racks
You can remove the hook-in racks in order to clean
them separately.
The hook-in racks are all fixed to the walls of the
cooking compartment at four points.
Removing the hook-in
racks
To remove the hook-in racks, proceed as follows:
1. Take hold of the bottom of the hook-in rack and
pull it slightly forward.
The lower hooks of the hook-in rack are released.
2. Take hold of the top of the hook-in rack and pull it
up and out of the drill holes.
76

Inserting the hook-in rack To reinsert the hook-in racks, proceed as follows:
1. Insert the upper hooks into the drill holes in the
side panel.
2. Pull the hook-in rack slightly downwards and insert
the lower hooks into the drill holes.
77

Faults and the after-sales service
Malfunctions often have simple explanations.
Please read the following notes before calling the
aftersales service.
Fault Possible cause Remedial action
The door panel steams up when
the oven is hot.
The flame (oven) does not burn
through all outlet openings.
The appliance does not work. Defective circuit
All dishes that are prepared in
the oven become burnt very
quickly.
The oven lighting has failed. Oven light is faulty Replace the oven light.
Normal occurrence;
caused by the
difference in
temperature.
Normal build-up of dirt The burner must be
breaker
Power cut Check whether the kitchen
Thermostat faulty Call the after-sales service.
Repairs may only be carried out by fully trained aftersales service engineers.
Not possible; this has no
effect on oven performance.
professionally cleaned.
Look in the fuse box and
check that the circuit breaker
for the appliance is in
working order.
light works, for example.
(see section "Replacing
oven light")
78
If your appliance is not repaired professionally, you
may be exposing yourself to substantial risks.

Replacing the oven light bulb
If the oven light bulb fails, it must be replaced.
Replacement heat-resistant bulbs can be obtained
from the after-sales service or from specialist
retailers. Please specify the E number and FD
number of your appliance. Do not use any other type
of bulb.
Proceed as follows:
1. Switch off the relevant circuit breaker in the fuse
box.
2. Open the appliance door.
3. Lay a tea towel in the cooking compartment if it is
cold to prevent damage.
4. Unscrew the glass cover from the bulb inside the
cooking compartment by turning it anti-clockwise.
5. Replace the bulb with one of the same type.
Voltage: 230 V
Power: 15 W
Thread: E14
Temperature resistance: 300°C
6. Screw on the glass cover again.
7. Remove the tea towel and switch the circuit
breaker back on.
Press the function button the oven lighting until it
locks into place
lighting is working properly.
in order to check whether the oven
79

Aftersales service
Our after-sales service is there for you if your
appliance needs to be repaired. You will find the
address and telephone number of your nearest aftersales service centre in the phone book. The aftersales service centres listed will also be happy to give
you the details of an after-sales service point near
you.
E number and FD number Please quote the E number (product number) and FD
number (production number) of the appliance when
contacting the after-sales service. These numbers
can be found on the identification plate which is
located on the inside of the storage compartment
flap. So you do not have to spend time looking for it if
there is a fault, you can enter the data for your
appliance here now.
E no.
After-sales service
FD no.
80

Tips and tricks
The following are tips and tricks to help you when
cooking food in your appliance.
Tips for saving energy
Here are a few tips for saving energy when using the
hob and oven.
Tips on using the hob
Suitable cookware
diameter
Cookware with lids Use cookware with a flat bottom.
Less water To reduce the cooking time for e.g. vegetables and
Make sure that the diameter of the cookware is
suitable for the diameter of whichever hotplate you
are using.
You can find an overview of suitable diameters in the
section entitled “Your new appliance - the hob”.
The flame of the gas burner must not be larger than
the diameter of the cookware.
If possible, use cookware with lids to save gas.
potatoes, use less water.
81

Tips on using the oven
Several cakes It is best to bake several cakes one after the other.
The oven is still warm. This reduces the baking time
for the second cake. You can also place two cake tins
next to each other.
Using residual heat Where longer cooking times are used, you can switch
the oven off 10 minutes before the end of the cooking
time and use the residual heat to finish cooking.
Closing the appliance door Always keep the appliance door closed when it is in
operation. If you need to open the appliance door,
close it again as soon as possible. Otherwise, the
temperature will drop and the oven will need to heat
itself up again.
82

Tips for using your appliance
The following tips relate to ovenware and cooking
and explain what to do if something goes wrong.
General tips Since a lower temperature allows more even
browning.
Clean the appliance and accessories after each use,
once they have cooled down.
Always place baking tins or ovenware in the centre of
the wire rack.
Always place cookware in the middle of the hotplate
on the hob.
Boiling and frying
Cookware For dishes which require a lot of liquid, use deep-
sided pots so that they do not boil over.
The pan base must be clean, dry and flat.
Application examples
Method
Heating
(depending on quantity)
Bringing to the boil
Simmering
(high or low, depending on
requirement)
Searing
Longer frying
* Depending on the model.
Power level
Gas Electro*
J
J
J - Ÿ
Ÿ
Ÿ
1-2
6
2
6
4
83

Baking
Baking tins Use light-coloured baking tins and trays wherever
possible.
Notes on tables Temperature and baking time depend on the amount
and composition of the ingredients.
Application examples More information can be found in the “Baking tips”
section which follows the baking tables.
Shelf
Type of baked item
Sponge cakes (2) 3 170 - 10 50
Filled sponge cake (2)
(Victoria sponge cake)
Bread 3 200 - 15 30
position
2 170 - 10 60
ðx
Preheating
time
Minutes
Cooking
time
Minutes
84

Baking tips
How to confirm whether your
sponge cake is cooked
through.
The cake collapses.
The cake has risen high in the
middle and less around the
edges.
The cake is too dark on the
top.
The cake is too dry.
The bread or cake looks good
but it is streaked with water
inside.
The pastries are not evenly
browned.
Approximately 10 minutes before the end of the
baking time stated in the recipe, pierce the highest
point of the cake with a wooden skewer. If no cake
mixture sticks to the wood, the cake is ready.
Next time, use less liquid or bake at a slightly lower
temperature. Note the stirring times indicated in the
recipe.
Do not grease the edges of the baking tin. After
baking, carefully loosen the cake using a knife.
Place the cake lower in the oven and bake at a lower
temperature for slightly longer.
Make tiny holes in the finished cake using a cocktail
stick. Then pour fruit juice or an alcoholic drink over
the cake. Next time, bake at a slightly higher
temperature for less time.
Next time, use less liquid and bake at a lower
temperature for slightly longer. For cakes with a moist
topping: Pre-bake the base first. Sprinkle the base
with almonds and breadcrumbs and then pour the
topping on. Take care to follow recipes and baking
times.
Set the temperature slightly lower. Excess
greaseproof paper can affect the air circulation.
Always cut the greaseproof paper down to the size of
the baking tray.
85

Roasting and grilling
Ovenware You can use ovenware made from enamel, fireproof
glass, clay or cast iron. The baking tray is also
suitable for large roasts.
Optimum grilling surface You will achieve the best results if you use the grill
zone.
Notes on tables Temperature and baking time depend on the amount
and composition of the ingredients.
Roasting tips Depending on the size of the joint, add 2 or 3
tablespoons of liquid to lean meat and 8 to 10
tablespoons of liquid to pot roasts.
When cooking duck or goose, pierce the skin on the
underside of the wings to allow the fat to escape.
Poultry will turn out particularly crispy and brown if
you baste it towards the end of the roasting time with
butter, salted water or orange juice.
Turn pieces of meat halfway through the roasting
time.
When roasting large pieces of meat, you may find
that the amount of steam and condensation on the
oven door is more than usual. This is a normal
occurrence which has no effect on the oven's
performance. Once roasting is complete, dry the
oven door and window with a cloth.
If you are roasting on the wire rack, insert the
enamelled baking tray into shelf position 1 to collect
the run-off fat.
Grilling tips Drizzle some oil over the food to be grilled before you
place it on the wire rack under the grill.
86

Place the food to be grilled in the centre of the wire
rack. Pour a little bit of water into the enamelled
baking tray and insert this into the shelf position
underneath the grill to collect the run-off fat. Never
place it on the cooking compartment floor.
If possible, grill items should be of equal thickness.
They should be at least 2 to 3 cm thick. This ensures
that they brown evenly while also remaining
succulent.
If the food to be grilled is thin, turn it over halfway
through grilling; if it is thick, turn it over several times
during grilling. Use tongs when turning the food to
avoid piercing it and, in the case of meat, to keep the
meat juices inside the meat.
Dark meats such as lamb and beef brown better and
more quickly than light meats such as pork and veal.
Tips on using the rotary
spit
Place the joint as centrally as possible on the rotary
spit and secure it at both ends with the retaining clips.
You can also truss the joint with string. With poultry,
bind the ends of the wings underneath the back and
the thighs against the body. This will prevent them
from becoming too dark.
Pierce the skin on the underside of the wings to allow
the fat to escape.
87

Application examples For the HG193510ME model:
Shelf posi-
tion
Dish
Toast 4 -
Beef rissoles, 6 x 100 g 4 -
Steak, 5 x 150 g 4 -
Veal ragout, 700 g 4 -
* Turn halfway through the cooking time.
For the HG196510ME/HG197510ME/HG198210ME/
HG198510ME/HG195510ME, HG199210ME/
HG199510ME model:
Shelf posi-
tion
Dish
Toast 4 -
Beef rissoles, 6 x 100 g 4 -
Steak, 5 x 150 g 4 -
Veal ragout, 700 g 4 -
Sirloin, 2 kg 2 140
F
Joint of veal, 2 x 600 g 2 140
F
Chicken, 2 x 1.2 kg 2 140
F
* Turn halfway through the cooking time.
ðx
ðx
140
140
140
x
x
x
x
J
J
J
J
J
J
J
J
J
J
Preheating
time
Minutes
55
5 30*
5 20*
5 30*
Preheating
time
Minutes
55
5 30*
5 20*
5 30*
15 130
15 150
15 80
15 80
15 60
15 80
Cooking
time
Minutes
Cooking
time
Minutes
88

Roasting tips The table below contains additional information on
how to be successful at roasting.
How can you tell when the
roast is ready?
The roast is too dark and the
crackling is burnt in places.
The roast looks good but the
juices are burnt.
The roast looks good, but the
juices are too clear and
watery.
Use a meat thermometer (available from specialist
retailers) or carry out a "spoon test".
Press down on the roast with a spoon. If it feels firm, it
is ready. If the spoon can be pressed in, it needs to be
cooked for a little longer.
Check the shelf position and temperature.
Next time, use a smaller roasting dish and add more
liquid.
Next time, use a larger roasting dish and add less
liquid.
89

90


Siemens-Electrogeräte GmbH
Carl-Wery-Str. 34
D-81739 München
EN | 07.2009
 Loading...