

Page 1
>HQ@ ,QVWUXFWLRQPDQXDO
>IU@ 1RWLFHG·XWLOLVDWLRQ
>KX@ +DV]QiODWLXWDVtWiV
>QO@ *HEUXLNVDDQZLM]LQJ
+%
%XLOWLQRYHQ
)RXUHQFDVWUDEOH
%HpStWKHWŌVWŌ
,QERXZRYHQ
Page 2

Page 3

3
Ú Table of contents
[en]Instruction manual
Important safety information..................................................... 3
Causes of damage .............................................................................4
Your new oven ............................................................................5
Control panel .......................................................................................5
Function selector.................................................................................5
Buttons and display............................................................................6
Temperature selector .........................................................................6
Cooking compartment .......................................................................6
Your accessories........................................................................6
Inserting the accessories ..................................................................6
Optional accessories .........................................................................7
Before using the oven for the first time....................................7
Setting the clock .................................................................................7
Heating up the oven...........................................................................7
Cleaning the accessories..................................................................7
Setting the oven..........................................................................8
Types of heating and temperature ..................................................8
The oven should switch off automatically ......................................8
The oven should switch on and off automatically ........................8
Rapid heating ......................................................................................9
Setting the clock.........................................................................9
Setting the timer .........................................................................9
Childproof lock .........................................................................10
Oven................................................................................................... 10
Care and cleaning ....................................................................10
Cleaning agents ............................................................................... 10
Detaching and refitting the rails.................................................... 10
Detaching and attaching the oven door...................................... 11
Removing and refitting the door panels...................................... 12
Troubleshooting .......................................................................12
Malfunction table.............................................................................. 12
Replacing the bulb in the oven ceiling light ............................... 13
Glass cover....................................................................................... 13
After-sales service ...................................................................13
E number and FD number ............................................................. 13
Energy and environment tips..................................................13
Saving energy................................................................................... 13
Environmentally-friendly disposal.................................................. 13
Measures to be noted during transport....................................... 13
Tested for you in our cooking studio .....................................14
Cakes and pastries ......................................................................... 14
Baking tips ........................................................................................15
Meat, poultry, fish............................................................................. 16
Tips for roasting and grilling..........................................................18
Bakes, gratins, toast with toppings ..............................................18
Preprepared products.....................................................................18
Special dishes .................................................................................. 19
Defrosting .......................................................................................... 19
Drying.................................................................................................19
Preserving ......................................................................................... 19
Acrylamide in foodstuffs .........................................................20
Test dishes................................................................................21
Baking................................................................................................ 21
Grilling................................................................................................21
Produktinfo
Additional information on products, accessories, replacement
parts and services can be found at www.siemens-home.com
and in the online shop www.siemens-eshop.com
: Important safety information
Read these instructions carefully. Only then
will you be able to operate your appliance
safely and correctly. Retain the instruction
manual and installation instructions for
future use or for subsequent owners.
This appliance is only intended to be fully
fitted in a kitchen. Observe the special
installation instructions.
Check the appliance for damage after
unpacking it. Do not connect the appliance
if it has been damaged in transport.
Only a licensed professional may connect
appliances without plugs. Damage caused
by incorrect connection is not covered
under warranty.
This appliance is intended for domestic use
only. The appliance must only be used for
the preparation of food and drink. The
appliance must be supervised during
operation. Only use this appliance indoors.
This appliance is intended for use up to a
maximum height of 2000 metres above sea
level.
This appliance may be used by children
over the age of 8 years old and by persons
with reduced physical, sensory or mental
capabilities or by persons with a lack of
experience or knowledge if they are
supervised or are instructed by a person
responsible for their safety how to use the
appliance safely and have understood the
associated hazards.
Children must not play with, on, or around
the appliance. Children must not clean the
appliance or carry out general maintenance
unless they are at least 8 years old and are
being supervised.
Keep children below the age of 8 years old
at a safe distance from the appliance and
power cable.
Page 4

4
Always slide accessories into the cooking
compartment correctly. See "Description of
accessories in the instruction manual.
Risk of fire!
■
Combustible items stored in the cooking
compartment may catch fire. Never store
combustible items in the cooking
compartment. Never open the appliance
door if there is smoke inside. Switch off
the appliance and unplug it from the
mains or switch off the circuit breaker in
the fuse box.
Risk of fire!
■
A draught is created when the appliance
door is opened. Greaseproof paper may
come into contact with the heating
element and catch fire. Do not place
greaseproof paper loosely over
accessories during preheating. Always
weight down the greaseproof paper with a
dish or a baking tin. Only cover the
surface required with greaseproof paper.
Greaseproof paper must not protrude over
the accessories.
Risk of burns!
■
The appliance becomes very hot. Never
touch the interior surfaces of the cooking
compartment or the heating elements.
Always allow the appliance to cool down.
Keep children at a safe distance.
Risk of serious burns!
■
Accessories and ovenware become very
hot. Always use oven gloves to remove
accessories or ovenware from the cooking
compartment.
Risk of burns!
■
Alcoholic vapours may catch fire in the hot
cooking compartment. Never prepare food
containing large quantities of drinks with a
high alcohol content. Only use small
quantities of drinks with a high alcohol
content. Open the appliance door with
care.
Risk of scalding!
■
The accessible parts become hot during
operation. Never touch the hot parts. Keep
children at a safe distance.
Risk of scalding!
■
When you open the appliance door, hot
steam may escape. Open the appliance
door with care. Keep children at a safe
distance.
Risk of scalding!
■
Water in a hot cooking compartment may
create hot steam. Never pour water into
the hot cooking compartment.
Risk of injury!
Scratched glass in the appliance door may
develop into a crack. Do not use a glass
scraper, sharp or abrasive cleaning aids or
detergents.
Risk of electric shock!
■
Incorrect repairs are dangerous. Repairs
may only be carried out by one of our
trained after-sales engineers. If the
appliance is faulty, unplug the mains plug
or switch off the fuse in the fuse box.
Contact the after-sales service.
Risk of electric shock and serious injury!
■
The cable insulation on electrical
appliances may melt when touching hot
parts of the appliance. Never bring
electrical appliance cables into contact
with hot parts of the appliance.
Risk of electric shock!
■
Do not use any high-pressure cleaners or
steam cleaners, which can result in an
electric shock.
Risk of electric shock!
■
When replacing the cooking compartment
bulb, the bulb socket contacts are live.
Before replacing the bulb, unplug the
appliance from the mains or switch off the
circuit breaker in the fuse box.
Risk of electric shock!
■
A defective appliance may cause electric
shock. Never switch on a defective
appliance. Unplug the appliance from the
mains or switch off the circuit breaker in
the fuse box. Contact the after-sales
service.
Causes of damage
Caution!
■ Accessories, foil, greaseproof paper or ovenware on the
cooking compartment floor: do not place accessories on the
cooking compartment floor. Do not cover the cooking
compartment floor with any sort of foil or greaseproof paper.
Do not place ovenware on the cooking compartment floor if a
temperature of over 50 ºC has been set. This will cause heat
to accumulate. The baking and roasting times will no longer
be correct and the enamel will be damaged.
■ Water in a hot cooking compartment: do not pour water into
the cooking compartment when it is hot. This will cause
steam. The temperature change can cause damage to the
enamel.
■ Moist food: do not store moist food in the cooking
compartment when it is closed for prolonged periods This will
damage the enamel.
■ Fruit juice: when baking particularly juicy fruit pies, do not
pack the baking tray too generously. Fruit juice dripping from
the baking tray leaves stains that cannot be removed. If
possible, use the deeper universal pan.
■ Cooling with the appliance door open: only allow the cooking
compartment to cool when it is closed. Even if the appliance
door is only open a little, front panels of adjacent units could
be damaged over time.
Page 5
5
■ Very dirty door seal: If the door seal is very dirty, the
appliance door will no longer close properly when the
appliance is in use. The fronts of adjacent units could be
damaged.Always keep the door seal clean.
■ Appliance door as a seat, shelf or worktop: Do not sit on the
appliance door, or place or hang anything on it. Do not place
any cookware or accessories on the appliance door.
■ Inserting accessories: depending on the appliance model,
accessories can scratch the door panel when closing the
appliance door. Always insert the accessories into the
cooking compartment as far as they will go.
■ Carrying the appliance: do not carry or hold the appliance by
the door handle. The door handle cannot support the weight
of the appliance and could break.
Your new oven
Here you will learn about your new oven. The control panel and
the individual operating controls are explained. You will find
information on the cooking compartment and the accessories.
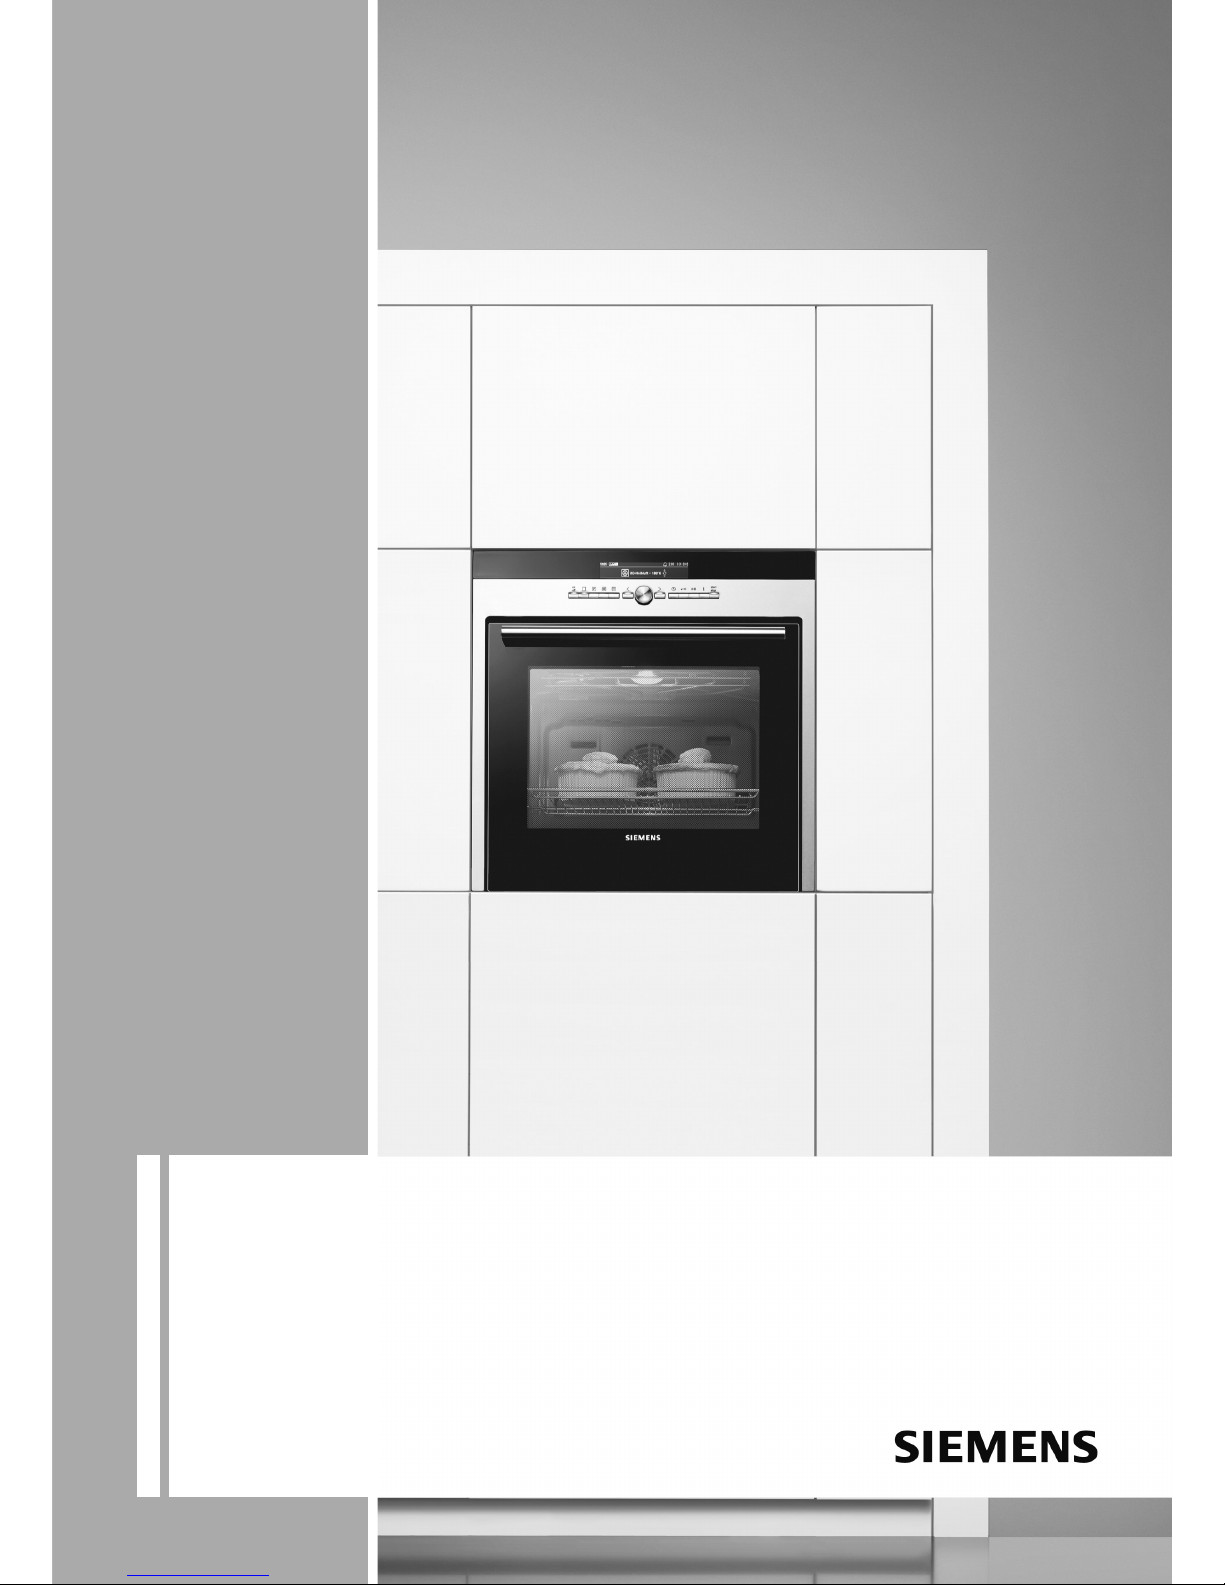
Control panel
Here you can see an overview of the control panel. The design
depends on the respective appliance model.
Function selector
With the function selector knob you can set the heating mode
for the oven. The function selector knob can be rotated to the
right or to the left.
When you switch on the function selector, the oven light
switches on.
Explanations
1 Function selector
2 Operating switches and display panel
3 Temperature selector
Positions Function
ý
Off The oven is switched off.
%
Top/bottom heating
Baking, roasting or grilling is possible on a single level only. This setting is well-suited for cakes and
pizza in tins or on the baking tray,
and for lean joints of beef, veal and
game. Heat is emitted evenly from
the top and bottom.
:
3D hot air* You can bake cakes, pizza, bis-
cuits, muffins and puff pastry on
two levels at the same time.
A fan with a ring heating element
on the back panel of the oven
ensures that the heated air is distributed evenly.
* Type of heating in accordance with energy efficiency class
EN50304.
$
Bottom heating You can use bottom heating for the
final baking stage and for browning
meals from the bottom. The temperature comes from below.
4
Hot air grilling Hot air grilling is particularly suita-
ble for grilling fish, poultry and
larger pieces of meat. The grill element and fan switch on and off
alternately. The fan distributes the
heated air around the food.
(
Radiant grilling,
large area
Can be used to grill a large number
of beef steaks, sausages and fish,
or to toast bread. The whole area
below the grill heating element
becomes hot.
I
Rapid heating For heating food rapidly.
Positions Function
* Type of heating in accordance with energy efficiency class
EN50304.
Page 6
6
Buttons and display
You can use the buttons to set various additional functions. You
can read the values that you have set in the display.
Temperature selector
Use the temperature selector to set the temperature and the
grill setting.
The small light above the temperature selector is lit when the
oven is heating. It goes out during pauses in the heating. For
some settings, it does not light up.
Grill settings
With
( Radiant grilling, use the temperature selector to set a
grill setting.
Cooking compartment
The oven light is located in the cooking compartment. A cooling
fan protects the oven from overheating.
Oven light
During oven operation, the oven light is on. By turning the
function selector to any position, the oven light can also be
switched on without the oven heating up.
Cooling fan
The cooling fan switches on and off as required. The hot air
escapes above the door.
So that the cooking compartment cools down more quickly
after operation, the cooling fan continues to run for a certain
period afterwards.
Caution!
do not cover the ventilation slots. Otherwise the oven will
overheat.
Your accessories
The accessories supplied with your appliance are suitable for
making many meals. Ensure that you always insert the
accessories into the cooking compartment the right way round.
There is also a selection of optional accessories, with which
you can improve on some of your favourite dishes, or simply to
make working with your oven more convenient.
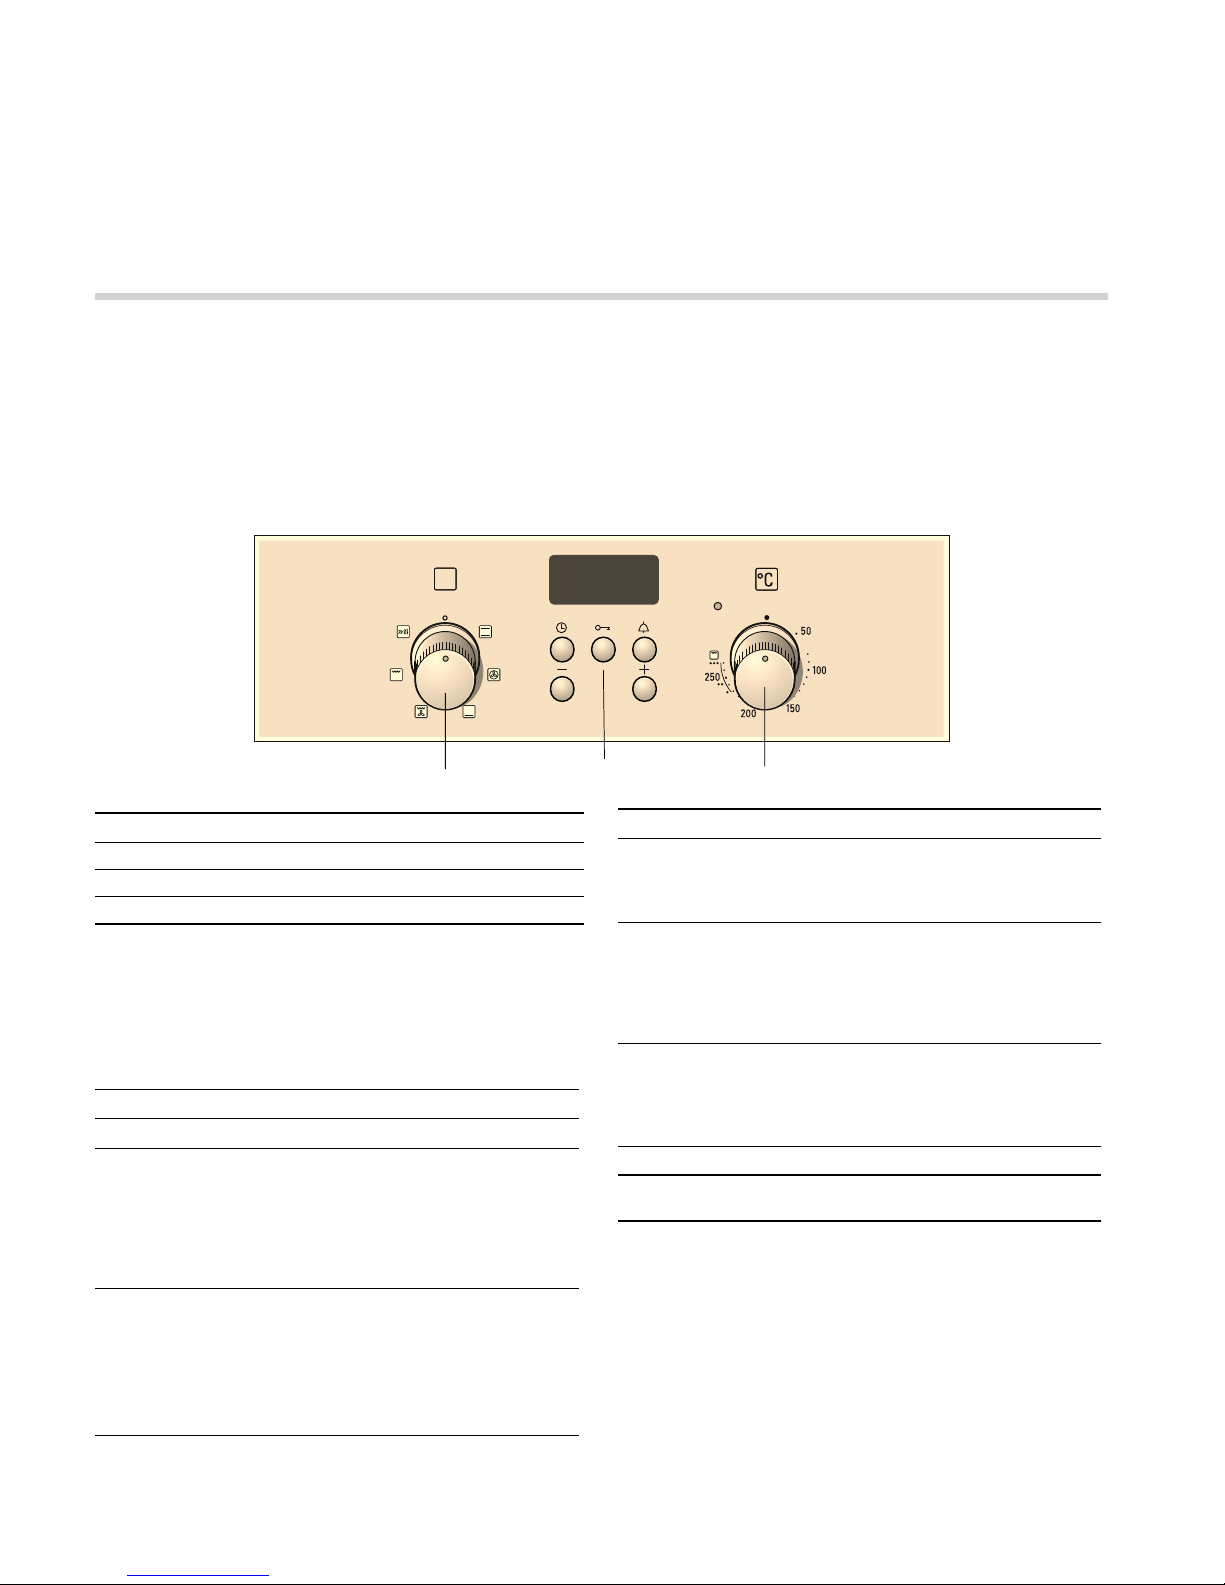
Inserting the accessories
The accessories can be inserted in the oven at 4 different
levels. Always insert the accessories as far as they can go to
ensure that they do not touch the door glass.
When the accessories are pulled approximately halfway out,
they lock into position. This allows meals to be taken out easily.
When placing the accessories in the oven, check that the
indentation is at the back. They can only lock correctly in place
in this position.
Note: Heat may cause the accessories to deform. As soon as
the accessories cool down, they regain their original shape.
Their function is not impaired.
Hold the baking tray securely on the sides with both hands and
push it parallel into the frame. Avoid movements to the right or
left when pushing the baking tray in. Otherwise, it will be difficult
to push the tray in and the enamelled surfaces could be
damaged.
Button Use
0
Clock button
This is used to set the Clock,
x
Oven cooking time and
y End
time.
C
Key button This is used to switch the child-
proof lock on and off.
V
Timer button This is used to set the timer.
A
Minus button Use this button to decrease the
setting values.
@
Plus button Use this button to increase the set-
ting values.
Positions Function
ÿ
Off Oven not hot.
50-270 Temperature range The temperature is speci-
fied in ºC.
•, ••, ••• Grill settings The grill settings for "Grill,
large
( area".
• = setting 1, low
•• = setting 2, medium
••• = setting 3, high
Page 7
7
You can buy accessories from the after-sales service, from
specialist retailers or online. Please specify the HZ number.
Optional accessories
You can buy optional accessories from your after-sales service
or from specialist retailers. You will find a variety of suitable
products for your oven in our brochures and on the Internet.
The availability of optional accessories and the options for
ordering them on the internet vary depending on the country.
Information regarding this can be found in the sales
documents.
Not every optional accessory is suitable for every appliance.
When purchasing, always quote the complete identification
number (E no.) of your appliance.
Oven door - Additional safety precautions
During long cooking times, the oven door may become very
hot.
If you have small children, extra supervision is required during
oven operation.
In addition, there is a safety device which prevents direct
contact with the oven door. This optional accessory (440651)
is available from the after-sales service.
Before using the oven for the first time
In this section, you can find out what you must do before using
your oven to prepare food for the first time. First read the
section on Safety information.
Setting the clock
After the oven has been connected, the 0 symbol and three
zeros light up in the display. Set the clock.
1. Press the 0 button.
The time 12:00 appears in the display and the
0 symbol
flashes.
2. Use the + or - button to change the clock.
After a few seconds, the time that has been set is adopted.
Heating up the oven
To remove the new cooker smell, heat up the oven when it is
empty and closed. An hour of
% Top/bottom heating at
240 °C is ideal for this purpose. Make sure that there are no
remnants of packing in the cooking compartment.
1. Use the function selector to set % Top/bottom heating.
2. Set the temperature selector to 240 °C.
After an hour, switch off the oven. Turn the function selector
and temperature selector to the off position.
Cleaning the accessories
Before you use the accessories for the first time, clean them
thoroughly with hot soapy water and a soft dish cloth.
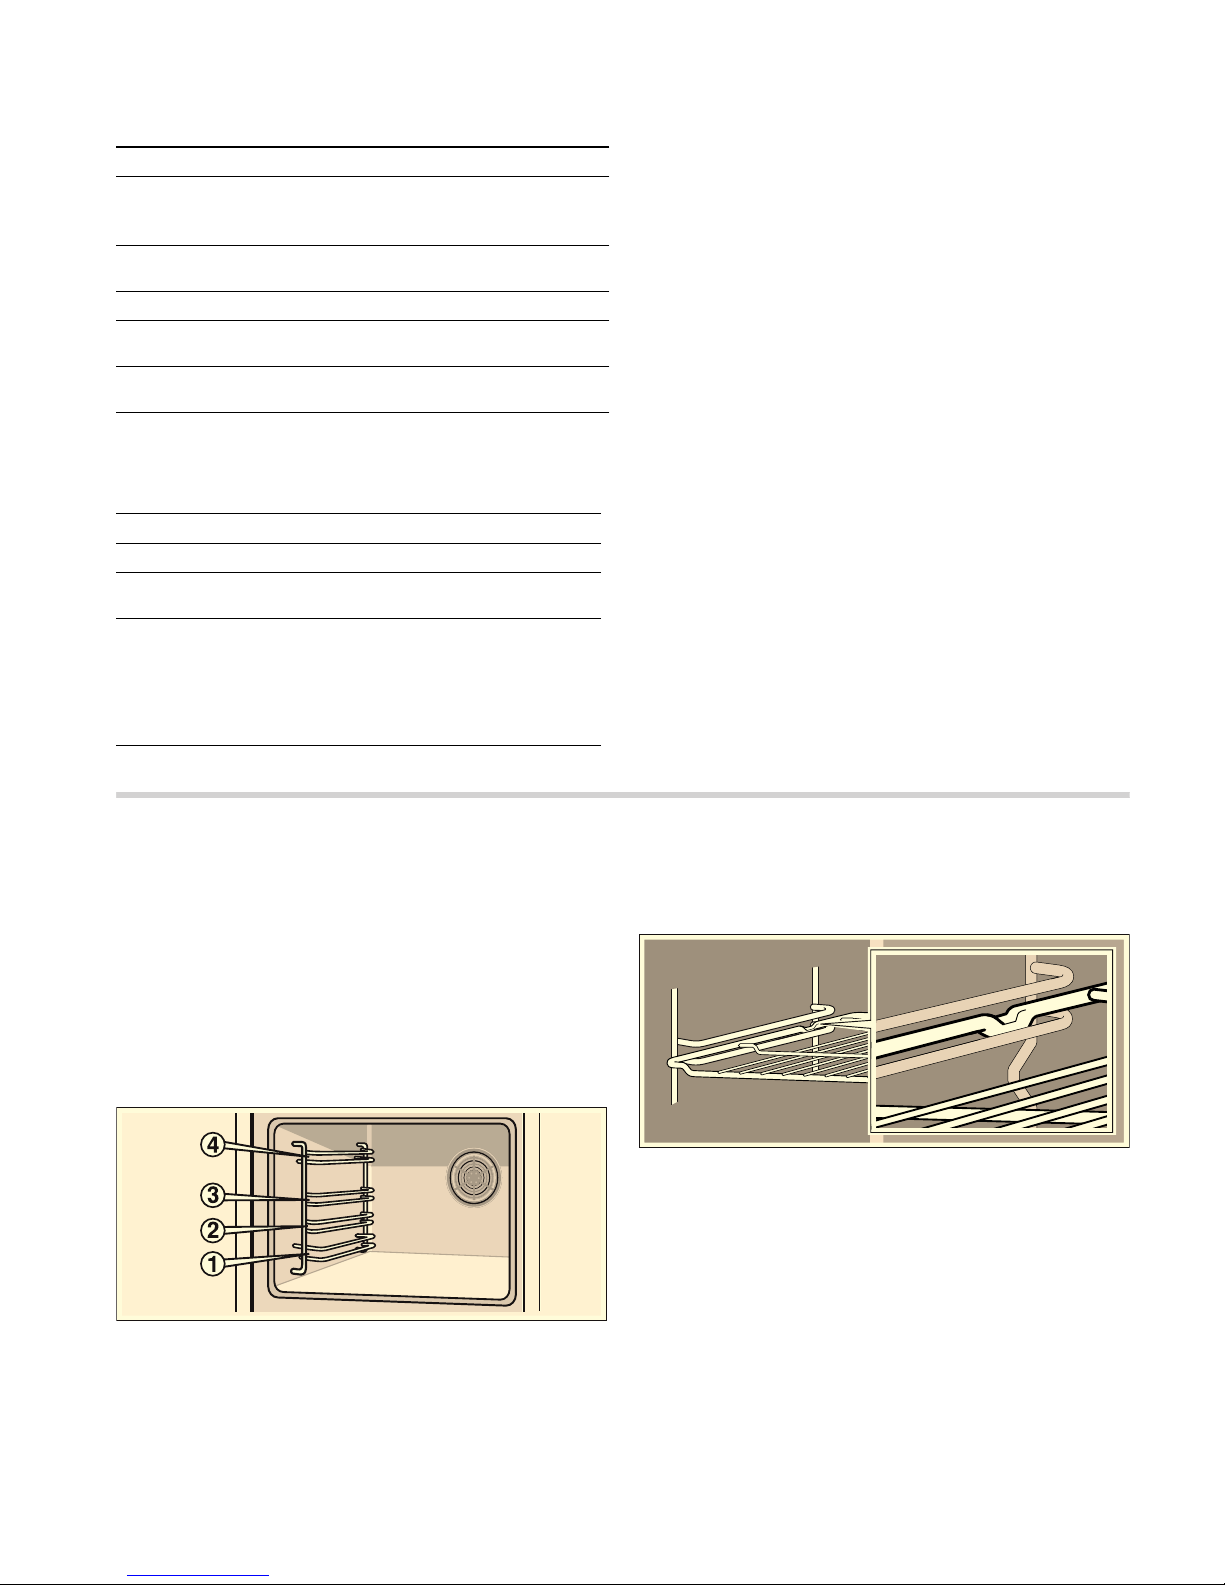
Wire rack
For ovenware, cake tins, joints,
grilled items and frozen meals.
Insert the wire rack with the open
side facing the oven door and the
curvature pointing downwards
¾.
Universal pan
For moist cakes, pastries, frozen
meals and large roasts. It can also
be used to catch dripping fat when
you are grilling directly on the wire
rack.
Slide in the universal pan with the
sloping edge facing the oven door.
Optional accessories HZ number Function
Wire rack HZ434000 For ovenware, cake tins, roasts, grilling and frozen meals.
Aluminium baking tray HZ430001 For cakes and biscuits.
Place the baking tray in the oven with the sloping edge towards the oven door.
Enamel baking tray HZ431001 For cakes and biscuits.
Place the baking tray in the oven with the sloping edge towards the oven door.
Universal pan HZ432001 For moist cakes, pastries, frozen meals and large roasts. Can also be used
under the wire rack to catch fat or meat juices.
Place the universal pan in the oven with the sloping edge towards the oven
door.
Page 8

8
Setting the oven
There are various ways in which you can set your oven. Here
we will explain how you can select the desired type of heating
and temperature or grill setting. You can select the cooking
time and end time for your dish on the oven.
Types of heating and temperature
Example in the picture: Top/bottom heating, 190 ºC.
1. Use the function selector to select the required type of
heating.
2. Use the temperature selector to set the temperature or the
grill setting.
The oven heats up.
Switch off the oven
Turn the function selector to the off position.
Changing the settings
You can change the type of heating, temperature and grill
setting as required.
The oven should switch off automatically
Enter a cooking time for your dish.
Example in the picture:
%Top/bottom heat, 200 °C, cooking
time 45 minutes.
1. Use the function selector to select the required type of
heating.
2. Use the temperature selector to set the temperature or the
grill setting.
3. Press the 0 clock button.
The
x Cooking time symbol flashes.
4. Use the + or - button to set the cooking time.
Default value for + button = 30 minutes
Default value for - button = 10 minutes
The cooking time has elapsed
A signal sounds. The oven switches off. Press the
0 button
twice and switch off the function selector.
Changing the setting
Press the
0 Clock button. Use the + or - button to change the
cooking time.
Cancelling the setting
Press the
0 Clock button. Press the - button until zero is
shown on the display. Switch off the function selector.
Setting the cooking time if the clock is hidden
Press the
0 Clock button twice and make your settings as
described in point 4.
The oven should switch on and off
automatically
Do not allow food to stand for too long in the oven. Meat and
fish spoils easily if not kept chilled.
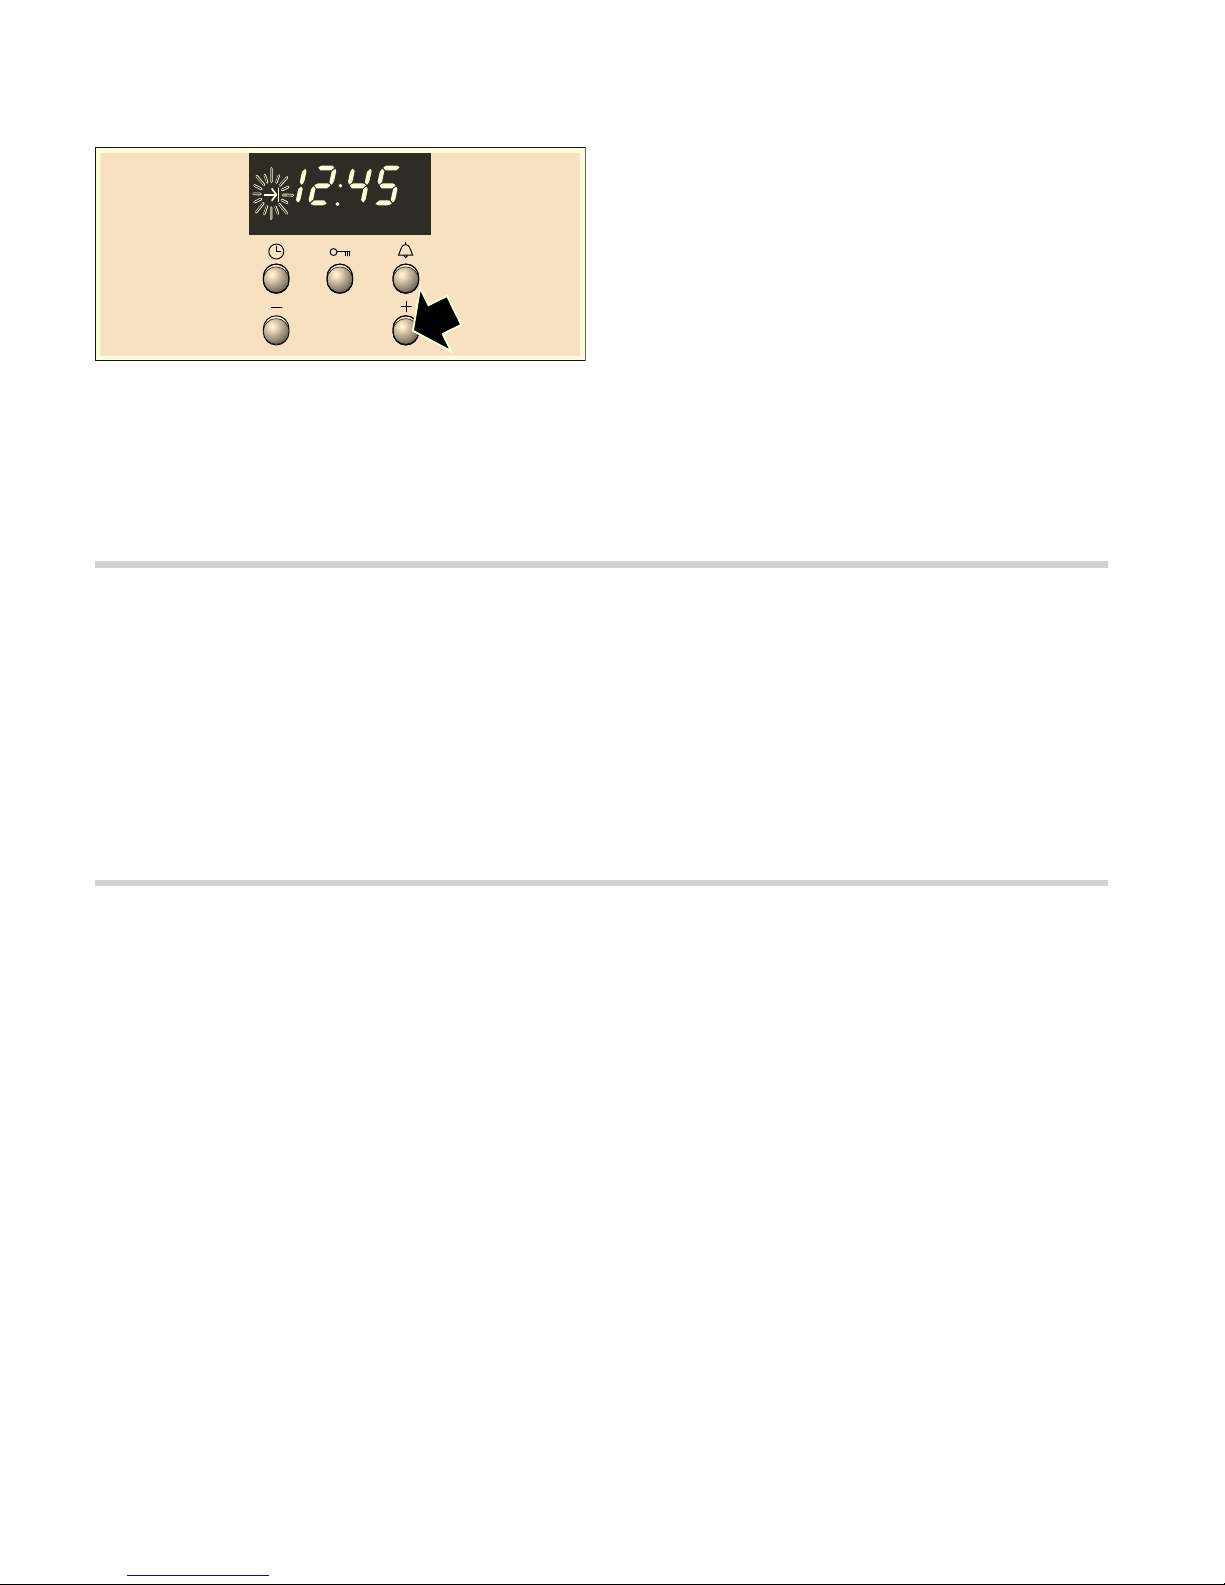
Example in the picture: Top/bottom heating
%, 200 °C. It is
10:45 . The meal takes 45 minutes to cook and should be
ready at 12:45 .
1. Use the function selector to select the required type of
heating.
2. Use the temperature selector to set the temperature or the
grill setting.
3. Press the 0 clock button.
The
x Cooking time symbol flashes.
4. Use the + or - button to set the cooking time.
5. Press the 0 Clock button repeatedly until the yEnd time
symbol flashes.
You can see in the display when the meal will be ready.
NJ
PLQ
K
NJ
PLQ
K
NJ
PLQ
K
Page 9
9
6. Use the + button to set a later end time.
The setting is adopted after a few seconds.
The display shows the end time until the oven starts
operating.
The cooking time has elapsed
A signal sounds. The oven switches off. Press the
0 button
twice and switch off the function selector.
Note: You can make changes as long as the symbol is
flashing. When the symbol lights up, the setting has been
adopted.
Rapid heating
With rapid heating, your oven reaches the temperature selected
particularly quickly.
Use rapid heating when temperatures above 100 °C are
selected.
To ensure an even cooking result, do not place your dish in the
cooking compartment until rapid heating is complete.
1. Set the function selector to I.
2. Use the temperature selector to set the temperature.
The oven will start heating after a few seconds. The indicator
light above the temperature selector lights up.
The rapid heating process is complete
The indicator light above the temperature selector goes out.
Place your dish in the oven and select the desired type of
heating.
Cancelling rapid heating
Turn the function selector to the off position. The oven switches
off.
Setting the clock
When the appliance is connected for the first time or after a
power cut, the
0 symbol and three zeros flash in the display.
Set the clock. The function selector must be switched off.
Setting procedure
1. Press the 0 Clock button.
12.00 appears in the display and the
0 symbol flashes.
2. Use the + or - button to change the clock.
After a few seconds, the time is saved. The
0 symbol goes
out.
Changing from summer to winter time, for example
Press the
0 Clock button twice and change the time using the
+ or - button.
Setting the timer
You can use the timer as a kitchen timer. It runs independently
of the oven. The timer has a special signal. This means that you
can tell whether the timer duration or the cooking time has
elapsed. You can also set the timer if the childproof lock is
active.
Setting procedure
1. Press the S Timer button.
The
S symbol flashes.
2. Use the - or + button to change the timer duration.
Default value for + button = 10 minutes
Default value for - button = 5 minutes
The timer starts after a few seconds. The
S symbol lights up in
the display. You will see the time counting down.
When the time has elapsed
A signal sounds. Press the
S Timer button. The timer goes out.
Changing the timer duration
Press the
S Timer button. Use the + or - button to change the
time.
Cancelling the setting
Press the
S Timer button. Press the - button until zero is shown
on the display.
The timer and cooking time count down at the same time
Both symbols light up. You can see the timer duration counting
down in the display.
To call up the
x remaining cooking time, y end time or 0
clock:
Press the
0 Clock button repeatedly until the relevant symbol
appears.
The value you are checking appears for several seconds on the
display.
NJ
PLQ
K
Page 10
10
Childproof lock
Oven
The oven has a childproof lock to prevent children switching it
on accidentally.
Switching the childproof lock on and off
The function selector must be switched off.
To switch on: press and hold the
C key button until the C
symbol appears in the display. This takes about 4 seconds.
To switch off: press and hold the
C key button until the C
symbol goes out.
Notes
■ You can set the timer and clock at any time.
■ If the childproof lock is active, it will be cancelled following a
power cut.
Care and cleaning
With good care and cleaning, your oven will remain clean and
fully-functioning for a long time to come. Here we will explain
how to maintain and clean your oven correctly.
Notes
■ Slight differences in the colours on the front of the oven are
caused by the use of different materials, such as glass,
plastic and metal.
■ Shadows on the door panel which look like streaks, are
caused by reflections made by the oven light.
■ Enamel is baked on at very high temperatures. This can
cause some slight colour variations. This is normal and does
not affect their function. The edges of thin trays cannot be
completely enamelled. As a result, these edges can be
rough. This will not impair the anti-corrosion protection.
Cleaning agents
Damage to the various different surfaces caused by using the
wrong cleaning agent can be avoided by observing the
following instructions.
When cleaning the oven do not use
■ sharp or abrasive cleaning agents,
■ cleaning agent with a high alcohol content,
■ scouring pads,
■ high-pressure cleaners or steam jets.
■ Do not clean individual parts in the dishwasher.
Wash new sponges thoroughly before first use.
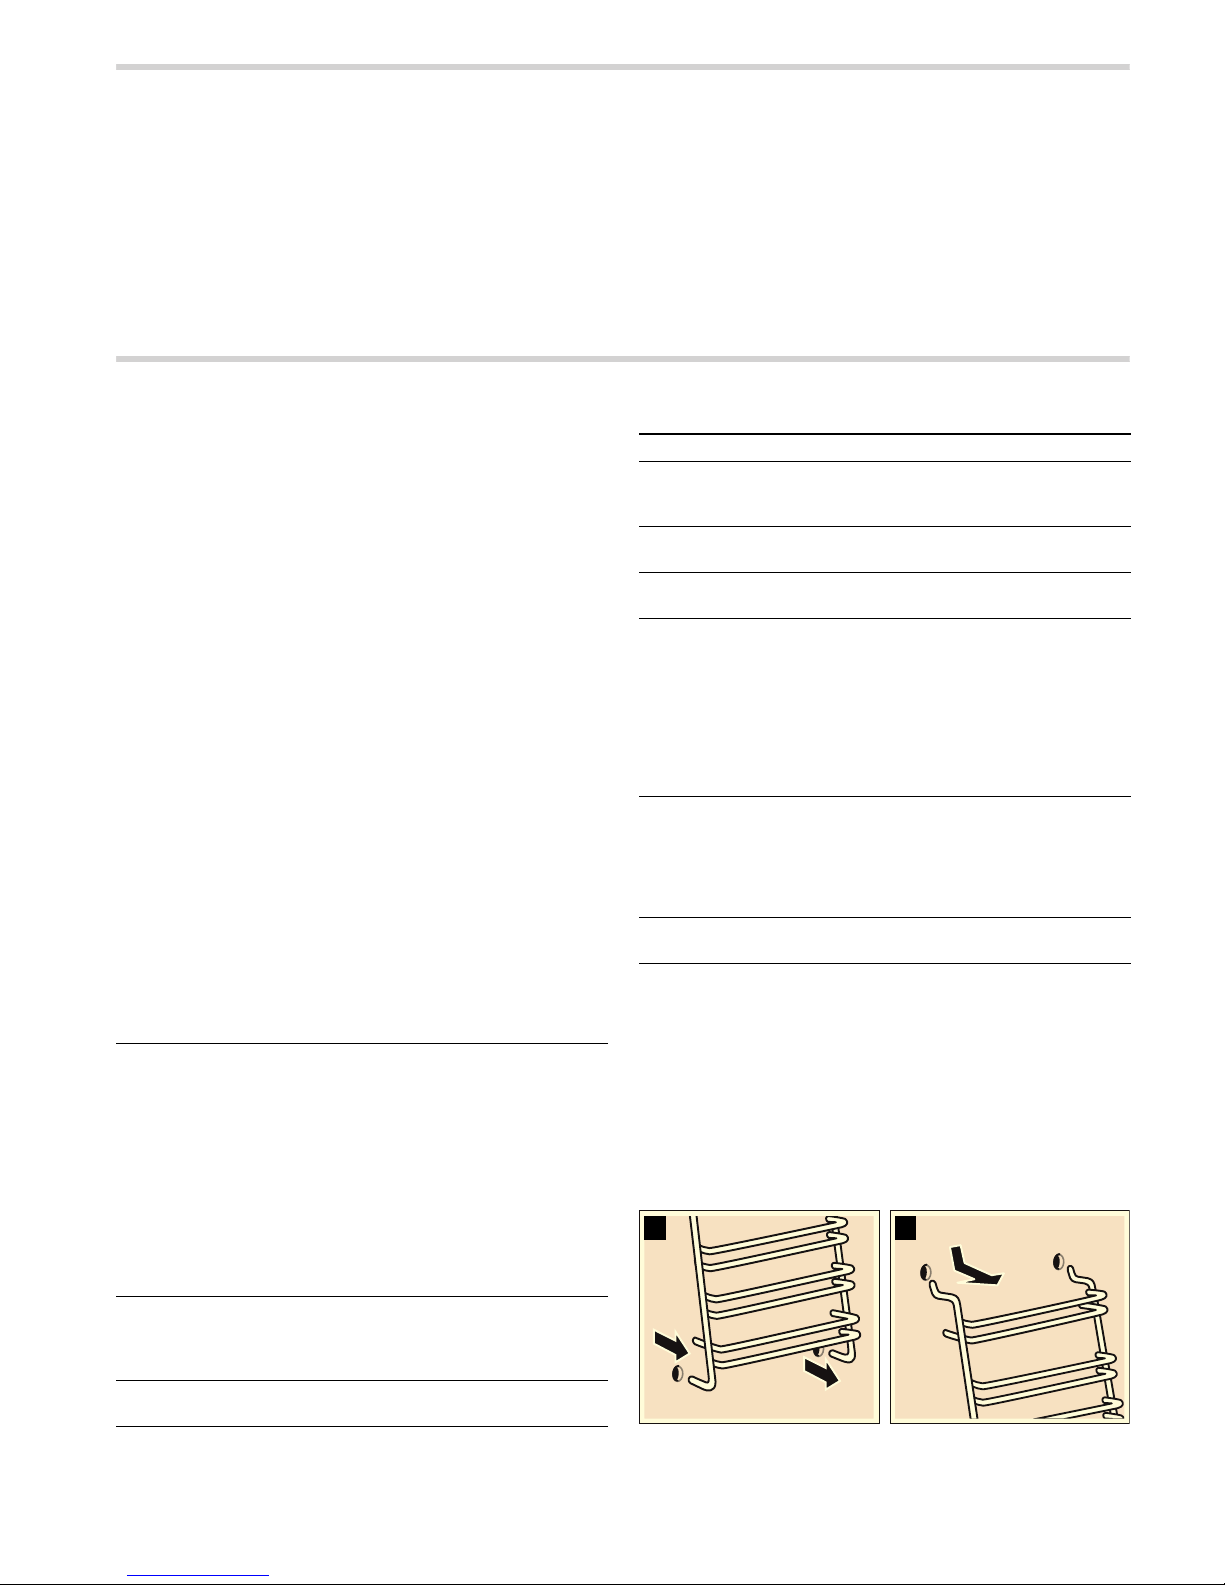
Detaching and refitting the rails
The rails can be removed for cleaning. The oven must have
cooled down.
Unhooking the rails
1. Hold the shelf frames from underneath and pull slightly
forward. Pull the extension pins at the bottom of the rails out
of the mounting holes (Fig. A).
2. Then fold the rails upwards and carefully remove them
(Fig. B).
Clean the rails with washing-up liquid and a sponge. For
stubborn deposits of dirt, use a brush.
Stainless steel
fronts
Wipe the appliance with plenty of water and
some washing-up liquid. Always wipe parallel
to the natural grain. Otherwise, you may
scratch the surface. Dry with a soft cloth.
Remove flecks of limescale, grease, starch
and albumin (e.g. egg white) immediately. Do
not use any abrasive materials, scouring
sponges or rough cleaning cloths. The stainless steel fronts can be polished using a special care product. Follow the manufacturer's
instructions. You can purchase special stainless steel cleaner from our after-sales service
or from specialist retailers.
Enamel surfaces and lacquered
surfaces
Wipe the appliance with some washing-up liquid and warm water. Dry with a soft cloth.
Knobs Wipe the appliance with some washing-up liq-
uid and warm water. Dry with a soft cloth.
Glass panel Can be cleaned with glass cleaner. Do not
use any abrasive cleaning agents or sharp
metal objects. These could scratch and damage the surface of the glass panel.
Seal Wipe with a damp cloth. Dry with a soft cloth.
Inside the
oven
Clean with hot water or vinegar solution. For
heavy soiling: Only use oven cleaner on cold
surfaces.
Glass cover on
the oven light
Wipe the appliance with some washing-up liquid and warm water. Dry with a soft cloth.
Accessories Soak in hot soapy water. Clean with a brush
or a sponge.
Aluminium
baking tray
(option)
Do not clean in the dishwasher. Never use
oven cleaner. To avoid scratches, never touch
the metal surfaces with a knife or similar
sharp object. Clean horizontally with some
washing-up liquid and a damp glass cleaning
cloth or a microfibre cloth. Dry with a soft
cloth. Do not use any abrasive materials,
scouring sponges or rough cleaning cloths.
They could scratch the baking tray
Childproof
lock (option)
If a childproof lock has been fitted on the
oven door, it must be removed before cleaning. Soak all plastic parts in hot soapy water
and wash with a sponge. Dry with a soft cloth.
If very dirty, the childproof lock will not work
properly.
Hob Information on care and cleaning can be
found in the instruction manual for your hob.
%$
Page 11
11
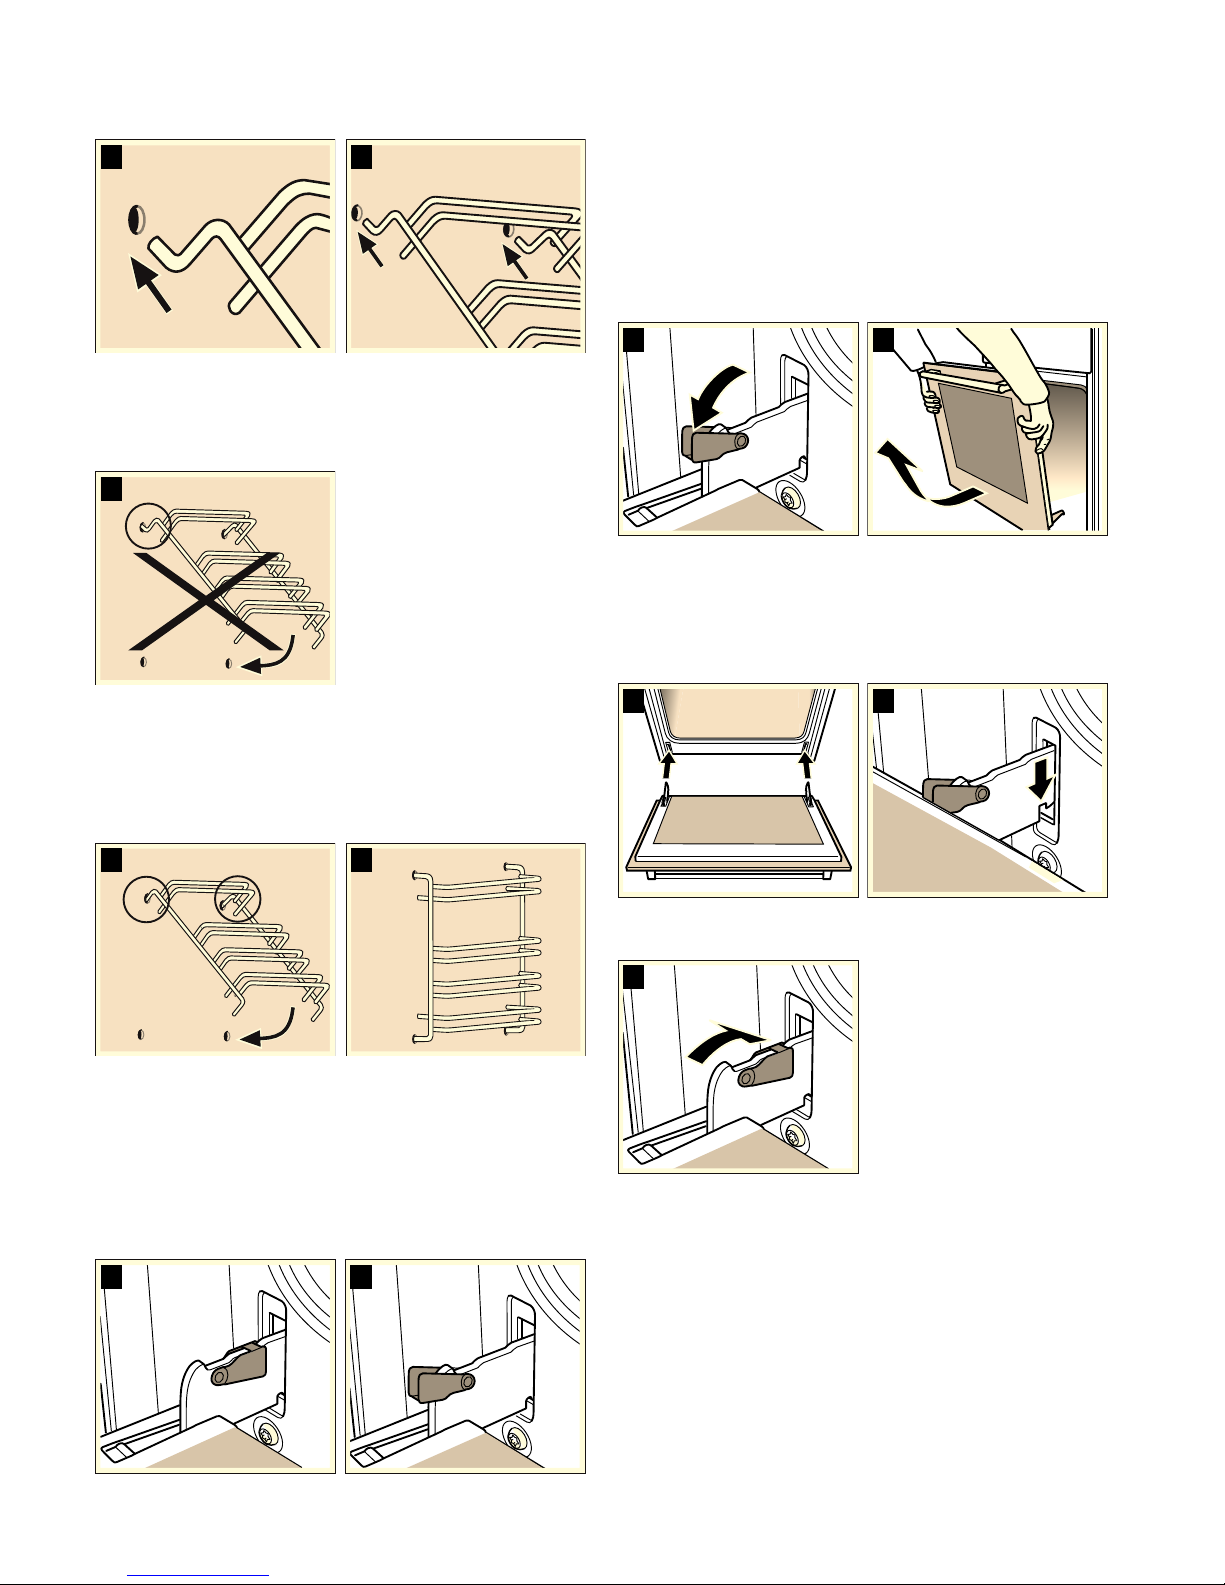
Installing the frames
1. Insert the two hooks carefully into the upper holes. (Figure A-
B)
: Incorrect assembly!
Never move the frame before the two hooks are fully
anchored in the upper holes. The enamel could be damaged
and may break (figure C).
2. the two hooks must be inserted fully into the upper holes.
Now move the frame slowly and carefully downwards and
insert in the lower holes (figure D).
3. Insert both frames into the side walls of the oven (figure E).
If the rails are fitted correctly, the distance between the two
upper shelf positions is greater.
Detaching and attaching the oven door
For cleaning purposes and to remove the door panels, you can
detach the oven door.
The oven door hinges each have a locking lever. When the
locking levers are closed (figure A), the oven door is secured in
place. It cannot be detached. When the locking levers are open
in order to detach the oven door (figure B), the hinges are
locked. They cannot snap shut.
: Risk of injury!
Whenever the hinges are not locked, they snap shut with great
force. Ensure that the locking levers are always fully closed or,
when detaching the oven door, fully open.
Detaching the door
1. Open the oven door fully.
2. Fold up the two locking levers on the left and right (figure A).
3. Close the oven door as far as the limit stop. With both hands,
grip the door on the left and right-hand sides. Close the door
a little further and pull it out (figure B).
Attaching the door
Reattach the oven door in the reverse sequence to removal.
1. When attaching the oven door, ensure that both hinges are
inserted straight into the opening (figure A).
2. The notch on the hinge must engage on both sides (figure B).
3. Fold back both locking levers (figure C). Close the oven
door.
: Risk of injury!
Risk of injury. If the oven door falls out accidentally or a hinge
snaps shut, do not reach into the hinge. Call the aftersales
service.
%$
&
(
'
%$
%
$
%
$
&
Page 12
12
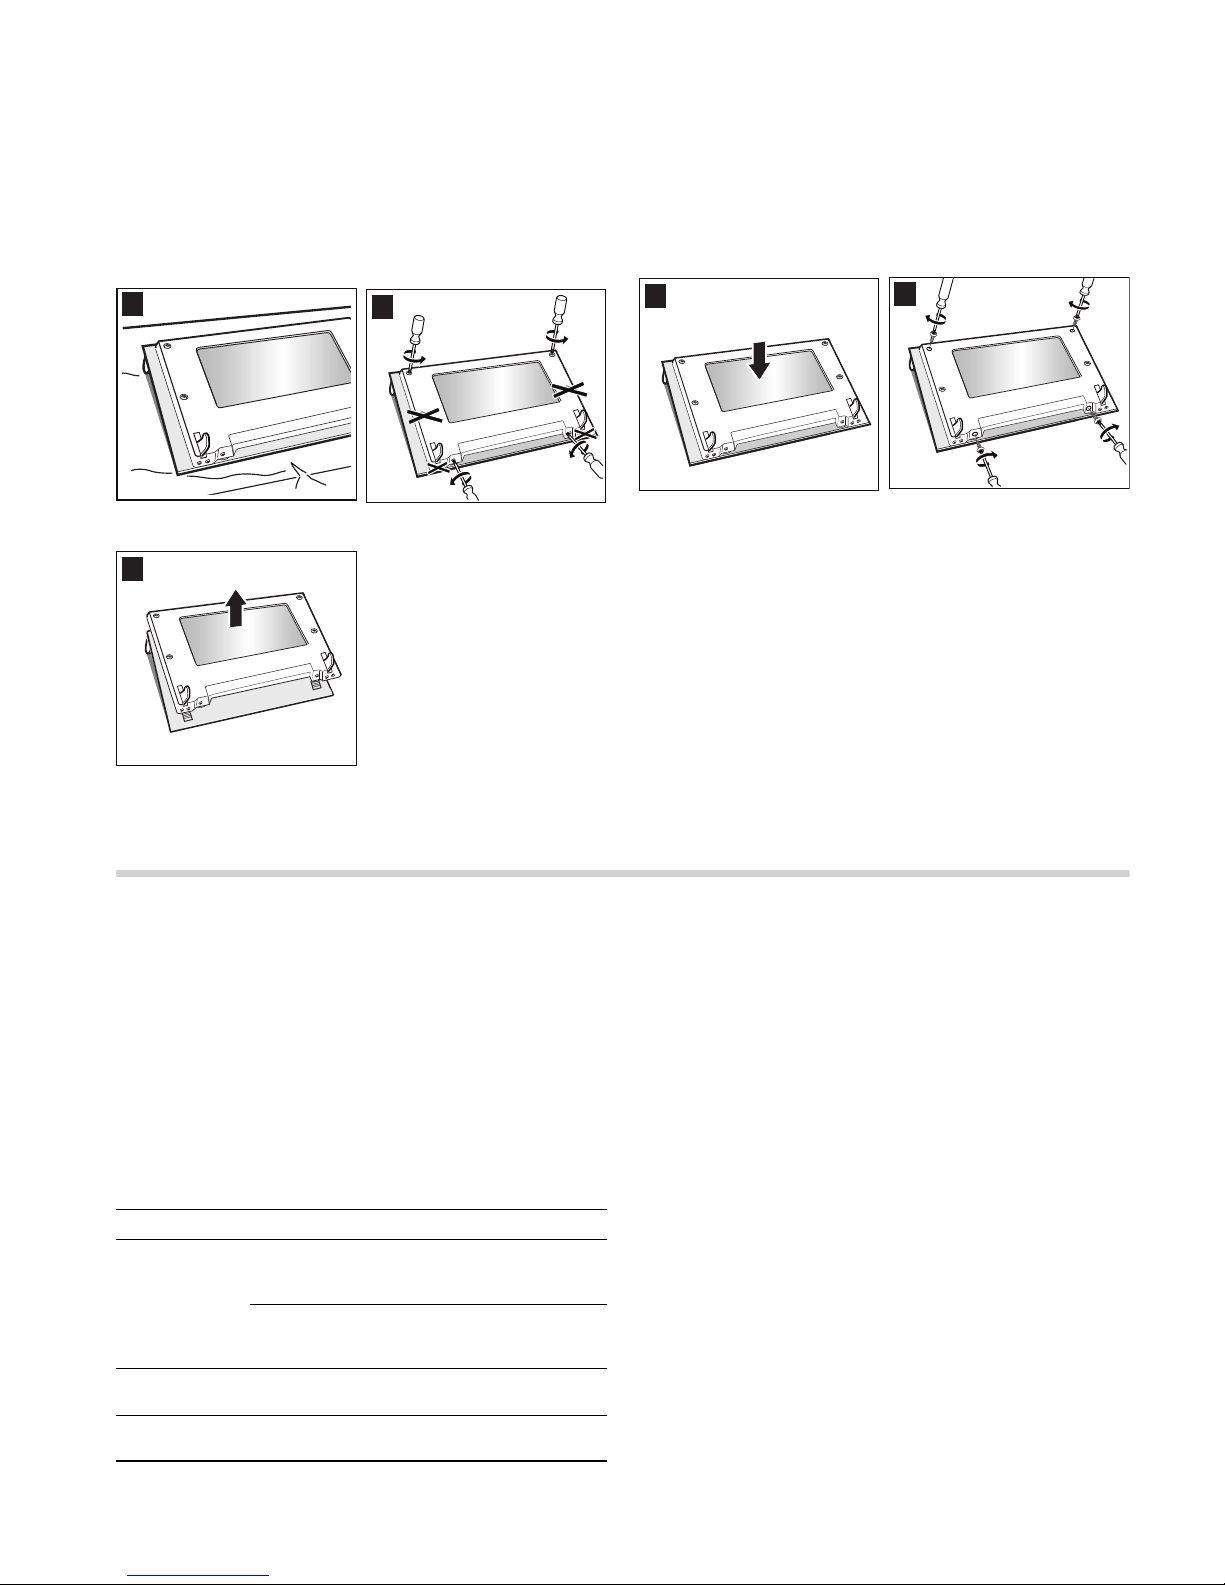
Removing and refitting the door panels
The glass panels can be removed from the oven door to allow
more thorough cleaning.
Removal
1. Removing the oven door See the section Removing the oven
door. Lay the oven door on a cloth with the handle facing
downwards (Fig. A).
2. First turn the two screws at the bottom anticlockwise, then the
two screws at the top, also anticlockwise (Fig. B).
3. Remove the cover (Fig. C).
The parts that have been removed must not be washed. Clean
the panels with a glass cleaner and a soft cloth.
: Risk of injury!
Scratched glass in the appliance door may develop into a
crack. Do not use a glass scraper, sharp or abrasive cleaning
aids or detergents.
Refitting
1. Place the cover back in position (Fig. A).
2. First retighten the two screws at the bottom, then the two
screws at the top (Fig. B).
3. Fitting the oven door See the section Fitting the oven door.
Do not use the oven again until the panels have been
correctly fitted.
Troubleshooting
Malfunctions often have simple explanations. Refer to the table
before calling the after-sales service as you may be able to
remedy the fault yourself.
Malfunction table
If a dish doesn't turn out as well as you had hoped, refer to the
section Tested for you in our cooking studio, where you will
find plenty of cooking tips and tricks.
: Risk of electric shock!
Incorrect repairs are dangerous. Repairs may only be carried
out by one of our trained after-sales engineers.
Caution!
If the supply cord is damaged, it must be replaced by the
manufacturer, its service agent or similarly qualified persons in
order to avoid a hazard.
%
$
&
%
$
Problem Possible cause Remedy/information
The oven does
not work.
The circuit
breaker is
defective.
Look in the fuse box and
check that the circuit
breaker is in working order.
Power cut Check whether the kitchen
light or other kitchen appliances are working.
The clock display flashes.
Power cut Reset the clock.
The oven does
not heat up.
There is dust on
the contacts.
Turn the control knobs back
and forth several times.
Page 13
13
Replacing the bulb in the oven ceiling light
If the bulb in the oven light fails, it must be replaced. Heatresistant, 40 watt spare bulbs can be obtained from our aftersales service or a specialist retailer. Only use these bulbs.
: Risk of electric shock!
Switch off the circuit breaker in the fuse box.
1. Place a tea towel in the oven when it is cold to prevent
damage.
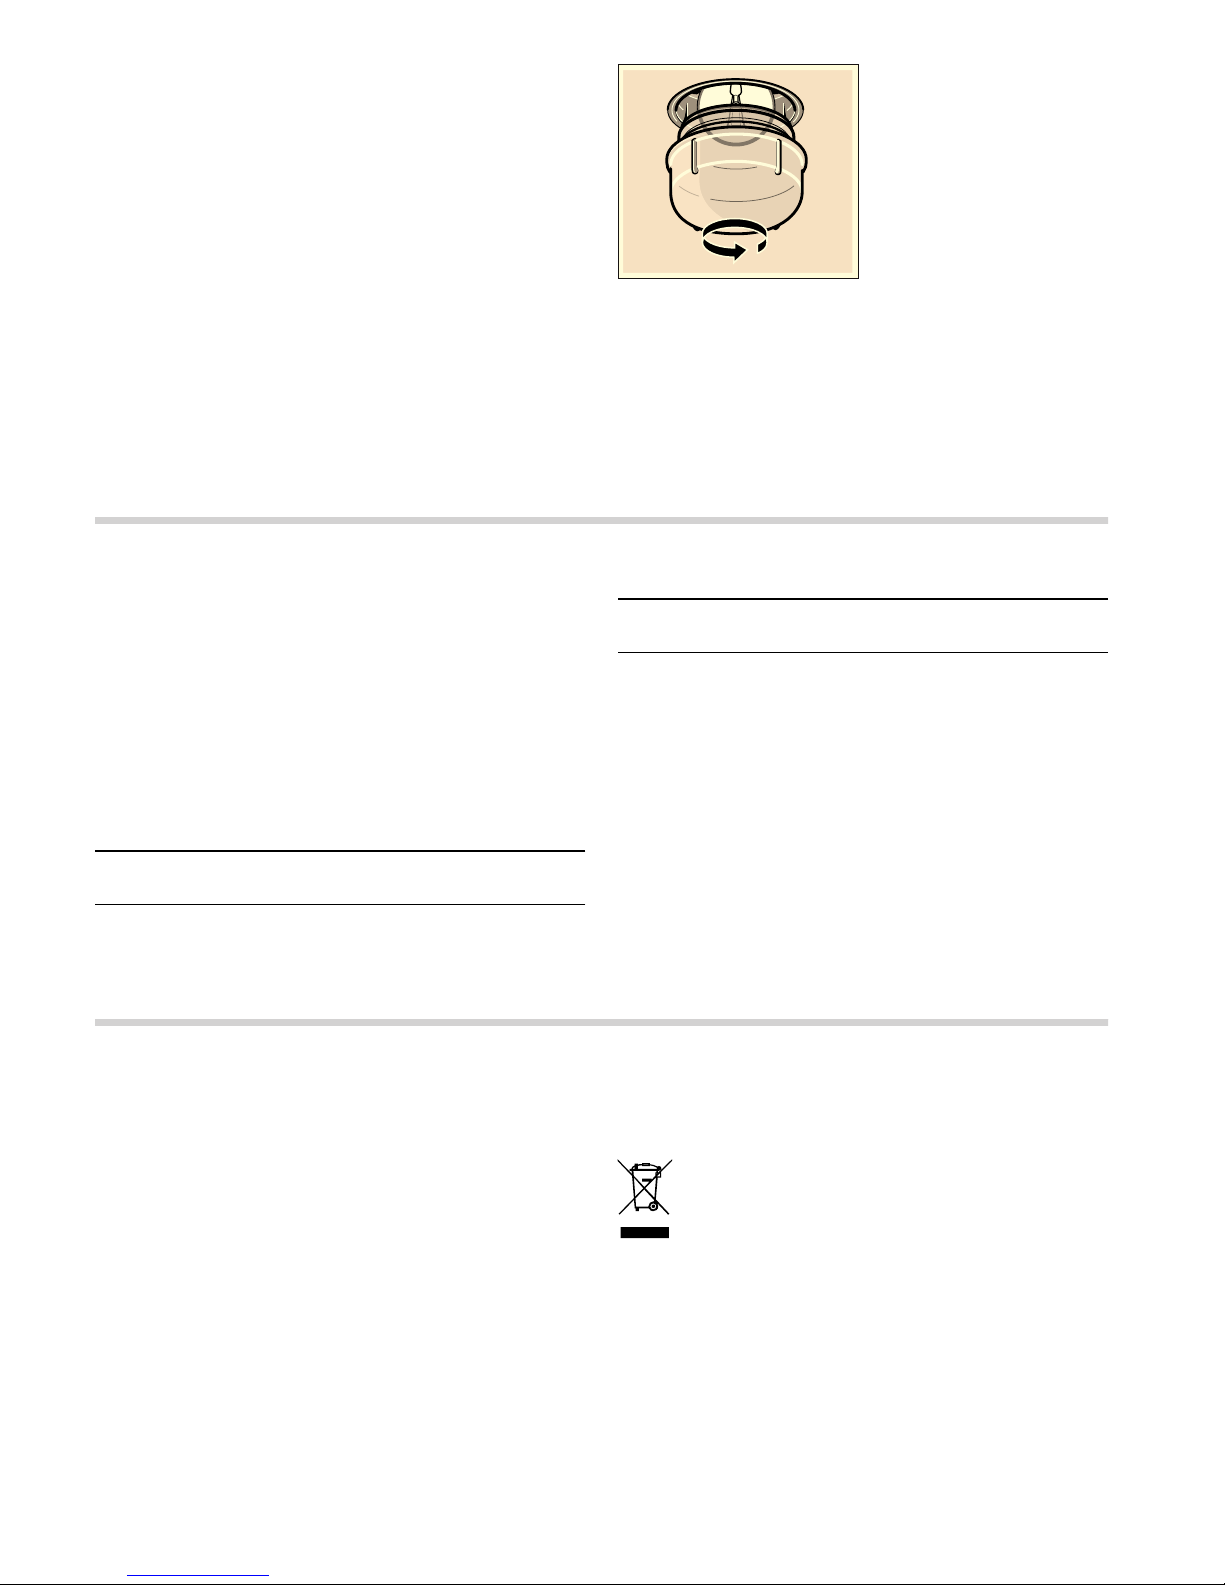
2. Unscrew the glass cover by turning it anti-clockwise.
3. Replace the bulb with one of the same type.
4. Screw the glass cover back in.
5. Remove the tea towel and switch on the circuit breaker.
Glass cover
You must replace a damaged glass cover. Suitable glass
covers may be obtained from the after-sales service. Please
specify the E number and FD number of your appliance.
After-sales service
Our after-sales service is there for you if your appliance needs
to be repaired. We will always find the right solution in order to
avoid unnecessary visits from a service technician.
E number and FD number
When calling us, please give the product number (E no.) and
the production number (FD no.) so that we can provide you with
the correct advice. The rating plate containing these numbers is
found on the side of the oven door. To save time, you can make
a note of the number of your appliance and the telephone
number of the after-sales service in the space below, should it
be required.
Please note that there will be a fee for a visit by a service
technician in the event of a malfunction, even during the
warranty period.
Please find the contact data of all countries in the enclosed
customer service list.
To book an engineer visit and product advice
Rely on the professionalism of the manufacturer. You can
therefore be sure that the repair is carried out by trained service
technicians who carry original spare parts for your appliances.
Energy and environment tips
Here you can find tips on how to save energy when baking and
roasting and how to dispose of your appliance properly.
Saving energy
■ Only preheat the oven if this is specified in the recipe or in
the operating instruction tables.
■ Use dark, black lacquered or enamelled baking tins. They
absorb the heat particularly well.
■ Open the oven door as infrequently as possible while you are
cooking, baking or roasting.
■ It is best to bake several cakes one after the other. The oven
is still warm. This reduces the baking time for the second
cake. You can also place two loaf tins next to each other.
■ For longer cooking times, you can switch the oven off
10 minutes before the end of the cooking time and use the
residual heat to finish cooking.
Environmentally-friendly disposal
Dispose of packaging in an environmentally-friendly manner.
Measures to be noted during transport
Secure all mobile parts in and on the appliance using an
adhesive tape that can be removed without leaving any traces.
Push all accessories (e.g. baking tray) into the corresponding
slots with cardboard at the edges, in order to avoid damaging
the appliance. Place cardboard or similar between the front and
rear side to prevent knocks against the inside of the door glass.
E no.
FD no.
After-sales service O
GB 0344 892 8999
Calls charged at local or mobile rate.
IE 01450 2655
0.03 € per minute at peak. Off peak 0.0088 € per
minute.
This appliance is labelled in accordance with
European Directive 2012/19/EU concerning used
electrical and electronic appliances (waste electrical
and electronic equipment - WEEE). The guideline
determines the framework for the return and recycling
of used appliances as applicable throughout the EU.
Page 14

14
Secure the oven door to the side walls of the appliance using
adhesive tape.
Keep the original appliance packaging. Only transport the
appliance in the original packaging. Observe the transport
arrows on the packaging.
If the original packaging is no longer available
pack the appliance in protective packaging to guarantee
sufficient protection against any transport damage.
Transport the appliance in an upright position. Do not hold the
appliance by the door handle or the connections on the rear, as
these could be damaged. Do not place any heavy objects on
the appliance.
Tested for you in our cooking studio
Here you will find a selection of dishes and the ideal settings for
them. We will show you which type of heating and which
temperature are best suited for your dish. You can find
information about suitable accessories and the height at which
they should be inserted. There are also tips about cookware
and preparation methods.
Notes
■ The values in the table always apply to dishes placed into the
cooking compartment when it is cold and empty.
Only preheat the appliance if the table specifies that you
should do so. Do not line the accessories with greaseproof
paper until after they have been preheated.
■ The times specified in the tables are guidelines only. They will
depend on the quality and composition of the food.
■ Use the accessories supplied. Additional accessories may be
obtained as special accessories from specialist retailers or
from the after-sales service.
Before using the oven, remove any unnecessary accessories
and ovenware from the cooking compartment.
■ Always use oven gloves when taking hot accessories or
ovenware out of the cooking compartment.
Cakes and pastries
Baking on one level
When baking cakes and tarts, the best results can be achieved
using
% Top/bottom heating.
When baking with
: 3D Hot air, use the following shelf
positions for the accessories:
■ Cake in a cake tin: Shelf position 2
■ Cake on a baking tray: Shelf position 3
Baking and roasting on two or more levels
Use
: 3D hot air.
Shelf positions for baking and roasting on 2 levels:
■ Universal pan: Shelf position 3
■ Baking tray: Shelf position 1
Dishes that are put in the oven at the same time do not have to
be ready at the same time.
The tables contain a selection of dishes.
Baking tins
It is best to use dark-coloured metal baking tins.
Baking times are increased when light-coloured baking tins
made of thin metal or glass dishes are used, and cakes do not
brown so evenly.
If you wish to use silicone baking tins, use the information and
recipes provided by the manufacturer as a guide. Silicone
baking tins are often smaller than normal tins. The amount of
mixture and recipe instructions may differ.
Tables
The tables show the ideal type of heating for the various cakes
and pastries. The temperature and baking time depend on the
amount and composition of the mixture. This is why
temperature ranges are given in the tables. You should try the
lower temperature first, since a lower temperature results in
more even browning. You can increase the temperature next
time if necessary.
If you preheat the oven, the baking time is shortened by 5 to 10
minutes.
Additional information can be found in the Baking tips section
following the tables.
Note: Do not place food directly onto the aluminium baking
tray. Line the aluminium baking tray with greaseproof paper.
Cake in a mould Tin Level Type of
heating
Temperature, °C Cooking time
in minutes
Sponge cake, simple Fruit loaf tin 2
%
160-180 55-65
Sponge cake, delicate (e.g. sand cake) Fruit loaf tin 2
%
155-175 65-75
Shortcrust pastry base with crust Springform cake tin 1
%
160-180 30-40
Sponge flan base Flan-base cake tin 2
%
160-180 25-35
Sponge cake Springform cake tin 2
%
160-180 30-40
Fruit tart or cheesecake, shortcrust pastry*
Dark springform cake tin 1
%
170-190 70-90
Delicate fruit flan, sponge Springform cake tin 2
%
150-170 55-65
Savoury cakes* (e.g. quiche/onion tart) Springform cake tin 1
%
180-200 50-60
* Allow cakes to cool in the appliance for approx. 20 minutes.
Page 15

15
Bread and bread rolls
If not specified otherwise, always preheat the oven for baking
bread.
Never pour water directly into a hot oven.
Baking tips
Cakes on trays Accessories Level Type of
heating
Temperature in °C Cooking time
in minutes
Sponge mixture or yeast dough with dry
topping
Universal pan: 3
%
160-180 25-35
Aluminium baking tray* +
universal pan**
1+3
:
150-170 35-45
Sponge mixture or yeast dough with
fresh fruit
Universal pan: 3
%
140-160 40-50
Aluminium baking tray* +
universal pan**
1+3
:
130-150 50-60
Swiss roll (preheat) Universal pan: 2
%
170-190 15-20
Plaited loaf, 500 g flour Universal pan: 2
%
160-180 25-35
Stollen, 500 g flour Universal pan: 3
%
160-180 50-60
Stollen, 1 g flour Universal pan: 3
%
150-170 90-100
Strudel, sweet Universal pan: 2
%
180-200 55-65
Pizza Universal pan: 3
%
180-200 20-30
Aluminium baking tray* +
universal pan**
1+3
:
150-170 35-45
* Additional baking trays can be ordered from the after-sales service or specialist retailers.
** When baking on two levels, always place the universal pan above the baking tray.
Bread and bread rolls Accessories Level Type of
heating
Temperature, °C Cooking time
in minutes
Yeast bread, 1.2 kg flour Universal pan: 2
%
270
190
8
35-45
Sourdough bread, 1.2 kg flour Universal pan: 2
%
270
190
8
35-45
Bread rolls (e.g. rye rolls) Universal pan: 2
%
200-220 20-30
Small baked products Accessories Level Type of
heating
Temperature in °C Cooking time
in minutes
Biscuits Universal pan: 3
%
150-170 10-20
Aluminium baking tray* + universal pan** 1+3
:
130-150 25-35
Meringue Universal pan: 3
:
70-90 135-145
Cream puffs Universal pan 2
%
200-220 30-40
Macaroons Universal pan 3
%
110-130 30-40
Aluminium baking tray* + universal pan** 1+3
:
100-120 35-45
Puff pastry Universal pan 3
:
190-210 20-30
Aluminium baking tray* + universal pan** 1+3
:
180-200 25-35
* Additional baking trays can be ordered from the after-sales service or specialist retailers.
** When baking on two levels, always place the universal pan above the baking tray.
You wish to bake according to your own
recipe.
Use similar items in the baking tables as a guide.
How to establish whether sponge cake
is baked through.
Approximately 10 minutes before the end of the baking time specified in the recipe, stick
a cocktail stick into the cake at the highest point. If the cocktail stick comes out clean,
the cake is ready.
The cake collapses. Use less fluid next time or set the oven temperature 10 degrees lower. Observe the
specified mixing times in the recipe.
The cake has risen in the middle but is
lower around the edge.
Do not grease the sides of the springform cake tin. After baking, loosen the cake carefully with a knife.
The cake goes too dark on top. Place it lower in the oven, select a lower temperature and bake the cake for a little
longer.
Page 16
16
Meat, poultry, fish
Ovenware
You may use any heatresistant ovenware. The universal pan is
suitable for large roasts.
Glass ovenware is the most suitable. Ensure that the lid of the
roasting dish fits well and closes properly.
Add a little more liquid when using enamelled roasting dishes.
With roasting dishes made of stainless steel, browning is not so
intense and the meat may be somewhat less well cooked.
Increase the cooking times.
Information in the tables:
Ovenware without a lid = open
Ovenware with a lid = closed
Always place the ovenware in the centre of the wire rack.
Place hot glass ovenware on a dry mat after cooking. The glass
could crack if placed on a cold or wet surface.
Roasting
Add in a little liquid if the meat is lean. Cover the base of the
ovenware with approx. ½ cm of liquid.
Add liquid generously for pot roasts. Cover the base of the
ovenware with approx. 1 - 2 cm of liquid.
The amount of liquid depends on the type of meat and the
material the ovenware is made of. If preparing meat in an
enamelled roasting dish, it will need a little more liquid than if
cooked in glass ovenware.
Roasting dishes made from stainless steel are not ideal. The
meat cooks more slowly and browns less fully. Use a higher
temperature and/or a longer cooking time.
Tips for grilling
Always grill with the oven door closed.
Heat the grill for approximately 3 minutes before placing the
food to be grilled on the wire rack.
Place the food to be grilled directly on the wire rack. If you are
grilling a single piece, the best results are achieved by placing
it in the centre of the wire rack. The universal pan should also
be inserted at level 1. The meat juices are collected in the pan,
keeping the oven cleaner.
Do not insert the baking tray or universal pan at level 4. They
may become deformed at high temperatures and damage the
cooking compartment when they are removed.
If possible, grill items should be of equal thickness. This will
allow them to brown evenly and remain succulent and juicy.
Only add salt to steaks once they have been grilled.
Turn grilled items after
Z of the specified time.
The grill element switches on and off intermittently. This is
normal. The grill setting determines how frequently this occurs.
Meat
Turn pieces of meat halfway through the cooking time.
When the roast is ready, turn off the oven and allow it to rest for
an additional 10 minutes. This allows better distribution of the
meat juices.
After cooking, wrap sirloin in aluminium foil and leave it to rest
for 10 minutes in the oven.
For roast pork with a rind, score the rind in a crossways pattern,
then lay the roast in the dish with the rind at the bottom.
The cake is too dry. When it is done, make small holes in the cake using a cocktail stick. Then drizzle fruit
juice or an alcoholic beverage over it. Next time, select a temperature 10 degrees higher
and reduce the baking time.
The bread or cake (e.g. cheesecake)
looks good, but is soggy on the inside
(sticky, streaked with water).
Use slightly less fluid next time and bake for slightly longer at a lower temperature. For
cakes with a moist topping, bake the base first. Sprinkle it with almonds or bread crumbs
and then place the topping on top. Please follow the recipe and baking times.
The cake is unevenly browned. Select a slightly lower temperature to ensure that the cake is baked more evenly. Bake
delicate pastries on one level using
% Top/bottom heating. Protruding greaseproof
paper can affect the air circulation. For this reason, always cut greaseproof paper to fit
the baking tray.
The bottom of a fruit cake is too light. Place the cake one level lower the next time.
The fruit juice overflows. Next time, use the deeper universal pan, if you have one.
Small baked items made out of yeast
dough stick to one another when baking.
There should be a gap of approx. 2 cm around each item. This gives enough space for
the baked items to expand well and turn brown on all sides.
You were baking on several levels. The
items on the top baking tray are darker
than that on the bottom baking tray.
Always use
: 3D hot air to bake on more than one level. Baking trays that are placed in
the oven at the same time will not necessarily be ready at the same time.
Condensation forms when you bake
moist cakes.
Baking may result in the formation of water vapour, which escapes above the door. The
steam may settle and form water droplets on the control panel or on the fronts of adja-
cent units. This is a natural process.
Meat Weight Accessories and
ovenware
Level Type of
heating
Temperature
°C, grill setting
Cooking time
in minutes
Beef
Joint of beef 1.0 kg Covered 2
%
200-220 120
1.5 kg 2
%
190-210 140
2.0 kg 2
%
180-200 160
Tenderloin, medium rare 1.0 kg Uncovered 1
%
210-230 70
1.5 kg 1
%
200-220 80
Sirloin, medium rare 1.0 kg Uncovered 1
4
230-250 50
Steaks, 3 cm, medium rare Wire rack + univer-
sal pan
4+1
(
315
Page 17
17
Poultry
The values in the table apply to dishes placed in a cold oven.
The weights indicated in the table are for unstuffed poultry that
is ready for roasting.
If you are grilling directly on the wire rack, you should also
insert the universal pan at level 1.
When cooking duck or goose, pierce the skin on the underside
of the wings to allow the fat to escape.
Place the bird onto the wire rack with the breast side facing
downwards. Turn the whole bird when two thirds of the cooking
time has elapsed.
Poultry will turn out particularly crispy and brown if you baste it
towards the end of the roasting time with butter, salted water or
orange juice.
Fish
Turn the pieces of fish after
Z of the specified time.
Whole fish do not need to be turned. Place the whole fish in the
oven in swimming position with the dorsal fin facing upwards.
To ensure that the fish remains in position, place half a potato
or a small, ovenproof container into the stomach cavity.
If you are grilling directly on the wire rack, also insert the
universal pan at level 1. The fish juices are collected in the pan
and the oven is kept cleaner.
Veal
Joint of veal 1.0 kg Uncovered 1
%
200-220 100
1.5 kg 1
%
190-210 120
2.0 kg 1
%
180-200 140
Pork
without rind (e.g. neck) 1.0 kg Uncovered 1
4
190-210 120
1.5 kg 1
4
180-200 150
2.0 kg 1
4
170-190 170
with rind (e.g. shoulder) 1.0 kg Uncovered 1
4
180-200 130
1.5 kg 1
4
190-210 160
2.0 kg 1
4
170-190 190
Smoked pork on the bone 1.0 kg Covered 1
%
210-230 80
Lamb
Leg of lamb, boned, medium 1.5 kg Uncovered 1
4
170-190 120
Minced meat
Meat loaf approx.
750 g
Uncovered 1
4
180-200 70
Sausage
Sausage Wire rack + univer-
sal pan
4+1
(
315
Meat Weight Accessories and
ovenware
Level Type of
heating
Temperature
°C, grill setting
Cooking time
in minutes
Poultry Weight Accessories and
ovenware
Level Type of
heating
Temperature °C,
grill setting
Cooking time in
minutes
Chicken halves, 1-4 pieces 400g each Wire rack 2
4
210-230 40-50
Chicken pieces 250 g each Wire rack 3
4
210-230 30-40
Chicken, whole, 14 pieces per 1 kg Wire rack 2
4
200-220 55-85
Duck, whole 1.7 kg Wire rack 2
4
170-190 80-100
Goose, whole 3.0 kg Wire rack 2
4
160-180 110-130
Small turkey, whole 3.0 kg Wire rack 2
4
180-200 80-100
2 turkey drumsticks 800g each Wire rack 2
4
180-200 80-100
Fish Weight Accessories and
ovenware
Level Type of
heating
Temperature
°C, grill setting
Cooking time
in minutes
Fish, whole 300 g each Wire rack 3
(
2 20-25
1.0 kg Wire rack 2
4
190-210 40-50
1.5 kg Wire rack 2
4
180-200 60-70
Fish, in slices (e.g. steaks) 300 g each Wire rack 4
(
2 20-25
Page 18

18
Tips for roasting and grilling
Bakes, gratins, toast with toppings
If you are grilling directly on the wire rack, the universal pan
should also be inserted at level 1. This keeps the oven cleaner.
Always place the ovenware on the wire rack.
How well cooked the bake is will depend on the size of the dish
and the height of the bake. The figures in the table are only
average values.
Preprepared products
Observe the instructions on the packaging.
If you line the accessories with greaseproof paper, make sure
that the paper is suitable for these temperatures. Make sure the
paper is a suitable size for the dish to be cooked.
The cooking result greatly depends on the quality of the food.
Pre-browning and irregularities can sometimes even be found
on the raw product.
Note
The universal pan may warp when cooking frozen dishes. The reason for this is the large temperature differences that the
accessory is subjected to. The deformation disappears as early as during the cooking process.
The table does not contain information
for the weight of the joint.
Select the next lowest weight from the instructions and extend the time.
How to tell when the roast is ready. Use a meat thermometer (available from specialist shops) or carry out a “spoon test”.
Press down on the roast with a spoon. If it feels firm, it is ready. If the spoon can be
pressed in, it needs to be cooked for a little longer.
The roast is too dark and the crackling
is partly burnt.
Check the shelf height and temperature.
The roast looks good but the juices are
burnt.
Next time, use a smaller roasting dish or add more liquid.
The roast looks good but the juices are
too clear and watery.
Next time, use a larger roasting dish and use less liquid.
Steam rises from the roast when basted. This is normal and due to the laws of physics. The majority of the steam escapes through
the steam outlet. It may settle and form condensation on the cooler switch panel or on
the fronts of adjacent units.
Dish Accessories and oven-
ware
Level Type of
heating
Temperature in °CCooking time
in minutes
Bakes
Bake, sweet Ovenproof dish 2
%
170-190 50-60
Pasta bake Ovenproof dish 2
%
210-230 25-35
Gratin
Potato gratin made using raw ingredients,
Max. 2 cm deep
Ovenproof dish 2
4
150-170 50-60
Toast
Toasting bread, 12 slices Wire rack 4
(
3 4-5
Toast, with topping, 12 slices Wire rack 3
(
3 5-8
Dish Accessories Level Type of
heating
Temperature in °CCooking time
in minutes
Strudel with fruit filling Universal pan 3
:
190-210 45-55
Chips Universal pan 3
%
210-230 25-30
Pizza Wire rack 2
%
200-220 15-20
Pizza baguette Wire rack 2
4
190-210 15-20
Page 19

19
Special dishes
At low temperatures, : 3D hot air is equally useful for
producing creamy yoghurt as it is for proving light yeast dough.
First, remove accessories, hook-in racks or telescopic shelves
from the cooking compartment.
Preparing yoghurt
1. Bring 1 litre of milk (3.5 % fat) to the boil and cool down to
40 °C.
2. Stir in 150 g of yoghurt (at refrigerator temperature).
3. Pour into cups or small screw-top jars and cover with cling
film.
4. Preheat the cooking compartment as indicated.
5. Place the cups or jars on the cooking compartment floor and
incubate as indicated.
Proving dough
1. Prepare the dough as usual, place it in a heat-resistant
ceramic dish and cover.
2. Preheat the cooking compartment as indicated.
3. Switch off the oven and place the dough in the cooking
compartment and leave it to prove.
Defrosting
The defrosting time depends on the amount and type of food.
Observe the instructions on the packaging.
Take food out of its packaging and place in suitable ovenware
on the wire rack.
Place poultry with the breast side to the plate.
Drying
With : 3D hot air, you can dry foods brilliantly.
Use unblemished fruit and vegetables only and wash them
thoroughly.
Drain off the excess water, then dry them.
Line the universal pan and the wire rack with greaseproof or
parchment paper.
Turn very juicy fruit or vegetables several times.
Remove fruit and vegetables from the paper as soon as they
have dried.
Preserving
For preserving, the jars and rubber seals must be clean and
intact. If possible, use jars of the same size. The information in
the table is for round, one-litre jars.
Caution!
Do not use jars that are larger or taller than this. The lids could
crack.
Only use fruit and vegetables in good condition. Wash them
thoroughly.
The times given in the tables are a guide only. The time will
depend on the room temperature, number of jars, and the
quantity and temperature of the contents. Before you switch off
the appliance or change the cooking mode, check whether the
contents of the jars are bubbling as they should.
Preparation
1. Fill the jars, but not to the top.
2. Wipe the rims of the jars, as they must be clean.
3. Place a damp rubber seal and a lid on each jar.
4. Seal the jars with the clips.
Place no more than six jars in the cooking compartment.
Making settings
1. Insert the universal pan at level 2. Arrange the jars on it so
that they do not touch each other.
2. Pour ½ litre of hot water (approx. 80 °C) into the universal
pan.
3. Close the oven door.
4. Set $ Bottom heating.
5. Set the temperature to between 170 and 180 °C.
Dish Ovenware Type of
heating
Temperature Cooking time
Yoghurt Cups or screw-top
jars
on the cooking
compartment floor
:
50 °C Preheat
50 °C
5 mins
8 hrs
Proving dough Heat-resistant dish on the cooking
compartment floor
:
50 °C Preheat
Switch off the appliance and
place the yeast dough in the
cooking compartment
5-10 mins
20-30 mins
Frozen food Accessories Level Type of
heating
Temperature
e.g. cream cakes, buttercream cakes, gateaux with chocolate or
sugar icing, fruit, chicken, sausage and meat, bread and bread
rolls, cakes and other baked items
Wire rack 2
:
The temperature selector
remains switched off
Fruit and herbs Accessories Level Type of
heating
Temperature Cooking time
600 g apple rings Universal pan + rack 3+1
:
80 °C 5 hrs (approx.)
800 g pear slices Universal pan + rack 3+1
:
80 °C 8 hrs (approx.)
1.5 kg damsons or plums Universal pan + rack 3+1
:
80 °C 8-10 hrs
(approx.)
200 g herbs, washed Universal pan + rack 3+1
:
80 °C 1½ hrs (approx.)
Page 20

20
Preserving
Fruit
After approx. 40 to 50 minutes, small bubbles begin to form at
short intervals. Switch off the oven.
After 25 to 35 minutes of residual heat, remove the preserving
jars from the cooking compartment. If they are allowed to cool
for longer in the cooking compartment, germs could multiply,
promoting acidification of the preserved fruit.
Vegetables
As soon as bubbles begin to form in the jars, set the
temperature back to between 120 and 140 °C. Depending on
the type of vegetable, heat for approx. 35 to 70 minutes. Switch
off the oven after this time and use the residual heat.
Taking out the jars
After preserving, remove the jars from the cooking
compartment.
Caution!
Do not place the hot jars on a cold or wet surface. They could
suddenly burst.
Acrylamide in foodstuffs
Acrylamide is mainly produced in grain and potato products
prepared at high temperatures, such as potato crisps, chips,
toast, bread rolls, bread or fine baked goods (biscuits,
gingerbread, cookies).
Fruit in one-litre jars When it starts to bubble Residual heat
Apples, redcurrants, strawberries Switch off approx. 25 minutes
Cherries, apricots, peaches, gooseberries Switch off approx. 30 minutes
Apple purée, pears, plums Switch off approx. 35 minutes
Vegetables with cold cooking water in one-litre jars When it starts to bubble Residual heat
Gherkins - approx. 35 minutes
Beetroot approx. 35 minutes approx. 30 minutes
Brussels sprouts approx. 45 minutes approx. 30 minutes
Beans, kohlrabi, red cabbage approx. 60 minutes approx. 30 minutes
Peas approx. 70 minutes approx. 30 minutes
Tips for keeping acrylamide to a minimum when preparing food
General
■ Keep cooking times to a minimum.
■ Cook meals until they are golden brown, but not too dark.
■ Large, thick pieces of food contain less acrylamide.
Baking With top/bottom heating max. 200 °C.
With 3D hot air or hot air max.180 °C.
Biscuits With top/bottom heating max. 190 °C.
With 3D hot air or hot air max. 170 °C.
Egg or egg yolk reduces the production of acrylamide.
Oven chips Spread evenly over the baking tray, in a single layer. Bake at least 400 g per baking tray
so that the chips do not dry out
Page 21
21
Test dishes
These tables have been produced for test institutes to facilitate
the inspection and testing of the various appliances.
In accordance with EN 50304/EN 60350 (2009) and IEC
60350.
Baking
Baking on 2 levels:
Always insert the universal pan above the baking tray.
Piped cookies (such as Spritz cookies in sugar syrup):
Dishes that are put in the oven at the same time do not have to
be ready at the same time.
German apple pie, level 1
Change the position of the dark springform cake tin, slide in
diagonally.
German apple pie, level 2
Change the position of the dark springform cake tin.
Cakes in a metal springform cake tin:
Bake on level 1 with
% Top/bottom heating Place the
springform cake tin on the universal pan instead of on the wire
rack.
Grilling
If you are grilling food directly on the wire rack, the universal
pan should also be inserted at level 1. The liquid is then
collected, keeping the oven cleaner.
Dish Accessories and ovenware Level Type of
heating
Temperature in °CCooking time
in minutes
Viennese whirls Universal pan 3
%
150-170 20-30
Aluminium baking tray* + universal pan**
1+3
:
140-160 30-40
Small cakes Universal pan 3
%
150-170 25-35
Small cakes, preheat Aluminium baking tray* + uni-
versal pan**
1+3
:
140-160 30-40
Hot water sponge cake Springform cake tin 2
%
160-180 30-40
German apple pie Universal pan + 2 springform
cake tins, dia. 20 cm***
1
%
190-210 70-80
2 wire racks* + 2 springform
cake tins, dia. 20 cm***
1+3
:
170-190 65-75
* Additional baking trays and wire racks can be obtained as an optional accessory from the after-sales service or specialist retailers.
** When baking on two levels, always place the universal pan in the upper level.
*** Place the cake tins diagonally on the accessories.
Dish Accessories and oven-
ware
Level Type of
heating
Grill setting Cooking time
in minutes
Browning toast
Preheat for 10 mins
Wire rack 4
(
3 ½-2
Beefburgers, 12 pieces*
No preheating
Wire rack + universal pan 4+1
(
3 25-30
* Turn over after
Z of the cooking time.
Page 22

22
Þ Table des matières
[fr]Notice d’utilisation
Précautions de sécurité importantes..................................... 22
Causes de dommages ...................................................................24
Votre nouveau four .................................................................. 24
Bandeau de commande................................................................. 24
Sélecteur de fonctions .................................................................... 25
Touches et affichage....................................................................... 25
Sélecteur de température............................................................... 25
Compartiment de cuisson..............................................................25
Vos accessoires....................................................................... 26
Insertion de l'accessoire................................................................. 26
Accessoires supplémentaires ....................................................... 26
Avant la première utilisation................................................... 27
Réglage de l'heure ..........................................................................27
Chauffer le four.................................................................................27
Nettoyer les accessoires ................................................................ 27
Réglage du four........................................................................ 27
Modes de cuisson et température ............................................... 27
Le four doit s'arrêter automatiquement ....................................... 27
Le four doit se mettre en marche et s'arrêter automatiquement
.............................................................................................................28
Chauffage rapide .............................................................................28
Réglage de l'heure ................................................................... 28
Réglage de la minuterie........................................................... 29
Sécuritéenfants....................................................................... 29
Four ....................................................................................................29
Entretien et nettoyage ............................................................. 29
Produit nettoyants............................................................................ 29
Décrocher et accrocher les supports .......................................... 30
Décrocher et accrocher la porte du four .................................... 31
Démontage et remontage des vitres ........................................... 31
Pannes et dépannage.............................................................. 32
Tableau de dérangements............................................................. 32
Changer la lampe du four au plafond ......................................... 32
Cache en verre................................................................................. 32
Service après-vente................................................................. 33
Numéro E et numéro FD ................................................................ 33
Conseils concernant l'énergie et l'environnement ............... 33
Economiser de l'énergie................................................................. 33
Elimination écologique.................................................................... 33
Mesures à respecter au cours du transport.............................. 33
Testés pour vous dans notre laboratoire .............................. 34
Gâteaux et pâtisseries ....................................................................34
Conseils pour la pâtisserie ............................................................ 35
Viande, volaille, poisson................................................................. 36
Conseils pour les rôtis et grillades...............................................38
Soufflés, gratins, toasts................................................................... 38
Plats cuisinés....................................................................................38
Mets spéciaux...................................................................................39
Décongélation...................................................................................39
Déshydratation .................................................................................39
Mise en conserve............................................................................. 40
L'acrylamide dans certains aliments ..................................... 40
Plats tests................................................................................. 41
Cuisson de gâteaux ........................................................................ 41
Grillades............................................................................................. 41
Produktinfo
Vous trouverez des informations supplementaires concernant
les produits, accessoires, pièces de rechange et services sur
Internet sous : www.siemens-home.com et la boutique en
ligne : www.siemens-eshop.com
: Précautions de sécurité importantes
Lire attentivement ce manuel. Ce n'est
qu'alors que vous pourrez utiliser votre
appareil correctement et en toute sécurité.
Conserver la notice d'utilisation et de
montage pour un usage ultérieur ou pour le
propriétaire suivant.
Cet appareil est conçu pour être encastré
uniquement. Respecter la notice spéciale
de montage.
Contrôler l'état de l'appareil après l'avoir
déballé. Ne pas le raccorder s'il présente
des avaries de transport.
Seul un expert agréé peut raccorder
l'appareil sans fiche. La garantie ne couvre
pas les dommages résultant d'un mauvais
raccordement.
Cet appareil est conçu uniquement pour un
usage ménager privé et un environnement
domestique. Utiliser l'appareil uniquement
pour préparer des aliments et des
boissons. Surveiller l'appareil lorsqu'il
fonctionne. Utiliser l'appareil uniquement
dans des pièces fermées.
Cet appareil est conçu pour une utilisation
jusqu'à une altitude maximale de 2 000 m.
Cet appareil peut être utilisé par des
enfants de 8 ans ou plus et par des
personnes dotées de capacités physiques,
sensorielles ou mentales réduites ou
disposant de connaissances ou
d’expérience insuffisantes, sous la
surveillance d'un tiers responsable de leur
sécurité ou bien lorsqu'ils ont reçu des
instructions liées à l'utilisation de l'appareil
en toute sécurité et qu'ils ont intégré les
risques qui en résultent.
Page 23

23
Les enfants ne doivent pas jouer avec
l'appareil. Le nettoyage et l'entretien
effectué par l'utilisateur ne doivent pas être
accomplis par des enfants, sauf s'ils sont
âgés de 8 ans et plus et qu'un adulte les
surveille.
Les enfants de moins de 8 ans doivent être
tenus à distance de l'appareil et du cordon
d'alimentation.
Toujours insérer les accessoires à l'endroit
dans le four. Voir la description des
accessoires dans la notice d'utilisation.
Risque d'incendie !
■
Tout objet inflammable entreposé dans le
compartiment de cuisson peut
s'enflammer. Ne jamais entreposer
d'objets inflammables dans le
compartiment de cuisson. Ne jamais
ouvrir la porte de l'appareil lorsqu'il s'en
dégage de la fumée. Éteindre l'appareil et
débrancher la fiche secteur ou enlever le
fusible dans le boîtier à fusibles.
Risque d'incendie !
■
Il se produit un courant d'air lors de
l'ouverture de la porte de l'appareil. Le
papier sulfurisé peut toucher les
résistances chauffantes et s'enflammer.
Ne jamais poser de papier sulfurisé non
attaché sur un accessoire lors du
préchauffage. Toujours déposer un plat ou
un moule de cuisson sur le papier
sulfurisé pour le lester. Recouvrir
uniquement la surface nécessaire de
papier sulfurisé. Le papier sulfurisé ne doit
pas dépasser des accessoires.
Risque de brûlure !
■
L'appareil devient très chaud. Ne jamais
toucher les surfaces intérieures chaudes
du compartiment de cuisson ni les
résistances chauffantes. Toujours laisser
l'appareil refroidir. Tenir les enfants
éloignés
Risque de brûlure !
■
Les récipients ou les accessoires
deviennent très chaud. Toujours utiliser
des maniques pour retirer le récipient ou
les accessoires du compartiment de
cuisson.
Risque de brûlure !
■
Les vapeurs d'alcool peuvent s'enflammer
dans un compartiment de cuisson chaud.
Ne jamais préparer de plats contenant de
grandes quantités de boissons fortement
alcoolisées. Utiliser uniquement de petites
quantités de boissons fortement
alcoolisées. Ouvrir la porte de l'appareil
avec précaution.
Risque de brûlures !
■
Les éléments accessibles deviennent
chauds pendant le fonctionnement. Ne
jamais toucher les éléments chauds.
Eloigner les enfants.
Risque de brûlure !
■
De la vapeur chaude peut s'échapper lors
de l'ouverture de la porte de l'appareil.
Ouvrir la porte de l'appareil avec
précaution. Tenir les enfants éloignés
Risque de brûlure !
■
La présence d'eau dans un compartiment
de cuisson chaud peut générer de la
vapeur d'eau chaude. Ne jamais verser
d'eau dans le compartiment de cuisson
chaud.
Risque de blessure !
Un verre de porte d'appareil rayé peut se
fendre. Ne pas utiliser de racloir à verre, ni
de produit de nettoyage agressif ou abrasif.
Risque de choc électrique !
■
Les réparations inexpertes sont
dangereuses.Seul un technicien du
service après-vente formé par nos soins
est habilité à effectuer des réparations.Si
l'appareil est défectueux, retirer la fiche
secteur ou enlever le fusible dans le
boîtier à fusibles. Appeler le service
aprèsvente.
Risque de choc électrique !
■
L'isolation des câbles des appareils
électroménagers peut fondre au contact
des pièces chaudes de l'appareil. Ne
jamais mettre le câble de raccordement
des appareils électroménagers en contact
avec des pièces chaudes de l'appareil.
Risque de choc électrique !
■
De l'humidité qui pénètre peut
occasionner un choc électrique. Ne pas
utiliser de nettoyeur haute pression ou de
nettoyer à vapeur.
Risque de choc électrique !
■
Lors du remplacement de l'ampoule du
compartiment de cuisson, les contacts du
culot de l'ampoule sont sous tension.
Retirer la fiche secteur ou couper le
fusible dans le boîtier à fusibles avant de
procéder au remplacement.
Risque de choc électrique !
■
Un appareil défectueux peut provoquer un
choc électrique. Ne jamais mettre en
service un appareil défectueux.
Débrancher la fiche secteur ou enlever le
fusible dans le boîtier à fusibles. Appeler
le service après-vente.
Page 24
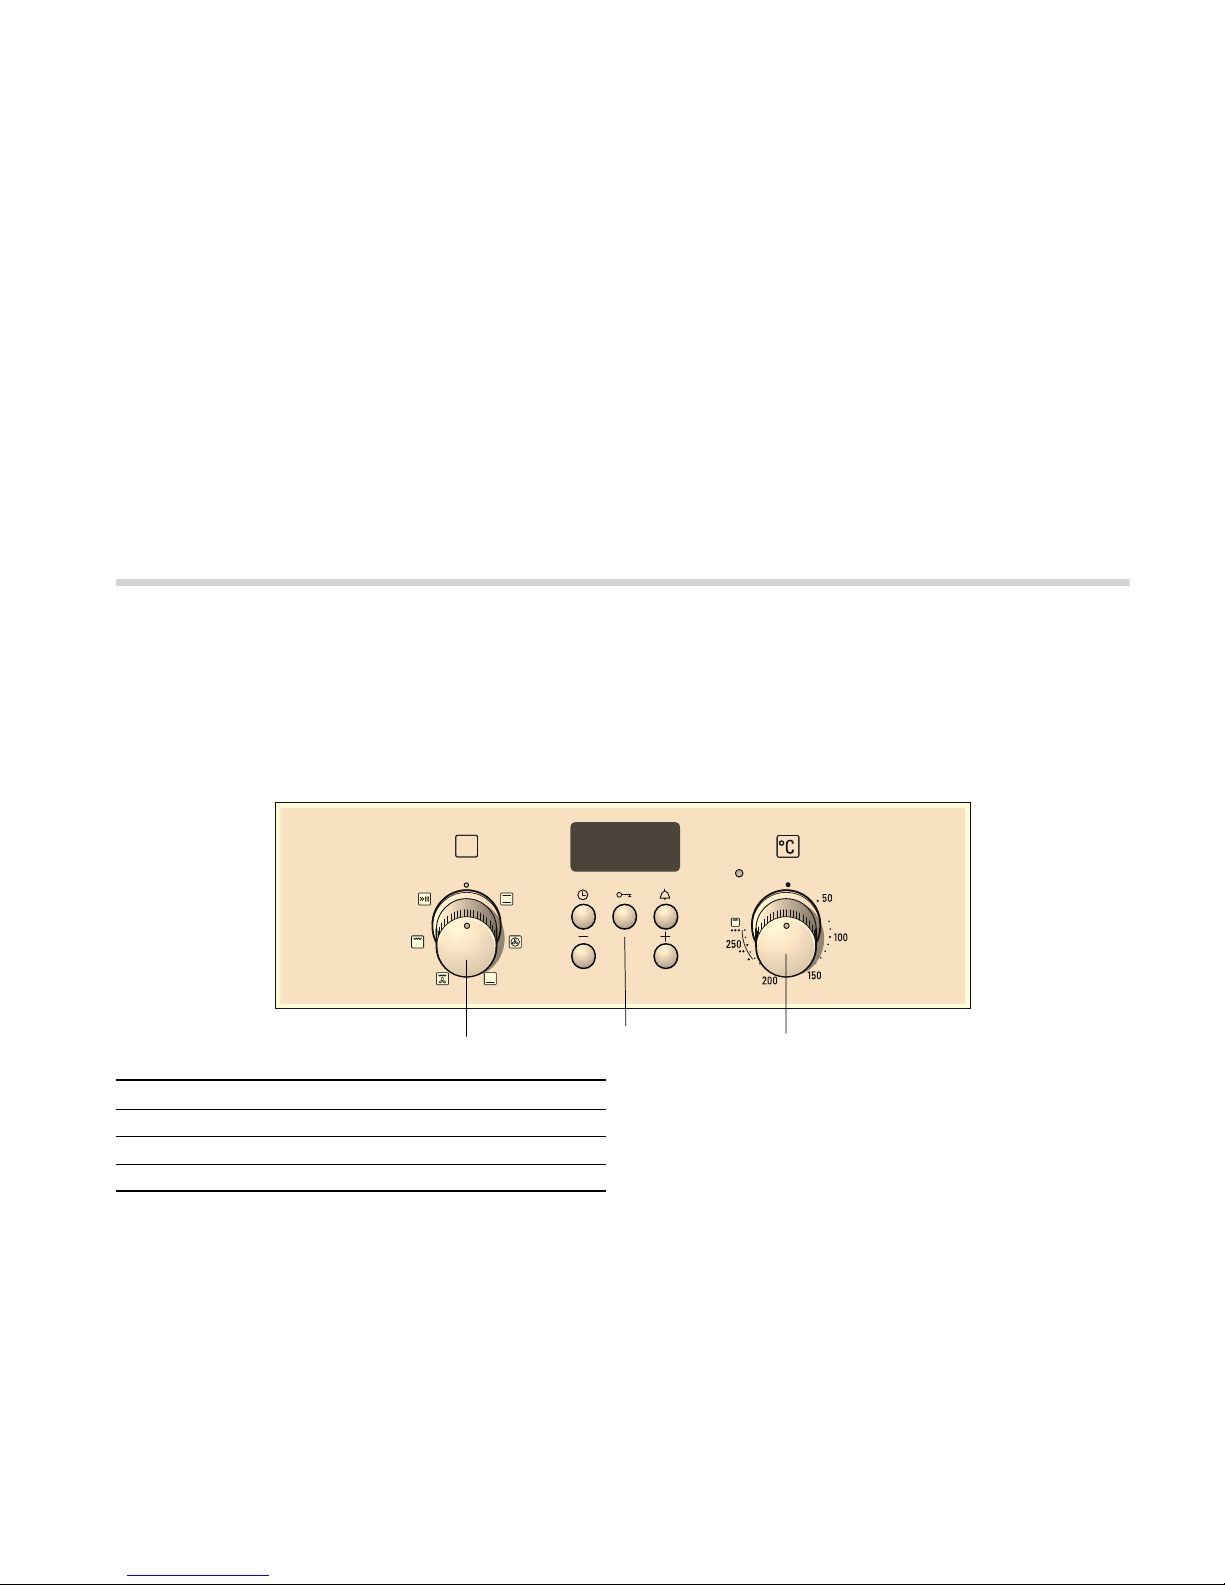
24
Causes de dommages
Attention !
■ Accessoires, feuille, papier cuisson ou récipient sur le fond
du compartiment de cuisson : Ne posez pas d'accessoires
sur le fond du compartiment de cuisson. Ne recouvrez pas le
fond du compartiment de cuisson d'une feuille, quel que soit
le type, ni de papier cuisson. Ne placez pas de récipient sur
le fond du compartiment de cuisson si vous avez réglé une
température supérieure à 50 °C. Cela crée une accumulation
de chaleur. Les temps de cuisson ne correspondent plus et
l'émail sera endommagé.
■ Eau dans le compartiment de cuisson chaud : Ne versez
jamais d'eau dans le compartiment de cuisson chaud. Cela
produit de la vapeur d'eau. Le changement de température
peut occasionner des dommages sur l'émail.
■ Aliments humides : Ne conservez pas d'aliments humides
dans le compartiment de cuisson pendant une longue durée.
Cela endommage l'émail.
■ Jus de fruits : Ne garnissez pas trop la plaque à pâtisserie en
cas de gâteaux aux fruits très juteux. Le jus de fruits qui
goutte de la plaque laisse des taches définitives. Utilisez de
préférence la lèchefrite à bords hauts.
■ Refroidissement la porte de l'appareil ouverte : Laissez
refroidir le compartiment de cuisson uniquement la porte
fermée. Même si la porte de l'appareil n'est qu'entrouverte,
les façades des meubles voisins risquent d'être
endommagées au fil du temps.
■ Joint de porte très encrassé : si le joint de la porte est très
encrassé, la porte de l'appareil ne fermera plus correctement
lors du fonctionnement. La façade des meubles voisins peut
être endommagée.Veillez à ce que le joint de l'appareil soit
toujours propre.
■ Porte de l'appareil utilisée comme surface d'assise ou
support : il est interdit de grimper, de s'asseoir et de
s'accrocher à la porte de l'appareil. Ne pas déposer de
récipients ou des accessoires sur la porte de l'appareil.
■ Introduire l'accessoire : Selon le modèle d'appareil, les
accessoires peuvent rayer la vitre en fermant la porte.
Introduire les accessoires toujours jusqu'en butée dans le
compartiment de cuisson.
■ Transporter l'appareil : Ne transportez ou ne portez pas
l'appareil par la poignée de la porte. La poignée ne
supportera pas le poids de l'appareil et risque de se casser.
Votre nouveau four
Vous apprenez ici à connaître votre nouveau four. Nous vous
expliquons le bandeau de commande et les différents éléments
de commande. Vous obtenez des informations concernant le
compartiment de cuisson et les accessoires.
Bandeau de commande
Voici un aperçu du panneau de commande. La version dépend
du type d'appareil actuel.
Explications
1 Sélecteur de fonctions
2 Touches de commande et zone d'affichage
3 Sélecteur de température
Page 25

25
Sélecteur de fonctions
Le sélecteur de mode de fonctionnement permet de régler le
mode de cuisson du four. Il se tourne vers la droite ou vers la
gauche.
Lors du réglage du sélecteur de fonctions, la lampe du four
s'allume.
Touches et affichage
Les touches permettent de régler différentes fonctions
supplémentaires. A l'affichage vous pouvez lire les valeurs
réglées.
Sélecteur de température
Vous pouvez régler la température et la position gril au moyen
du sélecteur de température.
Lorsque le four chauffe, le témoin au-dessus du sélecteur de
température est allumé. Le témoin s'éteint pendant les périodes
où le four ne chauffe pas. Avec certains réglages, il ne s'allume
pas.
Positions gril
En mode Gril (, réglez une position de gril avec le sélecteur
de température.
Compartiment de cuisson
La lampe du four est située dans le compartiment de cuisson.
Un ventilateur de refroidissement protège le four d'une
surchauffe.
Lampe du four
La lampe du four est allumée quand le four est en service.
Lorsque vous placez le sélecteur de fonctions sur n'importe
quelle position, il se peut que la lampe du four s'allume
également, sans que ce dernier soit utilisé.
Ventilateur de refroidissement
Le ventilateur de refroidissement se met en marche et se
coupe en cas de besoin. L'air chaud s'échappe au-dessus de
la porte.
Le ventilateur continue de fonctionner un certain temps, afin
que le compartiment de cuisson refroidisse plus vite après le
fonctionnement.
Attention !
Ne pas couvrir les fentes d'aération. Sinon, le four surchauffe.
Positions Fonction
ý
Arrêt Le four est arrêté.
%
Cuisson traditionnelle
La cuisson et le rôtissage fonctionnent sur un seul niveau. Ce
réglage est bien adapté aux
gâteaux et aux pizzas (moule ou
plaque) et aux rôtis maigres (bœuf,
veau et gibier). La chaleur est diffusée uniformément par le haut et par
le bas.
:
Air pulsé 3D* Vous pouvez cuire en parallèle des
pizzas, des petites pâtisseries, des
muffins et des pâtes feuilletées sur
deux niveaux.
L'air réchauffé est diffusé de
manière uniforme par un ventilateur
équipé d'une résistance annulaire,
placé sur la paroi arrière du four.
$
Chaleur de sole Le mode Chaleur de sole permet
de faire dorer les plats sur le dessous ou de les maintenir au chaud.
La chaleur est diffusée par le bas.
4
Gril avec chaleur
tournante
La position Gril avec chaleur tournante est particulièrement indiquée
pour les poissons, volailles et gros
morceaux de viande. Dans ce cas,
la résistance du gril et le ventilateur
sont mis en marche et arrêtés en
alternance. Le ventilateur diffuse
l'air chauffé autour des plats.
(
Gril, grande surface
Cette position permet de griller plusieurs steaks, saucisses, poissons
et toasts. Toute la surface sous la
résistance du gril est chauffée.
I
Chauffage rapide Cette position permet de réchauffer
rapidement vos plats.
* Mode de cuisson selon la catégorie d'efficacité énergétique
EN 50304.
Touche Utilisation
0
Touche Horloge Permet de régler l'heure, la durée
du four
x et l'heure de la fin y.
C
Touche Sécuritéenfants (clé)
Permet d'activer et de désactiver
la sécuritéenfants.
V
Touche Minuteur Permet de régler le minuteur
A
Touche Moins Permet de modifier les valeurs de
réglage vers le bas.
@
Touche Plus Permet de modifier les valeurs de
réglage vers le haut.
Positions Fonction
ÿ
Arrêt Le four n'est pas chaud.
50-270 Plage de tempéra-
ture
L'affichage de la température se fait en ºC.
•, ••, ••• Positions gril Positions pour le gril,
grande
( surface.
• = Position 1, faible
•• = Position 2, intermédiaire
••• = Position 3, puissant
Page 26

26
Vos accessoires
Vos accessoires fournis sont adaptés à de nombreux
récipients. Assurez-vous que les accessoires toujours insérés
dans le four dans le bon sens.
Pour que certains plats soient encore plus réussis et que le
maniement de votre four soit encore plus confortable, il existe
une variété d'accessoires optionnels.
Insertion de l'accessoire
4 hauteurs sont possibles pour l'insertion de l'accessoire dans
le four. Insérez systématiquement l'accessoire en butée afin
d'éviter tout contact avec la porte vitrée.
Lorsque l'accessoire est sorti jusqu'à la moitié environ, il
s'enclenche. Ainsi, il est facile de retirer les plats du four.
Lors de l'insertion dans le four, faites attention à la courbure sur
la partie arrière de l'accessoire. C'est le seul moyen de garantir
son insertion appropriée.
Remarque : L'accessoire peut se déformer sous l'effet de la
chaleur. Une fois refroidi, l'accessoire reprend sa forme initiale.
Cela n'a pas d'incidence sur son fonctionnement.
Tenez la plaque de four sur les côtés avec les deux mains et
insérez-la parallèlement au support. Évitez les mouvements
vers la droite ou la gauche lors du coulissement de la plaque
de four. Dans le cas contraire, il est plus difficile d'insérer la
plaque de four. Les surfaces émaillées peuvent être
endommagées.
Vous pouvez acheter des accessoires auprès du service aprèsvente, dans le commerce spécialisé ou sur Internet. Veuillez
indiquer le numéro HZ.
Accessoires supplémentaires
Vous pouvez vous procurer des accessoires supplémentaires
auprès du service après-vente ou chez un revendeur
spécialisé. Vous trouverez différents produits adaptés à votre
four dans nos brochures ou sur Internet. La disponibilité des
accessoires supplémentaires ou la possibilité de les
commander sur Internet diffère selon les pays. Pour plus de
détails, veuillez consulter nos documents commerciaux.
Les accessoires supplémentaires ne conviennent pas à tous
les appareils. Il est donc important d'indiquer le nom complet
(N° E) de votre appareil lors de l'achat.
Porte du four - mesures de sécurité supplémentaires
La porte du four peut devenir très chaude en cas de temps de
cuisson longs.
Si vous avez des enfants en bas âge, il faut redoubler
d'attention lors de l'utilisation du four.
Il existe pour cela un dispositif de protection qui empêche un
contact direct avec la porte du four. Cet accessoire vendu
séparément (440651) est disponible auprès du service aprèsvente.
Grille
Pour des récipients, moules à
gâteau, rôtis, grillades et plats surgelés.
Insérer la grille avec le coude vers
le bas
¾ la face ouverte vers la
porte du four.
Lèchefrite
Pour des gâteaux fondants, pâtisseries, plats surgelés et gros rôtis. Elle
peut également servir à récupérer la
graisse si vous posez les grillades
directement sur la grille.
Enfournez la lèchefrite jusqu’à la
butée, la partie inclinée orientée
vers la porte du four.
Accessoires supplémentaires Numéro HZ Fonction
Grille HZ434000 Pour les plats, les moules à gâteau, les rôtis, les plats à passer sous le gril et
les plats cuisinés surgelés.
Plaque de four en aluminium HZ430001 Pour les gâteaux et les pâtisseries.
Insérez la plaque de cuisson dans le four avec le rebord incliné orienté vers
la porte du four.
Plaque de four en émail HZ431001 Pour les gâteaux et les pâtisseries.
Insérez la plaque de cuisson dans le four avec le rebord incliné orienté vers
la porte du four.
La lèchefrite HZ432001 Pour les gâteaux fondants, pâtisseries, plats surgelés et les gros rôtis. Elle
peut aussi servir à récupérer la graisse ou le jus de viande sous la grille.
Insérez la lèchefrite dans le four avec le rebord incliné orienté vers la porte du
four.
Page 27

27
Avant la première utilisation
Vous apprendrez ici ce que vous devez faire avant d'utiliser
votre four pour la première fois pour préparer des mets. Lisez
auparavant le chapitre Consignes de sécurité.
Réglage de l'heure
Après le raccordement, le symbole 0 et trois zéros s'allument
dans l'affichage. Réglez l'heure.
1. Appuyer sur la touche 0.
Dans l'affichage apparaît 12:00 h et le symbole
0 clignote.
2. Régler l'heure au moyen de la touche + ou de la touche -.
L'heure réglée sera validée au bout de quelques secondes.
Chauffer le four
Afin d'éliminer l'odeur de neuf, laissez chauffer le four à vide,
porte fermée. Idéalement une heure en mode Convection
naturelle
% à 240 °C. Assurez-vous que le compartiment de
cuisson ne contient pas de restes d'emballage.
1. Avec le sélecteur des fonctions, régler sur Convection
naturelle
%.
2. Régler le thermostat sur 240 °C.
Éteindre le four au bout d'une heure. Régler le sélecteur des
fonctions et le thermostat sur la position zéro.
Nettoyer les accessoires
Avant d'utiliser les accessoires pour la première fois, nettoyezles soigneusement à l'eau chaude additionnée de produit à
vaisselle et une lavette douce.
Réglage du four
Vous avez plusieurs possibilités pour régler votre four. Nous
vous expliquons ici comment régler le mode de cuisson et la
température ou la position gril souhaités. Vous pouvez régler
au four la durée et l'heure de la fin pour votre mets.
Modes de cuisson et température
Exemple illustré : Cuisson traditionnelle 190 ºC.
1. Réglez le mode de cuisson souhaité avec le sélecteur de
fonctions.
2. Vous pouvez régler la température ou la position de gril au
moyen du sélecteur de température.
Le four chauffe.
Arrêter le four
Ramenez le sélecteur de fonctions sur la position zéro.
Modification des réglages
Il est possible de modifier le mode de cuisson, la température
et la position du gril selon les besoins.
Le four doit s'arrêter automatiquement
Indiquez une durée (temps de cuisson) pour votre plat.
Exemple illustré sur la figure : Cuisson traditionnelle
%,
200 °C, Durée 45 minutes.
1. Réglez le mode de cuisson souhaité avec le sélecteur de
fonctions.
2. Vous pouvez régler la température ou la position de gril au
moyen du sélecteur de température.
3. Appuyez sur la touche de l'heure 0.
Le symbole de durée
x clignote.
4. Réglez la durée avec la touche + ou -.
Touche + / valeur par défaut = 30 minutes
Touche - / valeur par défaut = 10 minutes
Le temps de cuisson est écoulé
Un signal retentit. Le four s'éteint. Appuyer deux fois sur la
touche
0 et éteindre le sélecteur des fonctions.
Modifier le réglage
Appuyer sur la touche Horloge
0. Modifier la durée au moyen
de la touche + ou de la touche -.
NJ
PLQ
K
NJ
PLQ
K
Page 28

28
Annuler le réglage
Appuyer sur la touche Horloge
0 . Appuyer sur la touche -,
jusqu'à ce que l'affichage soit sur zéro. Éteindre le sélecteur
des fonctions.
Régler la durée lorsque l'heure est masquée
Appuyer deux fois sur la touche Horloge
0 et régler comme
décrit sous le point 4.
Le four doit se mettre en marche et s'arrêter
automatiquement
Ne laissez pas les aliments trop longtemps dans le four. La
viande et le poisson non placés au réfrigérateur peuvent se
gâter facilement..
Exemple illustré sur la figure : Cuisson traditionnelle
%,
200 °C. Il est 10:45 . Le temps de cuisson est de 45 minutes
et le plat doit être prêt à 12:45 .
1. Réglez le mode de cuisson souhaité avec le sélecteur de
fonctions.
2. Vous pouvez régler la température ou la position de gril au
moyen du sélecteur de température.
3. Appuyez sur la touche de l'heure 0.
Le symbole de durée
x clignote.
4. Réglez la durée avec la touche + ou -.
5. Appuyez sur la touche de l'heure 0 jusqu'à ce que le
symbole de fin
y clignote.
L'affichage indique que le plat est prêt.
6. La touche + permet de retarder la fin de la cuisson.
Le réglage est mémorisé au bout de quelques secondes.
La fin de la cuisson est visible sur l'affichage jusqu'à la mise
en marche du four.
Le temps de cuisson est écoulé
Un signal retentit. Le four s'éteint. Appuyer deux fois sur la
touche
0 et éteindre le sélecteur des fonctions.
Remarque : Tant qu'un signal clignote, vous pouvez modifier le
réglage. Le réglage est validé lorsque le symbole s'allume.
Chauffage rapide
Avec le chauffage rapide, votre four atteint particulièrement vite
la température réglée.
Utilisez le chauffage rapide pour des températures réglées,
supérieures à 100 °C.
Afin d'obtenir un résultat de cuisson uniforme, enfournez votre
plat seulement lorsque le chauffage rapide est terminé.
1. Régler le sélecteur des fonctions sur I.
2. Régler la température avec le thermostat.
Le four commence à chauffer au bout de quelques secondes.
Le voyant lumineux au-dessus du thermostat s'allume.
Le chauffage rapide est terminé
Le voyant lumineux au-dessus du thermostat s'éteint. Enfournez
votre mets et réglez le mode de cuisson désiré.
Annuler le chauffage rapide
Régler le sélecteur des fonctions sur la position zéro. Le four
est éteint.
Réglage de l'heure
Après avoir branché l'appareil pour la première fois ou après
une panne de courant, le symbole
0 et trois zéros clignotent
dans l'affichage. Réglez l'heure. Le sélecteur des fonctions doit
être éteint.
Réglages
1. Appuyer sur la touche Horloge 0.
Dans l'affichage apparaît 12:00 h et le symbole
0 clignote.
2. Régler l'heure au moyen de la touche + ou de la touche -.
L'heure sera validée après quelques secondes. Le
symbole
0 s'éteint.
Modifier l'heure, par ex. passage de l'heure d'été à l'heure
d'hiver
Appuyer deux fois sur la touche Horloge
0 et modifier au
moyen de la touche + ou de la touche -.
NJ
PLQ
K
NJ
PLQ
K
Page 29

29
Réglage de la minuterie
Vous pouvez utiliser la minuterie comme minuteur de cuisine.
Elle fonctionne indépendamment du four. La minuterie émet un
signal sonore particulier. De la sorte, vous pouvez distinguer si
c'est la minuterie ou une durée du four qui est écoulée. Vous
pouvez également régler la minuterie lorsque la
sécuritéenfants est active.
Réglages
1. Appuyer sur la touche Minuterie S.
Le symbole
S clignote.
2. Régler le temps de minuterie au moyen de la touche + ou de
la touche -.
Touche + valeur de référence = 10 minutes
Touche - valeur de référence = 5 minutes
La minuterie se met en marche quelques secondes plus tard.
Le symbole S s'allume dans l'affichage. Le temps s'écoule
visiblement.
Après écoulement du temps
Un signal retentit. Appuyer sur la touche Minuterie S.
L'affichage de la minuterie s'éteint.
Modifier le temps de la minuterie
Appuyer sur la touche Minuterie
S. Modifier le temps au
moyen de la touche + ou de la touche -.
Annuler le réglage
Appuyer sur la touche Minuterie
S. Appuyer sur la touche -,
jusqu'à ce que l'affichage soit sur zéro.
La minuterie et la durée s'écoulent en même temps
Les symboles s'allument. Le temps de minuterie s'écoule
visiblement dans l'affichage.
Interroger la durée restante
x, l'heure de fin y ou l'heure 0 :
Appuyer répétitivement sur la touche Horloge
0 jusqu'à ce
que le symbole respectif apparaisse.
La valeur interrogée apparaît pendant quelques secondes dans
l'affichage.
Sécuritéenfants
Four
Le four est équipé d'une sécuritéenfants, afin que les enfants
ne puissent pas le mettre en marche par mégarde.
Activer et désactiver la sécuritéenfants
Le sélecteur des fonctions doit être éteint.
Marche : appuyer sur la touche Clé
C jusqu'à ce que le
symbole
C apparaisse dans l'affichage. Ceci demande
env. 4 secondes.
Arrêt : appuyer sur la touche Clé
C jusqu'à ce que le
symbole
C s'éteigne.
Remarques
■ Vous pouvez régler à tout moment la minuterie et l'heure.
■ La sécurité-enfants réglée est supprimée après une panne de
courant.
Entretien et nettoyage
Si vous entretenez et nettoyez soigneusement votre four il
gardera longtemps l'aspect du neuf et restera opérationnel.
Nous vous expliquons ici comment entretenir et nettoyer
correctement votre four.
Remarques
■ Les légères variations de couleur apparaissant sur la façade
du four sont dues aux différents matériaux tels que le verre,
le plastique et le métal.
■ Des ombres sur la vitre de la porte, qui ressemblent à des
stries, sont des reflets de lumière de la lampe du four.
■ L'émail est cuit à des températures très élevées. Ceci peut
engendrer des différences de teintes. Ce phénomène est
normal et n'a aucune incidence sur le fonctionnement du
four. Les bords de plaques minces ne peuvent pas être
émaillés complètement. Ils peuvent donc présenter des
aspérités. La protection contre la corrosion n'en est pas
compromise.
Produit nettoyants
Pour ne pas endommager les différences surfaces par l'emploi
de nettoyants non adaptés, veuillez respecter les instructions
suivantes.
Pour le nettoyage du four
■ ne pas utiliser de nettoyant agressif ou récurant,
■ pas de nettoyant a taux d'alcool élevé,
■ pas d'éponge abrasive,
■ pas de nettoyeur haute pression ou de jet de vapeur.
■ Ne pas nettoyer les éléments dans une machine à laver la
vaisselle.
Rincez convenablement les nouvelles éponges avant leur
première utilisation.
Surfaces en
acier affiné
Nettoyer l'appareil avec de l'eau et un peu de
produit vaisselle. Toujours essuyer parallèlement à la veinure naturelle. Le contraire peut
entraîner des rayures. Sécher avec un chiffon
doux. Éliminer immédiatement les taches de
calcaire, de graisse, d'amidon et de blanc
d'œuf. Ne pas utiliser de produits à récurer,
d'éponges avec grattoir ou de chiffons de
nettoyage grossiers. Les surfaces en acier
affiné peuvent être polies au moyen d'un produit d'entretien spécial. Veuillez respecter les
consignes du fabricant. Vous pouvez obtenir
des nettoyants spéciaux pour acier affiné
auprès de notre service après-vente ou dans
les boutiques spécialisées.
Surfaces en
émail et surfaces vernies
Nettoyer avec un peu de produit vaisselle et
de l'eau chaude. Sécher avec un chiffon doux.
Boutons Nettoyer avec un peu de produit vaisselle et
de l'eau chaude. Sécher avec un chiffon doux.
Page 30

30
Décrocher et accrocher les supports
Pour le nettoyage, vous pouvez enlever les supports. Le four
doit être refroidi.
Démontage des supports
1. Maintenez le support par le bas et tirez-le quelque peu vers
l'avant. Retirez les pointes prolongatrices du bas du support
des orifices de fixation (Figure A).
2. Ensuite, rabattez le support vers le haut et retirez-le avec
précaution (Figure B).
Nettoyez les supports avec du produit nettoyant et une éponge.
Pour les salissures tenaces, utilisez une brosse.
Installation des supports
1. Insérez avec précaution les deux crochets dans les trous
situés dans le haut de la paroi. (Figure A-B)
: Mauvaise installation !
Ne déplacez jamais le support tant que les deux crochets ne
sont pas complètement insérés dans les trous situés dans le
haut de la paroi. L'émail risquerait d'être endommagé et de
casser (Figure C).
2. les deux crochets doivent être complètement insérés dans
les trous situés dans le haut de la paroi. Déplacez ensuite le
support vers le bas, lentement et avec précaution, et insérez
les crochets inférieurs (Figure D).
3. Insérez les deux supports dans les parois latérales du four
(Figure E).
L'installation des supports est réussie lorsque l'écart entre les
deux niveaux d'insertion supérieurs est plus important.
Vitre Celle-ci peut être nettoyée avec du nettoyant
pour vitres. Ne pas utiliser de nettoyant agressif ou d'objet métallique acéré. Cela pourrait
rayer et endommager la surface de la vitre.
Joint Essuyer avec un chiffon humide. Sécher avec
un chiffon doux.
Intérieur du
four
Nettoyer avec de l'eau chaude ou de l'au
vinaigrée. En cas d'encrassement important :
N'utiliser du nettoyant pour four que sur des
surfaces refroidies.
Vitre d'éclairage du four
Nettoyer avec un peu de produit vaisselle et
de l'eau chaude. Sécher avec un chiffon doux.
Accessoires Tremper dans de l'eau savonneuse chaude.
Nettoyer avec une brosse ou une éponge.
Plaque de four
en aluminium
(en option)
Ne pas les nettoyer dans une machine à laver
la vaisselle. Ne jamais utiliser de nettoyant
pour four. Afin d'éviter toute rayure, ne jamais
toucher les surfaces métalliques avec un couteau ou autre objet acéré équivalent. Nettoyer
horizontalement avec un peu de produit vaisselle et un chiffon de nettoyage de vitre
humide ou avec un chiffon en microfibres.
Sécher avec un chiffon doux. Ne pas utiliser
de produits à récurer, d'éponges avec grattoir
ou de chiffons de nettoyage grossiers. Ils
rayent la plaque de cuisson
Sécurité
enfants (en
option)
Si une sécurité enfants est installée sur la
porte du four, celle-ci doit être retirée avant le
nettoyage. Laissez tremper toutes les pièces
en plastique dans de l'eau savonneuse
chaude et nettoyez-les avec une éponge.
Sécher avec un chiffon doux. En cas d'encrassement important, la sécurité enfants ne fonctionne plus de manière correcte.
Table de cuisson
Vous trouverez les indications pour l'entretien
et le nettoyage de votre table de cuisson dans
la notice d'utilisation consacrée à cette dernière.
%$
%$
&
(
'
Page 31

31
Décrocher et accrocher la porte du four
Pour le nettoyage et pour la dépose des vitres de la porte, vous
pouvez décrocher la porte du four.
Les charnières de la porte du four possèdent respectivement
un levier de verrouillage. Lorsque le levier de verrouillage est
pivoté vers l'intérieur (fig. A), la porte du four est sécurisée. Elle
ne peut pas être décrochée. Lorsque les leviers de verrouillage
sont pivotés vers l'extérieur pour décrocher la porte du four
(fig B), les charnières sont sécurisées. Elles ne peuvent pas se
fermer subitement.
: Risque de blessure !
Si les charnières ne sont pas bloquées, elles peuvent se fermer
violemment. Veillez à ce que les leviers de verrouillage soient
toujours entièrement fermés ou bien entièrement ouverts lors
du décrochage de la porte du four.
Décrocher la porte
1. Ouvrir complètement la porte du four.
2. Ouvrir les deux leviers de verrouillage à gauche et à droite
(fig. A).
3. Fermer la porte du four jusqu'en butée. Avec les deux mains,
la tenir à gauche et à droite. La refermer un peu plus et la
retirer (fig. B).
Accrocher la porte
Accrocher la porte du four en procédant dans l'ordre inverse
du décrochage.
1. En accrochant la porte du four, veiller à ce que les deux
charnières soient introduites tout droit dans l'orifice (fig. A).
2. L'encoche à la charnière doit s'enclencher des deux côtés
(fig. B).
3. Refermer les deux leviers de verrouillage (fig. C). Fermer la
porte du four.
: Risque de blessure !
Risque de blessures ! Si la porte du four tombe par
inadvertance ou une charnière se ferme, ne pas mettre la main
dans la charnière. Appelez le service aprèsvente.
Démontage et remontage des vitres
Pour un meilleur nettoyage, il est possible de déposer les vitres
de la porte du four.
Démontage
1. Démontez la porte du four. Pour cela, voir la section
Démontage de la porte du four. Déposez la porte du four
avec la poignée vers le bas sur un torchon (Figure A).
2. Commencez par tourner les deux vis du bas, puis les deux
vis du haut dans le sens inverse des aiguilles d'une montre
(Figure B).
3. Retirez le couvercle (Figure C).
Ne lavez pas les éléments démontés. Nettoyez les vitres avec
un produit pour vitres et essuyez avec un chiffon doux.
: Risque de blessure !
Un verre de porte d'appareil rayé peut se fendre. Ne pas utiliser
de racloir à verre, ni de produit de nettoyage agressif ou
abrasif.
%$
%
$
%
$
&
%
$
&
Page 32

32
Montage
1. Remettez le couvercle en place (Figure A).
2. Commencez par resserrer les deux vis du bas, puis les deux
vis du haut (Figure B).
3. Installez la porte du four. Pour cela, voir la section Montage
de la porte du four.
N'utilisez de nouveau le four que lorsque les vitres sont
installées correctement.
Pannes et dépannage
Il se peut qu'une petite panne gêne le bon fonctionnement de
votre appareil. Avant d'appeler le service après-vente, consultez
le tableau. Vous pouvez éventuellement remédier vous-même
au dérangement.
Tableau de dérangements
Si le résultat de cuisson d'un plat n'est pas optimal, veuillez
consulter le chapitre Testés pour vous dans notre laboratoire.
Vous y trouverez de nombreux conseils et astuces pour la
cuisson.
: Risque de choc électrique !
Les réparations inexpertes sont dangereuses. Seul un
technicien du service après-vente formé par nos soins est
habilité à effectuer des réparations.
Attention !
Si le cordon d'alimentation électrique est endommagé, il doit
être remplacé par le fabricant, son service après-vente ou un
autre professionnel qualifié.
Changer la lampe du four au plafond
Si l'ampoule du four a grillé, vous devez la changer. Des
ampoules de rechange de 40 W, résistantes aux températures
élevées, sont en vente auprès du service après-vente ou dans
le commerce spécialisé. Utilisez exclusivement ces ampoules.
: Risque de choc électrique !
Couper le fusible dans la boîte à fusibles.
1. Etaler un torchon à vaisselle dans le four froid, afin d'éviter
des dégâts.
2. Dévisser le cache en verre en le tournant à gauche.
3. Remplacer l'ampoule par un modèle identique.
4. Revisser le cache en verre.
5. Enlever le torchon et armer le fusible.
Cache en verre
Un cache en verre endommagé doit être remplacé. Des caches
en verre appropriés sont en vente auprès du service
aprèsvente. Veuillez indiquer les numéros E et FD de votre
appareil.
%
$
Panne Cause possible Remède/Remarques
Le four ne fonctionne pas.
Le fusible est
défectueux.
Vérifiez dans le boîtier à
fusibles si le fusible est en
bon état.
Coupure de
courant.
Vérifiez si la lumière de la
cuisine ou d'autres appareils ménagers fonctionnent.
L'affichage de
l'heure clignote
Coupure de
courant.
Réglez l'heure à nouveau.
Le four ne
chauffe pas.
Il y a de la
poussière sur
les contacts.
Tournez plusieurs fois les
manettes dans les deux
sens.
Page 33

33
Service après-vente
Si votre appareil a besoin d'être réparé, notre service aprèsvente se tient à votre disposition. Nous trouvons toujours une
solution appropriée pour éviter des visites inutiles d'un
technicien.
Numéro E et numéro FD
Lors de votre appel, veuillez indiquer le numéro de produit (n°
E) et le numéro de fabrication (n° FD), afin que nous puissions
vous apporter une assistance qualifiée. La plaque signalétique
avec les numéros se trouvent sur le côté de la porte du four.
Pour éviter d'avoir à les rechercher en cas de besoin, vous
pouvez inscrire ici les données de votre appareil et le numéro
de téléphone du service après-vente.
Tenez compte du fait que la visite d'un technicien du SAV n'est
pas gratuite en cas de manipulation incorrecte, même pendant
la période de garantie.
Vous trouverez les données de contact pour tous les pays dans
l'annuaire ci-joint du service après-vente.
Commande de réparation et conseils en cas de
dérangements
Faites confiance à la compétence du fabricant. Vous
garantissez ainsi que la réparation sera effectuée par des
techniciens de SAV formés qui disposent des pièces de
rechange d’origine adaptées à votre appareil.
Conseils concernant l'énergie et l'environnement
Vous trouverez ici des conseils comment vous pouvez
économiser de l'énergie lors de la cuisson et comment
correctement éliminer votre appareil.
Economiser de l'énergie
■ Préchauffez le four seulement si cela est indiqué dans la
recette ou dans les tableaux de la notice d'utilisation.
■ Utilisez des moules sombres, laqués noirs ou émaillés. Ces
types de moule absorbent bien la chaleur.
■ Pendant la cuisson ou le rôtissage, ouvrez la porte du four
aussi rarement que possible.
■ Si vous voulez faire cuire plusieurs gâteaux, faitesles cuire
les uns après les autres. Le four étant encore chaud. Le
temps de cuisson diminue au deuxième gâteau. Vous pouvez
également enfourner 2 moules à cake l'un à côté de l'autre.
■ Si les temps de cuisson sont assez longs, vous pouvez
éteindre le four 10 minutes avant la fin de la durée impartie
puis terminez la cuisson avec la chaleur résiduelle.
Elimination écologique
Mesures à respecter au cours du transport
Fixez toutes les parties mobiles à l'intérieur et au-dessus de
l'appareil avec un ruban adhésif qui peut être retiré sans
laisser de traces. Insérez les différents accessoires (par ex.
plaque de four) avec du carton fin sur les bords dans les
gradins correspondants, afin d'éviter d'endommager l'appareil.
Placez du carton ou autre protection similaire entre la face
avant et la face arrière afin d'éviter tout choc contre le côté
intérieur de la porte vitrée. Fixez la porte du four avec de
l'adhésif sur les parois latérales de l'appareil.
Conservez l'emballage d'origine de l'appareil. Transportez
l'appareil en position verticale. Veuillez respecter les flèches de
transport situées sur l'emballage.
Si l'emballage d'origine n'est plus disponible
Emballez l'appareil dans un emballage de protection afin de
pouvoir garantir une protection suffisante contre tout
endommagement lié à son transport.
Transportez l'appareil en position verticale. Ne tenez pas
l'appareil par la poignée de la porte ou par les raccordements
situés à l'arrière car ceux-ci pourraient être endommagés. Ne
posez aucun objet lourd sur l'appareil.
N° E
N° FD
Service après-vente O
B 070 222 142
FR 01 40 10 12 00
CH 0848 840 040
Eliminez l'emballage en respectant l'environnement.
Cet appareil est marqué selon la directive
européenne 2012/19/UE relative aux appareils
électriques et électroniques usagés (waste electrical
and electronic equipment - WEEE).
La directive définit le cadre pour une reprise et une
récupération des appareils usagés applicables dans
les pays de la CE.
Page 34

34
Testés pour vous dans notre laboratoire
Vous trouverez ici un choix de plats et les réglages optimaux
correspondants. Nous vous montrons le mode de cuisson et la
température les plus appropriés pour votre plat. Vous obtenez
des indications concernant l'accessoire adapté et à quel
hauteur il doit être enfourné, ainsi que des conseils concernant
les récipients et la préparation.
Remarques
■ Les valeurs des tableaux s'entendent toujours pour un
enfournement dans le compartiment de cuisson froid.
Préchauffez uniquement si cela est indiqué dans les tableaux.
Recouvrez l'accessoire de papier cuisson uniquement après
le préchauffage.
■ Les durées indiquées dans les tableaux sont indicatives.
Elles dépendent de la qualité et de la nature de l'aliment.
■ Utilisez les accessoires livrés avec l'appareil. Des
accessoires supplémentaires sont en vente auprès du
service après-vente ou dans le commerce spécialisé comme
accessoires optionnels.
Avant l'utilisation, retirez du compartiment de cuisson tous les
accessoires et récipients dont vous n'avez pas besoin.
■ Utilisez toujours des maniques lorsque vous retirez des
accessoires ou récipients chauds du compartiment de
cuisson.
Gâteaux et pâtisseries
Cuisson sur un seul niveau
Lors de la cuisson de gâteaux et tartes, le mode Cuisson
traditionnelle
% est le plus approprié.
Lors de la cuisson en mode Air pulsé 3D
:, insérez
l'accessoire sur les niveaux suivants :
■ Gâteau dans un moule à gâteau : Hauteur d'enfournement 2
■ Gâteau sur la plaque : Hauteur d'enfournement 3
Cuisson et rôtissage sur plusieurs niveaux
Utilisez le mode Air pulsé 3D
:.
Hauteurs d'enfournement pour la cuisson et le rôtissage sur 2
niveaux :
■ Lèchefrite : Hauteur d'enfournement 3
■ Plaque de cuisson : Hauteur d'enfournement 1
Les plats enfournés ensemble ne doivent pas tous être prêts au
même moment.
Les tableaux proposent une sélection de plats.
Moules
Les moules en métal de couleur foncée sont les plus
appropriés.
En cas de moules en métal à paroi mince ou en cas de plats
en Pyrex les temps de cuisson sont plus longs et le gâteau
brunit moins uniformément.
Si vous voulez utiliser des moules en silicone, basez-vous sur
les indications et les recettes du fabricant. Les moules en
silicone sont souvent plus petits que les moules normaux. Les
quantités de pâte et les indications des recettes peuvent
diverger.
Tableaux
Dans les tableaux vous trouverez le mode de cuisson optimal
pour les différents gâteaux et pâtisseries. La température et la
durée de cuisson dépendent de la quantité et de la nature de la
pâte préparée. C'est pourquoi les tableaux présentent des
fourchettes de valeurs. Commencez par la valeur la plus basse.
Une température plus basse permet d'obtenir des mets plus
uniformément dorés. Si nécessaire, sélectionnez la fois
suivante une valeur plus élevée.
Les temps de cuisson sont de 5 à 10 minutes plus courts
lorsque vous préchauffez.
Vous trouverez des informations supplémentaires dans la
section Conseils pour la pâtisserie à la suite des tableaux.
Remarque : Ne posez pas d'aliment directement sur la plaque
à pâtisserie en aluminium. Recouvrez la plaque à pâtisserie en
aluminium avec du papier cuisson.
Gâteaux dans moules Moule Hauteur Mode de
cuisson
Thermostat, °C Durée, minutes
Génoise, simple Moule à cake 2
%
160-180 55-65
Génoise, fine (sablés, par exemple) Moule à cake 2
%
155-175 65-75
Fond de tarte en pâte brisée avec bord Moule démontable 1
%
160-180 30-40
Fond de tarte, génoise Moule tatin 2
%
160-180 25-35
Tarte en pâte à biscuit Moule démontable 2
%
160-180 30-40
Tartes aux fruits ou au fromage blanc,
pâte brisée*
moule démontable foncé 1
%
170-190 70-90
Gâteaux aux fruits fins, en génoise Moule démontable 2
%
150-170 55-65
Tartes salées* (quiche/tarte aux
oignons)
Moule démontable 1
%
180-200 50-60
* Laissez refroidir le gâteau environ 20 minutes dans l'appareil.
Page 35

35
Pain et petits pains
Sauf indication contraire, il faut toujours préchauffer le four pour
la cuisson du pain.
Ne versez jamais d'eau directement dans le four chaud.
Conseils pour la pâtisserie
Gâteau sur la plaque Accessoires Niveau Mode de
cuisson
Affichage de la
température en °C
Durée,
minutes
Pâte à gâteau de consistance molle ou pâte
levée avec une garniture sèche
Lèchefrite 3
%
160-180 25-35
Plaque de cuisson en aluminium* + lèchefrite**
1+3
:
150-170 35-45
Pâte à gâteau de consistance molle ou pâte
levée, aux fruits frais
Lèchefrite 3
%
140-160 40-50
Plaque de cuisson en aluminium* + lèchefrite**
1+3
:
130-150 50-60
Biscuit roulé fourré (préchauffer) Lèchefrite 2
%
170-190 15-20
Brioche en forme de natte tressée, 500 g de
farine
Lèchefrite 2
%
160-180 25-35
Gâteau de Noël allemand, 500 g de farine Lèchefrite 3
%
160-180 50-60
Gâteau de Noël allemand, 1 kg de farine Lèchefrite 3
%
150-170 90-100
Strudel, sucré Lèchefrite 2
%
180-200 55-65
Pizza Lèchefrite 3
%
180-200 20-30
Plaque de cuisson en aluminium* + lèchefrite**
1+3
:
150-170 35-45
* Vous pouvez vous procurer des plaques supplémentaires auprès du service après-vente ou chez un revendeur spécialisé.
** En cas de cuisson sur deux niveaux, insérez toujours la lèchefrite au-dessus de la plaque de cuisson.
Pain et petits pains Accessoires Niveau Mode de
cuisson
Thermostat, °C Durée,
minutes
Pain à la levure de boulanger,
1,2 kg de farine
Lèchefrite 2
%
270
190
8
35-45
Pain au levain, 1,2 kg de farine Lèchefrite 2
%
270
190
8
35-45
Petits pains (par ex. petits pains
de seigle)
Lèchefrite 2
%
200-220 20-30
Petites pâtisseries Accessoires Niveau Mode de
cuisson
Affichage de la
température en °C
Durée,
minutes
Biscuits Lèchefrite 3
%
150-170 10-20
Plaque de cuisson en aluminium* + lèchefrite** 1+3
:
130-150 25-35
Meringues Lèchefrite 3
:
70-90 135-145
Choux La lèchefrite 2
%
200-220 30-40
Macarons La lèchefrite 3
%
110-130 30-40
Plaque de cuisson en aluminium* + lèchefrite** 1+3
:
100-120 35-45
Pâte feuilletée La lèchefrite 3
:
190-210 20-30
Plaque de cuisson en aluminium* + lèchefrite** 1+3
:
180-200 25-35
* Vous pouvez vous procurer des plaques supplémentaires auprès du service après-vente ou chez un revendeur spécialisé.
** En cas de cuisson sur deux niveaux, insérez toujours la lèchefrite au-dessus de la plaque de cuisson.
Vous voulez utiliser votre propre recette. Basez-vous sur les tableaux qui se rapprochent le plus de votre recette.
Vérifiez si votre cake est complètement
cuit.
A l'aide d'un bâtonnet en bois, piquez le sommet du gâteau environ 10 minutes avant la
fin du temps de cuisson indiqué dans la recette. Le gâteau est cuit si la pâte n'adhère
plus au bâtonnet.
Le gâteau s'affaisse. La fois suivante, veillez à ce que la pâte soit moins liquide ou bien réduisez la tempéra-
ture du four de 10 degrés. Respectez les temps de malaxage indiqués dans la recette.
Le gâteau a monté davantage au centre
que sur les bords.
Ne graissez pas le tour du moule démontable. Après la cuisson, détachez soigneusement le gâteau à l'aide d'un couteau.
Le dessus du gâteau est trop cuit. Enfournezle jusqu'au fond, choisissez une température plus basse et faites cuire le
gâteau un peu plus longtemps.
Page 36

36
Viande, volaille, poisson
Récipient
Vous pouvez utiliser tout récipient résistant à la chaleur. La
lèchefrite convient également très bien pour de gros rôtis.
Des récipients en verre sont les plus appropriés. Veillez à ce
que le couvercle soit adapté à la cocotte et ferme bien.
Si vous utilisez des cocottes émaillées, ajoutez un peu plus de
liquide.
En cas de cocottes en inox, la viande sera moins dorée et peut
être un peu moins cuite. Allongez les temps de cuisson.
Indications dans les tableaux :
Récipient sans couvercle = ouvert
Récipient avec couvercle = fermé
Placez toujours le plat au centre de la grille.
Poser le récipient en verre chaud sur un support sec. Si la
surface est humide ou froide, le verre peut se casser.
Rôtissage
Ajoutez un peu de liquide à une viande maigre. Le fond du
récipient doit être recouvert d'env. ½ cm de liquide.
Pour du rôti à braiser, ajoutez suffisamment de liquide. Le fond
du récipient doit être recouvert d'env. 1 - 2 cm de liquide.
La quantité de liquide dépend du type de viande et du matériau
du récipient. Si vous préparez de la viande dans une cocotte
émaillée, il faut ajouter un peu plus de liquide que dans un
récipient en verre.
Les cocottes en inox ne conviennent que sous réserve. La
viande cuit plus lentement et dore moins. Réglez une
température plus élevée et/ou un temps de cuisson plus long.
Instructions pour la cuisson au gril
La fonction gril doit systématiquement être utilisée avec le four
fermé.
Préchauffez le gril pendant environ 3 minutes, avant de placer
les aliments sur la grille.
Placez les aliments directement sur la grille. En cas d'aliment
unique, placez-le au centre de la grille afin d'obtenir une
cuisson optimale. Introduisez par ailleurs la lèchefrite au
niveau 1. Cela permet ainsi de récupérer le jus de viande et de
moins salir le four.
La plaque ou la lèchefrite ne doit pas être placée sur le niveau
4. Elles peuvent se déformer sous l'effet de températures
élevées et être endommagées lors du retrait du compartiment
de cuisson.
Dans la mesure du possible, sélectionnez des aliments de
même taille. Ce faisant, ils seront dorés de manière uniforme,
tout en restant juteux à souhait. Salez les steaks seulement
après leur cuisson au gril.
Retournez les aliments après
Z la durée indiquée.
La résistance du gril alterne en permanence les phases de
fonctionnement et d'arrêt. Il s'agit d'un phénomène normal. La
fréquence de mise en marche et d'arrêt dépend du réglage de
la fonction gril.
Viande
Retournez les pièces de viande à micuisson.
Une fois le rôti cuit, laissez-le reposer 10 minutes de plus dans
le four éteint et fermé. Cela permet au jus de mieux se répartir
dans la viande.
Après la cuisson d'un rosbif, enveloppezle dans une feuille
d'aluminium et laissezle reposer 10 minutes dans le four.
En cas de rôti de porc avec couenne, entaillez la couenne en
croix et posez le rôti avec la couenne au contact du récipient.
Le gâteau est trop sec. A l'aide d'un curedent, percez plusieurs petits trous dans le gâteau cuit. Arrosez de jus
de fruit ou de liquide légèrement alcoolisé. Au gâteau suivant, augmentez la température
de 10 degrés et réduisez le temps de cuisson.
Le pain ou le gâteau (gâteau au fromage blanc par ex.) a un bel aspect
mais l'intérieur est pâteux (filets d'eau à
l'intérieur).
Pour le gâteau suivant, veillez à ce que la pâte soit moins liquide. Augmentez le temps
de cuisson et réduisez la température. En cas de gâteau avec une garniture fondante,
faites d'abord précuire le fond. Saupoudrez-le de poudre d'amandes ou de chapelure et
mettez ensuite la garniture. Respectez la recette et les temps de cuisson.
Les pâtisseries ne sont pas uniformément dorées.
Baissez la température, la cuisson sera alors plus uniforme. Faites cuire les pâtisseries
délicats sur un seul niveau avec la convection naturelle
%. Le papier cuisson dépassant
de la plaque peut également gêner la circulation de l'air. Découpez toujours le papier
aux dimensions de la plaque.
Le dessous de la tarte aux fruits est trop
clair.
La fois suivante, enfournez le gâteau un niveau plus bas.
Le jus des fruits a coulé. La fois suivante, utilisez la lèchefrite à bords hauts (s'il y en a).
Les petites pâtisseries en pâte levée
collent ensemble pendant la cuisson.
Disposez les pièces de pâtisserie sur la plaque en respectant un espace d'env. 2 cm
autour de chaque pièce. Il y aura ainsi suffisamment de place pour que les pièces de
pâtisserie puissent gonfler et dorer tout autour.
Vous avez fait cuire des pâtisseries sur
plusieurs niveaux. Les pâtisseries placées sur la plaque supérieure sont plus
cuites que celles placées sur la plaque
inférieure.
Pour la cuisson sur plusieurs niveaux, utilisez toujours la Chaleur tournante 3D
:. La
cuisson des préparations sur des plaques enfournées en même temps ne sera pas forcément terminée au même moment.
La cuisson de gâteaux aux fruits juteux
produit de la condensation.
La cuisson peut générer de la vapeur d'eau. Elle s'échappe au-dessus de la porte. Cette
vapeur peut se condenser sur le bandeau de commande ou sur les façades des
meubles situés à proximité et se mettre à goutter. C'est là une propriété physique normale.
Page 37

37
Volaille
Les valeurs du tableau s'appliquent pour un enfournement à
four froid.
Les données de poids du tableau concernent la volaille non
farcie et prête à cuire.
Si vous faîtes rôtir la volaille directement sur la grille,
introduisez la lèchefrite au niveau 1.
Pour les canards ou les oies, piquez la peau sous les ailes afin
que la graisse puisse s'écouler.
Veuillez placer les volailles côté blanc vers le bas sur la grille.
Tournez la volaille aux deux tiers de la cuisson.
Pour obtenir une peau de volaille dorée et croustillante,
enduisez la peau de beurre ou versez de l'eau salée ou du jus
d'orange sur la peau vers la fin de la cuisson.
Viande Poids Accessoires et plats Niveau Mode de
cuisson
Température °C,
Niveau du gril
Durée,
minutes
Boeuf
Rôti de boeuf 1,0 kg couvert 2
%
200-220 120
1,5 kg 2
%
190-210 140
2,0 kg 2
%
180-200 160
Filet de boeuf, rosé 1,0 kg non couvert 1
%
210-230 70
1,5 kg 1
%
200-220 80
Rosbif, rosé 1,0 kg non couvert 1
4
230-250 50
Steaks, 3 cm, rosé Grille + lèchefrite 4+1
(
315
Veau
Rôti de veau 1,0 kg non couvert 1
%
200-220 100
1,5 kg 1
%
190-210 120
2,0 kg 1
%
180-200 140
Porc
sans couenne (par ex. le cou) 1,0 kg non couvert 1
4
190-210 120
1,5 kg 1
4
180-200 150
2,0 kg 1
4
170-190 170
avec couenne (par ex. l'épaule ) 1,0 kg non couvert 1
4
180-200 130
1,5 kg 1
4
190-210 160
2,0 kg 1
4
170-190 190
Côtes de porc avec os 1,0 kg couvert 1
%
210-230 80
Agneau
Gigot d'agneau sans os, médium 1,5 kg non couvert 1
4
170-190 120
Viande hachée
Rôti de viande hachée env. 750 g non couvert 1
4
180-200 70
Saucisses
Saucisses Grille + lèchefrite 4+1
(
315
Volaille Poids Accessoires et
plats
Niveau Mode de
cuisson
Température °C,
Niveau du gril
Durée, minutes
Demi-poulet (1 à 4 morceaux) 400 g chaque Grille 2
4
210-230 40-50
Morceaux de poulet 250 g chaque Grille 3
4
210-230 30-40
Poulet entier (1 à 4 morceaux) 1 kg chaque Grille 2
4
200-220 55-85
Canard, entier 1,7 kg Grille 2
4
170-190 80-100
Oie, entière 3,0 kg Grille 2
4
160-180 110-130
Jeune dinde, entière 3,0 kg Grille 2
4
180-200 80-100
2cuisses de dinde 800 g chaque Grille 2
4
180-200 80-100
Page 38

38
Poisson
Tournez les morceaux de poisson après la
Z durée indiquée.
Il ne faut pas retourner les poissons entiers. Enfournez le
poisson entier dans le four de sorte que les nageoires dorsales
soient en haut. Placez dans l'abdomen une demie pomme de
terre ou un petit récipient adapté au four pour que le poisson
ait une position plus stable.
En cas de cuisson au gril directement sur la grille, introduisez
par ailleurs la lèchefrite au niveau 1. Cela permet ainsi de
récupérer le jus du poisson et de moins salir le four.
Conseils pour les rôtis et grillades
Soufflés, gratins, toasts
Si vous faites des grillades directement sur la grille, enfournez
en plus la lèchefrite au niveau .1. Le four restera plus propre.
Placez le récipient toujours sur la grille.
L'état de cuisson d'un soufflé/gratin dépend de la taille du
récipient et de l'épaisseur du soufflé/gratin. Les indications
dans le tableau ne sont que des valeurs indicatives.
Plats cuisinés
Respectez les indications du fabricant figurant sur l'emballage.
Si vous recouvrez l'accessoire de papier cuisson, veillez à ce
que le papier cuisson soit approprié pour ces températures.
Adaptez la taille du papier cuisson au mets.
Le résultat de cuisson dépend beaucoup de l'aliment. Le
produit cru peut déjà présenter des pré-brunissages et des
inégalités.
Poisson Poids Accessoires et
plats
Niveau Mode de
cuisson
Température °C,
Niveau du gril
Durée,
minutes
Poisson, entier 300 g chaque Grille 3
(
2 20-25
1,0 kg Grille 2
4
190-210 40-50
1,5 kg Grille 2
4
180-200 60-70
Morceaux de poisson, des filets par ex. 300 g chaque Grille 4
(
2 20-25
Le tableau ne contient pas de valeur
pour le poids du rôti.
Choisissez les valeurs qui correspondent au poids immédiatement inférieur et allongez la
durée de cuisson.
Vous voulez savoir si le rôti est cuit. Utilisez un thermomètre pour viande (en vente dans le commerce) ou bien faites le « test
de la cuillère ». Appuyez sur le rôti avec une cuillère. Si vous sentez une résistance, le
rôti est cuit. Si la cuillère s'enfonce, allongez le temps de cuisson.
Le rôti est trop cuit et l'extérieur est
brûlé par endroits.
Vérifiez le niveau d'enfournement ainsi que la température.
Le rôti a un bel aspect mais la sauce est
brûlée.
La fois suivante, choisissez un plat à rôti plus petit ou ajoutez plus de liquide.
Le rôti a un bel aspect, mais la sauce
est trop claire et insipide.
La fois suivante, choisissez un plat à rôti plus grand et ajoutez moins de liquide.
L'arrosage du rôti produit un dégagement de vapeur.
C'est un phénomène physique normal. Une grande partie de la vapeur s'échappe par
l'orifice de sortie de vapeur. Elle peut se condenser sur le bandeau de commande plus
froid ou sur les façades des meubles voisins et se mettre à goutter.
Plat cuisiné Accessoires et
plats
Niveau Mode de
cuisson
Affichage de la
température en °C
Durée, minutes
Gratins
Gratin, sucré Plat à gratin 2
%
170-190 50-60
Gratin de pâtes Plat à gratin 2
%
210-230 25-35
Soufflé
Soufflé de pommes de terre (ingrédients crus),
Hauteur max. 2 cm
Plat à gratin 2
4
150-170 50-60
Toasts
Pains grillés, 12tranches Grille 4
(
3 4-5
Toasts, 12tranches Grille 3
(
3 5-8
Plat cuisiné Accessoires Niveau Mode de
cuisson
Affichage de la
température en °C
Durée, minutes
Strudel aux fruits La lèchefrite 3
:
190-210 45-55
Pommes frites La lèchefrite 3
%
210-230 25-30
Pizza Grille 2
%
200-220 15-20
Pizza baguette Grille 2
4
190-210 15-20
Page 39

39
Remarque
La cuisson des plats surgelés peut provoquer une déformation de la lèchefrite. Cela provient des grandes différences de
température auxquelles l'accessoire est soumis. Cette déformation disparaît déjà pendant le processus de cuisson.
Mets spéciaux
Avec des températures basses et le mode chaleur tournante
3D
: vous réussirez alors aussi bien du yaourt crémeux
qu'une pâte légère à la levure du boulanger.
Enlevez d'abord du compartiment de cuisson les accessoires,
les grilles supports ou les rails télescopiques.
Préparer du yaourt
1. Porter 1 litre de lait (3,5 % de m.g) à ébullition et laisser
refroidir à 40 °C.
2. Délayer 150 g de yaourt (à la température du réfrigérateur)
dans le lait.
3. En remplir des tasses ou des petits pots Twist-Off, couvrir de
film alimentaire
4. Préchauffer le compartiment de cuisson comme indiqué.
5. Placer ensuite les tasses ou bien les pots sur le fond du
compartiment de cuisson et préparer comme indiqué.
Laisser lever de la pâte à la levure du boulanger
1. Préparer la pâte à la levure du boulanger comme d'habitude,
la placer dans un récipient en céramique résistant à la
chaleur et couvrir.
2. Préchauffer le compartiment de cuisson comme indiqué.
3. Eteindre le four et placer la pâte dans le compartiment de
cuisson pour la laisser lever.
Décongélation
Les délais de décongélation dépendent du type et de la
quantité de l'aliment concerné.
Veuillez respecter les consignes du fabricant figurant sur
l'emballage.
Retirez les aliments de l'emballage et placez-les dans un plat
approprié, que vous posez sur la grille.
Veuillez placer les volailles côté blanc dans l'assiette.
Déshydratation
Le mode Chaleur tournante 3D : est idéale pour la
déshydratation.
Sélectionnez uniquement des fruits et légumes de qualité
irréprochable puis lavezles soigneusement.
Laissezles bien égoutter et essuyezles.
Recouvrez la lèchefrite et la grille de papier cuisson ou
sulfurisé.
Retournez plusieurs fois les fruits ou légumes très juteux.
Une fois le processus de séchage terminé, détachez
immédiatement du papier les aliments déshydratés.
Plat Récipient Mode de
cuisson
Température Durée
Yaourt Tasses ou pots
Twist-Off
Placer sur le fond
du compartiment
de cuisson
:
Préchauffer à 50 °C
50 °C
5 min.
8 h
Laisser lever de la pâte à
la levure de boulanger
Récipient résistant
à la chaleur
Placer sur le fond
du compartiment
de cuisson
:
Préchauffer à 50 °C
Eteindre l'appareil et mettre la
pâte à la levure dans le compartiment de cuisson
5-10 min.
20-30 min.
Produit surgelé Accessoires Niveau Mode de
cuisson
Température
Par ex. tartes à la crème fraîche, tartes à la crème au beurre, tartes
recouvertes d'un glaçage au chocolat ou au sucre, fruits, poulet,
saucisses et viande, pain, petits pains, gâteaux et autres pâtisseries
Grille 2
:
Le sélecteur de température demeure sur la position d'arrêt.
Fruits et herbes Accessoire Niveau Mode de
cuisson
Température Durée
600 g de tranches de pommes Lèchefrite + grille 3+1
:
80 °C env. 5 h
800 g de poires en quartier Lèchefrite + grille 3+1
:
80 °C env. 8 h
1,5 kg de quetsches ou de
prunes
Lèchefrite + grille 3+1
:
80 °C env. 8-10 h
200 g d'herbes aromatiques, nettoyées
Lèchefrite + grille 3+1
:
80 °C env. 1½ h
Page 40

40
Mise en conserve
Pour la mise en conserves, les bocaux et les joints en
caoutchouc doivent être propres et en bon état. Utilisez si
possible des bocaux de même taille. Les valeurs indiquées
dans les tableaux s'entendent pour des bocaux ronds d'un litre.
Attention !
N'utilisez pas de bocaux plus grands ou plus hauts. Leurs
couvercles risqueraient d'éclater.
Utilisez uniquement des fruits et légumes de première qualité.
Lavezles soigneusement.
Les durées mentionnées dans les tableaux sont indicatives. Elle
peuvent être influencées par la température ambiante, le
nombre de bocaux, la quantité et la chaleur du contenu des
bocaux. Avant de changer le réglage ou d'éteindre, vérifiez si
des bulles montent bien dans les bocaux.
Préparation
1. Remplir les bocaux, mais pas trop.
2. Essuyer les bords des bocaux, ils doivent être propres.
3. Poser un joint en caoutchouc humide et un couvercle sur
chaque bocal.
4. Fermer les bocaux avec des agrafes.
Ne placez jamais plus de six bocaux dans le compartiment de
cuisson.
Réglage
1. Enfournez la lèchefrite au niveau 2. Disposer les bocaux de
sorte qu'ils ne se touchent pas.
2. Verser ½ l d'eau chaude (env. 80 °C) dans la lèchefrite.
3. Fermer la porte du four.
4. Régler Chaleur de sole $.
5. Régler la température sur 170 à 180 °C.
Mise en conserve
Fruits
Au bout d'env. 40 à 50 minutes, des petites bulles montent à la
surface à de courts intervalles. Eteignez le four.
Retirez les bocaux du compartiment de cuisson au bout de 25
à 35 minutes de chaleur résiduelle. Un refroidissement plus
lent dans le compartiment de cuisson favorise la prolifération
de moisissures sur le fruit en bocal ainsi que son acidification.
Légumes
Dès que des bulles montent dans les bocaux, ramener la
température à 120 - 140 °C. Selon le type de légume env. 35 à
70 minutes. Après ce temps, éteignez ensuite le four et utilisez
la chaleur rémanente.
Sortir les bocaux
Après la mise en conserves, sortez les bocaux du
compartiment de cuisson.
Attention !
Ne posez pas les bocaux chauds sur une surface froide ou
humide. Ils risquent d'éclater.
L'acrylamide dans certains aliments
L'acrylamide se forme avant tout en cas de produits céréaliers
et de pommes de terre cuits à haute température, tels que
chips, frites, toast, petits pains, pain ou pâtisseries fines
(biscuits, pain d'épices, speculoos).
Fruits en bocaux d'un litre Dès l'ébullition Chaleur résiduelle
Pommes, groseilles, fraises éteindre env. 25 minutes
Cerises, abricots, pêches, groseilles à maquereau éteindre env. 30 minutes
Compote de pommes, poires, prunes éteindre env. 35 minutes
Légumes au bouillon froid dans des bocaux d'un litre Dès l'ébullition Chaleur résiduelle
Cornichons - env. 35 minutes
Betterave rouge env. 35 minutes env. 30 minutes
Choux de Bruxelles env. 45 minutes env. 30 minutes
Haricots verts, chourave, chou rouge env. 60 minutes env. 30 minutes
Petits pois env. 70 minutes env. 30 minutes
Conseils pour la préparation de mets avec une faible formation d'acrylamide
En général
■ Réduire les temps de cuisson à un minimum.
■ Faire uniquement dorer les aliments, ne pas les faire trop brunir.
■ Un aliment gros et épais contient moins d'acrylamide.
Cuisson de pâtisseries En mode Convection naturelle, max. 200 °C.
En mode Chaleur tournante 3D ou Chaleur tournante, max.180 °C.
Petits gâteaux secs En mode Convection naturelle, max. 190 °C.
En mode Chaleur tournante 3D ou Chaleur tournante, max. 170 °C.
Des oeufs ou des jaunes d'oeuf réduisent la formation d'acrylamide.
Frites au four Les répartir uniformément et en une couche sur la plaque. Faire cuire au moins 400 g
par plaque, afin que les frites ne se dessèchent pas
Page 41

41
Plats tests
Ces tableaux ont été conçus pour des laboratoires d'essai, afin
de leur permettre de contrôler et tester plus facilement les
différents appareils.
Selon EN 50304/EN 60350 (2009) ou bien IEC 60350.
Cuisson de gâteaux
Cuisson sur 2 niveaux :
Insérez toujours la lèchefrite au-dessus de la plaque de
cuisson.
Petits gâteaux secs (par ex., Tulumba Tatlisi turc) :
Les plats enfournés ensemble ne doivent pas tous être prêts au
même moment.
Tarte au pompes couverte, niveau 1 :
Changez la position du moule démontable foncé, placez-le en
diagonal.
Tarte au pompes couverte, niveau 2 :
Changez la position du moule démontable foncé.
Gâteaux dans moules démontables en métal :
Cuisson traditionnelle
% au niveau 1. Utilisez la lèchefrite à la
place de la grille et placez-y le moule démontable.
Grillades
Si vous placez les aliments directement sur la grille, enfournez
en plus la lèchefrite au niveau 1. Elle récupère le liquide et le
four restera plus propre.
Plat cuisiné Accessoires et plats Niveau Mode de
cuisson
Affichage de la température en °C
Durée, minutes
Petits gâteaux secs La lèchefrite 3
%
150-170 20-30
Plaque de cuisson en aluminium* + lèchefrite**
1+3
:
140-160 30-40
Mini cakes La lèchefrite 3
%
150-170 25-35
Mini cakes, préchauffage Plaque de cuisson en alu-
minium* + lèchefrite**
1+3
:
140-160 30-40
Gâteaux à l'eau Moule démontable 2
%
160-180 30-40
Tarte aux pommes couverte Lèchefrite + 2 moules
démontables Ø 20 cm***
1
%
190-210 70-80
2 grilles* + 2 moules
démontables Ø 20 cm***
1+3
:
170-190 65-75
* Vous pouvez vous procurer des plaques et grilles supplémentaires auprès du service après-vente ou chez un revendeur spécia-
lisé.
** Lors de la cuisson sur deux niveaux, placez systématiquement la lèchefrite sur le niveau supérieur.
**** Placez les moules à gâteau en diagonale sur l'accessoire.
Plat cuisiné Accessoires et plats Niveau Mode de cuisson Niveau de grille Durée, minutes
Pain grillé
Préchauffez 10min.
Grille 4
(
3 ½-2
Beefburger, 12 pièces*
sans préchauffage
Grille + lèchefrite 4+1
(
3 25-30
* Retournez après
Z du temps de cuisson
Page 42

42
á Tartalomjegyzék
[hu]Használati utasítás
Fontos biztonsági előírások ................................................... 42
A károsodások okai ........................................................................43
Az Ön új sütője......................................................................... 44
Kezelőfelület...................................................................................... 44
Funkcióválasztó................................................................................ 44
Nyomógombok és kijelzések ........................................................ 44
Hőfokszabályozó..............................................................................45
Sütőtér................................................................................................ 45
Tartozékok ................................................................................ 45
Tartozékok betolása ........................................................................ 45
Kiegészítő tartozékok......................................................................46
Az első használat előtt ............................................................ 46
Az idő beállítása............................................................................... 46
A sütő felfűtése.................................................................................46
A tartozékok tisztítása ..................................................................... 46
A sütő beállítása ...................................................................... 46
Fűtési módok és hőmérséklet.......................................................46
A sütőnek automatikusan ki kell kapcsolnia .............................. 47
A sütőnek automatikusan be- és ki kell kapcsolnia.................. 47
Gyorsfelfűtés..................................................................................... 47
Az idő beállítása....................................................................... 48
Jelzőóra beállítása................................................................... 48
Gyerekzár.................................................................................. 48
Sütő ....................................................................................................48
Ápolás és tisztítás.................................................................... 49
Tisztítószerek ....................................................................................49
Állványok ki és beakasztása......................................................... 49
A sütőajtó ki és beakasztása........................................................ 50
Ajtólapok ki- és beszerelése.......................................................... 51
Mit tegyünk meghibásodás esetén? ...................................... 51
Hibatáblázat ...................................................................................... 51
A fedélen lévő sütőlámpa cseréje ................................................ 51
Üvegbura........................................................................................... 52
Ügyfélszolgálat......................................................................... 52
E-szám és FD-szám.........................................................................52
Energiamegtakarítási és környezetbarát ötletek................... 52
Energiamegtakarítás........................................................................52
Ártalmatlanítás környezetbarát módon ........................................ 52
Szállítási utasítások ......................................................................... 52
Kísérleti konyhánkban teszteltük Önnek............................... 53
Torták és sütemények..................................................................... 53
Sütési ötletek ....................................................................................54
Hús, szárnyas, hal............................................................................ 55
Tippek sütéshez és grillezéshez ................................................... 57
Felfújtak, gratinírozott ételek, pirítós............................................. 57
Késztermékek................................................................................... 57
Különleges ételek ............................................................................58
Felolvasztás.......................................................................................58
Aszalás............................................................................................... 58
Befőzés .............................................................................................. 58
Akrilamid az élelmiszerekben................................................. 59
Próbaételek............................................................................... 60
Sütés .................................................................................................. 60
Grillezés ............................................................................................. 60
Produktinfo
További információkat a termékekről, a tartozékokról, az
alkatrészekről és a szervizzel kapcsolatban internetes
oldalunkon: www.siemens-home.com és az Online-Shop-ban:
www.siemens-eshop.com talál.
: Fontos biztonsági előírások
Gondosan olvassa el ezt az útmutatót. Csak
így tudja készülékét helyesen és
biztonságosan kezelni. A használati és
szerelési utasítást őrizze meg a későbbi
használathoz vagy a későbbi tulajdonos
számára.
Ezen készülék csak beépítésre készült.
Vegye figyelembe a speciális szerelési
útmutatót.
Kicsomagolás után ellenőrizze a készüléket.
Szállítási sérülés esetén ne csatlakoztassa.
A csatlakozódugó nélküli készüléket csak
hivatalos engedéllyel rendelkező
szakember csatlakoztathatja. Hibás
csatlakoztatás miatt keletkezett károkra
nem vonatkozik a garancia.
Ez a készülék csak háztartásban vagy ház
körül való alkalmazásra készült. A
készüléket kizárólag ételek és italok
készítésére használja. A készüléket
üzemelés közben soha ne hagyja felügyelet
nélkül. A készüléket csak zárt helyiségben
használja.
Ezt a készüléket legfeljebb 2000 méter
tengerszint feletti magasságig való
használatra tervezték.
Ezt a készüléket 8 év feletti gyerekek és
csökkent fizikai, érzékszervi vagy szellemi
képességű, ill. tapasztalatlan személyek
csak a biztonságukért felelős személy
felügyelete mellett használhatják, illetve
akkor, ha megtanulták a készülék
biztonságos használatát és megértették az
ebből eredő veszélyeket.
Soha ne engedjen gyerekeket a
készülékkel játszani. A tisztítást és a
felhasználói karbantartást nem végezhetik
Page 43

43
gyerekek, kivéve ha 8 évnél idősebbek és
felügyelet mellett vannak.
8 évnél fiatalabb gyerekeket ne engedjen a
készülék és a csatlakozóvezeték közelébe.
A tartozékokat mindig megfelelő helyzetben
tolja be a sütőtérbe.Lásd a tartozékok
leírását a használati utasításban.
Égésveszély!
■
A sütőtérben tárolt gyúlékony tárgyak
lángra lobbanhatnak. Soha ne tartson
gyúlékony tárgyakat a sütőtérben. Soha
ne nyissa ki a készülék ajtaját, ha a
készülék füstöl. Kapcsolja ki a készüléket
és húzza ki a hálózati csatlakozódugót
vagy kapcsolja ki a biztosítékot a
biztosítékszekrényben.
Égésveszély!
■
A készülékajtó nyitásakor légáramlat
keletkezik. A sütőpapír hozzáérhet a
fűtőelemekhez és meggyulladhat. Az
előmelegítés ideje alatt soha ne helyezzen
rögzítés nélkül sütőpapírt a tartozékra.
Nehezékként helyezzen a sütőpapírra egy
edényt vagy egy sütőformát. Csak a
szükséges felületet bélelje ki sütőpapírral.
A sütőpapír nem lóghat túl a tartozékon.
Égésveszély!
■
A készülék nagyon forró. Soha ne érintse
meg a sütőtér forró belső felületeit vagy a
fűtőelemeket. Mindig hagyja lehűlni a
készüléket. Ne engedjen gyerekeket a
készülék közelébe.
Égésveszély!
■
A tartozék vagy az edény nagyon forró. A
forró edényt vagy tartozékot mindig
fogókesztyűvel vegye ki a sütőtérből.
Égésveszély!
■
Az alkoholgőzök meggyulladhatnak a
forró sütőtérben. Soha ne készítsen olyan
ételeket, amelyek magas százalékarányú
alkoholtartalmú italt tartalmaznak. Csak kis
mennyiségű magas százalékarányú
alkoholos italt használjon. Óvatosan
nyissa ki a készülék ajtaját.
Forrázásveszély!
■
A hozzáférhető részek működés közben
felforrósodnak. Soha ne érintse meg a
forró részeket. Tartsa távol a gyerekeket.
Forrázásveszély!
■
A készülék ajtajának kinyitásakor forró gőz
távozhat a készülékből. Óvatosan nyissa
ki a készülék ajtaját. Ne engedjen
gyerekeket a készülék közelébe.
Forrázásveszély!
■
A forró sütőtérben lévő vízből forró vízgőz
képződhet. Soha ne öntsön vizet
közvetlenül a forró sütőtérbe.
Sérülésveszély!
A készülék ajtajának összekarcolt üvege
megrepedhet. Ne használjon üvegkaparót,
éles vagy súroló hatású tisztítóeszközöket.
Áramütésveszély!
■
A szakszerűtlen javítások
veszélyesek.Javításokat csakis
szakképzett ügyfélszolgálati technikus
végezhet.Ha a készülék meghibásodott,
húzza ki a hálózati csatlakozót, vagy
cserélje ki a biztosítékot a
biztosítékszekrényben. Hívja az
ügyfélszolgálatot
Áramütésveszély!
■
A forró készülékrészeknél az elektromos
készülékek kábelszigetelése megolvadhat.
Soha ne érintkezzen az elektromos
készülékek csatlakozó kábele forró
készülékrészekkel.
Áramütésveszély!
■
Az intenzív nedvesség áramütést okozhat.
Ne használjon magasnyomású vagy
gőzsugaras tisztítógépet.
Áramütésveszély!
■
A sütőtérlámpa cseréjekor a lámpafoglalat
érintkezése áram alatt van. Csere előtt
húzza ki a csatlakozódugót vagy kapcsolja
ki a biztosítékot a biztosítékszekrényben.
Áramütésveszély!
■
A hibás készülék áramütést okozhat. Soha
ne kapcsolja be a hibás készüléket. Húzza
ki a csatlakozódugót és kapcsolja ki a
biztosítékot a biztosítékszekrényben. Hívja
az ügyfélszolgálatot
A károsodások okai
Figyelem!
■ Tartozék, fólia, sütőpapír vagy edény a sütőtér alján: Ne
tegyen tartozékot a sütőtér aljára. A sütőtér alját ne bélelje ki
semmilyen fajtájú fóliával vagy sütőpapírral. Ne tegyen edényt
a sütőtér aljára, ha 50 ºC feletti hőmérsékletet állított be.
Hőtorlasz alakul ki. A sütési idők már nem egyeznek, és a
zománc megsérül.
■ Víz a forró sütőtérben: Soha ne öntsön vizet közvetlenül a
forró sütőtérbe. Vízgőz keletkezik. A hőmérsékletváltozás
miatt megsérülhet a zománc.
■ Nedves élelmiszerek: Ne tároljon hosszabb ideig nedves
élelmiszereket a zárt sütőtérben. A zománc megsérül.
■ Gyümölcslé: A lédús gyümölcsös süteményekből ne tegyen
túl sokat a sütőtepsibe. A gyümölcslé kifröcsköl a
sütőtepsiből és eltávolíthatatlan foltokat hagy. Ha lehetséges,
használja a mélyebb univerzális serpenyőt.
■ Lehűlés nyitott készülékajtó mellett : A sütőteret csak zárt
ajtónál hagyja lehűlni. Még ha csak résnyire is marad nyitva a
készülékajtó, a szomszédos bútorlapok idővel sérülhetnek.
■ Erősen szennyezett ajtótömítés: Ha az ajtótömítés erősen
szennyezett, akkor a készülék ajtaja működés közben már
nem zár rendesen. A szomszédos bútorlapok
megsérülhetnek. Mindig tartsa tisztán az ajtó tömítését.
■ Készülék ajtaja mint ülő vagy rakodófelület: Soha ne
használja ülő- vagy rakodófelületként a készülék ajtaját. Ne
tartson edényt vagy tartozékokat a készülék ajtaján.
■ Tartozékok betolása: készüléktípustól függően a tartozékok
megkarcolhatják az ajtólapot a készülék ajtajának
Page 44

44
becsukásakor. A tartozékokat ezért mindig ütközésig tolja be
a sütőtérbe.
■ A készülék szállítása: A készüléket ne hordozza vagy tartsa
az ajtófogantyúnál fogva. Az ajtófogantyú nem tartja meg a
készülék súlyát, és letörhet.
Az Ön új sütője
Itt megismerheti új sütőjét. Bemutatjuk a kezelőfelületet és az
egyes kezelőelemeket. A sütőtérre és a tartozékokra vonatkozó
információkat kap.
Kezelőfelület
Itt található egy áttekintés a kezelőfelületről. A kialakítás az
adott készüléktípustól függ.
Funkcióválasztó
A funkcióválasztóval állítsa be a sütő fűtési módját. A
funkcióválasztó jobbra vagy balra forgatható.
Ha bekapcsolja a funkcióválasztót, a sütőlámpa világít.
Nyomógombok és kijelzések
A nyomógombokkal különböző kiegészítő funkciók állíthatók
be. A kijelzőn megjelennek a beállított értékek.
Magyarázatok
1 Funkcióválasztó
2 Kezelőgombok és kijelzőmező
3Hőfokszabályozó
Állásai Funkció
ý
Ki A sütő ki van kapcsolva.
%
Felső/alsó fűtés A sütés csak egy szinten lehetsé-
ges. Sütőformában vagy tepsiben
sütött süteményekhez, pizzához,
illetve sovány marha-, borjú- és vadsültekhez ez a beállítás kiválóan
alkalmas. A hő egyenletesen áramlik fentről és lentről.
:
3D forró levegő* Sütemény, pizza, aprósütemény,
muffin és leveles tészta egyidejűleg
két szinten süthető.
A sütő hátfalán lévő körfűtőtestes
ventilátor egyenletes elosztja a felmelegített levegőt.
$
Alsó fűtés Az alsó fűtéssel után tudja sütni, ill.
meg tudja pirítani az ételeket. A
meleg levegő alulról éri az ételt.
* Az EN50304 energiahatékonysági osztály szerinti fűtési
mód.
4
Légkeverős grillezés
A légkeverős grillezés különösen
alkalmas hal, baromfi és nagy húsdarabok grillezésére. A grillfűtőtest
és a ventilátor felváltva be- és
kikapcsol. A ventilátor elosztja a felmelegített levegőt az ételek körül.
(
Felületi grill, nagy
felület
Így több szelet frissensültet, virslit,
halat és pirítóst készíthet. A grillfűtőtest alatti teljes felület felforrósodik.
I
Gyorsfelfűtés Az ételek gyors felmelegítéséhez.
Nyomógomb Használat
0
Óra nyomógomb Ezzel állítható be az idő, a sütés
időtartama
x és a kikapcsolási
idő
y.
C
Kulcs nyomógomb Ezzel kapcsolható be és ki a gye-
rekzár.
V
Jelzőóra nyomógomb Ezzel állítható be a jelzőóra.
A
Mínusz nyomógomb Ezzel lefelé módosíthatja a beállí-
tási értékeket.
@
Plusz nyomógomb Ezzel felfelé módosíthatja a beállí-
tási értékeket.
Állásai Funkció
* Az EN50304 energiahatékonysági osztály szerinti fűtési
mód.
Page 45

45
Hőfokszabályozó
A hőfokszabályozóval be tudja állítani a kívánt hőmérsékletet és
a grillfokozatot.
Ha a sütő fűt, a hőfokszabályozó feletti lámpa világít. A sütés
szünetelésekor kialszik. Néhány beállításnál a lámpa nem
világít.
Grillfokozatok
Felületi grillnél
( a hőfokszabályozóval állítson be egy
grillfokozatot.
Sütőtér
A sütőlámpa a sütőtérben található. A sütőt egy hűtőventilátor
védi a túlmelegedéstől.
Sütőlámpa
A sütőlámpa világít a sütő működése közben. A funkcióválasztó
tetszőleges helyzetbe történő elforgatásával a sütőlámpa a sütő
felfűtése nélkül bekapcsolható .
Hűtőventilátor
A hűtőventilátor szükség szerint be- és kikapcsol. A meleg
levegő az ajtón át távozik.
Azért, hogy a működést követően a sütőtér gyorsabban
lehűljön, a hűtőventilátor meghatározott ideig még működik.
Figyelem!
Hagyja szabadon a szellőztető nyílást. Különben a sütő
túlhevül.
Tartozékok
A tartozékok számos étel elkészítéséhez használhatók.
Ügyeljen arra, hogy a tartozékok mindig megfelelően legyenek
a sütőtérbe helyezve.
A még jobb sütési eredményhez és a sütő még kényelmesebb
kezeléséhez különböző kiegészítő tartozékok állnak
rendelkezésére.
Tartozékok betolása
A tartozékok 4 különböző magasságban tolhatók be a sütőbe.
A tartozékot mindig ütközésig tolja be úgy, hogy az ne érjen az
ajtóüveghez.
Ha a tartozék félig ki van húzva, bekattan. Így könnyen kiveheti
az ételeket.
A sütőbe való betolásakor ügyeljen a kiöblösödésre a tartozék
hátoldalán. Csak így kattan be megfelelően.
Utasítás: A tartozék hő hatására eldeformálódhat. Amikor a
tartozék lehűl, visszanyeri az eredeti formáját. Ez nem
befolyásolja a működést.
Mindkét kezével fogja meg oldalt a sütőtepsit, és
párhuzamosan tolja be az állványra. A sütőtepsi betolásánál
ügyeljen, hogy a sütőtepsi ne mozduljon el jobbra vagy balra.
Ellenkező esetben a sütőtepsit csak nehezen tudja betolni. A
zománcozott felületek megsérülhetnek.
Tartozékokat a vevőszolgálatnál, szakkereskedésekben vagy
interneten vásárolhat. Kérjük, adja meg a HZ számot.
Állásai Funkció
ÿ
Ki A sütő nem fűt.
50-270 Hőmérséklet-tarto-
mány
Hőmérséklet a sütőtérben
(ºC).
•, ••, ••• Grillfokozatok Grillfokozatok a grill,
nagy
( felülethez.
• = 1-es fokozat, gyenge
•• = 2-es fokozat, közepes
••• = 3-as fokozat, erős
Rostély
Edényekhez, süteményformákhoz,
sültekhez, grillszeletekhez és mélyhűtött ételekhez.
A rostélyt a nyitott oldalával a
sütőajtó felé és hajlattal lefelé
¾tolja be.
Univerzális serpenyő
Lédús süteményekhez, süteményekhez, mélyhűtött ételekhez vagy sültekhez. Zsírfelfogó edényként is
használhatja akkor, amikor közvetlenül a rostélyon grillez.
Az univerzális serpenyőt a letompított élével a sütőajtó felé tolja be.
Page 46

46
Kiegészítő tartozékok
Kiegészítő tartozékokat a vevőszolgálatnál vagy a
szakkereskedésekben vásárolhat. Brosúráinkban vagy az
interneten számos, az Ön sütőjéhez megfelelő terméket talál. A
kiegészítő tartozékok készlete és online rendelhetőségük
országonként változó. Ezzel kapcsolatban az útmutatókban
talál információkat.
Nem minden kiegészítő tartozék alkalmas minden készülékhez.
Vásárláskor mindig adja meg készüléke teljes nevét (E-szám).
Sütőajtó - További biztonsági intézkedések
Hosszabb sütési idő esetén a sütőajtó felforrósodhat.
Amennyiben gyermek tartózkodik a közelben, a sütő
működtetésekor fokozott óvatosság szükséges.
Ezenfelül rendelkezésre áll egy védőeszköz, amely
megakadályozza a sütőajtó közvetlen megérintését. Ez a
kiegészítő tartozék( 440651) az ügyfélszolgálaton kapható.
Az első használat előtt
Itt megtudhatja, hogy mit kell tennie, mielőtt először készítene
ételt a sütőjével. Olvassa el előbb a Biztonsági útmutató című
fejezetet.
Az idő beállítása
A csatlakoztatás után világít a kijelzőn a 0 szimbólum és
három nulla. Állítsa be az időt.
1. Nyomja meg a 0 gombot.
A kijelzőn látható az idő 12:00 és a
0 szimbólum villog.
2. A + vagy a - gombbal állítsa be az időt.
Néhány másodperc múlva a készülék átveszi a beállított időt.
A sütő felfűtése
Az új szag megszüntetéséhez fűtse fel az üres, zárt sütőt. Ehhez
egy óra időtartam az ideális felső/alsó fűtésnél
% 240 °C-on.
Ügyeljen rá, hogy ne maradjon csomagolóanyag a sütőtérben.
1. A funkcióválasztóval állítsa be a felső/alsó fűtést %.
2. A hőfokszabályozóval állítsa be a 240 °C-ot.
Egy óra elteltével kapcsolja ki a sütőt. A funkcióválasztót és a
hőfokszabályozót forgassa nulla állásba.
A tartozékok tisztítása
Mielőtt először használná a tartozékokat, alaposan tisztítsa meg
azokat forró mosogatószeres vízzel és egy puha törlőruhával.
A sütő beállítása
A sütő beállítására különböző lehetőségei vannak. Innen
megtudhatja, hogyan állíthatja be a kívánt fűtési módot és a
hőmérsékletet vagy a grillfokozatot. A sütőn beállíthatja az
ételhez az időtartamot és a kikapcsolási időt .
Fűtési módok és hőmérséklet
Példa az ábrán: Felső/alsó fűtés 190 ºC.
1. A funkcióválasztóval állítsa be a kívánt fűtési módot.
2. A hőfokszabályozóval be tudja állítani a kívánt hőmérsékletet
vagy a grillfokozatot.
A sütő elkezd fűteni.
Sütő kikapcsolása
Forgassa a funkcióválasztót a nulla állásba.
Kiegészítő tartozékok HZ-szám Funkció
Rostély HZ434000 Edényekhez, süteményformákhoz, sültekhez, grillszeletekhez és mélyhűtött
ételekhez.
Alumínium sütőtepsi HZ430001 Süteményekhez és aprósüteményekhez.
A sütőtepsit a letompított élével a sütőajtó felé tolja a sütőbe.
Zománcozott sütőtepsi HZ431001 Süteményekhez és aprósüteményekhez.
A sütőtepsit a letompított élével a sütőajtó felé tolja a sütőbe.
Univerzális serpenyő HZ432001 Lédús süteményekhez, aprósüteményekhez, mélyhűtött ételekhez és nagy sül-
tekhez. A rostély alá helyezve a zsír vagy a húslé felfogására is használható.
Az univerzális serpenyőt a letompított élével a sütőajtó felé tolja a sütőbe.
Page 47

47
Beállítások módosítása
A fűtési mód, hőmérséklet és grillfokozat szükség szerint
módosítható.
A sütőnek automatikusan ki kell kapcsolnia
Adja meg az étel elkészítéséhez szükséges időtartamot (sütési
idő).
Példa az ábrán: Felső/alsó fűtés
%, 200 °C, időtartam:
45 perc.
1. A funkcióválasztóval állítsa be a kívánt fűtési módot.
2. A hőfokszabályozóval be tudja állítani a kívánt hőmérsékletet
vagy a grillfokozatot.
3. Nyomja meg az óra 0 gombot.
Az időtartam
x szimbólum villog.
4. Állítsa be az időtartamot a + vagy - gombbal.
+ gomb / javasolt érték = 30 perc
- gomb / javasolt érték = 10 perc
Ha a párolási idő letelt
Egy hangjelzés hallható. A sütő kikapcsol. Nyomja meg kétszer
a
0 gombot, és a funkcióválasztóval kapcsolja ki.
A beállítás megváltoztatása
Nyomja meg az óra
0 gombot. A + vagy - gombbal
változtassa meg az időtartamot.
A beállítás megszakítása
Nyomja meg az óra
0 gombot. Nyomja meg a - gombot, míg a
kijelző eléri a nullát. Kapcsolja ki a funkcióválasztót.
Állítsa be az időtartamot, ha az idő eltűnik
Nyomja meg kétszer az óra
0 gombot, és állítsa be a
4. pontban leírtak szerint.
A sütőnek automatikusan be- és ki kell
kapcsolnia
Az élelmiszert ne hagyja hosszú ideig állni a sütőben. Hűtés
nélkül a hús és a hal könnyen megromlik.
Példa az ábrán: Felső/alsó fűtés
%, 200 °C. 10:45 óra van. Az
étel sütési ideje 45 perc, és 12:45 órára kell elkészülnie.
1. A funkcióválasztóval állítsa be a kívánt fűtési módot.
2. A hőfokszabályozóval be tudja állítani a kívánt hőmérsékletet
vagy a grillfokozatot.
3. Nyomja meg az óra 0 gombot.
Az időtartam
x szimbólum villog.
4. Állítsa be az időtartamot a + vagy - gombbal.
5. Annyiszor nyomja meg az óra 0 gombot, hogy a sütési idő
vége
y szimbólum villogjon.
A kijelzőn látható, mikor lesz kész az étel.
6. A + gombbal állítsa későbbre a kikapcsolási időt.
Pár másodperc után rögzíti a beállítást.
A kijelzőn a kikapcsolási idő látható, amely időpont előtt még
bekapcsol a sütő.
Ha a párolási idő letelt
Egy hangjelzés hallható. A sütő kikapcsol. Nyomja meg kétszer
a 0 gombot és a funkcióválasztóval kapcsolja ki.
Utasítás: Ameddig villog egy szimbólum, módosíthat a
beállításon. Ha a szimbólum világít, akkor készülék átvette a
beállítást.
Gyorsfelfűtés
A gyorsfelfűtéssel a sütő különlegesen gyorsan éri el a beállított
hőmérsékletet.
Használja a gyorsfelfűtést a 100 °C feletti beállított
hőmérsékleteknél.
Ahhoz, hogy az étel egyenletesen puhuljon, csak akkor tegye
be a sütőtérbe, amikor a gyorsfelfűtés befejeződött.
1. Állítsa a funkcióválasztót a I-ra.
2. A hőfokszabályozóval állítsa be a hőmérsékletet.
Néhány másodperc után a sütő melegíteni kezd. A
hőfokszabályzó fölötti jelzőlámpa világít.
A gyorsfelfűtés befejeződött
A hőfokszabályzó fölötti jelzőlámpa kialszik. Tegye az ételt a
sütőbe, és állítsa be a kívánt fűtési módot.
A gyorsfelfűtés megszakítása
Forgassa a funkcióválasztót a nulla-állásba. A sütő ki van
kapcsolva.
NJ
PLQ
K
NJ
PLQ
K
NJ
PLQ
K
NJ
PLQ
K
Page 48

48
Az idő beállítása
Az első bekapcsolás vagy áramszünet után a kijelzőn a 0
szimbólum és három nulla villog. Állítsa be az időt. A
funkcióválasztónak kikapcsolva kell lennie.
Így állítsa be
1. Nyomja meg az óra 0 gombot.
A kijelzőn megjelenik a 12.00 óra és a
0 szimbólum villog.
2. A + vagy a - gombbal állítsa be az időt.
Néhány másodperc elteltével a készülék elfogadja a pontos
időt. A
0 szimbólum kialszik.
Módosítás pl. nyári időszámításról télire
Nyomja meg kétszer az óra
0 gombot és a + vagy - gombbal
módosítsa.
Jelzőóra beállítása
A jelzőóra konyhai óraként használható. Ez az óra a sütőtől
függetlenül működik. A jelzőóra külön hangjelzéssel
rendelkezik. Így hallja, hogy a jelzőóra vagy egy sütési
időtartam járt-e le. A jelzőórát akkor is be tudja állítani, amikor a
gyerekzár aktív.
Így állítsa be
1. Nyomja meg a jelzőóra S gombot.
A
S szimbólum villog.
2. A + vagy a - gombbal állítsa be a jelzési időt.
Gomb + javasolt érték = 10 perc
Gomb - javasolt érték = 5 perc
Néhány másodperc múlva elindul a jelzőóra. A kijelzőn világít a
S szimbólum. Az idő leteltét mindig mutatja a kijelző.
Az időtartam letelte után
Egy hangjelzés hallható. Nyomja meg a jelzőóra
S gombot. A
jelzőórakijelzés kialszik.
A jelzőórán beállított idő módosítása
Nyomja meg a jelzőóra
S gombot. A + vagy - gombbal
változtassa meg az időt.
A beállítás törlése
Nyomja meg a jelzőóra
S gombot. Nyomja meg a - gombot,
míg a kijelző eléri a nullát.
A jelzőóra ideje és az időtartam egyszerre jár le
A szimbólumok világítanak. A jelzési idő leteltét mindig mutatja
a kijelző.
Maradék időtartam
x, kikapcsolási idő y vagy idő 0
lekérdezése:
Addig nyomja meg újra és újra az óra
0 gombot, amíg a
megfelelő szimbólum meg nem jelenik.
A lekérdezett érték néhány másodpercre megjelenik a kijelzőn.
Gyerekzár
Sütő
A sütő gyerekzárral van ellátva, nehogy a gyerekek tévedésből
bekapcsolják.
Gyerekzár be és kikapcsolása
A funkcióválasztónak kikapcsolva kell lennie.
Bekapcsolás: nyomja meg a kulcs
C gombot újra és újra
mindaddig, amíg a kijelzőn meg nem jelenik a
C szimbólum.
Ez kb. 4 másodpercig tart.
Kikapcsolás: nyomja meg a kulcs
C gombot újra és újra
mindaddig, amíg a
C szimbólum ki nem alszik.
Utasítások
■ A jelzőórát és az időt bármikor beállíthatja.
■ Áramkimaradás után a beállított gyerekzár törlődik.
Page 49

49
Ápolás és tisztítás
Gondos ápolással és tisztítással a sütő sokáig szép és
működőképes marad. Az alábbiakban bemutatjuk, hogyan
ápolja és tisztítsa megfelelően a sütőt.
Utasítások
■ Különböző anyagok, mint üveg, műanyag vagy fém, kis
színeltéréseket okozhatnak a sütő előlapján.
■ Az ajtólapokon látható árnyékok, melyek fátyolnak tűnnek, a
sütőlámpa fényvisszaverődései.
■ A zománcot nagyon magas hőmérsékleten égetik ki. Ezért
enyhe színeltérések keletkezhetnek. Ez normális és nem
befolyásolja a működést. A vékony sütőtepsik éleit nem lehet
tökéletesen zománcozni. Ezért ezek érdesek lehetnek. Ez
nem befolyásolja a korrózióvédelmet.
Tisztítószerek
Annak érdekében, hogy a különböző felületek ne sérüljenek a
nem megfelelő tisztítószer használatából adódóan, vegye
figyelembe a következő adatokat.
A sütő tisztításakor
■ ne használjon éles vagy súroló tisztítószert,
■ magas alkoholtartalmú tisztítószert,
■ súrolószivacsot,
■ nagynyomású vagy gőzsugaras tisztítógépet.
■ Ne tisztítsa az alkatrészeket mosogatógépben.
Az első használat előtt alaposan mossa ki az új szivacsot.
Állványok ki és beakasztása
Tisztításhoz az állványok kivehetők. A sütőnek le kell hűlnie.
Az állványok kiakasztása:
1. Alul húzza ki az állványt és egy kissé húzza előre. Húzza ki a
rögzítőnyílásból az állvány alsó részén lévő
hosszabbítószögeket (A ábra).
2. Végül hajtsa fel az állványt és óvatosan vegye ki (B ábra).
Tisztítószeres mosogatószivaccsal tisztítsa meg az állványokat.
Makacs szennyeződések eltávolításához használjon kefét.
Az állványok beakasztása:
1. A két horgot óvatosan helyezze a felső furatokba. (A-B ábra)
Nemesacél
előlapok
Törölje le a készüléket mosogatószeres vízzel.
Mindig szálirányban törölje. Másképpen felkarcolódhatnak. Puha törlőkendővel törölje
szárazra. Azonnal távolítsa el a vízkő, zsír,
keményítő és tojásfehérje-maradványokat. Ne
használjon súrolószert, karcoló szivacsot vagy
durva törlőkendőt. A nemesacél előlapok
polírozásához speciális nemesacél-tisztítószerek használhatók. Vegye figyelembe a gyártó
utasításait. Speciális nemesacél-tisztítószerek
a vevőszolgálatnál vagy a szakkereskedésekben kaphatók.
Zománcozott
felületek és
lakkozott felületek
Törölje le a készüléket meleg, mosogatószeres vízzel. Puha törlőkendővel törölje szárazra.
Gombok Törölje le a készüléket meleg, mosogatósze-
res vízzel. Puha törlőkendővel törölje szárazra.
Üvegtábla Üvegtisztítóval tisztítható. Ne használjon
agresszív tisztítószert vagy éles fémtárgyakat.
Ezek megkarcolhatják és károsíthatják az
üvegtábla felületét.
Tömítés Nedves törlőkendővel törölje le. Puha törlő-
kendővel törölje szárazra.
A sütő belseje Meleg vízzel vagy ecetes vízzel tisztítsa. Erős
szennyeződés esetén: Csak a kihűlt felületen
használjon sütőtisztítót.
A sütőlámpa
üvegburája
Törölje le a készüléket meleg, mosogatószeres vízzel. Puha törlőkendővel törölje szárazra.
Tartozék Áztassa be meleg mosogatószeres vízbe.
Kefével vagy szivaccsal tisztítsa meg.
Alumínium
sütőtepsi
(opcionális)
Ne tisztítsa mosogatógépben. Soha ne használjon sütőtisztítót. A karcolások elkerülése
érdekében a fémfelületet soha ne érintse meg
késsel vagy más éles tárggyal. Némi mosogatószerrel és nedves üvegtörlő-kendővel vagy
mikroszálas törlőkendővel vízszintes mozdulatokkal tisztítsa. Puha törlőkendővel törölje szárazra. Ne használjon súrolószert, karcoló
szivacsot vagy durva törlőkendőt. Összekarcolják a sütőtepsit
Gyerekzár
(opcionális)
Amennyiben a sütőajtóra fel van szerelve gyerekzár, tisztítás előtt el kell távolítani. Valamennyi műanyag alkatrészt áztassa be meleg
mosogatószeres vízbe, és tisztítsa meg szivaccsal. Puha törlőkendővel törölje szárazra.
Erős szennyeződés esetén a gyerekzár nem
működik megfelelően.
Főzőfelület A készülék ápolásával és tisztításával kapcso-
latos tudnivalók a főzőfelület használati utasításában találhatók.
%$
%$
Page 50

50
: Hibás összeszerelés:!
Soha ne mozgassa az állványt, mielőtt a két horog teljesen
beakadt volna a felső furatokba. A zománc megsérülhet és
lepattogzódhat (C ábra).
2. A két horognak teljesen be kell akadnia a felső furatokba.
Ekkor az állványt lassan és óvatosan lefelé mozgatva
akassza be az alsó furatokba (D ábra).
3. Mindkét állványt akassza be a sütő oldalfalaiba (E ábra).
A megfelelően összeszerelt állványok esetén a két felső
betolási magasság közötti távolság nagyobb.
A sütőajtó ki és beakasztása
Az ajtólapok tisztításához és kiszereléséhez a sütőajtó
kiakasztható.
A sütőajtó csuklópántjai egy-egy reteszelőkarral rendelkeznek.
Ha a reteszelőkar le van hajtva (A ábra), a sütőajtó biztosítva
van. Nem lehet kiakasztani. Ha a reteszelőkarok a sütőajtó
kiakasztásához fel vannak hajtva (B ábra), a csuklópántok
biztosítva vannak. Nem tudnak bekattanni.
: Sérülésveszély!
Ha a csuklópántok nincsenek biztosítva, nagy erővel
bekattannak. Ügyeljen rá, hogy a reteszelőkarok mindig
teljesen le legyenek hajtva, ill. a sütőajtó kiakasztásához
teljesen fel legyenek hajtva.
Ajtó kiakasztása
1. Nyissa ki teljesen a sütőajtót.
2. A bal és jobb oldali reteszelőkart hajtsa fel (A ábra).
3. A sütőajtót ütközésig csukja be. Két kézzel baloldalt és
jobboldalt fogja meg. Kissé csukja beljebb és húzza ki
(B ábra).
Ajtó beakasztása
A sütőajtót fordított sorrendben visszaakaszthatja.
1. A sütőajtó beakasztásánál ügyeljen rá, hogy mindkét
csuklópánt pontosan a nyílásba kerüljön (A ábra).
2. A csuklópántnál levő bevágásnak mindkét oldalon be kell
kattannia (B ábra).
3. Hajtsa vissza mindkét reteszelőkart (C ábra). Csukja be a
sütőajtót.
: Sérülésveszély!
Sérülésveszély! Ha a sütőajtó véletlenül kiesik vagy egy
csuklópánt bekattan, ne nyúljon a csuklópántba. Hívja az
ügyfélszolgálatot.
&
(
'
%$
%
$
%
$
&
Page 51

51
Ajtólapok ki- és beszerelése
A sütőajtó üveglapjai a jobb tisztítás érdekében kiszerelhetők.
Kiszerelés
1. Akassza ki a sütőajtót. Lásd a Sütőajtó kiakasztása fejezetet.
A sütőajtót markolattal lefelé tegye egy ruhára (A ábra).
2. Először a két alsó csavart, majd a két felső csavart fordítsa el
az óramutató járásával ellentétes irányban (B ábra).
3. Távolítsa el a borítást (C ábra).
A kiszerelt részeket ne mossa el. A lapokat ablaktisztítószerrel
és egy puha ruhával tisztítsa meg.
: Sérülésveszély!
A készülék ajtajának összekarcolt üvege megrepedhet. Ne
használjon üvegkaparót, éles vagy súroló hatású
tisztítóeszközöket.
Beszerelés
1. Tegye vissza a borítást (A ábra).
2. Először a két alsó csavart, majd a két felső csavart csavarja
be (B ábra).
3. Akassza be a sütőajtót. Lásd a Sütőajtó beakasztása
fejezetet.
A sütő akkor használható újra, ha a lapok megfelelően be
vannak helyezve.
Mit tegyünk meghibásodás esetén?
Ha valami zavar keletkezik, akkor igen gyakran csak apróságról
van szó. Mielőtt hívná az ügyfélszolgálatot, nézzen után a
táblázatban. Lehetséges, hogy saját kezűleg is el tudja hárítani
a hibát.
Hibatáblázat
Ha egyszer egy ételt nem sikerül optimálisan elkészíteni,
nézzen utána a Kísérleti konyhánkban Önnek teszteltük
fejezetben. Ott sok ötletet és útmutatást talál a főzéshez.
: Áramütésveszély!
A szakszerűtlen javítások veszélyesek. Javításokat csak
szakképzett ügyfélszolgálati technikus végezhet.
Figyelem!
Ha a csatlakozókábel megsérül, csak a gyártó, a vevőszolgálat
vagy egy hasonlóan képzett személy cserélheti ki.
A fedélen lévő sütőlámpa cseréje
Ha a sütőlámpa kiég, ki kell cserélni. 40 wattos hőálló pótégő
az ügyfélszolgálatnál vagy a szakkereskedésekben kapható.
Csakis ilyen lámpákat használjon.
: Áramütésveszély!
Kapcsolja ki a biztosítékot a biztosítékszekrényben.
1. A károsodások megelőzése érdekében tegyen törlőruhát a
hideg sütőbe.
2. Az üvegburát balra forgatva csavarja ki.
3. A lámpát ugyanolyan típusú lámpával pótolja.
%
$
&
%
$
Zavar Lehetséges ok Elhárítás/Útmutatás
A sütő nem
működik.
A biztosíték
meghibásodott.
Nézzen utána a biztosítékszekrényben, hogy a biztosíték rendben van-e.
Áramkimaradás.
Ellenőrizze, hogy a konyhai
világítás vagy más konyhai
készülék működik-e.
Az óra kijelző
villog
Áramkimaradás.
Állítsa be ismét az időt.
A sütő nem fűt. Por van az érint-
kezőkön.
Forgassa a kapcsolófogantyúkat többször errearra.
Page 52

52
4. Csavarja vissza az üvegburát.
5. Vegye ki a törlőruhát és kapcsolja be a biztosítékot.
Üvegbura
A sérült üvegburát ki kell cserélni. Megfelelő üvegbura az
ügyfélszolgálatnál kapható. Adja meg készüléke E-számát és
FD-számát.
Ügyfélszolgálat
Amennyiben az Ön készülékét javítani kell, vevőszolgálatunk a
rendelkezésére áll. Mindig megtaláljuk a megfelelő megoldást
már csak azért is, hogy elkerüljük szerviztechnikusaink
szükségtelen kiszállásait.
E-szám és FD-szám
Telefonos megkeresés esetén adja meg a termékszámot
(E-szám) és a gyártási számot (FD-szám), hogy szakszerű
segítséget nyújthassunk Önnek. A számmal ellátott típustáblát a
sütőajtó oldalán találja. Hogy szükség esetén ne kelljen sokáig
keresgélnie, felírhatja ide a készülékének adatait és az
ügyfélszolgálat telefonszámát.
Vegye figyelembe, hogy a szerviztechnikus kiszállása hibás
kezelésből eredő hibák esetén a garanciális időszakban sem
ingyenes.
Az egyes országok kapcsolati adatait megtalálja a mellékelt
ügyfélszolgálati jegyzékben.
Javítási megrendelés és tanácsadás zavarok esetén
Bízzon a gyártó hozzáértésében. Ezzel biztosítja, hogy a javítást
szakképzett szerelők végzik el, akik eredeti pótalkatrészekkel
rendelkeznek az Ön készülékéhez.
Energiamegtakarítási és környezetbarát ötletek
Itt ötleteket adunk Önnek ahhoz, hogyan takaríthat meg sütés
közben energiát, és hogyan ártalmatlaníthatja készülékét
megfelelően.
Energiamegtakarítás
■ A sütőt csak akkor melegítse elő, ha azt a recept vagy a
használati útmutató táblázata előírja.
■ Használjon sötét, feketére lakkozott vagy zománcozott
sütőformákat. Ezek különösen jól veszik fel a hőt.
■ Főzés vagy sütés közben lehetőleg ritkán nyitogassa a
sütőajtót.
■ Ha többféle süteményt készít, azokat legjobb egymás után
sütni. A sütő még meleg. Így a második sütemény sütési
ideje rövidebb lesz. 2 négyszögletes sütőformát egymás
mellé is betolhat.
■ Hosszabb párolási idők esetén a sütő mintegy 10 perccel a
párolási idő lejárta előtt kikapcsolható, a maradékhőt
használva a készre pároláshoz.
Ártalmatlanítás környezetbarát módon
A csomagolást környezetbarát módon ártalmatlanítsa.
Szállítási utasítások
A készülék minden mozgatható részét rögzítse
ragasztószalaggal, amely később nyom nélkül eltávolítható. Az
összes tartozék (pl. sütőtepsi) szélét borítsa be vékony
kartonnal, és tolja őket a megfelelő rekeszbe, nehogy a
készülék megsérüljön. Helyezzen kartont vagy hasonló anyagot
az elő- és hátlap közé, nehogy az üvegajtó belső oldala
megütődjön. Egy ragasztószalag segítségével rögzítse a
sütőajtót a készülék oldalfalaihoz.
Őrizze meg a készülék eredeti csomagolását. Csak az eredeti
csomagolásban szállítsa a készüléket. Ügyeljen a
csomagoláson található nyilakra.
Ha az eredeti csomagolás már nem áll rendelkezésre
Tegye a készüléket új védőcsomagolásba, hogy megfelelő
védelmet biztosítson az esetleges szállítási károkkal szemben.
A készüléket függőleges helyzetben szállítsa. Ne fogja meg a
készüléket az ajtófogantyúnál vagy a hátlap csatlakozásainál,
mert azok megsérülhetnek. Ne helyezzen nehéz tárgyakat a
készülékre.
Eszám.
FDszám
(gyártási
szám)
Ügyfélszolgálat O
H +361 489 5461
Ez a készülék az elhasznált villamossági és
elektronikai készülékekről szóló 2012/19/EK
irányelvnek megfelelő jelölést kapott.
Ez az irányelv a már nem használt készülékek
visszavételének és hasznosításának EU-szerte
érvényes kereteit határozza meg.
Page 53

53
Kísérleti konyhánkban teszteltük Önnek
Ebben a fejezetben ételek és azok optimális beállításai
találhatók. Megmutatjuk Önnek, melyik fűtési mód és
hőmérséklet a legmegfelelőbb a kiválasztott ételhez. Adatok is
olvashatók a megfelelő tartozékokról és arról, melyik szintre
kell betolni azokat. Tippeket adunk Önnek az edényekhez és az
elkészítéshez.
Utasítások
■ A táblázatban lévő értékek mindig a hideg és üres sütőtérbe
való betolásra érvényesek.
Csak akkor melegítsen elő, ha ez a táblázatban szerepel. A
tartozékot csak az előmelegítés után bélelje ki sütőpapírral.
■ A táblázatokban megadott időtartamok irányértékek.
Függnek az élelmiszer minőségétől és tulajdonságaitól.
■ A mellékelt tartozékokat használja. További tartozékok
kiegészítő tartozékként a szakkereskedésben vagy a
vevőszolgálatnál kaphatók.
Használat előtt minden olyan tartozékot vegyen ki a
sütőtérből, amelyre nincs szüksége.
■ Mindig használjon edényfogót, ha a forró tartozékot vagy az
edényt kiveszi a sütőtérből.
Torták és sütemények
Sütés egy szinten
Sütemények és torták sütéséhez a felső/alsó fűtési mód
% a
legjobb.
A 3D forró levegő
: alkalmazásakor a tartozékokat az alábbi
betolási magasságokra tolja be:
■ Sütemények süteményformában: 2. szint
■ Sütemények sütőtepsin: 3. szint
Több szinten való sütés
Használja a 3D forró levegőt
:.
Betolási magasságok 2 szinten való sütéskor:
■ univerzális serpenyő: 3. szint
■ sütőtepsi: 1. szint
Az egyidejűleg a sütőbe tett ételeknek nem kell ugyanakkor
készen lenniük.
A táblázatokban megtalálható az ételválaszték.
Sütőformák:
A sötét, fémből készült sütőformák a legalkalmasabbak.
Vékony falú fémből készült világos sütőforma vagy üveg
sütőforma használata esetén a sütési idő meghosszabbodik és
a sütemény nem pirul meg olyan egyenletesen.
Ha szilikonformát szeretne használni, vegye figyelembe a
gyártó adatait és receptjeit. A szilikonformák gyakran kisebbek,
mint a normál formák. A tésztamennyiségek és a receptben
megadott adatok eltérhetnek.
Táblázatok
A táblázatokban a különböző sütemények elkészítéséhez
megtalálható az optimális fűtési mód. Hőmérséklet és sütési idő
a tészta mennyiségétől és minőségétől függ. Ezért
tartományokat adtunk meg a táblázatokban. Először próbálja
meg az alacsonyabb értékkel. Az alacsonyabb hőmérséklet
egyenletesebb barnulást biztosít. Ha szükséges, legközelebb
állítsa eggyel magasabbra.
Ha előmelegít, a sütési idő 5-10 perccel lecsökken.
Kiegészítő információk a Tippek sütéshez fejezetben találhatók
a táblázatok után.
Utasítás: Ne helyezze az élelmiszert közvetlenül az alumínium
sütőtepsire. Bélelje ki az alumínium sütőtepsit sütőpapírral.
Formában sült sütemények Forma Magasság Fűtési mód Hőmérséklet, °C Időtartam, perc
Kevert tészta, egyszerűŐzgerincforma 2
%
160-180 55-65
Kevert tészta, finom (pl. omlós sütemény)
Őzgerincforma 2
%
155-175 65-75
Omlóstészta-lap széllel Kerek sütőforma 1
%
160-180 30-40
Tortalap kevert tésztából Gyümölcsös sütőforma 2
%
160-180 25-35
Piskótatorta Kerek sütőforma 2
%
160-180 30-40
Gyümölcs vagy túrótorta, omlós tészta* Sötét, kerek sütőforma 1
%
170-190 70-90
Gyümölcsös finom sütemény, kevert
tésztából
Kerek sütőforma 2
%
150-170 55-65
Pikáns sütemény* (pl. omlós torta,
hagymatorta)
Kerek sütőforma 1
%
180-200 50-60
* A süteményt kb. 20 percig hagyja a készülékben kihűlni.
Sütemény a sütőlapon Tartozék Magasság Fűtési mód Hőmérséklet
°C-ban
Időtartam,
perc
Kevert vagy kelt tészta, száraz töltelékkel univerzális serpenyő:3
%
160-180 25-35
alumínium sütőtepsi* +
univerzális serpenyő**
1+3
:
150-170 35-45
Kevert vagy kelt tészta lédús töltelékkel
(gyümölcs)
univerzális serpenyő:3
%
140-160 40-50
alumínium sütőtepsi* +
univerzális serpenyő**
1+3
:
130-150 50-60
* Kiegészítő sütőtepsik az ügyfélszolgálaton vagy a szakkereskedésben kaphatók.
** Két szinten való sütéskor az univerzális serpenyőt mindig tolja be a sütőtepsi fölé.
Page 54

54
Kenyér- és zsemlefélék
Amennyiben nincs másként megadva, kenyérsütéshez mindig
melegítse elő a sütőt.
Soha ne öntsön vizet közvetlenül a forró sütőbe.
Sütési ötletek
Piskótatekercs (előmelegítés) univerzális serpenyő:2
%
170-190 15-20
Kelesztett fonott kalács, 500 g liszt univerzális serpenyő:2
%
160-180 25-35
Püspökkenyér, 500 g liszt univerzális serpenyő:3
%
160-180 50-60
Püspökkenyér, 1 kg liszt univerzális serpenyő:3
%
150-170 90-100
Rétes, édes univerzális serpenyő:2
%
180-200 55-65
Pizza univerzális serpenyő:3
%
180-200 20-30
alumínium sütőtepsi* +
univerzális serpenyő**
1+3
:
150-170 35-45
Sütemény a sütőlapon Tartozék Magasság Fűtési mód Hőmérséklet
°C-ban
Időtartam,
perc
* Kiegészítő sütőtepsik az ügyfélszolgálaton vagy a szakkereskedésben kaphatók.
** Két szinten való sütéskor az univerzális serpenyőt mindig tolja be a sütőtepsi fölé.
Kenyér- és zsemlefélék Tartozék Magasság Fűtési mód Hőmérséklet, °C Időtartam,
perc
Kelesztett kenyér, 1,2 kg liszt Univerzális serpenyő:2
%
270
190
8
35-45
Kovászos kenyér, 1,2 kg liszt Univerzális serpenyő:2
%
270
190
8
35-45
Zsemle (pl.: rozsos zsemle) Univerzális serpenyő:2
%
200-220 20-30
Aprósütemény Tartozék Magasság Fűtési mód Hőmérséklet
°C-ban
Időtartam,
perc
Aprósütemény univerzális serpenyő:3
%
150-170 10-20
alumínium sütőtepsi* + univerzális serpenyő** 1+3
:
130-150 25-35
Habcsók univerzális serpenyő:3
:
70-90 135-145
Képviselőfánk univerzális serpenyő 2
%
200-220 30-40
Mandulás habcsók univerzális serpenyő 3
%
110-130 30-40
alumínium sütőtepsi* + univerzális serpenyő** 1+3
:
100-120 35-45
Leveles tészta univerzális serpenyő 3
:
190-210 20-30
alumínium sütőtepsi* + univerzális serpenyő** 1+3
:
180-200 25-35
* Kiegészítő sütőtepsik az ügyfélszolgálaton vagy a szakkereskedésben kaphatók.
** Két szinten való sütéskor az univerzális serpenyőt mindig tolja be a sütőtepsi fölé.
Ha saját recept szerint szeretne sütni. Tájékozódjon a sütési táblázatokban bemutatott hasonló sütemények alapján.
Így lehet megállapítani, hogy a kevert
tésztából készült sütemény átsült-e.
A receptben megadott sütési idő vége előtt mintegy 10 perccel szúrjon bele a tészta legmagasabb pontjába egy fogpiszkálót. Ha nem ragad már tészta a fogpiszkálóra, akkor a
sütemény kész.
A sütemény összeesik. Legközelebb használjon kevesebb folyadékot, vagy állítsa 10 fokkal alacsonyabbra a
sütőhőmérsékletet. Tartsa be a receptben megadott keverési időket.
A sütemény középen szépen feljött, de a
szélén alacsony maradt.
A kerek tortaformák peremét ne kenje ki. Sütés után óvatosan, késsel lazítsa fel a süteményt.
A sütemény felül túl sötét lett. Mélyebbre tolja be, válasszon alacsonyabb hőmérsékletet és a süteményt valamivel hos-
szabb ideig süsse.
A sütemény túl száraz. Fogpiszkálóval szúrjon lyukakat a kész süteménybe. Azután permetezze meg gyümölcs-
lével vagy alkoholos itallal. A következő alkalommal válasszon 10 fokkal magasabb
hőmérsékletet és csökkentse a sütési időt.
A kenyér vagy a sütemény (p l. túró-
torta) jól néz ki, de belül nyúlós (raga-
csos, csíkokban vizes).
A következő alkalommal használjon kevesebb folyadékot, és alacsonyabb hőmérsékleten süsse, valamivel hosszabb ideig. A lédús töltelékkel készülő süteményhez süsse
meg előre az alapot. Szórja meg mandulával vagy zsemlemorzsával, és azután tegye rá
a tölteléket. Tartsa be a receptben leírtakat és a sütési időt.
Page 55

55
Hús, szárnyas, hal
Edény
Bármilyen hőálló edény használható. Nagy sültekhez jó az
univerzális serpenyő is.
Legmegfelelőbbek az üvegből készült edények. Ügyeljen rá,
hogy a sütőedény fedele illeszkedjen és jól záródjon.
Ha zománcozott sütőedényt használ, adjon hozzá kicsivel több
folyadékot.
A nemesacélból készült sütőedényeknél a pirítás nem olyan
erős és a hús kicsivel keményebb. Hosszabbítsa meg a sütési
időt.
A táblázatokban szereplő adatok:
Edény fedő nélkül = nyitott
Edény fedővel = zárt
Az edényt mindig a rostély közepére tegye.
A forró üvegedényt száraz alátétre tegye. Ha az alátét nyirkos
vagy hideg, az üveg megrepedhet.
Sültek
A sovány húshoz adjon egy kevés folyadékot. Az edény alján
kb. ½ cm folyadék legyen.
Párolt sültekhez bőven adjon folyadékot. Az edény alján 1 2 cm folyadék legyen.
A folyadék mennyisége függ a hús fajtájától és az edény
anyagától. Ha zománcozott sütőedényben készít húst, valamivel
több folyadékra van szükség, mint az üvegedények esetében.
A nemesacélból készült sütőedények csak feltételesen
használhatók. A hús lassabban fő és kevésbé pirul meg.
Magasabb hőmérsékletet és/vagy hosszabb sütési időt
használjon.
Tudnivalók a grillezéshez
Mindig zárt sütőben grillezzen.
Melegítse elő a grillt kb. 3 percig, mielőtt a rostélyra teszi a
grillszeleteket.
A grillszeleteket helyezze közvetlenül a rostélyra. Ha egyetlen
grillszeletet süt, azt legjobb a rostély közepére tenni. Az
univerzális serpenyőt pedig tolja be az 1. szintre. Ez felfogja a
húslevet, és a sütő tisztább marad.
A sütőtepsit vagy az univerzális serpenyőt ne tolja be a 4.
szintre. Magas hőmérsékletnél eldeformálódhatnak, és
kihúzáskor károsíthatják a sütőteret.
A grillszeletek lehetőleg egyforma méretűek legyenek. Így
egyenletesen pirulnak meg, és finom szaftosak maradnak. A
frissensülteket csak grillezés után sózza meg.
A grillszeleteket a megadott idő
Z-a után fordítsa meg.
A grillfűtőtest folyamatosan be- és kikapcsol. Ez normális. A beés kikapcsolás gyakorisága a beállított grillfokozattól függ.
Hús
Az időtartam felénél fordítsa meg a húsdarabokat.
Amikor a sült elkészült, hagyja még 10 percig a kikapcsolt, zárt
sütőben pihenni. Így a hús szaftja jobban eloszlik.
A sült hátszínt főzés után tekerje alufóliába és hagyja 10 percig
a sütőben pihenni.
A bőrös sertéscombnál vágja be a bőrt keresztbe, és a sültet
először bőrével lefelé tegye az edénybe.
A sütemény egyenetlenül pirult meg. Alacsonyabb hőmérsékletet válasszon, akkor a sütemény egyenletesebben fog pirulni.
Kényes süteményt felső/alsó fűtéssel
% süssön egy szinten. A kiálló sütőpapír is befo-
lyásolhatja a légkeringetést. A sütőpapírt mindig a tepsi méretére vágja le.
A gyümölcsös sütemény alul túl világos. Legközelebb egy szinttel lejjebb tolja be a süteményt.
A gyümölcslé kifut. Legközelebb használjon mélyebb univerzális serpenyőt, ha van.
A kelt tésztából készült aprósütemény
sütés közben egymáshoz ragad.
Minden süteménydarab körül hagyjon kb. 2 cm távolságot. Így van elég hely, hogy a
sütemények szépen feljöjjenek és körös-körül megpiruljanak.
Ha több szinten sütött. A felső sütőtepsin a sütemény sötétebb, mint az alsón.
Több szinten való sütésnél mindig 3 dimenziós forró levegős üzemmódot
: használjon.
Az egyidejűleg betolt tepsiknek nem kell egyidejűleg készen lenniük.
Lédús sütemények sütésekor kondenzvíz keletkezik.
Sütéskor vízgőz keletkezhet. A vízgőz az ajtó felett távozik. A vízgőz lecsapódhat a kezelőfelületen vagy a szomszédos bútorlapokon, és kondenzvízként lecsepeghet. Ez fizikai
jelenség.
Hús Súly Tartozék és edény Magasság Fűtési mód Hőmérséklet
°C, grillfokozat
Időtartam,
perc
Marhahús
Marhasült 1,0 kg zárt 2
%
200-220 120
1,5 kg 2
%
190-210 140
2,0 kg 2
%
180-200 160
Bélszín, rózsaszín 1,0 kg nyitott 1
%
210-230 70
1,5 kg 1
%
200-220 80
Sült hátszín, rózsaszín 1,0 kg nyitott 1
4
230-250 50
Steak, 3 cm, rózsaszín rostély + univerzális
serpenyő
4+1
(
315
Borjúhús
Borjúsült 1,0 kg nyitott 1
%
200-220 100
1,5 kg 1
%
190-210 120
2,0 kg 1
%
180-200 140
Page 56

56
Baromfi
A táblázatban megadott értékek hideg sütőbe való
behelyezésre vonatkoznak.
A táblázatban megadott súlyok a töltelék nélküli, sütésre
előkészített baromfihúsra vonatkoznak.
Ha közvetlenül a rostélyon grillezi a húst, tegye be az
univerzális serpenyőt az 1. szintre.
Kacsa vagy liba sütésekor szúrja fel a szárny alatti bőrt, hogy a
zsír kifolyhasson.
A baromfit mellső oldalával lefelé tegye a rostélyra. Az
egészben sütött baromfit a sütési idő kétharmadánál fordítsa
meg.
A baromfi különösen ropogós barna lesz, ha a sütési idő vége
felé vajjal, sósvízzel vagy narancslével keni meg.
Hal
A haldarabokat a megadott idő
Z-a után fordítsa meg.
Nem kell megfordítania az egész halat. Az egész halat hasával
lefelé, hátuszonyával felfelé tolja be a sütőbe. Helyezzen egy fél
burgonyát vagy egy kisméretű, sütésálló edényt a hasüregbe,
hogy a hal stabilabban álljon.
Ha közvetlenül a rostélyon grillez, tolja be a sütőtepsit az
1. szintre. Ez felfogja a hal levét, és a sütő tisztább marad.
Sertéshús
bőr nélkül (pl . tarja) 1,0 kg nyitott 1
4
190-210 120
1,5 kg 1
4
180-200 150
2,0 kg 1
4
170-190 170
bőrös sült (pl . lapocka) 1,0 kg nyitott 1
4
180-200 130
1,5 kg 1
4
190-210 160
2,0 kg 1
4
170-190 190
Pácolt füstölt karaj csonttal 1,0 kg zárt 1
%
210-230 80
Bárányhús
Báránycomb csont nélkül, köze-
pesen átsütve
1,5 kg nyitott 1
4
170-190 120
Darált hús
Fasírt kb. 750 g nyitott 1
4
180-200 70
Virsli
Virsli rostély + univerzális
serpenyő
4+1
(
315
Hús Súly Tartozék és edény Magasság Fűtési mód Hőmérséklet
°C, grillfokozat
Időtartam,
perc
Baromfi Súly Tartozék és edény Magasság Fűtési mód Hőmérséklet,
°C, grillfokozat
Időtartam, perc
Fél csirke, 1-4 darab darabja 400 g rostély 2
4
210-230 40-50
Darabolt csirke darabja 250 g rostély 3
4
210-230 30-40
Csirke, egész, 1-4 darab darabja 1 kg rostély 2
4
200-220 55-85
Kacsa, egész 1,7 kg rostély 2
4
170-190 80-100
Liba, egész 3,0 kg rostély 2
4
160-180 110-130
Bébipulyka, egész 3,0 kg rostély 2
4
180-200 80-100
2 pulykacomb darabja 800 g rostély 2
4
180-200 80-100
Hal Súly Tartozék és
edény
Magasság Fűtési mód Hőmérséklet °C-
ban, grillfokozat
Időtartam, perc
Hal, egész darabja 300 g rostély 3
(
2 20-25
1,0 kg rostély 2
4
190-210 40-50
1,5 kg rostély 2
4
180-200 60-70
Szeletelt hal, pl. kottlet darabja 300 g rostély 4
(
2 20-25
Page 57

57
Tippek sütéshez és grillezéshez
Felfújtak, gratinírozott ételek, pirítós
Ha közvetlenül a rostélyon grillez, tolja be még az univerzális
serpenyőt is az 1. szintre. A sütő tisztább marad.
Az edényt mindig állítsa a rostélyra.
A felfújt főzési állapota függ az edény nagyságától és a felfújt
magasságától. A táblázatban megadott értékek csak
irányértékek.
Késztermékek
Ügyeljen a csomagoláson található gyártói utasításokra.
Ha a tartozékokat kibéleli sütőpapírral, ügyeljen rá, hogy a
sütőpapír használható legyen ezeken a hőmérsékleteken. A
papír nagyságát igazítsa az ételhez.
A főzés eredménye nagymértékben függ az élelmiszertől.
Előzetes barnulás és egyenetlenség már a nyers árunál
előfordulhat.
Megjegyzés
Mélyfagyasztott ételek sütésekor az univerzális serpenyő deformálódhat. Ennek az az oka, hogy a tartozék nagy hőmérsékletkülönbségeknek van kitéve. A deformálódás még a sütési folyamat közben eltűnik.
A sült pontos súlyára vonatkozóan nincsenek adatok a táblázatban.
Az adatokat a legközelebbi legalacsonyabb súlynak megfelelően válassza ki, és hosszabbítsa meg az időt.
Hogyan állapítható meg, hogy a sült
elkészült-e.
Használjon húshőmérőt (a szakkereskedésben kapható), vagy végezze el a „kanál-próbát“. Nyomja meg a kanállal a sültet. Ha a húst feszesnek érzi, készen van. Ha enged a
nyomásnak, még süsse egy darabig.
A sült túl sötét és a bőr helyenként megégett.
Ellenőrizze a betolási magasságot és a hőmérsékletet.
Ha a sült jól néz ki, de a mártás megégett.
Válasszon a következő alkalommal kisebb sütőedényt, vagy adjon hozzá több folyadékot.
Ha a sült jól néz ki, de a mártás túl világos és vízízű.
Válasszon a következő alkalommal nagyobb sütőedényt, és adjon hozzá kevesebb folyadékot.
A sült felöntésekor vízgőz keletkezik. Ez fizikai jelenség és normális. A vízgőz nagy része a gőzrésen át távozik. A vízgőz
lecsapódhat a hűvösebb kapcsolótáblán vagy a szomszédos bútorlapokon, és kondenzvízként lecsepeghet.
Étel Tartozék és edény Magasság Fűtési mód Hőmérséklet °C-ban Időtartam, perc
Felfújtak
Felfújt, édes felfújt forma 2
%
170-190 50-60
Tésztafelfújt felfújt forma 2
%
210-230 25-35
Felfújt
Burgonyafelfújt nyers hozzávalókból
max. 2 cm magas
felfújt forma 2
4
150-170 50-60
Pirítós
Kenyérpirítás, 12 darab rostély 4
(
3 4-5
Pirítós átsütve, 12 darab rostély 3
(
3 5-8
Étel Tartozék Magasság Fűtési mód Hőmérséklet
°C-ban
Időtartam, perc
Rétes gyümölcstöltelékkel univerzális ser-
penyő
3
:
190-210 45-55
Hasábburgonya univerzális ser-
penyő
3
%
210-230 25-30
Pizza rostély 2
%
200-220 15-20
Pizzás bagett rostély 2
4
190-210 15-20
Page 58

58
Különleges ételek
Alacsony hőmérsékleten a 3 dimenziós forró levegővel : a
krémes joghurt ugyanolyan finom lesz, mint a laza kelt tészta.
Először vegye ki a sütőből a tartozékokat, beakasztott rácsot
vagy a teleszkópos kihúzókat.
Joghurt készítése
1. Főzzön fel 1 liter tejet (3,5 % zsír), majd hűtse le 40 °C-ra.
2. Keverjen bele 150 g joghurtot (hűtőszekrény-hőmérséklet).
3. Töltse csészékbe vagy kis csavaros üvegekbe és fedje le
frissentartó fóliával.
4. A sütőt előírás szerint melegítse elő.
5. Ezután a csészéket vagy az üvegeket tegye a sütőtér aljára
és előírás szerint készítse el a joghurtot.
Kelt tészta kelesztése
1. A kelt tésztát a szokott módon készítse el, tegye kerámia
hőálló edénybe és fedje le.
2. A sütőt előírás szerint melegítse elő.
3. Kapcsolja ki a készüléket és a tésztát hagyja a sütőtérben
megkelni.
Felolvasztás
A felolvadási idő az élelmiszer fajtájától és mennyiségétől függ.
Kérjük, vegye figyelembe a gyártó által a csomagoláson
feltüntetett információkat.
Vegye ki az élelmiszert a csomagolásból, és tegye egy
megfelelő edényben a rostélyra.
A szárnyast mellére fektetve tegye a tányérra.
Aszalás
3 dimenziós forró levegővel : kiválóan aszalhat.
Csak kifogástalan gyümölcsöt és zöldséget használjon, és
alaposan mossa meg.
Hagyja jól lecsepegni, majd szárítsa meg.
Az univerzális serpenyőt és a rostélyt bélelje ki sütőpapírral
vagy pergamennel.
A nagyon lédús gyümölcsöt vagy zöldséget többször forgassa
meg.
Az aszalt ételt száradás után azonnal válassza el a papírtól.
Befőzés
Befőzéshez az üvegeknek és a gumigyűrűknek tisztának kell
lenniük. Lehetőleg ugyanakkora üvegeket használjon. A
táblázatban található adatok egy literes kerek üvegekre
vonatkoznak.
Figyelem!
Ne használjon nagyobb vagy magasabb üvegeket. A fedelük
megrepedhet.
Csakis kifogástalan gyümölcsöt és zöldséget használjon.
Alaposan mossa meg őket.
A táblázatokban megadott időtartamok irányértékek. Azokat
befolyásolhatja a szobahőmérséklet, az üvegek száma,
mennyisége és az üvegek tartalmának hője. Át-, ill. kikapcsolás
előtt ellenőrizze, hogy az üvegek megfelelően gyöngyöznek.
Előkészítés
1. Töltse meg az üvegeket, de ne legyenek teljesen tele.
2. Törölje le az üveg szélét, mindenképpen legyen tiszta.
3. Minden üvegre tegyen egy nedves gumigyűrűt, majd a
fedelet.
4. Az üvegeket csatokkal zárja le.
Hatnál több üveget ne tegyen a sütőtérbe.
Beállítás
1. Tolja be az univerzális serpenyőt a 2. szintre. Úgy állítsa az
üvegeket, hogy azok ne érjenek egymáshoz.
2. Öntsön ½ liter forró vizet (kb. 80 °C) az univerzális
serpenyőbe.
3. Csukja be a sütőajtót.
4. Állítsa be az alsó fűtést $.
5. Állítsa a hőmérsékletet 170-180 °C-ra.
Étel Edény Fűtési mód Hőmérséklet Időtartam
Joghurt Csésze vagy csa-
varos üveg
tegye a sütőtér
aljára
:
50 °C-ra melegítse elő
50 °C
5 perc
8 óra
Kelt tészta kelesztése Hőálló edény tegye a sütőtér
aljára
:
50 °C-ra melegítse elő
Kapcsolja ki a készüléket és a
kelt tésztát tegye a sütőtérbe
5-10 perc
20-30 perc
Mélyhűtött áru Tartozék Magas-
ság
Fűtési
mód
Hőmérséklet
pl. tejszínes torták, vajas krémtorták, csokoládé vagy cukorbevo-
natú torták, gyümölcsök, csirke, kolbász és hús, kenyér és zsemle,
sütemények és más pékáruk
rostély 2
:
A hőfokszabályozó
kikapcsolt állapotban
marad
Gyümölcs és fűszerek Tartozékok Szint Fűtési mód Hőmérséklet Időtartam
600 g almakarika univerzális serpenyő + rostély 3+1
:
80 °C kb. 5 óra
800 g körtehasáb univerzális serpenyő + rostély 3+1
:
80 °C kb. 8 óra
1,5 kg szilva univerzális serpenyő + rostély 3+1
:
80 °C kb. 8-10 óra
200 g konyhai fűszer, tisztítva univerzális serpenyő + rostély 3+1
:
80 °C kb. 1½ óra
Page 59

59
Befőzés
Gyümölcs
Kb. 40-50 perc múlva rövid időközönként buborékok
keletkeznek. Kapcsolja ki a sütőt.
25-35 perc utómelegítés után vegye ki az üvegeket a
sütőtérből. Ha hosszabb ideig hűl a befőtt a sütőtérben, csírák
képződhetnek, és ez a befőzött gyümölcs savanyodásához
vezethet.
Zöldség
Amikor az üvegekben buborékok keletkeznek, a hőmérsékletet
állítsa vissza 120-140 °C-ra. Zöldségfajtától függően kb. 35-
70 perc. Ezután kapcsolja ki a sütőt és használja a
maradékhőt.
Üvegek kivétele
Az üvegeket befőzés után vegyye ki a sütőtérből.
Figyelem!
A forró üvegeket ne tegye hideg vagy nedves alátétre.
Megrepedhetnek.
Akrilamid az élelmiszerekben
Az akrilamid elsősorban a nagyon felhevített gabonafélékből
és burgonyatermékekből szabadul fel, pl. burgonyaszirom,
hasábburgonya, pirítós, zsemle, kenyér vagy finom pékáru
(kekszek, mézeskalács, mézesbáb).
Gyümölcs egy literes üvegekben A gyöngyözéstől számítva Utómelegítés
alma, ribizli, eper kikapcsolni kb. 25 perc
cseresznye, kajszibarack, őszibarack, egres kikapcsolni kb. 30 perc
almapép, körte, szilva kikapcsolni kb. 35 perc
Zöldség hideg lében egy literes üvegekben A gyöngyözéstől számítva Utómelegítés
uborka - kb. 35 perc
cékla kb. 35 perc kb. 30 perc
kelbimbó kb. 45 perc kb. 30 perc
bab, karalábé, vörös káposzta kb. 60 perc kb. 30 perc
borsó kb. 70 perc kb. 30 perc
Ötletek az ételek akrilamidszegény elkészítéséhez
Általános tudnivalók
■ A sütés idejét korlátozza a lehető legrövidebbre.
■ Az ételt csak aranysárgára süsse, ne túl sötétre.
■ A nagy, vastag burgonya kevesebb akrilamidot tartalmaz.
Sütés: Felső/alsó sütéssel max. 200 °C.
A 3 dim. forró levegővel vagy forró levegővel max.180 °C.
Aprósütemény Felső/alsó sütéssel max. 190 °C.
A 3 dim. forró levegővel vagy forró levegővel max.170 °C.
A tojás vagy a tojássárgája csökkenti az akrilamid képződését.
Sütő hasábburgonya Egyenletesen és egy rétegben ossza el az ételt a sütőtepsin. Legalább 400 g-ot süssön
sütőtepsinként, hogy a hasábburgonya ne száradjon ki
Page 60

60
Próbaételek
Ezek a táblázatok minőségellenőrző intézetek számára
készültek a különböző készülékek ellenőrzésének és
tesztelésének megkönnyítése érdekében.
EN 50304/EN 60350 (2009), ill. IEC 60350 irányelvek szerint.
Sütés
Sütés két szinten
Az univerzális serpenyőt mindig a sütőtepsi fölé helyezze.
Kinyomós sütemény (pl. kinyomós fánk cukorsziruppal):
Az egyidejűleg a sütőbe tett ételeknek nem kell ugyanakkor
készen lenniük.
Almás lepény, 1. szint:
Módosítsa a sötét kerek sütőforma pozícióját, átlósan tolja be.
Almás lepény, 2. szint:
Módosítsa a sötét kerek sütőforma pozícióját.
Sütemények a fém, kerek sütőformában:
Felső/alsó fűtéssel
% az 1. szinten süssön. A rostély helyett
használja az univerzális serpenyőt, és arra tegye a kerek
sütőformát.
Grillezés
Ha az élelmiszert közvetlenül a rostélyra teszi, tolja be az 1.
szintre az univerzális serpenyőt. Így felfogja a folyadékot, és a
sütő tisztább marad.
Étel Tartozék és edény Magasság Fűtési mód Hőmérséklet °C-
ban
Időtartam, perc
Kinyomós sütemény univerzális serpenyő 3
%
150-170 20-30
alumínium sütőtepsi* + univerzális serpenyő**
1+3
:
140-160 30-40
Aprósütemény univerzális serpenyő 3
%
150-170 25-35
Aprósütemény, melegítse elő alumínium sütőtepsi* + uni-
verzális serpenyő**
1+3
:
140-160 30-40
Vizespiskóta kerek sütőforma 2
%
160-180 30-40
Almás lepény univerzális serpenyő + 2
kerek sütőforma Ø 20 cm***
1
%
190-210 70-80
2 rostély* + 2 kerek sütőforma Ø 20 cm***
1+3
:
170-190 65-75
* További tartozékok kiegészítő tartozékként a szakkereskedésekben vagy az ügyfélszolgálatnál kaphatók.
** Két szinten való sütéskor az univerzális serpenyőt mindig a felső szintre tolja be.
*** A süteményformákat átlósan elhelyezve állítsa a tartozékra.
Étel Tartozék és edény Magasság Fűtési mód Grillfokozat Időtartam, perc
Kenyérpirítás
10 perc előmelegítés
rostély 4
(
3 ½-2
Hamburger fasírt, 12 darab*
előmelegítés nélkül
rostély + univerzális serpenyő
4+1
(
3 25-30
* Az időtartam
Z-ánál fordítsa meg
Page 61

61
é Inhoudsopgave
[nl]Gebruiksaanwijzing
Belangrijke veiligheidsvoorschriften......................................61
Oorzaken van schade.....................................................................63
Uw nieuwe oven........................................................................63
Bedieningspaneel ............................................................................ 63
Functiekiezer..................................................................................... 64
Toetsen en indicatie ........................................................................ 64
Temperatuurkeuzeknop.................................................................. 64
Binnenruimte..................................................................................... 64
De toebehoren ..........................................................................65
Inschuiven van het toebehoren..................................................... 65
Extra toebehoren.............................................................................. 65
Voor het eerste gebruik ...........................................................66
Tijd instellen ...................................................................................... 66
De oven opwarmen ......................................................................... 66
Toebehoren reinigen ....................................................................... 66
Oven instellen...........................................................................66
Wijzen van verwarmen en temperatuur ....................................... 66
De oven zal automatisch uitschakelen ........................................ 66
De oven zal automatisch in- en uitschakelen.............................67
Snelvoorverwarming........................................................................67
Tijd instellen .............................................................................67
Kookwekker instellen............................................................... 68
Kinderslot..................................................................................68
Oven................................................................................................... 68
Onderhoud en reiniging...........................................................68
Reinigingsmiddelen......................................................................... 68
Inschuifrails verwijderen en bevestigen....................................... 69
Ovendeur verwijderen en inbrengen............................................69
Glazen deurplaten uit- en inbouwen............................................. 70
Wat te doen bij storingen? ......................................................71
Storingstabel.....................................................................................71
Ovenlamp aan het plafond vervangen ........................................ 71
Glazen afscherming.........................................................................71
Servicedienst ............................................................................71
Enummer en FDnummer.............................................................. 71
Energie en milieutips ..............................................................72
Energie besparen ............................................................................ 72
Milieuvriendelijk afvoeren ............................................................... 72
Maatregelen tijdens het transport.................................................72
Voor u in onze kookstudio uitgetest. ......................................72
Gebak.................................................................................................72
Tips voor het bakken ...................................................................... 74
Vlees, gevogelte, vis........................................................................74
Tips voor het braden en grillen..................................................... 76
Ovenschotels, gegratineerde gerechten, toast .......................... 76
Kant-en-klaar producten ................................................................. 77
Bijzondere gerechten ...................................................................... 77
Ontdooien.......................................................................................... 77
Drogen ............................................................................................... 78
Inmaak ...............................................................................................78
Acrylamide in levensmiddelen................................................79
Testgerechten...........................................................................79
Bakken...............................................................................................79
Grillen.................................................................................................79
Produktinfo
Meer informatie over producten, accessoires, onderdelen en
diensten vindt u op het internet: www.siemens-home.com en in
de online-shop: www.siemens-eshop.com
: Belangrijke veiligheidsvoorschriften
Lees deze gebruiksaanwijzing zorgvuldig
door. Alleen dan kunt u uw apparaat goed
en veilig bedienen. Bewaar de
gebruiksaanwijzing voor later gebruik of om
door te geven aan een volgende eigenaar.
Dit apparaat is alleen bestemd voor inbouw.
Neem het speciale installatievoorschrift in
acht.
Controleer het apparaat na het uitpakken.
Niet aansluiten in geval van
transportschade.
Alleen een daartoe bevoegd vakman mag
apparaten zonder stekker aansluiten. Bij
schade door een verkeerde aansluiting
maakt u geen aanspraak op garantie.
Dit apparaat is alleen bestemd voor
huishoudelijk gebruik en de huiselijke
omgeving. Gebruik het uitsluitend voor het
bereiden van gerechten en drank. Zorg
ervoor dat het apparaat onder toezicht
gebruikt wordt. Het toestel alleen gebruiken
in gesloten ruimtes.
Dit apparaat is bestemd voor gebruik tot op
hoogten van maximaal 2.000 meter boven
zeeniveau.
Dit toestel kan worden gebruikt door
kinderen vanaf 8 jaar en door personen met
beperkte fysieke, sensorische of geestelijke
vermogens of personen die gebrek aan
kennis of ervaring hebben, wanneer zij
onder toezicht staan van een persoon die
verantwoordelijk is voor hun veiligheid of
geleerd hebben het op een veilige manier
te gebruiken en zich bewust zijn van de
risico's die het gebruik van het toestel met
zich meebrengt.
Page 62

62
Kinderen mogen niet met het apparaat
spelen. Reiniging en onderhoud van het
toestel mogen niet worden uitgevoerd door
kinderen, tenzij zij 8 jaar of ouder zijn en
onder toezicht staan.
Zorg ervoor dat kinderen die jonger zijn dan
8 jaar uit de buurt blijven van het toestel of
de aansluitkabel.
Toebehoren altijd op de juiste manier in de
binnenruimte plaatsen. Zie beschrijving
toebehoren in de gebruiksaanwijzing.
Risico van brand!
■
Brandbare voorwerpen die in de
binnenruimte worden bewaard kunnen
vlam vatten. Bewaar geen brandbare
voorwerpen in de binnenruimte. Open
nooit de deur wanneer er sprake is van
rookontwikkeling in het apparaat. Het
toestel uitschakelen en de stekker uit het
stopcontact halen of de zekering in de
meterkast uitschakelen.
Risico van brand!
■
Wanneer de apparaatdeur geopend wordt,
ontstaat er een luchtstroom. Het
bakpapier kan dan de
verwarmingselementen raken en vlam
vatten. Tijdens het voorverwarmen mag er
nooit bakpapier los op de toebehoren
liggen. Verzwaar het bakpapier altijd met
een vorm. Bakpapier alleen op het
benodigde oppervlak leggen. Het
bakpapier mag niet uitsteken over de
toebehoren.
Risico van verbranding!
■
Het toestel wordt zeer heet. Nooit de hete
vlakken in de binnenruimte of
verwarmingselementen aanraken. Het
apparaat altijd laten afkoelen. Zorg ervoor
dat er geen kinderen in de buurt zijn.
Risico van verbranding!
■
Toebehoren of vormen worden zeer heet.
Neem hete toebehoren en vormen altijd
met behulp van een pannenlap uit de
binnenruimte.
Risico van verbranding!
■
Alcoholdampen kunnen in de
binnenruimte vlam vatten. Nooit gerechten
klaarmaken die een hoog percentage
alcohol bevatten. Alleen kleine
hoeveelheden drank met een hoog
alcoholpercentage gebruiken. De deur
van het toestel voorzichtig openen.
Kans op verbranding!
■
Tijdens het gebruik worden de
toegankelijke onderdelen heet. De hete
onderdelen nooit aanraken. Zorg ervoor
dat er geen kinderen in de buurt zijn.
Risico van verbranding!
■
Bij het openen van de apparaatdeur kan
hete stoom vrijkomen. De deur van het
toestel voorzichtig openen. Zorg ervoor
dat er geen kinderen in de buurt zijn.
Kans op verbrandingen!
■
Door water in de hete binnnruimte kan
hete waterdamp ontstaan. Nooit water in
de hete binnenruimte gieten.
Risico van letsel!
Wanneer er krassen op het glas van de
apparaatdeur zitten, kan dit springen. Geen
schraper, scherpe of schurende
schoonmaakmiddelen gebruiken.
Kans op een elektrische schok!
■
Ondeskundige reparaties zijn
gevaarlijk.Reparaties mogen uitsluitend
worden uitgevoerd door technici die zijn
geïnstrueerd door de klantenservice.Is het
apparaat defect, haal dan de stekker uit
het stopcontact of schakel de zekering in
de meterkast uit. Contact opnemen met
de klantenservice.
Kans op een elektrische schok!
■
De kabelisolatie van hete
toestelonderdelen kan smelten. Zorg
ervoor dat er nooit aansluitkabels van
elektrische toestellen in contact komen
met hete onderdelen van het apparaat.
Kans op een elektrische schok!
■
Binnendringend vocht kan een schok
veroorzaken. Geen hogedrukreiniger of
stoomreiniger gebruiken.
Kans op een elektrische schok!
■
Bij vervanging van de lamp in de
binnenruimte staan de contacten van de
lampfitting onder stroom. Trek voordat u
tot vervanging overgaat de netstekker uit
het stopcontact trekken of schakel de
zekering in de meterkast uit.
Kans op een elektrische schok!
■
Een defect toestel kan een schok
veroorzaken. Een defect toestel nooit
inschakelen. De netstekker uit het
stopcontact halen of de zekering in de
meterkast uitschakelen. Contact opnemen
met de klantenservice.
Page 63

63
Oorzaken van schade
Attentie!
■ Toebehoren, folie, bakpapier of vormen op de bodem van de
binnenruimte: Geen toebehoren op de bodem van de
binnenruimte leggen. Geen bakpapier of folie, van welk type
dan ook, op de bodem van de binnenruimte leggen. Geen
vorm op de bodem van de binnenruimte plaatsen wanneer
een temperatuur van meer dan 50 °C ingesteld is. Er
ontstaat dan een opeenhoping van warmte. De bak- en
braadtijden kloppen niet meer en het email wordt
beschadigd.
■ Water in de hete binnenruimte: Nooit water in de hete
binnenruimte gieten. Er ontstaat dan waterdamp. Door de
verandering van temperatuur kan schade aan het email
ontstaan.
■ Vochtige levensmiddelen: Geen vochtige levensmiddelen
langere tijd in de afgesloten binnenruimte bewaren. Het email
raakt dan beschadigd.
■ Vruchtensap: De bakplaat bij zeer vochtig vruchtengebak niet
te overvloedig bedekken. Vruchtensap dat van de bakplaat
druppelt, laat vlekken achter die niet meer kunnen worden
verwijderd. Gebruik zo mogelijk de diepere braadslede.
■ Afkoelen met open apparaatdeur: De binnenruimte alleen
laten afkoelen wanneer deze afgesloten is. Ook wanneer de
deur slechts op een kier openstaat, kan de voorzijde van
aangrenzende meubels op den duur worden beschadigd.
■ Sterk vervuilde deurdichting: is de deurdichting sterk vervuild,
dan sluit de apparaatdeur tijdens het gebruik niet meer goed.
De voorzijde van aangrenzende meubels kan worden
beschadigd.Zorg ervoor dat de deurdichting altijd schoon is.
■ Apparaatdeur als vlak om op iets op te leggen of te plaatsen:
niets op de apparaatdeur leggen of plaatsen en er niets aan
hangen. Geen vormen of toebehoren op de apparaatdeur
plaatsen.
■ Toebehoren inschuiven: afhankelijk van het type toestel
kunnen de toebehoren krassen geven op de deur.
Toebehoren altijd tot de aanslag in de binnenruimte schuiven.
■ Apparaat transporteren: Het apparaat niet aan de deurgreep
vasthouden of dragen. De deurgreep houdt op den duur het
gewicht van het apparaat niet en kan afbreken.
Uw nieuwe oven
Hier maakt u kennis met uw nieuwe oven. We leggen u de
werking van het bedieningspaneel en de afzonderlijke
bedieningselementen uit. U krijgt informatie over de
binnenruimte en de toebehoren.
Bedieningspaneel
Hier krijgt u een overzicht van het bedieningspaneel. De
uitvoering hangt van het type apparaat af.
Verklaringen
1 Functiekiezer
2 Bedieningstoetsen en weergaveveld
3 Temperatuurkeuzeknop
Page 64

64
Functiekiezer
Met de functiekiezer stelt u de wijze van verwarmen van de
oven in. U kunt de functiekiezer naar rechts of naar links
draaien.
Wanneer u de functiekiezer inschakelt, brandt de ovenlamp.
Toetsen en indicatie
Met de toetsen stelt u de verschillende extra functies in. Op het
display kunt u de ingestelde waarden aflezen.
Temperatuurkeuzeknop
Met de temperatuurkeuzeknop kunt u de temperatuur en de
grillstand instellen.
Als de oven opwarmt, brandt het lampje boven de
temperatuurkeuzeknop. Deze gaat uit tijdens de
verwarmingspauzes. Bij sommige instellingen brandt het
symbool niet.
Grillstanden
Voor het vlakgrillen
( stelt u met de temperatuurkeuzeknop
een grillstand in.
Binnenruimte
In de binnenruimte bevindt zich de ovenlamp. Een
koelventilator beschermt de oven tegen oververhitting.
Ovenlamp
De ovenlamp brandt tijdens het gebruik van de oven. Door de
functiekeuzeknop op een willekeurige stand te draaien, kan de
ovenlamp ook worden ingeschakeld zonder dat de oven wordt
verwarmd.
Koelventilator
De koelventilator wordt zo nodig in- en uitgeschakeld. De
warme lucht ontsnapt via de deur.
De koelventilator loopt een bepaalde tijd na, zodat de
binnenruimte na gebruik sneller afkoelt.
Attentie!
De ventilatiesleuven niet afdekken. Anders raakt de oven
oververhit.
Standen Functie
ý
Uit De oven is uitgeschakeld.
%
Boven- en onderwarmte
Het bakken en braden is op één
niveau mogelijk. Voor cake en
pizza in een vorm of op de plaat, en
voor magere braadstukken van
rund- en kalfsvlees en wild is deze
instelling goed geschikt. De warmte
komt gelijkmatig van boven en
onder.
:
3D hetelucht* Cake, pizza, klein gebak, muffins
en bladerdeeg kunt u op twee
niveaus tegelijk bakken.
Door een ventilator met ringverwarmingslichaam aan de achterwand
van de oven wordt de verwarmde
lucht gelijkmatig verdeeld.
$
Onderwarmte Met onderwarmte kunt u de onder-
kant van gerechten nabakken en bruinen. De warmte komt van
onderen.
4
Circulatieluchtgrillen
Circulatieluchtgrillen is bijzonder
geschikt voor het grillen van vis,
gevogelte en grote stukken vlees.
De grill en de ventilator schakelen
afwisselend in en uit. De ventilator
verdeelt de verwarmde lucht om de
gerechten.
(
Vlakgrillen, grote
vlakken
U kunt meerdere steaks, worstjes,
vis en toasts grillen. Het gehele
vlak onder de grill wordt verwarmd.
I
Snelvoorverwarming
Voor het snel verwarmen van
gerechten.
* Wijze van verwarmen volgens energierendementsklasse
EN50304.
Toets Gebruik
0
Toets Klok Hiermee stelt u de tijd, de tijds-
duur van de oven
x en de
eindtijd
y in.
C
Toets Sleutel Hiermee schakelt u het kinderslot
in en uit.
V
Toets Kookwekker Hiermee stelt u de wekker in.
A
Toets Min Hiermee stelt u een lagere instel-
waarde in.
@
Toets Plus Hiermee stelt u een hogere instel-
waarde in.
Standen Functie
ÿ
Uit Oven niet heet.
50-270 Temperatuurbereik De temperatuurweergave is
in ºC.
•, ••, ••• Grillstanden Grillstanden voor de grill,
grote
( oppervlak.
• = Stand 1, zwak
•• = Stand 2, gemiddeld
••• = Stand 3, sterk
Page 65

65
De toebehoren
De meegeleverde toebehoren zijn geschikt voor vele
gerechten. Let erop dat u de toebehoren altijd op de juiste
manier in de binnenruimte plaatst.
Het grote assortiment speciale toebehoren zorgt ervoor dat
vele van uw gerechten nog beter lukken en u de oven nog
comfortabler kunt gebruiken.
Inschuiven van het toebehoren
Het toebehoren kan in 4 verschillende hoogtes in de oven
worden geschoven. Schuif het toebehoren steeds tot aan de
aanslag erin, zodat het deurglas niet wordt geraakt.
Wanneer het toebehoren ongeveer tot aan de helft eruit
getrokken is, klikt het vast. Nu kunt u de gerechten gemakkelijk
uit de oven nemen.
Bij het inschuiven moet u op de uitstulping aan de achterzijde
van het toebehoren letten. Alleen zo klikt het op de juiste
manier vast.
Aanwijzing: Het toebehoren kan door de hitte vervormen.
Zodra het toebehoren afgekoeld is, neemt het zijn
oorspronkelijke vorm weer aan. De functie wordt niet beïnvloed.
Houd de bakplaat aan weerszijden met beide handen vast en
schuif de bakplaat recht in het frame. Vermijd bij het inschuiven
bewegingen naar links of rechts. Anders kan de bakplaat niet
gemakkelijk ingeschoven worden. Het geëmailleerde oppervlak
kan beschadigd raken.
Toebehoren kunt u nabestellen bij de klantenservice, in de
vakhandel of via Internet. Geef hiervoor alstublieft het
HZnummer op.
Extra toebehoren
Extra toebehoren kunt u bij de servicedienst of in de
speciaalzaak kopen. In onze brochures of op internet vindt u
diverse producten die voor uw oven geschikt zijn. De
beschikbaarheid van extra toebehoren en de mogelijkheid om
deze via internet te kopen is per land verschillend. Informatie
hierover vindt u in de verkoopbrochures.
Niet elk extra toebehoren is voor elk apparaat geschikt. Geef bij
aankoop steeds de volledige naam (E-nr.) van uw apparaat op.
Ovendeur - aanvullende veiligheidsinstructies
Bij langere baktijden kan de ovendeur erg heet worden.
Indien u kinderen hebt, is bij het gebruik van de oven extra
voorzichtigheid geboden.
Verder is er een beveiligingsvoorziening beschikbaar waarmee
directe aanraking van de ovendeur wordt verhinderd. Dit
speciale toebehoren (440651) is bij de servicedienst
verkrijgbaar.
Rooster
Voor servies, taart- en cakevormen,
braadstukken, grillstukken en diepvriesgerechten.
Het rooster met de open kant naar
de ovendeur en de welving naar
beneden
¾ inschuiven.
Braadslede
Voor vochtig gebak, taarten, diepvriesgerechten en grote braadstukken. Hij kan ook worden gebruikt
om het vet op te vangen, als u
direct op het rooster grilt.
Plaats de braadslede met de
schuine kant naar de ovendeur.
Extra toebehoren HZ-nummer Functie
Rooster HZ434000 Voor ovenschalen, bakvormen, braadstukken, gegrilde stukken en diepvries-
gerechten.
Aluminium bakplaat HZ430001 Voor gebak en koekjes.
Schuif de bakplaat met de schuine kant naar de ovendeur in de oven.
Geëmailleerde bakplaat HZ431001 Voor gebak en koekjes.
Schuif de bakplaat met de schuine kant naar de ovendeur in de oven.
Braadslede HZ432001 Voor vochtig gebak, koekjes, diepvriesgerechten en grote braadstukken. Kan
ook voor het opvangen van vet of vleesvocht onder het rooster worden
gebruikt.
Schuif de braadslede met de schuine kant naar de ovendeur in de oven.
Page 66

66
Voor het eerste gebruik
Hier vindt u alles wat u moet doen voordat u voor het eerst
gerechten klaarmaakt met de oven. Lees eerst het hoofdstuk
Veiligheidsvoorschriften.
Tijd instellen
Na de aansluiting zijn op het display het symbool 0 en drie
nullen verlicht. Stel de tijd in.
1. De toets 0 indrukken.
Op het display verschijnt de tijd 12:00 uur en het symbool
0
knippert.
2. Met de toets + of de toets - de tijd instellen.
Na enige seconden wordt de ingestelde tijd overgenomen.
De oven opwarmen
Om de geur van het nieuwe te verwijderen, warmt u de lege,
gesloten oven op. Ideaal hiervoor is een uur met boven- en
onderwarmte
% bij 240 °C. Let erop dat zich geen
verpakkingsresten in de binnenruimte bevinden.
1. Met de functiekeuzeknop Boven- en onderwarmte %
instellen.
2. Met de temperatuurkeuzeknop 240 °C instellen.
Na een uur de oven uitschakelen. Functie- en
temperatuurkeuzeknop op de nulstand draaien.
Toebehoren reinigen
Reinig de toebehoren voor het eerste gebruik grondig met
warm zeepsop en een zacht schoonmaakdoekje.
Oven instellen
U heeft verschillende mogelijkheden om de oven in te stellen.
Hier geven wij u uitleg over de manier waarop u de gewenste
verwarmingsmethode en temperatuur of grillstand instelt. U
kunt voor uw gerecht de tijdsduur en eindtijd instellen.
Wijzen van verwarmen en temperatuur
Voorbeeld op de afbeelding: Boven-/onderwarmte 190 ºC.
1. Met de functiekiezer de gewenste wijze van verwarmen
instellen.
2. Met de temperatuurkeuzeknop kunt u de temperatuur of de
grillstand instellen.
De oven wordt opgewarmd.
Oven uitschakelen
De functiekiezer in de nulstand zetten.
Instellingen wijzigen
Wijze van verwarmen, temperatuur en grillstand kunnen naar
behoefte worden gewijzigd.
De oven zal automatisch uitschakelen
Voer de bereidingstijd (gaartijd) voor uw gerecht in.
Voorbeeld in afbeelding: Boven-/onderwarmte
%, 200 °C,
bereidingstijd 45 minuten.
1. Met de functiekiezer de gewenste wijze van verwarmen
instellen.
2. Met de temperatuurkeuzeknop kunt u de temperatuur of de
grillstand instellen.
3. De kloktoets 0 indrukken.
Het symbool bereidingstijd
x knippert.
4. Met de toets + of - de bereidingstijd instellen.
Toets + / voorgestelde waarde = 30 minuten
Toets - / voorgestelde waarde = 10 minuten
De bereidingstijd is afgelopen
Er klinkt een signaal. De oven schakelt zichzelf uit. De toets
0
tweemaal indrukken en de functiekeuzeknop uitzetten.
Instelling wijzigen
De toets Klok
0 indrukken. Met de toets + of de toets - de
tijdsduur veranderen.
NJ
PLQ
K
NJ
PLQ
K
Page 67

67
Het instellen afbreken
De toets Klok
0 indrukken. De toets - indrukken tot de indicatie
op nul staat. De functiekeuzeknop uitzetten.
Tijdsduur instellen wanneer de tijd niet meer weergegeven
wordt
De toets Klok
0 twee keer indrukken en instellen, zoals
beschreven bij punt 4.
De oven zal automatisch in- en uitschakelen
Laat levensmiddelen niet te lang in de oven staan. Ongekoeld
vlees en vis bederven snel.
Voorbeeld in afbeelding: Boven-/onderwarmte
%, 200 °C. Het
is 10:45 . De bereidingstijd is 45 minuten en het gerecht moet
om 12:45 uur klaar zijn.
1. Met de functiekiezer de gewenste wijze van verwarmen
instellen.
2. Met de temperatuurkeuzeknop kunt u de temperatuur of de
grillstand instellen.
3. De kloktoets 0 indrukken.
Het symbool bereidingstijd
x knippert.
4. Met de toets + of - de bereidingstijd instellen.
5. De kloktoets 0 zo vaak indrukken, tot het symbool einde y
knippert.
In het display ziet u wanneer het gerecht klaar is.
6. Met de toets + de eindtijd naar een later tijdstip verschuiven.
Na een paar seconden wordt de instelling overgenomen.
In het display staat de eindtijd, tot de oven start.
De bereidingstijd is afgelopen
Er klinkt een signaal. De oven schakelt zichzelf uit. De toets
0
tweemaal indrukken en de functiekeuzeknop uitzetten.
Aanwijzing: Zolang er een symbool knippert kunt u wijzigen.
Wanneer het symbool verlicht is, is de instelling overgenomen.
Snelvoorverwarming
Met de snelvoorverwarming bereikt de oven de ingestelde
temperatuur bijzonder snel.
Gebruik de snelvoorverwarming bij een ingestelde temperatuur
boven 100 °C.
Om een gelijkmatig resultaat te krijgen, doet u het gerecht pas
in de binnenruimte wanneer het snel voorverwarmen beëindigd
is.
1. De functiekeuzeknop op I zetten.
2. Met de temperatuurkeuzeknop de temperatuur instellen.
Na enkele seconden begint de oven op te warmen. Het
indicatielampje boven de temperatuurkeuzeknop gaat uit.
Het snel voorverwarmen is beëindigd
Het indicatielampje boven de temperatuurkeuzeknop gaat uit.
Plaats uw gerecht in de oven en stel de gewenste
verwarmingsmethode in.
Snelvoorverwarming afbreken
De functiekeuzeknop op de nulstand draaien. De oven is
uitgeschakeld.
Tijd instellen
Na de eerste aansluiting of na een stroomonderbreking
knipperen op het display het symbool
0 en drie nullen. Stel de
tijd in. De functiekeuzeknop dient uitgeschakeld te zijn.
Zo stelt u in
1. De toets Klok 0 indrukken.
Op het display verschijnt 12.00 uur en het symbool
0
knippert.
2. Met de toets + of de toets - de tijd instellen.
Na enkele seconden wordt de tijd overgenomen. Het
symbool
0 verdwijnt.
Wijzigen van bijv. zomer- in wintertijd
De toets Klok
0 twee keer indrukken en wijzigen met de toets
+ of de toets -.
NJ
PLQ
K
NJ
PLQ
K
Page 68

68
Kookwekker instellen
U kunt de wekker gebruiken als een kookwekker. Hij loopt
onafhankelijk van de oven. De wekker heeft een speciaal
signaal. Zo hoort u of de wekker of een tijdsduur van de oven
afgelopen is. U kunt de wekker ook instellen wanneer het
kinderslot actief is.
Zo stelt u in
1. De toets Kookwekker S indrukken.
Het symbool
S knippert.
2. Met de toets + of de toets - de wekkertijd instellen.
Toets + voorgestelde waarde = 10 minuten.
Toets + voorgestelde waarde = 5 minuten.
Na enige seconden start de wekker. Op het display is het
symbool
S verlicht. De tijd loopt zichtbaar af.
Aan het einde van de ingestelde tijd
Er klinkt een signaal. De toets Kookwekker
S indrukken. De
indicatie van de wekker gaat uit.
Wekkertijd veranderen
De toets Kookwekker
S indrukken. Met de toets + of de toets -
de tijd veranderen.
Instelling wissen
De toets Kookwekker
S indrukken. De toets - indrukken tot de
indicatie op nul staat.
De wekker en tijdsduur lopen gelijktijdig af
De symbolen zijn verlicht. De wekkertijd loopt zichtbaar op het
display af.
Resterende tijd
x, Eindtijd y of Tijd 0 opvragen:
de toets Tijd
0 zo vaak indrukken tot het betreffende symbool
verschijnt.
De opgevraagde waarde verschijnt enkele seconden op het
display.
Kinderslot
Oven
Om te voorkomen dat kinderen per ongeluk de oven
inschakelen, is deze voorzien van een kinderslot.
Kinderslot in- en uitschakelen
De functiekeuzeknop dient uitgeschakeld te zijn.
Inschakelen: de toets Sleutel
C indrukken tot op het display
het symbool
C verschijnt. Dit duurt ca. 4 seconden.
Uitschakelen: de toets Sleutel
C indrukken tot het
symbool
C verdwijnt.
Aanwijzingen
■ De wekker en de tijd kunt u altijd instellen.
■ Na een stroomonderbreking is het ingestelde kinderslot
opgeheven.
Onderhoud en reiniging
Wanneer u de oven goed verzorgt en schoonmaakt, blijft hij
lang mooi en intact. Hieronder wordt uitgelegd hoe u de oven
op de juiste manier verzorgt en schoonmaakt.
Aanwijzingen
■ Geringe kleurverschillen op de voorzijde van de oven zijn het
gevolg van het gebruik van verschillende materialen, zoals
glas, kunststof en metaal.
■ Schaduwen op de ruit van de deur, die eruit zien als strepen,
zijn lichtreflexen van de ovenlamp.
■ Het email wordt ingebrand op zeer hoge temperaturen.
Hierdoor kunnen er kleine kleurverschillen ontstaan. Dit is
normaal en heeft geen nadelige invloed op de werking. De
smalle randen van de bakplaten kunnen niet volledig worden
geëmailleerd. Ze kunnen daarom ruw zijn. De bescherming
tegen corrosie blijft hierbij intact.
Reinigingsmiddelen
Om te voorkomen dat de verschillende oppervlakken door
verkeerde reinigingsmiddelen beschadigd raken, moet u zich
aan het volgende houden.
Gebruik bij de reiniging van de oven
■ geen scherpe of schurende reinigingsmiddelen,
■ geen reinigingsmiddelen met een hoog alcoholpercentage,
■ geen schuursponsjes,
■ geen hogedrukreiniger of stoomstraler.
■ Reinig losse onderdelen niet in de vaatwasmachine.
Was nieuwe sponsen voor het eerste gebruik goed uit.
Roestvrijstalen oppervlakken
Maak het apparaat met water en een beetje
zeepsop schoon. Veeg bij roestvrijstalen
oppervlakken altijd in de slijprichting. Anders
kunnen er krassen ontstaan. Droog met een
zachte doek af. Kalk, vet, zetmeel en eiwitvlekken moeten altijd onmiddellijk worden verwijderd. Gebruik geen schuurmiddelen,
schuursponsjes of grove reinigingsdoeken.
De roestvrijstalen oppervlakken kunnen met
speciale onderhoudsmiddelen gepoetst worden. Neem de instructies van de fabrikant in
acht. Speciale reinigingsmiddelen voor roestvrij staal zijn bij de servicedienst of in de speciaalzaak verkrijgbaar.
Geëmailleerde
en geglazuurde oppervlakken
Maak met warm water en een beetje zeepsop
schoon. Droog met een zachte doek af.
Knoppen Maak met warm water en een beetje zeepsop
schoon. Droog met een zachte doek af.
Deurglas Dit kan met een glasreiniger worden gerei-
nigd. Gebruik geen agressieve reinigingsmiddelen of schrapers. Deze kunnen het
glasoppervlak bekrassen en beschadigen.
Afdichting Reinig deze met een vochtige doek. Droog
met een zachte doek af.
Page 69

69
Inschuifrails verwijderen en bevestigen
U kunt de rails voor het reinigen verwijderen. De oven dient
afgekoeld te zijn.
Uithangen van het frame
1. Frame naar beneden eruit trekken en iets naar voren trekken.
De verlengstift aan de onderkant van het frame uit het
bevestigingsgaten trekken (afbeelding A).
2. Daarna het frame omhoogklappen en voorzichtig uitnemen
(afbeelding B).
Reinig het frame met afwasmiddel en een spons. Gebruik op
hardnekkig vuil een borstel.
Plaatsen van de rekjes
1. Plaats de twee haken voorzichtig in de bovenste gaten.
(afbeelding A-B)
: Verkeerde montage!
Beweeg het rekje nooit, voordat de twee haken volledig en
stevig in de bovenste gaten zijn bevestigd. Het email kan
beschadigen en breken (afbeelding C).
2. De twee haken moeten volledig in de bovenste gaten zijn
gehangen. Beweeg het rekje vervolgens langzaam en
voorzichtig naar beneden en hang het in de onderste gaten
(afbeelding D).
3. Beide rekjes in de zijwanden van de oven hangen (afbeelding
E).
Wanneer de rekjes op de juiste wijze gemonteerd zijn is de
afstand tussen de twee bovenste inschuifhoogtes groter.
Ovendeur verwijderen en inbrengen
Om de deurruiten schoon te maken en te demonteren, kunt u
de ovendeur verwijderen.
De scharnieren van de ovendeur zijn alle voorzien van een
blokkeerhendel. Wanneer de blokkeerhendel is dichtgeklapt
(Afbeelding A), is de ovendeur beveiligd. Hij kan niet worden
verwijderd. Wanneer de blokkeerhendels voor het verwijderen
van de ovendeur opengeklapt zijn (Afbeelding B), zijn de
scharnieren beveiligd. Ze kunnen niet dichtklappen.
: Risico van letsel!
Wanneer de scharnieren niet beveiligd zijn, klappen ze met
grote kracht dicht. Let erop dat de blokkeerhendels altijd
helemaal dichtgeklapt zijn, en bij het verwijderen van de
ovendeur helemaal opengeklapt.
Binnenruimte
van de oven
Reinig deze met warm water of met azijn verdund water. Wanneer de oven erg vuil is:
Gebruik een ovenreiniger. Deze mag alleen
op afgekoelde oppervlakken worden gebruikt.
Glazen kapje
op de ovenlamp
Maak met warm water en een beetje zeepsop
schoon. Droog met een zachte doek af.
Accessoires Laat deze in warm zeepsop inweken. Reinig
deze met een borstel of spons.
Aluminium
bakblik (optie)
Niet in de vaatwasmachine reinigen. Gebruik
in geen geval ovenreiniger. Om krassen te
vermijden mogen de metalen oppervlakken
nooit met een mes of soortgelijk scherp voorwerp in aanraking komen. Reinig met een
vochtige doek voor glaswerk en wat afwasmiddel of met een microvezeldoek in horizontale richting. Droog met een zachte doek af.
Gebruik geen schuurmiddelen, schuursponsjes of grove reinigingsdoeken. Die maken
krassen op het bakblik.
Kinderbeveiliging (optie)
Indien een kinderbeveiliging op de ovendeur
is aangebracht, moet deze voor het reinigen
worden verwijderd. Laat alle kunststofonderdelen in warm zeepsop weken en was deze
met een spons af. Droog met een zachte
doek af. Bij sterke vervuiling functioneert de
kinderbeveiliging niet meer goed.
Kookplaat Instructies voor het onderhoud en de reiniging
vindt u in de gebruiksaanwijzing van uw
afzuigkap.
%$
%$
&
(
'
%$
Page 70

70
Deur verwijderen
1. Ovendeur helemaal openen.
2. Beide blokkeerhendels links en rechts openklappen
(Afbeelding A).
3. Ovendeur tot de aanslag sluiten. Met beide handen links en
rechts vastpakken. Nog wat verder sluiten en uitnemen
(Afbeelding B).
Deur inbrengen
De ovendeur in de omgekeerde volgorde weer inbrengen.
1. Let er bij het inbrengen van de ovendeur op dat beide
scharnieren recht in de opening worden geleid
(Afbeelding A).
2. De keep op het scharnier dient aan beide kanten in te klikken
(Afbeelding B).
3. Beide blokkeerhendels weer dichtklappen (Afbeelding C).
Ovendeur sluiten.
: Risico van letsel!
Risico van letsel! Wanneer de ovendeur er per ongeluk uitvalt
of een scharnier dichtklapt, het scharnier niet met uw hand
aanraken. Neem contact op met de klantenservice.
Glazen deurplaten uit- en inbouwen
Om de glazen platen in de ovendeur beter te kunnen reinigen,
kunnen deze worden uitgebouwd.
Uitbouw
1. Hang de ovendeur uit. Zie de instructies in het hoofdstuk
Ovendeur uithangen. Leg de ovendeur met de greep naar
onderen op een doek (afbeelding A).
2. Draai eerst de onderste twee schroeven en vervolgens de
bovenste twee schroeven linksom (afbeelding B).
3. Verwijder de afdekking (afbeelding C).
De gedemonteerde onderdelen mogen niet worden gewassen.
Reinig de glazen platen met een glasreiniger en een zachte
doek.
: Risico van letsel!
Wanneer er krassen op het glas van de apparaatdeur zitten,
kan dit springen. Geen schraper, scherpe of schurende
schoonmaakmiddelen gebruiken.
Inbouw
1. Plaats de afdekking weer (afbeelding A).
2. Draai eerst de onderste twee schroeven en vervolgens de
bovenste twee schroeven weer vast (afbeelding B).
3. Ovendeur inhangen. Zie de instructies in het hoofdstuk
Ovendeur inhangen.
Gebruik de oven pas weer als de glazen platen correct zijn
ingebouwd.
%
$
%
$
&
%
$
&
%
$
Page 71

71
Wat te doen bij storingen?
Storingen worden vaak veroorzaakt door een kleinigheid.
Raadpleeg de volgende tabel voordat u contact opneemt met
de servicedienst. Wellicht kunt u zelf de storing verhelpen.
Storingstabel
Wanneer een gerecht niet goed gelukt is, lees hier dan het
hoofdstuk Voor u in onze kookstudio getest op na. Hier vindt u
vele tips en aanwijzingen voor het koken.
: Kans op een elektrische schok!
Ondeskundige reparaties zijn gevaarlijk. Reparaties mogen
uitsluitend worden uitgevoerd door technici die zijn
geïnstrueerd door de klantenservice.
Attentie!
Als de aansluitkabel beschadigd raakt, moet deze door de
fabrikant, door de servicedienst of door een erkende monteur
worden vervangen.
Ovenlamp aan het plafond vervangen
Als de ovenlamp is uitgevallen, moet deze worden vervangen.
Temperatuurbestendige reservelampen, 40 watt, kunt u krijgen
bij de klantenservice of uw speciaalzaak. Gebruik uitsluitend
originele lampen.
: Kans op een elektrische schok!
Zekering in de meterkast uitschakelen.
1. Theedoek in de onverwarmde oven leggen, om schade te
voorkomen.
2. Glazen afscherming eruit halen door de schroeven naar links
te draaien.
3. Lamp vervangen door een van hetzelfde type.
4. Glazen afscherming er weer inschroeven.
5. Theedoek eruit nemen en de zekering inschakelen.
Glazen afscherming
Als de glazen afscherming beschadigd is, dient hij te worden
vervangen. Passende glazen afschermingen zijn verkrijgbaar bij
de klantenservice. Vermeld a.u.b. het productnummer (Enr.) en
het fabricagenummer (FD-nr.) van uw apparaat.
Servicedienst
Wanneer uw apparaat gerepareerd moet worden, staat onze
servicedienst voor u klaar. Wij vinden altijd een passende
oplossing, ook om onnodig bezoek van een technicus te
voorkomen.
Enummer en FDnummer
Geef aan de klantenservice altijd het productnummer (E-nr.) en
het fabricagenummer (FD-nr.) van uw apparaat op, zodat wij u
goed van dienst kunnen zijn. Het typeplaatje met de nummers
vindt u aan de zijkant van de ovendeur. Om niet te lang te
hoeven zoeken wanneer u de klantenservice nodig heeft, kunt u
hier direct de gegevens van uw apparaat en het
telefoonnummer van de servicedienst invullen.
Let erop dat het bezoek van een technicus van de servicedienst
in het geval van een verkeerde bediening ook tijdens de
garantietijd kosten met zich meebrengt.
De contactgegevens in alle landen vindt u in de bijgesloten lijst
met Servicedienstadressen.
Verzoek om reparatie en advies bij storingen
Vertrouw op de competentie van de fabrikant. Dan bent u ervan
verzekerd dat de reparatie wordt uitgevoerd door ervaren
technici die gebruikmaken van de originele reserveonderdelen
voor uw apparaat.
Storing Mogelijke oor-
zaak
Oplossing/aanwijzing
De oven functioneert niet.
De zekering is
defect.
Kijk in de meterkast na of
de zekering in orde is.
De stroom is uitgevallen.
Controleer of het keukenlicht of andere keukenapparaten functioneren.
De tijdsindicatie knippert.
De stroom is uitgevallen.
Stel de tijd opnieuw in.
De oven warmt
niet op.
Er zit stof op de
contacten.
Draai de schakelaars meerdere keren heen en weer.
Enr.
FDnr.
Servicedienst
O
NL 088 424 4020
B 070 222 142
Page 72

72
Energie en milieutips
Hier krijgt u tips over de manier waarop u bij het bakken en
braden kunt besparen op energie en het apparaat op de juiste
manier afvoert.
Energie besparen
■ De oven alleen voorverwarmen als dit in het recept of in de
tabellen van de gebruiksaanwijzing is opgegeven.
■ Gebruik donkere, zwart gelakte of geëmailleerde bakvormen.
Deze nemen de hitte bijzonder goed op.
■ Open de ovendeur tijdens het garen, bakken of braden zo
weinig mogelijk.
■ Meerdere taarten of cakes kunt u het beste na elkaar bakken.
De oven is dan nog warm. Daardoor is de baktijd voor het
tweede gerecht korter. U kunt ook 2 rechthoekige bakvormen
naast elkaar in de oven plaatsen.
■ Bij langere bereidingstijden kunt u de oven 10 minuten voor
het einde van de bereidingstijd uitzetten en de restwarmte
gebruiken voor het afbakken.
Milieuvriendelijk afvoeren
Voer de verpakking op een milieuvriendelijke manier af.
Maatregelen tijdens het transport
Bevestig alle beweegbare onderdelen in en op het apparaat
met plakband, dat zonder sporen verwijderd kan worden.
Schuif alle toebehoren (bijv. de bakplaat) met een dunne strook
karton aan beide zijden in de vakken om beschadiging van het
apparaat te voorkomen. Leg karton of iets dergelijks tussen de
voorzijde van de bakplaat en de achterzijde van de deur om te
voorkomen dat de bakplaat tegen de binnenzijde van de glazen
deur stoot. Bevestig de ovendeur met plakband aan de
zijwanden van het apparaat.
Bewaar de originele verpakking van het apparaat. Transporteer
het apparaat alleen in de originele verpakking. Let op de
transportpijlen op de verpakking.
Als de originele verpakking niet meer beschikbaar is
Verpak het apparaat in een beschermende verpakking om
voldoende bescherming tegen eventuele transportschade te
garanderen.
Transporteer het apparaat rechtop. Houd het apparaat niet aan
de deurgreep of aan aansluitingen op de achterzijde vast,
omdat deze dan beschadigd kunnen raken. Leg geen zware
voorwerpen op het apparaat.
Voor u in onze kookstudio uitgetest.
Hier vindt u een keur aan gerechten en de daarbij behorende
optimale instellingen. Wij laten u zien welke
verwarmingsmethode en temperatuur het meest geschikt is
voor uw gerecht. U krijgt informatie over de juiste toebehoren
en de hoogte waarop ze ingeschoven dienen te worden. U
krijgt tips over de te gebruiken vormen en de bereiding.
Aanwijzingen
■ De tabel geldt altijd voor producten die in de onverwarmde
en lege binnenruimte worden geplaatst.
Alleen voorverwarmen wanneer dit in de tabel wordt
aangegeven. Leg pas na het voorverwarmen bakpapier op
de toebehoren.
■ De aangegeven tijden in de tabellen zijn richtwaarden. Ze zijn
afhankelijk van de kwaliteit en de aard van de
levensmiddelen.
■ Maak gebruik van de meegeleverde toebehoren. Bij de
klantenservice of in de vakhandel kunt u toebehoren of extra
toebehoren kopen.
Verwijder voor het gebruik alle toebehoren en vormen die u
niet nodig heeft uit de binnenruimte.
■ Gebruik altijd een pannenlap wanneer u hete toebehoren of
vormen uit de oven neemt.
Gebak
Bak op één niveau
Bij het bakken van cake en taarten geeft boven-/
onderwarmte
% het beste resultaat.
Bij het bakken met 3D hetelucht
: het toebehoren op de
volgende inschuifhoogte inschuiven:
■ Cake in cakevorm: inschuifhoogte 2
■ Cake op bakplaat: inschuifhoogte 3
Bakken en braden op meerdere niveaus
3D hetelucht
: gebruiken.
Inschuifhoogte voor het bakken en braden op 2 niveaus:
■ Braadslede: Inschuifhoogte 3
■ Bakplaat: Inschuifhoogte 1
Gerechten die tegelijk in de oven worden geschoven, hoeven
niet tegelijk klaar te zijn.
In de tabellen vindt u een aantal gerechten.
Bakvormen
Het meest geschikt zijn donkere metalen bakvormen.
Bij lichte bakvormen van dunwandig metaal of glazen vormen is
de baktijd langer en wordt het gebak niet zo gelijkmatig bruin.
Wanneer u siliconen vormen wilt gebruiken, raadpleeg dan de
informatie en de recepten van de fabrikant. Vormen van
silicone zijn vaak kleiner dan normale vormen. De deegvormen
en receptgegevens kunnen afwijken.
Dit apparaat is gekenmerkt in overeenstemming met
de Europese richtlijn 2012/19/EU betreffende
afgedankte elektrische en elektronische apparatuur
(waste electrical and electronic equipment - WEEE).
De richtlijn geeft het kader aan voor de in de EU
geldige terugneming en verwerking van oude
apparaten.
Page 73

73
Tabellen
In de tabellen vindt u voor de verschillende soorten gebak de
optimale verwarmingsmethode. Temperatuur en tijdsduur zijn
afhankelijk van de hoeveelheid en de kwaliteit van het deeg. In
de tabellen zijn bereiken aangegeven. Probeer het eerst met de
laagste waarde. Een lage temperatuur zorgt ervoor dat het
gerecht gelijkmatiger bruin wordt. Stel de oven indien nodig de
volgende keer hoger in.
De baktijden worden 5 tot 10 minuten korter wanneer u
voorverwarmt.
Bijkomende informatie vindt u onder Tips voor het bakken na
de tabellen.
Aanwijzing: Levensmiddelen niet direct op de aluminium
bakplaat leggen. De aluminium bakplaat bedekken met
bakpapier.
Brood en broodjes
Tenzij anders aangegeven, moet de oven voor het bakken van
brood altijd worden voorverwarmd.
Giet nooit water direct in de hete oven.
Gebak in vormen Vorm Hoogte Wijze van
verwarmen
Temperatuur, °C Bereidingsduu
r, minuten
Cake eenvoudig Krans-/rechthoekige vorm 2
%
160-180 55-65
Cake fijn (bijv. zandgebak) Krans-/rechthoekige vorm 2
%
155-175 65-75
Bodem van zandtaartdeeg met rand Springvorm 1
%
160-180 30-40
Taartbodem van roerdeeg Vruchtentaartbodem 2
%
160-180 25-35
Biscuittaart Springvorm 2
%
160-180 30-40
Vruchten- of kwarktaart, zandtaartdeeg* Donkere springvorm 1
%
170-190 70-90
Vruchtentaart fijn, van roerdeeg Springvorm 2
%
150-170 55-65
Hartig gebak* (bijv. quiche/uientaart) Springvorm 1
%
180-200 50-60
* Gebak ca. 20 minuten in de oven laten afkoelen.
Gebak op de plaat Toebehoren Hoogte Wijze van
verwarmen
Temperatuurin
stelling in °C
Bereidingsduur,
minuten
Roer of gistdeeg met een droge vulling Braadslede: 3
%
160-180 25-35
Aluminium bakplaat* +
braadslede**
1+3
:
150-170 35-45
Roer- of gistdeeg met verse vruchten Braadslede: 3
%
140-160 40-50
Aluminium bakplaat* +
braadslede**
1+3
:
130-150 50-60
Biscuitrol (voorverwarmen) Braadslede: 2
%
170-190 15-20
Broodvlecht, 500 g meel Braadslede: 2
%
160-180 25-35
Kerststol, 500 g meel Braadslede: 3
%
160-180 50-60
Kerststol, 1 kg meel Braadslede: 3
%
150-170 90-100
Strudel, zoet Braadslede: 2
%
180-200 55-65
Pizza Braadslede: 3
%
180-200 20-30
Aluminium bakplaat* +
braadslede**
1+3
:
150-170 35-45
* U kunt extra bakplaten kopen bij de servicedienst of bij de speciaalzaak.
** Wanneer u op twee niveaus bakt, dient u de braadslede altijd boven de bakplaat te schuiven.
Brood en broodjes Toebehoren Hoogte Wijze van
verwarmen
Temperatuur, °C Bereidingsduu
r, minuten
Gistbrood, 1,2 kg meel Braadslede: 2
%
270
190
8
35-45
Zuurdeegbrood, 1,2 kg meel Braadslede: 2
%
270
190
8
35-45
Broodjes (bijv. roggenbroodjes) Braadslede: 2
%
200-220 20-30
Page 74

74
Tips voor het bakken
Vlees, gevogelte, vis
Vormen
U kunt alle vormen gebruiken die hittebestendig zijn. Voor grote
stukken vlees is ook de braadslede geschikt.
Het meest geschikt zijn vormen van glas. Let erop dat het
deksel voor de pan past en goed sluit
Gebruikt u geëmailleerde braadpannen, voeg dan wat meer
vloeistof toe.
Bij braadgerei van roestvrij staal wordt het gerecht niet zo erg
bruin en kan het vlees wat minder gaar zijn. Houd langere
bereidingstijden aan.
Opgaven in de tabellen:
Vorm zonder deksel = open
Vorm met deksel = gesloten
Zet de vorm altijd midden op het rooster.
Zet hete vormen van glas op een droge onderzetter. Is de
ondergrond nat of koud, dan kan het glas knappen.
Braden
Voeg aan mager vlees een beetje vloeistof toe. De bodem van
de vorm dient ca. ½ cm bedekt te zijn.
Voeg aan stoofvlees royaal vloeistof toe. De bodem van de
vorm dient ca 1 - 2 cm bedekt te zijn.
De hoeveelheid vloeistof is afhankelijk van het soort vlees en
het materiaal van de vormen. Wanneer u vlees in geëmailleerde
braadvormen klaarmaakt, is er wat meer vloeistof nodig dan in
glazen vormen.
Klein gebak Toebehoren Hoogte Wijze van
verwarmen
Temperatuurin
stelling in °C
Bereidingsduu
r, minuten
Koekjes Braadslede: 3
%
150-170 10-20
Aluminium bakplaat* + braadslede** 1+3
:
130-150 25-35
Schuimgebak Braadslede: 3
:
70-90 135-145
Soesjes Braadslede 2
%
200-220 30-40
Bitterkoekjes Braadslede 3
%
110-130 30-40
Aluminium bakplaat* + braadslede** 1+3
:
100-120 35-45
Bladerdeeg Braadslede 3
:
190-210 20-30
Aluminium bakplaat* + braadslede** 1+3
:
180-200 25-35
* U kunt extra bakplaten kopen bij de servicedienst of bij de speciaalzaak.
** Wanneer u op twee niveaus bakt, dient u de braadslede altijd boven de bakplaat te schuiven.
U wilt bakken volgens uw eigen recept. Raadpleeg de baktabellen voor gelijksoortig gebak.
Zo stelt u vast of de cake goed door-
bakken is.
Prik ca. 10 voor het einde van de in het recept vermelde baktijd met een stokje in het
hoogste punt van het gebak. Wanneer er geen deeg meer aan de prikker zit, is het
gebak klaar.
Het gebak zakt in. Voeg de volgende keer minder vloeistof toe of stel de oventemperatuur 10 graden lager
in.Houd rekening met de omroertijden in het recept.
Het gebak is in het midden hoog gerezen en lager bij de randen.
De rand van de springvorm niet invetten. Na het bakken maakt u het gebak voorzichtig
los met een mes.
Het gebak wordt te donker aan de
bovenkant.
Plaats het verder naar binnen, kies een lagere temperatuur en bak het iets langer.
Het gebak is te droog. Als het gebak klaar is, prikt u er met een prikker kleine gaatjes in. Vervolgens bedruppelt
u het met vruchtensap of alcohol. Stel de temperatuur de volgende keer 10 graden
hoger in en houd een kortere baktijd aan.
Het brood of het gebak (bijv. kwarktaart)
ziet er goed uit, maar is van binnen klef
(zacht, doortrokken met waterstrepen).
Gebruik de volgende keer wat minder vloeistof en bak iets langer bij een wat lagere temperatuur. Bij gebak met een vochtige bovenkant bakt u eerst de bodem voor. Bestrooi
het met amandelen of paneermeel en doe dan de bovenlaag erop. Houd u aan de recepten en baktijden.
Het gebak is ongelijkmatig bruin geworden.
Kies een wat lagere temperatuur, dan wordt het gebak gelijkmatiger bruin. Gebruik bij
kwetsbaar gebak boven- en onderwarmte
% op één niveau. Ook bakpapier dat uitsteekt
kan de luchtcirculatie beïnvloeden. Knip het bakpapier altijd zodanig af dat het goed op
de plaat past.
Het vruchtengebak is te licht aan de
onderkant.
Plaats het gebak de volgende keer één niveau lager.
Het sap van de vruchten stroomt over. Gebruik, indien beschikbaar, de volgende keer de diepere braadslede.
Klein gebak van gistdeeg plakt bij het
bakken aan elkaar.
Tussen de gebakstukken dient een afstand van ca. 2 cm te zijn. Zo is er voldoende
plaats en kan het gebak goed rijzen en helemaal bruin worden.
U hebt op meerdere niveaus gebakken.
Op de bovenste plaat is het gebak donkerder dan op de onderste.
Gebruik voor het bakken op meerdere niveaus altijd 3Dhetelucht
:. Bakplaten die
gelijktijdig in de oven worden gedaan, hoeven niet op hetzelfde moment klaar te zijn.
Bij het bakken van vochtig gebak ontstaat er condenswater.
Bij het bakken kan waterdamp ontstaan. Deze komt vrij via de deur. De waterdamp kan
neerslaan op het bedieningspaneel of op het meubilair en als condens neerdruppelen.
Dit is normaal.
Page 75

75
Braadsledes van roestvrij staal zijn slechts beperkt geschikt.
Het vlees gaart langzamer en wordt minder bruin. Houd een
hogere temperatuur en/of een langere bereidingstijd aan.
Aanwijzingen voor het grillen
Altijd grillen in een gesloten oven.
Verwarm de grill ca. 3 minuten voor, voordat u de te grillen
stukken op het rooster legt.
Leg de te grillen stukken direct op het rooster. Een enkel te
grillen stuk kunt u het beste op het middelste deel van het
rooster leggen. Schuif vervolgens de braadslede op hoogte 1
in. Het vleessap wordt opgevangen, en de oven blijft schoner.
Bakplaat of braadslede mogen niet op hoogte 4 worden
ingeschoven. Bij hoge temperaturen kunnen zij vervormen en
bij het uittrekken de ovenruimte beschadigen.
Neem bij voorkeur te grillen stukken die even groot zijn. Zo
bruinen deze gelijkmatig en blijven zij lekker sappig. Bestrooi
steaks pas na het grillen met zout.
Keer de te grillen stukken na
Z van de opgegeven tijd om.
De grill schakelt voortdurend in en uit. Dat is normaal. Hoe
vaak dit gebeurt is afhankelijk van de ingestelde grillstand.
Vlees
Draai stukken vlees na de helft van de tijd om.
Als het vlees klaar is, moet het nog 10 minuten in de
uitgeschakelde, gesloten oven blijven. Het vocht kan zich dan
beter verdelen.
Wikkel rosbief na de bereiding in aluminiumfolie en laat het
10 minuten in de oven nagaren.
Snijd bij varkensvlees met zwoerd, het zwoerd kruisgewijs in en
leg het vlees eerst met het zwoerd naar beneden in de vorm.
Vlees Gewicht Toebehoren en
vormen
Hoogte Wijze van
verwarmen
Temperatuur
°C, grillstand
Bereidingsduu
r, minuten
Rundvlees
Gebraden rundvlees 1,0 kg gesloten 2
%
200-220 120
1,5 kg 2
%
190-210 140
2,0 kg 2
%
180-200 160
Runderfilet, rosé 1,0 kg open 1
%
210-230 70
1,5 kg 1
%
200-220 80
Rosbief, rosé 1,0 kg open 1
4
230-250 50
Steaks, 3 cm, rosé Rooster + braads-
lede
4+1
(
315
Kalfsvlees
Gebraden kalfsvlees 1,0 kg open 1
%
200-220 100
1,5 kg 1
%
190-210 120
2,0 kg 1
%
180-200 140
Varkensvlees
zonder zwoerd (bijv . halsstuk) 1,0 kg open 1
4
190-210 120
1,5 kg 1
4
180-200 150
2,0 kg 1
4
170-190 170
met zwoerd (bijv . schouder) 1,0 kg open 1
4
180-200 130
1,5 kg 1
4
190-210 160
2,0 kg 1
4
170-190 190
Casselerrib met been 1,0 kg gesloten 1
%
210-230 80
Lamsvlees
Lamsbout zonder been, medium 1,5 kg open 1
4
170-190 120
Gehakt
Gebraden gehakt ca. 750 g open 1
4
180-200 70
Worstjes
Worstjes Rooster + braads-
lede
4+1
(
315
Page 76

76
Gevogelte
De waarden in de tabel gelden voor het inschuiven in de koude
oven.
De gewichtsgegevens in de tabel hebben betrekking op
ongevuld gevogelte dat gereed is om te worden gebraden.
Wanneer u rechtstreeks op het rooster grillt, schuif de
braadslede dan op hoogte 1 in de oven.
Bij eend of gans dient u de huid onder de vleugels in te steken,
zodat het vet kan weglopen.
Leg gevogelte met de borstzijde naar onderen op het rooster.
Geheel gevogelte na tweederde van de tijd omkeren.
Gevogelte wordt vooral knapperig bruin, wanneer u het tegen
het einde van de braadtijd met boter, zout water of
sinaasappelsap bestrijkt.
Vis
Keer de visstukken na
Z van de opgegeven tijd om.
Hele vissen hoeven niet omgekeerd te worden. Plaats de hele
vis in de zwemstand met de rugvin naar boven in de oven. Stop
de helft van een aardappel of een kleine ovenvaste vorm in de
buik zodat de vis stabieler staat.
Schuif bij het rechtstreeks op het rooster grillen ook de
braadslede op hoogte 1 in. Het visvocht wordt opgevangen, en
de oven blijft schoner.
Tips voor het braden en grillen
Ovenschotels, gegratineerde gerechten, toast
Grilt u direct op het rooster, plaats dan ook de braadslede op
hoogte 1. De oven blijft schoner.
Plaats de vormen altijd op het rooster.
De bereidingstoestand van een ovenschotel is afhankelijk van
de grootte van de vorm en de hoogte van het gerecht. De
opgaven in de tabellen zijn slechts richtwaarden.
Gevogelte Gewicht Toebehoren en
vormen
Hoogte Wijze van
verwarmen
Temperatuur
°C, grillstand
Bereidingsduur,
minuten
Halve kippen, 1-4 stuks 400g per stuk Rooster 2
4
210-230 40-50
Kip in stukken 250 g per stuk Rooster 3
4
210-230 30-40
Kip, heel 1-4 stuks 1 kg per stuk Rooster 2
4
200-220 55-85
Eend, heel 1,7 kg Rooster 2
4
170-190 80-100
Gans, heel 3,0 kg Rooster 2
4
160-180 110-130
Babykalkoen, heel 3,0 kg Rooster 2
4
180-200 80-100
2 kalkoenbouten 800g per stuk Rooster 2
4
180-200 80-100
Vis Gewicht Toebehoren en
vormen
Hoogte Wijze van
verwarmen
Temperatuur
°C, grillstand
Bereidingsduur, minuten
Vis, heel 300 g per stuk Rooster 3
(
2 20-25
1,0 kg Rooster 2
4
190-210 40-50
1,5 kg Rooster 2
4
180-200 60-70
Vis in plakken, bijv. koteletten 300 g per stuk Rooster 4
(
2 20-25
Voor het gewicht van het vlees staan
geen gegevens in de tabel.
Maak uw keuze in overeenstemming met het eerstvolgende, lagere gewicht en houd een
langere tijd aan.
Hoe kunt u vaststellen of het vlees klaar
is?
Gebruik de vleesthermometer (verkrijgbaar in de speciaalzaak) of doe de “lepeltest".
Druk met een lepel op het vlees. Voelt het stevig aan, dan is het klaar. Geeft het mee,
dan heeft het nog wat tijd nodig.
Het vlees is te donker en de korst is op
enkele plaatsen verbrand.
Controleer de inschuifhoogte en de temperatuur.
Het vlees ziet er goed uit, maar de jus is
aangebrand.
Neem de volgende keer kleiner braadgerei of voeg wat meer vloeistof toe.
Het vlees ziet er goed uit, maar de jus is
te licht en te waterig.
Gebruik de volgende keer groter braadgerei en voeg minder vloeistof toe.
Bij het overgieten van het vlees ontstaat
waterdamp.
Dit is normaal. Een groot deel van de waterdamp ontsnapt uit de oven. Het kan neerslaan op het koudere schakelpaneel of op meubilair en als condens neerdruppelen.
Gerecht Toebehoren en vormen Hoogte Wijze van
verwarmen
Temperatuurinstelling in °C
Bereidingsduur, minuten
Soufflés
Soufflé, zoet Ovenschaal 2
%
170-190 50-60
Noedelsoufflé Ovenschaal 2
%
210-230 25-35
Gratin
Aardappelgratin met rauwe ingrediënten,
Hoogte max. 2 cm
Ovenschaal 2
4
150-170 50-60
Page 77

77
Kant-en-klaar producten
Houd u aan de opgaven van de fabrikant op de verpakking.
Wanneer u de toebehoren bekleedt met bakpapier, let er dan
op dat het bakpapier geschikt is voor deze temperaturen. Pas
de grootte van het papier aan het gerecht aan.
Het bereidingsresultaat is zeer sterk afhankelijk van het soort
levensmiddelen. Op het rauwe product kunnen al bruine
plekken en ongelijkmatigheden te zien zijn.
Opmerking
Bij het bereiden van diepvriesgerechten kan de braadslede vervormen. De reden daarvan zijn de grote temperatuursverschillen
waaraan het toebehoren is blootgesteld. De vervorming verdwijnt weer tijdens het bereidingsproces.
Bijzondere gerechten
Bij lage temperaturen lukt romige yoghurt u met
3D-hetelucht
: even goed als luchtig gistdeeg.
Verwijder eerst de toebehoren, inhangroosters of telescooprails
uit de binnenruimte.
Yoghurt maken
1. 1 liter melk (3,5 % vet) aan de kook brengen en tot 40 °C
aafkoelen.
2. Hier 150 g yoghurt (koelkasttemperatuur) door roeren.
3. Hiermee koppen of kleine twist-off potjes vullen en afdekken
met vershoudfolie.
4. Den binnenruimte zoals aangegeven voorverwarmen
5. De koppen of potjes vervolgens op de bodem van de
binnenruimte zetten en bereiden zoals aangegeven.
Gistdeeg laten rijzen
1. Het gistdeeg maken zoals gebruikelijk, in een hittebestendige
vorm van keramiek leggen en afdekken
2. Den binnenruimte zoals aangegeven voorverwarmen
3. De oven uitschakelen en het deeg in de uitgeschakelde
binnenruimte plaatsen om het te laten rijzen.
Ontdooien
De ontdooitijden zijn afhankelijk van de aard en de hoeveelheid
van de levensmiddelen.
Let op de aanwijzingen van de fabrikant op de verpakking.
Levensmiddelen uit de verpakking halen en in een geschikte
schaal op het rooster zetten.
Gevogelte met de borstzijde op het bord leggen.
Toast
Toast roosteren, 12 stuks Rooster 4
(
3 4-5
Toast, gratineren, 12 stuks Rooster 3
(
3 5-8
Gerecht Toebehoren en vormen Hoogte Wijze van
verwarmen
Temperatuurinstelling in °C
Bereidingsduur, minuten
Gerecht Toebehoren Hoogte Wijze van
verwarmen
Temperatuurinstelling in °C
Bereidingsduur, minuten
Strudel met vruchtenvulling Braadslede 3
:
190-210 45-55
Patates frites Braadslede 3
%
210-230 25-30
Pizza Rooster 2
%
200-220 15-20
Pizza-Baguette Rooster 2
4
190-210 15-20
Gerecht Vormen Verwarmings-
methode
Temperatuur Tijdsduur
Yoghurt Koppen of Twist-Off
potten
op de bodem van
de binnenruimte
plaatsen
:
50 °C
50 °C
5 m
8 uur
Gistdeeg laten rijzen Hittebestendige
vorm
op de bodem van
de binnenruimte
plaatsen
:
50 °C
Apparaat uitschakelen en
gistdeeg in de binneruimte
plaatsen
510 min..
2030 min..
Diepvries Toebehoren Hoogte Wijze van
verwarmen
Temperatuur
Bijv. slagroomtaarten, bakkersroomtaarten, taarten met chocolade- of suikerglazuur, vruchten, kip, worst en vlees, brood,
broodjes, cake en ander gebak
Rooster 2
:
De temperatuurkeuzeknop blijft uitgeschakeld
Page 78

78
Drogen
Met 3D-hetelucht : kunt u uitstekend drogen.
Gebruik uitsluitend fruit en groente zonder gebreken en was
deze grondig.
Laat ze goed afdruipen en droog ze af.
Bedek de braadslede en het rooster met bak- of
perkamentpapier.
Fruit of groente met veel vocht enkele malen keren.
Het gedroogde gerecht direct na het drogen losmaken van het
papier.
Inmaak
Voor het inmaken moeten de potten en rubberen ringen
schoon en in orde zijn. Gebruik zo mogelijk potten van gelijke
grootte. De gegevens in de tabel hebben betrekking op ronde
glazen potten van 1 liter.
Attentie!
Gebruik geen grotere of hogere potten. De deksels zouden
kunnen springen.
Gebruik uitsluitend fruit en groente zonder gebreken. Was het
grondig.
De aangegeven tijden in de tabellen zijn richtwaarden. Deze
kunnen worden beïnvloed door de omgevingstemperatuur, het
aantal potten, de hoeveelheid en de temperatuur van de
inhoud. Controleer voor u om- of uitschakelt of de potten
werkelijk borrelen.
Voorbereiden
1. De potten vullen, niet te
2. De glazen randen schoonmaken.
3. Leg op elke pot een natte rubberen ring en een deksel.
4. Sluit de potten af met klemmen.
Plaats niet meer dan zes potten in de ovenruimte.
Instellen
1. * Braadslede op hoogte 2 plaatsen. Plaats de glazen potten
zó dat ze elkaar niet raken.
2. ½ Liter heet water (ca. 80 ºC) in de braadslede gieten.
3. Ovendeur sluiten.
4. Onderwarmte $ instellen.
5. Temperatuur op170 tot 180 °C instellen
Inmaak
Fruit
Na ca. 40 tot 50 minuten stijgen er met korte tussenpozen
belletjes op. Schakel de oven uit.
Na 25 tot 35 minuten nawarmen haalt u de weckflessen uit de
ovenruimte. Als u ze langer in de ovenruimte laat afkoelen,
kunnen zich kiemen vormen waardoor het ingemaakte fruit
sneller zuur wordt.
Groente
Zodra er in de potten belletjes opstijgen de temperatuur naar
120 tot 140 °C terugbrengen. Afhankelijk van de soort groente
ca. 35 tot 70 m. Schakel vervolgens de oven uit en gebruik de
restwarmte.
Glazen potten verwijderen
Neem de potten na het inkoken uit de binnenruimte.
Attentie!
Zet de hete potten niet op een koude of natte ondergrond. Ze
kunnen knappen.
Vruchten en kruiden Toebehoren Hoogte Verwar-
mingsmethode
Temperatuur Tijdsduur
600 g appelringen Braadslede + rooster 3+1
:
80 °C ca. 5 uur
800 g stukjes peer Braadslede + rooster 3+1
:
80 °C ca. 8 uur
1,5 kg kwetsen of pruimten Braadslede + rooster 3+1
:
80 °C ca. 8-10 uur
200 g panklare keukenkruiden Braadslede + rooster 3+1
:
80 °C ca. 1½ uur
Fruit in glazen potten van één liter Wanneer het borrelen begint Nawarmen
Appels, rode bessen, aardbeien Uitschakelen Ca. 25 minuten
Kersen, abrikozen, perziken, kruisbessen Uitschakelen Ca. 30 minuten
Appelmoes, peren, pruimen Uitschakelen Ca. 35 minuten
Groente met koud vocht in glazen potten van één liter Wanneer het borrelen begint Nawarmen
Augurken - Ca. 35 minuten
Rode biet Ca. 35 minuten Ca. 30 minuten
Spruitjes ca. 45 minuten Ca. 30 minuten
Bonen, koolrabi, rodekool Ca. 60 minuten Ca. 30 minuten
Erwten Ca. 70 minuten Ca. 30 minuten
Page 79

79
Acrylamide in levensmiddelen
Acrylamide ontstaat vooral bij graan- en aardappelproducten
die met grote hitte worden bereid, zoals aardappelchips, frites,
toast, broodjes, brood of fijne bakwaren (koekjes, taaitaai,
speculaas).
Testgerechten
Deze tabellen zijn gemaakt voor onderzoeksinstituten om het
controleren en testen van verschillende apparaten te
vergemakkelijken.
Volgens EN 50304/EN 60350 (2009) resp. IEC 60350.
Bakken
Bakken op 2 niveaus:
De braadslede altijd boven de bakplaat inschuiven.
Spritsgebak (zoals spritskoeken in suikerstroop):
Gerechten die tegelijk in de oven worden geschoven, hoeven
niet tegelijk klaar te zijn.
Afgedekte appeltaart, hoogte 1:
De positie van de donkere springvorm wijzigen, diagonaal
inschuiven.
Afgedekte appeltaart, hoogte 2:
De positie van de donkere springvorm wijzigen.
Gebak in springvorm van metaal:
Met boven-/onderwarmte
% op hoogte 1 bakken. Gebruik in
plaats van het rooster de braadslede en zet daarop de
springvorm.
Grillen
Wanneer u eten direct op het rooster plaatst, schuif dan ook de
braadslede in op hoogte 1.De vloeistof wordt opgevangen en
de oven blijft schoner.
Tips voor het klaarmaken van gerechten met weinig acrylamide
Algemeen
■ Bereidingstijden zo kort mogelijk houden.
■ De gerechten goudgeel en niet te donker bakken.
■ Grote, dikke ingrediënten bevatten minder acrylamide.
Bakken Met boven- en onderwarmte max. 200 °C.
Met 3D-hetelucht of hete lucht max.180 °C.
Koekjes Met boven- en onderwarmte max. 190 °C.
Met 3D-hetelucht of hete lucht max. 170 °C.
Ei of eierdooier gaat de vorming van acrylamide tegen.
Frites uit de oven Gelijkmatig en in één laag verdelen over de plaat. Minstens 400 g per plaat bakken,
zodat de frites niet uitdrogen
Gerecht Toebehoren en vormen Hoogte Wijze van
verwarmen
Temperatuurinstelling in °C
Bereidingsduur, minuten
Sprits Braadslede 3
%
150-170 20-30
Aluminium bakplaat* + braadslede** 1+3
:
140-160 30-40
Kleine cakejes Braadslede 3
%
150-170 25-35
Kleine cakejes, voorverwarmen Aluminium bakplaat* + braadslede** 1+3
:
140-160 30-40
Biscuittaart Springvorm 2
%
160-180 30-40
Bedekte appeltaart Braadslede + 2 springvormen
Ø 20 cm***
1
%
190-210 70-80
2 roosters* + 2 springvormen
Ø 20 cm***
1+3
:
170-190 65-75
* U kunt extra bakplaten en roosters kopen als speciale toebehoren bij de servicedienst of bij de speciaalzaak.
** Wanneer u op twee niveaus bakt, moet u de braadslede altijd op het hogere niveau inschuiven.
*** Zet de bakvormen diagonaal verzet op het toebehoren.
Gerecht Toebehoren en vormen Hoogte Wijze van
verwarmen
Grillstand Bereidings-
duur, minuten
Toast roosteren
10 min. voorverwarmen
Rooster 4
(
3 ½-2
Biefburgers, 12 stuks*
zonder voorverwarmen
Rooster + braadslede 4+1
(
3 25-30
* Na
Z van de tijd omkeren
Page 80

BSH Hausgeräte GmbH
Carl-Wery-Straße 34
81739 München
GERMANY
*9000739044*
9000739044 05 301295
.BOVGBDUVSFECZ#4))BVTHFS¤UF(NC)VOEFS5SBEFNBSL-JDFOTFPG4JFNFOT"(
'BCSJRV©QBS#4))BVTHFS¤UF(NC)UJUVMBJSFEFTESPJUTE࣐VUJMJTBUJPOEFMB`NBSRVF4JFNFOT"(
(Z¡SU³B#4))BVTHFS¤UF(NC)B4JFNFOT"(W©EKFHZIBT[O¡MBUJFOHFE©MZFBMBQK¡O
(FGBCSJDFFSEEPPS#4))BVTHFS¤UF(NC)POEFSIBOEFMTNFSLMJDFOUJFWBO4JFNFOT"(
 Loading...