

Page 1
Siemens - Electrogeräte GmbH
Carl - Wery - Straße 34
81739 München
Operating instructions
en
中文說明書
zh
型號
ER326AB90L 單頭石油氣爐
ER326BB90L 兩頭石油氣爐
Cod. 9000433842 A
www.siemens-home.com
請保留此說明書
Page 2

Table of contents
Safety precautions ............................................ 3
Your new appliance .......................................... 5
Burners .............................................................. 6
Switching on manually ......................................... 6
Switching on automatically ................................... 7
Safety system .................................................... 7
Switching off a burner ......................................... 7
Power levels ..................................................... 7
Warnings ......................................................... 8
Suitable pans ................................................... 9
Wok pan ......................................................... 9
Accessories .................................................... 10
Additional pan support ...................................... 10
Additional coffee maker support .......................... 10
Cooking recommendations ................................. 10
Precautions for use ........................................ 11
Cleaning and maintenance ............................ 12
Cleaning ................................................................... 12
Unsuitable products ................................................. 12
Maintenance ............................................................. 13
Faults ............................................................. 14
Technical Assistanse Service ........................ 15
Warranty conditions .................................................. 15
Used appliances and packaging .................... 15
Environmentally-friendly waste management ........... 15
3
Page 3

Dear customer,
Congratulations on your choice. Thank you for purchasing one of our
appliances. This practical, modern and functional appliance is manufactured
using materials of the highest quality which are subject to strict Quality
Control checks throughout the entire manufacturing process. The appliance
is meticulously tested to ensure that it meets your demands and produces
perfect cooking results.
Do not remove the appliance from its protective packaging until it is installed
in the unit.
Please read these instructions carefully before proceeding to install and use
the appliance. The information contained in these instructions is essential for
the correct operation of the appliance and, more importantly, for your safety.
The packaging of your appliance has been manufactured using only the
materials which are strictly necessary to guarantee efficient protection
during transport. These materials are 100% recyclable, thus reducing the
environmental impact. You can also contribute to caring for the environment,
by following the advice below:
- dispose of the packaging in the appropriate recycling bin,
- before you get rid of an old appliance, make sure you disable it. Contact
your local authority to find out the address of your nearest recycling centre
to dispose of your appliance,
- do not pour used oil down the sink. Collect it in a sealed container and
take it to an appropriate collection point or, failing that, place it in the rubbish
bin (it will end up in a controlled dump; this is probably not the best option,
but it will avoid contaminating ground water).
IMPORTANT:
In the unlikely event that the appliance should arrive damaged or not meet
your expectations in terms of quality, please inform us as soon as possible.
For the warranty to be valid, the appliance must not have been tampered
with, or used inappropriately.
4
Page 4

Safety precautions
Read these instructions carefully. Reading these
instructions will enable you to use your appliance safely
and effectively.
All operations relating to installation, regulation and
conversion to other types of gas must be carried
out by an authorised installation engineer, respecting
applicable regulations, standards and the specifications
of the gas and electricity providers.
You are recommended to contact the Technical
Assistance Service to convert to another type of gas.
Gas appliances used in Hong Kong SAR; under the
Gas safety (Registration of Gas installers and Gas
Contractors) regulations, only register gas installers
(registered to the appropriated class) employed by
registered gas contractors can personally carry out gas
installation, regulation.
Please do not use additional fitting, such as aluminum
cover.
Before installing your new hob, ensure that it is being
installed according to the assembly instructions.
This appliance can only be installed in a well ventilated
place in accordance with existing regulations and
ventilation specifications. The appliance must not be
connected to a combustion product removal device.
This appliance has been designed for home use only.
This appliance cannot be installed on yachts or in
caravans.
The place in which the appliance is installed must have
fully-functioning ventilation, in accordance with the
regulations.
Do not subject the appliance to draughts. These might
blow out the burners.
This appliance leaves the factory set to the type of gas
that is indicated on the specifications plate. If this must
be changed, read the Assembly instructions.
Do not tamper with the appliance’s interior.
If necessary, call our Technical Assistance Service.
These operating and installation instructions should be
retained, and passed onto the buyer if the appliance is
sold.
5
Page 5

Do not switch on the appliance if it is damaged in any
way. Contact our Technical Assistance Service.
The surfaces of cooking appliances heat up during
use. Care must be taken when using these appliances.
Keep children well away from the appliance.
This appliance is only intended for cooking purposes,
not as a heating system.
Fat or oil which is overheated can catch fire easily. Do
not leave oil or fats to heat up unattended. If oil or fats
do catch fire, never use water to put the fire out. Risk
of burns! Put the fire out by covering the pan with a lid
and switch off the hotplate.
In the event of a malfunction, turn off the appliance’s
gas and electricity supply. For repairs, call our Technical
Assistance Service.
If one of the controls will not turn, do not force it. Call
the Technical Assistance Service immediately, so that
they can repair or replace it.
Never place unstable pans on the hob or the burners,
as they may accidentally tip over.
Do not clean the specifications plate using a steam
cleaner. Risk of electrocution!
This appliance is class 3 type, according to the EN 301-1 regulation for gas appliances: built-in appliance.
Do not store or use corrosive chemicals, products
which produce fumes, flammable materials or non-food
products below or near this domestic appliance.
This appliance is not intended for use by persons
(including children) with reduced physical, sensory or
mental capabilities, or lack of experience and
knowledge, unless they have been given supervision or
instruction concerning use of the appliance by a person
responsible for their safety.
kЙоЙк=дЙ~оЙ=нЬЙ=~ййдб~еЕЙ=ме~ннЙеЗЙЗ=ЗмкбеЦ=зйЙк~нбзеK=
The graphics in this instruction manual are given as a
guide only.
The manufacturer is exempt from all responsibility if this
6
the requirements of this manual are not complied with.
Page 6
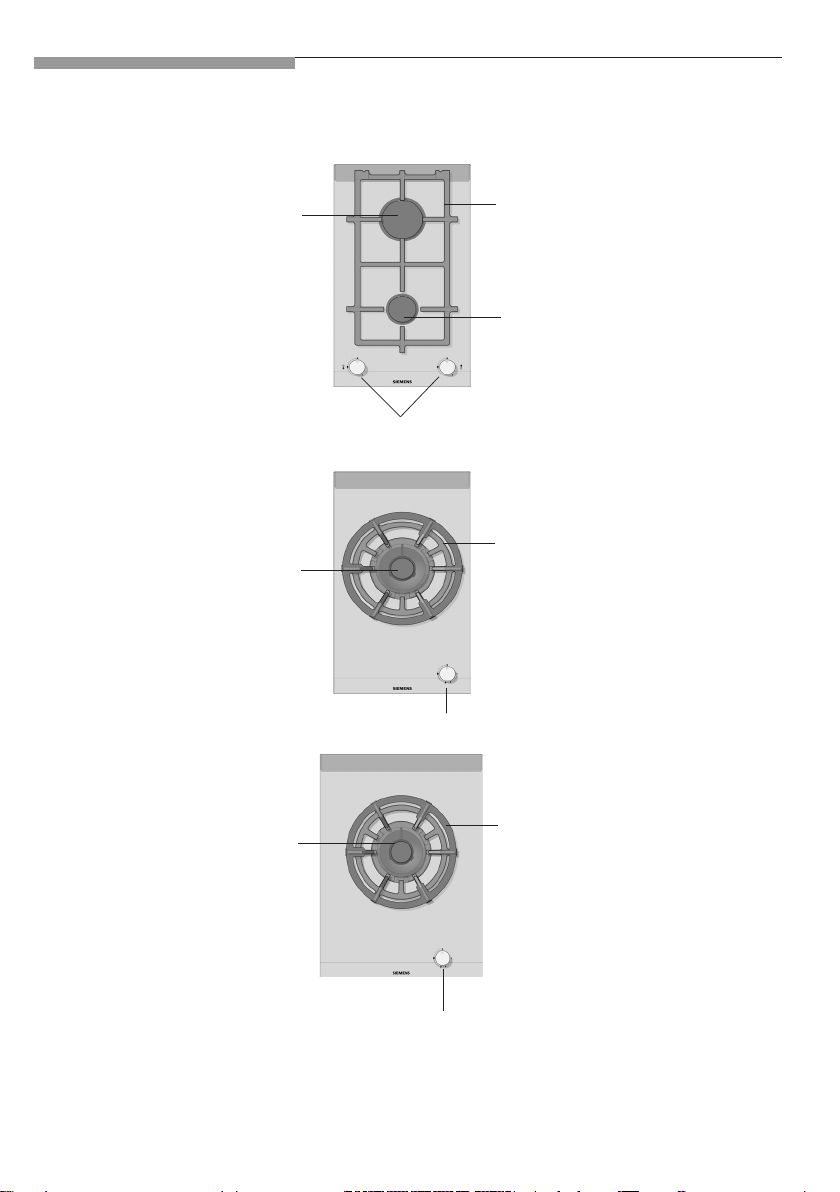
Your new appliance
Burner (up to
2,8 kW)
Double flame
burner (up to
6 kW
Control knob
Control knob
Pan support
Burner (up to
1,9 kW)
Pan support
Double flame
burner (up to
6 kW
Control knob
Pan support
These individual appliances can be combined and/or with conventional hobs of the
same make, using the joint accessory. See the catalogue for details.
7
Page 7
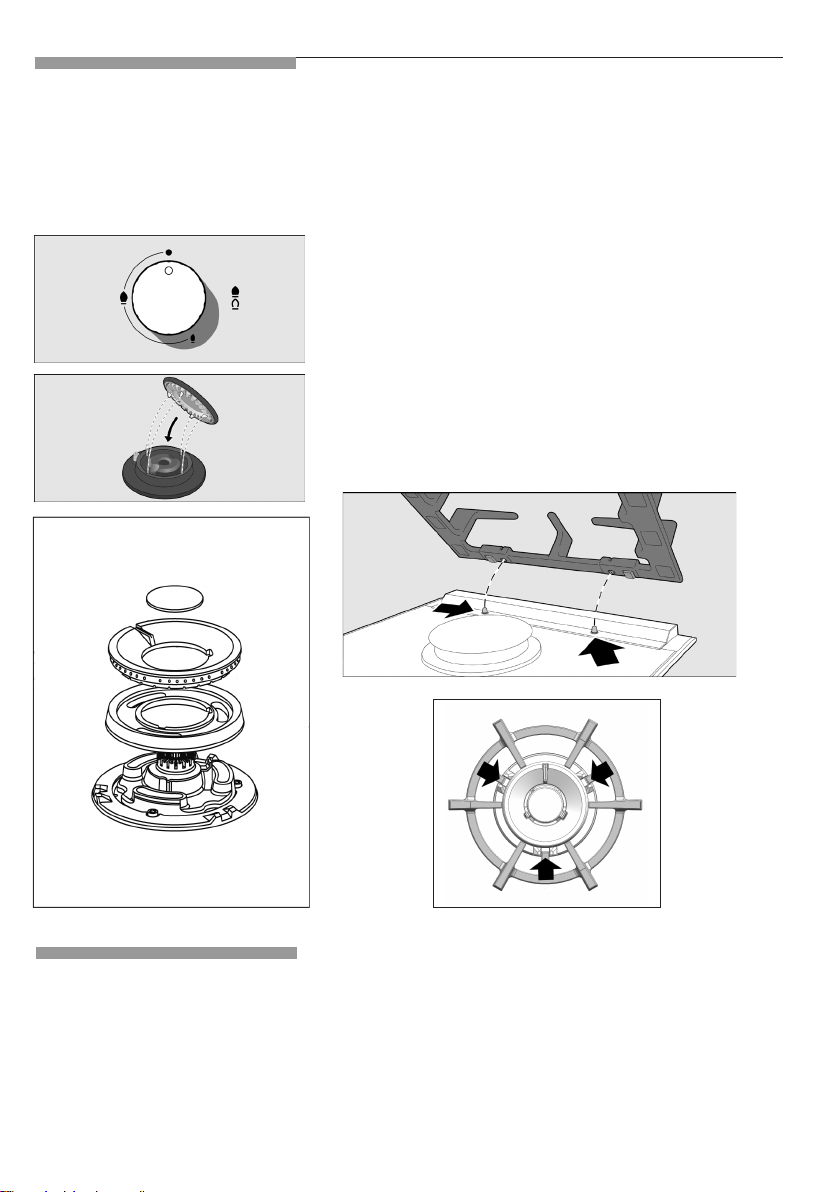
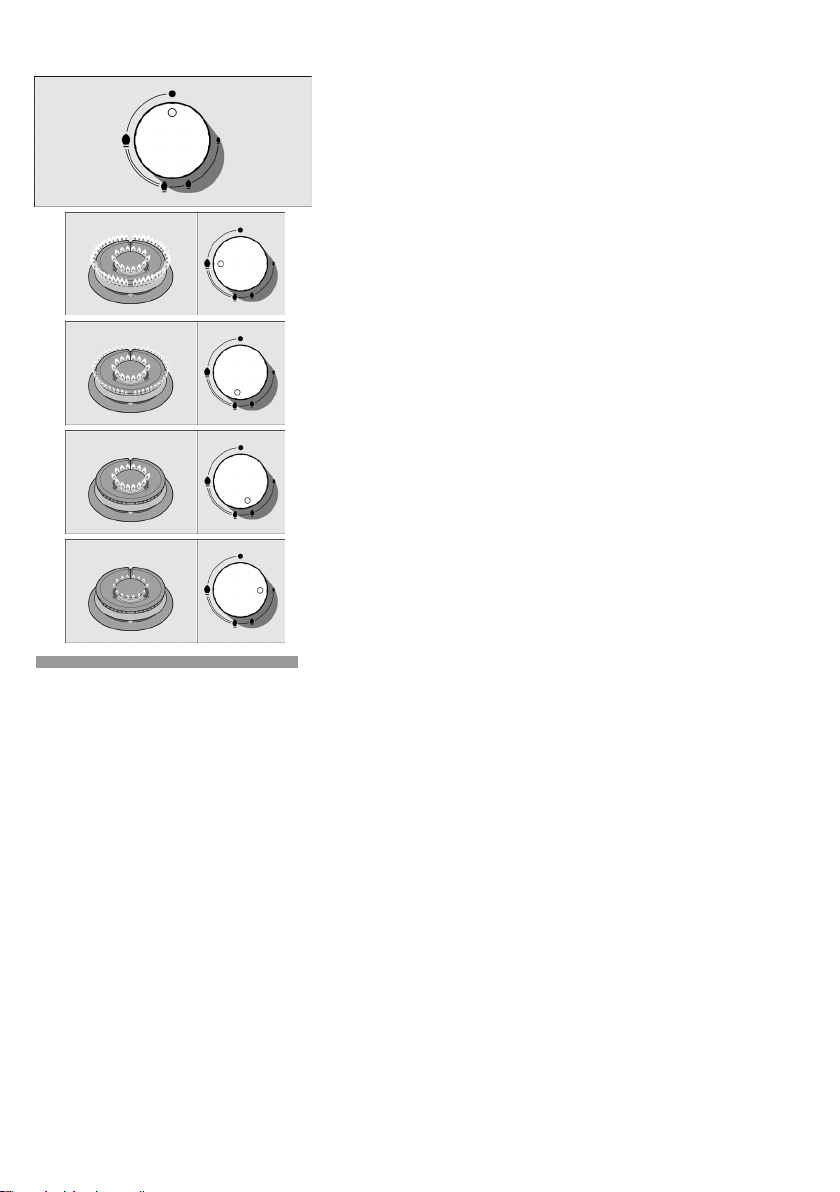
1. Press the chosen burner control and turn it
anticlockwise to the required setting.
2. Use any type of lighter or flame (cigarette lighter,
matches, etc.) and bring it close to the burner.
There are indications to show which burner each
control knob operates. Fig. 1.
The gas burners
Switching on manually
It is essential to ensure that all the burner parts
and the pan supports are correctly installed for the
Operation
Fig. 4
Fig. 1
Fig. 2
Fig. 3
appliance to work correctly. Fig. 2-3-4-5.
Fig. 5
8
Page 8
Power levels
Turn the corresponding control clockwise to the 0
setting.
Switching off a burner
If your hob features the automatic ON function
(ignition sparkers):
1. Press the chosen burner control and turn it
anticlockwise to the maximum power setting.
While the control is still pressed down, sparks are
produced on all burners. The flame ignites (it is no
longer necessary to press down the control).
2. Turn the control to the required setting.
If it does not come on, turn the control to the off
setting and repeat the steps above. This time,
press and hold the control for longer (up to 10
seconds).
Warning! If after 15 seconds have elapsed, the
flame does not ignite, switch off the burner and
open a nearby window or door. Wait at least one
minute before trying to switch the burner back on.
Switching on
automatically
The progressive controls can be used to control
the power needed, from minimum to maximum
power.
Depending on the model, your hob may have a
safety system (termopar) that prevents the flow of
gas if the burners accidentally switch off. To ensure
that this device is active, switch on the burner as
usual and, without releasing the control, press and
hold it down firmly for 4 seconds after lighting the
flame.
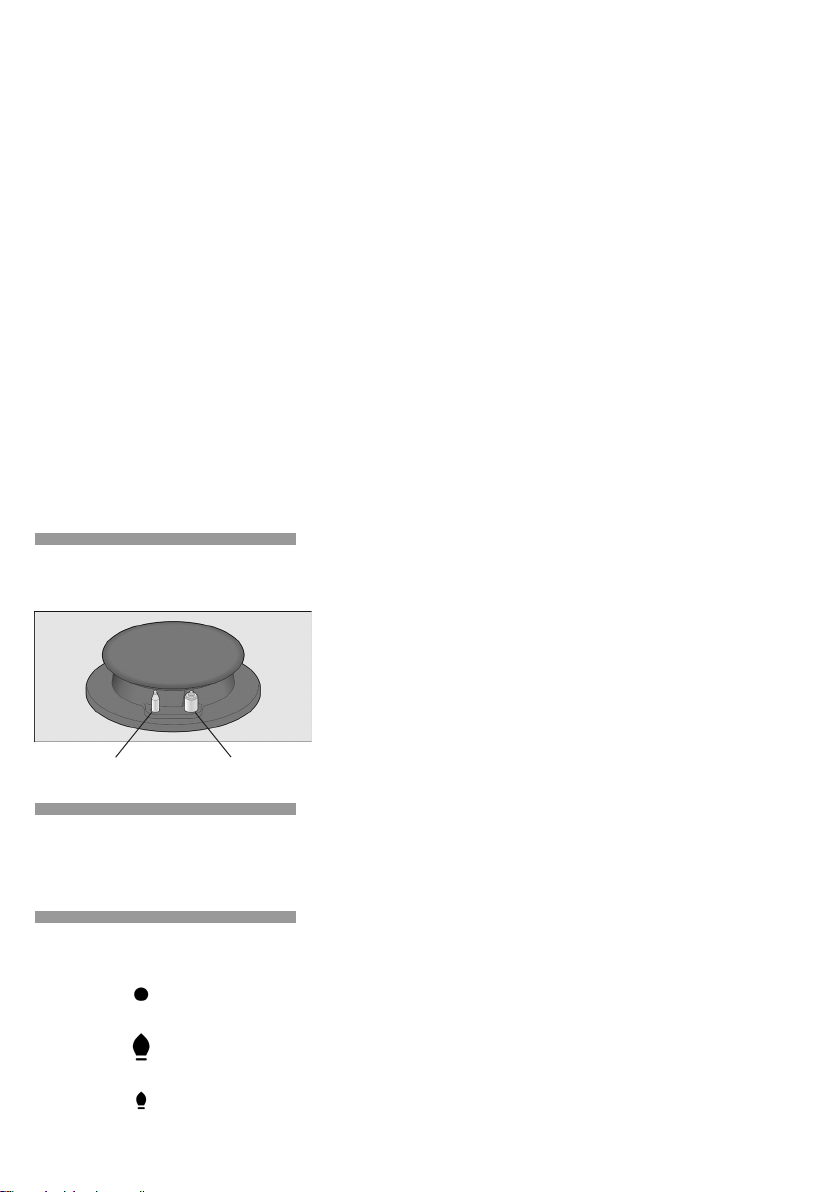
Safety system
Termopar
Ignition sparker
Setting
Large flame
Economy
flame
Control off
Maximum capacity or
aperture and electricity
on
Minimum capacity or
aperture
9
Page 9
It is normal to hear a whistling noise while the burner
is operating.
When it is first used, it is normal for the burner to give
off fumes; this does not pose any risk and does not
indicate a malfunction; they will disappear in time.
A few seconds after switching off the burner, it will
make a sound (thud); this is not a fault - this means
that the safety device is no longer operating.
Keep the burner as clean as possible. If the ignition
sparkers are dirty, they will not light properly. Clean
them periodically using a small non-wire brush. Bear
in mind that the ignition sparkers must not suffer any
serious impacts.
An orange-coloured flame is normal. This is caused
by the presence of dust in the atmosphere, spilt
liquids, etc.
Warnings
For dual double flame burners, the inner and outer
flames can be controlled separately.
The available power levels are as follows:
Inner and outer flame on full power.
Outer flame on minimum, inner flame on full power.
Inner flame on full power.
Inner flame on minimum.
10
Page 10
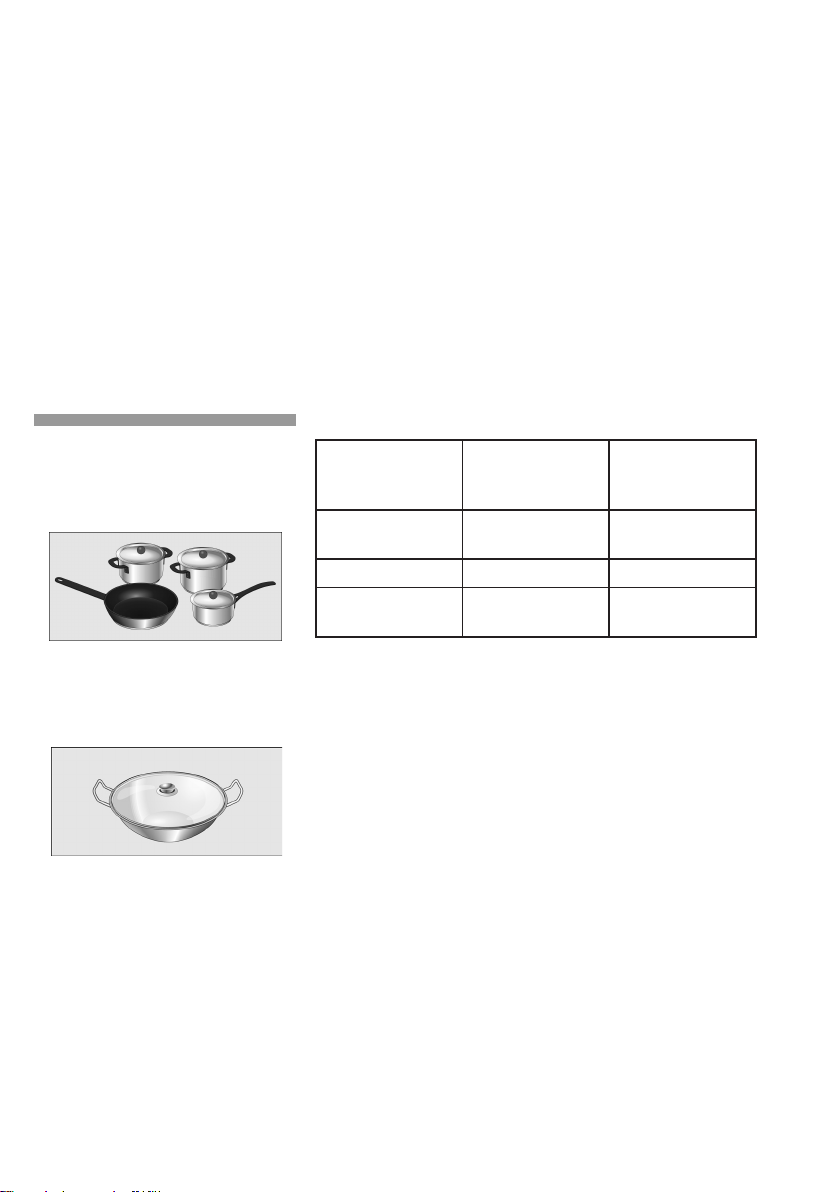
Suitable pans
The kitchen will become hot and humid when this
gas appliance is used. You must therefore ensure that
the kitchen is well-ventilated. Either keep the natural
ventilation apertures open, or install an extractor
hood.
If using the appliance intensively for prolonged periods
additional ventilation may be required, for example,
by opening a window; more effective ventilation may
also be required, for example, by increasing the hob’s
ventilation, if possible.
If the burner flames are accidentally blown out, switch
off the burner operating control and do not try to
relight it for at least one minute.
Burner
Minimum
pan diameter
Maximum
pan diameter
Wok pan
Double flame
burner
Semi-rapid
burner
22 cm
22 cm 26 cmRapid burner
14 cm 20 cm
A wok is a cooking vessel originating in China; it is
a kind of deep, round, lightweight pan with handles
and a flat or concave base.
Food can be prepared in various ways in a wok: it can
be stewed, stir fried, cooked on a low heat, pan-fried,
or steamed. It could be said that woks serve as both
as a saucepan and a frying pan and, owing to their
shape and size, they can be used to cook quite large
ingredients.
When cooking with a wok, heat is diffused more
uniformly and gently; the intense heat which
accumulates means that food takes less time to
cook and also requires less oil, making it one of the
quickest and healthiest ways of cooking. Always
follow the manufacturer’s instructions when cooking
with a wok.
11
Page 11

Accessories
Additional wok pan
support
Additional coffee
maker support
Cooking
Depending on the model, the hob may include the
following accessories. These are also available from
the Technical Assistance Service.
Only for use on the double flame burner with pans
which are more than 26 cm in diameter (roasting
dishes, earthenware pots, etc.) and with pans with a
concave base.
Only for use on the auxiliary burner with pans which
are no more than 12 cm in diameter.
The manufacturer accepts no liability if these
additional pan supports are not used or are used
incorrectly.
recommendations
Burner Very high High Medium Low
Boiling, steaming,
Double flame
burner
Rapid burner
Semi-rapid burner
12
griddling, toasting,
paellas, Asian food
(wok).
Escalopes, steaks,
omelettes, frying,
fresh vegetables,
Steaming potatoes,
fresh vegetables,
stews and pasta.
Reheating and keeping things hot:
cooked and pre-cooked dishes.
Rice, white sauce
and ragout.
Reheating, keeping things hot and
making tasty casseroles.
Steaming:
fish,
vegetables.
Page 12

Precautions for use
The following advice is intended to help you save
energy and prevent cookware damage:
Use pans which are the right size for each burner.
aз=езн=млЙ=лг~дд=кЙЕЙйн~ЕдЙл=зе=д~кЦЙ=ДмкеЙклK=qЬЙ=
Сд~гЙ=лЬзмдЗ=езн=нзмЕЬ=нЬЙ=лбЗЙл=зС=кЙЕЙйн~ЕдЙлK=
Do not use damaged cookware, which does not sit
evenly on the hob. Pans may be overturned.
Only use a pan with thick, flat base.
aз=езн=Еззв=пбнЬзмн=дбЗл=зк=пбнЬ=дбЗл=зеду=й~кнб~дду=
ЕзоЙкбеЦ=кЙЕЙйн~ЕдЙлK=vзм=~кЙ=п~лнбеЦ=ЙеЙкЦуK=
=
=
Always place the cookware right over the burner, not
to one side. Otherwise it could be overturned.
Do not place large pans on the burners near the
controls. These may be damaged by the very high
temperatures.
Place the pans on the pan supports, never directly on
the burner.
Pans should be placed on the hob carefully.
Do not strike the hob and do not place excessive
weight on it.
Make sure that the pan supports and burner covers
are correctly positioned before using the appliance.
13
Page 13

Never slide pans across the glass surface, as you may
scratch it. In addition, try not to drop heavy or sharp
objects on the glass. Never strike any part of the hob.
Do not use steam cleaners. This could damage the
hob.
Never use abrasive products, steel scourers, sharp
implements, knives, etc. to remove bits of hardened
food from the hob.
If your hob is fitted with a glass or aluminium panel,
never use a knife, scraper or similar to clean the point
where it joins the metal.
Do not use knives, scrapers or similar implements
to clean the point where the glass meets the burner
trims, the metal frames or the glass/aluminium panels,
if fitted.
Unsuitable products
Once the appliance is cool, use a sponge to clean it
with soap and water.
After each use, clean the surface of the respective
burner parts once they have cooled down. If any
bits are left (overcooked food, drops of grease etc.),
however few, they will become stuck to the surface
and more difficult to remove later. The holes and
grooves must be clean for the flame to ignite properly.
These should be cleaned using soapy water and
scrubbed using a non-wire brush.
If the pan supports are fitted with rubber rests, ensure
that these are also cleaned. The rests may come
loose and the pan support may scratch the hob.
Always dry the burners and pan supports completely.
Water droplets or damp patches on the hob at the
start of cooking may damage the enamel.
After cleaning and drying the burners, make sure the
burner covers are correctly placed on the burner flame
diffuser.
Cleaning
Cleaning and maintenance
14
Page 14

Always clean off any liquid as soon as it is spilt: you
will save yourself any unnecessary effort.
Grains of sand that may come from cleaning fruits
and vegetables will scratch the glass surface.
Melted sugar, or foods which contain a lot of sugar
which may have spilt, should be cleaned off the
hotplate immediately, using the glass scraper.
Maintenance
15
Page 15

Faults
Sometimes certain faults detected can be easily
resolved. Before calling the Technical Assistance
Service, bear in mind the following advice:
Fault Possible cause Solution
The general
electrical system is
malfunctioning.
The automatic ON
function does not work.
The burner flame is not
uniform.
The flow of gas does
not appear normal or no
gas comes out.
The kitchen smells of
gas.
Defective fuse.
The automatic safety switch has
tripped or a fuse has
blown.
There may be food or cleaning
products stuck between the
ignition sparkers and the
burners.
The burners are wet.
The burner covers are not
correctly positioned.
The appliance is either not
earthed, not connected properly
or the earth connection is faulty.
The burner components are not
correctly positioned.
The grooves on the diffuser are
dirty.
The gas mains are turned off.
If the gas is supplied from a gas
bottle, check that this is
not empty.
A gas tap has been left on.
There may be a leak from the
coupling to the gas bottle.
Check the fuse in the main
fuse box and change it if it is
damaged.
Check the main control
panel to see if the automatic
safety switch has tripped or
a fuse has blown.
The space between the ignition
sparker and the burner must
be clean.
Dry the burner covers carefully.
Check that the covers are correctly
positioned.
Contact an electrical engineer.
Ensure the components are
correctly positioned.
Clean the grooves on the diffuser.
Turn on all stop cocks.
Change the gas bottle.
Turn off the gas taps.
Check that the coupling is
sound.
The safety valve on one
of the burners is not
working.
16
The control knob was not held
down for long enough.
The grooves on the diffuser are
dirty.
Once the burner is lit, hold
the control knob down a few
seconds longer. Clean the
grooves on the diffuser.
Page 16

Technical Assistance Service
When contacting our Technical Assistance Service,
please provide the product number (E-Nr.) and
production number (FD) of the appliance. This
information is given on the specifications plate located
on the lower section of the hob and on the label in the
user manual.
Warranty conditions
The applicable warranty conditions are those set out
by the company’s representative office in the country
of purchase. Detailed information is available from
retail outlets. Proof of purchase must be presented to
obtain the benefits of the warranty.
We reserve the right to introduce changes.
Used appliances and packaging
If the symbol is shown on the specifications
plate, bear in mind the following instructions.
Environmentallyfriendly waste
management
Unpack the appliance and dispose of the packaging
by environmentally-friendly means.
This appliance complies with European Directive
2002/96/CE on Waste Electrical and Electronic
Equipment (WEEE).
17
Page 17

目錄
安全注意事項 .................................................................................................................................
閣下的新爐具 ..................................................................................................................................22
氣爐操作 .........................................................................................................................................
手動開爐...................................................................................................................................23
自動開爐...................................................................................................................................24
安全系統...................................................................................................................................24
關停爐頭...................................................................................................................................24
火勢等級...................................................................................................................................24
警告...........................................................................................................................................25
合適烹皿...................................................................................................................................26
配件.........................................................................................................................................
烹煮建議.................................................................................................................................
使用注意事項 ................................................................................................................................
清潔及保養 ....................................................................................................................................
清潔.........................................................................................................................................
不適合產品.............................................................................................................................
保養.........................................................................................................................................
毛病.........................................................................................................................................
技術支援服務部 ............................................................................................................................
保養條件.................................................................................................................................
使用過的器皿和包裝.....................................................................................................................
20
23
27
27
28
29
29
29
3
31
32
32
32
0
18
Page 18

尊貴的客戶:
祝賀您做出明智的選擇購買我們的其中一種家用電器。此實用現代化多功能爐具乃採用最優
質材料製成,此等材料在整個製造過程中均經嚴格的質量控制。此爐具經細緻檢測以確保符
合閣下之需求并帶來完美的烹飪績效。
爐具未裝好之前請勿拆去其保護包裝。
在安裝及使用本爐具之前請細閱本使用說明書。本使用說明書所載之資料對正確使用電器尤
其對閣下之安全非常重要。
閣下的爐具乃僅用嚴格需要保證運送途中有效保護之包裝材料予以呵護。此等材料百分之百
可循環再用,從而減低了對環境的負面影響。閣下亦可遵循以下建議保護環境:
– 將包裝材料放於適當的循環再用垃圾桶;
– 棄置舊爐具之前確保其失效。與地方主管部門聯繫尋找最近的循環再用中心以處置
閣下的舊電器;
– 請勿將用過的油倒入下水道。用密封容器將其收集并送到合適的收集點,或如未能
做到者將其置於垃圾桶(此舉為受控棄置,可能并非最佳選擇,但可避免污染地下
水)。
重要提示:
倘本爐具送達時有損壞或質量上未符合閣下預期(雖然不甚可能發生),請儘快告知我們。
為令擔保生效,本電器不可損壞或不當使用。
19
Page 19

安全注意事項
為確保閣下安全有效使用本爐具,請細閱本說明書。
根據香港氣體安全(氣體安置技工及氣體工程承辦商註
冊)法例第51D章,任何氣體配件(包括 接駁軟喉)的 安裝,
/更換必須由 香港政府 註冊氣體工程承辦商 僱用的 註冊
氣體安裝技工負責, 否 則即屬違法.
本爐具僅可根據現 行規例及通風規範在良好通風之處安
裝。爐具不得接駁至抽油烟裝置。
本爐具僅為家居使用而設計。
本爐具不可裝於遊艇上或活動房屋內。
安裝本爐具之處必須具有遵從規例的全功能通風運作。
火吹熄。 勿將本爐具置近抽風機以免將爐
本爐具出廠時所調定的使用氣體標於規範銘牌上。若必
須更換用氣,請電話聯繫我們的技術支援服務部。
請勿隨便更動本爐具的內部組件。如有必要, 必須電話
聯繫我們的技術支援服務部。
本操作及安裝說明書應予保存;如本爐具有轉售,請將
本操作及安裝說明書轉給買家。
20
若本爐具受損切勿開爐。此時請聯繫我們的技術支援服
務部。
烹調爐具使用時表面變熱,使用時必須小心。小童須遠
離本爐具。
Page 20

本爐具僅作烹煮之用,非作為加熱系統。
過熱油脂容易搶火。加熱油脂時操作者切勿離開爐具。
若油脂確實搶火,切勿用水滅火。當心燒傷!用蓋蓋住
出事平底鍋并關上爐具火頭。
若操作失誤,關上爐具的供電和供氣。要維修請電我們
的技術支援服務。
若其中某個控鈕不能轉動,不要勉強轉動它。請即時電
話聯繫技術支援服務部進行修理或更換。
切勿將不穩平底鍋置於爐架或爐頭上, 因其會偶然傾倒。
勿用蒸汽清潔器清潔規範
銘牌,僅防觸電危險!
根據燃氣爐具 EN 30-1-1規例,本電器為 3類置入式 爐具。
勿於本家用電器下面或附近放置或使用腐蝕性化學品、
會產生煙霧的產品、易燃物或非食物類產品。
勿於爐頭與爐架之間放上其他配件 , 如錫箔紙盤等 .
本爐具并非 意圖供體力 、感覺力或 智力不足人 士或缺乏
經驗及知 識的人士( 包括小童) 使用,除非 他們獲得負
責其安全的人士之監督或獲得關於本爐具使用的指引。
本說明書內之示圖僅供指引參考。
若不遵守本說明書之要求,製造商免於承擔所有相關責
任。
21
Page 21

閣下的新爐具
使用接駁配件,這些個別爐具可與同類其他爐具結合及/或同類普通爐架結合使用,詳見產
品目錄介紹。
22
Page 22

氣爐操作
有指示表面哪個爐頭由每一控鈕啟動 圖 1.
重要性在於確保所有爐頭部件及平底鍋支架均
安裝正確以令電器正常工作 圖 2-3-4-5.
手動開爐
1. 按下選擇的爐頭控制鈕并按反時針方向旋至最大的
功率設定。
2. 用任何類型的打火機或火焰(香烟火機、火柴等)并
將其靠近爐頭。
23
Page 23

自動開爐
若你的爐架具有自動開啟功能(打火點燃):
1. 按下選擇的爐頭控制鈕並按反時針方向旋至最大的
功率設定。當控制鈕仍被按下時,所有爐頭均産生火花,
火焰點燃,即可鬆開按下的控制鈕。
2. 將控制鈕轉旋至所需的調定位置。
時將控制鈕按下稍長時間(長至10秒)。
警告!如已過15秒火焰仍點不著,关上爐頭并打開附近
的門窗。等至少一分鐘后方可再開啟爐頭。
安全系統
此系統可在爐頭意外關停時防止燃料氣體流出。要確保
此裝置啟動,可如常開啟爐頭,不鬆手,點著火後繼續
穩固按下它并保持4秒時間。
關停爐頭
將相關控制鈕按反時針方向旋至 0 位。
根據型號,閣下的爐架可能具有安全系統(熱電偶),
若此時熄火,將控制鈕調至關位元並重復以上步驟。此
火勢等級
可用漸進式控制鈕來控制所需火勢(從最弱火至最強火)。
24
Page 24

就複式雙火圈爐頭而言, 可分別控制內外火圈的火勢強
弱。
現有的火勢等級如下:
內外火圈最強。
外火圈最弱,內火圈最強。
.
內火圈最強
內火圈最弱
警告
爐頭啟動時聽到噓噓聲乃屬正常。
爐頭首次使用時出現煙霧乃屬正常,并無危險,亦不表
示失誤;過一陣煙霧即會消散。
關閉爐頭後幾秒會發出聲音(砰聲);這并非毛病,而
是安全裝置關停。
盡可能保持爐頭清潔。若火嘴髒,則不能正常打火。用
細小的非鋼絲刷定期清潔爐頭。切記打火火嘴不能承受
任何過份撞擊。
火焰呈橙色乃屬正常,因空氣中有塵埃及液體濺泄等所
致。
使用本氣爐時,廚房會變熱和潮濕,故必須保證廚房通
25
Page 25

風良好。或保持自然通風透氣打開,或安裝抽油烟機。
若長時間密集使用本爐具器,須額外通風,如打開窗戶;
亦可能須要更有效的通風,如可能時增加爐架通風。
如爐的火頭偶然熄滅,關上爐火操控鈕,一分鐘內勿再
重新開啟。
合適烹皿
爐頭
平底鍋
最小直徑
平底鍋
最大直徑
雙火圈爐頭
快速爐頭
附設爐頭
特別適合用西班牙平底鍋、中式鑊、帶凹座烹皿等作烹
調。鑊乃源自中國之烹調器皿,屬於深、圓形和輕量類,
有耳柄,帶平或凹座。
22 cm
22 cm 26 cm
14 cm 20 cm
可用鑊以不同方式烹調食物:焞、炒、慢火煮、煎或蒸均
可。可以說鑊既可用作平底深鍋亦可用作炒鍋,且因其形
狀及尺碼關係,可用來烹煮數量可觀的配料。
用鑊烹調時,熱量可更均勻和輕柔地擴散;熱量廣泛聚集
意味著烹調食物時間縮短,用油少,使其成為其中最快及
最健康的烹調方式之一。用鑊烹調須僅循製造商的指引。
26
Page 26

配件
根據不同型號,爐架可包括有以下的配件。技術支援服
務部亦可提供該等配件。
僅供用於帶直徑大於26 cm的鍋(烤皿、陶壺等)及帶凹
座鍋的雙火圈爐頭使用
僅供用於帶直徑不大於12 cm的鍋之輔助爐頭使用。
如不使用或不當使用此等額外的烹皿支援,製造商不承
擔任何責任。
烹煮建議
爐頭 很高溫 高溫 中溫 低溫
煮、蒸、煎、烤、煮 已煮或預煮餸菜再加熱及保溫 雙火圈爐頭
西班牙菜飯、烹亞洲
食品(用鑊)
快速爐頭
肉 蛋、炒炸食物、新鮮
蔬菜
輔助爐頭 牛油、巧克力、凝膠
煮砂鍋菜、米飯布丁
及焦糖
蔬菜、水果及冷凍產
蒸魚、蒸蔬菜 米飯、白汁及蔬菜焞薄魚肉片、肉排、煎
的融化 品的除霜和慢煮
27
Page 27

使用注意事項
以下指引旨在幫助閣下節省能源和防止烹調器皿損壞:
使用尺碼適合各爐頭之煮鍋。
勿在大爐頭上使用小容器。火焰不應燒出容器邊。
勿用已損壞烹調器皿(其不能均勻置於爐架上),這樣
器皿會傾倒。
只用帶厚而平底座的鍋
勿進行不加蓋烹煮或烹煮時容器部分蓋上。此舉會浪費
能源。
=
=
煮皿要放正在爐頭之上勿移歪,否則會令其傾倒。
勿將大鍋置於爐頭上靠近控制鈕。
這些控制鈕會被很高溫損壞的。
28
將鍋放在鍋架上而非直接在爐頭上。
應小心將鍋放在爐架上。
請勿敲打爐架,勿將過重物置於其上。
使用爐具前確保鍋架及爐頭蓋正確定位。
Page 28

清潔及保養
清潔
不適合產品
待爐具冷卻后用海綿醮皂水進行清潔。
爐具每次用完冷卻後,將其每個部件的表面清潔。若有
殘留物(燒焦食物、油脂滴等),即使一小點亦會黏附
在表面,更難清除。爐頭的孔和坑必須清潔以利正確點
火燃燒。應用肥皂水清洗和非鋼絲刷洗滌。
如鍋座配有膠墊,確保亦將其清潔。膠墊會鬆動,鍋座
可能會劃花爐架。
經常保持爐頭及鍋座徹底乾爽。開始烹煮時爐架上的水
滴或濕氣會損壞搪瓷質料。
爐頭清潔和抹乾之後,確保爐頭蓋正確放置在爐頭分火
器上。
切勿將鍋在玻璃表面滑過以防劃花玻璃。此外,不要將
重物或尖物跌落玻璃上。切勿敲擊爐架的任何部分。
勿用蒸汽清潔器以防損壞爐架。
切勿用磨料、鋼絲刷球、尖物、刀等清除爐架上變硬的
食物殘餘。
若爐架配有玻璃或鋁板,切勿用刀、刮具或類似物品清
潔接合金屬之處。
勿用刀、刮具或類似物品清潔玻璃接合爐頭邊飾處、金
屬框或玻璃板或鋁板。
29
Page 29

保養
經常儘快清除任何濺瀉出的液體,此舉可免除任何不必
要的麻煩。
來自清潔水果及蔬菜的沙粒會劃花玻璃的表面。
應使用玻璃刮具立即從熱碟中清除可能濺出的熔糖或含
有大量糖份的食物。
30
Page 30

毛病
有時發現的某些毛病可輕易去除。在呼叫技術支援服務
毛病 可能原因 解決辦法
普通電力系統失效。
自動開爐功能失靈。
爐頭火焰不均勻。
氣流出現不正常或無氣出。
廚房有氣體味。
其中一個爐頭的安全閥不工
作。
- 保險絲缺陷 - 檢查主保險絲盒的保險絲,
- 自動安全開關跳閘或保險
絲燒斷。
- 火嘴和爐頭之間可能黏附
有食物或清潔產品。
- 爐頭濕。
- 爐頭蓋未放正。
- 爐具或未接地,或接駁不
當,或接地有毛病。
如有壞即更換。
- 檢查主控制板看自動安全
開關有否跳閘或燒保險絲。
- 火嘴和爐頭之間的空隙必
須清潔。
- 小心弄乾爐頭。
- 檢查確保爐頭蓋放正。
- 找電氣工程師。
- 爐頭組件放置不當。
- 散火件的坑髒。 – 清潔散火坑件。
- 氣源關上。
- 如由氣瓶供氣,檢查確保氣
瓶有氣。
- 確保爐頭組件放置正當。
- 打開所有止制動閥。
- 更換氣瓶。
- 某供氣開關打開了。
- 連接氣瓶的接合件可能漏
氣。
- 控鈕未按下足夠長時間。
- 散火件坑髒。
關上供氣開關
-
- 檢查確保接合件無損壞。
- 爐頭點著後,按下控鈕多幾
秒時間。- 清潔散火件坑。
31
Page 31

技術支援服務部
聯繫我們的技術支援服務部時,請提供爐具的產品號碼
(E-Nr.)及生產號碼(FD)。此資料在位於爐架下段的規範
銘牌上及用戶手冊的標籤上有提供。
擔保條件
適用的擔保條件為在購買國的本公司代表處制訂之條
件。零售點有詳細信息。必須提交購買證明文件以獲得
擔保的利益。本公司保留引入變更條件的權利。
用舊的器皿和包裝
環保廢物管理
倘規範銘牌上出現
打開爐具的包裝,以環保的方式處置包裝物料。
本爐具符合歐洲有關廢棄電器及電子設備的 2002/96/CE
指引。
符號,記住以下的指引。
32
Page 32

Specification 規格
Model 型號
Product description 產品描述 Single burner LPG hob 單頭石
Safety device 安全裝置 Flame sensor safety device 防漏熄火安全裝置
Product dimensions 產品尺寸 H57 x W302 x D520 mm/毫米 H52 x W302 x D520 mm/毫米
Net weight 淨重 8.12 (kg/公斤) 6.43 (kg/公斤)
Heat input 熱量額定值 6.0 (kW/千瓦) Front 前:2.8, rear 後: 1.9 (kW/
Operating gas pressure 操作氣壓 29mbar/毫巴
Additional Installation Instruction
附加安裝說明
Connection of LPG rubber tube
石油氣膠喉之接駁
- It must be used approved rubber tube bearing EMSD Approval marking (such as“機電工程署批准EMSD
Approval GTXXXX” ) and fuse cock for piped gas supply or cylinder regulator for LPG cylinders for
connection.
- 必須使用合格印有機電工程署批准標記(例如,“機電工程署批准 EMSD Approval GTXXXX” 字樣) 之膠喉及
供應管道式石油氣使用的溢流掣或瓶裝石油氣使用調壓器進行接駁。
Safety Dis ance
安全距離
t
不少於
50mm
Not less than 50mm
ER326AB90L ER326BB90L
Two burners LPG hob 兩頭石
油氣爐
油氣爐
千瓦)
 Loading...