

Page 1
Fully automatic espresso machine
TI351…, TI35A…
de Gebrauchsanleitung
en Instruction manual
Register your product on My Siemens
and discover exclusive services and offers.
siemens-home.bsh-group.com/welcome
The future moving in.
fr Mode d’emploi
it Istruzioni per l’uso
Siemens Home Appliances
Page 2
!
"
Page 3
#
N
N
,
,,
,,,
$
, ,,,
FOLF
,9
,,
FOLF
9 9,
Page 4
%
, ,, ,,,
&
'
,,
,9 9 9,
, ,, ,,,
,,,,
Page 5

en
Table of contents
enInst r ucti on manual
8 Intended use . . . . . . . . . . . . . . . 31
( Important safety information. . 31
7 Environmental protection . . . . 33
Saving energy . . . . . . . . . . . . . . . . . .33
Environmentally-friendly disposal . . . .33
*
Getting to know your appliance
Included in delivery . . . . . . . . . . . . . .34
Assembly and components . . . . . . . .34
Controls . . . . . . . . . . . . . . . . . . . . . . .35
34
_ Accessories. . . . . . . . . . . . . . . . 36
K Before using for the first time . 36
Installing and connecting the
appliance. . . . . . . . . . . . . . . . . . . . . .36
Commissioning the appliance . . . . . .36
1 Operating the appliance. . . . . . 38
Preparing coffee using freshly ground
beans. . . . . . . . . . . . . . . . . . . . . . . . .38
Preparing drinks with milk . . . . . . . . .38
Adjusting beverage settings . . . . . . . 39
Water filter . . . . . . . . . . . . . . . . . . . . . 41
Frost protection . . . . . . . . . . . . . . . . .41
. Service programme . . . . . . . . . .46
Starting Calc’nClean. . . . . . . . . . . . . 47
3 Trouble shooting . . . . . . . . . . . .48
4 Customer service . . . . . . . . . . . .52
Technical data . . . . . . . . . . . . . . . . . 52
E number and FD number . . . . . . . . 52
Guarantee . . . . . . . . . . . . . . . . . . . . 52
1 Settings . . . . . . . . . . . . . . . . . . . 42
Automatic switch-off . . . . . . . . . . . . .42
Switching the audible signal on/off . .42
Setting the water hardness . . . . . . . .42
Factory reset . . . . . . . . . . . . . . . . . . .43
D Daily care and cleaning . . . . . . 44
Cleaning agent . . . . . . . . . . . . . . . . .44
Cleaning the appliance . . . . . . . . . . .44
Cleaning the drip tray and coffee
grounds container . . . . . . . . . . . . . . .45
Cleaning the milk system. . . . . . . . . .45
Cleaning the brewing unit . . . . . . . . .45
30
Page 6

Intended use en
8 Intended use
I nt ended use
Check the appliance for
damage after unpacking it. Do
not connect the appliance if it
has been damaged in
transport.
This appliance is intended for
domestic use only.
Only use the appliance indoors
at room temperature and up to
2000 m above sea level.
( Important safety
information
Impor t ant safet y informat i on
Please read carefully, follow
and retain the operating
instructions. When passing on
the appliance, enclose these
instructions.
This appliance can be used by
children aged from 8years and
above and by persons with
reduced physical, sensory or
mental capabilities or lack of
experience and knowledge if
they have been given
supervision or instruction
concerning use of the
appliance in a safe way and if
they understand the hazards
involved. Keep children under
8years of age away from the
appliance and connecting
cable and do not allow them to
use the appliance. Children
shall not play with the
appliance. Cleaning and user
maintenance shall not be made
by children unless they are
older than 8years and
supervised.
31
Page 7

en Important safety information
:Warning
Danger of electric shock!
■ The appliance may only be
connected to a power supply
with alternating current via a
correctly installed socket
with earthing. Ensure that the
protective conductor system
of the domestic electricity
supply has been correctly
installed.
Risk of electric shock!
■ Connect and operate the
appliance only in
accordance with the
specifications on the rating
plate. If the power cord of
this appliance is damaged, it
must be replaced by
customer service.
Risk of electric shock!
■ Do not use if the power
cable or appliance is
damaged. If a fault occurs,
pull the mains plug or switch
off the mains voltage
immediately.
Risk of electric shock!
■ To prevent hazards, the
appliance may be repaired
by our customer service
only.
Risk of electric shock!
■ Never immerse the
appliance or mains cord in
water.
Risk of electric shock!
■ The plug and socket
connection of the appliance
must not come into contact
with liquids.
Risk of electric shock!
■ Please note the special
information on cleaning in
the instructions.
:Warning
Hazard due to magnetism!
The appliance contains
permanent magnets which may
affect electronic implants, e.g.
heart pacemakers or insulin
pumps. Persons with electronic
implants should keep a
minimum distance of 10 cm
from the appliance and the
water tank when removed.
:Warning
Risk of suffocation!
Do not let children play with
packaging material. Store small
parts safely as they can be
easily swallowed.
:Warning
Risk of burns!
■ The milk system becomes
very hot. After use, allow it to
cool down first before
touching it.
Risk of burns!
■ After use, surfaces may still
be hot for a certain period.
Risk of burns!
■ Freshly prepared beverages
are very hot.Leave to cool a
little if necessary.
32
Page 8
Environmental protection en
:Warning
Risk of injury!
■ Improper use of this
appliance may result in
injury.
Risk of injury!
■ Do not reach into the
grinding unit.
:Warning
Fire hazard!
■ The appliance will become
hot.
Fire hazard!
■ Never operate the appliance
in a cupboard.
7 Environmental
protection
Env i r o n ment al pr ot ect i on
Saving energy
■ If the appliance is not being used,
switch it off.
■ Set the interval for automatic
switch-off to the smallest value.
■ If possible, do not interrupt coffee or
milk froth dispensing. Stopping a
process prematurely results in
higher energy consumption and the
drip tray fills up more quickly.
■ Descale the appliance regularly to
avoid a build-up of limescale.
Limescale residue results in higher
energy consumption.
Environmentally-friendly
disposal
Dispose of packaging in an
environmentally-friendly manner.
This appliance is labelled in
accordance with European
Directive 2012/19/EU
concerning used electrical and
electronic appliances (waste
electrical and electronic
equipment - WEEE). The
guideline determines the
framework for the return and
recycling of used appliances as
applicable throughout the EU.
Please ask your dealer about current
disposal routes.
33
Page 9

en Getting to know your appliance
* Getting to know your
appliance
Gett i ng to know your appl i ance
This section provides an overview of
the scope of delivery, the assembly and
the components of your appliance. It
also introduces you to the different
controls.
Note: Depending on the appliance
model, individual details and colours
may differ.
How to use these instructions:
The cover pages of the operating
instructions can be folded out towards
the front. The illustrations are identified
using numbers that are referred to in the
operating instructions.
Example: ~ Fig. !
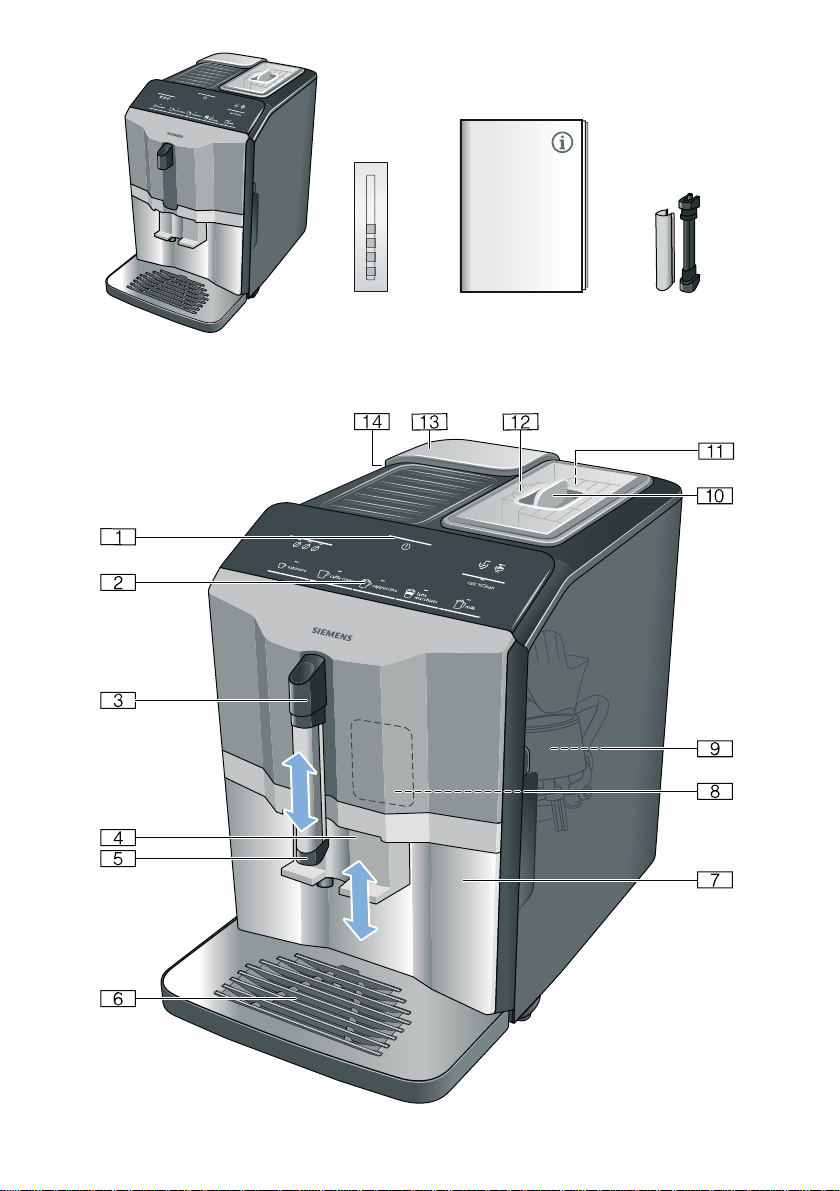
Included in delivery
~ Fig. !
# Fully automatic coffee machine
+ Water hardness testing strip
3 Instruction manual
; Milk frother
Assembly and components
~ Fig. "
( On / off button (stand-by mode)
0 Control panel
8 Handle of milk frother
@ Outlet system for coffee, height
adjustable
H Milk frother (holder, frother, cover),
height adjustable
P Drip tray (coffee grounds
container, drip grate, drip plate,
float)
X Door of brewing chamber
` Rating plate
h Brewing unit
)" Aroma lid
)* Bean container
)2 Rotary selector for setting grinding
level
): Cover for water tank
)B Water tank
34
Page 10
Controls
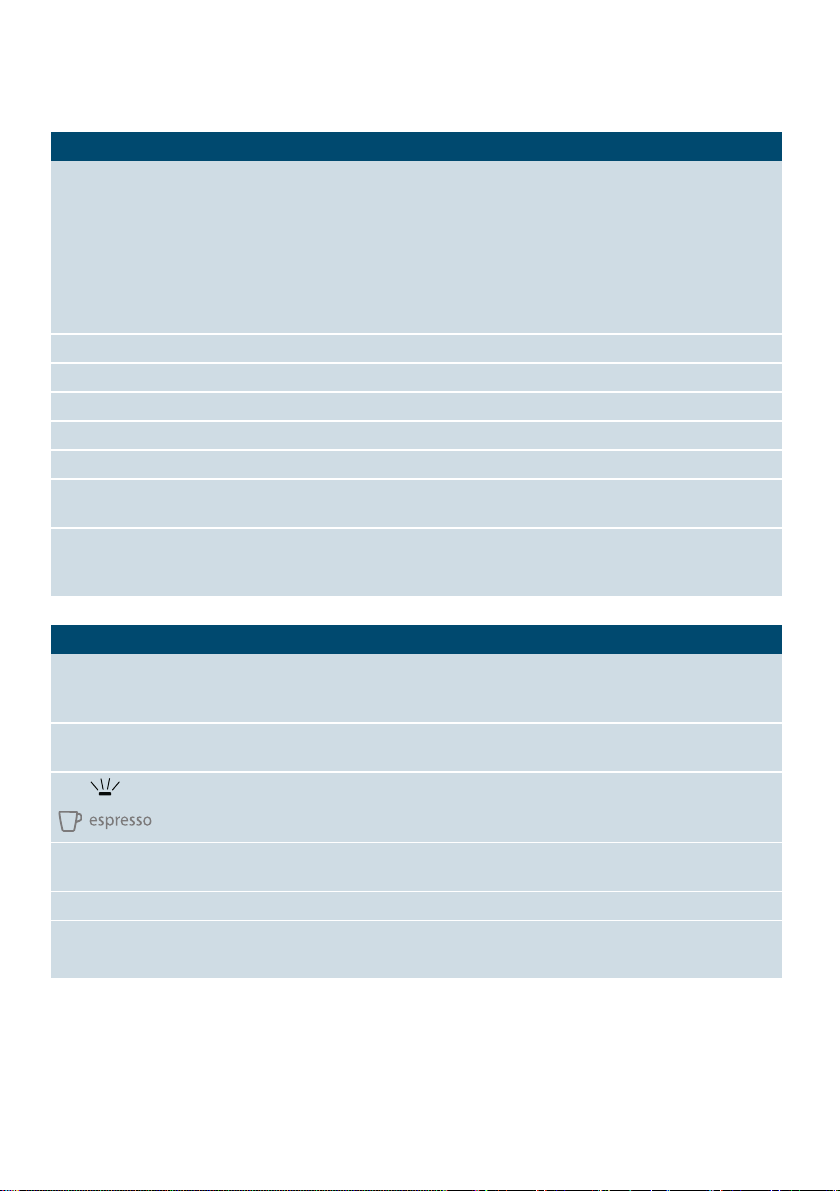
Button Meaning
Switch the appliance on and off
k
espresso Dispensing Espresso
caffe crema Dispensing Caffe crema
cappuccino Dispensing cappuccino
latte macchiato Dispensing latte macchiato
milk Frothing up milk
% Coffee strength
calc’nClean Start the service programme
--------
Symbol
'
(
The appliance rinses automatically when it is switched on and off.
The appliance is not rinsed if:
■ it is still warm when switched on, or
■ coffee was not dispensed before the appliance was switched off.
The appliance is ready for use when the LEDs of the buttons for selecting drinks light
up in the control panel. The appliance has automatic switch-off. ~ "Selecting
automatic switch-off" on page 42
Adjusting the coffee strength ~ "Adjusting beverage settings" on page 39
Flashes when the service programme needs to be performed.~ "Calc’nClean
service programme" on page 47
Lights up when the water tank needs to be topped up with water or the water tank is not
inserted.
Flashes when the water filter needs to be replaced.
Lights up when trays need to be emptied.
Flashes when door of brewing chamber is open.
Getting to know your appliance en
is continu-
Ready to use, selection possible
ously lit
is pulsing Dispensing underway
is flashing Waiting for operation, e.g. with calc’nClean
off Not available
--------
35
Page 11
en Accessories
_ Accessories
Accessori es
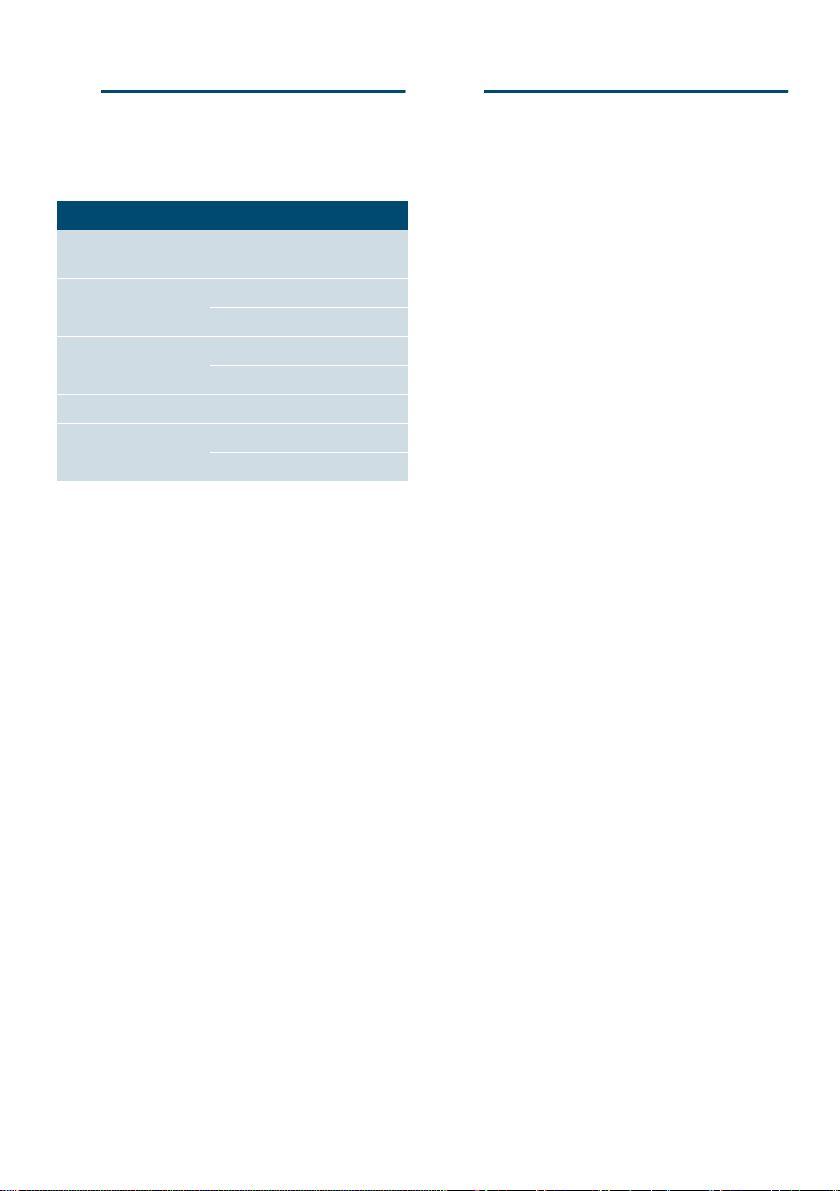
The following accessories are available
from retailers or from customer service:
Accessory Order number
Retail Customer ser-
vice
Cleaning tablets TZ80001A 00312097
TZ80001B 00312098
Descaling tablets TZ80002A 00312094
TZ80002B 00312095
Water filter TZ70003 00575491
Care set TZ80004A 00312105
--------
The contact data for customer service in
all countries can be found at the back of
these instructions.
TZ80004B 00312106
K Before using for the
first time
Bef or e us i ng for the first time
In this section, you will learn how to
commission your appliance.
Note: Only use the appliance in
frost-free areas. If the appliance was
transported or stored at temperatures
below 0°C, you must wait for at least
3hours before using it.
Installing and connecting the
appliance
1. Remove any protective plastic film.
2. Place the appliance on a level,
water-resistant surface which can
bear the weight.
3. Using the mains plug, connect the
appliance to an earthed socket that
has been correctly installed.
Note: After plugging in, always wait
(approx. 5 seconds).
Commissioning the appliance
36
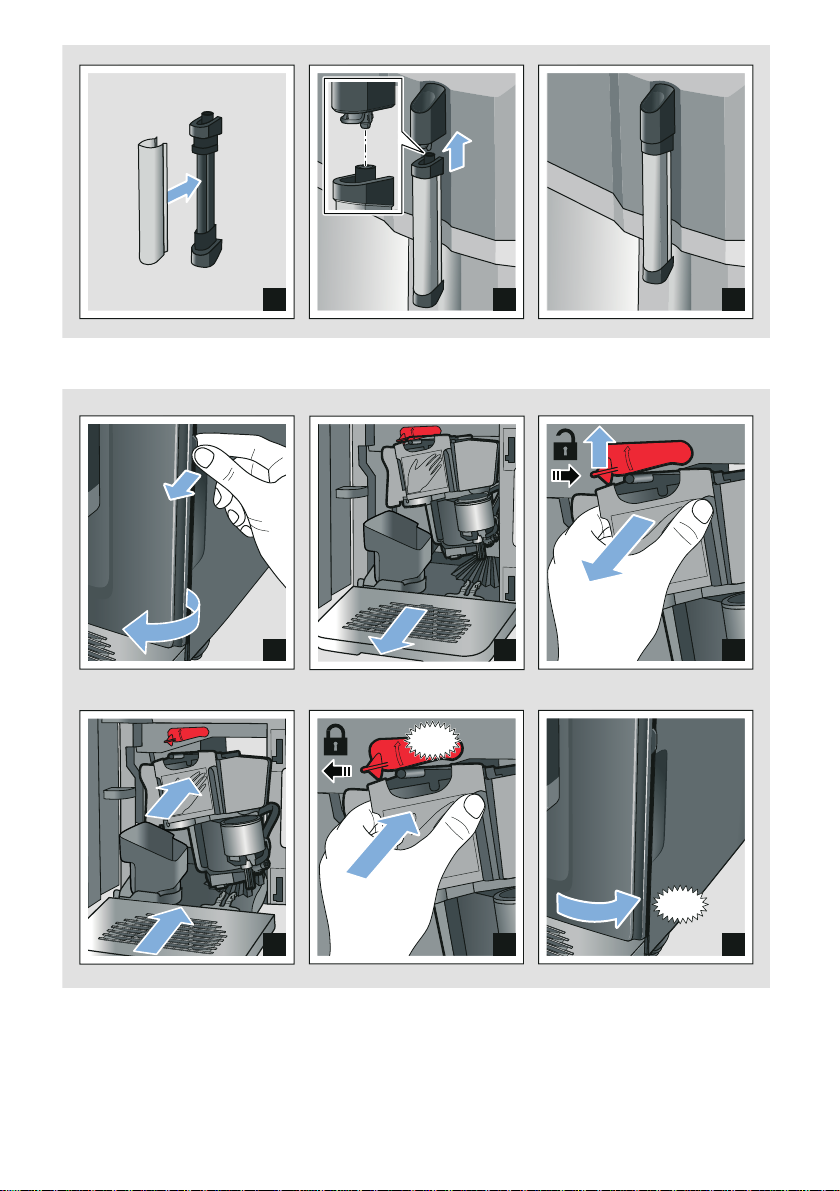
Attaching milk frother
~ Fig. #
1. Remove milk frother parts from the
bag.
2. Assemble milk frother.
3. Attach the milk frother on the front of
the appliance.
Filling the bean container
This appliance can be used to make
coffee drinks from coffee beans.
1. Open the lid )" of the bean
container )*.
2. Add coffee beans.
3. Close the lid again.
Page 12
Before using for the first time en
Notes
■ Coffee beans that have been glazed,
caramelised or treated with other
sugary additives will block the
brewing unit.Only use pure, roasted
bean mixes that are suitable for use
in espresso or fully automatic coffee
machines.
■ The coffee beans are freshly ground
for each brewing operation.
■ Store coffee beans in a sealed
container in a cool place to ensure
optimum quality.
■ Coffee beans can be stored in the
bean container for a number of days
without losing their aroma.
Filling the water tank
Important: Fill the water tank with fresh,
cold, still water on a daily basis. Prior to
operation, check whether the water tank
has been sufficiently filled.
1. Carefully remove the cover of the
water tank.
2. Use the handle to remove the water
tank and then rinse out.
3. Fill the water tank with water up to
the "max" marking.
4. Put the water tank back in the holder
again, keeping it straight, and fit the
cover of the water tank.
General information
The factory settings of the fully
automatic coffee machine are
programmed for optimal performance.
■ The appliance switches off
automatically after a specific time.
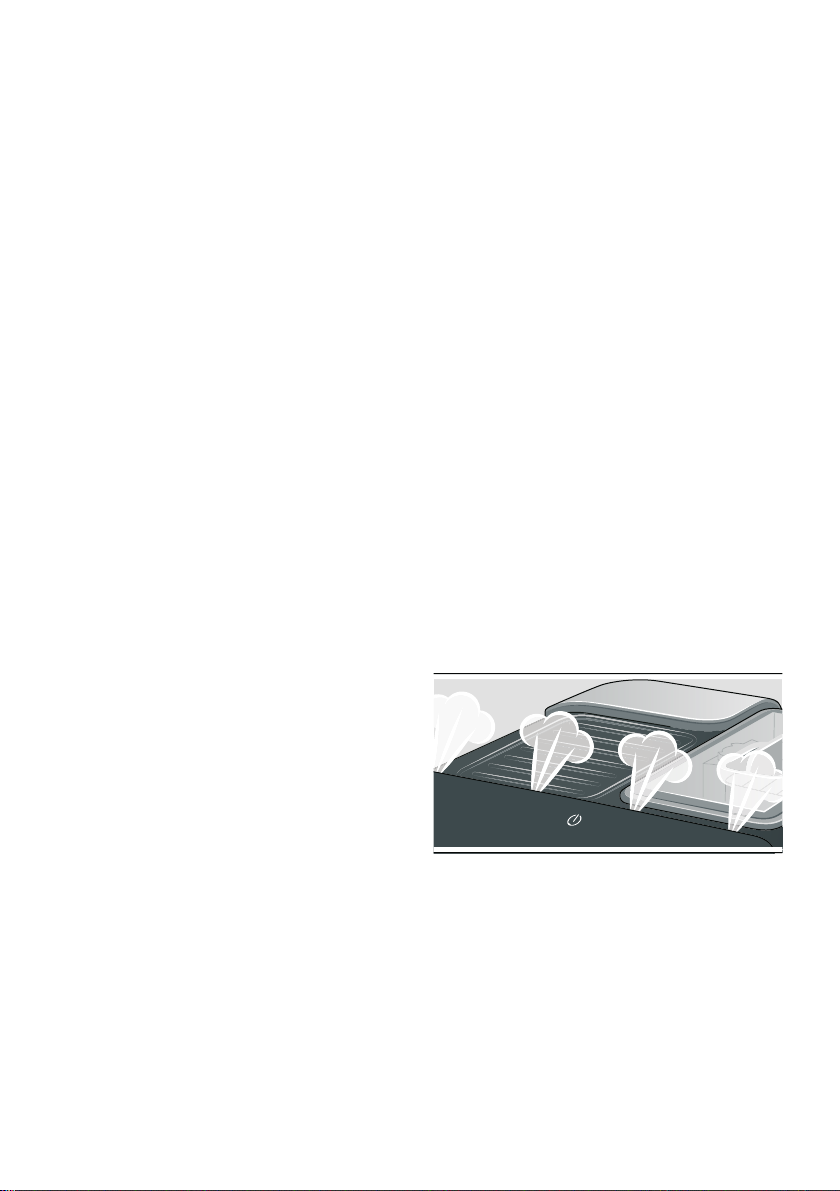
■ When switched off, the appliance will
emit steam into the tray for cleaning
purposes.
■ Whenever a button is pressed, a
signal sounds. It can be switched
off.~ "Settings" on page 42
■ When the appliance is used for the
first time, after running a service
programme or has not been
operated for a long period, the first
beverage will not have the full aroma
and should not be consumed.
■ After commissioning the appliance,
you will only achieve a suitably thick
and stable "crema" after the first few
cups have been dispensed.
■ If the appliance is in use for a long
period of time, water droplets will
form on the ventilation slots. This is
normal.
■ Escaping steam is not a fault but
due to the design of the machine.
Before using your new appliance, you
should check and select the water
hardness.~ "Settings" on page 42
37
Page 13
en Operating the appliance
1 Operating the
appliance
Operat i ng the appl i ance
In this section, you will learn how to
make beverages with coffee and milk. It
contains information about settings,
water filters and adjustment of the
grinding level, in addition to frost
protection.
Note: Freshly prepared beverages may
be very hot.
Preparing coffee using freshly
ground beans
You can choose between Espresso and
Caffe crema. ~ "Preparing drinks with
milk" on page 38
The appliance is switched on. The water
tank and bean container have been
filled.
1. Place a cup under the outlet system.
2. Touch % repeatedly to select
the required coffee strength.
3. Touch the espresso or caffe crema
button.
The coffee is brewed and then
dispensed into the cup.
Preparing drinks with milk
This appliance has a milk frother. You
can make drinks of coffee with milk or
froth up milk.
Tip: You can also use plant-based
alternatives to milk, e.g. soya milk.
Notes
■ The quality of the milk froth depends
on the type of milk or the
plant-based alternative used.
■ Dried milk residues are difficult to
remove so always perform
cleaning.~ Fig. &III ~ "Daily care
and cleaning" on page 44
:Warning
Risk of burns!
The milk frother gets very hot. Hold only
by the handle. After use, let it cool down
first before touching it.
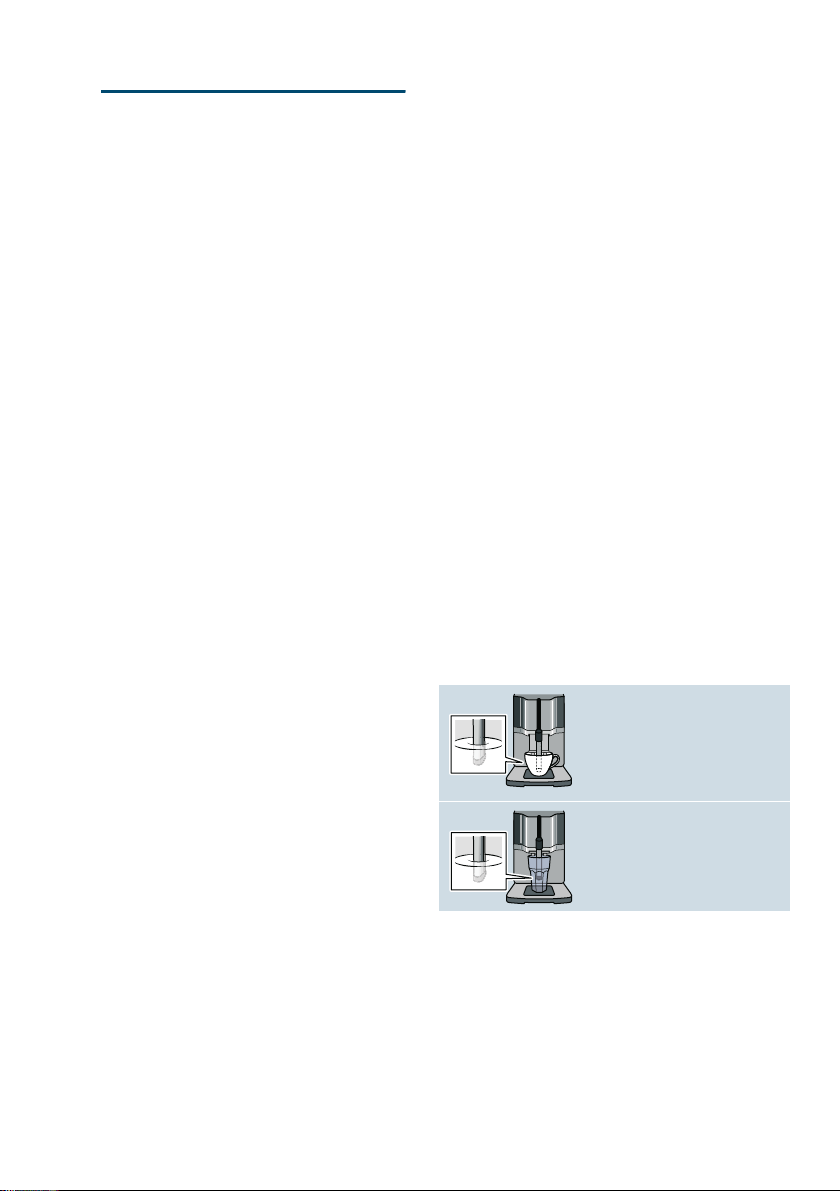
Coffee drinks with milk
You can choose between cappuccino
and latte macchiato. When doing so,
please check the position of the coffee
dispenser and milk frother.
Cappuccino
Note: To stop dispensing the drink
before the end, touch espresso or caffe
crema again.
38
Latte Macchiato
Page 14
Operating the appliance en
The appliance is switched on. The water
tank and bean container have been
filled.
The milk frother is installed.
1. Fill a large cup or a large glass with
approx. 100ml milk for cappuccino
and approx. 150ml milk for latte
macchiato.
2. Place a cup or a glass under the
outlet system.
3. Push the coffee dispenser and milk
frother right down.
4. Touch % repeatedly to select
the required coffee strength.
5. Touch the cappuccino or latte
macchiato button.
The milk is first frothed up in the cup or
glass. The coffee is then brewed and
dispensed into the cup or glass.
Note: To stop current dispensing of the
drink before the end, touch cappuccino
or latte macchiato again.
Frothing up milk
The appliance is switched on. The water
tank has been filled.
The milk frother is installed.
1. Fill a large cup or a large glass with
approx. 100ml milk.
2. Place a cup or a glass under the
outlet system.
3. Push the coffee dispenser and milk
frother right down.
4. Touch the milk button.
The milk is frothed up.
Note: To stop the process before the
end, touch milkagain.
Adjusting beverage settings
Adj us t i n g bever age sett i ngs
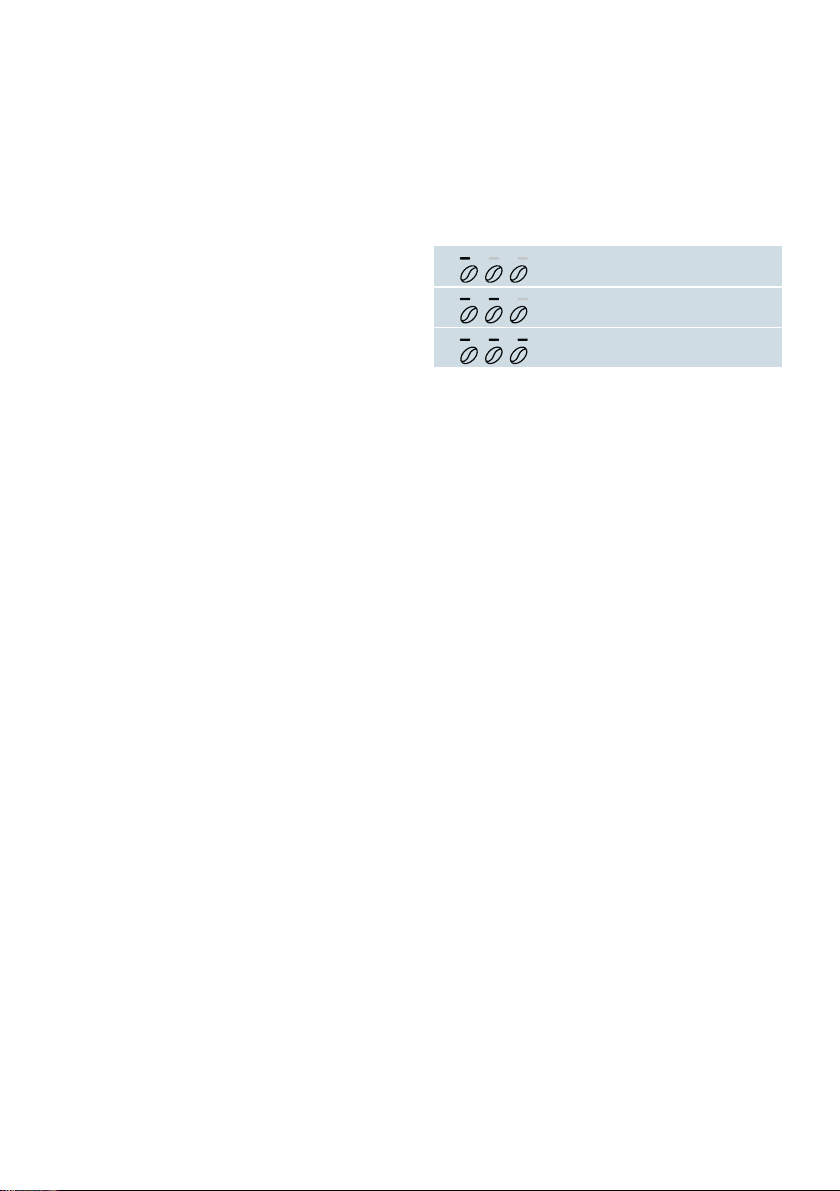
Coffee strength
Before making a drink, you can adjust
the coffee strength:
To do so, touch % to select the
strength you require.
mild
regular
strong
Note: The coffee strength selected is
then active for all drinks made with
coffee.
Filling level
You can adjust the filling level of your
drinks.
Press and hold espresso or caffe
crema for 3 seconds.
Dispensing takes place, with the button
selected flashing.
Once the required filling level is reached
in the cup, touch the button selected to
stop. The new filling level is only
apparent after the next drink is
dispensed.
Note: The filling level can be selected
either for Espresso (25- 60ml) or Caffe
crema (80- 200ml).A minimum
quantity is always brewed: Espresso
approx. 25 ml and Caffe crema
approx. 80 ml.
39
Page 15
en Operating the appliance
Frothing time
You can adjust the frothing time of your
drinks.
Press and hold cappuccino, latte
macchiato or milk for 3 seconds.
The milk is frothed up, and the button
selected flashes.
Once the required frothing time is
reached, touch the button selected to
stop.
Note: Setting the frothing time has no
impact on the amount of coffee.
Setting the grinding level
This appliance features an adjustable
grinder. This enables the grinding level
of the coffee to be individually changed.
:Warning
Risk of injury!
Do not reach into the grinding unit.
Caution!
The appliance may be damaged! Only
adjust the grinding level when the
grinder is running!
Notes
■ The new setting will not become
apparent until after the second cup
of coffee.
■ Set a finer grinding level with
dark-roasted coffee beans and a
coarser grinding level with lighter
coffee beans.
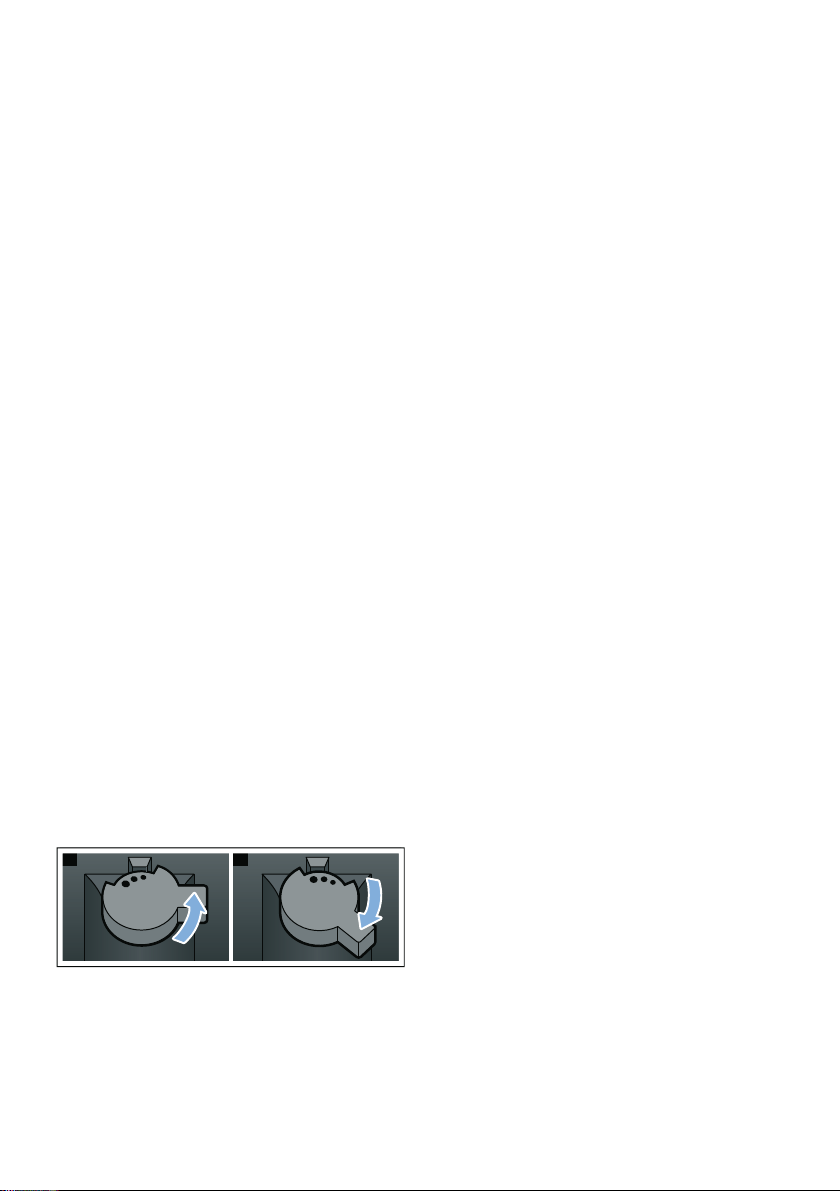
When the grinder is in operation, use
the rotary selector )2 to set the
grinding level.
■ Finer grinding level: turn
anticlockwise. (Fig. a)
■ Coarser grinding level: turn
clockwise. (Fig. b)
D E
40
Page 16

Operating the appliance en
Water filter
Water fi lter
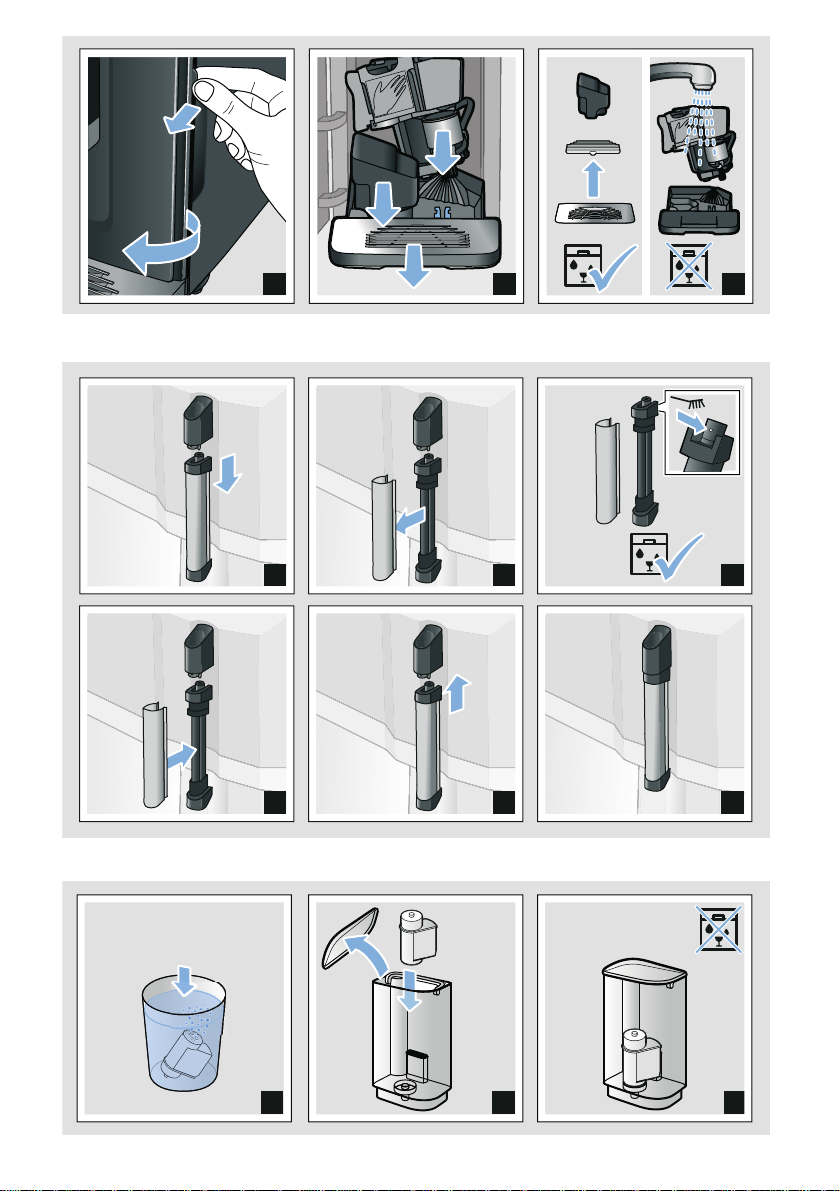
~ Fig. '
A water filter lessens limescale deposits
and reduces impurities in the water. The
appliance also does not need to be
descaled so often. Water filters are
available from retailers or from
customer service.
If a water filter is inserted, the appliance
will show when this needs to be
changed. The ) symbol is flashing.
Inserting or replacing a water filter
A new water filter must be rinsed before
it can be used.
The appliance is switched on. The water
tank has been filled.
1. Simultaneously hold down %
and calc’nClean for at least
3 seconds.
2. Touch espresso button, and "W.
hardness" will be activated.
3. Touch % button and make the
following selection:
with water filter
4. Immerse the water filter (opening
facing up) in a container filled with
water until no more air bubbles rise
to the surface.
~ Fig. '
5. Then press the water filter firmly into
the empty water tank.
6. Fill the water tank with water up to
the "max" marking.
7. Place a container with a capacity of
1.0litre under the outlet.
8. Touch espresso button to save the
setting and activate rinsing.
9. Insert water tank.
10. Touch espresso button to save the
setting and start rinsing. Water will
now flow through the filter.
11. Touch calc’nClean button to exit the
menu.
12. Then empty the container. The
appliance is ready for use again.
Removing the water filter
If the water filter has been removed and
no new one inserted, please select the
appropriate water hardness. ~ "Setting
the water hardness" on page 42
Frost protection
To prevent frost damage during
transportation and storage, the
appliance must be completely emptied
beforehand.
Info: The appliance must be ready for
use and the water tank filled.
1. Place a large container under the
outlet of the milk frother and push
the frother down.
2. Press and hold milk button for at
least 5 seconds.
The LED in the button flashes, and
the appliance now heats up.
3. As soon as steam escapes from the
milk frother, remove the water tank.
4. Allow the appliance to cool down.
Wait until ' symbol and all LEDs are
flashing.
5. Use k button to switch the
appliance off.
6. Empty the water tank and the drip
tray and thoroughly clean the
appliance.
The appliance can now be transported
or stored.
Note: The brewing unit is now secured
and cannot be removed.
41
Page 17
en Settings
1 Settings
Settings
This appliance has different factory
settings. You can customise the settings
on the appliance.
Note: If no button is pressed within
90 seconds, the appliance switches to
"Choose beverage" without saving. The
previous setting remains unchanged.
You can select the following settings:
Automatic switch-off
Selecting aut omat i c swit ch-of f
The appliance switches off
automatically at a specific time after the
last button was pressed. This time can
be selected, with settings from
15 minutes to 4 hours possible here.
1. Simultaneously hold down %
and calc’nClean for at least
3 seconds.
2. Touch caffe crema button and
"Automatic switch-off" will be
activated.
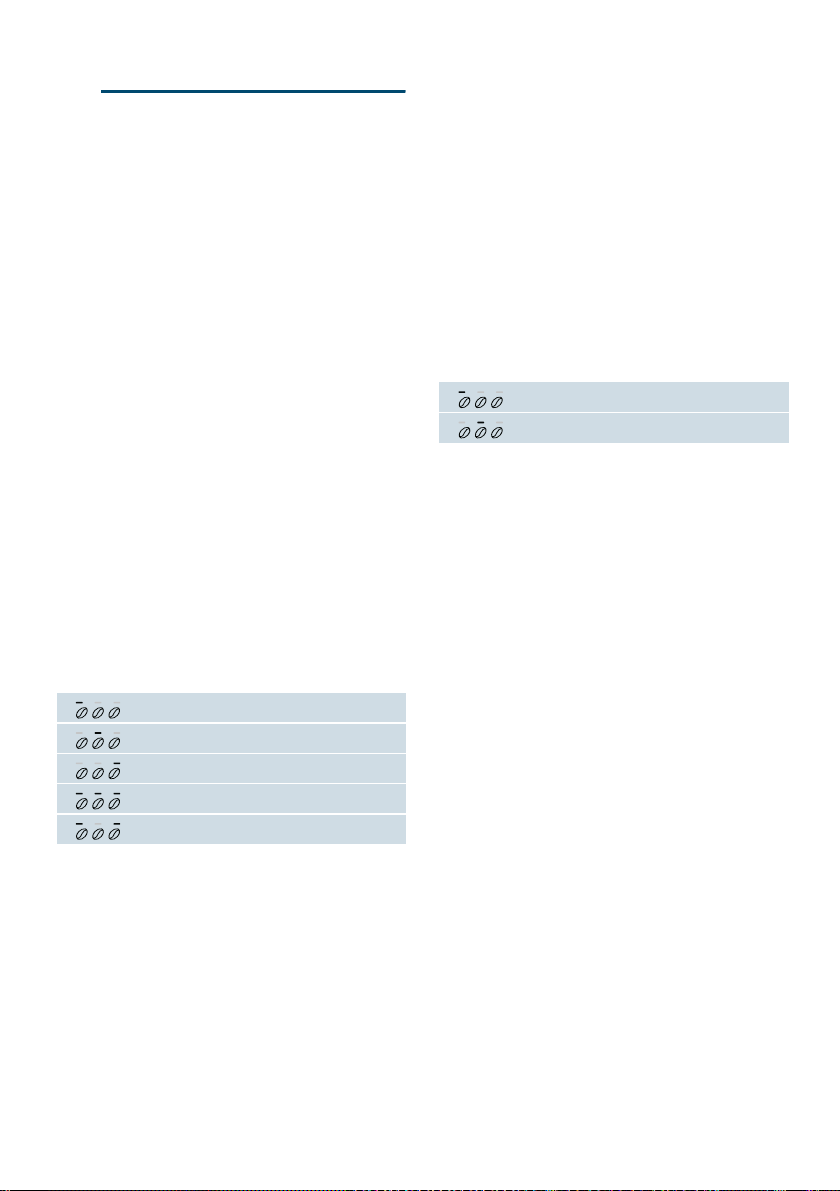
3. Touch % button and select the
required time.
The following settings are possible:
15 minutes
30 minutes (factory setting)
1 hour
2 hours
4 hours
4. Touch caffe crema button to save
the setting.
5. Touch calc’nClean button to exit the
menu.
Switching the audible signal
on/off
Whenever a button is pressed, an
audible signal sounds.
This can be switched on or off.
1. Simultaneously hold down %
and calc’nClean for at least
3 seconds.
2. Touch cappuccino button, and
"Signal tone" menu will be activated.
3. Touch % button and switch
signal tone on or off.
On (factory setting)
Off
4. Touch cappuccino button to save
the setting.
5. Touch calc’nClean button to exit the
menu.
Setting the water hardness
It is important to set the water hardness
correctly so that the appliance indicates
in good time when the descaling
programme should be run. The preset
water hardness is level 4.
You can check the water hardness
using the enclosed test strip or by
asking your local water supplier.
1. Briefly immerse the enclosed test
strip in fresh tap water, leave it to
drip and read off the result after
1minute.
2. Simultaneously hold down %
and calc’nClean for at least
3 seconds.
3. Touch espresso button, and "W.
hardness" menu will be activated.
42
Page 18
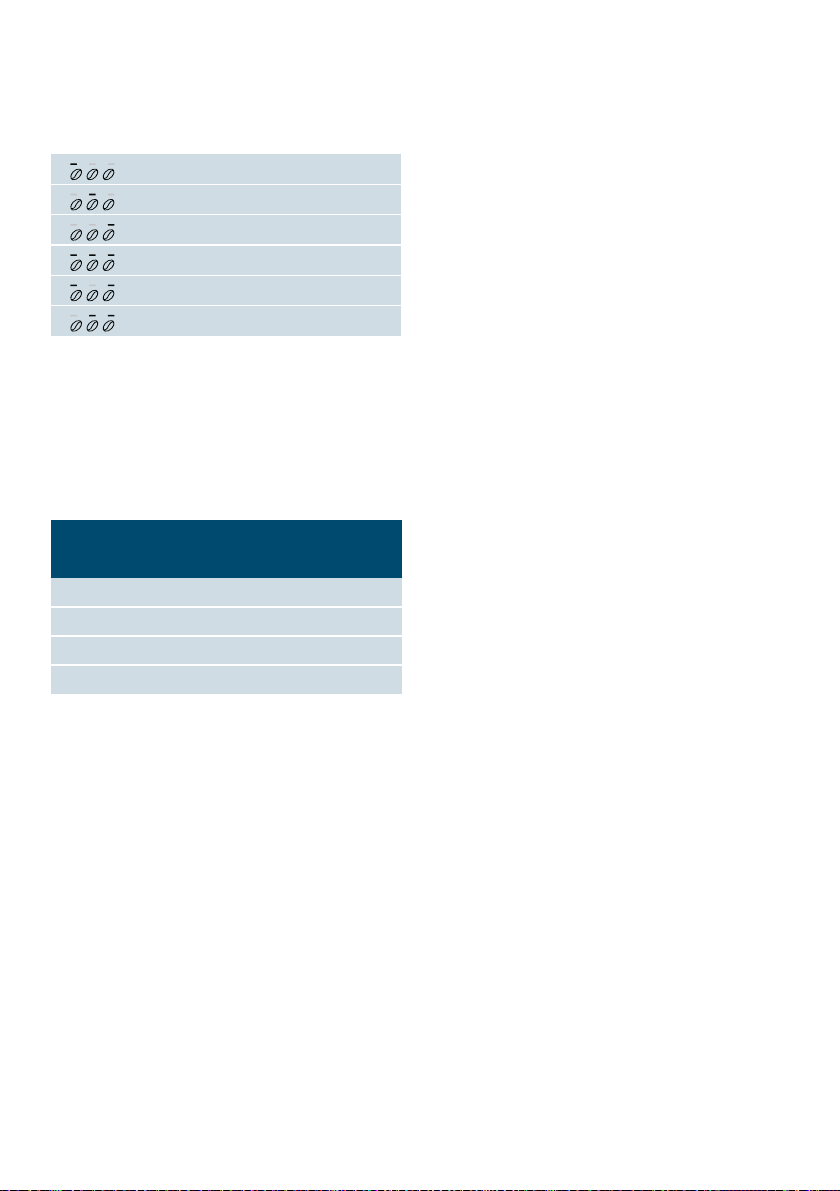
Settings en
4. Touch % button and select the
water hardness.
The following settings are possible:
W. hardness 1
W. hardness 2
W. hardness 3
W. hardness 4(factory setting)
Water filter (when used)
H2O-softener (if available)
5. Touch espresso button to save the
setting.
6. Touch calc’nClean button to exit the
menu.
The table shows the allocation of the
levels to the different degrees of water
hardness:
Setting Degree of water hardness
German (°dH) French (°fH)
1 1-7 1-13
2 8-14 14-25
3 15-21 26-38
4 22-30 39-54
Factory reset
If you set the appliance back to the
factory settings, you will lose your own
settings.
1. Simultaneously hold down %
and calc’nClean for at least
3 seconds.
2. Touch latte macchiato button.
The factory settings are reactivated.
3. Touch calc’nClean button to exit the
menu.
Subsequent changes to the water
hardness can be made at any time.
Note: When using the water filter (see
section "Accessories"), proceed as
follows. ~ "Water filter" on page 41
43
Page 19
en Daily care and cleaning
D Daily care and
cleaning
Dai l y car e and cl eani ng
With good care and cleaning, your
appliance will remain fully functioning
for a long time to come. In this section,
you will learn how to correctly clean and
care for your appliance.
:Warning
Risk of electric shock!
Before cleaning the appliance, pull out
the mains plug. Never immerse the
appliance in water. Do not use a steam
cleaner.
Cleaning agent
Please observe the following
information to ensure that the different
surfaces are not damaged by using the
wrong type of cleaning agent.
Do not use:
■ Harsh or abrasive cleaning agents.
■ Any cleaning agents containing
alcohol or spirits.
■ Hard scouring pads or sponges.
9
Caution!
Not all of the appliance's components
can be cleaned in the dishwasher.
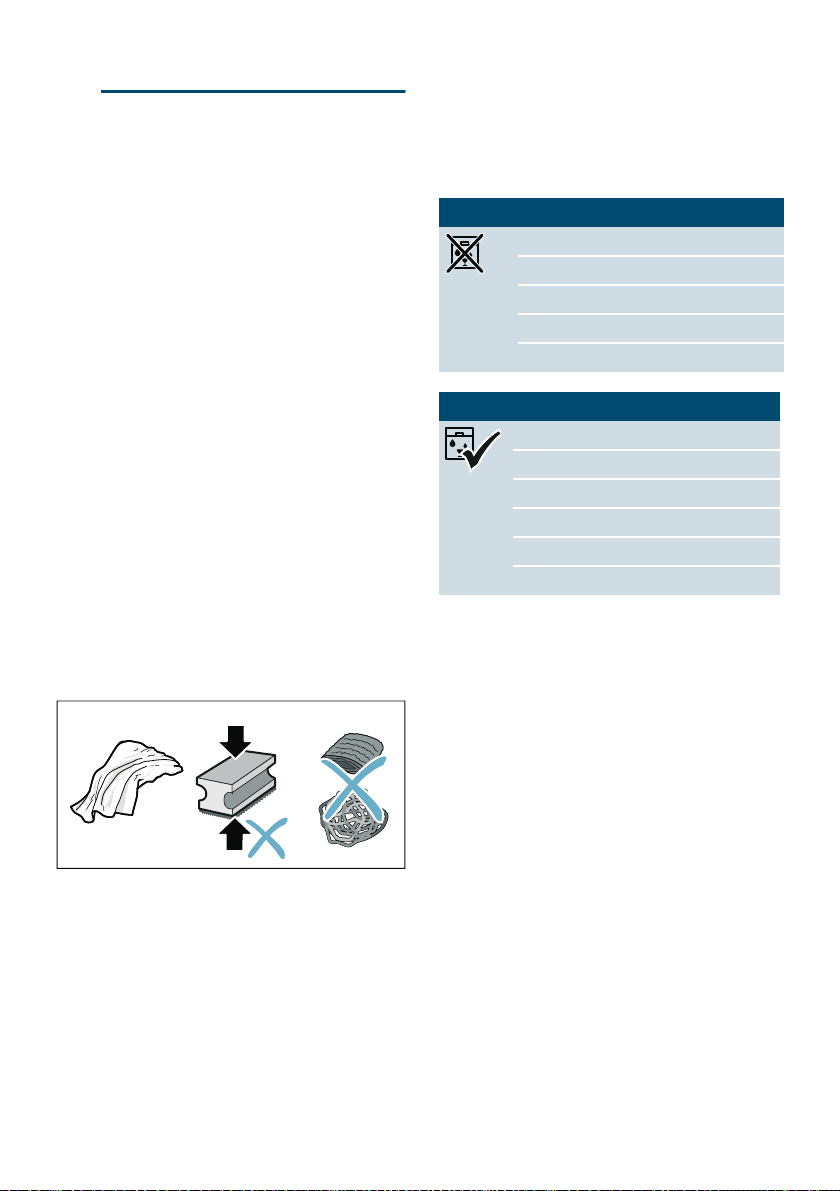
~ Fig. % - '
Not dishwasher-safe:
Water tank
Cover for water tank
Aroma lid
Brewing unit
Drip tray
Dishwasher-safe:
Drip plate
Drip grate
Coffee grounds container
max.
60°C
Float
Milk frother
Cover for milk frother
Cleaning the appliance
1. Wipe down the outside of the
appliance with a soft, damp cloth.
2. Clean the control panel using a
micro-fibre cloth.
3. Wipe down the coffee dispenser if
required after dispensing each
beverage.
9
Notes
■ New sponge cloths may contain
salts. Salts can cause rust film on
stainless steel. Wash new sponge
cloths thoroughly before use.
■ Always remove any limescale,
residues of coffee or milk, cleaning
or descaling solution
immediately.This residue may cause
corrosion.
44
Notes
■ If the appliance is cold when
switched on or if it is switched off
after dispensing coffee, it rinses
automatically.The system is therefore
self-cleaning.
■ If the appliance has not been used
for a long period of time (e.g. while
you are on holiday), clean the entire
appliance thoroughly, including the
milk frother, trays and brewing unit.
Page 20

Daily care and cleaning en
Cleaning the drip tray and
coffee grounds container
~ Fig. %
Note: The drip tray and coffee grounds
container should be emptied and
cleaned every day in order to prevent
deposits.With frequent use also empty
from time to time as soon as the float is
clearly visible if or the relevant symbol
lights up.
1. Open the door.
2. Pull the drip tray with the coffee
grounds container forwards and out.
3. Remove the drip plate with grate.
4. Empty and clean the drip tray and
coffee grounds container.
5. Wipe out the inside of the appliance
(area of drip tray).
Cleaning the milk system
Cl e a n i ng the mil k syst em
Clean the milk system after each use to
remove residues and ensure the
function.
:Warning
Risk of burns!
The milk frother gets very hot. Hold only
by the handle. After use, let it cool down
first before touching it.
1. Fill a glass half-full with water and
place under the outlet system.
2. Push the milk frother right down.
3. Touch the milk button to clean the
milk system.
4. Push the milk frother right up and
allow it to cool down.
5. Dismantle the milk frother into its
individual parts and clean
thoroughly.
~ Fig. &
6. Dry the individual parts, reassemble
and fit back onto the appliance.
Notes
■ To stop the process before the end,
touch milk again.
■ All parts of the milk system should
be cleaned in the dishwasher.
Detergent residues in the milk
system must be thoroughly removed
following the rinsing process.
Cleaning the brewing unit
~ Fig. $, ~ Fig. %
In addition to automatic cleaning, the
brewing unit should be removed
regularly for cleaning.
Caution!
Clean the brewing unit without detergent
or products containing vinegar or acid
and do not place in the dishwasher.
Remove the brewing unit:
1. Switch off the appliance.
2. Open the door to the brewing
chamber.
3. Remove the coffee grounds
container.
4. Push the red lever up, grasp the
brewing unit by the handle and pull
forwards carefully.
5. Rinse the brewing unit thoroughly
under warm, running water.
6. Clean the interior of the appliance
thoroughly with a damp cloth,
removing any coffee residues.
7. Allow the brewing unit and the
interior of the appliance to dry.
Insert the brewing unit:
1. Hold the brewing unit only by the
handle.
2. Push the red lever up, position the
brewing unit underneath and slide
back as far as it will go. The lever
must snap into place.
3. Insert the coffee grounds container
again and close the door.
Important: If the brewing unit has not
been inserted, or the brewing unit or
drip tray not inserted correctly, it will not
be possible to close the door.
45
Page 21

en Service programme
. Service programme
Ser v i c e progr amme
The calc’nClean button will light up
every so often, with the exact frequency
depending on the water hardness and
usage of the appliance.
The appliance should be immediately
cleaned and descaled using the
programme.
Notes
■ Important: If the appliance is not
cleaned and descaled in good time,
it may be damaged.
■ Caution! For each of the service
programmes, use Calc’nClean
descaling and cleaning agents as
described in the instructions and
observe the (relevant) safety
information.
■ Do not drink the liquids.
■ Never use citric acid, vinegar or any
vinegar-based agents to descale the
appliance.
■ For cleaning and descaling, only use
the tablets intended for such
purposes.They have been specially
developed for this appliance, and
new stocks can be ordered through
customer service. ~ "Accessories"
on page 36
■ Do not use descaling agent with
phosphoric acid.
■ Never insert descaling tablets or
other products into the brewing unit.
■ Never interrupt the service
programme.
■ Prior to starting a service
programme, remove, clean and
re-insert the brewing unit. Clean the
milk frother.
■ At the end of a service programme,
wipe down the appliance using a
soft, damp cloth to immediately
remove any descaler residue. This
residue may cause corrosion.
■ New sponge cloths may contain
salts. Salts can cause rust film on
stainless steel, so cloths must
always be washed out thoroughly
before use.
■ Using a water filter increases the
intervals until a service programme
needs to be performed.
■ If the service programme is
interrupted, e.g. by a power failure,
' and calc’nClean will light up.
Then proceed as follows:
1. Rinse out the water tank.
2. Pour in fresh, still water up to the
"max" marking.
3. Touch the calc’nClean button.
The programme starts and rinses the
appliance.Duration: approx.
2 minutes.
4. Empty, clean and re-insert the drip
tray. Close the door.
The programme has finished. The
appliance is ready for use again.
46
Page 22
Service programme en
Starting Calc’nClean
Calc’nClean ser vi ce pr ogramme
Duration: approx. 40 minutes
1. Press and hold the calc’nClean
button for approx. 5 seconds.
( symbol lights up.
2. Open the door, remove the drip tray
and coffee grounds container and
empty.
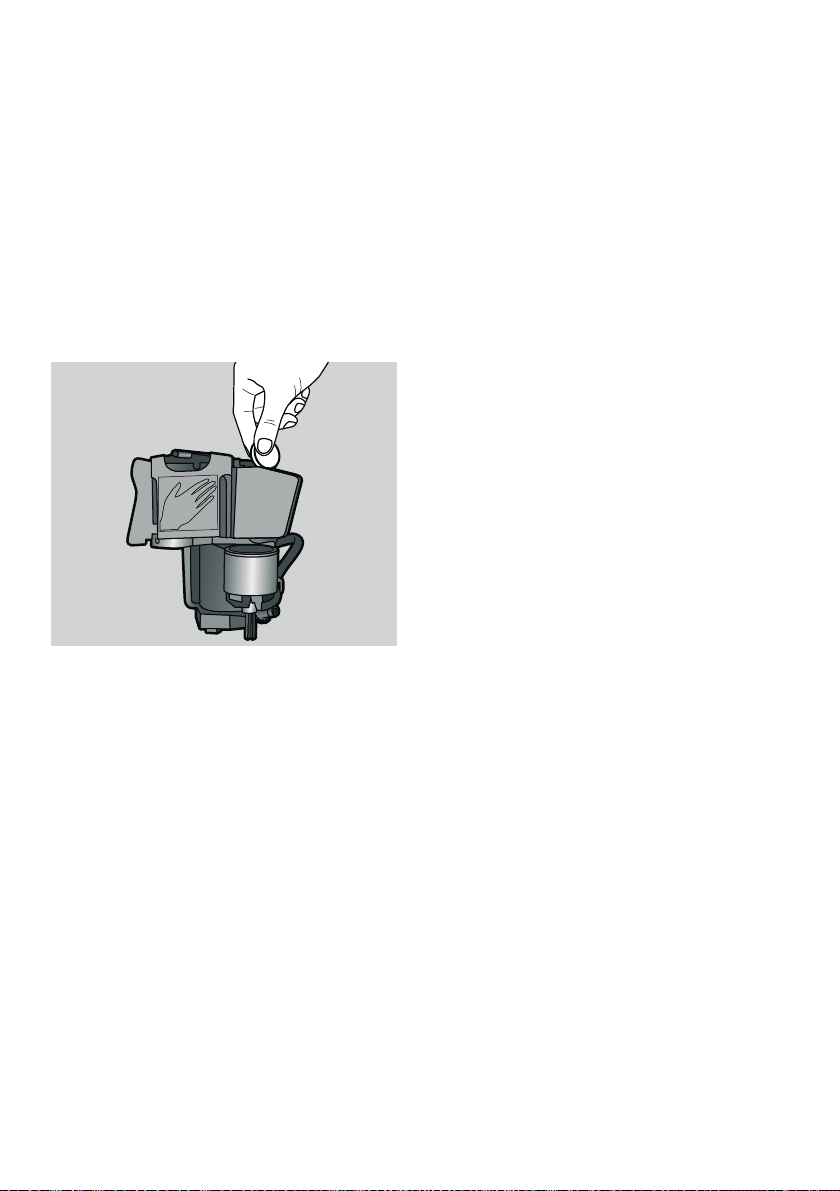
3. Remove and clean the brewing unit.
4. Place a Siemens cleaning tablet in
the brewing unit and re-insert the
unit.
5. Re-insert the drip tray and coffee
grounds container and close the
door.
' symbol lights up.
6. Remove the water filter (if there is
one).
7. Pour 0.5litres of lukewarm water
into the empty water tank up to the
mark and dissolve a Siemens
descaling tablet in it.
8. Re-insert the water tank and place a
large container (approx. 1 litre)
under the outlet system.
9. calc’nClean flashes, touch
calc’nClean.
The programme starts, cleans and
descales the appliance. calc’nClean
pulses. Duration approx. 20 minutes.
( symbol lights up.
10. Empty the container, open the door,
empty the drip tray and re-insert.
11. Close the door and place a
container under the outlet system.
' symbol lights up.
12. Clean the water tank and replace the
water filter (if removed).
~ Fig. '
13. Fill with fresh, still water up to the
"max" mark. Place the container
under the outlet system again.
14. calc’nClean flashes, touch
calc’nClean.
The programme starts and then cleans
and rinses the appliance. calc’nClean
pulses.
( symbol lights up.
15. Empty, clean and re-insert the drip
tray and coffee grounds container.
The programme has finished. The
appliance is ready for use again.
47
Page 23
en Trouble shooting
3 Trouble shooting
Troubl e shooti ng
Faults often have simple explanations.
Before calling the customer service,
please refer to the fault table and
attempt to correct the fault yourself.
Please read through the safety
information at the beginning of these
instructions.
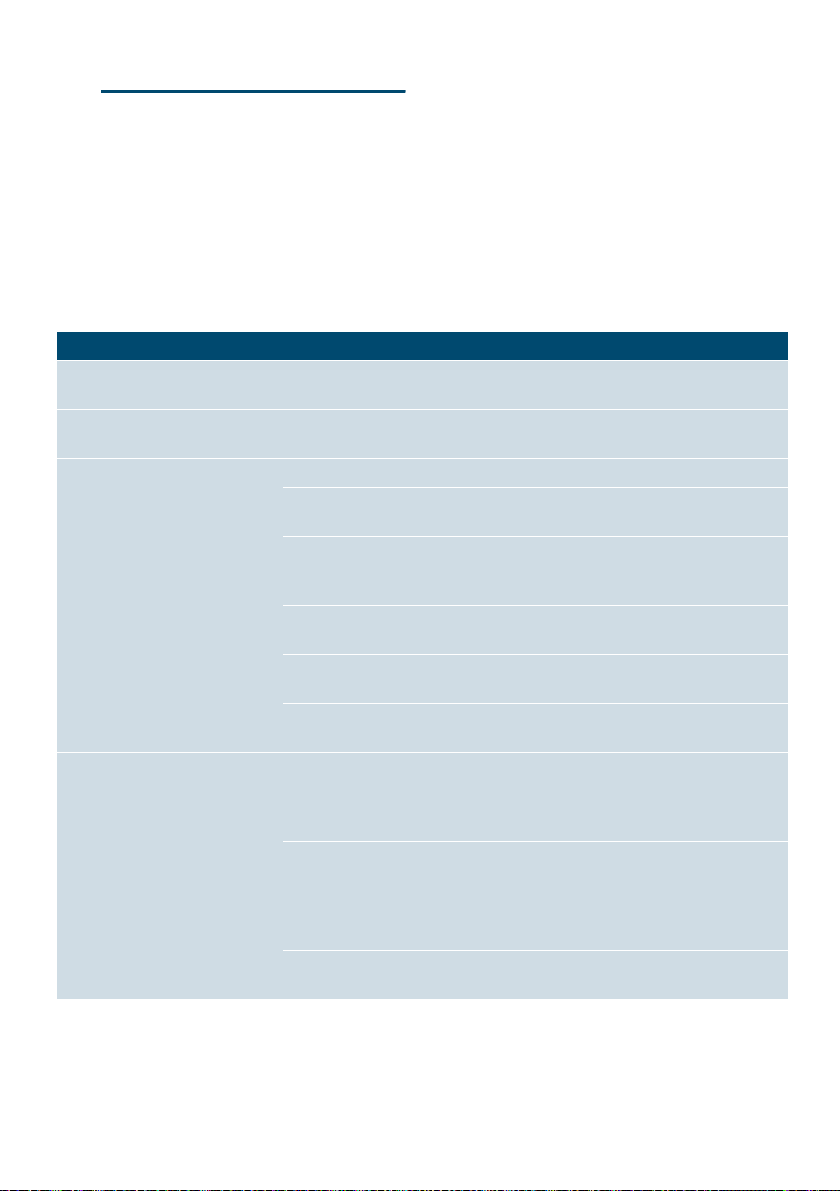
Fault table
Problem Cause Solution
The appliance no longer
responds.
Coffee or milk froth quality varies considerably.
The individually selected
per-cup quantity is not reached.
Coffee dispensing slows to a
trickle or stops completely
No milk froth is produced. / The
quality of the milk froth varies.
Fault in the appliance. Pull out the mains plug, wait
10 seconds, plug back in.
Build-up of limescale in the
appliance.
Descale the appliance in accordance
with the instructions.
The grinding level is too fine. Set a coarser grinding level.
Heavy build-up of limescale in
the appliance.
Descale the appliance as described in
the instructions.
Air in the water filter. Immerse the water filter in water until
no more air bubbles escape; insert the
filter again.
The appliance is soiled. Clean the brewing unit or run the
"Calc'nClean" service programme.
Residues of descaling agent
Clean the water tank thoroughly.
are blocking the water tank.
The coffee strength is set too
Reduce the coffee strength.
high.
The quality of the milk froth
depends on the type of milk or
the plant-based alternative
Optimise the result by selecting your
milk or plant-based alternative as
appropriate.
used.
The milk frother is soiled.
The milk frother is not inserted
in the milk.
Clean the milk frother in the dish-
washer.
Use more milk, check whether the milk
frother is inserted in the milk. Slide the
outlet system right down.
Heavy build-up of limescale in
the appliance.
Descale the appliance as described in
the instructions.
48
Page 24
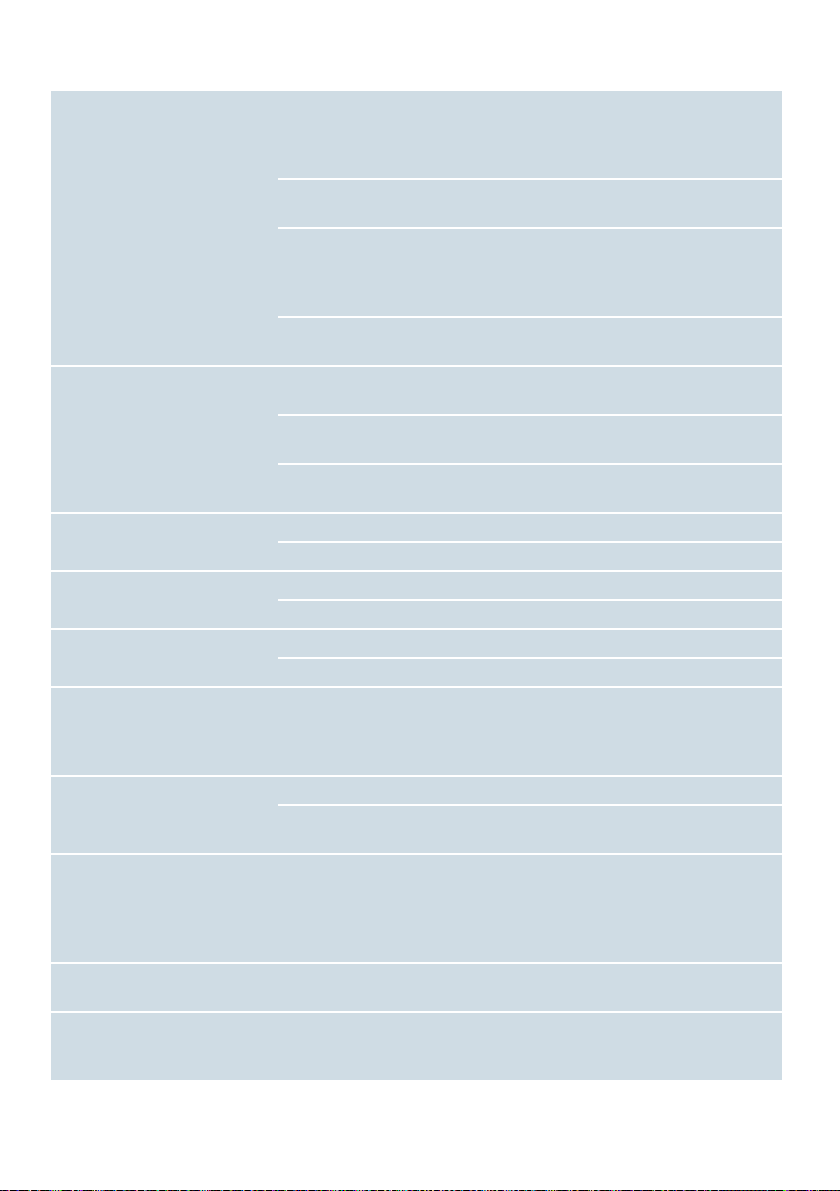
Trouble shooting en
No coffee dispensed, only
water.
An empty bean container is not
detected by the appliance.
Add coffee beans
Note: The appliance will adjust to the
coffee beans on the next dispensing
process.
The coffee shaft on the brewing
unit is blocked.
Beans are not falling into the
grinding unit (beans too oily).
Clean the brewing unit. ~ "Cleaning
the brewing unit" on page 45
Gently tap the bean container.Possibly
change the type of coffee. When the
bean container is empty, wipe it with a
dry cloth.
The brewing unit is not inserted
Slide the brewing unit right back.
properly.
Coffee has no “crema”. Unsuitable type of coffee. Use a type of coffee with a higher pro-
portion of robusta beans.
The beans are no longer freshly
Use fresh beans.
roasted.
The grinding level is not suita-
Set a finer grinding level.
ble for the coffee beans.
The coffee is too "acidic". Grinding level set too coarse. Set a finer grinding level.
Unsuitable type of coffee. Use a darker roast.
The coffee is too "bitter". Coffee is ground too fine. Set a coarser grinding level.
Unsuitable type of coffee. Change the type of coffee.
The coffee tastes "burnt". Coffee is ground too fine. Set a coarser grinding level.
Unsuitable type of coffee. Change the type of coffee.
Milk/blended milk drinks too
Too little milk in glass or cup. Use more milk or adjust frothing time.
hot.
Milk froth too thin, loud sucking
noise.
Milk/blended milk drinks too
cold.
Too much milk in glass or cup. Use less milk or adjust frothing time.
Milk in the glass or cup is too
Use lukewarm milk.
cold.
The appliance is not dispensing
drinks.
Air in the water filter. Immerse the water filter in water until
no more air bubbles escape; insert the
filter again.
Firmly press the water filter straight
down into the tank connection.
Several buttons flashing, a loud
noise can be heard.
Water dripped onto the inner
floor of the appliance when the
drip tray was removed.
Water tank missing or wrongly
Insert water tank correctly.
inserted.
Drip tray removed too early. Wait a few seconds after the last drink
was dispensed before removing the
drip tray.
49
Page 25

en Trouble shooting
The brewing unit cannot be
removed.
The brewing unit is not in the
removal position (e.g. frost pro-
Switch the appliance on again.
tection activated).
The appliance cannot be operated, LEDs lit up or flashing.
The appliance is in demo mode. Hold k button for at least 5 seconds
to deactivate demo mode. Remove the
water tank, fill with fresh water and
re-insert.
The grinder will not start. The appliance is too hot. Disconnect the appliance from the
mains and leave to cool down for
1 hour.
( LED flashes. The door is not closed properly. Press the door firmly closed.
The appliance is too hot. Disconnect the appliance from the
mains and leave to cool down for
1 hour.
( LED lit up despite empty
drip tray - what to do?
' LED lit up despite water
tank being full.
Emptying is not detected when
the appliance is off.
When the appliance is switched on,
remove and re-insert the drip tray.
Water tank wrongly inserted. Insert water tank correctly.
Carbonated water in the water
Fill the water tank with fresh tap water.
tank.
Float is stuck in the water tank. Remove the water tank and clean thor-
oughly.
New water filter not rinsed
according to the instructions.
Rinse the water filter according to the
instructions and then switch on.
Air in the water filter. Immerse the water filter (opening up)
in water until no more air bubbles
escape; insert the filter again.
~ "Inserting or replacing a water
filter" on page 41
Water filter is old. Insert a new water filter.
Limescale deposits in the water
tank can block up the system.
Thoroughly clean the water tank and
start calc'nClean. ~ "Calc’nClean
service programme" on page 47
' LED flashes and all beverage LEDs flashing.
Water tank is missing or not
inserted correctly.
The pipe system in the appliance is dry.
Insert water tank correctly.
Insert water tank correctly.
Fill the water tank with fresh tap water.
Do not fill with carbonated water.
Air in the water filter. Immerse the water filter (opening up)
in water until no more air bubbles
escape; insert the filter again.
~ "Inserting or replacing a water
filter" on page 41
50
Page 26

Trouble shooting en
All LEDs flashing. Incorrect voltage in building. Only operate the appliance at
220V-240V.
', ( and calc’nClean LEDs
flashing.
( and % LEDs flashing. Brewing unit very heavily soiled
The ambient temperature is too
cold.
or brewing unit cannot be
removed.
Operate the appliance at temperatures
> 5 °C.
Clean brewing unit if possible and
switch appliance off and back on
again.
% LEDs flashing. Fault in the appliance. Restart appliance.
calc’nClean and ) light up. The descaling process has
been interrupted.
Display "calc'nClean" keeps on
The water is too hard. Insert water filter and activate accord-
appearing.
Continue the descaling process.
~ "Service programme" on page 46
ing to the instructions. ~ "Water
filter" on page 41
If you are unable to solve the problem, always call the hotline.
You will find the telephone numbers at the back of these instructions
--------
51
Page 27
en Customer service
4 Customer service
Cus t o mer ser vi ce
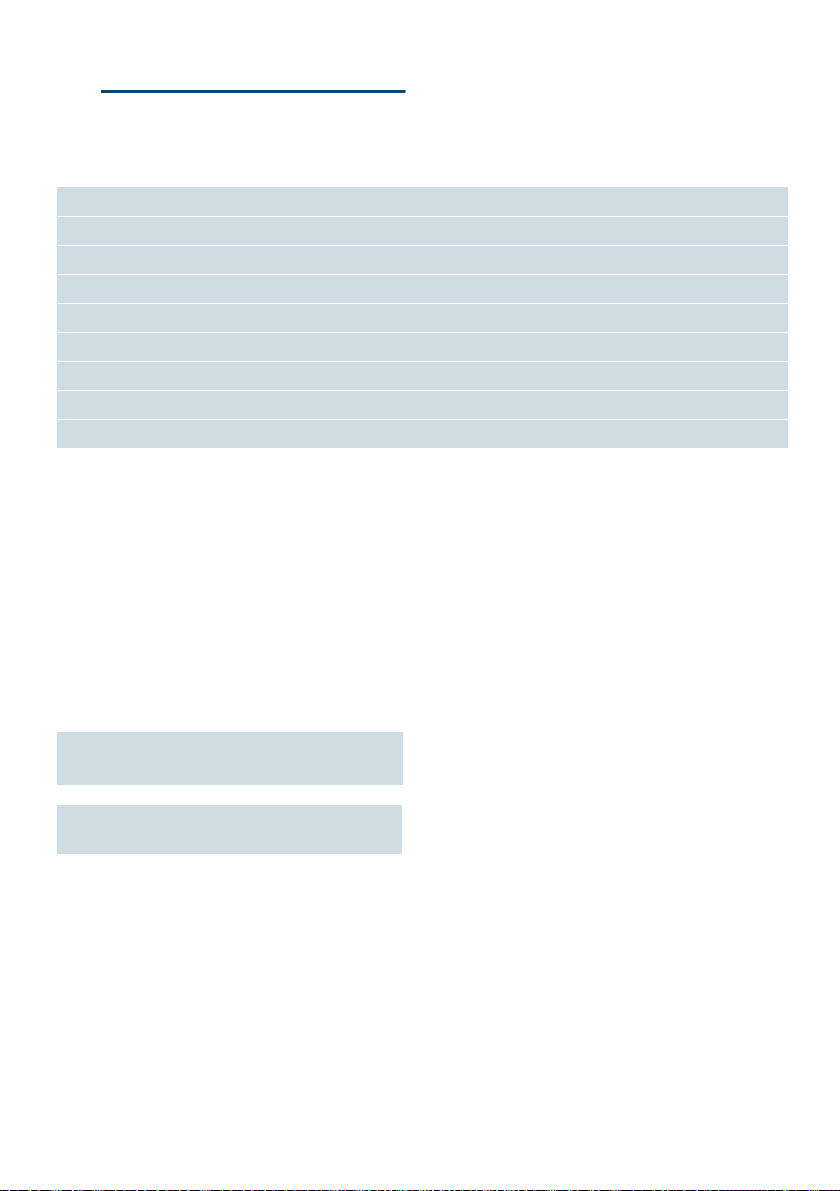
Technical data
Electrical connection (voltage – frequency) 220–240 V ∼, 50/60 Hz
Power rating 1300 W
Maximum static pump pressure 15 bar
Maximum capacity of water tank (without filter) 1.3l
Maximum capacity of bean container ≈ 250 g
Length of power cable 100 cm
Dimensions (H x W x D) 38.3x 25.1x 43.3 cm
Weight, empty approx. 8–9 kg
Type of grinding unit Ceramic/steel
E number and FD number
When calling us, please give the full
product number (E no.) and the
production number (FD no.) so that we
can provide you with the correct advice.
These numbers can be found on the
rating plate `. (~ Fig. ")
To save time, you can make a note of
the data for your appliance and the
telephone number for customer service
here, should this be required.
E no.
Customer service O
The contact data for customer service in
all countries can be found at the back of
these instructions.
FD
Number
Guarantee
The guarantee conditions for this
appliance are as defined by our
representative in the country in which it
is sold. Details regarding these
conditions can be obtained from the
dealer from whom the appliance was
purchased. The bill of sale or receipt
must be produced when making any
claim under the terms of this guarantee.
Changes reserved.
52
Page 28
Page 29
Page 30
Page 31
Page 32
6
Page 33
6
Page 34
6
Page 35

BSH Hausgeräte GmbH
Carl-Wery-Straße 34
81739 München
GERMANY
siemens-home.bsh-group.com
8001179091
(9912)
de © Hergestellt von BSH Hausgeräte GmbH
unter Markenlizenz der Siemens AG.
en © Manufactured by BSH Hausgeräte GmbH
under Trademark License of Siemens AG.
fr © Fabriqué par BSH Hausgeräte GmbH
titulaire des droits d’utilisation de la marque
Siemens AG.
it © Prodotto da BSH Hausgeräte GmbH
in quanto licenziatario del marchio di
Siemens AG.
 Loading...