

Page 1

Preface, Contents
SIMATIC
Distributed I/O System
DP/ASi Link
Manual
Overview
ASi Basics
Configuration Options
Installing and Wiring DP/ASi Link
Configuring the DP/ASi Link
DP/ASi Link to S7
Operating Modes
Diagnostics and Error Handling
Appendices
1
2
3
4
5
6
7
8
EWA 4NEB 710 6055-02b
Edition 3
Technical Data
I/O Code
Parameterization Message
Configuration Message
Glossary, Index
A
B
C
D
Page 2
Safety Guidelines
!
!
!
This manual contains notices which you should observe to ensure your own personal safety, as
well as to protect the product and connected equipment. These notices are highlighted in the
manual by a warning triangle and are marked as follows according to the level of danger:
Danger
indicates that death, severe personal injury or substantial property damage will result if proper
precautions are not taken.
Warning
indicates that death, severe personal injury or substantial property damage can result if proper
precautions are not taken.
Caution
indicates that minor personal injury or property damage can result if proper precautions are not taken.
Note
draws your attention to particularly important information on the product, handling the product, or
to a particular part of the documentation.
Qualified Personnel
Correct Usage
!
Trademarks
The reproduction, transmission or use of this document or its
contents is not permitted without express written authority.
Offenders will be liable for damages. All rights, including rights
created by patent grant or registration of a utility model or design, are
reserved.
Siemens AG
Automation Group
Industrial Automation Systems
P.O. Box 4848, D-90327 Nuremberg
The device/system may only be set up and operated in conjunction with this manual.
Only qualified personnel should be allowed to install and work on this equipment. Qualified
persons are defined as persons who are authorized to commission, to ground, and to tag circuits,
equipment, and systems in accordance with established safety practices and standards.
Note the following:
Warning
This device and its components may only be used for the applications described in the catalog or the
technical description, and only in connection with devices or components from other manufacturers
which have been approved or recommended by Siemens.
This product can only function correctly and safely if it is transported, stored, set up, and installed
correctly, and operated and maintained as recommended.
SIMATIC and SIMATIC NET are registered trademarks of SIEMENS AG.
Some of the other designations used in these documents are also registered trademarks; the own-
er’s rights may be violated if they are used be third parties for their own purposes.
Disclaimer of LiabilityCopyright Siemens AG 1995 All rights reserved
We have checked the contents of this manual for agreement with the
hardware and software described. Since deviations cannot be precluded entirely, we cannot guarantee full agreement. However , the
data in this manual are reviewed regularly and any necessary corrections included in subsequent editions. Suggestions for improvement are welcomed.
Technical data subject to change.
Siemens AG 1995
Siemens Aktiengesellschaft Order No. 6ES7 156-0AA00-8BA0
Distributed I/O System DP/ASi Link
Page 3
Preface
03
Purpose of manual
Manual contents
Applicability
The information contained in this manual will enable you to:
install an Actuator Sensor Interface (ASi)
commission the DP/ASi link
The scope of delivery of MLFB 6ES7 156-0AA00-8AA0 consists of the
manual:
Distributed I/O System
DP/ASi Link, Edition 3
installing and wiring the distributed I/O system DP/ASi link
configuring the DP/ASi link
diagnostics and error handling
technical data
The present manual is valid for:
6ES7 156-0AA00-0XA0 03
6ES7 156-0AA01-0XA0 01
The present manual contains a description of all the functions incorporated in
the DP/ASi link at the time this manual was published. We reserve the right
to describe modified functions in a Product Information.
Distributed I/O System DP/ASi Link
EWA 4NEB 710 6055-02b
Order No.
DP/ASi Link
Release (or Later)
DP/ASi Link
Manual
Edition
iii
Page 4

Preface
Changes from
previous edition
Compared to the previous edition of this manual, Distributed I/O System DP/
ASi Link having the Order No. 6ES7 156-0AA00-8AA0, Edition 2, the fol-
lowing changes have been incorporated:
DP/ASi link to S7
diagnostics during operation with an S7/M7 DP master
The DP/ASi link meets the requirements and criteria of the following stan-
Standards and
approvals
dards and approvals:
IEC 1131, Part 2
EN 50170 Volume 2, PROFIBUS
ASi: Actuator Sensor Interface Complete Specification
CE mark requirements
CSA, UL and FM approvals
You will find complete details of approvals and standards in appendix A.1.
How this manual
fits in
This manual, DP/ASi Link, describes the DP/ASi link and the installation of
the ASi.
The description of the PROFIBUS-DP and a master interface such as
IM 308-C do not form a part of this manual. You will find further information
on these subjects in the manual called Distributed I/O System ET 200, Order
No. 6ES5 998-3ES12.
CD-ROM
Aids to accessing
the manual
The Distributed I/O System DP/ASi Link can be acquired on a CD-ROM as
an electronic manual.
You can quickly access specific information in the manual using the following access aids:
At the beginning of the manual, you will find a complete list of manual
contents and lists of illustrations and tables contained in the whole document.
Within the chapters, you will find information in the left-hand margin
giving you an overview of the subject that is dealt with.
Following the appendices, there is a glossary in which technical terms
used in the manual are defined.
At the end of the manual, you will find a comprehensive index enabling
rapid access to the information you require.
iv
Distributed I/O System DP/ASi Link
EWA 4NEB 710 6055-02b
Page 5

Preface
Further support
Should you have any technical queries, please contact your Siemens representative at the agents or branch office responsible. You will find the address
in the manuals describing the DP masters – for example, in the appendix
“Siemens Worldwide” to the S7-300 Programmable Controller; Hardware
and Installation manual, in catalogs and on CompuServe (GO AUTFORUM).
In addition, you can contact our hotline by calling +49 (911) 895-7000 (Fax
7001).
Should you require the type file or the GSD file, you can download them
over your modem by dialing +49 (911) 737972.
In the event of queries or remarks concerning the manual itself, please com-
plete the Remarks Form at the end of the manual and return it to the address
specified. We would kindly ask you to enter your own personal assessment of
the manual on the Remarks Form.
T o help you get started with the distributed I/O system ET 200, we hold a
”KO-ET 200” workshop. If you are interested in attending the workshop,
please contact your next area training center or the principal training center
in Nuremberg, Germany, by dialing +49 911 895 3154.
Distributed I/O System DP/ASi Link
EWA 4NEB 710 6055-02b
v
Page 6

Preface
vi
Distributed I/O System DP/ASi Link
EWA 4NEB 710 6055-02b
Page 7

Contents
Preface
1 Overview
1.1 Using the DP/ASi Link 1-2. . . . . . . . . . . . . . . . . . . . . . . . . . . . . . . . . . . . . . . . . . . .
1.2 What is the DP/ASi Link? 1-3. . . . . . . . . . . . . . . . . . . . . . . . . . . . . . . . . . . . . . . . .
1.3 View of the DP/ASi Link 1-5. . . . . . . . . . . . . . . . . . . . . . . . . . . . . . . . . . . . . . . . . . .
2 ASi Basics
2.1 Structure of ASi 2-2. . . . . . . . . . . . . . . . . . . . . . . . . . . . . . . . . . . . . . . . . . . . . . . . . .
2.2 Elements of ASi 2-3. . . . . . . . . . . . . . . . . . . . . . . . . . . . . . . . . . . . . . . . . . . . . . . . . .
2.3 Example Configuration of a Module 2-5. . . . . . . . . . . . . . . . . . . . . . . . . . . . . . . . .
2.4 Connecting Elements 2-6. . . . . . . . . . . . . . . . . . . . . . . . . . . . . . . . . . . . . . . . . . . . .
2.5 Interruption or Short-Circuit of the ASi cable 2-7. . . . . . . . . . . . . . . . . . . . . . . . .
3 Configuration Options
3.1 Summary of Configuration Options 3-2. . . . . . . . . . . . . . . . . . . . . . . . . . . . . . . . .
3.2 Configuration without T Connector and with Power Supply Connector 3-3. . .
3.3 Configuration with T Connector and with Power Supply Connector 3-4. . . . .
3.4 Configuration with Several Power Supply Connectors 3-6. . . . . . . . . . . . . . . . .
3.5 Configuration without Power Supply Connector 3-7. . . . . . . . . . . . . . . . . . . . . .
3.6 Configuration with Programmer Connector 3-9. . . . . . . . . . . . . . . . . . . . . . . . . .
4 Installing and Wiring the DP/ASi Link
4.1 Installation 4-2. . . . . . . . . . . . . . . . . . . . . . . . . . . . . . . . . . . . . . . . . . . . . . . . . . . . . .
4.2 Electrical Wiring of DP/ASi Link 4-3. . . . . . . . . . . . . . . . . . . . . . . . . . . . . . . . . . . .
4.2.1 Grounded Installation 4-4. . . . . . . . . . . . . . . . . . . . . . . . . . . . . . . . . . . . . . . . . . . . .
4.2.2 Ungrounded Installation 4-6. . . . . . . . . . . . . . . . . . . . . . . . . . . . . . . . . . . . . . . . . . .
4.2.3 Connecting the DP/ASi Link to ASi and PROFIBUS-DP 4-8. . . . . . . . . . . . . . .
4.3 Commissioning 4-10. . . . . . . . . . . . . . . . . . . . . . . . . . . . . . . . . . . . . . . . . . . . . . . . . .
4.3.1 Selecting the Station Number for PROFIBUS-DP 4-11. . . . . . . . . . . . . . . . . . . . .
4.3.2 Setting a Station Number on the DIP Switch Block 4-12. . . . . . . . . . . . . . . . . . . .
4.3.3 Station Number in EEPROM 4-13. . . . . . . . . . . . . . . . . . . . . . . . . . . . . . . . . . . . . . .
Distributed I/O System DP/ASi Link
EWA 4NEB 710 6055-02b
vii
Page 8

Contents
4.4 Additional Components for PROFIBUS-DP 4-15. . . . . . . . . . . . . . . . . . . . . . . . . .
4.4.1 T Connector (6ES5 762-2CT11) 4-16. . . . . . . . . . . . . . . . . . . . . . . . . . . . . . . . . . . .
4.4.2 Power Supply Connector (6ES5 762-2CS11) 4-17. . . . . . . . . . . . . . . . . . . . . . . .
4.4.3 Programmer Connector (6ES5 762-2CA12) 4-18. . . . . . . . . . . . . . . . . . . . . . . . .
4.4.4 Cables 4-19. . . . . . . . . . . . . . . . . . . . . . . . . . . . . . . . . . . . . . . . . . . . . . . . . . . . . . . . . .
4.4.5 Terminating Resistor (6ES5 755-2CA11) 4-21. . . . . . . . . . . . . . . . . . . . . . . . . . . .
4.4.6 Adapter Cable (6ES5 755-8CA11) 4-22. . . . . . . . . . . . . . . . . . . . . . . . . . . . . . . . . .
4.4.7 Wiring of PROFIBUS-DP 4-23. . . . . . . . . . . . . . . . . . . . . . . . . . . . . . . . . . . . . . . . . .
5 Configuring the DP/ASi Link
5.1 Configuring – for Example with COM ET 200 Windows
(Version 2.0 or Later) 5-3. . . . . . . . . . . . . . . . . . . . . . . . . . . . . . . . . . . . . . . . . . . . .
5.2 Example Using COM ET 200 Windows (Version 2.0 or Later) 5-5. . . . . . . . . .
5.3 Operating the DP/ASi Link with an External Master 5-6. . . . . . . . . . . . . . . . . . .
5.3.1 Configuring with Address Space Optimization 5-7. . . . . . . . . . . . . . . . . . . . . . . .
5.3.2 Simple Configuration 5-8. . . . . . . . . . . . . . . . . . . . . . . . . . . . . . . . . . . . . . . . . . . . .
5.3.3 Default Start–Up 5-9. . . . . . . . . . . . . . . . . . . . . . . . . . . . . . . . . . . . . . . . . . . . . . . . .
6 DP/ASi Link to S7
6.1 Reading Data Records with SFC 59 ”RD_REC” 6-3. . . . . . . . . . . . . . . . . . . . . .
6.2 Writing Data Records with SFC 58 “WR_REC” 6-6. . . . . . . . . . . . . . . . . . . . . . .
6.3 Example of Re-assigning Parameters to an ASi Slave with S7 6-7. . . . . . . . .
7 Operating Modes
7.1 Automatic Start-up of DP/ASi Link 7-2. . . . . . . . . . . . . . . . . . . . . . . . . . . . . . . . . .
7.2 Normal Operation 7-4. . . . . . . . . . . . . . . . . . . . . . . . . . . . . . . . . . . . . . . . . . . . . . . .
7.3 Automatic Programming 7-6. . . . . . . . . . . . . . . . . . . . . . . . . . . . . . . . . . . . . . . . . .
8 Diagnostics and Error handling
8.1 Diagnostics by Means of LEDs of DP/ASi Link 8-2. . . . . . . . . . . . . . . . . . . . . . .
8.2 Diagnostics by Means of User Program 8-6. . . . . . . . . . . . . . . . . . . . . . . . . . . . .
8.2.1 Diagnostic Fundamentals in Operations with an IM308C 8-7. . . . . . . . . . . . . .
8.2.2 Diagnostic Fundamentals in Operations with an S7/M7 DP Master
(STEP 7) or with Another PROFIBUS-DP Master 8-9. . . . . . . . . . . . . . . . . . . . .
8.2.3 Structure of Diagnosis 8-10. . . . . . . . . . . . . . . . . . . . . . . . . . . . . . . . . . . . . . . . . . . .
8.2.4 Contents of DP Standard Part 8-12. . . . . . . . . . . . . . . . . . . . . . . . . . . . . . . . . . . . .
8.2.5 Module and First Station Diagnoses for the IM308C 8-14. . . . . . . . . . . . . . . . . .
8.2.6 Module and First Station Diagnoses for the S7/M7 DP Master 8-16. . . . . . . . .
8.2.7 Second Station Diagnosis for the IM308C 8-18. . . . . . . . . . . . . . . . . . . . . . . . . . .
8.2.8 Second Station Diagnosis for the S7/ M7 DP Master 8-20. . . . . . . . . . . . . . . . . .
8.2.9 Diagnostics for a Default Start-Up with the IM308C
(6ES7 156 0AA00-0XA0 or higher, Issue 3) 8-21. . . . . . . . . . . . . . . . . . . . . . . . . .
viii
Distributed I/O System DP/ASi Link
EWA 4NEB 710 6055-02b
Page 9

A Technical Data
A.1 Standards and Approvals A-2. . . . . . . . . . . . . . . . . . . . . . . . . . . . . . . . . . . . . . . . .
A.2 General Technical Data A-4. . . . . . . . . . . . . . . . . . . . . . . . . . . . . . . . . . . . . . . . . . .
B I/O Code
C Parameterization Message
C.1 Structure of the Parameterization Message in Configuring with Address
Optimization C-2. . . . . . . . . . . . . . . . . . . . . . . . . . . . . . . . . . . . . . . . . . . . . . . . . . . . .
C.2 Parameterization Data for ASi Slaves C-6. . . . . . . . . . . . . . . . . . . . . . . . . . . . . . .
C.3 Optimizing Address Assignment C-8. . . . . . . . . . . . . . . . . . . . . . . . . . . . . . . . . . .
C.4 Structure of the Parameterization Message in Simple Configuration C-10. . . .
D Configuration Message
D.1 Structure of the Configuration Message with a Default Start-Up D-2. . . . . . . .
D.2 Structure of the Configuration Message with a Default Start-Up D-3. . . . . . . .
D.3 Structure of the Configuration Message in Simple Configuration D-7. . . . . . . .
Contents
Glossary
Index
Distributed I/O System DP/ASi Link
EWA 4NEB 710 6055-02b
ix
Page 10

Contents
Figures
1-1 Integrating the DP/ASi link 1-2. . . . . . . . . . . . . . . . . . . . . . . . . . . . . . . . . . . . . . . .
1-2 Components 1-3. . . . . . . . . . . . . . . . . . . . . . . . . . . . . . . . . . . . . . . . . . . . . . . . . . . .
1-3 View of DP/ASi link 1-5. . . . . . . . . . . . . . . . . . . . . . . . . . . . . . . . . . . . . . . . . . . . . . .
2-1 Example installation of an ASi 2-2. . . . . . . . . . . . . . . . . . . . . . . . . . . . . . . . . . . . .
2-2 View of module, example of an upper part and a lower part 2-5. . . . . . . . . . . .
3-1 Legend 3-2. . . . . . . . . . . . . . . . . . . . . . . . . . . . . . . . . . . . . . . . . . . . . . . . . . . . . . . . .
3-2 PROFIBUS-DP and power supply looped through on DP/ASi link 3-3. . . . . . .
3-3 PROFIBUS-DP and power supply looped through by means of T
connector 3-4. . . . . . . . . . . . . . . . . . . . . . . . . . . . . . . . . . . . . . . . . . . . . . . . . . . . . . .
3-4 Rule for installation with a T connector 3-5. . . . . . . . . . . . . . . . . . . . . . . . . . . . . .
3-5 Configuration with several power supply connectors 3-6. . . . . . . . . . . . . . . . . .
3-6 PROFIBUS-DP looped through T connectors –
external power supply fed separately to every slave station 3-7. . . . . . . . . . . .
3-7 Rule for installation with a T connector 3-8. . . . . . . . . . . . . . . . . . . . . . . . . . . . . .
3-8 Configuration with programmer connector 3-9. . . . . . . . . . . . . . . . . . . . . . . . . . .
4-1 Grounded installation of DP/ASi link 4-5. . . . . . . . . . . . . . . . . . . . . . . . . . . . . . . .
4-2 Ungrounded installation of DP/ASi link 4-7. . . . . . . . . . . . . . . . . . . . . . . . . . . . . .
4-3 Location of DIP switch block 4-12. . . . . . . . . . . . . . . . . . . . . . . . . . . . . . . . . . . . . . .
4-4 T connector 4-16. . . . . . . . . . . . . . . . . . . . . . . . . . . . . . . . . . . . . . . . . . . . . . . . . . . . .
4-5 Terminating resistor 4-21. . . . . . . . . . . . . . . . . . . . . . . . . . . . . . . . . . . . . . . . . . . . . .
4-6 Adapter cable 4-22. . . . . . . . . . . . . . . . . . . . . . . . . . . . . . . . . . . . . . . . . . . . . . . . . . .
8-1 Location of LEDs of DP/ASi link 8-2. . . . . . . . . . . . . . . . . . . . . . . . . . . . . . . . . . . .
A-1 DP/ASi link; dimension drawing A-6. . . . . . . . . . . . . . . . . . . . . . . . . . . . . . . . . . . .
C-1 Sorting ASi slaves into address space template C-9. . . . . . . . . . . . . . . . . . . . . .
x
Distributed I/O System DP/ASi Link
EWA 4NEB 710 6055-02b
Page 11

T ables
1-1 Length of the PROFIBUS bus cable as a function of the baud rate on the
PROFIBUS DP bus 1-4. . . . . . . . . . . . . . . . . . . . . . . . . . . . . . . . . . . . . . . . . . . . . .
3-1 Configuration options 3-2. . . . . . . . . . . . . . . . . . . . . . . . . . . . . . . . . . . . . . . . . . . .
3-2 Length of bus cable when PROFIBUS-DP and power supply
are fed on the same bus cable 3-6. . . . . . . . . . . . . . . . . . . . . . . . . . . . . . . . . . . . .
3-3 Length of the spur line of the programmer connection as a function of the
baud rate on the PROFIBUS-DP bus 3-10. . . . . . . . . . . . . . . . . . . . . . . . . . . . . . .
4-1 Spacing between DP/ASi link and cable duct 4-2. . . . . . . . . . . . . . . . . . . . . . . .
4-2 Pin assignment of ASi terminal connection 4-8. . . . . . . . . . . . . . . . . . . . . . . . . .
4-3 Pin assignment of 12-pin device connector 4-9. . . . . . . . . . . . . . . . . . . . . . . . .
4-4 Station number selection on DIP switch block 4-11. . . . . . . . . . . . . . . . . . . . . . .
4-5 PROFIBUS-DP cables 4-19. . . . . . . . . . . . . . . . . . . . . . . . . . . . . . . . . . . . . . . . . . . .
4-6 Order Numbers for cables in standard lengths
(core cross-section 0.75 mm
2
, maximum current loading 4 A) 4-20. . . . . . . . . .
4-7 Order Numbers for cables having a Z number
(core cross-section 0.75 mm
2
, maximum current loading 4 A) 4-20. . . . . . . . . .
4-8 Order Number for circular connector 4-23. . . . . . . . . . . . . . . . . . . . . . . . . . . . . . . .
5-1 Assigning the slave to the ASi address, an example 5-5. . . . . . . . . . . . . . . . . .
5-2 I/O Area Assignment 5-10. . . . . . . . . . . . . . . . . . . . . . . . . . . . . . . . . . . . . . . . . . . . .
6-1 Parameters for SFC 59 “RD_REC” 6-1. . . . . . . . . . . . . . . . . . . . . . . . . . . . . . . . .
6-2 Parameters for SFC 58 “WR_REC” 6-2. . . . . . . . . . . . . . . . . . . . . . . . . . . . . . . . .
6-3 Structure of data record 140: Read lists and flags 6-3. . . . . . . . . . . . . . . . . . . .
6-4 Structure of data record 141: Read parameter echoes of ASi slaves 6-4. . . .
6-5 Structure of data record 2: Read response 6-5. . . . . . . . . . . . . . . . . . . . . . . . . .
6-6 Error codes in byte 1 of data record 2 6-5. . . . . . . . . . . . . . . . . . . . . . . . . . . . . . .
6-7 Structure of data record 142: Write parameters to ASi slaves 6-6. . . . . . . . . .
6-8 Structure of data record 143: Modify operating address of ASi slave 6-6. . . .
6-9 Srtructure of data record 144: Set DP/ASi link to “Offline” mode 6-6. . . . . . . .
8-1 Meanings of display LEDs 8-2. . . . . . . . . . . . . . . . . . . . . . . . . . . . . . . . . . . . . . . .
8-2 LED display for modes and bus faults on PROFIBUS-DP 8-3. . . . . . . . . . . . .
8-3 LED display for faults on ASi side 8-4. . . . . . . . . . . . . . . . . . . . . . . . . . . . . . . . . .
8-4 Combination of several LEDs 8-5. . . . . . . . . . . . . . . . . . . . . . . . . . . . . . . . . . . . .
8-5 Parameters for SFC 13 “DPNRM_DG” 8-9. . . . . . . . . . . . . . . . . . . . . . . . . . . . . .
8-6 Structure of diagnostic message 8-10. . . . . . . . . . . . . . . . . . . . . . . . . . . . . . . . . .
8-7 Diagnostic message structure for the S7/M7 DP master 8-11. . . . . . . . . . . . . .
8-8 Structure of station status 1 8-12. . . . . . . . . . . . . . . . . . . . . . . . . . . . . . . . . . . . . . .
8-9 Structure of station status 2 8-12. . . . . . . . . . . . . . . . . . . . . . . . . . . . . . . . . . . . . . .
8-10 Structure of bytes 6 to 11 of diagnostic message 8-14. . . . . . . . . . . . . . . . . . . . .
8-11 Structure of diagnosis, bytes 12 to 15 8-15. . . . . . . . . . . . . . . . . . . . . . . . . . . . . .
8-12 Structure of bytes 6 to 12 of diagnostic message for operations with
IM308C 8-16. . . . . . . . . . . . . . . . . . . . . . . . . . . . . . . . . . . . . . . . . . . . . . . . . . . . . . . . .
8-13 Structure of diagnosis, bytes 13 to 16 8-17. . . . . . . . . . . . . . . . . . . . . . . . . . . . . .
8-14 Structure of bytes 16 to 19 in diagnostic message 8-18. . . . . . . . . . . . . . . . . . .
8-15 Structure of diagnostic data, bytes 20 and 21 8-18. . . . . . . . . . . . . . . . . . . . . . .
8-16 Assignment of ASi address to bit positions, bytes 22 to 25 8-19. . . . . . . . . . . . .
Contents
Distributed I/O System DP/ASi Link
EWA 4NEB 710 6055-02b
xi
Page 12

Contents
8-17 Structure of bytes 17 to 19 in diagnostic message 8-20. . . . . . . . . . . . . . . . . . .
8-18 Assignment of the ASi address to bit positions, bytes 20 to 23 8-20. . . . . . . . .
8-19 Basic structure of diagnostic message 8-21. . . . . . . . . . . . . . . . . . . . . . . . . . . . . .
8-20 Indication of failed ASi slaves 8-21. . . . . . . . . . . . . . . . . . . . . . . . . . . . . . . . . . . . . .
8-21 Actual ASi configuration 8-22. . . . . . . . . . . . . . . . . . . . . . . . . . . . . . . . . . . . . . . . . .
B-1 I/O code of ASi slaves B-1. . . . . . . . . . . . . . . . . . . . . . . . . . . . . . . . . . . . . . . . . . . .
C-1 Structure of the DP standard part in parameterization message C-2. . . . . . . .
C-2 Structure of station status in parameterization message C-3. . . . . . . . . . . . . .
C-3 Structure of byte 7 for initialization C-4. . . . . . . . . . . . . . . . . . . . . . . . . . . . . . . . . .
C-4 Default values of bytes 8 to 14 for initialization C-4. . . . . . . . . . . . . . . . . . . . . .
C-5 Value of control byte (byte 15) C-4. . . . . . . . . . . . . . . . . . . . . . . . . . . . . . . . . . . . .
C-6 Parameterization data for an ASi slave C-6. . . . . . . . . . . . . . . . . . . . . . . . . . . .
C-7 Assignment of parameterization data of ASi slaves to byte numbers of
parameterization message C-7. . . . . . . . . . . . . . . . . . . . . . . . . . . . . . . . . . . . . . . .
C-8 Assigning the DP standard part C-10. . . . . . . . . . . . . . . . . . . . . . . . . . . . . . . . . . . .
C-9 Default values of bytes 8 to 14 for initialization C-10. . . . . . . . . . . . . . . . . . . . . . .
C-10 Definition of response when setpoint and actual configurations differ C-10. . . .
C-11 I/O code of configured ASi slaves C-11. . . . . . . . . . . . . . . . . . . . . . . . . . . . . . . . . .
D-1 Configuration message structure for a default start-up D-2. . . . . . . . . . . . . . . .
D-2 Default assignment of bytes 0 to 14 of the configuration message,
shown in hexadecimal numbers D-3. . . . . . . . . . . . . . . . . . . . . . . . . . . . . . . . . . . .
D-3 Value of identification byte in configuration message D-4. . . . . . . . . . . . . . . . .
D-4 Value of the I/O length byte in configuration message D-4. . . . . . . . . . . . . . . .
D-5 Configuration message for masters with reduced parameter assignment D-7
D-6 IDs for the variable part of the configuration message D-7. . . . . . . . . . . . . . . . .
xii
Distributed I/O System DP/ASi Link
EWA 4NEB 710 6055-02b
Page 13

Overview
1
Introduction
Devices and modules
In this chapter
You use the DP/ASi link to interface the Actuator Sensor Interface to the
PROFIBUS-DP.
The DP/ASi link operates as a DP slave and requires a DP master – for example, an IM 308-C.
In Section You Will Find on Page
1.1 Using the DP/ASi Link 1-2
1.2 What is the DP/ASi Link? 1-3
1.3 View of the DP/ASi Link 1-5
Distributed I/O System DP/ASi Link
EWA 4NEB 710 6055-02b
1-1
Page 14
Overview
1.1 Using the DP/ASi Link
Definition
ASi and PROFIBUS-DP
The DP/ASi link connects the Actuator Sensor Interface (referred to in the
following as ASi) to the PROFIBUS-DP.
PROFIBUS-DP conforms to the PROFIBUS-DP standard EN 50170 Volume 2, PROFIBUS; the term DP means ”distributed I/O”.
You will find an explanation of how the ASi works in Chapter 2.
Higher level
slave
DP
DP master
PROFIBUS-DP
DP/ASi
link
ASi
Explanation
ASi master
IP 66/67
Installation
1-2
Lowest level
Figure 1-1 Integrating the DP/ASi link
SensorActuator
SensorActuator
Up to 31 binary actuators and sensors are networked over the ASi cable. The
DP/ASi link is used to interface the ASi cable to PROFIBUS-DP. You can
operate up to 122 DP/ASi links to PROFIBUS-DP, should you use the
IM 308-C, for example, as the DP master.
ASi allows one ASi master. The DP/ASi link is the ASi master.
The DP/ASi link meets the IP 66/IP 67 degree of protection.
Owing to the IP 66/IP 67 degree of protection, you can use the DP/ASi link in
a harsh industrial environment. There is no preferred mounting location for
the DP/ASi link.
Distributed I/O System DP/ASi Link
EWA 4NEB 710 6055-02b
Page 15
1.2 What is the DP/ASi Link?
Overview
Definition
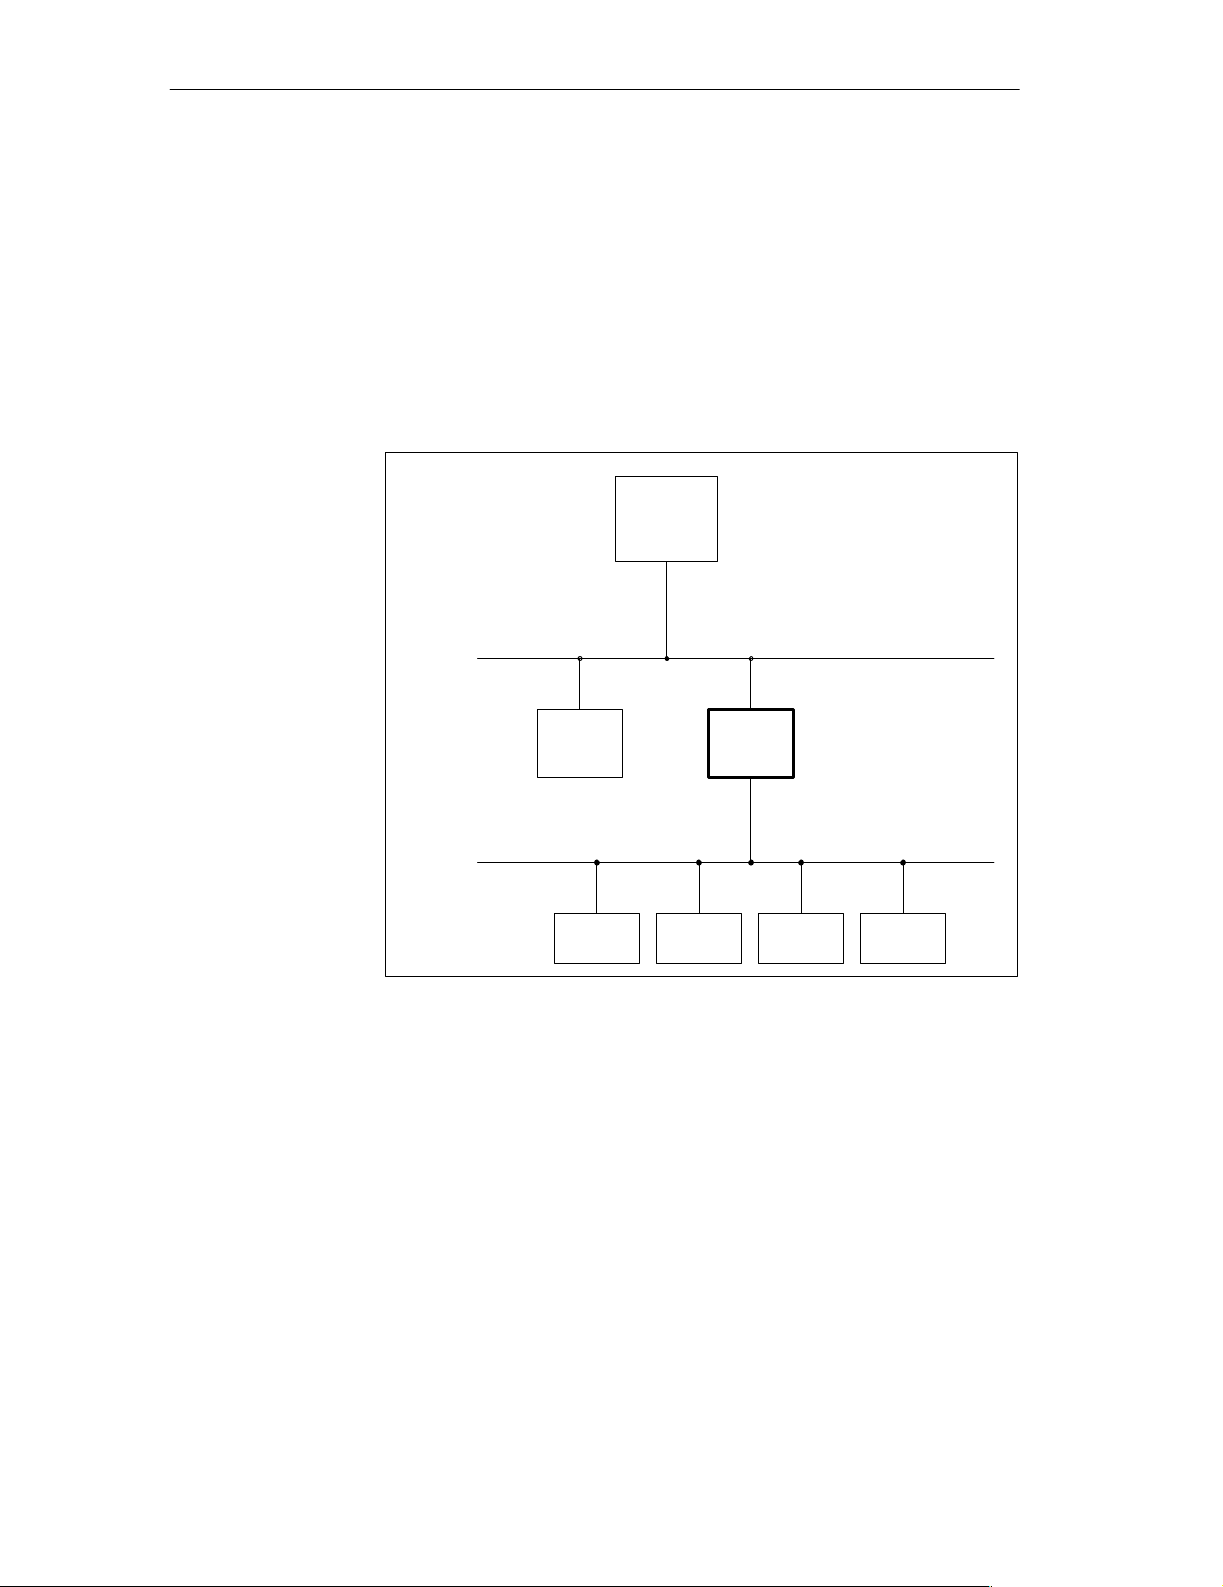
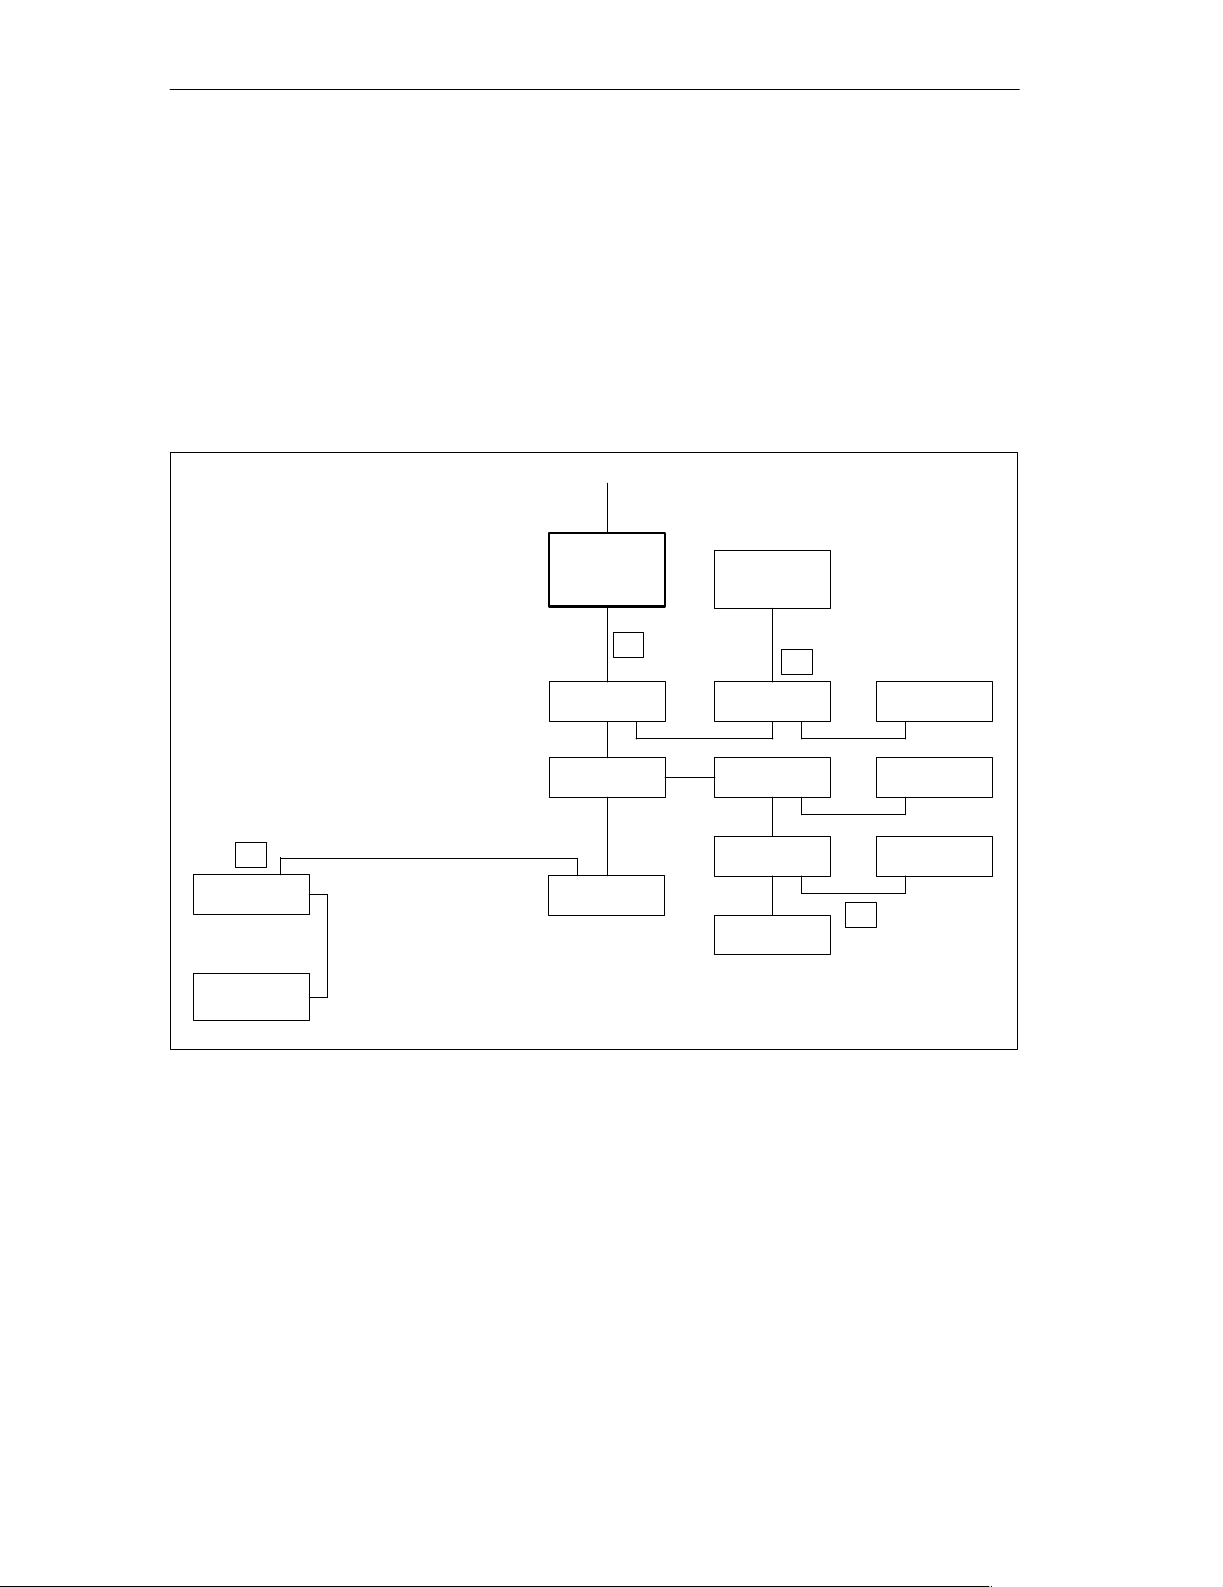
Overview
Components
The DP/ASi link connects the actuator sensor interface (ASi) to the PROFIBUS-DP field bus. In doing so, the protocols of the bus systems are converted.
The DP/ASi link belongs to the Distributed I/O.
The DP/ASi link is a DP slave. In addition, other components belong to the
DP/ASi link. Not all components are necessarily required for operation:
T connector
PS
Power supply connector
Programmer connector
Bus cable
Power supply cable
Bus cable incl. power supply cable
SV
cntr
PG
2-core
3-core
5-core
Terminating resistor
Adapter cable
Figure 1-2 Components
Master interface
The DP/ASi link can be operated, for example, with the following master
interface module and COM ET 200 version:
IM 308-C (version 1 or later)
COM ET 200 Windows (version 2.0 or later).
Characteristics
The DP/ASi link has the following characteristics:
IP 66/IP 67 degree of protection
Compact design
Distributed I/O System DP/ASi Link
EWA 4NEB 710 6055-02b
The DP/ASi link is installed in degrees of protection IP 66 and IP 67.
When assembling, note that IP 66/IP 67 is insured only when you follow
the rules on installation set out in section 4.1.
The DP/ASi link is suitable for applications requiring little space. Its dimensions are 2058057 mm plus the T connector.
1-3
Page 16

Overview
Connections
– PROFIBUS-DP
– ASi cable
– 24 V DC power supply
Optical isolation between PROFIBUS-DP and ASi
Direct ET 200 Handheld connection possible for setting the station num-
ber (using an adapter cable)
ASi diagnostics using LEDs
The diagnosis can also be read using the DP master.
The DP/ASi link has LEDs with the following meanings
– RUN
– BF (bus error)
– ASi POWER FAIL (ASi power supply failure)
– CONFIG ERROR (configuration error)
– AUTOPROG AV (automatic programming possible)
– CONFIG MODE (configuration mode)
– ASi-SLAVE FAIL (5 LEDs for displaying the failed ASi slave)
The DP/ASi link can be operated on the PROFIBUS-DP with a baud rate
of up to 12000 kBd.
Length of PROFIBUS bus cable
The following values apply to installation of the DP/ASi link for the
PROFIBUS bus cable as a function of the baud rate on the bus.
Table 1-1 Length of the PROFIBUS bus cable as a function of the baud rate on the
PROFIBUS DP bus
Baud Rate Max. Length of Bus Cable
< 187.5 kBd 1200 m per segment
187.5 kBd 1000 m per segment
500 kBd 400 m per segment
1500 kBd 200 m per segment
> 1500 kBd 100 m per segment
1-4
Distributed I/O System DP/ASi Link
EWA 4NEB 710 6055-02b
Page 17
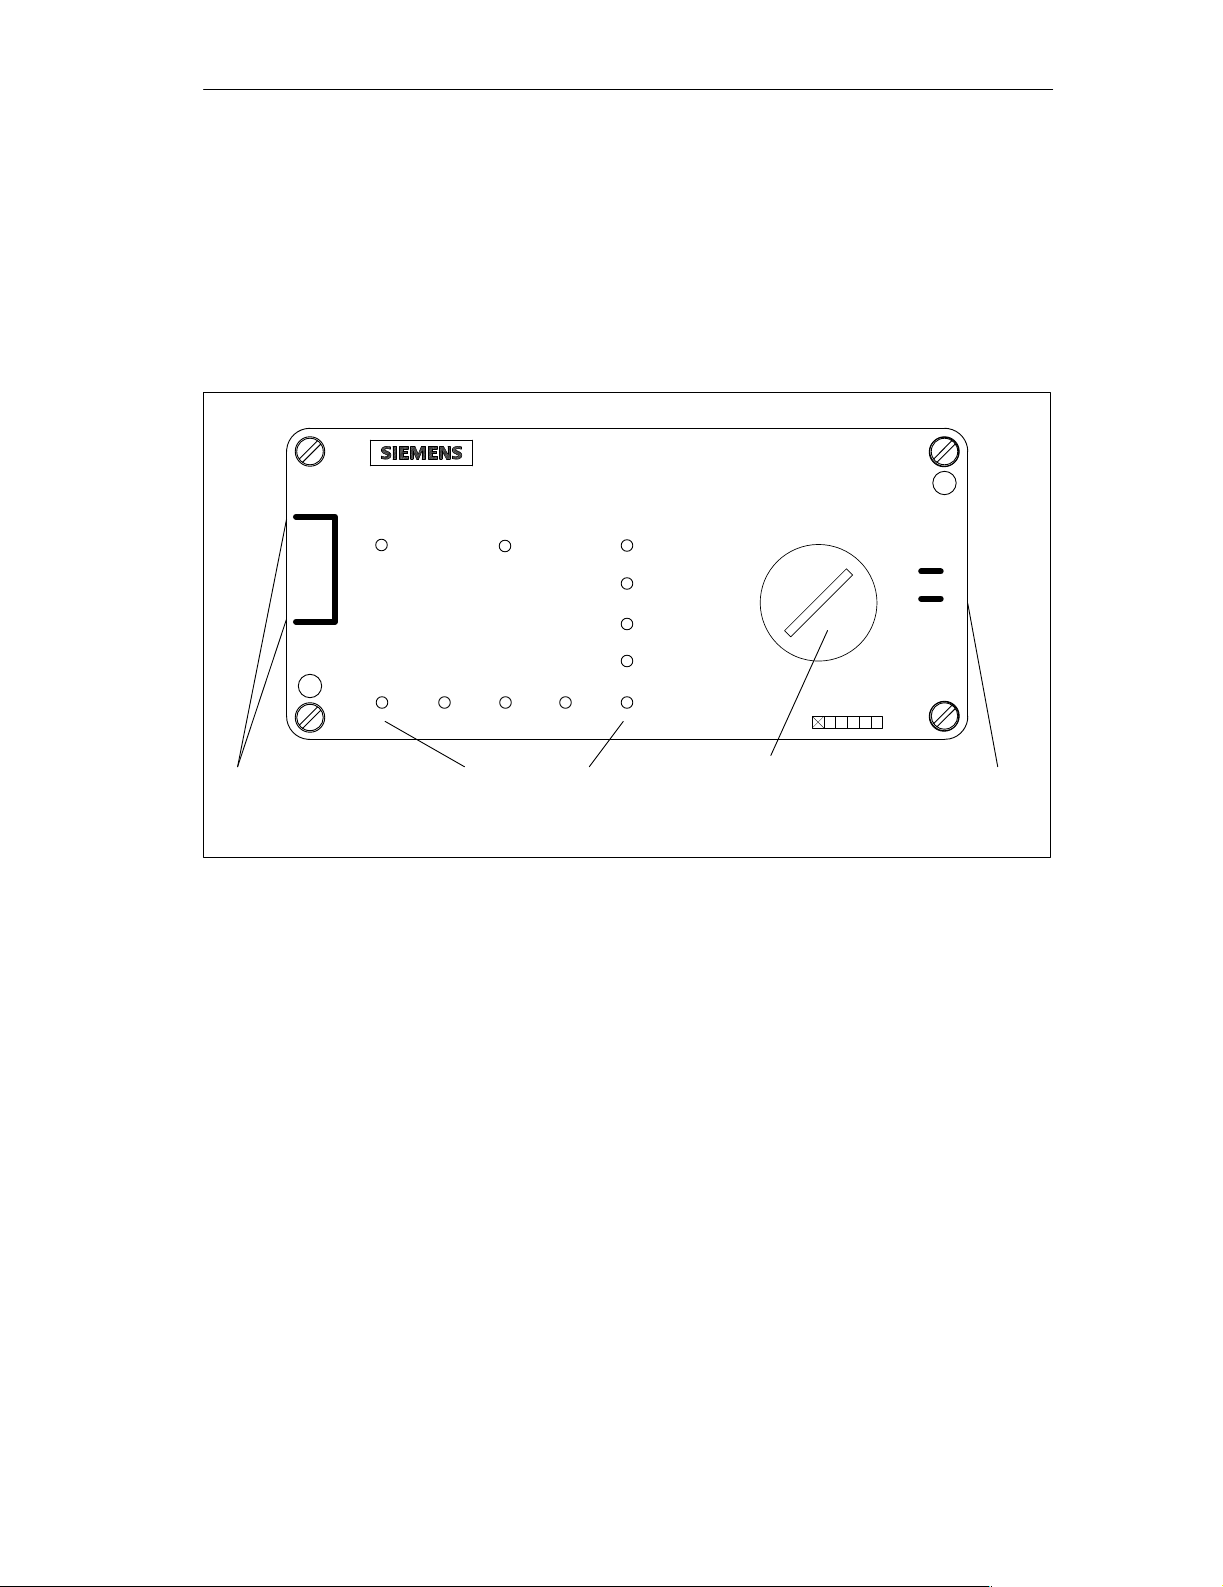
1.3 View of the DP/ASi Link
Overview
View
SINEC
L2-DP
+ PS
2 connections for
PROFIBUS-DP
Fig. 1-3 contains an illustration of the DP/ASi link.
You will find detailed descriptions of the different areas of the DP/ASi link in
Chapter 4.
DP / ASi LINK
RUN BF
124816+
+ + + = ASi SLAVE FAIL
LEDs Connection
ASi POWER FAIL
CONFIG ERROR
AUTOPROG A V
CONFIG MODE
6ES7 156-0AA01-0XA0
Screw-type cover
for DIP switch
block
ASi
3
123456
for ASi cable
+ 1
Figure 1-3 View of DP/ASi link
Distributed I/O System DP/ASi Link
EWA 4NEB 710 6055-02b
1-5
Page 18

Overview
1-6
Distributed I/O System DP/ASi Link
EWA 4NEB 710 6055-02b
Page 19

ASi Basics
2
Introduction
Definition
Overview
In this chapter
If you wish to acquire a general idea of ASi, this is the right chapter for you.
If you are already familiar with ASi, you can skip this chapter.
The Actuator Sensor Interface is a wiring system to which a master and up to
31 slaves can be connected.
The ASi master (the DP/ASi link) periodically transfers input and output data
from and to all the ASi slaves within a period not exceeding 5 ms.
The slaves may be configured as modules or intelligent actuators and sensors.
Intelligent sensors are BEROs, for instance.
After you have studied this chapter, you will know how the ASi is structured
and how it operates.
In Section You Will Find on Page
2.1 Structure of ASi 2-2
2.2 Elements of ASi 2-3
2.3 Example Configuration of a Module 2-5
2.4 Connecting Elements 2-6
2.5 Interruption or Short-Circuit of the ASi Cable 2-7
Distributed I/O System DP/ASi Link
EWA 4NEB 710 6055-02b
2-1
Page 20
ASi Basics
2.1 Structure of ASi
Structure
You can install the ASi as branched with a single 2-wire cable. You connect
the DP/ASi link, the different ASi slaves and the ASi power supply unit to
any point on the ASi cable.
Example installa-
Fig. 2-1 shows an example installation of an ASi.
tion
a
Connection of DP/ASi link by means
of ASi cable
b
Remote ASi slave with external power
supply unit
c
ASi with star termination
d
You can also connect the ASi power
supply unit directly to an ASi slave.
b
To PROFIBUS-DP
DP/ASi link
a
ASi slave
ASi distribu-
tion unit
ASi power
supply unit
d
ASi distribu-
tion unit
ASi slave ASi slave
ASi slave ASi slave
ASi slave
ASi slave
Ext. power
supply unit
Figure 2-1 Example installation of an ASi
ASi slave
c
ASi slave
2-2
Distributed I/O System DP/ASi Link
EWA 4NEB 710 6055-02b
Page 21

2.2 Elements of ASi
ASi Basics
DP/ASi link
ASi slave
The DP/ASi link is the ASi master. It controls communication in the ASi.
The DP/ASi link periodically exchanges data with the ASi slaves.
ASi slaves are the input and output channels of the ASi. ASi slaves transfer
data to the DP/ASi link when requested to do so by the DP/ASi link. ASi
slaves are:
Modules
You connect up to 4 binary actuators and sensors to a single module.
A supply voltage of 24 VDC is available for the actuators and sensors at
the output of the modules.
You can combine different upper and lower parts to form a module, de-
pending on the application. The configuration of a module depends on
the:
– ASi cable used
– number of inputs and outputs (I/O code)
– use of an external power supply unit
You will find an example of a module in section 2.3.
Intelligent actuators or sensors
You connect intelligent actuators and sensors directly to the ASi cable.
I/O code
ID code
You differentiate between the individual ASi slaves by means of an ASi address that you can set. You set the ASi address, for example, by using the ASi
addressing unit (Order No: 3RX9 400-0AA00).
All ASi slaves are supplied ex works with an ASi address of 0. This ASi address is not enabled within the ASi for data exchange.
The I/O code contains the definition of the distribution of the inputs and outputs of the different ASi slaves. You will find the complete I/O code in Appendix B.
You choose the ASi slave type according to the distribution of inputs and
outputs. From the viewpoint of the DP/ASi link, sensors are inputs and actuators are outputs.
The ID code is an additional code that be optionally used for any ASi slave.
The ID code is specified for every ASi slave. The default value for the ID
code is 0.
Distributed I/O System DP/ASi Link
EWA 4NEB 710 6055-02b
2-3
Page 22

ASi Basics
ASi distribution
unit
ASi cable
!
You use the ASi distribution unit when you
branch the ASi cable without using an ASi slave
reroute the ASi cable to a normal 2-wire cable.
The ASi distribution unit is designed as a module and is not assigned an ASi
address.
You connect the different elements via an ASi cable that is protected against
polarity reversal.
Within the ASi, you can branch the ASi cable over a total length of up to
100 m. You can connect your elements to the ASi cable at any points you
like.
Caution
If you connect the ASi cable to a ring feeder or roll up the ASi cable, reliable data transfer is not assured.
According to the ASi standard, multiple interconnections of the ASi cable
are prohibited, as is rolling it up (not even as a standby).
ASi power supply
unit
!
External power
supply
For the ASi power supply, you require a separate ASi power supply unit. The
ASi power supply unit is connected directly to the ASi cable. Data are superimposed on the supply voltage. The ASi power supply unit has data decoupling and supplies a voltage of approximately 30 VDC.
ASi power supply units are available in different protection classes. Apart
from power supply units in IP 20, we also provide a power supply unit in
IP 66/IP 67. You can acquire it by ordering 6EP1 632-1AL01.
Caution
If you overload the power supply unit, either erroneous data transfer takes
place on the ASi cable or none at all.
If the supply voltage falls, it is possible that individual ASi slaves will not
operate properly. Please pay attention to the data sheets for the ASi slaves
you are using.
Do not load the ASi power supply unit above its rated output.
The external power supply is optically isolated from the ASi power supply.
You use an external power supply when an ASi slave requires a higher load
voltage or a higher load current.
2-4
You connect an external power supply unit directly to the module concerned.
Distributed I/O System DP/ASi Link
EWA 4NEB 710 6055-02b
Page 23
2.3 Example Configuration of a Module
ASi Basics
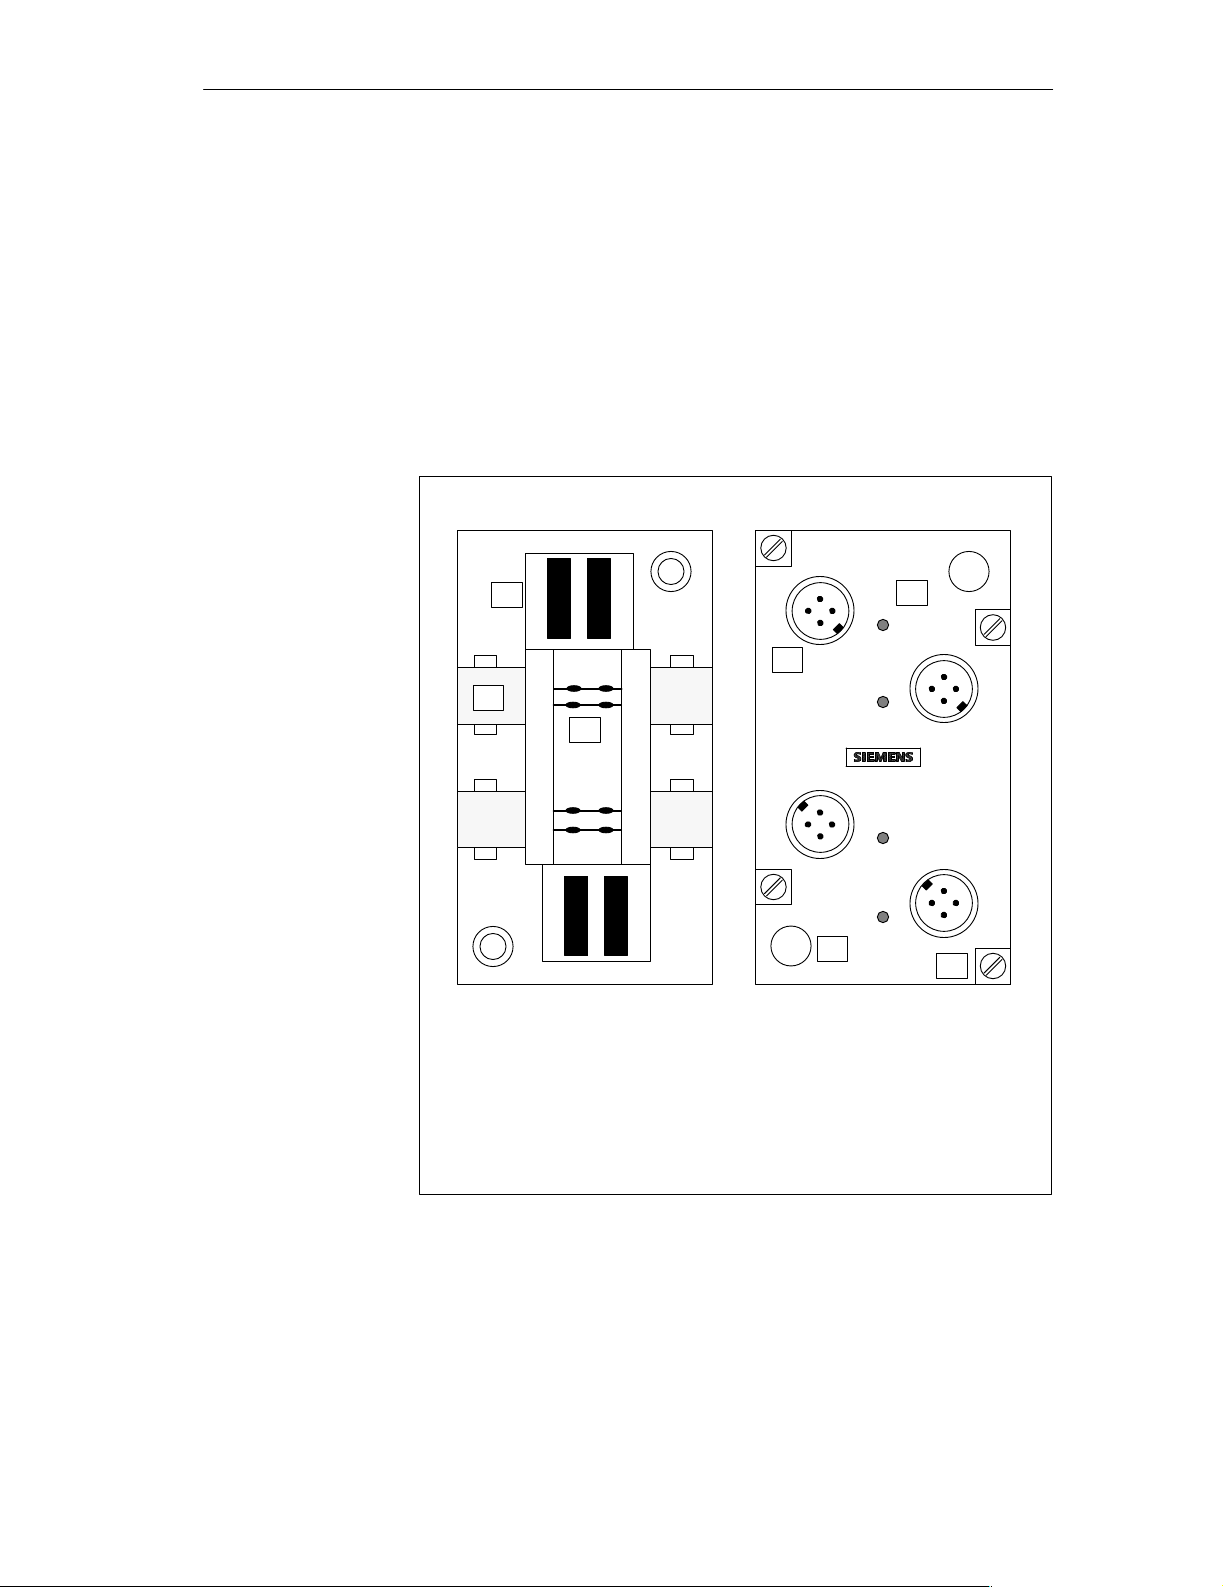
Module configuration
Every module consists of an upper part and a lower part.
As an example, you can see an illustration in Fig. 2-2 of an upper part with
two inputs and two outputs and a lower part for the ASi cable without an interface for an external power supply.
The upper part is attached to the lower part with four attaching screws (see
remark g).
Module lower
part
c
b
a
Module upper
d
part
I1
I2
O3
e
O4
f
a
Contact spikes with two contacts per core
b
ASi cable aperture
c
Seals for the cable apertures that are not required
d
Actuator/sensor connection with M12 bush
e
Display LEDs for input and output
f
Drilled through-hole for attaching the module
g
Screws for attaching the upper part to the lower part
Figure 2-2 View of module, example of an upper part and a lower part
g
Distributed I/O System DP/ASi Link
EWA 4NEB 710 6055-02b
2-5
Page 24

ASi Basics
2.4 Connecting Elements
Connecting
Penetration technique
Contacts for 2-wire
cable
You connect the elements of the ASi by attaching the modules to the ASi
cable. You do not have to operate the ASi cable for this.
The ASi cable is connected to the DP/ASi link by means of a connector.
In section 2.3, Fig. 2-2, you can see an illustration of an example of a module.
You place the ASi cable in the module lower part. By attaching the module
upper part to the lower part, the two contact spikes per core penetrate the
insulation of the ASi cable and establish the contact.
You will find comprehensive installation instructions in the description of the
module that you wish to integrate in the ASi.
Should you wish to use a normal 2-wire cable instead of the ASi cable, connect it to the module in accordance with the manufacturer’s specifications.
2-6
Distributed I/O System DP/ASi Link
EWA 4NEB 710 6055-02b
Page 25

2.5 Interruption or Short-Circuit of the ASi cable
ASi Basics
ASi short-circuit
ASi interruption
!
ASi slave reaction
!
If the ASi cable is short-circuited due to pinching or fraying of the insulation,
data exchange no longer takes place on the ASi cable.
If the ASi cable is interrupted, you can no longer address the actuators or
sensors which, as viewed from the DP/ASi link, are located downstream of
the point of interruption.
The actuators and sensors upstream of the point of interruption are still able
to operate.
Warning
If the ASi fails completely or partially, the DP/ASi link can no longer address the actuators and sensors affected by the failure.
Data is no longer exchanged with the ASi slaves affected.
If an ASi slave detects a failure of the ASi, the response depends on the ASi
slave concerned.
Warning
There is a possibility of the ASi slave retaining its latest state after a failure
– for instance, outputs that have been set remain set.
Study the description of the ASi slave.
Distributed I/O System DP/ASi Link
EWA 4NEB 710 6055-02b
2-7
Page 26

ASi Basics
2-8
Distributed I/O System DP/ASi Link
EWA 4NEB 710 6055-02b
Page 27

Configuration Options
3
Introduction
Tip
In this chapter
At this point we will show you how you integrate the DP/ASi link into the
PROFIBUS-DP, and what you have to bear in mind when you do so.
The power supply (PS) described in this chapter is the 24 VDC power supply
of the DP/ASi link, which is required to operate it.
If you are already familiar with the configuration options of the PROFIBUSDP – for example, from the Distributed I/O System ET 200C manual, you can
skip this chapter.
In this chapter we take a look at the PROFIBUS-DP side of the DP/ASi link.
In Section You Will Find on Page
3.1 Summary of Configuration Options 3-2
3.2 Configuration without T Connector and with Power Supply
Connector
3.3 Configuration with T Connector and with Power Supply
Connector
3.4 Configuration with Several Power Supply Connectors 3-6
3.5 Configuration without Power Supply Connector 3-7
3.6 Configuration with Programmer Connector 3-9
3-3
3-4
Distributed I/O System DP/ASi Link
EWA 4NEB 710 6055-02b
3-1
Page 28
g p pp y
(y p
Configuration Options
3.1 Summary of Configuration Options
Configuration
options
PROFIBUS-DP presents you with different configuration options for combining the PROFIBUS-DP and the 24 V power supply of the devices. The following T able 3-1 shows the different options.
Table 3-1 Configuration options
Power Supply Connector for Device’s
Configuration Refer to
Internal Power Consumption
Configuration with power supply connector
Configuration without T connector Section 3.2
Configuration with T connector Section 3.3
Configuration with programmer
connector
Configuration with several power supply connectors (the degree of expansion is
limited with a PS connector)
Configuration without power supply
connector (every L2 station has a separate power supply)
Configuration without power supply connector
Configuration with programmer
connector
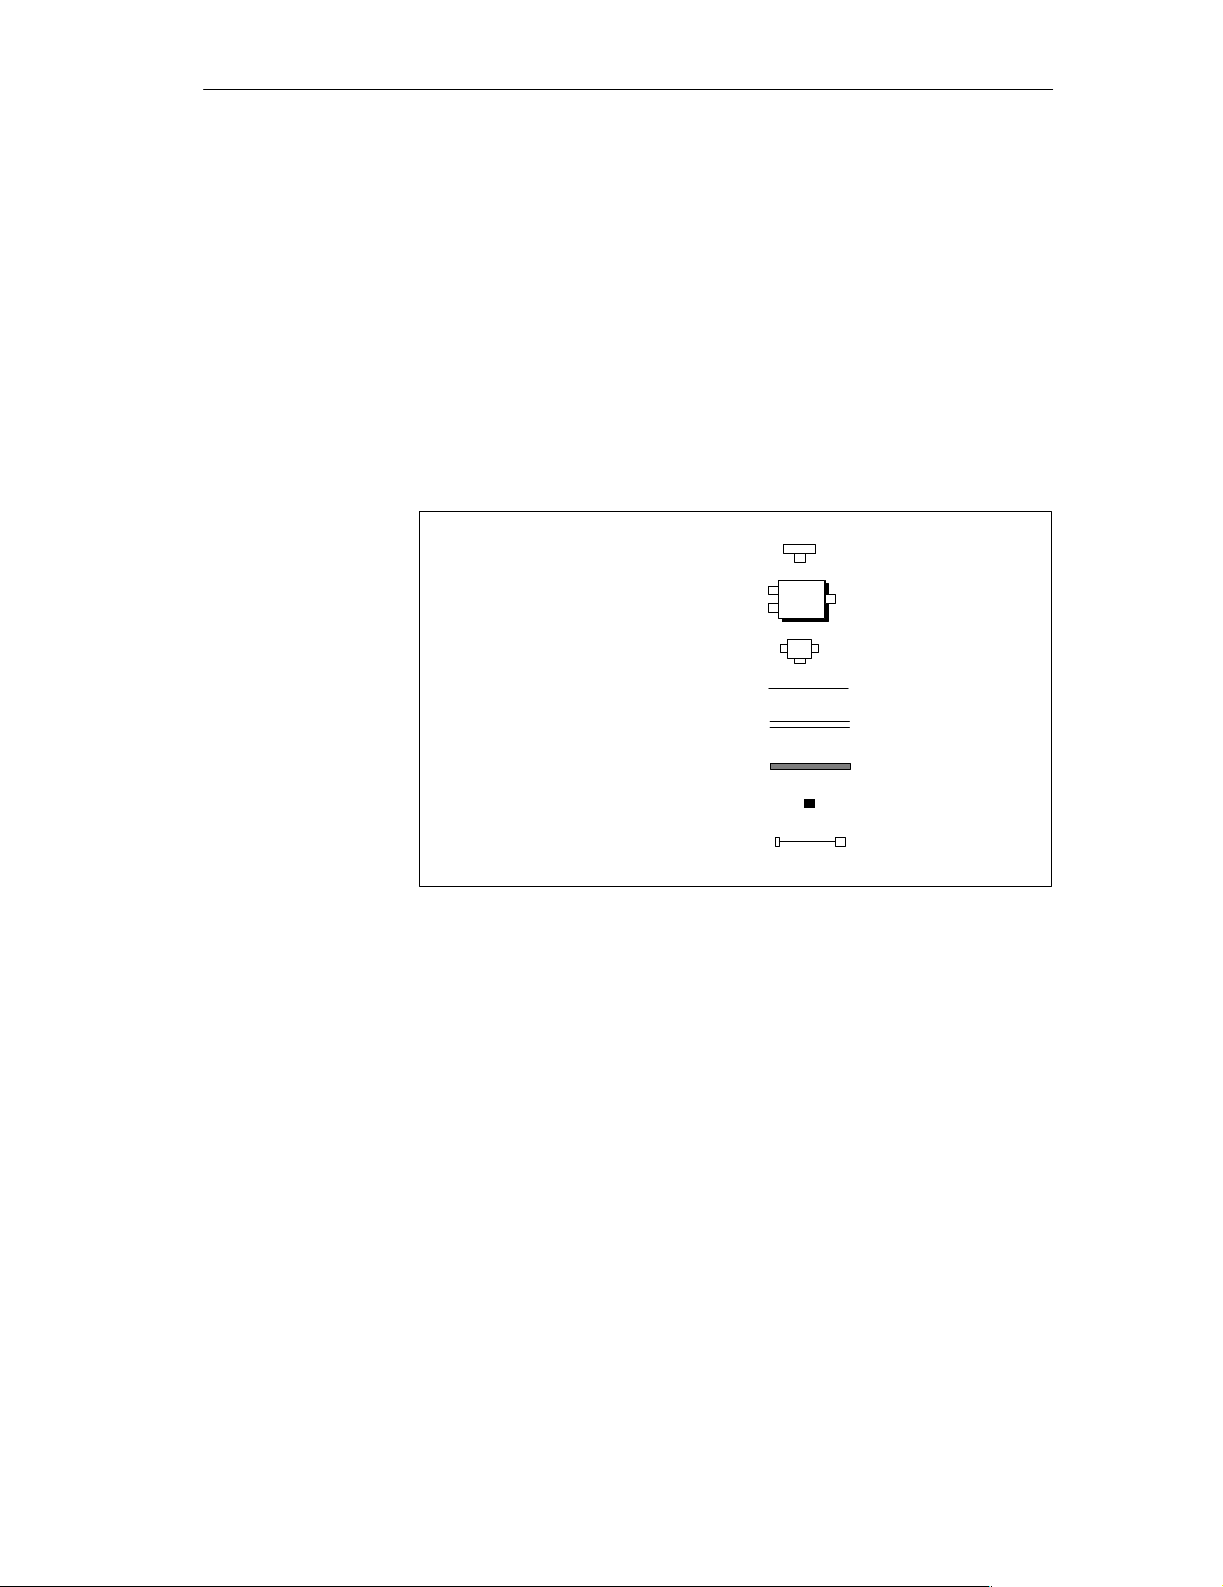
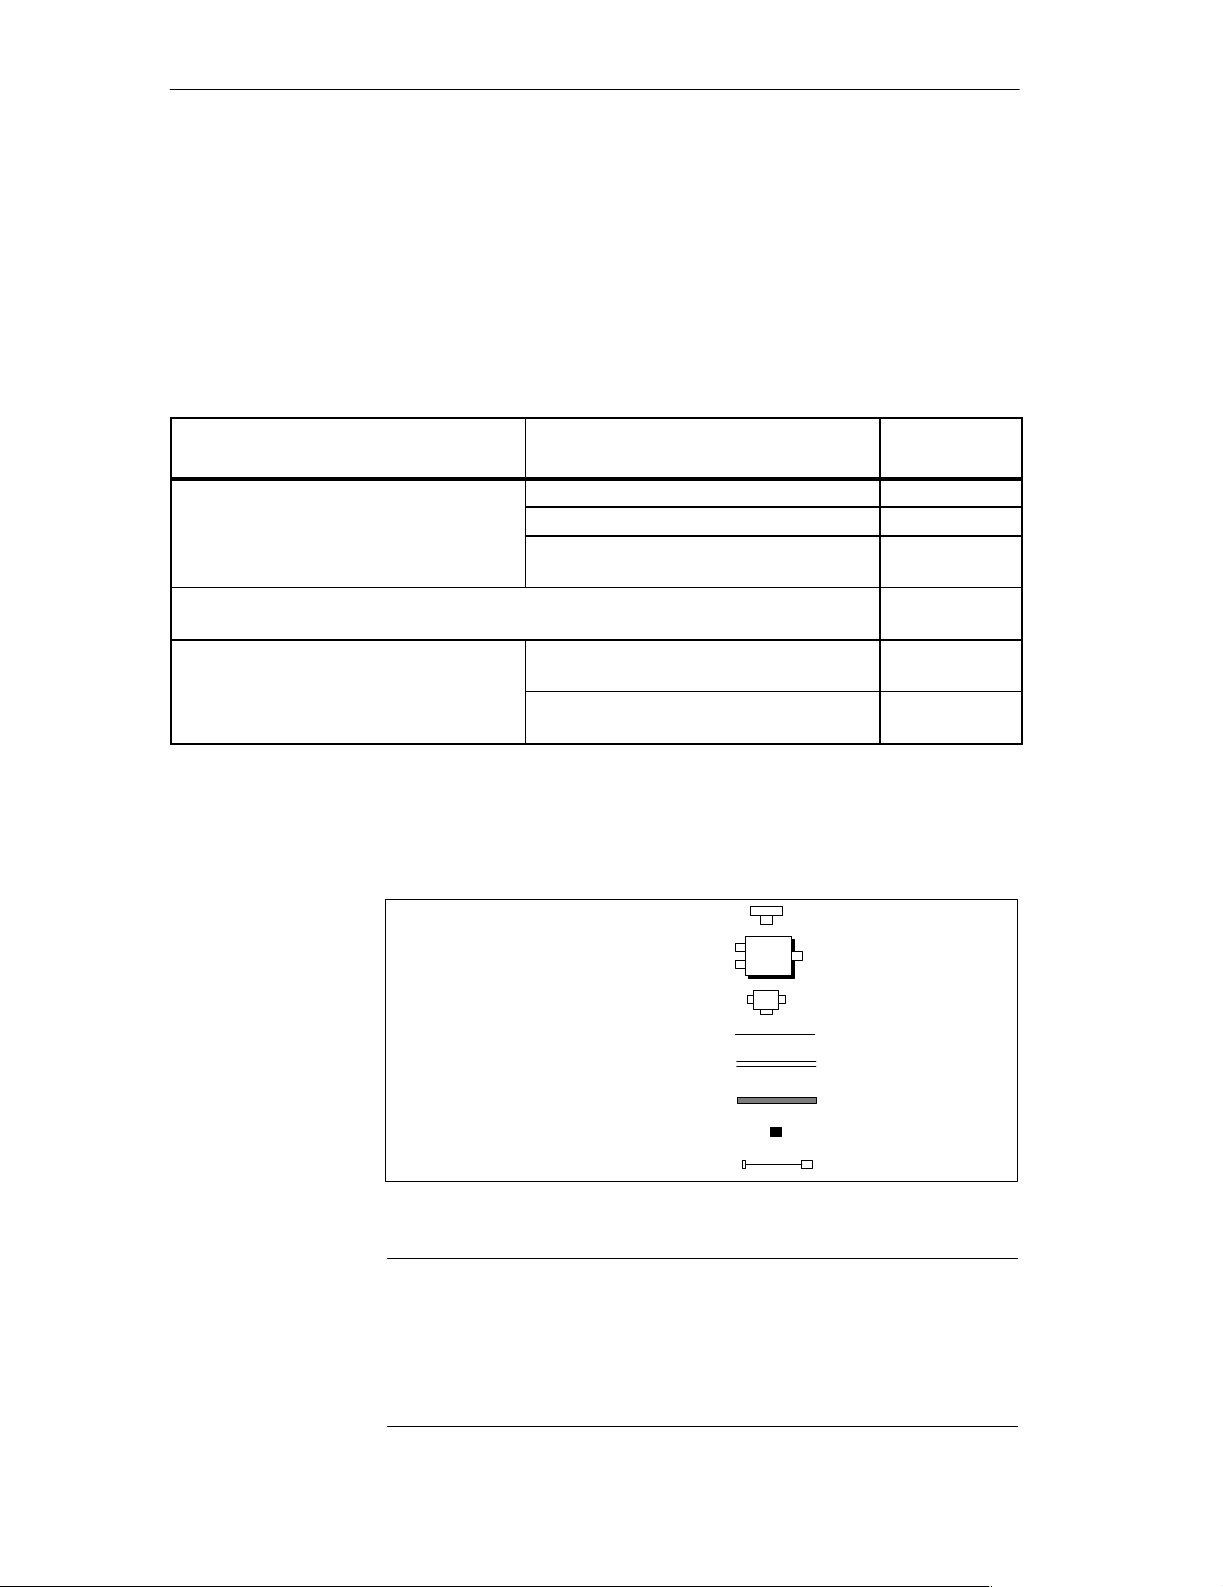
Legend for
following sections
Configuration options are described in the following using illustrations for a
possible installation. We use the following legend:
Section 3.6
Section 3.4
Section 3.5
Section 3.6
3-2
T connector
PS
Power supply connector
Programmer connector
Bus cable
Power supply (PS) cable
Bus cable incl. PS cable
PS
cntr
PG
2-core
3-core (see note)
5-core
Terminating resistor
Adapter cable
Figure 3-1 Legend
Note
The 2-core bus cable must not be incorporated between the power supply
unit and a load.
If you incorporate the bus cable in the power supply cable, an inadmissible
spur line occurs. Data transfer is no longer assured in the PROFIBUS-DP.
Distributed I/O System DP/ASi Link
EWA 4NEB 710 6055-02b
Page 29
Configuration Options
3.2 Configuration without T Connector and with Power Supply Connector
Definition
Advantage
Constraint
Cables
In a configuration with a looped-through field bus and a power supply, the
DP/ASi link is connected directly to the PROFIBUS-DP.
The power supply is gated by means of the power supply connector with the
PROFIBUS-DP in a single cable.
You do not require a T connector.
The power supply is fed along the bus cable, i.e. an external power supply of
the slave station is not required.
If a slave station is disconnected from the bus, ”bus traffic” is interrupted for
the slave stations that follow it.
Bus traffic may be disrupted for the slave stations still on the bus owing to
the absence of the terminating resistor.
The degree of expansion with a power supply connector is limited (refer to
section 3.4).
You use cables of different design for the installation:
If you wish to use prefabricated Siemens cables, please turn to sec-
tion 4.4.4.
If you wish to prepare your own cables, please turn to section 4.4.7.
Installation
Distributed I/O System DP/ASi Link
EWA 4NEB 710 6055-02b
Fig. 3-2 shows a possible installation for the configuration with a power supply connector and without a T connector:
Figure 3-2 PROFIBUS-DP and power supply looped through on DP/ASi link
External
power supply
PROFIBUS-DP
PS-
SV
cntr
DP/ASi link
DP/ASi link
3-3
Page 30
Configuration Options
3.3 Configuration with T Connector and with Power Supply Connector
Definition
Advantage
Constraint
Cables
Installation
In a configuration with a power supply connector and a T connector, the DP/
ASi link is connected by means of a T connector to the PROFIBUS-DP.
The power supply is gated by means of the power supply connector with the
PROFIBUS-DP in a single cable.
A slave station can be disconnected at any time from the bus without the ”bus
traffic” being interrupted for the other slave stations.
The power supply is fed along the bus cable, i.e. an external power supply of
the slave station is not required.
The degree of expansion with a PS connector is limited (refer to section 3.4).
You use cables of different design for the installation:
If you wish to use prefabricated Siemens cables, please turn to sec-
tion 4.4.4.
If you wish to prepare your own cables, please turn to section 4.4.7.
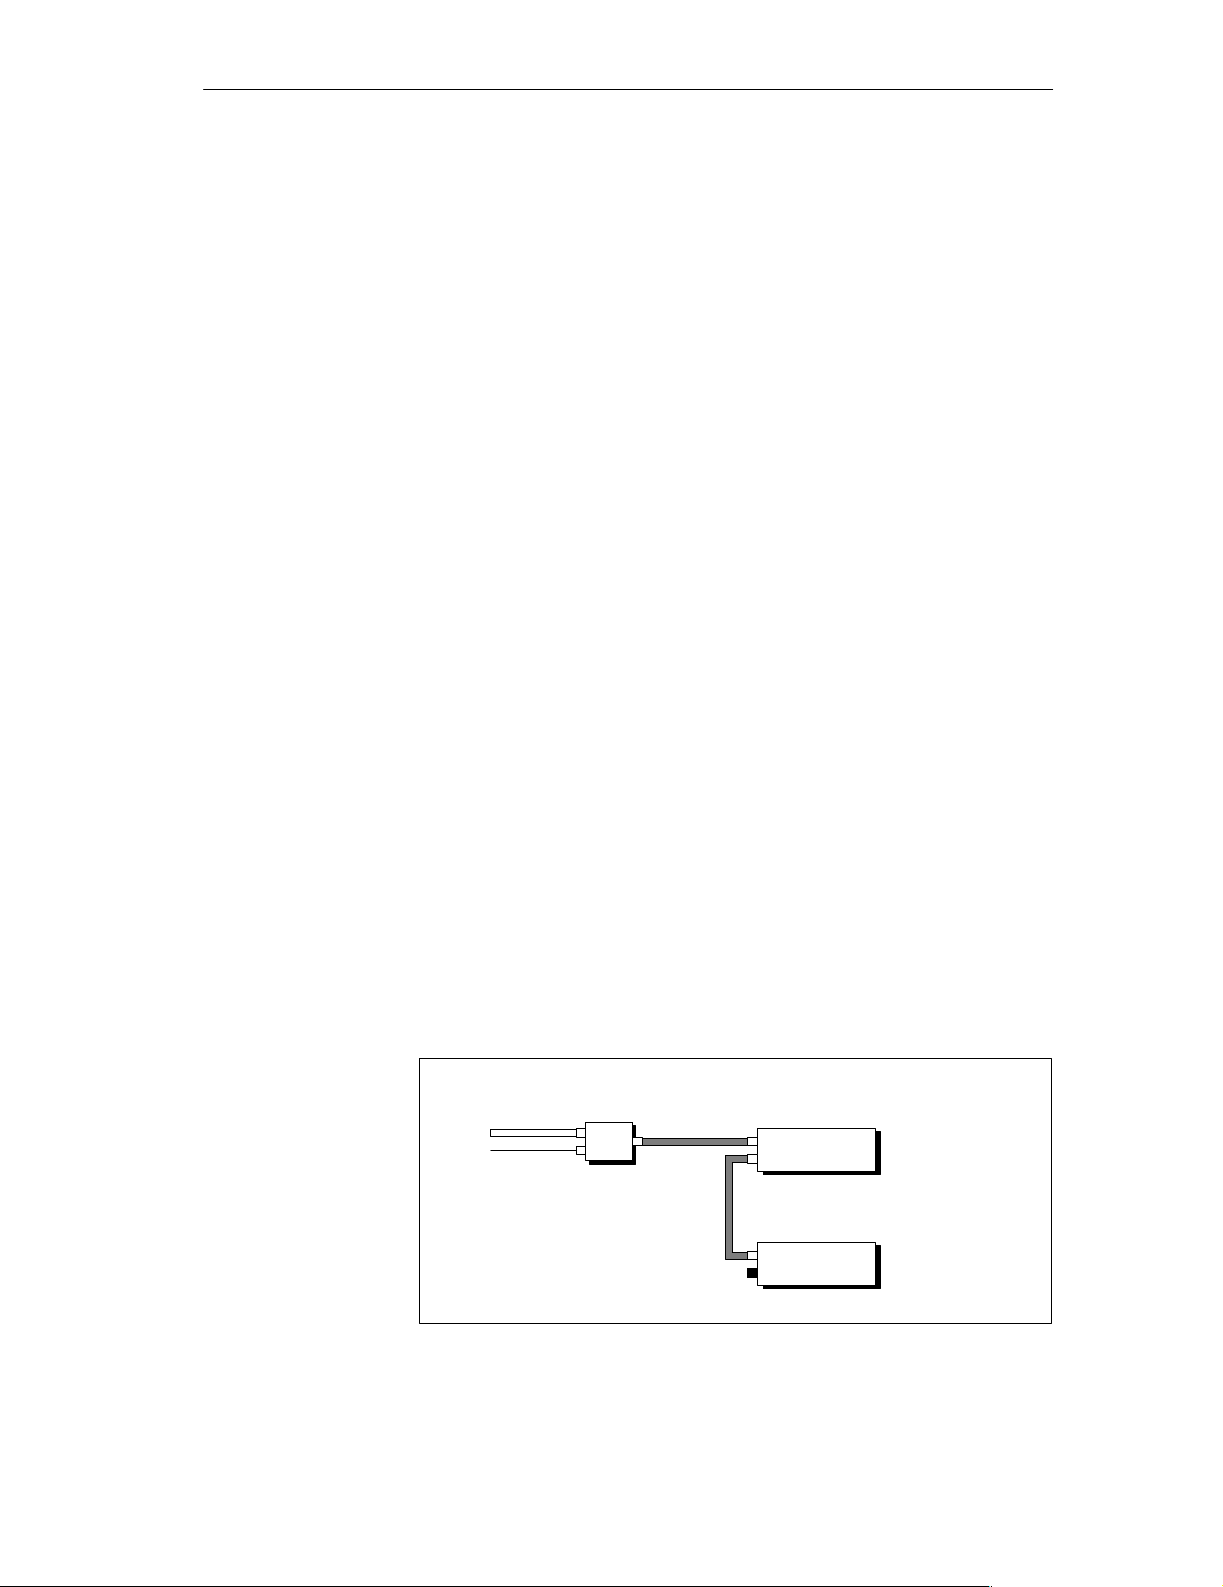
Fig. 3-3 shows a possible installation for the configuration with a power supply connector and with a T connector:
3-4
External
power supply
PS
PS
cntr
PROFIBUS-DP
Figure 3-3 PROFIBUS-DP and power supply looped through by means of T
connector
DP/ASi link
DP/ASi link
Distributed I/O System DP/ASi Link
EWA 4NEB 710 6055-02b
Page 31

Configuration Options
Rules for the
T connector
With the DP/ASi link, spur lines are not authorized except for the programmer or the ET 200 Handheld. This means that the 12-pin plug of the T connector is always screwed directly to the bus connection of a module.
Without spur line With spur line
Figure 3-4 Rule for installation with a T connector
Distributed I/O System DP/ASi Link
EWA 4NEB 710 6055-02b
3-5
Page 32

Configuration Options
3.4 Configuration with Several Power Supply Connectors
Constraint for
installation with
one power supply
connector
Remedy
In configurations with a power supply connector (refer to sections 3.2 and
3.3), the power supply is fed along the bus cable.
This configuration is limited by the following factors:
If the power supply and the PROFIBUS-DP field bus are fed on the same
cable, the following values apply to the length of the bus cable between
the power supply connector and the last slave station connected:
Table 3-2 Length of bus cable when PROFIBUS-DP and power supply
are fed on the same bus cable
Current Loading Max. Cable Length
< 1 A 80 m
< 2 A 40 m
< 4 A 20 m
Not more than 4 A may be looped through the power supply connector.
The input power of the ET 200 modules and of the DP/ASi link limits the
number of modules that you can connect.
You make allowance for several power supply connectors per segment.
Fig. 3-5 shows a possible installation for the configuration with several
power supply connectors.
3-6
External
power supply
PROFIBUS-DP
External
power supply
1
In this case you can use a 2- or 5-core cable, because the two ”left” connections for ”external power supply” and ”PROFIBUS-DP” are not
bridged.
Figure 3-5 Configuration with several power supply connectors
PS-
SV
cntr
PROFIBUS-DP
PS-
PS
cntr
DP/ASi link
1
DP/ASi link
DP/ASi link
Distributed I/O System DP/ASi Link
EWA 4NEB 710 6055-02b
Page 33

3.5 Configuration without Power Supply Connector
Configuration Options
Definition
Advantage
Cables
Installation
In a configuration with a separate power supply, every slave station is supplied with power separately. This power supply must not be fed on the bus
cable.
The T connector for connecting PROFIBUS-DP is imperative for continuous
looping of the PROFIBUS-DP.
You do not feed the power supply over the bus (2-core instead of a 5-core
cable).
A slave station can be disconnected at any time from the bus without ”bus
traffic” being interrupted for the slave stations beyond it, because the PROFIBUS-DP is looped through T connectors.
You use cables of different design for the installation:
If you wish to use prefabricated Siemens cables, please turn to sec-
tion 4.4.4.
If you wish to prepare your own cables, please turn to section 4.4.7.
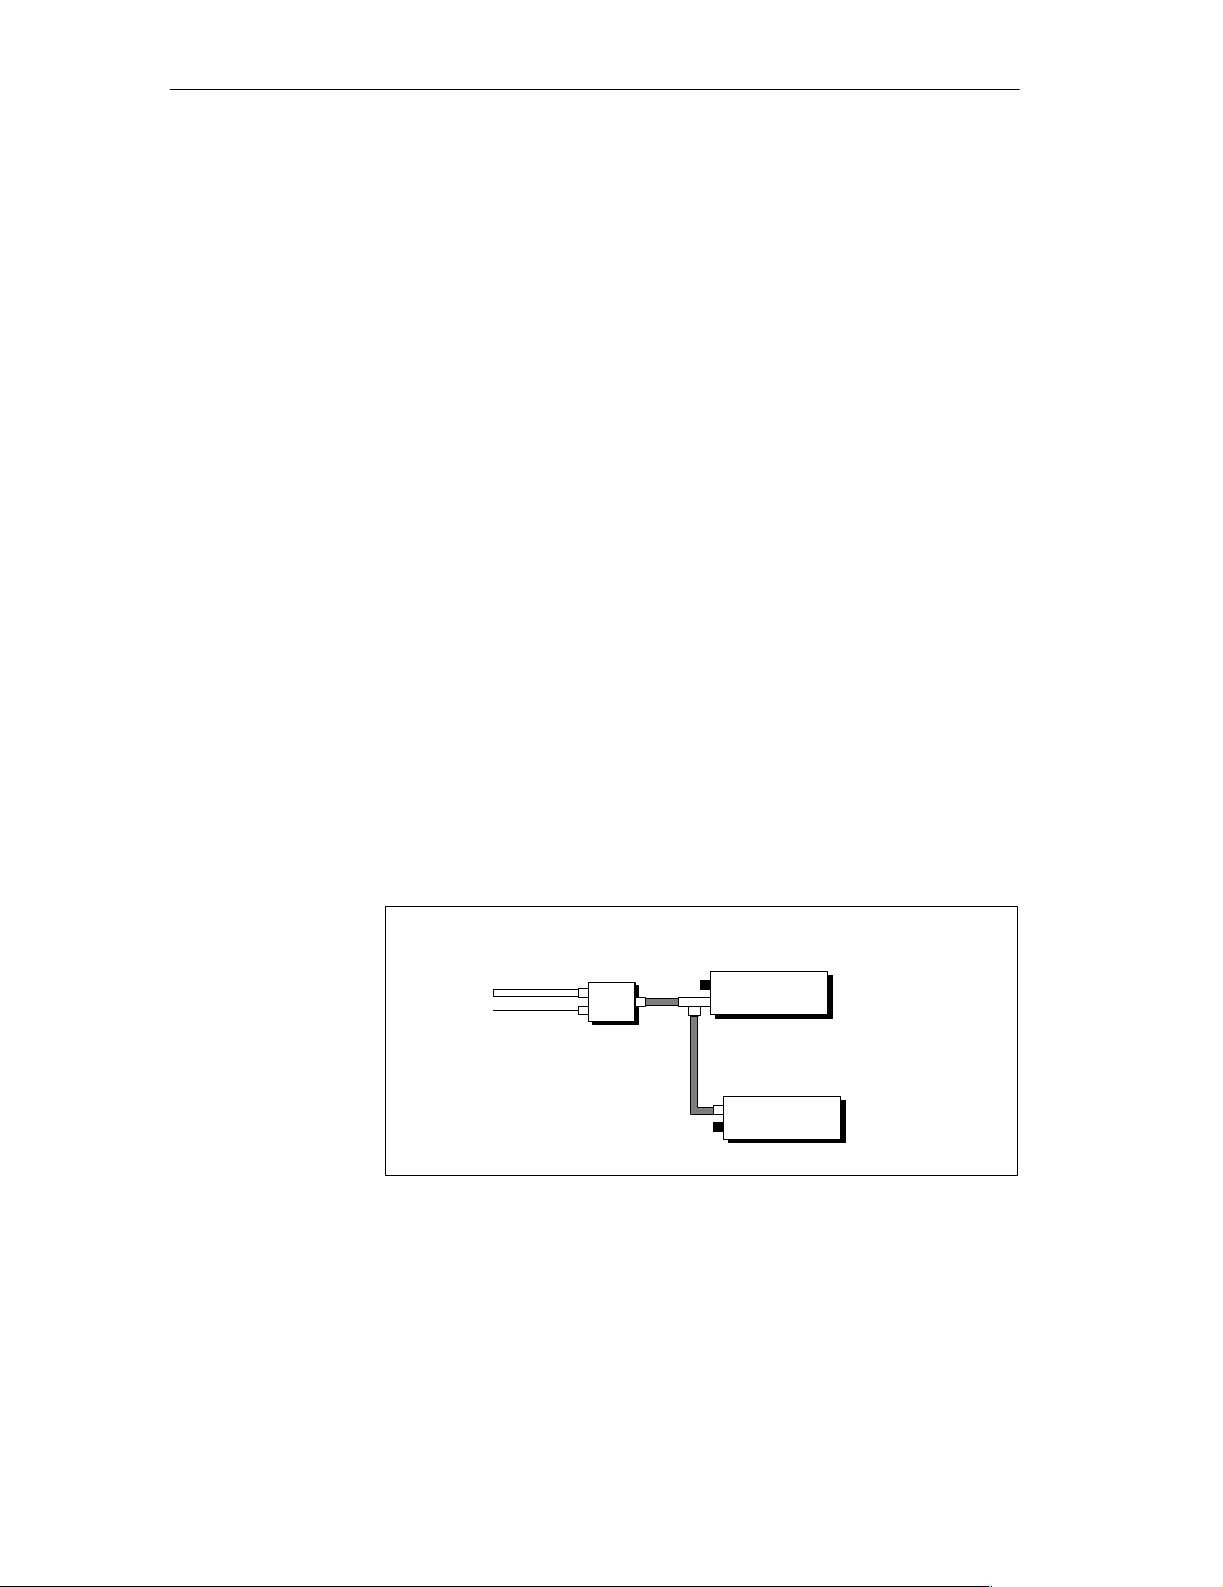
Fig. 3-6 shows a possible installation for the configuration without a power
supply connector.
Figure 3-6 PROFIBUS-DP looped through T connectors –
Distributed I/O System DP/ASi Link
EWA 4NEB 710 6055-02b
PROFIBUS-DP
Two-wirecable (!!)
external power supply fed separately to every slave station
External
power supply
DP/ASi link
External
power supply
DP/ASi link
3-7
Page 34

Configuration Options
Rules for the
T connector
With the DP/ASi link, spur lines are not authorized except for the programmer or the ET 200 Handheld. This means that the 12-pin plug of the T connector is always screwed directly to the bus connection of a module.
Without spur line With spur line
Figure 3-7 Rule for installation with a T connector
3-8
Distributed I/O System DP/ASi Link
EWA 4NEB 710 6055-02b
Page 35

3.6 Configuration with Programmer Connector
Configuration Options
Definition
Connecting the
programmer
Installation
If you wish to operate the programmer on the PROFIBUS-DP in an
IP 66/IP 67 environment, you require a programmer connector.
T o connect the programmer to the programmer connector, you require two
plug-in connectors:
adapter cable
programmer connecting cable
An ET 200 Handheld cannot be connected to the programmer connector. The
ET 200 Handheld can be plugged only into the bus connection of a slave station (using the adapter cable).
Fig. 3-8 shows a possible installation for the configuration with a programmer connector.
External
power supply
PROFIBUS-DP
Adapter cable
PS
PS
cntr.
PG
DP/ASi link
DP/ASi link
IP 66/IP 67 world
Figure 3-8 Configuration with programmer connector
Distributed I/O System DP/ASi Link
EWA 4NEB 710 6055-02b
Programmer
connecting
cable
DP/ASi link
IP 20 world
3-9
Page 36

Configuration Options
Rule for
connection of
programmer
connector
Both the 2-core cable and the 5-core cable can be connected to the programmer connector.
A programmer connector may be placed anywhere on the PROFIBUS-DP
field bus. When doing so, pay attention to the following:
Since a terminating resistor cannot be inserted, the programmer connector
must not be located at the ends of the bus line.
You may place several programmer connectors on the bus. However, you
may connect only one programmer to one of the programmer connectors
on the bus, since the programmer represents a node having the station
number 0.
For connecting a programmer, the following values apply to the length of
the spur line as a function of the baud rate on the PROFIBUS-DP bus:
Table 3-3 Length of the spur line of the programmer connection as a function of
the baud rate on the PROFIBUS-DP bus
Baud Rate Max. Length of Spur Line
< 500 kBd Max. 32 3 m
Max. 10 5 m
Max. 1 10 m
1500 kBd Max. 5 2 m
(3 m spacing)
or
PROFIBUS bus terminal
> 1500 kBd Max. 1 1.5 m
3-10
Distributed I/O System DP/ASi Link
EWA 4NEB 710 6055-02b
Page 37

Installing and Wiring the DP/ASi Link
4
Introduction
Objective
In this chapter
In this chapter you will learn how the DP/ASi link is installed mechanically
and electrically.
When you have worked your way through this chapter, you will be in a position to install and connect the DP/ASi link. You will know what accessories
you require to perform these jobs.
In Section You Will Find on Page
4.1 Installation 4-2
4.2 Electrical Wiring of DP/ASi Link 4-3
4.3 Commissioning 4-10
4.4 Additional Components for PROFIBUS-DP 4-15
Distributed I/O System DP/ASi Link
EWA 4NEB 710 6055-02b
4-1
Page 38

Installing and Wiring the DP/ASi Link
4.1 Installation
Rules
IP 66/IP 67 degree
of protection
Installing
The IP 66/IP 67 degree of protection can be guaranteed for the DP/ASi link
only under the following conditions:
The supporting surface for the DP/ASi link must be level (without distor-
tions).
You must always cover the unused connection with the enclosed metal
cap.
IP 66/IP 67 is not guaranteed with the transparent transit protective cap.
Pay attention to the following note so that the IP 66/IP 67 degree of protection can be insured.
Note
Before commissioning, check that all covers on the DP/ASi link have been
tightened.
You are free to chose where you wish to install the DP/ASi link. You can
install the DP/ASi Link at any inclination.
Pay attention to the minimum spacing between the DP/ASi link and the cable
duct:
4-2
Table 4-1 Spacing between DP/ASi link and cable duct
Between DP/ASi Link and Cable Duct...
Spacing
... there is no T connector 10 cm
... there is a T connector 15 cm
Install the DP/ASi link using the drilling jig at the end of the manual with
two fastening screws (M4 DIN 912) on an even surface or on supporting bars.
The fastening screws on the housing are captive screws. You require an Allan
key 3.0 DIN 911 for installation.
Distributed I/O System DP/ASi Link
EWA 4NEB 710 6055-02b
Page 39

4.2 Electrical Wiring of DP/ASi Link
Installing and Wiring the DP/ASi Link
Introduction
Characteristics
In this section
You can wire the 24 V supply to the DP/ASi link either as a grounded or an
ungrounded installation, depending on the requirements of your system
installation.
The DP/ASi link exhibits the following characteristics:
PROFIBUS-DP and the ASi cable are floating with reference to the 24 V
supply of the DP/ASi link
PROFIBUS-DP and the ASi cable are optically isolated with reference to
the 24 V supply and to each other
PROFIBUS-DP and the ASi cable are optically isolated from the
DP/ASi link
In Section You Will Find on Page
4.2.1 Grounded Installation 4-4
4.2.2 Ungrounded Installation 4-6
4.2.3 Connecting the DP/ASi Link to ASi and PROFIBUS-DP 4-8
Distributed I/O System DP/ASi Link
EWA 4NEB 710 6055-02b
4-3
Page 40

Installing and Wiring the DP/ASi Link
4.2.1 Grounded Installation
Introduction
Rules
With grounded installation of the DP/ASi link, you have to connect the reference potential of the electronics section to the protective conducter.
Note that in this case only the power supply for the electronics (M24V) is
grounded. The PROFIBUS-DP bus and the AS interface are not grounded by
this action.
For grounded installation you must pay attention to the following points:
You have to provide a master switch (1) conforming to VDE 0100 for the
DP/ASi link.
For the connection of the external power supply (24 VDC) to the supply
system, you require a fuse (2).
For the power supply, use a Siemens Series 6EV1 external power supply
(refer to catalog ET 1).
If you connect other external power supplies (24 VDC), make sure that
the voltage is between 20 and 30 V (including ripple). The external power
supply must generate a functional extra-low voltage with safe electrical
isolation in accordance with VDE 0106, Part 101. For non-stabilized external power supplies, you require a backup capacitor (200 F per 1 A
load current, (3)).
Provide a separable connection (4) to the protective conductor on the ex-
ternal power supply (terminal M) in the secondary circuit.
The 24 VDC supply should be fused separately (5).
With both grounded and ungrounded installation,connect the PI connec-
tion of the DP/ASi link in a low-resistance manner to the protective conductor (6).
On the right side of the DP/ASi link and of the power supply connector
there is a screw for connecting the conductor conducter.
The protective conductor terminal of the DP/ASi link is connected internally to a pin 9 of the circular connector (refer to T able 4-3).
All machine parts have to be grounded.
Use a minimum diameter of 10 mm
ground connections.
2
for equipotential bonding and
4-4
Distributed I/O System DP/ASi Link
EWA 4NEB 710 6055-02b
Page 41

Installing and Wiring the DP/ASi Link
Installation
Grounded installation of the DP/ASi link is shown in the diagram below .
(1)
L1
L2
L3
N
PI
(2)
(4)
G L+
Connection
for grounded
installation
G L+
24 V
(3)
(5)
L+
L+
PS DP/ASi
G
G
PI
cntr.
PI
(6)
L+
DP/ASi
G
link
PI
24 V
L+
G
PI
link
(6)
Figure 4-1 Grounded installation of DP/ASi link
Distributed I/O System DP/ASi Link
EWA 4NEB 710 6055-02b
4-5
Page 42

Installing and Wiring the DP/ASi Link
4.2.2 Ungrounded Installation
Definition
Rules
With ungrounded installation of the 24V supply to the DP/ASi link, there is
no link between the external power supply (terminal G) and PI, thus resulting
in the protective conductor loosing its protective function.
Due to the internal design of the DP/ASi link, the supply voltage is connected
capacitively to the protective conductor. This results in high-frequency interference being diverted.
For ungrounded installation you must pay attention to the following points:
You have to provide a master switch (1) conforming to VDE 0100 for the
DP/ASi link.
For the connection of the external power supply (24 VDC) to the supply
system, you require a fuse (2).
For the power supply use a Siemens Series 6EV1 external power supply
(refer to catalog ET 1).
If you connect other external power supplies (24 VDC), make sure that
the voltage is between 20 and 30 V (including ripple). The external power
supply must generate a functional extra-low voltage with safe electrical
isolation in accordance with VDE 0106, Part 101. For non-stabilized external power supplies, you require a backup capacitor (200 F per 1 A
load current, (3)).
The 24 VDC supply should be fused separately (5).
With both grounded and ungrounded installation,connect the PI connec-
tion of the DP/ASi link in a low-resistance manner to the protective conductor (6).
On the right side of the DP/ASi link and of the power supply connector
there is a screw for connecting the protective conductor.
The protective conductor terminal of the DP/ASi link is connected internally to a pin 9 of the circular connector (refer to T able 4-3).
Provide isolation monitoring to earth with voltage clamping (7).
Warning
!
Ungrounded installation may be canceled by grounded machine parts or
grounded electrical apparatus.
Example: A grounded sensor or a grounded signal control element connects
the PI to the chassis ground potential of the PLC.
4-6
Distributed I/O System DP/ASi Link
EWA 4NEB 710 6055-02b
Page 43

Installing and Wiring the DP/ASi Link
Installation
Ungrounded installation of the DP/ASi link is shown in the diagram below.
(1)
L1
L2
L3
N
PI
(2)
(7)
>U
Figure 4-2 Ungrounded installation of DP/ASi link
(3)
G L+
G L+
24 V
(5)
L+
L+
G
PS
G
PI
cntr.
PI
L+
DP/ASi
G
PI
(6)
link
24 V
L+
DP/ASi
G
PI
link
(6)
Distributed I/O System DP/ASi Link
EWA 4NEB 710 6055-02b
4-7
Page 44

12
Installing and Wiring the DP/ASi Link
4.2.3 Connecting the DP/ASi Link to ASi and PROFIBUS-DP
Pinout
Connecting the
ASi
The location of the three sockets of the DP/ASi link is described in Fig. A-1.
You will find the pinout of the DP/ASi link sockets in Table 4-2 and
T able 4-3.
Connect the ASi cable with the special terminal. Secure the connector with
the union nut.
You obtain the special terminal for the ASi cable by quoting Order Number
6ES7 194-5AA00-0XA0. The assignment of the ASi socket can be seen in
T able 4-2.
You can also connect the ASi by using a 2-wire round cable.
Table 4-2 Pin assignment of ASi terminal connection
Pin Assignment View
1 ASi cable )
1
12
2 Unused
3 ASi cable *
4 Unused
1
Brown on Siemens sourced cable
2
Blue on Siemens sourced cable
2
34
View: mating side
Connecting the
PROFIBUS-DP
4-8
Connect the PROFIBUS-DP using one of the two 12-pin device connectors
with a tee unit to the DP/ASi link. You will find the assignment of the 12-pin
connector in T able 4-3.
Distributed I/O System DP/ASi Link
EWA 4NEB 710 6055-02b
Page 45

Installing and Wiring the DP/ASi Link
Device connector
assignment
You can connect either the PROFIBUS-DP or the power supply to the device
connector. The two 12-pin connectors are interconnected internally. Table 4-3
shows the assignment of the 12-pin device connector.
Table 4-3 Pin assignment of 12-pin device connector
Pin
Assign-
ment
Meaning View
1 – Reserved
2 A
1
Data line P
3 – Reserved
4 B
2
Data line N
5 – Reserved
6 – Reserved
7 P24V 24 V input voltage
8 M24V 24 V reference poten-
tial
9 PI Protective conductor
10 – Reserved
View: mating side
11 – Reserved
Power supply
!
Unused device
connector
12 – Reserved
1
Green on Siemens sourced cable
2
Red on Siemens sourced cable
You connect the power supply to the DP/ASi link using the second device
connector. Make sure that the power supply cable is deenergized at the time
of connection.
Warning
The DP/ASi link may be destroyed by voltage glitches that may occur while
the connector is being slipped on.
The DP/ASi link starts up automatically when the operating voltage is turned
on.
If you run the supply voltage over the PROFIBUS-DP and do not loop the
PROFIBUS-DP through the DP/ASi link, you must seal the second device
connector with the metal cap or, if necessary, screw on the terminating resistor. Only then is IP 66/IP 67 assured.
Distributed I/O System DP/ASi Link
EWA 4NEB 710 6055-02b
4-9
Page 46

Installing and Wiring the DP/ASi Link
4.3 Commissioning
In this section
Sequence
Step
1 Install and wire the ASi completely. Connect
the ASi power supply to the ASi cable.
In this section you will learn what you have to take into consideration to
commission the DP/ASi link.
You commission the DP/ASi link in several steps.
Action Note
Refer to the instructions for the different ASi
slaves and modules concerned to learn how
to install them.
The following assignment applies to the Siemens ASi cable:
ASi cable + = brown
ASi cable – = blue
2 Install the DP/ASi link. Refer to section 4.1
3 Select the station number you are using. You can choose between EEPROM and DIP
switch block (refer to section 4.3.1).
EEPROM: refer to section 4.3.3
DIP switch block: refer to section 4.3.2
4 Connect the ASi cable to the DP/ASi link
M12 connector provided for it.
Refer to section 4.2
5 Connect the PROFIBUS-DP with a tee unit
to the DP/ASi link.
6 Connect the 24 V power supply for the DP/
ASi link to the remaining device connector.
7 Turn on the power supply. –
Automatic start-up
4-10
After you have connected the DP/ASi link in the specified order and have
turned on the power supply of the DP/ASi link, the DP/ASi link starts up automatically (refer to section 7.1).
Refer to section 4.2
Refer to section 4.2
Distributed I/O System DP/ASi Link
EWA 4NEB 710 6055-02b
Page 47

Installing and Wiring the DP/ASi Link
4.3.1 Selecting the Station Number for PROFIBUS-DP
Definition
Selecting station
numbers
Range of values
With the station number, you identify every station of the PROFIBUS-DP.
The station number represents the name used by the DP master to address
individual stations.
With switch 8 of the DIP switch block (refer to Fig. 4-3), you define whether
the station number in the EEPROM or the station number on the DIP switch
block is valid.
Table 4-4 Station number selection on DIP switch block
Switch 8 Meaning Refer to
OFF Station number on DIP switch block is
Section 4.3.2
valid. The station number in the EEPROM
is reset to station number 126
ON Station number in the EEPROM is valid Section 4.3.3
You can set the station number within the range between 0 and 125. Station
numbers 126 and 127 are not authorized.
Address 126 is used to identify new DP slaves. Address 127 is reserved for
sending messages to a group of stations (multicasting, a sub-form of broadcasting).
Note that you cannot use station numbers 124 and 125 with IM 308-C.
IM 308-C does not support diagnostics for these two station numbers.
Modifying station
numbers
If you use the station number stored in the EEPROM, you can modify it during operation, as described in section 4.3.3.
You cannot modify the station number set with the DIP switch block during
operation. If you alter the station number on the DIP switch block, the new
station number is only taken into account after a cold restart.
Distributed I/O System DP/ASi Link
EWA 4NEB 710 6055-02b
4-11
Page 48

Installing and Wiring the DP/ASi Link
4.3.2 Setting a Station Number on the DIP Switch Block
Station number
DIP switch block
If you wish to use the station number of the DIP switch block, you must set
the configured station number of the DP/ASi link on the DIP switch block
before initial startup.
You will find the DIP switch block under the screw-type cover on top of the
DP/ASi link (refer to Fig. 4-3). Open the screw-type cover using a suitable
coin.
Using switch 8, you set whether the station number in the EEPROM or that on
the DIP switch block is used.
With switches 1 through 7, you set the
station number.
Example: Switches 1, 5 and 6 at ON
0)24)25
2
SINEC
L2-DP
+ PS
+1)16) 32 +49
RUN BF
ASi POWER FAIL
CONFIG ERROR
AUTOPROG A V
CONFIG MODE
ON
1234
DP / ASI LINK
5678
Switch 8
ASi
3–
+ 1
Converting station
numbers
Replace cover
!
124816+
+ ++= ASi-SLAVE FAIL
6ES7 156-0AA01-0XA0
123456
Figure 4-3 Location of DIP switch block
You have to convert the station number into binary. When doing so, bear in
mind that switch 1 corresponds to bit 0, switch 2 corresponds to bit 1, etc.
Carefully close the DP/ASi link after setting the station number (torque
100 Ncm).
Caution
If you operate the DP/ASi link without the screw type cover for the DIP
switch block, moisture and dirt may penetrate into the DP/ASi link, possibly
resulting in destruction of the DP/ASi link.
IP 66/IP 67 degree of protection is not met when the screw-type cover is
open.
4-12
Distributed I/O System DP/ASi Link
EWA 4NEB 710 6055-02b
Page 49

4.3.3 Station Number in EEPROM
Installing and Wiring the DP/ASi Link
Default station
number
Modifying station
numbers
The DP/ASi link is supplied to you with the default station number,126, in
the EEPROM. The DIP switch block is set ex works so that the station number in the EEPROM is valid. You have to modify this station number either
by using the ET 200 Handheld or by means of the DP master.
If you use the station number set in the EEPROM, you have to modify the
default station number, since one DP slave at most may exhibit this number.
You can modify this station number either on your SIMATIC with
FB IM308C (FKT = CS) or the ET 200 Handheld. The procedure is described
in the Distributed I/O System ET 200 manual. Note that any modification of
the address can be saved only if the ASi power supply is turned on.
Note that any modification of the address can be saved only if the ASi power
supply is turned on.
Note
If you modify the station number with FB IM308C, you must have configured the new station number and notified it to the IM 308-C via the memory
card.
Should you attempt to assign to the DP/ASi link a station number that is unknown to the IM 308-C, an error message is issued in FB IM308C. Assign
only defined station numbers.
Deleting station
numbers
In special cases you have to set the address of the DP/ASi link to the default
address of 126.
Proceed as follows at this stage:
Set switch 8 to ”Off” and perform a cold start.
Distributed I/O System DP/ASi Link
EWA 4NEB 710 6055-02b
4-13
Page 50

Installing and Wiring the DP/ASi Link
Resetting station
numbers
In certain cases the station number in the EEPROM of the DP/ASi link has to
be reset. Proceed in the following order:
Step
Action
1 Turn off the power supply for the DP/ASi link.
2 Turn switch 8 on the DIP switch block to OFF.
3 Turn on the power supply for the DP/ASi link and then turn it off
after automatic start-up of the DP/ASi link. Start-up is aborted
with an error message. The station number is reset to 126.
4 Turn switch 8 on the DIP switch block to ON.
5 Turn on the power supply for the DP/ASi link.
6 Set the correct station number again with the ET 200 Handheld or
by means of the DP master.
4-14
Distributed I/O System DP/ASi Link
EWA 4NEB 710 6055-02b
Page 51

Installing and Wiring the DP/ASi Link
4.4 Additional Components for PROFIBUS-DP
Introduction
In this section
You require additional components to operate the DP/ASi link on the
PROFIBUS-DP. You will learn what components are involved, and their
characteristics, in this section.
In Section You Will Find on Page
4.4.1 T Connector (6ES5 762-2CT11) 4-16
4.4.2 Power Supply Connector (6ES5 2CS11) 4-17
4.4.3 Programmer Connector (6ES5 762-2CA12) 4-18
4.4.4 Cables 4-19
4.4.5 Terminating Resistor (6ES5 755-2CA11) 4-21
4.4.6 Adapter Cable (6ES5 755-8CA11) 4-22
4.4.7 Wiring of PROFIBUS-DP 4-23
Distributed I/O System DP/ASi Link
EWA 4NEB 710 6055-02b
4-15
Page 52

Installing and Wiring the DP/ASi Link
4.4.1 T Connector (6ES5 762-2CT11)
Usage
Characteristics
Connections
You require a T connector for the following configurations:
Configuration with power supply connector and T connectors (refer to
section 3.3)
Configuration with external power supply (refer to section 3.5)
This means that the PROFIBUS-DP can continue to run even when a slave
station is uncoupled via a T connector.
The T connector has the following characteristics:
Degree of protection: IP 66/IP 67 (refer to installation rules, section 4.1)
Can be operated with the following baud rates:
9.6; 19.2; 93.75; 187.5; 500; 1500; 3000; 6000 and 12000 kBd
The 3000, 6000 and 12000 kBd baud rates are possible only in the case of
operation with a suitable DP master – for example, the IM 308-C.
A T connector has three bus connections:
two 12-pin sockets
one 12-pin connector.
The T connector is screwed with the 12-pin connector onto the bus connection of a DP/ASi link. Both bus connections of the DP/ASi link can be used
in all cases.
4-16
Figure 4-4 T connector
Distributed I/O System DP/ASi Link
EWA 4NEB 710 6055-02b
Page 53

Installing and Wiring the DP/ASi Link
4.4.2 Power Supply Connector (6ES5 762-2CS11)
Usage
Characteristics
Connections
The power supply connector is used to link the PROFIBUS-DP and the 24
VDC external power supply for the DP/ASi link.
The power supply connector has the following characteristics:
Degree of protection: IP 66/IP 67 (refer to installation rules, section 4.1)
Can be operated at the following baud rates
9.6; 19.2; 93.75; 187.5; 500; 1500; 3000; 6000 and 12000 kBd
The 3000, 6000 and 12000 kBd baud rates are possible only in the case of
operation with a suitable DP master – for example, the IM 308-C.
Can be loaded with up to 4 A input power. This limits the number of mod-
ules that can be connected (refer to section 3.4)
Is not a bus station having a station number.
Is secured without opening the cover.
The power supply connector has the following connections:
Connection for an ”incoming” PROFIBUS-DP (12-pin socket)
Connection for an ”incoming” external power supply
(6-pin connector)
Connection for an ”outgoing” PROFIBUS-DP with power supply (12-pin
socket)
Grounding screw for connecting PI
Distributed I/O System DP/ASi Link
EWA 4NEB 710 6055-02b
4-17
Page 54

Installing and Wiring the DP/ASi Link
4.4.3 Programmer Connector (6ES5 762-2CA12)
Usage
Characteristics
Connections
A programmer connector is used to connect the programmer within the
IP 66/IP 67 environment to the PROFIBUS-DP.
The programmer connector has the following characteristics:
Degree of protection: IP 66/IP 67 (refer to installation rules, section 4.1)
Can be operated at the following baud rates:
9.6; 19.2; 93.75; 187.5; 500; 1500; 3000; 6000 and 12000 kBd
The 3000, 6000 and 12000 kBd baud rates are possible only in the case of
operation with a suitable DP master – for example, the IM 308-C.
Can be located anywhere on the bus (exception: the programmer connec-
tor must not be located at the extremities of the bus cable, since the terminating resistor must not be inserted).
Is not a bus station having a station number.
Is secured without opening the cover.
A programmer connector has three bus connections:
Connection for an ”incoming” PROFIBUS-DP (possibly with power sup-
ply, 12-pin socket).
Connection for an ”outgoing” PROFIBUS-DP (possibly with power sup-
ply, 12-pin socket).
4-18
Connection for adapter cable (refer to section 4.4.6) to the programmer
(12-pin socket)
Distributed I/O System DP/ASi Link
EWA 4NEB 710 6055-02b
Page 55

4.4.4 Cables
Installing and Wiring the DP/ASi Link
Types of cables
Designs
The PROFIBUS-DP features different installation options, for which you
need the correct cables. There are the following types of cables.
Table 4-5 PROFIBUS-DP cables
No. of
Cores
Usage
2 PROFIBUS-DP field bus, power supply is not incorporated
5 For PROFIBUS-DP field bus and power supply in one
cable
For power supply feed line to the power supply connector
SIEMENS supplies cables for the PROFIBUS-DP in different designs.
All cables are precut with connectors at both ends, at one end or not at all
with a 12-pin connector for connection to the PROFIBUS-DP bus and/or
power supply.
You can cut the cables and fit connectors yourself. You will find the necessary information in section 4.4.7.
Note
All precut cables fitted with connectors are designed with a core cross-section of 0.75 mm
2
for a current loading not exceeding 4 A.
You have to precut the cable for the power supply feed line for a separate
power supply and fit the connectors yourself.
Distributed I/O System DP/ASi Link
EWA 4NEB 710 6055-02b
4-19
Page 56

Installing and Wiring the DP/ASi Link
Order Numbers
Table 4-6 Order Numbers for cables in standard lengths
(core cross-section 0.75 mm
The following table shows the Order Numbers for the standard lengths:
2
, maximum current loading 4 A)
Preparation
5-core cable (unprepared) 6ES5 717-11 6ES5 718-11
5-core cable, terminated at one end
(6-pin circular socket)
5-core cable, terminated at both ends
(6-pin circular socket/6-pin circular connector)
5-core cable, terminated at one end
(12-pin circular connector)1
5-core cable, terminated at both ends
(12-pin circular connector)
Length
0.5 m
1 m
2 m
5 m
10 m
Cable (Standard
Sheath)
Cable (Non-welding
Sheath)
6ES5 717-21 6ES5 718-21
6ES5 717-31 6ES5 718-31
6ES5 717-61 6ES5 718-61
6ES5 717-71
° ° °
A B 4
B B 0
B C 0
B F 0
C B 0
6ES5 718-71
° ° °
A B 4
B B 0
B C 0
B F 0
C B 0
1
Do not use for separate power supply feed line (as bus cable connected ³ bus disturbances are possible).
If you require other lengths, you can order the cables having a Z number.
When you order, quote the Order Number and the length you require – for
example, 6ES5 717-1AA01-Z 3.50 m.
Table 4-7 Order Numbers for cables having a Z number
(core cross-section 0.75 mm
Preparation
2
, maximum current loading 4 A)
Cable (Standard
Sheath)
Cable (Non-welding
5-core cable (unprepared) 6ES5 717-1AA01-Z 6ES5 718-1AA01-Z
5-core cable, terminated at one end
6ES5 717-2AA01-Z 6ES5 718-2AA01-Z
(6-pin circular socket)
5-core cable, terminated at both ends
6ES5 717-3AA01-Z 6ES5 718-3AA01-Z
(6-pin circular socket/6-pin circular connector)
5-core cable, terminated at one end
(12-pin circular connector)
1
5-core cable, terminated at both ends
6ES5 717-6AA01-Z 6ES5 718-6AA01-Z
6ES5 717-7AA01-Z 6ES5 718-7AA01-Z
(12-pin circular connector)
1
Do not use for separate power supply feed line (as bus cable connected ³ bus disturbances possible).
Sheath)
4-20
Distributed I/O System DP/ASi Link
EWA 4NEB 710 6055-02b
Page 57

Installing and Wiring the DP/ASi Link
4.4.5 Terminating Resistor (6ES5 755-2CA11)
Usage
Characteristics
A bus cable must always be terminated at both ends with a terminating resistor.
Screw the terminating resistor on a 12-pin socket or on the bus connector of
the:
DP/ASi link or
T connector
The terminating resistor has the
IP 66/IP 67 degree of protection (refer to installation rules, section 4.1)
Figure 4-5 Terminating resistor
Distributed I/O System DP/ASi Link
EWA 4NEB 710 6055-02b
4-21
Page 58

Installing and Wiring the DP/ASi Link
4.4.6 Adapter Cable (6ES5 755-8CA11)
Usage
Characteristics
Connections
The adapter cable is required to connect the programmers (with programmer
interface module CP 5410-S5 DOS/ST) or the ET 200 Handheld to the
PROFIBUS-DP.
The programmer or the ET 200 Handheld are required for
Setting the station number
T est and commissioning (not ET 200 Handheld)
Diagnostic functions (not ET 200 Handheld)
The adapter cable has the following characteristics:
Degree of protection: IP 66/IP 67 (refer to installation rules, section 4.1)
only at extremity with IP 66/IP 67 bus connector
can be operated at the following baud rates
9.6; 19.2; 93.75; 187.5; 500; 1500; 3000; 6000 and 12000 kBd
The 3000, 6000 and 12000 kBd baud rates are possible only in the case of
operation with a suitable DP master – for example, the IM 308-C.
The adapter cable has the following connections:
Bus connector in IP 20 (9-pin connector)
Bus connector in IP 66/IP 67 (12-pin connector)
T o connect the programmer, you also require the programmer connecting
cable.
Figure 4-6 Adapter cable
4-22
Distributed I/O System DP/ASi Link
EWA 4NEB 710 6055-02b
Page 59

4.4.7 Wiring of PROFIBUS-DP
Installing and Wiring the DP/ASi Link
Introduction
Circular
connectors
Rules: circular
connectors
This section describes the points you have to take into account when you
wish to prepare the bus cables yourself.
We can provide you with ready cut and terminated cables for the bus connection and the power supply (refer to section 4.4.3).
For the bus connection and connection of the power supply, you require
12-pin circular connectors.
T able 4-8 shows the Order Number for the 12-pin circular connector:
Table 4-8 Order Number for circular connector
Circular Connector Order Number
12-pin connector with pin insert
(unprepared)
The following applies to all connections to circular connectors:
6ES5 760-2CB11
Strip sufficient insulation from the cable so that the screen is firmly en-
closed by the clamping ring in the circular connector.
Always use the same color of the cores for the same signal; the following
applies to the green/red PROFIBUS cable:
Power supply
cable
!
– always connect terminal A to the green wire
– connect terminal B to the red wire
Use only a 3-core cable for the power supply.
Caution
If you use a 5-core cable for the power supply, the PROFIBUS-DP can no
longer operate.
Since the two DP connections on the DP/ASi link are connected internally, a
5-core power supply cable represents a prohibited spur line.
Distributed I/O System DP/ASi Link
EWA 4NEB 710 6055-02b
4-23
Page 60

Installing and Wiring the DP/ASi Link
4-24
Distributed I/O System DP/ASi Link
EWA 4NEB 710 6055-02b
Page 61

Configuring the DP/ASi Link
5
Introduction
Method
STEP 7
COM ET 200
Windows
T o operate the DP/ASi link to the PROFIBUS-DP, you must configure and
assign parameters to it.
There are two ways in which you can configure a DP/ASi link:
1. You can use the STEP 7 application ( version 2.1 or higher) or
COM ET 200 Windows (version 2.0 or higher).
2. You can use any external master that is not covered by COM ET 200
Windows.
The simplest method is to configure the DP/ASi link using STEP 7 (version
2.1 or higher).
With STEP 7 (version 2.1 or higher) the DP/ASi link is easy to configure, as
is also the assignment of parameters to it. The approach is described in the
Standart STEP 7 Standard Software for S7 and M7 user’s guide. STEP 7 con-
tains a detailed online Help for support when you are configuring and assigning parameters.
If you are already familiar with the COM ET 200 Windows package, you will
not learn anything new here.
Should you not be certain about how to handle the COM ET 200 Windows
package, you will receive instructions on how to integrate a DP/ASi link in
the PROFIBUS-DP.
COM ET 200 Windows contains an integrated Help.
External master
Parameterization
data
Distributed I/O System DP/ASi Link
EWA 4NEB 710 6055-02b
If you wish to operate the DP/ASi link on an external master, section 5.3 is
relevant for you.
Of special importance in configuration is the assignment of parameters to
ASi slaves. A detailed description of how parameterization data are stored in
the parameterization message will be found in appendix C.
The re-assignment of parameters to the DP/ASi link in the S5 (IM308C as the
S5 master) is described in detail in the Distributed I/O System ET 200 manual, Order No. 6ES5 998-3ES12.
5-1
Page 62

Configuring the DP/ASi Link
In this chapter
In Section You Will Find on Page
5.1 Configuring - for Example with COM ET 200 Windows
(Version 2.0 or Later)
5.2 Example Using COM ET 200 Windows (Version 2.0 or
Later)
5.3 Operating the DP/ASi Link with an External Master 5-6
5-3
5-5
5-2
Distributed I/O System DP/ASi Link
EWA 4NEB 710 6055-02b
Page 63

Configuring the DP/ASi Link
5.1 Configuring – for Example with COM ET 200 Windows (Version 2.0 or Later)
Method
Configuring
In the following you will find a description of the method by which you can
integrate the DP/ASi link into the PROFIBUS-DP using COM ET 200
Windows (version 2.0 or later). You will find additional information about
the different steps in the integrated online Help of COM ET 200 Windows.
1. Open the worksheet with the DP master to which you wish to connect the
DP/ASi link.
2. Click in the Slaves window on ASi . As soon as you exit from the Slaves
window , the mouse pointer changes its appearance.
3. Click the mouse on the point of the user interface at which you wish to
insert the DP/ASi link.
4. Select the slave station number from the list box.
5. Click OK to confirm your selection.
You can configure or assign parameters to the DP/ASi link even at this
stage by clicking once on Configure... or Parameterize....
6. T o insert further DP slaves, repeat steps 3 to 5 above.
Once you have inserted the DP/ASi link in the PROFIBUS-DP, you have to
configure it. Proceed in the following order:
1. Click on Configure...
2. Select an ASi slave number. Double-click in the I/O field of the slave
number to go to a new input window.
3. Select the I/O code of your ASi slave from the list.
4. You can now edit the ID code and the parameter value of the ASi slave
you selected, the default values both being 15. If the ID code of your ASi
slave is not 15, you have to enter the corresponding value here.
In the case of a DP standard master of limited configuration – for example, S5-95U – step 4 cannot be performed.
5. Set the base address of the SIMATIC address assignment. You have to set
the base address separately for inputs and outputs only once for every
DP/ASi link.
6. Assign the corresponding address assignment to the ASi slave using
Auto addr.
You do not obtain the final address assignment until you have
configured all the ASi slaves.
7. For all the other ASi slaves you wish to connect to the DP/ASi link, repeat steps 2 to 6 above with the exception of step 5.
Distributed I/O System DP/ASi Link
EWA 4NEB 710 6055-02b
5-3
Page 64

Configuring the DP/ASi Link
Parameterize
Actual
configuration
Setpoint
configuration
Actual equal to
setpoint
configuration
Actual less than or
equal to setpoint
configuration
By choosing Parameterize..., you can influence the start-up characteristics
of the DP/ASi link. You can differentiate between ”actual is equal to setpoint
configuration” and ”actual is less than or equal to setpoint configuration”.
By actual configuration we mean the actual configuration of the ASi as detected by the DP/ASi link.
By setpoint configuration we mean the configured configuration of the ASi
as stored in the DP master.
”Actual is equal to setpoint configuration” means that the DP/ASi link starts
up only when the actual configuration is identical with the setpoint configuration. If there is a discrepancy between the actual and setpoint configurations, the DP/ASi link requests a new parameterization message.
”Actual is less than or equal to setpoint configuration” means that the DP/
ASi link compares the actual configuration with the setpoint configuration. If
the DP/ASi link establishes a discrepancy, it reacts in two different ways:
If the DP/ASi link detects unconfigured ASi slaves, it behaves as for ”ac-
tual is equal to setpoint configuration”, that is, the DP/ASi link does not
start up.
Hex...
Re-configuring
If a comparison of the actual and setpoint configurations determines that
configured ASi slaves are missing, the non-existent ASi slaves are reported to have failed in the diagnosis. Data exchange is initiated, however.
If the setpoint and actual configurations are identical, the DP/ASi link starts
without issuing an error message. If the actual and setpoint configurations are
not identical, a diagnosis is generated (refer to Chapter 8).
By pressing the Hex... button, you can view the parameterization table of the
DP/ASi link. The structure of this table is described in Appendix C.
You can later add more ASi slaves to the DP/ASi link or remove them later.
T o do this, select the corresponding DP/ASi link from the master system concerned.
5-4
Distributed I/O System DP/ASi Link
EWA 4NEB 710 6055-02b
Page 65

Configuring the DP/ASi Link
5.2 Example Using COM ET 200 Windows (Version 2.0 or Later)
Model structure
Method
You wish to connect an ASi with an ASi slave over the DP/ASi link to the
PROFIBUS-DP. The ASi slave has the following assignment:
S one ASi slave with 4 inputs
Assign the ASi slave to the ASi address as shown in T able 5-1.
Set the ASi address according to your requirements. The I/O code (refer to
Appendix B) results from the input/output assignment.
Table 5-1 Assigning the slave to the ASi address, an example
ASi Address Input/Output Assignment I/O Code
1 4 inputs 0
Proceed in the following order:
S Integrate the DP/ASi link into the PROFIBUS-DP (refer to section 5.1).
S In the window, select Slave parameters
"
Configure...
S Double-click on the line containing ASi address 1 in the ”I/O Code” field
to open a new input window.
S Select the ASi slave with 4 inputs. Enter I/O code 0 in the field you se-
lected.
Confirming inputs
S Position the mouse pointer in the field for the input address.
S With base address, set this address for the address assignment of the
SIMATIC, for example, P54.
S Select Auto addr. Start address P54.0 is assigned to the ASi slave.
Confirm your inputs and write the data to the memory card. Insert the
memory card in your DP master. You can now commission the DP/ASi link.
Distributed I/O System DP/ASi Link
EWA 4NEB 710 6055-02b
5-5
Page 66

Configuring the DP/ASi Link
5.3 Operating the DP/ASi Link with an External Master
Introduction
If you do not use an application having an easy-to-use user interface for the
DP/ASi link – for example, COM ET 200 Windows (version 2.0 or later) or a
comparable application, you must pay attention to the following points.
In Section You Will Find on Page
5.3.1 Configuring with Address Space Optimization 5-7
5.3.2 Simple Configuration 5-8
5.3.3 Default Start-Up 5-9
5-6
Distributed I/O System DP/ASi Link
EWA 4NEB 710 6055-02b
Page 67

Configuring the DP/ASi Link
5.3.1 Configuring with Address Space Optimization
Requirement
You can operate the DP/ASi link with any DP master that conforms with the
DP standard and supports a parameterization message containing 140 bytes
(full assignment of parameters).
Basics
We will confine ourselves here to showing you how to address the DP/ASi
link on the PROFIBUS-DP side.
Configuring
Step
Configure the DP/ASi link in the following order:
Action Meaning
1 Define the installation of the ASi. From the installation, you learn the total num-
ber of inputs and outputs that you will assign.
2 Optimize the address assignment of the
input and output data of the DP/ASi link
In this way you make optimum use of the limited address area.
(refer to appendix C.3).
3 Create the parameterization data from the
address assignment received.
4 Create the parameterization message (re-
fer to appendix C.1).
You require the parameterization data of the
ASi slaves for the parameterization message.
The DP/ASi link requires the data contained in
the parameterization message upon power up.
5 Create the configuration message (refer to
appendix D.2).
Commissioning
You commission the DP/ASi link as described in section 4.3. The DP/ASi
link performs as described in chapter 7.
DP standard slave
The DP/ASi link behaves like a DP standard slave.
In the configuration message, define the number of bytes for the input and output data.
Distributed I/O System DP/ASi Link
EWA 4NEB 710 6055-02b
5-7
Page 68

Configuring the DP/ASi Link
5.3.2 Simple Configuration
Requirement
The DP/ASi link, version 3 or later, can also be operated on DP standard masters having a reduced message length of 32 bytes (reduced parameter assignment). A DP standard master of this type is the S5-95U with its integrated DP
master interface, for example.
Configuring
Step
Configure the DP/ASi link in the following order:
Action Meaning
1 Define the ASi installation. From the installation, you learn the total num-
ber of inputs and outputs that you will assign.
2 Create the parameterization message (re-
fer to appendix C.4).
3 Create the configuration message (refer to
appendix D.3).
Commissioning
You commission the DP/ASi link as described in section 4.3. The DP/ASi
The DP/ASi link requires the data contained in
the parameterization message during power up.
In the configuration message, define the number of bytes for the input and output data.
link performs as described in chapter 7.
DP standard slave
The DP/ASi link behaves like a DP standard slave.
5-8
Distributed I/O System DP/ASi Link
EWA 4NEB 710 6055-02b
Page 69

5.3.3 Default Start-Up
Configuring the DP/ASi Link
Introduction
Requirements for
DP standard
master
Characteristics
You can also configure and assign parameters to the DP/ASi link from the DP
standard master by means of a ”default start-up”. In a default start-up, the
DP/ASi link operates with preset parameters, which are described in detail on
the next few pages. The information is important if you wish to operate the
DP/ASi link on the DP standard master of a manufacturer who does not provide an easy-to-use configuring tool.
The DP standard master must be able to process the following messages:
20-byte configuration messages
7-byte parameterization messages
32-byte diagnostic messages
The following characteristics apply to a default start-up:
The I/O area assigns 16 input bytes and 16 output bytes.
The location of the ASi slave in the I/O area is uniquely defined by its
address. The distribution of ASi slave inputs and outputs is determined by
their I/O codes.
Upon start-up, the DP/ASi link automatically sends the parameter F
all the ASi slaves connected.
to
H
The ASi slaves present during start-up are detected as the actual configu-
ration and accepted as the setpoint configuration at the same time.
Note
The current ASi configuration is always applied as the setpoint configuration
every time the DP/ASi link starts up. This means that ASi slaves which have
failed are no longer detected or reported after a re-start.
If you wish to monitor the ASi configuration, you must compare the actual
configurations (bytes 16 to 31 of the diagnostic message) in the user program.
Distributed I/O System DP/ASi Link
EWA 4NEB 710 6055-02b
5-9
Page 70

Configuring the DP/ASi Link
Input and output
area
The table below describes the location of ASi data in the input and output
area. A specific address is permanently assigned to every ASi slave:
even-numbered ASi slaves: bits 4 to 7
odd-numbered ASi slaves: bits 0 to 3
Table 5-2 I/O area assignment
Input and Output
Byte Bit 7 Bit 6 Bit 5 Bit 4 Bit 3 Bit 2 Bit 1 Bit 0
n Slave 1
n + 1 Slave 2 Slave 3
n + 2 Slave 4 Slave 5
n + 3 Slave 6 Slave 7
n + 4 Slave 8 Slave 9
n + 5 Slave 10 Slave 11
n + 6 Slave 12 Slave 13
n + 7 Slave 14 Slave 15
n + 8 Slave 16 Slave 17
n + 9 Slave 18 Slave 19
n + 10 Slave 20 Slave 21
n + 11 Slave 22 Slave 23
n + 12 Slave 24 Slave 25
n + 13 Slave 26 Slave 27
n + 14 Slave 28 Slave 29
n + 15 Slave 30 Slave 31
Subsequent
modification of
ASi configuration
5-10
Should you wish to modify the ASi configuration, you must keep to the following procedure:
1. Add or remove ASi slaves.
2. Perform a new default start-up.
As soon as the DP/ASi link receives the parameterization message from the
DP master, ASi slaves that are added or removed after this point of time are
ignored. ASi slaves that have been removed are reported as having failed in
the diagnosis.
Distributed I/O System DP/ASi Link
EWA 4NEB 710 6055-02b
Page 71

Configuring the DP/ASi Link
Parameterization
and configuration
messages
Following power up, the DP/ASi link determines the configuration of the AS
interface and expects a parameterization message and a configuration message from the DP master.
The parameterization message is identical to the first seven bytes of the DP
standard part (bytes 0 to 6). You will find a detailed account of the DP standard part in appendix C.1.
The length of the configuration message for default start-up is exactly 20
bytes and is described in appendix D.1.
Distributed I/O System DP/ASi Link
EWA 4NEB 710 6055-02b
5-11
Page 72

Configuring the DP/ASi Link
5-12
Distributed I/O System DP/ASi Link
EWA 4NEB 710 6055-02b
Page 73

DP/ASi Link to S7
6
Introduction
If you operate the DP/ASi link to an S7 (6ES7 156-0AA01-0XA0 or later,
version 1), you can re-assign the parameters of the ASi slaves connected to
the DP/ASi link during operation. This is done on the S7 by SFCs 59
“RD_REC” and 58 “WR_REC”, which permit data records to be read and
written.
Read data records with SFC 59 ”RD_REC”
– Data record 140: Read lists and flags of ASi slaves
– Data record 141: Read parameter echo of ASi slaves
– Data record 2: Read response
Write data records with SFC 58 ”WR_REC”
– Data record 142: Write parameters to ASi slaves
– Data record 143: Modify operating address of an ASi slave
– Data record 144: Set DP/ASi link to ”Offline” mode
SFC 59 ”RD_REC”
Table 6-1 Parameters for SFC 59 “RD_REC”
You use SFC 59 to read a data record from the DP/ASi link. The parameters
are described in the table below:
Parameter Declaration Data Type Memory Area Description
REC INPUT BOOL I, O, M, D, L, Const. REQ = 1: Request to read
IOID INPUT BYTE I, O, M, D, L, Const. Area: DP/ASi link is a hybrid module IOID =
B#16#54
LADDR INPUT WORD I, O, M, D, L, Const. Logical address of the DP/ASi link.
Example: Logical address = 336 (decimal),
LADDR = W#16#150 (hexadecimal)
RECNUM INPUT BYTE I, O, M, D, L, Const. Data record number
Example: Data record 140, RECNUM =
B#16#8C
RET_VAL OUTPUT INT I, O, M, D, L If an error occurs while a function is being pro-
cessed, the return value contains an error code.
Distributed I/O System DP/ASi Link
EWA 4NEB 710 6055-02b
6-1
Page 74

DP/ASi Link to S7
Table 6-1 Parameters for SFC 59 “RD_REC”, continued
Parameter DescriptionMemory AreaData TypeDeclaration
BUSY OUTPUT BOOL I, O, M, D, L BUSY = 1: Read operation still being processed
RECORD OUTPUT ANY I, O, M, D, L Destination area for data record read
Example: Data record 140 (22 bytes long) is to
be stored in bit memory address area from MB
50 onward, RECORD = P#M50.0 BYTE22
SFC 58 ”WR_REC”
You use the SFC 58 to transfer a data record to the DP/ASi link. The parameters are described in the table below:
Table 6-2 Parameters for SFC 58 “WR_REC”
Parameter Declaration Data Type Memory Area Description
REC INPUT BOOL I, O, M, D, L, Const. REQ = 1: Request to write
IOID INPUT BYTE I, O, M, D, L, Const. Area: The DP/ASi link is a hybrid module
IOID = B#16#54
LADDR INPUT WORD I, O, M, D, L, Const. Logical address of the DP/ASi link.
Example: Logical address = 336 (decimal),
LADDR = W#16#150 (hexadecimal)
RECNUM INPUT BYTE I, O, M, D, L, Const. Data record number
Example: Data record 143, RECNUM =
B#16#8F
RECORD INPUT ANY I, O, M, D, L Data record
Example: Data record 142 (2 bytes long) is to
be read in the bit memory address area from
MB 50 onward, RE CORD = P#M50.0 BYTE2
RET_VAL OUTPUT INT I, O, M, D, L If an error occurs while a function is being pro-
cessed, the return value contains an error code.
BUSY OUTPUT BOOL I, O, M, D, L BUSY = 1: Write operation still being pro-
cessed
Further reading
In this chapter
6-2
You will find a detailed description of SFC 58 and SFC 59 in the System and
Standard Functions reference manual.
In Section You Will Find on Page
6.1 Reading Data Records with SFC 59 “RD_REC” 6-3
6.2 Writing Data Records with SFC 58 “WR_REC” 6-5
6.3 Example of Re-assigning Parameters to the DP/ASi Link
with S7
Distributed I/O System DP/ASi Link
EWA 4NEB 710 6055-02b
6-6
Page 75

6.1 Reading Data Records with SFC 59 ”RD_REC”
t
0 ASi slave not
“1”
pp
ASi link
DP/ASi Link to S7
Data record 140
You use data record 140 to read lists and flags of the ASi slaves. In the case
of lists, the ASi slaves present, enabled and configured are displayed. This
data record also displays the version and release date of the DP/ASi link.
Table 6-3 Structure of data record 140: Read lists and flags
Description Byte Contents
Read lists
7 6 5 4 3 2 1 0
Bits:
“1” ASi slave
present
“0” ASi slave not
present
Read flags
Bits:
”
applicable
“
“0” not applicable
Version and release date of DP/
ASi link
ASi slaves
presen
ASi slaves
enabled
ASi slaves
configured
Version
Date
0
1
2
3
4 7 6 5 4 3 2
5 15 14 13 12 11 10
6 23 22 21 20 19 18
7 31 30 29 28 27 26
8 7 6 5 4 3 2
9 15 14 13 12 11 10
10 23 22 21 20 19 18
11 31 30 29 28 27 26
12.0 Config_OK flag
12.1 Null slave present
12.2 Automatic programming enabled
12.3 Automatic programming possible
12.4 Normal mode enabled
12.5 “Offline” mode enabled
12.6 ASi power supply missing
13 5AH=Z (version Z01 dated 12.15.96)
14 30H=0 (version Z01 dated 12.15.96)
15 31H=1 (version Z01 dated 12.15.96)
16 31H=1 (version Z01 dated 12.15.96)
17 35H=5 (version Z01 dated 12.15.96)
18 31H=1 (version Z01 dated 12.15.96)
19 32H=2 (version Z01 dated 12.15.96)
20 39H=9 (version Z01 dated 12.15.96)
21 36H=6 (version Z01 dated 12.15.96)
7 6 5 4 3 2 1 –––
15 14 13 12 11 10 9 8
23 22 21 20 19 18 17 16
31 30 29 28 27 26 25 24
Bit (corresponds to ASi address)
17
25
17
25
1
–––
9
1
9
8
16
24
–––
8
16
24
Distributed I/O System DP/ASi Link
EWA 4NEB 710 6055-02b
6-3
Page 76

DP/ASi Link to S7
Data record 141
Data record 141 reads outs the parameter echoes of the different ASi slaves.
You can evaluate the reactions of the different ASi slaves in a parameter echo
following a “WR_REC” write job in the user program. You thus obtain a current image of the state of the ASi slaves. A nibble is assigned to every ASi
slave.
Table 6-4 Structure of data record 141: Read parameter echoes of ASi slaves
Byte
0 ––––– Slave 1
1 Slave 2 Slave 3
2 Slave 4 Slave 5
3 Slave 6 Slave 7
4 Slave 8 Slave 9
5 Slave 10 Slave 11
6 Slave 12 Slave 13
7 Slave 14 Slave 15
8 Slave 16 Slave 17
9 Slave 18 Slave 19
10 Slave 20 Slave 21
11 Slave 22 Slave 23
12 Slave 24 Slave 25
13 Slave 26 Slave 27
14 Slave 28 Slave 29
15 Slave 30 Slave 31
Parameter Echoes of ASi Slaves (4 Bits in All Cases)
Bits 4 to 7 Bits 0 to 3
6-4
Distributed I/O System DP/ASi Link
EWA 4NEB 710 6055-02b
Page 77

DP/ASi Link to S7
Data record 2
Data record 2 reads the response of the last “WR_REC” write job.
You have to call a “RD_REC” read job by means of data record 2 after every
“WR_REC” write job for the response of the last “WR_REC” write job to be
read.
Table 6-5 Structure of data record 2: Read response
Contents
Error codes in data
record 2
Byte
0 Data record number of last “WR_REC” job
1 Response of last “WR_REC” job
You can read out in byte 1 of data record 2 any error code that has been issued.
If you read data record 2 without executing a write job beforehand, undefined responses of the error codes may occur.
Table 6-6 Error codes in byte 1 of data record 2
Byte 1
Hex. Dec.
00H000 No error –––
01H001 ASi slave not enabled –––
02H002 Source slave not present Input error; enter correct value
03H003 ASi slave with address 0 present –––
04H004 Destination slave already present –––
05H005 Source address cannot be deleted –––
06H006
07H007
08H008 Could not write new parameters Input error; enter correct value
09H009 No meaning –––
0AH010 No meaning –––
0BH011 Unknown job number Input error; enter correct value
0CH012 Unknown data record Input error; enter correct value
0DH013 Unknown ASi Manager OP code Input error; enter correct value
0EH014 Message too long or too short Correct number of bytes
0FH015 Automatic programming enabled Repeat job
10H016 Argument too large; source address = destination
11
H
12H018 Configuration in DP/ASi Link erroneous Check configuration
Source address could not be programmed with
new address
address
017 ASi master is in Offline mode, job is not possible Wait until the DP master is in Operating mode
Meaning Action
–––
Input error; enter correct argument
Distributed I/O System DP/ASi Link
EWA 4NEB 710 6055-02b
6-5
Page 78

DP/ASi Link to S7
6.2 Writing Data Records with SFC 58 “WR_REC”
Data record 142
Data record 143
Data record 144
Data record 142 writes parameters to ASi slaves.
Table 6-7 Structure of data record 142: Write parameters to ASi slaves
Byte Contents
0 01 to 1FH: Slave address
1 00 to 0FH: Parameters for the ASi slave
Data record 143 modifies the operating address of an ASi slave
Table 6-8 Structure of data record 143: Modify operating address of ASi slave
Byte Contents
0 00 to 1FH: Source address (old) of the ASi slave
1 00 to 1FH: Destination address (new) of the ASi slave
Data record 144 sets the DP/ASi link to “Offline” mode. In “Of fline” mode,
all the ASi slaves are reset and there is no periodic data exchange with the
DP/ASi link.
6-6
Table 6-9 Srtructure of data record 144: Set DP/ASi link to “Offline” mode
Byte Contents
0
“1”: Set “Offline” mode
“0”: Reset “Offline” mode
Distributed I/O System DP/ASi Link
EWA 4NEB 710 6055-02b
Page 79

DP/ASi Link to S7
6.3 Example of Re-assigning Parameters to an ASi Slave with S7
Introduction
Below you will find an example program for assigning parameters to the DP/
ASi link using an S7. It shows you how you can read out lists and flags of the
ASi slave.
Cyclic program
You use data record 140 to read the lists and flags of the ASi slaves. To do
this, call SFC 59 “RD_REC” using data record 140, for example in the cyclic
program (OB1):
STL Description
CALL “RD_REC” SFC59 ––Read Data Record
REC :=M0.0
IOID :=B#16#54
LADDR :=W#16#0
RECNUM :=B#16#8C
RET_VAL :=MW100
BUSY :=M102.0
RECORD :=P#DB59.DBX 0.0 BYTE 22
Call SFC 59
Read data record enabled via M0.0
DP/ASi link is a hybrid module
Logical module address
Data record No. DR140
Error code while executing SFC59
Read status (1:Read operation still being
processed)
Destination area of DR140 (in DB59, from byte
0 onward)
Distributed I/O System DP/ASi Link
EWA 4NEB 710 6055-02b
6-7
Page 80

DP/ASi Link to S7
Destination area of
DR140
Address Name Type Initial Value Comment
0.0 STRUCT
+0.0 Vorh_Slaves ARRAY[0..3] Slaves present
*1.0 BYTE
+4.0 Akt_Slaves ARRAY[0..3] Slaves enabled
*1.0 BYTE
+8.0 Proj_Slaves ARRAY[0..3] Slaves configured
*1.0 BYTE
+12.0 Konf_Flag BOOL FALSE Config_OK flag
+12.1 Nullslave BOOL FALSE Null slave present
+12.2 AutoProg_Frei BOOL FALSE Automatic programming enabled
+12.3 AutoProg_Moegl BOOL FALSE Automatic programming possible
+12.4 Nrmbetr_akt BOOL FALSE Normal mode enabled
+12.5 Offl_akt BOOL FALSE Offline mode enabled
+12.6 Spgvers_flt BOOL FALSE ASi power supply missing
+13.0 Version_1 BYTE B#16#0 Version_Part 1
+14.0 Version_2 BYTE B#16#0 Version_Part 2
+15.0 Version_3 BYTE B#16#0 Version_Part 3
+16.0 Datum_1 BYTE B#16#0 Date_Part 1
+17.0 Datum_2 BYTE B#16#0 Date_Part 2
+18.0 Datum_3 BYTE B#16#0 Date_Part 3
+19.0 Datum_4 BYTE B#16#0 Date_Part 4
+20.0 Datum_5 BYTE B#16#0 Date_Part 5
+21.0 Datum_6 BYTE B#16#0 Date_Part 6
=22.0 END_STRUCT
The destination area of data record 140 is located in data block DB 59, for
example. The following table describes the contents of DB59:
6-8
Distributed I/O System DP/ASi Link
EWA 4NEB 710 6055-02b
Page 81

Operating Modes
7
Introduction
CONFIG MODE
In this chapter
The DP/ASi link goes through various operating modes during operation,
ranging from automatic start-up to normal mode and automatic programming.
We will briefly describe these operating modes for you.
The configuration mode, which is assigned to the CONFIG MODE LED, is
provided for extensions of the SIMATIC S7.
In Section You Will Find on Page
7.1 Automatic Start-up of DP/ASi Link 7-2
7.2 Normal Operation 7-4
7.3 Automatic Programming 7-6
Distributed I/O System DP/ASi Link
EWA 4NEB 710 6055-02b
7-1
Page 82

YES
Delete internal data
Operating Modes
7.1 Automatic Start-up of DP/ASi Link
Start-up behavior
There are not any switches on the DP/ASi link. The DP/ASi link commences
work as soon as it is connected to the power supply.
The following flowchart shows the sequence of automatic startup.
Step Flowchart Meaning
1
Start
2
Initialize interface controller
The power supply of the DP/ASi link is
turned on.
The two interface controllers for the ASi and
the PROFIBUS-DP are initialized. The DP/
ASi link enters a defined basic state.
3
Switch 8 of DIP switch
block+OFF?
NO
YE
4
Read out DIP switch block
The DP/ASi link checks for the valid station
address.
YES+DIP switch block: proceed to step 4,
NO+EEPROM: proceed to step 5.
The DP/ASi link applies the station address
set on the DIP switch block.
Proceed to step 6.
5
Read out EEPROM
The DP/ASi link applies the station address
stored in the EEPROM. The EEPROM is
checked simultaneously.
6
Turn on all LEDs
The DP/ASi link turns on all eleven LEDs
for test purposes. You can thus detect on site
whether a LED has failed.
7
All internal lists with the ASi slave data are
deleted. This means that the DP/ASi link insures that old data are no longer present.
8
Wait for delay time to elapse
The DP/ASi link waits for a delay time to
expire before resuming automatic start-up.
This behavior insures that the DP/ASi link
A
does not enter an undefined state caused by a
short-term voltage drop during start-up.
7-2
Distributed I/O System DP/ASi Link
EWA 4NEB 710 6055-02b
Page 83

Step Flowchart Meaning
9
The DP/ASi link, as the ASi master, periodically polls the I/O code and the ID code of
A
10
all the ASi slaves possible.
During the polling cycle, the DP/ASi link
must detect at least one ASi slave.
Poll the data of all ASi slaves
If no ASi slave is present, the DP/ASi link
does not resume start-up. The five ASi
SLAVE FAIL LEDs flash. This is followed
by a return to step 9.
The DP/ASi link waits for the parameteriza-
NO
tion message from the DP master.
Once the parameterization message has been
received, the DP/ASi link compares the set-
11
12
Was at least one ASi
slave detected?
YES
Read in parameterization message
point and actual configurations.
If you selected the ”actual is equal to set-
point configuration”, start-up is resumed
NO
Does the
parameterization mes-
sage correspond to the
configuration?
only if the setpoint and actual configurations
are identical. In the event of an error, you
return to step 7.
If you selected ”actual is less than or equal
YES
to setpoint configuration”, you return to
step 7 only if unconfigured ASi slaves are
present.
13
Read in configuration message
The DP/ASi link waits for the configuration
message.
14
NO
Do the contents
of the configuration mes-
sage correspond to the de-
tected configuration?
Once the configuration message has been
received, the DP/ASi link compares the specified structure of the data message with the
self-detected structure.
If the DP/ASi detects an error, you return to
step 7.
15
YES
The DP/ASi link resets the LEDs.
Operating Modes
Reset LEDs
Error detection
If an error occurs during start-up, it is detected and evaluated internally. Depending on the error, either the whole start-up process or a part thereof is repeated.
Distributed I/O System DP/ASi Link
EWA 4NEB 710 6055-02b
Operation
If no errors have been detected, only the
green ”RUN” LED is on.
In the case of ”actual is less than or equal to
setpoint configuration” and if there are no
configured ASi slaves, the corresponding
error LEDs are on. The missing slave having
the lowest address is displayed.
7-3
Page 84

Operating Modes
7.2 Normal Operation
Method of
operation
Tasks
Monitoring the ASi
Monitoring the
PROFIBUS-DP
In normal operation, the DP master exchanges data with the DP/ASi link in
exactly the same manner as with any other DP slave.
You do not have take any specific action.
In normal operation, there is a continuous exchange of data with the ASi and
the PROFIBUS-DP. The activities of the DP/ASi link can be divided into two
tasks:
1. Monitor the ASi
2. Monitor the PROFIBUS-DP
The task of the ASi monitor is to monitor and control communication within
the ASi. The input data from the ASi slaves are read and the output data are
written to the ASi slaves. The data are stored in the internal work memory.
The DP/ASi link simultaneously senses the actual configuration and
compares it with the setpoint configuration. If it is found to be different, a
diagnosis is prepared.
If the DP/ASi link is addressed by the DP master, the DP/ASi link transmits
the input data to the DP master and receives the output data for the ASi
slaves.
Error detection
ASi power failure
7-4
If an error is detected, the DP/ASi link generates a diagnosis, which is
fetched by the DP master (refer to Chapter 8).
If the ASi power supply fails during routine operation, the outputs of the ASi
slaves are reset. The input data are reset in the DP/ASi link and are not updated until the power is restored.
Note
In the event of an ASi power failure, the data sent to the DP master by the
DP/ASi link are no longer valid.
Check, therefore, the data for validity by evaluating the slave diagnosis
(byte 12.4) and do not read them into your PLC until you have checked the
data.
Distributed I/O System DP/ASi Link
EWA 4NEB 710 6055-02b
Page 85

Operating Modes
ASi slave failure
If the connection to an ASi slave or an ASi slave fails during routine operation, undefined states may occur at the outputs. Behavior depends on the
slaves concerned and the causes of failure. The input data are reset in the
DP/ASi link.
The input data are not updated until a cause of failure has been remedied.
Note
If an ASi slave fails, the data sent by the DP/ASi link to the DP master are
no longer valid for to that ASi slave.
Check, therefore, the validity of the data by evaluating the slave diagnosis
(bytes 22 to 25) and do not read the data into your PLC until you have
checked the data.
Distributed I/O System DP/ASi Link
EWA 4NEB 710 6055-02b
7-5
Page 86

Operating Modes
7.3 Automatic Programming
Definition
Display
Meaning
Constraint
Replacing
ASi slaves
”Automatic programming” is an operating mode that occurs only when one
ASi slave fails.
The DP/ASi link shows you the ”automatic programming” mode using the
”AUTOPROG AV” LED.
Byte 20.4 is set simultaneously in the diagnostic message.
If ”automatic programming” mode is displayed, then precisely one ASi slave
has failed.
Furthermore, there is no ASi slave with ASi address 0 in the ASi. ASi address 0 is the default address for automatic programming.
Automatic programming is not possible if an ASi slave that has been connected to the ASi has not been configured.
The constraint of automatic programming is defined in this manner in the
ASi standard.
As long as ”automatic programming” mode is displayed, you can replace the
failed ASi slave with a suitable ASi slave having ASi address 0. The DP/ASi
link assigns the correct ASi address to the new ASi slave.
7-6
Note
The replacement slave must have the same I/O code and ID code as the ASi
slave it replaced.
If this is not the case and if this ASi slave is operated only for a short time
on the ASi, automatic programming is no longer authorized, according to the
draft ASi Standard.
Automatic programming is not possible again until after power OFF/ON of
the DP/ASi link.
Distributed I/O System DP/ASi Link
EWA 4NEB 710 6055-02b
Page 87

Diagnostics and Error Handling
8
Introduction
Diagnostic options
Online Help
Diagnosing with
IM308C
You use the chapter entitled ”Diagnostics and Error Handling” to evaluate the
diagnosis of the DP/ASi link and to take the necessary action.
You have two diagnostic options which refer you to the location at which the
diagnostic information is stored.
Diagnosis by means of LEDs gives you the opportunity to evaluate mes-
sages and to remedy any errors which have occurred.
The diagnostic message gives you the opportunity to react to fail-state
characteristics of the DP/ASi link by means of the user program of the
DP master or the higher level PLC.
The COM ET 200 Windows configuration software has an integrated online
Help which enables you to activate context-sensitive Help. A description of
the error messages is therefore not necessary at this stage.
You can read the DP/ASi link diagnosis into your PLC using the IM308C
module with function block IM308C (FB 192, FKT = SD).
You will find an in-depth description of FB IM308C and the diagnostic options in respect of the PROFIBUS-DP in the Distributed I/O System ET 200
manual.
Diagnosing with a
S7/M7 DP master
In this chapter
Distributed I/O System DP/ASi Link
EWA 4NEB 710 6055-02b
If you wish to operate the DP/ASi link as a DP slave with a SIMATIC
S7/M7 DP master, the DP/ASi link behaves like a central S7-300 module.
You read out the diagnosis (data records 0 and 1) using the SFC 13
”DPNRM_DG”. You will find information on requesting diagnostic data in
the STEP 7 Standard and System Functions manual.
In Section You Will Find on Page
8.1 Diagnostics by Means of LEDs of DP/ASi Link 8-2
8.2 Diagnostics by Means of User Program 8-6
8-1
Page 88

Diagnostics and Error Handling
8.1 Diagnostics by Means of LEDs of DP/ASi Link
Diagnostics
For on-site diagnostics, the operating modes of the DP/ASi link are displayed
by six LEDs. Five other LEDs indicate the address of the failed ASi slave
(refer to Fig. 8-1).
SINEC
L2 DP
+ PS
Figure 8-1 Location of LEDs of DP/ASi link
Display elements
Table 8-1 Meanings of display LEDs
The meanings of the different LEDs is shown in Table 8-1.
DP / ASi LINK
RUN BF
124816+ + + + = ASi SLAVE FAIL
ASi POWER FAIL
CONFIG ERROR
AUTOPROG A V
CONFIG MODE
6ES7 156-0AA01-0XA0
123456
ASi
3
+ 1
Name Color State Function
RUN Green On
Off
24 V power supply is in order.
24 V power supply is either not present or below permitted limit
value.
BF Red On
Response monitoring has terminated or parameters have not been as
signed yet to DP/ASi link for the PROFIBUS-DP and the DP/ASi link
Off
has not been configured.
PROFIBUS-DP is in data cycle.
ASi POWER
F AIL
Red On
Off
ASi power supply is either not present or below the permitted limit
value.
ASi power supply is in order.
CONFIG
ERROR
AUTPROGAVGreen On
CONFIG
Yellow On
Off
Off
No function
Configuration error on ASi
Configuration is in order
Automatic programming is possible.
Automatic programming is not possible.
MODE
ASi SLAVE
FAIL
Red These five LEDs are used to indicate the failed ASi slave with the
lowest ASi address.
8-2
Distributed I/O System DP/ASi Link
EWA 4NEB 710 6055-02b
Page 89

Diagnostics and Error Handling
ASi slave address
Example
Normal operation
Start-up
LED display
So that the DP/ASi link display is not cluttered, failed ASi slaves (ASiSLAVE FAIL) are displayed in binary code by five LEDs.
You have to add the numbers shown on the lit LEDs to determine the address
of the failed ASi slave.
If several ASi slaves have failed, the failed ASi slave having the lowest address is indicated. In this case the ”AUTOPROG AV” LED is off.
LEDs showing the numbers ”1”, ”)2” and ”)4” are on.
Add up the numbers: 1)2)4+7.
The ASi slave with ASi address 7 has failed.
In normal operation, the only LED to be on is the ”RUN” LED, which indicates to you that the DP/ASi link is running properly.
During automatic start-up, all eleven LEDs are turned on briefly. This behavior allows you to check that all LEDs are in order.
The display of the DP/ASi link can be divided into two arrays:
Operation and PROFIBUS-DP faults
ASi array with indication of failed slaves
Mode display and
PROFIBUS-DP
Table 8-2 LED display for modes and bus faults on PROFIBUS-DP
LED Reason Meaning Remedy
RUN
LED off
BF
LED on
The mode display with the ”RUN” LED is turned on as soon as the power
supply is established. If the DP/ASi link detects a fault on the PROFIBUSDP, the ”BF” (Bus Fault) LED goes on.
In Table 8-2 you will find the reaction of the DP/ASi link and troubleshooting information.
24 V power supply This LED goes on as soon as the
24 V power supply is established.
PROFIBUS-DP failed The DP/ASi link is restarting.
Input and output data are set to
0 by the DP/ASi link.
Check the 24 V power supply.
Check the PROFIBUS-DP for
interrupt.
Check the DP master for availability.
Distributed I/O System DP/ASi Link
EWA 4NEB 710 6055-02b
8-3
Page 90

Diagnostics and Error Handling
ASi diagnostics
T able 8-3 shows the meanings of the LEDs for ASi diagnostics and describes
the action required to be taken for troubleshooting.
For ASi diagnostics, the DP/ASi link has four LEDs. In the event of a failure,
one or several LEDs are turned on.
Table 8-3 LED display for faults on ASi side
LED on
ASi POWER FAIL The ASi power supply
has failed.
CONFIG ERROR Actual and setpoint con-
figurations are not identifical.
Reason Meaning Remedy
Data exchange between the DP/
ASi link and the ASi slave is no
longer possible.
During power up:
”Actual is equal to setpoint
configuration”:
no data exchange
”Actual is less than setpoint
configuration”:
data exchange possible (refer to section 5.1)
The data exchange continues in
operation.
The fault is caused by:
one ASi slave has been
added
one ASi slave has failed
ASi slave 0 has been added
The lowest address of the failed
ASi slaves is indicated by five
ASi-SLAVE FAIL LEDs.
Check the ASi power supply.
Check ASi connections.
Check the ASi slave having the
address indicated.
Check whether a slave type different from that specified in the
parameterization message (different I/O or ID code) is being
used.
AUTOPROG AV Precisely one ASi slave
has failed.
The DP/ASi link is in au-
tomatic programming
mode.
CONFIG MODE No meaning
8-4
The DP/ASi link enables one
ASi slave having ASi address 0
automatically to be allocated the
ASi address of the failed ASi
slave.
The ASi address of the failed
ASi slave is indicated by the
five ASi-SLAVE FAIL LEDs.
Replace the failed ASi slave
with a new ASi slave having the
same I/O code and ID code (refer to section 7.3).
Distributed I/O System DP/ASi Link
EWA 4NEB 710 6055-02b
Page 91

Diagnostics and Error Handling
Combinations
In addition to the different displays described in Table 8-2 and Table 8-3,
combinations of several LEDs are also possible. T able 8-4 shows you the
meanings of the displays.
Table 8-4 Combination of several LEDs
LEDs
All on DP/ASi link starting up. –
All on except ASi
POWER FAIL
ASi SLAVE FAIL
flashing
BF flashing Station number 126 or 127 is set on the DIP
CONFIG ERROR
and all ASi SLAVE
FAIL light
A fault has occurred in the PROFIBUS-DP
during start-up.
DP/ASi link has not detected an ASi slave.
DP/ASi link not starting.
switch block or switch 8 is in OFF position.
Normal mode: ASi slave 31 has failed
S7 start-up: data record 128 missing
Meaning Remedy
Check the PROFIBUS-DP, the DP master
and the bus connection.
Check the ASi cable and the cable termination.
Set the correct station number on the DIP
switch block.
Set switch 8 on the DIP switch block to ON
and set a valid station number in the EEPROM.
Check your configuration. Possibly no ASi
slaves have been configured.
ASi slave failure
DP/ASi link reaction
Check
If several ASi slaves have failed, the failed ASi slave having the lowest ASi
address is indicated with the ”ASi-SLAVE F AIL” LEDs. You recognize the
failure of several ASi slaves by the ”AUTOPROG AV” LED not being on.
Check, therefore, the ASi cable for damage in all cases as well.
If the DP/ASi link detects that an ASi slave has failed or that there is no
longer a connection to it, it takes the following action:
The input data to the DP master are reset to 0 for the failed ASi slave.
A diagnostic message is generated (refer to section 8.2)
All data, including the reset data of the failed ASi slave, are still transmitted
to the DP master.
If you have remedied the reason for the failure, you can establish immediately whether the DP/ASi link is working properly again. If everything is in
order, the DP/ASi link enters normal operation. Only the ”RUN” LED is on.
Distributed I/O System DP/ASi Link
EWA 4NEB 710 6055-02b
8-5
Page 92

Diagnostics and Error Handling
8.2 Diagnostics by Means of User Program
In this chapter
In Section You Will Find on Page
8.2.1 Diagnostic Fundamentals in Operations with an IM308C 8-7
8.2.2 Diagnostic Fundamentals in Operations with an S7/M7 DP
Master (STEP 7) or with Another PROFIBUS-DP Master
8.2.3 Structure of Diagnosis 8-10
8.2.4 Contents of DP Standard Part 8-12
8.2.5 Module and First Station Diagnoses with the IM308C 8-14
8.2.6 Module and First Station Diagnoses with the S7/M7 DP
Master
8.2.7 Second Station Diagnosis with the IM308C 8-18
8.2.8 Second Station Diagnosis with the S7/ M7 DP Master 8-20
8.2.9 Diagnostics for a Default Start-Up with the IM308C
(MLFB 6ES7 156 0AA00-8AA0 or Later)
8-9
8-16
8-21
8-6
Distributed I/O System DP/ASi Link
EWA 4NEB 710 6055-02b
Page 93

Diagnostics and Error Handling
8.2.1 Diagnostic Fundamentals in Operations with an IM308C
FB IM308C
Exchanging diagnostic data
Selecting a diagnosis
Master diagnosis
You can read the DP/ASi link diagnosis, as the ”slave diagnosis”, using function block IM308C (FB192) into your PLC – for example, SIMATIC S5 with
IM 308 C.
FB IM308C is described in detail in the Distributed I/O System ET 200
manual.
The DP/ASi link informs the DP master, by means of a high-priority transmission of user data, that a diagnosis is available. The DP master then requests the diagnostic message from the DP/ASi link.
You have two options for requesting a diagnosis:
1. Master diagnostics as overview diagnosis and
2. Slave diagnostics as secondary diagnosis.
The master diagnosis includes an overview diagnosis in the first 16 bytes.
From the overview diagnosis, you can determine the DP slaves which have
reported a diagnosis or which cannot be addressed by that DP master.
The overview diagnosis is recommended especially when you are using several DP slaves. By using the master diagnosis, you do not have to request the
slave diagnosis from every DP slave you are using.
Slave diagnosis
The slave diagnosis includes all the diagnostic information of a specific
DP slave.
The structure of the slave diagnosis is explained in section 8.2.3.
Method
The method for reading the diagnosis into your PLC is described in detail in
the Distributed I/O System ET 200 manual.
Distributed I/O System DP/ASi Link
EWA 4NEB 710 6055-02b
8-7
Page 94

Diagnostics and Error Handling
Example
At this point you will find a brief example of how to read the slave diagnosis
into your PLC using FB IM308C.
The following assumptions apply to this STEP 5 program:
The IM 308-C is assigned, as a PROFIBUS-DP master, pages 0 to 15
(number 0 of IM 308-C).
The station number of the DP/ASi link is 3.
The slave diagnosis is to be stored in DB 30. You may also use any other
data block to store it in.
The slave diagnosis consists of 26 bytes.
AWL Explanation
:A DB 30
Name :IM308C
DPAD : KH F800
IMST : KY 0, 3
FCT : KC SD
GCGR : KM 0
TYP : KY 0, 20
STAD : KF +1
LENG : KF 26
ERR : DW 0
:SPA FB 192
Default address area of the IM 308-C
IM No. = 0, DP/ASi link No. = 3
Function: Read slave diagnosis
Not evaluated
S5 data area: DB 20
Diagnostic data, from data word 1 onward
Length of diagnosis = 26 bytes
Error code stored in DW 0 of DB 30
Diagnostic status
Fault remedied
The DP/ASi link can send two different diagnostic messages:
Dynamic diagnostics
If a new fault occurs on the DP/ASi link, the diagnosis is fetched automatically by the DP master.
This procedure is repeated every time the diagnosis is modified.
Static diagnostics
The DP/ASi link uses static diagnostics when the ASi power fails. While
static diagnosis is enabled, the DP master requests diagnostic messages
from the DP/ASi link.
Neither input nor output data are exchanged between the DP master and
the DP/ASi link during this period.
Static diagnostics is retained until you have remedied the reason for the
failure for the diagnostic message.
If there is no longer a reason for a diagnosis, the DP/ASi link sends a final
diagnostic message without any further error messages.
8-8
Distributed I/O System DP/ASi Link
EWA 4NEB 710 6055-02b
Page 95

Diagnostics and Error Handling
8.2.2 Diagnostic Fundamentals in Operations with an S7/M7 DP Master (STEP 7) or with Another PROFIBUS-DP Master
Diagnosis with
S7/M7 DP Master
SFC 13
“DPNRM_DG”
Table 8-5 Parameters for SFC 13 “DPNRM_DG”
Parameter Declaration Data Type Memory Area Description
REC INPUT BOOL I, O, M, D, L, Const. REQ = 1: Read request
LADDR INPUT WORD I, O, M, D, L, Const. Configured diagnostic address from I area of
RET_VAL OUTPUT INT I, O, M, D, L If an error occurs while the function is being
RECORD OUTPUT ANY I, O, M, D, L Destination area for diagnostic data after being
BUSY OUTPUT BOOL I, O, M, D, L BUSY = 1: Read process continuing.
If you are operating the DP/ASi link as a DP slave with a SIMATIC S7/M7
DP master, the DP/ASi link behaves like a central S7-300 I/O module.
You read out the diagnosis (data records 0 and 1) using SFC 13
”DPNRM_DG”. You will find information on requesting diagnostic data in
the STEP
7 Standard and System Functions manual.
DP/ASi link.
processed, the return value contains an error
code. If an error does not occur, the length of
the data actually transferred is located in
RET_VAL.
read. Only data type BYTE is allowed.
Diagnosing with
other PROFIBUSDP masters
If you operate the DP/ASi link as a DP slave with a DP master from Siemens
that is not part of the SIMATIC S5/S7/M7 PLCs or with a DP master from
another manufacturer, please refer to the documentation for the DP master
concerned for the way in which the slave diagnosis is requested.
Diagnostic interrupts
The DP/ASi link supports diagnostic interrupts.
You can evaluate these interrupts using an S7/M7 DP master. Should an inter-
rupt occur, interrupt OBs are processed automatically by the CPU (refer to
the System Software for S7-300 and S7-400, Program Design programming
manual).
Distributed I/O System DP/ASi Link
EWA 4NEB 710 6055-02b
8-9
Page 96

Diagnostics and Error Handling
8.2.3 Structure of Diagnosis
Introduction
Structure for
IM 308C
The structure of the diagnostic message conforms with the PROFIBUS-DP
standard.
Note
The structure of the diagnostic message described below does not apply to a
default start-up (refer to section 8.2.9).
The diagnostic message for the IM308C contains 26 bytes of data. The structure of the complete diagnosis is shown in T able 8-6.
Table 8-6 Structure of diagnostic message
Byte(s) Contents
0 Station status 1
1 Station status 2
2 Station status 3
3 Station number, DP master
4
5
6 Header and length of module diagnosis
7 Module diagnosis
8 Header and length of first station diagnosis
9 Length of S7 area
10 Reserved
11 Reserved
12 – 15 Part 1 of diagnostic data
16 Length of second station diagnosis (ASi-specific part)
17 Length of S7 area
18 Reserved
19 Reserved
20 – 25 Part 2 of diagnostic data.
Manufacturer ID (801BH)
8-10
Distributed I/O System DP/ASi Link
EWA 4NEB 710 6055-02b
Page 97

Diagnostics and Error Handling
Structure for
S7/M7 DP master
The diagnostic message for the S7/M7 DP master contains 24 bytes of data.
The structure of the entire diagnosis is shown in T able 8-7.
Table 8-7 Diagnostic message structure for the S7/M7 DP master
Byte(s) S7/M7 DP Master
0 Stations status 1
1 Stations status 2
2 Stations status 3
3 Station number, DP Master
4
5
6 Header and length of module diagnosis
7 Module diagnosis
8 Module diagnosis
9 Header and length of station diagnosis
10 S7 diagnostic interrupt ID
11 S7 slot
12 Reserved
13 – 16 Part 1 of station diagnostic data (DS 0)
17 – 23 Part 2 of station diagnostic data (DS 1)
Manufacturer ID (801BH)
Distributed I/O System DP/ASi Link
EWA 4NEB 710 6055-02b
8-11
Page 98

Diagnostics and Error Handling
8.2.4 Contents of DP Standard Part
DP standard part
Station status 1
The first six bytes of the diagnostic message (byte 0 to byte 5) are termed the
DP standard part. They are independent of the DP slave used.
You will find a description of the structure of station status 1 in Table 8-8.
The default setting is 02
Table 8-8 Structure of station status 1
Bit Value Contents
0 1 DP/ASi link cannot be addressed.
1 1 DP/ASi link not yet ready for data exchange.
2 1 The configuration data sent by the DP master do not correspond to
the configuration of the ASi.
3 1 Slave diagnosis available.
4 1 Requested function not supported by DP/ASi link.
5 1 Implausible response received from DP/ASi link.
6 1 Erroneous parameterization message present.
7 1 DP/ASi link assigned parameters by a DP master other than the DP
master that is just attempting to access the DP/ASi link.
.
H
Station status 2
You will find a description of the structure of station status 2 in Table 8-9.
The default setting is 05
Table 8-9 Structure of station status 2
Bit Value Contents
0 1 New parameters have to be assigned to DP/ASi link.
1 1 Static diagnostics available.
2 1 Reserved
3 1 Response monitoring activated.
4 1 FREEZE mode enabled.
5 1 SYNC mode enabled.
6 0 Reserved
7 0 DP/ASi link de-activated.
.
H
8-12
Distributed I/O System DP/ASi Link
EWA 4NEB 710 6055-02b
Page 99

Diagnostics and Error Handling
Station status 3
Station number of
DP master
Manufacturer ID
Station status 3 is reserved for later applications. Its value is always 00H.
This byte contains the station number of the DP master which assigned parameters to the DP slave. Only this DP master has read and write access to
this DP slave.
The default value of the station number during startup is FF
. This means
H
that the DP/ASi link has so far not been assigned parameters by any DP master.
The manufacturer ID enables you to precisely identify the DP slave. The
manufacturer ID is specific to a product.
The manufacturer ID for the DP/ASi link has a value of 32795 (801B
).
H
Distributed I/O System DP/ASi Link
EWA 4NEB 710 6055-02b
8-13
Page 100

Diagnostics and Error Handling
8.2.5 Module and First Station Diagnoses with the IM308C
Area
Contents
Module and first station diagnoses are contained in bytes 6 to 15.
The contents of bytes 6 to 11 are shown in Table 8-10.
Table 8-10 Structure of bytes 6 to 11 of diagnostic message
Byte Contents Contents
6 42
7 00
8 08
9 XX
10 04
11 00
Header of module diagnosis including length specification in
H
accordance with DP standard.
This diagnosis is not used by the DP/ASi link.
Module diagnosis
H
This diagnosis is not used by the DP/ASi link.
First station diagnosis with 8 bytes including header
H
The first station diagnosis comprises bytes 8 to 15.
This area is prepared for an extended diagnosis by your S7.
H
Reserved
H
Reserved
H
8-14
Distributed I/O System DP/ASi Link
EWA 4NEB 710 6055-02b
 Loading...